

Page 1
DriveTools32™
Version 2.5
Using RSLinx™ Lite
Version 2.10.118
Getting Started
Manual
Page 2

Important User Information
Because of the variety of uses for the products described in this publication, those responsible for the application and use of this control equipment must satisfy themselves that all necessary steps have been taken to
assure that each application and use meets all performance and safety
requirements, including any applicable laws, regulations, codes and standards.
The illustrations, ch arts, s ample pro grams and l ayout e x amples sho wn in
this guide are intended solely for purposes of example. Since there are
many variables and requirements associated with any particular installation, Rockwell Automa tion d oes not assu me re sponsibil ity or li abilit y (to
include intellectual property liability) for actual use based upon the
examples shown in this publication.
Rockwell Au tomation publication SGI-1.1, Safety Guidelines for the
Application, Installation, and Maintenance of Solid-State Control (available from your local Rockwell Automation office), describes some
important differences between solid-state equipment and electromechanical devices that should be taken into consideration when applying products such as those described in this publication.
Reproduction of the conten ts of th is cop yri ghted publi catio n, in wh ole or
in part, without written permission of Rockwell Automation, is prohibited.
Throughout this manual we use notes to make you aware of safety considerations:
ATTENTION: Identifie s information about practices
or circumstances that can lead to personal injury or
!
Attention statements help you to:
• Identify a hazard.
• Avoid th e hazard.
• Recognize the consequences.
Important: Identifies information that is critical for successful applica-
tion and understanding of the product.
death, property damage or economic loss.
Page 3

Summary of Changes
Summary of Changes
The information below summarizes the changes to th e comp any -wide temp lates
since the last release.
Product Changes
Manual Changes
The following changes have been made to DriveTools32 software:
• Added ControlLogix gateway communications.
• Communications interface has changed.
• Fixed bugs and anomalies. Refer to the DriveTools32 Readme file.
The following changes have been made to this manual:
• Added information on ControlLogix gateway communications.
• Removed information on RS-485 serial multi-drop communications.
• Updated instructions and screen shots to reflect the new communications
dialog boxes.
Page 4

Notes:
Page 5

Preface Using This Manual
Objectives. . . . . . . . . . . . . . . . . . . . . . . . . . . . . . . . . . . . . . . . . . . . . . . . . . . . . . . . . . . . P-1
Who Should Use This Manual? . . . . . . . . . . . . . . . . . . . . . . . . . . . . . . . . . . . . . . . . . . . P-1
Purpose of This Manual . . . . . . . . . . . . . . . . . . . . . . . . . . . . . . . . . . . . . . . . . . . . . . . . . P-1
Safety Precautions and Important Info rmation . . . . . . . . . . . . . . . . . . . . . . . . . . . . . . . . P-3
Terms and Abbreviations . . . . . . . . . . . . . . . . . . . . . . . . . . . . . . . . . . . . . . . . . . . . . . . . P-4
Conventions Used in This Manual . . . . . . . . . . . . . . . . . . . . . . . . . . . . . . . . . . . . . . . . . P-4
Rockwell Automation Support. . . . . . . . . . . . . . . . . . . . . . . . . . . . . . . . . . . . . . . . . . . . . P-5
Chapter 1 Overview
Chapter Objectives. . . . . . . . . . . . . . . . . . . . . . . . . . . . . . . . . . . . . . . . . . . . . . . . . . . . . .1-1
What Is DriveTools32? . . . . . . . . . . . . . . . . . . . . . . . . . . . . . . . . . . . . . . . . . . . . . . . . . . .1-1
What Is RSLinx?. . . . . . . . . . . . . . . . . . . . . . . . . . . . . . . . . . . . . . . . . . . . . . . . . . . . . . . .1-2
Types of Communications . . . . . . . . . . . . . . . . . . . . . . . . . . . . . . . . . . . . . . . . . . . . . . . .1 -2
Required Hardware. . . . . . . . . . . . . . . . . . . . . . . . . . . . . . . . . . . . . . . . . . . . . . . . . . . . . .1-4
Getting Started with DriveTools32 . . . . . . . . . . . . . . . . . . . . . . . . . . . . . . . . . . . . . . . . . .1-8
Table of Contents
Chapter 2 Installing and Starting DriveTools32
Chapter Objectives. . . . . . . . . . . . . . . . . . . . . . . . . . . . . . . . . . . . . . . . . . . . . . . . . . . . . .2-1
System Requirements . . . . . . . . . . . . . . . . . . . . . . . . . . . . . . . . . . . . . . . . . . . . . . . . . . .2-1
Installing DriveTools32 . . . . . . . . . . . . . . . . . . . . . . . . . . . . . . . . . . . . . . . . . . . . . . . . . . .2-2
Installing RSLinx. . . . . . . . . . . . . . . . . . . . . . . . . . . . . . . . . . . . . . . . . . . . . . . . . . . . . . . .2-3
Starting DriveTools32 Applic ations and RSLinx . . . . . . . . . . . . . . . . . . . . . . . . . . . . . . . .2-4
DriveTools32 and Database Files. . . . . . . . . . . . . . . . . . . . . . . . . . . . . . . . . . . . . . . . . . .2-5
Chapter 3 Setting Up RS-232 Point-to-Point Serial Communications
Chapter Objectives. . . . . . . . . . . . . . . . . . . . . . . . . . . . . . . . . . . . . . . . . . . . . . . . . . . . . .3-1
About RS-232 Point-to-Point Serial Communications . . . . . . . . . . . . . . . . . . . . . . . . . . .3-1
Hardware . . . . . . . . . . . . . . . . . . . . . . . . . . . . . . . . . . . . . . . . . . . . . . . . . . . . . . . . . . . . .3-2
Configuring RSLinx. . . . . . . . . . . . . . . . . . . . . . . . . . . . . . . . . . . . . . . . . . . . . . . . . . . . . .3-3
Setting Up Communications in a DriveTools32 Application . . . . . . . . . . . . . . . . . . . . . . .3-6
Connecting to the Drive . . . . . . . . . . . . . . . . . . . . . . . . . . . . . . . . . . . . . . . . . . . . . . . . . .3-7
Page 6

ii Table of Contents
Chapter 4 Setting up RS-232 Point-to-Point Serial Communications for a 1395 Drive
Chapter Objectives . . . . . . . . . . . . . . . . . . . . . . . . . . . . . . . . . . . . . . . . . . . . . . . . . . . . . 4-1
About RS-232 Point-to-Point Serial Communications for a 1395 Drive . . . . . . . . . . . . . 4-1
Hardware. . . . . . . . . . . . . . . . . . . . . . . . . . . . . . . . . . . . . . . . . . . . . . . . . . . . . . . . . . . . . 4-2
Disabling RSLinx. . . . . . . . . . . . . . . . . . . . . . . . . . . . . . . . . . . . . . . . . . . . . . . . . . . . . . . 4-2
Setting Up Communications in a DriveTools32 Application . . . . . . . . . . . . . . . . . . . . . . 4-3
Connecting to the Drive. . . . . . . . . . . . . . . . . . . . . . . . . . . . . . . . . . . . . . . . . . . . . . . . . . 4-4
Chapter 5 Setting Up DH+ Direct Communications
Chapter Objectives . . . . . . . . . . . . . . . . . . . . . . . . . . . . . . . . . . . . . . . . . . . . . . . . . . . . . 5-1
About DH+ Direct Communications. . . . . . . . . . . . . . . . . . . . . . . . . . . . . . . . . . . . . . . . . 5-1
Using DH+ Direct Communications. . . . . . . . . . . . . . . . . . . . . . . . . . . . . . . . . . . . . . . . . 5-2
Using RS-232 to DH+ Communications . . . . . . . . . . . . . . . . . . . . . . . . . . . . . . . . . . . . . 5-8
Chapter 6 Setting Up DH+ to RIO Block Transfer Pass Thru Communications
Chapter Objectives . . . . . . . . . . . . . . . . . . . . . . . . . . . . . . . . . . . . . . . . . . . . . . . . . . . . . 6-1
About DH+ to RIO Block Transfer Pass Thru Communications . . . . . . . . . . . . . . . . . . . 6-1
Using DH+ to RIO Block Transfer Pass Thru Communications . . . . . . . . . . . . . . . . . . . 6-3
Using RS-232 to DH+ to RIO Block Transfer Pass Thru Communications. . . . . . . . . . . 6-7
Chapter 7 Setting Up ControlNet Direct Communications
Chapter Objectives . . . . . . . . . . . . . . . . . . . . . . . . . . . . . . . . . . . . . . . . . . . . . . . . . . . . . 7-1
About ControlNet Communications. . . . . . . . . . . . . . . . . . . . . . . . . . . . . . . . . . . . . . . . . 7-1
Using ControlNet Direct Communications. . . . . . . . . . . . . . . . . . . . . . . . . . . . . . . . . . . . 7-2
Using RS-232 to ControlNet Direct Communications . . . . . . . . . . . . . . . . . . . . . . . . . . . 7-8
Using a 1203-CN1 Module to Connect to a ControlNet Network . . . . . . . . . . . . . . . . . 7-12
Chapter 8 Setting Up ControlNet to RIO Block Transfer Pass Thru Communica tions
Chapter Objectives . . . . . . . . . . . . . . . . . . . . . . . . . . . . . . . . . . . . . . . . . . . . . . . . . . . . . 8-1
About ControlNet to RIO Block Transfer Pass Thru Communications . . . . . . . . . . . . . . 8-1
Using ControlNet to RIO Block Transfer Pass Thru Communications . . . . . . . . . . . . . . 8-3
Using RS-232 to ControlNet to RIO Block Transfer Pass Thru Communications. . . . . . 8-7
Chapter 9 Setting Up DeviceNet Direct Communications
Chapter Objectives . . . . . . . . . . . . . . . . . . . . . . . . . . . . . . . . . . . . . . . . . . . . . . . . . . . . . 9-1
About DeviceNet Communications . . . . . . . . . . . . . . . . . . . . . . . . . . . . . . . . . . . . . . . . . 9-1
Setting Up DeviceNet Direct Communications . . . . . . . . . . . . . . . . . . . . . . . . . . . . . . . . 9-2
Using RS-232 to DeviceNet Direct Communications . . . . . . . . . . . . . . . . . . . . . . . . . . . 9-8
Using a 1203-GU6 Module to Connect to a DeviceNet Network. . . . . . . . . . . . . . . . . . 9-14
Page 7

Table of Contents iii
Chapter 10 Setting Up Allen-Bradley Ethernet to RIO Block Transfer Pass Thru Communications
Chapter Objectives. . . . . . . . . . . . . . . . . . . . . . . . . . . . . . . . . . . . . . . . . . . . . . . . . . . . .10-1
About Ethernet Communications . . . . . . . . . . . . . . . . . . . . . . . . . . . . . . . . . . . . . . . . . .10-1
Hardware . . . . . . . . . . . . . . . . . . . . . . . . . . . . . . . . . . . . . . . . . . . . . . . . . . . . . . . . . . . .10-2
Configuring RSLinx. . . . . . . . . . . . . . . . . . . . . . . . . . . . . . . . . . . . . . . . . . . . . . . . . . . . .10-3
Setting Up Communications in a DriveTools32 Application . . . . . . . . . . . . . . . . . . . . . .10-6
Connecting to the Drive . . . . . . . . . . . . . . . . . . . . . . . . . . . . . . . . . . . . . . . . . . . . . . . . .10-7
Chapter 11 Using RSLinx Gateways
Chapter Objectives. . . . . . . . . . . . . . . . . . . . . . . . . . . . . . . . . . . . . . . . . . . . . . . . . . . . .11-1
About RSLinx Gateways. . . . . . . . . . . . . . . . . . . . . . . . . . . . . . . . . . . . . . . . . . . . . . . . .11-1
Hardware . . . . . . . . . . . . . . . . . . . . . . . . . . . . . . . . . . . . . . . . . . . . . . . . . . . . . . . . . . . .11-2
Configuring RSLinx. . . . . . . . . . . . . . . . . . . . . . . . . . . . . . . . . . . . . . . . . . . . . . . . . . . . .11-3
Setting Up Communications in a DriveTools32 Application . . . . . . . . . . . . . . . . . . . . . .11-6
Connecting to the Drive . . . . . . . . . . . . . . . . . . . . . . . . . . . . . . . . . . . . . . . . . . . . . . . . .11-7
Chapter 12 Using a Modem Connection
Chapter Objectives. . . . . . . . . . . . . . . . . . . . . . . . . . . . . . . . . . . . . . . . . . . . . . . . . . . . .12-1
About Modem Connections . . . . . . . . . . . . . . . . . . . . . . . . . . . . . . . . . . . . . . . . . . . . . .12-1
Hardware . . . . . . . . . . . . . . . . . . . . . . . . . . . . . . . . . . . . . . . . . . . . . . . . . . . . . . . . . . . .12-2
Configuring RSLinx. . . . . . . . . . . . . . . . . . . . . . . . . . . . . . . . . . . . . . . . . . . . . . . . . . . . .12-3
Setting Up Communications in a DriveTools32 Application . . . . . . . . . . . . . . . . . . . . . .12-8
Connecting to the Drive . . . . . . . . . . . . . . . . . . . . . . . . . . . . . . . . . . . . . . . . . . . . . . . . .12-9
Chapter 13 Using ControlLogix Gateways
Chapter Objectives. . . . . . . . . . . . . . . . . . . . . . . . . . . . . . . . . . . . . . . . . . . . . . . . . . . . .13-1
About ControlLogix Gateways . . . . . . . . . . . . . . . . . . . . . . . . . . . . . . . . . . . . . . . . . . . .13-1
Hardware . . . . . . . . . . . . . . . . . . . . . . . . . . . . . . . . . . . . . . . . . . . . . . . . . . . . . . . . . . . .13-2
Configuring RSLinx. . . . . . . . . . . . . . . . . . . . . . . . . . . . . . . . . . . . . . . . . . . . . . . . . . . . .13-3
Setting Up Communications in a DriveTools32 Application . . . . . . . . . . . . . . . . . . . . . .13-8
Connecting to the Drive . . . . . . . . . . . . . . . . . . . . . . . . . . . . . . . . . . . . . . . . . . . . . . . . .13-9
Chapter 14 Using ControlLogix Gateway to RIO Block Transfer Pass Thru Communications
Chapter Objectives. . . . . . . . . . . . . . . . . . . . . . . . . . . . . . . . . . . . . . . . . . . . . . . . . . . . .14-1
About ControlLogix Gateways To RIO Block Transfer Pass Thru Communications . . .14-1
Hardware . . . . . . . . . . . . . . . . . . . . . . . . . . . . . . . . . . . . . . . . . . . . . . . . . . . . . . . . . . . .14-3
Configuring RSLinx. . . . . . . . . . . . . . . . . . . . . . . . . . . . . . . . . . . . . . . . . . . . . . . . . . . . .14-4
Setting Up Communications in a DriveTools32 Application . . . . . . . . . . . . . . . . . . . . . .14-4
Connecting to the Drive . . . . . . . . . . . . . . . . . . . . . . . . . . . . . . . . . . . . . . . . . . . . . . . . .14-5
Page 8

iv Table of Contents
Chapter 15 Using Online Help
Chapter Objectives . . . . . . . . . . . . . . . . . . . . . . . . . . . . . . . . . . . . . . . . . . . . . . . . . . . . 15-1
Accessing Online Help . . . . . . . . . . . . . . . . . . . . . . . . . . . . . . . . . . . . . . . . . . . . . . . . . 15-1
Finding Information in Online Help . . . . . . . . . . . . . . . . . . . . . . . . . . . . . . . . . . . . . . . . 15-2
Accessing Context-Sensitive Help . . . . . . . . . . . . . . . . . . . . . . . . . . . . . . . . . . . . . . . . 15-4
Chapter 16 Troubleshooting
Chapter Objectives . . . . . . . . . . . . . . . . . . . . . . . . . . . . . . . . . . . . . . . . . . . . . . . . . . . . 16-1
Communications Messages . . . . . . . . . . . . . . . . . . . . . . . . . . . . . . . . . . . . . . . . . . . . . 16-1
Troubleshooting Procedures. . . . . . . . . . . . . . . . . . . . . . . . . . . . . . . . . . . . . . . . . . . . . 16-4
Appendix A Products Supported by DriveTools32
Appendix Objectives . . . . . . . . . . . . . . . . . . . . . . . . . . . . . . . . . . . . . . . . . . . . . . . . . . . . A-1
Supported SCANport-Compatible Products . . . . . . . . . . . . . . . . . . . . . . . . . . . . . . . . . . A-1
Other Supported Drives. . . . . . . . . . . . . . . . . . . . . . . . . . . . . . . . . . . . . . . . . . . . . . . . . . A-2
Tool Connectivity. . . . . . . . . . . . . . . . . . . . . . . . . . . . . . . . . . . . . . . . . . . . . . . . . . . . . . . A-2
Adapter Version Requirements. . . . . . . . . . . . . . . . . . . . . . . . . . . . . . . . . . . . . . . . . . . . A-4
Page 9

Using This Manual
Preface
Objectives
Who Should Use This Manual?
Purpose of This Manual
Read this preface to become familiar with the rest of the manual. In this preface,
you will read about the following:
• Who should use this manual.
• The purpose of this manual.
• Terms and abbreviations.
• Safety precautions.
• Conventions used in this manu al.
• Rockwell Automation support.
Use this manual if you are responsible for using the DriveTools32™ software to
program, monitor, and troubleshoot Allen-Bradley AC and DC digital drive
products. You should be familiar with programming and operating
Allen-Bradley digital drives and have basic personal computer and Windows™
95/98/NT operation skills, such as s tarting applications, navigating between
applications, using menus and dialog boxes, and accessing Windows online
help.
This manual is designed to get you started using DriveTools32 software. It
begins with an o v erview of DriveTools32 and the communications with which it
works. Then, instructions are provided for installing the software. Finally,
instructions are provided for using DriveTools32 with different types of
communications. For each type, you will read about the following:
• Ensuring that you have the necessary hardware set up properly.
• Configuring RSLinx Lite.
• Configuring a DriveTools32 application.
• Connecting to a drive.
After getting started, you should use the online help to become acquainted with
the DriveTools32 application that you are using. Each application’s online help
contains detailed information and step-by-step instructions on how to use the
application to configure, monitor, or control a drive.
Page 10

P-2 Using This Manual
Contents of This Manual
Chapter Title Contents
Preface Using This Manual Purpose, background, and scope of this manual.
Chapter 1 Overview Overview of DriveTools32 software, RSLinx software, types of communications that you
can use, and the steps to get started using DriveTools32.
Chapter 2 Installing and Starting DriveTools32 Instructions for installing DriveTools32 and RSLinx.
Chapter 3 Setting Up RS-232 Point-to-Point
Serial Communications
Chapter 4 Setting up RS-232 Point-to-Point
Serial Communications for a 1395
Drive
Chapter 5 Setting Up DH+ Direct
Communications
Chapter 6 Setting Up DH+ to RIO Block Transfer
Pass Thru Communications
Chapter 7 Setting Up ControlNet Direct
Communications
Chapter 8 Setting Up ControlNet to RIO Block
Transfer Pass Thru Communications
Chapter 9 Setting Up DeviceNet Direct
Communications
Chapter 10 Setting Up Allen-Bradley Ethernet to
RIO Block Transfer Pass Thru
Communications
Chapter 11 Using RSLinx Gateways Instructions for setting up the required hardware, configuring RSLinx, and configuring
Chapter 12 Using a Modem Connection Instructions for setting up the required hardware, configuring RSLinx, and configuring
Instructions for setting up the required hardware, configuring RSLinx, and configuring
DriveTools32 for RS-232 point-to-point serial communications.
Instructions for setting up the required hardware, configuring RSLinx, and configuring
DriveTools32 for 1395 RS-232 point-to-point serial communications.
Instructions for setting up the required hardware, configuring RSLinx, and configuring
DriveTools32 for DH+ direct communications.
Instructions for setting up the required hardware, configuring RSLinx, and configuring
DriveTools32 for DH+ to RIO Block Transfer Pass Thru communications.
Instructions for setting up the required hardware, configuring RSLinx, and configuring
DriveTools32 for ControlNet direct communications.
Instructions for setting up the required hardware, configuring RSLinx, and configuring
DriveTools32 for ControlNet to RIO Block Transfer Pass Thru communications.
Instructions for setting up the required hardware, configuring RSLinx, and configuring
DriveTools32 for DeviceNet direct communications.
Instructions for setting up the required hardware, configuring RSLinx, and configuring
DriveTools32 for Allen-Bradley Ethernet to RIO Pass Thru communications.
DriveTools32 for RSLinx gateways.
DriveTools32 for modem connections.
Chapter 13 Using ControlLogix Gateways Instructions for setting up the required hardware, configuring RSLinx, and configuring
Chapter 14 Using ControlLogix Gateway to RIO
Block Transfer Pass Thru
Communications
Chapter 15 Using Online Help Instructions for using DriveTools32 online help.
Chapter 16 Troubleshooting Instructions for troubleshooting communications problems.
Appendix A Products Supported by DriveTools32 A list of products with which you can use DriveTools32.
DriveTools32 for ControlLogix gateways.
Instructions for setting up the required hardware, configuring RSLinx, and configuring
DriveTools32 for ControlLogix gateways to RIO Block Transfer Pass Thru
communications.
Page 11

Related Documentation
Refer to the following documents:
For Help On: Refer to:
Using This Manual P-3
Safety Precautions and Important Information
DriveTools32 applications Online help for the individual DriveTools32 applications. All
RSLinx Online help for RSLinx. In the RSLinx
Please read the following safety precautions before using DriveTools32
software.
ATTENTION:
drives and the associated machinery that the dri ves control should
!
!
!
plan or implement the installation, start up, and subsequent
maintenance of the drive. Failure to comply may result in personal
injury and/or equipment damage.
ATTENTION:
or stopping a driv e using Dri veP anel32. Do not use Dri veP anel32
until you have read and understood the hazards explained in your
drive user manual(s).
ATTENTION:
Stop/Jog functions of DriveP anel32 software rely on the integrity
of software and communications between the dri ve and computer .
A software malfunction or loss of communications may result in
the inability to stop the drive using DrivePanel32. You
configure an adapter time-out (when prompted) and have an
independent hardwired stop device within reach when using
DrivePanel32 to control a drive. Dri v eP anel32 is not a substitute
for primary operator controls that meet industry standards and
local codes.
documentation for DriveTools32 is currently in the online help. Refer to
Chapter 15,
Topics
Using Online Help
to access RSLinx online help.
Only people familiar with Allen-Bradley
Hazard of injury or death exists when starting
Hazard of injury or death exists. The Start/
.
Help
menu, select
RSLinx Help
must
Important:
the same version to ensure proper communications. For example you can use
DrivePan el32 (version 2.5) and DriveManager32 (version 2.5) at the same time.
However, you should not use DrivePanel32 (version 2.0) and DriveManager32
(version 2.5) at the same time.
If you are using multiple DriveTools32 applications, they must be
Page 12

P-4 Using This Manual
Terms and Abbreviations
The following terms and abbreviations are specific to this product. For a
complete listing of Allen-Bradley terminology, refer to the Allen-Bradley
Industrial Automation Glossary
Terms Definition
Drive You can use DriveTools32 with many Allen-Bradley products. These products include
DriveTools32 DriveTools32 software is a family of tools designed for Microsoft Windows 95,
Interchange In this manual, Interchange is a component of RSLinx.
RSLinx RSLinx is a Rockwell Software application that provides the communications drivers
SCANport A standard peripheral communications protocol for various Allen-Bradley drives and
SCANpor t
Peripheral
Device
the 1395 drive, 1336 FORCE™ drive, A-B/Stromberg drives, 160 SSC drive, and
SCANport™-compatible products (e.g., 1336 PLUS drive). For a list of SCANportcompatible products, refer to Appendix A,
Windows 98, and Windows NT™ 4.0 operating systems. This manual provides
instructions for getting started with DriveTools32 (release 2.5).
that let DriveTools32 communicate with Allen-Bradley drives using a variety of
networks as well as direct serial connections. This manual provides instructions for
configuring RSLinx 2.10.118 so that it can be used with DriveTools32.
power products.
A device that provides an interface between SCANport and a network. It is often
referred to as an adapter. For example, the 1203-SSS converter is a SCANport
peripheral device.
, Publication AG-7.1.
Products Supported by DriveTools32.
Conventions Used in This Manual
SCANpor tCompatible
Product
An Allen-Bradley device that uses the SCANport communications interface to
communicate with one or more peripheral devices. For example, a motor drive such as
a 1336 PLUS is a SCANport product.
The following conventions are used throughout this manual:
• Bulleted lists p rovide information, not procedural steps.
• Numbered lists provide sequential steps or hierarchical information.
•
•
type is used for chapter names and titles of other manuals.
Italic
Bold
type is used for names of dialog boxes, dialog box fields, menus,
menu options, and buttons.
• In this manual, DriveTools32 refers to DriveTools32 (version 2.5).
• In some names, “x” is used as a place holder. F or e xample, 12 03-Gx1 r efers
to both 1203-GK1 and 1203-GD1.
• In this manual, RSLinx refers to either RSLinx Lite (version 2.10.118)
shipped with DriveTools32 or RSLinx (version 2.10.118).
Important:
This type of paragraph contains tips or notes that have been added
to call attention to useful information.
Page 13

Using This Manual P-5
Rockw ell Automation Support
Rockwell Automation offers support services worldwide, with over 75 sales/
support offices, over 500 authorized distributors, over 250 authorized systems
integrators located through the United States alone, and Rockwell Automation
representatives in every m a jor country in the world.
Local Product Support
Contact your local Rockwell Automation representative for:
• Sales and order support.
• Product technical training.
• Warranty support.
• Support service agreements.
Technical Product Assistance
If you need to contact Rockwell Automation for technical assistance, please
review the information in this manual and the online help first. If you still have
problems, then call your local Rockwell Automation representative.
Refer to http://www.ab.com/drives/drivetools32 for updates and supporti ng
documentation.
When You Call
When you call, you should be at your computer and prepared to give the
following information:
• Product serial number and version number.
The product serial number and v ersion number can be fo und i n the soft ware
by selecting
• Hardware you are using.
• Exact wording of any errors or messages that appeared on your screen.
• Description of what happened and what you were doing when the problem
occurred.
• Description of how you attempted to solve the problem.
Help > About [DriveTools32 Program]
.
Feedback
To report errors or let us know what information you would like to see added in
future additions of this manual, please send an email message to
support@drives.ra.ro ckwell.com.
Page 14

P-6 Using This Manual
Notes:
Page 15

Overview
Chapter
1
Chapter Objectives
What Is DriveTools32?
Chapter 1 provides an overview of the DriveTools32 software package. In this
chapter, you will read about the following:
• DriveTools32 software suite.
• RSLinx software.
• Types of communications with which DriveTools32 is used.
• Hardware required for each type of communications system.
The DriveTools32 software suite is a family of tools designed for Microsoft
Windows 95, Windows 98, and Windows NT 4.0 (and greater) operating
systems. With the DriveTools32 applications, you can program, troubleshoot,
and maintain many Allen-Bradley AC and DC drives and products (refer to
Appendix A for a list). You initiate all changes to a drive.
The full DriveTools32 suite comprises the following software products:
Product: Lets you:
DriveManager32
DriveMonitor32
Create and edit the data tables that are used to configure the drive for your
application. DriveManager32 also provides several methods of displaying drive
diagnostic information.
Graphically monitor drive and/or PLC controller data points. You can display
live data values in a graphic format.
Important:
1395 serial communications when using DriveMonitor32.
You cannot access a drive via RIO Block Transfer Pass Thru or
DrivePanel32
Use the programming and control functions available with a Human Interface
Module (HIM) from your computer.
ATTENTION:
Stop/Jog functions of DrivePanel32 software rely on the
!
integrity of software and communications between the drive
and computer. A software malfunction or loss of
communications may result in the inability to stop the drive
using DrivePanel32. You
(when prompted) and have an independent hardwired stop
devic e within r each when usi ng DriveP anel3 2 to contro l a drive .
DrivePanel32 is not a substitute for primary operator controls
that meet industry standards and local codes.
Hazard of injury or death exists. The Start/
must
configure an adapter time-out
Page 16
1-2 Overview
Product: Lets you:
What Is RSLinx?
Types of Communications
DriveTrending32
DriveBlockEditor32
Program and monitor the internal drive trending functions that are supported by
some drives (i.e., 1336 FORCE drives, 1395 DC drives, and 2364F
Regenerative DC Bus Supply units).
Create and monitor function block programs that run internally in 1336 FORCE
drives.
RSLinx provides the communications drivers that enable DriveTools32 to
communicate with Allen-Bradley drives and products using a variety of
networks as well as direct serial connections.
Before you can start DriveTools32 appli cations, you must either load RSLinx
Lite (version 2.10.118), which is shipped with DriveTools32, or you must
already have RSLinx 2.10.118 running and properly configured on your
computer. Later versions of RSLinx can also be used.
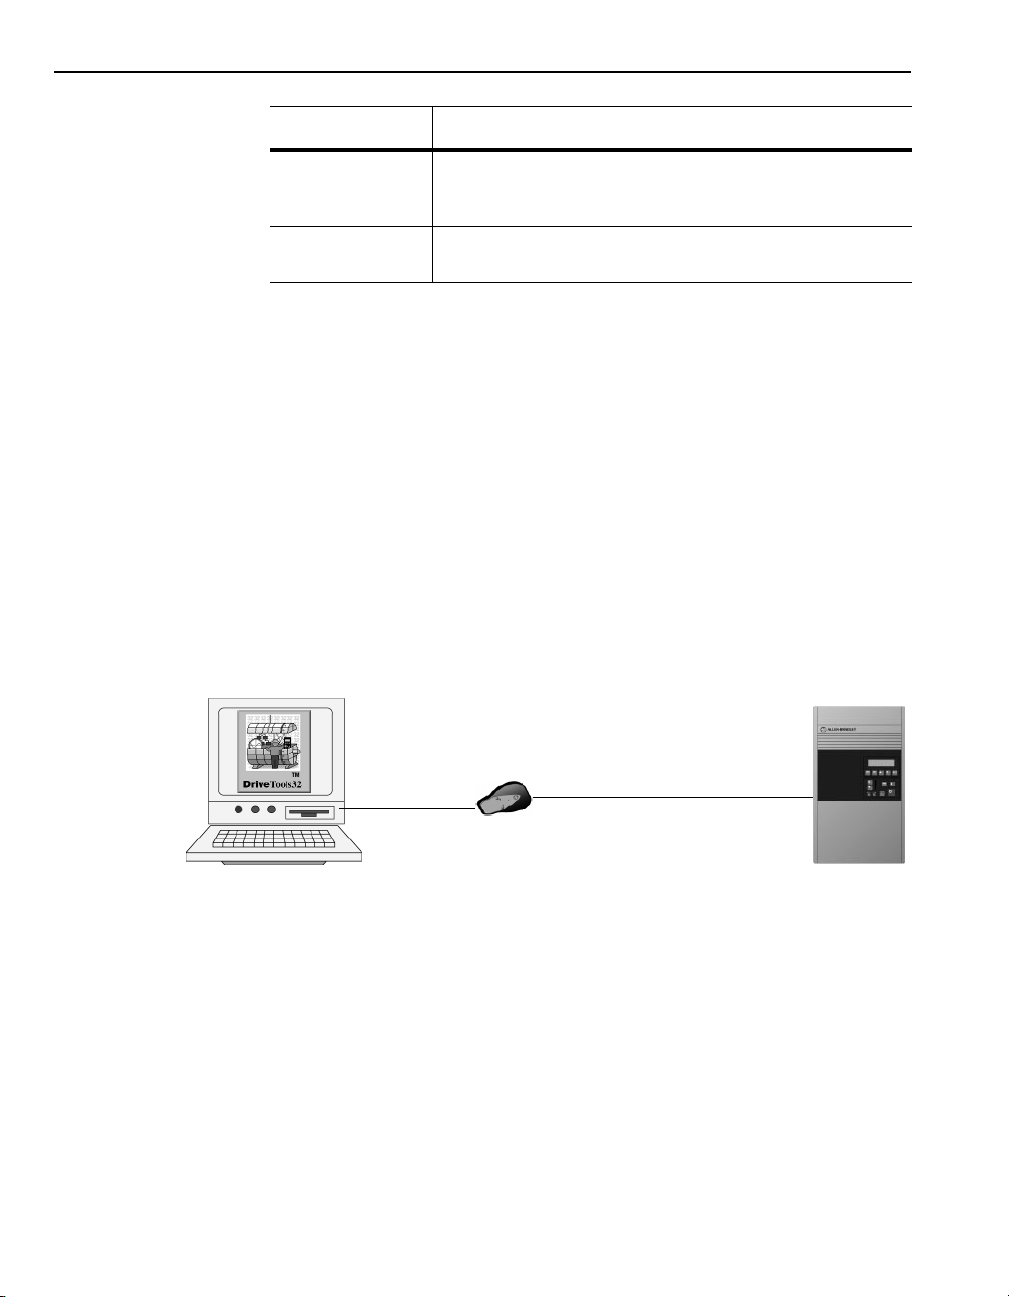
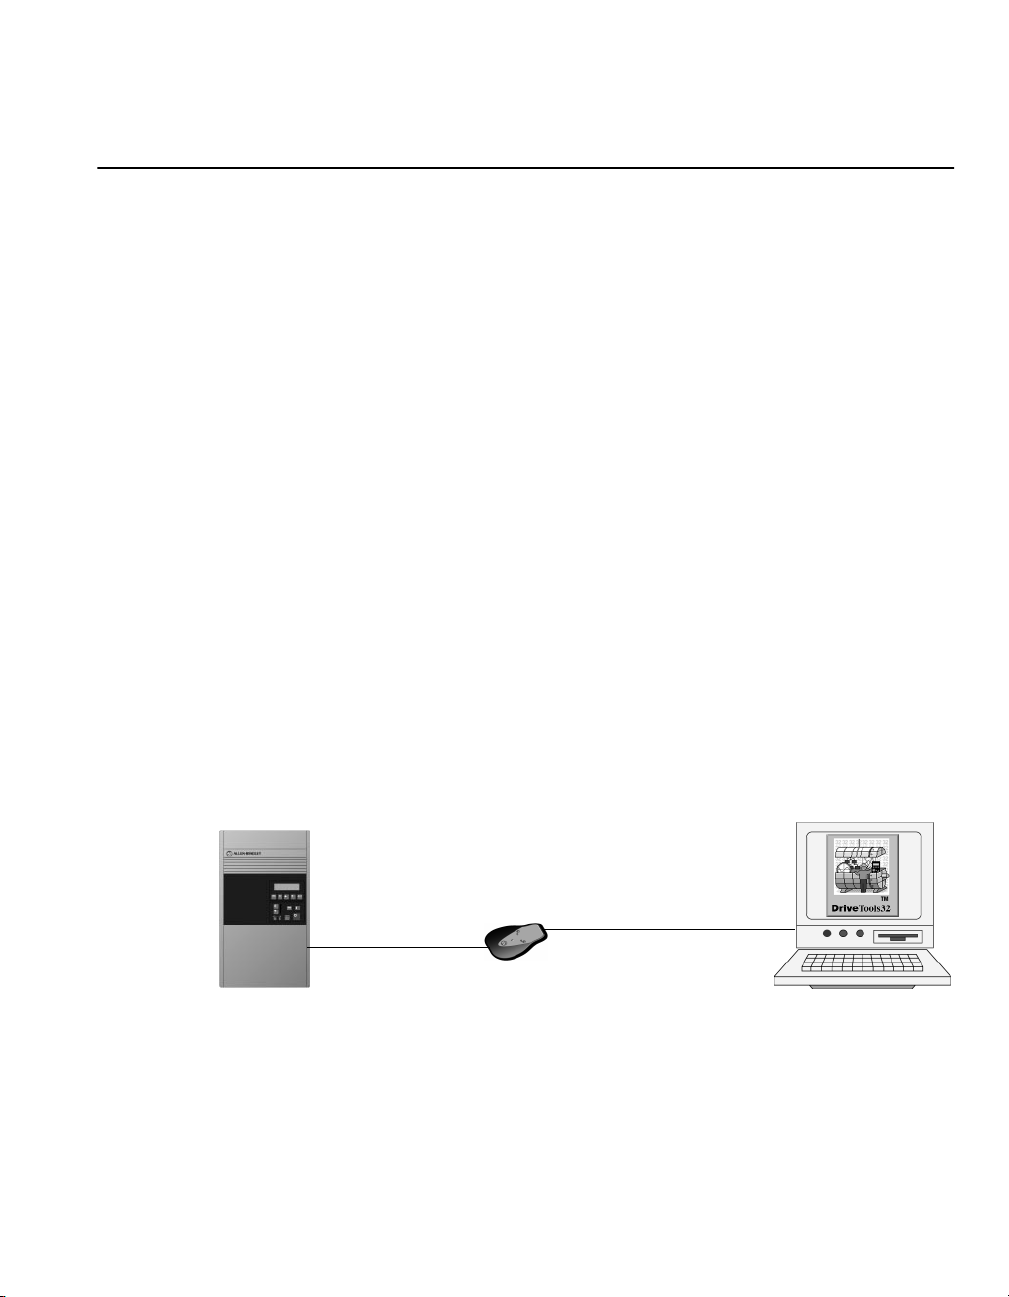
When you use DriveTools32 and RSLinx, you can connect to and communicate
with a drive using a variety of communications. For example, you can
communicate with a drive using a direct serial connection (Refer to Figure 1.1).
Figure 1.1
Direct Serial Connection
Computer
Adapter
Drive
Page 17
Overview 1-3
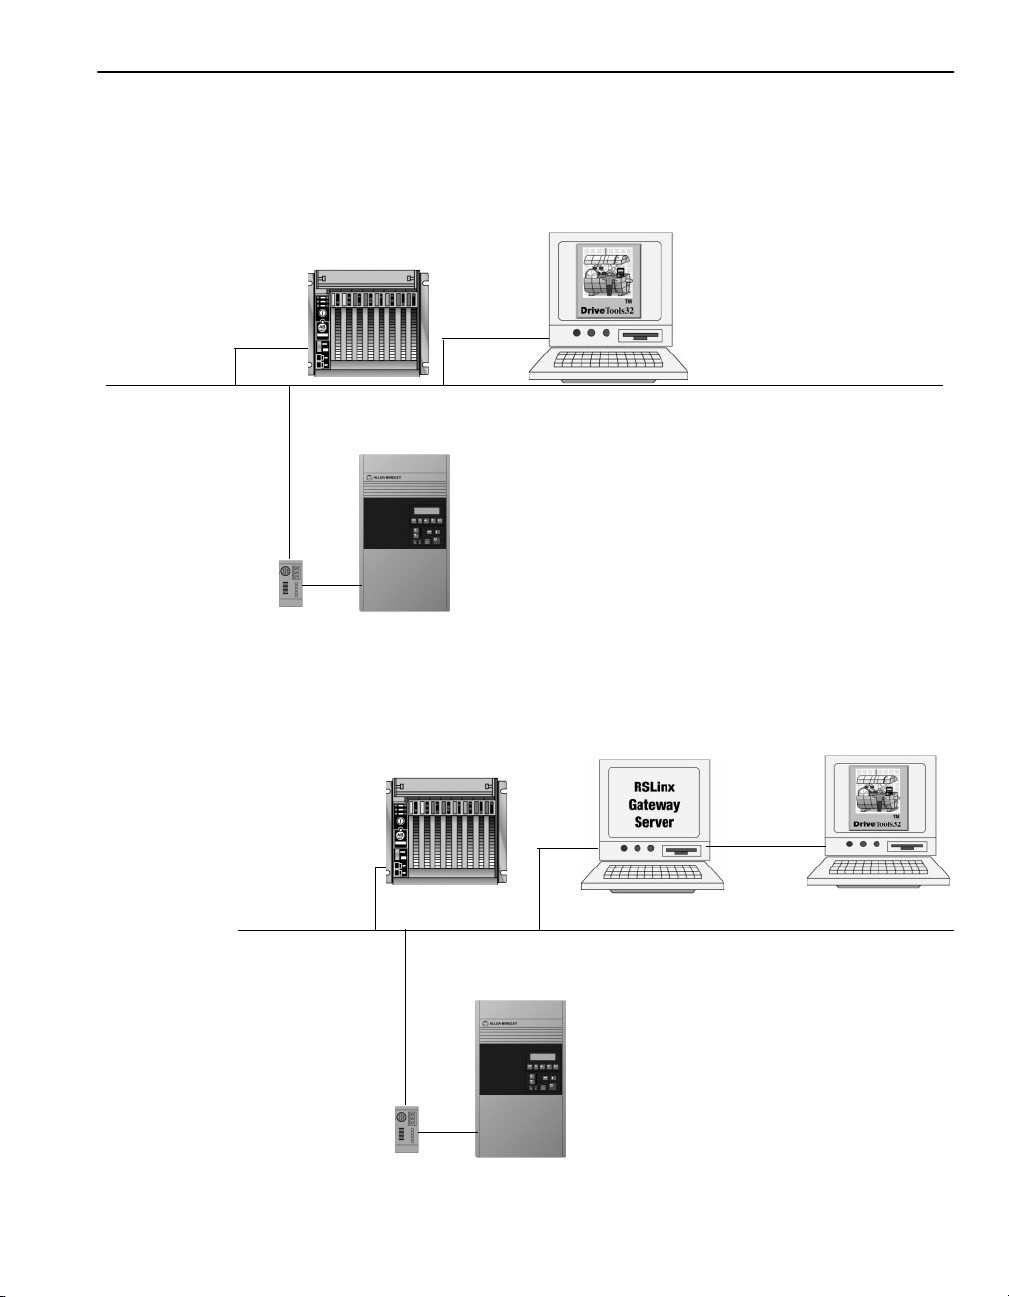
You can also communicate with a drive or controller using a netw ork connection
(Refer to Figure 1.2).
Figure 1.2
Network Connection
Network
Controller
Adapter
Computer
Drive
A third option lets you communicate with a drive or controller using a remote
connection such as a gateway (Refer to Figure 1.3).
Figure 1.3
Remote Connection
Controller
Network
Computer
Drive
Adapter
Page 18

1-4 Overview
You can use DriveTools32 with any of the following types of communications:
This Type of Communications: Refer To:
Required Hardware
RS-232 Point-to-Point Serial Communications for a SCANport-Compatible
Product
RS-232 Point-to-Point Serial Communications for a 1395 Drive Chapter 4
DH+
Direct Communications
DH+ to RIO Block Transfer Pass Thru Communications Chapter 6
ControlNet
ControlNet to RIO Block Transfer Pass Thru Communications Chapter 8
DeviceNet
Allen-Bradley Ethernet
RSLinx Gateways Chapter 11
Modem Connection Chapter 12
ControlLogix Gateways Chapter 13
ControlLogix Gateways to RIO Block Transfer Pass Thru Communications Chapter 14
Direct Communication s
Direct Communications
to RIO Block Transfer Pass Thru Communications
Chapter 3
Chapter 5
Chapter 7
Chapter 9
Chapter 10
Because DriveTools32 works with many types of communications, the har dware
you need depends on the type of drive that you want to access and the type of
communications that you are using. Refer to the following table:
Drive Refer To:
SCANpor t-C om pat ible
(e.g., 1336 PLUS drives or SMP)
1336 FORCE “Using DriveTools32 with a 1336 FORCE Drive” on page 1-6
1395 “Using DriveTools32 with a 1395 Drive” on page 1-7
A-B/Stromberg “Using DriveTools32 with an A-B/Stromberg Drive” on page 1-8
160 “Using DriveTools32 with a 160 Drive” on page 1-8
“Using DriveTools32 with an Allen-Bradley SCANportCompatible Product” on page 1-5
Page 19

Overview 1-5
Using DriveTools32 with an Allen-Bradley SCANport-Compatible Product
You can use DriveTools32 with many Allen-Bradley SCANport-compatible
products. For a list of Allen-Bradley SCA N port products, re fer to Appendix A,
Prod ucts Supp orte d by DriveTools32
products, you have the following options:
Communications Required Drive Hardware Required Computer Hardware Refer To:
RS-232 Point-to-Point Serial Serial Adapter (1203-SSS, 1203-GD2,
DH+ to RIO Block Transfer
Pass Thru (PLC or SLC)
RS-232 to ControlNet Direct ControlNet Adapter (1203-CN1) & appropriate
ControlNet Direct ControlNet Adapter (1203-CN1) & appropriate
RS-232 to ControlNet to RIO
Block Transfer Pass Thru
(PLC)
ControlNet to RIO Block
Transfer Pass Thru (PLC)
RS-232 to DeviceNet Direct DeviceNet Adapter (1203-GK5, 1203-GU6,
DeviceNet Direct DeviceNet Adapter (1203-GK5, 1203-GU6,
Ethernet t o RI O B l o c k Tran sfer
Pass Thru
RSLinx Gateway Server:
Ethernet to DH+ to RIO Block
Transfer Pass Thru
RSLinx Gateway Server:
Ethernet to ControlNet Direct
RSLinx Gateway Server:
Ethernet to RS-232 Point-toPoint Serial
Modem (Serial) Serial Adapter (1203-SSS, 1203-GD2,
ControlLogix Equipment depends on network to which the
ControlLogix to RIO Block
Transfer Pass Thru
1203-GK2, or 1336-GM2) & appropriate cable(s)
Remote I/O Adapter (1203-GD1, 1203-GK1, or
1336-GM1) & appropriate cable(s)
cables
cables
Remote I/O Adapter (1203-GD1, 1203-GK1, or
1336-GM1) & appropriate cable(s)
Remote I/O Adapter (1203-GD1, 1203-GK1, or
1336-GM1) & appropriate cable(s)
1336-GM5, or 1336-GM6) & appropriate
cable(s)
1336-GM5, or 1336-GM6) & appropriate
cable(s)
Remote I/O Adapter (1203-GD1, 1203-GK1, or
1336-GM1) & appropriate cable(s)
Remote I/O Adapter (1203-GD1, 1203-GK1 or
1336-GM1) & appropriate cable(s)
ControlNet Adapter (1203-CN1) & appropriate
cables
Serial Adapter(1203-SSS, 1203-GD2,
1203-GK2, or 1336-GM2) & appropriate cable(s)
1203-GK2, or 1336-GM2), appropriate cable(s),
null modem converter, and modem
drive is connected.
Remote I/O Adapter (1203-GD1, 1203-GK1 or
1336-GM1) & appropriate cable(s)
. If you use DriveTools32 with o ne of th ese
RS-232 port Chapter 3
1784-KT, -KTX, -KTXD, or -PCMK Chapter 6
1770-KFC & RS-232 port Chapter 7
1784-KTC, -KTCX, or -PCC Chapter 7
1770-KFC & RS-232 port Chapter 8
1784-KTC, -KTCX, or -PCC Chapter 8
1770-KFD & RS-232 port Chapter 9
1784-PCD or -PCIDS Chapter 9
Ethernet Interface Running TCP/IP Chapter 10
Client:
Ethernet Interface Running TCP/IP
Server:
Ethernet Interface Running TCP/IP and
1784-KT, -KTX, -KTXD, or -PCMK
Client:
Ethernet Interface Running TCP/IP
Server:
Ethernet Interface Running TCP/IP and
1784-KTC, -KTCX, or -PCC
Client:
Ethernet Interface Running TCP/IP
Server:
Ethernet Interface Running TCP/IP and
RS-232 port
RS-232 port and modem Chapter 12
Equipment depends on network to which the
computer is connected.
Equipment depends on network to which the
computer is connected.
Chapter 11
Chapter 11
Chapter 11
Chapter 13
Chapter 14
Page 20

1-6 Overview
Using DriveTools32 with a 1336 FORCE Drive
The 1336 FORCE drives are SCANpor t-compatible pro ducts and of f er all of the
options available to SCANport-compatible products (refer to page 1-5). In
addition, 1336 FORCE drives offer the following options:
Communications Required Drive Hardware Required Computer Hardware Refer To:
RS-232 Serial to DH+
Direct
DH+ Direct PLC Communications Adapter Board
DH+ to RIO Block T ransf er
Pass Thru
RS-232 to ControlNet
Direct
ControlNet Direct ControlNet Adapter Board (1336T-GT3EN),
RS-232 to ControlNet to
RIO Block Transfer Pass
Thru (PLC)
ControlNet to RIO Block
Transfer Pass Thru (PLC)
Ethernet to RIO Block
Transfer Pass Thru
RSLinx Gateway Server:
Ethernet to DH+ Direct
RSLinx Gateway Server:
Ethernet to DH+ to RIO
Block Transfer Pass Thru
RSLinx Gateway Server:
Ethernet to ControlNet
Direct
ControlLogix Equipment depends on network to which the drive
Control Log ix to RIO Bl oc k
Transfer Pass Thru
PLC Communications Adapter Board
(1336T-GT1EN)
(1336T-GT1EN)
PLC Communications Adapter Board
(1336T-GT1EN)
ControlNet Adapte r Boar d (133 6T- GT 3EN ),
ControlNet Repea ter Ada pte r (1786 -RPA), and
ControlNet Fiber Module (1786-RPFM)
ControlNet Repea ter Ada pte r (1786 -RPA), and
ControlNet Fiber Module (1786-RPFM)
PLC Communications Adapter Board
(1336T-GT1EN)
PLC Communications Adapter Board
(1336T-GT1EN)
PLC Communications Adapter Board
(1336T-GT1EN)
PLC Communications Adapter Board
(1336T-GT1EN)
PLC Communications Adapter Board
(1336T-GT1EN)
ControlNet Adapte r Boar d (133 6T- GT 3EN ),
ControlNet Repea ter Ada pte r (1786 -RPA), and
ControlNet Fiber Module (1786-RPFM)
is connected.
PLC Communications Adapter Board
(1336T-GT1EN)
RS-232 port and 1770-KF2 Chapter 5
1784-KT, -KTX, -KTXD, or -PCMK Chapter 5
1784-KT, -KTX, -KTXD, or -PCMK Chapter 6
1770-KFC & RS-232 port Chapter 7
1784-KTC, -KTCX, or -PCC Chapter 7
1770-KFC & RS-232 port Chapter 8
1784-KTC, -KTCX, or -PCC Chapter 8
Ethernet Interface Running TCP/IP Chapter 10
Client:
Ethernet Interface Running TCP/IP
Server:
Ethernet Interface Running TCP/
IP and 1784-KT, -KTX, -KTXD, or -PCMK
Client:
Ethernet Interface Running TCP/IP
Server:
Ethernet Interface Running TCP/
IP and 1784-KT, -KTX, -KTXD, or -PCMK
Client:
Ethernet Interface Running TCP/IP
Server:
Ethernet Interface Running TCP/
IP and 1784-KTC, -KTCX, or -PCC
Equipment depends on network to which
the computer is connected.
Equipment depends on network to which
the computer is connected.
Chapter 11
Chapter 11
Chapter 11
Chapter 13
Chapter 14
Page 21

Overview 1-7
Using DriveTools32 with a 1395 Drive
With the 1395 drive, you have the following options:
Communications Required Drive Hardware Required Computer Hardware Refer To:
RS-232 Point-to-Point Serial 1300-ITSSC RS-232 port Chapter 4
RS-232 Serial to DH+ Direct Multi-Communications Adapter Board
(1395-KP51)
DH+ Direct Multi-Communications Adapter Board
DH+ to RIO Block Transfer
Pass Thru
RS-232 to ControlNet Direct ControlNet Adapter Board (1395-KP54EN),
ControlNet Direct ControlNet Adapter Board (1395-KP54EN),
RS-232 to ControlNet to
RIO Block Transfer Pass
Thru (PLC)
ControlNet to RIO Block
Transfer Pass Thru (PLC)
Ethernet to RIO Block
Transfer Pass Thru
RSLinx Gateway Server:
Ethernet to DH+ Direct
(1935-KP51)
Node Adapter (1395-KP50) or
Multi-Communications Adapter (1395-KP51)
ControlNet Repeater Adapter (1786-RPA),
and ControlNet Fiber Module (1786-RPFM)
ControlNet Repeater Adapter (1786-RPA),
and ControlNet Fiber Module (1786-RPFM)
Node Adapter (1395-KP50) or
Multi-Communications Adapter (1395-KP51)
Node Adapter (1395-KP50) or
Multi-Communications Adapter (1395-KP51)
Node Adapter (1395-KP50) or
Multi-Communications Adapter (1395-KP51)
Multi-Communications Adapter (1395-KP51)
RS-232 port and 1770-KF2 Chapter 5
1784-KT, -KTX, -KTXD, or -PCMK Chapter 5
1784-KT, -KTX, -KTXD, or -PCMK Chapter 6
1770-KFC & RS-232 port Chapter 7
1784-KTC, -KTCX, or -PCC Chapter 7
1770-KFC & RS-232 port Chapter 8
1784-KTC, -KTCX, or -PCC Chapter 8
Ethernet Interface Running TCP/IP Chapter 10
Client:
Ethernet Interface Running TCP/IP
Server:
Ethernet Interface Running TCP/IP
and 1784-KT, -KTX, -KTXD, or -PCMK
Chapter 11
RSLinx Gateway Server:
Ethernet to DH+ to RIO
Block Transfer Pass Thru
RSLinx Gateway Server:
Ethernet to ControlNet
Direct
ControlLogix Equipment depends on network to which the
ControlLogix to RIO Block
Transfer Pass Thru
Node Adapter (1395-KP50) or
Multi-Communications Adapter (1395-KP51)
ControlNet Adapter Board (1395-KP54EN),
ControlNet Repeater Adapter (1786-RPA),
and ControlNet Fiber Module (1786-RPFM)
drive is connected.
Multi-Communications Adapter (1395-KP51) Equipment depends on network to which the
Client:
Ethernet Interface Running TCP/IP
Server:
Ethernet Interface Running TCP/IP
and 1784-KT, -KTX, -KTXD, or -PCMK
Client:
Ethernet Interface Running TCP/IP
Server:
Ethernet Interface Running TCP/IP
and 1784-KTC, -KTCX, or -PCC
Equipment depends on network to which the
computer is connected.
computer is connected.
Chapter 11
Chapter 11
Chapter 13
Chapter 14
Page 22

1-8 Overview
Using DriveTools32 with an A-B/Stromberg Drive
With a 1352, 1352 C, 1352 C Plus, 3400 DC, or 3502 LGU Stromberg drive,
you have th e foll owing options:
Communications Required Drive Hardware Required Computer Hardware Refer To:
RS-232 Serial to DH+ Direct 3500-TBX card
(147096 or 157676)
DH+ Direct 3500-TBX card
RSLinx Gateway Server:
Ethernet to DH+ Direct
(147096 or 157676)
3500-TBX card
(147096 or 157676)
RS-232 port and 1770-KF2 Chapter 5
1784 -KT, -KTX, KTXD, or -PCMK Chapter 5
Client:
Ethernet Interface Running TCP/IP
Server:
Ethernet Interface Running TCP/IP
and 1784-KT, -KTX, -KTXD, or -PCMK
Chapter 11
Using DriveTools32 with a 160 Drive
With a 160 drive, you have the following option:
Communications Required Drive Hardware Required Computer Hardware Refer To:
RS-232 Point-to-Point Serial 160-RS1 Communications Adapter and
Modem 160-RS1 Communications Adapter,
Getting Started
appropriate cables
appropriate cables, null modem converter,
and modem
To use DriveTools32 to monitor, configure, or control a drive, you need to:
RS-232 port Chapter 3
RS-232 port and modem Chapter 12
with DriveTools32
1.
Install DriveTools32 and RSLinx. Refer to Chapter 2,
Starting Drive Tools32
.
Installing and
2.
Verify that you are using the correct hardware and settings for your type of
communications.
3.
Configure RSLinx for your type of communications.
4.
Configure the DriveToo ls32 application for your type of communications.
5.
Connect to a drive.
➀
Determine the type of communications that you will be using, and then refer to the appropriate
➀
➀
➀
chapter. Chapter 3 through Chapter 14 provide instructions for setting up hardware, configuring
RSLinx and DriveTools32, and connecting to a drive for each type of communications.
➀
Page 23

Installing and Starting DriveTools32
Chapter
2
Chapter Objectives
System Requirements
Chapter 2 provides instructions for installing DriveTools32 and RSLinx. In this
chapter, you will read about the following:
• System Requirements.
• Installin g DriveTools32 and RSLinx.
• Starting RSLinx and DriveTools32 applications.
• Creating databases in DriveTools32.
DriveTools32 runs on the Microsof t Windows 95, Windows 98, or Windows NT
(4.0 or greater) operating systems.
Windows 95 and Windows 98 System Requirements
• Personal computer using 486 66 MHz processor or better with at least 16
MB (MegaBytes) of RAM and 50 MB or hard drive space.
• VGA Monitor capable of 640 x 480 resolution or better.
•CD-ROM drive.
• Mouse or other Windows 95/98 compatible pointing device.
Windows NT System Requirements
• Personal computer using at least 100MHz Pentium® class processor with at
least 32 MB (MegaBytes) of RAM and 50 MB of hard drive space.
• VGA Monitor capable of 800 x 600 resolution or better.
•CD-ROM drive.
• Mouse or other Window s NT compatible pointing device.
Page 24
2-2 Installing and Star ting DriveTools32
Installing DriveTools32
You can install Driv eTools32 on a computer running Windows 95, Windows 98,
or Windows NT.
Important:
must have administrator privileges on the computer.
Important:
installing the new version.
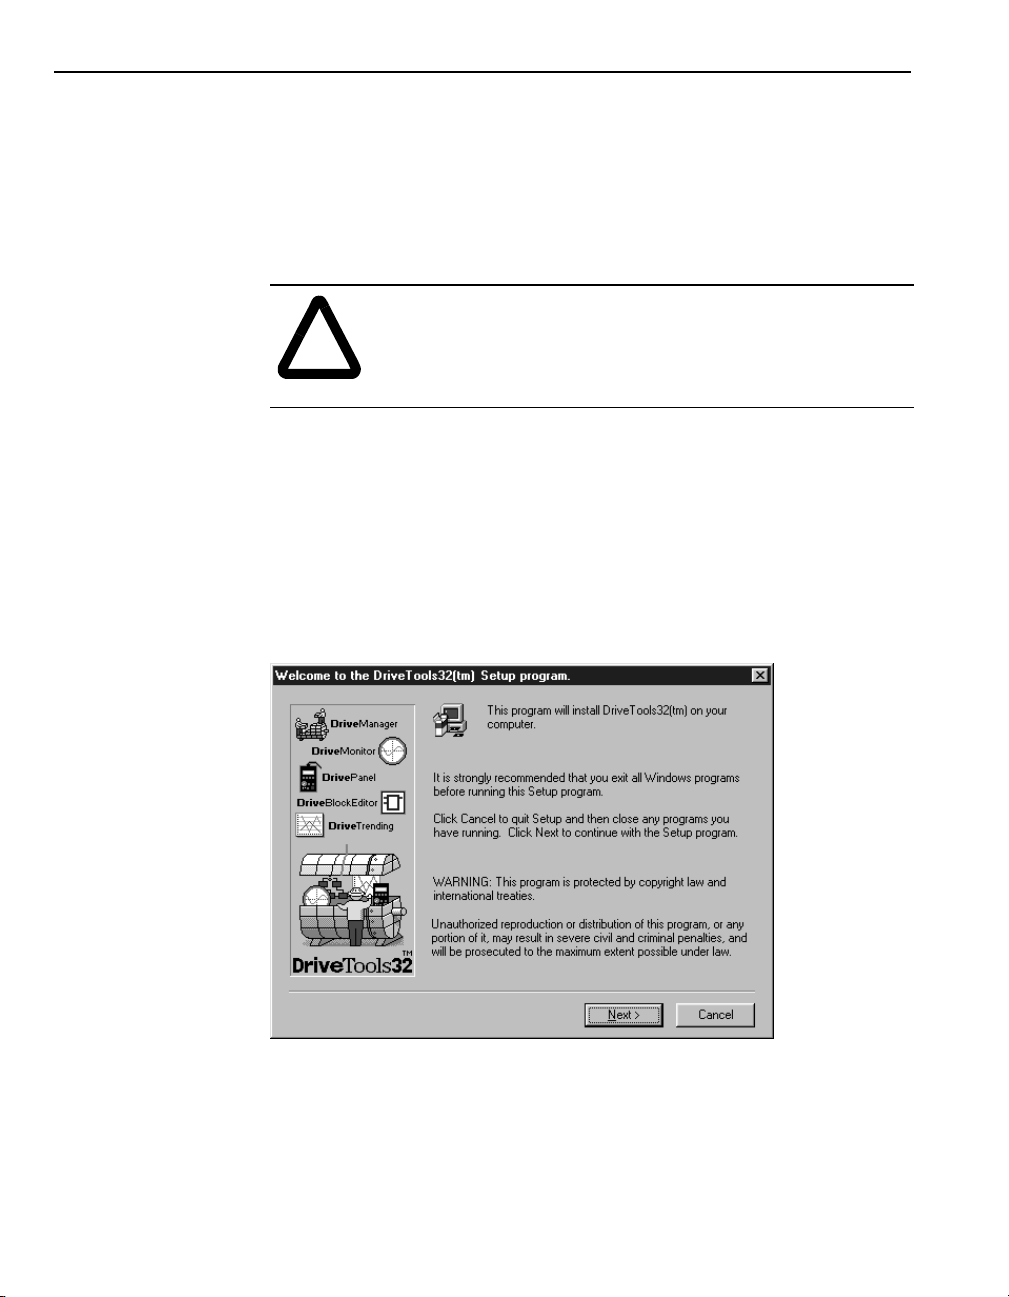
To install DriveTools32, you need to:
1.
If necessary, uninstall old versions of DriveTools32 from the computer.
Important:
install DriveTools32 in the same location as the old program. This preserves the
mapping between existing databases and the DriveTools32 applications.
2.
Exit all Windows programs.
3.
Insert the DriveTools32 CD in the CD-ROM drive. The install wizard starts.
To install DriveTools32 on a computer running Wi ndows NT, you
If you are upgrading DriveTools32, uninstall the old version before
ATTENTION:
DriveT ools32 may overwrite e xisting DriveT ools32 database files.
!
Ensure that needed database files are saved in a safe location to
avoid losing them when you install DriveTools32.
If you are upgrading DriveTools32, it is recommended that you
Hazard of equipment damage exists. Installing
4.
Follow the instructions in the Install wizard.
Important:
Important:
must be re-installed to activate or deactivate the security system. During a
reinstallation, data may be lost.
The serial number for registration is on the DriveTools32 box.
Selecting a security system is a one time decision. DriveTools32
Page 25
Installing and Star ting DriveTools32 2-3
Installing RSLinx
You must have version 2.10.118 (or greater) of RSLinx or RSLinx Lite installed
and properly configured before you can use DriveTools32 to communicate with
a drive. It is recommended that y ou also install RS Linx Service P ack 1 to update
RSLinx to versio n 2.10.167. When you finish installing DriveTools32, you are
prompted to install RSLinx Lite and the necessary service packs.
Important:
computer, do not install the RSLinx that is shipped with DriveTools32. Click
No
.
If you need to install RSLinx, follow these directions:
1.
Click
If you already have RSLinx (version 2.10.118) installed on the
Yes
to display the RSLinx Install wizard.
Page 26
2-4 Installing and Star ting DriveTools32
2.
Follow the instructions in the Install wizard.
Important:
start it using Windows Explorer. Start Windows Explorer, click your CD-ROM
drive,
Lite setup. Start Windows Explorer, click your CD-ROM drive,
V2.1_SP1
If the RSLinx Install wizard does not appear automatically, you can
RSLinx
, and then double-click
RSLinx
Service Pack 1
, and
V2.1
, and then double-click
Setup.exe
Setup.exe
to run the service pack setup.
to run the RSLinx
RSLinx
, and
Starting DriveTools32 Applications and RSLinx
The first time that yo u use Dri v eTools32, you must start RSLinx bef ore you star t
the DriveTools32 application. T o start RSLinx in Windows, click
Programs, Rockwell Software, RSLinx
To start a DriveTools32 application, click
then the DriveTools32 application (e.g.,
Important:
ADMIN
KEY
is
DriveManager32 online help.
Important:
starts with it. If you reconfigure a driver, you must close the DriveTools32
application and then restart it.
If you have enabled the security system, the default user name is
, and the default password is
. For instructions on changing user names and passwords, refer to the
When you start a DriveTools32 application, RSLinx automatically
, and then
Start, Programs, DriveTools32
DriveManager32
PASS
. The default administrator keyword
RSLinx
Start
,
.
and
).
Page 27
Installing and Star ting DriveTools32 2-5
DriveTools32 and Database Files
DriveTools32 uses a unique database file for each drive so that you can
configure each dri v e individually. Dri v eTools32 ships with many of the database
files that it will need (refer to Appendix A,
DriveTools32
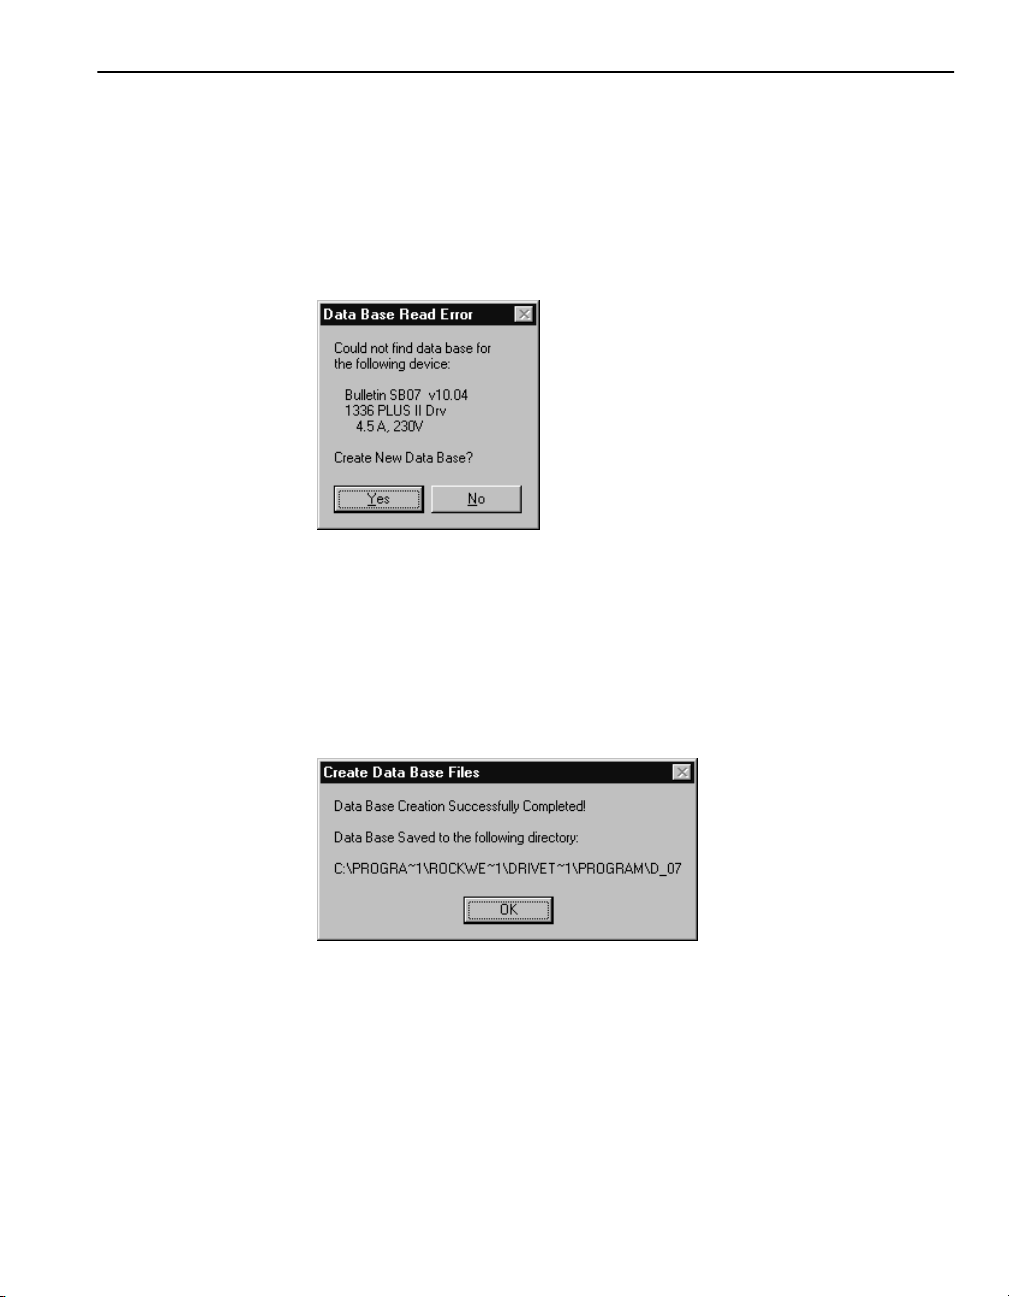
If a drive does not ha ve a data base f ile in DriveTo ols32, yo u will be pro mpted to
download a database file when you try to connect to it in a DriveTools32
application.
Important:
folder. You can change the folder to which database files are downloaded by
selecting
You must specify a path and then select
1.
If the
uploads a database file. The following prompt appears to inform you that
the download is complete.
).
By default, DriveTools32 downloads database files into its program
Set Data Base Path
Data Base Read Error
in the DriveTools32 application’s
dialog box appears, click
Products Supported by
Options
Use Alternate Data Base Directory
Yes
. DriveToo ls32
menu.
.
2.
Click OK.
Page 28

2-6 Installing and Star ting DriveTools32
Notes:
Page 29
Setting Up RS-232 Point-to-Point Serial
Communications
Chapter
3
Chapter Objectives
About RS-232 Point-to-Point Serial Communications
Chapter 3 provides instructions for using DriveTools32 with RS-232 point-topoint serial communications to a SCANport-compatible product. In this chapter,
you will read about the following:
• Required equipment and settings.
• Configuring RSLinx for RS-232 point-to-point serial communications.
• Configuring a DriveTools32 application for RS-232 point-to-point serial
communications.
• Connecting to a drive.
Important:
compatible product. For information on a 1395 drive, refer to Chapter 4,
up RS-232 Point-to-Point Serial Comm unications for a 1395 Drive
Using RS-232 point-to-point serial communications, you can establish a direct
serial connection between a computer and a dri ve. Figure 3.1 shows an example:
Figure 3.1
RS-232 Point-to-Point Serial Communications for a SCANport-Compatible Product
SCANport
For this type of configuration, you must connect to a SCANport-
Protocol
RS-232
DF1 Protocol
Setting
.
SCANport-
Compatible
Drive
1203-SSS
Important:
capacities greater than an RS-232 connection can provide. Communication
faults may occur when you use a serial connection with these applications.
Some DriveTools32 applications may require communication
Page 30

3-2 Setting Up RS-232 Point-to-Point Serial Communications
Hardware
Required Hardware
The following hardware is required for an RS-232 serial connection:
Drive Required Drive Hardware Required Computer
Hardware
➀
SCANport-Compatible
160 SSC 160-RS1 Serial Adapter and appropriate cable RS-232 port
➀
For a list of SCANport-compatible products, refer to Appendix A,
Serial Adapter(1203-SSS, 1203-GD2,
1203-GK2, or 1336-GM2) and appropriate
cable(s)
Products Supported by DriveTools32
RS-232 port
.
Setting Up the Hardware
To use DriveTools32 with this type of communications, you must:
• Ensure that the drive and adapter are properly installed and powered.
• Ensure that cables are securely connected and protected from damage.
• Use a standard straight-thru serial cable to connect your computer to the
adapter.
• Ensure that your serial communications module settings are correct. In most
cases, you should use the factory-set defaults. If you decide to change the
default settings, note the new settings because you need to know them when
you configure RSLinx and DriveTools32. Refer to the appropriate manual:
Communications Module Refer To:
1203-GD2, 1203-GK2, or 1336 GM2
1203-SSS
Important:
If you are using a 1203-GD2 serial communications module, its
Bulletin 1203 Serial Communications Module User Manual
Smart Self-powered Serial Converter User Manual
firmware must be release 2.04 or greater. If you use an earlier version, all
parameters may not be shown.
Page 31

Setting Up RS-232 Point-to-Point Serial Communications 3-3
Configuring RSLinx
The following instructions describe how to configure for RS-232 serial
communications. If you have questions about RSLinx, refer to its online help.
To use RSLinx for an RS-232 serial communications, you need to:
• Configure the communications driver.
• Map the configured driver to a KTPort Value.
Important:
computer communications port is correctly conf igur ed (e.g., baud rate). You can
configure the communications port in the Windows Control Panel.
Before configuring the com mun ications driver, make sure that you r
Configuring the Communications Driver
A driver is the software interface to the hardware device that allows RSLinx to
communicate with your drive. To configure the driver, you need to:
1.
Start RSLinx.
2.
Communications
In the
Drivers
dialog box appears.
menu, select
Configure Drivers
. The
Configure
3.
4.
Available Driver Types
In the
Add New
Click
. The
field, select
Add New RSLinx Driver
RS-232 DF1 Devices
.
dialog box appears.
Page 32

3-4 Setting Up RS-232 Point-to-Point Serial Communications
5.
Click OK to accept the default name. The
Communications Device
dialog box appears.
Configure Allen-Bradley DF1
6.
In the
Comm Port
field, select the communications port that you computer
is using.
Important:
Note the communications port and baud rate that you use. When
you configure a DriveTools32 application, you need to enter this information in
Communication Setup
the
7.
In the
Device
field, select
dialog box.
1770-KF2/1785-KE
. If you are using RS-232
serial to ControlNet communications, select KFC 1.5.
8.
Station Number
In the
field, type the station number for your
communications module.
9.
Auto-Configure
Click
to have RSLinx co nf igu re your driver automatically .
If the auto-configure was successful, a message box is displayed to inform
you that RSLinx failed to identify the device. If it was unsuccessful,
RSLinx displays why it failed next to the Auto-Configure button.
10.
Click OK to acknowledge the message. “Auto-Configuration Successful”
appears next to the Auto-Configure button.
11.
Station Number
In the
field, type a new, unique number. This number will
be the station number of the computer. The adapter and drive use the station
number that was set for the auto-configure.
Page 33

Setting Up RS-232 Point-to-Point Serial Communications 3-5
12.
Click OK to save the configuration. The new driver appears in the
Configure Drivers
dialog box.
13.
Click
Close
.
Mapping the Configured Driver to the KTPort Value
After configuring the driver, you must map it to a legacy INTERCHANGE API
xKT:0 label in RSLinx so that DriveTools32 can use it.
1.
2.
Communications
In the
menu, select
Configure Client Applications
In an unused
KT:0
field, select the DF1 device.
Configure Client Applications
dialog box appears.
. The
Important:
Note the KT:0 field that you select. When you configure a
DriveTools32 application, you need to enter the field number in the
Communication Setup
3.
Click OK to map the driver to the KT:0 value.
dialog box.
Page 34

3-6 Setting Up RS-232 Point-to-Point Serial Communications
Setting Up Communications in a DriveTools32 Application
Before a DriveTools32 application can communicate with a drive, you must
configure the application.
Important:
communications port at a time. If you have previously configured a serial
connection to a 1395 drive, click
box to delete that configuration. You mu st then restart the DriveTools32
application.
To configure the DriveTools32 application, you need to:
1.
Start the DriveTools32 application.
2.
In the
Setup
DriveTools32 can support only one type of serial connection at a
Options
dialog box appears.
menu, select
Delete
Communication Setup
Communications Setup
in the
Communication
. The
dialog
3.
Click the
4.
Under
5.
In the
the KT:0 port used by the DF1 driver in the RSLinx
Applications
Important:
Configure Client Applications
Serial
tab.
Connect Type
Enter INTERCHANGE Port Mapping #
dialog box.
To view the KT port number used by the DF1 driver, select
, select
RS-232/RS-485 SCANport Point-to-Point
in the RSLinx
field, type the number of
Configure Client
Communications
.
menu.
Page 35

Setting Up RS-232 Point-to-Point Serial Communications 3-7
Connecting to the Drive
6.
7.
8.
9.
After configuring RSLinx and the DriveTools32 application, you are ready to
connect to a drive.
1.
Enter Serial Communication Port
In the
port number that your computer is using. You must use the same
communications port for which RSLinx is configured.
Enter The Port Baud Rate
In the
communications module and port are using.
If you are usi ng a 1336 FORCE and its drive firmware version is 0.10,
1336T Two Word Header (used ONLY for 1336T version 0.10)
select
Click OK.
Drive
In the
Connect to Drive
menu, select
dialog box appears.
Connect to Drive
field, type the baud rate that your
field, type the communications
SCANport Network
. The
.
2.
3.
The DriveTools32 application is now communicating with the drive. If you are
prompted to create a new database, click
Important:
communicate with the drive, refer to Chapter 16,
WHO
Click
box appears.
Double-click the station to which you want to connect.
If a prompt appears to alert you that the application failed to
SCANport Network Connect to Drive WHO
. The
Yes
.
Troubleshooting
dialog
.
Page 36

3-8 Setting Up RS-232 Point-to-Point Serial Communications
Notes:
Page 37

Setting up RS-232 Point-to-Point Serial
Communicat ions for a 1395 Drive
Chapter
4
Chapter Objectives
About RS-232
Point-to-Point
Serial
Communications
for a 1395 Drive
Chapter 4 provides instructions for using DriveTools32 with RS-232 point-topoint serial communications for a 1395 drive. In this chapter, you will read about
the following:
• Required equipment and settings.
• Disabling RSLinx if it is using the communications port of the computer.
• Configuring a DriveTools32 application for a serial connection to a 1395
drive.
• Connecting to a drive.
With RS-232 point-to-point serial communications for a 1395 drive, you
establish a direct serial connection between a computer and a 1395 dri ve. Figure
4.1 shows an example:
Figure 4.1
1395 RS-232 Point-to-Point Serial Communications
RS-232
Serial Protocol
1395 Serial
Protocol
Important:
serial communications.
You can use on DriveManager32 and DriveTrending32 with 1395
1300-ITSSC
1395 Drive
Page 38

4-2 Setting up RS-232 Point-to-Point Serial Communications for a 1395 Dr ive
Hardware
Disabling RSLinx
Required Hardware
The following hardware is required for 1395 serial communications:
Drive Required Drive Hardware Required Computer Hardware
1395 1300-ITSSC RS-232 port
Setting Up the Hardware
To use DriveTools32 with this type of communications, you must:
• Ensure that the drive and adapter are properly installed and powered.
• Ensure that cables are securely connected and protected from damage.
The following in structio ns descri be ho w to disable RSLi nx so that Dri v eTools32
can use the serial communications port for a 1395 connection. If you have
questions about RSLinx, refer to its online help. To disable it, follow these
instructions:
1.
Start RSLinx.
2.
Communications
In the
Drivers
dialog box appears.
menu, select
Configure driv ers
. The
Configure
3.
If a configured driver using the communications port is running, click it in
Configured Drivers
the
4.
5.
Click
Click
Delete
. The driver is removed from the
Close
.
list.
Configured Drivers
list.
Page 39

Setting up RS-232 Point-to-Point Serial Communications for a 1395 Drive 4- 3
Setting Up Communications in a DriveTools32 Application
Before a DriveTools32 application can communicate with a drive, you must
configure the application.
Important:
communications port at a time. If you have previously configured a serial
connection to a SCANport-compa tible drive, click
Communications Setup
restart the application.
To configure a DriveTools32 application, you need to:
1.
Start the DriveTools32 application.
2.
In the
Setup
DriveTools32 can support only one type of serial connection at a
Delete
in the
dialog box to delete that configuration. You must then
Options
dialog box appears.
menu, select
Communication Setup
Communication
. The
3.
Click the
4.
Under
5.
In the
communications port number that is being used on your computer.
6.
In the
communications port and 1300-ITSSC communications module are using.
You can choose either 2400 or 4800 baud.
7.
In the
Important:
adapter, you will have to increase the value for DTR Pu lse Delay. Start at 4 000
and increase the value by increments of 1000 until communications work.
Serial
tab.
Connect Type
Enter Serial Communication Port
Enter The Port Baud Rate
DTR Pulse Delay (0 to calculate automatically)
If the transmissi o n o f y our computer is too fast for the 13 00-ITSSC
RS-232 To 1395 Drive using a converter
, select
field, type the serial
field, type the baud rate that your
field, type 0.
.
Page 40
4-4 Setting up RS-232 Point-to-Point Serial Communications for a 1395 Dr ive
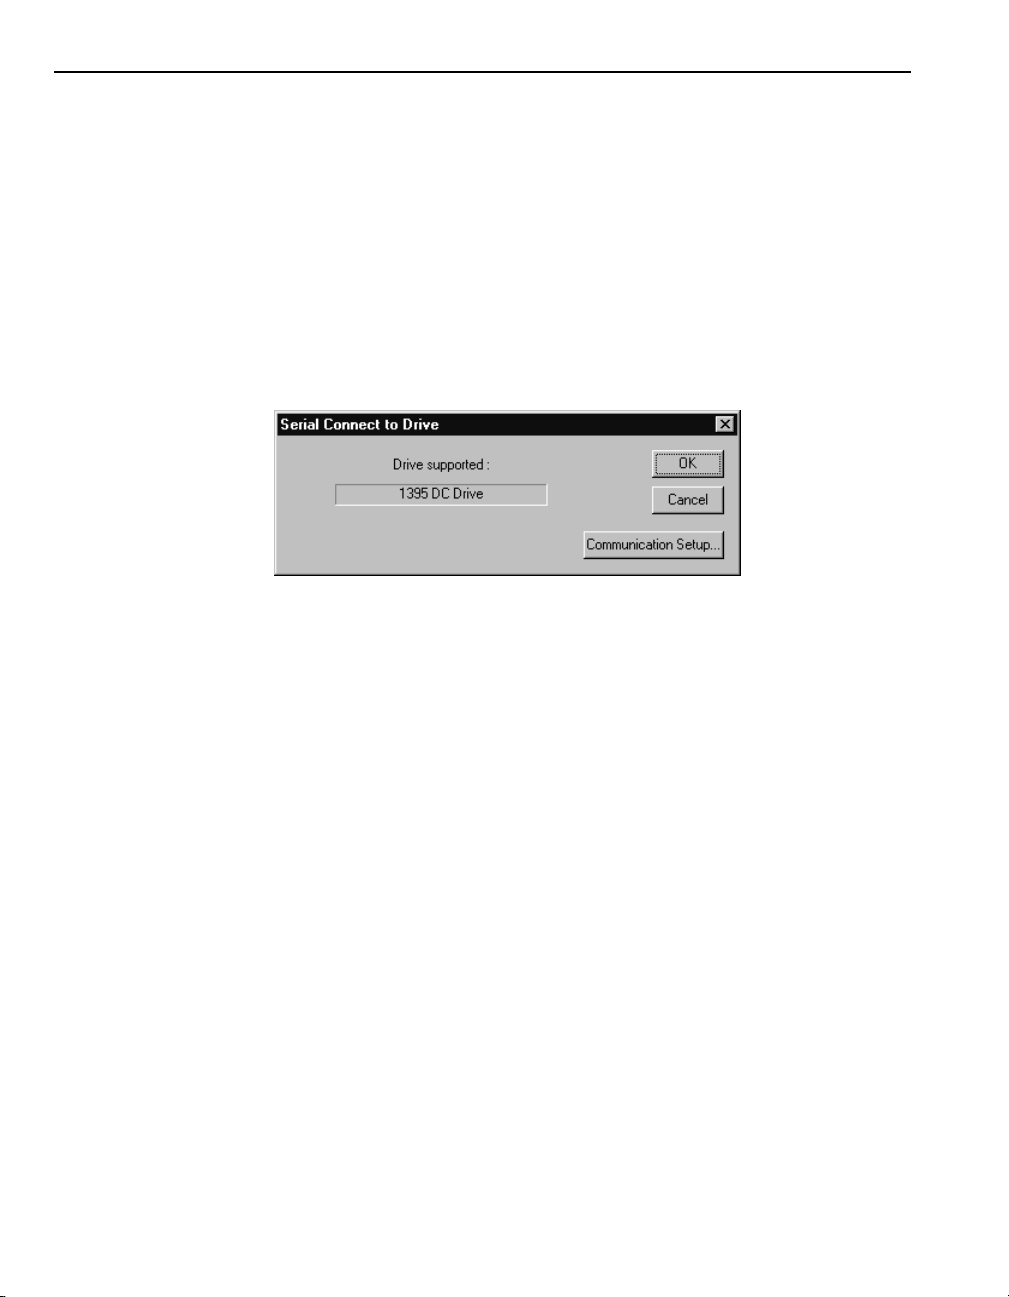
Connecting to the Drive
8.
Important:
adapter, you will have to increase the value for DTR Pu lse Width. Start at 500
and increase the value by increments of 100 until communications work.
9.
After disabling RSLinx and configuring the DriveTools32 application, you are
ready to connect to the drive.
1.
2.
The DriveTools32 application is now communicating with the drive. If you are
prompted to create a new database, click
DTR Pulse Width (0 to calculate automatically)
In the
If the transmission of your computer is too fast for the 1300-ITSSC
Click OK.
Drive
In the
dialog box appears.
Click OK.
menu, select
Connect to Drive
Yes
.
field, type 0.
Serial Connect to Drive
. The
Important:
communicate with the drive, make sure that you are using either
DriveManager32 o r Dri veT rend ing32. Other applications will no t work with this
type of communications system. Also, try adjustin g the settings as indicated in
step 7 and step 8. If you are still not able to communicate with the drive, refer to
Chapter 16,
If a prompt appears to alert you that the application failed to
Troubleshooting
.
Page 41

Setting Up DH+ Direct Communications
Chapter
5
Chapter Objectives
About DH+ Direct Communications
DH+
Chapter 5 provides instructions for using DriveTools32 wit h DH+ direct
communications. In this chapter, you will read about the following:
• Required equipment and settings.
• Configuring RSLinx for DH+ direct communications.
• Configuring a DriveTools32 application for DH+ direct communications.
• Connecting to a drive.
With DH+ (Data Highway Plus) communications, you can communicate
directly with drives that are connected to a DH+ network. To access a DH+
network, your computer needs either an internal interface card or an external
converter. Figure 5.1 shows an example:
Figure 5.1
DH+ Direct Network
Computer with
Internal Card
Computer with
1770-KF2
Converter
OR
1336
FORCE
Drive
1395
Drive
Page 42

5-2 Setting Up DH+ Direct C ommunications
How you set up the hardware and configure RSLinx and DriveTools32 for DH+
direct communications depends on whether you are using an internal interface
card or external converter.
Using: Communications Refer To:
Using DH+ Direct Communications
Internal Interface Card
(1784-KT, -KTX, -KTXD, or -PCMK)
External Converter
(1770-KF2)
DH+ Direct “Using DH+ Direct Communications”
RS-232 Serial to DH+
Direct
on page 5-2
“Using RS-232 to DH+
Communications” on page 5-8
DH+ direct communications use an internal interface card (1784-KT, -KTX,
-KTXD, or -PCMK) in your computer.
Important:
If you are using an external converter, refer to “Using RS-232 to
DH+ Communications” on page 5-8.
Hardware
Required Hardware
The hardware required for this type of communications depends on the drive
type. Refer to the following table:
Drive Required Drive Hardware Required Computer Hardware
1336
FORCE
1395 Multi-Communications Adapter Board
A-B/
Stromberg
PLC Communications Adapter Board
(1336-GT1EN)
(1395-KP51)
3500-TBX card
(147096 or 157676)
1784 -KT, -KTX, -KTXD, or -PCMK
1784 -KT, -KTX, -KTXD, or -PCMK
1784-KT, -KTX, -KTXD, or -PCMK
Setting Up the Hardware
To use DriveTools32 with this type of communications, you must:
• Ensure that the drive and adapter are properly installed and powered.
• Ensure that cables are securely connected and protected from damage.
Page 43

Setting Up DH+ Direct Co mmunications 5- 3
Configuring RSLinx
The following instructions describe how to configure RSLinx for DH+ direct
communications. If you have questions about RSLinx, refer to its help.
To use RSLinx for DH+ direct communications, you need to:
• Configure the communications driver.
• Map the configured driver to the KTPort Value.
Configuring the Communications Driver
A driver is the software interface to the hardware device that allows RSLinx to
communicate with your drive. To configure the driver, you need to:
1.
Start RSLinx.
2.
3.
4.
Communications
In the
Drivers
In the
PCMK
select
help if you have questions.
Click
dialog box appears.
Available Driver Types
. If you are using W indo ws NT and conf ig uring a 1784-P CMK card,
Allen-Bradley 1784-PCMK Devices
Add New
menu, select
field, select
Add New RSLinx Driver
. The
Configure Drivers
1784-KT/KTX(D)/PKTX(D)/
. Refer to the RSLinx online
dialog box appears.
. The
Configure
Page 44

5-4 Setting Up DH+ Direct C ommunications
5.
T ype a name (if desi red), and then click OK. The
1784-KTX/KTXD
Important:
If you are configuring a 1784-PCMK card, a different dialog box
dialog box appears.
Configure Allen-Bradley
appears (not shown). If you are using Windows NT, you must specify an
interrupt in the
Start
button, and select
Diagnostics
Interrupt
. In the
field. To view interrupts in Windows NT, click the
Programs, Administrative Tools
Windows NT Diagnostics
dialog box, click the
, and
Windows NT
Resources
tab.
6.
In the
Value
field, select the DH+ interface card that you are using.
7.
Important:
the
8.
9.
Property
In the
Value
To edit a field, click it in the
field.
box, edit fields to match the settings of the interface card.
Property
box; then select a value in
Click OK to save the configuration. The new driver appears in the
Configure Drivers
Close
Click
dialog box.
.
Page 45

Setting Up DH+ Direct Co mmunications 5- 5
Mapping the Configured Driver to the KTPort Value
After configuring the driver, you must map it to a legacy INTERCHANGE API
xKT:0 label in RSLinx so that DriveTools32 can use it. To map the configured
driver, you need to:
1.
2.
Important:
Communications
In the
menu, select
Configure Client Applications
In an unused
KT:0
field, select the new DH+ driver.
Note the KT:0 field that you select. When you configure a
Configure Client Applications
dialog box appears.
DriveTools32 application, you need to enter the field number in the
Communication Setup
3.
Click OK to map the driver to the KT:0 value.
dialog box.
. The
Page 46

5-6 Setting Up DH+ Direct C ommunications
Setting Up Communications in a DriveTools32 Application
Before a DriveTools32 application can communicate with a drive, you need to
configure the application. To do so, you need to:
1.
Start the DriveTools32 application.
2.
3.
4.
Options
In the
Setup
dialog box appears.
Click the
Under
DH+
Connect Type
menu, select
tab.
, select
Communication Setup
Data Highway Plus (DH+) Direct
Communication
. The
.
5.
Important:
Configure Client Applications
6.
7.
Enter INTERCHANGE Port Mapping #
In the
the KT:0 port used by the DH+ d r iver in the RSLinx
Applications
If you are using a 1336 FORCE and its drive firmware version is 0.10,
select
Click OK.
dialog box.
To view the KT Port number used by the DH+ driver, select
in the RSLinx
1336T Two Word Header (used ONLY for 1336T version 0.10)
Communications
field, type the number of
Configure Client
menu.
.
Page 47

Setting Up DH+ Direct Co mmunications 5- 7
Connecting to the Drive
After configuring RSLinx and Dri v eTools32, you are ready to connect to a drive.
1.
2.
Drive
In the
to Drive
WHO
Click
menu, select
dialog box appears.
WHO’s Active on DH+ Network
. The
Connect to Drive
DH+ Network Connect
. The
dialog box appears.
3.
Double-click the station to which you want to connect.
The DriveTools32 application is now communicating with the drive. If you are
prompted to create a new database, click
Important:
communicate with the drive, refer to Chapter 16,
If a prompt appears to alert you that the application failed to
Yes
.
Troubleshooting
.
Page 48

5-8 Setting Up DH+ Direct C ommunications
Using RS-232 to
DH+
Communications
RS-232 to DH+ direct communications use an external converter (1770-KF2).
Important:
If you are using an internal interface card, refer to “Using DH+
Direct Communications” on page 5-2.
Hardware
Required Hardware
The hardware required for this type of communications depends on the drive
type. Refer to the following table:
Drive Required Drive Hardware Required Computer Hardware
1336
FORCE
1395 Multi-Communicatio ns Ada pte r Boar d
A-B/
Stromberg
Setting Up the Hardware
To use DriveTools32 with this type of communications, you must:
• Ensure that the drive and adapter are properly installed and powered.
PLC Communications Adapter Board
(1336-GT1EN)
(1395-KP51)
3500-TBX card
(147096 or 157676)
RS-232 port and 1770-KF2
RS-232 port and 1770-KF2
RS-232 port and 1770-KF2
• Ensure that cables are securely connected and protected from damage.
Configuring RSLinx
For RS-232 to DH+ communications, you must configure RSLinx for RS-232
serial communications. Refe r to the “Conf iguri ng RSLinx” s ection in Chapt er 3,
Setting Up RS-232 Point-to-Point Serial Communications,
configuring RSLi nx.
for instructions on
Page 49

Setting Up DH+ Direct Co mmunications 5- 9
Setting Up Communications in a DriveTools32 Application
Before a DriveTools32 application can communicate with a drive, you need to
configure the application.
1.
Start the DriveTools32 application.
2.
3.
4.
Options
In the
Setup
dialog box appears.
Click the
Under
DH+
Connect Type
menu, select
tab.
, select
Communication Setup
DF1 (KF2) To Data Highway Plus (DH+)
Communication
. The
.
5.
Important:
Configure Client Applications
6.
7.
Enter INTERCHANGE Port Mapping #
In the
the KT:0 port used by the DF1 driver in the RSLinx
Applications
In the
computer communications port that is being used.
In the
communications module and port are using.
dialog box.
To view the KT Port number used by DF1 communications, select
in the RSLinx
Enter Serial Communication Port
Enter The Port Baud Rate
field, type the baud rate that your
field, type the number of
Configure Client
Communications
field, type the number of the
menu.
Page 50

5-10 Setting Up DH+ Direct C ommunications
8.
If you are using a 1336 FORCE and its drive firmware version is 0.10,
1336T Two Word Header (used ONLY for 1336T version 0.10)
select
9.
Click OK.
Connecting to the Drive
After configuring RSLinx and the DriveTools32 application, you are ready to
connect to the drive.
.
1.
2.
Drive
In the
Network (DH+...)
WHO
Click
appears.
menu, select
dialog box appears.
WHO’s active on DF1 to DH+ network
. The
Connect to Drive
. The
DF1(KF2...) to Other
dialog box
3.
Double-click the station to which you want to connect.
The DriveTools32 application is now communicating with the drive. If you are
prompted to create a new database, click
Important:
communicate with the drive, refer to Chapter 16,
If a prompt appears to alert you that the application failed to
Yes
.
Troubleshooting
.
Page 51

Chapter
Setting Up DH+ to RIO Block Transfer Pass Thru
Communications
6
Chapter Objectives
About DH+ to RIO Block Transfer Pass Thru Communications
Chapter 6 provides instructions for using DriveTools32 with DH+ to RIO Block
Transfer (BT) Pass Thru communications. In this chapter, you will read about
the following:
• Required equipment and settings.
• Configuring RSLinx for DH+ to RIO Block Transfer Pass Thru
communications.
• Configuring a DriveTools32 application for DH+ to RIO Block Transfer
Pass Thru communications.
• Connecting to a drive.
With DH+ (Data High way Plus) to RIO (Remote I/O) Block Trans fer Pass Thru
communications, you access a controller over the DH+ network, and then yo u
access a drive connected to that controller’s RIO network. The RIO Block
Transfer Pass Th ru mechan ism requires that a drive be connected to a controller
(PLC-5 or SLC) over the RIO network and that block transfers are enabled.
When you use RIO Block Transfer Pass Thru communications, note:
• You cannot use DriveBlockEditor32 and the control features in
DrivePanel32.
• You cannot use DriveMonitor32 to monitor parameters and data in a drive
on an RIO network; however, you can use it to monitor parameters and data
in the controller.
• You may observe that communications are slow. RIO Block Transfer Pass
Thru communications to drives can take 2 seconds per point.
• If you are using an SLC, it must be from the SL C-500 processor family and
use a Series B 1747-SN RIO scanner.
Page 52

6-2 Setting Up DH+ to RIO Block Transfer Pass Thru Communications
Figure 6.1 shows an example:
Figure 6.1
DH+ to RIO Block Transfer Pass Thru Network
DH+
RIO
PLC-5
Computer with
1770-KF2
Converter
OR
Important:
communications module, Switch 1 of SW3
must be On to enable block transfer.
SCANportCompatible
Product
In the Remote I/O
1336
FORCE
Drive
Computer with
Internal Card
1395
Drive
How you set up the hardware and configure RSLinx and DriveTools32 for DH+
to RIO block transfer pass thru communications depends on whether you are
using an internal interface card or external converter.
Using: Communications Refer To:
Internal Interface Card
(1784-KT, -KTX, -KTXD, -PCMK)
External Converter
(1770-KF2)
DH+ to RIO Block Transfer
Pass Thru
RS-232 Serial to DH+ to RIO
Block Transfer Pass Thru
“Using DH+ to RIO Block Transfer Pass
Thru Communications” on page 6-3
“Using RS-232 to DH+ to RIO Block
Transfer Pass Thru Communications” on
page 6-7
Page 53

Setting Up DH+ to RIO Block Transfer Pass Thru Communications 6-3
Using DH+ to RIO Block Transfer Pass Thru Communications
With DH+ to RIO Block Transfer communications, you must use an internal
interface card (1784-KT, -KTX, -KTXD, or -PCMK) in your computer.
Important:
If you are using an external converter, see “Using RS-232 to DH+
to RIO Block Transfer Pass Thru Communications” on page 6-7.
Hardware
Required Hardware
The hardware required for this type of communications depends on the drive
type. Refer to the following table:
Drive Required Drive Hardware Required Computer Hardware
➀
SCANport-Compatible
1336 FORCE PLC Communications Adapter Board
1395 Node Adapter (1395-KP50) or
➀
For a list of SCANport-compatible products, refer to Appendix A,
Remote I/O Adapter (1203-GD1,
1203-GK1 or 1336-GM1) and
appropriate cable(s)
(1336T-GT1EN)
Multi-Communications Adapter
(1395-KP51)
1784-KT, -KTX, -KTXD, or -PCMK
1784-KT, -KTX, -KTXD, or -PCMK
1784-KT, -KTX, -KTXD, or -PCMK
Products Supported by DriveTools32
.
Setting Up the Hardware
To use DriveTo ols 32 with this type of communications, you must:
• Ensure that the drive and adapter are properly installed and powered.
• Ensure that cables are securely connected and protected from damage.
• Ensure that block transfer is enabled in your adapter. If you are using a
1203-Gx1 or 1336-GM1 module, switch 1 on SW3 must be ON.
Important:
Ensure that the ladder logic program and controller configuration
reflect the image table with Block Transfer enabled.
• Note the Remote I/O adapter settings. You need to specify the rack and
group number when configuring a DriveTools32 application:
Adapter Refer To:
Remote I/O Adapter (1203-GD1, 1203-GK1 or
1336-GM1) and appro pr ia te cable(s )
PLC Communications Adapter Board
(1336T-GT1EN)
Node Adapter (1395-KP50) or
Multi-Communications Adapter (1395-KP51)
Bulletin 1203 Remote I/O Communications Module User
Manual
1336 FORCE PLC Communications Adapter User Manual
Bulletin 1395 Multi-Communications Board Hardware/
Software Reference Manual
Page 54

6-4 Setting Up DH+ to RIO Block Transfer Pass Thru Communications
• Ensure that the controller connected to the drive is not using any Block
Transfer instructions addressed to the drive in its ladder logic program.
• Ensure that the controller connected to the drive is in R UN mod e. If it is not
in RUN mode, pass thru messages cannot be delivered to the connected
drive product.
Configuring RSLinx
For DH+ to RIO Block T ransfer Pass Thru communicati ons, you must conf ig ure
RSLinx for DH + communicat i ons. Refer to the “ Configuring RSLinx” section
in Chapter 5,
configuring RSLi nx.
Setting Up DH+ Direct Communications,
Setting Up Communications in a DriveTools32 Application
Before a DriveTools32 application can communicate with a drive, you must
configure the application. To do this, you need to:
1.
Start the DriveTools32 application.
for instructions on
2.
3.
4.
Options
In the
Setup
dialog box appears.
Click the
Under
DH+
Connect Type
menu, select
tab.
, select
Communication Setup
DH+ To PLC RIO pass-thru
. The
Communication
.
Page 55

Setting Up DH+ to RIO Block Transfer Pass Thru Communications 6-5
5.
Important:
Configure Client Applications
6.
7.
8.
Enter INTERCHANGE Port Mapping #
In the
the KT:0 port used by the DH+ d r iver in the RSLinx
Applications
If you are usi ng a 1336 FORCE and its drive firmware version is 0.10,
select
Click OK. The following prompt appears.
Read the information, and then click OK.
dialog box.
To view the KT Port number used by the DH+ driver, select
in the RSLinx
1336T Two Word Header (used ONLY for 1336T version 0.10)
Communications
field, type the number of
Configure Client
menu.
Connecting to the Drive
After configuring RSLinx and the DriveTools32 application, you are ready to
connect to a drive.
.
1.
Drive
In the
Network Connect to Drive
menu, select
Connect to Drive
dialog box appears.
RIO Pass Through
. The
Page 56

6-6 Setting Up DH+ to RIO Block Transfer Pass Thru Communications
2.
3.
Click
WHO
Who’s Active on DH+ Network
. The
dialog box appears.
Double-click the controller (PLC or SLC) that has the dri v e co nnected to its
RIO channel. (Note that the controller, not the drive on RIO, is displayed in
the Who dialog box.) The
RIO Pass Thru Network Connect to Drive
dialog box reappears.
4.
Enter Drive Rack #
In the
field, type the RIO rack number of the drive.
The rack number is specified in octal and is set in the communications
module.
5.
Enter Starting Group #
In the
field, type the RIO start ing group number of
the drive. The RIO starting group number is set in the communications
module. Valid numbers are 0, 2, 4, and 6.
6.
Select either
7.
If you are using an SLC, type the slot number of the RIO scanner in the
Enter SN/B Slot Number
PLC Type
SLC Type
or
.
field. This fi eld appears only if you hav e selected
SLC T ype.
8.
If you are using a 1395 drive, select
9.
Click OK.
Use 1395 Protocol
.
The DriveTools32 application is now communicating with the drive. If you are
prompted to create a new database, click
Important:
If a prompt appears to alert you that the application failed to
communicate with the drive, refer to Chapter 16,
Yes
.
Troubleshooting
.
Page 57

Setting Up DH+ to RIO Block Transfer Pass Thru Communications 6-7
Using RS-232 to
DH+ to RIO Block
Transfer Pass Thru
Communications
RS-232 to DH+ to RIO Pass Thr u communications req uire an e xternal co nverter
(1770-KF2).
Important:
If you are using an internal interface card, refer to “Using DH+ to
RIO Block Transfer Pass Thru Communications” on page 6-3.
Hardware
Required Hardware
The hardware required for this type of communications depends on the drive
type. Refer to the following table:
Drive Required Drive Hardware Required Computer Hardware
➀
SCANport-Compatible
1336 FORCE PLC Communications Adapter Board
1395 Node Adapter (1395-KP50) or
➀
For a list of SCANport-compatible products, refer to Appendix A,
Remote I/O Adapter (1203-GD1,
1203-GK1 or 1336-GM1) and
appropriate cable(s)
(1336T-GT1EN)
Multi-Communications Adapter
(1395-KP51)
Setting Up the Hardware
To use DriveTo ols 32 with this type of communications, you must:
RS-232 port and 1770-KF2
RS-232 port and 1770-KF2
RS-232 port and 1770-KF2
Products Supported by DriveTools32
.
• Ensure that the drive and adapter are properly installed and powered.
• Ensure that cables are securely connected and protected from damage.
• Ensure that block transfer is enabled in your adapter. If you are using a
1203-Gx1 or 1336-GM1 module, switch 1 on SW3 must be ON.
Important:
Ensure that the ladder logic program and controller configuration
reflect the image table with Block Transfer enabled.
• Note the Remote I/O adapter settings. You need to specify the rack and
group number when configuring a DriveTools32 application.
Adapter Refer To:
Remote I/O Adapter (1203-GD1, 1203-GK1 or
1336-GM1) and appro pr ia te cable(s )
PLC Communications Adapter Board
(1336T-GT1EN)
Node Adapter (1395-KP50) or
Multi-Communications Adapter (1395-KP51)
Bulletin 1203 Remote I/O Communications Module User
Manual
1336 FORCE PLC Communications Adapter User Manual
Bulletin 1395 Multi-Communications Board Hardware/
Software Reference Manual
Page 58

6-8 Setting Up DH+ to RIO Block Transfer Pass Thru Communications
• Ensure that the controller connected to the drive is not using any Block
Transfer instructions addressed to the drive in its ladder logic program.
• Ensure that the controller connected to the drive is in R UN mod e. If it is not
in RUN mode, pass thru messages cannot be delivered to the connected
drive product.
Configuring RSLinx
For RS-232 to DH+ to RIO Bl ock Transfer Pass Thru communications, you
must configure RSLinx for RS-232 serial communications. Refer to the
“Configuring RSLinx” section in Chapter 3,
Serial Communications,
for instructions on configuring RSLinx.
Setting Up Communications in a DriveTools32 Application
Before a DriveTools32 application can communicate with a drive, you need to
configure the application. To do so, you need to:
1.
Start the DriveTools32 application.
Setting Up RS-232 Point-to-Point
2.
3.
4.
Options
In the
Setup
dialog box appears.
Click the
Under
DH+
Connect Type
menu, select
tab.
, select
Communication Setup
DF1 (KF2) DH+ To PLC RIO Pass Thru
Communication
. The
.
Page 59

Setting Up DH+ to RIO Block Transfer Pass Thru Communications 6-9
5.
Important:
Configure Client Applications
6.
7.
8.
9.
Enter INTERCHANGE Port Mapping #
In the
the KT:0 port used by the DF1 driver in the RSLinx
Applications
In the
computer serial communications port that is being used.
In the
communications module and port are using.
If you are usi ng a 1336 FORCE and its drive firmware version is 0.10,
select
Click OK. The following prompt appears.
dialog box.
To view the KT Port number used by the DF1 driver, select
in the RSLinx
Enter Serial Communication Port
Enter The Port Baud Rate
1336T Two Word Header (used ONLY for 1336T version 0.10)
field, type the baud rate that your
Communications
field, type the number of the
field, type the number of
Configure Client
menu.
.
10.
Read the message, and then click OK.
Connecting to the Drive
After configuring RSLinx and Dri v eTools32, you are ready to connect to a drive.
1.
Drive
In the
Network Connect to Drive
menu, select
Connect to Drive
dialog box appears.
RIO Pass Through
. The
Page 60

6-10 Setting Up DH+ to RIO Block Transfer Pass Thru Communications
2.
Click
WHO
Who’s active on DF1 to D H+ network
. The
dialog box
appears.
3.
Double-click the controller (PLC or SLC) that has the dri v e co nnected to its
RIO channel. (Note that the controller, not the RIO device, is displayed in
the Who dialog box.) The
RIO Pass Thru Network Connect to Drive
dialog box reappears.
4.
Enter Drive Rack #
In the
field, type the RIO rack number of the drive.
The rack number is specified in octal and is set in the communications
module.
5.
Enter Starting Group #
In the
field, type the RIO start ing group number of
the drive. The RIO starting group number is set in the communications
module. Valid numbers are 0, 2, 4, and 6.
6.
Select either
7.
If you are using an SLC, type the slot number of the RIO scanner in the
Enter SN/B Slot Number
PLC Type
SLC Type
or
.
field. This fi eld appears only if you hav e selected
SLC T ype.
8.
If you are using a 1395 drive, select
9.
Click OK.
Use 1395 Protocol
.
The DriveTools32 application is now communicating with the drive. If you are
prompted to create a new database, click
Important:
If a prompt appears to alert you that the application failed to
communicate with the drive, refer to Chapter 16,
Yes
.
Troubleshooting
.
Page 61

Chapter
Setting Up ControlNet Direct Communications
7
Chapter Objectives
About ControlNet Communications
PLC-5C
Chapter 7 provides instructions for using DriveTools32 wit h C ontrolNet
communications. In this chapter, you will read about the following:
• Required equipment and settings.
• Configuring RSLinx for ControlNet direct communications.
• Configuring a DriveTools32 application for ControlNet direct
communications.
• Connecting to a drive.
ControlNet is a real-time, control-layer network providing high-speed
deterministic transport of time-critical I/O data. With ControlNet direct
communications, you access a dri ve o ver a ControlNet network using messaging
data (this is not real-time). Figure 7.1 shows an example:
Figure 7.1
ControlNet Communications
Computer with
Internal
Interface Card
Computer with
1770-KFC
Converter
OR
ControlNet
Channel A
Channel B
1203-CN1
SCANportCompatible
Product
1336
FORCE
Drive
1395
Drive
Page 62

7-2 Setting Up ControlNet Di rect Communications
How you set up the hardware and configure RSLinx and DriveTools32 for
ControlNet direct commun ications de pends on whether yo u are using an intern al
interface card or external converter.
Using: Communications Refer To:
Using ControlNet Direct Communications
Internal Interface Card
(1784-KTC, -KTCX, -PCC)
External Converter
(1770-KFC)
ControlNet Direct “Using ControlNet Direct Communications”
RS-232 Serial to ControlNet
Direct
on page 7-2
“Using RS-232 to ControlNet Direct
Communications” on page 7-8
ControlNet direct communications use an internal interface card (1784-KTC,
-KTCX, or -PCC).
Important:
If you are using an external converter, refer to “Using RS-232 to
ControlNet Direct Commun icat ion s” on page 7-8.
Hardware
Required Hardware
The hardware required for this type of communications depends on the drive
type. Refer to the following table:
Drive Required Drive Hardware Required Computer Hardware
➀
SCANport-Compatible
1336 FORCE ControlNet Adapter Board (1336T-
1395 ControlNet Adapter Board
➀
For a list of SCANport-compatible products, refer to Appendix A,
ControlNet Adapter (1203-CN1) and
appropriate cables
GT3EN), C ont rol Net Repe ater Adap ter
(1786-RPA), and ControlNet Fiber
Module (1786-RPFM)
(1395-KP54EN), ControlNet Repeater
Adapter (1786-RPA), and ControlNet
Fiber Module (1786-RPFM)
1784-KTC, -KTCX, or -PCC
1784-KTC, -KTCX, or -PCC
1784-KTC, -KTCX, or -PCC
Products Supported by DriveTools32
.
Setting Up the Hardware
To use DriveTools32 with this type of communications, you must:
• Ensure that the drive and adapter are properly installed and powered.
• Ensure that cables are securely connected and protected from damage.
• Ensure that a ControlNet interface device (e.g., a 1784-KTC(X) board) is
installed correctly in your computer.
Page 63

Setting Up ControlNet Di rect Communications 7-3
• Ensure that the adapter is correctly configured. Refer to the appropriate
manual:
Communications Adapter Refer To:
1203-CN1 Communications Module
ControlNet Communications Board
(1336-GT3EN)
ControlNet Communications Board
(1395-KP54EN)
ControlNet Communications Module User Manual
1336 FORCE ControlNet User Manual
Bulletin 1395 ControlNet Communication Board User
Manual
• If you are using a ControlNet communications board with a 1336 FORCE
or 1395 drive, use a ControlNet Repeater Adapter and ControlNet Fiber
Module to connect the network to your drive.
Configuring RSLinx
The following instructions describe how to configure RSLinx for ControlNet
communications. If you have questions about RSLinx, refer to its online help.
To use RSLinx for a ControlNet direct communications, you need to:
• Configure the communications driver.
• Map the configured driver to the KTPort Value.
Configuring the Communications Driver
A driver is the software interface to the hardware device that allows RSLinx to
communicate with your drive. To configure the driver, you need to:
1.
Start RSLinx.
2.
In the
Drivers
Communications
dialog box appears.
menu, select
Configure Drivers
. The
Configure
Page 64

7-4 Setting Up ControlNet Di rect Communications
3.
In the
devices
for ControlNet)
4.
Click
5.
Click OK. The
appears.
Available Driver Types
field, select
Allen-Bradley 1784-KTC(X)
. If you are using a 1784-PCC card, select
.
Add New
Add New RSLinx Driver
. The
Configure Allen-Bradley 1784-KTC(X)
1784-PCC (PCMCIA
dialog box appears.
dialog box
6.
Verify the information is correct.
Page 65

Setting Up ControlNet Di rect Communications 7-5
7.
Click OK to configure the driver. The new driver appears in the
8.
Drivers
Click
dialog box.
Close
.
Configure
Mapping the Configured Driver to the KTPort Value
After configuring the driver, you must map it to a legacy INTERCHANGE API
xKT:0 label in RSLinx. To map the configured driver, you need to:
1.
Communications
In the
menu, select
Configure Client Applications
Configure Client Applications
dialog box appears.
. The
2.
In an unused
Important:
KT:0
field, select the ControlNet driver.
Note the KT:0 field that you select. When you configure a
DriveTools32 application, you need to enter the field number in the
Communication Setup
3.
Click OK.
dialog box.
Page 66

7-6 Setting Up ControlNet Di rect Communications
Setting Up Communications in a DriveTools32 Application
Before a DriveTools32 application can communicate with a drive, you must
configure the application. To do this, you need to:
1.
Start the DriveTools32 application.
2.
3.
Options
In the
Setup
dialog box appears.
Click the
ControlNet
menu, select
tab.
Communication Setup
Communication
. The
4.
5.
Important:
Configure Client Applications
6.
7.
Connect Type
Under
Enter INTERCHANGE Port Mapping #
In the
the KT:0 port used by the ControlNet driver in the RSLinx
Client Applications
To view the KT Port number used by the ControlNet driver, select
If you are using a 1336 FORCE and its drive firmware version is 0.10,
1336T Two Word Header (used ONLY for 1336T version 0.10)
select
Click OK.
, select
dialog box.
ControlNet Phase 1.5 Direct
field, type the number of
in the RSLinx
Communications
.
Configure
menu.
.
Page 67

Setting Up ControlNet Di rect Communications 7-7
Connecting to the Drive
After configuring RSLinx and the DriveTools32 application, you are ready to
connect to a drive.
1.
2.
Drive
In the
Connect to Drive
WHO
Click
appears.
menu, select
dialog box appears.
Who’s active on ControlNet Ne twork
. The
Connect to Drive
ControlNet Network
. The
dialog box
3.
Double-click on the drive to which you want to connect.
The DriveTools32 application is now communicating with the drive. If you are
prompted to create a new database, click
Important:
communicate with the drive, refer to Chapter 16,
If a prompt appears to alert you that the application failed to
Yes
.
Troubleshooting
.
Page 68

7-8 Setting Up ControlNet Di rect Communications
Using RS-232 to
ControlNet Direct
Communications
RS-232 to ControlNet direct communications use an external converter
(1770-KFC).
Important:
If you are using an internal interface card, refer to “Using
ControlNet Direct Commun icat ion s” on page 7-2.
Hardware
Required Hardware
The hardware required for this type of communications depends on the drive
type. Refer to the following table:
Drive Required Drive Hardware Required Computer Hardware
➀
SCANport-Compatible
1336 FORCE ControlNet Adapter Board (1336T-
1395 ControlNet Adapter Board
➀
For a list of SCANport-compatible products, refer to Appendix A,
ControlNet Adapter (1203-CN1) and
appropriate cables
GT3EN), C ont rol Net Repe ater Adap ter
(1786-RPA), and ControlNet Fiber
Module (1786-RPFM)
(1395-KP54EN), ControlNet Repeater
Adapter (1786-RPA), and ControlNet
Fiber Module (1786-RPFM)
1770-KFC and RS-232 port
1770-KFC and RS-232 port
1770-KFC and RS-232 port
Products Supported by DriveTools32
.
Setting Up the Hardware
To use DriveTools32 with this type of communications, you must:
• Ensure that the drive and adapter are properly installed and powered.
• Ensure that cables are securely connected and protected from damage.
• Ensure that a ControlNet converter (e.g., a 1770-KFC board) is installed
correctly.
• Ensure that the adapter is correctly configured. Refer to its manual:
Communications Adapter Refer To:
1203-CN1 Communications Module
ControlNet Communications Board (1336-
GT3EN)
ControlNet Communications Board (1395-CNA)
ControlNet Communications Module User Manual
1336 FORCE ControlNet User Manual
Bulletin 1395 ControlNet Communication Board
• If you are using a ControlNet communications board with a 1336 FORCE
or 1395 drive, use a ControlNet Repeater Adapter and ControlNet Fiber
Module to connect the network to your drive.
Page 69

Setting Up ControlNet Di rect Communications 7-9
Configuring RSLinx
For RS-232 to ControlNet communications, you must configure RSLinx for
RS-232 serial communications.
Important:
select the
KFC 1.5
When configuring a driver for RS-232 to ControlNet, you should
card in the
Device
field of the following RSLinx dialog box.
Select
KFC 1.5
Refer to the “Configuring RSLinx” section in Chapter 3,
Point-to-Point Serial Communications,
for instructions on configuring RSLinx.
Setting Up RS-232
Page 70

7-10 Setting Up ControlNet Di rect Communications
Setting Up Communications in a DriveTools32 Application
Before a DriveTools32 application can communicate with a drive, you must
configure the application. To do this, you need to:
1.
Start the DriveTools32 application.
2.
3.
Options
In the
Setup
dialog box appears.
Click the
ControlNet
menu, select
tab.
Communication Setup
Communication
. The
4.
5.
Important:
Configure Client Applications
6.
7.
Connect Type
Under
Enter INTERCHANGE Port Mapping #
In the
the KT:0 port used by the ControlNet driver in the RSLinx
Client Applications
To view the KT Port number used by the DF1 driver, select
If you are using a 1336 FORCE and its drive firmware version is 0.10,
1336T Two Word Header (used ONLY for 1336T version 0.10)
select
Click OK.
, select
dialog box.
KFC to ControlNet Phase 1.5 Direct
field, type the number of
Configure
in the RSLinx
Communications
.
menu.
.
Page 71

Setting Up ControlNet Di rect Communications 7-11
Connecting to the Drive
After configuring RSLinx and the DriveTools32 application, you are ready to
connect to a drive.
1.
2.
Drive
In the
uses KFC device Connect to Drive
Click
menu, select
RSWHO
. The
RSWHO
Connect to Drive
dialog box appears.
dialog box appears.
ControlNet Network
. The
3.
Navigate to the desired drive.
4.
Double-click on the drive to which you want to connect.
The DriveTools32 application is now communicating with the drive. If you are
prompted to create a new database, click
Important:
communicate with the drive, refer to Chapter 16,
If a prompt appears to alert you that the application failed to
Yes
.
Troubleshooting
.
Page 72

7-12 Setting Up ControlNet Di rect Communications
Using a 1203-CN1 Module to Connect to a ControlNet Network
A 1203-CN1 module lets you connect to a ControlNet netw ork via its serial port.
Figure 7.2
Connecting to a ControlNet Network via a 1203-CN1 Module
Decimal: Node 8
Octal: Node 10
1203-SFC
cable
1203-CN1
Decimal: Node 52
Octal: Node 64
1203-CN1
ControlNet Channel A
ControlNet Channel B
Before using this type of connection, you must do the following:
• Note the statio n number of the module on the ControlNet network. It is
displayed on the front of the modu le as a decimal value.
this value from the displayed decimal value to an octal value.
You must convert
You can
use the Windows Calculator program set in scientific mode to do the
calculation.
• Note the serial baud rate of the module. View
21) to find the baud rate. Refer to the
User Manual
for information on viewing and editing module parameters.
ControlNet Communications Module
Serial Port Rate
(Parameter
• Remember that you can access 99 stations on the ControlNet network.
In RSLinx, you need to configure RS-232 point-to-point or multi-drop serial
communications (Refer to Chapter 3). As you configure RSLinx, you need to:
• Enter the correct station number as an octal value in the
Bradley DF1 Communications Device
• Select the correct baud rate in the
Communications Device
dialog box.
dialog box.
Configure Allen-Bradley DF1
Configure Allen-
In a DriveTools32 application, you must set up RS-232 point-to-point
communications (Refer to Chapter 3). As you configure the DriveTools32
application, you must:
• Enter the correct baud rate in the
Communication Setup
dialog box.
• Enter the station number to which you intend to connect as an octal value in
SCANport Network Connect to Drive
the
• Note that you cannot use the
WHO
button if you are using a point-to-point
dialog box.
connection.
Important:
Verify that you have connected to the correct product before you
use the DriveTools32 application to edit p a rameters or control the product.
Page 73

Chapter
Setting Up ControlNet to RIO Block Transfer Pass
Thru Communications
8
Chapter Objectives
About ControlNet to RIO Block Transfer Pass Thru Communications
Chapter 8 provides instructions for using DriveTools32 wit h C ontrolNet to RIO
Block Transfer (BT) Pass Thru communications. In this chapter, you will read
about the following:
• Required equipment and settings.
• Configuring RSLinx for ControlNet to RIO Block Transfer Pass Thru
communications.
• Configuring a DriveTools32 application for ControlNet to RIO Block
Transfer Pass Thru communications.
• Connecting to a drive.
With a ControlNet to RIO (Remote I/O) Block Transfer Pass Thru
communications, you access a controller ov er the C ontro lNet netw or k, and then
you access a drive connected to the controller’s RIO network. The RIO Block
Transfer Pass Th ru mechan ism requires that a drive be connected to a controller
(PLC-5) over the RIO network and that block transfer is enabled.
When you use RIO Block Transfer Pass Thru communications, note:
• You cannot use DriveBlockEditor32 and the control features in
DrivePanel32.
• You cannot use DriveMonitor32 to monitor parameters and data in a drive
on an RIO network; however, you can use it to monitor parameters and data
in the controller.
• You may observe that communications are slow. RIO Block Transfer Pass
Thru communications to drives can take 2 seconds per point.
Page 74

8-2 Setting Up ControlNet to RIO Block Transfer Pass Thru Communic ations
Figure 8.1 shows an example:
Figure 8.1
ControlNet to RIO Block Transfer Pass Thru Network
Computer with
1770-KFC
Converter
OR
In your RIO communications
SCANportCompatible
Drive
PLC-5C
ControlNet
Channel A
Channel B
RIO
1336
FORCE
Computer with
Internal
Interface Card
Important:
module, Switch 1 of SW3 must be On to
enable block transfer.
1395
How you set up the hardware and configure RSLinx and DriveTools32 for
ControlNet to RIO Block Transfer Pass Thru communications depends on
whether you are using an internal interface card or external converter.
Using: Communications Refer To:
Internal Interface Card
(1784-KTC, -KTCX, -PCC)
External Converter
(1770-KFC)
ControlNet to RIO Block
Transfer Pass Thru
RS-232 Serial to ControlNet
to RIO Block Transfer Pass
Thru
“Using ControlNet to RIO Block T ransfer
Pass Thru Communications” on page 8-3
“Using RS-232 to ControlNet to RIO Block
Transfer Pass Thru Communications” on
page 8-7
Page 75

Setting Up ControlNet to RIO Blo ck Trans fer Pass Thru Communications 8-3
Using ControlNet to RIO Block Transfer Pass Thru Communications
ControlNet to RIO Block Transfer Pass Thru communications use an internal
interface card (1784-KTC, -KTCX, or -PCC) in your computer.
Important:
If you are using an external interface card, refer to “Using RS-232
to ControlNet to RIO Block Transfer Pass Thru Communications” on page 8-7.
Hardware
Required Hardware
The hardware required for this type of communications depends on the drive
type. Refer to the following table:
Drive Required Drive Hardware Required Computer Hardware
➀
SCANport-Compatible
1336 FORCE PLC Communications Adapter Board
1395 Node Adapter (1395-KP50) or
➀
For a list of SCANport-compatible products, refer to Appendix A,
Remote I/O adapter (1203-GD1,
1203-GK1, or 1336-GM1) and
appropriate cable(s )
(1336T-GT1EN)
Multi-Communications Adapter
(1395-KP51)
Setting Up the Hardware
To use DriveTo ols 32 with this type of communications, you must:
1784-KTC, -KTCX, or -PCC
1784-KTC, -KTCX, or -PCC
1784-KTC, -KTCX, or -PCC
Products Supported by DriveTools32
.
• Ensure that the drive and adapter are properly installed and powered.
• Ensure that cables are securely connected and protected from damage.
• Ensure that block transfer is enabled in your adapter. If you are using a
1203-Gx1 or 1336-GM1 module, switch 1 on SW3 must be ON.
Important:
Ensure that the ladder logic program and controller configuration
reflect the image table with Block Transfer enabled.
• Note the Remote I/O adapter settings. You need to specify the rack and
group number when configuring a DriveTools32 application.
If Using: Refer To:
Remote I/O Adapter (1203-GD1, 1203-GK1 or
1336-GM1) and appro pr ia te cable(s )
PLC Communications Adapter Board
(1336T-GT1EN)
Node Adapter (1395-KP50) or
Multi-Communications Adapter (1395-KP51)
Bulletin 1203 Remote I/O Communications Module User
Manual
1336 FORCE PLC Communications Adapter User Manual
Bulletin 1395 Multi-Communications Board Hardware/
Software Reference Manual
Page 76

8-4 Setting Up ControlNet to RIO Block Transfer Pass Thru Communic ations
• Ensure that the controller connected to the drive is not using any Block
Transfer instructions addressed to the drive in its ladder logic program.
• Ensure that the controller connected to the drive is in R UN mod e. If it is not
in RUN mode, pass thru messages cannot be delivered to the connected
drive product.
Configuring RSLinx
For ControlNet to RIO Block Transfer Pass Thru communications, you must
configure RSLinx for ControlNet communications. Refer to the “Configuring
RSLinx” section in Chapter 7,
for instructions on configuring RSLinx.
Setting Up ControlNet Direct Communications,
Setting Up Communications in a DriveTools32 Application
Before a DriveTools32 application can communicate with a drive, you must
configure it. To do so, you need to:
1.
Start the DriveTools32 application.
2.
In the
Setup
3.
Click the
4.
Under
Pass-Thru
Options
dialog box appears.
Connect Type
menu, select
ControlNet
.
tab.
, select
Communication Setup
ControlNet Phase 1.5 to PLC RIO
Communication
. The
Page 77

Setting Up ControlNet to RIO Blo ck Trans fer Pass Thru Communications 8-5
5.
Important:
Configure Client Applications
6.
7.
8.
Enter INTERCHANGE Port Mapping #
In the
the KT:0 port used by the ControlNet driver in the RSLinx
Client Applications
To view the KT Port number used by the ControlNet driver, select
If you are usi ng a 1336 FORCE and its drive firmware version is 0.10,
1336T Two Word Header (used ONLY for 1336T version 0.10)
select
Click OK. The following prompt appears.
Read the information, and then click OK to save the configuration.
dialog box.
in the RSLinx
Communications
field, type the number of
Configure
menu.
Connecting to the Drive
After configuring RSLinx and the DriveTools32 application, you are ready to
connect to a drive.
.
1.
2.
Drive
In the
Network Connect to Drive
Click
WHO
menu, select
.
Connect to Drive
dialog box appears.
RIO Pass Through
. The
Page 78

8-6 Setting Up ControlNet to RIO Block Transfer Pass Thru Communic ations
Who’s active on ControlNet network
The
3.
Double-click the controller (PLC-5C) that has the drive connected to its
RIO channel. (Note that the controller, not the drive on RIO, is displayed in
the Who dialog box.) The
RIO Pass Thru Network Connect to Drive
dialog box reappears.
dialog box appears.
4.
Enter Drive Rack #
In the
field, type the RIO rack number of the drive.
The rack number is specified in octal and is set in the communications
module.
5.
Enter Starting Group #
In the
field, type the RIO start ing group number of
the drive. The RIO starting group number is set in the communications
module. Valid numbers are 0, 2, 4, and 6.
6.
7.
8.
PLC Type
Select
.
If you are using a 1395 drive, select
Click OK.
Use 1395 Protocol
.
The DriveTools32 application is now communicating with the drive. If you are
prompted to create a new database, click
Important:
If a prompt appears to alert you that the application failed to
communicate with the drive, refer to Chapter 16,
Yes
.
Troubleshooting
.
Page 79

Setting Up ControlNet to RIO Blo ck Trans fer Pass Thru Communications 8-7
Using RS-232 to
ControlNet to RIO
Block Transfer
Pass Thru
Communications
RS-232 to ControlNet t o RI O Bl ock Transfer Pass Thru communications us e an
external con verter (1770-KFC).
Important:
If you are using an interface card, refer to “Using ControlNet to
RIO Block Transfer Pass Thru Communications” on page 8-3.
Hardware
Required Hardware
The hardware required for this type of communications depends on the drive
type. Refer to the following table:
Drive Required Drive Hardware Required Computer Hardware
➀
SCANport Product
1336 FORCE PLC Communications Adapter Board
1395 Node Adapter (1395-KP50) or
➀
For a list of SCANport-compatible products, refer to Appendix A,
Remote I/O adapter (1203-GD1,
1203-GK1, or 1336-GM1) and
appropriate cable(s )
(1336T-GT1EN)
Multi-Communications Adapter
(1395-KP51)
1770-KFC and RS-232 port
1770-KFC and RS-232 port
1770-KFC and RS-232 port
Products Supported by DriveTools32
.
Setting Up the Hardware
To use DriveTo ols 32 with this type of communications, you must:
• Ensure that the drive and adapter are properly installed and powered.
• Ensure that cables are securely connected and protected from damage.
• Ensure that block transfer is enabled in your adapter. If you are using a
1203-Gx1 or 1336-GM1 module, switch 1 on SW3 must be ON.
Important:
Ensure that the ladder logic program and PLC configuration reflect
the image table with Block Transfer enabled.
• Note the Remote I/O adapter settings. You need to specify the rack and
group number when configuring a DriveTools32 application.
If Using: Refer To:
Remote I/O Adapter (1203-GD1, 1203-GK1 or
1336-GM1) and appro pr ia te cable(s )
PLC Communications Adapter Board
(1336T-GT1EN)
Node Adapter (1395-KP50) or
Multi-Communications Adapter (1395-KP51)
Bulletin 1203 Remote I/O Communications Module User
Manual
1336 FORCE PLC Communications Adapter User Manual
Bulletin 1395 Multi-Communications Board Hardware/
Software Reference Manual
Page 80

8-8 Setting Up ControlNet to RIO Block Transfer Pass Thru Communic ations
• Ensure that the controller connected to the drive is not using any Block
Transfer instructions addressed to the drive in its ladder logic program.
• Ensure that the controller connected to the drive is in R UN mod e. If it is not
in RUN mode, pass thru messages cannot be delivered to the connected
drive product.
Configuring RSLinx
For RS-232 to ControlNet communications, you must configure RSLinx for
RS-232 serial communications.
Important:
select the
KFC 1.5
When configuring a driver for RS-232 to ControlNet, you should
card in the
Device
field of the following RSLinx dialog box.
Select
KFC 1.5
Refer to the “Configuring RSLinx” section in Chapter 3,
Point-to-Point Serial Communications,
for instructions on configuring RSLinx.
Setting Up RS-232
Setting Up Communications in a DriveTools32 Application
Before a DriveTools32 application can communicate with a drive, you must
configure it. To do so, you need to:
1.
Start the DriveTools32 application.
Page 81

Setting Up ControlNet to RIO Blo ck Trans fer Pass Thru Communications 8-9
2.
3.
4.
Options
In the
Setup
dialog box appears.
Click the
Under
Pass-Thru
ControlNet
Connect Type
.
menu, select
tab.
, select
Communication Setup
Communication
. The
KFC to ControlNet Phase 1.5 to PLC RIO
5.
Important:
Configure Client Applications
6.
7.
8.
Enter INTERCHANGE Port Mapping
In the
the KT:0 port used by the ControlNet driver in the RSLinx
Client Applications
dialog box.
field, type the number of
Configure
To view the KT Port number used by the ControlNet driver, select
in the RSLinx
Communications
If you are usi ng a 1336 FORCE and its drive firmware version is 0.10,
1336T Two Word Header (used ONLY for 1336T version 0.10)
select
Click OK. The following prompt appears.
Read the information, and then click OK to save the configuration.
menu.
.
Page 82

8-10 Setting Up ControlNet to RIO Block Transfer Pass Thru Communic ations
Connecting to the Drive
After configuring RSLinx and the DriveTools32 application, you are ready to
connect to a drive.
1.
2.
Drive
In the
uses KFC device
RSWHO
Click
menu, select
dialog box appears.
RSWHO
. The
Connect to Drive
dialog box appears.
ControlNet Network
. The
3.
Double-click the controller (PLC-5C) that has the drive connected to its
RIO channel. (Note that the controller, not the drive on RIO, is displayed in
the RSWHO dialog box.) The
dialog box reappears.
4.
Enter Drive Rack #
In the
The rack number is specified in octal and is set in the communications
module.
ControlNet Network uses KFC device
field, type the RIO rack number of the drive.
Page 83

Setting Up ControlNet to RIO Blo ck Trans fer Pass Thru Communications 8-11
5.
Enter Starting Group #
In the
field, type the RIO start ing group number of
the drive. The RIO starting group number is set in the communications
module. Valid numbers are 0, 2, 4, and 6.
6.
7.
8.
PLC Type
Select
.
If you are using a 1395 drive, select
Click OK.
Use 1395 Protocol
.
The DriveTools32 application is now communicating with the drive. If you are
prompted to create a new database, click
Important:
If a prompt appears to alert you that the application failed to
communicate with the drive, refer to Chapter 16,
Yes
.
Troubleshooting
.
Page 84

8-12 Setting Up ControlNet to RIO Block Transfer Pass Thru Communic ations
Notes:
Page 85

Chapter
Setting Up DeviceNet Direct Communications
9
Chapter Objectives
About DeviceNet Communications
PLC-5 with
DeviceNet scanner
Chapter 9 provides instructions for using DriveTools32 with DeviceNet
communications. In this chapter, you will read about the following:
• Required equipment and settings.
• Configuring RSLinx for DeviceNet direct communications.
• Configuring a DriveTools32 application for DeviceNet direct
communications.
• Connecting to a drive.
DeviceNet is an open, global, industry-standard communications network
designed to provide an interface through a single cable from a programmable
controller to smart devices such as drives. With DeviceNet direct
communications, you access a drive over a DeviceNet network. Figure 9.1
shows an example:
Figure 9.1
DeviceNet Network
Computer with
Internal
Interface Card
Computer with
1770-KFD
Converter
OR
DeviceNet
1203-GU6
SCANportCompatible
Product
Page 86

9-2 Setting Up DeviceNet Direct Communications
How you set up the hardware and configure RSLinx and DriveTools32 for
DeviceNet communications depends on whether you are using an internal
interface card or external converter.
Using: Communications Refer To:
Setting Up DeviceNet Direct Communications
Internal Interface Card
(1784-PCD or -PCIDS)
External Converter
(1770-KFD)
DeviceNet Direct “Setting Up DeviceNet Direct
Communications” on page 9-2
RS-232 Serial to DeviceNet “Using RS-232 to DeviceNet Direct
Communications” on page 9-8
DeviceNet Direct communications use an internal interface card (1784-PCD).
Important:
If you are using an external converter, refer to “Using RS-232 to
DeviceNet Direct Communications” on page 9-8.
Hardware
Required Hardware
The following hardware is required for a DeviceNet connection:
Drive Required Drive Hardware Required Computer Hardware
➀
SCANport-Compatible
➀
For a list of SCANport-compatible products, refer to Appendix A,
DeviceNet Adapter (1203-GK5, 1203GU6, 1336-GM5, or 1336-GM6) and
appropriate cable(s)
Setting Up the Hardware
To use DriveTools32 with this type of communications, you must:
1784-PCD or -PCID
Products Supported by DriveTools32
.
• Ensure that the drive and adapter are properly installed and powered.
• Ensure that cables are securely connected and protected from damage.
• V erify that the settings in your communications module are correct. Refer to
the appropriate manual:
Communications Module Refer To:
1203-GK5 or 1336-GM5
1203-GU6 or 1336-GM6
Important:
If you are using a 1203-GK5 module or 1336-GM5 board, it must
Bulletin 1203 DeviceNet Communications Module
User Manual
Enhanced DeviceNet Communications Module User
Manual
have firmware 2.001.
Page 87

Setting Up DeviceNet Direct Communic ations 9-3
Configuring RSLinx
The following instructions describe how to configure RSLinx for DeviceNet
communications. If you have questions about RSLinx, refer to its online help.
• Configure the communications driver.
• Map the configured driver to the KTPort Value.
Configuring the Communications Driver
A driver is the software interface to the hardware device that allows RSLinx to
communicate with your drive. To configure the driver, you need to:
1.
Start RSLinx.
2.
3.
4.
Communications
In the
Drivers
In the
Click
dialog box appears.
Available Driver Types
Add New
. The
menu, select
field, select
DeviceNet Driver Selection
Configure Drivers
DeviceNet Drivers
Configure
. The
.
dialog box appears.
Page 88

9-4 Setting Up DeviceNet Direct Communications
5.
Double-click the
Configuration
6.
In the
Node Address
dialog box appears.
on the DeviceNet network.
Allen-Bradley 1784-PCIDS
1784-PCIDS Driver
. The
field, type a unique node address for your computer
7.
Network Baud Rate
In the
network is using.
8.
Click OK to configure the dri ver. The
appears.
field, select the baud rate that the DeviceNet
Add New RSLinx Driver
dialog box
Page 89

Setting Up DeviceNet Direct Communic ations 9-5
9.
Type a name for the driver, and then click OK. The new driver appears in
Configure Drivers
the
dialog box.
10.
Click
Close
.
Mapping the Configured Driver to the KTPort Value
After configuring the driver, you must map it to a legacy INTERCHANGE API
xKT:0 label in RSLinx. To map the configured driver, you need to:
1.
2.
Communications
In the
menu, select
Configure Client Applications
In an unused
KT:0
field, select the DeviceNet driver.
Configure Client Applications
dialog box appears.
. The
Important:
Note the KT:0 field that you select. When you configure a
DriveTools32 application, you need to enter the field number in the
Communication Setup
3.
Click OK.
dialog box.
Page 90

9-6 Setting Up DeviceNet Direct Communications
Setting Up Communications in a DriveTools32 Application
Before a DriveTools32 application can communicate with a drive, you must
configure the application. To do so, you need to:
1.
Start the DriveTools32 application.
2.
3.
Options
In the
Setup
dialog box appears.
Click the
DeviceNet
menu, select
tab.
Communication Setup
Communication
. The
4.
5.
Important:
Configure Client Applications
6.
7.
Connect Type
Under
(PCIDS) CARD
Enter INTERCHANGE Port Mapping #
In the
the KT :0 port used b y the De viceNet dri v er in the RSLinx
Applications
If you are using a 1336 FORCE and its drive firmware version is 0.10,
select
Click OK.
dialog box.
To view the KT Port number used by the DeviceNet driver, select
1336T Two Word Header (used ONLY for 1336T version 0.10)
, select
.
DeviceNet using Allen-Bradl ey 1784 -PCD
field, type the number of
Configure Client
in the RSLinx
Communications
menu.
.
Page 91

Setting Up DeviceNet Direct Communic ations 9-7
Connecting to the Drive
After RSLinx and the DriveTools32 ap plication are configured, you are ready to
connect to a drive.
1.
2.
Drive
In the
Connect to Drive
RSWHO
Click
menu, select
dialog box appears.
RSWHO
. The
Connect to Drive
dialog box appears.
DeviceNet Network
. The
3.
Navigate to the drive to which you want to connect. You can identify the
drive b y its nod e address. The RS Who dial og box may descr ibe the dri v e as
an “unrecognized device” because of its communication module.
4.
Double-click on the drive.
The DriveTools32 application is now communicating with the drive. If you are
prompted to create a new database, click
Important:
communicate with the drive, refer to Chapter 16,
If a prompt appears to alert you that the application failed to
Yes
.
Troubleshooting
.
Page 92

9-8 Setting Up DeviceNet Direct Communications
Using RS-232 to
DeviceNet Direct
Communications
RS-232 to DeviceNet Direct communications use an external converter
(1770-KFD).
If you are using an internal interface card, refer to “Setting Up De viceNet Direct
Communications” on page 9-2.
Hardware
Required Hardware
The following hardware is required for a DeviceNet connection:
Drive Required Drive Hardware Required Computer Hardware
➀
SCANport-Compatible
➀
For a list of SCANport-compatible products, refer to Appendix A,
DeviceNet Adapter (1203-GK5, 1203GU6, 1336-GM5, or 1336-GM6) and
appropriate cable(s)
Setting Up the Hardware
To use DriveTools32 with this type of communications, you must:
• Ensure that the drive and adapter are properly installed and powered.
• Ensure that cables are securely connected and protected from damage.
1770-KFD
Products Supported by DriveTools32
.
• V erify that the settings in your communications module are correct. Refer to
the appropriate manual:
Communications Module Refer To:
1203-GK5 or 1336-GM5
1203-GU6 or 1336-GM6
Important:
If you are using a 1203-GK5 or 1336-GM5, it must have firmware
Bulletin 1203 DeviceNet Communications Module
User Manual
Enhanced DeviceNet Communications Module User
Manual
2.001 or greater.
Configuring RSLinx
The following instructions describe how to configure RSLinx 2.xx for
DeviceNet communications. If you have questions about RSLinx, refer to its
online help.
• Configure the communications driver.
• Map the configured driver to the KTPort Value.
Page 93

Setting Up DeviceNet Direct Communic ations 9-9
Configuring the Communications Driver
A driver is the software interface to the hardware device that allows RSLinx to
communicate with your drive. To configure the driver, you need to:
1.
Start RSLinx.
2.
3.
4.
Communications
In the
Drivers
In the
Click
dialog box appears.
Available Driver Types
Add New
. The
menu, select
field, select
Configure Drivers
DeviceNet Drivers
DeviceNet Driver Selection
Configure
. The
.
dialog box appears.
Page 94

9-10 Setting Up DeviceNet Direct Communications
5.
Double-click the type of adapter that you are using to connect your
computer to the DeviceNet network. A
appears.
Device Configuration
dialog box
6.
Serial Port Setup
Under
, select the communications port and the data rate
that you are using in the computer.
7.
DeviceNet Port Setup
Under
, select a unique node address for the
computer on the DeviceNet network and the DeviceNet network data rate.
8.
Click OK to configure the dri ver. The
Add New RSLinx Driver
appears.
9.
Type a name, and then click OK. The new driver appears in the
Drivers
dialog box.
dialog box
Configure
10.
Click
Close
.
Page 95

Setting Up DeviceNet Direct Communic ations 9-11
Mapping the Configured Driver to the KTPort Value
After configuring the driver, you must map it to a legacy INTERCHANGE API
xKT:0 label in RSLinx. To map the configured driver, you need to:
1.
2.
Important:
Communications
In the
menu, select
Configure Client Applications
In an unused
KT:0
field, select the DeviceNet driver.
Note the KT:0 field that you select. When you configure a
Configure Client Applications
dialog box appears.
DriveTools32 application, you need to enter the field number in the
Communication Setup
3.
Click OK.
dialog box.
. The
Page 96

9-12 Setting Up DeviceNet Direct Communications
Setting Up Communications in a DriveTools32 Application
Before a DriveTools32 application can communicate with a drive, you must
configure the application. To do so, you need to:
1.
Start the DriveTools32 application.
2.
3.
Options
In the
Setup
dialog box appears.
Click the
DeviceNet
menu, select
tab.
Communication Setup
Communication
. The
4.
5.
Important:
Configure Client Applications
6.
7.
Connect Type
Under
Enter INTERCHANGE Port Mapping #
In the
the KT :0 port used b y the De viceNet dri v er in the RSLinx
Applications
If you are using a 1336 FORCE and its drive firmware version is 0.10,
select
Click OK.
dialog box.
To view the KT Port number used by the DeviceNet driver, select
1336T Two Word Header (used ONLY for 1336T version 0.10)
, select
DeviceNet using Allen-Bradley 1770-KFD
field, type the number of
Configure Client
in the RSLinx
Communications
.
menu.
.
Page 97

Setting Up DeviceNet Direct Communic ations 9-13
Connecting to the Drive
After RSLinx and the DriveTools32 ap plication are configured, you are ready to
connect to a drive.
1.
2.
Drive
In the
Connect to Drive
RSWHO
Click
menu, select
dialog box appears.
RSWHO
. The
Connect to Drive
dialog box appears.
DeviceNet Network
. The
3.
Navigate to the drive to which you want to connect.
4.
Double-click on the drive.
The DriveTools32 application is now communicating with the drive. If you are
prompted to create a new database, click
Important:
communicate with the drive, refer to Chapter 16,
If a prompt appears to alert you that the application failed to
Yes
.
Troubleshooting
.
Page 98

9-14 Setting Up DeviceNet Direct Communications
Using a 1203-GU6 Module to Connect to a DeviceNet Network
A1203-GU6 module lets you connect to a DeviceNet netwo rk via its serial port.
Figure 9.2
Connecting to a DeviceNet Network via a 1203-GU6 Module
Decimal: Node 8
Octal: Node 10
1203-SFC
cable
1203-GU6
Decimal: Node 52
Octal: Node 64
1203-GU6
DeviceNet
Before using this type of connection, you must do the following:
• Note the station number of the module on the DeviceNet network. You can
locate it by viewing
DN Node Addres s
DeviceNet Communications Module User Manual
viewing and editing parameters.
displayed decimal value to an octal value.
(Parameter 2). Refer to the
Enhanced
for information on
You must convert this value from the
You can use the Windows
Calculator program set in scientific mode to do the calculation.
• Note the serial baud rate of the module. View
21) to find the baud rate. Refer to the
Module User Manual
for information on viewing and editing module
Enhanced DeviceNet Communications
Serial Port Rate
(Parameter
parameters.
In RSLinx, you need to configure RS-232 point-to-point or multi-drop serial
communications (Refer to Chapter 3). As you configure RSLinx, you must:
• Enter the correct station number as an octal value in the
Bradley DF1 Communications Device
• Select the correct baud rate in the
Communications Device
dialog box.
dialog box.
Configure Allen-Bradley DF1
Configure Allen-
In a DriveTools32 application, you must set up RS-232 point-to-point
communications (Refer to Chapter 3). As you configure the DriveTools32
application, you must:
• Enter the correct baud rate in the
Communication Setup
dialog box.
• Enter the station number to which you intend to connect as an octal value in
SCANport Network Connect to Drive
the
• Note that you cannot use the
WHO
button if you are using a point-to-point
dialog box.
connection.
Important:
Verify that you have connected to the correct product before you
use the DriveTools32 application to edit p a rameters or control the product.
Page 99

Chapter
Setting Up Allen-Bradley Ethernet to RIO Block
Transfer Pass Thru Communications
10
Chapter Objectives
About Ethernet Communications
Chapter 10 provides information for using DriveTools32 with Allen-Bradley
Ethernet to RIO block transfer (BT) pass thru communications. In this chapter,
you will read about the following:
• Required equipment and settings.
• Configuring RSLinx for Ethern et to RIO Block Transfer Pass Thru
communications.
• Configuring a DriveTools32 application for Ethernet to RIO Block Transfer
Pass Thru communications.
• Connecting to a drive.
Ethernet is a local area network (LAN) that provides non-deterministic data
transport. With Ethernet to RIO Block Transfer Pass Thru communications, you
access a controller over the Ethernet network, and then you access a drive
connected to that controller on an RIO network. The RIO Block Transfer Pass
Thru mechanism requires that a drive be connected to a controller (PLC-5E or
SLC 5/05) over the RIO network and that block transfer is enabled.
When you use RIO Block Transfer Pass Thru communications, note:
• You cannot use DriveBlockEditor32 and the control features in
DrivePanel32.
• You cannot use DriveMonitor32 to monitor parameters and data in a drive
on an RIO network; however, you can use it to monitor parameters and data
in the controller.
• You may observe that communications are slow. RIO Block Transfer Pass
Thru communications to drives can take 2 seconds per point.
Page 100

10-2 Setting Up Allen-Bradley Ethernet to RIO Block Transfer Pass Thru Communications
Figure 10.1 shows an example:
Figure 10.1
Allen-Bradley Ethernet Communications
PLC-5E
Ethernet
Ethernet
RIO
Important:
communications module, Switch 1 of SW3
must be On to enable block transfer.
In the Remote I/O
Hardware
1336
FORCE
Drive
SCANport1395
Drive
Compatible
Product
Required Hardware
The hardware required for this type of communications depends on the drive
type. Refer to the following table:
Drive Required Drive Hardware Required Computer Hardware
➀
SCANport Product
1336 FORCE PLC Communications Board
1395 Node Adapter (1395-KP50) or
➀
For a list of SCANport-compatible products, refer to Appendix A,
Remote I/O adapter (1203-GD1,
1203-GK1, or 1336-GM1) and
appropriate cable(s)
(1336T-GT1EN)
Multi-Communicatio ns Ad apte r
(1395-KP51)
Ethernet Interface Runn ing TCP/IP
Protocol
Ethernet Interface Runn ing TCP/IP
Protocol
Ethernet Interface Runn ing TCP/IP
Protocol
Products Supported by DriveTools32
.
 Loading...