

Page 1
On safety
R
R
QUICK START
SC300
Safety camera system
Rockwell Automation
2 Executive Drive
Chelmsford, MA 01824
10000222627 Ver 00
January 2012
Printed in Germany • All rights reserved
R
Safety notes
Only use the safety camera system in
suitable applications that do not exceed
the maximum data in the technical
specifications, in particular for aspect
ration and size of the area to be protected.
This device manual must be given to the
operator of the device together with the
original operating instructions for the
corresponding SC300.
The SC300 safety camera system shall
be used only by qualified personnel and
only on the machine where it has been
installed and initialized by qualified safety
personnel in accordance with the operating
instructions. It is only permitted to be used
on machines on which the dangerous state
can be stopped immediately by the safety
camera system and/or it is possible to
prevent the machine being placed into
operation.
The manufacturer herewith declares that the
product SC300 complies with the stipulations in
the related EC directive(s), and that the related
standards have been applied. You can obtain the
EC declaration of conformity with used standards
at: www.rockwellautomation.com
Device components
Note: In addition to the safety camera system, you
will require one of the resolution sets.
Part Cat. No.
Camera, teach-in pin
and documentation
SC300 safety
camera documentation
About this document
This document is only valid in conjunction with
the original operating instructions (Rockwell
Automation 10000202762 Ver 00) for the
corresponding SC300 safety camera referred
to in the following as SC300 for short.
Resolution kit
(reflective tape and
test rod)
Resolution 20 mm
(0.4…1.0 m)
Resolution 24 mm
(0.4…1.2 m)
Resolution 30 mm
(0.6…1.5 m)
Status indicators
Status LED
Red OSSDs switched off (e.g. for object in protective field or “lock-out”)
Green OSSDs activated. Protective field unoccupied
Yellow
Diagnostics LED
Meaning
No valid configuration taught-in (default delivery status)
²
Perform the teach-in procedure (see operating instructions).
Even flashing: Reset required
Press the reset button.
²
Warning
Carry out a fault diagnosis.
²
Error
²
Carry out a fault diagnosis.
Meaning
Protective field sector free
Interruption of the protective field in the allocated protective field sector. A
protective field sector represents one quarter of the field of view of the
SC300.
Teach-in mode (see operating instructions)
Warning (see “Fault diagnosis”)
Error (see “Fault diagnosis”)
442L-SAFCAM1
442L-ACAM20MMKIT
442L-ACAM24MMKIT
442L-ACAM20MMKIT
1
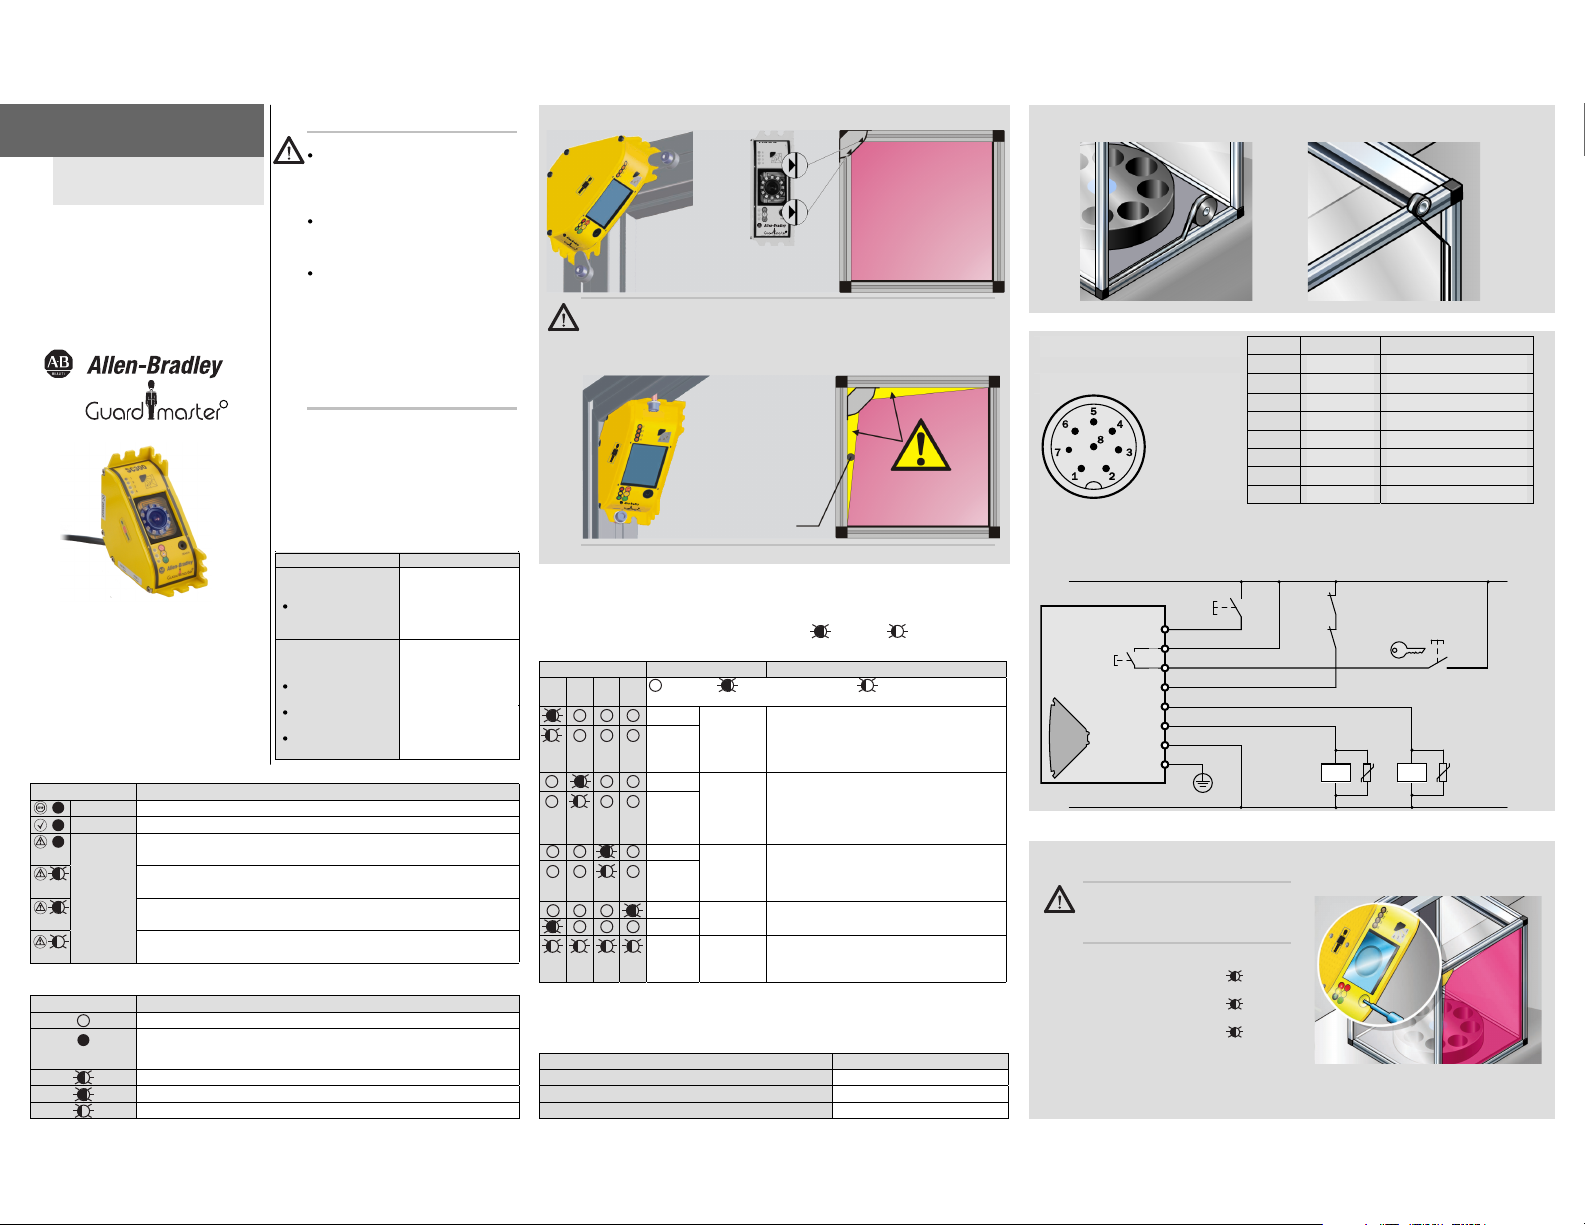
Mounting of the camera
SC300
Avoid mounting in a frame!
In the case if mounting in a frame, due to the principle of operation unmonitored areas
will be produced through which an operator could reach the hazardous point (see
operating instructions).
²
Protect unmonitored areas using mechanical guards.
SC300
SC300
R
Tape
Unmonitored areas
Test rod
Fault diagnosis
The procedure for troubleshooting varies for warnings and errors only in the last step:
If there is an error, you must re-start the SC300 after rectification.
Diagnostics LEDs
1
3 4
2
Meaning
= LED off; = LED flashing slowly;
a short duty cycle
Short-
Warning
Warning
Warning
Error
Error
circuit or
overcurrent
on an
OSSD
External
device
monitoring
Reset
button
TEACH
input
System
error
Error
Error
Warning
Error
Rectification of the error
²
Check the contactor. Replace, if necessary.
²
Check the wiring for short-circuits or crosscircuits.
Check the contactors and their wiring,
²
eliminate any wiring errors, if necessary.
²
Switch the device off and back on again.
Check the configuration of the external
device monitoring.
Check the reset button for correct function.
²
The button may be defective or stuck.
²
Check the wiring of the reset button for any
short-circuit to 24V.
Check the connection of the external key-
²
operated pushbutton for teach-in.
Disconnect the supply voltage to the
²
SC300 for at least 3 seconds.
If the problem persists, replace the unit.
²
= The LED flashes with
System data
Suitable up to …
Category/Performance Level (EN ISO 13849-1)
Type (EN 61 496-1, IEC/TR 61 496-4)
Safety integrity level (IEC 61 508/EN 62 061)
SC300
3/PL d
3
SIL2/SILCL2
2
Mounting the reflective tape
Tape
Color
3
Electrical installation
Pin assignment
Example: SC300 with external device monitoring (EDM), with internal restart interlock and with
external key-operated pushbutton for teach-in (For further examples: see operating instructions)
+24V
4
Teach-in procedure:
Checks of the protective device:
1) To c omply with the requirements of the relevant product standards (e.g., EN 61496-1),
the external voltage supply for the devices must be provided using power supplies in
accordance with EN 60204-1.
RESTART
1
2
3
4
5
6
7
8
+24V
TEACH/SYNC
EDM
OSSD1
OSSD2
GND
FE
0V
Internal
teach-in
key
Teach-in and test
Teach-in and test: Only by qualified and
authorized safety personnel!
Read and follow the operating
²
instructions!
²
Actuate for approx. 5 seconds ( 4 flashes 5
times)
Release for approx. 2 seconds (4 flashes 2
²
times)
²
Actuate for approx. 5 seconds (4 flashes 5
times)
²
Test the protective device as per the instructions
on the “Important Information” label (attached in
the immediate vicinity) or in the operating instructions.
Pin
1 White RESTART
Brown
2
3
Green
Yellow
4
Grey
5
6
Pink
7 Blue
8 –
k1
k2
Signal
+24 V SELV
TEACH/SYNC
EDM
OSSD1
OSSD2
GND
FE
Key-operated
pushbutton for
teach-in
K1K2
1)
 Loading...