

Page 1
Installation Instructions
PHOTOSWITCH® Bulletin 42CF General Purpose 12mm Cylindrical
IMPORTANT: SAVE THESE INSTRUCTIONS FOR FUTURE USE.
Description
The 42CF is a family of general purpose photoelectric sensors
intended for light to medium duty industrial applications. They
are packaged in an industry standard 12mm cylindrical
housing.
Three possible modes of sensing include transmitted beam,
diffuse and polarized retroreflective, allow the 42CF to be
used in a variety of complex applications.
Indication of target presence is provided through a discrete
NPN or PNP output which is compatible with most
measurement and control circuits found in today’s factory
automation systems. Outputs are short-circuit protected to
provide continuous operation even under unexpected
conditions.
Features
S
Short circuit protection
S Reverse polarity protection
S Light status LED Indicator
S NPN or PNP outputs
S L.O. or D.O.
S Teach and remote teach function
General Specifications
Light Source Infrared 880nm or visible red 660nm
Unit Protection Reverse polarity, output shortĆcircuit and overload
Supply Voltage 10-30V DC
Current Consumption 20mA maximum
Output Type NPN or PNP
Output Mode Light or dark operate selectable
Output Rating 100mA
Response Time Transmitted beam: 2ms
Housing Material NickelĆplated brass
Lens Material Acrylic
LED Indicators Yellow light status LED indicator
Connection Types 2m cable, 4Ćpin DC micro QD
Optional Accessories Mounting brackets, reflectors, cordsets
Operating Environment IP67, Type 1 enclosure
Vibration 10-55Hz, 0.5mm amplitude, Meets or exceeds IEC
Operating Temperature
Relative Humidity 29 to 90%
Ambient Light Immunity 3000 Lx
Approvals cULus and CE marked for all applicable directives
protection (SCP)
Diffuse and polarized retroreflective: 1.25ms
60068-2-6
Shock 30g with 11ms pulse duration, Meets or exceeds
IEC 60068-2-27
-25_C to +70_C (-13_F to +158_F)
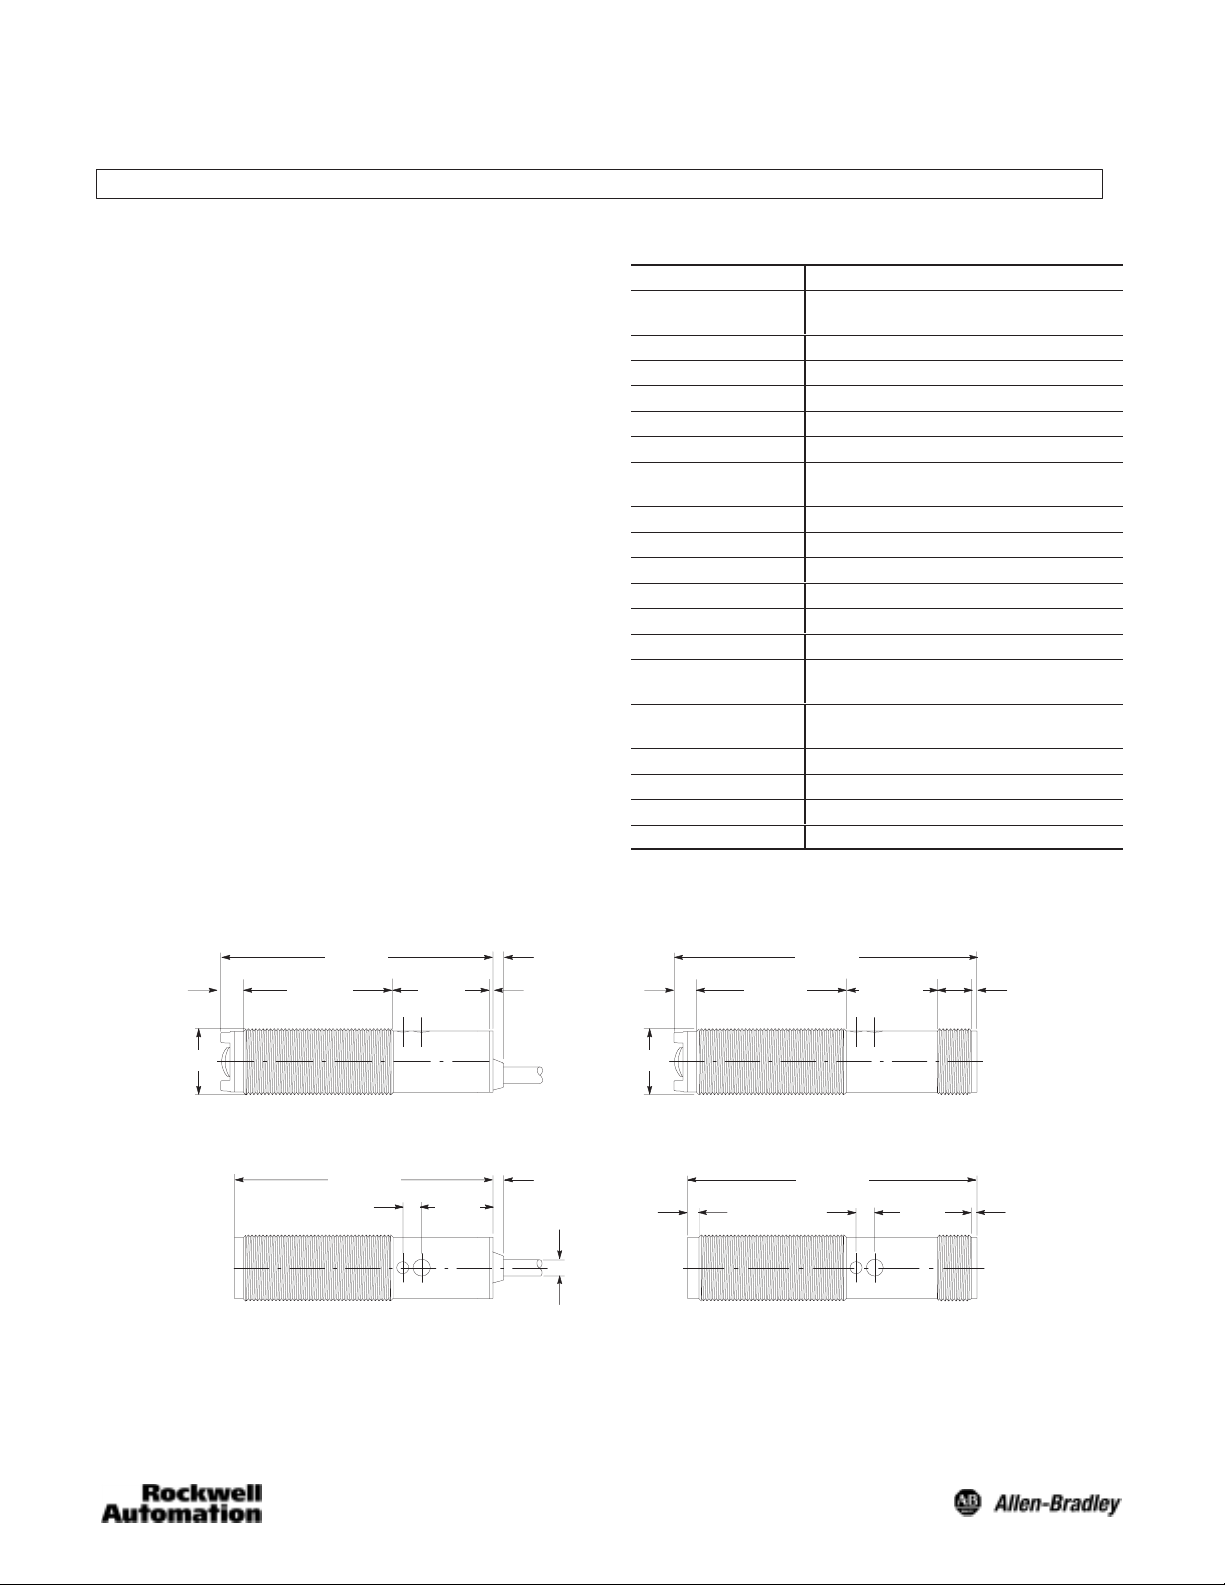
Dimensions—mm (inches)
Diffuse and Polarized Retroreflective
55 (2.16)
2.5
(0.09)
34 (1.33)
Transmitted Beam
54.5 (2.14)
4.4
(0.17)
17.7
(0.69)
12.3
(0.48)
4.0 (0.15)
0.8 (0.03)
4.0 (0.15)
3.75 (0.14)
Dia.
2.5
(0.09)
M12 x 1M12 x 1
(0.07)
66 (2.60)
22.3
(0.87)
6.5
(0.25)
1.0 (0.04)
34 (1.33) 22 (0.86) 1.0 (0.04)
65.5 (2.57)
2.0
4.4
(0.17)
Page 2
Installation
The Type 42CF Series sensor must be mounted on a firm,
stable surface or support. A mounting, which is subject to
excessive vibration or shifting may cause intermittent
operation. For installation convenience, we offer the following
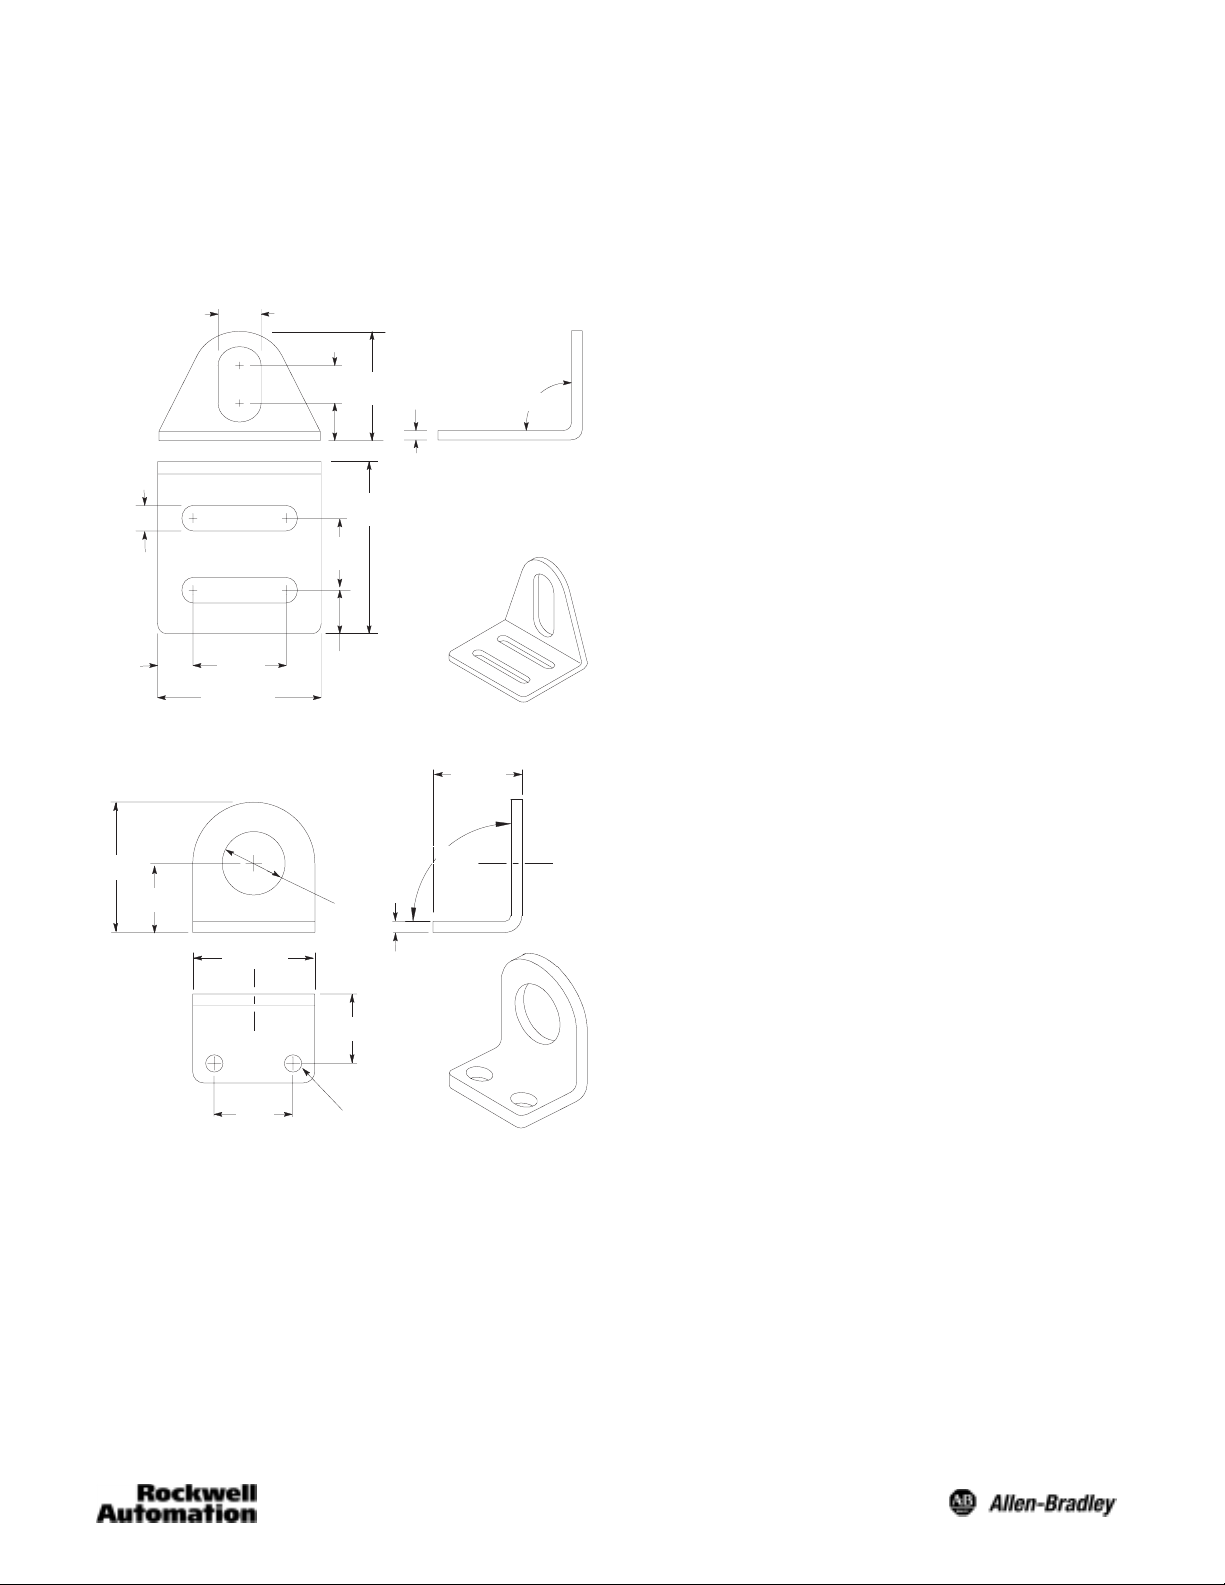
mounting bracket.
Right Angle Bracket #871A-BRN12
5.54
(0.21)
9.53
(0.37)
Right Angle Bracket #871A-BRF12
28.5
(1.13)
13.46
(0.53)
12.7
(0.50)
19.1
(0.75)
38.1 (1.50)
31.75 (1.25)
12.7
(0.50)
13.9
(0.55)
14.3
(0.56)
7.92
(0.31)
12.15 (0.47)
Dia.
38.1
(1.50)
34.8
(1.37)
3.02
(0.11)
1.78
(0.07)
90°
25.4 (1.0)
90°
Alignment
Polarized Retroreflective
Install the retroreflector so that its surface is perpendicular to
the sensor’s optical axis. Ensure that distance between the
sensor and reflector does not exceed sensor’s specifications.
Secure sensor in a stable position and select output state (LO
or DO). To achieve best alignment, use the following
procedure. Sweep the beam on the reflector in the horizontal
plane and determine the position the LED indicator turns On
and then Off. Set the beam halfway between both positions.
Do the same in the vertical plane. Break the beam with the
object to be detected and ensure the LED indicator changes
state.
For sensing semi-transparent objects use the fine adjustment
feature. Press the teach button, or connect pin 2 (white) to
ground for t > 8 seconds, until the yellow LED starts flashing.
The threshold is set below the detected signal of the
hysteresis amplitude. Adjust the sensor vertically and
horizontally until the LED switches on constantly or at least
until the frequency of the flashes decreases. Secure the
sensor in a stable position and ensure that the LED switches
off when the beam is interrupted by the target object. A solid
LED during both target presence and absence denotes
inability to sense a semi-transparent object, another solution
must be used.
Transmitted Beam
Using recommended brackets, provisionally mount the emitter
and receiver within sensing specifications. Position the
sensors so that they coincide with the optical axis as much as
possible. To achieve best alignment, use the following
procedure. Sweep the beam on the emitter in the horizontal
plane and determine the position the LED indicator turns On
and then Off. Set the beam halfway between both positions.
Do the same in the vertical plane, and repeat the procedure
for the Receiver. Break the beam with the object to be
detected and ensure the LED indicator changes state.
Diffuse
Teach
19.05
(0.75)
13.46
(0.53)
5.54 (0.21)
Dia.
Present target in front of the sensor face within sensing range.
Push and release “Teach Button” with target present. Remove
and restore the target being detected ensuring that indicator
turns on and off.
Solid yellow LED represents target presence with 2X margin
signal strength. Blinking yellow LED represents target
presence with signal strength meeting switching threshold but
less than 2X margin.
Remote-Teach
A momentary N.O. pushbutton switch must be wired between
the white wire and dc common. Present target in front of the
sensor face within sensing range. Push and release
“Momentary Push Button.” Restore and remove the target
being detected ensuring that indicator turns on and off.
Solid yellow LED represents target presence with 2X margin
signal strength. Blinking yellow LED represents target
presence with signal strength meeting switching threshold but
less than 2X margin.
2
Page 3

Fine Adjustment
To perform fine adjustment with target present push “Teach
Button” or “Momentary Push Button” for eight seconds until
the yellow LED flashes quickly. The threshold is set to a
minimum sensing setting. After teaching the sensor the
yellow LEDs will flash quickly when target is present and off
when absent. A solid LED during target presence denotes
inability to use fine adjustment due to misaligned sensor or
incompatible target/background properties.
Remote Teach with Dark Operate Mode
To remote teach with the Dark Operate Mode, a 2.2kΩ resistor
must be added to avoid short circuits in the power supply
when the teach mode is active.
Wiring
Diffuse, Polarized Retroreflective and Transmitted Beam
Cable QuickĆDisconnect Face View Male Receptacle (Sensor)
Brown
+
1
Brown
2.2k Ω
BN (10-30V DC)
1
BK (Output)
4
WT (LO/DO/Teach)
2
BU (0V DC)
3
+
DC Micro
1324
Blue
–
3
Blue
–
NPN Output
Cable QuickĆDisconnect Face View Male Receptacle (Sensor)
Brown
White
Black
Blue
+
Load
–
1
Brown
2
White
4
Black
Load
3
Blue
+
Ê
–
DC Micro
1324
PNP Output
Cable QuickĆDisconnect Face View Male Receptacle (Sensor)
Brown
White
Black
Load
Blue
Ê Polarized retroreflective or transmitted beam: open circuit (2) & brown (1) conductors together for LO. Tie white (2) & blue (3) conductors together for DO.
Diffuse: Open Circuit for LO. Tie white (2) & brown (1) conductors together for DO. Tie white (2) & blue (3) conductors to N.O. Switch for REMOTE TEACH.
+
–
1
Brown
2
White
4
Black
Load
3
Blue
+
Ê
–
DC Micro
1324
3
Page 4

Accessories
Description Catalog Number
Reflector, 76mm (3in) diameter with center mount hole 92-39
2m (6.5ft) pico QD Cordset 889D-F4AC-2
PHOTOSWITCHR is a registered trademark of AllenĆBradley Company.
ValoxR is a registered trademark of General Electric Company.
4
Publication 75009–164–01(D)
May 2004
Printed in USA
 Loading...