

Page 1
4 or 8 Way Encoder
Buffer Unit
(Cat. Nos. 4100-EF04, 4100-EF08)
Installation and Setup Manual
Page 2

Important User Information
Because of the variety of uses for the products described in this
publication, those responsible for the application and use of this
control equipment must satisfy themselves that all necessary steps
have been taken to assure that each application and use meets all
performance and safety requirements, including any applicable laws,
regulations, codes and standards.
The illustrations, charts, sample programs and layout examples shown
in this guide are intended solely for purposes of example. Since there
are many variables and requirements associated with any particular
installation, Allen-Bradley does not assume responsibility or liability
(to include intellectual property liability) for actual use based upon
the examples shown in this publication.
Allen-Bradley publication SGI-1.1, Safety Guidelines for the
Application, Installation and Maintenance of Solid-State Control
(available from your local Allen-Bradley office), describes some
important differences between solid-state equipment and
electromechanical devices that should be taken into consideration
when applying products such as those described in this publication.
Reproduction of the contents of this copyrighted publication, in whole
or part, without written permission of Rockwell Automation, is
prohibited.
Throughout this manual we use notes to make you aware of safety
considerations:
WARNING
Identifies information about practices or
circumstances that can lead to personal injury or
death, property damage or economic loss
!
Attention statements help you to:
• identify a hazard
• avoid a hazard
• recognize the consequences
IMPORTANT
Allen-Bradley is a trademark of Rockwell Automation
Identifies information that is critical for successful
application and understanding of the product.
Page 3

European Communities (EC)
Directive Compliance
If this product has the CE mark it is approved for installation within
the European Union and EEA regions. It has been designed and
tested to meet the following directives.
EMC Directive
This product is tested to meet the Council Directive 89/336/EC
Electromagnetic Compatibility (EMC) by applying the following
standards, in whole or in part, documented in a technical
construction file:
• EN 50081-2 EMC — Generic Emission Standard, Part 2 —
Industrial Environment
• EN 50082-2 EMC — Generic Immunity Standard, Part 2 —
Industrial Environment
This product is intended for use in an industrial environment.
Low Voltage Directive
This product is tested to meet Council Directive 73/23/EEC Low
Voltage, by applying the safety requirements of EN 61131-2
Programmable Controllers, Part 2 - Equipment Requirements and
Tests. For specific information required by EN 61131-2, see the
appropriate sections in this publication, as well as the Allen-Bradley
publication Industrial Automation Wiring and Grounding Guidelines
For Noise Immunity, publication 1770-4.1.
This equipment is classified as open equipment and must be
mounted in an enclosure during operation to provide safety
protection.
Page 4

Page 5

Table of Contents
Preface
Chapter 1
Using This Manual
Read This Manual . . . . . . . . . . . . . . . . . . . . . . . . . . . . . . . P-1
Who Should Use this Manual. . . . . . . . . . . . . . . . . . . . . . . P-1
Purpose of this Manual . . . . . . . . . . . . . . . . . . . . . . . . . . . P-1
Safety Precautions . . . . . . . . . . . . . . . . . . . . . . . . . . . . . . . P-2
Contents of this Manual . . . . . . . . . . . . . . . . . . . . . . . . P-3
Related Documentation . . . . . . . . . . . . . . . . . . . . . . . . P-3
Terminology . . . . . . . . . . . . . . . . . . . . . . . . . . . . . . . . . . . P-3
Common Techniques Used in this Manual . . . . . . . . . . . . . P-4
Product Receiving & Storage Responsibility . . . . . . . . . . . . P-5
Allen-Bradley Support . . . . . . . . . . . . . . . . . . . . . . . . . . . . P-5
Local Product Support . . . . . . . . . . . . . . . . . . . . . . . . . P-5
Technical Product Assistance . . . . . . . . . . . . . . . . . . . . P-6
On the Web . . . . . . . . . . . . . . . . . . . . . . . . . . . . . . . . . . . P-6
Overview
Encoder Buffer Unit Description . . . . . . . . . . . . . . . . . . . . 1-1
Encoder Buffer Unit Principal Features . . . . . . . . . . . . . 1-1
Encoder Buffer Unit Principal Specifications. . . . . . . . . . . . 1-2
Mechanical Specifications. . . . . . . . . . . . . . . . . . . . . . . 1-2
Environmental Specifications . . . . . . . . . . . . . . . . . . . . 1-2
Power Supply . . . . . . . . . . . . . . . . . . . . . . . . . . . . . . . . . . 1-2
Power Input Specifications . . . . . . . . . . . . . . . . . . . . . . 1-2
Encoder Power Supply (master socket). . . . . . . . . . . . . 1-3
Follower Outputs. . . . . . . . . . . . . . . . . . . . . . . . . . . . . 1-3
8 Way Encoder Buffer Unit Mechanical Drawing . . . . . . 1-4
4 Way Encoder Buffer Unit Mechanical Drawing . . . . . . 1-4
Chapter 2
i Publication 4100-IN054B-EN-P -January 2001
Installation
Mounting the Encoder Buffer Unit . . . . . . . . . . . . . . . . . . . 2-2
Typical Applications . . . . . . . . . . . . . . . . . . . . . . . . . . . . . 2-2
Page 6

ii
Chapter 3
Appendix A
Operation
General . . . . . . . . . . . . . . . . . . . . . . . . . . . . . . . . . . . . . . 3-1
Indicators . . . . . . . . . . . . . . . . . . . . . . . . . . . . . . . . . . . . . 3-1
Inputs and Outputs . . . . . . . . . . . . . . . . . . . . . . . . . . . . . . 3-1
Master Input . . . . . . . . . . . . . . . . . . . . . . . . . . . . . . . . 3-1
Follower-1 Output . . . . . . . . . . . . . . . . . . . . . . . . . . . . 3-2
Follower-2 to 4 or 8 Outputs . . . . . . . . . . . . . . . . . . . . 3-2
Configuration Links. . . . . . . . . . . . . . . . . . . . . . . . . . . . . . 3-3
Encoder Supply Voltage . . . . . . . . . . . . . . . . . . . . . . . . 3-3
Encoder Direction . . . . . . . . . . . . . . . . . . . . . . . . . . . . 3-4
Follower Power . . . . . . . . . . . . . . . . . . . . . . . . . . . . . . 3-5
Accessories
Principle Accessories. . . . . . . . . . . . . . . . . . . . . . . . . . . . . A-1
Index
Publication 4100-IN054B-EN-P -January 2001
Page 7

Preface
Read This Manual
Who Should Use this
Manual
Read and understand this instruction manual. It provides the
necessary information to let you install, connect, and set up the
Encoder Buffer Unit for safe, reliable operation. This preface covers
the following topics:
• Who should use this manual
• The purpose of this manual
• Terminology
• Common techniques used in this manual
• Allen-Bradley support
You should read this manual if you are responsible for the installation
or set up of the Encoder Buffer Unit in either its 8 or 4 way
configuration.
If you do not have a basic understanding of the products listed below,
contact your local Allen-Bradley representative for information on
available training courses before using this product.
Purpose of this Manual
• S Class Compact motion controller
• 1394 GMC System module
This manual is an installation and set up guide for the Encoder Buffer
Unit in both its 8 and 4 Way configurations. It describes the
procedures necessary to properly install and configure it into your
motion control system. Apart form the number of outputs both units
are identical and the information in this manual applies equally to
both. Where it is necessary to differentiate between them, this is
clearly indicated in the text.
1 Publication 4100-IN054B-EN-P - January 2001
Page 8
Preface P-2
Safety Precautions
The following general precautions apply to the Encoder Buffer Unit:
WARNING
!
Electric shock can kill. Make sure the Encoder Buffer
Unit is safely installed in accordance with the
Installation and Set-up chapters of this manual. Avoid
contact with electrical wires and cabling while power
is on. Only trained service personnel should open
the electrical cabinet.
This product contains stored energy devices. To
avoid hazard of electrical shock, verify that all
voltage on the capacitors has been discharged before
attempting to service, repair, or remove this unit. You
should only attempt the procedures in this manual if
you are qualified to do so and familiar with
solid-state control equipment and the safety
procedures in publication NFPA 70E and
BS-EN60204.
The system integrator is responsible for local safety
and electrical codes.
WARNING
!
An incorrectly applied or installed product can result
in component damage or a reduction in product life.
Wiring or application errors, such as undersizing or
inadequate DC supply, or excessive ambient
temperatures can result in a malfunction.
The Encoder Buffer Unit contains ESD (Electrostatic
Discharge) sensitive parts and assemblies. Static
control precautions are required when installing,
testing, servicing, or repairing this assembly.
Component damage can result if ESD control
procedures are not followed. If you are not familiar
with static control procedures, refer to Allen-Bradley
publication 8000-4.5.2, Guarding Against Electrostatic
Damage or any other applicable ESD Protection
Handbook.
Publication 4100-IN054B-EN-P - January 2001
Page 9

Contents of this Manual
Chapter Title Contents
Preface Describes the purpose, background, and scope
1 Overview Provides a general description of the Encoder
2 Installation Provides the steps needed to successfully
3 Operation Provides information on using the Encoder
Appendix A Accessories Contains a list of principle accessories
Related Documentation
Preface P-3
of this manual. Also specifies the audience for
whom this manual is intended.
Buffer Unit, its features and mechanical
specifications.
mount and wire the Encoder Buffer Unit.
Buffer Unit.
available for use with the Encoder Buffer Unit
The following documents contain additional information concerning
related Allen-Bradley products. To obtain a copy, contact your local
Allen-Bradley office or distributor.
For Read This Document Document Number
Instructions for installation and set-up for the 1394 GMC
system
Instructions for installation and set-up for the S Class
Compact motion controller
Instructions for using the Ultra Plus 1398 Ultra plus User Manual 1398-5.1
An article on wire sizes and types for grounding electrical
equipment (North American standards)
An article on wire sizes and types for grounding electrical
equipment (European standards).
A complete listing of current Allen-Bradley documentation,
including ordering instructions. Also indicates whether the
documents are available on CD-ROM or in multi-languages
A glossary of industrial automation terms and abbreviations Allen-Bradley Industrial Automation Glossary AG-7.1
1394 Digital, AC, Multi-Axis Motion Control
System User Manual
IMC S Class Compact Motion Controller
Installation and Set-up Manual
National Electrical Code Published by the
BS-EN 60204 Electrical Equipment of
Machines
Allen-Bradley Publication Index SD499
1394-5.0
999-122
National Fire
Protection
Association of
Boston, MA.
Published by British
Standards Institute
Terminology
In order to avoid confusion, we have used the following general terms
in a specific manner within this manual. We define them as follows:
Encoder Buffer Unit - Refers to the product in general terms where the
information applies to both the 8 Way and 4 Way configurations.
Publication 4100-IN054B-EN-P - January 2001
Page 10

Preface P-4
ESRS - Refers to the Encoder Signal Reference Simulator.
Way - Refers to the number of channels on the Encoder Buffer Unit.
8 Way- Refers to the Encoder Buffer Unit when configured for 8
follower outputs.
4 Way- Refers to the Encoder Buffer Unit when configured for 4
follower outputs.
System Control Encoder - Is used interchangeably with Master
Encoder.
For specific definitions of other terms used in industrial automation,
see the Allen-Bradley Industrial Automation Glossary (publication
number AG-7.1).
Common Techniques Used
in this Manual
The following conventions are used throughout this manual:
• Bulleted lists such as this one provide information, not
procedural steps.
• Numbered lists provide sequential steps or hierarchical
information.
• When we refer you to another location, the section name
appears in italics.
• An Important Table as shown below provides information that
is necessary to successful use and understanding of the product.
IMPORTANT
• The exclamation point inside of a triangle indicates
circumstances that can lead to personal injury, death, property
damage or economic loss. See example below.
Identifies information that is critical for successful
application and understanding of the product.
Publication 4100-IN054B-EN-P - January 2001
WARNING
!
Failure to observe these warnings may cause damage
to the unit, unexpected and/or uncontrolled
movement of peripheral equipment, and your health
and safety.
Page 11

Preface P-5
Product Receiving &
Storage Responsibility
You, the customer, are responsible for thoroughly inspecting the
equipment before accepting the shipment from the freight company.
Check the item(s) you receive against your purchase order. If any
items are obviously damaged, it is your responsibility to refuse
delivery until the freight agent has noted the damage on the freight
bill. Should you discover any concealed damage during unpacking,
you are responsible for notifying the freight agent. Leave the shipping
container intact and request that the freight agent make a visual
inspection of the equipment.
Leave the product in its shipping container prior to installation. If you
are not going to use the equipment for a period of time, store it:
• in a clean, dry location
• within an ambient temperature range of 0 to 85° C (32 to 185° F)
• within a relative humidity range of 5% to 95%, non-condensing
• in an area where it cannot be exposed to a corrosive
atmosphere
• in a non-construction area
Allen-Bradley Support
Allen-Bradley offers support services worldwide, with over 75 Sales/
Support Offices, 512 authorized Distributors and 260 authorized
Systems Integrators located throughout the United States alone, plus
Allen-Bradley representatives in every major country in the world.
Local Product Support
Contact your local Allen-Bradley representative for:
• sales and order support
• product technical training
• warranty support
• support service agreements
Publication 4100-IN054B-EN-P - January 2001
Page 12

Preface P-6
Technical Product Assistance
If you need to contact Allen-Bradley for technical assistance, please
review the information in this manual first. Then call your local
Allen-Bradley representative. For the quickest possible response, we
recommend that you have the catalog numbers of your products
available when you call. See the Related Documentation section of
this chapter for the publication numbers of other manuals that can
help with this product.
The Rockwell Automation Technical Support numbers are:
For Europe: (+44) 1270 580142
For North America: 1-603-443-5419
On the Web
For information about Allen-Bradley, visit the following World Wide
Web s ite:
http://www.ab.com/
Publication 4100-IN054B-EN-P - January 2001
Page 13

Overview
Chapter
1
Encoder Buffer Unit
Description
The Encoder Buffer Unit is a DIN rail mounting module designed to
duplicate the master incremental quadrature pulse train with index.
The device accepts the master incremental signals at connector P2,
buffers them, and makes a duplicate of them available on all follower
outputs.
Provided the format of the signal at the master input is TTL level
RS422, the Encoder Buffer Unit is not concerned about its source.
Therefore, an encoder (the master encoder) can be connected to this
input or other hardware items such as an ESRS (Encoder Signal
Reference Simulator) can be used.
Encoder Buffer Unit Principal Features
• Selectable “As Master” or “Reversed” of quadrature A & B phases
to provide an electrical reverse at the buffer outputs.
• Selectable 5V or 12V Master encoder supply.
• Individually selectable 5V power to follower outputs.
• Individual 5V and 12V power supply OK indicators.
• Product housed in a rugged DIN rail mounting PCB tray with
integral mounting feet.
• Powered from a single +24V DC supply.
1 Publication 4100-IN054B-EN-P - January 2001
Page 14

1-2 Overview
Encoder Buffer Unit
Principal Specifications
Mechanical Specifications
Table 1.A Mechanical Specifications
Enclosure Type Plastic DIN rail mounting tray with integral feet.
Enclosure Size, 8 Way English (inch)
16.90 x 3.00 x 2.50
Enclosure Size, 4 Way English (inch)
11.6 x 3.00 x 2.50
Metric (mm)
430 x 76 x 64
Metric (mm)
294 x 76 x 64
Environmental Specifications
Table 1.B Environmental Specifications
Operating Storage
Temperature
Humidity
o
C -40 to 70oC
0 to 60
95% non condensing @ 60
o
C
Power Supply
Power Input Specifications
Table 1.C Power Specifications Input
Input Voltage Range +18 to +36V DC.
Reverse Polarity Protection Yes
Maximum Input Current, 8 Way Approx. 1.1A at 18V Supply
Approx. 0.80A at 24V Supply
Approx. 0.70A at 36V Supply
Maximum Input Current, 4Way Approx. 0.70A at 18V Supply
Approx. 0.60A at 24V Supply
Approx. 0.50A at 36V Supply
Inrush Approx. 5 times maximum input current
Note: The above input currents are drawn when full rated current is
drawn from the master and all outputs.
Publication 4100-IN054B-EN-P - January 2001
Page 15

Encoder Power Supply (master socket)
Table 1.D Encoder Power Supply (master socket)
Overview 1-3
Output Voltages +5V or +12V DC. Both
Maximum Output Current 0.75A DC 5V DC Selected
0.25A DC 12V DC Selected
Overcurrent Protection Both supplies are short circuit and over
temperature protected.
± 7.5%.
Follower Outputs
Table 1.E Follower Outputs
Number of follower outputs. 8 or 4
Output data type. RS422 TTL Levels
Output phase definitions. “As Master” is defined as the A & B
phases from the master input remaining
unchanged at the follower outputs.
“Reversed” is defined as the A & B
phases from the master input being
reversed at the follower outputs.
Power Output 5V DC
follower output
± 7.5% at 0.2A maximum per
Publication 4100-IN054B-EN-P - January 2001
Page 16

1-4 Overview
8 Way Encoder Buffer Unit Mechanical Drawing
(Part Number 4100-EF08 series B)
Figure 1.1 8 Way Encoder Buffer Unit
430 mm MAX
77 mm
ENCODER DIRECTIONLK-DIRLK-VOLTS ENC VOLTAGE
MASTER
+12V +5V
HEALTHY
P1
FLWR-1
P2 P3 P4 P5 P6 P7 P8 P9 P10
FLWR-2 FLWR-3 FLWR-4 FLWR-5 FLWR-6 FLWR-7 FLWR-8
8 Channel Encoder Buffer
FOLLOWER POWER LK-5V-FX
LK-5V-F4LK-5V-F1 LK-5V-F2 LK-5V-F3 LK-5V-F5 LK-5V-F6 LK-5V-F7 LK-5V-F8
4 Way Encoder Buffer Unit Mechanical Drawing
(Part Number 4100-EF04 series B)
Figure 1.2 4 Way Encoder Buffer Unit
+12V +5V
77 mm
HEALTHY
P1
Publication 4100-IN054B-EN-P - January 2001
295 mm MAX
LK-Volts ENC VOLTAGE LK-DIR ENCODER DIRECTION
MASTER
P2 P3 P4 P5 P6
FLWR-1 FLWR-2 FLWR-3 FLWR-4
LK-5V-F1 LK-5V-F2 LK-5V-F3 LK-5V-F4
4 Channel Encoder Buffer
FOLLOWER POWER LK-5V-FX
Page 17

Chapter
2
Installation
The Encoder Buffer Unit is designed to be mounted in an electrical
cabinet via its integral mounting feet. For all applications, this
installation method should be observed. Before powering up your
Encoder Buffer Unit, make sure it has been configured correctly and
that all peripheral equipment has been correctly connected to it.
WARNING
!
WARNING
!
A feedback loop must not be closed via the
Encoder Buffer Unit. Use of this Buffer in the
feedback path of a position controller disables any
"encoder loss" detection function which can cause a
runaway condition.
Failure to observe these warnings will cause
unexpected and/or uncontrolled movement of
peripheral equipment. This may cause damage to the
equipment and to your health and safety.
Do not apply power to your Encoder Buffer Unit
when it is part of a control system without first
establishing that this will not have any adverse
effects.
Do not make or break any electrical connections to
your Encoder Buffer Unit while power is applied.
Do not change any selection link settings on your
Encoder Buffer Unit while power is applied.
Failure to observe the above warnings may cause
damage to the follower unit, unexpected and/or
uncontrolled movement of peripheral equipment
and your health and safety.
1 Publication 4100-IN054B-EN-P - January 2001
Page 18

2-2 Installation
The following safety points must be observed when installing the unit:
• The 24V DC supplies must be electrically isolated from all other
supplies with higher potentials.
• The 0V (common) side of the 24V DC supply must be connected
to a safety ground.
• The unit is intended for installation and use within an electrical
control cabinet in a normal industrial environment.
Mounting the Encoder
Buffer Unit
IMPORTANT
The Encoder Buffer Unit is mounted onto a DIN rail using the
mounting feet on the back of the board.
Figure 2.1 Encoder Buffer Unit DIN Rail Mounting Foot
System designers should take care to avoid long
encoder cable runs when using a 5V encoder. If
cable volt drop is a problem, the use of a 12V
encoder is recommended.
64 mm
Typical Applications
Publication 4100-IN054B-EN-P - January 2001
This section illustrates some typical applications for the Encoder
Buffer Unit. Although the 4 channel unit is shown in the diagrams, all
applications apply equally to the 8 channel unit. A range of cables and
other accessories are available for use with this product – see the table
in Appendix B - Accessories.
The following diagram shows two units connected in cascade. The
cable, which connects P4 (first unit) to P2 (second unit), must join
only the following pins: 1, 2, 3, 4, 5, 6, 10 &15.
Page 19
Figure 2.2 EBU Units Connected in Cascade
System Control Encoder
Installation 2-3
To additional Encoder Buffer Units
LK-Volts ENC VOLTAGE LK-DIR ENCODER DIRECTION
MASTER
FLWR-1 FLWR-2 FLWR-3 FLWR-4
+12V +5V
HEALTHY
P1
LK-5V-F1 LK-5V-F2 LK-5V-F3 LK-5V-F4
P2 P3 P4 P5 P6
FOLLOWER POWER LK-5V-FX
4 Channel Encoder Buffer
+12V +5V
HEALTHY
P1
4 Channel Encoder Buffer Unit
LK-Volts ENC VOLTAGE LK-DIR ENCODER DIRECTION
MASTER
FLWR-1 FLWR-2 FLWR-3 FLWR-4
LK-5V-F1 LK-5V-F2 LK-5V-F3 LK-5V-F4
P2 P3 P4 P5 P6
Second 4 Channel Encoder Buffer Unit
FOLLOWER POWER LK-5V-FX
4 Channel Encoder Buffer
24V DC Power
This diagram shows a system control encoder, in the stand-alone
mode, connected to the master input of the 4 Channel Encoder Buffer
and an ALEC module being driven off each follower output.
Publication 4100-IN054B-EN-P - January 2001
Page 20
2-4 Installation
Figure 2.3 4 Way EBU and ALEC
ALEC 1 ALEC 2 ALEC 3 ALEC 4
QUALITY
Reset
AL
CPU OK
Mode
AxisLink
Address
123456
12V/5V
Extd Node On/Off
Enc. Fault On/Off
Extd Length On/Off
Extd Term 1 On/Off
Extd Term 2 On/Off
1
2
AxisLink
Encoder OK
Incremental
Registration
Input
Common
24V DC
Fault Power
Relay Input
Fuse
Encoder Input
QUALITY
Reset
AL
CPU OK
Mode
AxisLink
Address
123456
12V/5V
Extd Node On/Off
Enc. Fault On/Off
Extd Length On/Off
Extd Term 1 On/Off
Extd Term 2 On/Off
1
2
AxisLink
Encoder OK
Incremental
Encoder Input
Registration
Input
Common
24V DC
Fault Power
Relay Input
Fuse
QUALITY
Reset
AL
CPU OK
Mode
AxisLink
Address
123456
12V/5V
Extd Node On/Off
Enc. Fault On/Off
Extd Length On/Off
Extd Term 1 On/Off
Extd Term 2 On/Off
AxisLink
Encoder OK
Registration
Input
Common
24V DC
Fault Power
Relay Input
Fuse
1
2
Incremental
Encoder Input
QUALITY
Reset
AL
CPU OK
Mode
AxisLink
Address
12
12V/5V
Extd Node On/Off
3
Enc. Fault On/Off
45
Extd Length On/Off
Extd Term 1 On/Off
6
Extd Term 2 On/Off
AxisLink
Encoder OK
Registration
Input
Common
24V DC
Fault Power
Relay Input
Fuse
1
2
Incremental
Encoder Input
ALEC
ALEC
ALEC
ALEC
System Control Encoder
LK-Volts ENC VOLTAGE LK-DIR ENCODER DIRECTION
MASTER
FLWR-1 FLWR-2 FLWR-3 FLWR-4
+12V +5V
HEALTHY
P1
LK-5V-F1 LK-5V-F2 LK-5V-F3 LK-5V-F4
P2 P3 P4 P5 P6
FOLLOWER POWER LK-5V-FX
4 Channel Encoder Buffer
4 Channel Encoder Buffer Unit
24V DC Power
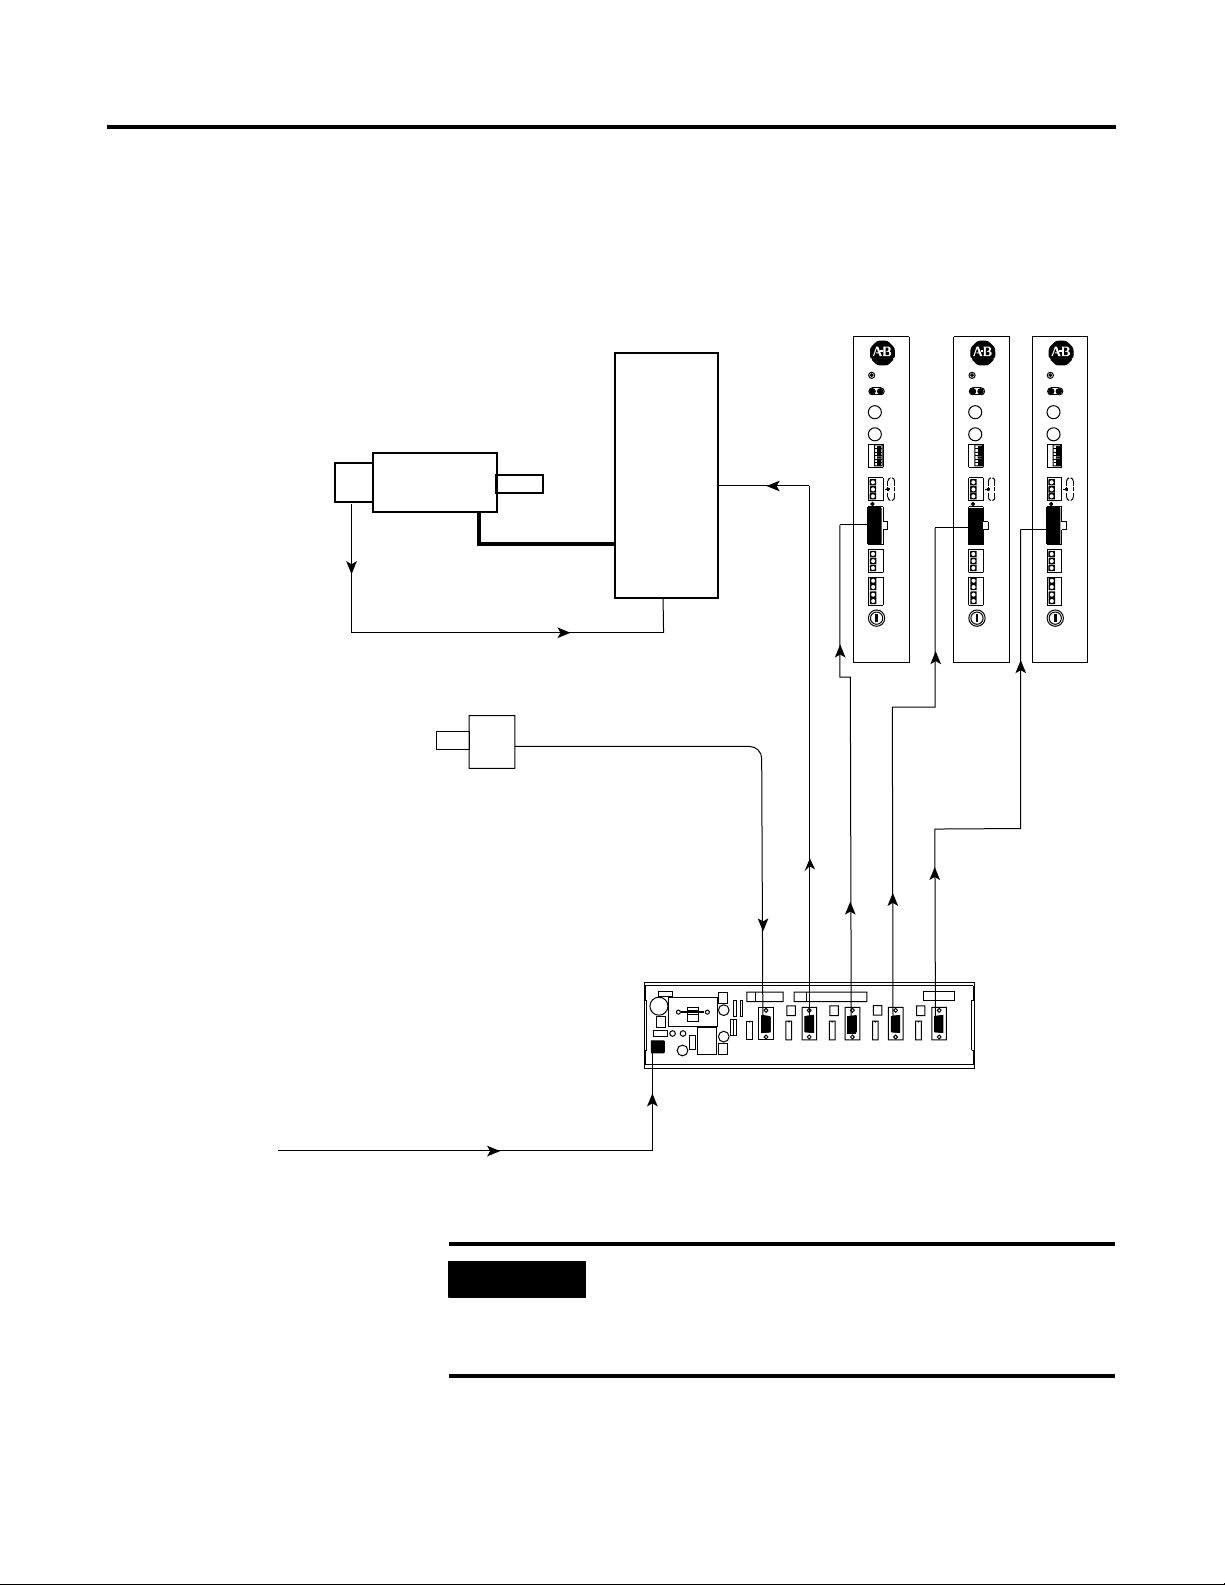
This diagram shows a system control encoder used in the stand-alone
mode and connected to the master input of the 4 Channel Encoder
Buffer Unit. One follower output is connected to the “Master Encoder”
input on a follower drive (this drive must be in the encoder follower
mode). With this arrangement, the follower encoder follows the
system control encoder, taking into account any gearing, etc.
configured in the drive.
Publication 4100-IN054B-EN-P - January 2001
Page 21
Follower
Encoder
Installation 2-5
ALEC units are also shown connected to other follower outputs
demonstrating that a combination of ALEC modules and follower
drives is permissible.
Figure 2.4 4 Way EBU with Follower Drive
FOLLOWER DRIVE
Motor
Master
Encoder
Powe r
Follower
Encoder
ALEC 1 ALEC 2 ALEC 3
QUALITY
Reset
AL
CPU OK
Mode
AxisLink
Address
123456
12V/5V
Extd Node On/Off
Enc. Fault On/Off
Extd Length On/Off
Extd Term 1 On/Off
Extd Term 2 On/Off
1
2
AxisLink
Encoder OK
Incremental
Encoder Input
Registration
Input
Common
24V DC
Fault Power
Relay Input
Fuse
QUALITY
Reset
AL
CPU OK
Mode
AxisLink
Address
123456
12V/5V
Extd Node On/Off
Enc. Fault On/Off
Extd Length On/Off
Extd Term 1 On/Off
Extd Term 2 On/Off
1
2
AxisLink
Encoder OK
Incremental
Encoder Input
Registration
Input
Common
24V DC
Fault Power
Relay Input
Fuse
QUALITY
Reset
AL
CPU OK
Mode
AxisLink
Address
123456
12V/5V
Extd Node On/Off
Enc. Fault On/Off
Extd Length On/Off
Extd Term 1 On/Off
Extd Term 2 On/Off
1
2
AxisLink
Encoder OK
Incremental
Encoder Input
Registration
Input
Common
24V DC
Fault Power
Relay Input
Fuse
System Control Encoder
24V DC Power
LK-Volts ENC VOLTAGE LK-DIR ENCODER DIRECTION
MASTER
+12V +5V
HEALTHY
P1
P2 P3 P4 P5 P6
4 Channel Encoder Buffer Unit
ALEC
FLWR-1 FLWR-2 FLWR-3 FLWR-4
LK-5V-F1 LK-5V-F2 LK-5V-F3 LK-5V-F4
FOLLOWER POWER LK-5V-FX
4 Channel Encoder Buffer
ALEC
ALEC
IMPORTANT
P3 is the only output to which the motor thermal
information and analog position reference are
brought out. Only this output should be used to
complete the encoder feedback loop.
Publication 4100-IN054B-EN-P - January 2001
Page 22

2-6 Installation
Publication 4100-IN054B-EN-P - January 2001
Page 23

Operation
Chapter
3
General
Indicators
Inputs and Outputs
Your Encoder Buffer Unit is fitted with a range of indicators, I/O ports
and links to allow easy configuration and use. This section explains
the function and operation of these and provides additional technical
data where appropriate.
Two green LED indicators are provided on the Encoder Buffer Unit
front panel to give you at-a-glance information regarding the status of
the Encoder Buffer Unit. When they are both lit the encoder power
supply are healthy.
The following digital I/Os are provided with the Encoder Buffer unit.
The only difference between the 4 Way and the 8 Way is the number
of Follower Outputs available.
Master Input
The Master input (P2) receives the signal from the master encoder or
other peripheral equipment. It has a 15 way male high density D
socket that connects the Master Encoder cable to the Encoder Buffer
Unit.
The following table shows the pin outs for the connector.
Table 3.A Master Connector Pin Layout
Pin Number Signal Name
1A+
2A3B+
4B5 I+ (Z+)
6 Encoder Return
7 Encoder Return
8 Encoder Supply
9 Encoder Supply
10 I- (Z-)
11* Motor Thermal
1 Publication 4100-IN054B-EN-P - January 2001
Page 24

3-2 Operation
Table 3.A Master Connector Pin Layout
12* Motor Thermal
13* Absolute Position
14 No Connection
15 Shield
* This pin configuration is for IQ and Ultra Plus drives only.
Follower-1 Output
The Follower-1 Output (P3) allows the user to connect a follower
drive or other peripheral equipment to the Encoder buffer Unit. The
connector is a 15 way male high density D plug.
Note: The Motor Thermal and analog position reference are brought
out through this follower connector.
Table 3.B Follower-1 Output Connector Pin Layout
Pin Number Signal Name
1A+
2A3B+
4B5 I+ (Z+)
6 Encoder Return
7 Encoder Return
8 No Connection
9 5V DC (optional)
10 I- (Z-)
11* Motor Thermal
12* Motor Thermal
13* Absolute Position
14 No Connection
15 Shield
* This pin configuration is for IQ and Ultra Plus drives only.
Publication 4100-IN054B-EN-P - January 2001
Follower-2 to 4 or 8 Outputs
The Follower-2 through Follower-4 (4 Way unit) or Follower-2
through Follower-8 (8 Way unit) outputs let you connect to follower
drives or other devices. The connector is a 15 way male high density
D plug.
Page 25

Operation 3-3
Note: The Motor Thermal and analog position reference are NOT
brought out to these follower connectors.
The pin layout for these connectors is illustrated in the following
table.
Table 3.C Follower-2 through 4 (or 8) Pin Layout
Pin Number Signal Name
1A+
2A3B+
4B5 I+ (Z+)
6 Encoder Return
7 Encoder Return
8 No Connection
9 5V DC (optional)
10 I- (Z-)
11 No Connection
12 No Connection
13 No Connection
14 No Connection
15 Shield
Configuration Links
Configuration links have been provided on the Encoder Buffer Unit to
let you set the Encoder Supply Voltage, Encoder Direction, and
Follower Power. The Configuration Links are a series of pins and
two-way jumpers. The required configuration is set by connecting the
pins with the two-way jumpers as specified in the following
directions.
Encoder Supply Voltage
The Encoder Buffer Unit lets you set the Encoder Supply voltage to
either +5V DC or +12V DC. This is done through the three-way link
marked LK-VOLTS . Where you place the two-way jumper determines
the supply voltage.
The Encoder Supply Voltage is set by placing the two-way jumper so
that is connects the link pins in the following sequence:
For a 12V Encoder Supply, Link 1- 2.
For a 5V Encoder Supply, Link 2 – 3
Publication 4100-IN054B-EN-P - January 2001
Page 26

3-4 Operation
The following diagram shows the layout of the links that select
encoder supply voltage.
LK-VOLTS ENC VOLTAGE
n 1
Link 1 – 2 = 12V
n 2
Link 2 – 3 = 5V
n 3
The default setting is for +5V DC.
Encoder Direction
The Encoder Direction is set with the Configuration Link marked
LK-DIR. This is four links arranged in a square with 2 two-way
jumpers. The direction can be set to either As Master or Reversed.
When the configuration link is set in the As Master position, the
quadrature pulse train at the follower outputs are in phase with those
produced by the encoder.
When the configuration link is set in the Reversed position, it changes
the A&B phases produced by the Master encoder such that, when
viewed at a follower output, the encoder appears to be rotating in the
opposite direction (i.e. Reversed produces an electrical direction
reverse.) The Index pulse gating is not affected. All follower outputs
are reversed simultaneously.
To set the Encoder Direction to As Master, move the 2 two-way
jumpers to link 1- 2 & 3 - 4.
To set the Encoder Direction to Reversed, move the 2 two-way
jumpers to link 1 - 3 & 2 - 4
The following diagram shows the layout of the links that select
encoder direction as laid out on the Encoder Buffer Unit.
LK-DIR ENCODER DIRECTION
1 n n 2
Link 1 – 2 & 3 – 4 = As Master
Publication 4100-IN054B-EN-P - January 2001
3 n n 4
Link 1 – 3 & 2 – 4 = Reversed
Page 27

The default setting is As Master.
Operation 3-5
WARNING
A feedback loop must not be closed via the
Encoder Buffer Unit. Use of this Buffer in the
feedback path of a position controller disables any
"encoder loss" detection function which can cause a
runaway condition.
!
Failure to observe these warnings will cause
unexpected and/or uncontrolled movement of
peripheral equipment. This may cause damage to the
equipment and to your health and safety.
Follower Power
The Follower Power configuration link sets the follower output to
either unpowered or powered. There is one Configuration Link for
each follower channel, marked LK-5V-F1 etc. These are three-way
links with two-way jumpers. In the powered state, the follower
supplies +5V output power.
To set the Follower output to unpowered, link 1- 2 with the two-way
jumper.
To set the Follower output to powered, Link 2 - 3 with the two-way
jumper.
The following diagram shows the layout of the links that select
encoder supply voltage. These are located to the left of the Follower
Output that they effect and are numbered accordingly.
LK-5V-FX
n 1
n 2
n 3
The following diagram shows the text indicating the selection options
for the Follower Outputs. It is located in one location near the top of
the board.
Publication 4100-IN054B-EN-P - January 2001
Page 28

3-6 Operation
FOLLOWER POWER
LK-5V-FX
Link 1 – 2 = OFF
Link 2 – 3 = ON
The default setting is unpowered (OFF).
Publication 4100-IN054B-EN-P - January 2001
Page 29

Accessories
Appendix
A
Principle Accessories
Table 0.A Principle Accessories
Crimped flying leads to 15 way high density D socket.
Supplied with loose 12 way AMP connector shell which
can be used for 1394 or ALEC. User connection drawing
for 1394 & ALEC included. Red and Black wires for the
1394 5V encoder supply included.
Un-crimped flying leads to 15 way high density D plug
compatible with EF08/04 Master socket. Allows
customers to connect non-standard encoder to EFO08/4.
Data sheet defining pin-out and color included. Has
encoder power connected to pin 9.
This section lists the principle accessories available for use with this
product. It includes cables for connecting the Encoder Buffer Unit to
Master Encoders and other devices.
Crewe Part number 44-0268-XXX
Crewe Description 8 or 4 Channel Buffer to 1394 or
ALEC
Passport No. 4100-EFCCXXX
Passport Description Encoder Fanout Board to 1394
cable
Crewe Part number 44-0269-XXX
Crewe Description Flying lead to 8/4 Channel Buffer
I/P
Passport No 4100-EFCEXXX
Passport Description Encoder Fanout Board to Encoder
Flying leads.
MIL spec 10way (18-1) socket to 15 way high density D
plug compatible with EF08/04 Master socket. Connects
845 encoder (or equivalent) to EF08/04. Has encoder
power connected to pin 9.
Fitted 12 way AMP connector to 15 way high density D
socket. Dedicated for 1394 only and supplied with user
sheet for external 5V connection.
1 Publication 4100-IN054B-EN-P - January 2001
Crewe Part number 44-0192-XXX
Crewe Description 5V & 12V encoder to 8/4 Channel
Buffer I/P
Passport No. N/A
Passport Description N/A
Crewe Part number 44-0254-XXX
Crewe Description 8/4 Channel Follower to 1394 only
Passport No. N/A
Passport Description N/A
Page 30

A-2 Accessories
Table 0.A Principle Accessories
Fitted 12 way AMP connector to15 way high density D
socket. Dedicated for ALEC only. No other data supplied
as it is not required
15 way high density D socket to 15 way high density D
plug compatible with EF08/04 Master socket. Cable
connects EF08/04 to ESRS or to IQ2000 or UltraPlus.
This unit generates a variable frequency bi-directional
quadrature pulse train with index at selectable counts.
The unit excepts an external speed command, produces a
commanded velocity output and provides a square wave
strobe locked to the index pulse. Same size as the AEC
and REC.
Crewe Part number 44-0249-XXX
Crewe Description 8/4 Channel Buffer to ALEC only
Passport No. N/A
Passport Description N/A
Crewe Part number 44-0280-XXX
Crewe Description IQ2000 to ESRS
Passport No. 4100-EFCS
Passport Description Encoder Fanout Board to ESRS
Crewe Part number 9103-0170
Crewe Description ESRS
Passport No. 4100-ESRS
Passport Description Encoder Simulator
Publication 4100-IN054B-EN-P - January 2001
NOTE: In the Crewe part numbers for cables, XXX defines the cable
length in feet.
Page 31

Index
A
Accessories A-1
Principle Accessories A-1
Allen-Bradley Support P-5
C
Configuration Links 3-3
Encoder Direction 3-4
Encoder Supply Voltage 3-3
Follower Power 3-5
Contents of this Manual P-3
D
Definitions P-3
encoder, P-4
Drawing
4 Way EBU Mechanical
8 Way EBUMechanical 1-4
1-4
E
EBU
Description
Overview 1-1
Principal Features 1-1
Encoder Direction 3-4
Encoder Supply voltage 3-3
1-1
F
Follower Power 3-5
Follower-1 Output 3-2
Follower-2 through Follower-4 3-2
I
Input
Master Input
Installation 2-1
4 Way EBU and ALEC 2-4
4 Way EBU with Follower Drive 2-5
EBU Units Connected in Cascade 2-3
Mounting 2-2
3-1
M
Master input 3-1
O
ollower-2 through Follower-8 3-2
Operation 3-1
General 3-1
Indicators 3-1
Inputs 3-1
Outputs 3-1
Output
Follower-1 Output
Follower-2 to 4 or 8 Outputs 3-2
3-2
P
Principle Accessories A-1
Product Receiving P-5
Purpose of this Manual P-1
R
Read This Manual P-1
Related Documentation P-3
S
Safety Precautions P-2
Specifications
Power Supply
Encoder 1-3
Follower Outputs 1-3
Input 1-2
Storage Responsibility P-5
Support
Allen-Bradley,
local product, P-5
technical product assistance, P-6
support
On the Web
P-5
P-6
T
Typical Applications 2-2
W
Who Should Use this Manual P-1
World Wide Web site P-6
Publication 4100-IN054B-EN-P -January 2001
Page 32

Back Cover
Publication 4100-IN054B-EN-P - January 2001 1 PN 4100-IN054B
Supersedes Publication 4100-IN054A - November 2000 © 2001 Rockwell International Corporation. Printed in the U.S.A.
 Loading...