

Page 1
Installation Instructions
MobileView Tablet Power Kit
(Cat. No. 2727-TRSP1xx)
CHARGE
READY
A
SER
2727-TRS71
CAT
Inside...
English Section ..................................................................................................... 3
Section française .................................................................................................. 9
Deutscher Abschnitt ........................................................................................... 15
Sezione in Italiano .............................................................................................. 21
Sección de español............................................................................................. 27
Seção em Português........................................................................................... 33
1 Publication 2727-IN007B-MU-P
Page 2

2 MobileView Tablet Power Kit
Publication 2727-IN007B-MU-P
Page 3

Installation Instructions
English Section
Introduction
Safety Instructions
MobileView Tablet Power Kit
(Cat. No. 2727-TRSP1xx)
The MobileView Tablet Power Kit accommodates a single Lithium-Ion
battery and charges it in approximately four hours. The LED display
indicates charge status.
Before using your MobileView Tablet Power Kit, read all the
instructions and cautionary markings on the battery charger, the
battery and any product that uses the battery.
WARNING
To reduce risk of injury, use this charger only with
authorized adapters and power supplies. Other
adapters or equipment may cause personal injury or
damage to equipment.
!
• Do not expose the charger to rain, snow or direct sunlight.
• The charger should be used at room temperature +20°C to
+25°C (+68°F to +77°F)
• The charger should be placed in a well ventilated area free from
foreign matter.
• Unplug the charger from the outlet before attempting to clean or
change adapters in order to reduce risk of electrical shock.
• Do not disassemble, incinerate, modify or short circuit the
batteries, charger or related components.
3 Publication 2727-IN007B-MU-P
Page 4

4 MobileView Tablet Power Kit
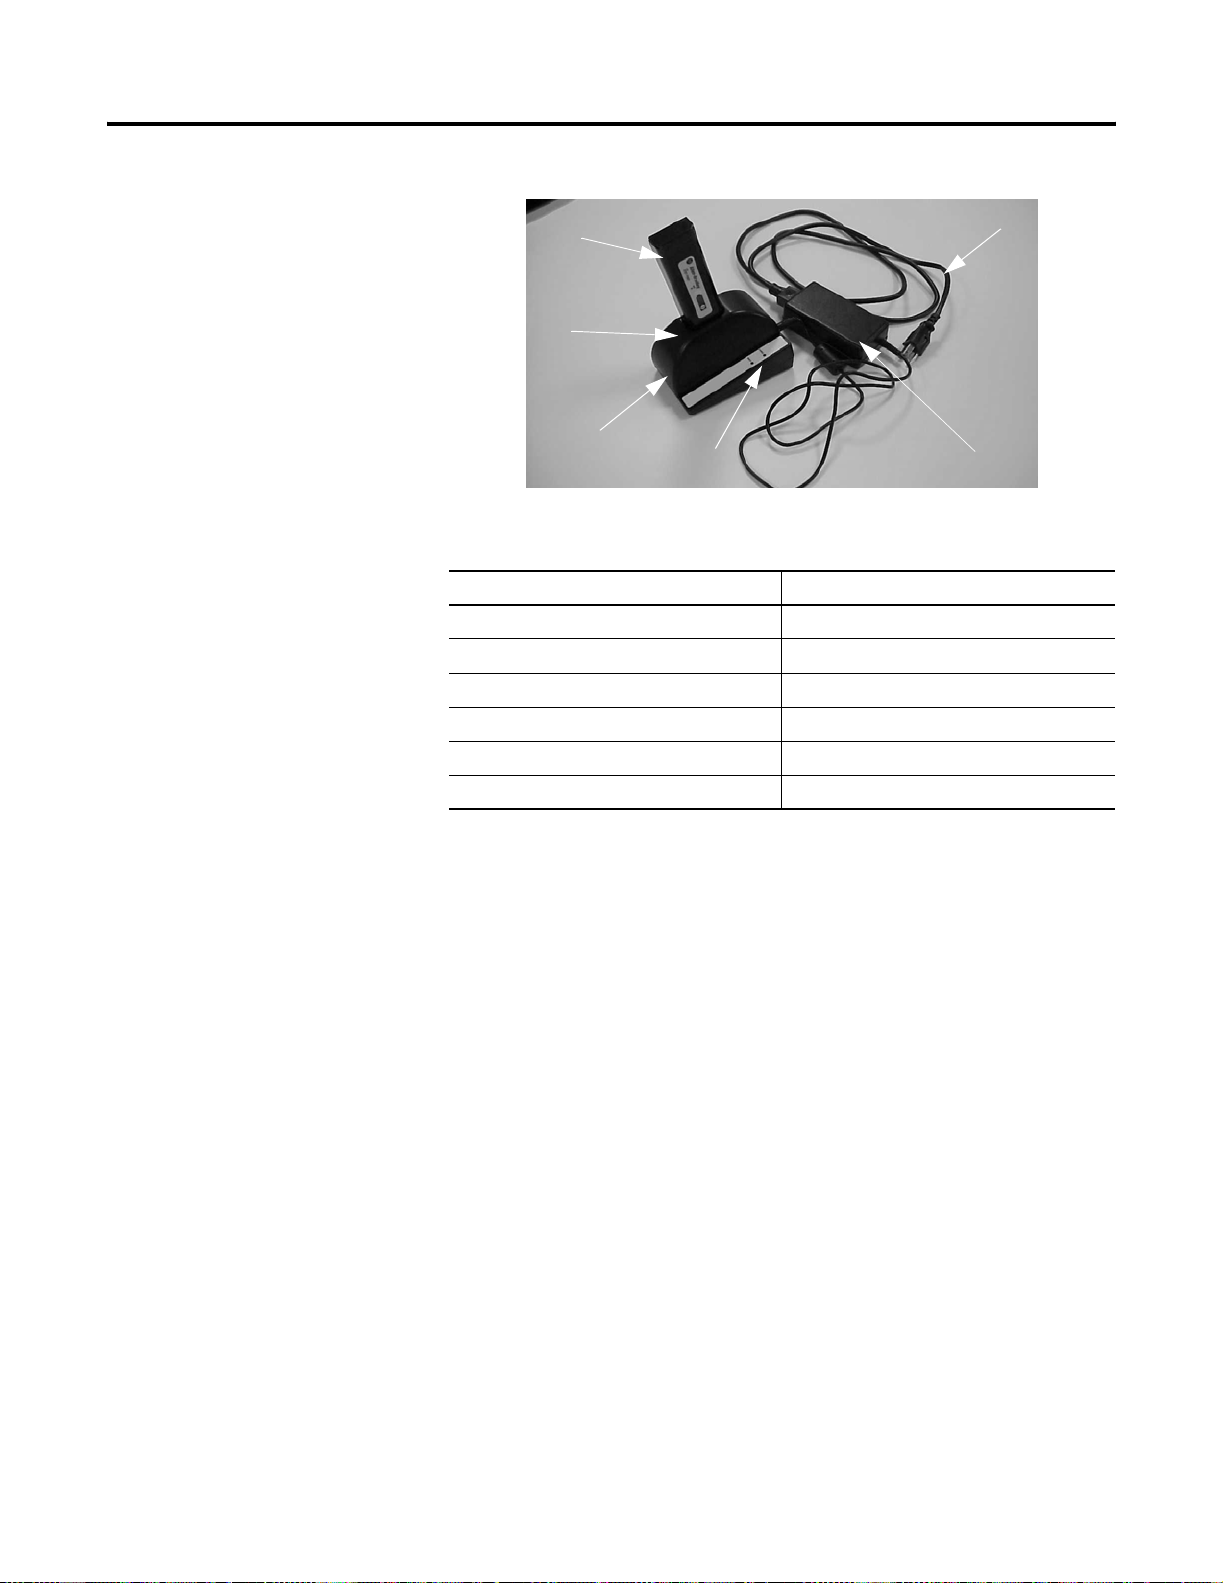
Power Kit Description
6
3
1
2
Table 1 MobileView Tablet Smart Charger
Feature Description
1 Charger Base
2 Battery Status Display
5
4
Installation
3 Battery Adapter
4 Power Supply
5 Power Cord Adapter
6 Extra Battery
Desktop Unit
1. Place the charger on a solid, level surface that is free of debris.
2. Attach adapters and connect the power supply and power cord
per the Power Cord Connection section.
Publication 2727-IN007B-MU-P
Page 5
MobileView Tablet Power Kit 5
Power Cord Connection
Before connecting the AC power cord make sure to connect the
power supply to the charger. The charger must be grounded to reduce
the risk of electrical shock. It has a power cord with an
equipment-grounding conductor and a grounding plug. This plug
must be inserted into an outlet that is properly installed and grounded
in compliance with all local codes and ordinances.
WARNING
Never alter an AC cord or its plug. If it does not fit
into your outlet, have a proper outlet installed by a
qualified electrician. An improper connection can
cause an electrical shock.
!
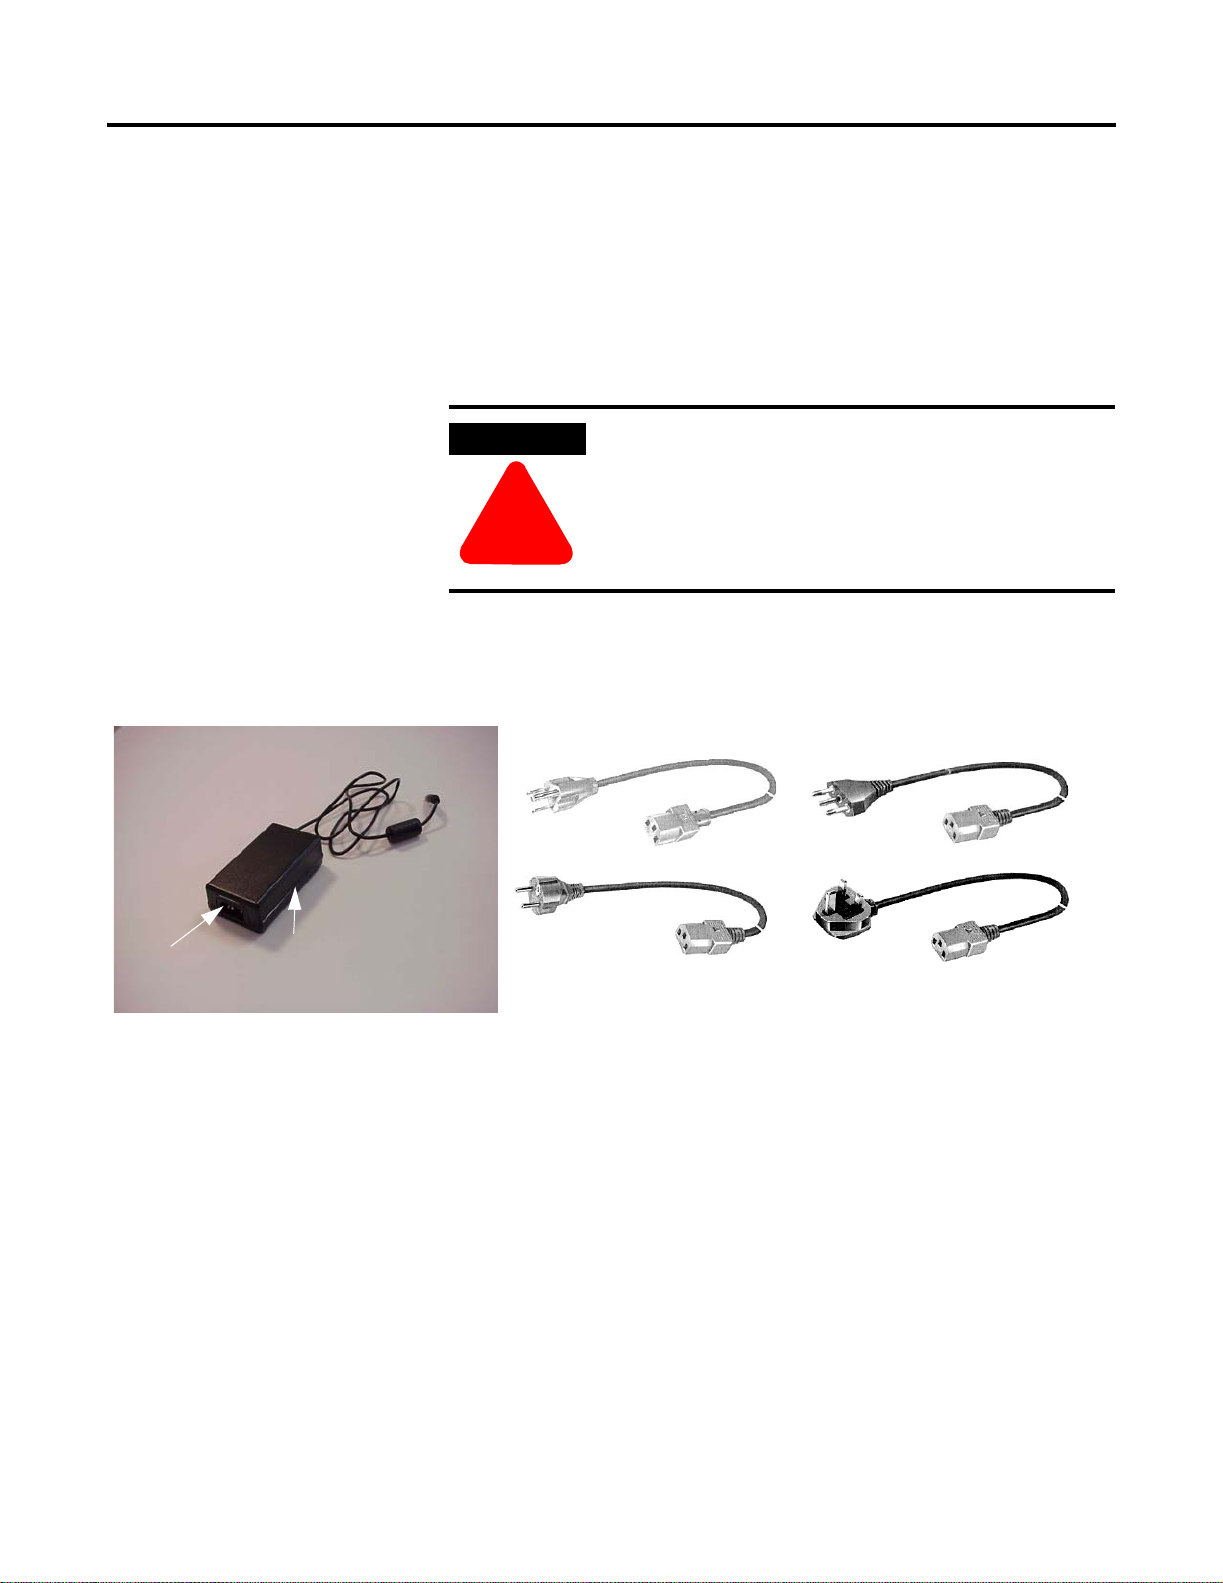
The power supply uses a nominal 115 volt or 230 volt circuit with a
power cord socket that fits one of the adapters shown below.
Power Cord Socket
North American Standard Adapter Italian Standard Adapter
Power Supply
United Kingdom Standard AdapterEuropean Standard Adapter
Publication 2727-IN007B-MU-P
Page 6

6 MobileView Tablet Power Kit
Battery Status Display/Operation
CHARGE
READY
A
SER
Charging
TIP
1. Set Smart Charger on a flat surface. Plug AC adapter into outlet.
2. Plug power supply adapter into charger.
3. Insert battery into the battery holder.
Within 15 seconds, battery charging LED flashes when voltage drops
below 6 volts.
After an additional 3 seconds, if battery is within voltage and
temperature parameters, charge LED will illuminate signaling charge is
in progress. Charge cycle is complete when ready green light is lit.
Battery/Charger contacts should always be clean.
Dirty contacts can result in a battery charger
malfunction. To clean contacts use a pencil eraser or
an alcohol swab.
2727-TRS71
CAT
Battery Fault
A battery fault condition has occurred if the yellow Charging LED
continues to flash. This could be caused by a defective, over
discharged or hot battery. If the battery is over discharged, allow the
battery to sit on the charger for 15 minutes, then remove the battery
and reinsert. A hot battery should be allowed to cool and be
reinserted. If the LED continues to flash, the battery is defective. The
battery should be analyzed by a battery technician or disposed of
properly. Contact your local waste management officials for
information regarding collection, recycling, and disposal of
Lithium-Ion batteries.
New Batteries
When charging battery packs that are new or have been on a shelf for
an extended period of time, the charger may prematurely switch to
ready. If this occurs, remove the battery from the charging bay and
reinsert. This may take 3 to 4 cycles to adequately form battery pack.
Publication 2727-IN007B-MU-P
Page 7
Cleaning
MobileView Tablet Power Kit 7
WARNING
To reduce shock hazard and possible damage to the
charger, always disconnect the power cord from the
wall outlet and charger before cleaning the charger.
!
Unit
Disconnect the power cord and power supply from the charger. The
case and faceplate can be cleaned using a soft cloth dampened with
water. Alcohol can be used for stubborn stains. Do not apply liquids
directly to the unit; apply sparingly on the cloth.
Contacts
The contacts on the charger and battery holders can be cleaned by
gently rubbing with a pencil eraser. Do not use abrasive or harsh
detergent cleaners.
Troubleshooting
Table 2 Troubleshooting
Symptom/Situation
(Fault Indication)
Charge or ready indicators
do not illuminate when
battery is inserted.
Automatic power supply
shut down.
Power supply power
indicator is not lit.
Probable Cause Corrective
Action/Solution
Power supply cord is not
connected to wall or power
supply.
Connecting AC power
source before connecting
the power supply to the
charger.
Power supply protection
circuitry is tripped.
Bad power supply.
Check power supply cord.
Disconnect AC power
source, wait 15 seconds,
reconnect AC power source.
Unplug power supply and
retry in 15 minutes.
Replace power supply.
Publication 2727-IN007B-MU-P
Page 8
8 MobileView Tablet Power Kit
Table 2 Troubleshooting
Specifications
Symptom/Situation
(Fault Indication)
Charge indicator continues
to flash after battery
insertion.
Charger will not go into
charge.
Battery not getting full
charge.
Table 3 Specifications
Dimensions 1.5 in x 3.2 in x 5.1 in
Weight 0.4 lbs (180 g)
Input voltage 15V, 2A
Charge Temperature 5°C to 40°C (41°F to 104°F)
Probable Cause Corrective
Action/Solution
Over discharged battery.
Defective battery.
Hot battery.
Dirty contacts/connection.
Defective battery.
Defective charger.
Dirty contacts/connection.
Defective battery.
(3.8 cm x 8 cm x 13 cm)
25°C (77°F) is Optimal Charge Temperature
Leave battery in charger for
15 minutes then reinsert.
Replace battery.
Let battery cool.
Clean contacts.
Replace battery.
Replace adapter.
Clean contacts.
Replace battery.
Certification UL/CSA DC wall supply
TIP
For indoor use only.
Publication 2727-IN007B-MU-P
Page 9
Notice d’installation
Section française
Introduction
Instructions de sécurité
Kit d’alimentation MobileView Tablet
(référence 2727-TRSP1xx)
Le kit d’alimentation MobileView Tablet permet de charger une pile au
lithium-ion en quatre heures environ. Son voyant indique l’état de
charge.
Avant d’utiliser le kit d’alimentation MobileView Tablet, lisez toutes les
instructions et les avertissements inscrits sur le chargeur, sur la pile et
sur tout autre appareil qui utilise la pile.
AVERTISSEMENT
!
Pour réduire les risques de blessure, utilisez ce
chargeur uniquement avec des adaptateurs et des
alimentations agréés. Des adaptateurs ou
équipements non agréés peuvent entraîner des
blessures ou endommager l’équipement.
• Ne pas exposer le chargeur à la pluie, la neige ou aux rayons
directs du soleil.
• Le chargeur doit être utilisé à une température ambiante
comprise entre +20 °C et +25 °C.
• Le chargeur doit être placé dans un endroit bien ventilé et
propre.
• Pour limiter les risques d’électrocution, débranchez le chargeur
de l’alimentation secteur avant de le nettoyer ou de changer les
adaptateurs.
• Ne pas démonter, incinérer, modifier ou court-circuiter les piles,
le chargeur ou les composants connexes.
9 Public ation 2 727-IN 007B-M U-P
Page 10
10 Kit d’alimentation MobileView Tablet
Description du kit d’alimentation
6
3
1
2
Tableau 4 Chargeur MobileView Tablet
Elément Description
1 Base du chargeur
2 Voyant d’état de la pile
5
4
Installation
3 Adaptateur pour pile
4 Alimentation
5 Cordon d’alimentation
6 Pile supplémentaire
Chargeur de bureau
1. Placez le chargeur sur une surface plane, stable et propre.
2. Fixez les adaptateurs et branchez l’alimentation et le cordon
d’alimentation comme indiqué à la section Connexion du
cordon d’alimentation.
Publication 2727-IN007B-MU-P
Page 11

Kit d’alimentation MobileView Tablet 11
Connexion du cordon d’alimentation
Connectez l’alimentation au chargeur avant de brancher le cordon
d’alimentation c.a. Le chargeur doit être mis à la terre pour limiter les
risques d’électrocution. Le cordon d’alimentation comporte une fiche
avec mise à la terre, qui doit être branchée sur une prise installée et
mise à la terre en conformité avec les réglementations locales en
vigueur.
AVERTISSEMENT
!
La tension nominale de l’alimentation est de 115 ou 230 volts : elle
comporte une prise qui accepte l’un des adaptateurs ci-dessous.
Ne modifiez jamais un cordon c.a. ni sa fiche. Si vous
ne parvenez pas à le brancher sur vos prises,
demandez à un électricien qualifié d’installer une
prise adaptée. Une mauvaise installation peut
entraîner un risque d’électrocution.
Prise pour le cordon
d’alimentation
Adaptateur standard pour l’Amérique du nord Adaptateur standard pour l’Italie
Alimentation
Adaptateur standard pour le Royaume-UniAdaptateur standard pour l’Europe
Publication 2727-IN007B-MU-P
Page 12
12 Kit d’alimentation MobileView Tablet
Voyant d’état/de fonctionnement de la pile
CHARGE
READY
A
SER
Charge
CONSEIL
1. Placez le chargeur sur une surface plane. Branchez l’adaptateur
secteur sur une prise secteur.
2. Branchez l’alimentation sur le chargeur.
3. Insérez la pile dans le support de pile.
Dans un délai de 15 secondes, le voyant de charge clignote si la
tension est inférieure à 6 volts.
3 secondes après, si la pile est dans les plages de tensions et de
températures, le voyant de charge s’allume pour indiquer que la pile
est en charge. Lorsque la pile est chargée, le voyant vert Ready (prêt)
s’allume.
Les contacts de la pile et du chargeur doivent
toujours être propres. Des contacts sales peuvent
entraîner un dysfonctionnement du chargeur. Pour
nettoyer les contacts, utilisez une gomme ou un
coton-tige imbibé d’alcool.
2727-TRS71
CAT
Défaut de la pile
La pile présente un défaut si le voyant jaune de charge clignote sans
arrêt : la pile est peut-être défectueuse, trop déchargée ou trop
chaude. Si elle est trop déchargée, laissez-la sur le chargeur pendant
15 minutes, puis retirez-la et remettez-la. Si elle est trop chaude,
laissez-la refroidir avant de la remettre sur le chargeur. Si le voyant
continue de clignoter, la pile est défectueuse : demandez à un
technicien qualifié de l’examiner ou mettez-la au rebut. Pour obtenir
des renseignements sur la collecte, le recyclage et la mise au rebut des
piles au lithium-ion, contactez les autorités locales chargées de la
gestion des déchets.
Piles neuves
Lorsque vous chargez des piles neuves ou qui sont restées longtemps
en stockage, le chargeur peut indiquer qu’elles sont chargées avant
qu’elles ne le soient vraiment. Si cela se produit, retirez la pile du
chargeur et remettez-la ensuite. La pile peut nécessiter 3 à 4 cycles de
charge avant d’être complètement chargée.
Publication 2727-IN007B-MU-P
Page 13

Nettoyage
Kit d’alimentation MobileView Tablet 13
AVERTISSEMENT
Pour éviter tout risque d’électrocution et
d’endommager le chargeur, débranchez toujours le
cordon d’alimentation de la prise secteur et du
chargeur avant de nettoyer ce dernier.
!
Chargeur
Débranchez le cordon d’alimentation et l’alimentation du chargeur. Le
boîtier peut être nettoyé avec un chiffon doux et humide. Vous
pouvez éventuellement utiliser de l’alcool pour les tâches rebelles. Ne
jamais verser de liquide directement sur l’appareil : appliquez de
petites quantités de liquide sur le chiffon.
Contacts
Vous pouvez nettoyer les contacts du chargeur et les supports de pile
en les frottant doucement avec une gomme. N’utilisez pas de produits
abrasifs ni de détergents.
Dépannage
Tableau 5 Dépannage
Symptôme/situation
(défaut)
Les voyants de charge ou de
charge terminée ne
s’allument pas lorsqu’une
pile est insérée.
Arrêt automatique de
l’alimentation.
Le voyant de marche de
l’alimentation ne s’allume
pas.
Cause probable Action
corrective/solution
Le cordon d’alimentation
n’est pas branché sur la
prise secteur ou sur
l’alimentation.
Vous avez branché
l’alimentation sur le secteur
avant de la connecter au
chargeur.
Le circuit de protection de
l’alimentation s’est
déclenché.
Alimentation défectueuse.
Vérifiez le cordon
d’alimentation.
Débranchez l’alimentation,
attendez 15 secondes puis
rebranchez-la.
Débranchez l’alimentation
et réessayez après
15 minutes.
Remplacez l’alimentation.
Publication 2727-IN007B-MU-P
Page 14

14 Kit d’alimentation MobileView Tablet
Tableau 5 Dépannage
Spécifications
Symptôme/situation
(défaut)
Le voyant de charge
continue de clignoter une
fois la pile insérée dans le
chargeur.
Le chargeur ne se met pas
en charge.
La pile ne se charge pas
complètement.
Tableau 6 Spécifications
Dimensions 3,8 x 8 x 13 cm
Poids 180 g
Tension d’alimentation 15 V, 2A
Température de charge 5 °C à 40 °C
Cause probable Action
Pile trop déchargée.
Pile défectueuse.
Pile trop chaude.
Contacts/connexions sales.
Pile défectueuse.
Chargeur défectueux.
Contacts/connexions sales.
Pile défectueuse.
La température de charge optimale est de
25 °C
corrective/solution
Laissez la pile en charge
pendant 15 minutes, puis
réinsérez-la.
Remplacez la pile.
Laissez la pile refroidir.
Nettoyez les contacts.
Remplacez la pile.
Remplacez l'adaptateur.
Nettoyez les contacts.
Remplacez la pile.
Homologations Alimentation secteur c.c. UL/CSA
CONSEIL
Pour usage à l’intérieur uniquement.
Publication 2727-IN007B-MU-P
Page 15

Installationsanleitung
Deutscher Abschnitt
Einführung
Sicherheitshinweise
Ladegerät für MobileView Tablet
(Bestell-Nr. 2727-TRSP1xx)
Mit dem Ladegerät für MobileView Tablet kann eine einzelne
Lithium-Ionen-Batterie in etwa vier Stunden geladen werden. Dabei
zeigt die LED den Ladezustand der Batterie an.
Lesen Sie vor Verwendung des Ladegeräts für MobileView Tablet alle
Anweisungen und Sicherheitshinweise auf dem Batterie-Ladegerät, der
Batterie und allen Produkten, bei denen die Batterie verwendet wird.
WARNUNG
!
Um Verletzungen zu vermeiden, darf dieses
Ladegerät nur mit den dafür vorgesehenen Adaptern
und Netzteilen verwendet werden. Die Verwendung
anderer Adapter oder Geräte kann zu Verletzungen
oder Sachschäden führen.
• Das Ladegerät darf weder dem direkten Sonnenlicht noch Regen
oder Schnee ausgesetzt werden.
• Das Ladegerät sollte bei einer Raumtemperatur von +20 °C bis
+25 °C eingesetzt werden.
• Stellen Sie das Ladegerät auf einer gut belüfteten Fläche auf, die
frei von Verschmutzungen ist.
• Ziehen Sie zur Vermeidung eines elektrischen Schlags den
Netzstecker des Ladegeräts aus der Netzsteckdose, bevor Sie den
Adapter reinigen oder wechseln.
• Die Batterien, das Ladegerät oder zugehörige Komponenten
dürfen nicht zerlegt, verbrannt, verändert oder kurzgeschlossen
werden.
15 Publikation 2727-IN007B-MU-P
Page 16

16 Ladegerät für MobileView Tablet
Beschreibung des Ladegeräts
6
3
1
2
Tabelle 7 Intelligentes Ladegerät für MobileView Tablet
Nummer Bezeichnung
1 Basisstation des Ladegeräts
2 Batterie-Statusanzeige
5
4
Installation
3 Batterieadapter
4Netzteil
5 Netzkabeladapter
6 Ersatzbatterie
Tischgerät
1. Stellen Sie das Ladegerät auf eine feste, ebene Fläche, die frei
von Schmutz ist.
2. Bringen Sie die Adapter an, und schließen Sie das Netzteil sowie
das Netzkabel entsprechend der Anweisungen im Abschnitt
„Netzkabel anschließen“ an.
Publikation 2727-IN007B-MU-P
Page 17

Ladegerät für MobileView Tablet 17
Netzkabel anschließen
Vergewissern Sie sich, dass das Netzteil mit dem Ladegerät verbunden
ist, bevor Sie das Wechselstrom-Netzkabel anschließen. Das Ladegerät
muss zur Vermeidung eines elektrischen Schlags geerdet sein. Das
Ladegerät verfügt über ein Netzkabel mit einem Erdungsleiter und
einem SCHUKO-Stecker. Dieser Stecker muss an einer Steckdose
eingesteckt werden, die fachgerecht und entsprechend den geltenden
Gesetzen und Bestimmungen installiert und geerdet wurde.
WARNUNG
!
Das Netzteil arbeitet mit einer Nennspannung von 115 oder 230 Volt
und verfügt über einen Netzkabelanschluss, der zu einem der
nachfolgend dargestellten Adapter passt.
Nehmen Sie keinerlei Veränderungen an einem
Wechselstromkabel oder dem zugehörigen Stecker
vor. Wenn der Stecker nicht in die vorhandene
Steckdose passt, lassen Sie durch einen qualifizierten
Elektriker eine geeignete Steckdose anbringen. Ein
unsachgemäßer Anschluss kann zu einem
elektrischen Schlag führen.
Anschluss für
Netzkabel
nordamerikanischer Standard-Adapter italienischer Standard-Adapter
Netzteil
britischer Standard-Adaptereuropäischer Standard-Adapter
Publikation 2727-IN007B-MU-P
Page 18

18 Ladegerät für MobileView Tablet
Batterie-Statusanzeige/ Betriebsweise
CHARGE
READY
A
SER
Laden
TIPP
1. Stellen Sie das Ladegerät auf eine ebene Fläche. Stecken Sie den
Wechselstromadapter an der Steckdose ein.
2. Stecken Sie den Netzteiladapter am Ladegerät ein.
3. Setzen Sie die Batterie in das Batterieladefach ein.
Wenn die Spannung unter 6 Volt fällt, blinkt innerhalb von
15 Sekunden die LED für den Batterieladevorgang.
Nach weiteren drei Sekunden leuchtet die LED für den Ladevorgang
permanent, sofern die Batterie den Spannungs- und
Temperaturparametern entspricht; dies bedeutet, dass der
Ladevorgang läuft. Der Ladevorgang ist abgeschlossen, wenn die
grüne Lampe aufleuchtet.
Die Kontakte der Batterie und des Ladegeräts sollten
immer sauber sein. Verunreinigungen an den
Kontakten können zu einem Funktionsfehler des
Batterie-Ladegeräts führen. Verwenden Sie zum
Reinigen der Kontakte einen Radiergummi oder
einen in Alkohol getränkten Wattetupfer.
2727-TRS71
CAT
Batteriefehler
Wenn die gelbe LED für den Ladevorgang weiterhin blinkt, ist ein
Batteriefehler aufgetreten. Dieser könnte durch eine defekte,
tiefentladene oder heiße Batterie verursacht worden sein. Wenn die
Batterie tiefentladen ist, belassen Sie sie zunächst für 15 Minuten im
Ladegerät; dann entnehmen Sie die Batterie und setzen Sie sie erneut
ein. Eine heiße Batterie sollten Sie zunächst abkühlen lassen und dann
erneut einsetzen. Wenn die LED weiterhin blinkt, ist die Batterie
defekt. Die Batterie sollte durch einen Fachmann geprüft oder
ordnungsgemäß entsorgt werden. Informationen hinsichtlich
Sammlung, Recycling und Entsorgung von Lithium-Ionen-Akkus
erhalten Sie bei Ihrem lokalen Entsorgungsunternehmen.
Neue Batterien
Beim Laden von Batterien, die neu sind oder über einen längeren
Zeitraum gelagert wurden, zeigt das Ladegerät unter Umständen
vorzeitig den Abschluss des Ladevorgangs an. Nehmen Sie in einem
solchen Fall die Batterie aus dem Ladefach und setzen Sie sie erneut
ein. Unter Umständen müssen Sie diesen Vorgang drei- oder viermal
wiederholen, bis die Batterie vollständig geladen ist.
Publikation 2727-IN007B-MU-P
Page 19

Reinigen
Ladegerät für MobileView Tablet 19
WARNUNG
Zur Vermeidung eines elektrischen Schlags oder
einer Beschädigung des Ladegeräts sollten Sie vor
dem Reinigen des Ladegeräts immer das Netzkabel
an der Wandsteckdose und am Ladegerät ausstecken.
!
Gerät
Stecken Sie das Netzkabel und das Netzteil am Ladegerät aus. Das
Gehäuse und die Frontplatte können mit einem weichen, feuchten
Tuch gereinigt werden. Für hartnäckige Flecken können Sie Alkohol
verwenden. Allerdings dürfen keinerlei Flüssigkeiten direkt auf das
Gerät gelangen; stattdessen sollte die Flüssigkeit sparsam auf ein
Reinigungstuch gegeben werden.
Kontakte
Die Kontakte des Ladegeräts und des Batteriefachs können durch
vorsichtiges Reiben mit einem Radiergummi gereinigt werden.
Verwenden Sie keine scheuernden oder aggressiven Reinigungsmittel.
Fehlersuche
Tabelle 8 Fehlersuche
Symptom/Situation
(Fehleranzeige)
Lade- oder
Bereitschaftsanzeige
leuchtet nach Einsetzen der
Batterie nicht auf.
Das Netzteil hat sich
automatisch abgeschaltet.
Die Anzeige für die
Stromversorgung des
Netzteils leuchtet nicht.
Mögliche Ursache Erforderliche
Maßnahme/Lösung
Das Netzteilkabel ist nicht
an die Wandsteckdose oder
das Netzteil angeschlossen.
Das Netzteil wurde mit der
Wechselstromquelle
verbunden, bevor die
Verbindung zwischen
Netzteil und Ladegerät
hergestellt wurde.
Die Schutzschaltung für das
Netzteil wurde ausgelöst.
Das Netzteil arbeitet nicht
ordnungsgemäß.
Netzteilkabel überprüfen.
Unterbrechen Sie die
Verbindung zur
Wechselstromquelle,
warten Sie 15 Sekunden,
und stellen Sie dann die
Verbindung zur Wechselstromquelle wieder her.
Stecken Sie das Netzteil
aus, warten Sie 15 Minuten,
und unternehmen Sie dann
einen erneuten Versuch.
Tauschen Sie das Netzteil
aus.
Publikation 2727-IN007B-MU-P
Page 20

20 Ladegerät für MobileView Tablet
Tabelle 8 Fehlersuche
Technische Daten
Symptom/Situation
(Fehleranzeige)
Die Anzeige für den
Ladevorgang blinkt auch
nach dem Einlegen der
Batterie.
Der Ladevorgang wird nicht
gestartet.
Die Batterie wird nicht
vollständig geladen.
Mögliche Ursache Erforderliche
Maßnahme/Lösung
Die Batterie ist tiefentladen.
Die Batterie ist defekt.
Die Batterie ist heiß.
Die Kontakte/Anschlüsse
sind verschmutzt.
Die Batterie ist defekt.
Das Ladegerät ist defekt.
Die Kontakte/Anschlüsse
sind verschmutzt.
Die Batterie ist defekt.
Lassen Sie die Batterie
15 Minuten im Ladegerät,
nehmen Sie sie heraus, und
setzen Sie sie wieder ein.
Wechseln Sie die Batterie
aus.
Lassen sie die Batterie
abkühlen.
Reinigen Sie die Kontakte.
Wechseln Sie die Batterie
aus.
Wechseln Sie den Adapter
aus.
Reinigen Sie die Kontakte.
Wechseln Sie die Batterie
aus.
Tabelle 9 Technische Daten
Abmessungen 3,8 x 8,1 x 13 cm
Gewicht 180 g
Eingangsspannung 15 V, 2A
Ladetemperatur 5 °C bis 40 °C
25 °C ist die optimale Ladetemperatur
Zulassung UL/CSA Gleichstrom-Netzsteckdose
TIPP
Nur zur Verwendung in geschlossenen Räumen.
Publikation 2727-IN007B-MU-P
Page 21

Istruzioni per l'installazione
Sezione in Italiano
Introduzione
Istruzioni sulla sicurezza
Kit di alimentazione MobileView Tablet
(Num. di cat. 2727-TRSP1xx)
Il kit di alimentazione MobileView Tablet può contenere una singola
batteria agli ioni di litio. Il tempo di ricarica è di circa quattro ore. Il
display LED indica lo stato della carica.
Prima di utilizzare il kit di alimentazione MobileView Tablet, leggere
tutte le istruzioni e le avvertenze impresse sul caricabatteria, sulla
batteria e su qualsiasi prodotto utilizzi la batteria.
AVVERTENZA
!
Per ridurre il rischio di lesioni, utilizzare il
caricabatteriasolo con adattatori e alimentatori
omologati. Altri adattatori o apparecchi possono
causare lesioni personali o danni alle
apparecchiature.
• Non esporre il caricabatteria alla pioggia, alla neve o alla luce
solare diretta.
• Il caricabatteria deve essere utilizzato a una temperatura
ambiente compresa tra +20°C e +25°C (tra +68°F e +77°F)
• Il caricabatteria deve essere posto in un’area ben ventilata e
libera da sostanze estranee.
• Disinserire il caricabatteria dalla presa prima di procedere a
operazioni di pulizia o sostituzione degli adattatori al fine di
ridurre il rischio di scosse elettriche.
• Non smontare, bruciare, modificare o cortocircuitare le batterie,
il caricabatteria o i relativi componenti.
21 Pubblicazione 2727-IN007B-MU-P
Page 22

22 Kit di alimentazione MobileView Tablet
Descrizione kit di alimentazione
6
3
1
2
Tabella 10 Caricabatteria intelligente MobileView Tablet
Caratteristica Descrizione
1 Base caricabatteria
2 Display di stato batteria
5
4
Installazione
3 Adattatore batteria
4 Alimentatore
5 Adattatore cavo di alimentazione
6 Batteria sostitutiva
Unità da tavolo
1. Porre il caricabatteria su una superficie piana solida libera da
detriti.
2. Fissare gli adattatori e collegare l’alimentatore e il cavo di
alimentazione come descritto nella sezione Collegamento cavo
di alimentazione.
Pubblicazione 2727-IN007B-MU-P
Page 23

Kit di alimentazione MobileView Tablet 23
Collegamento cavo di alimentazione
Prima di collegare il cavo di alimentazione CA, accertarsi di aver
collegato l’alimentatore al caricabatteria. Il caricabatteria deve essere
fornito di collegamento a terra per ridurre il rischio di scosse
elettriche. È presente un cavo di alimentazione con un filo e una spina
per la messa a terra dell’apparecchio. La spina deve essere inserita in
una presa correttamente installata e collegata a terra in conformità con
le leggi e le disposizioni locali.
AVVERTENZA
Non modificare in nessun caso il cavo CA o la spina.
Se la spina non si inserisce nella presa, far installare
una presa adatta da un elettricista qualificato. Un
collegamento errato può causare una scossa elettrica.
!
L’alimentatore utilizza un circuito a 115 volt o 230 volt nominali con
una presa nella quale può essere inserito uno degli adattatori sotto
illustrati.
Presa per cavo di
alimentazione
Adattatore standard nordamericano Adattatore standard italiano
Alimentatore
Adattatore standard britannicoAdattatore standard europeo
Pubblicazione 2727-IN007B-MU-P
Page 24

24 Kit di alimentazione MobileView Tablet
Display di stato batteria/funzionamento
CHARGE
READY
A
SER
Caricamento
SUGGERIMENTO
1. Porre il caricabatteria su una superficie piana. Inserire
l’adattatore CA nella presa.
2. Inserire l’adattatore dell’alimentatore nel caricatore.
3. Inserire la batteria nel portabatteria.
Entro 15 secondi, il LED di caricamento batteria lampeggerà quando la
tensione scenderà sotto i 6 volt.
Dopo altri 3 secondi, se i valori della batteria sono compresi nei
parametri di tensione e temperatura, il LED di caricamento si
illuminerà indicando che la batteria è in carica. Quando si illumina la
luce verde, il ciclo di carica è completo.
I contatti della batteria e del caricatore devono
sempre essere puliti. Eventuale sporcizia sui contatti
può provocare un malfunzionamento del
caricabatteria. Per pulire i contatti utilizzare una
gomma per matita o un batuffolo di cotone imbevuto
di alcol.
2727-TRS71
CAT
Errore batteria
Se il LED di caricamento giallo continua a lampeggiare, si è verificata
una condizione di errore della batteria. La causa può essere una
batteria difettosa, eccessivamente scarica o surriscaldata. Se la batteria
è eccessivamente scarica, lasciarla nel caricatore per 15 minuti, quindi
toglierla e reinserirla. Se risulta surriscaldata, lasciarla raffreddare e
reinserirla. Se il LED continua a lampeggiare, la batteria è difettosa.
Farla controllare da un tecnico specializzato o smaltirla in modo
corretto. Per maggiori informazioni sulla raccolta, il riciclo e lo
smaltimento delle batterie agli ioni di litio contattare le autorita' locali
preposte al trattamento dei rifiuti.
Batterie nuove
Quando si caricano pacchi batteria nuovi o rimasti inutilizzati a lungo,
il caricatore può passare allo stato “ready” prima che il caricamento sia
effettivamente completato. Ove si verifichi ciò, togliere la batteria dal
supporto di carica e reinserirla. Una carica completa del pacco batteria
può richiedere da 3 a 4 cicli di rimozione/inserimento.
Pubblicazione 2727-IN007B-MU-P
Page 25

Pulizia
Kit di alimentazione MobileView Tablet 25
AVVERTENZA
Per ridurre il rischio di scosse e di possibili danni al
caricatore, disinserire sempre il cavo di
alimentazione dalla presa a muro e dal caricatore
prima di procedere alla pulizia del caricatore.
!
Unità
Disinserire il cavo di alimentazione e l’alimentatore dal caricatore. La
custodia e il frontalino possono essere puliti con un panno morbido
umido. Per macchie ostinate si può usare alcol. Non versare liquidi
direttamente sull’unità; versarne unicamente piccole quantità sul
panno.
Contatti
I contatti del caricabatteria e del portabatteria possono essere puliti
sfregando leggermente con una gomma per matita. Non usare
detergenti abrasivi o corrosivi.
Ricerca guasti
Tabella 11 Ricerca guasti
Sintomo/situazione
(indicazione errore)
Le spie di carica o di
funzionamento non si
illuminano all’inserimento
della batteria.
L’alimentatore si
disinserisce
automaticamente.
La spia di accensione
dell’alimentatore non si
illumina.
Causa probabile Azione correttiva/
soluzione
Il cavo di alimentazione non
è collegato alla presa a
muro o all’alimentatore.
L’alimentazione CA è stata
inserita prima di collegare
l’alimentatore al
caricabatteria.
È scattata la circuiteria di
protezione
dell’alimentatore.
L’alimentatore è
danneggiato.
Controllare il cavo di
alimentazione.
Disinserire l’alimentazione
CA, attendere 15 secondi,
quindi reinserirla.
Disinserire l’alimentatore e
tentare nuovamente dopo
15 minuti.
Sostituire l’alimentatore.
Pubblicazione 2727-IN007B-MU-P
Page 26

26 Kit di alimentazione MobileView Tablet
Tabella 11 Ricerca guasti
Caratteristiche tecniche
Sintomo/situazione
(indicazione errore)
La spia di carica continua a
lampeggiare dopo
l’inserimento della batteria.
Il caricabatteria non carica. Sporcizia sui contatti o sui
La batteria non si carica
completamente.
Tabella 12 Caratteristiche tecniche
Dimensioni 3,8 cm x 8,1 cm x 13 cm
Causa probabile Azione correttiva/
soluzione
Batteria eccessivamente
scarica.
Batteria difettosa.
Batteria surriscaldata.
collegamenti.
Batteria difettosa.
Caricatore difettoso.
Sporcizia sui contatti o sui
collegamenti. Batteria
difettosa.
(1,5 poll. x 3,2 poll. x 5,1 poll.)
Lasciare la batteria nel
caricatore per 15 minuti,
quindi reinserirla.
Sostituire la batteria.
Lasciar raffreddare la
batteria.
Pulire i contatti.
Sostituire la batteria.
Sostituire l’adattatore.
Pulire i contatti.
Sostituire la batteria.
Peso 180 g (0,4 lb)
Tensione di ingresso 15 V, 2A
Temperatura di carica da 5°C a 40°C (da 41°F a 104°F)
La temperatura di carica ottimale è
25°C (77°F)
Certificazione Alimentazione di rete CC UL/CSA
SUGGERIMENTO
Solo per uso interno.
Pubblicazione 2727-IN007B-MU-P
Page 27

Instrucciones de instalación
Sección de español
Introducción
Instrucciones de seguridad
Kit de alimentación MobileView Tablet
(No. de cat. 2727-TRSP1xx)
El kit de alimentación MobileView Tablet admite una batería de
litio-ión y la carga en aproximadamente cuatro horas. El indicador
LED indica el estado de la carga.
Antes de usar el kit de alimentación MobileView Tablet, lea todas las
instrucciones y advertencias indicadas en el cargador de batería, la
batería y cualquier producto que use la batería.
ADVERTENCIA
!
Para reducir el riesgo de lesiones personales, use
este cargador sólo con los adaptadores y fuentes de
alimentación aprobadas. Otros adaptadores y
equipos pueden causar lesiones personales o daño al
equipo.
• No exponga el cargador a la lluvia, a la nieve ni a la luz del sol
directa.
• El cargador debe usarse a una temperatura ambiente de +20 °C
a +25 °C (+68 °F a +77 °F)
• El cargador debe colocarse en un área bien ventilada, libre de
materias extrañas.
• Para reducir el riesgo de choque eléctrico, desenchufe el
cargador del tomacorriente antes de limpiarlo o cambiar
adaptadores.
• No desarme, incinere, modifique ni ponga en cortocircuito las
baterías, el cargador ni los componentes asociados.
27 Publicación 2727-IN007B-MU-P
Page 28

28 Kit de alimentación MobileView Tablet
Descripción del kit de alimentación
6
3
1
2
Tabla 13 Cargador inteligente MobileView Tablet
Característica Descripción
1 Base del cargador
2 Indicador de estado de la batería
4
5
Instalación
3 Adaptador de la batería
4 Fuente de alimentación
5 Adaptador del cable de alimentación
6 Batería adicional
Unidad de escritorio
1. Coloque el cargador sobre una superficie sólida y nivelada, libre
de desechos.
2. Conecte los adaptadores, la fuente de alimentación y el cable de
alimentación según lo indicado en la sección Conexión del cable
de alimentación.
Publicación 2727-IN007B-MU-P
Page 29

Kit de alimentación MobileView Tablet 29
Conexión del cable de alimentación
Antes de conectar el cable de alimentación de CA, asegúrese de
conectar la fuente de alimentación al cargador. El cargador debe estar
conectado a tierra para reducir el riesgo de choque eléctrico. Éste
tiene una cable de alimentación con un conductor a tierra del equipo
y un enchufe de conexión a tierra. Este enchufe debe insertarse en un
tomacorriente correctamente instalado y conectado a tierra de
conformidad con todos los códigos y reglamentos locales.
ADVERTENCIA
!
La fuente de alimentación utiliza un circuito de 115 voltios o
230 voltios nominales con un enchufe de cable de alimentación
que encaja en uno de los adaptadores mostrados a continuación.
Nunca modifique un cable de CA ni su enchufe.
Si no entra en su tomacorriente, solicite que un
electricista calificado instale un tomacorriente
apropiado. Una conexión incorrecta puede causar un
choque eléctrico.
Enchufe de cable de
alimentación
Adaptador de estándar norteamericano Adaptador de estándar italiano
Fuente de alimentación
Adaptador de estándar del Reino UnidoAdaptador de estándar europeo
Publicación 2727-IN007B-MU-P
Page 30

30 Kit de alimentación MobileView Tablet
Indicador de estado/operación de la batería
CHARGE
READY
A
SER
Cómo realizar la carga
SUGERENCIA
1. Coloque el cargador inteligente sobre una superficie plana.
Enchufe el adaptador de CA en un tomacorriente.
2. Enchufe del adaptador de la fuente de alimentación en el
cargador.
3. Inserte la batería en el portabatería.
En un lapso de 15 segundos, el indicador LED de carga de la batería
parpadeará cuando el voltaje caiga por debajo de 6 voltios.
Después de 3 segundos adicionales, si la batería está dentro de los
parámetros de voltaje y temperatura, se encenderá el indicador LED,
lo cual significa que se está realizando la carga. El ciclo de carga
concluye cuando se enciende la luz verde de listo.
Los contactos de la batería/cargador siempre deben
estar limpios. Los contactos sucios pueden causar un
mal funcionamiento del cargador de la batería. Para
limpiar los contactos, use un borrador de lápiz o un
bastoncillo de algodón humedecido en alcohol.
2727-TRS71
CAT
Fallo de la batería
Si el indicador LED amarillo de carga continúa parpadeando, significa
que ocurrió un fallo de la batería. La causa podría ser una batería
defectuosa, excesivamente descargada o caliente. Si la batería está
excesivamente descargada, deje la batería en el cargador durante
15 minutos, luego retire la batería y vuelva a insertarla. Una batería
caliente debe dejarse enfriar y luego volver a insertarse. Si el indicador
LED continúa parpadeando, significa que la batería está defectuosa.
Solicite a un técnico de batería que analice la batería, o deséchela
como es debido. Comuníquese con los funcionarios locales
encargados del tratamiento de desechos para obtener informacion
sobre recogida, recliclaje y desecho de baterías de litio-ion.
Baterías nuevas
Cuando se cargan baterías nuevas o que han estado en
almacenamiento durante un largo período de tiempo, es posible que
el cargador cambie a “listo” prematuramente. En este caso, retire la
batería del compartimiento de carga y reinsértela. Es posible que se
requiera 3 a 4 ciclos para realizar adecuadamente este proceso.
Publicación 2727-IN007B-MU-P
Page 31

Limpieza
Kit de alimentación MobileView Tablet 31
ADVERTENCIA
Para reducir el peligro de choque y posible daño al
cargador, siempre desconecte el cable de
alimentación eléctrica del tomacorriente de la pared
y el cargador antes de limpiar el cargador.
!
Unidad
Desconecte el cable de alimentación y la fuente de alimentación del
cargador. La caja y la placa frontal se pueden limpiar con un paño
suave humedecido con agua. Se puede usar alcohol para limpiar
manchas persistentes. No aplique líquidos directamente a la unidad; el
líquido debe aplicarse al paño con moderación.
Contactos
Los contactos del cargador y del portabaterías se pueden limpiar
frotándolos suavemente con un borrador de lápiz. No use detergentes
ni limpiadores abrasivos ni corrosivos.
Resolución de problemas
Tabla 14 Resolución de problemas
Síntoma/situación
(indicación de fallo)
Los indicadores de carga o
“listo” no se encienden
cuando se inserta la batería.
Desactivación automática
de la fuente de
alimentación.
El indicador de alimentación
de la fuente de alimentación
no se enciende.
Causa probable Acción correctiva/
El cable de alimentación no
está conectado a la pared ni
a una fuente de
alimentación.
Conexión de la fuente de
alimentación de CA antes de
conexión de la fuente de
alimentación al cargador.
Disparo del circuito de
protección de la fuente de
alimentación.
Fuente de alimentación
defectuosa.
solución
Revise el cable de
alimentación.
Desconecte la fuente de
alimentación de CA, espere
15 segundos, vuelva a
conectar la fuente de
alimentación de CA.
Desenchufe la fuente de
alimentación y vuelva a
intentarlo en 15 minutos.
Reemplace la fuente de
alimentación.
Publicación 2727-IN007B-MU-P
Page 32

32 Kit de alimentación MobileView Tablet
Tabla 14 Resolución de problemas
Especificaciones
Síntoma/situación
(indicación de fallo)
El indicador de carga
continúa parpadeando
después de insertar la
batería.
El cargador no entra al modo
de carga.
La batería no se carga
completamente.
Tabla 15 Especificaciones
Dimensiones 3,8 cm x 8,1 cm x 13 cm (1.5” x 3.2” x 5.1”)
Peso 180 g
Voltaje de entrada 15 V, 2A
Temperatura de carga 5 °C a 40 °C (41 °F a 104 °F)
Causa probable Acción correctiva/
solución
Batería excesivamente
descargada.
Batería defectuosa.
Batería caliente.
Conexión o contactos
sucios.
Batería defectuosa.
Cargador defectuoso.
Conexión o contactos
sucios. Batería defectuosa.
25 °C (77 °F) es la temperatura de carga
óptima
Deje la batería en el cargador durante 15 minutos,
luego reinsértela.
Reemplace la batería.
Deje enfriar la batería.
Limpie los contactos.
Reemplace la batería.
Reemplace el adaptador.
Limpie los contactos.
Reemplace la batería.
Certificación Suministro de pared de CC, según UL/CSA
SUGERENCIA
Para uso en interiores solamente.
Publicación 2727-IN007B-MU-P
Page 33

Instruções de Instalação
Seção em Português
Introdução
Considerações Gerais sobre Segurança
Recarregador de Bateria MobileView Tablet
(Cód. Cat. 2727-TRSP1xx)
O Recarregador de Bateria MobileView Tablet acomoda uma única
bateria de Íons de Lítio e a carrega em, aproximadamente, quatro
horas. O display de LED indica o status da carga.
Antes de usar seu Recarregador de Bateria MobileView Tablet, leia
todas as instruções e as indicações de advertência no recarregador
da bateria, na própria bateria e em todos os produtos que utilizam a
bateria.
AVISO
!
Para reduzir os riscos de ferimentos, use este
recarregador somente com os adaptadores e as
fontes de alimentação autorizados. Outros
adaptadores ou equipamentos podem causar
ferimentos ou danos ao equipamento.
• Não deixe o recarregador exposto à chuva, neve e mantenha-o
ao abrigo da luz do sol.
• O recarregador deve ser usado a uma temperatura ambiente de
+20 °C a +25 °C (+68 °F a +77 °F)
• O recarregador deve ser colocado em uma área bem ventilada e
livre de influências externas.
• Desconecte o recarregador da tomada antes de tentar limpá-lo
ou trocar os adaptadores a fim de reduzir o risco de choque
elétrico.
• Não desmonte, incinere, modifique ou coloque em
curto-circuito as baterias, o recarregador ou os componentes
relacionados.
33 Publicação 2727-IN007B-MU-P
Page 34

34 Recarregador de Bateria MobileView Tablet
Descrição do Recarregador
Tabela 16 Recarregador Inteligente da Bateria MobileView Tablet
6
3
1
2
Componente Descrição
1 Base do Recarregador
2 Display de Status da Bateria
4
5
Instalação
3 Adaptador da Bateria
4 Fonte de Alimentação
5 Adaptador do Cabo de Alimentação
6 Bateria Sobressalente
Unidade da Área de Trabalho
1. Coloque o adaptador em uma superfície plana e firme que esteja
livre de detritos.
2. Encaixe os adaptadores e conecte a fonte e o cabo de
alimentação de acordo com a seção Conexão do Cabo de
Alimentação.
Publicação 2727-IN007B-MU-P
Page 35

Recarregador de Bateria MobileView Tablet 35
Conexão do Cabo de Alimentação
Antes de conectar o cabo de alimentação CA, certifique-se de que a
fonte de alimentação está conectada ao recarregador. O recarregador
deve estar aterrado para reduzir o risco de choque elétrico. Ele tem
um cabo de alimentação com um condutor de aterramento do
equipamento e um plug de aterramento. Este plug deve ser inserido
em uma tomada adequadamente instalada e aterrada de acordo com
todas as normas e códigos locais.
AVISO
Nunca troque um cabo CA ou seu plug. Se ele não
encaixar na tomada, consiga uma tomada adequada
instalada por um eletricista qualificado. Uma
conexão imprópria pode causar um choque elétrico.
!
A fonte de alimentação utiliza um circuito nominal de 115 ou 230 volts
com um soquete do cabo de alimentação que se encaixa a um dos
adaptadores mostrados abaixo.
Soquete do Cabo de
Alimentação
Adaptador Padrão da América do Norte Adaptador Padrão da Itália
Fonte de Alimentação
Adaptador Padrão do Reino UnidoAdaptador Padrão da Europa
Publicação 2727-IN007B-MU-P
Page 36

36 Recarregador de Bateria MobileView Tablet
Display de Status/Operação da Bateria
CHARGE
READY
A
SER
Carregamento
DICA
1. Coloque o Recarregador Inteligente em uma superfície plana.
Conecte o adaptador CA à tomada.
2. Conecte o adaptador da fonte de alimentação ao recarregador.
3. Insira a bateria em seu suporte.
Dentro de 15 segundos, o LED de carregamento da bateria pisca
quando a tensão cair para menos de 6 volts.
Após mais 3 segundos, se a bateria estiver dentro dos parâmetros de
tensão e de temperatura, o LED de carga acenderá sinalizando que o
carregamento está em andamento. O ciclo de carregamento é
concluído quando a luz verde de concluído estiver acesa.
Os contatos da bateria/recarregador devem estar
sempre limpos. Contatos sujos podem resultar no
mal funcionamento do recarregador da bateria. Para
limpar os contatos, use uma borracha para lápis ou
uma escova umedecida com álcool.
2727-TRS71
CAT
Falha da Bateria
Uma condição de falha na bateria ocorreu se o LED de Carregamento
amarelo continuar a piscar. Esta condição pode ser causada por um
defeito, sobredescarga ou aquecimento da bateria. Caso a bateria seja
sobredescarregada, coloque-a no recarregador por 15 minutos, em
seguida, remova e reinsira a bateria. Uma bateria quente deve esfriar e
ser reinserida. Se o LED continuar a piscar, a bateria está com defeito.
Neste caso, a bateria deve ser analisada por um técnico especializado
ou descartada adequadamente. Entre em contato com os responsáveis
locais por resíduos industriais para obter mais informações sobre
coleta, reciclagem e descarte de baterias de lítio-íon.
Baterias Novas
Ao carregar baterias novas ou que estão em uma prateleira por um
longo período de tempo, o recarregador pode chavear para pronto
prematuramente. Caso isto ocorra, remova a bateria do
compartimento de carregamento e reinsira-a. O carregamento pode
levar de 3 a 4 ciclos para ser concluído de forma adequada.
Publicação 2727-IN007B-MU-P
Page 37

Limpeza
Recarregador de Bateria MobileView Tablet 37
AVISO
Para reduzir o risco de choque e possíveis danos ao
recarregador, sempre desconecte o cabo de
alimentação da tomada da parede antes de limpar o
recarregador.
!
Unidade
Desconecte o cabo e a fonte de alimentação do recarregador. A caixa
e as placas frontais podem ser limpas com um pano macio umedecido
com água. Álcool pode ser usado para manchas persistentes. Não
aplique líquidos diretamente à unidade; aplique moderamente com
um pano.
Contatos
Os contatos e os suportes da bateria podem ser limpos utilizando,
cuidadosamente, uma borracha para lápis. Não use detergentes
abrasivos ou adstringentes.
Localização de Falhas
Tabela 17 Localização de Falhas
Sintoma/Situação
(Indicação de Falha)
Os indicadores de carga ou
pronto não acendem quando
a bateria for inserida.
Desligamento automático
da fonte de alimentação.
O indicador da fonte de
alimentação não está aceso.
Causa Provável Ação/Solução Corretiva
O cabo da fonte de
alimentação não está
conectada à tomada da
parede ou à fonte de
alimentação.
A fonte de alimentação CA
foi conectada antes de
conectar a fonte de
alimentação ao
recarregador.
O circuito de proteção da
fonte de alimentação é
desarmado.
Fonte de alimentação ruim.
Cheque o cabo da fonte de
alimentação.
Desconecte a fonte de
alimentação CA, espere
15 segundos e reconecte a
fonte de alimentação CA.
Desconecte a fonte de
alimentação, espere
15 minutos e, então,
reconecte-a.
Substitua a fonte de
alimentação.
Publicação 2727-IN007B-MU-P
Page 38

38 Recarregador de Bateria MobileView Tablet
Tabela 17 Localização de Falhas
Especificações
Sintoma/Situação
(Indicação de Falha)
O indicador de carga
continua a piscar após a
inserção da bateria.
O recarregador não se
encaixa à carga.
A bateria não está
carregando totalmente.
Tabela 18 Especificações
Dimensões 3,8 cm x 8,1 cm x 13 cm (1,5” x 3,2” x 5,1”)
Peso 180 g (0,4 lbs)
Tensão de Entrada 15 V, 2A
Temperatura de Carregamento 5 °C a 40 °C (41 °F a 104 °F)
Causa Provável Ação/Solução Corretiva
Bateria sobredescarregada.
Bateria com defeito.
Bateria quente.
Contato/conexão sujo(a).
Bateria com defeito.
Recarregador com defeito.
Contato/conexão sujo(a).
Bateria com defeito.
25 °C (77 °F) é a Temperatura Ótima de
Carregamento
Deixe a bateria no recarregador por 15 minutos e,
depois, reinsira-a.
Substitua a bateria.
Deixe a bateria esfriar.
Limpe os contatos.
Substitua a bateria.
Substitua o adaptador.
Limpe os contatos.
Substitua a bateria.
Certificação UL/CSA tomada CC
DICA
Para uso em locais abrigados somente.
Publicação 2727-IN007B-MU-P
Page 39

Page 40

Publication 2727-IN0007B-MU-P - April 2003 41 PN 41061-274-01(2)
Supersedes Publication 2727-IN007A-EN-P - April 2002 Copyright © 2003 Rockwell Automation. All rights reserved. Printed in the U.S.A.
 Loading...