

Page 1

Installation Instructions
Bulletin 1405 (M620) Operating Instructions
Overview
The MiniPowermonitor (1405-M620) measures all the important
parameters of 3-phase power lines in low-voltage AC power
applications. The measurements are indicated on a 3-line display, one
parameter at time, either by auto-sequencing or by manual access.
There are 6 parameter groups:
• Line-to-line voltages
• Line-to-neutral voltages
• Instantaneous, time-averaged and peak currents
• Real power per phase, apparent power per phase, total real and
apparent power, and 3-phase power factor
• Power factor (Cos φ) per phase
• Net real energy: per phase and total for all 3 phases
Phase voltages are monitored continuously for under- and
over-voltage conditions, and when such a condition is detected, an
alarm relay is activated. Energy units are also transmitted as relay
pulses. Relay contacts are connected via rear panel terminal points.
Measured values for each of the 3 phases are indicated simultaneously
on bright red 7-segment LED displays, 14 mm high, arranged in 3
horizontal lines of 5 digits each. The displayed values can be easily
read even in high ambient light conditions, at substantial viewing
distances, and at acute viewing angles.
The left-most 7-segment digit on each of the three lines functions as a
limited alphanumeric indicator. These digits, along with the LED status
lamps on the right of the instrument front panel, indicate either which
measurement parameter is being displayed at any instant, or the
set-up status.
The instrument is operated through three key-switches (‘-’, ‘F’, and ‘+’)
arranged in a row at the bottom right of the front panel. These keys
are used for instrument set-up, and for manual selection of displayed
measurements. Different functions are selectable using the function
(‘F’) key-switch, by keeping it pressed for varying lengths of time. The
left-most character of the lowest display line indicates the selected
function.
1 Publication 1405-IN002C-EN-P - November 2004
Page 2
2 Bulletin 1405 (M620) Operating Instructions
External connections to the instrument are terminated on plug-in
connector blocks with spring-clamp wire terminals, at the rear of the
instrument. Phase voltage connections are terminated on a 7-pin
connector block. Another 12-pin connector block is used for the
current transformer inputs, and alarm and energy pulse relay outputs.
The instrument’s operating power supply is drawn from a separate
120V or 240V ac power supply input, through an additional 3-pin
connector block. An optional 400V or 480V version of the unit is
available with operating power drawn from two of the phase voltage
input lines (L1 - L2). Therefore the M620 can be used with either
3-wire (3 phase) or 4-wire (3 phase and neutral) power systems.
The M620 is a compact instrument, with a 96 x 96 mm front panel,
and a depth of approximately 85 mm.
Installation
Only qualified personnel should install and wire this equipment. Refer
to the following safety guidelines prior to installation.
ATTENTION
Only qualified personnel, following accepted safety
procedures, should install and wire the
MiniPowermonitor. Before beginning any work,
disconnect all sources of power and verify that they
are de-energized and locked out. Failure to follow
these instructions may result in personal injury or
death, property damage or economic loss.
ATTENTION
Never open a current transformer (CT) secondary
circuit with primary current applied. Wiring between
the CTs and the MiniPowermonitor should include a
shorting terminal block in the CT secondary circuit.
Shorting the secondary with primary current present
allows other connections to be removed if needed.
An open CT secondary with primary current applied
produces a hazardous voltage, which can lead to
personal injury, death, property damage or economic
loss.
Publication 1405-IN002C-EN-P - November 2004
Page 3

Bulletin 1405 (M620) Operating Instructions 3
1. Install your module within a suitable enclosure. Make sure the
enclosure provides adequate clearance for ventilation and wiring
of the module.
Refer to Dimensions on page 20 for dimensions and spacing
guidelines for the MiniPowermonitor.
2. Determine your wiring mode and install wiring between the
MiniPowermonitor and your power system.
Refer to Electrical Connections on page 3 for more information.
3. Configure the instrument settings to match those used in your
power system connections.
Refer to Instrument Set-Up on page 14 for more information.
Grounding
Electrical Connections
MiniPowermonitors do not need to be grounded because of the
isolated enclosures. Follow all local requirements for grounding of PT
and CT secondaries.
Electrical connections are terminated on two plug-in connector blocks
with spring-clamp wire terminals, at the rear of the instrument. These
connector blocks, 7- and 12-pin respectively, can accept wire sizes
from 28 to 14 AWG (0.08 to 2.5 sq.mm).
Publication 1405-IN002C-EN-P - November 2004
Page 4

4 Bulletin 1405 (M620) Operating Instructions
-
Current Inputs
M620
-
-
L1
GND
Aux. Supply
(120V or 240V only)
L2
NCNCL3
NNGND
TIP
L1
Voltage Inputs
Pins 2 and 4 (counting from the left side) of the 7-pin
connector are not used: no external wires should be
connected to these terminals!
CT Connection: Careful consideration should be given when
connecting the secondary of the CT to the current inputs of the
MiniPowermonitor. Extended lengths of connection wire will cause
the VA rating of the CT to increase and will create higher common
mode input voltage. It is recommended that the wire size be selected
to limit the impedance to 200 milliohms. Exceeding this limit may
cause current readings to become less accurate when using a star
connection.
Publication 1405-IN002C-EN-P - November 2004
Aux Supply: With this option, instrument power is supplied by a
separate 120V or 240V line, independent of the measured power lines.
A third connector block (3-pin, spring-clamp terminals type) is added
at the rear with this option.
Page 5

Bulletin 1405 (M620) Operating Instructions 5
IMPORTANT
Units are rated 120V or 240V but not both. A 120V
unit will not accept 240V, and a 240V unit will not
accept 120V.
A unit with the 120V supply option is not designed to operate on
240V or any other voltage. Likewise, a unit with the 240V supply
option is not designed to operate on 120V or any other voltage. Units
designed for 400V and 480V operation do not have an auxiliary
supply connection and receive power from the measurement line.
Ensure that each unit is properly supplied with a power source that
matches the voltage designation of your unit.
Relay Output Connections
Alarm and energy pulse relay contact connections are made to the
spring-clamp wire terminals on the 12-pin connector block, as
follows:
Table 1 Alarm and Energy Pulse Relay Contact Connections
Measurement Operations
Alarm: Terminals 7 - 8
Energy pulses: Terminals 9 - 10
Immediately after the instrument is switched on, the software version
is first displayed for 8 seconds, after which the measured values are
displayed. The measured parameter that is displayed when the
instrument is switched on will be the main displayed parameter group
that was on display when the instrument was switched off. This will
happen regardless of whether the instrument was in the “constant
parameter” or auto-sequencing display mode at that time the
instrument was switched off.
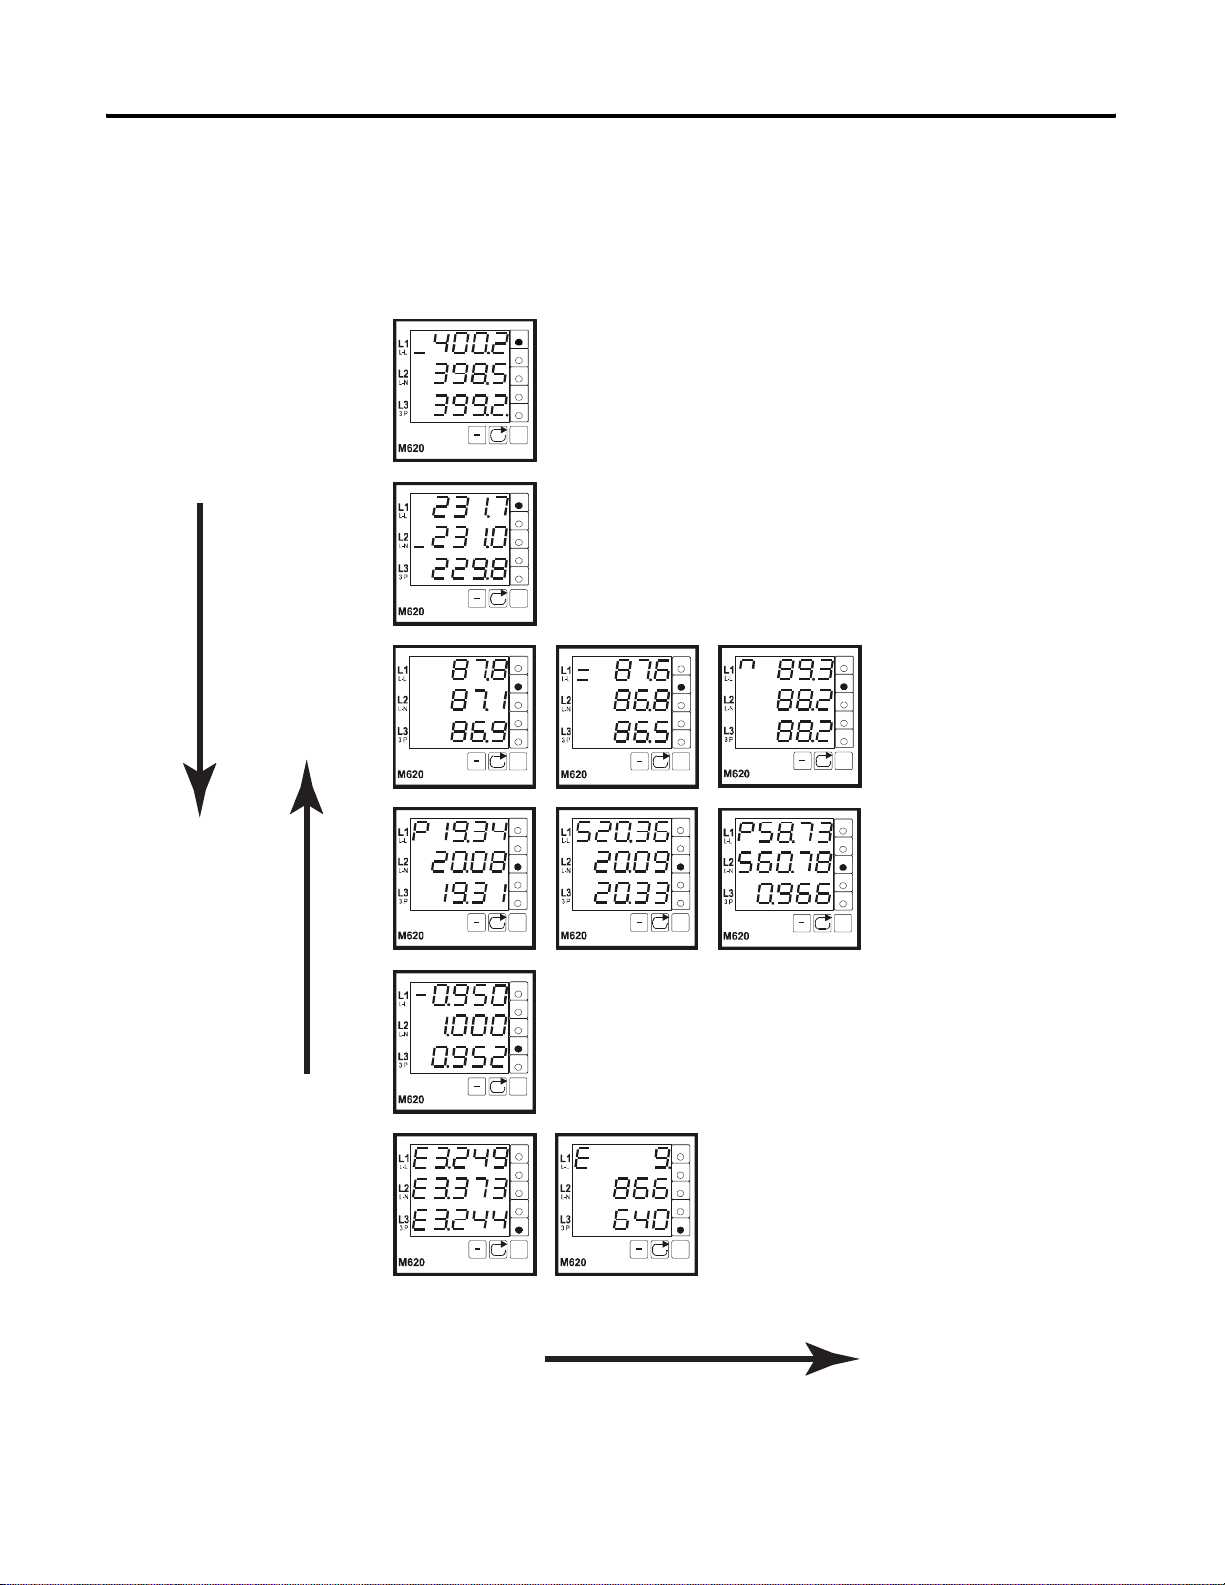
In the “constant parameter” display mode, any one of the 6 parameter
groups can be manually selected, by forward or backward sequential
stepping, using the “+” or “-“keys. Only that parameter will be
displayed, until another parameter is manually selected, or the
instrument is switched to auto-sequencing display mode. Some of the
parameter groups (current, power, and energy) have a main displayed
parameter and also additional parameters within the same group. The
additional parameters can be accessed when the instrument is
displaying the main parameter of that group. For example, when the
instrument is displaying current measurements, the main parameter
Publication 1405-IN002C-EN-P - November 2004
Page 6

6 Bulletin 1405 (M620) Operating Instructions
displayed is instantaneous phase currents, while the additional
parameters are time-averaged phase currents and peak phase currents.
For power measurements, the main parameters displayed are real
power for each phase. The additional parameters in this group are
apparent power of each phase, total real and apparent power, and
3-phase power factor. When the instrument is displaying the main
parameter of a group, the additional parameters within that group can
be scrolled using the “F” key.
Measurement Modes
The functions of the instrument are accessed as follows:
Table 2
Key Function
Indication
“+” Skip to the next measured parameter Short
Auto-sequencing display mode: enable /
disable
Re-set average and peak values - “c” Very long
“F” Sequentially display one parameter type: e.g.,
current
Enter set-up mode Very long
“-“ Go back to the previous displayed parameter
- “r” Long
Key Press
Duration
Short
The instrument measures voltage and current for each of three phases
in an alternating sequence of 2 seconds each. This corresponds to the
integrating time of the A/D converter circuits. At the same time, the
values of power, power factor (Cos f), and energy consumption are
computed. The energy value is computed for each phase over the
integration period, and the accumulated values are stored in memory.
The measured voltage values are continuously evaluated for over- and
under-voltage occurrences, and the energy transfer rate is converted
to an output pulse rate. Voltage limit alarms and energy unit pulses
are transmitted by relay contacts.
Publication 1405-IN002C-EN-P - November 2004
In the auto-sequencing displayed mode, the displayed parameter
change every 6 seconds. The user can halt the auto-sequencing of
displayed parameters, so that one desired parameter is displayed
continuously. Independent of the sequencing mode, the measured
values are updated and displayed in 2-second intervals.
Page 7
Bulletin 1405 (M620) Operating Instructions 7
The measured values of the electrical parameters are available with six
analog retransmission outputs (4-20 mA) (optional). Details of these
analog outputs are found on
V
Line-to-line voltage
A
L1-L2
P
L2-L3
cos
ϕ
L1-L3
E
F
+
page 22.
"+" Key
Scrolls Down
"-" Key
Scrolls Up
Line-to-neutral voltage
V
A
L1-N
P
L2-N
cos
ϕ
L1-N
E
F
+
V
A
P
cos
ϕ
E
F
+
V
A
P
cos
ϕ
E
F
+
V
A
P
cos
ϕ
E
F
+
V
A
P
cos
ϕ
E
F
+
V
Left:
A
Instantaneous current
P
Middle:
cos
ϕ
Time-averaged current
E
+
V
A
P
cos
ϕ
E
+
Right:
Peak current
Left:
Real power
Middle:
Apparent power
Right:
Total real power
F
F
Total apparent power
V
A
Power factor (Cos φ)
P
L1
cos
ϕ
L2
E
F
L3
+
3-phase power factor
V
A
P
cos
ϕ
E
F
+
V
A
P
cos
ϕ
E
F
+
"F" Key Scrolls Right
Left
Net real energy
L1
L2
L3
Right:
Total net real energy
Publication 1405-IN002C-EN-P - November 2004
Page 8

8 Bulletin 1405 (M620) Operating Instructions
Auto-Sequencing Display Mode
In this display mode, the instrument automatically switches the
displayed values from one parameter group to the next, at intervals of
6 seconds, cycling continuously through all 6 parameter groups.
Any of the additional parameters can be selected instead of the main
parameter. Thereafter only the selected additional parameter will be
displayed when the turn of that parameter group comes up during
display sequencing. For example, if time-averaged phase currents are
selected in the current (I) parameter group, only these values will be
displayed when it is the turn of this group during auto-sequencing.
Irrespective of the specific parameter selected for display within each
group, the total period of the display cycle for the 6 parameter groups
remains constant.
Line-to-neutral voltages and line-to-line voltages are treated as
separate parameter groups, so that both these parameters are always
displayed during auto-sequencing.
Analog Outputs
Examples of all the parameter displays, and parameters grouping, are
illustrated on the next page.
The M620 is also available with six analog retransmission outputs.
These outputs can be user programmed for 0-20 mA or 4-20 mA, and
assigned to any of the measured power-line measured variables.
These outputs are electrically isolated from the rest of the instrument’s
circuits. Each output has a positive polarity. A common return line at 0
V potential is used for all analog outputs. Each output can drive a load
of up to 250 ohms, with output voltage of up to 5V dc. These outputs
may be connected in parallel.
Configure the analog outputs during instrument setup. The following
key sequences and indications apply during setup.
The “-” key scrolls through the parameters that may be assigned as a
0 to 20 mA output:
VVoltage P-P
nVoltage P-N
I Current instantaneous
= Current time average
Preal power
S apparent power
C cos phi (power factor)
Publication 1405-IN002C-EN-P - November 2004
Page 9

Bulletin 1405 (M620) Operating Instructions 9
If you continue scrolling the list repeats with a “4” appearing in the
line above the parameter indicator to designate a 4 to 20 mA output.
Analog Output Connections
Connections to all analog outputs (1 to 6, depending on the option)
are made via a 9-pin D-sub connector. The female socket is on the
rear panel. A matching male connector with a patch cable is used for
external connections. Pin assignments are as follows:
Table 3
Output Pin Output Pin
Output 1 Pin 1 Output 2 Pin 2
Output 3 Pin 3 Output 4 Pin 4
Output 5 Pin 5 Output 6 Pin 6
Output GND Pins 7, 8, 9
Scaling of Measured Parameters
Analog outputs selected as voltages (‘V’ or ‘n’) provide a linear
measurement range centered around the nominal value of the
line-to-line (V
nominal
) or line-to-neutral 3V
respectively. This diagram depicts the scaling of line-to-line voltage.
Max
50%
Output current
Min
50% 75% 100% 125% 150%
Voltage, per cent of V
nominal
•() voltage,
nominal
Publication 1405-IN002C-EN-P - November 2004
Page 10

10 Bulletin 1405 (M620) Operating Instructions
Analog outputs selected as ‘I’, ‘=’, ‘P’ or ‘S’ provide a linear
measurement scaled from zero to the full-scale value as configured by
the V
nominal
and I
nominal
settings.
Refer to Table 4 and Table 5 for more information.
With the output range set to 0 to 20 mA, the relationships are:
Table 4
Line-to-line voltages (V
L-L
)
10 mA V V
⁄()1–()4 10 mA••+
nom
for 0 to 20 mA Range
Line-to-neutral voltages (V
for 0 to 20 mA Range
Currents
Power (per phase)
Total power
Power factor
)
L-N
10 mA 3() VV
20 mA I I
20 mA PX V
20 mA P V
10 mA 10 mA 1 Cos f–()0.5 (capacitive⁄()•+
10 mA 10 mA 1 Cos f–()0.5 (inductive⁄()•–
ڥ
⁄()1–()4 10 mA•••+
nom
nominal
nominal
nominalInominal
3I
•⁄()⁄•
nominal
3••()⁄•
With the output range set to 4 to 20 mA, the relationships are:
Table 5
Line-to-line voltages (V
Line-to-neutral voltages (V
L-L
)
4 mA 8 mA V V
)
L-N
4 mA 8 mA 3() VV
⁄()1–()48 mA••++
nom
⁄()1–()48 mA•••++
nom
Publication 1405-IN002C-EN-P - November 2004
Currents
Power (per phase)
Total power
Power factor
4 mA 16 mA I I
4 mA 16 mA PX V
20 mA P V
4 mA 8 mA 8 mA 1 Cos f–()0.5 (capacitive)⁄•++
4 mA 8 mA 8 mA 1 Cos f–()0.5 (inductive)⁄•–+
ڥ+
nominal
nominalInominal
nominal
3I
•⁄()⁄•+
3••()⁄•
nominal
Page 11

Bulletin 1405 (M620) Operating Instructions 11
Modbus Communications
The M620 is available with an RS-485 half-duplex communications
port which supports Modbus RTU slave protocol version 1.0. The
following Modbus commands are supported:
03 (0x03) Read Holding Registers
16 (0x10) Write Multiple Registers
43 (0x2B) Read Device Identification
The port may be configured during instrument setup. The baud rate
may be set to 9.6 K or 19.2 K bits per second. The Modbus address
may be set in the range 1 to 257.
The M620 equipped with Modbus includes 2 LEDs which display
Modbus status and Network status.
Modbus Port Connections
Connections to the Modbus port are made via a 3-pin connector as
shown below:
1
2
3
IMPORTANT
Rx Tx-
Grd
Rx Tx+
Terminating resistors are not included in the M620. If
needed, terminating resistors must be provided and
installed by the user.
Modbus Memory Map
The tables below provide a cross-reference of Modbus register
address to metered value along with data type.
Publication 1405-IN002C-EN-P - November 2004
Page 12

12 Bulletin 1405 (M620) Operating Instructions
Table 6 Modbus Memory Map
Register Byte Low Metered Value Data Type
0 0 L1-N voltage WORD
1 2 L2-N voltage WORD
2 4 L3-N voltage WORD
3 6 L1-L2 voltage WORD
4 8 L2-L3 voltage WORD
5 10 L3-L1 voltage WORD
6 12 I1 WORD
7 14 I2 WORD
8 16 I3 WORD
9 18 I1 peak WORD
10 20 I2 peak WORD
11 22 I3 peak WORD
12 24 I1 average WORD
13 26 I2 average WORD
14 28 I3 average WORD
15 30 Cos1 (power factor) WORD
16 32 Cos2 WORD
17 34 Cos3 WORD
18 36 P1 real power DWORD
19 38
20 40 P2 real power DWORD
21 42
22 44 P3 real power DWORD
23 46
24 48 S1 apparent power DWORD
25 50
26 52 S2 apparent power DWORD
27 54
28 56 S3 apparent power DWORD
29 58
30 60 E1 real energy DWORD
31 62
32 64 E2 real energy DWORD
Publication 1405-IN002C-EN-P - November 2004
33 66
Page 13

Bulletin 1405 (M620) Operating Instructions 13
Table 6 Modbus Memory Map
Register Byte Low Metered Value Data Type
34 68 E3 real energy DWORD
35 70
36 72 Total Power DWORD
37 74
38 76 Total Energy DWORD
39 78
40 80 Status/Alarm WORD
41 82 Baud/Address WORD
42 84 Diagnostic 0 WORD
43 86 Diagnostic 1 WORD
44 88 Diagnostic 2 WORD
45 90 Diagnostic 3 WORD
46 92 Diagnostic 4 WORD
47 94 Diagnostic 5 WORD
48 96 Diagnostic 6 WORD
49 98 Diagnostic 7 WORD
80 100 Under Voltage WORD
81 102 Over Voltage WORD
82 104 Control WORD
Notes:
• Registers 0 to 35 contain the named measured values.
• Registers 18 to 39 represent values as 32 bit DWORD.
• Registers are organized as “big-Endian”, with first the high-Byte
and then the low-Byte. The transferred bytes are not in a rising
sequence, but the higher register follows after the lower register.
• Register 40 returns the status of device M620 and status
over/under voltage alarm.
• Register 41 returns the node address and baud rate.
• Registers 42 to 49 return diagnostic registers per the Modbus
specifications.
• Registers 80 and 81 are read/write registers for over/under
voltage parameter.
• Register 82 is a read/write register for control of M620 functions:
reset I peak, reset E-Counter.
Publication 1405-IN002C-EN-P - November 2004
Page 14

14 Bulletin 1405 (M620) Operating Instructions
Instrument Set-Up
For instrument set-up, numeric values are entered in one of two ways.
For some setting, a continuously variable value is to be entered. In
this case, the right-most digit of the display line blinks when a
numeric value is to be altered. The value of each digit is changed in
succession.
Table 7
Key Description
“+” key: Scrolls a value of the currently
blinking digit, from 0 through 9
“-“key: Shifts to the next digit
“F” key: Leaves the currently displayed
value, and skips to the next setting
For other settings, a specific value is to be selected from a
pre-programmed list of values. Digits do not blink, in this case.
Table 8
Key Description
“+” key: Scrolls to the next higher value, of a
list of fixed values
“-“key: Scrolls to the next lower value, of a
list of fixed values
“F” key: Leaves the currently displayed
value, and skips to the next setting
To enter into setting mode, the “F” key is kept pressed for 2.4
seconds, while the instrument is switched on. When this is done, the
displays are initially unlit for a few seconds, and then the setting mode
prompt (“PArA”), and the software version number are displayed.
When the “F” key is released, the prompt for the first setting
parameter appears: “Uno”, which is the prompt for nominal voltage
range selection.
Publication 1405-IN002C-EN-P - November 2004
Page 15

Bulletin 1405 (M620) Operating Instructions 15
V
A
P
cos
E
F
+
V
A
P
cos
E
F
+
Begin settings
Indicates software version
ϕ
Select nominal voltage
ϕ
Repeatedly pressing the “F” key causes the prompts for the other
parameters to be displayed in succession. If the settings are to be
selected from a limited number of fixed values (e.g. the initial values
of the energy counters, or the analog retransmission output ranges)
only index characters are displayed.
Publication 1405-IN002C-EN-P - November 2004
Page 16

16 Bulletin 1405 (M620) Operating Instructions
V
Set undervoltage alarm voltage limit
A
Range: 000.0 to 650.0 volts
P
cos
ϕ
E
F
+
Set overvoltage alarm voltage limit
V
A
Range: 000.0 to 650.0 volts
P
cos
ϕ
E
F
+
Select primary current transformer value.
V
A
Selectable values: 1, 2.5, 5, 10, 15, 20,
P
25, 30, 40, 50, 60, 75, 80, 100, 125, 150,
cos
ϕ
200, 250, 300, 400, 500, 600, 750, 800,
E
F
1000, 1200, 1250, 1500, 1600, 1800,
+
2000, 2500, 3000, 4000 amperes
V
Select current transformer output
A
range 1A or 5A
P
cos
ϕ
E
F
+
V
A
P
cos
ϕ
E
F
+
V
Select the energy pulse output rate
A
Selectable values: 0.00, 0.01, 0.10,
P
cos
ϕ
1.00, 10.0, 100 kWh/pulse
E
No pulse output if vale 0.00 is
selectable
F
+
V
A
P
cos
ϕ
E
F
+
V
A
P
cos
ϕ
E
F
+
V
Similarly for analog
A
outputs A3 through
P
cos
ϕ
A6s
E
F
+
V
Set initial energy counter values
A
Range: 0000.000 to 0999.999 Mwh
P
cos
ϕ
When the value reaches 1000.000 Mwh,
E
the energy counter resets to zero. Overflow
F
+
condition is indicated by “c”.
Assign optional analog outputs to
measure parameters:
“-” key: V, n, l, =, c
“+” key: V, n, I, +, P, S, c
“F” key: A1 to Ax
Analog output range:
Left: 0 to 20 mA
Right: 4 to 20 mA
Publication 1405-IN002C-EN-P - November 2004
Page 17

Bulletin 1405 (M620) Operating Instructions 17
V
A
P
cos
ϕ
E
F
+
V
A
P
cos
E
F
+
Address: 1 to 257
Baud Rate: 9.6 or 19.2
kbaud
ϕ
The changed setting values are stored only when a password code is
entered. The default password code is “3136”. After all the setting
parameters are stepped through, the prompt “PASS” is displayed. If no
password code or a wrong password code is entered, the instrument
will exit the setting mode without storing any changes to the previous
settings.
V
Enable storage of changed settings
A
P
cos
ϕ
Enter the password code
E
F
+
V
Store the changed settings
A
P
cos
ϕ
E
F
+
Display Functions
V
Settings done
A
P
cos
ϕ
E
F
+
The following display related functions are described below.
• Version indication
• Under- and overvoltage alarm indication
• Enabling / disabling the auto-sequencing display mode
• and re-setting peak values
• Re-set energy counters
Version indication: The software version of the instrument is
indicated by this display, which determines the features and functions
Publication 1405-IN002C-EN-P - November 2004
Page 18

18 Bulletin 1405 (M620) Operating Instructions
built into the instrument. This number should be stated if and when
information or technical assistance is requested relating to this
instrument.
V
Version number displayed at start
A
P
cos
ϕ
E
F
+
Under- and overvoltage alarm indication: If any of the phase
voltages cross either of the user-programmed undervoltage or
overvoltage limits, not only is the alarm relay activated, but also the
alarm condition is indicated on the instrument display panel. An
undervoltage condition causes the character “u” to blink in the
left-most digit position to the left of the corresponding phase voltage
display. An overvoltage condition is similarly indicated by the blinking
character “o”. These alarm indications are independent of the
measuring range.
V
A
P
cos
ϕ
E
F
+
F
Under and overvoltage alarm
V
indication
A
P
cos
ϕ
E
+
Enabling / disabling the auto-sequencing display mode and
re-setting peak values: The “+” key has three functions, depending
on the duration for which this key is pressed, and indicated by a
function character at in the bottom left digit position. These functions
are selected sequentially when this key is kept pressed for different
durations.
Publication 1405-IN002C-EN-P - November 2004
Page 19

Table 9
Bulletin 1405 (M620) Operating Instructions 19
Key
Function Function
Key Press Duration
Indication
Switch
“+” Skip to the next measured parameter Approx. 0 to 2 seconds
Auto-sequencing display mode: enable / disable - “r” Approx. 2 to 4 seconds
Re-set peak current values - “c” Approx. 4 to 8
seconds
V
A
P
cos
E
F
+
Auto-sequencing display
enabled/disabled
ϕ
The display can be manually skipped to the next measured parameter
in the sequence, regardless of whether the auto-sequencing display
mode is enabled or disabled. Similarly, the stored peak current values
can be deleted at any time.
V
A
P
cos
E
F
+
Reset peak current value
ϕ
The setting of the initial values of the energy counters can be used for
simply resetting any of them to zero, while the instrument is in set-up
mode. To do this, first the “-“key is used to shift the digit to the
left-most position. Then the “+” key is pressed to scroll the digit from
0 upward, until the function character “c” appears in the bottom left
digit position. Since the counter capacity is limited to 0999.999 MWh,
when it reaches 1000.000 MWh, it causes the counter to overflow,
automatically resetting it to 0000.000 MWh. This value is then locked
and stored by pressing the “F” key. Energy counting then starts from
0000.000 MWh. This setting is to be done for all three energy counters
separately.
Publication 1405-IN002C-EN-P - November 2004
Page 20

20 Bulletin 1405 (M620) Operating Instructions
Reset energy counter
V
A
P
cos
ϕ
E
F
+
Dimensions
Specifications
Panel cut-outs should be 92 x 92 mm (3.6 x 3.6 in).
Table 10 Measured Parameters
Parameter Value
Voltage, RMS (Vrms) V
Instantaneous current
Average current (15 min.)
Peak current
/ V
L1-L2
L2-L3
V
/ V
L1-N
L2-N
IL1, IL2, I
L3
IL1=, IL2=, I
L3
IL1^, IL2^, IL3^
/ V
=
/ V
L3-L1
L3-N
Publication 1405-IN002C-EN-P - November 2004
Real power PL1, PL2, P
Apparent power SL1, SL2, S
L3
L3
Total power (P, S, 3-Phase Power Factor) PS, SS, PS/SS (power factor)
Power factor (Cos φ) Cos
Net real energy, per phase energy, total
, CosL2, Cos
L1
EL1, EL2, EL3, E
L3
S
energy
Energy counter range per phase 1000.000 MWh
Measuring rate Approx. 0.5 measurements / second
Update time 2 seconds
Page 21

Table 11 General Parameters
Parameter Value
Bulletin 1405 (M620) Operating Instructions 21
Input impedance Voltage input, per
2 Mohm
phase
Input load Current, 1A and 5A 0.02 ohm
Nominal voltage per catalog number version
Units with separate 120V or 240V supply: 600V
Units powered from 400V measurement line: 400V
Units powered from 480V measurement line: 480V
Nominal current input 1 A or 5 A
Overload current rating Nominal
2 x, continuous
current input 5A
Temperature coefficient < 0.01% / K
Temperature - Operating +5 to +50°C (+41 to +122°F) (ambient)
Temperature - Storage -20 to +70°C (-4 to +158°F)
Frequency range 47 to 63 Hz
Power consumption Approx. 3 W
Weight Approx. 0.3 kg
Front dimensions 96 x 96 mm
Breakdown rating Per DIN 41700
Panel insertion depth 85 mm
Panel mounting fasteners Screw clamps
Panel cutout dimensions 92 mm x 92 mm +/- 0.8 mm
Spacing between cutouts 4 mm (minimum), 20 mm (typical)
Protection class Enclosure IP 20
(IP 65 with optional protective hood
(1)
)
Terminals IP 00
Agency Certifications UL, CE
(1)
The optional hood, catalog number 1405-PRO, can be ordered separately. Contact your Rockwell Automation
distributor for additional information.
Table 12 Digital Displays
Typ e 7-segment LED, red
Lines x characters 3 x 5
Character height 14 mm
Publication 1405-IN002C-EN-P - November 2004
Page 22

22 Bulletin 1405 (M620) Operating Instructions
Table 13 Relay Outputs
Alarm Logic: contacts open on alarm
Energy pulses Contacts close: 128 ms / 128 ms
Energy pulse output rate Selectable: 0.01, 0.10, 1.00, 10.0, 100
kWh/pulse (0.0 disables)
Contacts rating Voltage 250Vac; 220V dc
Load: 60 VA; 60 W
Table 14 Measurement Accuracy and Range
Parameter Percent of Reading Nominal Value Operating Range Maximum Limit
Volts ±1% 240V rms 10V rms to 347V rms L-N or
17V rms to 600V rms L-L
Current ±1% 5 Amps 0.1 Amps to 8 Amps 10 Amps
Power and Energy ±2% n/a n/a n/a
Power Factor ±0.2% n/a n/a n/a
400V rms L-N or
690V rms L-L
Product Approvals
Table 15 Modbus Communications
Port specifications RS-485, 2-wire, half-duplex
Protocol Modbus RTU slave
Data Rate 9.6 or 19.2 Kbaud, selectable
Isolation 500 Vac, tested 1 kV ac
UL/CUL
cULus Listed, File E96956, per UL508, the Standard for Industrial
Control Equipment.
CE Certification
If this product bears the CE marking, it is approved for installation
within the European Union and EEA regions. It has been designed to
meet the following directives.
Publication 1405-IN002C-EN-P - November 2004
EMC Directive
This product is tested to meet Council Directive 89/336/EEC
Electromagnetic Compatibility (EMC) and the following standards, in
whole, documented in a technical construction file:
Page 23

Bulletin 1405 (M620) Operating Instructions 23
• EN 50081-2 - Generic Emission Standard, Part 2 - Industrial
Environment
• EN 61000-6-2 - Generic Immunity Standard, Part 2 - Industrial
Environment.
This product is intended for use in an industrial environment.
Low Voltage Directive
This product is tested to meet Council Directive 73/23/EEC Low
Voltage, by applying the safety requirements of EN/IEC 61010-1.
This equipment is classified as open equipment and must be installed
(mounted) in an enclosure during operation as a means of providing
safety protection.
International Standard IEC 529 / NEMA / UL 508 Degree of
Catalog Number Explanation
Protection
The MiniPowermonitor is rated as IP10 degree of protection per
International Standard IEC 529. It is considered an open device per
NEMA and UL 508.
1405-M620-400-420
Bulletin Number
1405 = MiniPowermonitor
1
- 120V and 240V connections are via a separate
connection
2
- 400V and 480V connections are via the measurement line
3 - M620 current is 1A / 5A programmable
Device Category
M620 = Power and
Energy Meter
Power Supply
Voltage
No Designator =
120V 60 Hz
120 = 120V 60 Hz
240 = 240V 60 Hz
480 = 480V 60 Hz
400 = 400V 50 Hz
Data Output
420 = Analog Output
Option (480V model 2
1
outputs, all others have
6 outputs)
1
485 = RS485 port with
2
Modbus protocol
2
No Designator = Relay
and Pulse Output only
3
Publication 1405-IN002C-EN-P - November 2004
Page 24

Rockwell Automation Support
Rockwell Automation provides technical information on the web to assist you in using our products. At
http://support.rockwellautomation.com, you can find technical manuals, a knowledge base of FAQs, technical and
application notes, sample code and links to software service packs, and a MySupport feature that you can customize
to make the best use of these tools.
For an additional level of technical phone support for installation, configuration and troubleshooting, we offer
TechConnect Support programs. For more information, contact your local distributor or Rockwell Automation
representative, or visit http://support.rockwellautomation.com.
Installation Assistance
If you experience a problem with a hardware module within the first 24 hours of installation, please review the
information that's contained in this manual. You can also contact a special Customer Support number for initial help
in getting your module up and running:
United States 1.440.646.3223
Monday – Friday, 8am – 5pm EST
Outside United States Please contact your local Rockwell Automation representative for any technical support issues.
New Product Satisfaction Return
Rockwell tests all of our products to ensure that they are fully operational when shipped from the manufacturing
facility. However, if your product is not functioning and needs to be returned:
United States Contact your distributor. You must provide a Customer Support case number (see phone number
above to obtain one) to your distributor in order to complete the return process.
Outside United States Please contact your local Rockwell Automation representative for return procedure.
Publication 1405-IN002C-EN-P - November 2004 24 PN 40055-220-01(3)
Supersedes Publication 1405-IN002A-EN-P - July 2003 Copyright © 2004 Rockwell Automation, In c. All rights reserved. Printed in the U.S.A.
 Loading...