


 Loading...
PT0E-0980
Portable Gas Monitor
GX-8000
Operating Manual
(PT0-098)
Request for the Customers
•Read and understand this operating manual before using the gas monitor.
•Use the gas monitor in accordance with the operating manual.
•Regardless of warranty period, we shall not make any compensation for accidents and damage caused by using this product.
The compensation shall be made only under the warranty policy of products or parts replacement.
•Because this is a safety unit, a regular maintenance for every six months and regular maintenance must be performed.
•If any abnormality was found in the gas monitor, notify them to RIKEN KEIKI immediately.

Safety information
The Portable Gas Monitor Model GX-8000 is a gas monitor designed to provide continuous exposure monitoring of combustible gas, oxygen (O2), toxic gas such as carbon monoxide (CO) and hydrogen sulfide (H2S) in hazardous environments. The gas sample is sucked in by build-in micro pump.
The battery can be selected either Li-ion battery or alkaline dry battery.
Li-ion battery unit is called BUL-8000 and alkaline dry battery unit is called BUD-8000. The battery unit can be changed even by the end users.
Specification for safety
Ga Ex ia IIC T4
II 1 G Ex ia IIC T4
Ambient temperature range for use -20°C to +50°C
Ambient temperature range during battery charging 0°C to +40°C
Electrical data
Power supply of Li-ion battery unit : BUL-8000
Two parallel connected Li-ion cells used in battery pack BP-8000 are from type Maxell INR18650PB1. Um=250V.
Power supply of alkaline battery unit : BUD-8000
Powered by three series AA size alkaline batteries , model LR6 by TOSHIBA.Backup battery type CR1220 manufactured by Maxell.
Certificate numbers
IECEx Certificate number IECEx KEM 10.0038ATEX Certificate number KEMA 10ATEX 0085
List of standards
IEC 60079-0 2004 ed.4.0 |
|
EN60079-0:2006 |
|
||
IEC 60079-11 2006 ed.5.0 |
|
EN60079-11:2007 |
IEC 60079-26 2006 ed.2 |
|
EN60079-26:2007 |
WARNING
Do not charge in hazardous location.
Do not charge it expect by genuine charger.
Do not replace battery unit in hazardous location.Do not replace dry batteries in hazardous location.Do not attempt to disassemble or alter the instrument.
Use only battery unit type BUD-8000 with three series connected Alkaline
AA batteries, type LR6 manufactured by Toshiba, or use chargeable battery unit type BUL-8000.
INST. No. 0 0 0 0 0 0 0 0 0 0 0
A B C D E
A:Manufacturing year (0-9)
B:Manufacturing month (1-9,XYZ for Oct.-Dec.)
C:Manufacturing lot
D:Serial number
E:Code of factory
2-7-6 Azusawa, Itabashi-ku, Tokyo, 174-8744, Japan
Phone |
: +81-3-3966-1113 |
Fax |
: +81-3-3558-9110 GIII |
: intdept@rikenkeiki.co.jp |
|
Web site |
: http://www.rikenkeiki.co.jp |

<Contents>
1 |
Outline of the Product.............................................................................................. |
4 |
1-1. |
Preface .................................................................................................................... |
4 |
1-2. |
Purpose of use ........................................................................................................ |
4 |
1-3. |
Definition of DANGER, WARNING, CAUTION, and NOTE ..................................... |
4 |
2 |
Important Notices on Safety .................................................................................... |
5 |
2-1. |
Danger cases .......................................................................................................... |
5 |
2-2. |
Warning cases......................................................................................................... |
6 |
2-3. |
Precautions ............................................................................................................. |
7 |
3 |
Product Components............................................................................................... |
9 |
3-1. |
Main unit and standard accessories ........................................................................ |
9 |
3-2. |
Names and functions for each part.......................................................................... |
10 |
4 |
How to Use.............................................................................................................. |
13 |
4-1. |
Before using the gas monitor................................................................................... |
13 |
4-2. |
Preparation for start-up............................................................................................ |
13 |
4-3. |
Basic operating procedures..................................................................................... |
18 |
4-4. |
How to start the gas monitor.................................................................................... |
19 |
4-5. |
How to detect .......................................................................................................... |
21 |
4-6. |
Modes...................................................................................................................... |
25 |
4-7. |
Air calibration mode................................................................................................. |
26 |
4-8. |
Display/setting mode ............................................................................................... |
28 |
4-9. |
How to exit............................................................................................................... |
35 |
5 |
Operations and Functions ....................................................................................... |
36 |
5-1. |
Gas alarm activation................................................................................................ |
36 |
5-2. |
Fault alarm activation .............................................................................................. |
38 |
5-3. |
Other functions ........................................................................................................ |
38 |
6 |
Maintenance............................................................................................................ |
39 |
6-1. |
Maintenance intervals and items ............................................................................. |
39 |
6-2. |
Gas calibration method............................................................................................ |
40 |
6-3. |
How to clean............................................................................................................ |
41 |
6-4. |
Parts replacement ................................................................................................... |
41 |
7 |
Storage and Disposal .............................................................................................. |
44 |
7-1. |
Procedures to store the gas monitor or leave it for a long time ............................... |
44 |
7-2. |
Procedures to use the gas monitor again ................................................................ |
44 |
7-3. |
Disposal of products ................................................................................................ |
45 |
8 |
Troubleshooting....................................................................................................... |
46 |
9 |
Product Specifications ............................................................................................. |
48 |
9-1. |
List of specifications ................................................................................................ |
48 |
9-2. |
List of accessories................................................................................................... |
50 |
10 |
Definition of Terms................................................................................................... |
51 |
GX-8000 |
- 3 - |
1 Outline of the Product |
1-1. Preface |
|
|
1
Outline of the Product
1-1. Preface
Thank you for choosing our portable gas monitor GX-8000. Please check that the model number of the product you purchased is included in the specifications on this manual.
This manual explains how to use the gas monitor and its specifications. It contains information required for using the gas monitor properly. Not only the first-time users but also the users who have already used the product must read and understand the operating manual to enhance the knowledge and experience before using the gas monitor.
1-2. Purpose of use
This gas monitor is a multi gas type that enables simultaneous monitoring of all of the following five types of gases at the maximum: oxygen, combustible gases, and toxic gases (carbon monoxide and hydrogen sulfide) in the air and high-concentration combustible gases (vol%) in N2 and inert gases.
Detection results are not intended to guarantee life or safety in any way.
The gas monitor comes in several types for different combinations of gases to be detected. Check the specifications of the gas monitor before use and conduct gas detection properly in accordance with purposes. (See the list of gases to be detected at the end of this operating manual.)
In addition to this operating manual, an operating manual for the data logger management program (option) is available for the gas monitor. Contact RIKEN KEIKI if it is needed.
1-3. Definition of DANGER, WARNING, CAUTION, and
NOTE
DANGER |
This message indicates that improper handling may cause serious damage on |
|
life, health or assets. |
WARNING |
This message indicates that improper handling may cause serious damage on |
|
health or assets. |
CAUTION |
This message indicates that improper handling may cause minor damage on |
|
health or assets. |
NOTE |
This message indicates advice on handling. |
GX-8000 |
- 4 - |

2 Important Notices on Safety |
2-1. Danger cases |
|
|
2
Important Notices on Safety
2-1. Danger cases
 DANGER
About explosion-proof
•Do not modify or change the circuit or structure, etc.
•When measuring the oxygen concentration, do not measure anything but a mixture of air and combustible gases or vapors and toxic gases.
•When using this gas monitor in a hazardous area, take the following countermeasures for preventing dangers resulting from electrostatic charges.
(1)Wear anti-static clothes and conductive shoes (anti-static work shoes).
(2)For indoor use, use the gas monitor while standing on a conductive work floor (with a leakage resistance of 10 MΩ or less).
•The battery units that can be connected are the BUL-8000(G) (certificate number TC19437) or BUD-8000(G) (certificate number TC19438).
•The specifications of the gas monitor are as follows:
Pump circuit: |
Allowable voltage of 4.95 V, allowable current of 1.12 A, and |
|
allowable power of 1138 mW |
Combustible gas sensor circuit: Allowable voltage of 4.95 V, allowable current of 0.834 A, and
|
allowable power of 853 mW |
Buzzer circuit: |
Allowable voltage of 4.95 V, allowable current of 0.431 A, and |
|
allowable power of 441 mW |
Main circuit: |
Allowable voltage of 4.95 V, allowable current of 0.717 A, and |
|
allowable power of 733 mW |
Backup circuit: |
3.0 VDC, 10 µA |
About use
•While conducting measurement in a manhole or confined space, do not lean over or look into the manhole or closed space. It may lead to dangers because oxygen-deficient air or other gases may blow out.
•Oxygen-deficient air or other gases may blow out from the gas exhausting outlet. Never inhale the air or gases.
•High-concentration (more than LEL) gases may blow out. Never use fire near the gas monitor.
- 5 - |
GX-8000 |

2 Important Notices on Safety |
2-2. Warning cases |
|
|
2-2. Warning cases
 WARNING
Sampling point pressure
•The gas monitor is designed to draw gases around it under the atmospheric pressure. If excessive pressure is applied to the gas inlet and outlet (GAS IN, GAS OUT) of the gas monitor, detected gases may be leaked from its inside, thus leading to dangers. Be sure that excessive pressure is not applied to the gas monitor while used.
•Do not connect the gas sampling hose directly to a location with a pressure higher than the atmospheric pressure. The internal piping system may be damaged.
Handling of sensor
Do not disassemble the electrochemical type sensor or galvanic cell type sensor because they contain electrolyte. Electrolyte may cause severe skin burns if it contacts skin, while it may cause blindness if it contacts eyes.
If electrolyte is adhered on your clothes, that part on your clothes is discolored or its material is decomposed. If contact occurs, rinse the area immediately with a large quantity of water.
Fresh air adjustment in atmosphere
When the fresh air adjustment is performed in the atmosphere, check the atmosphere for freshness before beginning the adjustment. If other gases exist, the adjustment cannot be performed properly, thus leading to dangers when the gas leaks.
Response to gas alarm
Issuance of a gas alarm indicates that there are extreme dangers. Take proper actions based on your judgment.
Battery level check
•Before use, check that there remains sufficient battery power. When the gas monitor is used for the first time or is not used for a long period, the batteries may be exhausted. Either fully recharge the batteries or replace them with new ones before use.
•If a low battery voltage alarm occurs, gas detection cannot be conducted. If the alarm occurs during use, turn off the power and promptly recharge the batteries in a non-hazardous area.
Others
•Do not throw the gas monitor into fire.
•Do not wash the gas monitor in a washing machine or ultrasonic cleaner.
•Do not block the buzzer sound opening. No alarm sound can be heard.
•Do not remove the battery unit while the power is ON.
GX-8000 |
- 6 - |
2 Important Notices on Safety |
2-3. Precautions |
|
|
2-3. Precautions
 CAUTION
Do not use the gas monitor where it is exposed to oil, chemicals, etc. Do not submerge the gas
monitor under water on purpose.
•Do not use in a place where the gas monitor is exposed to liquids such as oil and chemicals.
•The gas monitor, being compliant to IP67, is not water-pressure-resistant. Do not use the gas monitor where a high water pressure is applied to it (under a faucet, shower, etc.) or submerge it under water for a long time. The gas monitor is water-proof only in fresh water and running water, and not in hot water, salt water, detergent, chemicals, human sweat, etc.
•The gas inlet and outlet are not water-proof. Be careful not to let water such as rainwater get into these parts. Because this may cause trouble and gas cannot be detected.
•Do not use the gas monitor where water or dirt gets accumulated. The gas monitor placed at such a location may malfunction due to water or dirt that gets into the buzzer opening, gas inlet, etc.
•Note that drawing in dirty water, dust, metallic powder, etc. will significantly deteriorate the sensor sensitivities. Be careful when the gas monitor is used in an environment where these elements exist.
Do not use the gas monitor in a place where the temperature drops below -20ºC or rises over 50ºC.
•The operating temperature of the gas monitor is -20 to 50ºC. Do not use the gas monitor at higher temperatures, humidities, and pressures or at lower temperatures than the operating range.
•Avoid long-term use of the gas monitor in a place where it is exposed to direct sunlight.
•Do not store the gas monitor in a sun-heated car.
Observe the operating restrictions to prevent condensation inside the gas monitor or gas sampling
hose.
Condensation formed inside the gas monitor or gas sampling hose causes clogging or gas adsorption, which may disturb accurate gas detection. Thus, condensation must be avoided. In addition to the operating environment, carefully monitor the temperature/humidity of the sampling point to prevent condensation inside the gas monitor or gas sampling hose. Please observe the operating restrictions.
Do not use a transceiver near the gas monitor.
•Radio wave from a transceiver near the gas monitor may disturb readings. If a transceiver is used, it must be used in a place where it disturbs nothing.
•Do not use the gas monitor near a device that emits strong electromagnetic waves (high-frequency or high-voltage devices).
Verify that the pump driving indicator is rotating before using the gas monitor.
If the pump driving indicator is not rotating, gas detection cannot be performed properly. Check whether the flow rate is lost.
Do not forget to perform a regular maintenance.
Since this is a safety unit, a regular maintenance must be performed to ensure safety. Continuing to use the gas monitor without performing a maintenance will compromise the sensitivity of the sensor, thus resulting in inaccurate gas detection.
- 7 - |
GX-8000 |

2 Important Notices on Safety |
2-3. Precautions |
|
|
 CAUTION
Others
•Pressing buttons unnecessarily may change the settings, preventing alarms from activating correctly. Operate the gas monitor using only the procedures described in this operating manual.
•Do not drop or give shock to the gas monitor. The water-proof and explosion-proof properties and accuracy may be deteriorated.
•Do not use the gas monitor while recharging it.
•Whereas the gas monitor can detect oxygen, combustible gases, carbon monoxide, and hydrogen sulfide, the operating environment may include gases that have harmful effects on the sensors of this unit. (Different gases can be defected depending on the type.)
The gas monitor cannot be used in the presence of the following gases:
(1)Sulfides (such as H2S and SO2) continuously existing in high concentrations
(2)Halogen gases (such as chloride compounds and chlorofluorocarbons)
(3)Silicone (Si compounds)
Do not use the gas monitor in the presence of the above gases (such as high-concentration sulfides, halogen gases, and silicone), which may shorten the sensor life significantly or cause malfunctions such as inaccurate readings.
In case the gas monitor is used for detection in the presence of silicone, etc., be sure to check the gas sensitivities before using it again.
GX-8000 |
- 8 - |
3 Product Components |
3-1. Main unit and standard accessories |
|
|
3
Product Components
3-1. Main unit and standard accessories
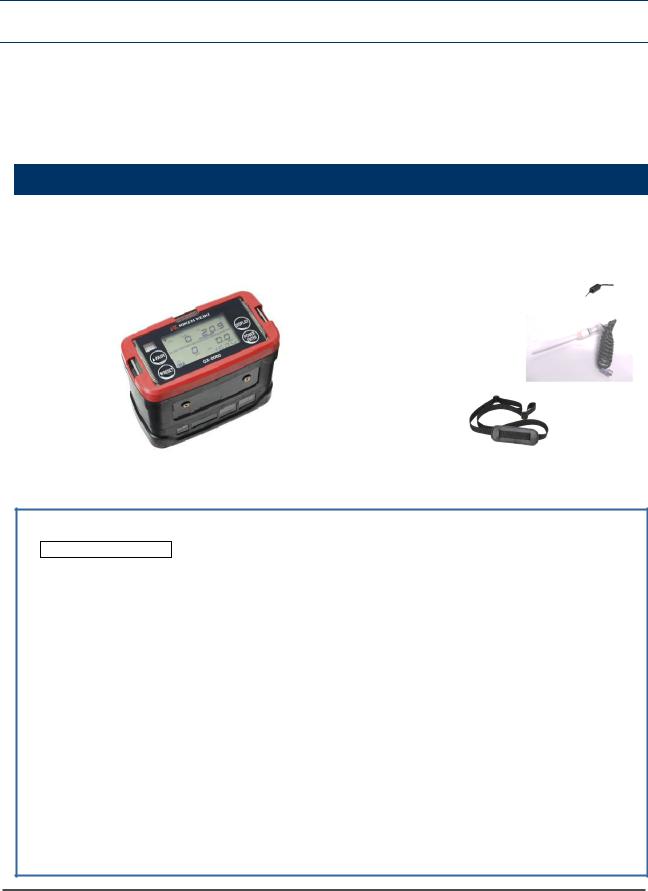
After opening the package, check the main unit and accessories.
If anything in the following list is not included, contact RIKEN KEIKI.
<Main Unit> |
<Standard Accessories> |
|
|
• AC powered charger: 1 |
|
GX-8000 |
|
|
main unit |
• Gas sampling probe and |
|
|
||
|
|
gas sampling hose: 1 |
|
• |
Shoulder strap: 1 |
|
• |
Operating manual |
Li-ion battery unit |
• |
Product warranty |
|
|
|
 DANGER
About explosion-proof
•Do not modify or change the circuit or structure, etc.
•When measuring the oxygen concentration, do not measure anything but a mixture of air and combustible gases or vapors and toxic gases.
•When using this gas monitor in a hazardous area, take the following countermeasures for preventing dangers resulting from electrostatic charges.
(1)Wear anti-static clothes and conductive shoes (anti-static work shoes).
(2)For indoor use, use the gas monitor while standing on a conductive work floor (with a leakage resistance of 10 MΩ or less).
•The battery units that can be connected are the BUL-8000(G) (certificate number TC19437) or BUD-8000(G) (certificate number TC19438).
•The specifications of the gas monitor are as follows:
Pump circuit: |
Allowable voltage of 4.95 V, allowable current of 1.12 A, and |
|
allowable power of 1138 mW |
Combustible gas sensor circuit: Allowable voltage of 4.95 V, allowable current of 0.834 A, and
|
allowable power of 853 mW |
Buzzer circuit: |
Allowable voltage of 4.95 V, allowable current of 0.431 A, and |
|
allowable power of 441 mW |
Main circuit: |
Allowable voltage of 4.95 V, allowable current of 0.717 A, and |
|
allowable power of 733 mW |
Backup circuit: |
3.0 VDC, 10 µA |
- 9 - |
GX-8000 |

3 Product Components |
3-2. Names and functions for each part |
|
|
NOTE
There are the following two combinations of battery units. The following information is printed on the battery unit for the sake of identification to prevent a mistake in combinations.
•BUL-8000 (certification number TC19437)=> BUL-8000(G)
•BUL-8000 (certification number TC19438)=> BUD-8000(G)
Additionally, a nameplate indicating a compatible model is affixed on the top of the battery unit. Check this information and use a correct combination.
Printing for identification
3-2. Names and functions for each part
<Outline Drawing>
GX-8000 |
- 10 - |
3 Product Components |
3-2. Names and functions for each part |
||
|
|
|
|
|
|
|
|
(1) |
LCD display |
Displays gas concentrations, alarms, etc. |
|
(2) |
Buzzer sound opening |
Emits a buzzer sound at an alarm. (Do not block it.) |
|
(3) |
Alarm LED arrays |
The lamp blinks in response to an alarm. |
|
(4) |
Infrared communication port |
Used to carry out data communications with a PC in data logger |
|
|
|
mode. |
|
(5) |
▲/AIR switch |
Keep this switch pressed to perform fresh air adjustment. |
|
(6) |
▼/RESET switch |
When an alarm occurs, press this switch to reset the alarm. |
|
(7) |
DISPLAY switch |
Press this switch to change between display modes. |
|
(8) |
POWER/ENTER switch |
Turns on and off the power. |
|
(9) |
Gas inlet |
Connect a sampling hose to this port. |
|
(10) |
Gas outlet |
Exhausts the gas drawn into the gas monitor. (Do not block it.) |
|
(11) |
Recharging jack cover |
Remove this cover to connect an AC powered charger and recharge |
|
|
|
the batteries. |
|
(12) |
Recharging indicator lamp |
Lights up in red during recharging and goes off when recharging is |
|
|
|
completed. |
|
(13) |
Sensor cover |
There are sensors inside. May be opened only when the sensor is to |
|
|
|
be replaced. |
|
(14) |
Activated carbon filter knob |
Turn this knob to detach and replace the activated carbon filter. No |
|
|
|
activated carbon filter is used on a type that does not measure carbon |
|
|
|
monoxide. Keep this knob tightened at all times. |
|
(15) |
Battery unit screws |
Turn these screws to detach and replace the battery unit. |
|
 CAUTION
•Do not jab the buzzer opening with a sharp-pointed item. The unit may malfunction or get damaged, allowing water or foreign substance, etc. to get inside.
•Do not remove the panel sheet on the display. The water-proof and dust-proof performances will be deteriorated.
•Do not affix a label on the infrared port. Infrared communications can no longer be conducted.
- 11 - |
GX-8000 |
3 Product Components 3-2. Names and functions for each part
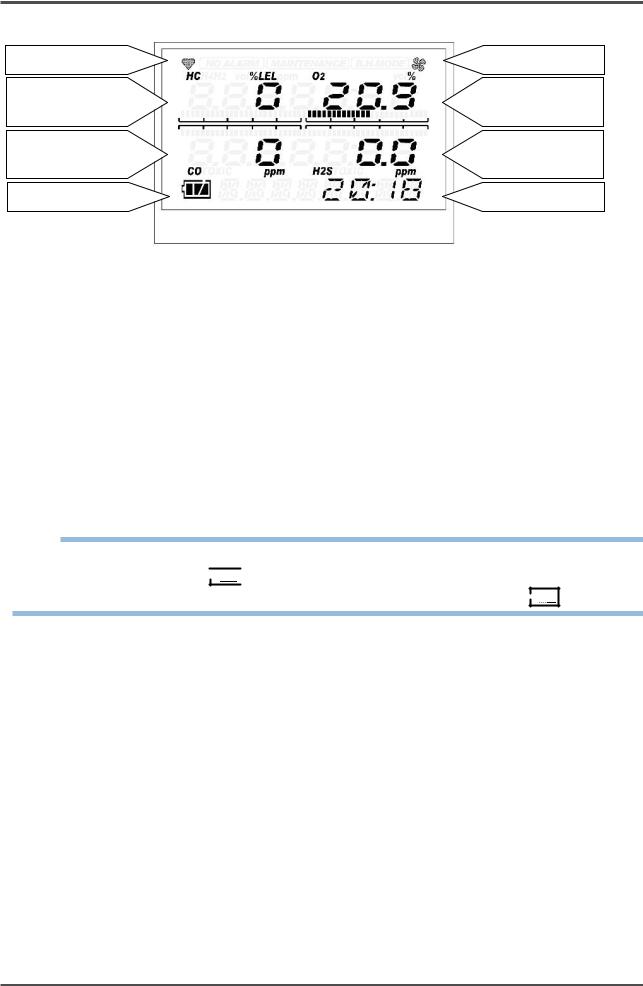
<LCD Display>
(1) Pilot indicator |
(5) Pump driving |
||
|
|
|
indicator |
(2) |
Combustible gas |
(6) |
Oxygen |
|
concentration digital |
|
concentration digital |
|
and bar display |
|
and bar display |
(3) |
Carbon monoxide |
(7) |
Hydrogen sulfide |
|
concentration digital |
|
concentration digital |
|
and bar display |
|
and bar display |
(4) Battery level icon |
(8) |
Clock display |
|
(1) |
Pilot indicator |
Displays the operating status in the detection mode. Normal: Blinking |
(2) |
Combustible gas |
Displays the gas concentration as a numeric value and a level in the bar |
|
concentration |
|
|
graph. |
|
|
digital and bar display |
|
|
|
|
(3) |
Carbon monoxide |
Displays the gas concentration as a numeric value and a level in the bar |
|
concentration |
|
|
graph. |
|
|
digital and bar display |
|
|
|
|
(4) |
Battery level display |
Displays the battery level. See the information below for the meanings of |
|
battery level icons. |
|
|
|
|
(5) |
Pump driving indicator |
Displays the suction status in the detection mode. Normal: Rotating |
(6) |
Oxygen concentration |
Displays the gas concentration as a numeric value and a level in the bar |
|
digital and bar display |
graph. |
(7) |
Hydrogen sulfide |
Displays the gas concentration as a numeric value and a level in the bar |
|
concentration |
|
|
graph. |
|
|
digital and bar display |
|
|
|
|
(8) |
Clock display |
Displays the current time. |
NOTE
The meanings of battery level icons are as follows:
 : Sufficient /
  : Low /


 : Needs recharging
If the battery level is lower than the above, the inside of the battery icon starts to blink (
 ).
).
GX-8000 |
- 12 - |

4 How to Use |
4-1. Before using the gas monitor |
|
|
4
How to Use
4-1. Before using the gas monitor
Not only the first-time users but also the users who have already used the product must follow the operating precautions.
Ignoring the precautions may damage the gas monitor, resulting in inaccurate gas detection.
4-2. Preparation for start-up
Before starting gas detection, read and understand the following precautions. Ignoring these precautions may prevent correct gas detection.
•Check that the battery level is sufficient.
•Check that there is no bend or hole in the gas sampling hose.
•Check that the filter in the gas sampling probe is free of dust or clogging.
•Check that the gas monitor, gas sampling probe, and gas sampling hose are connected properly.
<Recharging of Batteries>
When the gas monitor is used for the first time, or when the battery level is low, be sure to use the accessory AC powered charger to recharge the batteries.
 CAUTION
•Use the dedicated AC powered charger.
•Recharge the batteries in a non-hazardous area.
•Recharge the batteries at ambient temperatures between 0 to 40ºC.
•Do not use the gas monitor while recharging it. Correct measurements cannot be obtained. Furthermore, the batteries get deteriorated more quickly and may have a shorter life.
•The AC powered charger is not water-proof or dust-proof. Do not recharge the batteries while the gas monitor is wet.
•The AC powered charger is not explosion-proof.
- 13 - |
GX-8000 |

4 How to Use |
4-2. Preparation for start-up |
|
|
(1) Open the recharging jack cover of the gas monitor.
 CAUTION
Do not pull the recharging jack cover too hard.
It may get damaged.
(2)Put the plug of the AC powered charger into the recharging jack of the gas monitor.
(3)Connect the AC powered charger to the wall electric outlet.
When recharging is started, the recharging indicator lamp lights up (red).
(Recharging time: Three hours at the maximum until the batteries are fully recharged)
(4)When recharging is completed, the recharging indicator lamp goes off.
(5)When recharging is completed, disconnect the AC powered charger from the wall electric outlet.
(6)Pull out the AC powered charger plug from the power jack of the gas monitor and reattach the recharging jack cover. Put the recharging jack cover as far as it will go.
 CAUTION
•Do not use the gas monitor with the recharging jack cover detached. Dust or water may get into the gas monitor, causing it to malfunction. Replace the recharging jack cover if it is damaged.
•If the recharging jack cover is not completely closed, water may get in from the power jack. The same thing occurs if a minute foreign substance is caught beneath the cover.
•Disconnect the AC powered charger from the wall electric outlet while it is not in use.
NOTE
•During recharging, the battery pack may get hot, but this is not abnormal.
•The temperature of the gas monitor is high immediately after recharging is completed. Let it leave for 10 minutes or more before using it. Otherwise, correct measurements may not be obtained.
•When fully recharged batteries are recharged again, the recharging indicator lamp does not go on.
GX-8000 |
- 14 - |
4 How to Use |
4-2. Preparation for start-up |
|
|
<Attaching Batteries> (when the optional unit BUD-8000(G) is used)
When the gas monitor is used for the first time, or when the battery level is low, attach new AA alkaline batteries.
 CAUTION
<Replacement>
•Turn off the power of the gas monitor before replacing the batteries.
•Replace the batteries in a non-hazardous area.
•Replace all of the three batteries with new ones at one time.
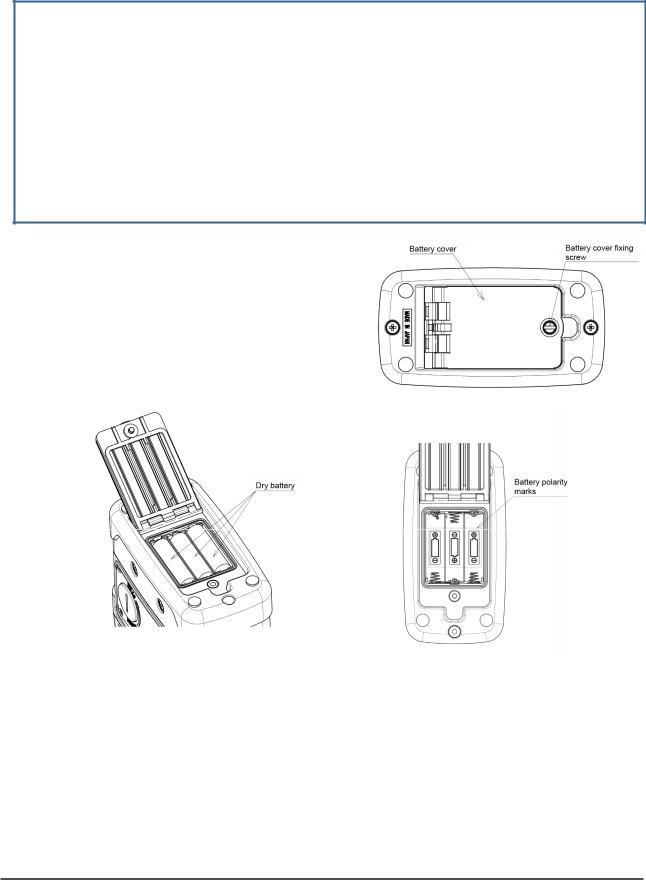
•Pay attention to the polarities of the batteries.
•If the battery cover fixing screw is not completely tightened, the dry batteries may drop off or water may get in through the clearance. Water may also get in if a minute foreign substance is
caught beneath the battery unit. <Batteries>
•Use AA alkaline batteries. Rechargeable batteries cannot be used.
(1)Using a flathead screwdriver or coin, turn the battery cover fixing screw counterclockwise to open the battery cover.
(2)Paying attention to the polarities of batteries, replace all the three batteries with new ones.
(3)Close the battery cover and tighten the battery cover fixing screw.
- 15 - |
GX-8000 |
4 How to Use |
4-2. Preparation for start-up |
|
|
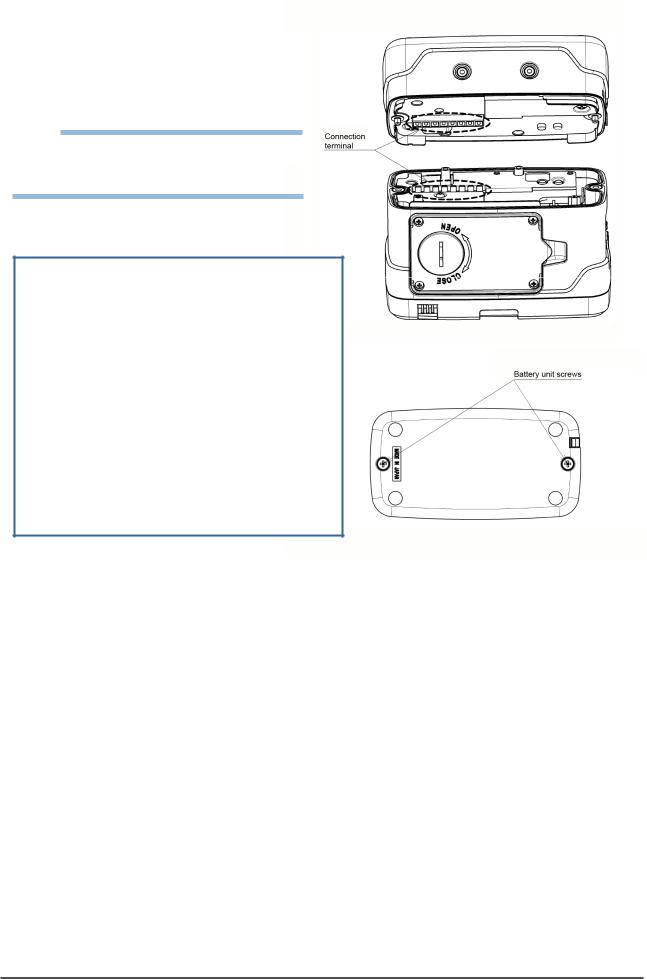
<Detaching Battery Unit>
(1)Loosen the two battery unit screws. (They need not be completely detached.)
(2)Detach the battery unit.
(3)Attach a new battery unit.
NOTE
Make sure that the battery unit is installed in correct orientation by checking the locations of the connection terminal and projection portions.
(4) Securely tighten the two battery unit screws.
 CAUTION
•Turn off the power of the gas monitor before replacing the battery unit.
•Detach and reattach the battery unit in a non-hazardous area.
•If the battery unit screw is not completely tightened, the battery unit may drop off or water may get in through the clearance.
Water may also get in if a minute foreign substance is caught beneath the battery unit.
•Do not damage the rubber seal.
•To maintain the water-proof and dust-proof performances, it is recommended to replace the rubber seal every two years, whether or not it has an abnormality.
GX-8000 |
- 16 - |
Loading...