


 Loading...

INTRODUCTION
Thank you for choosing our product.
The accessories described in this manual are of the highest quality, carefully designed and built in order to ensure excellent performance.
This manual contains detailed instructions on how to install and use the product.
This manual must be stored in a safe place and CONSULTED BEFORE USING THE DEVICE for proper usage instructions as well as maximum performance from the device itself.
NOTE: Some images contained in this document are for informational purposes only and may not faithfully demonstrate the parts of the product they represent.
Symbols used in this manual:
Warning |
Indicates important information that must not be ignored. |
Information |
Provides notes and useful suggestions for the User. |
SAFETY
This part of the manual contains SAFETY precautions that must be followed scrupulously.
The device has been designed for professional use and is therefore not suitable for use in the home.
The device has been designed to operate only in closed environments. It should be installed in rooms where there are no inflammable liquids, gas or other harmful substances.
Take care that no water or liquids and/or foreign bodies fall into the device.
In the event of a fault and/or impaired operation of the device, do not attempt to repair it but contact the authorized service centre.
The device must be used exclusively for the purpose for which it was designed. Any other use is to be considered improper and as such dangerous. The manufacturer declines all responsibility for damage caused by improper, wrong and unreasonable use.
-2 -

ENVIRONMENTAL PROTECTION
Our company devotes abundant resources to analyzing environmental aspects in the development of its products. All our products pursue the objectives defined in the environmental management system developed by the company in compliance with applicable standards.
Hazardous materials such as CFCs, HCFCs or asbestos have not been used in this product.
When evaluating packaging, the choice of material has been made favoring recyclable materials. Please separate the different material of which the packaging is made and dispose of all material in compliance with applicable standards in the country in which the product is used.
DISPOSING OF THE PRODUCT
The device contains internal material which (in case of dismantling/disposal) are considered TOXIC, such as electronic circuit boards. Treat these materials according to the laws in force, contacting qualified centers. Proper disposal contributes to respect for the environment and human health.
©The reproduction of any part of this manual, even in part, is prohibited unless authorized by the manufacturer.
The manufacturer reserves the right to change the product described at any time without prior notice for improvement purposes.
-3 -

CONTENTS
DESCRIPTION ____________________________________________________ 6
OVERVIEW ____________________________________________________________6 PACKAGE CONTENTS _____________________________________________________6 FRONT PANEL __________________________________________________________7
Network port _____________________________________________________________ 7 Micro-USB port ___________________________________________________________ 7 Serial port _______________________________________________________________ 7 Led _____________________________________________________________________ 7 Reset button _____________________________________________________________ 8
USERS _______________________________________________________________8 NETWORK SERVICES _____________________________________________________9
SSH_____________________________________________________________________ 9 Serial network ____________________________________________________________ 9 Wake-on-LAN_____________________________________________________________ 9 HTTP____________________________________________________________________ 9 SNMP ___________________________________________________________________ 9 UDP_____________________________________________________________________ 9 Modbus TCP/IP __________________________________________________________ 10 BACnet/IP_______________________________________________________________ 10 FTP ____________________________________________________________________ 10 Email___________________________________________________________________ 10 Reports_________________________________________________________________ 10
UPS VALUES AND EVENTS HISTORY LOG ARCHIVE _______________________________11
Eventlog________________________________________________________________ 11 Datalog_________________________________________________________________ 11
ENVIRONMENTAL SENSORS (OPTIONAL)_______________________________________12
Available sensors ________________________________________________________ 12
INSTALLATION __________________________________________________ 12
CONFIGURATION ________________________________________________ 13
OVERVIEW ___________________________________________________________13
Configuration via HTTP/HTTPS _____________________________________________ 13 Configuration via USB ____________________________________________________ 14 Configuration via SSH ____________________________________________________ 14
CONFIGURATION MENU DESCRIPTION ________________________________________15
Start menu ______________________________________________________________ 15 Setup __________________________________________________________________ 16
- 4 -
IP config________________________________________________________________ 18 Time setting_____________________________________________________________ 19 Scheduled NTP __________________________________________________________ 20 UPS config______________________________________________________________ 20 Services 1 ______________________________________________________________ 21 SNMPv1 config __________________________________________________________ 22 SNMPv1 community ______________________________________________________ 22 Email config_____________________________________________________________ 23 Email logic ______________________________________________________________ 24 Miscellaneous ___________________________________________________________ 25 Activation 1 _____________________________________________________________ 26 Services 2 ______________________________________________________________ 26 Wake-On-LAN address ____________________________________________________ 27 Wake-On-LAN delay ______________________________________________________ 27 Activation 2 _____________________________________________________________ 28 Sensors Config __________________________________________________________ 28 I/O Sensors _____________________________________________________________ 30 Security ________________________________________________________________ 31 Save and load ___________________________________________________________ 33 Password recovery _______________________________________________________ 33 Wi-Fi setup (optional card required) _________________________________________ 34 Expert mode ____________________________________________________________ 35
CONFIGURATION OF SEVERAL DEVICES _______________________________________35
FIRMWARE UPGRADE ____________________________________________ 36
FIRMWARE UPGRADE VIA HTTP ____________________________________________36 FIRMWARE UPGRADE VIA FTP _____________________________________________36
SNMPV3 CONFIGURATION ________________________________________ 37 MODBUS TCP/IP PROTOCOL_______________________________________ 39 BACNET/IP CONFIGURATION ______________________________________ 43 MODEM CONFIGURATION _________________________________________ 45
TECHNICAL DATA________________________________________________ 47
NETWORK CABLE ______________________________________________________47 OPERATING AND STORAGE CONDITIONS_______________________________________47
- 5 -

DESCRIPTION
OVERVIEW
NetMan 204 is a device that allows UPS management through a LAN (Local Area Network); the accessory supports all the main network protocols (SNMP v1 and v3, TCP/IP, HTTP and so on) and is compatible with Ethernet 10/100Mbps IPv4/6 networks. The UPS can therefore be integrated easily into medium and large-sized networks.
The device also records UPS values and events in the history log archive and can manage optional environmental sensors (not supplied with the device, but provided separately)
PACKAGE CONTENTS
NetMan 204 |
|
|
|
|
|
USB cable |
|||||||||||||||||||||
|
|
|
|
|
|
|
|
|
|
|
|
|
|
|
|
|
|
|
|
|
|
|
|
|
|
|
|
|
|
|
|
|
|
|
|
|
|
|
|
|
|
|
|
|
|
|
|
|
|
|
|
|
|
|
|
|
|
|
|
|
|
|
|
|
|
|
|
|
|
|
|
|
|
|
|
|
|
|
|
|
|
|
|
|
|
|
|
|
|
|
|
|
|
|
|
|
|
|
|
|
|
|
|
|
|
|
|
|
|
|
|
|
|
|
|
|
|
|
|
|
|
|
|
|
|
|
|
|
|
|
|
|
|
|
|
|
|
|
|
|
|
|
|
|
|
|
|
|
|
|
|
|
|
|
|
|
|
|
|
|
|
|
|
|
|
|
|
|
|
|
|
|
|
|
|
|
|
|
|
|
|
|
|
|
|
|
|
|
|
|
|
|
|
|
|
|
|
|
|
|
|
|
|
|
|
|
|
|
|
|
|
|
|
|
|
|
|
|
|
|
|
|
|
|
|
|
|
|
|
|
|
|
|
|
|
|
|
|
|
|
|
|
|
|
|
|
|
|
|
|
|
|
|
|
|
|
|
|
|
|
|
|
|
|
|
|
|
|
|
|
|
|
|
|
|
|
|
|
|
|
|
|
|
|
|
|
|
|
|
|
|
|
|
|
|
|
|
|
|
|
|
|
|
|
|
|
|
|
|
|
|
|
|
|
|
|
|
|
|
|
|
|
|
|
|
|
|
|
|
|
|
|
|
|
|
|
|
|
|
|
|
|
|
|
|
|
|
|
|
|
|
|
|
|
|
|
|
|
|
|
|
|
|
|
|
|
|
|
|
|
|
|
|
|
|
|
|
|
|
|
|
|
|
|
|
|
|
|
|
|
|
|
|
|
|
|
|
|
|
|
|
|
|
|
|
|
|
|
|
|
|
|
|
|
|
|
|
|
|
|
|
|
|
|
|
|
|
|
|
|
|
|
|
|
|
|
|
|
|
|
|
|
|
|
|
|
|
|
|
|
|
|
|
|
|
|
|
|
|
|
|
|
|
|
|
|
|
|
|
|
|
|
|
|
|
|
|
|
|
|
|
|
|
|
|
|
|
|
|
|
|
|
|
|
|
|
|
|
|
|
|
|
|
|
|
|
|
|
|
|
|
|
|
|
|
|
|
|
|
|
|
|
|
|
|
|
|
|
|
|
|
|
|
|
|
|
|
|
|
|
|
|
|
|
|
|
|
|
|
|
|
|
|
|
|
|
|
|
|
|
|
|
|
|
|
|
|
|
|
|
|
|
|
|
|
|
|
|
|
|
|
|
|
|
|
|
|
CD-Rom (User manual) |
Quick start |
- 6 -
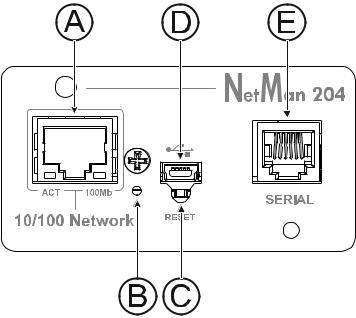
FRONT PANEL
A: Network port
B: Led
C: Reset button
D: Micro-USB port
E: Serial port
Network port
NetMan 204 connects to 10/100 Mbps Ethernet networks by means of connector RJ45. The LEDs built into the connector describe the status of the network:
•Left LED:
SOLID YELLOW: NetMan204 has detected a valid link.
FLASHING YELLOW: NetMan204 is receiving or transmitting data packets.
•Right LED
SOLID GREEN: NetMan204 is connected to a network operating at 100 Megabits per second.
Micro-USB port
NetMan 204 makes available an USB communication port through which it is possible to configure it (see paragraph “Configuration via USB”).
Serial port
NetMan 204 makes available a serial communication port to which you can connect environmental sensors (not supplied with the device, but provided separately) or a modem (not supplied with the device) for UPS teleservice.
Led
This led describes the status of NetMan 204:
•SOLID RED: NetMan 204 is not communicating with the UPS (verify PRTK Code).
•FLASHING RED: the DHCP server does not have assigned a valid IP address to NetMan 204.
•OFF: regular working.
-7 -

Reset button
The reset button allows to restart the NetMan204 or to load a default configuration with a predefined static IP address.
To reset NetMan204: keep press the reset button until the red led start flashing (ca. 2 seconds) and then release it.
To load a configuration with predefined static IP address: keep press the reset button; first the led starts flashing, then turns to solid red (ca. 10 seconds). When the led is solid red, release the reset button and the NetMan 204 will reboot with:
•IP address: 192.168.0.204
•Netmask: 255.255.0.0
•SSH service enabled
•HTTP service enabled
HTTP and SSH service are enabled temporarily without changing the configuration saved in non-volatile memory.
USERS
It is possible to access to NetMan 204 with three different users (admin / fwupgrade / user).
|
Username |
|
|
Default password |
|
|
Privileges |
|
|
|
|
|
|
|
|
|
|
|
|
|
|
|
|
|
admin |
|
|
admin |
|
|
user with right to modify the configuration |
|
|
|
|
|
|
|
|
|
|
|
|
|
|
|
|
|
fwupgrade |
|
|
fwupgrade |
|
|
user with right to upgrade the firmware |
|
|
|
|
|
|
|
|
|
|
|
|
|
|
|
|
|
user |
|
|
user |
|
|
user with right to read and download the log files |
|
|
|
|
|
|
|
|
- 8 -
NETWORK SERVICES
NetMan 204 implements a series of services based on the main network protocols. These services can be activated or deactivated according to requirements (see paragraph “Configuration”). A brief description for each of these is given below.
SSH
By means of a SSH client (available on all the main operating systems) a remote connection with NetMan 204 can be established to change its configuration (see paragraph “Configuration via SSH”).
Serial network
To emulate a point-to-point serial connection through the network (TCP/IP protocol) in order to use special function service software.
Wake-on-LAN
NetMan 204 can send “Wake-on-LAN” command for remote computers boot.
HTTP
Using the HTTP (Hyper Text Transfer Protocol), is possible to configure the NetMan 204 and the status of the UPS can be monitored by means of a web browser without having to install additional software. All the most popular web browsers are supported.
SNMP
SNMP (Simple Network Management Protocol) is a communication protocol that allows a client (manager) to make requests to a server (agent). NetMan 204 is an SNMP agent.
To exchange information, manager and agent use an addressing technique called MIB (Management Information Base). There is a MIB file for each agent, defining which variables can be requested and the respective access rights. The agent can also send messages (TRAP) without a prior request from the manager, to inform the latter of particularly important events. SNMPv3 is the evolution of SNMP and introduces new important features related to security. (See paragraph “SNMPv3”).
UDP
UDP (User Datagram Protocol) is a low level network protocol that guarantees speed in the exchange of data and low network congestion. It is the protocol used by the UPSMon software for monitoring and control of the UPS.
The UDP connection uses the UDP 33000 port by default but can be configured on other ports according to requirements.
- 9 -
Modbus TCP/IP
The UPS status can be monitored by means of the standard network protocol MODBUS TCP/IP. Modbus TCP/IP is simply the Modbus RTU protocol with a TCP interface that runs on Ethernet.
BACnet/IP
The UPS status can be monitored by means of the standard network protocol BACnet/IP.
BACnet (Building Automation and Control networks) is a data communication protocol mainly used in the building automation and HVAC industry (Heating Ventilation and Air-Conditioning).
FTP
FTP (File Transfer Protocol) is a network protocol used for file exchange. NetMan 204 uses this protocol for:
1.download of files of the UPS values and events history log archive (Datalog and Eventlog);
2.download and upload of configuration files;
3.firmware upgrade.
In both cases a client FTP is required, configured with these parameters:
•Host: hostname or NetMan 204 IP address;
•User: see chapter “Users”;
•Password: current password.
The connection can also be established using a web browser (all the most popular web browsers are supported), by inserting the hostname or IP address of the NetMan 204.
NetMan 204 can send a notification e-mail if one or more alarm conditions occur. The e-mails can be sent to up to three recipients and they can be sent for seven different kinds of alarm.
SMTP (Simple Mail Transfer Protocol) is the protocol used to send the e-mails. They are sent to an SMTP server on port 25. For more details, see paragraph “Configuration”
Reports
NetMan 204 can send periodic e-mails with an attachment containing the files of the UPS values and events history log archive.
This service can be used to periodically save the history log archives.
The “Email” service must be enabled in order to send reports; the reports are sent to all the addresses configured for this service (for more details see paragraph “Configuration”).
- 10 -
UPS VALUES AND EVENTS HISTORY LOG ARCHIVE
NetMan 204 records the UPS values (Datalog) and events (Eventlog) in a history log archive. The data are saved to file in text format.
The format used to record the date and time is of the type: YY/MM/DD HH:MM:SS
Eventlog
The Eventlog service is always active and records all relevant UPS events in the ‘event.log’ file. The file can be downloaded via FTP or sent by e-mail using the “Email report” service. The data are saved in circular list mode, thus the most recent data are saved by overwriting the oldest data.
Datalog
The Datalog service records the main data of the UPS in the ‘data.log’ file. The file can be downloaded via FTP or can be sent by e-mail using the “Email report” service. The following data are monitored:
•Input voltage phase 1
•Input voltage phase 2
•Input voltage phase 3
•Input frequency
•Output voltage phase 1
•Output voltage phase 2
•Output voltage phase 3
•Load on phase 1
•Load on phase 2
•Load on phase 3
The interval of time between one recording and the next (Log frequency) can be configured by the user (see paragraph “Miscellaneous Menu”). The data are saved in circular list mode, thus the most recent data are saved by overwriting the oldest data. Data for up to 256 different points of time can be recorded.
- 11 -

ENVIRONMENTAL SENSORS (OPTIONAL)
It is possibile to connect to NetMan 204 the environmental sensors for monitoring temperature, humidity and digital input/output.
The information provided by these sensors can be showed with the UPS monitoring and control software or with a web browser (the HTTP service must be active).
The values provided by the sensors may also be requested with SNMP according to the RFC 3433 standard (MIB files in the bundled CD).
Available sensors
•Temperature: detects the environmental temperature in °C.
•Humidity & Temperature: detects the relative humidity in % and the environmental temperature in °C.
•Digital I/O & Temperature: detects the environmental temperature in °C and features a digital input and a digital output.
It is possible to connect up to 3 environmental sensor to a NetMan 204 (for sensor installation please see the sensors’ manual).
INSTALLATION
1.Remove the cover of the UPS expansion slot by removing the two retaining screws.
2.Insert NetMan 204 in the slot.
3.Secure Netman 204 in the slot using the two screws removed previously.
4.Connect the device to the network by means of connector RJ-45 (see “Specifications for the cabling of the network cable”)
- 12 -

CONFIGURATION
OVERVIEW
NetMan 204 can be configured via USB, via SSH or via HTTPS.
NetMan 204 comes provided as factory default with DHCP enabled and with the following services active: SSH, HTTP, SNMP, UDP and FTP.
In order to change the configuration of NetMan 204, you have to log in as admin (default password “admin”).
5
NetMan 204 needs approx. 2 minutes to become operational from when it is powered up or after a reboot; before this time the device may not respond to commands that are sent to it.
Configuration via HTTP/HTTPS
In order to change the configuration via http/https, you have to insert in your web browser the hostname or IP address of the NetMan 204 and then log in as admin (default password: "admin").
The HTTPS service uses TLS (transport layer security) in order to provide cryptographic security. However, the certificate used is self-signed and therefore the web browser may prompt a security alert; in this case you can ignore the alert and proceed with the configuration of NetMan 204.
Once login has been effected, you can browse through the menus to configure the NetMan 204.
In order to make a new configuration effective, it is necessary to confirm it (OK button for each configuration page changed) and then reboot the NetMan 204 (as required with a pop-up by your web browser).
- 13 -

Configuration via USB
To configure NetMan 204 via USB it is necessary to:
•Connect, with the USB cable provided, the micro-USB port with the USB port of a PC with Windows operating system.
•If not previously installed, install the USB driver (after driver installation, a virtual COM named “NetMan 204 Serial” will be present in device manager).
•Execute a terminal emulation program with the following settings: COMn (1), 115200 baud, no parity, 8 databits, 1 stop bit, no flow control.
(1) COMn = COM port assigned to “NetMan 204 Serial” by device manager.
•Press the “Enter” key of the PC.
•At the login prompt, enter “admin”.
•At the password prompt, enter the current password (default password: "admin").
During password’s typing, no character is shown.
Once login has been effected, the screen of the start menu is displayed. From this screen it is possible to access the various menus to change NetMan 204 settings (see paragraph “Start menu” and following paragraphs).
Configuration via SSH
To configure NetMan 204 via SSH it is necessary to:
•Execute a SSH client on a PC connected in a network to NetMan 204 set with the IP address of the device to be configured.
•At the login prompt, enter “admin”.
•At the password prompt, enter the current password (default password: "admin").
During password’s typing, no character is shown.
For proper configuration of NetMan 204, you must configure the SSH client so that the backspace key sends "Control-H".
Please verify the keyboard options of your SSH client.
Once login has been effected, the screen of the start menu is displayed. From this screen it is possible to access the various menus to change NetMan 204 settings (see paragraph “Start menu” and following paragraphs).
- 14 -

CONFIGURATION MENU DESCRIPTION
In order to make a new configuration effective, it is necessary to save it in the flash memory; this action automatically reboot the NetMan 204 (refer to “Menu Save and load”).
Start menu
Once login has been effected via SSH or USB, a screen like the following is displayed:
|
------------------------/ |
/ |
/ |
Netman 204 |
/ |
/------------------------ |
|
/ |
|
Setup.......... |
:<-- |
|
View status.... |
: |
|
Change password: |
|
|
Service log.... |
: |
|
Wi-Fi setup.... |
:no card installed |
|
Expert mode.... |
: |
Press [ESC] for logout
SysVer. S15-1 - AppVer. 01.04.000
|
Function |
|
|
Description |
|
|
|
|
|
||
|
|
|
|
|
|
|
Setup |
|
To enter main configuration menu |
||
|
|
|
|
||
|
View status |
|
To see the status of the device |
||
|
|
|
|
||
|
Change password |
|
To modify the password (see also Password recovery) |
||
|
|
|
|
||
|
Service log |
|
To generate a log file of the card (when requested by the service) |
||
|
|
|
|
||
|
|
|
To configure Wi-Fi connection |
||
|
Wi-Fi setup |
For Wi-Fi connection, an optional card is required. The Wi-Fi card is not |
|||
|
|
|
|
provided with NetMan 204 but it has to be purchased separately. |
|
|
Expert mode |
|
To enter Expert mode (more information at paragraph “Expert mode”) |
||
|
|
|
|
|
|
To move within this menu and the following menus, use the keys as described in the following table; the arrow or the cursor shows the current selection.
|
Key |
|
Function |
|
|
||
|
|
|
|
|
Direction keys (Arrow up, down, right, left) |
|
To move the cursor within the menus |
|
Tab |
|
Goes on to next option |
|
Enter (1) |
|
Choice of submenu |
|
|
|
|
|
|
Confirmation of characters entered |
|
|
|
|
|
|
Esc (1) |
|
Exit main menu (2) |
|
|
Return to previous menu |
|
|
|
|
|
|
|
|
|
(1)Some keys can have a different function depending on the menu.
(2)To exit from a menu a confirmation (‘Y’ or ‘N’) is required after pressing the ESC key.
-15 -
Loading...