

Page 1
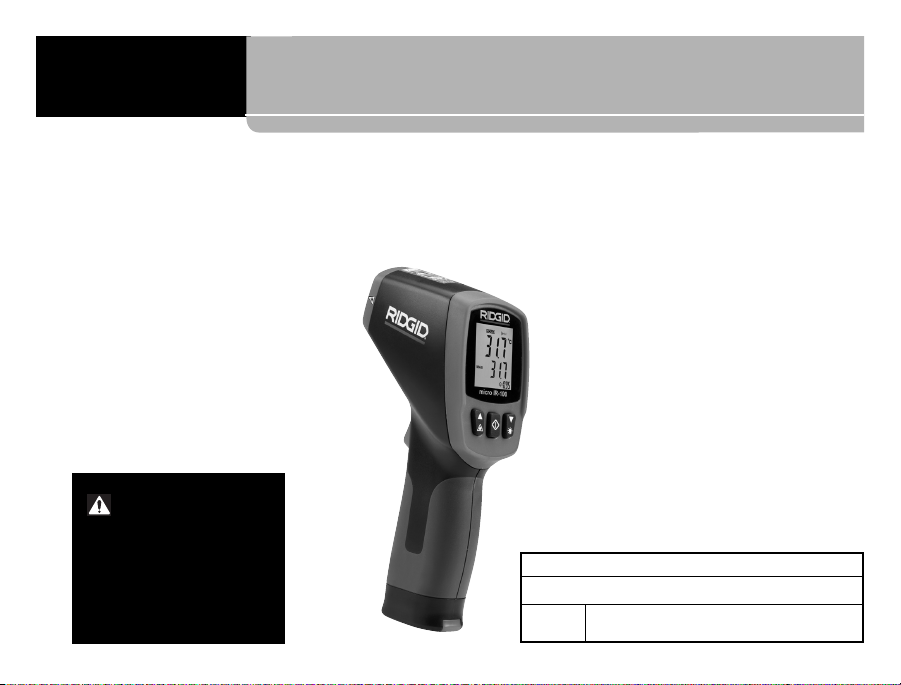
micro IR-100
Non-Contact Infrared Thermometer
micro IR-100 Operator’s Manual
• Français – 13
• Castellano – pág. 27
• Türkçe – 41
• Русский язык – 55
WARNING!
Read this Operator’s Man ual carefully before using
this tool. Failure to understand and follow the contents of this manual may
result in electrical shock,
fire and/or serious person al injury.
Page 2

micro IR-100 Non-Contact Infrared Thermometer
Ridge Tool Company
II
Menu Button Use ..................................................................11
High Alarm ............................................................................11
Low Alarm .............................................................................11
Temperature Display Units-C/F.............................................11
Cleaning ..................................................................................11
Storage ....................................................................................11
Service and Repair.................................................................12
Disposal ..................................................................................12
Battery Disposal.....................................................................12
Lifetime Warranty.....................................................Back Cover
*Original Instructions - English
Table of Contents
Recording Form for Machine Serial Number.........................1
Safety Symbols.........................................................................2
General Safety Rules
Work Area Safety ...................................................................3
Electrical Safety......................................................................3
Personal Safety ......................................................................3
Equipment Use and Care .......................................................3
Service....................................................................................4
Specific Safety Information
Infrared Thermometer Safety .................................................4
Description, Specifications and Standard Equipment
Description..............................................................................4
Specifications .........................................................................4
Parts .......................................................................................6
LCD Display Icons..................................................................6
Standard Equipment...............................................................6
Laser Classification .................................................................7
FCC Statement..........................................................................7
Electromagnetic Compatibility (EMC) ....................................7
Changing/Installing Batteries..................................................7
Pre-Operation Inspection ........................................................8
Set-Up and Operation
Set-Up ....................................................................................8
Operation
Turning ON and OFF (Taking Measurements) .....................10
micro IR-100 Controls
Continuous Measurement (Scanning) Mode........................10
Laser Enabled/Disabled .......................................................10
Backlight ...............................................................................11
Page 3
micro IR-100
Non-Contact Infrared Thermometer
micro IR-100 Non-Contact Infrared Thermometer
Record Serial Number below and retain product serial number which is located on nameplate.
Serial
No.
micro IR-100
Page 4
micro IR-100 Non-Contact Infrared Thermometer
Ridge Tool Company
2
Safety Symbols
In this operator’s manual and on the product, safety symbols and signal words are used to communicate important safety information. This
section is provided to improve understanding of these signal words and symbols.
This is the safety alert symbol. It is used to alert you to potential personal injury hazards. Obey all safety messages that follow this
symbol to avoid possible injury or death.
DANGER indicates a hazardous situation which, if not avoided, will result in death or serious injury.
WARNING indicates a hazardous situation which, if not avoided, could result in death or serious injury.
CAUTION indicates a hazardous situation which, if not avoided, could result in minor or moderate injury.
NOTICE indicates information that relates to the protection of property.
This symbol means read the operator’s manual carefully before using the equipment. The operator’s manual contains important
information on the safe and proper operation of the equipment.
NOTICE
DANGER
WARNING
CAUTION
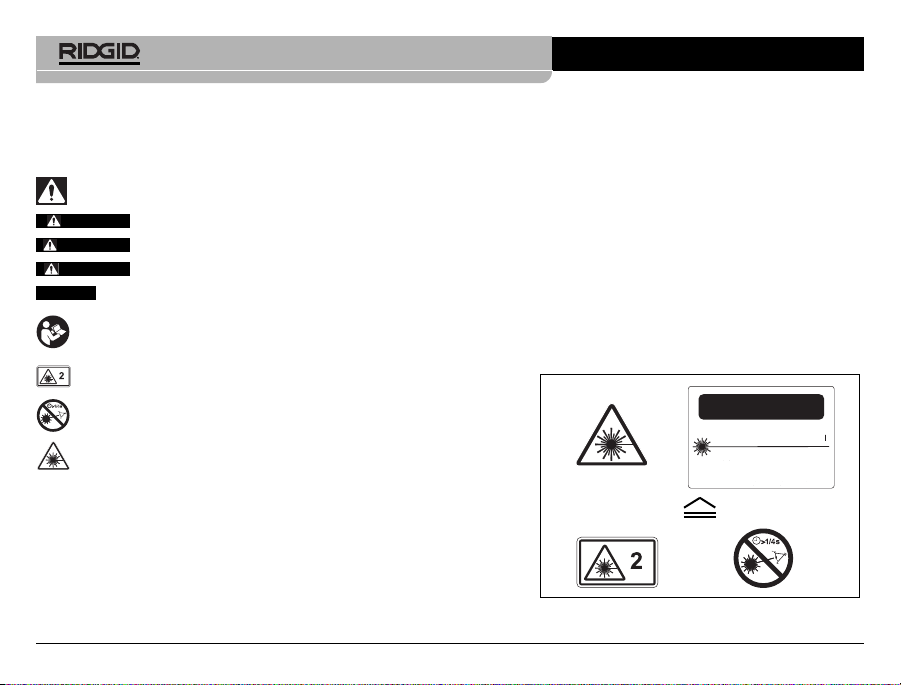
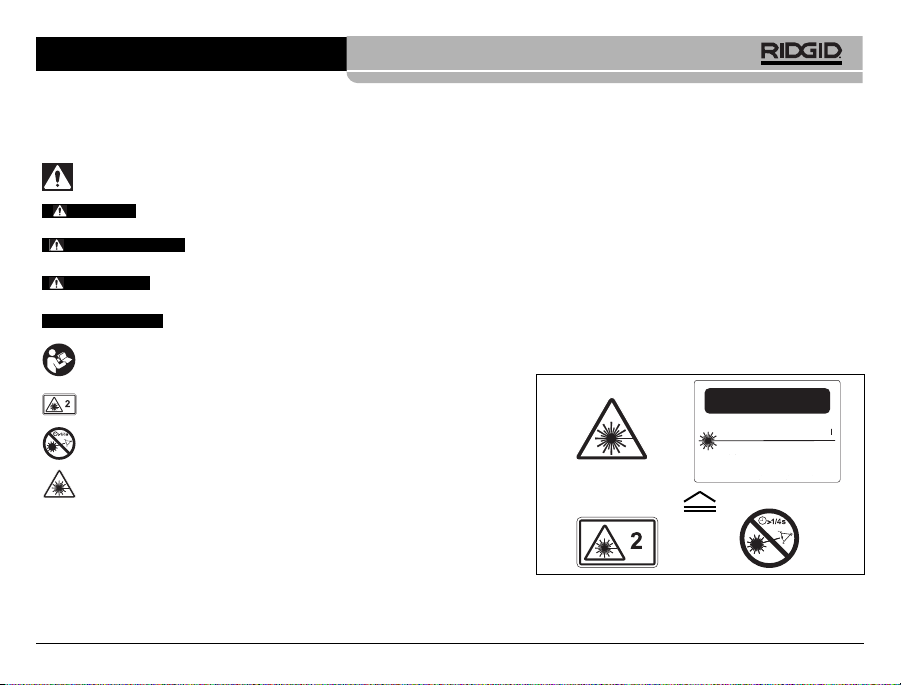
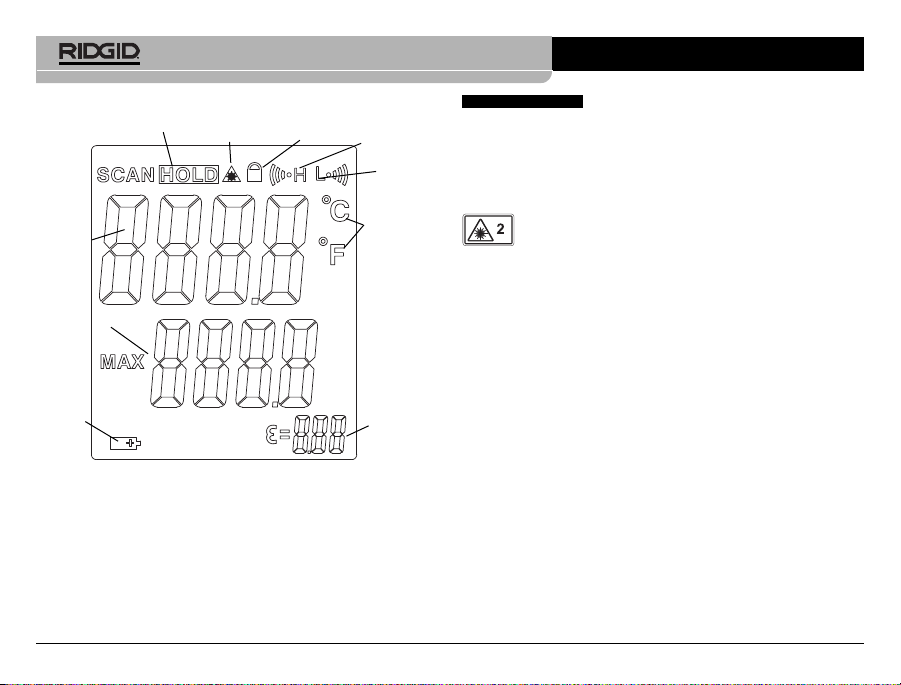
This symbol means this device contains a Class 2 Laser.
This symbol means do not stare into the laser beam.
This symbol warns of the presence and hazard of a laser beam.
CAUTION
LASER RADIATION
DO NOT STARE INTO BEAM
MAXIMUM OUTPUT < 1mW
WAVELENGTH 630-670nm
CLASS 2 LASER PRODUCT
EN 60825-1:1994/A11:1996/A2:2001/A1:2002
Page 5
micro IR-100 Non-Contact Infrared Thermometer
Ridge Tool Company
3
shoes, hard hat, or hearing protection used for appropriate conditions will reduce personal injuries.
• Do not overreach. Keep proper footing and balance at all
times. This enables better control of the power tool in unexpected situations.
Equipment Use and Care
• Do not force equipment. Use the correct equipment for your
application. The correct equipment will do the job better and
safer at the rate for which it is designed.
• Do not use equipment if the switch does not turn it ON and
OFF. Any tool that cannot be controlled with the switch is dangerous and must be repaired.
• Disconnect the batteries from the equipment before making
any adjustments, changing accessories, or storing. Such
preventive safety measures reduce the risk of injury.
• Store idle equipment out of the reach of children and do not
allow persons unfamiliar with the equipment or these instructions to operate the equipment. Equipment can be dan-
gerous in the hands of untrained users.
• Maintain equipment. Check for misalignment or binding of mov-
ing parts, missing parts, breakage of parts and any other condition that may affect the equipment’s operation. If damaged, have
the equipment repaired before use. Many accidents are caused
by poorly maintained equipment.
• Use the equipment and accessories in accordance with
these instructions, taking into account the working conditions and the work to be performed. Use of the equipment for
operations different from those intended could result in a hazardous situation.
• Use only accessories that are recommended by the manu-
facturer for your equipment. Accessories that may be suitable
General Safety Rules
WARNING
Read all safety warnings and instructions. Failure to follow the
warnings and instructions may result in electric shock, fire
and/or serious injury.
SAVE THESE INSTRUCTIONS!
Work Area Safety
• Keep your work area clean and well lit. Cluttered or dark areas
invite accidents.
• Do not operate equipment in explosive atmospheres, such
as in the presence of flammable liquids, gases or dust. Equipment can create sparks which may ignite the dust or fumes.
• Keep children and by-standers away while operating equip-
ment. Distractions can cause you to lose control.
Electrical Safety
• Avoid body contact with earthed or grounded surfaces such
as pipes, radiators, ranges and refrigerators. There is an in-
creased risk of electrical shock if your body is earthed or
grounded.
• Do not expose equipment to rain or wet conditions. Water
entering equipment will increase the risk of electrical shock.
Personal Safety
• Stay alert, watch what you are doing and use common sense
when operating equipment. Do not use equipment while you
are tired or under the influence of drugs, alcohol or medication. Amoment of inattention while operating equipment may re-
sult in serious personal injury.
• Use personal protective equipment. Always wear eye protection. Protective equipment such as dust mask, non-skid safety
Page 6
micro IR-100 Non-Contact Infrared Thermometer
Ridge Tool Company
4
If you have any question concerning this Ridge Tool product:
• Contact your local RIDGID distributor.
• Visit www.RIDGID.com or www.RIDGID.eu to find your local
Ridge Tool contact point.
• Contact Ridge Tool Technical Services Department at rtctechservices@emerson.com, or in the U.S. and Canada call (800) 519-
3456.
Description, Specifications
And Standard Equipment
Description
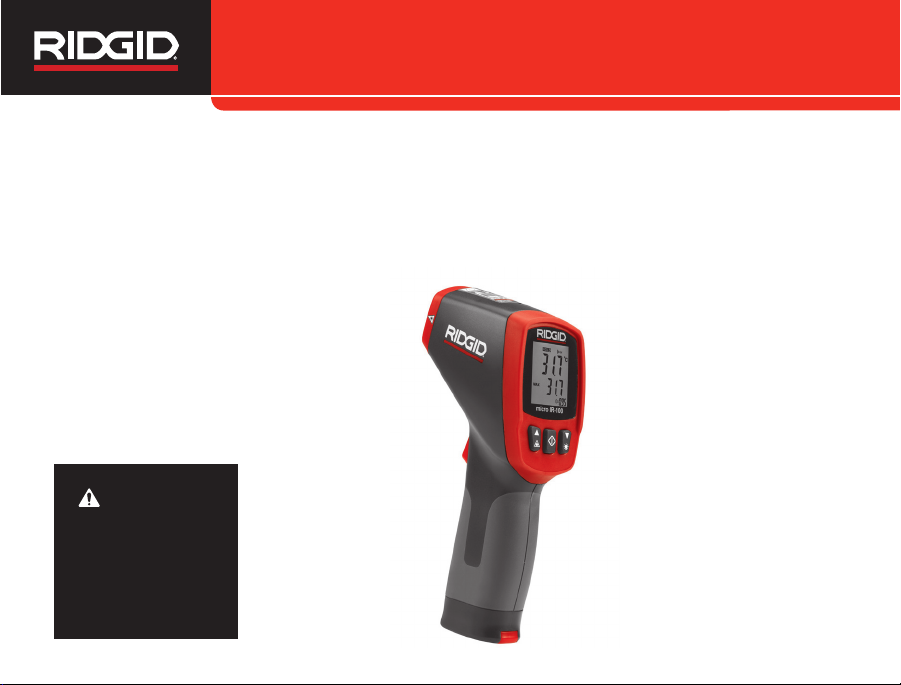
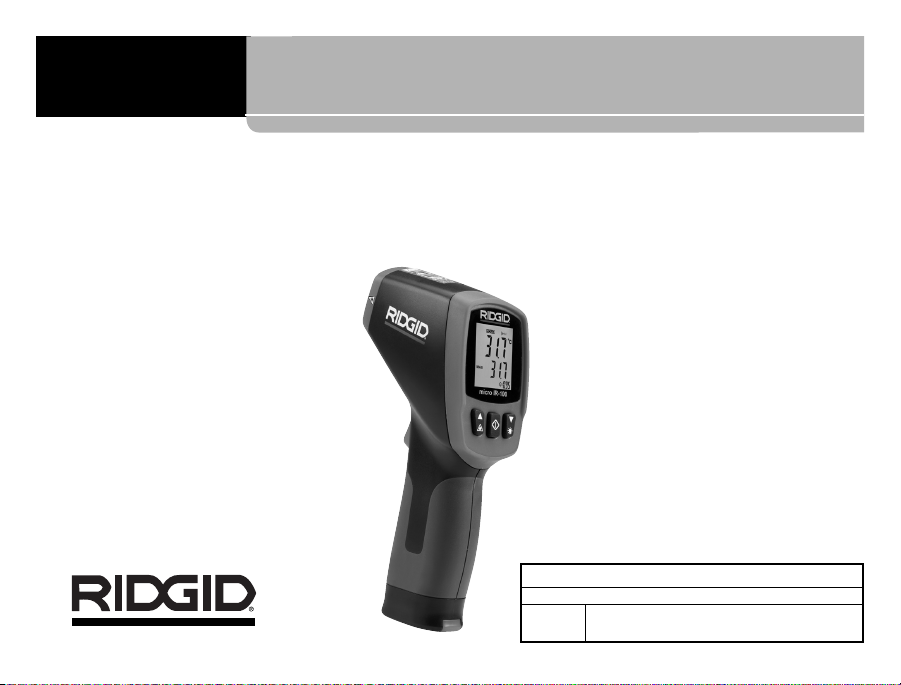
The RIDGID®micro IR-100 Non-Contact Infrared Thermometer provides simple, quick, and accurate surface temperature readings at
the push of a button. You simply squeeze the trigger and point the
ultra-sharp dual class II lasers at the surface being measured. The
micro IR-100 provides an immediate temperature measurement on
a clear, easy-to-read backlit LCD display. In addition to numerous
other uses, this rugged, compact instrument enables professional
tradesman to diagnose heating and ventilation problems, perform
preventative monitoring of electrical motors and systems, troubleshoot steam traps and quickly check fuses or circuit breakers for
overheating without contact.
The micro IR-100 uses optics to sense emitted, reflected and transmitted energy, which is collected and focused onto a detector. The
unit’s electronics translate the information into a temperature reading, which is displayed. Lasers are used to assist in aiming.
Specifications
Temperature Range......................-58°F to 1472°F
(-50°C to 800°C)
Distance To Spot Ratio .................20 to 1
for one piece of equipment may become hazardous when used
with other equipment.
• Keep handles dry and clean; free from oil and grease.Allows
for better control of the equipment.
Service
• Have your equipment serviced by a qualified repair person
using only identical replacement parts. This will ensure that
the safety of the tool is maintained.
Specific Safety Information
WARNING
This section contains important safety information that is
specific to this tool.
Read these precautions carefully before using the RIDGID
®
micro IR-100 Non-Contact Infrared Thermometer to reduce the
risk of eye injury or other serious personal injury.
SAVE THESE INSTRUCTIONS!
Keep this manual with the tool for use by the operator.
Infrared Thermometer Safety
• Do not look into the laser beam. Looking into the laser beam
may be hazardous to the eyes. Do not look at the laser beam with
optical aids (such as binoculars or telescopes).
• Do not direct the laser beam towards other people. Make
sure the laser is aimed above or below eye level. Laser beams
may be hazardous to the eyes.
• Take appropriate precautions when working near electrical,
moving or hot parts. Close contact may cause electrical shock,
entanglement, burns and other serious injury. Protective equipment may be required.
Page 7
Measuring Accuracy .....................-58°F ~68°F (-50°C ~20°C) :
±4.5°F (2.5°C)
68°F ~1472°F (20°C ~800°C)
±1.0% or ±1.8°F (1.0°C)
Repeatability...................................-58°F ~68°F (-50°C ~20°C) :
±2.3°F (1.3°C)
68°F ~1472°F (20°C ~800°C)
±0.5% or ±0.9°F (0.5°C)
Response Time ..............................150ms
Spectral Response.........................8~14um
Emissivity .......................................Fixed, 0.95
Over Range Indication ...................LCD will show “----”
Diode Laser ..................................Output <1mW, Wavelength
630~670nm, Class 2 Laser
Product
Temperature Display.....................Current Temperature, MAX
Temperature
Measuring Units............................Fahrenheit, Celsius
Operating Temperature .................32°F to 122°F (0°C to 50°C)
Storage Temperature....................14°F to 140°F (-10°C to 60°C)
Display Resolution ..........................0.1°F (0.1°C)
Relative Humidity..........................10%~90% RH Operating,
<80% RH Storage
Batteries ....................................... 9V Battery (1), NEDA 1604A
or IEC 6LR61, or Equivalent
IP Rating.......................................IP54
Weight...........................................0.6 lbs (0.3 kg)
micro IR-100 Non-Contact Infrared Thermometer
Ridge Tool Company
5
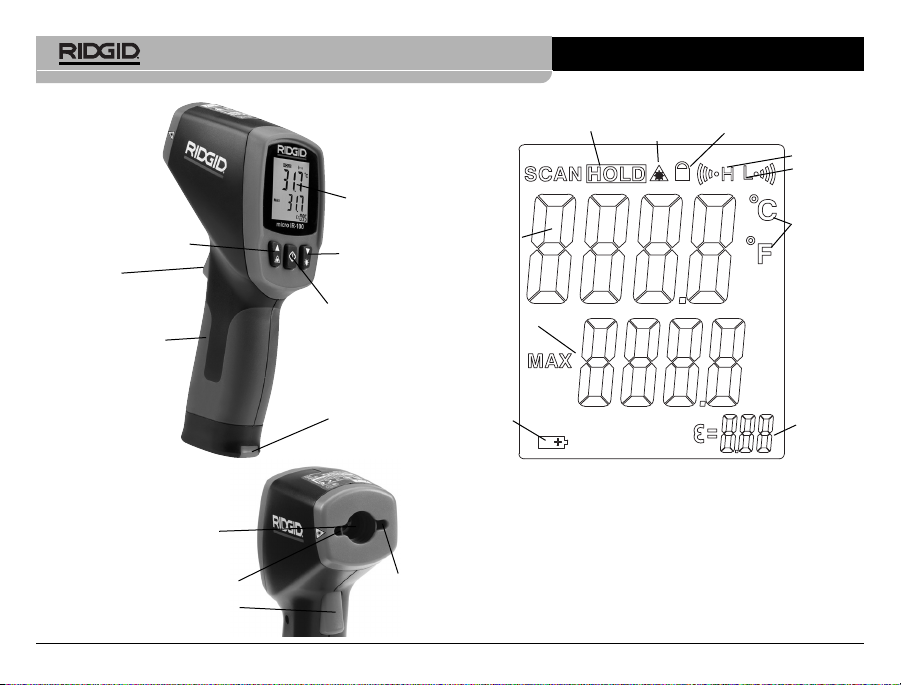
• Backlight LCD Display
• Trigger Lock
• Set High and Low Alarms
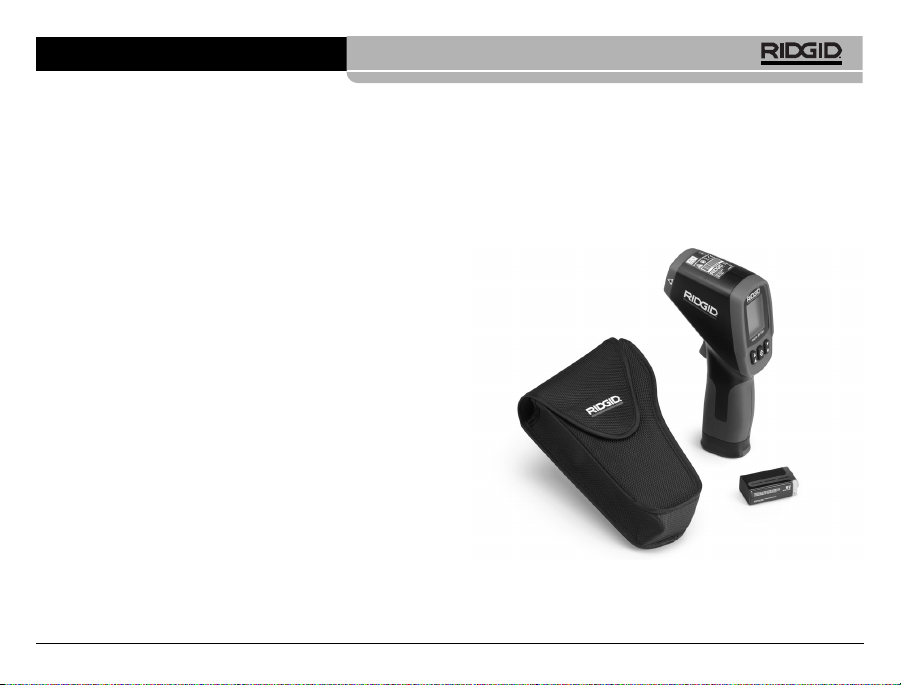
Figure 1 – micro IR-100 Non-Contact Infrared Thermometer
Features
• Rapid Detection Function
• Dual Class II Laser Sighting
• Automatic Data Hold
• MAX Temperature Displays
• Precise Non-Contact Measurements
• Automatic Selection Range and Display Resolution 0.1°F (0.1°C)
Page 8
micro IR-100 Non-Contact Infrared Thermometer
Ridge Tool Company
6
Standard Equipment
• micro IR-100
• Carrying Case
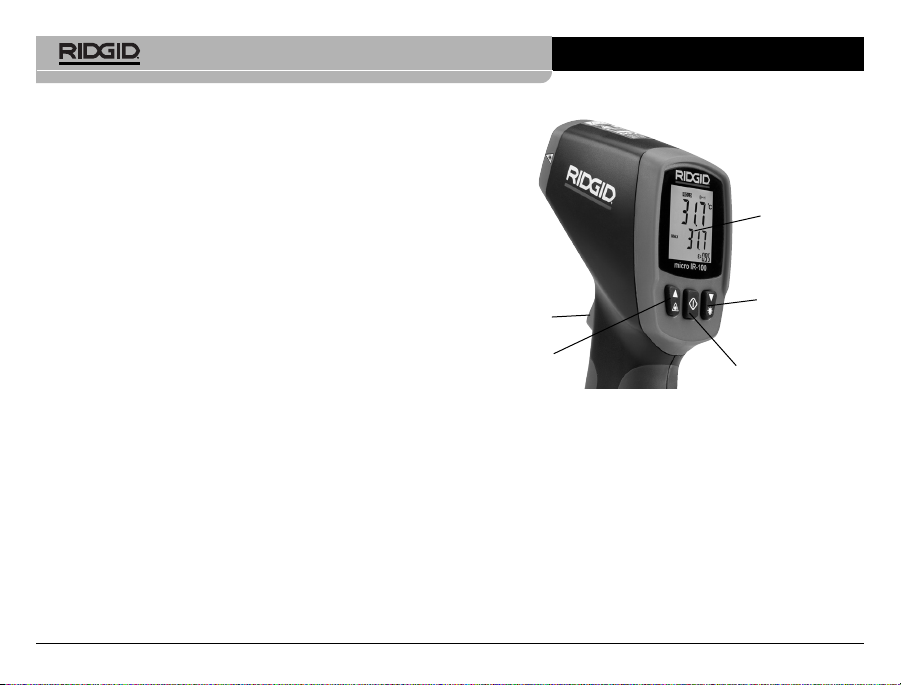
Current
Temperature
Value
Lock
Low
Battery
High Alarm
Low Alarm
Celsius/-
Fahrenheit
Temperature
Units
Maximum
Temperature
Value
Data Hold
Emissivity
Value
Figure 3 – micro IR-100 Display Icons
LCD Display Icons
Laser Enable
• Battery 1 x 9V
• Operator's Manual
Battery
Compartment
Handle Grip
Trigger
Menu Button
Up Button/Laser Enable
LCD Display
Down Button/-
Backlight
Figure 2 – micro IR-100 Parts
Parts
Trigger
Infrared Sensor
Laser
Laser
Page 9
micro IR-100 Non-Contact Infrared Thermometer
Ridge Tool Company
7
Electromagnetic Compatibility (EMC)
The term electromagnetic compatibility is taken to mean the capability of the product to function smoothly in an environment where
electromagnetic radiation and electrostatic discharges are present
and without causing electromagnet interference to other equipment.
The RIDGID micro IR-100 conforms to all applicable
EMC standards. However, the possibility of it causing interference
in other devices cannot be precluded.
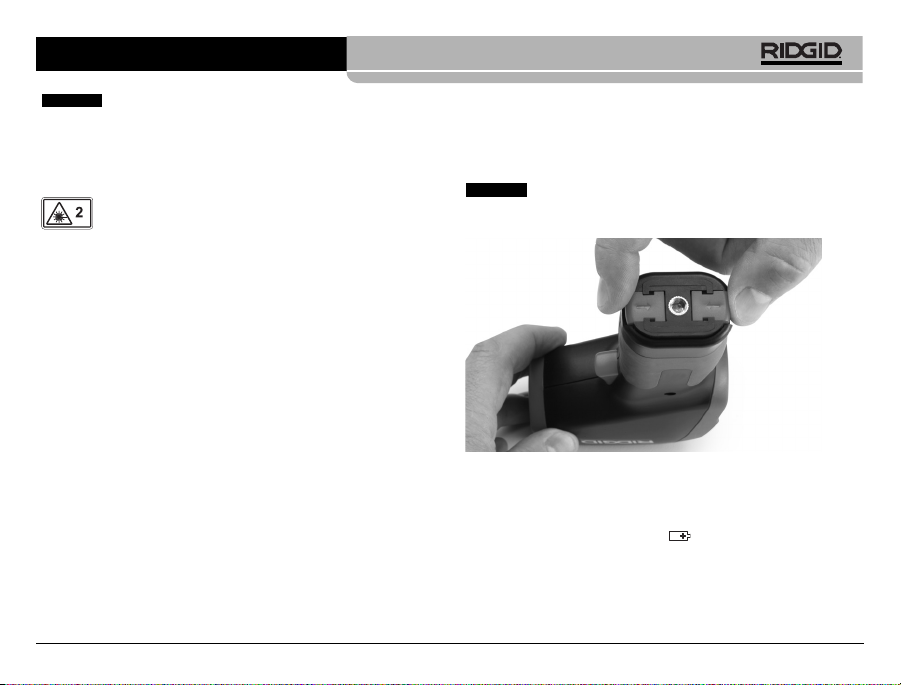
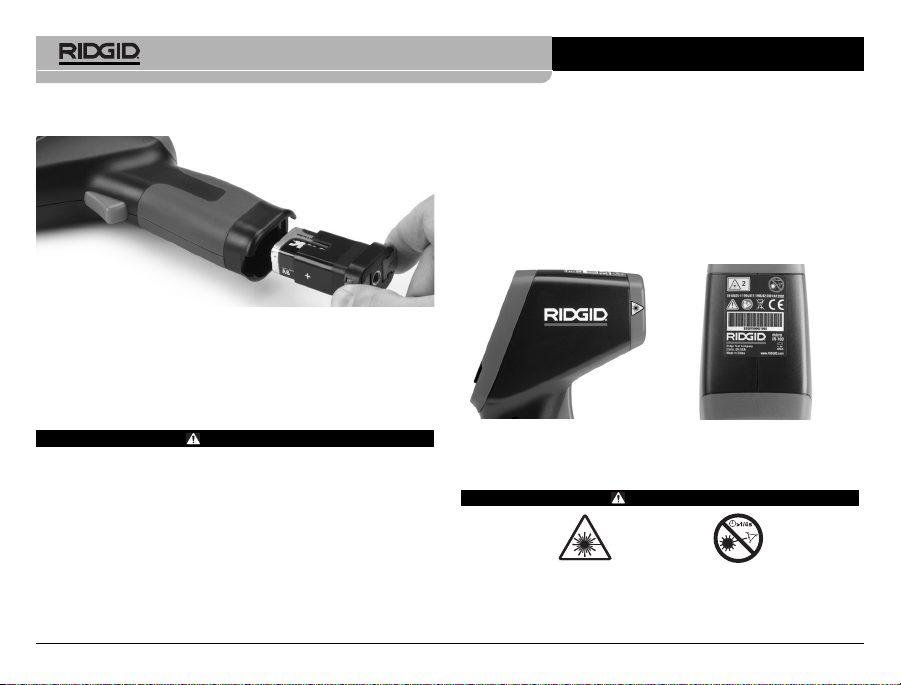
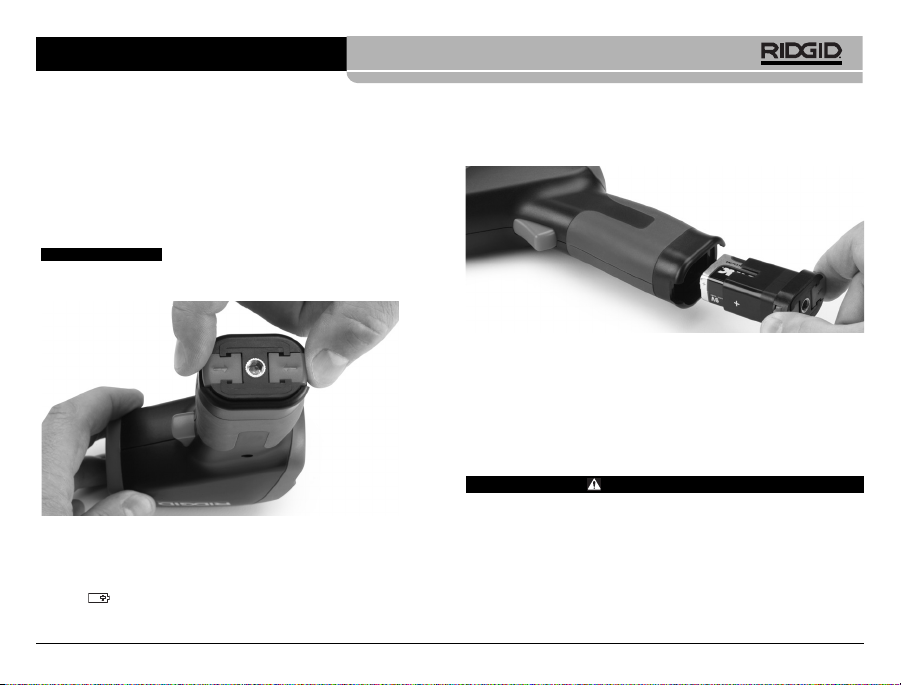
Figure 4 – Removing Battery Compartment
Changing/Installing Batteries
The micro IR-100 is supplied without a battery installed. If the battery indicator
(Figure 3)
displays , the battery needs to be replaced. Remove the battery prior to long term storage to avoid
battery leakage.
1. Squeeze the battery clips and remove battery compartment
from the thermometer
(See Figure 4)
. If needed, remove bat-
tery.
This equipment is used to make temperature measurements. Incorrect use or improper application may result in incorrect
or inaccurate measurements. Selection of appropriate measurement methods for the conditions is the responsibility of the user.
Laser Classification
The RIDGID micro IR-100 generates a visible laser beam
that is emitted from the front of the device.
The device complies with class 2 lasers according to: EN 608251:1994/A11:1996/A2:2001/A1:2002
FCC Statement
This equipment has been tested and found to comply with the limits for a Class B digital device, pursuant to part 15 of the FCC Rules.
These limits are designed to provide reasonable protection against
harmful interference in a residential installation.
This equipment generates, uses, and can radiate radio frequency
energy and, if not installed and used in accordance with the instructions, may cause harmful interference to radio communications.
However, there is no guarantee that interference will not occur in a
particular installation.
If this equipment does cause harmful interference to radio or television reception, which can be determined by turning the equipment off and on, the user is encouraged to try to correct the
interference by one or more of the following measures:
• Reorient or relocate the receiving antenna.
• Increase the separation between the equipment and receiver.
• Consult the dealer or an experienced radio/TV technician for
help.
NOTICE
NOTICE
Page 10
2. Install 9V alkaline battery (6LR61), observing the correct polarity as indicated on the battery compartment.
Figure 5 – Battery Holder and Polarity Marking
3. Squeeze the clips and firmly insert into thermometer. The
holder will only go in one way. Do not force. Confirm securely
attached.
Pre-Operation Inspection
WARNING
Before each use, inspect your infrared thermometer and correct any problems to reduce the risk of injury or incorrect
measurements.
Do not look into the laser beam. Looking into the laser beam
may be hazardous to the eyes.
1. Clean any oil, grease or dirt from equipment. This aids inspection.
2. Inspect the micro IR-100 for any broken, worn, missing, misaligned or binding parts, or any other condition which may prevent safe and normal operation.
micro IR-100 Non-Contact Infrared Thermometer
Ridge Tool Company
8
3. Check that the warning labels are present, firmly attached and
readable.
(See Figure 6.)
4. If any issues are found during the inspection, do not use the infrared thermometer until it has been properly serviced.
5. Following the Operation Instructions, turn the infrared thermometer ON, make a measurement and confirm the same
measurement with another instrument (contact thermometer,
etc.). If the correlation between the measurements is not acceptable, do not use the infrared thermometer until it has been
properly serviced.
Figure 6 – Warning Labels
Set-Up and Operation
WARNING
Do not look into the laser beam. Looking into the laser beam
may be hazardous to the eyes. Do not look at the laser beam
with optical aids (such as binoculars or telescopes).
Page 11
micro IR-100 Non-Contact Infrared Thermometer
Ridge Tool Company
9
Figure 7 – Field Of View
The spot should always be smaller than the surface. The
smaller the surface, the closer the micro IR-100 should be to
the surface. For the best accuracy, the surface should be twice
as large as the spot.
Emissivity – Emissivity is a term use to describe energy emitting characteristics of materials and has a value ranging from
0 to 1. The micro IR-100 uses a fixed emissivity of 0.95 to calculate temperatures. This value is appropriate for the great majority of uses, including most painted surfaces
.
Shiny or polished surfaces have a low emissivity and will give
inaccurate readings. One way to compensate for this is to apply
masking tape or flat black paint to the surface. Allow the tape
or paint to come to the same temperature as the surface and
measure the temperature of the tape or paint.
Temperature – While the micro IR-100 compensates for variation from ambient temperature, large changes in ambient and
measured temperatures can reduce accuracy. When signifi-
Do not direct the laser beam towards other people. Make sure
the laser is aimed above or below eye level. Laser beams may
be hazardous to the eyes.
Take appropriate precautions when working near electrical,
moving or hot parts. Close contact may cause electrical shock,
entanglement, burns and other serious injury. Protective equipment may be required.
Set up and operate the infrared thermometer according to
these procedures to reduce the risk of injury or incorrect measurements.
Set-Up
1. Check for an appropriate work area as indicated in the
General
Safety Section
.
2. Inspect the object being measured to and confirm that you have
correct equipment for the application.
See the Specifications
section
for range, accuracy and other information.
There are a variety of factors that can affect the accuracy of
the micro IR-100, including:
Field of view – The micro IR-100 uses two lasers to project
points on either side of the area to be measured. These points
indicate the approximate diameter of the area (the “Spot”) that
the temperature is being measured in. As the micro IR-100
moves further (D) away from the surface, that area and spot
size (S) increases. The area is approximately 0.05 times the
distance to the surface.
(See Figure 7.)
Surface
D:S=20:1
25.4mm @
1.0in@ 20in
508mm
1016mm
508mm @
S
2.0in@ 40in
D
Page 12
micro IR-100 Non-Contact Infrared Thermometer
Ridge Tool Company
10
micro IR-100 Controls
Figure 8 – micro IR-100 Display/Buttons
Continuous Measurement (Scanning) Mode
The micro IR-100 can be locked ON to allow measurements without holding the trigger. Make sure that the unit is pointed in a safe
direction away from any bystanders before turning ON. Turn the
micro IR-100 ON by squeezing and holding the trigger. While holding the trigger, press and release the menu button. The SCAN and
Lock icons will be ON. Release the trigger, and the micro IR-100 will
continuously update the measured temperature until the trigger
switch is squeezed and released again.
Laser Enabled/Disabled
If needed, the lasers used for aiming can be turned off to help conserve battery life. If this is done, extra care must be used when aim-
cant changes in ambient temperature (more than 30°F or 17°C)
are encountered, allow fifteen minutes for the micro IR-100 to
adjust for best accuracy.
Obstructions – Steam, dust, smoke and other obstructions
like glass or plastic between the micro IR-100 and the surface
being measured can decrease accuracy. These obstruct the
unit optics or give false readings (measure the temperature of
the glass instead of the surface). Do not use when obstructions
are present.
Consider these factors prior to operating the micro IR-100.
3. Make sure that all equipment has been properly inspected.
Operation
Turning ON and OFF (Taking Measurements)
1. Hold the micro IR-100 by the handle grip and point it at the
surface to be measured. Keep away from any electrical, moving or hot parts. Make sure that the unit is pointed in a safe direction away from any bystanders before turning ON.
2. Squeeze the trigger to turn the micro IR-100 ON. When the
trigger is squeezed, the SCAN icon will be ON, and the micro
IR-100 will continuously update the displayed current temperature value and display the maximum temperature value since
the unit was turned ON.
The micro IR-100 can be moved slowly over the surface to locate hot or cool areas.
See the High Alarm and Low Alarm sec-
tions
for information on high and low alarm settings.
3. When the trigger is released, the HOLD icon will be ON. The
micro IR-100 will automatically turn OFF after seven seconds
unless the unit is in Continuous Measurement mode.
Menu Button
Trigger
LCD Display
Down Button/-
Backlight
Laser
Page 13
micro IR-100 Non-Contact Infrared Thermometer
Ridge Tool Company
11
turn the Low Alarm feature ON/OFF as indicated on the current
temperature value line. Press and release the menu button again.
The Low Alarm icon will continue to flash, and the Low Alarm temperature will appear. Use the up/down buttons to change the Low
Alarm temperature as desired. Squeeze the trigger to exit the Settings mode and save your selection.
Temperature Display Units - °C/°F
The micro IR-100 can display temperatures in either degrees Celsius (C) or Fahrenheit (F). To change the display unit, squeeze and
release the trigger, and then press and release the menu button until
the temperature unit on the screen is flashing. Use the up/down buttons to switch between F or C as desired. Squeeze the trigger to
exit the Settings mode and save your selection.
Cleaning
Do not immerse the RIDGID micro IR-100 Non-Contact Infrared
Thermometer in water. Wipe off dirt with a damp soft cloth. Do not
use aggressive cleaning agents or solutions. Treat the instrument
as you would a telescope or camera.
Storage
The RIDGID micro IR-100 Infrared Thermometer must be stored in
a dry secure area between -10°C (14°F) and 60°C (140°F).
Store the tool in a locked area out of the reach of children and people unfamiliar with the micro IR-100.
Remove the battery before any long period of storage or shipping
to avoid battery leakage.
ing the micro IR-100 to ensure good readings. To enable or disable,
while squeezing the trigger, press and release the laser enable button. The Laser Enable icon will be ON when the laser is enabled.
Backlight
If using in a low lit area, the micro IR-100 is equipped with a display
backlight. To turn the backlight ON and OFF, with the unit ON, press
the backlight button.
Menu Button Use
After squeezing the trigger, pressing and releasing the menu button will allow you to cycle through the following settings in this order:
High Alarm ON/OFF, High Alarm Temperature Setting, Low Alarm
ON/OFF, Low Alarm Temperature Setting, Temperature Display
Units.
High Alarm
High Alarm will give an audible tone when the current temperature
exceeds a preset limit. To turn the High Alarm ON, squeeze and release the trigger, and then press and release the menu button until
the High Alarm icon is flashing. Use the up/down buttons to turn
the High Alarm feature ON/OFF as indicated on the current temperature value line. Press and release the menu button again. The
High Alarm icon will continue to flash, and the High Alarm temperature will appear. Use the up/down buttons to change the High
Alarm temperature as desired. Squeeze the trigger to exit the Settings mode and save your selection.
Low Alarm
Low Alarm will give an audible tone when the current temperature
falls below a preset limit. To turn the Low Alarm ON, squeeze and
release the trigger, and then press and release the menu button
until the Low Alarm icon is flashing. Use the up/down buttons to
Page 14

micro IR-100 Non-Contact Infrared Thermometer
Ridge Tool Company
12
Service and Repair
WARNING
Improper service or repair can make the RIDGID micro IR-100
Non-Contact Infrared Thermometer unsafe to operate.
Service and repair of the micro IR-100 must be performed by a
RIDGID Independent Authorized Service Center.
For information on your nearest RIDGID Independent Service Center or any service or repair questions:
• Contact your local RIDGID distributor.
• Visit www.RIDGID.com or www.RIDGID.eu to find your local
Ridge Tool contact point.
• Contact Ridge Tool Technical Services Department at rtctechservices@emerson.com, or in the U.S. and Canada call (800) 519-
3456.
Disposal
Parts of the RIDGID micro IR-100 Non-Contact Infrared Thermometer contain valuable materials and can be recycled. There are
companies that specialize in recycling that may be found locally.
Dispose of the components in compliance with all applicable regulations. Contact your local waste management authority for more information.
For EC Countries: Do not dispose of electrical equipment
with household waste!
According to the European Guideline 2002/96/EC for
Waste Electrical and Electronic Equipment and its imple-
mentation into national legislation, electrical equipment
that is no longer usable must be collected separately and disposed
of in an environmentally correct manner.
Battery Disposal
For EC countries: Defective or used batteries must be recycled according to the guideline 2006/66/EEC.
Page 15
Thermomètre infrarouge à distance
micro IR-100
Thermomètre infrarouge à distance micro IR-100
Pour future référence, notez ci-dessous le numéro de série de l’appareil indiqué sur sa plaque
signalétique.
N° de
série
micro IR-100
AVERTISSEMENT
Familiarisez-vous bien avec le mode
d’emploi avant d’utiliser l’appareil.
L’incompréhension ou le non-respect
des consignes ci-après augmenteraient les risques de choc électrique,
d’incendie et/ou d’accident grave.
Page 16
Utilisation de la touche «Menu» ...........................................24
Alarme température élevée ..................................................24
Alarme basse température ...................................................25
Unités d’affichage de température (°C/°F)............................25
Nettoyage................................................................................25
Stockage .................................................................................25
Révisions et réparations........................................................25
Recyclage de l’appareil..........................................................26
Recyclage des piles ...............................................................26
Garantie à vie ......................................................Page de garde
*Traduction du texte d’origine en anglais.
Table des matières
Fiche d’enregistrement du n° de série de l’appareil ...........13
Symboles de sécurité ............................................................15
Consignes générales de sécurité
Sécurité des lieux .................................................................16
Sécurité électrique................................................................16
Sécurité individuelle..............................................................16
Utilisation et entretien du matériel ........................................16
Service après-vente..............................................................17
Consignes de sécurité particulières
Sécurité du thermomètre infrarouge.....................................17
Description, caractéristiques et équipements de base
Description............................................................................17
Caractéristiques....................................................................18
Composants .........................................................................19
Icônes d’affichage ACL.........................................................20
Equipements de base...........................................................20
Classification du laser ...........................................................20
Enoncé FCC............................................................................20
Compatibilité électromagnétique (EMC) ..............................21
Remplacement et installation des piles ...............................21
Inspection préalable...............................................................21
Préparation et utilisation de l’appareil
Préparation...........................................................................22
Fonctionnement
Activation, désactivation, prises de température..................23
Commandes du micro IR-100
Mode «Scanning» (balayage de températures en continu)...24
Activation/désactivation du laser ..........................................24
Eclairage de fond..................................................................24
Thermomètre infrarouge à distance micro IR-100
Ridge Tool Company
14
Page 17
Thermomètre infrarouge à distance micro IR-100
Ridge Tool Company
15
Symboles de sécurité
Des symboles et mots clés spécifiques, utilisés à la fois dans ce mode d’emploi et sur l’appareil lui-même, servent à signaler d’importants
risques de sécurité. Ce qui suit permettra de mieux comprendre la signification de ces mots clés et symboles.
Ce symbole sert à vous avertir aux dangers physiques potentiels. Le respect des consignes qui le suivent vous permettra d’éviter
les risques de blessures graves ou mortelles.
Le terme DANGER signifie une situation dangereuse potentielle qui, faute d’être évitée, provoquerait la mort ou de graves
blessures corporelles.
Le terme AVERTISSEMENT signifie une situation dangereuse potentielle qui, faute d’être évitée, serait susceptible d’entraîner la mort ou de graves blessures corporelles.
Le terme ATTENTION signifie une situation dangereuse potentielle qui, faute d’être évitée, serait susceptible d’entraîner des blessures corporelles légères ou modérées.
Le terme AVIS IMPORTANT signifie des informations concernant la protection des biens.
Ce symbole indique la nécessité de lire le manuel soigneusement avant d’utiliser le matériel. Le mode d’emploi renferme d’importantes informations concernant la sécurité d’utilisation du matériel.
AVIS IMPORTANT
DANGER
AVERTISSEMENT
ATTENTION
Ce symbole signale que l’appareil renferme un laser de Classe 2.
Ce symbole interdit de regarder dans le faisceau laser.
Ce symbole indique la présence d’un faisceau laser et des dangers
associés.
* ATTENTION
Présence de faisceau laser. Ne pas regarder dans le faisceau.
Débit maximum : 1 mW. Longueur d’onde : 630-670 nm.
Laser Classe 2
*
CAUTION
LASER RADIATION
DO NOT STARE INTO BEAM
MAXIMUM OUTPUT < 1mW
WAVELENGTH 630-670nm
CLASS 2 LASER PRODUCT
EN 60825-1:1994/A11:1996/A2:2001/A1:2002
Page 18

vous êtes sous l’influence de drogues, de l’alcool ou de médicaments. Lors de l’utilisation d’un appareil électrique, un instant d’inattention risque d’entraîner de graves lésions corporelles.
• Prévoyez les équipements de protection individuelle néces-
saires. Portez systématiquement une protection oculaire. Le port
d’un masque à poussière, de chaussures de sécurité antidérapantes, d’un casque de chantier ou de protecteurs d’oreilles s’impose lorsque les conditions l’exigent.
• Ne vous mettez pas en porte-à-faux. Maintenez une bonne
position de travail et un bon équilibre à tout moment. Cela
vous permettra de mieux contrôler l’appareil en cas d’imprévu.
Utilisation et entretien de l’appareil
• Ne forcez pas l’appareil. Prévoyez un appareil adapté aux
travaux envisagés. L’appareil approprié fera le travail plus effi-
cacement et avec un plus grand niveau de sécurité lorsqu’il
tourne au régime prévu.
• N’utilisez pas l’appareil si son interrupteur marche/arrêt ne
fonctionne pas correctement. Tout appareil qui ne peut pas être
contrôlé par son interrupteur est dangereux et doit être réparé.
• Retirez le bloc-piles de l’appareil avant de le régler, de
changer ses accessoires ou de le ranger. De telles mesures
préventives limiteront les risques de blessure.
• Rangez tout appareil non utilisé hors de la portée des en-
fants et des individus qui n’ont pas été familiarisés avec ce
type de matériel ou son mode d’emploi. Les appareils élec-
triques peuvent devenir dangereux s’ils tombent entre les mains
d’utilisateurs non initiés.
• Veillez à l’entretien de l’appareil. Examinez-le pour signes de
désalignement, de grippage, d’absence ou de bris de ces
composants, et de toute autre anomalie qui risquerait de
nuire à son bon fonctionnement. Le cas échéant, faire ré-
Consignes générales de sécurité
AVERTISSEMENT
Familiarisez-vous avec l’ensemble du mode d’emploi. Le nonrespect des consignes d’utilisation et de sécurité ci-après augmenterait les risques de choc électrique, d’incendie et/ou de
grave blessure corporelle.
CONSERVEZ CES INSTRUCTIONS !
Sécurité des lieux
• Assurez-vous de la propreté et du bon éclairage des lieux.
Les zones encombrées ou mal éclairées sont une invitation aux
accidents.
• N’utilisez pas d’instruments électriques en présence de
matières explosives telles que liquides, gaz ou poussières
combustibles. Les appareils électriques produisent des étin-
celles susceptibles d’enflammer les poussières et émanations
combustibles.
• Eloignez les enfants et les curieux lors de l’utilisation d’un
appareil électrique. Les distractions risquent de vous faire perdre le contrôle de l’appareil.
Sécurité électrique
• Evitez tout contact physique avec les objets reliés à la terre
tels que canalisations, radiateurs, cuisinières et réfrigérateurs. Tout contact avec la terre augmenterait les risques de
choc électrique.
• N’exposez pas l’appareil à la pluie ou aux intempéries. Toute
pénétration d’eau à l’intérieur d’un appareil électrique augmenterait les risques de choc électrique.
Sécurité individuelle
• Soyez attentif, faites attention à ce que vous faites et faites
preuve de bon sens. N’utilisez pas d’appareil électrique lorsque
Thermomètre infrarouge à distance micro IR-100
Ridge Tool Company
16
Page 19
Thermomètre infrarouge à distance micro IR-100
Ridge Tool Company
17
Sécurité du thermomètre infrarouge
• Ne pas regarder dans le faisceau laser de l’instrument. Le
faisceau laser est capable d’endommager la vue. Ne pas regarder vers le faisceau laser avec des jumelles, un télescope ou
autres aides oculaires.
• Ne jamais orienter le faisceau laser vers autrui. S’assurer que
le laser est orienté plus haut ou plus bas que le niveau des yeux.
Tout faisceau laser est capable d’endommager la vue.
• Soyez particulièrement attentif lors des travaux à proximité
d’éléments électriques, mécaniques ou brûlants. Un contact
rapproché risque de provoquer des chocs électriques, un
enchevêtrement, des brûlures ou autres graves blessures. Des
équipements de protection peuvent s’avérer nécessaires.
En cas de questions concernant ce produit Ridge Tool :
• Consultez votre distributeur RIDGID
• Consultez les sites www.RIDGID.com ou www.RIDGID.eu pour
localiser le représentant Ridge Tool le plus proche.
• Consultez les services techniques de Ridge Tool par mail
adressé à rtctechservices@emerson.com, ou, à partir des EtatsUnis et du Canada, en composant le (800) 519-3456.
Description, caractéristiques
techniques et équipements de base
Description
Le thermomètre infrarouge RIDGID®micro IR-100 fournit des mesures de température de surface à la fois simples, rapides et précises avec un seul appui de touche. Appuyez simplement sur la
gâchette en visant la surface avec les deux lasers classe II ultra
précis. La température relevée s’affiche instantanément sur l’écran
à éclairage de fond du micro IR-100. En plus de nombreuses autres
parer l’appareil avant de l’utiliser.De nombreux accidents sont
provoqués par des appareils mal entretenus.
• Servez-vous de l’appareil et de ses accessoires selon les
consignes ci-présentes en tenant compte des conditions
de travail et des travaux envisagés. L’utilisation de ce matériel
à des fins autres que celles prévues pourrait s’avérer dangereux.
• Utilisez exclusivement les accessoires prévus par le fabri-
cant pour votre type d’appareil particulier. L’utilisation d’accessoires adaptés à d’autres types d’appareil risque de s’avérer
dangereuse.
• Assurez la parfaite propreté de l’appareil. Cela permettra de
mieux le contrôler.
Révisions
• Confiez les révisions de ce matériel a un réparateur qualifié
utilisant exclusivement des pièces de rechange identiques
à celles d’origine. Cela assurera la sécurité intrinsèque du
matériel.
Consignes de sécurité spécifiques
AVERTISSEMENT
La section suivante contient d’importantes consignes de sécurité qui s’adressent spécifiquement à ce type d’instrument.
Afin de limiter les risques d’incendie et de choc électrique ou
autres blessures graves, lisez le mode d’emploi soigneusement avant d’utiliser le thermomètre infrarouge RIDGID
®
micro
IR-100.
CONSERVEZ CES INSTRUCTIONS !
Gardez le présent manuel à portée de main de l’utilisateur.
Page 20

applications, cet instrument compact et robuste permet au professionnel de diagnostiquer les problèmes de chauffage et de ventilation, d’effectuer le contrôle préventif des moteurs et systèmes
électriques, de dépanner les soupapes à vapeur, et de rapidement
vérifier la température d’un boîtier à fusible ou coupe-circuit, le tout
sans avoir à toucher les éléments concernés.
Le micro IR-100 fait appel à un système optique pour relever l’énergie émise, réfléchie et transmise, pour ensuite la renvoyer sur un
détecteur. Le système électronique de l’instrument traduit alors ces
informations sous forme de lecture de température affichée à
l’écran. Les lasers servent à viser la cible avec un maximum de
précision.
Caractéristiques techniques
Plage de températures .................-50°C à 800°C
Rapport distance/point de mire.....20 : 1
Précision de mesure.....................-50°C à 20°C : ± 4,5%
ou 2,5°C
20°C à 800°C : ± 1%
ou 1,0°C
Prise de contrôle ............................-50°C à 20°C : ± 2,3#
ou 1,3°C
20°C à 800°C : ±0,5%
ou 0,5°C
Temps de réponse..........................150 m/s
Réponse spectrale .........................8 à 14 um
Emissivité .......................................(Fixe) 0,95
Indicateur hors portée ....................Affichage LCD : « ---- »
Laser à diodes ..............................Puissance < 1mW, longueur
d’onde 630 à 670 nm, laser
Classe 2
Affichage de températures............Température actuelle,
température maximum
Unités de mesure .........................Fahrenheit, Celsius
Température opérationnelle..........0°C à 50°C
Température de stockage .............-10°C à 60°C
Résolution d’écran ..........................0,1°C
Humidité relative...........................1Fonctionnement : 10% à
90%, stockage : <80%
Piles..............................................1 pile 9V type NEDA 1604a,
IEC 6LR61 ou équivalente
Grade IP .......................................IP54
Poids.............................................0,6 livres (300g)
Avantages
• Fonction « mesure rapide »
• Visée à deux lasers Classe II
• Mémoire de données automatique
• Affichage des températures maxi relevées
• Mesures précises sans contact
• Sélection de portée et résolution d’affichage automatique 0,1°C
• Affichage LCD à éclairage de fond
• Gâchette à verrouillage
• Réglage des paramètres d’alarme de température élevée et
basse température
Thermomètre infrarouge à distance micro IR-100
Ridge Tool Company
18
Page 21
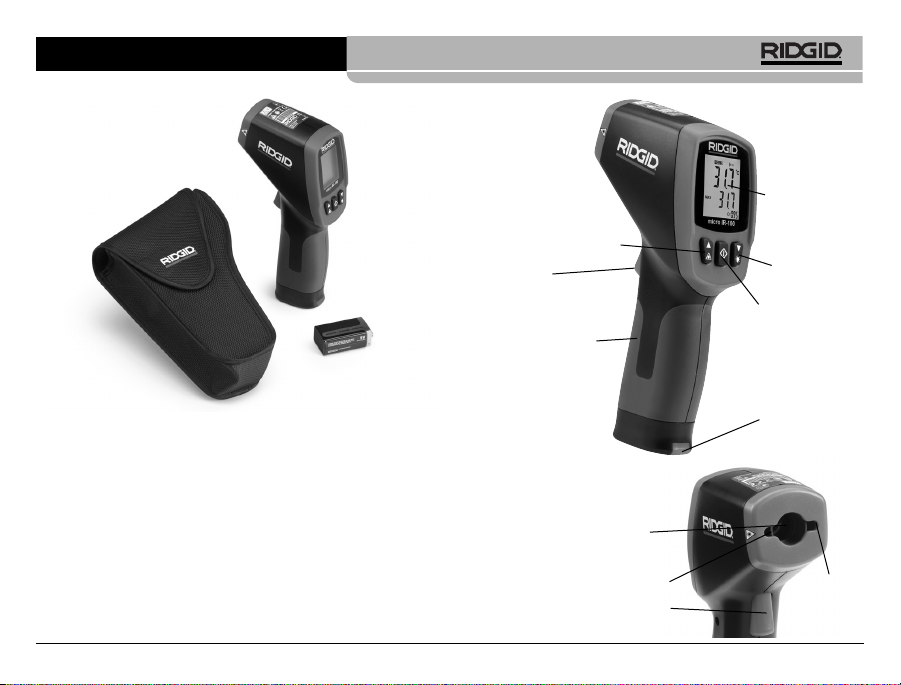
Figure 1 – Thermomètre infrarouge à distance micro IR-100
Thermomètre infrarouge à distance micro IR-100
Ridge Tool Company
19
Logement
de pile
Poignée
Gâchette
Menu
Augmenter/Activer laser
Affichage LCD
Diminuer/Eclairage
de fond
Figure 2 – Composants du micro
IR-100
Composants
Gâchette
Sonde Infrarouge
Laser
Laser
Page 22
Cet instrument est destiné aux mesures de
température. Toute utilisation incorrecte ou mal appropriée pourrait
entraîner des résultats incorrects et des manques de précision. Le
choix des méthodes de mesure appropriées reste la seule responsabilité de l’utilisateur.
Classification du laser
Le RIDGID micro IR-100 produit un faisceau laser émis
depuis le haut de l’instrument.
Cet instrument est conforme aux normes suivantes visant les lasers
Classe 2 : EN 60825 – 1 :1994/A11. 1996/A2, 2001/A1, 2002.
Avertissement FCC
Cet instrument a été testé et trouvé conforme aux limites applicables aux appareils numériques Classe B selon l’article 15 de la réglementation FCC. Ces limites assurent un minimum de protection
contre les parasites dans les installations domestiques.
Ce matériel produit, utilise et risque de rayonner des fréquences
radio et, s’il n’est pas installer et utilisé conformément aux instructions, risque de provoquer des parasites nuisibles aux communications radio.
Il n’y a cependant aucune garantie que des parasites n’auront pas
lieu dans une installation particulière.
Au cas où ce matériel provoquerait des parasites nuisibles à la réception radio ou télévision, chose vérifiable par la mise en marche
et l’arrêt de l’instrument, l’utilisateur serait conseillé d’entreprendre l’une ou plusieurs des mesures suivantes afin d’éliminer le
problème :
• Réorienter ou déplacer l’antenne de réception.
• Accroître la distance entre le matériel et le récepteur.
Thermomètre infrarouge à distance micro IR-100
Ridge Tool Company
20
Equipements de base
• micro IR-100
• Mallette de transport
Température
actuelle
Verrouillage
Pile
Alarme
température
élevée
Alarme
basse
température
Celsius/
Fahrenheit
Température
maximum
Mémoire
Emissivité
Figure 3 – Icônes d’affichage du micro IR-100
Icônes d’affichage LCD
Laser activé
• Pile 9V
• Mode d’emploi
AVIS IMPORTANT
Page 23
• Demander conseil au concessionnaire ou à un réparateur
radio/télé compétent.
Compatibilité électromagnétique (EMC)
Le terme « compatibilité électromagnétique » sous-entend le fonctionnement normal d’un appareil en présence de radiations électromagnétiques et décharges électrostatiques sans provoquer de
parasites électromagnétiques nuisibles aux autres appareils environnants.
Le RIDGID micro IR-100 est conforme aux
normes EMC applicables. Cependant, la possibilité du parasitage
des appareils environnants ne peut pas être exclue.
Figure 4 – Retrait du porte-pile
Remplacement des piles
Le micro IR-100 est fournie sans pile installée. Si le témoin de
charge apparaît
(Figure 3),
il sera nécessaire de remplacer la
pile. Retirez la pile avant le stockage prolongé de l’instrument pour
éviter les fuites d’électrolyte.
Thermomètre infrarouge à distance micro IR-100
Ridge Tool Company
21
1. Comprimez les languettes du porte-pile et retirez-le du thermomètre
(Figure 4).
Le cas échéant, retirez la pile existante.
2. Installez une pile alcaline de 9V type 6LR61 en respectant la
polarité indiquée dans le porte-pile.
Figure 5 – Indications de polarité sur le porte-pile
3. Comprimez les languettes du porte-pile et réintroduisez-le
dans le thermomètre. Le porte-pile ne peut être introduit que
dans un sens. Ne pas forcer. Assurez-vous de son emboîtement complet.
Inspection préalable
AVERTISSEMENT
Examinez le thermomètre infrarouge avant chaque utilisation
et corrigez toute anomalie éventuelle afin de limiter les risques
de blessure et de prises de mesure incorrectes.
Ne pas regarder dans le faisceau laser. Le faisceau laser risque
d’endommager la vue.
1. Nettoyez l’instrument afin d’en faciliter l’inspection.
2. Examinez le micro IR-100 pour signes de composants brisés,
usés, manquants mal alignés ou grippés, ainsi que pour toute
AVIS IMPORTANT
Page 24

laser à l’aide d’un instrument optique tel qu’un télescope ou
des jumelles.
Ne jamais orienter le faisceau laser vers autrui. S’assurer que
le laser est orienté plus haut ou plus bas que le niveau des
yeux. Un faisceau laser peut endommager la vue.
Prenez les précautions nécessaires lors des travaux à proximité d’éléments électriques, mécaniques ou brûlants. Un contact rapproché risque de provoquer des chocs électriques, un
enchevêtrement, des brûlures ou autres graves blessures. Des
équipements de protection peuvent s’avérer nécessaires.
Préparez et utilisez le thermomètre infrarouge selon les consignes suivantes afin de limiter les risques de blessure et de
mesures erronées.
Préparation
1. Trouvez une zone de travail appropriée en respectant la section
Consignes générales de sécurité.
2. Examinez l’objet à mesurer afin de vous assurer que vous disposez du matériel approprié. Reportez-vous à la section
Carac-
téristiques techniques
pour, entre autres informations, les limites
de portée et de précision.
Plusieurs facteurs peuvent influencer la précision du micro IR-
100, notamment :
Champ de vision – Le micro IR-100 fait appel à deux lasers
pour projeter des points de part et d’autre de la zone à mesurer.
Ces points délimitent la surface approximative de la zone de
prise de température. Le diamètre de cette zone (S) augmente
au fur et à mesure de l’éloignement du micro IR-100 de la surface (D) en question. La surface de la zone est approximativement égale à 5% de la distance entre le thermomètre et la
surface visée
(Figure 7).
Thermomètre infrarouge à distance micro IR-100
Ridge Tool Company
22
autre anomalie qui pourrait nuire au bon fonctionnement et à la
sécurité de l’instrument.
3. Assurez-vous de la présence et de la lisibilité des étiquettes
d’avertissement
(Figure 6).
4. N’utilisez pas le thermomètre infrarouge avant d’avoir corrigé
toute anomalie éventuelle.
5. Allumez le thermomètre infrarouge selon les instructions,
prenez une mesure, puis confirmez-la à l’aide d’un autre instrument (thermomètre à contact, etc.). Si la corrélation entre
les deux mesures n’est pas acceptable, il sera nécessaire de
faire réviser le thermomètre infrarouge avant de vous en servir.
Figure 6 – Etiquettes d’avertissement
Préparation et utilisation de l’appareil
AVERTISSEMENT
Ne jamais regarder dans le faisceau laser. Le faisceau laser
peut endommager la vue. Ne jamais regarder dans le faisceau
Page 25

Figure 7 – Champ de vision
Le diamètre de la zone de prise de température doit toujours
s’inscrire dans la surface mesurée. Plus la surface est petite,
plus il sera nécessaire de se rapprocher d’elle. Une précision
optimale sera obtenue lorsque la surface mesurée est au moins
deux fois plus grande que la zone de prise de température.
Emissivité – Le terme «émissivité» sert à décrire les caractéristiques d’émission d’énergie d’une matière sur une échelle
de 0 à 1. Le micro IR-100 utilise une émissivité fixe de 0,95
pour calculer les températures. Cette valeur est adaptée à la
grande majorité des possibilités d’utilisation, y compris la majorité des surfaces peintes.
Les surfaces brillantes ou polies ont une faible émissivité et
produisent des résultats erronés. Un moyen de parer à cet inconvénient est d’apposer une bande adhésive sur la surface ou
de peindre la surface en noir mat. Permettez à la bande adhésive ou à la peinture d’atteindre la température de la surface
avant de prendre la température à cet endroit.
Thermomètre infrarouge à distance micro IR-100
Ridge Tool Company
23
Température – Même si le micro IR-100 tient compte des variations de température ambiante, de grandes variations de température ambiante ou de température mesurée peuvent limiter
sa précision. Afin d’obtenir un maximum de précision en
présence de variations importantes de température ambiante
(supérieures à 17°C), permettez au micro IR-100 de s’acclimater pendant une quinzaine de minutes.
Obstacles – L’interposition d’obstacles tels que vapeur, poussière, fumée verre ou matières plastiques entre le micro IR100 et la surface à mesurer peut nuire à la précision des
relevés. De tels obstacles peuvent occulter l’optique de l’instrument ou produire des lectures erronées (mesure de la température du verre au lieu de celle de la surface). Ne pas utiliser
cet instrument en présence de tels obstacles.
Tenez compte de ces facteurs avant d’utiliser le micro IR-100.
3. Assurez-vous qu’une inspection appropriée de l’ensemble du
matériel a bien été effectuée.
Fonctionnement
Activation, désactivation, prises de
température
1. Tenez le micro IR-100 par sa poignée et orientez-le vers la
surface à mesurer. Eloignez-le de tout élément électrique,
mécanique ou brûlant. Assurez-vous que l’instrument n’est
pas orienté vers autrui avant de l’activer.
2. Appuyez sur la gâchette pour activer le micro IR-100. En appuyant sur la gâchette, l’icône SCAN s’allume et le micro IR100 affiche à la fois et en continu la prise de température en
cours et la température maximale relevée depuis l’activation
de l’instrument.
Surface
D:S=20:1
25.4mm @
1.0in@ 20in
508mm
1016mm
508mm @
S
2.0in@ 40in
D
Page 26

surez-vous que l’instrument n’est pas orienté vers autrui avant de
l’activer. Appuyez sur la gâchette pour activer le micro IR-100. Tout
en tenant la gâchette appuyée, appuyez momentanément sur la
touche Menu. Les icônes SCAN et Lock (verrouillage) s’allumeront.
Lâchez la gâchette, et le micro IR-100 continuera de mesurer la
température actuelle jusqu’à ce que vous appuyez à nouveau momentanément sur la gâchette.
Activation et désactivation du laser
Les lasers de visée peuvent éventuellement être éteints afin d’aider
à conserver la pile. Le cas échéant, il convient de faire particulièrement attention lorsque l’on vise le micro IR-100 afin d’assurer des
lectures précises. Pour activer ou désactiver les lasers, tenez la
gâchette appuyée, puis appuyez sur la touche Laser. Lorsque le
laser est activé, son icône s’allume.
Eclairage de fond
L’écran du micro IR-100 est équipé d’un éclairage de fond pour
servir dans les endroits mal éclairés. Pour allumer ou éteindre l’éclairage de fond lorsque l’instrument est activé, appuyez sur la
touche d’éclairage de fond.
Utilisation de la touche Menu
Avec la gâchette appuyée, appuyez momentanément sur la touche
Menu pour naviguer entre les paramètres suivants : activation/désactivation d’alarme de température élevée, réglage d’alarme de
température élevée, activation/désactivation d’alarme de basse
température, réglage d’alarme de basse température, unités de
mesure de température (dans l’ordre).
Alarme de température élevée
L’alarme de température élevée émettra une tonalité audible dès
que la température présente dépasse une limité préétablie. Pour
activer l’alarme de température élevée, appuyez momentanément
Thermomètre infrarouge à distance micro IR-100
Ridge Tool Company
24
TIl s’agit de déplacer le micro IR-100 lentement sur une surface pour localiser d’éventuels points chauds ou froids. Reportez-vous à la section
Alarme de température élevée/Alarme
de basse température
pour de plus amples détails sur l’utilisa-
tion des alarmes haute et basse température.
3. Lorsque l’on lâche la gâchette, l’icône HOLD s’allume. Le micro
IR-100 s’éteindra automatiquement au bout de sept secondes
s’il n’est pas en mode de mesure en continu.
micro IR-100 Controls
Figure 8 – Touches et écran du micro IR-100
Mesure en continu (scanner)
Il est possible de verrouiller la gâchette pour que le micro IR-100
prenne des mesures en continu sans avoir à la tenir appuyée. As-
Menu
Gâchette
Ecran LCD
Diminuer /
Eclairage de fond
Laser
Page 27

sur la gâchette, puis aussi souvent que nécessaire sur la touche
Menu pour que l’icône d’alarme de température élevée s’affiche en
clignotant. Servez-vous des flèches haute et basse pour activer ou
désactivé l’alarme comme indiqué sur la ligne de température
actuelle. Appuyez à nouveau momentanément sur la touche Menu.
L’icône d’alarme de température élevée continuera à clignoter et
la température limite sera affichée. Servez-vous des flèches haute
et basse pour régler la température d’alarme au souhait. Appuyez
sur la gâchette pour quitter le mode de réglage et sauvegarder vos
paramètres.
Alarme de basse température
L’alarme de basse température émettra une tonalité audible dès
que la température présente tombe en dessous d’une limité
préétablie. Pour activer l’alarme de basse température, appuyez
momentanément sur la gâchette, puis aussi souvent que nécessaire sur la touche Menu pour que l’icône d’alarme de basse température s’affiche en clignotant. Servez-vous des flèches haute et
basse pour activer ou désactivé l’alarme comme indiqué sur la ligne
de température actuelle. Appuyez à nouveau momentanément sur
la touche Menu. L’icône d’alarme de basse température continuera
à clignoter et la température limite sera affichée. Servez-vous des
flèches haute et basse pour régler la température d’alarme au
souhait. Appuyez sur la gâchette pour quitter le mode de réglage et
sauvegarder vos paramètres.
Unités d’affichage de température (°C ou °F)
Le thermomètre infrarouge RIDGID micro IR-100 peut afficher les
températures en degrés Celsius (°C) ou Fahrenheit (°F) au choix.
Pour changer d’unités d’affichage, appuyez momentanément sur la
gâchette, puis momentanément sur la touche Menu aussi souvent
qu’il faudra pour que l’unité de température affichée à l’écran se
mette à clignoter. Servez-vous des flèches haute et basse pour
changer d’unités de température affichée. Appuyez sur la gâchette
pour quitter le mode de réglage et sauvegarder vos paramètres.
Thermomètre infrarouge à distance micro IR-100
Ridge Tool Company
25
Nettoyage
Ne jamais immerger le thermomètre infrarouge RIDGID micro IR100 dans l’eau. Essuyez-le à l’aide d’un chiffon doux humecté. Ne
pas utiliser de produits de nettoyage abrasifs. Traitez l’instrument
comme s’il s’agissait d’un télescope ou d’un appareil photo.
Stockage
Le thermomètre infrarouge RIDGID micro IR-100 doit être remisé
dans un lieu sec et sécurisé, et à une température ambiante située
entre –10°C (14°F) et 60°C (140°F).
Rangez l’instrument dans un endroit sécurisé, hors de la portée
des enfants et de tout individu étranger au fonctionnement du micro
IR-100.
Afin de parer aux fuites éventuelles, retirez le piles de l’instrument
avant son expédition ou son stockage prolongé.
Révisions et réparations
AVERTISSEMENT
La sécurité d’emploi du RIDGID micro IR-100 dépend d’un entretien approprié.
Toute révision ou réparation du micro IR-100 doit être confiée à un
réparateur RIDGID agréé.
Pour obtenir les coordonnées du réparateur RIDGID le plus proche
ou pour toutes questions visant l’entretien et la réparation de l’instrument :
• Consultez votre distributeur RIDGID.
• Consultez les sites www.RIDGID.com ou www.RIDGID.eu pour
localiser le représentant Ridge Tool le plus proche.
• Consultez les services techniques de Ridge Tool par mail
adressé à rtctechservices@emerson.com, ou, à partir des
Etats-Unis et du Canada, en composant le (800)519-3456.
Page 28

Thermomètre infrarouge à distance micro IR-100
Ridge Tool Company
26
Recyclage des piles
Pays de la CE : Les piles défectueuses ou hors d’usage doivent
être recyclées selon la norme 2006/66/EEC.
Recyclage de l’instrument
Certains composants du thermomètre infrarouge RIDGID micro IR100 contiennent des matières de valeur susceptibles d’être recyclées. Il se peut que certaines des entreprises de recyclage
concernées se trouvent localement. Disposez de ces composants
selon la réglementation en vigueur. Pour de plus amples renseignements, consultez votre centre de recyclage local.
A l’attention des pays de la CE : Ne pas jeter les composants électriques à la poubelle !
Selon la norme européenne 2002/96/EC visant les
déchets de matériel électrique et électronique et son ap-
plication vis-à-vis de la législation nationale, tout matériel
électrique non utilisable doit être collecté à part et recyclé d’une
manière écologiquement responsable.
Page 29

Termómetro infrarrojo sin contacto
micro IR-100
Termómetro infrarrojo sin contacto micro IR-100
Apunte aquí el número de serie del aparato ubicado en su placa de características.
No. de
serie
micro IR-100
ADVERTENCIA
Antes de utilizar este aparato, lea
detenidamente su Manual del Operario. Pueden ocurrir descargas eléctricas, incendios y/o graves lesiones si no se comprenden y siguen
las instrucciones de este manual.
Page 30

Empleo de los botones del Menú .........................................38
Alarma Alta ...........................................................................38
Alarma Baja..........................................................................39
Escalas de medición térmica: °C ó °F ..................................39
Limpieza..................................................................................39
Almacenamiento.....................................................................39
Servicio y reparaciones.........................................................39
Eliminación del aparato.........................................................40
Eliminación de la pila.............................................................40
Garantía vitalicia.............................................carátula posterior
*Instrucciones originales en inglés
Índice
Ficha para apuntar el Número de Serie del aparato ...........27
Simbología de seguridad.......................................................29
Normas de seguridad general
Seguridad en la zona de trabajo ..........................................30
Seguridad eléctrica...............................................................30
Seguridad personal ..............................................................30
Uso y cuidado del equipo .....................................................30
Servicio.................................................................................31
Normas de seguridad específica
Seguridad del Termómetro infrarrojo ....................................31
Descripción, especificaciones y equipo estándar
Descripción...........................................................................31
Especificaciones...................................................................32
Piezas y partes.....................................................................33
Íconos en la pantalla LCD ....................................................34
Equipo estándar ...................................................................34
Clasificación del láser............................................................34
Declaración de la FCC ...........................................................34
Compatibilidad electromagnética (CEM) .............................35
Reemplazo o instalación de la pila.......................................35
Inspección previa al funcionamiento ...................................35
Preparativos y funcionamiento
Preparativos .........................................................................36
Funcionamiento
Encendido y apagado (toma de temperaturas) ....................37
Mandos del micro IR-100
Modalidad de medición continua (escanear)........................38
Láser activado/desactivado..................................................38
Alumbrado de fondo de la pantalla.......................................38
Termómetro infrarrojo sin contacto micro IR-100
Ridge Tool Company
28
Page 31

Termómetro infrarrojo sin contacto micro IR-100
Ridge Tool Company
29
Simbología de seguridad
En este manual del operario y en el aparato mismo encontrará símbolos y palabras de advertencia que comunican información de
seguridad importante. En esta sección se explica el significado de estos símbolos.
Este es el símbolo de una alerta de seguridad. Sirve para prevenir al operario de las lesiones corporales que podría sufrir.
Obedezca todas las instrucciones que acompañan a este símbolo de alerta para evitar lesiones o muertes.
Este símbolo de PELIGRO advierte de una situación de riesgo o peligro que, si no se evita, podría ocasionar muertes o
graves lesiones.
Este símbolo de ADVERTENCIAadvierte de una situación de riesgo o peligro que, si no se evita, podría ocasionar
la muerte o lesiones graves.
Este símbolo de CUIDADO advierte de una situación de riesgo o peligro que, si no se evita, podría ocasionar lesiones
leves o moderadas
Un AVISO advierte de la existencia de información relacionada con la protección de un bien o propiedad.
Este símbolo significa que, antes de usar el aparato, es indispensable leer detenidamente su manual del operario. El manual del
aparato contiene importante información acerca del funcionamiento apropiado y seguro del equipo.
AVI SO
PELIGRO
ADVERTENCIA
CUIDADO
Este símbolo señala que este dispositivo contiene un láser clase 2.
Este símbolo señala que no se debe fijar la vista en el rayo láser.
Este símbolo advierte de la presencia y peligrosidad de un rayo láser.
CAUTION
LASER RADIATION
DO NOT STARE INTO BEAM
MAXIMUM OUTPUT < 1mW
WAVELENGTH 630-670nm
CLASS 2 LASER PRODUCT
EN 60825-1:1994/A11:1996/A2:2001/A1:2002
Page 32

No lo use si está cansado o se encuentra bajo la influencia
de drogas, alcohol o medicamentos. Sólo un breve descuido
mientras hace funcionar el aparato puede ocasionar lesiones
personales graves.
• Use el equipo de protección personal que corresponda.
Siempre use protección para sus ojos. Al usar mascarilla para
el polvo, calzado de seguridad antideslizante, casco duro o protección para los oídos, según las circunstancias, usted evitará
lesionarse.
• No extienda su cuerpo para alcanzar algo. Mantenga sus
pies firmes en tierra y un buen equilibrio en todo momento.
Así se ejerce mejor control sobre el aparato en situaciones inesperadas.
Uso y cuidado del equipo
• No fuerce el aparato. Use el equipo apropiado para la tarea
que realizará. El aparato adecuado hará el trabajo mejor y de
manera más segura, al ritmo para el cual fue diseñado.
• Si el interruptor del aparato no lo enciende o no lo apaga, no
lo haga funcionar.Cualquier aparato que no pueda ser controlado mediante su interruptor es peligroso y debe ser reparado.
• Extráigale la pila al aparato antes de efectuarle ajustes, de
cambiarle accesorios o de guardarlo. Esta medida preventiva
evita accidentes.
• Almacene los aparatos que no estén en uso fuera del
alcance de niños y no permita que los hagan funcionar personas sin capacitación o que no hayan leído estas instrucciones. Cualquier aparato es peligroso en manos de inexpertos.
• Hágale buen mantenimiento a este aparato. Revísele sus
piezas movibles por si están desalineadas o agarrotadas. Cerciórese de que no tenga piezas quebradas y que no existen
condiciones que puedan afectar su buen funcionamiento. Si está
Normas de seguridad general
ADVERTENCIA
Lea todas estas advertencias e instrucciones. Pueden ocurrir
golpes eléctricos, incendios y/o lesiones corporales graves si
no se siguen todas las instrucciones y respetan las advertencias detalladas a continuación.
¡GUARDE ESTAS INSTRUCCIONES!
Seguridad en la zona de trabajo
• Mantenga su zona de trabajo ordenada, limpia y bien iluminada. Las áreas oscuras o atestadas de cosas provocan acci-
dentes.
• No haga funcionar este aparato en presencia de combusti-
bles tales como líquidos, gases o polvo inflamables. Este
aparato puede generar chispas, las que podrían inflamar el polvo
o las emanaciones combustibles.
• Mientras haga funcionar este aparato, mantenga apartados
a niños y espectadores. Cualquier distracción puede hacerle
perder el control del aparato.
Seguridad eléctrica
• Evite el contacto de su cuerpo con artefactos conectados a
tierra tales como cañerías, radiadores, estufas o cocinas y
refrigeradores. Aumenta el riesgo de que se produzca un
choque eléctrico cuando su cuerpo ofrece conducción a tierra.
• No exponga este aparato a la lluvia o a la humedad. Si al dis-
positivo le entra agua, aumenta el riesgo de que ocurran descargas eléctricas.
Seguridad personal
• Manténgase alerta, preste atención a lo que está haciendo
y use sentido común cuando haga funcionar este aparato.
Termómetro infrarrojo sin contacto micro IR-100
Ridge Tool Company
30
Page 33

Termómetro infrarrojo sin contacto micro IR-100
Ridge Tool Company
31
Seguridad del Termómetro infrarrojo
• No mire el rayo láser. Le hará mal a sus ojos. Tampoco mire el
rayo láser con aparatos ópticos como binoculares o telescopios.
• No dirija el rayo láser hacia los demás. Asegure que el rayo
láser se apunte por encima o por debajo del nivel de los ojos. Los
rayos láser pueden ser dañinos para los ojos.
• Tome las precauciones pertinentes cuando vaya a trabajar
cerca de objetos eléctricos, en movimiento o calientes. La
cercanía a uno de ellos podría causar descargas eléctricas, enganches, quemaduras y otras lesiones graves. Es posible que
necesite vestir equipos de seguridad personal.
Si tiene cualquier pregunta acerca de este producto de Ridge Tool:
• Contacte al distribuidor de RIDGID en su localidad.
• Por internet visite el sitio www.RIDGID.com ó www.RIDGID.eu
para averiguar dónde se encuentran los centros autorizados de
Ridge Tool más cercanos.
• Llame al Departamento de Servicio Técnico de Ridge Tool
desde EE.UU. o Canadá al (800) 519-3456 o escriba a
rtctechservices@emerson.com .
Descripción, especificaciones y
equipo estándar
Descripción
El Termómetro infrarrojo sin contacto micro IR-100 de RIDGID®entrega, con sólo pulsarle un botón, lecturas rápidas y precisas de la
temperatura que tiene la superficie de un objeto. Usted simplemente aprieta el gatillo del aparato y apunta los dos intensos
láseres clase II hacia la superficie a la cual se desea tomarle la
temperatura. El micro IR-100 entrega de inmediato la medición de
la temperatura en su nítida pantalla LCD. Este instrumento com-
dañado, antes de usarlo, hágalo componer. Los equipos en
malas condiciones causan accidentes.
•Utilice este dispositivo y sus accesorios en conformidad
con estas instrucciones, teniendo en cuenta las condiciones imperantes y las tareas que realizará. Cuando se em-
plea un equipo para efectuar operaciones que no le son propias,
se crean situaciones peligrosas.
• Con este aparato, utilice únicamente los accesorios reco-
mendados por su fabricante. Los accesorios aptos para usarse con un aparato determinado pueden resultar peligrosos si
se utilizan con otros aparatos diferentes.
• Mantenga los mangos y mandos del aparato limpios y secos,
libres de aceite y grasa. Así se ejerce un mejor control sobre el
aparato.
Servicio
• El servicio del aparato debe encomendarse únicamente a
un técnico calificado que emplea repuestos idénticos. Así
se garantiza la continua seguridad del aparato.
Normas de seguridad específica
ADVERTENCIA
Esta sección entrega información de seguridad específica
para esta herramienta.
Antes de usar este Termómetro infrarrojo sin contacto micro
IR-100, lea estas precauciones detenidamente para evitar lesiones oculares y otras de carácter grave.
¡GUARDE ESTAS INSTRUCCIONES!
Mantenga este manual junto al aparato, a la mano del operario.
Page 34

pacto y robusto, además de servir para otras múltiples aplicaciones,
permite a técnicos en reparaciones diagnosticar problemas de calefacción y ventilación, realizar revisiones preventivas de motores y
sistemas eléctricos, detectar averías en trampas de vapor, e inspeccionar rápidamente fusibles e interruptores de circuito por si se
están recalentando, sin necesidad de tocar con sus manos superficie alguna.
El micro IR-100 utiliza la óptica para detectar la energía siendo
emitida, reflejada o transmitida, la cual capta y enfoca hacia un
detector. El sistema electrónico del aparato traduce los datos y los
entrega en la pantalla en grados de temperatura. Los haces laséricos cumplen la función de apuntar.
Especificaciones
Gama térmica mensurable ...........-50°C a 800°C
(-58°F a 1472°F)
Cociente distancia-objetivo...........20 a 1
Exactitud de medición ..................-50°C ~20°C (-58°F ~68°F) :
± 2,5°C (4,5°F)
620°C ~800°C (68°F ~1472°F)
± 1,0% ±1°C (1,8°F)
Reproducibilidad.............................-50°C ~20°C (-58°F ~68°F) :
±1,3°C (2,3°F)
68°F ~1472°F (20°C ~800°C)
±0,5% ó ± 0,5°C (0,9°F)
Tiempo de respuesta .....................150 ms
Respuesta espectral ......................8~14um
Emisividad ......................................fija, 0,95
Indicación de superposición
de gamas........................................pantalla LCD mostrará “----”
Láser diódico ................................Salida <1mW, longitud de
onda 630~670nm, producto
láser clase 2
Visualización de la temperatura .....última temperatura,
temperatura MAX
Unidades de medición....................en °Celsius o °Fahrenheit
Temperatura de funcionamiento.....0 a 50°C (32 a 122°F)
Temperatura de almacenamiento...-10 a 60°C (14 a 140°F)
Resolución del display....................0,1°C (0,1°F)
Humedad relativa ...........................en funciones 10%~90%,
almacenado <80%
Pila..................................................(1) de 9V, NEDA 1604A ó IEC
6LR61, ó equivalente
Protección contra polvo ................hasta 54 IP
Peso .............................................0.3 Kg. (0,6 lbs.)
Características
• Función de detección rápida
• Avistamiento de doble láser Clase II
• Sujeción automática de los datos
• Visualización de temperaturas MAX
• Mediciones precisas sin contacto
• Distancia de selección y resolución de pantalla automáticas de
0,1°C (0,1°F)
• Pantalla de cristal líquido (LCD) con alumbrado de fondo
• Traba para el gatillo
• Alarmas de alta y baja establecidas
Termómetro infrarrojo sin contacto micro IR-100
Ridge Tool Company
32
Page 35

Figura 1 – Termómetro infrarrojo sin contacto micro IR-100
Termómetro infrarrojo sin contacto micro IR-100
Ridge Tool Company
33
Compartimiento
de la pila
Empuñadura
Gatillo
Botón de Menú
Botón de flecha
ascendente y de
Activar el láser
Pantalla LCD
Botón de flecha
descendente y
del alumbrado
de fondo
Figura 2 – Piezas del micro IR-100
Piezas
Gatillo
Sensor infrarrojo
Láser
Láser
Page 36

Clasificación del láser
El micro IR-100 de RIDGID genera haces laséricos visibles emitidos desde la parte delantera del aparato.
El dispositivo cumple con las normas de láseres clase 2 en concordancia con: EN 60825- 1:199/A11: 1996/A2:2001/A1:2002
Declaración de la FCC
Este aparato ha sido sometido a pruebas y se encuentra dentro de
los parámetros exigidos a un dispositivo digital de Clase B, de conformidad con el apartado 15 de las Normas de la agencia federal
FCC. Estos límites otorgan una protección razonable contra interferencias perjudiciales en una instalación residencial.
Este aparato genera, utiliza y puede irradiar energía de radiofrecuencia y, si no se instala y utiliza de acuerdo con las instrucciones,
puede causar interferencias perjudiciales a las comunicaciones de
radio.
Sin embargo, no puede garantizarse que no ocurrirán interferencias en funa determinada instalación.
Si este aparato llegara a causar interferencias dañinas sobre la recepción de señales de radio o televisión, las que pueden detectarse apagando y prendiendo el aparato, el usuario debe intentar
eliminar la interferencia tomando una o más de las siguientes medidas:
• Reorientar o reubicar la antena receptora.
• Aumentar la distancia entre el equipo y el receptor.
• Consultar al distribuidor o a un técnico de radio y televisión para
obtener ayuda.
Este aparato sirve para medir temperaturas. Su aplicación o uso incorrecto puede ocasionar mediciones inexactas o
erróneas. Es responsabilidad del usuario seleccionar los métodos
adecuados de medición según las condiciones imperantes.
AVI SO
Termómetro infrarrojo sin contacto micro IR-100
Ridge Tool Company
34
Equipo estándar
• micro IR-100
• Estuche del aparato
Temperatura
actual
Candado
Pila con
baja
carga
Alarma
Alta (H)
Alarma
Baja (L)
Escalas de
medición
térmica
(°C ó °F)
Temperatura
máxima
Sujeción de
datos (HOLD)
Emisividad
Figura 3 – Íconos en la pantalla del micro IR-100
Íconos en la pantalla
Activar láser
• Pila de 9V (1)
• Manual del operario
Page 37

Termómetro infrarrojo sin contacto micro IR-100
Ridge Tool Company
35
Compatibilidad electromagnética (CEM)
Se entiende por compatibilidad electromagnética la capacidad del
producto para funcionar sin problemas en un entorno donde existen radiación electromagnética y descargas electroestáticas, sin
causarle interferencia electromagnética a otros equipos.
El micro IR-100 RIDGID cumple con todas las normas
CEM pertinentes. Sin embargo, no se puede descartar del todo la
posibilidad de que cause interferencias en otros dispositivos.
Figura 4 – Extracción del compartimiento de la pila
Reemplazo o instalación de la pila
El micro IR-100 se suministra con una pila instalada. Si el indicador
del nivel de carga de la pila
(Figura 3)
muestra , se necesita
reemplazar la pila. Extráigale la pila antes de almacenar el aparato
por un período prolongado, para evitar que la pila tenga fugas.
1. Apriete los clips en el cabezal del portapila y extráigalo del
aparato
(vea la Figura 4).
Extraiga la pila que tiene dentro.
2. Instale una nueva pila alcalina de 9V (6LR61), fijándose bien
en la polaridad indicada en el portapila.
Figura 5 – Portapila y marcas de polaridad
3. Apriete los clips en el cabezal del portapila e introdúzcalo en el
aparato. El portapila entra en el compartimiento de pila de una
sola manera. No lo fuerce. Revise que quedó bien asentado.
Inspección previa al funcionamiento
ADVERTENCIA
Antes de cada uso, inspeccione el Termómetro infrarrojo y solucione cualquier problema que pudiera ocasionar lesiones o lecturas erróneas.
No mire el rayo láser directamente. Esto es peligroso para sus
ojos.
1. Quite el aceite, grasa o mugre del aparato para facilitar su inspección.
2. Revise el Termómetro micro IR-100 para asegurar que no le
faltan piezas, no tiene partes quebradas, desgastadas, desalineadas o trabadas, o por si existe cualquiera otra condición
que pueda afectar su funcionamiento normal y seguro.
AVI SO
Page 38

No dirija el haz lasérico hacia los demás. Asegure que el rayo
láser se apunte por encima o por debajo del nivel de sus ojos.
Los rayos láser pueden ser peligrosos para los ojos.
Tome las precauciones pertinentes cuando vaya a trabajar
cerca de objetos eléctricos, en movimiento o calientes. La cercanía a uno de éstos podría causar descargas eléctricas, enganches, quemaduras y otras lesiones graves. Es posible que
necesite vestir equipos de seguridad personal.
Prepare y haga funcionar el Termómetro infrarrojo de acuerdo
a los siguientes procedimientos, con el fin de prevenir lesiones
y mediciones incorrectas.
Preparativos
1. Busque situarse en una zona apropiada, como se indica en la
sección
Normas de seguridad general.
2. Revise el objetivo cuya temperatura medirá y cerciórese de que
usted dispone del equipo correcto para efectuar esta tarea.
Consulte la sección
Especificaciones
para verificar el alcance,
precisión y otras características de este instrumento.
Una serie de factores podrían afectar la precisión de las
mediciones del micro IR-100, entre ellos:
Campo visual: El micro IR-100 emplea dos láseres para apun-
tar hacia ambos lados de la zona que se medirá. Estos puntos
indican el diámetro aproximado del área (el “Sitio”) en la que se
medirá la temperatura. A medida que el micro IR-100 se aleja
(D) de la superficie, el tamaño de esta área y del sitio (S) aumenta. El área es aproximadamente 0,05 veces la distancia
hasta la superficie
(Figura 7).
3. Revise que las etiquetas de advertencias estén bien pegadas
al aparato y legibles.
(Vea la Figura 6).
4. Si detecta cualquier problema, no use el Termómetro infrarrojo
hasta que no haya sido debidamente reparado.
5. Siguiendo las instrucciones de
Funcionamiento
del aparato,
enciéndalo, efectúe una medición y confirme esta misma medida con otro instrumento (termómetro de contacto u otro). Si
las mediciones no guardan correlación entre ellas, no utilice el
Termómetro infrarrojo hasta que haya sido reparado.
Figura 6 – Etiquetas de advertencias
Preparativos y funcionamiento
ADVERTENCIA
No mire el haz lasérico directamente, puede herir sus ojos.
Nunca mire un rayo láser con aparatos ópticos como anteojos
de larga vista o telescopios.
Termómetro infrarrojo sin contacto micro IR-100
Ridge Tool Company
36
Page 39

Figura 7 – Campo visual
El Sitio debe ser siempre más pequeño que la superficie. Mientras más reducida la superficie, más cerca debería estar el
micro IR-100 de la superficie. Para obtener la mayor precisión,
la superficie debe ser dos veces más amplia que el Sitio.
Emisividad: es el término que se emplea para describir las
características de la radiación (poder emisor) emitida por la
superficie de un material, cuyo valor oscila entre 0 y 1. El micro
IR-100 utiliza una emisividad de 0,95 para calcular temperaturas. Este valor es apropiado para la gran mayoría de aplicaciones, incluyendo la mayoría de las superficies pintadas.
Las superficies brillantes o pulidas tienen una emisividad baja
y darán lecturas inexactas. Una forma de compensar esto es
pegar cinta adhesiva o pintura negra mate (sin brillo) a la superficie. Permita que la cinta o la pintura alcancen la misma
temperatura que la superficie y proceda a medir la temperatura
de la cinta o de la pintura.
Termómetro infrarrojo sin contacto micro IR-100
Ridge Tool Company
37
Temperatura: Si bien el micro IR-100 compensa las variaciones a partir de la temperatura ambiente, los cambios significativos en las temperaturas ambiente y en las medidas
pueden reducir la exactitud. Cuando ocurran cambios de gran
magnitud en la temperatura ambiente (más de 17°C ó 30°F),
espere 15 minutos para que el micro IR-100 efectúe los ajustes
necesarios para mejorar su exactitud.
Obstrucciones: El vapor, polvo, humo u otras obstrucciones
-como el vidrio o el plástico- que se encuentren entre el micro
IR-100 y la superficie que se está midiendo, pueden hacer disminuir la exactitud. Éstos obstruyen la óptica del aparato o dan
lecturas falsas (se mide la temperatura del vidrio en vez de la
superficie). No utilice el aparato si hay obstrucciones presentes.
Tenga en cuenta estos factores obstructivos antes de tomar
temperaturas con el micro IR-100.
3. Asegure que el aparato ha sido revisado correctamente.
Funcionamiento
Encendido y apagado (toma de temperaturas)
1. Tome el micro IR-100 por su empuñadura y apúntelo hacia la
superficie cuya temperatura desea medir. Apártese de objetos eléctricos, móviles o calientes. Antes de encender y apuntar el aparato en la dirección deseada, asegure que no se
encuentre nadie en la trayectoria del haz lasérico.
2. Apriete el gatillo para encender el micro IR-100. Cuando se
apriete el gatillo, el ícono de SCAN estará encendido y el micro
IR-100 irá actualizando continuamente los grados de la temperatura actual en la pantalla. Asimismo, debajo de estos valores
térmicos “en curso”, aparecerá en la pantalla -junto al símbolo
MAX- la temperatura máxima medida desde que se encendió
el aparato.
25,4mm @ 508 mm
508mm @ 1016 mm
1,0 plugs. @ 20 plugs.
2,0 plugs. @ 40 plugs.
Superficie
D:S=20:1
508mm
25.4mm @
1.0in@ 20in
D
1016mm
508mm @
2.0in@ 40in
S
Page 40

vaya a apuntar en dirección a algún transeúnte. Apriete el gatillo y
manténgalo oprimido para encender el micro IR-100. Mientras lo
mantiene apretado, oprima y suelte el botón de Menú. Verá encendidos los íconos de SCAN y del candado (cerrado). Suelte el gatillo
y el micro IR-100 irá mostrando continuamente las temperaturas
que ha ido midiendo hasta que al gatillo se le vuelva a apretar y
soltar.
Láser activado/desactivado
Para conservar la carga de la pila, pueden apagarse los láseres,
empleados para apuntar. Pero si se apagan, debe tenerse especial
cuidado al apuntar el micro IR-100 con el fin de lograr buenas
mediciones. Para activar o desactivar los haces laséricos, mientras
aprieta el gatillo, oprima y suelte el botón de Activar el láser. El ícono
de láser activado aparecerá encendido en la pantalla.
Alumbrado de fondo de la pantalla
Si utilizará el IR-100 en una zona oscura, su pantalla cuenta con
alumbrado de fondo. Para encenderlo o apagarlo, estando el
aparato encendido, oprima el botón del alumbrado de fondo.
Funciones del botón de Menú
Habiendo apretado el gatillo, oprima y suelte el botón de Menú:
éste le permite recorrer las siguientes posiciones, en este orden:
ON/OFF de la Alarma Alta, valor térmico fijado para Alarma Alta,
ON/OFF de la Alarma Baja, valor térmico fijado para Alarma Baja,
escala térmica deseada.
Alarma Alta
La Alarma Alta sonará cuando la temperatura del momento o actual excede el límite predeterminado. Para encender la Alarma Alta
apriete y suelte el gatillo; luego oprima y suelte el botón de Menú
hasta que el ícono de la Alarma Alta parpadee. Emplee los botones
de flecha ascendente y descendente para encender o apagar la
Es posible mover el micro IR-100 lentamente por sobre la superficie para localizar zonas calientes o frescas.
Vea las sec-
ciones de Alarma Alta y Alarma Baja
para saber regularlas.
3. Cuando se suelte el gatillo, el ícono de HOLD (Sujeción de
datos) estará encendido. El micro IR-100 se apagará automáticamente en un lapso de siete segundos, salvo que el aparato
se encuentre en la modalidad de Medición continua.
Mandos del micro IR-100
Figura 8 – Botones de ajuste de la pantalla del micro IR-100
Modalidad de medición continua (escanear)
El micro IR-100 se le puede “trabar” para que efectúe mediciones
sin que haya que mantener el dedo cargado en su gatillo. Nuevamente fíjese, antes de encender el aparato, en que el rayo láser no
Termómetro infrarrojo sin contacto micro IR-100
Ridge Tool Company
38
Botón de Menú
Gatillo
Pantalla LCD
Botón de flecha
descendente y
de alumbrado
de fondo
Láser
Page 41

Termómetro infrarrojo sin contacto micro IR-100
Ridge Tool Company
39
Alarma Alta lo cual va siendo indicado en la línea de la temperatura actual. De nuevo oprima y suelte el botón de Menú. El ícono
de Alarma Alta continuará parpadeando y aparecerá la temperatura
de Alarma Alta que había sido fijada anteriormente. Utilice los
botones de flecha ascendente y descendente para cambiar la temperatura de Alarma Alta por la que usted desee. Apriete el gatillo
para salir de la modalidad de configuración y guardar su selección.
Alarma Baja
La Alarma Baja sonará cuando la temperatura del momento o actual es inferior al límite predeterminado. Para encender la Alarma
Baja apriete y suelte el gatillo; luego oprima y suelte el botón de
Menú hasta que el ícono de la Alarma Baja parpadee. Emplee los
botones de flecha ascendente y descendente para encender o apagar la Alarma Baja como se indica en la línea de la temperatura actual. De nuevo oprima y suelte el botón de Menú. El ícono de
Alarma Baja continuará parpadeando y aparecerá la temperatura
anteriormente fijada de Alarma Baja. Utilice los botones de flecha
ascendente y descendente para cambiar la temperatura de Alarma
Baja por otra que usted prefiera. Apriete el gatillo para salir de la
modalidad de configuración y guardar su selección.
Escalas de medición térmica: °C ó °F
El micro IR-100 puede mostrar temperaturas ya sea en grados Celsius (C) o Fahrenheit (F). Para cambiar la escala que se muestra en
pantalla, apriete y suelte el gatillo; luego pulse y suelte el botón de
Menú hasta que la escala de medición térmica deseada parpadee
en la pantalla. Utilice los botones de flecha ascendente y descendente para cambiar entre °C y °F. Apriete el gatillo para salir de la
modalidad de configuración y guardar su selección.
Limpieza
No sumerja el Termómetro infrarrojo sin contacto micro IR-100 de
RIDGID en agua. Quítele la mugre con un paño húmedo suave.
No emplee agentes de limpieza fuertes ni disolventes. Cuide este
instrumento como si fuese un telescopio o cámara.
Almacenamiento
Guarde el Termómetro infrarrojo micro IR-100 de RIDGID en un
lugar seguro y seco a temperaturas entre -10 a 60°C (14 a 140°F).
Almacénelo bajo llave fuera del alcance de niños y personas que
no saben usarlo.
Extráigale su pila si lo va a guardar por un período prolongado de
tiempo o lo va a enviar por encomienda. La pila puede perder
líquido.
Servicio y reparaciones
ADVERTENCIA
El Termómetro infrarrojo sin contacto micro IR-100 de RIDGID
puede tornarse inseguro si se le repara o mantiene incorrectamente.
El servicio y reparaciones del micro IR-100 deben confiarse únicamente a un Servicentro Autorizado de RIDGID.
Para obtener información acerca del Servicentro Autorizado
RIDGID más cercano a su localidad o consultar sobre el servicio
o reparación de este aparato:
• Contacte al distribuidor RIDGID en su localidad.
• En internet visite el sitio www.RIDGID.com ó www.RIDGID.eu
para averiguar dónde se encuentran los centros autorizados de
Ridge Tool más cercanos.
Page 42

Termómetro infrarrojo sin contacto micro IR-100
Ridge Tool Company
40
Eliminación de la pila
En la CE: Las pilas usadas o defectuosas deben reciclarse conforme a la directriz 2006/66/EC.
• Llame al Departamento de Servicio Técnico de Ridge Tool
desde EE.UU. o Canadá al (800) 519-3456 o escriba a
rtctechservices@emerson.com .
Eliminación del aparato
Piezas y partes del Termómetro infrarrojo sin contacto micro IR-100
de RIDGID están fabricadas de materiales de valor, posibles de reciclar. Averigüe cuáles empresas se especializan en reciclaje en su
localidad. Deseche el aparato o sus componentes cumpliendo con
todas y cada una de las disposiciones vigentes en su jurisdicción.
Para mayor información, llame a la agencia local encargada de la
eliminación de residuos sólidos.
En los países miembros de la Comunidad Europea
(CE): ¡No se deshaga de equipos eléctricos junto con la
basura doméstica!
Según la directriz de la Comunidad Europea 2002/96/EC,
impartida a sus países miembros sobre desechos eléctricos y electrónicos, los equipos eléctricos inutilizables deben ser
recolectados en forma separada de la basura municipal y eliminados sin causar daños al medio ambiente.
Page 43

micro IR-100
micro IR-100 Temassız Kızılötesi Termometre
UYARI
Bu aleti kullanmadan önce kullanıcı kılavuzunu dikkat le okuyun. Bu kılavuzun içe riğinin anlaşılmaması ve ona uyulmaması
elektrik çarp ması, yangın ve/
veya ağır kişisel yaralanmalara
yol açabilir.
micro IR-100 Temassız Kızılötesi Termometre
Aşağıdaki Seri Numarası'nı kaydedin ve isim levhasındaki ürün seri
numarasını muhafaza edin.
Seri
No.
Page 44

micro IR-100 Temassız Kızılötesi Termometre
İçindekiler
Makine Seri Numarası için Kayıt Formu .................................................41
Güvenlik Sembolleri......................................................................................... 43
Genel Güvenlik Kuralları
Çalışma Alanı Güvenliği .............................................................................. 44
Elektrik Güvenliği ..........................................................................................44
Kişisel Güvenlik ..............................................................................................44
Kullanım ve Bakım ........................................................................................44
Servis ................................................................................................................. 45
Özel Güvenlik Bilgileri
Kızılötesi Termometre Güvenliği .............................................................. 45
Açıklama, Teknik Özellikler ve Standart Ekipman
Açıklama ........................................................................................................... 45
Özellikler ........................................................................................................... 46
Parçalar..............................................................................................................47
LCD Ekran Simgeleri ..................................................................................... 47
Standart Ekipman ......................................................................................... 47
Lazer Sınıandırması ....................................................................................... 48
FCC Açıklaması .................................................................................................... 48
Elektromanyetik Uyumluluk (EMC) .......................................................... 48
Pillerin Değiştirilmesi/Takılması ................................................................ 48
Çalışma Öncesi Kontrol ................................................................................... 49
Hazırlama ve Çalıştırma
Hazırlanması.................................................................................................... 50
Çalıştırma
AÇMA ve KAPAMA (Ölçüm Yapma) .........................................................51
micro IR-100 Kontrolleri
Sürekli Ölçüm (Tarama) Modu .................................................................. 51
Lazer Etkin/Devre Dışı.................................................................................. 52
Arka ışık ............................................................................................................. 52
Menü Düğmesi Kullanımı ........................................................................... 52
Yüksek Alarmı ................................................................................................. 52
Düşük Alarmı ..................................................................................................52
Sıcaklık Gösterme Birimleri-C/F................................................................ 52
Temizlik .................................................................................................................. 52
Saklama .................................................................................................................. 53
Servis ve Tamir .................................................................................................... 53
Elden Çıkarma .....................................................................................................53
Pillerin Elden Çıkarılması ............................................................................... 53
Ömür Boyu Garanti ........................................................................Arka Kapak
*Orijinal kılavuzun çevirisidir
42
Ridge Tool Company
Page 45

micro IR-100 Temassız Kızılötesi Termometre
IŞIĞA DOĞRU BAKMAYINIZ
LAZER DALGASI
MAKSİMUM ÇIKIŞ < 1mW
DALGABOYU 630-670nm
SINIF 2 LAZER ÜRÜNÜ
EN 60825-1:1994/A11:1996/A2:2001/A1:2002
DİKKAT
Güvenlik Sembolleri
Bu kullanıcı kılavuzunda ve ürün üzerinde güvenlik sembolleri ve uyarı kelimeleri önemli güvenlik bilgilerini bildirmek için kullanılmıştır. Bu kısım
bu uyarı kelimelerinin ve sembollerin daha iyi anlaşılması için sunulmuştur.
Bu güvenlik uyarı sembolüdür. Sizi potansiyel kişisel yaralanma tehlikesine karşı uyarmak için kullanılır. Muhtemel yaralanma veya ölümden sakınmak için bu sembolü izleyen tüm güvenlik mesajlarına uyun.
TEHLİKE
UYARI
DİKKAT
BİLDİRİM
TEHLİKE sakınılmadığı takdirde ölüm veya ciddi yaralanmayla sonuçlanacak tehlikeli bir durumu gösterir.
UYARI sakınılmadığı takdirde ölüm veya ciddi yaralanmayla sonuçlanabilecek tehlikeli bir durumu gösterir.
DİKKAT sakınılmadığı takdirde küçük veya orta derece yaralanmaya yol açabilecek tehlikeli bir durumu gösterir.
BİLDİRİM eşyanın korunmasıyla ilgili bilgileri gösterir.
Bu sembol ekipmanı kullanmadan önce kullanıcı kılavuzunun dikkatlice okunması gerektiği anlamına gelir. Kullanıcı kılavuzu ekipmanın
güvenli ve düzgün kullanımına dair önemli bilgiler içerir.
Bu sembol bu cihazın bir Sınıf 2 Lazer içerdiği anlamına gelir.
Bu sembol lazer ışınına uzun ve dikkatli şekilde bakmamanız gerektiğini anlamına gelir.
Bu sembol bir lazer ışınının varlığı ve tehlikesi konusunda uyarır.
Ridge Tool Company
43
Page 46

micro IR-100 Temassız Kızılötesi Termometre
Genel Güvenlik Kuralları
UYARI
Tüm güvenlik uyarılarını ve talimatlarını okuyun. Uyarı ve talimatların tam olarak takip edilmemesi elektrik çarpması, yangın ve ağır
yaralanmalara yol açabilir.
BU TALİMATLARI SAKLAYIN!
Gerektiğinde, CE uyumluluk beyanı (890-011-320) ayrı bir kitapçık olarak, bu kılavuzun yanında yer alır.
Çalışma Alanı Güvenliği
• Çalışma alanınıntemizveiyi aydınlatılmış olmasını sağlayın.
Dağınık ve karanlık alanlar kazalara yol açabilir.
• Ekipmanıalevalabilensıvıların,gazlarınyadatozlarınolduğu
patlayıcıortamlarda kullanmayın.Ekipman toz ya da gazları tu-
tuşturabilecek kıvılcımlar üretebilir.
• Ekipmanı kullanırken çocukları ve izleyenleri uzakta tutun.
Dikkatinizi dağıtan şeyler kontrolü kaybetmenize sebep olabilir.
Elektrik Güvenliği
• Aletingövdesiniborular,radyatörler,ocaklarve buzdolapları
gibitopraklanmışyüzeylerletemas ettirmekten kaçının. Eğer
vücudunuz topraklanmışsa elektrik çarpması ihtimali artar.
• Ekipmanı yağmura ya da ıslak koşullara maruz bırakmayın.
Ekipmana giren su, elektrik çarpması ihtimalini artırır.
Kişisel Güvenlik
• Dikkatliolun,neyaptığınızadikkatedinveekipmanıkullanırkensağduyunuzukullanın.Yorgunkenyadailaçların,alkolveyatedavietkisindeykenekipmanıkullanmayın.Ekipmanın kul-
lanımı esnasında bir anlık dikkatsizlik önemli kişisel yaralanmalara
yol açabilir.
44
Ridge Tool Company
• Kişisel koruyucu ekipmanlar kullanın. Daima koruyucu gözlük
takın. Toz maskeleri, kaymaz güvenlik ayakkabıları, sert şapkalar ve
kulak korumaları gibi koruyucu ekipmanların kullanımı kişisel yaralanmaların azalmasını sağlar.
• Aşırı zorlamadan kullanın. Her seferinde uygun düzeyde ve
dengedekullanın.Bu, beklenmedik durumlarda elektrikli aleti da-
ha iyi kontrol etmenizi sağlar.
Kullanım ve Bakım
• Ekipmanızorlamayın.Yapacağınızişeuygunekipmankullanın.
Doğru ekipman işinizi, uygun tasarlandığı oranda daha iyi ve güvenli şekilde yapar.
• Anahtar ekipmanı AÇIP KAPATMIYORSA ekipmanı kullanmayın. Anahtar ile kontrol edilemeyen aletler tehlikelidir ve tamir
e dilmelidir.
• Tümayarlamaları,aksesuardeğişiminigerçekleştirmedenveya
saklamadanöncepillericihazdançıkarın.Bu güvenlik önlemleri
yaralanma riskini azaltır.
• Kullanmadığınız ekipmanı çocukların erişemeyeceği yerlerde saklayın ve ekipmanı kullanma deneyimi olmayan ya da
bu talimatlardan habersiz kişilerin ekipmanı kullanmalarına
izinvermeyin.Ekipman, eğitimsiz kullanıcıların ellerinde tehlikeli
olabilir.
• Ekipmanınbakımınıyapın.Yanlış hizalanmış ya da yanlış bağlanmış hareketli parçaları, arızalı parçaları ve ekipmanın çalışmasını etkileyebilecek diğer durumları kontrol edin. Eğer hasarlıysa, ekipmanı
kullanmadan önce tamir ettirin. Birçok kaza bakımsız ekipmandan
kaynaklanır.
• Ekipmanıveaksesuarlarınıçalışmakoşullarınıveyapılacakişi
gözönündebulundurarakbutalimatlarauygunşekildekullanın.Ekipmanın tasarlandığı uygulama dışında kullanılması tehlikeli
durumlara sebep olabilir.
Page 47

micro IR-100 Temassız Kızılötesi Termometre
• Sadece,üreticitarafındanekipmanınıziçintavsiyeedilenaksesuarlarıkullanın.Bir ekipman için uygun olan aksesuarlar başka bir
ekipmanda kullanıldığında tehlikeli olabilir.
• Tutmayerlerinikuruvetemiz tutun;yağ vegresten arındırın.
Bu, ekipmanı daha iyi kavramanızı sağlar.
Servis
• Ekipmanınızınonarımınıyetkiliuzman kişileresadece orijinal
yedekparçalarıkullanarak yaptırın. Bu, aletin güvenliğinin de-
vamlılığını sağlayacaktır.
Özel Güvenlik Bilgileri
UYARI
Bu bölüm alete özel önemli güvenlik bilgileri içerir.
Yangın, patlama veya diğer ciddi kişisel yaralanma tehlikesini azalt-
mak için RIDGID® mic ro I R-100 Temassız Kızı lötesi Termo metreyi
kullanmadan önce bu önlemleri dikkatli şekilde okuyun.
BU TALİMATLARI SAKLAYIN!
Operatörün kullanması için bu kılavuzu aletin yanında bulundurun.
Kızılötesi Termometre Güvenliği
• Lazerışınınabakmayın.Lazer ışınına bakmak gözleriniz için tehlikeli olabilir. Lazer ışınına optik aletlerle (dürbünler veya teleskoplar
gibi) bakmayın.
• Lazerışınınıdiğerinsanlarınüzerinedoğrultmayın.Lazerin, göz
seviyesinin üzerinde veya altında yöneltilmesini sağlayın. Lazer ışınları gözleriniz için tehlikeli olabilir.
Ridge Tool Company
• Elektrikli, hareketliveya sıcakparçalarınyakınında çalışırken
uygunönlemleri alın.Yakın temas elektrik çarpmasına, dolaşma-
ya, yanıklara ve diğer ciddi yaralanmalara neden olabilir. Koruyucu
ekipman gerekebilir.
Bu RIDGID ürünü ile ilgili sorularınız için:
• BulunduğunuzbölgedekiRIDGIDbayisiileiletişimkurun.
• YerelRIDGIDirtibatnoktasınıniletişimbilgilerineerişmekiçinwww.
RIDGID.com.trveyawww.RIDGID.euadresiniziyaretedin.
• RIDGIDTeknikServisDepartmanıileiletişimkurmakiçinrtctechser-
vices@emerson.com adresine yazın veya ABD ve Kanada'da (800)
519-3456 numaralı telefonu arayın.
Açıklama, Teknik Özellikler ve Standart
Ekipman
Açıklama
RIDGID® micro IR-100 Temassız Kızılötesi Termometre, tek tuşa basışla
basit, hızlı ve hassas yüzey sıcaklığı okuması yapmayı sağlar. Basitçe
tetiği sıkın ve ultra-keskin çift sınıf II lazerini ölçülecek yüzeyin üzerine
tutun. micro IR-100, net ve arka ışıklı okuması kolay LCD ekranda hızlı
ölçüm sağlar. Çeşitli diğer kullanım alanlarına ek olarak bu dayanıklı,
kompakt alet profesyonel meslek erbaplarının ısıtma ve havalandırma
sorunlarını teşhis etmelerini, elektrik motorları ve sistemlerin koruyucu gözetim işlemlerini gerçekleştirmelerini, buhar kapanlarında arıza
teşhisi uygulamalarını ve sigortaları ve devre kesicileri aşırı ısınmaya
karşı temassız bir şekilde kontrol etmelerini sağlar.
micro IR-100 toplanıp bir detektör üzerine odaklanan, yayılan, yansı tılan veya aktarılan enerjiyi algılamak için optikleri kullanır. Ünite e lektroniği bilgiyi görüntülenecek bir sıcaklık okumasına dönüştürür. Lazerler yönlendirmeye yardımcı olmak için kullanılır.
45
Page 48

micro IR-100 Temassız Kızılötesi Termometre
Özellikler
Sıcaklık Aralığı................................................... -50°C - 800°C (-58°F - 1472°F)
Noktaya olan Mesafe Oranı.......................... 20 - 1
Ölçüm Hassasiyeti........................................... 50°C ~20°C (-58°F ~68°F): ± 2,5°C
Yinelenebilirlik................................................... 50°C ~20°C (-58°F ~68°F): ± 1,3°C
Yanıt Süresi......................................................... 150ms
Spektral Yanıt..................................................... 8~14um
Salım Gücü......................................................... Sabit, 0,95
Aralık Üzeri Göstergesi................................... LCD şunu gösterir “----”
Diyot Lazer......................................................... Çıkış<1mW, Dalga boyu 630~670nm,
Sıcaklık Göstergesi.......................................... G eçerli Sıcaklık, MAKS Sıcaklık
Ölçü Birimleri.................................................... Santigrat, Fahrenhayt
Çalışma Sıcaklığı.............................................. 0°C - 50°C (32°F - 122°F)
Saklama Sıcaklığı............................................. -10°C - 60°C (14°F - 140°F)
Ekran Çözünürlüğü......................................... 0,1°C (0,1°F)
Bağıl Nem........................................................... %10~%90 RH Çalışma,
Piller...................................................................... 9VPil(1),NEDA1604A
IP Sınıandırması............................................. IP54
Ağırlık................................................................... 0,3 kg (0,6 lbs)
46
(4,5°F) 20°C ~800°C (68°F ~1472°F)
±%1,0 veya ± 1,0°C (1,8°F)
(2,3°F) 20°C ~800°C (68°F ~1472°F)
±%0,5 veya ± 0,5°C (0,9°F)
Sınıf 2 Lazer Ürünü
<%80 RH Saklama
veya IEC 6LR61, veya Eşdeğeri
Ridge Tool Company
Özellikler
• HızlıAlgılamaFonksiyonu
• ÇiftSınıfIILazerNişangah
Düzeni
• OtomatikVeriTutma
• MAKSSıcaklıkGöstergeleri
• HassasTemassızÖlçümler
• OtomatikSeçimAralığıve
Ekran Çözünürlüğü 0,1°C
(0,1°F)
• ArkaışıklıLCDEkran
• TetikKilidi
• YüksekveDüşükAlarmAyarı
Şekil1–microIR-100TemassızKızılötesiTermometre
Page 49

micro IR-100 Temassız Kızılötesi Termometre
Parçalar
Yukarı Düğmesi/
Lazer Etkin
Tetik
Tutamak
Şekil 2 – micro IR-100 Parçaları
Kızılötesi
Sensör
Lazer
Tetik
LCD Ekran
Aşağı Düğmesi/
Arka Işık
Menü Düğmesi
PilBölmesi
Lazer
LCD Ekran Simgeleri
Geçerli
Sıcaklık
Değeri
simum
Sıcaklık
Değeri
Düşük
Şekil 3 – micro IR-100 Ekran Simgeleri
Standart Ekipman
• microIR-100
• TaşımaÇantası
Ridge Tool Company
Mak-
Pil
Veri Tutma
Lazer Etkin Kilit
• Pil1x9V
• KullanıcıKılavuzu
Yüksek
Alarmı
Düşük
Alarmı
Santigrat/
Fahrenhayt
Sıcaklık
Birimleri
Salım
Gücü
Değeri
47
Page 50

micro IR-100 Temassız Kızılötesi Termometre
BİLDİRİM
gun olmayan kullanım veya hatalı uygulama hatalı veya doğru
olma yan ölçümlere neden olabilir. Koşullara göre uygun ölçüm yönteminin seçilmesi kullanıcının sorumluluğundadır.
Bu ekipman sıcaklık ölçümü yapmak için kullanılır. Uy-
Lazer Sınıflandırması
RIDGID micro IR-100, cihazın ön kısmından yayılan gözle
görünür bir lazer ışını üretir.
Ürün aşağıdaki standarda göre sınıf 2 lazerlerle uyumludur: EN
60825-1: 1994/A11:1996/A2:2001/A1:2002
FCC Açıklaması
Bu cihaz test edilmiş ve FCC Kurallarının 15. bölümü çerçevesinde B
Sınıfı dijital cihaz limitlerine uygun bulunmuştur Bu limitler bir yerleşim alanında zararlı parazitlere karşı makul bir koruma sağlamak
üzere tasarlanmışlardır.
Bu cihaz, radyo frekans enerjisi üretir, kullanır ve yayabilir, eğer talimatlara uygun olarak kurulup kullanılmaz ise telsiz iletişimlerde
zararlı parazitlere neden olabilir.
Bununla birlikte belli bir kurulum sonrasında parazitlenmenin ortaya çıkmayacağına dair bir garanti yoktur.
Eğer bu cihaz, cihazı açıp kapatarak tespit edilebilir şekilde radyo ve
televizyon alımında zararlı parazitlenmelere neden olursa kullanıcının parazitlenmeleri düzeltebilmek için aşağıdaki önlemlerden bir
veya daha fazlasını denemesi önerilir:
• Alıcıantenitekraryönlendirinyadayerleştirin.
• Cihazvealıcıarasındakimesafeyiarttırın.
• Yardım için satıcıya ya da tecrübeli bir radyo/TV teknisyenine
danışın.
48
Ridge Tool Company
Elektromanyetik Uyumluluk (EMC)
Elektromanyetik uyumluluk terimi, elektromanyetik yayılma ve elektrostatik boşalmaların bulunduğu ortamlarda ve diğer ekipmanlarda
elektromanyetik parazite neden olmadan ürünün, sorunsuz olarak
çalışması anlamına gelir.
BİLDİRİM
lu dur. Ancak diğer cihazlarda parazite neden olma ihtimali ön lenemez.
Şekil4–PilBölmesininÇıkarılması
RIDGID micro IR-100 tüm geçerli EMC standartlarına u yum-
Pillerin Değiştirilmesi/Takılması
micro IR-100 üzerinde piller takılı olarak gelir. Pil göstergesi (Şekil 3) pilin değiştirilmesi gerektiğini
için uzun süreli saklamadan önce pilleri çıkarın.
1. Pil klipslerini sıkın ve pil bölmesini termometreden çıkartın (Şekil 4).
Gerekirse pili çıkarın.
2. Pilbölmesindegösterilen doğru kutup yönünedikkatederek9V
alkalin pil (6LR61) takın.
, gösteriyorsa. Pil akmalarını önlemek
Page 51

Şekil5–PilTutucuveKutupYönüİşareti
3. Klipsleri sıkın ve sıkı bir şekilde termometreye yerleştirin. Tutacak
sadece tek yöne hareket eder. Zorlamayın. Yerine oturduğundan
emin olun.
micro IR-100 Temassız Kızılötesi Termometre
4. İnceleme sırasında herhangi bir sorun tespit edildiği takdirde, kızılö tesi termometreyi gerektiği gibi tamir edilene kadar kullanmayın.
5. Kullanım talimatlarına uyarak kızılötesi termometreyi açın, bir ölçüm yapın ve aynı ölçümü başka bir aletle (temaslı termometre
vb.) ger çekleştirerek doğrulayın. Ölçümler arasındaki eşleşme kabul e dilemez orandaysa tam anlamıyla onarılana kadar kızılötesi
termo metreyi kullanmayın.
Çalışma Öncesi Kontrol
UYARI
Her kullanımdan önce kızılötesi termometrenizi inceleyin ve yaralanma tehlikesini veya hatalı ölçüm olasılığını azaltmak için tüm
sorunlarını giderin.
Lazer ışınına bakmayın. Lazer ışınına bakmak gözleriniz için tehlikeli olabilir.
1. Ekipmanın üzerindeki tüm yağı, gres yağını veya tozu temizleyin.
Bu, incelemeyi kolaylaştırır.
2. micro IR-100 parçalarının kırık, aşınmış, eksik, yanlış yerleştirilmiş
veya yanlış bağlanmış olup olmadığını ve normal ve güvenli kullanımı engelleyebilecek diğer durumları kontrol edin.
3. Uyarı etiketlerinin varlığını, sağlam iliştirildiğini ve okunur olduğunu kontrol edin (Şekil 6).
Ridge Tool Company
Şekil 6 – Uyarı Etiketleri
49
Page 52

micro IR-100 Temassız Kızılötesi Termometre
D:S=20:1
25.4mm @
508mm
508mm @
1016mm
1.0in@ 20in
S
D
2.0in@ 40in
Hazırlama ve Çalıştırma
UYARI
Lazer ışınına bakmayın. Lazer ışınına bakmak gözleriniz için tehlikeli olabilir. Lazer ışınına optik aletlerle (dürbünler veya teleskoplar gibi) bakmayın.
Lazer ışınını diğe r i nsanların üzerine doğrultmayın . L azerin, göz
se viyesinin üzerinde veya altında yöneltilmesini sağlayın. Lazer
ı şın ları gözleriniz için tehlikeli olabilir.
Elektrikli, hareketli veya sıcak parçaların yakınında çalışırken uygun önlemleri alın. Yakın temas elektrik çarpmasına, dolaşm aya,
ya nıkla ra ve diğer ciddi yaralanmal ara neden olabilir. Koruyucu
e kipman gerekebilir.
Yaralanma tehlikesini veya hatalı ölçüm olasılığını azaltmak i çin kızılötesi ter mometreyi bu prosedürle re göre hazırlayın ve ça lış tı rın.
Hazırlanması
1. Genel Güvenlik bölümünde belirtildiği şekilde uygun bir çalışma alanı kontrolü yapın.
2. Ölçülecek olan nesneyi inceleyin ve uygulamaya yönelik doğru
ekipmana sahip olduğunuzu onaylayın. Aralık, hassasiyet ve diğer
bilgiler için Özellikler bölümüne bakın.
Aşağıdaki dahil olmak üzere micro IR-100'ün hassaslığını etkileyebi-
lecek çeşitli faktörler vardır:
Görüş sahası – micro IR-100 ölçülecek alanın her iki tarafındaki
noktalara yöneltilmek üzere iki lazer kullanır. Bu noktalar sıcaklığın
ölçüleceği alanın ("Nokta") ortalama çapını gösterir. micro IR-100
50
Ridge Tool Company
yüzeyden ileri doğru hareket ettirildiğinde (D) alan ve nokta boyutu (S) artar. Alan yaklaşık olarak yüzeye olan mesafenin 0,05 katıdır
(Şekil 7).
Yüz ey
Şekil7–GörüşAlanı
Nokta her zaman yüzeyden küçük olmalıdır. Yüzey küçüldükçe mic-
ro IR-100 yüzeye daha fazla yaklaştırılmalıdır. En iyi hassasiyet için,
yüzey noktadan iki kat büyük olmalıdır.
Salım gücü– Salım gücü maddelerin enerji salım gücü karakteristi-
ğini anlatan bir terimdir ve 0 ila 1 aralığında bir değere sahiptir. micro IR-100 sıcaklıkları hesaplamak için 0,95 değerinde sabit bir sa lım
gü cü değeri kullanır. Bu değer çoğu boyalı yüzeyler dahil olmak
ü zere çoğu önemli kullanım alanı için uygundur.
Parlak veya cilalı yüzeyler düşük bir salım gücüne sahiptir ve hatalı
o ku malar verirler. Bunu telafi etmenin yolu bir maskeleme bandı
kul lanmak veya yüzeyin üzerine siyah düz bir nokta uygulamaktır.
Bant veya boyanın yüzeyle aynı sıcaklığa gelmesi için bekleyin ve
ar dından bandın veya boyanın sıcaklığını ölçün.
Page 53

micro IR-100 Temassız Kızılötesi Termometre
Sıcaklık – micro IR-100 ortam sıcaklığı sapmalarını telafi etmekle
birlikte, ortamdaki ve ölçülen sıcaklıklardaki büyük orandaki değişiklikler hassaslığı düşürebilir. Ortam sıcaklığında belirgin değişiklikler yaşandığında (17°C veya 30°F'tan fazla) micro IR-100'ün en iyi
hassaslığı ayarlaması için on beş dakika bekleyin.
Engeller– micro IR-100 ile ölçülecek yüzey arasındaki buhar, toz,
duman ve cam veya plastik gibi diğer benzeri engeller hassaslığı
düşürebilir. Bunlar ünitenin optiğini engeller veya yanlış okumalar
verirler (yüzeyin yerine camın sıcaklığını ölçer). Engeller varken
kullanmayın.
Bu faktörleri micro IR-100'ü çalıştırmadan önce hesap edin.
3. Tüm ekipmanı düzgün şekilde kontrol ettiğinizden emin olun.
Çalıştırma
AÇMA ve KAPAMA (Ölçüm Yapma)
1. micro IR-100'ü tutamağından tutun ve ölçülecek yüzeye doğru
doğrultun. Elektrikli, hareketli veya sıcak parçalardan uzak durun.
Ci hazı AÇMADAN önce ünitenin seyredenlerden uzakta güvenli bir
yö ne yöneltildiğinden emin olun.
2. micro IR-100'ü açmak için tetiği sıkın. Tetik sıkıldığında TARAMA
simgesi AÇIK hale gelir ve micro IR-100 geçerli sıcaklık değerini
sürekli olarak güncellemeye başlar ve ünite AÇILDIKTAN bu yana
gerçekleşen maksimum sıcaklık değerini gösterir.
micro IR-100 soğuk ve sıcak alanları bulmak için yüzey üzerinde ya-
vaşça gezdirilebilir. Yüksek ve düşük alarm ayarları hakkında bilgi için
Yüksek Alarm ve Düşük Alarm bölümlerine bakın.
3. Tetik bırakıldığında, BEKLEMEDE simgesi AÇIK hale gelir. micro
IR-100 Sürekli Ölçüm modunda değilse yedi saniye sonra otomatik
o larak KAPANIR.
Ridge Tool Company
micro IR-100 Kontrolleri
LCD Ekran
Tetik
Lazer
Şekil 8 – micro IR-100 Ekran/Düğmeleri
Sürekli Ölçüm (Tarama) Modu
micro IR-100 tetiği basılı tutmadan ölçüm yapmayı sağlamak için
KİLİTLENEBİLİR. Cihazı AÇMADAN önce ünitenin seyredenlerden uzakta güvenli bir yöne yöneltildiğinden emin olun. Tetiği sıkıp basılı tutarak micro IR-100'ü AÇIN. Tetik basılı halde iken menü düğmesine basıp
bı rakın. TARAMA ve Kilitleme simgeleri AÇIK hale gelir. Tetiği bıra kın,
micro IR-100 tetik tekrar sıkılıp bırakılana kadar ölçülen sıcaklığı sü rekli olarak güncelleyecektir.
Aşağı
Düğmesi/ Arka
Işık
Menü
Düğmesi
51
Page 54

micro IR-100 Temassız Kızılötesi Termometre
Lazer Etkin/Devre Dışı
Gerekirse, yönlendirme için kullanılan lazerler pil ömrünü korumak için
kapatılabilir. Bu yapılırsa, doğru okumalardan emin olmak için micro
IR-100 yönlendirilirken ekstra dikkat gösterilmelidir. Etkinleştirmek
ve ya deve dışı bırakmak için, tetiği sıkarken, lazer etkin düğmesine basın ve bırakın. Lazer etkinleştirildiğinde Lazer Etkin simgesi AÇIK ha le
ge lir.
Arka ışık
Işıklandırması zayıf olan bir alanlarda kullanabilmek için micro IR-100
e kran arka ışığı donatılmıştır. Arka ışığı AÇMAK ve KAPATMAK için ünite AÇIK haldeyken arka ışık düğmesine basın.
Menü Düğmesi Kullanımı
Tetik sıkıldıktan sonra menü düğmesine basıp bırakmak aşağıdaki
a yarlar arasında gösterilen sıra ile dolaşmanızı sağlar: Yüksek Alarmı
AÇIK/KAPALI, Yüksek Alarmı Sıcaklık Ayarı, Düşük Alarmı AÇIK/KAPALI,
Dü şük Alarmı Sıcaklık Ayarı, Sıcaklık Gösterme Birimleri.
Yüksek Alarmı
Yüksek Alarmı geçerli sıcaklık önceden ayarlanan sınırı aştığında sesli
bir uyarı verir. Yüksek Alarmı AÇMAK için, tetiği sıkıp bırakın ve ardından Yüksek Alarmı simgesi yanıp sönmeye başlayana kadar menü
düğmesine basıp bırakın. Geçerli sıcaklık değeri satırında göründüğü
için Yüksek Alarmını AÇMAK/KAPATMAK için yukarı/aşağı düğmelerini
kullanın. Menü düğmesine tekrar basıp bırakın. Yüksek Alarmı simgesi
yanıp sönmeye devam eder ve Yüksek Alarmı sıcaklığı görünür. Yüksek
Alarmı sıcaklığını istediğiniz gibi değiştirmek için yukarı/aşağı düğmelerini kullanın. Ayarlar modundan çıkmak ve seçiminizi kaydetmek için
tetiği sıkın.
52
Ridge Tool Company
Düşük Alarmı
Düşük Alarmı geçerli sıcaklık önceden ayarlanan sınırın altına düştüğünde sesli bir uyarı verir. Düşük Alarmı AÇMAK için, tetiği sıkıp bırakın ve ardından Düşük Alarmı simgesi yanıp sönmeye başlayana kadar menü düğmesine basıp bırakın. Geçerli sıcaklık değeri satırında
göründüğü için Düşük Alarmını AÇMAK/KAPATMAK için yukarı/a şağı
düğmelerini kullanın. Menü düğmesine tekrar basıp bırakın. Dü şük
A larmı simgesi yanıp sönmeye devam eder ve Düşük Alarmı sı caklığı
gö rünür. Düşük Alarmı sıcaklığını istediğiniz gibi değiştirmek i çin yuka rı/aşağı düğmelerini kullanın. Ayarlar modundan çıkmak ve se çi mini zi kaydetmek için tetiği sıkın.
Sıcaklık Gösterme Birimleri - °C/°F
IR-100 sıcaklığı Santigrat (C) ve Fahrenhayt (F) derece olarak gösterebilir. Ekran birimini değiştirmek için tetiği sıkıp bırakın ve ardından ekran
üzerindeki sıcaklık birimi yanıp sönmeye başlayana kadar menü düğmesine basın ve bırakın. İstenildiği gibi C ve F arasında geçiş yapmak
için yukarı ve aşağı düğmelerini kullanın. Ayarlar modundan çıkmak
ve seçiminizi kaydetmek için tetiği sıkın.
Temizlik
RIDGID micro IR-100 Temassız Kızılötesi Termometreyi suya batırmayın. Tozları nemli ve yumuşak bir bezle silerek temizleyin. Aşındırıcı
te mizlik maddelerini veya solüsyonlarını kullanmayın. Teleskopa veya
ka meraya özen gösterdiğiniz kadar bu alete de özen gösterin.
Page 55

micro IR-100 Temassız Kızılötesi Termometre
Saklama
RIDGID micro IR-100 Kızılötesi Termometre, -10°C (14°F) ile 60°C
(140°F) derece arasındaki kuru ve güvenli bir alanda saklanmalıdır.
micro IR-100'ü, çocukların ve aleti kullanma deneyimi olmayan kişilerin erişemeyeceği kilitli bir yerde saklayın.
Pil akmalarını önlemek için uzun süreli depolamadan veya nakletmeden önce pili çıkarın.
Servis ve Tamir
UYARI
Hatalı bakım veya ona rım RIDGID m icro IR-100 Temassız Kızılötesi
Termometrenin güvenli şekilde çalışmasını önleyebilir.
micro IR-100'ün bakım ve onarımı bir RIDGID Yetkili Servis Merkezi tarafından yapılmalıdır.
Size en yakın RIDGID Servis Merkezi veya bakım veya onarım ile ilgili
bilgi almak için:
• BulunduğunuzbölgedekiRIDGIDbayisiileiletişimkurun.
• YerelRIDGIDirtibatnoktasınıniletişimbilgilerineerişmekiçinwww.
RIDGID.com.trveyawww.RIDGID.euadresiniziyaretedin.
• RIDGIDTeknikServisDepartmanıileiletişimkurmakiçinrtctechser-
vices@emerson.com adresine yazın veya ABD ve Kanada'da (800)
519-3456 numaralı telefonu arayın.
Ridge Tool Company
Elden Çıkarma
RIDGID micro IR-100 Temassız Kızılötesi Termometrenin parçaları değerli malzemeler içerir ve geri dönüşüme tabi tutulabilir.
Bulunduğunuz bölgede geri dönüşüm konusunda uzmanlaşmış şirketler bulunabilir. Parçaları geçerli düzenlemelere göre elden çıkarın.
Daha fazla bilgi için yerel yetkili atık yönetimi birimi ile iletişim kurun.
AB Ülkeleri için: Elektrikli cihazları ev atıkları ile birlikte
atmayın!
Atık Elektrikli ve Elektronik Cihazlar için Avrupa Yönergesi
2002/96/EC ve yerel mevzuata uygulanmasına göre, kulla-
lanmalı ve çevreye zarar vermeyecek şekilde elden çıkarılmalıdır.
nılamayacak durumdaki elektrikli cihazlar ayrı olarak top-
Pillerin Elden Çıkarılması
AB ülkeleri için: Arızalı veya kullanılmış piller 2006/66/EEC yönergesine göre geri dönüştürülmelidir.
53
Page 56

micro IR-100 Temassız Kızılötesi Termometre
54
Ridge Tool Company
Page 57

micro IR-100
Бесконтактный инфракрасный
термометр micro IR-100
ВНИМАНИЕ
Прежде чем пользоваться этим
прибором, внимательно прочитай те данное руководство по
эксплуатации. Непонимание и несоблюдение содержания данного
руководства может привести к поражению электрическим током,
пожару и (или) серьезной травме.
Бесконтактный инфракрасный термометр micro IR-100
Запишите серийный номер, указанный далее, и сохраните серийный
номер, указанный на фирменной табличке.
Серийный
№.
Page 58

Бесконтактный инфракрасный термометр micro IR-100
Содержание
Бланк для записи серийного номера прибора .............................55
Обозначения техники безопасности ..................................................57
Общие правила техники безопасности
Безопасность в рабочей зоне ............................................................... 58
Электробезопасность ...............................................................................58
Личная безопасность ................................................................................58
Эксплуатация и обслуживание оборудования .............................. 58
Техническое обслуживание ................................................................... 59
Информация по технике безопасности при работе с
данным устройством
Техника безопасности при работе с инфракрасным
термометром ................................................................................................. 59
Описание, характеристики и стандартные
принадлежности
Описание ........................................................................................................ 59
Технические характеристики ................................................................60
Детали............................................................................................................... 61
Значки ЖК-дисплея ....................................................................................61
Стандартные принадлежности ............................................................. 61
Классификация лазера ................................................................................62
Заявление Федеральной Комиссии связи США ...........................62
Электромагнитная совместимость (ЭМС) ........................................62
Замена/Установка батарей ........................................................................ 62
Предэксплуатационный осмотр ............................................................ 63
Подготовка и эксплуатация устройства
Подготовка устройства к работе .......................................................... 64
Функционирование
Включение и выключение прибора
(Выполнение измерений) ........................................................................ 65
Органы управления прибора micro IR-100
Непрерывный режим измерения (Сканирование) .....................66
Включение/Выключение лазера ..........................................................66
Тыльная подсветка дисплея ................................................................... 66
Пользование кнопкой Меню .................................................................66
Сигнализация высокого предела измерения ................................ 66
Сигнализация низкого предела измерения ...................................67
Единицы измерения температуры на дисплее °C/°F ..................67
Чистка ..................................................................................................................... 67
Хранение ..............................................................................................................67
Обслуживание и ремонт ............................................................................. 67
Утилизация .......................................................................................................... 68
Утилизация батареек .................................................................................... 68
Пожизненная гарантия .................................................Задняя обложка
* Перевод исходных инструкций
56
Ridge Tool Company
Page 59

Бесконтактный инфракрасный термометр micro IR-100
ЗАПРЕЩАЕТСЯ НАЦЕЛИВАТЬ
ЛАЗЕРНЫЙ ЛУЧ В ГЛАЗА
ЛАЗЕРНОЕ ИЗЛУЧЕНИЕ
МАКСИМАЛЬНАЯ ВЫХОДНАЯ
МОЩНОСТЬ < 1 мВт
ДЛИНА ВОЛНЫ 630-670 нм
ИЗДЕЛИЕ С ПРИМЕНЕНИЕМ
ЛАЗЕРА КЛАССА 2
EN 60825-1:1994/A11:1996/A2:2001/A1:2002
ОСТОРОЖНО
Обозначения техники безопасности
В данном руководстве по эксплуатации инструмента обозначения техники безопасности и сигнальные слова используются для сообщения важной информации по безопасности. В данном разделе объясняется значение этих сигнальных слов и знаков.
Это обозначение опасности. Оно используется, чтобы предупредить вас о травматических опасностях. Следуйте всем сообщениям по технике безопасности, которые следуют за данным символом, чтобы избежать возможных травм или летального исхода.
ОПАСНО
ВНИМАНИЕ
ОСТОРОЖНО
ПРЕДУПРЕЖДЕНИЕ
ОПАСНО указывает на опасную ситуацию, которая, если ее не избежать, приведет к летальному исходу либо значительной травме.
ВНИМАНИЕ указывает на опасную ситуацию, которая, если ее не избежать, может привести к летальному исходу либо
значительной травме.
ОСТОРОЖНО указывает на опасную ситуацию, которая, если ее не избежать, может привести к незначительной либо
средней тяжести травме.
ПРЕДУПРЕЖДЕНИЕ указывает на информацию, относящуюся к защите собственности.
Это обозначение означает "внимательно прочитайте руководство по эксплуатации перед использованием оборудования".
Руководство по эксплуатации содержит важную информацию по безопасной и надлежащей работе с оборудованием.
Этот символ означает, что в данном устройстве применен лазер Класса 2.
Этот символ означает, что запрещается направлять луч лазера в глаза.
Этот символ предупреждает о наличии опасного лазерного луча.
Ridge Tool Company
57
Page 60

Бесконтактный инфракрасный термометр micro IR-100
Общие правила техники безопасности
Прочтите все предупреж дения относительно безопасного использования и все инструкции. Несоблюдение этих предупреждений и инструкций может привести к поражению электрическим током, пожару
и/или серьезной травме.
СОХРАНИТЕ НАСТОЯЩУЮ ИНСТРУКЦИЮ!
Декларация соответствия СЕ (890-011-320) выпускается отдельным сопро водительным бук летом к данному руководству только по тре бованию.
Безопасность в рабочей зоне
•Рабочаязона должна бытьрасчищенаихорошо освещена. Нес-
частные случаи происходят, как правило, в загроможденных и слабоосвещенных зонах.
•Недопустимоиспользоватьоборудованиевовзрывоопасныхсре-
дах,тоестьвблизигорючихжидкостей,газовилипыли.При рабо-
те с оборудованием могут появиться искры, что может привести к
воспламенению пыли или газов.
•Недопускаетсяприсутствиедетейипосторонних лиц во время
работысоборудованием.Не отвлекайтесь от работы, чтобы не по-
терять управление прибором.
Электробезопасность
•Не прикасайтесь к заземленным поверхностям, например, тру-
бам,нагревателям,печамихолодильникам.В противном случае,
если тело человека заземлено, риск поражения током повышается.
•Берегитеоборудование от дождя и влаги. Проникновение воды
внутрь оборудования увеличивает риск удара током.
Личная безопасность
•Будьте внимательны, контролируйте выполняемые действия
и пользуйтесь здравым смыслом при работе с прибором. За
прещаетсяэксплуатироватьприбор,находясьвуставшемсостоя-
нии или под действием наркотиков, алкоголя или лекарственных
препаратов. Потеря концентрации при работе с оборудованием
может привести к серьезным травмам.
58
ВНИМАНИЕ
Ridge Tool Company
•Используйте индивидуальныесредствазащиты. Всегда исполь-
зуйте средства защиты глаз. Использование в соответствующих
условиях пылезащитной маски, ботинок с нескользящими подошвами, каски, берушей и других защитных средств снижает
травмоопасность.
•Неперенапрягайтесь. Ноги должны быть надлежащим образом
расставлены,чтобывлюбоевремяобеспечиватьравновесие.Это
обеспечивает более уверенное владение прибором в непредсказуемых ситуациях.
Эксплуатация и обслуживание оборудования
•Не перегружайте оборудование. Используйте соответствующее
оборудованиедлякаждоготипаработы.Правильный выбор обо-
рудования способствует более качественному, безопасному и быстрому выполнению работы.
•Не допускается использование оборудования, если его переключатель не переводится в положение «ВКЛ.» или «ВЫКЛ.».
Инструмент, который нельзя включить или выключить, опасен и
нуждается в ремонте.
•Передвыполнениемлюбыхрегулировок, заменыпринадлежностей или постановкой прибора на хранение следует вынуть из не-
гобатарейкиэлектропитания.Подобные меры предосторожности
снижают травмоопасность.
•Храните неиспользуемое оборудование вдали от детей. Не допускайте использование оборудования лицами, не работавшимис нимранееинеознакомленнымисданными инструкциями.
Оборудование может представлять опасность в руках неквалифицированных пользователей.
•Следитезасостояниемоборудования. Следует проверять отсутствие несоосности или заедания движущихся частей, отсутствия
или поломки деталей и иных условий, которые могут отрицательно
повлиять на работу прибора. В случае повреждения оборудования
устраните неполадки перед работой. Неисправное техническое состояние приборов является причиной многих несчастных случаев.
•Используйте оборудование и принадлежности в соответствии с
настоящим руководством, принимая во внимания условия и цели
эксплуатации.Использование оборудования не по назначению может стать причиной опасной ситуации.
Page 61

Бесконтактный инфракрасный термометр micro IR-100
•Используйте только принадлежности, рекомендованные производителем для данного прибора. Принадлежности, подходящие
для работы с одним оборудованием, могут быть опасными при использовании с другим.
•Следитезатем,чтобыручкиприбораоставалисьсухимиичистыми;недопускайтепопаданиянанихмаслаилисмазки.Это обеспе-
чит надежное управление оборудованием.
Техническое обслуживание
•Ремонт оборудования должен осуществляться квалифицированным персоналом с использованием оригинальных з апасных
частей.Только таким образом гарантируется безопасность при использовании прибора.
Информация по технике безопасности при
работе с данным устройством
Данный раздел содержит важную информацию по безопасности, имеющую отношение именно к данному прибору.
Чтобы снизить риск возникновения пожара, взрыва или получения
тяжелой травмы, перед использованием бесконтактного инфракрасного термометра micro IR-100 RIDGID® внимательно ознакомьтесь с
указанными мерами предосторожности.
СОХРАНИТЕ НАСТОЯЩУЮ ИНСТРУКЦИЮ!
Храните данную инструкцию рядом с прибором для использования ее
оператором.
Техника безопасности при работе с инфракрасным
термометром
•Запрещаетсянаправлять лучлазеравглаза. Луч лазера, направленный в глаза, может быть опасен. Запрещается наблюдать луч
лазера напрямую с помощью оптических приборов (например, биноклей или телескопов).
•Запрещаетсянаправлятьлучлазеранадругихлюдей.Луч лазера
следует направлять выше или ниже уровня глаз. Лучи лазера могут
быть опасны для органов зрения.
ВНИМАНИЕ
Ridge Tool Company
•Приработевблизиэлектроприборов, движущихся или горячих
деталей следует соблюдать соответствующие меры предосторож-
ности.Касание таких объектов может привести к поражению электрическим током, к попаданию в движущиеся детали и к другим серьезным травмам. Возможно, потребуется надеть индивидуальные
средства защиты.
Дальнейшую информацию по данному продукту
чить следующим образом:
• ОбратитеськместномудистрибьюторуRIDGID.
• Контактнуюинформациюближайшего представительствакомпании
RIDGID можно найти на сайте www.RIDGID.com или www.RIDGID.ru
• Обратитесь в Отдел технического обслуживания RIDGID по адресу
rtctechservices@emerson.com, в США и Канаде вы также можете позвонить по номеру (800) 519-3456.
RIDGID
можно по лу-
Описание, характеристики и стандартные
принадлежности
Описание
Бесконтактный инфракрасный термометр RIDGID® micro IR-100 позволяет прос то, быс тро и точно определить температуру поверхности одним нажатием кнопки. Необходимо просто нажать спусковую кнопку и
направить лучи двух сверхчетких лазеров класса II на измеряемую поверхность. Термометр micro IR-100 обеспечивает быстрое измерение
температуры с помощью четкого и разборчивого ЖК дисплея с тыльной
подсветкой. Помимо различных других видов применения, этот надежный и компактный прибор позволяет профессиональным специалистам
выполнять поиск дефектов в системах отопления и вентиляции, осуществлять профилак тический контроль электродвигателей и систем,
выполнять поиск и устранение неисправностей в конденсационных
горшках и быстро бесконтактно проверять отсутствие перегрева предохранителей или автоматических выключателей.
В приборе micro IR-100 используется оптика для измерения излученной,
отраженной и передаваемой энергии, которая собирается и фокусируется на датчике. Электронные схемы прибора преобразуют эту информацию в показание температуры, которое выводится на дисплей. Лучи
лазеров используются для облегчения нацеливания прибора.
59
Page 62

Бесконтактный инфракрасный термометр micro IR-100
Технические характеристики
Диапазон температур................................... от -50°C до 800°C
Отношение расстояния до
поверхности к размеру пятна................... 20 : 1
Точность измерения...................................... 50°C ~20°C (-58°F ~68°F): ± 2,5°C
Воспроизводимость измерений.............. 50°C ~20°C (-58°F ~68°F): ± 1,3°C
Время ответной реакции............................ 150 мс
Спектральная характеристика................. 8~14 мкм
Коэффициент излучения............................. Фиксированный,0,95
Индикация превышения диапазона...... На ЖК дисплее появится “----”
Диодный лазер................................................ Выходная мощность <1 мВт, длина
Дисплей температуры.................................. Текущая температура,
Единицы измерения...................................... ГрадусыЦельсия,Фаренгейта
Диапазон рабочих температур................ от 0°C до 50°C (от 32°F до 122°F)
Температура хранения................................. от -10°C до 60°C (от 14°F до 140°F)
Разрешающая способность дисплея..... 0,1°C (0,1°F)
Относительная влажность.......................... 10%~90% рабочая отн. влажн.,
Батарейка питания......................................... Батарейка напряжением 9 В (1),
Класс защиты IP................................................ IP54
Вес.......................................................................... 0,3 кг (0,6 фунта)
60
(от -58°F до 1472°F)
(4,5°F) 20°C ~800°C (68°F ~1472°F)
±1,0% или ± 1,0°C (1,8°F)
(2,3°F) 20°C ~800°C (68°F ~1472°F)
±0,5% или ± 0,5°C (0,9°F)
волны 630~670 нм, лазер класса 2
максимальная температура
<80% отн. влажн. хранения
NEDA 1604A или IEC 6LR61, или
аналогичная
Ridge Tool Company
Характерные особенности
• Функциябыстрогоизмерения
• Нацеливаниедвухлазеров
класса II
• Автоматическаяфиксация
данных
• Отображениемаксимальной
температуры
• Точныебесконтактные
измерения
• Автоматическийвыбор
диапазона и разрешающая
способность на дисплее 0,1°C
(0,1°F)
• ЖК-дисплейстыльной
подсветкой
• Блокировкаспусковойкнопки
• Установкасигнализации
верхнего и нижнего пределов
измерения
Рис.1–Бесконтактныйинфракрасныйтермометрmicro
IR-100
Page 63

Бесконтактный инфракрасный термометр micro IR-100
Детали
Кнопка со
стрелкой вверх/
Включение лазера
Спусковая кнопка
Рукоятка
Рис.2–ДеталиприбораmicroIR100
Инфракрасный
датчик
Лазер
Спусковая
кнопка
ЖК-экран
Кнопка со стрелкой
вниз/Тыльная подсветка дисплея
Кнопка Меню
Держатель
батарейки
Лазер
Значки ЖК-дисплея
Значе ние
текущей
темпера-
Значе ние
макси-
мальной
темпера-
Бата рейка
раз ряжена
Рис.3–ЗначкинадисплееприбораmicroIR100
Стандартные
принадлежности
• ПриборmicroIR-100
• Футлярдляпереноски
Ridge Tool Company
Фиксация данных
туры
туры
Лазер включен
Сигнализа-
Замок включения питания
• Батареяпитания1шт.x9В
• Руководствооператора
ция высокого предела
измерения
Сигнализа ция
низкого предела измерения
Единицы измерения температуры - градусы Цельсия/
Фаренгейта
Коэф фи ци ент
излучения
61
Page 64

Бесконтактный инфракрасный термометр micro IR-100
ПРЕДУПРЕЖДЕНИЕ
температуры. Неверная эксплуатация или неправильное применение
прибора могут привести к неверным или к неточным результатам измерений. Выбор соответствующего способа измерения для конкретных условий предоставляется самому пользователю.
Классификация лазера
Инфракрасный термометр RIDGID micro IR-100 генерирует
видимый лазерный луч, излучаемый из переднего торца
прибора.
Прибор соответствует параметрам лазеров класса 2, указанным в
стандартах: EN 60825-1:1994/A11:1996/A2:2001/A1:2002
Данный прибор предназначен для измерения
Заявление Федеральной Комиссии связи США
Данный прибор был протестирован и показал соответствие с ограничениями для Класса В цифровых устройств, в соответствии с Частью
15ПравилФКС.Этиограниченияпредставляютсобойобоснованную
защиту против недопустимых помех в жилых помещениях.
Этот прибор генерирует, использует и может излучать энергию радио
частот, и, ес ли он не будет установлен и использован в соответствии
с руководством, может создавать недопустимые помехи для радио
связи.
Однако нет гарантий, что в к аком-то конкретном случае не случится
помех.
Если данный прибор создает недопустимые помехи для радио либо
телевизионного приема, что можно определить включая и выключая
прибор, пользователь может попробовать исправить помехи следующими способами:
• Переориентироватьлибопереместитьпринимающуюантенну.
• Увеличитьдистанциюмеждуприборомиприемником.
• Получитьконсультациюудилералибоопытноготехникапорадио/
ТВ.
62
Ridge Tool Company
Электромагнитная совместимость (ЭМС)
Термин "электромагнитная совместимость" использован с целью обозначить способность продукта безошибочно функционировать в среде с излучаемыми электромагнитными помехами и э лектростатическими разрядами, не создавая электромагнитных помех другому оборудованию.
ПРЕДУПРЕЖДЕНИЕ
соответствует всем действующим стандартам по электромагнитной совместимости ЭМС. Однако, невозможно полнос тью исключить вероятность создания прибором помех для других устройств.
Рис.4–Извлечениедержателябатарейки
Инфракрасный термометр RIDGID micro IR-100
Замена/Установка батарей
Инфракрасный термометр micro IR-100 поставляется без батарейки питания. Если на дисплее прибора загорается индикатор батарейки
(Pис. 3), то разряженную батарейку прибора следует заменить. Извлеките
батарейку из прибора перед его длительным хранением во избежание
возникновения течи электролита из батарейки.
Page 65

Бесконтактный инфракрасный термометр micro IR-100
1. Сожмите защелки держателя батарейки и извлеките держатель
батарейки из термометра (Pис. 4). При необходимости извлеките батарейку.
2. Установите щелочную 9-вольтовую батарейку (6LR61), соблюдая
надлежащую полярность, указанную на держателе батарейки.
Рис.5–Держательбатарейкиимаркировкаполярности
3. Сожмите защелки и плотно вставьте держатель батарейки в
термометр. Держатель батарейки можно вставить в прибор
только в одном положении. Не следует прилагать усилий.
Проверьте надежность крепления.
Предэксплуатационный осмотр
Перед каж дым применением проверяйте инфракрасный термометр
и устраняйте любые обнаруженные неисправности, чтобы снизить
опасность травмы или риск получения неверного измерения.
Запрещается направлять луч лазера в глаза. Луч лазера, направленный в глаза, может быть опасен.
1. Удалите любое масло, смазку или грязь с прибора. Это также
является частью проверки.
ВНИМАНИЕ
Ridge Tool Company
2. Осмотрите прибор micro IR-100 и убедитесь в отсутствии поврежденных, изношенных, утерянных, несоосных или заедающих деталей или любых других неисправностей, которые могут
помешать нормальной и безопасной работе.
3. Проверьте, на месте ли предупредительные этикетки, хорошо
ли они прикреплены и разборчивы (Pис. 6).
4. Если во время проверки были обнаружены какие-либо неисправности, не пользуйтесь инфракрасным термометром до их
устранения.
5. В соответствии с инструкцией по эксплуатации включите инфракрасный термометр, выполните измерение и проверьте полученное показание с помощью другого прибора (контактного
термометра и пр.). Если отличия в показаниях недопустимые,
не пользуйтесь инфракрасным термометром до выполнения
надлежащего технического обслуживания.
Рис.6–Предупредительныеэтикетки
63
Page 66

Бесконтактный инфракрасный термометр micro IR-100
D:S=20:1
25.4mm @
508mm
508mm @
1016mm
1.0in@ 20in
S
D
2.0in@ 40in
Подготовка и эксплуатация устройства
ВНИМАНИЕ
Запрещается направлять луч лазера в глаза. Луч лазера, направленный в глаза, может быть опасен. Запрещ ается наблюдать луч лазера
напрямую с помощью оптических приборов (например, биноклей или
телескопов).
Запрещается направлять луч лазера на других людей. Луч лазера следует направлять выше или ниже уровня глаз. Лучи лазера могут быть
опасны для органов зрения.
При работе вблизи электроприборов, движущихся или горячих деталей следует соблюдать соответствующие меры предосторожности.
Касание таких объектов может привести к поражению электрическим
током, к попаданию в движущиеся детали и к другим серьезным
травмам. Возможно, потребуется надеть индивидуальные средства
защиты.
Подготовьте инфракрасный термометр к работе и выполняйте его
эксплуатацию в соответствии с данными процедурами, чтобы снизить
опасность травмы или риск получения неверного измерения.
Подготовка устройства к работе
1. Проведите проверку рабочей зоны, как указано в разделе
Общие правила техники безопасности.
2. Проверьте измеряемый объект и убедитесь, что данный измерительный прибор подходит для применения. Диапазон,
погрешность измерения и другая информация представлены
в разделе "Технические характеристики".
Имеется много факторов, которые могут отрицательно сказать-
ся на точности показаний прибора micro IR-100, в том числе:
64
Ridge Tool Company
Зонаобзораприбора– В приборе micro IR-100 используются
два лазера для проецирования точек нацеливания с каждой
стороны от измеряемой зоны. Эти точки указывают приблизительный диаметр зоны, в которой прибор измеряет температуру (“пятно”). При удалении прибора micro IR-100 от поверхности (D) зона и размер пятна измерения (S) увеличиваются.
Размер зоны измерения составляет приблизительно 0,05 от
расстояния до поверхности (Pис. 7).
Поверхность
Рис.7–Зонаобзораприбора
Пятно измерения всегда должно быть меньше измеряемой
поверхности. Чем меньше поверхность, тем ближе следует
располагать прибор micro IR-100 к поверхности. Для достижения наивысшей точности поверхность должна быть в два раза
больше пятна измерения.
Коэффициент излучения – Термин "коэффициент излуче-
ния" используют для описания характеристик излучательной
способности материалов, величина коэффициента меняется в
Page 67

Бесконтактный инфракрасный термометр micro IR-100
диапазоне от 0 до 1. В приборе micro IR-100 для расчета температур используется фиксированный коэффициент излучения 0,95. Это значение соответствует большинству ситуаций
применения прибора, в том числе большинству окрашенных
поверхностей.
Блестящие или отполированные поверхности имеют понижен-
ный коэффициент излучения и дают неточные показания. Один
из способов компенсации этого явления – нанесение маскирующей ленты или окрашивание плоского участка поверхности
черной краской. Следует дождаться выравнивания температуры ленты или краски относительно температуры поверхности.
Температура – Хотя прибор micro IR-100 осуществляет ком-
пенсацию изменений температуры окружающей среды, значительные изменения температуры окружающей среды и
измеренной температуры могут привести к понижению точности измерения. При значительных изменениях температуры
окружающей среды (более 17°C или 30°F) для достижения прибором micro IR-100 максимальной точности измерения следует
выдержать его пятнадцать минут при новой температуре.
Препятствия– Пар, пыль, дым и другие препятствия, напри-
мер, стекло или пластик между прибором micro IR-100 и измеряемой поверхностью могут приводить к снижению точности
измерения. Эти препятствия мешают работе оптики прибора
или дают неверные показания (измеряется температура стекла вместо поверхности). При наличии препятствий не следует
пользоваться прибором.
До начала работы прибора micro IR-100 следует учесть наличие
этих неблагоприятных факторов.
3. Удостоверьтесь в полной проверке всего оборудования.
Ridge Tool Company
Функционирование
Включение и выключение прибора
(Выполнение измерений)
1. Возьмитесь за ручку прибора micro IR-100 и направьте его на
измеряемую поверхность. Не работайте с инфракрасным термометром вблизи электроприборов, движущихся или горячих
деталей. Перед вк лючением прибора убедитесь, что он направлен в безопасное место в сторону от посторонних.
2. Чтобы включить прибор micro IR-100, нажмите его спусковую
кнопку. После нажатия спусковой кнопки на дисплее появится
значок сканирования SCAN, и прибор micro IR-100 начнет постоянно обновлять значение текущей измеренной температуры, при этом на дисплее также появится максимальное значение измеренной температуры, отсчитываемое от момента
включения прибора.
Прибор micro IR-100 можно медленно перемещать над по-
верхностью для поиска горячих или холодных зон. В разделах
"Сигнализация высокого предела измерения" и "Сигнализация
низкого предела измерения" представлена информация о на-
стройках высокого и низкого пределов измерения.
3. После отпускания спусковой кнопки прибора на дисплее появится значок фиксации измерения HOLD. Прибор micro IR-100
автоматически выключится через несколько секунд, если он не
находится в непрерывном режиме измерения температуры.
65
Page 68

Бесконтактный инфракрасный термометр micro IR-100
Органы управления прибора micro IR-100
ЖК-экран
Спусковая
кнопка
Лазер
Рис.8–ДисплейикнопкиприбораmicroIR100
Непрерывный режим измерения (Сканирование)
Прибор micro IR-100 можно зафиксировать во вк люченном состоянии,
чтобы выполнять измерения без постоянного нажатия спусковой кнопки. Перед включением прибора убедитесь, что он направлен в безопасное место в сторону от посторонних. Вк лючите прибор micro IR-100, для
этого нажмите и удерживайте его спусковую кнопку. Удерживая нажатой
спусковую кнопку прибора, нажмите и отпустите кнопку меню. На дисплее появится значок сканирования SCAN и значок замка фиксации
включения прибора. Отпустите спусковую кнопку, прибор micro IR-100
будет непрерывно измерять температуру до следующего наж атия и отпускания спусковой кнопки.
66
Кнопка
со стрелкой вниз/
Тыльная
подсветка
дисплея
Кнопка Меню
Ridge Tool Company
Включение/Выключение лазера
Для экономии энергии батарейки при необходимости можно выключить лазеры, применяемые для нацеливания прибора. После этого для
получения надежных результатов измерения следует тщательнее нацеливать прибор micro IR-100. Чтобы включить или выключить лазер,
при нажатой спусковой кнопке прибора нажмите и отпустите кнопку
включения лазера. При включенном лазере на дисплее появится треугольный значок включения лазера.
Тыльная подсветка дисплея
Для работы в плохо освещенных местах в приборе micro IR-100 предусмотрена тыльная подсветка диспле я. Чтобы вк лючить или выключить
тыльную подсветку дисплея вк люченного прибора, нажмите кнопку
тыльной подсветки.
Пользование кнопкой Меню
После нажатия спусковой кнопки прибора нажатие и отпускание кнопки
Меню позволяет циклически переключать нижеследующие настройки в
указанном порядке: ВКЛ/ВЫКЛ сигнализации высокого предела измерения, настройка высокого предела измерения температуры, ВКЛ/ВЫКЛ
сигнализации низкого предела измерения, настройка низкого предела
измерения температуры, единицы измерения температуры на дисплее.
Сигнализация высокого предела измерения
Сигнализация высокого предела измерения подает звуковой сигнал,
когда текущая температура превышает предварительно заданный предел. Чтобы включить сигнализацию высокого предела измерения, следует нажать и отпустить спусковую кнопку, а затем нажимать и отпускать
кнопку Меню до тех пор, пока не начнет мигать значок сигнализации
высокого предела измерения. Используйте кнопки со стрелками вверх/
вниз для включения/вык лючения функции сигнализации высокого предела измерения, температура которого указана в с троке значения текущей температуры. Нажмите и отпустите кнопку Меню еще раз. Значок
Page 69

Бесконтактный инфракрасный термометр micro IR-100
сигнализации высокого предела измерения будет продолжать мигать,
и на дисплее появится температура сигнализации высокого предела измерения. Используйте кнопки со стрелками вверх/вниз, чтобы требуемым образом изменить температуру сигнализации высокого предела
измерения. Для сохранения выбранной настройки и выхода из режима
настройки нажмите спусковую кнопку прибора.
Сигнализация низкого предела измерения
Сигнализация низкого предела измерения подает звуковой сигнал, когда текущая температура становится ниже предварительно заданного
предела. Чтобы включить сигнализацию низкого предела измерения,
следует нажать и отпустить спусковую кнопку, а затем нажимать и отпускать кнопку Меню до тех пор, пока не начнет мигать значок сигнализации низкого предела измерения. Используйте кнопки со стрелк ами
вверх/вниз для включения/выключения функции сигнализации низкого
предела измерения, температура которого указана в строке значения
текущей температуры. Нажмите и отпустите кнопку Меню еще раз.
Значок сигнализации низкого предела измерения будет продолжать мигать, и на дисплее появится температура сигнализации низкого предела
измерения. Используйте кнопки со стрелками вверх/вниз, чтобы требуемым образом изменить температуру сигнализации низкого предела
измерения. Для сохранения выбранной настройки и выхода из режима
настройки нажмите спусковую кнопку прибора.
Единицы измерения температуры на дисплее - °C/°F
Прибор micro IR-100 может отображать температуру на дисплее в градусахЦельсия(°C)илиФаренгейта(°F).Чтобыпереключитьединицыизмерения температуры на дисплее, следует нажать и отпустить спусковую
кнопку, а затем нажимать и отпускать кнопку Меню до тех пор, пока не
начнет мигать единица измерения температуры на дисплее. Чтобы переключить единицы измерения температуры на дисплее °C или °F, с ледует
нажать кнопку со стрелкой вверх или вниз. Для сохранения выбранной
настройки и выхода из режима настройки нажмите спусковую кнопку
прибора.
Ridge Tool Company
Чистка
Запрещается погружать бесконтактный инфракрасный термометр
RIDGID micro IR-100 в воду. Грязь с прибора следует вытирать влажной
мягкой тряпкой. Запрещается использовать для чистки агрессивные
чистящие средства или рас творы. С прибором следует обращаться
как со с ложным оптическим прибором (например, телескопом или
фотокамерой).
Хранение
Бесконтактный инфракрасный термометр micro IR-100 RIDGID следует
хранить в сухом безопасном месте при температуре от -10°C (14°F) до
60°C (140°F).
Прибор надлежит хранить в запираемом помещении, недос тупном для
детей и людей, которые не знакомы с инфракрасным термометром micro
IR-100.
Извлеките батарейку из прибора перед его длительным хранением или
транспортировкой во избежание возникновения течи электролита из
батарейки.
Обслуживание и ремонт
Неправильное обслуживание или ремонт может стать причиной неполадок в работе бесконтактного инфракрасного термометра micro
IR-100 RIDGID.
Обслуживание и ремонт прибора micro IR-100 следует производить в независимых авторизованных сервисных центрах RIDGID.
Для получения любой интересующей информации о ближ айшем независимом центре технического обслуживания RIDGID, обслуживании или
ремонте:
ВНИМАНИЕ
67
Page 70

Бесконтактный инфракрасный термометр micro IR-100
• ОбратитеськместномудистрибьюторуRIDGID.
• Контактнуюинформациюближайшего представительствакомпании
RIDGID можно найти на сайте www.RIDGID.com или www.RIDGID.ru
• Обратитесь в Отдел технического обслуживания RIDGID по адресу
rtctechservices@emerson.com, в США и Канаде вы также можете позвонить по номеру (800) 519-3456.
Утилизация
Детали бесконтактного инфракрасного термометра micro IR-100 RIDGID
содержат ценные материалы и могут быть подвергнуты повторной
переработке. В своем регионе вы можете найти компании, специализирующиеся на утилизации. Утилизируйте компоненты в соответствии со
всеми нормативами. Узнайте дополнительную информацию в местной
организации по утилизации отходов.
Для стран ЕС: Не утилизируйте электрооборудование вместе с бытовыми отходами!
В соответствии с Директивой 2002/96/EC по утилизации электрического и электронного оборудования, электрическое
оборудование, не пригодное для дальнейшего использования, следует собирать отдельно и у тилизировать безопасным для окружающей среды способом.
Утилизация батареек
Для стран ЕС: Дефектные и использованные батарейки подлежат повторной переработке в соответствии с директивой 2006/66/EEC.
68
Ridge Tool Company
Page 71

micro IR-100 Non-Contact Infrared Thermometer
Ridge Tool Company
69
del Consiglio Europeo descritta dalle seguenti normative: EN 61326-1:2006,
EN 61326-2-1:2006.
Conformidade CE
Este instrumento está em conformidade com a Directiva de Compatibilidade
Electromagnética do Conselho Europeu utilizando as normas seguintes: EN
61326-1:2006, EN 61326-2-1:2006.
CE-märkning
Det här instrumentet uppfyller det europeiska direktivet om elektromagnetisk kompatibilitet enligt följande standarder: EN 61326-1:2006, EN 613262-1:2006.
CE-overensstemmelse
Dette instrument overholder Det Europæiske Råds direktiv om elektromagnetisk kompatibilitet med følgende standarder: EN 61326-1:2006, EN 613262-1:2006.
CE-samsvar
Dette instrumentet er i samsvar med Europarådets direktiv om elektromagnetisk kompatibilitet som retter seg etter følgende standarder: EN 613261:2006, EN 61326-2-1:2006.
CE-vastaavuus
Tämä laite on sähkömagneettista yhteensopivuutta koskevan Euroopan
yhteisön direktiivin mukainen käyttäen seuraavia standardeja: EN 613261:2006, EN 61326-2-1:2006.
CE sukladnost
Ovaj instrument sukladan je dokumentu ‘European Council Electromagnetic
Compatibility Directive’ uz primjenu slijedećih normi: EN 61326-1:2006, EN
61326-2-1:2006.
Manufacturer: Authorized Representative:
RIDGE TOOL COMPANY RIDGE TOOL EUROPE N.V.
400 Clark Street Research Park, Haasrode
Elyria, Ohio 44035-6001 B-3001 Leuven
U.S.A. Belgium
CE Conformity
This instrument complies with the European Council Electromagnetic Compatibility Directive using the following standards: EN 61326-1:2006, EN
61326-2-1:2006.
Conformité CE
Cet instrument est conforme à la Directive du Conseil européen relative à la
compatibilité électromagnétique sur la base des normes suivantes : EN
61326-1:2006, EN 61326-2-1:2006.
Conformidad CE
Este instrumento cumple con la Directiva de Compatibilidad Electromagnética del Consejo Europeo mediante las siguientes normas: EN 613261:2006, EN 61326-2-1:2006.
CE-Konformität
Dieses Instrument entspricht der EU-Richtlinie über elektromagnetische
Kompatibilität unter Anwendung folgender Normen: EN 61326-1:2006, EN
61326-2-1:2006.
EG-conformiteit
Dit instrument voldoet aan de Elektromagnetische-compatibiliteitsrichtlijn
van de Europese Raad, die gebaseerd is op de volgende normen: EN 613261:2006, EN 61326-2-1:2006.
Conformità CE
Questo strumento soddisfa la Direttiva sulla Compatibilità Elettromagnetica
Page 72

micro IR-100 Non-Contact Infrared Thermometer
Ridge Tool Company
70
Zgodność z dyrektywami Unii Europejskiej
Ten przyrząd spełnia wymagania Dyrektywy Zgodności Elektromagnetycznej
Komisji Europejskiej, zgodnie z następującymi normami: EN 61326-1:2006,
EN 61326-2-1:2006.
Conformitate CE
Acest aparat se conformează Directivei Consiliului European privind compatibilitatea electromagnetică utilizând următoarele standarde: EN 613261:2006, EN 61326-2-1:2006.
Shoda CE
Tento přístroj vyhovuje Směrnici Rady Evropy o elektromagnetické kompatibilitě a odpovídá těmto normám: EN 61326-1:2006, EN 61326-2-1:2006.
CE konform
Ez a műszer megfelel az Európai Tanács Elektromágneses kompatibilitási direktívája alábbi szabványainak: EN 61326-1:2006 és EN 61326-2-1:2006.
Δήλωση συμμόρφωσης CE
Η παρούσα συσκευή συμμορφώνεται με την Οδηγία του Ευρωπαϊκού
Συμβουλίου περί Ηλεκτρομαγνητικής Συμβατότητας σύμφωνα με τα
παρακάτω πρότυπα: EN 61326-1:2006, EN 61326-2-1:2006.
Соответствие требованиям Евросоюза (CE)
Настоящий прибор соответствует требованиям по электромагнитной
совместимости Директивы Европейского Союза с применением
следующих стандартов: EN 61326-1:2006, EN 61326-2-1:2006..
Page 73

micro IR-100 Non-Contact Infrared Thermometer
Ridge Tool Company
71
Page 74

micro IR-100 Non-Contact Infrared Thermometer
Ridge Tool Company
72
Page 75

EMERSON. CONSIDER IT SOLVED.
™
Printed in China. 1/11
© 2010 RIDGID, Inc.
999-998-259.10
EC37829
REV. B
What is covered
RIDGID®tools are warranted to be free of defects in workmanship and material.
How long coverage lasts
This warranty lasts for the lifetime of the RIDGID
®
tool. Warranty coverage ends
when the product becomes unusable for reasons other than defects in workmanship or material.
How you can get service
To obtain the benefit of this warranty, deliver via prepaid transportation the complete
product to RIDGE TOOL COMPANY, Elyria, Ohio, or any authorized RIDGID
®
INDEPENDENT SERVICE CENTER. Pipe wrenches and other hand tools should be returned
to the place of purchase.
What we will do to correct problems
Warranted products will be repaired or replaced, at RIDGE TOOL’S option, and returned at no charge; or, if after three attempts to repair or replace during the warranty
period the product is still defective, you can elect to receive a full refund of your purchase price.
What is not covered
Failures due to misuse, abuse or normal wear and tear are not covered by this warranty. RIDGE TOOL shall not be responsible for any incidental or consequential damages.
How local law relates to the warranty
Some states do not allow the exclusion or limitation of incidental or consequential
damages, so the above limitation or exclusion may not apply to you. This warranty
gives you specific rights, and you may also have other rights, which vary, from state
to state, province to province, or country to country.
No other express warranty applies
This FULL LIFETIME WARRANTY is the sole and exclusive warranty for RIDGID
®
products. No employee, agent, dealer, or other person is authorized to alter this warranty or make any other warranty on behalf of the RIDGE TOOL COMPANY.
Ce qui est couvert
Les outils RIDGE
®
sont garantis contre tous vices de matériaux et de main d’oeuvre.
Durée de couverture
Cette garantie est applicable durant la vie entière de l’outil RIDGE
®
. La couverture cesse
dès lors que le produit devient inutilisable pour raisons autres que des vices de matériaux ou de main d’oeuvre.
Pour invoquer la garantie
Pour toutes réparations au titre de la garantie, il convient d’expédier le produit complet en port payé à la RIDGE TOOL COMPANY, Elyria, Ohio, ou bien le remettre à un
réparateur RIDGID
®
agréé. Les clés à pipe et autres outils à main doivent être ramenés
au lieu d’achat.
Ce que nous ferons pour résoudre le problème
Les produits sous garantie seront à la discrétion de RIDGE TOOL, soit réparés ou remplacés, puis réexpédiés gratuitement ; ou si, après trois tentatives de réparation ou de
remplacement durant la période de validité de la garantie le produit s’avère toujours
défectueux, vous aurez l’option de demander le remboursement intégral de son prix
d’achat.
Ce qui n’est pas couvert
Les défaillances dues au mauvais emploi, à l’abus ou à l’usure normale ne sont pas
couvertes par cette garantie. RIDGE TOOL ne sera tenue responsable d’aucuns dommages directs ou indirects.
L’influence de la législation locale sur la garantie
Puisque certaines législations locales interdisent l’exclusion des dommages directs
ou indirects, il se peut que la limitation ou exclusion ci-dessus ne vous soit pas applicable. Cette garantie vous donne des droits spécifiques qui peuvent être éventuellement complétés par d’autres droits prévus par votre législation locale.
Il n’existe aucune autre garantie expresse
Cette GARANTIE PERPETUELLE INTEGRALE est la seule et unique garantie couvrant
les produits RIDGID
®
. Aucun employé, agent, distributeur ou tiers n’est autorisé à
modifier cette garantie ou à offrir une garantie supplémentaire au nom de la RIDGE
TOOL COMPANY.
Qué cubre
Las herramientas RIDGID están garantizadas contra defectos de la mano de obra y
de los materiales empleados en su fabricación.
Duración de la cobertura
Esta garantía cubre a la herramienta RIDGID durante toda su vida útil. La cobertura
de la garantía caduca cuando el producto se torna inservible por razones distintas
a las de defectos en la mano de obra o en los materiales.
Cómo obtener servicio
Para obtener los beneficios de esta garantía, envíe mediante porte pagado, la totalidad del producto a RIDGE TOOL COMPANY, en Elyria, Ohio, o a cualquier Servicentro Independiente RIDGID. Las llaves para tubos y demás herramientas de mano
deben devolverse a la tienda donde se adquirieron.
Lo que hacemos para corregir el problema
El producto bajo garantía será reparado o reemplazado por otro, a discreción de
RIDGE TOOL, y devuelto sin costo; o, si aún resulta defectuoso después de haber
sido reparado o sustituido tres veces durante el período de su garantía, Ud. puede
optar por recibir un reembolso por el valor total de su compra.
Lo que no está cubierto
Esta garantía no cubre fallas debido al mal uso, abuso o desgaste normal. RIDGE
TOOL no se hace responsable de daño incidental o consiguiente alguno.
Relación entre la garantía y las leyes locales
Algunos estados de los EE.UU. no permiten la exclusión o restricción referente a
daños incidentales o consiguientes. Por lo tanto, puede que la limitación o restricción mencionada anteriormente no rija para Ud. Esta garantía le otorga derechos
específicos, y puede que, además, Ud tenga otros derechos, los cuales varían de estado a estado, provincia a provincia o país a país.
No rige ninguna otra garantía expresa
Esta GARANTIA VITALICIA es la única y exclusiva garantía para los productos
RIDGID. Ningún empleado, agente, distribuidor u otra persona está autorizado para
modificar esta garantía u ofrecer cualquier otra garantía en nombre de RIDGE TOOL
COMPANY.
Ridge Tool Company
400 Clark Street • Elyria, Ohio 44035-6001
U.S.A .
FULL LIFETIME
WARRANTY
Against Material Defects
& Workmanship
 Loading...