

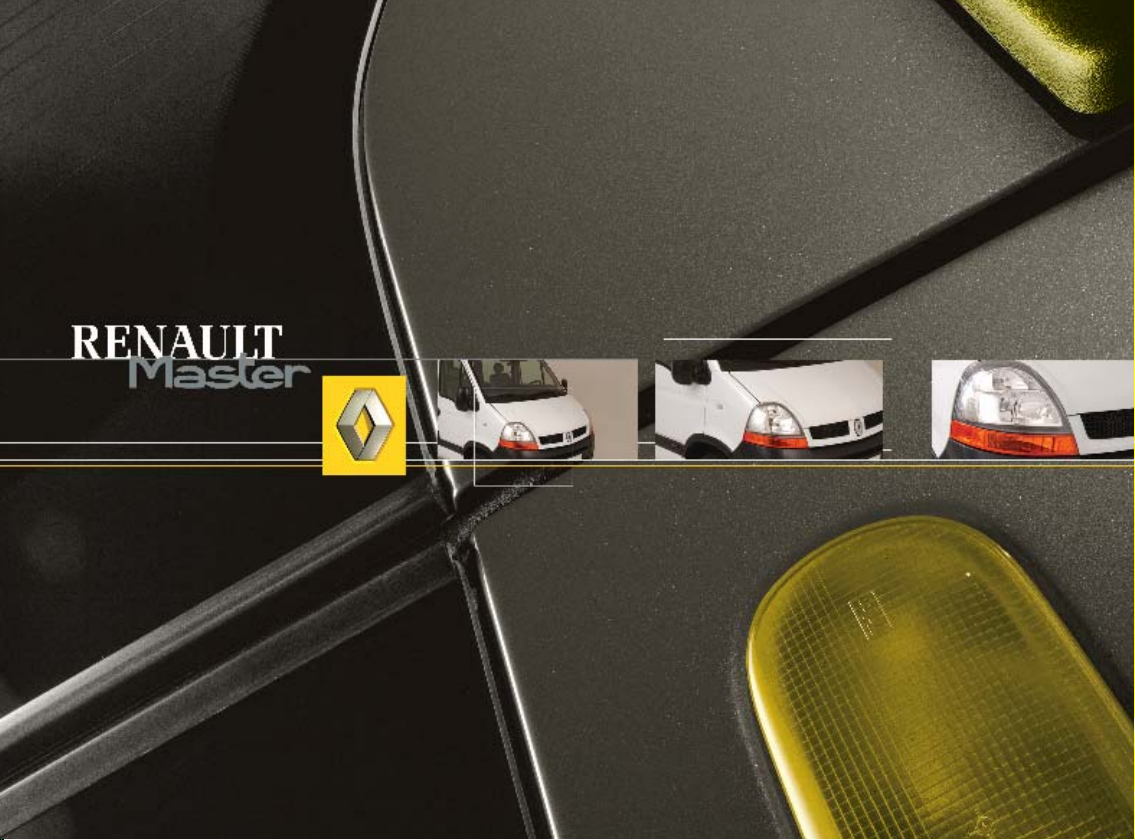
Page 1
Page 2
has chosen ELF
For all engines
ELF EXCELLIUM LDX 5W-40 ACEA A3/B4
Optimum performance and maximum protection in the most severe conditions
All types of driving
ELF EVOLUTION SXR 5W-40 ACEA A3/B4
Optimum performance
All types of driving
For all engines
ELF COMPETITION ST 10W-40 ACEA A3/B4
ELF TURBO DIESEL 10W-40 ACEA B3/B4
Other RENAULT approved lubricants for normal use.
5-speed manual gearbox
6-speed manual gearbox
Automatic transmission
Elf has developed specific lubricants for each Renault transmission:
Tranself TRJ 75W80, Tranself TRT 75W80, Tranself TRP 75W80, Tranself TRX 75W80
for manual gearboxes, Renaultmatic D3Syn and Renaultmatic D2 for automatic gearboxes
These fluids are actively involved in the operation of your vehicle. (*)
RENAULT recommends using approved ELF products when topping up or changing the oil.
(*) Refer to your vehicle's Warranty and Services booklet for information regarding which grade of oil to use.
Consult your RENAULT Dealer or visit www.lubricants.elf.com
Page 3

Quick overview
•
Tyre pressures ......................................................................................................... 0.04
•
Adjusting the seats and the driver's position ......................................... 1.16 - 1.17
•
Child restraint devices ............................................................................. 1.28
➟ 1.35
0.02
•
Warning lights ........................................................................................... 1.40
•
Audible and visible signals ..................................................................... 1.53
•
Running in, driving .................................................................................. 2.02
•
Heating/air conditioning .......................................................................... 3.02
•
Opening the bonnet ............................................................................................... 4.02
•
Levels (engine oil, windscreen washer, etc.) ......................................... 4.03
•
Emergency spare wheel ............................................................................ 5.02
•
Practical advice (changing the bulbs, fuses, repairs,
operating faults) .................................................................................... 5.02
➟ 1.47
➟ 1.56
➟ 2.25
➟ 3.11
➟ 4.09
➟ 5.06
➟ 5.41
Page 4
CONTENTS
Sections
Getting to know your vehicle ............................................................
Driving ...............................................................................................................
Your comfort .................................................................................................
Maintenance ..................................................................................................
Practical advice ...........................................................................................
Technical specifications ........................................................................
Alphabetical index ....................................................................................
1
2
3
4
5
6
7
0.03
Page 5
TYRE PRESSURES
(in bar or kg/cm2, when cold)
Ty re s i z es
(original fittings)
Wheel sizes 6 J 16
Front 3.8 3.9 3.8 4.2
Rear 3.8 4.3 4.4 4.75
Emergency spare wheel 3.8 4.3 4.4 4.75
Special features of 205/75 R 16 tyres
These tyres cannot be fitted with chains. Contact your RENAULT Dealer.
195/65 R 16 215/65 R 16 225/65 R 16 205/75 R 16
0.04
Page 6

Section 1: Getting to know your vehicle
Keys - Remote control units ................................................................................................................. 1.02 - 1.03
Doors ..................................................................................................................................................... 1.04
Dropside ................................................................................................................................................. 1.11 - 1.12
Anti-intrusion alarm .............................................................................................................................. 1.13 - 1.14
Engine immobiliser ........................................................................................................................................... 1.15
Seats ................................................................................................................................................................... 1.16
Headrests ........................................................................................................................................................... 1.17
Rear view mirrors ............................................................................................................................................. 1.18
Seat belts ............................................................................................................................................... 1.19
Methods of restraint in addition to the front seat belts ................................................................... 1.23
Airbag .................................................................................................................................................... 1.23
Child safety ........................................................................................................................................... 1.28
Driver's position ................................................................................................................................... 1.36
Instrument panel .................................................................................................................................. 1.40
Clock .................................................................................................................................................................. 1.51
Exterior temperature ......................................................................................................................................... 1.51
Windscreen wipers ........................................................................................................................................... 1.52
Buzzers/Lights ...................................................................................................................................... 1.53
Electric beam height adjustment ..................................................................................................................... 1.55
Fuel tank ................................................................................................................................................. 1.57 - 1.58
➟ 1.10
➟ 1.22
➟ 1.27
➟ 1.27
➟ 1.35
➟ 1.39
➟ 1.50
➟ 1.56
1.01
Page 7
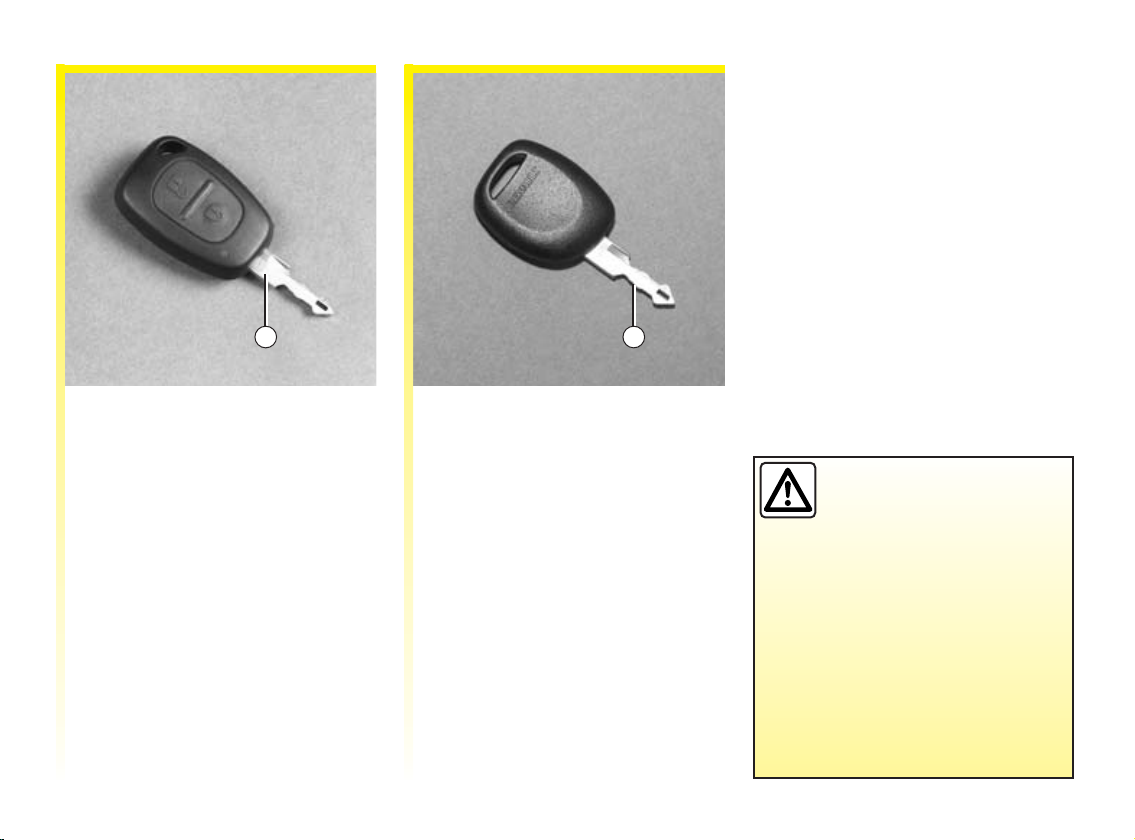
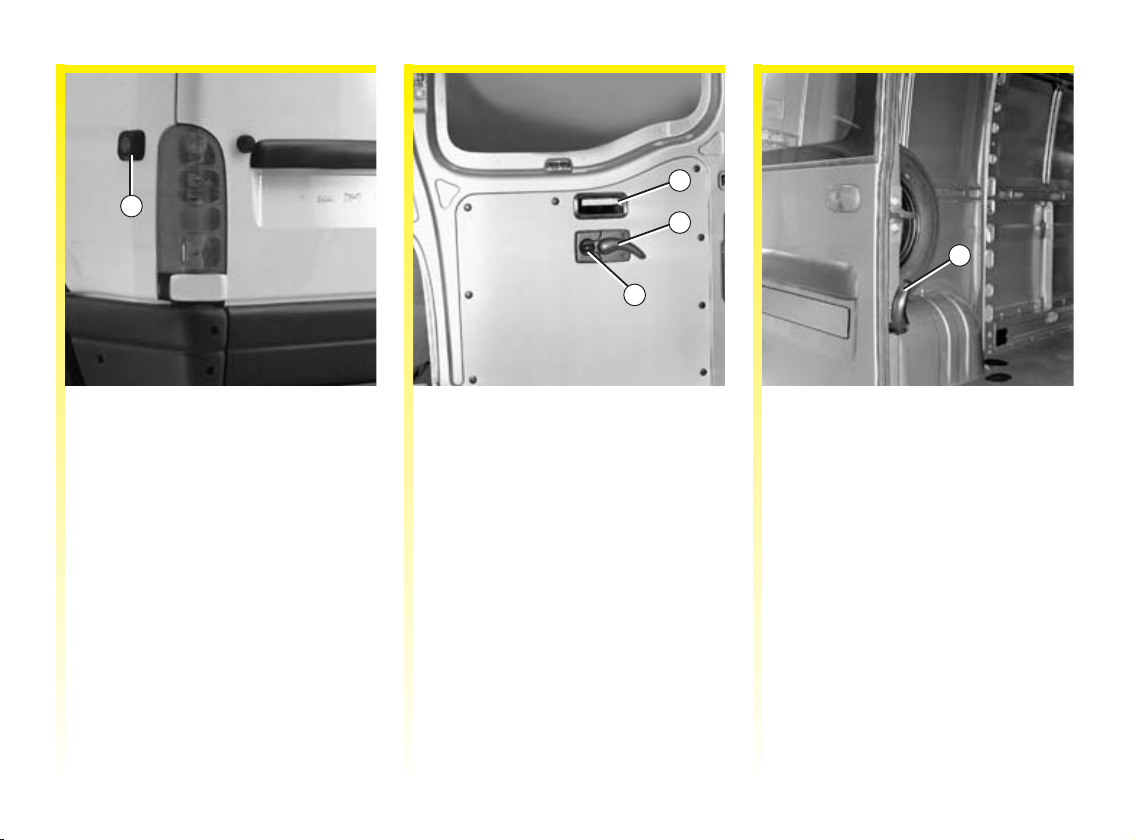
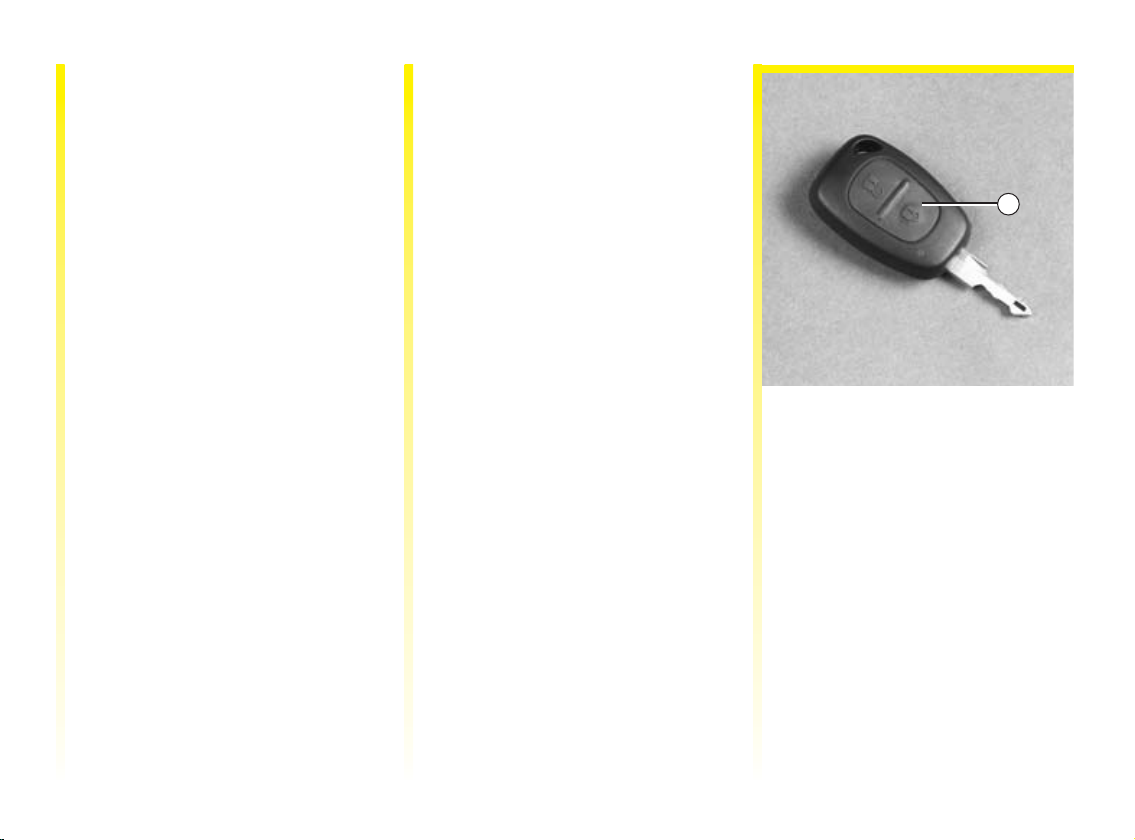
KEYS/REMOTE CONTROL UNITS
1 2
1 Radio frequency remote control,
ignition key, doors and fuel filler
cap.
1.02
2 Ignition key, doors and fuel filler
cap.
Never leave the vehicle
unattended with the key in
the ignition if there is a
child (or animal) in the
vehicle. With the key in the
ignition, he or she could start the
engine or operate electrical
equipment such as the electric
windows and there is a risk that the
child may be injured by trapping
his orher neck, arm,hand, etc. Risk
of serious injury.
Page 8
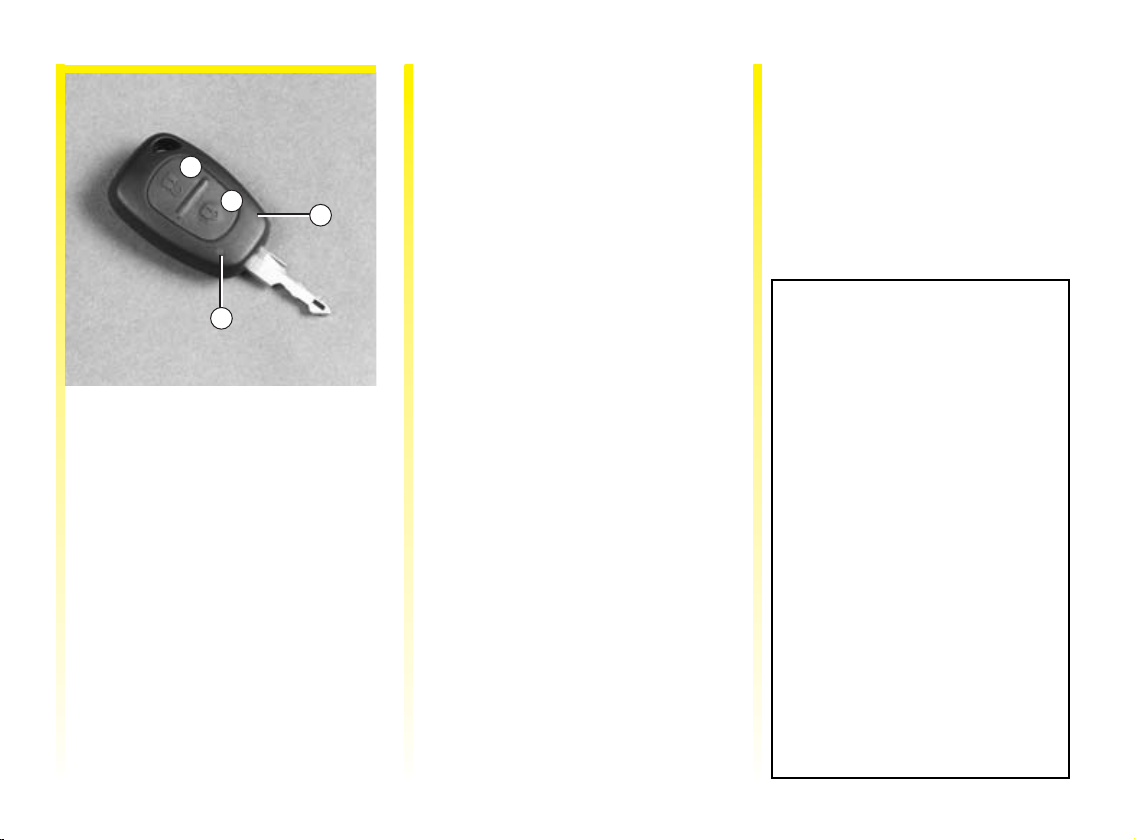
RADIO FREQUENCY REMOTE CONTROL
Locking/unlocking the doors
Press the remote control unit for
approximately one second
(indicator light 2 lights up) to lock
A
B
1
2
Remote control 1 locks and unlocks
the doors.
It is supplied by a battery which
must be replaced when battery
warning light 2 no longer lights up.
(Refer to the information on remote
control locking: batteries).
(side B) or to unlock (side A).
The hazard warning lights flash
twice to indicatethat the doors have
been locked.
Note: depending on the vehicle, if
either a door or the tailgate is open
or not properly closed, the hazard
warning lights will not flash.
The hazard warning lights flash
once to indicate that the doors have
been unlocked.
Remote control unit operating
range
This varies according to the
surroundings: therefore when
handling the remote control, be
carefulthatyoudonot
inadvertently lock or unlock the
doors.
Note: on certainvehicles, if a door is
not opened within approximately
30 seconds of the door being
unlocked by remote control, the
doors will lock again automatically.
Interference
Operation of the remote control may
be disrupted by equipment being
used close to the vehicle (e.g.
external equipment or the use of
devices which operate on the same
frequency as the remote control).
If you lose your keys or need
another set of keys (or a remote
control), contact your RENAULT
Dealer.
• If a remote control is replaced,
it will be necessary to take the
vehicle and all sets of keys to
your RENAULT Dealer to
initialise the system.
• It is not possible to use more
than two remote control units
for one vehicle.
Make sure that the batteries are
always in good condition - they
last for approximately two years.
Refer to the Remote control door
locking: batteries section of the
driver's handbook for the
procedure for changing the
batteries.
1.03
Page 9
INTERIOR ELECTRIC DOOR LOCKING CONTROL
Note: central locking is neutralised
when a door is opened.
1
Fromtheinsidewithelectric
control 1
This enables all the doors to
be locked simultaneously.
To lock, press the switch on
theoppositesidetothesymbol.
1.04
If you decide to keep the
doors locked when you
are driving, remember
that it may be more
difficult for those assisting you
to gain access to the passenger
compartment in the event of an
emergency.
NOTE
The front door mechanism
cannot be locked if the door is
open.
Page 10
RENAULT ANTI-INTRUDER DEVICE (RAID)
You must first decide if you want to
activate this function.
To activate
With the ignition on, press central
door locking button1 on thelocking
side (opposite the symbol) and hold
for approximately 5 seconds, until
you hear the operating noise
(unlocking/locking).
To deactivate
With the ignition on, press central
door locking button 1 on the
unlocking side (symbol) and hold
for approximately 5 seconds, until
you hear the operating noise
(locking/unlocking).
If you decide to keep the
doors locked when you
are driving, remember
that it may be more
difficult for those assisting you
to gain access to your vehicle in
the event of an emergency.
Operating principle
When the vehicle moves off, the
system automatically locks the
doors as soon as a speed of 5 mph (8
km/h) is reached.
The door is unlocked
- if a front door is opened.
Note: ifareardoorisopened,it
will automatically be locked again
when the car reaches a speed of
approximately 5 mph (8 km/h);
- by pressing door unlocking button
1.
1
Operating faults
If you note that the system is not
operating correctly (automatic
locking does not take place), first
check that all the doors have been
properly closed. If they are closed
correctly, consult your RENAULT
Dealer.
Also make sure that locking has not
accidentally been deactivated.
If this isthe case, switchthe ignition
off and on again and reactivate the
system as described above.
1.05
Page 11
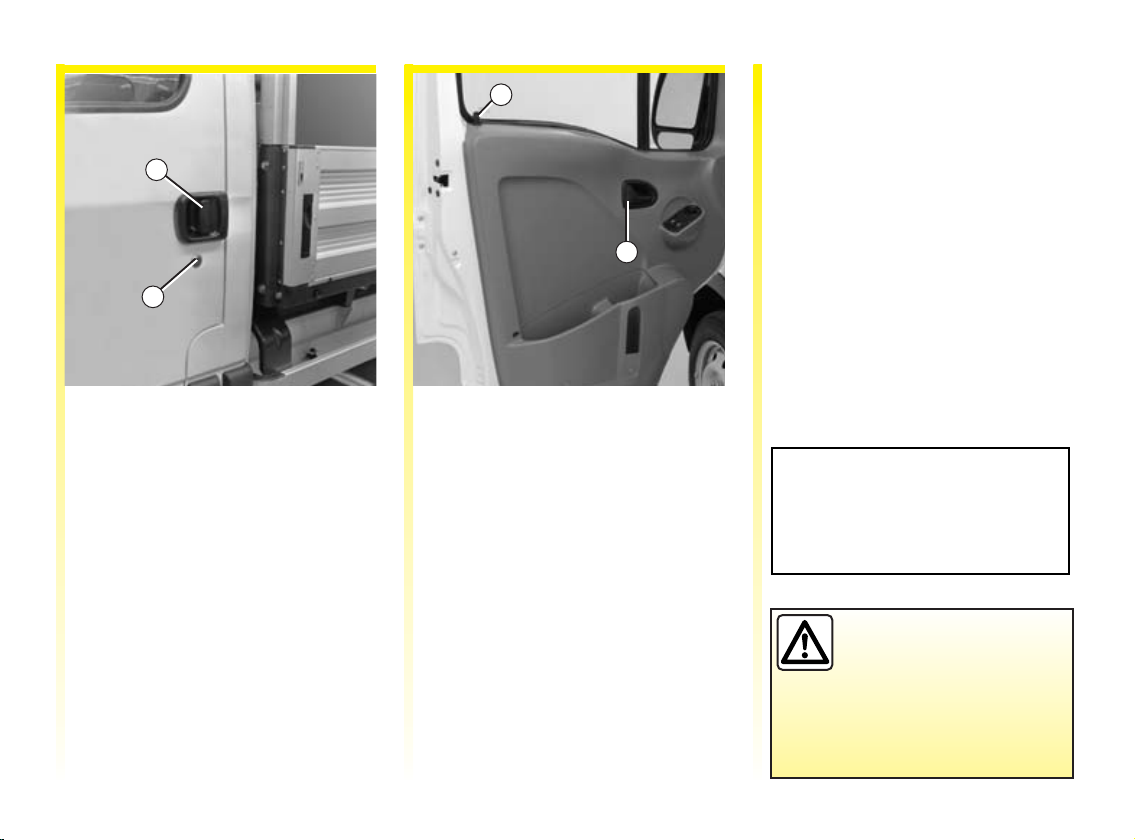
FRONT DOORS
1
2
"Lights on" reminder buzzer
3
If you have left the lights switched
on after switching off the ignition, a
warning buzzer will sound when a
door is opened (to prevent the
battery running down, etc.).
4
Opening the doors from the
outside
Unlock one of the front doors 2,or,
depending on the vehicle, the
driver's door.
Use the remote control if the vehicle
is equipped with this function. Pull
lever 1 towardsyouandopenthe
door.
Closing from the outside
Push the door until it latches
automatically. Lock it via lock 2 or
use the remote control.
1.06
Opening the doors from the
inside
Pull handle 4 andpushopenthe
door.
Closing from the inside
Pull the door until it latches
automatically.
Manual locking
With the door closed, lock the door
by pressing button 3.
NOTE
The front door mechanism
cannot be locked if the door is
open.
As a safety precaution,
the doors should only be
opened or closed when
the vehicle is stationary.
Page 12
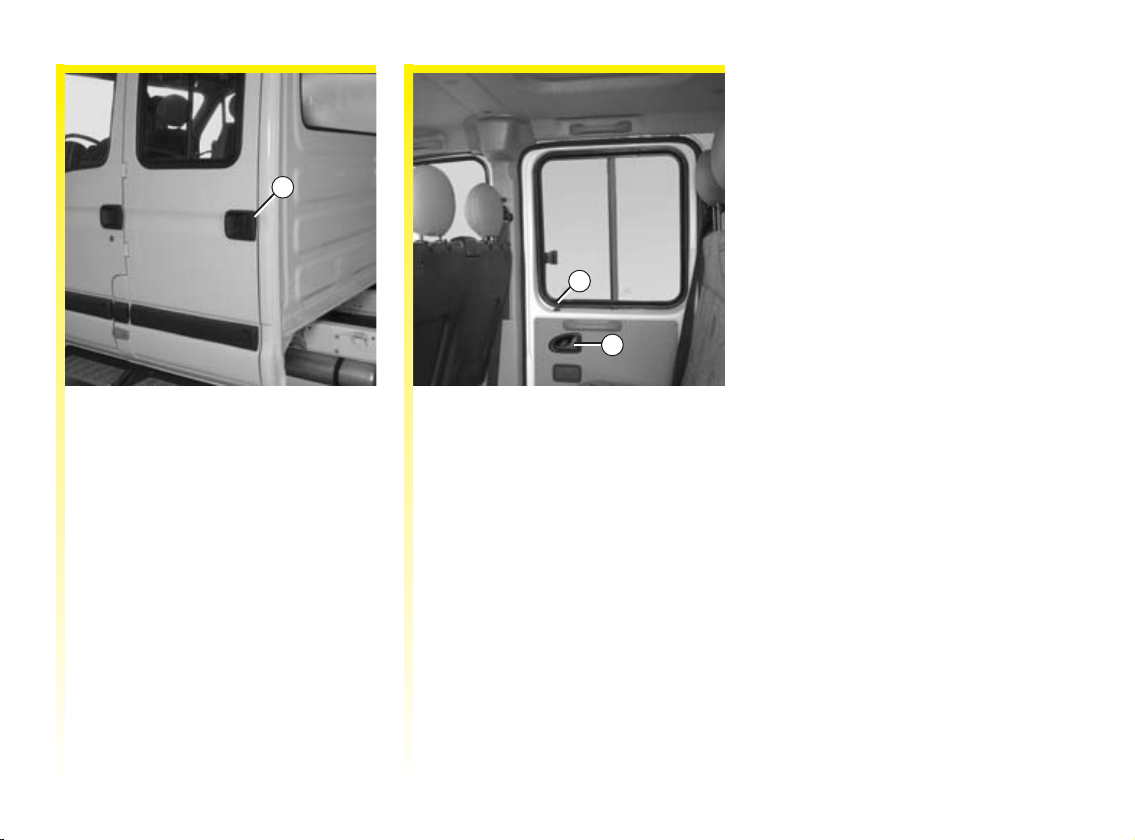
SIDE HINGED DOORS
1
2
3
Opening the doors from the
outside
Pull handle 1 towards you after
unlocking the door from the inside.
Closing from the outside
Push the door until it latches
automatically.
Opening the doors from the
inside
Pull handle 3 and push the door.
Closing from the inside
Pull the door until it latches
automatically.
Manual locking
With the door closed, lock the door
by pressing button 2.
1.07
Page 13
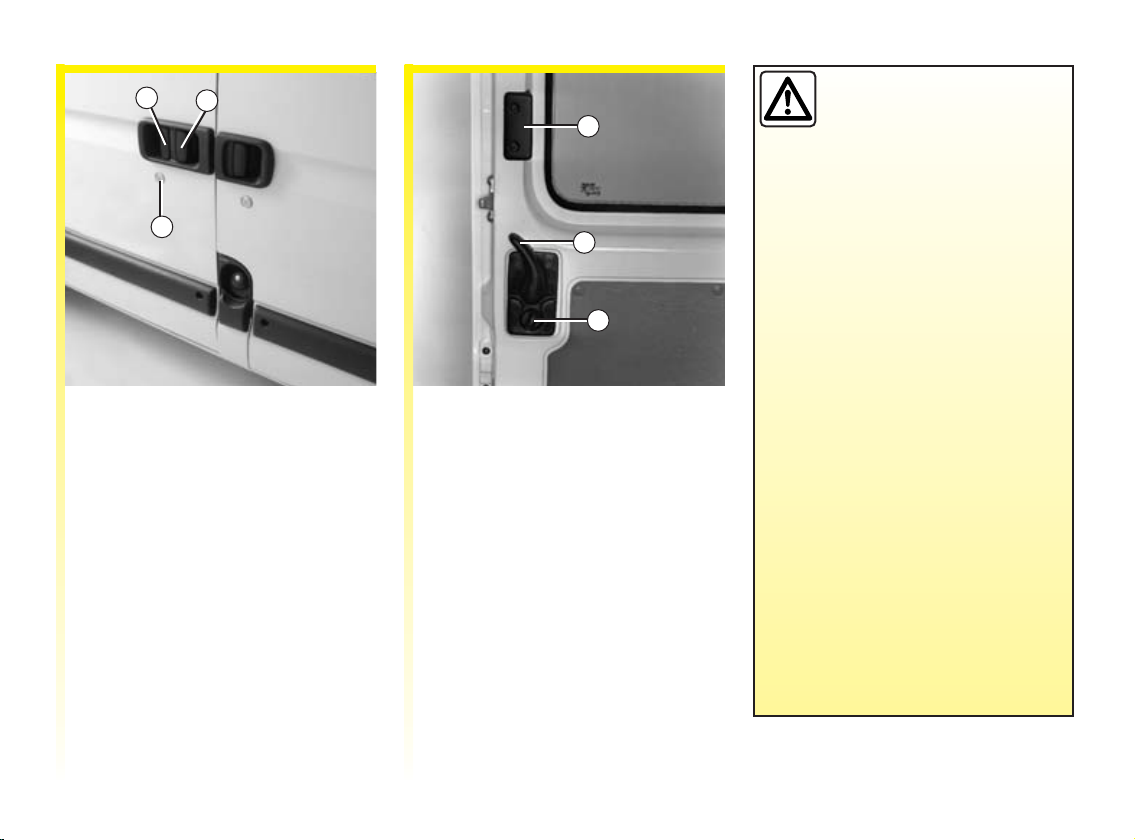
SLIDING SIDE DOORS
2
3
1
Opening from the outside
Unlock 1, with the door key, or with
the remote control, if the vehicle is
equipped with this function. Pull
lever 3 towards you and slide the
door towards the rear.
Closing from the outside
Slide the door towards the front of
the vehicle holding fixed door
handle 2 until the door is fully
closed.
Lock it via lock 1 or use the remote
control.
4
5
6
Opening from the inside
Pull handle 5 towards the rear and
open the sliding door to the point
where it locks into position.
Closing from the inside
Holding handle 4, slide the door
until it latches automatically.
Manual locking
Use button 6.
Recommendations
concerning the sliding side
door.
Care must be taken when
opening or closing the sliding door,
as is the case for any of the opening
elements on the vehicle:
• Check that the door will not
come into contact with any
person,partofthebody,animal
or object.
• Only use the handles on the
inside and outside of the door to
operate it.
• Take care when opening and
closing the door.
• Take particular care when the
vehicle is parked on a slope:
open the doorwith care until it is
fully open and latches into its
locking position.
• Before moving off, always ensure
that the sliding door is properly
closed.
1.08
Page 14
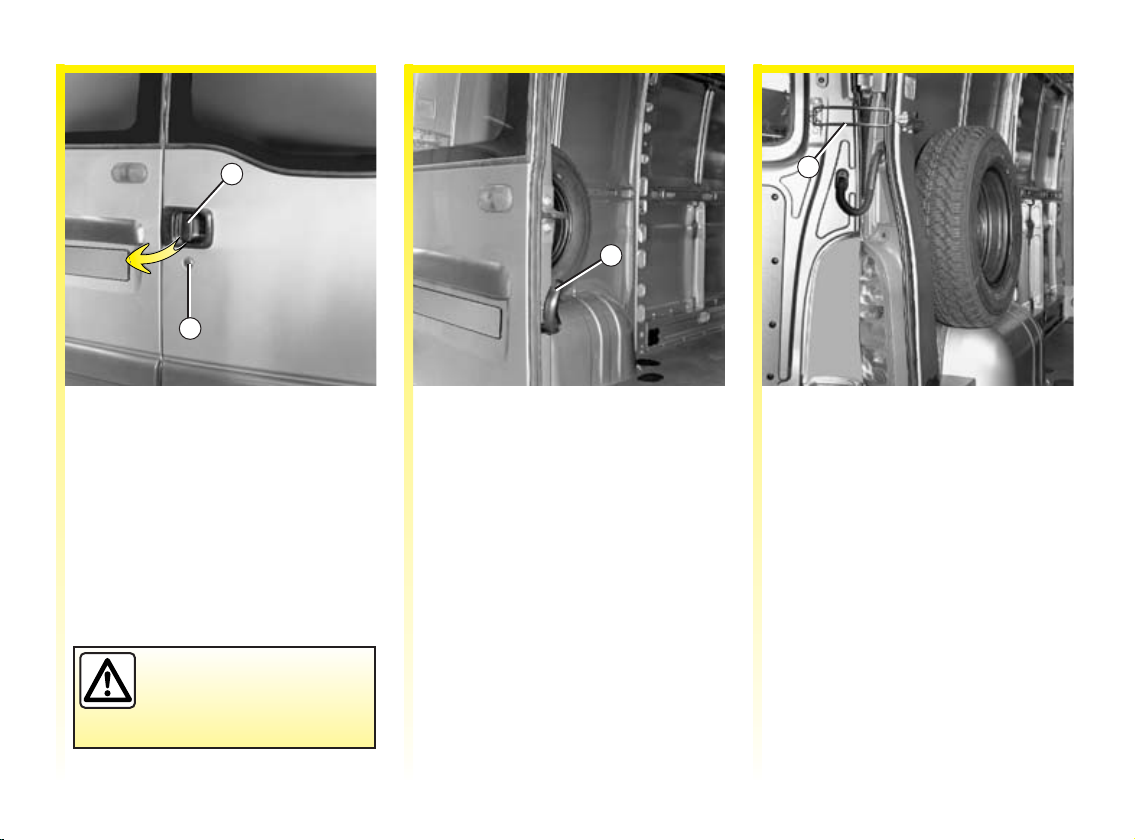
REAR DOORS
1
2
Opening from the outside
Unlock with the door key 2,orwith
the remote control, if the vehicle is
equipped with this function. Pull
handle 1 towardsyouandopenthe
right-hand door.
There is no device to
restrain the doors in the
wind.
3
Pull handle 3 andopenthe
left-hand door.
4
Opening the doors to 180°
Remove check-strap 4 from its
housing. Open the door as far as
possible.
1.09
Page 15
REAR DOORS (continued)
5
6
7
9
8
Opening the doors to 270°
Remove the check-strap from its
housing as when opening to 180°.
Open the door fully until it stops on
the magnets 5 located on the side
panels.
Closing from the outside
First return the left-hand door to an
almost-closed position and then
slam it shut.
Thendothesamewiththedooron
the right-hand side.
Lock with the key.
1.10
Opening from the inside
Lift handle 7 andpushthe
right-hand door.
Pull down handle 9 andopenthe
left-hand door.
Closing from the inside
First return the left-hand door to an
almost-closed position and then
slam it shut. Use handle 6.
Then do the same with the door on
the right-hand side.
Locking/unlocking
Use button 8.
Page 16
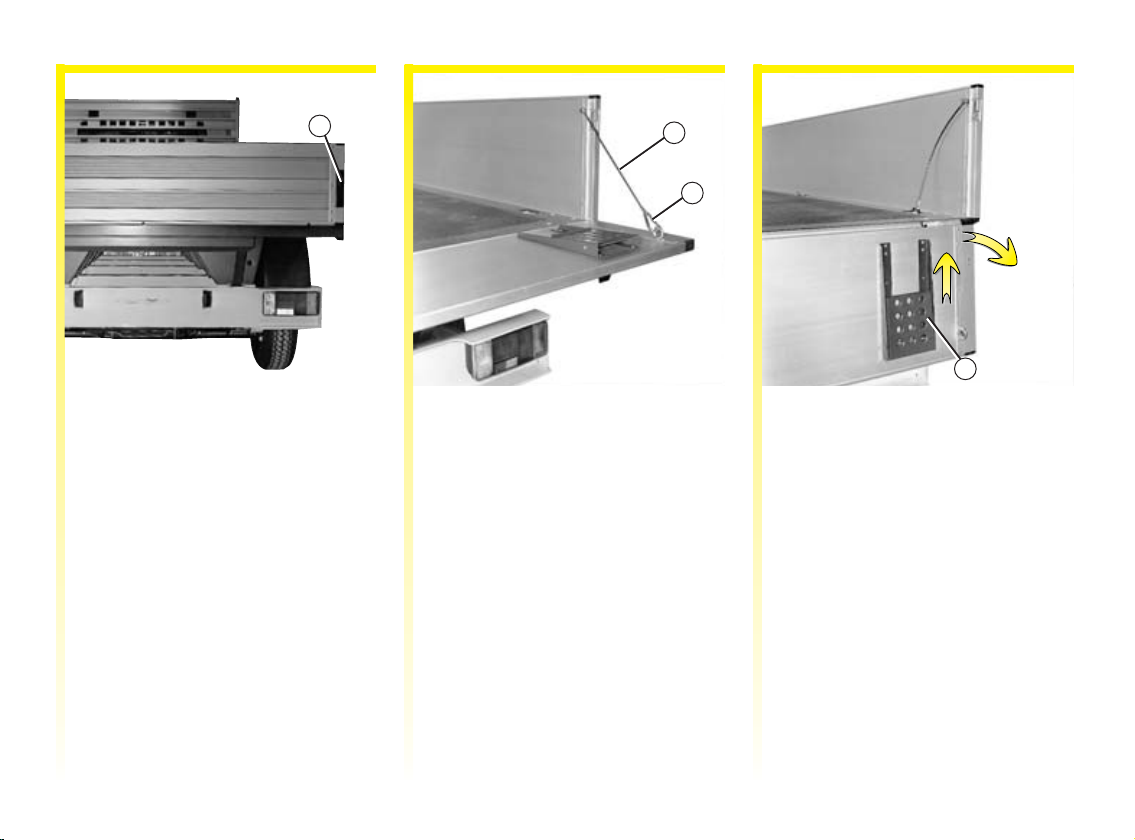
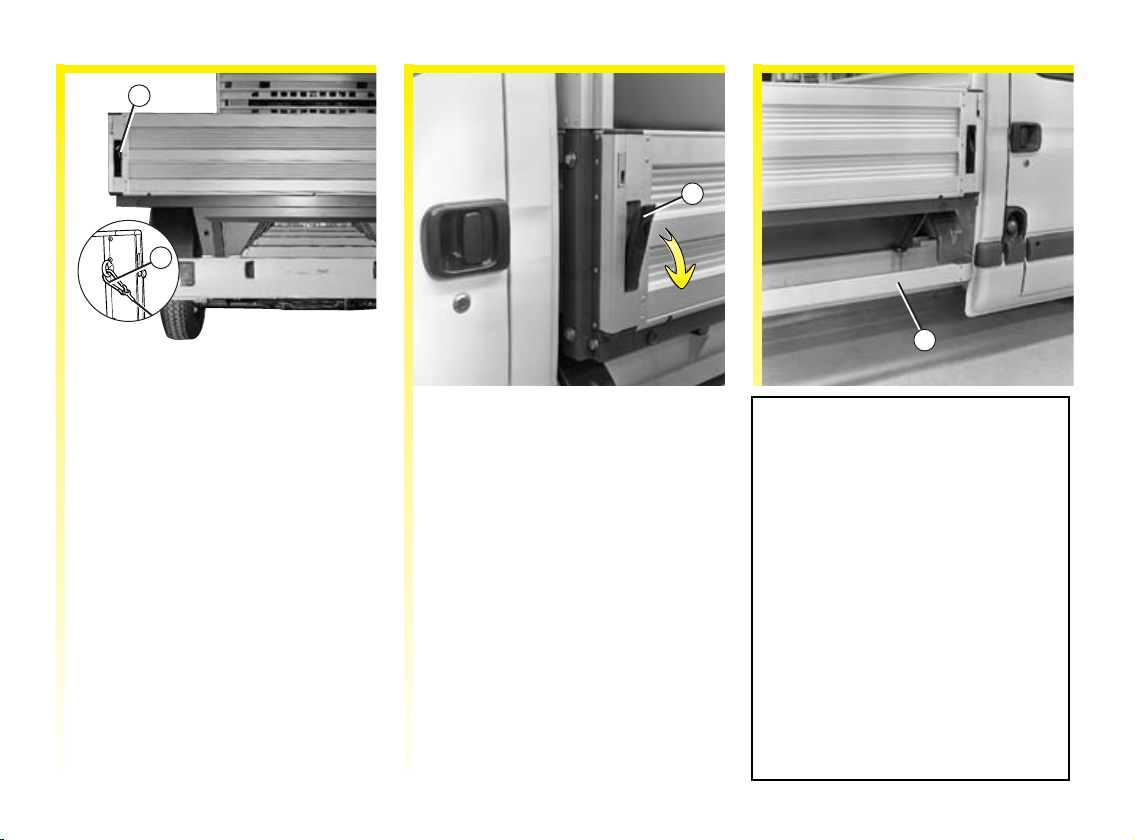
DROPSIDE
1
A
Opening rear panel A
Check that the retaining cables 2 are
properly attached.
Lower levers 1 completely.
Lower the rear panel.
Folding rear panel A
Release hooks 3 and lower the rear
panel completely.
2
3
A
Removing rear panel A from its
hinges
This operation can only be carried
out after removing the left-hand
side panel from its hinges (refer to
the following page).
With the side panel in horizontal
position, release hooks 3 and slide
the side panel towards the left.
Closing rear panel A
Proceedinthereverseorderto
opening. Check that the levers are
properly locked 1.
4
Footplate 4
Gently raise and lower the plate.
1.11
Page 17
DROPSIDE (continued)
5
A
6
Opening side panel B
• Rear panel A is closed
Lower lever 5 completely. Hook 6
must be detached.
Lower lever 7 and side panel B
completely.
• Rear panel A is hanging
Lower lever 7 completely and
lower side panel B.
B
7
Removing side panel B from its
hinges
With the panel in its side position,
release hook 6 and slide the panel
towards the rear.
ClosingsidepanelB
Proceedinthereverseorderto
opening. Check that levers 5 and 7
are correctly locked.
Special note
The panels are designed so that a
tonneau cover with tensioning
devices can be attached.
8
The lower bars 8 cannot support a
person's weight.
Whenever loading, take care to
follow local laws regarding the
transport of objects, e.g:
- draw attention to any object
which exceeds the length of the
bed;
- check that the vehicle's exterior
lights and number plate are still
visible;
- secure transported objects using
the lashing rings on the loading
bed, etc.
1.12
Page 18
ANTI-INTRUSION ALARM
This protects the vehicle by
performing the following functions:
- volumetric protection of the front
passenger compartment using an
ultrasound field;
- protection of the passenger
compartment perimeter;
- protection of the rear load area
and bonnet;
- monitoring in the event of an
attempt tostart the engine withan
incorrect ignition key;
- monitoring in the event of alarm
power supply cut-off.
Before activating the alarm
function
Check that:
- the windows and doors are
properly closed;
- there are no passengers, animals
or objectsinside the vehicle which
could move and set off the alarm.
Otherwise, it will be necessary to
disable the volumetric protection
promptly; refer to the section on
disabling the spatial protection.
1
To disable the volumetric
protection
there being a moving object or
animal in the vehicle).
Press and hold locking side 1 of the
remote control unit; the alarm will
bleep to confirm it is disabled.
It remains disabled even if you
press locking side 1 of the remote
control locking unit several times.
Unlocking the doors stops the
protection from being disabled.
(e.g. in the event of
1.13
Page 19
ANTI-INTRUSION ALARM (continued)
Activating the alarm function
The alarm is set when the doors are
locked with the remote control unit.
This is signalled by the hazard
warning lights flashing twice
When the alarm function is
activated, any detection leads to the
alarm being triggered and the
hazard warning lights flashing for
around 25 seconds.
After approximately 5 seconds, if
the detection continues, the system
will start once more for
approximately 25 seconds and then
again (8 to 10 times, depending on
the type of detection).
Beyond that, there is no more
monitoring until the doors are next
unlocked/locked.
Deactivating the alarm function
Even when triggered, the alarm
stops:
- when the doors are unlocked with
the remote control unit;
- when the vehicle ignition is
switched on.
Deactivation is indicated by the
hazard warning lights flashing
once.
The absence of flashing
hazard warning lights
when the alarm is set
indicates that a door or
the bonnet is open or incorrectly
closed: check. If this is not the
case, contact your RENAULT
Dealer.
1.14
Failure of the hazard
warning lights to flash
when the alarm is
deactivated indicates
that the alarm was triggered
during your absence.
Opening the doors with the
key doesnot stop the alarm;
it must be stopped using
the remote control unit or
by switching on the ignition.
Page 20
ENGINE IMMOBILISER
1
Immobiliser warning
light
This prevents the vehicle being
driven by anyone not in possession
of the vehicle's coded ignition key.
Any work on or
modification to the
engine immobiliser
system (computers,
wiring, etc.) may be dangerous.
Work m us t be c arr ied ou t by
qualified RENAULT network
personnel.
Operating principle
The vehicle is automatically
protected for a few seconds after the
key is removed from the ignition.
If the vehicle does not recognise the
ignition key code, warning light 1
will flash continuously and the
engine cannot be started.
• System operation indicator light
When the ignition is switched on,
warning light 1 comes on for
approximately three seconds and
then goes out. The vehicle has
recognised the code. You can then
start the engine.
• Vehicle protection indicator light
A few seconds after the ignition
has been switched off, indicator
light 1 will flash continuously.
The vehicle will not be protected
until the key has been takenout of
the ignition.
• Operating fault warning light
After the ignition has been
switched on, if warning light 1
remains continuously lit or
continues to flash, this indicates
an operating fault in the system.
In all cases,itisessential to
contact a RENAULT Dealer. Only
RENAULT Dealers are qualified to
repair the engine immobiliser.
If the coded ignition key is faulty,
use the second key (supplied with
the vehicle). If you do not have
access to this, it is essential to
contact a RENAULT Dealer. Only
RENAULT Dealers are authorised to
repair the engine immobiliser
system.
1.15
Page 21
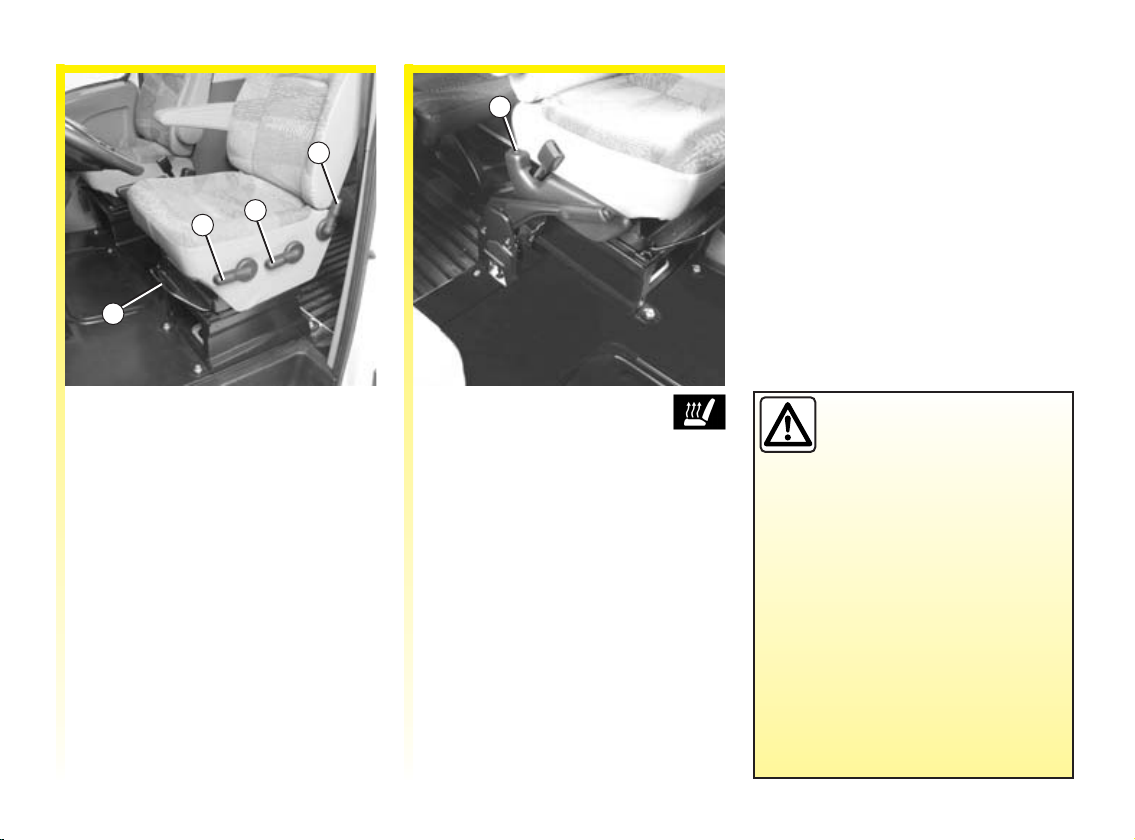
SEATS
1
5
4
3
2
Frontseatadjustment
To move forwards or backwards
Lift bar 1 to release. Release the bar
once the seat is in the correct
position and ensure that the seat is
fully locked into position.
To tilt the seatback
Use lever 4.
To adjust the height of the seat base
Adjustment is made in two stages:
For the front section of the seat, lift
lever 2.
For the rear section of the seat, lift
lever 3.
1.16
Heated seats
With the ignition on,move
switch 5; an indicator on the
instrument panel lights up.
The system, which has athermostat,
decides whether or not the heating
is needed.
We would advise you not to
recline the seatbacks too far
back to ensure that the
effectiveness of the seat
beltsisnotreduced.
Make sure that the seatback is
locked in place correctly.
Nothing should be placed on the
floor (area in front of driver) as
objects could slide under the
pedals during sudden braking
manoeuvres and obstruct their use.
Page 22
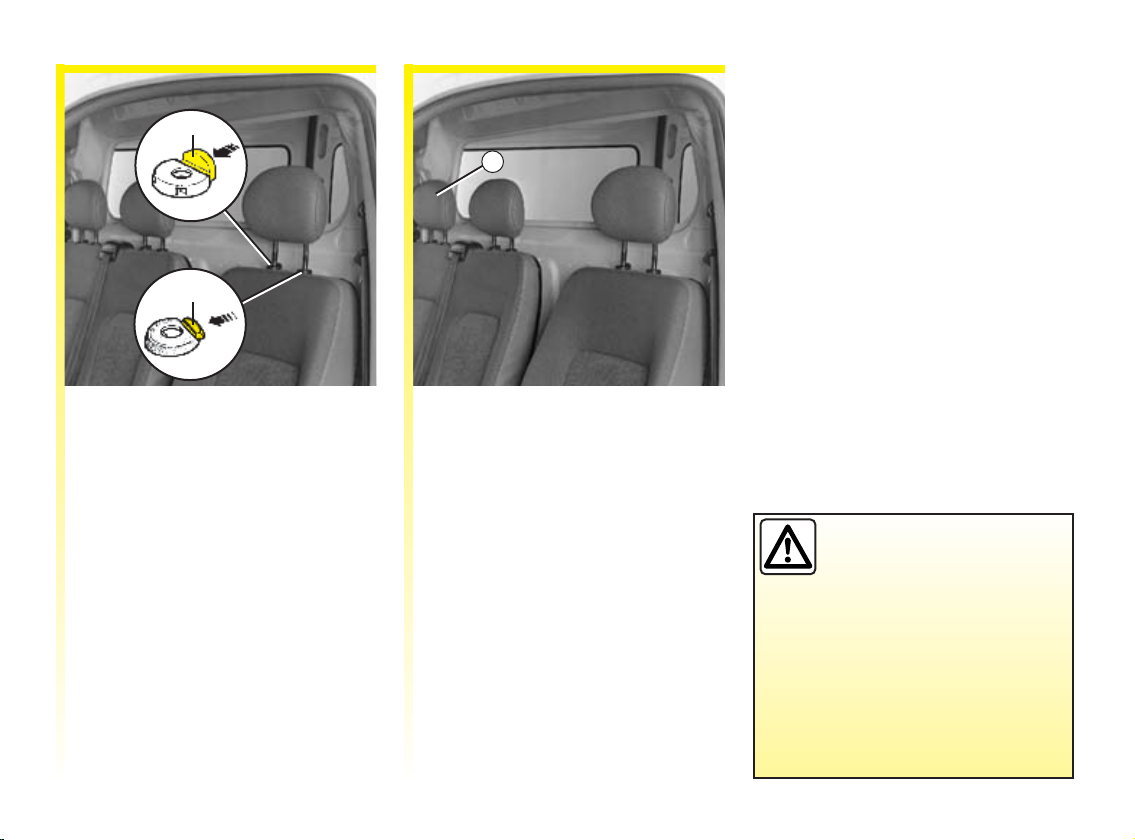
HEADREST
A
1
D
B
Adjustment
To raise it
Simply slide it up.
To lower it
Press tab A and lower it at the same
time.
To remove the headrest
Raise the headrest and then press
tabs A and B to release it.
C
To fit the headrest
Insert the rods into the holes, with
the notches to the front, and lower
the headrest to the desired height by
pressing tab A.
Special case
If the vehicle is fitted with bench
seat C on the passenger side and
partition D, it is not possible to
remove side headrest 1.
As the headrest is a safety
component, check its
presence and correct
positioning: the distance
between your head and the
headrest should be minimal, the
top of the headrest should be as
close as possible to the top of the
head.
1.17
Page 23
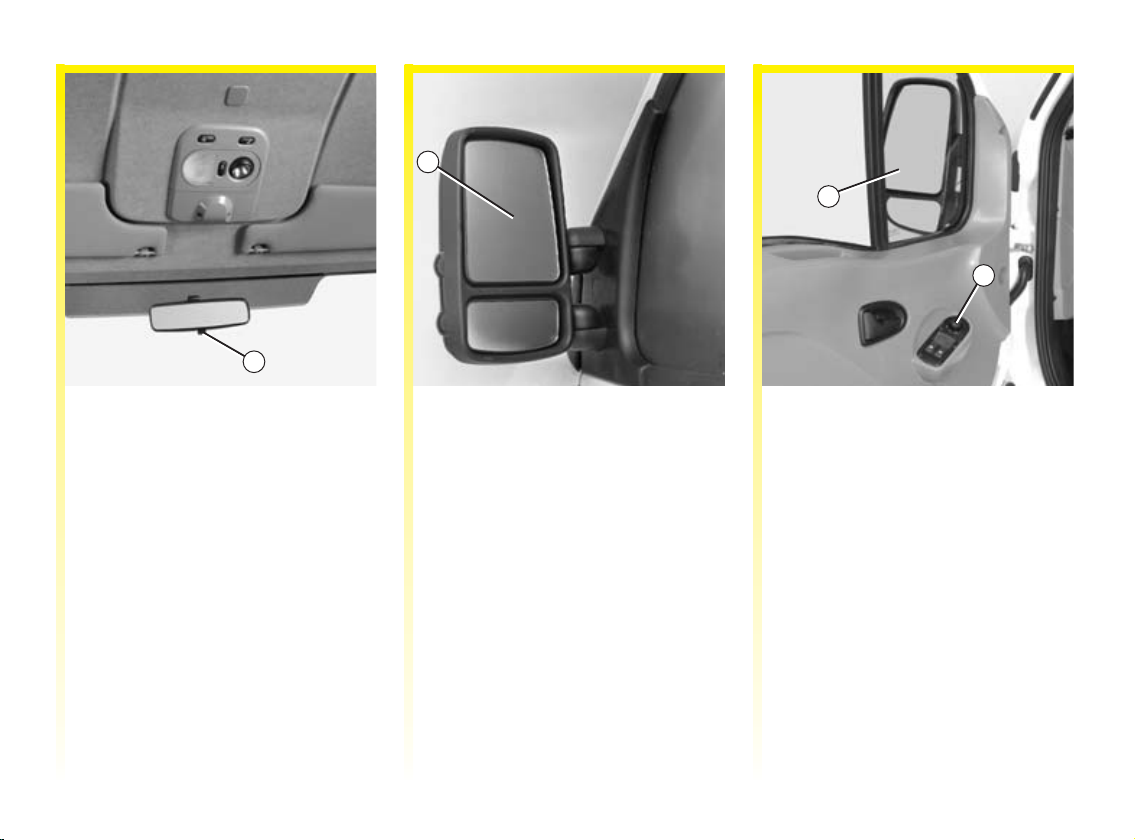
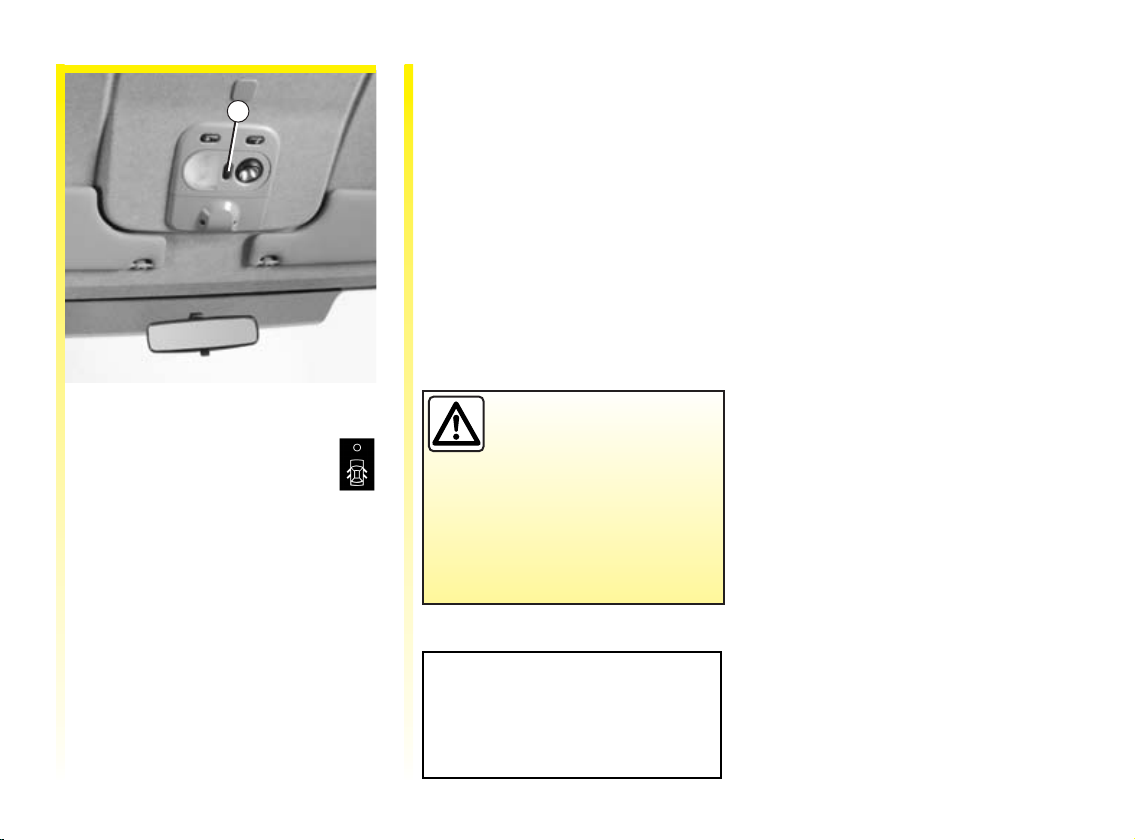
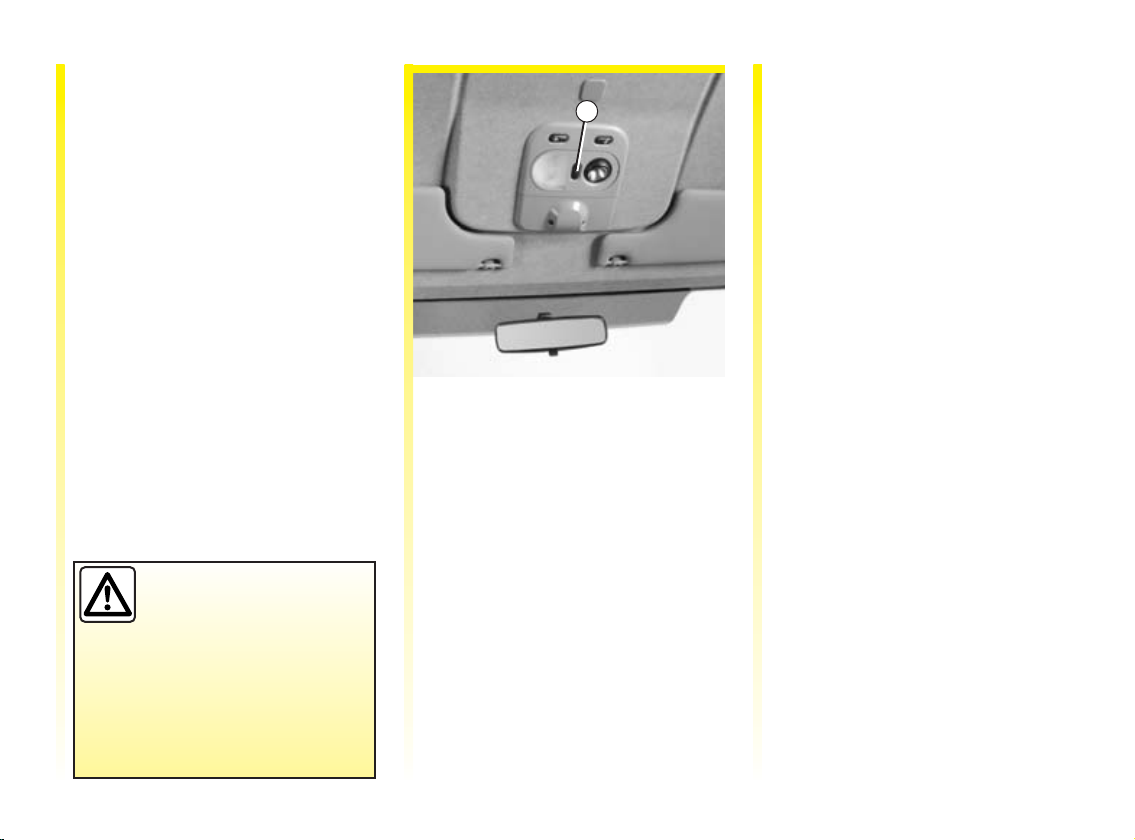
REAR-VIEW MIRRORS
1
2
3
4
A
C
B
Interior rear-view mirror
The interior rear-view mirror is
adjustable. When driving at night,
tilt small lever 1 to avoid being
dazzled by the headlights of the
vehicle behind.
1.18
Door mirrors
To adjust, press mirror 2.
Electrically-adjustable door
mirrors
With the ignition on, position
control 4 to:
- A to adjust the left-hand door
mirror,
- C to adjust the right-hand door
mirror,
- B to deactivate it.
Heated door mirrors
Mirrors 3 are heated at the same
time as the rear screen.
Page 24
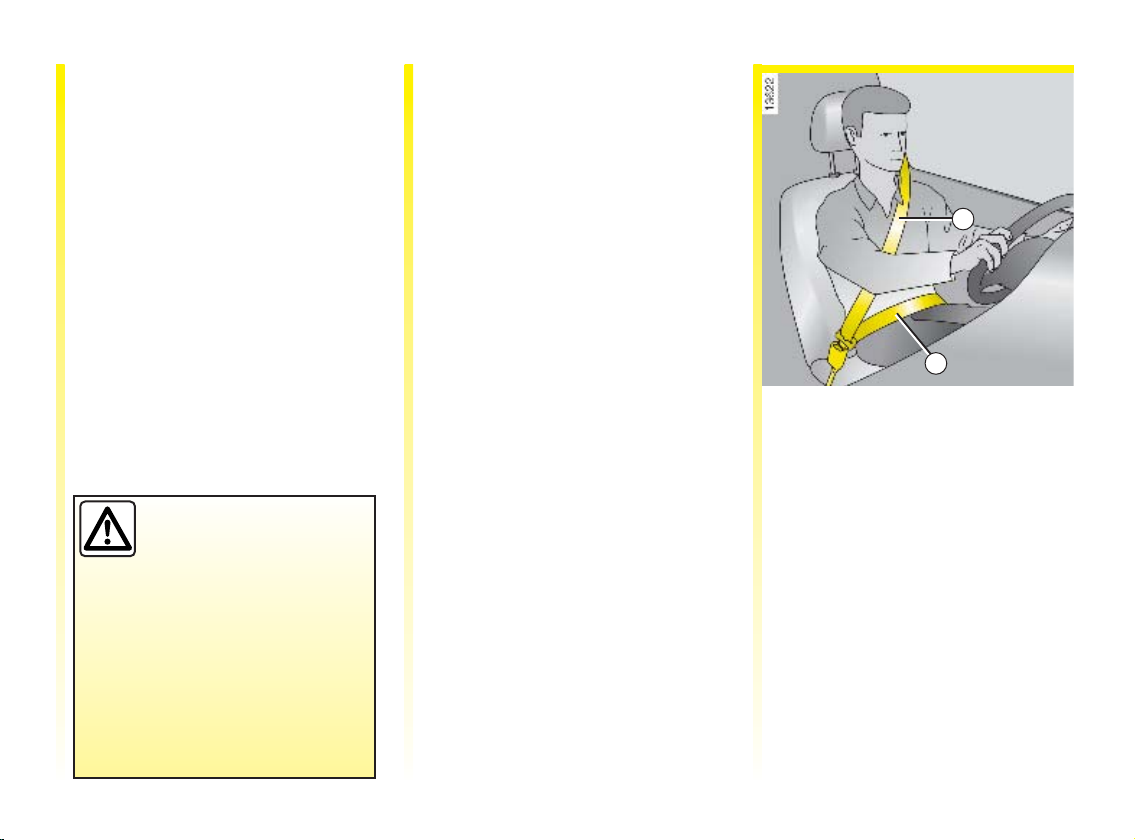
FRONT SEAT BELTS
Always wear your seat belt when
travelling in your vehicle. You must
also comply with the legislation of
the particular country you are in.
Before starting:
- first ensure that your driving
position is correct,
- then adjust your seat belt to
provide the maximum possible
protection.
Incorrectly adjusted seat
belts may cause injuries
in the event of an
accident.
Even pregnant women should
wear a seat belt. In this case,
ensure that the lap belt is not
exerting too much pressure on
the abdomen but do not allow
any slack.
Adjusting your driving position
•Sit well back in your seat (having
removed your coat or jacket).
This is essential to ensure your
back is positioned correctly.
•Adjust the distance between the
seat and the pedals.
Your seat should be as far back as
possible while still allowing you
to fully depress the clutch pedal.
The seatback should be adjusted
so that your arms are slightly bent
when you hold the steering wheel.
•Adjust the position of your
headrest.
For safety reasons, the top of your
head should be inline with the top
of the headrest.
•Adjusttheheightoftheseat.
This adjustment allows you to
select the seat position which
offers you the best possible view.
1
2
Adjusting the seat belts
Sit with your back firmly against the
seatback.
Shoulder strap 1 should be as close
tothebaseofyourneckaspossible
but not on it.
The lap belt 2 should be worn flat
over your thighs and against your
pelvis.
Thebeltshouldbewornsothatitis
as close to your body as possible,
Avoid wearing heavy clothing or
placing bulky objects under the
belts.
1.19
Page 25
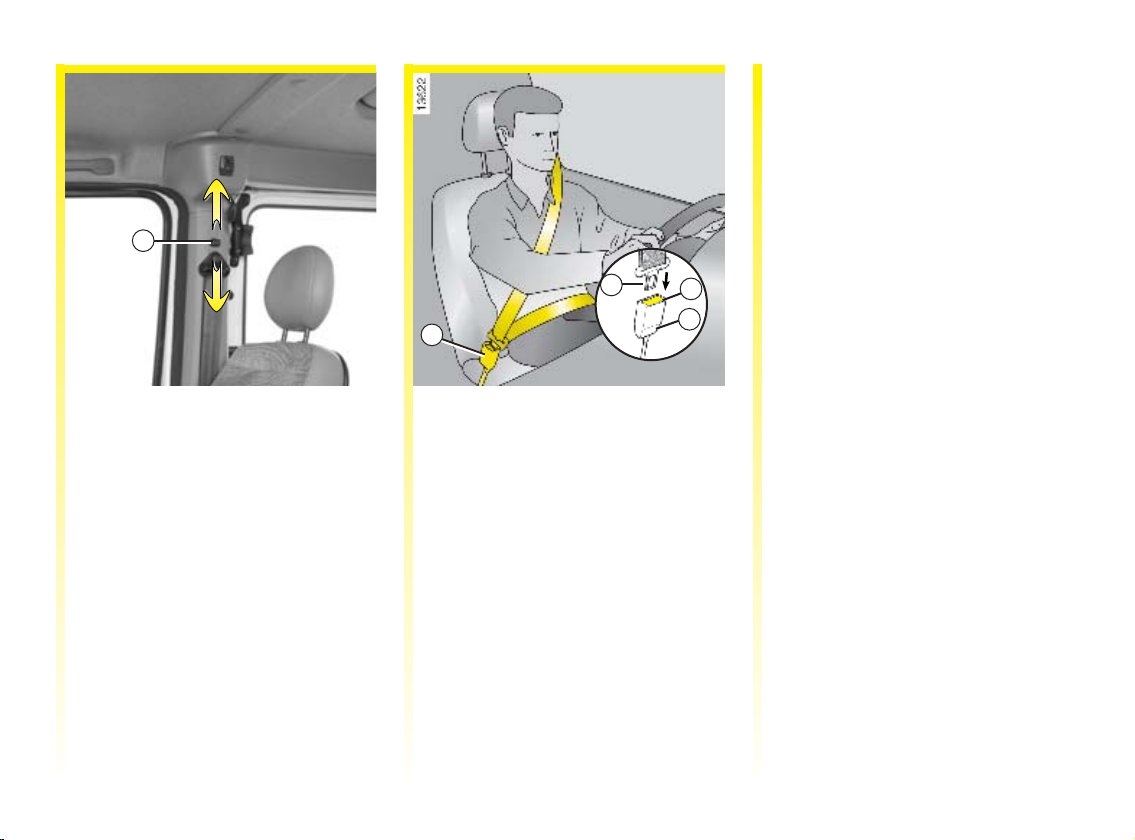
FRONT SEAT BELTS (continued)
3
Adjusting the height of the seat
belt
Move button 3 to select the position
you require so that shoulder strap 1
is worn as described above.
Make sure that the seat belt is
locked in position correctly after
you have adjusted it.
4
6
5
6
Locking
Unwind the belt slowly and
smoothly and ensure that tongue 4
locks into buckle 6 (check that it is
locked by pulling tongue 4). If the
belt jams, allow it to runback before
attempting to unwind it again.
Locking (continued)
If your belt becomes completely
jammed:
- pull the belt slowly but firmly so
that just over 3 cm unwinds;
- then allow the belt to rewind
automatically;
-unwinditagain;
- if there is still a problem, contact
your RENAULT Dealer.
Unlocking
Press button 5 on buckle 6 and the
seat belt will be rewound by the
inertia reel.
Guide the tongue to help the
operation.
1.20
Page 26
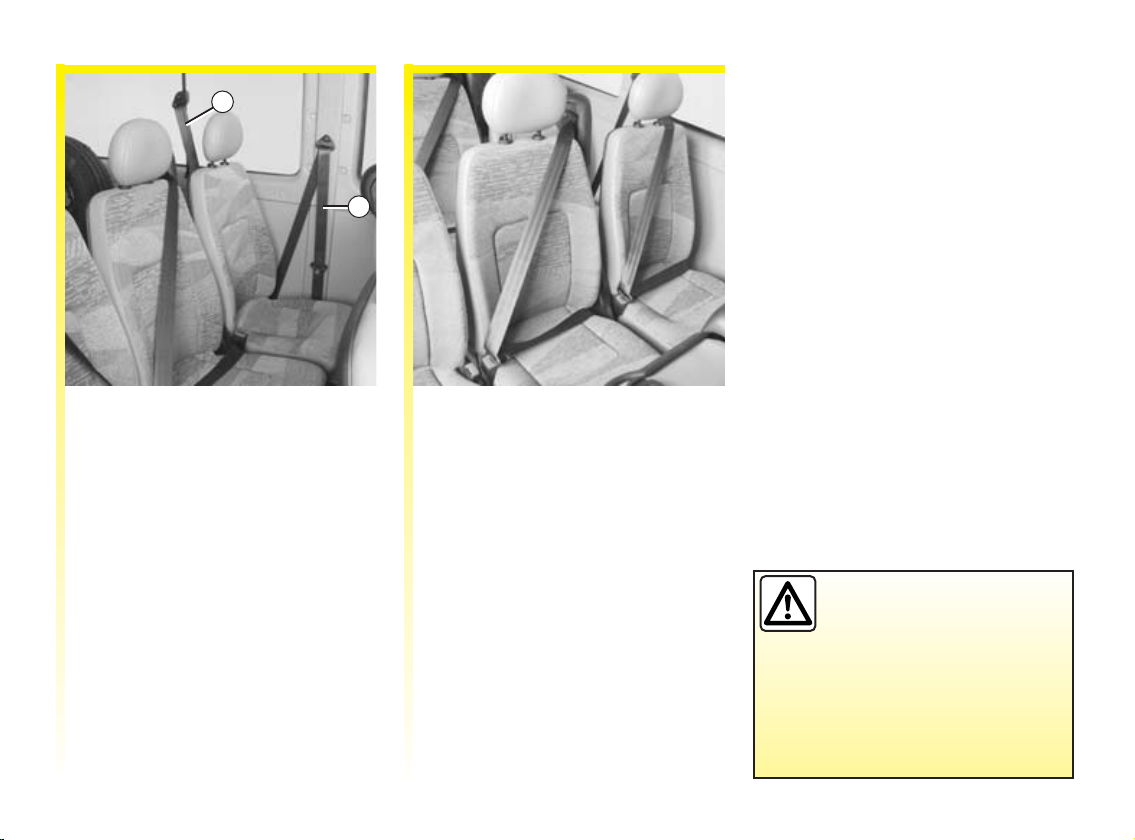
REAR SEAT BELTS
1
2
Rear side seat belts
(Vehicles fitted with rear bench
seats)
The side seat belts are fitted with
specific tongues so that it is not
possible to lock the belt into the
wrong housing: for the first housing
use belt 2; for the second housing
use belt 1.
Rear seat belts with inertia reel
The belts are fastened, unfastened
and adjusted in the same way as the
front belts.
Slowly unwind the belt.
Click the tongue into the buckle.
Make sure that the rear
bench seat is locked in
position correctly so that
the seat belts will operate
efficiently. Refer to the information
on the rear bench seat in section 3.
1.21
Page 27
SEAT BELTS
The following information applies to both the vehicle's front and rear seat belts.
• No adjustments should be made to the original component parts of the restraint system (belts, seats and their
mountings).
For special cases (e.g. fitting child seats) contact your RENAULT Dealer.
• Do not use devices which allow any play in the belts (e.g. clothes pegs, clips, etc.): a seat belt which is worn too
loosely risks causing injuries in the event of an accident.
• Never wear the shoulder strap under your arm or behind your back.
• Never use the same belt for more than one person and never hold a baby or child on your lap with your seat belt
around them.
• The belt should never be twisted.
• Seat belts should be replaced after a serious accident. Always replace your seat belts as soon as they show any signs
of wear.
• When refitting the rear bench seat, take care that the seat belts are correctly positioned so that they can be used
properly.
• If necessary, readjust the position and tightness of the belt while travelling.
1.22
Page 28
METHODS OF RESTRAINT IN ADDITION TO THE FRONT SEAT BELTS
Depending on the model, these
include:
■ Pretensioners
(described below).
■ Driver and front passenger
airbags (described on the
following pages).
The passenger airbagprotects the
front passenger(s) (according to
whether there is a conventional
seat or a bench seat in the front).
These systems are designed to act
independently or together when the
vehicle is subjected to a frontal
impact.
There are three possibilities,
depending on the force of the
impact:
- protection is provided by the belt
only;
- the pretensioner is triggered to
rectify belt position and take up
play in the belt;
- the airbag will inflate in the most
severe cases.
1
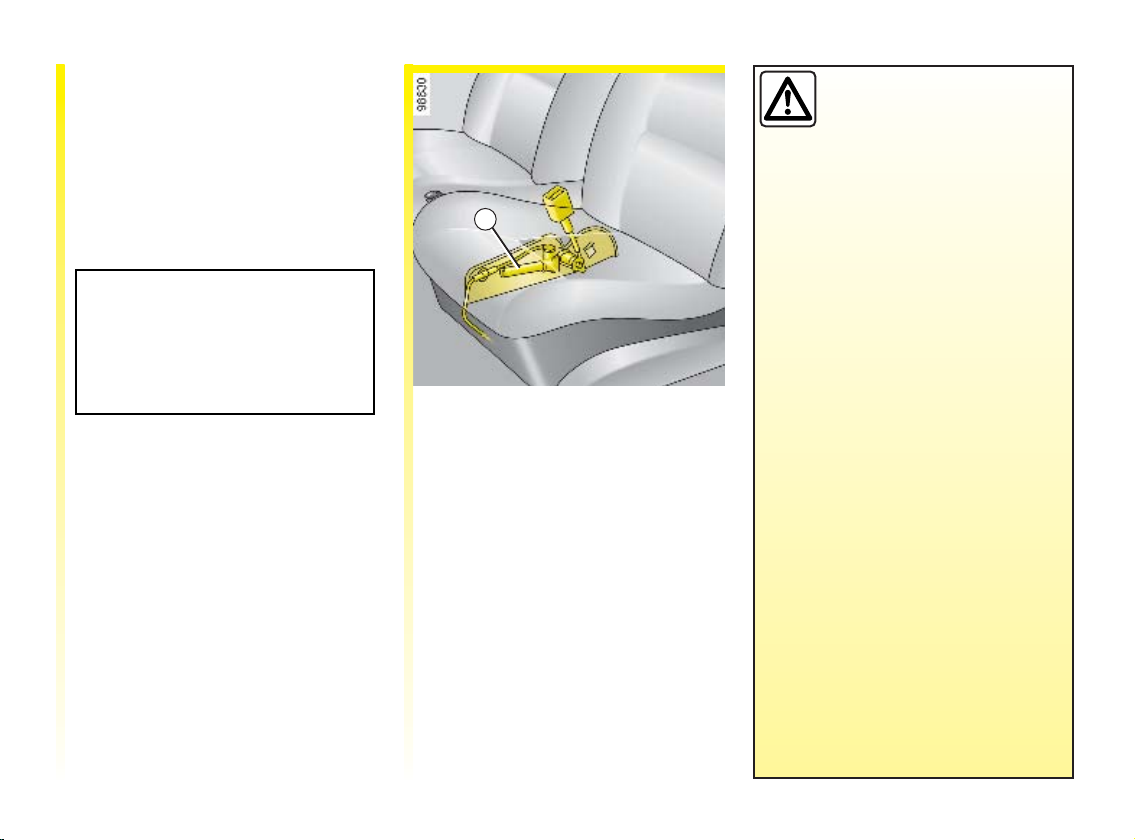
Pretensioners
Withthe ignition on, if the vehicle is
subjected to a severe frontal impact,
piston 1 immediately retracts the
seat belt buckle, pulling the seat belt
against the body and thereby
increasing its efficiency.
• No operation whatsoever is
• To avoid accidental triggering of
• Testing of the electrical trigger
• When the vehicle is scrapped,
• Following an accident,
have the entire restraint
system checked.
permitted on any part of the
system (pretensioners, airbags,
computers, wiring) and the
system components must not be
reused on any other vehicle,
even if identical.
the system which may cause
injury, only qualified Renault
Networkpersonnelmayworkon
the pretensioner and airbag
system.
system may only be carried out
by a specially trained technician
using suitable equipment.
contact your RENAULT Dealer
for disposal of the pretensioners
and airbag gas generators.
1.23
Page 29
METHODS OF RESTRAINT IN ADDITION TO THE FRONT SEAT BELTS (continued)
Driver and passenger airbags
An airbag may be provided for both
the driver and the front passenger.
Airbag inscriptions on the steering
wheel and dashboard together with
a label on the lower part of the
windscreen indicate that the
vehicleisequippedwithanairbag.
The passenger airbagprotects the
front passenger(s) (according to
whether there is a conventional
seat or a bench seat in the front).
Each airbag system consists of:
- an airbag and gas generator fitted
on the steering wheel for the
driver and in the dashboard for the
front passenger;
- a computer for both systems,
which includes the impact sensor
and a monitor controlling the
electrical trigger system for the gas
generator;
- a single warning light on
the instrument panel.
1.24
Page 30
METHODS OF RESTRAINT IN ADDITION TO THE FRONT SEAT BELTS (continued)
Operating faults
Warning li ght 1 will light up on the
1
Driver and passenger airbags
(continued)
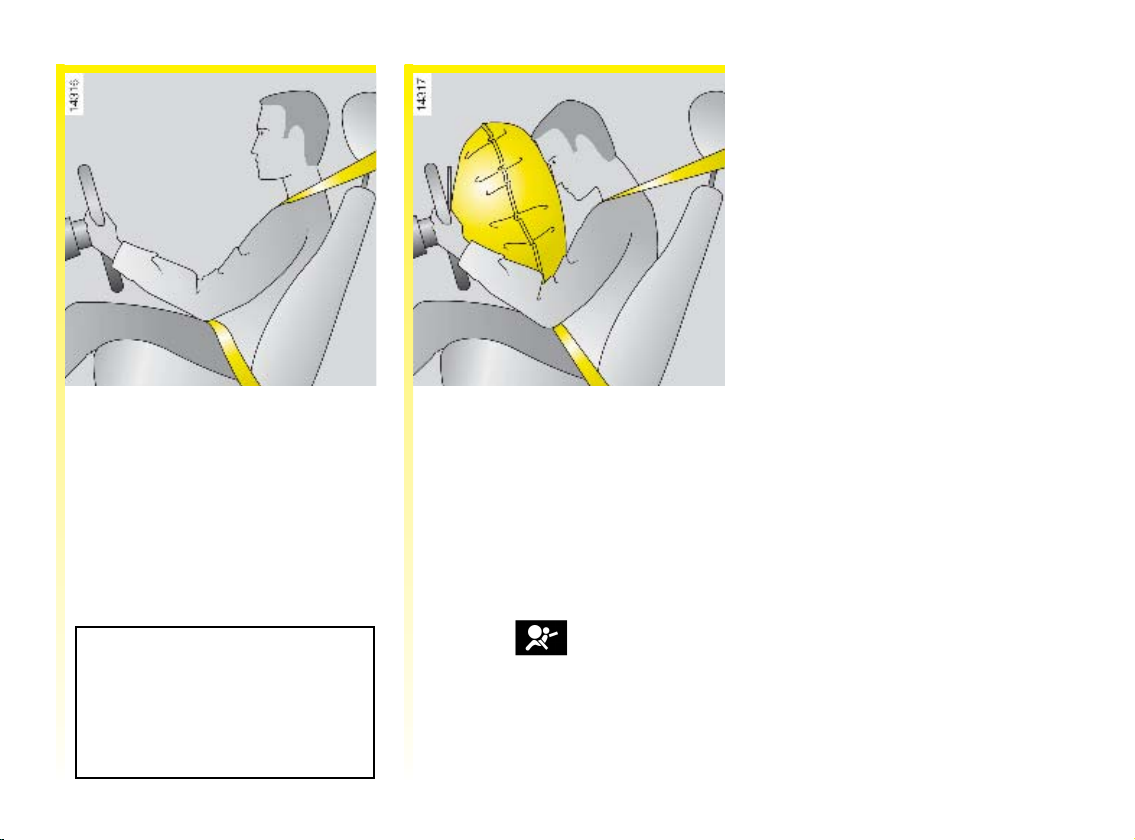
Operation
This system is only operational
when the ignition is switched on.
If a severe frontal impact occurs, the
airbag(s) inflate(s) rapidly,
cushioning the impact of the
driver's head and chest against the
steering wheel and the front
passenger's head against the
dashboard. The airbag then deflates
immediately so that the passengers
are not impeded in any way when
they get out of the vehicle.
instrument panel when the ignition
is switched on and then will go out
after a few seconds.
If it does not light up when the
ignition is switched on, or comes on
when the engine is running, there is
a fault in the system.
Consult your RENAULT Dealer as
soon as possible. Your protection
will be reduced until this fault is
rectified.
Theairbagsystemusesthe
principles of pyrotechnics. This
explains why, when the airbag
inflates, it will generate heat,
produce smoke (this does not
mean that a fire is about to start)
and make a noise upon
detonation. In a situation where
an airbag is required, it will
inflate immediately and this may
cause some minor, superficial
grazing to the skin or other
problems.
1.25
Page 31

METHODS OF RESTRAINT IN ADDITION TO THE FRONT SEAT BELTS (continued)
Warnings concerning the driver’sairbag
• Do not modify the steering wheel or the steering wheel boss.
A
All the warnings below are given so
that airbag activation is not
obstructed in any way and also to
prevent the risk of serious injuries
caused by items which may be
dislodged when the airbag inflates.
• Do not cover the steering wheel boss.
• Do not attach any objects (badge, logo, clock, telephone holder, etc.) to the
steering wheel boss.
• The steering wheel must not be removed (except by qualified personnel
from the RENAULT Network).
• Do not sit too close to the steering wheel when driving. Sit with your arms
slightly bent (see the information on Adjusting your driving position in
Section 1). This will allow sufficient space for the airbag to deploy
correctly and be fully effective.
Warnings for passenger airbag: location A
• Do not attach or glue any objects (badge, clock, telephone holder, etc.) to
the dashboard near the airbag.
• Nothing should be placed between the dashboard and the passenger (pet,
umbrella, walking stick, parcels, etc.).
• The passenger must not put his or her feet on the dashboard or seat as there
is a risk that serious injuries may be sustained. As a general rule, keep all
parts of your body(knees, hands, head, etc.) well away from the dashboard.
A REAR-FACING CHILD/BABY SEAT MUST NOT BE FITTED TO THE
PASSENGER SEAT IF THE VEHICLE IS EQUIPPED WITH A
PASSENGER AIRBAG.
1.26
Page 32

METHODS OF RESTRAINT IN ADDITION TO THE FRONT SEAT BELTS (continued)
All of the warnings below are given so that the airbag is not obstructed in any way when it is inflated and also to prevent
the risk of serious injuries caused by items which may be dislodged when the airbag inflates.
The airbag is designed to complement the action of the seat belt. Both the airbags and seat belts are integral parts
of the same protection system. It is therefore essential to wear a seat belt at all times. If seat belts are not worn,
the occupants are exposed to the risk of serious injury in theevent of an accident. It may also increase therisk of
possible with airbags.
If the vehicle should overturn, or in the event of a rear impact, however severe, the pretensioners and airbags are not
always triggered. Shocks to the underbody of the vehicle, from pavements, potholes, stones etc. can all trigger these
systems.
• No work or modification whatsoever may be carried out on any part of the driver or passenger airbag system
• To ensure that the system is in good working order and to avoid accidental triggering of the system which may cause
• As a safety precaution, have the airbag system checked if your vehicle has been involved in an accident, stolen or
• When selling or lending the vehicle, inform the user of these points and hand over this handbook with the vehicle.
• When scrapping your vehicle, contact your RENAULT Dealer for disposal of the gas generator(s).
minor superficial injuries occurring when the airbag is deployed, although such minor injuries are always
(computer, wiring harness, etc.), except by qualified RENAULT Network personnel.
injury, only qualified RENAULT Network personnel may work on the airbag system.
broken into.
1.27
Page 33

CHILD SAFETY
In all countries there are regulations
governing the use of restraints for
children and babies.
In Europe, children under 10 years
of age (1) must be seated in an
approved safety device which is
suitable for the weight and size of
the child.
The driver is responsible for
ensuring that this equipment is
used correctly.
Child restraints for which type
approval was obtained after January
1992 offer a level of safety much
greater than for restraints with type
approval before that date.
It is therefore advisable to select a
child restraint that complies with
European regulation ECE 44.
Restraints that comply with this
legislationmustbemarkedwithan
orange label bearing the letter E
followed by a number (which
represents the country where it is
type approved) and the year in
which the type approval was
granted.
Refer to the Child safety equipment
booklet available from the
RENAULT Network to choose the
seat suited to your child and
recommended for your vehicle.
1.28
Remember that a collision at
30 mph (50 km/h) is the same as
falling a distance of 10 metres.
Expressedinotherterms,
transporting a child without a
restraint is the equivalent of
allowing him or her to play on a
fourth-floor balcony without
railings.
Under no circumstances
should babies or children
be allowed to travel sitting
on the knees of another
passenger in the vehicle.
If a frontal impact occurs at 30 mph
(50 km/h) a child weighing 30 kg
will be transformed into a missile
equivalent to one ton: you will find
it impossible to hold the child,
even if you yourself are wearing a
belt.
It is particularly dangerous to put
the belt round your child when he
or she is sitting on your lap. Never
use the belt for more than one
person at the same time.
There are some passenger seats on
which the installation of child seats
is forbidden. To find out the
authorised seats and types of child
seats that can be installed in each of
the authorised seats, refer to the
tables on the following pages.
Before installing a child seat in the
front seat (if installation is
permitted)
If fitted to the passenger seat, carry
out the following adjustments:
- move the passenger seat as far
back as possible,
- set the seatback to its fully upright
position,
- lower the seat base as far as
possible,
- raise the headrest to its highest
setting,
- move the seat belt height control
to the bottom position.
(1) You must always comply with the
laws of the country in which you are
travelling. They may be different to
the guidelines in this handbook.
Page 34

CHILD SAFETY (continued)
Seats suitable for installing a child seat
Age of the child
(weight of the child)
Birth to approximately 9 months
(weight below 13 kg)
From 9 months to 3 years approximately
(weight from 9 kg to 18 kg)
From 3 years to 12 years approximately (1)
(weightfrom15kgto36kg)
X : seat not suitable for fitting a child seat for this age range.
U : seat suitable for fitting a belt-fitted child seat approved as Universal for this age range; check that it can be fitted.
UF : seat only suitable for fitting a belt-fitted forward-facing child seat approved as Universal for this age range; check that it can be
fitted.
(1) A child taller than 1.36 m or weighing more than 36 kg can be strapped directly into the seat like an adult.
(2) Prohibited if a two-seat front bench seat is fitted.
(3) DANGER RISK OF DEATH OR SERIOUS INJURY: NEVER FIT A REAR-FACING CHILD SEAT TO THIS SEAT.
WITH PASSENGER AIRBAG WITHOUT PASSENGER AIRBAG
Front centre
passenger seat
X(3) X(3) U U
UF UF (2) U U
UF UF (2) U U
passenger seat
Van - Chassis cab
Front side
Front centre
passenger seat
Front side
passenger seat
1.29
Page 35

CHILD SAFETY (continued)
Seats suitable for installing a child seat
Double cab
Age of the child
(weight of the child)
Birthtoapproximately9months
(weight below 13 kg)
From9monthsto3yearsapproximately
(weight from 9 kg to 18 kg)
From 3 years to 12 years approximately (1)
(weight from 15 kg to 36 kg)
X : seat not suitable for fitting a child seat for this age range.
U : seat suitable for fitting a belt-fitted child seat approved as universal for this age range; check that it can be fitted.
(1) A child taller than 1.36 m or weighing more than 36 kg can be strapped directly into the seat like an adult.
(2) Only a rear-facing seat may be fitted to this seat.
(3) DANGER RISK OF DEATH OR SERIOUS INJURY: NEVER FIT A REAR-FACING CHILD SEAT TO THIS
SEAT.
WITH PASSENGER AIRBAG WITHOUT PASSENGER AIRBAG
Front
centre
passenger
seat (3)
XXUUUX
XXUUUX
XXXXUX
Front
side
passenger
seat (3)
Front
centre
passenger
seat (2)
Front
side
passenger
seat (2)
Rear
side
seats
Rear
centre
seat
1.30
Page 36

CHILD SAFETY (continued)
Age of the child
(weight of the child)
Front
centre
passenger
seat (2)
Seats suitable for installing a child seat
Combi with front passenger airbag
Front
side
passenger
seat (2)
Rear 2nd
row
side seats
Rear 2nd
row
centre seat
Rear 3rd
row
side seats
Rear 3rd
row
centre seat
Birth to approximately 9 months
(weight below 13 kg)
From 9 months to 3 years approximately
(weight from 9 kg to 18 kg)
From 3 years to 12 years approximately (1)
(weight from 15 kg to 36 kg)
X : seat not suitable for fitting a child seat for this age range.
U : seat suitable for fitting a belt-fitted child seat approved as Universal for this age range; check that it can be fitted.
UF : seat only suitable for fitting a belt-fitted forward-facing child seat approved as Universal for this age range; check that
it can be fitted.
L1 : seat suitable for fitting RENAULT-approved booster seat; use only the seat, without the seatback.
(1) A child taller than 1.36 m or weighing more than 36 kg can be strapped directly into the seat like an adult.
(2) DANGER RISK OF DEATH OR SERIOUS INJURY: NEVER FIT A REAR-FACING CHILD SEAT TO THIS
SEAT.
XXXUXX
XXUFUXX
XXUFUL1L1
1.31
Page 37

CHILD SAFETY (continued)
Seats suitable for installing a child seat
Age of the child
(weight of the child)
Birthtoapproximately9months
(weight below 13 kg)
From 9 months to 3 years approximately
(weight from 9 kg to 18 kg)
From 3 years to 12 years approximately (1)
(weightfrom15kgto36kg)
X : seat not suitable for fitting a child seat for this age range.
U : seat suitable for fitting a belt-fitted child seat approved as Universal for this age range; check that it can be fitted.
UF: seat only suitable for fitting a belt-fitted forward-facing child seat approved as Universal for this age range; check that
it can be fitted.
L1 : seat suitable for fitting RENAULT-approved booster seat; use only the seat, without the seatback.
(1) A child taller than 1.36 m or weighing more than 36 kg can be strapped directly into the seat like an adult.
(2) Only a rear-facing seat may be fitted to this seat.
Front
centre
passenger
seat (2)
UUXUXX
UUUFUXX
XXUFUL1L1
Combi without front passenger airbag
Front
side
passenger
seat (2)
Rear 2nd
row
side seats
Rear 2nd
row
centre seat
Rear 3rd
row
side seats
Rear 3rd
row
centre seat
1.32
Page 38

CHILD SAFETY (continued)
The right choice
The safety of your children is also
your responsibility.
To ensure that your child has the
maximum possible protection, we
recommend that you use seats
approved by the RENAULT
Network.
Restraint systems for all the
categories are available. These
systems have been developed in
consultation with the
manufacturers and have been tested
in RENAULT vehicles.
Contact your RENAULT Dealer for
help installing it.
To avoid any risk to your safety, we recommend that you use
RENAULT approved accessories because they are designed for your
vehicle and are the only accessories for which RENAULT will
provide a warranty.
Categories 0 and 0+ (from 0 to
13 kg)
A child's neck is very susceptible to
injury up to the age of two. It is
preferable to put your child into a
rear-facing enclosing shell seat. This
position enhances safety.
Category1(from9kgto18kg)
Between the ages of 2 and 4, a
child's pelvis isnot fully developed.
Restraints using the vehicle's
three-point belts are not adequate
and there is also a risk that the child
will sustain abdominal injuries in
the event of a frontal impact. It is
therefore advisable to use a bucket
type seat that restrains the child by
means of a harness or shock
absorbing pad.
1.33
Page 39

CHILD SAFETY (continued)
Category 2 (from 15 kg to 25 kg)
Category 3 (from 22 kg to 36 kg)
For correctly supporting the pelvis
of a child under 10 years, with a
height under 1.36 m and a weight of
less than36 kg, it is preferable touse
a booster cushion with belt guides
that ensure that the three-point belt
lies flat over the child's thighs.
A booster seat with a
height-adjustable seatback and a
belt guide are recommended as this
will allow the belt to be worn as
close to the base of the neck as
possible but not on it.
Place the headrest in the top
position to allow you to press the
seatback of the child seat firmly
against the vehicle seatback.
If a booster seat without a seatback
is used, the vehicle's headrest will
have to be adjusted to suit the
child's stature; the upper edge of the
headrest must be at the same height
as the top of the child's head and
should never be lower than in line
with the child's eyes.
The standard classifies the child
restraints in five categories:
Category0 : 0to10kg
Category 0+: 0 to 13 kg
Category1 : 9to18kg
Category 2 : 15 kg to 25 kg
Category 3 : 22 kg to 36 kg
DANGER
It is forbidden to install a
rear-facing child seat on the
front passenger seat when
the vehicle is fitted with a front
passenger airbag. There is a risk of
very serious injury if the airbag
inflates.
The label (on the dashboard) and
marking (on the front passenger
sun visor) remind you of these
instructions.
1.34
Page 40

CHILD SAFETY (continued)
CHILD SAFETY
• No modifications may be made to the original component parts of the restraint system (belts and seats and
their mountings).
• Carefully follow the instructions for fitting provided by the manufacturer of the restraint system.
• Always avoid dressing the child in bulky garments and do not place any objects between the child and the restraint
system.
• The seat belt in the vehicle must be tight enough to hold the child's seat in position securely. Check the tension
regularly.
• Never wear the belt under your arm or behind your back.
• The harness or belt should be taut and fitted to suit the child's size.
• Never allow your child to stand up or kneel on the seats while the vehicle is moving.
• Check that the child is in the correct position for the entire journey, particularly when they are asleep.
• Use the seat belts to hold the seat in position, evenif it is not occupied. Otherwise, ifan accident were tooccur, it may
become dislodged and pose a risk to other vehicle occupants.
• Following a serious accident, have the seat belts and restraint systems in use at the time checked.
• Never leave a child unsupervised in a vehicle, even if they are in a restraint device.
• Lock the rear doors (if your vehicle is equipped with the function).
• Makesurethechilddoesnotgetoutofthevehicleatthesidewherethereistraffic.
• Set your children a good example; always wear your seat belt.
1.35
Page 41

DRIVER’S POSITION, LEFT-HAND DRIVE
1 2 3 4 5 6 7 8 9 10 11 12 13 14
28 27 26 25 24 23 22 21 20 19 18 17 16 15
1.36
Page 42

DRIVER'S POSITION, LEFT-HAND DRIVE
(presence of equipment depending on the vehicle) (continued)
1 Side window demisting outlet.
2 Side air vent.
3 Stalk for:
• direction indicators,
• external lights,
• rear fog lights.
• horn.
4 Instrument panel.
5 Location for driver's airbag.
6 Radio remote control.
7 • Windscreen washer/wiper
stalk.
• Information readout
10 Location for:
• radio,
• display (radio, time,
temperature),
• navigation system,
• glove compartment,
• tachograph.
11 Centre air vent.
12 Storage compartment or
location for passenger airbag.
13 Side air vent.
14 Side window demisting outlet.
15 Passenger side cup holder.
16 Glove box.
19 Ashtray.
20 Document holder.
21 Hazard warning lights switch.
22 Gear lever.
23 Switches for:
• Heated rear windows,
• cruise control and speed
limiter controls,
• air suspension,
• electrically heated wind-
screen,
24 Ignition switch.
25 Fuse box.
26 Control for electric beam height
adjustment.
8 Centre air vent.
9 Heating controls.
17 Document clip.
18 Cigarette lighter.
27 Bonnet release.
28 Driver's side cup holder.
1.37
Page 43

DRIVER’S POSITION, RIGHT-HAND DRIVE
1 2 3 4 5 6 7 8 9 10 11 12 13 14
28 27 26 25 24 23 22 21 20 19 18 17 16 15
1.38
Page 44

DRIVER’S POSITION, RIGHT-HAND DRIVE
(presence of equipment depending on the vehicle) (continued)
1 Side window demisting outlet.
2 Side air vent.
3 Storage compartment or
location for passenger airbag.
4 Centre air vent.
5 Location for:
• radio,
• display (radio, time,
temperature),
• navigation system,
• storage compartment.
6 Heating controls.
7 Centre air vent.
8 Stalk for:
• direction indicators,
• external lights,
• rear fog light,
• horn.
9 Location for driver's airbag.
10 Instrument panel.
11 Radio satellite controls.
12 Windscreen wiper/washer
stalk.
13 Side air vent.
14 Side window demisting outlet.
15 Driver's side cup holder.
16 Ignition switch.
17 Headlight beam adjustment
controls.
18 Fuse box.
19 Switches for:
• heated rear windows,
• cruise control and speed
limiter control,
• air suspension,
• electrically heated
windscreen,
• tachograph.
20 Gear lever.
21 Hazard warning lights switch.
22 Document holder.
23 Ashtray.
24 Cigarette lighter.
25 Document clip.
26 Glove box.
27 Bonnet release.
28 Passenger side cup holder.
1.39
Page 45
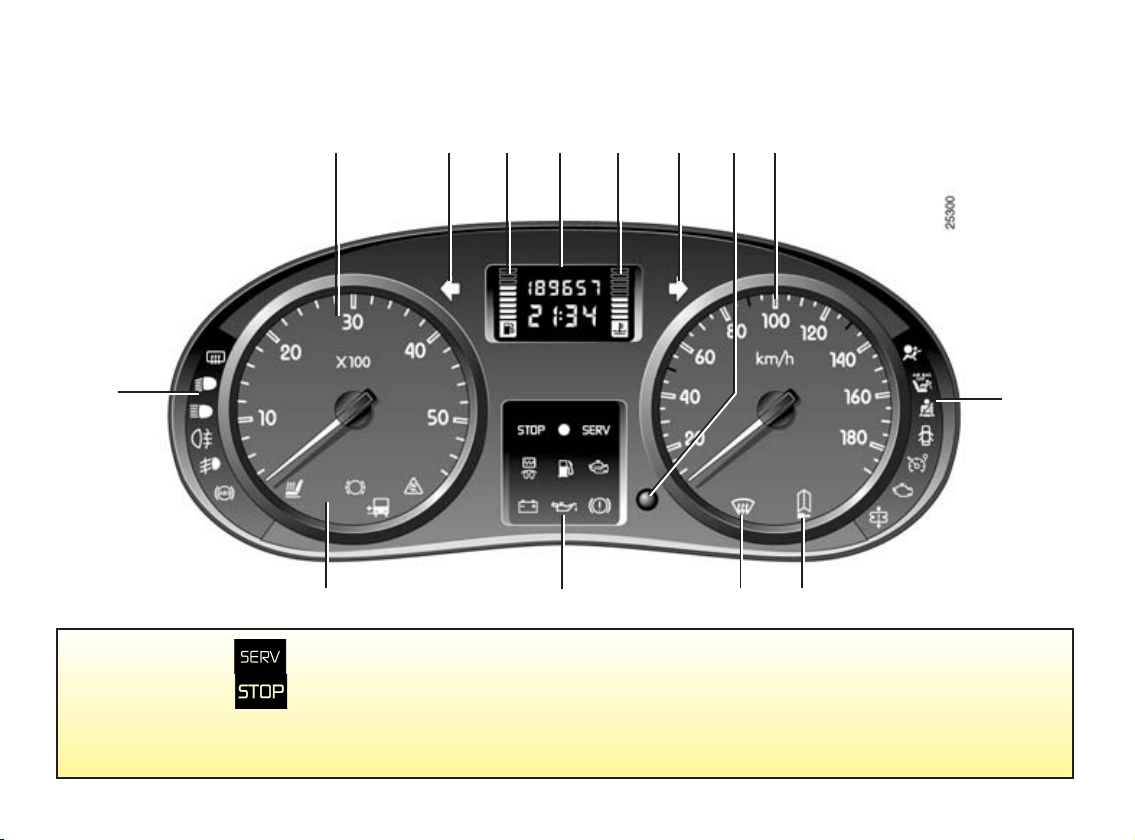
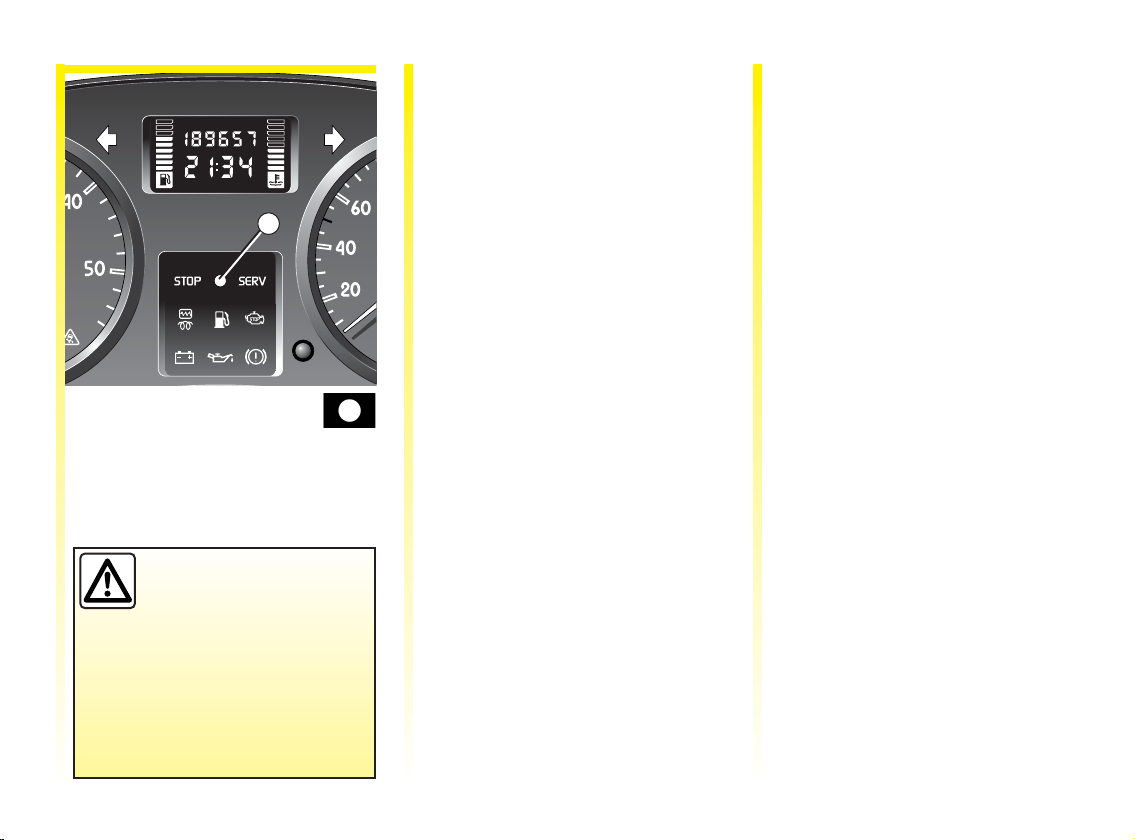
INSTRUMENT PANEL
The presence and operation of the indicator lights described below depend on the vehicle equipment and
country.
234a44b356
1.40
1
11 10 9 8
If the warning light comes on, you should visit a RENAULT Dealer immediately.
If the warning light comes on, you must stop as soon as traffic conditions allow.
If no information appears on the instrument panel,
it is essential to stop as soon as traffic conditions allow.
7
Page 46

INSTRUMENT PANEL (continued)
The presence and operation of the indicator lights described below depend on the vehicle equipment and
country.
1 Not used
Dipped beam headlights
indicator light
Main beam headlight
indicator light
Rear fog light indicator
light
Front fog light
indicator light
Anti-lock braking
system (ABS) warning
light
This light comes on when the
ignition is switched on and
goes out within 3 seconds. If it
comes on when you are
driving, it indicates a fault in
the anti-lock braking system
(ABS).
Braking will then be as normal,
without the ABS system.
Contact your RENAULT Dealer
as soon as possible.
2 Rev counter
(×100 scale)
3 Left-hand direction
indicator light
Right-hand direction
indicator light
4 Multifunction display
Low engine oil level warning
When starting the engine, the
display shows the engine oil
minimum level warning for 30
seconds. Refer to the
information on the Engine Oil
LevelinSection4.
4 Total mileage recorder, clock
(except on vehicle with
chronotachograph) trip
mileage recorder.
This can be read for
approximately 30 seconds after
the ignition has been switched
on.
OR
Trip computer
Refer to the information in
section 1 on the trip computer.
1.41
Page 47

INSTRUMENT PANEL (continued)
The presence and operation of the indicator lights described below depend on the vehicle equipment and
country.
234a44b356
1.42
1
11 10 9 8
If the warning light comes on, you should visit a RENAULT Dealer immediately.
If the warning light comes on, you must stop as soon as traffic conditions allow.
If no information appears on the instrument panel,
it is essential to stop as soon as traffic conditions allow.
7
Page 48

INSTRUMENT PANEL (continued)
The presence and operation of the indicator lights described below depend on the vehicle equipment and
country.
4 Multifunction display
(continued)
4a Fuel level gauge
The number of squares lit
shows the fuel level. When it is
at minimum, the squares
disappear and the low fuel
level warning light comes on.
4b Coolant temperature indicator
Under normal use, four squares
are lit. The number of squares
lit depends on the engine
coolant temperature. There is
no warning unless the last three
squares light up.
5 Multifunction key
Pressing the key repeatedly lets
youselectinformationonthe
display, reset the trip mileage
recorder or set the time on the
clock in the instrument panel.
6 Speedometer (km or miles per
hour)
Overspeed buzzer
Depending on the vehicle, a
buzzer sounds for
approximately 10 seconds
every 40 seconds, as long as the
vehicle is travelling in excess of
72 mph (120 km/h).
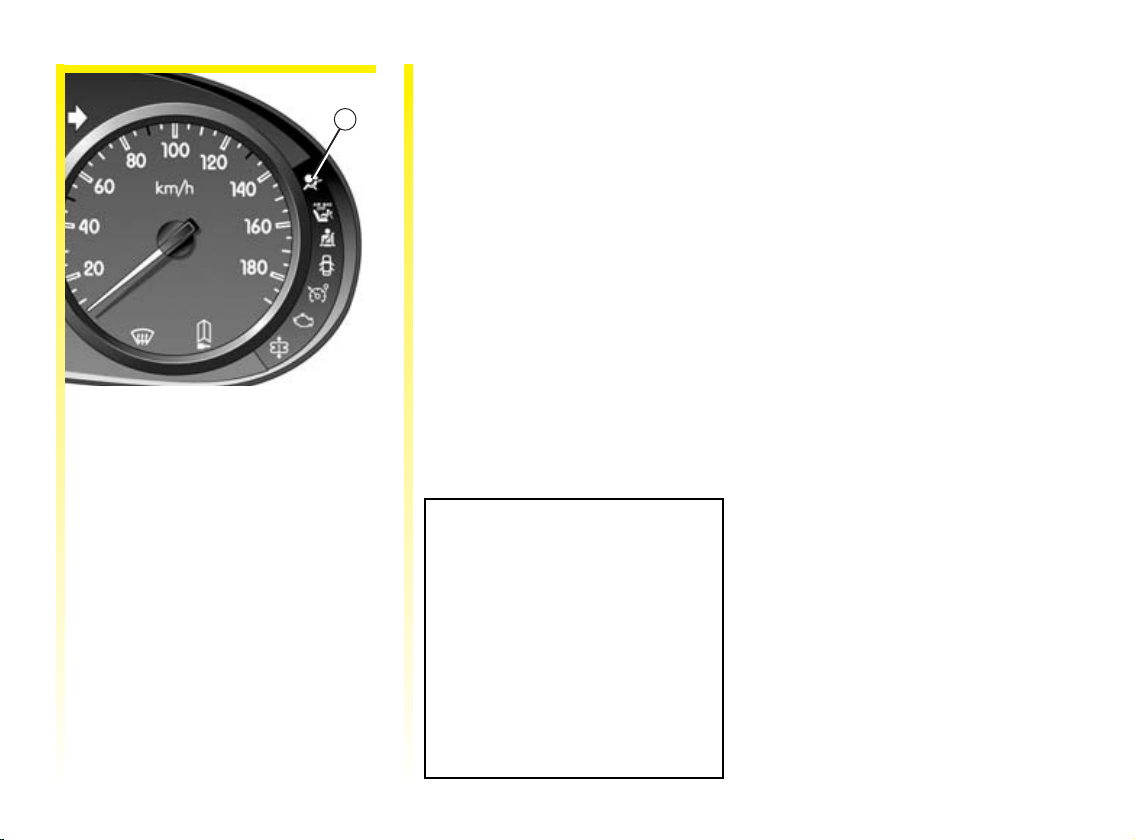
7 Airbag warning light
This lights up when the
ignition is switched on
and goes out after a few
seconds.
If it does not light up when the
ignition is switched on or if it
flashes, there is a fault in the
system. Consult your
RENAULT Dealer as soon as
possible.
Not used
7 Seat belt not fastened
warning light
Not used
Speed limiter and
cruise control indicator
light
Refer to the Cruise
control/speed limiter
paragraphs in Section 2.
Not used
1.43
Page 49

INSTRUMENT PANEL (continued)
The presence and operation of the indicator lights described below depend on the vehicle equipment and
country.
234a44b356
1.44
1
11 10 9 8
If the warning light comes on, you should visit a RENAULT Dealer immediately.
If the warning light comes on, you must stop as soon as traffic conditions allow.
If no information appears on the instrument panel,
it is essential to stop as soon as traffic conditions allow.
7
Page 50

INSTRUMENT PANEL (continued)
The presence and operation of the indicator lights described below depend on the vehicle equipment and
country.
7 Air suspension
operating fault
warning light.
Call a RENAULT Dealer.
8 Not used
9 Not used
10 STOP light
It goes out as soon as
the engine starts.
It lights up in conjunction with
one of the warning lights:
Engine immobiliser
system warning light
This light performs
several functions.
Refer to the information on the
engine immobiliser in section 1.
SERVICE warning light
This lights up when the
ignition is switched on
and goes out after 3 seconds.
It may light up alone or together
with other warning lights.
If it lights up when the vehicle is
being driven, it isadvisable to see a
RENAULT Dealer soon.
10 Preheating indicator
light/water in the diesel
filter or electronic fault
warning light
Preheating warning light
This light should come on when
the ignition key is in position M;it
indicates that the heater plugs are
in operation. It goes out after
preheating is sufficient and the
engine can be started.
Electronic fault or water in the
diesel filter warning light
If the warning light remains on or
comes on while the engine is
running, this indicates that there is
an electrical or electronic fault or
that there is still water in the fuel
filter. Consult your RENAULT
Dealer as soon as possible.
1.45
Page 51

INSTRUMENT PANEL (continued)
The presence and operation of the indicator lights described below depend on the vehicle equipment and
country.
234a44b356
1.46
1
11 10 9 8
If the warning light comes on, you should visit a RENAULT Dealer immediately.
If the warning light comes on, you must stop as soon as traffic conditions allow.
If no information appears on the instrument panel,
it is essential to stop as soon as traffic conditions allow.
7
Page 52

INSTRUMENT PANEL (continued)
The presence and operation of the indicator lights described below depend on the vehicle equipment and
country.
10 Warning light for
serious injection fault /
coolant temperature
warning light
Warning light for serious
injection system fault
If this light flashes when you
are driving, it indicates a fault
in the injection system. Stop
immediately, switch off the
ignition and contact a
RENAULT Dealer.
Coolant temperature warning
light
If this light comes on when you
are driving, it indicates engine
overheating. Stopand allow the
engine to run at idle speed for a
minute or two. The
temperature should drop. If
not, stop the engine. Let the
engine cool down, then check
the coolant level. Contact a
RENAULT Dealer if necessary.
10 Battery charge warning
light
It should go out as soon
as the engine starts.
If it lights up when you are
driving, it indicates that the
electrical circuit is overloaded
or is discharging. Stop and
have the circuit checked.
Oil pressure indicator
light
This lights up when the
ignition is switched on and
goes out within 3 seconds. If it
lights up while you are driving,
stop at once and switch off the
ignition. Check the oil level. If
the level iscorrect, the light has
come on for another reason;
contact a RENAULT dealer.
Handbrake on and
brake circuit fault
warning light.
If it lights up when the brakes
are applied, it indicates that the
fluid level in the circuit is low.
It may be dangerous to
continue driving; contact a
RENAULT Dealer.
10 Low fuel level warning
light
It goes out as soon as
the engine starts.
If it lights up or remains lit, fill
up with fuel as soon as
possible.
11 Not used
Heated seat indicator
light
Not used
1.47
Page 53

TRIP COMPUTER AND WARNING SYSTEM
Display selection key 3
Keep pressing key 3 briefly to scroll
1
2
3
Display 1
General reset and trip
mileometer reset button 2
The display must be showing the
trip mileometer function before it
can be reset.
through the following information
in sequence:
a) total mileage recorder,
b) trip mileage recorder,
c) fuel used,
d) average consumption,
e) current consumption,
f) estimated range,
g) distance travelled,
h) average speed,
i) programmed speed (speed
limiter/cruise control).
Refer to the table on the following
page for display examples.
Interpreting values displayed
after resetting:
The values showing average fuel
consumption, range and average
speed will become more stable and
reliable the further you travel since
the last time the reset button was
pressed.
For the first few miles after pressing
the reset button you will notice:
• that the range increases as you
travel. This is normal; average
fuel consumption may decrease
when:
- the vehicle stops accelerating,
- the engine reaches its operating
temperature (engine cold when
reset button pressed),
- when driving from an urban
area onto the open road.
Therefore, if the average fuel
consumption decreases, the range
will increase.
• You may also notice that the
average fuel consumption
increases when the vehicle is
stationary and the engine idling.
This is normal sincethe computer
takes account of fuel used during
idling.
Note: resetting is automatic when
the maximum capacity of any of the
memories is exceeded.
1.48
Page 54

24320
24321
24322
24323
TRIP COMPUTER AND WARNING SYSTEM (continued)
Examples of display
selections by repeatedly
pressing 3
Interpreting the display
a) Total mileage recorder (except on vehicles with chronotachograph).
b) Trip mileage recorder.
c) Fuel used (in litres) since the last reset.
d) Average consumption (in litres/100 km) since the last reset.
This value is displayed after driving 400 metres and takes into account the
distance travelled and the fuel used since the last time the reset button was
pressed.
1.49
Page 55

24324
24325
24326
24327
24349
TRIP COMPUTER AND WARNING SYSTEM (continued)
Examples of display
selections by repeatedly
pressing 3
Interpreting the display
e) Current fuel consumption (in litres/100 km)
This value is displayed after reaching a speed of 15 mph (25 km/h).
f) Estimated range with remaining fuel (in miles/km)
This range takes into account the average fuel consumption since the last
time the reset button was pressed.
The value is displayed after driving 400 metres.
g) Distance covered (in miles/km) since the last reset.
h) Average speed (in mph/km/h) since the last reset.
The value is displayed after driving 400 metres.
1.50
i) Cruise control or speed limiter programmed speed (depending on vehicle).
See Speed limiter and Cruise control in Section 2.
Page 56

CLOCK AND EXTERNAL TEMPERATURE
1
3
2
Setting the time 1
With the ignition on and total
mileage and clock function selected
on display 1,pressandholdbutton
2, to enter Set time mode, then
release the button:
- pressing and holding button 2
allows you to scroll through the
hours and minutes quickly;
- short presses on button 2 allow
you to set the time minute by
minute.
5
4
Setting the time on clock 3
The time and external temperature
appear on display 3.
With the ignition on, press button:
4 for minutes.
5 for hours.
For vehicles with navigation
system and/or tachograph, refer to
the handbook provided for the
special features of this equipment.
If the electrical supply is cut
(battery disconnected, supply wire
broken, etc.), the clock will lose its
time setting.
Youshouldresetthetimeonthe
clock.
For your safety, we recommend
that you do not adjust the clock
while driving.
1.51
Page 57

SCREEN WASH/WIPE
1
A
B
C
D
Windscreen wiper
With the ignition on, move
switch 1 in line with the steering
wheel:
• A Off.
• B Intermittent wiping.
The wipers will pause for
several seconds between
sweeps.
• C Normal wiping speed.
• D Fast wiping speed.
Windscreen washer
With the ignition
switched on, pull switch 1 towards
you.
A short press triggers one sweep
cycle of the wiper.
A longer press triggers four sweep
cycles.
In frosty weather, make sure that the
wiper blades are not stuck by ice
(risk of motor overheating).
Keep an eye on the condition of the
blades. Replace the wiper blades as
soon as they begin to lose efficiency
(approximately once a year).
If you switch off the ignition before
switching off the windscreen wiper
(position A) the blades will stop at
random on the windscreen. Simply
move stalk 1 to position A to return
the blades to park position.
1.52
Page 58

EXTERIOR LIGHTING AND SIGNALS
1
1
Main beam headlights
With switch 1 in the
dipped beam position, pull the
switch towards you.
2
When the main beam headlights are
lit, an indicator light lights up on
the instrument panel.
To return to the dipped headlight
position, pull the stalk towards you.
Switching off the lights
Tu rn t h e e n d o f s t al k 1
back to its original position.
Side lights
Turn the end of switch 1
until the symbol is opposite mark 2.
The instrument panel will light up.
Before driving at night, check that the electrical equipment is operating correctly and adjust the headlight
beams (if your vehicle is not carrying its normal load). In general, check that the lights are not obscured (by
dirt, mud, snow or objects which could cover them).
Dipped beam headlights
Turn the end of switch 1
until the symbol is opposite mark 2.
The indicator light will light up on
the instrument panel.
Lights-on warning buzzer
A reminder buzzer will sound when
the driver's door is opened and the
lights are left switched on after the
ignition has been switched off (to
prevent the battery running down,
etc.).
1.53
Page 59

EXTERNAL LIGHTING AND SIGNALS (continued)
When the exterior vehicle lights are
extinguished, the rear fog light is
extinguished or the setting returns
to the front lights position (if fitted).
4
3
Rear fog lights
Tu rn c e n tr a l r i ng 3 of the
switch until the symbol appears
opposite mark 4.
The rear fog light only works if the
exterior lights have been activated.
An indicator light on the instrument
panelwillcomeon.
To avoid inconveniencing other
road users, remember to switch off
the rear fog light when it is no
longer needed.
1.54
Page 60

EXTERNAL LIGHTING AND SIGNALS (continued)
Load states Suspension types Tumblewheel position
Driver alone or with
passengers
COMBI
All suspension systems 0
A
Electric beam height adjustment
Button A enables the headlight
beam height to be adjusted.
Turn button A to adjust the
headlights according to load.
This control only works when the
lighting is indippedbeam headlight
position.
(1) Load states at maximum
permitted weight.
All seats occupied and luggage
compartment loaded (1)
Driver alone with luggage
compartment loaded (1)
Driver alone All suspension types 0
Driver alone with luggage
compartment loaded (1)
Other cases
CHASSIS (SINGLE/DOUBLE) CAB AND DROPSIDE
Driver alone All suspension types 0
Driver alone,
rear axle
loaded (1)
Air suspension 0
Other suspension systems 1
Air suspension 1
Other suspension systems 2
VAN
Air
suspension
Other suspension
systems
Air suspension 1
Other suspension systems 2
According to driver's
According to driver's
According to driver's
0 or 1
judgement
2 or 3
judgement
judgement
1.55
Page 61

AUDIBLE AND VISUAL SIGNALS
1
Horn
Press the end of stalk 1.
Headlight flasher
Even if the lights are not switched
on, pull stalk 1 towards you.
1
Direction indicators
Shift stalk 1 in linewith the steering
wheel and in the direction you are
going to turn.
When driving on the motorway, the
steering wheel is not usually turned
sufficiently to return the stalk
automatically to its starting
position. There is an intermediate
position in which you should keep
the stalk when the steering wheel is
moved.
When the stalk is released, it will
automatically return to its starting
position.
2
Hazard warning lights
Press switch 2.
This switch lights up all four
indicators simultaneously.
It is to be used only to warn other
road users if you are:
• obliged to stop for any reason
beyond your control in an
unusual or prohibited location,
• obliged to drive under particular
conditions.
1.56
Page 62

FUEL TANK
Filling up with fuel
No more than two filling operations
may be made after the fuel feed has
switched off automatically for the
first time because there must be
sufficient space in the fuel tank to
allow for expansion.
1
Filling the tank
Unlock with the key.
Remove cap 1 with the key.
Effective tank capacity:
approximately 100 litres or 70
litres (depending on vehicle).
Fuel grade
It is essential to only use diesel.
Make sure that no water
accidentally enters the fuel tank
during filling. The shut-off system
and its surrounding area must be
dust-free. The diesel fuel must be of
ahighgrade.
Do not mix even small
volumes of petrol with
diesel.
Fuel filler cap: this is of a
special type. If you have to
replace it, make sure the
new cap isof the same type.
Contact your RENAULT Dealer.
Never place the cap near a source
of heat or flame.
System for cutting off the fuel
supply in the event of a severe
impact
Refer to Section 5 for information
on Cutting off the fuel supply in the
event of a severe impact.
1.57
Page 63

FUEL TANK (continued)
Persistent fuel odour
If you notice a persistent fuel odour
you should:
• stop the vehicle when traffic
conditions allow and switch off
the ignition;
• switch on the hazard warning
lights and ask your passengers to
leave the vehicle to keep them
away from the traffic;
• not work on, or restart, the vehicle
before it has been inspected by
qualified staff from the RENAULT
Network.
No modifications
whatsoever are permitted
on any part of the fuel
supply system (computers,
wiring, fuel circuit, injector,
protective covers, etc.) as this may
be dangerous (such work must only
be undertaken by qualified
RENAULT Network personnel).
1.58
Page 64

Section 2: Driving
(Advice on use relating to fuel economy and the environment)
Running in ........................................................................................................................................................ 2.02
Ignition switch .................................................................................................................................................. 2.02
Starting the engine ........................................................................................................................................... 2.03
Special features of diesel versions .................................................................................................................. 2.04
Advice on emission control and how to economise on fuel ........................................................... 2.05
Gear lever .......................................................................................................................................................... 2.08
Power assisted steering .................................................................................................................................... 2.08
Handbrake ......................................................................................................................................................... 2.09
Anti-lock braking system (ABS) ...................................................................................................................... 2.10
Air suspension .................................................................................................................................................. 2.11
Cruise control/Speed limiter ............................................................................................................... 2.12
Parking proximity sensor ................................................................................................................................. 2.18
QUICKSHIFT gearbox .......................................................................................................................... 2.19
Overspeed function .......................................................................................................................................... 2.25
➟ 2.07
➟ 2.17
➟ 2.24
2.01
Page 65

RUNNING IN IGNITION SWITCH
For the first 900 miles (1,500 km),
do not exceed 2,500 rpm. After
completing this mileage you may
drive faster, although you may only
expect top performance after
approximately 3,600 miles (6,000
km).
During the running in period, do
not accelerate hardwhile the engine
is still cold and donot let theengine
over-rev.
Service intervals: refer to the
vehicle's Warranty and Services
booklet.
"Stop" position and anti-theft lock
applied (St)
To lock: remove the key and turnthe
steering wheel until the steering
column locks.
To unlock: turn the key and the
steering wheel slightly.
"Accessories" position A
When the ignition is switched off,
any accessories (radio, etc.) will
continue to function.
"Ignition on" position M
Withthe ignition on, the engine will
be preheating.
"Start" position D
If the engine fails to start at the first
attempt, the key must be turned
back before the starter motor can be
activated again. Release the key as
soon as the engine starts.
2.02
Page 66

STARTING/STOPPING THE ENGINE
Starting the engine
Shift the gear lever into
neutral.
SPECIAL NOTE
When starting the engine, it is
advisable to start with the clutch
pedal depressed.
A label on the sun visor reminds
you of this.
Turn the ignition key to position M
(on)andholditinthisposition
until the engine preheating warning
light goes out.
Turn the key to "start" position D
without accelerating.
Release the key as soon as the
engine starts.
Stopping the engine
With the engine idling, turn the key
back to the "Stop" position.
Never leave the vehicle
unattended with the key in
the ignition if there is a
child (or animal) in the
vehicle. With the key in the
ignition, he or she could start the
engine or operate electrical
equipment such as the electric
windows and there is a risk that the
child may be injured by trapping
his orher neck, arm,hand, etc. Risk
of serious injury.
Never switch off the ignition before
the vehicle has stopped
completely. Once the engine has
stopped, the brake servo, power
assisted steering, etc. and the
passive safety devices such as
airbags and pretensioners will no
longer operate.
The steering is locked when the
key is removed.
2.03
Page 67

SPECIAL FEATURES
Diesel engine speed
Diesel engines are fitted with
injection equipment which
prevents the engine speed from
being exceeded irrespective of the
gear selected.
Running out of fuel
If the fuel tank has been drained
completely, you may start the
engine normally after refilling the
fuel tank provided that thebattery is
well charged.
However, if after a few seconds and
several attempts the engine fails to
start, contact a RENAULT Dealer.
Precautions to be taken in
winter
To avoid any faults in icy weather:
• ensure that your battery is always
well charged;
• always keep the fuel tank
relatively full to avoid water
vapour condensing in it and
accumulating at the bottom of the
tank.
Vehicles fitted with diesel fuel
heater
This equipment enables diesel fuel
to be used with no additives up to
–18°C or, if the vehicle is used
regularly over short distances (cold
engine), up to –5°C.
Do not park the vehicle or
run the engine in locations
where combustible
substances or materials
such as grass or leaves can come
into contact with a hot exhaust
system.
2.04
Page 68

ADVICE ON EMISSION CONTROL, FUEL ECONOMY AND DRIVING
RENAULT is actively striving to
reduce pollutant exhaust gas
emissions and to save energy.
By virtue of its design, moderate
fuel consumption and initial
settings, your RENAULT conforms
to current antipollution standards.
Technical design, however, cannot
achieve all. The fuel consumption
of your vehicle and the level of
pollutant exhaust gas emissions are
very much within your control.
Make sure that your vehicle is
maintained correctly, and is driven
carefully.
Maintenance
It should be noted that failure to
respect antipollution standards may
lead to legal action being taken
against the vehicle owner. In
addition, replacing engine, fuel
supply system and exhaust
components with parts other than
those originally recommended by
the manufacturer may alter your
vehicle so that it no longer complies
with antipollution standards.
Have your vehicle checked and
adjusted by your RENAULT Dealer
in accordance with the instructions
in the vehicle’s Warranty and
Services booklet.
Your RENAULT Dealer has all the
equipment necessary for ensuring
that your vehicle is maintained to
its original standard.
Engine adjustments
• Idle speed: this does not require
adjustment.
• Air filter, diesel filter: achoked
filter element reduces output and
must be replaced.
2.05
Page 69

ADVICE ON EMISSION CONTROL, FUEL ECONOMY AND DRIVING (continued)
• Study the road ahead so that you
are able to brake as little as
possible, it can be sufficient just
to lift your foot off the accelerator.
• Avoid sudden acceleration.
• Do not over-rev the engine in the
intermediate gears. Always use
the highest gear possible without
labouring the engine.
• Do not try to maintain the same
speed up a hill, accelerate no
more than you would on level
ground. Keep your foot in the
same position on the accelerator
pedal.
Driving
• Drive carefully for the first few
miles until the engine reaches its
normal operating temperature,
rather than let it warm up while
the vehicle is stationary.
• Speed is expensive.
• "Sporty" driving is expensive:
drive with a "light right foot".
• Double de-clutching and
accelerating before switching off
are superfluous actions in
modern vehicles.
2.06
• Bad weather, flooded roads.
Do not drive through
floods if the depth of
water is above the lower
edge of the wheel rims.
Page 70

ADVICE ON EMISSION CONTROL, FUEL ECONOMY AND DRIVING (continued)
• On vehicles with air
conditioning,itisnormalto
observe an increase in fuel
consumption (especially when
driving in town) when it is used.
Switch off the system when it is
not required.
• Never fill the fuel tank right to the
brim to avoid overflow.
• Do not leave an empty roof rack
fitted to the vehicle.
• It is better to fit a trailer for bulky
objects.
When towing a caravan, fit a wind
deflector and adjust it carefully.
Advice on use
• Electricity is fuel; switch off all
the electrical components which
are not really needed.
However (safety first), keep your
lights on when the visibility is
poor ("see and be seen").
• Use the air vents. Driving with the
windows open will increase fuel
consumption by 4% when
travelling at a speed of 60 mph
(100 km/h).
Some advice for reducing
consumption and helping to
preserve the environment:
Drive with the air vents open and
the windows closed.
Ifthevehiclehasbeenparkedinthe
sun, open the doors for a few
moments to let the hot air escape
before starting the engine.
Avoid using the vehicle for
door-to-door calls (short journeys
with long waits in between) because
the engine never reaches its normal
operating temperature.
Tyres
Increased fuel consumption could
be the result of:
• insufficient pressure,
• using non-recommended tyres.
2.07
Page 71

GEAR LEVER POWER STEERING
If you have power assisted steering
fitted, do not leave the steering
wheel on full lock when the vehicle
1
2
Selecting reverse gear
With the vehicle stationary, move
the gear selector lever into neutral
then into reverse.
Followthegridongearknob1 and,
depending on the vehicle, lift ring 2
up against the gear lever knob to
select reverse gear.
The reversing lights will light up as
soon as reverse gear is selected
(with the ignition on).
is parked as this may damage the
pump.
Never switch off the
ignition when travelling
downhill, and avoid
doing so in normal
driving (power steering and
brake servo will not function).
2.08
Page 72

HANDBRAKE
1
To release:
Pull up the lever slightly, press
button 1 and then lower the lever to
the floor.
The red warning light on the
instrument panel will light up if
you are driving with an incorrectly
released handbrake.
Make sure that the
handbrake is properly
released when driving,
otherwise overheating
may occur.
To apply:
Pull upwards, check that the
vehicle is properly immobilised.
Depending on the
vehicle gradient and/or
load, it may be necessary
to add at least two
additional locking notches and
engage a gear (1st or reverse).
2.09
Page 73

ANTI-LOCK BRAKING SYSTEM (ABS)
Under heavy braking, the system
has two principal aims; to reduce
the stopping distance and keep your
vehicle under control. However,
there is a risk that roadholding and
directional control may be lost and
the wheels may lock under braking,
depending on the nature of the
ground, weather conditions and
your reactions. The Anti-lock
Braking System (ABS) has been
designed to combat this danger.
The safety enhancement is that the
brake control system prevents the
wheels from locking, even if the
brakes are applied too sharply, and
allows the vehicle to be steered and
thus its direction to be controlled.
Under these circumstances it is
quite possible for the driver to steer
the vehicle and to avoid an obstacle
whilst at the same time applying the
brake. This system also allows you
to optimise stopping distances
when the grip of one ormore wheels
maybelost(wetroads,slipperyor
varying road surfaces).
The braking modulation provided by the ABS is independent of the effort
applied to the brake pedal. In an emergency, apply firm and continuous
pressure to the brake pedal. There is no need to pump it repeatedly.
Although this system allows you to
make maximum use of stopping
distances, even with the ABS you
still have to take account of the
actual condition of the road surface.
It is still essential to follow the rules
of good driving practice (such as
driving at a safe distance from the
vehicle in front). Thefactthatthe
vehicle’s safety has been increased
should not encourage you to take
risks.
You will feel pulsing through the
brake pedal when the system has
been activated. These tangible signs
will warn you that the grip of the
tyres on the ground has reached its
limit and enable you to adapt your
driving style to suit the road
conditions.
Operating faults
Two possible situations may occur:
1 - The warning light on
the instrument panel is on.
Braking is still performed, but
without the ABS system.
Contact a RENAULT Dealer as
soon as possible.
2-Warninglights
and on the
instrument panel are lit.
This indicates that both the
braking system and the ABS
system are faulty. Your braking
systems are only partially
operational. However, it is
dangerous to brake suddenly
and it is essential to stop
immediately, as soon as traffic
conditions allow. Contact a
RENAULT Dealer.
2.10
Page 74

AIR SUSPENSION
1
This function ensures that the body
height is kept at a constant level
whatever the load.
Switch 1 allows the vehicle to be
loweredorraisedattherear(e.g.for
loading).
How the system operates
If switch 1 is on, it indicates
that the system is working.
To lower the rear of the vehicle
With the vehicle stationary and the
handbrake applied, press switch 1.
If the ignition is on, the
switch flashes while the rear
of the vehicle is lowering
and then stays lit when the vehicle
has lowered.
To raise the rear of the vehicle
With the vehicle stationary, the
ignition on and the handbrake
applied, press switch 1.
The switch on the
instrument panel flashes for
the time during which the
rear of the vehicle is being raised
and then goes out when the vehicle
returns to the initial position.
Note: the action of releasing the
handbrake or driving will cause the
vehicle to be raised automatically if
it is in the lowered position.
Operating fault warning light
If the red warning light on
the instrument panel comes
on, this indicates that an
operating fault has occurred.
Contact a RENAULT Dealer.
2.11
Page 75

24349
CRUISE CONTROL/SPEED LIMITER: cruise control function
The cruise control function helps
you to maintain your driving speed
at a speed that you choose, called
the cruising speed.
This set speed can be adjusted
continuously from 18 mph or
(30 km/h).
1
2
3
The cruise control
function does not affect
the braking system.
This function is asupplementary driving aid. It cannot, however, act on the driver's behalf. Thus, it can,under
no circumstances, replace the driver's responsibilityto respect speed limits and tobe vigilant (the drivermust
always be ready to brake). Cruise control must not be used in heavy traffic, on winding or slippery roads
(black ice, aquaplaning, gravel) and during bad weather (fog, rain, side winds etc.).
There is a risk of accident.
2.12
Controls
1 Main On/Off switch.
2 Activation of cruising speed.
Increasing or decreasing the
cruising speed.
Indicator light
This green indicator light on the
instrument panel lights up to
indicate that the cruise control
function is in operation.
The stored speed information
appears on instrument panel
display 3.
Page 76
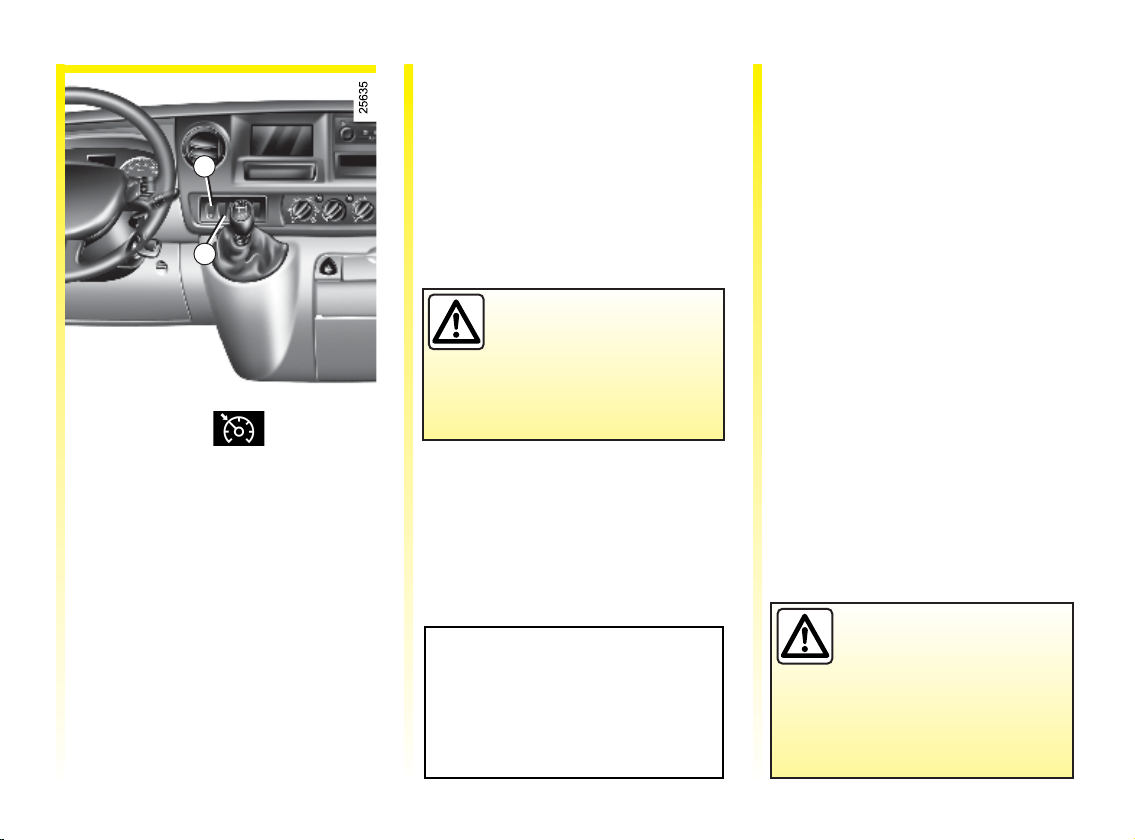
CRUISE CONTROL/SPEED LIMITER: cruise control function (continued)
Driving
Whenacruisingspeedisstoredyou
may lift your foot off the accelerator
pedal.
1
2
N.B. you are advised to
keep your feet near to the
pedals in case of
emergency.
Switching on
Press switch 1 side.
The indicator light on the switch
lights up and the trip computer
enters Cruise control mode.
Activating cruise control
At steady speeds (from 18 mph
(30 km/h)) and in the correct gear,
press one side of switch 2:the
function is activated.
The system is designed in such a
waythatitispossibletodetecta
difference between the cruising
speed and the speed shown on
the instrument panel.
Varying the cruising speed
You may change the cruising speed
by pressing button 2 (consecutive
presses or pressing and holding):
-on the – side to decrease the
speed,
-onthe+ side to increase the speed.
The cruising function
doesnotaffectthe
braking system.
2.13
Page 77

CRUISE CONTROL/SPEED LIMITER: cruise control function (continued)
Exceeding the cruising speed
In the event of an emergency
The cruising speed may be
exceeded at any time by depressing
the accelerator pedal. When this
happens, the cruising speed flashes
on the trip computer.
Cruising speed cannot be
maintained
In some driving conditions (for
example when driving up or downa
steep gradient), the system is unable
to maintain the set speed: the speed
on the instrument panel
information display will flash to
inform you of this.
Switching off the function
The function is interrupted when
you depress the clutch or brake
pedal, or press button 1.The
cruising speed is no longer active.
2.14
Stopping the cruising
function does not cause a
rapidreductioninspeed:
you must brake by
depressing the brake pedal.
Page 78

CRUISE CONTROL/SPEED LIMITER: limiter function
The speed limiter function helps
you stay within the driving speed
limit that you choose.
This may be useful, for example, in
town driving or in areas with speed
restriction (roadworks), etc.
The system operates from a driving
speed of about 18 mph (30 km/h).
1
2
24349
3
Controls
1 Main On/Off switch
2 Limit speed increase, decrease
and storage.
Indicator light
This orange indicator light on the
instrument panel lights up to
indicate that the limiter function is
in operation.
Depending on the vehicle, the
stored speed information appears
on instrument panel display 3.
2.15
Page 79

CRUISE CONTROL/SPEED LIMITER: limiter function (continued)
1
2
Switching on
Press switch 1
The indicator light lights up on the
instrument panel and the trip
computer enters Speed limiter
mode.
Limiting the speed
At a steady speed (above 18 mph
(30 km/h)) and in the correct gear
(for vehicles with manual
gearboxes), press switch 2:the
speed is stored.
Driving
When a limit speed has been stored,
the vehicle works in a similar way
to vehicles without the speed
limiter function, as long as the limit
speed is not reached.
From this point, no effort on the
accelerator pedal will allow you to
exceed the programmed speed
except in an emergency (see
information on Exceeding the limit
speed).
The system is designed in such a
waythatitispossibletodetecta
difference between the limit
speed and the speed shown on
the instrument panel.
Varying the limit speed
You may change the limit speed at
any time by pressing button 2
(pressing it briefly several times or
pressing and holding it):
-onthe+ side to increase the speed,
-on the – side to decrease the
speed.
2.16
Page 80

CRUISE CONTROL/SPEED LIMITER: limiter function (continued)
Exceeding the limit speed
In the event of an emergency
It is possible to exceed the limit
speed at any moment. To do this:
depress the accelerator pedal firmly
and fully (beyond the kickdown
point).
The speed flashes on the instrument
panel (trip computer) to inform you
that the limit speed is being
exceeded.
When the emergency situation is
over, release the accelerator pedal:
the speed limiter function returns as
soon as you reach a speed that is
lower than the speed set before the
emergency action.
Limit speed cannot be maintained
In some driving conditions (for
example when driving up or downa
steep gradient), the system is unable
to maintain the limit speed: the
stored speed on the instrument
panel information display will flash
to inform you of this situation.
Stopping the function
The speed limiter function is
interrupted when you press:
- button 1, the limit speed is no
longer stored.
The instrument panel indicator
light going out confirms that the
function is stopped.
1
2.17
Page 81

PARKING PROXIMITY SENSOR
Operating principle
Ultrasonic sensors located in the
rear bumper measure the distance
between the vehicle and an obstacle
when reversing.
A beep sounds for less than one
second when reverse gear is
selected.
This measurement is indicated by
beeps which become more frequent
the closer you are to the obstacle,
until they become one continuous
beep when the obstacle is
approximately 25 centimetres from
the vehicle.
Note: make sure that the ultrasonic
sensors are not blocked (dirt, mud,
snow, etc.).
Operating faults
When the system detects a fault
there will be a 3 second continuous
beep asa warning whenreverse gear
is selected. Contact your RENAULT
Dealer.
This function is an
additional aid that
indicates the distance
between the vehicle and an
obstacle whilst reversing, using
sound signals.
Under no circumstances should it
replace the driver's care or
responsibility whilst reversing.
The driver should always pay
attention to sudden incidents
during driving: always ensure that
there are no moving obstacles
(such as a child, animal, pram or
bicycle, etc.) or small, narrow
objectssuchasstonesorpostsin
your path when manoeuvring.
2.18
Page 82

24575
QUICKSHIFT GEARBOX
1
Selector lever 1
- This allows you to shift directly
from first gear to reverse gear, to
select reverse gear and neutral and
to change gear in manual mode.
- It also allows you to switch
between manual and automatic
modes atany time, with the engine
switched on and reverse gear
engaged, by moving the lever to
the left.
Note: the selector lever
automatically returns to the centre
position after use.
3
2
4
567
Display
2 Depress brake pedal indicator
light
3 Gear display
4 Automatic mode
5 Snow mode
6 Gearbox fault warning light
7 Load mode
The gear engaged (1, 2..., 6, N, R) is
indicated on the instrument panel
display. In automatic mode, (A) is
displayed.
Driving
Switch on the ignition.
The display lights up on the
instrument panel.
If neutral (N) is displayed, start the
engine but do not depress the
accelerator.
If a gear other than neutral (N) is
displayed, the display will flash; it
will only be possible to start the
engine if you depress the brake
pedal (warning light 2 will light up
if you forget) when holding the key
in starting position.
The gear will then automatically
change to neutral (N) and the engine
will start.
You may also select neutral after
switching on the ignition by
pushing the lever to the right whilst
depressing the brake pedal.
Note: do not attempt to bump start
the engine if the battery is
discharged (the display remains off
when the ignition is switched on).
2.19
Page 83

24615
QUICKSHIFT GEARBOX (continued)
Starting
Driving forwards (from neutral)
The gear display shows N and A.
• With your foot on the brakepedal,
push the selector lever forwards
and then release it.
• Take your foot of the brake pedal
and accelerate gently to drive
forwards.
Moving the lever (changing gears up
or down or moving the lever to the
left) will switch to semiautomatic
mode (refer to the "Semiautomatic
operating mode" section).
Move the lever tothe left toreturn to
automatic mode.
Reverse gear (vehicle stopped)
• With your foot on the brake
pedal. Push the selector lever
towards the right and to the rear
asshownonthebaseofthelever,
and then releaseit. Reverse gearis
engaged and the letter R appears
on the display.
• Release the brake pedal:
- The engine's idle speed is
- Accelerate gently to reverse.
You may shift from reverse gear to a
forwards gear by pushing the lever
forward once the vehicle is
stationary.
Note: you should depress the brake
to engage or disengage a gear when
stopped. Otherwise, warning light 2
will light up.
sufficient for parking
manoeuvres.
Gear selection grid
(see the marking on the lever base)
+ To change up through the gears
– To change down through the
gears
N Neutral
R Reverse
Only stable position of the lever
•
A/M to switch from automatic
mode to manual mode and
vice-versa
2.20
In the same way as a vehicle equipped with a manual gearbox, a
vehicle equipped with a Quickshiftgearbox is unable toprevent the
vehicle fromrolling on aslope if the handbrake is not applied or the
brake pedal constantly depressed.
Page 84

QUICKSHIFT GEARBOX (continued)
Operation in semiautomatic
mode (manual)
It is possible to switch from
automatic mode to semiautomatic
mode at any time when the vehicle
is in motion by moving the selector
leverupordownthroughthegears
or by pushing the lever to the left. In
this case, the switch will be made
without changing upwards.
You can initiate gear changes using
the selector lever.
To shift up a gear, simply push the
selector lever forwards; the
accelerator pedal does not have to
be released.
To move down through the gears,
simply push the selector lever
backwards; the accelerator pedal
does not have to be released.
The system does not accept
downshifts which would generate a
high engine speed or upshifts which
would cause low engine speed.
By pushing the lever forwards twice
you can move up two gears at a time
(except at low speeds). By pushing
the lever backwards twice you can
move down two gears at a time
(unless this causes overrevving).
When decelerating with the foot off
the pedal, the gears will
automatically drop to the low speed
limit to avoid stalling. First gear
automatically engages below a
certain speed limit. You can stop the
vehicle at red lights or junctions etc.
by pressing the brake pedal; there is
no need to change to neutral (N).
The vehicle will move off again:
- either slowly, if you release the
brake without accelerating (e.g.
when in a traffic jam)
- or quickly, if you release the brake
and accelerate.
Note: neutral may only be selected
when the vehicle is being driven or
is stationary when the brake pedal
is depressed (if you forget, warning
light 2 will light up).
Push the gear lever to the right to
select neutral.
If the engine speed is too high or too
low, the system will choose the
optimum gear.
Semiautomatic mode can be
deactivated and reactivated at any
time when the engine is running by
pushing the lever to the left.
2.21
Page 85

QUICKSHIFT GEARBOX (continued)
Operation in automatic mode
Automatic mode is selected by
default every time the ignition is
switched on.
It can be activated or deactivated at
any time when the engine is
running by pushing the lever to the
left. The letter A appears on the
display. The vehicle is controlled
using the accelerator and the brake.
Gears will change automatically at
the correct moment at a suitable
engine speed because automatic
mode takes into consideration the
roadsurfaceandthechosendriving
style.
Gears may be shifted manually in
this mode. Pushing the lever
forwards once shifts up a gear
(unless there is a risk of
underrevving) and pulling it back
once shifts down a gear (unless
there is a risk of overrevving), and
the system switches to manual
mode.
Note:
Automatic mode takes account of:
- the position and speed of
depression of the accelerator
pedal to assess driving style and
select the optimum gear,
- action on the brake pedal to alert
the engine brake by anticipating
the down-change.
When the vehicle is stopped at
traffic lights, with a gear engaged,
you can keep the vehicle stationary
usingthebrakewithouthavingto
select neutral.
The vehicle will move off again:
- either slowly, if you release just
the brake without accelerating
(e.g. when in a traffic jam)
- or quickly, if you release the brake
and accelerate.
Automatic mode is selected by
default every time the ignition is
switched on.
The level of oil in the automatic
transmission system reservoir
varies according to use. Adding
oil is strictly forbidden (except
by qualified RENAULT network
personnel).
2.22
Page 86

QUICKSHIFT GEARBOX (continued)
Special circumstances
Snow mode
If you are driving on ground where
you are likely to skid (snow, mud,
etc.), press the switchon the
dashboard. The indicator light will
light up on the instrument panel.
Once these driving conditions no
longer apply, deselect this position
by pressing the switch again. The
indicator light will go out.
Switching to snow mode selects the
gearbox automatic mode (switching
to manual inhibits snow mode until
automatic mode is selected again).
Snow mode is deselectedevery time
the engine is switched off. It will be
necessary to select it again.
Load position
When the vehicle is driven laden,
press the switch on the
dashboard. The indicator light will
light up on the instrument panel.
Load mode is deselected every time
the engine is switched off. It will be
necessary to select it again.
Load mode may be used to equal
effect in both automatic and manual
modes.
Accelerating and overtaking
You have two options:
- slowly depress the accelerator
pedal to accelerate gradually,
- to obtain maximum vehicle
performance regardless of the
mode selected (automatic or
manual), quickly depress the
accelerator pedal beyond the
kickdown point.
The speed that you depress the
pedal will allow you to shift down
to obtain maximum performance.
Parking
It is possible to park in gear (for
example, on a slope). To do this:
- with the ignition on, select a gear
with the brake pedal depressed,
- check that a gear other than N is
displayedontheinstrument
panel, then remove the ignition
key.
To disengage the gear, switch on the
ignition without starting the engine
and shift the selector lever to
neutral with the brake pedal
depressed. Check that N is
displayed on the instrument panel.
2.23
Page 87

QUICKSHIFT GEARBOX (continued)
Buzzer
•Ifyoukeepthevehicleonaslope
for too long without applying the
brakes or handbrake, there is a risk
that the clutch will overheat.
In this event, an intermittent beep
will remind you that you should
put your foot on the brake or apply
the handbrake.
•Never leave the vehicle with the
engine running when in gear. For
safety reasons, if you have not
selected neutral or you have not
switched off the ignition or
depressed the brake pedal you
will hear an intermittent beep
when you open the door.
•If your vehicle will not start, you
can perform a 'rolling' start,
provided that the battery is not flat
(display lit up).
Proceed as follows:
- switch on the ignition,
- select neutral,
- push or tow the vehicle or roll it
Note: never attempt this manoeuvre
in reverse.
down a steep enough slope.
Moving the selector lever
forwards will engage the gear
most suited to starting the
engine.
Operating faults
If this warning light comes
on when the vehicle is in
motion, it indicates a fault
in the system.
In most cases, you may still drive
the vehicle, although it will not
function perfectly. However, you
should contact a RENAULT Dealer
as soon as possible.
Towing a vehicle with a
sequential gearbox
If the gearbox is stuck in a gear:
- switch on the ignition,
- select neutral with the brake
pedal depressed,
- check that thegearbox is in neutral
(by pushing the vehicle, for
example).
If you cannot find neutral you must
tow the vehicle with the front
wheels raised.
The vehicle should always be
towed with the ignition switched
off.
2.24
Page 88

VEHICLE WITH OVERSPEED FUNCTION
Special case: if your vehicle is fitted
with a Quickshift gearbox and/or
the Cruise control/Speed limiter,
fully depressing the accelerator
pedal (beyond the kickdown point)
will not allow you to exceed the
overspeed function set speed (refer
to the Speed limiter paragraph in
section 2).
1
The overspeed function speed may
be permanently set at a fixed value
depending on the vehicle or on
local legislation.
To adjust the value or
activate/deactivate the function,
consult your RENAULT Dealer.
Label 1 attached to the dashboard
tells you the speed selected.
In exceptional circumstances
(e.g. steep gradient), the
overspeed function speed may
be exceeded slightly as the
function does not affect the
braking system.
This function is an
additional driving aid.
However, the function does
not take the place of the
driver. Under no circumstances
should it replace observation of
speed limits nor vigilance and
responsibility on the part of the
driver.
2.25
Page 89

2.26
Page 90

Section 3: Your comfort
Air vents ................................................................................................................................................. 3.02 - 3.03
Heating - ventilation ............................................................................................................................ 3.04
Air conditioning ................................................................................................................................... 3.07
Windows ............................................................................................................................................... 3.12
Sunroof .............................................................................................................................................................. 3.15
Interior lights .......................................................................................................................................... 3.16 - 3.17
Sun visor/grab handle ...................................................................................................................................... 3.18
Ashtrays/cigarette lighter/accessories socket ................................................................................................. 3.19
Passenger compartment storage space ............................................................................................... 3.20
Navigation system ............................................................................................................................................. 3.24
Rear bench seat ................................................................................................................................................. 3.25
Transporting objects .......................................................................................................................................... 3.26
➟ 3.06
➟ 3.11
➟ 3.14
➟ 3.23
3.01
Page 91

AIR VENTS (air outlets)
12 3 4 5 4 67
88
1 - Left-hand side window demister
outlet.
2 - Left-hand side air vent.
3 - Windscreen demisting outlets.
5 - Control panel.
6 - Right-hand side air vent.
7 - Right-hand side window demister
outlet.
4 - Centre air vents.
3.02
8 - Passenger footwell heater outlets.
Page 92

AIR VENTS (continued)
Centre and side air vents
Direction
To direct the air flow, swivel air vent
1 or 2.
11
2
3.03
Page 93

HEATING/VENTILATION WITH PASSENGER COMPARTMENT ISOLATION
Position
A
Controls
A Air distribution.
B Air temperature adjustment.
C Passenger compartment isolation
(air recirculation).
D Air recirculation operation
indicator light.
E Adjusting the volume of air
blown into the passenger
compartment.
B
C
D
E
Distribution of air in the
passenger compartment
Move control A.
Position
All the air flow is directed to the
dashboard vents.
This selection isnot applicable with
all the air vents closed.
The air flow is distributed between
the dashboard vents and the
footwells.
Position
The air flow is directed to the
footwells.
Position
The air flow is distributed between
all the air vents, the front side
window demisting air vents, the
windscreen demisting vents and the
footwells.
De-icing position
The air flow is directed towards the
windscreen vents and the side air
vents.
Use at the highest temperature.
Demisting position
The air flow is directed to the
demisting vents for the windscreen
and the side windows.
Position incompatible with air
recirculation.
3.04
Page 94

HEATING/VENTILATION WITH PASSENGER COMPARTMENT ISOLATION (continued)
Adjusting the air temperature
Turn button B.
Turning the control to the right
increases the temperature.
B
E
Adjusting the amount of air
blown into the passenger
compartment
Move control E from 1 to 4.
The passenger compartment is
ventilated by blown air.
The blower determines how much
air enters but vehicle speed also has
some influence on this.
The further thecontrol is positioned
to the right, the greater the quantity
of air blown into the passenger
compartment.
3.05
Page 95

HEATING/VENTILATION WITH PASSENGER COMPARTMENT ISOLATION (continued)
Note: using the demisting position
prevents use of the recirculation
C
D
function
Passenger compartment
isolation
Button C
Normal operation of the heating and
ventilation systemis obtained using
air from outside.
Recycling of air allows the external
atmosphere to be isolated (driving
in polluted areas).
Press button C to switch to isolation
mode.
3.06
Air recycling allows the desired
comfort level to be achieved as
quickly as possible.
This starts or stops air recycling.
Operating indicator light D lights
up when this function is in use. In
this position the air is taken from
inside the passenger compartment
and is recycledwithout letting air in
from outside.
Prolonged use of this position
can lead to condensation
forming on the side windows
and windscreen and problems
due to the use of non-renewed
air in the passenger
compartment.
We therefore advise you to return
to normal mode (external air) as
soon as you have passed through
the polluted area, by pressing
button C.
Page 96

AIR CONDITIONING
A
Using the air conditioning system
B
C
D
E
allows you to:
• lower the temperature inside the
passenger compartment;
• eliminate condensation more
quickly.
Fuel consumption increases when
the air conditioning system is being
used (switch it off when it is not
required).
Note: The air conditioning may be
used in all conditions but does not
operate when the external
temperature is low.
Controls
A Air distribution
B Switching on the air conditioning
C Adjusting the air temperature
D Passenger compartment isolation
(air recirculation)
E Adjusting the volume of air
blown into the passenger
compartment.
Information and advice for use
Refer to the end of the Air
conditioning paragraph.
Air conditioning controls
Control B operates or stops
the air conditioning system.
3.07
Page 97

AIR CONDITIONING (continued)
B
1
When the air conditioning system is
operating, all windows must be
closed for maximum efficiency.
If there is an operating fault, contact
your RENAULT Dealer.
Nocoldairisproduced
Check that the controls are set
correctly and that the fuses are
sound. If both these points are
correct, switch off the system
(indicator light 1 off) and contact a
RENAULT Dealer.
•ButtonB not activated (indicator
light 1 off)
The air conditioning is not
operating.
Heating and ventilation are
therefore identical to that of a
vehicle without air conditioning.
• Button B activated (indicator
light 1 on)
The air conditioning is activated.
Air is taken from outside the
vehicle, providing a continuous
supply of fresh air.
3.08
In very hot weather or when the
vehicle has been parked in the sun,
open the doors for a few moments to
let the hot air escape before starting
the engine.
Use the Isolation of the passenger
compartment function to lower the
temperature as quickly as possible
to the required level. Switch off the
air recirculation function once a
comfortable level has been reached.
Do not open the
refrigerant circuit: the
fluid is dangerous to the
eyes and skin.
Page 98

AIR CONDITIONING (continued)
A
Distribution of air in the
passenger compartment
Move control A.
Position
All the air flow is directed to the
dashboard vents.
This selection isnot applicable with
all the air vents closed.
Position
The air flow is distributed between
the dashboard vents and the
footwells.
Position
The air flow is directed to the
footwells.
Position
The air flow is distributed between
all the air vents, the front side
window demisting air vents, the
windscreen demisting vents and the
footwells.
De-icing position
The air flow is directed to the
demisting vents for the windscreen
and the side air vents.
Use at the highest temperature.
Demisting position
The air flow is directed to the
demisting vents for the windscreen
and the side windows.
Position incompatible with air
recirculation, air conditioning is
triggered automatically.
3.09
Page 99

AIR CONDITIONING (continued)
C
Passenger compartment
isolation
Button D
Normal operation of the heating and
ventilation systemis obtained using
air from outside.
Recycling of air allows the external
atmosphere to be isolated (driving
in polluted areas).
Press button D to switch to isolation
mode.
Air recycling allows the desired
temperaturetobeachievedas
quickly as possible.
D
2
This starts or stops air recycling.
Operation indicator light 2 switches
on when this function is in use. In
this position the air is taken from
inside the passenger compartment
and is recycledwithout letting air in
from outside.
Prolonged use of this position
(recirculated air) may mist up the
windows slightly or cause odours
due to the air not being renewed.
It is therefore advisable to return to
normal operation (outside air) by
pressing button D when you have
passed through the polluted area.
E
Adjusting the air temperature
Move control C.
To the right: Maximum possible
temperature.
To the left: Minimum possible
temperature.
Adjusting the amount of air
blown into the passenger
compartment
Move control E from 0 to 4.
The passenger compartment is
ventilated by blown air. The blower
determines how much air enters but
vehicle speed has a slight effect on
this.
The further thecontrol is positioned
to the right, the greater the quantity
of air blown into the passenger
compartment.
Note: using the demisting
position prevents use of the
recirculation function and
triggers theair conditioning.
3.10
Page 100

AIR CONDITIONING: information and operating advice
Fuel consumption
You will normally notice an
increase in fuel consumption
(especially in town) when the air
conditioning is operating.
For vehicles fitted with manual air
conditioning, switch off the system
when it is not required.
Some advice for reducing
consumption and helping to
conserve the environment:
It is advisable to drive with the
vents open and the windows
closed.
If the vehicle has been parked in
the sun, open the doors for a few
moments to let the hot air escape
before starting the engine.
Maintenance
Refer to the Warranty and Services
booklet for your vehicle for the
service intervals.
Operating faults
Generally, in the event of an
operating fault, consult your
RENAULT Dealer.
- Reduction in de-icing, demisting
or air conditioning performance.
Thismaybecausedbythecabin
filter element becoming clogged.
- Nocoldairisbeingproduced.
Check that the controls are set
correctly and that the fuses are
sound. Otherwise, switch off the
system.
- Presence of water under the
vehicle. After prolonged use of
the air conditioning system, it is
normal for water to be present
under the vehicle. This is caused
by condensation.
Do not open the refrigerant fluid
circuit. The fluid is harmful to the
eyes and skin.
3.11
 Loading...