

Renault ALASKAN
Driver's handbook

Foreword
Welcome to the growing family of new RENAULT owners. This vehicle is delivered to you with confidence. It is produced using the latest techniques and strict quality control.
This handbook was prepared to help you understand the operation and maintenance of your vehicle so that you may enjoy many kilometres (miles) of drivingpleasure.
Please read through this handbook before operating your vehicle.
Aseparate Warranty Information &Maintenance Booklet explains in detail the warranty coverage that applies to your vehicle.
Your approved dealer knows your vehicle best. When you require any service or have any questions, your approved dealer will be glad to assist you with theextensive
resources available for you.
IMPORTANT SAFETY INFORMATION REMINDERS!
Follow these important driving rules to help ensure asafe and complete trip for
you and your passengers!
•
NEVER drive under the influence of alcohol or drugs.
•
ALWAYS observe posted speed limits and never drive too fast for conditions.
•
ALWAYS use your seat belts and appropriate child restraint systems.
Preteen children should be seated in the rear seat.
•
ALWAYS provide information about the proper use of vehicle safety features to all occupants of the vehicle.
•
ALWAYS review this Driver’s handbook for important safety information.
WHEN READING THE HANDBOOK
This handbook includes information for all options available on this model. Therefore, you may find some information that does not apply to your vehicle.
Throughout this handbook, some illustrations may only show the layout for LeftHand Drive (LHD) models. For Right-Hand Drive (RHD) models, the illustrated
shape and location of some components may differ.
All information, specifications and illustrations in this handbook are those in
effect at the time of printing. RENAULT reserves the right to change specifications or designs at any time without notice and without obligation.
MODIFICATION OF YOUR VEHICLE
This vehicle cannot be modified without taking into consideration the RENAULT
“Bodybuilders Standards for Assembly, Equipment and Conversion” that has
been written for this purpose. All modifications done which do not follow the
instructions in that document could affect the vehicle functioning and its lifetime.
Furthermore, failure to comply with these Standards may arise in security problems and could even result in prosecution. Damages or failures in the vehicle as
aconsequence of modifications may not be covered under RENAULT warranty.
READ FIRST —THEN DRIVE SAFELY
Before driving your vehicle, read this Driver’s handbook carefully. This will ensure familiarity with controls and maintenance requirements, assisting you in the
safe operation of your vehicle.
Throughout this handbook the following symbols and words are used:
WARNING
Indicates the presence of ahazard that could cause death or serious personal injury. To avoid or reduce the risk, the procedures described must be
followed precisely.
CAUTION
Indicates the presence of ahazard that could cause minor or moderate personal injury, or damage to your vehicle. To avoid or reduce the risk, the procedures described must be followed carefully.
NOTE
Indicates additional helpful information.
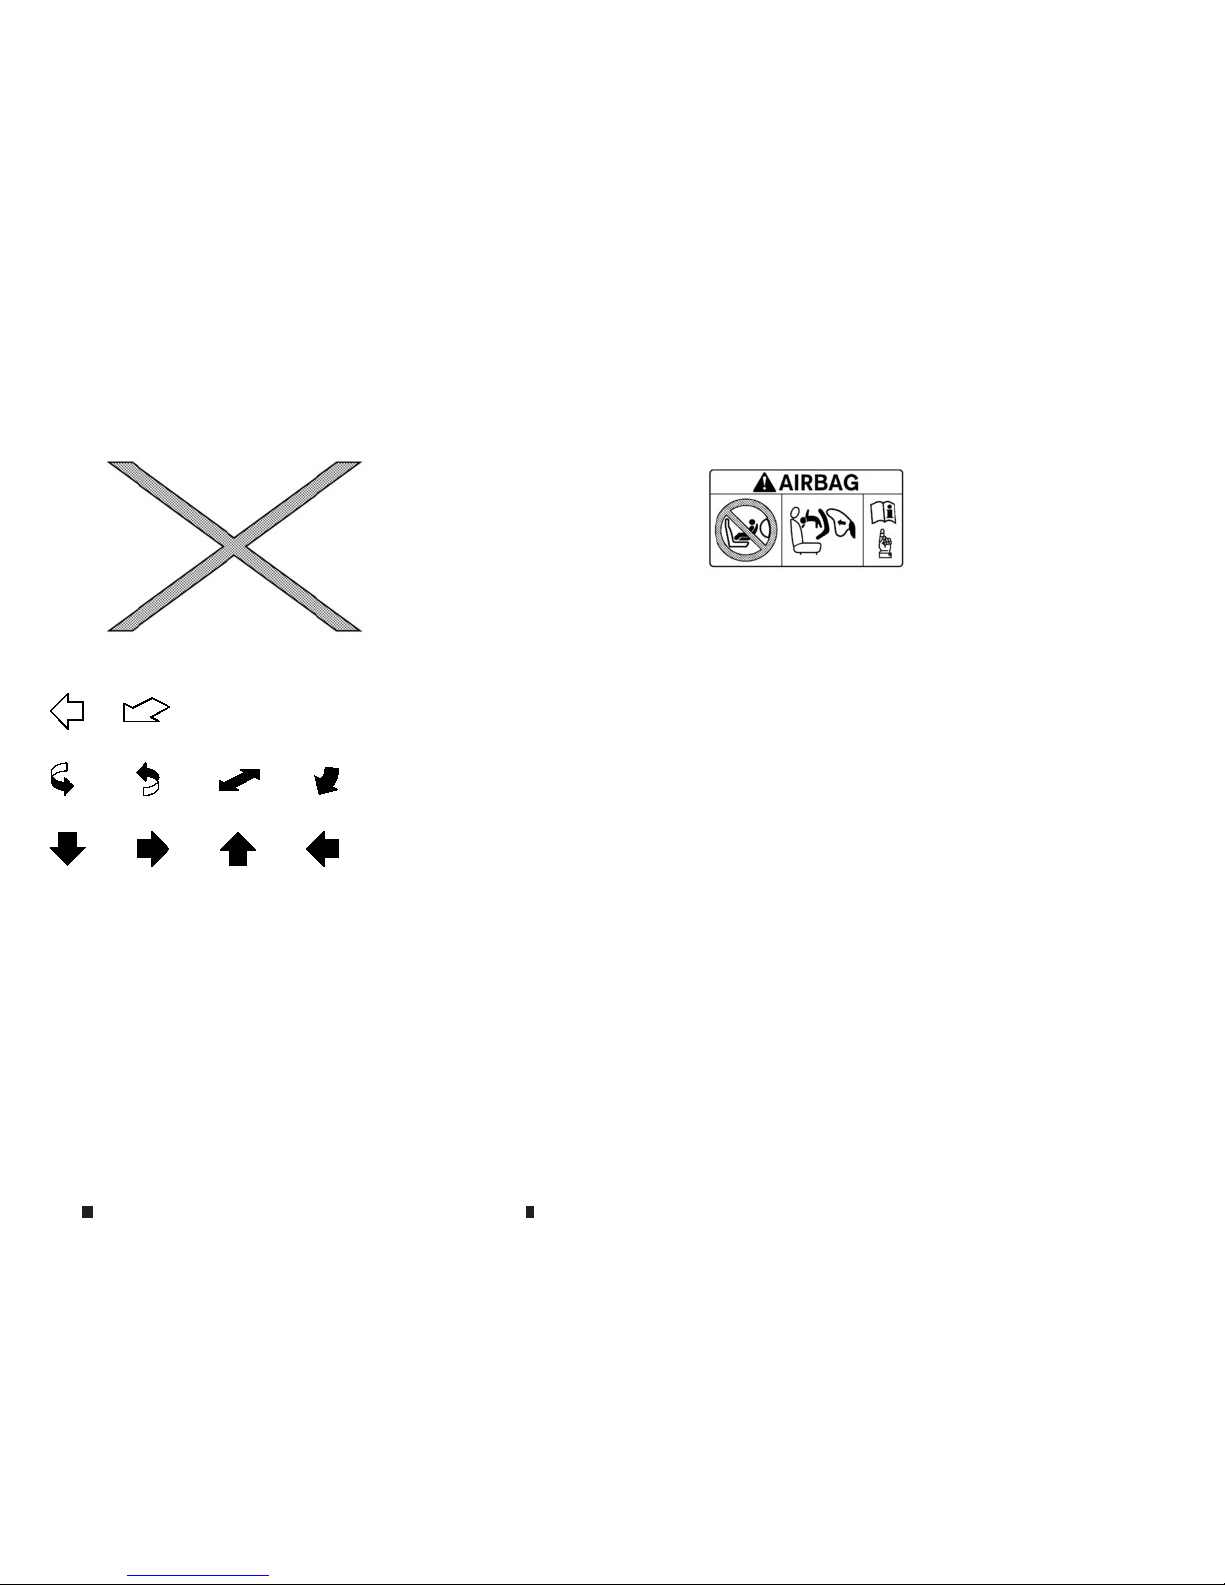
This symbol means “Do not do this” or “Do not let this happen”.
Arrows in an illustration that are similar to these point to the front of the vehicle.
Arrows in an illustration that are similar to these indicate movement or action.
Arrows in an illustration that are similar to these call attention to an item in the
illustration.
[]:
Square brackets are used to indicate messages, keys, or items displayed on a
screen.
<>:
Chevrons or angle brackets are used to indicate texts on controls like buttons or
switches inside or on the vehicle.
Air bag warning labels:
“NEVER use arearward facing child restraint on aseat protected by an ACTIVE
AIRBAG in front of it, DEATH or SERIOUS INJURY to the CHILD can occur.”
Be sure to read the “Air bag warning labels” description in the Safety section of
this handbook; and the “Air bag label” description at the end of this handbook.
ON-PAVEMENT AND OFF-ROAD DRIVING (4WD models)
This vehicle will handle and manoeuvre differently from an ordinary passenger
vehicle, because it has ahigher centre of gravity. As with other vehicles with features of this type, failure to operate this vehicle correctly may result in loss of
control or an accident.
Be sure to read “On-pavement and off-road driving precautions” and “Fourwheel drive (4WD)” in the “5. Starting and driving” section of this handbook.

BATTERY DISPOSAL
CAUTION
An improperly disposed battery can harm the environment. Always confirm
local regulations for battery disposal.
Examples of the batteries that the vehicle contains:
•
Vehicle battery
•
Remote controller battery (for Remote Control Key and/or Remote keyless
entry system)
•
Tyre Pressure Monitoring System (TPMS) sensor battery
•
Remote controller battery (for Mobile Entertainment system)
If in doubt, contact your local authority, or approved dealer, or aqualified workshop for advice on disposal.
m
Bluetooth® is atrademark owned by Bluetooth SIG, Inc.
and licensed to Visteon Corporation.
m
iPod® is atrademark of Apple Inc.
m
Gracenote® and CDDB are registered trademarks of
Gracenote, Inc. The Gracenote logo and logo type, and
the “Powered by Gracenote” logo are trademarks of
Gracenote.
Contents
Illustrated table of contents
0
Safety —seats, seat belts and supplemental restraint system
1
Instruments and controls
2
Pre-driving checks and adjustments
3
Display screen, heater and air conditioner, and audio system
4
Starting and driving
5
In case of emergency
6
Appearance and care
7
Maintenance and do-it-yourself
8
Technical information
9
Index
10


0 Illustrated table of contentsIllustrated table of contents
Seats, seat belts and Supplemental Restraint
System (SRS).......................................................... 0-2
Exterior front ............................................................ 0-3
Exterior rear............................................................. 0-4
Passenger compartment .......................................... 0-5
Cockpit ................................................................... 0-6
Left-Hand Drive (LHD) model.............................. 0-6
Right-Hand Drive (RHD) model........................... 0-7
Instrument panel ...................................................... 0-8
Left-Hand Drive (LHD) model.............................. 0-8
Right-Hand Drive (RHD) model........................... 0-9
Meters and gauges .................................................. 0-10
Engine compartment................................................ 0-11
M9T 2.3DCI engine ............................................ 0-11
1.
Supplemental front-impact air bags* (P. 1-29)
2.
Front passenger air bag switch* (P. 1-38)
3.
Supplemental curtain side-impact air bags*
(P. 1-30)
4.
Seat belts (P. 1-9)
5.
Head restraints (P. 1-6)
6.
Child restraint anchor point* (for top tether
strap child restraint) (P. 1-21)
7.
Rear seats* (P. 1-5) or Jump seat* (P. 1-6)
8.
Supplemental side-impact air bags* (P. 1-30)
9.
Pre-tensioner seat belt system* (P. 1-34)
10.
Front seats (P. 1-2)
11.
Supplemental driver’s knee air bag* (P. 1-29)
*:
where fitted
NIC2797
SEATS, SEAT BELTS AND SUPPLEMENTAL RESTRAINT SYSTEM (SRS)
0-2 Illustrated table of contents
1.
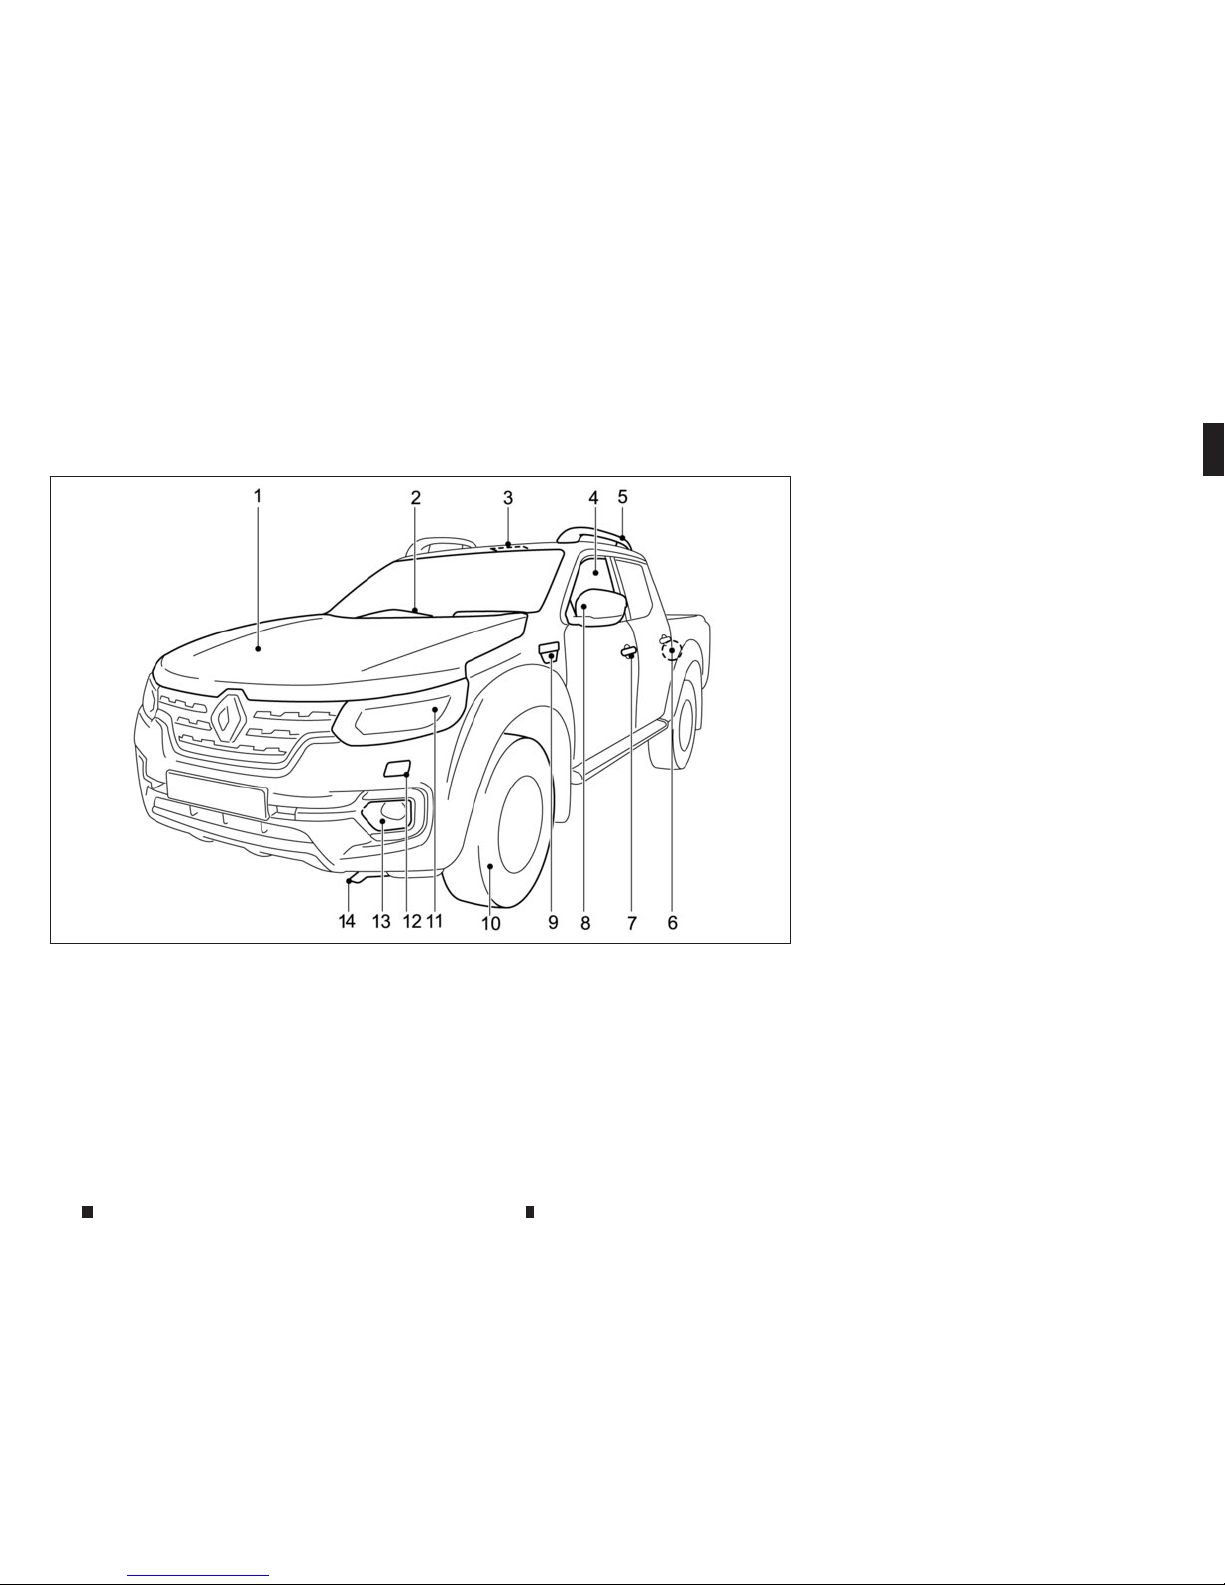
Bonnet (P. 3-17)
2.
Windscreen wipers and washers
—Switch operation (P. 2-34)
—Wiper blade replacement (P. 8-16)
—Window washer fluid (P. 8-11)
3.
Sunroof*1 (P. 2-42)
4.
Windows (P. 2-36)
5.
Roof rail*1 (P. 2-41)
6.
Child safety rear door locks*1 (P. 3-5)
7.
Doors
—Keys (P. 3-2)
—Door locks (P. 3-4)
—Remote keyless entry system*1 (P. 3-6)
—Remote Control Key system*1 (P. 3-7)
—Security system*1 (P. 3-15)
8.
Outside rearview mirrors (P. 3-25)
9.
Side turn signal lights
—Bulb replacement (P. 8-23)
10.
Tyres
—Tyres and wheels (P. 8-26)
—Flat tyre (P. 6-2)
—Specifications (P. 9-4)
—Four-Wheel Drive (4WD)*1 (P. 5-32)
11.
Headlights and turn signal lights
—Switch operation (P. 2-31)
—Bulb replacement (P. 8-21)
12.
Headlight cleaner*1
—Operation (P. 2-35)
13.
Front fog lights*1 or Daytime running lights*1
—Switch operation (P. 2-33, P. 2-31)
—Bulb replacement (P. 8-23)
14.
Towing eye*2 (P. 6-13)
*1:
where fitted
*2:
The layout illustrated is for the Right-Hand
Drive (RHD) model. On the Left-Hand Drive
(LHD) model, the towing eye is located on the
opposite side.
NIC3080
EXTERIOR FRONT
Illustrated table of contents 0-3
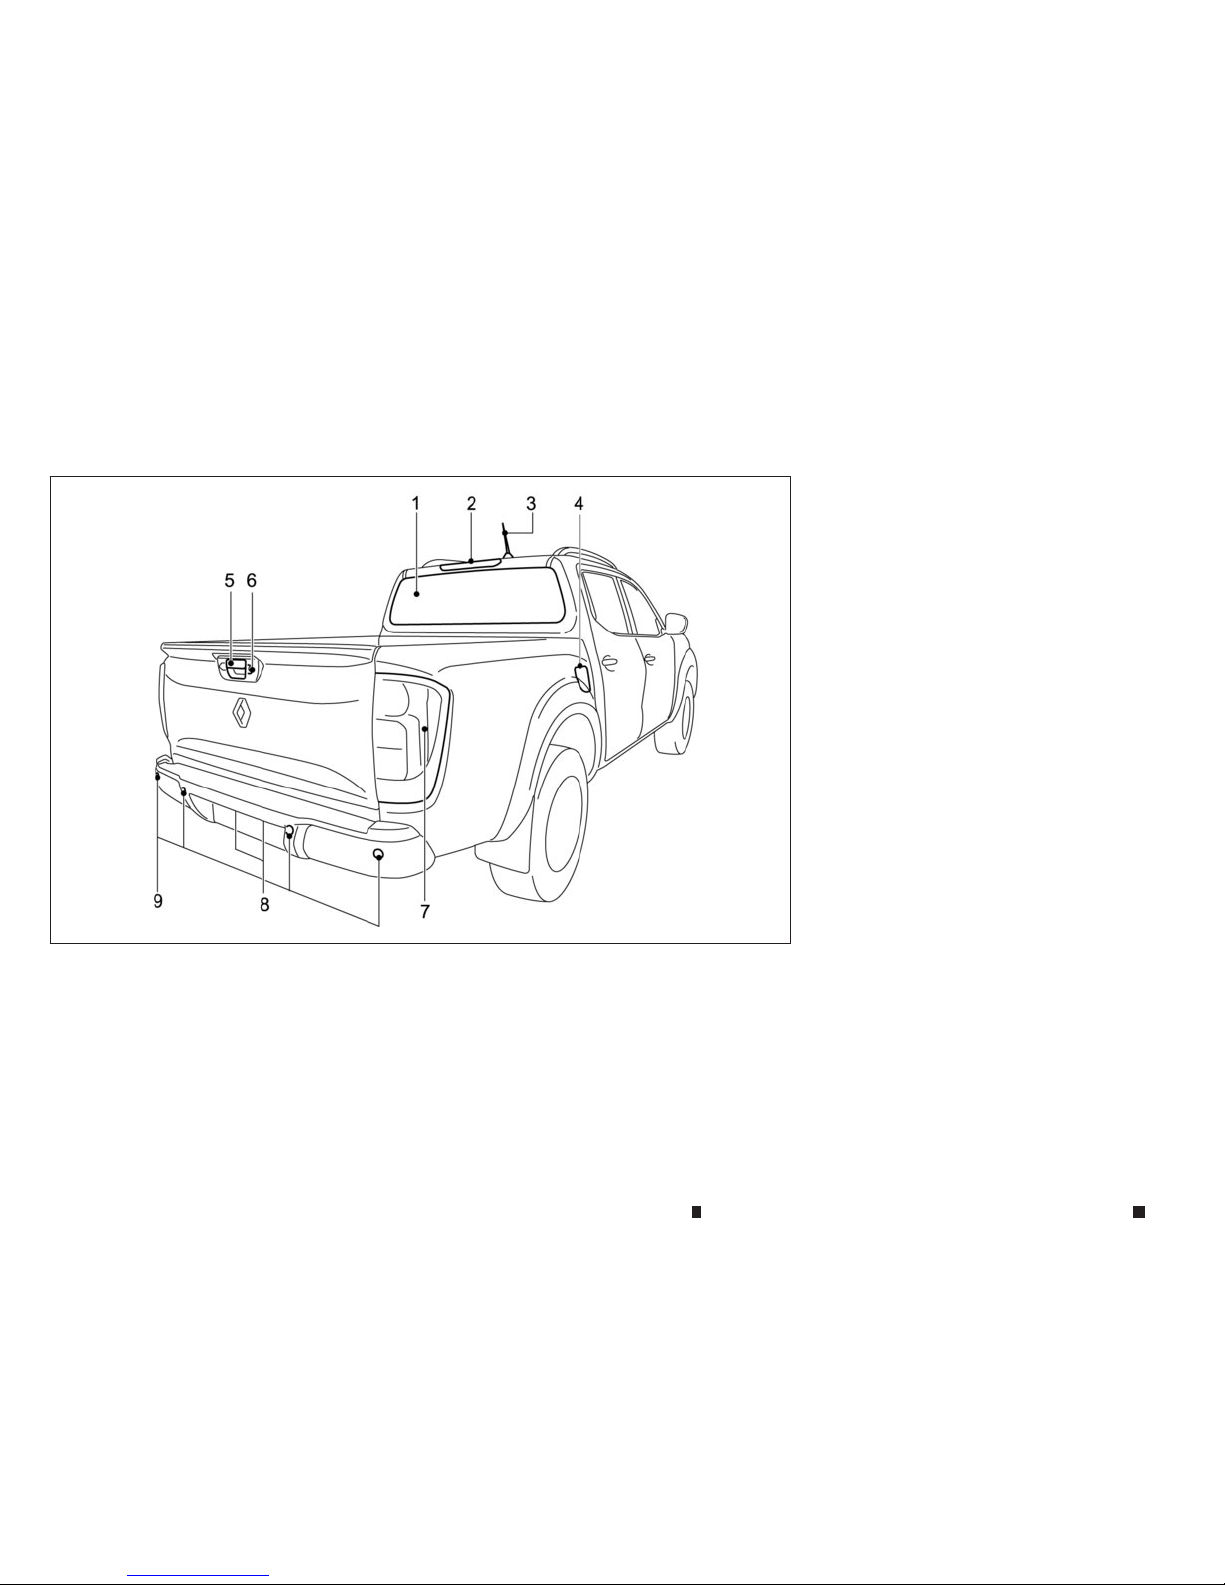
1.
Rear window defogger* (P. 2-34)
2.
High-mounted stop light* (P. 5-49)
3.
Antenna* (P. 4-35)
4.
AdBlue filler lid (P. 3-19)
5.
Rear view camera*
—Reversing camera* (P. 4-7)
6.
Cargo bed* (P. 3-20)
7.
Rear combination lights (bulb replacement)
(P. 8-23)
8.
Number plate lights (bulb replacement)
(P. 8-23)
9.
Parking sensor (sonar)* (P. 5-46)
*:
where fitted
NIC3081
EXTERIOR REAR
0-4 Illustrated table of contents
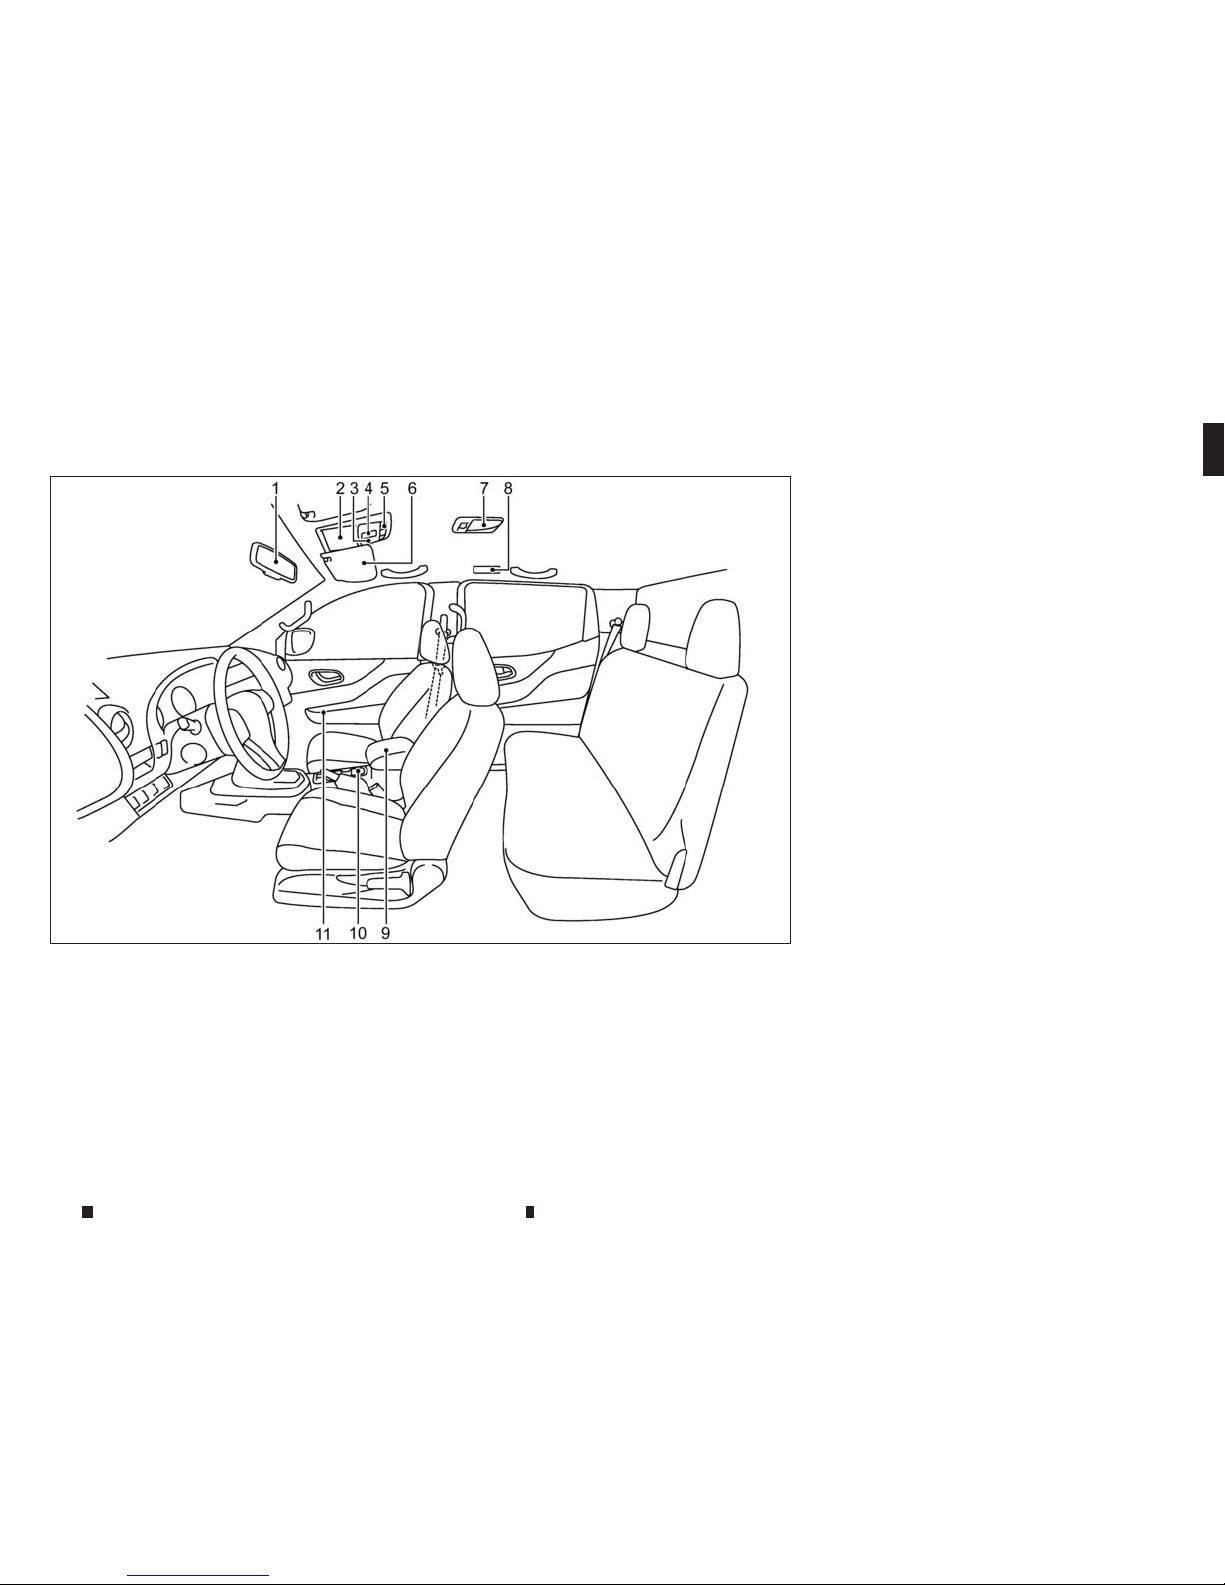
1.
Inside rearview mirror (P. 3-23)
2.
Sunglasses holder* (P. 2-40)
3.
Microphone*
—Bluetooth® Hands-Free Phone System*
(P. 4-59, P. 4-65)
4.
Sunroof switch* (P. 2-42)
5.
Map lights (P. 2-43)
6.
Sun visors (P. 2-41)
7.
Room light* (P. 2-44)
8.
Rear personal light* (P. 2-45)
9.
Console box* (P. 2-40)
—Power outlet (P. 2-38)
10.
Cup holders* (P. 2-40)
11.
Door armrest
—Power window controls* (P. 2-36)
—Power door lock switch (driver’s door)*
(P. 3-4)
—Outside rearview mirror remote control
switch (driver’s door)* (P. 3-25)
*:
where fitted
NIC2792
PASSENGER COMPARTMENT
Illustrated table of contents 0-5
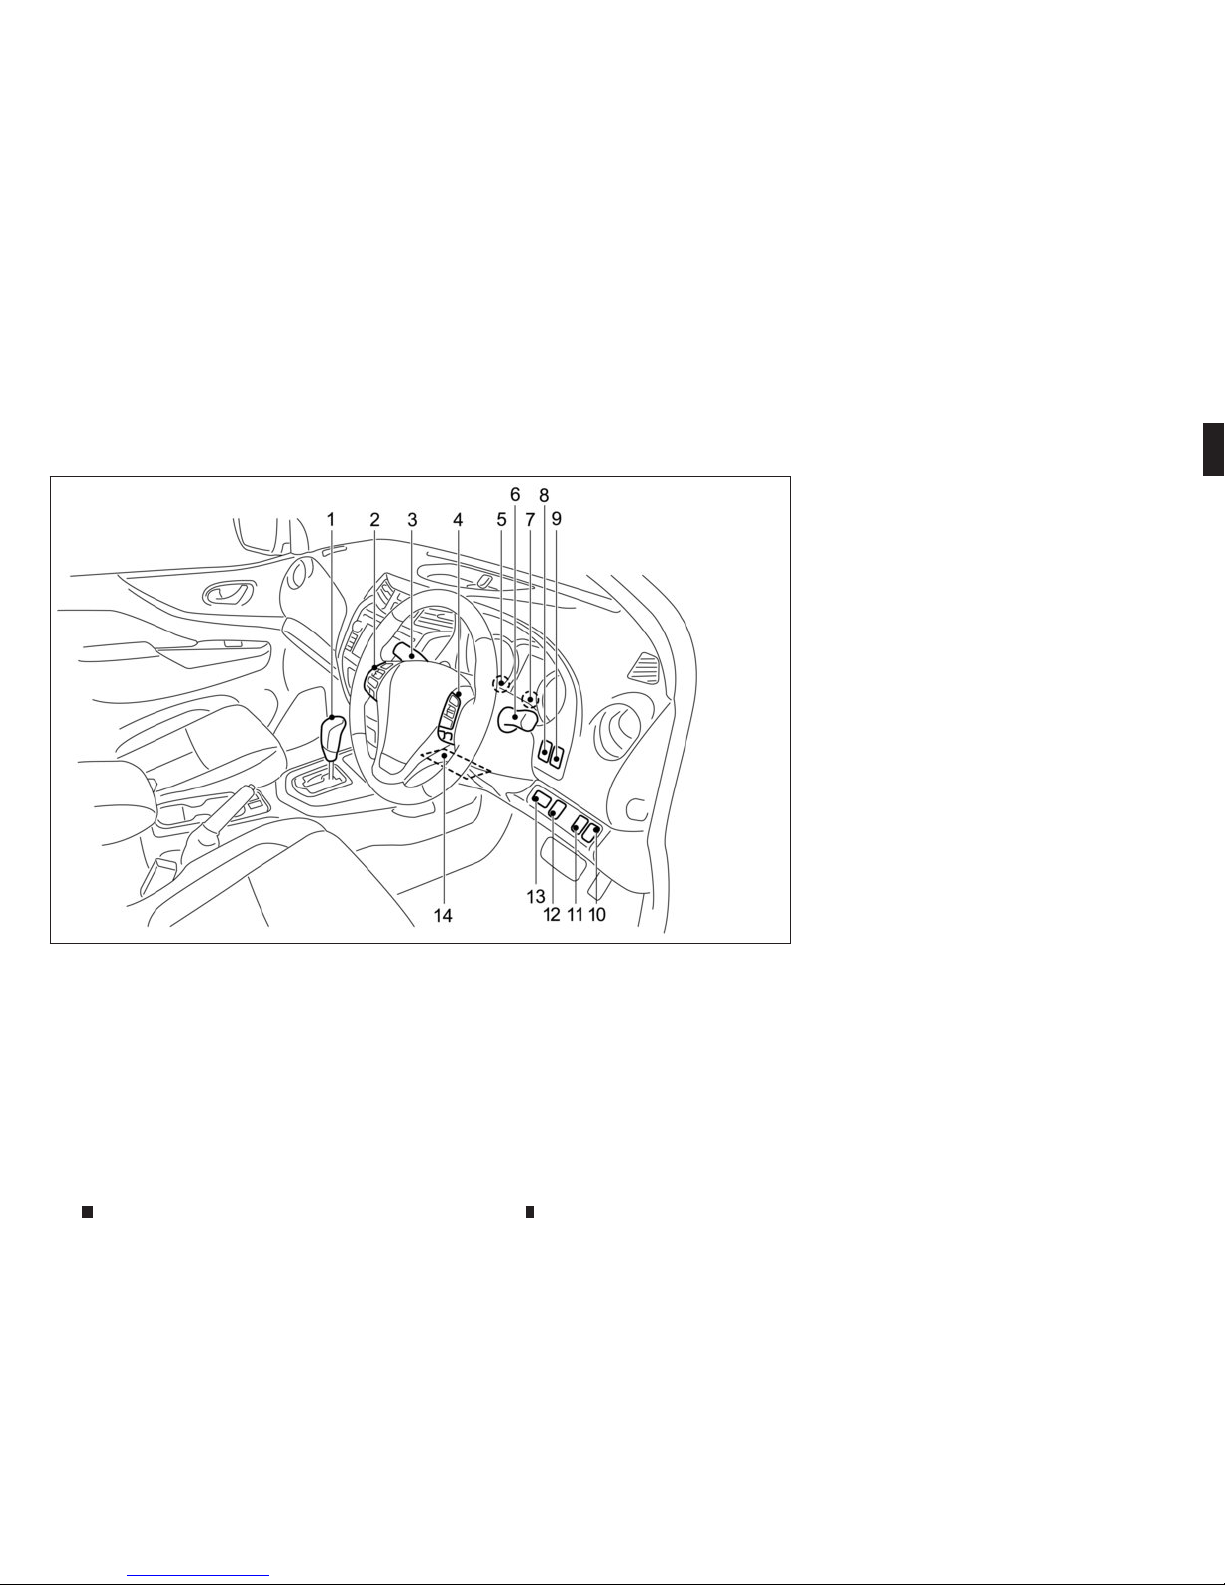
LEFT-HAND DRIVE (LHD) MODEL
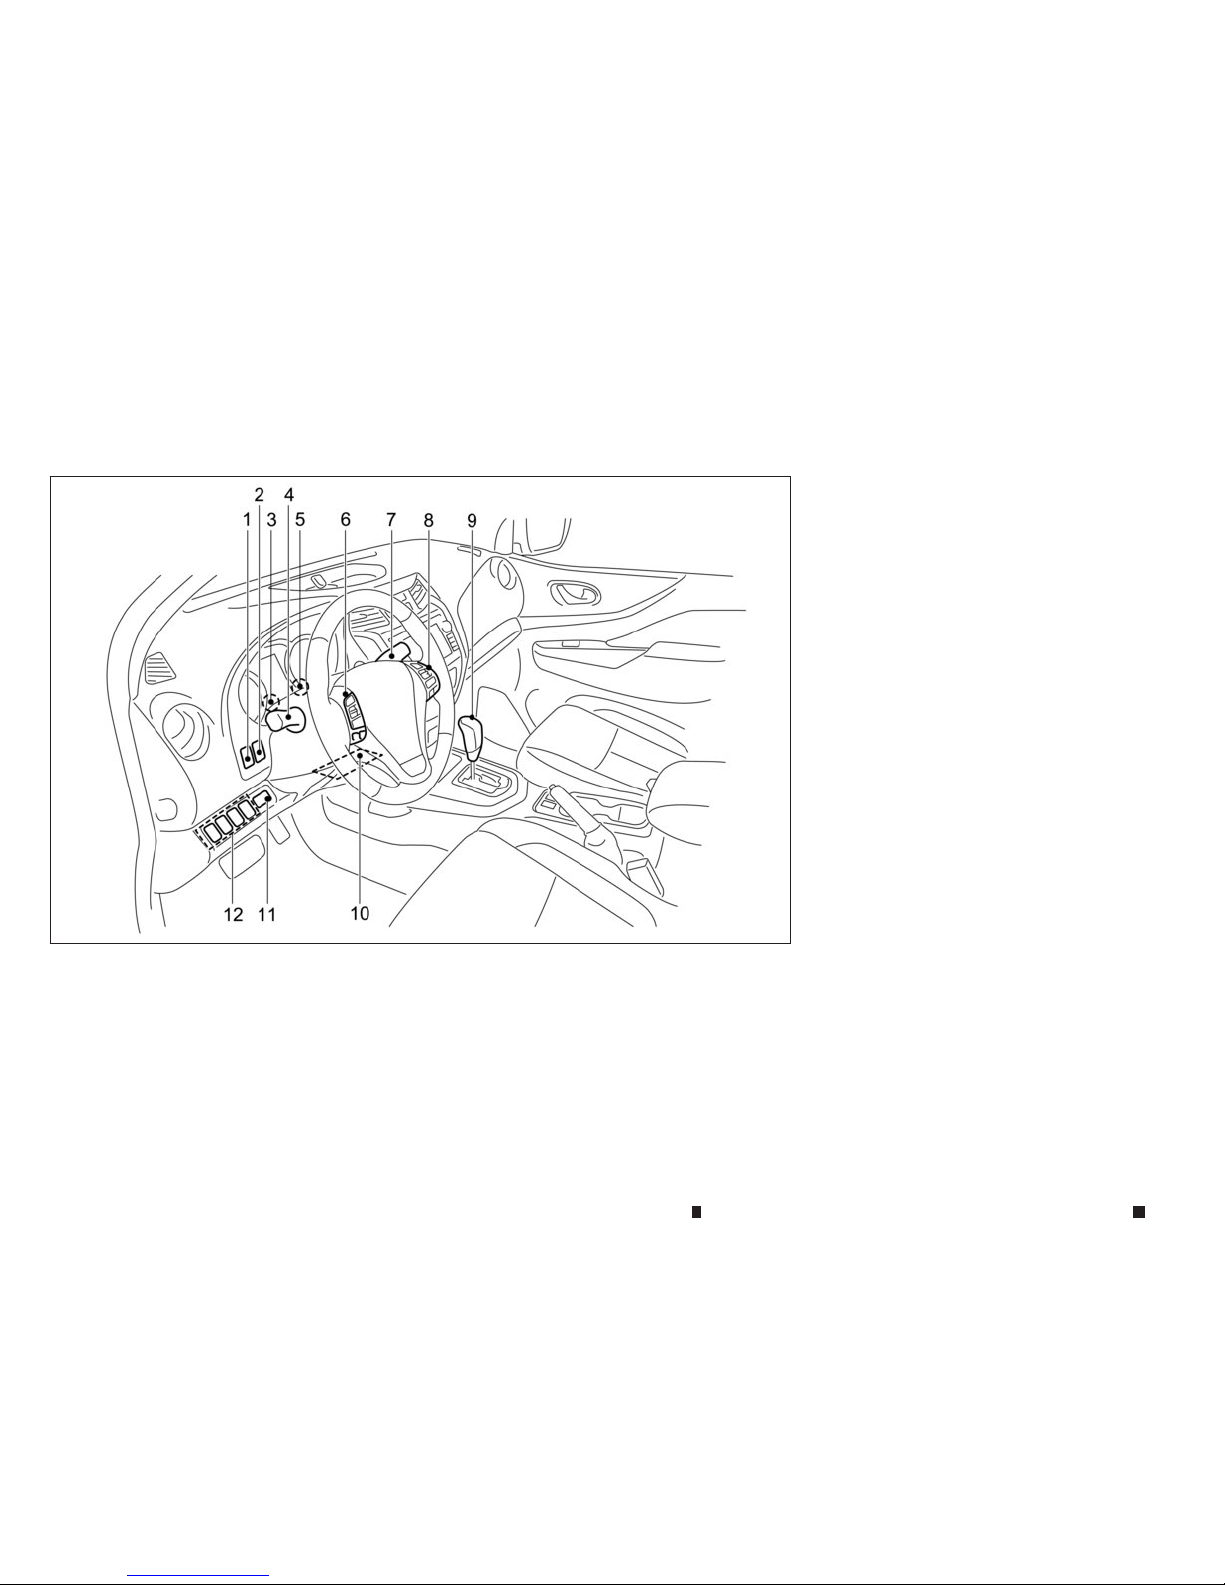
1.
Instrument brightness control switch (P. 2-4)
2.
<TRIP RESET> switch for twin trip odometer
(P. 2-21)
3.
Instrument brightness control switch (P. 2-4)
4.
Headlight, fog light, and turn signal switch
—Headlight (P. 2-31)
—Fog light* (P. 2-33)
—Turn signal (P. 2-32)
5.
Twin trip odometer (P. 2-32)
6.
Steering-wheel-mounted controls* (left side)
—Audio control steering switch* (P. 4-58)
—Vehicle information display control switch*
(P. 2-15)
7.
Wiper and washer switch (P. 2-34)
8.
Steering-wheel-mounted controls* (right side)
—Cruise control system* (P. 5-39)
—Speed limiter system* (P. 5-42)
—Hands-Free Phone System switch*
(P. 4-59, P. 4-66)
9.
Shift lever
—Automatic Transmission (AT) (P. 5-19)
—Manual Transmission (MT) (P. 5-22)
10.
Tilting steering wheel lever* (P. 3-23)
11.
Fuel filler lid opener switch* (P. 3-18)
12.
—Parking sensor (sonar) system off switch*
(P. 5-46)
—Active Emergency Braking system off
switch* (P. 5-35)
—Electronic Stability Programme (ESP) OFF
switch (P. 5-33)
—Headlight cleaner switch* (P. 2-35)
—Stop/Start OFF switch* (P. 5-23)
—Headlight aiming control* (P. 2-32)
*:
where fitted
NIC3089
COCKPIT
0-6 Illustrated table of contents
RIGHT-HAND DRIVE (RHD) MODEL
1.
Shift lever
—Automatic Transmission (AT) (P. 5-19)
—Manual Transmission (MT) (P. 5-22)
2.
Steering-wheel-mounted controls* (left side)
—Audio control steering switch* (P. 4-58)
—Vehicle information display control switch*
(P. 2-15)
3.
Wiper and washer switch (P. 2-34)
4.
Steering-wheel-mounted controls* (right side)
—Cruise control system* (P. 5-39)
—Speed limiter system* (P. 5-42)
—Hands-Free Phone System switch*
(P. 4-59, P. 4-66)
5.
Instrument brightness control switch (P. 2-4)
6.
Headlight, fog light, and turn signal switch
—Headlight (P. 2-31)
—Fog light* (P. 2-33)
—Turn signal (P. 2-32)
7.
Twin trip odometer (P. 2-21)
8.
<TRIP RESET> switch for twin trip odometer
(P. 2-21)
9.
Instrument brightness control switch (P. 2-4)
10.
—Headlight aiming control* (P. 2-32)
—Stop/Start OFF switch* (P. 5-23)
11.
Electronic Stability Programme (ESP) OFF
switch* (P. 5-33)
12.
—Parking sensor (sonar) system off switch*
(P. 5-46)
—Active Emergency Braking system off
switch* (P. 5-35)
13.
Fuel filler lid opener switch* (P. 3-18)
14.
Tilting steering wheel lever* (P. 3-23)
*:
where fitted
NIC3090
Illustrated table of contents 0-7
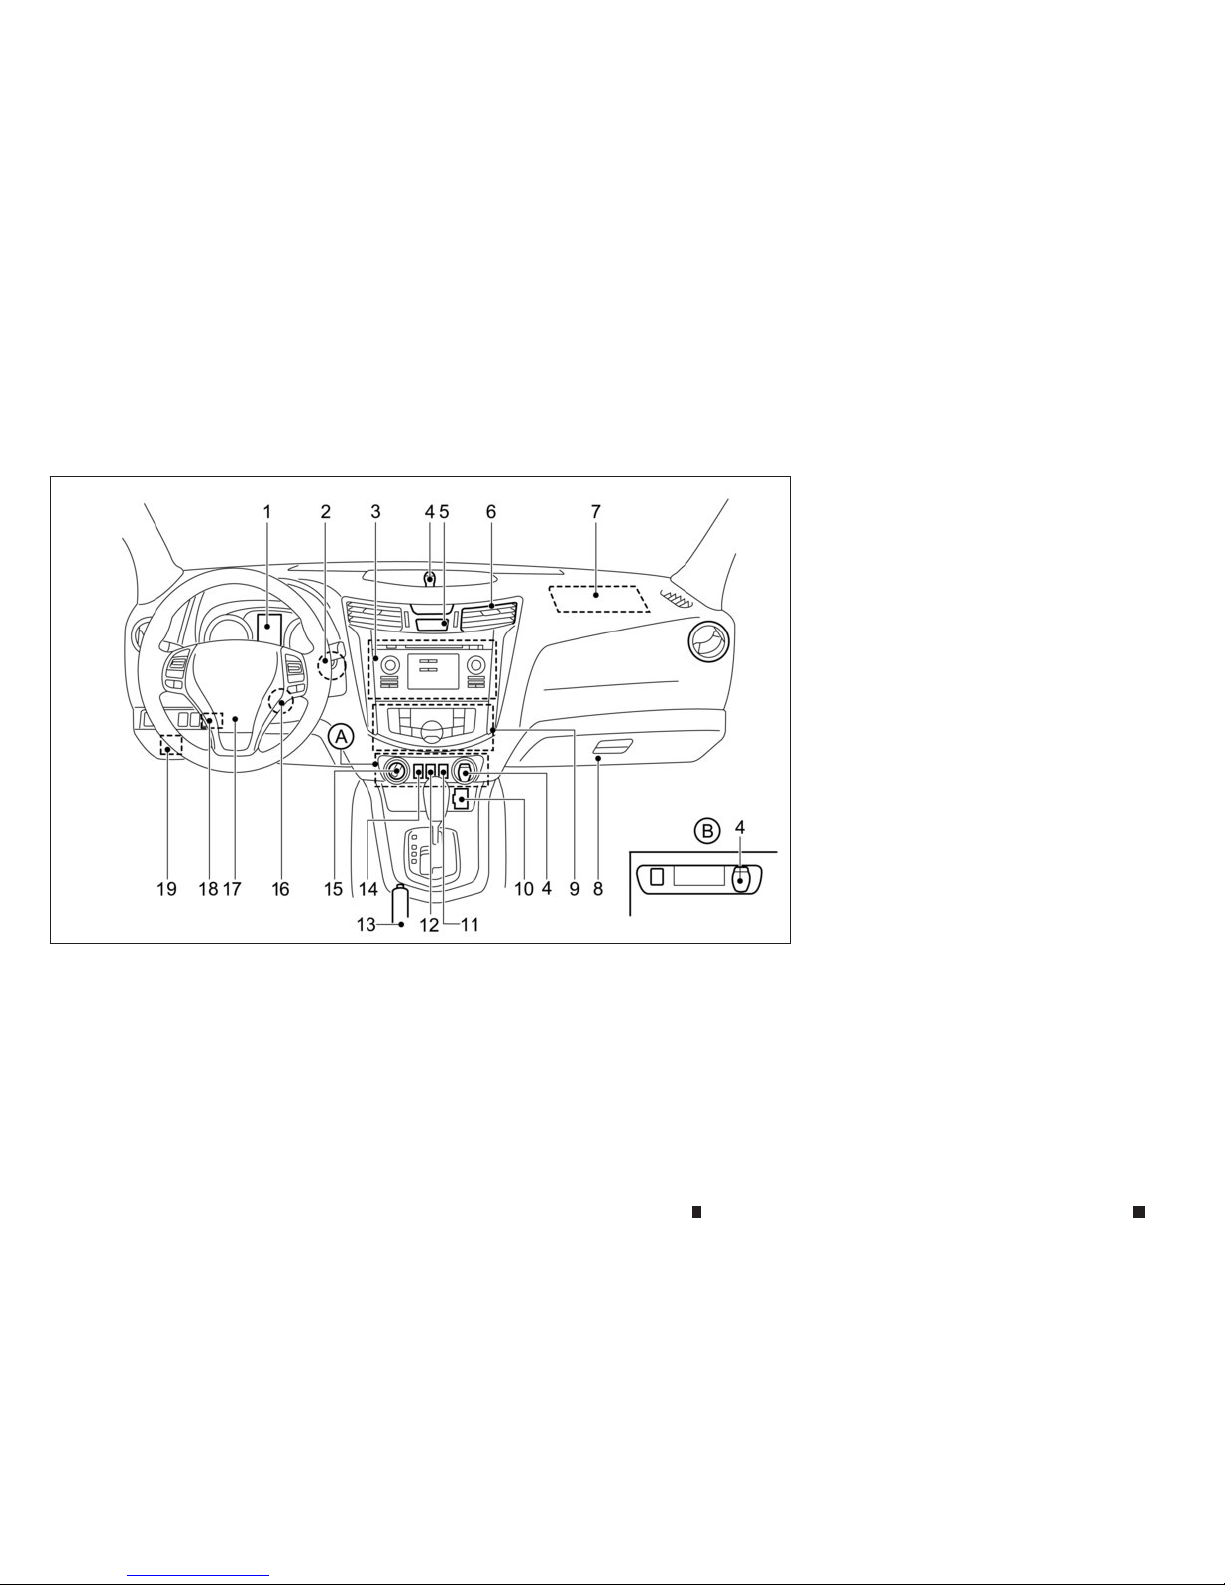
LEFT-HAND DRIVE (LHD) MODEL
1.
Meters and gauges (P. 2-2)
—Vehicle information display (P. 2-14)
2.
Push-button ignition switch (models with
Remote Control Key system) (P. 5-15)
3.
Audio system* (P. 4-31) or Navigation
system**
—Reversing camera* (P. 4-7)
—360° Camera* (P. 4-11)
4.
Power outlet (P. 2-38)
5.
Hazard warning flasher switch (P. 6-2)
6.
Centre vent (P. 4-20)
7.
Front passenger’s supplemental front-impact
air bag* (P. 1-29)
8.
Glove box (P. 2-39)
9.
Heater and air conditioner control (P. 4-21)
10.
USB (Universal Serial Bus) connection port
(P. 4-35)/iPod connection port (P. 4-45)
—Auxiliary (AUX) input jack (P. 4-36)
11.
Power door lock switch* (P. 3-4)
12.
Hill descent control switch* (P. 5-38)
13.
Parking brake
—Operation (P. 3-26)
—Check (P. 8-9)
14.
Differential lock mode switch* (P. 5-32)
15.
Four-Wheel Drive (4WD) mode switch*
(P. 5-26)
16.
Ignition switch (models without Remote
Control Key system) (P. 5-14)
17.
Steering wheel
—Horn (P. 2-36)
—Driver’s supplemental front-impact air bag*
(P. 1-29)
—Power steering system (P. 5-49)
18.
Fuel filler lid release (P. 3-18)
19.
Bonnet release handle (P. 3-17)
jA:
4WD models
jB:
2WD models
*:
where fitted
**:
See the separate Navigation System Owner’s
Manual (where fitted).
NIC3091
INSTRUMENT PANEL
0-8 Illustrated table of contents
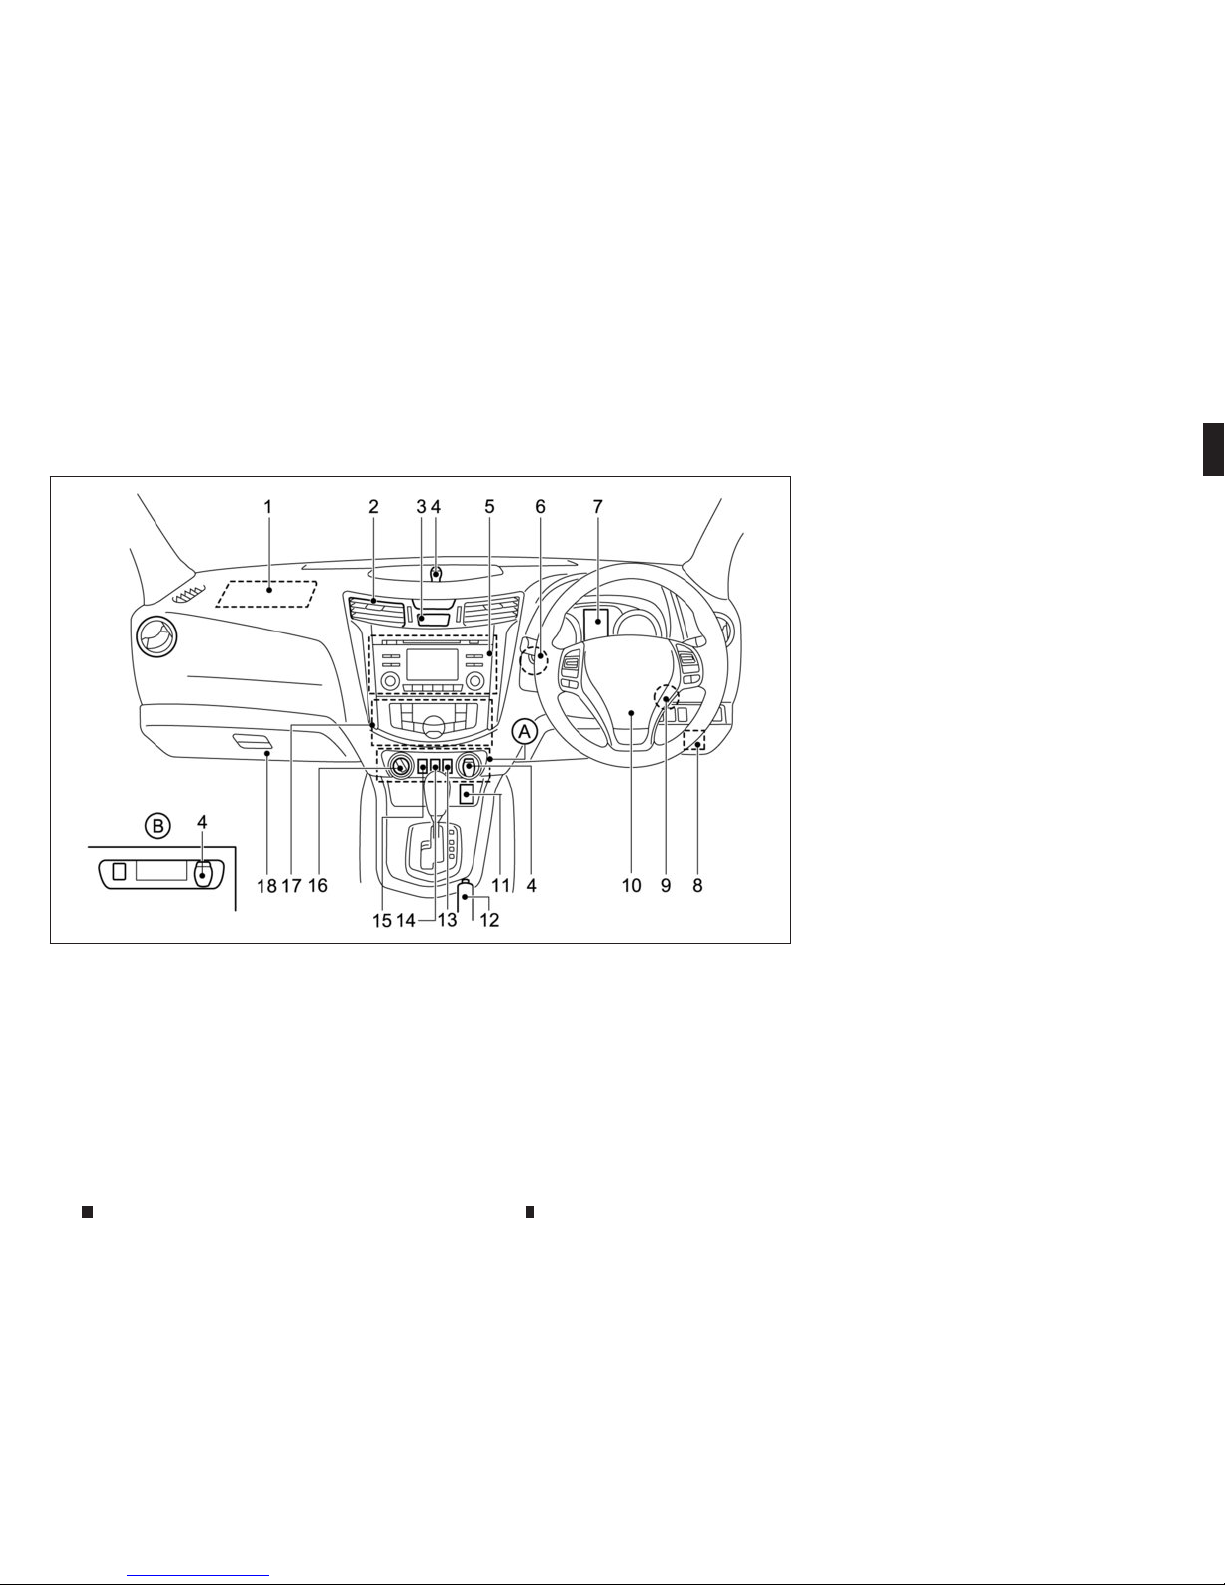
RIGHT-HAND DRIVE (RHD) MODEL
1.
Front passenger’s supplemental front-impact
air bag* (P. 1-29)
2.
Centre vent (P. 4-20)
3.
Hazard warning flasher switch (P. 6-2)
4.
Power outlet (P. 2-38)
5.
Audio system* (P. 4-31) or Navigation
system**
—Reversing camera* (P. 4-7)
—360° Camera* (P. 4-11)
6.
Push-button ignition switch (models with
Remote Control Key system) (P. 5-15)
7.
Meters and gauges (P. 2-2)
—Vehicle information display (P. 2-14)
8.
Bonnet release handle (P. 3-17)
9.
Ignition switch (models without Remote
Control Key system) (P. 5-14)
10.
Steering wheel
—Horn (P. 2-36)
—Driver’s supplemental front-impact air bag*
(P. 1-29)
—Power steering system (P. 5-49)
11.
USB (Universal Serial Bus) connection port
(P. 4-35)/iPod connection port (P. 4-45)
—Auxiliary (AUX) input jack (P. 4-36)
12.
Parking brake
—Operation (P. 3-26)
—Check (P. 8-9)
13.
Power door lock switch (P. 3-4)
14.
Hill descent control switch* (P. 5-38)
15.
Differential lock mode switch* (P. 5-32)
16.
Four-Wheel Drive (4WD) mode switch*
(P. 5-26)
17.
Heater and air conditioner control (P. 4-21)
18.
Glove box (P. 2-39)
—Fuse box (P. 8-19)
jA:
4WD models
jB:
2WD models
*:
where fitted
**:
See the separate Navigation System Owner’s
Manual (where fitted).
NIC3092
Illustrated table of contents 0-9
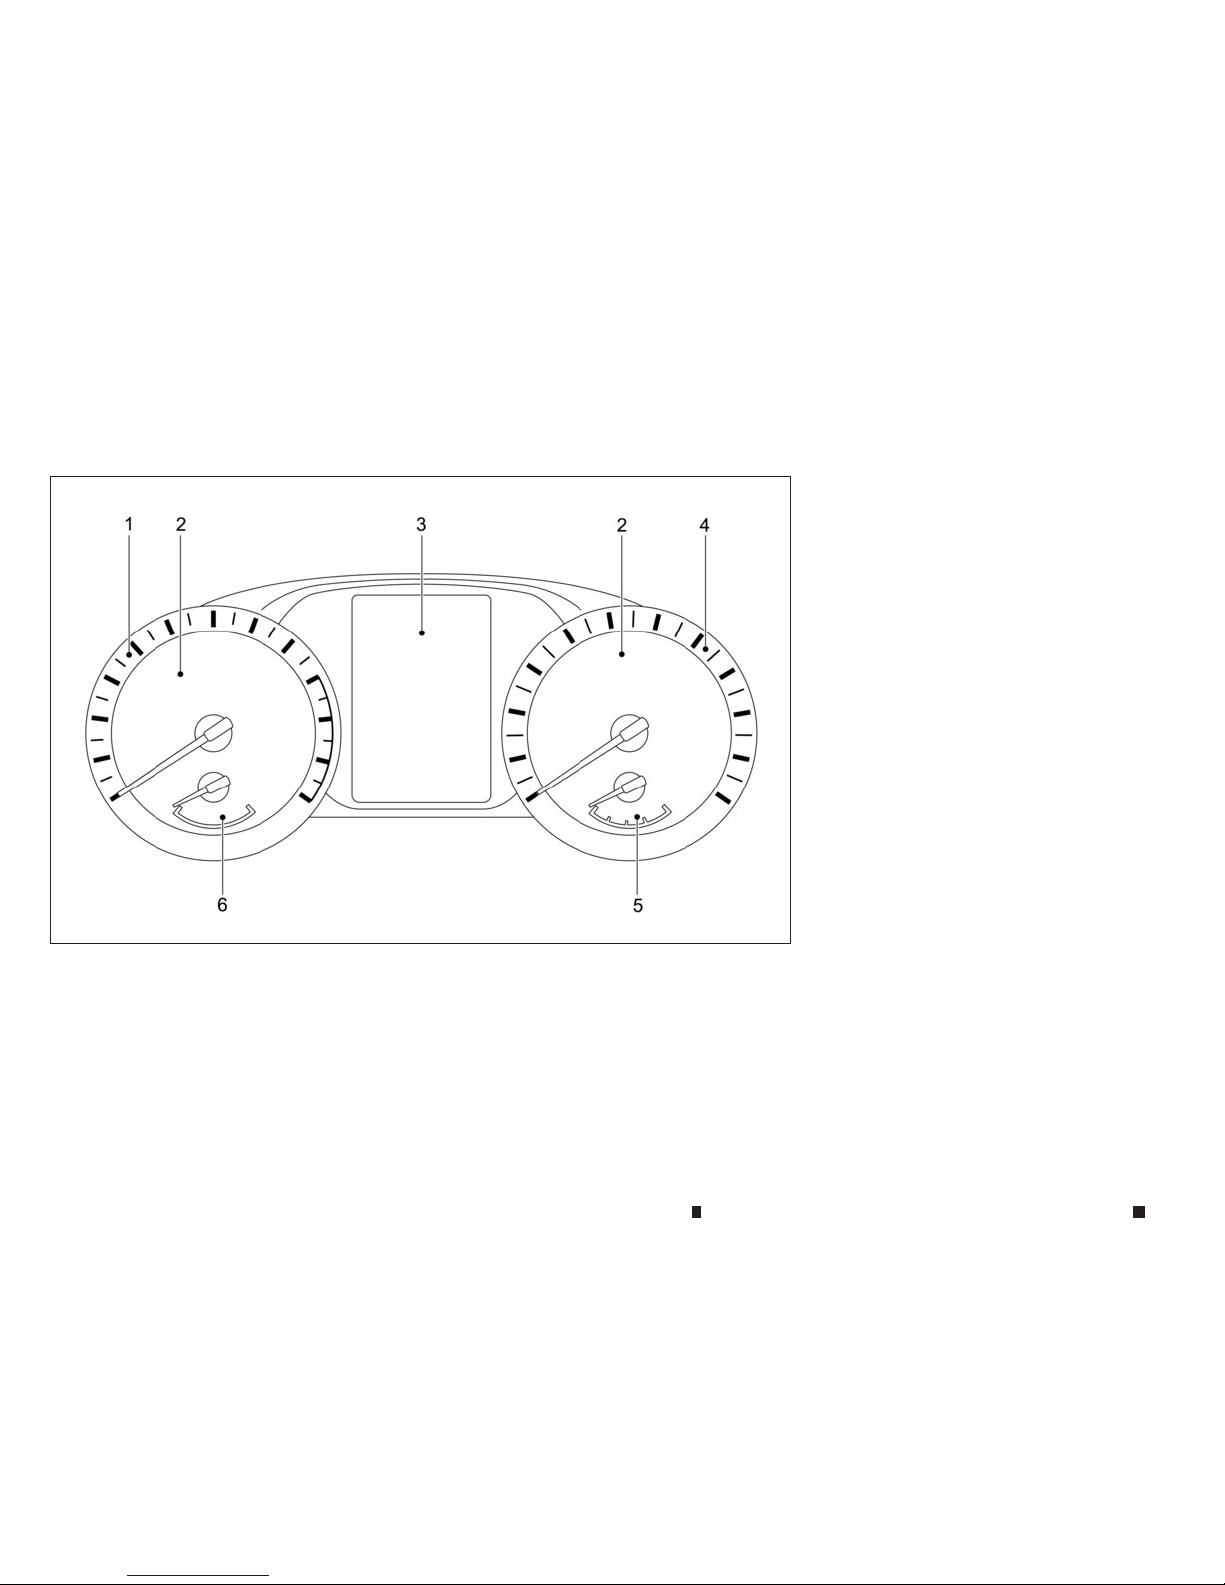
1.
Tachometer (P. 2-3)
2.
Warning and indicator lights (P. 2-3)
3.
Vehicle information display (P. 2-14)
—Four-Wheel Drive (4WD) mode indicator*
(P. 5-30)
—Oil control system* (P. 2-29)
—Odometer/twin trip odometer (P. 2-3)
—Trip computer (P. 2-21)
—Instrument brightness control (P. 2-4)
—A
utomatic Transmission (AT) position
indicator (AT model) (P. 2-28, P. 5-19)
4.
Speedometer (P. 2-2)
5.
Fuel gauge (P. 2-2)
6.
Engine coolant temperature gauge (P. 2-3)
*:
where fitted
NIC2681
METERS AND GAUGES
0-10 Illustrated table of contents
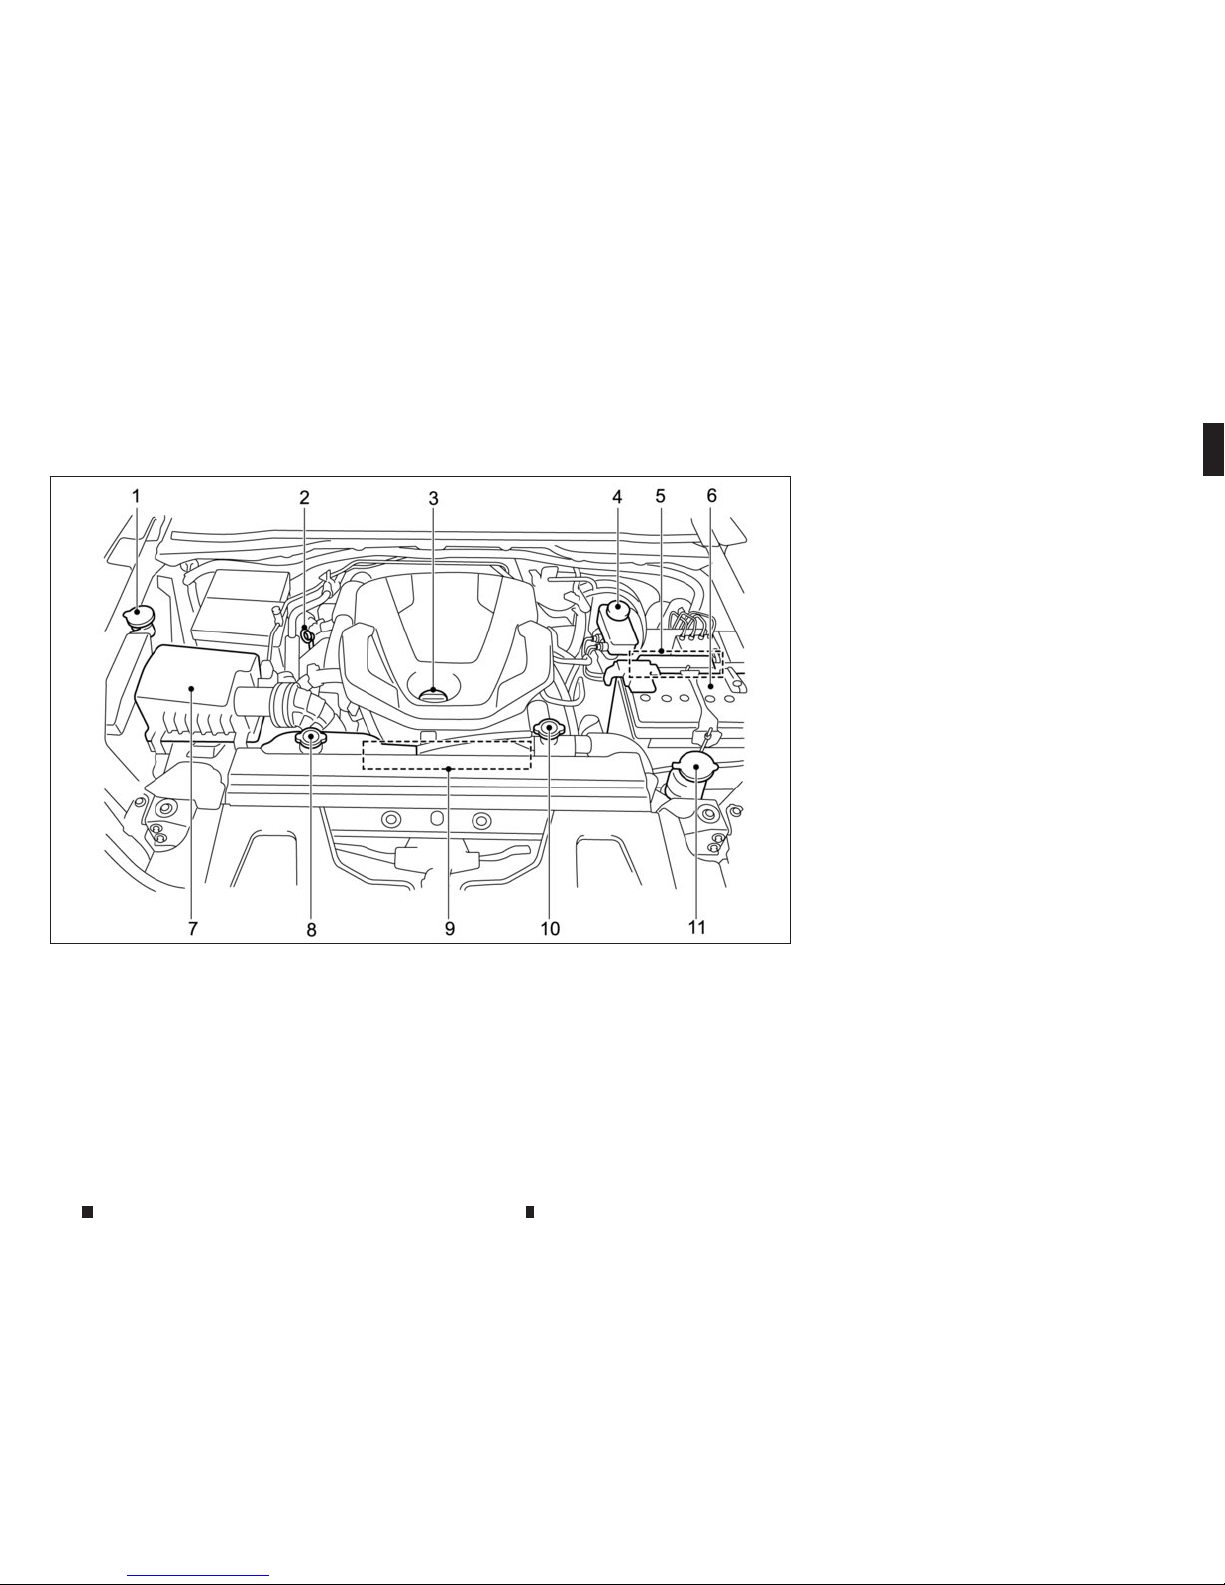
M9T 2.3DCI ENGINE
1.
Window washer fluid reservoir (P. 8-11)
2.
Engine oil dipstick (P. 8-7)
3.
Engine oil filler cap (P. 8-7)
4.
Brake and clutch*1,*2 fluid reservoir (P. 8-10)
5.
Fuse/fusible link holder (P. 8-18)
6.
Battery (P. 8-12)
—Jump starting (P. 6-10)
7.
Air cleaner (P. 8-15)
8.
Engine coolant reservoir (P. 8-5)
9.
Engine drive belt location (P. 8-8)
10.
Radiator filler cap (P. 8-5)
—Vehicle overheat (P. 6-12)
11.
Power steering fluid reservoir (P. 8-8)
*1:
For Manual Transmission (MT) model
*2:
The layout illustrated is for the Left-Hand Drive
(LHD) model. On the Right-Hand Drive (RHD)
model, brake (and clutch) fluid reservoir is
located on the opposite side.
NIC3082
ENGINE COMPARTMENT
Illustrated table of contents 0-11

NOTE
0-12 Illustrated table of contents

1 Safety —seats, seat belts and supplemental
restraint system
Safety —seats, seat belts and supplemental
restraint system
Seats....................................................................... 1-2
Front seats ......................................................... 1-2
Rear seats (Double Cab model).......................... 1-5
Jump seats (where fitted for King Cab models) ... 1-6
Head restraints ........................................................ 1-6
Adjustable head restraint .................................... 1-7
Non-adjustable head restraint.............................. 1-7
Remove.............................................................. 1-7
Install.................................................................. 1-7
Adjust................................................................. 1-8
Seat belts ................................................................ 1-9
Precautions on seat belt usage ........................... 1-9
Child safety ........................................................ 1-11
Pregnant women ................................................ 1-11
Injured persons................................................... 1-11
Centre mark on seat belts (where fitted) ............. 1-11
Three-point type seat belts.................................. 1-12
Two-point type seat belts (where fitted)............... 1-13
Seat belt maintenance ........................................ 1-14
Child restraints ........................................................ 1-14
Precautions on child restraint usage.................... 1-14
Universal child restraints for front seat and rear
seats (for Europe) ............................................... 1-15
ISOFIX and i-Size child restraint system (for
second row seats) .............................................. 1-20
Child restraint anchorage (where fitted) .............. 1-21
Child restraint installation using ISOFIX .............. 1-22
Child restraint installation using three-point
type seat belt ...................................................... 1-24
Supplemental Restraint System (SRS) (where
fitted)....................................................................... 1-29
Precautions on Supplemental Restraint
System (SRS)..................................................... 1-29
Supplemental air bag systems ............................ 1-36
Pre-tensioner seat belt system (where fitted) ....... 1-39
Repair and replacement procedure..................... 1-40
WARNING
•
Do not drive and/or ride in the vehicle with
the seatback reclined. This can be dangerous. The shoulder belt will not be properly
against the body. In an accident, you and your
passengers could be thrown into the shoulder belt and receive neck or other serious
injuries. You and your passengers could also
slide under the lap belt and receive serious
injuries.
•
For the most effective protection while the
vehicle is in motion, the seatback should be
upright. Always sit well back and upright in
the seat and adjust the seat properly. (See
“Manual seat adjustment (where fitted)” later
in this section.)
•
To help avoid risk of injury or death through
unintended operation of the vehicle and/or its
systems, do not leave children, people who
require the assistance of others, or pets unat-
tended in your vehicle. Additionally, the temperature inside aclosed vehicle on awarm
day can quickly become high enough to cause
asignificant risk of injury or death to people
and pets.
CAUTION
When adjusting the seat positions, be sure not to
contact any moving parts to avoid possible injuries and/or damages.
FRONT SEATS
WARNING
Do not adjust the driver’s seat while driving so
that full attention may be given to vehicle operation.
Manual seat adjustment (where fitted)
WARNING
After adjusting aseat, gently shake the seat to
confirm that the seat is locked securely. If the
seat is not locked securely, it may move suddenly and could cause the loss of control of the
vehicle.
SSS0133AZ
SEATS
1-2 Safety —seats, seat belts and supplemental restraint system
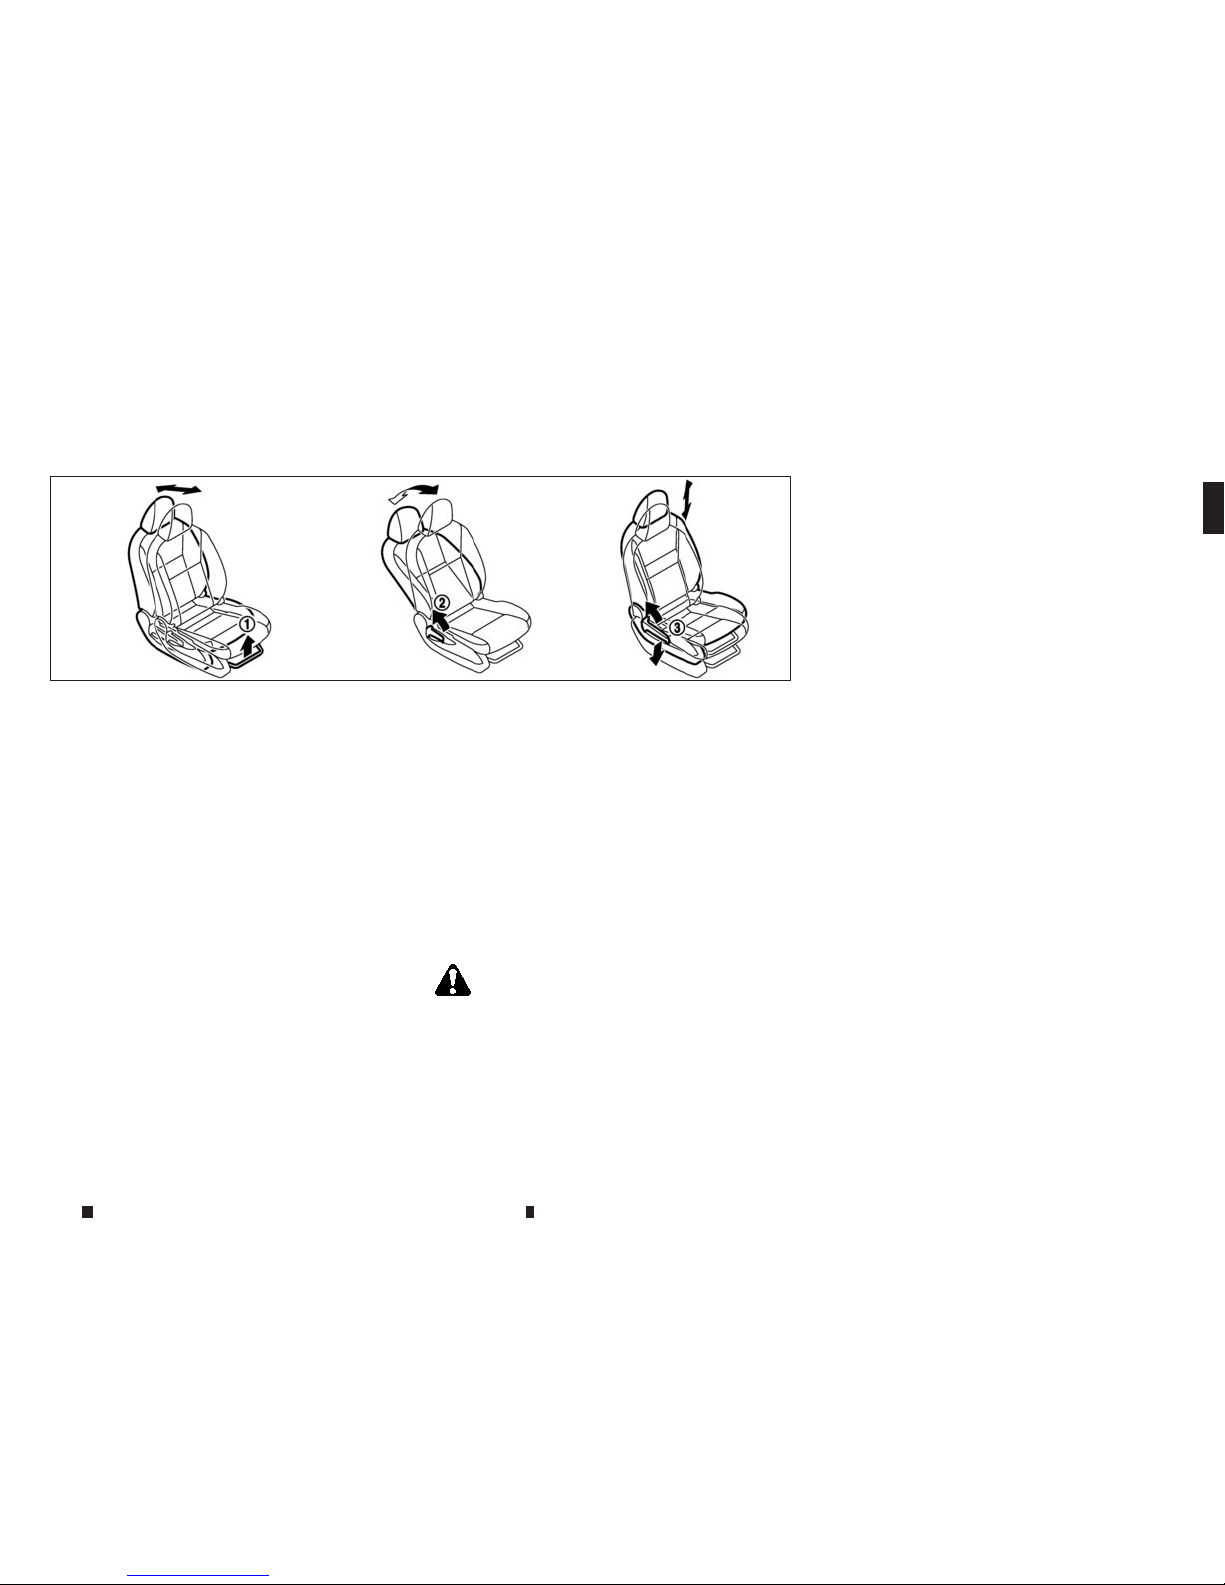
Forward and backward:
1. Pull up the adjusting lever➀.
2. Slide the seat to the desired position.
3. Release the adjusting lever to lock the seat in
position.
Reclining:
CAUTION
When moving the seats forward or backward, or
returning arear-reclined seatback to its upright
position, make sure you hold onto the seatback
while operating. If the seatback is not held, the
seat or seatback will move suddenly and could
cause injury.
1. Pull up the adjusting lever
➁
.
2. Tilt the seatback to the desired position.
3. Release the adjusting lever to lock the seatback
in position.
The reclining feature allows the adjustment of the
seatback for occupants of different sizes to help
obtain the proper seat belt fit. (See “Fastening seat
belts” later in this section.)
The seatback may be reclined to allow occupants to
rest when the vehicle is parked.
Seat lifter (where fitted):
Pull up or push down the adjusting lever
➂
to adjust the seat height until the desired position is
achieved.
Power seat adjustment (where fitted)
WARNING
Never leave children or adults who would normally require the support of others alone in the
vehicle. Pets should not be left alone either. They
could unknowingly activate switches or controls,
or move the vehicle, and inadvertently become
involved in aserious accident and injure themselves.
Operating tips:
•
The power seat motor has an auto-reset overload protection circuit. If the motor stops during
the seat adjustment, wait 30 seconds, then reactivate the switch.
•
To avoid discharge of the battery, do not operate
the power seats for along period of time when
the engine is not running.
JVR0392XZ
Safety —seats, seat belts and supplemental restraint system 1-3

Forward and backward:
Move forward or backward the adjusting switch
➀
to the desired position.
Reclining:
Move forward or backward the adjusting switch
➁
to the desired position.
The reclining feature allows the adjustment of the
seatback for occupants of different sizes to help
obtain the proper seat belt fit. (See “Fastening seat
belts” later in this section.)
The seatback may be reclined to allow occupants to
rest when the vehicle is parked.
WARNING
The seatback should not be reclined any more
than needed for comfort. Seat belts are most
effective when the passenger sits well back and
straight up in the seat. If the seatback is reclined,
the risk of sliding under the lap belt and being
injured is increased.
Seat lifter:
1. Pull up or push down the adjusting switch to
adjust the seat height until the desired position is
achieved.
2. Tilt up or down the adjusting switch to adjust the
front angle of the seat until the desired position is
achieved.
Lumbar support:
The lumbar support feature provides lower back
support to the driver.
Push each side of the adjusting switch
➀
and
➁
to adjust the seat lumbar area until the desired position is achieved.
JVR0054XZ
JVR0055XZ
JVR0056XZ
1-4 Safety —seats, seat belts and supplemental restraint system
Heated seats (where fitted)
The front seats can be warmed by built-in heaters.
The switches located on the centre console can be
operated independently of each other.
1. Start the engine.
2. Select heat range.
•
For high heat, push the <HI> (High) side of
the switch
➀
.
•
For low heat, push the <LO> (Low) side of
the switch
➁
.
•
The indicator light➂will illuminate when the
heater is on.
3. To turn off the heater, return the switch to the
level position. Make sure the indicator light turns
off.
The heater is controlled by athermostat, automatically turning the heater on and off. The indicator light will remain on as long as the switch is
on.
When the vehicle’s interior is warmed be sure to
turn off the switch.
CAUTION
•
The battery could run down if the seat heater
is operated while the engine is not running.
•
Do not use the seat heater for extended periods or when no one is using the seat.
•
Do not put anything on the seat which insulates heat, such as ablanket, cushion, seat
cover, etc. Otherwise, the seat may become
overheated.
•
Do not place anything hard or heavy on the
seat or pierce it with apin or similar object.
This may result in damage to the seat heater.
•
Any liquid spilled on the heated seat should
be removed immediately with adry cloth.
•
When cleaning the seat, never use petrol, thinner, or any similar materials.
•
If any malfunctions are found or the heated
seat does not operate, turn the switch off and
have the system checked by an approved
dealer or qualified workshop.
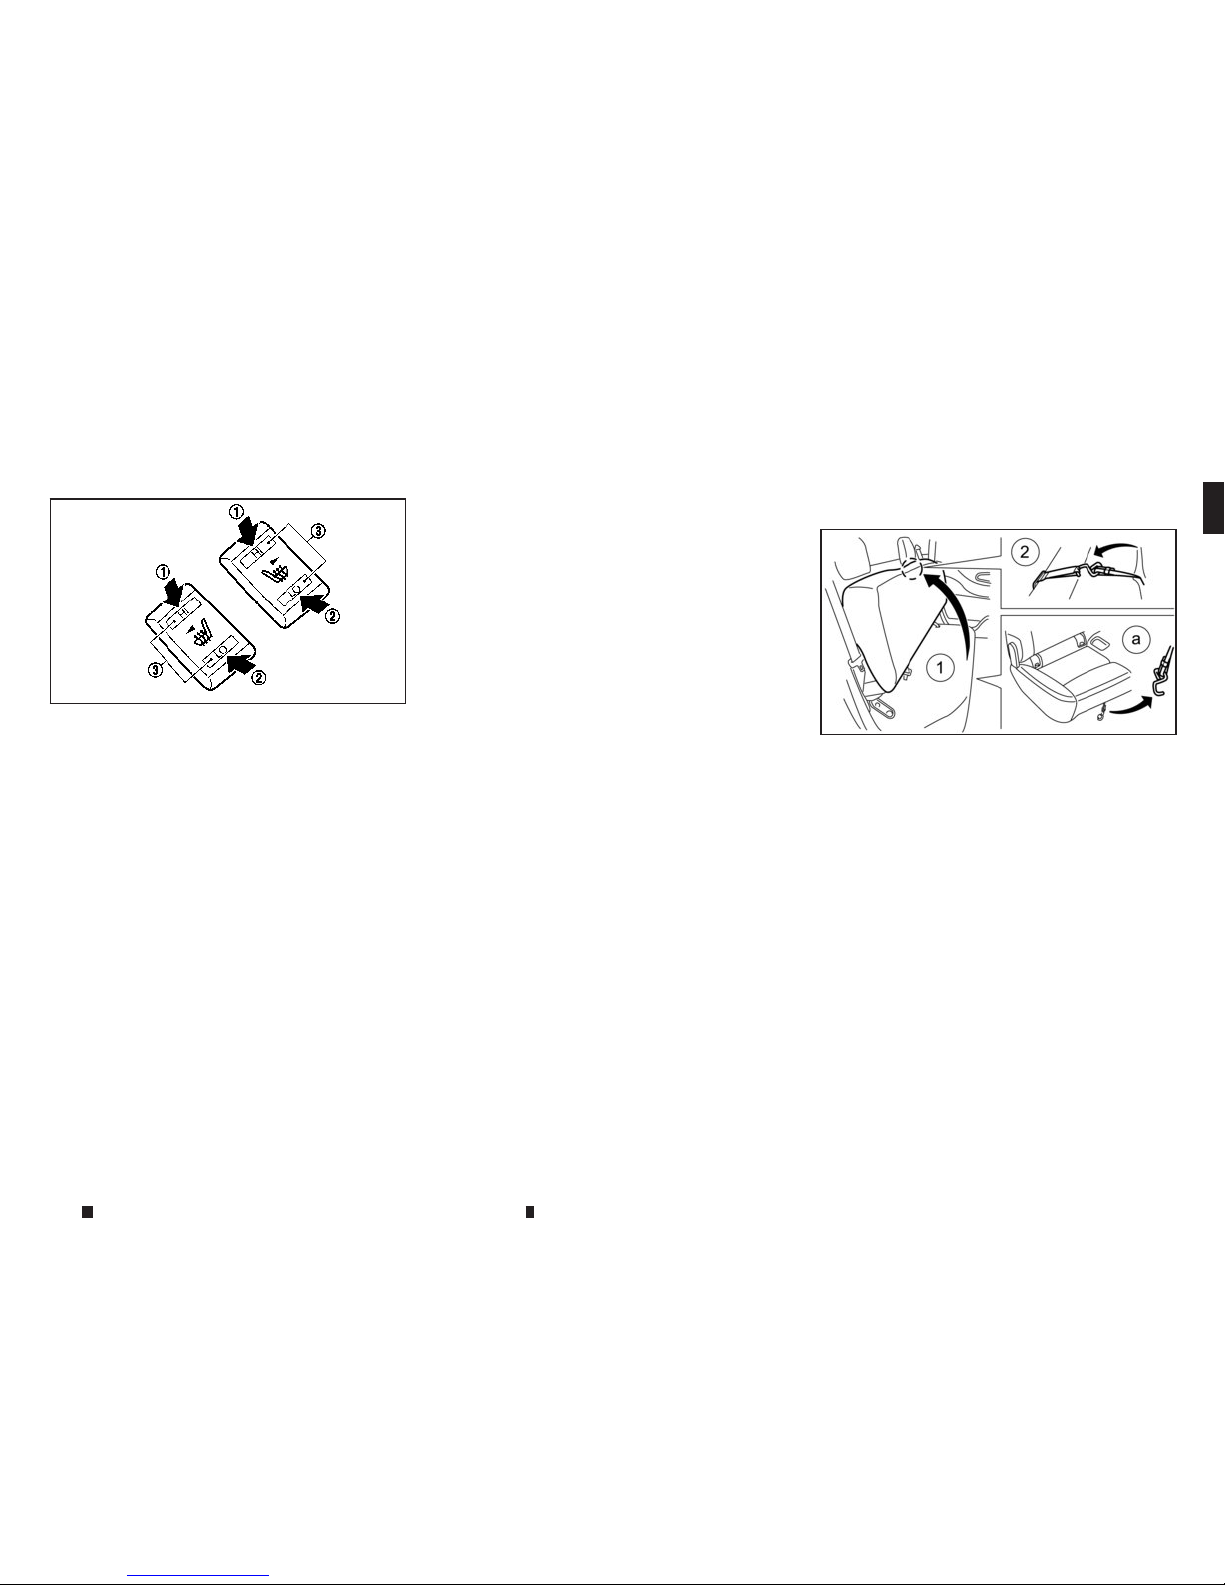
REAR SEATS (Double Cab model)
Folding
The jack and tools are stored in the tool storage
compartment located under the rear seat cushion.
To access the tool storage compartment, fold the
rear seats in the following steps.
1. Remove the hook
ja.
2. Lift up the seat cushion
➀
.
3. Secure the seat cushion with the strap➁.
To remove the jack and tools, see “Preparing tools”
in the “6. In case of emergency” section.
Do not drive the vehicle with the rear seat folded.
When returning the rear seat to the original position,
be certain the seat belts and the buckles are positioned properly. Secure the seat cushion using the
hook
ja.
JVR0322XZ
NIC2816
Safety —seats, seat belts and supplemental restraint system 1-5
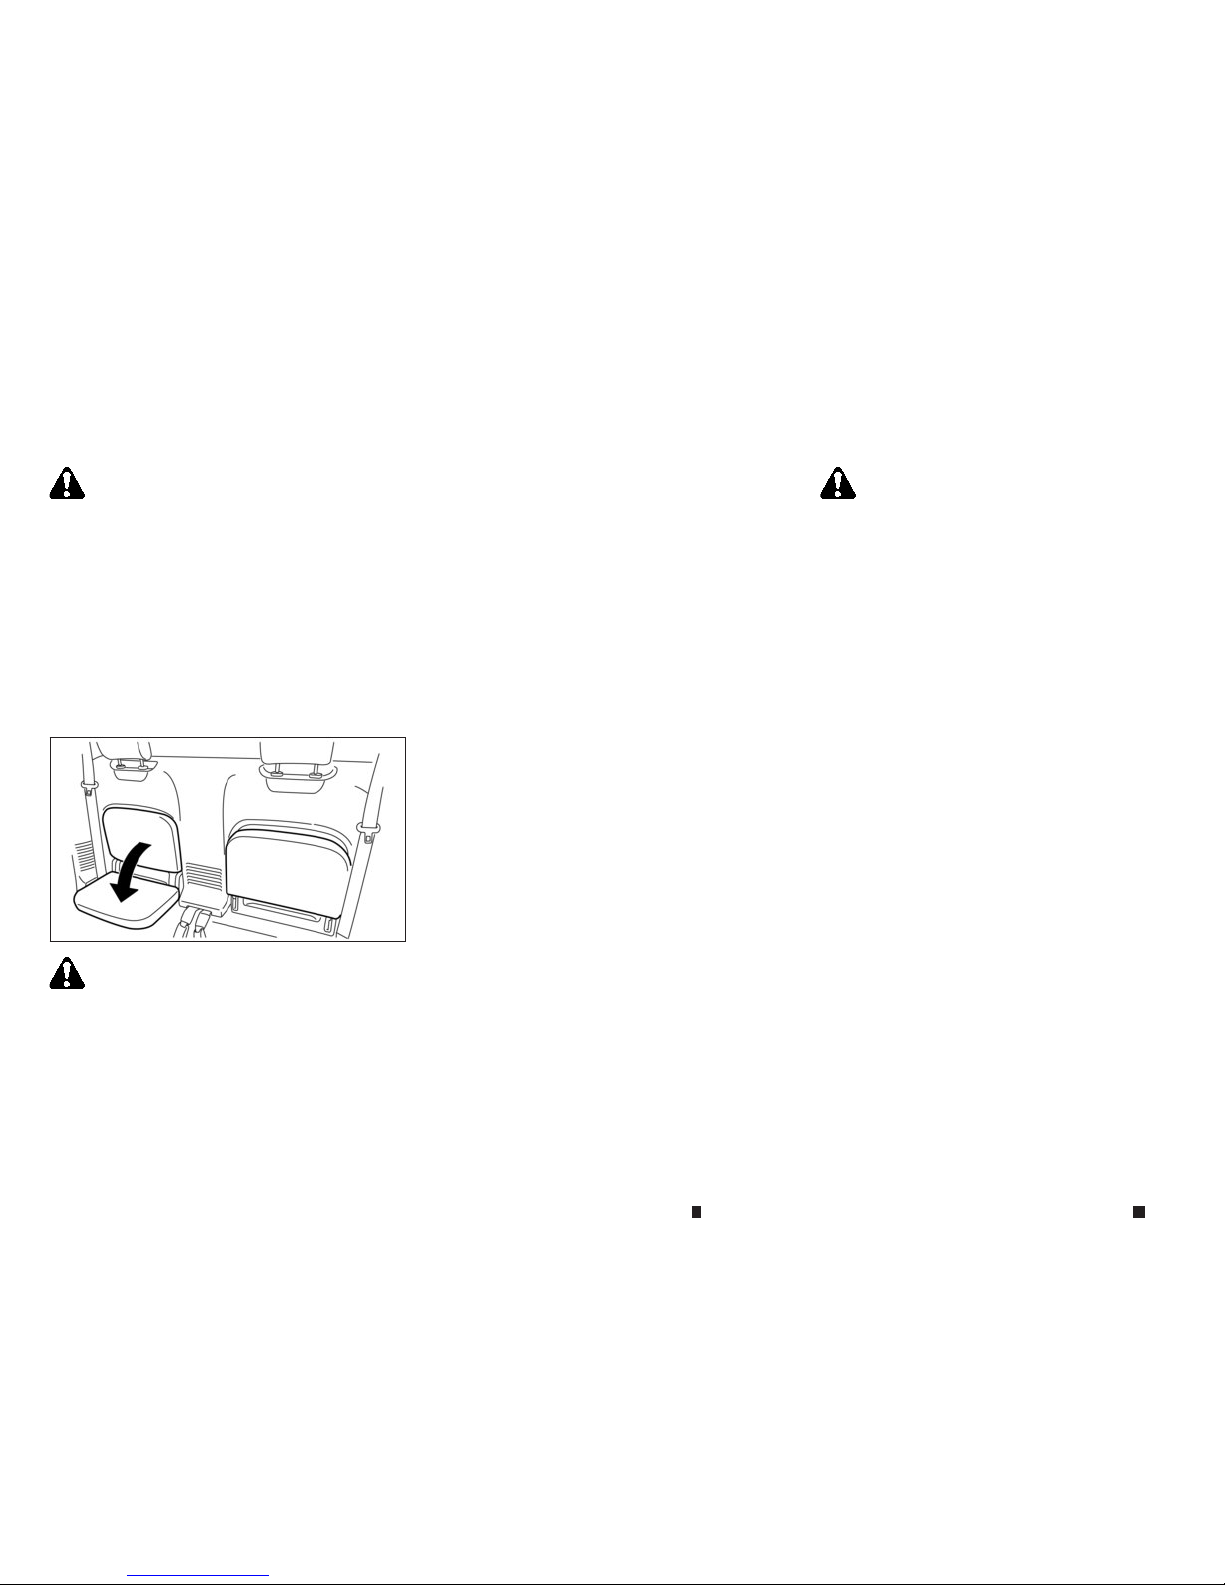
WARNING
•
Never allow anyone to ride on the rear seats
when they are in the fold-up position. Use of
this area by passengers without proper restraints could result in serious injury or death
in an accident or sudden stop.
•
When folding or returning the rear seat, be
careful not to squeeze your finger between
the seat cushion and the body side.
JUMP SEATS (where fitted for King Cab
models)
WARNING
•
Do not use the jump seats for child restraint
installation.
•
When folding or returning the jump seat, be
careful not to squeeze your finger between
the seat cushion and the body side.
•
Jump seats are designed as temporary seats
only and should only be used on occasional
short distance travels.
WARNING
Head restraints supplement the other vehicle
safety systems. They may provide additional protection against injury in certain rear end collisions. Adjustable head restraints must be adjusted properly, as specified in this section.
Check the adjustment after someone else uses
the seat. Do not attach anything to the head restraint stalks or remove the head restraint. Do
not use the seat if the head restraint has been
removed. If the head restraint was removed, reinstall and properly adjust the head restraint before an occupant uses the seating position. Failure to follow these instructions can reduce the
effectiveness of the head restraint. This may increase the risk of serious injury or death in acollision.
•
Your vehicle is equipped with ahead restraint
that may be integrated, adjustable or non-adjustable.
•
Adjustable head restraints have multiple notches
along the stalk to lock them in adesired adjustment position.
•
The non-adjustable head restraints have asingle
locking notch to secure them to the seat frame.
•
Proper Adjustment:
–For the adjustable type, align the head re-
straint so the centre of your ear is approximately level with the centre of the head restraint.
NIC2817
HEAD RESTRAINTS
1-6 Safety —seats, seat belts and supplemental restraint system

–Ifyour ear position is still higher than the rec-
ommended alignment, place the head
restraint at the highest position.
•
If the head restraint has been removed, ensure
that it is reinstalled and locked in place before
riding in that designated seating position.
ADJUSTABLE HEAD RESTRAINT
1. Removable head restraint
2. Multiple notches
3. Lock knob
4. Stalks
NON-ADJUSTABLE HEAD RESTRAINT
1. Removable head restraint
2. Single notch
3. Lock knob
4. Stalks
REMOVE
Use the following procedure to remove the head
restraint.
1. Pull the head restraint up to the highest position.
2. Push and hold the lock knob.
3. Remove the head restraint from the seat.
4. Store the head restraint properly in asecure
place so it is not loose in the vehicle.
5. Reinstall and properly adjust the head restraint
before an occupant uses the seating position.
INSTALL
1. Align the head restraint stalks with the holes in
the seat. Make sure that the head restraint is facing the correct direction. The stalk with the adjustment notch must be installed in the hole with
the lock knob.
2. Push and hold the lock knob and push the head
restraint down.
3. Properly adjust the head restraint before an occupant uses the seating position.
NPA1314
NPA1315
NPA1316
NPA1316
Safety —seats, seat belts and supplemental restraint system 1-7
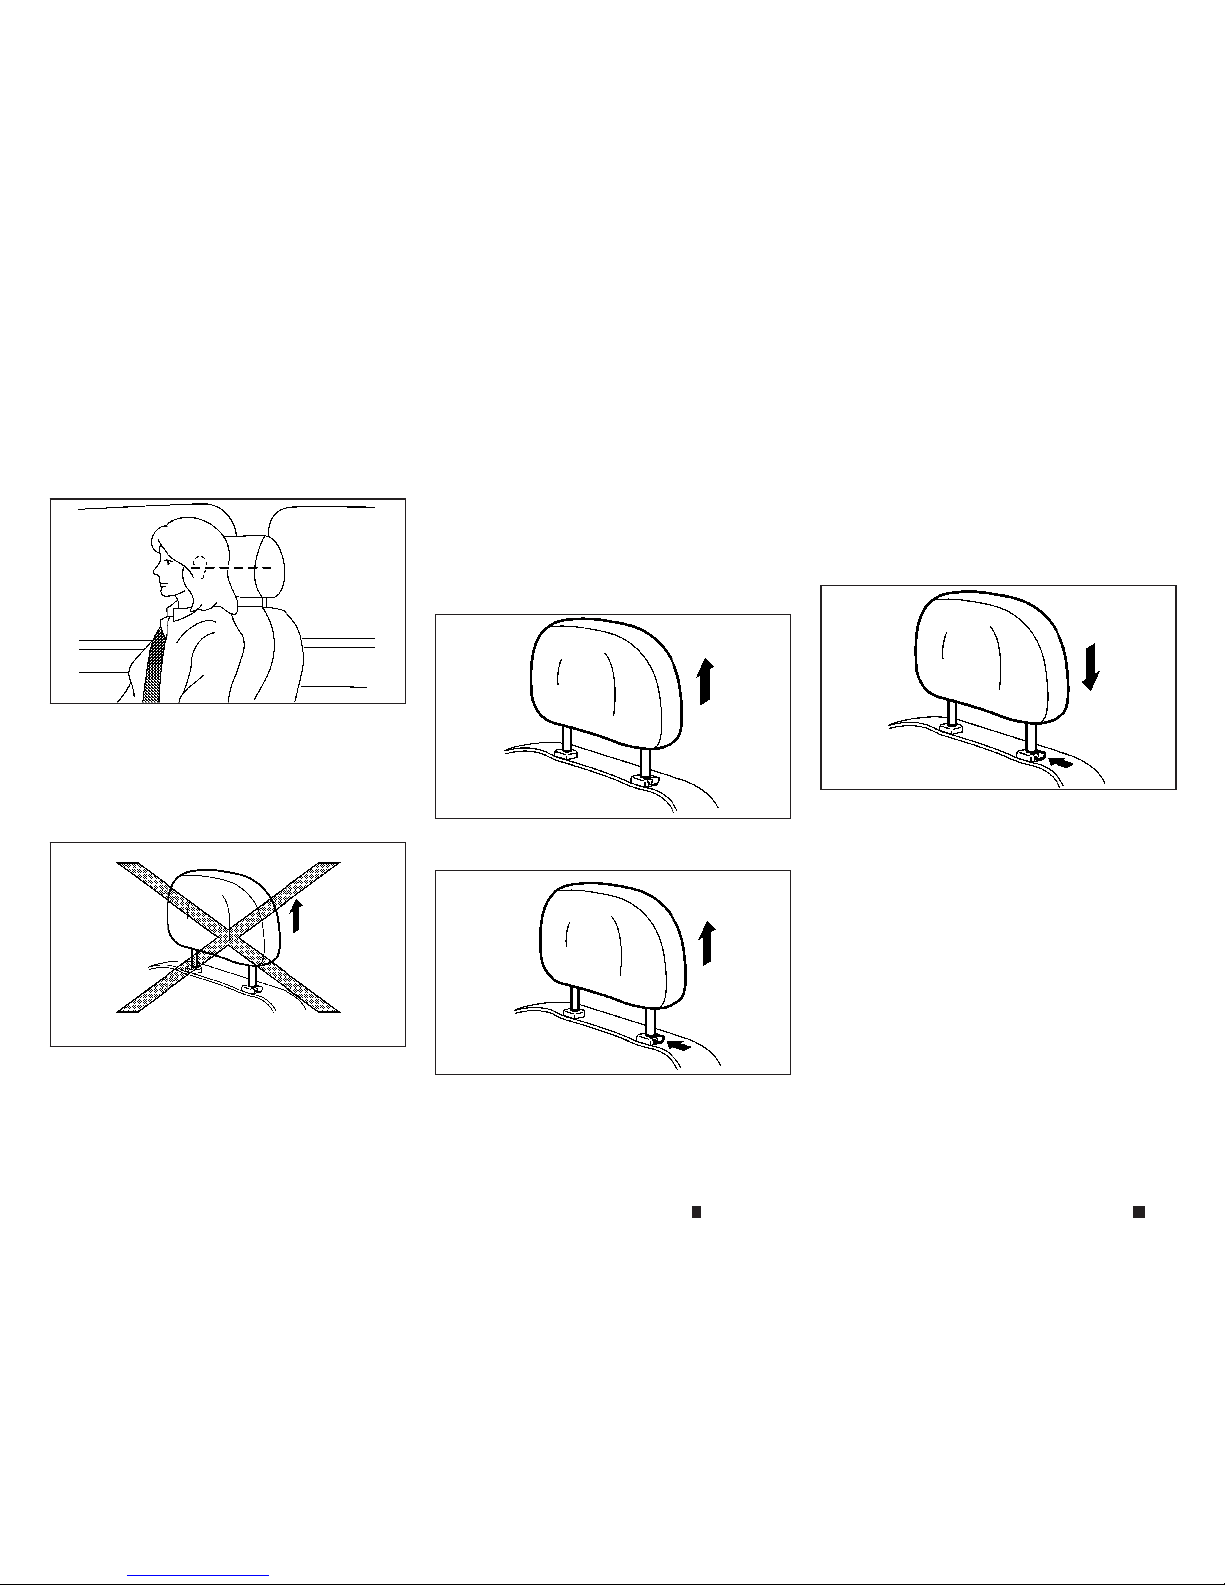
ADJUST
For adjustable head restraint
Adjust the head restraint so the centre is level with
the centre of your ears. If your ear position is still
higher than the recommended alignment, place the
head restraint at the highest position.
For non-adjustable head restraint
Make sure the head restraint is positioned from the
stored position or any non-latch position so the lock
knob is engaged in the notch before riding in that
designated seating position.
Raise
To raise the head restraint, pull it up.
To raise the head restraint, push and hold the lock
knob. Then, pull it up.
Make sure the head restraint is positioned from the
stored position or any non-latch position so the lock
knob is engaged in the notch before riding in that
designated seating position.
Lower
To lower, push and hold the lock knob and push the
head restraint down.
Make sure the head restraint is positioned so the
lock knob is engaged in the notch before riding in
that designated seating position.
SSS0997Z
JVR0259XZ
SSS1035Z
Type A
SSS1037Z
Type B
SSS1036Z
1-8 Safety —seats, seat belts and supplemental restraint system
PRECAUTIONS ON SEAT BELT
USAGE
If you are wearing the seat belt properly adjusted
and sitting upright and well back in the seat, chances
of being injured or killed in an accident and/or the
severity of injury may be greatly reduced. RENAULT
strongly encourages you and all of your passengers
to buckle up every time you drive, even if your seating position includes the supplemental air bag systems.
SSS0134AZ
SSS0136AZ
SEAT BELTS
Safety —seats, seat belts and supplemental restraint system 1-9
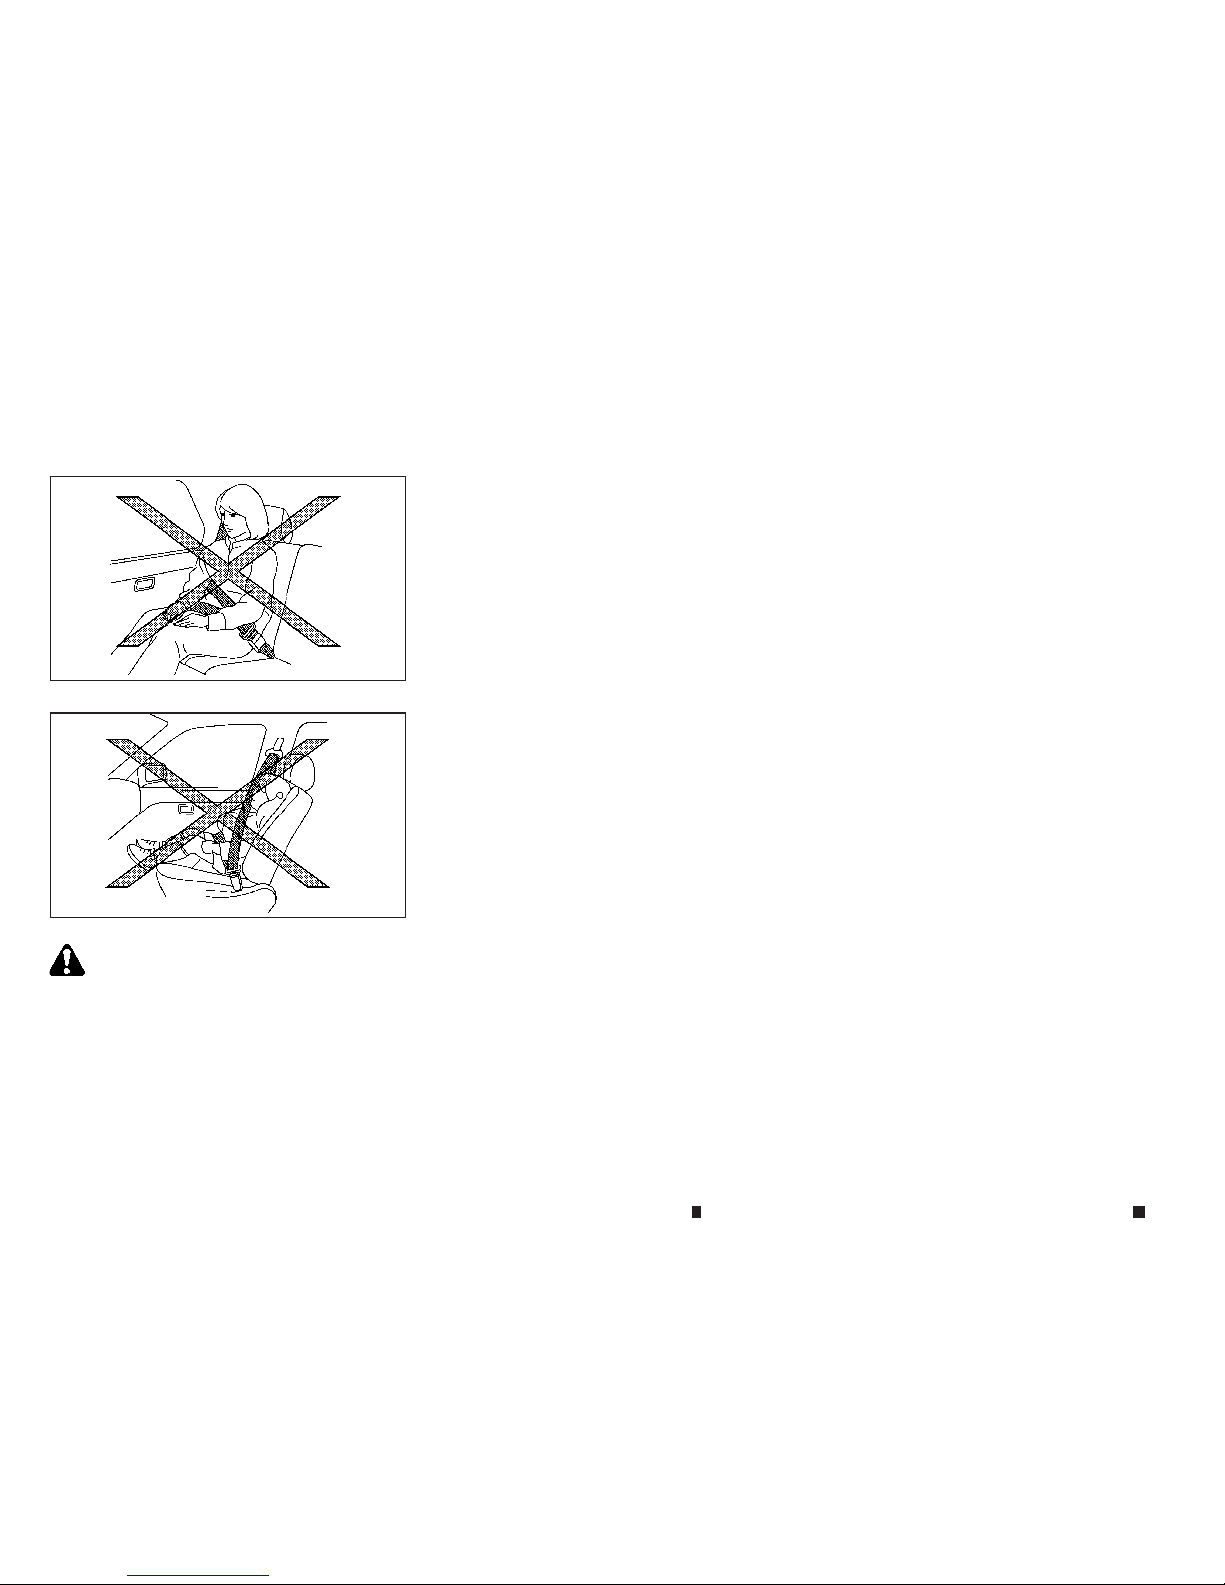
WARNING
•
Seat belts are designed to bear upon the bony
structure of the body, and should be worn low
across the front of the pelvis or the pelvis,
chest and shoulders, as applicable; wearing
the lap section of the belt across the abdominal area must be avoided. Serious injury may
occur if aseat belt is not worn properly.
•
Position the lap belt as low and snug as possible around the hips, not the waist. Alap belt
worn too high could increase the risk of internal injuries in an accident.
•
Do not allow more than one person to use the
same seat belt. Each belt assembly must only
be used by one occupant; it is dangerous to
put abelt around achild being carried on the
occupant’s lap.
•
Never carry more people in the vehicle than
there are seat belts.
•
Never wear seat belts inside out. Belts should
not be worn with straps twisted. Doing so may
reduce their effectiveness.
•
Seat belts should be adjusted as firmly as
possible, consistent with comfort, to provide
the protection for which they have been designed. Aslack belt will greatly reduce the
protection afforded to the wearer.
•
Every person who drives or rides in this vehicle should use aseat belt at all times. Children should be in the rear seats and in an
appropriate restraint.
•
Do not put the belt behind your back or under
your arm. Always route the shoulder belt over
your shoulder and across your chest. The belt
should be away from your face and neck, but
not falling off your shoulder. Serious injury
may occur if aseat belt is not worn properly.
•
No modifications or additions should be made
by the user which will either prevent the seat
belt adjusting devices from operating to remove slack, or prevent the seat belt assembly
from being adjusted to remove slack.
•
Care should be taken to avoid contamination
of the webbing with polishes, oils and chemicals, and particularly battery acid. Cleaning
may safely be carried out using mild soap and
water. The belt should be replaced if webbing
becomes frayed, contaminated or damaged.
•
It is essential to replace the entire assembly
after it has been worn in asevere impact even
if damage to the assembly is not obvious.
•
All seat belt assemblies including retractors
and attaching hardware should be inspected
after any collision by an approved dealer or
qualified workshop. RENAULT recommends
that all seat belt assemblies in use during a
collision be replaced unless the collision was
minor and the belts show no damage and continue to operate properly. Seat belt assemblies not in use during acollision should also
be inspected and, when necessary, replaced
if either damage or improper operation is
noted.
•
Once the pre-tensioner seat belt (where fitted) has activated, it cannot be reused. It must
be replaced together with the retractor. Contact an approved dealer or qualified workshop.
SSS0014Z
SSS0016Z
1-10 Safety —seats, seat belts and supplemental restraint system
•
Removal and installation of the pre-tensioner
seat belt system (where fitted) components
should be done by an approved dealer or
qualified workshop.
CHILD SAFETY
WARNING
•
Infants and children need special protection.
The vehicle’s seat belts may not fit them properly. The shoulder belt may come too close to
the face or neck. The lap belt may not fit over
their small hipbones. In an accident, an improperly fitted seat belt could cause serious
or fatal injury.
•
Always use an appropriate child restraint system.
Children need adults to help protect them. They
need to be properly restrained. The proper restraint
depends on the child’s size.
Infants and small children
RENAULT recommends that infants and small children be seated in achild restraint system. You
should choose achild restraint system that fits your
vehicle and the child, and always follow the manufacturer’s instructions for installation and use.
Large children
WARNING
•
Never allow children to stand or kneel on any
seats.
•
Never allow children in the luggage areas
while the vehicle is moving. Achild could be
seriously injured in an accident or sudden
stop.
Children who are too large for achild restraint system should be seated and restrained by the seat
belts that are provided.
If the child’s seating position has ashoulder belt that
fits close to the face or neck, the use of abooster
seat (commercially available) may help overcome
this. The booster seat should raise the child so that
the shoulder belt is properly positioned across the
top, middle portion of the shoulder and the lap belt
is low on the hips. The booster seat should also fit
the vehicle seat. Once the child has grown so that
the shoulder belt is no longer on or near the face or
neck of the child, use the shoulder belt without the
booster seat. In addition, there are many types of
child restraint systems available for larger children
that should be used for maximum protection.
PREGNANT WOMEN
RENAULT recommends that pregnant women use
seat belts. The seat belt should be worn snug, and
always position the lap belt as low as possible
around the hips, not the waist. Place the shoulder
belt over your shoulder and across your chest. Never
run the lap/shoulder belt over your abdominal area.
Contact your doctor for specific recommendations.
INJURED PERSONS
RENAULT recommends that injured persons use
seat belts. Contact your doctor for specific recommendations.
CENTRE MARK ON SEAT BELTS
(where fitted)
Selecting correct set of seat belts
The centre seat belt buckle (and/or tongue, where
fitted) is identified by the <CENTER> mark. The
centre seat belt tongue can be fastened only into the
centre seat belt buckle.
SSS0099Z
SSS0703Z
Safety —seats, seat belts and supplemental restraint system 1-11
THREE-POINT TYPE SEAT BELTS
Fastening seat belts
WARNING
The seatback should not be in areclined position
any more than needed for comfort. Seat belts are
most effective when the passenger sits well back
and straight up in the seat.
1. Adjust the seat. (See “Manual seat adjustment
(where fitted)” earlier in this section.)
2. Slowly pull the seat belt out of the retractor and
insert the tongue into the buckle until you hear
and feel the latch engage.
•
The retractor is designed to lock during a
sudden stop or on impact. Aslow pulling
motion permits the seat belt to move, and
allows you some freedom of movement in
the seat.
•
If the seat belt cannot be pulled from its
fully retracted position, firmly pull the belt
and release it. Then smoothly pull the belt
out of the retractor.
3. Position the lap belt portion low and snug on the
hips as shown.
4. Pull the shoulder belt portion toward the retractor to take up extra slack. Be sure the shoulder
belt is routed over your shoulder and is snug
across your chest.
Shoulder belt height adjustment (for
front seats)
WARNING
•
The shoulder belt anchor height should be
adjusted to the position best for you. Failure
to do so may reduce the effectiveness of the
entire restraint system and increase the
chance or severity of injury in an accident.
•
The shoulder belt should rest on the middle
of the shoulder. It must not rest against the
neck.
•
Be sure that the seat belt is not twisted in any
way.
•
Be sure that the shoulder belt anchor is secured by trying to move the shoulder belt anchor up and down after adjustment.
To adjust, pull on the release button
➀
and move
the shoulder belt anchor to the proper position
➁
,
so that the belt passes over the centre of the shoul-
SSS0292Z
SSS0467Z
SSS0351AZ
1-12 Safety —seats, seat belts and supplemental restraint system
 Loading...