

43-1101.fm Page 1 Friday, July 9, 1999 9:32 AM
Cat. No. 43-1101
OWNER’S MANUAL
Please read before using this equipment.
ET-1101
900MHz 40-Channel
Headset Cordless Phone

43-1101.fm Page 2 Friday, July 9, 1999 9:32 AM
FEATURES
Your RadioShack ET-1101 900MHz 40Channel Headset Cordless Phone combines the clarity o f 900MHz communication with portability and convenience.
The ET-1101’s headset connects to a
cordless keypad, so you can make calls
away from the base. And the headset lets
you keep your hands free while you talk.
Your phone includes these features:
900 MHz
— provides less interference
and clearer sound t han 46–49 M Hz cordless phones.
40-Channel Auto Scan
— automaticall y
selects a clear channel when you make or
answer a call.
Ample Talk and Standby Time
— the
supplied battery ( when ful ly c ha rg ed) p rovides about 8 hou rs of tal k ti me or 7 d ays
of standby time.
10-Number Memory
— stores up to 10
frequently called p hone nu mbers fo r eas y
dialing.
Intercom
— lets you page the keypad
from the base, or th e base from the keypad, and hold a conversation with the person at the other end.
Headset Volume Control
— lets you adjust the volume you hear through the
headset.
Ringer Volume Control
— lets you
choose high, medium, or low volume on
the keypad’s ringer.
Advanced Super CCT Circuitry
— provides sound clar ity comparable to that of
a corded phone.
Security Access-Protection Code
—
prevents other cordless phone users from
using your phone li ne while the keypa d is
off the base.
COM-LOK
®
— ensures that other cordless phone users canno t use your phone
line when the keypad is on the base.
Redial
— lets you redial the las t number
dialed, with the touch of a button.
Dual Charging Slots
— lets you ch arge
a spare battery pack (not s uppl ie d) so the
ET-1101 is always ready to go, even under constant use.
© 1998, 1999 Tandy Corpor ation.
COM-LOK and RadioShack are registered trademarks used by Tandy Corporation.
All Rights Reserved.
2
Mute
— prevents the person on the other
end of the phone line from hearing you as
you talk to someone else in the room.
CAUTION
43-1101.fm Page 3 Friday, July 9, 1999 9:32 AM
Flash
— sends an electronic switchhook
signal for use with s pec ia l p hon e s ervi ce s
such as Call Waiting.
Tone or Pulse (Rotary) Dialing
— lets
you use your phone with tone or pulse di aling and lets you easily switch from pulse
to tone dialing for lo ng-di stanc e, bank- byphone, or other special services.
Belt Clip
— lets you carry the keypad on
your belt for easy portability.
Hearing-Aid Compatibility
— lets you
use your phone with hearing aids that
have a T (telephone) switch.
Your ET-1101 is ETL listed to UL standards and meets all appl icable F CC stan dards.
Important Note:
Cordless phones such
as this one require AC po wer to operate.
When the AC power is off, you cannot dial
out or receive incoming calls using your
ET-1101. To be safe, you should also
have a phone that does not need AC
power to operate (no t a cordless phone)
so you can still make and receive calls if
there is an AC power failure.
tion or cause interference. This possible
lack of privacy can occur with any cordless phone.
We recommend you record your phone’s
serial number her e. T he n umb er i s on th e
bottom of the base.
Serial Number: __________________
Warning
: To prevent fire or shock
hazard, do not expose this product
to rain or moisture.
RISK OF ELECTRIC SHOCK.
DO NOT OPEN.
CAUTION
ELECTRIC SHOCK, DO NOT REMOVE
COVER OR BACK. NO USER-SERVICEABLE PARTS INSIDE. REFER SERVICING TO QUALIFIED PERSONNEL.
: TO REDUCE THE RISK OF
This symbol is intended to alert you to
the presence of uninsulated dangerous
voltage within the product’s enclosure
that might be of sufficient magnitude to
constitute a risk of electric shock. Do not
open the product’s case.
!
Note:
Your phone operates on standard
radio frequencies as allocated by the
FCC. It is possible for other radio units
operating nearby on similar frequencies
to unintentionally intercept your conversa-
This symbol is intended to inform you
that important operating and mainte-
!
nance instructions are included in the literature accompanying this product.
3

43-1101.fm Page 4 Friday, July 9, 1999 9:32 AM
READ THIS BEFORE
INSTALLATION
We have designed your phone to conform
to federal regulations, and you can connect it to most telephone lines. However ,
each device that you connect to the
phone line draws power from the phone
line. We refer to this power draw as the
device’s
REN. The REN is on the bottom of the
base.
If you are using more th an one phone or
other device on the line, add up all the
RENs. If the total is m ore than five (t hree
in rural areas), your phones might not
ring. If ringer operation is impaired, remove a device from the line.
ringer equivalence number
, or
FCC STATEMENT
This telephone complies with Part 68 of
FCC Rules
vide the FCC registration number and the
REN to your phone company. These
numbers are shown on the bottom of the
base.
Note:
to any of the following:
• coin-operated systems
• party-line systems
• most electronic key phone systems
Warning:
this unit not expressly approved by RadioShack could void the user’s authority
to operate the equipment.
. You must, upon r eque st , pr o-
You must not connect yo ur phone
Changes or modifications to
4

43-1101.fm Page 5 Friday, July 9, 1999 9:32 AM
CONTENTS
Preparation .......................... ............................................. ............................................ 6
Selecting a Location ................................................................................................ 6
Connecting the Phone ............................................................................................. 6
Connecting and Charging the Battery Pack ............................................................ 7
Attaching the Headset Holder ................................................................................. 8
Adjusting the Headset ............................................................................................. 9
Setting the Ringers On or Off .................................................................................. 9
Setting the Keypad’s Ringer Volume ..................................................................... 10
Setting the Dialing Mode ....................................................................................... 10
Operation ............................. ............................................. .......................................... 11
Making and Receiving Calls .................................................................................. 11
Adjusting the Headset’s Volume ............................................................................ 11
Changing Channels ............................................................................................... 11
Using Redial .......................................................................................................... 12
Using Mute ............................................................................................................ 12
Using Flash ........................................................................................................... 12
Using Tone Services on a Pulse Line .................................................................... 12
Using Page/Intercom ............................................................................................. 13
Paging the Headset/Keypad ........................................................................... 13
Paging the Base .............................................................................................. 13
Memory Dialing .............. ...... ....... ...... ....... ....................................... ...... ...... ....... ... 14
Storing a Number in Memory .......................................................................... 14
Entering a Pause in a Memory Number .......................................................... 15
Dialing a Stored Number ................................................................................ 15
Chain Dialing Service Numbers ...................................................................... 15
Testing Stored Emergency Numbers .............................................................. 15
Troubleshooting ........................ ........................................................... ...................... 16
Care and Maintenance ............................................................................................... 17
Replacing the Battery Pack ................................................................................... 17
The FCC Wants You to Know ................................................................................ 18
Lightning ......................... ................................ ................................. ...................... 19
5
!
43-1101.fm Page 6 Friday, July 9, 1999 9:32 AM
PREPARATION
SELECTING A LOCATION
You can place the phone’s ba se on a flat
surface such as desk, shelf, o r table. Select a location that is:
• near an easily accessible AC outlet
• near a telephone line jack
• out of the way of normal activities
• away from electrical machinery, elec-
trical appliances, metal walls, filing
cabinets, wireless interc oms, security
alarms, and room monitors
The base’s location affects the phone’s
range. If you have a ch oice of several lo cations, try each to see which provides
the best performance.
Notes:
• Your telephone connects directly to a
modular telephone line jack. If your
phone line jack is not a modular jack,
you can update the wiring yourself,
using jacks and adapters available at
your local RadioShack store. Or, you
can let the phone company update
the wiring for you.
• The USOC number of the jack to be
installed is RJ11C.
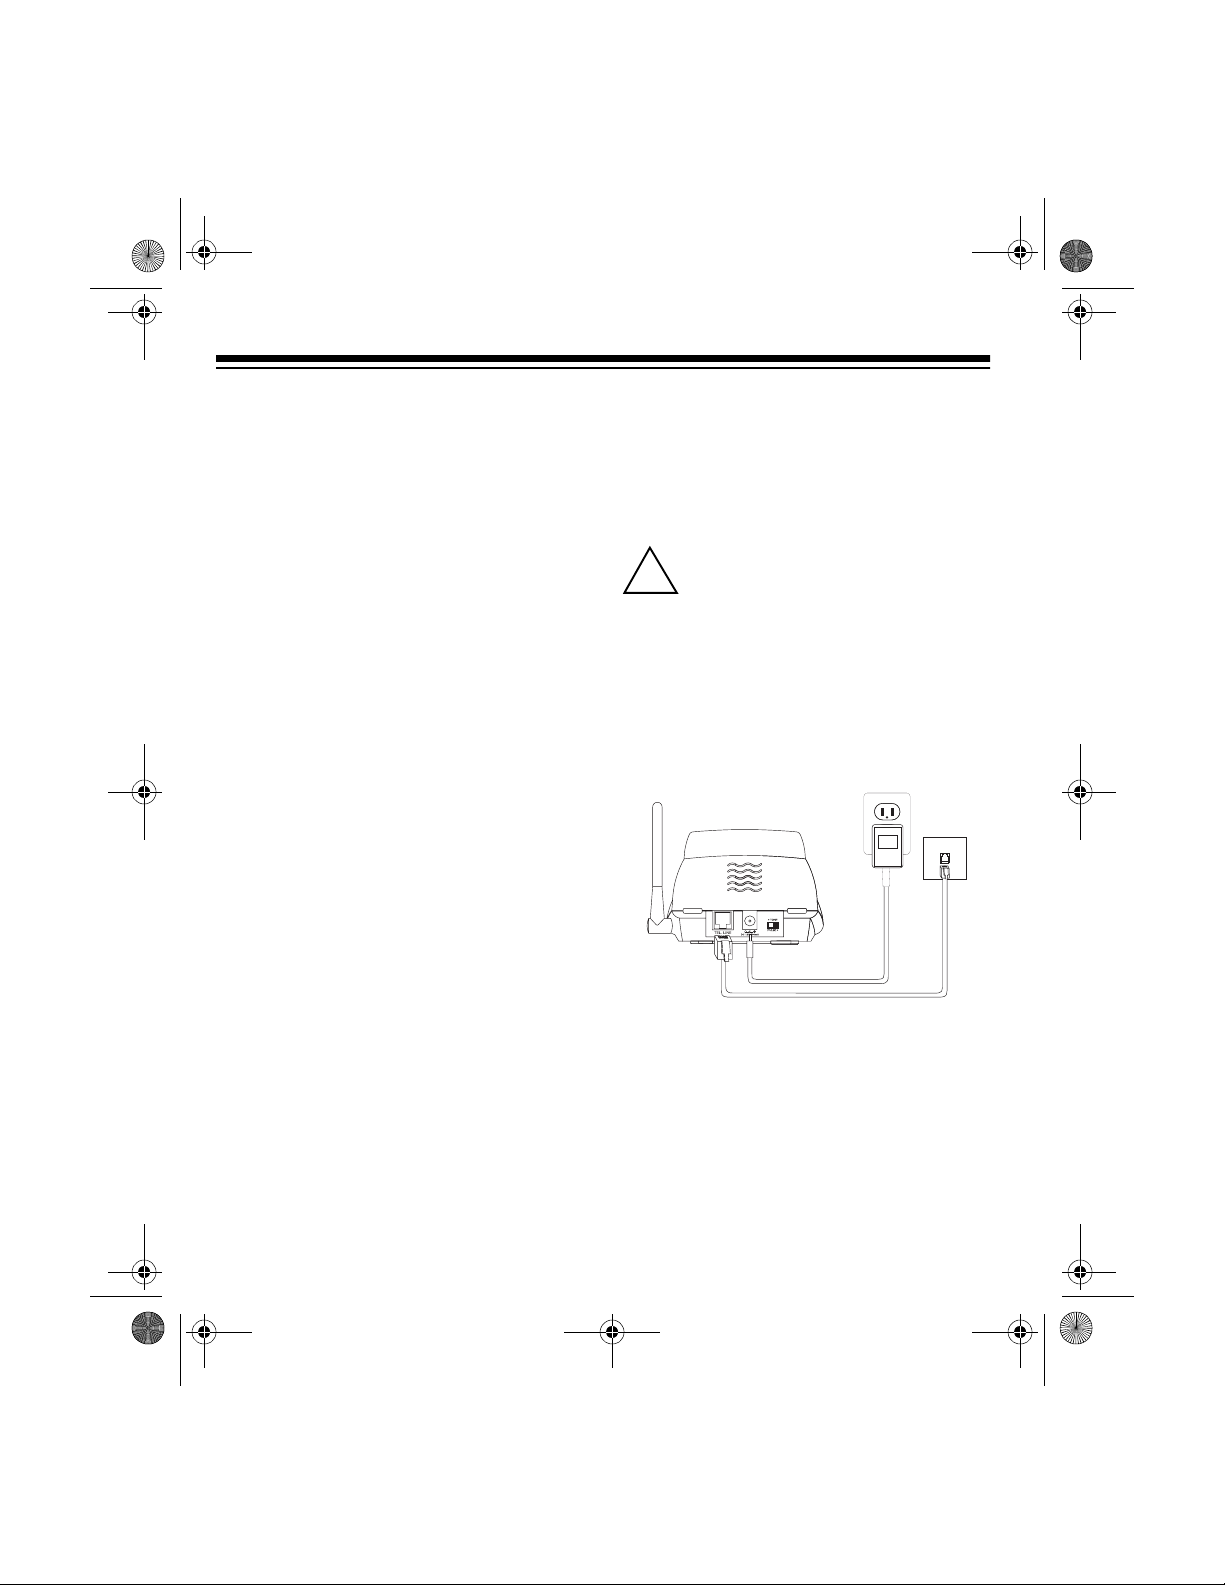
CONNECTING THE PHONE
After you select a locati on for the phone’s
base, follow these steps to connect it t o
AC power and to the phone line.
Caution:
2 power source that supplies 12
volts DC and delivers at least
500 mA. Its center tip must be set to positive and its plug must fit the ET-1101's
12V 500mA
meets these specifications. Using an
adapter that does not meet these specifications could damage the ET-1 101 or the
adapter.
1. Plug one end o f th e s up plied modular
cord into the
back of the base.
2. Plug the modular cord’s other end
into a modular phone line jack.
You must use a Class
DC
jack. The supplied adapter
TEL. LINE jack on the
6

43-1101.fm Page 7 Friday, July 9, 1999 9:32 AM
3. Plug the supplied AC adapter ’s barrel
plug into the
DC 12V 500mA jack on
the back of the base.
4. Plug the adapter into a s tandard AC
outlet.
5. Lift the base’s antenna to a vertical
position.
CONNECTING AND
CHARGING THE BATTERY
PACK
The ET-1101 comes with a recha rgeable
nickel-cadmium battery pack. You must
connect the battery pac k a nd c harge it fo r
at least 15 hours before you use the
phone.
To connect the bat tery pack, line up the
slots on the battery pack with the posts on
the back of the keypad. Press down and
slide the battery pack forward until the
latch clicks.
To charge the battery pack, place the
keypad in the front charging slot on the
base. The
CHARGE/IN USE indicato r on
the base lights.
Rear
Charging
Slot
Front
Charging
Slot
To charge a spare battery pack, place it in
the rear charging slot with its latch end
facing down and its contacts toward the
rear of the base. The CHA RGE indicator
lights.
Spare battery packs (RadioShack Cat.
No. 23-810, not suppl ied) a re a vaila ble at
your local RadioShack store.
Recharge the battery pack when the LOW
BATT indicator on the keypad flashes.
LOW BATT
Indicator
7

43-1101.fm Page 8 Friday, July 9, 1999 9:32 AM
Notes:
• When you first use the phone after
charging or recharging the battery
pack, the phone might not work and
you might hear error tones (three
beeps).
If you hear the error tones, retur n the
keypad to the base for about 5 seconds to reset the security accessprotection code.
• About once a month, fully discharge
the battery pack by keeping the
phone off the base until the LOW
BATT indicator flashes. Otherwise,
the battery pack loses its ability to
fully recharge.
• If the CHARGE/IN
USE indicator does
not light when you
place the keypad
on the base, be
sure the battery
pack and AC
adapter are correctly and securely
connected. Also,
check the charging
contacts on the
keypad and base. If
the contacts are
dirty or tarnished,
clean them with a
pencil eraser.
Charging Contacts
Charging Contacts
• If the battery pack becomes completely discharged or the base loses
power while the handse t is away from
it, the security acce ss-pr ote ction code
needs to be reset. To reset the security code, place the handset on the
base for about 5 seconds. If it was the
handset that lost power, leave it on
the base to charge the battery pack.
• If you ar e no t goi ng to use your phone
for an extended period of time, disconnect its battery pack. This helps
increase the battery pack’s usable
life.
ATTACHING THE HEADSET
HOLDER
Insert the tabs on the headset hol der into
the slots on the base and snap it into
place.
8

43-1101.fm Page 9 Friday, July 9, 1999 9:32 AM
ADJUSTING THE HEADSET
1. Place the headset on your head wi th
the earpiece over either ear.
2. Adjust the headset band un til it rests
with almost no pressur e on your ear
and the top of your head.
Note:
When you are not using the he adset, place it on the headset hange r. Otherwise (if you just lay it down on a flat
surface, for e xample), you might ha ve to
repeat these adjustments.
SETTING THE RINGERS ON
OR OFF
The ringer swit ch on the right side of th e
base controls bo th the keypad and base
ringers. To have the ET-1101 ring when a
call comes in, set
the ringer off, set
RINGER to ON. To turn
RINGER to OFF.
RINGER
If the headset is loose, adjust it
inward slightly to tighten it. If the
headset is tight, gen tly pull the head set band out to loosen it.
3. Hold the headset in pl ace, and adju st
the microphone boom until it is about
even with your chin. Experiment until
you find the most comfortable position.
Caution:
swivels on the headset. Do not be nd
the microphone boom while you
adjust it.
The microphone boom
RINGER set to OFF, the phon e does
With
not ring, but you can still make outgoing
calls. If you hear an extens ion telephone
ring, you can answer the in comi ng call on
this phone. The CHARG E/IN USE ind icator on the base and the IN USE indicator
on the keyp ad flash until you an swer the
call.
9

43-1101.fm Page 10 Friday, July 9, 1999 9:32 AM
SETTING THE KEYPAD’S
RINGER VOLUME
You can adjust the keypad’s ringer volume by repeatedly pre ssing
JUST
when the phone is not in use. The
keypad rings with the current volume
(high, medium, or low) as you select it.
Note:
You cannot adjust the base’s ringer
volume.
RINGER
ADJUST
RINGER AD-
2. Press TALK so the IN USE indicator
lights and listen for a dial tone.
IN USE
Indicator
SETTING THE DIALING
MODE
Set TONE-PULSE on the side of the base
for the type of service you have. If you are
not sure which type you have, do this simple test after charging the battery pack.
1. Set
10
TONE-PULSE to TONE.
3. Press any number other than
Note:
If your phone system requires
0.
that you dial an access code (9, for
example) before you dial an outside
number, do not press the access
code either.
If the dial to ne s tops, you have touchtone service. If the dial tone continues, you have pulse service.
4. If you have tone service, leave
PULSE
set to TONE. If you have pulse
service, set
TONE-PULSE to PULSE.
TONE-
5. To hang up, place the keypad on the
base or press
TALK.

43-1101.fm Page 11 Friday, July 9, 1999 9:32 AM
OPERATION
MAKING AND RECEIVING
CALLS
Before you use the phone, pu t the headset on and adjust it as needed.
To make a call, lift the keypad off the
base, then press
tone and the IN USE indi cator lights . Dial
the number you want to call.
To answer a call, lift the keypad off the
base, then press
cator lights.
TALK
To end a call, press
keypad on the base.
Notes:
• When you press a button, a single
tone indicates that the p hone has accepted the command. Thr ee to nes in dicate that you pressed a button in
error, you are out of range, or there is
too much interference. If there is severe interference, see “Changing
Channels.”
TALK. You hear the di al
TALK. The IN USE indi-
VOLUME
TA L K or place the
• If interference is severe, the keypad
might lose communication with the
base and the call might disconnect. If
this happens, return the keypad to the
base for about five seconds to reset
the security access-protection code.
ADJUSTING THE
HEADSET’S VOLUME
To adjust the headset’s volume, repeatedly press
ing a call until the sound level is
comfortable. You can set the headset’s
volume to one of eight levels, and it will
remain set even after you hang up.
VOLUME ▲ or VOLUME ▼ dur-
CHANGING CHANNELS
Every time you pr ess TALK, the ET- 1101
automatically selects a clear channel from
the 40 it uses for communication between
the headset and the base. If you hear interference during a call, repeatedly pre ss
CHANNEL to change the channel until you
get a clear one.
CHANNEL
REDIAL
11

43-1101.fm Page 12 Friday, July 9, 1999 9:32 AM
USING REDIAL
To quickly redial the last number dialed,
press
TALK then REDIAL.
Notes:
• The redial memory holds up to 32
digits, so you can redial long-distance
as well as local numbers.
• The redial memory can also store
tone entries (see “Using Tone Services On a Pulse Line”) and pause
entries (see “Entering a Pause in a
Memory Number” on Page 15).
USING MUTE
To talk to someone else i n the room without the person on the other end of the
phone line hearing your conversation,
press
MUTE.
USING FLASH
FLASH provides the ele ctronic equivalent
of a switchhoo k signal for special phone
services such as Call Waiting.
TONE
FLASH
For example, if you have Call Waiting,
press
FLASH to answer an inc oming call
without disconnecting the current call.
Press
call.
Note:
phone services, pressing
disconnect your current call.
FLASH again to return to the first
If you do not have any special
FLASH might
MUTE
Press
MUTE again to resume yo ur phone
conversation.
12
USING T ONE SERVICES ON
A PULSE LINE
Some special se rvices, such as ba nk-byphone, require tone signals. If you have
pulse service, you can still use these tone
services by following these steps.
1. Dial the service’s main number.

43-1101.fm Page 13 Friday, July 9, 1999 9:32 AM
2. When the service answers, press
TONE. Any additional numbers you
dial are sent as tone signals.
3. After you complete the call, press
TALK or return the keypad to the
base. The phone autom ati ca ll y re se ts
to pulse dialing.
INTERCOM
USING PAGE/INTERCOM
You can send a page and use the ET1101 as an intercom between the base
and the headset/keypad. T his is useful if
the headset/keypad is away from the
base and you want t o locate it, or if you
want to have a conversation between
someone using the headset/keypad and
someone at the base.
Paging the Headset/Keypad
To page the person who has the headset/
keypad or to locate the headset/keypad
when the phone is not in use, press
TERCOM
on the base. The keypad rings
three times and its INTE RCOM indicator
flashes. To have the keypad ring for a
longer time, hold down
INTERCOM for 3
seconds. The keypad rings about 9 times.
IN-
To answer the page, press
INTERCOM on
the keypad before the INTERCOM indicator stops flashing (about 6 seconds).
When you finish your intercom conversation, press
INTERCOM again to hang up.
Paging the Base
To page the base, press INTERCOM on
the keypad. The base rings nine times
and its INTERCOM indicator flashes.
INTERCOM Indicator
To answer the page, press
the base before the INTERCOM indi cator
stops flashing (about 18 seconds). To end
the intercom conversation, press
COM
again.
INTERCOM on
INTER-
13

43-1101.fm Page 14 Friday, July 9, 1999 9:32 AM
MEMORY DIALING
You can store up to 10 n umbers of up to
16 digits each in the ET-1101’s memory.
Notes:
• To keep your accounts secure, we
recommend you do not store your
personal access code for services
such as bank-by-phone i n a memory
location.
• When storing numbers for special
services ( such as alternate long distance or bank-by-phone), store the
service’s main phone number in o ne
memory locati on and number s for additional information in other locations.
Storing a Number in Memory
Note:
If you do not press a ny button on
the keypad within about 10 seconds, 3
beeps sound and the phone exits the
memory storing pr ocess. Star t again from
Step 1.
1. While the phone is not i n use, press
MEMORY.
2. Dial the number you want to store.
3. Press
MEMORY again.
4. Press the memory location number
(
0–9) you want to use. The keypad
sounds one long tone to confir m that
the phone number has been stored.
Note:
If you do not hear a long to ne,
you did not successfully store the
number. Start again at Step 1.
5. Pull out the memory index card at the
bottom of the base and write the
associated name or stored number
next to the location number. We recommend you use a pencil so you can
change it later.
14
MEMORY

43-1101.fm Page 15 Friday, July 9, 1999 9:32 AM
Notes:
• If you receive a call while you are
storing a number in memory, press
TA LK to answer the call. After the call,
begin again at Step 1.
• To change a number stored in memory , simply store a new number in that
memory location.
Entering a Pause in a Memory
Number
In some telephone systems, you must dial
an access code (9, for exam ple) and wa it
for the second dial tone before you can
dial an outside number. You can store the
access code with the phone number.
However, you should also s tore a pause
after the access c ode to al lo w t he out si de
line time to connect. To do so, press
PAU SE to enter a 3-second pause after
entering the access code. For a longer
pause, press
PAUSE again.
Dialing a Stored Number
Press TALK. When you hear the dial tone,
press
MEMORY then th e memory lo cation
number. The phone dials the number.
Chain Dialing Service Numbers
For quick recall of numbers for special
services (such as alt ernate long distance
or bank by phone), store each group of
numbers in its own memory location.
When calling special services, dial the
service’s main number first. Then, at the
appropriate place in the call, press
RY
, then the number for the location
where the additional numbers are stored.
Note:
If you use pulse dialing, be sure
you have stored a tone entry in another
memory location (see “Using Tone Services on a Pulse Line” on Page 12).
MEMO-
PAUSE
Test ing Stored Emergency
Numbers
If you store an emergency service’ s number (police department, fire department,
ambulance) and you want to test the
stored number, make th e test call during
the late evening or e ar ly m or ning to avoid
peak demand periods. Remain on the line
to explain the reason for your call.
15

43-1101.fm Page 16 Friday, July 9, 1999 9:32 AM
TROUBLESHOOTING
We do not expect you to have any problems with your phone, but if you do, the following
suggestions might help.
Problem Suggestion
The keypad does not work. Move the keypad closer to the base.
Raise the base’s antenna to a vertical position.
Ensure the phone’s modular cord and the AC adapter are
correctly and securely connected.
Recharge the keypad’s battery pack. (If battery power is
too low, the LOW BATT indicator does not light.)
Reset the security access-protection code by placing the
keypad on the base for about five seconds.
Call is noisy. Keep the headset and base away from interference
sources such as computers, remote control toys, wireless alarm systems, wireless intercoms and room monitors, fluorescent lights, and electrical appliances. If the
interference is severe, turn off the interfering device.
Move the keypad closer to the base.
Hang up and redial the number.
Press
CHANNEL to change the channel.
The range decreases. Ensure the base’s antenna is raised and is not touching a
metal surface.
Recharge the keypad’s battery pack.
Can receive calls, but cannot make calls.
If you still have pro blems , disco nnect the phon e. If o ther phones on the sa me li ne wo rk
properly, the fault is in this phone or its installation. If you ca nnot locate the problem,
take your ET-1101 to your local RadioShack store for assistance.
16
Set
TONE-PULSE correctly for the type of service you
have (see “Setting the Dialing Mode” on Page 10).

43-1101.fm Page 17 Friday, July 9, 1999 9:32 AM
CARE AND MAINTENANCE
To enjoy your RadioShack ET-1101 900
MHz 40-Channel Headset Cordless
Phone for a long time:
• Keep the phone dry. If it gets wet,
wipe it dry immediately.
• Use and store the phon e only in normal temperature environments.
• Handle the phone gently and carefully. Don’t drop it.
• Keep the phone away from dust and
dirt.
• Wipe the phone with a damp cloth occasionally to keep it looking new.
Modifying or tampering with the phone’s
internal components can cause a malfunction and invalidate its warranty. If
your phone is no t p er for mi ng as it should,
take it to your local RadioShack store fo r
assistance. If the trouble is affecting the
telephone lines, the phone company c an
ask you to disconnect your phone until
you have resolved the problem.
REPLACIN G THE BATTERY
PACK
If you follow th e instructions in “Con necting and Charging the Battery Pack” on
Page 7, the battery pack should last
about a year. If the bat tery pack d oes not
hold a charge for more than 2 hours after
an overnight char ge, replace it. You can
order a replacement battery pack (Cat.
No. 23-810) through your local RadioShack store.
Note:
To avoid losing numbers stored in
memory, try to install and begin charging
the new battery pack within 2 minutes of
removing the old one.
1. To remove the old battery pack, press
the latch release, then slide the battery pack back and lift it from the keypad.
Latch Relea s e
2. To connect the new battery pack, line
up the slots on the battery pack with
the posts on the keypad. Press down
and slide it forward until the latch
clicks.
17

43-1101.fm Page 18 Friday, July 9, 1999 9:32 AM
3. Charge the battery pack for 15 hours
before using it.
Cautions:
• Be careful not to short the battery
pack by touching it with conducting
materials, such as rings, bracelets,
and keys. The battery pack or conductor might overheat and burn.
• Do not dispose of the bat tery p ack in
a fire because it might explode.
• Do not open or mutilate the battery
pack.
Note:
If you have trouble replacing the
battery pack, take t he phon e to y our loc al
RadioShack store for assistance.
Important:
chargeable nickel cadmium battery pac k.
At the end of t h e b a t ter y pa ck ’s useful life,
it must be recycled or dis pos ed of prop er ly. Contact your local, county, or state
hazardous waste management authorities for information on recycling or disposal programs in your area. Some options
that might be available are: municipal
curb-side collecti on, drop-off boxes at retailers such as your local RadioShack
store, recycling collection centers, and
mail-back programs.
Your telephone contai ns a re-
THE FCC WANTS YOU TO
KNOW
In the unlikely event that your phone
causes problems on the phone line, the
phone company can temporarily discontinue your service. If this happens, the
phone company attemp ts to notify you in
advance. If advance notice is not practical, the phone company notifies you as
soon as possible an d advi ses yo u o f your
right to file a complaint with the FCC.
Also, the phone company can make
changes to its lines, equipment, operations, or procedures that c ould affect the
operation of this telephone. The telephone company notifies you of these
changes in advanc e, so you c an take the
necessary steps to pr event interru ption o f
your telephone service.
This equipment complies with the limits
for a Class B digital d ev ice as sp ec ifi ed i n
Part 15 of
vide reasonable protection against radio
and TV interference in a residential area.
However, your equipment might cause
TV or radio interference even when it is
operating properly. To eliminate interference, you can try one or more of the following corrective measures:
FCC Rules
. These limits pro-
18
• Reorient or r elocate the receivi ng antenna.

43-1101.fm Page 19 Friday, July 9, 1999 9:32 AM
• Increase the distance between the
equipment and the radio or TV.
• Use outlets on dif ferent electrical circuits for the equipment and the radio
or TV.
Consult your local RadioShack store if the
problem still exists.
LIGHTNING
Your telephone has built-in lightning p rotection to reduce the risk of damage from
surges in telephone line and power line
current. This lightning protectio n m eets o r
exceeds FCC requirements. However,
lightning striking the telephone or power
lines can damage your telephone.
Lightning damage is no t common. N evertheless, if you li ve in an area that has severe electrical storms, we suggest that
you unplug your phone before storms to
reduce the possibility of damage.
19

43-1101.fm Page 20 Friday, July 9, 1999 9:32 AM
Limited One-Year Warranty
This product is warrant ed by RadioShack ag ainst manufactur ing defects in mat erial and workm anship under normal use for one (1) year from the date of purchase from RadioShack company-owned
stores and authorized RadioShack franchisees and dealers. EXCEPT AS PROVIDED HEREIN, RadioShack MAKES NO EXPRESS WARRANTIES AND ANY IMPLIED WARRANTIES, INCLUDING
THOSE OF MERCHANTABILITY AND FITNESS FOR A PARTICULAR PURPOSE, ARE LIMITED
IN DURATION TO THE DURATION OF THE WRITTEN LIMITED WARRANTIES CONTAINED
HEREIN. EXCEPT AS PROVIDED HEREIN, RadioShack SHALL HAVE NO LIABILITY OR RESPONSIBILITY TO CUSTOMER OR ANY OTHER PERSON OR ENTITY WI TH RESP ECT TO ANY
LIABILITY, LOSS OR DAMAGE CAUSED DIRECTLY OR INDIRECTLY BY USE OR PERFORMANCE OF THE PRODUCT OR ARISING OUT OF ANY BREACH OF THIS WARRANTY, INCLUDING, BUT NOT LIMITED TO, ANY DAMAGES RESULTING FROM INCONVENIENCE, LOSS
OF TIME, DATA, PROPERTY, REVENUE, OR PROFIT OR ANY INDIRECT, SPECIAL, INCIDENTAL, OR CONSEQUENTIAL DAMAGES, EVEN IF RadioShack HAS BEEN ADVISED OF THE
POSSIBILITY OF SUCH DAMAGES.
Some states do not allow the limitations on how long an implied warranty lasts or the exclusion of incidental or consequential damages, so the above limitations or exclusions may not apply to you.
In the event of a pr oduct defect dur ing the warranty p eriod, take the pr oduct and the R adioShack
sales receipt as proof of purchase date to any RadioShack store. RadioShack will, at its option, unless otherwise provid ed by l a w: ( a) corr ect the defect by product repai r wit ho ut char ge for pa rts and
labor; (b) replace the product with on e of the same or sim ilar design; or (c ) refund the purchase
price. All replaced parts and products, and produ cts on which a refund is made, become the property of RadioShack. New or reconditioned parts and products may be used in the performance of
warranty service. Repaired or repla ced parts and pr oducts are war ranted for the remainder of the
original warranty period. You will be charged for repair or replacement of the product made after the
expiration of the warranty period.
This warranty does not cover: (a ) dam ag e or fa ilu re cause d by or att ribu tab le to acts of God, abuse,
accident, misuse, imp rop er o r a bn orm al usa ge, fa i lure to f ol low i nstr uct ions, i mp roper i n stall a tion or
maintenance, altera tion, lightning or oth er incidence of excess voltage or current; (b ) any repairs
other than those provided by a Rad ioShack Authorized Service Facility; (c) con sumables such as
fuses or batteries; (d) cos meti c damag e; (e) tr anspor tation, sh ippin g or insura nce costs; or (f) cost s
of product removal, installation, set-up service adjustment or reinstallation.
This warranty gives you specific l egal rights, and you may also have other ri ghts which vary from
state to state.
RadioShack Customer Relations, 200 Taylor Street, 6th Floor, Fort Worth, TX 76102
We Servi ce What We Sell
04/99
RadioShack
A Division of Tandy Corporation
Fort Worth, Texas 76102
07A99 Printed in China
 Loading...