

Page 1
15-191 6b.fm Page 1 Monday, July 19 , 1999 12:17 PM
Cat. No. 15-1916B
OWNER’S MANUAL
3 in 1 Easy Remote
Please read before using this equipment.
P
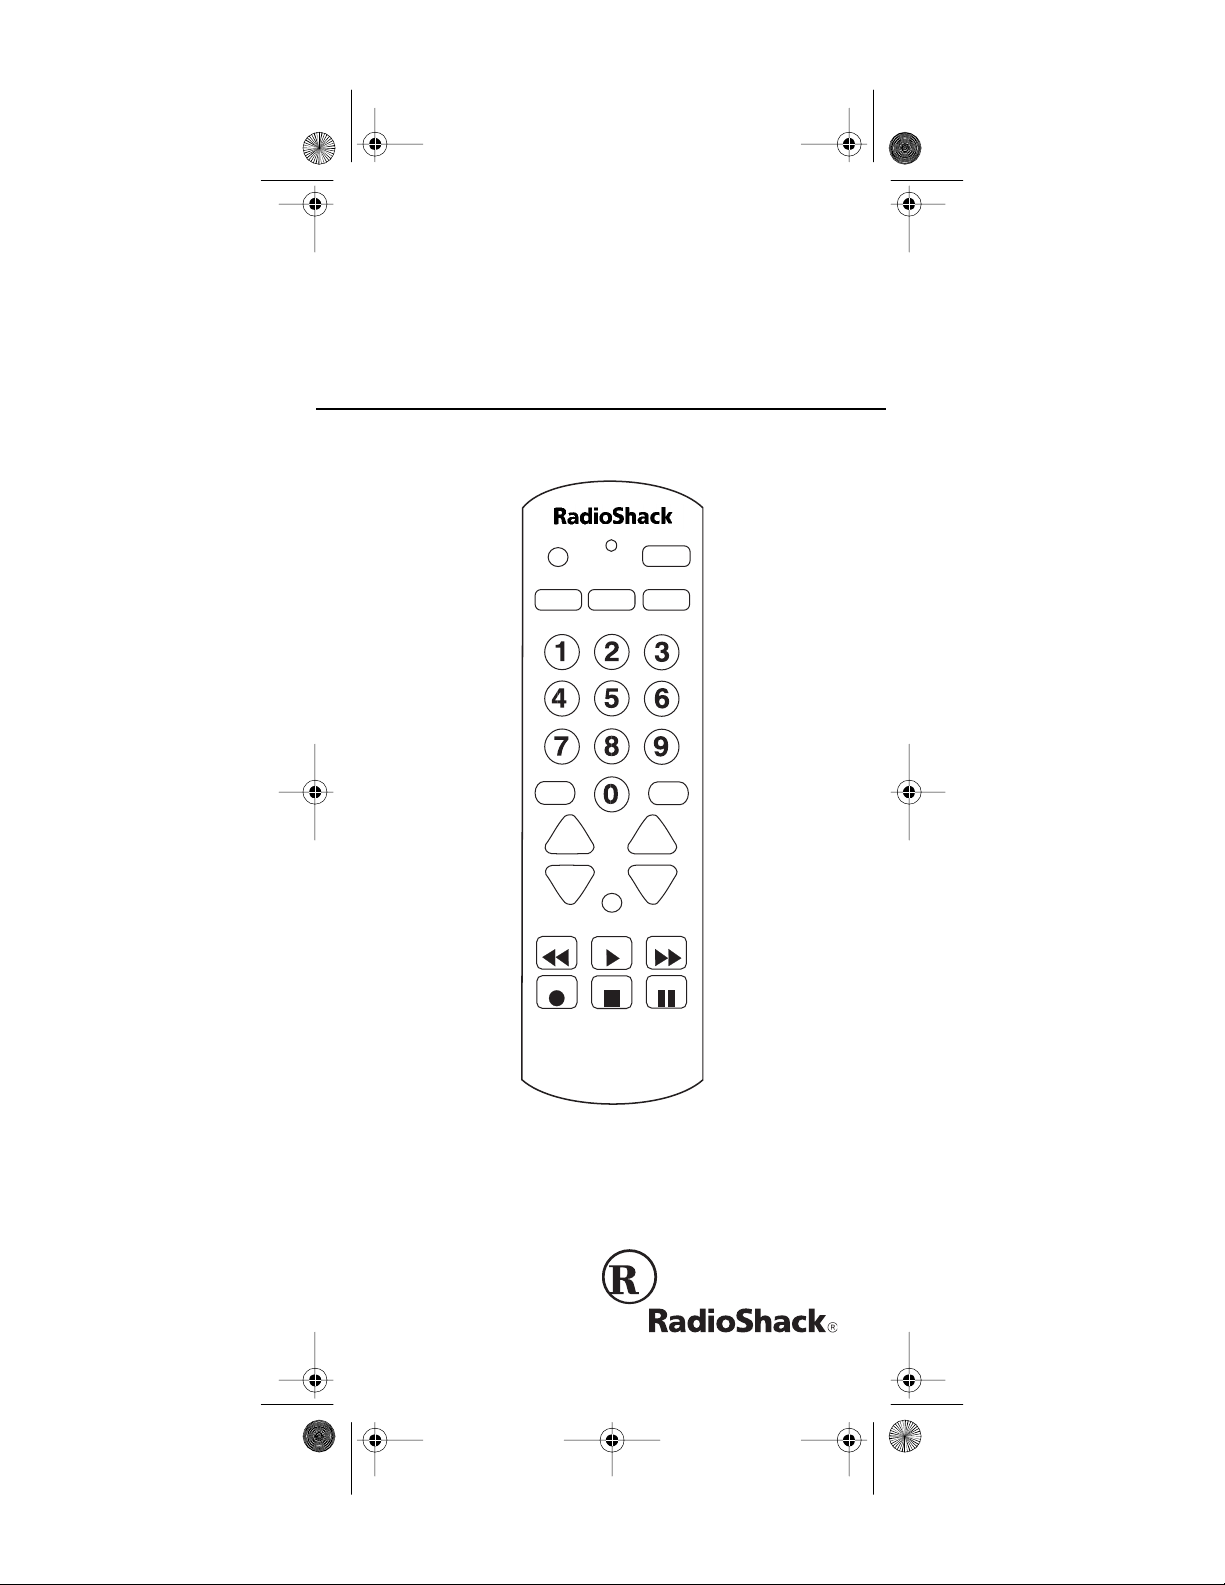
TV VCR
MUTE
VOL CHAN
PWR
CBL
LAST
S
FAST F
REWIND
RECORD STOP PAUSE
PLAY
3 IN 1
EASY REMOTE
Page 2

y
y
15-191 6b.fm Page 2 Monday, July 19 , 1999 12:17 PM
INTRODUCTION
Your RadioShack 3 in 1 Easy Remote can replace up to three standard infrared remote control s.
Unlike some universal remote controls, the 3 in 1
is
preprogrammed
commands from the original remote controls. All
you have to do is tell the 3 in 1 which remote controls you want it to replace.
After you’ve entered the manufacturers’ codes for
your original remotes, the 3 in 1 is automatically
ready to operate most of the same functions as
the original remotes. (This manual includes a list
of manufacturers’ codes for TVs, VCRs, and cable converters.)
Your 3 in 1 remote has these features:
and does not have to learn its
Replaces Other Remotes
— lets you replace up
to three remote controls with one easy-to-use remote control.
Powerful Infrared Beam
— in many cases, lets
you operate your remote-c ontrolled devices from
a greater distance than with the origin al remote
controls.
Convenient Ke
pad Design
— places each
control key in the best position for easy operation.
Hand
Reference Label
— provides a convenient place for you to write down the manufacturers’ codes.
Toll Free Support
your 3 in 1 by calling
You need two AAA batteries (not supplied)
Note:
— you can get expert help for
1-800-955-2599
.
to operate your 3 in 1 remote.
©
1997 Tandy Corporation.
RadioShack is a registered trademark used by
All Rights Reserved.
Tandy Corporation
Need help? Call 1-800-955-2599
2
Page 3

15-191 6b.fm Page 3 Monday, July 19 , 1999 12:17 PM
CONTENTS
How the 3 in 1 Works ..................................... 4
Preparatio n ............... .......... ......... ................... 5
Installing Batteries ...................................... 5
Setting Up Your Remote Control ................ 6
Operation ................ ......... .......... ......... ............ 8
Punch Through .......................................... 8
Favorite Channel Scan .............................. 9
Clearing Favorite Channel Scan ................ 9
Manufacturers’ Codes ................................. 10
Cable Converters.......................................10
Televisions .................................................12
TV/VCR Combinations...............................16
VCRs..........................................................17
If You Have Problems .................................. 23
Manual Code Search ............................... 23
Determining the 3-Digit Code ................... 23
Troubleshooting ....................................... 25
Care and Maintenance ................................. 26
Specifications .............................................. 27
Need help? Call 1-800-955-2599
3
Page 4

15-191 6b.fm Page 4 Monday, July 19 , 1999 12:17 PM
HOW THE 3 IN 1 WORKS
Before you begin to use the 3 in 1, it is helpful to
understand a little about how it wo rks — no thing
technical, only an idea of what you can expect
from i t.
After you set up the 3 in 1, its command keys work
like the keys on your original remote controls,
though the labeling might differ slightly. For example, a key on your original rem ote control that
might be labeled PWR ON/OFF is equivalent to
the 3 in 1’s
PWR
key.
Notes:
is a special key that you use whe n you set
•
P
up (program) the 3 in 1 to replace your original remote controls.
•
TV, VCR
, and
CBL
are
keys. You use
device
them when you set up the 3 in 1 to replace
your original remote controls. You also use
the device keys during normal operation to
tell the 3 in 1 which device you want to control.
•
PWR
(power),
MUTE
, and
LAST
(recall) operate the same as on your original remote control.
• Whenever you us e the 3 in 1’s
RECORD
you must press it twice. This safety feature
helps prevent you from accidentally erasing
video tapes.
key,
Need help? Call 1-800-955-2599
4
Page 5

15-191 6b.fm Page 5 Monday, July 19 , 1999 12:17 PM
PREPARATION
INSTALLING BATTERIES
Cautions:
• Be sure to have fresh batteries ready to
install before you remove the old batteries.
The 3 in 1’s memory only lasts about a
minute without the batteries. If the memory is
lost, simply re-enter the 3-digit manufacturers’ codes for your remote-controlled
devices.
• Do not mix old and new batteries, different
types of batteries (standard, alkaline, or
rechargeable), or rechargeable batteries of
different capacities.
1.Press the battery
compartment cover
tab and lift off the
cover.
2.Install two AAA alkaline batteries as indicated by the polarity
symbols marked
inside the compartment.
3.Replace the cover.
When the 3 in 1’s range decrease s or the 3 in 1
operates erratically, replace the batteries.
Need help? Call 1-800-955-2599
5
Page 6

15-191 6b.fm Page 6 Monday, July 19 , 1999 12:17 PM
Do not place objects on top of the remote
Note:
control after you install the batteries. This can
press down keys and reduce battery life.
SETTING UP YOUR REMOTE
CONTROL
1. Refer to “Manufacturers’ Cod es” on Page 10
and write down the codes for your original
remote controls on the provided label.
2. Press the device key for the type of remote
you are replacing (
3. Hold down
twice, then release
TV, VCR
P
until the red indicator blinks
P
and enter the 3-digit
manufacturer ’s code.
For example, to replace a Panasonic TV’s
remote control (manufacturer code 051), you
would press:
TV P 0 5 1
4. When the indicator blinks twice aga in, point
the 3 in 1 at your device and press
device should turn on (or off, if it was on).
, or
CBL
).
PWR
. The
Repeat these steps for additional devices.
Notes:
• The punch-through feature is automatically
turned on for the TV’s volume and mute controls. This means that when you select
and press one of the volume buttons or
MUTE
, the remote actuall y sends the codes
to the television to control it, not the cable
converter. If you want to use y our c able converter’s volume and mute controls, disable
the punch-through feature for these buttons.
See “Punch Through” on Page 8.
Need help? Call 1-800-955-2599
6
CBL
Page 7

15-191 6b.fm Page 7 Monday, July 19 , 1999 12:17 PM
• If the remote does no t operate your device,
try other codes listed in “Manufacturers’
Codes” for your bran d of TV, VCR, or cable
box. If your device still doe s not res pond, follow the steps outlined in “If You Have Problems” on Page 23.
Need help? Call 1-800-955-2599
7
Page 8

15-191 6b.fm Page 8 Monday, July 19 , 1999 12:17 PM
OPERATION
1. Press the device key for the device you want
to control.
2. Point the 3 in 1 toward the device an d press
to turn it on.
PWR
3. Repeat Steps 1 and 2 for other devices.
4. Point the 3 in 1 toward the device you want
to control and press the appropriate device
key, then the desired command keys.
The command keys on the 3 in 1 work the
same as the keys on the device’s original
remote control; however, the labeling might
differ slightly.
5. To turn off the last device you selected, press
. To turn off other devices, press the
PWR
device key for the device you want to turn off,
and then press
PWR
.
PUNCH THROUGH
The punch-through feature lets you control two
different devices without pressing the device keys
for each one first. Here’s how it works.
No device uses all of the 3 in 1’s keys. For example, a TV is often the only device that uses th e
keys, and a VCR is usually t he only device
VOL
that uses keys such as
RECORD
When you press
VCR
.
TV
to control a VCR, any keys not used by the
REWIND, FAST F
to control a TV, then press
VCR will still control the TV. For examp le,
still controls the TV’s volume.
If your cable box or VCR has a volume control,
you can turn off the punch-through feature so you
can use the cable box’s or VCR’ s volum e cont rol
to control the sound (if it can already do so).
Need help? Call 1-800-955-2599
8
, and
VOL
Page 9

15-191 6b.fm Page 9 Monday, July 19 , 1999 12:17 PM
If you want to turn off the punch-through feature
and control the volume t hrough your cable box,
hold down
Release
until the red indicator blinks twice.
P
, the n p res s
P
9 9 3 CBL
. When the indicator blinks twice, you can control the volume
through your cable box.
If you want to turn the punch-through feature back
on and con trol t he volume through your TV, hold
down
lease
until the red indicator blinks twice. Re-
P
then press
P,
. When the indicator
9 8 0
blinks twice, you can control the volume using
your TV.
The punch-through feat ure does not work if the
last two devices you select have the same (or
similar) features. For example, most TVs and
VCRs have channel keys on their remote controls. In this case, you would have to press the desired device key before you use the 3 in 1’s
channel keys.
FAVORITE CHANNEL SCAN
Your 3 in 1 is equipped with a favorite channel
scan (
peatedly scan through up to 10 of your favorite
channels on your TV, VCR, or cable box anytime
you press
Note:
set up for one device (TV, VCR or CBL). You cannot set up a favorite channel list for another device until you clear the existing list.
) key. You can set up the remote to re-
S
.
S
The favorite channel scan key c an o nly be
1. Press the device key (
TV, VCR
, or
CBL
the device that will contain your favorite
channel list.
2. Hold down
twice. Release
Need help? Call 1-800-955-2599
until the 3 in 1’s red light blinks
P
and enter
P
9 9 6
.
) for
9
Page 10

15-191 6b.fm Page 10 Monday, July 19, 1999 12:17 PM
3. Enter the channel number of the first channel
you want to include in your favorite channel
list. Then press
.
P
You must press
Note:
before entering a
0
single digit channel number. If you are entering a channel that is t hree digits long, such
as 103, you do not have to press
after
P
entering the channel number.
4. Repeat Step 3 for other channels (up to 10)
you want to include in your list. Then, hold
down
until the 3 in 1’s red light blinks twice.
P
5. To scan through your favorite channel list,
press the device key (TV,
VCR
, or
CBL
) for
the device that contains your favorite channel list, then press
. Your 3 in 1 repeatedly
S
scans through your favorite channel list,
stopping at each channel for three seconds.
6. To stop at one of your f avorite channels while
the 3 in 1 is running through your list, press
any key on the remote (other than
).
S
Clearing Favorite Channel Scan
1. Hold down P until the 3 in 1’s red light blinks
twice, then release
2. Press
, then hold down P until the 3 in
9 9 6
1’s red light blinks twice.
.
P
10
Need help? Call 1-800-955-2599
Page 11

15-191 6b.fm Page 11 Monday, July 19, 1999 12:17 PM
MANUF ACTURERS’ CODES
The following lists show which 3-digit codes to enter to set up the 3 in 1 for your rem ot e-controlled
devices.
Notes:
• The 3 in 1 might not always have every com-
mand that your original remote controls
have.
• Use the label included with the 3 in 1 to
record the manufacturers’ codes for your
remote-controlled devices.
Manufacturer Code(s)
Cable Converters
ABC 001, 003 , 007, 011 ,
013, 01 4, 017
Antronix 022
Archer 022 1 5-1285
153 15-1287
Cable Star 056
Century 153, 618
Citizen 153, 315
Comtronics Eagle 008, 040
Contec 019
Daeryung 008
Eagle 008
Eastern 002
Focus 400
Funai 153
GC Electronics 056
Gemini 015
Gener al Instruments 003, 011, 01 4, 476
Hamlin 009, 020, 034, 259
Hitachi 003 , 00 8, 011
Hytex 007
Jasco 153, 315
Jerrold 003, 011, 012, 014,
015, 476
Millen iu m 3 618
Memorex 525
Movie Time 063, 156
Novaplex 618
RadioShack
Cat. No.
Need help? Call 1-800-955-2599
11
Page 12

15-191 6b.fm Page 12 Monday, July 19, 1999 12:17 PM
Manufacturer Code(s)
Cable Converters
NSC 063
Oak 007, 01 9
Omega 015
Optimus 021 16-548
021 16-631
Panasonic 021, 107
Paragon 525
Philips 025, 15 3
Pioneer 144
Popular Mechanics 400
Pulsar 525
PVP 003
Quasar 525
Quest 020, 144
RCA 021
Regal 020
Regency 002, 02 0
Rembrandt 022, 153
Samsung 144
Scientific Atlanta 008, 01 7, 477
Sigma 019
Signal 011, 015
Signatu re 003, 01 1 , 012, 01 4,
476
Sprucer 021, 144
Starcom 003, 014, 015
Stargate 015
Sylvania 001
Tandy 258
Telecaption 171
Teleview 063
Tempest 015
Texscan 001
Tocom 012, 013
Toshiba 525
TV86 063
TV Comm 019
Unika 022, 153
United Artists 007
United C able 003, 011, 014, 476
(Conti nu ed )
RadioShack
Cat. No.
12
Need help? Call 1-800-955-2599
Page 13

15-191 6b.fm Page 13 Monday, July 19, 1999 12:17 PM
Manufacturer Code(s)
Cable Converters
Univer s al 022, 05 6, 06 3, 15 3
U.S. Electronics 003, 008, 017, 476
Videowa y 250, 52 5
Viewstar 063, 258
Walmart 400
Zenith 525
Zentek 400
Televisions
Action 003, 030, 01 9, 18 5
Admira l 016, 047, 093 , 165 ,
180
Aiko 092
Akai 030, 05 6, 14 5, 15 1
Amstrad 039,171, 177
Anam 055, 180
Anam National 055
AOC 003, 01 9, 030, 13 7
, 185
Audiov ox 0 03 , 092, 179, 18 0
Bell & Howell 016, 093, 154
Brokso nic 177, 179, 180 , 236 ,
463
Candle 030, 046, 056, 18 6
Capeha rt 003, 017, 030 , 052 ,
178
Carver 054
Citize n 030, 03 9, 046 , 054 ,
056, 06 0, 092 , 180 ,
186, 280
Concerto 056
Contec 180, 185
Craig 171 , 180
Crosley 020, 030, 054, 096,
171, 18 6, 187
Crown 039 , 09 3, 18 0
Curtis Mathes 030, 039, 047, 054 ,
060, 154
Daewoo 0 19 , 03 9, 092, 451
Daytro n 019, 03 9, 05 6, 092
Eaton 060
Electrohome 000, 039, 056, 150,
154, 185
(Continued)
RadioShack
Cat. No.
Need help? Call 1-800-955-2599
13
Page 14

15-191 6b.fm Page 14 Monday, July 19, 1999 12:17 PM
Manufacturer Code(s)
Televisions
Emerson 039, 177 , 178, 179,
Envision 0 30
Fisher 154, 159
Funai 171, 179, 180
Futuretech 180
GE 021, 0 27, 04 7, 05 1,
Goldsta r 019, 0 30, 039, 056,
Granada 145, 151, 178
Hallmar k 019, 178, 179, 180,
Hitachi 039, 056, 145, 151
Ima 178, 179, 180, 236
Infinity 054
Inteq 017
JVC 053
KEC 180
KLH 180
KTV 039, 180, 185, 280
Kamp 017, 019, 180, 185
Kawasho 019, 030, 185
Kloss 024, 030, 046
LXI 0 47, 0 54, 056, 14 6,
Logik 016, 180, 236
Lotus 282
Luxman 056
MGA 030, 019, 150, 178
Magnavox 020, 024, 030, 054,
Magnasonic 030, 054, 093, 156,
Marantz 030, 05 4
Matsui 039, 177
Megatro n 003, 047 , 145, 151,
Memorex 030 1 6-254
(Continued)
180, 1 85, 23 6, 28 0,
282, 46 3
055, 1 35, 17 4, 17 8,
282, 45 1
060, 17 8
236
154, 15 6, 159
096, 18 6, 187
179
178
019 16-263
178 16-280
RadioShack
Cat. No.
14
Need help? Call 1-800-955-2599
Page 15

15-191 6b.fm Page 15 Monday, July 19, 1999 12:17 PM
Manufacturer Code(s)
Televisions
Midla nds 017, 039, 0 47, 051,
Mitsu bishi 019, 093, 150, 178
MTC 019, 030, 05 6, 06 0
Multite c h 179, 180
Nakamichi 154, 159
NAD 019, 056, 1 56, 166 ,
NEC 019 , 030, 056
Nikko 0 30 , 09 2, 17 8
Nyon 000
Okron 019
Omega 019
Onwa 180
Optimus 154 1 3- 1 28 3
Optonica 093, 165
Orion 019, 177, 1 78, 180 ,
Panas onic 051, 054, 05 5, 250
Penneys 019, 018, 021, 030,
Philc o 01 9, 02 0, 0 24, 030 ,
Philip s 020, 054, 096 , 186 ,
Pilot 019, 030, 051 , 060 ,
Pioneer 0 55, 166
Portla nd 019, 03 9, 09 2
Proscan 047
Proton 039, 17 8
Pulsar 017, 016, 019, 09 2
Quasar 051, 055, 250
RadioShack 180 16-246A
(Continued)
135
178
250 16-548
250 16-631
166 31-3031
166 31-3033
166 31-3038
236, 463
039, 04 7, 051 , 060 ,
135
054, 09 6, 186, 187
187
178
165 16-250
030 16-255
RadioShack
Cat. No.
Need help? Call 1-800-955-2599
15
Page 16

15-191 6b.fm Page 16 Monday, July 19, 1999 12:17 PM
Manufacturer Code(s)
Televisions
RadioShack 030, 178 16-256
RCA 018, 019 , 047, 093,
Realistic 165 16-232
Sampo 0 30
Samsung 019, 0 30, 03 9, 05 6,
Sansui 019, 030, 060, 165
Sanyo 146, 154, 15 9
Scott 019, 177, 178, 179,
Sears 047, 054 , 05 6, 146,
Sharp 039, 093, 165
Signatu re 016, 093 , 15 4, 165,
Simpson 030, 186, 187
Sony 000, 080
Soundesign 178, 179, 180, 186
Spectracon 019, 030, 180
Squareview 171, 179, 180
SSS 019, 180, 236
Supre-Macy 046, 039, 186
Sylvan ia 020, 0 24, 030, 054,
(Continued)
165 16-260
030 16-265
030,1 78 16-268
156 16-288
178 16-289
180 16-292
135, 17 4
165 16-233
039 16-234
165 16-235
165 16-235A
165 16-236
165 16-251
180 16-252
180 16-253
180 16-262
154 16-299
060
180, 23 6
154, 1 56, 15 9, 17 8,
179
178
096, 18 6, 187
RadioShack
Cat. No.
16
Need help? Call 1-800-955-2599
Page 17

15-191 6b.fm Page 17 Monday, July 19, 1999 12:17 PM
Manufacturer Code(s)
Televisions
Sympho ni c 171 , 17 9, 180
Tandy 039, 09 3, 16 5
Tatung 003, 05 1, 05 5
Teac 154, 159
Technics 051, 054, 055, 250
Techwood 051, 055, 056, 250
Technovox 019, 030, 051,
T ekn ika 016, 019, 0 39, 056,
Tera 178
Thomas 019, 03 9, 05 6, 17 8
TMK 056, 177, 1 78, 180 ,
Toshiba 0 60 , 15 4, 15 6
Tosonic 185
Totevision 039
Truetone 051, 055, 25 0
Ultra 0 19 , 03 9, 09 2, 45 1
Univer s al 021, 02 7, 04 7, 13 5
Vector Research 030
Victor 053
Video Concepts 186. 187
Vidtech 019 , 17 8
Viking 046
Wa rds 016, 019, 020 , 021,
Weltron 019, 178
XR100 171, 17 9, 18 0, 23 6
Yamaha 019, 030
York 030
Zenith 016, 017, 09 2
Zonda 003
TV/VCR Combinations
These codes are accessed through the
Note:
VCR device key. You might also need to use a
Daewoo 278
Emerso n 002, 294, 479
Funai 0 00
TV code to control volume.
(Continued)
055, 178
060, 09 2, 150 , 179 ,
180, 186
236
027, 03 0, 054 , 093 ,
096, 16 5, 178 , 179 ,
187
RadioShack
Cat. No.
Need help? Call 1-800-955-2599
17
Page 18

15-191 6b.fm Page 18 Monday, July 19, 1999 12:17 PM
Manufacturer Code(s)
TV/VCR Combinations
Goldstar 037
Harley-Davidson 000
Hitachi 000, 035, 042
Magnavox 000, 035
Magnin 037
Memorex 000 16-410
000 16-411
037 16-412
240 (TV: 060) 16-655
MGN 240
Optimus 000, 325 16-420
162, 45 4
(TV: 250)
162, 45 4
(TV: 250)
Orion 002, 479
Panasonic 035, 162
Quasar 035, 162
RadioShack 037 16-415
000, 32 5 16-417
RCA 035, 048
Samsung 240
Shintom 000, 002, 479
Symphonic 000
Totevision 037
Zenith 000
VCRs
Action 317
Aiwa 000, 037 , 30 7, 315,
406, 46 8
Akai 041, 061
Akiba 072
Akura 271
Alba 020, 209, 278, 2 95
Ambassador 020
Amstrad 000, 325
Anam 162, 240, 454
Anitech 072
Baird 000, 041, 104
Basic Line 020, 072
Beaumark 240
(Continued)
RadioShack
Cat. No.
16-421
16-422
18
Need help? Call 1-800-955-2599
Page 19

15-191 6b.fm Page 19 Monday, July 19, 1999 12:17 PM
Manufacturer Code(s)
VCRs
(Conti nu ed )
Bell & How el l 035 , 048, 104
Broksonic 121, 184, 211, 361,
Bush 072, 20 9, 27 8
Canon 035
Capehart 020
Carver 035, 081, 110
Craig 047 , 072, 240, 27 1
Criteri on 0 72
Crosley 035, 081
Crown 020 , 07 2, 27 8
Curtis Mathes 035, 060, 162
Daewoo 0 20 , 04 5, 278
Daytro n 020, 27 8
Dynatec h 000, 072, 24 0
Electrohome 000, 037, 043, 061,
Emerson 000, 002, 037, 061,
Fishe r 046, 047, 0 54, 066,
Funai 0 00 , 07 2, 27 8
GE 060, 20 2, 035
Garrard 000
Go Video 232, 240
Goldstar 037, 038
Harely Davidson 000
Harman Kardon 038
Harwood 072
Hitachi 000 , 04 1, 04 2
JVC 0 08, 041, 06 7
Jensen 041, 067
Kenwoo d 008, 038, 0 41, 046,
Lloyd 000 , 038, 072, 24 0
LXI 000 , 03 7
Logik 000 , 072
Magnav ox 035, 039, 08 1, 110,
Magnasonic 037, 240, 278
Magnin 240
479
240
121, 18 4, 208,
209, 211, 278, 479
104
067
149
RadioShack
Cat. No.
Need help? Call 1-800-955-2599
19
Page 20

15-191 6b.fm Page 20 Monday, July 19, 1999 12:17 PM
Manufacturer Code(s)
VCRs
(Continued)
Marantz 035, 03 8, 081
Marta 037
Matsush ita 035, 162
MEI 035
Memorex 000 1 6-406
037 16-413
037 16-414
000 16-517
104 16-523
037 16-524
104 16-525
104 16-526
046, 10 4 16-529
046, 10 4 16-530
048 16-531
240 16-533
037 16-534
104 16-536
048 16-618
104 16-619
104 16-620
048 16-622
104 16-623
035 16-705
307 16-706
MGA 043, 061, 173
MTC 000, 240
Minolta 042
Mitsubishi 043, 06 1, 173
MTC 000, 240
Movie W alker 072
Multitech 000, 072
NEC 008, 038, 041, 067
Nikko 037, 278
Optimus 104 13-1283
037 16-419
037 16-535
104 16-537
048 16-538
048 16-539
RadioShack
Cat. No.
20
Need help? Call 1-800-955-2599
Page 21

15-191 6b.fm Page 21 Monday, July 19, 1999 12:17 PM
Manufacturer Code(s)
VCRs
(Conti nu ed )
Optimus 048 1 6- 5 40
240 16-541
048 16-542
048 16-543
048 16-544
048 16-546
162, 454 16-547
162, 454 16-548
046 16-600
046 16-601
104 16-617
037 16-624
104 16-625
048 16-627
048 16-628
162, 454 16-630
162, 454 16-631
Optonica 048, 062
Orion 002, 121, 1 84, 209 ,
Panasonic 035, 081, 110, 162,
Penney 035, 037, 042 , 038,
Pentax 042
Philco 035 , 062, 081, 110
Philips 035, 06 2, 08 1, 110
Pilot 037
Portland 0 20
Pulsar 039, 046, 278
Quartz 046
Quasar 035, 081, 110, 162,
RCA 035, 042, 0 48, 060 ,
Realistic 000 16-404
479
225, 454
240
454
149, 202
037 16-408
035 16-472
000 16-505
047 16-506
037 16-507
RadioShack
Cat. No.
Need help? Call 1-800-955-2599
21
Page 22

15-191 6b.fm Page 22 Monday, July 19, 1999 12:17 PM
Manufacturer Code(s)
VCRs
(Continued)
Realistic 000 16-508
000 16-510
047 16-511
047 16-512
047 16-513
240 16-514
047 16-515
047 16-516
047 16-518
000 16-519
104 16-520
104 16-521
000 16-522
104 16-563
062 16-610
048 16-611
048 16-612
047 16-613
047 16-614
047 16-615
048 16-616
104 16-617
035 16-651
047 16-652
048 16-653
062 16-700
048 16-701
048 16-702
000 16-703
000 16-704
Ricoh 034, 035
Runco 039
Samsung 038, 045, 240
Sansui 008, 041, 067, 271
Sanyo 046, 047, 054, 06 6,
Scott 045, 121, 184, 210,
Sears 000, 037 , 04 2, 046,
Sharp 048, 062
104, 24 0
479
047, 05 4, 066, 10 4
RadioShack
Cat. No.
22
Need help? Call 1-800-955-2599
Page 23

15-191 6b.fm Page 23 Monday, July 19, 1999 12:17 PM
Manufacturer Code(s)
VCRs
(Conti nu ed )
Manufacturer Code(s)
Shogun 240
Shintom 072
Sony 032, 03 3, 03 4
STS 042
Sylva nia 000, 035, 043 , 081 ,
Sympho nic 0 00 , 32 5
T at ung 000, 041, 048 , 067,
TEAC 0 00, 041, 06 7
T ech nics 000, 035, 08 1, 110,
Teknika 000, 035, 03 7
Thomas 000, 00 2, 03 5, 03 7
Tosonic 000
Toshiba 0 43 , 04 5, 06 6
Totevi sion 037, 240
Ultra 0 20 , 04 5, 27 8
Unitech 240
Vector Research 038
Victor 008, 067
Video Concepts 061
Videosonic 240
Videotronic 035
Viewmax 037 , 000
Wa rds 000, 035, 04 2, 047,
XR1000 000, 035, 0 72, 208,
Yamaha 038, 041
York 000
Zenith 032, 033, 03 4, 03 9
110
081
162, 454
048, 06 2, 072 , 149 ,
240
240
RadioShack
Cat. No.
RadioShack
Cat. No.
Need help? Call 1-800-955-2599
23
Page 24

15-191 6b.fm Page 24 Monday, July 19, 1999 12:17 PM
IF YOU HAVE PROBLEMS
MANUAL CODE SEARCH
If the 3 in 1 does not control your remote-controlled devices when you first set it up, you probably did not enter the correct 3-digit codes for
your devices.
You can try all the codes for the brand of your device, or because many manufacturers make products using several different brand names, you
might want to search the 3 in 1 ’s entire li brary by
following these steps.
1. Manually turn on the d evice y ou a r e trying t o
set up.
2. Aim the 3 in 1 at the device.
3. Press the device key, then hold down
the red indicator blinks twice. Release
4. Press
5. When the device responds, press and
If necessary, repeat these steps for each device.
9 9 1 PWR
Alternate between pressing
device key until the device responds.
Each time you press the dev ice key, the 3 in
1 advances to the nex t manufacturer ’s code
in its list.
release
The red indicator blinks twice.
to lock in the manufacturer’s code.
P
, then press the device key.
PWR
until
P
.
P
and the
DETERMINING THE 3-DIGIT
CODE
After you set up your 3 in 1 remote control using
the manual code search, you can find which 3digit code the 3-1in-1 is set to by following thes e
steps.
1. Press the device key you want to get the
manufacturer ’s code from.
Need help? Call 1-800-955-2599
24
Page 25

15-191 6b.fm Page 25 Monday, July 19, 1999 12:17 PM
2. Hold down P until the red indicator blinks
twice, then release it.
3. Press
4. Press
. The red indicator blinks twice.
9 9 0
and count the number of times the
1
red indicator blinks. This is t he first number
of your 3-digit manufacturer’s code. If the red
indicator does not blink, the digit is a zero.
5. Press
and count the number of times the
2
red indicator blinks. This is t he second n umber of your 3-digit manufacturer’s code. If the
red indicator does not blink, the digit is a
zero
6. Press
and count the number of times the
3
red indicator blinks. Th is is the third num ber
of your 3-digit manufacturer’s code. If the red
indicator does not blink, the digit is a zero.
Need help? Call 1-800-955-2599
25
Page 26

15-191 6b.fm Page 26 Monday, July 19, 1999 12:17 PM
TROUBLESHOOTING
If the 3 in 1 stops working after you successfully
test the control of each device, or if you are unable to get the 3 in 1 to work at all, c heck t he f ollowing:
• Be sure you press the device key for the
device you want to control.
• Check and replace the batteries, if necessary.
• Confirm that your remote-controlled devices
are working properly using manual controls
or their original remotes.
• If some buttons do not work for your device,
you might be able to scan to a better device
code.
If you are still unable to determine the problem,
call our nationwide Universal Remote Control
Hotline at 1-800-955-2599.
26
Need help? Call 1-800-955-2599
Page 27

15-191 6b.fm Page 27 Monday, July 19, 1999 12:17 PM
CARE AND MAINTENANCE
Your 3 in 1 Eas y Rem ote is an ex amp le of s uperior design and craftsmanship, and should be
treated with care. The suggestions below will help
you enjoy the 3 in 1 for many years.
• Keep the 3 in 1 dry. If it gets wet, wipe it dry
immediately. Liquids might contain minerals
that can corrode the electronic circuits.
• Use and s tore the 3 in 1 onl y in normal t em-
perature environments. Temperature
extremes can shorten the life of electronic
devices, damage batteries, and distort or
melt plastic parts.
• Keep the 3 in 1 away from dust and dirt,
which can cause premature wear of parts.
• Handle the 3 in 1 gent ly and c arefully. Drop-
ping it can damage circuit boards and cases
and can cause the 3 in 1 to work improperly.
• Use only fresh batteries of the required size
and type. Batteries can lea k chemicals th at
damage your 3 in 1’s electronic parts.
• Wipe the 3 in 1 with a damp cloth occasion-
ally to keep it looking new. Do not use harsh
chemicals, cleaning solvents, or strong
detergents to clean the 3 in 1.
Modifying or tampering with the 3 in 1’s internal
components c an cause a malfunction and m ight
invalidate your 3 i n 1’s warrant y. If y our 3 i n 1 is
not performing as it should, take it to your local
RadioShack store for assistance.
Need help? Call 1-800-955-2599
27
Page 28

g
)
g
y
y
y
(b)
g
15-191 6b.fm Page 28 Monday, July 19, 1999 12:17 PM
SPECIFICATIONS
Power........ .. .. ............... .....Two AAA Alkaline Bat teries
IR Control Ran
e..................................25 Feet (7.5 m
Size (HWD)....... .. ................. 11/8 ¥ 113/16 ¥ 63/8 Inches
Wei
ht (Without Batteries)...... .. ........................ 2.3 oz.
Specifications are typical; individual units might
var
. Specifications are subject to change and im-
provement without notice.
Limited Ninety-Day Warrant
This product is warranted by RadioShack against manufacturing defects in
material and workmanship under normal use for ninety (90) days from the
date of purchase from RadioShack company-owned stores and authorized
RadioShack franchisees and dealers. EXCEPT AS PROVIDED HEREIN, RadioShack MAKES NO EXPRESS WARRANTIES AND ANY IMPLIED WARRANTIES, INCLUDING THOSE OF MERCHANTABILITY AND FITNESS
FOR A PARTICULAR PURPOSE, ARE LIMITED IN DURATION TO THE DURATION OF THE WRITTEN LIMITED WARRANTIES CONTAINED HEREIN.
EXCEPT AS PROVIDED HEREIN, RadioShack SHALL HAVE NO LIABILITY
OR RESPONSIBILITY TO CUSTOMER OR ANY OTHER PERSON OR ENTITY WITH RESPECT TO ANY LIABILITY, LOSS OR DAMAGE CAUSED DIRECTLY OR INDIRECTLY BY USE OR PERFORMANCE OF THE
PRODUCT OR ARISING OUT OF ANY BREACH OF THIS WARRANTY, INCLUDING, BUT NOT LIMITED TO, ANY DAMAGES RESULTING FROM INCONVENIENCE, LOSS OF TIME, DATA, PROPERTY, REVENUE, OR
PROFIT OR ANY INDIRECT, SPECIAL, INCIDENTAL, OR CONSEQUENTIAL DAMAGES, EVEN IF RadioShack HAS BEEN ADVISED OF THE POSSIBILITY OF SUCH DAMAGES.
Some states do not allow the limitations on how long an implied warranty lasts
or the exclusion of incidental or consequential damages, so the above limitations or exclusions may not apply to you.
In the event of a product defect during the warranty period, take the product
and the RadioShack sales receipt as proof of purchase date to any RadioShack store. RadioShack will, at its option, unless otherwise provided b
law: (a)correct the defect by product repair without charge for parts and labor;
replace the product with one of the same or similar design; or (c) refund
the purchase price. All replaced parts and products, and products on which a
refund is made, become the property of RadioShack. New or reconditioned
parts and products may be used in the performance of warranty service . Re paired or replaced parts and products are warranted for the remainder of the
original warranty period. You will be charged for repair or replacement of the
product made after the expiration of the warranty period.
This warranty does not cover: (a) damage or failure caused by or attributable
to acts of God, abuse, accident, misuse, improper or abnormal usage, failure
to follow instructions, improper installation or maintenance, alteration, lightning or other incidence of excess voltage or current; (b) any repairs other than
those provided by a RadioShack Authorized Service Facility; (c) consumables
such as fuses or batteries; (d) cosmetic damage; (e) transportation, shippin
or insurance costs; or (f) costs of product removal, installation, set-up service
adjustment or reinstallation.
This warranty gives you specific legal r ights, and you may also have other
rights which vary from state to state.
RadioShack Customer Relations, Dept. W, 100 Throckmorton St.,
Suite 600, Fort Worth, TX 76102
We Service What We Sell
3/97
A Division of Tandy Corporation
RadioShack
Fort Worth, Texas 76102
3/97 Printed in Korea
 Loading...