

Dual-Tray CD Player/Recorder
.
Thank you for purchasing the RCA DualTray CD Player/Recorder. Your CD
recorder is easy to operate and provides
many options for its use as listed below.
Features
Dual Tray — lets you record from CD to
CD-R/RW to create your own music mixes.
4X High Speed Dubbing —quickly
copies a disc.
Digital and Analog Inputs — allow
recording from both digital and analog
audio sources.
Sequence Programming — lets you
program up to 32 selections to play in any
order you choose.
Intro Check — helps you locate a desired
track by playing the first 10 seconds of
each track on the current CD.
Remote Control — lets you control the
CD recorder from a distance.
This CD player is made and tested to meet
exacting safety standards. It meets FCC
requirements and complies with safety
performance standards of the U.S.
Department of Health and Human Services.
Warnings:
• This CD player employs a laser light
beam. Only a qualified service person
should remove the cover or attempt to
service this device, due to possible eye
injury.
• The use of controls, adjustments, or
procedures other than those specified
herein might result in hazardous
radiation exposure.
WARNING: Toreducetheriskoffireorshock
hazard, do not expose this product to rain or
moisture.
.CAUTION.
RISK OF ELECTRIC
SHOCK
CAUTION: TO REDUCE THE RISK OF ELEC-
TRIC SHOCK, DO NOT REMOVE COVER OR
BACK. NO USER-SERVICEABLE PARTS INSIDE
REFER SERVICING TO QUALIFIED PERSONNEL.
DO NOT OPEN
The lightning symbol is intendedto alert you
to the presence of uninsulated dangerous
voltage within this product’s enclosure that
might be of sufficient magnitude to constitute a risk of electric shock. Do not open the
product’s case.
The excl amation symbol is intended to inform you that important operating and
maintenance instructions are included in
!
the literature accompanying t his product.
!
Repeat Play — lets you automatically
repeat a single track, two CDs, or a series
of programmed tracks.
Shuffle Play — randomly selects tracks on
loaded CDs and plays them.
Note: Most material on compact discs and
prerecorded tapes is copyrighted.
Unauthorized duplication of copyrighted
material is a violation of the copyright laws
of most countries and such duplication
may result in fines and/or imprisonment.
© 2003 RadioShack Corporation.
All Rights Reserved.

Note, however, that in the United States, it is
not a violation of U.S. copyright laws for a
consumer to use an audio recording device
to duplicate musical recordings for
noncommercial (personal) use.
The FCC Wants You To Know
This system complies with the limits for a
Class B digital device as specified in Part 15
of FCC Rules. These limits provide
reasonable protection against TV or radio
interference in a residential area. However,
your system might cause TV or radio
interference even when it is operating
properly.
To eliminate interference, try one or more of
the following corrective measures.
• Reorient or relocate the TV or radio's
receiving antenna.
• Increase the distance between the
system and the TV or radio.
• Use outlets on different electrical
circuits for the system and the TV or
radio.
Consult your local RadioShack store if the
problem still exists.
Important Safety
recorder, and safety is a major factor in its
design. However, safety is also your
responsibility.
This section lists important information that
will help you properly use and enjoy your
CD recorder and accessories. Read all the
included safety and operating instructions
before using your CD recorder. Follow them
closely, and retain them for future reference.
Heed Warnings — Follow all warnings on
the product and in the operating
instructions.
Cleaning — Unplug this product from the
wall outlet before cleaning. Use only a damp
cloth for cleaning. Do not use liquid or
aerosol cleaners.
Water and Moisture — Do not use this
product near water (for example, near a
bathtub, washbowl, kitchen sink, or laundry
tub, in a wet basement; or near a swimming
pool).
Accessories — Do not place this product
on an unstable cart, stand, tripod, bracket,
or table. The product may fall, causing
serious injury to a child or adult, and serious
damage to the product. Use only with a cart,
stand, tripod, bracket, or table
recommended by the manufacturer or sold
with the product. Follow the manufacturer's
instructions for mounting, and use a
recommended mounting accessory.
Instructions
Careful attention is devoted to quality
standards in the manufacture of your CD
2

Cart — Use only with the
cart, stand, tripod, bracket, or
table specified by the
manufacturer, or sold with
the apparatus. When a cart is
used, use caution when moving the cart/
apparatus combination to avoid injury from
tip-over.
Ventilation — Slots and openings in the
cabinet provide ventilation, ensure reliable
operation, and protect from overheating. Do
not block or cover these openings, and do
not place the product on a bed, sofa, rug, or
other similar surface. Do not place the
product in a built-in bookcase or rack unless
it provides proper ventilation as specified by
the manufacturer.
Power Sources — Operate this product
using only the power source indicated on its
marking label. If you are not sure of your
home's power type, consult your product
dealer or local power company.
Polarization — This product is equipped
with a polarized AC line plug (a plug having
one blade wider than the other). This plug
will fit in the power outlet only one way.
This is a safety feature. If you cannot insert
the plug fully into the outlet, try reversing
the plug. If the plug still doesn't fit, contact
your electrician to replace your obsolete
outlet. Do not defeat the safety purpose of
the polarized plug. If you need an extension,
use a polarized cord.
Power-Cord Protection — Route powersupply cords so they are not likely to be
walked on or pinched by items placed on or
against them, paying particular attention to
cords at plugs, convenience receptacles, and
the point where they exit from the product.
Non use Periods — Unplug the CD
recorder's power cord when you will not use
it for extended periods.
Lightning — For added protection for this
product during a lightning storm, or when it
is left unattended and unused for long
periods of time, unplug it from the wall
outlet. This will prevent damage to the
product due to lightning and power-line
surges.
Overloading — Do not overload wall
outlets, extension cords, or convenience
receptacles, as this can result in a risk of fire
or electric shock.
Objects and Liquids — Never push
objects of any kind into this product
through openings, as they may touch
dangerous voltage points or short out parts
that could result in a fire or electric shock.
Never spill liquid of any kind on the
product.
Servicing — Do not attempt to service this
product yourself, as opening or removing
covers may expose you to dangerous voltage
or other hazards. Refer all servicing to
qualified service personnel.
Damage Requiring Service — Unplug this
product from the wall outlet and refer
servicing to qualified service personnel
under the following conditions:
• When the power-supply cord or plug is
damaged.
3

• If liquid has been spilled or objects have
fallen into the product.
• If the product has been exposed to rain
or water.
• If the product does not operate
normally by following the operating
instructions, adjust only those controls
that are covered by the operating
instructions, as an improper adjustment
of other controls may result in damage
and will often require extensive work by
a qualified technician to restore the
product to normal operation.
• If the product has been dropped or
damaged in any way.
• When the product exhibits a distinct
change in performance.
Replacement Parts — When replacement
parts are required, be sure the service
technician uses replacement parts specified
by the manufacturer or having the same
characteristics as the original part.
Unauthorized substitutions may result in
fire, electric shock, or other hazards.
Safety Check — Upon completion of
service or repairs to this product, ask the
service technician to perform safety checks
to determine that the product is in proper
operating condition.
Heat — The product should be situated
away from heat sources such as radiators,
heat registers, stoves, or other products
(including amplifiers) that produce heat.
4

Contents
Before Use ..................................................................................................................... 7
Compact Discs ....................................................................................................... 7
About CD-R and CD-RW Discs .............................................................................. 7
Finalizing ............................................................................................................... 7
Recordable Discs .................................................................................................... 8
Handling Discs ....................................................................................................... 8
Condensation ................................................................................................................ 9
Connections and Setup ...................................................................................................... 10
LINE IN/OUT Jacks .................................................................................................... 10
DIGITAL IN/OUT Terminals ....................................................................................... 11
AC Power Cord .................................................................................................... 11
A Quick Look At The Remote Control ........................................................................ 12
Installing Batteries ....................................................................................................... 13
Using the Remote ........................................................................................................ 13
A Quick Look At The Display ..................................................................................... 14
A Quick Look at the CD Recorder’s Controls ............................................................... 14
Operation .......................................................................................................................... 16
Playing CDs ................................................................................................................ 16
Selecting a Track ......................................................................................................... 16
Searching For a Part of a Track ............................................................................. 17
Directly Selecting a Track ..................................................................................... 17
Repeat Play ................................................................................................................. 17
Repeating One Track ............................................................................................ 17
Repeating All of the Tracks ................................................................................... 17
Repeating a Designated Section (A-B Repeat) ....................................................... 18
Shuffle Play ................................................................................................................. 18
Intro Check ................................................................................................................. 18
Programming a Sequence of Tracks ............................................................................. 19
Checking/Changing the Programmed Sequence ................................................... 19
Adding to the Programmed Sequence .................................................................. 20
Erasing a Track ..................................................................................................... 20
Clearing Programmed Tracks ............................................................................... 20
Repeating Programmed Tracks ............................................................................. 20
Before Recording ......................................................................................................... 20
Serial Copy Management System .......................................................................... 21
Dubbing ............................................................................................................... 21
Dubbing a Programmed Sequence ....................................................................... 22
Dubbing a CD from a Selected Track to the Last Track ......................................... 23
Basic Recording ........................................................................................................... 23
Manually Assigning Track Numbers ..................................................................... 24
5

Setting the Recording Level ................................................................................. 24
Finalizing ............................................................................................................ 24
Erasing or Unfinalizing a CD-RW ........................................................................ 24
Advanced Recording ................................................................................................... 25
Assigning Track Numbers to Recordings .............................................................. 25
Setting the Track Number Increment Level and the
Synchronized Recording Starting Level ....................................................................... 26
Synchronized Recording ...................................................................................... 26
Mixing Recording ................................................................................................ 27
Time Display .............................................................................................................. 27
Messages .................................................................................................................... 27
Error Messages .................................................................................................... 28
Troubleshooting ................................................................................................................ 29
Specifications .................................................................................................................... 30
6

Before Use
• The nominal temperature should be
between 41°F and 95°F (5°C and
35°C). The CD-RW recorder is more
sensitive to extremes of temperature
than ordinary CD players.
• Relative humidity should be 30 to 90%
non-condensing.
Compact Discs
Depending on the quality of the disc and/or
the condition of the recording, some CD-R
and CD-RW discs may not be playable.
About CD-R and CD-RW Discs
Caution: Please use CD-R and CD-RW
discs bearing the “DIGITAL AUDIO” mark.
You cannot use CD-R and CD-RW discs
designed for computing systems with this
CD recorder for recording, though you can
use them for play.
material. The packaging of CD-R discs
includes this logo below.
By contrast, you can use a CD-RW disc in
much the same way as a CD-R disc, but you
can erase the last track or all the tracks, and
you can use the space on the disc for other
recordings. The packaging of CD-RW discs
includes a logo similar to the following:
However, you should note that an audio CD
created using a CD-RW disc may not play
back satisfactorily on every audio CDplayer. By contrast, you may be able to play
CD-R satisfactorily on the majority of audio
CD players.
CDs that can be played on this CD recorder
have this mark on them.
In this manual, although we refer to “CD-R”
and “CD-RW” discs, we always mean “CD-R
Digital Audio” and “CD-RW Digital Audio,”
even when this is not explicitly stated.
You can record CD-R discs only once. Once
you used them for recording, you cannot
erase or re-record. However, if space is
available on the disc and if the disc is not
finalized, you can record additional
Finalizing
Although audio data may be written on a
CD-R or CD-RW disc, a standard CD player
will not be able to play back the audio until
a final table of contents (TOC) has been
written at the start of the disc.
7
The process of writing this table of contents
is known as “finalizing.” Once this has been
done, no further data can be written to the
CD-R disc.
A CD-RW disc that has been finalized can be
“unfinalized.” This allows further tracks to
be recorded to the disc, provided that there
is space on the disc.
Recordable Discs
In this manual, we use the term “recordable”
disc to describe a CD-R or CD-RW disc that
has not been finalized, and has enough space
to record.
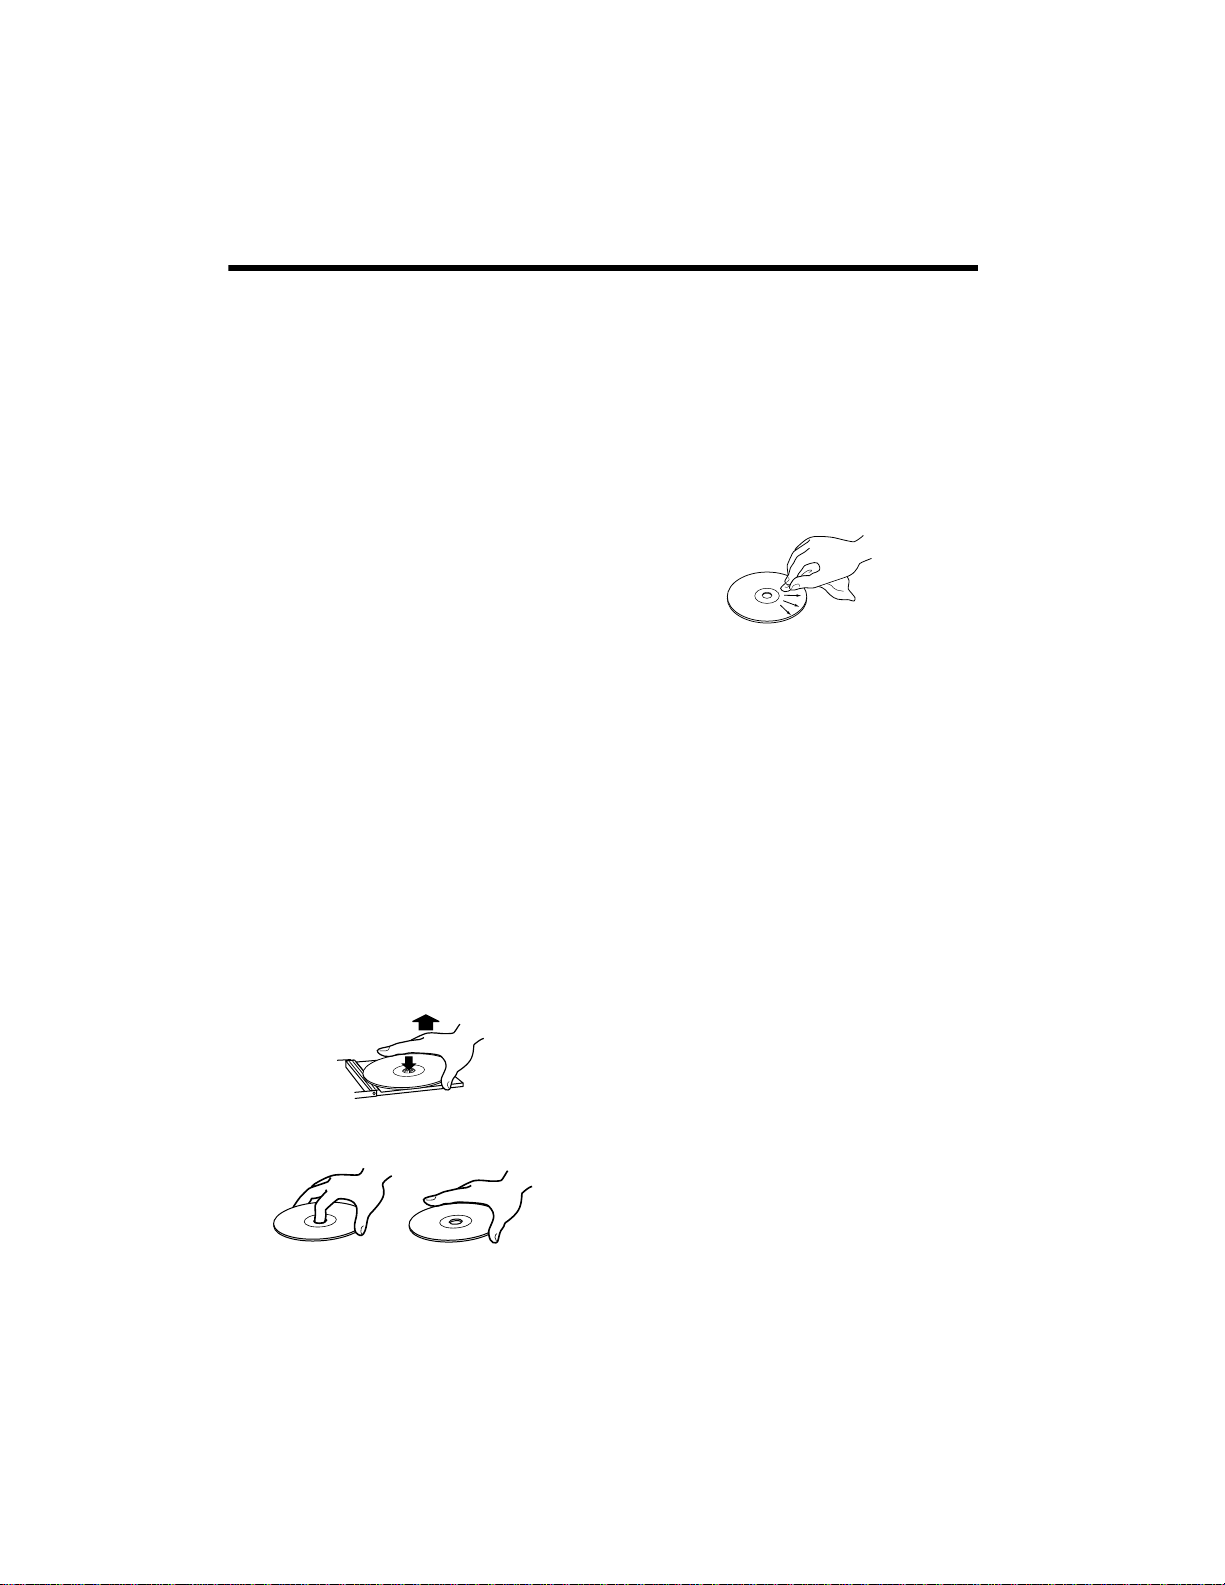
Handling Discs
• Always place the disc on the disc tray
with the label side uppermost.
(Compact discs can be played or
recorded only on one side.)
• To remove a disc from its storage case,
press down on the center of the case
and lift the disc out, holding it carefully
by the edges.
,
• Never touch the recording (non-label)
side of a disc on which you will be
recording. Recording on a disc requires
a cleaner surface than playing back, and
fingerprints, dust, grease, and so on,
can cause errors in the recording
process.
• Should the disc become dirty, wipe the
surface with a soft, dry cloth.
• Never use such chemicals as record
sprays, antistatic sprays or fluid,
benzene or thinner to clean the discs.
Such chemicals will do irreparable
damage to the disc’s plastic surface.
• Discs should be returned to their cases
after use to avoid dust and scratches
that could cause the laser pickup to
“skip.”
• Do not expose discs to direct sunlight or
high humidity and temperature for
extended periods. Long exposure to
high temperatures will warp the disc.
• CD-R and CD-RW discs are more
sensitive to the effects of heat and
ultraviolet rays than ordinary CDs. It is
important that they are not stored in a
location where direct sunlight will fall
on them, and which is away from
sources of heat such as radiators or
heat-generating electrical devices.
• Printable CD-R and CD-RW discs are
not recommended, as the label side
might be sticky and damage the CD
recorder.
8

• Do not stick papers or protective sheets
on the discs and do not use any
protective coating spray.
• Use a soft oil-based felt-tipped pen to
write the information on the label side.
Never use a ball-point or hard-tipped
pen, as this may cause damage to the
recorded side.
Condensation
When the CD recorder (or a disc) is moved
from a cold to a warm place, or used after a
sudden temperature change, there is a
danger of condensation; vapor in the air
could condense on the internal mechanism,
making correct operation impossible.
• Never use a stabilizer. Using
commercially available CD stabilizers
with this CD recorder will damage its
mechanisms and cause them to
malfunction.
• Do not use irregular shape CDs
(octagonal, heart-shape, etc.). CDs of
this sort can damage the CD recorder.
• If you are in any doubt as to the care
and handling of a CD-R/CD-RW disc,
read the precautions supplied with the
disc, or contact the disc manufacturer
directly.
To prevent this, or if this occurs, leave the
CD recorder for one or two hours with the
power turned on. Then the CD recorder will
stabilize at the temperature of its
surroundings.
9
Connections and Setup
Note: Turn off the power of all the equipment before making connections and read the
instructions of each component you intend to use with the CD recorder.
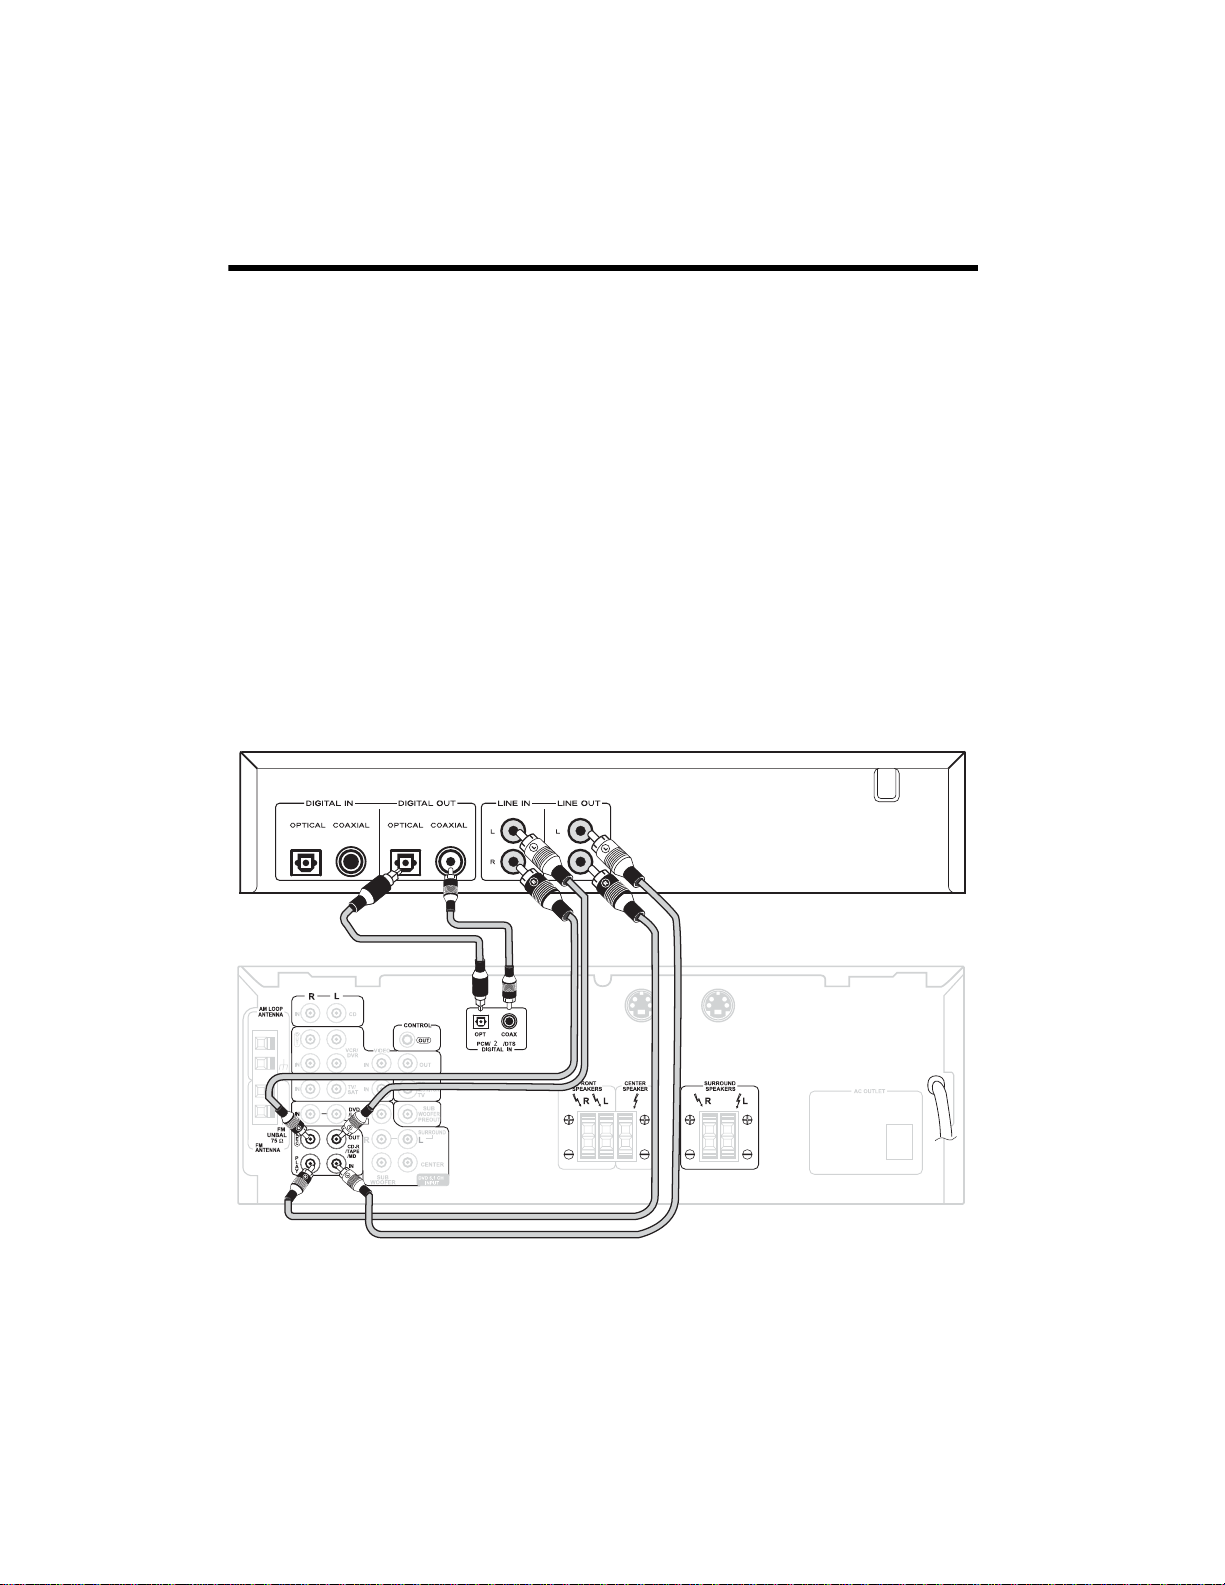
LINE IN/OUT Jacks
Connect the LINE IN/OUT jacks to your analog source (receiver) using the supplied RCA
stereo patch cable. An additional patch cable is available at your local RadioShack store or at
RadioShack.com.
Insert
LINE IN to your receiver’s line out jack (REC). Connect the LINE OUT jack to your
receiver’s line in jack (
Notes:
PLAY).
• Make sure the white plugs are connected to the white jacks
to the red jacks
• Be sure to insert each plug securely. To prevent hum and noise, do not bundle the
connection cables with the power cord or speaker cable.
R (Right).
S-VIDEO IN S-VIDEO OUT
L (Left) and the red plugs are
10

DIGITAL IN/OUT Terminals
Connect the component which has a digital
input or output terminal using a digital
coaxial cable or an optical cable (neither
supplied and available at your local
RadioShack store).
Insert
DIGITAL IN to your component’s
output jack (
DIGITAL OUT to your component’s input
jack (
Notes:
DIGITAL OUT). Connect
DIGITAL IN).
• When using
OUT terminals, remove the caps from
DIGITAL OPTICAL IN/
the terminals. When you do not use
them, leave the caps in place.
• Connect either
or
DIGITAL OPTICAL IN. It is possible
DIGITAL COAXIAL IN
to connect them to other equipment at
the same time; however, the CD
recorder can receive signals from only
one input at a time.
AC Power Cord
Plug the AC power cord into an AC wall
socket.
11

A Quick Look At The Remote Control
.
REPEAT 1/ALL —pressto
repeat a track or C Ds.
REPEAT A-B — press to
repeat a designated section.
CD-R — press to select the
RECORD/PLAYBACK tray
CD-R Operation buttons
Numeric Buttons — Use
these buttons to select track
numbers.
— hold down to
@I
search for a part of a track.
TIME — press to change the time display.
SHUFFLE – press for shuffle playback.
INTRO CHECK — press for intro check
function. The beginning of each track is
played for 10 seconds.
PROGRAM, CLEAR, PROGRAM CHECK
— press to create a programmed sequence.
FJ
— press to skip tracks forward or
backward.
CD — press to select the PLAYBACK tray.
12
DIGITAL REC LEVEL
–/+ — press to adjust
the recording level.
RECORD — press to
enter record pause
mode.
g — press to start playback, recording,
finalizing, and erasing.
† — press to pause playback or
recording.
D – press to stop playback or recording.
CD Operation buttons
g — press to start playback.
† — press to pause playback.
D — press to stop playback.

Installing Batteries
Your CD recorder's remote control requires
two AA batteries (not supplied) for power.
We recommend alkaline batteries, available
at your local RadioShack store, for the best
performance and longest life.
Cautions:
• Always use fresh batteries of the
required size and recommended type.
• Do not mix old and new batteries,
different types of batteries (standard,
alkaline, or rechargeable), or
rechargeable batteries of different
capacities.
• If you do not plan to use the remote
control for a month or more, remove
the batteries.
Using the Remote
For the best results, point the remote control
toward REMOTE SENSOR on the front of
the CD recorder.
1. Press down on the battery compartment
cover and slide it off in the direction of
the arrow.
2. Insert the batteries into the battery
compartment as indicated by the
polarity symbols (
inside.
3. Replace the cover.
When the remote control operates erratically
or does not work, replace the batteries.
Cautions:
• Never leave dead or weak batteries in
the remote control. Batteries can leak
chemicals that can corrode the remote.
+ and –) marked
13

A Quick Look At The Display
Pause
Indicator
Playback
Indicator
SHUFFLE
Indicator
Program
Indicator
INTRO
CHECK
Indicator
Track Number of
PLAYBACK Tray
REPEAT
Indicator
Time Display (Min. and
Sec.) of PLAYBACK Tray
Peak
Level
Meter
Message Display
Input
Selection
Time Display (Min. and
Sec.) of RECORD/PLAYBACK
Tray
A-TRACK
(Auto Track)
A Quick Look at the CD Recorder’s Controls
Type of Disc in
RECORD/PLAYBACK
Tray
SYNC
Recording
Indicator
Record
Indicator
Track Number of
RECORD/PLAYBACK
Tray
POWER — press to turn the CD recorder on
and off. (The equipment draws nominal
non-operating power from the AC outlet
with its
POWER switch in the off position).
14
DUBBING MODE — press to select the
dubbing speed
DUBB 4X, DUBB 2X, or
DUBB 1X.
OPEN/CLOSE (for PLAYBACK and
RECORD/PLAYBACK trays) — press to
open and close the disc trays.

AUTO/MANUAL — press (button on the left
of the CD recorder) to select the track
number increment level, or to select the
synchronized recording starting level.
BC
— (for PLAYBACK and RECORD/
PLAYBACK trays) — press to skip tracks.
Hold down to search for a part of a track.
SYNC REC — press for synchronized
recording.
RECORD — press to enter record pause
mode.
DIGITAL REC LEVEL –/+ — press to adjust
the recording level.
RECORD/PLAYBACK Tray Operation
Buttons
/ENTER — press to start playback,
²
recording, finalizing, and erasing.
† — press to pause playback or
recording.
INPUT SELECTOR — press to select the
source you want to record from.
PHONES — insert your
plug into the
PHONES jack on the front of
1
/4-inch headphones
the CD recorder.
Note: To further reduce the headphone
volume level, use a headphone with an
adjustable output level.
REMOTE SENSOR — Sensor for the
remote control. Use the remote control
within the effective range (15ft/5m) and
point at the sensor.
— press to stop playback or
G
recording.
ERASE — press to erase or unfinalize a
CD-RW disc.
FINALIZE — press to finalize a
CD-R/CD-RW disc.
PLAYBACK Tray Operation Buttons
— press to start playback.
²
† — press to pause playback.
— Press to stop playback.
G
15

Operation
Playing CDs
You can use the RECORD/PLAYBACK tray
to play back CD, CD-R, and CD-RW discs.
You can use the PLAYBACK tray to play
back CD and finalized CD-R/CD-RW discs.
You cannot play CD-R/CD-RW discs that
haven’t been finalized on the PLAYBACK
tray.
1. Press
2. Press
3. Carefully place the disc, label side up,
4. Press
POWER on the CD recorder.
READING flashes for a while. When
no disc is set,
appears.
OPEN/CLOSE for the PLAYBACK
tray or the RECORD/PLAYBACK tray.
into the recessed CD holder.
OPEN/CLOSE for the PLAYBACK
tray or the RECORD/PLAYBACK tray to
close the disc tray. When a disc is
loaded into the CD recorder,
no DISC or DISC no
READING flashes for a while as it
determines the contents of the disc.
When the CD recorder reads the TOC
(Table of Contents), the display shows
the total number of tracks, total play
time, and the type of disc (the
RECORD/PLAYBACK tray only).
• When a blank disc is set on the
RECORD/PLAYBACK tray,
appears.
• When a disc is set on the RECORD/
PLAYBACK tray, the display shows
one of the following:
BLANK
CD — a commercial pre-recorded CD.
CD-R — finalized CD-R.
CD-R, NO TOC —aCD-Rwhich
has yet to be finalized.
CD-RW, NO TOC — a CD-RW
which has yet to be finalized.
CD-RW — a finalized CD-RW.
BLANK — No disc or unreadable disc.
5. Press
²
PLAYBACK tray to start playback.
6. Press
To resume playback, press
ENTER
7. Press
If you set CDs on both the PLAYBACK tray
and the RECORD/PLAYBACK tray, the CD
recorder automatically plays the other CD
when the current CD finishes. The CD
recorder stops playing at the end of the
second CD.
for the PLAYBACK tray or
²
/ENTER for the RECORD/
† to temporarily stop playback.
†,
.
to stop playback.
G
² or
²
Selecting a Track
Press
BorC
desired track.
• When you press
playback, the CD recorder plays the
current track from the beginning. To
return to the beginning of the previous
track, press
• In the stop or pause mode, the CD
recorder enters pause mode at the
beginning of the selected track. Press
²
repeatedly until you find the
once during
B
twice.
B
to start playback.
/
16

• During program playback, press
once to return to the beginning of the
current track. To return to the beginning
of the previous track in the program,
press
track in the program, press
cannot use the numeric buttons on the
remote control.
• When using the remote control, select
the tray by pressing
pressing
twice. To playback the next
B
CD or CD-R before
orJ.
F
C
B
. You
Searching For a Part of a Track
During playback, hold downBorCon
the CD recorder and release it when you
find the section you want to listen to.
Notes:
• If you press the numeric button in the
pause mode, the CD recorder enters
pause mode at the beginning of the
selected track.
• Direct playback is not possible during
shuffle playback and program playback.
Repeat Play
Your CD recorder can repeat a single track,
tracks on both CDs of the PLAYBACK tray
and the RECORD/PLAYBACK tray, a
programmed sequence, or a designated
section.
When using the remote control, select the
tray by pressing
and hold
CD or CD-R and then press
@ orI
.
Directly Selecting a Track
Press CD or CD-R to select the tray and then
press the numeric buttons on the remote
control to select the track. Playback starts
from the selected track.
To play tracks 1 through 9, simply press the
appropriate button (1 through 9).
To play a track that has a higher number
than 9, press
times to set the “tens” digit of the track
number, followed by a single button to set
the digit for less than 10.
+10 appropriate number of
Repeating One Track
PressREPEAT 1/ALL. REPEAT 1 appears
during playback. The CD recorder plays
back the track repeatedly. If you select
another track in
recorder repeatedly plays back the track you
just selected. You can also select a track in
the stop mode. Press
then select the track number using the
numeric buttons.
REPEAT 1 mode, the CD
REPEAT 1/ALL and
Repeating All of the Tracks
Press REPEAT 1/ALL twice. REPEAT
ALL appears. The CD recorder repeatedly
plays all the tracks on the disc. During
program playback, the CD recorder
repeatedly plays back programmed tracks.
17

When you set discs in both the PLAYBACK
tray and the RECORD/PLAYBACK tray, the
CD recorder repeats all the tracks of each
disc alternately for five cycles and then
stops.
Repeating a Designated Section
(A-B Repeat)
Notes:
• You cannot repeat a designated section
on CD-R/CD-RW discs if they have not
been finalized.
• A section should be designated within a
track. If the track ends or if a different
track is selected before point B is
selected, the CD recorder cancels the
A-B repeat mode.
1. During play, press
point where you want to start the
repeat.
REPEAT A- appears.
2. Press
3. To cancel A-B repeat mode, press
REPEAT A-B again at the point
where you want to finish the repeat.
The CD recorder automatically repeats
the selected part.
You can use
the CD during A-B repeat.
REPEAT A-B,
REPEAT A-B at the
or
@
to move through
I
, or OPEN/CLOSE.
G
current track finishes. In the stop mode,
press
SHUFFLE then
If you press
recorder randomly selects the next track. If
you press
current track from the beginning.
To cancel shuffle play at any time, press
SHUFFLE once so SHUFFLE disappears.
Note: Shuffle play can be used for both the
PLAYBACK tray and RECORD PLAYBACK
tray simultaneously.
during shuffle play, the CD
J
, the CD recorder plays the
F
.
g
Intro Check
Intro check automatically plays the first 10
seconds of each track on the CD or the
programmed sequence. Press
CHECK
on the remote control, then g.
INTRO lights. If you press INTRO CHECK
during play, the CD recorder starts intro
check from the next track.
Note: If you press
within 10 seconds from the beginning
of a track, intro check starts from that
track.
To cancel intro check and resume normal
play, press
INTRO CHECK again.
INTRO
INTRO CHECK
Shuffle Play
To set the CD recorder to select and play all
tracks in random order from the loaded
CDs, during play, press
remote control.
recorder starts random play when the
18
SHUFFLE lights. The CD
SHUFFLE on the
When all the tracks of both discs have been
checked, intro check stops.

Programming a Sequence
of Tracks
5. When you finish the selection of track
numbers, press
programmed to
. The track number
D
ST: 01 appears.
You can program up to 32 selections from 2
discs to play in any order you choose.
Note: Shuffle playback does not work
during program playback.
1. Using your remote control, press
PROGRAM in the stop mode. STEP
01 appears and PROGRAM and the
track number
2. Press
3. Press
CD or CD-R to select the tray, and
press numeric buttons, or
select a track. If you make a mistake,
press the numeric buttons again.
PROGRAM to store the track into
memory. The next program number
1 flashes.
or J to
F
STEP 02 appears.
4. Repeat Steps 2 and 3 to program more
tracks, up to 32 selections. When you
select tracks from the same disc
successively, you do not have to press
CD or CD-R.
Notes:
• If you enter a track number higher than
the highest track on a CD, the CD
recorder ignores the entry.
• If you try to store more than 32
selections, the CD recorder displays
PGM FULL.
• If you press
selecting a track number, the CD
recorder programs the first track.
PROGRAM without
6. Press g to play the sequence. After the
CD recorder plays all programmed
tracks, it stops and
The CD recorder keeps the sequence in
memory even after programmed
playback has finished or stopped by
pressing D.
Notes:
• During program playback, press
once to return to the beginning of the
current track. To return to the
beginning of the previous track in the
program, press
the next track in the program, press
• If a program is stored, both gfor the
PLAYBACK tray and g/
RECORD/PLAYBACK tray work to play
the programmed tracks.
ST: 01 appears.
twice. To playback
B
ENTER for the
B
C
Checking/Changing the
Programmed Sequence
In the stop mode, press PROGRAM CHECK.
The CD recorder displays the programmed
sequence's first selection. Each time you
press
PROGRAM CHECK, the CD recorder
displays the next programmed selection.
To change a selection, repeatedly press
PROGRAM CHECK in the stop mode until
the CD recorder displays the track number
you want to change. Enter the desired track
number, then press
PROGRAM.
.
• To cancel the program mode, press D
and
CLEAR.
19

Adding to the Programmed
Sequence
You can add tracks at the end of a
programmed sequence, up to a maximum of
32 tracks.
1. Press
2. Enter the desired track number, then
3. Press D after adding all the additional
PROGRAM in the stop mode.
press
PROGRAM. The CD recorder
adds the selection to the end of the
programmed sequence.
tracks.
Erasing a Track
To erase the programmed sequence from
memory, in the stop mode, repeatedly press
PROGRAM CHECK until the program
number to be deleted appears. Press
to delete the track.
CLEAR
Clearing Programmed Tracks
To clear all tracks, pressDand CLEAR (or
press
CLEAR in the stop mode).
The program also clears when you press
OPEN/CLOSE.
Repeating Programmed Tracks
Press REPEAT 1/ALL twice and select
REPEAT ALL. The CD recorder plays the
programmed tracks five times then stops.
Before Recording
Before you start recording, make sure that
you understand the following points:
• The CD recorder requires Digital Audio
CD-R or CD-RW media for recording.
Computer CD-R or CD-RW discs do
not work with this CD recorder.
• Once you have recorded on a CD-R
disc, you cannot erase the data from it.
• You can add tracks to an unfinalized
recordable disc. Once finalized, a CD-R
disc is “fixed” and behaves in the same
way as a CD. You can, however, erase,
refresh, and re-record finalized CD-RW
discs.
• Due to the system restriction of CDs, a
track cannot be less than four seconds
in length, and there can be a maximum
of 99 tracks on an audio CD.
• If you press D or
from the beginning of a track, the CD
recorder continues to record no signal
and stops when the track’s length
reaches four seconds.
• When the recording is finished,
WRITE and COMPLETE appear for a
few seconds, and the CD recorder then
stops. Do not apply shock or vibration
to the CD recorder during recording.
• If the disc reaches the end during
recording, the CD recorder starts a fadeout over a few seconds. When the fadeout has finished, the CD recorder
finalizes the disc automatically and
stops.
†within four seconds
PMA
20
• If the tracks reach 99 during recording,
the CD recorder stops recording.

• The recording time of a track may
slightly differ from the original one.
Serial Copy Management
System
This CD recorder is in compliance with the
Serial Copy Management System (SCMS)
standard. This standard has been elaborated
to restrict digital-to-digital copying to only
the first generation. The basic rules
governing this system are as follows:
3. Repeatedly press
set the dubbing speed.
DUBBING MODE to
DUBB 4X: high speed dubbing (four
times as fast as the normal playback
speed).
DUBB 2X: high speed dubbing (twice
as fast as the normal playback speed).
DUBB 1X: normal s peed dubbing.
When you set the dubbing speed, the CD
recorder enters the pause mode until you are
ready to begin dubbing.
Rule 1: A digital recording is possible from
a digital source such as a CD, DAT, or MD
onto a recordable CD-R, CD-RW, MD, or
DAT through a digital input connection;
however, further digital-to-digital recording
is prohibited for the second and later
generations.
Rule 2: When an analog source such as an
analog disc or FM broadcast is digitally
recorded by using a CD-R, CD-RW, MD, or
DAT, this recorded source can be digitally
recorded on another CD-R, CD-RW, MD, or
DAT; however, further digital copying is
prohibited.
Dubbing
1. Set the disc to be dubbed in the
PLAYBACK tray, and a CD-R/RW
recordable disc in the RECORD/
PLAYBACK tray. When a blank disc is
set in the RECORD/PLAYBACK tray,
BLANK appears.
2. Set the recording level. (See “Setting the
Recording Level” on Page 24.)
Notes:
• If a recordable disc is not set in the
RECORD/PLAYBACK tray,
CAN’T
REC appears. Replace the disc with a
recordable one.
• The CD recorder automatically changes
the dubbing speed from
finds a problem such as a scratched
disc.
• The slower the speed is, the more
tolerant the CD recorder is of errors on
the CD-R/RW disc. If you are in doubt
about the quality of the CD-R/RW discs,
select
DUBB 1X.
• If you intend to monitor the sound
during high speed dubbing, turn the
volume of your amplifier down enough
to prevent possible damage to your
system from the high-pitched sound.
• Analog output can be monitored at all
three dubbing speeds but digital output
can only be monitored at
4. Press g/
PLAYBACK tray to start dubbing. There
is a slight delay before the CD recorder
begins dubbing.
ENTER for the RECORD/
4X to 2X if it
1X.
21

5. When the playback of the disc in the
PLAYBACK tray ends, the CD recorder
stops recording, finalizes the disc, and
stops.
PMA WRITE, COMPLETE,
FINALIZE, COMPLETE appears. It
takes about 1 minute to finalize the
disc.
Notes:
• If the CD-R/RW disc set in the
RECORD/PLAYBACK tray does not
have enough space to dub the entire disc
set in the PLAYBACK tray,
NO
SPACE:D2 briefly appears and then
DUBB 1/2/4X appears. It is possible
to dub a part of t he disc. Press
C
DUBB 1/2/4X appears to s elect the
track to start dubbing, then press
ENTER.
when
/
g
• During 2X or 4X dubbing, you cannot
monitor the dubbing through the digital
outputs (optical and coaxial).
• To dub only one track, program the
track, then dub it. See “Dubbing a
Programmed Sequence”.
• If you attempt to dub a disc that
contains an SCMS copy protection
signal,
SCMS appears. If you press
ENTER, ANALOG MODE appears then
the CD recorder records the entire disc
at 1X speed in analog mode. When the
recording finishes, the CD recorder
automatically finalizes the disc.
Dubbing a Programmed
Sequence
/
g
• When the disc reaches the end during
recording, the CD recorder starts a fadeout over a few seconds. When the fadeout has finished, the CD recorder
finalizes the disc automatically and
stops.
• Press D of the PLAYBACK tray or the
RECORD/PLAYBACK tray to stop
dubbing.
• Track numbers are automatically
incremented. During dubbing, you
cannot add track numbers manually.
• During dubbing, only D of the
PLAYBACK tray and the RECORD/
PLAYBACK tray work. When dubbing is
stopped by pressing D, the CD recorder
will not finalize the disc.
• If you set a CD-RW in the PLAYBACK
tray, the CD recorder automatically
disables 4X speed dubbing.
22
1. Program a sequence of tracks on the CD
in the PLAYBACK tray.
2. Press
3. Press g/
4. At the end of dubbing,
5. Repeat Steps 1–4 above if you want to
Notes:
• You can use Program Dubbing in all
DUBBING MODE to select a
dubbing speed.
ENTER.
PMA WRITE
then
COMPLETE appears. The CD
recorder does not automatically finalize
the disc.
dub another sequence.
three dubbing speeds (1X, 2X, and 4X).

• After dubbing, if a program is stored,
bothgof the PLAYBACK tray andg/
ENTER of the RECORD/PLAYBACK
tray allow you to play the programmed
tracks.
Dubbing a CD from a Selected
Track to the Last Track
Instead of dubbing the entire source disc
from the beginning to the end, you can dub
tracks from a selected track to the last track.
You can select from the first track to the last
track so the CD recorder dubs all the disc
yet it does not finalize the disc in the
RECORD/PLAYBACK tray at the end of the
dubbing.
1. In the stop mode after installing discs,
select the track you want to start from.
2. Press
3. At the end of the dubbing,
DUBBING MODE to select a
dubbing speed then press g/
ENTER.
PMA
WRITE then COMPLETE appears.
4. Repeat Steps 1–3 above if you want to
dub additional tracks.
Basic Recording
2. Select the source to be recorded. Every
time you press
input changes as follows:
INPUT SELECTOR, the
DIGITAL OPTICAL (OPTICAL
and
DIGITAL light at the right of the
peak level meter): use to record from a
source connected to the
OPTICAL) terminal.
(
DIGITAL IN
DIGITAL COAXIAL (DIGITAL
and
COAXIAL light at the right of the
peak level meter): To record a source
connected to the
(
COAXIAL) terminal.
DIGITAL IN
ANALOG (ANALOG lights at the right
of the peak level meter): use to record
from a source connected to
jacks.
Note: If you select a digital input which
is not connected to the CD recorder,
LINE IN
D-UNLOCK briefly appears.
3. Adjust the recording level. See “Setting
the Recording Level” on Page 24.
4. Select the mode of track number
assignment by pressing
MANUAL
Numbers to Recordings” on Page 25.
5. Press
appears. The CD recorder enters record
pause mode.
. See “Assigning Track
RECORD. BUSY then READY
† and REC flashes.
AUTO/
This section describes the basics of
recording from external sources.
1. Set a recordable CD-R/RW disc in the
RECORD/PLAYBACK tray. When a
blank disc is set in the RECORD/
PLAYBACK tray,
BLANK appears.
6. Press g/
PLAYBACK tray to start recording. Play
the source to be recorded.
If the CD recorder detects copy-prohibit
signals during recording,
ENTER of the RECORD/
CAN’T
COPY appears and recording stops.
7. Press
† to temporarily pause recording.
To restart recording, press g/
ENTER.
23

Note: Every time recording is paused or
stopped, a new track number is always
assigned.
8. Press D to stop recording.
Manually Assigning Track
Numbers
It is possible to assign track numbers while
recording. While recording, press
The current track number is incremented by
one.
RECORD.
Finalizing
As explained earlier, in order for a disc to
become a standard CD, it must have a Table
of Contents (TOC) written to it. This
process is known as finalizing. Once
finalized, CD-R discs are truly final. You
cannot record any more tracks on them. By
contrast, you can “unfinalize” CD-RW discs
and record more tracks on them.
1. Load an unfinalized (recordable) disc in
the RECORD/PLAYBACK tray.
appears if the disc is unfinalized.
NO TOC
Setting the Recording Level
Play the source to be recorded, and press
DIGITAL REC LEVEL – or + to adjust the
recording level (± 6 dB). The loudest sound
should not exceed the 0 dB of the peak level
meter.
Unlike analog equipment, digital audio units
produce extremely unpleasant sounds when
distorted, and there is no “headroom” after
the 0 mark. When you record digitally from
a commercially-produced CD, set the digital
volume to 0 dB. This will maintain all the
dynamic range of the source CD without
clipping. Only boost the signal if the source
is exceptionally quiet.
Notes:
• Recording level is set to 0 dB when the
power is turned on.
• Youcan only changethe recording level
when the CD recorder is in the stop
mode or when the CD recorder plays
the PLAYBACK tray.
2. Press
3. Press g/
FINALIZE in the stop mode. To
cancel the finalizing process, pressD.
ENTER to start finalizing.
FINALIZE scrolls on the display.
When the operation is finished, the display
returns to the track/time display.
disappears.
Notes:
• During finalizing, never turn the power
off or unplug the power cord.
• Although finalized CD-R discs may be
replayed on ordinary CD players,
finalized CD-RW discs may not play on
ordinary CD players.
NO TOC
Erasing or Unfinalizing a CD-RW
If a CD-RW is finalized, you can unfinalize it
or erase all tracks on it. If a CD-RW is not
finalized, you can erase the last track on it or
erase all tracks on it. Remember that it is not
possible to perform any erase procedures on
a CD-R disc.
24

1. Insert a recorded CD-RW in the
RECORD/PLAYBACK tray. If the disc is
finalized, only
upper right on the display. If the disc is
not finalized
appear.
2. If the disc is finalized, press
once to select
to select
mode. If the disc is not finalized, press
ERASE once to select ERASE # (#
means the last track number) or twice
to select
To cancel the erasing or unfinalizing
process, pressD.
3. Press g/
Note: You cannot cancel this operation once
you press g/
erase tracks, make sure that they are
recordings that you really want to erase.
CD-RW appears at the
CD-RW and NO TOC
ERASE
UNFINALIZE or twice
ERASE ALL in the stop
ERASE ALL.
ENTER.
ENTER. If you are going to
When the auto track feature is on,
A-
TRACK appears. If you want to assign track
numbers manually, select
During dubbing, the auto track feature is
always
ON. When the CD recorder detects
an increment signal, the CD recorder
automatically increments a track number.
You cannot manually add track numbers.
When you record digitally from an external
source with the auto track feature set to
the CD recorder automatically inserts a track
division in the recorded material when an
increment signal is detected. If the source
does not contain increment signals, auto
track does not work at all. In such a case,
add track numbers by pressing
during recording. When the CD recorder is
in manual track division mode (
is off), the track number on the disc you are
recording is only increased when you press
RECORD during recording.
MANUAL.
ON,
RECORD
A-TRACK
Advanced Recording
Assigning Track Numbers to
Recordings
You can set the CD recorder to automatically
or manually assign track numbers to
recordings by pressing
you press
displays
AUTO/MANUAL, the CD recorder
INCLVL -60, INCLVL -50,
INCLVL -40, and MANUAL. If you want
the CD recorder to automatically assign
track numbers to recording, select
, INCLVL -50, or INCLVL -40.
-60
-60, -50, and -40 indicate the recording
level at which the CD recorder automatically
increments a track number.
AUTO/MANUAL. As
INCLVL
When you record analogically from an
external source with the auto track feature
set to ON, the CD recorder automatically
inserts a track division in the recorded
material when sound level once drops below
the increment level (-60, -50, or -40 dB) for
more than 3 seconds and then the sound restarts.
You can add track numbers by pressing
RECORD during recording from an external
source. When the CD recorder is in manual
track division mode (A-TRACK is off), the
track number on the disc you are recording
is only increased when you press
during recording.
RECORD
25

Setting the Track Number
Increment Level and the
Synchronized Recording
Starting Level
By pressing AUTO/MANUAL, you can set
the track number increment level so the CD
recorder automatically increments track
numbers when you make a recording or you
can set the record starting level when you
make a synchronized recording. As you
press AUTO/MANUAL, the CD recorder
displays
INCLVL-40, and MANUAL. -60, -50 and
-40 mean the signal levels in decibels. The
default setting is INCLVL-60 when the CD
recorder is turned on.
Track Number Increment Level
INCLVL-60, INCLVL-50,
• A lower setting (-60 dB) indicates that a
very silent passage with little or no
background hiss will trigger the track
number increment.
• A higher setting (-40 dB) indicates that
a fairly silent passage with some
background hiss will trigger the track
number increment.
• A higher setting (-40 dB) indicates that
a relatively loud input signal will trigger
the recording.
• MANUAL setting indicates the
synchronized recording feature does not
work.
Synchronized Recording
Synchronized recording means that
recording begins automatically when the CD
recorder detects a signal above the selected
level, and stops when the signal ends.
(If your digital external source is compatible
with the CD SYNC feature, the track
information and recording cues
automatically operate. If your digital
external source is not compatible with the
CD SYNC signal, the digital synchronized
recording does not work. You can still make
a synchronized recording in analog mode.)
1. Set a recordable CD-R/RW disc in the
RECORD/PLAYBACK tray.
2. Select the input (
OPTICAL, DIGITAL COAXIAL, or
ANALOG).
DIGITAL
• MANUAL setting indicates the auto
track increment feature does not work.
Synchronized Recording Starting Level
• A lower setting (-60 dB) indicates that a
relatively quiet input signal will trigger
the recording.
26
3. Press
4. Press
AUTO/MANUAL to select the level
at which the synchronized recording
starts. See “Setting the Track Number
Increment Level and the Synchronized
Recording Starting Level”.
SYNC REC to select SYNC-1 or
SYNC-ALL.
To record only one track, select
To record all the tracks, select
SYNC-1.
SYNC-
ALL.

Note: You cannot select SYNC-1 for
analog recording.
5. After
READY appears, press
of the RECORD/PLAYBACK tray.
g
/ENTER
† disappears, and REC lights steadily.
6. Start playing the source. The CD
recorder starts synchronized recording.
During digital recording, if the input
signal stops for 5 seconds, recording
stops. During analog recording, if the
input signal stops for 20 seconds,
recording stops.
• Total elapsed play time of tracks.
• Remaining time of the track being
played.
• Total remaining play time of tracks.
• The total play time and the number of
tracks.
In the Stop Mode
• The total play time and the number of
tracks for both trays.
• Remaining recording time of the disc in
the record tray.
Mixing Recording
You can mix the sound of an analog external
input and a CD placed in the PLAYBACK
tray on a CD-R/RW disc. For example, if you
have a microphone and its amplifier, you
can add narration to your CD. Or you can
mix the sound of your musical instruments
to your CD.
1. Connect the external analog source and
load the discs.
2. Record the external analog source and
then press g of the PLAYBACK tray.
Time Display
Press TIME to switch the mode of the time
display. Each time you press
mode changes as follows:
In the Play/Pause Mode
TIME, the
In the Recording Mode
• Elapsed recording time of the track
being recorded.
• Remaining recording time of disc.
Messages
BLANK —AblankCD-R/CD-RWdiscis
set on the tray.
CLOSE — Close the disc tray.
COMPLETE — Dubbing, recording,
finalizing, or erasure has been completed.
DUBB 1X — Normal speed dubbing from
the PLAYBACK tray to the RECORD/
PLAYBACK tray.
DUBB 2X — 2X speed dubbing from the
PLAYBACK tray to the RECORD/
PLAYBACK tray.
• Elapsed time of the track being played.
27

DUBB 4X — 4X speed dubbing from the
PLAYBACK tray to the RECORD/
PLAYBACK tray.
ERASE
CD-RW disc.
— Erase the last track of the
**
ERASE ALL — Erase all the track of the
CD-RW disc.
FINALIZE — Finalizethe disc.
INCLVL
— Increment level
**
MANUAL — Auto track division is off.
NO DISC — No disc is set on the tray.
Error Messages
When an error message appears, pressDand
check the cause.
CAN’T REC — Cannot record, erase, or
finalize the disc. Change the disc. If the CDRW disc is finalized, unfinalize it. See
“Erasing or Unfinalizing a CD-RW” on
Page 24.
D-UNLOCK — Digital input is selected,
but the digital source is not connected or the
source’s power is off.
DISC FULL — There is no space on the
disc, or no tracks are available.
OPEN — Open the tray.
PMA WRITE — Writing the recorded
memories on the disc. (PMA: Program
Memory Area)
READING — The CD recorder is reading
the disc.
REC
STEP
— Recording level
DB
**
— Program number
**
SYNC-1 — Record one track
synchronously.
SYNC-ALL — Record all the tracks
synchronously.
UNFINALIZ — Unfinalize the CD-RW
disc.
Note:
indicates variable.
**
NO CD-DA:D2 — Discs designed for
computing systems cannot be used for
recording. Use the discs bearing DIGITAL
AUDIO mark.
NO SPACE:D2 — The recordable space
of the CD-R/CD-RW disc set in the
RECORD/PLAYBACK tray is not enough to
dub the whole disc in the PLAYBACK tray.
Dubbing stops halfway.
PGM FULL — 32 tracks have been
programmed. You cannot program any more
tracks.
SCMS —
(SerialCopy Management System) If you are
trying to record digitally from a
“second-generation” digital copy, try analog
recording.
28

Troubleshooting
Incorrect operations are often mistaken for trouble and malfunctions. If you think that there is
something wrong with this component, check the points below. Sometimes the trouble may
lie in another component. Investigate the other components and electrical appliances being
used. If the trouble cannot be resolved by following the suggested remedies below, take the
CD recorder to your nearest local RadioShack store.
This CD recorder has been manufactured to the specifications of RadioShack and is covered
by a limited warranty from RadioShack. If your CD recorder is not operating as it should, take
it to your local RadioShack store or call 1-800-THE-SHACK for assistance.
Problem Solution
No power. Check the connection to the AC power supply.
No sound from speakers. Check the connection to the stereo system.
No disc has been loaded. Load a disc.
The sound is noisy. The CD recorder is too close to a TV set or similar appliances.
Install the CD recorder away from TV’s and other electronic
devices or turn the devices off.
Remote control does not
work.
Does not play. Load a disc with the label side up.
Sound skips. Place the CD recorder in a stable place to avoid vibration and
The recording level is too
low.
Check the batteries and replace them if necessary.
Use the remote control within the range of 15 ft./5m and point
at the front panel.
Clear obstacles between the remote control and the CD
recorder.
If a fluorescent light is near the CD recorder, turn it off.
If the disc is dirty, clean the surface on the disc.
A blank disc has been loaded. Load a pre-recorded disc.
shock.
If the disc is dirty, clean the surface of the disc.
Do not use scratched, damaged, or warped discs.
Adjust the recording level.
Check the connected components. If the CD recorder still does
not operate normally, unplug the power cord from the outlet
and plug it in again.
29

Specifications
Media Type ... CD-RW and CD-R for digital audio (record and playback), CD (playback only)
Converter Input Sampling Frequency ........................................................... 32 kHz–48 kHz
Recording Sampling Frequency ............................................................................... 44.1 kHz
Frequency Response ........................................................................................ 20 Hz-20 kHz
........................................................................... (playback: ±1.5 dB, recording: ±1.5 dB)
Signal to Noise Ratio
Playback ............................................................................................... More than 92 dB
Recording ............................................................................................. More than 86 dB
Dynamic Range
Playback ............................................................................................... More than 92 dB
Recording ............................................................................................. More than 86 dB
Total Harmonic Distortion
Playback ................................................................................................ Less than 0.01%
Recording .............................................................................................. Less than 0.02%
Wow & Flutter ................................................................................................. unmeasurable
Audio Input Sensitivity/Impedance......................................... LINE: -6 dBV (0.5 V)/20 kOhm
Output Level/Impedance.......................................................... LINE: -6 dBV (0.5 V)/1 kOhm
Maximum Output Level ......................................................................... LINE: +6 dBV (2.0V)
Power Supply ............................................................................................... 120 V AC, 60 Hz
Power Consumption....................................................................................................... 20 W
Dimensions (WHD).............................................................................17
1
/8 × 4 × 124/8 Inches
(435 × 102 × 320 mm)
Weight .......................................................................................................................11
3
/16 lb.
(5.1 kg)
Supplied Accessories ............................................................................. RCA Patch Cable × 1
Remote Control × 1
Specifications are typical; individual units might vary. Specifications are subject to change and
improvement without notice.
30

Optional Accessories
Your local RadioShack has a
wide selection of headphones.
Protect your CDs by storing
them in a RadioShack CD Wallet
You will need two AA batteries for
the remote control.
RadioShack CD Cleaning Kits
can help you care for your CDs.
You can purchase blank CD-R discs
at RadioShack.
31

Limited One-Year Warranty
This product is warranted by RadioShack against manufacturing defects in material and workmanship under normal use for one (1) year from the date of purchase from RadioShack company-owned
stores and authorized RadioShack franchisees and dealers. EXCEPT AS PROVIDED HEREIN, RadioShack MAKES NO EXPRESS WARRANTIES AND ANY IMPLIED WARRANTIES, INCLUDING
THOSE OF MERCHANTABILITY AND FITNESS FOR A PARTICULAR PURPOSE, ARE LIMITED
IN DURATION TO THE DURATION OF THE WRITTEN LIMITED WARRANTIES CONTAINED
HEREIN. EXCEPT AS PROVIDED HEREIN, RadioShack SHALL HAVE NO LIABILITY OR RESPONSIBILITY TO CUSTOMER OR ANY OTHER PERSON OR ENTITY WITH RESPECT TO ANY
LIABILITY, LOSS OR DAMAGE CAUSED DIRECTLY OR INDIRECTLY BY USE OR PERFORMANCE OF THE PRODUCT OR ARISING OUT OF ANY BREACH OF THIS WARRANTY, INCLUDING,BUT NOT LIMITED TO, ANY DAMAGES RESULTING FROM INCONVENIENCE, LOSS
OF TIME, DATA, PROPERTY, REVENUE, OR PROFIT OR ANY INDIRECT, SPECIAL, INCIDENTAL, OR CONSEQUENTIAL DAMAGES, EVEN IF RadioShack HAS BEEN ADVISED OF THE
POSSIBILITY OF SUCH DAMAGES.
Some states do not allow limitations on how long an implied warranty lasts or the exclusion or limitation of incidental or consequential damages, so the above limitations or exclusions may not apply to
you.
In the event of a product defect during the warranty period, take the product and the RadioShack
sales receipt as proof of purchase date to any RadioShack store. RadioShack will, at its option, unless otherwise provided by law: (a) correct the defect by product repair without charge for parts and
labor; (b) replace the product with one of the same or similar design; or (c) refund the purchase
price. All replaced parts and products, and products on which a refund is made, become the property
of RadioShack. New or reconditioned parts and products may be used in the performance of warranty service. Repaired or replaced parts and products are warranted for the remainder of the original warranty period. You will be charged for repair or replacement of the product made after the
expiration of the warranty period.
This warranty does not cover: (a) damage or failure caused by or attributable to acts of God, abuse,
accident, misuse, improper or abnormal usage, failure to follow instructions, improper installation or
maintenance, alteration, lightning or other incidence of excess voltage or current; (b) any repairs
other than those provided by a RadioShack Authorized Service Facility; (c) consumables such as
fuses or batteries; (d) cosmetic damage; (e) transportation, shipping or insurance costs; or (f) costs
of product removal, installation, set-up service adjustment or reinstallation.
This warranty gives you specific legal rights, and you may also have other rights which vary from
state to state.
RadioShack Customer Relations, 200 Taylor Street, 6th Floor, Fort Worth, TX 76102
12/99
42-7011
Printed in China
03A03
 Loading...