

RadioShack DX-402 Owners Manual

45-Memory, Digital SSB
Shortwave Receiver
with AM/FM Radio
Owner’s Manual
Please read before using this equipment.
WARNING:
or shock hazard, do not expose this
product to rain or moisture.
To reduce the risk of fire
CAUTION
RISK OF ELECTRIC
SHOCK. DO NOT OPEN.
CAUTION:
RISK OF ELECTRIC SHOCK, DO
NOT REMOVE COVER OR BACK.
NO USER-SERVICEABLE PARTS
INSIDE. REFER SERVICING TO
QUALIFIED PERSONNEL.
TO REDUCE THE
!
!
This symbol is intended to
alert you to the presence of
uninsulated dangerous voltage within the product’s
enclosure that might be of
sufficient magnitude to constitute a risk of electric
shock. Do not open the
product’s case.
This symbol is intended to
inform you that important
operating and maintenance
instructions are included in
the literature accompanying this product.
©
2000 Tandy Corporation.
All Rights Reserved.
RadioShack and RadioShack.com are trademarks used by Tandy Corporation.
2

Features ............................................................................................................ 5
A Quick Look at the Receiver ......................................................................... 6
Preparation ....................................................................................................... 8
Contents
Connecting to Power .................................................................................. 8
Installing Batteries ............................................................................... 8
Using Standard AC Power .................................................................. 9
Using Vehicle Battery Power ............................................................... 9
Connecting Headphones .......................................................................... 10
Using the FM ST/FM Switch .............................................................. 10
Listening Safely ................................................................................. 10
Traffic Safety ............................................................ ......................... 10
Using the Clock ................................................. ....................................... 11
Setting the CLOCK1 Time ................................................................. 11
Setting the CLOCK 2 Time ........... ............................................. ........ 11
Connecting an External Antenna .............................................................. 12
Setting the AM Tuning Increment ............................................................. 12
Using the Folding Stand ........................................................................... 12
Operation ........................................................................................................ 12
Turning th e Receiver On/Off ..................................................................... 12
Adjusting the Antenna .............................................................................. 12
Tuning ....................................................................................................... 13
Selecting the Band .................... .......................................... ... ........... 13
Improving Reception ......................................................................... 13
Automatic Tuning System (ATS) ......................................... .............. 13
Direct-Access Tuning ...................... .. ... ... .......................................... 14
Manual Tuning ................................................................................... 15
Scan Tuning ...................................................................................... 15
Tuning an SW Meter Band ................................................................ 15
Tuning SSB Stations Using Clarity Control ....................................... 16
Memory Tuning ........ ... .......................................... ... ......................... 16
Recalling a Station in Memory ................. ... ... .................................... 17
Deleting a Station from Memory ........................................................ 17
Memory Scan .............................................................. ...................... 17
Exchanging Station Positions in Memory .......................................... 17
3

Special Features ............................................................................................ 18
Setting the Alarm Time ..................................................................... 18
Setting the Radio Alarm .................................................................... 18
Setting the Humane Wake System (HWS) Alarm ................ ... .......... 18
Silencing the Alarm ........................................................................... 19
Using the Sleep Timer .......... .. ... .......................................... ... ... ....... 19
Using Mode .................................................... ................................... 20
Using the NORM/NEWS/MUSIC Switch ........................................... 20
Using the Display Backlight .............................................................. 20
Locking the Controls ......................................................................... 20
Listening Hints .................................... ... ... .................................................... 21
Reference Sources ..... .. ........................................... .. .............................. 21
Frequency Conversion ............................................................................. 21
Band Allocations ......... .. ... .......................................... ... ........................... 22
Amateur Radio Frequencies .................... ......................................... 22
International Frequencies ................................................................. 22
Aircraft Frequencies .......................................................................... 23
Ships and Coastal Station Frequencies ............................................ 23
Time Standard Frequencies .............................................................. 23
Longwave Band .............................................................. .. ... ............. 24
Listening Guide ......................................................................................... .. .. 24
Birdies ...................................................................................................... 29
Amateur Shortwave Bands in the US ....................................................... 29
Amateur Shortwave Bands (in MHz) ................................................. 30
Troubleshooting ............................................................................................ 30
Resetting the Receiver ................. ............................................ ................ 31
Care and Maintenance ....................................................... ........................... 32
The FCC Wants You To Know .................................................................. 33
Specifications ................................................................................................ 34
4

Features
Your RadioShack 45 Memory, Digital
SSB Shortwave Receiver provides
high quality in a compact design and
brings the voices of the world to you.
In the 18 international shortwave
(SW) bands, you can hear news
broadcasts and other programs from
sources such as the British Broadcasting Company, Radio Cairo, and
Radio Moscow.
You can get emergency information
firsthand by listening to amateur radio
broadcasts, which include single sideband (SSB) voice transmissions.
In the LW (longwave) band, you can
Memory Tuning
to 45 frequencies in memory so you
can quickly select your favorite stations.
Scan Tuning
stations.
Stereo Headphone Jack
connect stereo headphones for FM
stereo reception.
Dual Time Clock
primary clock to your local time and a
secondary clock to another time zone
so you can quickly check the time in
another part of the world.
— you can store up
— lets you quickly find
— lets you
— you can set a
sometimes hear hurricane reports,
ship-to-shore calls, and other marine
and aeronautical services. You can
tune to local broadcasts in the FM
and medium-wave (MW) AM bands.
The receiver’s features include:
Single Side Band (SSB) Reception
— lets you receive the popular band
among ham and business radio users.
Continuous SW Coverage
1.711 MHz to 29.999 MHz) — all ows
you to scan the entire SW band.
Digital Synthesized Receiver
(from
— en-
Auto Tuning System
matically tunes to the stations with the
strongest signals and stores them in
memory locations according to each
station’s signal strength.
Timer Alarms
buzzer to sound or the receiver to
turn on to awaken you at a time you
set.
Sleep Timer
ceiver to turn off after a preset length
of time so you can fall asleep as it
plays.
— lets you set the
— lets you set the re-
(ATS) — auto-
sures fast, accurate, and drift-free
tuning.
Features
5

A Quick Look at the Receiver
TUNE/SSB Indicator
SW SELECT
C (M. DEL)
0 (M.SCAN)
(Display Backlight)
POWER
/
DISPLAY
MODE
ALARM
ALARM
O
M
E
M
O
T
U
A
(TUNING/AUTO MEMO)
(ENTER/FREQ/TIME SET)
Band
VOLUME
M (AM/PM)
CLOCK 1/2
(SW PAGE)
SW EXT.ANT
(Control
/
FM/SW
DX LOCAL
NEWS/NORM/MUSIC
FM/FM ST
SSB/AM
TUNING/
Jack
+CLARIFY–
DC IN 6V Jack
6
A Quick Look at the Receiver

(Display Backlight) — lights the
BAND
— toggles between the AM,
display for about 7 seconds.
POWER
/ — turns the receiver and
the sleep timer on and off.
DISPLAY
MODE
— displays settings.
— changes the receiver’s set-
tings.
ALARM
ALARM
— sets the Humane Wak-
— sets the radio alarm.
ing System (HWS) alarm.
TUNING/AUTO MEMO
(
up or down.
) — tunes
LW (longwave), FM, and SW bands.
VOLUME
— controls the volume.
/ (Control Lock) — prevents you
from accidentally turning the receiver
on or off, changing the band or frequency, or accidentally selecting
front-panel buttons.
NEWS/NORM/MUSIC
— sets the receiver to enhance the sound of different types of programs.
TUNING
/
— sets the tuning range
for manual tuning (see “Direct-Access
Tuning” on Page 14).
ENTER/FREQ/TIME SET
(
)—
stores frequencies and the time.
C(M. DEL
) — cancels an entry or de-
letes a frequency stored in memory.
0(M. SCAN
) — scans the receiver’s
preset memory locations.
M(AM/PM
) — stores frequencies to
memory or changes the time from AM
to PM.
CLOCK 1/2(SW PAGE
— toggles be-
)
tween two clock settings. It also toggles between the two memory pages
(see “Memory Tuning” on Page 16).
+CLARIFY–
— helps provide clearer
reception for SSB (single side band)
broadcast.
SW EXT. ANT
— lets you connect an
external antenna for shortwave use.
FM/SW/DX LOCAL
— reduces interference from adjacent stations in the FM
and SW bands.
FM/FM ST/SSB/AM
— lets you select
the FM, FM Stereo, Single Side Band
(SSB) or AM band.
Jack — lets you connect head-
phones to the receiver.
SW PAGE/SW SELECT
— toggles between the SW (shortwave) meter
bands (see “Selecting the Band” on
Page 13).
A Quick Look at the Receiver
DC IN 6V Jack
— lets you connect ex-
ternal power to the receiver.
7
Preparation
CONNECTING TO
POWER
You can power the receiver from internal batteries, standard AC power,
or your vehicle’s battery.
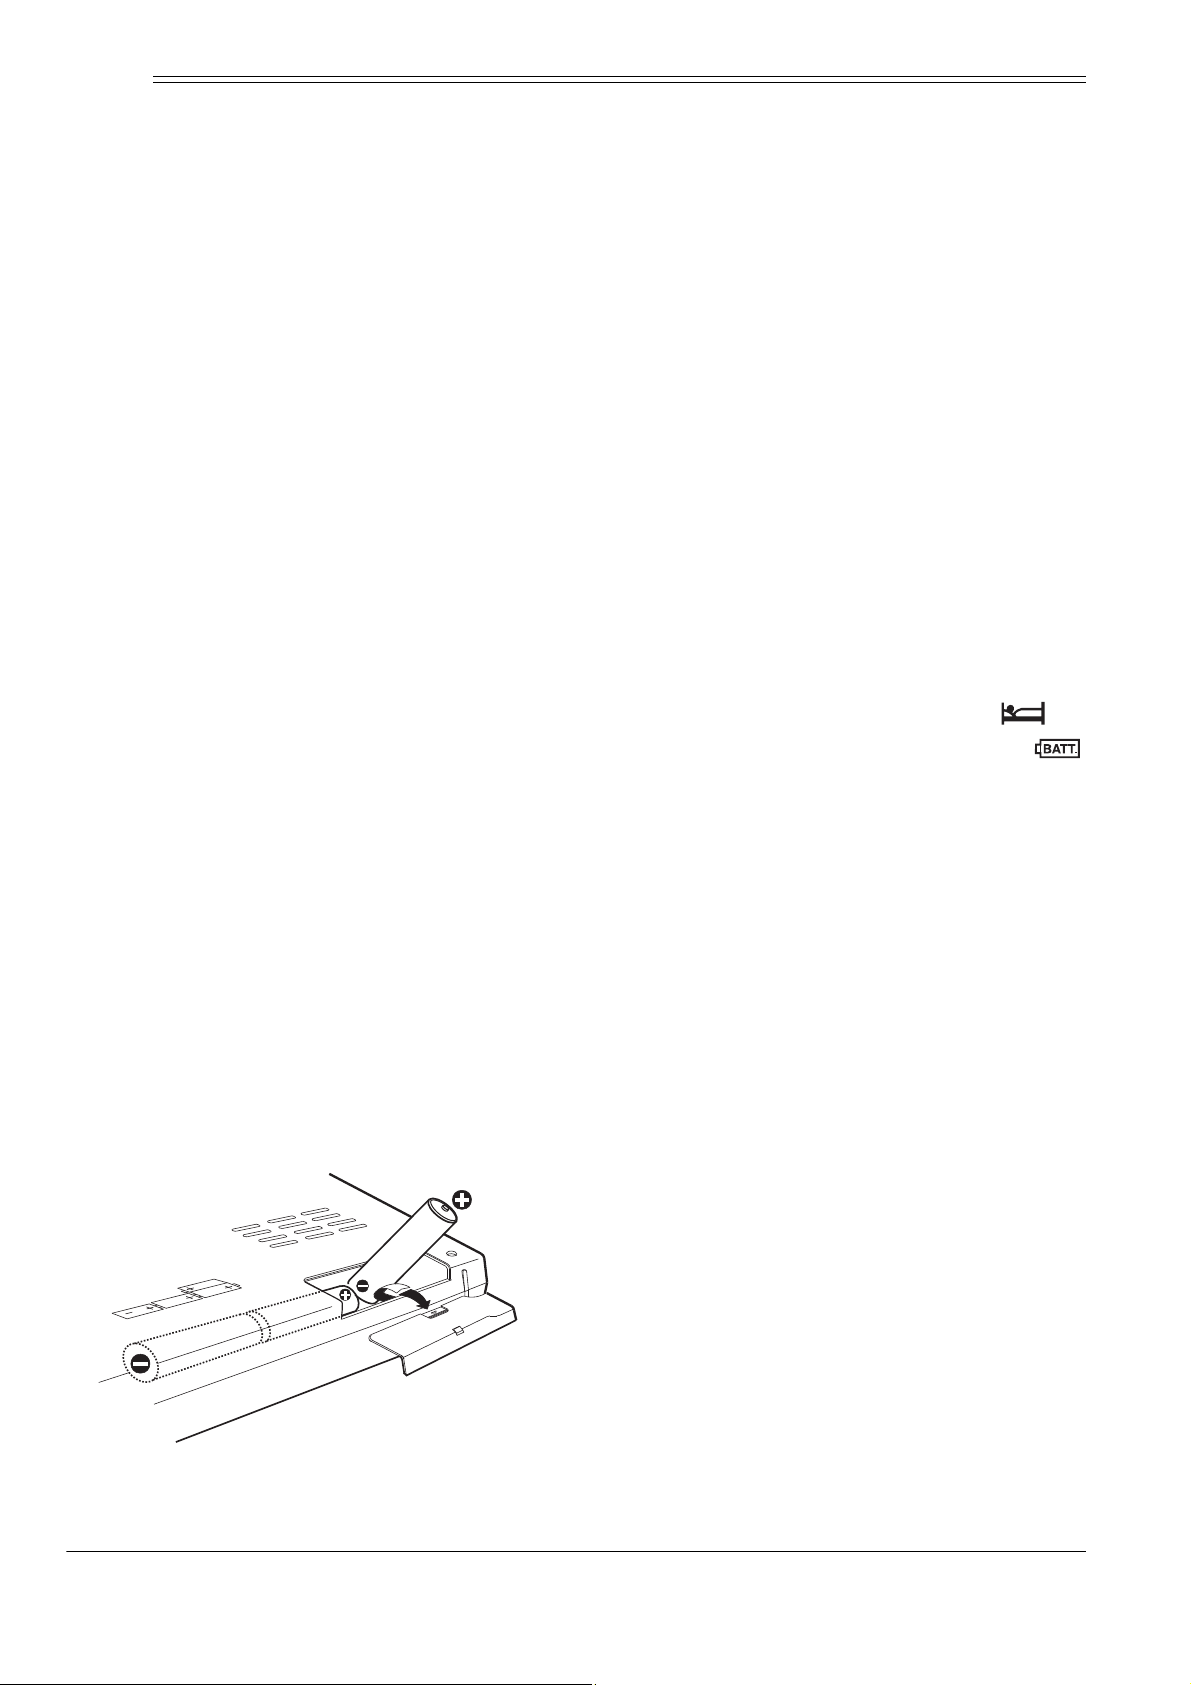
Installing Batteries
Your receiver can use four AA batteries for power (not supplied). For the
best performance, we recommend
RadioShack alkaline batteries.
Cautions:
• Use only fresh batteries of the
required size and recommended
type.
1. Slide the battery compartment
cover in the direction of the arrow
and remove it.
2. Slide four AA batteries into the
compartment, according to the
+
polarity symbols (
marked next to the compartment.
For easy removal, place the batteries on top of the lift-out ribbon.
3. Replace the cover.
Notes:
• When you press
turn on the receiver and
flashes on the display, or the
receiver stops operating properly, replace the batteries.
and –)
POWER
/ to
• Do not mix old and new batteries,
different types of batteries (standard, alkaline, or rechargeable),
or rechargeable batteries of different capacities.
Follow these steps to install the batteries.
• To test the batteries’ power
strength, turn off the receiver.
The battery power indicator displays for 7 seconds. If the battery
power indicator is below 2,
replace the battery.
• The receiver maintains all the
memory settings for about 3 minutes after the batteries are
removed.
Warning:
promptly and properly. Do not burn or
bury them.
Dispose of old batteries
8
Preparation

Caution:
!
receiver with batteries for a month or
longer, remove the batteries. Batteries can leak chemicals that can destroy electronic parts.
If you do not plan to use the
Using Vehicle Battery Power
You can power the receiver from your
vehicle’s 12V power source (such as
a cigarette-lighter socket) using a 6V,
300-mA DC adapter (not supplied)
Using Standard AC Power
You can power the receiver using a
6V, 300 mA AC adapter (not supplied) available at your local RadioShack store.
Note:
connects the battery power.
Cautions:
Connecting an AC adapter dis-
You must use a Class 2
power source that sup-
!
plies 6V DC and delivers at least 300 mA. Its center tip
must be set to negative and its
plug must fit the receiver's
6V
jack. Using an adapter that
does not meet these specifications could damage the receiver
or the adapter.
• Always connect the AC adapter
DC IN
available at your local RadioShack
store.
Cautions:
You must use a power
source that supplies 6V
DC and delivers at
least 300 mA. Its center tip must
be set to negative and its plug
must fit the receiver's
jack. Using an adapter that does
not meet these specifications
could damage the receiver or the
adapter.
• Always connect the DC adapter
to the receiver before you connect it to the power source.
When you finish, disconnect the
adapter from the power source
before you disconnect it from the
receiver.
DC IN 6V
to the receiver before you connect it to AC power. When you
finish, disconnect the adapter
from AC power before you disconnect it from the receiver.
Insert the adapter’s barrel plug into
the receiver’s
the adapter into a standard AC outlet.
DC IN 6V
jack, then plug
Insert the adapter’s barrel plug into
the receiver’s
Insert the adapter’s large plug into the
vehicle’s cigarette-lighter socket.
Preparation
DC IN 6V
jack.
9

CONNECTING
HEADPHONES
• Set the volu me to the lowe st setting before you begin listening.
After you begin listening, adjust
For private listening and for stereo
sound during FM stereo broadcasts,
you can connect optional stereo
1
headphones with a
plug. Your local RadioShack store
sells a wide selection of stereo headphones.
Insert the headphones’ plug into the
receiver’s jack. When you connect stereo headphones and tune to a
stereo broadcast,
display and the receiver’s internal
speaker disconnects. For the best reception, fine tune the receiver until
appears continuously.
/8-inch (3.5-mm)
ST
appears on the
ST
the volume to a comfortable
level.
• Do not listen at extremely high
volume levels. Extended highvolume listening can lead to permanent hearing loss.
• Once you set the volume, do not
increase it. Over time, your ears
adapt to the volume level, so a
volume level that does not cause
discomfort might still damage
your hearing.
Traffic Safety
Using the FM ST/FM Switch
You can receive FM broadcasts in
stereo by connecting optional stereo
headphones to the jack and slid-
FM/FM ST/SSB/AM toFM ST
ing
reo).
To improve reception for weak FM
stereo stations, slide
AM
to
comes monaural, but the sound might
improve. To return to a stereo signal,
slide
FM
(mono). The signal be-
FM/FM ST/SSB/AM
FM/FM ST/SSB/
FM ST
to
.
ste-
(
Listening Safely
• Do not wear headphones while
operating a motor vehicle or
riding a bicycle. This can create a
traffic hazard and could be illegal
in some areas.
• Even though some headphones
let you hear some outside
sounds when listening at normal
volume levels, they still can
present a traffic hazard.
To protect your hearing, follow these
guidelines when you use headphones.
10
Preparation

USING THE CLOCK
3. To set AM or PM, press
M
.
Your receiver has dual clocks. We
recommend you set the primary clock
for local time and the secondary clock
for UTC (Coordinated Universal Time,
formerly called Greenwich Mean
time), because most shortwave stations announce broadcast times in
UTC 24-hour format.
To switch back and forth between
times, press
CLOCK 1/2
then .
Setting the CLOCK1 Time
1. If the receiver is on, press
PLAY
. appears and the
CLOCK 1 time displays. Hold
down for about 2 seconds
until flashes and
appears.
DIS-
–:– –
4. Press to store the setting.
The CLOCK 1 time displays.
Setting the CLOCK 2 Time
You can set CLOCK 2 to store a different time than CLOCK 1.
1. If the receiver is on, press
PLAY
so appears and the
CLOCK1 time displays. Then
press
CLOCK 1/2
.
If the receiver is off and while
and the CLOCK1 time display,
press
CLOCK 1/2
.
2. flashes for about 7 seconds
and the CLOCK 2 time displays.
While flashes, press .
stops flashing.
DIS-
If the receiver is off, hold down
for about 2 seconds until
flashes and
–:– –
appears.
2. While flashes, enter the time
using the number keys.
Notes:
• The clock default is a 12-hour
format. If you enter an invalid
time, such as 13:00 o r 11:69, the
receiver beeps and
Err
appears, prompting you to enter
the correct time.
• To change the 12-ho ur format to
a 24-hour format, see “Using
3. Hold down for about 2 seconds until flashes and
–:– –
appears.
4. While flashes, enter the time
using the number keys.
M
5. To set AM or PM, press
.
6. Press to store the setting.
The CLOCK 2 time appears.
Note:
CLOCK 2 time, press
To constantly display the
CLOCK 1/2
then
. and the time appear. To re-
turn to CLOCK 1, press
CLOCK 1/2
then . and the time appear.
Mode” on Page 20.
Preparation
11
 Loading...