

Radio Shack DR-92 Digital Recorder, 14-1199 Owner's Manual

©
2002 RadioShack Corporation. All Rights Reserved.
RadioShack and RadioShack.com are trademarks used
by RadioShack Corporation.
OWNER’S MANUAL —
Please read before using this equipment.
14-1199
www.radioshack.com
SM
#
"+/2146#06"
#
If an icon appears at the end of a paragraph, go to the box on that
page with the corresponding icon for pertinent information.
Rý
— Warning
....
— Caution
±
— Note
&4/;4"&KIKVCN
4GEQTFGT
%106'065
Preparation .............................................. 2
Installing Batteries .............................. 2
Using AC or DC Power ....................... 3
Connecting Earphones ....................... 4
Connecting an External Microphone .. 5
Listening Safely .................................. 6
Traffic Safety ...................................... 7
Attaching the Wrist Strap .................... 7
Locking the Recorder’s Controls ........ 8
Installing a Multi-Media Card (MMC) or
Secure Digital (SD) ............................. 9
Operation ................................................ 11
Turning the Recorder On or Off ......... 11
Setting the Clock .............................. 12
Files .................................................. 13
Recording ......................................... 13
Using Voice-Activat ed Recording ..... 16
Playing Back Messages ................... 17
Changing Playback Speed ............... 18

Preparation
2
Thank you for purchasing the
RadioShack DR-92 Digital
Recorder. It provides up to
eight hours recording time, and
its light weight and small size
make it easy to slip into a
pocket, briefcase, or purse. Use
it at school, a business
conference, or anywhere on the
go. You can record manually or
set the recorder so sound
activates recording.
24'2#4#6+10
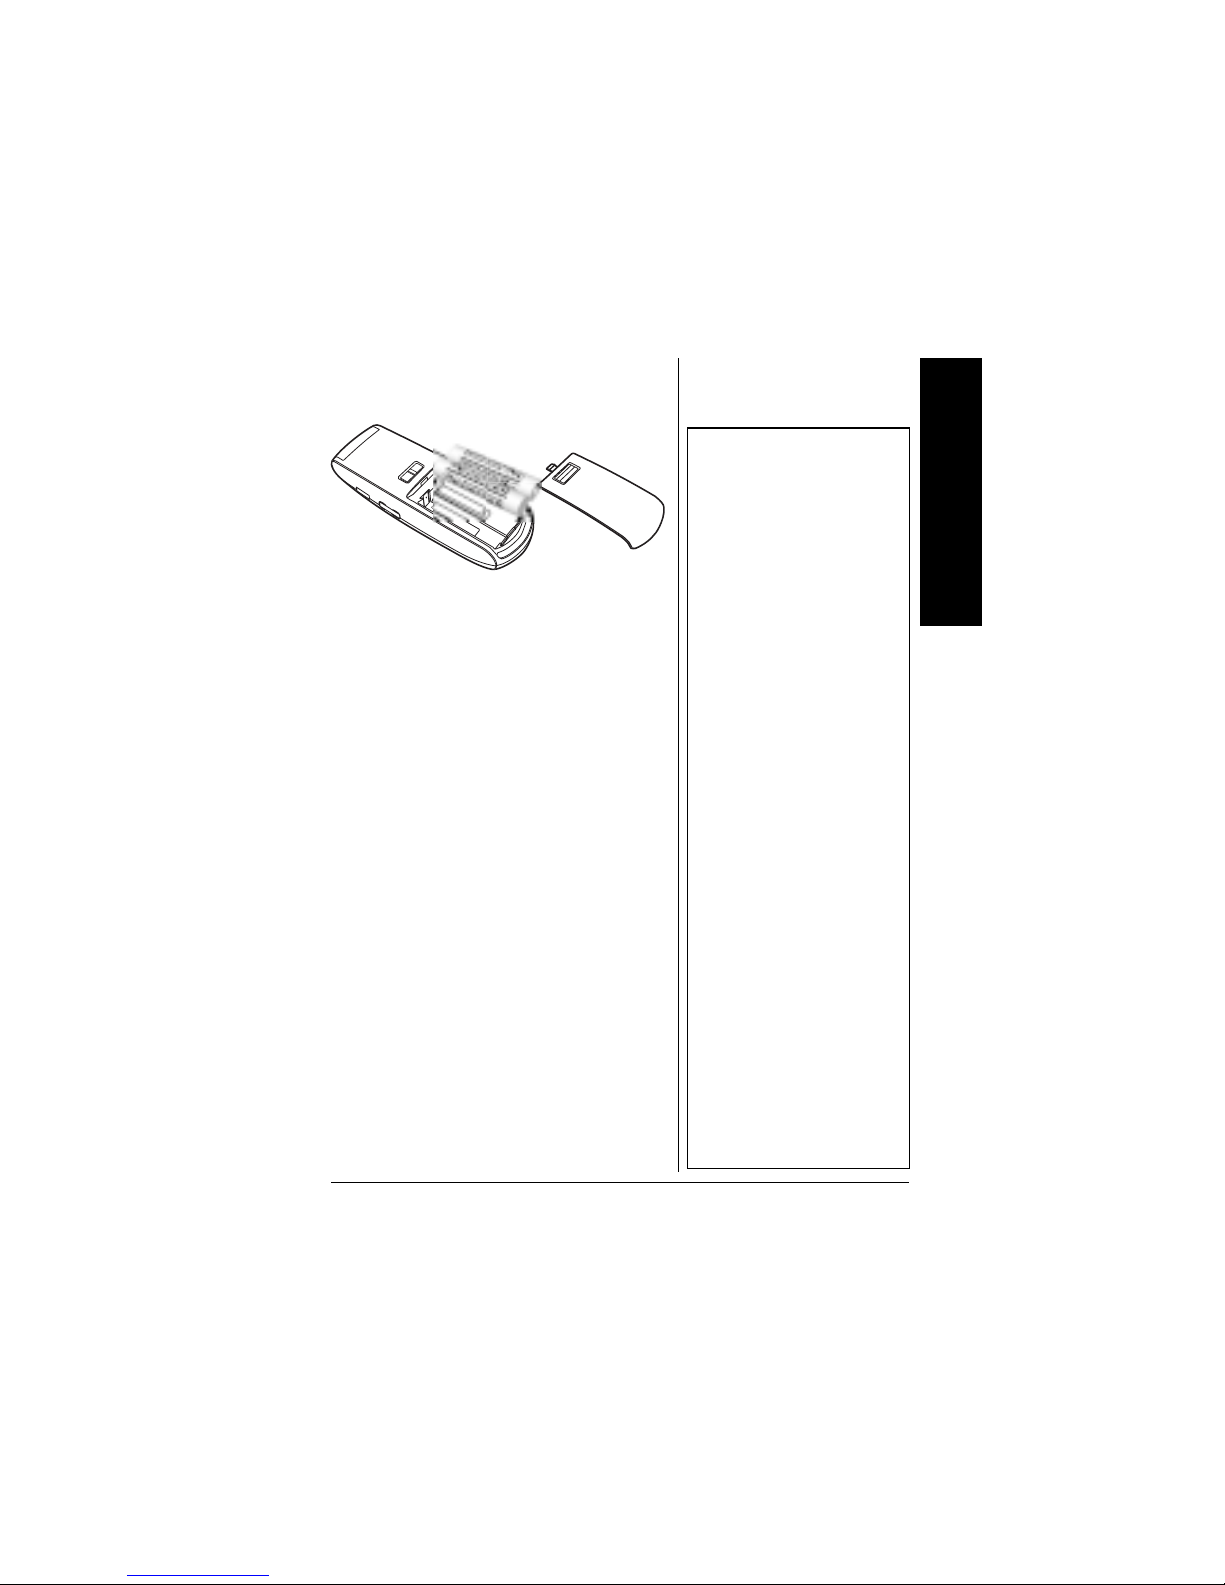
+056#..+0)"$#66'4+'5"
Your recorder requires two AAA
batteries (not supplied) for
power.
1. Slide the battery cover
downward to remove it.
2. Place the batteries in the
compartment as indicated
Fast-Forwarding/
Reversing ............... 18
Forward Skip/Reverse
Skip ......................... 19
Viewing Remaining
Recording Time and
Message Time/Date 19
Repeat Play ............ 20
Repeating a Part of
Message ................. 21
Erasing Messages ........ 22
Erasing a Single
Message ................ 22
Erasing All Messages
in a File ................. 22
Erasing All Messages
in All Files
(Except [M]) ........... 23
Moving a Message to
Another File ........... 24
Using the Recorder
with a PC ..................... 24
Operating
Environment .......... 25
Troubleshooting ............ 26
Care ............................. 27
Service and Repair ....... 27
FCC Declaration of Confor-
mity ............................... 28
Specifications ............... 29
Notes ............................ 31
Preparation
3
by the polarity symbols
(+ and –) marked inside.
3. Replace the cover.
When the batteries are
depleted, ƒ flashes. Replace
the batteries as soon as
possible.
±±±±
75+0)"#%"14"&%"
219'4
You can power the recorder
using a 9V, 150 mA AC or DC
adapter and a size H
Adaptaplug
connector
(neither supplied). Both are
available at your local
RadioShack store. Remove the
batteries if you use an external
DC power supply.
±
"016'"±"
• Use only fresh
batteries of the
required size and
recommended type.
• Do not mix old and
new batteries,
different types of
batteries, or
rechargeable
batteries of different
capacities.
• If you do not plan to
use the recorder for
a month or longer,
remove batteries.
Batteries can leak
chemicals that
destroy parts.
• When replacing
batteries, the LCD
may become
blurred. It will
gradually increase in
sharpness.
• The stored time/date
lasts for one month
without batteries.
• If in recording mode,
ƒ does not flash
and recording stops
when batteries are
depleted.

Preparation
4
You must use a Class
2 power source that
supplies 9V DC and
delivers at least 150 mA. Its
center tip must be set to
positive and its plug must fit the
recorder's
DC 9V
jack. Using an
adapter that does not meet
these specifications could
damage the recorder or the
adapter.
Always connect the AC or DC
adapter to the recorder before
you connect it to power. When
you finish, disconnect the
adapter from power before you
disconnect it from the recorder.
%100'%6+0)"
'#42*10'5
You can use an optional mono
earphone with a 1/8 inch (3.5
mm) mini-plug to listen to your
recordings in privat e. Your local
RadioShack store carries a
wide selection of earphones.
!
Preparation
5
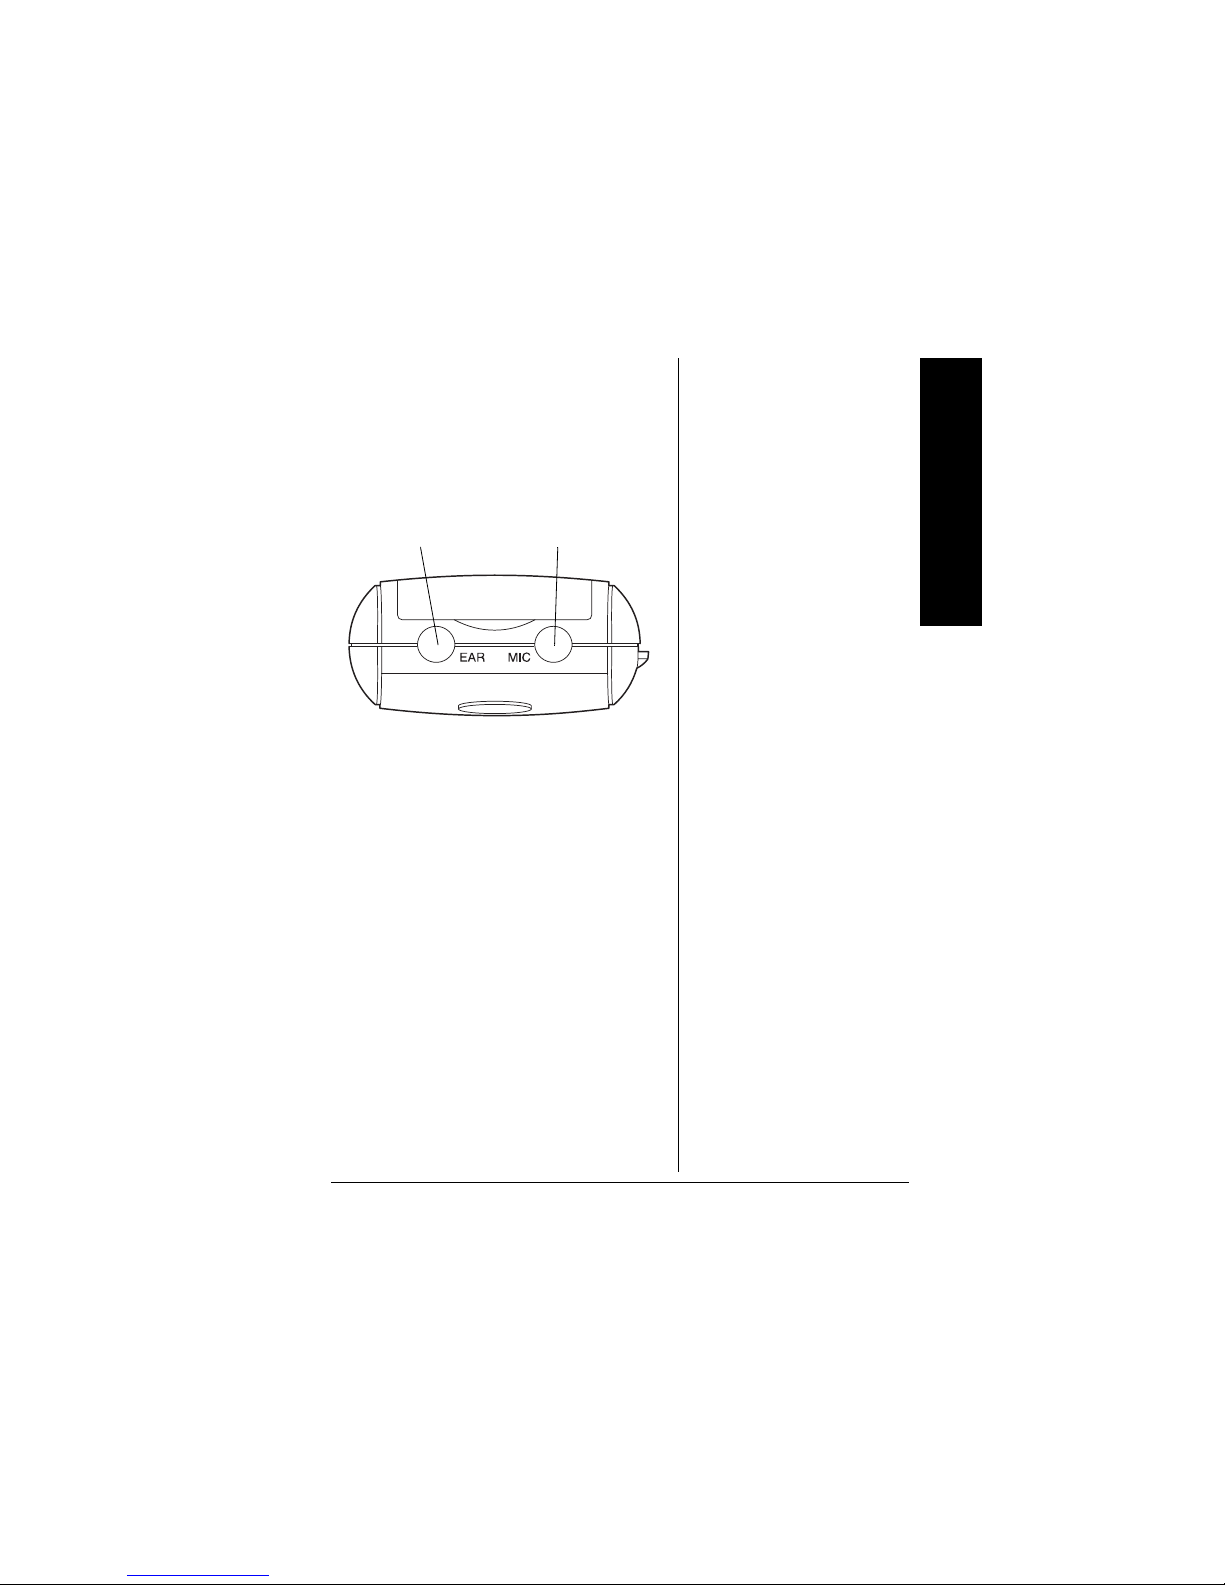
Insert the earphone’s plug into
the recorder’s
EAR
jack. The
built-in speaker automatically
disconnects.
%100'%6+0)"#0"
':6'40#."
/+%412*10'
You can use an optional
microphone with
1
/8-inch (3.5
mm) plug to extend recording
range. Your local RadioShack
store carries a wide sele ction of
microphones.
Insert the microphone’s plug
into the recorder’s
MIC
jack.
EAR Jack MIC Jack
Top View

Preparation
6
The built-in microphone
automatically disconnects.
.+56'0+0)"5#('.;
To protect your hearing, follow
these guidelines when you use
earphones.
• Set the volume to the
lowest setting before you
begin listening. After you
begin listening, adjust the
volume to a comfortable
level.
• Do not listen at extremely
high volume levels.
Extended high-volume
listening can lead to
permanent hearing loss.
• Once you set the volume,
do not increase it. Over
time, your ears adapt to
the volume level, so a
volume level that does not
cause discomfort might still
damage your hearing.

Preparation
7
64#((+%"5#('6;
Do not wear earphones while
operating a motor vehicle or
riding a bicycle. This can create
a traffic hazard and could be
illegal in some areas.
Even though some earphones
let you hear some outside
sounds when listening at
normal volume levels, they still
can present a traffic hazard.
#66#%*+0)"6*'"9 4+56"
564#2
Thread the strap’s small loop
through the holes on the bottom
of the recorder. Slip the larger
end of the strap through the
smaller loop. Pull the larger
loop to tighten it.
Preparation
8
.1%-+0)"6*'"
4'%14&'4O5"
%10641.5
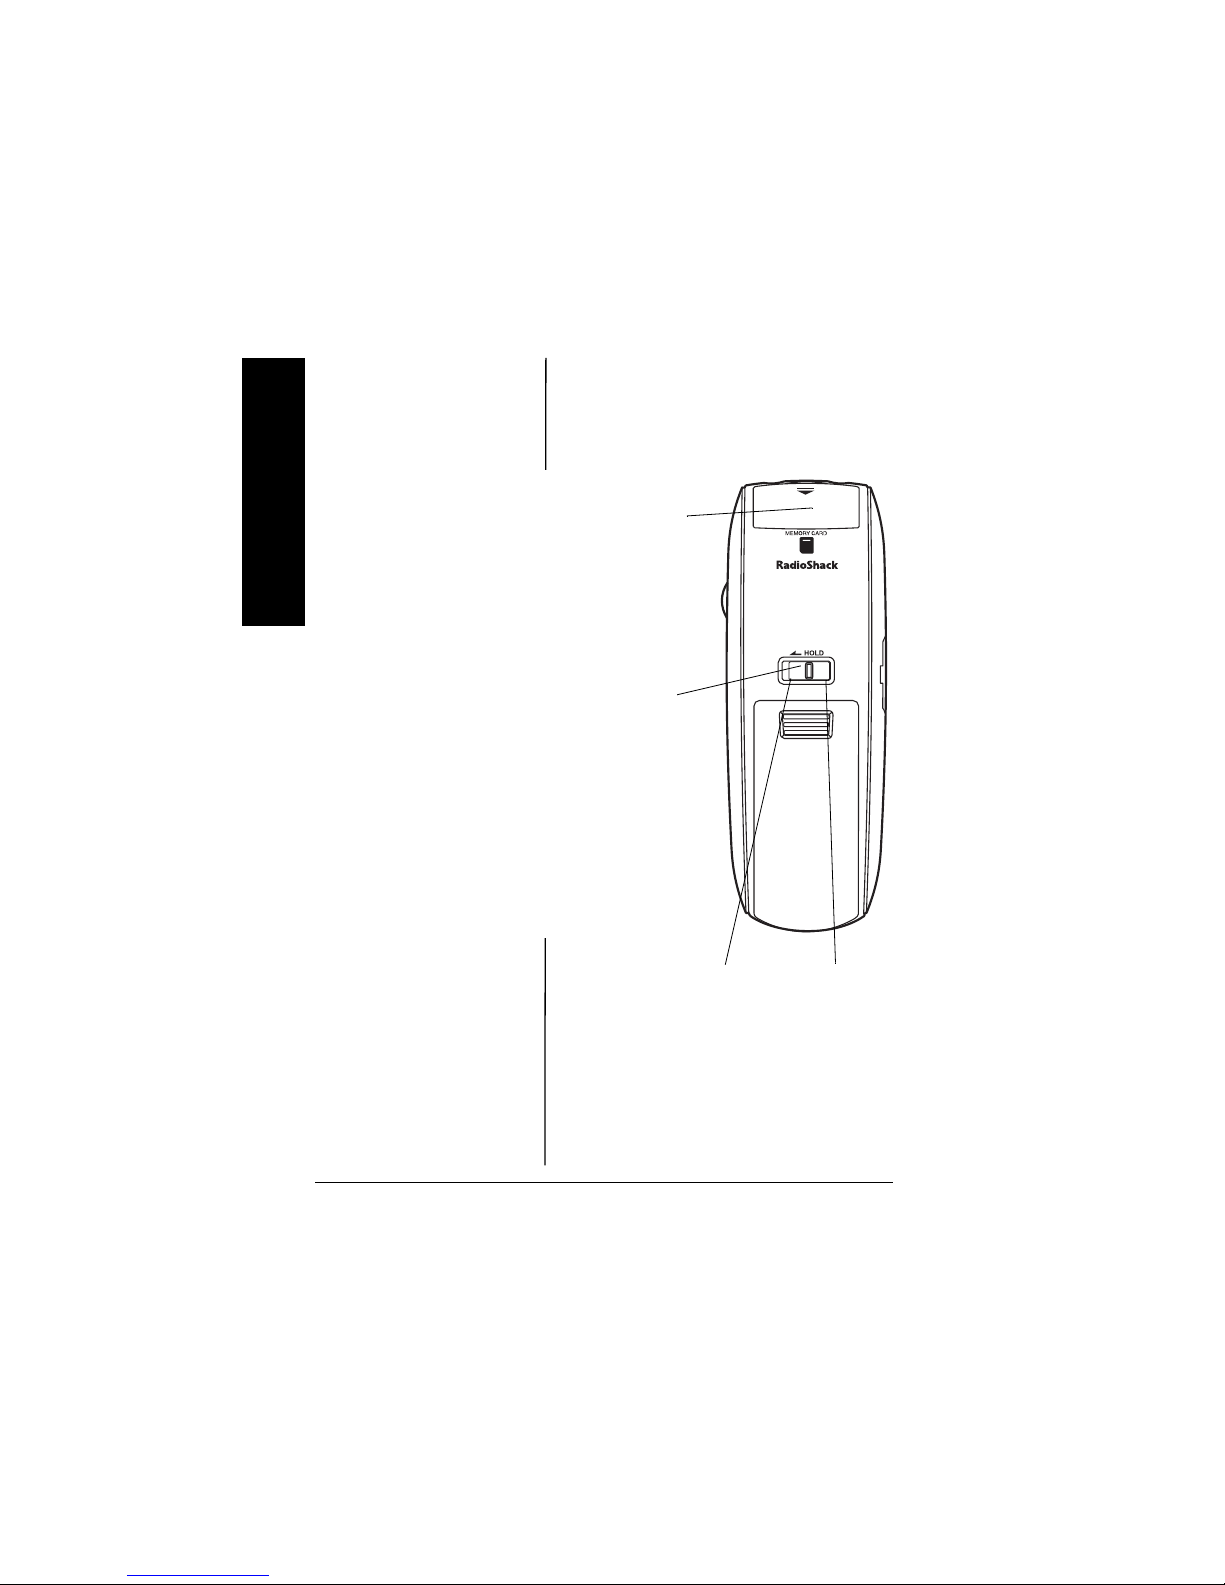
HOLD —
Locks the recorder’s settings
so that they cannot be changed. Slide
HOLD
in the direction of the arrow to
lock the controls. Slide
HOLD
in the
opposite direction of the arrow to unlock
the controls.
MEMORY CARD —
Lets you insert a
memory expansion card. When card is
installed, a new folder [M] is created for
extra storage. See Page 9.
Lock Unlock

Preparation
9
+056#..+0)"#"/7.6+/
/'&+#"%#4&"*//%+"
14"5'%74'"&+)+6#."
*5&+
Open the lid of the
MEMORY
CARD
compartment and insert
an MMC or SD (not supplied)
until it clicks.
To remove the card, push it in
until it clicks, then springs back.
Remove the card and replace
the lid. Your local RadioShack
store carries MMCs and SDs.
See “Files” on Page 13 to use
this feature.
±
±
"016'"±"
When using an
MMC, it takes a few
extra seconds to
begin operation, to
erase or save
messages, change
files, and change
modes.
Preparation
10
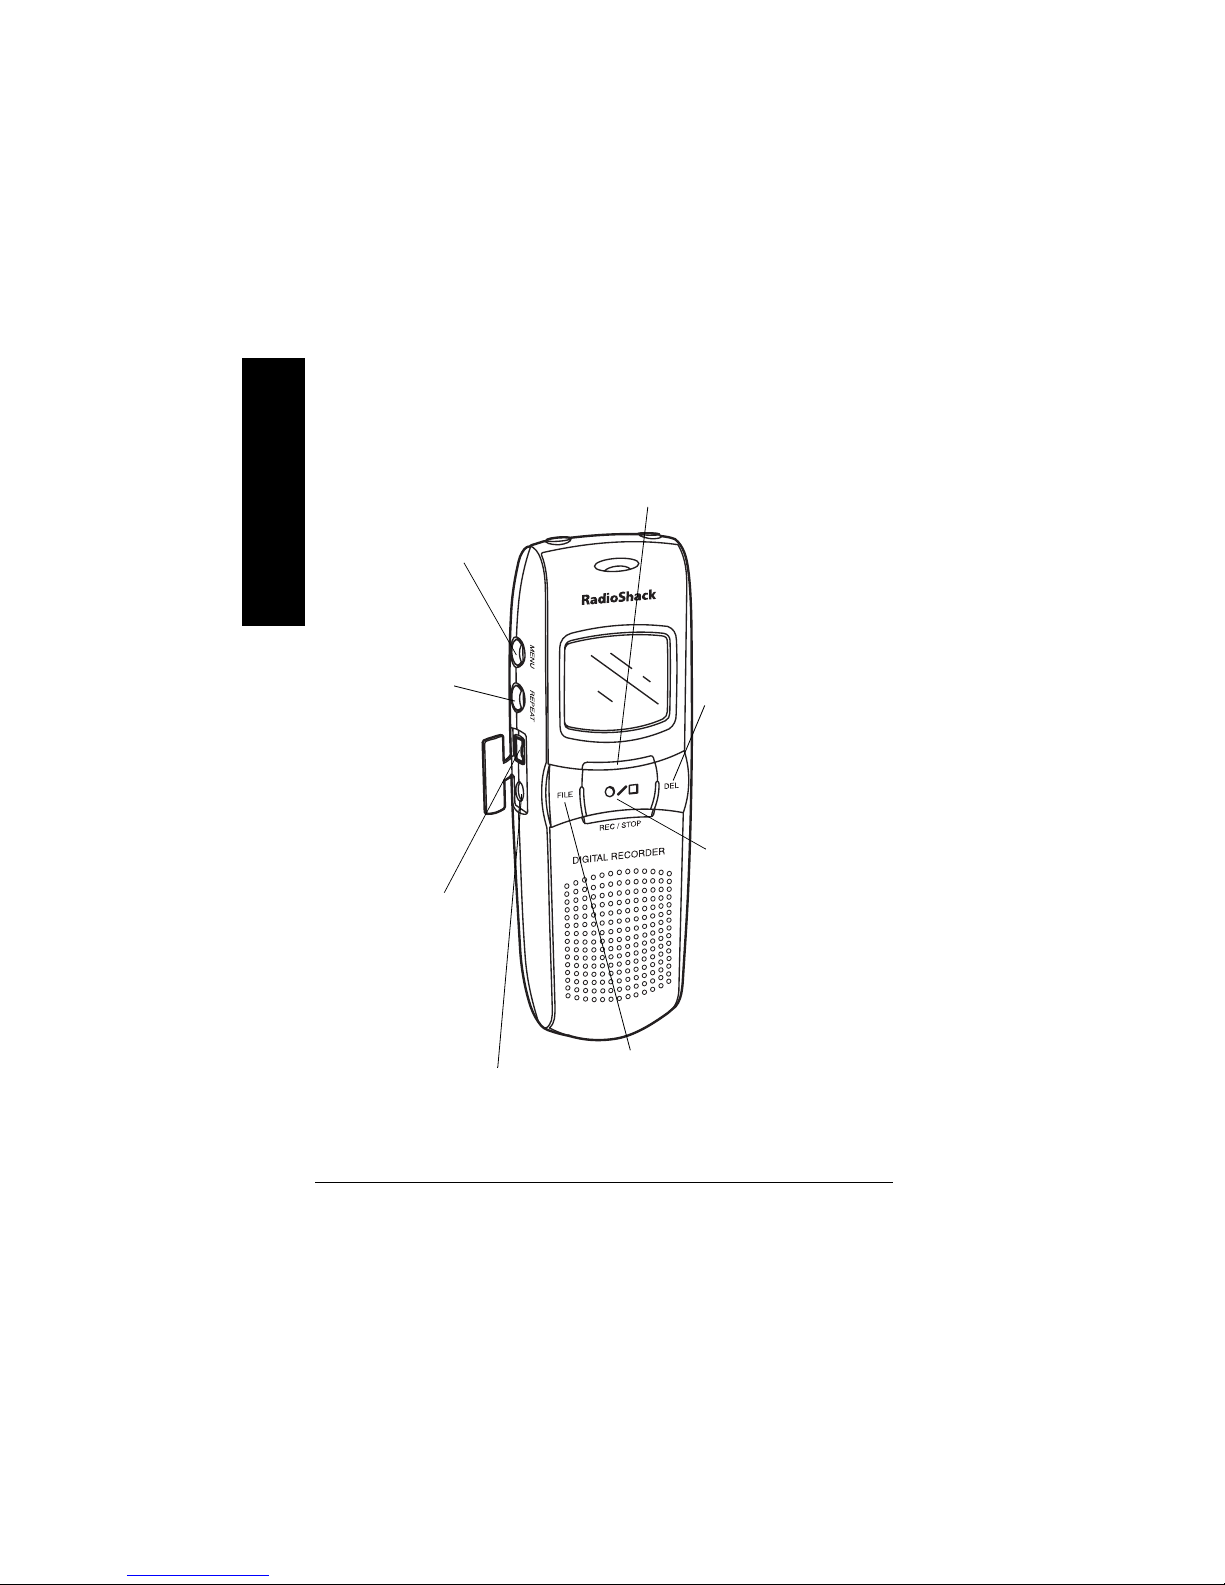
REC/STOP
çççç/'ý
'ý'ý
'ý
—
Press
REC/
çççç
to
begin recording a
message. Press
STOP/
'ý
'ý'ý
'ý
to stop
recording. Press
REC/STOP
çççç/'ý
'ý'ý
'ý
to
store settings. See
Page 13.
DEL —
Press to
delete the selected
message, or press
during playback to
see the time and
date the message
was recorded. See
Page 19 and 20.
Operation Indicator —
Lights
red during recording and lights
green during playback.
MENU A-B —
Press to
select a menu item or
to select a point at
which you want to
repeat a message.
See Page 21.
REPEAT
INTRO —
Press
to repeatedly
play a
message or to
play the
beginning of
each message.
See Page 20.
USB PORT —
Connect a USB
cable here to
connect to your
PC.
FILE —
Press to select the
desired file, or hold down to
see remaining recording time.
See Page 13.
DC 9V —
Connect an
optional AC adapter.
See Page 3.
 Loading...