

17-111 1.fm Page 1 We dnesday, July 21, 1999 2:23 PM
Owner’s Manual
CT-502 Flip-Style Handheld
Cellular Telephone
with Silent Vibrating Alert
Please read before using this equipment.
Cat. No. 17-1111

17-111 1.fm Page 2 We dnesday, July 21, 1999 2:23 PM
FEATURES
Your RadioShack CT-502 Flip-Style Handheld Cellular Telephone with Silent Vibrating Alert is a state-of-the-art personal
cellular tel ephone. It has all of these features:
Special Messaging Service Features — the phone is preprogrammed t o work with special (subscription-only) messaging services offered by many cellular carriers, including
calling line ID, voice mail notification, and short (alphanumeric) messages.
Vibration and Silent Alert Modes — let you set the phone
to vibrate gently (instead of ring) when it receives a call, or
make no sound or movement at all, to avoid disturbing others.
Nine Different Ringer Styl es — let you set the phone’s ringer to help you distinguish your phone’s ring from that of another phone.
Easy-to-Read Seven-Character Display — bright red LED
characters let you see essential call information in almost any
lighting condition.
Call Tim er s — let you keep track of th e indi vidual and cumulative c all time (air-time), and i ncludes a timer that you can reset as you wish (so you can track monthly airtime, for
example).
Speed/Memory Dialing — lets you store up to 50 phone
numbers (of up to 32 digits each) and names (of up to 14
characters eac h) in memory and dial any of them by pressing
one or two buttons.
Memory Scrolling — lets you rapidly search the memory locations for a number you stored.
©
1997 Tandy Corporation.
RadioShack is a registered trademark used by Tandy Corporation.
All Rights Reserved.
2
17-111 1.fm Page 3 We dnesday, July 21, 1999 2:23 PM
Last Number Redial — lets you quickly review and redial
any of the last 10 numbers that you called.
Scratchpad Memory — lets you temporarily store a num ber
(even during a call), then easily dial it.
Security Features — to prevent unauthorized phone use,
you can lock the phone (so it cannot be used at all) or set up
to five different levels of service restrictions (so only local
calls can be made, for examp le).
Multiple Key Answer — lets you set the phone so pressing
one of several keys answers a call.
Ample Talk and Standby Time — the supplied battery provides about 85 minutes of talk time or 24 hours of standby
time, when fully charged.
Battery and Cellular Signal Strength Meters — easy-toread graduated bar graphs let you quickly check the battery
power remaining or the current cellular signal strength.
Automatic Answer — lets you set the phone to answer automatically after two rings (if you are using optional handsfree
equipment, for exa mp le) .
Two Phone Number Capability — lets you use this one
phone with two different cellular services, with a different
phone number from each.
Handsfree Feature — the phone is preprogrammed to work
with most optional handsfree equipment.
We recommend you record your phone’s Electronic Serial
Number (ESN) here. The number is on the back of the
handset under the bat tery.
3

17-111 1.fm Page 4 We dnesday, July 21, 1999 2:23 PM
TABLE OF CONTENTS
A Look at Y our Phone ................ .. .......... .. .................... .. ... 6
Reading the Status Indicators ...................................... 7
Reading the Display ..................................................... 8
Using the Battery ............................................................... 9
Installing the Battery ..................................................... 9
Charging the Battery .................................................. 10
Checking Battery Power ............................................. 11
Replacing a Battery During a Call .............................. 12
Important Battery Tips ................................................ 13
Basic Operation ............................................................... 14
Turning the Phone On/Off .......................... ................ 14
Signal Strength/Service Area ................... .................. 14
Making a Call ............................................................. 15
Answering a Call ........................................................ 16
Adjusting the Volume ................................................. 18
Making Emergency Calls ........................................... 19
Redialing Numbers ..................................................... 20
Displa y in g N u mb e rs ..... ... ................. .......... ................ 21
Menu Functions ............ ............................... .. .......... .. ...... 22
Overv ie w .......... .......... ................. .......... ................. .... 22
Using the Menu Functions ......................................... 26
Using Memory .................................................................. 36
Storing Speed Dial Numbers ...................................... 36
One-Touch Dialing ...................................................... 39
Speed Recall/Dialing .................................................. 39
Memory Scrolling/Dialing ........................................... 40
Changing Information in a Memory Location ............. 42
Cleari ng a Me m o ry ..... .......... ......... .................. ......... .. 43
Using Sc ra tc hpad Mem o ry ............ .......... .......... ......... 44
Memory Dialing Tips .................................................. 44
Security Features ............................................................ 45
Locking Your Phone ............................ ....................... 45
Using Service Restrictions ......................................... 48
4

17-111 1.fm Page 5 We dnesday, July 21, 1999 2:23 PM
Other Features ................................................................. 50
Using the Messaging Functions ................................. 50
Using the Phone with Handsfree Equipment .............. 52
Using the Call Timers ................................................. 53
Selecting the Active Phone Number ............. .............. 55
Setting the Cellular System Type ............................... 56
Roaming ..................................................................... 59
Using Cellular System PIN Dialing ............................. 59
Using Touch-Tone Services .............. ................... ....... 61
Calling Card Dialing .................................................... 62
Resetting the Phone .................. .. .. .......... .. .......... .. .......... 64
Using Master Reset .................................................... 64
Using Master Clear ..................................................... 65
Trou bleshooting ................. .. .................... .. .................... .. 66
Safety Information ........................................................... 67
Traffic Safety .............................................................. 67
Operating Environment ............................................... 67
Emergency Calls ........................................................ 68
FCC Regulations ........................................................ 69
Care and Maintenance ..................................................... 70
Specifications .................................................................. 71
Patent Information ...................................................... 71
Display Message Glossary ...... .......... ................... .......... 73
5
17-111 1.fm Page 6 We dnesday, July 21, 1999 2:23 PM
A LOOK AT YOUR PHONE
1
2
8
4
5
Retractable Antenna
1.
ALPHA NUMERIC
3
6
7
Extend during a call for optimum performance.
2. Earpiece
Status Indicators
3.
(See “Reading the St atus Indicators” on Page 7.)
Alphanumeric Display (Seven-Character LED)
4.
Displays the phone number, name, memory location
number, or message.
Alphanumeric Keypad
5.
Enters call information or programs functions.
6
17-111 1.fm Page 7 We dnesday, July 21, 1999 2:23 PM
6. Function Keys
RCL
— Recalls num bers stored in memory.
CLR
— Removes characters or clears functions .
END
— Ends a call or exits the funct ions menu.
SND
— Places or answers call s.
NAME
MENU
— Accesses the memory or functions menu.
FCN
— Selects functions.
STO
— Stores to memory; tur ns on functions.
PWR
— Turns the phone on and off.
7. Flip Cover
8. Volume Controls
Press to increase or decrease the ringer or earpiece
(during a call) volume levels.
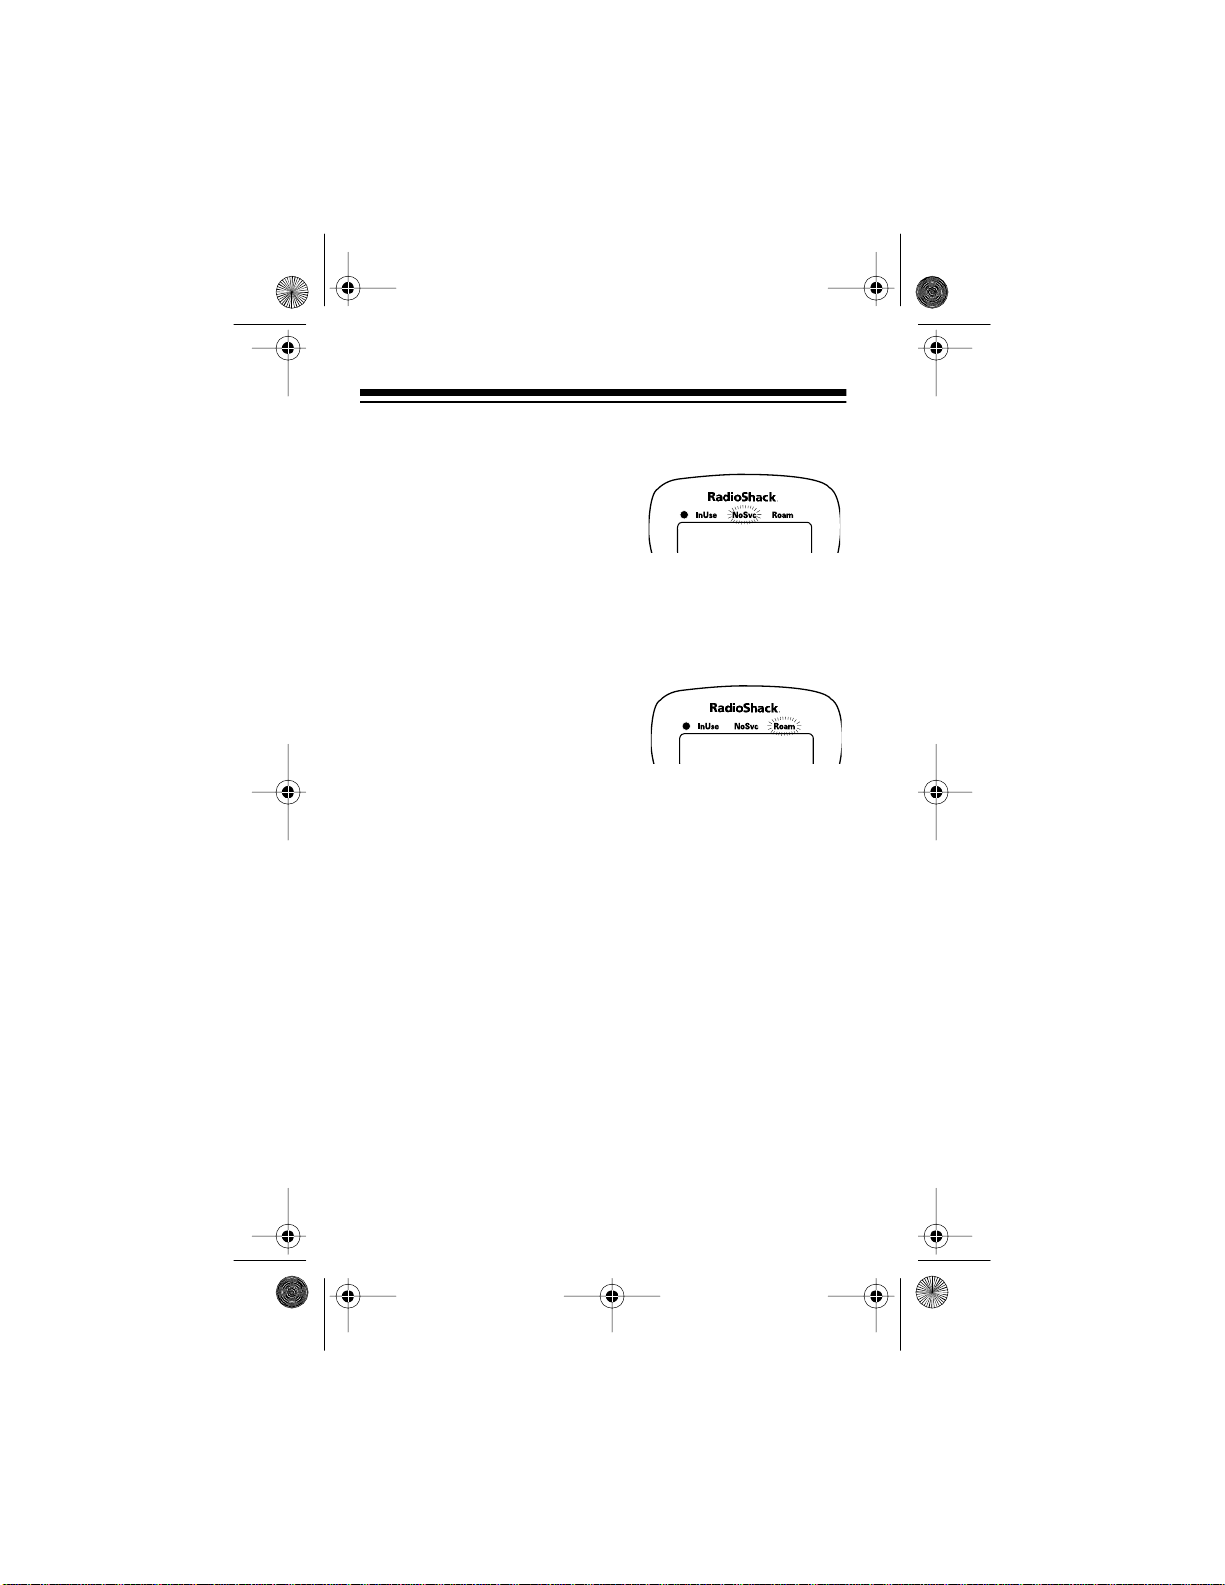
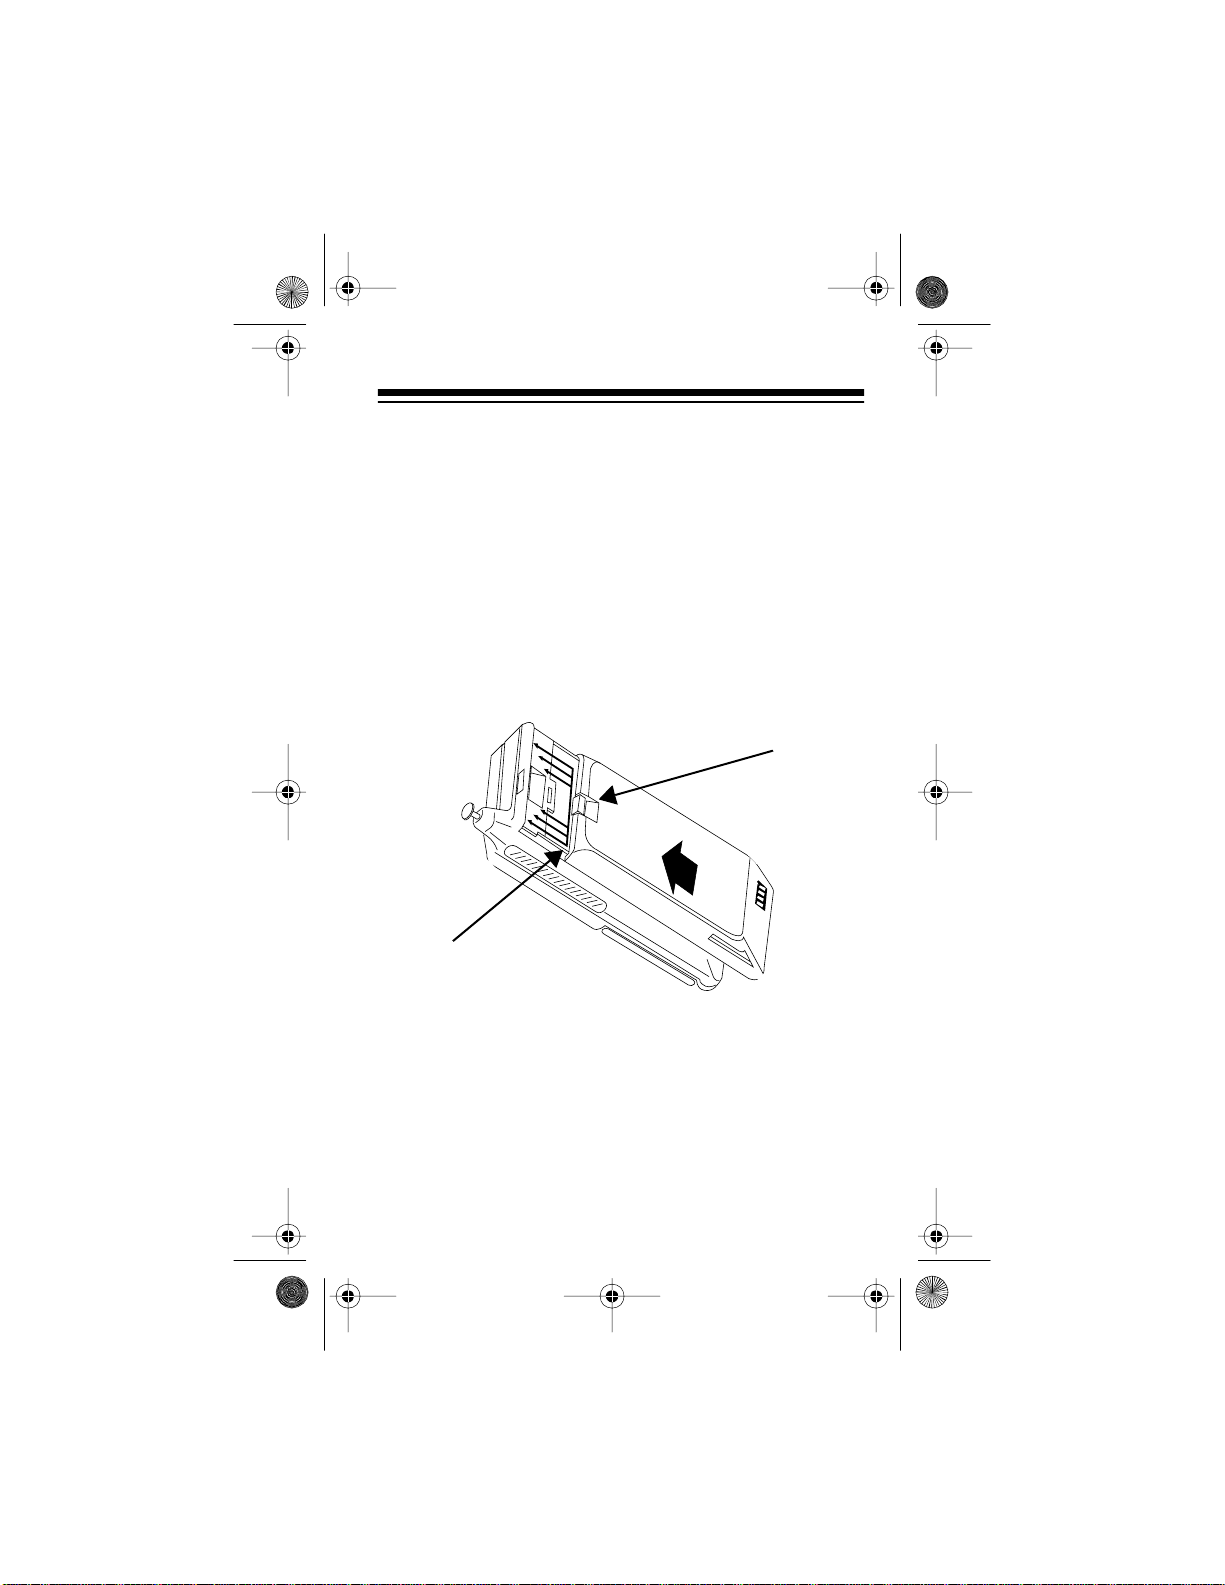
READING THE STATUS INDICATORS
Power/Lock Indicator
•
Flashes slowly
when the
phone is on and in service.
•
Lights steadily
when the
phone is locked.
InUse Indicator
Flashes when a call is in progress.
7
17-111 1.fm Page 8 We dnesday, July 21, 1999 2:23 PM
NoSvc (No Service) Indicator
Flashes or lights steadily if the
phone is beyond the range of the
cellular service area, meaning
calls cannot be made or received.
vice Area” on Page 14
See “Signal St rength/Ser-
.
Roam Indicator
Flashes or lights steadily if the
phone is accessing a service
area outside of your home system (roaming).
Page 59
See “Roaming” on
.
READING THE DISPLAY
Your phone’s di splay provides a full range of messages and
indicators to assist you with the phone’s operation. Since
many of these messages contain more characters than your
phone can display at one time, the phone displ ays m ost messages across more than one display. For example, the phone
displays
dicate that the signal meter display feature is turned on.
Note
cludes the entire message (such as
For a complete listing of display messages and indicators,
see “Display Message Glossary” on Page 73.
8
Signal
: When referring to a display ed message , this manual in-
then (within about 1 second)
Signal Mtr On
Mtr On
to in-
).
17-111 1.fm Page 9 We dnesday, July 21, 1999 2:23 PM
USING THE BATTERY
Warning:
injury, or burns if a metal object (such as a pen spr ing, beaded chain, or piece of jewelry) contacts the battery’s terminals
and causes a short circuit. Be careful when placing a charged
battery inside a coat pocket, purse, or other container that
might contain metal objects.
Caution:
cycled or disposed of properly. They must not be disposed of
in municipal waste.
A detached battery could cause property damage,
Nickel metal-hydride (NiMH) batteries must be re-
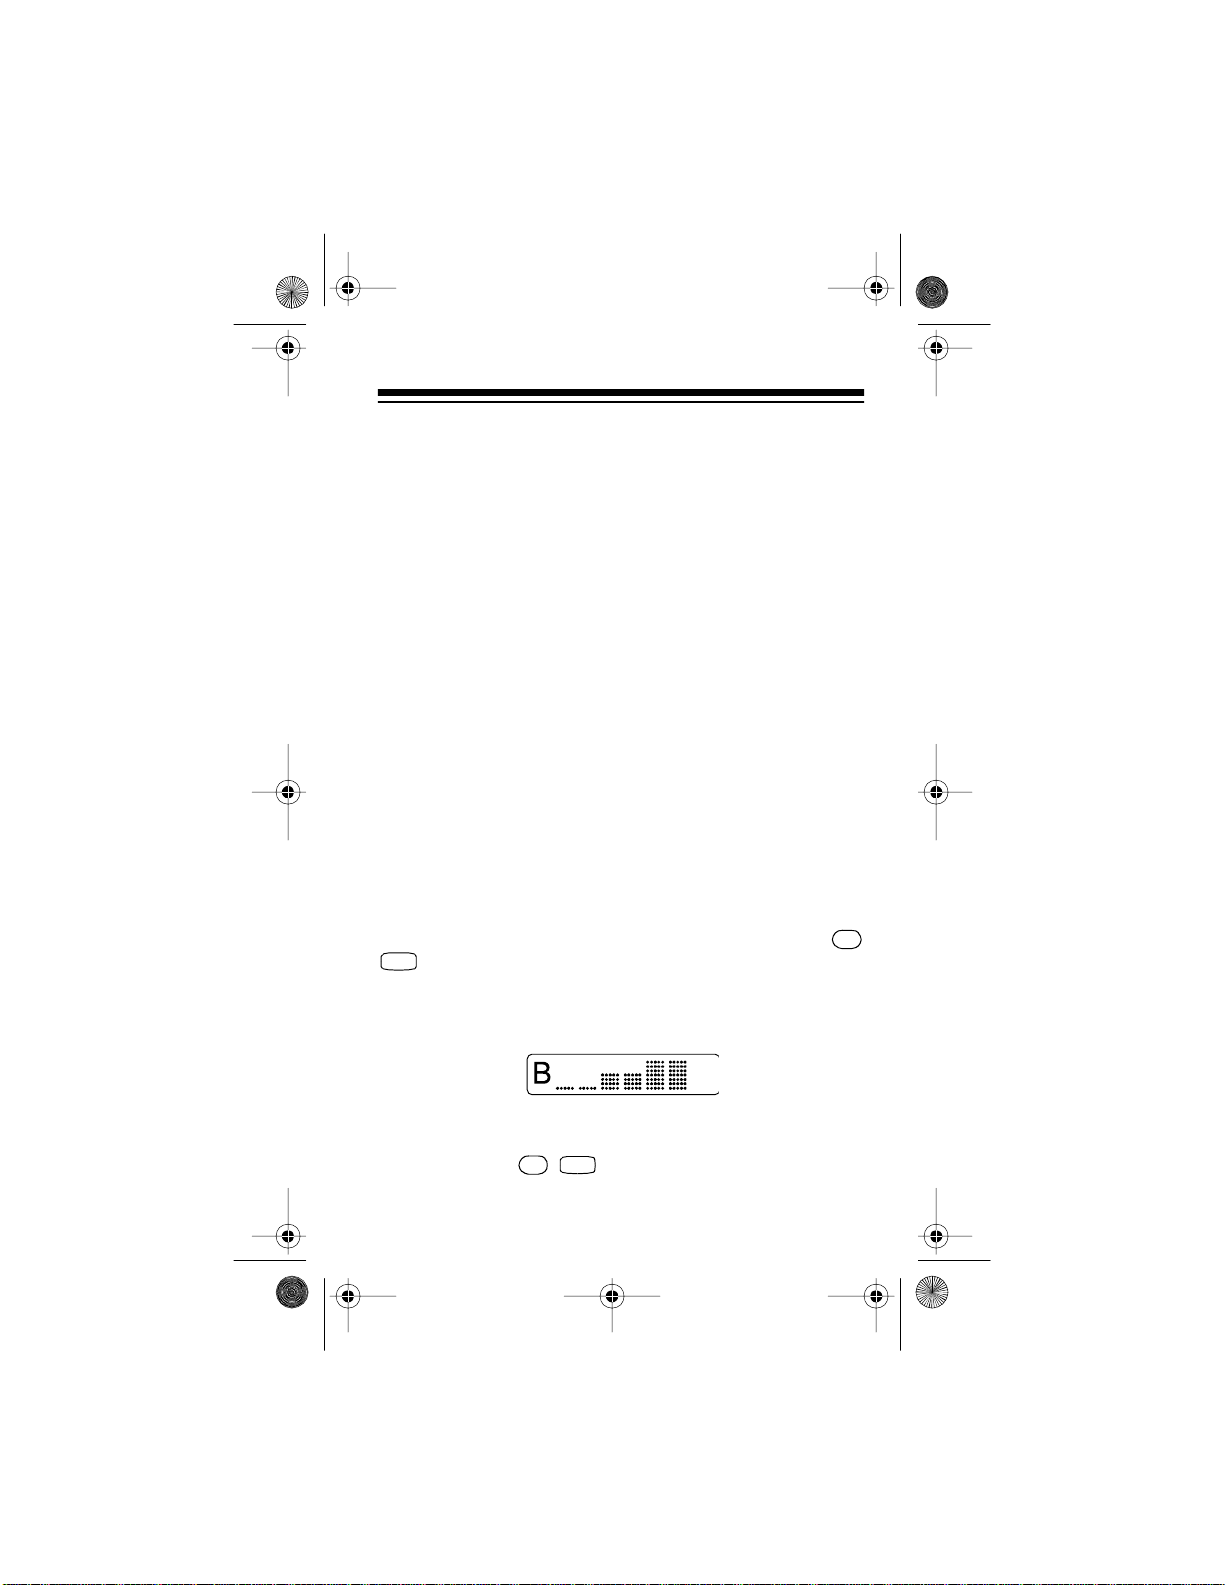
INSTALLING THE BATTERY
Latch
Align Here
1. Place the battery flat against the back of the phone and
align the top of the battery below the raised arrows.
2. Slide the battery toward the top of the phone until it
snaps into place.
9

17-111 1.fm Page 10 We dnesday, July 21, 1999 2:23 PM
To remove the battery
press the l atch at the top of the battery and slide the battery
toward the bot tom of the phone until it stops. Then lift t he battery off the phone.
Note: If you have an extra char ged battery and the currently
installed batt ery becomes low during a call, you can change
the battery without ending the call or losing the connection.
See “Replacing a Battery During a Call” on Page 12.
, be sure t he phone is turned off, then
CHARGING THE BATTERY
The nickel metal-hydride (NiMH) battery supplied with your
telephone is shipped in a discharged state to extend the battery’s life. It must be fully charged before you can us e your
phone.
We recommend that you charge a new battery overnight, but
no longer than 24 hours, using the AC charger supplied with
your phone. Recharging time for the supplied battery is about
3 hours, although the time varies based on the amount of
charge left in the battery. For the recharging time of any other
battery type , see t he instructions provided with that battery.
Follow these steps to charge the supplied (or any approved)
battery using the charger supplied wit h your phone.
1. Install the batt ery on the phone.
2. Insert the charger’s flat plug into the charging jack on the
bottom of t he phone.
Note: The plug fits into the jack only one way. If you
have difficulty inserting the plug, turn it over and try
again. Do not force it !
3. Plug the charger’s power cor d into a standard AC outlet .
10
17-111 1.fm Page 11 We dnesday, July 21, 1999 2:23 PM
Notes:
• You can use the phone while it is charging, but charging takes longer.
• For the fastest charging, be sure the phone is turned
off during cha rgi ng, if you are not expecting a call.
• If the phone is on when you connect the charger, the
phone beeps once and the keypad backlight remains
on until you disconnect the charger.
4. When the battery i s fully charged, disconnect the ch arger
from the AC outlet. Then press in the clips on the sides
of the plug and pull i t away from the phone to disconnect
the charger.
CHECKING BATTERY POWER
When battery power becomes low, the phone displays
and sounds a warning tone every few seconds. When
Bat
Low
power becomes too low for the phone to operate, it automat ically turns off. Recharge the battery as soon as possible.
To check the battery’s charge level at any time, press
GHI
4
. The battery strength meter appears on the display for
FCN
about 5 seconds. The more bars that appear on the meter,
the higher the battery’s current charge level. If few or no bars
appear, the battery’s power is low.
Notes:
FCN
GHI
• If you press while the phone is charging, the
phone flashes
4
Chrging Battery
for about 5 seconds
instead of the battery strengt h meter.
11

17-111 1.fm Page 12 We dnesday, July 21, 1999 2:23 PM
Note: Rechargeable batteries last longer and perform better
if occasionally allowed to fully discharge. You can do this by
leaving the p hone on until it automatically turns off or you can
use the battery discharge feature of any approved accessory
available for your phone. Do not try to discharge the battery
by any other means.
REPLACING A BATTERY
DURING A CALL
If you have an extra charged battery and the currently installed battery becomes l ow during a call, follow these steps
to change the battery without ending the call or losing the
connection.
1. Tell the other party on the line what you plan to do (tell
them, for example, that t hey will hear some noise as you
remove the battery and you will call back if for any reason you lose the connect ion).
2. Remove the battery, and within 3 seconds, install the
fresh battery. Your call is still on the l ine.
Note: If you do not complete Step 2 within 3 seconds,
the call disconnects.
12

17-111 1.fm Page 13 We dnesday, July 21, 1999 2:23 PM
IMPORTANT BATTERY TIPS
• Use only the supplied charger and use only batteries
designed for this phone.
• You can purchase additional standard or extended
capacity batt eri es through your local Radi oShack store.
• When you are not using the charger, disconnect it from
power. Do not leave the battery connected to the charger
for more than 24 hours, since overcharging could
shorten the battery’s life.
• When the battery is not in use, store it uncharged in a
cool and dark place.
• The battery is a sealed unit with no s erviceable parts. Do
not try to open the case.
• For the best results, be sure the battery is at or near
room temperature when you charge it.
• A battery can be charged and discharged hundreds of
times, but it eventually wears out. When the operating
time (talk time and standby time) is noticeably shorter
than normal, get a new battery and recycle or pr operly
dispose of the old one.
• Do not dispose of batteries in a fire.
• Never use any charger or battery that is damaged or
worn out.
13
17-111 1.fm Page 14 We dnesday, July 21, 1999 2:23 PM
BASIC OPERATION
TURNING THE PHONE ON/OFF
To turn on the phone
The phone performs a short self test and sounds a tone or vibrates (see “Changing the Alert Type” on Page 29), then the
signal strength meter appears (see “Signal Strength/Service
Area”) and the keypad backlight turns on for about 16 seconds. The phone is ready to use when the green power/lock
indicator begins to flash.
Notes:
every time you press a key, then it turns off and the display
goes blank to conserve battery power.
The keypad backlight turns on for about 16 seconds
To turn off the phone
blank and the green on/ lock indicator tu rns off.
, flip down the cover then press .
, press again. The display goes
PWR
PWR
SIGNAL STRENGTH/SERVICE AREA
Each time you turn on the phone, clear the display, or make a
call, the signal strength meter appears on the display to indicate the strength of the cellular signal currently being received. The more bar s that appear on the mete r, the stronger
the signal.
Notes:
• If few or no bars appear (meaning the signal strength is
weak) and you want to make or receive a call, move the
phone to a different location so the signal strength
increases.
14
17-111 1.fm Page 15 We dnesday, July 21, 1999 2:23 PM
• You can disable the signal strength meter so it does not
appear. See “Turning the Signal Strength Meter Off/On”
on Page 26.
If the NoSvc indicator (above the display) turns on, the phone
is outside the cellular service area and you cannot make or
receive calls until you reach an area with service your phone
can use.
MAKING A CALL
1. Extend the antenna, flip open the cover, and be sure the
phone is on (the green power/l ock indicator is flashing).
2. Press the number keys to enter the phone number you
want to dial (including the area code, if necessary). The
numbers appear on the display as you press them.
Notes:
• If you make a m istake, r epeatedly pres s to delete
one digit at a time, or hold down to delete all digits.
• The phone can display up to 7 characters at once. If
you enter (or display a message containing) more
than 7 characters, the characters automatically scroll
off the left side of the display. Press at any time
to recall the overflow characters. See “A Number
Longer than Seven Digits” on Page 21.
3. Press to dial the phone number. The InUse indica-
SND
tor flashes and the phone briefly displays
then the number calle d, t hen the signal strengt h meter.
4. To end the call, press .
END
CLR
CLR
RCL
Dialing
Note
: Closing the cover does
not
end or disconnect a call.
15
17-111 1.fm Page 16 We dnesday, July 21, 1999 2:23 PM
System Busy Messag e
In addition to the normal busy signal you hear when a number you call is busy, your phone sounds tones and displays a
message to indicat e other situations when it cannot complete
a call.
T one Display Shows Description
Fast Busy
SND to
Redial
High/low
SND to
Redial
When either of these conditions occur, you can pr ess
again to redial the number im mediately (see “Using Aut omatic Redial” on Page 20), or press then dial the number
again.
The cellular system is
busy.
The cellular system
could not com plet e the
call.
SND
END
ANSWERING A CALL
When the phone receives an incoming c all, it ri ngs or vibrates
(depending on the alert setting — see “Changing the Alert
Type” on Page 29) and
swer the call, press . To end the call, press .
Notes:
• Your phone can receive calls even if the ant enna is not
extended. For optimum performance or if the signal
strength becomes weak, however , extend the antenna.
SND
flashes on the display. To an-
Call
END
16
CLR
17-111 1.fm Page 17 We dnesday, July 21, 1999 2:23 PM
• To set your phone so you can answer a call by pressing
keys other than just , see “Using Multiple Key
SND
Answer” on Page 32.
• If you subscribe to calling line ID service through your
cellular carrier, you can view the calling party’s phone
number on the phone’s display. See “Viewing/Recalling
Mes s a ges” o n P a ge 51.
• If your phone receives a call but the signal st rength is too
weak to support it,
appears as usual, but you hear
Call
the phone sound a series of beeps (rat her than ringing or
vibrating). The caller hears the standard “not in service”
message. If this happens, pre ss to cle ar
Call
from
the display.
Missed Call Message
If your phone i s on and receives a call, but you do not answer
it,
the calling party hangs up. The next time you press any key
(except , , or ),
seconds to notify you that you missed a call.
appears on the display for about 15 seconds after
Call
CLR
END
PWR
reappears for about 15
Call
To clear
from the display, press or .
Call
CLR
END
17
17-111 1.fm Page 18 We dnesday, July 21, 1999 2:23 PM
ADJUSTING THE VOLUME
Adjusting the Earpiece Volume
To increase or decrease the earpiece volume dur ing a call,
repeatedly press the top (increase) or bottom (decrease) volume button on the side of the phone. Each time you press the
button, the volume meter appears on t he display for about 8
seconds. The more bars that appear on the meter, the higher
the earpiece vol um e.
Adjusting the Ringer Volume
To increase or decrease the phone’s ringer volume
phone is not in use, press then repeatedly press the top
FCN
, when the
(increase) or bottom (decrease) volume button on the side of
the phone. Each time you press the button, the phone rings
once and displays the volume meter for about 8 seconds.
The more bar s that appear on the meter, the higher the ringer
volume sounds.
Using Mute
To turn off the phone’s microphone during a call so the other
party on the phone cannot hear you (so you can tal k privately
with someone else in the room, for example), press
MNO
6
.
appears.
Mute
18
FCN
1
17-111 1.fm Page 19 We dnesday, July 21, 1999 2:23 PM
MNO
FCN
To turn the microphone on again, press again so
disappears.
Mute
6
Hint: To help you remember which key to use, note that “M”
MNO
(for mute) appears on the key.
6
Note: Pressing to end a call also turns the microphone
END
back on.
MAKING EMERGENCY CALLS
Your phone is preprogrammed to let you dial your local emer gency number (such as 911) at the press of a single button,
even if the phone is locked (see “Locking Your Phone” on
Page 45). Before you can use this feature, however, you
must first program the emergency number you want to use in
memory location 01 of your phone. See “Storing Speed Dial
Numbers” on Page 36.
To place an emergency call
gency number, simply hold down for about 1 second.
Emergcy
appears and the phone dials the emergency num-
ber.
Important Notes:
• If one-touch dialing is turned off (see “Turning One-
Touch Dialing Off/On” on Page 32), you
emergency calls using the key.
• When you make an emergency call, give your name and
cellular phone num ber, as well as the location of the incident. Remember that your phone might be the only
means of communication at the accident scene. Do not
end the call until you are advised you may do so.
once you have stored the emer-
cannot
make
1
19
#
17-111 1.fm Page 20 We dnesday, July 21, 1999 2:23 PM
•
Emergcy
does not appear if the emergency display
function is turned off (see “Turning the Emergency Display Off/On” on Page 33).
REDIALING NUMBERS
Using Last T en Number Redial
Your phone constantly stores the last 10 phone numbers you
called. To recall and redial one of those 10 numbers, follow
these steps.
RCL
OPER 0OPER
1. Press .
recent number called flash on the display.
2. To scroll through the last 10 numbers cal led (
and so on), repeatedly press to scroll forward or
to scroll backward.
3. To redial a displayed number, press .
To exit without redialing a number and clear the display,
hold down for about 1 second.
Using Automatic Redial
To automatically redial a number when you get the cellular
system busy signal (when
SND
so
Redial
the number at regul ar intervals for up to 4 minutes or until the
call goes through.
0
(location 0) and the most
L0’
L0’, L1’
SND
CLR
Snd to Redial
appears. The phone automatically redials
appears), press
,
If the call goes throug h, the phone rings onc e (or vibr ates, depending on the alert setting) to alert you. Simply begi n your
conversation as usual when the other party answers.
20
#
17-111 1.fm Page 21 We dnesday, July 21, 1999 2:23 PM
If the call cannot be completed within 4 min utes (and
Redial
the redial cycle or to end the call.
appears again), you can press again to repeat
END
SND
Snd to
DISPLAYING NUMBERS
Your Phone Number
To display your phone number at any time (even while a call
RCL
RCL
#
is in progress), simply press .
Notes
:
• If you have two phone numbers programmed into your
phone (see “Selecting the Active Phone Number” on
Page 55), pressing displays the currently
active phone number.
• Unless you selected the silent scratchpad function (see
“Using Silent Scratchpad” on Page 27), the other party
on the line hears tones if you press these or any other
keys on your phone during a call.
A Number Longer than Seven Digits
You can enter and dial phone numbers of up to 32 digits;
however, the phone can display only 7 digits at onc e.
To review the overflow digits of a number 8–10 digits long,
RCL
press once. Or, if the number is longer than 10 digits,
RCL
press twice. The phone displays the overflow digits (first
to last), up to 7 digits at a time.
21
END
17-111 1.fm Page 22 We dnesday, July 21, 1999 2:23 PM
MENU FUNCTIONS
OVERVIEW
Turning a Function On/Off
Follow these steps to turn any of your phone’s special functions on or off. For a complete description of any function,
see the section that descr ibes that function. The page numbers of each of the sections are listed in “Menu Functions
List” on Page 24.
NAME
FCN
1. Press to access the functions menu. The fi rst
function’s name and its cur rent status (
on the display.
2. To select a different function, repeatedly press to
scroll forward or to scroll backward through the
menu until that function appears.
3. Press to t urn the function on or t o turn the function off.
Note:
and status, the phone alternately displays
then
CLR-off
press.
4. To select and turn a nother function on/off, r epeat Steps 2
and 3.
To exit the functions menu, press .
MENU
STO CLR
On
or
Off
) flash
#
A few seconds after you display the function name
STO-On
as a prompt to remind you what key to
22
#
17-111 1.fm Page 23 We dnesday, July 21, 1999 2:23 PM
Function Status Quick-Review
Several commonly used functions on your phone (such as
the message reminder tone and emergency dialing) are preset to “on” so you can begin using them immediately; however, you can t urn any function on or off. Follow these steps to
quickly review the nam es of those functions for which t he preset (default) status has been changed.
Notes
:
• You can set all functions back to their default setting at
one time. See “Using Mast er Reset” on Page 64.
• If all functions are set to their default setting, only the
current cellular system type setting (such as
Scan AB
) appears.
• If your phone is set to use the home cellular system type
(see “Setting the Cellular System Type” on Page 56),
always appears as one of the settings during a
Home
quick-review.
Home
or
FCN
OPER
1. Press
0
changed functi on (such as
WXY
RCL
9
. The abbreviation for t he first
Signal Mtr Off
for “signal
meter off”) appears on the display.
Note:
For a complete list of all functions and their default
settings, see “Menu Functi ons List” on Page 24.
2. Repeatedly press or to scroll forward or
backward through the abbreviations for all other
changed functions (if any).
3. The phone automatically exits the quick-review about 8
seconds after you last press a key. To exit sooner, press
END
.
23

17-111 1.fm Page 24 We dnesday, July 21, 1999 2:23 PM
Menu Functions List
Display Shows
Signal Mtr
One Min Timr
Indiv Timr
Scrpad Tone
Ringer Style
Ring Or Vib Sel
Keypad T one
Auto Ansr
MultKey Ansr
Function Description and
Default Setting
Turns off/on the signal
strength meter
Sets the phone to sound
a tone once each minute
during a call
Sets the call timer to display automatically during
a call
Turns off/on the keypad
tones (heard by the other
party)
Sets the phone to use
one of ni ne different
ringer sty l es
Sets the phone to vibrate
or ring only, both vibrate
and ring, or only display
(instead of ring or
Call
vibrat e) to ale r t yo u of a
call
Turns off/on the keypad
tones (that you hear)
Sets the phone to automatically answer after
two rings
Sets th e phon e to ans wer
a call when you press
one of several keys
See
Page
On 26
Off 26
Off 53
On 27
128
Ring
Only
On 30
Off 31
Off 32
29
24

y
g
g
17-111 1.fm Page 25 We dnesday, July 21, 1999 2:23 PM
Displa
Shows
Auto Lock
Turbo Dial
Emergcy Call
Number Pref
Call Rcv
Remind Msg
Select
Languag
PIN InActiv or
Activ
Function Des cri ptio n and
Default Settin
Sets the phone to automatically lock when you
turn power on
Turns off/on one-touch
dialing
Turns off/on the emergency dialing display
Can be turned off so the
phone displays the speed
dial name (instead of the
number) first
Sets the phone to alert
you of a call us in g a
unique tone (compatible
with optional call-forwarding service)
Sets the phone to alert
you of mes sa g e s
received (with optional
messaging services)
(Function not available
on thi s phone)
Sets the phone to automatically send a cellular
system PIN with every
call
See
Pa
Off 46
On 32
On 33
On 33
Off 34
On 35
N/A N/A
Inac-
tive
e
59
25

STO
17-111 1.fm Page 26 We dnesday, July 21, 1999 2:23 PM
USING THE MENU FUNCTIONS
Turning the Signal Strength Meter Off/On
Your phone is preset to display the signal strength meter
each time you turn on the phone, clear the display, or make a
call; however, you can set the phone so it does not display
the meter. Follow these steps to turn the signal strength
meter off or on.
NAME
FCN
CLR
END
FCN
#
STO
END
MENU
Signal Mtr On
appears or so On appears.
Off
NAME
MENU
or
appears on the display
on
One Min Timr Off
appears or so
On
CLR
flashes
Off
or On flashes.
appears.
Off
1. Press .
2. Press so
3. Press to exit the functi ons menu. If you turned off
the signal strength meter,
instead of the si gnal strength met er.
Turning the Call-Time Reminder Tone Off/On
The call-time reminder function lets you set the phone to
sound a subtle tone 40 seconds after you place or answer a
call, then once every minute after that, to remind you of how
long you have been on the phone. Follow these steps to turn
the call-time reminder tone off or on.
1. Press .
2. Press once so
3. Press so
4. Press to exit the functions menu.
26

CLR
17-111 1.fm Page 27 We dnesday, July 21, 1999 2:23 PM
Turning the Automatic Call Timer On/Off
To track how long you are on the phone, you can set your
phone to automatically display the time (minutes and seconds) you spend on each call. Follow these steps to turn the
automatic call ti me r on or of f.
Note
: If you turn on the automatic call timer, the phone displays the timer at all times during a call. This uses more battery power than usual.
NAME
FCN
STO
END
MENU
appears or so
On
#
Indiv Timr Off
appears.
Off
1. Press .
2. Repeatedly press or until
or On flashes.
3. Press so
4. Press to exit the funct ions menu.
Note
: Your phone also has a resettable call timer and a cu-
mulative call timer. See “Using the Call Timers” on Page 53.
Using Silent Scratchpad
Your phone is preset to sound dual-tone multi-frequency
(DTMF) tones when you press the num ber keys during a call;
however, you can set the phone so it does not sound those
tones. This is handy if you plan to use the scratchpad memory during a call, but you do not want t he other par ty on the line
to hear tones when you press the keys.
Follow these steps to turn the silent scratchpad on or off.
NAME
FCN
1. Press .
2. Repeatedly press or until
or
Off
MENU
flashes.
#
Scrpad Tone On
27

STO
17-111 1.fm Page 28 We dnesday, July 21, 1999 2:23 PM
3. Press so
4. Press to exit the functions menu.
CLR
END
appears or so On appears.
Off
Notes:
• In order to send DTMF tones when you use special
phone services (such as bank by phone), you must disable the silent scratchpad function before you pl ace the
call, or (if silent scratchpad is on) press after
RCL
SND
you enter the commands or codes, so your phone sends
those entries as DTMF tones. See “Using Touch- Tone
Services” on Page 61.
• If silent scratchpad is on, you might hear tones when you
press the phone’s number keys, but the other party on
the line does not hear them.
Changing the Ringer Style
Your phone has 9 different ringer styles for you to choose
from (to help you distinguish your phone’s ring from that of
another phone, for example). Follow these steps to change
the ringer st yle.
NAME
FCN
STO
MENU
#
and a number from 1–9 (the last
Select 1–9
.
1. Press .
2. Repeatedly press or until the phone displays
Ringer Style
selected ringer style).
3. Press . The phone sounds the currently selected
ringer style, then it displays the prompt
Note: If your phone is set to vibrate or make no sound/
movement at all when it receives an incoming call (see
“Changing the Al ert Type” on Page 29), your phone does
not sound the ringe r tones during this procedure.
28
9
WXY
17-111 1.fm Page 29 We dnesday, July 21, 1999 2:23 PM
4. Press the number keys ( – ) on the phone’s key-
1
pad to hear the vari ous ringer styles (or repeatedly press
#
or to scroll backward or forward and hear
each of them).
5. When you hear the ringer style you want to use, press
STO
to select it. The phone displays
Ringer n Set
(where n is the number of the ringer style you selected).
6. Press to exit the funct ions menu.
END
Changing the Alert Type
Your phone is preset to ring when it receives an incoming
call. To avoid disturbing others with a ringing sound, however, you can set your phone to vibrate gently or only flash
to alert you of an incoming cal l.
CALL
Here is a quick chart to help you understand how your phone
works using the different incoming call alert settings.
Display Shows Description
Ring Only
Vibrate Only
Ring On
and
Vib On
Ring Off
and
Vib Off
Phone rings as usual and
Phone vibrates three times and
Phone vibrates three times then rings and
flashes.
Call
Silent alert — phone ma kes no sound or
movement, but
Call
flashes.
Call
flashes
Call
flashes.
Notes
:
• If the battery is being charged, the phone
only
rings,
regardless of the alert setting. That way, you can hear
the phone ring (since you are not carrying/wearing it dur ing charging).
29

17-111 1.fm Page 30 We dnesday, July 21, 1999 2:23 PM
• If the call screening function is turned on, your phone
sounds a d ifferent alert tone or num ber of vibrations. See
“Using Call Screening” on Page 34.
Follow these steps to change the alert type.
NAME
FCN
END
MENU
STO
Ring Only
#
or
#
Ring Or Vib
) appears.
until you see the setting
STO
1. Press .
2. Repeatedly press or until
flashes, then press to enter the change mode.
Sel
The current setting ( such as
3. Repeatedly press
you want to use, then press to select that setting.
4. Press to exit the functions menu.
Using the Quick-Set Method — To quickly set your phone
to ring or vibrate to alert you of an incoming call, press
TUV
8
. The phone displays
Vibrate Only
Ring Only
(for vibration al ert).
(for ring as usual) or
FCN
Note: Using the quick-set method to set your phone to ring
(
Ring Only
) automa tically disables the silent alert if it is set.
Turning the Keypad Tones Off/On
Your phone is preset to sound a tone each time you press a
key; however, you can turn off the keypad tones. Follow
these steps to turn the keypad tones off or on.
NAME
FCN
1. Press .
2. Repeatedly pr ess or until
or
Off
30
MENU
flashes.
#
Keypad Tone On

STO
#
CLR
17-111 1.fm Page 31 We dnesday, July 21, 1999 2:23 PM
3. Press so
4. Press to exit the funct ions menu.
CLR
END
appears or so On appears.
Off
Note: Regardless of the silent keypad setting, unless you
turn on the silent scratchpad function (see “Using Silent
Scratchpad” on Page 27), the other party on the line hears
tones if you press th e keys during a call.
Using Automatic Answer
The automatic answer function lets you set the phone to automatically answer incomin g calls without you having to press
a key. When automatic answer is turned on and the phone
receives a call, it rings (and/or vibrates), then it automatically
answers the call and the InUse indicator begins to flash. Begin your conversation as usual.
Note: To prevent your phone from answering incoming cal ls
without any easily noticeable indication (such as a ring or vibration), we recommend you not use the silent aler t and automatic answer functions at the same time.
Follow these steps to turn the automatic answer function on
or off.
NAME
FCN
STO
END
MENU
appears or so
On
Auto Ansr Off
appears.
Off
1. Press .
2. Repeatedly press or until
or On flashes.
3. Press so
4. Press to exit the funct ions menu.
31

STO
17-111 1.fm Page 32 We dnesday, July 21, 1999 2:23 PM
Using Multiple Key Answer
Your phone is preset to answer an incoming call only when
you press ; however, you can set the phone to answer a
SND
call when you press any of these keys after the first ring (or
WXY
vibration): , any number key ( – ), or either vol-
SND 1 9
ume button.
Follow these steps to turn multiple key ans wer on or off.
NAME
FCN
STO
END
MENU
appears or so
On
#
CLR
MultKey On
appears.
Off
or
1. Press .
2. Repeatedly press or until
flashes.
Off
3. Press so
4. Press to exit the functions menu.
Turning One-Touch Dialing Off/On
Your phone is preset to automati cally dial a number stored in
memory locations 01–09 when you hold down that number
key for about 1 second; however, you can disable one-touch
dialing. Foll ow these steps to turn one-t ouch dialing off or on.
Important
from making emergency calls using the key (see “Making Emergency Call s” on Page19).
1. Press .
2. Repeatedly press or until
3. Press so
4. Press to exit the functions menu.
: Disabling one-touch dialing also prevents you
1
NAME
FCN
MENU
of
Off
flashes.
CLR
END
#
appears or so On appears.
Off
Turbo Dial On
32

#
STO
STO
17-111 1.fm Page 33 We dnesday, July 21, 1999 2:23 PM
Turning the Emergency Display Off/On
Your phone is preset to display
down to make an em ergency call; however, you c an set
the phone so
1
Emergcy
does not appear (if you did not store
Emergcy
when you hold
an emergency number in memor y 01, for example).
Follow these steps to turn the emergency display feature off
or on.
NAME
FCN
Off
CLR
END
MENU
flashes.
Off
Emergcy Call
appears or so On appears.
1. Press .
2. Repeatedly press or until
or
On
3. Press so
4. Press to exit the funct ions menu.
T urning the Number Display Preference Off/On
When you recall a speed dial memory (see “Spee d Recall/Dialing” on Page 39), your phone is preset to display the number stored in memory before it displays the name (if any);
however, you can set it to di splay the name first.
Follow these steps to tur n the number preference off or on.
NAME
FCN
1. Press .
2. Repeatedly press or until
or
Off
3. Press so
4. Press to exit the funct ions menu.
MENU
flashes.
CLR
END
#
appears or so On appears.
Off
Number Pref On
33

STO
17-111 1.fm Page 34 We dnesday, July 21, 1999 2:23 PM
Using Call Screening
The call screening function lets you set your phone so
Call
appears and the phone sounds several unique beeps (or vibrates) when it recei ves a call, but you cannot answer the
call. The caller receives the standard “not in service” message that they would n ormally hear when you have the phone
turned off. This function is handy if you want to use your
phone only for outg oing calls.
Note:
If your carrier offers no-answer transfer service (like
call forwarding) and you subscribe to that service, turning on
your phone’s call screening function so means
Call
appears and the phone sounds several unique beeps (or vibrates) when a call is received and is being transferred.
Follow these steps to turn call screeni ng on or off.
NAME
FCN
CLR
END
MENU
#
appears or so On appears.
Off
Call Rcv On
or
1. Press .
2. Repeatedly press or until
flashes.
Off
3. Press so
4. Press to exit the functions menu.
34

#
STO
17-111 1.fm Page 35 We dnesday, July 21, 1999 2:23 PM
T urning the Message Reminder Tones Off/On
If your cellu lar carrier offers a special messaging service, and
you subscribe to that service, your phone is preset to beep
every 2 minutes until you read all new messages, but you can
turn off the tones.
Note
: If you do not subscribe to a messaging service, the re-
minder tone f unction has no effect on your phone.
Follow these steps to turn the message reminder tones off or
on.
NAME
FCN
MENU
1. Press
2. Repeatedly press or until
or
Off
3. Press so
4. To exit the functions menu, press .
flashes.
CLR
.
Remind Msg On
appears or so On appears.
Off
END
35

STO
2
ABC
17-111 1.fm Page 36 We dnesday, July 21, 1999 2:23 PM
USING MEMORY
Your phone has 50 speed-dial memory locations that can
each hold a phone number (up to 32 digits) and a name (up
to 14 characters, including spaces).
STORING SPEED DIAL NUMBERS
Note:
If you are unable to complete Steps 1 and 2 within 8
seconds, the display goes blank to conserve battery power.
END
Press to recall the display, then try the steps again.
1. Clear the display (if necessary), enter the phone number
you want to store, then press . The phone displays
Locatn
2. Within 8 seconds, enter the 2-digit memory location
number (01–50) where you want to store the phone
number, or press to automatically select the first
unused memory location.
prompt you for the next step.
Notes:
• Remember that your phone uses memory location 01
• If you enter an invalid location number (such as 51),
3. To enter the phone number
skip to Step 4.
Or, for each letter of the speed-dial name you want to
enter, repeatedly press the key ( , , and so on)
that contains that letter, then press to move the
cursor to the next position.
(location) then _ _.
Alpha or STO
appears to
for one-touc h em ergency dialing. Store only your local
emergency number (such as 911) in that location.
the phone displays
Invalid Locatn
followed by
the locatio n prompt. Enter a valid locati on num ber.
without
entering a name,
DEF
3
#
36

17-111 1.fm Page 37 We dnesday, July 21, 1999 2:23 PM
WXY
For example, to enter the le tter Y, press three times
9
(since the letter Y is third in the series of letters on that
key).
Notes:
• To store a space, press twice (without entering a
#
letter).
• To enter the letter Q (even though it is not printed on
PRS
the key), press twice. The other letters (P, R,
7
and S) appear in sequence before/after Q as they do
in the alphabet.
• If you make a mistake, repeatedly press or
CLR
to erase each incorrect character, then enter the correct character(s).
4. When you finish, press to store the information in
STO
memory. The selected memory location number appears
on the display to confirm the entry.
Note: If you previously stored information in the selected
memory location, or if the phone’s memory is full, the
selected memory location number and
Full
appear
briefly, then the currently stored information and
Change?
To select a different memory location
STO
flash on t he display.
, press then
END
, enter the new memory location number ( or press
to automatically select the first unused location),
then press .
STO
To use the selected memory location and replace
information currently stored there, press .
STO
the
37

17-111 1.fm Page 38 We dnesday, July 21, 1999 2:23 PM
Storing Speed Dial Numbers in Blocks
To help you organize and easily recall information, you can
store speed dial num bers in “blocks,” so numbers with simil ar
characteristics (such as family, friends, services, and so on)
are stored together.
The memory blocks in your phone are divided this way:
Block Number Includes Memory Locat ions
0 01 – 09
1 10 – 19
2 20 – 29
3 30 – 39
4 40 – 49
550
To store a number in a memory block, follow Steps 1–4 in
“Storing Speed Dial Numbers,” but in Step 2, enter the
number then press . The phone automatically selects
the first unu sed m em ory location in the sel ected block.
block
Note
: If the block you select is full,
and the last memo-
Full
ry location number in that block appear briefly, then the currently stored information and
Change?
To select a different mem ory block
flash on the display.
END
, press
then
STO
, en-
ter the new block number , then press .
To store t he number in the last availabl e memory locat ion of
the current block and replace
there, press .
STO
the information currently stored
38

SND
17-111 1.fm Page 39 We dnesday, July 21, 1999 2:23 PM
ONE-TOUCH DIALING
To quickly place a call to any number stored in memory locations 02–09 (without pressing ), simply hold down that
SND
number key for about 1 second. The InUse indicator flashes
and the phone briefly displays
Dialing
then the number
called, then the signal strength meter.
SPEED RECALL/DIALING
If you know the memory number you want to use, simply enter that number (such as 06), then press to place the
call.
If you know the memory number you want to use, but you
want to review the stored information (just to be sure!) before
you place the call, press then enter the memory location
RCL
number. The memory number and phone number flash on
the display. To place the call, press .
SND
The InUse indicator flashes and the phone briefly displays
Dialing
, then the number called, then the signal strength
meter.
Notes:
• To view the name stored in a memory location when the
phone and memory numbers appear, press . To view
the numbers agai n, press .
RCL
RCL
• Y ou can set the phone so it displays the name (instead of
the phone number) fi rst when you select a specific memory location number. See “Turning the Number Display
Preference Off /On” on Page33.
39

RCL
17-111 1.fm Page 40 We dnesday, July 21, 1999 2:23 PM
MEMORY SCROLLING/DIALING
Scrolling by Name (Alphabetical Order)
Your phone stores names in alphabetical order, based on th e
first few characters of the name. Follow these st eps to scroll
through memory by name.
NAME
1. Press . The phone displays the first name in memory.
Notes:
• If no names are stored in memory,
• If you press immediately after recalling/dialing
2. To scroll forward through all names in memory, repeatedly press .
To start scrolling forward from a specific letter of the
alphabet, enter the letter (press three times to
enter C, for example). The first name that starts with that
letter appears.
Notes:
• When you reach the l ast name in memory (or any time
• If there are no names stored under the selected letter
• To view the memory number and phone number of a
40
MENU
NoNames
Stored
another memory name/number, that memory name
appears first.
after you first press ), you can press to
scroll backward through the names.
(C, for exampl e), the phone displays
by the next name in memory.
selected nam e, simply press . To view the name
again, press .
appears.
NAME
MENU
#
NAME
MENU
ABC
2
#
No C’s
followed

17-111 1.fm Page 41 We dnesday, July 21, 1999 2:23 PM
3. When you see the name you want to use, press to
SND
place the call.
Scrolling by Memory Location Number
1. Press .
2. Press to start scrolling from the first memory
3. Repeatedly press or to scroll forward or
4. When you see the name or number you want to use,
RCL
OPER
1
0
location, or enter a specific memory number (such as 11)
that you want to start from. The memory number followed by
(to indicate scr olling is active) and the stored
’
phone number flash on the display.
Note:
If the memory number you select ed is unused, the
memory number (
, for example) app ears steadily.
03’
#
backward through the numbers.
Notes:
To view the name stored in the selected memory,
simply press . The phone number automatically
RCL
reappears after a few seconds.
press to place the call.
SND
Scrolling While a Call is in Progress
For convenience (so you can see if you have a caller’s phone
number, for example), your phone lets you scroll through
memory while a call is in progress. Simply follow the steps to
scroll by n am e or memory location number, but press instead of when you finish.
SND
END
41

17-111 1.fm Page 42 We dnesday, July 21, 1999 2:23 PM
CHANGING INFORMATION IN A
MEMORY LOCATION
1. Recall the memory lo cation informati on.
2. Press (if necessary) to display the phone number.
3. Repeatedly press to backspace and erase digits,
4. Repeatedly press or to erase each character
5. Press . The selected memory number and
RCL
CLR
then enter the correct numbers; or, to simply add digits to
the existing num ber, enter t he additional numbers. Then
press and enter the two-digit memory number.
Alpha or STO
Note:
51), the phone displays
STO
appears to prompt you f or the next step.
If you enter an invalid location number (such as
Invalid Locatn
followed by
the locatio n prompt. Enter a valid locati on num ber.
Or, if you want to edit only the name, press , enter
STO
the two-digit memory location number, then skip to the
next step.
CLR
you want to change, then enter the correct character(s).
Or, to simply add characters to the existing name, enter
the addition al characters.
Or, if you do not want to edit the name, skip t o the next
step.
STO
appear briefly, then the phone number and
flash. Press again to store the edi ted memory. The
STO
Full
Change?
memory location number appears briefly to confirm the
entry.
42

17-111 1.fm Page 43 We dnesday, July 21, 1999 2:23 PM
CLEARING A MEMORY
With a name
and
number
—
Follow these steps to clear a
memory that has a name and phone number (or only a name)
stored in it.
NAME
1. Press to display the first name st ored in memory,
then repeatedly press until the name you want to
MENU
#
clear appears.
2. Press .
3. To clear the selected memory, press . The selected
CLR
Clear?
appears.
STO
memory location number appears, confirming the entry.
To exit without clearing the selected m em ory, press .
Only a Number
— Follow these steps to clear a memory that
END
has only a phone number stored in it.
1. Press , then enter the 2-digit memory location
number you want to clear.
CLR STO
Alpha or STO
appears to
prompt you for the next step.
2. Press . The memory location number, phone number, then
and
3. To clear the selected memory, press . The selected
STO
Full
Change?
briefly flash. Then the phone number
flash.
STO
memory location number appears, confirming the entry.
To exit without clearing the selected m em ory, press .
END
43

SND
17-111 1.fm Page 44 We dnesday, July 21, 1999 2:23 PM
USING SCRATCHPAD MEMORY
Your phone’s scrat chpad memory let s you tempora ril y store a
telephone number on the display during a call. This is handy,
for example, when someone gives you a number during a call
and you don’t have a place to write it down.
To store a number in the scratchpad memory during a call,
simply press the keys to enter that number. After you press
END
to end the call, you can press to immediately dial
the scratchpad memory number.
Note
: Unless you previously selected the silent scratchpad
feature (see “Using Silent Scratchpad” on Page 27), be sure
to tell the other party on the call that they will hear tones as
you press the keys to enter the number.
MEMORY DIALING TIPS
Frequently Dialed Area Codes/Prefixes
To reduce the number of keystrokes you use to dial frequently called area codes or prefixes, store that ar ea code or prefix
(including the 1, if necessary) in memory. To dial a number
using that memory, simply recall that memory, enter the remaining digits of the telephone number you are calling, then
SND
press to place the call.
Banking or Other Phone Services
For convenience, you can store in your phone’s memory the
touch-tone command sequences you use when calling your
bank or other phone services. See “Using Touch-Tone Services” on Page 61.
44

5
JKL
STO
17-111 1.fm Page 45 We dnesday, July 21, 1999 2:23 PM
SECURITY FEATURES
LOCKING YOUR PHONE
To prevent unauthorized use of your phone, you can enter a
3-digit co de to lock your phone a t any time (see “Using Manu al Lock”). For added convenience, you can also set the
phone to automatically lock every time you turn it on (see
“Using Automatic Lock” on Page 46).
When the phone is locked,
any key (except ). When the phone is locked and re-
PWR
Locked
appears when you press
ceives a call, it rings or vibrates as usual. To answer the call,
you must enter the lock code and then press .
Your phone’s preset lock code is 123.
SND
For added security,
you can change the code to one t hat you can easily remember. See “Changing the Lock Code” on Page 46.
Note
: If you lock your phone then forget the
can enter a 6-di git
security
code to display the lock code. See
lock
code, you
“Displaying the Lock Code” on Page 47.
Using Manual Lock
Follow these steps to loc k or unl ock your phone at any time.
1. Press , then hold down until the phone displays
2. To lock your phone, press within 8 seconds.
Locked
lights steadily.
To exit without locking the phone, pre ss .
Note
phone automatically exits the lock program without locking the phone.
FCN
.
Lock?
appears and the green power/lock indicator
END
: If you do not press within 8 seconds, your
STO
45

CLR
END
17-111 1.fm Page 46 We dnesday, July 21, 1999 2:23 PM
The phone remains locked until you unlock it. To unlock your
phone, simply enter the 3-digit lock code so
Locked
disap-
pears. If you make a mistake, press then try again.
Using Automatic Lock
The automatic lock feature lets you set your phone to automatically lock each time you turn it on. When automatic lock
is turned on,
Locked
turn on the phone. To use the phone, you must unlock it.
Follow these steps to turn automatic lock on or off.
1. Press .
FCN
2. Repeatedly press or until
or On flashes.
3. Press so
STO
4. To exit the functions menu, press .
appears after the self test when you
NAME
MENU
#
appears or so
On
CLR
Auto Lock Off
appears.
OFF
Changing the Lock Code
For added security, you can change the lock code, but you
must enter a preset 6-digit security code first.
preset security code is 000000
(you cannot change this
code).
Follow these ste p s to change your phone’s lock code.
Note
: The phone’s display does not change (no characters
appear when you press the keys) until you press in Step
4.
FCN
OPER
1. Press .
0
46
Your phone’s
STO

17-111 1.fm Page 47 We dnesday, July 21, 1999 2:23 PM
2. Enter the 6-digit security code.
3. Enter the new 3-digit lock code you want to use.
4. Press . The phone displays
STO
Changed To
and the
new lock code.
5. Press to clear the lock code message from the dis-
CLR
play.
Displaying the Lock Code
If you change your lock code then forget it, you can use your
phone’s preset security code (
lock code.
Follow these steps to display the current lock code.
Note
: The phone’s display does not change (no characters
appear when you press the keys) until you press in Step
3.
FCN
OPER
1. Press .
0
2. Enter the 6-digit security code.
3. Press . The phone displays
RCL
rently set 3-digit lock cod e.
4. Press to clear the lock code message from the dis-
CLR
play.
000000
) to display the current
RCL
LocCode
and the cur-
47

17-111 1.fm Page 48 We dnesday, July 21, 1999 2:23 PM
USING SERVICE RESTRICTIONS
Your phone is preset to let you (or anyone else) dial any type
of number (local or long distance) and freely access any information stored in its memory. To prevent unauthorized use
of your phone, however, you can enter your phone’s preset
security code (
service restrictions.
000000
) and set any of these varying levels of
Service
Level
1 Calls can be plac ed only to numbers
stored in memory loc ations 01–10 using
speed dialing. Otherwise, the keypad is
locked. The memory cannot be accessed
or changed.
2 Calls can be plac ed only to numbers
stored in memory. Otherwise, the keypad
is locked. The memory can not be
changed.
3 Calls can be placed only by direct di aling
using the keypad. The memory cannot be
accessed or changed.
4 No restrictions (default setting).
5 7-digit (local) dialing only.
6 Calls can be plac ed to numbers stored in
memory or using direc t dialing on the key-
pad. The memory cannot be changed.
Note
: Your phone is preset to ser vice level 4.
Description
48

17-111 1.fm Page 49 We dnesday, July 21, 1999 2:23 PM
Follow these steps to change the service restriction level on
your phone.
Note: The phone’s display does not change (no characters
appear when you press the keys) until you press in Step
STO
4.
FCN
OPER
1. Press .
0
2. Enter the 6-digit security code.
3. Enter the service level (1–6) you want t o use.
4. Press . The phone displays
the service level number you entered (such as
vice
5. Press to clear the service level message from the
STO
Level 5
CLR
Service Level
and
Ser-
).
display.
If you selected a service levels other than level 4, the phone
sounds a “no service ” fast busy signal when someone tries to
use a restricted feature on the phone. To cancel that busy
signal, press .
END
49

17-111 1.fm Page 50 We dnesday, July 21, 1999 2:23 PM
OTHER FEATURES
USING THE MESSAGING FUNCTIONS
Some cellular systems provide services that can send up to
three different types of messages to your phone, including
calling line ID, voice mail notification, and short (alphanumeric) messages. Your phone is preprogrammed to work with
thes e se rvic es .
Note:
In order to use these functions on your phone, your
cellular carrier must provide, and you must subscribe to,
these services. Otherwise, selecting or setting them will have
no effect. For more information about these services, call
your cellular carrier.
Overvie w/ R eceiving Messages
When your phone is turned on and receives calling line ID,
voice mail notification, or short message data from your cellular carrier, it alternately displays:
You See Meaning
xx New
YY Total
Your phone stores each message in a special memory area
called the “message stack.” The message stack can hold up
to 20 messages at once, with messages stored in order from
newest (memory position 1) to oldest (memor y position 20).
50
Number (xx) of new messages received
Total number (YY) of messages currently
stored in the message stack

17-111 1.fm Page 51 We dnesday, July 21, 1999 2:23 PM
Notes:
• If the message stack is full (20 messages are currently
stored) and the phone receives a new message, it automatically stores the new message and deletes the oldest
message in the stack.
• Your phone does not receive messages whi le it is turned
off. Contact your cellular carrier to find out how the carrier handles undeliverable/queued messages.
Viewing/Recalling Messages
1. Press and release , then hold it down for about 1
RCL
second. The phone displays the first (newest) message
in the stack.
If the message is a calling line ID message
briefly displays
CID yy
(where yy is the message num-
, the phone
ber) then the number of the party that called (up to 14
digits).
If the message is a short (text) message
briefly displays
yy New
(where yy is the message num-
, the phone
ber of a new message) then the message (up to 14 characters).
If the message i s voice mail notification
, the phone di splays the message data (such as a message number
and number of total/new messages waiting) sent by your
cellular carrier. The type and format of the message waiting informati on sent varies by carrier — contact your cellular carrier for more inf ormation .
Note: If there are no messages in the stack, the phone
displays
No Msgs
message displa y. To exit sooner, press .
for about 8 seconds then exits the
CLR
51

17-111 1.fm Page 52 We dnesday, July 21, 1999 2:23 PM
2. To view another message, repeatedly press (to
scroll backwards) or ( to scroll forwards) until that
#
message appears .
3. When you finish, press to exit the message func-
END
tion.
Deleting Messages
To delete an individual message
hold down until the phone displays
CLR
To delete al l messages in the stack
sage, hold down until the phone displays
(briefly) then
CLR
Erase All
, recall that message, then
Deleted
.
, while viewing any mes-
Deleted
. Then press again to confirm
CLR
the deletion .
When you finish, pr ess to exit the message function.
END
USING THE PHONE WITH HANDSFREE
EQUIPMENT
Your phone is preprogrammed to work with most optional
handsfree equipment that lets you automatically switch from
handset to handsfree mode in your vehicle when you place
the phone in the handsfree holder.
Some handsfree equipment might require you to turn off
(mute) the phone’s microphone when switching to handsfree,
using the procedure described in “Using Mute” on Page 18.
See the owner’s manual provided with your handsfree equipment for more information, or contact your local RadioShack
store for assistance.
52

17-111 1.fm Page 53 We dnesday, July 21, 1999 2:23 PM
USING THE CALL TIMERS
Your phone has three call timers that let you check the length
of your calls (“air time”):
Individual call timer
•
answer in minutes and seconds, and automatically
resets each time you make or answer a call or turn off
the phone. See “Displaying the Individual Call Timer.”
•
Resettable call timer
answer in minutes, and it can be reset at any time. See
“Using the Resettable Call Timer” on Page 54.
•
Cumula tive c all time r
answer in minutes, and it cannot be reset. See “Displaying the Cumulative Call Timer” on Page 54.
Notes:
• Each call timer begins counting when you hear the first
ring (during an outgoing call) or when your phone rings
(or vibrates) to signal an incomin g call.
• If your phone receives a call but you do not answer it,
each timer resets to the time it had before it received that
incoming call.
— times each call you make or
— times the calls you make or
— times all the calls you make or
Displaying the Individual Call Timer
The individual call timer tracks each call you make in minutes
and seconds, and automatically resets each time you make
or answer a call or when you turn off the phone.
00 45
RCL
to
53
To display the individual call timer for the last call, press
# #
. The air time of your last call (such as
show 45 seconds) appears for about 15 seconds. Press any
key to clear the display sooner.

17-111 1.fm Page 54 We dnesday, July 21, 1999 2:23 PM
RCL
If you press during a call, the air time of the
# #
call flashes on the display until you clear the display or end
the call.
Note: To set your phone s o it displays the individual call t imer
automatically, see “Turning the Automatic Call Timer On/Off”
on Pa ge 27.
Using the Resettable Call Timer
The resettable call timer tracks the calls you make or answer
in minutes, and it can be reset at any time. You can reset this
timer to coincide with your cellular bi lling statement date, for
example, then tr ack your monthly air ti me .
RCL
To display the resettable call timer, press
#
. The phone displays
time minutes (such as
Resetbl
00215
and the number of air
) accumulated since you last
reset the timer. Press any key to clear the timer from the display.
# #
FCN
To reset the timer, with the display clear, press
PRS
CLR
7
.
OPER
Displaying the Cumulative Call Timer
The cumulative call timer tracks all the calls you make or answer in minutes. It
To display the cumulative call timer, press ,
# #
. The phone displays
air time mi nutes (such as
call was made or answered on your phone. Press any key to
clear the timer from the display.
54
cannot
be reset.
00846
RCL
# #
Cumul
and the number of
) accumulated si nce the first
0

RCL
17-111 1.fm Page 55 We dnesday, July 21, 1999 2:23 PM
SELECTING THE ACTIVE PHONE
NUMBER
If you subscribe to two cellular services (for example, competitive cellular systems in your area or cellular systems in
different cities), your dealer programs your phone with two
different phone num bers.
If you have two phone numbers programmed into your
phone, the phone displays one of the following messages
each time you turn it on, to indicate which cellular system
type and phone number are curr ently active.
Phone
Number
1 Non-wireline (type A)
2 Non-wireline (type A)
1 Wireline (type B)
2 Wireline (type B)
Note
: To set the cellular system type, see “Setting the Cellu-
Cellular System Type Display Shows
A1
A2
B1
B2
lar System Type ” on P age 56.
To deactivate the phone number currently selected and acti-
STO
vate the other phone number, press . The dis-
#
play briefly blanks, then the cur rently active number appears
to confirm your select ion. To clear the display when you finish, press .
CLR
55

17-111 1.fm Page 56 We dnesday, July 21, 1999 2:23 PM
Notes:
• Calls can be made on your phone from only one phone
number at a time, and you cannot activate the other
phone number while a cal l i s in pr ogress.
• To receive calls o n both numbers at the sa me time (if you
subscribe to no-answer transfer or call forwarding service through your cellular carrier), you can set both numbers to forward to the other number if not answered.
Otherwise, a caller who calls the inactive number
receives the st andard “not in service” message.
SETTING THE CELLULAR
SYSTEM TYPE
Each cellular market area has two cellular service providers.
One of the providers is designated
Provider B
from your dealer whether your cellular pr ovider is type A or B.
. When your phone is activated for s ervice, find out
Provider A
and the other
Notes:
• Usually, it is less expensive to use the same company f or
cellular service when you are in your home city and
when you roam (see “Roaming” on Page 59). To do this,
you need to know whether your cellular service provider
is type A or B in your home city and in each city where
you plan to travel.
• It is possible for a cellular service provider to be (or have
agreements with) Provider A in some cities and Provider
B in others.
56

17-111 1.fm Page 57 We dnesday, July 21, 1999 2:23 PM
Your phone’s selectable system registration function lets you
select one of six poss ible roaming modes:
Roaming Mode Description Display
Standard Mode
system, then it seeks a non-home type.
If you are using a type A (non-wireline) home system
If you are using a type B (wireline) home system
Invert Pr eference Mode
home type system, then it seeks a home type. (Select
this set ting while on the fringe of your home area or in
certain roaming situations.)
If your home system is non-wireline (type A):
• Roam flashes rapidly — call on system B
• Roam flashes slowly — call on home type system
• InUse flashes slowly — call on home system
If your ho me system is wireline (type B ):
• Roam flashes rapidly — call on system A
• Roam flashes slowly — call on home type system
• InUse flashes slowly — call on home system
Home Only Mo de
your home system.
Scan A Mode
non-wireline (A) systems.
Scan B Mode
wireline (B) systems.
SID Mode
more preferred systems to use
tems
not
by the dealer; prefer red system (SID) feature requires
special service (contact your cellular carrier).
— the phone first seeks a home type
— the phone first se eks a non-
— the phone will not operate outside
— the phone will operate only within
— the phone will operate only within
— the phone automatically scans for one or
one or mor e sys-
to use. System IDs mu st be preprogrammed
and
Std AB
Std BA
ScanBA
ScanAB
Home
Scan A
Scan B
P Scan
57

17-111 1.fm Page 58 We dnesday, July 21, 1999 2:23 PM
Displaying the Currently Selected
System Type
To display the system type currently sel ected on your phone,
RCL
press . The currently selecte d system type (such as
Std BA
sooner, press .
) appears for about 8 seconds. To clear the display
END
Selecting the Cellular System Type
Note
: If you are unable to complete Steps 2 and 3 within 8
seconds, the display clears without changing the system
type. Start at Step 1 and t ry again.
1. Press . The currently selected system type
appears.
2. Repeatedly press or until you see the system
type you want to use.
3. To store the displayed system type, press . The
phone briefl y d isplays
To exit without changing the system type, press .
RCL
#
to confirm your sele ction.
Set
STO
END
58

17-111 1.fm Page 59 We dnesday, July 21, 1999 2:23 PM
ROAMING
In some areas, the cellular system’s computer automatical ly
recognizes roaming telephones. In other areas, you must
contact the service provider before it can recognize your
phone. The operator needs to know your telephone number,
your phone’s ESN (Electronic Serial Number), and how you
plan to pay for your calls. There is normally an additional
charge for roaming calls.
Note
: Your phone’s ESN is under the phone’s battery; however, the roaming cellular service provider can usually automatically determine your phone’s ESN when you call.
When you roam, the Roam indicator on your phone flashes
slowly when the phone is using a home-type cellular system.
The indicator flashes rapidly when the phone is using a cellular system that is different from your home system.
USING CELLULAR SYSTEM
PIN DIALING
Your cellular carrier might require that you use a personal
identification number (PIN) when you make calls. This number assures t he cellular system that the person placing the
call is an authorized user.
Contact your cellular service provider to determine if a PIN is
required and obtain the PIN (7 digits or less) to place calls
through the cellular system you subscribe to. If a PIN is required, follow the steps in “Storing Speed Dial Numbers” on
Page 36 to store your PIN in memory 07, then follow the
steps in “Enabling/Disabling PIN Dialing” on Page 60 to enable PIN dialing on your phone.
59

17-111 1.fm Page 60 We dnesday, July 21, 1999 2:23 PM
Notes:
• Enable PIN dialing on your phone only if it is required by
your cellular provider.
• You must store your PIN in memory 07, otherwise your
phone cannot properly make calls through your cellular
system.
• If you enter a service area that does not require PIN dial-
ing, disable PIN dia ling on your phone.
Enabling/Disabling PIN Dia ling
NAME
FCN
STO
END
MENU
flashes.
Active
#
appears or so
PIN InActive
CLR
InActiv
1. Press to access the funct ions menu.
2. Repeatedly press or until
or
Active
3. Press so
appears.
4. Press to exit the functions menu.
Making a Call Using Your PIN
1. Dial or speed dial the number you want to call, as usual,
then press .
2. When you hear the tones (2 beeps), press again.
The phone automatically sends your PIN code to finish
dialing the call.
Note: If you did not store your PIN in memory 07, or you
stored an incorrect PIN,
your PIN is correct, then try again.
60
SND
Invalid PIN
SND
appears. Be sure

17-111 1.fm Page 61 We dnesday, July 21, 1999 2:23 PM
USING TOUCH-TONE SERVICES
To use your cellular phone to control answering machines
and special telephone services (such as bank-by-phone or
voicemail), simply enter touch-tone commands using your
phone’s keypad aft er the service answers (and when prompted).
Note
: If the silent scratchpad function is turned on, you must
RCL
STO
SND
FCN
SND
Insert Pause
o
wherever you insert a
RCL
SND
o flashes, t hen
press to send the tones after entering each set of
touch-tone comm ands.
Or, you can store the service’s command sequence in a
memory location. After the service answers (for each sequence you want to send), simply recall the memory location
that contains the com m and sequence and press .
Adding a Pause
Some services, such as voicemail, require you to enter an access code then wait before entering additional digits. To include one or more pauses in a sequence when storing it in
memory, press so
press . The phone displays
pause.
Note
: If you do not press within 8 seconds, the display
STO
clears. Simply press the key for the next digit you want to enter or store. The characters you previously entered appear
along with the pause you just entered.
When you send a sequence with pauses stored in it, the
phone stops at each place in the sequence where you entered a pause. To send the next group of numbers in the sequence, press again.
SND
61

SND
STO
17-111 1.fm Page 62 We dnesday, July 21, 1999 2:23 PM
CALLING CARD DIALING
To use your cell ular phone to dial long distance numbers with
a calling card number, you can simply dial as you usually
would (for example, dial 0 and the telephone number then
SND
press , then enter your calling card number when you
hear the pr ompt).
For convenience, your phone lets you store a call ing card sequence in memory with your long distance carrier’s calling
card PIN. When you use thi s stored sequence to make a call ,
the phone automatically sends the required calling card information and prompts you to enter the telephone number you
want to call.
Storing a Calling Card Sequence
1. If you dial a regular phone number (such as a 1-800
number) to start a calling card call, enter that number,
then enter a pause (pr ess ).
FCN
Or, if you dial 0 before the telephone number to start a
OPER
calling card call, press so 0 appears.
2. Press
FCN
#
SND
so
3. Within 8 seconds, press so
0
Insert Num‘N
STO
numbers you previously entered. (
place where the phone will prompt you to enter the area
code and number you want to cal l. )
Note
: If you are unable to press within 8 seconds,
the display cl ears. Press any key to recall the displ ay.
4. Enter another pause.
5. Enter your calli ng card PIN number .
STO
flashes.
appears after the
‘N
represents the
‘N
62

17-111 1.fm Page 63 We dnesday, July 21, 1999 2:23 PM
6. Within 8 seconds, press then enter the 2-digit mem-
STO
ory location numbe r (01–50) where you want to st ore the
card sequence, or pr ess to automatically select the
first unused memory locati on.
Alpha or STO
appears
to prompt you for the next step.
Note: If you are unable to complete this step within 8
STO
seconds, the display goes blank. Press to
END
recall the disp lay and try again.
7. Enter the name to describe this calling card sequence
(
XYZ LONG DIST
, for example), then press . To
proceed without storing a name, simply press .The
STO
STO
phone displays the memory location number you
selected to confirm the entry.
Placing a Call Using a Stored Calling
Card Sequence
1. Recall the calling card sequence from memory, then
press to dial the call. (Or, if you stored the sequence
SND
in any memory from 02–09, simply hold down that number for one-touch dialing.)
Enter Number
This prompts you to enter the ar ea code and phone number you want to call.
2. Enter the area code and phone number you want to call,
or recall that number fr om me mo ry, then press . The
phone begins di aling the call.
Note: When you press the keys, the phone sounds different tones than the ones it normally makes.
3. When you hear the prompt, press to dial the calling
SND
card PIN (or other information you stored in the calling
card sequence).
Note: Repeat this step for each sequence you stored.
appears.
SND
63

STO
17-111 1.fm Page 64 We dnesday, July 21, 1999 2:23 PM
RESETTING THE PHONE
USING MASTER RESET
Master reset lets you enter the phone’s preset security code
000000
(
default settings (see “Menu Functions List” on Page 24), but
it does
Follow these steps to perform master reset.
) and reset all of the phone’s speci al functions to their
not
clear any information you st ored in memory.
FCN
OPER
1. Press .
2. Enter the 6-digit security code
3. To reset the phone, press . The phone displays
Std Setting
0
twice
.
1
(standard setting) and begins to
reset.
When the phone finishes resetting (when
disappears), you can use it as usual.
ting
Note
: Depending on your phone’s settings, the phone
Std Set-
might take se veral minutes to reset.
To exit without performing master reset, press .
END
64

STO
17-111 1.fm Page 65 We dnesday, July 21, 1999 2:23 PM
USING MASTER CLEAR
Master clear lets you enter the preset security code (
000000
to do the following:
• Reset all of the phone’s special functions to their default
settings (see “Menu Functions List” on Page24)
• Delete all informat ion stored in memory
• Clear the resettable call timer
Follow these steps to perform master clear.
Caution:
Performing master clear deletes all information
stored in memory.
FCN
OPER
0
1. Press
2. Enter the 6-digit security code
3. To clear the phone, press .
When the phone finishes resetting (when
.
twice
.
WXY
9
disap-
Busy
pears, for example ), you can use it as usual.
Note
: Depending on your phone’s settings and the
amount of information stored in memory,
Busy
appear, the phone might sound a continuous beep, and it
might take several minutes to finish clearing.
To exit without performing master clear , press .
END
)
might
65

17-111 1.fm Page 66 We dnesday, July 21, 1999 2:23 PM
TROUBLESHOOTING
If the phone’s power does not come on or stay on:
• Make sure the battery is proper ly installed and cha rged.
• Be sure that the contacts on the battery are clean. If they
are not, clean them wit h a soft cloth or pencil eraser.
• The battery charge might be too low for operation. Check
the display and listen for the low battery war ning tones.
If the power comes on, but the phone does not work:
• Make sure that the antenna is fully extended.
• Be sure you selected the correct cellular system type
(see “Setting the Cell ular System Type” on Page 56).
• Make sure that functions you might have previously
selected (but forgotten) are not causing the phone to
operate differently than you expect it to (see “Function
Status Quick-Re view” on Page 23).
• Check the display for error messages.
If you see an error message that is not cov ered in any section
in this Owner’s Manual, or if your phone does not seem to be
operating properly, contact your local RadioShack store for
assistance.
66

17-111 1.fm Page 67 We dnesday, July 21, 1999 2:23 PM
SAFETY INFORMATION
TRAFFIC SAFETY
• Do not use a handheld phone while driving a vehicle. If
using a handheld phone, park the vehicle before taking
or making a call.
• Always secure the phone in its holder; do not place the
phone on the passenger seat or where it can break loose
in a collision or sudden stop.
• Never install a phone alert device that operates your
vehicle’ s li ghts or horn. This is ill egal in most areas.
Remember, always put road safety first!
OPERATING ENVIRONMENT
• Remember to follow all special regulations and always
turn off your phone whenever you are required to do so,
or when it might cause inter ference or be dangerou s.
• Any radio transmitting equipment, including cellular
phones, might interfere with inadequately protected
medical devices. Consult a physician or the manufacturer of the medical device if you have any questions.
Other electronic equipment might also be subject to
interference.
• As with other mobile radio transmitting equipment, for
your safety, only use your phone in the normal operating
position (held to your ear with the antenna pointing over
your shoulder).
• Turn off the phone while getting gasoli ne (at a filling sta-
tion). Observe rest rictions on the use of radio equipment
in fuel depots (fuel storage and distribution areas),
chemical plants , or around blasting operations.
67

17-111 1.fm Page 68 We dnesday, July 21, 1999 2:23 PM
• Do not store or carry flammable liquids, gases, or explosive materials in the same compartment as a cellular
phone or any of its parts or accessories.
• Only qualified personnel should install or service the
phone in a vehicl e. Faulty installation or service mi ght be
dangerous and could invalidate the pho ne’s warranty.
• Electronic fuel injection systems, electronic anti-lock
braking systems, electronic cruise control systems, and
other electronic systems can malfunction due to the lack
of protection from radio signals. Check regularly that all
cellular phone equipment in your vehicle is mounted and
operating pro perly.
• Turn off your cellular phone when in an aircraft. The use
of cellular phones in an aircraft might be dangerous to
the operation of the aircraft, disrupt cellular networks,
and is illegal.
Failure to observe these instructions could lead to suspension or denial of cellular telephone services, legal action, or
both.
EMERGENCY CALLS
IMPORTANT!
using radio signals, cellular, and land-line networks, as well
as user-progr ammed functions. These factors make it impossible to guarantee connection in all condit ions. Therefore, you
should never rely solel y upon any cellular phone for essential
communications (such as medical emergencies).
Remember, to make or receive any calls, the phone must be
turned on and in a service area with adequate cel lular signal
strength.
68
This phone, like any cellular phone, operates

17-111 1.fm Page 69 We dnesday, July 21, 1999 2:23 PM
You might not be abl e to make emergency calls on all cellular
phone networks or when certain network services or phone
features are set. Check with your local ser vic e providers.
FCC REGULATIONS
A cellular phone might cause TV or radio interference, even
when it is operating properly. The FCC can require you to
stop using your cellular phone if you cannot eliminate the interference. If you need assistance, contact your local RadioShack store.
This device complies with Part 15 of the
tion is subject t o the condition that this device does not cause
harmful interference.
FCC Rules
. Opera-
69

17-111 1.fm Page 70 We dnesday, July 21, 1999 2:23 PM
CARE AND MAINTENANCE
Your RadioShack CT-502 Flip-Style Handheld Cellular Telephone with Silent Vibrating Alert is an example of superior
design and craftsmanship. The following suggestions will
help you care for your phone so you can enjoy it for years.
• Keep the phone and all of its parts and accessories out
of the reach of children.
• Keep the phone dry. Liquids might contain minerals that
corrode elect ronic circuits.
• Do not use or store the phone in dust y, dirty areas. Its
moving parts can be damaged.
• Do not store the phone in hot areas. Temperature
extremes can shorten the life of electronic devices, damage batteries , and war p or m elt plastic parts.
• Do not store the phone in cold areas. When the phone
warms up (to its normal operating temperature), moisture can form inside the phone, which could damage the
phone’s electronic circuits.
• Do not drop, knock, or sh ake the phone. Rough handl ing
can break internal circuit boar ds.
• Wipe the phone with a damp cloth occasionally to keep it
looking new. Do not use harsh chemicals, cleaning solvents, or strong detergents to clean your phone.
Modifying or tampering with the phone’s internal components
can cause a malfunct ion and invalidate your phone’s warranty and void your FCC authorization to operate it. If your
phone is not performing as it should, take it to your local RadioShack store for assistance.
70

17-111 1.fm Page 71 We dnesday, July 21, 1999 2:23 PM
SPECIFICATIONS
Dimensions: ...................................... 55/8 × 23/8 × 13/8 Inches
Weight (with Supplied Battery): ................................... 7.7 oz
(218 g)
Transmitting Power: ................................. 0.6W + 2dB – 4dB
Operating Voltage: ............................................. µ5.2–7.5 DC
Internal battery:......................................................... 6.0V DC
Input to AC charger: ................................................ 110V AC
Frequency Band: .....................................824–849 MHz (TX)
869–894 MHz (RX)
Specifications are typical; individual units might vary. Specifications are subject to change and improvement without notice.
PATENT INFORMATION
This phone is manufactured under one or more of the following U.S. patents.
4121218 4617520 D295975 4965537 D327061 5261119
4124879 D286778 4751737 4972355 5128834 5262710
4127824 4626309 D296187 4972432 D328302 5263052
4128740 4628529 4761621 4972455 5142551 5276707
4138681 4629829 4764737 4975808 5142696 5278994
4193036 4630304 D297734 4984290 5146620 D343173
4254382 4630305 D297735 D314173 5148471 5280637
4302845 4633141 4777564 D315330 5148473 D344087
4312074 4636593 Re32768 D315346 5148961 5287553
4327319 4636741 D299136 D315543 5150359 5287555
4329666 D288432 4797929 D315559 5150384 5287556
4369516 4648125 4798975 D315565 5152006 D344511
4369522 4649543 4800348 5004992 5157693 5301365
4378603 D288683 4802236 D315907 5163159 5321847
4390963 4654655 4809356 5008925 5164652 D348880
D269873 D289156 4811377 D316417 5166596 5349588
4389265 4662691 4811404 D316859 5175759 5359696
4400584 4667333 4827226 5017856 5175874 5361400
71

17-111 1.fm Page 72 We dnesday, July 21, 1999 2:23 PM
4400585 4668917 4827507 5018188 D332261 5363071
D270835 4670747 4829274 5020091 5182749 5365549
D271491 4672502 4837534 5020092 D332785 D352497
Re31470 4680787 D301476 5020093 5185566 5366826
4431977 4681476 4843621 5028083 5187809 5375143
4434461 4683585 4845772 5028859 5193223 5375258
4455534 4692726 D302015 5029044 5195106 5379324
4462098 4704588 4851966 5029233 5195108 D354055
D275951 D292578 4868576 5031028 5201069 D354062
4484153 4706036 4870686 5036532 5204977 5384825
4485486 D292920 D303656 5053924 5210793 D356084
4486624 4710724 4876552 5057762 5214675 5402447
D276809 4711361 4879533 D320780 5222104 5406146
4491972 4715063 D305427 5059885 5222251 5406562
D277667 4716319 4896124 5060294 D337332 D357224
4504834 4716391 4897873 D322783 5230007 D357457
D278708 4723305 D305717 D322955 5230093 5410741
4523155 D294257 4904549 5081674 5233633 D357680
4546329 4727306 4905288 5083304 5235492 D357681
4550426 4727583 4905301 D324024 5237257 5428836
4551696 4730195 D306293 D324388 5239127 D359734
4564821 4734635 D306441 5095503 5241545 D359735
D282169 4736277 D306594 D325028 5241548 D359959
4571595 4737976 4912602 D325583 5241650 5432017
4573017 4740794 4918732 5109536 5241693 D360632
4574243 4741018 4922178 D325915 5242767 5438684
4585957 4741034 4945570 5113436 D339582
4602218 4742562 4954796 5117450 5249302
D284759 D295627 4959851 5121047 5251331
D285439 4746242 4963812 5122480 D340710
4616314 D295973 4963843 5122722 5260988
72

17-111 1.fm Page 73 We dnesday, July 21, 1999 2:23 PM
DISPLAY MESSAGE GLOSSARY
Message Description See
NN’
o
Alpha or STO
Auto Ansr
Auto Lock
A1
A2
B1
B2
One Min Timr
Busy
Call
Change?
Clear?
Emergcy
Memory scrolling is active (where
NN is the memory number)
Shows a pause stored in memory 61
Prompts you to press the “alpha ”
keys or
Auto ma tic answe r 31
Automati c lock 46
Two-syst em ope ration; no n-w i re-
line system is active, using phone
number 1
Two-syst em ope ration; no n-w i reline system is active, using phone
number 2
Two-system operation; wireline system is active, using phone number
1
Two-system operation; wireline system is active, using phone number
2
Call-time re minder tone 26
Master clear in progress 65
Call now being, or was previously,
received
Memo ry prompt to ca ut ion before
overwriting previously stored information
Memo ry prompt to ca ut ion before
clearing a memor y entry
Emergency call in progress
(using )
STO
1
Page(s)
40
36
55
55
55
55
16, 17
36, 42
43
19, 33
73

g
g
17-111 1.fm Page 74 We dnesday, July 21, 1999 2:23 PM
Messa
e Description See
NoNames
No names are stor ed in memory 40
Stored
Emergcy Call
Full
Home
Indiv Timer
Keypad T one
Level (
1-6
LocCode
Lock
Locked
Low Bat
MultKey Ansr
Mute
Number Pref
on
PIN Active or
Emergency dialing display set ting
(appears with On or Off)
Memor y is full or the requeste d
memory block is unavailable
Home system-type selected 56
Automatic timer function 53
Keypad tone setting 30
Service restriction level 48
)
Appears before lock co de 45
Appears during manual lock proce-
?
dure
Phone is locked 45
Battery power is low 11
Multip le ke y answer 32
Microphone is turned off 18
Number display preference funct ion 33
Appears when display is clear (if
signal strength meter is off)
PIN dialing f unction is on or off 60
Inactiv
Redial
Ring Off
Ring On
Automat i c redi al in progres s 20
Ringer alert off (appears with
)
Off
Ringer alert on (appears with
)
On
Vib
Vib
Pa
e(s)
33
36, 42
45
26
29
29
74
g
g
17-111 1.fm Page 75 We dnesday, July 21, 1999 2:23 PM
Messa
e Description See
Ring Only
Scan A
Scan AB
Scan B
Scan BA
Call Rcv
Pref’d SIDs
Signal Mtr
Std Setting
Std AB
Std BA
Tu rbo Di al
Scrpad Tone
Vib Off
Vib On
Vibrate Only
Ring only alert type 29
Non-wireline A system-type
selected
A then B scan system-type selected 56
Wireli ne B scan syst em-type
selected
B then A scan system-type selected 56
Call screening function 34
(System ID) Spec ific cellular I D
requir e d (sy s t em -type selected )
Signal strength meter 14, 26
Appears during master reset proce-
dure
Standa r d no n- wi r el in e sy stem-type
selected
Standard wireline system-type
selected
One-touch dialing 32
Scratchpad tone 27
Vibration alert off (appears with
Ring Off
Vibration alert on (appears with
Ring On
Vibration only alert type 29
)
)
Pa
e(s)
56
56
56
56
56
56
29
29
75

17-111 1.fm Page 76 We dnesday, July 21, 1999 2:23 PM
Limited One-Year Warranty
This product is warranted by RadioShack against manufacturing defects in material and workmanship under normal use for one (1) year from the dat e of purchase from RadioShack company-owned stores and authorized RadioShack
franchisees and dealers. EXCEPT AS PROVIDED HEREIN, RadioShack
MAKES NO EXPRESS WARRANTIES AND ANY IMPLIED WARRANTIES, INCLUDING THOSE OF MERCHANTABILITY AND FITNESS FOR A PARTICULAR PURPOSE, ARE LIMITED IN DURATION TO THE DURATION OF THE
WRITTEN LIMITED WARRANTIES CONTAINED HEREIN. EXCEPT AS PROVIDED HEREIN, RadioShack SHALL HAVE NO LIABILITY OR RESPONSIBILITY TO CUSTOMER OR ANY OTHER PERSON OR ENTITY WITH RESPECT
TO ANY LIABILITY, LOSS OR DAMAGE CAUSED DIRECTLY OR INDIRECTLY
BY USE OR PERFORMANCE OF THE PRODUCT OR ARISING OUT OF ANY
BREACH OF THIS WARRANTY, INCLUDING, BUT NOT LIMITED TO, ANY
DAMAGES RESULTING FROM INCONVENIENCE, LOSS OF TIME, DATA,
PROPERTY, REVENUE, OR PROFIT OR ANY INDIRECT , SPECIAL, INCIDENTAL, OR CONSEQUENTIAL DAMAGES, EVEN IF RadioShack HAS BEEN ADVISED OF THE POSSIBILITY OF SUCH DAMAGES.
Some states do not allow the limitations on how long an implied warranty lasts or
the exclusion of incidental or consequential damages, so the above limitations or
exclusions may not apply to you.
In the event of a product defect during the warranty period, take the product and
the RadioShack sales receipt as proof of purchase date to any RadioShack
store. RadioShack will, at its option, unless otherwise provided by law: (a) correct
the defect by product repair without charge for parts and labor; (b) replace the
product with one of the same or similar design; o r (c) refund t he purchase pric e.
All replaced parts and products, and products on which a refund is made, become the property of RadioShack. New or reconditioned parts and products may
be used in the performance of warranty service. Repaired or replaced parts and
products are warranted for the remainder of the original warranty period. You will
be charged for repair or replacement of the product made after the expiration of
the warranty period.
This warranty does not c over: (a) damage or failure c aused by or attributable to
acts of God, abuse, accident, misuse, improper or abnormal usage, failure to follow instructions, improper installation or maintenance, alteration, lightning or
other incidence of excess voltage or current; (b) any repairs other than those
provided by a RadioShack Authorized Service Facility; (c) consumables such as
fuses or batteries; (d) cosmetic damage; (e) transportation, shipping or insurance
costs; or (f) costs of product removal, installation, set-up service adjustment or
reinstallation.
This warranty gives you specific legal rights, and you may also have other rights
which vary from state to state.
RadioShack Customer Relations, Dept. W, 100 Throckmorton St., Suite 600,
Fort Worth, TX 76102
We Service What We S ell
3/97
RadioShack
A Division of Tandy Corporation
Fort Worth, Texas 76102
68P09398A53-A
10/97 Printed in the USA
7/28/97 - RGC
 Loading...