

Page 1
Quick
Installation G
uide
MODEL QT19DVR8C
Package C
1. 1-19" TFT w/built-in 8 Channel MPEG4 DVR
2. 8 - CCD Outdoor Night Vision Cameras
3. 1-
Remote control
4. 1-
Power Cable
5. 8-
BNC Cables (60 foot)
6. 1-
USB cable
8. 1-
Installation CD for Remote Client Program
9. Hard drive (Optional)
10. 1-
set key for the hard drive bay
11. Manual
Tech Support:
Website: www.q-see.com and click on support.
Email: ts@dpsi-usa.com
Phone: Toll Free: 877-998-3440 or 714-998-3440 Monday-Friday 9-5 PST.
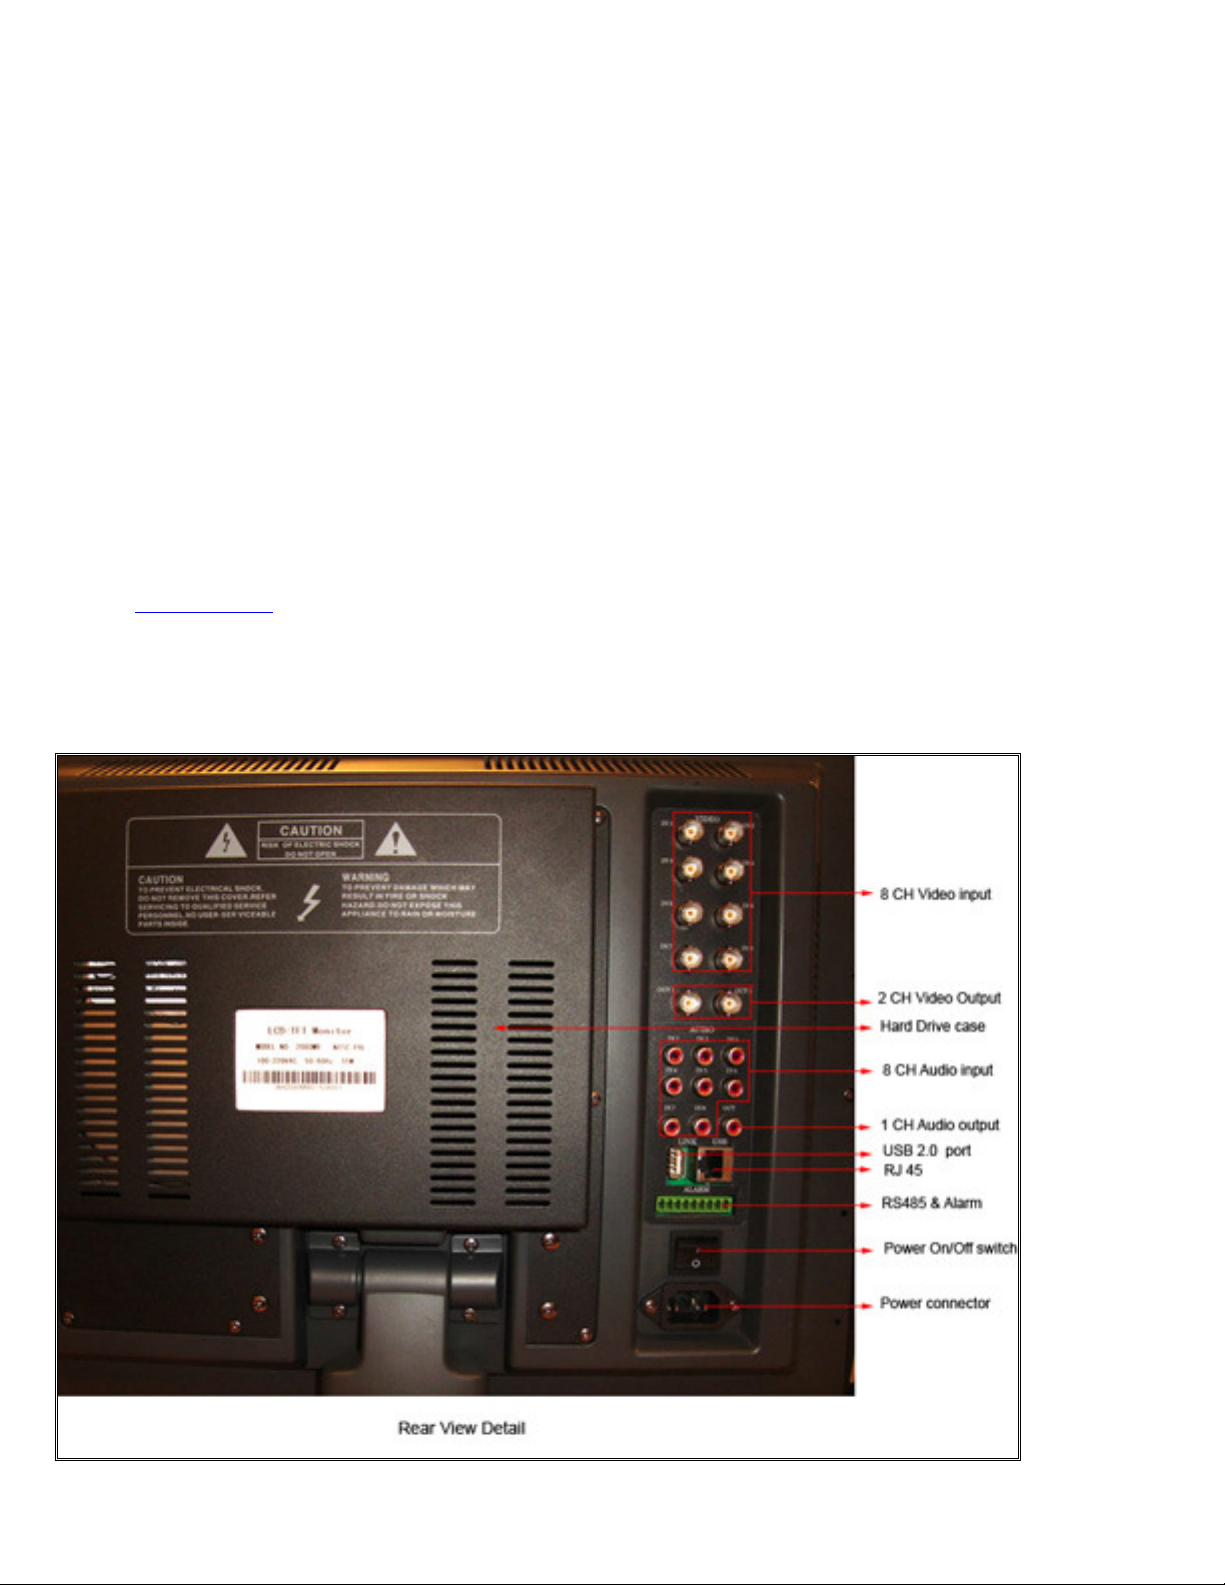
Ports on Back of the Monitor:
ontents:
8 CH DVR
Page 2

To Rec
ord With Y
our DV
R:
There are 3 modes for recording:
1. Manual recording: Push the RECORD button. It will record all the time until you stop it by pushing the RECORD button again.
2. Motion Detection Recording: This will record only when there is a Motion in front of the camera.
3. Time Schedule Recording: Use this option to record during specific times.
To Set Up Motion D
etection Recording:
Use the remote control and push MENU, the default password is 88888888 then follow the instructions below:
Go to DETECT and push MENU to enter Motion setup
Use the Down arrow to get to the second button which is the
RECORD button and push MENU to enter.
In the Motion Setup screen, we need to setup CH 1 through 8
or whatever channel we want to enable motion detection like
in the above picture.
Then go to Detect Area and select SET ALL and push MENU to
enter the area and you will see an all screen purple (right
picture)
Then you need to push 0 (number 0) on remote control to
exit the area. And use LEFT Arrow to exit all the way out of
the menus.
The system will start recording when there is motion and a Blue Round ball will come up where a camera is detecting
motion.
Page 3

This screen lists all the latest recorded files. To go to the
To Set Up Schedule Recording:
Use the remote control and push MENU, the default password is 88888888 then follow the instructions below:
Go to Schedule and push Menu to enter
In this Menu, click the second icon (Record)
Highlight the first line and push RIGHT arrow on remote
control, you will get the next screen……..
Select Monday and select the quality then select ENABLE at the
bottom. Push LEFT arrow to exit and repeat steps for the other
days.
Playback
To playback a recorded file: Push the SEARCH button on remote control to bring up the next screen:
previous files, use Left arrow. Use Up or Down arrows to select
the file and push MENU to play it. It plays one camera at a
time. To display a different camera, just push the camera
number on the remote control. To go back to live camera view;
push the PLAY button on remote control.
Page 4

Accessing the DVR through a Computer
You can access the DVR through the client software that comes with the DVR, or through an internet
browser. Instructions to access through a browser are included below, to access through the client program
please see client program instructions on the included CD. To access the DVR through a computer you need to
make sure the default gateway on the DVR is the same IP address as your router, and the first three sets of
numbers of the DVR IP address are the same as the first three sets of numbers of routers address. Example: if
you router’s default gateway is 192.168.1.1 then the default gateway setting in the DVR should be
192.168.001.001, and the first three sets of numbers on the DVR's IP address should be 192.168.001. The
subnet on the DVR also needs to be the same as the router, example: if the subnet on the router is
255.255.255.0 the subnet on the DVR needs to be 255.255.255.000. To get the default gateway and subnet of
the router go to a computer that is attached to the same router as the DVR, click on the start button, then click
on run, then enter type cmd into the space and click on OK. At the curser type ipconfig, the default gateway and
subnet will be displayed.
Network Setup Options Network Settings Window
To Access DVR Through an Internet Browser
Once you have setup the network settings on the DVR to match the settings of your router you need
to modify your browser controls. You need to allow Pop-ups. To do so go to the Internet Explorer tool bar
and select the "tools" option, then select the "Pop up Blocker" option and select "Turn Off
Pop-up Blocker.” You will also need to enable Active X controls. To do so go to the Internet Explorer tool
bar and select the "tools" option, then "Internet Options", then "Security", then click the "Custom Level"
button, and then select the option to enable Active X Controls and Plug Ins. You would then access the
DVR by opening a browser window and typing the IP address of the DVR into the browser window
(Example:http://192.168.1.168). You will get a login screen where you will need to enter user name and
password (admin and 88888888 by default). The first time you connect a webcam program will be
downloaded to your system and you may get a message that an ActiveX control on the page may be
unsafe but it is ok to click the Yes option to download the control and program. This will take you to the
Internet Explorer Webcam screen. You would click on the Camera Icon to display cameras. Please see
the included IE Explorer Manual on information how to use the program.
Page 5

Login Screen Internet Explorer Webcam Screen
Accessing the DVR From a Remote Computer
In addition to the above, before you can access the DVR from a remote computer you would need to
forward port 80 , 3357 and 3358 on the router that the DVR is attached to the IP address of the DVR.
How you would do this depends on the brand and model number of your router. You can go to
www.portforward.com to get instructions on how to forward ports on most popular routers. To access
your router's program you would open an internet browser window and type the default gateway of the
router into the address bar at the top of the window. Then follow the instructions for your router. To
connect to the DVR from a remote computer you would then open the client program or an internet
browser window, go to the settings tab and enter the internet IP of your router. To get the internet IP of
your router go to www.myipaddress.com from a computer that is attached to the same router as the
DVR. You would then access the DVR by opening a browser window and typing the IP address you get
from this website into the browser window (Example:http://72.125.52.121). You will get a login screen
where you will need to enter user name and password (admin and 88888888 by default). The first time
you connect a webcam program will be downloaded to your system and you may get a message that an
ActiveX control on the page may be unsafe but it is ok to click the Yes option to download the control and
program. This will take you to the Internet Explorer Webcam screen. You would click on the Camera Icon
to display cameras. Please see the included IE Explorer Manual on information how to use the program.
We strongly recommend getting a static IP address so that you do not have to be concerned about the
address you use to access the system changing and making it necessary for you to return to
www.myipaddress.com to determine what the new address is. Another alternative could be to use a DNS
service such as no-ip.com (www.no-ip.com) to change the contact dynamic IP address whenever it
changes. If you are going to access the DVR remotely from the client program instead of an internet
browser then follow the instructions in the client program after you forward the ports and get the
router’s IP address.
Page 6

 Loading...