

Page 1
4 CH DVR Quick Installation Guide
MODEL QT17DVR4C
Version: 6214C-P01.010
Package Contents:
1. 1-17" TFT w/built-in 4 Channel MPEG4 DVR
2. 4 - CCD Outdoor Night Vision Cameras
3. 1- Remote control
4. 1- Power Cable
5. 4- BNC Cables (60 foot)
6. 1- USB cable
7. 1- VGA Cable (PC Monitor)
8. 1- Installation CD for Remote Client Program
9. Hard drive (Optional)
10. 1- set key for the hard drive bay
11. Manual
Tech Support:
Website: www.q-see.com click on support.
Email : ts@dpsi-usa.com
Phone: Toll Free: 877-998-3440 or 714-998-3440 Monday-Friday 9-5 PST.
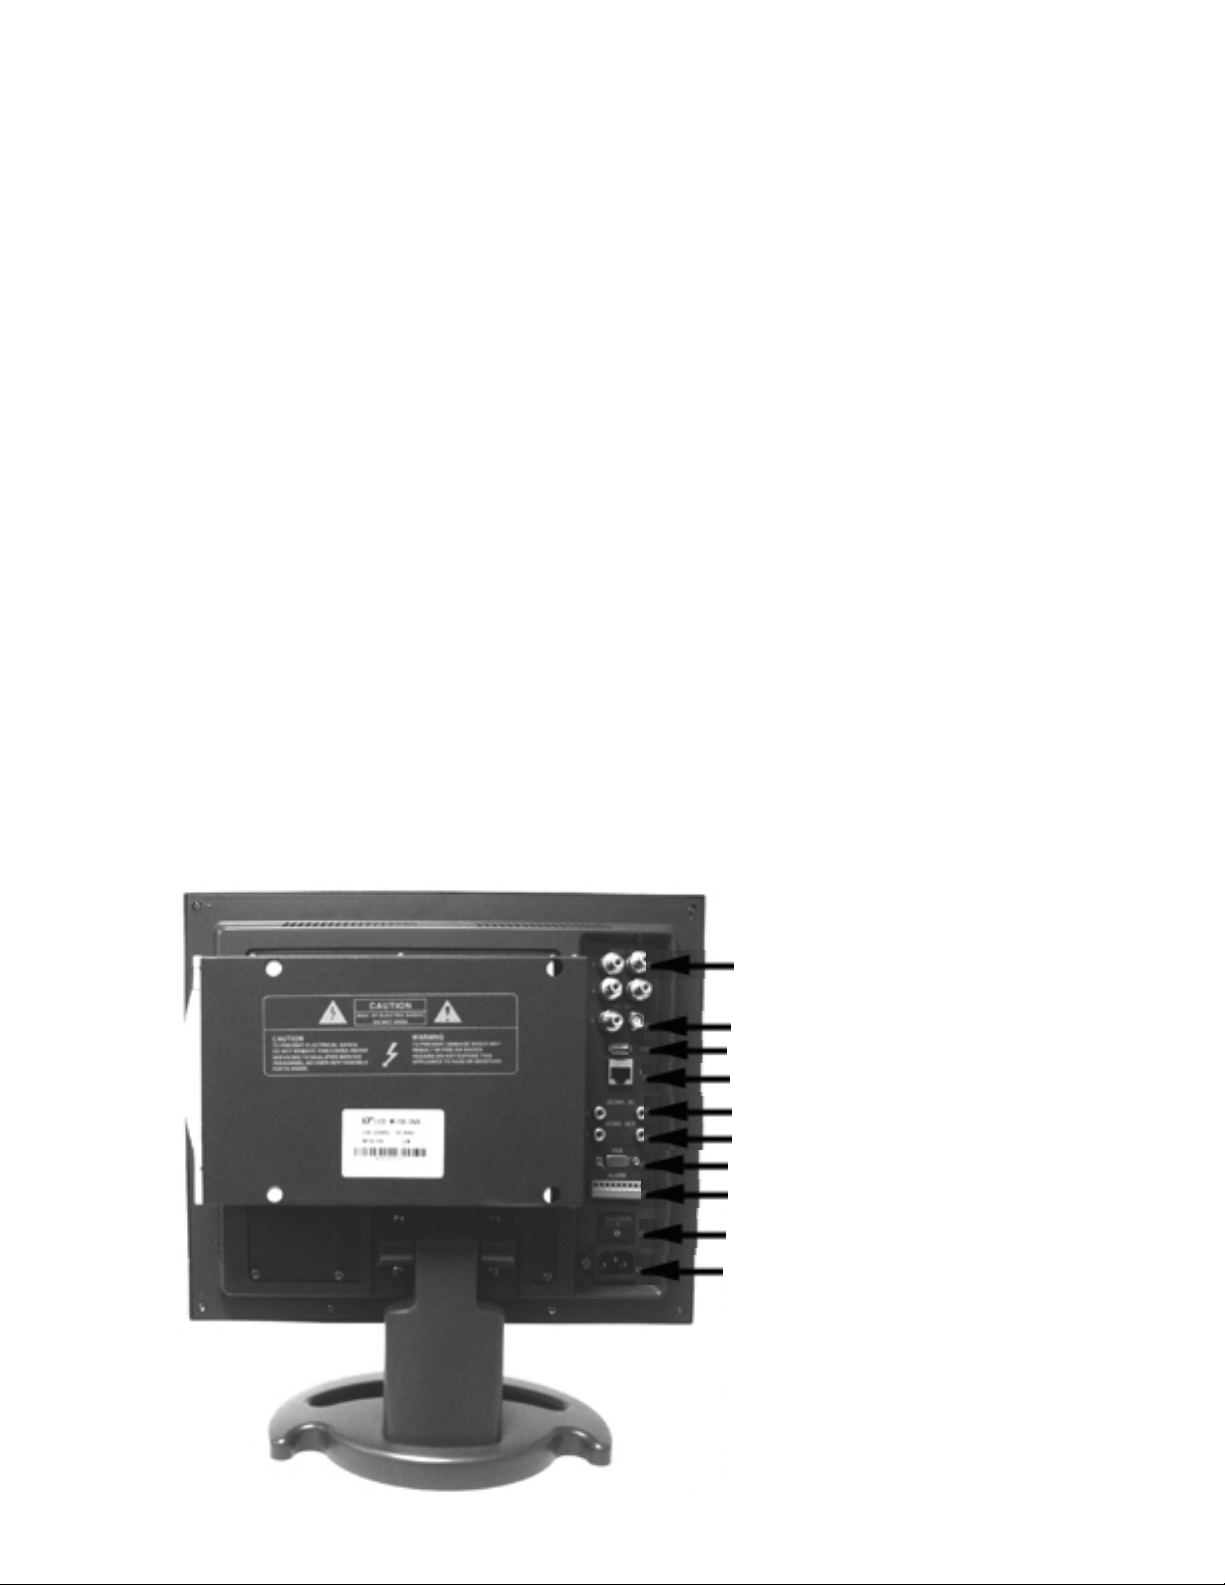
Ports on Back of the Monitor:
4 Video In for Cameras
2 Video Out for TV
1 USB port
1 Network input
2 Feeds Audio In (R/L Channels)
2 Feeds Audio Out (R/L Channels)
1 VGA output for computer monitor
1 Alarm connection (input/output)
On/Off Switch
Power Connection
Page 2
Installation:
1. Attach the camera to the BNC connector and the power connection.
Line up the slots on the yellow BNC connector (1)
with the tabs on the grey connector(2), then push in
and turn the head on the yellow connector clockwise
to lock it in place.
Push the red connector (1) with long chrome head
with the black tip into the other grey connector(2).
Page 2
Page 3
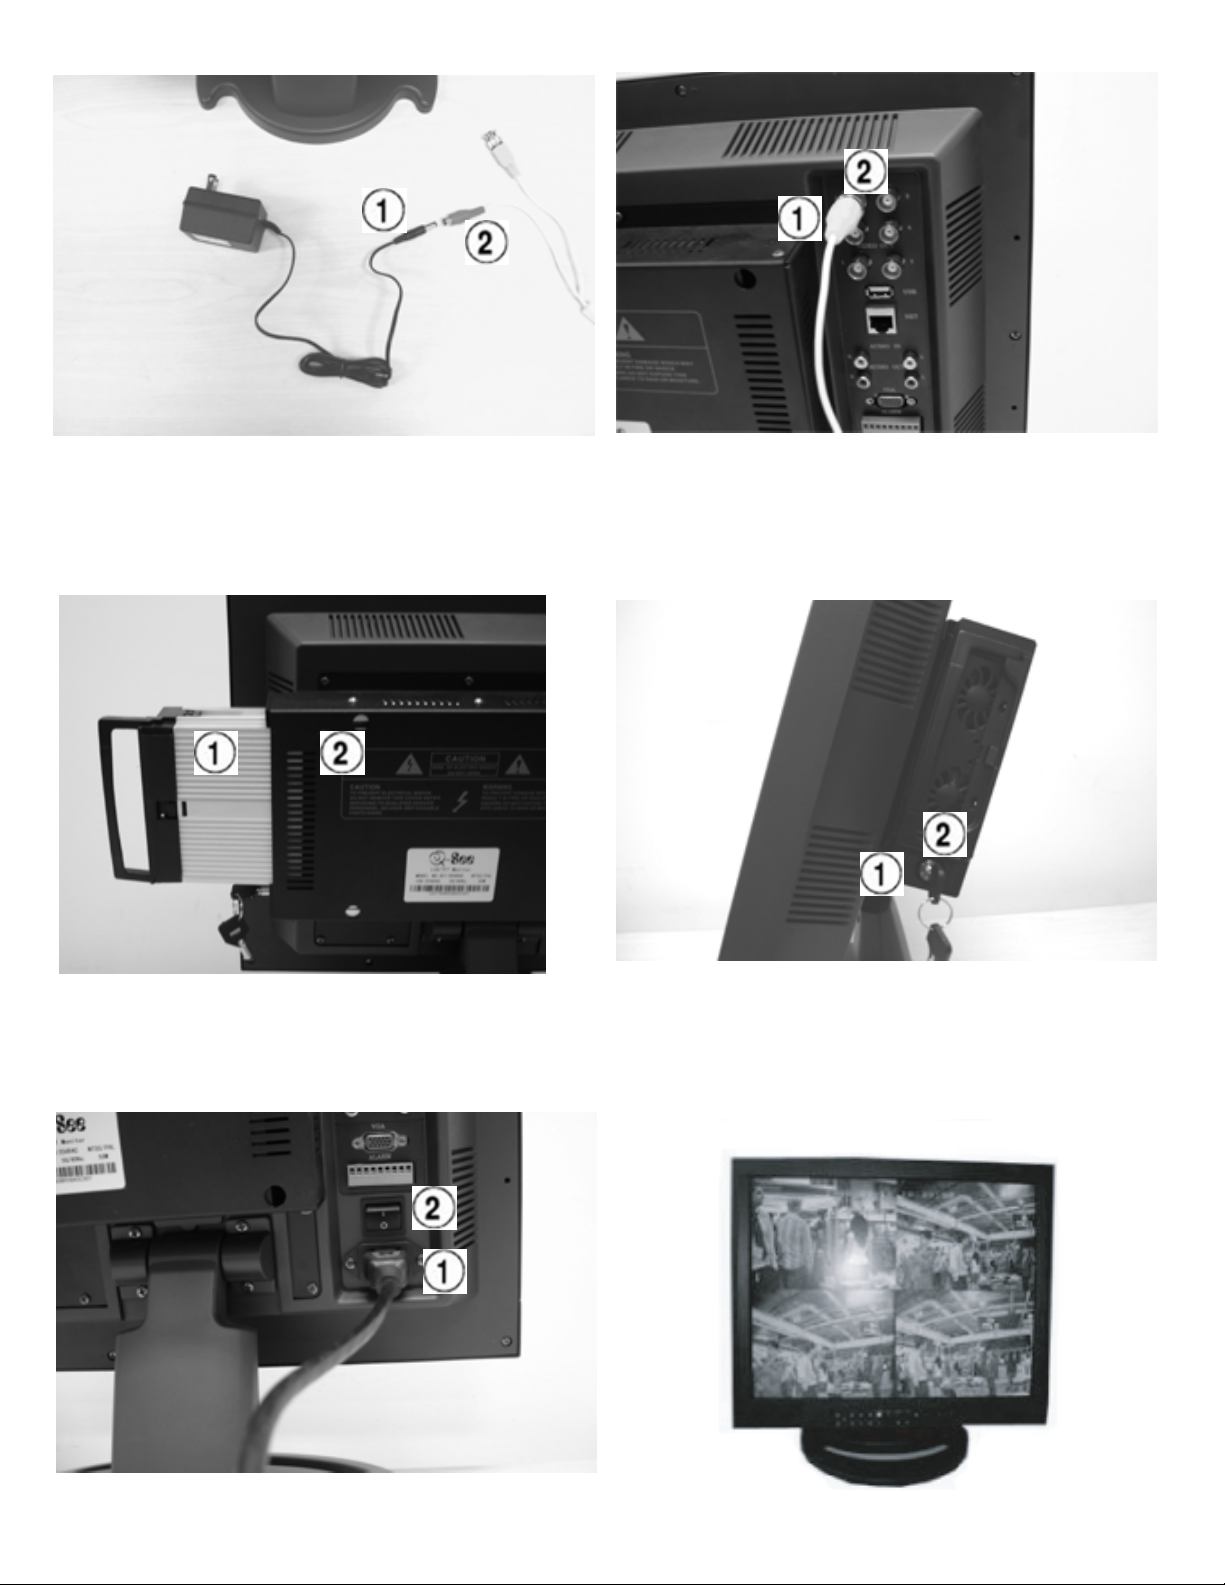
1. Connect the other end of the camera cable to the camera's power supply and to the Video IN on the DVR
Push the connector from the power supply (1) into the
red connector with the short chrome head (2). Plug
power supply into outlet near DVR.
2. Make sure the Hard Drive (1) is in the bay (2) and
locked.
You need to push the drive in hard to snap it into
the connector in the DVR
Line up the opennings on the yellow BNC connector (1)
with the stubs on the top & bottom of the connection
on the DVR (2), push in and then turn clockwise to
lock in place.
Turn the key from the horizontal position (1) to the
vertical position (2) to lock the hard drive bay.
3. Plug the DVR power cord into the bottom
connector on the back of the DVR (1)
Turn the DVR on by pushing in on the (-) end of the
power switch above the power connector (2)
4. After you attach all 4 cameras
you will see quad screen on the Monitor
Page 3
Page 4

To Record With Your DVR :
There are 3 modes for recording.
1. Manual recording: Push the RECORD button. It will record all the time until you stop it by pushing the RECORD
button again.
2. Motion Detection Recording: This will record only when there is a Motion in front of the camera.
3. Time Schedule Recording: Use this option to record during specific times.
To Set Up Motion Detection Recording:
Use the remote control and push SETUP, then follow the instructions below:
1. Select "Work Set" using the directional arrows
and hit ENTER.
3. Select the first heading under "Week" and use the
+/- keys to change setting to "Everyday", then use
number pad to change "First Period" to 00.00 - 23.59.
Then use the arrow keys and number keys to
change the "Type" to "Motion".
Repeat this process for the other channels
Page 4
2. Use the directional arrows to select "Setup"
and hit ENTER
4. Use directional arrows to select "Return" at the
bottom of the page and hit ENTER.
Use directional arrows to select "Setup" under
"Area Set", then hit ENTER button. If the screen is
all blue this means the entire area is covered by
motion detection. If not push ENTER button again
to make it blue. Do this for the other channels.
Page 5

To Set Up Time Schedule Recording:
Use the Remote Control and push SETUP and follow the instruction below:
1. Select "Work Set" using the directional arrows
and hit ENTER.
3. Select the first heading under "Week" and use the
+/- keys to change setting to "Everyday", then use
number pad to set the schedule time, as in the
example, from 18:00 (6:00PM) to 8:00 (8:00AM)
Make sure that under the "Type" setting you
select "Time" using the +/- keys.
Repeat this process for the other channels
2. Use the directional arrows to select "Setup"
and hit ENTER
Page 5
Page 6

To Playback the Recording:
1. Using the remote control, push CHECK
Select "All Record" and hit the ENTER button.
2. Select "All Record" and hit ENTER.
You can now use the number pad to enter
a specific date and time then use the arrow
keys to select "Start" and hit the ENTER button.
3. This will bring up a calender and the file you
created will be listed at the bottom.
Use the arrow keys to select it and hit the ENTER
button to playback.
To stop playback hit EXIT on the remote control.
NOTE: Recording will not be interrupted while you are in Playback mode.
Page 6
Page 7

To Back Up the files:
You can use the USB cable and connect it directly from DVR to USB port on the PC
and either copy it your PC hard drive or play it back on your PC
1. Push SETUP on the romote control
Use the directional arrows to select
"Basic Set".
The PC will find the new hardware and will put a new drive letter in "My Computer".
Open the new drive letter by clicking on the icon to see the files.
You can play the files back using the client program that comes with this DVR
through the record info option and local playback.
2. Use the directional arrows to select
"Setup" under "USB Settings".
Hit ENTER on the remote.
Page 7
3. Use the directional
arrows to select "Open"
and hit ENTER.
Page 8

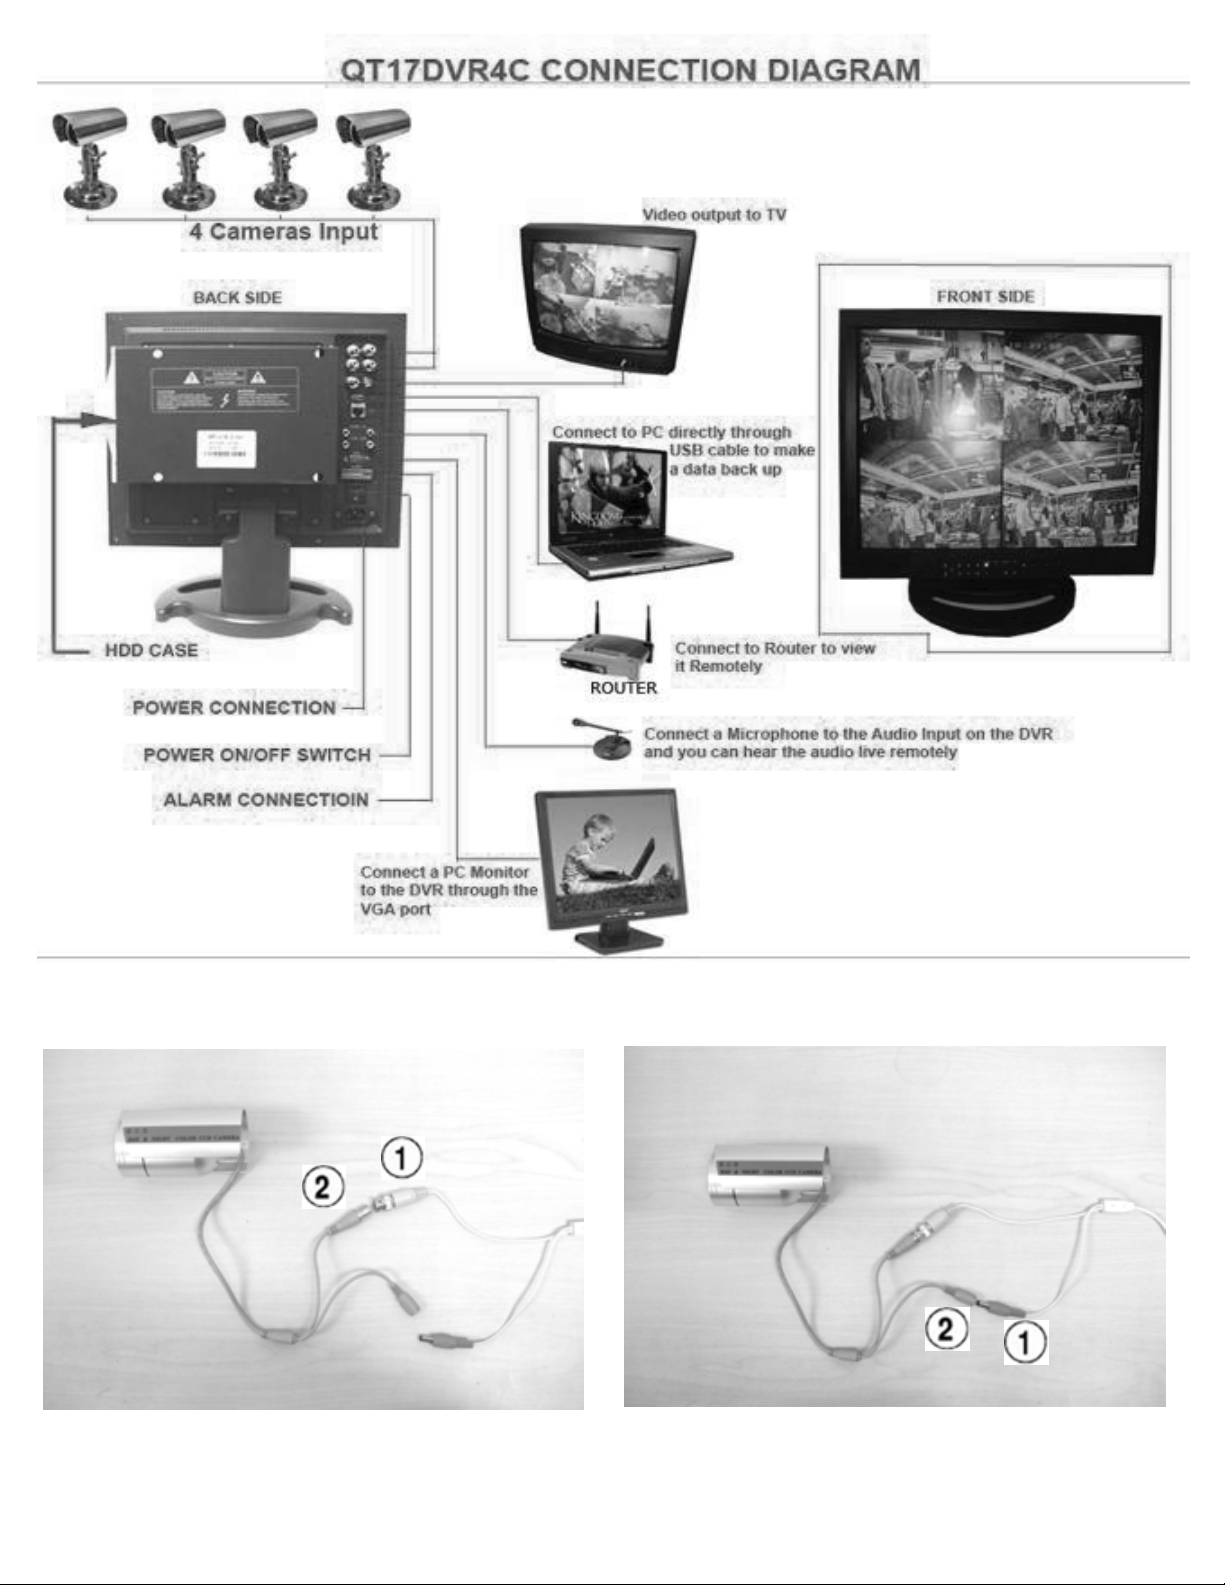
To Monitor the Camera on a Remote Computer:
Here is the connection diagram:
To monitor your camera on a remote computer you need to forward your IP port to the remote computer.
There are instructions on how to do this on the website http://www.portforward.com based on the brand
and model of router you have.
Here is a sample of the port forwarding screen for a Linksys router:
Page 8
Page 9

The QT17DVR4C comes with Remote Client software to allow you to monitor the system,
record, and playback through a remote PC through port forwarding.
To Install the DVR6214 Remote Client Program:
1. Insert the Remote Client Program CD into the CD/DVD-ROM drive on the computer
2. Double click on the QT17DVR4C folder
3. Double click on the Remote Client Program icon
4. Click on "Next"
5. Click "Next" to accept the default folder location
6. Click "Next" to install the program
7. After Program installs Click on "Finish"
8. Click on the Remote Client Manual icon to learn how to use the program.
Open the program by clicking on the Dvr6214 client shortcut icon on the computer's desktop.
The default user ID is admin, the default passwork is 88888888
Here is the program's openning screen:
Page 9
Page 10

You can also connect to the DVR using the Internet Explorer web browser by typing your WAN IP & the Web port
from the Network Set ( EX: http://75.4.207.211:8100/) on the browser's address bar. You need to allow Pop-ups.
To do so go to the Internet Explorer tool bar and select the "tools" option, then select the "Pop up Blocker"
option and select "Turn Off Pop-up Blocker".
You will also need to enable Active X controls. To do so go to the Internet Explorer tool bar and select the "tools"
option, then "Internet Options", then "Security", then click the "Custom Level" button, and then select the option
to enable Active X Controls and Plug Ins.
If you do not do this you will not get the following screen:
Select "Administrator", the default password is 88888888, click on "Submit".
This will bring up the following screen, you need to click on the "Video" option to display all Video.
Page 10
 Loading...