

Page 1
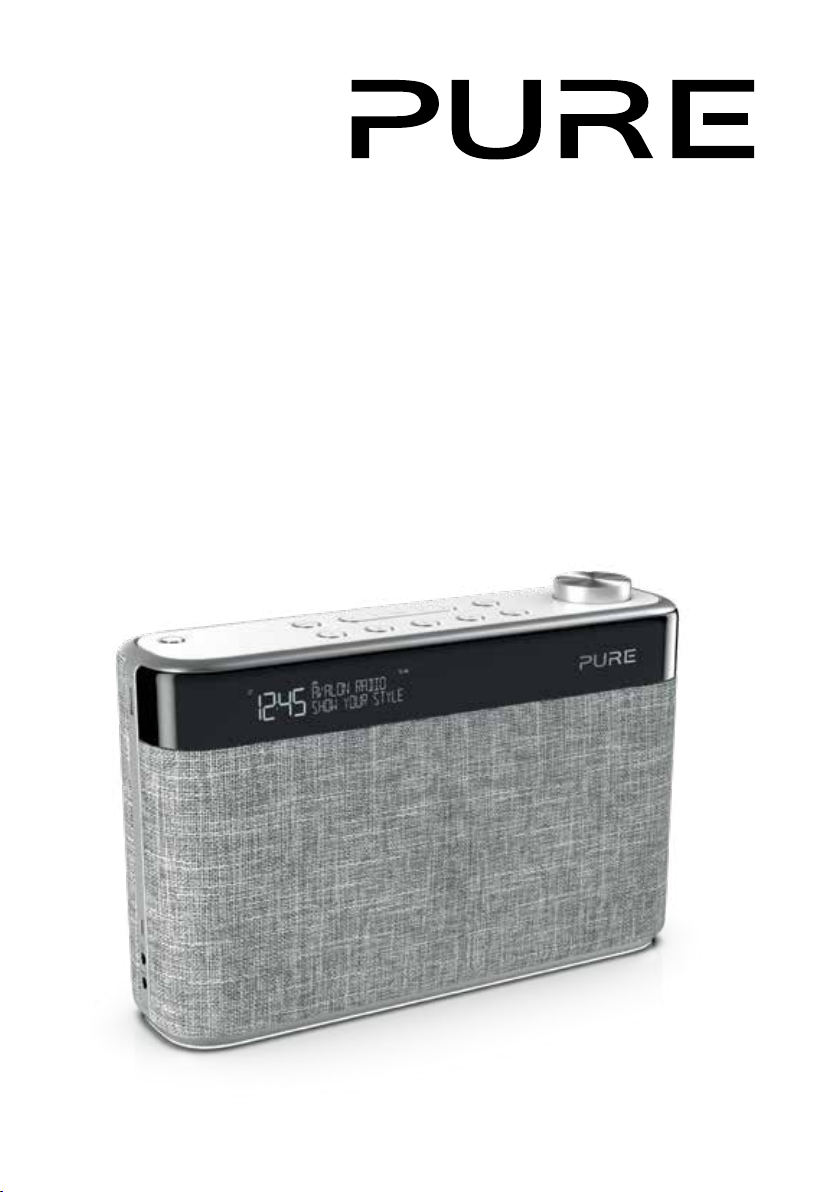
Avalon N5
Page 2

Page 3
Avalon N5
Thank you for choosing the Avalon N5. This user manual explains how
to use the various features of your Avalon N5. If you need more help,
you can view our help topics at support.pure.com.
ES
EN
DE
FR
IT
NO
DA
NL
1
Page 4

2
Page 5

Contents
EN
Safety 4
Getting started 5
Your Avalon N5 5
Setting up your Avalon N5 6
Switching your Avalon N5 on and off 7
Changing the volume 7
Digital radio 8
Listening to digital radio 8
Changing the digital radio station 8
Automatically tuning to stations 8
FM radio 9
Listening to FM radio 9
Changing the FM radio station 9
Choosing stereo or mono reception 9
Radio station presets 10
About presets 10
Storing a radio station as a preset 10
Listening to a preset 10
Bluetooth and auxiliary devices 11
Connecting a Bluetooth device 11
Connecting a device with an aux cable 11
Changing the language 16
Resetting to factory settings 16
Updating the software 16
Using a ChargePAK 17
About ChargePAKs 17
Inserting a ChargePAK 17
Troubleshooting 18
Specifications 19
Alarms 12
Setting an alarm 12
Cancelling an existing alarm 12
Snoozing or silencing an alarm 12
Timers 13
Setting the kitchen timer 13
Silencing the kitchen timer 13
Setting the sleep timer 13
Settings 14
Personalising the sound 14
Display settings 14
Clock settings 15
3
Page 6
Safety
Safety information
1. Familiarise yourself with all of the safety information and instructions before using the radio. When passing this radio on to
others, please include all documents.
2. The apparatus shall not be exposed to dripping or splashing and that no objects filled with liquids, such as vases, shall be
placed on the apparatus.
If liquid or water is spilled on to the radio, switch it off at the mains immediately, disconnect the mains plug and contact
your dealer.
Never touch the plug or the radio itself with wet hands. Never pull the power cable when disconnecting the power adaptor
from the power supply.
3. The batteries (battery pack or batteries installed) shall not be exposed to excessive heat such as sunshine, fire or the like
4. Using the radio in rooms or climates with high humidity and temperatures may cause condensation to form inside the radio,
which can damage the radio. Use apparatus in moderate climates only.
5. Avoid extreme degrees of temperature,either hot or cold. Place the device well away from heat sources such as radiators or
gas/electric fires. No naked flame sources, such as lighted candles, should be placed on the apparatus
6. The mains power adapter is used as the disconnect device, the disconnect device shall remain readily operable.
Fit the mains adaptor to an easily accessible socket located near the radio and only use the mains power adaptor to
connect to this product.
7. Use only the mains power adaptor listed in the user instructions (supplied by Pure with model number SW1202400-IM).
8. Ensure that the available supply voltage corresponds with the required operational voltage of the radio before use.
9. Disconnect your radio from the power supply if you will not use your radio for a long period of time (e.g. if you are going on
holiday).
10. Always unplug your radio from the mains socket before cleaning. When cleaning the radio, do not use any type of abrasive
pad or abrasive cleaning solutions as these may damage the radio’s surface.
11. To reduce the risk of electric shock, do not remove any screws as there are no user-serviceable parts inside. Refer
servicing to qualified personnel.
ChargePAK F1 safety instructions
1. Read the instructions for ChargePAK use in this document.
2. Only use your ChargePAK with original Pure products. Use only the origina l Pure ChargePAK F1. Caution: Danger of
explosion if battery is incorrectly replaced or another type used.
3. Store ChargePAK in a cool, dry place at normal room temperature. Remove from devices that will be stored unused for
extended periods.
4. Do not puncture, modify, drop, throw, or cause other unnecessar y shocks to your ChargePAK. May present a risk of fire,
explosion, or chemical burn if mistreated.
5. Do not dispose of ChargePAK in a fire or incinerator, or leave in hot places such as a motor car under direct sunlight. Do
not store near oven, stove, or other heat source.
6. Do not connect ChargePAK directly to an electrical source, such as a building outlet or automobile power-point. Do not
place into a microwave oven, or any other high-pressure container.
7. Do not immerse ChargePAK in water or otherwise expose it to liquids.
8. Do not short circuit ChargePAK.
9. Do not use or charge a ChargePAK that appears to be leaking, discoloured, rusty, deformed; emitting an odour; or is
otherwise abnormal.
10. Do not touch a leaking ChargePAK directly; wear protective material to remove and dispose of it properly immediately.
11. Do not store where children may have access.
12. Dispose of ChargePAK as per normal rechargeable batteries according to the local laws and regulations of your region.
Symbols on the product and in the user manual
Potentially serious risk to your personal safety. To avoid possible injury or death, obey all safety notices with this symbol.
Caution. Read the user manual before use.
12V DC power supply input, 2.4 amps
DC connector polarity, the centre of the connector terminal is positive
4
Page 7
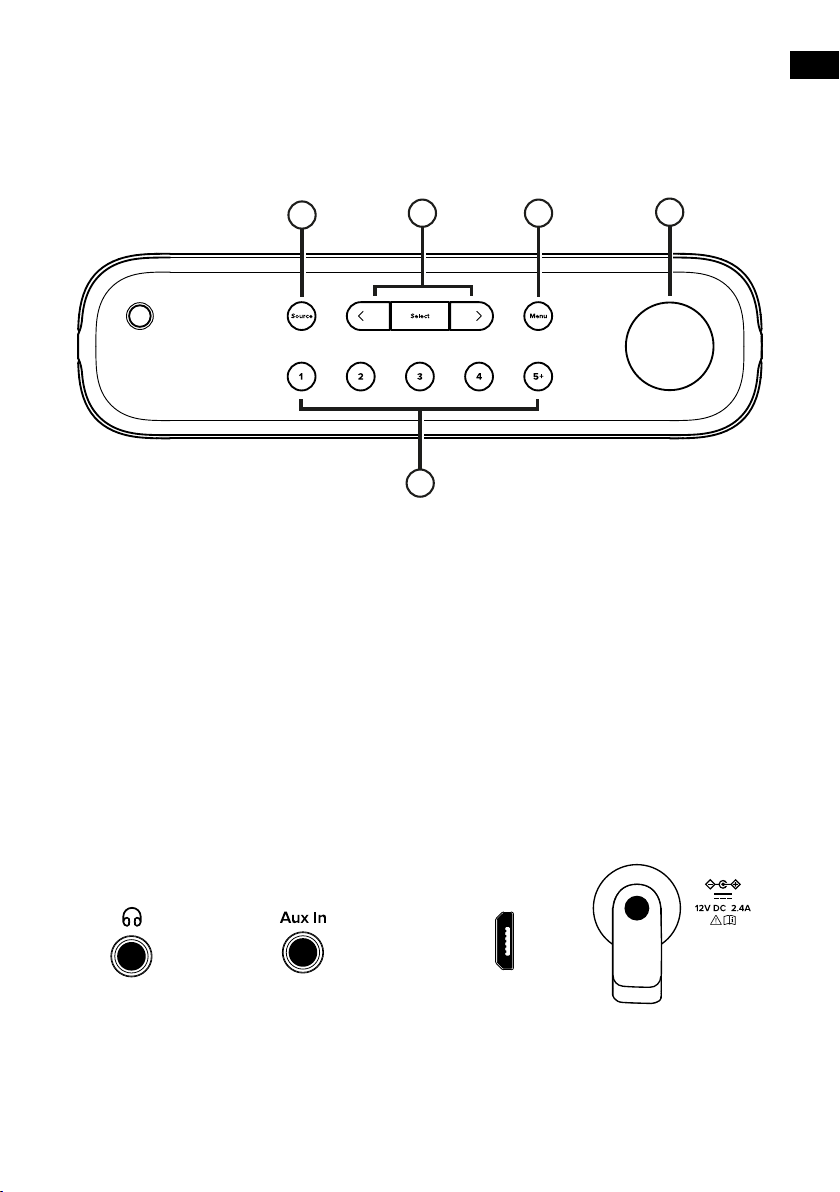
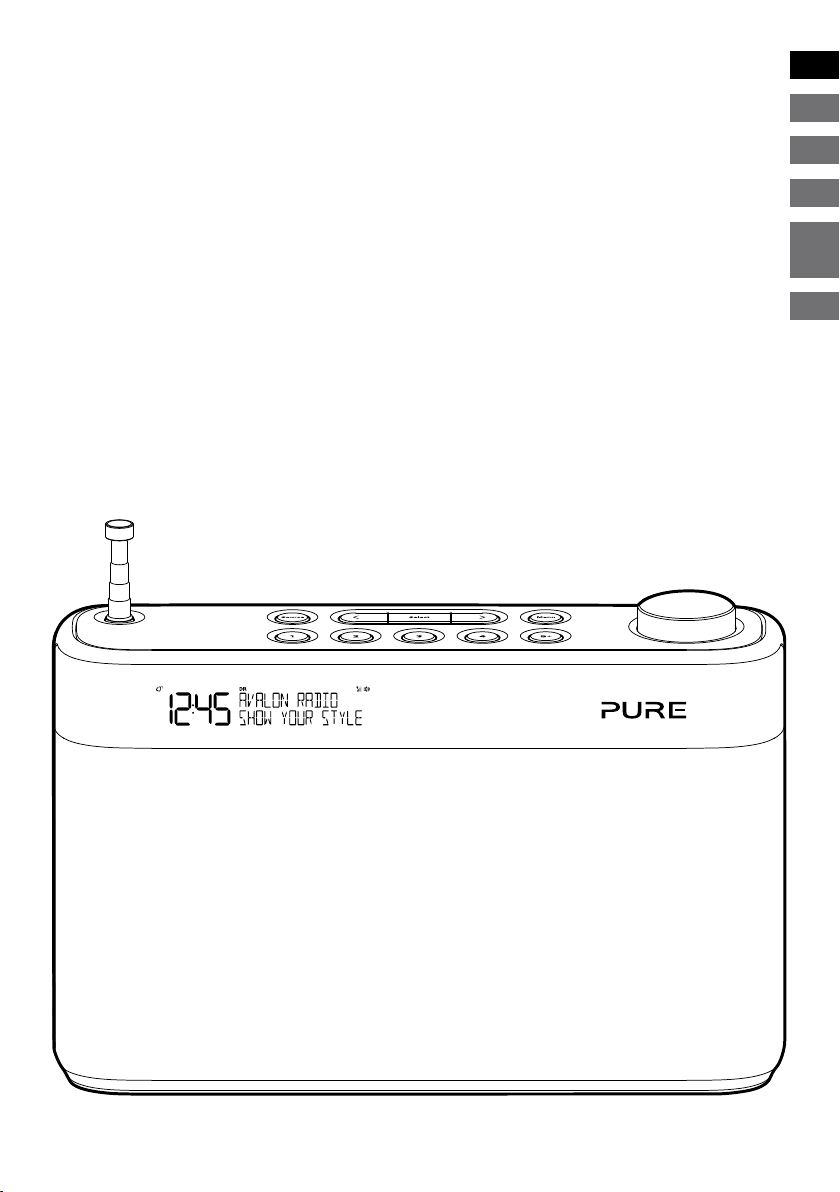
Getting started
Your Avalon N5
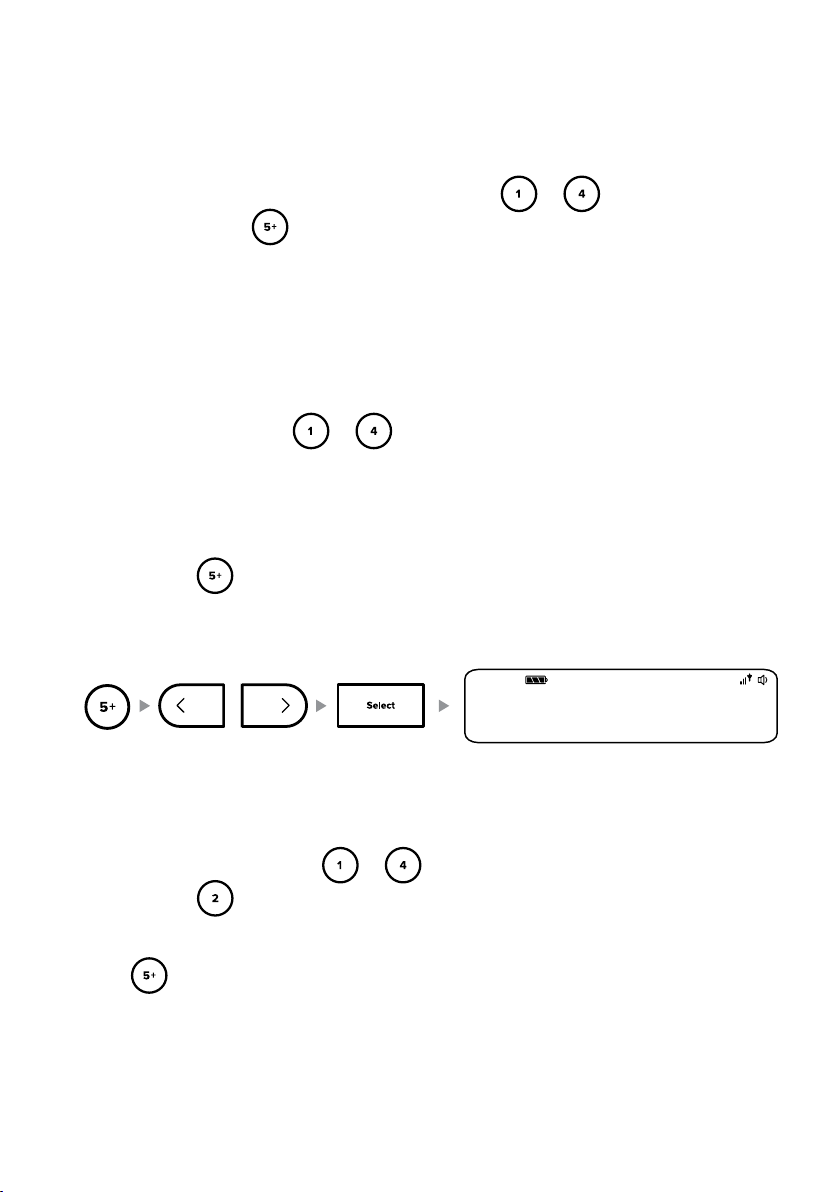
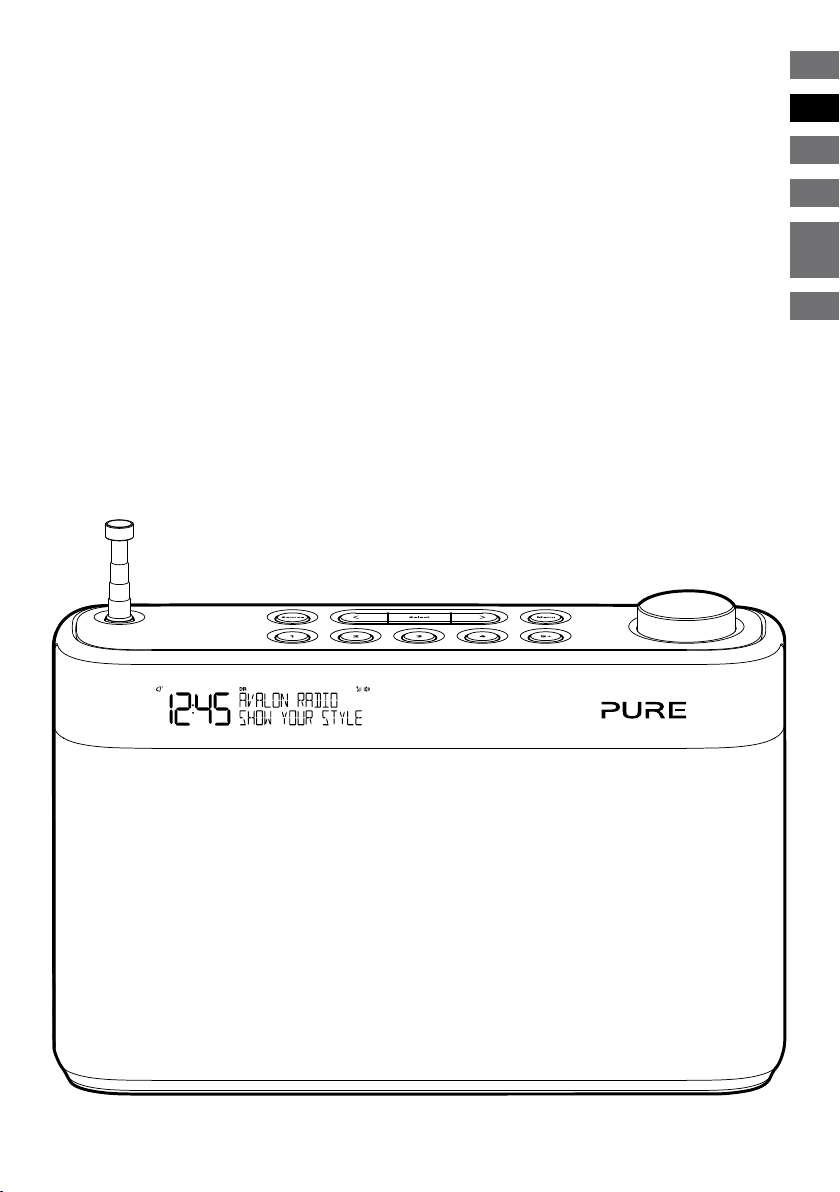
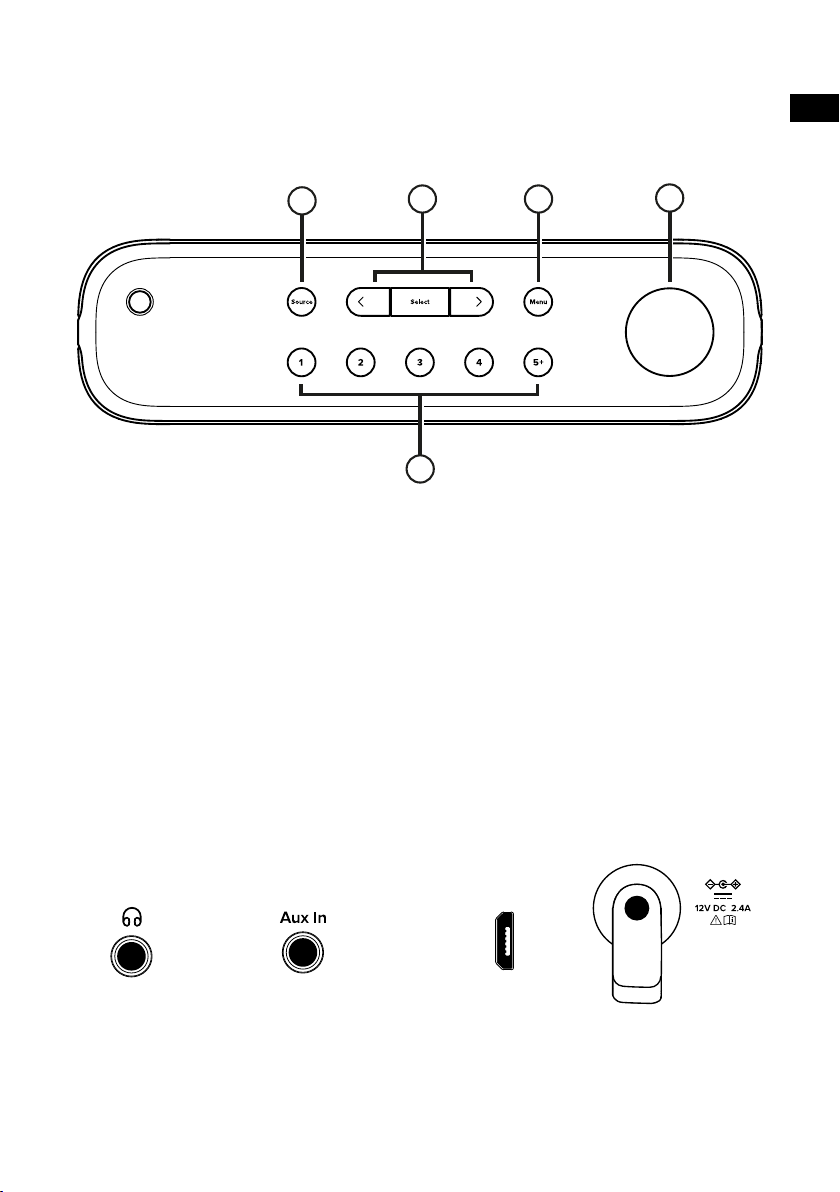
Top panel controls
EN
1
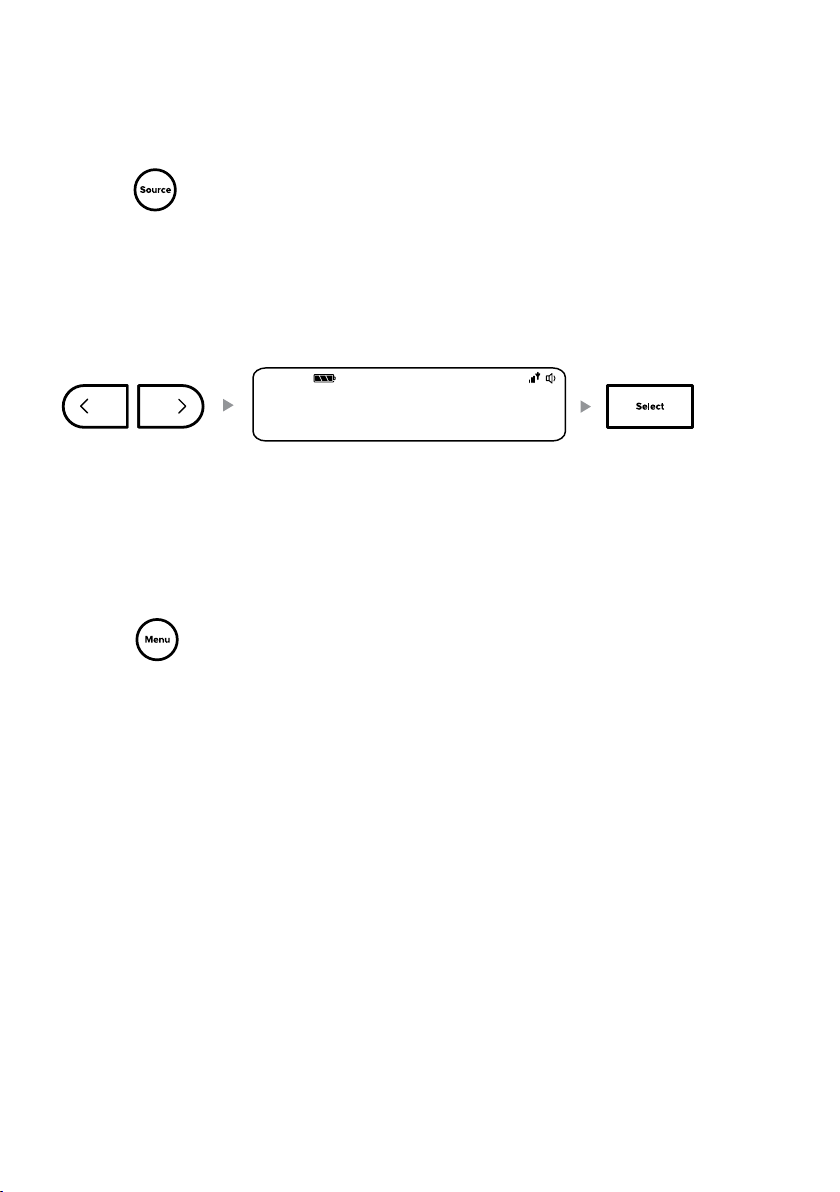
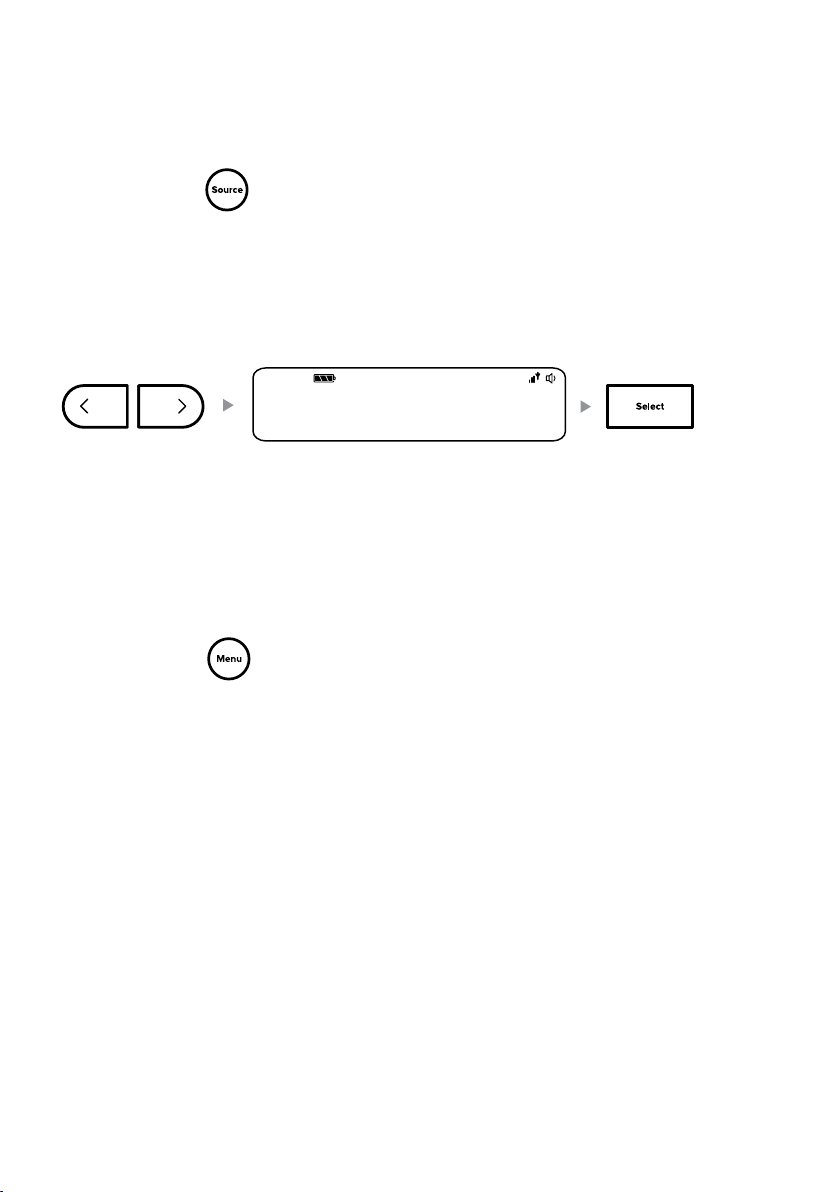
1 Source Press to change between digital radio, FM radio, Bluetooth, and
auxiliary input
2 < Select > Press < or > to scroll and press Select to change radio stations (see page
8/9) or choose options in a menu.
Note: < Select > buttons can perform the following in Bluetooth mode:
Track skip forward/backward, as well as play/pause functions when
streaming in Bluetooth.
3 Menu Press to change settings and options
4 Power/Volume Push to switch your Avalon N5 on/off. Turn to adjust volume.
5 Presets 1-5+ Press to store and access your favourite radio stations (see page 10)
2
5
3
4
Side connections Base connection
3.5mm output for
stereo headphones
Analogue stereo
input for auxiliary
cables
Micro USB
connector for
software updates
Input for supplied
mains adapter only
5
Page 8
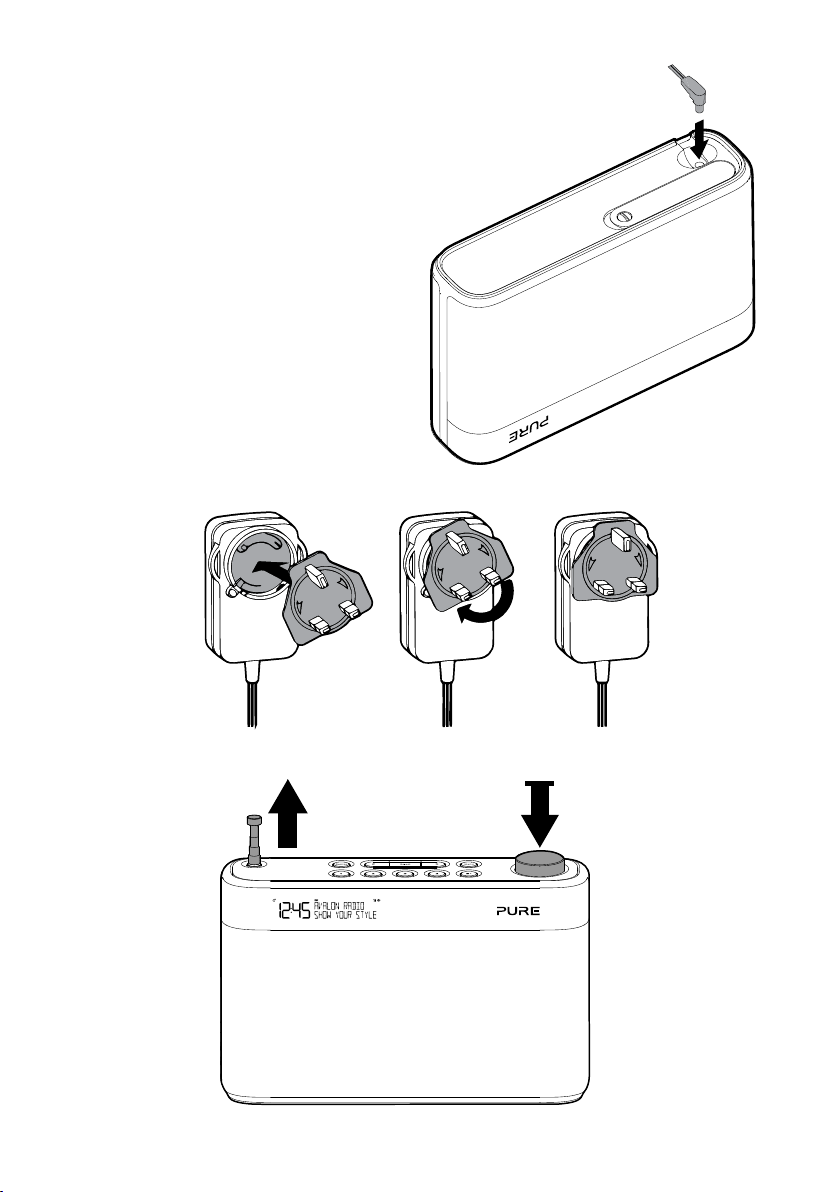
Setting up your Avalon N5
To set up your Avalon N5:
1. Connect the supplied mains adapter to the
input on the base of your Avalon N5.
2. Attach the appropriate power pins for your
region and plug the mains adapter into your
mains supply.
3. Push down to pop up the aerial and fully
extend it.
6
Page 9
Switching your Avalon N5 on and off
If you have a ChargePAK F1 rechargeable battery (available seperately), insert it before you switch your
Avalon N5 on. Read more about using a ChargePAK on page 17.
To switch your Avalon N5 on:
• Push down and release the Power/Volume dial until it pops up.
Note: When you switch your Avalon N5 on for the first time, it starts tuning to digital radio stations.
After the autotune is complete, you can start listening to digital radio.
To switch your Avalon N5 off or put it in standby:
Push down and release the Power/Volume dial until it latches down.
• If your Avalon N5 is connected to a power socket, your Avalon N5 enters standby. In standby, your
Avalon N5 uses a low amount of power and displays the time and date on the screen.
• If your Avalon N5 is being powered by a ChargePAK, your Avalon N5 switches off.
Note: Any alarms set will not sound if your Avalon N5 is being powered by a ChargePAK and you switch
your unit off.
Changing the volume
To change the volume:
• To increase the volume, turn the Power/Volume dial clockwise.
• To decrease the volume, turn the Power/Volume dial anticlockwise.
EN
7
Page 10
Digital radio
1
3
2
4
3
4
3
243
4
Listening to digital radio
To listen to digital radio:
• Press
until ‘DIGITAL RADIO’ is displayed.
Changing the digital radio station
To change the digital radio station:
1. Press the < or > buttons to browse through the available radio stations.
2. Press the Select button to change radio station.
DR
PRESET 5
10:00
Tip: A ‘?’ next to a radio station name means the station is inactive or unavailable.
<BBC RADIO 1 >
EMPTY
DR FM AUX BTDR FM AUX BTDR FM AUX BTDR FM AUX BTDR FM AUX BTDR FM AUX BTDR FM AUX BTDR FM AUX BTDR FM AUX BTDR FM AUX BTDR FM AUX BTDR FM AUX BTDR FM AUX BTDR FM AUX BTDR FM AUX BTDR FM AUX BTDR FM AUX BTDR FM AUX BTDR FM AUX BTDR FM AUX BTDR FM AUX BTDR FM AUX BTDR FM AUX BTDR FM AUX BTDR FM AUX BTDR FM AUX BTDR FM AUX BTDR FM AUX BTDR FM AUX BTDR FM AUX BTDR FM AUX BTDR FM AUX BTDR FM AUX BTDR FM AUX BTDR FM AUX BTDR FM AUX BTDR FM AUX BTDR FM AUX BTDR FM AUX BTDR FM AUX BTDR FM AUX BTDR FM AUX BTDR FM AUX BT
STATION LIST
Automatically tuning to digital radio stations
When you switch your Avalon N5 on for the first time, it automatically scans for digital radio stations. If you
move your Avalon N5 to a new location, perform an autotune to update the list of radio stations.
To automatically tune to digital radio stations:
1. Press
2. Press the < or > buttons to scroll and press the Select button to choose ‘AUTOTUNE’.
Your Avalon N5 starts scanning for digital radio stations.
.
8
Page 11
FM radio
1
3
2
4
3
4
3
243
4
Listening to FM radio
To listen to FM radio:
EN
• Press
until ‘FM’ is displayed.
Changing the FM radio station
To change the FM radio station:
• To scan to the previous or next radio station, press and hold the < or > buttons to seek to the next
or previous FM radio station that has a strong signal.
• To manually tune to a radio station, press the < or > buttons.
The frequency steps up or down by 0.05 MHz.
Choosing stereo or mono reception for FM radio
You can choose between ‘STEREO’ or ‘MONO’ reception when listening to FM radio. You may want to
choose stereo if listening using headphones.
To choose stereo or mono reception:
1. Press
2. Press the < or > buttons to scroll and press the Select button to choose ‘FM STEREO’.
3. Press the < or > buttons to scroll and press the Select button to choose ‘STEREO’ or ‘MONO’.
9
Page 12
Radio station presets
1
3
2
4
3
4
3
4
1
3
2
4
3
4
3
4
1
3
2
4
3
4
3
2
4
3
4
3
243
4
3
4
About presets
You can store your favourite radio stations as presets. You can use presets to quickly tune to your stored
radio stations whenever you want.
On the top of your Avalon N5, there are five preset buttons. Use
favourite radio stations. Use
You can store up to 10 digital radio stations and up to 10 FM radio stations as presets.
to open a list of all your presets.
to
for quick access to your
Storing a radio station as a preset
To store a radio station to a preset from 1 to 4:
1. Tune to the radio station you want to store.
2. Choose a preset button from
message is displayed.
Tip: If there is already a radio station stored to the preset you’ve selected, the new station replaces it.
To store a radio station to the preset list:
1. Tune to the radio station you want to store.
2. Press and hold
3. Press the < or > buttons to scroll and press the Select button to choose a preset number.
A‘PRESET STORED’ message is displayed.
Tip: If there is already a radio station stored to the preset you’ve selected, the new station replaces it.
until the preset list is displayed.
to
then press and hold it until a ‘PRESET STORED’
DR
10:00
PRESET 5
EMPTY
DR FM AUX BTDR FM AUX BTDR FM AUX BTDR FM AUX BTDR FM AUX BTDR FM AUX BTDR FM AUX BTDR FM AUX BTDR FM AUX BTDR FM AUX BTDR FM AUX BTDR FM AUX BTDR FM AUX BTDR FM AUX BTDR FM AUX BTDR FM AUX BTDR FM AUX BTDR FM AUX BTDR FM AUX BTDR FM AUX BTDR FM AUX BTDR FM AUX BTDR FM AUX BTDR FM AUX BTDR FM AUX BTDR FM AUX BTDR FM AUX BTDR FM AUX BTDR FM AUX BTDR FM AUX BTDR FM AUX BTDR FM AUX BTDR FM AUX BTDR FM AUX BTDR FM AUX BTDR FM AUX BTDR FM AUX BTDR FM AUX BTDR FM AUX BTDR FM AUX BTDR FM AUX BTDR FM AUX BTDR FM AUX BT
PRESET 7
STORED
Listening to a preset
To listen to a preset from 1 to 4:
• Quick press a preset button from
preset 2, press
To listen to any preset:
1. Press
2. Press the < or > buttons to scroll and press the Select button to choose a preset.
to open the preset list.
.
to
10
. For example, to listen to the radio station stored as
Page 13
Bluetooth and auxiliary devices
1
3
2
4
1
3
2
4
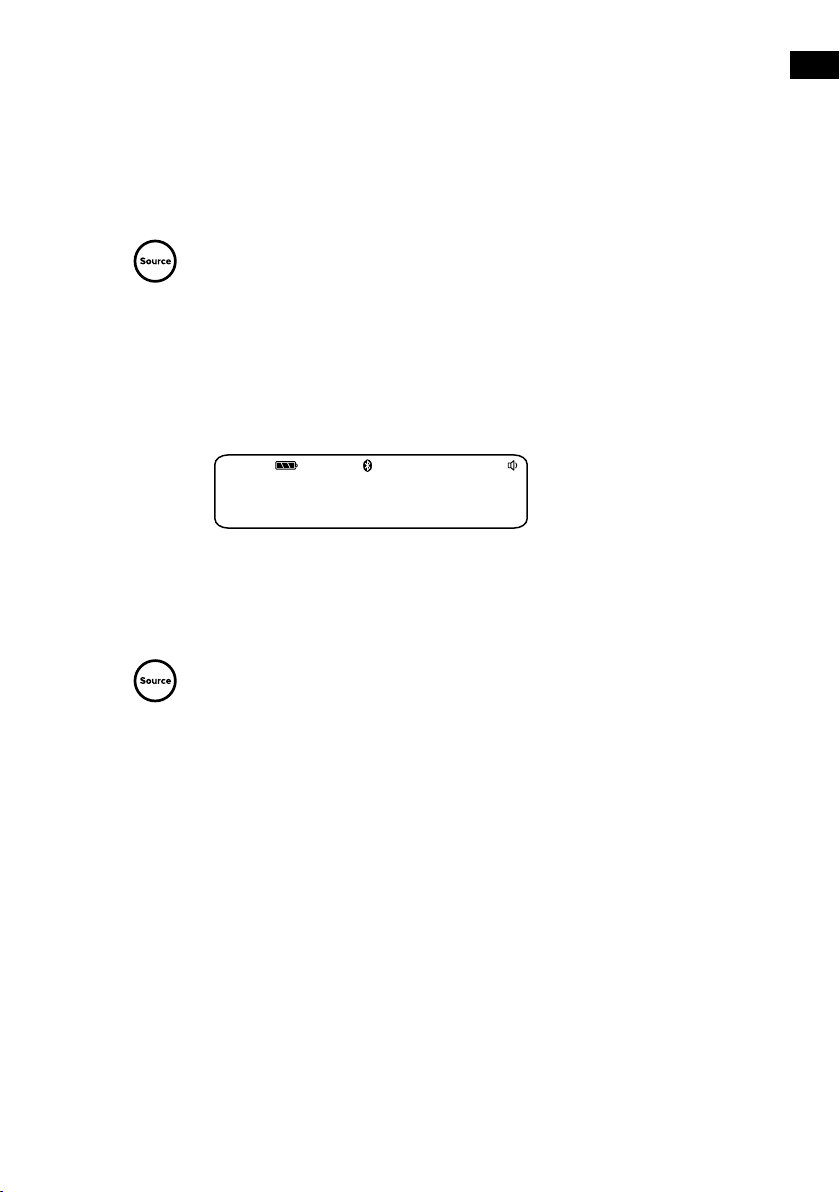
Connecting a Bluetooth device
You can use Bluetooth to wirelessly connect to a device, such as a mobile phone or tablet. You can then
stream music from your mobile phone or tablet through your Avalon N5.
To connect your device to Avalon N5 just select ‘Avalon’ in the Bluetooth menu on your device.
To connect a Bluetooth device:
EN
1. Press
2. On your Bluetooth device, switch Bluetooth on and connect to ‘Avalon’.
Note: For more information, see your Bluetooth device’s user manual. If you are asked to enter a
passcode, enter 0000.
When ‘BT CONNECTED’ is displayed on your Avalon N5 screen, your Avalon N5 is ready to stream
music.
Tip: If you want to connect a different Bluetooth device to your Avalon N5, connect it as described
above. This will automatically disconnect any currently connected device.
until ‘BLUETOOTH’ is displayed.
PRESET 5
BT CONNECTED
10:00
10-10-2017
EMPTY
DR FM AUX BTDR FM AUX BTDR FM AUX BTDR FM AUX BTDR FM AUX BTDR FM AUX BTDR FM AUX BTDR FM AUX BTDR FM AUX BTDR FM AUX BTDR FM AUX BTDR FM AUX BTDR FM AUX BTDR FM AUX BTDR FM AUX BTDR FM AUX BTDR FM AUX BTDR FM AUX BTDR FM AUX BTDR FM AUX BTDR FM AUX BTDR FM AUX BTDR FM AUX BTDR FM AUX BTDR FM AUX BTDR FM AUX BTDR FM AUX BTDR FM AUX BTDR FM AUX BTDR FM AUX BTDR FM AUX BTDR FM AUX BTDR FM AUX BTDR FM AUX BTDR FM AUX BTDR FM AUX BTDR FM AUX BTDR FM AUX BTDR FM AUX BTDR FM AUX BTDR FM AUX BTDR FM AUX BTDR FM AUX BT
Connecting a device with an auxiliary cable
You can use an auxiliary cable to connect a device, such as an MP3 player, to your Avalon N5. You can
then enjoy music saved on the device through your Avalon N5.
To connect a device with an auxiliary cable:
1. Press
2. Insert an auxiliary cable into the Aux socket on the side of your Avalon N5.
3. Insert the other end of the auxiliary cable into the device you want to connect.
Your Avalon N5 is now ready to play music from the connected device.
until ‘AUXILIARY INPUT’ is displayed.
11
Page 14
Alarms
3
4
DR FM AUX BTDR FM AUX BTDR FM AUX BTDR FM AUX BTDR FM AUX BTDR FM AUX BTDR FM AUX BTDR FM AUX BTDR FM AUX BTDR FM AUX BTDR FM AUX BTDR FM AUX BTDR FM AUX BTDR FM AUX BTDR FM AUX BTDR FM AUX BTDR FM AUX BTDR FM AUX BTDR FM AUX BTDR FM AUX BTDR FM AUX BTDR FM AUX BTDR FM AUX BTDR FM AUX BTDR FM AUX BTDR FM AUX BTDR FM AUX BTDR FM AUX BTDR FM AUX BTDR FM AUX BTDR FM AUX BTDR FM AUX BTDR FM AUX BTDR FM AUX BTDR FM AUX BTDR FM AUX BTDR FM AUX BTDR FM AUX BTDR FM AUX BTDR FM AUX BTDR FM AUX BTDR FM AUX BTDR FM AUX BT
DR
3
4
3
4
To wake up to your favourite radio station, you can set up to two alarms on your Avalon N5.
Note: You cannot set alarms when your Avalon N5 is being powered by a ChargePAK.
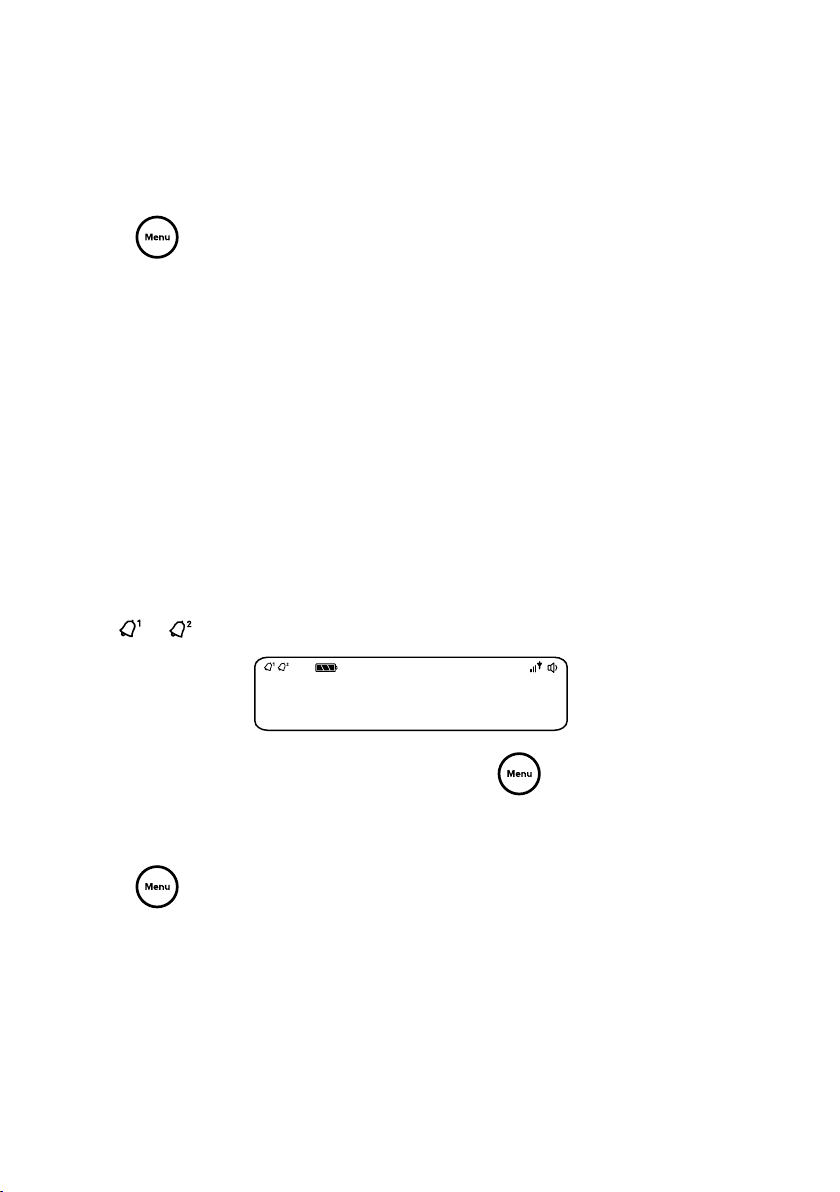
Setting an alarm
To set an alarm:
1. Press
2. Press the < or > buttons to scroll and press the Select button to choose ‘ALARM’
3. Press the < or > buttons to scroll and press the Select button to choose ‘ALARM 1’ or ‘ALARM 2’.
4. Press the < or > buttons to scroll and press the Select button to change settings for the alarm:
‘ALARM’ Turn the alarm on or off
‘ON TIME’ Choose the time for the alarm
‘DURATION’ Choose how many minutes the alarm sounds for
‘SOURCE’ Choose to wake up to an ‘FM’ or ‘DAB’ radio station, or a ‘TONE’
‘REPEAT’ Choose how often you want the alarm to sound from ‘DAILY’,
‘ALARM VOLUME’ Choose the volume for the alarm (applies to radio alarms only)
You’ll see an ‘ALARM SAVED’ message displayed when complete.
The
5. When you have made all of your changes, press and hold
.
Tip: For FM or DAB You have the option of selecting a preset
station (if you have some saved) or you can select ‘LAST USED’ to
select the station that you were last listening to.
‘ONCE’, ‘ WEEKENDS’ or ‘WEEKDAYS’
or
symbol is displayed at the top of the screen when an alarm is set.
DR
10:00
PRESET 5
EMPTY
DR FM AUX BTDR FM AUX BTDR FM AUX BTDR FM AUX BTDR FM AUX BTDR FM AUX BTDR FM AUX BTDR FM AUX BTDR FM AUX BTDR FM AUX BTDR FM AUX BTDR FM AUX BTDR FM AUX BTDR FM AUX BTDR FM AUX BTDR FM AUX BTDR FM AUX BTDR FM AUX BTDR FM AUX BTDR FM AUX BTDR FM AUX BTDR FM AUX BTDR FM AUX BTDR FM AUX BTDR FM AUX BTDR FM AUX BTDR FM AUX BTDR FM AUX BTDR FM AUX BTDR FM AUX BTDR FM AUX BTDR FM AUX BTDR FM AUX BTDR FM AUX BTDR FM AUX BTDR FM AUX BTDR FM AUX BTDR FM AUX BTDR FM AUX BTDR FM AUX BTDR FM AUX BTDR FM AUX BTDR FM AUX BT
ALARM
SAVED
to exit the menu.
Cancelling an existing alarm
To cancel an existing alarm:
1. Press
2. Press the < or > buttons to scroll and press the Select button to choose ‘ALARM’
3. Press the < or > buttons to scroll and press the Select button to choose ‘ALARM 1’ or ‘ALARM 2’.
3. Press the < or > buttons to scroll and press the Select button to change the setting to ‘OFF’.
You’ll see an ‘ALARM SAVED’ message displayed.
.
Snoozing or silencing an alarm
To snooze an alarm:
• Press one of the preset buttons
The alarm snoozes for 8 minutes.
12
To silence an alarm:
• Press either the Source, < Select > or Menu
buttons.
Page 15
Timers
3
4
DR FM AUX BTDR FM AUX BTDR FM AUX BTDR FM AUX BTDR FM AUX BTDR FM AUX BTDR FM AUX BTDR FM AUX BTDR FM AUX BTDR FM AUX BTDR FM AUX BTDR FM AUX BTDR FM AUX BTDR FM AUX BTDR FM AUX BTDR FM AUX BTDR FM AUX BTDR FM AUX BTDR FM AUX BTDR FM AUX BTDR FM AUX BTDR FM AUX BTDR FM AUX BTDR FM AUX BTDR FM AUX BTDR FM AUX BTDR FM AUX BTDR FM AUX BTDR FM AUX BTDR FM AUX BTDR FM AUX BTDR FM AUX BTDR FM AUX BTDR FM AUX BTDR FM AUX BTDR FM AUX BTDR FM AUX BTDR FM AUX BTDR FM AUX BTDR FM AUX BTDR FM AUX BTDR FM AUX BTDR FM AUX BT
DR
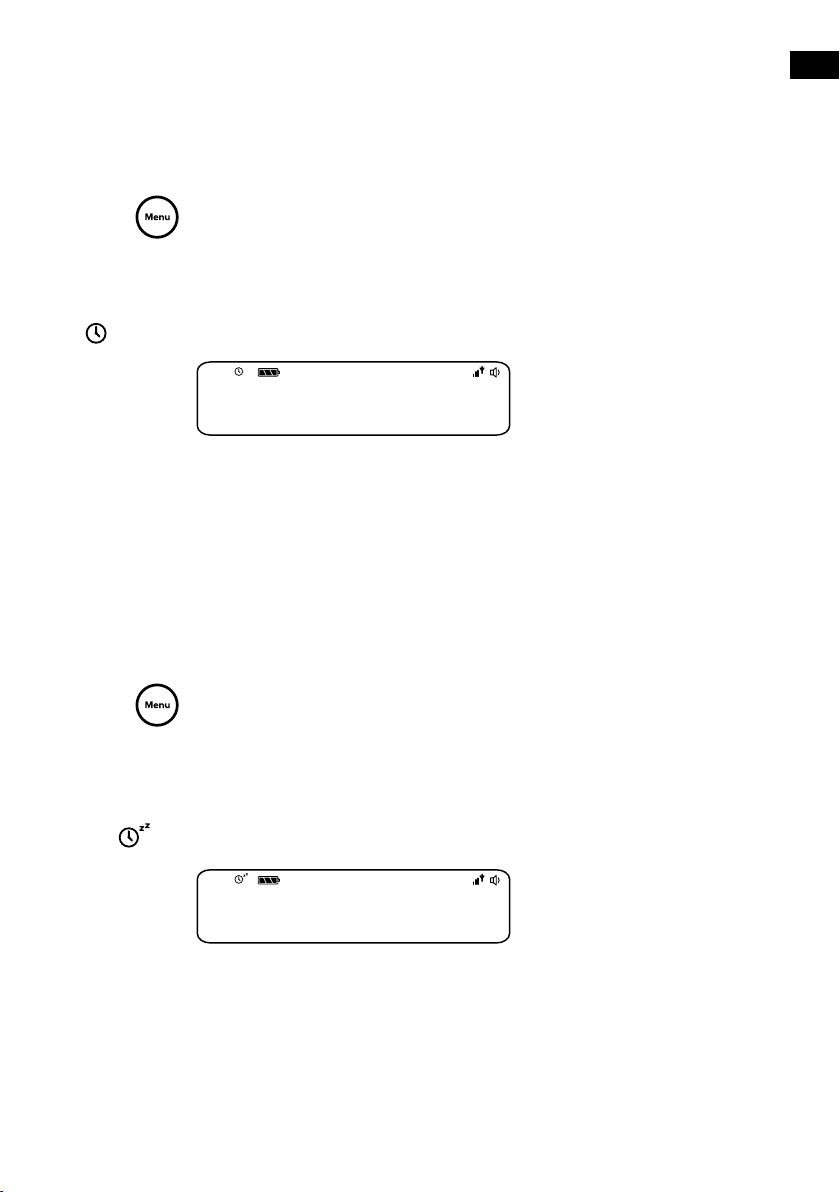
Setting the kitchen timer
The kitchen timer counts down and then ends with an alarm tone.
To set the kitchen timer:
EN
1. Press
2. Press the < or > buttons to scroll and press the Select button to choose ‘KITCHEN TIMER’
3. Scroll < or > to change the hours and press the Select button.
4. Scroll < or > again to change the minutes and push to confirm and start the timer.
The
symbol is displayed at the top of the screen when the timer is set.
.
10:00
DR
PRESET 5
KITCHEN TIMER
STORED
EMPTY
DR FM AUX BTDR FM AUX BTDR FM AUX BTDR FM AUX BTDR FM AUX BTDR FM AUX BTDR FM AUX BTDR FM AUX BTDR FM AUX BTDR FM AUX BTDR FM AUX BTDR FM AUX BTDR FM AUX BTDR FM AUX BTDR FM AUX BTDR FM AUX BTDR FM AUX BTDR FM AUX BTDR FM AUX BTDR FM AUX BTDR FM AUX BTDR FM AUX BTDR FM AUX BTDR FM AUX BTDR FM AUX BTDR FM AUX BTDR FM AUX BTDR FM AUX BTDR FM AUX BTDR FM AUX BTDR FM AUX BTDR FM AUX BTDR FM AUX BTDR FM AUX BTDR FM AUX BTDR FM AUX BTDR FM AUX BTDR FM AUX BTDR FM AUX BTDR FM AUX BTDR FM AUX BTDR FM AUX BTDR FM AUX BT
Silencing the kitchen timer
To silence the kitchen timer:
• Press either the Source, < Select > or Menu buttons.
Setting the sleep timer
The sleep timer puts your Avalon N5 in standby after a set amount of time.
To set the sleep timer:
1. Press
2. Press the < or > buttons to scroll and press the Select button to choose ‘SLEEP TIMER’
3. Press the < or > buttons to scroll and press the Select button to choose the duration of the timer.
Tip: You can choose between 15 and 90 minutes.
4. The
.
symbol is displayed at the top of the screen when the timer is set.
DR
PRESET 5
SLEEP TIMER
10:00
STORED
EMPTY
DR FM AUX BTDR FM AUX BTDR FM AUX BTDR FM AUX BTDR FM AUX BTDR FM AUX BTDR FM AUX BTDR FM AUX BTDR FM AUX BTDR FM AUX BTDR FM AUX BTDR FM AUX BTDR FM AUX BTDR FM AUX BTDR FM AUX BTDR FM AUX BTDR FM AUX BTDR FM AUX BTDR FM AUX BTDR FM AUX BTDR FM AUX BTDR FM AUX BTDR FM AUX BTDR FM AUX BTDR FM AUX BTDR FM AUX BTDR FM AUX BTDR FM AUX BTDR FM AUX BTDR FM AUX BTDR FM AUX BTDR FM AUX BTDR FM AUX BTDR FM AUX BTDR FM AUX BTDR FM AUX BTDR FM AUX BTDR FM AUX BTDR FM AUX BTDR FM AUX BTDR FM AUX BTDR FM AUX BTDR FM AUX BT
13
Page 16

Settings
3
4
3
4
3
4
3
4
Personalising the sound on your Avalon N5
Use the equaliser and boost setting to get the most out of your music. There are several equaliser settings
set up already. For example, to hear classical music at its best, change the equaliser setting to ‘CLASSIC’.
You can also customise the equaliser to change the treble, bass and loudness.
To use the equaliser:
1. Press
2. Press the Select button to choose ‘AUDIO’.
3. Press the < or > buttons to scroll and press the Select button to choose ‘EQUALISER’.
4. Choose an equaliser setting:
• Press the < or > buttons to scroll and press the Select button to choose from: ‘NATURAL’,
‘FL AT’, ‘ ROCK’, ‘POP’, ‘CLASSIC’, ‘JAZZ’, ‘ NEWS’ or ‘CUSTOM’.
• To use custom settings, press the < or > buttons to scroll and press the Select button to
choose ‘CUSTOM’. Then press the < or > buttons to scroll and press the Select button to
change the treble, bass and loudness.
To turn boost on or off:
1. Press
2. Press the Select button to choose ‘AUDIO’.
3. Press the < or > buttons to scroll and press the Select button to choose ‘BOOST’.
4. Press the < or > buttons to scroll and press the Select button to turn boost ‘ON’ or ‘OFF’.
.
.
Display settings
Changing the information displayed on the screen
You can change the information that is displayed on the screen when you are listening to the radio. For
example, you can display scrolling information about the current radio station.
1. Press
.
2. Press the < or > buttons to scroll and press the Select button to choose ‘DISPL AY’.
3. Press the Select button to choose ‘INFO’.
4. Press the < or > buttons to scroll and press the Select button to choose the information to display.
Changing the screen brightness
Your Avalon N5 has a light sensor, which adjusts the screen brightness based on your surroundings. You
can also manually change the screen brightness and control how long the display backlight stays on for.
To change the brightness of the screen:
1. Press
2. Press the < or > buttons to scroll and press the Select button to choose ‘DISPL AY’.
.
14
Page 17

3. Press the < or > buttons to scroll and press the Select button to choose ‘BACKLIGHT’.
3
4
3
4
3
4
4. Press the < or > buttons to scroll and press the Select button to choose ‘ACTIVE’ to change the
settings that apply when Avalon N5 is switched on, or select ‘STANDBY’ to change settings that
apply in standby.
5. Press the < or > buttons to scroll and press the Select button to choose ‘BRIGHTNESS’.
4. Press the < or > buttons to scroll and press the Select button to choose a brightness level. To
makeyour screen brighter, choose a higher number. To automatically set the screen brightness,
choose ‘AUTO’.
To change how long the display backlight stays on for:
EN
1. Press
2. Press the < or > buttons to scroll and press the Select button to choose ‘DISPL AY’.
3. Press the < or > buttons to scroll and press the Select button to choose ‘BACKLIGHT’.
4. Press the < or > buttons to scroll and press the Select button to choose ‘ACTIVE’ to change the
settings that apply when Avalon N5 is switched on, or select ‘STANDBY’ to change settings that
apply in standby.
5. For ACTIVE settings only Press the < or > buttons to scroll and press the Select button to choose
‘TIMEOUT’.
6. Press the < or > buttons to scroll and press the Select button to choose from ‘ALWAYS O N’ or
‘TIMED OFF’
.
Clock settings
Setting the time and date
Your Avalon N5 can use FM and digital radio signals to set the time and date automatically. If the time
and date do not update automatically, you can set them manually.
To set the time and date manually:
1. Press
2. Press the < or > buttons to scroll and press the Select button to choose ‘CLOCK’.
3. Press the < or > buttons to scroll and press the Select button to choose ‘SET TIME/DATE’.
4. Press the < or > buttons to scroll and press the Select button to set the hour. Repeat to set the
minutes.
6. Press the < or > buttons to scroll and press the Select button to set the day. Repeat to set the
month and year.
.
Changing the time format
To change the time format:
1. Press
2. Press the < or > buttons to scroll and press the Select button to choose ‘CLOCK’.
3. Press the < or > buttons to scroll and press the Select button to choose ‘SET 12/24 HOUR’.
4. Press the < or > buttons to scroll and press the Select button to choose ‘SET 12 HOUR’ or
‘SET24HOUR’.
.
15
Page 18

Changing the date format
3
4
3
4
3
4
3
4
To change the date format:
1. Press
2. Press the < or > buttons to scroll and press the Select button to choose ‘CLOCK’.
3. Press the < or > buttons to scroll and press the Select button to choose ‘SE T DATE FORMAT’.
4. Press the < or > buttons to scroll and press the Select button to choose between displaying the
date in day, month and year order ‘DD-MM-YYYY’ or in month, day and year order ‘MM-DD-YYYY’.
.
Changing the clock synchronisation source
You can select the radio sources that you want to use for setting the time. By default, Avalon N5 uses
both the FM and digital radio signals to synchronize the time.
To change the Clock synchronisation:
1. Press
2. Press the < or > buttons to scroll and press the Select button to choose ‘CLOCK’.
3. Press the < or > buttons to scroll and press the Select button to choose ‘CLOCK SYNC’.
4. Press the < or > buttons to scroll and press the Select button to choose the required option.
.
Changing the language
You can change the language of menus and settings.
To change the language:
1. Press
2. Press the < or > buttons to scroll and press the Select button to choose ‘SETTINGS’.
3. Press the < or > buttons to scroll and press the Select button to choose ‘LANGUAGE’.
4. Press the < or > buttons to scroll and press the Select button to choose a language.
.
Resetting to factory settings
A factory reset removes all stored presets, alarms, timers and settings on your Avalon N5.
Note: You cannot undo a factory reset.
To reset to factory settings:
1. Press
2. Press the < or > buttons to scroll and press the Select button to choose ‘SETTINGS’.
3. Press the < or > buttons to scroll and press the Select button to choose ‘FACTORY RESET’.
4. Press the < or > buttons to scroll and press the Select button to choose ‘YES’.
Your Avalon N5 resets to factory settings and then restarts.
.
Updating the software
Pure may provide software updates for your Avalon N5. To check for available software updates, visit
support.pure.com.
Tip: To be contacted when software updates are available, register your product at pure.com/register.
16
Page 19
To check the current software version:
3
4
EN
1. Press
2. Press the < or > buttons to scroll and press the Select button to choose ‘SETTINGS’.
3. Press the < or > buttons to scroll and press the Select button to choose ‘VERSION’.
To update the software:
1. Use a Micro USB cable to connect your Avalon N5 to your computer.
2. Follow the instructions provided with the software update file.
.
Using a ChargePAK
About ChargePAKs
A ChargePAK is a rechargeable battery pack (available separately) that allows you to listen to your music
anywhere. When your Avalon N5 is connected to a power outlet, it charges the ChargePAK. You can
then disconnect your Avalon N5 from the power and take your music with you.
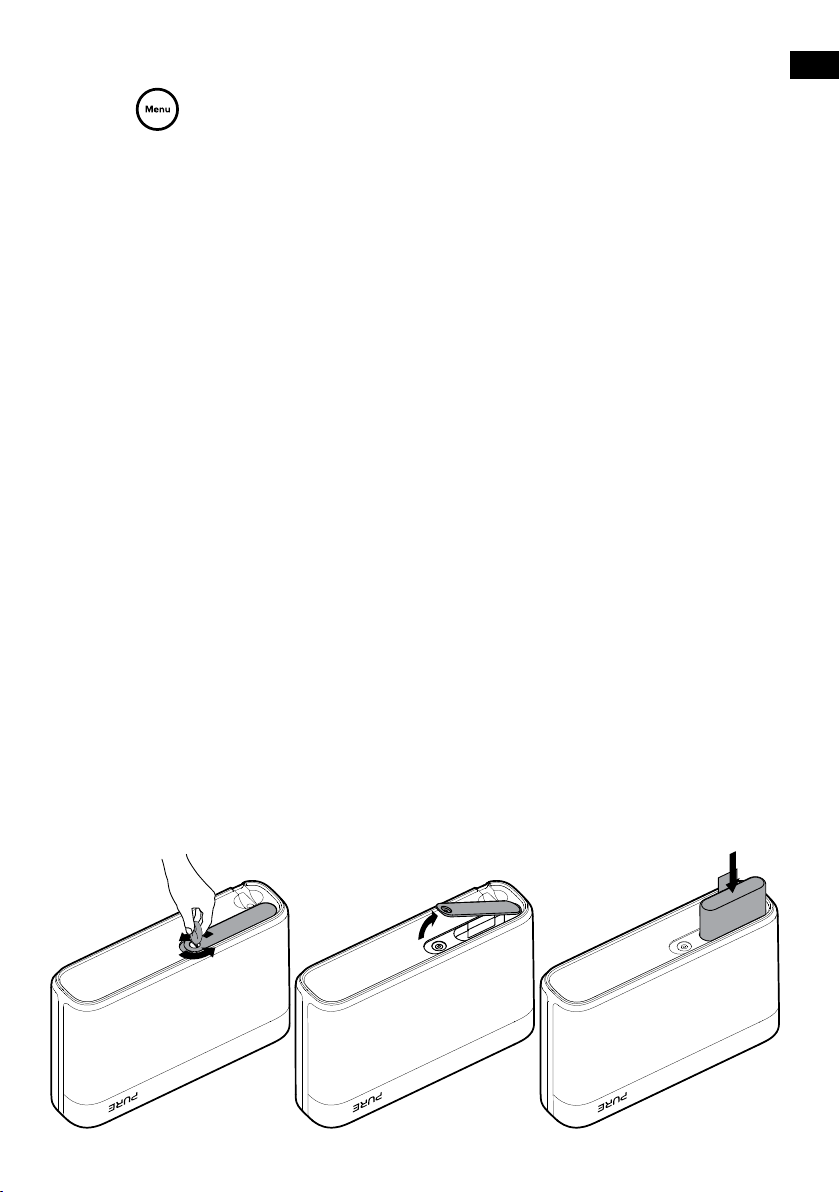
Inserting a ChargePAK
Note: Your Avalon N5 is only compatible with a Pure ChargePAK F1. Do not use any other batteries or
ChargePAK models with your Avalon N5.
To insert a ChargePAK:
1. Switch your Avalon N5 off and disconnect it from the power supply.
2. At the base of your Avalon N5, use a coin to undo the screw on the battery cover to remove it.
3. Insert the ChargePAK into the battery compartment, with the electrical contacts on the ChargePAK
facing down and the Pure label facing away from the front of the radio.
4. Replace the battery cover.
5. Connect your Avalon N5 to the power supply.
The ChargePAK starts charging. If the ChargePAK is new or has not been used for a long time, we
recommend you charge it for at least 24 hours.
Note: When the ChargePAK is charging, it is normal for it to get warm. The efficiency of the
ChargePAK will decrease over time.
17
Page 20

Troubleshooting
Problem Solution
I can’t hear any sound Use the Power/Volume dial to turn the volume up.
For digital radio, perform an autotune. Read more on page 8.
For Bluetooth or auxiliary devices, check a device is connected. Turn
the volume up on the connected device.
The screen is very dark Remove any obstructions from in front of the radio. There is a light
I can’t find an FM or
digital radio station
sensor near the display.
Turn up the screen brightness. Read more on page 14.
Adjust your aerial and check it is fully extended.
Move your radio to another location.
For digital radio, perform an autotune. Read more on page 8.
For FM radio, try forcing the radio to use mono reception to improve the
signal strength. Read more on page 9.
18
Page 21

Specifications
Radio Digital and FM radio
Frequencies Digital: Band III 174-240 MHz
Bluetooth Bluetooth v4.1
Speaker
Audio output power
Inputs 12V DC power adapter socket (230V supplied)
Outputs 3.5mm stereo headphone
Presets 10 digital radio and 10 FM radio presets
Display 2 x line LCD display
Software version v1.2
Mains power adapter Adapter Input AC 100-240V~, 50/60 Hz, 0.8A
ChargePAK Pure ChargePAK F1 rechargeable battery pack (available separately)
Dimensions 170mm high x 260mm wide x 70mm deep
Operational temperature 0°C to +40°C
Aerial Captive telescopic aerial
Approvals CE marked. Hereby, Pure International Limited declares that this radio
FM radio 87.5-108MHz
AVRCP 1.4 support
AAC codec support
Frequency range: 2402~2480 MHz, Maximum power: 4.07 dBm (EIRP)
Full range 3" driver unit and 2 x passive bass radiators (1 front, 1 rear)
20 Watts RMS
3.5mm stereo aux-in for auxiliary devices
USB connection (Micro USB) for software updates only
Output DC 12V
Main unit DC 12V , 2.4A
model Avalon N5 is in compliance with the essential requirements of RED
2014/53/EU, RoHS recast Directive (2011/65/EU) and is ETSI EN300
401 compliant. In an environment with radio frequency disturbance the
radio may lose audio but will recover when the interference is removed.
The full text of the EU Declaration of Conformity is available at the
following internet http://www.pure.com/about/red
, 2400mA
EN
19
Page 22
Warranty information
Pure International Limited warrants to the end user that this product will be free from defects in materials and
workmanship in the course of normal use for a period of three years from the date of purchase. This guarantee
covers breakdowns due to manufacturing or design faults; it does not apply in cases such as accidental
damage, however caused, wear and tear, negligence, adjustment, modification or repair not authorised
by us. Should you have a problem with your unit please contact your supplier or contact Pure Support at
ht tp:// support.pure.com.
Disclaimer
Pure International Limited makes no representation or warranties with respect to the content of this document
and specifically disclaims any implied warranties of merchantability or fitness for any particular purpose. Further,
Pure International Limited reserves the right to revise this publication and to make changes in it from time to time
without obligation of Pure International Limited to notify any person or organization of such revisions or changes.
Trademarks
Avalon N5, Pure and the Pure logo are trademarks or registered trademarks of Pure International Limited.
Copyright
Copyright © 2017 Pure International Limited. All rights reserved. No part of this publication may be copied or
distributed, transmitted, transcribed, stored in a retrieval system, or translated into any human or computer language,
in any form or by any means, electronic, mechanical, magnetic, manual or otherwise, or disclosed to third parties
without the express written permission of Pure International Limited.
Disposal of Waste Electrical & Electronic Equipment
This symbol on the product or on its packaging indicates that this product should not be treated as
household waste. Instead it should be handed over to a suitable collection point for the recycling of
electrical and electronic equipment. By ensuring this product is disposed of correctly, you will help
prevent potential negative consequences for the environment and human health, which could otherwise
be caused by inappropriate waste handling of this product. The recycling of materials will help to
conserve natural resources. For more detailed information about recycling of this product, please contact
your local council office, your household waste disposal service or the shop where you purchased the
product.
20
Page 23
Avalon N5
Vielen Dank dafür, dass Sie sich für Avalon N5 entschieden
haben. Diese Bedienungsanleitung erklärt, wie die verschiedenen
Funktionen Ihres Avalon N5 zu nutzen sind. Sollten Sie weitere Hilfe
benötigen, können Sie sich unsere Hilfethemen beim Support unter
support. pure. com anschauen.
EN
DE
FR
IT
NO
DA
NL
1
Page 24

2
Page 25

Inhalt
DE
Sicherheit 4
Erste Schritte 5
Ihr Avalon N5 5
Einrichten Ihres Avalon N5 6
Ein- und Ausschalten Ihres Avalon N5 7
Lautstärkeregelung 7
Digitalradio 8
Digitalradio hören 8
Digitalradiosender ändern 8
Automatische Digitalsendereinstellung 8
UKW-Radio 9
UKW-Radiobetrieb 9
UKW-Radiosender ändern 9
Auswahl von Stereo- oder Monoempfang
fürIhr UKW-Radio 9
Radiosender-Favoriten 10
Über Favoriten 10
Speichern eines Radiosenders als Favorit 10
Favoriten hören 10
Timer 13
Einstellen des Küchen-Timers 13
Abstellen des Küchen-Timers 13
Einstellen des Sleep-Timers 13
Einstellungen 14
Individuelle Klangeinstellungen
IhresAvalonN5 14
Anzeigeeinstellungen 14
Einstellungen der Uhr 15
Änderung der Sprache 17
Zurücksetzen auf Werkseinstellungen 17
Aktualisieren der Software 17
ChargePAK verwenden 18
Über ChargePAKs 18
ChargePAK einsetzen 18
Fehlersuche 19
Technische Daten 20
Bluetooth- und Zusatzgeräte 11
Anschließen eines Bluetooth-Geräts 11
Anschließen eines Geräts mit einem
Aux-Kabel 11
Wecker 12
Einstellen der Wecker 12
Löschen eines bestehenden Weckers 12
Einen Wecker auf Schlummern stellen
oderabstellen 13
3
Page 26
Sicherheit
Informationen zur Sicherheit
1. Machen Sie sich vor der Nutzung des Radios mit allen Sicherheitsinformationen und Anweisungen vertraut. Wenn Sie dieses Radio an
andere Personen weitergeben, reichen Sie bitte auch alle Dokumente weiter.
2. Stellen Sie sicher, dass das Gerät keinen tropfenden oder spritzenden Flüssigkeiten ausgesetzt ist. Es sollten keinerlei Objekte, die mit
Flüssigkeit gefüllt sind, wie z. B. Vasen, auf das Gerät gestellt werden.
Wenn Wasser oder eine andere Flüssigkeit auf dem Radio verschüttet wird, schalten Sie das Gerät sofort aus, trennen Sie es vom Netz
und kontaktieren Sie Ihren Händler.
Fassen Sie niemals den Stecker oder das Radio mit nassen Händen an. Ziehen Sie niemals am Netzkabel, wenn Sie den Netzadapter
von der Stromversorgung trennen.
3. Die Batterien (Batteriepack oder installierte Batterien) dürfen nicht übermäßiger Hitze wie durch Sonneneinstrahlung, Feuer oder
ähnlichen Wärmequellen ausgesetzt werden.
4. Bei der Nutzung des Radios in Räumen oder Klimaumgebungen mit hoher Luftfeuchtigkeit und hohen Temperaturen kann sich
Kondensation im Inneren des Radios bilden und Schäden verursachen. Das Gerät nur bei gemäßigtem Klima verwenden.
5. Vermeiden Sie extrem hohe oder tiefe Temperaturen. Halten Sie das Gerät fern von Wärmequellen wie Heizungen und Gas- oder
Elektroheizstrahlern. Stellen Sie kein of fenes Feuer wie angezündete Kerzen auf das Gerät.
6. Der Netzadapter wird als Trennvorrichtung verwendet. Die Trennvorrichtung sollte jederzeit betriebsbereit sein.
Stecken Sie den Netzadapter in eine einfach zugängliche Steckdose in der Nähe des Radios und verwenden Sie nur den Netzadapter,
um dieses Produkt anzuschließen.
7. Verwenden Sie nur den Netzadapter, der in der Bedienungsanleitung aufgeführt ist (geliefert von Pure, Modellnummer SW1202400-IM).
8. Vergewissern Sie sich vor der Nutzung des Radios, dass die verfügbare Netzspannung der erforderlichen Betriebsspannung des
Geräts entspricht.
9. Trennen Sie Ihr Radio von der Stromversorgung, wenn Sie es für längere Zeit nicht benutzen (z. B. wenn Sie in den Urlaub fahren).
10. Ziehen Sie immer den Netzstecker des Radios aus der Steckdose, bevor Sie das Gerät reinigen. Verwenden Sie für die Reinigung des
Radios keine Scheuerpads- oder mittel, da diese die Geräteoberfläche beschädigen könnten.
11. Um das Risiko eines Stromschlags zu vermeiden, entfernen Sie keine Schrauben. Im Radio befinden sich keine vom Benutzer
wartbaren Teile. Wenden Sie sich für Reparaturarbeiten an qualifiziertes Personal.
ChargePAK F1 Sicherheitshinweise
1. Lesen Sie die Anleitungen zur Verwendung des ChargePAKs in diesem Dokument.
2. Verwenden Sie Ihr ChargePAK ausschließlich mit Originalteilen von Pure. Verwenden Sie ausschließlich das Original-ChargePAK
F1 von Pure. Bei einem unsachgemäßen Austausch der Batterie besteht Explosionsgefahr (achten Sie auf eine korrekte Polarität).
Tauschen Sie Batterien nur gegen Batterien desselben oder gleichwertigen Typs aus.
3. Lagern Sie das ChargePAK an einem kühlen, trockenen Ort bei Zimmertemperatur. Nehmen Sie es aus dem Gerät heraus, wenn es längere
Zeit nicht benutzt wird.
4. Achten Sie darauf, dass das ChargePAK nicht mit spitzen Gegenständen bearbeitet wird, dass es weder verändert, fallen gelassen,
geworfen noch unnötigen Erschütterungen ausgesetzt wird. Bei fehlerhafter Verwendung besteht das Risiko von Feuer, Explosion oder
Verätzung.
5. Das ChargePAK nicht in einem Feuer oder einer Verbrennungsanlage entsorgen. Nicht an heißen Or ten wie in einem Auto bei direkter
Sonneneinstrahlung liegen lassen. Lagern Sie es nicht in der Nähe von Öfen, Herden oder anderen Wärmequellen.
6. Das ChargePAK nicht direkt mit einer Stromquelle verbinden, wie z. B. einer Steckdose in Haus oder Auto. Nicht in die Mikrowelle oder
einen Hochdruckbehälter stellen.
7. Tauchen Sie das ChargePAK nicht in Wasser ein und setzen Sie es keinen Flüssigkeiten aus.
8. Schließen Sie das ChargePAK nicht kurz.
9. Ein ChargePAK, das offensichtlich undicht, verfärbt, rostig oder verformt ist, das merkwürdig riecht oder Ihnen anderweitig ungewöhnlich
vorkommt, nicht verwenden.
10. Fassen Sie ein ChargePAK mit einem Leck nicht direkt an; tragen Sie Schutzkleidung, um es sofort ordnungsgemäß zu entfernen und zu
entsorgen.
11. Lagern Sie es nicht an Orten, die für Kinder zugänglich sind.
12. Das ChargePAK wie normale wiederaufladbare Batterien entsprechend Ihren lokalen Gesetzen und Bestimmungen in Ihrer Region
entsorgen.
Symbole am Produkt und in der Bedienungsanleitung
Potenziell ernsthaftes Risiko für Ihre persönliche Sicherheit. Beachten Sie alle Warnhinweise mit diesem Symbol, um
mögliche Gefährdungen für Leben und Gesundheit auszuschließen.
Achtung. Vor der Verwendung Bedienungsanleitung lesen.
12-V-DC-Netzeingang, 2,4 Amp.
Polarität des Gleichstromanschlusses, die Mitte der Anschlussklemme ist positiv.
4
Page 27
Erste Schritte
Ihr Avalon N5
Bedienelemente an der Oberseite
1
1 Quelle Drücken, um zwischen Digitalradio, UKW-Radio, Bluetooth und
2 < Select > < oder > drücken, um zu suchen und Select drücken, um den Radiosender
3 Menü Zum Ändern der Einstellungen und Optionen drücken
4 Einschalten/
Lautstärke
5 Favoriten 1-5+ Drücken, um Ihre Lieblingsradiosender zu speichern und abzurufen (siehe
Aux-Eingang umzuschalten.
zu wechseln (siehe Seite 8/9) oder Optionen in einem Menü zu
wählen.
Hinweis: < Select > -Tasten können im Bluetooth-Modus Folgendes
ausführen: Titelsprung vorwärts / rückwärts sowie Play / Pause-Funktionen
beim Streaming in Bluetooth.
Zum Ein-/Ausschalten Ihres Avalon N5 drücken. Drehen Sie den Regler,
umdie Lautstärke einzustellen.
Seite 10).
2
5
3
4
DE
Seitliche Anschlüsse Anschlüsse unten
3,5-mm-Ausgang
für Stereo-
Kopfhörer.
Analoger Stereoeingang
für Aux-Kabel.
Micro-USB-Anschluss
für Software-
aktualisierungen
Eingang ausschließlich
für mitgeliefertes Netzteil
5
Page 28

Einrichten Ihres Avalon N5
Vorgehensweise zum Einrichten Ihres Avalon N5:
1. Verbinden Sie den mitgelieferten
Netzadapter mit dem Eingang an der
Unterseite Ihres Avalon N5.
2. Bringen Sie die passenden Adapterstifte
für Ihre Region an und verbinden Sie den
Netzadapter mit Ihrer Netzsteckdose.
3. Drücken Sie die Antenne nach unten,
damit sie herausspringt, und ziehen Sie sie
vollständig heraus.
6
Page 29
Ein- und Ausschalten Ihres Avalon N5
Wenn Sie eine wiederaufladbare Batterie (ChargePAK F1) haben (separat erhältlich), setzen Sie sie vor
dem Einschalten Ihres Avalon N5 ein. Weitere Informationen über die Verwendung eines ChargePAKs
finden Sie auf Seite 18.
Einschalten Ihres Avalon N5:
• Drücken Sie die Power-/Lautstärke-Taste und lassen Sie sie wieder los, bis sie herausspringt.
Hinweis: Beim erstmaligen Einschalten Ihres Avalon N5 beginnt das Gerät digitale Radiosender
zu suchen. Nachdem die automatische Sendersuche abgeschlossen ist, können Sie digitale
Radiosender hören.
Ausschalten Ihres Avalon N5 oder Einschalten des Standby-Modus:
Den Power-/Lautstärke-Regler eindrücken und lösen, bis er unten einrastet.
• Ist Ihr Avalon mit einer Netzsteckdose verbunden, schaltet Ihr Avalon N5 in den Standby-Modus. Im
Standby-Modus benötigt Ihr Avalon N5 eine geringe Strommenge und zeigt auf dem Display Zeit und
Datum an.
• Erhält Ihr Avalon N5 seinen Strom von einem ChargePAK, schaltet sich Ihr Avalon N5 aus.
Hinweis: Eventuell eingestellte Wecker schalten sich nicht ein, wenn Ihr Avalon N5 mit einem ChargePAK
betrieben wird und Sie das Gerät ausschalten.
Lautstärkeregelung
Vorgehensweise zur Lautstärkeregelung:
• Zum Erhöhen der Lautstärke drehen Sie den Power-/Lautstärke-Regler im Uhrzeigersinn.
• Zum Reduzieren der Lautstärke drehen Sie den Power-/Lautstärke-Regler gegen den
Uhrzeigersinn.
DE
7
Page 30
Digitalradio
1
3
2
4
3
4
3
243
4
Digitalradio hören
Vorgehensweise zum Hören des Digitalradios:
• Drücken Sie auf
, bis ‘DIGITALRADIO’ angezeigt wird.
Digitalradiosender ändern
Vorgehensweise zum Ändern des Digitalradiosenders:
1. Drücken Sie auf die Tasten < oder >, um die verfügbaren Radiosender durchzublättern.
2. Drücken Sie auf die Auswahltaste Select, um den Radiosender zu ändern.
DR
PRESET 5
SENDERLISTE
10:00
Tipp: Ein ‘?’ neben dem Namen des Radiosenders bedeutet, dass der Sender inaktiv oder nicht verfügbar ist.
<BBC RADIO 1 >
EMPTY
DR FM AUX BTDR FM AUX BTDR FM AUX BTDR FM AUX BTDR FM AUX BTDR FM AUX BTDR FM AUX BTDR FM AUX BTDR FM AUX BTDR FM AUX BTDR FM AUX BTDR FM AUX BTDR FM AUX BTDR FM AUX BTDR FM AUX BTDR FM AUX BTDR FM AUX BTDR FM AUX BTDR FM AUX BTDR FM AUX BTDR FM AUX BTDR FM AUX BTDR FM AUX BTDR FM AUX BTDR FM AUX BTDR FM AUX BTDR FM AUX BTDR FM AUX BTDR FM AUX BTDR FM AUX BTDR FM AUX BTDR FM AUX BTDR FM AUX BTDR FM AUX BTDR FM AUX BTDR FM AUX BTDR FM AUX BTDR FM AUX BTDR FM AUX BTDR FM AUX BTDR FM AUX BTDR FM AUX BTDR FM AUX BT
Automatische Digitalsendereinstellung
Wenn Sie Ihr Avalon N5 zum ersten Mal einschalten, sucht es automatisch nach Digitalradiosendern. Führen
Sie einen automatischen Sendersuchlauf durch, um die Liste der Radiosender zu aktualisieren, wenn Sie Ihr
Avalon N5 an einem neuen Ort verwenden.
Automatische Digitalradiosendersuche:
1. Drücken Sie auf
2. Drücken Sie zum Blättern auf die Tasten < oder >, und drücken Sie auf die Auswahltaste Select,
um‘AUT. SUCH E’ zu wählen.
Ihr Avalon N5 beginnt mit der Suche nach Digitalradiosendern.
.
8
Page 31

UKW-Radio
1
3
2
4
3
4
3
243
4
UKW-Radiobetrieb
UKW-Radio hören:
• Drücken Sie auf
, bis ‘UKW’ angezeigt wird.
UKW-Radiosender ändern
Vorgehensweise zum Ändern des UKW-Radiosenders:
• Zum Suchen nach dem vorherigen oder nächsten Radiosender drücken und halten Sie die
<-oder>-Taste gedrückt, um den nächsten oder vorherigen UKW-Radiosender mit einem
starkenSignal zu finden.
• Zur manuellen Radiosendersuche drücken Sie auf die Taste < oder >.
Die Frequenz geht in 0,05-MHz-Schritten nach oben oder unten.
Auswahl von Stereo- oder Monoempfang für Ihr UKW-Radio
Sie können zwischen ‘STEREO-’ oder ‘MONO-’ Empfang wählen, wenn Sie UKW-Radio hören. Wenn
SieKopfhörer verwenden, ist es angeraten, Stereo zu wählen.
Vorgehensweise zur Auswahl von Stereo- oder Mono-Empfang:
1. Drücken Sie auf
2. Drücken Sie zum Blättern auf die Tasten < oder > und drücken Sie auf die Auswahltaste Select,
um‘UKW STEREO’ zu wählen.
3. Drücken Sie zum Blättern auf die Tasten < oder > und drücken Sie auf die Auswahltaste Select,
um‘STEREO’ oder ‘MONO’ zu wählen.
.
DE
9
Page 32

Radiosender-Favoriten
1
3
2
4
3
4
3
4
1
3
2
4
3
4
3
4
1
3
2
4
3
4
3
2
4
3
4
3
243
4
3
4
Über Favoriten
Sie können Ihre Lieblingsradiosender als Favoriten speichern. Mit Favoriten können Sie Ihre
gespeicherten Radiosender schnell immer dann einschalten, wenn Sie es wollen.
Oben auf Ihrem Avalon N5 befinden sich fünf Favoriten-Tasten. Verwenden Sie
Lieblingsradiosender schnell einzustellen. Verwenden Sie
zuöffnen.
Sie können bis zu zehn Digitalradiosender und bis zu zehn UKW-Radiosender als Favoriten speichern.
, um eine Liste mit all Ihren Favoriten
, um
Ihre
Speichern eines Radiosenders als Favorit
Vorgehensweise zum Speichern eines Radiosenders als Favorit von 1 bis 4:
1. Stellen Sie den Radiosender ein, den Sie speichern möchten.
2. Wählen Sie eine Favoritentaste von
‘PROGR. GESP.’ angezeigt wird.
Tipp: Wurde bereits ein Radiosender unter der von Ihnen gewählten Favoritennummer gespeichert,
wird dieser durch den neuen Radiosender ersetzt.
Speichern eines Radiosenders in der Favoritenliste:
1. Stellen Sie den Radiosender ein, den Sie speichern möchten.
2. Drücken und halten Sie
3. Drücken Sie zum Blättern auf die Tasten < oder > und drücken Sie auf die Auswahltaste Select,
umeine Favoritennummer zu wählen. Die Meldung ‘PROGR. GESP.’ wird angezeigt.
Tipp: Wurde bereits ein Radiosender unter der von Ihnen gewählten Favoritennummer gespeichert,
wird dieser durch den neuen Radiosender ersetzt.
gedrückt, bis die Favoritenliste angezeigt wird.
bis
und drücken und halten Sie sie, bis die Meldung
DR
10:00
PRESET 5
EMPTY
DR FM AUX BTDR FM AUX BTDR FM AUX BTDR FM AUX BTDR FM AUX BTDR FM AUX BTDR FM AUX BTDR FM AUX BTDR FM AUX BTDR FM AUX BTDR FM AUX BTDR FM AUX BTDR FM AUX BTDR FM AUX BTDR FM AUX BTDR FM AUX BTDR FM AUX BTDR FM AUX BTDR FM AUX BTDR FM AUX BTDR FM AUX BTDR FM AUX BTDR FM AUX BTDR FM AUX BTDR FM AUX BTDR FM AUX BTDR FM AUX BTDR FM AUX BTDR FM AUX BTDR FM AUX BTDR FM AUX BTDR FM AUX BTDR FM AUX BTDR FM AUX BTDR FM AUX BTDR FM AUX BTDR FM AUX BTDR FM AUX BTDR FM AUX BTDR FM AUX BTDR FM AUX BTDR FM AUX BTDR FM AUX BT
PROGR. 7
GESP.
Favoriten hören
Favoriten von 1 bis 4 hören:
• Drücken Sie eine Favoritentaste von
möchten, der als Favorit 2 gespeichert wurde, drücken Sie auf
Beliebigen Favoriten anhören:
1. Drücken Sie auf
2. Drücken Sie zum Blättern auf die Tasten < oder > und drücken Sie auf die Auswahltaste Select,
umeinen Favoriten zu wählen.
, um die Favoritenliste zu öffnen.
bis
10
. Wenn Sie zum Beispiel den Radiosender hören
.
Page 33

Bluetooth- und Zusatzgeräte
1
3
2
4
1
3
2
4
Anschließen eines Bluetooth-Geräts
Sie können Bluetooth verwenden, um ein Gerät, wie z. B. ein Handy oder Tablet, drahtlos anzuschließen.
Mit Ihrem Avalon N5 ist es möglich, Musik von Ihrem Handy oder Tablet zu streamen.
Um Ihr Gerät mit dem Avalon N5 zu verbinden, wählen Sie einfach "Avalon" im Bluetooth-Menü Ihres
Geräts.
Vorgehensweise zum Anschluss eines Bluetooth-Geräts:
1. Drücken Sie auf
2. Schalten Sie auf Ihrem Bluetooth-Gerät Bluetooth ein und stellen Sie eine Verbindung zu "Avalon"
he r.
Hinweis: Weitere Informationen finden Sie im Handbuch zu Ihrem Bluetooth-Gerät. Geben Sie
0000 ein, wenn Sie aufgefordert werden, ein Kennwort einzugeben.
Wenn ‘BT VERBUNDEN’ auf Ihrem Avalon N5-Display angezeigt wird, ist Ihr Avalon N5 bereit, Musik
zu streamen.
Tipp: Wenn Sie ein anderes Bluetooth-Gerät an Ihr Avalon N5 anschließen möchten, gehen Sie wie oben
beschrieben vor. Damit wird das aktuell verbundene Gerät automatisch getrennt.
, bis ‘BLUETOOTH’ angezeigt wird.
PRESET 5
BT VERBUNDEN
10:00
10-10-2017
EMPTY
DR FM AUX BTDR FM AUX BTDR FM AUX BTDR FM AUX BTDR FM AUX BTDR FM AUX BTDR FM AUX BTDR FM AUX BTDR FM AUX BTDR FM AUX BTDR FM AUX BTDR FM AUX BTDR FM AUX BTDR FM AUX BTDR FM AUX BTDR FM AUX BTDR FM AUX BTDR FM AUX BTDR FM AUX BTDR FM AUX BTDR FM AUX BTDR FM AUX BTDR FM AUX BTDR FM AUX BTDR FM AUX BTDR FM AUX BTDR FM AUX BTDR FM AUX BTDR FM AUX BTDR FM AUX BTDR FM AUX BTDR FM AUX BTDR FM AUX BTDR FM AUX BTDR FM AUX BTDR FM AUX BTDR FM AUX BTDR FM AUX BTDR FM AUX BTDR FM AUX BTDR FM AUX BTDR FM AUX BTDR FM AUX BT
Anschließen eines Geräts mit einem Aux-Kabel
Sie können ein Aux-Kabel verwenden, um ein Gerät wie z. B. einen MP3-Player an Ihr Avalon N5
anzuschließen. Die Musik, die Sie auf dem Gerät gespeichert haben, kann mit Ihrem Avalon N5
wiedergegeben werden.
DE
Vorgehensweise zum Anschluss eines Geräts mit einem Aux-Kabel:
1. Drücken Sie auf
2. Stecken Sie das Aux-Kabel in die Aux-Buchse an der Seite Ihres Avalon N5.
3. Stecken Sie das andere Ende des Aux-Kabels in das Gerät, das Sie anschließen möchten.
Ihr Avalon N5 ist jetzt bereit, Musik vom angeschlossenen Gerät wiederzugeben.
, bis ‘AUX-EINGANG’ angezeigt wird.
11
Page 34

Wecker
3
4
DR FM AUX BTDR FM AUX BTDR FM AUX BTDR FM AUX BTDR FM AUX BTDR FM AUX BTDR FM AUX BTDR FM AUX BTDR FM AUX BTDR FM AUX BTDR FM AUX BTDR FM AUX BTDR FM AUX BTDR FM AUX BTDR FM AUX BTDR FM AUX BTDR FM AUX BTDR FM AUX BTDR FM AUX BTDR FM AUX BTDR FM AUX BTDR FM AUX BTDR FM AUX BTDR FM AUX BTDR FM AUX BTDR FM AUX BTDR FM AUX BTDR FM AUX BTDR FM AUX BTDR FM AUX BTDR FM AUX BTDR FM AUX BTDR FM AUX BTDR FM AUX BTDR FM AUX BTDR FM AUX BTDR FM AUX BTDR FM AUX BTDR FM AUX BTDR FM AUX BTDR FM AUX BTDR FM AUX BTDR FM AUX BT
DR
3
4
3
4
Um mit Ihrem Lieblingsradiosender aufzuwachen, können Sie zwei Wecker auf Ihrem Avalon N5 einstellen.
Hinweis: Sie können keine Wecker einstellen, wenn Ihr Avalon N5 mit einem ChargePAK betrieben wird.
Einstellen der Wecker
Vorgehensweise zum Einstellen eines Weckers:
1. Drücken Sie auf
2. Drücken Sie zum Blättern auf die Tasten < oder > und drücken Sie auf die Auswahltaste Select,
um‘WECKER’ zu wählen.
3. Drücken Sie zum Blättern auf die Tasten < oder > und drücken Sie auf die Auswahltaste Select,
um‘WECKER 1’ oder ‘WECKER 2’ zu wählen.
4. Drücken Sie zum Blättern auf die Tasten < oder > und drücken Sie auf die Auswahltaste Select,
umdie Weckereinstellungen zu ändern:
‘WECKER’ Wecker ein- oder ausschalten
‘ZT. EIN’ Wählen Sie die Uhrzeit für den Wecker
‘DAUER’ Wählen Sie, wie viele Minuten der Wecker ertönen soll.
‘QUELLE’ Wählen Sie, ob Sie zu einem ‘UKW-’ oder ‘DAB’-Radiosender oder zu einem
‘WIEDERH.’ Wählen Sie, wie oft sich der Wecker einschalten soll: ‘TÄGLICH’, ‘EINMAL’,
‘WECKERLAUTSTÄRKE’
Es erscheint die Meldung ‘WECKER GESPEICHERT’, wenn der Vorgang abgeschlossen ist.
Das Symbol
.
‘KLANG’ aufwachen möchten.
Tipp: Für UKW oder DAB haben Sie die Option, einen Favoritensender zu
wählen (wenn Sie Favoriten gespeichert haben). Alternativ können Sie ‘ZULETZT
VERWENDET’ wählen, um den Sender zu wählen, den Sie sich zuletzt angehört
haben.
‘WOCHENENDE’ oder ‘WERKTAGE’.
Wählen Sie die Lautstärke für den Wecker (bezieht sich nur auf Radiowecker).
oder
10:00
wird oben auf dem Display angezeigt, wenn ein Wecker eingestellt ist.
DR
PRESET 5
EMPTY
DR FM AUX BTDR FM AUX BTDR FM AUX BTDR FM AUX BTDR FM AUX BTDR FM AUX BTDR FM AUX BTDR FM AUX BTDR FM AUX BTDR FM AUX BTDR FM AUX BTDR FM AUX BTDR FM AUX BTDR FM AUX BTDR FM AUX BTDR FM AUX BTDR FM AUX BTDR FM AUX BTDR FM AUX BTDR FM AUX BTDR FM AUX BTDR FM AUX BTDR FM AUX BTDR FM AUX BTDR FM AUX BTDR FM AUX BTDR FM AUX BTDR FM AUX BTDR FM AUX BTDR FM AUX BTDR FM AUX BTDR FM AUX BTDR FM AUX BTDR FM AUX BTDR FM AUX BTDR FM AUX BTDR FM AUX BTDR FM AUX BTDR FM AUX BTDR FM AUX BTDR FM AUX BTDR FM AUX BTDR FM AUX BT
WECKER
GESPEICHERT
5. Drücken und halten Sie
durchgeführt haben.
, um das Menü zu verlassen, wenn Sie all Ihre Änderungen
Löschen eines bestehenden Weckers
Vorgehensweise zum Löschen eines bestehenden Weckers:
..
1. Drücken Sie auf
2. Drücken Sie zum Blättern auf die Tasten < oder > und drücken Sie auf die Auswahltaste Select, um
‘WECKER’ zu wählen.
3. Drücken Sie zum Blättern auf die Tasten < oder > und drücken Sie auf die Auswahltaste Select, um
‘WECKER 1’ oder ‘WECKER 2’ zu wählen.
12
Page 35

3
4
DR FM AUX BTDR FM AUX BTDR FM AUX BTDR FM AUX BTDR FM AUX BTDR FM AUX BTDR FM AUX BTDR FM AUX BTDR FM AUX BTDR FM AUX BTDR FM AUX BTDR FM AUX BTDR FM AUX BTDR FM AUX BTDR FM AUX BTDR FM AUX BTDR FM AUX BTDR FM AUX BTDR FM AUX BTDR FM AUX BTDR FM AUX BTDR FM AUX BTDR FM AUX BTDR FM AUX BTDR FM AUX BTDR FM AUX BTDR FM AUX BTDR FM AUX BTDR FM AUX BTDR FM AUX BTDR FM AUX BTDR FM AUX BTDR FM AUX BTDR FM AUX BTDR FM AUX BTDR FM AUX BTDR FM AUX BTDR FM AUX BTDR FM AUX BTDR FM AUX BTDR FM AUX BTDR FM AUX BTDR FM AUX BT
DR
4. Drücken Sie zum Blättern auf die Tasten < oder > und drücken Sie auf die Auswahltaste Select, um
die Einstellung zu ‘AUS’ zu ändern.
Die Meldung ‘WECKER GESPEICHERT’ wird angezeigt.
Einen Wecker auf Schlummern stellen oder abstellen
DE
Wecker auf Schlummern stellen:
• Drücken Sie eine der Favoritentasten.
Der Wecker schlummert acht Minuten lang.
Einen Wecker ausschalten:
• Drücken Sie auf die Taste Quelle, < Select >
oder Menü.
Timer
Einstellen des Küchen-Timers
Der Küchen-Timer führt einen Countdown durch und endet mit einem Alarmton.
Einstellen des Küchen-Timers:
1. Drücken Sie auf
2. Drücken Sie zum Blättern auf die Tasten < oder > und drücken Sie auf die Auswahltaste Select, um
den ‘KÜCHEN-TIMER’ zu wählen.
3. Blättern Sie mit < oder >, um die Stunden zu ändern, und drücken Sie auf die Auswahltaste Select.
4. Blättern Sie erneut mit < oder >, um die Minuten zu ändern, und drücken Sie, um Ihre Auswahl zu
bestätigen und den Timer zu starten.
Das Symbol
wird oben auf dem Display angezeigt, wenn der Timer eingeschaltet ist.
Abstellen des Küchen-Timers
.
DR
10:00
DR FM AUX BTDR FM AUX BTDR FM AUX BTDR FM AUX BTDR FM AUX BTDR FM AUX BTDR FM AUX BTDR FM AUX BTDR FM AUX BTDR FM AUX BTDR FM AUX BTDR FM AUX BTDR FM AUX BTDR FM AUX BTDR FM AUX BTDR FM AUX BTDR FM AUX BTDR FM AUX BTDR FM AUX BTDR FM AUX BTDR FM AUX BTDR FM AUX BTDR FM AUX BTDR FM AUX BTDR FM AUX BTDR FM AUX BTDR FM AUX BTDR FM AUX BTDR FM AUX BTDR FM AUX BTDR FM AUX BTDR FM AUX BTDR FM AUX BTDR FM AUX BTDR FM AUX BTDR FM AUX BTDR FM AUX BTDR FM AUX BTDR FM AUX BTDR FM AUX BTDR FM AUX BTDR FM AUX BTDR FM AUX BT
PRESET 5
KUCHEN-TIMER
GESP.
EMPTY
Vorgehensweise zum Abstellen des Küchen-Timers:
• Drücken Sie auf die Taste Quelle, < Select > oder Menü.
Einstellen des Sleep-Timers
Mit dem Sleep-Timer wird Ihr Avalon N5 nach einer bestimmten Zeit auf Standby geschaltet.
Vorgehensweise zum Einstellen des Sleep-Timers:
1. Drücken Sie auf
2. Drücken Sie zum Blättern auf die Tasten < oder >
und drücken Sie auf die Auswahltaste Select, umden ‘SLEEP-TIMER’ zu wählen.
3. Drücken Sie zum Blättern auf die Tasten < oder > und drücken Sie auf die Auswahltaste Select,
umdie Dauer des Timers einzustellen. Tipp: Sie können zwischen 15 und 90 Minuten wählen.
4. Das Symbol
.
10:00
wird oben auf dem Display angezeigt, wenn der Timer eingeschaltet ist.
DR
PRESET 5
SLEEP-TIMER
GESP.
EMPTY
DR FM AUX BTDR FM AUX BTDR FM AUX BTDR FM AUX BTDR FM AUX BTDR FM AUX BTDR FM AUX BTDR FM AUX BTDR FM AUX BTDR FM AUX BTDR FM AUX BTDR FM AUX BTDR FM AUX BTDR FM AUX BTDR FM AUX BTDR FM AUX BTDR FM AUX BTDR FM AUX BTDR FM AUX BTDR FM AUX BTDR FM AUX BTDR FM AUX BTDR FM AUX BTDR FM AUX BTDR FM AUX BTDR FM AUX BTDR FM AUX BTDR FM AUX BTDR FM AUX BTDR FM AUX BTDR FM AUX BTDR FM AUX BTDR FM AUX BTDR FM AUX BTDR FM AUX BTDR FM AUX BTDR FM AUX BTDR FM AUX BTDR FM AUX BTDR FM AUX BTDR FM AUX BTDR FM AUX BTDR FM AUX BT
13
Page 36

Einstellungen
3
4
3
4
3
4
Individuelle Klangeinstellungen Ihres Avalon N5
Verwenden Sie den Equalizer, um die Einstellungen zu optimieren und Ihre Musik bestmöglich zu genießen. Es
sind mehrere Equalizer-Einstellungen voreingestellt. Wenn Sie zum Beispiel klassische Musik wiedergeben, ist
es am besten, die Equalizer-Einstellungen auf ‘KLASSIK’ zu ändern. Sie können den Equalizer auch individuell
einstellen, um Höhen, Bass und Loudness anzupassen.
Verwenden des Equalizers:
1. Drücken Sie auf
2. Drücken Sie auf die Auswahltaste Select, um ‘AUDIO’ zu wählen.
3. Drücken Sie zum Blättern auf die Tasten < oder > und drücken Sie auf die Auswahltaste Select,
um‘EQUALIZER’zu wählen.
4. Wählen Sie eine Equalizer-Einstellung:
• Drücken Sie zum Blättern auf die Tasten < oder > und drücken Sie auf die Auswahltaste Select,
um zwischen folgenden Optionen zu wählen: ‘NORMAL’, ‘ F L AT’, ‘ROCK’, ‘POP’, ‘KLASSIK’,
‘JAZZ’, ‘ NACHRICHTEN’ oder ‘INDIVIDUELL’.
• Wenn Sie die individuellen Einstellungen verwenden möchten, drücken Sie zum Blättern auf die
Tasten < oder > und drücken Sie auf die Auswahltaste Select, um ‘INDIVIDUELL’ zu wählen.
Drücken Sie dann zum Blättern auf die Tasten < oder > und drücken Sie auf die Auswahltaste
Select,, um Höhen, Bass und Loudness zu ändern.
Boost ein- und ausschalten:
1. Drücken Sie auf
2. Drücken Sie auf die Auswahltaste Select, um ‘AUDIO’ zu wählen.
3. Drücken Sie zum Blättern auf die Tasten < oder > und drücken Sie auf die Auswahltaste Select,
um‘BOOST’ zu wählen.
4. Drücken Sie zum Blättern auf die Tasten < oder > und drücken Sie auf die Auswahltaste Select,
umBoost auf ‘EIN’ oder ‘AUS’ zu schalten.
.
.
Anzeigeeinstellungen
Ändern der auf dem Display angezeigten Informationen
Die beim Radioempfang auf dem Display angezeigten Informationen lassen sich ändern. Es ist zum Beispiel
möglich, durchlaufende Informationen über den aktuellen Radiosender anzuzeigen.
1. Drücken Sie auf
2. Drücken Sie zum Blättern auf die Tasten < oder > und drücken Sie auf die Auswahltaste Select,
um‘DISPL AY’ zu wählen.
3. Drücken Sie auf die Auswahltaste Select , um ‘INFO’ zu wählen.
4. Drücken Sie zum Blättern auf die Tasten < oder > und drücken Sie auf die Auswahltaste Select,
umdieanzuzeigenden Informationen auszuwählen.
.
14
Page 37

Ändern der Display-Helligkeit
3
4
3
4
3
4
Ihr Avalon N5 verfügt über einen Lichtsensor, der die Helligkeit des Displays an Ihre Umgebung anpasst.
Es ist auch möglich, die Displayhelligkeit manuell zu ändern und zu steuern, wie lange die DisplayHintergrundbeleuchtung eingeschaltet bleiben soll.
Ändern der Displayhelligkeit:
1. Drücken Sie auf
2. Drücken Sie zum Blättern auf die Tasten < oder > und drücken Sie auf die Auswahltaste Select,
um‘DISPL AY’ zu wählen.
3. Drücken Sie zum Blättern auf die Tasten < oder > und drücken Sie auf die Auswahltaste Select,
um‘HINTERGRUNDBELEUCHTUNG’ zu wählen.
4. Drücken Sie zum Blättern auf die Tasten < oder > und drücken Sie auf die Auswahltaste Select,
um‘AKTIV’ zu wählen und die Einstellungen zu ändern, die bei Einschalten des Avalon N5 angewandt
werden, oder wählen Sie ‘STANDBY’, um die Einstellungen im Standby-Modus zu ändern.
5. Drücken Sie zum Blättern auf die Tasten < oder > und drücken Sie auf die Auswahltaste Select,
um‘HELLIGKEIT’ zu wählen.
6. Drücken Sie zum Blättern auf die Tasten < oder > und drücken Sie auf die Auswahltaste Select,
umeine Helligkeitsstufe zu wählen. Wählen Sie eine höhere Zahl, um das Display heller zu machen.
Damit die Displayhelligkeit automatisch eingestellt wird, wählen Sie ‘AUTO’.
Um zu ändern, wie lange die Hintergrundbeleuchtung des Displays eingeschaltet bleibt:
1. Drücken Sie auf
2. Drücken Sie zum Blättern auf die Tasten < oder > und drücken Sie auf die Auswahltaste Select,
um‘DISPL AY’ zu wählen.
3. Drücken Sie zum Blättern auf die Tasten < oder > und drücken Sie auf die Auswahltaste Select,
um‘HINTERGRUNDBELEUCHTUNG’ zu wählen.
4. Drücken Sie zum Blättern auf die Tasten < oder > und drücken Sie auf die Auswahltaste Select,
um‘AKTIV’ zu wählen und die Einstellungen zu ändern, die bei Einschalten des Avalon N5 angewandt
werden, oder wählen Sie ‚STANDBY‘, um die Einstellung im Standby-Modus zu ändern.
5. Nur für die AKTIV-Einstellungen
Drücken Sie zum Blättern auf die Tasten < oder > und drücken Sie auf die Auswahltaste Select,
um‘ABSCHALTUNG’ zu wählen.
6. Drücken Sie zum Blättern auf die Tasten < oder > und drücken Sie auf die Auswahltaste Select,
um‘IMMER AN’ oder ‘ZEITGEST. AU S’ zu wählen.
.
.
DE
Einstellungen der Uhr
Einstellung von Uhrzeit und Datum
Ihr Avalon N5 kann UKW- und Digitalradiosignale verwenden, um Zeit und Datum automatisch einzustellen.
Wenn Zeit und Datum nicht automatisch aktualisiert werden, können Sie sie manuell einstellen.
Vorgehensweise zum manuellen Einstellen von Zeit und Datum:
1. Drücken Sie auf
2. Drücken Sie zum Blättern auf die Tasten < oder > und drücken Sie auf die Auswahltaste Select,
um‘UHR’ zu wählen.
.
15
Page 38

3
4
3
4
3. Drücken Sie zum Blättern auf die Tasten < oder > und drücken Sie auf die Auswahltaste Select,
3
4
um‘ZEIT/DAT UM EINSTELLEN’ zu wählen.
4. Drücken Sie zum Blättern auf die Tasten < oder > und drücken Sie auf die Auswahltaste Select,
umdieUhrzeit einzustellen. Wiederholen Sie diesen Schritt, um die Minuten einzustellen.
5. Drücken Sie zum Blättern auf die Tasten < oder > und drücken Sie auf die Auswahltaste Select,
umden Tag einzustellen. Wiederholen Sie diese Schritte zum Einstellen von Monat und Jahr.
Änderung des Uhrzeitformats
Vorgehensweise zur Änderung des Uhrzeitformats:
1. Drücken Sie auf
2. Drücken Sie zum Blättern auf die Tasten < oder > und drücken Sie auf die Auswahltaste Select,
um‘UHR’ zu wählen.
3. Drücken Sie zum Blättern auf die Tasten < oder > und drücken Sie auf die Auswahltaste Select,
um‘12/24 STD. EINSTELLEN’ zu wählen.
4. Drücken Sie zum Blättern auf die Tasten < oder > und drücken Sie auf die Auswahltaste Select,
um‘12STD. EINSTELLEN’ oder ‘24 STD. EINSTELLEN’ zu wählen.
.
Änderung des Datumsformats
Vorgehensweise zu Änderung des Datumsformats:
1. Drücken Sie auf
2. Drücken Sie zum Blättern auf die Tasten < oder > und drücken Sie auf die Auswahltaste Select,
um‘UHR’ zu wählen.
3. Drücken Sie zum Blättern auf die Tasten < oder > und drücken Sie auf die Auswahltaste Select,
um‘DAT UMSFORMAT EINST.’ zu wählen.
4. Drücken Sie zum Blättern auf die Tasten < oder > und drücken Sie auf die Auswahltaste Select,
umzu wählen, ob Sie das Datum in der Reihenfolge Tag, Monat und Jahr ‘TT-MM-JJJJ’ oder
Monat, Tag und Jahr ‘MM-TT-JJJJ’ anzeigen möchten.
.
Ändern der Quelle für die Synchronisierung der Uhr
Sie können die Radioquellen auswählen, die Sie zur Einstellung der Uhrzeit verwenden möchten. Avalon
N5 verwendet standardmäßig sowohl die UKW- als auch die Digitalradiosignale, um die Uhrzeit zu
synchronisieren.
Vorgehensweise zum Ändern der Synchronisierung der Uhr:
1. Drücken Sie auf
2. Drücken Sie zum Blättern auf die Tasten < oder > und drücken Sie auf die Auswahltaste Select,
um‘UHR’ zu wählen.
3. Drücken Sie zum Blättern auf die Tasten < oder > und drücken Sie auf die Auswahltaste Select,
um‘UHR SYNCHR.’ zu wählen.
4. Drücken Sie zum Blättern auf die Tasten < oder > und drücken Sie auf die Auswahltaste Select,
umdie gewünschte Option zu wählen.
.
16
Page 39

Änderung der Sprache
3
4
3
4
3
4
Es ist möglich, die Sprache von Menüs und Einstellungen zu ändern.
So wechseln Sie die Sprache:
DE
1. Drücken Sie auf
2. Drücken Sie zum Blättern auf die Tasten < oder > und drücken Sie auf die Auswahltaste Select, um
‘EINSTELLUNGEN’ zu wählen.
3. Drücken Sie zum Blättern auf die Tasten < oder > und drücken Sie auf die Auswahltaste Select,
um‘SPRACHE’ zu wählen.
4. Drücken Sie zum Blättern auf die Tasten < oder > und drücken Sie auf die Auswahltaste Select,
umeine Sprache zu wählen.
.
Zurücksetzen auf Werkseinstellungen
Durch das Zurücksetzen auf die Werkseinstellungen werden alle gespeicherten Favoriten, Wecker,
Timerund Einstellungen auf Ihrem Avalon N5 gelöscht.
Hinweis: Das Zurücksetzen auf die Werkseinstellungen kann nicht rückgängig gemacht werden.
Vorgehensweise zum Zurücksetzen auf Werkseinstellungen:
1. Drücken Sie auf
2. Drücken Sie zum Blättern auf die Tasten < oder > und drücken Sie auf die Auswahltaste Select,
um‘EINSTELLUNGEN’ zu wählen.
3. Drücken Sie zum Blättern auf die Tasten < oder > und drücken Sie auf die Auswahltaste Select,
um‘WERKSEINSTELLUNGEN’ zu wählen.
4. Drücken Sie zum Blättern auf die Tasten < oder > und drücken Sie auf die Auswahltaste Select,
um‘JA’ zu wählen.
Ihr Avalon N5 wird auf die Werkseinstellungen zurückgesetzt und startet erneut.
.
Aktualisieren der Software
Pure stellt eventuell Software-Updates für Ihr Avalon N5 bereit. Um zu prüfen, ob Software-Updates
verfügbar sind, besuchen Sie support.pure.com.
Tipp: Um kontaktiert zu werden, wenn Software-Updates verfügbar sind, registrieren Sie Ihr Produkt
unter pure.com/register.
Prüfen Ihrer aktuellen Softwareversion:
1. Drücken Sie auf
2. Drücken Sie zum Blättern auf die Tasten < oder > und drücken Sie auf die Auswahltaste Select,
um‘EINSTELLUNGEN’ zu wählen.
3. Drücken Sie zum Blättern auf die Tasten < oder > und drücken Sie auf die Auswahltaste Select,
um‘VERSION’ zu wählen.
Vorgehensweise zur Aktualisierung der Software:
1. Verwenden Sie ein Micro-USB-Kabel, um Ihr Avalon N5 an Ihren Computer anzuschließen.
2. Befolgen Sie die Anweisungen aus der Software-Update-Datei.
.
17
Page 40

ChargePAK verwenden
Über ChargePAKs
Ein ChargePAK ist ein wiederaufladbares Batteriepack (separat erhältlich), mit dem Sie Ihre Musik überall
wiedergeben können. Wenn Ihr Avalon N5 mit einer Netzsteckdose verbunden ist, wird das ChargePAK
geladen. Sie können Ihr Avalon N5 vom Stromnetz trennen und Ihre Musik mitnehmen.
ChargePAK einsetzen
Hinweis: Ihr Avalon N5 ist nur mit einem Pure ChargePAK F1 kompatibel. Verwenden Sie keine anderen
Batterien oder ChargePAK-Modelle mit Ihrem Avalon N5.
Vorgehensweise zum Einsetzen eines ChargePAKs:
1. Schalten Sie Ihr Avalon N5 aus und trennen Sie es vom Stromnetz.
2. Verwenden Sie an der Unterseite Ihres N5 eine Münze, um die Schraube zur Batterieabdeckung zu
lösen.
3. Setzen Sie das ChargePAK in das Batteriefach ein. Die elektrischen Kontakte am ChargePAK sind
dabei nach unten gerichtet und das Pure-Etikett weist weg von der Radiovorderseite.
4. Bringen Sie die Batterieabdeckung wieder an.
5. Schließen Sie Ihr Avalon N5 an die Stromquelle an.
Das ChargePAK beginnt zu laden. Ist das ChargePAK neu oder wurde es noch nicht lange
verwendet, empfehlen wir Ihnen eine Ladedauer von mindestens 24 Stunden.
Hinweis: Es ist normal, dass das ChargePAK beim Laden warm wird. Die Wirksamkeit des
ChargePAKs nimmt im Laufe der Zeit ab.
18
Page 41

Fehlersuche
Problem Lösung
Ich höre keinen Ton Verwenden Sie den Power-/Lautstärke-Regler, um die Lautstärke zu
Das Display ist sehr
dunkel.
Ich kann keinen UKWoder Digitalradiosender
finden
erhöhen.
Führen Sie für das Digitalradio einen automatischen Sendersuchlauf
durch. Weitere Informationen auf Seite 8.
Prüfen Sie bei Bluetooth- oder Zusatzgeräten, ob ein Gerät
angeschlossen ist. Erhöhen Sie die Lautstärke des angeschlossenen
Geräts.
Entfernen Sie alle störenden Objekte von der Radiovorderseite. In der
Nähe des Displays befindet sich ein Lichtsensor.
Erhöhen Sie die Helligkeit. Weitere Informationen auf Seite 14.
Stellen Sie Ihre Antenne ein und prüfen Sie, dass sie vollständig
ausgezogen ist.
Stellen Sie Ihr Radio an einem anderen Ort auf.
Führen Sie für das Digitalradio einen automatischen Sendersuchlauf
durch. Weitere Informationen auf Seite 8.
Versuchen Sie für das UKW-Radio eine Verwendung des Mono-
Empfangs zu erzwingen, um die Signalstärke zu verbessern. Weitere
Informationen auf Seite 9.
DE
19
Page 42

Technische Daten
Radio Digital- und UKW-Radio
Frequenzen Digital: Band III 174-240 MHz
Bluetooth Bluetooth v4.1
Lautsprecher
Leistung Audioausgang
Eingänge 12-V-DC-Netzadapteranschluss (230 V geliefert)
Ausgänge 3,5-mm-Stereoausgang für Kopfhörer
Favoriten 10 Senderspeicherplätze für Digitalradio und 10 für UKW
Anzeige 2 Zeilen LCD-Display
Softwareversion V 1.2
Netzstromadapter Adapter Eingang AC 100 -240 V~, 50/60 Hz, 0,8 A
ChargePAK Pure ChargePAK F1-Paket mit wiederaufladbaren Akkus (separat erhältlich)
Abmessungen 170 mm Höhe x 260 mm Breite x 70 mm Tiefe
Betriebstemperatur 0°C bis +40°C
Antenne Integrierte Teleskopantenne
Zulassungen CE-Kennzeichnung. Pure International Limited erklärt hiermit, dass
UKW-Radio 87,5-108 MHz
AVRCP 1.4-Support
AAC Codec-Unterstützung
Frequenzbereich: 2402~2480 MHz, maximale Leistung: 4,07 dBm (EIRP)
Breitband 3"-Treibereinheit und 2 x passive Bassstrahler (1 vorne, 1hinten)
20 Watt eff.
3,5-mm-Stereo-Aux-Eingangsbuchs für Zusatzgeräte
USB-Anschluss (Micro USB) ausschließlich für Softwareupdates
Ausgang DC 12 V
Hauptgerät DC 12 V , 2,4 A
dieses Radiomodell Avalon N5 die wesentlichen Anforderungen von
RED2014/53/ EU und der Neufassung der RoHS-Richtlinie (2011/65/ EU)
erfüllt und ETSI EN300 401-kompatibel ist. In einer Umgebung mit
Störungen der Radiofrequenzen kann das Radio seine Audio-Leistung
verlieren. Diese wird jedoch wiederhergestellt, sobald die Interferenz
entfernturde.
Der vollständige Text der EU-Konformitätserklärung ist auf folgender
Internetseite verfügbar: http://www.pure.com/about/red
, 2400 mA
20
Page 43

Garantieerklärung
Pure International Limited gewährleistet dem Endverbraucher, dass dieses Produkt für einen Zeitraum
von drei Jahren ab Kaufdatum bei normaler Nutzung frei von Material- und Fertigungsfehlern ist. Die
Garantie umfasst Störungen aufgrund von Herstellungs- oder Ausführungsfehlern. Sie ist nicht anwendbar
bei Unfallschäden, unabhängig davon, wie sie verursacht wurden, Verschleiß, Fahrlässigkeit, Anpassungen,
Modifikationen oder Reparaturen, die nicht von uns autorisiert wurden. Bei Problemen mit Ihrer Einheit wenden
Sie sich bitte an Ihren Lieferanten oder an den Pure-Support unter http://support.pure.com.
Haftungsausschluss
Pure International Limited übernimmt keine Verantwortung oder Garantien im Hinblick auf den Inhalt dieses
Dokuments und schließt insbesondere alle implizierten Zusicherungen zur Marktgängigkeit oder Eignung zu einem
bestimmten Zweck aus. Weiterhin behält sich Pure International Limited das Recht vor, diese Veröffentlichung
zu überarbeiten und von Zeit zu Zeit Änderungen vorzunehmen, ohne dass Pure International Limited dazu
verpflichtet ist, Personen oder Organisationen über solche Überarbeitungen oder Änderungen zu informieren.
Warenzeichen
Avalon N5, Pure und das Pure-Logo sind Warenzeichen oder registrierte Warenzeichen von Pure International
Limited.
Urheberrecht
Copyright © 2017 Pure International Limited. Alle Rechte vorbehalten. Ohne ausdrückliche schriftliche Einwilligung
durch Pure International Limited ist jede Vervielfältigung dieser Publikation, auch auszugsweise, verboten. Ebenso
ist ihre Verbreitung, Übermittlung, Abschrift, Speicherung in einem Datenverarbeitungssystem oder Übersetzung in
eine natürliche Sprache oder Programmiersprache in jeglicher Form, sei es elektronisch, mechanisch, magnetisch,
manuell oder anderweitig sowie jegliche Offenlegung gegenüber Dritten, verboten.
Entsorgung von elektrischen und elektronischen Geräten
Dieses Symbol auf dem Produkt oder seiner Verpackung zeigt an, dass dieses Produkt nicht als
Hausmüll entsorgt werden darf. Es sollte stattdessen an eine geeignete Sammelstelle zum Recycling
von elektrischen oder elektronischen Anlagen gebracht werden. Durch die richtige Entsorgung dieses
Produkts helfen Sie, negative Auswirkungen auf Umwelt und menschliche Gesundheit zu vermeiden,
die bei einer unangemessenen Behandlung des Produkts auftreten können. Die Wiederverwertung
von Materialien trägt zur Erhaltung natürlicher Rohstoffe bei. Für weitere Informationen über
die Wiederverwertung dieses Produkts wenden Sie sich bitte an Ihre Gemeindeverwaltung, Ihr
Abfallentsorgungsunternehmen für Hausmüll oder das Geschäft, in dem Sie das Produkt gekauft haben.
DE
21
Page 44

22
Page 45

Avalon N5
Merci d’avoir choisi Avalon N5. Ce manuel d’utilisation vous explique
comment utiliser les diverses fonctionnalités de votre Avalon N5.
Sivous avez besoin d’aide, vous pouvez consulter nos rubriques d’aide
àl’adresse support.pure.com.
EN
DE
FR
IT
NO
DA
NL
1
Page 46

2
Page 47

Table des matières
Sécurité 4
Pour commencer 5
Votre Avalon N5 5
Configuration de votre Avalon N5 6
Mise sous/hors tension de votre
AvalonN5 7
Réglage du volume 7
Radio numérique 8
Écoute de la radio numérique 8
Changement de station de radio
numérique 8
Syntonisation automatique sur des
stations de radio numériques 8
Radio FM 9
Écoute des stations radio FM 9
Changement de station de radio FM 9
Sélection de la réception stéréo ou
mono pour la radio FM 9
Présélections de stations
de radio 10
À propos des présélections 10
Mémorisation d’une station de radio
en tant que présélection 10
Écoute d’une présélection 10
Minuteries 13
Programmation de la minuterie
de cuisine 13
Extinction de la minuterie de cuisine 13
Programmation de la minuterie
de mise en veille 13
Paramètres 14
Personnalisation du son de votre
Avalon N5 14
Paramètres d’affichage 14
Paramètres de l’horloge 15
Modification de la langue 17
Réinitialisation aux paramètres
d’usine 17
Mise à jour logicielle 17
Utilisation d’une batterie
ChargePAK 18
À propos des batteries ChargePAK 18
Insertion d’une batterie ChargePAK 18
Dépannage 19
Spécifications 20
FR
Périphériques Bluetooth
et appareils auxiliaires 11
Connexion d’un périphérique Bluetooth 11
Connexion d’un appareil avec
un câble auxiliaire 11
Alarmes 11
Programmation d’une alarme 11
Interruption/Extinction d’une alarme 12
3
Page 48

Sécurité
Informations de sécurité
1. Avant d’utiliser la radio, familiarisez-vous avec toutes les instructions et informations de sécurité. Dans le cas où cette radio serait
cédée à une autre personne, merci de transmettre également tous les documents qui lui sont associés.
2. N’exposez pas cet appareil à des éclaboussures ni à des gouttes d’eau; ne placez aucun objet contenant du liquide (telqu’unvase)
sur l’appareil.
En cas de projection d’eau ou d’autres liquides sur la radio, coupez immédiatement son alimentation, débranchez la prise du
secteur et contactez votre revendeur.
Ne branchez et ne touchez jamais la radio si vos mains sont humides. Ne tirez jamais sur le câble d’alimentation pour débrancher
l’adaptateur secteur de la prise d’alimentation.
3. Les piles (bloc-batterie ou piles mises en place) ne doivent pas être exposées à une source de chaleur excessive (telle que les
rayons du soleil, du feu, etc.).
4. L’utilisation de la radio dans une pièce ou sous un climat à forte humidité ou à température élevée peut entraîner l’apparition de
condensation à l’intérieur de la radio, ce qui pourrait l’endommager.N’utilisez l’appareil que dans des climats tempérés.
5. Évitez les températures extrêmes, qu’elles soient basses ou élevées. Placez l’appareil à l’abri de toute source de chaleur, telles que
les radiateurs et les cheminées électriques ou au gaz. Ne posez aucune source de flamme nue, comme des bougies allumées, sur
l’appareil.
6. L’adaptateur secteur sert de dispositif de déconnexion ; en tant que tel, il doit toujours rester prêt à l’emploi.
Branchez l’adaptateur sur une prise de courant facilement accessible à proximité de la radio et utilisez uniquement l’adaptateur
secteur pour effectuer la connexion avec ce produit.
7. Utilisez uniquement l’adaptateur secteur répertorié dans le guide utilisateur. (fourni par Pure avec la Modèle SW1202400-IM).
8. Avant d’utiliser la radio, assurez-vous que la tension d’alimentation correspond à la tension nominale de fonctionnement de la radio.
9. Débranchez votre radio de la prise d’alimentation lors des longues périodes d’inutilisation (ex.: départ en vacances).
10. Débranchez toujours la radio de la prise secteur avant tout nettoyage. N’utilisez pas de tampon ni de solution abrasive pour nettoyer
votre radio. Vous risqueriez d’endommager sa surface.
11. Afin de réduire le risque de choc électrique, n’ôtez pas les vis, car aucune pièce à l’intérieur de l’appareil n’est susceptible de
requérir une intervention de la part de l’utilisateur. Confiez les opérations d’entretien et de réparation à des techniciens qualifiés.
Instructions de sécurité relatives à la batterie ChargePAK F1
1. Prenez connaissance des instructions liées à l’utilisation de la batterie ChargePAK, figurant dans ce document.
2. Utilisez votre ChargePAK uniquement avec des produits d’origine Pure.Utilisez uniquement la batterie ChargePAK F1 Pure
d’origine. Il existe un risque d’explosion si la pile n’est pas remplacée correctement (veillez à respecter les polarités). Remplacez-la
uniquement par une pile de type identique ou équivalent.
3. Stockez votre ChargePAK dans un endroit sec, à température ambiante. Retirez-la des appareils amenés à être stockés et non
utilisés pendant une période prolongée.
4. Assurez-vous de ne pas percer, modifier, laisser tomber, lancer ou causer tout autre choc inutile à votre ChargePAK, qui peut
constituer un risque d’incendie, d’explosion ou de brûlures chimiques en cas de mauvaise utilisation.
5. Ne jetez pas votre ChargePAK dans les flammes ni dans un incinérateur, ne la laissez pas directement exposée aux rayons du soleil
ou dans des endroits chauds, par exemple à proximité d’un moteur de voiture. Ne conservez pas votre ChargePAK près d’un four,
d’une cuisinière ou de toute autre source de chaleur.
6. Ne branchez pas votre ChargePAK directement à une source électrique telle qu’une prise de courant ou l’allume-cigare d’une
voiture. Ne la mettez pas dans un four à micro-ondes ni dans tout autre conteneur haute pression.
7. Ne plongez pas votre ChargePAK dans l’eau. De manière générale, évitez toute projection de liquide sur votre ChargePAK.
8. Ne placez pas votre ChargePAK en cour t-circuit.
9. N’utilisez ou ne rechargez pas votre ChargePAK si elle présente des traces de fuite, de décoloration, de rouille ou de déformation,
sielle émet une odeur suspecte ou si elle présente une autre anomalie, quelle qu’elle soit.
10. Ne touchez pas directement votre ChargePAK si elle fuit. Portez des équipements de protection individuelle pour l’évacuer et la
mettre au rebut dans les plus brefs délais.
11. Ne conservez pas votre ChargePAK en un lieu où elle serait accessible par des enfants.
12. En fin de vie, procédez à la mise au rebut de votre ChargePAK comme vous le feriez avec des piles rechargeables standard, en
vous conformant aux lois et réglementations locales applicables.
Symboles figurant sur le produit et dans le manuel d’utilisation
Danger potentiellement grave pour votre propre sécurité. Pour éviter tout risque de blessure grave, voire mortelle,
appliquez toutes les consignes de sécurité qui comportent ce symbole.
Attention. Lisez le manuel d’utilisation avant toute utilisation.
Entrée d’alimentation 12VCC, 2,4A
Polarité du connecteur CC, le centre de la borne du connecteur est positif
4
Page 49

Pour commencer
Votre Avalon N5
Commandes du dessus
1
1 Source Appuyez pour basculer entre la radio numérique, la radio FM,
2 < Select > Appuyez sur les boutons < > pour faire défiler les options
3 Menu Appuyez pour modifier les paramètres et les options
4 Bouton d’alimentation/
volume
5 Présélections 1-5+ Appuyez pour mémoriser vos stations de radio préférées et
leBluetooth et l’entrée auxiliaire
etappuyez sur Select pour changer de station de radio (voir
page 8/9) ou pour sélectionner une option dans un menu
Remarque: Les boutons < Select > peuvent effectuer les
opérations suivantes en mode Bluetooth: Piste en avant / en
arrière, ainsi que les fonctions de lecture / pause lors de la diffusion
en Bluetooth.
Appuyez pour allumer/éteindre votre Avalon N5. Tournez le
boutonpour régler le volume.
yaccéder (voirpage 10)
2
5
3
4
FR
Connexions latérales Connexions de base
Sortie 3,5mm pour
écouteurs stéréo
Entrée stéréo analogique
pour câbles auxiliaires
Connecteur micro USB
pour les mises à jour
logicielles
Entrée pour adaptateur
secteur fourni
uniquement
5
Page 50

Configuration de votre Avalon N5
Pour configurer votre Avalon N5:
1. Connectez l’adaptateur secteur fourni
à l’entrée située sur la base de votre
AvalonN5.
2. Utilisez les broches d’alimentation adaptées
à votre région et branchez l’adaptateur
secteur à votre alimentation secteur.
3. Appuyez pour faire sortir l’antenne et la
déployer complètement.
6
Page 51

Mise sous/hors tension de votre AvalonN5
Si vous avez une batterie rechargeable ChargePAK F1 (disponible séparément), insérez-la avant d’allumer
votre Avalon N5. Plus d’informations sur l’utilisation d’une batterie ChargePAK à la page 18.
Pour allumer votre Avalon N5:
• Appuyez sur le bouton d’alimentation/volume et relâchez-le jusqu’à ce que le bouton remonte.
Remarque: lorsque vous allumez votre Avalon N5 pour la première fois, celle-ci se syntonise tout
d’abord sur des stations de radio numériques. Dès que la syntonisation automatique est terminée,
vous pouvez commencer à écouter la radio numérique.
Pour éteindre votre Avalon N5 ou la mettre en veille:
Appuyez sur le bouton d’alimentation/volume et relâchez-le jusqu’à ce que le bouton se verrouille en
position basse.
• Si votre AvalonN5 est connectée à une prise d’alimentation, votre Avalon N5 entre en veille.
Lorsqu’elle est en veille, votre Avalon N5 utilise une quantité faible d’énergie et affiche la date et
l’heure à l’écran.
• Si votre Avalon N5 est alimentée par une batterie ChargePAK, votre Avalon N5 s’éteint.
Remarque: les alarmes programmées ne retentiront pas lorsque vous éteignez votre Avalon N5 si celle-ci
est alimentée par une batterie ChargePAK.
Réglage du volume
Pour régler le volume:
• Pour augmenter le volume, tournez le bouton d’alimentation/volume dans le sens des aiguilles
d’une montre.
• Pour baisser le volume, tournez le bouton d’alimentation/volume dans le sens inverse des
aiguilles d’une montre.
FR
7
Page 52

Radio numérique
1
3
2
4
3
4
3
243
4
Écoute de la radio numérique
Pour écouter la radio numérique:
• Appuyez sur
jusqu’à ce que «RADIO NUMÉRIQUE» s’affiche.
Changement de station de radio numérique
Pour changer de station de radio numérique:
1. Appuyez sur les boutons < > pour parcourir les stations de radio disponibles.
2. Appuyez sur le bouton Select pour changer de station de radio.
DR
PRESET 5
LISTE STATIONS
10:00
Astuce: L’apparition d’un «?» à côté du nom d’une station de radio signifie que cette station est inactive
ou indisponible.
<BBC RADIO 1 >
EMPTY
DR FM AUX BTDR FM AUX BTDR FM AUX BTDR FM AUX BTDR FM AUX BTDR FM AUX BTDR FM AUX BTDR FM AUX BTDR FM AUX BTDR FM AUX BTDR FM AUX BTDR FM AUX BTDR FM AUX BTDR FM AUX BTDR FM AUX BTDR FM AUX BTDR FM AUX BTDR FM AUX BTDR FM AUX BTDR FM AUX BTDR FM AUX BTDR FM AUX BTDR FM AUX BTDR FM AUX BTDR FM AUX BTDR FM AUX BTDR FM AUX BTDR FM AUX BTDR FM AUX BTDR FM AUX BTDR FM AUX BTDR FM AUX BTDR FM AUX BTDR FM AUX BTDR FM AUX BTDR FM AUX BTDR FM AUX BTDR FM AUX BTDR FM AUX BTDR FM AUX BTDR FM AUX BTDR FM AUX BTDR FM AUX BT
Syntonisation automatique sur des stations de radio numériques
Lorsque vous allumez votre Avalon N5 pour la première fois, celle-ci lance une recherche automatique
de stations de radio numériques. Si vous placez votre Avalon N5 à un autre endroit, procédez à une
syntonisation automatique afin de mettre à jour la liste de stations de radio.
Pour effectuer une syntonisation automatique sur des stations de radio numériques:
1. Appuyez sur
2. Appuyez sur les boutons < > pour faire défiler les options et appuyez sur le bouton Select pour
sélectionner «SYNT. AUTO.».
Votre Avalon N5 lance une recherche de stations de radio numériques.
.
8
Page 53

Radio FM
1
3
2
4
3
4
3
243
4
Écoute des stations radio FM
Pour écouter la radio FM:
• Appuyez sur
jusqu’à ce que «FM» s’affiche.
Changement de station de radio FM
Pour changer de station de radio FM:
• Pour rechercher la prochaine station de radio ou la station précédente, appuyez sur le bouton
<ou>et maintenez-le enfoncé pour atteindre la prochaine station de radio FM ou la station
précédente qui émet un signal fort.
• Pour effectuer une syntonisation manuelle sur une station de radio, appuyez sur le bouton < ou >.
La fréquence augmente ou baisse de 0,05MHz.
Sélection de la réception stéréo ou mono pour la radio FM
Vous pouvez choisir entre la réception «STÉRÉO» ou «MONO» lorsque vous écoutez la radio FM. Si vous
utilisez des écouteurs, la réception stéréo sera préférable.
Pour sélectionner la réception stéréo ou mono:
1. Appuyez sur
2. Appuyez sur les boutons < > pour faire défiler les options et appuyez sur le bouton Select pour
sélectionner «FM STÉRÉO».
3. Appuyez sur les boutons < > pour faire défiler les options et appuyez sur le bouton Select pour
sélectionner «STÉRÉO» ou «MONO».
FR
9
Page 54

Présélections de stations de radio
1
3
2
4
3
4
3
4
1
3
2
4
3
4
3
4
1
3
2
4
3
4
3
2
4
3
4
3
243
4
3
4
À propos des présélections
Vous pouvez mémoriser vos stations de radio préférées en tant que présélections. Vous pouvez utiliser
les présélections pour effectuer à tout moment une syntonisation rapide sur les stations que vous avez
mémorisées.
Sur le dessus de votre Avalon N5 figurent cinq boutons de présélections. Utilisez les touches
pour accéder rapidement à vos stations de radio préférées. Utilisez
vos présélections.
Vous pouvez mémoriser jusqu’à 10stations de radio numériques et 10stations de radio FM en tant que
présélections.
pour ouvrir une liste de toutes
Mémorisation d’une station de radio en tant que présélection
Pour mémoriser une station de radio sur les présélections allant de 1 à 4:
1. Syntonisez la station de radio que vous souhaitez mémoriser.
à
2. Choisissez un bouton de présélection allant de
message «PRÉRÉGL. MÉM.SÉ» soit affiché.
Astuce: si une station de radio est déjà mémorisée sur la présélection que vous avez sélectionnée,
cette station est remplacée par la nouvelle.
Pour mémoriser une station de radio dans la liste des présélections:
1. Syntonisez la station de radio que vous souhaitez mémoriser.
, puis appuyez dessus jusqu’à ce que le
à
2. Appuyez sur le bouton
affichée.
3. Appuyez sur les boutons < > pour faire défiler les options et appuyez sur le bouton Select pour
sélectionner un numéro de présélection. Le message «PRÉRÉGL. MÉM.SÉ s’affiche.
Astuce: si une station de radio est déjà mémorisée sur la présélection que vous avez sélectionnée,
cette station est remplacée par la nouvelle.
et maintenez-le enfoncé jusqu’à ce que la liste des présélections soit
DR
PRESET 5
PREREGL. 7
10:00
MEM.SE
EMPTY
Écoute d’une présélection
Pour écouter une présélection allant de 1 à 4:
• Appuyez brièvement sur un bouton de présélection allant de
Par exemple, pour écouter la station de radio mémorisée en présélection 2, appuyez sur
Pour écouter une présélection parmi toutes les présélections mémorisées:
1. Appuyez sur
2. Appuyez sur les boutons < > pour faire défiler les options et appuyez sur le bouton Select pour
sélectionner une présélection.
10
pour ouvrir la liste des présélections.
à
.
DR FM AUX BTDR FM AUX BTDR FM AUX BTDR FM AUX BTDR FM AUX BTDR FM AUX BTDR FM AUX BTDR FM AUX BTDR FM AUX BTDR FM AUX BTDR FM AUX BTDR FM AUX BTDR FM AUX BTDR FM AUX BTDR FM AUX BTDR FM AUX BTDR FM AUX BTDR FM AUX BTDR FM AUX BTDR FM AUX BTDR FM AUX BTDR FM AUX BTDR FM AUX BTDR FM AUX BTDR FM AUX BTDR FM AUX BTDR FM AUX BTDR FM AUX BTDR FM AUX BTDR FM AUX BTDR FM AUX BTDR FM AUX BTDR FM AUX BTDR FM AUX BTDR FM AUX BTDR FM AUX BTDR FM AUX BTDR FM AUX BTDR FM AUX BTDR FM AUX BTDR FM AUX BTDR FM AUX BTDR FM AUX BT
.
Page 55

Périphériques Bluetooth et appareils auxiliaires
1
3
2
4
1
3
2
4
3
4
Connexion d’un périphérique Bluetooth
Vous pouvez utiliser le Bluetooth pour vous connecter sans fil à un appareil tel qu’un téléphone mobile ou
une tablette. Vous pouvez alors diffuser de la musique depuis votre téléphone mobile ou votre tablette via
votre Avalon N5.
Pour connecter votre périphérique à votre Avalon N5, il vous suffit de sélectionner «Avalon» dans le menu
Bluetooth de votre appareil.
Pour vous connecter à un périphérique Bluetooth:
FR
1. Appuyez sur
2. Sur votre périphérique Bluetooth, activez le Bluetooth et connectez-vous à «Avalon».
Remarque: pour plus d’informations, reportez-vous au manuel d’utilisation de votre périphérique
Bluetooth. Si un mot de passe vous est demandé, saisissez «0000».
Lorsque le message «BT CONNECTÉ» est affiché sur l’écran de votre Avalon N5, celle-ci est prête
à diffuser de la musique.
Astuce: si vous souhaitez connecter un autre périphérique Bluetooth à votre Avalon N5,
connectez-le en suivant les étapes décrites ci-dessus. Cela entraînera automatiquement la déconnexion
de tout périphérique connecté à ce moment-là.
jusqu’à ce que «BLUETOOTH» s’affiche.
DR FM AUX BTDR FM AUX BTDR FM AUX BTDR FM AUX BTDR FM AUX BTDR FM AUX BTDR FM AUX BTDR FM AUX BTDR FM AUX BTDR FM AUX BTDR FM AUX BTDR FM AUX BTDR FM AUX BTDR FM AUX BTDR FM AUX BTDR FM AUX BTDR FM AUX BTDR FM AUX BTDR FM AUX BTDR FM AUX BTDR FM AUX BTDR FM AUX BTDR FM AUX BTDR FM AUX BTDR FM AUX BTDR FM AUX BTDR FM AUX BTDR FM AUX BTDR FM AUX BTDR FM AUX BTDR FM AUX BTDR FM AUX BTDR FM AUX BTDR FM AUX BTDR FM AUX BTDR FM AUX BTDR FM AUX BTDR FM AUX BTDR FM AUX BTDR FM AUX BTDR FM AUX BTDR FM AUX BTDR FM AUX BT
PRESET 5
BT CONNECTE
10:00
10-10-2017
EMPTY
Connexion d’un appareil avec un câble auxiliaire
Vous pouvez utiliser un câble auxiliaire pour connecter un appareil tel qu’un lecteur MP3 à votre Avalon N5.
Vous pouvez alors profiter de la musique enregistrée sur votre appareil via votre Avalon N5.
Pour connecter un appareil avec un câble auxiliaire:
1. Appuyez sur
2. Insérez un câble auxiliaire dans la prise Aux située sur le côté de votre Avalon N5.
3. Insérez l’autre extrémité du câble auxiliaire dans l’appareil que vous souhaitez connecter.
Votre Avalon N5 est désormais prête à diffuser de la musique depuis l’appareil connecté.
jusqu’à ce que «ENTRÉE AUX» s’affiche.
Alarmes
Pour vous réveiller en écoutant votre station de radio préférée, vous pouvez programmer jusqu’à deux alarmes
sur votre Avalon N5. Remarque: vous ne pouvez pas programmer d’alarmes lorsque votre Avalon N5 est
alimentée par une batterie ChargePAK.
Programmation d’une alarme
Pour programmer une alarme:
1. Appuyez sur
2. Appuyez sur les boutons < > pour faire défiler les options et appuyez sur le bouton Select pour
sélectionner «RÉVEILS».
.
11
Page 56

3. Appuyez sur les boutons < > pour faire défiler les options et appuyez sur le bouton Select pour
DR FM AUX BTDR FM AUX BTDR FM AUX BTDR FM AUX BTDR FM AUX BTDR FM AUX BTDR FM AUX BTDR FM AUX BTDR FM AUX BTDR FM AUX BTDR FM AUX BTDR FM AUX BTDR FM AUX BTDR FM AUX BTDR FM AUX BTDR FM AUX BTDR FM AUX BTDR FM AUX BTDR FM AUX BTDR FM AUX BTDR FM AUX BTDR FM AUX BTDR FM AUX BTDR FM AUX BTDR FM AUX BTDR FM AUX BTDR FM AUX BTDR FM AUX BTDR FM AUX BTDR FM AUX BTDR FM AUX BTDR FM AUX BTDR FM AUX BTDR FM AUX BTDR FM AUX BTDR FM AUX BTDR FM AUX BTDR FM AUX BTDR FM AUX BTDR FM AUX BTDR FM AUX BTDR FM AUX BTDR FM AUX BT
DR
3
4
3
4
sélectionner «RÉVEILS 1 ou «RÉVEILS 2».
4. Appuyez sur les boutons < > pour faire défiler les options et appuyez sur le bouton Select pour
modifier les paramètres de l’alarme:
«RÉVEILS» Allumez ou éteignez l’alarme
«H.M.CHE» Choisissez l’heure de l’alarme
«DURÉE» Choisissez la durée d’activation de l’alarme en minutes
«SOURCE» Choisissez de vous réveiller en écoutant une station de radio «FM» ou
«RÉPÉTER» Choisissez la fréquence de votre alarme entre «TOUS LES JOURS»,
«VOLUME» Choisissez le volume de l’alarme (alarmes radio uniquement)
Le message «RÉVEILS ENREGISTRÉ» apparaît lorsque la configuration est terminée.
Le symbole
5. Lorsque vous avez effectué toutes les modifications que vous souhaitiez, appuyez sur le
«DAB» ou une «SONNERIE»
Astuce: pour les options «FM» et «DAB», vous pouvez soit sélectionner
une présélection (si vous en avez mémorisé), soit opter pour «DERNIÈRE
UTILIS.» pour sélectionner la dernière station que vous avez écoutée.
«UNEFOIS», «WEEK END» et «SEMAINE»
ou
est affiché en haut de l’écran lorsqu’une alarme est programmée.
DR
10:00
PRESET 5
EMPTY
DR FM AUX BTDR FM AUX BTDR FM AUX BTDR FM AUX BTDR FM AUX BTDR FM AUX BTDR FM AUX BTDR FM AUX BTDR FM AUX BTDR FM AUX BTDR FM AUX BTDR FM AUX BTDR FM AUX BTDR FM AUX BTDR FM AUX BTDR FM AUX BTDR FM AUX BTDR FM AUX BTDR FM AUX BTDR FM AUX BTDR FM AUX BTDR FM AUX BTDR FM AUX BTDR FM AUX BTDR FM AUX BTDR FM AUX BTDR FM AUX BTDR FM AUX BTDR FM AUX BTDR FM AUX BTDR FM AUX BTDR FM AUX BTDR FM AUX BTDR FM AUX BTDR FM AUX BTDR FM AUX BTDR FM AUX BTDR FM AUX BTDR FM AUX BTDR FM AUX BTDR FM AUX BTDR FM AUX BTDR FM AUX BT
REVEILS
ENREGISTRE
bouton
et maintenez-le enfoncé pour quitter le menu.
Annulation d’une alarme existante
Pour annuler une alarme existante:
1. Appuyez sur
2. Appuyez sur les boutons < > pour faire défiler les options et appuyez sur le bouton Select pour
sélectionner «RÉVEILS».
3. Appuyez sur les boutons < > pour faire défiler les options et appuyez sur le bouton Select pour
sélectionner «RÉVEILS 1 ou «RÉVEILS 2».
4. Appuyez sur les boutons < > pour faire défiler les options et appuyez sur le bouton Select pour
paramétrer l’alarme sur «ARRÊT».
Le message «RÉVEILS ENREGISTRÉ» apparaît.
.
Interruption/Extinction d’une alarme
Pour interrompre une alarme:
• Appuyez sur un des boutons de présélection.
L’alarme est interrompue pendant 8 minutes.
12
Pour éteindre une alarme:
• Appuyez sur le bouton Source, < Select > ou
Menu.
Page 57

Minuteries
3
4
DR FM AUX BTDR FM AUX BTDR FM AUX BTDR FM AUX BTDR FM AUX BTDR FM AUX BTDR FM AUX BTDR FM AUX BTDR FM AUX BTDR FM AUX BTDR FM AUX BTDR FM AUX BTDR FM AUX BTDR FM AUX BTDR FM AUX BTDR FM AUX BTDR FM AUX BTDR FM AUX BTDR FM AUX BTDR FM AUX BTDR FM AUX BTDR FM AUX BTDR FM AUX BTDR FM AUX BTDR FM AUX BTDR FM AUX BTDR FM AUX BTDR FM AUX BTDR FM AUX BTDR FM AUX BTDR FM AUX BTDR FM AUX BTDR FM AUX BTDR FM AUX BTDR FM AUX BTDR FM AUX BTDR FM AUX BTDR FM AUX BTDR FM AUX BTDR FM AUX BTDR FM AUX BTDR FM AUX BTDR FM AUX BT
DR
Programmation de la minuterie de cuisine
La minuterie de cuisine est un compte à rebours qui se termine avec une tonalité d’alarme.
Pour programmer la minuterie de cuisine :
FR
1. Appuyez sur
2. Appuyez sur les boutons < > pour faire défiler les options et appuyez sur le bouton Select pour
sélectionner «MINUTERIE»
3. Utilisez les boutons de défilement < > pour modifier les heures, puis appuyez sur le bouton Select.
4. Utilisez à nouveau les boutons de défilement < > pour modifier les minutes, puis appuyez pour
confirmer et déclencher la minuterie.
Le symbole
est affiché en haut de l’écran lorsque la minuterie est programmée.
.
10:00
DR
PRESET 5
MINUTERIE
MEM.SEE
EMPTY
DR FM AUX BTDR FM AUX BTDR FM AUX BTDR FM AUX BTDR FM AUX BTDR FM AUX BTDR FM AUX BTDR FM AUX BTDR FM AUX BTDR FM AUX BTDR FM AUX BTDR FM AUX BTDR FM AUX BTDR FM AUX BTDR FM AUX BTDR FM AUX BTDR FM AUX BTDR FM AUX BTDR FM AUX BTDR FM AUX BTDR FM AUX BTDR FM AUX BTDR FM AUX BTDR FM AUX BTDR FM AUX BTDR FM AUX BTDR FM AUX BTDR FM AUX BTDR FM AUX BTDR FM AUX BTDR FM AUX BTDR FM AUX BTDR FM AUX BTDR FM AUX BTDR FM AUX BTDR FM AUX BTDR FM AUX BTDR FM AUX BTDR FM AUX BTDR FM AUX BTDR FM AUX BTDR FM AUX BTDR FM AUX BT
Extinction de la minuterie de cuisine
Pour éteindre la minuterie de cuisine :
• Appuyez sur le bouton Source, < Select > ou Menu.
Programmation de la minuterie de mise en veille
La minuterie de mise en veille met votre Avalon N5 en veille au bout d’une période définie.
Pour programmer la minuterie de mise en veille :
1. Appuyez sur
2. Appuyez sur les boutons < > pour faire défiler les options et appuyez sur le bouton Select pour
sélectionner «SOMMEIL TIMER »
3. Appuyez sur les boutons < > pour faire défiler les options et appuyez sur le bouton Select pour
sélectionner la durée de la minuterie.
Astuce: vous pouvez choisir une durée allant de 15 à 90minutes.
4. Le symbole
.
est affiché en haut de l’écran lorsque la minuterie est programmée.
DR
PRESET 5
SOMMEIL TIMER
10:00
MEM.SE
EMPTY
DR FM AUX BTDR FM AUX BTDR FM AUX BTDR FM AUX BTDR FM AUX BTDR FM AUX BTDR FM AUX BTDR FM AUX BTDR FM AUX BTDR FM AUX BTDR FM AUX BTDR FM AUX BTDR FM AUX BTDR FM AUX BTDR FM AUX BTDR FM AUX BTDR FM AUX BTDR FM AUX BTDR FM AUX BTDR FM AUX BTDR FM AUX BTDR FM AUX BTDR FM AUX BTDR FM AUX BTDR FM AUX BTDR FM AUX BTDR FM AUX BTDR FM AUX BTDR FM AUX BTDR FM AUX BTDR FM AUX BTDR FM AUX BTDR FM AUX BTDR FM AUX BTDR FM AUX BTDR FM AUX BTDR FM AUX BTDR FM AUX BTDR FM AUX BTDR FM AUX BTDR FM AUX BTDR FM AUX BTDR FM AUX BT
13
Page 58

Paramètres
3
4
3
4
3
4
Personnalisation du son de votre Avalon N5
Tirez le meilleur de votre musique à l’aide des paramètres d’égaliseur et d’amplification. Plusieurs
paramètres d’égaliseur sont déjà configurés. Par exemple, pour profiter au mieux d’un morceau de
musique classique, réglez le paramètre d’égaliseur sur «CLASSIQUE». Vous pouvez également
personnaliser l’égaliseur pour régler les aigus, les basses et la puissance sonore.
Pour utiliser l’égaliseur:
1. Appuyez sur
2. Appuyez sur le bouton Select pour sélectionner «AUDIO».
3. Appuyez sur les boutons < > pour faire défiler les options et appuyez sur le bouton Select pour
sélectionner «ÉGALISEUR».
4. Choisissez un paramètre d’égaliseur:
• Appuyez sur les boutons < > pour faire défiler les options et appuyez sur le bouton Select
pour sélectionner l’un des paramètres suivants: «NORMAL», «PL AT», «ROCK», «POP»,
«CLASSIQUE», «JAZZ», «INFORMATIONS» ou «PERSONNALISÉE».
• Pour utiliser des paramètres personnalisés, appuyez sur les boutons < > pour faire défiler les
options et appuyez sur le bouton Select pour sélectionner «PERSONNALISÉE». Ensuite,
appuyez sur les boutons < > pour faire défiler les options et appuyez sur le bouton Select pour
régler les aigus, les basses et la puissance sonore.
Pour activer ou désactiver l’amplification:
1. Appuyez sur
2. Appuyez sur le bouton Select pour sélectionner «AUDIO».
3. Appuyez sur les boutons < > pour faire défiler les options et appuyez sur le bouton Select pour
sélectionner «AMPLIFICATION».
4. Appuyez sur les boutons < > pour faire défiler les options et appuyez sur le bouton Select pour
activer («MARCHE») ou désactiver («ARRÊT») l’amplification.
.
.
Paramètres d’affichage
Sélection des informations affichées à l’écran
Vous avez la possibilité de changer les informations affichées à l’écran lorsque vous écoutez la radio. Par
exemple, vous pouvez afficher des informations défilantes sur la station de radio en cours de lecture.
1. Appuyez sur
2. Appuyez sur les boutons < > pour faire défiler les options et appuyez sur le bouton Select pour
sélectionner «AFFICHAGE».
3. Appuyez sur le bouton Select pour sélectionner «INFOS».
4. Appuyez sur les boutons < > pour faire défiler les options et appuyez sur le bouton Select pour
sélectionner les informations à afficher.
.
14
Page 59

Réglage de la luminosité de l’écran
3
4
3
4
3
4
Votre Avalon N5 est équipée d’un capteur de lumière, qui ajuste la luminosité de l’écran en fonction de
votre environnement. Vous pouvez également régler manuellement la luminosité de l’écran et contrôler la
durée d’activation du rétroéclairage.
Pour modifier la luminosité de l’écran:
FR
1. Appuyez sur
2. Appuyez sur les boutons < > pour faire défiler les options et appuyez sur le bouton Select pour
sélectionner «AFFICHAGE».
3. Appuyez sur les boutons < > pour faire défiler les options et appuyez sur le bouton Select pour
sélectionner «RÉTROÉCLAIRAGE».
4. Appuyez sur les boutons < > pour faire défiler les options et appuyez sur le bouton Select pour
sélectionner «ACTIF» si vous souhaitez modifier les paramètres qui s’appliquent lorsque votre
Avalon N5 est en marche, ou «VEILLE» si vous souhaitez modifier les paramètres qui s’appliquent
en mode veille.
5. Appuyez sur les boutons < > pour faire défiler les options et appuyez sur le bouton Select pour
sélectionner «LUMINOSITÉ».
6. Appuyez sur les boutons < > pour faire défiler les options et appuyez sur le bouton Select pour
sélectionner un niveau de luminosité. Pour que votre écran soit plus éclairé, choisissez un chiffre
plus élevé. Pour régler automatiquement la luminosité de l’écran, sélectionnez «AUTO».
Pour modifier la durée d’activation du rétroéclairage:
1. Appuyez sur
2. Appuyez sur les boutons < > pour faire défiler les options et appuyez sur le bouton Select pour
sélectionner «AFFICHAGE».
3. Appuyez sur les boutons < > pour faire défiler les options et appuyez sur le bouton Select pour
sélectionner «RÉTROÉCLAIRAGE».
4. Appuyez sur les boutons < > pour faire défiler les options et appuyez sur le bouton Select pour
sélectionner «ACTIF» si vous souhaitez modifier les paramètres qui s’appliquent lorsque votre
Avalon N5 est en marche, ou «VEILLE» si vous souhaitez modifier les paramètres qui s’appliquent
en mode veille.
5. Pour les paramètres en mode «ACTIF» uniquement, appuyez sur les boutons < > pour faire défiler
les options et appuyez sur le bouton Select pour sélectionner «TEMPORISATION».
6. Appuyez sur les boutons < > pour faire défiler les options et appuyez sur le bouton Select pour
sélectionner «TOUJOURS ACT.» ou «ARRÊT MINUTÉ».
.
.
Paramètres de l’horloge
Réglage de la date et de l’heure
Votre Avalon N5 peut utiliser les signaux radio FM et numériques pour régler automatiquement la date et l’heure.
Si la date et l’heure ne se mettent pas à jour automatiquement, vous pouvez effectuer un réglage manuel.
Pour régler manuellement la date et l’heure:
1. Appuyez sur
2. Appuyez sur les boutons < > pour faire défiler les options et appuyez sur le bouton Select pour
sélectionner «HORLOGE».
.
15
Page 60

3
4
3
4
3. Appuyez sur les boutons < > pour faire défiler les options et appuyez sur le bouton Select pour
3
4
sélectionner «RÉGL. HEURE/DATE».
4. Appuyez sur les boutons < > pour faire défiler les options et appuyez sur le bouton Select pour
définir l’heure. Répétez l’opération pour régler les minutes.
5. Appuyez sur les boutons < > pour faire défiler les options et appuyez sur le bouton Select pour
définir le jour. Répétez l’opération pour définir le mois et l’année.
Modification du format de l’heure
Pour modifier le format de l’heure:
1. Appuyez sur
2. Appuyez sur les boutons < > pour faire défiler les options et appuyez sur le bouton Select pour
sélectionner «HORLOGE».
3. Appuyez sur les boutons < > pour faire défiler les options et appuyez sur le bouton Select pour
sélectionner «RÉGL. 12H/24H».
4. Appuyez sur les boutons < > pour faire défiler les options et appuyez sur le bouton Select pour
sélectionner «RÉGL. 12H» ou «RÉGL. 24H».
.
Modification du format de date
Pour modifier le format de date:
1. Appuyez sur
2. Appuyez sur les boutons < > pour faire défiler les options et appuyez sur le bouton Select pour
sélectionner «HORLOGE».
3. Appuyez sur les boutons < > pour faire défiler les options et appuyez sur le bouton Select pour
sélectionner «RÉGL.FORMAT DATE».
4. Appuyez sur les boutons < > pour faire défiler les options et appuyez sur le bouton Select pour
choisir entre l’affichage de la date dans l’ordre jour, mois, année («JJ-MM-AAAA») ou dans l’ordre
mois, jour, année («MM-JJ-AAAA»).
.
Modification de la source de synchronisation de l’horloge
Vous pouvez sélectionner les sources radio que vous souhaitez utiliser pour le réglage de l’heure. Par
défaut, Avalon N5 utilise à la fois la FM et la radio numérique pour synchroniser l’heure.
Pour modifier la source de synchronisation de l’horloge:
1. Appuyez sur
2. Appuyez sur les boutons < > pour faire défiler les options et appuyez sur le bouton Select pour
sélectionner «HORLOGE».
3. Appuyez sur les boutons < > pour faire défiler les options et appuyez sur le bouton Select pour
sélectionner «SYNCHRONISATION DE L’HORLOGE».
4. Appuyez sur les boutons < > pour faire défiler les options et appuyez sur le bouton Select pour
sélectionner l’option souhaitée.
.
16
Page 61

Modification de la langue
3
4
3
4
3
4
Vous pouvez modifier la langue des menus et des paramètres.
Pour changer la langue:
1. Appuyez sur
2. Appuyez sur les boutons < > pour faire défiler les options et appuyez sur le bouton Select pour
sélectionner «PARAMÈTRES».
3. Appuyez sur les boutons < > pour faire défiler les options et appuyez sur le bouton Select pour
sélectionner «LANGUE».
4. Appuyez sur les boutons < > pour faire défiler les options et appuyez sur le bouton Select pour
sélectionner une langue.
.
Réinitialisation aux paramètres d’usine
La réinitialisation aux paramètres d’usine supprime l’intégralité des présélections, alarmes, minuteries et
paramètres enregistrés sur votre Avalon N5.
Remarque: Une réinitialisation aux paramètres d’usine est irréversible.
Pour effectuer une réinitialisation aux paramètres d’usine:
FR
1. Appuyez sur
2. Appuyez sur les boutons < > pour faire défiler les options et appuyez sur le bouton Select pour
sélectionner «PARAMÈTRES».
3. Appuyez sur les boutons < > pour faire défiler les options et appuyez sur le bouton Select pour
sélectionner «RÉGL. EN USINE».
4. Appuyez sur les boutons < > pour faire défiler les options et appuyez sur le bouton Select pour
sélectionner «OUI».
Votre Avalon N5 procède alors à une réinitialisation aux paramètres d’usineet redémarre.
.
Mise à jour logicielle
Pure peut fournir des mises à jour logicielles pour votre Avalon N5. Pour vérifier les mises à jour
logicielles disponibles, rendez-vous sur support.pure.com.
Astuce: si vous souhaitez être contacté(e) lorsque des mises à jour logicielles sont disponibles,
enregistrez votre produit sur pure.com/register.
Pour vérifier la version logicielle actuelle:
1. Appuyez sur
2. Appuyez sur les boutons < > pour faire défiler les options et appuyez sur le bouton Select pour
sélectionner «PARAMÈTRES».
3. Appuyez sur les boutons < > pour faire défiler les options et appuyez sur le bouton Select pour
sélectionner «VERSION».
Pour mettre à jour le logiciel:
1. Utilisez un câble micro USB pour connecter votre Avalon N5 à votre ordinateur.
2. Suivez les instructions données avec le fichier de mise à jour logicielle.
.
17
Page 62

Utilisation d’une batterie ChargePAK
À propos des batteries ChargePAK
Une batterie ChargePAK est un bloc-batterie rechargeable (disponible séparément) qui vous permet
d’écouter votre musique partout. Lorsque votre Avalon N5 est connectée à une prise d’alimentation, la
batterie ChargePAK se met en charge. Vous pouvez ainsi déconnecter votre Avalon N5 de l’alimentation
et emporter votre musique avec vous.
Insertion d’une batterie ChargePAK
Remarque: votre Avalon N5 est uniquement compatible avec une batterie ChargePAK F1 Pure.
N’utilisez pas d’autres batteries ou d’autres modèles ChargePAK avec votre Avalon N5.
Pour insérer une batterie ChargePAK:
1. Éteignez votre Avalon N5 et débranchez-le de la prise secteur.
2. Sur la base de votre Avalon N5, desserrez la vis du couvercle de la batterie à l’aide d’une pièce et
retirez-la.
3. Insérez la batterie ChargePAK dans le compartiment batterie, en orientant les contacts électriques
de la batterie ChargePAK vers le bas et l’étiquette Pure vers l’extérieur de l’avant de la radio.
4. Replacez le couvercle de la batterie.
5. Branchez votre Avalon N5 sur la prise secteur.
La batterie ChargePAK se met en charge. Si la batterie ChargePAK est neuve ou n’a pas été utilisée
depuis longtemps, nous vous recommandons de la charger pendant au moins 24heures.
Remarque: lorsque la batterie ChargePAK est en charge, celle-ci chauffe, ce qui est normal.
L’efficacité de la batterie ChargePAK baisse avec le temps.
18
Page 63

Dépannage
Problème Solution
Je n’ai pas de son Augmentez le volume à l’aide du bouton d’alimentation/volume.
Pour la radio numérique, effectuez une syntonisation automatique.
Plusd’informations à la page 8.
Pour les périphériques Bluetooth et les appareils auxiliaires, vérifiez
qu’un appareil est connecté. Augmentez le volume sur l’appareil
connecté.
L’écran est très sombre Retirez les obstacles pouvant se trouver devant la radio. Un capteur de
Je ne trouve pas de
station de radio FM ou
numérique
lumière se trouve près de l’écran.
Augmentez la luminosité de l’écran. Plus d’informations à la page 14.
Ajustez votre antenne et vérifiez que celle-ci est complètement
déployée.
Déplacez votre radio.
Pour la radio numérique, effectuez une syntonisation automatique.
Plusd’informations à la page 8
Pour la radio FM, essayez de forcer la radio à utiliser la réception
monoafin d’augmenter l’intensité du signal. Plus d’informations à la
page 9.
FR
19
Page 64

Spécifications
Radio Radio numérique et FM
Fréquences Numérique: 174–240MHz en bande III
Bluetooth Bluetooth v4.1
Haut-parleur Haut-parleur 3" à gamme étendue et 2 récupérateurs de basses passifs
Puissance de sortie audio 20watts RMS
Entrées Prise pour adaptateur secteur 12V CC (230V fourni)
Sorties Écouteurs stéréo format mini-jack
Présélections 10présélections de radios numériques et 10présélections de radios
Écran Écran LCD 2lignes
Version logicielle v1.2
Adaptateur secteur Adaptateur Entrée 100–240V~ CA, 50/60Hz, 0,8A
ChargePAK Bloc-batterie rechargeable ChargePAK F1 Pure (disponible séparément)
Dimensions 170mmx260mmx70mm (LxHxP).
Température de
fonctionnement
Antenne Antenne télescopique intégrée
Homologations Certifié CE. Pure International Limited déclare par les présentes
Radio FM 87,5 – 108MHz.
AVRCP 1.4 pris en charge
Codec AAC pris en charge
Gamme de fréquences: 2402~2480MHz, puissance maximale:
4,07dBm (PIRE)
(1 à l’avant, 1 à l’arrière)
Entrée stéréo format mini-jack pour appareils auxiliaires
Connexion USB (micro USB) pour les mises à jour logicielles
uniquement
FM
Output 12V CC
Unité principale 12VCC , 2,4A
0 °C à +40 °C
que ce modèle de radio Avalon N5 est conforme aux principales
exigences de ladirective RED (2014/53/UE) et de la directive RoHS
(refondue) (2011/65/UE), ainsi qu’à la norme ETSI EN 300 401. Dans
un environnement présentant des perturbations des fréquences radio,
leson de la radio peut faiblir mais est récupéré lorsque l’interférence
estsupprimée.
Le texte intégral de la Déclaration de conformité UE est disponible
àl’adresse suivante: http://www.pure.com/about/red
, 2400mA
20
Page 65

Informations sur la garantie
Pure International Limited garantit à l’utilisateur final que le présent produit est exempt de défauts de matière
et de main-d’œuvre dans le cadre d’une utilisation normale, pour une période de trois ans à compter de la
date d’achat. La présente garantie couvre les pannes dues à un défaut de conception ou de fabrication;
elle n’est pas applicable aux dommages accidentels, quelle qu’en soit la cause, à l’usure normale du
produit, ainsi qu’à tous les dommages dus à la négligence et aux interventions, modifications ou réparations
effectuées sans notre autorisation. Si vous rencontrez un problème avec votre appareil, veuillez contacter votre
fournisseur ou le support technique de Pure à l’adresse http://support.pure.com.
Avis de non-responsabilité
Pure International Limited décline toute responsabilité et n’accorde aucune garantie quant au contenu du présent
document, notamment en ce qui concerne les garanties implicites de valeur marchande ou d’adéquation à un
usage spécifique. En outre, Pure International Limited se réserve le droit de réviser ce document et d’y apporter
des modifications de temps à autre sans obligation pour Imagination Technologies Limited d’en avertir quelque
personne ou organisation que ce soit.
Marques déposées
Avalon N5, Pure et le logo Pure sont des marques commerciales ou des marques déposées de Pure International
Limited.
Copyright
Copyright © 2017 Pure International Limited. Tous droits réservés. Aucune partie de cette publication ne peut être
copiée, distribuée, transmise, transcrite, stockée dans un système de recherche de documents ou traduite dans
un langage humain ou informatique, en tout ou partie, sous quelque forme et par quelque procédé que ce soit,
électronique, mécanique, magnétique, manuel ou autre, ni divulguée à des tiers, sans le consentement écrit préalable
de Pure International Limited.
Élimination en fin de vie des appareils électriques et électroniques
Ce symbole, apposé directement sur le produit ou sur son emballage, indique que le produit ne doit pas
être éliminé avec les déchets ménagers. Il doit être remis à un point de collecte agréé pour le recyclage
des équipements électriques et électroniques. En jetant ce produit dans le respect du tri sélectif, vous
contribuerez à éviter de possibles effets néfastes sur l’environnement et la santé, qui pourraient être
causés par l’abandon de ce produit dans la mauvaise catégorie de déchets. Le recyclage des matériaux
contribue à la préservation des ressources naturelles. Pour tout complément d’information sur le
recyclage de ce produit, n’hésitez pas à contacter votre municipalité, votre déchetterie ou le magasin
dans lequel vous avez acheté le produit.
FR
21
Page 66

22
Page 67

Avalon N5
Grazie per aver scelto Avalon N5. Il presente manuale utente spiega
come usare le diverse funzioni di Avalon N5. Per ulteriore supporto,
consultare gli argomenti disponibili al link support.pure.com.
EN
DE
FR
IT
NO
DA
NL
1
Page 68

2
Page 69

Sommario
Istruzioni di sicurezza 4
Per iniziare 5
Avalon N5 5
Impostazione di Avalon N5 6
Accensione e spegnimento di Avalon N5 7
Regolazione del volume 7
Radio digitale 8
Ascolto della radio digitale 8
Cambio della stazione radio digitale 8
Sintonizzazione automatica delle
stazioni radio digitali 8
Radio FM 9
Ascolto della radio FM 9
Cambio della stazione radio FM 9
Selezione ricezione stereo o mono
per radio FM 9
Stazioni radio preselezionabili 10
Info stazioni preselezionabili 10
Memorizzazione di una stazione
come preselezione 10
Ascolto di una stazione preselezionabile 10
Timer 13
Impostazione del timer da cucina 13
Silenziamento del timer da cucina 13
Impostazione del timer di
autospegnimento (sleep timer) 13
Impostazioni 14
Personalizzazione del suono su
Avalon N5 14
Impostazioni del display 14
Modifica della lingua 16
Ripristino delle impostazioni predefinite 17
Aggiornamento del software 17
Utilizzo di ChargePAK 18
Informazioni su ChargePAK 18
Inserimento di ChargePAK 18
Risoluzione dei problemi 19
Specifiche 20
IT
Bluetooth e dispositivi ausiliari 11
Connessione di un dispositivo Bluetooth 11
Connessione di un dispositivo con cavo
ausiliario 11
Sveglie 12
Impostazione di una sveglia 12
Annullamento di una sveglia 12
Interruzione temporanea della sveglia con
la funzione Snooze osilenziamento 13
3
Page 70

Istruzioni di sicurezza
Informazioni di sicurezza
1. Leggere attentamente tutte le informazioni e istruzioni di sicurezza prima di utilizzare la radio. In caso di cessione della radio a
terzi, includere tutta la documentazione correlata.
2. L'apparecchio non deve esposto a spruzzi o gocciolamenti. Non collocare oggetti contenenti liquidi (ad esempio vasi)
sull'apparecchio.
Se si è versato del liquido o acqua sulla radio, spegnere l’unità, scollegare la presa dalla rete di alimentazione e contattare il
rivenditore.
Non toccare mai la spina o la radio stessa con le mani bagnate. Quando si scollega l'adattatore dalla presa di alimentazione
elettrica, non tirare mai il cavo di alimentazione.
3. Non esporre le batterie (blocco batterie o batterie installate) a temperature eccessivamente alte, raggi solari diretti o fuoco.
4. L'utilizzo della radio in ambienti o climi con elevata umidità e temperatura può causare la formazione di condensa all'interno
della radio, con conseguenti danni alla radio. Usare l'apparecchio solo in ambienti con clima mite.
5. Evitare condizioni estreme, sia minime che massime, di temperatura. Collocare il dispositivo lontano da fonti di calore come
radiatori e fornelli a gas/elettrici. Non collocare sull'apparecchio fonti di calore come fiamme vive o candele.
6. L'adattatore di alimentazione è utilizzato come dispositivo di disconnessione; tale dispositivo sarà sempre pronto all'uso.
Inserire l'adattatore in una presa elettrica facilmente accessibile, posta nelle vicinanze della radio. Utilizzare esclusivamente
l'adattatore di alimentazione indicato per la connessione di questo prodotto.
7. Utilizzare solo l'adattatore di alimentazione indicato nelle istruzioni di utilizzo (fornito da Pure con il numero di modello
SW1202400-IM).
8. Prima di utilizzare la radio, assicurarsi che la tensione di alimentazione elettrica disponibile corrisponda alla tensione nominale
richiesta per la radio.
9. Se la radio non sarà utilizzata per un lungo periodo di tempo, scollegarla dall'alimentazione elettrica (ad es. quando si va in
vacanza).
10. Prima di pulire la radio, scollegarla sempre dalla presa di alimenta zione di rete. Quando si pulisce la radio, non utilizzare spugne
abrasive o soluzioni detergenti abrasive che potrebbero danneggiare la superficie della radio.
11. Per ridurre il rischio di scosse elettriche, non rimuovere alcuna vite, poiché all'interno non vi sono parti riparabili dall'utente.
Affidare le riparazioni a personale qualificato.
ChargePAK F1 - Istruzioni di sicurezza
1. Leggere le istruzioni per l'utilizzo di ChargePAK nel presente documento.
2. Utilizzare ChargePAK solo con prodotti originali Pure. Usare solo batterie ChargePAK F1 Pure origin ali. Pericolo di
esplosione se la batteria viene sostituita in modo non corretto (verificare la polarità). Sostituire solo con una batteria uguale o di
tipo equivalente.
3. Conservare ChargePAK in un luogo fresco e asciutto a temperatura ambiente. Rimuovere il prodotto da dispositivi non utilizzati
per lunghi periodi di tempo.
4. Non forare, modificare, fare cadere o lanciare ChargePAK e non provocare urti non necessari. Se utilizzato in modo scorretto, il
prodotto può comportare il rischio di incendi, esplosioni o ustioni chimiche.
5. Non gettare ChargePAK nel fuoco o in un inceneritore e non lasciare in luoghi molto caldi, ad esempio in un'automobile sotto la
luce solare diretta. Non conservare in prossimità di forni, stufe o altre fonti di calore.
6. Non collegare direttamente ChargePAK a una fonte di energia elettrica, come la presa elettrica di un edificio o la presa
accendisigari di un'automobile. Non collocare in un forno a microonde o in altri contenitori ad alta pressione.
7. Non bagnare o immergere ChargePAK nell’acqua e non esporre a liquidi.
8. Non mettere il prodotto in corto circuito.
9. Non usare o caricare ChargePAK se presenta perdite, scolorimento, tracce di ruggine, deformazioni, odori o altre anomalie.
10. Non toccare direttamente ChargePAK se presenta delle perdite; rimuoverlo nell'immediato indossando guanti di protezione e
smaltirlo appropriatamente.
11. Conservare in un posto non accessibile ai bambini.
12. Smaltire ChargePAK come le normali batterie ricaricabili, conformemente alle norme e alle disposizioni in vigore nell'area di
utilizzo.
Simboli sull'apparecchio e nel manuale utente
Rischio potenzialmente grave per la sicurezza della propria persona. Per evitare possibili infortuni, anche letali, rispettare
tutte le avvertenze di sicurezza associate a questo simbolo.
Attenzione. Prima dell'uso, leggere il manuale utente.
Ingresso alimentazione 12 V CC, 2,4 A
Polarità del connettore CC, il centro del morsetto è positivo
4
Page 71

Per iniziare
Avalon N5
Comandi del pannello superiore
1
1 Source Premere per selezionare radio digitale, FM, Bluetooth e ingresso ausiliario
2 < Select > Premere < o > per scorrere e premere Select per cambiare stazione radio
3 Menu Premere per modificare le impostazioni e le opzioni
4 Manopola di
accensione/
volume
5 Stazioni
preselezionabili
1-5+
(v. pagina 8/9) o selezionare le opzioni di un menu
Nota: I pulsanti < Select > possono eseguire quanto segue in modalità
Bluetooth: Traccia salta avanti / indietro, così come le funzioni di
riproduzione / pausa durante lo streaming in Bluetooth.
Premere per accendere/spegnere Avalon N5; ruotare per regolare il volume
Premere per memorizzare e accedere alle proprie stazioni radio preferite
(v. pagina 10)
2
5
3
4
IT
Connessioni laterali Connessioni inferiori
Uscita 3,5 mm per
cuffie stereo
Ingresso stereo analogico
per cavi ausiliari
Connettore Micro USB
per aggiornamenti
software
Ingresso esclusivo
per l'adattatore di rete
fornito
5
Page 72

Impostazione di Avalon N5
Per impostare Avalon N5:
1. Collegare l'adattatore di rete fornito
all'ingresso che si trova alla base di
AvalonN5.
2. Collegare i terminali di alimentazione idonei
alla propria regione e collegare l'adattatore
alla rete.
3. Premere per estrarre l'antenna ed
estenderla completamente.
6
Page 73

Accensione e spegnimento di Avalon N5
Se si dispone di una batteria ricaricabile ChargePAK F1 (disponibile separatamente), inserirla prima di
accendere Avalon N5. Ulteriori informazioni sull'uso di ChargePAK a pagina 18.
Per accendere Avalon N5:
• Premere e rilasciare la manopola di accensione/volume in modo che fuoriesca.
Nota: quando si accende Avalon N5 per la prima volta, il dispositivo inizia a sintonizzare le stazioni
radio digitali. Una volta completata la sintonizzazione automatica, è possibile cominciare ad
ascoltare la radio digitale.
Per spegnere o mettere in standby Avalon N5:
Premere e rilasciare la manopola di accensione/volume in modo che resti abbassata.
• Se Avalon N5 è collegato a una presa elettrica, entra in standby. Quando in standby, Avalon N5 usa
una quantità di energia ridotta e sullo schermo vengono visualizzati ora e data.
• Se Avalon N5 è alimentato da ChargePAK, si spegne.
Nota: se Avalon N5 è alimentato da ChargePAK e viene spento, le sveglie e gli allarmi impostati non
suonano.
Regolazione del volume
Per regolare il volume:
• Per aumentare il volume, ruotare in senso orario la manopola di accensione/volume.
• Per diminuire il volume, ruotare in senso antiorario la manopola di accensione/volume.
IT
7
Page 74

Radio digitale
1
3
2
4
3
4
3
243
4
Ascolto della radio digitale
Per ascoltare la radio digitale:
• Premere
fino a quando sul display viene visualizzato ‘RADIO DIGITALE’.
Cambio della stazione radio digitale
Per cambiare la stazione radio digitale:
1. Premere il pulsante < o > per scorrere tra le stazioni radio disponibili.
2. Premere il pulsante Select per cambiare stazione radio.
DR
PRESET 5
LISTA STAZIONI
10:00
Suggerimento: Il simbolo ‘?’ accanto al nome della stazione indica che la stazione è inattiva o non è
disponibile.
<BBC RADIO 1 >
EMPTY
DR FM AUX BTDR FM AUX BTDR FM AUX BTDR FM AUX BTDR FM AUX BTDR FM AUX BTDR FM AUX BTDR FM AUX BTDR FM AUX BTDR FM AUX BTDR FM AUX BTDR FM AUX BTDR FM AUX BTDR FM AUX BTDR FM AUX BTDR FM AUX BTDR FM AUX BTDR FM AUX BTDR FM AUX BTDR FM AUX BTDR FM AUX BTDR FM AUX BTDR FM AUX BTDR FM AUX BTDR FM AUX BTDR FM AUX BTDR FM AUX BTDR FM AUX BTDR FM AUX BTDR FM AUX BTDR FM AUX BTDR FM AUX BTDR FM AUX BTDR FM AUX BTDR FM AUX BTDR FM AUX BTDR FM AUX BTDR FM AUX BTDR FM AUX BTDR FM AUX BTDR FM AUX BTDR FM AUX BTDR FM AUX BT
Sintonizzazione automatica delle stazioni radio digitali
Quando si accende Avalon N5 per la prima volta, il dispositivo avvia automaticamente una ricerca delle
stazioni radio digitali. Se si sposta Avalon N5 in un luogo nuovo, eseguire una sintonizzazione automatica
per aggiornare l'elenco delle stazioni radio.
Per sintonizzare automaticamente le stazioni radio digitali:
1. Premere
2. Premere il pulsante < o > per scorrere e premere il pulsante Select per selezionare ‘SINT. AUTO.’.
Avalon N5 avvia la ricerca delle stazioni radio digitali.
.
8
Page 75

Radio FM
1
3
2
4
3
4
3
243
4
Ascolto della radio FM
Per ascoltare la radio FM:
• Premere
fino a quando viene visualizzato ‘FM’.
Cambio della stazione radio FM
Per cambiare la stazione radio FM:
• Per passare alla stazione radio precedente o successiva, tenere premuto il pulsante < o > per
cercare la stazione radio FM precedente o successiva con un segnale forte.
• Per sintonizzarsi manualmente su una stazione radio, premere il pulsante < o >.
La frequenza va avanti o indietro a intervalli di 0,05 MHz.
Selezione ricezione stereo o mono per radio FM
Durante l'ascolto di una radio FM si può scegliere tra ricezione 'STEREO' e 'MONO'. Se si ascolta con le
cuffie, è preferibile selezionare l'opzione Stereo.
Per scegliere la ricezione stereo o mono:
1. Premere
2. Premere il pulsante < o > per scorrere e premere il pulsante Select per selezionare ‘FM STEREO’.
3. Premere il pulsante < o > per scorrere e premere il pulsante Select per selezionare ‘STEREO’
o‘MONO’.
.
IT
9
Page 76

Stazioni radio preselezionabili
1
3
2
4
3
4
3
4
1
3
2
4
3
4
3
4
1
3
2
4
3
4
3
2
4
3
4
3
243
4
3
4
Info stazioni preselezionabili
È possibile memorizzare le proprie stazioni radio preferite come stazioni preselezionabili. È possibile
usare le stazioni preselezionabili per sintonizzarsi velocemente sulle stazioni radio memorizzate in
qualsiasi momento.
a
Avalon N5 presenta cinque pulsanti di preselezione. Usare i pulsanti da
rapido alle proprie stazioni radio preferite. Usare
preselezionabili.
È possibile memorizzare un massimo di 10 stazioni radio digitali e 10 stazioni FM.
per aprire un elenco di tutte le stazioni
Memorizzazione di una stazione come preselezione
Per memorizzare una stazione radio come preselezione da 1 a 4:
1. Sintonizzarsi sulla stazione radio da memorizzare.
a
2. Scegliere un pulsante di preselezione da
visualizzato il messaggio ‘PRESELEZ.MEMOR.’.
Suggerimento: se nella preselezione scelta è già stata memorizzata una stazione radio, la stazione
esistente viene sostituita con quella nuova.
Per memorizzare una stazione radio nell'elenco di preselezione:
1. Sintonizzarsi sulla stazione radio da memorizzare.
, quindi tenere premuto fino a quando viene
per l'accesso
2. Tenere premuto
3. Premere il pulsante < o > per scorrere e premere il pulsante Select per scegliere un numero di
preselezione. Viene visualizzato il messaggio ‘PRESELEZ.MEMOR.’.
Suggerimento: se nella preselezione scelta è già stata memorizzata una stazione radio, la stazione
esistente viene sostituita con quella nuova.
fino a quando viene visualizzato l'elenco delle stazioni preselezionabili.
DR
10:00
PRESET 5
PRESELEZ. 7
EMPTY
DR FM AUX BTDR FM AUX BTDR FM AUX BTDR FM AUX BTDR FM AUX BTDR FM AUX BTDR FM AUX BTDR FM AUX BTDR FM AUX BTDR FM AUX BTDR FM AUX BTDR FM AUX BTDR FM AUX BTDR FM AUX BTDR FM AUX BTDR FM AUX BTDR FM AUX BTDR FM AUX BTDR FM AUX BTDR FM AUX BTDR FM AUX BTDR FM AUX BTDR FM AUX BTDR FM AUX BTDR FM AUX BTDR FM AUX BTDR FM AUX BTDR FM AUX BTDR FM AUX BTDR FM AUX BTDR FM AUX BTDR FM AUX BTDR FM AUX BTDR FM AUX BTDR FM AUX BTDR FM AUX BTDR FM AUX BTDR FM AUX BTDR FM AUX BTDR FM AUX BTDR FM AUX BTDR FM AUX BTDR FM AUX BT
MEMOR.
Ascolto di una stazione preselezionabile
Per ascoltare una stazione preselezionabile da 1 a 4:
• Premere brevemente un pulsante di preselezione da
Ad esempio, per ascoltare unastazione radio memorizzata come preselezione 2, premere
Per ascoltare qualsiasi stazione preselezionabile:
1. Premere
2. Premere il pulsante < o > per scorrere e premere il pulsante Select per scegliere una preselezione.
10
per aprire l'elenco delle stazioni preselezionabili.
a
.
.
Page 77

Bluetooth e dispositivi ausiliari
1
3
2
4
1
3
2
4
Connessione di un dispositivo Bluetooth
Per connettere l'unità a un dispositivo mobile quale telefono o tablet senza l'uso di cavi, è possibile usare il
Bluetooth. Con Avalon N5 è possibile trasmettere musica da un telefono o tablet.
Per connettere il dispositivo ad Avalon N5 è sufficiente selezionare ‘Avalon’ nel menu Bluetooth sul
dispositivo mobile.
Per connettere un dispositivo Bluetooth:
IT
1. Premere
2. Sul dispositivo Bluetooth, attivare la connessione Bluetooth e collegarsi ad ‘Avalon’.
Nota: per maggiori informazioni, consultare il manuale utente del dispositivo Bluetooth. Se viene
richiesta una password, inserire 0000.
Quando sul display di Avalon N5 viene visualizzato ‘BT CONNESSO’, il dispositivo è pronto
atrasmettere musica.
Suggerimento: per connettere ad Avalon N5 un altro dispositivo Bluetooth, seguire le istruzioni riportate
sopra. I dispositivi attualmente connessi verranno automaticamente disconnessi.
fino a quando viene visualizzato ‘BLUETOOTH’.
DR FM AUX BTDR FM AUX BTDR FM AUX BTDR FM AUX BTDR FM AUX BTDR FM AUX BTDR FM AUX BTDR FM AUX BTDR FM AUX BTDR FM AUX BTDR FM AUX BTDR FM AUX BTDR FM AUX BTDR FM AUX BTDR FM AUX BTDR FM AUX BTDR FM AUX BTDR FM AUX BTDR FM AUX BTDR FM AUX BTDR FM AUX BTDR FM AUX BTDR FM AUX BTDR FM AUX BTDR FM AUX BTDR FM AUX BTDR FM AUX BTDR FM AUX BTDR FM AUX BTDR FM AUX BTDR FM AUX BTDR FM AUX BTDR FM AUX BTDR FM AUX BTDR FM AUX BTDR FM AUX BTDR FM AUX BTDR FM AUX BTDR FM AUX BTDR FM AUX BTDR FM AUX BTDR FM AUX BTDR FM AUX BT
PRESET 5
BT CONNESSO
10:00
10-10-2017
EMPTY
Connessione di un dispositivo con cavo ausiliario
Per ascoltare la musica memorizzata su un dispositivo, ad esempio un lettore MP3, su Avalon N5,
èpossibile collegare le due unità con un cavo ausiliario.
Per collegare un dispositivo con cavo ausiliario:
1. Premere
2. Inserire un cavo ausiliario nell'ingresso Aux posto lateralmente su Avalon N5.
3. Inserire l'altro capo del cavo ausiliario nel dispositivo che si desidera collegare.
Avalon N5 è ora pronto a riprodurre la musica dal dispositivo collegato.
fino a quando non viene visualizzato ‘INGRESSO AUX’.
11
Page 78

Sveglie
3
4
DR FM AUX BTDR FM AUX BTDR FM AUX BTDR FM AUX BTDR FM AUX BTDR FM AUX BTDR FM AUX BTDR FM AUX BTDR FM AUX BTDR FM AUX BTDR FM AUX BTDR FM AUX BTDR FM AUX BTDR FM AUX BTDR FM AUX BTDR FM AUX BTDR FM AUX BTDR FM AUX BTDR FM AUX BTDR FM AUX BTDR FM AUX BTDR FM AUX BTDR FM AUX BTDR FM AUX BTDR FM AUX BTDR FM AUX BTDR FM AUX BTDR FM AUX BTDR FM AUX BTDR FM AUX BTDR FM AUX BTDR FM AUX BTDR FM AUX BTDR FM AUX BTDR FM AUX BTDR FM AUX BTDR FM AUX BTDR FM AUX BTDR FM AUX BTDR FM AUX BTDR FM AUX BTDR FM AUX BTDR FM AUX BT
DR
3
4
3
4
Per svegliarsi in compagnia della propria stazione radio preferita, è possibile impostare su Avalon N5 due
diverse sveglie.
Nota: quando Avalon N5 è alimentato da una batteria ChargePAK, non è possibile impostare le sveglie.
Impostazione di una sveglia
Per impostare una sveglia:
1. Premere
2. Premere il pulsante < o > per scorrere e premere il pulsante Select per selezionare ‘SVEGLIA’.
3. Premere il pulsante < o > per scorrere e premere il pulsante Select per selezionare ‘SVEGLIA 1’
o‘SVEGLIA 2’.
4. Premere il pulsante < o > per scorrere e premere il pulsante Select per modificare le impostazioni
della sveglia:
‘SVEGLIA’ Attivare o disattivare la sveglia
‘IN ORAR’ Selezionare l'ora della sveglia
‘DU R ATA’ Selezionare la durata della sveglia in minuti
‘FONTE’ Scegliere tra una stazione radio ‘FM’ o ‘DAB’ oppure un ‘TONO’
‘RIPETI’ Scegliere la frequenza con cui si desidera attivare la sveglia tra
‘VOLUME’ Regolare il volume della sveglia (valido solo per le sveglie radio)
Una volta terminata l'impostazione, sul display comparirà il messaggio ‘SVEGLIA MEMORIZ ZATA’.
Quando una sveglia viene impostata, in alto sullo schermo compare il simbolo
.
Suggerimento: per quanto riguarda le stazioni FM o DAB,
èpossibile scegliere una stazione preselezionabile (se presente)
oselezionare ‘ULTIMA ASCOLTATA’ per scegliere l'ultima stazione
ascoltata.
‘OGNI GIORNO’, ‘UNA VO LTA’, ‘ FINE SETTIMANA’ o ‘GIORNI
FERIALI’
DR
10:00
PRESET 5
EMPTY
DR FM AUX BTDR FM AUX BTDR FM AUX BTDR FM AUX BTDR FM AUX BTDR FM AUX BTDR FM AUX BTDR FM AUX BTDR FM AUX BTDR FM AUX BTDR FM AUX BTDR FM AUX BTDR FM AUX BTDR FM AUX BTDR FM AUX BTDR FM AUX BTDR FM AUX BTDR FM AUX BTDR FM AUX BTDR FM AUX BTDR FM AUX BTDR FM AUX BTDR FM AUX BTDR FM AUX BTDR FM AUX BTDR FM AUX BTDR FM AUX BTDR FM AUX BTDR FM AUX BTDR FM AUX BTDR FM AUX BTDR FM AUX BTDR FM AUX BTDR FM AUX BTDR FM AUX BTDR FM AUX BTDR FM AUX BTDR FM AUX BTDR FM AUX BTDR FM AUX BTDR FM AUX BTDR FM AUX BTDR FM AUX BT
SVEGLIA
MEMORIZZATA
o
.
5. Una volta effettuate tutte le modifiche, tenere premuto
per uscire dal menu.
Annullamento di una sveglia
Per annullare una sveglia:
.
1. Premere
2. Premere il pulsante < o > per scorrere e premere il pulsante Select per selezionare ‘SVEGLIA’.
3. Premere il pulsante < o > per scorrere e premere il pulsante Select per selezionare ‘SVEGLIA 1’
o‘SVEGLIA 2’.
4. Premere il pulsante < o > per scorrere e premere il pulsante Select per selezionare ‘OFF’.
Sul display comparirà il messaggio ‘SVEGLI A MEMORI Z Z ATA’.
12
Page 79

3
4
DR FM AUX BTDR FM AUX BTDR FM AUX BTDR FM AUX BTDR FM AUX BTDR FM AUX BTDR FM AUX BTDR FM AUX BTDR FM AUX BTDR FM AUX BTDR FM AUX BTDR FM AUX BTDR FM AUX BTDR FM AUX BTDR FM AUX BTDR FM AUX BTDR FM AUX BTDR FM AUX BTDR FM AUX BTDR FM AUX BTDR FM AUX BTDR FM AUX BTDR FM AUX BTDR FM AUX BTDR FM AUX BTDR FM AUX BTDR FM AUX BTDR FM AUX BTDR FM AUX BTDR FM AUX BTDR FM AUX BTDR FM AUX BTDR FM AUX BTDR FM AUX BTDR FM AUX BTDR FM AUX BTDR FM AUX BTDR FM AUX BTDR FM AUX BTDR FM AUX BTDR FM AUX BTDR FM AUX BTDR FM AUX BT
DR
Interruzione temporanea della sveglia con la funzione Snooze
osilenziamento
Per usare la funzione Snooze:
• Premere uno dei pulsanti delle stazioni preselezionabili.
La sveglia viene posticipata di 8 minuti.
Per silenziare una sveglia:
• Premere il pulsante Source, < Select > o Menu.
Timer
Impostazione del timer da cucina
Il timer da cucina effettua un conto alla rovescia che termina con un segnale di allarme.
Per impostare il timer da cucina:
IT
1. Premere
2. Premere il pulsante < o > per scorrere e premere il pulsante Select per selezionare ‘TIMER DA
CUCINA'.
3. Scorrere usando i pulsanti < o > per modificare l'ora e premere il pulsante Select.
4. Scorrere nuovamente con il pulsante < o > per modificare i minuti e premere per confermare
eavviare il timer.
Quando il timer viene impostato, in alto sul display viene visualizzato il simbolo
.
DR
10:00
DR FM AUX BTDR FM AUX BTDR FM AUX BTDR FM AUX BTDR FM AUX BTDR FM AUX BTDR FM AUX BTDR FM AUX BTDR FM AUX BTDR FM AUX BTDR FM AUX BTDR FM AUX BTDR FM AUX BTDR FM AUX BTDR FM AUX BTDR FM AUX BTDR FM AUX BTDR FM AUX BTDR FM AUX BTDR FM AUX BTDR FM AUX BTDR FM AUX BTDR FM AUX BTDR FM AUX BTDR FM AUX BTDR FM AUX BTDR FM AUX BTDR FM AUX BTDR FM AUX BTDR FM AUX BTDR FM AUX BTDR FM AUX BTDR FM AUX BTDR FM AUX BTDR FM AUX BTDR FM AUX BTDR FM AUX BTDR FM AUX BTDR FM AUX BTDR FM AUX BTDR FM AUX BTDR FM AUX BTDR FM AUX BT
PRESET 5
TIMER DA CUCINA
MEMOR.
EMPTY
.
Silenziamento del timer da cucina
Per silenziare il timer da cucina:
• Premere il pulsante Source, < Select > o Menu.
Impostazione del timer di autospegnimento (sleep timer)
Dopo un determinato periodo di tempo, lo sleep timer mette Avalon N5 in standby.
Per impostare il timer di autospegnimento:
1. Premere
2. Premere il pulsante < o > per scorrere e premere
il pulsante Select per selezionare ‘SLEEP TIMER’.
3. Premere il pulsante < o > per scorrere e premere il pulsante Select per selezionare la durata del
ti mer.
Suggerimento: è possibile selezionare una durata da 15 a 90 minuti.
4. Quando il timer viene impostato, in alto sul display viene visualizzato il simbolo
.
10:00
DR
PRESET 5
SLEEP TIMER
MEMOR.
EMPTY
DR FM AUX BTDR FM AUX BTDR FM AUX BTDR FM AUX BTDR FM AUX BTDR FM AUX BTDR FM AUX BTDR FM AUX BTDR FM AUX BTDR FM AUX BTDR FM AUX BTDR FM AUX BTDR FM AUX BTDR FM AUX BTDR FM AUX BTDR FM AUX BTDR FM AUX BTDR FM AUX BTDR FM AUX BTDR FM AUX BTDR FM AUX BTDR FM AUX BTDR FM AUX BTDR FM AUX BTDR FM AUX BTDR FM AUX BTDR FM AUX BTDR FM AUX BTDR FM AUX BTDR FM AUX BTDR FM AUX BTDR FM AUX BTDR FM AUX BTDR FM AUX BTDR FM AUX BTDR FM AUX BTDR FM AUX BTDR FM AUX BTDR FM AUX BTDR FM AUX BTDR FM AUX BTDR FM AUX BTDR FM AUX BT
.
13
Page 80

Impostazioni
3
4
3
4
3
4
Personalizzazione del suono su Avalon N5
Con l'equalizzatore e le impostazioni di amplificazione è possibile ottenere un sound eccezionale. Molte
impostazioni dell'equalizzatore sono già impostate. Ad esempio, per esaltare i suoni della musica classica,
scegliere ‘CLASSICA’ tra le impostazioni dell'equalizzatore. È inoltre possibile personalizzare l'equalizzatore
modificando gli acuti, i bassi e l'intensità del suono.
Per utilizzare l'equalizzatore:
1. Premere
2. Premere il pulsante Select per selezionare ‘AUDIO’.
3. Premere il pulsante < o > per scorrere e premere il pulsante Select per selezionare ‘EQUALISER’.
4. Scegliere le impostazioni dell'equalizzatore:
• Premere il pulsante < o > per scorrere e premere il pulsante Select per scegliere tra: ‘NORMALE’,
‘FL AT’, ‘ROCK’, ‘POP’, ‘CLASSICA’, ‘JAZZ’, ‘NOTIZIE’ o ‘PERSONALIZZAZ.’.
• Per usare le impostazioni personalizzate, premere il pulsante < o > per scorrere e premere il
pulsante Select per selezionare ‘PERSONALIZZAZ.’. Quindi premere il pulsante < o > per scorrere
e premere il pulsante Select per modificare gli acuti, i bassi e l'intensità del suono.
Per attivare o disattivare l'amplificazione:
1. Premere
2. Premere il pulsante Select per selezionare ‘AUDIO’.
3. Premere il pulsante < o > per scorrere e premere il pulsante Select per selezionare ‘AMPLIFICAZIONE’.
4. Premere il pulsante < o > per scorrere e premere il pulsante Select per attivare (‘ON’) o disattivare
(‘OFF’) l'amplificazione.
.
.
Impostazioni del display
Modifica delle informazioni visualizzate sul display
Durante l'ascolto della radio è possibile modificare le informazioni visualizzate sullo schermo. Ad esempio,
èpossibile visualizzare informazioni a scorrimento sulla stazione radio in ascolto.
1. Premere
.
2. Premere il pulsante < o > per scorrere e premere il pulsante Select per selezionare ‘DIS PL AY’.
3. Premere il pulsante Select per selezionare ‘INFO’.
4. Premere il pulsante < o > per scorrere e premere il pulsante Select per scegliere quali informazioni
visualizzare.
14
Page 81

3
4
3
4
Regolazione della luminosità dello schermo
3
4
Avalon N5 dispone di un sensore di luce che regola la luminosità dello schermo in base all'ambiente.
È possibile modificare manualmente la luminosità dello schermo e decidere la durata di attivazione
dellaretroilluminazione del display.
Per modificare la luminosità dello schermo:
1. Premere
2. Premere il pulsante < o > per scorrere e premere il pulsante Select per selezionare ‘DIS PL AY’.
3. Premere il pulsante < o > per scorrere e premere il pulsante Select per selezionare
‘RETROILLUMINAZIONE’.
4. Premere il pulsante < o > per scorrere e premere il pulsante Select per selezionare ‘ATTIVO’
emodificare le impostazioni di Avalon N5 quando è acceso, oppure selezionare ‘STANDBY’ per
modificare le impostazioni quando in standby.
5. Premere il pulsante < o > per scorrere e premere il pulsante Select per selezionare ‘LUMINOSITÀ’.
6. Premere il pulsante < o > per scorrere e premere il pulsante Select per scegliere il livello di
luminosità. Per aumentare la luminosità dello schermo, selezionare un numero più alto. Per impostare
automaticamente la luminosità dello schermo, selezionare ‘AUTO’.
Per modificare la durata della retroilluminazione del display:
1. Premere
2. Premere il pulsante < o > per scorrere e premere il pulsante Select per selezionare ‘DIS PL AY’.
3. Premere il pulsante < o > per scorrere e premere il pulsante Select per selezionare
‘RETROILLUMINAZIONE’.
4. Premere il pulsante < o > per scorrere e premere il pulsante Select per selezionare ‘ATTIVO’
emodificare le impostazioni di Avalon N5 quando è acceso, oppure selezionare ‘STANDBY’ per
modificare le impostazioni quando in standby.
5. Per modificare solo le impostazioni ATTIVO, premere il pulsante < o > per scorrere e premere il pulsante
Select per selezionare ‘TIMEOUT’.
6. Premere il pulsante < o > per scorrere e premere il pulsante Select per scegliere tra ‘SEMPRE
ACCESO’ o ‘SPEGNIMENTO’.
.
.
Impostazioni dell'orologio
IT
Impostazione di ora e data
Avalon N5 può usare il segnale radio FM e digitale per impostare automaticamente l'ora e la data. Se data e
ora non si aggiornano automaticamente, è possibile impostarli manualmente.
Per impostare manualmente l'ora e la data:
1. Premere
2. Premere il pulsante < o > per scorrere e premere il pulsante Select per selezionare ‘OROLOGIO’.
3. Premere il pulsante < o > per scorrere e premere il pulsante Select per selezionare ‘IMPOST. ORA/
DATA’.
4. Premere il pulsante < o > per scorrere e premere il pulsante Select per selezionare l'ora. Ripetere per
regolare i minuti.
5. Premere il pulsante < o > per scorrere e premere il pulsante Select per selezionare il giorno. Ripetere
per impostare il mese e l'anno.
.
15
Page 82

3
4
3
4
3
4
Modifica del formato dell'ora
3
4
Per cambiare il formato dell'ora:
1. Premere
2. Premere il pulsante < o > per scorrere e premere il pulsante Select per selezionare ‘OROLOGIO’.
3. Premere il pulsante < o > per scorrere e premere il pulsante Select per selezionare ‘IMPOST. 12/24
ORE’.
4. Premere il pulsante < o > per scorrere e premere il pulsante Select per selezionare ‘IMPOST. 12 ORE’
o ‘IMPOST. 24 ORE’.
.
Modifica del formato della data
Per cambiare il formato della data:
1. Premere
2. Premere il pulsante < o > per scorrere e premere il pulsante Select per selezionare ‘OROLOGIO’.
3. Premere il pulsante < o > per scorrere e premere il pulsante Select per selezionare ‘IM PO ST.
FO RMATO DATA’.
4. Premere il pulsante < o > per scorrere e premere il pulsante Select per scegliere tra la
visualizzazione della data nell'ordine giorno, mese e anno ‘GG-MM-AAAA’ o nell'ordine mese,
giorno e anno ‘MM-GG-AAAA’.
.
Modifica della fonte di sincronizzazione dell'orologio
È possibile scegliere le fonti radio da utilizzare per l'impostazione dell'ora. Come impostazione
predefinita, per la sincronizzazione dell'ora Avalon N5 utilizza segnali radio sia FM che digitali.
Per modificare la sincronizzazione dell'orologio:
1. Premere
.
2. Premere il pulsante < o > per scorrere e premere il pulsante Select per selezionare ‘OROLOGIO’.
3. Premere il pulsante < o > per scorrere e premere il pulsante Select per selezionare
‘SINCRONIZZAZIONE OROLOGIO’.
4. Premere il pulsante < o > per scorrere e premere il pulsante Select per selezionare l'opzione
desiderata.
Modifica della lingua
È possibile cambiare la lingua dei menu e delle impostazioni.
Per cambiare la lingua:
1. Premere
2. Premere il pulsante < o > per scorrere e premere il pulsante Select per selezionare
‘IMPOSTAZIONI’.
3. Premere il pulsante < o > per scorrere e premere il pulsante Select per selezionare ‘LINGUA’.
4. Premere il pulsante < o > per scorrere e premere il pulsante Select per selezionare una lingua.
16
.
Page 83

Ripristino delle impostazioni predefinite
3
4
3
4
Il ripristino dei valori di default rimuove tutte le stazioni preselezionabili, le sveglie, i timer e le impostazioni
memorizzati su Avalon N5.
Nota: il ripristino dei valori di default non è reversibile.
Per ripristinare le impostazioni predefinite:
1. Premere
2. Premere il pulsante < o > per scorrere e premere il pulsante Select per selezionare
‘IMPOSTAZIONI’.
3. Premere il pulsante < o > per scorrere e premere il pulsante Select per selezionare ‘RIPRISTINO
VALORI DI DEFAULT’.
4. Premere il pulsante < o > per scorrere e premere il pulsante Select per selezionare ‘SÌ’.
Avalon N5 ripristina i valori di default e si riavvia.
.
Aggiornamento del software
Pure può mettere a disposizione aggiornamenti software per Avalon N5. Per verificare gli aggiornamenti
software disponibili, visitare support.pure.com.
Suggerimento: per ricevere una notifica quando vi sono aggiornamenti software disponibili, registrare il
prodotto su pure.com/register.
Per verificare la versione del software attuale:
IT
1. Premere
2. Premere il pulsante < o > per scorrere e premere il pulsante Select per selezionare
‘IMPOSTAZIONI’.
3. Premere il pulsante < o > per scorrere e premere il pulsante Select per selezionare ‘VERSIONE’.
Per aggiornare il software:
1. Connettere Avalon N5 al computer con un cavo Micro USB.
2. Seguire le istruzioni fornite con il file per l'aggiornamento software.
.
17
Page 84

Utilizzo di ChargePAK
Informazioni su ChargePAK
ChargePAK è un pacco di batterie ricaricabili (disponibile separatamente) che consente di ascoltare la
musica ovunque. Quando Avalon N5 è collegato a una presa elettrica, ChargePAK si ricarica. È possibile
disconnettere Avalon N5 dall'alimentazione elettrica e portare la propria musica con sé.
Inserimento di ChargePAK
Nota: Avalon N5 è compatibile solo con i ChargePAK F1 Pure. Non usare altre batterie o modelli di
ChargePAK con Avalon N5.
Per inserire ChargePAK:
1. Spegnere Avalon N5 e scollegarlo dall'alimentazione elettrica.
2. Utilizzare una moneta per svitare e rimuovere la vite che tiene il pannello di copertura del vano
batterie che si trova alla base di Avalon N5.
3. Inserire ChargePAK nello scomparto batterie, con i contatti elettrici di ChargePAK rivolti verso il
basso e l'etichetta Pure rivolta verso il lato opposto rispetto alla parte anteriore della radio.
4. Riposizionare il pannello di copertura del vano batterie.
5. Collegare Avalon N5 all'alimentazione elettrica.
ChargePAK comincia a ricaricarsi. Se ChargePAK è nuovo o non è stato utilizzato per molto tempo,
si consiglia di caricarlo per almeno 24 ore.
Nota: quando ChargePAK è sotto carica, è normale che si riscaldi. L'efficienza di ChargePAK
diminuisce con il tempo.
18
Page 85

Risoluzione dei problemi
Problema Soluzione
Non riesco a sentire
nulla
Il display è molto scuro Rimuovere eventuali ostruzioni davanti alla radio. Vicino al display vi
Non riesco a trovare una
stazione FM o digitale
Per aumentare il volume, usare la manopola di accensione/volume.
Per la radio digitale, eseguire una sintonizzazione automatica. Ulteriori
informazioni a pagina 8.
Per i dispositivi Bluetooth o ausiliari, verificare la connessione dell'unità.
Aumentare il volume del dispositivo connesso.
èun sensore di luce.
Aumentare la luminosità dello schermo.
Ulteriori informazioni a pagina 14.
Regolare l'antenna e controllare che sia completamente estesa.
Spostare la radio.
Per la radio digitale, eseguire una sintonizzazione automatica. Ulteriori
informazioni a pagina 8.
Per la radio FM, provare a forzare la radio a usare la ricezione mono per
migliorare l'intensità del segnale. Ulteriori informazioni a pagina 9.
IT
19
Page 86

Specifiche
Radio Radio digitale ed FM
Frequenze Digitale: Banda III 174-240 MHz
Bluetooth Bluetooth v4.1
Altoparlante
Potenza uscita audio
Ingressi Presa adattatore 12 V CC (230 V in dotazione)
Uscite Cuffie stereo 3,5 mm
Stazioni
preselezionabili
Display Display LCD 2 righe
Versione software V1.2
Adattatore di rete Adattatore Ingresso CA 100-240 V~, 50/60 Hz, 0,8 A
ChargePAK Batteria ricaricabile ChargePAK F1 Pure (disponibile separatamente)
Dimensioni 170 mm altezza x 260 mm larghezza x 70 mm profondità
Temperatura
operativa
Antenna Antenna telescopica di ricezione
Approvazioni Marchio CE. Con la presente, Pure International Limited dichiara che il
Radio FM: 87,5-108 MHz
Supporto AVRCP 1.4
Supporto codec AAC
Gamma di frequenza: 2402~2480 MHz. Potenza massima: 4,07 dBm (EIRP)
Unità di comando full range da 3" e 2 radiatori passivi per bassi(1 anteriore,
1posteriore)
20 W RMS
Ingresso ausiliario stereo da 3,5 mm per dispositivi ausiliari
Connessione USB (Micro USB) solo per aggiornamenti software
10 stazioni radio digitali e 10 stazioni FM preselezionabili
Uscita 12 V CC
Unità principale 12 V CC , 2,4 A
Da 0°C a +40°C
modello di radio Avalon N5 è conforme ai requisiti essenziali della direttiva
RED 2014/53/UE, della direttiva RoHS revisionata (2011/65/UE) e dello
standard ETSI EN300 401. In un ambiente caratterizzato da disturbi di
frequenza, la radio potrebbe perdere l'audio, che sarà recuperato una volta
rimossa l'interferenza.
Il testo intero della Dichiarazione di Conformità UE è disponibile al seguente
indirizzo internet http://www.pure.com/about/red
, 2400 mA
20
Page 87

Informazioni sulla garanzia
Pure International Limited garantisce all’utente finale che questo prodotto, se usato normalmente, non
presenterà difetti di materiale e manodopera per un periodo di tre anni dalla data di acquisto. Questa garanzia
copre i guasti dovuti ad anomalie di fabbricazione o progettazione; non si applica in caso di danni accidentali
di qualunque tipo, dovuti a usura e negligenza o a interventi di regolazione, modifica o riparazione non
autorizzati da noi. In caso di problemi con l’unità, contattare il proprio fornitore o l’assistenza PURE
all’indirizzo http://support.pure.com.
Esclusione di responsabilità
Pure International Limited non rilascia alcuna dichiarazione o garanzia rispetto al contenuto di questo documento
ed esclude specificamente qualunque garanzia implicita di commerciabilità o adeguatezza a un particolare scopo.
Inoltre, Pure International Limited si riserva il diritto di rivedere e modificare periodicamente questa pubblicazione
senza obbligo di notificare tali interventi ad altri soggetti.
Marchi commerciali
Avalon N5, Pure e il logo Pure sono marchi commerciali o registrati di Pure International Limited.
Copyright
Copyright © 2017 Pure International Limited. Tutti i diritti riservati. Nessuna parte della presente pubblicazione può
essere copiata o distribuita, trasmessa, trascritta, memorizzata in un sistema di archiviazione o tradotta in un formato
comprensibile dall'uomo o da un computer, in qualsiasi forma o con qualsiasi mezzo, elettronico, meccanico,
magnetico, manuale o altro, o divulgata a terze parti senza il permesso scritto di Pure International Limited.
Smaltimento di rifiuti di apparecchiature elettriche ed elettroniche
La presenza di questo simbolo sul prodotto o sulla sua confezione indica che il prodotto non deve essere
trattato come rifiuto domestico. Deve infatti essere consegnato presso un adeguato punto di raccolta
per il riciclaggio di apparecchiature elettriche ed elettroniche. Assicurandosi del corretto smaltimento di
questo prodotto si contribuisce a evitare potenziali ripercussioni negative sull’ambiente e sulla salute,
che potrebbero derivare da un’inadeguata gestione dello smaltimento stesso. Il riciclaggio di materiali
contribuisce a preservare le risorse naturali. Per informazioni più dettagliate sul riciclaggio di questo
prodotto, si prega di rivolgersi alle autorità locali, al servizio locale di smaltimento di rifiuti domestici o al
negozio presso il quale il prodotto è stato acquistato.
IT
21
Page 88

22
Page 89

Avalon N5
Takk for at du valgte Avalon N5. Bruksanvisningen beskriver bruken av
de forskjellige funksjonene på din Avalon N5. Hvis du trenger mer hjelp,
kan du ta en titt på våre hjelpeemner på support.pure.com.
EN
DE
FR
IT
NO
DA
NL
1
Page 90

2
Page 91

Innhold
Sikkerhet 4
Komme i gang 5
Din Avalon N5 5
Konfigurere Avalon N5 6
Slå på og av Avalon N5 7
Endre volumet 7
Digitalradio 8
Lytte til digitalradio 8
Bytte digitalradiostasjon 8
Automatisk tuning til
digitalradiostasjoner 8
FM-radio 9
Lytte til FM-radio 9
Bytte FM-radiostasjon 9
Velge stereo- eller monomottak
for FM-radio 9
Forvalg av radiostasjoner 10
Om forvalg 10
Lagre en radiostasjon som forvalg 10
Lytte til et forvalg 10
Innstillinger 14
Tilpasse lyden på Avalon N5 14
Displayinnstillinger 14
Klokkeinnstillinger 15
Endre språk 16
Tilbakestilling til fabrikkoppsett 16
Oppdatere programvaren 16
Bruke et ChargePAK-batteri 17
Om ChargePAK-batterier 17
Sette i et ChargePAK-batteri 17
Feilsøking 18
Tekniske data 19
NO
DA
Bluetooth og Aux-enheter 11
Koble til en Bluetooth-enhet 11
Koble til en enhet via en Aux-kabel 11
Alarmer 12
Stille inn en alarm 12
Slette en eksisterende alarm 12
Slumre eller slå av en alarm 12
Tidsur 13
Stille inn kjøkkentidsuret 13
Slå av kjøkkentidsuret 13
Stille inn innsovningsfunksjonen 13
3
Page 92

Sikkerhet
Sikkerhetsinformasjon
1. Gjør deg kjent med alle sikkerhetsreglene og -anvisningene før du tar radioen i bruk. Hvis du gir denne radioen videre til andre, må
du også sørge for at de får med alle relevante dokumenter.
2. Apparatet må ikke utsettes for sprut eller dråper. Gjenstander som er fylt med vann - for eksempel vaser - må ikke settes oppå
apparatet.
Hvis du søler vann eller annen væske på radioen, må du slå den av, koble den fra strømnettet og kontakte forhandleren.
Ikke ta på støpslet eller selve radioen med våte hender. Ikke trekk i ledningen når du kobler strømadapteren fra strømforsyningen.
3. Batterier må ikke utsettes for sterk varme som sollys, åpen ild eller lignende
4. Bruk av radioen i rom eller klima med høy fuktighet og høye temperaturer kan føre til kondensdannelse inni radioen, og dette kan
skade radioen. Bruk apparatet bare i middels varmt klima.
5. Unngå ekstreme temperaturer, både ekstrem varme og ekstrem kulde. Plasser apparatet på trygg avstand fra varmekilder som
radiatorer, gassovner og elektriske ovner. Det må ikke settets varmekilder med åpen flamme, som tente stearinlys, oppå apparatet
6. Strømadapteren brukes som frakoblingsenhet, og frakoblingsenheten må alltid være lett tilgjengelig.
Koble strømadapteren til en lett tilgjengelig stikkontakt i nærheten av enheten, og ikke bruk strømadapteren til noe annet enn
åkoble til dette produktet.
7. Bruk bare strømadapteren som er spesifiser t i bruksanvisningen. (levert av Pure, med modellnummer SW1202400-IM).
8. Kontroller før bruk at den tilgjengelige tilførselsspenningen stemmer med påkrevd driftsspenning for radioen.
9. Koble radioen fra strømforsyningen hvis du ikke skal bruke den på en stund (f.eks. hvis du reiser på ferie).
10. Koble alltid radioen fra stikkontakten før rengjøring. Ikke rengjør radioen med slipende svamper eller slipende rengjøringsløsninger,
for dette kan skade radioens overflate.
11. For å redusere faren for elektrisk støt må du ikke fjerne noen skruer. Det er ingen deler inni radioen som skal vedlikeholdes av
brukeren. Overlat vedlikeholdet til autoriserte fagfolk.
Sikkerhetsanvisninger for det oppladbare batteriet ChargePAK F1
1. Les bruksanvisningen for ChargePAK i dette dokumentet.
2. Bruk ChargePAK bare med originale Pure-produkter. Bruk bare den originale Pure ChargePAK F1. Eksplosjonsfare hvis
batteriet ikke skiftes riktig (pass på rik tig polaritet). Må bare skiftes ut med samme eller tilsvarende type.
3. Oppbevar ChargePAK på et kjølig og tørt sted ved normal romtemperatur. Ta batteriet ut av radioen hvis den settes til oppbevaring
eller ikke skal brukes i lengre tid.
4. ChargePAK må ikke punkteres, mistes, kastes eller utsettes for unødvendige støt. Feil behandling kan medføre fare for brann,
eksplosjon eller kjemisk forbrenning.
5. Ikke kast ChargePAK på åpen ild eller i et forbrenningsanlegg, og ikke legg ChargePAK fra deg på varme steder slik som i en bil
somstår midt i solsteiken. Må ikke oppbevares i nærheten av en komfyr, ovn eller andre varmekilder.
6. ChargePAK må ikke kobles direkte til en elektrisk kilde som for eksempel en stikkontakt eller et strømuttak i en bil. Må aldri
plasseres i en mikrobølgeovn eller andre høytrykksbeholdere.
7. ChargePAK må aldri senkes ned i vann, og aldri utsettes for væsker på andre måter.
8. ChargePAK må ikke kortsluttes.
9. Ikke bruk eller lad opp et ChargePAK-batteri som lekker, er misfarget, rustent eller deformert, lukter rart eller er unormalt på andre
må te r.
10. Berør aldri et ChargePAK-batteri som lekker, med bare hender. Fjern batteriet og avhend det forskriftsmessig. Husk å bruke
vernehansker.
11. Skal oppbevares utilgjengelig for barn.
12. ChargePAK skal avhendes som vanlige, oppladbare batterier i henhold til lokale lover og forskrifter.
Symboler på produktet og i bruksanvisningen
Mulig alvorlig fare for din personlige sikkerhet. Følg alle sikkerhetsanvisninger merket med dette symbolet for å unngå
faren for personskader eller død.
Forsiktig. Les bruksanvisningen før bruk.
12 V DC-strømforsyningsinngang, 2,4 A
DC-kontaktpolaritet, midten av tilkoblingsklemmen er positiv
4
Page 93

Komme i gang
Din Avalon N5
Kontroller oppå radioen
1
1 Source Trykk her for å veksle mellom digitalradio, FM-radio, Bluetooth og
Aux-inngang
2 < Select > Trykk på < eller > for å bla, og trykk på Select for å skifte radiostasjon
(seside 8/9) eller velge elementer i en meny
Merk: <Select> knappene kan utføre følgende i Bluetooth-modus:
Spor hoppe fremover / bakover, samt spill / pause-funksjoner når du
streamer i Bluetooth.
3 Menu Trykk her for å endre innstillinger og funksjoner
4 Av/på/volum Trykk her for å slå Avalon N5 på eller av. Drei for å justere volumet.
5 Forvalg 1-5+ Trykk her for å lagre og få tilgang til dine favorittradiostasjoner (se side 10)
2
5
3
4
NO
DA
Kontakter på siden Kontakt på undersiden
3,5 mm-utgang for
stereohodetelefoner
Analog stereoinngang
forAux-kabler
Mikro-USB-kontakt
for programvare-
oppdateringer
Inngang bare
for medfølgende
strømadapter
5
Page 94

Konfigurere Avalon N5
Slik konfigurerer du Avalon N5:
1. Koble den medfølgende strømadapteren til
inngangen på undersiden av Avalon N5.
2. Sett på riktig type støpsel for din region,
ogkoble strømadapteren til strømnettet.
3. Trykk ned for å få antennen til å sprette opp,
og trekk den helt ut.
6
Page 95

Slå på og av Avalon N5
Hvis du har det oppladbare batteriet ChargePAK F1 (tilgjengelig separat), må du sette det inn før du slår på
Avalon N5. Les mer om bruk av ChargePAK på side 17.
Slik slår du på Avalon N5:
• Trykk ned og slipp dreieknappen Av/på/volum til den spretter opp.
Merk: Når du slår på Avalon N5 for første gang, begynner den å tune til digitalradiostasjoner. Når
autotuningen er ferdig, kan du begynne å lytte til digitalradio.
Slik slår du av Avalon N5 eller setter den i standby:
Trykk ned og slipp dreieknappen av/på/volum til går i lås nede.
• Hvis Avalon N5 er koblet til en stikkontakt, går Avalon N5 i standby. I standby bruker Avalon N5
bare litt strøm og viser klokkeslett og dato på displayet.
• Hvis Avalon N5 forsynes med strøm fra et ChargePAK-batteri, slås Avalon N5 av.
Merk: Eventuelle innstilte alarmer vil ikke høres hvis Avalon N5 får strøm fra et ChargePAK-batteri og du
slår enheten av.
Endre volumet
Slik endrer du volumet:
• Volumet økes ved å dreie knappen Av/på/volum med urviseren.
• Volumet reduseres ved å dreie knappen Av/på/volum mot urviseren.
NO
DA
7
Page 96

Digitalradio
1
3
2
4
3
4
3
243
4
Lytte til digitalradio
Slik lytter du til digitalradio:
• Trykk på
til ‘DIGITALRADIO’ vises på displayet.
Bytte digitalradiostasjon
Slik bytter du digitalradiostasjon:
1. Trykk på knappen < eller > for å bla gjennom de tilgjengelige radiostasjonene.
2. Trykk på knappen Select for å bytte radiostasjon.
DR
PRESET 5
STASJONSLISTE
10:00
Tips: Tegnet ‘?’ ved siden av navnet på en radiostasjon betyr at stasjonen er inaktiv eller ikke tilgjengelig.
<BBC RADIO 1 >
EMPTY
DR FM AUX BTDR FM AUX BTDR FM AUX BTDR FM AUX BTDR FM AUX BTDR FM AUX BTDR FM AUX BTDR FM AUX BTDR FM AUX BTDR FM AUX BTDR FM AUX BTDR FM AUX BTDR FM AUX BTDR FM AUX BTDR FM AUX BTDR FM AUX BTDR FM AUX BTDR FM AUX BTDR FM AUX BTDR FM AUX BTDR FM AUX BTDR FM AUX BTDR FM AUX BTDR FM AUX BTDR FM AUX BTDR FM AUX BTDR FM AUX BTDR FM AUX BTDR FM AUX BTDR FM AUX BTDR FM AUX BTDR FM AUX BTDR FM AUX BTDR FM AUX BTDR FM AUX BTDR FM AUX BTDR FM AUX BTDR FM AUX BTDR FM AUX BTDR FM AUX BTDR FM AUX BTDR FM AUX BTDR FM AUX BT
Automatisk tuning til digitalradiostasjoner
Når du slår på Avalon N5 for første gang, begynner den å skanne etter digitalradiostasjoner. Hvis du flytter
Avalon N5 til et nytt sted, må du foreta en autotuning for å oppdatere listen over radiostasjoner.
Slik tunes automatisk til digitalradiostasjoner:
1. Trykk på
2. Trykk på knappen < eller > for å bla, og trykk på knappen Select for å velge ‘AUTOTUNING’.
Avalon N5 starter skanningen etter digitalradiostasjoner.
.
8
Page 97

FM-radio
1
3
2
4
3
4
3
243
4
Lytte til FM-radio
Slik lytter du til FM-radio:
• Trykk på
til ‘FM’ vises på displayet.
Bytte FM-radiostasjon
Slik bytter du FM-radiostasjon:
• For å skanne etter neste eller forrige radiostasjon trykker du på knappen < eller > og holder den
inne; da finner radioen den neste eller den forrige FM-radiostasjonen som har et sterkt signal.
• Trykk på knappen < eller > for å tune manuelt til en radiostasjon.
Frekvensen øker eller reduseres med 0,05 MHz.
Velge stereo- eller monomottak for FM-radio
Du kan velge mellom ‘FM STEREO’- og ‘MONO’-mottak når du lytter til FM-radio. Du ønsker kanskje
åvelge stereo hvis du lytter ved bruk av hodetelefoner.
Slik velger du stereo- eller monomottak:
1. Trykk på
2. Trykk på knappen < eller > for å bla, og trykk på knappen Select for å velge ‘FM STEREO’.
3. Trykk på knappen < eller > for å bla, og trykk på knappen Select for å velge ‘FM STEREO’
eller‘MONO’.
NO
DA
9
Page 98

Forvalg av radiostasjoner
1
3
2
4
3
4
3
4
1
3
2
4
3
4
3
4
1
3
2
4
3
4
3
2
4
3
4
3
243
4
3
4
Om forvalg
Du kan lagre dine favorittradiostasjoner som forvalg. Du kan når som helst bruke forvalg for å tune raskt
til dine lagrede radiostasjoner.
Oppå Avalon N5 er det fem forvalgsknapper. Bruk
favorittradiostasjoner. Bruk
Du kan lagre inntil 10 digitalradiostasjoner og inntil 10 FM-radiostasjoner som forvalg.
for å åpne en liste over alle forvalgene dine.
til
for rask tilgang til dine
Lagre en radiostasjon som forvalg
Slik lagrer du en radiostasjon som forvalg mellom 1 og 4:
1. Tune til den radiostasjonen du vil lagre.
2. Velg en forvalgsknapp mellom
LAGRET’ vises på displayet.
Tips: Hvis det allerede er lagret en radiostasjon på det valgte forvalget, vil den nye stasjonen erstatte
denne.
Slik lagrer du en radiostasjon i forvalgslisten:
1. Tune til den radiostasjonen du vil lagre.
2. Trykk på og hold inne knappen
3. Trykk på knappen < eller > for å bla, og trykk på knappen Select for å velge et forvalgsnummer.
Meldingen ‘FORVALG LAGRET’ vises på displayet.
Tips: Hvis det allerede er lagret en radiostasjon på det valgte forvalget, vil den nye stasjonen erstatte
denne.
og
til forvalgslisten vises på displayet.
, og trykk og hold den inne til meldingen ‘FORVALG
DR
10:00
PRESET 5
EMPTY
DR FM AUX BTDR FM AUX BTDR FM AUX BTDR FM AUX BTDR FM AUX BTDR FM AUX BTDR FM AUX BTDR FM AUX BTDR FM AUX BTDR FM AUX BTDR FM AUX BTDR FM AUX BTDR FM AUX BTDR FM AUX BTDR FM AUX BTDR FM AUX BTDR FM AUX BTDR FM AUX BTDR FM AUX BTDR FM AUX BTDR FM AUX BTDR FM AUX BTDR FM AUX BTDR FM AUX BTDR FM AUX BTDR FM AUX BTDR FM AUX BTDR FM AUX BTDR FM AUX BTDR FM AUX BTDR FM AUX BTDR FM AUX BTDR FM AUX BTDR FM AUX BTDR FM AUX BTDR FM AUX BTDR FM AUX BTDR FM AUX BTDR FM AUX BTDR FM AUX BTDR FM AUX BTDR FM AUX BTDR FM AUX BT
FORVALG 7
LAGRET
Lytte til et forvalg
Slik lytter du til et forvalg mellom 1 og 4:
• Trykk raskt på en forvalgsknapp mellom
radiostasjonen som er lagret som forvalg 2, trykker du på
Slik lytter du til en fritt valgt forvalgt radiostasjon:
1. Trykk på
2. Trykk på knappen < eller > for å bla, og trykk på knappen Select for å velge et forvalg.
for å åpne forvalgslisten.
og
10
. Eksempel: Hvis du vil lytte til
.
Page 99

Bluetooth og Aux-enheter
1
3
2
4
1
3
2
4
Koble til en Bluetooth-enhet
Via Bluetooth kan du koble deg trådløst til en enhet, for eksempel en mobiltelefon eller et nettbrett. Du kan
da strømme musikk fra mobiltelefonen eller nettbrettet gjennom Avalon N5.
For å koble enheten din til Avalon N5 velger du bare ‘Avalon’ i Bluetooth-menyen på enheten.
Slik kobler du til en Bluetooth-enhet:
1. Trykk på
2. Slå på Bluetooth på Bluetooth-enheten din, og koble den til ‘Avalon’.
Merk: Du finner mer informasjon om dette i bruksanvisningen for Bluetooth-enheten. Hvis du blir
bedt om å angi et passord, taster du inn 0000.
Når ‘BT TILKOBLET’ vises på displayet på din Avalon N5, er Avalon N5 klar til å strømme musikk.
Tips: Hvis du vil koble en annen Bluetooth-enhet til Avalon N5, må du koble den til som beskrevet
ovenfor. Dette vil automatisk koble fra eventuelle enheter som allerede er tilkoblet.
til ‘BLUETOOTH’ vises på displayet.
DR FM AUX BTDR FM AUX BTDR FM AUX BTDR FM AUX BTDR FM AUX BTDR FM AUX BTDR FM AUX BTDR FM AUX BTDR FM AUX BTDR FM AUX BTDR FM AUX BTDR FM AUX BTDR FM AUX BTDR FM AUX BTDR FM AUX BTDR FM AUX BTDR FM AUX BTDR FM AUX BTDR FM AUX BTDR FM AUX BTDR FM AUX BTDR FM AUX BTDR FM AUX BTDR FM AUX BTDR FM AUX BTDR FM AUX BTDR FM AUX BTDR FM AUX BTDR FM AUX BTDR FM AUX BTDR FM AUX BTDR FM AUX BTDR FM AUX BTDR FM AUX BTDR FM AUX BTDR FM AUX BTDR FM AUX BTDR FM AUX BTDR FM AUX BTDR FM AUX BTDR FM AUX BTDR FM AUX BTDR FM AUX BT
PRESET 5
BT TILKOBLET
10:00
10-10-2017
EMPTY
Koble til en enhet via en Aux-kabel
Via en Aux-kabel kan du koble en enhet, for eksempel en MP3-spiller, til Avalon N5. Du kan da høre på
musikk som er lagret på enheten gjennom din Avalon N5.
Slik kobler du til en enhet via en Aux-kabel:
1. Trykk på
2. Stikk en Aux-kabel inn i Aux-kontakten på siden av Avalon N5.
3. Sett den andre enden av Aux-kabelen inn i enheten du vil koble til.
Avalon N5 er nå klar til å spille av musikk fra den tilkoblede enheten.
til ‘AUX INNGANG’ vises på displayet.
NO
DA
11
Page 100

Alarmer
3
4
DR FM AUX BTDR FM AUX BTDR FM AUX BTDR FM AUX BTDR FM AUX BTDR FM AUX BTDR FM AUX BTDR FM AUX BTDR FM AUX BTDR FM AUX BTDR FM AUX BTDR FM AUX BTDR FM AUX BTDR FM AUX BTDR FM AUX BTDR FM AUX BTDR FM AUX BTDR FM AUX BTDR FM AUX BTDR FM AUX BTDR FM AUX BTDR FM AUX BTDR FM AUX BTDR FM AUX BTDR FM AUX BTDR FM AUX BTDR FM AUX BTDR FM AUX BTDR FM AUX BTDR FM AUX BTDR FM AUX BTDR FM AUX BTDR FM AUX BTDR FM AUX BTDR FM AUX BTDR FM AUX BTDR FM AUX BTDR FM AUX BTDR FM AUX BTDR FM AUX BTDR FM AUX BTDR FM AUX BTDR FM AUX BT
DR
3
4
3
4
Hvis du vil våkne opp til din favorittradiostasjon, kan du stille inn to alarmer på Avalon N5.
Merk: Du kan ikke stille inn noen alarmer når Avalon N5 får strøm fra et ChargePAK-batteri.
Stille inn en alarm
Slik stiller du inn en alarm:
1. Trykk på
2. Trykk på knappen < eller > for å bla, og trykk på knappen Select for å velge ‘ALARM’
3. Trykk på knappen < eller > for å bla, og trykk på knappen Select for å velge ‘ALARM 1’ eller ‘ALARM 2’.
4. Trykk på knappen < eller > for å bla, og trykk på knappen Select for å ‘endre innstillingene for
alarmen’:
‘ALARM’ Slå alarmen på eller av
‘I TIDE’ Velge klokkeslett for alarmen
‘VARIGHET’ Velge hvor mange minutter alarmen skal lyde
‘KILDE’ Velge om du vil vekkes av en ‘FM’- eller ‘DAB’-radiostasjon eller en ‘TONE’
‘REPETER’ Velge hvor ofte du vil at alarmen skal lyde: ‘DAGLIG’, ‘ EN GANG’, ‘HELGER’
‘VOLUM’ Velge volumet for alarmen (gjelder bare radioalarmer)
Meldingen ‘ALARM LAGRET’ vises når du er ferdig.
Symbolet
5. Når du har foretatt alle endringene, trykker du på og holder inne
.
Tips: For FM og DAB kan du velge en forvalgt stasjon (hvis du har lagret
noen), eller du kan velge ‘SIST HØRT PÅ for å velge stasjonen du sist lyttet til.
eller ‘UKEDAGER’
eller
vises øverst på displayet når en alarm er innstilt.
DR
10:00
PRESET 5
EMPTY
DR FM AUX BTDR FM AUX BTDR FM AUX BTDR FM AUX BTDR FM AUX BTDR FM AUX BTDR FM AUX BTDR FM AUX BTDR FM AUX BTDR FM AUX BTDR FM AUX BTDR FM AUX BTDR FM AUX BTDR FM AUX BTDR FM AUX BTDR FM AUX BTDR FM AUX BTDR FM AUX BTDR FM AUX BTDR FM AUX BTDR FM AUX BTDR FM AUX BTDR FM AUX BTDR FM AUX BTDR FM AUX BTDR FM AUX BTDR FM AUX BTDR FM AUX BTDR FM AUX BTDR FM AUX BTDR FM AUX BTDR FM AUX BTDR FM AUX BTDR FM AUX BTDR FM AUX BTDR FM AUX BTDR FM AUX BTDR FM AUX BTDR FM AUX BTDR FM AUX BTDR FM AUX BTDR FM AUX BTDR FM AUX BT
ALARM
LAGRET
for å gå ut av menyen.
Slette en eksisterende alarm
Slik sletter du en eksisterende alarm:
1. Trykk på
2. Trykk på knappen < eller > for å bla, og trykk på knappen Select for å velge ‘ALARM’
3. Trykk på knappen < eller > for å bla, og trykk på knappen Select for å velge ‘ALARM 1’ eller ‘ALARM 2’.
4. Trykk på knappen < eller > for å bla, og trykk på knappen Select for å endre innstillingen til ‘AV’.
Meldingen ‘ALARM LAGRET vises på displayet.
.
Slumre eller slå av en alarm
Slik slumrer du en alarm:
• Trykk på en av forvalgsknappene
Alarmen slumrer i 8 minutter.
12
Slik slår du av en alarm:
• Trykk på knappen Source, < Select > eller Menu.
 Loading...