


2411

TYPE 2411
Gebruiksaanwijzing
Instructions for use
Mode d’emploi
Anleitung
Instrucciones de Uso
Istruzioni d’uso
Bruksanvisning
Brugsanvisning
Bruksanvisning
Käyttöohje
Instruções de utilização
STEAM STATION de luxe

Gebruiksaanwijzing . . . . . . . . . . . . . . . . . . . . . . . . . . . . . . . . . 4
Instructions for use . . . . . . . . . . . . . . . . . . . . . . . . . . . . . . . . . 7
Mode d’emploi . . . . . . . . . . . . . . . . . . . . . . . . . . . . . . . . . . . . . 10
Anleitung . . . . . . . . . . . . . . . . . . . . . . . . . . . . . . . . . . . . . . . . . . . 13
Instrucciones de Uso . . . . . . . . . . . . . . . . . . . . . . . . . . . . . . 16
Istruzioni d’uso . . . . . . . . . . . . . . . . . . . . . . . . . . . . . . . . . . . . 19
Bruksanvisning . . . . . . . . . . . . . . . . . . . . . . . . . . . . . . . . . . . . 22
Brugsanvisning . . . . . . . . . . . . . . . . . . . . . . . . . . . . . . . . . . . . 25
Bruksanvisning . . . . . . . . . . . . . . . . . . . . . . . . . . . . . . . . . . . . 28
Käyttöohje . . . . . . . . . . . . . . . . . . . . . . . . . . . . . . . . . . . . . . . . . 31
Instruções de utilização . . . . . . . . . . . . . . . . . . . . . . . . . . .34
GARANTIEKAART/GUARANTEE CARD/CARTE DE GARANTIE/ GARANTIEKARTE
CERTIFICADO DI GARANTÍA/CARTOLINA DI GARANZIA/GARANTIKORT/
G
ARANTIBEVIS/GARANTIKORT/TAKUUTODISTUS . . . . . . . . . . . . . . . . . . . . . . . . . 37
OKTOBER 2002
NL
UK
F
D
E
I
S
DK
N
SF
P
4
PRINCESS STEAM STATION DE LUXE ART. 2411
ALLEEN VOOR HUISHOUDELIJK GEBRUIK
Lees eerst deze handleiding voordat u het strijkijzer gebruikt.
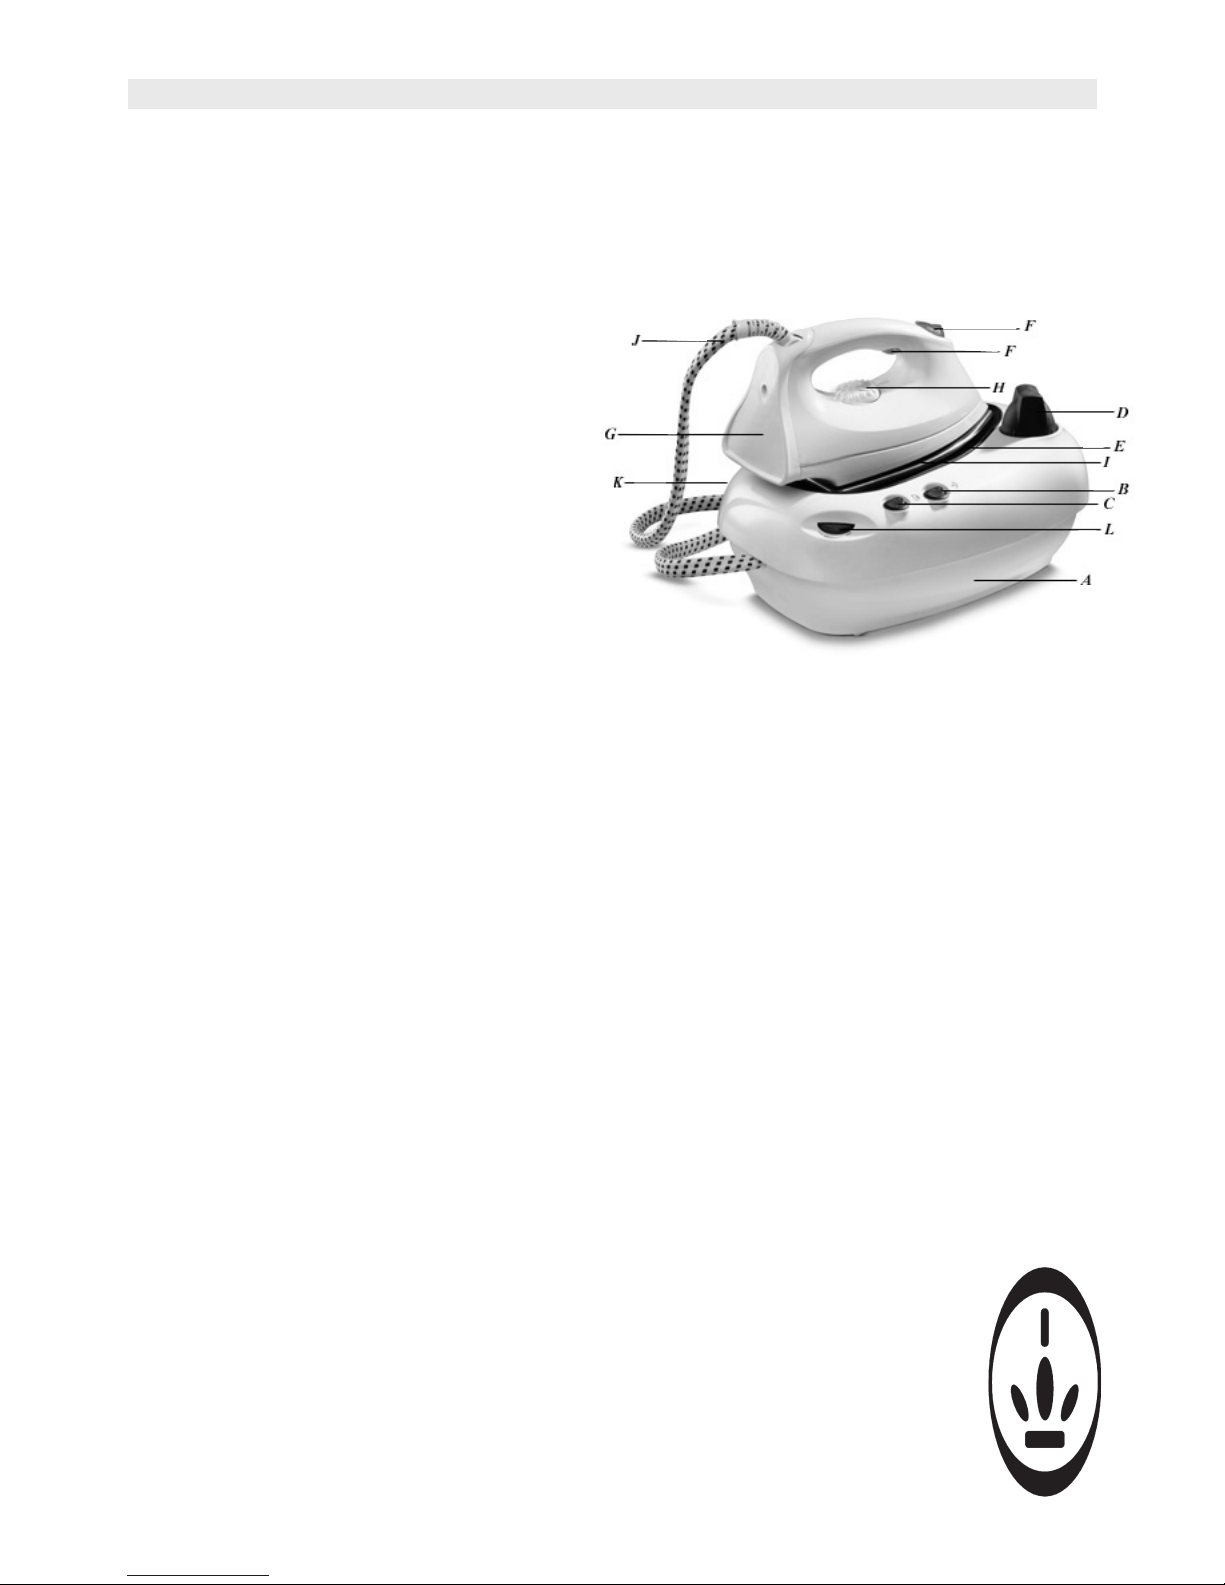
DE ONDERDELEN VAN HET STRIJKIJZER
A. Stoomreservoir
B. Stoomschakelaar
C. Strijkijzerschakelaar
D. Vulopening met afsluitdop
E. Strijkijzerstand
F. Stoomknoppen
(boven = stoom aan, onder = uit + stoomstoot)
G. Indicatielampje
H. Thermostaat
I. Strijkzool
J. Snoertoevoer
K. Netsnoer
L. Stoomregelaar
HET STRIJKIJZER GEBRUIKEN
De eerste keer
1. Gebruikt u het strijkijzer voor de eerste keer, controleer dan of de spanning die op de onderkant van
het strijkijzer staat vermeld, overeenkomt met de netspanning waarop u het strijkijzer wilt aansluiten.
2. Verwijder eventueel alle labels en stickers van het strijkijzer.
3. Enkele delen van het strijkijzer zijn licht ingevet. Daardoor kan het strijkijzer een beetje roken als het
voor het eerst wordt ingeschakeld. Dit roken zal na korte tijd stoppen. Gebruik normaal kraanwater
voor het stoomstrijken. Maar als u in een hardwatergebied woont, raden we u aan om alleen gedestil-
leerd water te gebruiken, voor een optimaal strijkresultaat.
WATERRESERVOIR VULLEN
• Zorg dat de stekker uit het stopcontact is.
• Plaats het reservoir op een stabiele ondergrond.
• Vul het waterreservoir (max. 1 liter).
• U kunt kraanwater gebruiken. Als u in een gebied met hard water woont, kunt u ook gedestilleerd water
gebruiken.Gebruik nooit azijn, ontkalkingsmiddelen of andere chemische middelen.
• Sluit het stoomreservoir door met de hand de vuldop met de klok mee te draaien tot deze vastzit.
VULLEN WATERRESERVOIR ALS HET STRIJKIJZER EN/OF WATERRESERVOIR WARM IS
LET OP: wanneer het strijkijzer aan het opwarmen is, staat het waterreservoir onder druk. Vul het reservoir alleen als dit leeg en afgekoeld is.
1. Schakel het strijkijzer uit door de knop “Iron switch” uit te schakelen.
2. Schakel het water reservoir uit door de knop “Steam Tank Switch” uit te schakelen.
3. Haal de stekker uit het stopcontact.
4. Draai voorzichtig de vuldop van het waterreservoir af (tegen de klok in) tot stoom hoorbaar ontsnapt. Wacht tot het geluid stopt. Dit geluid is normaal en duidt niet op een
defect. OPMERKING: Als de druk nog te hoog is, is het onmogelijk om de dop los te
draaien. Wacht dan nog even tot het reservoir voldoende afgekoeld is.
5. Draai de vuldop voorzichtig verder tot u het geluid weer hoort. Wacht dan weer even tot
het geluid stopt. Ga zo verder tot de vuldop eraf is.
6. Wacht een aantal minuutjes. Dan langzaam water in de opening gieten.
5
DROOGSTRIJKEN
Voor het strijken zonder stoom moet u de schakelaar van de stoomtank op OFF zetten.
STOOMSTRIJKEN
1. Zoals aangegeven staat op de thermostaat, is stoomstrijken alleen mogelijk op hogere strijktemperaturen; dus zet de thermostaat op •• of •••.
2. Steek de stekker in het stopcontact.
3. Zet de schakelaar “steam tank on/off” aan. Het indicatielampje gaat aan.
4. Het strijkijzer warmt sneller op dan de watertank. U zou het strijkijzer eventueel een paar minuten
later kunnen aanzetten.
5. Selecteer de juiste temperatuur met de thermostaat.
6. Zet de schakelaar “iron on/off” aan, het indicatielampje in de schakelaar en het indicatielicht voor het
opwarmen van het strijkijzer gaan aan.
7. Na enkele minuten gaat het indicatielampje voor het opwarmen van het strijkijzer uit. Dit betekent dat
de strijkzool de juiste temperatuur heeft bereikt.
8. Wanneer het indicatielampje op de schakelaar uitgaat, betekent dit dat het waterreservoir opgewarmd
is en dat de stoom “klaar” is. U kunt beginnen met stoomstrijken.
STOOM INSCHAKELEN
Zorg dat er water in het reservoir zit en dat de thermostaat op “stomen” staat.
Druk de bovenste knop in om het stomen in te schakelen.
BELANGRIJK: het kan voorkomen dat u de onderste knop (stoomstoot) een paar keer moet indrukken
om alle lucht uit het systeem te verwijderen, zodat de pomp start.
Door de knop bovenop in te drukken gaat het strijkijzer stomen. Het stomen schakelt u uit door de onderste knop kort en “half” in te drukken.
Door de onderste knop geheel in te drukken geeft u een stoomstoot.
Het strijkijzer kan zowel horizontaal als verticaal stomen (bijv. om gordijnen en kleding te reinigen).
REINIGEN, ONDERHOUD EN OPSLAG
• Trek de stekker uit het stopcontact en laat het strijkijzer volledig afkoelen voordat u het strijkijzer reinigt.
• Veeg kalkaanslag en andere resten van de strijkzool met behulp van een vochtige doek en krasvrij
schuurmiddel, kras nooit met metalen voorwerpen over de strijkzool.
• Doe nooit azijn of andere middelen in het waterreservoir.
• Reinig het strijkijzerhuis met een vochtige, zachte doek.
• Laat na elk gebruik het resterende water uit het reservoir lopen.
• Zet het strijkijzer rechtop nadat u het water heeft verwijderd.
• Voor ontkalken kunt u de normale ontkalkingsmiddelen gebruiken die in de supermarkt te koop zijn.
Let wel op dat deze geschikt zijn voor strijkijzers. Volg de aanwijzingen op de verpakking van het ontkalkingsmiddel op en spoel een paar keer na met schoon water.
STRIJKTIPS
1. Sorteer uw wasgoed op samenstelling. Volg altijd het strijkadvies op dat doorgaans op een etiket staat
in één van de naden aan de binnenkant van de kleding. Strijk het wasgoed dat de laagste temperatuurstand nodig heeft als eerste. We raden u aan de volgende thermostaatstanden te gebruiken.
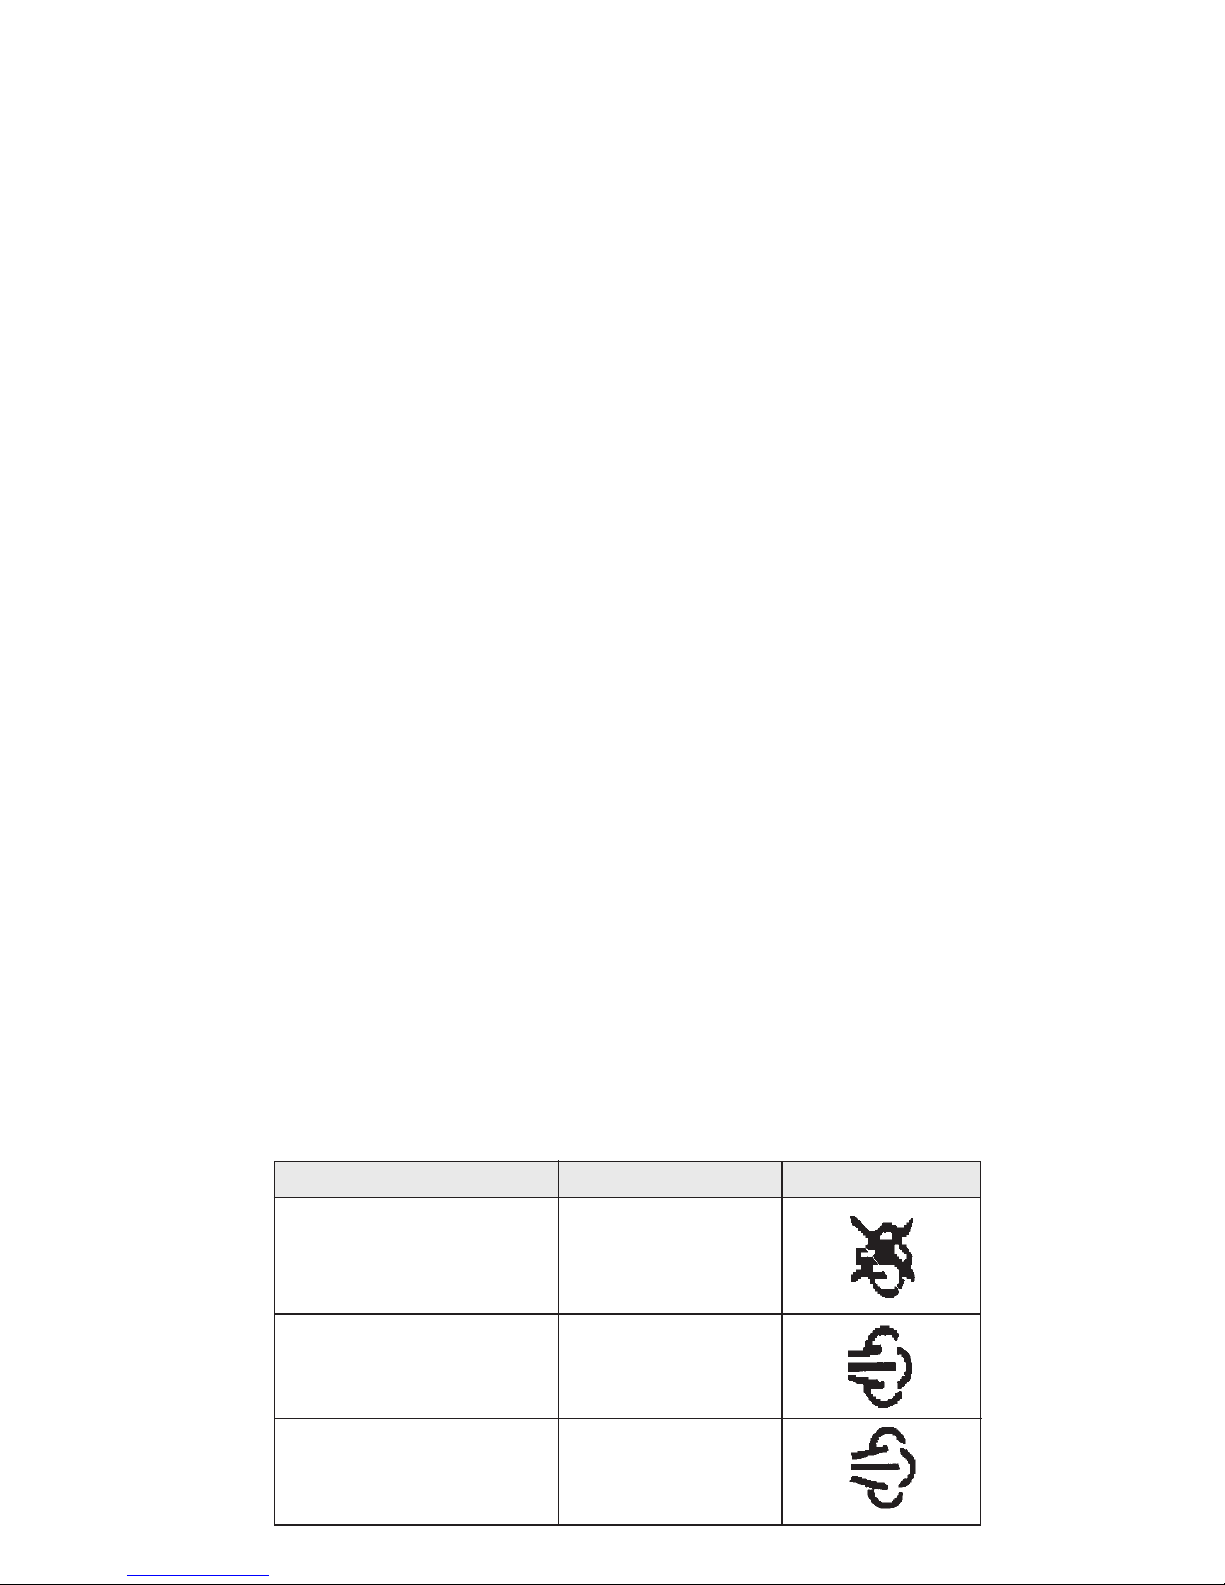
Textielsoort Thermostaat Stoom strijken
Synthetisch MIN
(acetaat, acryl, viscose, |
polyamide,polyester) zijde •
|
Wol |
••
|
Katoen |
Linnen •••
|
MAX

6
2. Weet u niet welke vezels in een kledingstuk zijn verwerkt? Test dan eerst het strijkresultaat op een
onopvallende plaats (een naad of een zoom) voordat u de rest strijkt.
3. Twijfelt u? Begin dan altijd op de laagste stand. Strijkt u kreukels op die lage temperatuur niet weg,
zet de thermostaat dan langzaam hoger tot u tevreden bent over het strijkresultaat zonder het weefsel
te beschadigen.
PRINCESS-TIPS
• Gebruik het strijkijzer alleen om te strijken.
• Dompel het apparaat nooit in water of in een andere vloeistof. Doet u dit toch dan zijn elektrische
schokken niet uit te sluiten.
• Zet de thermostaat altijd op “MIN” voordat u de stekker in het stopcontact steekt of uit het stopcontact
trekt. En trek nooit aan het snoer, maar altijd aan de stekker zelf.
• Het snoer mag nooit in aanraking komen met hete oppervlakken. Laat het strijkijzer helemaal afkoelen
voordat u het opbergt.
• Trek altijd de stekker uit het stopcontact wanneer u het strijkijzer met water vult of water uit het reservoir laat lopen en wanneer het strijkijzer niet gebruikt wordt.
• Gebruik het strijkijzer niet als het snoer beschadigd is, of als het strijkijzer is gevallen of beschadigd is.
Om elektrische schokken te voorkomen mag u het strijkijzer nooit zelf demonteren; breng het voor
reparatie naar een erkend onderhoudsmonteur. Onjuiste montage kan bij gebruik elektrische schokken
veroorzaken.
• Pas altijd goed op als u strijkt in de nabijheid van kinderen, en bij gebruik van het strijkijzer door kinderen. Laat een aangesloten strijkijzer nooit onbewaakt achter, ook niet op een strijkplank.
• Het aanraken van hete metalen delen, heet water of stoom kan verbranding veroorzaken. Pas op als u
het strijkijzer op zijn kop houdt: in het reservoir kan heet water zitten.
• Reparaties mogen alleen door een erkende servicewerkplaats worden uitgevoerd.
• Druk na gebruik van het strijkijzer een paar keer op de stoomknop en schud voorzichtig tot u zeker
weet dat alle water uit het reservoir is verwijderd. Het restvocht zal verdampen als u daarna de stekker
in het stopcontact steekt en het strijkijzer even laat opwarmen.
• Voorkom overbelasting van het elektrische systeem bij u in huis, en sluit geen andere apparaten die
veel elektriciteit verbruiken aan op dezelfde groep als het strijkijzer.
• Gebruik alleen verlengsnoeren met een doorsnede van min. 1 mm2. Verlengsnoeren met een kleinere
doorsnede kunnen oververhit raken. Leg verlengsnoeren altijd zo neer dat er niet aan getrokken kan
worden en dat niemand erover kan struikelen.
• Controleer regelmatig of het netsnoer niet beschadigd is en nog veilig kan worden gebruikt.
• Strijk nooit over ritsen, klinknagels in spijkerbroeken enz.; deze beschadigen de strijkzool. Strijk om
dergelijke voorwerpen heen.
• Demonteer en repareer uw strijkijzer nooit zelf.
7
PRINCESS STEAM STATION DE LUXE ART. 2411
ONLY FOR DOMESTIC USE
Read this manual before using the iron.
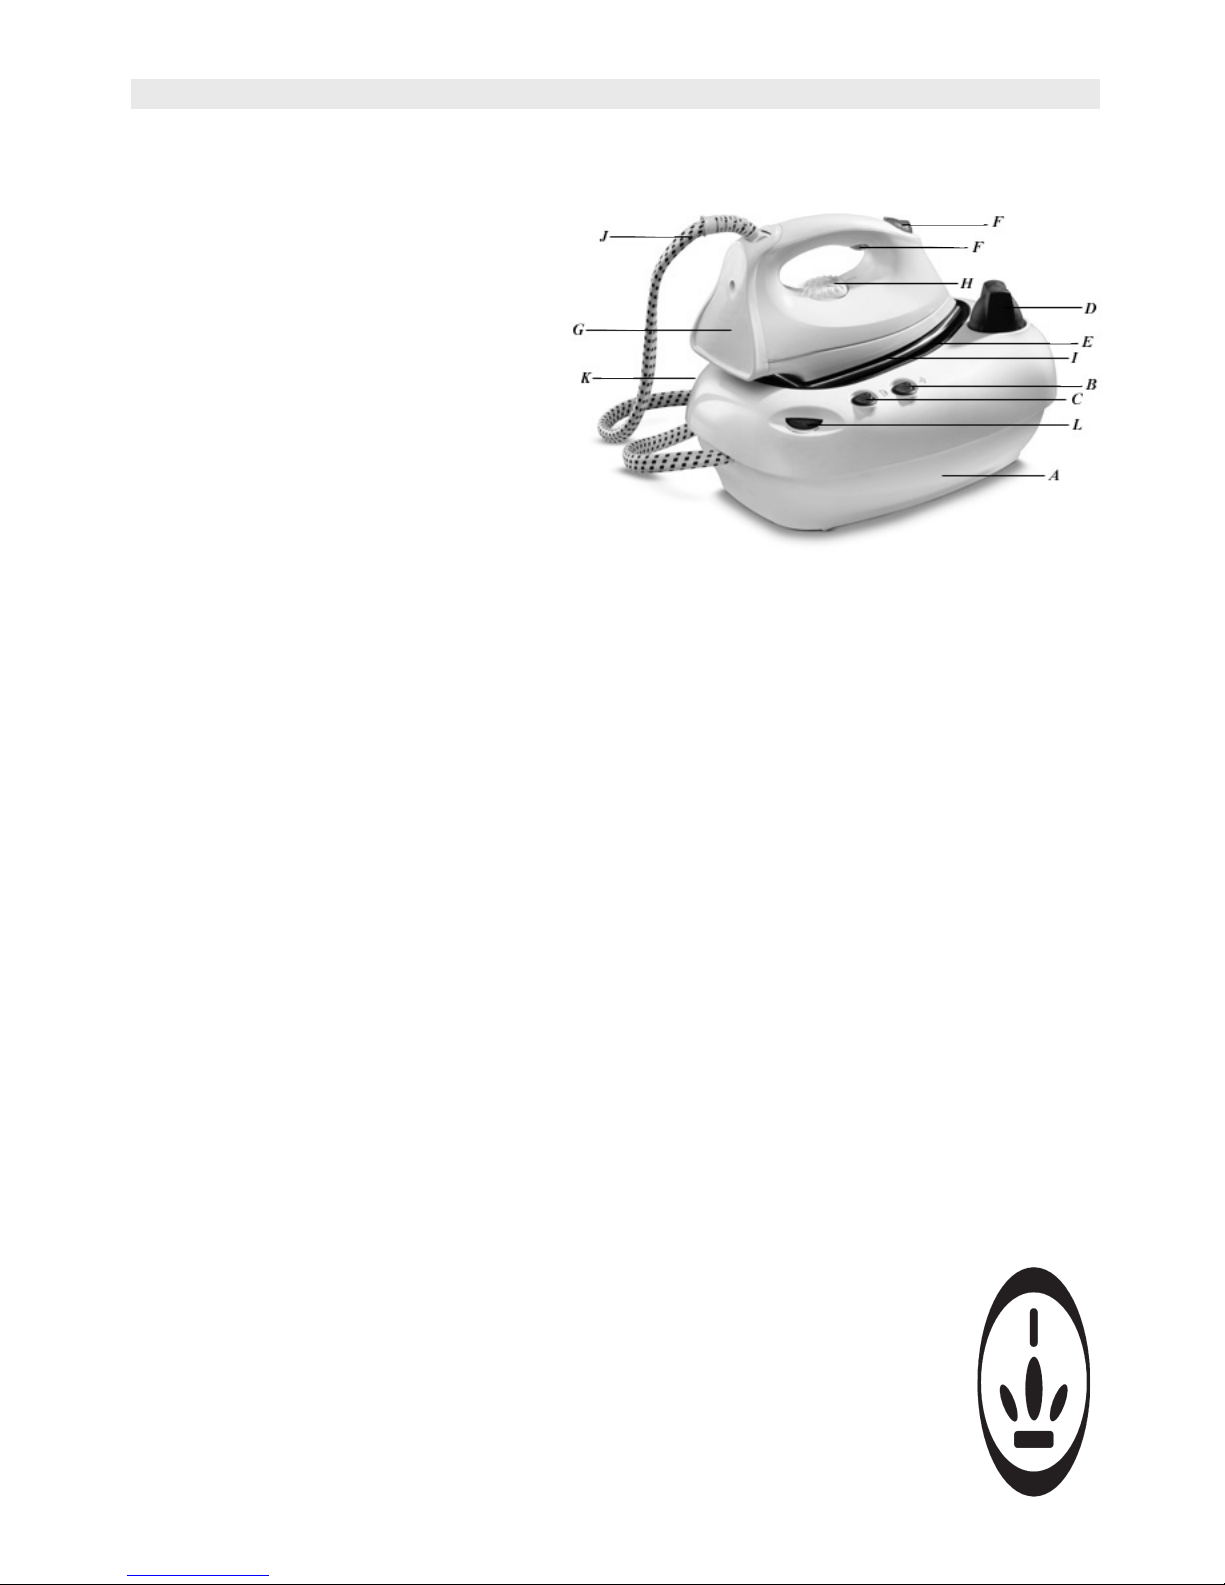
THE IRON’S COMPONENTS
A. Steam reservoir
B. Steam switch
C. Iron switch
D. Filling aperture with cap
E. Iron setting
F. Steam buttons
(up = steam on, down = off + steam jet)
G. Indicator light
H. Thermostat
I. Ironing plate
J. Cable attachment
K. Power cable
L. Steam control
USING THE IRON
The first time
1. If you are using the iron for the first time, check that the voltage indicated on the underside of the
iron corresponds to the voltage of the circuit to which you intend to connect the iron.
2. Remove any labels and stickers from the iron.
3. Some parts of the iron have been lightly greased; this may cause the iron to give off a little smoke
when it is switched on for the first time. The smoke will stop after a short time. Use ordinary tap
water for steam ironing. However, if you live in a hard water area, we recommend the use of distilled
water for best results.
FILLING THE WATER RESERVOIR
• Ensure that the appliance is not plugged in.
• Place the reservoir on a stable surface.
• Fill the water reservoir (max. 1 litre)
• You can use tap water. If you live in a hard water area, you can use distilled water instead.
• Never use vinegar, decalcifying agents or other chemicals.
• Close the steam reservoir by manually turning the cap clockwise until firmly closed.
FILLING THE WATER RESERVOIR WHEN THE IRON AND/OR WATER RESERVOIR IS HOT
ATTENTION: when the iron is heating up, the water reservoir is pressurised. Only fill the reservoir when
it is empty and cool.
1. Turn the iron off using the ‘iron switch’.
2. Turn the water reservoir off using the ‘steam reservoir switch’
3. Remove the plug from the socket.
4. Carefully unscrew the cap of the water reservoir (anticlockwise) until steam can be heard escaping.
Wait until the noise stops. This sound is quite normal and does not mean that anything is wrong with
the appliance. NOTE: When the pressure is still too great it is impossible to unscrew the cap. You
should then wait until the reservoir has cooled sufficiently.
5. Continue to unscrew the cap carefully until the sound is heard again. Wait once more
until the noise stops. Continue in this fashion until the cap is removed.
6. Wait for a few minutes, then slowly pour water into the aperture.
DRY IRONING
To iron without steam, the steam reservoir switch must be in the OFF position.

8
STEAM IRONING
1. As indicated on the thermostat, steam ironing is only possible at higher ironing temperatures, so set
the thermostat to •• or •••
2. Insert the plug into the electricity socket.
3. Set the “steam tank on/off” switch to “on”. The indicator light will come on.
4. The iron heats up faster than the water tank. If you wish, you can switch the iron on a couple of
minutes later.
5. Select the right temperature using the thermostat.
6. Set the “iron on/off” switch to “on”. The indicator light in the switch and the iron heating indicator
light will come on.
7. After a few minutes, the iron heating indicator light will go out. This means that the iron plate has
reached the right temperature.
8. When the indicator light on the switch goes out it means that the water reservoir has heated up and
that there is enough steam. You can now start to steam iron.
SWITCHING ON THE STEAM
Ensure that there is water in the reservoir and that the thermostat is set to “steam”.
Press the uppermost button to turn on the steam.
IMPORTANT: you may have to press the bottom button (steam jet) a few times to remove all the air
from the system before the pump will start.
Pressing the button on top will cause the iron to emit steam. You can turn the steam off by briefly pressing the bottom button halfway in.
Pressing the bottom button all the way in produces a jet of steam.
The iron can be used to steam iron horizontally or vertically (e.g. to clean curtains and clothing).
CLEANING, MAINTENANCE AND STORAGE
• Always remove the plug from the socket and allow the iron to cool off fully before you clean it.
• Wipe lime deposits and other impurities from the iron plate using a damp cloth and a non-scratch cleaning agent; never scratch at the iron plate with metal objects.
• Never put vinegar or other agents in the water reservoir.
• Clean the iron’s casing with a soft, damp cloth.
• Empty the remaining water out of the reservoir after each time you use the iron.
• Stand the iron upright after emptying out the water.
• For descaling you can use the normal decalcifying agents on sale at supermarkets. Take care that these
are suitable for irons. Follow the instructions on the packaging of the decalcifying agent, and afterwards rinse a couple of times with clean water.
IRONING TIPS
1. Sort your washing by fabric type. Always follow the advice on ironing that is usually to be found on a
label in one of the seams of the garment. Iron the garments that require the lowest temperature setting first.
We recommend using the following thermostat settings:
Type of Textile Thermostat e Steam Iron
Synthetic MIN
(acetaet, acryle, viscose, |
polyamide,polyester zijde) •
|
Wool |
••
|
Kotton |
Linnen •••
|
MAX

2. You don’t know what fibres a garment is made of? Then test for results on an unobtrusive place first
(a hem or a seam) before ironing the rest.
3. Still in doubt? Then always start ironing at the lowest setting. If you cannot iron out the creases at
that low temperature, then gradually increase the thermostat setting until you are happy with the
results without damaging the fabric.
PRINCESS TIPS
• Only use the iron for ironing.
• Never immerse the appliance in water or any other liquid. If you do this, you could get an electric shock.
• Always set the thermostat to “MIN” before you put the plug in the electricity socket or remove it from
the electricity socket. Never pull on the cable; always pull the plug itself.
• The cable should never be allowed to come into contact with hot surfaces. Allow the iron to cool off
fully before putting it away.
• Always remove the plug from the electricity socket when you fill the iron with water or empty water
out of the reservoir, and whenever the iron is not in use.
• Do not use the iron if the cable is damaged, or if the iron has been dropped or damaged. In order to
avoid getting an electric shock, you should never dismantle the iron yourself; instead, take it to a recognised service centre for repair. Improper assembly could result in electric shocks when used.
• Always take care when you are ironing in the presence of children, and if children are using the iron.
Never leave an iron unsupervised when it is switched on, even on an ironing board.
• Touching hot metal parts, hot water or steam can result in burns and scalds. Take care if you hold the
iron upside-down: there could be hot water in the reservoir.
• Repairs may only be carried out by a recognised service centre.
• After using the iron, press the steam button a few times and shake carefully until you are sure that all
the water has been removed from the reservoir. The remaining moisture will evaporate if you then
insert the plug into the electricity socket and allow the iron to heat up for a short time.
• Avoid overloading your domestic electric system, and do not connect other appliances that use a lot of
electricity to the same ring main as the iron.
• Only use extension leads with a diameter of at least 1 mm2. Extension leads of a smaller diameter may
overheat. Always position extension leads so that nobody can pull at them or trip over them.
• Check regularly that the cable is not damaged and can still be used safely.
• Never iron over zips, rivets in jeans etc; these will damage the plate of the iron. Iron around such objects.
• Never dismantle and repair the iron yourself.
9
U.K. WIRING INSTRUCTIONS
The wires in the mains lead are coloured in accordance with the following code:
BLUE = NEUTRAL, BROWN = LIVE, GREEN-YELLOW = EARTH
As the colours of the wire in the mains lead of this appliance may not correspond with the colour
markings identifying the terminals on your plug, proceed as follows:
The wire which is coloured BLUE must be connected to the terminal which is marked with the
letter N or coloured black.
The wire which is coloured BROWN must be connected to the terminal which is marked with the
letter L or coloured red.
The wire which is coloured GREEN-YELLOW must be connected to the earth terminal which is marked
with the letter E or or coloured green and yellow.
With this appliance, if a 13 amp plug is used a 13 amp fuse should be fitted. If any other type of plug is
used a 15 amp fuse must be fitted either in the plug or at the distribution board.

10
PRINCESS STEAM STATION DE LUXE ART. 2411
UNIQUEMENT POUR UN USAGE DOMESTIQUE
Avant d’utiliser le fer à repasser, veuillez lire attentivement ce mode d’emploi.
DESCRIPTION DES PIECES DU FER A REPASSER
A. Réservoir vapeur
B. Interrupteur de la vapeur
C. Interrupteur du fer à repasser
D. Orifice de remplissage avec bouchon
E. Position de repassage
F. Boutons vapeur
(en haut = vapeur, en bas = arrêt + jet de vapeur)
G. Témoin lumineux
H. Thermostat
I. Semelle
J. Entrée cordon
K. Cordon de raccordement au secteur
L. Régulateur de vapeur
UTILISATION DU FER A REPASSER
La première fois
1. Si vous utilisez le fer pour la première fois, vérifiez que la tension indiquée sous le fer correspond à
la tension du secteur auquel vous souhaitez raccorder le fer.
2. Enlevez toutes les étiquettes et autocollants éventuels du fer.
3. Certaines parties du fer ont été légèrement graissées et peuvent éventuellement dégager un peu de
fumée lorsque vous branchez le fer pour la première fois. Ce phénomène est de courte durée. Utilisez
l’eau du robinet habituelle pour repasser à la vapeur. Par contre, si vous habitez dans une région où
l’eau est calcaire, nous vous conseillons d’utiliser uniquement de l’eau distillée si vous voulez obtenir
un résultat optimal.
REMPLISSAGE DU RESERVOIR D’EAU
• Enlevez la fiche de la prise.
• Placez le réservoir sur une surface stable.
• Remplissez le réservoir avec de l’eau (1 litre max.)
• Vous pouvez utiliser de l’eau du robinet. Si vous habitez dans une région où l’eau est calcaire, vous
pouvez aussi utiliser de l’eau distillée.
• N’utilisez jamais du vinaigre, des détartrants ou autres produits chimiques.
• Fermez le réservoir de la vapeur en vissant le bouchon dans les sens des aiguilles d’une montre.
REMPLISSAGE DU RESERVOIR SI LE FER ET/OU LE RESERVOIR SONT
CHAUDS
ATTENTION : quand le fer chauffe, le réservoir d’eau est sous pression. Remplissez le
réservoir seulement s’il est vide et qu’il a refroidi.
1. Débranchez le fer en mettant le bouton “Iron switch” sur arrêt.
2. Débranchez le réservoir à eau en mettant le bouton “Steam Tank Switch” sur arrêt.
3. Enlevez la fiche de la prise.
4. Dévissez avec précaution le bouton de remplissage du réservoir à eau (dans le sens
inverse des aiguilles d’une montre) jusqu’à ce que vous entendiez de la vapeur
s’échapper. Attendez jusqu’à ce que le bruit ait cessé. Il s’agit d’un bruit normal et
non pas d’un défaut de l’appareil.

11
REMARQUE : Si la pression est encore trop élevée, vous ne pouvez pas dévisser le bouchon.
Attendez encore quelques instants jusqu’à ce que le réservoir ait suffisamment refroidi.
5. Continuez de dévisser avec précaution le bouchon de remplissage jusqu’à ce que vous entendiez de
nouveau le bruit de la vapeur. Attendez encore quelques instants jusqu’à ce que le bruit cesse. Procédez
ainsi jusqu’à ce que vous ayez entièrement dévissé le bouchon.
Attendez quelques minutes. Versez ensuite lentement de l’eau dans l’orifice.
REPASSAGE A SEC
Pour repasser sans vapeur, placez l’interrupteur du réservoir vapeur sur OFF.
REPASSAGE A LA VAPEUR
1. Comme indiqué sur le thermostat, le repassage à la vapeur est seulement possible à des températures
de repassage élevées, donc réglez le thermostat sur •• ou •••
2. Introduisez la fiche dans la prise.
3. Réglez l’interrupteur “steam tank on/off” (réservoir vapeur marche/arrêt) sur “on”. Le témoin lumineux s’allume.
4. Le fer chauffe plus rapidement que le réservoir à eau. Vous pourriez donc éventuellement allumer le
fer quelques minutes plus tard.
5. Sélectionnez la température adéquate avec le thermostat.
6. Réglez l’interrupteur “iron on/off” (fer marche/arrêt) sur “on”, le témoin lumineux de l’interrupteur
et le témoin lumineux pour le réchauffement du fer s’allument.
7. Après quelques minutes, le témoin lumineux pour le réchauffement du fer s’éteint. Cela signifie que
la semelle du fer a atteint la bonne température.
8. Lorsque le témoin lumineux de l’interrupteur s’éteint, cela signifie que le réservoir à eau est chaud et
que la vapeur est “prête”. Vous pouvez commencer à repasser à la vapeur.
UTILISATION DE LA VAPEUR
Assurez-vous que le réservoir contient de l’eau et que le thermostat est réglé sur “vapeur”.
Appuyez sur le bouton du haut pour utiliser la vapeur.
IMPORTANT : il se peut que vous deviez appuyer une ou deux fois sur le bouton du bas (jet de vapeur)
pour purger l’air du circuit de sorte que la pompe se mette en marche.
Si vous appuyez sur le bouton du haut, vous faites sortir de la vapeur du fer. Vous pouvez cesser d’utiliser
la vapeur en appuyant brièvement et à ”moitié” sur le bouton du bas.
Si vous appuyez complètement sur le bouton du bas, vous obtenez un jet de vapeur.
Le repassage à la vapeur peut se faire aussi bien horizontalement que verticalement (par exemple pour
nettoyer des rideaux ou des vêtements).
NETTOYAGE, ENTRETIEN ET RANGEMENT
• Enlevez la fiche de la prise et laissez entièrement refroidir le fer avant de le nettoyer.
• Essuyez les dépôts de calcaire et autres impuretés de la semelle avec un chiffon humide et un produit
abrasif ne rayant pas. Ne rayez jamais la semelle avec des objets en métal.
• Ne versez jamais de vinaigre ni d’autres produits dans le réservoir à eau.
• Nettoyez le boîtier du fer avec un chiffon doux et humide.
• Après chaque utilisation, videz l’eau du réservoir.
• Posez le fer en position verticale sur son talon après avoir vidé l’eau.
• Pour détartrer le fer, vous pouvez utiliser les détartrants habituels en vente en grande surface. Vérifiez
qu’ils conviennent pour les fers à repasser. Suivez les indications figurant sur l’emballage du détartrant
et après avoir traité le fer, rincez plusieurs fois avec de l’eau propre.
CONSEILS DE REPASSAGE
1. Triez le linge à repasser en fonction du type de tissu. Suivez toujours les indications de
repassage figurant habituellement sur l’étiquette cousue dans l’une des coutures à
l’intérieur des vêtements. Repassez en premier les tissus qui se repassent à la température la plus basse.
Nous vous conseillons d’utiliser les positions de thermostat suivantes :
2. Si vous ne savez pas quelle température utiliser (fibres inconnues), faites d’abord un essai sur une
couture ou un ourlet du vêtement avant de le repasser entièrement.
3. Si vous hésitez, utilisez toujours la température la plus basse. Si les plis ne disparaissent pas, augmentez progressivement la température jusqu’à satisfaction du résultat sans que le tissu soit endommagé.
CONSEILS PRINCESS
Utilisez le fer uniquement pour le repassage.
• Ne plongez jamais l’appareil dans l’eau ni dans tout autre liquide. Cela pourrait provoquer des décharges électriques.
• Réglez toujours le thermostat sur “MIN” avant d’introduire la fiche dans la prise ou de l’en retirer. Ne
tirez jamais sur le cordon, mais saisissez toujours la fiche pour la sortir de la prise.
• Le cordon ne doit jamais entrer en contact avec des surfaces chaudes. Laissez refroidir complètement le
fer avant de le ranger.
• Retirez toujours la fiche de la prise quand vous remplissez ou videz le réservoir, et quand vous n’utilisez pas le fer.
• N’utilisez pas le fer si le cordon ou le fer sont endommagés (chute du fer par exemple). Pour éviter des
décharges électriques, ne démontez jamais le fer vous-même, mais adressez-vous à un monteur agréé pour le
faire réparer. Un montage incorrect peut provoquer des décharges électriques quand vous utilisez le fer.
• Observez toujours la plus grande prudence si vous repassez à proximité d’enfants ou si vous laissez les
enfants utiliser le fer. Ne laissez jamais un fer branché sans surveillance, même sur une planche à
repasser.
• Veillez à ne pas toucher les parties métalliques chaudes ni l’eau ou la vapeur bouillante, qui causent des
brûlures. Faites très attention si vous tenez le fer la pointe en bas, car de l’eau bouillante peut s’écouler
du réservoir.
• Les réparations doivent toujours être confiées à un service après-vente agréé.
• Après avoir utilisé le fer, appuyez plusieurs fois sur le bouton de la vapeur et secouez délicatement le
fer pour vous assurer que le réservoir ne contient plus d’eau. L’humidité résiduelle s’évaporera si vous
introduisez ensuite la fiche dans la prise et que vous laissez chauffer le fer quelques instants.
• Pour éviter la surcharge de votre installation électrique ne raccordez pas d’autres appareils consommant
beaucoup d’électricité sur le même groupe que le fer.
• Utilisez uniquement une rallonge ayant un diamètre minimal de 1 mm2. Les rallonges
ayant un diamètre inférieur peuvent chauffer. Veillez toujours à ce que personne ne puisse tirer sur la rallonge ni trébucher dessus.
• Contrôlez régulièrement si le cordon est en bon état et qu’il peut être utilisé en toute sécurité.
• Ne repassez pas les fermetures éclair, les boutons de jeans, etc., mais seulement tout
autour, pour ne pas endommager la semelle du fer.
• Ne démontez ni ne réparez jamais vous-même votre fer.
12
Type de textile Thermostat Repassage à la vapeur
Tissus synthétiques MIN
(acétate, acrylique, viscose, |
polyamide,polyester) soie •
|
Laine |
••
|
Coton |
Lin •••
|
MAX
 Loading...