

Page 1
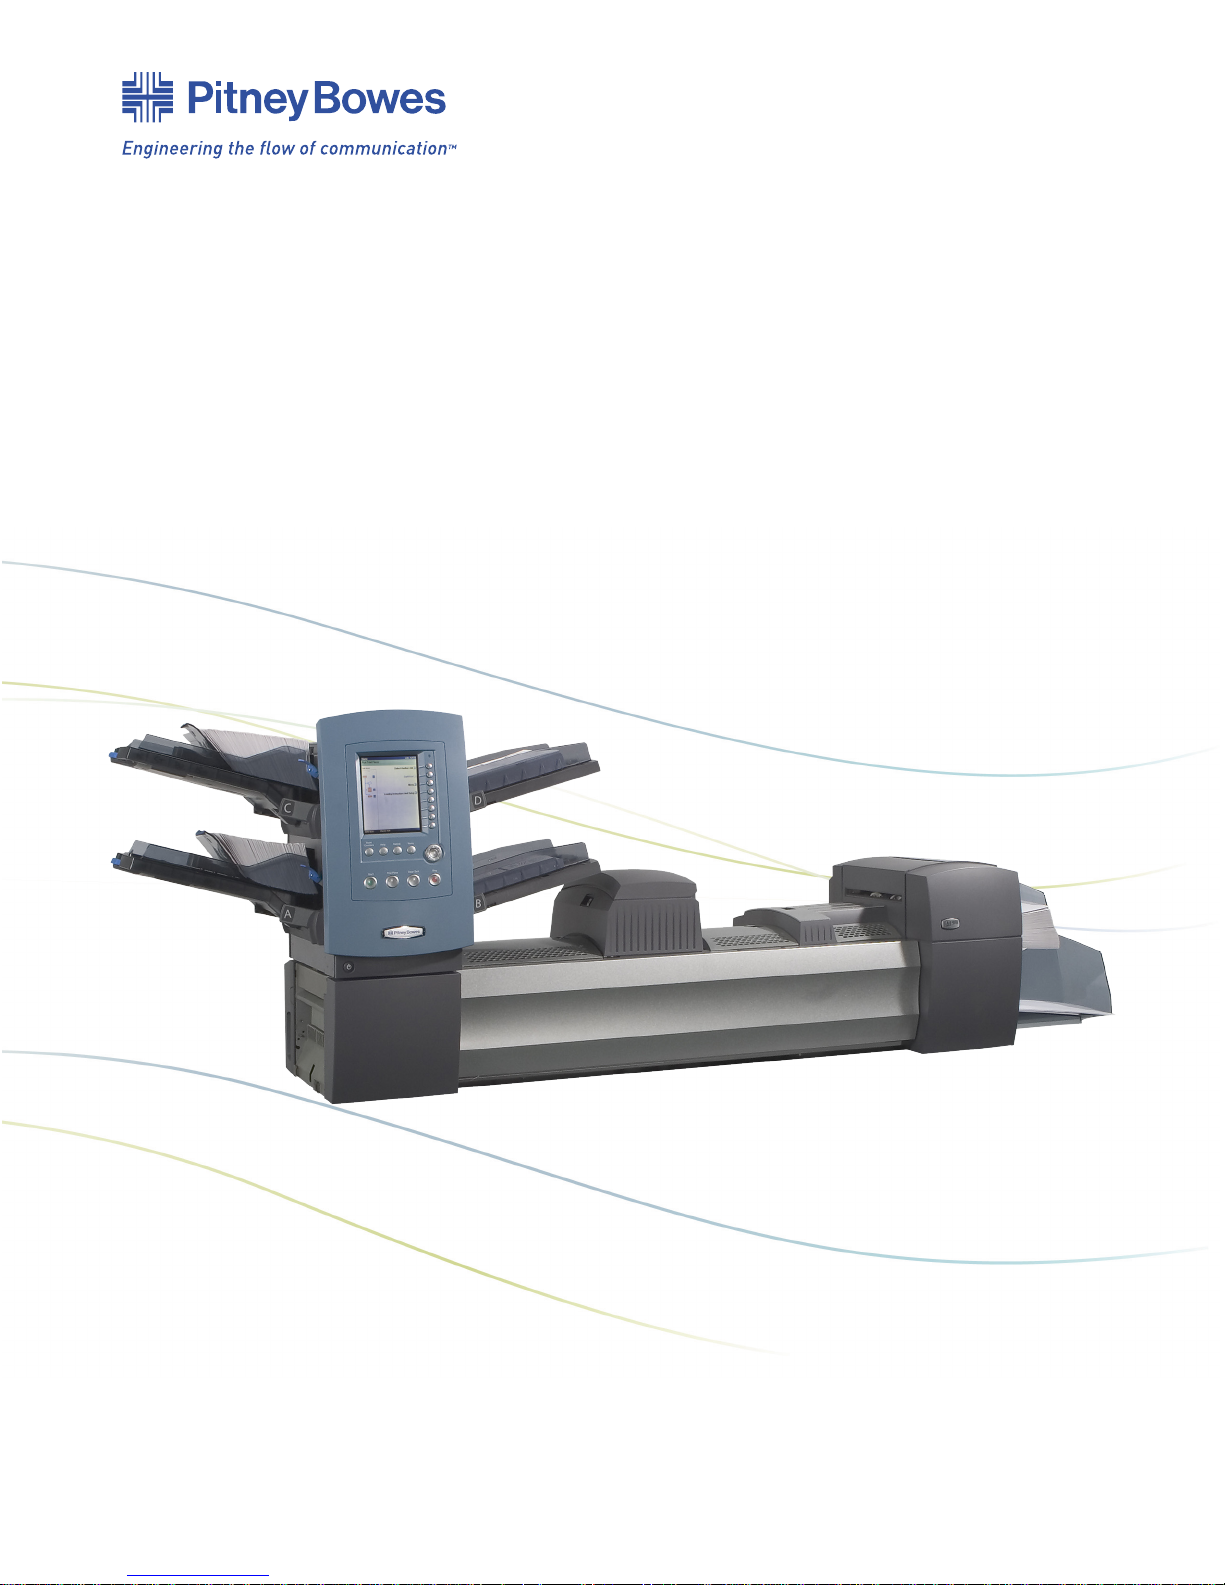
DI900/DI950/DI950e
FastPac™ Document Inserting System
Operator Guide Addendum
US/Canada English Version
Page 2

Statement of FCC Compliance
This equipment has been tested and found to comply with the limits for a Class A digital device, pursuant to part 15 of the FCC rules. These limits are designed to provide reasonable protection against
interference when the equipment is operated in a commercial environment. This equipment generates, uses, and can radiate radio frequency energy and, if not installed and used in accordance with
the instruction manual, may cause interference to radio communications. Operation of this equipment in a residential area is likely to cause interference, in which case the user will be required to
correct the interference at his own expense.
CAUTION: Changes or modications to this equipment not expressly approved by the party responsible for
compliance (Pitney Bowes) could void the user’s authority to operate the equipment.
Canada
This class A digital apparatus complies with Canadian ICES-003.
Cet appareil numérique de la classe A est conforme á la norme NMB-003 du Canada.
SV62081 Rev. A 12/07 ©2007 Pitney Bowes Inc.
All rights reserved. This book may not be reproduced in whole or in part in any fashion or stored in
a retrieval system of any type or transmitted by any means, electronically or mechanically, without
the express, written permission of Pitney Bowes. We have made every reasonable effort to ensure
the accuracy and usefulness of this manual; however, we cannot assume responsibility for errors or
omissions or liability for the misuse or misapplication of our products.
Due to our continuing program of product improvement, equipment and material specifications as
well as performance features are subject to change without notice. FastPac, DM Series, DM800i,
DM1000, SwiftStart, SureTrac, Optiflow, IntelliLink and E-Z Seal are trademarks or registered trademarks of Pitney Bowes.
Page 3

DI900/DI950 Operator
Guide Addendum
Introduction .....................................................................................4
Meet the Inserting System ..............................................................4
Fixed Function Keys ..................................................................4
Basic Operation .............................................................................. 7
Powering Up ..............................................................................7
Making Pre-Run Adjustments ....................................................8
Creating a Job ...........................................................................9
Creating a Job that Uses the Universal Feeder .......................11
Job Options .............................................................................14
Selecting a Job ........................................................................24
Troubleshooting ............................................................................26
Reference ..................................................................................... 31
System Specifications .............................................................31
Universal Feeder .....................................................................31
Feeder Tower Sheet Specifications .........................................31
DI900/DI950 Input Transport (F733) ........................................32
Add Ons and Options ...................................................................33
Universal Feeder .....................................................................33
High Capacity Loader (Optional) .............................................34
DI900/DI950 Input Transport ...................................................35
Scanning.......................................................................................40
Scanning Features ..................................................................40
3SV62081 Rev. A
Page 4

DI900/DI950/DI950e Operator Guide Addendum
Introduction
Meet the
Inserting
System
This document contains information about the new features and options
available for the DI900/DI950 Inserting System. This document should be
used in conjunction with the FastPac™ Document Inserting System Operator
Guide.
NOTE: The availability of add-ons and options for your inserting system varies by
region. Refer to your system supplier for availability details.
New Features
• The inserter can single fold up to 10 20 lb. sheets.
• The inserter supports multiple inserts into flat envelopes.
• The inserter supports mail pieces that include inflexible inserts in envelopes having a depth of 6 in. (152.4 mm) to 7 in. (177.8 mm).
• The inserter supports marking of every nth envelope if the Flats Sealer
is present on the system.
The information in this section is intended for use as a replacement or supplement to information contained in Chapter 2, Meet the Inserting System in
the DI900/DI950 FastPac™ Document Inserting System Operator Guide.
Fixed Function Keys
The Fixed Function Keys are the top row of keys under the screen. Each
of these keys has an assigned function that is enabled or disabled based
on the screen that displays. Use of each of these keys is explained next in
more detail.
4 SV62081 Rev. A
Page 5
DI900/DI950/DI950e Operator Guide Addendum
Fixed Function
Keys (continued)
Reset Counters
The system has two
counters:
• Piece Counter
• Batch Counter
NOTE: If the Flats Sealer
is present on the system,
the “Mark Piece Count”
option will be available
on this screen. When the
“Mark Piece Count” option
is available, the “Both”
reset option changes to
“All”. Refer to Chapter 7
in the DI900/DI950 Fast-
Pac™ Document Inserting
System Operator Guide
for more information
about the Flats Sealer.
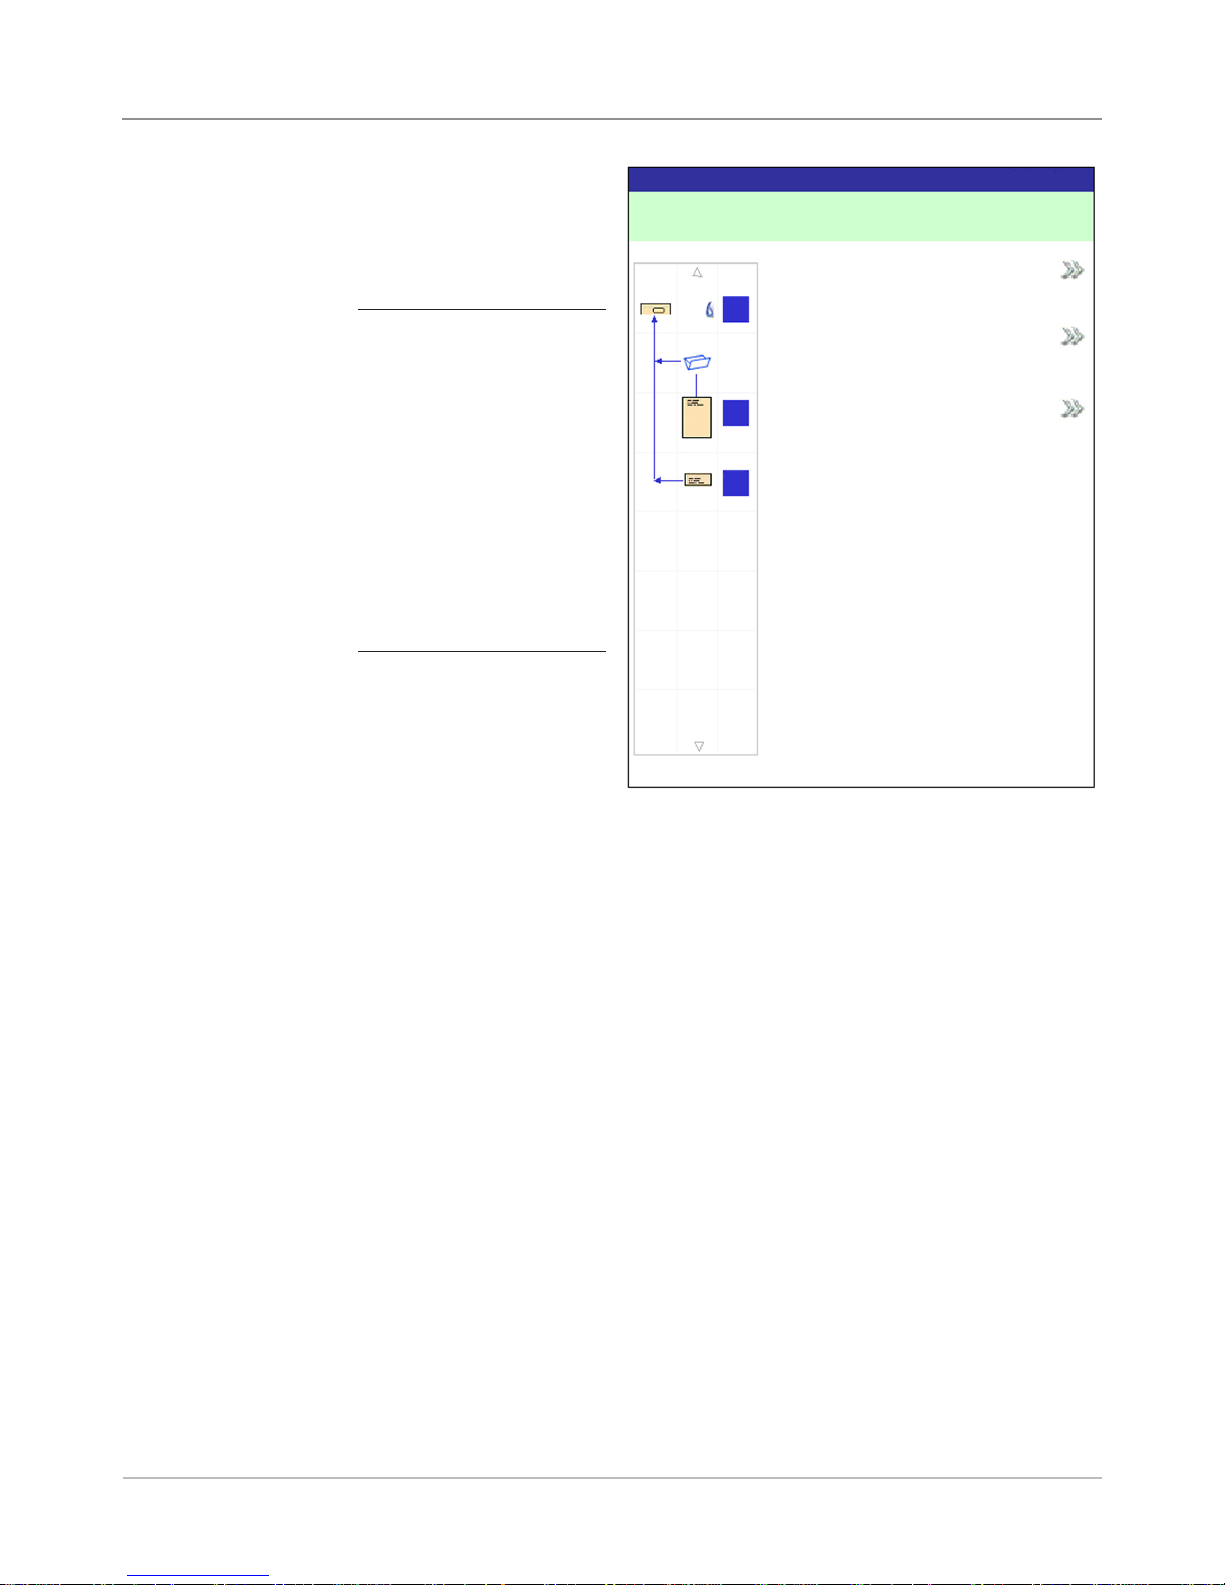
Reset Counters
Job Items
A
B
D
Job: ABC
Piece Count
Batch Count
Both
Reset Counters Screen
Resetting the Piece Counter
The Piece Counter appears in the bottom portion of the Display screen. It is
a cumulative counter, i.e., it increments for each completed mail piece.
If you run the same job but for a different customer and/or use different
materials, you'll need to zero the counter and ready it for counting the completed mail pieces in the new run.
To reset the Piece Counter:
1. Press RESET COUNTERS to display the Reset Counters screen.
2. Select "Piece Count".
3. You will be returned to the Home screen. The Piece Counter at the bottom of the screen will read "0".
SV62081 Rev. A
5
Page 6

DI900/DI950/DI950e Operator Guide Addendum
Fixed Function
Keys (continued)
Resetting the Batch Counter
The Batch Counter counts up to a set number. It increments one count for
each completed mail piece that the system detects. The system stops when
it reaches the batch count.
To reset the desired number for the job you are running:
1. Press RESET COUNTERS to display the Reset Counters screen.
2. Select "Batch Count".
3. You will be returned to the Home screen. The Batch Counter at the bottom of the screen will return to its original setting.
NOTE: The original setting for the Batch Counter cannot be less than “5” or
greater than “9999”.
Resetting the Mark Piece Count
The Mark Piece Count selection allows you to reset the counter for the envelope edge mark to zero.
1. Press RESET COUNTERS to display the Reset Counters screen.
2. Select "Mark Piece Count".
3. You will be returned to the Home screen. The counter will be reset to
zero.
Resetting Both (or All) Counters
The Both selection allows you to reset both the Piece Counter and the
Batch Counter to zero.
1. Press RESET COUNTERS to display the Reset Counters screen.
2. Select "Both".
NOTE: If the Mark Piece Count option is available, select “All.” The counter
for the envelope edge mark will be reset to zero as well.
3. You will be returned to the Home screen. The Piece Counter at the bottom of the screen will read "0" and the Batch Counter will return to its
original setting.
6 SV62081 Rev. A
Page 7

DI900/DI950/DI950e Operator Guide Addendum
Basic Operation
Powering Up
The information in this section is intended for use as a replacement or
supplement to information contained in Chapter 3, Basic Operation in the
DI900/DI950 FastPac™ Document Inserting System Operator Guide. These
instructions explain how to:
• properly power up the inserting system;
• create a job using the Universal Feeder on the DI900/DI950 Inserting
System; and
NOTE: You should be thoroughly familiar with each component of the Universal Feeder and the optional High Capacity Loader before creating a job
on the DI900/DI950 Inserting System (see the Model F731/F732 Universal
Feeder and the optional Model F734/F735 High Capacity Loader Operator
Guide supplied with the system).
• select a job.
Press the ON/OFF switch (located below the Control Panel) to start the
power up process.
IMPORTANT:
• If additional modules are present (e.g. High Capacity Sheet Feeder, Universal
Feeder, DI900/DI950 Input Transport, Exit Transport), power on each module
from left to right.
• When powering the system off and on, be sure to power off all modules, from
left to right, then power them all back on from left to right.
The system will automatically conduct a number of checks to verify the operational integrity of the system. If any problems are detected, the system
will display information directing you to a solution to the problem.
SV62081 Rev. A
7
Page 8
DI900/DI950/DI950e Operator Guide Addendum
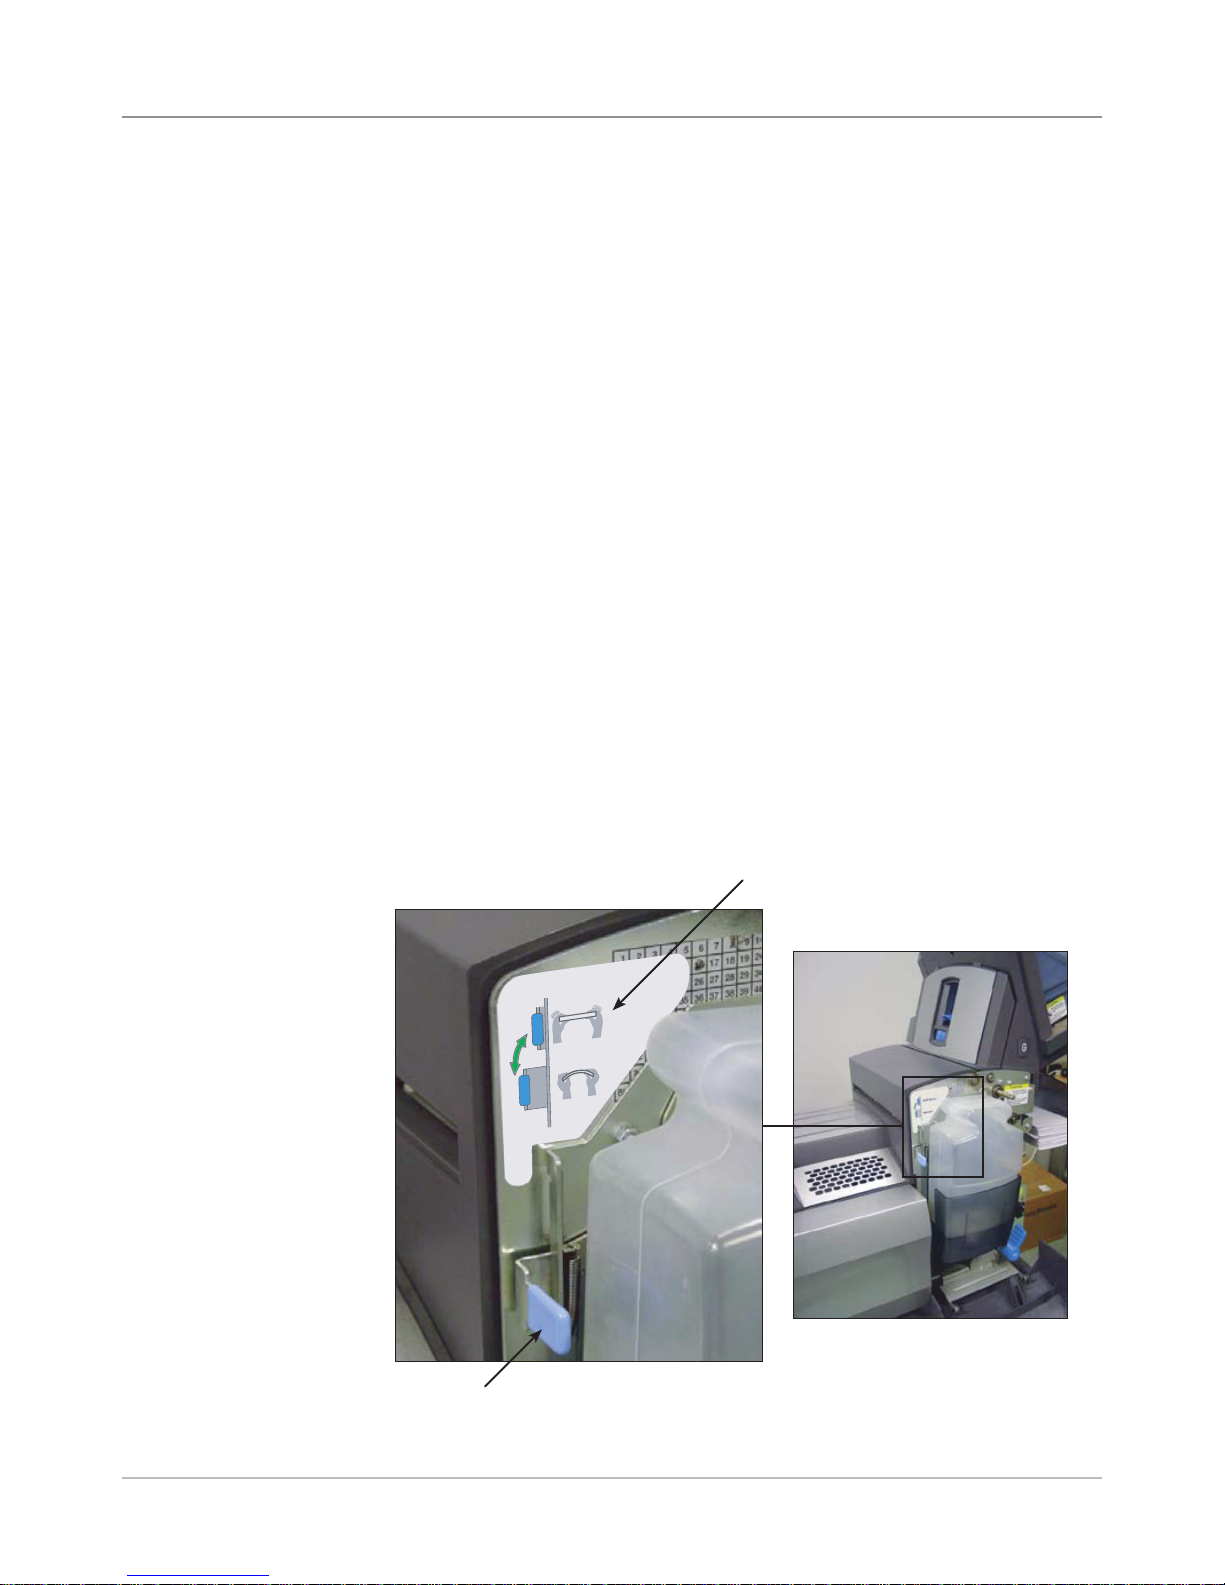
Making Pre-Run
Adjustments
Adjusting the Manual Lever for Stiff Media Mode (DI950e Only)
Mail pieces with stiff inserts leave the machine through the flats exit. The
Stiff media feature requires manual lever (with sensor) to hold the flats gate
open. This hardware is included with DI950e inserters.
If the stiff media hardware is present, one or more of any insert type may be
designated “stiff”.
• Most common case is a single stiff insert from the Input Transport.
• Also possible is a job with multiple inserts from the tower that, taken together, are stiff.
Once one or more inserts have been designated “stiff”, the job requires an
envelope of length 6 in. (152.4 mm) to 7 in. (177.8 mm) and the manual lever placed in the flats position.
• Envelopes must be fed from the Feeder Tower; the HCEF cannot be
used.
• Since mail piece components may be too short to leave the machine
through the flats exit when they are not in an envelope, CLEAR DECK
does not function in Stiff Media mode. Instead, you must clear the machine manually.
To adjust the manual lever for Stiff Media mode:
1. Open the Sealer cover.
2. Adjust the lever to the stiff media position.
3. Close the Sealer cover.
Manual Lever
Position for Stiff Media
8 SV62081 Rev. A
Page 9

DI900/DI950/DI950e Operator Guide Addendum
Creating a Job
The Stiff Media option is an addition to the “Menu Options” table on page
3-27 of the DI900/DI950 FastPac™ Document Inserting System Operator
Guide:
Reply Card
Reply Envelope
Pre-Folded Insert
Small Booklet
Slip
Generic Insert
Large Booklet
Stiff Media*
*The DI950e is required to feed this item.
a. If this is a scanning job, follow the steps below. Otherwise, go
to step b.
• The Scan Type screen displays. Select the appropriate
Scan Type (OMR, Code 3 of 9, or Interleaved 2 of 5.)
• The Scan Configuration screen displays. Select the
appropriate Scan Configuration.
• The Content - In Line with Marks screen displays. If there
is content in line with the scan marks, select "Yes". If there
is no content in line with the scan marks, select "No".
b. Select the appropriate options for the insert. Press “Accept”
when done.
Refer to the Insert Options table in Chapter 3 of the FastPac™
DI900, DI950 Operator Guide for specific information about each of
the related menu options.
The following definition is an addition to the “Menu Options” table on page
3-29 of the DI900/DI950 FastPac™ Document Inserting System Operator
Guide:
Mark Piece Count Select this option if you have a Flats Sealer and want to use
the envelope edge marker to mark every nth envelope. Use the
numeric matrix to enter the appropriate value.
NOTE: The Flats Sealer is a purchasable exit option. Only lettersized envelopes can be marked using the envelope edge marker.
Refer to Chapter 7 of the FastPac™ DI900, DI950 Operator Guide
for more information about the Flats Sealer.
The following replaces the “Length of Clear Zone” definition on page 3-35 of
the DI900/DI950 FastPac™ Document Inserting System Operator Guide:
Additional Settings
(continued)
- Length of Clear Zone is the is the total length of the scan
marks plus the Clear Zones before and after the scan
marks.
The following replaces the “Insert Type” definition on page 3-36 of the
SV62081 Rev. A
9
Page 10

DI900/DI950/DI950e Operator Guide Addendum
Creating a Job
(continued)
DI900/DI950 FastPac™ Document Inserting System Operator Guide:
Insert Type includes
all items that do not
need folding or have
been pre-folded.
• Reply Envelope - is also called a Business Reply Envelope.
• Reply Card - is a thick slip.
• Pre-folded Insert - is a sheet or set of sheets already folded
together.
• Small Booklet - is a type of insert that typically has a bound or
stapled edge.
• Slip - is single thickness document that fits into the outer
envelope without folding.
• Generic - is an undeclared type of insert used by SwiftStart™
jobs.
• Large Booklet - is a type of insert that typically has a bound or
stapled edge.
NOTE: A Custom Feeder is required to feed this item.
• Stiff Media - is a type of insert that is inflexible.
NOTE: The DI950e is required to feed this item. Once one (or
more) Stiff Media insert has been selected, the job requires an
outer envelope length of 6 in. (152.4 mm) to 7 in. (177.8 mm).
In addition, the manual lever for Stiff Media must be placed in
the flats position in order to run the job. Refer to Making Pre-
Run Adjustments in this document for more information.
The following replaces the “Quantity” definition on page 3-36 of the DI900/
DI950 FastPac™ Document Inserting System Operator Guide:
Quantity is the
number of this
particular insert to
include in each mail
piece.
NOTE: This menu
option is not available
when “Large Booklet”
is the selected insert.
• 1, 2, 3, 4, 5, 6
• Custom Quantity
- Use UP/DOWN arrow keys to select number.
- Select "Accept" when done.
• Variable - used with scanning-controlled jobs.
The following replaces the “Item Over Count Quantity” definition on page
3-38 of the DI900/DI950 FastPac™ Document Inserting System Operator
Guide:
Additional Settings
(continued)
• Item Over Count Quantity is the number of inserts that cannot
be run normally.
The following replaces the “Batch Mode” definition on page 3-39 of the
DI900/DI950 FastPac™ Document Inserting System Operator Guide:
Batch Mode Toggle:
• Off means this feature will not function for this job, or
• On means this feature is active.
10 SV62081 Rev. A
Page 11

DI900/DI950/DI950e Operator Guide Addendum
Creating a Job
that Uses the
Universal Feeder
Creating a new job involves defining the contents of a new mail piece, and
optionally, saving the job for future use. This process consists of identifying
each item in the mail piece and selecting settings for the job. A Mail Piece
Icon Tree automatically builds on the screen as you add items.
To access the Create New Job screen:
1. From the Home screen, select “Menu”, then “Jobs”, and finally “Create
New Job.” The Create Job screen displays.
2. Enter the Job Name using the alphanumeric matrix.
a. Use the UP/DOWN and LEFT/RIGHT arrow keys to select a letter.
b. Press OK to add the letter to the job name. Highlight the arrow char-
acter and press OK to move the cursor within the job name.
c. Select “Accept Name” when done.
3. If scanning is present on the system, the Create - Job Type screen displays.
• If the new job does not require scanning, select "Normal Type" to
continue.
• If the new job requires scanning, select "Scanning Job".
4. The Create Outer Envelope screen displays.
• If the job does not require an Outer Envelope, select "No".
• If the job requires an Outer Envelope, select “Yes.”
- Select the appropriate Outer Envelope options for the job. Refer
to the Envelope Options table in this document for more information about each of the related menu options.
- Press “Accept” when done.
- If the job is a scanning job, the Create - Only One Envelope
screen displays. If the job requires only one envelope, select
"Yes" and proceed to step 5.
- If the job requires an additional envelope, select "No, Two Outer
Envelopes". Validate the available options, and press "Accept"
when done.
SV62081 Rev. A
NOTE: If this is a scanning job, and you will be using dynamic envelope selection, you must select “No, Two Outer Envelopes”.
11
Page 12

DI900/DI950/DI950e Operator Guide Addendum
Creating a Job
that Uses the
Universal Feeder
(continued)
5. The Create - Select Next Item screen displays. Select the appropriate
option.
NOTE: These instructions apply to items being fed by the Universal Feeder.
Menu Options Associated Options/Actions
Reply Card
Reply Envelope
Pre-Folded Insert
Small Booklet
Slip
Generic Insert
Large Booklet
Stiff Media
Sheet a. Select the “Custom Feeder” option. The Sheet - Personalized
a. If this is a scanning job, follow the steps in this section.
Otherwise, go to step b.
The Scan Type screen displays. Select “External Scan
Definition”.
NOTE: The External Scan Definition option is only available
if the Universal Feeder is present on the system. If the job
requires a Universal Feeder, External Scan Definition is the
only available option.
b. Select the appropriate options for the insert. Press “Accept”
when done.
Refer to the Insert Options section in this document for specific
information about each of the related menu options.
Create screen appears. Select the appropriate personalization
option. The Create - Verify Sheet screen appears.
b. If this is a scanning job, follow the steps below. Otherwise, go
to step c.
• The Scan Type screen displays. Select “External Scan
Definition”.
NOTE: The External Scan Definition option is only
available if the Custom Feeder is present on the system.
If the job requires a Custom Feeder, External Scan
Definition is the only available option.
• The Scan Configuration screen displays. Select the
appropriate Scan Configuration.
• The Content in Line with Marks screen displays. If there is
content in line with the scan marks, select "Yes". If there is
no content in line with the scan marks, select "No".
• If you selected "Yes", the Mark Locations Settings screen
appears. Follow the steps below to enter the various
mark-related measurements:
- Select an option, then use the UP/DOWN arrow keys
to enter the appropriate measurement (in millimeters).
- Press "Accept" when done entering the
measurement.
- Once all measurements have been entered, select
"Accept".
c. Select the appropriate Sheet options for the job. Press
"Accept" when done.
NOTE: If this is a scan job, set the Select Feed setting.
Refer to the Sheet Options table in this document for more
information about each of the related menu options.
d. Select the appropriate Fold options for the sheet. Press
"Accept" when done.
Refer to the Fold Options table in this document for specific
information about each of the related menu items.
12 SV62081 Rev. A
Page 13

DI900/DI950/DI950e Operator Guide Addendum
Creating a Job
that Uses the
Universal Feeder
(continued)
6. Once you have finished adding a Sheet or Insert, the Add New Item
screen appears.
• Select "Yes" to add additional items to the job. Repeat step 4 as nec-
essary.
• Select "No" if you have finished adding items to the job.
7. The Create - Edit Job Settings screen displays. Select the appropriate
options.
Menu Options Associated Options/Actions
Job Comments Use the alphanumeric matrix to enter any additional information
related to the job. If the job will be saved by a supervisor or
manager, you can make it easy for operators to identify/select the
correct job in the future by entering a job description in the job
comments area.
NOTE: Job comments can contain up to 120 characters.
Batch Mode Toggle:
• Off means this feature will not function for this job, or
• On means this feature is active.
Batch Count Use the numeric matrix to enter the batch count value.
NOTE: The batch count can contain up to four digits. The
minimum is "5" and the maximum is "9999".
Set Over Max Count Indicates what will happen to sets that exceed the set over count
quantity. Choices include Divert and Stop.
Use Postage Meter Select this option if you will be using the Mail Machine Interface
(MMI). This interface enables communication between the Inserting
System and either a DM Series™ DM800i™ or DM1000™ mailing
system via a USB connection.
The system sends start and stop signals to the mailing system, and
the mailing system can send error messages back to the inserter to
stop feeding.
Toggle:
• Off means this feature will not function for this job, or
• On means this feature is active.
NOTE: The MMI is a purchasable exit option. Only letter-sized
envelopes can be used with this interface.
Refer to Chapter 7 of the FastPac™ DI900, DI950 Operator Guide
for more information about the MMI.
Mark Piece Count Select this option if you have a Flats Sealer and want to use
the envelope edge marker to mark every nth envelope. Use the
numeric matrix to enter the appropriate value.
NOTE: The Flats Sealer is a purchasable exit option. Only lettersized envelopes can be marked using the envelope edge marker.
Refer to Chapter 7 of the FastPac™ DI900, DI950 Operator Guide
for more information about the Flats Sealer.
Advanced Allows access to advanced job settings.
IMPORTANT: Do not change the advanced job settings unless
instructed to do so. Changing settings may affect machine
performance.
SV62081 Rev. A
13
Page 14

DI900/DI950/DI950e Operator Guide Addendum
Creating a Job
that Uses the
Universal Feeder
(continued)
Job Options
8. Select "Accept" when done.
9. The Create - Saved Created Job screen displays.
• Select "Yes, Save" to save the job (optional). You must have supervisor or manager access rights to save jobs.
• Select "No, Save Later" if you do not have supervisor or manager
access rights.
This section contains descriptions of the various options you can add or
modify when creating or editing a job.
Envelope Options
Menu Item Associated Options and Actions
Name Use the alphanumeric matrix to enter the envelope name.
Size refers
specifically to the
outer envelope that
contains the final
mail piece.
Window allows use
of windowed or nonwindowed envelope.
Type allows choice of
windowed envelope.
Seal refers to using
the Moistener unit to
close the envelope.
Depth is the
dimension of an
envelope from its flap
fold to its opposite
edge.
Toggle:
• Letter generally has smaller depth and contains folded sheets,
or
• Flat generally is larger than Letter size and typically contains
unfolded sheets. If the job will contain a Large Booklet, you
must select this envelope size.
Refer to Envelopes in Chapter 6 of the FastPac® DI900, DI950
Operator Guide for specification information.
Toggle:
• Yes means you are using a windowed envelope, or
• No means you are using a non-windowed envelope.
• Standard Flap is a regular envelope.
• Forward Flap means the window and flap are on the same
side of the envelope.
• Bottom Flap means the flap is at the bottom (instead of the
top) of the envelope.
• Off means the envelope will not be sealed closed, or
• On means the envelope will be sealed closed.
• Safe Seal means the envelope will be sealed closed. However,
the envelope moves through the system at a slower rate to
provide more time for better sealing. This option is available
only for flat envelopes, when the Flats Sealer is present on the
system.
NOTE: If you are using a mailing machine in-line with the inserting
system, you must instruct the system to seal the envelope.
• Auto Measure - system measures depth when envelope is fed.
• Custom Depth - allows you to enter the depth of the envelope.
• Letter Options: #10 - 105 mm, #6 ¾ - 165 mm, C5 - 162 mm,
C6 - 114 mm. Flat Options: #12 ½ - 317 mm, C4 - 229 mm.
14 SV62081 Rev. A
Page 15

DI900/DI950/DI950e Operator Guide Addendum
Job Options
(continued)
Envelope Options (continued)
Menu Item Associated Options and Actions
Additional Settings Double Detect allows the system sense when multiple envelopes
are fed unintentionally.
• Double Detect Feature allows you to toggle:
- Off means this feature will not function for this item, or
- On means this feature is active.
• Location allows you to toggle:
- Default, or
- Custom.
• Custom Location for Top Edge allows you to enter a specific
measurement (distance from the edge feeding first into the
feeder) where the system should attempt to detect a double.
Set this option when Location is set to "Custom".
- Use the UP/DOWN arrow keys to adjust the measurement
(in millimeters).
- Select "Accept" when you are done.
NOTE: The double detect region cannot be within 25 mm of
the lead or trail edges of the envelope.
If the envelope is feeding from the HCEF, measure from the
bottom of the envelope.
If the envelope is feeding from the Feeder Tower, measure
from the top of the envelope. The custom location must be at
least 5 mm away from the edge of the window (if present), at
least 5 mm away from the edge of flap, and cannot lie on top
of a seam.
For best results, be sure to avoid areas that overlap with the
window, flap, or seams.
• Action On Double allows you to select where the items should
be fed to if a double is detected.
Feeder Type allows you to change the Feeder setting when
material is problematic.
• Normal is used for most items.
• Special Feeder helps problematic material run better.
NOTE: The Special Feeder is a purchasable option. If available,
it will be located at the top left or right of the Feeder Tower. It is
an option for one or more tower feeders to improve feeding of
thin prefolded items or booklets with thin covers. It reduces the
tendency of these items to separate while they are being fed. You
must push the “Special Feeder” lever up to run a job when the
Feeder Type is set to Special Feeder.
Feeder Linking allows multiple Feeders to feed the same
envelope.
• None means there is no linking of Feeder Trays.
• Two Feeders indicates that two Feeder Trays are linked and
feeding the same material.
NOTE: Feeders must be on the same module and on the same
side of the tower to be linked. For scanned items, always load
linked feeders at a collation break.
SV62081 Rev. A
15
Page 16

DI900/DI950/DI950e Operator Guide Addendum
Job Options
(continued)
Envelope Options (continued)
Menu Item Associated Options and Actions
Additional Settings
(continued)
Envelope Select Feed allows you to indicate when the envelope
should be used.
Toggle:
• Main
• Alternate
NOTE: This option is enabled only when the Scan feature is
activated, two Outer Envelopes have been defined in a job and
either one of the following:
• The Item Over Count Action is set to “Use Alternate Envelope”
on the control document in the job, OR
• An Envelope Select mark is contained in the scan
configuration file associated with the control document in the
job.
Fold Options
Menu Item Associated Options and Actions
Fold Type refers
to the way sheets
are folded to be
able to show certain
portions through a
window, and/or when
a sheet is opened.
Auto Fold Lengths
lets the system
choose the type of
fold.
Fold 1 Length
Fold 2 Length
• C Fold
• Z Fold
• Single Fold
• Double Fold
• No Fold
Toggle:
• Yes means the system calculates the fold length, or
• No means you will enter the fold lengths you want.
Fold Length is shown on the display screen for each fold type/
address combination.
• Use the UP/DOWN Arrow Keys to select desired length.
• Press "Accept" when done.
16 SV62081 Rev. A
Page 17

DI900/DI950/DI950e Operator Guide Addendum
Job Options
(continued)
Sheet Options
Menu Item Associated Options and Actions
Name Use the alphanumeric matrix to enter the job name.
Control Document
is the top sheet in
the Mail Piece Icon
Tree. This field is
read-only.
Type identifies the
printing source of the
job.
Personalized refers
to the top sheet that
contains the address
that will show in the
windowed envelope
and/or a sheet that
contains information
customized to a
specific recipient.
Quantity is the
number of this type
of sheet to include in
each mail piece.
Page Order
identifies the feeding
pattern of multiple
sheets that are not
identical.
Read-Only field
• Yes, or
• No
• Printed Separately - indicates the sheet is not printed by the
Attached Printer.
• Printed by Attached Printer - indicates the sheet is printed by
the Attached Printer.
NOTE: This menu option is available only with configurations that
contain an Attached Printer. If an Attached Printer is not present,
this option appears as a read-only field with “Printed Separately” as
the default setting.
• Top Address
• Middle Address
• Bottom Address
• Not Personalized
• Personalized - No Address
• 1, 2, 3, 4, 5, 6
• Custom Quantity
- Use UP/DOWN arrows to select number.
- Select "Accept" when done.
NOTE: Quantity is always set to Variable (n) for scanning jobs.
Forward - indicates page 1 is on top and pages 2, 3, 4, etc. follow in
that order.
Reverse - indicates that the last page, for example, page 4, is first
followed by pages 3, then 2, then 1.
NOTE: This menu option appears as a read-only field when the
job requires a Custom Feeder. The feeding pattern is set by the
Custom Feeder.
SV62081 Rev. A
17
Page 18

DI900/DI950/DI950e Operator Guide Addendum
Job Options
(continued)
Sheet Options (continued)
Menu Item Associated Options and Actions
Length is the
dimension of the
sheet in the direction
of the feed.
Additional Settings. Double Detect allows the system to sense when multiple sheets
• Auto measure - measures the recommended length
automatically.
NOTE: This menu option appears as a read-only field when
the job requires a Custom Feeder.
• Custom Length - allows increase or decrease of sheet length.
- Use UP/DOWN arrows to select number.
- Select "Accept" when done.
NOTE: If the job requires a Custom Feeder, you must enter
the sheet length using the Custom Length option. The job will
not be valid if the sheet length is not entered.
• Letter - 279 mm, Legal - 356 mm, and A4 - 279 mm are
additional options.
NOTE: The “Legal” option is not available when the sheet
is printed by the Attached Printer. Additionally, legal-sized
documents cannot be fed from the High Capacity Sheet
Feeder. The system will assign these documents to a Tower
Feeder, even when the High Capacity Sheet Feeder is
available.
are fed unintentionally.
NOTE: This menu option is not available when the job requires a
Custom Feeder.
• Double Detect Feature allows you to toggle:
- Off means this feature will not function for this item, or
- On means this feature is active.
• Location allows you to toggle:
- Default, or
- Custom.
• Custom Location for Top Edge allows you to enter a specific
measurement (the distance from the edge feeding first into the
feeder) where the system should attempt to detect a double.
NOTE: Set this option when Location is set to "Custom". The
double detect region cannot be within 25 mm of the lead or trail
edges of the sheet.
- Use the UP/DOWN arrow keys to adjust the measurement
(in millimeters).
- Select "Accept" when you are done.
• Action On Double allows you to select where the items should
be fed to if a double is detected.
18 SV62081 Rev. A
Page 19

DI900/DI950/DI950e Operator Guide Addendum
Job Options
(continued)
Sheet Options (continued)
Menu Item Associated Options and Actions
Additional Settings.
(continued)
Feeder Type allows you to change the Feeder setting when
material is problematic, or to indicate that the job requires a Custom
Feeder.
NOTE: This menu option is not available when the job requires an
Attached Printer.
• Normal is used for most items.
• Manual Feed is used when items will be fed into the system
by hand. Refer to Manual Feeder in Chapter 2 for more
information.
• Custom Feeder is used when items will be fed into the system
by the Custom Feeder.
Feeder Linking allows multiple Feeders to feed the same material.
NOTE: This menu option is not available when the job requires a
Custom Feeder or an Attached Printer.
• None means there is no linking of Feeder Trays.
• Two Feeders indicates that two Feeder Trays are linked and
feeding the same material.
NOTE: Scanned sheets can be linked vertically in both the High
Capacity Sheet Feeder and the Feeder Tower.
Scan Items allows you to indicate whether or not an item should be
scanned.
Toggle:
• Yes means this feature is active, or
• No means this feature will not function for the item.
SV62081 Rev. A
19
Page 20

DI900/DI950/DI950e Operator Guide Addendum
Job Options
(continued)
Insert Options
Menu Item Associated Options and Actions
Name Use the alphanumeric matrix to enter the job name.
Insert Type includes
all items that do not
need folding or have
been pre-folded.
Personalized
means the insert
contains information
customized to a
specific recipient.
NOTE: This menu
option is not available
when “Large Booklet”
is the selected insert.
Quantity is the
number of this
particular insert to
include in each mail
piece.
NOTE: This menu
option is not available
when “Large Booklet”
is the selected insert.
Page Order identifies
the feeding pattern of
multiple inserts that
are not identical.
NOTE: This menu
option is not available
when “Large Booklet”
is the selected insert.
• Reply Envelope - is also called a Business Reply Envelope.
• Reply Card - is a thick slip.
• Pre-folded Insert - is a sheet or set of sheets already folded
together.
• Small Booklet - is a type of insert that typically has a bound or
stapled edge.
• Slip - is single thickness document that fits into the outer
envelope without folding.
• Generic - is an undeclared type of insert used by SwiftStart™
jobs.
• Large Booklet - is a type of insert that typically has a bound or
stapled edge.
NOTE: A Custom Feeder is required to feed this item.
• Stiff Media - is a type of insert that is inflexible.
NOTE: Once one or more “Stiff Media” insert has been
selected, the job requires an outer envelope length 6 in.
(152.4 mm) to 7 in. (177.8 mm). In addition, the Stiff Media
lever must be placed in the flats position in order to run the
job. Refer to Making Pre-Run Adjustments in this document for
more information.
Yes means there is unique information on this insert, or
No means the insert does not contain unique information.
• 1, 2, 3, 4, 5, 6
• Custom Quantity
- Use UP/DOWN arrow keys to select number.
- Select "Accept" when done.
• Variable - used with scanning-controlled jobs.
Forward - indicates page 1 is on top and pages 2, 3, 4, etc. follow
in that order.
Reverse - indicates that the last page, for example, page 4, is first
followed by pages 3, then 2, then 1.
20 SV62081 Rev. A
Page 21

DI900/DI950/DI950e Operator Guide Addendum
Job Options
(continued)
Insert Options (continued)
Menu Item Associated Options and Actions
Length is the
dimension of the
insert in the direction
of the feed.
Additional Settings Double Detect allows the system sense when multiple inserts are
• Auto measure - measures the recommended length
automatically.
NOTE: Auto measure is not available when “Large Booklet” is
the selected insert or when the job requires a Custom Feeder.
• Custom Length - allows increase or decrease of insert length.
- Use the UP/DOWN Arrow Keys to select number.
- Select "Accept" when done.
NOTE: If the job requires a Large Booklet, you must enter the
sheet length using this Custom Length option. The job will not
be valid if the booklet length is not entered.
• Custom Length (Large Booklet Only) - allows selection of large
booklet size: 8.5” x 11” (215.9 mm x 279.4 mm) or 5.5” x 8.5”
(139.7 mm x 215.9 mm).
NOTE: If the job requires a Large Booklet, you must enter the
sheet length using this Custom Length option. The job will not
be valid if the booklet length is not entered.
fed unintentionally.
NOTE: This menu option is not available when the job requires a
Custom Feeder.
• Double Detect Feature allows you to toggle:
- Off means this feature will not function for this item, or
- On means this feature is active.
• Location allows you to toggle:
- Default, or
- Custom.
• Custom Location for Top Edge allows you to enter a specific
measurement (the distance from the edge feeding first into the
feeder) where the system should attempt to detect a double.
NOTE: Set this option when Location is set to "Custom". The
double detect region cannot be within 25 mm of the lead or trail
edges of the insert.
- Use the UP/DOWN arrow keys to adjust the measurement
(in millimeters).
- Select "Accept" when you are done.
• Action On Double allows you to select where the items should
be fed to if a double is detected.
SV62081 Rev. A
21
Page 22

DI900/DI950/DI950e Operator Guide Addendum
Job Options
(continued)
Insert Options (continued)
Menu Item Associated Options and Actions
Additional Settings Feeder Type allows you to change the Feeder setting when
material is problematic, or to indicate that the job requires a Custom
Feeder.
NOTE: This menu option is not available when the job requires
an Attached Printer. The Custom Feeder is selected automatically
when “Large Booklet” is the selected insert.
• Normal is used for most items.
• Manual Feed is used when items will be fed into the system
by hand. Refer to Manual Feeder in Chapter 2 for more
information.
• Custom Feeder is used when items will be fed into the system
by the Custom Feeder.
Feeder Linking allows multiple Feeders to feed the same material.
NOTE: This menu option is not available when the job requires a
Custom Feeder.
• None means there is no linking of Feeder Trays.
• Two Feeders indicates that two Feeder Trays are linked and
feeding the same material.
Scan Items allows you to indicate whether or not an item should be
scanned.
Toggle:
• Yes means this feature is active, or
• No means this feature will not function for the item.
22 SV62081 Rev. A
Page 23

DI900/DI950/DI950e Operator Guide Addendum
Job Options
(continued)
Insert Options (continued)
Menu Item Associated Options and Actions
Additional Settings
(continued)
Scan Settings
NOTE: The “Content in Line with Marks”, “Marks On”, “Marks on
First Page Only”, and “Mark Location Settings” options are not
available when the job requires a Custom Feeder.
• Scan Configuration allows choice of saved scan configurations
to interpret scan marks.
• Content in Line with Marks indicates that content is in line with
the scan marks in the feed direction.
• Marks On indicates if marks are on the front or back of the
page.
• Marks on First Page Only indicates marks are on only the first
of multiple inserts.
• Mark Location Settings allows setup of various mark-related
measurements.
- Top of Page to First Mark is the distance from the top of
the page to the first mark.
- Total Length of Marks is the length from the top of the first
possible mark to the bottom of the last mark.
- Top of Page to Clear Zone is distance from the top of the
page to the beginning of the Clear Zone.
- Length of Clear Zone is the is the total length of the scan
marks plus the Clear Zones before and after the scan
marks.
Refer to OMR Specifications in Chapter 8 for more information
on the Clear Zone and mark location settings.
• Item Over Count Quantity is the number of inserts that cannot
be run normally.
NOTE: At this time, only a single insert can be added to each
mail piece. When using a flat envelope, the insert must be a
Reply Envelope (BRE).
• Item Over Count Action indicates what will happen to items that
exceed the item over count quantity. Choices include:
- Divert - Select this option if the Scan Configuration does
not have the Divert Sheet (DVS) scan mark, and you
want the system to divert items once the item over count
quantity has been exceeded.
- Stop - Select this option if you want the system to stop
processing items once the item over count quantity has
been exceeded.
Refer to Scanning Features in Chapter 8 for more information
on divert sheet functionality.
Select Feed (SF) Settings allows assignment of a Feeder to one of
the 9 Select Feed scan marks.
NOTE: This option is not available if the item requires a
Custom Feeder and a High Capacity Sheet Feeder is part of the
configuration.
SV62081 Rev. A
23
Page 24

DI900/DI950/DI950e Operator Guide Addendum
Selecting a Job
If the job that you want to run is the one that currently displays in the Home
screen, proceed to the Running a Trial Piece section of this chapter.
IMPORTANT: If the job requires the Universal Feeder, you must select the job on
the Universal Feeder and on the inserter before running a Trial Piece.
• Select the job on the inserter rst to avoid job validation errors on the Universal Feeder.
• The “Custom Feeder not Ready” message will appear on the display screen if
the selected job requires the Universal Feeder and the job is not selected on
the Universal Feeder.
Refer to Chapter 2, Operation, Select the Program in the F731/F732 Universal
Feeder and F734/F735 High Capacity Loader Operator Guide for information
about selecting the job at the Universal Feeder.
If the job that you want to run is not displayed on the Home screen, follow
the steps below to select the job.
1. From the Home screen:
• Select "Select Another Job" to view a list of saved jobs. Skip to step
3, below.
OR
• Select "Menu", then "Jobs", and finally "Select Job". The Select Job
Type screen displays.
Select Job Type
Select Job Type Screen
Saved Jobs
Recently Run Jobs
Library Jobs
24 SV62081 Rev. A
Page 25

DI900/DI950/DI950e Operator Guide Addendum
2. The Job Type screen provides access to all the jobs that are in your system. This screen displays three categories to search for the job that you
want to run:
• "Saved Jobs" displays the list of jobs that you created and saved.
• "Recently Run Jobs" displays a list of the last 8 jobs that your sys-
tem ran. This list shows each job's name and the date/time that the
job ran.
• "Library Jobs" displays the names of the pre-defined jobs that came
loaded on your system.
Select the desired category to display the list of jobs that are available in
that category.
3 Select the desired job from the list.
• If the job does not appear on the first page, use the UP/DOWN ar-
row keys to scroll through the list.
• As any job is highlighted in the list, the Mail Piece Icon Tree for the
job appears on the display so that it can be identified
4. If you are using a Universal Feeder for this job, you must select the appropriate job on the Universal Feeder. Refer to Chapter 2, Operation,
Select the Program in the F731/F732 Universal Feeder and F734/F735
High Capacity Loader Operator Guide.
SV62081 Rev. A
25
Page 26

DI900/DI950/DI950e Operator Guide Addendum
Troubleshooting
The information in this section is intended for use as a replacement or
supplement to information contained in Chapter 5, Troubleshooting in the
DI900/DI950 FastPac™ Document Inserting System Operator Guide.
Table 5-6 Insertion Area/Envelope Flapper Area Problems
Problem Cause Action
Stoppage in insertion area or
flapper area; failure to insert.
Outer envelope is skewed. Check Side Guides; incorrect adjustment can cause
skewing.
Refer to Adjusting Tray Side Guides in Chapter 3 of
this guide for instructions.
Envelope openers improperly
adjusted.
Envelope
Size
Flat No Yes Yes 3
Letter, DL,
6x9 and C5
*3 fingers if collation is thicker than 4 mm.
Inner Envelope Openers
Fulls Size
Booklet Sheets
Yes Yes No 3
Yes Yes Yes 3
Yes No No 3
Yes No Yes 3
No Yes No 5
n/a Yes No 5
n/a Yes Yes 5*
The standard insertion finger configuration is five
fingers (three inner envelope openers and two outer
envelope openers). The alternative configuration is
three fingers (three inner envelope openers).
To obtain the alternative configuration, slide the
fingers outside of the envelope. If the envelope is
too wide to have the fingers completely out of the
envelope, take the lower part of the outside fingers
off.
Insert/Small
Booklet
Inner Envelope Openers
Recommended
Finger Setting
26 SV62081 Rev. A
Recommended 3 Finger Setting
Outer Envelope Openers
Recommended 5 Finger Setting
Page 27

DI900/DI950/DI950e Operator Guide Addendum
Table 5-6 Insertion Area/Envelope Flapper Area Problems
Problem Cause Action
Stoppage in insertion area or
flapper area; failure to insert.
(continued)
Envelope openers improperly
adjusted. (continued)
Large booklet: Binding must be parallel to the feed direction; most likely booklets
that are inserted in flat envelopes that are close to the size of a full sheet.
15 mm
to
25 mm
Recommended
distance: 15 to 25
mm between the tip
of the outside finger
and the edge of the
envelope.
Feed direction
Binding parallel to feed direction
Small booklet: Binding must be perpendicular to the feed direction; most likely
booklets that are inserted in C5 or 6x9 envelopes.
Feed direction
Binding perpendicular to feed direction
Refer to Adjusting the Envelope Openers in Chapter 3 of this guide for instructions to
perform the setup adjustment.
Insufficient edge clearance. Check clearance: envelope width must be at least 13
mm greater than the sum of the width of the widest
insert plus the insert pack thickness.
Insertion pack or envelopes
not centered.
Ensure that Side Guides are set correctly. Too much
clearance between Side Guides and material can
cause material to become skewed in machine.
Refer to Adjusting Tray Side Guides in Chapter 3 of
this guide for instructions.
SV62081 Rev. A
27
Page 28

DI900/DI950/DI950e Operator Guide Addendum
Table 5-6 Insertion Area/Envelope Flapper Area Problems
Problem Cause Action
Stoppage in insertion area or
flapper area; failure to insert.
(continued)
• Contents of insertion
pack are catching on
side seam inside of
envelope.
• Contents of insertion
pack are thick and
difficult to insert into
smaller envelopes.
Adjust the Aligner custom settings:
NOTE: If the contents of the insertion pack are
thick, and you are having trouble inserting the pack
into a small envelope, be sure to set the "Envelope
Width" and "Widest Enclosure Width" to the exact
dimensions of the insertion pack.
1. From the Home screen, select "Menu", then
"Jobs".
2. Select "Edit Current Job", "Edit Job Settings",
then "Advanced".
3. Select "Aligner", then "On with Custom Settings".
The Customer Aligner Settings screen displays.
4. Select "Envelope Width". Use the UP/DOWN
arrow keys to increase or decrease the
measurement, as necessary. Select "Accept"
when done.
5. Select "Widest Enclosure Width". Use the
UP/DOWN arrow keys to increase or decrease
the measurement, as necessary. Select "Accept"
when done.
6. Select "Accept" on the Custom Aligner Settings
screen once the necessary adjustments have
been made.
28 SV62081 Rev. A
Page 29

DI900/DI950/DI950e Operator Guide Addendum
Table 5-7 Moistener/Mail Piece Exit Problems
Problem Cause Action
No seal, failure to seal,
incomplete seals.
High seal: flap is folded and
sealed above crease line.
Sealing is off in job set up. • Check job definition.
• Make sure sealer is ON.
Low sealant level. Add water or sealing solution.
Poor quality envelopes. Inspect envelopes. Examine glue lines.
Worn moistener brushes. Inspect. Replace if necessary. Refer to Replacing the
Moistener Brushes for instructions.
Worn moistener wick. Inspect. Replace if necessary. Refer to Replacing the
Moistener Wick for instructions.
Outer envelope or content
skew.
• Check Side Guide adjustment.
• Check for proper loading of material in Trays.
• Contents of insertion
pack are catching on
side seam inside of
envelope.
• Contents of insertion
pack are thick and
difficult to insert into
smaller envelopes.
Poor quality envelopes. Check side seam(s) inside of envelope for excessive
Adjust the Aligner custom settings:
NOTE: If the contents of the insertion pack are thick,
and you are having trouble inserting the pack into a
small envelope, be sure to set the "Envelope Width"
and "Widest Enclosure Width" to the exact dimensions
of the insertion pack.
1. From the Home screen, select "Menu", then
"Jobs".
2. Select "Edit Current Job", "Edit Job Settings", then
"Advanced".
3. Select "Aligner", then "On with Custom Settings".
The Customer Aligner Settings screen displays.
4. Select "Envelope Width". Use the UP/DOWN
arrow keys to increase or decrease the
measurement, as necessary. Select "Accept"
when done.
5. Select "Widest Enclosure Width". Use the UP/
DOWN arrow keys to increase or decrease the
measurement, as necessary. Select "Accept"
when done.
6. Select "Accept" on the Custom Aligner Settings
screen once the necessary adjustments have
been made.
stickiness. Glue residue inside of the envelope may
prevent it from opening fully and easily.
SV62081 Rev. A
29
Page 30

DI900/DI950/DI950e Operator Guide Addendum
Table 5-7 Moistener/Mail Piece Exit Problems
Problem Cause Action
Stoppage in envelope exit area. Glue contamination or debris
in transport.
Box seal: material obstructs
envelope fold, causing flat area
at crease.
Envelope exit through letter
path is unreliable; envelope is
damaged.
Materials are not inserted
deep enough into envelope.
Collations may be too stiff
to exit through the letter exit
path.
Inspect and clean transport.
Adjust the Envelope Crease Line upstream so
materials are inserted deeper into the envelope:
1. At the Home screen select: "Menu", then
"Tools", then "Configure System", and finally "Set
Envelope Crease".
2. Select the appropriate envelope position.
3. Press "Finished" three times to return to the Home
screen.
IMPORTANT: This setting is a system setting; it will be
effective for all the applications on the machine.
If the envelope is longer than 152 mm, process it
through the flat exit path:
1. At the Home screen select: “Menu”, then “Job”.
2. Select “Edit Current Job”, then “Choose the Item
to modify” and “Edit Highlighted Item”.
3. Select “Additional Setting”, then “Advanced”, and
“Stiff Media”.
4. Select “Yes”.
NOTES:
• If the Stiff media option is not available (grayed
out), make sure that the Stiff Media option is
enabled in the system setting.
• If the envelope is not a flat envelope, the system
will assign the envelope to a Tower feeder even if
a HCEF is installed on the machine.
Table 5-11 Universal Feeder Problems
Problem Cause Action
“Custom Feeder not Found”
message displays.
30 SV62081 Rev. A
The Universal Feeder and/or
Input Transport may not be
powered on.
Turn the Universal Feeder and/or Input Transport on.
NOTE: You may need to power the system off and
then on again. When powering the system off and on,
be sure to power off all modules, from left to right, then
power them all back on from left to right.
Page 31

DI900/DI950/DI950e Operator Guide Addendum
Reference
System
Specifications
20”
(51 mm)
The information in this section is intended for use as a replacement or
supplement to information contained in Chapter 6, Reference in the DI900/
DI950 FastPac™ Document Inserting System Operator Guide.
Dimensions
All dimensions are approximate.
Length overall, height Weight, unboxed
Universal Feeder
Universal Loader
Input Transport
39.4" (1000 mm), 18.5" (47 mm) 141 lb. (64 kg)
35.4" (900 mm), 20" (51 mm) 132 lb. (60 kg)
20" (51 mm), 10.5" (27 mm) 42 lb. (19 kg)
20” (51 mm)
10.5”
(27 mm)
35.4” (900 mm)
High Capacity Loader Universal Feeder Input Transport
Universal Feeder
Feeder
Tower Sheet
Specifications
39.4” (1000 mm)
20” (51 mm)
Refer to the Model F731/F732 Universal Feeder and the optional Model
F734/F735 High Capacity Loader Operator Guide for system specifications
and requirements.
The following table replaces the Feeder Tower - Sheet Specifications table
on page 6-11 of the DI900/DI950 FastPac™ Document Inserting System Operator Guide:
Feeder Tower - Sheet Specifications
Parameter Minimum Value Maximum Value
Width
Length
Thickness 0.003 inches (0.076 mm) 0.012 inches (0.305 mm)
Paper Weight 16 lb. (60 gsm) 44 lb. (175 gsm)
5 inches (127 mm) 9.84 inches (250 mm)
6.7 in (170 mm) 14 inches (356 mm)
SV62081 Rev. A
31
Page 32

DI900/DI950/DI950e Operator Guide Addendum
DI900/DI950 Input
Transport (F733)
Material
Sheet Dimensions Width: 6.89” (175 mm) to 9.84” (250 mm)
Booklet Dimensions Width: 5.31” (135 mm) to 9.84” (250 mm)
Throughput • A4 sheets: up to 5400 collations per hour.
Notes The processing capability of the Input Transport is limited by the
If you are using the Input Transport divert trays, refer to the tables below to ensure the
material meets the size specifications for each of the divert trays.
Parameter Minimum Maximum
Width 5.31” (135 mm) 8.58” (218 mm)
Length 5.47” (180 mm) 14.09” (358 mm)
Letter-size or A4 sheets or booklets
Length: 5.47” (139 mm) to 14.09” (358 mm)
Basis Weight: 16 lb. (60 gsm) to 47 lb. (175 gsm)
Length: 3.66” (93 mm) to 11.81” (300 mm)
Basis Weight: 24 lb. (90 gsm) to 47 lb. (175 gsm)
• Letter-size sheets: up to 5500 collations per hour.
requirements of the downstream upstream device (either the
HCSF or Base). Refer to the Chapter 6, Reference in the DI900/
DI950 FastPac™ Document Inserting System Operator Guide for
these requirements.
Lower Divert Tray
Upper Divert Tray
Parameter Minimum Maximum
Width 8.19” (208 mm) 8.58” (218 mm)
Length 5.47” (180 mm) 14.09” (358 mm)
32 SV62081 Rev. A
Page 33

DI900/DI950/DI950e Operator Guide Addendum
Add Ons and
Options
Universal Feeder
The information in this section is intended for use as a supplement to
Chapter 7, Add Ons and Options in the DI900/DI950 FastPac™ Document
Inserting System Operator Guide.
The Universal Feeder takes laser printed or pre-print cut sheets and efficiently collates them into customer sets. It can also feed single booklets up
to 4 mm (0.16”) thick. OMR/BCR/OCR/2D Matrix scanning ensures complete integrity and confidentiality of the sets.
Standard Features:
• Bottom feeding of material
• Variable speed control
• Overcount control
• Automatic double document detection
• Job storage - up to 99 jobs available
• Multi-function operator controls
• Easy to use self prompting display
• Out of material and jam detection
• Resettable sheet counter
• Batch count control
• Operator selectable ‘User Definable’ (if OMR scanning is fitted)
Refer to the Model F731/F732 Universal Feeder and the optional Model
F734/F735 High Capacity Loader Operator Guide for more information.
SV62081 Rev. A
Optional High
Capacity
Loader
Universal Feeder
33
Page 34

DI900/DI950/DI950e Operator Guide Addendum
High Capacity
Loader
(Optional)
The optional F734/F735 High Capacity Loader takes laser printed or preprinted cut sheets and conveys them to the feeder deck of the F731/F732
Universal Feeder.
The F734 and F735 are identical with the exception that the F734 is designed to handle US ‘Letter’-sized sheets, whereas the F735 handles DIN
A4 sized sheets.
After loading material into the F734/F735, operation is controlled by the
F731/F732 Universal Feeder. The F734/F735 will only convey material
when instructed to do so by the Universal Feeder.
In the event of a material stoppage on the F731/F732 Universal Feeder, the
High Capacity Loader will stop.
Standard Features:
• Automatic start/stop – Controlled by downstream F731/F732 Universal
Feeder
• Automatic paper flow control
• Automatic material detection
• Fully interlocked covers
• Operator adjustment to accommodate ‘curled material’
Refer to the Model F731/F732 Universal Feeder and the optional Model
F734/F735 High Capacity Loader Operator Guide for more information.
34 SV62081 Rev. A
Page 35

DI900/DI950/DI950e Operator Guide Addendum
DI900/DI950 Input
Transport
The DI900/DI950 Input Transport is located between the Universal Feeder
and either:
• the base unit or the
• a High Capacity Sheet Feeder (HCSF).
The Input Transport receives sheet(s) (in the form of complete collations),
inserts (or accumulations of inserts) and booklets from the Universal Feeder. It has the capability of buffering the material ahead of the base unit or
HCSF until the downstream unit is ready to receive the material.
Input Transport Top Cover
Power
button
Input Transport Attached to Base Unit
Input Transport Front Cover
SV62081 Rev. A
35
Page 36

DI900/DI950/DI950e Operator Guide Addendum
DI900/DI950
Input Transport
(continued)
The Input Transport has two sheet divert trays: an upper divert tray and a
lower divert tray. The lower divert tray provides capacity and function identical to the divert tray shipped with the basic DI900/DI950 system. The upper
divert tray provides a divert path accessible only to the upstream external
device.
Upper Divert Tray
Lower Divert Tray
NOTES:
• Refer to Reference, DI900/DI950 Input Transport in this guide for divert
tray material specications.
• The upper divert tray will accept input of up to 25 sheets with a basis
weight of 32 lb. (120 gsm) per sheet.
• Stiff media is not allowed in the upper divert tray since it will not be able to
negotiate the bend down from the paper path into the divert path.
36 SV62081 Rev. A
Page 37

DI900/DI950/DI950e Operator Guide Addendum
DI900/DI950
Input Transport
(continued)
The front cover of the Input Transport has two LED lights: the upper light
is for upper (upstream) divert tray; the lower light is for lower (DI900/DI950
base unit) divert tray. The LED lights indicate the following:
• No light means the divert tray is empty.
• Green light means tray has material in it.
• Red light means that tray is full.
LED for Upper Divert Tray
LED for Lower Divert Tray
SV62081 Rev. A
37
Page 38

DI900/DI950/DI950e Operator Guide Addendum
DI900/DI950
Input Transport
(continued)
There are two blue jam clearance knobs on the Input Transport.
• Knob 30 clears stoppages that occur while material enters the Input
Transport.
• Knob 31 clears stoppages that occur while material exits the Input
Transport.
NOTE: This knob also turns belts in the Feeder Tower. Be sure to open the
Feeder Tower cover when clearing a stoppage using this knob.
To access the jam clearance knobs, open the Input Transport front cover.
Jam Clearance Knobs
38 SV62081 Rev. A
Page 39

DI900/DI950/DI950e Operator Guide Addendum
DI900/DI950
Input Transport
(continued)
Adjusting the Stop on the Lower Divert Tray
Adjust the stop on the lower divert tray to the size of the material being fed
into the tray.
NOTE: The system must be stopped in order to perform this procedure. Opening
the covers while the system is running will cause an error.
1. Open the Input Transport covers.
2. Lift the blue lever and slide the stop to the position that corresponds with
the material size. Lower the stop into the appropriate slot to lock it in
place. The letter (11”) and A4 slots are marked for your convenience.
Letter (11”) Stop
3. Close the Input Transport covers.
SV62081 Rev. A
39
Page 40

DI900/DI950/DI950e Operator Guide Addendum
Scanning
Scanning
Features
The information in this section is intended to replace information contained
in Chapter 8, Scanning in the DI900/DI950 FastPac™ Document Inserting
System Operator Guide.
Dynamic Envelope Selection
Dynamic envelope selection allows you to create scanning jobs on DI950
systems (with or without a High Capacity Sheet Feeder) that will insert mail
piece contents into either letter-sized or flat envelopes.
Letter-sized envelopes are loaded at the High Capacity Envelope Feeder.
Flat envelopes are loaded at the Feeder Tower, and can be linked so that
they feed from Feeder A and Feeder C.
NOTE: You cannot use a windowed at envelope with Top Address, Z folded
jobs. Dynamic envelope selection cannot be used when the stiff media insert is
selected.
This feature is implemented in one of two ways:
• Using the Envelope Select (ES) scan mark. The Envelope Select scan
mark is available on systems that have BCR scanning or the Selective
Operations level of OMR scanning enabled. Refer to BCR and OMR
Mark Levels in this Chapter 8, Scanning of the DI900/DI950 FastPac™
Document Inserting System Operator Guide for more information about
the various levels of scanning.
• Setting the “Item Overcount Action” to “Use Alternate Envelope”. Refer
to Creating a Job in Chapter 3 or Assigning a Scan Configuration to an
Existing Job in Chapter 8 of the DI900/DI950 FastPac™ Document Inserting System Operator Guide for more information.
Jobs using dynamic envelope selection must be set up with two outer envelopes. The first set in the job must contain the information necessary to
make the envelope selection (either the Envelope Select scan mark or “Item
Overcount Action” setting). Secondary sets of scanned material, generic
(non-scanned) material, or sets containing select fed sheets can be included in a dynamic envelope selection job.
Additionally, a single Reply Envelope (BRE) can be included in the job. If
you wish to add an insert type other than a BRE to the flat envelope, the
insert must be called a BRE in the Mail Piece Icon Tree.
NOTE: Thick inserts (such as booklets) may have trouble accumulating in the
Pre-fold Accumulator and are not recommended for use.
The BRE/insert will accumulate with the flat set in the Pre-fold Accumulator
prior to insertion into the envelope.
40 SV62081 Rev. A
Page 41

Page 42

1 Elmcroft Road
Stamford, Connecticut 06926-0700
www.pb.com
For Service or Supplies
5500 Explorer Drive
Mississauga, Ontario L4W 5C7
www.pitneybowes.ca
PB Form SV62081 Rev. A 12/07
© 2007 Pitney Bowes Inc.
All Rights Reserved
Printed in the USA or Canada
Printed on recyclable paper
 Loading...