

Page 1

Stereo Cassette Deck Receiver
XV-EV500
XV-EV700
XV-EV1000
Speaker System
S-EV500V
S-EV700V
S-EV1000V
Operating Instructions
Page 2
IMPORTANT
The lightning flash with arrowhead symbol,
within an equilateral triangle, is intended to
alert the user to the presence of uninsulated
"dangerous voltage" within the product's
enclosure that may be of sufficient
magnitude to constitute a risk of electric
shock to persons.
CAUTION
RISK OF ELECTRIC SHOCK
DO NOT OPEN
CAUTION:
TO PREVENT THE RISK OF ELECTRIC
SHOCK, DO NOT REMOVE COVER (OR
BACK). NO USER-SERVICEABLE PARTS
INSIDE. REFER SERVICING TO QUALIFIED
SERVICE PERSONNEL.
The exclamation point within an equilateral
triangle is intended to alert the user to the
presence of important operating and
maintenance (servicing) instructions in the
literature accompanying the appliance.
D3-4-2-1-1_En-A
CAUTION
This product is a class 1 laser product, but this
product contains a laser diode higher than Class 1.
To ensure continued safety, do not remove any covers
or attempt to gain access to the inside of the product.
Refer all servicing to qualified personnel.
The following caution label appears on your unit.
Location: bonnet of the unit
Taiwan model
WARNING
This equipment is not waterproof. To prevent a fire
or shock hazard, do not place any container filed
with liquid near this equipment (such as a vase or
flower pot) or expose it to dripping, splashing, rain
or moisture.
WARNING
Before plugging in for the first time, read the following
D3-4-2-1-3_A_En
section carefully.
The voltage of the available power supply differs
according to country or region. Be sure that the
power supply voltage of the area where this unit
will be used meets the required voltage (e.g., 230V
or 120V) written on the rear panel.
D3-4-2-1-4_A_En
WARNING
To prevent a fire hazard, do not place any naked
flame sources (such as a lighted candle) on the
equipment.
D3-4-2-1-7a_A_En
Operating Environment
Operating environment temperature and humidity:
+5 ºC – +35 ºC (+41 ºF – +95 ºF); less than 85 %RH
(cooling vents not blocked)
Do not install this unit in a poorly ventilated area, or in
locations exposed to high humidity or direct sunlight (or
strong artificial light)
D3-4-2-1-7c_A_En
All other models
Location: rear of the unit
CLASS 1
LASER PRODUCT
D3-4-2-1-8_A_En
This product complies with the Low Voltage Directive
(73/23/EEC, amended by 93/68/EEC), EMC Directives
(89/336/EEC, amended by 92/31/EEC and
93/68/EEC).
Recording equipment and copyright: Recording
equipment should be used only for lawful copying
and you are advised to check carefully what is lawful
copying in the country in which you are making a
copy. Copying of copyright material such as films or
music is unlawful unless permitted by a legal
exception or consented to by the rightowners.
VENTILATION CAUTION
When installing this unit, make sure to leave space
around the unit for ventilation to improve heat
radiation (at least 30 cm at top, 15 cm at rear, and
15 cm at each side).
WARNING
Slots and openings in the cabinet are provided for
ventilation to ensure reliable operation of the
product, and to protect it from overheating. To
prevent fire hazard, the openings should never be
blocked or covered with items (such as newspapers,
table-cloths, curtains) or by operating the
equipment on thick carpet or a bed.
D3-4-2-1-9a_En
K018_En
D3-4-2-1-7b_A_En
Page 3
Y
T
CAUTION : USE OF CONTROLS OR ADJUSTMENTS OR PERFORMANCE OF PROCEDURES OTHER THAN THOSE
T
SPECIFIED HEREIN MAY RESULT IN HAZARDOUS RADIATION EXPOSURE.
CAUTION : THE USE OF OPTICAL INSTRUMENTS WITH THIS PRODUCT WILL INCREASE EYE HAZARD.
D6-8-2-1_En
NOTE: This equipment has been tested and found to comply with the limits for a Class B digital device, pursuant to
Part 15 of the FCC Rules. These limits are designed to provide reasonable protection against harmful interference in
a residential installation. This equipment generates, uses, and can radiate radio frequency energy and, if not
installed and used in accordance with the instructions, may cause harmful interference to radio communications.
However, there is no guarantee that interference will not occur in a particular installation. If this equipment does
cause harmful interference to radio or television reception, which can be determined by turning the equipment off
and on, the user is encouraged to try to correct the interference by one or more of the following measures:
– Reorient or relocate the receiving antenna.
– Increase the separation between the equipment and receiver.
– Connect the equipment into an outlet on a circuit different from that to which the receiver is connected.
– Consult the dealer or an experienced radio/TV technician for help.
D8-10-1-2_En
Information to User
Alteration or modifications carried out without appropriate authorization may invalidate the user’s right to operate
the equipment.
D8-10-2_En
CAUTION: This product satisfies FCC regulations when shielded cables and connectors are used to connect the
unit to other equipment. To prevent electromagnetic interference with electric appliances such as radios and
televisions, use shielded cables and connectors for connections.
D8-10-3a_En
CAUTION
The STANDBY/ON switch on this unit will not
completely shut off all power from the AC outlet.
Since the power cord serves as the main disconnect
device for the unit, you will need to unplug it from
the AC outlet to shut down all power. Therefore,
make sure the unit has been installed so that the
power cord can be easily unplugged from the AC
outlet in case of an accident. To avoid fire hazard,
the power cord should also be unplugged from the
AC outlet when left unused for a long period of time
(for example, when on vacation).
D3-4-2-2-2a_A_En
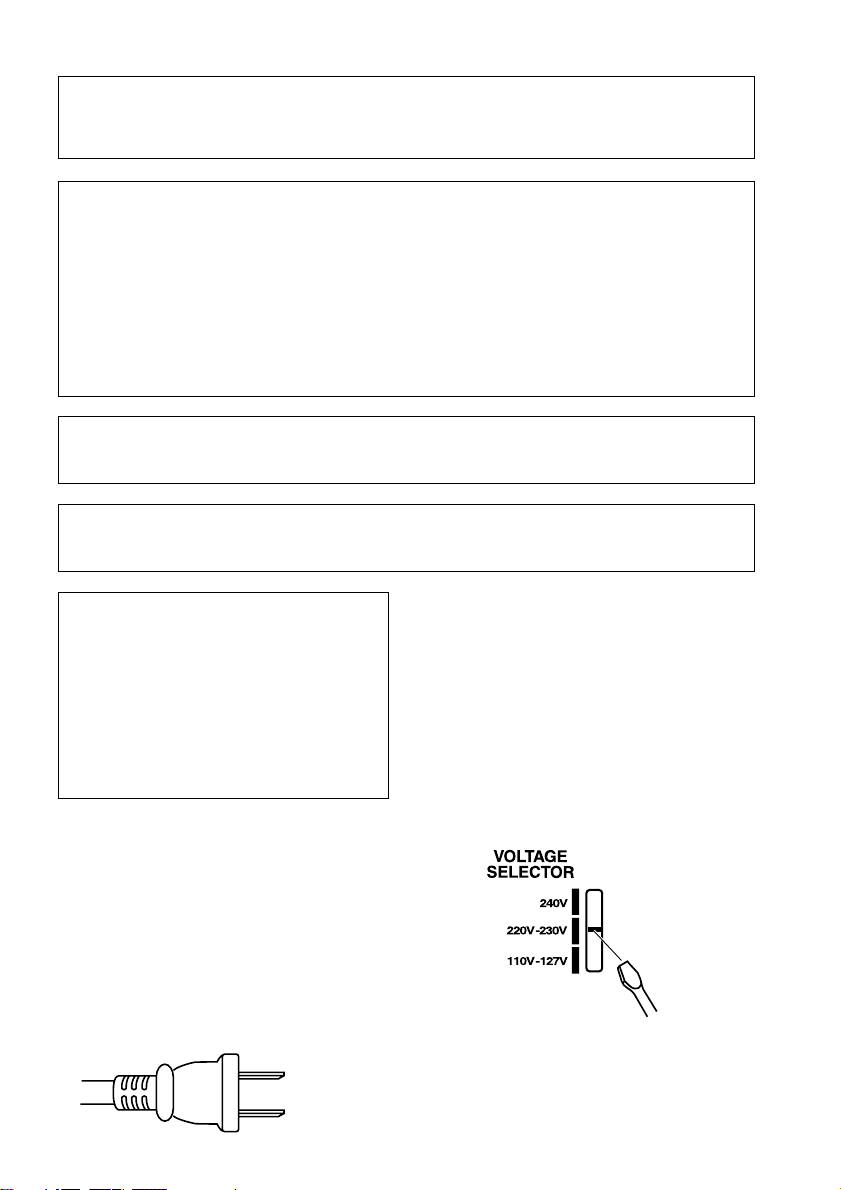
Voltage selector
ou can find the voltage selector switch on the rear
panel of multi-voltage models.
The factory setting for the voltage selector is
220V–230V. Please set it to the correct voltage for
your country or region.
• Saudi Arabia operates on 127V and 220V mains
voltage. Please set to the correct voltage before using.
• For Taiwan, please set to 110V–127V before using.
• For Mexico, please set to 110V–127V before using.
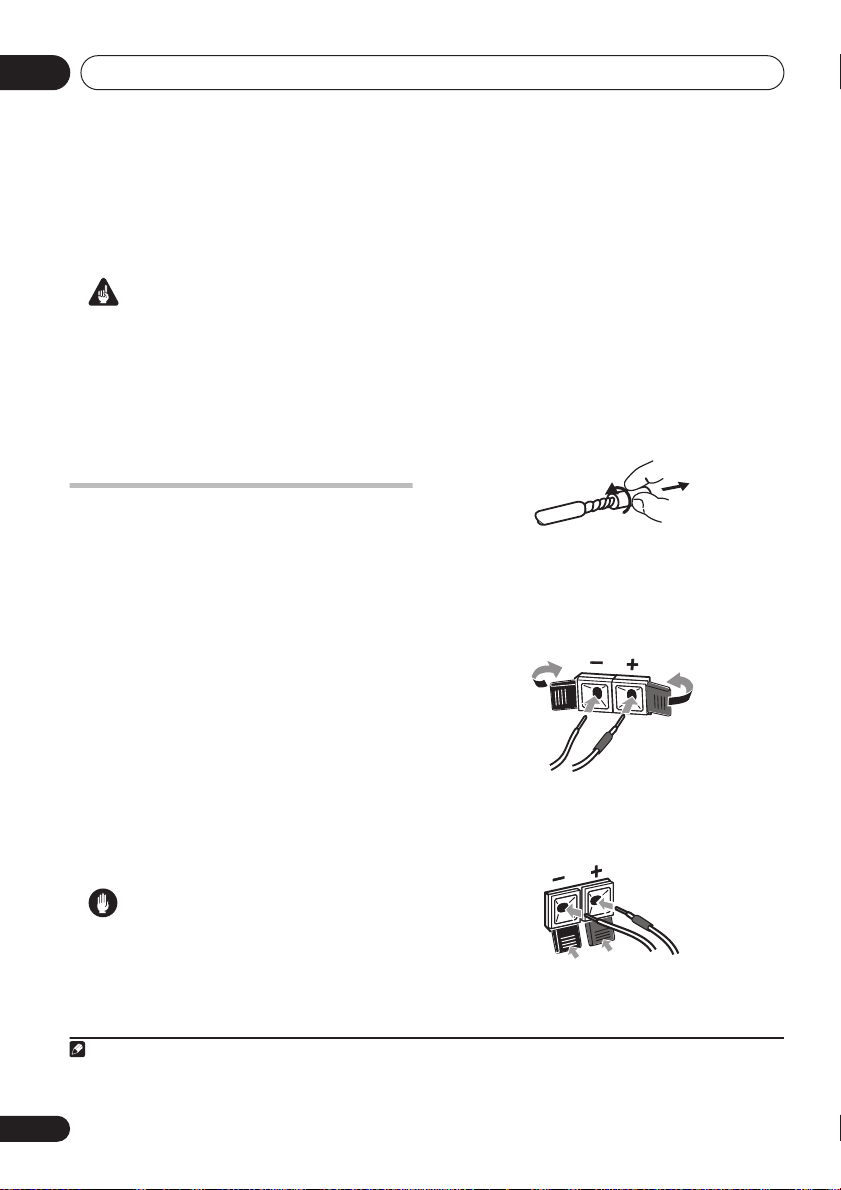
Before changing the voltage, disconnect the AC power
cord. Use a medium size screwdriver to change the
voltage selector switch.
CAUTION
hese speaker terminals carry HAZARDOUS LIVE
voltage. To prevent the risk of electric shock when
connecting or disconnecting the speaker cables,
disconnect the power cord before touching any
uninsulated parts.
D3-4-2-2-3_A_En
For Taiwan exclusively
aiwanese two pin flat-bladed plug
Medium size
screwdriver
D3-4-2-1-5_En
Page 4

Thank you for buying this Pioneer product.
Please read through these operating instructions so that you will know how to operate your model
properly. After you have finished reading the instructions, put them in a safe place for future
reference
Contents
.
01 Before you start
Checking what’s in the box
Loading the batteries
Range of the remote control unit
Attaching the non-skid pads
Removing the front speaker grilles
. . . . . . . . . . . . . . . 6
. . . . . . . . . . . . . . . . . . . 6
. . . . . . . . . . 6
. . . . . . . . . . . . . . 7
. . . . . . . . 7
02 Connecting up
Connecting the speaker terminals
Multichannel speaker connections
Hints on speaker placement
Attaching the surround speakers to the
speaker stands
Optional surround speaker connections
Connecting the radio antennas
Connecting external antennas
Connecting to your TV
Connecting using the component video
output
Connecting auxiliary components
Connecting the power
. . . . . . . . . . . . . . . . . . . . . . 10
. . . . . . . . . . . . . . . . . . 11
. . . . . . . . . . . . . . . . . . . . . . . . . . . . 12
. . . . . . . . . . . . . . . . . . 13
. . . . . . . . . 8
. . . . . . . . . 9
. . . . . . . . . . . . . 9
. . . . 10
. . . . . . . . . . . 10
. . . . . . . . . . 11
. . . . . . . . . 12
03 Controls and displays
Front panel
Display
Remote control
. . . . . . . . . . . . . . . . . . . . . . . . . . 14
. . . . . . . . . . . . . . . . . . . . . . . . . . . . . 15
. . . . . . . . . . . . . . . . . . . . . . . 17
04 Getting started
Setting the clock
Setting up the remote to control your TV
Using the on-screen displays
Playing discs
Basic playback controls
Resume and Last Memory
DVD-Video disc menus
Video CD/Super VCD PBC menus
Listening to the radio
Improving FM stereo sound
Listening to other sources
. . . . . . . . . . . . . . . . . . . . . . 19
. . . . 19
. . . . . . . . . . . . 19
. . . . . . . . . . . . . . . . . . . . . . . . 20
. . . . . . . . . . . . . . . 20
. . . . . . . . . . . . . 21
. . . . . . . . . . . . . . . . 21
. . . . . . . 21
. . . . . . . . . . . . . . . . . . 21
. . . . . . . . . . . . 22
. . . . . . . . . . . . . . 22
05 Setting up for surround sound
Home theater sound setup
Setting the channel levels
Choosing your surround settings
System Setup menu options
. . . . . . . . . . . . . . 23
. . . . . . . . . . . . . 23
. . . . . . . . . 24
. . . . . . . . . . . 24
06 Home theater sound
About the listening modes
Auto listening mode
Listening in surround sound
Using Front Surround
Listening in stereo
Listening with headphones
Using Advanced Surround
Using the Sound menu
. . . . . . . . . . . . . . 25
. . . . . . . . . . . . . . . . . . . 25
. . . . . . . . . . . . . 25
. . . . . . . . . . . . . . . . . . 26
. . . . . . . . . . . . . . . . . . . . . 26
. . . . . . . . . . . . . . 26
. . . . . . . . . . . . . . 26
. . . . . . . . . . . . . . . . . 27
07 Playing discs
Scanning discs
Playing in slow motion
Frame advance/frame reverse
Playing a JPEG slideshow
Browsing DVD or Video CD/Super VCD
discs with the Disc Navigator . . . . . . . . . . . . 29
Browsing WMA, MP3, DivX video and
JPEG files with the Disc Navigator . . . . . . . . 29
Looping a section of a disc . . . . . . . . . . . . . . 30
Using repeat play . . . . . . . . . . . . . . . . . . . . . 30
Using random play . . . . . . . . . . . . . . . . . . . . 31
Creating a program list . . . . . . . . . . . . . . . . . 31
Using the OSD . . . . . . . . . . . . . . . . . . . . . . 31
Other functions available from the
program menu . . . . . . . . . . . . . . . . . . . . . . 32
Using the front panel display . . . . . . . . . . . 32
Searching a disc . . . . . . . . . . . . . . . . . . . . . . 32
Switching subtitles . . . . . . . . . . . . . . . . . . . . 33
Switching language / audio channels . . . . . . 33
Zooming the screen . . . . . . . . . . . . . . . . . . . 33
Switching camera angles . . . . . . . . . . . . . . . 33
Displaying disc information. . . . . . . . . . . . . . 33
. . . . . . . . . . . . . . . . . . . . . . . 28
. . . . . . . . . . . . . . . . . 28
. . . . . . . . . . . . 28
. . . . . . . . . . . . . . . 28
08 Using the tape deck
Playing cassette tapes. . . . . . . . . . . . . . . . . . 34
Basic playback controls . . . . . . . . . . . . . . . 34
Making tape recordings. . . . . . . . . . . . . . . . . 35
Automatically recording CDs (ASES). . . . . . . 35
09 More tuner features
Memorizing stations . . . . . . . . . . . . . . . . . . . 37
Manually saving station presets . . . . . . . . . 37
Automatically saving station presets . . . . . 37
Listening to station presets. . . . . . . . . . . . . 37
4
En
Page 5

10 Singing karaoke
Singing karaoke
Changing the vocal mix
Changing the backing track
. . . . . . . . . . . . . . . . . . . . . . 38
. . . . . . . . . . . . . . . 38
. . . . . . . . . . . . 38
11 Adjusting the sound
Using the Sound menu
Using the Sound Field Control
Boosting the bass level
Muting the sound
. . . . . . . . . . . . . . . . . 39
. . . . . . . . . . . . 39
. . . . . . . . . . . . . . . . . 39
. . . . . . . . . . . . . . . . . . . . . 39
12 Using the timer
Setting the wake-up timer
Turning the wake-up timer on/off
Setting the sleep timer
Setting the record timer
Turning the record timer on/off
. . . . . . . . . . . . . . . 40
. . . . . . . . 40
. . . . . . . . . . . . . . . . . 40
. . . . . . . . . . . . . . . . 41
. . . . . . . . . . 41
13 Audio Settings and Video Adjust
menu
Audio Settings menu
Audio DRC
Virtual Surround
Video Adjust menu
. . . . . . . . . . . . . . . . . . . 42
. . . . . . . . . . . . . . . . . . . . . . . . . 42
. . . . . . . . . . . . . . . . . . . . . 42
. . . . . . . . . . . . . . . . . . . . 42
14 Initial Settings menu
Using the Initial Settings menu
Video Output settings
Language settings
Display settings
Options settings
Parental Lock
About DivX® VOD content
. . . . . . . . . . . . . . . . . . . 45
. . . . . . . . . . . . . . . . . . . . . 45
. . . . . . . . . . . . . . . . . . . . . 45
. . . . . . . . . . . . . . . . . . . . . . . 46
. . . . . . . . . . . 44
. . . . . . . . . . . . . . . . . 44
. . . . . . . . . . . . . 47
15 Additional information
Optional system settings
System Setup menu options in standby
Using and taking care of discs
DVD Video regions
Disc / content format playback
compatibility
Disc compatibility table
About DivX
DivX video compatibility
About WMA
Handling discs
Storing discs
Discs to avoid
Using cassette tapes
Tapes you should avoid
Protecting your recordings
Installation and maintenance
Hints on installation
Cleaning the pickup lens
Problems with condensation
Moving the system unit
Resetting the system
Troubleshooting
General
DVD/CD/Video CD player
WMA/MP3/JPEG discs
Tuner
Tape deck . . . . . . . . . . . . . . . . . . . . . . . . . .57
Error Messages . . . . . . . . . . . . . . . . . . . . . .57
Screen sizes and disc formats . . . . . . . . . . . .58
Using the language code list . . . . . . . . . . . . . 58
Language code list. . . . . . . . . . . . . . . . . . . . . 59
Country/Area code list . . . . . . . . . . . . . . . . . .59
Preset code list . . . . . . . . . . . . . . . . . . . . . . .60
Specifications . . . . . . . . . . . . . . . . . . . . . . . .61
. . . . . . . . . . . . . . . . . . . . . . . . .49
. . . . . . . . . . . . . . . . . . . . . . . . .50
. . . . . . . . . . . . . . . . . . . . . . . . .51
. . . . . . . . . . . . . . . . . . . . . . . .51
. . . . . . . . . . . . . . . . . . . . . . .51
. . . . . . . . . . . . . . . . . . . . . . . . . . . .54
. . . . . . . . . . . . . . . . . . . . . . . . . . . . . .56
. . . . . . . . . . . . . . . .48
. . .48
. . . . . . . . . . . .49
. . . . . . . . . . . . . . . . . . .49
. . . . . . . . . . . . . . . .50
. . . . . . . . . . . . . . .50
. . . . . . . . . . . . . . . . . . . . . .51
. . . . . . . . . . . . . . . . . . .52
. . . . . . . . . . . . . . . .52
. . . . . . . . . . . . .52
. . . . . . . . . . . .52
. . . . . . . . . . . . . . . . . .52
. . . . . . . . . . . . . . .53
. . . . . . . . . . . .53
. . . . . . . . . . . . . . . .53
. . . . . . . . . . . . . . . . . . .53
. . . . . . . . . . . . . . . . . . . . . . .54
. . . . . . . . . . . . . . .55
. . . . . . . . . . . . . . . .56
English
Deutsch
Français
Italiano
Nederlands
Español
En
5
Page 6
Before you start01
Chapter 1
Before you start
Checking what’s in the box
Please check that you've received the following
supplied accessories:
• Remote control
• Dry cell batteries (AA/R6) x2
• Video cord
• AM loop antenna
• FM antenna
• Power cord:
Central and South American, Taiwan,
Philippines models x2
All other models x1
• Speaker cords x3 (S-EV1000 only)
• Speaker stands x2 (S-EV700/1000 only)
• Non-skid pads x12 (S-EV700/1000 only)
• Power plug adapter (Central and South
American, US Military and Duty Free
models only)
• Warranty Card (US Military and Duty Free
models only)
• These operating instructions
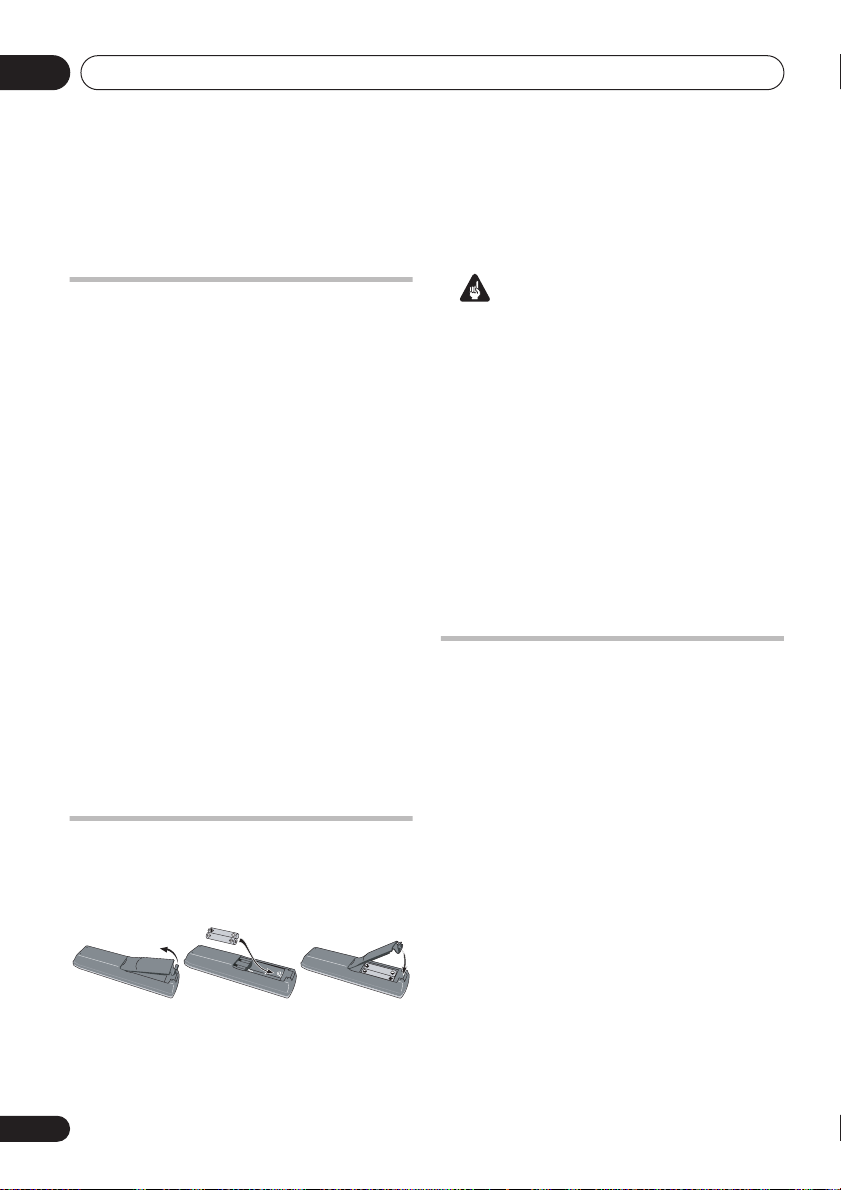
Loading the batteries
Use AA/R6 batteries with the supplied remote
control. Make sure to follow the indications (
) inside the compartment.
Important
Incorrect use of batteries may result in such
hazards as leakage and bursting. Observe the
following precautions:
• Never use new and old batteries together.
• Insert the plus and minus sides of the
batteries properly according to the marks
in the battery case.
• Batteries with the same shape may have
different voltages. Do not use different
batteries together.
• When disposing of used batteries, please
comply with governmental regulations or
environmental public instruction’s rules
that apply in your country or area.
Range of the remote control unit
The remote control has a range of about 7
meters (23 ft). It may not work properly if:
• There are obstacles between the remote
control and this unit’s remote sensor.
• Direct sunlight or fluorescent light is
shining onto the remote sensor.
• This system is located near a device that is
emitting infrared rays.
• This unit is operated simultaneously with
,
another infrared remote control unit.
6
En
Page 7
Before you start
01
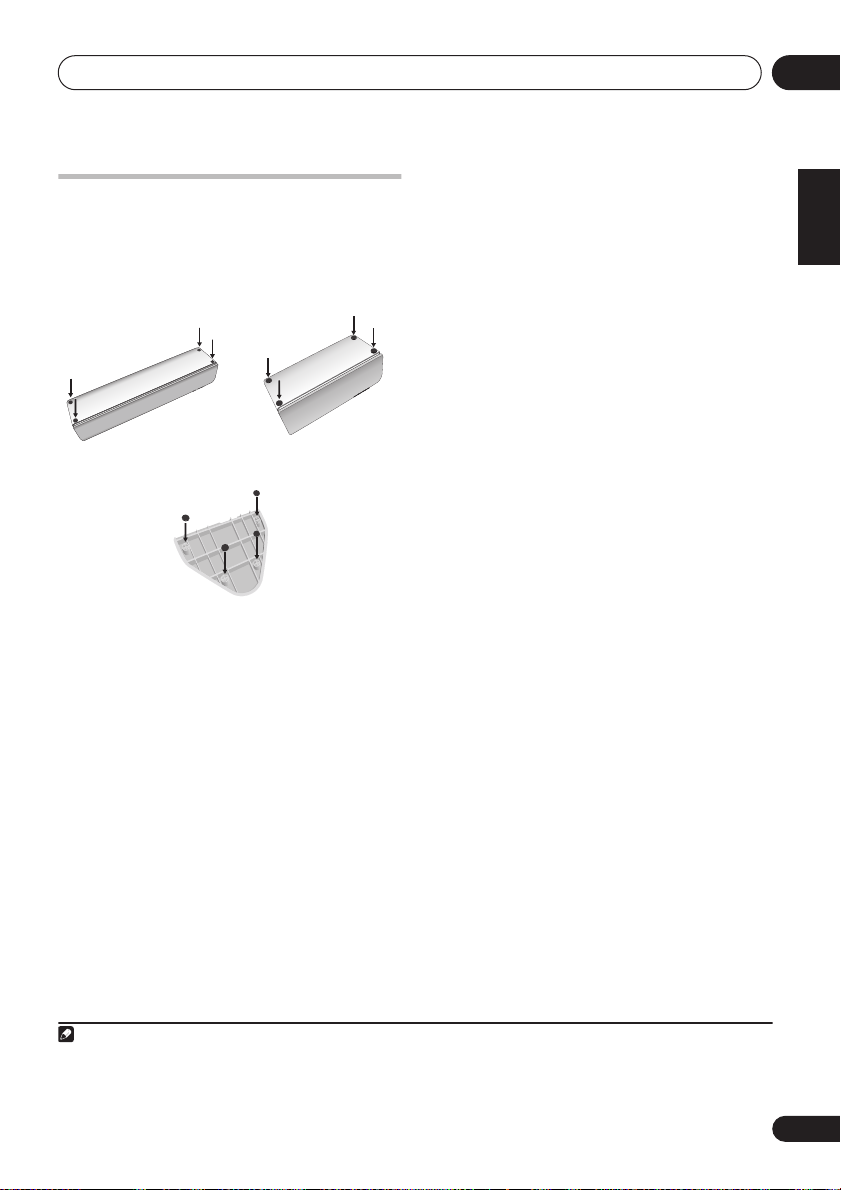
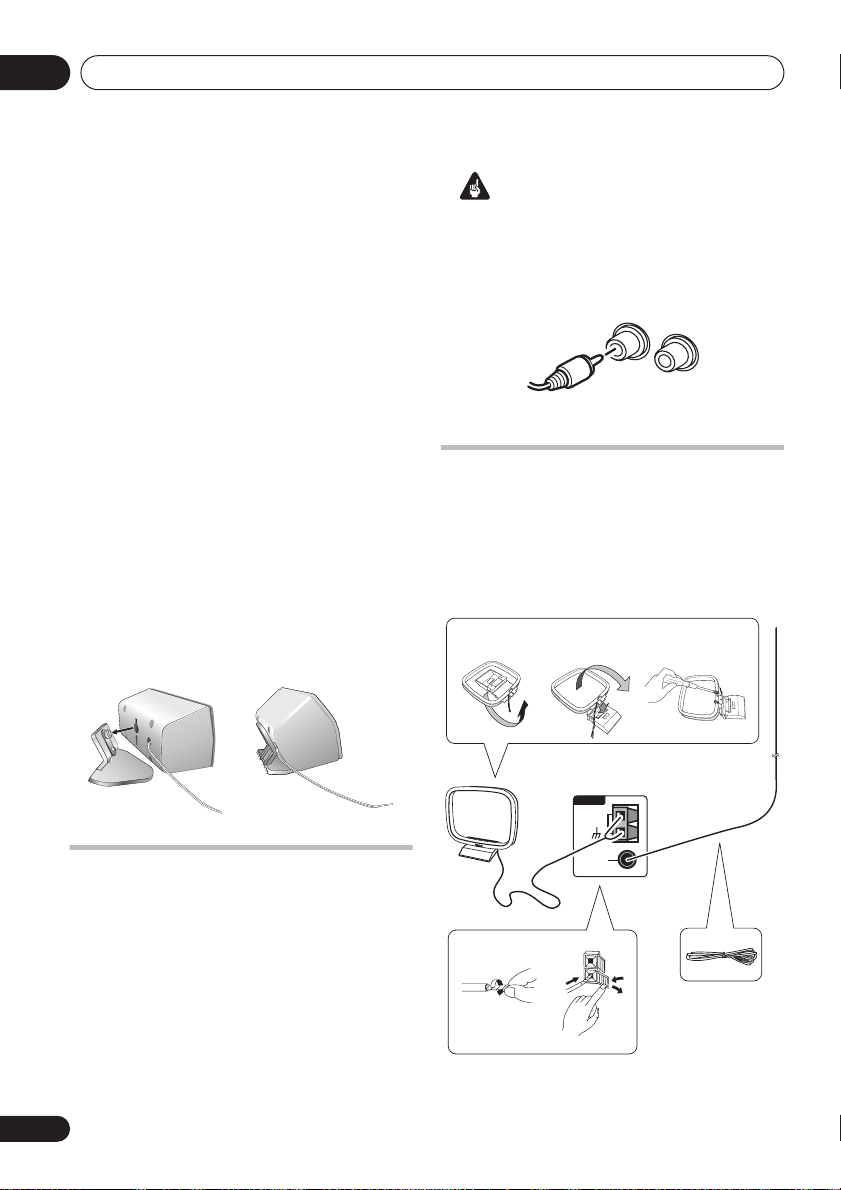
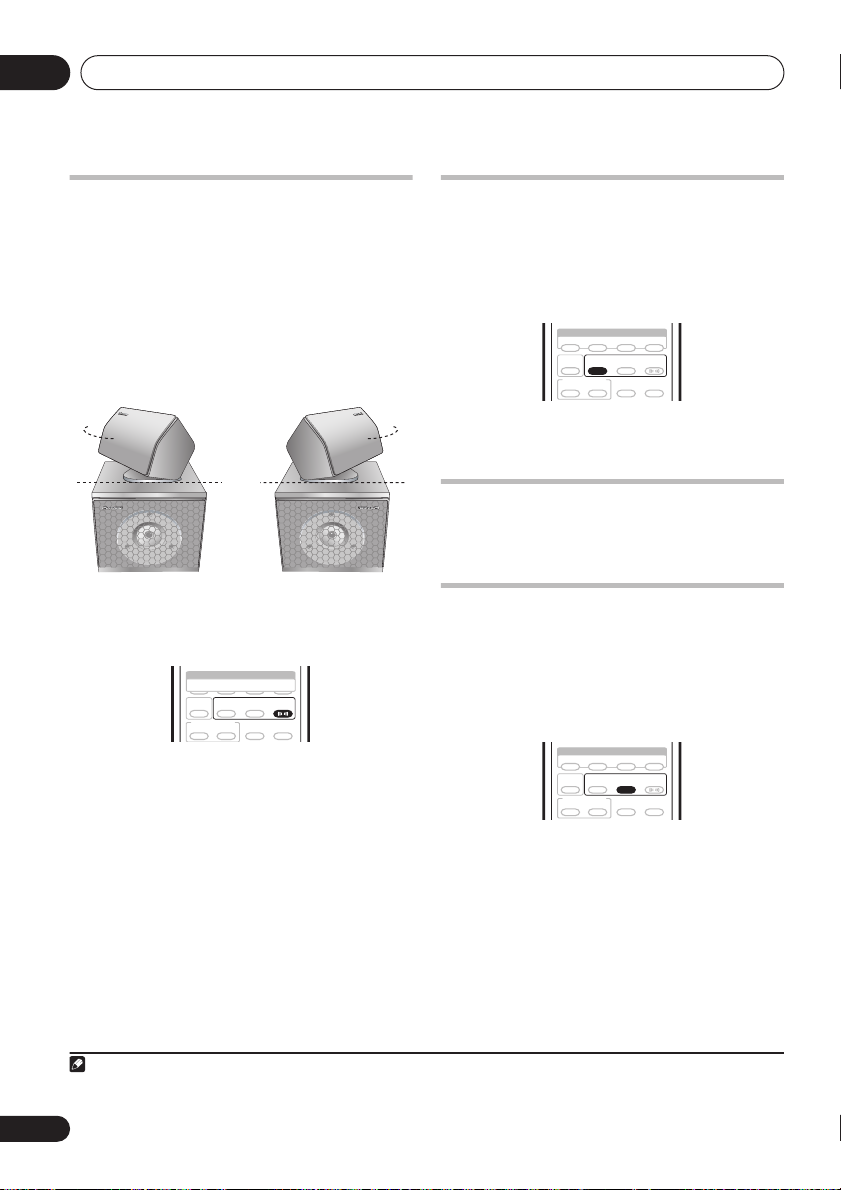
Attaching the non-skid pads
EV700/1000 model only
Use the self-adhesive non-skid pads to provide
a stable base for the speakers. Attach four to
each speaker or stand
Center speaker Surround speaker
Removing the front speaker grilles
If necessary, remove the front speaker grilles
as described below.
1 Gently ease the grille loose by gripping
the bottom and pulling towards you.
2 Pull the top free in the same way.
When reattaching, start from the top then push
the bottom in until secure.
• It is not recommended (due to dirt and
dust) to leave the speaker grilles removed.
• Since the speaker grilles may come loose,
make sure to place the speakers in a
location where they will not cause injury.
1
as shown below.
Speaker stands
English
Deutsch
Français
Italiano
Nederlands
Español
Note
1 If you choose to use the Front surround 3-spot setup (as explained in
to use the speaker stands provided (do not attach the pads to the base of the surround speakers). Using the speaker stands for
the Standard surround 5-spot setup is optional. See
on this.
Attaching the surround speakers to the speaker stands
Home theater sound setup
on page 23), it is necessary
on page 10 for more
7
En
Page 8
Connecting up02
Chapter 2
Connecting up
Important
• Before making or changing any
connections, switch off the power and
unplug the power cord from the AC outlet.
• When making cable connections, make
sure not to bend the cables over the top of
this unit. This may cause a humming noise
from the speakers.
Connecting the speaker
terminals
Connect the wires from the speakers to the
terminals on the main unit rear panel as shown
below. Before connecting, you may want to
consider the placement options available in
your room, and when using this system:
•
EV500 model only –
right speakers at equal distances from the
TV, then connect them as shown below.
See
Optional surround speaker connections
on page 10 to connect surround speakers.
•
EV700/1000 model only –
system is provided for speaker connections
(see
Multichannel speaker connections
below). See
page 23 for surround placement options.
Place the front left and
A color-coded
Home theater sound setup
1
on
• Make sure that the bare speaker wires
cannot touch each other, or come into
contact with other metal parts once the
unit is switched on.
1 Twist and pull off the protective shields
on each wire.
2 Connect to the speaker terminals on the
rear of the unit.
Make sure to insert the red/colored wire into
the red/colored (+) tab and the black/white
wire into the black (–) tab.
3 EV 1000 only: Connect to the terminals on
the rear of the subwoofer and front speakers
in the same way.
Caution
• Do not connect this speaker to any amplifier
other than the one supplied with this
system. Connection to any other amplifier
may result in a malfunction or fire.
Note
1• The speakers supplied with this system are magnetically shielded. However, placing them extremely close to a television
may result in color distortion on the screen. If this happens, move the speakers a little further away and switch off the television
for 15–30 minutes.
8
En
Page 9
Connecting up
02
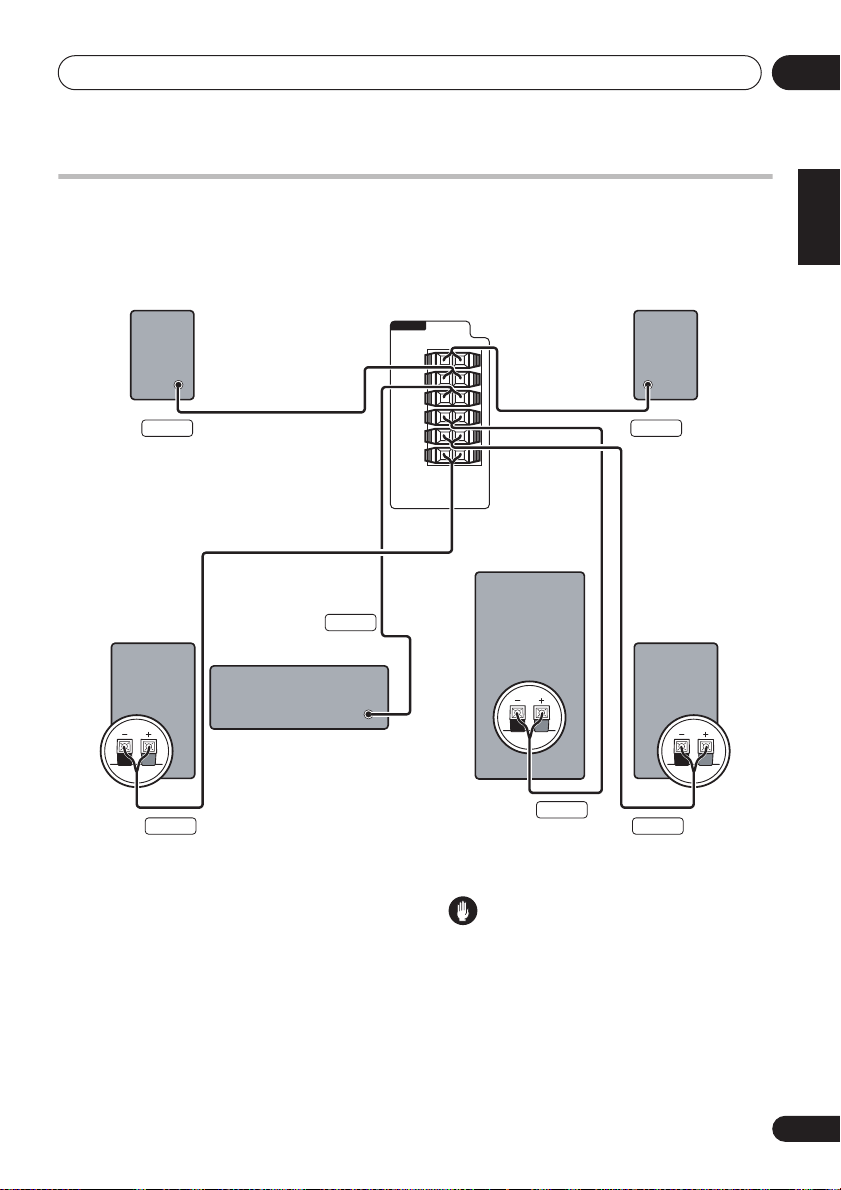
Multichannel speaker connections
EV700/1000 model only
Connect each speaker using the color-coded speaker cable. Match them to the colored labels
above the speaker terminals (see illustration below).
Surround right Surround left
Gray Blue
Front right*
Center
Green
EV700/1000DVD
SPEAKERS
L
SURROUND
R
CENTER
SUB
WOOFER
L
FRONT
R
Subwoofer*
Front left*
English
Deutsch
Français
Italiano
Nederlands
Español
*This connection is required only for the EV1000 model.
Hints on speaker placement
The following guidelines will help you to get the
best performance from your speaker system.
Home theater sound setup
See
on page 23 for
surround placement options with this system.
• Place the front left and right speakers at
equal distances from the TV.
• Place the center speaker above or below
the TV so that the sound of the center
channel is localized at the TV screen.
• If you choose to install the center speaker
• If possible, place the surround speakers
Purple
WhiteRed
Caution
on top of the TV, be sure to secure it with
putty, or by other suitable means, to reduce
the risk of damage or injury resulting from
the speaker falling from the TV in the event
of external shocks such as earthquakes.
slightly above ear level.
9
En
Page 10
Connecting up02
• Try not to place the surround speakers
further away from the listening position
than the front and center speakers. Doing
so can weaken the surround sound effect.
• Be sure all speakers are installed securely
to prevent accidents and improve sound
quality.
Attaching the surround speakers to
the speaker stands
EV700/1000 model only
If you have set up your system using the Front
surround 3-spot setup (as explained in
theater sound setup
on page 23), it is necessary
to use the speaker stands provided. Using the
speaker stands for the Standard surround 5spot setup is optional. Attach each speaker as
shown in the steps below.
1 Line up the spurs on the speaker stand
with the holes on the back of the surround
speaker and press into place.
2 With the spurs fixed in place, pull the
speaker downward to secure it on the stand.
12
Home
Important
• Use speakers with a nominal impedance of
Ω
at least 16
.
• Make sure you connect both surround
speakers or you won’t be able to hear
anything from the surround jacks.
R
L
SURROUND
Connecting the radio antennas
Connecting the supplied antennas will allow
you to listen to both AM and FM radio
broadcasts. If you find that reception quality is
poor, an outdoor antenna should give you
better sound quality—see
antennas
below for more on how to do this.
fig. a fig. b fig. c
Connecting external
Optional surround speaker
connections
EV500 model only
Using RCA speaker cables, you can connect
surround speakers to the left and right
SURROUND
for multichannel sound from this system.
For the best surround effect, place the
surround speakers slightly above ear level and
at the same distance from the listening
position as the front speakers.
10
En
speaker jacks on the rear panel
ANTENNA
AM LOOP
ANTENNA
FM
UNBAL
4
75Ω
6
1
2
3
Page 11
Connecting up
02
1 Pull off the protective shields of both AM
antenna wires.
2 Push open the tabs, then insert one wire
fully into each terminal, then release the tabs
to secure the AM antenna wires.
3 Fix the AM loop antenna to the stand.
To fix the stand to the antenna, bend in the
direction indicated by the arrow (
clip the loop onto the stand (
fig. b
fig. a
).
) then
• If you plan to mount the AM antenna to a
wall or other surface, secure the stand with
screws (
fig. c
) before clipping the loop to
the stand. Make sure the reception is clear.
4 Place the AM antenna on a flat surface
and point in the direction giving the best
reception.
Don’t let it come into contact with metal
objects and avoid placing near computers,
television sets or other electrical appliances.
1
5 Connect the FM wire antenna in the same
way as the AM loop antenna.
For best results, extend the FM antenna fully
and fix to a wall or door frame. Don’t drape
loosely or leave coiled up.
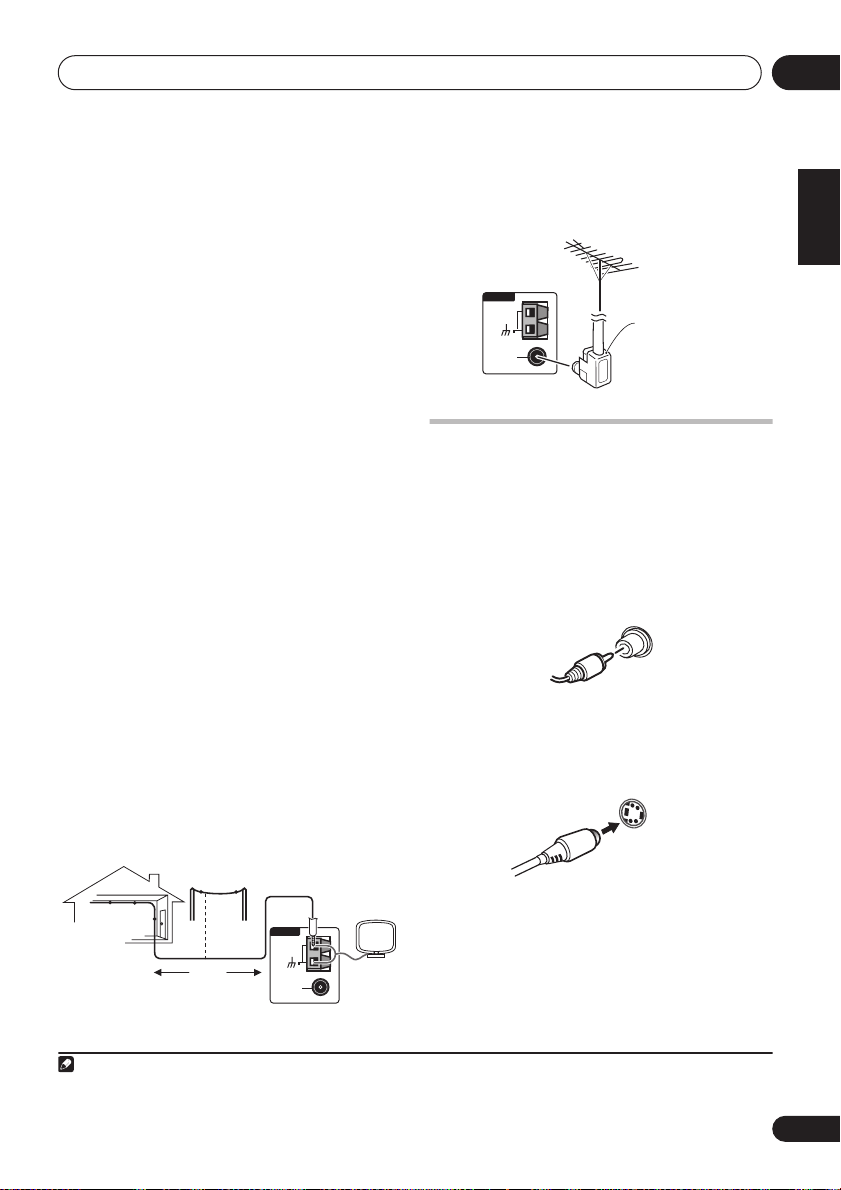
Connecting external antennas
External AM antenna
Use 5–6 meters of vinyl-insulated wire and set
up either indoors or outdoors. Leave the AM
loop antenna connected.
External FM antenna
Use a PAL connector to hook up an external
FM antenna.
ANTENNA
AM LOOP
ANTENNA
FM
UNBAL
75Ω
PAL connector
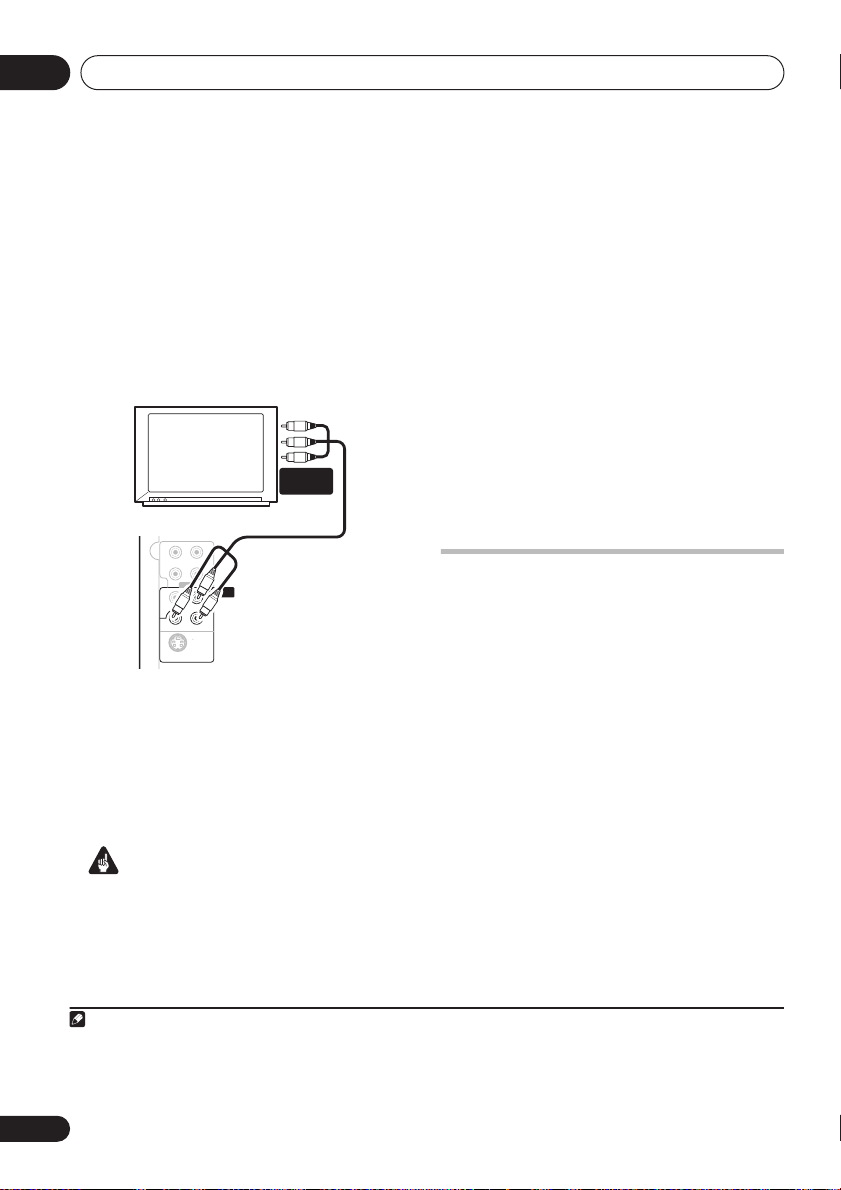
Connecting to your TV
This system offers three types of video
connections. If your TV has component video
inputs, see
video output
1 Use the supplied yellow video cable to
connect the VIDEO OUT jack to a video input
on your TV.
For a better image, you can also use a
commercially available S-Video cable to
connect the
input on your TV.
Connecting using the component
below.
VIDEO
OUT
S-VIDEO OUT
jack to an S-Video
S-VIDEO
OUT
English
Deutsch
Français
Italiano
Nederlands
Español
Outdoor antenna
2 Optionally: Use a stereo audio cable to
Indoor
antenna
(vinyl-coated
wire)
Note
1 The signal ground () is designed to reduce noise that occurs when an antenna is connected. It is not an electrical safety
ground.
5–6m
ANTENNA
AM LOOP
ANTENNA
FM
UNBAL
75Ω
connect the audio outs of your TV (or VCR) to
the LINE IN jacks on the rear of this unit.
This will enable you to hear the TV (or VCR)
sound through this system. See
auxiliary components
below for more on this.
Connecting
11
En
Page 12
Connecting up02
panel
Connecting using the component
video output
If your TV has component video inputs, you can
use these instead of the standard or S-Video
output to connect this system to your TV.
should give you the best quality picture from
the three types of video output available.
• Use a component video cable to connect
the
COMPONENT VIDEO OUT
to a set of
component inputs on your TV.
COMPONENT
INPUT
L
L
CUT
IN
R
R
LINE
COMPONENT
VIDEO OUT
Y
VIDEO
OUT
PR PB
S VIDEO
OUT
About progressive scan video
Compared to interlace video, progressive scan
video effectively doubles the scanning rate of
the picture, resulting in a very stable, flickerfree image. Progressive scan video is available
only from the component video output.
Important
• If you connect a TV that is not compatible
with a progressive scan signal and switch
the system to progressive, you will not be
able to see any picture at all. In this case,
press
STANDBY/ON
to put the system
in standby, then press and hold the front
Note
1 The component video output is switchable between interlaced and progressive formats. See
2 Consumers should note that not all high-definition television sets are fully compatible with this product and may cause artifacts to be displayed in the picture. In case of 525 progressive scan picture problems, it is recommended that the user switch
the connection to the ‘standard definition’ output (Interlace). If there are questions regarding our TV set compatibility with this
model, please contact our customer service center.
1
This
Compatibility of this player with
progressive-scan and high-definition TVs.
This player is compatible with progressive
video Macro Vision System Copy Guard.
This system is compatible with the following
Pioneer displays and monitors: PDP-505HDG,
PDP-435HDG, PDP-5040HD, PDP4340HD,
PDP-502MX, PDP-503HDG, PDP-504HDG,
PDP-433HDG, PDP-434HDG, SD-532HD5,
SD533HD5.
Connecting auxiliary components
This system has both stereo analog inputs and
outputs. Use these to connect external
components, such as a VCR, MD, CD-R or DAT
recorder.
• Connect the LINE IN jacks on the rear
panel to an auxiliary playback component.
These include components such as a VCR,
DAT, or your TV. Connect using RCA pin-plug
stereo cables.
• Connect the LINE OUT jacks on the rear
panel to a recording component.
These include components such as a cassette
deck, VCR, MD recorder, or another recorder
with analog inputs. Connect using RCA pinplug stereo cables.
(stop) button for about 7 seconds
until the display shows
the front panel
the display shows
panel
button to set to interlace and
MEM.CLR?
or button so that
INTERL?
switch the system back on.
Video Output settings
. Press
. Press the front
2
on page 44.
12
En
Page 13

Connecting up
02
Connecting the power
After making sure that everything is connected
properly, plug in the power cord to the AC inlet,
and the other end to a mains power outlet.
AC IN
Congratulations! You’re done setting up.
English
Deutsch
Français
Italiano
Nederlands
Español
13
En
Page 14
Controls and displays03
Chapter 3
Controls and displays
SFC (EV500 only) – Selects sound modes or
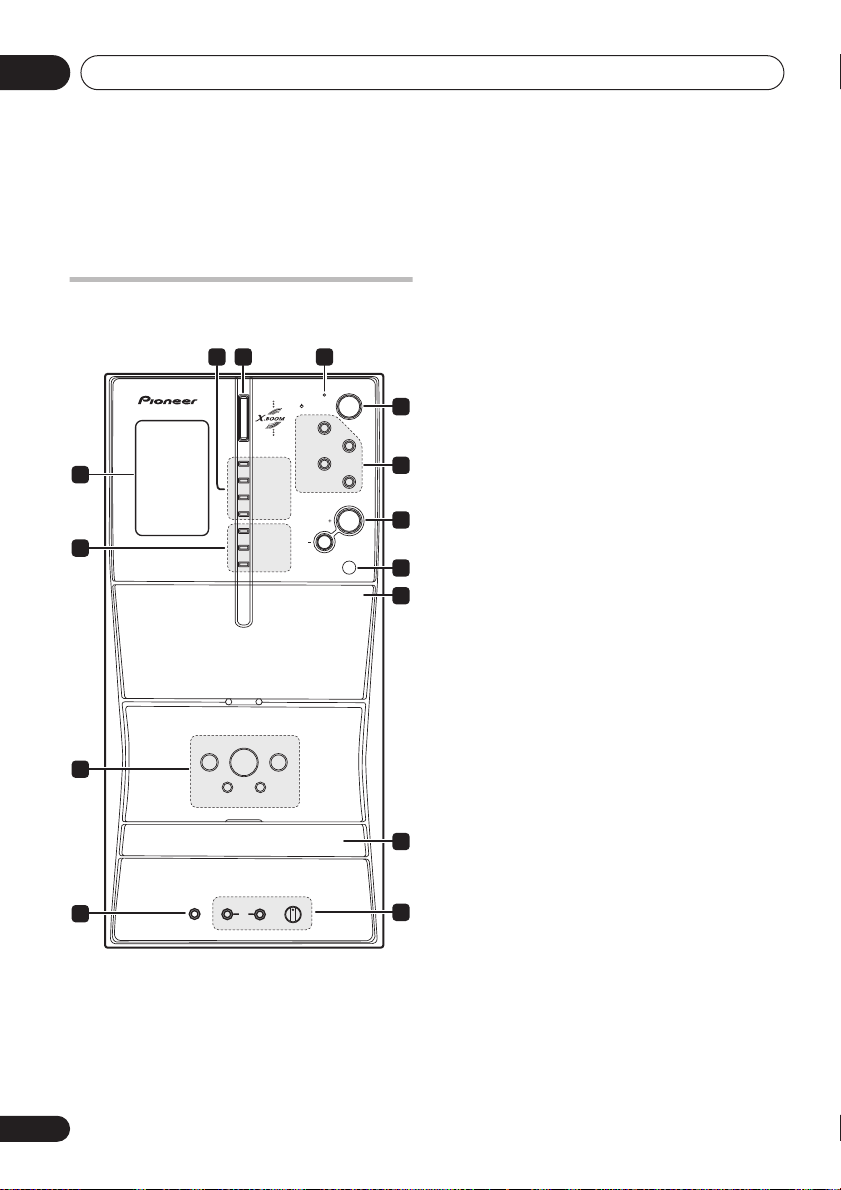
Front panel
Illustration shows the EV700/1000 model
32
FRONT SURROUND
SOUND MODE
KARAOKE
ENTER
REVERSE MODE
REC/STOP
ASES
+–
TUNING
MS+/FF
MS–/REW
MAIN
MIC
14
13
12
1
PHONES SUB
1 Display
See Display below.
2 Sound options
FRONT SURROUND (EV700/1000 only) –
Switches on the Front Surround mode
(page 26).
4
TIMER
MUSIC
STANDBY/ON
DVD/CD
MOVIE
TAPE
TUNER
LINE
VOLUME
PUSH OPEN
MIC VOL
MIN MAX
5
6
7
8
9
10
11
custom settings from the Sound Field
Control (page 39).
SOUND MODE
Accesses settings in the Sound menu,
such as the tone controls (page 39).
KARAOKE – Selects audio channels for
karaoke (page 38).
ENTER – Selects options or executes
commands.
3
X.BOOM
button
Press to switch on the bass boost (page 39).
4
TIMER
indicator
Lights when the timer has been set (page 40).
5
STANDBY/ON
Switches the player on or into standby.
6 Function select buttons
Selects the source you want to listen to.
7
VOLUME +/–
Adjusts the volume level.
8 Remote sensor
PUSH OPEN
9
Pressing down on this side on the cassette
door will open the tape deck.
10 Disc tray
11
MIC VOL
and MIC input jacks
Controls the volume of the karaoke mics
(MAIN and SUB) (page 38).
12
PHONES
jack
Headphone jack.
14
En
Page 15
Controls and displays
13
TUNING
and playback control buttons
The tuning/scan/skip buttons are used for
tuning into stations, skipping or scanning
tracks on discs or tapes. The playback control
buttons are used for playing, pausing and
stopping playback (
ejects the disc).
14 Tape cassette controls
REVERSE MODE
– Selects the playback
mode for tapes (page 34).
REC/STOP
– Starts/stops recording on the
tape deck (page 35).
ASES
– Press for CD-to-tape synchro
recording (page 35).
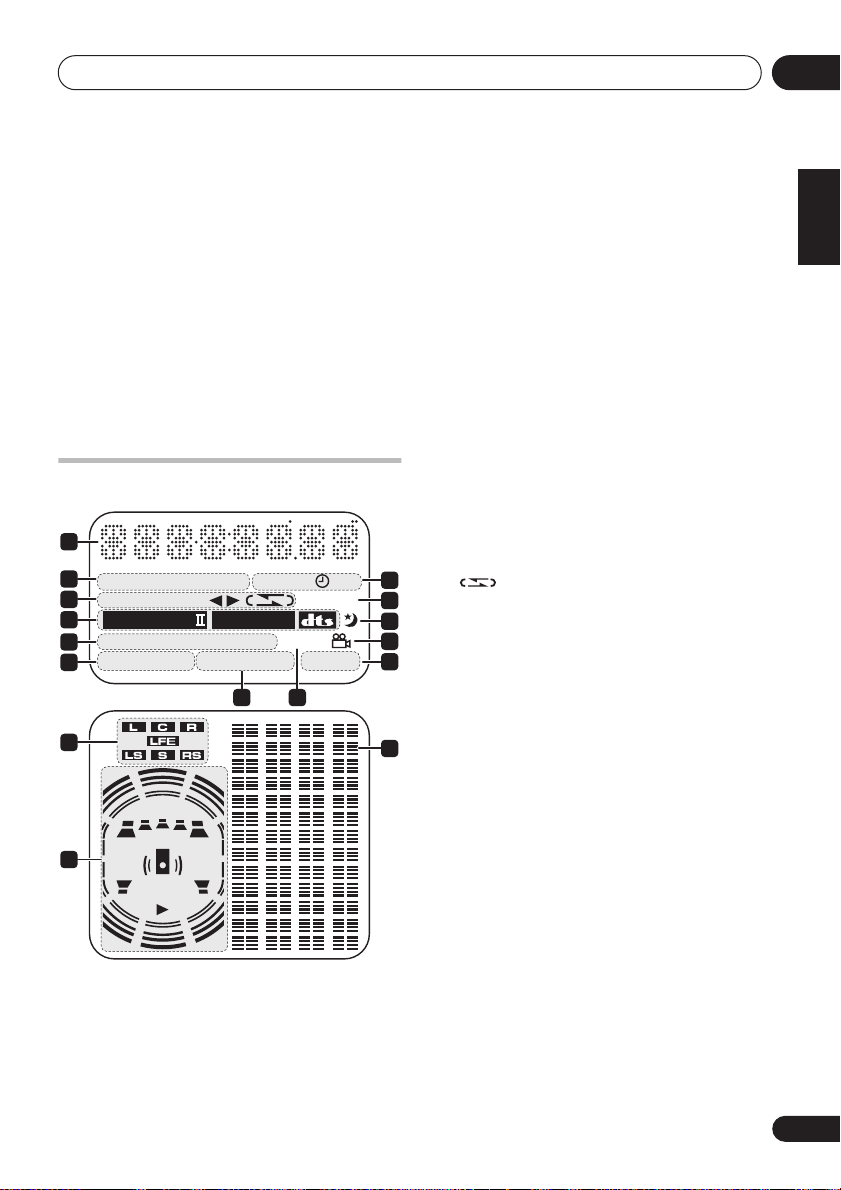
Display
1
2
ECHO
3
4
5
6
7
8
KEY KARAOKE L R WAKE–UP
B.CUT
ASES REC DIALOGUE
2
PRO LOGIC
MONO
STEREO TUNED 96kHz
ADV. SURR. SFC PGM RDM RPT–1 LINE REC
SUB
Wf
2
DIGITAL
9 10
1 Character display
2 Karaoke indicators
ECHO
– Lights when the Karaoke
effect is selected.
REC
ECHO
11
12
13
14
15
16
KEY
– Lights when the Karaoke pitch
control is selected.
KARAOKE
(Vocal cancel) – Vocals in the
backing track are partially eliminated using
EQ.
L
– Left channel only. Use for tracks that
have a vocal recorded in the right channel.
R
– Right channel only. Use for tracks that
have a vocal recorded in the left channel.
L R
– Use to put a single-channel vocal
track into the center of the mix.
3 Cassette deck indicators
B.CUT
– Lights when the beat cut mode
has been switched to
ASES REC
REC
– Lights during ASES recording.
– Lights when recording to the tape
B.CUT 2
.
deck.
– Indicates the direction of tape
playback.
– Indicates the reverse mode.
4 Format indicators
2 PRO LOGIC II
(EV700/1000 only) –
during Dolby Pro Logic II decoding.
2 DIGITAL
– Lights during playback of a
Dolby Digital signal.
DTS
– Lights during playback of a DTS
source.
5
Tuner indicators
MONO
– Lights when FM mono reception
is selected.
STEREO
– Lights when a stereo FM
broadcast is being received in auto stereo.
mode
TUNED
– Lights when a broadcast is being
received.
6 DSP indicators
ADV.SURR.
(EV700/1000 only)
Lights when one of the Advanced or Front
Surround listening modes is selected.
SFC
(EV500 only)
Lights when one of the Sound Field Control
listening modes is selected.
Lights
03
English
Deutsch
Français
Italiano
Nederlands
Español
15
En
Page 16
Controls and displays03
7 Channel indicators
(EV700/1000 only)
These will light according to which channels
are encoded on the Dolby Digital or DTS
multichannel disc currently in the player.
LFE
lights when the disc has an LFE channel.
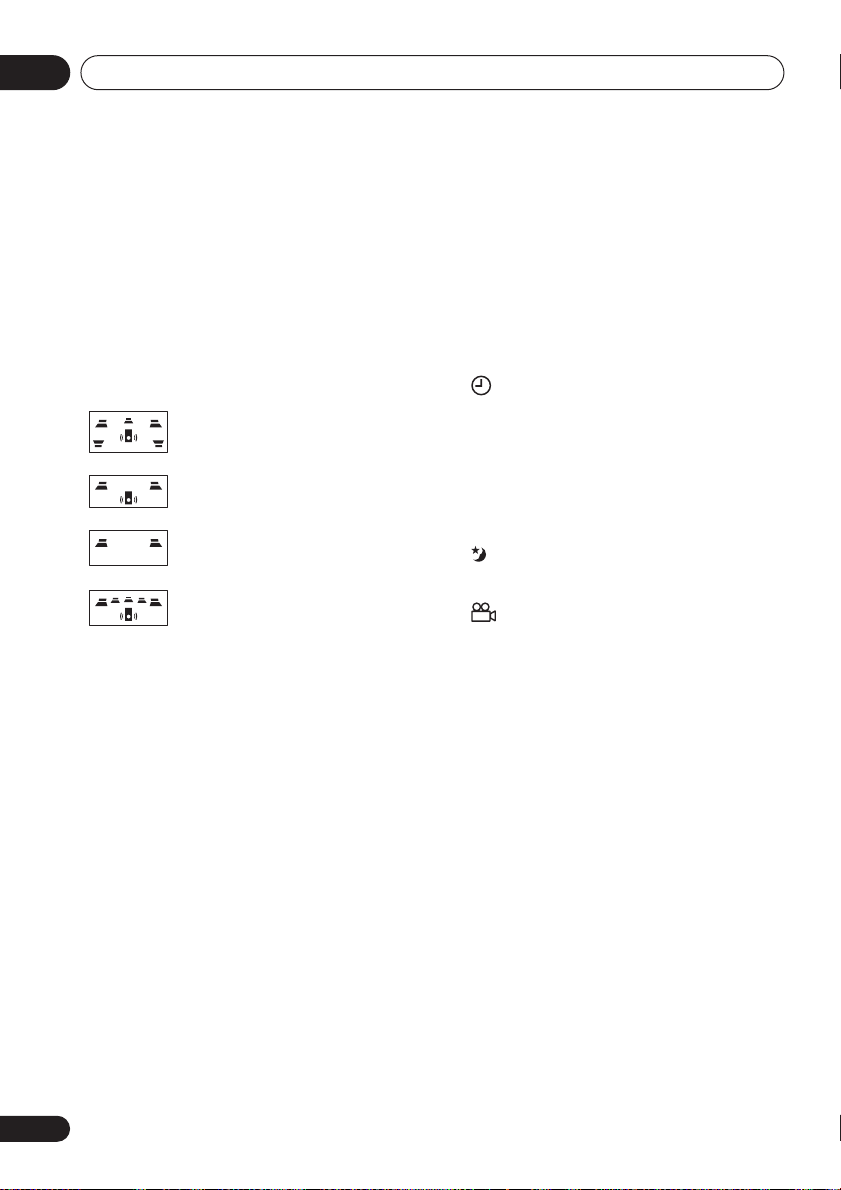
8 Speaker and playback indicators
The playback indicator () lights during playback,
and
the speaker indicators
(EV700/1000 only)
show which speakers are being used to output
the current source. The illustrations below
show some example displays.
5.1 channel surround sound
SUB Wf
SUB Wf
SUB Wf
Stereo (2.1 channel) sound
2 channel sound
5.1 channel surround sound
with the Front Surround mode
active
(When headphones are connected, none of the
speaker indicators are lit.)
9
Playback mode indicators
PGM
– Lights during program play
RDM
– Lights during random playback
RPT-1
–
RPT
lights during repeat play (
lights during repeat one-track play)
1
10 96 kHz
Lights when a 96kHz source is detected (may
not light if the source is copy–protected).
11 Timer indicators
WAKE-UP –
Lights when the wake-up
timer is set.
–
Lights when the wake-up timer is set
and flashes when it activates.
REC
– Lights when the record timer is set
and flashes when the timer starts
recording.
12 DIALOGUE
(EV700/1000 only)
Lights when Dialog Enhancement is on.
13
Lights when the sleep timer is active
14
Lights during multi-angle scenes on a DVD
15 LINE REC (EV700/1000 only)
Lights when the line recording mode is
switched on (see
Using the Sound menu
page 27).
16 Level meter
RPT-
on
16
En
Page 17
Controls and displays
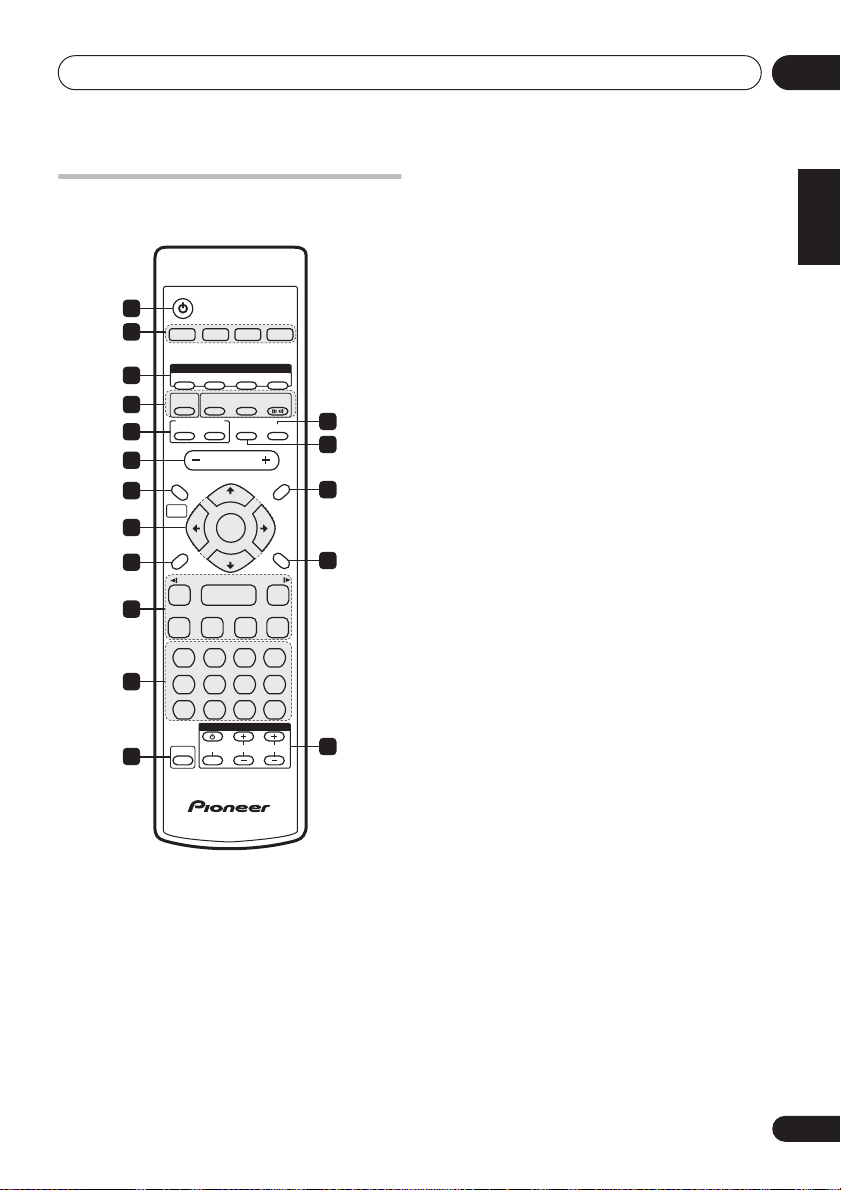
Remote control
Illustration shows the EV700/1000 model
STANDBY/ON
1
2
DVD/CD TAPE FM/AM LINE
DVD
AUDIO
SUBTITLE
—
KEYCON —
SURROUND
ECHO
8
REPEAT
MONO
CH LEVEL
INPUT
DSP
i
VOLUME
TUNE +
ENTER
TUNE –
3
3
3
TV CONTROL
ANGLE ZOOM
ADVANCED
DISPLAY MUTE
ST +ST –
7
RANDOM
TIMER
CHANNEL VOLUME
FRONT
SURROUND
TOP MENU
DVD MENU
RETURN
E/
¡
¢
CLEAR
ENTER
13
14
15
16
17
3
X.BOOM
4
I
KARAOKE
5
6
SYSTEM SETUP
7
HOME
MENU
8
SOUND
MODE
9
/e
1
10
4
PROGRAM
123
ST.MEMORY
11
456
TEST TONE
7890
SHIFT
12
1
STANDBY/ON
Switches the player on or into standby.
2 Input source function select
Selects the source you want to listen to.
3 DVD control buttons
AUDIO
– Selects the audio channel or
language (page 33).
SUBTITLE
– Selects a subtitle display
(page 33).
ANGLE
– Changes the camera angle
during DVD multi-angle scene playback
(page 33).
ZOOM
– Changes the zoom level
(page 33).
4 Sound Field / DSP buttons
X.BOOM
– Switches the bass boost on or
off (page 39).
SFC / SOUND FIELD
(EV500 only)
Selects sound modes or custom settings
from the Sound Field Control (page 39).
SURROUND (EV700/1000 only) –
Selects a
surround listening mode (page 25)
ADVANCED (EV700/1000 only) –
Selects an
advanced listening mode (page 26)
FRONT SURROUND
(EV700/1000 only) –
Switches on the Front Surround mode
(page 26).
5 KARAOKE controls
KARAOKE
– Selects audio channels for
karaoke (page 38).
ECHO
– Changes the echo level on the
karaoke mics (page 38).
KEY CONTROL
– Lowers/raises the pitch
of the backing track (page 38).
6 VOLUME
Adjusts the volume level.
7
HOME MENU
Press to display (or exit) the on-screen
menu for Initial Settings, Play Mode
functions, etc.
SYSTEM SETUP (SHIFT+HOME MENU
Use to make various system and surround
sound settings (page 48 and (
) page 24). Also used when
only
EV700/1000
automatically saving station presets when
using the tuner (page 37).
8
ENTER
, TUNE & cursor control buttons
Navigates on-screen displays and menus.
ENTER
selects an option or executes a
command.
03
English
Deutsch
Français
Italiano
Nederlands
Español
)
17
En
Page 18

Controls and displays03
9 SOUND MODE
Accesses settings in the Sound menu, such as
the tone controls (page 39).
10 Playback controls
– Starts/resumes playback
and
/
– Use for reverse slow
motion playback, frame reverse and
reverse scanning
and / – Use for forward slow
motion playback, frame advance and
forward scanning
– Jumps to the next chapter or track
– Jumps to the beginning of the
current chapter or track, then to previous
chapters/tracks
– Pauses playback; press again to restart
– Stops playback
11 Number buttons and SHIFT functions
The number buttons can be used for selecting
tracks directly, the functions above the buttons
SHIFT
are accessed by pressing
at the same
time as the button.
PROGRAM (SHIFT+1
) – Use to program/
play a program list (page 31).
REPEAT (SHIFT+2
) – Selects a repeat play
mode (page 30).
RANDOM (SHIFT+3
) – Selects a random
play mode (page 31).
ST.MEMORY (SHIFT+4) –
Use for saving
and listening to station presets (page 37).
MONO (SHIFT+5) –
Press to listen to a
stereo FM broadcast in mono (page 22).
TIMER (SHIFT+6) –
Use for setting and
checking the clock (page 19) and the
timers (page 40).
TEST TONE (SHIFT+7) (EV700/1000 only) –
Press to output the test tone for speaker
setup (page 23).
CH LEVEL (SHIFT+8) (EV700/1000 only) –
Use to adjust the speaker level (page 23).
CLEAR
– Clears an entry
ENTER
– Selects menu options, etc. (works
exactly the same as the ENTER button in 8
above)
12 SHIFT
Press to access the functions/commands
written in green on the remote
13
MUTE
Mutes the volume (page 39).
14
DISPLAY
Switches between information displays
(page 33).
15
TOP MENU
Displays the top menu of a DVD disc.
DVD MENU
Displays the DVD menu (for Video CD/
Super VCDs, DivX video and WMA/MP3/
JPEG discs, the Disc Navigator screen
appears).
16
RETURN
Press to return to a previous menu screen.
17 TV CONTROL
1
– Switches the TV on or into standby
INPUT – Switches the TV input
CHANNEL +/– – Selects channels
VOLUME +/– – Adjusts the TV volume
Note
1 Refer to Setting up the remote to control your TV on page 19 to use these controls with your TV.
18
En
Page 19
Getting started
3
04
Chapter 4
Getting started
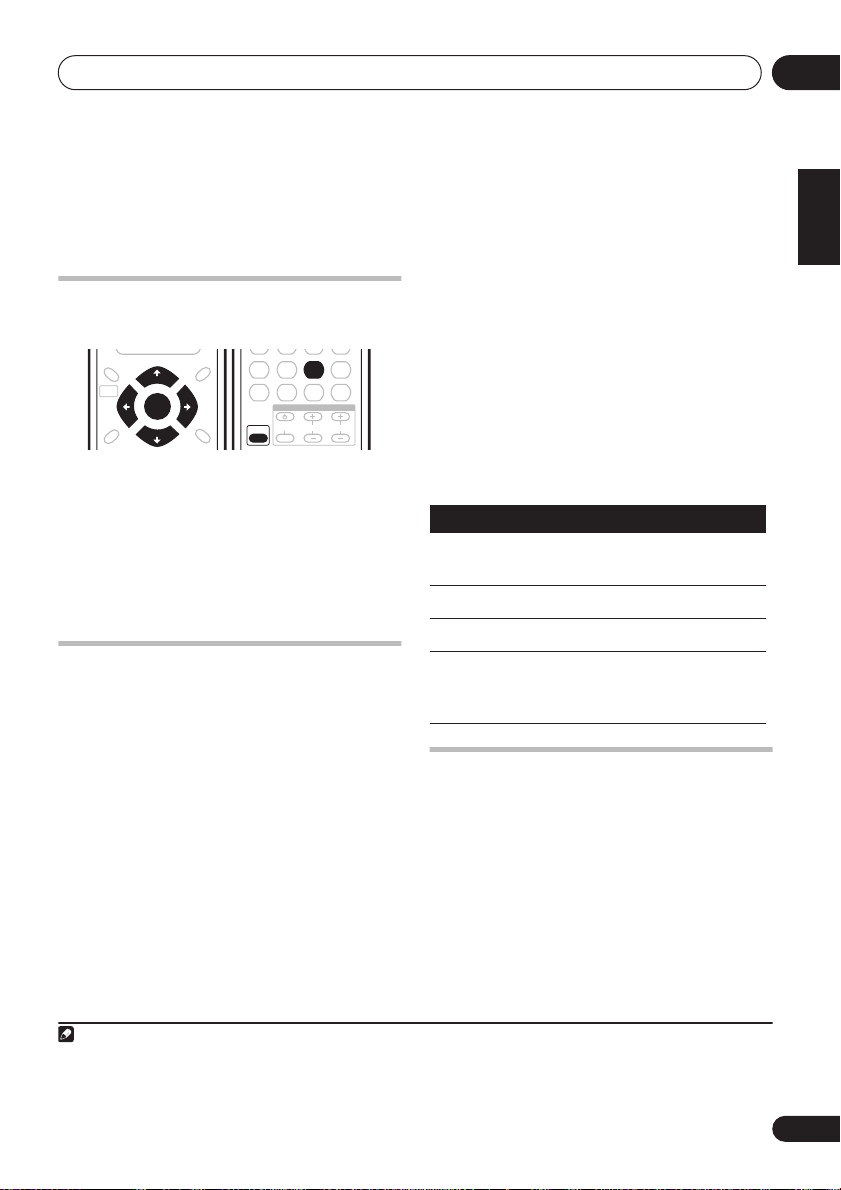
3 Point the remote at your TV, hold down
Setting the clock
Setting the clock allows you to use the timer.
ST.MEMORY
MONO
SYSTEM SETUP
HOME
MENU
SOUND
MODE
1 Press
TUNE +
ENTER
TUNE –
TIMER
TOP MENU
DVD MENU
ST +ST –
RETURN
(SHIFT+6).
TIMER
CH LEVEL
INPUT
ENTER
TV CONTROL
CHANNEL VOLUME
456
TEST TONE
7890
SHIFT
2 If ‘CLK ADJ?’ isn’t in the display, select it
or , then press
with
3 Use
4 Use
ENTER
/
/
to confirm.
to set the hour. Press
to set the minute then press
ENTER
.
ENTER
Setting up the remote to control
your TV
You can set up the supplied remote to control
your TV using the
TV CONTROL
buttons.
1 Switch on your TV.
2 Find the name of the manufacturer of
your TV in the Preset Code List on page 60.
Next to each manufacturer is one or more
three digit codes. These tell the remote what
kind of TV you have.
If the name of the manufacturer of your TV
does not appear in the table, you won’t be able
to set up this remote to control your TV.
2
the CLEAR button, then enter the three
digit code for your TV.
1
The remote transmits an on/off signal to the TV.
If you’ve entered the correct code, your TV
should switch off.
If your TV doesn’t turn off, repeat the procedure
using the next code in the list until your TV
switches off successfully. Once set, you can
then use the individual TV controls shown
below.
Button
.
CHANNEL +/–
VOLUME
INPUT
Using the on-screen displays
For ease of use, this system makes extensive
use of graphical on-screen displays (OSDs).
All the screens are navigated in basically the
same way, using the cursor buttons (
pressing
What it does
Switches your TV on or into
standby.
Changes the TV channel.
Adjusts the volume.
Switches the TV’s input
between the built in TV tuner
and an external video source.
, ,
) to change the highlighted item and
ENTER
to select it.
3
English
Deutsch
Français
Italiano
Nederlands
Español
,
Note
1 The default setting is 12-hour format. See
2• The default setting is for a Pioneer TV.
• Note that there are also cases where the codes listed for a manufacturer in the Preset Code List may not work for your TV.
3 The screen saver will appear after five minutes of inactivity.
Optional system settings
on page 48 to change it.
19
En
Page 20

Getting started04
Important
• Throughout this manual, ‘Select’ means
use the cursor buttons to highlight an item
on-screen, then press
Button
HOME
What it does
Displays/exits the on-screen display
ENTER
.
MENU
ENTER
RETURN
Changes the highlighted menu item
Selects the highlighted menu item
Returns to the main menu without
saving changes
Tip
• The button guide at the bottom of every
OSD screen shows you which buttons
you’ll need to use for that screen.
Playing discs
The basic playback controls for playing DVD,
CD, Video CD/Super VCD, DivX video and MP3/
WMA discs are covered here. Further functions
are detailed in chapter 7.
1 If the player isn’t already on, switch it on.
If you’re playing a DVD, Video CD/Super VCD or
DivX video, also turn on your TV and make sure
that it is set to the correct video input.
2 Press on the front panel to load a disc.
Load a disc with the label side facing up, using
the disc tray guide to align the disc (if you’re
loading a double-sided DVD disc, load it with
the side you want to play face down).
3 Press (play) to start playback.
If you’re playing a DVD or Video CD/Super VCD,
a menu may appear. See
menus
on page 21 and
PBC menus
on page 21 to navigate these.
DVD-Video disc
Video CD/Super VCD
If you’re playing a DivX video or WMA/MP3
disc, it may take a few seconds before playing.
If you loaded a CD/CD-R/RW containing
JPEGs, a slideshow will start. See
JPEG slideshow
on page 28 for more on this.
Playing a
• If a disc contains a mixture of DivX video
and other media file types (MP3, for
example), first select whether to play the
DivX video files (
file types (
MP3
DivX
) or the other media
/
WMA / JPEG
) from the on-
screen display.
4 Adjust the volume.
Use the
VOLUME +/–
control.
Basic playback controls
The following table shows the basic controls on
the remote for playing discs
other playback features in the chapter 7.
Button
What it does
Starts/resumes normal playback.
•
If the display shows
LAST MEM
resume or last memory point (see
Resume and Last Memory
Pauses/unpauses a disc.
Stops playback or cancels the resume
function (if the display shows
Press to start fast reverse scanning.
Press to start fast forward scanning.
Skips to the start of the current track or
chapter, then previous tracks/chapters.
Skips to the next track or chapter.
1
. You can find
RESUME
playback starts from the
or
below).
RESUME
).
Note
1 You may find with some DVD discs that some playback controls don’t work in certain parts of the disc.
20
En
Page 21

Getting started
04
Button
Numbers
What it does
Use to enter a title/chapter/track
number. Press
• If the disc is stopped, playback starts
from the selected title (for DVD) or
track (for CD/Video CD/Super VCD).
• If the disc is playing, playback jumps
to the start of the selected title (VR
mode DVD-RW), chapter (DVD-Video)
or track (CD/Video CD/Super VCD).
ENTER
to select.
Button
ENTER
RETURN
Numbers
Video CD/Super VCD PBC menus
What it does
Selects the current menu option.
Returns to the previously
displayed menu screen.
Highlights a numbered menu
option (some discs only). Press
to select.
ENTER
Some Video CD/Super VCDs have menus from
Resume and Last Memory
When you stop playback of a disc,
shows in the display indicating that you can
resume playback from that point.
With DVDs and Video CD/Super VCDs, even if
ejected, the play position is stored in memory.
The next time you load the disc, the display
shows
LAST MEM
and you can resume
playback.
If you want to clear the resume point, press
(stop) while
RESUME
is displayed.
RESUME
DVD-Video disc menus
Many DVD-Video discs contain menus from
which you can select what you want to watch.
Sometimes DVD-Video menus are displayed
which you can choose what you want to watch.
These are PBC (Playback control) menus.
You can play a PBC Video CD/Super VCD
without having to navigate the PBC menu by
starting playback using a number button to
select a track, rather than the
1
Button
RETURN
Numbers
What it does
Displays the PBC menu.
Selects numbered menu options.
Press
ENTER
to select.
Displays the previous menu page
(if there is one).
Displays the next menu page (if
there is one).
automatically when you start playback; others
only appear when you press
TOP MENU (SHIFT+DVD MENU
Button
TOP MENU
(
SHIFT+DVD
MENU
DVD
MENU
Note
1• The Last Memory function may not work with some discs.
• For DVD-Video discs (except VR mode DVD-RW), the player stores the play position of the last five discs.
What it does
Displays the ‘top menu’ of a DVD
disc—this varies with the disc.
)
Displays a DVD disc menu—this
varies with the disc and may be
the same as the ‘top menu’.
Moves the cursor around the
screen.
DVD MENU
).
or
Listening to the radio
The tuner can receive both FM and AM
broadcasts, and lets you memorize your
favorite stations so you don’t have to manually
tune in every time you want to listen (see
tuner features
1 Press
press repeatedly to select the AM or FM band.
The display shows the band and frequency.
2 Tune to a frequency.
There are three tuning modes—manual, auto,
and high-speed:
on page 37 for more on this).
FM/AM
to switch to the tuner, then
(play) button.
English
Deutsch
Français
Italiano
Nederlands
Español
More
21
En
Page 22

Getting started04
•
Manual tuning
repeatedly to change the displayed
frequency.
•
Auto tuning
until the frequency display starts to move,
then release. The tuner will stop on the next
station it finds. Repeat to keep searching.
•
High-speed tuning
+/–
until the frequency display starts to
move rapidly. Keep the button held down
until you reach the frequency you want. If
necessary, fine tune the frequency using
the manual tuning method.
Improving FM stereo sound
If you’re listening to an FM station in stereo but
the reception is weak, you can improve the
sound quality by switching to mono.
• Press
MONO?’ then press
The
in mono reception mode.
Select
stereo mode (the
when receiving a stereo broadcast).
MONO (SHIFT
MONO
indicator lights when the tuner is
FM AUTO?
: Press
TUNE +/–
: Press and hold
: Press and hold
+5) to choose ‘FM
ENTER
.
above to switch back to auto-
STEREO
indicator lights
TUNE +/–
TUNE
Tip
• If an auxiliary source is producing
unpleasant distortion from the speakers,
you can reduce the signal level by
switching on the attenuator. See
system settings
on page 48 to do this.
Optional
Listening to other sources
You can connect an external source for
playback through this system’s speakers. See
Connecting auxiliary components
for more on this.
1 Make sure that the external source (TV,
MD player, etc.) is switched on.
2 Press
to the rear panel LINE input.
3 If necessary, start playback of the source.
LINE
to select the source connected
22
En
on page 12
Page 23

Setting up for surround sound
05
Chapter 5
Setting up for surround sound
EV700/1000 model only
Home theater sound setup
Depending on the size and characteristics of
your room, you can place your speakers in one
of two ways using this system:
•
Standard surround 5-spot setup
a standard multichannel surround sound
speaker setup for optimal 5.1 channel
home theater sound.
Center
Front left
Listening position
Surround
left
•
Front surround 3-spot setup
is ideal when rear surround speaker
placement isn't possible or you want to
avoid running long speaker cables in your
listening area. Use this setup together with
the Front Surround modes to take
advantage of wall and ceiling reflections
for a very realistic surround effect.
left
Surround
left
Center
Listening position
Front
Subwoofer
Subwoofer
Surround
1
Front right
right
– This is
Surround
right
– This setup
Front
right
After placing your speakers, complete
the channel levels
distance setting
then refer to
on the next page to complete
your surround sound setup.
Setting the channel levels
Set the relative channel levels from your main
listening position.
1 Press
TEST TONE (SHIFT
The test tone is output in the following order
(from the speakers active in the current
listening mode):
•
L
– Front left speaker
•
C
– Center speaker
R
– Front right speaker
•
•
RS
– Surround right speaker
LS
– Surround left speaker
•
•
SW
– Subwoofer
2 Use the VOLUME +/– button to adjust
the volume to an appropriate level.
3 Use the
speaker levels in turn.
You should hear the test tone at the same
volume from each speaker when seated in the
main listening position. The channel level
range is ± 10 dB.
4 When you’re done, press TEST TONE to
exit test tone setup.
2
+7).
3
/
buttons to adjust the
Setting
Speaker
English
Deutsch
Français
Italiano
Nederlands
Español
Note
1 See
About the listening modes
2• Make sure headphones are unplugged.
• The channel balance can be adjusted (independently for each listening mode) while listening to any sound source you want:
CH LEVEL (SHIFT+8
Press
3 Since the subwoofer produces ultra-low frequencies its sound may seem quieter than it actually is.
on page 25 for more on using the different listening modes with each speaker setup.
) then use
/
to select channels and
/
to adjust the level. Press
ENTER
when you’re finished.
23
En
Page 24

Setting up for surround sound05
Dynamic Range Control
Choosing your surround settings
To get the best possible surround sound from
your system, make the settings below. You
should only need to make these settings once
(unless you change the placement of your
speakers or wish to change settings for a
particular disc).
1 Press SYSTEM SETUP (SHIFT+HOME MENU).
2 Use
/
to choose the setting.
The current setting is shown for each option as
you cycle through the display. See below for a
full list and description of each.
3 Use
/
to adjust.
4 Repeat steps 2 and 3 for other settings.
ENTER
ENTER
to leave
, then use
to
0.3m
5 When you’re done, press
the System Setup menu.
System Setup menu options
Below are all the available settings in the setup
2
menu.
The first setting in each section is the
default. See also the notes in each section for
additional information about the settings.
Speaker distance setting
Specifies the distance from your listening
position to your speakers.
When
DIST.?
appears, press
/
to adjust the distance, and /
switch between the following speakers:
•
L
– Front left speaker
C
– Center speaker
•
R
– Front right speaker
•
•
RS
– Surround right speaker
LS
– Surround left speaker
•
SW
– Subwoofer
•
Each speaker can be adjusted between
~
9m
. The default setting is 3m.
Note
1 These settings can’t be changed when recording, or when the Line Recording feature is on (see
page 27).
2 If the tuner is selected, the auto preset feature also appears (see
3 This setting works only with Dolby Digital and some DTS soundtracks.
Specifies dynamic range adjustment to Dolby
Digital or DTS soundtracks:
•
DRC OFF
– No dynamic range adjustment
(use when listening at higher volume)
•
DRC MID
•
DRC HIGH
1
(loud sounds are reduced in volume while
quieter sounds are increased)
– Mid setting
– Dynamic range is reduced
LFE attenuator setting
Dolby Digital and DTS audio sources include
ultra-low bass tones. Set the LFE attenuator as
needed to prevent the ultra-low bass from
distorting the sound.
•
LFEATT 0
•
LFEATT 10
•
LFE Off
– No attenuation
– LFE channel attenuated 10dB
– LFE channel is not played
Subwoofer setting
You can switch between subwoofer settings to
provide extra bass or to hear the subwoofer
channel ‘as is’.
•
SW PLUS
– This provides extra bass when
listening to an audio source
•
SW AUTO
– The subwoofer channel is
heard without any additional processing.
DTS CD setting
If you play a DTS-encoded CD, you will need to
change this setting to hear the decoded signal.
When
use
/
•
NORM.CD
CD TYPE?
appears, press
to select the setting:
– Regular CD playback, DTS-
encoded CDs may output some noise
•
DTS-CD
– Proper decoding of DTSencoded CDs, but regular CD playback
may lose quality
Automatically saving station presets
3
ENTER
, then
Using the Sound menu
on page 37).
on
24
En
Page 25

Home theater sound
06
Chapter 6
Home theater sound
EV700/1000 model only
About the listening modes
As explained in
page 23, there are two basic surround speaker
setup options available. Of course you can
select any of the listening modes regardless of
how you place your speakers, but you will
achieve the best surround effect by using the
listening modes in conjunction with your
speaker setup:
•
Standard surround 5-spot setup
the Standard (
on page 25) and Advanced (
Advanced Surround
listening modes
Front surround 3-spot setup
•
Front Surround
available with this speaker setup.
Make sure you have completed
channel levels
surround sound setup, see
surround settings
Home theater sound setup
– Use
Listening in surround sound
Using
on page 26) surround
1
with this setup.
– See
Using
on page 26 for the options1
Setting the
on page 23. For a more detailed
Choosing your
on page 24.
Auto listening mode
The Auto listening mode is the simplest way to
listen to any source as it was mastered: the
output from the speakers mirrors the channels
in the source material.
DVD
AUDIO
SUBTITLE ANGLE ZOOM
DSP
ECHO
i
ADVANCED
DISPLAY MUTE
FRONT
SURROUND
X.BOOM
KARAOKE
SURROUND
—
KEYCON —
I
Listening in surround sound
on
You can listen to stereo or multichannel
sources in surround sound. Surround sound is
generated from stereo sources using one of
the Dolby Pro Logic decoding modes.
X.BOOM
KARAOKE
• Press
listening mode.
The choices that appear in the display will vary
according to the type of source that’s playing.
SURROUND
•
AUTO
– Auto listening mode (see above)
DOLBY DIGITAL
•
DTS decoding (depending on the source).
For a multichannel source, this will be the
same as
PROLOGIC
•
AUTO
(Dolby Pro Logic) – 4.1 channel
surround sound for use with any twochannel source
•
MOVIE
(Dolby Pro Logic II Movie) – Pro
Logic II 5.1 channel surround sound,
especially suited to movie sources (use
with any two-channel source)
•
MUSIC
(Dolby Pro Logic II Music) – Pro
Logic II 5.1 channel surround sound,
especially suited to music sources, for use
with any two-channel source
•
STEREO
– See
DVD
AUDIO
SUBTITLE ANGLE ZOOM
DSP
FRONT
SURROUND
SURROUND
ADVANCED
—
KEYCON —
I
i
DISPLAY MUTE
ECHO
repeatedly to select a
/
DTS
– Dolby Digital or
.
Listening in stereo
below
2
English
Deutsch
Français
Italiano
Nederlands
Español
• Press
SURROUND
to select the AUTO
listening mode.
Note
1 These listening modes do not work with 96kHz sources.
2 When listening in
Dolby Pro Logic II decoding.
DOLBY DIGITAL
/
DTS
mode, two-channel material will automatically be played in surround sound using
25
En
Page 26
Home theater sound06
Using Front Surround
The Front Surround modes are effective when
you are using the Front surround 3-spot
speaker setup as described in
sound setup
on page 23. The surround
speakers should be placed on top of the front
speakers and oriented (about 60º) towards the
walls (as a guide, line up the edge of the
speaker stand base with the front edge of the
speaker as shown below).
60º 60º
Left speaker Right speaker
You can adjust the amount of Front Surround
effect in
Using the Sound menu
AUDIO
SUBTITLE ANGLE ZOOM
X.BOOM
SURROUND
—
KEYCON —
I
i
ECHO
KARAOKE
• Press FRONT SURROUND to select an
Front Surround mode.
Press repeatedly to select from:
FRT MOVIE
•
– The Front Surround Movie
mode gives a movie theater-type sound.
•
FRT MUSIC
– The Front Surround Music
mode gives a concert hall-type sound.
•
EXT POWER
– The Extra Power mode gives
additional energy to stereo sources.
DVD
DSP
ADVANCED
DISPLAY MUTE
Home theater
on page 27.
FRONT
SURROUND
Listening in stereo
You can listen to any source—stereo or
multichannel—in stereo. When playing a
multichannel source, all channels are
downmixed to the front left/right speakers and
the subwoofer.
DVD
AUDIO
SUBTITLE ANGLE ZOOM
DSP
FRONT
SURROUND
ADVANCED
i
DISPLAY MUTE
ECHO
repeatedly until
• Press
X.BOOM
SURROUND
—
KEYCON —
I
KARAOKE
SURROUND
STEREO shows in the display.
Listening with headphones
When headphones are connected, only the
STEREO
mode is available.
1
Using Advanced Surround
The Advanced Surround modes can be used
with any multichannel or stereo source for a
variety of additional surround sound effects.
You can adjust the amount of effect applied in
Using the Sound menu
AUDIO
SUBTITLE ANGLE ZOOM
X.BOOM
SURROUND
—
KEYCON —
I
KARAOKE
on page 27.
DVD
DSP
SURROUND
ADVANCED
i
ECHO
DISPLAY MUTE
FRONT
• Press ADVANCED to select an Advanced
Surround mode.
Press repeatedly to select from:
•
ADV MOVIE
– Gives a movie theater-type
sound
ADV MUSIC
•
– Gives a concert hall-type
sound
EXPANDED
•
– Creates an extra wide
surround field
2
Note
1 When you disconnect them it reverts to the previous mode.
2 The Standard surround setup described in
26
En
Home theater sound setup
on page 23 should be used with these effects.
Page 27

Home theater sound
SYSTEM SETUP
TOP MENU
06
• TV SURR. – Designed for mono or stereo
TV broadcasts and other sources
• SPORTS – Designed for sports and other
programs based on commentary
• GAME – Creates surround sound from
video game sources
• 5 STEREO – Designed to give powerful
surround sound to stereo music sources
Using the Sound menu
There are several optional sound settings you
can make from the sound menu.
TUNE +
HOME
MENU
SOUND
MODE
1 Press
2 Use
SOUND MODE
/
to choose the setting you want
to adjust.
The current setting is shown for each option (in
the order shown in step 3, with the defaults in
bold) as you cycle through the display.
3 Use
/
to adjust.
Make adjustments to the following settings:
Setting What it does
Bass Adjusts the amount of bass. –4 to +4
Treble Adjusts the amount of treble. –4 to +4
Effect Sets the effect level for the
Dialog
Enhancement
(Press
ENTER in
step 2 to
access)
currently selected Advanced
or Front Surround mode (each
mode can be set separately).
Localizes dialog in the center
channel to make it stand out
from other background
sounds in a TV or movie
soundtrack.
DVD MENU
ST +ST –
ENTER
RETURN
TUNE –
.
Option(s)
10 to 90
OFF
MAX
MID
Setting What it does
Center
Width
Dimension
Panorama
Line
Recording
(Press
ENTER in
step 2 to
access)
a.Only available when listening to 2-channel sources in Dolby
Pro Logic II Music mode.
b.• When the Line Recording mode is on, most sound
features cannot be used. The display will briefly blink
RMODE ON if you try and use a prohibited function.
• This mode automatically switches off if you change the in-
put function (DVD/CD, TUNER, etc.) or switch the power off.
• When the Line Recording mode is off, audio from the an-
alog output may be interrupted, depending on the operation.
Provides a better blend of the
a
front speakers by spreading
the center channel between
the front right and left
speakers, making it sound
wider (higher settings) or
narrower (lower settings).
a
Adjusts the depth of the
surround sound balance from
front to back, making the
sound more distant (minus
settings), or more forward
(positive settings).
a
Extends the front stereo
image to include the surround
speakers for a ‘wraparound’
effect.
To record a surround-
b
compatible downmix (lefttotal/right-total, or Lt/Rt) of a
Dolby multichannel source
(such as a DVD) from the line
outputs of this system, switch
this feature on. This enables
improved playback with
systems that can provide
matrix-decoding (like Dolby
Pro Logic). Switch to OFF for a
simple stereo downmix (leftonly/right-only, or Lo/Ro,
which is suitable for playback
on a two-channel stereo
system or on headphones).
Option(s)
0 to 7
Default: 3
–3 to +3
Default: 0
OFF
ON
OFF
ON
4 Repeat steps 2 and 3 for other settings.
ENTER
5 When you’re done, press
to leave
the Sound menu.
English
Deutsch
Français
Italiano
Nederlands
Español
27
En
Page 28

Playing discs07
Chapter 7
Playing discs
Important
• Many of the functions covered in this
chapter apply to DVD discs, Video CDs/
Super VCDs, CDs, DivX video and WMA/
MP3/JPEG discs, although the exact
operation of some varies slightly with the
kind of disc loaded.
• Some DVDs restrict the use of some
functions (random or repeat, for example)
in some or all parts of the disc. This is not a
malfunction.
• When playing Video CD/Super VCDs, some
of the functions are not available during
PBC playback. If you want to use them,
start the disc playing using a number
button to select a track.
Scanning discs
You can fast-scan discs forward or backward at
various different speeds.
• During playback, press or to start
scanning.
Press repeatedly to increase the scanning
speed (shown on-screen).
• To resume playback, press
1
(play).
2
Playing in slow motion
You can play DVDs, Video CD/Super VCDs and
DivX video at four different forward slow
motion speeds. DVD discs can also be played
in reverse slow motion.
1 During playback, press (pause).
2 Press and hold
motion playback starts.
Press repeatedly to change the slow motion
speed (shown on-screen).
• To resume playback, press
or until slow
(play).
2
Frame advance/frame reverse
You can advance or back up DVD discs frameby-frame. With Video CD/Super VCDs and DivX
video you can only use frame advance.
1 During playback, press (pause).
2 Press
frame at a time.
• To resume playback, press (play).
or to reverse or advance a
2
Playing a JPEG slideshow
After loading a CD/CD-R/RW containing JPEG
pictures, press
first folder/picture on the disc.
displays the pictures in each folder in alphabetical order.
Pictures are automatically adjusted so that
they fill as much of the screen as possible.
While the slideshow is running:
Button What it does
to start a slideshow from the
Pauses the slideshow; press
again to restart.
Displays the previous picture.
3
The player
Note
1 Only one speed is available for DivX video discs.
2• Depending on the disc, normal playback may automatically resume when a new chapter is reached on a DVD disc.
• With Video CD/Super VCDs in PBC mode or a WMA/MP3 track, playback automatically resumes at the end or beginning of
the track.
3• The time it takes for the player to load a file increases with large file sizes.
28
En
Page 29
Playing discs
Button
///
ZOOM
DVD
MENU
What it does
Displays the next picture.
Pauses the slideshow and
rotates/flips the displayed
picture. (Press (play) to restart
slideshow).
Pauses the slideshow and zooms
the picture. Press again to toggle
between 1x, 2x and 4x zoom.
(Press (play) to restart
slideshow).
Displays the Disc Navigator
screen (see below).
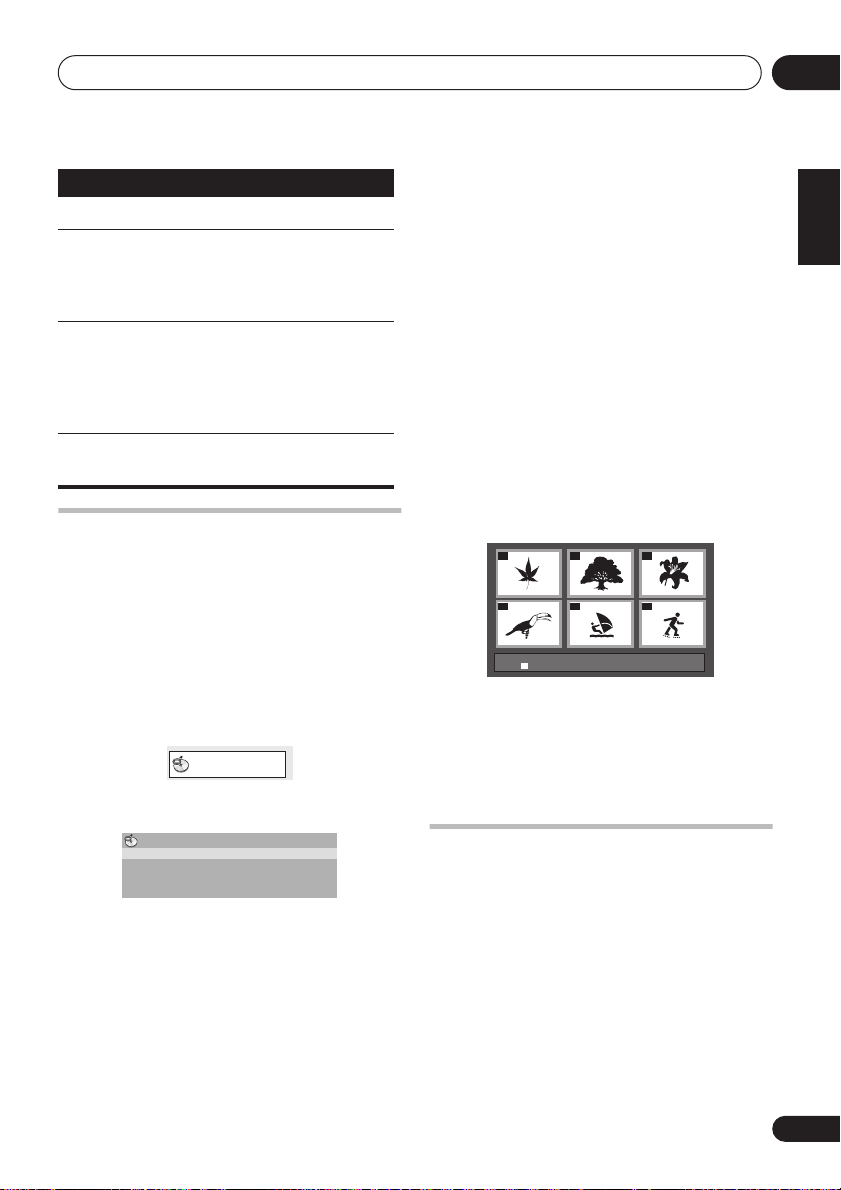
Browsing DVD or Video CD/
Super VCD discs with the Disc
Navigator
Use the Disc Navigator to browse through the
contents of a DVD or Video CD/Super VCD disc
to find the part you want to play.
1 During playback, press HOME MENU
and select ‘Disc Navigator’ from the onscreen menu.
Disc Navigator
2 Select a view option.
Time
– Thumbnails from a Video CD/Super
•
VCD disc at 10 minute intervals.
•
Original: Title
– Original titles from a VR
mode DVD-RW disc.
•
Playlist: Title
– Playlist titles from a VR
mode DVD-RW disc.
•
Original: Time
– Thumbnails from the
Original content at 10 minute intervals.
•
Playlist: Time
– Thumbnails from the
Playlist at 10 minute intervals.
The screen shows up to six moving thumbnail
images displayed one after another. To display
the previous/next six thumbnails, press
.
/
3 Select the thumbnail image for what
you want to play.
01
04
Disc Navigator: Title
01- 49: - -
You can use either the cursor buttons (
/
) and
02
05
ENTER
to select a thumbnail, or the
03
06
//
number buttons.
To select using the number buttons, enter a
two-digit number then press
ENTER
.
07
English
Deutsch
Français
Italiano
Nederlands
Español
Disc Navigator
Title
Chapter
The options available depend on the kind of
disc loaded and whether the disc is playing or
not, but include:
•
Title
– Titles from a DVD-Video disc.
Chapter
•
– Chapters from the current title
of a DVD-Video disc.
•
Track
– Tracks from a Video CD/Super VCD
disc.
Browsing WMA, MP3, DivX video
and JPEG files with the Disc
Navigator
Use the Disc Navigator to find a particular file
or folder by filename.
29
En
Page 30

Playing discs07
1 Press HOME MENU and select ‘Disc
Navigator’ from the on-screen menu.
00:00/ 00:00 0kbps
Folder1
Folder2
Folder3
Folder4
2 Use the cursor buttons (
///
)
and ENTER to navigate.
Use the cursor up/down buttons (
/
) to
move up and down the folder/file list.
Use the cursor left button (
parent folder.
Use
ENTER
1
or cursor right () to open a
) to return to the
highlighted folder.
• When a JPEG file is highlighted, a
thumbnail image is displayed on the right.
00:00/ 00:00 0kbps
Folder2
File1
File2
File3
File4
File5
3 To play the highlighted track or DivX
video file or display the highlighted JPEG
file, press ENTER.
• When a WMA/MP3 or DivX video file is
selected, playback begins from that file,
and continues until the end of the folder.
• When a JPEG file is selected, a slideshow
begins, starting with that file, and
continues to the end of the folder.
Tip
• To play the contents of the whole disc
rather than just the current folder, exit the
Disc Navigator and start playback using
the
(play) button.
Looping a section of a disc
The A-B Repeat function allows you to specify
two points (A and B) within a track (CD, Video
CD/Super Video CD) or title (DVD) that form a
loop which is played over and over.
1 During playback, press
select ‘
Play Mode
’.
2 Select ‘A-B Repeat’.
3 Press
ENTER
on ‘A(Start Point)’ to set the
HOME MENU
2
and
loop start point.
4 Press
ENTER
on ‘B(End Point)’ to set the
loop end point.
After pressing
ENTER
, playback jumps back to
the start point and plays the loop.
5 To resume normal playback, select ‘Off’.
Using repeat play
In addition to various repeat play options, it’s
also possible to use repeat play together with
program play (see
page 31).
1 During playback, press
select ‘
Play Mode
2 Select ‘Repeat’ then select a repeat play
3
option.
If program play is active, select
Repeat
to repeat the program list, or
Off
to cancel.
Creating a program list
HOME MENU
’.
Program
Repeat
on
and
Note
1 You can also do this by going to the ‘..’ folder at the top, then pressing
2 You can’t use repeat play with WMA/MP3 discs.
3 You can’t use A-B Repeat play with WMA/MP3 or DivX video discs.
30
En
ENTER
.
Page 31

Playing discs
07
• For DVD discs, select
Chapter Repeat
• For CDs and Video CD/Super VCDs, select
Disc Repeat, Track Repeat
• For DivX video discs, select
(or
Repeat Off
Tip
• You can also use the
button on the remote to select a repeat play
option. The repeat modes available are the
same as those from the
Using random play
Use this function to play titles or chapters
(DVD-Video) or tracks (CD and Video CD/Super
VCD) in a random order.
1 During playback, press
select ‘
Play Mode
2 Select ‘Random’ then select an option.
• For DVD discs, select
Random Chapter
• For CDs and Video CD/Super VCDs, select
On
or
Off
to switch random play on or off.
Tip
• Use the following controls during random
play:
Button
Note
1• You can set the random play option when a disc is playing or stopped. However, you can't use random play together with
program.
• You can’t use random play with VR format DVD-RW discs, WMA/MP3 discs, DivX video discs, or while a DVD disc menu is
being displayed.
2 You can’t use Program play with VR format DVD-RW discs, WMA/MP3 discs, DivX video discs, or while a DVD disc menu is
being displayed.
What it does
Selects a new track/title/chapter
at random.
Title Repeat
or
Repeat Off
).
REPEAT (SHIFT+2
Play Mode
1
HOME MENU
’.
Random Title
or
Random Off
,
.
or
Repeat Off
Repeat Title
menu.
,
.
)
and
Button
.
• You can also use the
button on the remote to select a random
play mode. The random modes available
are the same as when choosing from the
Play Mode
random play.
• Random play remains in effect until you
select
menu options.
What it does
Returns to the beginning of the
current track/title/chapter;
further presses select another
random track/title/chapter.
RANDOM (SHIFT+3
menu. Press
Random Off
ENTER
from the random play
to start
Creating a program list
This feature lets you program the play order of
titles/chapters/tracks on a disc.
Using the OSD
1 During playback, press
select ‘
Play Mode
2 Select ‘Program’ then select ‘Create/Edit’
from the list of program options.
3 Use the cursor buttons and
select a title, chapter or track for the current
step in the program list.
For a DVD disc, you can add a title or a chapter.
• For a CD or Video CD/Super VCD, select a
track to add to the program list.
After pressing
chapter/track, the step number automatically
moves down one.
4 Repeat step 3 to build up a program list.
A program list can contain up to 24 steps.
’.
ENTER
to select the title/
2
HOME MENU
ENTER
and
to
)
English
Deutsch
Français
Italiano
Nederlands
Español
31
En
Page 32

Playing discs07
• You can insert steps by just highlighting
the position where you want the new step
to appear and entering a title/chapter/track
number.
• To delete a step, highlight it and press
CLEAR
.
5 To play the program list, press (play).
Program play remains active until you turn off
program play (see below), erase the program
list (see below), eject the disc or switch off.
Tip
• Use the following controls during program
play:
Button What it does
HOME
MENU
Save the program list and exit
without starting playback.
Skip to the next step in the
program list.
Other functions available from the
program menu
There are a number of other options in the
program menu in addition to Create/Edit.
•
Playback Start
saved program list
•
Playback Stop
but does not erase the program list
•
Program Delete
and turns off program play
– Starts playback of a
– Turns off program play,
– Erases the program list
Using the front panel display
Even though the OSD is available for CDs, the
front panel display provides information to
make a program list easily. If a disc is playing,
stop it first.
1 Press
You’re prompted to enter a track for the first
step in the program list.
PROGRAM
(SHIFT+1).
2 Use the number buttons to select a track,
then press
If you make a mistake, press
the last (most recently) programmed track.
3 Repeat step 2 to build up a program list.
A program list can contain up to 24 steps.
4 To play the program list, press (play).
• Program play remains active until you
ENTER
.
CLEAR
to delete
press
(stop), clear the playlist (see tip
above), eject the disc or switch off the
player.
Searching a disc
You can search DVD discs by title or chapter
number, or by time; CDs and Video CD/Super
VCDs by track number or time; DivX video discs
by time.
1 Press
Mode
2 Select ‘Search Mode’.
The search options that appear depend on the
kind of disc loaded.
3 Select a search mode.
• The disc must be playing in order to use
4 Use the number buttons to enter a title,
chapter or track number, or a time.
• For a time search, enter the number of
5 Press
HOME MENU
’.
time search.
minutes and seconds into the currently
playing title (DVD/ DivX video) or track (CD/
Video CD/Super VCD) you want playback to
resume from. For example, press
to have playback start from 45 minutes into
the disc. For 1 hour, 20 minutes and 30
seconds, press
ENTER
and select ‘
8, 0, 3, 0
to start playback.
.
Play
4, 5, 0, 0
32
En
Page 33

Playing discs
07
Switching subtitles
Some DVD discs and DivX video discs have
subtitles in one or more languages; the disc
box will usually tell you which subtitle
languages are available. You can switch
subtitle language during playback.
• Press
SUBTITLE
repeatedly to select a
1
subtitle option.
• To set subtitle preferences, see
settings
on page 45.
Displaying DivX subtitle files
• See
Language
on
page 50 for more on DivX subtitles.
Switching language / audio
channels
When playing discs recorded with dialog in two
or more languages, or with dual-mono audio
you can switch these during playback.
• Press
AUDIO
repeatedly to select an
audio language option.
• To set audio language preferences, see
Language settings
on page 45.
2
3
Zooming the screen
Using the zoom feature you can magnify a part
of the screen by a factor of 2 or 4, while
watching a DVD, DivX video title or Video CD/
Super VCD or playing a JPEG disc.
1 During playback, use the
select the zoom factor (Normal, 2x or 4x).
ZOOM
button to
2 Use the cursor buttons to change the
zoomed area.
You can change the zoom factor and the
zoomed area freely during playback.
4
Switching camera angles
Some DVD discs feature scenes shot from two
or more angles—check the disc box for details.
When a multi-angle scene is playing, a
icon appears on screen (this can be switched
off if you prefer—see
Display settings
page 45).
• During playback (or when paused), press
ANGLE
to switch angle.
Displaying disc information
Various track, chapter and title information
can be displayed on-screen during playback.
• To show/switch/hide the information
displayed, press
Limited disc information also appears in the
front panel display. Press
the displayed information.
DISPLAY
repeatedly.
DISPLAY
to change
on
English
Deutsch
Français
Italiano
Nederlands
Español
Note
1 Some discs only allow you to change subtitle language from the disc menu. Press
2 Some Super VCDs have two soundtracks. With these discs you can switch between the two soundtracks as well as individual
channels in each.
3 Some discs only allow you to change audio language from the disc menu. Press
4• Since DVD, Video CD/Super VCD, DivX video title and JPEG pictures have a fixed resolution, picture quality will deteriorate,
especially at 4x zoom. This is not a malfunction.
• If the navigation square at the top of the screen disappears, press
ZOOM
TOP MENU
TOP MENU
again to display it.
or
DVD MENU
or
DVD MENU
to access.
to access.
33
En
Page 34

Using the tape deck08
Chapter 8
Using the tape deck
Playing cassette tapes
This unit has a tape deck that can be used for
both recording and playback. In addition, it
features automatic music search (AMS) and
auto-reverse functions
recordings
below for more features.
1 Push down on the cassette door where
indicated to open it and insert a tape.
2 Close the cassette door.
3 Press REVERSE MODE (front panel only) to
select the reverse mode.
Press repeatedly to choose between:
– Single side playback
•
•
– Auto-reverse playback: stops after
finishing playback in the ‘reverse’ (
direction
•
– Continuous playback (up to 16
complete plays)
4 Press TAPE to start playback.
You can also press (remote) or (front
panel) to start playback when
The side of the tape you’ll hear is whichever is
face up when you load it. This is the ‘forward’
) direction, while the other side is ‘reverse’
(
). The direction indicator is shown in the
(
display.
1
. See
Making tape
TAPE
is selected.
)
Basic playback controls
The following table shows the basic controls on
the remote for playing discs.
Button What it does
TAPE
Starts/resumes normal playback. Each
()
/
a.Track search is unlikely to work reliably if:
guage study tape.
such as some classical music recordings.
time you press either button during
playback, the other side of the tape
starts playing. Pressing
when the tape is stopped starts
playback on the side it was playing
previously.
Pauses playback.
Stops playback. Also resets the tape
counter to
tape is already stopped.
Press to fast-rewind a tape.
Press to fast-forward a tape.
Searches for the previous / next blank
a
space between tracks on the side
currently playing (in other words, to the
start of the current / next track), then
resumes playback.
By pressing more than once, the tape
will skip several tracks at once (up to a
maximum of 15). For example, press
– the space between tracks is less than about 4 seconds.
– the recording is noisy so the spaces are not recognized.
– the recording contains frequent silences, such as a lan-
– the recording contains sections of very quiet material,
0000
twice to skip forward two tracks.
TAPE (
if pressed when the
)
Note
1 The auto-reverse feature lets you play or record a tape without physically taking it out and turning it over.
34
En
Page 35

Using the tape deck
08
Making tape recordings
You can make tape recordings from the radio,
CDs, or from an external component
connected to the auxiliary inputs.
recording from CD it’s convenient to use the
ASES mode—see
below.
(ASES)
Automatically recording CDs
Unlike some tape decks, there’s no need to set
recording levels; the deck sets the level
automatically. When recording, the volume
has no effect on the recording. This means that
you can record something with the volume
turned right down if you want.
1 Press TAPE then load a cassette into the
tape deck.
In order to follow these instructions more
2
easily, load the cassette
with side A facing up,
then use the front panel controls.
2 Check the recording direction.
If you start recording in the direction, both
sides of the tape can be recorded (unless the
erase protect tab for side B is missing). If you
switch sides and start recording in the
direction, then recording will start from side B
and stop when the end of the tape is reached.
If you need to change the direction, press
) twice, then (stop).
(
3 Set the reverse mode (page 34).
• (record one side only)
or (record both sides if recording
•
starts in the
(forward) direction, or one
side if recording starts in the
direction)
1
If you're
(reverse)
4 Select the source you want to record.
For example, press
TUNER (FM/AM
on the
remote) to record from the radio. If you’ve
selected a CD, make sure that it’s stopped. You
TAPE
can’t record while
is selected.
5 Prepare the source for recording.
For example, tune in the radio station.
6 Press REC/STOP (front panel only).
The
REC
indicator lights in the display and the
deck starts recording.
7 Start the source playing (if necessary).
8 When you’re ready to stop recording,
press REC/STOP again.
Automatically recording CDs
(ASES)
Auto Synchro Editing System (ASES for short)
makes recording CDs
WMA/MP3 audio files) automatic. It also
makes sure that a CD track isn’t spread over
two sides of a tape.
If the tape runs out midway through a CD track,
the same track is automatically recorded from
the beginning again on the other side.
1 Prepare the tape deck for recording.
Recording starts in the (forward) direction,
so take care which way you load the tape.
2 Load the CD you want to record.
3 Press
DVD/CD
The CD should now be selected, but not
playing.
3
(including those with
, then press (stop).
4
English
Deutsch
Français
Italiano
Nederlands
Español
Note
1• Once recording has started, you can’t switch to another component until recording has stopped. So, for example, you can’t
switch over to the tuner while you’re recording a CD.
•
EV700/1000 model only
2• Before recording, check that the cassette erase-protect tabs have not been broken, and that the tape is Type I (normal position). You can’t record on Type II (high/CrO2) or IV (metal) tapes using this deck.
• If you’re recording from the start of a tape, it’s a good idea to wind the tape on a little so that you don’t accidently start recording over the leader tape. You can either do this by hand, or load the tape into the deck and play the tape for 5–6 seconds.
3 You can’t make ASES tape recordings of Video CD/Super VCDs or DVD-Video discs.
4 ASES may not work correctly if the first side of the tape finishes at the same time as a track ends. If this happens, stop the
recording then resume on the other side without ASES.
– During recording, all multichannel sources are downmixed to two channels.
35
En
Page 36

Using the tape deck08
If you want to record the tracks in a different
order, or record only one track, use the
program play feature—see page 31 for how to
make a program list. Make sure playback is
stopped, then press
before going to the next step.
4 Press ASES to start recording.
The
ASES REC
second pause while the tape winds past the
leader, then recording starts.
Recording finishes automatically when the end
of the disc is reached, or the tape ends
(whichever comes first).
5 If you want to stop recording before the
end of the CD, press
Tip
• If you find that you’re getting noisy
recordings from an AM radio station, see
Optional system settings
change the beat cut mode.
• If you find that the auxiliary source signal is
too high (resulting in unpleasant distortion
in your recording), you may need to reduce
the signal level of the line source by
switching on the attenuator (see
system settings
PROGRAM (SHIFT+1
indicator lights, followed by a 4
(stop).
on page 48 to
on page 48 to do this).
)
Optional
36
En
Page 37

More tuner features
09
Chapter 9
More tuner features
Memorizing stations
You can save up to 30 station presets so that
you always have easy access to your favorite
stations without having to tune in manually
each time.
Manually saving station presets
1 Tune to an AM or FM radio station.
For the FM band, select mono or auto-stereo
reception as necessary. This setting is saved
along with the preset.
2 Use
select a station preset then press
Automatically saving station presets
1 Press
MENU
press
Auto tuning starts in the FM band, stopping
when a strong signal is received.
2 When auto tuning stops at a station, press
ENTER
/
Auto tuning resumes. After the FM band is
finished, auto tuning continues in the AM
band. Press
Auto tuning stops automatically after the AM
band is finished, or after the limit of 30 presets
has been reached. When this happens, the
tuner automatically switches to preset
1
ST +/–
or the number buttons to
ENTER
.
SYSTEM SETUP (SHIFT+HOME
), use
/
to choose ‘A. PRESET’ then
ENTER
.
to save the station as a preset, or press
to continue without saving.
(stop) anytime to exit.
ST-1
Listening to station presets
1 Press
station preset mode.
The display shows ST.
2 Use the
preset.
.
FM/AM
ST +/–
• You can also use the number buttons and
ENTER
to do this.
English
Deutsch
repeatedly to select the
buttons to select a station
Français
Italiano
Nederlands
Español
Note
1 If the system is unplugged, saved stations will remain for several days, after which you’ll have to save them again.
37
En
Page 38

Singing karaoke10
Chapter 10
Singing karaoke
•
KARAOKE
Singing karaoke
Using the karaoke features you can plug in a
microphone and mix the sound of your own
voice with a backing track.
can be anything you like, from a song on the
radio, to a dedicated DVD karaoke disc. Adjust
the microphone level relative to the backing
track.
1
The backing track
vocals are partially eliminated using EQ.
•
L CH
that have a vocal recorded in the right
channel.
R CH
•
that have a vocal recorded in the left
channel.
L+R CH
•
track into the center of the mix.
OFF
•
5 Play the backing track.
6 Adjust the MIC VOL knob.
To avoid unpleasant feedback, make sure you
SUB
MIC
MIC VOL
MAIN
MIN MAX
1 Set the MIC VOL knob (front panel) to
minimum.
2 Plug in the microphone(s).
If you’re only using one mic, plug it into the
MIC (MAIN)
used only if
jack. The
MIC (MAIN)
MIC (SUB)
jack can be
is also connected.
• If the microphone has an on/off switch,
make sure it’s on.
3 Load a karaoke backing disc or tape.
You can also use the radio or a component
connected to the auxiliary inputs as source
material for a backing track.
4 To change the mix (CD or Video CD/Super
VCD only), press
Press to switch between these options:
Note
1
EV700/1000 model only
back, using the karaoke features (including connecting a mic) automatically switches to
tichannel sources to two channels.
2 The current setting is first shown in the display.
3 Depending on the microphone level, the sound of the disc may distort. If this happens, turn down the volume.
KARAOKE
– These features are only possible when a microphone is connected. Also note that during DVD play-
.
2
don’t point the microphone(s) at the speakers.
7 Sing!
Changing the vocal mix
Adding some effects to the microphone mix
can sometimes improve the overall sound. You
can choose between three echo levels.
• To add effects to the microphone mix,
press ECHO.
Pressing repeatedly switches between echo
levels 1 to 3 and off.
Changing the backing track
You may want to lower or raise the pitch of the
backing track to match your vocal range.
• Press
KARAOKE
raise the pitch of the backing track.
(Vocal cancel) – Backing track
– Left channel only. Use for tracks
– Right channel only. Use for tracks
– Use to put a single-channel vocal
– Switches the Karaoke mode off.
KEY CONTROL (SHIFT
) or (
SHIFT+ECHO
STEREO
playback and downmixes mul-
) to lower or
3
+
38
En
Page 39

Adjusting the sound
11
Chapter 11
Adjusting the sound
Using the Sound menu
EV500 only
There are several optional sound settings you
can make from the sound menu.
1 Press
2 Use
to adjust.
The current setting is shown for each option (in
the order shown in step 3) as you cycle through
the display.
3 Use
Make adjustments to the following settings:
Setting What it does
Bass
Treble
Balance Adjusts the left and right
Stereo
Wide
4 Repeat steps 2 and 3 for other settings.
5 When you’re done, press
the Sound menu.
• You can store your current bass, treble and
1 For the EV700/1000 model, see
2 If you have adjusted sound parameters for separate SFC modes (from the sound menu), these are applied as well.
1
SOUND MODE
/
to choose the setting you want
/
to adjust.
Adjusts the amount of bass.
Adjusts the amount of treble.
channel balance.
Makes the stereo spread
appear wider than it really is
Tip
stereo-wide settings as a preset. Simply
hold
ENTER
select
again to confirm. You can now select this
preset from the
Sound Field Control
Note
for three seconds, use
USER 1
.
or
USER 2
SFC
menu (see
below).
Using the Sound menu
Option(s)
CENTER to LEFT
10 / RIGHT 10
ENTER
then press
Using the
–4
to
–4
to
OFF
ON
to leave
/
ENTER
+4
+4
Using the Sound Field Control
EV500 only
Depending on the source you’re listening to,
you may want to use the Sound Field Control to
match the source you’re listening to.
• Press SFC repeatedly to select a mode.
The options are as follows:
ACTION
•
•
DOME
DRAMA
•
•
KARAOKE
tracks on pre-recorded music.
•
USER 1
SFC OFF
•
– Good for sound effects.
– Gives a ‘live’ feel to the sound.
– Good for enhancing dialogue.
– Reduces the level of vocal
/ 2 – See
– (
Tip
above.
SFC
indicator disappears)
Boosting the bass level
If you want to bring up the low end for certain
kinds of music or sound sources, you can use
the bass boost to do so.
• Press
The options are as follows:
Muting the sound
to
• Press MUTE to switch off the volume.
To switch the sound back on, adjust the
volume or press
on page 27.
X.BOOM
X.BOOM M
•
bass.
•
X.BOOM MV – Boosts low frequency
(bass) sounds in movies.
•
OFF – Switches the bass boost off.
repeatedly to select a mode.
– Good for music with lots of
MUTE
again.
English
Deutsch
2
Français
Italiano
Nederlands
Español
39
En
Page 40

Using the timer12
Chapter 12
Using the timer
Important
• The clock must be set for the timers to work
properly (see
Setting the clock
on page 19).
Setting the wake-up timer
Use the wake-up timer to set the system to
switch on at any time and start playing
whatever source you want.
1 Select the source you want played.
For example, press
as your source.
2 Prepare the source and set the volume.
For example, tune in the radio station you want
to wake up to. Adjust the volume as necessary.
3 Press
to select WAKE-UP then press
4 Use
ENTER
5 Set the switch-on time.
Use
Set the minute in the same way, pressing
ENTER
6 Set the switch-off time.
Set as above, pressing
WAKE-UP
switch-off times, the function (
and volume are confirmed in the display.
7 Switch the system into standby mode.
The wake-up timer will not work if the system is
left on!
TIMER (SHIFT
/
to select EDIT then press
.
/
to set the hour, then press
when you’re done.
indicator lights, and the switch-on,
1
FM/AM
to select the radio
+6) twice, use
ENTER
/
ENTER
.
ENTER
.
when done. The
DVD/CD
, etc.)
• You can check the timer settings in
standby by pressing
twice.
TIMER (SHIFT+6
Turning the wake-up timer on/off
If you have already set the wake-up timer, you
can switch it on/off by selecting
TIME OFF
in step 4 above (press
TIME ON
ENTER
Setting the sleep timer
The sleep timer switches off the system after a
specified time so you can fall asleep without
worrying about it.
1 Press
to select SLEEP then press
2 Use
switch-off time then press
Choose between the following options:
3 To check how much time is left, repeat
step 1.
The remaining time is displayed momentarily.
/
AUTO
•
the currently playing CD or Video CD has
finished.
•
SLEEP 90
SLEEP 60
•
•
SLEEP 30
OFF
– Cancels the sleep timer
•
2
TIMER (SHIFT
(cursor up/down) to select a
– Switches off automatically after
3
– Switches off after 90 minutes
– Switches off after an hour
– Switches off after 30 minutes
+6) twice, use
ENTER
ENTER
)
or
).
/
.
.
Note
1 You cannot have the wake-up timer and the record timer set at the same time.
2• If you set the sleep timer while either the wake-up or recording timer is active, the earlier switch off time takes priority.
• The system will switch into standby if you change the input function during AUTO sleep mode.
3 AUTO will not work with DVD/CDs in repeat play, cassette tapes, or Video CD/Super VCDs during PBC playback.
40
En
Page 41

Using the timer
12
Setting the record timer
You can set the timer to record from the
source, or something off the radio. For
example, you might want to record a program
that is broadcast while you're at work.
1 Set up the tape deck.
Load a cassette tape, wind on past the leader
tape and set the reverse mode (see
recordings
2 Select the source you want to record.
Press
LINE
3
to select REC then press
4 Use
ENTER
5 Set the switch-on time.
Use
Set the minute in the same way, pressing
ENTER
6 Set the switch-off time.
Set as above, pressing
REC
switch-off times and the function (or
frequency, if you selected the tuner) are
confirmed in the display.
7 Switch the system into standby mode.
The record timer will not work if the system is
left on!
on page 35 for more on this).
FM/AM (TUNER
and prepare the source.2
Press
TIMER (SHIFT
/
to select EDIT then press
.
/
to set the hour, then press
when you’re done.
indicator lights, then the switch-on,
on the front panel) or
+6) twice, use
ENTER
.
ENTER
when done. The
LINE
1
Making tape
/
ENTER
.
English
Deutsch
Français
Italiano
Nederlands
Español
Turning the record timer on/off
If you have already set the record timer, you
can switch it on/off by selecting
REC OFF
1• During the actual recording, the volume is automatically set to minimum. After the recording has finished, the record timer
is canceled.
2 For example, if you select the tuner, tune in the station you want to record (see
in step 4 above (press
Note
• You cannot have the record timer and the wake-up timer set at the same time.
REC ON
ENTER
or
).
Listening to the radio
on page 21).
41
En
Page 42

Audio Settings and Video Adjust menu13
Chapter 13
Audio Settings and Video
Adjust menu
Audio Settings menu
EV500 only
The Audio Settings menu offers features for
adjusting the way discs sound.
1 Press HOME MENU and select ‘Audio
Settings’ from the on-screen display.
2 Select and change settings using the
//
1
Audio Settings
(cursor) buttons, and
ENTER
/
.
• Settings: On,
Switch on Virtual Surround to enjoy realistic
surround sound effects from just two
speakers.
3
Off
(default)
Video Adjust menu
From the Video Adjust screen you can adjust
various settings that affect how the picture is
presented.
1 Press
Adjust’ from the on-screen display.
HOME MENU
and select ‘Video
Audio DRC
Virtual Surround
• Settings:
Off
When watching Dolby Digital DVDs at low
volume, it’s easy to lose the quieter sounds
completely—including some of the dialog.
Switching Audio DRC (Dynamic Range
Control) to on can help by bringing up the
quieter sounds, while controlling loud peaks.
How much of a difference you hear depends on
the material you’re listening to. If the material
doesn’t have wide variations in volume, you
may not notice much change.
Note
1 For the EV700/1000 model, see
is also available for the EV500 model, but an extra setting of
2• Audio DRC is only effective with Dolby Digital audio sources.
• The effect of Audio DRC also depends on your speakers and settings.
3• 96kHz Linear PCM audio is automatically downsampled to 48kHz if Virtual Surround is switched on.
• How good the surround effect is varies with the disc.
Low, Medium, High
(default)
,
2
Dynamic Range Control
2 Make settings using the
(cursor) buttons and
You can adjust the following picture quality
settings:
•
Sharpness
edges in the picture (
•
Brightness
brightness (
Contrast
•
light and dark (
•
Gamma
picture (
•
Hue
– Adjusts the red/green balance
(
Green 9
in
System Setup menu options
LOW
also appears).
Video Adjust
ENTER
– Adjusts the sharpness of
Fine, Standard, Soft
– Adjusts the overall
–20
to
+20
).
– Adjusts the contrast between
–16
to
+16
– Adjusts the ‘warmth’ of the
High, Medium, Low, Off
to
Red 9
).
on page 24 (this method of adjustment
///
.
).
)
).
42
En
Page 43

Audio Settings and Video Adjust menu
•
Chroma Level
colors appear (
Adjust the Brightness, Contrast, Hue and
Chroma Level settings using the
left/right) buttons.
Brightness min max 0
3 Press ENTER to return to the Video
Adjust screen, or HOME MENU to exit.
– Adjusts how saturated
–9
to +9).
/
(cursor
13
English
Deutsch
Français
Italiano
Nederlands
Español
43
En
Page 44

Initial Settings menu14
Chapter 14
Initial Settings menu
Using the Initial Settings menu
The Initial Settings menu provides audio and
video output settings, parental lock settings,
and display settings, among others.
If an option is grayed out it means that it
cannot be changed at the current time. This is
usually because a disc is playing. Stop the
disc, then change the setting.
1 Press
Settings’.
2 Use the cursor buttons and
select the setting and option you want to set.
All the settings and options are explained on
the following pages.
Video Output settings
Setting
TV Screen
(See also
and disc formats
page 58.)
Component Out
(See also
using the component
video output
page 12.)
HOME MENU
Initial Settings
Screen sizes
on
Connecting
on
and select ‘Initial
ENTER
to
Option What it means
4:3 (Letter Box)
4:3 (Pan & Scan)
16:9 (Wide)
Interlace
Progressive
Set if you have a conventional 4:3 TV. Widescreen movies are
shown with black bars top and bottom.
Set if you have a conventional 4:3 TV. Widescreen movies are
shown with the sides cropped so that the image fills the screen.
Set if you have a widescreen TV.
Set if your TV is not compatible with progressive scan video.
Set if your TV is compatible with progressive scan video (see
your TV’s instruction manual for details). Press
more to confirm (or
Note that progressive scan video is only output from the
component video jacks.
Important
• In the table below, the default setting is
shown in
italics
• Some settings, such as
Language
bold
: other settings are shown in
.
TV Screen, Audio
and
Subtitle Language
may be
overridden by the DVD disc. Often these
settings can also be made from the DVD
disc menu.
• The
Component Out
setting only needs to
be set if you have connected this player to
your TV using component video.
ENTER
RETURN
to cancel).
once
44
En
Page 45

Initial Settings menu
14
Language settings
Setting
Audio Language English
Subtitle Language English
DVD Menu
Language
Subtitle Display On
Option What it means
Languages as displayed
Other Language
Languages as displayed
Other Language
w/Subtitle Lang.
Languages as displayed
Other Language
Off
Display settings
Setting
OSD Language English
Angle Indicator On
Option What it means
Languages as displayed
Off
If there is an English soundtrack on the disc, it is played.
If there is a language selected on the disc, it is played.
Select to choose a language other than the ones displayed (see
Using the language code list
If there are English subtitles on the disc they are displayed.
The subtitle language selected on the disc is displayed.
Select to choose a language other than the ones displayed (see
Using the language code list
DVD disc menus are displayed in the same language as your
selected subtitle language, if possible.
DVD menus are displayed in the selected language, if possible.
Select to choose a language other than the ones displayed (see
Using the language code list
Subtitles are displayed in your selected subtitle language.
Subtitles are always off by default when you play a DVD disc.
On-screen displays of the player are in English.
On-screen displays are shown in the language selected.
A camera icon is displayed on-screen during multi-angle
scenes on a DVD disc.
No multi-angle indication is shown.
on page 58).
on page 58).
on page 58).
English
Deutsch
Français
Italiano
Nederlands
Español
Options settings
Setting
Parental Lock –
DivX VOD Display
Option What it means
See
Parental Lock
See
About DivX® VOD content
below.
below.
45
En
Page 46

Initial Settings menu14
Parental Lock
• Default level:
Default Country/Area code:
To give you some control over what your
children watch on your DVD player, some DVDVideo discs feature a Parental Lock level. If
your player is set to a lower level than the disc,
the disc won’t play.
Some discs also support the Country/Area
Code feature. The player does not play certain
scenes on these discs, depending on the
Country/Area Code you set.
Registering a new password
Register a password to change the Parental
Lock level or enter a Country/Area code.
1 Select ‘Password’.
Video Output
Language
Display
Options
2 Use the number buttons to input a 4-digit
password then press
Changing your password
To change your password, confirm your
existing password then enter a new one.
1 Select ‘Password Change’.
2 Input your existing password, then press
ENTER
.
3 Enter a new password and press
Initial Settings
Off
; Default password:
Parental Lock
Photoviewer
ENTER
Password
Level Change
Country Code
.
us (2119)
ENTER
none
1
;
.
Setting/changing the Parental Lock
1 Select ‘Level Change’.
2 Use number buttons to enter your
password, then press
3 Select a new level and press
ENTER
.
ENTER
.
• Press (cursor left) repeatedly to lock
more levels (more discs will require the
password); press
(cursor right) to
unlock levels. You can’t lock level 1.
Setting/changing the Country/Area code
You can find the
Country/Area code list
on
page 59.
1 Select ‘Country Code’.
2 Input your password, then press
ENTER
.
3 Select a Country/Area code then press
ENTER
.
There are two ways you can do this:
• Select by code letter: Use
/
(cursor up/
down) to change the Country/Area code.
• Select by code number: Press
(cursor
right) then use the number buttons to enter
the 4-digit Country/Area code.
The new Country/Area code takes effect after
ejecting the disc once.
Note
1• Not all discs use Parental Lock, and will play without requiring the password first.
• If you forget your password, you’ll need to reset the player to register a new password. (see
46
En
Resetting the system
on page 53).
Page 47

Initial Settings menu
14
About DivX® VOD content
In order to play DivX VOD (video on demand)
content on this player, you first need to register
the player with your DivX VOD content
provider. You do this by generating a DivX VOD
registration code, which you submit to your
provider.
Displaying your DivX VOD registration
code
1 Press HOME MENU and select ‘Initial
Settings’.
2 Select ‘Options’, then ‘DivX VOD’.
1
Important
• DivX VOD content is protected by a DRM
(Digital Rights Management) system. This
restricts playback of content to specific,
registered devices.
• If you load a disc that contains DivX VOD
content not authorized for your player, the
message
Authorization Error
is displayed
and the content will not play.
Initial Settings
Video Output
Language
Display
Options
Parental Lock
DivX VOD
Display
Playing DivX® VOD content
Some DivX VOD content may only be playable
a fixed number of times. When you load a disc
containing this type of DivX VOD content, the
remaining number of plays is shown on-screen
and you then have the option of playing the
disc (thereby using up one of the remaining
plays), or stopping. If you load a disc that
contains expired DivX VOD content (for
example, content that has zero remaining
plays), the message
Rental Expired
is
displayed.
If your DivX VOD content allows an unlimited
number of plays, then you may load the disc
into your player and play the content as often
as you like, and no message will be displayed.
English
Deutsch
Français
Italiano
Nederlands
Español
3 Select ‘Display’.
Your 8-digit registration code is displayed.
Initial Settings
Video Output
Language
Display
Options
DivX VOD Registration Code
0 1 2 3 4 5 6 7
Make a note of the code as you will need it
when you register with a DivX VOD provider.
Note
1 Resetting the player (as described in
Resetting the system
on page 53) will not cause you to lose your registration code.
47
En
Page 48

Additional information15
Chapter 15
Additional information
•
Optional system settings
These settings are accessed by using the
System Setup menu while in standby.
1 Switch the system into standby.
2 Press
MENU
3 Use
setting then press
The current setting is shown for each option as
you cycle through the display. See below for a
full list and description of each.
4 Use
setting then press
5 Repeat steps 2 to 4 to make other
settings.
SYSTEM SETUP (SHIFT+HOME
).
/
(cursor left/right) to choose the
ENTER
.
/
(cursor up/down) to adjust the
ENTER
to confirm.
System Setup menu options in standby
Below are all the available settings in the setup
menu. The first setting in each is the default.
System demo setting
Switches the automatic demo feature on or off1
(this starts when you plug in for the first time):
•
DEMO ON
DEMO OFF
•
Key lock setting
The Key Lock feature is useful when you’ve set
the wake-up timer and don’t want the system
switched on before it activates.
•
LOCK ON
and controls inoperative.
– Switches the demo feature on.
– Switches the demo feature off.
– Makes the front panel buttons
Clock format setting
Specifies how the clock is displayed:
•
•
Line attenuator setting
If the source connected to the analog
input is distorting, the attenuator will reduce
the signal level.
•
•
•
Tape deck beat cut setting
Recording AM broadcasts on cassette tape
can result in noisy recordings. If you
experience this, change the beat cut mode.
•
•
Frequency step setting
If you find that you can’t tune into stations
successfully, the frequency step may not be
suitable for your country/region.
• AM 9K
•
LOCK OFF
front panel buttons and controls.
12-HOUR
24-HOUR
ATT 6DB
ATT 10DB (EV700/1000 only)
signal level by 10dB.
ATT OFF
B.CUT 1
B.CUT 2
AM 10K
– Restores regular use of the
– Display shows 12-hour format.
– Display shows 24-hour format.
– Reduces signal level by 6dB.
– Reduces
– No attenuation
– AM 9kHz / FM50Hz
– AM10kHz / FM100Hz
LINE
Note
1 After setting the clock, the demo mode switches off automatically. However, if you unplug the system from the wall outlet, the
demo mode will revert to
DEMO ON
(and the clock will be reset).
48
En
Page 49

Additional information
15
TV system setting
The default setting of this system is
AUTO
, and
unless you notice that the picture is distorted
when playing some discs, you should leave it
set to
AUTO
. If you find picture distortion with
some discs, set the TV system to match your
country or region’s system. However, this may
restrict the kinds of disc you can watch. See
the table for the kinds of discs compatible with
each setting (
AUTO, PAL
• After selecting
press
ENTER
to change the TV system.
and
TV SYS
in step 3 above,
NTSC
1
).
The TV system as follows:
•
AUTO NTSC
•
NTSC PAL
•
PAL AUTO
The system automatically switches on and
you’ll see the new TV system setting in the
display after seeing
Disc Player setting
Type Format NTSC PAL AUTO
DVD/Super VCD/
Video CD/DivX
Video
CD/MP3/WMA/
JPEG/no disc
Welcome
NTSC
PAL
—
2
.
NTSC PAL
NTSC PAL
NTSC PAL
NTSC
PAL
NTSC or
PAL
Using and taking care of discs
DVD Video regions
All DVD Video discs carry a region mark that
indicates which region(s) of the world the disc
is compatible with. Your DVD system also has
a region mark (on the rear panel). Discs from
incompatible regions will not play in this
player. Discs marked
ALL
play in any player.
Disc / content format playback
compatibility
This player is compatible with a wide range of
disc types (media) and formats. Playable discs
will generally feature one of the following logos
on the disc and/or disc packaging. Note
however that some disc types, such as
recordable CD and DVD, may be in an
unplayable format.
See the
Disc compatibility table
information.
DVD-Video DVD-R DVD-RW
Audio CD CD-R
Video CD
Fujicolor CD
• is a trademark of Fuji Photo Film Co. Ltd.
• is a trademark of DVD Format/Logo
Licensing Corporation
• Also compatible with KODAK Picture CD
This player supports the IEC’s Super VCD standard for superior picture quality, dual
soundtracks, and widescreen support.
VIDEO
CD
Super Video CD (Super VCD)
below for more
CD-RW
English
Deutsch
Français
Italiano
Nederlands
Español
Note
1 Most models of the newly developed countdown PAL TV system detect 50 Hz (PAL)/60 Hz (NTSC) and automatically switch
vertical amplitude, resulting in a display without vertical shrinkage. However, in some cases, the image may appear without color. If your PAL TV does not have a V-Hold control, you may not be able to watch NTSC discs because of picture roll. If the TV has
a V-Hold control, adjust it until the picture stops rolling. On some TVs, the picture may shrink vertically, leaving black bands at
the top and bottom of the screen.
2 You have to switch the player into standby (press STANDBY/ON
) before each change.
49
En
Page 50

Additional information15
Disc compatibility table
Media
CD-R/RW
DVD-R/RW
PC-created disc
Compressed
audio
Compatible formats
• CD-Audio, Video CD/Super VCD,
ISO 9660 CD-ROM*
* ISO 9660 Level 1 or 2 compliant.
CD physical format: Mode1, Mode2
XA Form1. Romeo and Joliet file
systems are both compatible.
• Multi-session playback: No
• Unfinalized disc playback: No
• DVD-Video, Video Recording (VR)*
Edit points may not play exactly as
*
edited; screen may go momentarily
blank at edited points.
• Unfinalized playback: No
• WMA/MP3/JPEG file playback on
DVD-R/RW: No
• Discs recorded using a PC may
not be playable due to the setting of
the software used to create the
disc. In these instances, check the
DVD-R/RW or CD-R/RW software
manual or disc boxes for more on
compatibility.
• Discs recorded in packet write mode
(UDF format) are not compatible.
• MPEG-1 Audio Layer 3 (MP3),
Windows Media Audio (WMA)
• Sampling rates: 32, 44.1 or 48kHz
• Bit-rates: Any (128Kbps or higher
recommended)
• VBR (variable bit rate) MP3
playback: No
• VBR WMA playback: No
• WMA lossless encoding: No
• DRM (Digital Rights Management)
compatible: Yes (DRM-protected audio
not
files will
• File extensions: .mp3, .wma (these
must be used for the player to
recognize MP3 and WMA files
• File structure (may differ): Up to 299
folders on a disc; up to 648 folders and
files (combined) within each folder
play in this player).
Media
JPEG file
Compatible formats
• Baseline JPEG and EXIF 2.2* still
image files up to a resolution of 3072 x
2048.
File format for digital still cameras
*
• File extensions: .jpg (must be used
for the player to recognize JPEG files)
• File structure (may differ): Up to 299
folders on a disc; up to 648 folders and
files (combined) within each folder
About DivX
DivX is a compressed digital video format
created by the DivX
DivXNetworks, Inc. This player can play DivX
video files burned on CD-R/RW/ROM discs.
Keeping the same terminology as DVD-Video,
individual DivX video files are called "Titles."
When naming files/titles on a CD-R/RW disc
prior to burning, keep in mind that by default
they will be played in alphabetical order.
®
video codec from
DivX video compatibility
• Official DivX® Certified product.
• Plays DivX
VOD video content (in compliance with
DivX
• File extensions: .avi and .divx (these must
be used for the player to recognize DivX
video files).
extension are recognized as MPEG4, but not
all of these are necessarily DivX video files
and therefore may not be playable on this
player.
Displaying DivX subtitle files
The font sets listed below are available for DivX
external subtitle files. You can see the proper
font set on-screen by setting the
Language
to match the subtitle file.
This player displays subtitles for the following
language groups:
®
5, DivX® 4, DivX® 3, and DivX®
®
Certified technical requirements).
Note that all files with the .avi
Subtitle
(in
Language settings
on page 45)
1
50
En
Page 51

Additional information
Group 1:
Albanian (sq), Basque (eu), Catalan (ca),
Danish (da), Dutch (nl), English (en), Faroese (fo),
Finnish (fi), French (fr), German (de), Icelandic (is), Irish
(ga), Italian (it), Norwegian (no), Portuguese (pt), RhaetoRomanic (rm), Scottish (gd), Spanish (es), Swedish (sv)
Group 2:
Hungarian (hu), Polish (pl), Romanian (ro), Slovak (sk),
Slovenian (sl)
Group 3:
(mk), Russian (ru), Serbian (sr), Ukrainian (uk)
Group 4:
Group 5:
DivX, DivX Certified, and associated logos are
trademarks of DivXNetworks, Inc. and are used
under license.
About WMA
The Windows Media® logo printed on the box
indicates that this player can playback
Windows Media Audio content.
WMA is an acronym for Windows Media Audio
and refers to an audio compression technology
developed by Microsoft Corporation. WMA
content can be encoded by using Windows
Media
Player for Windows
Player 9 Series.
Microsoft, Windows Media, and the Windows
logo are trademarks, or registered trademarks of
Microsoft Corporation in the United States and/
or other countries.
Albanian (sq), Croatian (hr), Czech (cs),
Bulgarian (bg), Byelorussian (be), Macedonian
Hebrew (iw), Yiddish (ji)
Turkish (tr)
®
Player version 7, 7.1, Windows Media®
®
XP, or Windows Media®
Handling discs
Hold the disc by its edges when handling so as
not to leave fingerprints, dirt or scratches on
either side of the disc. Damaged or dirty discs
can affect playback performance.
If a disc becomes marked with fingerprints,
dust, etc., clean using a soft, dry cloth.
Wipe lightly from the center of the disc using
straight strokes. Don’t wipe the disc surface
with circular strokes.
If necessary, use a cloth soaked in alcohol, or a
commercially available CD/DVD cleaning kit to
clean a disc more thoroughly. Never use
benzine, thinner or other cleaning agents such
as those designed for cleaning vinyl records.
Storing discs
Avoid leaving discs in excessively cold, humid,
or hot environments (including under direct
sunlight). Don't glue paper or put stickers onto
the disc, or use a pencil, ball-point pen or other
sharp-tipped writing instrument. These could
all damage the disc.
Discs to avoid
Discs spin at high speed inside the player. If a
disc is cracked, chipped, warped, or otherwise
damaged, don't risk using it in your player—
you could end up damaging the unit.
This unit is designed for use with conventional,
fully circular discs only. Pioneer disclaims all
liability arising in connection with the use of
shaped discs.
15
English
Deutsch
Français
Italiano
Nederlands
Español
Note
1• For external subtitle files the following subtitle format filename extensions are supported (please note that these files are not
shown within the disc navigation menu): .srt, .sub, .ssa, .smi
• Some external subtitle files may be displayed incorrectly or not at all.
• The filename of the movie file has to be repeated at the beginning of the filename for the external subtitle file.
• The number of external subtitle files which can be switched for the same movie file is limited to a maximum of 10.
51
En
Page 52

Additional information15
Using cassette tapes
The tape of a cassette is quite easily damaged
and loose tape can jam in the tape deck
mechanism. If the tape has become unwound,
use a pen or pencil to wind it back on to the
spool.
When not using cassettes, always store in the
case. Store cassettes away from magnetic
fields, excessive heat, humidity, dust or oil.
Before recording on a tape, wind the tape on
past the leader tape (about the first 3 or 4
seconds of each side).
Tapes you should avoid
Since tapes longer than 90 minutes are so thin,
they are more susceptible to jamming in the
tape deck mechanism and other trouble such
as irregular winding. Avoid using cassette
tapes longer than 90 minutes.
Protecting your recordings
You can protect an important recording
against accidental erasure by breaking the
erase-protect tab(s) with a small screwdriver.
Erase-protect tab (For side A)
Erase-protect tab (For side B)
If you want to re-record on an erase-protected
cassette, cover the space left by the broken tab
with self-adhesive tape.
Installation and maintenance
Hints on installation
We want you to enjoy using this system for
years to come, so please bear in mind the
following points when choosing a location:
Do...
Use in a well-ventilated room.
Place on a solid, flat, level surface, such as a
table, shelf or stereo rack
Don’t...
Use in a place exposed to high temperatures or
humidity, including near radiators and other
heat-generating appliances.
Place on a window sill or other place where the
system will be exposed to direct sunlight.
Use in an excessively dusty or damp
environment.
Place directly on top of an amplifier, or other
component in your stereo system that becomes
hot in use.
Use near a television or monitor as you may
experience interference—especially if the
television uses an indoor antenna.
Use in a kitchen or other room where the system
may be exposed to smoke or steam.
Use on a thick rug or carpet, or cover with
cloth—this may prevent proper cooling of the
system unit.
Place on an unstable surface, or one that is not
large enough to support all four of the system
unit’s feet.
.
52
En
Page 53

Additional information
15
Cleaning the pickup lens
The DVD player’s lens should not become dirty
in normal use, but if for some reason it should
malfunction due to dust or dirt, consult your
nearest Pioneer authorized service center.
Although lens cleaners are commercially
available, we do not recommend using them
since some may damage the lens.
Problems with condensation
Condensation may form inside the player if it is
brought into a warm room from outside, or if
the temperature of the room rises quickly.
Although this won’t damage the player, it may
temporarily impair performance. You should
leave it to adjust to the warmer temperature for
about an hour before switching on.
Moving the system unit
If you need to move the main unit, first remove
a disc if there’s one in the player, then press
STANDBY/ON
system off. Wait for
from the display, then unplug the power cord.
Never lift or move the unit during playback—
discs rotate at high speeds and may damage.
on the front panel to turn the
GOOD BYE
to disappear
Resetting the system
Use this procedure to reset all system settings
to the factory default. Use the front panel
controls to do this.
1 Switch the system into standby.
2 Press and hold the
about 7 seconds until the display shows
‘MEM.CLR?’
Use or to select it if it does not show
in the display.
3 Press the button.
All the system’s settings are now reset, and
you should see
display.
Note
1 Unplugging the unit before
Welcome
(stop) button for
in the front panel
GOOD BYE
disappears from the display may cause the system to return to the factory settings.
English
Deutsch
Français
Italiano
Nederlands
1
Español
53
En
Page 54

Additional information15
Troubleshooting
Incorrect operations are often mistaken for trouble and malfunctions. If you think that there is
something wrong with this component, check the points below. Sometimes the trouble may lie in
another component. Investigate the other components and electrical appliances being used. If the
trouble cannot be rectified even after exercising the checks listed below, ask your nearest Pioneer
authorized service center or your dealer to carry out repair work.
• If the unit does not operate normally due to external effects such as static electricity
disconnect the power plug from the outlet and insert again to return to normal operating
conditions.
General
Problem
The power does not turn on. • Connect the power plug to the wall outlet.
The power suddenly switches off
automatically and won’t switch
back on for a minute or so. Also,
the timer indicator is blinking.
No sound is output when a
function is selected.
No image is output when
watching discs.
System does not output digital
audio at 96kHz.
Can’t operate the remote control. • Replace the batteries (see
Remedy
• Disconnect the power plug from the outlet, and insert again.
• Make sure the power source is the right voltage for the AC inlet.
• If the speaker cables aren’t connected properly, the system has a
safety feature that shuts the power off automatically. Check the
speaker wires to make sure they’re connected properly. If there
appears to be nothing wrong, try switching the power back on after
the timer indicator has been blinking for a minute or so.
• If you can’t seem to switch the power back on after the timer
indicator has been blinking for over a minute, the unit may be
malfunctioning. Take it to your nearest Pioneer authorized service
center or your dealer to carry out repair work.
• If you’re using the
connected correctly (see
page 12).
MUTE
• Press
• Adjust the volume.
• Make sure the TV is connected correctly (see
TV
on page 11).
• As a copy-protection measure, some DVDs do not output 96kHz
audio. In this case, even if 96 kHz is selected, the player
automatically outputs the audio at 48 kHz. This is not a
malfunction.
• Operate within 23 feet (7 m), 30° of the remote sensor on the front
panel (see
• Remove the obstacle or operate from another position.
• Avoid exposing the remote sensor on the front panel to direct
light.
Range of the remote control unit
LINE
input, make sure the component is
Connecting auxiliary components
on the remote control to turn muting off.
Connecting to your
Loading the batteries
on page 6).
on page 6).
on
54
En
Page 55

Additional information
15
Problem
The microphone can’t be heard. • Stop the disc, then restart playback.
Feedback noise when mic is
switched on.
SND. DEMO
display and the unit can’t be
controlled.
TRAYLOCK
and the tray can’t be ejected.
shows in the
shows in the display
Remedy
• You are only using one microphone and it’s plugged into the
(SUB)
jack. The
microphone plugged into the
• Adjust the
• The mic is pointing toward the speakers. Keep the mic pointed
away from the speakers.
• The microphone level is set too high. Turn down the mic control
level.
• Press and hold (stop) on the front panel for about five seconds.
The disc tray ejects automatically to indicate the Sound Demo
mode is disabled.
• Press and hold (eject) on the front panel for about eight
seconds. Then the tray can be opened/closed using (eject).
MIC (SUB)
MIC VOL
jack can only be used if there is also a
MIC (MAIN)
.
jack.
MIC
DVD/CD/Video CD player
Problem Remedy
The disc is ejected automatically
after loading.
Playback is not possible. • Disc may be loaded upside down. Reload the disc with the label
Picture playback stops and the
operation buttons cannot be
used.
Settings are canceled. • When the power is cut due to power failure or by unplugging the
No picture/No color. • Check that connections are correct and that plugs are inserted
Screen is stretched or aspect
does not change.
When recorded on a VCR or
passed through an AV selector,
there is disturbance in the
playback picture.
• Clean the disc.
• Align the disc properly in the disc guide.
• If the region number on a DVD-video disc does not match the
number on the player, the disc cannot be used (see
regions
on page 49).
• Allow time for any condensation inside the player to evaporate.
Avoid using the player near an air-conditioning unit.
side face up.
• Press , then start playback again ().
• Switch the power off once, then on again using the front panel
STANDBY/ON
power cord for several days, settings will be canceled.
fully.
• Check the instruction manual of the TV/monitor to make sure the
TV/monitor settings are incorrect.
• The
TV Screen
match the TV/monitor you're using (see
page 44).
• Due to the player’s copy protection circuits, connection of this
device through a VCR or an AV selector may prevent recording or
cause picture problems. This is not a malfunction.
button.
setting is incorrect. Set the TV Screen option to
Video Output settings
DVD Video
on
English
Deutsch
Français
Italiano
Nederlands
Español
55
En
Page 56

Additional information15
Problem
Picture disturbance during
playback or dark.
Noticeable difference in DVD
and CD volume.
WMA/MP3/JPEG discs
Problem Remedy
CD-ROM disc is not
recognized by the
system.
Files don’t show up in
the Disc Navigator/
Photo Browser.
• Make sure that the CD-ROM was recorded using the ISO 9660 disc format.
See
Disc / content format playback compatibility
compatibility information.
• The files on the disc must be named with the correct file extension: .mp3
for MP3 files; .wma for WMA files; .jpg for JPEG files (upper or lower-case is
OK). See
disc compatibility information.
Tuner
Problem
Considerable noise in
radio broadcasts.
Auto tuning does not
pick up some stations.
Remedy
• Connect the antenna (see
• Fully extend the FM wire antenna, position for best reception, and secure to
a wall.
• Connect an outdoor FM antenna (see
page 11).
• Adjust the direction and position for best reception.
• Connect an additional internal or external AM antenna (see
radio antennas
• Turn off any other equipment that may be causing the noise or move it
away from the unit.
• Place the antenna farther away from any other equipment that may be
causing the noise.
• The tuning interval is incorrect for your country or region. Try switching the
tuning interval (see
• The radio signal is weak. Auto tuning will only detect radio stations with a
good signal. For more sensitive tuning, connect an outdoor antenna.
Remedy
• This player is compatible with Macro-Vision System copy guard.
Some discs include a copy prevention signal, and when this type of
disc is played back, stripes etc., may appear on some sections of
the picture depending on the TV. This is not a malfunction.
• Discs respond differently to particular player functions. This may
result in the screen becoming black for a brief instant or shaking
slightly when the function is executed. These problems are largely
due to differences between discs and disc content and are not
malfunctions of this player.
• DVDs and CDs use different recording methods. This is not a
malfunction.
on page 49 for other disc
Disc / content format playback compatibility
Connecting the radio antennas
Connecting external antennas
on page 10).
Frequency step setting
on page 48).
on page 49 for other
on page 10).
on
Connecting the
56
En
Page 57

Additional information
15
Problem
Sound is mono only. • Check that the tuner is not set to FM mono (see
Remedy
Improving FM stereo sound
on page 22).
Tape deck
Problem Remedy
Cannot record. • Check that the cassette still has its erase-protect tabs intact, or
Sound is muffled or previous
recording is still audible
underneath the new one.
Music search does not work • The spaces between songs may be too short for music search to
Recording made from the
input are distorted or very quiet.
that they are covered with self-adhesive tape (
on page 52).
• The tape heads may be dirty. Clean the tape heads using a headcleaning cassette or cleaning kit.
• Check that you’re using a Type I (normal) tape. Do not use Type II
(high/CrO2) or Type IV (metal) tapes.
work.
• Make sure that the tape is playing when using music search—it
will not work if the tape is stopped.
• Set the line attenuator on or off as necessary (see
LINE
menu options in standby
on page 48).
Using cassette tapes
System Setup
Error Messages
Message
KEY LOCK
RMODE ON
PHONES IN
96K
MUTING
EXIT
NO MIC
MIC IN
Description
• This message appears when the front panel buttons are pressed
when the child lock feature is active. See
on page 48 for more on switching on/off the child lock.
• An operation is prohibited because the line recording mode is on
(see
Using the Sound menu
tape deck.
• An operation is prohibited because headphones are connected.
• An operation is prohibited because the source is digital 96kHz
PCM.
• An operation is prohibited because the sound is muted.
• Appears briefly when a menu is automatically exited after a set
period of inactivity.
• A karaoke feature is prohibited because no mic is connected.
• An operation is prohibited because the mic is connected.
on page 27), or when recording to the
Optional system settings
English
Deutsch
Français
Italiano
Nederlands
Español
57
En
Page 58
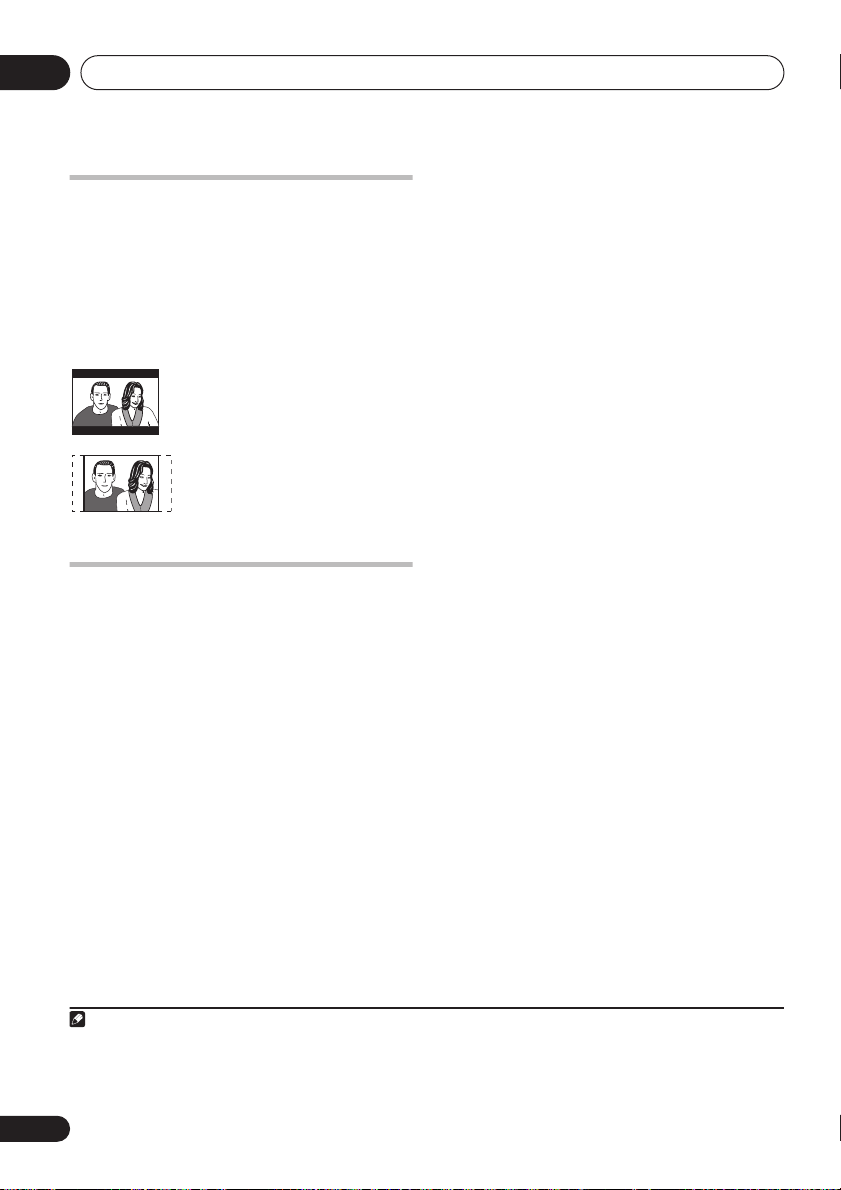
Additional information15
Screen sizes and disc formats
DVD-Video discs come in different screen
aspects, ranging from TV programs, which are
generally 4:3, to CinemaScope widescreen
1
movies
, with an aspect ratio of up to about 7:3.
Televisions also come in different aspect
ratios; ‘standard’ 4:3 and widescreen 16:9.
Set to 4:3 (Letter Box), widescreen
discs are shown with black bars top
and bottom.
Set to
4:3 (Pan&Scan)
discs are shown with the left and right
sides cropped. Although the picture
looks larger, you don’t actually see
the whole picture.
, widescreen
2
Using the language code list
Some of the language options (see
settings
on page 45) allow you to set your
preferred language from any of the 136
languages listed in the
Language code list
1 Select ‘Other Language’.
2 Use
/
(cursor left/right) to select
either a code letter or a code number.
3 Use
/
(cursor up/down) to select a
code letter or a code number.
See the
Language code list
(next page) for a
complete list of languages and codes.
Language
.
Note
1 Many widescreen discs override the system’s settings so that the disc is shown in letterbox format regardless of the setting.
2• Using the
• When you watch discs recorded in 4:3 format, you can use the TV controls to select how the picture is presented. Your TV
may offer various zoom and stretch options; see the instructions that came with your TV for details.
• Some movie aspect ratios are wider than 16:9, so even with a widescreen TV, these discs will still play in a ‘letterbox’ style.
16:9 (Wide)
setting with a standard 4:3 TV, or one of the
4:3
settings with a widescreen TV, will result in distortion.
58
En
Page 59

Additional information
15
Language code list
Language (Language code letter),
Japanese (ja),
English (en),
French (fr),
German (de),
Italian (it),
Spanish (es),
Dutch (nl),
Russian (ru),
Chinese (zh),
Korean (ko),
Greek (el),
Afar (aa),
Abkhazian (ab),
Afrikaans (af),
Amharic (am),
Arabic (ar),
Assamese (as),
Aymara (ay),
Azerbaijani (az),
Bashkir (ba),
Byelorussian (be),
Bulgarian (bg),
Bihari (bh),
Bislama (bi),
Bengali (bn),
Tibetan (bo),
Breton (br),
Catalan (ca),
Corsican (co),
Czech (cs),
Welsh (cy),
Danish (da),
Bhutani (dz),
Esperanto (eo),
0618
0920
1412
0512
0101
0118
0208
0218
0319
0325
1001
0514
0405
0519
1821
2608
1115
0106
0113
0125
0201
0209
0214
0215
0301
0315
0401
0426
0102
0119
0126
0207
0515
0205
Estonian (et),
Basque (eu),
Persian (fa),
Finnish (fi),
Fiji (fj),
0610
Faroese (fo),
Frisian (fy),
Irish (ga),
Scots-Gaelic (gd),
Galician (gl),
Guarani (gn),
Gujarati (gu),
Hausa (ha),
Hindi (hi),
Croatian (hr),
Hungarian (hu),
Armenian (hy),
Interlingua (ia),
Interlingue (ie),
Inupiak (ik),
Indonesian (in), 0914
Icelandic (is), 0919
Hebrew (iw), 0923
Yiddish (ji), 1009
Javanese (jw), 1023
Georgian (ka), 1101
Kazakh (kk), 1111
Greenlandic (kl), 1112
Cambodian (km), 1113
Kannada (kn), 1114
Kashmiri (ks), 1119
Kurdish (ku), 1121
Kirghiz (ky), 1125
Latin (la), 1201
Language code
0520
0521
0601
0609
0615
0625
0701
0704
0712
0714
0721
0801
0809
0818
0821
0825
0901
0905
0911
Lingala (ln), 1214
Laothian (lo), 1215
Lithuanian (lt), 1220
Latvian (lv), 1222
Malagasy (mg), 1307
Maori (mi), 1309
Macedonian (mk), 1311
Malayalam (ml), 1312
Mongolian (mn), 1314
Moldavian (mo), 1315
Marathi (mr), 1318
Malay (ms), 1319
Maltese (mt), 1320
Burmese (my), 1325
Nauru (na), 1401
Nepali (ne), 1405
Norwegian (no), 1415
Occitan (oc), 1503
Oromo (om), 1513
Oriya (or), 1518
Panjabi (pa), 1601
Polish (pl), 1612
Pashto, Pushto (ps), 1619
Portuguese (pt), 1620
Quechua (qu), 1721
Rhaeto-Romance (rm), 1813
Kirundi (rn), 1814
Romanian (ro), 1815
Kinyarwanda (rw), 1823
Sanskrit (sa), 1901
Sindhi (sd), 1904
Sangho (sg), 1907
Serbo-Croatian (sh), 1908
Sinhalese (si), 1909
Slovak (sk), 1911
Slovenian (sl), 1912
Samoan (sm), 1913
Shona (sn), 1914
Somali (so), 1915
Albanian (sq), 1917
Serbian (sr), 1918
Siswati (ss), 1919
Sesotho (st), 1920
Sundanese (su), 1921
Swedish (sv), 1922
Swahili (sw), 1923
Tamil (ta), 2001
Telugu (te), 2005
Tajik (tg), 2007
Thai (th), 2008
Tigrinya (ti), 2009
Turkmen (tk), 2011
Tagalog (tl), 2012
Setswana (tn), 2014
Tonga (to), 2015
Turkish (tr), 2018
Tsonga (ts), 2019
Tatar (tt), 2020
Twi (tw), 2023
Ukrainian (uk), 2111
Urdu (ur), 2118
Uzbek (uz), 2126
Vietnamese (vi), 2209
Volapük (vo), 2215
Wolof (wo), 2315
Xhosa (xh), 2408
Yoruba (yo), 2515
Zulu (zu), 2621
English
Deutsch
Français
Italiano
Nederlands
Español
Country/Area code list
Country/Area, Country/Area code,
Argentina, 0118, ar
Australia, 0121, au
Austria, 0120, at
Belgium, 0205, be
Brazil, 0218, br
Canada, 0301, ca
Chile, 0312, cl
China, 0314, cn
Denmark, 0411, dk
Finland, 0609, fi
France, 0618, fr
Germany, 0405, de
Country/Area code letter
Hong Kong, 0811, hk
India, 0914, in
Indonesia, 0904, id
Italy, 0920, it
Japan, 1016, jp
Korea, Republic of, 1118, kr
Malaysia, 1325, my
Mexico, 1324, mx
Netherlands, 1412, nl
New Zealand, 1426, nz
Norway, 1415, no
Pakistan, 1611, pk
Philippines, 1608, ph
Portugal, 1620, pt
Russian Federation, 1821, ru
Singapore, 1907, sg
Spain, 0519, es
Switzerland, 0308, ch
Sweden, 1905, se
Taiwan, 2023, tw
Thailand, 2008, th
United Kingdom, 0702, gb
United States of America, 2119, us
59
En
Page 60

Additional information15
Preset code list
Please note that there are cases where only certain functions may be controllable after assigning
the proper preset code, or the codes for the manufacturer in the list will not work for the model
that you are using.
ACURA
644
ADMIRAL
631
AIWA
660
AKAI
632, 635, 642
AKURA
641
ALBA
607, 639, 641, 644
AMSTRAD
ANITECH
ASA
ASUKA
AUDIOGONIC
BASIC LINE
BAUR
BEKO
BEON
BLAUPUNKT
BLUE SKY
BLUE STAR
BPL
BRANDT
BTC
BUSH
656
CASCADE
CATHAY
CENTURION
CGB
CIMLINE
CLARIVOX
CLATRONIC
CONDOR
CONTEC
CROSLEY
CROWN
CRYSTAL
CYBERTRON
DAEWOO
DAINICHI
DANSAI
DAYTON
DECCA
DIXI
DUMONT
ELIN
ELITE
ELTA
EMERSON
ERRES
FERGUSON
FINLANDIA
FINLUX
653, 654, 655
FIRSTLINE
FISHER
FORMENTI
FRONTECH
642, 644, 647
644
645
641
607, 636
641, 644
631, 607, 642
638
607
631
641
618
618
636
641
607, 641, 642, 644, 647,
644
607
607
642
644
607
638
638
644
632
638, 644
642
641
607, 644, 656
641
607
644
607, 648
607, 644
653
607
641
644
642
607
607, 636, 651
635, 643, 655
632, 607, 645, 648,
640, 644
632, 635, 638, 645
632, 607, 642
631, 642, 646
FRONTECH/PROTECH
FUJITSU
648, 629
FUNAI
640, 646, 658
GBC
632, 642
GE
601, 608, 607, 610, 617, 602,
628, 618
GEC
607, 634, 648
GELOSO
632, 644
GENEXXA
631, 641
GOLDSTAR 610, 623, 621, 602,
607, 650
GOODMANS 607, 639, 647, 648,
656
GORENJE 638
GPM 641
GRAETZ 631, 642
GRANADA 607, 635, 642, 643,
648
GRADIENTE 630, 657
GRANDIN 618
GRUNDIG 631, 653
HANSEATIC 607, 642
HCM 618, 644
HINARI 607, 641, 644
HISAWA 618
HITACHI 631, 633, 634, 636, 642,
643, 654, 606, 610, 624, 625, 618
HUANYU 656
HYPSON 607, 618, 646
ICE 646, 647
IMPERIAL 638, 642
INDIANA 607
INGELEN 631
INTERFUNK 631, 632, 607, 642
INTERVISION 646, 649
ISUKAI 641
ITC 642
ITT 631, 632, 642
JEC 605
JVC 613, 623
KAISUI 618, 641, 644
KAPSCH 631
KENDO 642
KENNEDY 632, 642
KORPEL 607
KOYODA 644
LEYCO 607, 640, 646, 648
LIESENK&TTER 607
LOEWE 607
LUXOR 632, 642, 643
M-ELECTRONIC 631, 644, 645,
654, 655, 656, 607, 636, 651
MAGNADYNE 632, 649
MAGNAFON 649
MAGNAVOX 607, 610, 603, 612,
629
632
MANESTH 639, 646
MARANTZ 607
MARK 607
MATSUI 607, 639, 640, 642, 644,
647, 648
MEDIATOR 607
MEMOREX 644
METZ 631
MINERVA 631, 653
MITSUBISHI 609, 610, 602, 621,
631
MULTITECH 644, 649
NEC 659
NECKERMANN 631, 607
NEI 607, 642
NIKKAI 605, 607, 641, 646, 648
NOBLIKO 649
NOKIA 632, 642, 652
NORDMENDE 632, 636, 651,
652
OCEANIC 631, 632, 642
ORION 632, 607, 639, 640
OSAKI 641, 646, 648
OSO 641
OSUME 648
OTTO VERSAND 631, 632, 607,
642
PALLADIUM 638
PANAMA 646
PANASONIC 631, 607, 608,642,
622
PATHO CINEMA 642
PAUSA 644
PHILCO 632, 642
PHILIPS 631, 607, 634, 656
PHOENIX 632
PHONOLA 607
PROFEX 642, 644
PROTECH 607, 642, 644, 646,
649
QUELLE 631, 632, 607, 642, 645,
653
R-LINE 607
RADIOLA 607
RADIOSHACK 610, 623, 621,
602
RBM 653
RCA 601, 610, 615, 616, 617, 618,
661, 662, 609
REDIFFUSION 632, 642
REX 631, 646
ROADSTAR 641, 644, 646
SABA 631, 636, 642, 651
SAISHO 639, 644, 646
SALORA 631, 632, 642, 643
SAMBERS 649
SAMSUNG 607, 638, 644, 646
SANYO 635, 645, 648, 621, 614
SBR 607, 634
SCHAUB LORENZ 642
SCHNEIDER 607, 641, 647
SEG 642, 646
MCMICHAEL 634
SEI 632, 640, 649
SELECO 631, 642
SHARP 602, 619, 627
SIAREM 632, 649
SIEMENS 631
SINUDYNE 632, 639, 640, 649
SKANTIC 643
SOLAVOX 631
SONOKO 607, 644
SONOLOR 631, 635
SONTEC 607
SONY 604
SOUNDWAVE 607
STANDARD 641, 644
STERN 631
SUSUMU 641
SYSLINE 607
TANDY 631, 641, 648
TASHIKO 634
TATUNG 607, 648
TEC 642
TELEAVIA 636
TELEFUNKEN 636, 637, 652
TELETECH 644
TENSAI 640, 641
THOMSON 636, 651, 652, 663
THORN 631, 607, 642, 645, 648
TOMASHI 618
TOSHIBA 605, 602, 626, 621, 653
TOWADA 642
ULTRAVOX 632, 642, 649
UNIVERSUM 631, 607, 638, 642,
645, 646, 654, 655
VESTEL 607
VICTOR 613
VOXSON 631
WALTHAM 643
WATSON 607
WATT RADIO 632, 642, 649
WHITE
WESTINGHOUSE 607
YOKO 607, 642, 646
ZENITH 603, 620
PIONEER 600, 631, 632, 607,
636, 642, 651
60
En
Page 61

Additional information
15
Specifications
• Amplifier section
EV700/1000 model
Continuous power output:
Front . . . . . . . . . . . . . . . . . . . . 100 W per channel
Center . . . . . . . . .100 W (1kHz, 10 % T.H.D., 6 Ω)
Surround . . . . . . . . . . . . . . . . 100 W per channel
Subwoofer . . . .100 W (100Hz, 10 % T.H.D., 6 Ω)
EV500 model
Front . . . . . . . . . . . . . . . . . . . . 100 W per channel
• Disc section
Digital audio
characteristics . . . . . . . . .DVD fs: 96 kHz, 24-bit
Type
. . .DVD system, Video CD/Super VCD system
Frequency response . . . . . . . . . . . 4 Hz to 44 kHz
S/N ratio . . . . . . . . . . . . . . . . . . . . . . . . . . . . 95 dB
Dynamic range . . . . . . . . . . . . . . . . . . . . . . 95 dB
Total harmonic distortion . . . . . . . . . . . . 0.005 %
Wow and Flutter. . . . . . . . Limit of measurement
and Compact Disc digital audio system
(±0.001 % W.PEAK) or less (JEITA)
• Cassette deck section
Systems . . . . . . . . . . . . 4 track, 2-channel stereo
Heads . . . . . . . . . . Recording/playback head x 1
Motor . . . . . . . . . . . . . . . . . . . DC servo motor x 1
Tape types . . . . . . . . . . . . . . . . . . Type I (Normal)
• FM tuner section
Frequency range . . . . . . . . 87.5 MHz to 108 MHz
Antenna . . . . . . . . . . . . . . . . . . 75 Ω, unbalanced
• AM tuner section
Frequency range
With 9kHz step. . . . . . . . 531 kHz to 1,602 kHz
With 10kHz step. . . . . . . 530 kHz to 1,700 kHz
Antenna . . . . . . . . . . . . . . . . . . . . . Loop antenna
• Miscellaneous
Power requirements
Multi voltage model. . . . .AC 110-127/220-230/
(1kHz, 10 % T.H.D., 6 Ω)
(1kHz, 10 % T.H.D., 6 Ω)
(1 kHz, 10 % T.H.D., 6 Ω)
Erasing head x 1
240 V (switchable), 50/60 Hz
Power consumption
EV700/1000 model . . . . . . . . . . . . . . . . . 179 W
EV500 model . . . . . . . . . . . . . . . . . . . . . . 151 W
Power consumption in standby mode . . . . 0.5 W
Dimensions:
DVD Tuner Deck Receiver . . . . 170(W) 351.5 (H)
Weight:
DVD Tuner Deck Receiver . . . . . . . . . . . . . 7.2 kg
340.1 (D) mm
• Accessories (Stereo DVD Tuner Deck)
Remote control . . . . . . . . . . . . . . . . . . . . . . . . . . 1
Power cord
Central and South American, Taiwan,
Philippines models. . . . . . . . . . . . . . . . . . . . . 2
All other models . . . . . . . . . . . . . . . . . . . . . . . 1
Power plug adapter (Central and South American,
US Military and Duty Free models only) . . . . . . 1
Video cord . . . . . . . . . . . . . . . . . . . . . . . . . . . . . . 1
AM loop antenna . . . . . . . . . . . . . . . . . . . . . . . . 1
FM antenna . . . . . . . . . . . . . . . . . . . . . . . . . . . . 1
Dry cell batteries (AA/R6) . . . . . . . . . . . . . . . . . 2
Warranty Card (US Military and Duty
Free models only) . . . . . . . . . . . . . . . . . . . . . . . . 1
These operating instructions
Speaker system
• Front speakers (S-EV500V/700V)
Enclosure . . . . . . . . . Bass-reflex bookshelf type
System . . . . . . . . . . . . . . . . . 16 cm 2-way system
Speakers:
Woofer . . . . . . . . . . . . . . . . . . .16 cm cone type
Tweeter . . . . . . . . . . . . . . . . 5.2 cm come type
Nominal impedance. . . . . . . . . . . . . . . . . . . . 6
Frequency range . . . . . . . . . . . . 42 Hz to 20 kHz
Maximum input power. . . . . . . . . . . . . . . . 100 W
Dimensions
. . . . . . . . . . . 200 (W) x 351.5 (H) x 235.5 (D) mm
Weight . . . . . . . . . . . . . . . . . . . . . . . . . . . . . 3.7 kg
(magnetically shielded)
Ω
English
Deutsch
Français
Italiano
Nederlands
Español
61
En
Page 62
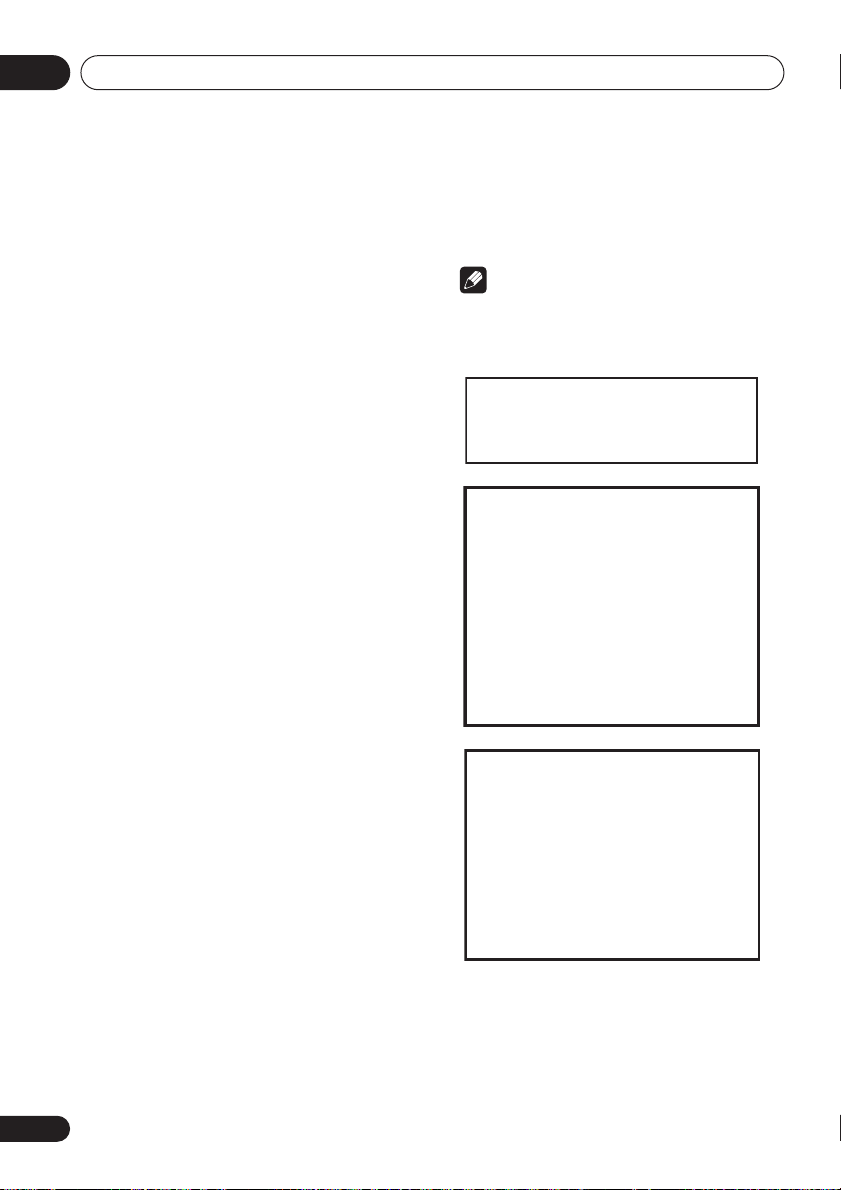
Additional information15
• Front speakers (S-EV1000V)
Enclosure. . . . . . . . . . . . . . .Passive radiator type
System . . . . . . . . . . . . . . . . . 16 cm 2-way system
Speakers:
Woofer . . . . . . . . . . . . . . . . . . 16 cm cone type
Tweeter . . . . . . . . . . . . . . . . 5.2 cm come type
Nominal impedance . . . . . . . . . . . . . . . . . . . . 6
Frequency range . . . . . . . . . . . . 50 Hz to 20 kHz
Maximum input power . . . . . . . . . . . . . . . . 100 W
Dimensions
. . . . . . . . . . . . 200 (W) x 465.5 (H) x 294 (D) mm
Weight . . . . . . . . . . . . . . . . . . . . . . . . . . . . . 5.4 kg
(magnetically shielded)
Ω
• Center speaker (S-EV700V/1000V only)
Enclosure. . . . . . . . . . Closed-box bookshelf type
System . . . . . . . . . . . . . . . . .7.7 cm 1-way system
Speaker . . . . . . . . . . . . . . . . . . . 7.7 cm cone type
Nominal impedance . . . . . . . . . . . . . . . . . . . . 6
Frequency range . . . . . . . . . . . . 94 Hz to 18 kHz
Maximum input power . . . . . . . . . . . . . . . . 100 W
Dimensions . . . . . 361 (W) x 108 (H) x 96 (D) mm
Weight . . . . . . . . . . . . . . . . . . . . . . . . . . . . . 0.9 kg
(magnetically shielded)
Ω
• Surround speakers (S-EV700V/1000V only)
Enclosure. . . . . . . . . . Closed-box bookshelf type
System . . . . . . . . . . . . . . . . .7.7 cm 1-way system
Speaker . . . . . . . . . . . . . . . . . . . 7.7 cm cone type
Nominal impedance . . . . . . . . . . . . . . . . . . . . 6
Frequency range . . . . . . . . . . . 104 Hz to 20 kHz
Maximum input power . . . . . . . . . . . . . . . . 100 W
Dimensions . . . . . 190 (W) x 108 (H) x 96 (D) mm
Weight . . . . . . . . . . . . . . . . . . . . . . . . . . . . 0.75 kg
(magnetically shielded)
Ω
• Subwoofer (S-EV700V/1000V only)
Enclosure. . . . . . . . . . . . . . Passive radiator type
System . . . . . . . . . . . . . . . . .16 cm 1-way system
Speaker . . . . . . . . . . . . . . . . . . .16 cm cone type
Nominal impedance . . . . . . . . . . . . . . . . . . . .6
Frequency range . . . . . . . . . . . . .38 Hz to 2 kHz
Maximum input power . . . . . . . . . . . . . . . 100 W
Dimensions
. . . . . . . . . . . .200 (W) x 351.5 (H) x 430 (D) mm
Weight . . . . . . . . . . . . . . . . . . . . . . . . . . . . . 5.9 kg
(magnetically shielded)
Ω
• Accessories (Speaker System)
Speaker cords (S-EV1000 only). . . . . . . . . . . . . . 3
Speaker stands (S-EV700/1000 only) . . . . . . . . . 2
Non-skid pads (S-EV700/1000 only) . . . . . . . . . 12
Note
• Specifications and design subject to
possible modification without notice, due
to improvements.
This product includes FontAvenue®
fonts licenced by NEC corporation.
FontAvenue is a registered trademark
of NEC Corporation.
This product incorporates copyright
protection technology that is protected
by method claims of certain U.S. patents
and other intellectual property rights
owned by Macrovision Corporation and
other rights owners. Use of this copyright
protection technology must be authorized
by Macrovision Corporation, and is
intended for home and other limited uses
only unless otherwise authorized by
Macrovision Corporation. Reverse
engineering or disassembly is prohibited.
DRM (digital rights management)
copy protection is a technology
designed to prevent unauthorized
copying by restricting playback, etc. of
material on devices other than the PC
(or other WMA recording equipment)
used to record it. For detailed
information, please see the instruction
manuals or help files that came with
your PC and/or software.
Manufactured under license from Dolby
Laboratories.“Dolby”, “Pro Logic” and the doubleD symbol are trademarks of Dolby Laboratories.
“DTS” and “DTS Digital Surround” are registered
trademarks of Digital Theater Systems, Inc.
62
En
Page 63

Published by Pioneer Corporation
Published by Pioneer Corporation
Copyright ©2005 Pioneer Corporation
Copyright ©2005 Pioneer Corporation
All rights reserved
All rights reserved
PIONEER CORPORATION
4-1, Meguro 1-Chome, Meguro-ku, Tokyo 153-8654, Japan
PIONEER ELECTRONICS (USA) INC.
P.O. BOX 1540, Long Beach, California 90810-1540, U.S.A. TEL: (800) 421-1404
PIONEER ELECTRONICS OF CANADA, INC.
300 Allstate Parkway, Markham, Ontario L3R OP2, Canada TEL: 1-877-283-5901
PIONEER EUROPE NV
Haven 1087, Keetberglaan 1, B-9120 Melsele, Belgium TEL: 03/570.05.11
PIONEER ELECTRONICS ASIACENTRE PTE. LTD.
253 Alexandra Road, #04-01, Singapore 159936 TEL: 65-6472-7555
PIONEER ELECTRONICS AUSTRALIA PTY. LTD.
178-184 Boundary Road, Braeside, Victoria 3195, Australia, TEL: (03) 9586-6300
PIONEER ELECTRONICS DE MEXICO S.A. DE C.V.
Blvd.Manuel Avila Camacho 138 10 piso Col.Lomas de Chapultepec, Mexico,D.F. 11000 TEL: 55-9178-4270
<05D00001> Printed in <XRB3053-A>
K002_A_En
 Loading...