

Page 1

English
Español
Deutsch
Multi-CD control High power DVD/VCD/CD player with
FM/AM tuner
Owner’s Manual
DVH-P7050
This product conforms to new cord colors
Page 2
Be sure to read this
DVD disc region numbers 7
• Region number 7
Disc operation 8
Compatible with DVD, Video CD and CD
Formats 77
Before You Start
About this manual 6
Precautions 6
Video system of a connected component 7
DVD disc region numbers 7
• Region number 7
To ensure safe driving 7
• When using a display connected to
DVD REAR MONITOR OUTPUT 8
Condition memory 8
What the marks on DVDs indicate 8
Disc operation 8
Disc organization 9
• DVD 9
• Video CD and CD 9
Main features 10
Protecting your unit from theft 11
• Removing the front panel 11
• Attaching the front panel 11
Switching the remote control operation
mode switch 12
About the demo mode 12
• Reverse mode 12
• Feature demo 12
What’s what 13
• Head unit 13
• Remote control 14
Use and care of the remote control 16
• Installing the battery 16
• Using the remote control 16
Power ON/OFF
Turning the unit on 17
• When the remote control is
set to DVH mode 17
• When the remote control is
set to DVD mode 17
Selecting a source 17
• When the remote control is
set to DVH mode 17
Turning the unit off 18
• When the remote control is
set to DVH mode 18
• When the remote control is
set to DVD mode 18
Tuner
Listening to the radio 19
Introduction of advanced tuner
operation 20
Storing and recalling broadcast
frequencies 20
Tuning in strong signals 21
Storing the strongest broadcast
frequencies 21
Playing DVDs on the built-in player
Playing a DVD 22
• OEL display 22
• Information display 22
Basic operation of DVD 23
Specifying title (DVD mode) 24
Specifying chapter (DVD mode) 24
Stopping playback 25
Frame-by-frame playback 25
Still playback 25
Thank you for buying this Pioneer product.
Please read through these operating instructions so you will know how to operate your model properly. After you have finished reading the instructions, put them
away in a safe place for future reference.
Contents
En
2
00
Section
Page 3
En
3
Slow motion playback 25
Changing audio language during
playback (Multi-audio) 26
Changing the subtitle language during
playback (Multi-subtitle) 26
Changing the viewing angle during
playback (Multi-angle) 27
• About scenes that let you change the
viewing angle 27
Operating from the information display 1
(DVH&DVD mode) 28
• Searching for a desired scene,
starting playback from a
specified time 28
• Selecting audio, subtitle and angle 29
Operating from the information display 2
(DVH&DVD mode) 30
• Selecting repeat range 30
• Selecting audio output 30
Operating from the function display
(DVH mode) 31
• Repeating play 31
• Pausing playback 31
Playing Video CDs on the built-in player
Playing a Video CD 32
• OEL display 32
• Information display 32
Basic operation of Video CD 33
Stopping playback 34
Specifying track (DVD mode) 34
Still playback 35
Operating from the information display
(DVH&DVD mode) 35
• Searching for a desired scene,
starting playback from a
specified time 36
• Selecting repeat range 36
• Selecting audio output 37
Operating from the function display
(DVH mode) 37
• Repeating play 37
• Pausing playback 38
Playing CDs on the built-in player
Playing a CD 39
• OEL display 39
• Information display 39
Basic operation of CD 40
Operating from the information display
(DVH&DVD mode) 41
• Searching for a desired track 41
• Selecting repeat range 42
• Setting random play 42
• Setting scan play 42
• Pausing playback 42
Operating from the function display
(DVH mode) 43
• Repeating play 43
• Playing tracks in a random order 44
• Scanning tracks of a CD 44
• Pausing CD playback 44
Contents
English
Español
Deutsch
Français
Italiano
Nederlands
00
Section
Page 4
Multi-CD Player
Playing a CD 45
Pausing playback 46
50-disc multi-CD player 46
Introduction of advanced multi-CD player
operation 46
Repeating play 47
Playing tracks in a random order 47
Scanning CDs and tracks 48
Pausing CD playback 48
Using ITS playlists 48
• Creating a playlist with ITS
programming 49
• Playback from your ITS playlist 49
• Erasing a track from your ITS
playlist 50
• Erasing a CD from your ITS playlist 50
Using disc title functions 50
• Entering disc titles 51
• Displaying disc titles 52
• Selecting discs from the disc
title list 52
Using CD TEXT functions 52
• Displaying titles on CD TEXT discs 52
• Scrolling titles in the display 52
Using compression and bass emphasis 53
Audio Adjustments
Introduction of audio adjustments 54
Setting the sound focus equalizer 55
Using balance adjustment 55
Using the equalizer 56
• Recalling equalizer curves 56
• Adjusting equalizer curves 56
• Fine adjusting equalizer curve 57
Adjusting bass 57
Adjusting treble 58
Adjusting loudness 58
Using subwoofer output 59
• Adjusting subwoofer settings 59
Using non fading output 60
• Adjusting non fading output level 60
Using the high pass filter 60
Adjusting source levels 61
Initial Settings for DVD player
Calling up the SET UP MENU 62
• Returning to the previous display 62
Setting the subtitle (SUBTITLE LANG.) 63
• Setting subtitles and assist subtitles
ON/OFF 63
• Assist subtitles 63
• Setting the subtitle language 63
• When you select OTHERS 64
Setting the audio language
(AUDIO LANG.) 64
Setting the menu language
(MENU LANG.) 65
Setting the parental lock (PARENTAL) 65
• Setting the code number and level 65
• Changing the level 66
• When playing DVDs enabling parental
lock 66
Setting aspect ratio (TV ASPECT) 67
Setting angle mark display (ANGLE) 67
Setting for digital output
(DIGITAL OUTPUT) 68
Setting digital and analog audio output
(OUTPUT SELECTION) 69
Setting remote control code type 70
If you forget your code number 70
Contents
En
4
00
Section
Page 5
Initial Settings
Adjusting initial settings 71
Setting the time 71
Setting the FM tuning step 71
Setting the AM tuning step 72
Switching the warning tone 72
Switching the auxiliary setting 72
Switching the dimmer setting 73
Selecting the brightness 73
Setting the rear output and
subwoofer controller 73
Switching the telephone
muting/attenuation 74
Switching the automatic disc playback 74
Other Functions
Setting the time display on or off 75
Using different entertainment displays 75
Using the AUX source 75
• Selecting AUX as the source 75
• Setting the AUX title 75
Using the telephone
muting/attenuation 76
• Telephone muting/attenuation
function 76
Displaying built-in player information 76
Additional Information
Compatible with DVD, Video CD and CD
formats 77
Care of discs 79
Language code chart for DVD 80
Troubleshooting 81
• Common problems 81
• Problems during DVD playback 83
• Problems during Video CD playback 84
Error messages 85
• Error messages on the OEL display 85
• Error messages on the display 85
Terms of DVD/Video CD 86
Connecting the units
Power cable connection 90
Connecting to separately sold
power amp 92
When connecting with a Multi-channel
processor 94
When connecting the display with RCA
input jacks 96
When using a display connected to rear
video output 97
Installation
DIN front/rear-mount 98
DIN front-mount 99
• Installation with the rubber bush 99
• Removing the unit 100
DIN rear-mount 101
• Installation using the screw holes on
the side of the unit 101
Specifications
Specifications 102
Contents
En
5
English
Español
Deutsch
Français
Italiano
Nederlands
00
Section
Page 6
Before You Start
En
6
01
Section
About this manual
This unit features a number of sophisticated
functions ensuring superior reception and operation. All the functions have been designed for
the easiest possible use, but many are not selfexplanatory. This operation manual will help you
benefit fully from this unit’s potential and to
maximize your listening enjoyment.
We recommend that you familiarize yourself
with the functions and their operation by reading through the manual before you begin using
this unit. It is especially important that you read
and observe precautions on this page and in
other sections.
This manual mainly explains remote control
operation. However, in addition to those functions related with DVD/Video CD/CD operation
that can only be operated by the remote control,
there are also functions that can be operated
similarly by the head unit and functions that can
only be operated by the buttons provided for the
head unit.
Precautions
• Keep this manual handy as a reference for
operating procedures and precautions.
• Always keep the volume low enough so you
can hear sounds outside of the car.
• Protect this product from moisture.
• If the battery is disconnected or discharged,
the preset memory will be erased and must be
reprogrammed.
• Should this product fail to operate properly,
contact your dealer or nearest authorized
Pioneer Service Station.
Page 7
Before You Start
En
7
English
Español
Deutsch
Français
Italiano
Nederlands
01
Section
Video system of a connected
component
This product is NTSC/PAL system compatible.
When connecting other components to this
product, be sure components are compatible
with the same video systems. If it is not, images
will not be correctly reproduced.
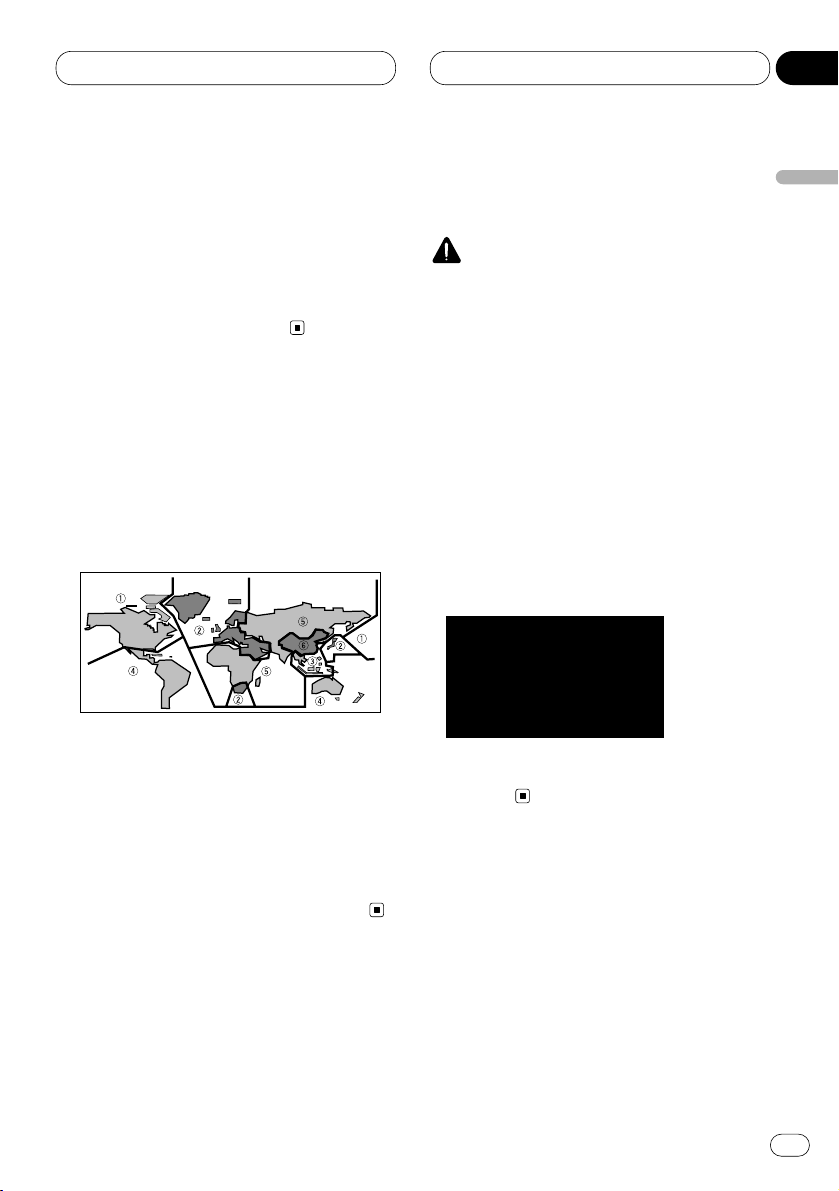
DVD disc region numbers
DVDs that have incompatible region numbers
cannot be played on this player. The region number of the player can be found on the bottom of
this product.
The illustration below shows the regions and
corresponding region numbers.
Region number
DVD players and DVD discs feature region numbers indicating the area in which they were
purchased. Playback of a DVD is not possible
unless it features the same region number as
the DVD player. This product’s region number is
displayed on the bottom of the this product.
To ensure safe driving
WARNING
• To avoid the risk of accident and the potential
violation of applicable laws, this product is not
for use with a video screen that is visible to
the driver.
• In some countries or states the viewing of
images on a display inside a vehicle even by
persons other than the driver may be illegal.
Where such regulations apply, they must be
obeyed.
This product detects whether your car’s parking
brake is engaged or not, and prevents you from
watching a DVD or Video CD on the display
connected to Front Video Output while driving.
When you attempt to watch a DVD/Video CD,
the screen will turn to black.
When you park your car in a safe place and
apply the parking brake, the picture appears on
the screen.
Page 8
Before You Start
When using a display connected to
DVD REAR MONITOR OUTPUT
This product’s DVD REAR MONITOR OUTPUT is
for connection of a display to enable passengers
in the rear seats to watch the DVD or Video CD.
WARNING
• NEVER install the display in a location that
enables the Driver to watch the DVD or Video
CD while Driving.
Condition memory
This function memorizes audio language, subtitle language, angle number, audio output (L, R)
and aspect ratio made during disc playback for
up to 30 discs. Without any special operations,
the final setting details during playback of a disc
are memorized. The next time a disc is played,
the previous settings are automatically applied.
Notes
• With some discs, audio language and subtitle
language are automatically specified, in
which case condition memory does not function.
• When the number of discs exceeds 30, settings for the latest disc replace those for the
least recent disc.
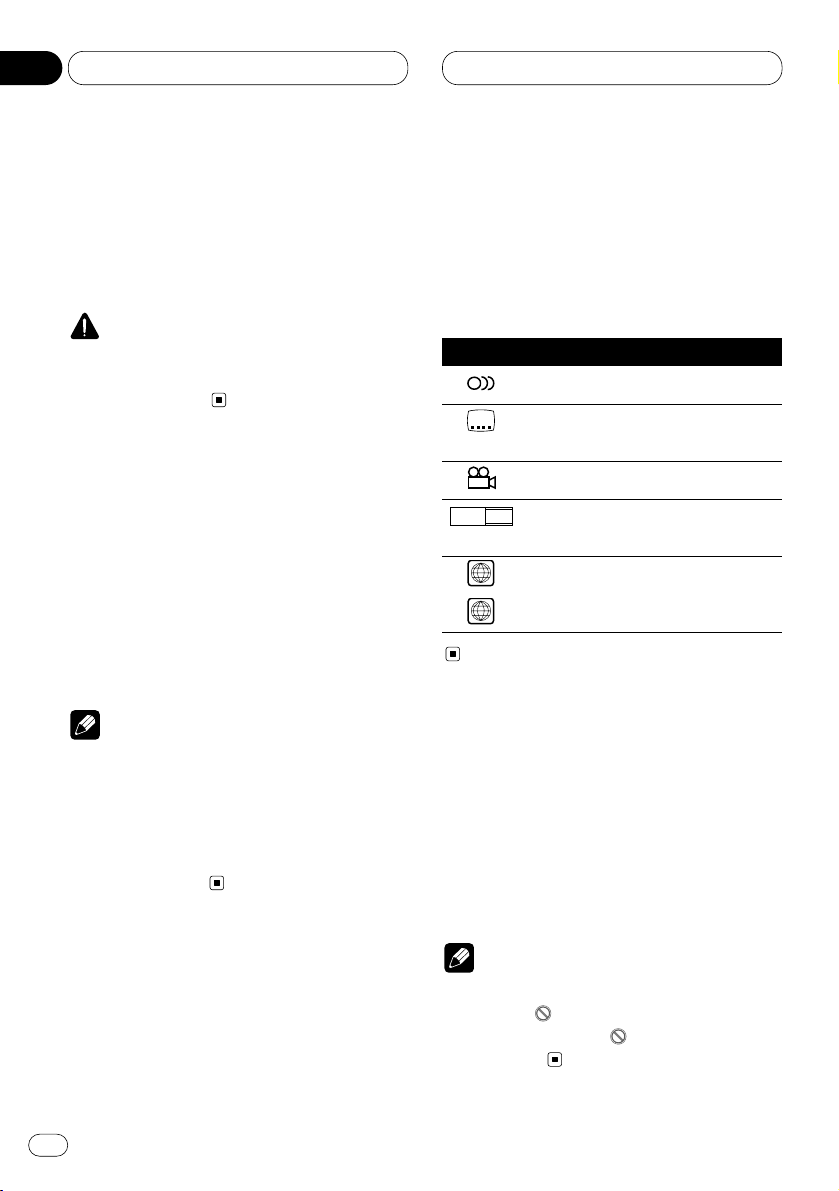
What the marks on DVDs
Indicate
The marks below can be found on DVD disc
labels and packages. They indicate the type of
images and audio recorded on the disc, and the
functions you can use.
Mark Meaning
Indicates the number of audio systems.
Indicates the number of subtitle
languages.
Indicates the number of viewing angles.
Indicates the picture size (aspect ratio:
screen width-to-height ratio) type.
Indicates the number of the region
where playback is possible.
Disc operation
With some DVDs, depending on the intentions
of the disc’s producer, certain operations may
be prohibited. Also, with discs enabling menu
operation and two-way operation during playback, the way titles and chapters are organized
may prevent certain operations such as Repeat
play.
Notes
• If this happens with this product, the prohibited mark “ ” is displayed.
• The prohibited mark “ ” may not appear on
some discs.
ALL
2
16 : 9 LB
3
2
2
En
8
01
Section
Page 9
Before You Start
En
9
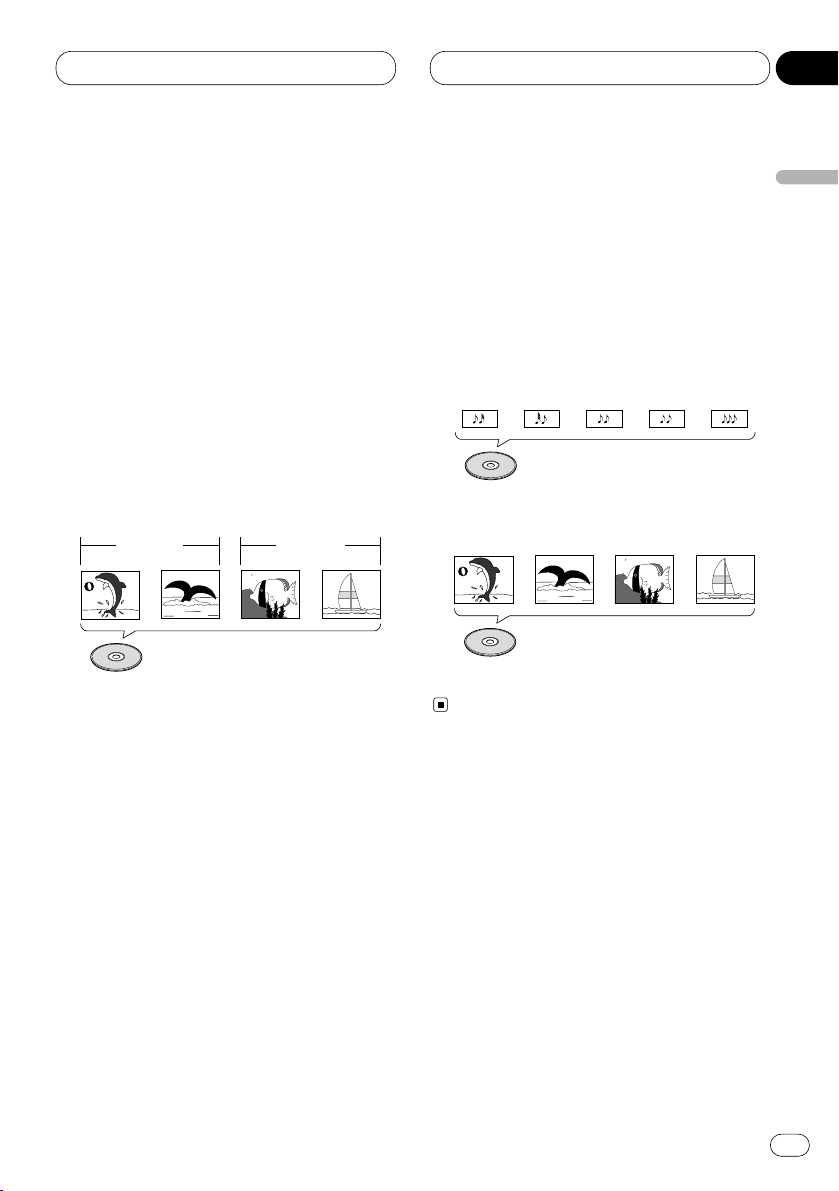
Disc organization
DVD
On DVD-Video discs, the contents are divided
into titles which are in turn divided into chapters.
With video material, a single work (movie etc.)
usually corresponds to a single title, with different scenes corresponding to separate chapters.
With karaoke discs, one song corresponds to
one title.
However, some discs are not organized like this,
so bear this in mind when using the search
function.
Video CD and CD
On CDs and Video CDs, the contents are divided
into tracks. One track usually corresponds to
one song. On some discs, tracks may also feature an index.
With Video CDs featuring PBC (Playback
Control), you can use a menu to perform playback operations. It may not be possible to use
functions such as repeat and search.
Track 1 Track 2
Video CD
Track 3 Track 4
Track 1 Track 2CDTrack 3 Track 4 Track 5
Title 1
Chapter 1 Chapter 2 Chapter 1 Chapter 2
Title 2
DVD
English
Español
Deutsch
Français
Italiano
Nederlands
01
Section
Page 10

Before You Start
Main features
You can play back DVDs, Video CDs (PBC compatibility) and CDs.
Repeat Play
You can enjoy different kinds of repeat play.
Still image & frame-by-flame playback
You can view still images or playback of one
frame at a time.
Slow motion playback
Slow motion playback is possible.
Multi-Aspect
Switching between Wide screen, Letter box
and Panscan display is possible.
Multi-Audio
You can switch between multiple audio
systems recorded on a DVD as desired.
Multi-Subtitle
You can switch between multiple subtitle
languages recorded on a DVD as desired.
Multi-Angle
You can switch between multiple viewing
angles of a scene recorded on a DVD as
desired.
Video CDs featuring PBC Compatibility
You can play back Video CDs featuring PBC
(Playback Control).
Parental Lock
You can use this to prevent your children
viewing violent or adult oriented scenes.
Dolby* Digital/DTS** Compatibility (When
combining this product with a Pioneer
Multi-channel processor such as DEQP7050)
When using this product with a Pioneer
Multi-channel processor, you can enjoy the
atmosphere and excitement provided by
DVD movie and music software featuring 5.1
channel recordings.
* Manufactured under license from Dolby
Laboratories. “Dolby” and the double-D symbol
are trademarks of Dolby Laboratories.
** “DTS” is a registered trademark of Digital
Theater Systems, Inc.
Notes
• This prodcuct incorporates copyright protection technology that is protected by method
claims of certain U.S. patents and other intellectual property rights owned by Macrovision
Corporation and other rights owners.
• Use of this copyright protection technology
must be authorized by Macrovision
Corporation, and is intended for home and
other limited viewing uses only unless otherwise authorized by Macrovision Corporation.
Reverse engineering or disassembly is prohibited.
En
10
01
Section
Page 11
Before You Start
En
11
Protecting your unit from theft
The front panel can be detached from the head
unit and stored in the protective case provided
to discourage theft.
• If the front panel is not detached from the
head unit within five seconds of turning off
the ignition, a warning tone will sound.
• You can turn off the warning tone. See
Switching the warning tone on page 72.
Important
• Never use force or grip the display and the
buttons tightly when removing or attaching.
• Avoid subjecting the front panel to excessive
shocks.
• Keep the front panel out of direct sunlight and
high temperatures.
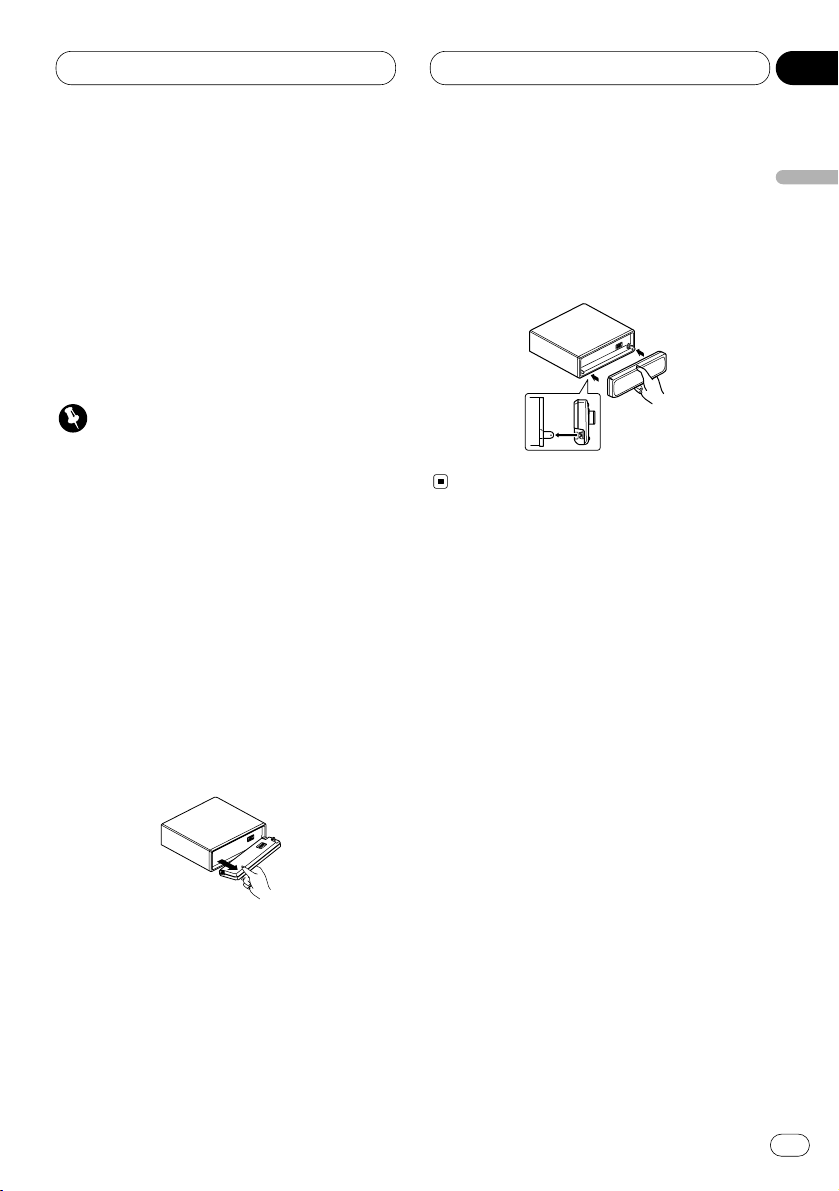
Removing the front panel
1 Press OPEN on the head unit to open the
front panel.
2 Grip the left side of the front panel and pull
it gently outward.
Take care not to grip it tightly or drop it.
3 Put the front panel into the protective case
provided for safe keeping.
Attaching the front panel
Replace the front panel by holding it upright
to this unit and clipping it securely into the
mounting hooks.
English
Español
Deutsch
Français
Italiano
Nederlands
01
Section
Page 12
Before You Start
Switching the remote control
operation mode switch
There are two remote control operation modes
on the supplied remote control.
If you want to operate this product by remote
control, turn the mode switch to DVH mode. In
this case, both the head unit’s buttons and
remote control can control this unit.
If you want to operate the DVD playback on the
rear display, turn the mode switch to DVD
mode. In this case, the remote control can control the DVD playback of the rear display independently. (If both the front and rear displays
are playing DVD as the source at the same time,
operation is the same for the front and rear
displays.)
If the rear display is connected to this product
and the remote control operation mode is set to
DVD mode, the rear display can playback DVD
even though the source which is selected by the
head unit is not DVD.
Note
• If the remote control operation mode is set to
DVD mode, only the DVD (built-in player) can
be operated by the remote control.
About the demo mode
This product features two demonstration
modes. One is the reverse mode, the other is the
feature demo mode.
Reverse mode
If you do not perform an operation within about
30 seconds, screen indications start to reverse,
and then continue reversing every 10 seconds.
Pressing 5 numbered button when power to this
product is switched off while the ignition switch
is set to ACC or ON cancels the reverse mode.
Pressing 5 numbered button again to start the
reverse mode.
Feature demo
The feature demo automatically starts when
power to this product is switched off while the
ignition switch is set to ACC or ON. Pressing 6
numbered button during feature demo operation cancels the feature demo mode. Pressing 6
numbered button again to start the feature
mode. Remember that if the feature demo continues operating when the car engine is
switched off, it may drain battery power.
Notes
• You cannot cancel a demo mode when the
front panel is open.
• The red lead (ACC) of this unit should be connected to a terminal coupled with ignition
switch on/off operations. If this is not done,
the vehicle battery may be drained.
En
12
01
Section
Page 13
Before You Start
En
13
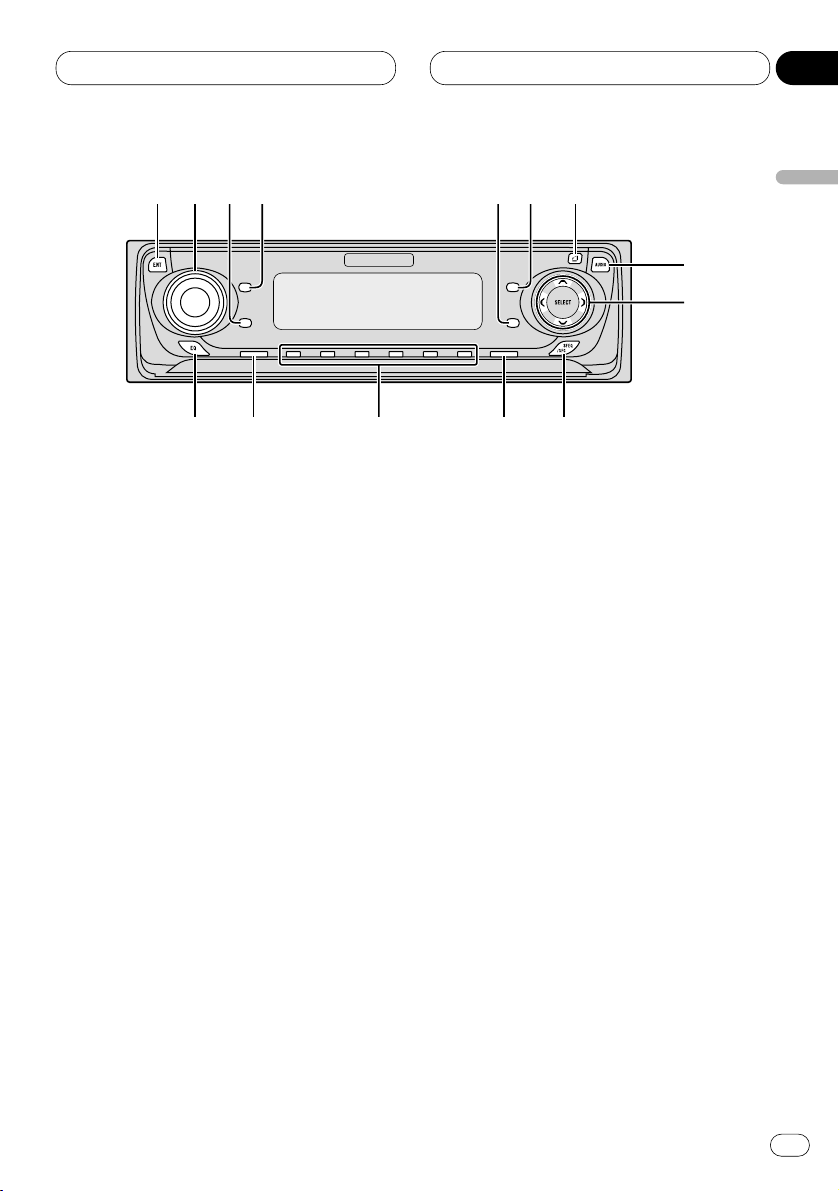
What’s what
Head unit
1 ENTERTAINMENT button
Press to change to the entertainment display.
2 VOLUME
When you press the VOLUME, it extends
outward so that it becomes easier to turn.
To retract the VOLUME, press it again.
Rotate to increase or decrease the volume.
3 CLOCK
button
Press to change to the clock display.
4
DISPLAY
button
Press to select different displays.
5
PAUSE
button
Press to pause play.
6
FUNCTION button
Press to select functions.
7 OPEN button
Press to open the front panel.
8
AUDIO button
Press to select various sound quality controls.
9 5/∞/2/3 buttons
Press to do manual seek tuning, fast forward, reverse and track search controls. Also
used for controlling functions.
0 SFEQ/SFC button
Press to select a natural sound with presence.
- BAND/ESC button
Press to select among three FM or one AM
bands and cancel the control mode of functions.
= 1–6 (PRESET TUNING) buttons
Press for preset tuning and disc number
search when using a multi-CD player.
~ SOURCE button
This unit is switched on by selecting a
source. Press to cycle through all of the
available sources.
! EQ button
Press to select various equalizer curves.
English
Español
Deutsch
Français
Italiano
Nederlands
01
Section
1
2
34
5
6
7
8
9
0-=~!
Page 14
Before You Start
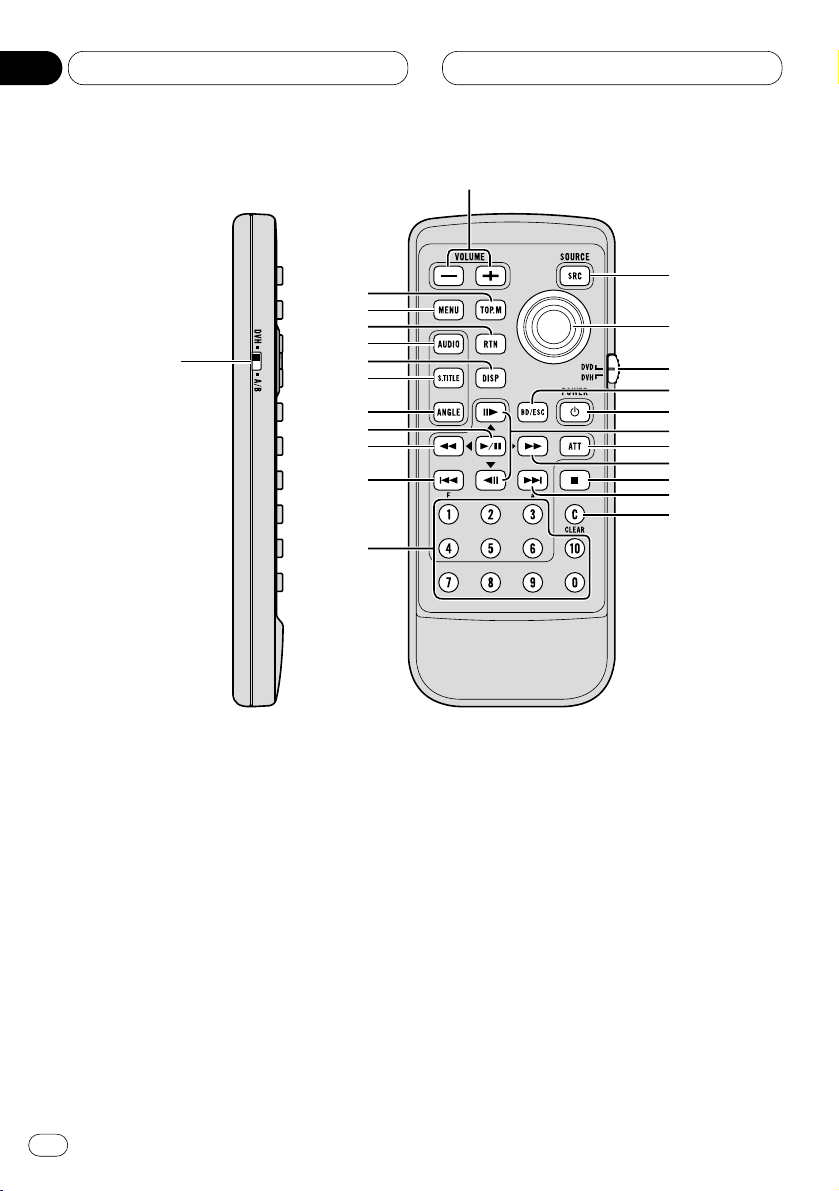
Remote control
1 Remote control selection switch
Switch to change the setting of the remote
control (refer to page 70).
2 VOLUME (+/–) button
Press to increase or decrease the volume.
3 TOP MENU button
Press to return to the top menu while the
built-in player is playing as the source.
4 MENU button
Press to display the menu while the built-in
player is playing as the source.
5 RETURN button
Press to return to the playback display when
the menu is displayed while the built-in
player is playing as the source.
6 AUDIO button
Press to change the audio language during
playback when the built-in player is playing
as the source.
7 DISPLAY button
Press to display the information display 1 or
2 while the built-in player is playing as the
source.
8 SUBTITLE button
Press to change the subtitle language during
playback when the built-in player is playing
as the source.
En
14
01
Section
1
2
r
t
y
u
i
o
;
a
s
e
w
q
p
9
8
7
6
5
4
3
d
f
Page 15

Before You Start
En
15
9 ANGLE button
Press to change the viewing angle during
playback when the built-in player is playing
as the source.
p PLAY/PAUSE (6) button
Press to switch sequentially between playback and pause play.
q REVERSE (1) button
Press to perform fast reverse playback or
seek tuning while the tuner is playing as the
source.
w PREVIOUS (4)/F button
When the remote control is set to DVD
mode, press to return to the previous track
(chapter). If the remote control is set to DVH
mode, the function menu appears on the
head unit display.
e NUMBER buttons
Press to directly select the desired track,
chapter, preset tuning and disc. Buttons 1-6
can operate the preset tuning for the tuner or
disc number search for the multi-CD player.
r SOURCE button
Press to select the desired source.
t Joystick
Move to select the setting. Click the joystick
to set the setting or select on or off.
y Remote control operation mode switch
Switch the operation mode between DVD
mode (only the built-in player can be operated by the remote control) or DVH mode (all
sources of this unit can be operated by the
remote control). (Refer to page 12.)
u BAND/ESC button
Press to select the tuner band or cancel the
setting mode.
i POWER button
Press to switch the DVD player on or off
while the DVD is operated from the rear seat.
o STEP (E/e) buttons
Press to move ahead one frame at a time
during playback. Press and hold for one
second to activate slow playback.
; ATT button
Press to quickly lower the volume level by
about 90%. Press once more to return to the
original volume level.
a FORWARD (¡) button
Press to perform fast forward of playback or
seek tuning while the tuner is playing as a
source.
s STOP (7) button
Press to stop playback while the built-in
player is playing as the source.
d NEXT (¢)/A button
When the remote control is set to DVD
mode, press to return to the previous track
(chapter). If the remote control is set to DVH
mode, the audio menu appears on the head
unit display.
f CLEAR button
Press to cancel the input number while the
NUMBER buttons are used.
English
Español
Deutsch
Français
Italiano
Nederlands
01
Section
Page 16
Before You Start
Use and care of the remote control
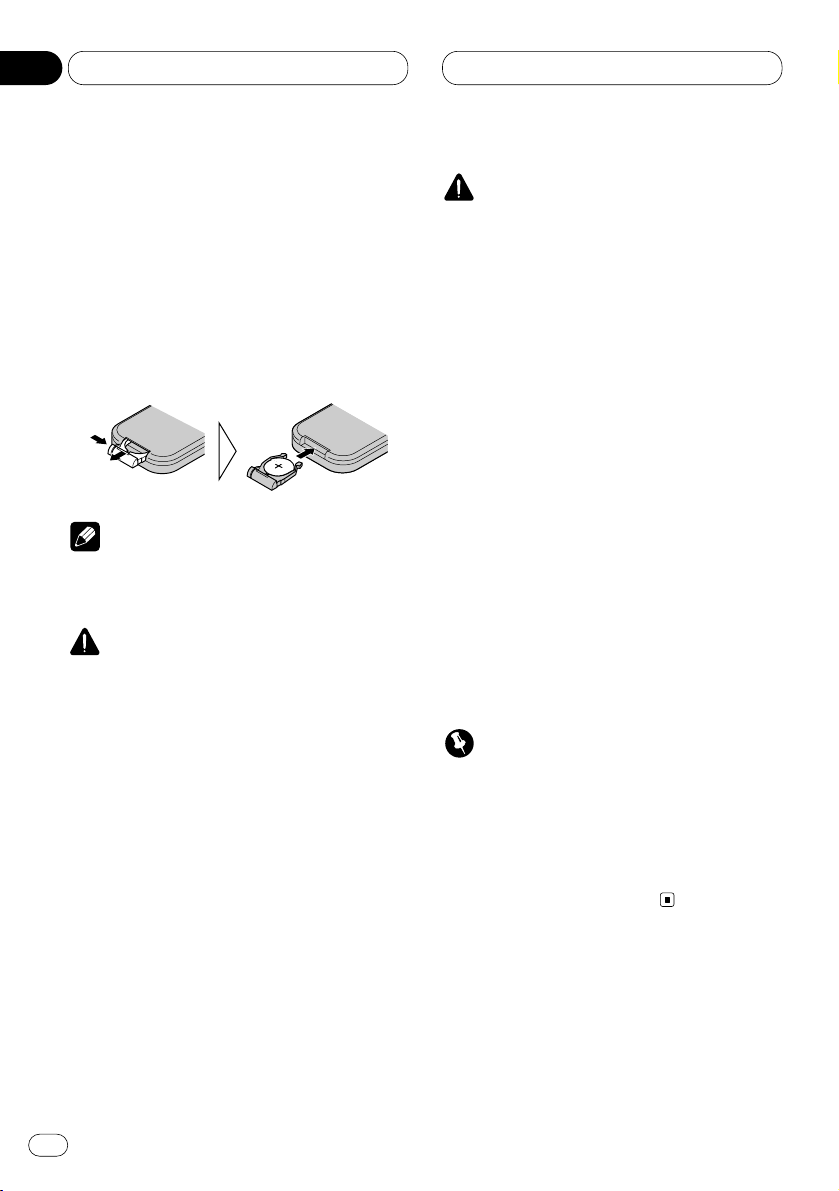
Installing the battery
Slide the tray out on the back of the remote
control and insert the battery with the plus (+)
and minus (–) poles pointing in the proper direction.
Note
• When using for the first time, pull out the film
protruding from the tray.
WARNING
• Keep the battery out of the reach of children.
Should the battery be swallowed, immediately
consult a doctor.
CAUTION
• Use only one
CR2025 (3V) lithium battery.
• Remove the battery if the remote control is not
to be used for a month or longer.
• Do not recharge, disassemble, heat or dispose of battery in fire.
• Do not handle the battery with metallic tools.
• Do not store the battery with metallic materials.
• In the event of battery leakage, wipe the
remote control completely clean and install a
new battery.
• When disposing of used batteries, please
comply with governmental regulations or
environmental public institution’s rules that
apply in your country/area.
• Always check carefully that you are loading
the battery with its plus (+) and minus (–)
poles facing in the proper directions.
Using the remote control
Point the remote control in the direction of the
front panel to operate.
Important
• Do not store the remote control in high temperatures or direct sunlight.
• The remote control may not function properly
in direct sunlight.
• Do not let the remote control fall onto the
floor, where it may become jammed under the
brake or accelerator pedals.
En
16
01
Section
Page 17
Power ON/OFF
En
17
Turning the unit on
When the remote control is set to
DVH mode
Press SOURCE to turn the unit on.
When you select a source the unit is turned on.
• Pressing SOURCE on the head unit also performs the same operation.
When the remote control is set to
DVD mode
Press POWER to turn the DVD playback on.
Notes
• Even if the source selected with this unit is
not DVD, if you switch power to this product
on with POWER, you can watch the DVD picture from this unit on the rear display.
• Regardless of whether this product is
switched on or off, you can watch the DVD
video on the rear display.
Selecting a source
You can select the source you want to listen to.
If AUTO PLAY (refer to page 74) is set to on, load
a disc into the disc loading slot to switch to the
built-in player.
When the remote control is set to
DVH mode
Press SOURCE to select a source.
Press SOURCE repeatedly to switch between
the following sources:
TV—Tuner—DVD (Built-in player)—Multi-CD
player—External unit 1—External unit 2 —AUX
• Pressing SOURCE on the head unit also performs the same operation.
Notes
• In the following cases, the sound source will
not change:
— When a product corresponding to each
source is not connected to this product.
— When no disc is set in this product.
— When no magazine is set in the multi-CD
player.
— When the AUX (auxiliary input) is set to off
(refer to page 72).
• External unit refers to a Pioneer product (such
as one available in the future) that, although
incompatible as a source, enables control of
basic functions by this product. Two external
units can be controlled by this product. When
two external units are connected, the allocation of them to external unit 1 or external unit
2 is automatically set by this product.
• When this unit’s blue/white lead is connected
to the car’s auto-antenna relay control terminal, the car’s antenna extends when this
unit’s source is switched on. To retract the
antenna, switch the source off.
English
Español
Deutsch
Français
Italiano
Nederlands
02
Section
Page 18

Power ON/OFF
Turning the unit off
When the remote control is set to
DVH mode
Press SOURCE and hold for about one second
to turn the unit off.
• Pressing and holding SOURCE on the head
unit also performs the same operation.
When the remote control is set to
DVD mode
Press POWER to turn the DVD playback off.
REAR will disappear from the OEL display.
Notes
• If the DVD playback is set to off, REAR will
disappear from the OEL display.
• When you have selected DVD (built-in player)
on the head unit, pressing POWER on the
remote control stops the DVD playback. In
this case, Power Off will be displayed on the
OEL display.
CAUTION
• When you have turned the DVD playback on
by pressing POWER, you cannot turn this
product off even if you press and hold
SOURCE. (REAR on the OEL display will be
flashing.) In this case, press POWER to turn
REAR off. When REAR has disappeared from
the OEL display, you can confirm that this
product is off.
En
18
02
Section
Page 19
Tuner
En
19
Listening to the radio
These are the basic steps necessary to operate
the radio. More advanced tuner operation is
explained starting on page 20.
Important
If you are using this unit in North, Central or
South America, reset the AM tuning step (see
Setting the AM tuning step on page 72).
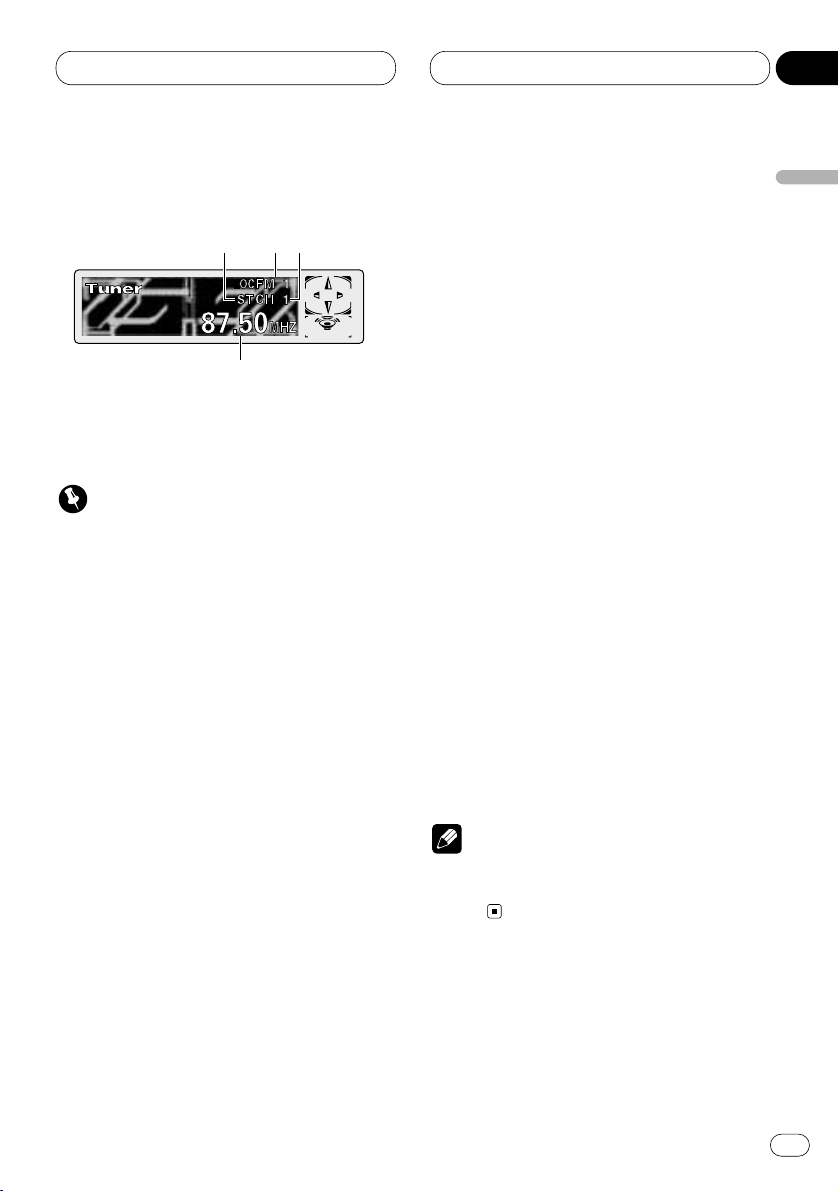
1 STEREO (ST) indicator
Shows that the frequency selected is being
broadcast in stereo.
2 BAND indicator
Shows which band the radio is tuned to, AM
or FM.
3 PRESET NUMBER indicator
Shows what preset has been selected.
4 FREQUENCY indicator
Shows to which frequency the tuner is
tuned.
1 Press SOURCE to select the tuner.
Press SOURCE until you see Tuner displayed.
• Pressing SOURCE on the head unit also performs the same operation.
2 Use
VOLUME to adjust the sound level.
Press VOLUME to increase or decrease the vol-
ume.
• Rotating VOLUME on the head unit also
increases or decreases the volume.
3 Press BAND/ESC
to select a band.
Press BAND/ESC until the desired band is dis-
played, FM1, FM2, FM3 for FM or AM.
• Pressing BAND/ESC on the head unit also
performs the same operation.
4 To perform manual tuning, press 1 or
¡ with quick presses.
The frequencies move up or down step by step.
• Pressing 2 or 3 on the head unit also performs the same operation.
5 To perform seek tuning, press and hold 1
or ¡ for about one second and release.
The tuner will scan the frequencies until a
broadcast strong enough for good reception is
found.
• You can cancel seek tuning by pressing either
1 or ¡ with a quick press.
• If you press and hold 1 or ¡ you can skip
broadcasting stations. Seek tuning starts as
soon as you release the buttons.
• Pressing 2 or 3 on the head unit also performs the same operation.
Note
• When the frequency selected is being broadcast in stereo the STEREO (ST) indicator will
light.
123
4
English
Español
Deutsch
Français
Italiano
Nederlands
03
Section
Page 20
Tuner
Introduction of advanced tuner
operation
1 FUNCTION display
Shows the function status.
Press F to display the function names.
Press F repeatedly to switch between the follow-
ing functions:
BSM (best stations memory)—LOCAL (local
seek tuning)
• Pressing FUNCTION on the head unit also
performs the same operation.
• To return to the frequency display, press
BAND/ESC.
Note
• If you do not operate the function within about
30 seconds, the display is automatically
returned to the frequency display.
Storing and recalling broadcast
frequencies
If you press any of the NUMBER (1-6) buttons
you can easily store up to six broadcast frequencies for later recall with the touch of a button.
When you find a frequency that you want to
store in memory press a NUMBER button and
hold until the preset number stops flashing.
The number you have pressed will flash in the
PRESET NUMBER indicator and then remain lit.
The selected radio station frequency has been
stored in memory.
The next time you press the same NUMBER (1-6)
buttons the radio station frequency is recalled
from memory.
• Pressing PRESET TUNING on the head unit
also performs the same operation.
Notes
• Up to 18 FM stations, 6 for each of the three
FM bands, and 6 AM stations can be stored in
memory.
• You can also use e and E (5 and ∞ on the
head unit) to recall radio station frequencies
assigned to NUMBER (1-6) buttons (PRESET
TUNING on the head unit).
1
En
20
03
Section
Page 21
Tuner
En
21
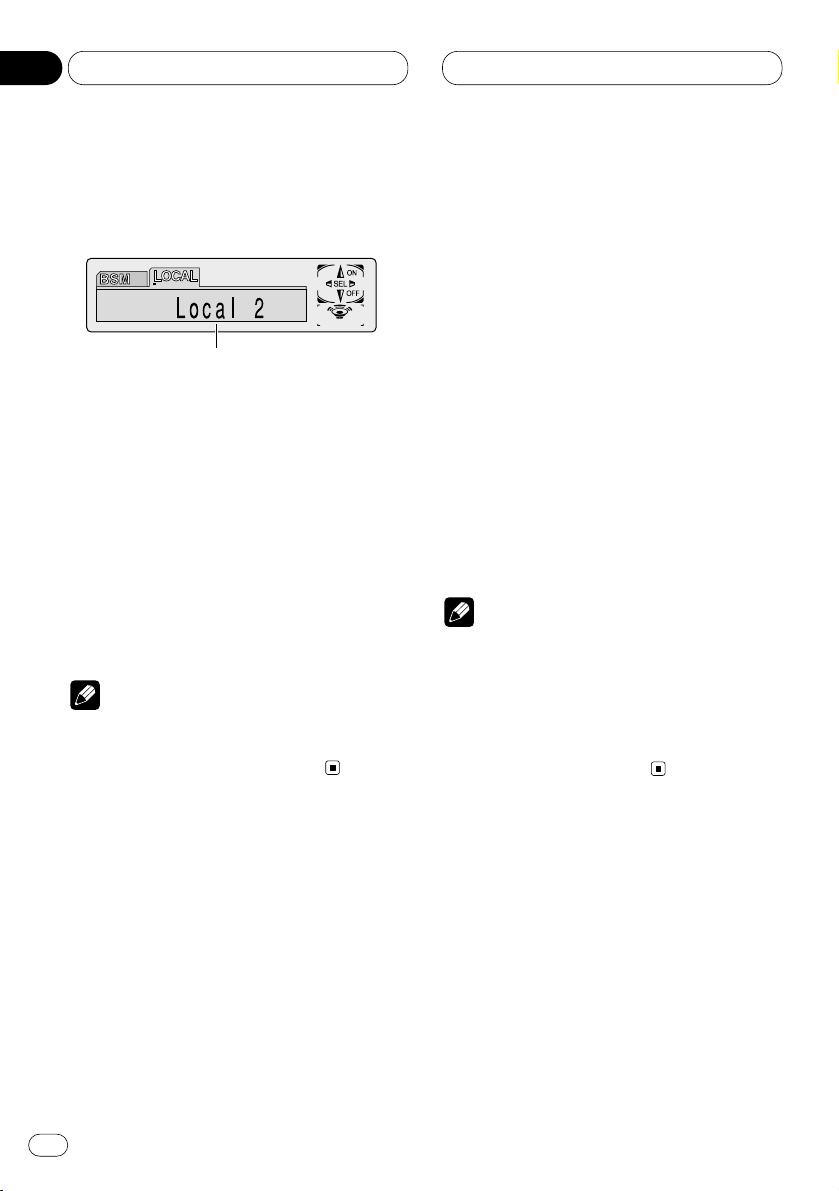
Tuning in strong signals
Local seek tuning lets you tune in only those
radio stations with sufficiently strong signals for
good reception.
1 Press
F to select LOCAL.
Press
F until Local appears in the display.
• Pressing FUNCTION on the head unit also
performs the same operation.
2 Press E to turn local seek tuning on.
Local seek sensitivity (e.g., Local 2) appears in
the display.
• Pressing 5 on the head unit also performs
the same operation.
3 Press 1 or ¡ to set the sensitivity.
There are four levels of sensitivity for FM and
two levels for AM:
FM: Local 1—Local 2—Local 3—Local 4
AM: Local 1—Local 2
The Local 4 setting allows reception of only the
strongest stations, while lower settings let you
receive progressively weaker stations.
• Pressing 2 or 3 on the head unit also performs the same operation.
4 When you want to return to normal seek
tuning, press e to turn local seek tuning off.
Local :OFF appears in the display.
• Pressing ∞ on the head unit also performs
the same operation.
Storing the strongest broadcast
frequencies
BSM (best stations memory) lets you automatically store the six strongest broadcast frequencies under NUMBER (1-6) buttons (PRESET
TUNING on the head unit) and once stored
there you can tune in to those frequencies with
the touch of a button.
1 Press F to select BSM.
Press F until BSM appears in the display.
• Pressing FUNCTION on the head unit also
performs the same operation.
2 Press E to turn
BSM on.
BSM begins to flash. While BSM is flashing the
six strongest broadcast frequencies will be
stored under NUMBER (1-6) buttons (PRESET
TUNING on the head unit) in order of their sig-
nal strength. When finished, BSM stops flashing.
• To cancel the storage process, press e.
• Pressing 5 or ∞ on the head unit also performs the same operation.
Note
• Storing broadcast frequencies with BSM may
replace the broadcast frequencies that you
have saved using NUMBER (1-6) buttons (PRE-
SET TUNING on the head unit).
English
Español
Deutsch
Français
Italiano
Nederlands
03
Section
Page 22
Playing DVDs on the
built-in player
Playing a DVD
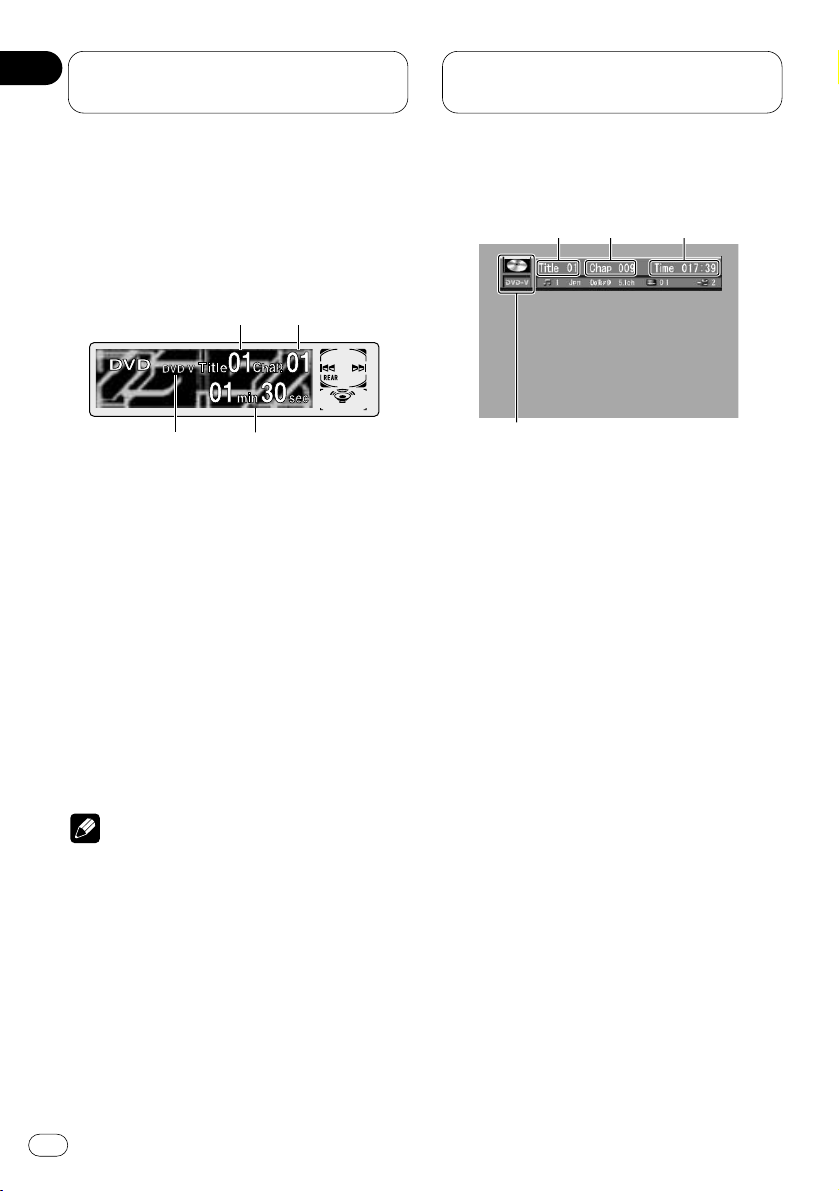
OEL display
These are the basic steps necessary to play a
DVD with your built-in player. More advanced
DVD operation is explained starting on page 28.
1 DVD.V indicator
Shows when a DVD disc is playing.
2 TITLE NUMBER indicator
Shows the title currently playing.
3
CHAPTER NUMBER indicator
Shows the chapter currently playing.
4 PLAY TIME indicator
Shows the elapsed playing time of the current chapter.
Notes
• If the DVD playback is on, REAR will be displayed on the OEL display.
• If you set AUTO PLAY :OFF, REAR will be displayed on the OEL display regardless of
whether the rear display is connected to this
product or not.
Information display
When the separately sold display is connected
to this product, the listed information will
appear on it.
1 DVD.V indicator
Shows when a DVD disc is playing.
2 TITLE NUMBER indicator
Shows the title currently playing.
3
CHAPTER NUMBER indicator
Shows the chapter currently playing.
4 PLAY TIME indicator
Shows the elapsed playing time of the current chapter.
1
23
4
1
4
32
En
22
04
Section
Page 23
Playing DVDs on the
built-in player
En
23
Basic operation of DVD
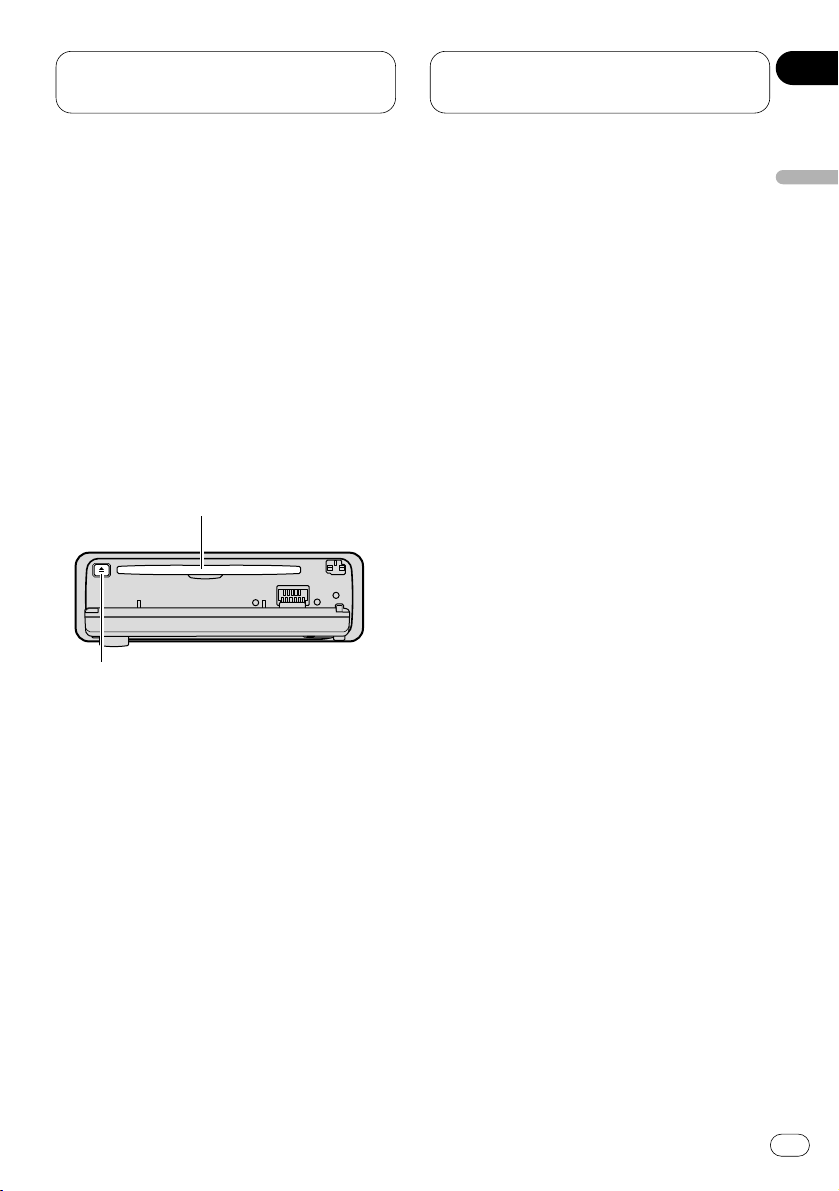
1 Press
OPEN on the head unit to open the
front panel.
Disc loading slot appears.
• After inserting a DVD, press
SOURCE to
select the built-in player.
• Pressing SOURCE on the head unit also performs the same operation.
2 Insert a DVD into the Disc loading slot.
When you set
AUTO PLAY :ON, playback will
automatically start. If you set AUTO PLAY :OFF,
press SOURCE to select DVD (refer to page 17).
Disc loading slot
EJECT button
• You can eject a DVD by pressing EJECT on the
head unit.
• To avoid a malfunction, make sure that no
metal object comes into contact with the front
panel is open.
3 After a DVD has been inserted, close the
front panel.
4 Use the joystick to select the desired
MENU option.
When the DVD offers a menu, a menu is displayed.
5 Click the joystick.
Playback starts from the selected menu option.
• You can display the menu by pressing the
MENU or TOP MENU while a disc is playing.
Pressing either of these buttons again lets you
start playback from the location selected from
the menu. For details, refer to the instructions
provided with the disc.
• The way to display the menu differs depending on the disc.
6 Use VOLUME to adjust the sound level.
Press VOLUME to increase or decrease the vol-
ume level.
• Rotating VOLUME on the head unit also
increases or decreases the volume.
7 To skip back or forward to another chapter,
press 4 or ¢.
Chapter numbers are displayed for 8 seconds.
• Pressing 2 or 3 on the head unit also performs the same operation.
• If the remote control is set to DVH mode,
4 and ¢ do not operate. In this case,
press 1 or ¡ to skip to another chapter.
• Using NUMBER buttons also performs the
same operation. For more details, refer to
Specifying chapter on page 24.
English
Español
Deutsch
Français
Italiano
Nederlands
04
Section
Page 24
Playing DVDs on the
built-in player
8 To perform fast forward or reverse, press
and hold 1 or ¡.
• Pressing and holding 2 or 3 on the head unit
also performs the same operation.
• If you continue pressing 1 or ¡ for 5
seconds, the color of the fast reverse/fast
forward mark ( / ) changes from
white to blue. When this happens, fast
reverse/fast forward continues even if you
release 1 or ¡. To resume playback at a
desired point, press 6.
• Fast forward/fast reverse may not be possible at certain locations on some discs. If
this happens, normal playback automatically resumes.
Notes
• The built-in player plays one, standard,
12-cm or 8-cm (single) DVD at a time. Do not
use an adapter when playing 8-cm DVDs.
• Do not insert anything other than a
DVD/Video CD/CD into the Disc loading slot.
• If you cannot insert a disc completely or if
after you insert a disc the disc does not play,
check that the label side of the disc is up.
Press EJECT to eject the disc, and check the
disc for damage before inserting the disc
again.
• If the built-in player does not operate properly,
an error message such as ERROR-11 may be
displayed. Refer to Error messages on page 85.
Specifying title (DVD mode)
Press NUMBER buttons corresponding to a
desired title number when the disc is stopped.
Title number is displayed for 8 seconds and
playback starts from the selected title.
• To select 3, press 3.
• To select 10, press 10 and 0 in order.
• To select 23, press 10, 10 and 3 in order.
Note
• You cannot select titles by using NUMBER
buttons when the remote control is set to DVH
mode.
Specifying chapter (DVD mode)
Press NUMBER buttons corresponding to a
desired chapter number during playback.
Chapter number is displayed for 8 seconds and
playback starts from the selected chapter.
• To select 3, press 3.
• To select 10, press 10 and 0 in order.
• To select 23, press 10, 10 and 3 in order.
Note
• You cannot select chapters by using NUMBER
buttons when the remote control is set to DVH
mode.
En
24
04
Section
Page 25
Playing DVDs on the
built-in player
En
25
Stopping playback
• This function is operated by using the remote
control.
Press 7.
Note
• When you stop DVD playback by pressing 7,
that location on the disc is memorized
enabling playback from that point when you
play the disc again.
Frame-by-frame playback
This lets you move ahead one frame at a time
during playback.
• This function is operated by using the remote
control.
Press E.
Each time you press E, you move ahead one
frame.
• To return to normal playback, press 6.
Still playback
This lets you pause playback and view a still
picture.
Press 6 during playback.
The still mark ( ) is displayed for 4 seconds
and playback is paused letting you view a still
image.
• Pressing PAUSE on the head unit also per-
forms the same operation.
• To return to normal playback, press 6 once
more.
Slow motion playback
This lets you slow down playback speed.
• This function is operated by using the remote
control.
Press E for 1 second during playback.
The slow playback mark ( ) is displayed, forward slow motion playback begins.
• To return to normal playback, press 6.
Notes
• There is no sound during still, frame-by-frame
or slow motion playback.
• Depending on the disc and the playback location on the disc, the prohibited mark “ ” may
be displayed indicating that still, frame-byframe and slow motion playback are not possible.
• With some discs, images may be unclear
during frame-by-frame and slow motion playback.
• Reverse frame-by-frame playback and reverse
slow motion playback are not possible.
English
Español
Deutsch
Français
Italiano
Nederlands
04
Section
Page 26
Playing DVDs on the
built-in player
Changing audio language
during playback (Multi-audio)
DVDs can provide audio playback with different
languages and different systems (Dolby Digital,
DTS etc.). With DVDs featuring multi-audio
recordings, you can switch between
languages/audio systems during playback.
• This function is operated by using the remote
control.
1 Press AUDIO during playback.
The audio selection mark ( ) is displayed for 8
seconds.
2 Press
AUDIO while the audio selection
mark is displayed.
The audio changes each time you press
AUDIO.
Notes
• This function only operates with DVDs featuring multi-audio recordings.
• The number in the “ ” mark on a DVD’s
package indicates the number of recorded
languages/audio systems.
• With some DVDs, switching between
languages/audio systems may only be possible using a menu display.
• You can also switch between languages/audio
systems using SET UP MENU. For details, see
Setting the audio language on page 64.
• Only digital output of DTS audio is possible. If
this unit’s optical digital outputs are not connected, DTS audio will not be output, so select
an audio setting other than DTS.
• While the audio selection mark is displayed,
you can also switch to a desired audio language number using
NUMBER buttons.
• Display indications such as Dolby D and
5.1ch indicate the audio system recorded on
the DVD. Depending on the setting, playback
may not be with the same audio system as
that indicated.
Changing the subtitle language
during playback (Multi-subtitle)
With DVDs featuring multi-subtitle recordings,
you can switch between subtitle languages
during playback.
• This function is operated by using the remote
control.
1 Press SUBTITLE during playback.
The subtitle selection mark ( ) is displayed
for 8 seconds.
2 Press SUBTITLE while the subtitle selection mark is displayed.
The subtitle language changes each time you
press SUBTITLE.
Notes
• This function only operates with DVDs featuring multi-subtitle recordings.
• The number in the “ ” mark on a DVD’s
package indicates the number of recorded
subtitle languages.
2
2
En
26
04
Section
Page 27
Playing DVDs on the
built-in player
En
27
• With some DVDs, switching between subtitle
languages may only be possible using a menu
display.
• You can also switch between subtitle
languages using SET UP MENU. For details,
see Setting the subtitle on page 63.
• While the subtitle selection mark is displayed,
you can also switch to a desired subtitle language number using the NUMBER buttons. At
this time, you can also switch subtitle display
OFF by pressing CLEAR.
Changing the viewing angle
during playback (Multi-angle)
With DVDs featuring multi-angle (scenes shot
from multiple angles) recordings, you can
switch among viewing angles during playback.
About scenes that let you change the
viewing angle
During playback of a scene shot from multiple
angles on this unit, the angle mark ( ) is
displayed in the bottom right of the screen.
Switch angle mark display ON/OFF using the
SET UP MENU. For details, see Setting angle
mark display on page 67.
• This function is operated by using the remote
control.
1 Press ANGLE during playback of a scene
shot from multiple angles.
The angle mark ( ) and angle number ( )
are displayed for 8 seconds.
2 Press ANGLE while the angle mark and
angle number are displayed.
The angle changes each time you press ANGLE.
Notes
• This function only operates with DVDs featuring multi-angle recordings.
• The “ ” mark on a DVD’s package indicates
it features multi-angle scenes. The number in
the “ ” mark indicates the number of
angles from which scenes were shot.
• You cannot switch angles during slow motion
playback.
• If you press ANGLE during fast forward/fast
reverse or pause, fast forward/fast reverse or
pause is canceled and normal playback
resumes but the viewing angle does not
change.
• While the angle mark and angle number are
displayed, you can also switch to a desired
angle number using the NUMBER buttons.
3
3
English
Español
Deutsch
Français
Italiano
Nederlands
04
Section
Page 28

Playing DVDs on the
built-in player
Operating from the information
display 1 (DVH & DVD mode)
This display lets you use the search function to
specify a title or chapter to search for a desired
scene, use the time search function to specify a
time to search for a desired scene, select the
desired audio and subtitle language, and select
the angle.
1 Information display 1
Shows the function status.
Press
DISPLAY to switch the information dis-
play.
Press DISPLAY repeatedly to switch between
the following display modes:
Information display 1—Information display 2—
Nomal playback display
Notes
• You can perform title, chapter and time settings with either the information display 1 or
2. This manual explains how to use the information display 1 to perform title, chapter and
time settings.
• Pressing DISPLAY during fast forward/reverse
returns you to normal playback.
Searching for a desired scene, starting
playback from a specified time
You can use the search function to search for a
desired scene by specifying a title or chapter,
and the time search function to specify the time
on a disc at which play starts.
1 Move the joystick left/right to select a
desired option.
The selected option is indicated in blue.
2 Press NUMBER buttons to input the desired
number.
For titles and chapters
• To select 3, press 3.
• To select 10, press 1 and 0 in order.
• To select 23, press 2 and 3 in order.
• To jump 10 titles or chapters ahead of the
selected one, press 10.
For time (Time search)
• To select 21 minutes 43 seconds, press 2, 1, 4
and 3 in order.
• To select 1 hour 11 minutes, convert the time
into 71 minutes 00 seconds and press buttons
7, 1, 0 and 0 in order.
• To jump 10 seconds ahead of the selected
time, press 10.
Notes
• Pressing CLEAR cancels the input number.
• You can also select titles and chapters by
moving the joystick up/down.
• You can not select titles and chapters by using
NUMBER buttons when the remote control is
set to DVH mode. In this case, use joystick to
select titles and chapters.
1
En
28
04
Section
Page 29
Playing DVDs on the
built-in player
En
29
3 While the input number is displayed, click
the joystick.
This starts playback from the selected scene.
Notes
• With discs featuring a menu, you can also
press MENU or TOP MENU and then make
selections from the displayed menu.
• With some discs, the prohibited mark “ ”
may be displayed, indicating that titles, chapters and time cannot be specified.
• Chapter search and time search are not possible when disc playback has been stopped.
Direct search
Even without using an information display you
can start playback from a specified title or chapter. For details, see page 24.
Selecting audio, subtitle and angle
You can perform audio (language, stereo, audio
type as Dolby Digital etc.), subtitle language
and angle selection.
1 Move the joystick left/right to select a
desired option.
The selected option is indicated in blue.
2 Move the joystick up/down to switch to
the desired setting.
This switches you to the selected setting.
For Audio
Selection options switch as follows:
Audio 1—Audio 2—Audio 3
For Subtitles
Selection options switch as follows:
Subtitles 1—Subtitles 2—Subtitles OFF
For Angle
Selection options switch as follows:
Angle 1—Angle 2—Angle 3
Notes
• The number of switching options depends on
how many options are recorded on the DVD.
• You can switch audio, subtitle and angle during playback using the respective buttons.
• You can also switch settings by inputting
numbers with the number buttons.
• Display indications such as Dolby D and
5.1ch indicate the audio system recorded on
the DVD. Depending on the setting, playback
may not be with the same audio system as
that indicated.
English
Español
Deutsch
Français
Italiano
Nederlands
04
Section
Page 30

Playing DVDs on the
built-in player
Operating from the information
display 2 (DVH & DVD mode)
In addition to the search and time search functions of the information display 1, this display
lets you select the range for repeat play, and
switch audio output.
1 Information display 2
Shows the function status.
Press
DISPLAY to switch the information dis-
play.
Press DISPLAY repeatedly to switch between
the following display modes:
Information display 1—Information display 2—
Nomal playback display
Note
• Pressing DISPLAY during fast forward/reverse
returns you to normal playback.
Selecting repeat range
You can choose between repeat play of a disc,
title or chapter.
1 Move the joystick left/right to select the
repeat range option.
The repeat range option is indicated in blue.
2 Move the joystick up/down to switch to
the desired setting.
This switches you to the selected setting.
Disc (disc)—Title (title)—Chapter (chapter)
• When you select Disc (disc), playback of the
entire disc is repeated. When you select Title
(title) or Chapter (chapter), playback of that title
or chapter only is repeated.
Note
• When the repeat play of a DVD disc is
selected, play stops and depending on the
disc a menu is displayed upon completion of
play of an entire disc once through.
Selecting audio output
You can select between stereo and monaural
audio output.
1 Move the joystick left/right to select the
audio option.
The audio option is indicated in blue.
2 Move the joystick up/down to switch to
the desired setting.
This switches you to the selected setting.
L+R (left and right)—L (left)—R (right)
• This function is effective only on dual mono
mode sound.
1
En
30
04
Section
Page 31

Playing DVDs on the
built-in player
En
31
Operating from the function display (DVH mode)
Repeat and pause functions can also be operated from the head unit’s OEL display.
1
FUNCTION display
Shows the function status.
Press F to display the function names.
Press F repeatedly to switch between the following functions:
PMODE (repeat play)—PAUSE (pause)
• Pressing FUNCTION on the head unit also
performs the same operation.
• To return to the playback display, press
BAND/ESC.
Note
• If you do not operate the function within about
30 seconds, the display is automatically
returned to the playback display.
Repeating play
There are three repeat play ranges for the builtin player (DVD): DISC (disc repeat), CHAP
(chapter repeat), and TITLE (title repeat).
1 Press
F to select PMODE.
Press
F until Repeat appears in the display.
• Pressing FUNCTION on the head unit also
performs the same operation.
2 Press 1 or ¡ to select the repeat range.
Press 1 or ¡ until the desired repeat range
appears in the display.
• DISC — Repeat the current disc
• TITLE — Repeat the current title
• CHAP — Repeat the current chapter
• Pressing 2 or 3 on the head unit also performs the same operation.
Note
• If you perform chapter search or fast
forward/reverse during CHAP (chapter
repeat), the repeat play range changes to
DISC (disc repeat).
Pausing playback
This lets you pause playback and view a still
picture.
1 Press
F to select
PAUSE.
Press
F until Pause appears in the display.
• Pressing FUNCTION on the head unit also
performs the same operation.
2 Press E to turn pause on.
Pause :ON appears in the display. Play of the
current track pauses.
• Pressing 5 on the head unit also performs
the same operation.
3 Press e to turn pause off.
Pause :OFF appears in the display. Play will
resume at the same point that you turned pause
on.
• Pressing ∞ on the head unit also performs the
same operation.
1
English
Español
Deutsch
Français
Italiano
Nederlands
04
Section
Page 32

Playing Video CDs on
the built-in player
Playing a Video CD
OEL display
These are the basic steps necessary to play a
Video CD with your built-in player. More
advanced Video CD operation is explained starting on page 35.
1 VCD indicator
Shows when a Video CD disc is playing.
2 TRACK NUMBER indicator
Shows the track currently playing.
3
PLAY TIME
indicator
Shows the elapsed playing time of the current track.
Notes
• If the Video CD playback is on,
REAR will be
displayed on the OEL display.
• If you set AUTO PLAY :OFF, REAR will be displayed on the OEL display regardless of
whether the rear display is connected to this
product or not.
Information display
When the separately sold display is connected
to this product, the listed information will
appear on it.
1 VCD indicator
Shows when a Video CD disc is playing.
2 TRACK NUMBER indicator
Shows the track currently playing.
3
PLAY TIME indicator
Shows the elapsed playing time of the current track.
1
2
3
1
3
2
En
32
05
Section
Page 33

Playing Video CDs on
the built-in player
En
33
Basic operation of Video CD
1 Press
OPEN on the head unit to open the
front panel.
Disc loading slot appears.
• After inserting a Video CD, press
SOURCE to
select the built-in player.
• Pressing SOURCE on the head unit also performs the same operation.
2 Insert a Video CD into the Disc loading
slot.
When you set
AUTO PLAY :ON, playback will
automatically start. If you set AUTO PLAY :OFF,
press SOURCE to select DVD (refer to page 17).
Disc loading slot
EJECT button
• You can eject a Video CD by pressing EJECT
on the head unit.
• To avoid a malfunction, make sure that no
metal object comes into contact with the front
panel is open.
3 After a Video CD has been inserted, close
the front panel.
4 Use
NUMBER buttons to select the desired
MENU option.
When a Video CD featuring the PBC (Playback
Control) function starts playing, a menu is displayed.
• Playback starts from the selected menu
option.
• Operation with the joystick is not possible.
• You can display the menu by pressing
RETURN while PBC playback. For details,
refer to the instructions provided with the
disc.
Notes
• When menu are two or more pages long,
press 4 or ¢ to switch between displays.
• If the remote control is set to DVH mode, 4
and ¢ do not operate. In this case, press
1 or ¡.
• To play a disc without using a menu (without
PBC playback), when the disc is stopped
press the appropriate number button to select
the desired track. To return to PBC playback,
stop playback and press 6.
5 Use VOLUME to adjust the sound level.
Press VOLUME to increase or decrease the vol-
ume level.
• Rotating VOLUME on the head unit also
increases or decreases the volume.
6 To skip back or forward to another track,
press 4 or ¢.
Track numbers are displayed for 8 seconds.
• Pressing 2 or 3 on the head unit also per-
forms the same operation.
• If the remote control is set to DVH mode,
4 and ¢ do not operate. In this case,
press 1 or ¡ to skip to another track.
• Using NUMBER buttons also performs the
same operation. For more details, refer to
Specifying track on page 34.
English
Español
Deutsch
Français
Italiano
Nederlands
05
Section
Page 34

Playing Video CDs on
the built-in player
7 To perform fast forward or reverse, press
and hold 1 or ¡.
• Pressing and holding 2 or 3 on the head unit
also performs the same operation.
• If you continue pressing 1 or ¡ for 5
seconds, the color of the fast reverse/fast
forward mark ( / ) changes from
white to blue. When this happens, fast
reverse/fast forward continues even if you
release 1 or ¡. To resume playback at a
desired point, press 6.
• Fast forward/fast reverse may not be possible at certain locations on some discs. If
this happens, normal playback automatically resumes.
Notes
• The built-in player plays one, standard,
12-cm or 8-cm (single) Video CD at a time. Do
not use an adapter when playing 8-cm Video
CDs.
• Do not insert anything other than a
DVD/Video CD/CD into the disc loading slot.
• If you cannot insert a disc completely or if
after you insert a disc the disc does not play,
check that the label side of the disc is up.
Press EJECT to eject the disc, and check the
disc for damage before inserting the disc
again.
• If the built-in player does not operate properly,
an error message such as ERROR-11 may be
displayed. Refer to Error messages on page 85.
Stopping playback
• This function is operated by using the remote
control.
Press 7.
Note
• When you stop Video CD playback (during
PBC playback only) by pressing 7, that location on the disc is memorized enabling playback from that point when you play the disc
again.
Specifying track (DVD mode)
• This function is operated by using the remote
control.
Press NUMBER buttons corresponding to a
desired track number.
Track number is displayed for 8 seconds and
playback starts from the selected track.
• To select 3, press button 3.
• To select 10, press buttons 10 and 0 in order.
• To select 23, press buttons 10, 10 and 3 in
order.
Notes
• With some discs, the prohibited mark “ ”
may be displayed and operation may not be
possible.
• With Video CD, direct search is not possible
during PBC playback.
• You cannot select tracks by using NUMBER
buttons when the remote control is set to DVH
mode.
En
34
05
Section
Page 35

Playing Video CDs on
the built-in player
En
35
Still playback
This lets you pause playback and view a still
picture.
Press 6 during playback.
The still mark ( ) is displayed for 4 seconds
and playback is paused letting you view a still
image.
• Pressing PAUSE on the head unit also per-
forms the same operation.
• To return to normal playback, press 6 once
more.
Operating from the information
display (DVH & DVD mode)
This display lets you use the search function to
specify a track to search for desired scenes, use
the time search function to specify a time to
search for a desired scene, switch audio output,
and select the range for repeat play. During
playback of Video CDs featuring PBC (Playback
Control), PLAYBACK CONTROL ON is displayed.
During such playback, search and time search
functions cannot be used nor can you select the
range for repeat play. (See page 36.)
• To play a disc without using a menu (without
PBC playback), when the disc is stopped
press the appropriate number button to select
the desired track. To return to PBC playback,
stop playback and press 6.
1 Information display
Shows the function status.
Press
DISPLAY to switch the information dis-
play.
Press DISPLAY repeatedly to switch between
the following display modes:
Information display—Nomal playback display
1
English
Español
Deutsch
Français
Italiano
Nederlands
05
Section
Page 36

Playing Video CDs on
the built-in player
Searching for a desired scene, starting
playback from a specified time
You can use the search function to search for a
desired scene by specifying a track, and the
time search function to specify the time on a
disc at which play starts.
1 Move the joystick left/right to select a
desired option.
The selected option is indicated in blue.
2 Press NUMBER buttons to input the desired
number.
For Tracks
• To select 3, press 3.
• To select 10, press 1 and 0 in order.
• To select 23, press 2 and 3 in order.
• To jump 10 tracks ahead of the selected
one, press 10.
Notes
• You can also select tracks by moving the joystick up/down.
• You cannot select tracks by using NUMBER
buttons when the remote control is set to DVH
mode. In this case, use the joystick to select
tracks.
For Time (Time Search) (DVD mode)
• To select 21 minutes 43 seconds, press 2, 1, 4
and 3 in order.
• To select 1 hour 11 minutes, convert the time
into 71 minutes 00 seconds and press 7, 1, 0
and 0 in order.
• To jump 10 seconds ahead of the selected
time, press 10.
Note
• Pressing CLEAR cancels the input number.
3 While the input number is displayed, click
the joystick.
This starts playback from the selected scene.
Note
• Time search is not possible while the disc is
stopped.
Direct Search
Even without using an information display you
can start playback of a desired track. For details,
see page 34.
Selecting repeat range
You can choose between Repeat play of a disc or
a track.
1 Move the joystick left/right to select the
repeat range option.
The repeat range option is indicated in blue.
En
36
05
Section
Page 37

Playing Video CDs on
the built-in player
En
37
2 Move the joystick up/down to switch to
the desired setting.
This switches you to the selected setting.
Disc (disc)—Track (track)
• When you select Disc (disc), playback of the
entire disc is repeated. When you select Track
(track), playback of that track only is repeated.
Note
• When the repeat play of a Video CD disc is
selected, play stops and depending on the
disc a menu is displayed upon completion of
play of an entire disc once through.
Selecting audio output
You can select between stereo and monaural
audio output.
1 Move the joystick left/right to select the
audio option.
The audio option is indicated in blue.
2 Move the joystick up/down to switch to
the desired setting.
This switches you to the selected setting.
L+R (left and right)—L (left)—R (right)
Operating from the function display (DVH mode)
Repeat and pause functions can also be operated from the head unit’s OEL display.
1
FUNCTION display
Shows the function status.
Press F to display the function names.
Press F repeatedly to switch between the following functions:
RPT (repeat play)—PAUSE (pause)
• Pressing FUNCTION on the head unit also
performs the same operation.
• To return to the playback display, press
BAND/ESC.
Note
• If you do not operate the function within about
30 seconds, the display is automatically
returned to the playback display.
Repeating play
Repeat play lets you hear the same track over
again.
1 Press
F to select RPT.
Press
F until Repeat appears in the display.
• Pressing FUNCTION on the head unit also
performs the same operation.
1
English
Español
Deutsch
Français
Italiano
Nederlands
05
Section
Page 38

Playing Video CDs on
the built-in player
2 Press E to turn repeat play on.
Repeat :ON appears in the display. The track
presently playing will play and then repeat.
• Pressing 5 on the head unit also performs
the same operation.
3 Press e to turn repeat play off.
Repeat :OFF appears in the display. The track
presently playing will continue to play and then
play the next track.
• Pressing ∞ on the head unit also performs the
same operation.
Note
• If you perform track search or fast
forward/reverse, repeat play is automatically
canceled.
Pausing playback
This lets you pause playback and view a still
picture.
1 Press
F to select PAUSE.
Press
F until Pause appears in the display.
• Pressing FUNCTION on the head unit also
performs the same operation.
2 Press E to turn pause on.
Pause :ON appears in the display. Play of the
current track pauses.
• Pressing 5 on the head unit also performs
the same operation.
3 Press e to turn pause off.
Pause :OFF appears in the display. Play will
resume at the same point that you turned pause
on.
• Pressing ∞ on the head unit also performs the
same operation.
En
38
05
Section
Page 39

Playing CDs on the
built-in player
En
39
Playing a CD
OEL display
These are the basic steps necessary to play a
CD with your built-in player. More advanced CD
operation is explained starting on page 41.
1 CD indicator
Shows when the CD disc is playing.
2 TRACK NUMBER indicator
Shows the track currently playing.
3
PLAY TIME
indicator
Shows the elapsed playing time of the current track.
Notes
• If the CD playback is on,
REAR will be dis-
played on the OEL display.
• If you set AUTO PLAY :OFF, REAR will be displayed on the OEL display regardless of
whether the rear display is connected to this
product or not.
Information display
When the separately sold display is connected
to this product, the listed information will
appear on it.
1 CD indicator
Shows when a CD disc is playing.
2 TRACK NUMBER indicator
Shows the track currently playing.
3
PLAY TIME indicator
Shows the elapsed playing time of the current track.
1
2
3
1
3
2
English
Español
Deutsch
Français
Italiano
Nederlands
06
Section
Page 40

Playing CDs on the
built-in player
Basic operation of CD
1 Press
OPEN on the head unit to open the
front panel.
Disc loading slot appears.
• After inserting a CD, press
SOURCE to select
the built-in player.
• Pressing SOURCE on the head unit also performs the same operation.
2 Insert a CD into the Disc loading slot.
When you set
AUTO PLAY :ON, playback will
automatically start. If you set AUTO PLAY :OFF,
press SOURCE to select DVD (refer to page 17).
Disc loading slot
EJECT button
• You can eject a CD by pressing EJECT on the
head unit.
• To avoid a malfunction, make sure that no
metal object comes into contact with the front
panel is open.
3 After a CD has been inserted, close the
front panel.
4 Use
VOLUME to adjust the sound level.
Press VOLUME to increase or decrease the vol-
ume level.
• Rotating VOLUME on the head unit also
increases or decreases the volume.
5 To skip back or forward to another track,
press 4 or ¢.
Track numbers are displayed for 8 seconds.
• Pressing 2 or 3 on the head unit also performs the same operation.
• If the remote control is set to
DVH mode,
4 and ¢ do not operate. In this case,
press 1 or ¡ to skip to another track.
6 To perform fast forward or reverse, press
and hold 1 or ¡.
• Pressing and holding 2 or 3 on the head unit
also performs the same operation.
• If you continue pressing 1 or ¡ for 5
seconds, the color of the fast reverse/fast
forward mark ( / ) changes from
white to blue. When this happens, fast
reverse/fast forward continues even if you
release 1 or ¡. To resume playback at a
desired point, press 6.
• If you fast forward to the end of a CD, fast
forward continues from the beginning of
the disc.
• If you fast reverse to the beginning of a CD,
normal playback resumes.
Notes
• The built-in player plays one, standard,
12-cm or 8-cm (single) CD at a time. Do not
use an adapter when playing 8-cm CDs.
• Do not insert anything other than a
DVD/Video CD/CD into the Disc loading slot.
• If you cannot insert a disc completely or if
after you insert a disc the disc does not play,
check that the label side of the disc is up.
Press EJECT to eject the disc, and check the
disc for damage before inserting the disc
again.
• If the built-in player does not operate properly,
an error message such as ERROR-11 may be
displayed. Refer to Error messages on page 85.
En
40
06
Section
Page 41

Playing CDs on the
built-in player
En
41
Operating from the information
display (DVH & DVD mode)
This display lets you use the search function to
specify a track to search for desired track, select
the range for repeat play, and switch random
play, scan play and pause playback on/off.
1 Information display
Shows the function status.
Press
DISPLAY to switch the information dis-
play.
Press DISPLAY repeatedly to switch between
the following display modes:
Information display—Nomal playback display
Searching for a desired track
You can use the Search function to specify a
track to search for a desired track.
1 Move the joystick left/right to select the
Track option.
The Track option is indicated in blue.
2 Press NUMBER buttons to input the desired
track number.
• To select 3, press 3.
• To select 10, press 1 and 0 in order.
• To select 23, press 2 and 3 in order.
• To jump 10 tracks ahead of the selected
one, press 10.
Notes
• Pressing CLEAR cancels the input number.
• You can also select tracks by moving the joystick up/down.
• You cannot select tracks by using NUMBER
buttons when the remote control is set to DVH
mode. In this case, use the joystick to select
tracks.
3 While the input number is displayed, click
the joystick.
Play of the selected track starts.
1
English
Español
Deutsch
Français
Italiano
Nederlands
06
Section
Page 42

Playing CDs on the
built-in player
Selecting repeat range
You can choose between repeat play of a disc or
a track.
1 Move the joystick left/right to select the
repeat range option.
The repeat range option is indicated in blue.
2 Move the joystick up/down to switch to
the desired setting.
This switches you to the selected setting.
Disc (disc)—Track (track)
• When you select Disc (disc), playback of the
entire disc is repeated. When you select Track
(track), playback of that track only is repeated.
Setting random play
Tracks of the CD you are currently listening to
are played in a random order.
1 Move the joystick left/right to select the
random option.
The random option is indicated in blue.
2 Move the joystick up/down to switch to
the desired setting.
This switches you to the selected setting.
ON (on)— OFF (off)
Setting scan play
The beginning of each track on the CD you are
currently listening to is played for about 10 seconds.
1 Move the joystick left/right to select the
scan option.
The scan option is indicated in blue.
2 Move the joystick up/down to switch to
the desired setting.
This switches you to the selected setting.
ON (on)— OFF (off)
3 When you find the desired track, move the
joystick up/down to cancel the scan play.
Note
• Scan play is canceled automatically after all
tracks have been scanned.
Pausing playback
Pause lets you temporarily stop playback of the
CD.
Press 6 during playback.
The still mark ( ) is displayed for 4 seconds
and playback is paused letting you view a still
image.
• Pressing PAUSE on the head unit also per-
forms the same operation.
• To return to normal playback, press 6 once
more.
En
42
06
Section
Page 43

Playing CDs on the
built-in player
En
43
Operating from the function display (DVH mode)
The following functions can also be operated
from the head unit’s OEL display.
1
FUNCTION display
Shows the function status.
Press F to display the function names.
Press F repeatedly to switch between the follow-
ing functions:
RPT (repeat play)—RDM (random play)—
T.SCAN (scan play)—PAUSE (pause)
• Pressing FUNCTION on the head unit also
performs the same operation.
• To return to the playback display, press
BAND/ESC.
Note
• If you do not operate the function within about
30 seconds, the display is automatically
returned to the playback display.
Repeating play
Repeat play lets you hear the same track over
again.
1 Press F to select RPT.
Press F until Repeat appears in the display.
• Pressing FUNCTION on the head unit also
performs the same operation.
2 Press E to turn repeat play on.
Repeat :ON appears in the display. The track
presently playing will play and then repeat.
• Pressing 5 on the head unit also performs
the same operation.
3 Press e to turn repeat play off.
Repeat :OFF appears in the display. The track
presently playing will continue to play and then
play the next track.
• Pressing ∞ on the head unit also performs the
same operation.
Note
• If you perform track search or fast
forward/reverse, repeat play is automatically
canceled.
1
English
Español
Deutsch
Français
Italiano
Nederlands
06
Section
Page 44

Playing CDs on the
built-in player
Playing tracks in a random order
Random play lets you play back tracks on the
CD in a random order.
1 Press F to select RDM.
Press F until Random appears in the display.
• Pressing FUNCTION on the head unit also
performs the same operation.
2 Press E to turn random play on.
Random :ON appears in the display. Tracks will
play in a random order.
• Pressing 5 on the head unit also performs
the same operation.
3 Press e to turn random play off.
Random :OFF appears in the display. Tracks will
continue to play in order.
• Pressing ∞ on the head unit also performs the
same operation.
Scanning tracks of a CD
Scan play lets you hear the first 10 seconds of
each track on the CD.
1 Press F to select T.SCAN.
Press F until Track Scan appears in the display.
• Pressing FUNCTION on the head unit also
performs the same operation.
2 Press E to turn scan play on.
Track Scan :ON appears in the display. The first
10 seconds of each track is played.
• Pressing 5 on the head unit also performs
the same operation.
3 When you find the desired track press e
to turn scan play off.
Track Scan :OFF appears in the display. The
track will continue to play.
• Pressing ∞ on the head unit also performs the
same operation.
• If the display has automatically returned to
the playback display, select T.SCAN again by
pressing F (FUNCTION on the head unit).
Note
• After scanning of a CD is finished, normal
playback of the tracks will begin again.
Pausing CD playback
Pause lets you temporarily stop playback of the
CD.
1 Press
F to select
PAUSE.
Press
F until Pause appears in the display.
• Pressing FUNCTION on the head unit also
performs the same operation.
2 Press E to turn pause on.
Pause :ON appears in the display. Play of the
current track pauses.
• Pressing 5 on the head unit also performs
the same operation.
3 Press e to turn pause off.
Pause :OFF appears in the display. Play will
resume at the same point that you turned pause
on.
• Pressing ∞ on the head unit also performs the
same operation.
En
44
06
Section
Page 45

Multi-CD Player
En
45
Playing a CD
You can use this unit to control a multi-CD player,
which is sold separately.
These are the basic steps necessary to play a
CD with your multi-CD player. More advanced
CD operation is explained starting on page 46.
1 DISC NUMBER
indicator
Shows the disc currently playing.
2
TRACK NUMBER indicator
Shows the track currently playing.
3 PLAY TIME
indicator
Shows the elapsed playing time of the current track.
1 Press SOURCE to select the multi-CD
player.
Press
SOURCE until you see Multi-CD displayed.
• Pressing SOURCE on the head unit also performs the same operation.
2 Use VOLUME to adjust the sound level.
Press VOLUME to increase or decrease the vol-
ume.
• Rotating VOLUME on the head unit also
increases or decreases the volume.
3 Select a disc you want to listen to with the
NUMBER (1-6) buttons .
For discs located at 1 to 6, press the corresponding number button.
If you want to select a disc located at 7 to 12,
press and hold the corresponding numbers
such as 1 for disc 7, until the disc number
appears in the display.
• Pressing 1-6 buttons on the head unit also
performs the same operation.
• You can also sequentially select a disc by
pressing E or e (5 or ∞on the head unit).
4 To perform fast forward or reverse, press
and hold 1 or ¡.
• Pressing and holding 2 or 3 on the head unit
also performs the same operation.
5 To skip back or forward to another track,
press 1 or ¡.
Pressing ¡ skips to the start of the next track.
Pressing 1 once skips to the start of the current track. Pressing again will skip to the previous track.
• Pressing 2 or 3 on the head unit also performs the same operation.
Notes
• When the multi-CD player performs the
preparatory operations, Ready is displayed.
• If the multi-CD player does not operate properly, an error message such as ERROR-11 may
be displayed. Refer to the multi-CD player
owner’s manual.
• If there are no discs in the multi-CD player
magazine, NO DISC is displayed.
132
English
Español
Deutsch
Français
Italiano
Nederlands
07
Section
Page 46

Multi-CD Player
Pausing playback
Pause lets you temporarily stop playback of the
CD.
Press 6 during playback.
• Pressing PAUSE on the head unit also per-
forms the same operation.
• To return to normal playback, press 6 once
more.
50-disc multi-CD player
Only those functions described in this manual
are supported for 50-disc multi-CD players.
Introduction of advanced multiCD player operation
1 FUNCTION display
Shows the function status.
Press F to display the function names.
Press F repeatedly to switch between the follow-
ing functions:
PMODE (repeat play)—T.LIST (disc title list)—
RDM (random play)—SCAN (scan play)—ITS-P
(ITS play)—PAUSE (pause)—COMP (compres-
sion and DBE)
• Pressing FUNCTION on the head unit also
performs the same operation.
• To return to the playback display, press
BAND/ESC.
Note
• If you do not operate the function within about
30 seconds, the display is automatically
returned to the playback display.
1
En
46
07
Section
Page 47

Multi-CD Player
En
47
Repeating play
There are three repeat play ranges for the multiCD player: MCD (multi-CD player repeat), TRK
(one-track repeat), and DISC (disc repeat).
1 Press
F to select PMODE.
Press
F until Repeat appears in the display.
• Pressing FUNCTION on the head unit also
performs the same operation.
2 Press 1 or ¡ to select the repeat range.
Press 1 or ¡ until the desired repeat range
appears in the display.
• MCD — Repeat all discs in the multi-CD
player
• TRK — Repeat just the current track
• DISC — Repeat the current disc
• Pressing 2 or 3 on the head unit also performs the same operation.
Notes
• If you select other discs during repeat play,
the repeat play range changes to MCD (multiCD player repeat).
• If you perform track search or fast
forward/reverse during TRK (one-track
repeat), the repeat play range changes to
DISC (disc repeat).
Playing tracks in a random order
Random play lets you playback tracks in a random order within the repeat range, RANDOM
(multi-CD player repeat) and D.RANDOM (disc
repeat).
1 Select the repeat range.
Refer to Repeating play on this page.
2 Press
F to select RDM.
Press
F until Random appears in the display.
• Pressing FUNCTION on the head unit also
performs the same operation.
3 Press E to turn random play on.
Random :ON appears in the display. Tracks will
play in a random order within the previously
selected RANDOM (multi-CD player repeat) or
D.RANDOM (disc repeat) ranges.
• Pressing 5 on the head unit also performs
the same operation.
4 Press e to turn random play off.
Random :OFF appears in the display. Tracks will
continue to play in order.
• Pressing ∞ on the head unit also performs the
same operation.
English
Español
Deutsch
Français
Italiano
Nederlands
07
Section
Page 48

Multi-CD Player
Scanning CDs and tracks
While you are using T.SCAN (disc repeat), the
beginning of each track on the selected disc
plays for about 10 seconds. When you are using
D.SCAN (multi-CD player repeat), the beginning
of the first track of each disc is played for about
10 seconds.
1 Select the repeat range.
Refer to Repeating play on page 47.
2 Press
F to select SCAN.
Press
F until Scan appears in the display.
• Pressing FUNCTION on the head unit also
performs the same operation.
3 Press E to turn scan play on.
Scan :ON appears in the display. The first 10
seconds of each track of the present disc (or the
first track of each disc) is played.
• Pressing 5 on the head unit also performs
the same operation.
4 When you find the desired track (or disc)
press e to turn scan play off.
Scan :OFF appears in the display. The track (or
disc) will continue to play.
• If the display has automatically returned to
the playback display, select SCAN again by
pressing F (FUNCTION on the head unit).
• Pressing ∞ on the head unit also performs the
same operation.
Note
• After track or disc scanning is finished, normal playback of the tracks will begin again.
Pausing CD playback
Pause lets you temporarily stop playback of the
CD.
1 Press
F to select PAUSE.
Press
F until Pause appears in the display.
• Pressing FUNCTION on the head unit also
performs the same operation.
2 Press E to turn pause on.
Pause :ON appears in the display. Play of the
current track pauses.
• Pressing 5 on the head unit also performs
the same operation.
3 Press e to turn pause off.
Pause :OFF appears in the display. Play will
resume at the same point that you turned pause
on.
• Pressing ∞ on the head unit also performs the
same operation.
Using ITS playlists
ITS (instant track selection) lets you make a
playlist of favorite tracks from those in the multiCD player magazine. After you have added your
favorite tracks to the playlist you can turn on ITS
play and play just those selections.
En
48
07
Section
Page 49

Multi-CD Player
En
49
Creating a playlist with ITS programming
You can use ITS to enter and playback up to 99
tracks per disc, up to 100 discs (with the disc
title). (With multi-CD players sold before the
CDX-P1250 and CDX-P650, up to 24 tracks can
be stored in the playlist.)
1 Play a CD that you want to program.
Press E ore to select a CD.
• Pressing 5 or ∞ on the head unit also performs the same operation.
2 Press F and hold until TITLE appears in the
display, then press F to select ITS.
After TITLE is displayed, press F repeatedly, the
following functions appear in the display:
TITLE (disc title input)—ITS (ITS programming)
• Pressing and holding FUNCTION on the head
unit also performs the same operation.
3 Select a desired track by pressing 1 or
¡.
• Pressing 2 or 3 on the head unit also performs the same operation.
4 Press E to store the currently playing
track in the playlist.
ITS Input is displayed briefly and the currently
playing selection is added to your playlist. The
display then shows ITS again.
• Pressing 5 on the head unit also performs
the same operation.
5 Press BAND/ESC to return to the playback
display.
Note
• After data for 100 discs has been stored in
memory, data for a new disc will overwrite the
oldest one.
Playback from your ITS playlist
ITS play lets you listen to the tracks that you
have entered into your ITS playlist. When you
turn on ITS play, tracks from your ITS playlist in
the multi-CD player will begin to play.
1 Select the repeat range.
Refer to Repeating play on page 47.
2 Press F to select
ITS-P.
Press
F until ITS Play appears in the display.
• Pressing FUNCTION on the head unit also
performs the same operation.
3 Press E to turn ITS play on.
ITS Play :ON appears in the display. Playback
begins of those tracks from your playlist within
the previously selected MCD (multi-CD player
repeat) or DISC (disc repeat) ranges.
• If no tracks in the current range are
programmed for ITS play then ITS Empty is
displayed.
• Pressing 5 on the head unit also performs
the same operation.
4 Press e to turn ITS play off.
ITS Play :OFF appears in the display. Playback
will continue in normal order from the currently
playing track and CD.
• Pressing ∞ on the head unit also performs the
same operation.
English
Español
Deutsch
Français
Italiano
Nederlands
07
Section
Page 50

Multi-CD Player
Erasing a track from your ITS playlist
When you want to delete a track from your ITS
playlist, you can if ITS play is on.
If ITS play is already on, skip to step 2. If ITS play
is not already on, press F (FUNCTION on the
head unit).
1 Play a CD you want to delete a track from
your ITS playlist, and turn ITS
play on.
Refer to Playback from your ITS playlist on page
49.
2 Press
F and hold until
TITLE appears in the
display, then press
F to select
ITS.
After
TITLE is displayed, press F until ITS
appears in the display.
• Pressing FUNCTION on the head unit also
performs the same operation.
3 Select a desired track by pressing 1 or
¡.
• Pressing 2 or 3 on the head unit also performs the same operation.
4 Press e to erase a track from your ITS
playlist.
The currently playing selection is erased from
your ITS playlist and playback of the next track
from your ITS playlist begins.
• If there are no tracks from your playlist in the
current range, ITS Empty is displayed and normal play resumes.
• Pressing ∞ on the head unit also performs the
same operation.
5 Press BAND/ESC to return to the playback
display.
Erasing a CD from your ITS playlist
When you want to delete all tracks of a CD from
your ITS playlist, you can if ITS play is off.
1 Play a CD that you want to delete.
Press E or e to select a CD.
• Pressing 5 or ∞ on the head unit also performs the same operation.
2 Press F and hold until
TITLE appears in the
display, then press
F to select
ITS.
After
TITLE is displayed, press F until ITS
appears in the display.
• Pressing FUNCTION on the head unit also
performs the same operation.
3 Press e to erase all tracks on the currently playing CD from your ITS playlist.
All tracks on the currently playing CD are erased
from your playlist and ITS Clear is displayed.
• Pressing ∞ on the head unit also performs the
same operation.
4 Press BAND/ESC to return to the playback
display.
Using disc title functions
You can input CD titles and display the title.
Then you can easily search for and select a
desired disc for play.
En
50
07
Section
Page 51

Multi-CD Player
En
51
Entering disc titles
Disc title input lets you input CD titles up to 10
letters long and up to 100 disc titles (with ITS
playlist) into the multi-CD player.
1 Play a CD that you want to enter the title.
Press E or e to select a CD.
• Pressing 5 or ∞ on the head unit also per-
forms the same operation.
2 Press F and hold until
TITLE appears in the
display.
After
TITLE is displayed, press F repeatedly, the
following functions appear in the display:
TITLE (disc title input)—ITS (ITS programming)
• When playing a CD TEXT disc on a CD TEXT
compatible multi-CD player, you cannot switch
to TITLE. The disc title will have already been
recorded on a CD TEXT disc.
• Pressing and holding FUNCTION on the head
unit also performs the same operation.
3 Press 1 numbered button to select the
desired character type.
Press 1 numbered button repeatedly to switch
between the following character type:
Alphabet (Upper case), Numbers and Symbols—
Alphabet (Lower case)
• You can select to input Numbers and Symbols
by pressing 2 numbered button.
4 Press E or e to select a letter of the
alphabet.
Each press of E will display a letter of the
alphabet in A B C ... X Y Z, numbers and symbols
in 1 2 3 ... @ # < order. Each press of e will
display a letter in the reverse order, such as Z Y
X ... C B A order.
• Pressing 5 or ∞ on the head unit also performs the same operation.
5 Press ¡ to move the cursor to the next
character position.
When the letter you want is displayed, press ¡
to move the cursor to the next position and then
select the next letter. Press 1 to move backwards in the display.
• Pressing 2 or 3 on the head unit also performs the same operation.
6 Move the cursor to the last position by
pressing ¡ after entering the title.
When you press ¡ one more time, the entered
title is stored in memory.
• Pressing 3 on the head unit also performs
the same operation.
7 Press
BAND/ESC to return to the playback
display.
Notes
• Titles remain in memory, even after the disc
has been removed from the magazine, and
are recalled when the disc is reinserted.
• After data for 100 discs has been stored in
memory, data for a new disc will overwrite the
oldest one.
English
Español
Deutsch
Français
Italiano
Nederlands
07
Section
Page 52

Multi-CD Player
Displaying disc titles
You can display the title of any disc that has had
a disc title entered.
Press DISPLAY on the head unit.
Press DISPLAY on the head unit repeatedly to
switch between the following settings:
PLAYBACK MODE (play time)—Disc Title (disc
title)
When you select Disc Title, the title of the currently playing disc is shown in the display.
• If no title has been entered for the currently
playing disc, NO TITLE is displayed.
Selecting discs from the disc title list
Disc title list lets you see the list of disc titles
that have been entered into the multi-CD player
and select one of them to playback.
1 Press F to select T.LIST.
Press F until disc title appears in the display.
• Pressing FUNCTION on the head unit also
performs the same operation.
2 Press 1 or ¡ to scroll through the list of
titles that have been entered.
• If no title has been entered for a disc, NO
D-TITLE will be displayed.
• Pressing 2 or 3 on the head unit also performs the same operation.
3 Press E to play your favorite CD title.
That selection will begin to play.
• Pressing 5 on the head unit also performs
the same operation.
Using CD TEXT functions
You can use these functions only with a CD TEXT
compatible multi-CD player.
Some discs have certain information encoded
on the disc during manufacture. These discs
may contain such information as the CD title,
track title, artist’s name and playback time and
are called CD TEXT discs. Only these specially
encoded CD TEXT discs support the functions
listed below.
Displaying titles on CD TEXT discs
Press DISPLAY on the head unit when playing
a CD TEXT disc on the multi-CD player.
Press DISPLAY on the head unit repeatedly to
switch between the following settings:
PLAYBACK MODE (play time)—Disc Title (disc
title)—DiscArtist Name (disc artist name)—
Track Title (track title)—TrackArtist Name (track
artist name)
• If specific information has not been recorded
on a CD TEXT disc, NO XXXX will be displayed
(e.g., NO Track Title).
Scrolling titles in the display
This unit can display the first 16 letters only of
Disc Title, DiscArtist Name, Track Title and
TrackArtist Name. When the recorded informa-
tion is longer than 16 letters, you can scroll the
text to the left so that the rest of the title can be
seen.
Press DISPLAY on the head unit and hold until
the title begins to scroll to the left.
The rest of the title will appear in the display.
En
52
07
Section
Page 53

Multi-CD Player
En
53
Using compression and bass
emphasis
You can use these functions only with a multi-CD
player that supports them.
Using COMP (compression) and DBE (dynamic
bass emphasis) functions let you adjust the
sound playback quality of the multi-CD player.
Each of the functions have a two-step adjustment. The COMP function balances the output
of louder and softer sounds at higher volumes.
DBE boosts bass levels to give playback a fuller
sound. Listen to each of the effects as you select
through them and use the one that best
enhances the playback of the track or CD that
you are listening to.
1 Press
F to select COMP
.
Press
F until Comp/DBE appears in the display.
• If the multi-CD player does not support
COMP/DBE, No Comp is displayed when you
attempt to select it.
• Pressing FUNCTION on the head unit also
performs the same operation.
2 Press E or e to select your favorite
setting.
Press E or e repeatedly to switch between
the following settings:
Comp OFF—Comp 1—Comp 2—Comp OFF—
DBE 1—DBE 2
• Pressing 5 or ∞ on the head unit also performs the same operation.
English
Español
Deutsch
Français
Italiano
Nederlands
07
Section
Page 54

Audio Adjustments
Introduction of audio
adjustments
1 AUDIO display
Shows the audio adjustments status.
2 SUBWOOFER indicator
Shows when the subwoofer in on.
Press
A to display the audio function names.
Press
A repeatedly to switch between the follow-
ing audio functions:
Fad (balance adjustment)—EQ (equalizer curve
adjustment)—Bass (bass)—Treble (treble)—
Loud (loudness)—Sub-W1 (subwoofer1)/Non Fad
(non fading output on/off)—Sub-W2
(subwoofer2)/Non Fad (non fading output setting)—HPF (high pass filter)—SLA (source level
adjustment)
• When the subwoofer controller setting is only
S.W Control:EXT, you cannot switch the Sub-W1.
(Refer to page 73.)
• You can select the Sub-W2 only when
Subwoofer output is switched on in the Sub-W1.
• When the subwoofer controller setting is only
S.W Control:EXT, you can switch the non fading
output on/off mode. (Refer to page 73.)
• You can select the non fading output setting
mode only when non fading output is switched
on in the non fading output on/off mode.
• Pressing AUDIO on the head unit also performs the same operation.
• When selecting the FM tuner as the source,
you cannot switch to SLA.
• To return to the playback display, press
BAND/ESC.
Important
• If the Multi-channel processor (DEQ-P7050) is
connected to this unit, the audio function will
be changed into the Multi-channel processor’s audio menu. For details, see the Multichannel processor (DEQ-P7050) owner’s
manual.
Notes
• If you do not operate the audio function within
about 30 seconds, the display is automatically
returned to the source display.
• Audio menu functions change depending on
the rear output setting in the initial setting
menu. Refer to Setting the rear output and
subwoofer controller on page 73.
21
En
54
08
Section
Page 55

Audio Adjustments
En
55
Setting the sound focus equalizer
Clarifying the sound image of vocals and instruments allows the simple staging of a natural,
pleasant sound environment.
Even greater listening enjoyment will be
obtained if seating positions are chosen carefully.
• FRT1 boosts the treble on the front output and
the bass on the rear output.
FRT2 boosts the treble and the bass on the front
output and the bass on the rear output. (The
bass boost is the same for both front and rear.)
For both FRT1 and FRT2 the H setting provides a
more pronounced effect than the L setting.
1 Press
SFEQ/SFC on the head unit to display
the
SFEQ
mode.
2 Press SFEQ/SFC on the head unit to select
the desired SFEQ mode.
FRT1-H (front1-high) —FRT1-L (front1-low) —
FRT2-H (front2-high) —FRT2-L (front2-low) —
CUSTOM (custom) —SFEQ OFF (off)
3 Press 1 or ¡ to select the desired
position.
Press 1 or ¡ until the desired position
appears in the display.
LEFT (left) —CENTER (center) —RIGHT (right)
• Pressing 2 or 3 on the head unit also performs the same operation.
Notes
• If you adjust the bass or treble, CUSTOM
memorizes an SFEQ mode in which the bass
and treble are adjusted for personal preference.
• If you switch the SFEQ mode, the H.P.F. func-
tion is automatically switched off. By switching the H.P.F. function on after selecting the
SFEQ mode, you can combine H.P.F. function
with SFEQ function.
Using balance adjustment
You can select a fader/balance setting that provides an ideal listening environment in all occupied seats.
1 Press
A to select Fad .
Press
A until Fad appears in the display.
• If the balance setting has been previously
adjusted, Bal will be displayed.
• Pressing AUDIO on the head unit also performs the same operation.
2 Press E or e to adjust front/rear
speaker balance.
Each press of E or e moves the front/rear
speaker balance towards the front or the rear.
• Fad F15 – Fad R15 is displayed as the front/rear
speaker balance moves from front to rear.
• Fad F/R 0 is the proper setting when only two
speakers are used.
• When the rear output setting is Rear SP:S.W,
you cannot adjust front/rear speaker balance.
Refer to Setting the rear output and subwoofer
controller on page 73.
• Pressing 5 or ∞ on the head unit also performs the same operation.
3 Press 1 or ¡ to adjust left/right
speaker balance.
When you press 1 or ¡, Bal L/R 0 is dis-
played. Each press of 1 or ¡ moves the
left/right speaker balance towards the left or the
right.
• Bal L9 – Bal R9 is displayed as the left/right
speaker balance moves from left to right.
• Pressing 2 or 3 on the head unit also performs the same operation.
English
Español
Deutsch
Français
Italiano
Nederlands
08
Section
Page 56

Audio Adjustments
Using the equalizer
The graphic equalizer lets you adjust the equalization to match car interior acoustic characteristics as desired.
Recalling equalizer curves
There are seven stored equalizer curves which
you can easily recall at any time. Here is a list of
the equalizer curves:
Display Equalizer curve
SUPER BASS Super bass
POWERFUL Powerful
NATURAL Natural
VOCAL Vocal
CUSTOM1, 2 Custom1, 2
FLAT Flat
• CUSTOM1 and CUSTOM2 are adjusted equalizer curves.
• A separate CUSTOM1 curve can be created
for each source.
• If you make adjustments when a curve other
than CUSTOM2 is selected, the equalizer curve
settings are memorized in CUSTOM1.
•A CUSTOM2 curve can be created common to
all sources.
• If you make adjustments when the CUSTOM2
curve is selected, the CUSTOM2 curve is
updated.
• When FLAT is selected no supplement or
correction is made to the sound. This is useful
to check the effect of the equalizer curves by
switching alternatively between
FLAT and a set
equalizer curve.
1 Press
EQ on the head unit to display the
equalizer mode.
2 Press
EQ on the head unit to select the
equalizer.
Press EQ on the head unit repeatedly to switch
between the following equalizer curves.
SUPER BASS—POWERFUL—NATURAL—
VOCAL—CUSTOM1—CUSTOM2—FLAT
Adjusting equalizer curves
You can adjust the currently selected equalizer
curve setting as desired. Adjusted equalizer
curve settings are memorized in CUSTOM1 or
CUSTOM2.
1 Press A to select the equalizer mode .
Press A until EQ Low/EQ Mid/EQ High appears in
the display.
• Pressing AUDIO on the head unit also performs the same operation.
2 Select the equalizer band you want to
adjust with 1 or ¡.
EQ Low (low)—EQ Mid (mid)—EQ High (high)
• Pressing 2 or 3 on the head unit also performs the same operation.
3 Press E or e to adjust the equalizer
curve.
Each press of E or e increases or decreases
the equalizer curve respectively.
• +6 – –6 is displayed as the equalizer curve is
increased or decreased.
• Pressing 5 or ∞ on the head unit also performs the same operation.
Note
• If you make adjustments when a curve other
than CUSTOM2 is selected, CUSTOM1 curve
is updated.
En
56
08
Section
Page 57

Audio Adjustments
En
57
Fine adjusting equalizer curve
You can adjust the center frequency and the Q
factor (curve characteristics) of each currently
selected curve band (EQ Low/EQ Mid/EQ High).
1 Press
A and hold unitil frequency and the
Q factor (e.g., F 80 Q 1W) appears in the display.
• Pressing and holding AUDIO on the head unit
also performs the same operation.
2 Press A to select the desired band for
adjustment.
Low—Mid—High
• Pressing AUDIO on the head unit also performs the same operation.
3 Select the desired frequency with
1 or ¡.
Press 1 or ¡ until the desired frequency
appears in the display.
Low : 40—80—100—160 (Hz)
Mid : 200—500—1 k—2 k (Hz)
High : 3.15 k—8 k—10 k—12.5 k (Hz)
• Pressing 2 or 3 on the head unit also performs the same operation.
4 Press E or e to select the desired Q
factor.
Press E or e until the desired Q factor
appears in the display.
2 N—1 N—1 W—2 W
• Pressing 5 or ∞ on the head unit also performs the same operation.
Note
• If you make adjustments when a curve other
than CUSTOM2 is selected, CUSTOM1 curve
is updated.
Adjusting bass
You can adjust the cut-off frequency and the
bass level.
• In FRT1 mode, bass adjustment affects only
the rear output: front output cannot be
adjusted.
1 Press A to select Bass.
Press A until Bass appears in the display.
• Pressing AUDIO on the head unit also per-
forms the same operation.
2 Select the desired frequency with 1 or
¡.
Press 1 or ¡ until the desired frequency
appears in the display.
40—63—100—160 (Hz)
• Pressing 2 or 3 on the head unit also per-
forms the same operation.
3 Press E or e to adjust the bass level.
Each press of E or e increases or decreases
the bass level. +6 – –6 is displayed as the level is
increased or decreased.
• Pressing 5 or ∞ on the head unit also per-
forms the same operation.
English
Español
Deutsch
Français
Italiano
Nederlands
08
Section
Level (dB)
Center frequency
Frequency (Hz)
Q=2N
Q=2W
Page 58

Audio Adjustments
Adjusting treble
You can adjust the cut-off frequency and the
Treble level.
• In FRT1 and FRT2 modes, treble adjustment
affects only the front output: rear output cannot
be adjusted.
1 Press
A to select Treble.
Press
A until Treble appears in the display.
• Pressing AUDIO on the head unit also performs the same operation.
2 Select the desired frequency with
1 or ¡.
Press 1 or ¡ until the desired frequency
appears in the display.
2.5k—4k—6.3k—10k (Hz)
• Pressing 2 or 3 on the head unit also performs the same operation.
3 Press E or e to adjust the treble level.
Each press of E or e increases or decreases
the treble level. +6 – –6 is displayed as the level
is increased or decreased.
• Pressing 5 or ∞ on the head unit also performs the same operation.
Adjusting loudness
Loudness compensates for deficiencies in the
low- and high-sound ranges at low volume.
1 Press
A to select Loud.
Press
A until Loud appears in the display.
• Pressing AUDIO on the head unit also performs the same operation.
2 Press E to turn loudness on.
Loudness level (e.g., Loud Mid) appears in the
display.
• Pressing 5 on the head unit also performs
the same operation.
3 Press 1 or ¡ to select the level.
Press 1 or ¡ until the desired level appears
in the display.
Low (low)—Mid (mid)—High (high)
• Pressing 2 or 3 on the head unit also performs the same operation.
4 Press e to turn loudness off.
Loud OFF appears in the display.
• Pressing ∞ on the head unit also performs the
same operation.
En
58
08
Section
Page 59

Audio Adjustments
En
59
Using subwoofer output
This unit is equipped with a subwoofer output
which can be switched on or off. When a subwoofer is connected to the rear output, first,
switch the rear output setting to subwoofer,
then turn the subwoofer output on. For more
details, see Setting the rear output and
subwoofer controller on page 73.
1 Press
A to select Sub-W1.
When the subwoofer controller setting is
S.W
Control:EXT, you cannot select Sub-W1. Press A
until Sub-W1 appears in the display.
• Pressing AUDIO on the head unit also performs the same operation.
2 Press E to turn subwoofer output on.
Sub-W1 Normal appears in the display.
Subwoofer output is now on.
• You can turn off subwoofer output by pressing
e.
• Pressing 5 or ∞ on the head unit also performs the same operation.
3 Press 1 or ¡ to select the phase of
subwoofer output.
Press 1 to select reverse phase and Rev.
appears in the display. Press ¡ to select normal phase and Normal appears in the display.
• Pressing 2 or 3 on the head unit also performs the same operation.
Adjusting subwoofer settings
When the subwoofer output is on, you can
adjust the cut-off frequency and the output level
of the subwoofer.
1 Press A to select the
Sub-W2.
When the subwoofer output is on, you can
select the
Sub-W2. Press A until Sub-W2 80 (Hz)
appears in the display.
• If the subwoofer setting has been previously
adjusted, the frequency of that previously
selected will be displayed, such as 50 (Hz) or 125
(Hz).
• Pressing AUDIO on the head unit also per-
forms the same operation.
2 Press 1 or ¡ to select cut-off
frequency.
Press 1 and 50 (Hz) is displayed. Press ¡
and 125 (Hz) is displayed. Only frequencies
lower than those in the selected range are output from the subwoofer.
• Pressing 2 or 3 on the head unit also per-
forms the same operation.
3 Press E or e to adjust the output level
of the subwoofer.
Each press of E or e increases or decreases
the level of the subwoofer (e.g., +6 to –6).
Press E or e until you see the desired value
displayed.
• Pressing 5 or ∞ on the head unit also per-
forms the same operation.
English
Español
Deutsch
Français
Italiano
Nederlands
08
Section
Page 60

Audio Adjustments
Using non fading output
When the non fading output setting is on, the
audio signal does not pass through this unit’s
low pass filter (for the subwoofer), but is output
through the RCA output.
1 Press
A to select non fading output on/off
mode.
When the subwoofer controller setting is
S.W
Control:EXT, you can select non fading output
on/off mode. Press A until NonFad ON appears
in the display.
• Pressing AUDIO on the head unit also performs the same operation.
2 Press E to turn non fading output on.
NonFad ON appears in the display. Non fading
output is now on.
• You can turn off non fading output by pressing
e.
• Pressing 5 or ∞ on the head unit also performs the same operation.
Adjusting non fading output level
When the non fading output is on, you can
adjust the level of non fading output.
1 Press
A to select non fading output setting
mode.
Press
A until NonFad 0 appears in the display.
• Pressing AUDIO on the head unit also performs the same operation.
2 Press E or e to adjust the output level
of the non fading.
Each press of E or e increases or decreases
the level of the non fading (e.g., +6 to –6).
Press E or e until you see the desired value
displayed.
• Pressing 5 or ∞ on the head unit also performs the same operation.
Using the high pass filter
When you do not want low sounds from the
subwoofer output frequency range to play from
the front or rear speakers, switch the HPF (high
pass filter) on. Only frequencies higher than
those in the selected range are output from the
front and rear speakers.
1 Press
A to select HPF.
Press
A until HPF appears in the display.
• Pressing AUDIO on the head unit also performs the same operation.
2 Press E to turn high pass filter on.
HPF 80 Hz appears in the display. High pass
filter is now on.
• To turn high pass filter off, press e .
• Pressing 5 or ∞ on the head unit also performs the same operation.
3 Press 1 or ¡ to select a high pass filter
range.
Press 1 and HPF 50 Hz is displayed. Press ¡
and 125 Hz is displayed. Only frequencies higher
than those in the selected range are output
from the front or rear speakers.
• Pressing 2 or 3 on the head unit also performs the same operation.
Note
• If you switch the SFEQ mode, the H.P.F. func-
tion is automatically switched off. By switching the H.P.F. function on after selecting the
SFEQ mode, you can combine H.P.F. function
with SFEQ function.
En
60
08
Section
Page 61

Audio Adjustments
En
61
Adjusting source levels
SLA (Source level adjustment) lets you adjust
the volume level of each source to prevent radical changes in volume when switching between
sources.
• Settings are based on the volume level of the
FM tuner, which remains unchanged.
1 Compare the FM tuner volume level with
the level of the source you wish to adjust.
2 Press
A to select SLA.
Press
A until SLA appears in the display.
• Pressing AUDIO on the head unit also per-
forms the same operation.
3 Press E or e to adjust the source volume.
Each press of E or e increases or decreases
the source volume.
• SLA +4 – SLA –4 is displayed as the source
volume is increased or decreased.
• Pressing 5 or ∞ on the head unit also per-
forms the same operation.
Notes
• Since the FM tuner volume is the control, it is
not possible to apply source level adjustments
to the FM tuner.
• The AM tuner volume level can also be
adjusted with source level adjustments.
• Video CD and CD are automatically set to the
same volume adjustment setting.
• External unit 1 and external unit 2 are set to
the same volume adjustment setting automatically.
English
Español
Deutsch
Français
Italiano
Nederlands
08
Section
Page 62

Initial Settings for
DVD player
Calling up the SET UP MENU
You can use this menu to change audio, subtitle, parental lock and other DVD settings.
This menu can be operated only by using the
remote control when it is set to DVD mode.
1
SET UP MENU
Shows the set up menu status.
1 Press 7.
2 Press
MENU when the disc is stopped.
The
SET UP MENU is displayed.
3 Press ¢.
The second SET UP MENU is displayed.
• To switch to the first SET UP MENU, press
w2.
Note
• If you press MENU during display of a SET UP
MENU, the SET UP MENU is canceled and the
unit returns to the previous display.
Returning to the previous display
The SET UP MENU lets you switch between
displays of different setting options. To continue
performing different settings, or if you make a
mistake during setting, pressing RETURN takes
you back to the previous display each time you
press it.
1
En
62
09
Section
Page 63

Initial Settings for
DVD player
En
63
Setting the subtitle
(SUBTITLE LANG.)
You can set a desired subtitle language. If the
selected subtitle language is recorded on the
DVD, subtitles are displayed in that language.
You can also switch subtitle and assist subtitle
display ON/OFF.
Setting subtitles and assist subtitles
ON/OFF
You can switch Subtitle and Assist Subtitle
ON/OFF as desired.
1 Move the joystick up/down to select
SUBTITLE LANG.
SUBTITLE LANG. is indicated in blue.
2 Click the joystick.
A subtitle language menu is displayed.
3 Move the joystick to select subtitle ON/OFF
(LANGUAGE) or assist subtitle ON/OFF
(ASSIST).
4 Click the joystick.
Each time you click the joystick the selected
setting switches ON/OFF.
Assist subtitles
Assist subtitles offer explanations for the aurally
impaired. However, they are only displayed if
they are recorded on the DVD.
Setting the subtitle language
You can set the preferred subtitle language.
1 Move the joystick up/down to select
SUBTITLE LANG.
SUBTITLE LANG. is indicated in blue.
2 Click the joystick.
A subtitle language menu is displayed.
3 Move the joystick up/down to select the
LANGUAGE SELECT.
LANGUAGE SELECT is indicated in blue.
4 Click the joystick.
A language select menu is displayed.
5 Move the joystick up/down to select the
desired language.
The currently set language is indicated the mark
“ ”. The language selected with the joystick is
indicated in blue.
• To switch to the second language select
menu, press ¢.
• To return to the first language select menu,
press 4.
6 Click the joystick.
A subtitle language is set.
English
Español
Deutsch
Français
Italiano
Nederlands
09
Section
Page 64

Initial Settings for
DVD player
Notes
• If the selected language is not recorded on
the disc, languages specified on the disc are
displayed.
• You can also switch the subtitle language
during playback with SUBTITLE. (See page
26.)
• Even if you use SUBTITLE to switch the subtitle language, this does not affect the settings
here.
• Pressing RETURN takes you back to the previous display.
When you select OTHERS
When you select OTHERS, a language code
input display is shown. Refer to Language code
chart for DVD on page 80, using the number
buttons to input the four digit code of the
desired language, then click the joystick.
Note
• Pressing CLEAR cancels the input numbers.
Setting the audio language
(AUDIO LANG.)
You can set the preferred audio language.
1 Move the joystick up/down to select
AUDIO LANG
.
AUDIO LANG. is indicated in blue.
2 Click the joystick.
An audio language menu is displayed.
3 Move the joystick up/down to select the
desired audio language.
The currently set language is indicated the mark
“ ”. The language selected with the joystick is
indicated in blue.
• To switch to the second audio language
menu, press ¢.
• To return to the first audio language menu,
press 4.
4 Click the joystick.
The audio language is set.
Notes
• If the selected language is not recorded on
the disc, the language specified on the disc is
output.
• You can also switch the audio language during playback with AUDIO. (Refer to page 26.)
• Even if you use AUDIO to switch the audio
language, this does not affect the settings
here.
• Pressing RETURN takes you back to the previous display.
• If you have selected OTHERS, refer to When
you select OTHERS on this page.
En
64
09
Section
Page 65

Initial Settings for
DVD player
En
65
Setting the menu language
(MENU LANG.)
You can set the preferred language for displays
of menus recorded on a disc.
1 Move the joystick up/down to select
MENU LANG.
MENU LANG. is indicated in blue.
2 Click the joystick.
A menu language menu is displayed.
3 Move the joystick up/down to select the
desired menu language.
The currently set language is indicated the mark
“ ”. The language selected with the joystick is
indicated in blue.
• To switch to the second menu language
menu, press ¢.
• To return to the first menu language menu,
press 4.
4 Click the joystick.
The menu language is set.
Notes
• If the selected language is not recorded on
the disc, the language specified on the disc is
displayed.
• Pressing RETURN takes you back to the previous display.
• If you have selected OTHERS, refer to When
you select OTHERS on page 64.
Setting the parental lock
(PARENTAL)
Some DVDs let you use parental lock to restrict
the viewing of violent and adult oriented scenes
by children. You can set the parental lock level
in steps as desired.
Setting the code number and level
When you first use this function, register your
code number. If you do not register a code number, parental lock will not operate.
1 Move the joystick up/down to select
PARENTAL
.
PARENTAL is indicated in blue.
2 Click the joystick.
Parental Lock setting menu is displayed.
3 Press NUMBER buttons to input a four digit
code number.
4 Click the joystick.
The code number is set, and you can now set
the level.
5 Move the joystick left/right to select the
desired level.
Level Parental lock details
LEVEL 8 Playback of the entire disc is
possible. (Initial setting)
LEVEL 7 – LEVEL 2 This prevents playback of discs
featuring adult oriented material. (Playback of discs for children and non-adult oriented
discs is possible.)
LEVEL 1 Playback of discs for children
only is possible.
English
Español
Deutsch
Français
Italiano
Nederlands
09
Section
Page 66

Initial Settings for
DVD player
6 Click the joystick.
The parental lock level is set.
Notes
• We recommend to keep a record of your code
number in case you forget it.
• The parental lock level is recorded on the disc.
You can confirm it by looking at the disc package, included literature or on the disc itself.
With discs that do not feature a recorded
parental lock level, you cannot use parental
lock.
• With some discs, parental lock operates to
skip certain scenes only, after which normal
playback resumes. For details, refer to the
disc’s instructions.
• Pressing RETURN takes you back to the previous display.
Changing the level
You can change the set parental lock level.
1 Move the joystick up/down to select
PARENTAL.
PARENTAL is indicated in blue.
2 Click the joystick.
Parental lock setting menu is displayed.
3 Press NUMBER buttons to input the registered code number.
4 Click the joystick.
This enters the code number, and you can now
change the level.
• If you input an incorrect code number, the
prohibited mark “ ” is displayed.
Press CLEAR and input the correct code number.
• If you forget your code number, refer to If you
forget your code number on page 70.
5 Move the joystick left/right to select the
desired level.
6 Click the joystick.
The new parental lock level is set.
Note
• Pressing RETURN takes you back to the previous display.
When playing DVDs enabling parental
lock
When you play a disc featuring parental lock,
code number input indications may be
displayed. If this happens and you do not input
the correct code number, playback will not
begin.
En
66
09
Section
Page 67

Initial Settings for
DVD player
En
67
Setting aspect ratio
(TV ASPECT)
There are two kinds of display. A wide screen
display has a width-to-height ratio (TV aspect) of
16:9, while a regular display has a TV aspect of
4:3. Be sure to select the correct TV aspect for
the display you use.
1 Move the joystick up/down to select
TV ASPECT in the second SET UP MENU.
TV ASPECT is indicated in blue.
2 Click the joystick.
TV aspect menu is displayed.
3 Move the joystick up/down to select the
desired TV aspect.
The currently set TV aspect is indicated the
mark “ ”. The TV aspect selected with the joystick is indicated in blue.
TV aspect Setting detail
16:9 Select when using a wide
screen display. (Initial setting)
LETTER BOX Select when using a regular
display. When playing discs
featuring images recorded with
a 16:9 TV aspect, the picture is
the shape of a letter box with
black bands at the top and
bottom of the screen.
PANSCAN Select when using a regular
display. When playing discs
featuring images recorded with
a 16:9 TV aspect, the picture is
cut short at the right and left of
the screen.
4 Click the joystick.
The selected TV aspect is set.
Precautions
• When using a regular display, select either
LETTER BOX or PANSCAN. Selecting 16:9 may
result in an unnatural picture.
• When playing discs that do not specify PA N-
SCAN, playback is with LETTER BOX even if
you select the PANSCAN setting. Confirm
whether the disc package bears the
“ ” mark. (See page 8.)
• Some discs do not enable changing of the TV
aspect. For details, refer to the disc’s instructions.
• Pressing RETURN takes you back to the previous display.
Setting angle mark display
(ANGLE)
With discs featuring multi-angle recordings, the
angle mark is displayed at the bottom right of
the screen during playback of scenes enabling
multi-angle viewing. You can set angle selection
mark display ON/OFF.
1 Move the joystick up/down to select
ANGLE in the second SET UP MENU.
ANGLE is indicated in blue.
2 Click the joystick.
Angle mark menu is displayed.
16 : 9 LB
English
Español
Deutsch
Français
Italiano
Nederlands
09
Section
Page 68

Initial Settings for
DVD player
3 Move the joystick up/down to select angle
mark display ON/OFF.
The currently set option is indicated the mark
“ ”. The option selected with the joystick is
indicated in blue.
4 Click the joystick.
Angle mark display is set ON/OFF.
Notes
• You can also switch the angle during playback
with ANGLE. (Refer to page 27.)
• Pressing RETURN takes you back to the previous display.
Setting for digital output
(DIGITAL OUTPUT)
Set digital output correctly to match the components you are using with this unit. There is no
need to change settings if this unit is not connected for digital output.
Precaution
• Incorrect setting may result in noise and damage to speakers so be sure to read the manuals of the connected components.
1 Move the joystick up/down to select
DIGITAL OUTPUT in the second SET UP MENU.
DIGITAL OUTPUT is indicated in blue.
2 Click the joystick.
Digital output setting menu is displayed.
3 Move the joystick up/down to select the
desired digital output setting.
The currently set digital output setting is indicated the mark “ ”. The digital output setting
selected with the joystick is indicated in blue.
Digital output Setting detail
Dolby D/LPCM Select when using a Dolby
Digital compatible amp and
decoder. The Dolby Digital
signal is output as it is. (Initial
setting)
LPCM Select when using an amp and
decoder that are not Dolby
Digital compatible. The Dolby
Digital signal is converted to
and output as a linear PCM
signal.
4 Click the joystick.
The selected digital output setting is set.
Notes
• Linear PCM output of DTS audio is not possible. If you select LPCM, DTS audio is not output.
• When using this unit with a Pioneer Multichannel processor with digital input (DEQP7050), select Dolby D/LPCM.
• Pressing RETURN takes you back to the previous display.
En
68
09
Section
Page 69

Initial Settings for
DVD player
En
69
Setting digital and analog audio
output (OUTPUT SELECTION)
You can set linear PCM audio output for both
digital and analog output. Set audio output
correctly to match the components you are
using with this unit.
Precaution
• If the setting is incorrect there will be no
sound so be sure to read the manuals of the
connected components.
1 Move the joystick up/down to select
OUTPUT SELECTION
in the second SET UP
MENU
.
OUTPUT SELECTION is indicated in blue.
2 Click the joystick.
Audio output setting menu is displayed.
3 Move the joystick up/down to select the
desired audio output setting.
The currently set audio output setting is indicated the mark “ ”. The audio output setting
selected with the joystick is indicated in blue.
Output setting Setting detail
48kHz Select this setting when using
digital connections. A 48 kHz
signal is output regardless of
the audio sampling frequency.
A 96 kHz signal is converted to
a 48 kHz signal. (Initial setting)
96kHz Select this setting when using
analog connections.
The signal is output with the
same frequency as the audio
sampling frequency. With a 96
kHz signal, you can enjoy
exceptionally high sound quality.
4 Click the joystick.
The selected audio output setting is set.
Notes
• With discs featuring 96 kHz recording, if you
select the 96kHz setting, audio is not output
from digital output.
• With discs do not feature a CSS (Content
Scrambling System) copy guard signal, a 96
kHz digital signal is output.
• When using this unit with a Pioneer Multichannel processor (DEQ-P7050), select 48kHz
setting. If you select the 96kHz setting, no
sound will be output when playing discs featuring 96 kHz recordings.
• Pressing RETURN takes you back to the previous display.
English
Español
Deutsch
Français
Italiano
Nederlands
09
Section
Page 70

Initial Settings for
DVD player
Setting remote control code type
When the remote control operation switch is set
to DVD, changing the remote control code type
enables you to operate the Pioneer DVD player
by the supplied remote control. There are three
remote codes, code type A, code type B and
code type DVH.
When using this unit with an Multi-DVD Player
(e.g. XDV-P9), select code A.
When using this unit with a DVD Navigation
Unit, select code B (Not used).
When using this unit only, select code DVH.
1 Set the remote control selection switch on
the left side of the remote control to the
appropriate position with a pen tip or other
pointed instrument .
• If you select DVH mode, there is no need to
take the following procedure.
• If you select A/B mode, take the following
procedure and change the code type to the
appropriate type.
2 Pressing 7 and 0 on the remote control
simultaneously changes the code type.
Initially, the code type is set to A.
Each time you press 7 and 0 simultaneously on
the remote control the code type changes
between A and B.
If you forget your code number
Refer to Changing the Level, step 3 on page 66,
and press CLEAR 10 times.
The registered code number is canceled, letting
you register a new one.
En
70
09
Section
Page 71

Initial Settings
En
71
Adjusting initial settings
Initial settings lets you perform initial set up of
different settings for this unit.
1 FUNCTION display
Shows the function status.
1 Press SOURCE and hold until the unit turns
off.
• Pressing SOURCE on the head unit also performs the same operation.
2 Press F and hold until time appears in the
display.
• Pressing and holding FUNCTION on the head
unit also performs the same operation.
3 Press F to select one of the initial settings.
Press F repeatedly to switch between the following settings:
CLOCK—FM—AM—WARN—AUX—DIM—
BRIGHT—SW—(D.ATT)—TEL—DVD
Use the following instructions to operate each
particular setting.
• To cancel initial settings, press BAND/ESC.
• You can also cancel initial settings by holding
down F until the unit turns off.
• Pressing FUNCTION on the head unit also
performs the same operation.
• D.ATT can only be operated when you have
connected the Multi-channel processor (DEQP7050) to this unit. For details, refer to the
Muliti-channel processor (DEQ-P7050) owner’s
manual.
Setting the time
This is used to set the time on the unit’s clock
display.
1 Press
F to select the CLOCK.
Press
F until the time appears in the display.
• Pressing FUNCTION on the head unit also
performs the same operation.
2 Select the portion of the time display you
wish to set with 1 or ¡.
Pressing 1 or ¡ will select a portion of the
clock display:
HOUR—MINUTE
As you select portions of the clock display the
portion selected will blink.
• Pressing 2 or 3 on the head unit also performs the same operation.
3 Select the correct time with E or e.
Pressing E will increase the selected hour or
minute. Pressing e will decrease the selected
hour or minute.
• Pressing 5 or ∞ on the head unit also performs the same operation.
Setting the FM tuning step
The FM tuning step employed by seek tuning
can be switched between 100 kHz, the preset
step, and 50 kHz.
1
English
Español
Deutsch
Français
Italiano
Nederlands
10
Section
Page 72

Initial Settings
1 Press F to select FM.
Press F repeatedly until FM Step appears in the
display.
• Pressing FUNCTION on the head unit also
performs the same operation.
2 Select the FM tuning step with 1 or ¡.
Pressing 1 or ¡ will switch the FM tuning
step between 50 kHz and 100 kHz. The selected
FM tuning step will appear in the display.
• Pressing 2 or 3 on the head unit also per-
forms the same operation.
Note
• If seek tuning is performed in 50 kHz steps,
stations may be tuned in imprecisely. Tune in
the stations with manual tuning or use seek
tuning again.
Setting the AM tuning step
The AM tuning step can be switched between 9
kHz, the preset step, and 10 kHz. When using
the tuner in North, Central or South America,
reset the tuning step from 9 kHz (531 – 1,602
kHz allowable) to 10 kHz (530 – 1,640 kHz allowable).
1 Press
F to select AM.
Press
F repeatedly until AM Step appears in the
display.
• Pressing FUNCTION on the head unit also
performs the same operation.
2 Select the AM tuning step with 1 or ¡.
Pressing 1 or ¡ will switch the AM tuning
step between 9 kHz and 10 kHz. The selected
AM tuning step will appear in the display.
• Pressing 2 or 3 on the head unit also performs the same operation.
Switching the warning tone
If the front panel is not detached from the head
unit within five seconds of turning off the ignition, a warning tone will sound. You can turn off
this warning tone.
1 Press F to select WARN.
Press F repeatedly until Warning appears in the
display.
• Pressing FUNCTION on the head unit also
performs the same operation.
2 Select WARN on or off with E or e.
Pressing E or e will switch Warning between
on and off and that status will be displayed (e.g.,
Warning :ON).
• Pressing 5 or ∞ on the head unit also performs the same operation.
Switching the auxiliary setting
It is possible to use auxiliary equipment with
this unit. Activate the auxiliary setting when
using auxiliary equipment connected to this
unit.
1 Press F to select AUX.
Press F repeatedly until AUX appears in the
display.
• Pressing FUNCTION on the head unit also
performs the same operation.
En
72
10
Section
Page 73

Initial Settings
En
73
2 Select AUX
on or off with E or e.
Pressing E or e will switch
AUX between on
and off and that status will be displayed (e.g.,
AUX :ON).
• Pressing 5 or ∞ on the head unit also performs the same operation.
Switching the dimmer setting
To prevent the display from being too bright at
night, the display is automatically dimmed
when the car’s headlights are turned on. You
can switch dimmer on or off.
1 Press F to select DIM.
Press F repeatedly until Dimmer appears in the
display.
• Pressing FUNCTION on the head unit also
performs the same operation.
2 Select DIM on or off with E or e.
Pressing E or e will switch Dimmer between
on and off and that status will be displayed (e.g.,
Dimmer :ON).
• Pressing 5 or ∞ on the head unit also performs the same operation.
Selecting the brightness
You can select the display brightness. Initially
this mode is set to 12.
1 Press F to select BRIGHT.
Press F repeatedly until Brightness appears in
the display.
• Pressing FUNCTION on the head unit also
performs the same operation.
2 Select the desired brightness with
E or e.
• The display shows
0 – 15.
• Pressing 5 or ∞ on the head unit also performs the same operation.
Setting the rear output and subwoofer controller
This unit’s rear output (rear speaker leads output) can be used for full-range speaker (Rear
SP:FULL) or subwoofer (Rear SP:S.W) connec-
tion. If you switch rear output setting to the Rear
SP:S.W, you can connect a rear speaker lead
directly to a subwoofer without using an auxiliary amp.
Initially, the unit is set for rear full-range speaker
connection (Rear SP:FULL).
When rear output are connected to full range
speakers (when Rear SP:FULL is selected), you
can connect the RCA subwoofer output to a
subwoofer. In this case, you can select whether
to use the subwoofer controller’s (low pass
filter, phase) built-in S.W Control:INT or the
auxiliary S.W Control:EXT.
Notes
• Even if you change this setting, there is no
output unless you switch the non fading output (refer to page 60) or subwoofer output
(refer to page 59) in the audio menu on.
• If you change the subwoofer controller, subwoofer output and non fading output in the
audio menu return to the factory settings.
• Both rear speaker leads output and RCA rear
output are switched simultaneously in this
setting mode.
English
Español
Deutsch
Français
Italiano
Nederlands
10
Section
Page 74

Initial Settings
1 Press F to select SW.
Press F repeatedly until Rear SP appears in the
display.
• Pressing FUNCTION on the head unit also
performs the same operation.
2 Change the rear output setting with E or
e.
Pressing E or e will switch between Rear SP
:FULL (full-range speaker) and Rear SP :S.W
(subwoofer) and that status will be displayed.
• Pressing 5 or ∞ on the head unit also performs the same operation.
Notes
• When no subwoofer is connected to the rear
output, select Rear SP:FULL.
• When a subwoofer is connected to the rear
output, set for subwoofer Rear SP:S.W.
• When the rear output setting is Rear SP:S.W,
you cannot change the subwoofer controller.
3 Change the subwoofer controller with 1
or ¡.
Pressing 1 or ¡ will switch between S.W
Control :INT and S.W Control :EXT and that
status will be displayed.
• Pressing 2 or 3 on the head unit also per-
forms the same operation.
Switching the telephone
muting/attenuation
Sound from this system is muted or attenuated
automatically when a call is made or received
using a cellular telephone connected to this
product.
1 Press
F to select TEL.
Press F repeatedly until Telephone appears in
the display.
• Pressing
FUNCTION on the head unit also
performs the same operation.
2 Switch the telephone muting/attenuation
with 1 or ¡.
Pressing 1 or ¡ will switch Telephone :ATT
(attenuation) and Telephone :MUTE (muting)
and that status will be displayed.
• Pressing 2 or 3 on the head unit also performs the same operation.
Switching the automatic disc
playback
You can select the mode between automatic
playback and manual playback when you insert
a disc into the disc loading slot. When the function is on, the disc will be automatically played
after it is inserted into the disc loading slot.
Initially, this function is set to on.
1 Press F to select DVD.
Press F repeatedly until AUTO PLAY appears in
the display.
• Pressing FUNCTION on the head unit also
performs the same operation.
2 Switch the automatic/manual disc playback by pressing E or e.
Pressing E or e will switch between
AUTO PLAY :ON (automatic playback) ,
AUTO PLAY :OFF (manual playback) and that
status will be displayed.
• Pressing 5 or ∞ on the head unit also performs the same operation.
En
74
10
Section
Page 75

Other Functions
En
75
Setting the time display on or off
You can display the clock on each sound source
display.
Press CLOCK
on the head unit to select the
time display.
Each press of
CLOCK on the head unit turns
time display on or off.
• The time display disappears temporarily when
you perform other operations, but the time indication is displayed again after 6 seconds.
Note
• Even when the sources and the feature demo
are off, the time appears on the display.
Pressing CLOCK on the head unit switches
the time display on/off.
Using different entertainment
displays
You can enjoy entertainment displays while
listening to each sound source.
Press ENTERTAINMENT on the head unit.
Each time you press ENTERTAINMENT on the
head unit the display changes in the following
order:
SOURCE ICON DISPLAY—BGV 1—BGV 2—BGV
3—BGV 4—LEVEL INDICATOR 1—LEVEL INDICATOR 2—MOVIE SCREEN 1—MOVIE SCREEN
2—ENTERTAINMENT CLOCK
• BGV stands for Back Ground Visual.
Using the AUX source
An IP-BUS-RCA Interconnector such as the
CD-RB20 or CD-RB10 (sold separately) lets you
connect this unit to auxiliary equipment featuring RCA output. For more details, refer to the
IP-BUS-RCA Interconnector owner’s manual.
Selecting AUX as the source
Press SOURCE
to select AUX as the source.
Press
SOURCE until AUX appears in the display.
• If the auxiliary setting is not switched on, AUX
cannot be selected. For more details, see
Switching the auxiliary setting on page 72.
• Pressing SOURCE on the head unit also performs the same operation.
Setting the AUX title
The title displayed for the AUX source can be
changed.
1 After you have selected AUX as the source,
press F and hold until TITLE appears in the
display.
• Pressing and holding FUNCTION on the head
unit also performs the same operation.
2 Press 1 numbered button to select the
desired character type.
Press 1 numbered button repeatedly to switch
between the following character type:
Alphabet (Upper case), Numbers and Symbols—
Alphabet (Lower case)
• You can select to input Numbers and Symbols
by pressing 2 numbered button.
English
Español
Deutsch
Français
Italiano
Nederlands
11
Section
Page 76

Other Functions
3 Press E or e to select a letter of the
alphabet.
Each press of E will display a letter of the
alphabet in A B C ... X Y Z, numbers and symbols
in 1 2 3 ... @ # < order. Each press of e will
display a letter in the reverse order, such as Z Y
X ... C B A order.
• Pressing 5 or ∞ on the head unit also performs the same operation.
4 Press ¡ to move the cursor to the next
character position.
When the letter you want is displayed, press ¡
to move the cursor to the next position and then
select the next letter. Press 1 to move backwards in the display.
• Pressing 2 or 3 on the head unit also performs the same operation.
5 Move the cursor to the last position by
pressing ¡ after entering the title.
When you press ¡ one more time, the entered
title is stored in memory.
• Pressing 3 on the head unit also performs
the same operation.
6 Press BAND/ESC to return to the playback
display.
Using the telephone
muting/attenuation
Telephone muting/attenuation function
Sound from this system is muted or attenuated
automatically when a call is made or received
using a cellular telephone connected to this
product.
• The sound is turned off, MUTE or ATT is displayed and no audio adjustment is possible.
• Operation returns to normal when the phone
connection is ended.
Displaying built-in player
information
You can display the information concerning the
built-in player digital output setting.
Press DISPLAY on the head unit.
Press DISPLAY on the head unit repeatedly to
switch between the following settings:
PLAYBACK MODE A (play time)—PLAYBACK
MODE B (play time and digital output setting
information)
• You can only switch to PLAYBACK MODE B
when a Pioneer Multi-channel processor (DEQP7050) is connected. If of the digital output is
set to LPCM, nothing will be displayed on the
display.
• When a Video CD is playing on the built-in
player, PLAYBACK MODE B will be skipped.
En
76
11
Section
Page 77

Additional Information
En
77
English
Español
Deutsch
Français
Italiano
Nederlands
12
Section
Compatible with DVD, Video CD and CD Formats
DVD, Video CD and CD discs that display the logos shown below can be played back on this product.
For more information on discs compatible with this product, refer to the table below.
The disc format logos shown above are found on disc labels or on disc jackets.
Disc types and logos Diameter/Playable sides Playback time
DVD VIDEO Digital audio/Digital video (MPEG 2)
12 cm (5 in.)/single-sided
1 layer 133 min.
2 layer 242 min.
12 cm (5 in.)/double-sided
1 layer 266 min.
2 layer 484 min.
DVD VIDEO Digital audio/Digital video (MPEG 2)
8 cm (3 in.)/single-sided
1 layer 41 min.
2 layer 75 min.
8 cm (3 in.)/double-sided
1 layer 82 min.
2 layer 150 min.
VIDEO CD
Digital audio/Digital video (MPEG 1)
12 cm (5 in.)/single-sided Max. 74 minutes
VIDEO CD single
Digital audio/Digital video (MPEG 1)
8 cm (3 in.)/single-sided Max. 20 minutes
CD Digital audio
12 cm (5 in.)/single-sided Max. 74 minutes
CD single Digital audio
8 cm (3 in.)/single-sided Max. 20 minutes
DVD VIDEO
CD
VIDEO CD
Page 78

Additional Information
En
78
12
Section
Notes
• With some DVD-Video discs, you may not be
able to use certain functions.
• Playback of some DVD-Video discs may not be
possible.
• With DVD-R/DVD-RW discs, only recordings
made in the Video format (Video mode) can be
played back. DVD-RW discs recorded in the
Video Recording format (VR mode) cannot be
played back.
• Even with DVD-R/DVD-RW discs featuring
recordings made in the Video format (Video
mode), playback may not be possible with this
unit due to disc characteristics or scratches
or dirt on the disc. Dirt or condensation on the
lens inside this unit may also prevent playback.
• Playback of CD-R/CD-RW and DVD-R/DVDRW discs that have not been finalized is not
possible.
• Playback of discs recorded with a PC using
the correct format is possible, but depending
on the application software settings, environment and other factors, playback may not be
possible. (For details, inquire at the store or
dealer’s where you purchased the application
software.)
• Playback of CD-TEXT discs is possible, but
display of titles and other information is not
possible when you use the built-in player as a
source.
• CD-Extra discs can be played back as music
CDs.
Precautions
• Playback of DVD-Audio and CD-ROM discs is
not possible. This player can only playback
discs bearing the marks shown on page 77.
• DVDs that have incompatible region numbers
(see pages 7 and 87) cannot be played on this
product. The region number of the player can
be found on the bottom of this product.
The illustration below shows the regions and
corresponding region numbers.
• Normal playback of CD-R/CD-RW discs other
than those recorded with a music CD recorder
may not be possible.
• Playback of music CD-R/CD-RW discs, even
those recorded with a music CD recorder, may
not be possible with this unit due to disc characteristics or scratches or dirt on the disc.
Dirt or condensation on the lens inside this
unit may also prevent playback.
• Titles and other text informations recorded on
a CD-R/CD-RW discs can not be displayed by
this unit.
• If you insert a CD-RW disc into this unit, time
to playback will be longer than when you
insert a conventional CD or CD-R disc.
• Read the precautions with the CD-R/CD-RW
discs before using.
Page 79

Additional Information
En
79
English
Español
Deutsch
Français
Italiano
Nederlands
12
Section
Care of discs
• This product is designed for use with conventional, fully circular discs only. Use of shaped
discs are not recommended for this product.
• Check all discs before playing and discard
cracked, scratched or warped discs.
• Wipe dirty or damp discs outward from the
center with a soft cloth.
• Avoid touching the recorded (iridescent) surface when handling discs.
• Store discs in their cases when not in use.
• Keep discs out of direct sunlight and high
temperatures.
• Do not affix labels or apply chemicals to discs.
• Condensation may collect inside the player
when using the heater in cold weather, interfering with playback. Turn it off for an hour or
so and wipe damp discs with a soft cloth.
• Road shocks may interrupt disc playback.
• Never insert anything other than discs. Do not
attach a label or tape to a disc.
• The use of benzine, thinner, insecticide, or
other volatile chemicals may damage the disc
surface.
Page 80

Additional Information
En
80
12
Section
Language code chart for DVD
Language (code) Input code
Japanese (ja) 1001
English (en) 0514
French (fr) 0618
Spanish (es) 0519
German (de) 0405
Italian (it) 0920
Chinese (zh) 2608
Dutch (nl) 1412
Portuguese (pt) 1620
Swedish (sv) 1922
Russian (ru) 1821
Korean (ko) 1115
Greek (el) 0512
Afar (aa) 0101
Abkhazian (ab) 0102
Afrikaans (af) 0106
Amharic (am) 0113
Arabic (ar) 0118
Assamese (as) 0119
Aymara (ay) 0125
Azerbaijani (az) 0126
Bashkir (ba) 0201
Byelorussian (be) 0205
Bulgarian (bg) 0207
Bihari (bh) 0208
Bislama (bi) 0209
Bengali (bn) 0214
Tibetan (bo) 0215
Breton (br) 0218
Catalan (ca) 0301
Corsican (co) 0315
Czech (cs) 0319
Welsh (cy) 0325
Danish (da) 0401
Bhutani (dz) 0426
Esperanto (eo) 0515
Estonian (et) 0520
Basque (eu) 0521
Persian (fa) 0601
Finnish (fi) 0609
Fiji (fj) 0610
Faroese (fo) 0615
Frisian (fy) 0625
Irish (ga) 0701
Scots-Gaelic (gd) 0704
Galician (gl) 0712
Language (code) Input code
Guarani (gn) 0714
Gujarati (gu) 0721
Hausa (ha) 0801
Hindi (hi) 0809
Croatian (hr) 0818
Hungarian (hu) 0821
Armenian (hy) 0825
Interlingua (ia) 0901
Interlingue (ie) 0905
Inupiak (ik) 0911
Indonesian (in) 0914
Icelandic (is) 0919
Hebrew (iw) 0923
Yiddish (ji) 1009
Javanese (jw) 1023
Georgian (ka) 1101
Kazakh (kk) 1111
Greenlandic (kl) 1112
Cambodian (km) 1113
Kannada (kn) 1114
Kashmiri (ks) 1119
Kurdish (ku) 1121
Kirghiz (ky) 1125
Latin (la) 1201
Lingala (ln) 1214
Laothian (lo) 1215
Lithuanian (lt) 1220
Latvian (lv) 1222
Malagasy (mg) 1307
Maori (mi) 1309
Macedonian (mk) 1311
Malayalam (ml) 1312
Mongolian (mn) 1314
Moldavian (mo) 1315
Marathi (mr) 1318
Malay (ms) 1319
Maltese (mt) 1320
Burmese (my) 1325
Nauru (na) 1401
Nepali (ne) 1405
Norwegian (no) 1415
Occitan (oc) 1503
Oromo (om) 1513
Oriya (or) 1518
Panjabi (pa) 1601
Polish (pl) 1612
Language (code) Input code
Pashto, Pushto (ps) 1619
Quechua (qu) 1721
Rhaeto-Romance (rm) 1813
Kirundi (rn) 1814
Romanian (ro) 1815
Kinyarwanda (rw) 1823
Sanskrit (sa) 1901
Sindhi (sd) 1904
Sangho (sg) 1907
Serbo-Croatian (sh) 1908
Sinhalese (si) 1909
Slovak (sk) 1911
Slovenian (sl) 1912
Samoan (sm) 1913
Shona (sn) 1914
Somali (so) 1915
Albanian (sq) 1917
Serbian (sr) 1918
Siswati (ss) 1919
Sesotho (st) 1920
Sundanese (su) 1921
Swahili (sw) 1923
Tamil (ta) 2001
Telugu (te) 2005
Tajik (tg) 2007
Thai (th) 2008
Tigrinya (ti) 2009
Turkmen (tk) 2011
Tagalog (tl) 2012
Setswana (tn) 2014
Tonga (to) 2015
Turkish (tr) 2018
Tsonga (ts) 2019
Tatar (tt) 2020
Twi (tw) 2023
Ukrainian (uk) 2111
Urdu (ur) 2118
Uzbek (uz) 2126
Vietnamese (vi) 2209
Volapük (vo) 2215
Wolof (wo) 2315
Xhosa (xh) 2408
Yoruba (yo) 2515
Zulu (zu) 2621
Page 81

Troubleshooting
Common problems
Symptom Cause Remedy
Additional Information
En
81
English
Español
Deutsch
Français
Italiano
Nederlands
12
Section
Power doesn’t switch ON.
The unit doesn’t operate.
Operation with the remote
control isn’t possible.
The unit does not operate
correctly even when the appropriate
remote control buttons are pressed.
Playback is not possible.
There’s no sound.
Leads and connectors are
incorrectly connected.
A fuse has blown.
Noise and other factors are
causing the built-in microprocessor to operate incorrectly.
The remote control operation
mode is incorrect.
The remote control code is
incorrect.
Battery power is low.
Some operations are prohibited with certain discs.
The disc is dirty.
The loaded disc is a type this
unit cannot play.
Non compatible video system
disc is loaded.
Connections are incorrect.
With some discs, 96 kHz output is prohibited.
The unit is performing still,
slow motion or frame-by-frame
playback.
Confirm once more that all connections
are correct. (See page 90 – 97.)
Fix the problem causing the blown fuse,
and replace the old fuse with a new one
of the same capacity. (See page 90.)
Turn the unit off and then on.
Switch to the correct remote control
mode. (See page 12.)
Make sure the remote control code selection switch setting and code type setting
are the same. (See page 70.)
Load new batteries. (See page 16.)
Check using another disc.
Clean the disc. (See page 79.)
Check what type the disc is.
Change to a disc compatible to your
video system.
Check connections. (See page 90 – 97.)
Switch the output setting to
48 kHz. (See page 68.)
There is no sound during still, slow
motion or frame-by-frame playback.
Page 82

Additional Information
En
82
12
Section
Common problems (continued)
Symptom Cause Remedy
There’s no picture.
The prohibited mark “ ” is
displayed, and operation is
not possible.
The picture stops (pauses)
and the unit cannot be
operated.
There’s no sound.
Volume level is low.
There’s audio and video
skipping.
The picture is stretched, the
aspect is incorrect.
Rear display picture
disappears.
When the ignition switch is
turned ON (or turned to
ACC), the motor sounds.
The parking brake cord is not
connected.
The parking brake is not
applied.
The operation is prohibited for
the disc.
The operation is not compatible with the disc’s organization.
Reading of data has become
impossible during playback.
The volume level is low.
The attenuator is ON.
This unit is not firmly secured.
The aspect setting is incorrect
for the display.
The source disc being listened
to with the head unit has been
ejected.
This unit confirms whether a
disc is loaded or not.
Connect a parking brake cord, and apply
the parking brake. (See page 90.)
Connect a parking brake cord, and apply
the parking brake. (See page 90.)
This operation is not possible.
This operation is not possible.
After pressing 7 once, start playback
once more.
Raise the volume level.
Switch the attenuator OFF.
Secure this unit firmly.
Select the appropriate setting for your
display. (See page 67.)
Before ejecting the disc, switch the
source. This problem may occur when
certain connection methods are used.
This is a normal operation.
Page 83

Additional Information
En
83
English
Español
Deutsch
Français
Italiano
Nederlands
12
Section
Problems during DVD playback
Symptom Cause Remedy
Playback is not possible.
A Parental Lock message is
displayed and playback is
not possible.
Parental Lock cannot be
canceled.
Dialog language (and
subtitle language) cannot be
switched.
No subtitles are displayed.
The loaded disc has a different
region number from this unit.
Parental lock is on.
The code number is incorrect.
You have forgotten your code
number.
The DVD playing does not
feature multiple language
recordings.
You can only switch between
options indicated in the disc
menu.
The DVD playing does not
feature subtitles.
You can only switch between
options indicated in the disc
menu.
Replace the disc with one featuring the
same region number as this unit. (See
pages 7, 78 and 87.)
Switch parental lock off or change the
level. (See page 65.)
Input the correct code number. (See
page 65.)
Press CLEAR 10 times to cancel the
code number. (See page 70.)
You cannot switch among multiple languages if they aren’t recorded on the
disc.
Switch using the disc menu.
Subtitles are not displayed if they are not
recorded on the disc.
Switch using the disc menu.
Page 84

Additional Information
En
84
12
Section
Problems during DVD playback (continued)
Symptom Cause Remedy
Problems during Video CD playback
Symptom Cause Remedy
The PBC (Playback Control)
menu display cannot be
called up.
Repeat play and track/time
search are not possible.
The Video CD playing does not
feature PBC.
PBC is switched OFF.
PBC is switched ON.
This operation is not possible with Video
CDs not featuring PBC.
Switch PBC ON. (See pages 33 and 35.)
Switch PBC OFF. (See pages 33 and 35.)
Playback is not with the
audio language and subtitle
language settings selected in
SET UP MENU.
Switching the viewing angle
is not possible.
The picture is extremely
unclear/distorted and dark
during playback.
The DVD playing does not
feature dialog or subtitles in
the language selected in the
SET UP MENU.
The DVD playing does not
feature scenes shot from
multiple angles.
You are trying to switch to
multiple angle viewing of a
scene that is not recorded
from multiple angles.
The disc features a signal to
prohibit copying. (Some discs
may have this.)
Switching to a selected language is not
possible if the language selected in the
SET UP MENU is not recorded on the
disc.
You cannot switch between multiple
angles if the DVD does not feature
scenes recorded from multiple angles.
Switch between multiple angles when
watching scenes recorded from multiple
angles.
Since this unit is compatible with the
copy guard analog copy protect system,
when playing a disc that has a signal
prohibiting copying, the picture may
suffer from horizontal stripes or other
imperfections when viewed on some
displays. This does not mean this unit is
malfunctioning.
Page 85

Error messages
When problems occur with disc playback, an
error message appears on the display. Refer to
the table below to identify the problem, then
take the suggested corrective action. If the error
persists, contact your dealer or your nearest
PIONEER Service Center.
Error massages on the OEL display
Error massages on the display
Additional Information
En
85
English
Español
Deutsch
Français
Italiano
Nederlands
12
Section
Message Cause Action
ERROR-02
The disc is dirty. Wipe the disc
clean. (See page
79.)
THERMAL
PROTECTION
IN MOTION
The tempera-
ture of this unit
is outside of the
normal operat-
ing range.
Wait until the
unit’s tempera-
ture returns to
within normal
operating limits.
The disc is
scratched.
If the disc is
scratched,
replace it with
another. (See
page 79.)
DIFFERENT
REGION DISC
The disc does
not have the
same region
number as this
unit.
Replace the
DVD with one
bearing the
correct region
number.
NON-
PLAYABLE
DISC
This type of disc
(CD-ROM etc.)
cannot be
played by this
unit.
Replace the
disc with one
this unit can
play. (See page
77.)
The disc is
loaded upside
down.
Check that the
disc is loaded
correctly.
Message Cause Action
ERROR-11, 12,
17, 30
Dirty disc Clean disc.
ERROR-11, 12,
17, 30
Scratched disc Replace disc.
ERROR-14 Blank disc Check the disc.
ERROR-10, 11,
12, 14, 17, 30,
A0
Electrical or
mechanical
Turn the ignition
ON and OFF, or
switch to a
different source,
then back to the
built-in player.
ERROR-44 All tracks are
skip tracks.
Replace disc.
Page 86

Additional Information
Terms of DVD/Video CD
Aspect Ratio
This is the width-to-height ratio of a TV screen. A
regular display has an aspect ratio of 4:3. Widescreen displays have an aspect ratio of 16:9,
providing a bigger picture for exceptional presence and atmosphere.
Chapter
DVD titles are in turn divided into chapters
which are numbered in the same way as the
chapters of a book. With DVDs featuring chapters, you can quickly find a desired scene with
chapter search.
Dolby Digital 1
Dolby Digital provides multi-channel audio from
up to 5.1 independent channels. This system is
the same as the Dolby Digital surround sound
system used in theaters.
To enjoy Dolby Digital entertainment, you must
connect this unit’s optical digital output jacks to
the optical digital input jacks of a Dolby Digital
compatible amp.
DTS
This stands for Digital Theater Systems. DTS is a
surround system delivering multi-channel audio
from up to 6 independent sources.
To enjoy discs featuring DTS audio recording,
you must connect this unit’s optical digital output jacks to the optical digital input jacks of a
DTS compatible amp or decoder.
Linear PCM (LPCM)
This stands for Linear Pulse Code Modulation,
which is the signal recording system used for
music CDs. Compared to music CDs, which
feature 44.1 kHz/16-bit recordings, DVDs feature
48 kHz/16-bit – 96 kHz/24-bit recordings. The
result is sound quality even higher than that
provided by music CDs.
MPEG
This stands for Moving Pictures Experts Group,
and is an international video image compression standard. Some DVDs feature digital audio
compressed and recorded using this system.
Multi-Angle
With regular TV programs, although multiple
cameras are used to simultaneously shoot
scenes, only images from one camera at a time
are transmitted to your TV. Some DVDs feature
scenes shot from multiple angles, letting you
choose your viewing angle as desired.
En
86
12
Section
Page 87

Additional Information
En
87
Multi-Audio (Multilingual Dialog)
Some DVDs feature dialog recorded in multiple
languages. Dialog in up to 8 languages can be
recorded on a single disc, letting you choose as
desired.
Multi-Subtitle
Subtitles in up to 32 languages can be recorded
on a single DVD, letting you choose as desired.
Optical Digital Output
By transmitting the audio signal as a digital
signal, it’s possible to minimize any loss of
sound quality. Optical digital output refers to the
transmission (output) of a digital audio signal
via optical cable. (The amp or other component
on the reception side must have optical digital
inputs.)
Parental Lock
Some DVDs with violent or adult-oriented
scenes feature parental lock which prevents
children from viewing such scenes. With this
kind of disc, if you set this unit’s parental lock
level, playback of scenes inappropriate for children will not be possible, or these scenes will be
skipped.
Playback Control (PBC)
This is a playback control signal recorded on
Video CDs (Version 2.0). Using menu displays
provided by Video CDs with PBC lets you enjoy
playback of simple interactive software and
software with search functions. You can also
enjoy viewing high- and standard-resolution still
images.
Region Number
DVD players and DVD discs feature region numbers indicating the area in which they were
purchased. Playback of a DVD is not possible
unless it features the same region number as
the DVD player. This product’s region number is
displayed on the bottom of this product.
Title
DVDs have a high data capacity, enabling
recording of multiple movies on a single disc. If,
for example, one disc contains three separate
movies, they are divided into Title 1, Title 2 and
Title 3. This lets you enjoy the convenience of
title search and other functions.
English
Español
Deutsch
Français
Italiano
Nederlands
12
Section
Page 88

Connecting the units
Notes
• This unit is for vehicles with a 12-volt battery
and negative grounding. Before installing it in
a recreational vehicle, truck, or bus, check the
battery voltage.
• To avoid shorts in the electrical system, be
sure to disconnect the ≠ battery cable before
beginning installation.
• Refer to the owner’s manual for details on
connecting the power amp and other units,
then make connections correctly.
• Secure the wiring with cable clamps or adhesive tape. To protect the wiring, wrap adhesive
tape around them where they lie against
metal parts.
• Route and secure all wiring so it cannot touch
any moving parts, such as the gear shift,
handbrake, and seat rails. Do not route wiring
in places that get hot, such as near the heater
outlet. If the insulation of the wiring melts or
gets torn, there is a danger of the wiring shortcircuiting to the vehicle body.
• Don’t pass the yellow lead through a hole into
the engine compartment to connect to the
battery. This will damage the lead insulation
and cause a very dangerous short.
• Do not shorten any leads. If you do, the protection circuit may fail to work when it should.
• Never feed power to other equipment by cutting the insulation of the power supply lead of
the unit and tapping into the lead. The current
capacity of the lead will be exceeded, causing
overheating.
• When replacing fuse, be sure to use only fuse
of the rating prescribed on this unit.
• Since a unique BPTL circuit is employed,
never wire so the speaker leads are directly
grounded or the left and right ≠ speaker
leads are common.
• Speakers connected to this unit must be highpower types with minimum rating of 50 W and
impedance of 4 to 8 ohms. Connecting speakers with output and/or impedance values
other than those noted here may result in the
speakers catching fire, emitting smoke, or
becoming damaged.
• When this product’s source is switched ON, a
control signal is output through the
blue/white lead. Connect to an external power
amp’s system remote control or the car’s
Auto-antenna relay control terminal (max. 300
mA 12 V DC). If the car features a glass
antenna, connect to the antenna booster
power supply terminal.
• When an external power amp is being used
with this system, be sure not to connect the
blue/white lead to the amp’s power terminal.
Likewise, do not connect the blue/white lead
to the power terminal of the auto-antenna.
Such connection could cause excessive current drain and malfunction.
• To avoid short-circuiting, cover the disconnected lead with insulating tape. Especially,
insulate the unused speaker leads without
fail. There is a possibility of short-circuiting if
the leads are not insulated.
• To prevent incorrect connection, the input
side of the IP-BUS connector is blue, and the
output side is black. Connect the connectors
of the same colors correctly.
En
88
13
Section
Page 89

• This unit can not be installed in a vehicle
that does not have an ACC (accessory)
position on the ignition switch.
• The black lead is ground. Please ground this
lead separately from the ground of high-current products such as power amps.
If you ground the products together and the
ground becomes detached, there is a risk of
damage to the products or fire.
• Cords for this product and those for other
products may be different colors even if they
have the same function. When connecting
this product to another product, refer to the
supplied Installation manuals of both products and connect cords that have the same
function.
No ACC positionACC position
Connecting the units
En
89
English
Español
Deutsch
Français
Italiano
Nederlands
13
Section
C
C
A
O
F
N
F
O
S
T
A
R
T
O
F
N
F
O
S
T
A
R
T
Page 90

Connecting the units
En
90
13
Section
Fuse holder
Fuse resistor
Fuse resistor
Yellow
To terminal always supplied
with power regardless of
ignition switch position.
Red
To electric terminal controlled
by ignition switch (12 V DC)
ON/OFF.
Black (ground)
To vehicle (metal) body.
Orange/white
To lighting switch terminal.
Fuse holder
Yellow/black
If you use a cellular telephone, connect it via the
Audio Mute lead on the cellular telephone. If not,
keep the Audio Mute lead free of any
connections.
IP-BUS cable
This Product
Antenna jack
15 cm
Multi-CD player
(sold separately)
15 cm
IP-BUS input (Blue)
Refer to pages 92 - 97.
Optical input
When you connect separately sold
Multi-channnel processor (DEQ-P7050)
to this unit, do not connect anything to the
speaker leads and system remote control
(blue/white).
Power cable connection
Page 91

Connecting the units
En
91
English
Español
Deutsch
Français
Italiano
Nederlands
13
Section
Blue/white
To system control terminal of the power amp
or Auto-antenna relay control terminal
(max. 300 mA 12 V DC).
White
White/black
Gray
Gray/black
Green
Green/black
Violet
Violet/black
Front speaker
Rear speaker
Front speaker
Rear speaker
Left Right
With a 2 speaker system, do not connect anything
to the speaker leads that are not connected to speakers.
+
≠
+
≠
+
≠
+
≠
Light green
Used to detect the ON/OFF status of the parking brake.
This lead must be connected to the power supply side of the
parking brake switch.
Parking brake
switch
Power supply side
Ground side
Note
• The position of the parking brake switch depends
on the vehicle model. For details, consult the
vehicle Owner’s Manual or dealer.
Connection method
2. Clamp firmly with
needle-nosed
pliers.
Clamp the switch
power supply side
lead for the parking
brake.
1.
Page 92

Connecting the units
En
92
13
Section
System remote control
Subwoofer output
or Non Fading Output
(SUBWOOFER OUTPUT
or NON-FADING
OUTPUT)
Front output
(FRONT OUTPUT)
Note
When you connect to DEQ-P7050 to this unit,
separately sold power amp must be connected to DEQP7050.
This Product
23 cm
Optical input
23 cm
Note
Change the Initial Setting of this Product (refer to the
Operation Manual). The subwoofer output of this unit
is monaural.
Antenna jack
Refer to Power cable
connection on page 90.
IP-BUS input (Blue)
Refer to Power cable
connection on page 90.
15 cm
15 cm
When you connect separately sold
Multi-channnel processor (DEQ-P7050)
to this unit, do not connect anything to the
speaker leads and system remote control
(blue/white).
Connecting to separately sold power amp
Page 93

Connecting the units
En
93
English
Español
Deutsch
Français
Italiano
Nederlands
13
Section
Use this for connections when
you have the separately available
amplifier.
Blue/white
To system control terminal of the
power amp or Auto-antenna relay
control terminal
(max. 300 mA 12 V DC).
Subwoofer
Subwoofer
Front speaker
Front speaker
Connecting cords
with RCA pin plugs
(sold separately)
Left Right
System remote control
≠
+
≠
+
≠
+
≠
+
Power amp
(sold separately)
Power amp
(sold separately)
Page 94

Connecting the units
En
94
13
Section
When connecting with a Multi-channel processor
RCA cables
(sold separately)
RCA cable (supplied with the
multi-channel processor)
20 pin cable
(supplied with the display)
Yellow
Yellow
Right (Red)
Left (White)
To audio
inputs
FM MODULATOR
IP-BUS MAIN UNIT
IP-BUS AV MASTER
To video
input
Right (Red)
Left (White)
IP-BUS cable
(supplied with
the TV tuner)
Hide-away TV Tuner
(e.g. GEX-P7000TVP)
(sold separately)
Multi-CD player
(sold separately)
Green
Green
Black
Blue
Blue
Display with RCA
input jacks
Black Blue
Multi-channel processor
(DEQ-P7050)
(sold separately)
Page 95

Connecting the units
En
95
English
Español
Deutsch
Français
Italiano
Nederlands
13
Section
This product
Rear video output
(REAR VIDEO OUTPUT)
(Yellow)
15 cm
23 cm
Optical cable (supplied with the
multi-channel processor)
Right (Red)
Left (White)
Not used.
AV system display
(e.g. AVX-7300)
(sold separately)
1.5 m
15 cm
15 cm
Video input
(VIDEO INPUT)
(Yellow)
RCA cable
(supplied)
15 cm
Rear audio output
(DVD REAR MONITOR
OUTPUT)
Right (Red)Left
(White)
Front video
output (FRONT
VIDEO OUTPUT)
(Yellow)
Subwoofer output or non fading
output (SUBWOOFER OUTPUT
or NON-FADING OUTPUT)
Blue
Black
Red
IP-BUS cable (supplied with
the multi-channel processor)
Page 96

Connecting the units
En
96
13
Section
When connecting the display with RCA input jack
This Product
15 cm
Front video output
(FRONT VIDEO OUTPUT)
RCA cable
(supplied)
To video input
Display with RCA
input jacks
1.5 m
Page 97

Connecting the units
En
97
English
Español
Deutsch
Français
Italiano
Nederlands
13
Section
When using a display connected to rear video output
This product’s rear video output is for connection of a display to enable passengers in the rear seats
to watch the DVD or Video CD.
WARNING
• NEVER install the display in a location that enables the Driver to watch the DVD or Video CD while
Driving.
• NEVER connect rear audio output (DVD REAR MONITOR OUTPUT) to separately sold power amp.
Display with RCA
input jacks
This Product
15 cm
Rear video output
(REAR VIDEO OUTPUT)
RCA cable
(supplied)
To video input
Rear audio output
(DVD REAR MONITOR OUTPUT)
15 cm
15 cm
To audio inputs
RCA cable
(sold separately)
1.5 m
Page 98

Installation
En
98
14
Section
DIN front/rear-mount
This unit can be properly installed either from “Front” (conventional DIN Front-mount) or “Rear ” (DIN
Rear-mount installation, utilizing threaded screw holes at the sides of unit chassis). For details, refer
to the following illustrated installation methods.
Notes
• Before finally installing the unit, connect the
wiring temporarily, making sure it is all connected up properly, and the unit and the system work properly.
• Use only the parts included with the unit to
ensure proper installation. The use of unauthorized parts can cause malfunctions.
• Consult with your nearest dealer if installation
requires the drilling of holes or other modifications of the vehicle.
• Install the unit where it does not get in the
driver’s way and cannot injure the passenger
if there is a sudden stop, like an emergency
stop.
• The semiconductor laser will be damaged if it
overheats, so don’t install the unit anywhere
hot — for instance, near a heater outlet.
• If installation angle exceeds 30° from horizontal, the unit might not give its optimum performance.
• The cords must not cover up the area shown
in the figure below. This is necessary to allow
the amplifires to radiate freely.
Do not close this area.
Page 99

Installation
En
99
DIN front-mount
Installation with the rubber bush
182
53
English
Español
Deutsch
Français
Italiano
Nederlands
14
Section
Holder
After inserting the holder into the dashboard, select the appropriate tabs according
to the thickness of the dash-board material
and bend them.
(Install as firmly as possible using the top
and bottom tabs. To secure, bend the tabs 90
degrees.)
Rubber bush
Dashboard
Screw
Page 100

Installation
Removing the unit
En
100
14
Section
Insert the release pin into
the hole in the bottom of
the frame and pull out to
remove the frame. (When
reattaching the frame,
point the side with a
groove downwards and
attach it.)
Frame
Insert the supplied extraction
keys into the unit, as shown in
the figure, until they click into
place. Keeping the keys
pressed against the sides of
the unit, pull the unit out.
 Loading...