

Pioneer DV-737 User Manual [en, de, fr, it]

DVD PLAYER
LECTEUR DE DVD
DVD-SPIELER
LETTORE PER DVD
DV-737
Operating Instructions
Mode d’emploi
Bedienungsanleitung
Istruzioni per l’uso
1 Before You Start / Avant de commencer
IMPORTANT
CAUTION
RISK OF ELECTRIC SHOCK
DO NOT OPEN
The lightning flash with arrowhead symbol, within an
equilateral triangle, is intended to alert the user to the
presence of uninsulated "dangerous voltage" within the
product's enclosure that may be of sufficient magnitude to
constitute a risk of electric shock to persons.
CAUTION:
TO PREVENT THE RISK OF ELECTRIC SHOCK, DO NOT
REMOVE COVER (OR BACK). NO USER-SERVICEABLE
PARTS INSIDE. REFER SERVICING TO QUALIFIED
SERVICE PERSONNEL.
The exclamation point within an equilateral triangle is
intended to alert the user to the presence of important
operating and maintenance (servicing) instructions in the
literature accompanying the appliance.
The cut-off plug should be disposed of and must not be
IMPORTANT
FOR USE IN THE UNITED
KINGDOM
The wires in this mains lead are coloured in accordance with the following code :
If the plug provided is unsuitable for your socket outlets,
the plug must be cut off and a suitable plug fitted.
Blue :Neutral
Brown :Live
inserted into any 13 amp socket as this can result in electric
shock. The plug or adaptor or the distribution panel should be
provided with 5A amp fuse. As the colours of the wires in the
mains lead of this appliance may not correspond with
coloured markings identifying the terminals in your plug,
proceed as follows :
The wire which is coloured blue must be connected to the
terminal which is marked with the letter N or coloured black.
The wire which is coloured brown must be connected
to the terminal which is marked with the letter L or coloured
red.
CAUTION
This product contains a laser diode of higher class than 1. To
ensure continued safety, do not remove any covers or attempt
to gain access to the inside of the product.
Refer all servicing to qualified personnel.
The following caution label appear on your player.
Location: On the rear panel of the player
CLASS 1
LASER PRODUCT
On the bonnet of the player
CAUTION :
VORSICHT :
ADVARSEL :
VARNING :
VARO! :
VISIBLE AND INVISIBLE LASER RADIATION WHEN OPEN.
AVOID EXPOSURE TO BEAM.
SICHTBARE UND UNSICHTBARE LASERSTRAHLUNG, WENN
ABDECKUNG GEÖFFNET NICHT DEM STRAHL AUSSETZEN!
SYNLIG OG USYNLIG LASERSTRÅLING VED ÅBNING
UNDGÅ UDSÆTTELSE FOR STRÀLING.
SYNLIG OCH OSYNLIG LASERSTRÅLNING NÄR DENNA
DEL ÄR ÖPPNAD BETRAKTA EJ STRÅLEN.
AVATTAESSA ALTISTUT NÄKYVÄ JA NÄKYMÄTTÖMÄLLE
LASERSATEIL YLLE. ÄLÄ KATSO SÄTEESEN.
VRW1699
Do not connect either wire to the earth terminal of a three pin
plug.
NOTE
After replacing or changing a fuse, the fuse cover in the plug
must be replaced with a fuse cover which corresponds to the
colour of the insert in the base of the plug or the word that
is embossed on the base of the plug, and the appliance must
not be used without a fuse cover. If lost, replacement fuse
covers can be obtained from your dealer.
This appliance is rated at 13 amps.
Only 5A amp fuses approved to B.S.
1362 A.S.T.A. should be used.
ATTENTION
Ce produit renferme une diode à laser d’une catégorie supérieure
à 1. Pour garantir une sécurité constante, ne pas retirer les
couvercles ni essayer d’accéder à l’intérieur de l’appareil.
Pour toute réparation, s’adresser à un personnel qualifié.
La note suivante se trouve sur votre lecteur.
Emplacement: Sur le panneau arrière du
lecteur
CLASS 1
LASER PRODUCT
Sur le couvercle supérieur du lecteur
CAUTION :
VORSICHT :
ADVARSEL :
VARNING :
VARO! :
VISIBLE AND INVISIBLE LASER RADIATION WHEN OPEN.
AVOID EXPOSURE TO BEAM.
SICHTBARE UND UNSICHTBARE LASERSTRAHLUNG, WENN
ABDECKUNG GEÖFFNET NICHT DEM STRAHL AUSSETZEN!
SYNLIG OG USYNLIG LASERSTRÅLING VED ÅBNING
UNDGÅ UDSÆTTELSE FOR STRÀLING.
SYNLIG OCH OSYNLIG LASERSTRÅLNING NÄR DENNA
DEL ÄR ÖPPNAD BETRAKTA EJ STRÅLEN.
AVATTAESSA ALTISTUT NÄKYVÄ JA NÄKYMÄTTÖMÄLLE
LASERSATEIL YLLE. ÄLÄ KATSO SÄTEESEN.
VRW1699
WARNING: TO PREVENT FIRE OR SHOCK HAZARD, DO NOT
EXPOSE THIS APPLIANCE TO RAIN OR MOISTURE.
• This product incorporates copyright protection technology
that is protected by method claims of certain U. S. patents
and other intellectual property rights owned by Macrovision
Corporation and other rights owners. Use of this copyright
protection technology must be authorized by Macrovision
Corporation, and is intended for home and other limited
viewing uses only unless otherwise authorized by Macrovision
corporation. Reverse engineering or disassembly is prohibited.
2
En / Fr
ATTENTION: AFIN DE PREVENIR TOUS RISQUES DE CHOC
ELECTRIQUE OU DE DEBUT D'ENCENDIE, NE PAS EXPOSER CET
APPAREIL A L'HUMIDITE OU A LA PLUIE.
Cet appareil fait appel à divers circuits et principes destinés á
•
interdire la piraterie des oeuvres protégées par des droits d’auteurs,
circuits et principes qui sont couverts aux Etats-Unis soit par des
brevets détenus par Macrovision Corporation et d’autres sociétés, soit
par d’autres formes de propriété intellectuelle appartenant
également á Macrovision et à d’autres sociétés. L’utilisation de la
technologie visant à la protection des droits dàuteur doit être
autorisée par Macrovision Corporation, et doit être limitée à des fins
domestiques, ou similaires, sauf accord préalable de Macrovision
Corporation. La rétro-technique et le désassemblage sont proscrits.
1 Vor der Inbetriebnahme / Istruzioni preliminari
VORSICHT
Dieses Gerät enthält eine Laserdiode mit einer höheren Klasse
als 1. Um einen stets sicheren Betrieb zu gewährleisten, weder
irgendwelche Abdeckungen entfernen, noch versuchen, sich
zum Geräteinneren Zugang zu verschaffen.
Alle Wartungsarbeiten sollten qualifiziertem Kundendienstpersonal überlassen werden.
Die folgenden Warnungsetiketten sind am DVD-Spieler
angebracht.
Stelle: An der Rückseite des Gerätes
PRECAUZIONE
Questo prodotto contiene un diodo al laser di classe superiore
alla classe 1. Per motivi di sicurezza, non smontare i coperchi e
non procedere ad interventi sulle parti interne.
Per qualsiasi riparazione rivolgersi a personale qualificato.
La nota seguente si trova.
Ubicazione: Sul pannello posteriore del
lettore
CLASS 1
LASER PRODUCT
An der Geräteabdeckung Sul coperchio dell'apparecchio
CAUTION :
VORSICHT :
ADVARSEL :
VARNING :
VARO! :
WARNUNG: UM EINEN BRAND ODER STROMSCHLAG ZU
VERMEIDEN, DIESES GERÄT NICHT REGEN ODER FEUCHTIGKEIT
AUSSETZEN.
VISIBLE AND INVISIBLE LASER RADIATION WHEN OPEN.
AVOID EXPOSURE TO BEAM.
SICHTBARE UND UNSICHTBARE LASERSTRAHLUNG, WENN
ABDECKUNG GEÖFFNET NICHT DEM STRAHL AUSSETZEN!
SYNLIG OG USYNLIG LASERSTRÅLING VED ÅBNING
UNDGÅ UDSÆTTELSE FOR STRÀLING.
SYNLIG OCH OSYNLIG LASERSTRÅLNING NÄR DENNA
DEL ÄR ÖPPNAD BETRAKTA EJ STRÅLEN.
AVATTAESSA ALTISTUT NÄKYVÄ JA NÄKYMÄTTÖMÄLLE
LASERSATEIL YLLE. ÄLÄ KATSO SÄTEESEN.
VRW1699
CAUTION :
VORSICHT :
ADVARSEL :
VARNING :
VARO! :
AVVERTENZA: PER EVITARE IL RISCHIO DI FIAMME O
SCOSSE ELETTRICHE, NON ESPORRE QUESTO APPARECCHIO
ALLA PIOGGIA O ALL 'UMIDITA'.
VISIBLE AND INVISIBLE LASER RADIATION WHEN OPEN.
AVOID EXPOSURE TO BEAM.
SICHTBARE UND UNSICHTBARE LASERSTRAHLUNG, WENN
ABDECKUNG GEÖFFNET NICHT DEM STRAHL AUSSETZEN!
SYNLIG OG USYNLIG LASERSTRÅLING VED ÅBNING
UNDGÅ UDSÆTTELSE FOR STRÀLING.
SYNLIG OCH OSYNLIG LASERSTRÅLNING NÄR DENNA
DEL ÄR ÖPPNAD BETRAKTA EJ STRÅLEN.
AVATTAESSA ALTISTUT NÄKYVÄ JA NÄKYMÄTTÖMÄLLE
LASERSATEIL YLLE. ÄLÄ KATSO SÄTEESEN.
English
Français
CLASS 1
LASER PRODUCT
Deutsch Italiano
VRW1699
Dieses Produkt entspricht den Niederspannungsrichtlinien (73/
23/EEC), EMV-Richtlinien (89/336/EEC, 92/31/EEC) und den CEMarkierungsrichtlinien (93/68/EEC).
• Dieses Produkt beinhaltet urheberrechtlich geschützte
Technologie gemäß Verfahrensansprüchen bestimmter USPatente und anderer Rechte geistigen Eigentums im Besitz
der Macrovision Corporation und anderer Rechtsinhaber.
Gebrauch dieser urheberrechtlich geschützten Technologie
muß von Macrovision Corporation autorisiert werden, und ist
nur auf Heimanwendungen und andere begrenzte
Anwendungen beschränkt, sofern nicht eine spezielle
Genehmigung der Macrovision Corporation eingeholt
worden ist. Nachbau und Zerlegung verboten.
Questo prodotto è conforme alla direttiva sul basso voltaggio
(73/23/CEE), alle direttive EMC (89/336/CEE, 92/31/CEE) e alla
direttiva sul marchio CE (93/68/CEE).
• Questo prodotto contiene una tecnologia di protezione dei
diritti di autore, che è a sua volta protetta dal contenuto di
certi brevetti americani e da altri diritti sulla proprietà
intellettuale, posseduti dalla Macrovision Corporation e da
altri possessori di diritti. L’uso di questa tecnologia di
protezione dei diritti d’autore deve essere autorizzato dalla
Macrovision Corporation, ed è inteso solamente per uso
domestico, o per altri scopi limitati, ove non altrimenti
autorizzato dalla Macrovision Corporation. L’uso di tecniche
di inversione e lo smontaggio sono proibiti.
3
Ge/It

CONGRATULATIONS ON YOUR PURCHASE OF THIS FINE
PIONEER PRODUCT.
Pioneer is on the leading edge of DVD research for consumer
products and this unit incorporates the latest technological
developments.
We are sure you will be fully satisfied with the DVD player.
Thank you for your support.
Table of contents
Please read through these operating instructions so you will
know how to operate your model properly. After you have
finished reading the instructions, put them away in a safe place
for future reference.
• This player is not suitable for commercial use.
1 Before You Start
Features............................................................................................ 8
Checking what’s in the box ........................................................... 10
Using this manual ......................................................................... 10
Putting the batteries in the remote ............................................... 10
Using the remote control............................................................... 12
Hints on installation...................................................................... 12
Avoiding problems with condensation .......................................... 14
Maintaining your DVD player ....................................................... 14
Moving the player .......................................................................... 14
Power cord caution........................................................................ 14
Discs compatible with this player.................................................. 16
DVD Video regions ......................................................................... 16
2 Connecting Up
Easy Setup ...................................................................................... 18
Home theater video connections ................................................... 22
Home theater audio connections .................................................. 26
3 Controls and Displays
Front panel .................................................................................... 30
Display window .............................................................................. 32
Remote control .............................................................................. 34
6 OSD Settings
Using the Setup menu ................................................................... 86
Setup Menu Mode .......................................................................... 86
OSD language ................................................................................ 86
On Screen Display (Expert mode) ................................................ 88
7 Video Settings
TV Screen Size................................................................................ 90
Video Out........................................................................................ 90
S-Video Out (Expert menu) ......................................................... 92
Still Picture (Expert menu) .......................................................... 94
Angle Indicator (Expert menu) .................................................... 94
Frame Search (Expert menu) ....................................................... 94
Adjusting the video quality ............................................................ 96
8 Audio Settings
Dolby Digital Out ......................................................................... 102
DTS Out ....................................................................................... 102
Linear PCM Out ........................................................................... 104
MPEG Out .................................................................................... 104
Digital Out (Expert menu) ......................................................... 106
Virtual Surround.......................................................................... 106
Audio DRC ................................................................................... 108
4 Getting Started
Introduction .................................................................................. 38
Using the Setup Navigator............................................................. 38
Playing DVD Video discs ................................................................ 44
Playing CDs ................................................................................... 50
Playing Video CDs.......................................................................... 54
5 More Playback Functions
Introduction .................................................................................. 60
Accessing discs ............................................................................... 62
Scanning discs (DVD-Video) ......................................................... 64
Scanning discs (Video CD) ............................................................ 64
Switching camera angles (DVD-Video only) ................................ 66
Switching subtitles (DVD-Video only)........................................... 66
Switching audio language (DVD-Video only) .............................. 68
Switching audio types (Video CD/CD) .......................................... 68
Programming a program list........................................................ 70
More programming options .......................................................... 74
Using repeat play ........................................................................... 76
Using random play ........................................................................ 78
Bookmarking a place in a disc (LAST MEMORY) ........................ 80
Memorizing DVD-Video disc settings
(CONDITION MEMORY) ............................................................... 82
Displaying disc information.......................................................... 84
4
En
9 Language Settings
Audio Language........................................................................... 110
Subtitle Language ....................................................................... 112
Auto Language............................................................................. 114
DVD Language (Expert menu) ................................................... 114
Subtitle Display (Expert menu) .................................................. 116
Subtitle Off (Expert menu) ......................................................... 118
10
Miscellaneous Settings
Parental Lock............................................................................... 120
Screen Saver (Expert menu) ....................................................... 124
Background Color (Expert menu) .............................................. 124
Using setup menu shortcuts (FUNCTION MEMORY) ................ 126
11
Additional Information
Handling discs ............................................................................. 130
Storing discs................................................................................. 130
Discs to avoid ............................................................................... 132
Cleaning the pickup lens............................................................. 132
Glossary ........................................................................................ 134
Language Code list ...................................................................... 140
Troubleshooting .......................................................................... 142
Resetting the player ..................................................................... 150
Screen sizes and disc formats ...................................................... 152
Specifications ............................................................................... 154

FÉLICITATIONS POUR AVOIR ACHETÉ CET EXCELLENT
PRODUIT PIONEER.
Pioneer se situe à la pointe de la recherche en DVD pour les
produits de consommation et cet appareil intègre les derniers
développements technologiques. Nous sommes sûrs que vous
serez pleinement satisfaits avec ce lecteur DVD.
Merci pour votre soutien.
Table des matières
1 Avant de commencer
Veuillez prendre le temps de lire ce mode d’emploi de façon à
utiliser l’appareil au mieux de ses possibilités.Conservez
soigneusement ce mode d’emploi à portée de main pour être en
mesure de vous y référer chaque fois que cela sera nécessaire.
• Cet appareil n’a pas été conçu pour un usage commercial.
English
Français
1 Avant de commencer
Caractéristiques ............................................................................... 8
Vérification du contenu de la boîte ............................................... 10
Utilisation de ce mode d’emploi ................................................... 10
Installation des piles dans la télécommande ............................... 10
Utilisation de la télécommande .................................................... 12
Conseils d’installation ................................................................... 12
Prévention de la condensation ...................................................... 14
Entretien de votre lecteur de DVD ................................................. 14
Déplacement de l’appareil ............................................................ 14
Manipulation du câble d’alimentation ........................................ 14
Disques compatibles avec ce lecteur ............................................. 16
Zones géographiques des DVD vidéo ............................................. 16
2 Raccordements
Installation accélérée .................................................................... 19
Raccordement vidéo pour le cinéma à domicile .......................... 23
Raccordement audio pour le cinéma à domicile ......................... 27
3 Commandes et fenêtre d’affichage
Panneau avant .............................................................................. 30
Fenêtre d’affichage ........................................................................ 32
Télécommande .............................................................................. 35
6 Réglages de menu
Utilisation du menu d’installation ............................................... 86
Mode de menu d’installation ........................................................ 86
Langue d’affichage des menus␣ .................................................... 86
Affichage des écrans de menu␣ (mode Expert) .............................. 88
7 Paramètres vidéo
Format de l’écran du téléviseur .................................................... 90
Sortie vidéo .................................................................................... 90
Sortie S-Vidéo (menu Expert) ....................................................... 92
Arrêt sur image (menu Expert) .................................................... 94
Indicateur d’angle (menu Expert) ............................................... 94
Recherche d’image (menu Expert) .............................................. 94
Réglage de la qualité vidéo ........................................................... 96
8 Paramètres audio
Sortie Dolby Digital ..................................................................... 102
Sortie DTS .................................................................................... 102
Sortie PCM 96 kHz ....................................................................... 104
Sortie MPEG................................................................................. 104
Sortie numérique (menu Expert) ............................................... 106
Son spatial virtuel........................................................................ 106
DRC audio ................................................................................... 108
4 Préparation
Introduction .................................................................................. 38
Utilisation du navigateur d’installation ....................................... 38
Lecture de DVD vidéo ..................................................................... 44
Lecture de CD ................................................................................. 50
Lecture de CD vidéo ....................................................................... 54
5 Autres fonctions de lecture
Introduction .................................................................................. 60
Accès aux disques .......................................................................... 62
Exploration d’un disque (DVD vidéo) .......................................... 64
Exploration d’un disque (CD vidéo) ............................................. 64
Commutation des angles de prise de vues
(DVD vidéo uniquement) .............................................................. 66
Commutation des sous-titres (DVD vidéo uniquement) .............. 66
Commutation de la langue des dialogues
(DVD vidéo uniquement) .............................................................. 68
Commutation des pistes audio (CD vidéo/CD) ............................ 68
Programmation d’une liste de lecture .......................................... 70
Autres options de programmation ................................................ 74
Mode de lecture répétée ................................................................. 76
Mode de lecture aléatoire .............................................................. 78
Indexation d’un passage sur un disque␣ (LAST MEMORY) .......... 80
Mémorisation des paramètres d’un DVD vidéo
(CONDITION MEMORY) ............................................................... 82
Affichage des informations sur le disque ...................................... 84
9 Sélection de la langue
Langue des dialogues .................................................................. 110
Langue d’affichage des sous-titres .............................................. 112
Sélection automatique de la langue ........................................... 114
Langue DVD (menu Expert) ....................................................... 114
Affichage des sous-titres (menu Expert)..................................... 116
Désactivation des sous-titres (menu Expert) .............................. 118
10 Paramètres divers
Blocage parental ...................................................................................... 120
Economiseur d’écran (menu Expert) ..................................................... 124
Couleur d’arrière-plan (menu Expert) ................................................... 124
Utilisation des raccourcis de menu (FUNCTION MEMORY).................. 126
11 Informations complémentaires
Manipulation des disques ........................................................................ 130
Rangement des disques ........................................................................... 130
Disques à éviter ........................................................................................ 132
Nettoyage de la lentille du capteur optique ............................................ 132
Glossaire ................................................................................................... 134
Tableau des code de langue..................................................................... 140
Dépannage ............................................................................................... 142
Réinitialisation du lecteur ....................................................................... 150
Tailles d’écrans et formats de disques ..................................................... 152
Spécifications ........................................................................................... 154
5
Fr

WIR DANKEN IHNEN, DASS SIE SICH FÜR DIESES
HOCHWERTIGE PIONEER-ERZEUGNIS ENTSCHIEDEN HABEN.
Pioneer ist eines der führenden Unternehmen in bezug auf DVDForschung für Unterhaltungselektronik; auch dieses Gerät ist mit
den neuesten technischen Vorzügen ausgestattet.
Wir sind sicher, daß Sie mit diesem DVD-Spieler in jeder Hinsicht
zufrieden sein werden.
Wir danken Ihnen für Ihr Vertrauen.
Inhaltsverzeichnis
Bitte lesen Sie diese Bedienungsanleitung aufmerksam durch, um
eine problemlose Bedienung Ihres Geräts zu gewährleisten. Nach
dem Durchlesen bewahren Sie die Anleitung gut auf, um sich
jederzeit darauf beziehen zu können.
• Dieses Gerät ist nicht für eine gewerbliche Verwendung
geeignet.
1 Vor der Inbetriebnahme
Merkmale ......................................................................................... 9
Überprüfung des Lieferumfangs ................................................... 11
Gebrauch dieser Bedienungsanleitung ......................................... 11
Einlegen von Batterien in die Fernbedienung.............................. 11
Verwendung der Fernbedienung ................................................... 13
Hinweise zur Aufstellung ............................................................... 13
Vermeiden von Störungen durch Kondensation........................... 15
Wartung und Pflege des DVD-Spielers .......................................... 15
Ändern des Aufstellorts .................................................................. 15
Vorsichtshinweise zum Netzkabel ................................................. 15
Verwendbare Discs ......................................................................... 17
DVD-Regionalcodes ....................................................................... 17
2 Anschlüsse
Einfache Systemanordnung .......................................................... 20
Video-Anschluss von Heimkino-Komponenten ............................ 24
Audio-Anschluss von Heimkino-Komponenten ........................... 28
3 Bedienelemente und Anzeigen
Frontplatte ..................................................................................... 31
Displayanzeigen ............................................................................ 33
Fernbedienung .............................................................................. 36
6 Einstellungen für Bildschirmeinblendungen
Das Systemeinstellmenü ............................................................... 87
Setup Menu Mode (Einstellmenü-Modus) ................................... 87
OSD language (Sprache für Bildschirmeinblendung) ................ 87
On Screen Display (Bildschirmeinblendung) (Expertenmodus) ......
7 Video-Einstellungen
Bildschirmformat .......................................................................... 91
Video Out (Video-Ausgang) ........................................................... 91
S-Video Out (S-Video-Ausgang) (Expertenmenü) ....................... 93
Still Picture (Standbild) (Expertenmenü) ................................... 95
Angle Indicator (Mehrfach-Blickwinkelsymbol) (Expertenmenü) ...
Frame search (Einzelbildsuche) (Expertenmenü) ...................... 95
Einstellung der Bildqualität .......................................................... 97
8 Audio-Einstellungen
Dolby Digital Out (Dolby-Digitalausgang) ................................ 103
DTS Out (DTS-Ausgang) ............................................................. 103
96kHz PCM-Ausgangssignale ...................................................... 105
MPEG Out (MPEG-Ausgang) ...................................................... 105
Digital Out (Digitalausgang) (Expertenmenü) ......................... 107
Virtual Surround (Virtueller Surround-Effekt) .......................... 107
Audio-DRC (Dynamik bereichkompression) ............................. 109
89
95
4 Grundlegende Bedienung
Einführung .................................................................................... 39
Der Setup-Navigator zur Systemeinstellung ................................. 39
DVD-Wiedergabe ............................................................................ 45
CD-Wiedergabe .............................................................................. 51
Wiedergabe von Video-CDs ............................................................ 55
5 Weitere Wiedergabefunktionen
Einführung .................................................................................... 61
Disc-Zugriff .................................................................................... 63
Bildsuchlauf (DVD-Video)............................................................. 65
Bildsuchlauf (Video-CD) ............................................................... 65
Umschalten des Blickwinkels (nur DVD-Video) ........................... 67
Umschalten der Untertitelsprache (nur DVD-Video).................... 67
Umschalten der Dialogsprache (nur DVD-Video) ........................ 69
Wahl der Audiokanäle (Video-CD/CD) ......................................... 69
Eingabe von Abspielprogrammen ................................................. 71
Weitere Programmiermöglichkeiten ............................................ 75
Wiederholfunktion ........................................................................ 77
Zufallswiedergabe .......................................................................... 79
Markieren von Positionen auf einer Disc (LAST MEMORY) ........ 81
Speichern von Einstellungen für individuelle DVDs
(CONDITION MEMORY) ............................................................... 83
Abruf von Disc-Informationen ...................................................... 85
6
Ge
9 Spracheneinstellung
Audio Language (Dialogsprache) ............................................... 111
Subtitle Language (Untertitelsprache) ....................................... 113
Auto Language (aut. Originalsprachenwahl) ............................ 115
DVD Language (DVD-Sprache) (Expertenmenü) ...................... 115
Subtiele Display (Untertitelanzeige) (Expertenmenü) .............. 117
Subtitle Off (Untertitelaus) (Expertenmenü) ............................ 119
10
Allgemeine Einstellungen
Kindersperre ................................................................................. 121
Screen Saver (Bildschirmschoner) (Expertenmenü) ................ 125
Background color (Hintergrundfarbe) (Expertenmenü) .......... 125
Verwendung von Einstellmenü-Abkürzungen (FUNCTION MEMORY).......
11
Weitere Informationen
Handhabung von Discs ............................................................... 131
Aufbewahren von Discs................................................................ 131
Ungeeignete Discs ........................................................................ 133
Reinigen der Abtastlinse .............................................................. 133
Erläuterung der Begriffe.............................................................. 135
Liste der Sprachen-Code .............................................................. 141
Fehlersuche .................................................................................. 143
Rückstellen des Geräts ................................................................. 151
Bildschirm- und Disc-Formate ................................................... 153
Technische Daten ........................................................................ 155
127

CONGRATULAZIONI PER L’ACQUISTO DI QUESTO
PRODOTTO PIONEER.
Pioneer è all’avanguardia della tecnologia DVD per il consumatore e
quest’unità include i suoi ultimi sviluppi tecnologici.
Siamo certi che sarete soddisfatti di questo lettore per DVD.
Vi ringraziamo per la vostra scelta.
Tarola degli argomenti
1 Istruzioni preliminari
Leggere completamente questo manuale per essere certi di saper
usare correttamente il lettore per DVD.
Terminata la lettura, conservare il manuale in un luogo sicuro per
poterlo riutilizzare in caso di bisogno.
• Questo lettore non è adatto all’uso commerciale.
1 Istruzioni preliminari
Dati tecnici....................................................................................... 9
Contenuto della confezione .......................................................... 11
Consultazione del manuale .......................................................... 11
Inserimento delle batterie nel telecomando ................................. 11
Uso del telecomando ..................................................................... 13
Suggerimenti per l’installazione .................................................. 13
Come evitare la formazione di condensa ..................................... 15
Istruzioni per la manutenzione del lettore DVD........................... 15
Precauzioni in caso di trasporto del lettore .................................. 15
Precazioni durante la manipolazione del cavo di alimentazione .....
Dischi compatibili con il lettore.................................................... 17
Regioni geografiche per i DVD Video ............................................ 17
2 Collegamento
Predisposizione facilitata .............................................................. 21
Collegamenti video di tipo Home Theater .................................... 25
Collegamenti audio di tipo Home Theater ................................... 29
3 Comandi e display
Lato anteriore e comandi .............................................................. 31
Display ........................................................................................... 33
Telecomando ................................................................................. 37
6 Impostazioni OSD
Uso del menu di Setup .................................................................. 87
Modo del menu di Setup .............................................................. 87
Lingua OSD ................................................................................... 87
Schermate OSD (menu Expert) .................................................... 89
7 Impostazioni Video
Dimensioni dello schermoTV ........................................................ 91
Uscita Video.................................................................................... 91
15
Uscita S-Video (menu Expert) ...................................................... 93
Fermo immagine (menu Expert) ................................................. 95
Indicatore di angolazione (menu Expert) ................................... 95
Ricerca del fotogramma (menu Expert) ...................................... 95
Regolazione della qualità de video ............................................... 97
8 Impostazioni audio
Uscita Dolby Digital ..................................................................... 103
Uscita DTS ................................................................................... 103
Uscita PCM 96 kHz ...................................................................... 105
Uscita MPEG ................................................................................ 105
Uscita digitale (menu Expert) .................................................... 107
Funzione Virtual Surround ......................................................... 107
Funzione Audio DRC ................................................................... 109
Deutsch Italiano
4 Istruzioni preliminari per l’uso
Introduzione .................................................................................. 39
Uso del Navigatore ......................................................................... 39
Riproduzione dei dischi DVD Video .............................................. 45
Riproduzione del CD ..................................................................... 51
Riproduzione dei Video CD........................................................... 55
5 Ulteriori funzioni di riproduzione
Introduzione .................................................................................. 61
Accessibilità al contenuto dei dischi ............................................. 63
Scansione dei dischi (DVD-Video) ................................................ 65
Scansione dei dischi (CD video) ................................................... 65
Modifica di angolazione della telecamera (solo per i DVD-Video) ....
Variazione dei sottotitoli (solo per DVD-Video) ............................ 67
Modifica della lingua di ascolto (solo per i DVD-Video) .............. 69
Modifica del modo di ascolto (Video CD/CD)............................... 69
Programmazione di una sequenza personalizzata ...................... 71
Ulteriori opzioni di programmazione .......................................... 75
Utilizzo della ripetizione ............................................................... 77
Utilizzo della riproduzione casuale .............................................. 79
Impostazione di un segnalibro su disco (LAST MEMORY).......... 81
Memorizzazione delle impostazioni del disco DVD-Video
(CONDITION MEMORY) ............................................................... 83
Visualizzazione delle informazioni contenute sul disco .............. 85
9 Impostazione della lingua
Lingua d’ascolto .......................................................................... 111
Lingua dei sottotitoli ................................................................... 113
Funzione Auto Language ............................................................ 115
Lingua del DVD (menu Expert) .................................................. 115
Visualizzazione dei sottotitoli (menu Expert) ............................ 117
Esclusione dei sottotitoli (menu Expert) .................................... 119
10
Impostazioni varie
Blocco bambini ........................................................................... 121
Funzione Screen Saver (menu Expert) ...................................... 125
Colore dello sfondo (menu Expert) ............................................ 125
Uso delle scelte rapide per il menu di impostazione
67
(FUNCTION MEMORY) ............................................................... 127
11
Ulteriori informazioni
Manipolazione dei dischi ............................................................ 131
Conservazione dei dischi ............................................................. 131
Dischi da non utilizzare .............................................................. 133
Pulizia della lente del pickup di lettura...................................... 133
Glossario ...................................................................................... 135
Lista codici di lingua ................................................................... 141
Individuazione guasti ................................................................. 143
Reset del lettore............................................................................ 151
Dimensioni dello schermo e formati del disco ........................... 153
Dati tecnici................................................................................... 155
7
It

1 Before You Start / Avant de commencer
Features
525 line progressive-scan component video output
(NTSC output only)
Compared to standard interlaced video, progressive scan effectively
doubles the amount of video information fed to your TV or monitor.
The result is a rock-steady, flicker-free image. (Check your TV/
monitor for compatibility with this feature.)
For the very highest picture quality, try watching a movie on DVDVideo in PureCinema mode on a progressive-scan compatible TV.
The DV-737 offers complete flexibility and compatibility with all types
of AV equipment with dual composite video, S-Video and AV connector
outputs, as well as component video outs.
Digital Noise Reduction PRO (Video Quality
Enhancement)
This new type of DNR (Digital Noise Reduction) for encoding video
(called VQE or Video Quality Encoder) enables you to adjust the video
settings on a more detailed and exact level. There are three possible
settings to choose from. These include: TV (CRT), Projector, and
Professional. This technology can remember which setting you've
chosen and employ it at the proper time.
Compatible with a wide range of DVD digital audio
output format
1
DVDs are recorded in one of four types of digital audio formats (as of
October 1998). The digital audio output jacks of this player output
Dolby Digital*, DTS**, MPEG, and linear PCM digital bitstreams.
This player has a function that converts Dolby Digital and MPEG
audio formats into the linear PCM format. This allows playback of
DVDs recorded in Dolby Digital and MPEG without the need for a
decoder.
New graphical Setup Navigator
Setting up the DV-737 is made as easy as possible using a graphical
Setup Navigator. Answer the questions that appear on-screen and the
Setup Navigator makes all the necessary audio, video and language
settings for you.
Energy-saving design
This unit is designed to use less than 1 W of energy when this player
is in standby mode.
Caractéristiques
Sortie vidéo à composantes à balayage progressif
de ligne 525
(sortie NTSC uniquement)
En comparaison du mode vidéo entrelacé standard, le balayage
progressif double effectivement la quantité d’informations vidéo
transmises à votre téléviseur ou à votre moniteur. Il en résulte une
image d’une stabilité à toute épreuve et exempte de scintillements.
(Contrôlez la compatibilité de votre téléviseur/moniteur avec cette
fonction.)
Pour obtenir la meilleure qualité d’image possible, visionnez les
films enregistrés sur DVD vidéo en mode PureCinema sur un
téléviseur compatible avec le balayage progressif.
Le DV-737 offre une flexibilité et une compatibilité totales avec tous
les types d’équipements AV dotés de connecteurs de sortie vidéo
composite double, S-Vidéo et AV ainsi que de sorties à composantes
vidéo.
Réduction de bruit numérique PRO (optimisation
de la qualité vidéo)
Ce nouveau type de DNR (réduction de bruit numérique) pour le
codage vidéo (dénommé VQE ou codeur de qualité vidéo) vous
permet d’ajuster les réglages vidéo de façon plus détaillée et plus
précise. Vous avez le choix entre trois réglages possibles. Il s’agit en
l’occurrence de : TV (CRT), Projector et Professional. Cette
technologie mémorise le réglage que vous avez sélectionné et l’utilise
au moment approprié.
Compatible avec une large gamme de formats de sortie
audio numérique pour DVD
1
Les DVD sont enregistrés suivant l’un des quatre types de formats
audio numériques (octobre 1998). Les prises de sortie audio
numériques de ce lecteur transmettent des trains de bits Dolby
Digital*, DTS**, MPEG et PCM linéaires.
Ce lecteur est doté d’une fonction de conversion des formats audio
Dolby Digital et MPEG en format PCM linéaire. Cela permet de
reproduire des DVD enregistrés en formats Dolby Digital et MPEG
sans qu’un décodeur ne soit nécessaire.
Nouveau navigateur d’installation graphique
L’installation du DV-737 a été simplifiée autant que possible grâce à
l’intégration d’un navigateur graphique. Répondez aux questions
qui apparaissent sur l’écran et le navigateur d’installation effectue
pour vous tous les réglages audio, vidéo et de langue requis.
Économie d’énergie
Cet appareil consomme moins de 1 W d'électricité lorsque le lecteur
est en mode de veille.
8
En / Fr
* Manufactured under license from Dolby Laboratories.
“Dolby” and the double-D symbol are trademarks of Dolby
Laboratories. Confidential unpublished works. © 1992-1997
Dolby Laboratories. All rights reserved.
** “DTS” is trademark of Digital Theater Systems, Inc.
* Fabriqué sous licence de Dolby Laboratories. «Dolby» et le
symbole double D sont des marques de commerce de Dolby
Laboratories. Œuvres confidentielles non publiées. © 19921997 Dolby Laboratories. Tous droits réservés.
** “DTS” est une marque de Digital Theater Systems, Inc.

1 Vor der Inbetriebnahme / Istruzioni preliminari
Merkmale
Video-Ausgang für Zeilensprung-Komponentensignal
durch progressive 525-Zeilen-Austastung (nur NTSCAusgang)
Im Vergleich zum herkömmlichen Video-Zeilensprungverfahren verdoppelt die
progressive Zeilenaustastung die Bildinformation, die Ihrem Fernseher oder
Bildschirm zugeführt wird. Dadurch bekommen Sie ein äußerst stabiles,
flimmerfreies Bild. (Überprüfen Sie jedoch zunächst, ob Ihr Bildschirm auf
dieses Merkmal ausgelegt ist.)
Die höchste Bildqualität bekommen Sie, wenn Sie ein DVD-Video im
PureCinema-Modus über einen Fernseher mit progressiver Zeilen-Austastung
wiedergeben.
Mit seinen Dual-Kompositsignal-, S-Video- und AV-Ausgangsbuchsen sowie
seinen Video-Komponentensignalausgängen bietet der DV-737 umfassende
Flexibilität und Kompatibilität mit praktisch allen Audio-/Videokomponenten.
Digital-Rauschunterdrückung PRO
(Videoqualitätsverbesserung)
Dieses neue DNR-System (Digital-Rauschunterdrückung) zum Kodieren von
Videos (als VQE oder Videoqualitätsverbesserung bezeichnet) erlaubt eine
detailliertere und präzisere Einstellung der Videoqualität. Es stehen drei
Einstellungen zur Wahl. Diese beinhalten: TV (CRT) (TV mit Kathodenröhre),
Projector (Projektor) und Professional (professioneller Monitor). Diese
Funktion kann Ihre Einstellungen abspeichern und zum entsprechenden
Zeitpunkt aufrufen.
Kompatibel mit zahlreichen digitalen DVDAudioformaten
1
DVDs werden mit einem von vier Digital-Audioformaten (Stand Oktober 1998)
bespielt. Dolby Digital-*, DTS**- und MPEG-Signale sowie lineare PCMBitreihen können über die digitalen Audio-Ausgänge dieses Players an andere
AV-Komponenten abgegeben werden.
Dank einer speziellen Funktion kann dieser Player Dolby Digital- oder MPEGAudioformate in ein lineares PCM-Format umwandeln. Dadurch können Sie
DVDs, die mit Dolby Digital- oder MPEG-Kodierung aufgezeichnet wurden,
ohne einen speziellen Dekoder abspielen.
Dati tecnici
Uscita per video componente a scansione
sequenziale a 525 righe (solo per NTSC )
Paragonata al video interlacciato di tipo standard, la scansione
sequenziale raddoppia realmente la quantità di informazioni video
inviate all'apparecchio TV o al monitor. Il risultato è un'immagine
più stabile, priva di tremolio. (Controllare il proprio apparecchio TV/
monitor per verificare la compatibilità con questa funzione.)
Per ottenere la migliore qualità dell'immagine, provare a guardare
un film in DVD-Video in modalità PureCinema su un apparecchio TV
compatibile a scansione sequenziale.
Il DV-737 offre completa flessibilità e compatibilà con tutti i tipi di
apparecchi AV con video composito doppio, uscite S-Video e
connettore AV, ed anche uscite per il video componente.
DNR (Digital Noise Reduction) PRO (Video Quality
Enhancement)
Questo nuovo tipo di DNR (Digital Noise Reduction) per la codifica
video (denominato VQE o Video Quality Encoder) consente di
regolare le impostazioni video su un livello più dettagliato ed esatto.
Si puo scegliere fra tre impostazioni. Queste includono: TV (CRT),
Proiettore, e Professionale. Questa tecnologia è in grado di ricordare
l’impostazione che è stata scelta e di impiegarla al momento
opportuno.
Compatibile con un ampia gamma di formati di
uscita audio digitale DVD
1
I DVD sono registrati in uno dei quattro tipi di formato audio digitale (da
ottobre 1998). I jack di uscita audio digitale di questo lettore emettono
flussi di bit per Dolby Digital*, DTS**, MPEG, e linear PCM.
Questo lettore ha una funzione che converte i formati audio Dolby
Digital e MPEG in formato linear PCM. Questo consente la
riproduzione di DVD registrati in Dolby Digital e MPEG senza il
bisogno di un decoder.
English
Français
Deutsch Italiano
Der neue graphische Setup-Navigator - die praktische
Benutzerführung zur Installation
Die Installation und Einstellung des DV-737 wird dank des graphischen SetupNavigators supereinfach. Sie müssen nur auf die Fragen antworten, die auf
dem Bildschirm erscheinen und der Setup-Navigator erledigt die notwendigen
Audio-, Video- und Spracheinstellungen für Sie.
Energiespar-Modus
Dieses Gerät ist auf eine Leistungsaufnahme von weniger als 1 W im
Bereitschaftsbetrieb ausgelegt.
* In Lizenz von Dolby Laboratories hergestellt.
“Dolby” und das Doppel-D-symbol sind Warenzeichen der
Dolby Laboratories. Vertrauliche, unveröffentlichte Schriften.
© 1992-1997 Dolby Laboratories. Alle Rechte vorbehalten.
** “DTS” ist ein geschütztes Warenzeichen der Digital Theater
Systems, Inc.
Nuovo Navigatore grafico
L'impostazione del DV-737 è resa il più semplice grazie all'uso del
Navigatore grafico. Rispondere alle domande che compaiono sullo
schermo, e il Navigatore imposta tutte le funzioni audio, video e
lingua necessarie.
Design di risparmio energetico
Questo apparecchio è realizzato per usare meno di 1 W di energia
quando il lettore è in modo di attesa.
* Prodotto sotto licenza della Dolby Laboratories.
“Dolby” ed il simbolo doppia D sono marchi registrati della
Dolby Laboratories. Lavori non pubblicati riservati.
© 1992-1997 Dolby Laboratories. Tutti i diritti sono riservati.
** “DTS” è un marchio di fabbrica della Digital Theater
Systems, Inc.
9
Ge/It
1 Before You Start / Avant de commencer
Checking what’s in the box
Thank you for buying this Pioneer product. Before starting to set up
your new DVD player, please check that you have received the
following supplied accessories:
• Audio cable • Video cable
• Power cord • Remote control unit
• Two ‘AA’ size R6P batteries • Operating instructions
Using this manual
This manual is for the DV-737 DVD Player. It is divided into several
sections: setting up (chapters 1 and 2); using the player (chapters 4
and 5); player settings and preferences (chapters 6 through 10).
Chapter 11 provides information on discs, a glossary of terms used in
throughout this manual, and a troubleshooting section.
To get up and running as quickly as possible, follow the Easy setup
instructions on page 18, then turn to Getting started (page 38).
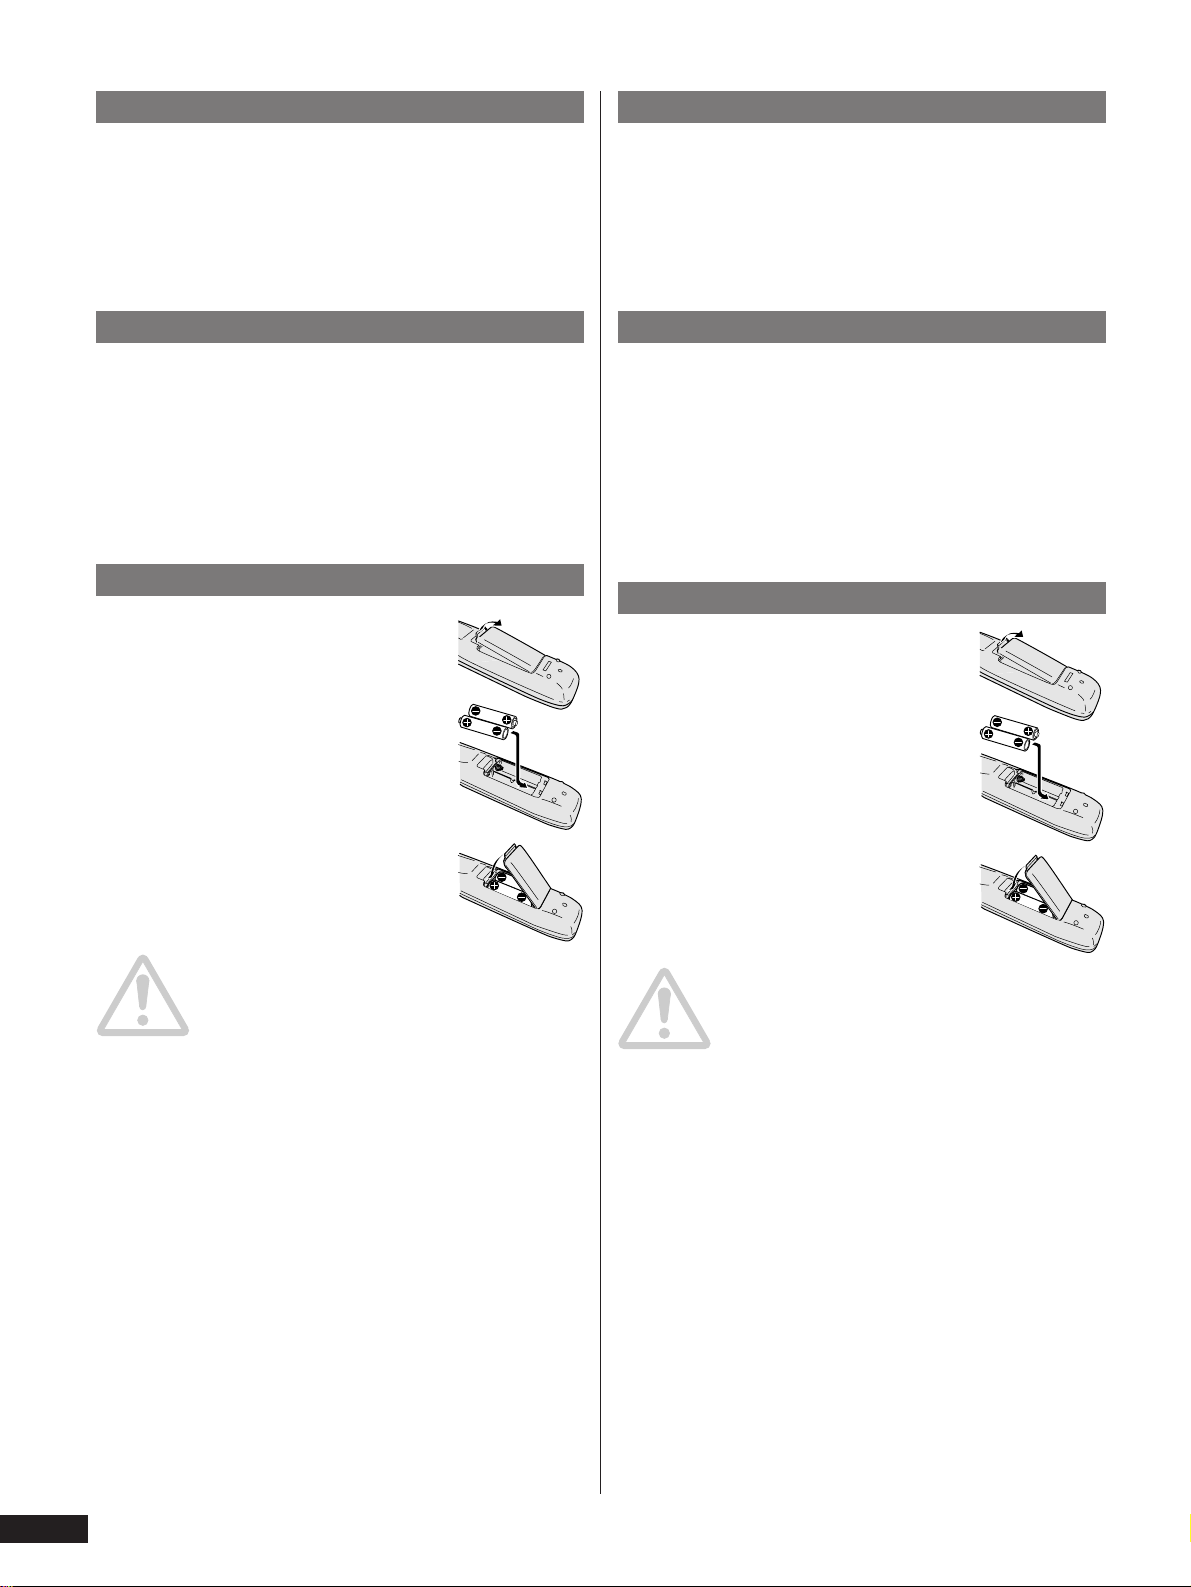
Putting the batteries in the remote
1 Turn over the remote control, then press
and slide the battery compartment cover
off.
Vérification du contenu de la boîte
Nous vous remercions pour cet achat d’un produit Pioneer. Avant
d’entamer la procédure d’installation de votre nouveau lecteur de
DVD, veuillez vous assurer que vous avez bien reçu tous les
accessoires suivants :
• Câble audio • Câble vidéo
• Câble d’alimentation • Télécommande
• Deux piles R6P (“␣ AA␣ ”) • Mode d’emploi
Utilisation de ce mode d’emploi
Ce mode d’emploi concerne le lecteur de DVD DV-737. Il est scindé en
plusieurs sections : installation (chapitres 1 et 2) ; utilisation du
lecteur (chapitres 4 et 5) ; réglages du lecteur et préférences
(chapitres 6 à 10). Le chapitre 11 présente des informations sur les
disques, un glossaire des termes employés tout au long de ce mode
d’emploi et une section de dépannage.
Pour installer et utiliser le lecteur le plus rapidement possible, suivez
les instructions de la section Installation accélérée à la page 19,
puis passez à la section Préparation (page 38).
Installation des piles dans la télécommande
1 Retournez la télécommande, puis faites
glisser le couvercle du compartiment à
piles pour l’enlever.
2 Put in the batteries supplied, taking care
to match the plus and minus ends of each
battery with the markings inside the
compartment.
3 Slide the cover back on, and your remote
is ready for use.
Caution!
Incorrect use of batteries can result in hazards such as leakage and
bursting. Please observe the following:
• Don’t mix new and old batteries together.
• Don’t use different kinds of battery together—although they
may look similar, different batteries may have different
voltages.
• Make sure that the plus and minus ends of each battery
match the indications in the battery compartment.
• Remove batteries from equipment that isn’t going to be used
for a month or more.
When disposing of used batteries, please comply with governmental
regulations or environmental public instruction’s rules that apply in
your country or area.
H048 En
2 Introduisez les piles fournies en veillant à
faire correspondre les pôles positif et
négatif de chacune des piles avec les
schémas à l’intérieur du compartiment à
piles.
3 Refermez ensuite le couvercle et votre
télécommande est prête à l’emploi.
Attention!
Une utilisation incorrecte des piles peut entraîner des risques tels que
des fuites d’électrolyte, voire une explosion. Aussi, veuillez vous
conformer aux précautions suivantes :
• Ne mélangez pas des piles neuves et des piles usagées.
• N’utilisez pas différents types de piles en même temps —
bien qu’elles semblent similaires, des piles différentes
peuvent présenter des tensions différentes.
• Assurez-vous que les pôles positif et négatif de chaque pile
correspondent aux indications figurant à l’intérieur du
compartiment à piles.
• Retirez les piles de la télécommande si vous prévoyez de ne
pas l’utiliser pendant une période d’un mois ou plus.
Lorsque vous diposez de piles / batteries usées, veuillez vous
conformer aux normes gouvernementales ou environnementales en
vigueur dans votre pays ou région. H048 Fr
10
En / Fr

1 Vor der Inbetriebnahme / Istruzioni preliminari
Überprüfung des Lieferumfangs
Vielen Dank für den Kauf dieses Pioneer-Produkts. Vor dem Aufstellen
Ihres neuen DVD-Players sollten Sie zunächst prüfen, ob Sie das
folgende Zubehör erhalten haben:
• Audiokabel • Videokabel
• Netzkabel • Fernbedienung
•
Zwei Batterien der Größe ‘AA’ (R6P)
• Bedienungsanleitung
Gebrauch dieser Bedienungsanleitung
Diese Anleitung ist für den DVD-Player DV-737 bestimmt. Sie ist in
mehrere Teile aufgegliedert: Installation (Kapitel 1 und 2),
Bedienung des Geräts (Kapitel 4 und 5) sowie Einstellungen und
Voreinstellungen (Kapitel 6 bis 10). In Kapitel 11 finden Sie
Informationen zu Discs, eine Erläuterung der in dieser Anleitung
verwendeten Begriffe und eine Fehlersuchtabelle.
Für schnelles Einrichten und umgehende Inbetriebnahme sollten Sie
zunächst die Anweisungen unter Einfache Systemanordnung auf
Seite 21 ausführen und dann Grundlegende Bedienung (Seite
39) lesen.
Einlegen von Batterien in die Fernbedienung
1 Die Fernbedienung umdrehen, den
Batteriefachdeckel drücken und
abnehmen.
Contenuto della confezione
Grazie per la preferenza accordataci con l’acquisto di questo lettore.
Prima di iniziare a predisporre il lettore per l’uso, controllare che
siano presenti tutti i seguenti accessori:
• Cavo audio • Cavo video
• Cavo di alimentazione • Telecomando
• Due pile tipo “AA” R6P • Istruzioni per l’uso
Consultazione del manuale
Il presente manuale si riferisce al lettore DVD modello DV-737 Il
manuale è suddiviso in capitoli diversi: Impostazioni (capitoli 1 e 2),
Uso del lettore (capitoli 4 e 5), Impostazioni preferenziali (capitoli da
6 a 10). Il capitolo 11 contiene alcune informazioni relative ai
dischi, un glossario dei termini usati e una sezione di individuazione
anomalie.
Per una predisposizione rapida del lettore, seguire le istruzione
contenute nel paragrafo Predisposizione facilitata a pag. 21,
quindi passare al paragrafo Istruzioni preliminari per l’uso (pag.
39).
Inserimento delle batterie nel telecomando
1 Capovolgere il telecomando, quindi
premere e far scorrere il coperchio del
vano batterie per toglierlo.
English
Français
Deutsch Italiano
2 Die beigelegten Batterien einsetzen.
Richten Sie die Plus- und Minuspole der
Batterien entsprechend den Symbolen
im Batteriefach aus.
3 Den Deckel wieder aufschieben. Nun ist
die Fernbedienung einsatzbereit.
Vorsicht!
Unsachgemäßer Einsatz und falsche Handhabung der Batterie kann
Defekte durch Austritt von Elektrolyt oder Platzen der Batterie zur
Folge haben. Daher folgenden Hinweise beachten:
• Niemals alte und neue Batterien zusammen verwenden.
• Niemals verschiedene Arten von Batterien zusammen
verwenden — obwohl sie sich ähneln können, liefern sie
unter Umständen verschiedene Spannungen.
• Achten Sie darauf, dass die Plus- und Minuspole der Batterien
entsprechend den Symbolen im Batteriefach ausgerichtet sind.
• Entfernen Sie die Batterien aus der Fernbedienung, wenn sie
einen Monat oder länger nicht verwendet wird.
Zur Entsorgung von verbrauchten Batterien beachten Sie bitte
diegesetzlichen Vorschriften bzw. Umweltschutzbestimmungen Ihres
Landes.
H048 Ge
2 Inserire le batterie in dotazione
controllando di far coincidere i segni di
positivo e negativo alle estremità delle
medesime con quelli presenti nel vano
portabatterie.
3 Inserire il coperchio: il telecomando è
pronto per l’uso.
Attenzione!
Un uso non corretto delle batterie può provocare fuoriuscita di acido e
ustioni. Si raccomanda di osservare le precauzioni descritte di seguito:
• Non abbinare batterie vecchie e nuove.
• Non abbinare batterie di tipo diverso. Anche se sembrano
simili possono avere tensioni diverse.
• Verificare il corretto inserimento delle batterie mediante la
corrispondenza del segno di polo positivo e negativo alle
estremità delle medesime con i segni presenti nel vano
portabatterie.
• Se il telecomando rimane inattivo per un mese o più, togliere
le batterie.
Quando recuperate le pile / batterie usate, fate riferimento alle norme di
legge in vigore nel vs. paese in tema di protezione dell’ambiente. H048 It
11
Ge/It
1 Before You Start / Avant de commencer
30
30
7m
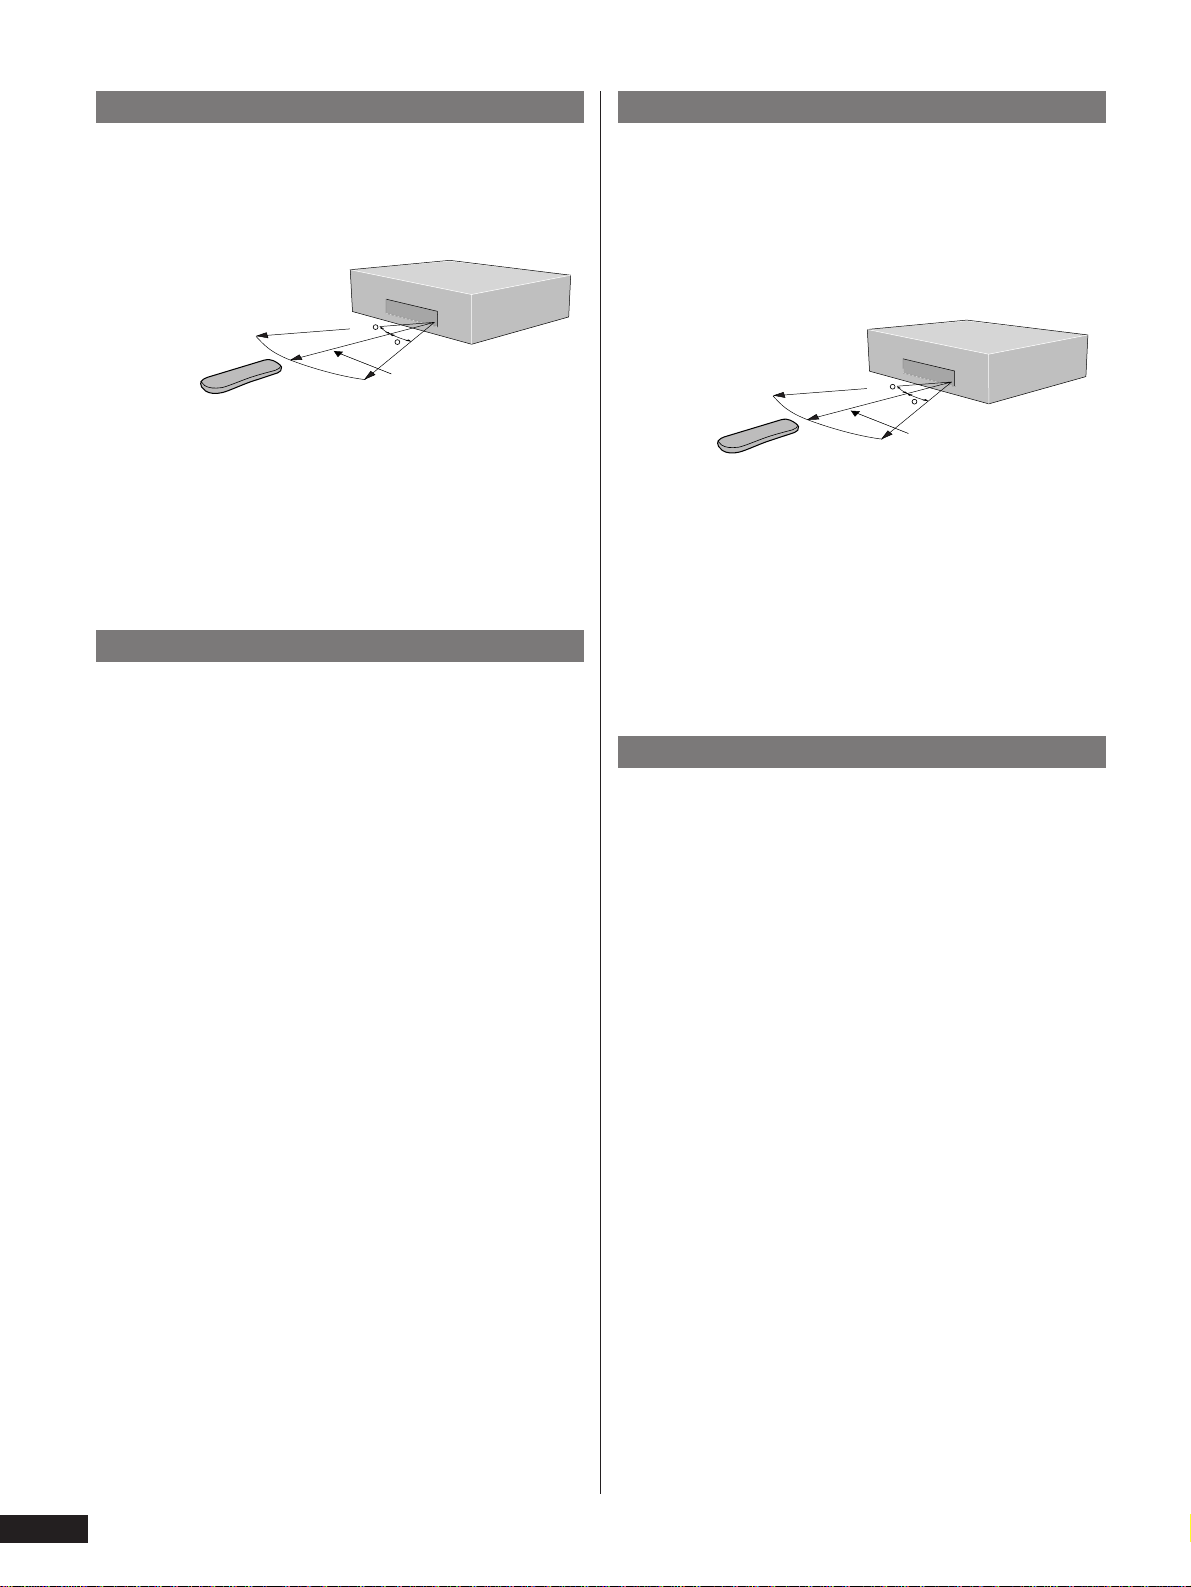
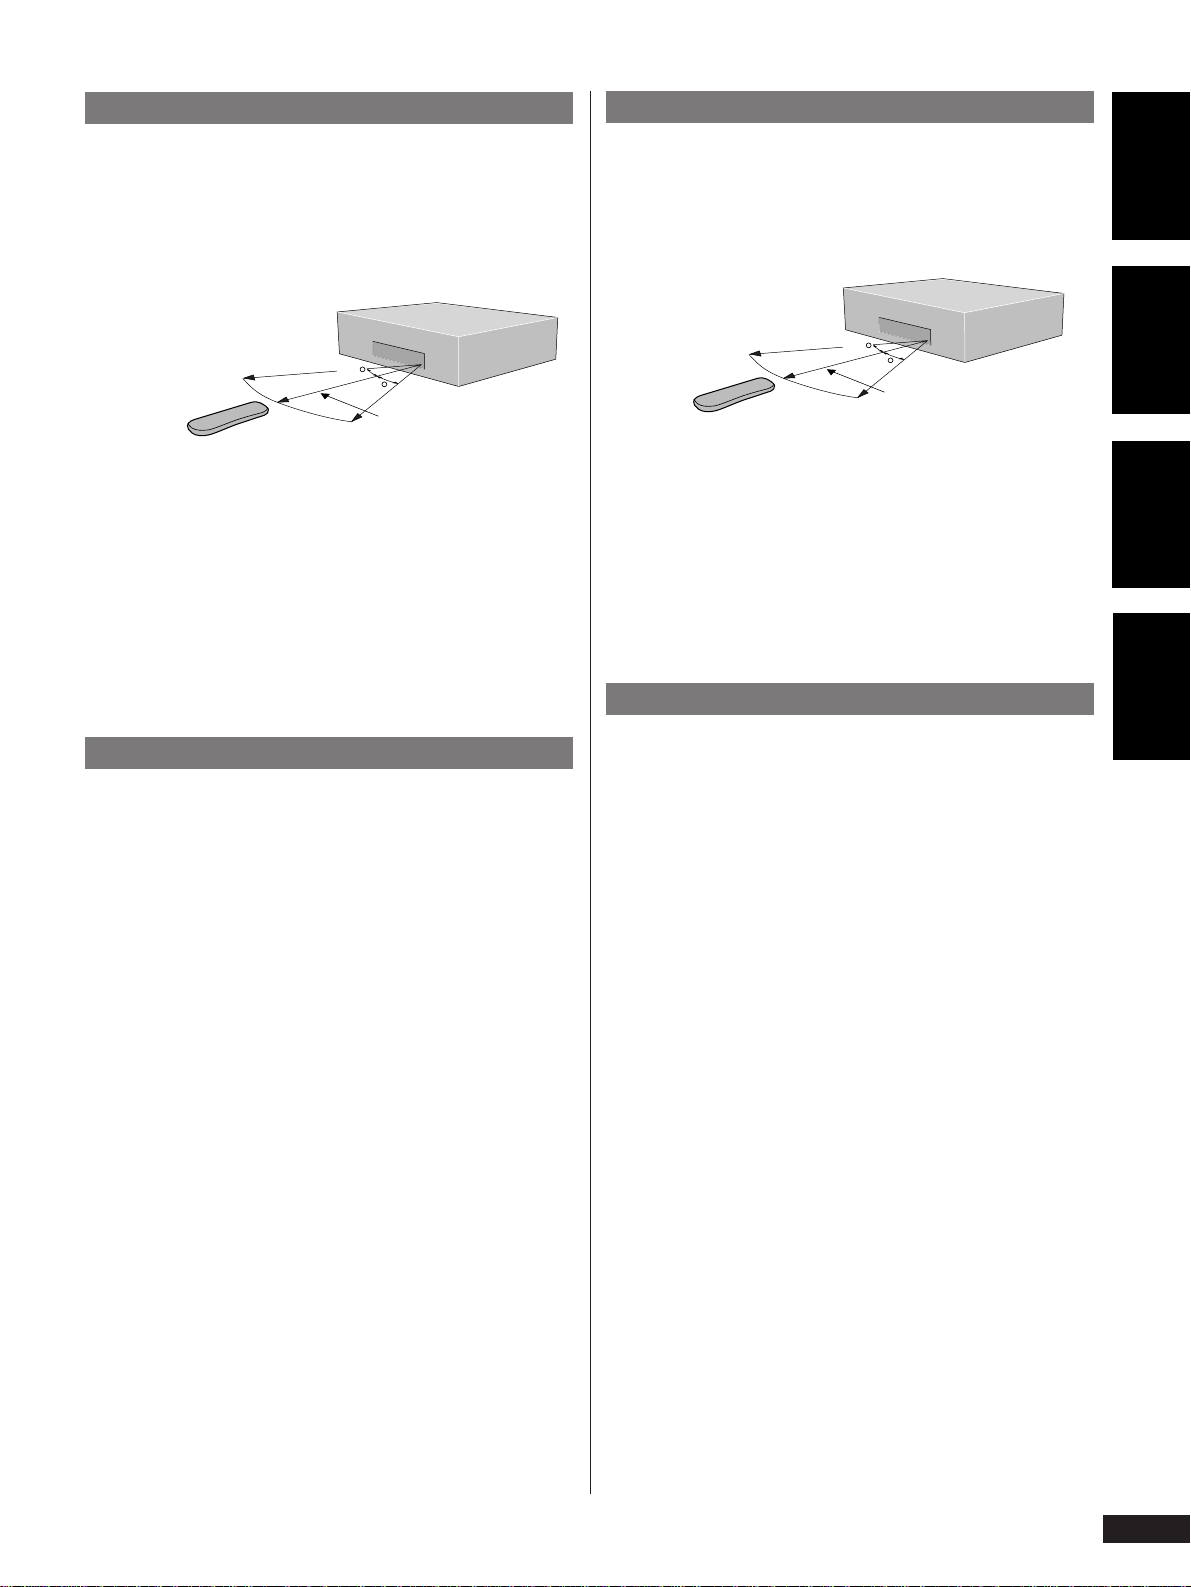
Using the remote control
Keep in mind the following when using the remote control:
• Make sure that there are no obstacles between the remote and
the remote sensor on the unit.
• Use within the operating range and angle, as shown.
30
30
7m
• Remote operation may become unreliable if strong sunlight
or fluorescent light is shining on the unit’s remote sensor.
• Remote controllers for different devices can interfere with
each other. Avoid using remotes for other equipment located
close to this unit.
• Replace the batteries when you notice a fall off in the
operating range of the remote.
Hints on installation
We want you to enjoy using this unit for years to come, so please bear
in mind the following points when choosing a suitable location for it:
Do...
✓ Use in a well-ventilated room.
✓ Place on a solid, flat, level surface, such as a table, shelf or
stereo rack.
Don’t...
✗ Use in a place exposed to high temperatures or humidity,
including near radiators and other heat-generating
appliances.
✗ Place on a window sill or other place where the player will be
exposed to direct sunlight.
✗ Use in an excessively dusty or damp environment.
✗ Place directly on top of an amplifier, or other component in
your stereo system that becomes hot in use.
✗ Use near a television or monitor as you may experience
interference—especially if the television uses an indoor
antenna.
Utilisation de la télécommande
Ne perdez pas de vue les consignes de base suivantes lorsque vous
utilisez la télécommande :
• Assurez-vous qu’il n’y a pas d’obstacle entre la
télécommande et le capteur de télécommande de l’appareil.
• Actionnez la télécommande dans la portée et sous l’angle
efficaces de la télécommande, comme illustré.
• Le fonctionnement de la télécommande peut devenir
aléatoire si le capteur de la télécommande de l’appareil est
exposé à une forte luminosité ou à une lampe fluorescente.
• Les télécommandes de différents appareils peuvent interférer
les unes avec les autres. Evitez d’utiliser les télécommandes
d’autres équipements situés à proximité de cet appareil.
• Remplacez les piles lorsque vous constatez que la portée
efficace de la télécommande diminue.
Conseils d’installation
Nous vous souhaitons de multiples plaisirs d’utilisation avec cet
appareil au cours des années à venir et c’est pourquoi nous vous
invitons à tenir compte des points suivants dans votre choix d’un
emplacement :
A préconiser...
✓ Utilisez votre lecteur dans un local bien ventilé.
✓ Placez votre lecteur sur une surface robuste et de niveau
comme une table, une étagère ou un meuble hi-fi.
A proscrire...
✗ Utilisation du lecteur à un endroit exposé à des températures
ou à une humidité élevée, notamment à proximité de
radiateurs ou de tout autre appareil générant de la chaleur.
✗ Installation du lecteur sur un appui de fenêtre ou à tout
autre endroit où il serait exposé au rayonnement direct du
soleil.
✗ Utilisation du lecteur dans un environnement excessivement
poussiéreux ou embué.
✗ Installation du lecteur directement au-dessus d’un
amplificateur ou d’un autre équipement de votre chaîne hi-fi
qui s’échauffe en cours d’utilisation.
✗ Utilisation du lecteur à proximité d’un téléviseur ou d’un
moniteur, car vous risqueriez de percevoir des
interférences—en particulier si le téléviseur fonctionne à
l’aide d’une antenne intérieure.
12
En / Fr
1 Vor der Inbetriebnahme / Istruzioni preliminari
Verwendung der Fernbedienung
Berücksichtigen Sie bitte folgende Hinweise zur Verwendung der
Fernbedienung:
• Achten Sie darauf, dass zwischen Fernbedienung und Sensor
im Gerät ein freies Feld besteht.
• Verwenden Sie die Fernbedienung im gezeigten Bereich und
Winkel.
30
30
7m
• Starke Sonneneinstrahlung oder Neonlichteinfall im
Fernbedienungssensor kann die Funktion der Fernbedienung
beeinträchtigen.
• Die Fernbedienungen verschiedener Geräte können sich
gegenseitig stören. Vermeiden Sie während der Verwendung
von Fernbedienungen für Geräte in unmittelbarer
Umgebung.
• Die Batterien austauschen, sobald die Reichweite der
Fernbedienung abnimmt.
Hinweise zur Aufstellung
Wir wollen, dass Sie dieses Gerät für viele Jahre genießen können.
Beachten Sie daher bitte bei der Wahl des Aufstellorts die
nachfolgenden Punkte:
Sie sollten ...
✓ An einem gut belüfteten Ort aufstellen.
✓ Das Gerät auf eine feste, ebene Unterlage wie z. B. ein
Audiorack, einen Tisch oder ein Regal platzieren.
Sie sollten keinesfalls ....
✗ Das Gerät an Orten verwenden, an denen hohe Feuchtigkeit
oder hohe Temperaturen auftreten, wie z. B. in der Nähe von
Heizkörpern und anderen Wärmequellen.
✗ Das Gerät direkter Sonneneinstrahlung aussetzen wie z. B.
auf einem Fensterbrett.
✗ Das Gerät in übermäßig staubiger oder feuchter Umgebung
betreiben.
✗ Das Gerät nicht direkt auf einen Verstärker oder ein anderes
Gerät stapeln, dass beim Betrieb heiß wird.
✗ Den DVD-Spieler in der Nähe von Antennen oder
Bildschirmen verwenden, da er Interferenzen verursachen
kann. Dies gilt besonders für Zimmerantennen von
Fernsehern.
Uso del telecomando
Per l’uso del telecomando osservare le regole seguenti:
• Controllare che non siano presenti ostacoli fisici tra il
telecomando e il sensore relativo sul lettore.
• Usare il telecomando nel campo operativo e con
l’angolazione illustrate in figura.
30
30
7m
• Se il sensore è esposto direttamente ai raggi solari di forte
intensità o a luce fluorescente, il comando remoto potrebbe
non rispondere efficacemente.
• I telecomandi in dotazione ad apparecchi diversi potrebbero
interferire tra di loro. Evitare l’uso telecomandi relativi ad
altri apparecchi a distanza troppo ravvicinata con il lettore.
• Sostituire le batterie non appena si nota un calo di
prestazioni del telecomando.
Suggerimenti per l’installazione
Per l’uso e la conservazione ottimale del lettore nel tempo, si
raccomanda di tenere a mente i seguenti suggerimenti al momento
di definirne la collocazione in un ambiente:
Sì...
✓ Scegliere una stanza ben aerata.
✓ Sistemare il lettore su una superficie piana e solida, quale un
tavolo, uno scaffale o un mobiletto portastereo.
No...
✗ Non usare in luoghi esposti a temperature elevate o umidità,
compreso in prossimità di termosifoni e/o altri
elettrodomestici che sviluppano calore.
✗ Non collocare il lettore su un davanzale né in altra posizione
in cu sia esposto ai raggi diretti del sole.
✗ Evitare l’uso in ambienti eccessivamente polverosi o umidi.
✗ Evitare di collocar il lettore direttamente sopra ad un
amplificatore o altro componente dell’impianto stereo che si
scaldi durante l’uso.
✗ Evitare di usare il lettore vicino ad un televisore o ad un
monitor in quanto si potrebbero generare delle interferenze,
in particolare se il televisore usa un’antenna da interni.
English
Français
Deutsch Italiano
13
Ge/It

1 Before You Start / Avant de commencer
✗ Use in a kitchen or other room where the player may be
exposed to smoke or steam.
✗ Use on a thick rug or carpet, or cover with cloth—this may
prevent proper cooling of the unit.
✗ Place on an unstable surface, or one that is not large enough
to support all four of the unit’s feet.
Avoiding problems with condensation
Condensation may form inside the player if it is brought into a warm
room from outside, or if the temperature of the room rises quickly.
Although the condensation won’t damage the player, it may
temporarily impair its performance. For this reason you should leave
it to adjust to the warmer temperature for about an hour before
switching on and using.
Maintaining your DVD player
To clean the player, wipe with a soft, dry cloth. For stubborn dirt, wet
a soft cloth with a mild detergent solution made by diluting one part
detergent to 5 or 6 parts water, wring well, then wipe off the dirt. Use a
dry cloth to wipe the surface dry. Do not use volatile liquids such as
benzene and thinner which may damage the surfaces.
Moving the player
If you need to move the player, first press on the remote control to
switch the power to standby checking that the ”-OFF-“
indication in the display goes off. Next, press POWER on
the front panel to turn the player off, and then disconnect the power
cord. Never lift or move the unit during playback—discs rotate at a
high speed and may be damaged.
Power cord caution
Handle the power cord by the plug part. Do not pull out the plug by
tugging the cord, and never touch the power cord when your hands
are wet, as this could cause a short circuit or electric shock. Do not
place the unit, a piece of furniture, or other object on the power cord
or pinch the cord in any other way. Never make a knot in the cord or
tie it with other cords. The power cords should be routed so that they
are not likely to be stepped on. A damaged power cord can cause a
fire or give you an electric shock. Check the power cord once in a
while. If you find it damaged, ask your nearest Pioneer authorized
service center or your dealer for a replacement.
✗ Utilisation du lecteur dans une cuisine ou toute autre pièce
où il est susceptible d’être exposé à de la fumée ou à de la
vapeur.
✗ Utilisation du lecteur sur une nappe épaisse ou un tapis, ou
sous une pièce de tissu — car cela risque d’empêcher le bon
refroidissement de l’appareil.
✗ Installation du lecteur sur une surface instable ou qui n’est
pas suffisamment large pour supporter les quatre pieds de
l’appareil.
Prévention de la condensation
De la condensation peut se former à l’intérieur de l’appareil s’il est
amené de l’extérieur dans un local chauffé ou si la température de la
pièce augmente rapidement. Bien que la condensation ne cause
aucun dommage à l’appareil, elle peut temporairement altérer ses
performances. C’est pourquoi nous vous conseillons de laisser
l’appareil s’adapter à la température plus élevée de la pièce pendant
environ une heure avant de le mettre sous tension et de commencer à
l’utiliser.
Entretien de votre lecteur de DVD
Pour nettoyer le lecteur, utilisez un chiffon doux et sec. En cas de
souillures tenaces, imprégnez un chiffon doux d’une solution
détergente neutre en diluant une part de détergent dans 5 à 6 parts
d’eau, tordez-le bien et nettoyez les souillures. Séchez ensuite la
surface à l’aide d’un chiffon sec. N’utilisez pas de liquides volatiles
tels que de la benzine et du diluant, qui risqueraient de ternir le fini
des surfaces.
Déplacement de l’appareil
Si vous devez déplacer le lecteur, appuyez sur la touche de la
télécommande pour commuter le mode de veille et vérifiez si
l’indication ”-OFF-“ disparaît de la fenêtre
d’affichage. Appuyez ensuite sur la touche POWER du panneau
avant pour mettre le lecteur hors tension, puis débranchez le câble
d’alimentation. Ne soulevez jamais l’appareil et ne le déplacez pas
lorsqu’il se trouve en mode de lecture — le disque tourne en effet à
grande vitesse et risque d’être endommagé.
Manipulation du câble d’alimentation
Manipulez le câble d’alimentation en le saisissant par la fiche. Ne
débranchez pas le câble d’alimentation en tirant sur le câble
proprement dit et ne touchez en aucune circonstance le câble
d’alimentation lorsque vous avez les mains mouillées, car vous
risquez de provoquer un court-circuit ou de recevoir un choc
électrique. Ne posez pas l’appareil , un élément de mobilier ou tout
autre objet sur le câble d’alimentation et veillez à ne pas coincer le
câble. Ne nouez en aucun cas le câble d’alimentation et ne le reliez
pas en faisceau avec d’autres câbles. Le câble d’alimentation doit être
acheminé de manière à ce que personne ne risque de marcher dessus.
Un câble d’alimentation endommagé peut être une cause d’incendie
ou de choc électrique. Vérifiez périodiquement le bon état du câble
d’alimentation. Si vous constatez que le câble d’alimentation est
endommagé, consultez un centre de service après-vente Pioneer.
14
En / Fr

1 Vor der Inbetriebnahme / Istruzioni preliminari
✗ das Gerät an Orten wie z. B. einer Küche usw. aufstellen, in
denen es Rauch oder Dampf ausgesetzt werden könnte.
✗ Das Gerät auf einen dicken Teppich platzieren oder mit
einem Tuch abdecken, da dies dessen Kühlung beeiträchtigen
würde.
✗ Das Gerät auf Flächen stellen, die nicht stabil sind. Achten
Sie darauf, dass alle vier Füsse des Geräts auf der Unterlage
Platz finden.
Vermeiden von Störungen durch Kondensation
Wenn Sie den DVD-Player von einem warmen Raum nach draußen
bringen bzw. wenn die Zimmertemperatur rasch ansteigt, kann sich
Kondenswasser im Inneren des Geräts bilden. Zwar wird die
Kondensation den Recorder nicht beschädigen, sie kann aber die
Funktion vorübergehend beeinträchtigen. Daher sollten Sie mit dem
Einschalten etwa eine Stunden warten, damit das Gerät die
Umgebungstemperatur annehmen kann.
Wartung und Pflege des DVD-Spielers
Das Gehäuse des DVD-Spielers mit einem weichen, trockenen Tuch
abwischen. Bei hartnäckigen Schmutz können Sie das Gerät mit
einem weichen Tuch abwischen, dass Sie in einer milden
Reinigungslösung (einen Teil Reiniger und 5 oder 6 Teile Wasser)
angefeuchtet haben. Wischen Sie dann das Gehäuse mit einem
trocken Tuch ab, um es zu trocknen. Keinesfalls flüchtige
Lösungsmittel wie Benzin oder Verdünner verwenden, da sie die
Oberflächen angreifen können.
Ändern des Aufstellorts
Falls Sie den Player umplatzieren wollen, zuerst auf der
Fernbedienung drücken, um das Gerät auf Bereitschaftsmodus zu
schalten. Vergewissern Sie sich, dass die Anzeige “-
OFF-” im Display erlischt. Drücken Sie dann POWER auf der
Frontplatte, um das Gerät auszuschalten, und trennen Sie dann das
Netzkabel von der Steckdose. Keinesfalls das Gerät während der
Wiedergabe bewegen — Discs drehen sich sehr schnell und könnten
beschädigt werden.
Vorsichtshinweise zum Netzkabel
Das Netzkabel ausschließlich am Stecker fassen. Ziehen Sie niemals
am Kabel selbst. Berühren Sie das Netzkabel keinesfalls mit nassen
Händen, da Gefahr von elektrischen Schlägen und Kurzschluss
besteht. Stellen Sie nicht das Gerät, Möbel oder andere Gegenstände
auf das Netzkabel. Achten Sie darauf, dass das Netzkabel nicht
eingeklemmt wird. Machen Sie niemals einen Knoten in das Kabel
und binden Sie es nicht mit anderen Kabeln zusammen. Das
Netzkabel so verlegen, dass niemand darauf tritt oder darüber
stolpern kann. Ein beschädigtes Netzkabel kann Brand und
elektrische Schläge verursachen. Kontrollieren Sie das Netzkabel
gelegentlich. Bei Mängeln das Netzkabel von einer autorisierten
Pioneer-Kundendienststelle oder einem Pioneer-Händler ersetzen
lassen.
✗ Evitare di usare in cucina o altro ambiente dove il lettore
sarebbe esposto a fumo o vapore.
✗ Evitare di collocare il lettore su un rivestmento di tessuto
spesso o su un tappeto e di coprirlo, poiché non potrebbe
raffreddarsi nel modo dovuto.
✗ Evitare di collocare il lettore su una superficie instabile o non
sufficientemente ampia da consentire l’appoggio solido di
tutti i piedini.
Come evitare la formazione di condensa
Se il lettore è sistemato in una stanza troppo calda o dove la
temperatura è soggetta ad un rapido aumento si potrebbe avere
formazione di condensa al suo interno. Anche se la condensa non
danneggia in sé l’apparecchio, può comprometterne
temporaneamente le prestazioni. Per questo motivo si raccomanda di
lasciare che il lettore si adatti all’aumento di temperatura per circa
un’ora prima di accenderlo e di usarlo.
Deutsch Italiano
Istruzioni per la manutenzione del lettore DVD
Pulire il lettore con un panno morbido e asciutto. In caso di sporcizia
resistente, inumidire il panno con una soluzione non aggressiva di
pulizia ottenuta mischiando una parte di detergente con 5 o 6 parti
di acqua. Strizzare bene il panno prima di pulire. Asciugare
accuratamente con un panno morbido e asciutto. Evitare l’uso di
sostanze volatili quali benzene o diluenti che potrebbero danneggiare
le superfici del lettore.
Precauzioni in caso di trasporto del lettore
Se il lettored dev’essere spostato, premere il tasto sul telecomando
controllando che si spenga la scritta ”-OFF-“ sul
display. Spegnere poi il lettore premendo il tasto POWER sulla
parte anteriore del medesimo, quindi scollegare il cavo di
alimentazione. Non sollevare mai, né spostare il lettore mentre la
riproduzione è in corso. I dischi contenuti girano ad alta velocità e
potrebbero rovinarsi.
Precazioni durante la manipolazione del cavo di alimentazione
Afferrare il cavo di alimentazione dalla presa. Non estrarre il cavo di
alimentazione tirando il filo e non toccarlo mai con le mani bagnate
per non rischiare di creare un cortocircuito o di ricevere una scossa
elettrica. Non collocare il lettore, un mobile, né alcun oggetto di altro
tipo sopra il cavo di alimentazione e fare attenzione a non pizzicarlo
in altro modo. Evitare la formazione di nodi sul cavo e di
attorcigliarlo con altri cavi. Far correre il cavo in modo da evitare di
inciamparvisi accidentalmente. Un cavo danneggiato può provocare
un incendio o generare scosse elettriche. Controllare di tanto in tanto
l’integrità del cavo. Se il cavo di alimentazione risultasse
danneggiato procurarsi un cavo sostitutivo rivolgendosi ad un centro
di assistenza Pioneer o ad un rivenditore di ricambi.
15
Ge/It
English
Français
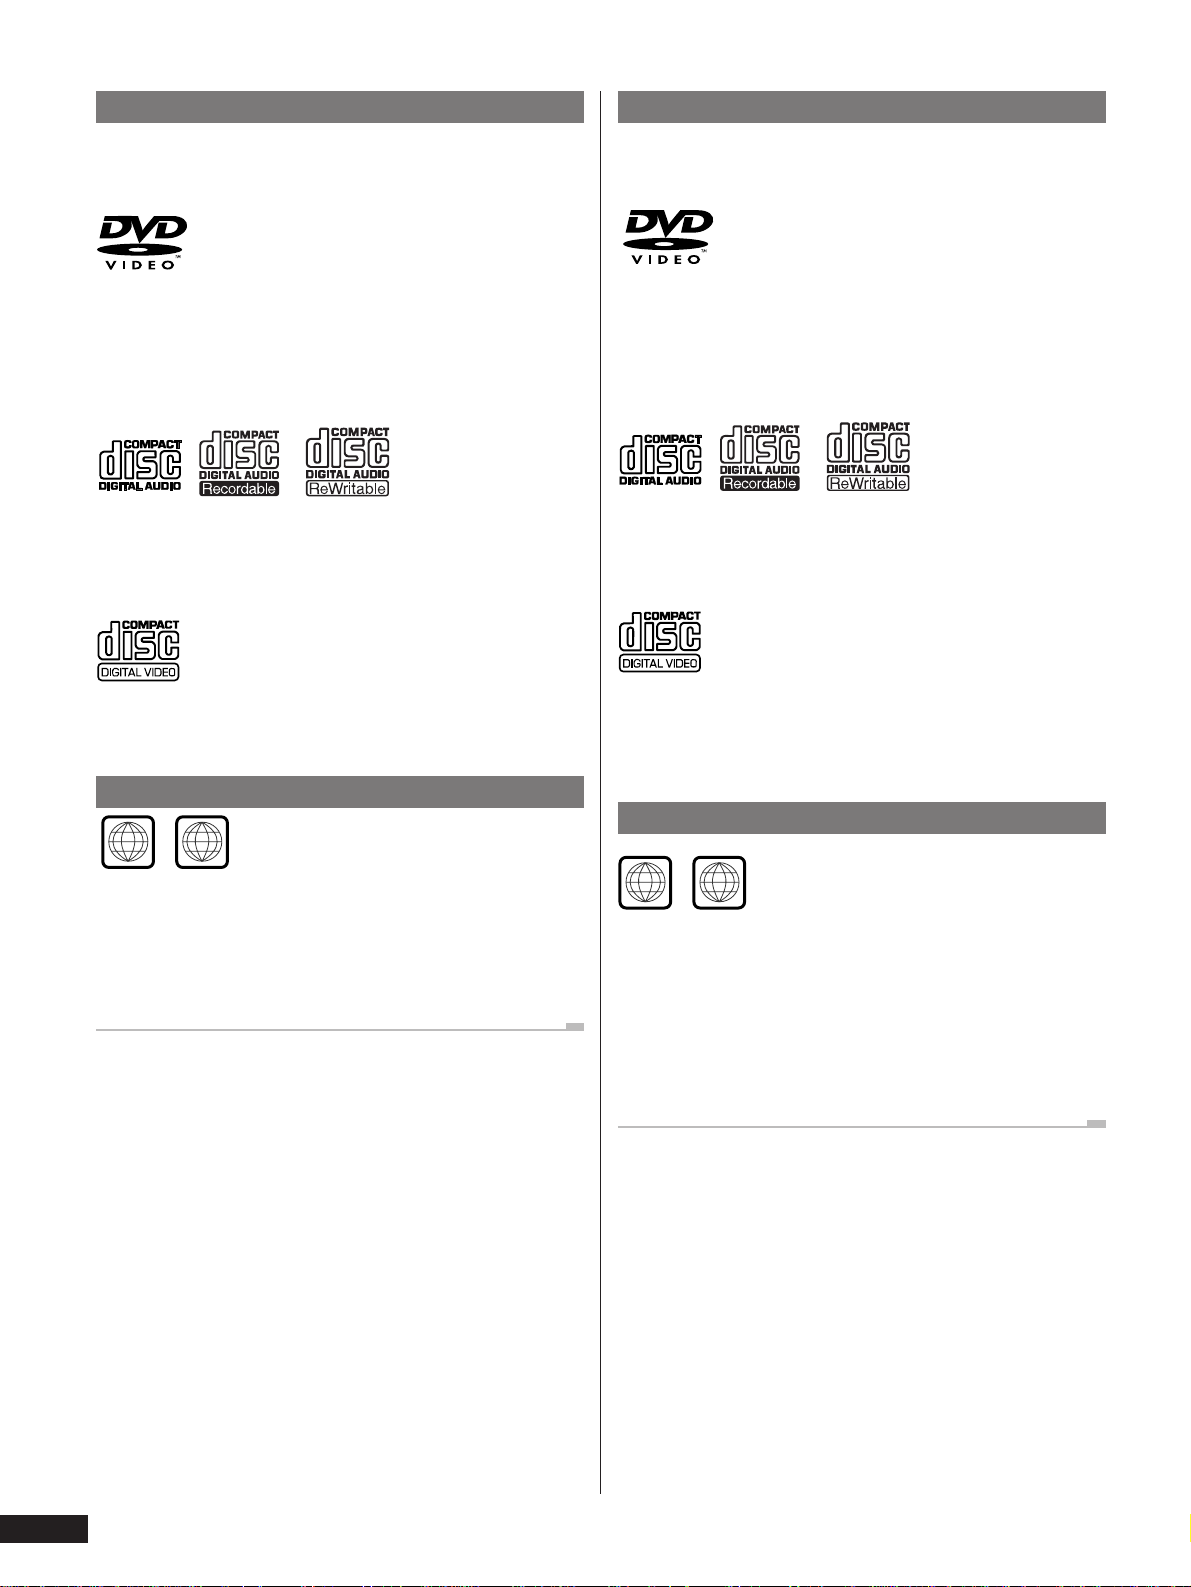
1 Before You Start / Avant de commencer
Discs compatible with this player
Any disc that displays one of the following logos should play in this
player. Other formats, including DVD-RAM, DVD-ROM, CD-ROM,
SACD and Photo CD will not play.
Single or double sided / Single or double layer. Dolby Digital, DTS,
MPEG or Linear PCM digital audio. MPEG-2 digital video.
Discs are generally divided into one or more ‘titles’. Titles are further
subdivided into ‘chapters’.
*
Single sided / Single layer. 12cm or 8cm discs. Linear PCM digital
audio. (Also compatible with finalized CD-Recordable discs.) Discs
are divided into ‘tracks’.
*
Disques compatibles avec ce lecteur
Tous les disques arborant l’un des logos suivants peut être reproduit
sur ce lecteur. Les autres formats, et notamment DVD-RAM, DVDROM, CD-ROM, SACD et Photo CD ne peuvent être reproduits.
Simple ou double face / Simple ou double couche. Dolby Digital,
DTS, MPEG ou audio numérique PCM linéaire. Vidéo numérique
MPEG-2.
Les disques sont généralement divisés en un ou plusieurs “␣ titres␣ ”.
Les titres sont à leur tour divisés en “␣ chapitres␣ ”.
*
Simple face / Simple couche. Disques de 12 ou 8 cm. Audio
numérique PCM linéaire. (Egalement compatible avec les CD
enregistrables finalisés.) Les disques sont divisés en “␣ plages␣ ”.
*
Single sided / Single layer. 12cm or 8cm discs. MPEG-1 digital audio.
MPEG-1 digital video. Discs are divided into ‘tracks’.
DVD Video regions
2
All DVD Video discs carry a region mark on the case somewhere that
indicates which region(s) of the world the disc is compatible with.
Your DVD player also has a region mark, which you can find on the
rear panel. Discs from incompatible regions will not play in this
player. Discs marked ALL will play in any player.
* Playing recordable CDs
• Note that this unit cannot record onto recordable
• This unit can play music-use CD-R and CD-RW discs.
ALL
discs.
However, depending on the condition of the CD recorder and
the disc, you may find that not all discs will play successfully.
(For example, if the disc is scratched or dirty, or if the player’s
pickup lens is dirty.)
Simple face / Simple couche. Disques de 12 ou 8 cm. Audio
numérique MPEG-1. Vidéo numérique MPEG-1. Les disques sont
divisés en “␣ plages␣ ”.
Zones géographiques des DVD vidéo
2
Tous les DVD vidéo portent sur le boîtier une indication de zone
géographique qui précise les régions du monde avec lesquelles ils sont
compatibles. Votre lecteur de DVD porte également, sur le panneau
arrière, une indication de zone géographique. Les disques destinés à
des régions incompatibles ne peuvent être reproduits sur ce lecteur.
Les disques portant l’indication ALL peuvent être reproduits sur tous
les lecteurs.
* Lecture des disques compacts enregistrables
• Sachez que cet appareil n’est pas conçu pour
• Cet appareil est conçu pour la lecture des CD-R et CD-RW
ALL
l’enregistrement sur disque compact enregistrable.
destinés aux enregistrements musicaux. Toutefois, selon le
disque et selon l’enregistreur de CD, certains disques
pourront être illisibles. (Par exemple parce que le disque est
rayé ou l’optique du lecteur est sale.)
16
En / Fr

1 Vor der Inbetriebnahme / Istruzioni preliminari
Verwendbare Discs
Alle Discs, die mit den nachfolgenden Symbolen gekennzeichnet
sind, sollten Sie mit diesem Gerät abspielen können. Andere Formate
wie DVD-RAM, DVD-ROM, CD-ROM,
SACD und Photo-CDs kann dieser DVD-Spieler nicht wiedergeben.
Ein- oder zweiseitig / ein- oder zweischichtig Digital-Audiodaten in
den Formaten Dolby Digital, DTS, MPEG oder lineare PCM-Bitreihen.
MPEG-2 Digital-Video
DVDs sind im allgemeinen in einen oder mehrere als Sektoren
bezeichnete Abschnitte unterteilt. Diese Sektoren wiederum sind in
Kapitel aufgegliedert.
*
Eine Seite / Eine Schicht 12- oder 8-cm-CDs Digital-Audiodaten im
PCM-Bitreihenformat (auf mit finalisierten CD-R kompatibel) CDs
sind in Titel unterteilt.
*
Dischi compatibili con il lettore
Il lettore è adatto alla riproduzione di tutti i dischi che riportano il
seguente logo. Al contrario, il lettore non consente l’uso di altri
formati, compreso DVD-RAM, DVD-ROM, CD-ROM,
SACD e Photo CD .
Lato singolo o doppio/layer singolo o doppio. Dolby Digital, DTS,
MPEG o audio digitale Linear PCM Video digitale MPEG-2
Il contenuto dei dischi solitamente suddiviso in uno o più ‘titoli’. I
titoli sono ulteriormente suddivisi in ‘capitoli’.
*
Lato singolo/layer singolo. Dischi da 12 cm o 8 cm . Audio digitale
Linear PCM. (compatibile anche con dischi CD-Recordable.) Il
contenuto dei dischi è solitamente suddiviso in ‘tracce’.
*
English
Français
Deutsch Italiano
Eine Seite / Eine Schicht 12- oder 8-cm-CDs MPEG 1 Digital-Audio
MPEG-1 Digital-Video CDs sind in Titel unterteilt.
DVD-Regionalcodes
2
Alle DVD-Video-Discs sind mit einer Regionalmarkierung auf dem
Gehäuse versehen, die anzeigt, auf welche Gebiete der Welt diese Disc
ausgelegt ist. Ihr DVD-Player weist ebenso eine Regionalmarkierung
auf, die Sie auf der Rückseite des Geräts finden. Discs, die für nicht
kompatible Gebiete vorgesehn sind, lassen sich mit diesem Player nicht
abspielen. Discs, die mit ALL gekennzeichnet sind, können mit jedem
beliebigen Player wiedergegeben werden.
* Wiedergabe von bespielbaren CDs
• Beachten Sie, daß mit diesem Gerät keine Discs bespielt
• Dieses Gerät ist für die Wiedergabe von Musik-Discs des Typs
ALL
werden können.
CD-R und CD-RW geeignet. Allerdings ist ein Abspielen von
gewissen Discs unter Umständen nicht immer möglich,
abhängig vom Zustand des CD-Recorders bzw. der Disc.
(Wenn zum Beispiel die Disc verkratzt oder verschmutzt ist,
oder wenn Verschmutzung am Laser-Abtaster des Geräts
anhaftet.)
Lato singolo/layer singolo. Dischi da 12 cm o 8 cm . Audio digitale
MPEG-1 Video digitale MPEG-1 Il contenuto dei dischi è solitamente
suddiviso in ‘tracce’.
Regioni geografiche per i DVD Video
2
Sulla custodia di tutti i dischi DVD Video viene riportata l’indicazione di
una regione che indica la/le regioni geografiche per la compatibilità
della riproduzione. Anche sul lettore in vostro possesso è riportato un
identificativo di regione, ubicato sul lato posteriore dell’apparecchio.
Il lettore non consente la riproduzione di dischi di regioni
geografiche non compatibili. I dischi contrassegnati con
l’identificativo ALL sono adatti alla riproduzione con tutti i lettori.
* Riproduzione di CD registrabili
• Tenere presente che quest’unità non può registrare CD
• Quest’unita può riprodurre CD-R e CD-RW ad uso musicale.
ALL
registrabili.
Tuttavia, se il registratore CD o il disco fossero danneggiati,
non tutti i dischi verranno riprodotti con successo.
Ciò accade ad esempio se il disco è sporco o graffiato o se la
lente del lettore è sporca.
17
Ge/It

2 Connecting Up
Easy Setup
Important: Before making or changing any rear panel connec-
tions, make sure that all components are switched off and unplugged
from the wall outlet.
This easy setup is the minimum set of connections you need to start
watching DVD video discs. Both sound and picture are fed directly to
your TV using the supplied audio and video cables. For other possible
connections, see pages 22 and 26.
Connect to a composite video input on your
1
TV using the supplied yellow video cable.
AV CONNECTOR
AV1(RGB)
-TV
AV2
CONTROL TV SYSTEMDIGITAL OUT
INOUT
OPT
Connect to a pair of stereo audio inputs on your
23
TV using the supplied red/white stereo audio
COAX
NTSC
PAL
AUTO
cable.
Connecting audio and video cables
Be sure to insert each plug fully for
the best connection. The plugs and
jacks are colour-coded to make
connection easier.
525i
525p
(480i)
(480p)
MENU
SELECT
COMPONENT VIDEO OUT
P
Y
B
P
R
12 12
AUDIO OUT
R
2
1
L
2
1
VIDEO OUTS-VIDEO OUT
AC IN
Plug into a standard AC wall
outlet.
Connecting control cables
Use a stereo mini-plug cable (not supplied) to connect the CON-
TROL OUT of your Pioneer amplifier/receiver to the CONTROL IN
of this unit. This allows you to operate this unit with the amplifier/
receiver’s remote control. See the instruction manual that came with
your amplifier/receiver for more detailed instructions. Add more
components to the chain by connecting the
unit to the
CONTROL IN of other Pioneer components.
CONTROL OUT of this
18
En / Fr
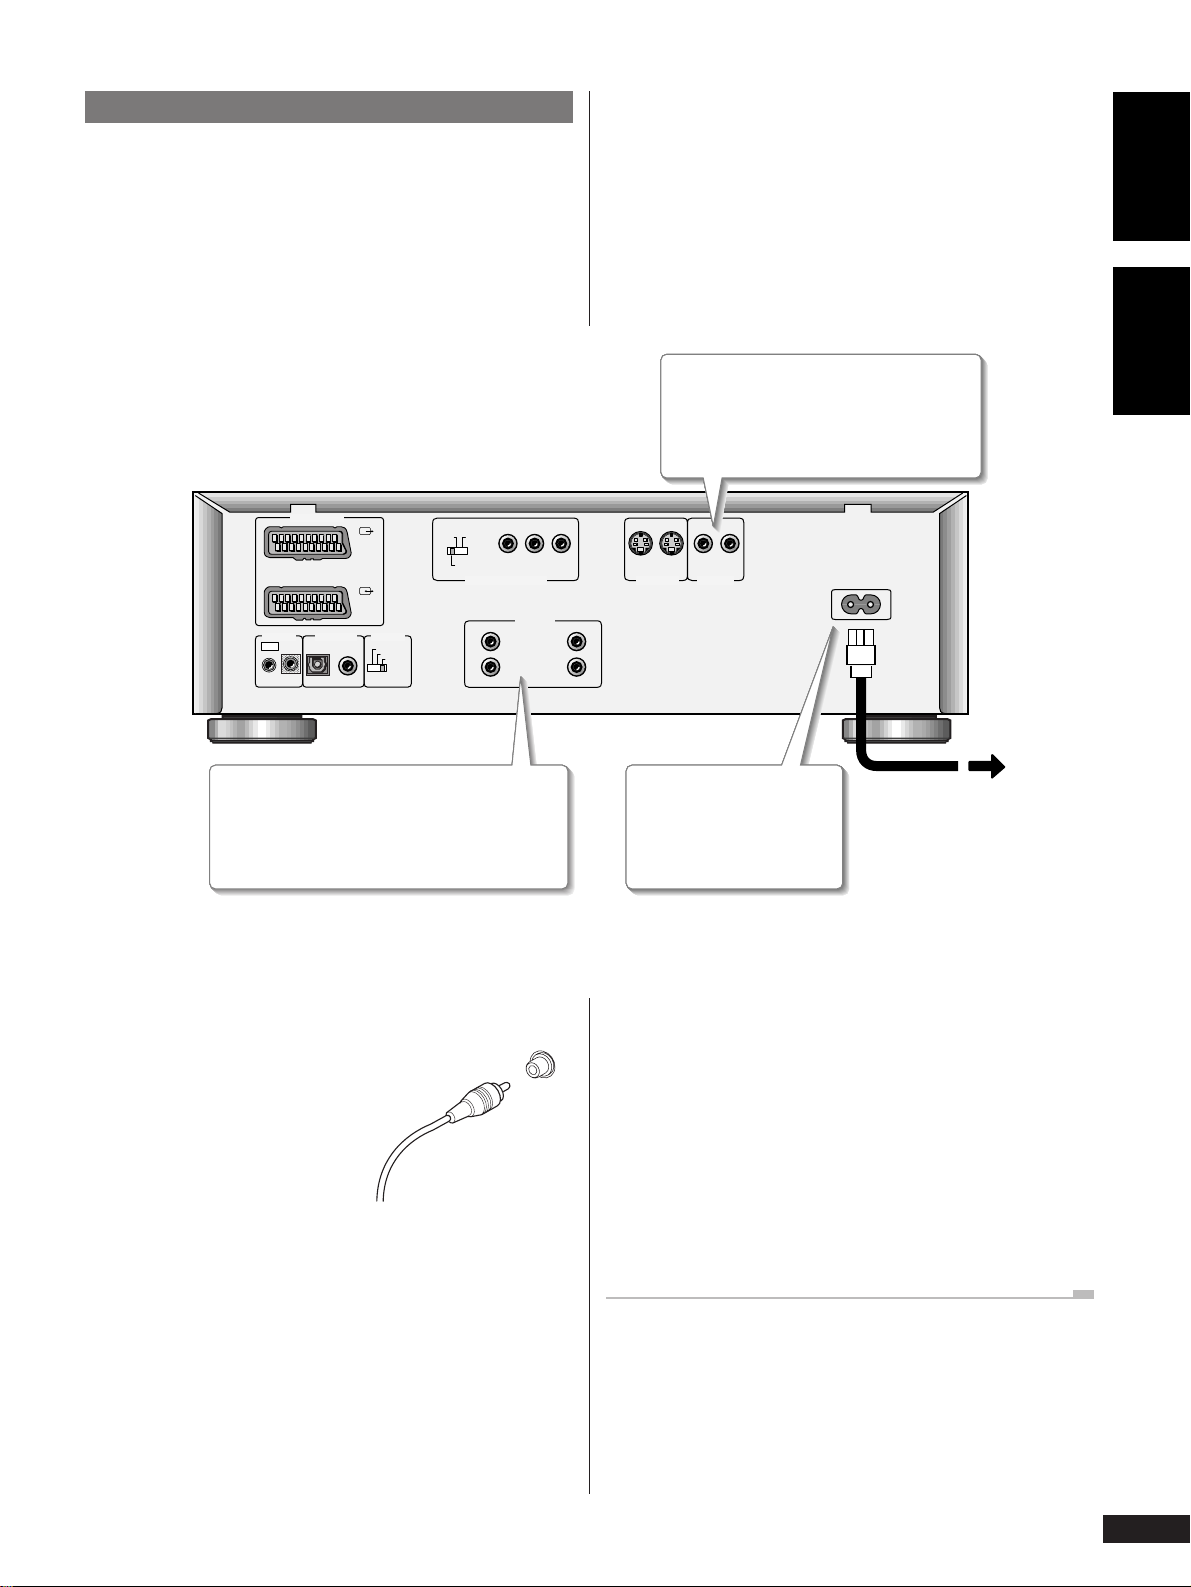
2 Raccordements
Installation accélérée
Important : Avant d’entamer ou de modifier des connexions sur
le panneau arrière, assurez-vous que tous les équipements sont hors
tension et débranchés de la prise murale.
La procédure d’installation accélérée décrit les connexions minimales
requises dont vous avez besoin pour commencer à visionner des DVD
vidéo. Le son et l’image sont directement transmis à votre téléviseur à
l’aide des câbles audio et vidéo fournis. Pour les autres raccordements
possibles, reportez-vous aux pages 23 et 27.
AV CONNECTOR
CONTROL TV SYSTEMDIGITAL OUT
INOUT
OPT
COAX
AV1(RGB)
-TV
AV2
525i
525p
(480i)
(480p)
MENU
SELECT
COMPONENT VIDEO OUT
NTSC
PAL
AUTO
P
Y
B
AUDIO OUT
R
2
1
English
Français
Raccordez-les à l’entrée vidéo composite de
1
votre téléviseur à l’aide du câble vidéo
jaune fourni.
P
R
12 12
L
2
1
VIDEO OUTS-VIDEO OUT
AC IN
Raccordez-les à une paire d’entrées audio stéréo
23
sur votre téléviseur à l’aide du câble audio stéréo
rouge/blanc fourni.
Raccordement des câbles audio et vidéo
Insérez complètement les fiches de
manière à obtenir la meilleure
connexion possible. Les fiches et les
prises sont identifiées par un code de
couleur pour faciliter les connexions.
Raccordez-la à une prise
murale secteur standard.
Raccordement de câbles de commande
Utilisez un câble terminé par une minifiche stéréo (non fourni) pour
raccorder la prise
Pioneer à la prise
commander cet appareil à l’aide de la télécommande de
l’amplificateur/récepteur. Pour des instructions plus détaillées,
reportez-vous au mode d’emploi fourni avec votre amplificateur/
récepteur. Ajoutez d’autres composants à la chaîne en raccordant la
CONTROL OUT de cet appareil à l’entrée CONTROL IN des
sortie
autres composants Pioneer.
CONTROL OUT de votre amplificateur/récepteur
CONTROL IN de cet appareil. Cela vous permet de
19
En / Fr
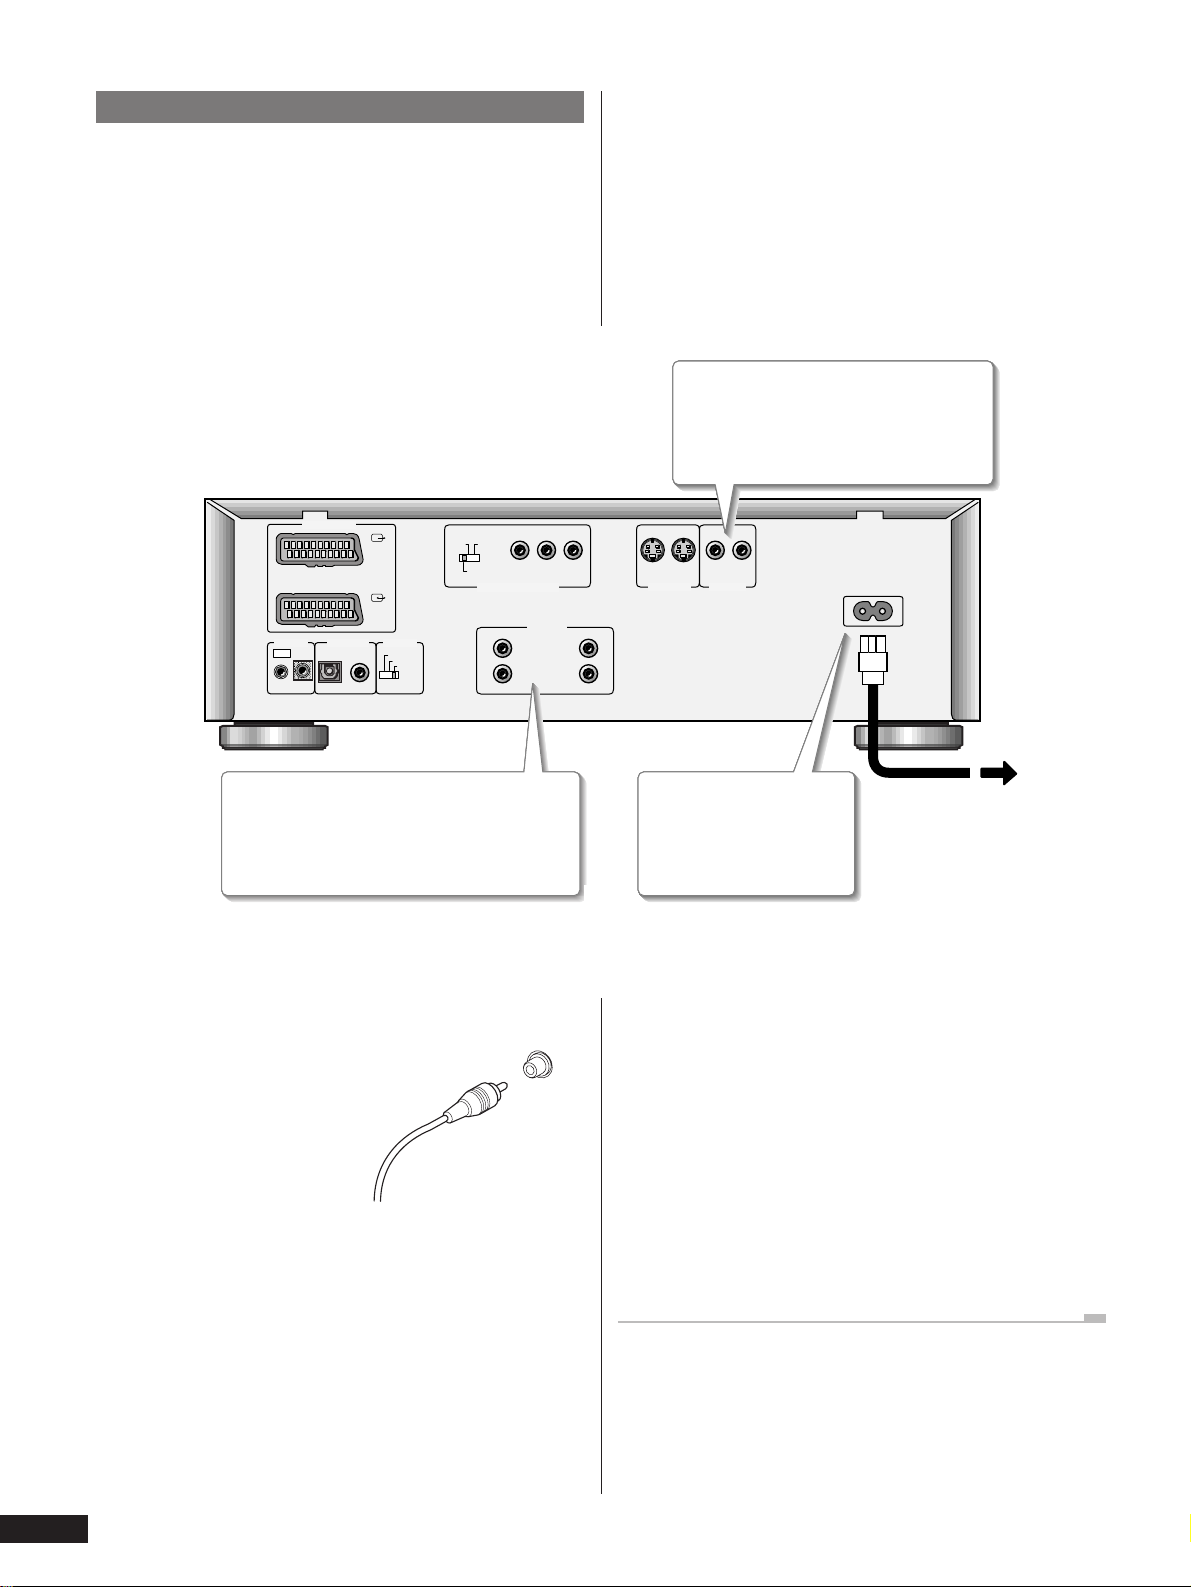
2 Anschlüsse
Einfache Systemanordnung
Wichtig: Vor dem Anschließen oder Ändern von Anschlüssen an der
Geräterückwand unbedingt alle Geräte ausschalten und deren
Netzstecker ziehen.
Diese einfache Systemanordnung beinhaltet die grundlegenden
Anschlüsse, um Video-DVDs abspielen zu können. Klang- und
Bildsignale werden hierbei über die mitgelieferten Audio- und
Videokabel direkt an Ihr Fernsehgerät abgegeben. Die Anschlüsse für
komplexere Systemanordnungen finden Sie auf den Seiten 24
und 28 veranschaulicht.
Über das beigelegte gelbe Videokabel mit
1
dem Kompositsignal-Videoeingang eines
Fernsehers verbinden.
AV CONNECTOR
CONTROL TV SYSTEMDIGITAL OUT
INOUT
OPT
COAX
AV1(RGB)
-TV
AV2
NTSC
PAL
525i
525p
(480i)
(480p)
MENU
SELECT
COMPONENT VIDEO OUT
AUTO
2
1
Über das mitgelieferte rot/weiße Audiokabel mit
23
den Stereo-Eingangsbuchsen eines Fernsehers
verbinden.
Anschluss von Audio- und Videokabeln
Führen Sie die Stecker stets
vollständig in die Buchsen ein, um
eine optimale Verbindung
sicherzustellen. Zur Vereinfachung
der Anschlüsse sind die Stecker und
Buchsen farbkodiert.
P
Y
B
P
R
12 12
AUDIO OUT
R
L
2
1
VIDEO OUTS-VIDEO OUT
AC IN
An eine Netzsteckdose
anschließen.
Anschluss von Systemsteuerungskabeln
Verbinden sie den anschluss CONTROL OUT Ihres Pioneer-
Verstärkers/Receivers über ein handelsübliches MiniKlinkensteckerkabel (separat erhältlich) mit
DVD-Player. Dadurch können Sie den DVD-Player über die
Fernbedienung Ihres Verstärkers/Receivers ansteuern. Bitte schlagen
Sie die Einzelheiten dazu in der Bedienungsanleitung Ihres
Verstärkers/Receivers nach. Sie können weitere Komponenten zentral
steuern, wenn Sie
Steuersignal-Eingangsbuchse
CONTROL OUT des DV-737 mit der
CONTROL IN eines anderen Pioneer-
Geräts verbinden.
CONTROL IN am
20
Ge
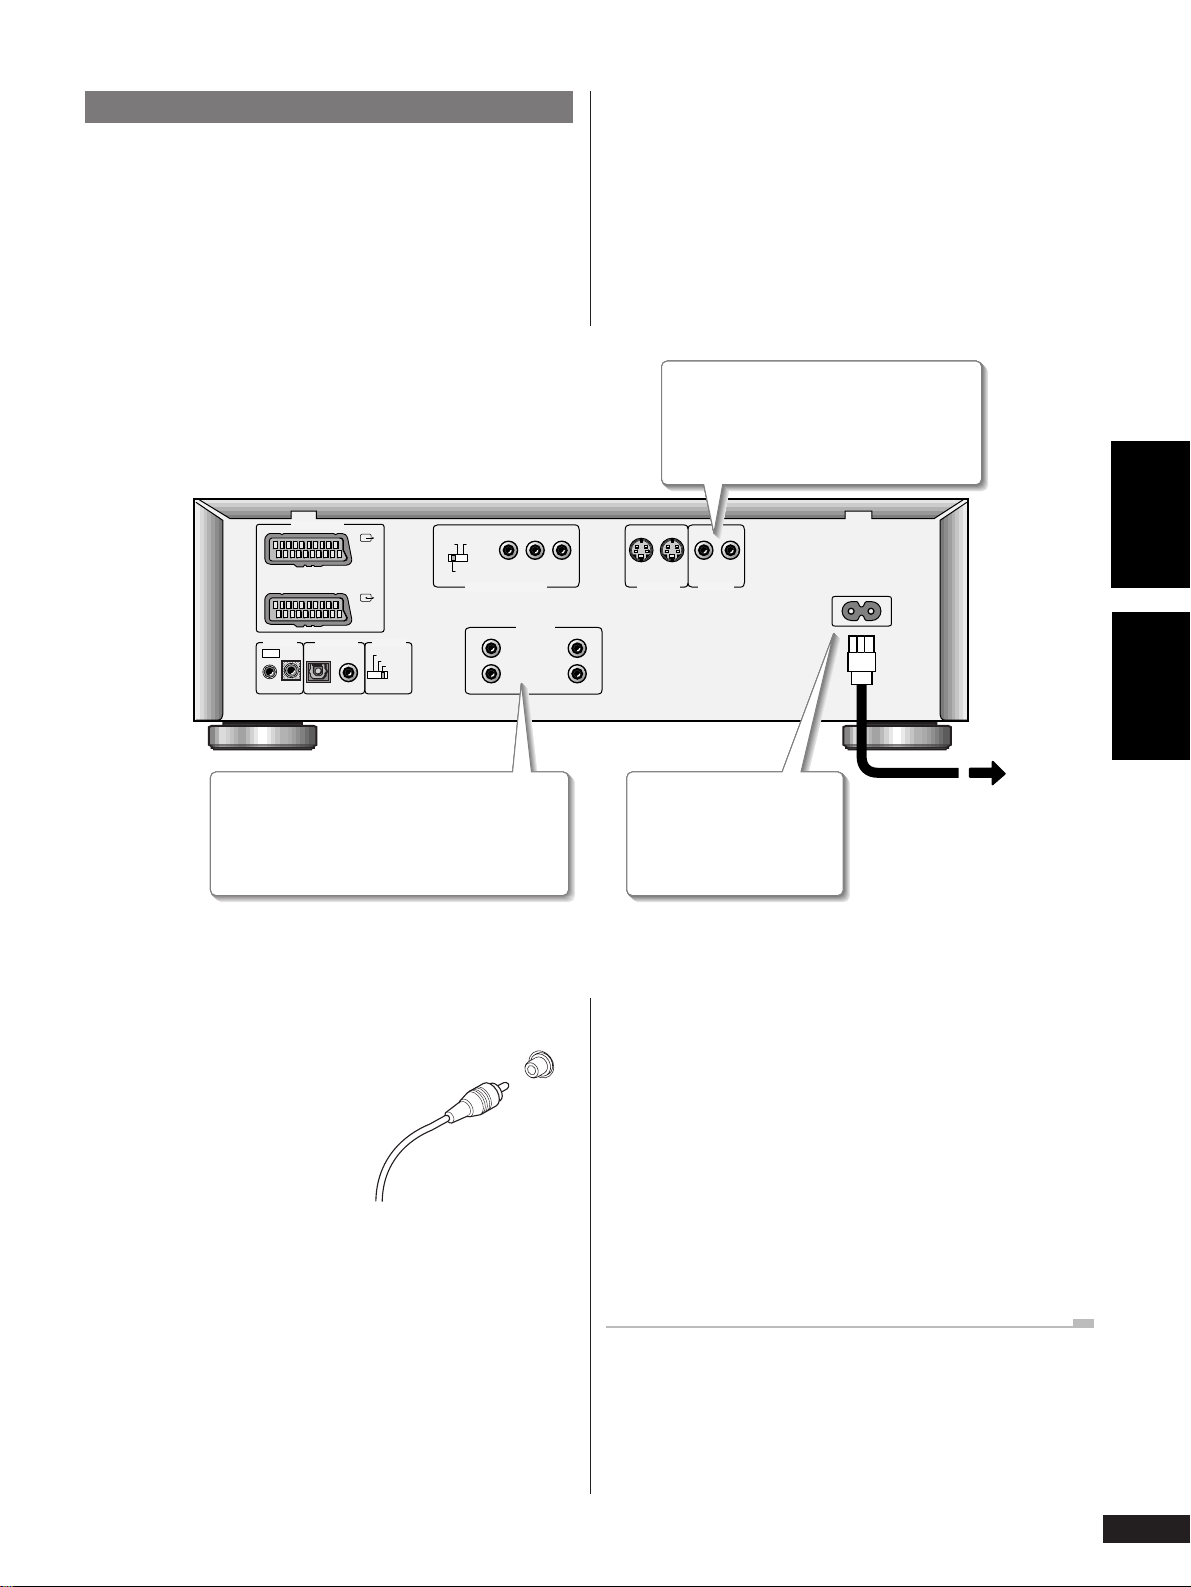
Predisposizione facilitata
Attenzione: Prima di eseguire o modificare qualsiasi
collegamento sul pannello posteriore del lettore, verificare che tutti i
componenti siano spenti o che la spina sia disinserita dalla presa a
muro.
La predisposizione facilitata comprende la serie minima di
collegamenti da eseguire per utilizzare il lettore DVD. Suono e
immagine vengono direttamente inviati all’apparecchio TV collegato
mediante gli appositi cavi in dotazione del lettore. Per altri eventuali
collegamenti, cfr. pagg. 25 e 29.
Per il collegamento ad un ingresso video
1
composito dell’apparecchio TV da collegare
utilizzare il cavo giallo in dotazione con il
lettore.
2 Collegamento
Deutsch Italiano
AV CONNECTOR
CONTROL TV SYSTEMDIGITAL OUT
INOUT
OPT
COAX
AV1(RGB)
-TV
AV2
NTSC
PAL
525i
525p
(480i)
(480p)
MENU
SELECT
COMPONENT VIDEO OUT
AUTO
Per il collegamento agli ingressi audio stereo
23
dell’apparecchio TV da collegare utilizzare il
cavo audio rosso/bianco in dotazione con il
lettore.
Collegamento dei cavi audio e video
Verificare che i cavi siano inseriti
correttamente e a fondo nelle rispettive
prese. Prese e jack sono contraddistinti
da colori diversi a seconda degli
accoppiamenti e delle funzioni per
facilitare i collegamenti.
P
Y
B
P
R
12 12
AUDIO OUT
R
2
1
L
2
1
VIDEO OUTS-VIDEO OUT
AC IN
Collegare la spina ad una
presa standard di corrente
alternata a parete.
Collegamento dei cavi di comando
Utilizzare un cavo stereo con mini-jack (non incluso tra i cavi in
dotazione del lettore) per collegare l’uscita
dell’amplificatore/ricevitore Pioneer all’ingresso CONTROL IN del
lettore. In questo modo il lettore potrà essere usato con il
telecomando dell’amplificatore/ricevitore. Consultare in proposito il
manuale di istruzioni fornito con l’amplificatore/ricevitore,
contenente le istruzioni dettagliate. Per aggiungere ulteriori
componenti al sistema è sufficiente collegare l’uscita
OUT del lettore all’ingresso CONTROL IN degli altri componenti
Pioneer.
CONTROL OUT
CONTROL
21
It

2 Connecting Up
Home theater video connections
Important: Before making or changing any rear panel connec-
tions, make sure that all components are switched off and unplugged
from the wall outlet.
This player outputs video in a number of different ways. Choose the
one most suitable for your system using the guide below.
If your TV has a SCART input, we recommend using it
1
to connect directly to the
AV1(RGB)-TV or AV2 output
on this player.
AV CONNECTOR
AV1(RGB)
-TV
AV2
CONTROL TV SYSTEMDIGITAL OUT
INOUT
OPT
See Setting the TV System switch and Setting the
4
component video switch below.
COAX
NTSC
PAL
AUTO
525i
525p
(480i)
(480p)
MENU
SELECT
COMPONENT VIDEO OUT
If your TV/monitor has component video inputs instead of a SCART
2
input, connect them to the
COMPONENT VIDEO OUT jacks on
this player.
P
Y
B
P
R
12 12
AUDIO OUT
R
2
1
3
L
2
1
If neither SCART nor component inputs are available to you,
connect this player to your TV or AV receiver using either the
VIDEO OUT or S-VIDEO OUT jacks.
VIDEO OUTS-VIDEO OUT
AC IN
Connecting SCART and S-Video cables
SCART and S-Video cables will only plug in one way, so make sure the
plug is correctly lined up with the jack before inserting. Be sure to
fully insert for a good connection.
Note: The AV1(RGB)-TV connector can output composite, SVideo or RGB component video; the AV2 SCART connector only
outputs composite video. If you connect just one TV, use the AV1
(RGB)-TV connector. You can select the type of video output by
changing the Video Out setting in the Setup Menu.
S-Video or composite video?
S-Video should give a better picture, so if you have an S-Video input,
use it. S-Video cables are available from any good audio/visual dealer.
Setting the TV System switch
Set the TV SYSTEM switch to match the TV system in your country
or region. If you have a multi-system TV that can display both PAL
and NTSC signals, set this switch to
watch both PAL and NTSC Video CDs and DVD discs.
This system can convert NTSC to PAL, so setting this switch to
will enable you to watch any PAL or NTSC disc.
AUTO. This will allow you to
PA L
This system can also convert PAL to NTSC, but only for Video CDs, so
setting this switch to
NTSC will limit you to NTSC DVD discs.
Setting the component video switch
You only need to set this switch if you’re using an NTSC TV/
monitor connected via the component video outputs of this player.
This player can output NTSC video as a standard interlaced signal
(the 525i(480i) setting), or as a non-interlaced, or progressive
scan signal (the 525p(480p) setting). Generally, however, you
should leave it set to
from the on-screen Setup menu. Switch manually if you have chosen
a setting from the Setup menu that is incompatible with your
television/monitor and therefore can’t see any picture.
MENU, which makes this setting switchable
22
En / Fr
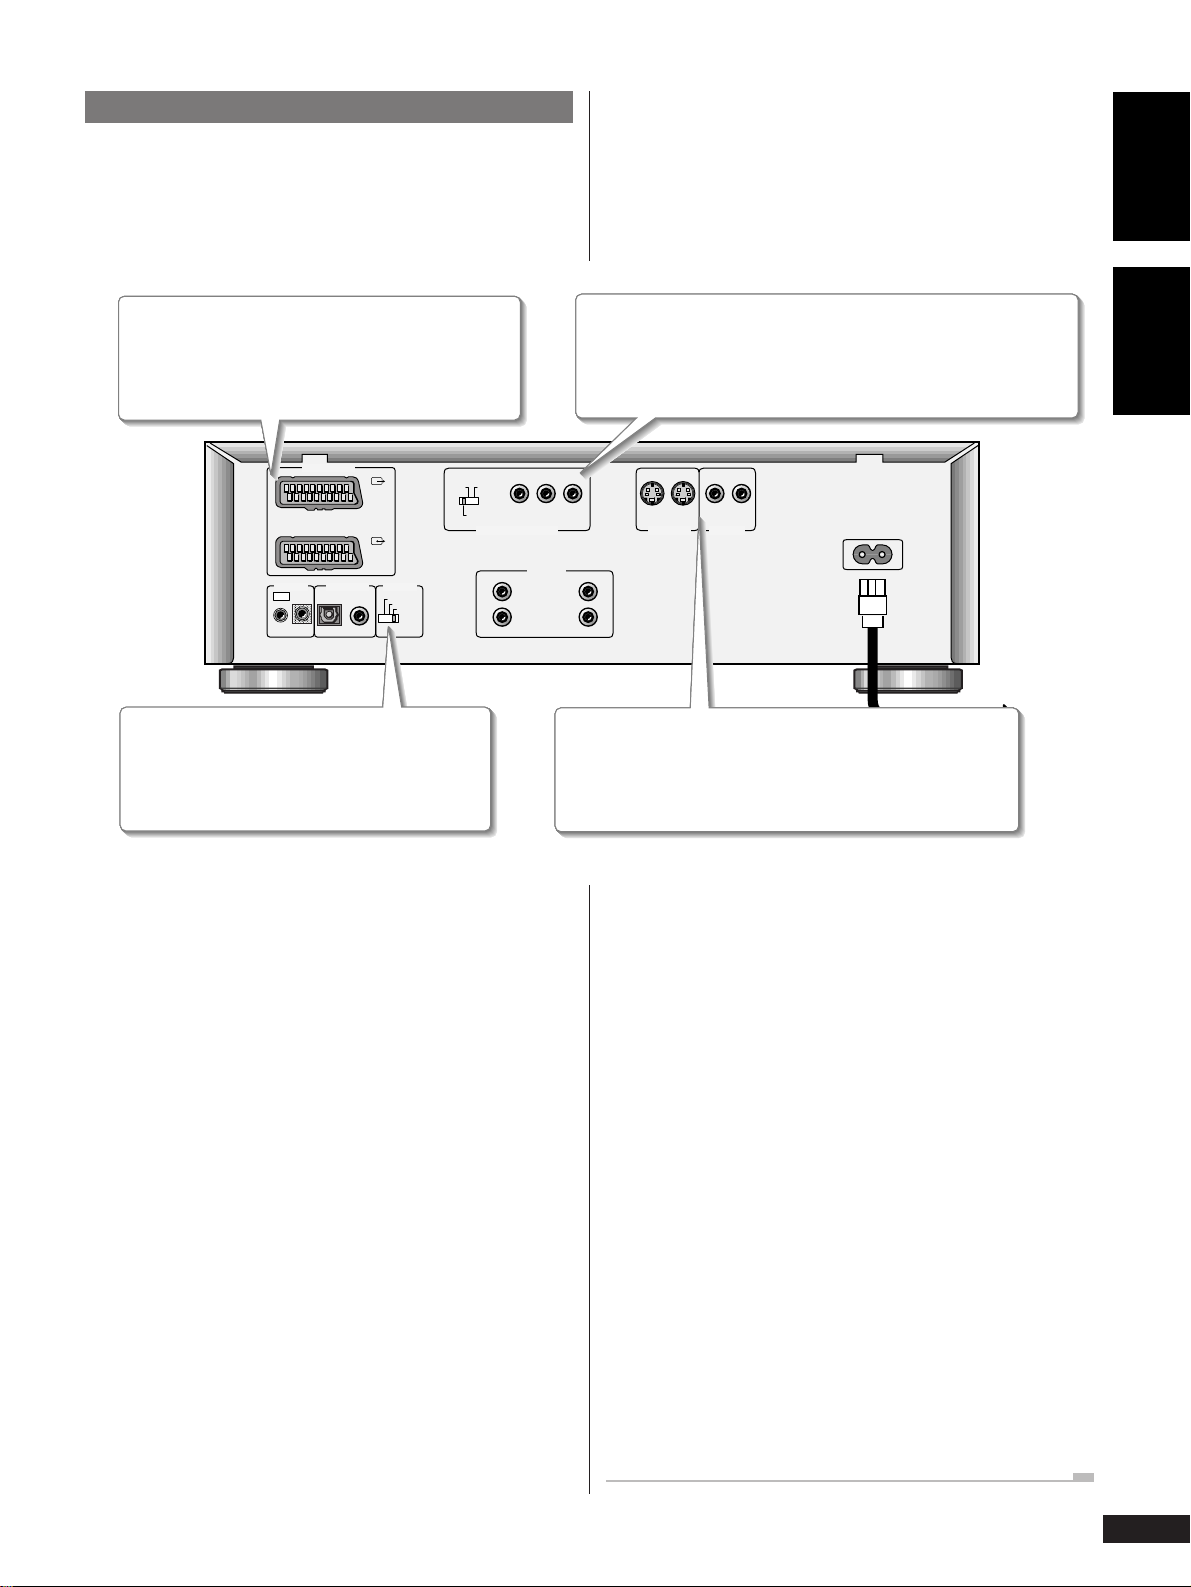
2 Raccordements
Raccordement vidéo pour le cinéma à domicile
Important : Avant d’entamer ou de modifier des connexions sur
le panneau arrière, assurez-vous que tous les équipements sont hors
tension et débranchés de la prise murale.
Ce lecteur sort les signaux vidéo de différentes manières. Choisissez le
mode le mieux approprié à votre système en consultant le guide cidessous.
Si votre téléviseur est doté d’une entrée Péritel, nous
1
vous conseillons de l’utiliser pour le raccorder
directement à la sortie
AV1(RGB)-TV ou AV2 de ce
lecteur.
AV CONNECTOR
AV1(RGB)
-TV
AV2
CONTROL TV SYSTEMDIGITAL OUT
INOUT
OPT
COAX
525p
(480p)
MENU
SELECT
COMPONENT VIDEO OUT
R
2
1
Y
525i
(480i)
NTSC
PAL
AUTO
Si votre téléviseur/moniteur est doté d’entrées vidéo à composantes au
2
lieu d’une entrée Péritel, raccordez-les aux prises
VIDEO OUT de ce lecteur.
P
B
P
R
AUDIO OUT
L
2
1
12 12
VIDEO OUTS-VIDEO OUT
English
Français
COMPONENT
AC IN
Reportez-vous aux sections Réglage du sélecteur
4
de système de télévision et Réglage du sélecteur
3
vidéo à composantes ci-dessous.
Raccordement des câbles Péritel et S-Vidéo
Comme les câbles Péritel et S-Vidéo ne se branchent que dans un
sens, alignez correctement la fiche sur la prise avant de l’insérer.
Insérez complètement les fiches pour obtenir une bonne connexion.
Remarque : Le connecteur AV1(RGB)-TV peut sortir des
signaux composites, S-Vidéo ou vidéo à composantes RVB ; le
connecteur Péritel AV2 ne sort que des signaux vidéo composites. Si
vous ne raccordez qu’un seul téléviseur, utilisez le connecteur AV1
(RGB)-TV. Vous pouvez sélectionner le type de sortie vidéo en
changeant le réglage de Video Out dans le menu Setup.
S-Vidéo ou vidéo composite ?
S-Vidéo produit une meilleure image – donc, si vous disposez d’un
connecteur d’entrée S-Vidéo, utilisez-le. Les câbles S-Vidéo sont
disponibles chez tous les bons revendeurs de matériel audio/vidéo.
Réglage du sélecteur de système de télévision
Réglez le sélecteur TV SYSTEM en fonction du système de télévision
utilisé dans votre pays ou dans votre région. Si vous disposez d’un
téléviseur multisystème pouvant afficher des signaux PAL et NTSC,
réglez ce sélecteur sur
AUTO. Cela vous permettra de visionner des
Si vous ne disposez ni d’entrée Péritel no d’entrées à
composantes, raccordez ce lecteur à votre téléviseur ou récepteur
AV via les prises
VIDEO OUT ou S-VIDEO OUT.
CD vidéo et des DVD aux formats PAL et NTSC.
Etant donné que ce système peut convertir le NTSC en PAL, le réglage
du sélecteur sur la position
PA L vous permet de visionner des disques
PAL et NTSC.
Ce système peut également convertir le PAL en NTSC, mais
uniquement pour les CD vidéo, de sorte que le réglage du sélecteur
sur la position
NTSC vous limite aux DVD NTSC.
Réglage du sélecteur vidéo à composantes
Vous ne devez régler ce sélecteur que si vous utilisez un téléviseur
ou un moniteur NTSC raccordé aux sorties vidéo à composantes
de ce lecteur. Ce lecteur peut sortir des signaux vidéo NTSC sous la
forme de signaux entrelacés standard (le réglage 525i(480i) ), de
signaux non entrelacés ou encore de signaux à balayage progressif
(le réglage 525p(480p) ). D’une manière générale, il est
cependant préférable de le laisser sur la position
permet de commuter ce réglage depuis le menu Setup. Commutez-le
manuellement si vous avez choisi un réglage dans le menu Setup qui
est incompatible avec votre téléviseur ou votre moniteur et si vous ne
voyez apparaître aucune image.
MENU, ce qui vous
23
En / Fr
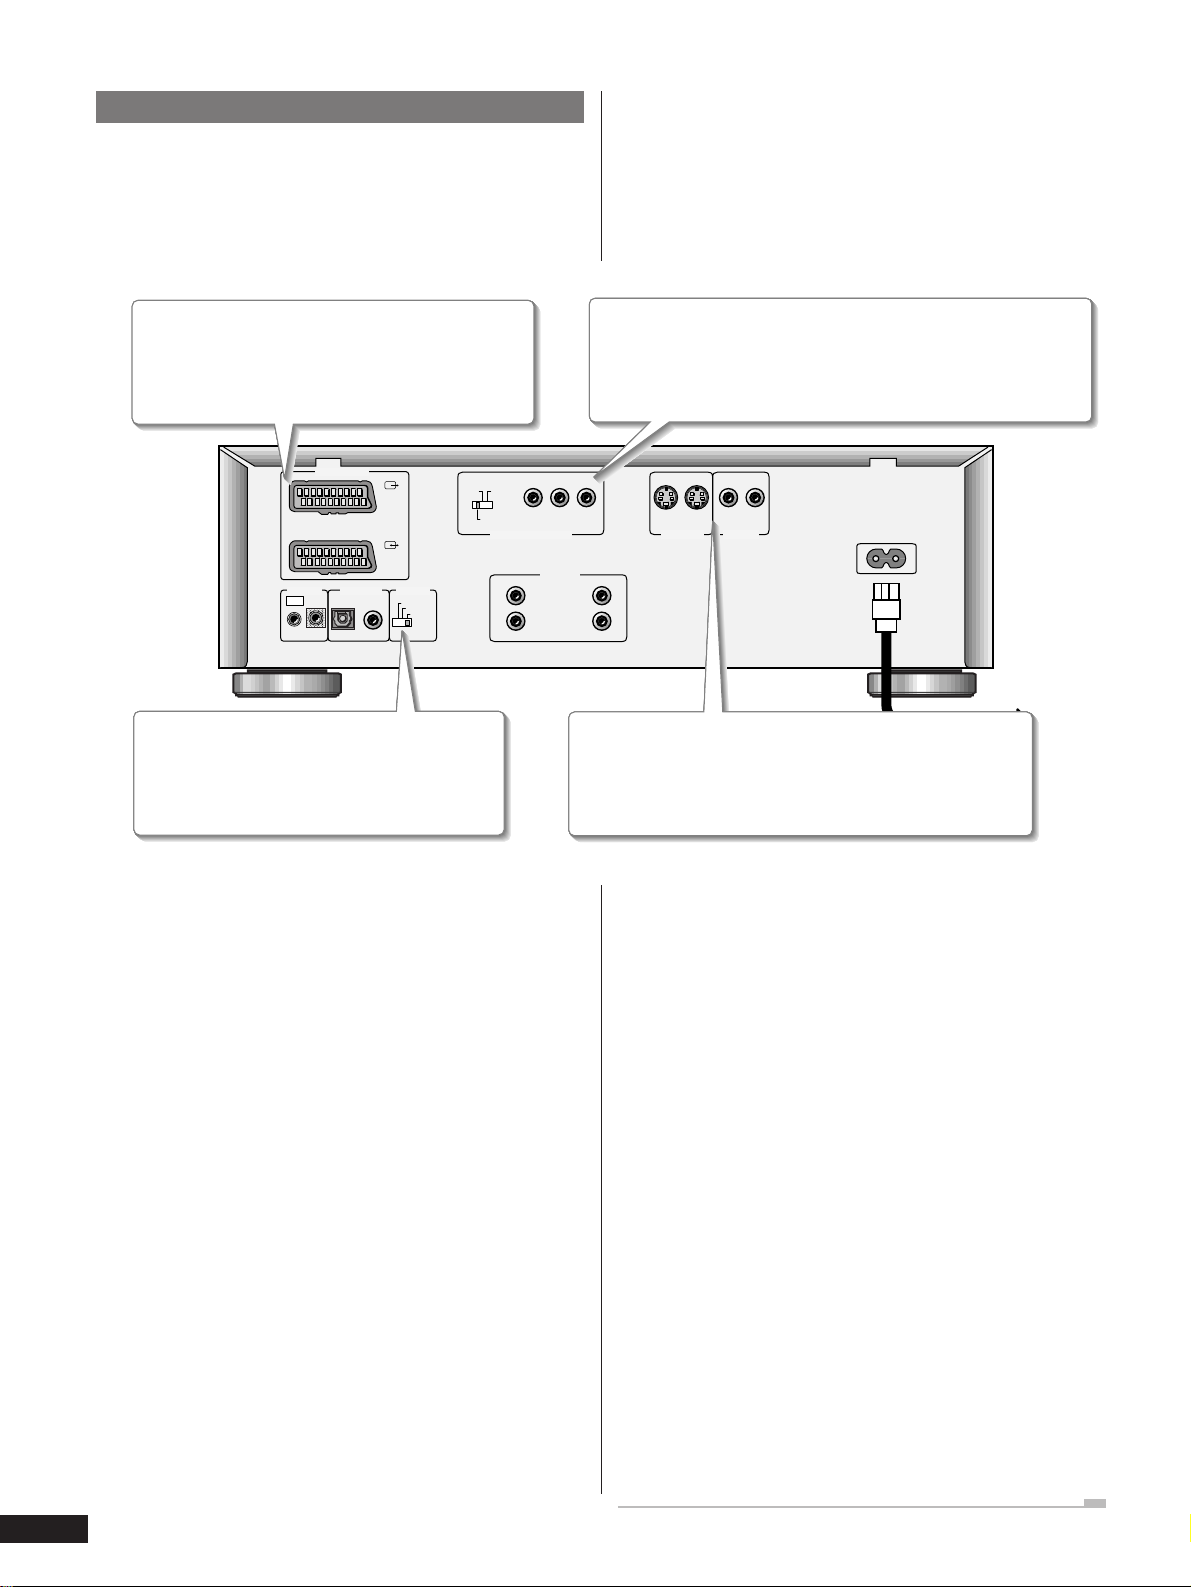
2 Anschlüsse
Video-Anschluss von Heimkino-Komponenten
Wichtig: Vor dem Anschließen oder Ändern von Anschlüssen an der
Geräterückwand unbedingt alle Geräte ausschalten und deren
Netzstecker ziehen.
Ihr DVD-Player kann Videosignale auf verschiedenste Weise
ausgeben. Wählen Sie die für Ihr System beste Methode anhand der
nachfolgenden Erläuterungen.
Falls Ihr Fernsehgerät über einen SCART-Eingang
1
verfügt, sollten Sie ihn direkt mit dem Ausgang
AV1(RGB)-TV oder AV2 dieses Geräts verbinden.
Falls Ihr Bildschirm statt einer SCART-Eingangsbuchse Video-
2
Komponentensignaleingänge aufweist sollten Sie diese mit den
Buchsen
COMPONENT VIDEO OUT des DVD-Players verbinden.
AV CONNECTOR
CONTROL TV SYSTEMDIGITAL OUT
INOUT
OPT
COAX
AV1(RGB)
-TV
AV2
525i
525p
(480i)
(480p)
MENU
SELECT
COMPONENT VIDEO OUT
NTSC
PAL
AUTO
P
Y
B
AUDIO OUT
R
2
1
Siehe Einstellen des Fernsehsystemschalters (TV
4
SYSTEM) und Einstellen des Video-
3
Komponentensignalschalters unten.
Anschluss von SCART- und S-Video-Kabeln
Da sich SCART- und S-Video-Kabel nur in einer Position anschließen
lassen, sollten Sie sich vor dem Einführen der Stecker überzeugen, dass
sie korrekt ausgerichtet sind. Führen Sie die Stecker stets vollständig in
die Anschlüsse ein, um eine optimale Verbindung sicherzustellen.
Hinweis: Die Anschlussleiste AV1(RGB)-TV kann zur Ausgabe
von Komposit-Video-, S-Video- oder RGB-Signalen verwendet werden,
der SCART-Anschluss AV2 dagegen dient nur zur Ausgabe von
Kompositsignalen. Falls Sie nur einen Bildschirm anschließen,
sollten Sie ihn mit Anschluss AV1 (RGB)-TV verbinden. Sie
können das Video-Ausgangssignalformat über Video Out im
Einstellungsmenü Setup Menu wechseln.
S-Video- oder Komposit-Videosignal
Da das S-Videoformat eine bessere Bildqualität ermöglicht, sollten Sie den SVideo-Eingang Ihres Fernsehers für den Anschluss wählen, falls vorhanden. Sie
bekommen S-Videokabel in jedem guten Audio/Video-Geschäft.
Einstellen des Fernsehsystemschalters (TV SYSTEM)
Stellen Sie den Schalter TV SYSTEM auf das Fernsehformat Ihres
Landes ein. Falls Sie einen Multisystem-Fernseher besitzen, der PAL-
P
R
12 12
L
2
1
VIDEO OUTS-VIDEO OUT
AC IN
Falls weder SCART- noch Komponentensignal-Eingänge zur
Verfügung stehen, diesen DVD-Spieler über die Buchsen
OUT oder S-VIDEO OUT an den Bildschirm oder einen AV-
VIDEO
Receiver anschließen.
und NTSC-Signale verarbeiten kann, diesen Schalter auf
stellen. Dadurch können Sie sowohl DVDs, die im PAL-Format
aufgenommen wurden, als auch DVDs mit NTSC-Format
wiedergeben.
Da dieses Gerät NTSC- in PAL-Signale umwandeln kann, können Sie
bei Schalterstellung
PA L Discs mit den Fernsehformaten PAL und
NTSC wiedergeben.
Dieses Gerät kann auch PAL- in NTSC-Signale konvertieren. Dies gilt
jedoch nur für Video-CDs. Wenn Sie daher diesen Schalter auf
stellen, können Sie folglich nur DVDs mit NTSC-Format abspielen.
Einstellen des Video-Komponentensignalschalters
Diese Einstellung ist nur notwendig, falls Sie einen NTSCFernseher über die Komponentensignal-Videoausgänge dieses
Geräts speisen. Dieser Player kann NTSC-Videosignale mit normalem
Zeilensprung-Abtastverfahren (Einstellung 525i(480i) ) oder mit
progressiver Zeilenfolge-Austastung (Einstellung 525p(480p) )
ausgeben. Es empfiehlt sich jedoch, den Schalter auf
belassen, damit Sie diese Einstellung über das in das Monitorbild
eingeblendete Einstellmenü vornehmen können. Falls Sie aufgrund
einer falschen Einstellung im Setup-Menü (Einstellmenü) kein Bild
bekommen, sollten Sie diesen Schalter manuell einstellen.
MENU zu
AUTO
NTSC
24
Ge
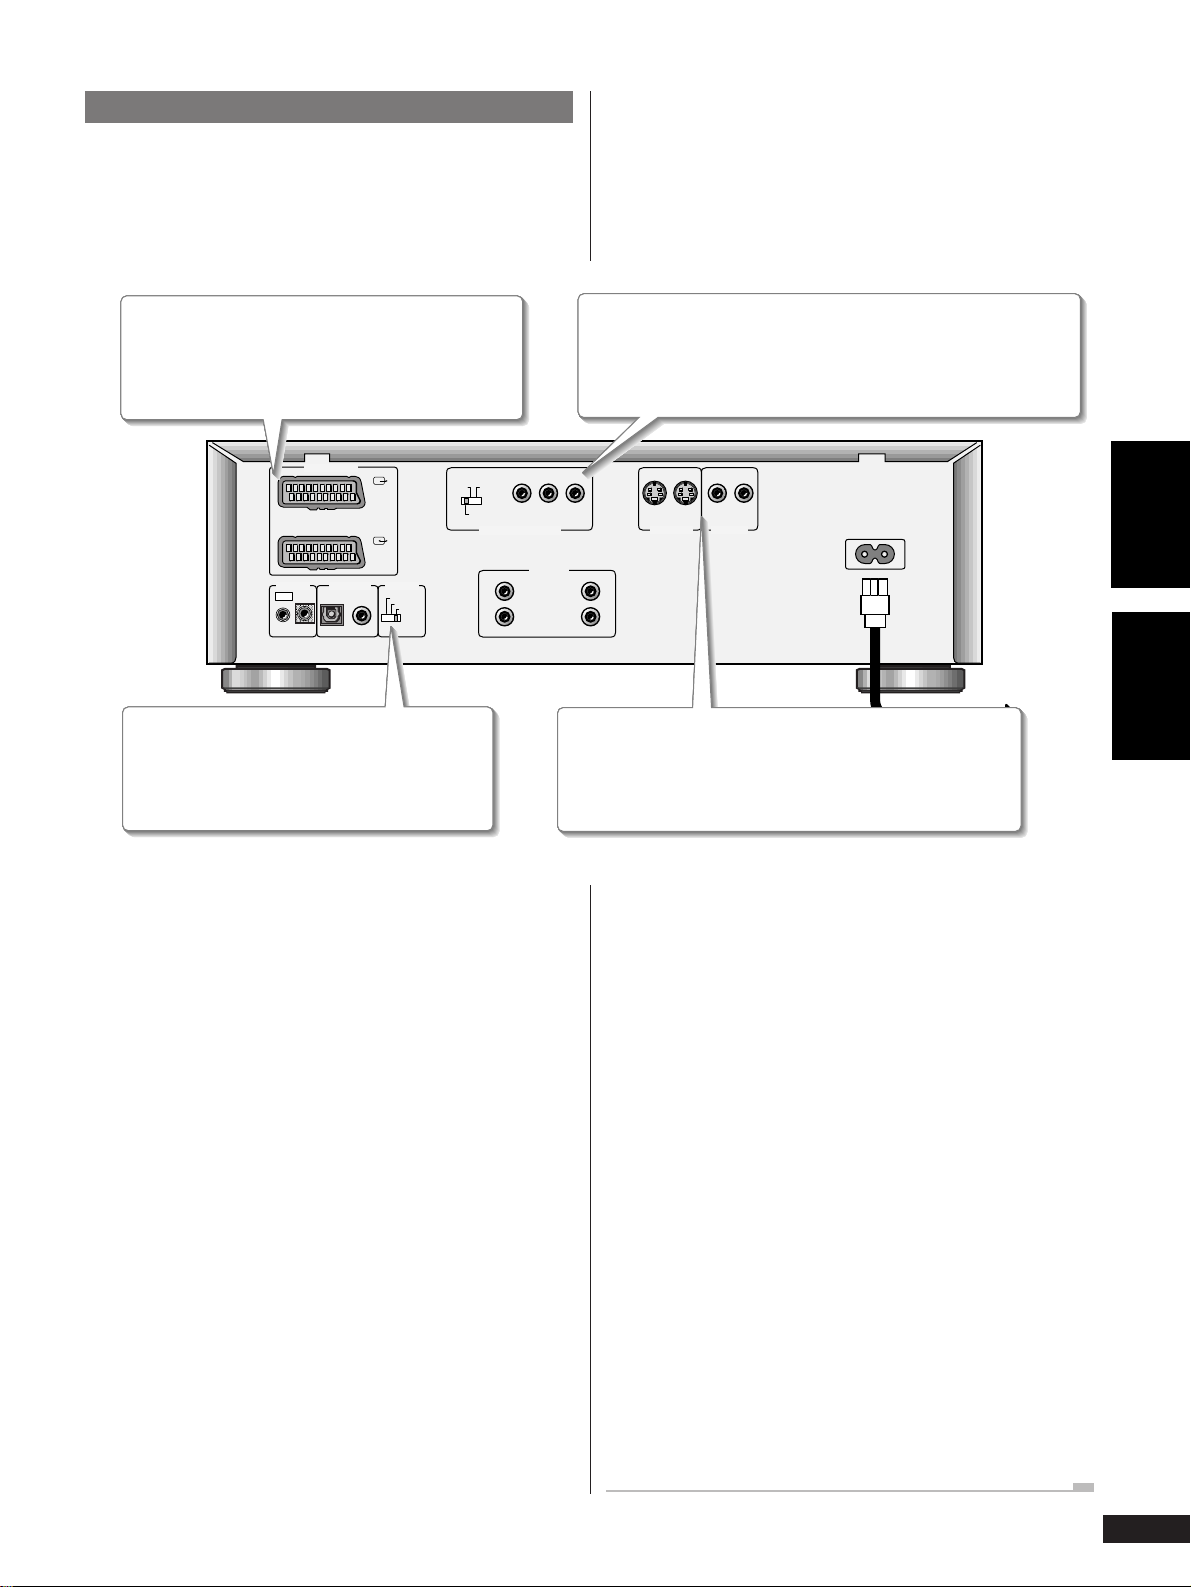
Collegamenti video di tipo Home Theater
Attenzione: Prima di eseguire o modificare qualsiasi collegamento
sul pannello posteriore del lettore, verificare che tutti i componenti siano
spenti o che la spina sia disinserita dalla presa a parete.
Il lettore permette l’uso di molte modalità di visione per i video. Scegliere
la modalità più adatta al sistema collegato utilizzando la guida seguente.
2 Collegamento
Se il televisore collegato ha un ingresso SCART se ne
1
raccomanda l’uso per il collegamento diretto all’uscita
AV1(RGB)-TV o AV2 del lettore.
AV CONNECTOR
AV1(RGB)
-TV
AV2
CONTROL TV SYSTEMDIGITAL OUT
INOUT
OPT
Cfr. Impostazione dell’interruttore TV System e
4
Impostazione del selettore per video componente
COAX
NTSC
PAL
AUTO
di seguito.
525i
525p
(480i)
(480p)
MENU
SELECT
COMPONENT VIDEO OUT
Se il televisore/monitor collegato dispone di ingressi per video
2
componenti ma non di ingresso SCART, collegarli ai jack dell’uscita
COMPONENT VIDEO OUT sul lettore.
Deutsch Italiano
P
Y
B
P
R
12 12
AUDIO OUT
R
2
1
3
L
2
1
Se non esistono ingressi SCART o per componenti disponibili, si
può collegare il lettore al televisore o al ricevitore AV mediante i
jack delle uscite video
VIDEO OUTS-VIDEO OUT
AC IN
VIDEO OUT o S-VIDEO OUT.
Collegamento di cavi SCART e S-Video
Esiste una sola possibilità di collegamento dei cavi SCART e S-Video,
pertanto verificare che la spina sia allineata correttamente con il jack
prima di procedere all’inserimento. Verificare che le prese siano inserite a
fondo per il corretto collegamento delle apparecchiature.
Nota: Il connettore AV1(RGB)-TV può essere usato come uscita
per video componente composito, S-Video o RGB; il connettore SCART
AV2 può essere usato solamente come uscita per video composito. Se si
collega un solo apparecchio TV, usare il connettore AV1 (RGB)-TV .
E’ possibile selezionare il tipo di uscita video modificando l’impostasione
Video Out dal menu Setup Menu.
S-Video o video composito?
Un S-Video dovrebbe garantire una migliore qualità di immagine,
pertanto si raccomanda di usare l’ingresso S Video eventualmente
esistente. I cavi S-Video si trovano comunemente in commercio presso
qualsiasi rivenditore di materiale audiovisivo ben fornito.
Impostazione del selettore TV System
Impostare il selettore TV SYSTEM regolandolo sul sistema adottato nel
paese o nell’area geografica di installazione. Se la TV da collegare
funziona sia con segnali PAL che con segnali NTSC impostare
l’interruttore su
AUTO. Sarà così possibile riprodurre Video CD e dischi
DVD registrati con sistema PAL o NTSC.
Il sistema è in grado di convertire i segnali NTSC in PAL, pertanto
impostando il selettore su
PA L sarà possibile vedere qualsiasi tipo di
disco, registrato in PAL o in NTSC.
Il sistema è in grado di convertire il segnale PAL in NTSC, ma solo per i
Video CD, pertanto, impostando il selettore su
NTSC, si potranno vedere
solo dischi DVD in NTSC.
Impostazione del selettore del video componente
Il selettore dev’essere impostato solo se al lettore viene collegato un
apparecchio TV/monitor NTSC sulle uscite video componente. Il lettore
emette un segnale video NTSC di tipo standard interallacciato
(impostazione 525i(480i) ), oppure di tipo non interallacciato, o
segnale a scansione sequenziale(impostazione 525p(480p) ). In
genere, si consiglia di mantenere l’impostazione su
modificare questa impostazione dal menu di Setup da video. Modificare
manualmente se dal menu di Setup è stata selezionata una impostazione
incompatibile con il televisore/monitor collegato, sul quale non compare
pertanto alcuna immagine.
MENU, così da poter
25
It
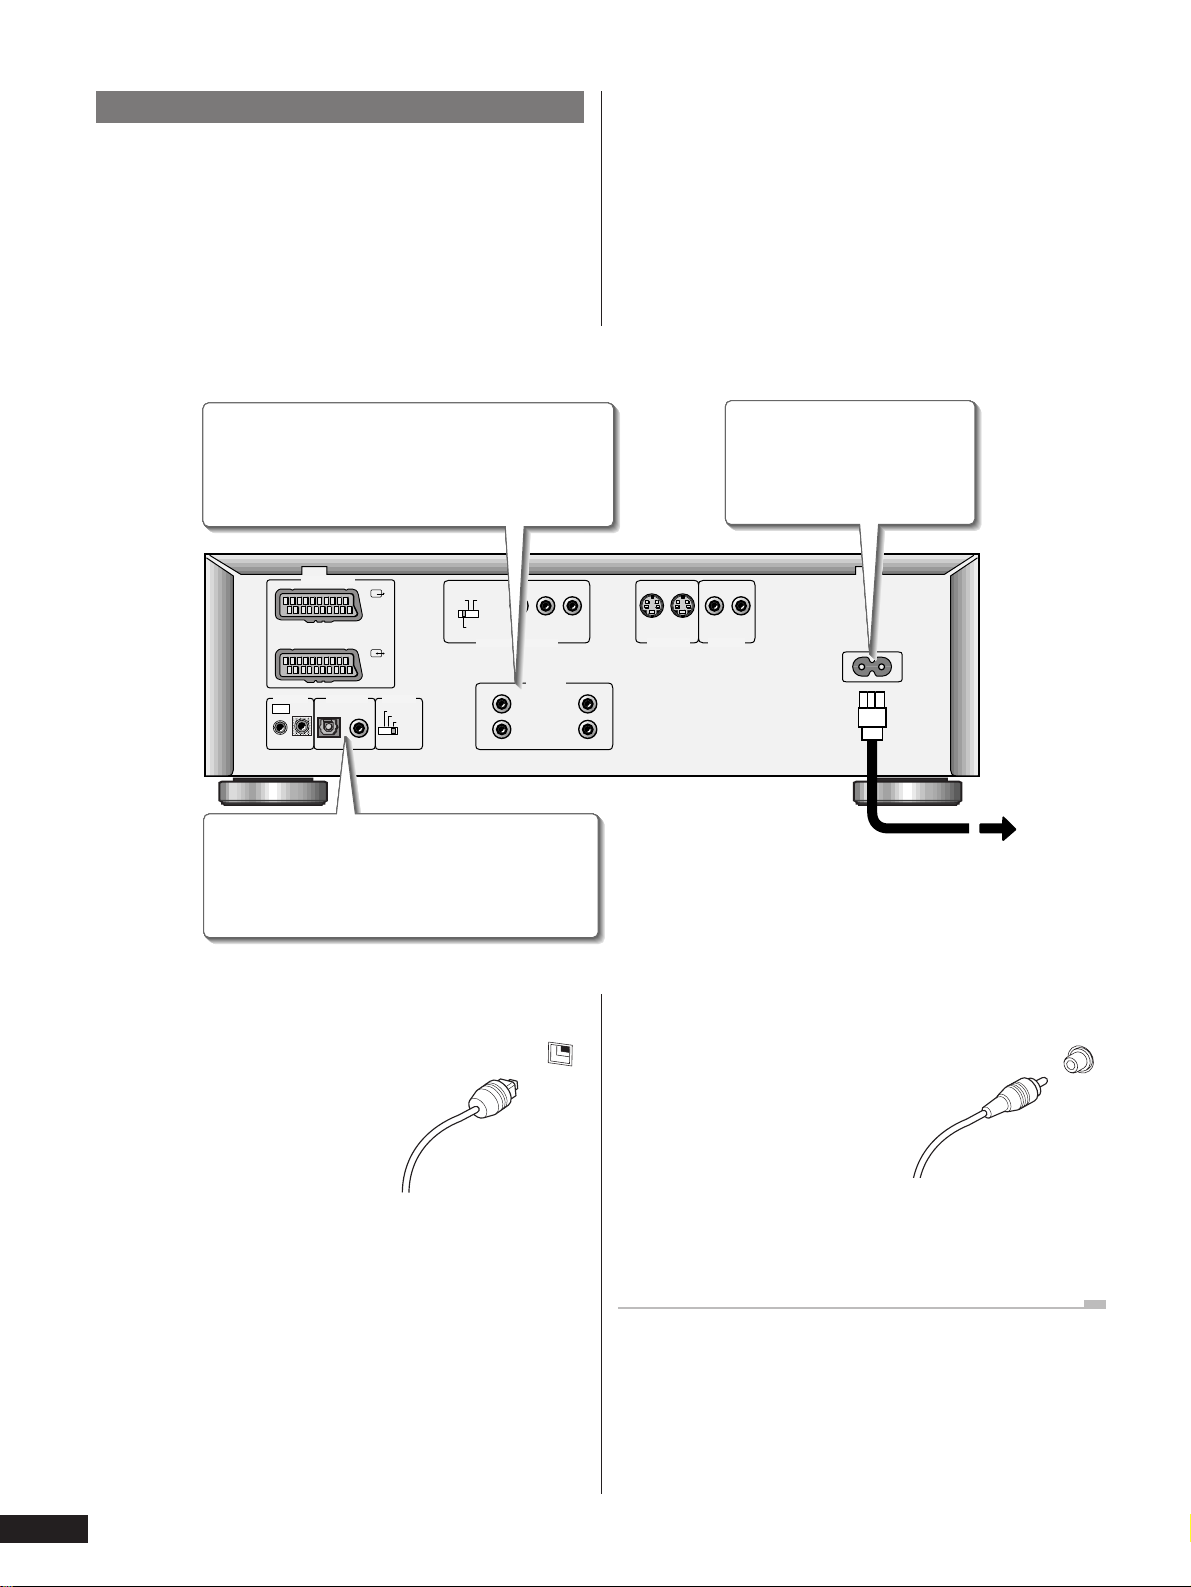
2 Connecting Up
Home theater audio connections
Important: Before making or changing any rear panel connec-
tions, make sure that all components are switched off and unplugged
from the wall outlet.
This player outputs multi-channel audio in digital form. Check the
manual for your amplifier/receiver to see what equipment it is
compatible with (especially which digital formats—Dolby Digital,
DTS, etc.—it can decode).
If your amplifier has analog inputs, connect to the left/
1
right inputs. Otherwise, connect to a pair of stereo inputs.
AV CONNECTOR
AV1(RGB)
-TV
AV2
CONTROL TV SYSTEMDIGITAL OUT
INOUT
OPT
Connect to the coaxial or optical input of your
2
amplifier, if it has digital inputs.
NTSC
COAX
525i
525p
(480i)
(480p)
MENU
SELECT
COMPONENT VIDEO OUT
R
PAL
AUTO
2
1
Y
P
AUDIO OUT
Plug into a standard AC wall
3
outlet.
B
P
R
12 12
L
2
1
VIDEO OUTS-VIDEO OUT
AC IN
Connecting optical cables
Before plugging in an optical cord, pull
out the protective cover from the optical
jack.
Optical interconnects only plug in one
way, so make sure the plug is correctly
lined up with the jack before inserting.
You should hear it click into position
when fully inserted.
26
En / Fr
OPT
Connnecting coaxial cables
Use an interconnect with a pin-type
(also called RCA or phono) plug on
each end to connect up digital coaxial-
COAX
type jacks. Make sure that the plug is
pushed fully home.
Connecting analog audio cables
Be sure to fully insert each plug for the best connection. The plugs
and jacks are colour-coded to make connection easier.
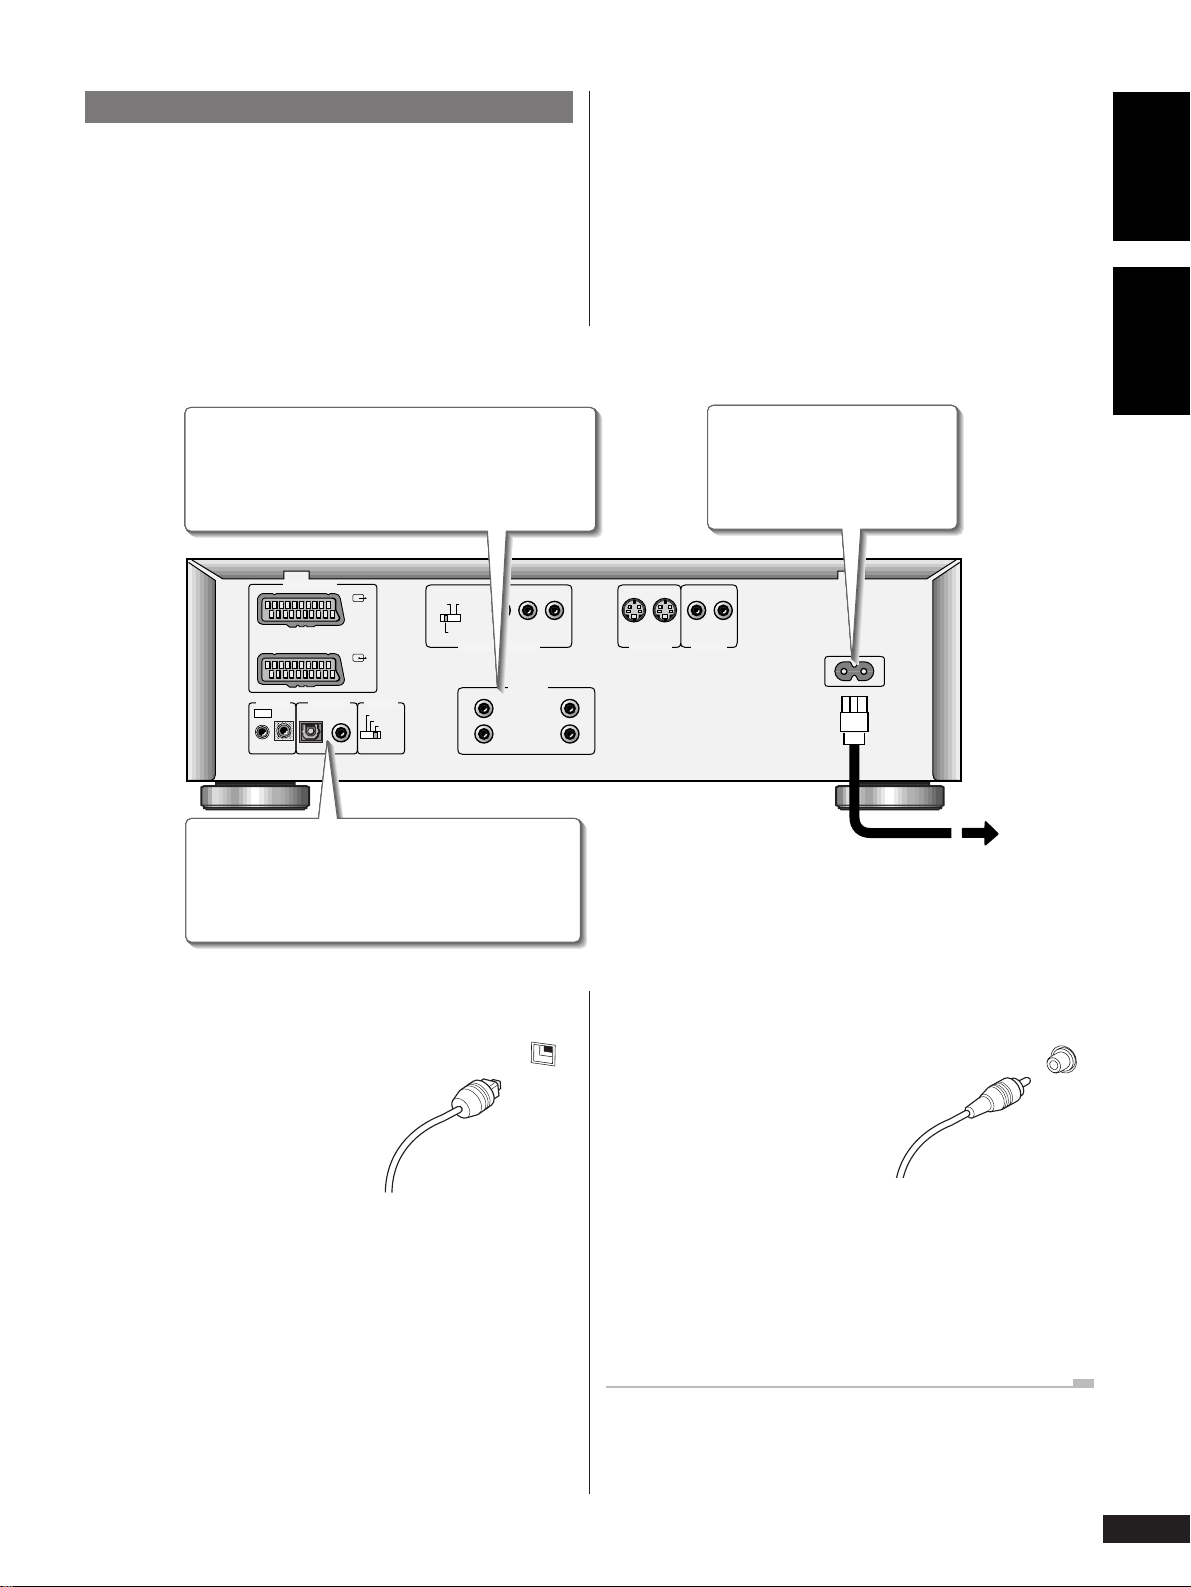
2 Raccordements
Raccordement audio pour le cinéma à domicile
Important : Avant d’entamer ou de modifier des connexions sur
le panneau arrière, assurez-vous que tous les équipements sont hors
tension et débranchés de la prise murale.
Ce lecteur sort des signaux audio multicanaux sous forme
numérique. Contrôlez dans le mode d’emploi de votre amplificateur/
récepteur avec quels équipements il est compatible (et plus
particulièrement quels formats numériques — Dolby Digital, DTS,
etc.— il peut décoder).
Si votre amplificateur est équipé d’entrées analogiques,
1
raccordez-le aux entrées gauche/droite. Sinon,
raccordez-le à une paire d’entrées stéréo.
AV CONNECTOR
CONTROL TV SYSTEMDIGITAL OUT
INOUT
OPT
COAX
AV1(RGB)
-TV
AV2
525i
525p
(480i)
(480p)
MENU
SELECT
COMPONENT VIDEO OUT
NTSC
PAL
AUTO
P
Y
B
P
R
AUDIO OUT
R
2
1
L
2
1
Raccordez-la à une prise
3
murale secteur standard.
12 12
VIDEO OUTS-VIDEO OUT
English
Français
AC IN
Raccordez-le à l’entrée coaxiale ou optique de votre
2
amplificateur, s’il est doté d’entrées numériques.
Raccordement des câbles optiques
Avant de brancher un câble optique,
retirez le capuchon de protection de la
prise optique.
Comme les interconnexions optiques ne
s’enfichent que dans un sens, assurezvous que la fiche est correctement
alignée sur la prise avant de l’insérer.
Elle produit un déclic lorsqu’elle est complètement enfichée en
position.
OPT
Raccordement des câbles coaxiaux
Utilisez un interconnecteur doté d’une
fiche à broche (également appelée
fiche RCA ou phono) aux deux
COAX
extrémités pour raccorder des prises
numériques coaxiales. Assurez-vous
que la fiche est complètement insérée
dans la prise.
Raccordement de câbles audio analogiques
Insérez complètement les fiches de manière à obtenir la meilleure
connexion possible. Les fiches et les prises sont identifiées par un code
de couleur pour faciliter les connexions.
27
En / Fr

2 Anschlüsse
Audio-Anschluss von Heimkino-Komponenten
Wichtig: Vor dem Anschließen oder Ändern von Anschlüssen an der
Geräterückwand unbedingt alle Geräte ausschalten und deren
Netzstecker ziehen.
Dieser DVD-Spieler liefert mehrkanalige Audiosignale in digitaler
Form. Lesen Sie in der Bedienungsanleitung Ihres Verstärkers/
Receivers nach, ob und mit welchen Digitalformaten (Dolby Digital,
DTS usw.) er kompatibel ist bzw. für welche er einen Dekoder besitzt.
Falls Ihr Verstärker über Analogeingänge verfügt, sollten
1
Sie den linken und rechten Eingang beschalten.
Anderenfalls mit einem Stereo-Eingangspaar verbinden.
AV CONNECTOR
CONTROL TV SYSTEMDIGITAL OUT
INOUT
OPT
COAX
AV1(RGB)
-TV
AV2
NTSC
PAL
525i
525p
(480i)
(480p)
MENU
SELECT
COMPONENT VIDEO OUT
R
AUTO
2
1
Mit dem Koaxial-Eingang oder dem optischen
2
Eingang des Verstärkers verbinden, falls dieser
Digitaleingänge besitzt.
Y
P
AUDIO OUT
An eine Netzsteckdose
3
anschließen.
B
P
R
12 12
L
2
1
VIDEO OUTS-VIDEO OUT
AC IN
Anschluss von optischen Kabeln
Vor dem Anschluss von optischen Kabeln
die Schutzkappe aus der
Lichtleiterbuchse ziehen.
Da sich optische Kabel nur in einer
Position anschließen lassen, sollten Sie
sich vor dem Einführen des Steckers
überzeugen, dass er korrekt ausgerichtet
ist. Achten Sie beim Anschluss darauf, dass der Stecker einrastet.
28
Ge
OPT
Anschluss von Koaxialkabeln
Zum Beschalten der digitalen
Koaxialbuchsen ein Kabel mit
Klinkensteckern (auch Cinchkabel
COAX
genannt) an beiden Enden verwenden.
Führen Sie den Klinkenstecker bis zum
Anschlag ein.
Anschluss von analogen Audiokabeln
Führen Sie die Stecker stets vollständig in die Buchsen ein, um eine
optimale Verbindung sicherzustellen. Zur Vereinfachung der
Anschlüsse sind die Stecker und Buchsen farbkodiert.

Collegamenti audio di tipo Home Theater
Attenzione: Prima di eseguire o modificare qualsiasi collegamento
sul pannello posteriore del lettore, verificare che tutti i componenti siano
spenti o che la spina sia disinserita dalla presa a muro.
Il lettore è dotato di uscite audio multicanale digitali. Consultare il
manuale in dotazione dell’amplificatore/ricevitore da collegare per
verificarne la compatibilità con le altre apparecchiature (in particolare
per quanto riguarda i formati digitali—Dolby Digital, DTS, etc.— che
può decodificare).
2 Collegamento
Se l’amplificatore è dotato di ingressi analogici,
1
collegare gli ingressi destro/sinistro. In caso contrario,
collegarsi ad una coppia di ingressi stereo.
AV CONNECTOR
AV1(RGB)
-TV
AV2
CONTROL TV SYSTEMDIGITAL OUT
INOUT
OPT
Collegare l’ingresso coassiale o ottico
2
dell’amplificatore, se questo è dotato di ingressi
COAX
NTSC
PAL
525i
525p
(480i)
(480p)
MENU
SELECT
COMPONENT VIDEO OUT
AUTO
digitali.
Collegare la spina ad una
3
presa standard di corrente
Deutsch Italiano
alternata a parete.
P
Y
B
P
R
12 12
AUDIO OUT
R
2
1
L
2
1
VIDEO OUTS-VIDEO OUT
AC IN
Collegamento di cavi ottici
Prima di collegare un cavo ottico,
togliere il rivestimanto protettivo dal
jack collegato.
Esiste una sola possibilità di
collegamento dei cavi ottici, pertanto
verificare che la spina sia allineata
correttamente con il jack prima di
procedere all’inserimento. Inserire il cavo a fondo sino ad udire uno
scatto, a conferma del corretto fissaggio.
OPT
Collegamento di cavi coassiali
Per il collegamento dei jack di tipo
coassiale, usare un sistema dotato di
connettore a pin (denominato anche
COAX
RCA o fono) su ciascuna estremità.
Verificare che il connettore sia inserito
a fondo.
Collegamento dei cavi audio analogici
Verificare che i connettori siano inseriti a fondo per il corretto
collegamento degli apparecchi. Prese e jack sono contraddistinti da
colori diversi a seconda degli accoppiamenti e delle funzioni per
facilitare i collegamenti.
29
It
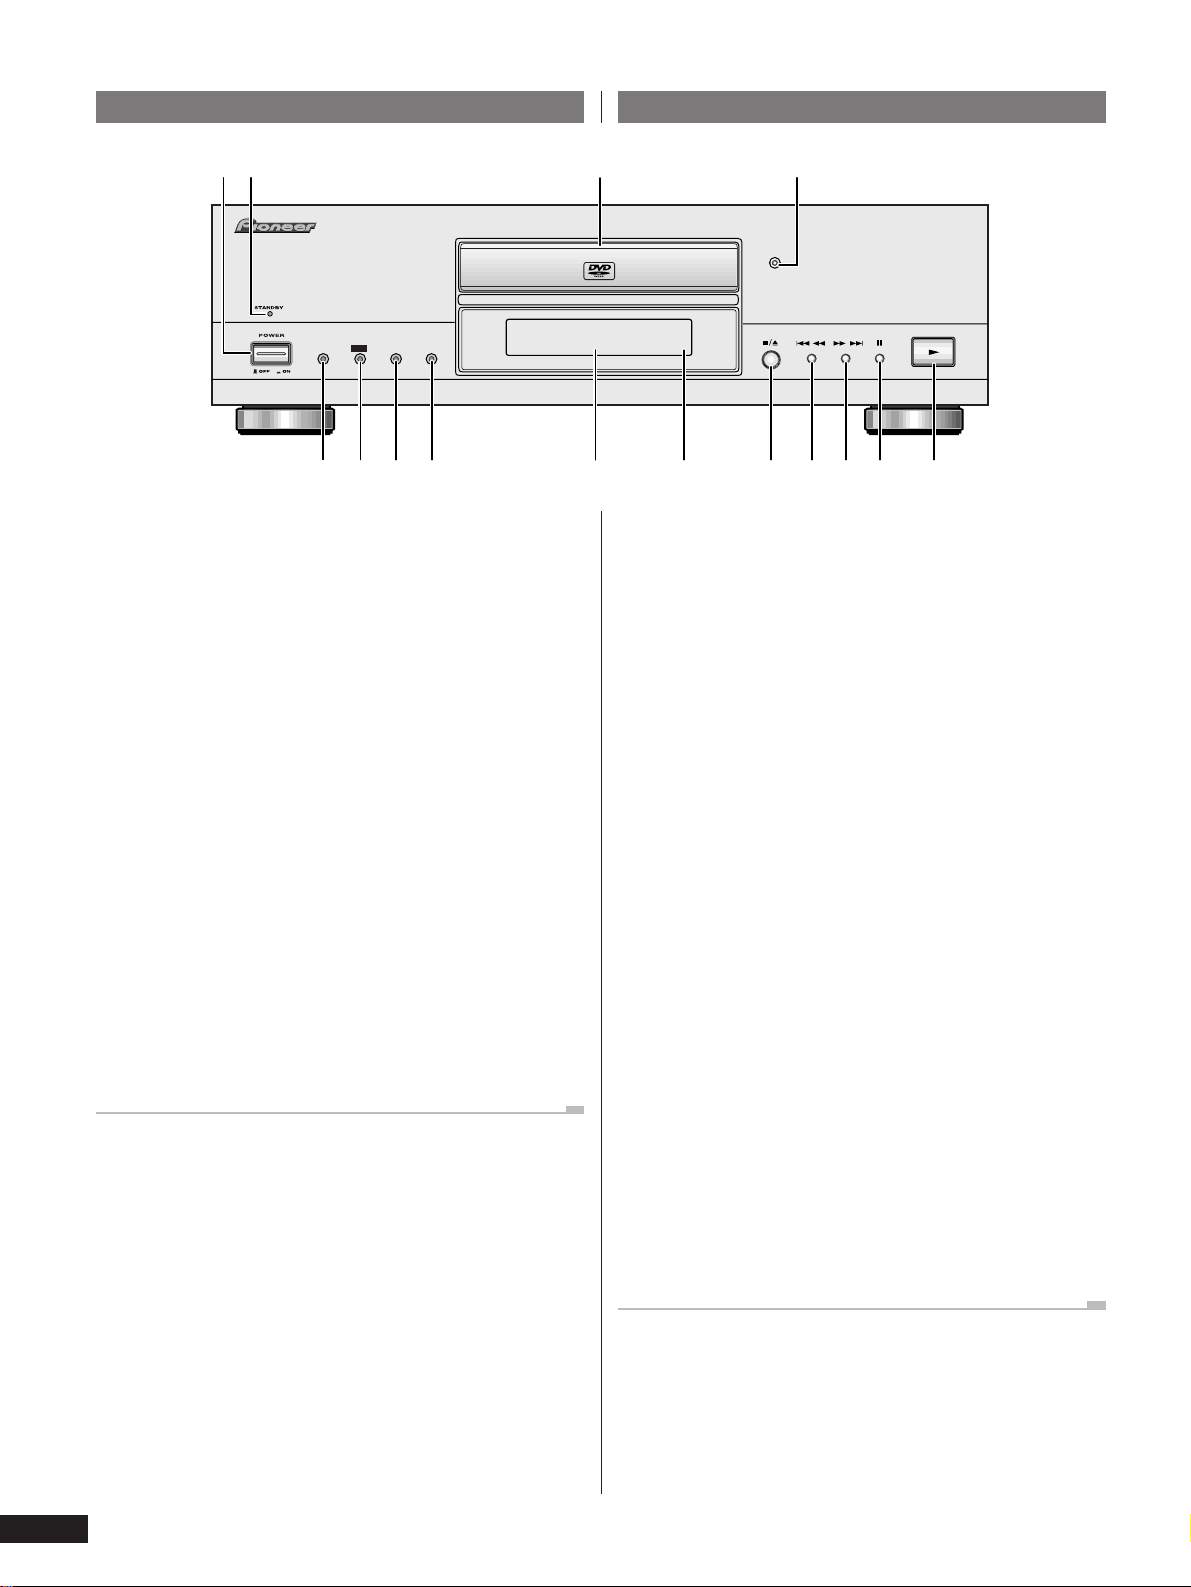
3 Controls and Displays / Commandes et fenêtre d’affichage
Front panel
1
DVD PLAYER
PROGRESSIVE
DNR
DIGITAL
SCAN
PRO
6
5
1 POWER OFF / ON
2 STANDBY indicator – lights when unit is in standby.
3 Disc tray
4 DVD indicator – lights when a DVD disc is loaded.
5 PROGRESSIVE SCAN indicator – lights when unit
is outputting 525 line progessive scan (non-interlaced) video.
6 DNR PRO indicator – lights when unit is set to DNR
PRO (YNR and/or CNR).
7 DIGITAL DATA OFF indicator – lights when unit is
set to Digital Out Off.
8 FL OFF indicator – lights when the fluorescent (FL)
display is switched off.
9 Display window (FL) – see page 32.
10 Remote control sensor
11 7/0 – stop/open/close.
12 4 1 – press to skip reverse title, chapter, or track.
You can also press and hold this button to scan the above.
13 ¡ ¢ – press to skip forward title, chapter, or track.
You can also press and hold this button to scan the above.
14 8 – pause.
15 3 – play.
FL OFF
DATA OFF
87-09~=!
Panneau avant
32
ACOUSTIC DAMPER MECHANISM
10 Capteur de télécommande
11 7/0 – arrêt/ouverture/fermeture.
12 4 1 – appuyez sur cette touche pour sauter des
13 ¡ ¢ – appuyez sur cette touche pour sauter des
14 8 – pause.
15 3 – lecture.
4
PureCinema Progressive
DVD
Î
@
1 POWER OFF / ON
2 Indicateur STANDBY – s’allume lorsque l’appareil se
trouve en mode de veille.
3 Plateau de lecture
4 Indicateur DVD – s’allume lorsqu’un DVD se trouve
dans l’appareil.
5 Indicateur PROGRESSIVE SCAN – s’allume
lorsque l’appareil est réglé pour sortir des signaux vidéo (non
entrelacés) à balayage progressif de 525 lignes.
6 Indicateur DNR PRO – s’allume lorsque l’appareil est
réglé sur DNR PRO (YNR ou CNR).
7 Indicateur DIGITAL DATA OFF – s’allume lorsque
l’appareil est réglé sur Digital Out Off.
8 Indicateur FL OFF – s’allume lorsque la fenêtre
d’affichage fluorescente (FL) est désactivée.
9 Fenêtre d’affichage (FL) – voir page 32.
titres/chapitres/plages en arrière.
Vous pouvez également maintenir cette touche enfoncée pour
les explorer.
titres/chapitres/plages en avant.
Vous pouvez également maintenir cette touche enfoncée pour
les explorer.
30
En / Fr
 Loading...