

Page 1

Operation Manual
CD RECEIVER
DEH-P7000BT
English
Page 2

Contents
Thank you for buying this Pioneer product.
Please read through these operating instructions so you will know how to operate
your model properly. After you have finished reading the instructions, keep this man-
ual in a safe place for future reference.
Before You Start
Information to User 5
For Canadian model 5
About this unit 5
After-sales service for Pioneer products 8
Visit our website 8
In case of trouble 8
Protecting your unit from theft 8
– Removing the front panel 8
– Attaching the front panel 9
Resetting the microprocessor 9
Use and care of the remote control 9
– Installing the battery 9
– Using the remote control 10
Operating this unit
What’s What 11
– Head unit 11
– Remote control 12
– Display indication 13
Basic Operations 14
– Power ON/OFF 14
– Selecting a source 14
– Adjusting the volume 14
Tuner 15
– Basic Operations 15
– Storing and recalling broadcast
frequencies 15
– Introduction to advanced
operations 15
– Storing the strongest broadcast
frequencies 15
– Tuning in strong signals 16
Built-in CD Player 16
– Basic Operations 16
– Selecting a track directly 17
– Displaying text information on disc 17
– Selecting tracks from the track title
list 18
– Selecting files from the file name
list 18
– Introduction to advanced
operations 18
– Selecting a repeat play range 18
– Playing tracks in random order 19
– Scanning folders and tracks 19
– Pausing playback 19
– Using Sound Retriever 19
– Using disc title functions 19
Playing songs on USB portable audio player/
USB memory 21
– Basic Operations 21
– Selecting an audio file directly in the
current folder 21
– Selecting files from the file name
list 21
– Displaying text information of an audio
file 21
– Introduction to advanced
operations 21
Playing songs on iPod 22
– Basic Operations 22
– Browsing for a song 22
– Displaying text information on
iPod 23
– Introduction to advanced
operations 23
– Playing songs in a random order
(shuffle) 24
– Playing all songs in a random order
(shuffle all) 24
– Selecting songs from album list of
currently playing artist 24
– Operating this unit’s iPod function
from your iPod 24
– Changing audiobook speed 25
Bluetooth Audio 25
– Connecting a Bluetooth audio
player 25
– Disconnecting a Bluetooth audio
player 26
– Basic Operations 27
– Introduction to advanced
operations 27
– Playing songs on a Bluetooth audio
player 27
2
En
Page 3
Contents
– Stopping playback 27
– Connecting to a Bluetooth audio player
automatically 27
– Displaying BD (Bluetooth Device)
address 28
Bluetooth Telephone 28
– Setting up for hands-free phoning 28
– Introduction of connection and
registration 29
– Connecting and disconnecting a
cellular phone 29
– Making a phone call 32
– Taking a phone call 33
– Using the phone number list 33
– Using the call history 34
– Using the phone book 34
– Using preset numbers 36
– Introduction to advanced
operations 37
– Downloading phone books from your
cellular phone 38
– Transferring entries to the phone
book 39
– Setting the automatic connection 39
– Setting automatic answering 39
– Echo canceling and noise
reduction 39
– Switching the ring tone 40
– Making a call by entering phone
number 40
– Clearing memory 40
– Changing the phone book display
order 40
– Selecting menu language 41
Audio Adjustments
Introduction of audio adjustments 42
Using balance adjustment 42
Using the equalizer 42
– Recalling equalizer curves 42
– Adjusting equalizer curves 43
– Fine-adjusting equalizer curve 43
Adjusting loudness 43
Using subwoofer output 44
– Adjusting subwoofer settings 44
Using the high pass filter 44
Boosting the bass 45
Adjusting source levels 45
Initial Settings
Adjusting initial settings 46
Setting the date 46
Setting the clock 46
Switching the warning tone 46
Switching the auxiliary setting 47
Setting the rear output and subwoofer
controller 47
Switching the sound muting/attenuation 47
Setting the internal power amplifier 48
Switching the ever scroll 48
Activating the BT AUDIO source 48
Entering PIN code for Bluetooth wireless
connection 48
Editing device name 49
Displaying system version for repair 49
Resetting the Bluetooth wireless technology
module 49
Updating the software about Bluetooth
connection 50
Other Functions
Using the AUX source 51
– About AUX1 and AUX2 51
– AUX1 source: 51
– AUX2 source: 51
– Selecting AUX as the source 51
– Setting the AUX title 51
Using the external unit 51
– Selecting the external unit as the
source 51
– Basic operation 52
– Advanced operations 52
Turning the clock display on or off 52
Switching the display indication and button
illumination 52
Using the PGM button 52
En
3
Page 4

Contents
Available accessories
Playing songs on iPod 54
– Basic operation 54
– Displaying text information on
iPod 54
– Browsing for a song 54
– Introduction to advanced
operations 54
– Playing songs in a random order
(shuffle) 55
XM tuner 55
– Listening to XM Satellite Radio 55
– Selecting an XM channel directly 55
– Switching the XM display 55
– Storing and recalling broadcast
stations 55
– Switching the XM channel select
mode 56
– Displaying the Radio ID 56
SIRIUS Satellite Radio tuner 56
– Listening to SIRIUS Satellite Radio 56
– Selecting a SIRIUS channel
directly 57
– Switching the SIRIUS display 57
– Storing and recalling broadcast
stations 57
– Introduction of advanced
operations 57
– Selecting the SIRIUS channel select
mode 58
– Using the Game Alert function 58
– Displaying the Radio ID 59
– Using Instant Replay function 59
HD Radio tuner 60
– Basic Operations 60
– Storing and recalling broadcast
frequencies 60
– Switching the display 60
– Introduction to advanced
operations 61
– Switching the seek mode 61
– Switching the reception mode 61
Multi-CD Player 61
– Basic Operations 61
– Using CD TEXT functions 62
– Selecting a track directly 62
– Introduction to advanced
operations 62
– Using compression and bass
emphasis 63
– Using ITS playlists 63
– Using disc title functions 64
DVD Player 65
– Basic Operations 65
– Selecting a disc 65
– Selecting a folder 65
– Introduction to advanced
operations 65
TV tuner 67
– Basic Operations 67
– Storing and recalling broadcast
stations 67
– Storing the strongest broadcast
stations sequentially 68
Additional Information
Troubleshooting 69
Error messages 69
Handling guideline of discs and player 71
Dual Discs 71
Compressed audio compatibility 71
Compressed audio files on the disc 72
– Example of a hierarchy 72
USB audio player/USB memory 72
– USB audio player/USB memory
compatibility 72
– Handling guideline and supplemental
information 73
iPod 74
– About handling the iPod 74
– About iPod settings 74
Bluetooth profiles 74
Specifications 75
4
En
Page 5
Before You Start
Section
01
Information to User
FCC ID: AJDK016
MODEL NO.: DEH-P7000BT
IC: 775E-K016
This device complies with Part 15 of FCC Rules
and RSS-Gen of IC Rules. Operation is subject
to the following two conditions: (1) this device
may not cause interference, and (2) this device
must accept any interference, including interference that may cause undesired operation of
this device.
MADE IN THAILAND
This equipment has been tested and found to
comply with the limits for a class B digital device, pursuant to Part 15 of the FCC Rules.
These limits are designed to provide reasonable protection against harmful interference in
a residential installation.
This equipment generates, uses and can radiate radio frequency energy and, if not installed
and used in accordance with the instructions,
may cause harmful interference to radio communications. However, there is no guarantee
that interference will not occur in a particular
installation.
If this equipment dose cause harmful interference to radio or television reception, which
can be determined by turning the equipment
off and on, the user is encouraged to try to correct the interference by one or more of the following measures:
! Reorient or relocate the receiving antenna.
! Increase the separation between the equip-
ment and receiver.
! Connect the equipment into an outlet on a
circuit different from that to which the receiver is connected.
! Consult the dealer or an experienced radio/
TV technician for help.
Alteration or modifications carried out without
appropriate authorization may invalidate the
user’s right to operate the equipment.
! This transmitter must not be co-located or op-
erated in conjunction with any other antenna
or transmitter.
! This equipment complies with FCC/IC radia-
tion exposure limits set forth for uncontrolled
equipment and meets the FCC/IC radio frequency (RF) Exposure Guidelines in Supplement C to OET65 and RSS-102 of the IC radio
frequency (RF) exposure rules. This equipment
has very low levels of RF energy that it is
deemed to comply without testing of specific
absorption ratio (SAR).
For Canadian model
Operation is subject to the following two conditions:
(1) This device may not cause harmful interference, and (2) this device must accept any interference received, including interference that
may cause undesired operation.
This Class B digital apparatus complies with
Canadian ICES-003.
About this unit
The tuner frequencies on this unit are allocated for use in North America. Use in other
areas may result in poor reception.
Before You Start
En
5
Page 6
Section
01
Before You Start
WARNING
Handling the cord on this product or cords associated with accessories sold with the product
may expose you to chemicals listed on proposition 65 known to the State of California and other
governmental entities to cause cancer and birth
defects or other reproductive harm. Wash hands
after handling.
CAUTION:
USE OF CONTROL OR ADJUSTMENT OR
PERFORMANCE OF PROCEDURES
OTHER THAN THOSE SPECIFIED HEREIN
MAY RESULT IN HAZARDOUS RADIATION
EXPOSURE.
CAUTION:
THE USE OF OPTICAL INSTRUMENTS
WITH THIS PRODUCT WILL INCREASE
EYE HAZARD.
CAUTION
! Do not allow this unit to come into contact
with liquids. Electrical shock could result.
Also, damage to this unit, smoke, and overheating could result from contact with liquids.
! Keep this manual handy as a reference for op-
erating procedures and precautions.
! Always keep the volume low enough so that
you can hear sounds from outside the vehicle.
! Protect this unit from moisture.
! If the battery is disconnected or discharged,
the preset memory will be erased and must be
reprogrammed.
Important (Serial number)
The serial number is located on the bottom of
this unit. For your own security and convenience,
be sure to record this number on the enclosed
warranty card.
About WMA
The Windows Media™ logo printed on the box
indicates that this unit can play back WMA
data.
Windows Media and the Windows logo are trademarks or registered trademarks of Microsoft
Corporation in the United States and/or other
countries.
! This unit may not operate correctly depend-
ing on the application used to encode
WMA files.
About MP3
Supply of this product only conveys a license
for private, non-commercial use and does not
convey a license nor imply any right to use
this product in any commercial (i.e. revenuegenerating) real time broadcasting (terrestrial,
satellite, cable and/or any other media), broadcasting/streaming via internet, intranets and/
or other networks or in other electronic content distribution systems, such as pay-audio or
audio-on-demand applications. An independent license for such use is required. For details, please visit
http://www.mp3licensing.com.
About AAC
This unit plays back AAC files encoded by
®
iTunes
.
iTunes is a trademark of Apple Inc., registered
in the U.S. and other countries.
Portable audio player compatibility
! Inquire at the manufacturer about your
USB portable audio player/USB memory.
This unit corresponds to the following.
— USB MSC (Mass Storage Class) compliant
portable audio player and memory
— WMA, MP3, AAC and WAV file playback
6
En
Page 7

Before You Start
Section
01
For details about the compatibility, refer to
USB audio player/USB memory compatibility
on page 72.
®
iPod
compatibility
This unit can control and listen to songs on an
iPod.
! This unit supports only the following iPods.
Supported iPod software versions are
shown below. Older versions of iPod software may not be supported.
— iPod nano first generation (software ver-
sion 1.3.1)
— iPod nano second generation (software
version 1.2.1)
— iPod nano third generation (software
version 1.0.2)
— iPod fifth generation (software version
1.2.1)
— iPod classic (software version 1.0.2)
— iPod touch (software version 1.1.1)
! Operations may vary depending on the soft-
ware version of iPod.
! When using an iPod, iPod Dock Connector
to USB Cable is required.
! Pioneer CD-IU50 interface cable is also
available. For details, consult your dealer.
! This unit can control previous generations
iPod models with a Pioneer iPod adapter
(e.g. CD-IB100N).
For details concerning operation with the
iPod adapter, refer to Playing songs on iPod
on page 54.
! iPod is a trademark of Apple Inc., regis-
tered in the U.S. and other countries.
About Bluetooth
held PCs and other devices. Bluetooth operates in 2.4 GHz frequency range and transmits
voice and data at speeds up to 1 megabit per
second. Bluetooth was launched by a special
interest group (SIG) that comprises of Ericsson
Inc., Intel Corp., Nokia Corp., Toshiba and IBM
in 1998, and it is currently developed by nearly
2 000 companies worldwide.
! The Bluetooth word mark and logos are
owned by the Bluetooth SIG, Inc. and any
use of such marks by Pioneer Corporation
is under license. Other trademarks and
trade names are those of their respective
owners.
About the SAT RADIO READY mark
The SAT RADIO READY mark indicates that
the Satellite Radio Tuner for Pioneer (i.e., XM
tuner and Sirius satellite tuner which are sold
separately) can be controlled by this unit.
Please inquire to your dealer or nearest
authorized Pioneer service station regarding
the satellite radio tuner that can be connected
to this unit. For satellite radio tuner operation,
please refer to the satellite radio tuner owner ’s
manual.
! The system will use direct satellite-to-recei-
ver broadcasting technology to provide listeners in their cars and at home with
crystal-clear sound seamlessly from coast
to coast. Satellite radio will create and
package over 100 channels of digital-quality
music, news, sports, talk and children’s
programming.
! “SAT Radio”, the SAT Radio logo and all re-
lated marks are trademarks of Sirius Satellite Radio inc., and XM Satellite Radio Inc.
Before You Start
Bluetooth is a short-range wireless radio connectivity technology that is developed as a
cable replacement for mobile phones, hand-
About HD Radio
! The HD Radio Ready logo is a proprietary
trademark of iBiquity Digital Corp.
En
7
Page 8
Section
01
Before You Start
CAUTION
! Pioneer accepts no responsibility for data lost
on the USB portable audio player/USB memory even if that data is lost while using this
unit.
! Pioneer accepts no responsibility for data lost
on the iPod even if that data is lost while
using this unit.
After-sales service for
Pioneer products
Please contact the dealer or distributor from
where you purchased this unit for after-sales
service (including warranty conditions) or any
other information. In case the necessary information is not available, please contact the
companies listed below:
Please do not ship your unit to the companies
at the addresses listed below for repair without
advance contact.
U.S.A.
Pioneer Electronics (USA) Inc.
CUSTOMER SUPPORT DIVISION
P.O. Box 1760
Long Beach, CA 90801-1760
800-421-1404
CANADA
Pioneer Electronics of Canada, Inc.
CUSTOMER SATISFACTION DEPARTMENT
300 Allstate Parkway
Markham, Ontario L3R 0P2
1-877-283-5901
905-479-4411
For warranty information please see the Limited Warranty sheet included with this unit.
Visit our website
Visit us at the following site:
http://www.pioneerelectronics.com
1 Register your product. We will keep the details
of your purchase on file to help you refer to
this information in the event of an insurance
claim such as loss or theft.
2 Receive updates on the latest products and
technologies.
3 Download owner’s manuals, order product
catalogues, research new products, and
much more.
In case of trouble
Should this product fail to operate properly,
contact your dealer or nearest authorized
Pioneer Service Station.
Protecting your unit from
theft
The front panel can be detached to deter theft.
! If the front panel is not detached from the
head unit within five seconds of turning off
the ignition, a warning tone sounds.
! You can turn off the warning tone. See
Switching the warning tone on page 46.
Important
! Handle gently when removing or attaching
the front panel.
! Avoid subjecting the front panel to excessive
shock.
! Keep the front panel out of direct sunlight and
high temperatures.
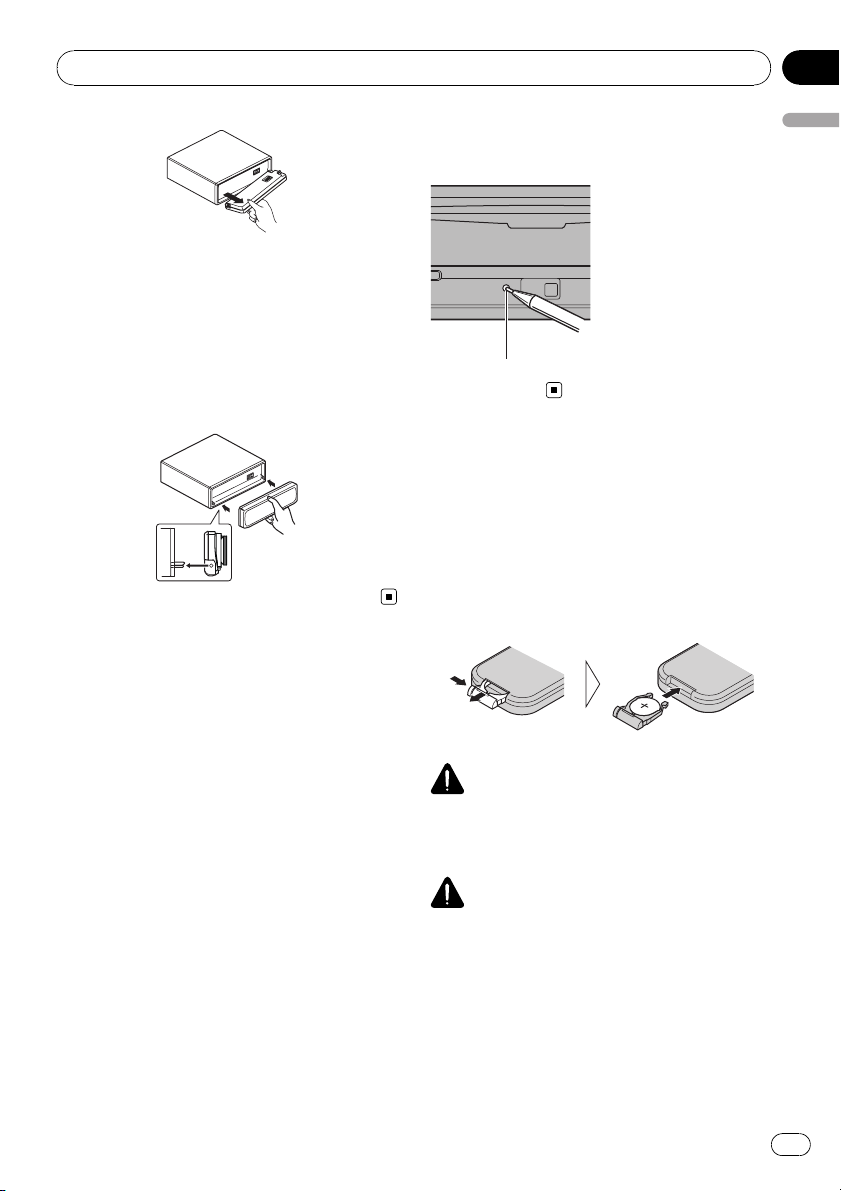
Removing the front panel
1 Press OPEN to open the front panel.
2 Grip the left side of the front panel and
pull it gently outward.
Take care not to grip it too tightly or to drop
the front panel and protect it from contact
with water or other fluids to prevent permanent damage.
8
En
Page 9
Before You Start
Section
01
3 Put the front panel into the provided
protective case for safe keeping.
Attaching the front panel
% Reattach the front panel by holding it
upright to the unit and clipping it securely
into the mounting hooks.
Resetting the microprocessor
The microprocessor must be reset under the
following conditions:
! Prior to using this unit for the first time
after installation
! If the unit fails to operate properly
! When strange or incorrect messages ap-
pear on the display
% Press RESET with a pen tip or other
pointed instrument.
RESET button
Use and care of the remote
control
Installing the battery
Slide the tray on the back of the remote control out and insert the battery with the plus (+)
and minus (–) poles aligned properly.
! When using for the first time, pull out the
film protruding from the tray.
WARNING
Keep the battery out of the reach of children.
Should the battery be swallowed, consult a doctor immediately.
Before You Start
CAUTION
! Use one CR2025 (3 V) lithium battery.
! Remove the battery if the remote control is not
used for a month or longer.
! There is a danger of explosion if the battery is
incorrectly replaced. Replace only with the
same or equivalent type.
! Do not handle the battery with metallic tools.
! Do not store the battery with metallic objects.
En
9
Page 10
Section
01
Before You Start
! If the battery leaks, wipe the remote control
completely clean and install a new battery.
! When disposing of used batteries, comply
with governmental regulations or environmental public institutions’ rules that apply in your
country/area.
! “Perchlorate Material – special handling may
apply.
See
www.dtsc.ca.gov/hazardouswaste/
perchlorate. (Applicable to California, U.S.A.)”
Using the remote control
Point the remote control in the direction of the
front panel to operate.
! The remote control may not function prop-
erly in direct sunlight.
Important
! Do not store the remote control in high tem-
peratures or direct sunlight.
! Do not let the remote control fall onto the
floor, where it may become jammed under the
brake or accelerator pedal.
10
En
Page 11

1
2
3
4
5
67acb
8
9
d
ecf
g
h
i
j
o
l
l
n
n
k
m
1
Operating this unit
Section
02
Operating this unit
What’s What
Head unit
1 SRC/OFF button
This unit is turned on by selecting a source.
Press to cycle through all the available
sources.
2 DISP/SCROLL button
Press to select different displays.
3 OPEN button
Press to open the front panel.
4 LIST button
Press to display the disc title list, track title
list, folder list, file list, preset channel list or
phone number list depending on the
source.
5 S.Rtrv/SAT MODE button
Press to switch Sound Retriever settings.
When XM tuner or SIRIUS tuner is selected
as the source, press to change the channel
select mode.
When SIRIUS tuner is selected as the
source, press and hold to perform the Instant Replay mode.
6 RDM/
Press to turn random function on or off
while using CD or USB.
While using an iPod, press to shuffle all
tracks.
Press and hold to switch the control mode
while using an iPod.
If using the iPod with an interface adapter
(CD-IB100N), press to switch the shuffle
function.
7 CLOCK/DISP OFF button
Press to change to the clock display.
Press and hold to turn the display indication
and button illumination off or on.
8
Lights up when your Bluetooth audio player
is connected via Bluetooth wireless technology.
! While connecting, this indicator flashes.
9
Lights up when your cellular phone is connected via Bluetooth wireless technology.
! While connecting, this indicator flashes.
! While phone connection is not com-
/iPod button
indicator
indicator
pleted, this indicator flashes.
En
11
Page 12
a bcd
Section
02
Operating this unit
1
2
3 4
5 6 78 9
e f g h i j
e VOLUME buttons
Press to increase or decrease the volume.
f FUNCTION button
Press to select functions.
g Thumb pad
Move to perform manual seek tuning, fast
forward, reverse and track search controls.
Also used for controlling functions.
Functions are the same as
MULTI-CONTROL except for volume control.
h DIRECT button
Press to directly select the desired track.
a MUTE/HOLD button
Press to turn off the sound. To turn on the
sound, press again.
While talking on the phone, press to put the
call on hold.
b MULTI-CONTROL
Move to perform manual seek tuning, fast
forward, reverse and track search controls.
Also used for controlling functions.
Turn to increase or decrease the volume.
c BAND/ESC button
Press to select among three FM bands and
one AM band.
Press to return to the ordinary display when
operating the menu.
d PHONE/
Press to select the phone as the source.
While operating a phone source, press to
end a call, reject an incoming call or cancel
making a call.
Press and hold to perform Bluetooth connection.
/CONNECT button
Remote control
Operation is the same as when using the buttons on the head unit.
i CLEAR button
Press to cancel the input number when 0 to
9 are used.
j 0 to 9 buttons
Press to directly select the desired track,
preset tuning or disc. Buttons 1 to 6 can operate the preset tuning for the tuner or disc
number search for the multi-CD player.
k
(off hook) button
Press to start talking on the phone while operating a phone source.
l
(on hook) button
While operating the phone source, press to
end a call or reject an incoming call.
m
(mute) button
Press to turn off the sound. To turn on the
sound, press again.
n PGM button
Press to operate the preprogrammed functions for each source. (Refer to Using the
PGM button on page 52.)
o AUDIO button
Press to select an audio function.
12
En
Page 13
Operating this unit
Section
02
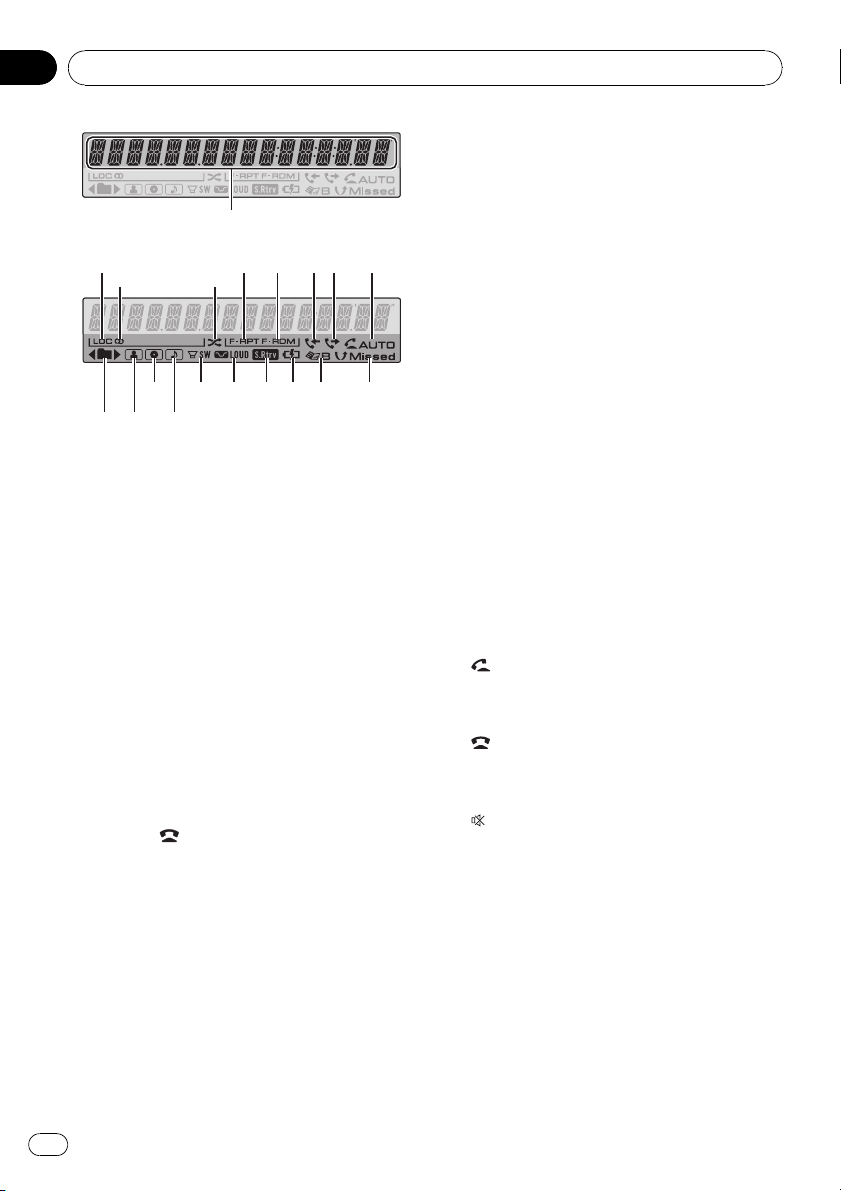
Display indication
1 Main display section
Displays band, frequency, elapsed playback
time and other settings.
! Tuner
Band and frequency are displayed.
! Bulit-in CD player, USB, iPod
Elapsed playback time and literal information are displayed.
2 LOC indicator
Appears when local seek tuning is on.
3 5 (stereo) indicator
Appears when the selected frequency is
being broadcast in stereo.
4
(shuffle) indicator
Appears when shuffle function is on while
iPod source is being selected.
5 F-RPT indicator
Appears when folder repeat is on.
When repeat function is on, only RPT is displayed.
6 F-RDM indicator
Appears when folder random is on.
When random function is on, only RDM is
displayed.
7
(received call) indicator
Appears when received call list is displayed
while telephone source is being selected.
8
(dialled call) indicator
Appears when dialled call list is displayed
while telephone source is being selected.
9
Shows when the automatic answering function is on (for more details, refer to Setting
automatic answering on page 39).
(auto answer) indicator
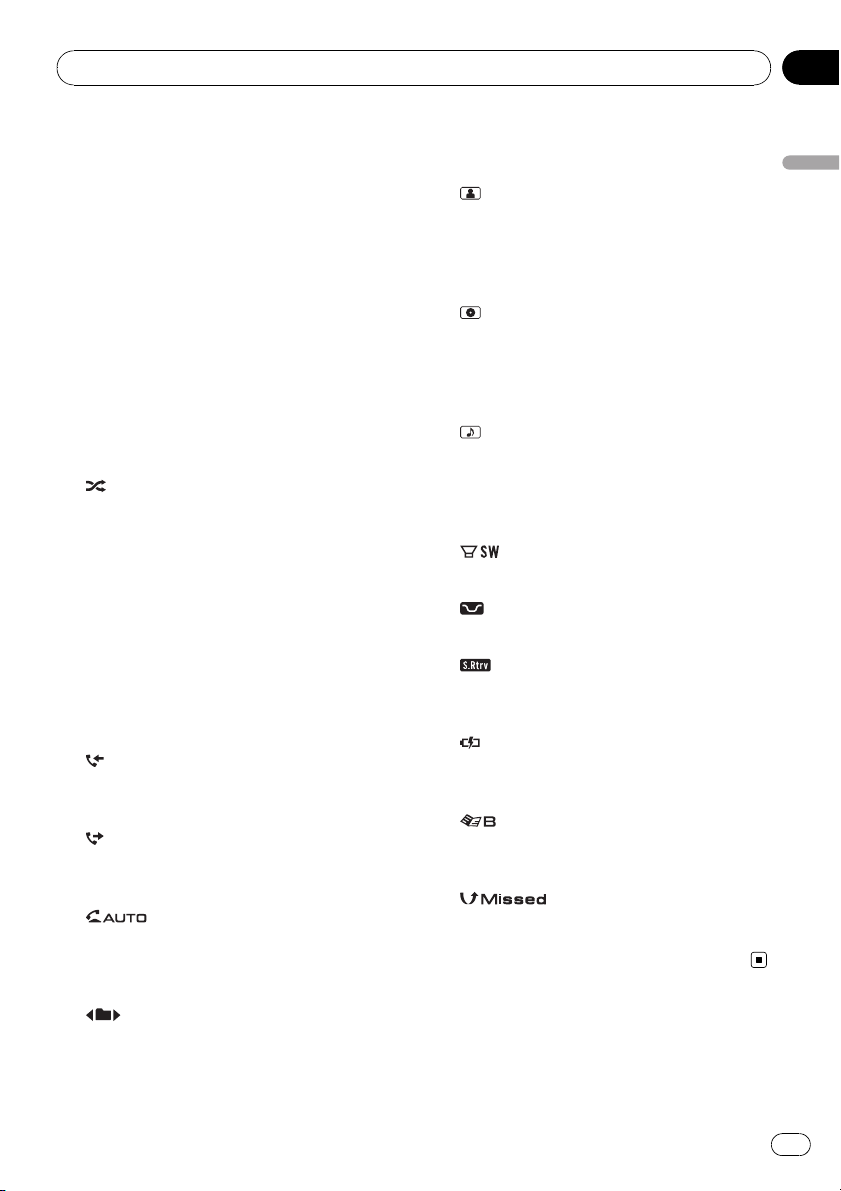
When a lower tier folder or menu exists, d
appears.
b
(artist) indicator
Appears when the disc (track) artist name is
displayed on the main display section.
Appears when artist search refinement on
the iPod browsing function is in use.
c
(disc) indicator
Appears when the disc (album) name is displayed on the main display section.
Appears when album search refinement on
the iPod browsing function is in use.
d
(song) indicator
Appears when the track (song) name is displayed on the main display section.
Appears when song search refinement on
the iPod browsing function is in use.
e
f
g
h
i
j
(subwoofer) indicator
Appears when subwoofer is on.
(loudness) indicator
Appears when loudness is on.
(Sound Retriever) indicator
Appears when Sound Retriever function is
on.
(iPod connection) indicator
Appears when the iPod connection is recognized while USB source is being selected.
(phone book) indicator
Appears when phone book list is displayed
while telephone source is being selected.
(missed call) indicator
Appears when there are missed call log.
Appears when missed call list is displayed
while telephone source is being selected.
Operating this unit
a
(folder) indicator
Appears when operating list function.
When an upper tier folder or menu exists, c
appears.
En
13
Page 14
Section
02
Operating this unit
Basic Operations
Power ON/OFF
Turning the unit on
% Press SRC to turn the unit on.
Turning the unit off
% Press OFF and hold until the unit turns
off.
Selecting a source
You can select a source you want to listen to.
To switch to the built-in CD player, load a disc
in the unit (refer to page 16).
% Press SRC repeatedly to switch between the following sources.
XM tuner—Sirius tuner—HD Radio—
Tuner—Television—DVD player/MultiDVD player—Built-in CD player—MultiCD player—iPod—USB—External unit 1—
External unit 2—AUX1—AUX2—BT Audio
—BT Telephone
Notes
! In the following cases, the sound source will
not change.
— When no unit corresponding to the se-
lected source is connected.
— When there is no disc or magazine in the
player.
— When the iPod is not connected to this
unit.
— When AUX (auxiliary input) is set to off
(refer to page 47).
— When the BT audio source is set to off
(refer to Activating the BT AUDIO source
on page 48).
! If the HD Radio tuner is connected to this
unit, tuner source is skipped.
! AUX1 is set to on by default. Turn off the AUX1
when not in use (refer to Switching the auxili-
ary setting on page 47).
! Charging the portable audio player using
car’s DC power source while connecting it to
AUX input may generate noise. In this case,
stop charging.
! External unit refers to a Pioneer product (such
as ones available in the future) that, although
incompatible as a source, enables control of
basic functions with this unit. Two external
units can be controlled with this unit. When
two external units are connected, the external
unit is automatically allocated to external unit
1 or external unit 2 by this unit.
! When this unit’s blue/white lead is connected
to the vehicle’s auto-antenna relay control
terminal, the vehicle’s antenna extends when
this unit’s source is turned on. To retract the
antenna, turn the source off.
Adjusting the volume
% Use MULTI-CONTROL to adjust the
sound level.
14
En
Page 15

Operating this unit
Section
02
Tuner
Basic Operations
% Select a band
Press BAND/ESC.
# Band can be selected from among FM1, FM2,
FM3 or AM.
% Manual tuning (step by step)
Push MULTI-CONTROL left or right.
% Seek tuning
Push and hold MULTI-CONTROL left or right,
and then release.
# You can cancel seek tuning by pushing
MULTI-CONTROL left or right.
# While pushing and holding MULTI-CONTROL
left or right, you can skip stations. Seek tuning
starts as soon as you release MULTI-CONTROL.
Storing and recalling broadcast
frequencies
You can easily store up to six broadcast frequencies for later recall.
! Six stations for each band can be stored in
memory.
1 Press LIST.
Preset screen is displayed.
2 Use MULTI-CONTROL to store the selected frequency in memory.
Turn to change the preset number. Press and
hold to store.
3 Use MULTI-CONTROL to select the desired station.
Turn to change the station. Press to select.
# You can also change the station by pushing
MULTI-CONTROL up or down.
# To return to the ordinary display, press
BAND/ESC or LIST.
# If you do not operate the list within about 30
seconds, the display automatically returns to the
ordinary display.
Using the remote control
% When you find a frequency that you
want to store in memory, press one of preset tuning buttons 1 to 6 and hold until the
preset number stops flashing.
The number you have pressed will flash in the
preset number indicator and then remain lit.
The selected radio station frequency has been
stored in memory.
The next time you press the same preset tuning button the radio station frequency is recalled from memory.
# You can also recall radio station frequencies
assigned to preset tuning numbers by pushing
MULTI-CONTROL up or down during the frequency display.
Introduction to advanced
operations
1 Press MULTI-CONTROL to display the
main menu.
2 Use MULTI-CONTROL to select
FUNCTION.
Turn to change the menu option. Press to select.
The function menu is displayed.
3 Turn MULTI-CONTROL to select the
function.
BSM (best stations memory)—LOCAL (local
seek tuning)
Notes
! You can also select the function by pressing
FUNCTION on the remote control.
! To return to the ordinary display, press
BAND/ESC.
Storing the strongest broadcast
frequencies
BSM (best stations memory) lets you automatically store the six strongest broadcast frequencies.
Operating this unit
En
15
Page 16
Section
02
Operating this unit
1 Display the function menu.
Refer to Introduction to advanced operations
on the previous page.
2 Use MULTI-CONTROL to select BSM in
the function menu.
3 Press MULTI-CONTROL to turn BSM on.
The six strongest broadcast frequencies are
stored in the order of their signal strength.
# To cancel, press MULTI-CONTROL again.
Tuning in strong signals
Local seek tuning lets you tune in only those
radio stations with sufficiently strong signals
for good reception.
1 Display the function menu.
Refer to Introduction to advanced operations
on the previous page.
2 Use MULTI-CONTROL to select LOCAL in
the function menu.
3 Press MULTI-CONTROL to turn local
seek tuning on.
# To turn local seek tuning off, press
MULTI-CONTROL again.
4 Push MULTI-CONTROL left or right to
set the sensitivity.
FM: LEVEL 1—LEVEL 2—LEVEL 3—LEVEL 4
AM: LEVEL 1—LEVEL 2
The LEVEL 4 setting allows reception of only
the strongest stations, while lower settings let
you receive progressively weaker stations.
Built-in CD Player
Basic Operations
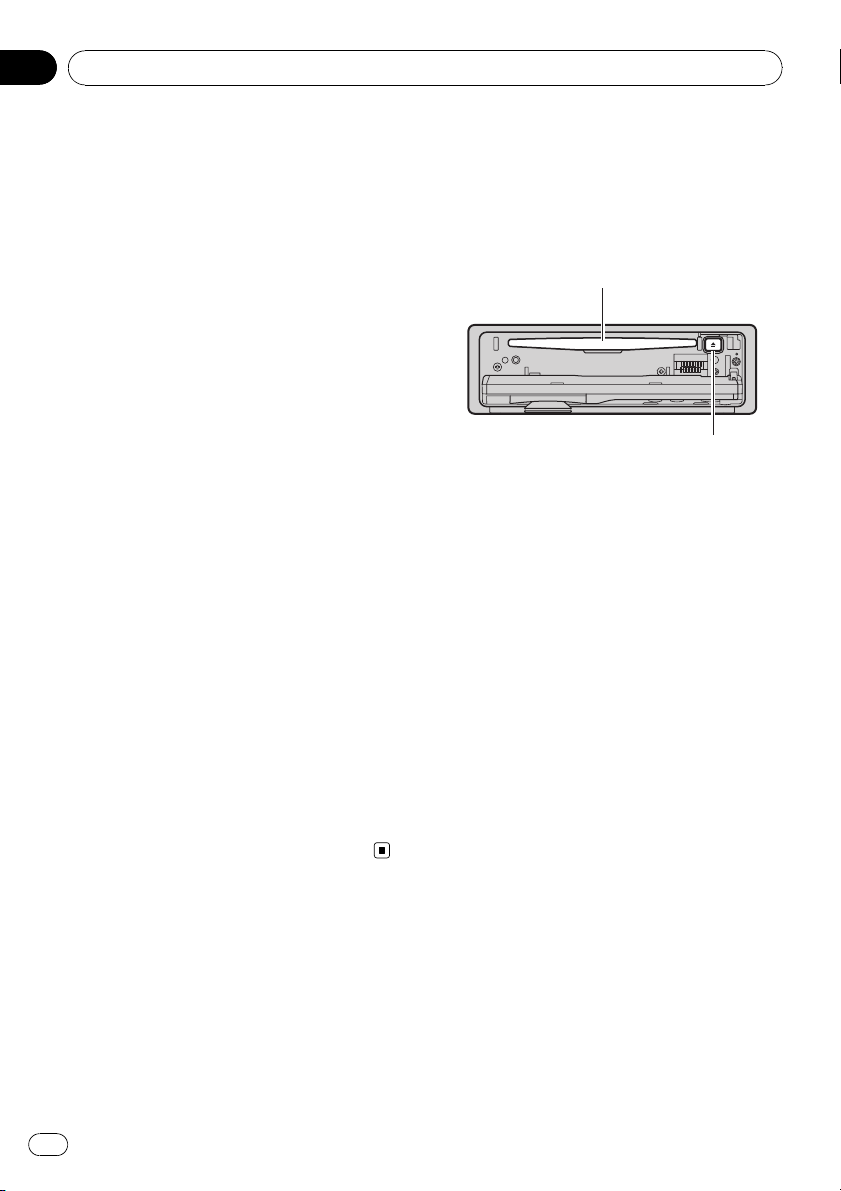
% Open the front panel
Press OPEN .
Disc loading slot appears.
Disc loading slot
h (eject) button
# When loading a disc, face the label side of
a disc up.
# To avoid a malfunction, make sure that no
metal objects come into contact with the terminals when the front panel is open.
% Eject a disc
Press h (eject).
% Select a folder
Push MULTI-CONTROL up or down.
# You cannot select a folder that does not have
a compressed audio file recorded in it.
% Select a track
Push MULTI-CONTROL left or right.
% Fast forward or reverse
Push and hold MULTI-CONTROL left or right.
# When playing compressed audio, there is no
sound on fast forward or reverse.
16
% Return to root folder
Press and hold BAND/ESC.
# If folder 01 (ROOT) contains no files, playback
commences with folder 02.
% Switch between compressed audio and
CD-DA
Press BAND/ESC.
# This operation is available only when playing
CD-EXTRA or MIXED-MODE CDs.
En
Page 17
Operating this unit
Section
02
# If you have switched between compressed
audio and CD-DA, playback starts at the first
track on the disc.
Notes
! The built-in CD player can play back audio CD
and compressed audio recorded on a CDROM. (Refer to page 72 for files that can be
played back.)
! Read the precautions for discs and player on
page 71.
! A disc has already been inserted, press SRC to
select the built-in CD player.
! There is sometimes a delay between starting
up disc playback and the sound being issued.
When being read, FORMAT READ is displayed.
! If an error message is displayed, refer to Error
messages on page 69.
! Playback is carried out in order of file number.
Folders are skipped if they contain no files. (If
folder 01 (ROOT) contains no files, playback
commences with folder 02.)
Selecting a track directly
When using the remote control, you can select
a track directly by entering the desired track
number.
! When audio files are being played back,
you can select track in the current folder.
1 Press DIRECT.
Track number input display appears.
2 Press 0 to 9 to enter the desired track
number.
# You can cancel the input number by pressing
CLEAR.
3 Press DIRECT.
The track for the entered number will play.
# After entering the number input mode, if you
do not perform an operation within about eight
seconds, the mode is automatically canceled.
Displaying text information on
disc
% Press DISP to select the desired text information.
For title entered CD
Play time—disc title
For CD TEXT discs
Play time—disc title—disc artist name—track
title—track artist name
For WMA/MP3/AAC
Play time—folder name—file name—track
title—artist name—album title—comment —
bit rate
For WAV
Play time—folder name—file name—sampling frequency
Notes
! You can scroll to the left of the title by pressing
and holding DISP.
! Audio CD that contains certain information
such as text and/or number is CD TEXT.
! If specific information is not recorded on a
disc, title or name is not displayed.
! Depending on the version of iTunes
write MP3 files onto a disc, comment information may not be correctly displayed.
! Depending on the version of Windows Media
Player used to encode WMA files, album
names and other text information may not be
correctly displayed.
! When playing back VBR (variable bit rate)-re-
corded WMA files, the average bit rate value is
displayed.
! When playing back VBR (variable bit rate)-re-
corded MP3 files, VBR is displayed instead of
bit rate value.
! The sampling frequency shown in the display
may be abbreviated.
! When Ever Scroll is set to ON at the initial set-
ting, text information scrolls continuously in
the display. Refer to Switching the ever scroll
on page 48.
®
used to
Operating this unit
En
17
Page 18

Section
02
Operating this unit
Selecting tracks from the track
title list
Track title list lets you see the list of track titles
on a CD TEXT disc and select one of them to
play back.
1 Press LIST to switch to the track title list
mode.
2 Use MULTI-CONTROL to select the desired track title.
Turn to change the track title. Press to play.
# You can also change the track title by pushing
MULTI-CONTROL up or down.
# You can also play the track by pushing
MULTI-CONTROL right.
# To return to the ordinary display, press
BAND/ESC or LIST.
# If you do not operate the list within about 30
seconds, the display automatically returns to the
ordinary display.
Selecting files from the file
name list
File name list lets you see the list of file names
(or folder names) and select one of them to
playback.
1 Press LIST to switch to the file name list
mode.
Names of files and folders appear in the display.
2 Use MULTI-CONTROL to select the desired file name (or folder name).
Turn to change the name of file or folder.
— when a file is selected, press to play.
— when a folder is selected, press to see a list
of files (or folders) in the seleted folder.
— when a folder is selected, press and hold to
play a song in the selected folder.
# You can also play the file by pushing
MULTI-CONTROL right.
# You can also play a song in the selected folder
by pushing and holding MULTI-CONTROL right.
# To return to the previous list (the folder one
level higher), push MULTI-CONTROL left.
# To return to the ordinary display, press
BAND/ESC or LIST.
# If you do not operate the list within about 30
seconds, the display automatically returns to the
ordinary display.
Introduction to advanced
operations
1 Press MULTI-CONTROL to display the
main menu.
2 Use MULTI-CONTROL to select
FUNCTION.
Turn to change the menu option. Press to select.
The function menu is displayed.
3 Turn MULTI-CONTROL to select the
function.
REPEAT (repeat play)—RANDOM (random
play)—SCAN (scan play)—PAUSE (pause)—
S. RTRV (sound retriever)—TITLE INPUT (disc
title input)
Notes
! You can also select the function by pressing
FUNCTION on the remote control.
! To return to the ordinary display, press
BAND/ESC.
! If you do not operate functions except for
TITLE INPUT within about 30 seconds, the dis-
play automatically returns to the ordinary dis-
play.
! When playing a compressed audio disc or CD
TEXT disc, you cannot switch to disc title input
display.
Selecting a repeat play range
1 Display the function menu.
Refer to Introduction to advanced operations
on this page.
18
En
Page 19
Operating this unit
Section
02
2 Use MULTI-CONTROL to select REPEAT
in the function menu.
3 Press MULTI-CONTROL to select the desired setting.
! DISC – Repeat all tracks
! TRACK – Repeat the current track
! FOLDER – Repeat the current folder
# If you select another folder during repeat play,
the repeat play range changes to disc repeat.
# Performing track search or fast forward/reverse during TRACK (track repeat) changes the
repeat play range to disc/folder.
# When FOLDER (folder repeat) is selected, it is
not possible to play back a subfolder of that
folder.
Playing tracks in random order
Tracks in a selected repeat range are played in
random order.
% Press RDM to turn random play on.
Tracks play in a random order.
# To turn random play off, press RDM again.
Note
You can also turn this function on or off in the
menu that appears by using MULTI-CONTROL.
Scanning folders and tracks
Scan play searches the song within the selected repeat range.
1 Display the function menu.
Refer to Introduction to advanced operations
on the previous page.
4 When you find the desired track press
MULTI-CONTROL to turn scan play off.
# If the display has automatically returned to
the playback display, select SCAN again by using
MULTI-CONTROL.
# After scanning of a disc (folder) is finished,
normal playback of the tracks begins.
Pausing playback
1 Display the function menu.
Refer to Introduction to advanced operations
on the previous page.
2 Use MULTI-CONTROL to select PAUSE in
the function menu.
3 Press MULTI-CONTROL to turn pause
on.
Playback of the current track pauses.
# To turn pause off, press MULTI-CONTROL
again.
Using Sound Retriever
Sound Retriever function automatically enhances compressed audio and restores rich
sound.
% Press S.Rtrv repeatedly to select the desired setting.
OFF (off)—1—2
# 2 is more effective than 1.
Note
You can also perform this operation in the menu
that appears by using MULTI-CONTROL.
Operating this unit
2 Use MULTI-CONTROL to select SCAN in
the function menu.
3 Press MULTI-CONTROL to turn scan play
on.
The first 10 seconds of each track is played.
Using disc title functions
You can input CD titles and display the title.
The next time you insert a CD for which you
have entered a title, the title of that CD is displayed.
En
19
Page 20

Section
02
Operating this unit
Entering disc titles
Use the disc title input feature to store up to
48 CD titles in the unit. Each title can be up to
10 characters long.
1 Display the function menu.
Refer to Introduction to advanced operations
on page 18.
2 Play the CD that you want to enter a
title for.
3 Use MULTI-CONTROL to select
TITLE INPUT in the function menu.
4 Press MULTI-CONTROL to display the
title input mode.
5 Push MULTI-CONTROL up or down to
select a letter of the alphabet.
6 Press DISP to select the desired character type.
Press DISP repeatedly to switch between the
following character types:
Alphabet—Numbers
7 Push MULTI-CONTROL left or right to
move the cursor to the previous or next
character position.
! If you connect a multi-CD player, you can
input disc titles for up to 100 discs.
! When a multi-CD player that does not support
disc title functions is connected, you cannot
enter disc titles in this unit.
8 Move the cursor to the last position by
pushing MULTI-CONTROL right after entering the title.
When you push MULTI-CONTROL right one
more time, the entered title is stored in memory.
9 Press BAND/ESC to return to the playback display.
Notes
! Titles remain in memory, even after the disc is
removed from the unit, and are recalled when
the disc is reinserted.
! After data for 48 discs are stored in the mem-
ory, data for a new disc overwrites the oldest
one.
20
En
Page 21
Operating this unit
Section
02
Playing songs on USB portable
audio player/USB memory
For details about the supported device, refer to
Portable audio player compatibility on page 6.
Basic Operations
% Select a folder
Push MULTI-CONTROL up or down.
% Fast forward or reverse
Push and hold MULTI-CONTROL left or right.
% Select a track
Push MULTI-CONTROL left or right.
% Return to root folder
Press and hold BAND/ESC.
Notes
! Optimum performance of this unit may not be
obtained depending on the connected USB
portable audio player/USB memory.
! If folder 01 (ROOT) contains no files, playback
commences with folder 02.
! When the USB portable audio player having
battery charging function is connected to this
unit and the ignition switch is set to ACC or
ON, the battery is charged.
! You can disconnect the USB portable audio
player/USB memory anytime you want to finish listening to it.
! If USB portable audio player/USB memory is
connected to this unit, the source is changed
to USB automatically. If you do not use an
USB device, disconnect it from this unit. Depending on the connected USB device, turning on the ignition switch while USB device is
connected to this unit may change the source
automatically.
Selecting an audio file directly
in the current folder
The operation is the same as that of the builtin CD player.
Refer to Selecting a track directly on page 17.
Selecting files from the file
name list
The operation is the same as that of the builtin CD player. (Refer to Selecting files from the
file name list on page 18.)
Displaying text information of
an audio file
The operation is the same as that of the builtin CD player.
Refer to Displaying text information on disc on
page 17.
Notes
! If the characters recorded on the audio file are
not compatible with the head unit, those characters are not displayed.
! If specific information is not recorded on an
audio file, title or name is not displayed.
! The text information of some audio files may
not be correctly displayed.
! You can scroll the text information to the left
by pressing and holding DISP.
! When Ever Scroll is set to ON at the initial set-
ting, text information scrolls continuously in
the display. Refer to Switching the ever scroll
on page 48.
Introduction to advanced
operations
1 Press MULTI-CONTROL to display the
main menu.
2 Use MULTI-CONTROL to select
FUNCTION.
Turn to change the menu option. Press to select.
The function menu is displayed.
3 Turn MULTI-CONTROL to select the
function.
REPEAT (repeat play)—RANDOM (random
play)—SCAN (scan play)—PAUSE (pause)—
S. RTRV (sound retriever)
Operating this unit
En
21
Page 22
Section
02
Operating this unit
Function and operation
REPEAT, RANDOM, SCAN, PAUSE and
S. RTRV operations are basically the same as
that of the built-in CD player.
Function name Operation
Refer to Selecting a repeat play
range on page 18.
However, the repeat play ranges
you can select are different from
that of the built-in CD player. The
repeat play ranges of the USB por-
REPEAT
RANDOM
SCAN
PAUSE
S. RTRV
table audio player/USB memory
are:
! TRACK – Repeat just the cur-
rent file
! FOLDER – Repeat the current
folder
! ALL – Repeat all files
Refer to Playing tracks in random
order on page 19.
Refer to Scanning folders and
tracks on page 19.
Refer to Pausing playback on page
19.
Refer to Using Sound Retriever on
page 19.
Notes
! You can also select the function by pressing
FUNCTION on the remote control.
! To return to the ordinary display, press
BAND/ESC.
! If you select another folder during repeat play,
the repeat play range changes to ALL.
! If you perform track search or fast forward/re-
verse during TRACK, the repeat play range
changes to FOLDER.
! When FOLDER is selected, it is not possible to
play back a subfolder of that folder.
! After file or folder scanning is finished, nor-
mal playback of the files begins again.
Playing songs on iPod
For details about the supported iPod, refer to
®
iPod
compatibility on page 7.
Basic Operations
% Fast forward or reverse
Push and hold MULTI-CONTROL left or right.
% Select a track (chapter)
Push MULTI-CONTROL left or right.
Notes
! When using an iPod, iPod Dock Connector to
USB Cable is required.
! Read the precautions for iPod on page 74.
! While iPod is connected to this unit, PIONEER
(or
(check mark)) is displayed on the iPod.
! If an error message is displayed, refer to Error
messages on page 69.
! When the ignition switch is set to ACC or ON,
the iPod’s battery is charged while the iPod is
connected to this unit.
! While the iPod is connected to this unit, the
iPod cannot be turned on or off.
! Before connecting the dock connector of this
unit to the iPod, disconnect the headphones
from the iPod.
! The iPod is turned off about two minutes after
the ignition switch is set to OFF.
Browsing for a song
Searching songs by category
Operations to control an iPod with this unit is
designed to be as close to the iPod as possible
to make operation and song search easy.
! Depending on the number of files in the
iPod, there may be a delay when displaying
a list.
! If the characters recorded on the iPod are
not compatible with this unit, those charac-
ters are not displayed.
22
1 Press LIST.
En
Page 23

Operating this unit
Section
02
2 Use MULTI-CONTROL to select a category.
Turn to change the category; press to select.
PLAYLISTS (playlists)—ARTISTS (artists)—
ALBUMS (albums)—SONGS (songs)—
PODCASTS (podcasts)—GENRES (genres)—
COMPOSERS (composers)—AUDIOBOOKS
(audiobooks)
List for the selected category is displayed.
# You can start playback throughout the selected category by pressing and holding
MULTI-CONTROL. You can also perform this operation by pushing and holding
MULTI-CONTROL right.
# You can also change the category by pushing
MULTI-CONTROL up or down.
# You can also select the category by pushing
MULTI-CONTROL right.
# To return to the previous category, push
MULTI-CONTROL left.
3 Repeat step 2 to find a song you want
to listen to.
# To return to the top tier of categories, push
and hold MULTI-CONTROL left.
# If you do not operate the list within about 30
seconds, the display automatically returns to the
ordinary display.
Searching songs by alphabet
1 Press LIST.
2 Use MULTI-CONTROL to select a category.
Turn to change the category. Press to select.
3 Press LIST to switch to alphabet search
mode.
Displaying text information on
iPod
% Press DISP to select the desired text information.
Play time—song title—artist name—album
title
# If the characters recorded on the iPod are not
compatible with this unit, those characters are
not displayed.
Notes
! You can scroll the text information to the left
by pressing and holding DISP.
! When Ever Scroll is set to ON at the initial set-
ting, text information scrolls continuously in
the display. Refer to Switching the ever scroll
on page 48.
Introduction to advanced
operations
1 Press MULTI-CONTROL to display the
main menu.
2 Use MULTI-CONTROL to select
FUNCTION.
Turn to change the menu option. Press to select.
The function menu is displayed.
3 Turn MULTI-CONTROL to select the
function.
REPEAT (repeat play)—SHUFFLE (shuffle)—
SHUFFLE ALL (shuffle all)—LINK SEARCH
(link search)—CONTROL (control mode)—
PAUSE (pause)—AUDIOBOOKS (audiobook
speed)—S. RTRV (sound retriever)
Operating this unit
4 Turn MULTI-CONTROL to select a desired alphabet.
5 Press MULTI-CONTROL to display the alphabetical list.
Function and operation
REPEAT, PAUSE and S. RTRV operations are
basically the same as that of the built-in CD
player.
En
23
Page 24
Section
02
Operating this unit
Function name Operation
Refer to Selecting a repeat play
range on page 18.
However, the repeat play ranges
you can select are different from
REPEAT
PAUSE
S. RTRV
Notes
! You can also select the function by pressing
FUNCTION on the remote control.
! To return to the ordinary display, press
BAND/ESC.
! If you do not operate functions within about
30 seconds, the display automatically returns
to the ordinary display.
! When CONTROL is on, only CONTROL and
S. RTRV can be operated.
that of the built-in CD player. The
repeat play ranges of the iPod are:
! ONE – Repeat the current
song
! ALL – Repeat all songs in the
selected list
Refer to Pausing playback on page
19.
Refer to Using Sound Retriever on
page 19.
Playing songs in a random
order (shuffle)
1 Display the function menu.
Refer to Introduction to advanced operations
on the previous page.
2 Use MULTI-CONTROL to select SHUFFLE
in the function menu.
3 Press MULTI-CONTROL to select the desired setting.
! SONGS – Play back songs in the selected
list in random order.
! ALBUMS – Play back songs from a ran-
domly selected album in order.
! OFF – Cancel random play.
Playing all songs in a random
order (shuffle all)
% Press to turn shuffle all on.
All songs on the iPod play randomly.
# To turn shuffle all off, set SHUFFLE in the
FUNCTION menu to off.
Note
You can also turn this function on in the menu
that appears by using MULTI-CONTROL.
Selecting songs from album list
of currently playing artist
Album list of the currently selected artist is
displayed. You can select an album or song
from the artist name.
! Depending on the number of files in the
iPod, there may be a delay when displaying
a list.
1 Press and hold LIST to turn link search
on.
Searches albums of the artist and displays the
list.
2 Use MULTI-CONTROL to select an album
or song from the list.
For more details about the selecting operation,
refer to step 2 of Browsing for a song on page
22.
Notes
! If link search is aborted, NOT FOUND is dis-
played.
! You can also turn this function on in the menu
that appears by using MULTI-CONTROL.
Operating this unit’s iPod
function from your iPod
This function cannot be operated with the following iPod models.
— iPod nano first generation (software version
1.3.1)
24
En
Page 25

Operating this unit
Section
02
— iPod fifth generation (software version 1.2.1)
This unit’s iPod function can be operated from
your iPod. Sound can be heard from car’s
speaker, and operation can be conducted from
your iPod.
! While this function is in use, even if the
ignition key is turned off, iPod is not turned
off. To turn off power, operate the iPod.
1 Press iPod and hold to switch the control mode.
# Each pressing and holding iPod switches the
control mode.
# While using this function, play time and titles
are not displayed on this unit.
# Even if this function is performed, track up/
down can be operated from this unit.
# While using this function, browse function
cannot be operated from this unit.
2 Operate the connected iPod to select a
song and play.
Note
You can also turn this function on or off in the
menu that appears by using MULTI-CONTROL.
Changing audiobook speed
While listening to an audiobook on iPod, playback speed can be changed.
1 Display the function menu.
Refer to Introduction to advanced operations
on page 23.
2 Use MULTI-CONTROL to select
AUDIOBOOKS in the function menu.
3 Press MULTI-CONTROL to select the desired setting.
! FASTER – Playback faster than normal
speed
! SLOWER – Playback slower than normal
speed
! NORMAL – Playback in normal speed
Bluetooth Audio
Important
! Depending on the Bluetooth audio player con-
nected to this unit, the operations available
with this unit are limited to the following two
levels:
— Lower level: Only playing back songs on
your audio player is possible.
— Higher level: Playing back, pausing, select-
ing songs, etc., are possible (all the operations illustrated in this manual).
! Since there are a number of Bluetooth audio
players available on the market, operations
with your Bluetooth audio player using this
unit vary extensively. Refer to the instruction
manual that came with your Bluetooth audio
player as well as this manual while operating
your player on this unit.
! Information about songs (e.g. the elapsed
playing time, song title, song index, etc.) cannot be displayed on this unit.
! While you are listening to songs on your Blue-
tooth audio player, refrain from using on your
cellular phone as much as possible. If you use
your cellular phone, the signal from your cellular phone may cause noise on the song playback.
! When you are talking on a cellular phone con-
nected to this unit via Bluetooth wireless technology, song playback from your Bluetooth
audio player connected to this unit is muted.
! Even if you are listening to a song on your
Bluetooth audio player and you switch to another source, song playback continues.
Connecting a Bluetooth audio
player
! Before you can use audio players you may
need to enter the PIN code into this unit. If
your player requires a PIN code to establish
a connection, look for the code on the
player or in its accompanying documentation. Refer to Entering PIN code for Blue-
tooth wireless connection on page 48.
Operating this unit
En
25
Page 26

Section
02
Operating this unit
Using a Bluetooth audio player to
initiate a connection
1 Press MULTI-CONTROL to display the
main menu.
2 Use MULTI-CONTROL to select
CONNECTION.
Turn to change the menu option. Press to select.
# You can also select this menu by pressing and
holding PHONE/
display.
/CONNECT on the ordinary
3 Turn MULTI-CONTROL to select
BT AUDIO DEVICE.
# If there is previous connection log in this unit,
you can select the Bluetooth device from
PAIRED DEVICE.
Refer to Connecting a paired Bluetooth audio
player.
4 Use MULTI-CONTROL to select a group.
Push MULTI-CONTROL up or down to select a
group.
NOKIA (Nokia)—STANDARD (standard)
# Normally select STANDARD. If the device of
Nokia is not paired to this unit, select NOKIA.
# Push MULTI-CONTROL left or right to display
a group name or an ID.
5 Press MULTI-CONTROL to open the connection.
READY will be displayed.
# This unit is now on standby for connection
from Bluetooth audio player.
# Push MULTI-CONTROL left or right to display
the device name, BD address and PIN code of
this unit.
6 Use your Bluetooth audio player to establish connection.
PIN code is set to 0000 as the default. You can
change this code in the initial setting. Refer to
Entering PIN code for Bluetooth wireless connection on page 48.
While connecting, CONNECTING is displayed.
If the connection is established, CONNECTED
is displayed.
Connecting a paired Bluetooth audio
player
1 Press MULTI-CONTROL to display the
main menu.
2 Use MULTI-CONTROL to select
CONNECTION.
Turn to change the menu option. Press to select.
3 Turn MULTI-CONTROL to select
PAIRED DEVICE.
Paired device name will be displayed.
# Push MULTI-CONTROL left or right to switch
the device name, BD address, group name and
group ID.
4 Press MULTI-CONTROL to establish connection.
# While connecting, CONNECTING flashes. If
the connection is established, CONNECTED is
displayed.
# If the connection fails, ERROR is displayed. In
this case, try again from the beginning.
Disconnecting a Bluetooth
audio player
This function can be operated only when the
Bluetooth wireless connection is being established.
1 Press MULTI-CONTROL to display the
main menu.
2 Use MULTI-CONTROL to select
CONNECTION.
Turn to change the menu option. Press to select.
3 Turn MULTI-CONTROL to select
DISCONNECT AUDIO.
4 Press MULTI-CONTROL to disconnect
the Bluetooth wireless connection.
26
En
Page 27

Operating this unit
Section
02
Basic Operations
% Fast forward or reverse
Push and hold MULTI-CONTROL left or right.
% Select a track
Push MULTI-CONTROL left or right.
Note
Even though your audio player does not contain a
Bluetooth module, you can still control it from
this unit via Bluetooth wireless technology. To
control your audio player using this unit, connect
a product featuring Bluetooth wireless technology (available on the market) to your audio player.
Introduction to advanced
operations
1 Press MULTI-CONTROL to display the
main menu.
2 Use MULTI-CONTROL to select
FUNCTION.
Turn to change the menu option. Press to select.
The function menu is displayed.
3 Turn MULTI-CONTROL to select the
function.
PLAY (play)—STOP (stop)—PAUSE (pause)—
AUTO CONNECT (automatic connection set-
ting)—DEVICE INFO (device information)
Function and operation
PAUSE is the same as that of the built-in CD
player.
Function name Operation
PAUSE
Notes
! You can also select the function by pressing
FUNCTION on the remote control.
! To return to the ordinary display, press
BAND/ESC.
Refer to Pausing playback on page
19.
! If a Bluetooth audio player is not connected to
this unit yet, AUTO CONNECT and
DEVICE INFO appear in the function menu
and other functions are not available.
! If a Bluetooth audio player is connected via
A2DP (Advanced Audio Distribution Profile),
only AUTO CONNECT and DEVICE INFO appear in the function menu.
! If you do not operate functions within about
30 seconds, the display automatically returns
to the ordinary display.
Playing songs on a Bluetooth
audio player
1 Display the function menu.
Refer to Introduction to advanced operations
on this page.
2 Use MULTI-CONTROL to select PLAY in
the function menu.
3 Press MULTI-CONTROL to start playback.
Stopping playback
1 Display the function menu.
Refer to Introduction to advanced operations
on this page.
2 Use MULTI-CONTROL to select STOP in
the function menu.
3 Press MULTI-CONTROL to stop the playback.
Connecting to a Bluetooth
audio player automatically
! Initially, this function is set to on.
1 Display the function menu.
Refer to Introduction to advanced operations
on this page.
2 Use MULTI-CONTROL to select
AUTO CONNECT in the function menu.
Operating this unit
En
27
Page 28

Section
02
Operating this unit
3 Press MULTI-CONTROL to turn automatic connection on.
If your Bluetooth audio player is ready for
Bluetooth wireless connection, connection to
this unit is automatically established.
# To turn automatic connection off, press
MULTI-CONTROL again.
Displaying BD (Bluetooth
Device) address
This unit displays the BD address of this unit.
1 Display the function menu.
Refer to Introduction to advanced operations
on the previous page.
2 Use MULTI-CONTROL to select
DEVICE INFO in the function menu.
3 Push MULTI-CONTROL left to switch to
the BD address.
12-digit hexadecimal string is displayed.
# Pushing MULTI-CONTROL right returns to the
device name.
Bluetooth Telephone
Important
! Since this unit is on standby to connect with
your cellular phone via Bluetooth wireless
technology, using this unit without running
the engine can result in battery drainage.
! Advanced operations that require your atten-
tion such as dialing numbers on the monitor,
using phone book, etc., are prohibited while
you are driving. When you need to use these
advanced operations, stop your vehicle in a
safe place.
Setting up for hands-free phoning
Before you can use the hands-free phoning
function you must set up the unit for use with
your cellular phone. This entails establishing a
Bluetooth wireless connection between this
unit and your phone, pairing your phone with
this unit, and adjusting the volume level.
1 Connection
For detailed instructions on connecting your
phone to this unit via Bluetooth wireless technology, refer to Connecting and disconnecting
a cellular phone on the next page.
2 Pairing
Pairing is usually performed automatically
during the connection operation. You only
need to perform this operation manually when
your phone is connected temporarily for any
reason.
We recommend you pair the phone to this unit
to make best use of the technology.
To pair your temporarily connected phone,
refer to Pairing a connected cellular phone on
page 31.
3 Volume adjustment
Adjust the earpiece volume on your cellular
phone for comfort. When adjusted, the volume
level is recorded in this unit as the default setting.
# Caller’s voice volume and ring volume may
vary depending on the type of cellular phone.
28
En
Page 29

Operating this unit
Section
02
# If the difference between the ring volume and
caller’s voice volume is big, overall volume level
may become unstable.
# Before disconnecting the cellular phone from
this unit, make sure to adjust the volume to a
proper level. If the volume is muted (zero level) on
your cellular phone, the volume level of your cellular phone remains muted even after the cellular
phone is disconnected.
Notes
! The equalizer curve for the phone source is
fixed.
! When selecting the phone source, you can
only operate FADER (balance adjustment) in
the audio menu.
! When selecting the phone source, the fader
value is set to FADER :F15 as an initial setting.
Introduction of connection and
registration
1 Press MULTI-CONTROL to display the
main menu.
2 Use MULTI-CONTROL to select
CONNECTION.
The connection menu is displayed.
Turn to change the menu option. Press to select.
# You can also select this menu by pressing and
holding PHONE/
display.
3 Turn MULTI-CONTROL to select the
function.
PAIRED PHONE (paired phone)—
BT HANDS FREE (new phone)—SET PHONE
(phone registration)—DISCONNECT PHONE
(disconnect phone)—DELETE PHONE (delete
phone)
If the phone is not connected and not
paired
The following function can be operated.
! BT HANDS FREE (new phone)
If the phone is not connected but paired
The following functions can be operated.
! PAIRED PHONE (pair phone manually)
/CONNECT on the ordinary
! BT HANDS FREE (new phone)
! DELETE PHONE (delete phone)
If the phone is connected but not paired
The following functions can be operated.
! SET PHONE (phone registration)
! DISCONNECT PHONE (disconnect phone)
! DELETE PHONE (delete phone)
If the phone is connected and paired
The following functions can be operated.
! DISCONNECT PHONE (disconnect phone)
! DELETE PHONE (delete phone)
Notes
! The device name is set to PIONEER FLAP BT
as default. You can change the device name
in the initial setting. Refer to Editing device
name on page 49.
! PIN code is set to 0000 as the default. You
can change this code in the initial setting.
Refer to Entering PIN code for Bluetooth wire-
less connection on page 48.
Connecting and disconnecting
a cellular phone
Using a cellular phone to initiate a
connection
1 Display the connection menu.
Refer to Introduction of connection and registration on this page.
2 Use MULTI-CONTROL to select
BT HANDS FREE.
3 Use MULTI-CONTROL to select a group.
Push MULTI-CONTROL up or down to select a
group.
NOKIA (Nokia)—STANDARD (standard)
# Normally select STANDARD. If the device of
Nokia is not paired to this unit, select NOKIA.
# Push MULTI-CONTROL left or right to display
a group name or an ID.
4 Press MULTI-CONTROL to switch to
PAIRE FROM PHONE.
Push MULTI-CONTROL up or down to switch
PAIRE FROM PHONE and SEARCH DEVICE.
Operating this unit
En
29
Page 30

Section
02
Operating this unit
5 Select PAIRE FROM PHONE and then
press MULTI-CONTROL to ready for pairing.
READY will be displayed.
6 Use your cellular phone to establish
connection.
PIN code is set to 0000 as the default. You can
change this code in the initial setting. Refer to
Entering PIN code for Bluetooth wireless connection on page 48.
While connecting, CONNECTING is displayed.
If the connection is established, COMPLETED
is displayed.
After connected, this unit automatically
changes to PH. BOOK DL (phone book download confirmation) display.
# If the connection fails, ERROR is displayed. In
this case, check the cellular phone and try again.
# If three cellular phones have already been
paired, the pairing assignment selection display
will appear. Select one assignment to pair the
new phone. The newly paired phone overwrites
the previously paired phone. The assignment selection operation is the same as Step 3 to 4 of
Pairing a connected cellular phone on the next
page except for the operation below.
! Switching the BD address and device name
7 Use MULTI-CONTROL to decide to
download the phone book from your cellular phone or not.
Push MULTI-CONTROL left or right to select
NO (No) or YES (Yes).
Press MULTI-CONTROL to decide.
When you select YES, this unit changes to
PH BOOK DOWNLOAD and the download operation automatically begins. After completing, DATA DOWNLOADED is displayed.
According to the circumstances, this unit
changes to PH BOOK TRANSFER. In this case,
refer to step 4 on Transferring entries to the
phone book on page 39.
# When you select NO, the display reverts to
normal.
Using this unit to initiate a connection
1 Display the connection menu.
Refer to Introduction of connection and registration on the previous page.
2 Use MULTI-CONTROL to select
BT HANDS FREE.
3 Use MULTI-CONTROL to select a group.
Push MULTI-CONTROL up or down to select a
group.
NOKIA (Nokia)—STANDARD (standard)
# Normally select STANDARD. If the device of
Nokia is not paired to this unit, select NOKIA.
# Push MULTI-CONTROL left or right to display
a group name or an ID.
4 Press MULTI-CONTROL to switch to
PAIRE FROM PHONE.
Push MULTI-CONTROL up or down to switch
PAIRE FROM PHONE and SEARCH DEVICE.
5 Select SEARCH DEVICE and then press
MULTI-CONTROL to start searching.
While searching, SEARCHING is displayed.
# If this unit fails to find any available cellular
phones, NOT FOUND is displayed.
6 Use MULTI-CONTROL to select a device.
Push MULTI-CONTROL up or down to select a
device name you want to connect.
Press MULTI-CONTROL to select a device
name.
# Push MULTI-CONTROL left or right to switch
the BD address and device name.
7 Use your cellular phone to establish
connection.
PIN code is set to 0000 as the default. You can
change this code in the initial setting. Refer to
Entering PIN code for Bluetooth wireless connection on page 48.
While connecting, CONNECTING is displayed.
If the connection is established, COMPLETED
is displayed.
After connected, this unit automatically
changes to PH. BOOK DL (phone book download confirmation) display.
30
En
Page 31

Operating this unit
Section
02
# If the connection fails, ERROR is displayed. In
this case, check the cellular phone and try again.
# If three cellular phones have already been
paired, the pairing assignment selection display
will appear. Select one assignment to pair the
new phone. The newly paired phone overwrites
the previously paired phone. The assignment selection operation is the same as Step 3 to 4 of
Pairing a connected cellular phone on this page except for the operation below.
! Switching the BD address and device name
8 Use MULTI-CONTROL to decide to
download the phone book from your cellular phone or not.
Push MULTI-CONTROL left or right to select
NO (No) or YES (Yes).
Press MULTI-CONTROL to decide.
When you select YES, this unit changes to
PH BOOK DOWNLOAD and the download operation automatically begins. After completing, DATA DOWNLOADED is displayed.
According to the circumstances, this unit
changes to PH BOOK TRANSFER. In this case,
refer to step 4 on Transferring entries to the
phone book on page 39.
# When you select NO, the display reverts to
normal.
Connecting a paired cellular phone
1 Display the connection menu.
Refer to Introduction of connection and registration on page 29.
2 Turn MULTI-CONTROL to select
PAIRED PHONE.
# Push MULTI-CONTROL up or down to select a
desired phone.
# Push MULTI-CONTROL left or right to switch
the device name, BD address, group name and
group ID.
3 Press MULTI-CONTROL to start connection.
While connecting, CONNECTING is displayed.
If the connection is established, CONNECTED
is displayed.
After connected, this unit automatically
changes to PH. BOOK DL (phone book download confirmation) display.
# If the connection fails, ERROR is displayed. In
this case, check the cellular phone and try again.
4 Use MULTI-CONTROL to decide to
download the phone book from your cellular phone or not.
Push MULTI-CONTROL left or right to select
NO (No) or YES (Yes).
Press MULTI-CONTROL to decide.
When you select YES, this unit changes to
PH BOOK DOWNLOAD and the download operation automatically begins. After completing, DATA DOWNLOADED is displayed.
# When you select NO, the display reverts to
normal.
Disconnecting a cellular phone
1 Display the connection menu.
Refer to Introduction of connection and registration on page 29.
2 Use MULTI-CONTROL to select
DISCONNECT PHONE.
3 Press MULTI-CONTROL to disconnect a
cellular phone from this unit.
After disconnection is completed,
DISCONNECTED is displayed.
Pairing a connected cellular phone
Pairing is usually performed automatically during the connection operation. You only need to
perform this operation manually when your
phone is connected temporarily for any reason.
We recommend you pair the phone to this unit
to make best use of the technology.
1 Display the connection menu.
Refer to Introduction of connection and registration on page 29.
2 Use MULTI-CONTROL to select
SET PHONE.
Operating this unit
En
31
Page 32

Section
02
Operating this unit
3 Push MULTI-CONTROL up or down to
select a pairing assignment.
1 (user phone 1)—2 (user phone 2)—3 (user
phone 3)
# Push MULTI-CONTROL left or right to switch
the BD address and device name.
# If a phone is already assigned to the user
phone number, the new phone will overwrite the
old one.
# As you select each assignment, you can see
whether or not a phone is already paired. If the
assignment is empty, NO DATA is displayed.
4 Press MULTI-CONTROL to pair the currently connected phone.
When pairing is completed, COMPLETED is
displayed.
# If the pairing fails, REGISTER ERROR is dis-
played. In this case, return to step 1 and try
again.
Deleting a registered phone
1 Display the connection menu.
Refer to Introduction of connection and registration on page 29.
2 Use MULTI-CONTROL to select
DELETE PHONE.
3 Push MULTI-CONTROL up or down to
select a pairing assignment.
1 (user phone 1)—2 (user phone 2)—3 (user
phone 3)
# Push MULTI-CONTROL left to display the BD
address of the selected device.
# If the assignment is empty, NO DATA is dis-
played and operation is not possible.
4 Push MULTI-CONTROL right to select
DELETE YES.
DELETE YES is displayed. Deleting phone is
now on standby.
5 Press MULTI-CONTROL to delete the
phone.
After the phone is deleted, DELETED is displayed.
Making a phone call
Dial a number
The most basic way to make a call is to simply
dial the number.
Refer to Making a call by entering phone num-
ber on page 40 for detailed instructions.
Calling a number in the Phone Book
or the Call History
Refer to Calling a number in the phone book on
page 34 and Using the call history on page 34
for detailed instructions.
Preset number
Numbers that you dial frequently can be assigned to presets for quick recall.
Refer to Using preset numbers on page 36 for
how to assign a number to a preset.
Voice recognition
If your cellular phone features voice recognition technology, you can make a call by voice
commands.
! Operation varies depending on the type of
cellular phone. Refer to the instruction
manual that came with your cellular phone
for detailed instructions.
! This function can be operated only when
the connection is established with HFP
(Hands Free Profile).
1 Press BAND/ESC and hold until
VOICE DIAL appears in the display.
When VOICE DIAL ON is displayed, voice recognition function is ready.
# If your cellular phone does not feature voice
recognition function, NO VOICE DIAL appears in
the display and operation is not possible.
2 Pronounce the name of your contact.
32
En
Page 33

Operating this unit
Section
02
Taking a phone call
Answering or rejecting an incoming call
% Answering an incoming call
When a call comes in, press
MULTI-CONTROL.
# You can also take a phone call by pressing
OFF HOOK on the remote control.
% End a call
Press
# You can also end the call by pressing
ON HOOK on the remote control.
% Rejecting an incoming call
When a call comes in, press
# You can also reject an incoming call by pressing ON HOOK on the remote control.
% Put the call on hold
Press MUTE while talking on the phone.
# You can also perform the same operation by
pressing
! Pressing MULTI-CONTROL while talking on
! The estimated call time appears in the display
.
.
on the remote control.
Notes
the phone changes into ECHO CANCEL of
FUNCTION. For details on ECHO CANCEL,
refer to Echo canceling and noise reduction on
page 39.
(this may differ slightly from the actual call
time).
Operating a call waiting
% Answering a call waiting
When a call comes in, press
MULTI-CONTROL.
# You can also answer a call waiting by pressing
OFF HOOK on the remote control.
% End all calls
Press
# You can also end all calls by pressing
ON HOOK on the remote control.
.
% Switch between callers on hold
Press MULTI-CONTROL.
# You can also switch between callers on hold
by pressing OFF HOOK on the remote control.
% Rejecting call waiting
Press
# You can also reject call waiting by pressing
ON HOOK on the remote control.
To end the call, both you and your caller need to
hang up the phone.
.
Note
Using the phone number list
Important
Be sure to park your vehicle and apply the parking brake when operating the list.
% Press LIST to display the list.
Press LIST repeatedly to switch between the
following lists:
RECENT CALLS (call history)—ABC SEARCH
(phone book)—DIAL PRESET (preset number
list)
! For more details about the call history, refer
to Using the call history on the next page.
! For more details about the Phone Book list,
refer to Using the phone book on the next
page.
! For more details about the preset number
list, refer to Using preset numbers on page
36.
Operating this unit
En
33
Page 34

Section
02
Operating this unit
# If no phone numbers are stored in the selected list, NO DATA is displayed.
Using the call history
The 20 most recent calls dialed, received, and
missed are stored in the call history. You can
browse the call history and call numbers from
it.
1 Press LIST to display RECENT CALLS (call
history list).
Refer to Using the phone number list on the
previous page.
2 Turn MULTI-CONTROL to select a phone
number.
Turning MULTI-CONTROL to change the
phone numbers stored in the list.
# If the phone number is already in the phone
book, the corresponding name is displayed.
In this case, press and hold DISP to scroll the
name.
# You can also change the phone number by
pushing MULTI-CONTROL up or down.
3 Push MULTI-CONTROL right to display
the detailed list.
Name, phone number and date are displayed
in the detailed list.
# If the number is already in the Phone Book
then the name is also displayed.
# Turning MULTI-CONTROL switches to the pre-
vious or next phone number diplayed in the detailed list.
# If you do not operate anything within about 30
seconds, the list display is canceled automatically.
4 Press MULTI-CONTROL to make a call.
# While in the phone number list, press and
hold MULTI-CONTROL to add or delete + to the
phone number.
5 To end the call, press .
Using the phone book
Before using the phone book, you need to set
up the phone book. To set up the phone book,
refer to Downloading phone books from your
cellular phone on page 38 and refer to Transferring entries to the phone book on page 39.
Calling a number in the phone book
After finding the number you want to call in
the phone book, you can select the entry and
make the call.
1 Press LIST to display ABC SEARCH
(phone book).
Refer to Using the phone number list on the
previous page.
2 Turn MULTI-CONTROL to select the first
letter of the name you are looking for.
# You can also perform the same operation by
pushing MULTI-CONTROL up or down.
3 Press MULTI-CONTROL to display entries.
The display shows the first Phone Book entry
starting with that letter (e.g. “Ben”, “Brian”
and “Burt” when “B” is selected).
4 Turn MULTI-CONTROL to select a phone
book entry you want to call.
# You can also perform the same operation by
pushing MULTI-CONTROL up or down.
# You can scroll literal information by pressing
and holding DISP.
5 Press MULTI-CONTROL to display the
phone number list of the selected entry.
# You can also display the phone number list of
the selected entry by pushing MULTI-CONTROL
right.
# You can scroll literal information by pressing
and holding DISP.
# If several phone numbers are included in an
entry, select one by turning MULTI-CONTROL.
# If you want to go back and select another
entry, push MULTI-CONTROL left.
6 Press MULTI-CONTROL to make a call.
7 To end the call, press
.
34
En
Page 35

Operating this unit
Section
02
Editing phone numbers
You can edit the phone numbers of phone
book entries.
1 Display the phone number list of your
desired phone book entry.
See step 1 to 5 on Calling a number in the
phone book on the previous page for how to do
this.
2 Press and hold MULTI-CONTROL to display the edit screen.
3 Turn MULTI-CONTROL to display
EDIT NUMBER (number edit screen).
Turning MULTI-CONTROL switches input
screens in the following order:
EDIT NUMBER (number edit screen)—
EDIT GENRE (genre edit screen)—CLR MEMO
(clear memory screen)
4 Push MULTI-CONTROL left or right to
move the cursor to the number you want
to change.
5 Push MULTI-CONTROL up or down to
change numbers.
Repeat these steps until you have finished
changing the number.
# Press and hold MULTI-CONTROL to add or
delete + to the phone number.
6 Press MULTI-CONTROL to store the new
number.
After the number is stored, the display reverts
to the detailed list.
Assign genres to phone numbers
If there are a lot of entries in the Phone Book it
can be useful to assign them to specific genres (categories) for easier searching. There are
four preset genres that you can assign entries
to: HOME, MOBILE, OFFICE and OTHERS.
1 Display the phone number list of your
desired phone book entry.
See step 1 to 5 on Calling a number in the
phone book on the previous page for how to do
this.
2 Press and hold MULTI-CONTROL to display the edit screen.
3 Turn MULTI-CONTROL to display
EDIT GENRE (genre edit screen).
Turning MULTI-CONTROL switches input
screens in the following order:
EDIT NUMBER (number edit screen)—
EDIT GENRE (genre edit screen)—CLR MEMO
(clear memory screen)
4 Push MULTI-CONTROL up or down to
select a genre.
Each time MULTI-CONTROL is pushed up or
down, the genres are switched in the following
order:
HOME (home)—MOBILE (mobile)—OFFICE
(office)—OTHERS (other)
5 Press MULTI-CONTROL to assign a
genre to the phone number.
The selected genre is assigned to the phone
number, and the display reverts to the detailed
list.
Clearing a phone book entry
1 Display the phone number list of your
desired phone book entry.
See step 1 to 5 on Calling a number in the
phone book on the previous page for how to do
this.
2 Press and hold MULTI-CONTROL to display the edit screen.
3 Turn MULTI-CONTROL to display
CLR MEMO (clear memory screen).
Turning MULTI-CONTROL switches input
screens in the following order:
EDIT NUMBER (number edit screen)—
EDIT GENRE (genre edit screen)—CLR MEMO
(clear memory screen)
4 Push MULTI-CONTROL right to show a
confirmation display.
CLEAR MEMORY YES is displayed.
# If you do not want to clear the memory that
you have selected, push MULTI-CONTROL left.
The display reverts to normal.
Operating this unit
En
35
Page 36

Section
02
Operating this unit
5 Press MULTI-CONTROL to delete the
Phone Book entry.
The Phone Book entry is deleted and
CLEARED is displayed. The display returns to
Phone Book entry list.
Using preset numbers
Numbers that you dial frequently can be assigned to presets for quick recall.
Assigning preset numbers
1 Press LIST to display DIAL PRESET (preset number list).
Refer to Using the phone number list on page
33.
2 Turn MULTI-CONTROL to switch preset
numbers.
You can select preset number from 1 to 10.
# Press and hold DISP to scroll the phone num-
ber.
# If the phone number is already in the phone
book, the corresponding name is displayed.
In this case, press and hold DISP to scroll the
name.
# You can also change the phone number by
pushing MULTI-CONTROL up or down.
3 Press MULTI-CONTROL to select a preset
number that you want to assign a phon e
number to.
4 Press and hold MULTI-CONTROL to display MEMORY.
Push MULTI-CONTROL up or down to switch
MEMORY (memory) and DELETE (delete).
# If a phone number is already stored in the selected preset number, the new phone number will
overwrite the old one.
# For details on deleting, refer to Deleting preset
numbers on this page.
5 Select MEMORY and then press
MULTI-CONTROL to display the phone
book.
6 Turn MULTI-CONTROL to select the first
letter of the name you are looking for.
# You can also perform the same operation by
pushing MULTI-CONTROL up or down.
7 Press MULTI-CONTROL to display entries.
The display shows the first three Phone Book
entries starting with that letter (e.g. “Ben”,
“Brian” and “Burt” when “B” is selected).
8 Turn MULTI-CONTROL to select a phone
book entry you want to store in the preset
list.
# You can also perform the same operation by
pushing MULTI-CONTROL up or down.
# You can scroll literal information by pressing
and holding DISP.
9 Press MULTI-CONTROL to display the
phone number list of the selected entry.
# You can also display the phone number list of
the selected entry by pushing MULTI-CONTROL
right.
# If several phone numbers are included in an
entry, select one by turning MULTI-CONTROL.
# You can scroll literal information by pressing
and holding DISP.
# If you want to go back and select another
entry, push MULTI-CONTROL left.
10 Press MULTI-CONTROL to store the
phone number in the preset list.
Deleting preset numbers
1 Press LIST to display DIAL PRESET (preset number list).
Refer to Using the phone number list on page
33.
2 Turn MULTI-CONTROL to switch preset
numbers.
# Press and hold DISP to scroll the phone num-
ber.
# If the phone number is already in the phone
book, the corresponding name is displayed.
In this case, press and hold DISP to scroll the
name.
# You can also change the preset phone number by pushing MULTI-CONTROL up or down.
36
En
Page 37

Operating this unit
Section
02
3 Press MULTI-CONTROL to select a preset
phone number that you want to delete.
4 Press and hold MULTI-CONTROL to display MEMORY.
Push MULTI-CONTROL up or down to switch
MEMORY (memory) and DELETE (delete).
# About assigning , Assigning preset numbers
on the previous page.
5 Select DELETE and then press
MULTI-CONTROL to delete the preset
phone number.
Calling a number in the preset list
After finding the number you want to call in
the preset list, you can select the entry and
make a call.
1 Press LIST to display DIAL PRESET (preset number list).
Refer to Using the phone number list on page
33.
2 Turn MULTI-CONTROL to select the
phone number.
# Press and hold DISP to scroll the phone num-
ber.
# If the phone number is already in the phone
book, the corresponding name is displayed.
In this case, press and hold DISP to scroll the
name.
# You can also change the phone number by
pushing MULTI-CONTROL up or down.
3 Press MULTI-CONTROL to make a call.
4 To end the call, press
.
Assigning preset numbers by using
MULTI-CONTROL
1 Push MULTI-CONTROL up or down to
switch preset numbers.
2 Perform from step 4 to 10 of Assigning
preset numbers on the previous page.
Assigning preset numbers by using
remote control
1 Press thumb pad to display
RECENT CALLS (call history list).
2 Push thumb pad up or down to select a
phone number.
3 Press a number from 0 to 9 and hold to
preset in memory.
Preset number 10 is assigned to 0.
Calling number in the preset list by
using MULTI-CONTROL
1 Push MULTI-CONTROL up or down to
switch preset numbers.
2 Press MULTI-CONTROL to make a call.
3 To end the call, press
.
Calling number in the preset list by
using remote control
1 Push thumb pad up or down to select a
preset phone number.
# Pressing a number from 0 to 9 also recalls the
preset phone number.
2 Press thumb pad to make a call.
# Pressing OFF HOOK can also make a call.
3 To end the call, press ON HOOK.
Introduction to advanced
operations
1 Press MULTI-CONTROL to display the
main menu.
2 Use MULTI-CONTROL to select
FUNCTION.
The function menu is displayed.
Turn to change the menu option. Press to select.
Operating this unit
En
37
Page 38

Section
02
Operating this unit
3 Turn MULTI-CONTROL to select the
function.
PH BOOK DOWNLOAD (phone book down-
load)—PH BOOK TRANSFER (phone book
transfer)—AUTO CONNECT (automatic connection setting)—AUTO ANSWER (automatic
answer setting)—ECHO CANCEL (echo cancel)—RING TONE (ring tone select)—
NUMBER DIAL (call by entering number)—
CLR MEMO (clear memory)—
PH. B. NAME VIEW (phone book name view)
—MENU (menu language)—DEVICE INFO
(device information)
If not connected yet
The following functions cannot be operated.
! PH BOOK DOWNLOAD (phone book
download)
! ECHO CANCEL (echo cancel)
! NUMBER DIAL (call by entering number)
! CLR MEMO (clear memory)
! PH. B. NAME VIEW (phone book name
view)
If connected but not paired yet
The following functions cannot be operated.
! PH BOOK DOWNLOAD (phone book
download)
! ECHO CANCEL (echo cancel)
! CLR MEMO (clear memory)
! PH. B. NAME VIEW (phone book name
view)
Notes
! You can also select the function by pressing
FUNCTION on the remote control.
! To return to the playback display, press
BAND/ESC.
! DEVICE INFO is the same as that of the Blue-
tooth audio. (Refer to Displaying BD (Bluetooth
Device) address on page 28.)
! If cellular phone is connected to this unit via
Bluetooth wireless technology with HFP
(Hands-Free Profile), PBAP (Phone Book Access Profile) and SPP (Serial Port Profile),
PH BOOK DOWNLOAD can be operated.
! If you do not operate functions other than
PH BOOK DOWNLOAD,
PH BOOK TRANSFER, and NUMBER DIAL
within about 30 seconds, the display automati-
cally returns to the ordinary display.
Downloading phone books
from your cellular phone
Phone books in your cellular phone can be
downloaded and stored in this unit.
! Depending on the cellular phone, you can-
not use this function.
! 400 entries for each user (max. 3 users) can
be stored in the phone book. Each indepen-
dent entry can hold three phone numbers
and genres.
1 Display the function menu.
Refer to Introduction to advanced operations
on the previous page.
2 Use MULTI-CONTROL to select
PH BOOK DOWNLOAD.
3 Press MULTI-CONTROL to enter in the
phone book download standby mode.
Phone book downloading starts automatically.
When phone book download is completed,
DATA DOWNLOADED is displayed.
# The display indicates how many entries have
been transferred and the total number to be
transferred.
# If the ID and the password are requested, refer
to Entering the ID and the password on this page.
Entering the ID and the password
If the ID and the password are requested, read
the following instructions to enter the ID and
the password.
! Up to 20 characters can be entered for the
ID and up to 16 characters can be entered
for the password.
1 Press DISP to switch between alphabet
and numbers.
Press DISP repeatedly to switch between the
following character types:
Alphabet—Numbers and symbols
2 Push MULTI-CONTROL up or down to
select a letter.
38
En
Page 39

Operating this unit
Section
02
3 Push MULTI-CONTROL left or right to
move the cursor to the previous or next
character position.
4 Press MULTI-CONTROL to determine
the ID and the password.
5 After entering the ID and password,
use your cellular phone to continue the
procedure.
Transferring entries to the
phone book
Phone books in your cellular phone can be
transferred to this unit by using your cellular
phone.
! 400 entries for each user (max. 3 users) can
be stored in the phone book. Each independent entry can hold three phone numbers
and genres.
1 Display the function menu.
Refer to Introduction to advanced operations
on page 37.
2 Use MULTI-CONTROL to select
PH BOOK TRANSFER.
3 Press MULTI-CONTROL to enter the
phone book transfer standby mode.
4 Use the cellular phone to perform
phone book transfer.
Perform phone book transfer using the cellular phone. For detailed instructions, refer to
the instruction manual that came with your
cellular phone.
When phone book transfer is completed,
DATA TRANSFERRED is displayed.
# The display indicates how many entries have
been transferred and the total number to be
transferred.
Setting the automatic connection
It is possible to set the automatic connection
between your cellular phone and this unit. If
this function is set to on, connection between
your cellular phone and this unit will take
place automatically as soon as the two devices
are less than a few meters apart.
! With some cellular phones, it may not be
possible to perform the automatic connection.
1 Display the function menu.
Refer to Introduction to advanced operations
on page 37.
2 Use MULTI-CONTROL to select
AUTO CONNECT.
3 Press MULTI-CONTROL to turn automatic connection on.
# To turn automatic connection off, press
MULTI-CONTROL again.
Note
Automatic connection is performed in the registration number order.
Setting automatic answering
1 Display the function menu.
Refer to Introduction to advanced operations
on page 37.
2 Use MULTI-CONTROL to select
AUTO ANSWER.
3 Press MULTI-CONTROL to turn automatic answering on.
# To turn automatic answering function off,
press MULTI-CONTROL again.
Echo canceling and noise reduction
1 Display the function menu.
Refer to Introduction to advanced operations
on page 37.
2 Use MULTI-CONTROL to select
ECHO CANCEL.
3 Push MULTI-CONTROL left or right to
select the desired setting.
OFF (off)—LOW—MID—HIGH
# This function can be performed even while
talking on the phone. In this case, press
MULTI-CONTROL to switch to ECHO CANCEL.
Operating this unit
En
39
Page 40

Section
02
Operating this unit
Switching the ring tone
1 Display the function menu.
Refer to Introduction to advanced operations
on page 37.
2 Use MULTI-CONTROL to select
RING TONE in the function menu.
3 Push MULTI-CONTROL left or right to
select the desired setting.
OFF (off)—1—2—3
Making a call by entering
phone number
Important
Be sure to park your vehicle and apply the parking brake when performing this operation.
1 Display the function menu.
Refer to Introduction to advanced operations
on page 37.
2 Use MULTI-CONTROL to select
NUMBER DIAL.
# You can also press DIRECT on the remote con-
trol to enter in this menu from the standby display.
3 Push MULTI-CONTROL up or down to
select a number.
# You can also perform the same operation by
pressing 0 to 9 on the remote control.
4 Push MULTI-CONTROL left or right to
move the cursor to the previous or next position.
# Up to 24 digits can be entered.
5 When you finish entering the number,
press MULTI-CONTROL.
Call confirmation appears.
# You can also perform the same operation by
pressing thumb pad on the remote control.
6 Press MULTI-CONTROL again to make a
call.
# You can also perform the same operation by
pressing on the remote control.
7 To end the call, press .
# You can also perform the same operation by
pressing
on the remote control.
Clearing memory
1 Display the function menu.
Refer to Introduction to advanced operations
on page 37.
2 Use MULTI-CONTROL to select
CLR MEMO.
3 Push MULTI-CONTROL up or down to
select an item.
PH BOOK (phone book)—ALL (delete all
memory)—PRESET (preset phone numbers)—
RECENT (call history)
# If you want to clear the entire Phone Book,
call history list and preset phone number, select
ALL.
4 Push MULTI-CONTROL right to determine the item that you want to delete
from this unit.
CLEAR MEMORY YES is displayed. Clearing
memory is now on standby.
# If you do not want to clear the memory that
you have selected, push MULTI-CONTROL left.
The display reverts to normal.
5 Press MULTI-CONTROL to clear the
memory.
CLEARED is displayed and data on the se-
lected item is cleared from this unit’s memory.
Changing the phone book
display order
1 Display the function menu.
Refer to Introduction to advanced operations
on page 37.
2 Use MULTI-CONTROL to select
PH. B. NAME VIEW.
INVERT NAMES YES is displayed.
3 Press MULTI-CONTROL to change the
name view order.
INVERTED is displayed.
40
En
Page 41

Operating this unit
Pressing MULTI-CONTROL repeatedly
changes the name view order between first
and last name.
Selecting menu language
Menu language related to Bluetooth audio/telephone can be changed.
! Some characters may not be displayed
properly.
1 Display the function menu.
Refer to Introduction to advanced operations
on page 37.
2 Use MULTI-CONTROL to select MENU.
3 Press MULTI-CONTROL to select the language.
ENGLISH (English)—ESPANOL (Spanish)
Section
02
Operating this unit
En
41
Page 42

Section
03
Audio Adjustments
Introduction of audio
adjustments
1 Press MULTI-CONTROL to display the
main menu.
2 Use MULTI-CONTROL to select AUDIO.
Turn to change the menu option. Press to select.
The audio menu is displayed.
3 Turn MULTI-CONTROL to select the
audio function.
Turn MULTI-CONTROL to switch between the
audio functions in the following order.
FADER (balance adjustment)—P. E Q (equalizer recall)—EQ (equalizer adjustment)—EQ
(equalizer fine adjustment)—LOUDNESS
(loudness)—SUB W1 (subwoofer on/off setting)—SUB W2 (subwoofer setting)—HPF
(high pass filter)—BASS BOOST (bass boost)
—SLA (source level adjustment)
# You can select the SUB W2 only when sub-
woofer output is turned on in SUB W1.
# When selecting FM as the source, you cannot
switch to SLA.
# You can also select the audio function by
pressing AUDIO on the remote control.
# To return to the display of each source, press
BAND/ESC.
# If you do not operate functions within about
30 seconds, the display automatically returns to
the ordinary display.
Using balance adjustment
You can change the fader/balance setting so
that it can provide the ideal listening environment in all occupied seats.
1 Display the audio menu.
Refer to Introduction of audio adjustments on
this page.
2 Use MULTI-CONTROL to select FADER.
# If the balance setting has been previously adjusted, BALANCE will be displayed.
3 Push MULTI-CONTROL up or down to
adjust front/rear speaker balance.
Each time MULTI-CONTROL is pushed up or
down, the front/rear speaker balance moves
towards the front or rear.
FADER :F15 to FADER :R15 is displayed as the
front/rear speaker balance moves from front to
rear.
# FADER :F/R 0 is the proper setting when only
two speakers are used.
# When the rear output setting is SUB W, you
cannot adjust front/rear speaker balance. Refer to
Setting the rear output and subwoofer controller
on page 47.
4 Push MULTI-CONTROL left or right to
adjust left/right speaker balance.
Each time MULTI-CONTROL is pushed left or
right, the left/right speaker balance moves towards the left or right.
BALANCE :L15 to BALANCE :R15 is displayed
as the lef t/right speaker balance moves from
left to right.
Using the equalizer
The equalizer lets you adjust the equalization
to match the car’s interior acoustic characteristics as desired.
Recalling equalizer curves
There are six stored equalizer curves which
you can easily recall at any time. Here is a list
of the equalizer curves.
Display Equalizer curve
POWERFUL Powerful
NATURAL Natural
VOCAL Voca l
CUSTOM Custom
FLAT Flat
SUPER BASS Super bass
42
En
Page 43

Audio Adjustments
Section
03
! CUSTOM is an adjusted equalizer curve
that you create. If you make adjustments to
an equalizer curve, the equalizer curve setting is memorized in CUSTOM.
! When FLAT is selected, no supplement or
correction is made to the sound. This is
useful to check the effect of the equalizer
curves by switching alternatively between
FLAT and a set equalizer curve.
1 Use MULTI-CONTROL to select P. EQ.
POWERFUL appears in the display.
If the equalizer curve has been previously selected, the curve of that previously selected
will be displayed instead of POWERFUL.
2 Push MULTI-CONTROL left or right to
select an equalizer curve.
Each time MULTI-CONTROL is pushed left or
right, equalizer curves are selected in the following order:
POWERFUL—NATURAL—VOCAL—CUSTOM
—FLAT—SUPER BASS
Adjusting equalizer curves
The factory supplied equalizer curves can be
adjusted to a fine degree (nuance control).
1 Recall the equalizer curve you want to
adjust.
See Recalling equalizer curves on the previous
page.
2 Push MULTI-CONTROL left or right to
select the equalizer band to adjust.
EQ-LOW (low)—EQ-MID (mid)—EQ-HI (high)
3 Push MULTI-CONTROL up or down to
adjust the equalizer curve.
+6 to –6 is displayed as the equalizer curve is
increased or decreased.
Fine-adjusting equalizer curve
You can adjust the center frequency and the Q
factor (curve characteristics) of each currently
selected curve band (EQ-LOW/EQ-MID/
EQ-HI).
Level (dB)
Q=2W
Q=2N
Center frequency
1 Use MULTI-CONTROL to select EQ.
2 Push MULTI-CONTROL left or right to
select a desired frequency.
Low: 40HZ—80HZ—100HZ—160HZ
Mid: 200HZ—500HZ—1KHZ—2KHZ
High: 3KHZ—8KHZ—10KHZ—12KHZ
3 Push MULTI-CONTROL up or down to
select the desired Q factor.
Q factor
2N—1N—1W—2W
Frequency (Hz)
Adjusting loudness
Loudness compensates for deficiencies in the
low- and high-sound ranges at low volume.
1 Display the audio menu.
Refer to Introduction of audio adjustments on
the previous page.
2 Use MULTI-CONTROL to select
LOUDNESS.
3 Press MULTI-CONTROL to turn loudness
on.
Loudness level (e.g., MID) appears in the display.
# To turn loudness off, press MULTI-CONTROL
again.
Audio Adjustments
En
43
Page 44

Section
03
Audio Adjustments
4 Push MULTI-CONTROL left or right to
select a desired level.
Each time MULTI-CONTROL is pushed left or
right, level is selected in the following order:
LOW (low)—MID (mid)—HIGH (high)
Using subwoofer output
This unit is equipped with a subwoofer output
which can be turned on or off.
Also, phase can be selected between normal
and reverse.
1 Display the audio menu.
Refer to Introduction of audio adjustments on
page 42.
2 Use MULTI-CONTROL to select SUB W1.
3 Press MULTI-CONTROL to turn subwoofer output on.
NORMAL appears in the display. Subwoofer
output is now on.
# To turn subwoofer output off, press
MULTI-CONTROL again.
4 Push MULTI-CONTROL left or right to
select the phase of subwoofer output.
Push MULTI-CONTROL left to select reverse
phase and REV appears in the display. Push
MULTI-CONTROL right to select normal phase
and NORMAL appears in the display.
Adjusting subwoofer settings
When the subwoofer output is on, you can adjust the cut-off frequency and the output level
of the subwoofer.
! When the subwoofer output is on, you can
select SUB W2.
1 Display the audio menu.
Refer to Introduction of audio adjustments on
page 42.
2 Use MULTI-CONTROL to select SUB W2.
3 Push MULTI-CONTROL left or right to
select cut-off frequency.
Each time MULTI-CONTROL is pushed left or
right, cut-off frequencies are selected in the
following order:
50—63—80—100—125
4 Push MULTI-CONTROL up or down to
adjust the output level of the subwoofer.
Each time MULTI-CONTROL is pushed up or
down, subwoofer level increases or decreases.
+6 to –24 is displayed as the level is increased
or decreased.
Using the high pass filter
When you do not want low sounds from the
subwoofer output frequency range to play
from the front or rear speakers, turn on the
HPF (high pass filter). Only frequencies higher
than those in the selected range are output
from the front or rear speakers.
1 Display the audio menu.
Refer to Introduction of audio adjustments on
page 42.
2 Use MULTI-CONTROL to select HPF.
3 Press MULTI-CONTROL to turn high
pass filter on.
80HZ appears in the display. High pass filter is
now on.
# If the high pass filter has been previously adjusted, the frequency of that previously selected
will be displayed instead of 80HZ.
# To turn high pass filter off, press
MULTI-CONTROL again.
4 Push MULTI-CONTROL left or right to
select cut-off frequency.
Each time MULTI-CONTROL is pushed left or
right, cut-off frequencies are selected in the
following order:
50HZ—63HZ—80HZ—100HZ—125HZ
44
En
Page 45

Audio Adjustments
Section
03
Boosting the bass
Bass boost function boosts the bass level of
sound.
1 Display the audio menu.
Refer to Introduction of audio adjustments on
page 42.
2 Use MULTI-CONTROL to select
BASS BOOST.
3 Push MULTI-CONTROL up or down to
select a desired level.
0 to +6 is displayed as the level is increased or
decreased.
Adjusting source levels
Source level adjustment (SLA) lets you adjust
the volume level of each source to prevent radical changes in volume when switching between sources.
! Settings are based on the FM volume level,
which remains unchanged.
1 Compare the FM volume level with the
level of the source you wish to adjust.
! External unit 1 and external unit 2 are set to
the same source level adjustment volume
automatically.
Audio Adjustments
2 Display the audio menu.
Refer to Introduction of audio adjustments on
page 42.
3 Use MULTI-CONTROL to select SLA.
4 Push MULTI-CONTROL up or down to
adjust the source volume.
Each time MULTI-CONTROL is pushed up or
down, source volume increases or decreases.
+4 to –4 is displayed as the source volume is
increased or decreased.
Notes
! The AM volume level can also be adjusted
with source level adjustments.
! The built-in CD player and the multi-CD player
are set to the same source level adjustment
volume automatically.
En
45
Page 46

Section
04
Initial Settings
Adjusting initial settings
1 Press SRC and hold until the unit turns
off.
2 Press MULTI-CONTROL and hold until
the initial setting menu appears in the display.
3 Turn MULTI-CONTROL to select one of
the initial settings.
CLNDR (calendar)—CLOCK (clock) —
WARNING (warning tone)—AUX1 (auxiliary
input 1)—AUX2 (auxiliary input 2)—REAR SP
(rear output and subwoofer controller)—TEL
(telephone muting/attenuation)—
BUILT-IN AMP (power amp setting)—
EVERSCROLL (ever scroll)—BT AUDIO (Blue-
tooth audio)—PIN CODE INPUT (pin code
input)—EDIT DEVICE NAME (device name
edit)—BT INFO (Bluetooth version information)—BT RESET :MEMORY (Bluetooth reset)
—SOFTWARE UPDATE (software update)
# You can also select the function by pressing
FUNCTION on the remote control.
# To cancel initial settings, press BAND/ESC.
Setting the date
The calender display adjusted in this mode appears when the telephone source is selected
or sources and the feature demo are off.
1 Display the initial setting menu.
Refer to Adjusting initial settings on this page.
4 Push MULTI-CONTROL up or down to
set the date.
Pushing MULTI-CONTROL up will increase
the selected day, month or year. Pushing
MULTI-CONTROL down will decrease the selected day, month or year.
Setting the clock
Use these instructions to set the clock.
1 Display the initial setting menu.
Refer to Adjusting initial settings on this page.
2 Use MULTI-CONTROL to select CLOCK.
3 Push MULTI-CONTROL left or right to
select the segment of the clock display you
wish to set.
Hour—Minute
As you select segments of the clock display,
the selected segment blinks.
4 Push MULTI-CONTROL up or down to
put a clock right.
Note
You can match the clock to a time signal by
pressing MULTI-CONTROL.
! If 00 to 29, the minutes are rounded down.
(e.g., 10:18 becomes 10:00.)
! If 30 to 59, the minutes are rounded up. (e.g.,
10:36 becomes 11:00.)
2 Use MULTI-CONTROL to select CLNDR.
CLNDR appears in the display.
3 Push MULTI-CONTROL left or right to
select the segment of the calendar display
you wish to set.
Day—Month—Year
As you select segments of the calendar display the segment selected will blink.
46
En
Switching the warning tone
If the front panel is not detached from the
head unit within four seconds of turning off
the ignition, a warning tone sounds. You can
turn off the warning tone.
1 Display the initial setting menu.
Refer to Adjusting initial settings on this page.
2 Use MULTI-CONTROL to select
WARNING.
Page 47

Initial Settings
Section
04
3 Press MULTI-CONTROL to turn warning
tone on.
# To turn warning tone off, press
MULTI-CONTROL again.
Switching the auxiliary setting
Auxiliary devices connected to this unit can be
activated individually. Set each AUX source to
ON when using. For more information about
connecting or using auxiliary devices, refer to
Using the AUX source on page 51.
1 Display the initial setting menu.
Refer to Adjusting initial settings on the previous page.
2 Use MULTI-CONTROL to select AUX1/
AUX2.
3 Press MULTI-CONTROL to turn AUX1/
AUX2 on.
# To turn AUX off, press MULTI-CONTROL
again.
Setting the rear output and
subwoofer controller
This unit’s rear output (rear speaker leads output) can be used for full-range speaker (FULL)
or subwoofer (SUB W) connection. If you
switch the rear output setting to SUB W, you
can connect a rear speaker lead directly to a
subwoofer without using an auxiliary amp.
Initially, the unit is set for rear full-range speaker connection (FULL).
1 Display the initial setting menu.
Refer to Adjusting initial settings on the previous page.
2 Use MULTI-CONTROL to select REAR SP.
3 Press MULTI-CONTROL to switch the
rear output setting.
Pressing MULTI-CONTROL will switch between FULL (full-range speaker) and SUB W
(subwoofer) and that status will be displayed.
# When no subwoofer is connected to the rear
output, select FULL (full-range speaker).
# When a subwoofer is connected to the rear
output, select SUB W (subwoofer).
Notes
! Even if you change this setting, there is no
output unless you turn the subwoofer output
on (refer to Using subwoofer output on page
44).
! If you change this setting, subwoofer output
in the audio menu return to the factory
settings.
Switching the sound
muting/attenuation
Sound from this system is muted or attenuated automatically when the signal from the
equipment with mute function is received.
! The sound is muted or attenuated, MUTE
or ATT ON are displayed and no audio adjustment is possible.
! Sound from this system returns to normal
when the muting or attenuation is canceled.
1 Display the initial setting menu.
Refer to Adjusting initial settings on the previous page.
2 Use MULTI-CONTROL to select TEL.
3 Press MULTI-CONTROL to switch the telephone muting/attenuation.
Pressing MULTI-CONTROL will switch between ATT (attenuation) and MUTE (muting)
and that status will be displayed.
Initial Settings
En
47
Page 48

Section
04
Initial Settings
Setting the internal power
amplifier
This unit features high power amplifier. However, in particular system, external amplifiers
are used instead of internal amplifier. If you
use external amplifiers in order to establish a
multi-amp system, and don’t use internal amplifier, it is recommended to turn off the internal amplifier. Turning off internal amplifier
reduces the noise that comes from the behavior of internal amplifier.
! For this function, verify the topic Adjusting
initial settings before initiating the opera-
tion.
1 Display the initial setting menu.
2 Use MULTI-CONTROL to select
BUILT-IN AMP.
3 Press MULTI-CONTROL to turn the internal power amplifier on.
# To turn the internal power amplifier off, press
MULTI-CONTROL again.
Switching the ever scroll
When Ever Scroll is set to ON, recorded text information scrolls continuously in the display.
Set to OFF if you prefer the information to
scroll just once.
1 Display the initial setting menu.
Refer to Adjusting initial settings on page 46.
2 Use MULTI-CONTROL to select
EVERSCROLL.
3 Press MULTI-CONTROL to turn the ever
scroll on.
# To turn the Ever Scroll off, press
MULTI-CONTROL again.
Activating the BT AUDIO source
You need to activate the BT AUDIO source in
order to use a Bluetooth audio player.
1 Display the initial setting menu.
Refer to Adjusting initial settings on page 46.
2 Use MULTI-CONTROL to select
BT AUDIO.
3 Press MULTI-CONTROL to turn the
BT AUDIO source on.
# To turn the BT AUDIO source off, press
MULTI-CONTROL again.
Entering PIN code for
Bluetooth wireless connection
To connect your cellular phone to this unit via
Bluetooth wireless technology, you need to
enter PIN code on your phone to verify the
connection. The default code is 0000, but you
can change this in this function.
! With some Bluetooth audio players, you
may be required to enter the Bluetooth
audio player PIN code in advance to set
this unit for a connection.
1 Display the initial setting menu.
Refer to Adjusting initial settings on page 46.
2 Use MULTI-CONTROL to select
PIN CODE INPUT.
3 Push MULTI-CONTROL up or down to
select a number.
4 Push MULTI-CONTROL left or right to
move the cursor to the previous or next position.
5 After inputting PIN code (up to 16 digits), press MULTI-CONTROL.
PIN code can be stored in memory.
When you press MULTI-CONTROL again on
the same display, the PIN code you entered is
stored in this unit.
48
En
Page 49

Initial Settings
Section
04
# Pushing MULTI-CONTROL right in the confir-
mation display returns you to the PIN code input
display, and you can change the PIN code.
Editing device name
You can edit the device name.
The device name is set to PIONEER FLAP BT
as default.
1 Display the initial setting menu.
Refer to Adjusting initial settings on page 46.
2 Use MULTI-CONTROL to select
EDIT DEVICE NAME.
3 Press DISP to select the desired character type.
Press DISP repeatedly to switch between the
following character types:
Alphabet—Numbers
4 Push MULTI-CONTROL up or down to
select a letter of the alphabet.
5 Push MULTI-CONTROL left or right to
move the cursor to the previous or next
character position.
6 Move the cursor to the last position by
pushing MULTI-CONTROL right after entering the device name.
Push MULTI-CONTROL right again to store
the device name in memory temporarily.
# Pressing MULTI-CONTROL can also store the
device name in memory temporarily. In this method, cursor doesn’t need to be the last position.
# If an invalid character has been entered, subsequent characters are not displayed.
# If an invalid character has been entered in the
beginning, device name cannot be stored in
memory.
Displaying system version
for repair
Should this unit fails to operate properly and
you consult your dealer for repair, you may be
asked to indicate the system versions of this
unit and of Bluetooth module. You can display
the versions and confirm them.
1 Display the initial setting menu.
Refer to Adjusting initial settings on page 46.
2 Use MULTI-CONTROL to select BT INFO.
The system (microprocessor) version of this
unit is displayed.
3 Push MULTI-CONTROL left to switch to
the version of the Bluetooth module of this
unit.
# Pushing MULTI-CONTROL right returns to the
system version of this unit.
Resetting the Bluetooth
wireless technology module
Bluetooth telephone and Bluetooth Audio
data can be deleted. To protect personal information, we recommend deleting this data before transferring the unit to other persons. The
following settings will be deleted.
— phone book entries on the Bluetooth tele-
phone
— preset numbers on the Bluetooth tele-
phone
— registration assignment of Bluetooth tele-
phone
— call history of Bluetooth telephone
— history of the most recently connected
Bluetooth audio
1 Display the initial setting menu.
Refer to Adjusting initial settings on page 46.
Initial Settings
2 Use MULTI-CONTROL to select
BT RESET :MEMORY.
En
49
Page 50

Section
04
Initial Settings
3 Push MULTI-CONTROL right to show a
confirmation display.
BT RESET :YES is displayed. Clearing memory
is now on standby.
# If you do not want to reset phone memory,
press BAND/ESC.
4 Press MULTI-CONTROL to clear the
memory.
Updating the software about
Bluetooth connection
This function is used to update this unit with
the latest software. For about software and updating, refer to our website.
1 Display the initial setting menu.
Refer to Adjusting initial settings on page 46.
2 Use MULTI-CONTROL to select
SOFTWARE UPDATE.
3 Push MULTI-CONTROL up or down to
select a appropriate group.
4 Press MULTI-CONTROL to display the
data transfer mode.
# To finish the updating, follow the on-screen instructions.
50
En
Page 51

Other Functions
Section
05
Using the AUX source
Up to two auxiliary devices such as VCR or
portable devices (sold separately) can be connected to this unit. When connected, auxiliar y
devices are automatically read as AUX sources
and assigned to AUX1 or AUX2. The relationship between AUX1 and AUX2 sources is explained below.
About AUX1 and AUX2
There are two methods to connect auxiliary devices to this unit.
AUX1 source:
When connecting auxiliar y device using a stereo
mini plug cable
% Insert the stereo mini plug into the
input jack on this unit.
For more details, refer to the installation manual.
This auxiliary device is automatically set to
AUX1.
AUX2 source:
When connecting auxiliar y device using an IPBUS-RCA Interconnector (sold separately)
% Use an IP-BUS-RCA Interconnector such
as the CD-RB20/CD-RB10 (sold separetely)
to connect this unit to auxiliary device featuring RCA output.
For more details, refer to the IP-BUS-RCA Interconnector owner’s manual.
This auxiliary device is automatically set to
AUX2.
# You can only make this type of connection if
the auxiliary device has RCA outputs.
Selecting AUX as the source
% Press SRC to select AUX as the source.
# If the auxiliary setting is not turned on, AUX
cannot be selected. For more details, see Switching the auxiliary setting on page 47.
Setting the AUX title
The title displayed for the AUX1 or AUX2
source can be changed.
1 After you have selected AUX as the
source, use MULTI-CONTROL and select
FUNCTION to display TITLE INPUT.
2 Enter a title in the same way as the
built-in CD player.
For details concerning operation, refer to Entering disc titles on page 20.
Using the external unit
External unit refers to a Pioneer product (such
as ones available in the future) that, although
incompatible as a source, enables control of
basic functions with this unit. Two external
units can be controlled with this unit. When
two external units are connected, the external
unit is automatically allocated to external unit
1 or external unit 2 by this unit.
Basic operations of the external unit are explained below. Allocated functions are different depending on the connected external unit.
For details concerning functions, refer to external unit’s owner ’s manual.
Selecting the external unit as
the source
% Press SRC to select EXTERNAL as the
source.
Other Functions
En
51
Page 52

Section
05
Other Functions
Basic operation
Functions allocated to the following operations are different depending on the connected external unit. For details concerning
functions, refer to the connected external
unit’s owner’s manual.
% Press BAND/ESC.
% Press and hold BAND/ESC.
% Push MULTI-CONTROL left or right.
% Push and hold MULTI-CONTROL left or
right.
% Push MULTI-CONTROL up or down.
Advanced operations
1 Press MULTI-CONTROL to display the
main menu.
2 Use MULTI-CONTROL to select
FUNCTION.
Turn to change the menu option. Press to select.
3 Turn MULTI-CONTROL to select the
function.
FUNC1 (function 1)—FUNC2 (function 2)—
FUNC3 (function 3)—FUNC4 (function 4)—
AUTO/MANUAL (auto/manual)
Note
To return to the ordinary display, press
BAND/ESC.
Turning the clock display
on or off
You can turn the clock display on or off.
! Even when the sources and the feature
demo are off, the clock display appears on
the display.
% Press CLOCK to turn the clock display
on or off.
Each press of CLOCK turns the clock display
on or off.
# The clock display disappears temporarily
when you perform other operations, but the clock
display appears again after 25 seconds.
Switching the display
indication and button
illumination
Display indication and button illumination can
be switched on or off.
% Press and hold DISP OFF.
Pressing and holding DISP OFF switches the
display indication and button illumination on
or off.
# While the display indication is turned off,
CLOCK/DISP OFF button lights up.
# Even if the display indication is turned off, operation can be conducted. If operation is conducted while the display indication is off, display
will light up for a few seconds and then turn off
again.
Using the PGM button
You can operate the preprogrammed functions
for each source by using PGM on the remote
control.
The remote control CD-R510 is sold separately.
% Press PGM to turn pause on when selecting the following sources:
! COMPACT DISC – Built-in CD player
! USB – USB portable audio player/USB
memory
! IPOD – iPod
! MULTI CD – Multi-CD player
! BT AUDIO – Bluetooth audio player
! DVD – DVD player/multi-DVD player
# To turn pause off, press PGM again.
52
En
Page 53

Other Functions
% Press PGM and hold to turn BSM on
when selecting tuner or HD Radio as the
source.
Press PGM and hold until the BSM turns on.
# To cancel the storage process, press PGM
again.
% Press PGM and hold to turn BSSM on
when selecting television as the source.
Press PGM and hold until the BSSM turns on.
# To cancel the storage process, press PGM
again.
% Press PGM to turn FUNC1 (function 1)
on when selecting external unit as the
source.
# To turn FUNC1 (function 1), press PGM again.
# Function allocated FUNC1 (function 1) is dif-
ferent depending on the connected external
unit.
Section
05
Other Functions
En
53
Page 54

Section
06
Available accessories
Playing songs on iPod
Basic operation
You can use this unit to control an interface
adapter for iPod, which is sold separately.
% Fast forward or reverse
Push and hold MULTI-CONTROL left or right.
% Select a track
Push MULTI-CONTROL left or right.
Notes
! Read the precautions for iPod on page 74.
! While iPod is connected to this unit, PIONEER
(or
(check mark)) is displayed on the iPod.
! If an error message is displayed, refer to Error
messages on page 69.
! When the ignition switch is set to ACC or ON,
the iPod’s battery is charged while the iPod is
connected to this unit.
! While the iPod is connected to this unit, the
iPod cannot be turned on or off.
! Before connecting the dock connector of this
unit to the iPod, disconnect the headphones
from the iPod.
! The iPod is turned off about two minutes after
the ignition switch is set to OFF.
Displaying text information on
iPod
The operation is the same as that of the iPod
connected to USB interface of this unit. (Refer
to Displaying text information on iPod on page
23.)
Browsing for a song
The operation is the same as that of the iPod
connected to USB interface of this unit. (Refer
to Browsing for a song on page 22.)
However, the selectable categories are slightly
different. Selectable categories are
PLAYLISTS (playlists)—ARTISTS (artists)—
ALBUMS (albums)—SONGS (songs)—
GENRES (genres)
Introduction to advanced
operations
1 Press MULTI-CONTROL to display the
main menu.
2 Use MULTI-CONTROL to select
FUNCTION.
Turn to change the menu option. Press to select.
The function menu is displayed.
3 Turn MULTI-CONTROL to select the
function.
REPEAT (repeat play)—SHUFFLE (shuffle)—
PAUSE (pause)
Function and operation
REPEAT and PAUSE operations are basically
the same as that of the built-in CD player.
Function name Operation
Refer to Selecting a repeat play
range on page 18.
However, the repeat play ranges
you can select are different from
REPEAT
PAUSE
Notes
! You can also select the function by pressing
FUNCTION on the remote control.
! To return to the ordinary display, press
BAND/ESC.
! If you do not operate functions within about
30 seconds, the display automatically returns
to the ordinary display.
that of the built-in CD player. The
repeat play ranges of the iPod are:
! ONE – Repeat the current
song
! ALL – Repeat all songs in the
selected list
Refer to Pausing playback on page
19.
54
En
Page 55

Available accessories
Section
06
Playing songs in a random
order (shuffle)
% Press repeatedly to select the de-
sired setting.
! SONGS – Play back songs in the selected
list in random order.
! ALBUMS – Play back songs from a ran-
domly selected album in order.
! OFF – Cancel random play.
# To turn shuffle off, press
Note
You can also perform this operation in the menu
that appears by using MULTI-CONTROL.
again.
XM tuner
Listening to XM Satellite Radio
You can use this unit to control an XM satellite
digital tuner (GEX-P920XM), which is sold
separately.
For details concerning operation, refer to the
XM tuner’s operation manuals. This section
provides information on XM operations with
this unit which differs from that described in
the XM tuner ’s operation manual.
! With this unit, you can operate two addi-
tional functions: XM channel direct selection and preset channel list.
% Select an XM band.
Press BAND/ESC.
# Band can be selected from XM1, XM2 or
XM3.
% Select a channel.
Push MULTI-CONTROL left or right.
# If you push and hold MULTI-CONTROL left or
right, you can increase or decrease channel number continuously.
# You can also perform tuning from a desired
channel category. (Refer to Selecting a channel in
the channel category on the next page.)
Selecting an XM channel directly
When using the remote control, you can select
the XM channel directly by entering the desired channel number.
1 Press DIRECT.
Channel number input display appears.
2 Press 0 to 9 to enter the desired channel
number.
# You can cancel the input number by pressing
CLEAR.
3 Press DIRECT.
The XM channel of entered number is
selected.
# After entering the number input mode, if you
do not perform an operation within about eight
seconds, the mode is automatically canceled.
Switching the XM display
% Press DISP to switch the XM display.
# You can scroll the text information to the left
by pressing and holding DISP.
Storing and recalling broadcast
stations
You can easily store up to six broadcast stations for later recall.
! Six stations for each band can be stored in
memory.
1 Press LIST.
Preset screen is displayed.
2 Use MULTI-CONTROL to store the selected station in memory.
Turn to change the preset number. Press and
hold to store.
The XM preset number you have selected will
flash and then remain lit. The selected station
has been stored in memory.
3 Use MULTI-CONTROL to select the desired station.
Turn to change the station; press to select.
Available accessories
En
55
Page 56

Section
06
Available accessories
# You can also change the station by pushing
MULTI-CONTROL up or down.
# If you do not operate the list within about 30
seconds, the display is automatically returned to
the ordinary display.
Using the remote control
% When you find a station that you want
to store in memory, press one of preset
tuning buttons 1 to 6 and hold until the
XM preset number stops flashing.
The number you have pressed will flash in the
XM preset number indicator and then remain
lit. The selected station has been stored in
memory.
The next time you press the same preset tuning button the station is recalled from memory.
# You can also recall stations assigned to preset
tuning numbers by pushing MULTI-CONTROL up
or down.
Switching the XM channel
select mode
You have two methods for selecting a channel:
by number and by category. When selecting
by number, channels in any category can be
selected. Select by category to narrow your
search down to only channels in a particular
category.
% Press SAT MODE repeatedly to select
the desired channel select setting.
CH NUMBER (channel number select setting)
—CATEGORY (channel category select
setting)
Note
You can also perform this operation in the menu
that appears by using MULTI-CONTROL.
Selecting a channel in the channel
category
1 Select the channel select settings to
CATEGORY.
Refer to Switching the XM channel select mode
on this page.
2 Push MULTI-CONTROL up or down to
select the desired channel category.
3 Push MULTI-CONTROL left or right to
select the desired channel in the selected
channel category.
Displaying the Radio ID
Channel number select setting
1 Select the channel select settings to
CH NUMBER.
Refer to Switching the XM channel select mode
on this page.
2 Push MULTI-CONTROL left or right to
select RADIO ID.
# If you select another channel, display of the ID
code is canceled.
# Display of the ID code repeats displaying
RADIO ID and the ID code one after the other.
SIRIUS Satellite Radio tuner
Listening to SIRIUS Satellite Radio
You can use this unit to control a SIRIUS Satellite Radio tuner, which is sold separately.
When the SIRIUS tuner is used together with
this unit, some operations differ slightly from
those described in the SIRIUS operation manual. This manual provides information on
these points. For all other information on
using the SIRIUS tuner, please refer to the SIRIUS operation manual.
56
% Select a SIRIUS band.
Press BAND/ESC.
# Band can be selected from SR1, SR2 or SR3.
En
Page 57

Available accessories
Section
06
% Select a channel.
Push MULTI-CONTROL left or right.
# If you push and hold MULTI-CONTROL left or
right, you can increase or decrease channel number continuously.
# You can also perform tuning from a desired
channel category. (Refer to Selecting a channel in
the channel category on the next page.)
Note
It may take a few seconds before you can hear
anything while this unit acquires and processes
the satellite signal when you change the source
to SIRIUS tuner or select a channel.
Selecting a SIRIUS channel directly
When using the remote control, you can select
the SIRIUS channel directly by entering the desired channel number.
1 Press DIRECT.
Channel number input display appears.
2 Press 0 to 9 to enter the desired channel
number.
# You can cancel the input number by pressing
CLEAR.
3 Press DIRECT.
The SIRIUS channel of entered number is
selected.
# After entering the number input mode, if you
do not perform an operation within about eight
seconds, the mode is automatically canceled.
Switching the SIRIUS display
% Press DISP to switch the SIRIUS display.
Each press of DISP changes the SIRIUS display in the following order:
Play time—Channel number—Channel name
—Category name—Artist name—Song title/
program title—Composer name
# Play time is displayed during the Instant Replay mode. Refer to Using Instant Replay function
on page 59.
# Play time display indicates the time inverted
from the live broadcast. Play time is displayed in
negative number.
Storing and recalling broadcast
stations
You can easily store up to six broadcast stations for later recall.
! Six stations for each band can be stored in
memory.
% When you find a station that you want
to store in memory press one of preset tuning buttons 1 to 6 and hold until the SIRIUS
preset number stops flashing.
The number you have pressed will flash in the
SIRIUS preset number indicator and then remain lit. The selected station has been stored
in memory.
The next time you press the same preset tuning button the station is recalled from memory.
# You can also recall stations assigned to preset
tuning numbers by pushing MULTI-CONTROL up
or down.
Introduction of advanced
operations
1 Press MULTI-CONTROL to display the
main menu.
2 Use MULTI-CONTROL to select
FUNCTION.
The function selection menu is displayed.
Turn to change the menu option. Press to
select.
3 Turn MULTI-CONTROL to select the
function.
MODE (channel select mode setting)—
GAME ALERT (game alert setting)—
TEAM SETTING (team setting)—GAME INFO
(game info)—PAUSE (pause)
Available accessories
En
57
Page 58

Section
06
Available accessories
Notes
! You can also select the function by pressing
FUNCTION on the remote control.
! To return to the ordinary display, press
BAND/ESC.
! If you do not operate functions within about
30 seconds, the display is automatically returned to the ordinary display.
! During the Instant Replay mode, you can se-
lect PAUSE (pause). Refer to Using Instant Re-
play function on the next page.
! PAUSE is the same as that of the built-in CD
player. (Refer to Pausing playback on page 19.)
Selecting the SIRIUS channel
select mode
You have two methods for selecting a channel:
by number and by category. When selecting
by number, channels in any category can be
selected. Select by category to narrow your
search down to only channels in a particular
category.
% Press SAT MODE repeatedly to select
the desired channel select setting.
CH NUMBER (channel number select setting)
—CATEGORY (channel category select
setting)
Note
You can also perform this operation in the menu
that appears by using MULTI-CONTROL.
Selecting a channel in the channel
category
1 Select the channel select settings to
CATEGORY.
Refer to Selecting the SIRIUS channel select
mode on this page.
2 Push MULTI-CONTROL up or down to
select the desired channel category.
3 Push MULTI-CONTROL left or right to
select the desired channel in the selected
channel category.
Using the Game Alert function
Only when SIR-PNR2/SIR-PNR2C is connected
to this unit, you can operate this function.
This system can alert you when games involving your favorite teams are about to start. To
use this function you need in advance to set
up a game alert for the teams.
Selecting teams for Game Alert
1 Display the function selection menu.
Refer to Introduction of advanced operations on
the previous page.
2 Use MULTI-CONTROL to select
TEAM SETTING in the function menu.
3 Push MULTI-CONTROL left or right to
select a desired league.
League names are switched in the display.
4 Push MULTI-CONTROL up or down to
select a desired team.
Teams in the selected category are switched in
the display.
5 Press MULTI-CONTROL to store the selected team in memory.
The game alert function will start on that
team.
# To turn the Game Alert off of the selected
team, press MULTI-CONTROL again.
# When you have already made 12 team selections, FULL is displayed and additional team selection is not possible. In this case, first delete
the team selection and then try again.
6 Repeat these steps for selecting other
teams.
Up to 12 teams can be selected.
58
En
Page 59

Available accessories
Section
06
Switching the Game Alert on or off
Once you made team selections, you need to
turn the Game Alert function on.
! The Game Alert function is on at the default
setting.
1 Display the function selection menu.
Refer to Introduction of advanced operations on
page 57.
2 Use MULTI-CONTROL to select
GAME ALERT in the function menu.
3 Press MULTI-CONTROL to turn the
Game Alert on.
The Game Alert function is now on.
# To turn the Game Alert function off, press
MULTI-CONTROL again.
When the game of the selected team
starts
When a game of the selected team is about to
start (or is currently playing) on a different station, GAME ALERT is displayed. Press and
hold MULTI-CONTROL to switch to that station, and you can listen to that game.
! If you do not operate the function within
about 10 seconds, the display is automatically returned.
Displaying game information
If games of your selected teams are currently
playing, you can display information of the
games and tune to the broadcast channel.
You can display information of the games
while enjoying the sound from currently tuning station. You can also tune to the broadcast
channel when you wish to.
1 Display the function selection menu.
Refer to Introduction of advanced operations on
page 57.
2 Use MULTI-CONTROL to select
GAME INFO in the function menu.
The game information of your selected team is
displayed.
3 Push MULTI-CONTROL up or down to
select a game.
The game is displayed, followed by more detailed game information.
! Game score will be updated automatically.
4 Press MULTI-CONTROL to switch to that
station to listen to the game.
Notes
! If you have not made any team selections,
NOT SET is displayed.
! When games involving your favorite teams are
not currently playing, NO GAME is displayed.
Displaying the Radio ID
If you select CH 000, the ID code is displayed.
% Push MULTI-CONTROL left or right to
select CH 000.
Note
To select CH 000, set the channel select setting to
CH NUMBER. About the channel select setting,
refer to Selecting the SIRIUS channel select mode
on the previous page.
Using Instant Replay function
Following functions can be operated during
the Instant Replay mode.
! To use this function, Pioneer SIRIUS bus in-
terface (e.g. CD-SB10) is required.
! To use this function, SIRIUS plug-and-play
unit with Instant Replay Function is required.
! For details, refer to SIRIUS plug-and-play
unit’s manuals.
% Performing the Instant Replay mode
When SIRIUS tuner is selected as the source,
press and hold SAT MODE.
# In the following conditions, tuner exits from
the Instant Replay mode.
— When BAND/ESC is pressed
— When another source is selected
Available accessories
En
59
Page 60

Section
06
Available accessories
% Select a track
Push MULTI-CONTROL left or right.
% Fast forward or reverse
Push and hold MULTI-CONTROL left or right
for about one second and release.
HD Radio tuner
Basic Operations
You can use this unit to control an HD Radio
tuner (GEX-P10HD), which is sold separately.
For details concerning operation, refer to the
HD Radio’s operation manual.
% Select a band
Press BAND/ESC.
# Band can be selected from among FM1, FM2,
FM3 or AM.
% Manual tuning (step by step)
Push MULTI-CONTROL left or right.
% Seek tuning
Push and hold MULTI-CONTROL left or right,
and then release.
# You can cancel seek tuning by pushing
MULTI-CONTROL left or right.
3 Use MULTI-CONTROL to select the desired station.
Turn to change the station. Press to select.
# You can also change the station by pushing
MULTI-CONTROL up or down.
# To return to the ordinary display, press
BAND/ESC or LIST.
# If you do not operate the list within about 30
seconds, the display automatically returns to the
ordinary display.
Using the remote control
% When you find a frequency that you
want to store in memory, press one of preset tuning buttons 1 to 6 and hold until the
preset number stops flashing.
The number you have pressed will flash in the
preset number indicator and then remain lit.
The selected radio station frequency has been
stored in memory.
The next time you press the same preset tuning button the radio station frequency is recalled from memory.
# You can also recall radio station frequencies
assigned to preset tuning numbers by pushing
MULTI-CONTROL up or down during the frequency display.
Storing and recalling broadcast
frequencies
You can easily store up to six broadcast frequencies for later recall.
! Six stations for each band can be stored in
memory.
1 Press LIST.
Preset screen is displayed.
2 Use MULTI-CONTROL to store the selected frequency in memory.
Turn to change the preset number. Press and
hold to store.
60
En
Switching the display
Desired information can be displayed.
% Press DISP.
Press DISP repeatedly to switch between the
following settings:
Frequency or station name—song title—artist
name—program type
# Only when the tuner has been tuned in to an
HD Radio broadcasting, display can be changed.
# When the tuner has been tuned in to an HD
Radio broadcasting, default display is changed
into station name instead of frequency.
Page 61

Available accessories
Section
06
Introduction to advanced
operations
1 Press MULTI-CONTROL to display the
main menu.
2 Use MULTI-CONTROL to select
FUNCTION.
Turn to change the menu option. Press to select.
The function menu is displayed.
3 Turn MULTI-CONTROL to select the
function.
BSM (best stations memory)—LOCAL (local
seek tuning)—SEEK MODE (seek mode)—
BLENDING (reception mode)
Function and operation
BSM and LOCAL operations are basically the
same as that of the tuner.
Function name Operation
BSM
LOCAL
Notes
! You can also select the function by pressing
FUNCTION on the remote control.
! To return to the playback display, press
BAND/ESC.
Refer to Storing the strongest
broadcast frequencies on page 15.
Refer to Tuning in strong signals
on page 16.
Switching the seek mode
There are two method of seek tuning settings,
one is HD (Digital broadcasting stations seek)
and the other is ALL (normal seek).
1 Display the function menu.
Refer to Introduction to advanced operations
on this page.
2 Use MULTI-CONTROL to select
SEEK MODE in the function menu.
3 Press MULTI-CONTROL to select your favorite setting.
ALL—HD
Switching the reception mode
If a digital broadcast reception condition gets
poor, this unit automatically switches to the
analog broadcast of the same frequency level.
If this function is set to on, the tuner switches
between digital broadcast and analog broadcast automatically. If this function is off, reception will be conducted within an analog
broadcast.
1 Display the function menu.
Refer to Introduction to advanced operations
on this page.
2 Use MULTI-CONTROL to select
BLENDING in the function menu.
3 Press MULTI-CONTROL to select your favorite setting.
ON—OFF
Multi-CD Player
Basic Operations
You can use this unit to control a multi-CD
player, which is sold separately.
! Only functions described in this manual are
supported by 50-disc multi-CD players.
! This unit is not designed to operate disc title
list functions with a 50-disc multi-CD player.
For information about the disc title list functions, refer to Selecting discs from the disc
title list on page 65.
% Select a disc
Push MULTI-CONTROL up or down.
# You can also select a disc by using 1 to 6 but-
tons on the remote control.
! For discs 1 to 6, press the corresponding
button number.
Available accessories
En
61
Page 62

Section
06
Available accessories
! For discs 7 to 12, press and hold the corre-
sponding numbers, such as 1 for disc 7,
until the disc number appears in the display.
% Fast forward or reverse
Push and hold MULTI-CONTROL left or right.
% Select a track
Push MULTI-CONTROL left or right.
Notes
! When multi-CD player completes preparatory
operations, READY is displayed.
! If an error message is displayed, refer to the
multi-CD player owner’s manual.
! If there are no discs in the multi-CD player ma-
gazine, NO DISC is displayed.
Using CD TEXT functions
You can use these functions only with a CD
TEXT compatible multi-CD player.
The operation is the same as that of the builtin CD player.
Refer to Displaying text information on disc on
page 17.
2 Use MULTI-CONTROL to select
FUNCTION.
Turn to change the menu option. Press to select.
The function menu is displayed.
3 Turn MULTI-CONTROL to select the
function.
REPEAT (repeat play)—RANDOM (random
play)—SCAN (scan play)—PAUSE (pause)—
COMP/DBE (compression and DBE)—
ITS PLAY (ITS play)—ITS MEMORY (ITS pro-
gramming)—TITLE INPUT (disc title input)
# If you do not operate functions other than
ITS MEMORY and TITLE INPUT within about 30
seconds, the display automatically returns to the
ordinary display.
# When playing a CD TEXT disc on a CD TEXT
compatible multi-CD player, you cannot switch to
TITLE INPUT. The disc title is already recorded on
the CD TEXT disc.
Function and operation
REPEAT, RANDOM, SCAN, PAUSE,
COMP/DBE and TITLE INPUT operations are
basically the same as that of the built-in CD
player.
Selecting a track directly
The operation is the same as that of the builtin CD player.
Refer to Selecting a track directly on page 17.
Introduction to advanced
operations
You can only use COMP/DBE (compression
and DBE) with a multi-CD player that supports
them.
1 Press MULTI-CONTROL to display the
main menu.
62
En
Function name Operation
Refer to Selecting a repeat play
range on page 18.
However, the repeat play ranges
you can select are different from
that of the built-in CD player. The
REPEAT
RANDOM
SCAN
repeat play ranges of the multi-CD
player are:
! MCD – Repeat all discs in the
multi-CD player
! TRACK – Repeat just the cur-
rent track
! DISC – Repeat the current disc
Refer to Playing tracks in random
order on page 19.
Refer to Scanning folders and
tracks on page 19.
Page 63

Available accessories
Section
06
PAUSE
TITLE INPUT
Notes
! You can also select the function by pressing
FUNCTION on the remote control.
! To return to the playback display, press
BAND/ESC.
! If you select other discs during repeat play,
the repeat play range changes to MCD.
! If you perform track search or fast forward/re-
verse during TRACK, the repeat play range
changes to DISC.
! After track or disc scanning is finished, nor-
mal playback of the tracks begins again.
Refer to Pausing playback on page
19.
Refer to Entering disc titles on
page 20.
Using compression and bass
emphasis
You can only use these functions with a multiCD player that supports them.
COMP (compression) and DBE (dynamic bass
emphasis) functions lets you adjust the sound
playback quality of the multi-CD player.
1 Display the function menu.
Refer to Introduction to advanced operations
on the previous page.
2 Use MULTI-CONTROL to select
COMP/DBE in the function menu.
# If the multi-CD player does not support
COMP/DBE, NO COMP is displayed when you attempt to select it.
3 Press MULTI-CONTROL to select your favorite setting.
OFF—COMP 1—COMP 2—OFF—DBE 1—
DBE 2
player magazine. After you have added your favorite tracks to the playlist, you can turn on ITS
play and play just those selections.
You can use ITS to enter and play back up to
99 tracks per disc from up to 100 discs (with
the disc titles). (With multi-CD players sold before the CDX-P1250 and CDX-P650, up to 24
tracks can be stored in the playlist.)
Creating a playlist with ITS programming
1 Play a CD that you want to program.
Push MULTI-CONTROL up or down to select
the CD.
2 Display the function menu.
Refer to Introduction to advanced operations
on the previous page.
3 Use MULTI-CONTROL to select
ITS MEMORY in the function menu.
4 Select the desired track by pushing
MULTI-CONTROL left or right.
5 Push MULTI-CONTROL up to store the
currently playing track in the playlist.
MEMORY COMPLETE is displayed and the
currently playing selection is added to your
playlist.
6 Press BAND/ESC to return to the playback display.
Note
After data for 100 discs is stored in memory, data
for a new disc will overwrite the oldest one.
Playback from your ITS playlist
ITS play lets you listen to the tracks that you
have entered into your ITS playlist. When you
turn on ITS play, tracks from your ITS playlist
in the multi-CD player begin to play.
Available accessories
Using ITS playlists
ITS (instant track selection) lets you make a
playlist of favorite tracks from the multi-CD
1 Select the repeat range.
Refer to Playing tracks in random order on
page 19.
En
63
Page 64

Section
06
Available accessories
2 Display the function menu.
Refer to Introduction to advanced operations
on page 62.
3 Use MULTI-CONTROL to select ITS PLAY
in the function menu.
4 Press MULTI-CONTROL to turn ITS play
on.
ITS PLAY: ON appears in the display. Playback
begins of those tracks from your playlist within
the previously selected MCD or DISC ranges.
# If no tracks in the current range are programmed for ITS play, then ITS PLAY: EMPTY is
displayed.
# To turn ITS play off, press MULTI-CONTROL
again.
Erasing a track from your ITS playlist
You can delete a track from your ITS playlist if
ITS play is on.
If ITS play is already on, skip to step 2. If ITS
play is off, use MULTI-CONTROL.
1 Play the CD with the track you want to
delete from your ITS playlist, and turn ITS
play on.
Refer to Playback from your ITS playlist on the
previous page.
Erasing a CD from your ITS playlist
You can delete all tracks of a CD from your ITS
playlist if ITS play is off.
1 Play the CD that you want to delete.
Push MULTI-CONTROL up or down to select
the CD.
2 Display the function menu.
Refer to Introduction to advanced operations
on page 62.
3 Use MULTI-CONTROL to select
ITS MEMORY in the function menu.
4 Push MULTI-CONTROL down to erase
all tracks on the currently playing CD from
your ITS playlist.
All tracks on the currently playing CD are deleted from your playlist and
MEMORY DELETED is displayed.
5 Press BAND/ESC to return to the playback display.
Using disc title functions
You can input CD titles and display the titles.
Then, you can easily search for and play a desired disc.
2 Display the function menu.
Refer to Introduction to advanced operations
on page 62.
3 Use MULTI-CONTROL to select
ITS MEMORY in the function menu.
4 Select the desired track by pushing
MULTI-CONTROL left or right.
5 Push MULTI-CONTROL down to erase
the track from your ITS playlist.
The currently playing selection is erased from
your ITS playlist and playback of the next track
begins.
6 Press BAND/ESC to return to the playback display.
64
En
Entering disc titles
Use the disc title input feature to store up to
100 CD titles (with ITS playlist) into the multiCD player. Each title can be up to 10 characters long.
For details concerning operation, refer to En-
tering disc titles on page 20.
! Titles remain in the memory even after the
disc is removed from the magazine, and
are recalled when the disc is reinserted.
! After data for 100 discs is stored in mem-
ory, data for a new disc will overwrite the
oldest one.
Page 65

Available accessories
Section
06
Displaying disc titles
You can display the text information of any
disc that has the disc title entered.
The operation is the same as that of the builtin CD player.
Refer to Displaying text information on disc on
page 17.
Selecting discs from the disc title list
Disc title list lets you see the list of disc titles
entered in the multi-CD player and select one
of them to play back.
1 Press LIST to switch to the disc title list
mode during the playback display.
2 Use MULTI-CONTROL to select the desired disc title.
Turn to change the disc title. Press to play.
# You can also change the disc title by pushing
MULTI-CONTROL up or down.
# When playing CD TEXT disc, push
MULTI-CONTROL right to see a list of the tracks
in the selected disc. Push MULTI-CONTROL left
to return to the disc list.
# If no title is entered for a disc, NO DISC TITLE
is displayed.
# NO DISC is displayed next to the disc number
when there is no disc in the magazine.
# If you do not operate the list within about 30
seconds, the display automatically returns to the
ordinary display.
DVD Player
Basic Operations
You can use this unit to control a DVD player or
multi-DVD player, which is sold separately.
For details concerning operation, refer to the
DVD player’s or multi-DVD player’s operation
manual. This section provides information on
DVD operations with this unit which differs
from that described in the DVD player’sor
multi-DVD player’s operation manual.
% Select a chapter/track
Push MULTI-CONTROL left or right.
% Fast forward or reverse
Push and hold MULTI-CONTROL left or right.
# When playing compressed audio, there is no
sound on fast forward or reverse.
% To skip back or forward to another
chapter/track, push MULTI-CONTROL left or
right.
Selecting a disc
! You can operate this function only when a
multi-DVD player is connected to this unit.
% Press any of 1 to 6 on the remote control to select the desired disc.
Selecting a folder
! You can operate this function only when a
DVD player compatible with compressed
audio playback is connected to this unit.
Available accessories
% Push MULTI-CONTROL up or down to
select a folder.
Introduction to advanced
operations
1 Press MULTI-CONTROL to display the
main menu.
En
65
Page 66

Section
06
Available accessories
2 Use MULTI-CONTROL to select
FUNCTION.
The function menu is displayed.
Turn to change the menu option. Press to select.
3 Turn MULTI-CONTROL to select the
function.
During DVD video or Video CD playback
REPEAT (repeat play)—PAUSE (pause)
During CD playback
REPEAT (repeat play)—RANDOM (random
play)—SCAN (scan play)—PAUSE (pause)—
ITS PLAY (ITS play)—ITS MEMO (ITS input)—
TITLE INPUT (disc title input)
During compressed audio playback
REPEAT (repeat play)—RANDOM (random
play)—SCAN (scan play)—PAUSE (pause)
# To return to the playback display, press
BAND/ESC.
# If you do not operate functions except for
ITS MEMO and TITLE INPUT within about 30 seconds, the display is automatically returned to the
ordinary display.
Function and operation
REPEAT, RANDOM, SCAN, PAUSE and
TITLE INPUT operations are basically the
same as that of the built-in CD player.
Also, ITS PLAY and ITS MEMO operations are
basically the same as that the multi-CD player.
Function name Operation
Refer to Selecting a repeat play
range on page 18.
But the repeat play range that you
can select is vary depending on
the type of disc or system. The repeat play ranges of the DVD
player/multi-DVD player are as
below:
During PBC playback of Video
REPEAT
RANDOM
SCAN
PAUSE
ITS PLAY
ITS MEMO
TITLE INPUT
CDs, this function cannot be operated.
! DISC – Repeat the current disc
! FOLDER – Repeat the current
folder
! TITLE – Repeat just the current
title
! CHAP – Repeat just the cur-
rent chapter
! TRACK – Repeat the current
track
Refer to Playing tracks in random
order on page 19.
Refer to Scanning folders and
tracks on page 19.
Refer to Pausing playback on page
19.
Refer to Using ITS playlists on
page 63.
Refer to Using ITS playlists on
page 63.
Refer to Entering disc titles on
page 20.
66
Notes
! You can also select the function by pressing
FUNCTION on the remote control.
! To return to the playback display, press
BAND/ESC.
! If you select other discs during repeat play,
the repeat play range changes to DISC.
! When playing back Video CD or CD, if you per-
form track search or fast forward/reverse dur-
ing TRACK, the repeat play range changes to
DISC.
En
Page 67

Available accessories
Section
06
! When playing back compressed audio, if you
select another folder during repeat play, the
repeat play range changes to DISC.
! When playing back compressed audio, if you
perform track search or fast forward/reverse
during TRACK, the repeat play range changes
to FOLDER.
! Multi-DVD player that has ITS functions and
disc title functions can also be connected to
this unit. In this case, ITS PLAY, ITS MEMO
and disc title input can be controlled.
! The ITS function of a DVD player differs
slightly from ITS playback with a multi-CD
player. With multi-DVD player, ITS playback applies only to the CD playing. For details, refer
to Using ITS playlists on page 63.
TV tuner
Basic Operations
You can use this unit to control a TV tuner,
which is sold separately.
For details concerning operation, refer to the
TV tuner’s operation manual. This section provides information on TV operations with this
unit, which differs from that described in the
TV tuner’s operation manual.
% Select a band
Press BAND/ESC.
% Select a channel (step by step)
Push MULTI-CONTROL left or right.
% Seek tuning
Push and hold MULTI-CONTROL left or right,
and then release.
Notes
! Band can be selected from TV-1 or TV-2.
! You can cancel seek tuning by pushing
MULTI-CONTROL left or right.
! While pushing and holding MULTI-CONTROL
left or right, you can skip stations. Seek tuning
starts as soon as you release
MULTI-CONTROL.
Storing and recalling broadcast
stations
You can easily store up to 12 broadcast stations for later recall.
! 12 stations for each band can be stored in
memory.
1 Press LIST.
Preset screen is displayed.
2 Use MULTI-CONTROL to store the selected station in memory.
Turn to change the preset number. Press and
hold to store.
3 Use MULTI-CONTROL to select the desired station.
Turn to change the station. Press to select.
# You can also change the station by pushing
MULTI-CONTROL up or down.
# If you do not operate the list within about 30
seconds, the display automatically returns to the
ordinary display.
Using the remote control
You can also store and recall stations assigned
to preset tuning numbers P1to P6by using
the remote control.
% When you find a station that you want
to store in memory, press one of preset
tuning buttons 1 to 6 and hold until the
preset number stops flashing.
The number you have pressed will flash in the
preset number indicator and then remain lit.
The selected station has been stored in memory.
The next time you press the same preset tuning button the station is recalled from memory.
# You can also recall stations assigned to preset
tuning numbers by pushing MULTI-CONTROL up
or down during the channel display.
Available accessories
En
67
Page 68

Section
06
Available accessories
Storing the strongest broadcast
stations sequentially
1 Press MULTI-CONTROL to display the
main menu.
2 Use MULTI-CONTROL and select
FUNCTION to display BSSM.
3 Press MULTI-CONTROL to turn BSSM
on.
SEARCH begins to flash. While SEARCH is
flashing, the 12 strongest broadcast stations
are stored in order from the lowest channel
up. When finished, the preset channel list appears.
# To cancel the storage process, press
MULTI-CONTROL again.
4 Use MULTI-CONTROL to select the desired station.
Turn to change the station. Press to select.
# You can also change the station by pushing
MULTI-CONTROL up or down.
# You can also select the function by pressing
FUNCTION on the remote control.
# To return to the ordinary display, press
BAND/ESC.
# If you do not operate the list within about 30
seconds, the display automatically returns to the
ordinary display.
68
En
Page 69

Additional Information
Appendix
Troubleshooting
Bluetooth audio/telephone
Symptom Cause Action
The audio of
the Bluetooth
audio source is
not played
back.
A Bluetooth-connected cellular
phone is currently in a phone
call.
A Bluetooth-connected cellular
phone is currently in operation.
A call was made
with a Bluetoothconnected cellular phone and
then immediately
terminated. As a
result, communication between
this unit and the
cellular phone
was not terminated properly.
The audio will be
played back when
the call is completed.
Do not operate the
cellular phone at
this time.
Reconnect the
Bluetooth connection between this
unit and the cellular phone.
Error messages
When you contact your dealer or your nearest
Pioneer Service Center, be sure to have the
error message recorded.
Built-in CD Player
Message Cause Action
ERROR-11, 12,
17, 30
ERROR-11, 12,
17, 30
ERROR-10, 11,
12, 15, 17, 30,
A0
ERROR-15 The inserted disc
Dirty disc Clean disc.
Scratched disc Replace disc.
Electrical or mechanical
does not contain
any data
Turn the ignition
switch OFF and
back ON, or switch
to a different
source, then back
to the CD player.
Replace disc.
The CD format
ERROR-22, 23
NO AUDIO The inserted disc
TRK SKIPPED The inserted disc
PROTECT All the files on
cannot be played
back
does not contain
any files that can
be played back
contains WMA
files that are protected by DRM
the inserted disc
are secured by
DRM
Replace disc.
Replace disc.
Replace disc.
Replace disc.
USB audio player/USB memory
Message Cause Action
NO AUDIO No songs Transfer the audio
USB memory
with security enabled is connected
No songs Transfer the songs
TRK SKIPPED The connected
USB portable
audio player/
USB memory
contains WMA
files that are protected by
Windows Media
DRM 9/10
PROTECT All the files on
the connected
USB portable
audio player/
USB memory are
protected by
Windows Media
DRM 9/10
N/A USB The USB device
connected to is
not supported by
this unit.
files to the USB
portable audio
player/USB memory and connect.
Follow the USB
memory instructions to disable the
security.
to iPod.
Play an audio file
not protected by
Windows Media
DRM 9/10.
Transfer audio files
not protected by
Windows Media
DRM 9/10 to the
USB portable
audio player/USB
memory and connect.
Connect a USB
portable audio
player or USB
memory that is
USB Mass Storage
Class compliant.
Additional Information
En
69
Page 70

Appendix
Additional Information
The USB connec-
CHECK USB
ERROR-19 Communication
ERROR-23 USB device is
tor or USB cable
is short-circuited.
The connected
USB portable
audio player/
USB memory
consumes more
than 500 mA
(maximum allowable current).
failure
not formatted
with FAT16 or
FAT32
Confirm that the
USB connector or
USB cable is not
caught in something or damaged.
Disconnect the
USB portable
audio player/USB
memory and do
not use it. Turn the
ignition switch to
OFF, then to ACC
or ON and then
connect the compliant USB portable audio player/
USB memory.
Perform one of the
following operations.
-Turn the ignition
switch OFF and
back ON.
-Disconnect the
USB portable
audio player/USB
memory.
-Change to a different source.
Then, return to the
USB portable
audio player/USB
memory.
USB device should
be formatted with
FAT16 or FAT32.
iPod
Message Cause Action
ERROR-19 Communication
failure
iPod failure Disconnect the
Disconnect the
cable from iPod.
Once iPod main
menu is displayed,
connect the cable
again.
Reset the iPod.
cable from iPod.
Once iPod main
menu is displayed,
connect the cable
again.
Reset the iPod.
Old version of
N/A USB
ERROR-16 Old version of
CHECK USB iPod is not
NO SONGS No songs Transfer the songs
STOP No songs in the
iPod
iPod failure Reset the iPod.
iPod
iPod failure Disconnect the
charged but operates correctly
current list
Update the iPod
version.
Update the iPod
version.
cable from iPod.
Once iPod main
menu is displayed,
connect the cable
again.
Reset the iPod.
Check if the connection cable for
iPod shorted out
(e.g., not caught in
metal objects).
After checking,
turn the ignition
switch OFF and
back ON or disconnect the iPod and
connect again.
to iPod.
Select a list that
contains the
songs.
Bluetooth audio/telephone
Message Cause Action
ERROR-10 Built-in Blue-
tooth unit encountered an
error
ERROR-80 Built-in FLASH
ROM encountered an error
Turn the ignition
OFF and ON.
Turn the ignition
OFF and ON.
70
En
Page 71

Additional Information
Appendix
Handling guideline of discs
and player
! Use only discs featuring either of following
two logos.
! Use only conventional, fully circular discs.
Do not use shaped discs.
! Use 12-cm or 8-cm CD. Do not use an
adapter when playing 8-cm CDs.
! Do not insert anything other than a CD into
the CD loading slot.
! Do not use cracked, chipped, warped, or
otherwise damaged discs as they may damage the player.
! Unfinalized CD-R/CD-RW disc playback is
not possible.
! Do not touch the recorded surface of the
discs.
! Store discs in their cases when not in use.
! Avoid leaving discs in excessively hot envir-
onments including under direct sunlight.
! Do not attach labels, write on or apply che-
micals to the surface of the discs.
! To clean a CD, wipe the disc with a soft
cloth outward from the center.
! Condensation may temporarily impair the
player’s performance. Leave it to adjust to
the warmer temperature for about one
hour. Also, wipe any dump discs with a soft
cloth.
! Playback of discs may not be possible be-
cause of disc characteristics, disc format,
recorded application, playback environment, storage conditions, and so on.
! Text information may not be correctly dis-
played depending on the recorded environment.
! Road shocks may interrupt disc playback.
! Read the precautions for discs before
using them.
Dual Discs
! Dual Discs are two-sided discs that have a
recordable CD for audio on one side and a
recordable DVD for video on the other.
! Since the CD side of Dual Discs is not phy-
sically compatible with the general CD
standard, it may not be possible to play the
CD side with this unit.
! Frequent loading and ejecting of a Dual
Disc may result in scratches on the disc.
Serious scratches can lead to playback problems on this unit. In some cases, a Dual
Disc may become stuck in the disc loading
slot and will not eject. To prevent this, we
recommend you refrain from using Dual
Disc with this unit.
! Please refer to the information from the
disc manufacturer for more detailed information about Dual Discs.
Compressed audio
compatibility
WMA
! Compatible format: WMA encoded by
Windows Media Player
! Bit rate: 48 kbps to 320 kbps (CBR), 48 kbps
to 384 kbps (VBR)
! Sampling frequency: 32 kHz to 48 kHz
! Windows Media Audio 9 Professional, Loss-
less, Voice: No
MP3
! Bit rate: 8 kbps to 320 kbps
! Sampling frequency: 16 kHz to 48 kHz (32,
44.1, 48 kHz for emphasis)
! Compatible ID3 tag version: 1.0, 1.1, 2.2,
2.3, 2.4 (ID3 tag Version 2.x is given priority
than Version 1.x.)
! M3u playlist: No
Additional Information
En
71
Page 72

1
2
5
6
Appendix
Additional Information
! MP3i (MP3 interactive), mp3 PRO: No
AAC
! Compatible format: AAC encoded by
! Sampling frequency: 11.025 kHz to 48 kHz
! Transmission rate: 16 kbps to 320 kbps
! AAC file bought on the iTunes Store (.m4p
! Apple Lossless: No
WAV
! Compatible format: Linear PCM (LPCM),
! Quantization bits: 8 and 16 (LPCM), 4 (MS
! Sampling frequency: 16 kHz to 48 kHz
®
iTunes
file extension): No
MS ADPCM
ADPCM)
(LPCM), 22.05 kHz to 44.1 kHz (MS ADPCM)
Compressed audio files on
the disc
! Depending on the version of Windows
Media Player used to encode WMA files,
album names and other text information
may not be correctly displayed.
! There may be a slight delay when starting
playback of WMA/AAC files encoded with
image data.
! ISO 9660 Level 1 and 2 compliant. Romeo
and Joliet file systems are both compatible
with this player.
! Multi-session playback is possible.
! Compressed audio files are not compatible
with packet write data transfer.
! Only 64 characters from the beginning can
be displayed as a file name (including the
extension such as .wma, .mp3, .m4a or
.wav) or a folder name.
! Folder selection sequence or other opera-
tion may be altered depending on the encoding or writing software.
! Regardless of the length of blank section
between the songs of original recording,
compressed audio discs play with a short
pause between songs.
! File extensions such as .wma, .mp3, .m4a
or .wav must be used properly.
Example of a hierarchy
: Folder
: Compressed audio file
3
4
Level 1 Level 2 Level 3 Level 4
! This unit assigns folder numbers. The user
cannot assign folder numbers.
! Folder hierarchy is allowed up to eight tiers.
However, a practical hierarchy of folder is
less than two tiers.
! Up to 99 folders on a disc can be played
back.
USB audio player/USB memory
USB audio player/USB memory
compatibility
! USB version: 2.0, 1.1 and 1.0
! USB data transfer rate: full speed
! USB Class: MSC (Mass Storage Class) de-
vice
! Protocol: bulk
! Minimum amount of memory: 250 MB
! Maximum amount of memory: 250 GB
! File system: FAT32 and FAT16
! Supply current: 500 mA
72
En
Page 73

1
2
5
6
Additional Information
Appendix
Notes
! Partitioned USB memory is not compatible
with this unit.
! Depending on the kind of USB portable audio
player/USB memory you use, this unit may
not recognize the USB audio player/USB
memory or audio files may not be played back
properly.
! This unit can play back files in the USB porta-
ble audio player/USB memory that is USB
Mass Storage Class. However, copyright protected files that are stored in above-mentioned
USB devices cannot be played back. (If the
iPod is connected to this unit, file playback
condition depends on the iPod specifications.)
! You cannot connect a USB portable audio
player/USB memory to this unit via a USB
hub.
Handling guideline and
supplemental information
! Do not leave the USB portable audio
player/USB memory in direct sunlight for
extended amounts of time. Extended exposure to direct sunlight can result in USB
portable audio player/USB memory malfunction due to the resulting high temperature.
! Do not leave the USB portable audio
player/USB memory in high temperature.
! Firmly secure the USB portable audio
player/USB memory when driving. Do not
let the USB portable audio player/USB
memory fall onto the floor, where it may become jammed under the brake or accelerator pedal.
! There may be a slight delay when starting
playback of audio files encoded with image
data.
! Depending on the USB devices connected
to this unit, it may generate noise in the
radio.
! Only 32 characters from the beginning can
be displayed as a file name (including the
extension) or a folder name when USB por-
table audio player/USB memory is selected
as a source.
! The text information of some audio files
may not be correctly displayed.
! File extensions must be used properly.
! Up to 15 000 files on a USB portable audio
player/USB memory can be played back.
! Up to 500 folders on a USB portable audio
player/USB memory can be played back.
! Up to eight tiers directory on a USB porta-
ble audio player/USB memory can be
played back.
! There may be a slight delay when starting
playback of audio files on a USB portable
audio player/USB memory with numerous
folder hierarchies.
! Do not connect anything other than the
USB portable audio player/USB memory.
! Operations may vary depending on the
kind of USB audio player and a USB memory.
The sequence of audio files on USB
memory
For USB portable audio players, the sequence is
different from that of USB memory and depends on the player.
Example of a hierarchy
: Folder
: Compressed audio file
3
4
Level 1 Level 2 Level 3 Level 4
Additional Information
73
En
Page 74

Appendix
Additional Information
! 01 to 05 represent assigned folder num-
bers. 1 to 6 represent the playback sequence. The user cannot assign folder
numbers and specify the playback sequence with this unit.
! Playback sequence of the audio file is the
same as recorded sequence in the USB device.
! To specify the playback sequence, the fol-
lowing method is recommended.
1 Create the file name including numbers
that specify the playback sequence (e.g.,
001xxx.mp3 and 099yyy.mp3).
2 Put those files into a folder.
3 Record the folder containing files into the
USB device.
However, depending on the system environment, you cannot specify the file playback
sequence.
iPod
About handling the iPod
! Do not leave the iPod in direct sunlight for
extended amounts of time. Extended exposure to direct sunlight can result in iPod
malfunction due to the resulting high temperature.
! Do not leave the iPod in a high tempera-
ture.
! Connect directly the dock connector cable
to the iPod so that this unit works properly.
! Firmly secure the iPod when driving. Do
not let the iPod fall onto the floor, where it
may become jammed under the brake or
accelerator pedal.
! For details, refer to the iPod’s manuals.
! You cannot set Repeat to off on the iPod
when using this unit. Even if you set Repeat
to off on the iPod, Repeat is automatically
changed to All when connecting the iPod
to this unit.
Bluetooth profiles
! In order to use Bluetooth wireless technol-
ogy, devices must be able to interpret certain profiles. This unit is compatible with
the following profiles.
— A2DP (Advanced Audio Distribution
Profile)
— AVRCP (Audio/Video Remote Control
Profile)
— GAP (Generic Access Profile)
— SDP (Service Discovery Protocol)
— OPP (Object Push Profile)
— HFP (Hands Free Profile)
— PBAP (Phone Book Access Profile)
— SPP (Serial Port Profile)
About iPod settings
! You cannot operate the iPod Equalizer on
Pioneer products. We recommend that you
set the iPod Equalizer to off, before connecting to this unit.
74
En
Page 75

Additional Information
Appendix
Specifications
General
Power s ource ............................. 14.4 V DC (10.8 V to 15.1 V
allowable)
Grounding system ................... N egative type
Max. current consumption
..................................................... 10.0 A
Dimensions (W × H × D):
DIN
Chassis ..................... 178 m m × 5 0 mm × 1 62
mm
(7 in. × 2 in. × 6-1/2 in.)
Nos e ........................... 188 mm × 58 mm × 15 mm
(7-3/8 in.× 2-1/4 in.× 5/8 in.)
D
Chassis ..................... 178 m m × 5 0 mm × 1 62
mm
(7 in.× 2 in.× 6-1/2 in.)
Nos e ........................... 170 mm × 46 mm × 15 mm
(6-3/4 in.× 1-3/4 in.× 5/8 in.)
Weight .......................................... 1.3 kg (2.9 lbs)
Audio
Maximum power output ....... 50 W × 4
50 W × 2/4 W + 70 W × 1/2
W (for subwoofer)
Continuous power output ...22 W × 4 (50 Hz to 15 000
Hz, 5% THD, 4 W load, both
channels driven)
Load impedance ...................... 4 W to 8 W ×4
4 W to 8 W ×2+2W ×1
Preout ma x output le vel ....... 4.0 V
Equalizer (3-Band Parametric Equalizer):
Low
Freq ue nc y ................ 40/80/100/160 Hz
Q Fac to r .................... 0.35/0.59/0.95/1.15 (+6 dB
when boosted)
Gai n ............................ ±12 dB
Mid
Freq ue nc y ................ 200/500/1k/2k Hz
Q Fac to r .................... 0.35/0.59/0.95/1.15 (+6 dB
when boosted)
Gai n ............................ ±12 dB
High
Freq ue nc y ................ 3.15k/8k/10k/12.5k Hz
Q Fac to r .................... 0.35/0.59/0.95/1.15 (+6 dB
when boosted)
Gai n ............................ ±12 dB
HPF:
Freq ue nc y .......................... 50/63/80/100/125 Hz
Slo pe .................................... –12 dB/oct
Subwoofer (mono):
Freq ue nc y .......................... 50/63/80/100/125 Hz
Slo pe .................................... –18 dB/oct
Gai n ...................................... +6 d B to –24 dB
Phase .................................. Norm al/Reverse
Bass boost:
Gai n ...................................... +12 dB to 0 dB
CD player
System .......................................... Compact disc audio system
Usa bl e discs .............................. Compact disc
Signal-to-noise ratio ............... 94 d B (1 kH z) (IEC -A ne t-
Number of channels .............. 2 (st er eo )
MP3 de coding f or ma t ........... MPEG-1 & 2 Audio Layer 3
WMA decoding format ......... Ver. 7, 7.1, 8, 9, 10, 11 (2ch
AAC decoding format ............ MPEG-4 AAC (iTunes
WAV s ig na l format .................. Linear PC M & MS A DP CM
work)
audio)
(Windows Media Player)
coded only) (.m4a)
(Ver. 7.2 and earlier)
(Non-compressed)
®
en-
USB
Specification .............................. USB 2 .0 f ul l speed
Supply current .......................... 50 0 mA
Maximum amount of memory
..................................................... 250 G B
File system .................................. FAT16, FAT32
MP3 de coding f or ma t ........... MPEG-1 & 2 Audio Layer 3
WMA decoding format ......... Ver. 7, 7.1, 8, 9, 10, 11 (2ch
AAC decoding format ............ MPEG-4 AAC (iTunes
WAV s ig na l format .................. Linear PC M & MS A DP CM
audio)
(Windows Media Player)
coded only) (.m4a)
(Ver. 7.2 and earlier)
(Non-compressed)
®
en-
FM tuner
Freq ue nc y range ...................... 87.9 MHz to 107.9 MHz
Usable sensitivity ..................... 8 dBf (0.7 µV/75 W, mono,
Signal-to-noise ratio ............... 75 d B (IEC -A network)
S/N: 30 dB)
AM tuner
Freq ue nc y range ...................... 530 kH z to 1 710 kH z (10
Usable sensitivity ..................... 1 8 µV (S /N : 20 dB )
Signal-to-noise ratio ............... 65 d B (IEC -A network)
kHz)
Bluetooth
Version .......................................... Bluetooth 2 .0 certified
Additional Information
En
75
Page 76

Appendix
Additional Information
CEA2006 Specifications
Power o ut pu t ............................. 14 W RMS × 4 C hannels (4
S/N ra ti o ....................................... 91 dBA (reference: 1 W into
W and ≦ 1 % THD+N)
4 W)
Note
Specifications and the design are subject to modifications without notice due to improvements.
76
En
Page 77

PIONEER CORPORATION
4-1, MEGURO 1-CHOME, MEGURO-KU
TOKYO 153-8654, JAPAN
PIONEER ELECTRONICS (USA) INC.
P.O. Box 1540, Long Beach, California 90801-1540, U.S.A.
TEL: (800) 421-1404
PIONEER EUROPE NV
Haven 1087, Keetberglaan 1, B-9120 Melsele, Belgium
TEL: (0) 3/570.05.11
PIONEER ELECTRONICS ASIACENTRE PTE. LTD.
253 Alexandra Road, #04-01, Singapore 159936
TEL: 65-6472-7555
PIONEER ELECTRONICS AUSTRALIA PTY. LTD.
178-184 Boundary Road, Braeside, Victoria 3195, Australia
TEL: (03) 9586-6300
PIONEER ELECTRONICS OF CANADA, INC.
300 Allstate Parkway, Markham, Ontario L3R 0P2, Canada
TEL: 1-877-283-5901
TEL: 905-479-4411
PIONEER ELECTRONICS DE MEXICO, S.A. de C.V.
Blvd.Manuel Avila Camacho 138 10 piso
Col.Lomas de Chapultepec, Mexico, D.F. 11000
TEL: 55-9178-4270
先鋒股份有限公司
總公司 : 台北市中山北路二段44 號 13樓
電話 : (02) 2521-3588
先鋒電子(香港)有限公司
香港九龍尖沙咀海港城世界商業中心
9樓901-6室
電話 : (0852) 2848-6488
Published by Pioneer Corporation.
Copyright © 2007 by Pioneer Corporation.
All rights reserved.
<KSNZX> <07L00000>
<CRB2546-A/N> UC
 Loading...