


MULTI-CD CONTROL CD PLAYER |
SYNTONISEUR RDS ET LECTEUR |
DE CD, AVEC CONTROLEUR POUR |
|
WITH RDS TUNER |
LECTEUR DE CD À CHARGEUR |
OWNER’S MANUAL |
MANUAL DEL PROPIETARIO |
MODE D’EMPLOI |
MANUAL DO PROPRIETÁRIO |
BEDIENUNGSANLEITUNG |
MANUALE D’ISTRUZIONI |
GEBRUIKSAANWIJZING |
BRUKSANVISNING |
Thank you for purchasing this product. Before attempting operation, be sure to read this manual.
Nous vous remercions d’avoir acheté cet appareil. Avant de l’utiliser, prendre soin dÏe lire Ïce manuel.
Muchas gracias por la adquisición de este producto. Antes de tratar de operarlo, lea atentamente este manual.
Muito obrigado por comprar este produto.
Leia este manual de instruções completamente antes de usar a unidade.
Vielen Dank für den Kauf dieses Produkts.
Diese Bedienungsanleitung vor der Inbetriebnahme sorgfältig durchlesen.
Dank U zeer voor de aanschaf van dit produkt.
Lees deze gebruiksaanwijzing goed door, voordat het toestel in gebruik genomen wordt.
Grazie per aver acquistato questo prodotto. Leggere attentamente le istruzioni prima di usare questa unità.
Gratulerar till ditt val av denna produkt.
Var noga med att läsa igenom denna bruksanvisning innan du börjar använda apparaten.
08A02-3C6-200
08A02-3C6-210

CONTENTS |
|
Fig. 1 ~ Fig. 4 ..................................................... |
3 |
Precautions ....................................................... |
4 |
Button Illustrations ........................................... |
4 |
Canceling the Anti-Theft Function .................. |
5 |
Basic Operations .............................................. |
5 |
Using the Radio ................................................ |
8 |
Using the CD Player ....................................... |
14 |
Playing CD Changer ....................................... |
15 |
Specifications ................................................. |
17 |
INHOUDSOPGAVE |
|
Afb. 1 ~ Afb. 4 ................................................... |
3 |
Voorzorgsmaatregelen .................................. |
46 |
Afbeeldingen van de toetsen ........................ |
46 |
Uitschakelen van de anti-diefstal functie...... |
46 |
Basisbediening ............................................... |
47 |
Gebruik van de radio ..................................... |
49 |
Gebruik van de CD-speler ............................. |
56 |
Weergave van de CD wisselaar .................... |
57 |
Technische gegevens .................................... |
59 |
TABLE DES MATIÈRES |
|
Fig. 1 ~ Fig. 4 ..................................................... |
3 |
Precautions ..................................................... |
18 |
Illustrations des touches ............................... |
18 |
Annulation de la fonction antivol ................... |
18 |
Operations de base ........................................ |
19 |
Utilisation de la radio ..................................... |
21 |
Utilisation du lecteur de CD .......................... |
28 |
Reproduction d’un CD changeur .................. |
29 |
Spécifications ................................................. |
31 |
ÍNDICE |
|
Fig. 1 ~ Fig. 4 ..................................................... |
3 |
Precauciones .................................................. |
60 |
Ilustraciones de los botones ......................... |
60 |
Cancelación de la función antirobo .............. |
60 |
Operaciones básicas ...................................... |
61 |
Utilización de la radio .................................... |
63 |
Uso del reproductor de CD ........................... |
70 |
Uso del cambiador de CD ............................. |
71 |
Especificaciones ............................................. |
73 |
INHALTSVERZEICHNIS |
|
Abb. 1 ~ Abb. 4 ................................................. |
3 |
Vorsichtsmassnahmen .................................. |
32 |
Abbildungen der Tasten ................................ |
32 |
Aufheben der Diebstahlschutzfunktion ........ |
32 |
Grundlegende Bedienung ............................. |
33 |
Radiobetrieb ................................................... |
35 |
Gebrauch des CD-players .............................. |
42 |
Wiedergabe-CD-Wechsler ............................. |
43 |
Technische Daten ........................................... |
45 |
ÍNDICE |
|
Fig. 1 ~ Fig. 4 ..................................................... |
3 |
Precauções....................................................... |
74 |
Ilustrações dos botões ................................... |
74 |
Cancelamento da função antirroubo ........... |
75 |
Operações básicas ......................................... |
75 |
Uso do rádio ................................................... |
77 |
Utilização do CD player ................................. |
84 |
Utilização do CD changer .............................. |
85 |
Especificações ................................................ |
87 |
INDICE |
|
Fig. 1 ~ Fig. 4 ..................................................... |
3 |
Precauzioni ..................................................... |
88 |
Illustrazioni sui tasti ....................................... |
88 |
Disattivazione della funzione antifurto ......... |
88 |
Operazioni fondamentali ............................... |
89 |
Uso della radio ............................................... |
91 |
Uso del lettore CD ........................................... |
98 |
Riproduzione con cambia CD ........................ |
99 |
Specifiche ..................................................... |
101 |
INNEHÅLL |
|
Figur 1 ~ figur 4 ................................................ |
3 |
Viktig information ........................................ |
102 |
Enhetens tangenter ....................................... |
102 |
Urkoppling av stöldskyddsfunktionen ....... |
103 |
Grundläggande handhavande .................... |
103 |
Radiodelen .................................................... |
106 |
Användning av CD-spelaren ....................... |
112 |
Skivspelning med CD-växlare ..................... |
113 |
Specifikationer .............................................. |
115 |
ITALIANO DEUTSCH FRANÇAIS ENGLISH

|
|
|
|
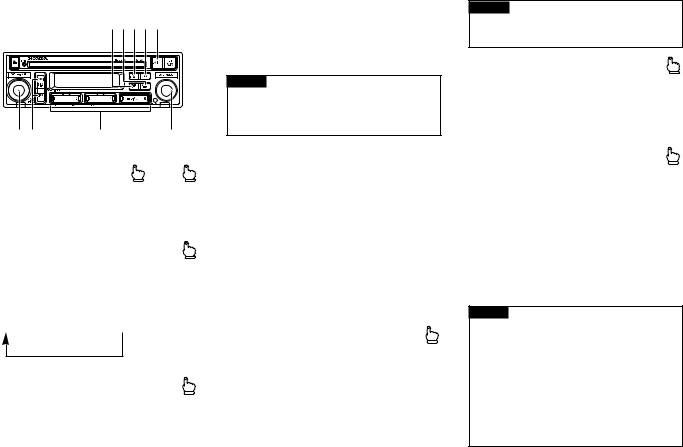
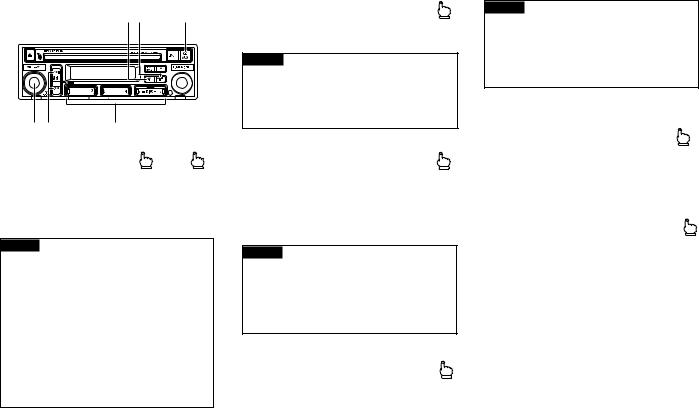
q w |
e |
r |
t |
y |
[1] [2] |
[3] |
[4] [5] [6] [7] [8] |
[9] |
u |
|
i |
o |
Fig. 2 |
|
|
|
|
|
|
|
|
|
|
|
|
|
|
|
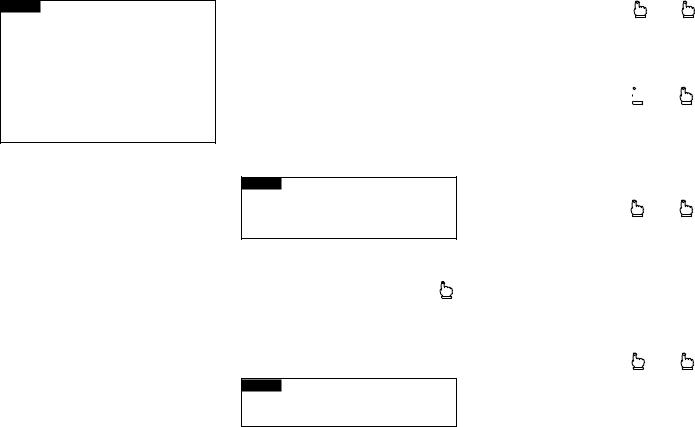
!0 |
!1 |
|
|
|
|
|
|
|
!2 |
!3 |
Fig. 3 |
[15][14] [13] |
[12] |
[11] |
[10] |
|
|
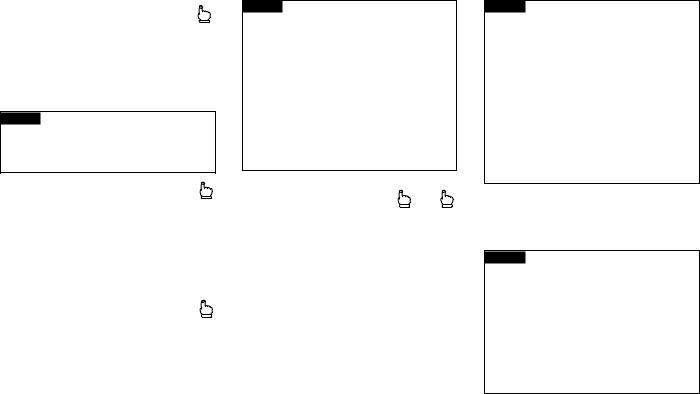
!4 |
!5 |
|
|
|
|
Fig. 1 |
!6 |
|
!7 |
!8 |
!9 Fig. 4 |
3
PRECAUTIONS
•This product complies with the EMC Directives (89/336/EEC, 92/31/EEC) and CE Marking Directive (93/68/EEC).
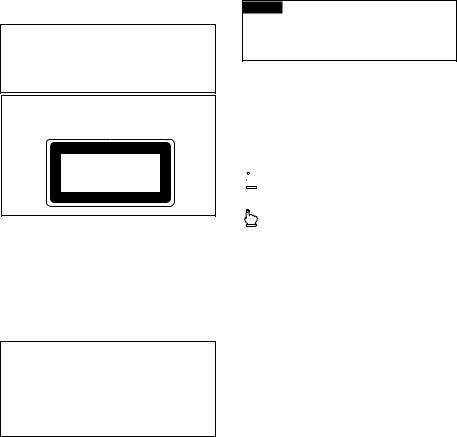
•A “CLASS 1 LASER PRODUCT” label is affixed to the top of the player.
CLASS 1
LASER PRODUCT
When the battery has been replaced
•When the power supply is started up after replacing the battery, etc., frequency settings and other stored information are lost. In this case, frequencies, etc., should be entered into the memory once again.
In case of trouble
If any problem should occur with this unit, inquire at the outlet where it was purchased.
Do not attempt to take this unit apart or to repair it yourself.
Advice
•For optional units other than a CD changer, refer to their respective Owner’s Manuals.
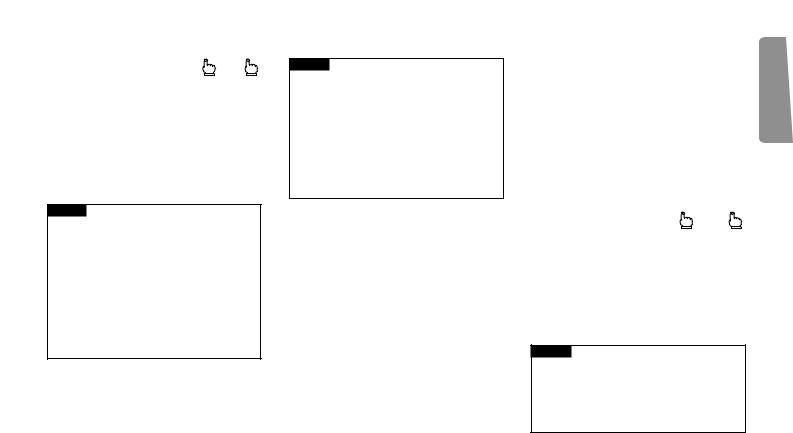
BUTTON ILLUSTRATIONS
The buttons used are shown for each item.
There are 2 ways of pressing a button, as indicated by the following illustrations.
 t Quick press and release immediately.
0.5t Press and hold for at least 0.5 seconds.
•The two numbers in the picture: 0.5 and 2, mean to press and hold those buttons for at least 0.5 or 2 seconds.
4
CANCELING THE ANTI-THEFT FUNCTION
.................................... [12] |
[15] |
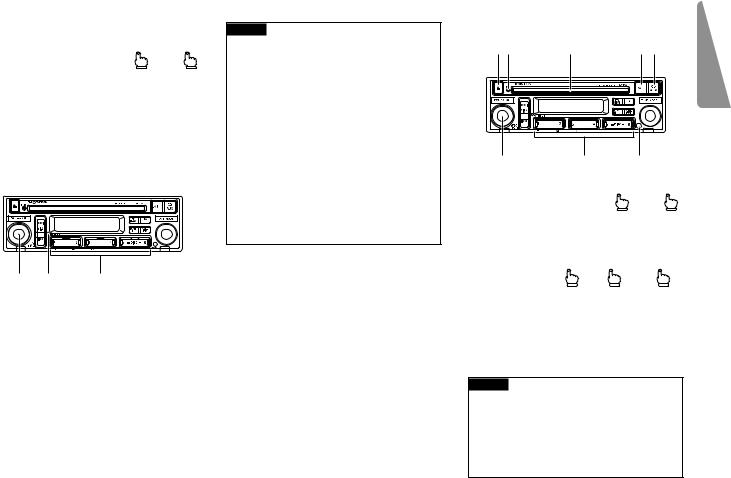
The anti-theft function prevents operation of this unit unless you enter the five-digit code number indicated on the attached ANTI-THEFT card. While the anti-theft function is operating, [13] flashes.
[15][13] [12]
1.Press button [15], and power to this unit switches ON. (Display shows “CODE”.)
2.Input the five-digit anti-theft code number with buttons [12] to cancel the anti-theft function.
Advice
•If you enter the wrong five-digit anti-theft code number a beep sounds three times to indicate an error. Repeat the process, entering the correct number.
•If you enter an incorrect anti-theft code number 10 times in a row, code number input is not possible for an hour. After an hour has passed, enter the correct number.
•Be sure to store your ANTI-THEFT card in a safe place.
•If you forget your code number, contact your nearest HONDA dealer.
BASIC OPERATIONS
[1] [2] |
[3] |
[8] [9] |
[15][12] [11]
SWITCHING POWER ON
Radio .......................... |
[8] |
[15] |
When button [8] is pressed, the radio power is turned on. To turn off, press button [15].
CD PLAYER
...................... [1] [9] [15]
When a CD is inserted in the disc slot [3], it is loaded and starts playing automatically. It can be stopped by pressing button [15], and restarted by pressing button [9]. To remove the CD, press button [1].
Advice
•When the proper Honda CD changer (MD player) (sold separately) is used, pressing button [9] will alternate between CD and CD changer (MD player) playback.
ITALIANO DEUTSCH FRANÇAIS ENGLISH
5
CD CHANGER |
[9] |
[15] |
(MD PLAYER) ........... |
• The proper Honda CD changer (MD Player) (sold separately) is required to play CDs (MDs).
Playing of a CD (MD) is started by pressing button [9], and stopped by pressing button [15].
Advice
•When a CD is loaded, pressing button [9] will alternate between CD and CD changer (MD Player) playback.
SWITCHING POWER ON ... [15]
If button [15] is pressed when the power is off, the power supply of the source before power was turned off is turned on.
ADJUSTING VOLUME ............. |
[15] |
The volume is increased by turning dial [15] to the right, and decreased by turning it to the left. (Display shows “VOL 0” ~ “VOL 40”.)
Advice
•When driving, a volume level should be selected that allows sounds outside the vehicle to be heard.
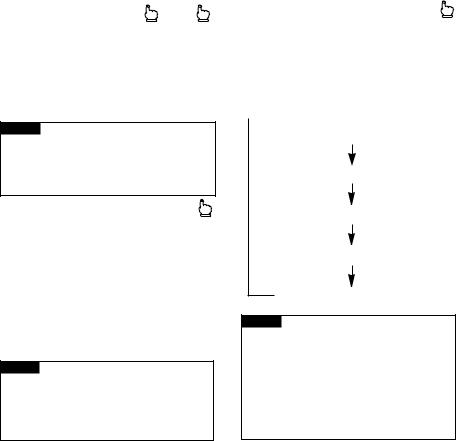
ADJUSTING AUDIO ........... |
[10] |
Press button [10] to switch to the mode in which you want to make the adjustment, and turn the dial to make the adjustment. The adjustment mode changes each time the dial is pressed, as shown below.
 Radio and other indicators (Volume Adjustment)
BASS (Bass Adjustment)
TREB (Treble Adjustment)
FAD (Fader Adjustment)
BAL (Balance Adjustment)
Advice
•When bass, treble, balance and fader adjustments are made, even if maximum or minimum levels are set, a beep will be heard at the center position. The adjustment mode is canceled approximately 5 seconds after an adjustment is made.
Adjusting Bass
Select the bass adjustment mode. Bass intensity is gradually increased by turning dial [10] to the right, and decreased by turning dial [10] to the left. (Display shows “BASS –6” ~ “BASS +6”.)
Adjusting Treble
Select the treble adjustment mode. Treble intensity is gradually increased by turning dial [10] to the right, and decreased by turning dial [10] to the left. (Display shows “TREB –6” ~ “TREB +6 ”.)
Adjusting the Fader
Select the fader adjustment mode. The balance is gradually changed to front speaker sound only, by turning dial [10] to the right, and to rear speaker sound only, by turning it to the left. (Display shows “FAD F+9” ~
“FAD R+9”.)
Adjusting Balance
Select the balance adjustment mode. The balance is gradually changed to left speaker sound only, by turning dial [10] to the left, and to right speaker sound only, by turning it to the right. (Display shows “BAL L+9” ~ “BAL R+9”.)
6
Advice
•When a two-speaker system is used, you should set “FAD C”.
TIME DISPLAY/SETTING
Displaying the time ................ |
[11] |
Press button [11] and the time is displayed.
To cancel the display, press button [11] again.
In the initial setting, the time is displayed.
Advice
•If the time is not adjusted, time indications continue flashing.
Setting the Hours ..... |
[11] |
[12] |
While pressing the [11] button, press button [12] 1 to set the hour.
Setting the Minutes
.................................... [11] [12]
While pressing button [11], press button [12] 2 to set the minute. When you release button [11], the second count begins from 00 seconds.
Synchronizing with the time
announcement ......... |
[11] |
[12] |
While pressing button [11], press button [12] 3 to reset the minute and second indications to zero. Example: When synchronizing between 11:30 and 12:29.
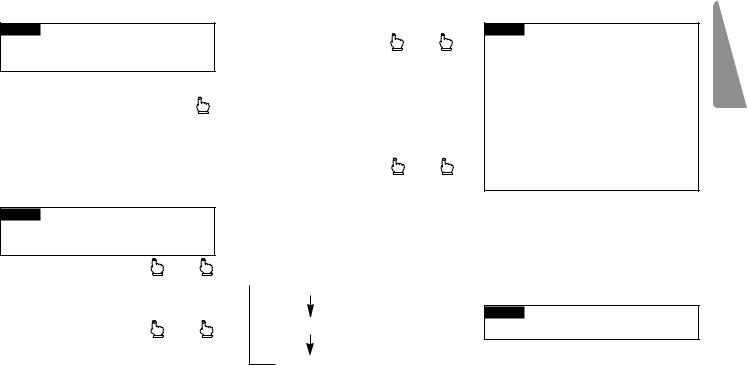
SWITCHING BETWEEN 12 HOUR AND 24 HOUR TIME DISPLAYS
.................................... [12] |
[15] |
2 |
1.Press button [15] for 2 seconds or longer to select the function setting mode.
2.Each time you press button [12] 5, the display changes as shown below.
 12H (12 hour indications)
24H (24 hour indications)
OFF (No clock display)
Advice
•If you do not perform an operation within 5 seconds of selecting the function setting mode, the function setting mode is canceled.
•You can also cancel the function setting mode by pressing button [15].
•Even if power to this unit is switched OFF, time indications continue to be displayed unless switched OFF.
OTHER FUNCTION
Illumination
The radio illumination is linked to the car light switch, and the button area lights up when the car lights are turned on.
Advice
• [2] lights when a CD is loaded.
ITALIANO DEUTSCH FRANÇAIS ENGLISH
7
USING THE RADIO
[4] [5] [6] [7] [8]
[15][14] |
[12] |
[10] |
LISTENING TO |
|
|
THE RADIO ............. |
[8] |
[15] |
When button [8] is pressed, the radio power is turned on and the Band 8 and Frequency 9 are displayed. To turn the radio off, press button [15].
CHANGING THE BAND ....... |
[8] |
The band is selected by pressing button [8] repeatedly. Each time the button is pressed, the band changes in the following order:
U1 (FM1) t U2 (FM2) t LW t MW
AUTOMATIC TUNING ....... |
[14] 0.5 |
Pressing button [14] 4or ¢for less than 0.5 seconds selects Seek Tuning.
Pressing button [14] 4or ¢for 0.5 seconds or longer lets you skip broadcast stations while the button is pressed. Seek Tuning resumes when you stop pressing the button.
Advice
•Pressing button [14] 4or ¢ again during Seek Tuning cancels Seek Tuning.
MANUAL TUNING ...................... |
[10] |
This is useful for tuning in to a station with a very weak signal that cannot be picked up with automatic tuning.
Turning the tuning dial [10] clockwise or counterclockwise raises or lowers the frequency one step at a time.
MEMORIZING STATIONS (PRESET MEMORY)
A selected station is memorized in one of buttons [12].
Memorizing a Station ............. |
[12] 2 |
Choose one of buttons [12], and hold it down until you hear a beep (about 2 seconds). The preset number 7 will light, and the station will be memorized in the chosen button.
Advice
•The radio cannot be heard while the button is being held down.
Recalling a Station .................. |
[12] |
When the button [12] is pressed again after a station has been memorized, the radio will be tuned to the station stored in that button. The number of the pressed button lights in 7 on the display.
SEEK SCAN .......................... |
[4] |
Pressing button [4] starts Seek Tuning operation. When a station broadcasting a strong signal is detected, that station is received for 5 seconds. If you do not press a button within 5 seconds, Scan continues to search for the next station and “SCAN” 5 is displayed. If you find a station you want to listen to, press button [4] to cancel Scan.
Advice
•If you cancel Scan when Seek Tuning stops for 5 seconds, that station is received.
•If you cancel Scan during Seek Tuning, the station received before Scan operation began is received.
•If there is an RDS interruption, Scan is canceled.
8
AUTO SELECT .......... |
[5] [8] |
Broadcasts of high output stations can be memorized in button [12] of UKW band according to the following procedure.
1.Press button [5] to start automatic memorization of high output stations. Through automatic memorization operation,“A.SEL” 4 is displayed. (A.SEL flashes 4)
Advice
•There is no audio output in automatic memorizing operation.
•When automatic memorization is started with U1/U2 band, the same is performed for UKW band that is automatically switched on to follow U1 and U2 bands.
•Automatic memorization cannot be activated for MW and LW bands.
2.With completion of general automatic memorization, the radio receives broadcast of the highest output station.
Advice
•When the set fails in finding the especially highest output station out of memorized stations, “0” appears on the display.
•In the case memorized stations are five or less in number, the display indicates “0” when button [13] in which no station is memorized is pressed.
OTHER FUNCTIONS
Stereo Indicator
When the radio is tuned to an FM stereo station, “ST” 6 will be displayed.
USING RDS FUNCTIONS
What is RDS?
RDS (Radio Data System) is a system for transmitting data signals along with FM programs. These data signals, which are inaudible, provide a variety of features such as: program service name, program type display, traffic announcement standby, automatic tuning, and program type tuning, intended to aid radio listeners in tuning to a desired station.
•RDS services may not be provided by all stations.
•RDS functions, like AF and TA, are only active when your radio is tuned to RDS stations.
PROGRAM SERVICE NAME DISPLAY
Displays the name of the network/ station when you tune in a station providing RDS services.
When you tune in to a RDS station, the frequency display automatically changes to the name of the network/station after a few seconds.
DISPLAYING BROADCAST STATION INDICATIONS
................................. [12] [15] 2
You can switch broadcast station display ON/OFF.
1.Press button [15] for 2 seconds or longer to select the function setting mode.
2.Each time you press button [12] 3, broadcast station display switches ON/OFF.
Advice
•Some broadcast stations may transmit multiple PS broadcasts consecutively. If this happens, precise PS display may not be possible.
ITALIANO DEUTSCH FRANÇAIS ENGLISH
9
AF FUNCTION ........ |
[12] |
[15] 2 |
AF (Alternative Frequencies search) function lets you set the receiver to search for other frequencies within the same network organization as the currently frequency. When the current frequency cannot be properly received, or another frequency in the network can provide better reception, AF mutes the sound of the radio and automatically retunes to the more suitable frequency.
Advice
•When you recall preset stations, the tuner may update the preset after searching a new frequency from that station’s “AF” list.
•The preset number does not appear in the display if the” RDS” data for the station received is different from the originally memorized RDS station.
•When “AF” is searching for the next frequency, muting may be temporarily interrupted by another program.
•The tuner will only tune RDS stations when you use “AUTOMATIC TUNING” tuning or “AUTO SELECT” function with the AF function on.
To activate the AF function
1.Press button [15] for 2 seconds or longer to select the function setting mode.
2.Each time you press button [12] 1, the AF function switches ON/OFF. “AF” is set ON by default.
PI SEARCH FUNCTION
.................................... [12] |
[15] |
2 |
If the receiver cannot find a suitable alternative frequency or the radio signal is too weak for proper reception. “SEARCH” appears in the display, and the receiver searches for another frequency broadcasting the same, or related program.
During “SEARCH”, the sound of the radio will be muted somewhat longer than for AF search. Muting is released after “SEARCH”, even if the radio could not find the same, or related program, and returns to the previous frequency.
PI Search
If the tuner fails to locate a suitable alternative frequency or if the broadcasting signal is too weak for proper reception, the PI Search will automatically start.
Auto PI Search (for preset station)
When preset stations cannot be recalled, as when traveling long distances, the product can be set to perform PI Search also during preset recall. The default setting for Auto PI Search is OFF.
To activate the Auto PI Search function
1.Press button [15] for 2 seconds or longer to select the function setting mode.
2.Each time you press button [12] 4, Auto PI Search switches ON/OFF.
REG FUNCTION
.................................... [12] |
[15] |
2 |
In the case of AF, which lets you set the tuner to re-tune frequencies automatically, REG (regional) lets you limit the list of alternative frequencies to stations broadcasting regional programs.
Regional programming and regional networks are organized differently by each country (i.e., they may change by the hour, state, or broadcast area).
To activate the REG function
1.Press button [15] for 2 seconds or longer to select the function setting mode.
2.Each time you press button [12] 2, the REG function switches ON/OFF.
10
Advice
•When you recall preset stations with REG ON, the preset number will not appear in the display if the tuner receives a regional station different from the originally memorized one.
•ON/OFF switching of REG is effective for all bands in common.
TA FUNCTION ...................... |
[7] |
TA (Traffic Announcement standby) function lets you set the system to switch automatically to traffic announcements as they are broadcast when you are tuned to a TP or EON TP station, whether you are listening to the radio,CD or CD changer.
Advice
•TP stations are stations that broadcast traffic information. The “TP” 2 indicator lights up when you tune a TP station.
•EON TP stations are stations that carry information which cross references TP stations. “TP” indication 2 is on also when the radio is tuned to an EON TP station.
To activate the TA function
Press the [7] button.
(“TA” 1 lights in the display.) The tuner begins waiting for traffic announcements.
To turn off the TA function
Press the [7] button again.
(“TA” 1 goes out from the display.) TA function is turned off.
Advice
•The system switches back to the original source after traffic announcement reception.
•The tuner only stops at TP or EONTP stations when you use SEEK tuning with the TA function ON.
•The tuner only stores TP or EONTP stations when you use AUTO SELECT function with the TA function ON.
PTY (PROGRAM TYPE)
HOW TO DISPLAY RECEIVED STATION PTY INDICATIONS
................................................ [6]
Press button [6] and PTY indications for the currently received station are displayed. Press button [6] again to cancel the display.
Advice
•When no PTY code is output from the station being received, “NONE” appears on the display.
PTY SEARCH FUNCTION
...... [6] |
[10] |
[12] |
[14] |
After you select the program type you desire, the tuner searches for a station broadcasting the same PTY code as the program type you selected.
To select the desired PTY code
1.Press button [6] to select the PTY group selection mode.
2.Each time you turn dial [10] clockwise/counterclockwise, the PTY changes.
Selecting by PTY group
1.Press button [6] to select the PTY group selection mode.
2.Select a PTY group with a [12] button.
To activate PTY Search
1.Press button [6] to select the PTY group selection mode.
PTY setting mode is activated with indication of the PTY code currently selected.
2.During PTY setting mode (continues for 5 seconds approximately), Press the 4or ¢side of button [14] to search a station that is putting desired PTY on the air.
ITALIANO DEUTSCH FRANÇAIS ENGLISH
11

Advice
•Perform each step within 5 seconds. If more than 5 seconds elapse between operations, the PTY mode is canceled.
•Some stations may broadcast program contents that are different from their PTY code.
•If there is no station to meet a desired PTY as a result of PTY search, “NO RDS” is displayed for about 10 seconds and the receiver returns to the original station.
Advice
Selecting by PTY
You can specify a particular PTY mode more precisely.
1.In the PTY group selection mode, select the desired PTY group.
2.Press the selected PTY group button and the button in [12] with the same number for 2 seconds or more.
A beep indicates the PTY selection mode has been selected.
3.Press the same [12] button to select the desired PTY.
4.Perform PTY Search by pressing the 4or ¢side of button [14].
PTY List
Button |
1 |
2 |
3 |
4 |
5 |
6 |
PTY Group |
INFO |
POP |
CLASSIC |
OTHER M |
CULTURE |
VARIED |
PTY |
NEWS |
POP MUS |
L. CLASS |
OTHER MUS |
AFFAIRS |
SPORT |
|
INFO |
ROCK MUS |
CLASSICS |
JAZZ |
EDUCATE |
DRAMA |
|
WEATHER |
EASY MUS |
|
COUNTRY |
CULTURE |
VARIED |
|
FINANCE |
|
|
NATION M |
SCIENCE |
CHILDREN |
|
TRAVEL |
|
|
OLDIES |
SOCIAL A |
PHONE IN |
|
|
|
|
FOLK MUS |
RELIGION |
LEISURE |
|
|
|
|
|
DOCUMENT |
|
|
|
|
|
|
|
|
NEWS : News.
INFO : General information and advice. WEATHER : Weather reports /
Meteorological information. FINANCE : Stock market reports, TRAVEL : Travel programs, not for
announcements about traffic problem.
POP MUS : Popular music.
ROCK MUS : Contemporary modern music. EASY MUS : Easy listening music.
L. CLASS : Light classical music.
CLASSICS : Serious classical music. OTHER MUS : Other types of music. which
can’t be categorized. JAZZ : Jazz music based programs. COUNTRY : Country music based
programs.
NATION M : National music based programs. OLDIES : Oldies music. “Golden age”
based programs.
FOLK MUS : Folk music based programs. AFFAIRS : Current affairs.
EDUCATE : Educational programs. CULTURE : Programs concerned with any
aspect of national or regional culture. SCIENCE : Programs about nature, science
and technology. SOCIAL A : Social affairs programs.
RELIGION : Religion affairs programs or services.
DOCUMENT : Documentary programs. SPORT : Sports programs.
DRAMA : All radio plays and serials. VARIED : Light entertainment programs. CHILDREN : Children’s programs. PHONE IN : Phone in based programs. LEISURE : Programs about hobbies and
recreational activities.
12

HOW TO ADJUST THE TA VOLUME
During traffic announcement reception, the volume automatically changes to an adjustable preset level so you can easily hear the traffic announcement. When using this function for the first time, you can listen to traffic information at the preset volume level “VOL 9” set by factory on shipment.
If you adjust the volume while listening to the traffic announcement, the new volume will be stored in the memory. The next time a traffic announcement is received, the volume will change to the adjusted level.
TP ALARM FUNCTION
If “TP” 2 indication is left in off-status continuously for 1 minute (due to a weak signal), a beeping alarm will sound to tell you to tune in another TP station.
(TA flashes 1)
Advice
•If “TP” 2 indication again goes out after reception recovered from failure condition, alarm again beeps. Moreover, alarm beeps when you try to access tuning or preset operation after “TA” was tuned on or in the case “TP” 2 indication is not turned on.
•In CD or CD changer mode, the tuner automatically tunes to the strongest TP station in the area and stands by for a traffic announcement immediately after “TP” 2 indication goes out. So you won’t miss any traffic announcements while continuing to listen to the CD or CD changer.
NEWS INTERRUPT |
|
FUNCTION ............................ |
[6] 2 |
Press button [6] for 2 seconds or longer and the “NEWS” 3 indication goes ON.
When the FM station (selected last) puts a newscast on the air for another type of program, operation of CD or CD changer is interrupted and the radio is activated to receive the newscast. On the other hand, when broadcast program is changed from news to another kind of program or when reception of broadcast discontinues for 10 seconds or more (for reason of weak signal, etc.), this function automatically restores sound source to the original as it was output before activation of this function. When tuned to FM, leaving this function ON automatically switches you to another station in the same network as soon as a newscast begins on that station.
ITALIANO DEUTSCH FRANÇAIS ENGLISH
13

Advice
•Volume level for receiving FM newscast is the same as it was set for TA.
•Besides the NEWS INTERRUPT function, this unit has another interrupt function called the TA function (this unit’s interrupt functions automatically switch the operation mode from CD/CD changer play to FM reception), and a PTY ALARM function. Operation priority is PTY ALARM followed by TA and then NEWS in that order. If you desire to activate the other interrupt function for that currently in activation, turn off the currently activated interrupt function. The other interrupt function is automatically activated to enable you to listen to FM broadcast on its channel.
PTY ALARM
ALARM is a special PTY code for emergency announcements, such as natural disasters. When the radio alarm code is received “ALARM” lights in the display and the volume changes. When the station stops broadcasting the alarm, the system returns to its previous source.
TUNING STEPS
When using tuning dial [10], the tuning step for the FM band is 50 kHz. However, if you select Seek Tuning with button [14] 4or ¢, the tuning step changes to 100 kHz when the AF or TA mode is activated.
USING THE CD PLAYER
[1] [2] |
[3] |
[4] [5] |
|
|||||||
|
|
|
|
|
|
|
|
|
|
|
|
|
|
|
|
|
|
|
|
|
|
|
|
|
|
|
|
|
|
|
|
|
|
|
|
|
|
|
|
|
|
|
|
[15][14]
BEFORE USING THE CD PLAYER
Disc Selection and Care
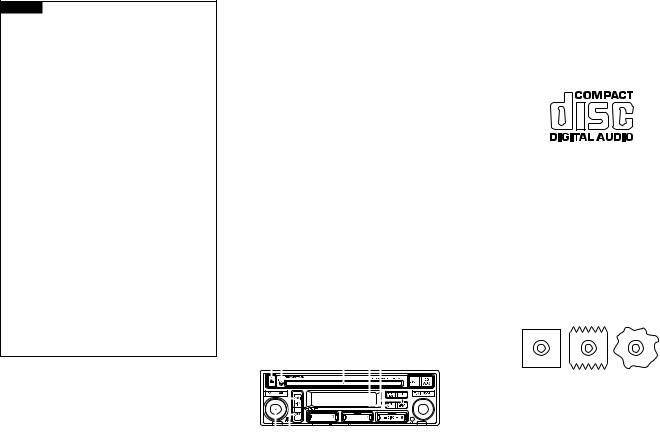
•Play only CDs bearing the Compact Disc Digital Audio mark.
•Check all CDs before playing, and discard cracked, scratched or warped discs.
14
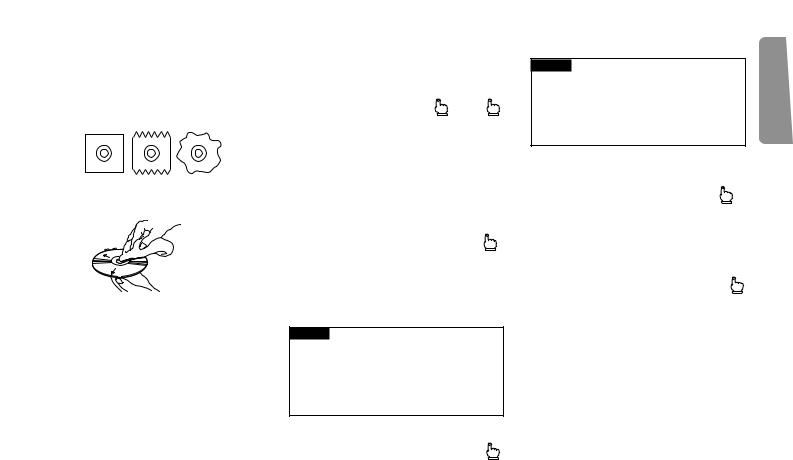
•Be sure to use round shape disc’s only for this unit and never use any other special shape discs.
Use of special shape disc’s may cause damage to the mechanism.
•Wipe dirty or damp discs outward from the center with a soft cloth.
•Avoid touching the recorded (iridescent) surface when handling discs.
•Store discs in their cases when not in use.
Precaution:
•Keep discs out of direct sunlight and high temperatures.
•Do not affix labels or apply chemicals to discs.
•Condensation may collect inside the player when using the heater in cold weather, interfering with playback.
Turn it off for an hour or so and wipe damp discs with a soft cloth.
•Road shocks may interrupt CD playback.
LISTENING |
|
|
TO A CD .................. |
[1] |
[15] |
When a CD is inserted in the disc slot [3], CD play starts. Disc indicator [2] and track number # are displayed. Playback is stopped by pressing button [15]. To remove the CD, press button [1].
TRACK SELECTION (TRACK
NUMBER SEARCH) ........... |
[14] |
Press the 4or ¢side of button [14] for a moment (less than 0.5 seconds), then press the button repeatedly until you reach the track you want to play.
Advice
•If you press the button for longer than 0.5 seconds, fast forward/rewind will operate, and it will not be possible to perform a track number search.
FAST FORWARD |
|
AND REVERSE ................... |
[14] 0.5 |
Press the 4or ¢side of button [14] until you hear a beep (0.5 seconds or more).
Advice
•Playback can be heard during fastforwarding or rewinding.
•Fast-forwarding or rewinding is performed only as long as the button is pressed.
REPEATED PLAYING OF THE
SAME TRACK |
|
(REPEAT PLAY) ................. |
[4] |
Press button [4] while the track you want to repeat is playing, and “RPT” 0 will light. To cancel this setting, press button [4] again, and “RPT” 0 will disappear.
RANDOM PLAY .................... |
[5] |
If you press button [5], Random Play is selected and “RDM” ! lights. To cancel this setting, press button [5] again, and “RDM” ! disappears.
PLAYING CD CHANGER
•The proper Honda CD changer (sold separately) is required to play CDs.
•Since the CD changer can be operated in the same way though there are some differences in indication between them, the following explains operation of the CD changer by way of example.
ITALIANO DEUTSCH FRANÇAIS ENGLISH
15
[4] [5] |
[9] |
[15][14] |
[12] |
|
LISTENING |
|
|
TO A CD ................ |
[9] |
[15] |
When button [9] is pressed, CD playback starts and the disc number *, track number ( appear on the display. Playback is stopped by pressing button [15].
Advice
•When a CD is inserted in the disc slot, pressing button [9] will alternate between CD and CD changer.
•If there is no magazine in the CD changer, “CD EJECT” will appear on the display.
•When two or more CD changers are connected, press button [9] to select a desired one. The number of selected changer appears in ^.
16
SELECTING A DISC ........... |
[12] |
Pressing buttons [12] 5 or 6, you can switch discs.
Advice
•There is a delay of several seconds before the music starts after pressing the button, due to the disc changeover operation.
TRACK SELECTION (TRACK
NUMBER SEARCH) ........... |
[14] |
Press the 4or ¢side of button [14] for a moment (less than 0.5 seconds), then press the button repeatedly until you reach the track you want to play.
Advice
•If you press the button for longer than 0.5 seconds, fast forward/rewind will operate, and it will not be possible to perform a track number search.
FAST FORWARD |
|
AND REVERSE ................... |
[14] 0.5 |
Press the 4or ¢side of button [14] until you hear a beep (0.5 seconds or more).
Advice
•Playback can be heard during fastforwarding or rewinding.
•Fast-forwarding or rewinding is performed only as long as the button is pressed.
REPEATED PLAYING OF THE
SAME TRACK |
|
(REPEAT PLAY) ................... |
[4] |
Press button [4] while the track you want to repeat is playing, and “RPT” $ will light. To cancel this setting, press button [4] again, and “RPT” $ will disappear.
RANDOM PLAY ..................... |
[5] |
If you press button [5], tracks on the disc are played in random order and “RDM” % lights. To cancel this setting, press button [5] again, and “RDM” % disappears.
CD HEAT INDICATOR
This is displayed to warn against possible damage when the inside of the CD player or CD changer overheats. CD player or changer functions are automatically halted when this indicator is lit. Be sure to switch off the power at this time, and leave to cool down before playing a CD again.

SPECIFICATIONS |
|
|
|
|
|
GENERAL |
|
|
|
|
|
Power source ............ |
13.2 V DC (10.8 — 16.0 V allowable) |
||||
Grounding system ......................................... |
|
|
Negative type |
||
Max. current consumption |
|
|
|
|
|
................. +B 15 A or less (When no slave is connected) |
|||||
ACC 1 A or less (When no slave is connected) |
|||||
Dimensions (chassis) ......... |
|
178 (W) × |
50 (H) × |
160 (D) mm |
|
(nose) ........... |
|
190 (W) × |
60 (H ) × |
11.8 (D) mm |
|
Weight .......................................................................... |
|
|
|
1.5 kg |
|
AMPLIFIER |
|
|
|
|
|
Maximum power output ........................................ |
|
|
30 W × |
4 |
|
Continuous power output ............................................ |
|
|
20 W × |
4 |
|
|
|
(DIN453241, +B = 14.4 V) |
|||
Load impedance ............................ |
|
4 Ω |
(4 — 8 Ω allowable) |
||
Tone controls (bass) ................................... |
|
|
±12 dB (100 Hz) |
||
(treble) |
................................. |
|
±12 dB (10 kHz) |
||
CD PLAYER |
|
|
|
|
|
System .................................... |
|
Compact disc audio system |
|||
Usable discs .................................................... |
|
|
Compact disc |
||
Signal format ...................... |
|
Sampling frequency: 44.1 kHz |
|||
Number of quantization bits: 16; linear |
|||||
Frequency characteristics ................ |
5 — 20,000 Hz (±1 dB) |
||||
Signal-to-noise ratio ............ |
|
94 dB (1 kHz) (IEC-A network) |
|||
Dynamic range ................................................ |
|
|
|
92 dB (1 kHz) |
|
Number of channels ............................................. |
|
|
|
2 (stereo) |
|
FM TUNER
Frequency range ........................................ |
87.5 — 108 MHz |
Usable sensitivity ...................... |
12 dBf (mono. S/N: 30 dB) |
50 dB quieting sensitivity ............................. |
16 dBf (mono) |
S/N ratio ............................................ |
70 dB (IEC-A network) |
Distortion ............................. |
0.3% (at 65 dBf, 1 kHz, stereo) |
Stereo separation ........................... |
40 dB (at 65 dBf, 1 kHz) |
MW TUNER
Frequency range ........................................ |
531 — 1,602 kHz |
Usable sensitivity .............................. |
26 dBµV (S/N: 20 dB) |
Selectivity ...................................................... |
50 dB (±9 kHz) |
LW TUNER
Frequency range ........................................... |
153 — 281 kHz |
Usable sensitivity .............................. |
28 dBµV (S/N: 20 dB) |
Selectivity ...................................................... |
50 dB (±9 kHz) |
Note:
Specifications and the design are subject to possible modification without notice due to improvements.
ITALIANO DEUTSCH FRANÇAIS ENGLISH
17

PRECAUTIONS
•Ce produit est conforme aux directives relatives à la compatibilité électromagnétique (89/336/CEE, 92/31/CEE) et à la directive CE relative aux marquages (93/68/CEE).
•Une étiquette signalétique “CLASS 1 LASER PRODUCT” est apposée sur la partie supérieure du lecteur.
CLASS 1
LASER PRODUCT
Quand la batterie a été remplacée
•Quand l’alimentation électrique est mise en service après avoir remplacé ou débranché la batterie, les réglages de fréquence et les autres informations mémorisés sont perdus. Le cas échéant, les fréquences et autres informations doivent de nouveau être mémorisées.
En cas de difficultés
Si cet appareil présente un problème, s’adresser au magasin où on l’a acheté.
N’essayez jamais de démonter cet appareil ou de le réparer vous-même.
Avis
•Pour les appareils optionnels autres qu’un changeur de CD, reportez-vous à leur mode d’emploi respectif.
ILLUSTRATIONS DES TOUCHES
Les touches utilisées sont montrées pour chaque élément.
Il existe deux manières d’appuyer sur une touche, comme indiqué par les illustrations suivantes.
 t Pression rapide et relâchement immédiat.
0.5t Pression et maintien pendant au moins une demi-seconde.
•Les deux numéros sur l’illustration: 0,5 et 2, signifient qu’il faut appuyer sur les touches et les tenir enfoncées pendant au moins 0,5 ou 2 secondes.
ANNULATION DE LA
FONCTION ANTIVOL
.................................... [12] |
[15] |
La fonction antivol empêche l’utilisation de cet appareil si le code de 5 chiffres indiqué sur la carte “ANTI-THEFT” fournie n’est pas entré. Quand la fonction antivol est en service, le témoin [13] clignote.
[15] |
[13] |
[12] |
1.Apuyer sur la touche [15] pour mettre cet appareil sous tension. (“CODE” apparaît sur l’affichage.)
2.Entrer le code antivol à cinq chiffres avec les touches [12] pour mettre hors service la fonction antivol.
Avis
•Si un mauvais code de cinq chiffres est entré, un bip retentit trois fois pour indiquer l’erreur. Répéter la procédure en entrant le numéro correct.
•Si un numéro de code antivol incorrect est entré 10 fois à suivre, l’entrée du code n’est plus possible pendant une heure. Après une heure, entrer le numéro correct.
•Conservez votre carte “ANTITHEFT” dans un endroit sûr.
•Si vous oubliez votre numéro de code, contactez votre revendeur HONDA le plus proche.
18

OPERATIONS DE BASE
[1] [2] |
[3] |
[8] [9] |
[15] [12] [11]
MISE SOUS TENSION
Radio .......................... [8]  [15]
[15]
Quand on appuie sur la touche [8], la radio est mise sous tension.
Pour mettre hors tension, appuyer sur la touche [15].
Lecteur de CD
........................ [1] [9] [15]
Lorsque vous introduisez un disque dans la fente [3], l’appareil en termine le chargement puis effectue la lecture du disque. Vous pouvez arrêter la lecture en appuyant sur la touche [15], puis reprendre la lecture en appuyant une nouvelle fois sur la touche [9]. Pour éjecter le disque, appuyez sur la touche [1].
Avis
•Si l’installation comporte le changeur de CD (lecteur de MD) Honda convenable (vendu séparément), une pression sur la touche [9] permet de passer alternativement de la lecture du CD à la lecture du changeur de CD (lecteur de MD).
Changeur de CD |
|
(Changeur de MD) ..... [9] |
[15] |
•Le changeur de CD (lecteur de MD) Honda approprié (vendu séparément) est nécessaire pour
reproduire des CD (MD).
La reproduction d’un CD (MD) est démarrée en appuyant sur la touche [9] et arrêtée en appuyant sur la touche [15].
Avis
•Lorsque le lecteur contient un CD, une pression sur la touche [9] permet de passer alternativement de la lecture du CD à la lecture du changeur de CD (lecteur de MD).
MISE SOUS TENSION ....... |
[15] |
Si la touche [15] est actionnée alors que l’appareil est hors tension, l’alimentation de la source sera établie.
REGLAGE DU |
|
VOLUME .................................... |
[15] |
L’intensité sonore augmente en tournant la bague [15] vers la droite et elle diminue en la tournant vers la gauche. (L’affichage indique “VOL 0” ~ “VOL 40”.)
Avis
•En conduisant, prière de choisir un niveau de volume qui permette d’entendre les bruits extérieurs.
RÉGLAGE DU SON ........... |
[10] |
Appuyer sur la touche [10] pour passer au mode où l’on désire apporter un ajustement et tourner la bague pour effectuer le réglage. Le mode de réglage change chaque fois que la bague est actionnée, comme indiqué ci-après.
 Indicateurs radio et autres (Réglage du volume)
BASS (Réglage des graves)
TREB (Réglage des aigus)
FAD (Réglage de l’équilibreur)
BAL (Réglage de la balance)
ITALIANO DEUTSCH FRANÇAIS ENGLISH
19
Avis
•Quand le réglage des graves, des aigus, de la balance et l’équilibrage sont réalisés, un bip sonore est entendu à la position centrale même si un niveau maximum ou minimum est réglé. Le mode de réglage est annulé environ 5 secondes après qu’un ajustement a été effectué.
Réglage des graves
Sélectionner le mode de réglage des graves. L’intensité des graves augmente progressivement en tournant la bague [10] vers la droite et elle diminue en la tournant vers la gauche. (L’affichage indique
“BASS –6” ~ “BASS +6”.)
Réglage des aigus
Sélectionner le mode de réglage des aigus. L’intensité des aigus augmente progressivement en tournant la bague [10] vers la droite et elle diminue en la tournant vers la gauche. (L’affichage indique “TREB –6” ~ “TREB +6”.)
Réglage de l’équilibreur
Sélectionner le mode de réglage de l’équilibreur. La balance change progressivement vers le haut-parleur avant uniquement en tournant la bague [10] vers la droite et vers le
haut-parleur arrière uniquement en la tournant vers la gauche. (L’affichage indique “FAD F+9” ~ “FAD R+9”.)
Réglage de la balance
Sélectionner le mode de réglage de la balance. La balance change progressivement vers le haut-parleur gauche uniquement en tournant la bague [10] vers la gauche et vers le haut-parleur droit uniquement en la tournant vers la droite. (L’affichage indique “BAL L+9” ~ “BAL R+9”.)
Avis
•Quand un système à deux hautparleurs est utilisé, il faut régler “FAD C”.
AFFICHAGE/RÉGLAGE DE L’HEURE
Affichage de l’heure ................ |
[11] |
Appuyer sur la touche [11] pour afficher l’heure.
Pour annuler l’affichage, appuyer de nouveau sur la touche [11].
Par défaut, l’heure est affichée.
Avis
•Si l’heure n’est pas ajustée, celle-ci clignote sur l’affichage.
Réglage de l’heure ..... |
[11] |
[12] |
Tout en maintenant pressée la touche [11], appuyer sur la touche [12] 1 pour régler les heures.
Réglage des minutes
.................................... [11]  [12]
[12]
Tout en maintenant pressée la touche [11], appuyer sur la touche [12] 2 pour régler les minutes. Quand la touche [11] est relâchée, l’horloge entre en service à partir de 00 secondes.
Synchronisation avec l’annonce
de l’heure .................. |
[11] |
[12] |
Tout en maintenant pressée la touche [11], appuyer sur la touche [12] 3 pour remettre à zéro l’indication des minutes et des secondes.
Exemple: Synchronisation entre 11:30 et 12:29.
CHANGEMENT DE L’AFFICHAGE DE L’HEURE ENTRE LE CYCLE DE 12 HEURES ET DE 24 HEURES
................................. [12] |
[15] |
2 |
1.Appuyer sur la touche [15] pendant 2 secondes ou plus pour choisir le mode de réglage de fonction.
2.Chaque fois que vous appuyer sur la touche [12] 5, l’affichage change comme montré ci-dessous.
20
 12H (Affichage par cycle de 12 heures)
24H (Affichage par cycle de 24 heures)
OFF (Pas d’affichage de l’horloge)
Avis
•Si aucune opération n’est réalisée pendant les 5 secondes suivant la sélection du mode de réglage de fonction, celui-ci est annulé.
•Il est aussi possible d’annuler le mode de réglage de fonction en appuyant sur la touche [15].
•Même si cet appareil est hors service, l’horloge continue d’être affichée à moins qu’elle ait été mise hors service.
AUTRES FONCTIONS
Eclairage
L’éclairage de la radio est lié au commutateur d’éclairage du véhicule, et les touches sont éclairées quand les feux du véhicule sont allumés.
Avis
•[2] s’allume quand un CD est inséré.
UTILISATION DE LA RADIO
[4] [5] [6] [7] [8]
[15][14] |
[12] |
[10] |
ECOUTE DE LA |
|
|
RADIO ..................... |
[8] |
[15] |
Quand on appuie sur la touche [8], la radio est mise sous tension et la gamme i et la fréquence o sont affichées. Pour mettre la radio hors tension, appuyer sur la touche [15].
CHANGEMENT DE |
|
GAMME ................................ |
[8] |
La gamme est sélectionnée en appuyant sur la touche [8] à plusieurs reprises. A chaque pression sur cette touche, la gamme change dans l’ordre suivant.
U1 (FM1) t U2 (FM2) t LW (GO) t MW (PO)
ACCORD AUTOMATIQUE
.............................................. [14] |
0.5 |
Appuyer sur la touche [14] 4ou ¢ pendant moins de 0,5 seconde vous permet de mettre en service la recherche de station.
Appuyer sur la touche [14] 4ou ¢ pendant 0,5 seconde ou plus vous permet de sauter les stations tant que la touche reste pressée. La recherche de station repend quand la touche est relâchée.
Avis
•Appuyer sur la touche [14] 4ou ¢pendant la recherche de station annule cette recherche.
ACCORD MANUEL ................... |
[10] |
L’accord manuel peut être employé pour se mettre à l’écoute d’une station dont le signal est trop faible pour que la fonction d’accord automatique puisse jouer son rôle.
Tourner la molette [10] dans le sens des aiguilles d’une montre ou dans le sens contraire augmente ou diminue la fréquence d’une unité à la fois.
MEMORISATION DE STATIONS (MEMOIRE DE PREREGLAGE)
Une station sélectionnée est affectée à une des touches [12].
ITALIANO DEUTSCH FRANÇAIS ENGLISH
21
Mémorisation d’une |
|
station ...................................... |
[12] 2 |
Choisir une des touches [12], et la tenir enfoncée jusqu’à ce qu’on entende une tonalité (environ 2 secondes). Le numéro de préréglage u s’allume, et la station est affectée à la touche choisie.
Avis
•La radio ne peut pas être entendue pendant que la touche est tenue enfoncée.
Rappel d’une station ............... |
[12] |
Quand on appuie de nouveau sur la touche [12] une fois qu’une station a été mémorisée, la radio est accordée sur la station affectée à cette touche. Le numéro de la touche actionnée s’allume en u sur l’affichage.
RECHERCHE DE STATION
................................................. [4]
Appuyer sur la touche [4] démarre la recherche de station. Quand une station émettant un signal suffisamment fort est détectée, cette station est reçue pendant 5 secondes. Si aucune touche n’est pressée pendant ces 5 secondes, la recherche de station reprend et “SCAN” t est affiché. Si une station que l’on souhaite écouter est trouvée, appuyer sur la touche [4] pour annuler la recherche.
Avis
•Si la recherche est annulée quand celle-ci est arrêtée pendant 5 secondes sur une station, cette station est reçue.
•Si la recherche est annulée pendant la recherche de station elle-même la station reçue avant le départ de la recherche est reçue.
•S’il y a une interruption RDS, la recherche est annulée.
CHOISI AUTOMATIQUE
.................................... [5] [8]
Les stations à forts signaux d’émission peuvent être mémorisées dans la touche [12] de la gamme UKW en procédant comme suit.
1.Appuyer sur la touche [5] pour démarrer la mémorisation automatique des stations à forts signaux.
Au cours de la mise en mémoire automatique, l’indication “A.SEL” 4 s’affiche. (L’indication A.SEL clignote
4)
Avis
•Il n’y a pas de sortie audio pendant l’opération de mémorisation automatique.
•Lorsque la mémorisation automatique est commencée avec la gamme U1/U2, elle est aussi effectuée pour la gamme UKW qui est automatiquement activée après les gammes U1 et U2.
•La mémorisation automatique ne peut pas être activée pour les gammes MW (PO) et LW (GO).
2.Lorsque la mémorisation automatique générale est terminée, la radio reçoit l’émission de la station ayant le signal le plus fort.
Avis
•Lorsque l’appareil ne trouve pas de station à signal spécialement fort dans les stations mémorisées, “0” apparaît sur l’affichage.
•Au cas où les stations mémorisées sont de cinq ou moins, l’affichage indique “0” lorsque la touche [13] dans laquelle aucune station n’est mémorisée est enfoncée.
AUTRES FONCTIONS
Indicateur de stéréo
Quand la radio est accordée sur une station FM stéréo, “ST” y est affiché.
22

UTILISATION DES FONCTIONS RDS
Qu’est-ce que RDS ?
RDS (système de données radio) est un système qui transmet des signaux de données avec les émissions FM. Ces signaux de données, qui sont inaudibles, fournissent une diversité de caractéristiques, comme: nom de service de programme, affichage de type de programme, attente d’annonce sur la circulation, syntonisation automatique et syntonisation de type de programme, destinées à aider les auditeurs à syntoniser la station qu’ils désirent.
•Les services RDS peuvent ne pas être fournis par toutes les stations.
•Des fonctions RDS, comme AF et TA, ne sont actives que lorsque la radio est syntonisée sur des stations RDS.
AFFICHAGE DU NOM DE SERVICE DE PROGRAMME
Affiche le nom de la chaîne d’émetteurs/station lors de la syntonisation d’une station fournissant des services RDS.
Lors de la syntonisation d’une station RDS, l’affichage de fréquence passe automatiquement au nom de la chaîne d’émetteurs/station après quelques secondes.
AFFICHAGE DE L’INDICATION
DES STATION ........ [12] |
[15] 2 |
Il est possible de mettre l’affichage des stations en/hors service.
1.Appuyer sur la touche [15] pendant 2 secondes ou plus pour choisir le
mode de réglage de fonction.
2Chaque fois que que l’on appuie sur la touche [12] 3, l’affichage de la station est mis en ou hors service.
Avis
•Certaines stations de radiodiffusion émettent consécutivement plusieurs noms (PS). En ce cas, l’affichage du nom exact de la station peut être tout simplement impossible.
FONCTION AF ....... |
[12] |
[15] 2 |
La fonction AF (recherche de fréquences alternatives) permet de régler le récepteur pour qu’il recherche d’autres fréquences dans la même organisation de chaîne d’émetteurs que la fréquence actuelle. Lorsque la fréquence actuelle ne peut pas être reçue correctement ou qu’une autre fréquence dans la chaîne d’émetteurs peut fournir une meilleure réception, la fonction AF met en sourdine le son de la radio et resyntonise automatiquement sur la fréquence plus claire.
Avis
•Lors du rappel d’une station préréglée, le syntoniseur peut actualiser le préréglage après avoir cherché une nouvelle fréquence dans la liste AF de cette station.
•Le numéro préréglé n’apparaît pas sur l’affichage si les données RDS pour la station reçue sont différentes de celles de la station RDS initialement mémorisée.
•Lorsque la fonction AF recherche une autre fréquence, la mise en sourdine peut être temporairement interrompue par un autre programme.
•Le syntoniseur ne syntonisera que des stations RDS lorsque la fonction “ACCORD AUTOMATIQUE” ou “CHOISI AUTOMATIQUE” est utilisée alors que la fonction AF est activée.
Pour activer la fonction AF
1.Appuyer sur la touche [15] pendant 2 secondes ou plus pour choisir le mode de réglage de fonction.
2.Chaque fois que l’on appuie sur la touche [12] 1, la fonction AF est mise en/hors service.
La fonction AF est activée par défaut.
ITALIANO DEUTSCH FRANÇAIS ENGLISH
23

FONCTION DE RECHERCHE PI
.................................... [12] |
[15] |
2 |
Si le récepteur ne peut pas trouver une fréquence alternative adéquate ou que le signal radio est trop faible pour une réception correcte, “SEARCH” apparaît sur l’affichage et le récepteur cherche une autre fréquence diffusant le même programme, ou un programme apparenté.
Pendant la fonction “SEARCH”, le son de la radio est mis en sourdine plus longtemps que pour la recherche AF. La sourdine est libérée après la fonction “SEARCH”, même si la radio n’a pas trouvé le même programme, ou un programme apparenté, et elle revient à la fréquence précédente.
Recherche PI
Si le syntoniseur ne peut pas localiser une autre fréquence possible, ou encore si le signal radiodiffusé est trop faible pour que la réception soit de bonne qualité, une recherche PI commence automatiquement.
Recherche PI automatique (recherche parmi les présélections)
Lorsqu’une présélection ne peut pas être utilisée (par exemple, dans le cas d’un trajet lointain), l’appareil peut être réglé de manière à effectuer une recherche PI également dans le cas d’un rappel de présélection. Par défaut, la recherche PI n’est pas en service.
Pour mettre en service la fonction de recherche PI automatique
1.Appuyer sur la touche [15] pendant 2 secondes ou plus pour choisir le mode de réglage de fonction.
2.Chaque fois que l’on appuie sur la touche [12] 4, la fonction de recherche PI automatique est mise en/hors service.
FONCTION REG
.................................... [12] |
[15] |
2 |
Avec la fonction AF, qui permet de régler le syntoniseur pour qu’il resyntonise automatiquement des fréquences, la fonction REG (régionale) permet de limiter la liste des fréquences alternatives aux stations diffusant des programmes régionaux.
La programmation régionale et les chaînes d’émetteurs régionales sont organisées différemment selon les pays (c’est-à-dire qu’elles peuvent changer selon l’heure, l’état ou la région d’émission).
Pour activer la fonction REG
1.Appuyer sur la touche [15] pendant 2 secondes ou plus pour choisir le mode de réglage de fonction.
2.Chaque fois que l’on appuie sur la touche [12] 2, la fonction REG est mise en/hors service.
Avis
•Lors du rappel d’une station préréglée avec la fonction REG activée, le numéro préréglé n’apparaît pas sur l’affichage si le syntoniseur reçoit une station régionale différente de celle initialement mémorisée.
•L’activation/désactivation de la fonction REG est effective pour toutes les bandes en commun.
FONCTION TA ...................... |
[7] |
La fonction TA (attente d’annonce sur la circulation) permet de régler le système pour qu’il se commute automatiquement sur les annonces sur la circulation lorsqu’elles sont diffusées quand une station TP ou EON TP est syntonisée, que la radio, un CD ou un changeur de CD soit écouté.
Avis
•Les stations TP sont des stations qui diffusent des informations sur la circulation. L’indicateur “TP” w s'allume lorsqu'une station TP est syntonisée.
•Les stations EON TP sont des stations qui émettent des informations qui établissent des correspondances avec les stations TP. L’indication “TP” w est aussi allumée lorsque la radio est syntonisée sur une station
EON TP.
24

Pour activer la fonction TA
Appuyer sur la touche [7].
(“TA” q s’allume sur l’affichage.) Le syntoniseur commence à attendre des informations sur la circulation.
Pour désactiver la fonction TA
Appuyer de nouveau sur la touche [7]. (“TA” q disparaît de l’affichage.)
La fonction TA est désactivée.
Avis
•Le système revient à la source initiale après la réception d’une annonce sur la circulation.
•Le syntoniseur ne s’arrête qu’aux stations TP ou EON-TP lorsque la syntonisation SEEK est utilisée alors que la fonction TA est activée.
•Le syntoniseur ne stocke que les stations TP ou EON-TP lorsque la fonction CHOISI AUTOMATIQUE est utilisée alors que la fonction TA est activée.
PTY (TYPE DE PROGRAMME)
COMMENT AFFICHER LES INDICATIONS DES STATIONS PTY
REÇUES |
..................................[6] |
Appuyer sur la touche [6] pour afficher les indications PTY de la station reçue actuellement. Appuyer de nouveau sur la touche [6] pour annuler l’affichage.
Avis
•Lorsqu'aucun code PTY n'est sorti de la station reçue, "NONE" apparaît sur l'affichage.
FONCTION DE RECHERCHE PTY
...... [6] |
[10] |
[12] |
[14] |
Après que le type de programme désiré est sélectionné, le syntoniseur recherche une station diffusant le même code PTY que le type de programme sélectionné.
Pour sélectionner le code PTY désiré
1.Appuyer sur la touche [6] pour choisir le mode de sélection de groupe PTY.
2.Chaque fois que vous tournez la molette [10] dans le sens des aiguilles d’une montre ou dans le sens contraire, le code PTY change.
Choix d’une station appartenant à un groupe PTY donné
1.Appuyez sur la touche [6] de manière à adopter le mode permettant la sélection d’un groupe PTY.
2.A l’aide de la touche [12], choisissez le code PTY convenable.
Pour activer la recherche PTY
1.Appuyez sur la touche [6] de manière à adopter le mode permettant la sélection d’un groupe PTY.
Le mode de réglage PTY est activé avec l’indication du code PTY actuellement sélectionné.
2.Pendant le mode de sélection PTY (ce qui dure environ 5 secondes), appuyez sur le côté 4, ou le côté ¢, de la touche [14] pour localiser une station qui émet le type d’émission (PTY) désiré.
Avis
•Effectuez chaque opération en moins de 5 secondes. Si plus de 5 secondes séparent deux opérations, le mode de sélection par code PTY est abandonné.
•Certaines stations peuvent diffuser des programmes qui sont différents de leur code PTY.
•S'il n’y a pas de station qui répond à un PTY désiré après une recherche PTY, “NO RDS” est affiché pendant environ 10 secondes et le récepteur revient à la station initiale.
ITALIANO DEUTSCH FRANÇAIS ENGLISH
25

Avis
Choix d’une station par le code PTY
Vous pouvez préciser très exactement le mode PTY.
1.Après avoir choisi le mode de sélection du groupe PTY, indiquez le groupe PTY qui convient.
2.Appuyez, pendant au moins 2 secondes, sur la touche de groupe PTY et sur la touche [12] qui porte le même numéro.
Un bip signale que le mode de sélection par code PTY a été adopté.
3.Appuyez une nouvelle fois sur la même touche [12] pour choisir le code PTY convenable.
4.Pour effectuer une recherche PTY, appuyez sur le côté 4, ou le côté ¢de la touche [14].
Liste des codes PTY
Touche |
1 |
2 |
3 |
4 |
5 |
6 |
Groupes PTY |
INFO |
POP |
CLASSIC |
OTHER M |
CULTURE |
VARIED |
PTY |
NEWS |
POP MUS |
L. CLASS |
OTHER MUS |
AFFAIRS |
SPORT |
|
INFO |
ROCK MUS |
CLASSICS |
JAZZ |
EDUCATE |
DRAMA |
|
WEATHER |
EASY MUS |
|
COUNTRY |
CULTURE |
VARIED |
|
FINANCE |
|
|
NATION M |
SCIENCE |
CHILDREN |
|
TRAVEL |
|
|
OLDIES |
SOCIAL A |
PHONE IN |
|
|
|
|
FOLK MUS |
RELIGION |
LEISURE |
|
|
|
|
|
DOCUMENT |
|
|
|
|
|
|
|
|
NEWS : Courts bulletins d’information. INFO : Informations générales et conseils. WEATHER : Bulletin météorologiques. FINANCE : Cours de la bourse, etc. TRAVEL : Emissions orientées vers les
voyages; aucun bulletin d’informations routières.
POP MUS : Musique populaire.
ROCK MUS : Musique contemporaine. EASY MUS : Musique légère.
L. CLASS : Musique classique d’abord aisé OTHERS (Autres).
CLASSICS : Interprétation d’oeuvres majeures.
OTHER MUS : Autres genres musicaux n’appartenant pas aux catégories ci-dessus.
JAZZ : Musique de jazz et musique voisine. COUNTRY : Musique Country et musique
voisine.
NATION M : Musique nationale et musique voisine.
OLDIES : Musique du bon vieux temps.
FOLK MUS : Musique folklorique et musique voisine.
AFFAIRS : Emissions à thème.
EDUCATE : Emissions ayant une vocation éducative.
CULTURE : Emissions culturelles couvrant tous les aspects nationaux ou régionaux.
SCIENCE : Emissions à vocation scientifique et technologique.
SOCIAL A : Emissions à vocation sociales. RELIGION : Emissions et services religieux. DOCUMENT : Emissions à caractère
documentaire. SPORT : Emissions couvrant tous les
aspects du sport. DRAMA : Pièces radiophoniques. VARIED : Emissions de variété.
CHILDREN : Emissions destinées aux enfants.
PHONE IN : Programmes à ligne ouverte. LEISURE : Emissions traitant des passetemps et des activités
récréatives.
26

COMMENT RÉGLER LE VOLUME TA
Pendant la réception d’une annonce sur la circulation, le volume passe automatiquement à un niveau préréglé ajustable afin que l’annonce soit bien entendue. Lors de la première utilisation de cette fonction, les informations sur la circulation peuvent être écoutées au niveau de volume “VOL 9” préréglé avant l’expédition de l’usine.
Si le volume est réglé pendant l’écoute d’une annonce sur la circulation, le nouveau volume est mis en mémoire. La fois suivante où une annonce sur la circulation est reçue, le volume passe au niveau réglé.
FONCTION D’ALARME TP
Si l’indication “TP” 2 reste éteinte continuellement pendant 1 minute (du fait d’un signal faible), un signal d’alarme retentit pour avertir de syntoniser une autre station TP.
(TA clignote 1)
Avis
•Si l’indication “TP” w s'éteint de nouveau après que la réception a repris à la suite d’une panne, un signal d’alarme retentit à nouveau. Il retentit aussi lors d’une tentative d’accès à une opération de syntonisation ou de préréglage après que la fonction “TA” a été activée ou au cas où l’indication “TP” w n’est pas allumée.
•Dans le mode CD ou changeur de CD, le syntoniseur syntonise automatiquement la station TP la plus forte dans la région et se met en attente d’annonce sur la circulation immédiatement après que l’indication “TP” w s’éteint. Il n’est donc pas possible de manquer une annonce sur la circulation tout en continuant à écouter un CD ou un changeur de CD.
FONCTION NEWS |
|
INTERRUPT .......................... |
[6] 2 |
Appuyer sur la touche [6] pendant 2 secondes ou plus pour que l’indication “NEWS” 3 s’allume.
Lorsque la station FM (sélectionnée en dernier lieu) diffuse un bulletin d’informations pour un autre type de programme, le fonctionnement du lecteur de CD ou du changeur de CD est interrompu et la radio est activée pour recevoir le bulletin d’informations. D’autre part, lorsque le programme diffusé passe des informations à un autre type ou lorsque la réception s’interrompt pendant 10 secondes ou plus (du fait d’un signal faible, etc.), cette fonction rétablit automatiquement la source sonore initiale, comme elle était sortie avant l’activation de cette fonction.
Si le syntoniseur est accordé sur une fréquence de la gamme FM et si cette fonction est en service, dès qu’une station du même réseau émet un bulletin d’information, le syntoniseur s’accorde sur la fréquence de cette station.
ITALIANO DEUTSCH FRANÇAIS ENGLISH
27
Avis
•Le niveau du volume pour recevoir des bulletins d’informations FM est le même que celui réglé pour TA.
•Outre la fonction NEWS INTERRUPT, cet appareil a une autre fonction d’interruption, la fonction TA (cet appareil interrompt automatiquement les fonctions et change le mode de fonctionnement du lecteur de CD/changeur de CD sur la réception FM) et la fonction PTY ALARM. La fonction PTY ALARM a la priorité suivie par la fonction TA puis par la fonction NEW, dans cet ordre.
Pour activer la fonction d’interruption autre que celle actuellement activée, désactiver la fonction d’interruption actuellement activée. L’autre fonction d’interruption est automatiquement activée pour permettre d’écouter l’émission FM sur son canal.
ALARME PTY
ALARM est un code PTY spécial pour les annonces d’urgence, comme dans le cas de catastrophes naturelles.
Lorsque le code d’alarme radio est reçu, “ALARM” s’allume sur l’affichage et le volume change. Lorsque la station arrête de diffuser l’alarme, le système revient à sa source précédente.
PAS DE SYNTONISATION
Lors de l’utilisation du la molette de syntonisation [10] le pas de syntonisation pour la gamme FM est de 50 Hz.
Cependant, si vous choisissez la recherche de station avec la touche [14] 4ou ¢, le pas de syntonisation passe à 100 kHz quand le mode AF ou TA est en service.
UTILISATION DU LECTEUR DE CD
[1] [2] |
[3] |
[4] [5] |
|
|||||||
|
|
|
|
|
|
|
|
|
|
|
|
|
|
|
|
|
|
|
|
|
|
|
|
|
|
|
|
|
|
|
|
|
|
|
|
|
|
|
|
|
|
|
|
[15][14]
AVANT D’UTILISER LE LECTEUR DE CD
Choix d’un disque et soins des disques
•N’utilisez que des CD portant la marque Compact Disc Digital Audio.
•Contrôlez tous les disques avant de les introduire dans l’appareil et n’utilisez aucun disque fissuré, rayé ou voilé.
•Ce lecteur n’accepte que les disques circulaires; n’utilisez aucun disque dont la forme serait différente. L’utilisation d’un disque dont la forme ne serait pas circulaire pourrait entraîner un endommagement du mécanisme.
28
•Nettoyez la surface du disque si elle est sale ou humide, en utilisant pour cela un chiffon doux que vous déplacerez, du centre vers la périphérie, selon un rayon.
•Evitez de toucher la face portant la gravure (face iridescente).
•Replacez les disques dans leur coffret lorsque vous ne les écoutez pas.
Précaution:
•Conservez les disques à l’abri de la lumière directe du soleil et des températures élevées.
•Ne collez aucune étiquette sur les disques; n’appliquez aucun produit chimique sur leurs surfaces.
•Si vous utilisez le chauffage par temps froid, l’humidité peut se condenser à l’intérieur du lecteur et interdire la lecture. En ce cas, mettez le lecteur hors service pendant environ une heure et essuyez les disques humides à l’aide d’un chiffon doux.
•Les cahots de la route peuvent gêner la lecture des disques.
ECOUTE D’UN |
|
|
CD ............................ |
[1] |
[15] |
Lorsque vous introduisez un disque dans la fente [3], la lecture de ce disque commence. Le témoin de disque [2] et le numéro de plage musicale !3sont éclairé. Vous pouvez arrêter la lecture en appuyant sur la touche [15]. Pour retirer le disque, appuyez sur la touche [1].
SELECTION DE PLAGE (RECHERCHE
DE NUMERO DE PLAGE) ..... [14]
Appuyer sur le côté (4) ou (¢) de la touche [14] pendant un moment (moins de 0,5 seconde), puis appuyer sur la touche à plusieurs reprises jusqu’à ce que la plage que l’on veut écouter soit atteinte.
Avis
•Si on appuie sur la touche pendant plus de 0,5 secondes, l’avance/le recul rapide se produit, et il est alors impossible de faire une recherche de numéro de plage.
AVANCE ET RECUL |
|
RAPIDES .............................. |
[14] 0.5 |
Appuyer sur le côté 4ou ¢de la touche [14] jusqu’à ce qu’une tonalité soit audible (0,5 secondes ou plus).
Avis
•Pendant l’avance ou le recul rapide, le son est audible.
•L’avance ou le recul rapide n’est fait que tant que l’on tient la touche enfoncée.
LECTURE REPETEE DE LA MEME
PLAGE |
|
(LECTURE REPETEE) ........... |
[4] |
Appuyer sur la touche [4] pendant que la plage que l’on veut répéter est en lecture, et “RPT” 0 s’allumera. Pour annuler ce réglage, appuyer de nouveau sur la touche [4], et “RPT” 0 disparaîtra.
LECTURE ALÉATOIRE .......... |
[5] |
Appuyer sur la touche [5] pour choisir la lecture aléatoire et allumer “RDM” !. Pour annuler ce réglage, appuyer de nouveau sur la touche [5] et “RDM” ! disparaît.
REPRODUCTION D’UN CD CHANGEUR
•Le changeur de CD Honda approprié (vendu séparément) est nécessaire pour reproduire des CD.
•Le changeur de CD pouvant être utilisés de la même manière bien qu’il y ait quelques différences dans leurs indications, l’explication suivante concerne, comme exemple, l’utilisation du changeur de CD.
ITALIANO DEUTSCH FRANÇAIS ENGLISH
29

[4] [5] |
[9] |
[15][14] |
[12] |
ECOUTE D’UN DISQUE
COMPACT ............... [9]  [15]
[15]
Quand on appuie sur la touche [9], la lecture de disque compact démarre et le numéro de disque *, le numéro de plage ( apparaissent sur l’affichage. La lecture s’arrête en appuyant sur la touche [15].
Avis
•Après avoir introduit un CD dans la fente, une pression sur la touche [9] permet de passer alternativement de la lecture du CD à la lecture d’un CD du changeur.
•S’il n’y a pas de chargeur dans le changeur de disques compacts, “CD EJECT” apparaît sur l’affichage.
•Lorsque deux changeurs de CD ou plus sont connectés, appuyer sur la touche [9] pour sélectionner celui qui est désiré. Le numéro du changeur sélectionné apparaît en ^.
30
SELECTION D’UN DISQUE
.............................................. [12]
En appuyant sur les touches [12] 5 ou 6 il est possible de changer le disque.
Avis
•Du fait de l’opération de mise en place du disque, la lecture démarre avec un retard de quelques secondes après la pression sur la touche.
SELECTION DE PLAGE (RECHERCHE
DE NUMERO DE PLAGE) ..... [14]
Appuyer sur le côté 4ou ¢de la touche [14] pendant un moment (moins de 0,5 seconde), puis appuyer sur la touche à plusieurs reprises jusqu’à ce que la plage que l’on veut écouter soit atteinte.
Avis
•Si on appuie sur la touche pendant plus de 0,5 secondes, l’avance/le recul rapide se produit, et il est alors impossible de faire une recherche de numéro de plage.
AVANCE ET RECUL |
|
RAPIDES ............................... |
[14] 0.5 |
Appuyer sur le côté 4ou 4de la touche [14] jusqu’à ce qu’une tonalité soit audible (0,5 secondes ou plus).
Avis
•Pendant l’avance ou le recul rapide, le son est audible.
•L’avance ou le recul rapide n’est fait que tant que l’on tient la touche enfoncée.
LECTURE REPETEE DE LA MEME
PLAGE |
|
(LECTURE REPETEE) ........ |
[4] |
Appuyer sur la touche [4] pendant que la plage que l’on veut répéter est en lecture, et “RPT” $ s’allumera. Pour annuler ce réglage, appuyer de nouveau sur la touche [4], et “RPT” $ disparaîtra.
LECTURE ALÉATOIRE .......... |
[5] |
Appuyer sur la touche [5] pour reproduire les plages du disque dans un ordre aléatoire et allumer “RDM” %. Pour annuler ce réglage, appuyer de nouveau sur la touche [5] et “RDM” % disparaît.
TÉMOIN CD HEAT
Lorsque la température intérieure du lecteur de CD ou du changeur de CD s’élève au point qu’il peut en résulter un dommage, ce témoin s’éclaire. A ce moment-là toutes les fonctions du lecteur de CD ou du changeur de CD deviennent indisponibles. Il vous faut alors mettre l’appareil hors tension et attendre qu’il ait repris une température normale de fonctionnement.
 Loading...