

Pioneer DEH-1590UB User Manual

CD RDS RECEIVER
DEH-1590UB
English
Owner’s Manual
Section
Before you start
01
02
Thank you for purchasing this PIONEER
product
To ensure proper use, please read through this
manual before using this product. It is especially
important that you read and observe WARN-
INGs and CAUTIONs in this manual. Please
keep the manual in a safe and accessible place for
future reference.
About this unit
CAUTION
! Do not allow this unit to come into contact
with liquids. Electrical shock could result.
Also, damage to this unit, smoke, and overheating could result from contact with
liquids.
! Always keep the volume low enough to hear
outside sounds.
! Avoid exposure to moisture.
! If the battery is disconnected or discharged,
any preset memor y will be erased.
Note
Function setting operations are completed even
if the menu is canceled before the operations
are confirmed.
About this manual
In the following instructions, USB memories
and USB audio players are collectively referred
to as “USB storage device”.
In case of trouble
Should this unit fail to operate properly, please
contact your dealer or nearest authorized
PIONEER Ser vice Station.
2
En
Visit our website
Visit us at the following site:
http://pioneer.jp/group/index-e.html
! We offer the latest information about
PIONEER CORPORATION on our website.
Operating this unit
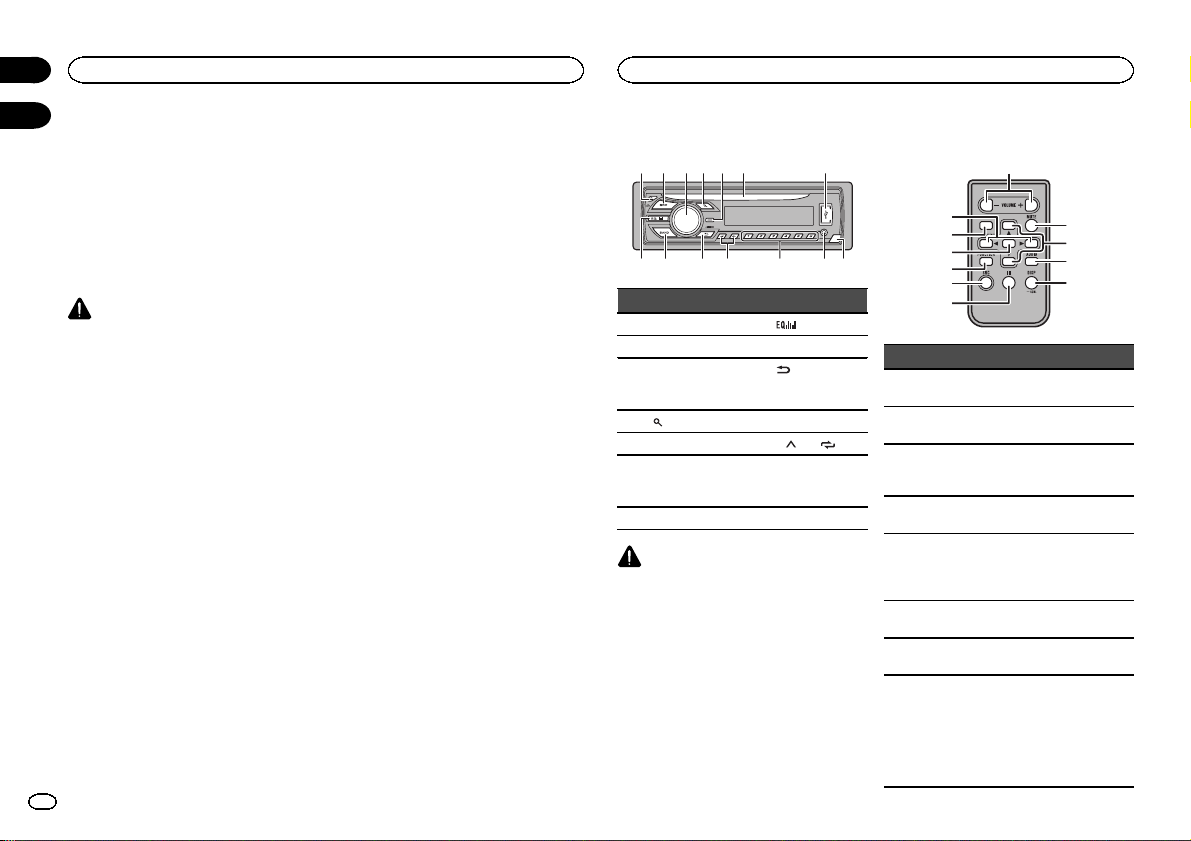
Head unit
5
2 3 4 6 7
1
9
Part Part
1 h (eject) 8
2 SRC/OFF 9 BAND
MULTI-CONTROL
3
(M.C.)
(list) b c/d
4
5 DISP/DISP OFF c 1/
6 Disc loading slot d
7 USB port e Detach button
CAUTION
! Use an optional Pioneer USB cable (CD-
U50E) to connect the USB storage device as
any device connected directly to the unit will
protrude out from the unit, which could be
dangerous.
! Do not use unauthorized products.
c d
bae8
(equalizer)
(back)/
DIMMER
a
(dimmer)
to 6/
AUX input jack
(3.5 mm stereo
jack)
Remote control
b
9
m
l
2
k
Part Operation
f VOLUME
g MUTE
h a/b
i AUDIO
j DISP/SCRL
k e
FUNC-
l
TION
LIST/
m
ENTER
Press to increase or decrease
volume.
Press to mute. Press again to
unmute.
Press to recall preset stations.
Press to select the next/previous folder.
Press to select an audio function.
Press to select different displays.
Press and hold to turn dimmer
on or off.
Press to pause or resume playback.
Press to select functions.
Press to display the disc title,
track title, folder, or file list depending on the source.
Press to display the list depending on the source.
While in the operating menu,
press to control functions.
f
g
h
i
j
Operating this unit
Operating this unit
Section
02
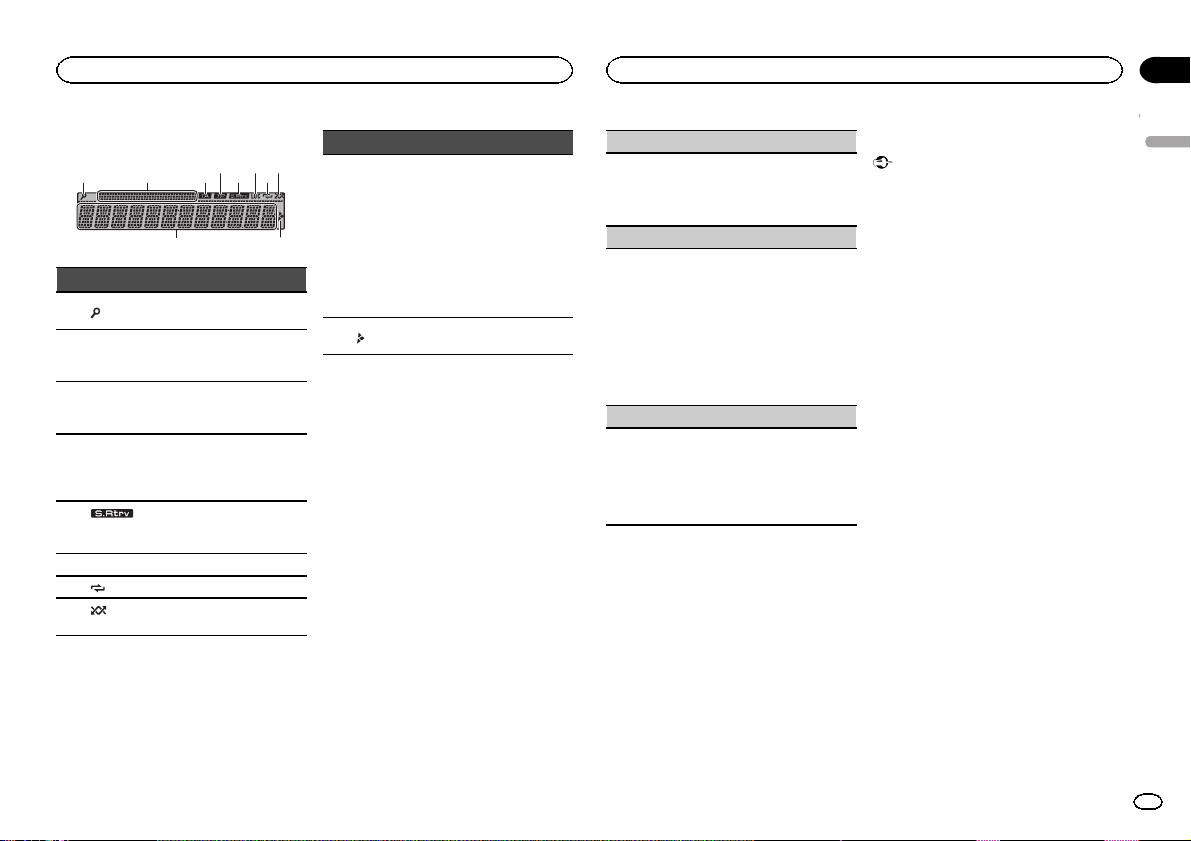
Display indication
21 3 75
Indicator State
1
(list)
Sub infor-
2
mation section
TA (traffic
3
announcements)
TP (traffic
program
4
identification)
(sound re-
5
triever)
6 LOC Local seek tuning is on.
(repeat) Track or folder repeat is on.
7
(ran-
8
dom)
4 6 8
9
The list function is being operated.
Sub information is displayed.
TA function is on.
A TP station is tuned in.
The sound retriever function
is on.
Random play is on.
Indicator State
! Tuner: band and fre-
quency
! RDS: program service
Main infor-
9
a
mation section
a
name, PTY information
and other literal information
! CD player and USB stor-
age device: elapsed playback time and text
information
Appears when a lower tier of
folder or menu exists.
Set up menu
When you turn the ignition switch to ON after installation, set up menu appears on the display.
You can set up the menu options below.
1 After installation of this unit, turn the
ignition switch to ON.
SET UP appears.
2 Turn M.C. to switch to YES.
# If you do not operate for 30 seconds, the set up
menu will not be displayed.
# If you prefer not to set up at this time, turn M.C.
to switch to NO. Press to select.
If you select NO, you cannot set up in the set up
menu.
3 Press M.C. to select.
4 Perform the following procedures to set
the menu.
To proceed to the next menu option, you need to
confirm your selection.
CLOCK SET (setting the clock)
1 Turn M.C. to adjust hour.
2 Press M.C. to select minute.
3 Turn M.C. to adjust minute.
4 Press M.C. to confirm the selection.
FM STEP (FM tuning step)
Normally, the FM tuning step employed by seek
tuning is 50 kHz. When AF or TA is on, the tuning
step automatically changes to 100 kHz. It may be
preferable to set the tuning step to 50 kHz when
AF is on.
! The tuning step remains at 50 kHz during man-
ual tuning.
1 Turn M.C. to select the FM tuning step.
50 (50 kHz)—100 (100 kHz)
2 Press M.C. to confirm the selection.
MW STEP (MW tuning step)
The MW tuning step can be switched between
9 kHz and 10 kHz.
1 Turn M.C. to select the MW tuning step.
9 (9 kHz)—10 (10 kHz)
2 Press M.C. to confirm the selection.
QUIT appears.
5 To finish your settings, turn M.C. to select
YES.
# If you prefer to change your setting again, turn
M.C. to switch to NO. Press to select.
6 Press M.C. to select.
Notes
! You can set up the menu options from the
system menu. For details about the settings,
refer to System menu on page 7.
! You can cancel set up menu by pressing
SRC/OFF.
Basic operations
Important
! Handle gently when removing or attaching
the front panel.
! Avoid subjecting the front panel to excessive
shock.
! Keep the front panel out of direct sunlight
and high temperatures.
! To avoid damaging the device or vehicle inte-
rior, remove any cables and devices attached
to the front panel before detaching it.
English
3
En
Section
Operating this unit
02
Operating this unit
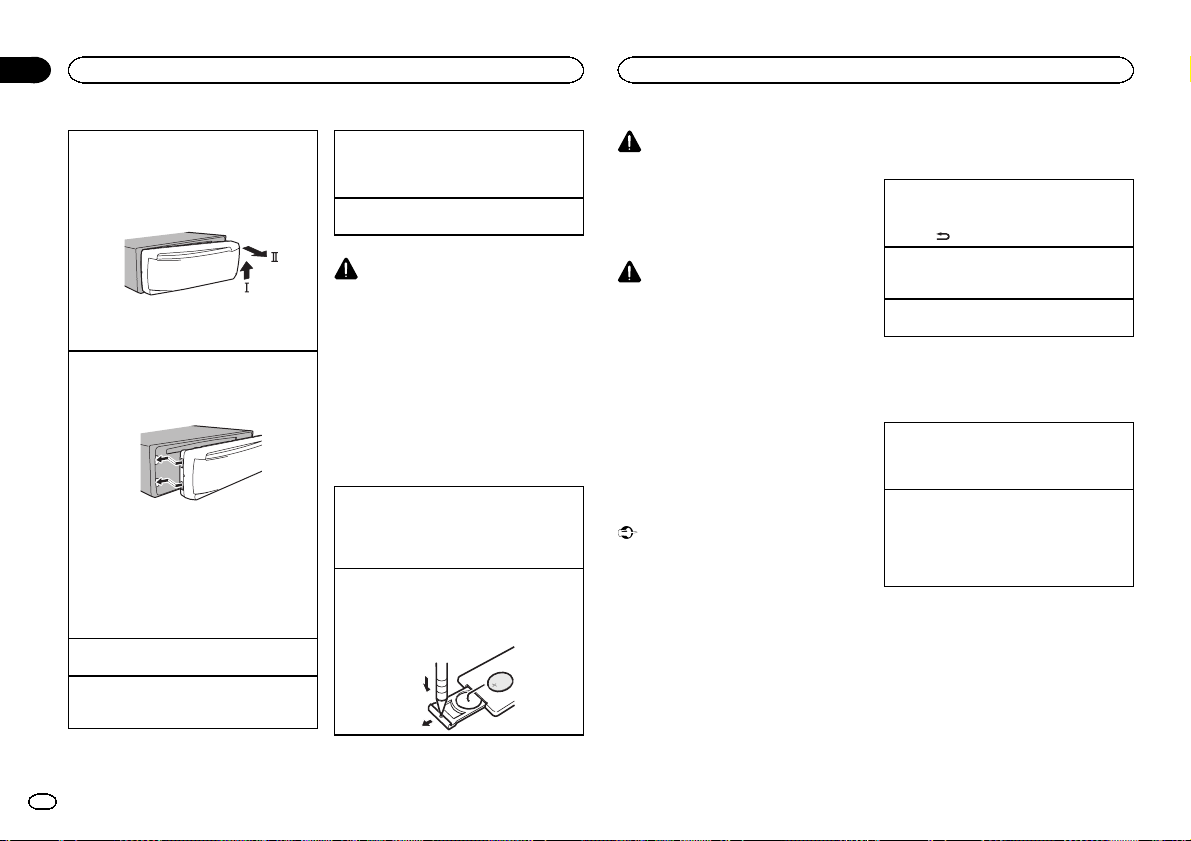
Removing the front panel to protect your unit from
theft
1 Press the detach button to release the front
panel.
2 Push the front panel upward (M) and then pull
it toward (N) you.
3 Always keep the detached front panel in a pro-
tection device such as a protection case.
Re-attaching the front panel
1 Slide the front panel to the left.
Make sure to insert the tabs on the left side of
the head unit into the slots on the front panel.
2 Press the right side of the front panel until it is
firmly seated.
If you cannot attach the front panel to the
head unit successfully, make sure that you are
placing the front panel onto the head unit correctly. Forcing the front panel into place may
result in damage to the front panel or head
unit.
Turning the unit on
1 Press SRC/OFF to turn the unit on.
Turning the unit off
1 Press and hold SRC/OFF until the unit turns
off.
Selecting a source
1 Press SRC/OFF to cycle between:
TUNER (tuner)—CD (CD player)—USB (USB)
—AUX (AUX)
Adjusting the volume
1 Turn M.C. to adjust the volume.
CAUTION
For safety reasons, park your vehicle when removing the front panel.
Note
When this unit’s blue/white lead is connected to
the vehicle’s auto-antenna relay control terminal, the vehicle’s antenna extends when this
unit’s source is turned on. To retract the antenna, turn the source off.
Use and care of the remote
control
Using the remote control
1 Point the remote control in the direction of the
front panel to operate.
When using for the first time, pull out the film
protruding from the tray.
Replacing the battery
1 Slide the tray out on the back of the remote
control.
2 Insert the battery with the plus (+) and minus
(–) poles aligned properly.
WARNING
! Keep the batter y out of the reach of children.
Should the batter y be swallowed, consult a
doctor immediately.
! Batteries (batter y pack or batteries installed)
must not be exposed to excessive heat such
as sunshine, fire or the like.
CAUTION
! Use one CR2025 (3 V) lithium batter y.
! Remove the battery if the remote control is
not used for a month or longer.
! There is a danger of explosion if the battery is
incorrectly replaced. Replace only with the
same or equivalent type.
! Do not handle the batter y with metallic tools.
! Do not store the battery with metallic ob-
jects.
! If the battery leaks, wipe the remote control
completely clean and install a new battery.
! When disposing of used batteries, comply
with governmental regulations or environmental public institutions’ rules that apply in
your countr y/area.
Important
! Do not store the remote control in high tem-
peratures or direct sunlight.
! The remote control may not function properly
in direct sunlight.
! Do not let the remote control fall onto the
floor, where it may become jammed under
the brake or accelerator pedal.
Frequently used menu
operations
Returning to the previous display
Returning to the previous list (the folder one level
higher)
/DIMMER.
1 Press
Returning to the ordinary display
Canceling the main menu
1 Press BAND.
Returning to the ordinary display from the list
1 Press BAND.
Tuner
Basic operations
Selecting a band
1 Press BAND until the desired band (FM1,
FM2, FM3 for FM, MW or SW1, SW2 for short-
wave) is displayed.
Switching preset stations
1 Press c or d.
! Select PCH (preset channel) under SEEK to
use this function. For details about the settings, refer to SEEK (left/right key setting) on
page 6.
4
En
Operating this unit
Operating this unit
Section
02
Manual tuning (step by step)
1 Press c or d.
! Select MAN (manual tuning) under SEEK to
use this function. For details about the settings, refer to SEEK (left/right key setting) on
the next page.
Seeking
1 Press and hold c or d, and then release.
You can cancel seek tuning by briefly pressing
c or d.
While pressing and holding c or d, you can
skip stations. Seek tuning starts as soon as
you release c or d.
Note
This unit’s AF (alternative frequencies search)
function can be turned on and off. AF should be
off for normal tuning operation (refer to AF (al-
ternative fre quencies search) on this page).
Storing and recalling stations
for each band
Using preset tuning buttons
1 When you find a station that you want
to store in memory, press one of the preset
tuning buttons (1/
the preset number stops flashing.
2 Press one of the preset tuning buttons
(1/
to 6/ ) to select the desired station.
to 6/ ) and hold until
Switching the display
Selecting the desired text information
1 Press DISP/DISP OFF to cycle between the fol-
lowing:
! FREQUENCY (program ser vice name or
frequency)
! BRDCST INFO (program service name/PTY
information)
! CLOCK (source name and clock)
Notes
! If the program ser vice name cannot be ac-
quired in FREQUENCY, the broadcast frequency is displayed instead. If the program
service name is detected, the program ser vice name will be displayed.
! BRDCST INFO text information will change
automatically.
! Depending on the band, text information can
be changed.
! Text information items that can be changed
depend on the area.
Using PTY functions
You can tune in to a station using PTY (program
type) information.
Searching for an RDS station by PTY information
You can search for general types of broadcasting
programs, such as those listed in the following
section. Refer to this page.
1 Press
2 Turn M.C. to select a program type.
3 Press M.C. to begin the search.
(list).
NEWS/INFO—POPULAR—CLASSICS—
OTHERS
The unit searches for a station broadcasting
that type of program. When a station is found,
its program service name is displayed.
! To cancel the search, press M.C. again.
! The program of some stations may differ
from that indicated by the transmitted PTY.
! If no station is broadcasting the type of
program you searched for, NOT FOUND is
displayed for about two seconds and then
the tuner returns to the original station.
PTY list
NEWS/INFO (news and information)
NEWS (News), AFFAIRS (Current affairs), INFO
(Information), SPORT (Sports), WEATHER (Weath-
er), FINANCE (Finance)
POPULAR (popular)
POP MUS (Popular music), ROCK MUS (Rock
music), EASY MUS (Easy listening), OTH MUS
(Other music), JAZZ (Jazz), COUNTRY (Country
music), NAT MUS (National music), OLDIES
(Oldies music), FOLK MUS (Folk music)
CLASSICS (classics)
L. CLASS (Light classical), CLASSIC (Classical)
OTHERS (others)
EDUCATE (Education), DRAMA (Drama), CULTURE (Culture), SCIENCE (Science), VARIED (Var-
ied), CHILDREN (Children’s), SOCIAL (Social
affairs), RELIGION (Religion), PHONE IN (Phone
in), TOURING (Travel), LEISURE (Leisure), DOCU-
MENT (Documentaries)
Function settings
1 Press M.C. to display the main menu.
2 Turn M.C. to change the menu option
and press to select FUNCTION.
3 Turn M.C. to select the function.
Once selected, the following functions can be
adjusted.
! If MW, SW1 or SW2 is selected, only BSM,
LOCAL and SEEK are available.
BSM (best stations memory)
BSM (best stations memory) automatically stores
the six strongest stations in the order of their signal strength.
1 Press M.C. to turn BSM on.
To cancel, press M.C. again.
REGION (regional)
When AF is used, the regional function limits the
selection of stations to those broadcasting regional programs.
1 Press M.C. to turn the regional function on or
off.
LOCAL (local seek tuning)
Local seek tuning lets you tune in to only those
radio stations with sufficiently strong signals for
good reception.
1 Press M.C. to select the desired setting.
FM: OFF—LV 1—LV 2 —LV3—LV 4
MW/shortwave: OFF—LV 1—LV 2
The highest level setting allows reception of
only the strongest stations, while lower levels
allow the reception of weaker stations.
TA (traffic announcement standby)
1 Press M.C. to turn traffic announcement
standby on or off.
AF (alternative frequencies search)
1 Press M.C. to turn AF on or off.
NEWS (news program interruption)
1 Press M.C. to turn the NEWS function on or
off.
English
5
En
 Loading...