

Page 1
DJ Controller
DDJ-XP1
pioneerdj.com/support/
rekordbox.com
The Pioneer DJ site shown above offers FAQs, information on software, and various other types of information
and services to allow you to use your product in greater comfort.
Operating Instructions
Page 2
Contents
How to read this manual
! Thank you for buying this Pioneer DJ product.
Be sure to read both this manual and the Operating Instructions
(Quick Start Guide). Both contain important information that you
should understand before using this unit.
For instructions on obtaining the rekordbox Operating Instructions,
see Viewing the rekordbox Operating Instructions (p.3).
! In this manual, names of menus displayed on the product and on the
computer screen, as well as names of buttons and terminals, etc.,
are indicated within brackets. (e.g. [File], [LOAD] button)
! Please note that the screens and specifications of the software
described in this manual as well as the external appearance and
specifications of the hardware are currently under development and
may differ from the final specifications.
! Please note that depending on the operating system version, web
browser settings, etc., operation may differ from the procedures
described in this manual.
! Please note that the language on the screens of the software
described in this guide may differ from the language on your
screens.
This manual consists mainly of explanations of functions of this unit as
hardware. For detailed instructions on operating rekordbox dj, see the
rekordbox Operating Instructions.
Before start
Features ........................................................................................................ 3
What’s in the box ......................................................................................... 3
Viewing the rekordbox Operating Instructions ......................................... 3
Operating environment ............................................................................... 3
Installing rekordbox
Downloading rekordbox .............................................................................. 5
Installing rekordbox ..................................................................................... 5
Part names and functions
Control panel ................................................................................................ 7
Rear panel .................................................................................................. 10
Example of system setup
Basic operation
Starting with the rekordbox dvs system using analog players and a DJ
Mixer ........................................................................................................... 12
Starting with the system which controls rekordbox dj using DJ players
..................................................................................................................... 13
Advanced operation
Using the 4 beat looping ........................................................................... 14
Using the manual looping ........................................................................ 14
Using the performance pads .................................................................... 14
Using the pad editing function ................................................................. 17
Using slide FX............................................................................................. 17
Changing the settings
Launching utilities mode .......................................................................... 18
Utilities modes ........................................................................................... 18
Additional information
Troubleshooting ......................................................................................... 20
Using as a controller for other DJ software ............................................. 21
About trademarks and registered trademarks ....................................... 21
Cautions on copyrights ............................................................................. 21
En
2
Page 3
Before start
Before start
Features
This unit is an intuitive DJ controller designed for controlling the various
functions of “rekordbox dj”. Adding the unit to a digital DJ system
maximizes the performance function of rekordbox dj. For example,
Pioneer DJ players or turntables combined with mixers corresponding
to rekordbox dj and rekordbox dvs, or the unit combined with rekordbox
dj. This allows users an intuitive and wide range of performances with a
highly operable interface.
PERFORMANCE PADS
You can control 7 functions such as HOT CUE, PAD FX, BEAT JUMP,
SAMPLER, KEYBOARD, BEAT LOOP, and KEY SHIFT on rekordbox dj.
The unit has 32 large “PERFORMANCE PADS” for tapping or thrumming.
These pads are soft, so you can perform comfortably for a long time.
Unique Design and Professional Build
Quality
The unit is thin and flat, easy to carry and install in the DJ booth,
enabling you maximize your performance when using rekordbox dj. The
surface of pads and effect areas is made of rubber, for a robust and
grippy performance.
“rekordbox dj” Supported
The unit supports the DJ software “rekordbox dj” which has many
functions required for DJ performances. All buttons and tabs of the unit
are preset, so you can enjoy DJ play soon after connecting the unit to a
computer.
What’s in the box
! USB cable
! Operating Instructions (Quick Start Guide)
! Warranty (for some regions)
! rekordbox dj license key card
! rekordbox dvs license key card
The included warranty is for the European region.
— For the Japanese region, the corresponding information is
provided on the back cover of the “Operating Instructions (Quick
Start Guide).”
— For the North American region, the corresponding information is
provided on the last page of both the English and French versions
of the “Operating Instructions (Quick Start Guide).”
Cautions
The license key cannot be reissued. Be careful not to lose it.
2 Click [Support].
3 Click [Manual].
4 Click the desired language from the list.
! For information and services for “rekordbox,” refer to the “rekordbox.
com” above.
Operating environment
The following software or devices are required to operate the unit.
rekordbox dj software
! “rekordbox dj” is the DJ performance function of rekordbox. To
be able to use this function, enter the license key shown on the
rekordbox dj license key card included with this unit.
! rekordbox is comprehensive software which can manage audio
tracks and make DJ performances.
! rekordbox dvs
The DVS function, which can be added to rekordbox dj to perform
deck operations using control signals played with CDJ or a turntable,
is called rekordbox dvs. To add this function, enter the license key
shown on the license key card included with this unit.
Minimum operating environment for rekordbox dj
Supported operating systems
Mac: macOS Sierra 10.12,
OS X 10.11/10.10
(latest updated)
Windows: Windows 10/
Windows 8.1/Windows 7
(latest service pack)
Others
USB port USB 2.0 port × 2
Display resolution Resolution of 1 280 × 768 or greater
Internet connection
! For information on the latest system requirements, compatibility,
and supported operating systems of rekordbox, see [System
Requirements] on the rekordbox.com site below.
rekordbox.com
! Operation is not guaranteed on all computers, even if all the required
operating environment conditions indicated here are fulfilled.
! Depending on the computer’s power-saving settings, etc., its CPU
and hard disk may not provide sufficient processing capabilities. For
notebook computers in particular, make sure the computer is in the
proper conditions to provide constant high performance (for example
by keeping the AC power connected) when using rekordbox.
! It is assumed that you are using the latest version of the operating
system.
®
Intel
processor Core™ i7, i5, i3
Intel® processor Core™ 2 Duo 2.0 GHz
or more
4 GB or more of RAM
®
Intel
processor Core™ i7, i5, i3
Intel® processor Core™ 2 Duo 2.0 GHz
or more
4 GB or more of RAM
Viewing the rekordbox Operating
Instructions
A manual may be made of the PDF format file. To view a PDF file,
installing Adobe® Reader® is required.
1 Launch a web browser on the computer and access
the “rekordbox.com”.
rekordbox.com
En
3
Page 4

Computer to operate the rekordbox dj software
A USB 2.0 port is required to connect the computer with this unit.
! The computer must have two USB 2.0 ports, one for connecting
with the unit, and another for connecting with the DJ mixer or audio
interface.
! For a computer with only a USB Type-C port, a USB Type-C (male) -
USB A (female) cable is required.
To use the unit with a rekordbox dvs record/CD
DJ mixer such as DJM-S9 or DJM-900NXS2, audio interface such as
INTERFACE 2, or DJ controller such as DDJ-RZ, corresponding to
rekordbox dvs, are required.
To add the unit to a system which controls rekordbox dj
using DJ players
DJ player such as CDJ-2000NXS2 or XDJ-1000MK2, and DJ mixer such
as DJM-900NXS2 corresponding to rekordbox dj, are required.
To use the unit with the DJ controller
DJ controller such as DDJ-RZ or DDJ-RX corresponding to rekordbox dj
is required.
To use the unit as a sub controller for the DJ player
DJ player such as CDJ-2000NXS2 or XDJ-1000MK2 is required.
Internet connection environment
An Internet connection is required for downloading rekordbox dj.
! Use of the Internet may require a separate contract with a provider
offering Internet services and payment of provider fees.
En
4
Page 5
Installing rekordbox
If you are installing rekordbox for the first time, use the following procedures.
If you have installed rekordbox already, update it to the latest version.
Installing rekordbox
Downloading rekordbox
1 Access “rekordbox.com”.
rekordbox.com/en/store/
! The site is subject to change without notice.
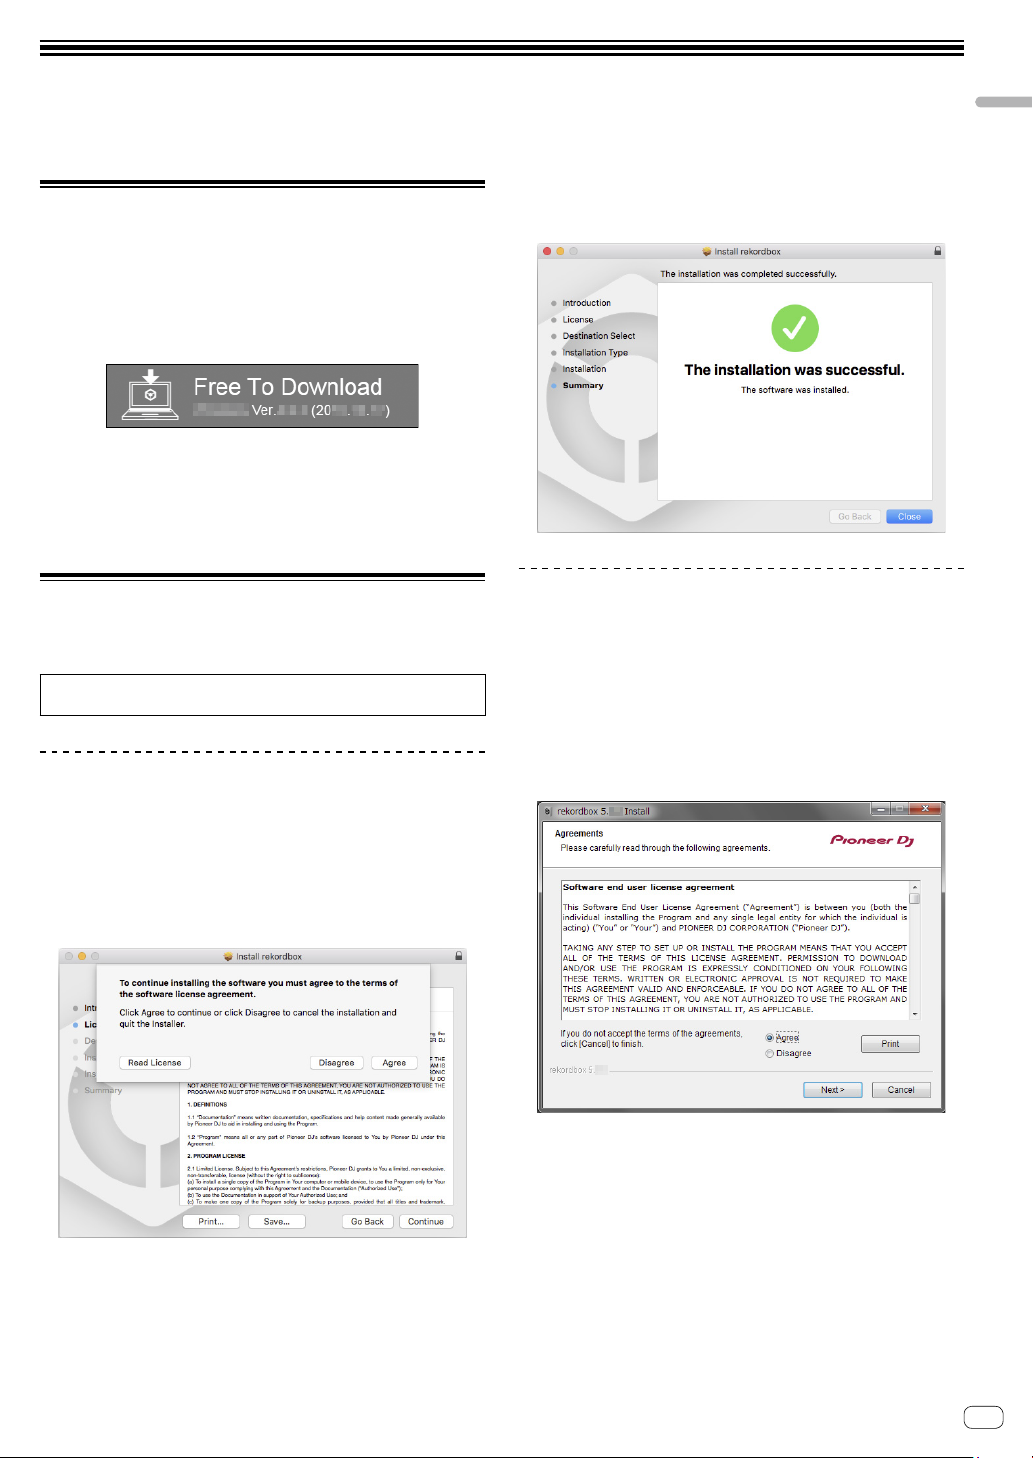
2 After reading the Get Started guide, click [Free To
Download].
3 Read the terms of the software license agreement
carefully, and then mark the [Agree] checkbox to
continue.
After marking the checkbox, click [Download] to start downloading
rekordbox.
Installing rekordbox
Depending on the Operating System (OS) of your computer, procedures
differ.
Do not connect the unit to your computer until the installation has
completed.
Installing (Mac)
4 When the screen for completing the installation
appears, click [Close] to end the installation.
Installing (Windows)
! Log into your computer as administrator before starting the
installation.
1 Unzip the downloaded rekordbox software file.
2 Double-click the unzipped software file, and then
start the installer.
3 Read the terms of the license agreement carefully,
and if you agree, select [Agree], then click [Next].
1 Unzip the downloaded rekordbox software file.
2 Double-click the unzipped software file, and then
start the installer.
3 Read the terms of the license agreement carefully,
and then click [Agree] to continue.
! If you do not agree to the contents of the license agreement, click
[Disagree] to cancel the installation.
! If you do not agree to the contents of the license agreement, click
[Cancel] to cancel the installation.
! After specifying the destination, the installation will be started.
When the installation is finished, a completion message will be
displayed.
En
5
Page 6

4 Click [Finish] to complete the installation.
Installation is completed.
En
6
Page 7

Part names and functions
This section explains the main feature of the buttons and pads for rekordbox dj.
For operation when using with CDJ-2000NXS2 or XDJ-1000MK2, refer to the following Pioneer DJ website.
pioneerdj.com
Control panel
Part names and functions
1 Browser section
2 Deck sections
3 Performance pad section
4 Slide FX sections
Browser section
1 INT button
Press:
Sets relative mode when rekordbox dvs is in internal mode.
Sets internal mode when rekordbox dvs is in relative mode.
[SHIFT] + press:
Selects the deck to be used.
When deck 3 or deck 4 is selected, the [INT] button lights if the
[SHIFT] button is pressed.
When deck 1 or deck 2 is selected, the [INT] button does not light if
the [SHIFT] button is pressed.
En
7
Page 8

! Before setting the play mode for rekordbox dvs, it is necessary
to activate the rekordbox dvs plus pack in the [License] tab and
check the [Enable DVS Function] checkbox in the [DVS] tab on
the rekordbox [Preferences] screen.
2 Rotary selector
Turn:
Moves the cursor up or down in the tree view or track list.
Press:
Moves the cursor between the tree view and track list each time the
rotary selector is pressed.
! When the playlist palette is displayed, the cursor moves between
playlists in addition to the tree view and track list.
! The tree view, track list and playlist palette are in the browse
section of rekordbox dj. For each function, refer to the rekordbox
Operating Instructions.
3 LOAD button
Press:
Loads the selected tracks to the decks.
Press twice in a row:
Loads the tracks loaded in the selected deck on the opposite side,
into the deck whose [LOAD] button was pressed.
If this is done while a track is playing, the track is played from the
same position. (Instant Doubles)
[SHIFT] + press:
Loads the track after the selected track into the deck.
4 SHIFT button
Press:
Calls out a different function when another button is pressed while
pressing the [SHIFT] button.
Deck sections
3 OUT•2X button
Press:
Sets the Loop Out Point, and loop playback begins during normal
playback.
Doubles the loop playback length during loop playback.
[SHIFT] + press:
Cancels the loop playback. (Loop Exit)
After loop playback is canceled, playback returns to the previously
set Loop In Point and loop playback resumes. (Reloop)
4 QUANTIZE button
Press:
Turns on the quantize function.
Sets a point closest to the beat position when setting a hot cue, etc.
! Resolution of the beat to be quantized can be selected in
[Preferences] of rekordbox.
5 SLIP REVERSE button
Press:
Plays backward while pressing the [SLIP REVERSE] button and
returns to normal playback when the button is released.
! Normal playback continues in the background while playing
backward, and start playing from the position where playback
reached in the background when the button is released.
! Backward playback is canceled automatically after 8 beats have
played backward even if the [SLIP REVERSE] button continues to
be pressed, and returns to the normal playback from the point
reached in the background.
6 MASTER TEMPO button
Press:
Turns on/off the master tempo function.
When the master tempo function is on and the tempo of the track
changes, the pitch is not changed.
! Sound quality may be deteriorated, as it is digitalized.
7 BEAT SYNC button
Press:
Synchronizes with the tempos of the deck set as the master for
synchronization automatically, when rekordbox dvs is played in
relative mode.
Synchronizes with the tempos and beat grids of the deck set as the
master for synchronization automatically, when rekordbox dvs is
played in internal mode.
! It may synchronize with twice or half the tempos of the track
playing on the deck set as the master.
! The SYNC function does not work when rekordbox dvs is played
in absolute mode.
1 4 BEAT LOOP / EXIT button
Press:
Turns the auto 4-beat loop on during normal playback.
Cancels the loop playback during loop playback.
[SHIFT] + press:
Switches the active/inactive status of the loop stored in a track.
(Active loop)
! During playback, activates the loop closest to the playback
position stored in the track.
! When calling out a loop stored in the track, the called out loop
status changes to active or inactive.
2 IN•1/2X button
Press:
Sets Loop In Point during normal playback.
Reduces the loop playback by half during loop playback.
[SHIFT] + press:
Returns to the set Loop In Point and loop playback continues.
En
8
[SHIFT] + press:
Sets the selected deck as the master deck for synchronization.
8 SILENT CUE button
Press:
Mutes the sound of the track playing on the selected deck.
Press again to cancel.
! Mute mode can be canceled by calling out hot cues when
rekordbox dvs is played in relative mode.
9 SEMITONE - button
Press:
Lowers the key of the track playing on the selected deck by a half.
[SHIFT] + press:
The key of the track playing on the selected deck shifts to the same
key as the track in the tuning source; either the dominant key (5
pitches higher) or the subdominant key (4 pitches higher). (KEY
SYNC)
Page 9

a SEMITONE + button
Press:
Raises the key of the track playing on the selected deck by a half.
[SHIFT] + press:
Turns the key of the track playing on the selected deck back to the
original key. (Key reset)
Performance pad section
1 PAGE c button, PAGE d button
Press:
Switches the pad display of the deck screen on rekordbox dj.
[SHIFT] + press:
Switches the sampler bank.
2 HOT CUE mode button
Press:
Sets pads to the hot cue mode.
[SHIFT] + press:
Sets pads to the keyboard mode.
3 PAD FX 1 mode button
Press:
Sets pads to the pad FX mode 1.
[SHIFT] + press:
Sets pads to the pad FX mode 2.
4 BEAT JUMP mode button
Press:
Sets pads to the beat jump mode.
Slide FX sections
Part names and functions
1 SLIDE FX [1] button, SLIDE FX [2] button, SLIDE FX [3]
button
Press:
Selects an effect type.
! Multiple effects cannot be selected.
2 Touch strip
Touch:
Turns on the selected effect, and changes the level/depth of the
effect according to the position touched.
! Effect turns to off when you release your finger from the touch
strip.
Slide:
Changes the value of the level/depth of the effect according to the
sliding position.
3 HOLD button
Press:
Keeps the effect on even if you release your finger from the touch
strip.
! The hold function is canceled when pressing again.
! The level/depth of the effect can be changed by sliding the touch
strip even when the hold function is on.
[SHIFT] + press:
Sets pads to the beat loop mode.
5 SAMPLER mode button
Press:
Sets pads to the sampler mode.
[SHIFT] + press:
Sets pads to the key shift mode.
6 Performance pad
Uses to play “hot cue”, “pad FX”, “beat jump”, “sampler”, “keyboard”,
“beat loop”, and “key shift”.
En
9
Page 10

Rear panel
1 USB terminal
Connects to a computer using the included USB cable.
! A USB hub cannot be used.
! For a computer with only a USB Type-C port, a USB Type-C (male)
- USB A (female) cable is required.
2 Kensington security slot
10
En
Page 11

Example of system setup
Combining with rekordbox dvs system using analog players and a DJ Mixer
DDJ-XP1
Example of system setup
For connecting to
DDJ-XP1, be sure to
use the USB cable
supplied with the
unit for optimum
performance.
\
Audio cable
Analog player
PLX-1000, etc.
USB cable (supplied)
USB cable
DJ Mixer
DJM-S9, etc.
Audio cable
Analog player
PLX-1000, etc.
Combining with a system which controls rekordbox dj by DJ players
For connecting to
DDJ-XP1, be sure to
use the USB cable
supplied with the
unit for optimum
performance.
USB cable (supplied)
USB cable
Computer
DDJ-XP1
Computer
DJ player
CDJ-2000NXS2,
etc.
DJ Mixer
DJM-900NXS2,
etc.
DJ player
CDJ-2000NXS2,
etc.
LAN cable
LAN cable
LAN cable
Switching hub
En
11
Page 12

Basic operation
Starting with the rekordbox dvs
system using analog players and a
DJ Mixer
Connection of a DJ mixer corresponding to rekordbox dvs and computer
with a USB cable is required.
! For rekordbox dj software, rekordbox dvs plus pack and operation
of DJ mixer corresponding to rekordbox dvs, refer to the respective
operating instructions.
rekordbox Operating Instructions can be obtained from the following
rekordbox website; [Support] > [Manual] > [rekordbox Manual].
rekordbox dvs Setup Guide can be obtained from the following
rekordbox website; [Support] > [Manual] > [rekordbox dvs Setup
Guide].
rekordbox.com
1 Connect the DJ mixer corresponding to rekordbox
dvs to a computer using a USB cable.
2 Connect the audio output of the analog player
to the channel input of the DJ mixer using an audio
cable (RCA (sold separately)).
3 Set a rekordbox dvs record (sold separately) to the
analog player.
! Make sure to use a rekordbox dvs record made by Pioneer DJ.
Records other than that cannot be used.
4 Turn on the computer.
! The audio driver for the DJ mixer should be installed in advance
before starting rekordbox.
5 Turn on the analog player and DJ mixer, then start
rekordbox dj.
When starting rekordbox for the first time, it is necessary to enter the
license keys to activate rekordbox dj and rekordbox dvs. You can find the
license keys on the cards supplied with the unit.
! For the procedure to activate, refer to the rekordbox Operating
Instructions and rekordbox dvs Setup Guide.
! It is not necessary to pay for the rekordbox dj and rekordbox dvs
license keys for this unit.
– For Windows 10/8.1
Click the [rekordbox] icon in [Apps view].
– For Windows 7
Select [All Programs] > [Pioneer] > [rekordbox X.X.X] from the
Windows [Start] menu, then click the [rekordbox] icon.
– For macOS Sierra 10.12, OS X 10.11/10.10
Open the [Applications] folder in Finder, then double click the
[rekordbox] icon in the [rekordbox X] folder.
6 Set the DJ mixer to use as an audio interface for
rekordbox dj.
! For details, refer to [rekordbox dvs Setup Guide].
7 Set to use rekordbox dvs with rekordbox dj.
! For details, refer to [rekordbox dvs Setup Guide].
8 Connect the unit and computer using the supplied
USB cable.
! The unit operates with the operating system’s standard driver. There
is no need to install separate driver software for the unit.
9 [DDJ-XP1 is connected.] appears on the rekordbox
dj screen and DDJ-XP1 is ready to use.
Adding audio tracks into [Collection]
The [Collection] screen contains a list of audio track files managed by
rekordbox.
Register audio tracks on your computer to rekordbox, and analyze them
so they can be used on rekordbox.
1 Click [Collection] on the tree view.
An audio track list registered on [Collection] is displayed.
2 Open Finder or Windows Explorer, and then drag
& drop audio track files or folders with audio track
files into the audio track list.
Audio track files are added into [Collection], and then analyzing of
waveform information for audio track files starts.
Wait until analyzing of all audio track files is completed.
Loading an audio track into a deck of the
unit
1 Press the rotary selector of the unit to move the
cursor to the tree view on the computer screen, then
turn the rotary selector to select [Collection].
2 Press the rotary selector to move the cursor to the
track list on the computer screen, then turn the rotary
selector to select a track.
3 Press the [LOAD] button to load the selected track
into a deck.
Before loading a track to deck 3 or 4, press the [SHIFT]+[INT] buttons.
The loading destination links with the deck selection.
Playing tracks
Tracks loaded on the deck start playing when you operate the analog
player to play the rekordbox dvs record.
! For operation of rekordbox dvs, refer to [rekordbox dvs Setup
Guide].
! For operation of analog players, refer to operating instructions
supplied with the analog player.
Closing the system
1 Close rekordbox dj.
2 Disconnect the USB cable from the computer.
12
En
Page 13

Starting with the system which
controls rekordbox dj using DJ
players
Connection of a DJ mixer corresponding to rekordbox dj and computer
with a USB cable is required.
! For operation of rekordbox dj software, DJ mixer or DJ player
corresponding to rekordbox dj, refer to the respective operating
instructions.
rekordbox Operating Instructions can be obtained from the following
rekordbox website; [Support] > [Manual] > [rekordbox Manual].
Connection Guide when controlling rekordbox dj with DJ players
can be obtained from the following rekordbox website; [Support] >
[Manual] > [Connection Guide for PERFORMANCE mode].
rekordbox.com
1 Connect the DJ mixer corresponding to rekordbox
dj to a computer using a USB cable.
2 Connect the DJ player, DJ mixer and computer.
! For details, see [Connection Guide for PERFORMANCE mode].
! For CDJ-2000NXS2, XDJ-1000MK2 and DJM-900NXS2, use LAN
cables to connect the DJ player and DJ mixer.
3 Turn on the computer.
! The audio driver for the DJ mixer should be installed in advance
before starting rekordbox.
4 Turn on the DJ player and DJ mixer, then start
rekordbox dj.
When starting rekordbox for the first time, it is necessary to enter the
license key to activate rekordbox dj. You can find the license key on the
card supplied with the unit.
! For the procedure to activate, refer to the rekordbox Operating
Instructions.
! It is not necessary to pay for the rekordbox dj license key for this unit.
– For Windows 10/8.1
Click the [rekordbox] icon in [Apps view].
– For Windows 7
Select [All Programs] > [Pioneer] > [rekordbox X.X.X] from the
Windows [Start] menu, then click the [rekordbox] icon.
– For macOS Sierra 10.12, OS X 10.11/10.10
Open the [Applications] folder in Finder, then double click the
[rekordbox] icon in the [rekordbox X] folder.
5 Set to control rekordbox dj with the DJ player.
! For details, see [Connection Guide for PERFORMANCE mode].
6 Set the DJ mixer to use as an audio interface for
rekordbox dj.
! For details, see [Connection Guide for PERFORMANCE mode].
7 Connect the unit and computer using the supplied
USB cable.
! The unit operates with the operating system’s standard driver. There
is no need to install separate driver software for the unit.
8 [DDJ-XP1 is connected.] appears on the rekordbox
dj screen and DDJ-XP1 is ready to use.
Adding audio tracks into [Collection]
The [Collection] screen contains a list of audio track files managed by
rekordbox.
Register audio tracks on your computer to rekordbox, and analyze them
so they can be used on rekordbox.
1 Click [Collection] on the tree view.
An audio track list registered on [Collection] is displayed.
2 Open Finder or Windows Explorer, and then drag
& drop audio track files or folders with audio track
files into the audio track list.
Audio track files are added into [Collection], and then analyzing of
waveform information for audio track files starts.
Wait until analyzing of all audio track files is completed.
Loading an audio track into a deck of the
unit
1 Press the rotary selector of the unit to move the
cursor to the tree view on the computer screen, then
turn the rotary selector to select [Collection].
2 Press the rotary selector to move the cursor to the
track list on the computer screen, then turn the rotary
selector to select a track.
3 Press the [LOAD] button to load the selected track
into a deck.
Before loading a track to deck 3 or 4, press the [SHIFT]+[INT] buttons.
The loading destination links with the deck selection.
Playing tracks
Tracks loaded on the deck of rekordbox dj start playing by operating the
DJ player.
! For operation of the DJ player, refer to operating instructions
supplied with the DJ player.
Closing the system
1 Close rekordbox dj.
2 Disconnect the USB cable from the computer.
Basic operation
En
13
Page 14

Advanced operation
Using the 4 beat looping
Press the [4 BEAT LOOP/EXIT] button during playback.
The 4 beat loop starts automatically from the position at which the
button is pressed and loop playback starts.
! When the quantize function is on, the performance may become
slow to keep time with the beat.
Canceling the loop playback
Press the [4 BEAT LOOP/EXIT] button again.
Loop playback does not return to the Loop In Point at the Loop Out point
and normal playback continues.
Using the manual looping
Playback of the specified section can be repeated.
! When the quantize function is on, the performance may become
slow to keep time with the beat.
1 During playback, press the [IN•1/2X] button at the
position (Loop In Point) to start the loop playback.
Loop In Point is set.
2 Press the [OUT•2X] button at the position (Loop
Out Point) to end the loop playback.
Loop Out Point is set and the loop playback starts.
Dividing the looping
Press the [IN•1/2X] button during loop playback.
Loop playback length is divided in half each time the button is pressed.
! Loop length can also be divided in half, during the 4 beat loop
playback.
Extending the looping
Returning to the Loop In Point and
continuing the loop playback
Press the [IN•1/2X] button while pressing the [SHIFT]
button.
Playback returns to the set Loop In Point and the loop playback
continues.
Using the performance pads
Using hot cues
Playback can be started instantaneously from the position at which a hot
cue is set.
In addition to hot cues, loops can be set and called out instantaneously.
! Up to sixteen hot cue points can be set and saved per track.
Setting and calling out a hot cue
1 Press the [HOT CUE] mode button.
Switches to hot cue mode.
! The hot cue display area in the rekordbox dj deck screen switches by
pressing the [PAGE c] or [PAGE d] button.
2 In the play or pause mode, press a performance
pad to set the hot cue point.
The hot cue points are assigned to the respective performance pads as
shown below.
Hot cue
A
Hot cue
E
Hot cue
B
Hot cue
F
Hot cue
C
Hot cue
G
Hot cue
D
Hot cue
H
Press the [OUT•2X] button during loop playback.
Loop playback length is doubled each time the button is pressed.
! Loop length can also be doubled, during the 4 beat loop playback.
Canceling the loop playback
Press the [OUT•2X] button while pressing the [SHIFT]
button.
Loop playback does not return to the Loop In Point when reaching to the
Loop Out point and normal playback continues. (Loop Exit)
Returning to the loop playback
After canceling the loop playback, press the [OUT•2X]
button during playback while pressing the [SHIFT]
button.
Playback returns to the previously set Loop In Point and loop playback
resumes. (Reloop)
En
14
Hot cue
I
Hot cue
M
Hot cue
J
Hot cue
N
Hot cue
K
Hot cue
O
Hot cue
L
Hot cue
P
3 Press the performance pad at which the hot cue
point was set.
Playback starts from the hot cue point.
! Set hot cue points can be cleared by pressing a performance pad
while pressing the [SHIFT] button.
Page 15

Setting and calling out a 4 beat loop
1 Press the [HOT CUE] mode button.
Switches to hot cue mode.
2 Press the [4 BEAT LOOP/EXIT] button during
playback.
The 4 beat loop is set to the position at which the button is pressed and
loop playback starts.
3 Press the performance pad to set a loop during
loop playback.
4 Press the performance pad at which the loop is set.
Loop playback starts from the Loop In Point of the set loop.
! The set loop can be cleared by pressing the performance pad while
pressing the [SHIFT] button.
Setting and calling out a manual loop
1 Press the [HOT CUE] mode button.
Switches to hot cue mode.
2 Press the [IN•1/2X] button during playback, and
then press the [OUT•2X] button.
Loop playback starts.
3 Press the performance pad to set a loop during
loop playback.
4 Press the performance pad at which the loop is set.
Loop playback starts from the Loop In Point of the set loop.
! The set loop can be cleared by pressing the performance pad while
pressing the [SHIFT] button.
Using the pad FX
A wide range of effect performances are possible with just the simple
operation of pressing and releasing performance pads.
1 Press the [PAD FX 1] mode button.
Switches to pad FX mode 1.
Effects are assigned to the performance pads as shown below.
! The pad FX display area in the rekordbox dj deck screen switches by
pressing the [PAGE c] or [PAGE d] button.
If the [PAD FX 1] mode button is pressed while pressing the [SHIFT]
button, the mode changes to pad FX mode 2.
Effects are assigned to the performance pads as shown below.
! The pad FX display area in the rekordbox dj deck screen switches by
pressing the [PAGE c] or [PAGE d] button.
Effect Q
Effect U
Effect Y
Effect AC
Effect R
Effect V
Effect Z
Effect AD
Effect S
Effect W
Effect AA
Effect AE
Effect T
Effect X
Effect AB
Effect AF
2 Press and hold a performance pad.
The effect turns on according to the effect and number of beats settings
assigned to the pad that was pressed.
3 Release the performance pad.
The effect turns off.
Using the release FX of the pad FX
! The release FX has to be assigned to the performance pad in
advance.
1 Press and hold the performance pad to which an
effect other than the release FX is assigned.
The effect turns on according to the effect and number of beats settings
assigned to the pad that was pressed.
2 Press the performance pad to which the release FX
is assigned.
The pad FX effect that was on up until now turns off and the release FX
effect is added.
Advanced operation
Effect A
Effect E
Effect I
Effect M
Effect B
Effect F
Effect J
Effect N
Effect C
Effect G
Effect K
Effect O
Effect D
Effect H
Effect L
Effect P
En
15
Page 16

Using beat jump
The playback position can be moved instantaneously without breaking
the rhythm of the track being played back.
1 Press the [BEAT JUMP] mode button.
Switches to the beat jump mode.
Number of beats or number of bars to jump are assigned to each
performance pad as follows. (default state)
! The set number of beats or bars assigned to the performance pads
switches by pressing the [PAGE c] or [PAGE d] button.
1 beat
(left
direction)
4 beats
(left
direction)
16 beats
(left
direction)
16 bars
(left
direction)
1 beat
(right
direction)
4 beats
(right
direction)
16 beats
(right
direction)
16 bars
(right
direction)
2 Press the pad 1, pad 3, pad 5, pad 7, pad 9, pad 11,
pad 13 or pad 15.
The playback position moves to the left by the number of beats or
number of bars assigned to the pressed pad.
3 Press the pad 2, pad 4, pad 6, pad 8, pad 10, pad
12, pad 14 or pad 16.
The playback position moves to the right by the number of beats or
number of bars assigned to the pressed pad.
2 beats
(left
direction)
8 beats
(left
direction)
8 bars
(left
direction)
32 bars
(left
direction)
2 beats
(right
direction)
8 beats
(right
direction)
8 bars
(right
direction)
32 bars
(right
direction)
5 Press the performance pad while pressing the
[SHIFT] button.
The selected track is loaded into the sample slot.
! Loading by overwriting an already loaded sampler slot may not be
possible depending on the [Preferences] of rekordbox.
Using the performance pads to play the sampler
1 Press the [SAMPLER] mode button.
Switches to the sampler mode.
2 Press the [PAGE c] or [PAGE d] button while
pressing the [SHIFT] button.
Switch the sampler bank.
3 Adjust the sampler gain on the rekordbox dj
screen.
4 Press a performance pad.
The sound for the slot assigned to the pad that was pressed is played.
! Sampler slots are assigned to the respective performance pads as
shown below.
Slot 1
Slot 5
Slot 9
Slot 13
Slot 2
Slot 6
Slot 10
Slot 14
Slot 3
Slot 7
Slot 11
Slot 15
Slot 4
Slot 8
Slot 12
Slot 16
Using the sampler function
This procedure can be used to play tracks loaded in the sampler’s
sampler slots using the performance pads.
Preparing to use the sampler
Check the [SAMPLER] checkbox on the top of the
rekordbox dj screen.
A sampler panel is displayed on the rekordbox dj screen.
Loading the track in a sampler slot
1 Press the [SAMPLER] mode button.
Switches to the sampler mode.
2 Press the [PAGE c] or [PAGE d] button while
pressing the [SHIFT] button.
Switch the sampler bank. Sampler has 4 banks and each bank has
sixteen slots.
3 Press the rotary selector to move the cursor to the
track list.
4 Turn the rotary selector.
Select the track you wish to load in a sampler slot.
5 During sampler playback, press a performance
pad.
Playback continues by returning to the beginning.
6 Press a performance pad while pressing the [SHIFT]
button during sampler playback.
The sound of the slot that is currently playing stops.
Using keyboard mode
Scales can be added to the hot cue like a keyboard by the performance
pad.
1 Press the [HOT CUE] mode button while pressing
the [SHIFT] button.
Switches to the keyboard mode.
! The setting of the sound pitch assigned to the performance pads
switches by pressing the [PAGE c] or [PAGE d] button.
2 Press a performance pad.
Select the hot cue to use with keyboard mode.
! If no hot cue is set, the current playback position is set as hot cue
and used in keyboard mode.
! When you reselect a hot cue to use in keyboard mode, press the
[HOT CUE] mode button while pressing the [SHIFT] button.
3 Press a performance pad.
The hot cue is played by the sound pitch assigned to the pad that was
pressed.
16
En
Page 17

Using beat loop
Loop of beats or bars assigned to the pad is set when the performance
pad is pressed. Loop playback continues if you release your finger from
the pad.
1 Press the [BEAT JUMP] mode button while pressing
the [SHIFT] button.
Switches to the beat loop mode.
The set number of beats or bars of the beat loop is assigned to each pad
as follows.
! The beat loop display area in the rekordbox dj deck screen switches
by pressing the [PAGE c] or [PAGE d] button.
Beat loop
1/64 beat
Beat loop
1/4 beat
Beat loop
4 beats
Beat loop
16 bars
Beat loop
1/32 beat
Beat loop
1/2 beat
Beat loop
8 beats
Beat loop
32 bars
2 Press a performance pad.
Loop playback starts with the number of beats or bars assigned to the
pad that was pressed.
3 Press the same performance pad again.
Loop playback is canceled.
Beat loop
1/16 beat
Beat loop
1 beat
Beat loop
16 beats
Beat loop
64 bars
Beat loop
1/8 beat
Beat loop
2 beats
Beat loop
8 bars
Beat loop
128 bars
Using the pad editing function
Functions to assign to the performance pads can be customized with
rekordbox dj.
For details, refer to the rekordbox.com site below.
rekordbox.com
Using slide FX
Quick effect performances are possible by touching and sliding the
touch strip of the unit.
1 Check the [FX] checkbox on the top of the
rekordbox dj screen.
The slide FX panel is displayed on the rekordbox dj screen.
! If the slide FX panel is not displayed, click the [SFX1] or [SFX2]
button on the FX panel to display it.
2 Press the [1], [2] or [3] button of the slide FX.
Selects an effect type.
! Multiple effects cannot be selected.
3 Touch and slide the touch strip.
Turns on the selected effect, and changes the level/depth of the effect
according to the position touched.
! Effect turns to off when you release your finger from the touch strip.
4 Press the [HOLD] button.
Keeps the effect on even if you release your finger from the touch strip.
! The hold function is turned off by pressing the [HOLD] button again.
! The level/depth of the effect can be changed by sliding the touch
strip even when the hold function is on.
Advanced operation
Using key shift function
The key of the track is changed to the sound pitch assigned to the pad
when pressing the performance pad.
1 Press the [SAMPLER] mode button while pressing
the [SHIFT] button.
Switches to the key shift mode.
! The setting of the sound pitch assigned to the performance pads
switches by pressing the [PAGE c] or [PAGE d] button.
2 Press a performance pad.
The track key is changed to the sound pitch assigned to the pad that was
pressed.
3 Press the [SEMITONE +] button while pressing the
[SHIFT] button.
The sound pitch of the playing track is turned back to the original key.
(Key reset)
En
17
Page 18

Changing the settings
Launching utilities mode
1 Disconnect the supplied USB cable from the unit.
! Keep the USB cable connected to the computer.
2 Close the DJ application, if it is open.
! If the utilities mode is launched while a DJ application, such as
rekordbox dj, is open on the computer, the set status may not be
displayed properly.
3 While pressing the [LOAD] buttons on the left and
right panel, connect the supplied USB cable to the
unit.
Utilities mode is launched.
4 After launching utilities mode, operate the
controller for the items whose settings you want to
change.
See the explanations below for the settings that can be changed.
5 Press the rotary selector.
Changed settings are saved in the unit.
The [HOT CUE] mode button, [PAD FX 1] mode button, [BEAT JUMP]
mode button and [SAMPLER] mode button on the left panel flash while
saving.
Do not disconnect the USB cable from the unit while saving.
6 Disconnect the USB cable from the unit when the
pad mode buttons stop flashing and remain lit.
! The changed setting can be used after reconnecting the supplied
USB cable and turning on the unit.
Utilities modes
The following settings can be changed:
! Demo mode setting
! Load illumination setting
! MIDI controller selecting setting
! MIDI output setting for touch strip
Press the [HOT CUE] mode button on the left panel.
The setting changes each time the [HOT CUE] mode button is pressed.
Pad 1
Pad 5
Pad 9
Pad 13
Pad 1 on the left lit: Demo mode off (default)
Pad 5 on the left lit: 1 minute
Pad 9 on the left lit: 5 minutes
Pad 13 on the left lit: 10 minutes
Changing the load illumination setting
Load illumination shows when the track is loaded to the deck.
Press the [PAD FX 1] mode button on the left panel.
The setting changes each time the [PAD FX 1] mode button is pressed.
Pad 2
Changing the demo mode setting
If no operation is performed within a certain time period the unit enters
the demo mode.
The time before entering the demo mode can be changed or the demo
mode can be turned off.
! When any button or touch strip on this unit is operated during the
demo mode, the demo mode is canceled.
En
18
Pad 6
Pad 2 on the left lit: Load illumination off
Pad 6 on the left lit: Load illumination on (default)
Page 19

Setting MIDI controller selection
There are two MIDI controller modes for the unit; a mode depending on
rekordbox dj functions, and the other is a general MIDI controller mode.
Set the MIDI controller selection.
Press the [BEAT JUMP] mode button on the left panel.
The setting changes each time the [BEAT JUMP] mode button is
pressed.
Changing the MIDI output setting for
touch strip
The MIDI (control change) value rises when sliding the touch strip
toward the maximum level. This can be inverted.
Press the [SAMPLER] mode button on the left panel.
The setting changes each time the [SAMPLER] mode button is pressed.
Pad 3
Pad 7
Pad 3 on the left lit: When rekordbox is running, controller operation
depends on the rekordbox dj functions. When
rekordbox is not running, the unit operates as a
general MIDI controller. (default)
Pad 7 on the left lit: Forcibly using the unit as the general MIDI
controller.
Pad 4
Pad 8
Pad 4 on the left lit: The MIDI (control change) value rises when sliding
the touch strip toward the maximum level. (default)
Pad 8 on the left lit: The MIDI (control change) value rises when sliding
the touch strip toward the minimum level.
Changing the settings
En
19
Page 20

Additional information
Troubleshooting
! If you think that there is something wrong with this unit, check the items below and access the Pioneer DJ site and check [FAQ] for the [DDJ-XP1].
pioneerdj.com
Sometimes the problem may lie in another component. Inspect the other components and electrical appliances being used. If the problem cannot
be rectified, ask your nearest Pioneer authorized service center or your dealer to carry out repair work.
! This unit may not operate properly due to static electricity or other external influences. In this case, proper operation may be restored by unplugging
the USB cable to turn the power off, waiting 1 minute, then plugging the USB cable in to turn the power back on.
Problem Check Remedy
The power of the unit does not
turn on.
This unit is not recognized. Is the supplied USB cable properly connected? Connect the supplied USB cable properly.
Tracks do not appear in the
track list.
Tracks cannot be loaded onto
deck 3 or deck 4.
Operation of rekordbox
becomes unstable.
Effect does not turn off even
when releasing a finger from the
touch strip.
Sound does not output from
the master output (such as a
DJ mixer).
The key does not lower when
pressing the [SEMITONE -]
button.
(The key does not rise when
pressing the [SEMITONE +]
button)
rekordbox dj functions, such as
hot cue, loop, beat jump or beat
sync, cannot be used.
Settings changed in utility mode
do not work.
The key sync function cannot
be used.
Is the supplied USB cable properly connected? Connect the supplied USB cable properly.
Is the supply enough from your computer
connected to this unit?
Are you using a USB hub? USB hubs cannot be used. Connect the computer and this unit directly using the
Are you using the latest version of rekordbox? Update the software to the latest version.
Has rekordbox dj been activated? Activate rekordbox dj.
Have audio track files been added to
[Collection]?
Has something other than [Collection] been
selected on the tree view?
Does the [INT] button light when you press the
[SHIFT] button?
Are you using other software at the same time? Quit other applications to decrease the load on the computer.
Are you using a USB hub? USB hubs cannot be used. Connect the computer and this unit directly using the
There is a problem with the USB port to which
this unit is connected.
Is this unit connected to a laptop computer
running on its battery?
Is the effect hold function turned on? Turn off the effect hold function by pressing the [HOLD] button when the [HOLD] button
Is the silent cue function turned on? Cancel muting by pressing the [SILENT CUE] button when the [SILENT CUE] button lights.
Does lowering (raising) go beyond 1 octave? Keep the change to within 1 octave of the audio track’s original key.
Is playback mode of rekordbox dvs set to
[Absolute]?
Did you quit utility mode without pressing the
rotary selector after changing the settings?
Does key information exist in the track
currently playing?
Connect to the USB terminal which can supplies enough.
If other devices which are not used for DJ play are connected to your computer,
disconnect them.
Do not use your computer running on its battery. Supply power to the computer from an
AC power supply.
supplied USB cable.
Add audio track files to [Collection].
For details, refer to the rekordbox Operating Instructions.
Select [Collection] on the tree view.
Audio tracks in the play list will appear when you select a play list on the tree view.
Press the [INT] button while pressing the [SHIFT] button. Then press the [LOAD] button.
If operation continues to be unstable, try disabling wireless devices (such as wireless
network), antivirus software, screen saver, low power mode, etc.
supplied USB cable.
If your computer has multiple USB ports, try connecting this unit to a different USB port.
Supply power to the laptop from an AC power supply. (Depending on the laptop’s
settings, the low power mode may be set when the computer is running on its battery,
automatically reducing the performance of the computer itself.)
lights.
Set playback mode of rekordbox dvs to [Relative].
After changing the settings in utility mode, press the rotary selector to save the changes
in the unit.
Perform the key detection of the track by operating rekordbox.
20
En
Page 21

Using as a controller for other DJ software
This unit also outputs the operating data for the buttons and touch
strip in MIDI format. If you connect a computer with a built-in MIDIcompatible DJ software via a USB cable, you can operate the DJ
software on this unit.
To use as a controller for operating DJ software other than the rekordbox
dj software, also configure the DJ software MIDI-related settings.
! For details, see your DJ software’s operating instructions.
About MIDI messages
For details on this unit’s MIDI messages, see “List of MIDI Messages”.
! “List of MIDI Messages” can be acquired from the following URL:
pioneerdj.com
About trademarks and registered trademarks
! “Pioneer DJ” is a trademark of PIONEER CORPORATION, and is
used under license.
! rekordbox is a trademark or registered trademark of the Pioneer DJ
Corporation.
! Adobe and Reader are trademarks of Adobe Systems Incorporated in
the U.S. and other countries.
! Windows is a registered trademark of Microsoft Corporation in the
United States and other countries.
! Finder, Mac, macOS and OS X are trademarks of Apple Inc.,
registered in the U.S. and other countries.
! Intel and Intel Core are trademarks of Intel Corporation in the U.S.
and/or other countries.
The names of companies and products mentioned herein are
trademarks or registered trademarks of their respective owners.
Additional information
Cautions on copyrights
rekordbox restricts playback and duplication of copyright-protected
music contents.
! When coded data, etc., for protecting the copyright is embedded in
the music contents, it may not be possible to operate the program
normally.
! When rekordbox detects that coded data, etc., for protecting the
copyright is embedded in the music contents, processing (playback,
reading, etc.) may stop.
Recordings you have made are for your personal enjoyment and
according to copyright laws may not be used without the consent of the
copyright holder.
! Music recorded from CDs, etc., is protected by the copyright laws
of individual countries and by international treaties. It is the full
responsibility of the person who has recorded the music to ensure
that it is used legally.
! When handling music downloaded from the Internet, etc., it is the
full responsibility of the person who has downloaded the music to
ensure that it is used in accordance with the contract concluded
with the download site.
The specifications and design of this product are subject to change
without notice.
© 2017 Pioneer DJ Corporation.
All rights reserved.
<DRI1498-A>
En
21
 Loading...