

Page 1

Before Using This Product
Owner’s Manual
AVH-P7490DVD
This product conforms to CEMA cord colors.
ENGLISH
AV Receiver/DVD Player with 7.0 inch Display and
Dolby Digital/DTS Multi Channel Surround
Page 2

1
Contents
Be sure to read this.
Discs Compatible with this Product .................... 12
Disc Operation ...................................................... 13
Dear Customer ........................................................ 5
Before Using This Product .................. 6
IMPORTANT SAFEGUARDS .................................... 6
•PLEASE READ ALL OF THESE INSTRUCTIONS
REGARDING YOUR DISPLAY AND RETAIN
THEM FOR FUTURE REFERENCE
About This Product .................................................. 7
•Video System of a Connected Component
•Output Setting of the DVD Player
•Be Sure to Adjust Picture Brightness
•Preventing the Battery from Becoming
Exhausted
About This Manual .................................................. 8
To Ensure Safe Driving ............................................ 9
•When Using a Display connected to
Rear Video Output
Important ................................................................ 9
Condition Memory ................................................ 10
Resetting the Microprocessor .............................. 10
Precaution.............................................................. 11
When using the 50-Disc Type Multi-CD Player .... 11
Discs Compatible with this Product .................... 12
•Features of This Player
•What the Marks on DVDs Indicate
•Disc Organization
Main Features of DVD Player ................................ 15
Care of Discs ........................................................ 16
•Precaution
Detaching and Replacing the Front Panel ............ 17
•Theft Protection
Key Finder ............................................................ 18
•DVD Player
•Setting the Remote Control for AV Receiver
Operation
•Setting the Remote Control for DVD Player
Operation
Using the Remote Control .................................... 21
•Batteries
Operation of the Display .................... 22
Deploying the Display .......................................... 22
Screen Angle Adjustment .................................... 23
Closing the Display .............................................. 24
Changing the Wide Mode .................................... 25
Switching the Video Source ................................ 26
Operation for Each Source Unit ........ 27
To Listen to Music ................................................ 27
•When using the DVD player
Virtual Theater Quick Tour ................ 29
Menu Structure...................................................... 30
Information Screen ................................................ 31
•Switching the Information Screen
Using the Screen Pictures
(Selecting the NAVI, VTR etc.) .... 33
Selecting the Navigation Picture .......................... 33
Selecting the Video Source .................................. 33
•Switching the Video ON/OFF Mode
•Selecting the Video Source
Selecting the BGTV, BGVTR .................................. 34
Selecting the Picture to Rear Display.................... 35
Adjusting the Picture ............................................ 36
Built-In Tuner ........................................ 37
Basics .................................................................... 37
Operation at the Function Menu Screen .............. 38
•Accessing the Tuner Function Menu
•Exit from the Tuner Function Menu
Operating Each Function ...................................... 39
•Best Stations Memory (BSM)
•Local Seek Tuning
•TA Function
•Seek Select
•PGM button
Display the Flip-Down Plate .................................. 41
Recalling Preset Stations by Preset
Frequency List .............................................. 41
Using the RDS Functions .................... 42
PTY Function .......................................................... 42
•Searching the PTY
•PTY Alarm
•Canceling Announcements
TA Function .......................................................... 45
•Activating/Deactivating the TA Function
Radio Text ............................................................ 47
•Radio Text display
•Storing Radio Text in memory
•Recalling preset Radio Text
Page 3

2
DVD Player
(Control with AV Receiver) .......... 49
Basics .................................................................... 49
Operation at the Function Menu Screen
(DVD, Video CD) ............................................ 50
•Accessing the DVD Function Menu
(DVD, Video CD)
•Exit from the DVD Function Menu
(DVD, Video CD)
Operating Each Function ...................................... 51
•Repeat Play
•Pause
•PGM button
Operation at the Function Menu Screen (CD) ...... 53
•Accessing the DVD Function Menu (CD)
•Exit from the DVD Function Menu (CD)
Operating Each Function ...................................... 54
•Repeat Play
•Random Play
•Scan Play
•Pause
•PGM button
Multi-CD Player .................................... 57
Basics .................................................................... 57
Operation at the Function Menu Screen .............. 58
•Accessing the Multi-CD Function Menu
•Exit from the Multi-CD Function Menu
Operating Each Function ...................................... 59
•Repeat Play
•Random Play
•Scan Play
•ITS Play
•Pause
•Compression and DBE
•PGM button
Display the Flip-Down Plate .................................. 62
Disc Title Input ...................................................... 63
Getting Text Displayed
(for CD TEXT compatible type) ...................... 64
Selecting Discs by Disc Title List .......................... 65
ITS (Instant Track Selection).................................. 65
•ITS Programming (ITS)
•Erase a Track Program
•Erase a Disc Program
TV Tuner ................................................ 67
Basics .................................................................... 67
Operation at the Function Menu Screen .............. 68
•Accessing the TV Tuner Function Menu
•Exit from the TV Tuner Function Menu
CD Player .............................................. 69
Basics .................................................................... 69
Operation at the Function Menu Screen .............. 70
•Accessing the CD Function Menu
•Exit from the CD Player Function Menu
MD Player .............................................. 71
Basics .................................................................... 71
Operation at the Function Menu Screen .............. 72
•Accessing the MD Function Menu
•Exit from the MD Function Menu
Basic Operations of DVD Player ........ 73
Selecting the DVD ................................................ 73
Disc (DVD/Video CD/CD) Playback ...................... 74
•Working with the Menu Screen
Chapter and Track Advance/Return .................... 75
•Skipping to the Next Chapter/Track
•Returning to the Previous Chapter/Track
Specifying Title/Chapter/Track
(Direct Search) .............................................. 76
•Specifying Title
•Specifying Chapter
•Specifying Track
Disc Fast Forward/Reverse .................................. 77
•Fast Forward
•Fast Reverse
Stopping Playback ................................................ 78
Playback Variations of
DVD Player ...................................... 79
Still, Frame-by-Frame and Slow Motion
Playback ........................................................ 79
•Still Playback
•Frame-by-Frame Playback
•Slow Motion Playback
Changing Audio Language during Playback
(Multi-Audio) ................................................ 80
Changing the Subtitle Language during Playback
(Multi-Subtitle) ............................................ 81
Changing the Viewing Angle during Playback
(Multi-Angle) ................................................ 82
Page 4

3
Operating DVD Player with
Information Displays .................... 83
Calling up Information Displays .......................... 83
Operating with the Information
Display 1 of a DVD ........................................ 84
•Searching for a Desired Scene, Starting
Playback from a Specified Time
•Selecting Audio, Subtitle and Angle
Operating with the Information
Display 2 of a DVD ........................................ 86
•Selecting Repeat Range
•Selecting Audio Output
Operating with the Information
Display of a Video CD .................................. 87
•Searching for a Desired Scene, Starting
Playback from a Specified Time
•Selecting Repeat Range
•Selecting Audio Output
Operating with the Information
Display of a CD ............................................ 89
•Searching for a Desired Track
•Selecting Repeat Range
•Setting Random Play
•Setting Scan Play
Adjusting Audio (Basic) ...................... 91
Accessing the Audio Menu .................................. 91
•Exit from the Audio Menu
Proper Setting for the In-car Acoustic
Characteristics .............................................. 92
Cabin Equalizer ...................................................... 92
•Operation at the Audio Setting Menu
Position Selector.................................................... 93
Balance Adjustment .............................................. 93
Adjustments for Speaker ...................................... 94
•Operation at the Speaker Setting Menu
Equalizer Curve ...................................................... 96
Source Level Adjustment (SLA) ............................ 97
Sound Field Control (SFC) ...................................... 98
Dynamic Range Control ........................................ 99
Direct Control ON/OFF .......................................... 99
Loudness Adjustment .......................................... 100
Fine Adjusting Audio (Expert) .......... 101
Before Getting Started ........................................ 101
Adjusting for the Speakers In Use ...................... 101
•Accessing the Speaker Setting Menu
•Adjusting the Speakers’ Output Levels
using a Test Tone
•Selecting a Crossover Frequency
•Correcting the Subwoofer’s Phase
Adjusting the Cabin Equalizer (Expert) ................ 104
•Accessing the Expert Setting Menu
•Operation at the Expert Setting Menu
•Adjusting 3-Band Parametric Equalizer
•Adjusting the Speakers’ Output Level
•Adjusting the Time Alignment
•Storing the Adjusted Cabin EQ into Memory
•Reset Adjusted Cabin EQ
Adjusting the Equalizer Curves .......................... 109
Changing the Initial Settings of
AV Receiver .................................. 111
Accessing the Initial Settings Menu .................. 111
•Exit from the Initial Settings Menu
Correcting Distorted Sound ................................ 112
Setting the Time .................................................. 112
Adjusting the Display Position ............................ 113
Changing the Pattern of Plate ............................ 113
Changing Initial Settings of
DVD Player .................................... 115
Calling up the SET UP MENU ............................ 115
Setting the Subtitle (SUBTITLE LANG.) .............. 117
•Setting Subtitles and Assist Subtitles ON/OFF
•Setting the Subtitle Language
Setting the Audio Language (AUDIO LANG.) .... 120
Setting the Menu Language (MENU LANG.) ...... 121
Setting the Parental Lock (PARENTAL) .............. 121
•Setting the Code Number and Level
•Changing the Level
Setting Aspect Ratio (TV ASPECT) .................... 124
Setting Angle Mark Display (ANGLE) ................ 125
Setting for Digital Output (DIGITAL OUTPUT) .... 126
Setting Digital and Analog Audio Output
(OUTPUT SELECTION) ................................ 127
Setting Remote Control Code Type
(REMOTE CODE SELECT) ............................ 128
Contents
Page 5

Setting the Display ............................ 129
Operating the Setting Menu .............................. 129
•Entering the Display Setting Menu
•Switching the Video Select Setting
•Setting the Automatic Open Mode
•Adjusting the Bright
•Adjusting the Color
•Adjusting the Hue
•Adjusting the Dimmer
Other Functions of AV Receiver ...... 133
Switching the Center Screen and
Time Display in the Center Room................ 133
Switching the Color of the Spectrum
Analyzer ...................................................... 133
Listening Sounds or Viewing Images from
Additional Units .......................................... 134
•Accessing the Set Up Menu
•Switching the AUX Source
•Switching the Video Mode
•Switching the Speaker Input Mode
AUX Title Input .................................................... 136
Muting Function .................................................. 136
•Navigation Unit Muting
•Cellular Telephone Muting
Others .................................................. 137
Using the Display Correctly ................................ 137
•Handling the Display
•About the Liquid Crystal Display (LCD) Screen
•Keeping the Display in Good Condition
•About the Small Fluorescent Tube
If You Forget Your Code Number ........................ 139
Error Message .................................................... 139
Language Code Chart ........................................ 140
Setting the Remote Control ................................ 141
•Setting the Dipswitches
•Using it as a Navigation System Remote
Control
Troubleshooting .................................. 143
Terms .................................................... 149
Installation .......................................... 151
Connecting the Units .......................................... 151
•Routing the Optical Cable
•Connecting the Power Cord of AV Receiver
•Connecting the Power Cord of DVD player
•Connecting to a Sold Separately Power Amp
•Speaker Input Jack Connection
•Connecting the System
•VIDEO Input/Output Connection of AV Receiver
•Rear Video Output of DVD player
Installation .......................................................... 163
•Installing the AV Receiver
•Installing the DVD Player (DIN Front/Rear-
mount)
•Installing the DVD Player (DIN Front-mount)
•Installing the DVD Player (DIN Rear-mount)
•Installing the Voice Guidance Speaker
•Installing the Remote Control Unit
•Installing the Center Speaker
Specifications .................................... 171
4
Continued overleaf.
Page 6

5
Selecting fine audio equipment such as the unit you’ve just purchased is only the start of your
musical enjoyment. Now it’s time to consider how you can maximize the fun and excitement your
equipment offers. This manufacturer and the Electronic Industries Association’s Consumer
Electronics Group want you to get the most out of your equipment by playing it at a safe level.
One that lets the sound come through loud and clear without annoying blaring or distortion—and,
most importantly, without affecting your sensitive hearing.
Sound can be deceiving. Over time your hearing “comfort level” adapts to higher volumes of
sound. So what sounds “normal” can actually be loud and harmful to your hearing. Guard against
this by setting your equipment at a safe level BEFORE your hearing adapts.
To establish a safe level:
• Start your volume control at a low setting.
• Slowly increase the sound until you can hear it comfortably and clearly, and without distor-
tion.
Once you have established a comfortable sound level:
• Set the dial and leave it there.
Taking a minute to do this now will help to prevent hearing damage or loss in the future. After all,
we want you listening for a lifetime.
We Want You Listening For A Lifetime
Used wisely, your new sound equipment will provide a lifetime of fun and enjoyment. Since
hearing damage from loud noise is often undetectable until it is too late, this manufacturer and the
Electronic Industries Association’s Consumer Electronics Group recommend you avoid prolonged exposure to excessive noise. This list of sound levels is included for your protection.
Decibel
Level Example
30 Quiet library, soft whispers
40 Living room, refrigerator, bedroom away from traffic
50 Light traffic, normal conversation, quiet office
60 Air conditioner at 20 feet, sewing machine
70 Vacuum cleaner, hair dryer, noisy restaurant
80 Average city traffic, garbage disposals, alarm clock at two feet.
THE FOLLOWING NOISES CAN BE DANGEROUS UNDER CONSTANT EXPOSURE
90 Subway, motorcycle, truck traffic, lawn mower
100 Garbage truck, chain saw, pneumatic drill
120 Rock band concert in front of speakers, thunderclap
140 Gunshot blast, jet plane
180 Rocket launching pad
Information courtesy of the Deafness Research Foundation.
Page 7

Before Using This Product
6
Before Using This Product
IMPORTANT SAFEGUARDS
PLEASE READ ALL OF THESE INSTRUCTIONS REGARDING YOUR DISPLAY
AND RETAIN THEM FOR FUTURE REFERENCE
1. Read this manual fully and carefully before operating your display.
2. Keep this manual handy for future reference.
3. Pay close attention to all warnings in this manual and follow the instructions
carefully.
4. Do not allow other persons to use this system until they have read and understood the operating instructions.
5. Do not install the display where it may (i) obstruct the driver’s vision, (ii)
impair the performance of any of the vehicle’s operating systems or safety
features, including air bags, or (iii) impair the driver’s ability to safely operate the vehicle.
6. As with any accessory in your vehicle’s interior, the display should not divert
your attention from the safe operation of your vehicle. If you experience difficulty in operating the system or reading the display, please park safely
before making adjustments.
7. Do not attempt to install or service your display by yourself. Installation or
servicing of the display by persons without training and experience in electronic equipment and automotive accessories may be dangerous and could
expose you to the risk of electric shock or other hazards.
8. Please remember to wear your seat belt at all times while operating your
vehicle. If you are ever in an accident, your injuries can be considerably more
severe if your seat belt is not properly buckled.
Page 8
Before Using This Product
7
About This Product
This product is a combination of an AV Receiver and a DVD Player featuring a 7-inch wide
display. Almost all operations can be performed with the AV Receiver, using the remote control with the operation mode switch set to “AUDIO”. To operate the DVD Player, set the
operation mode switch to “DVD”. (Refer to “Setting the Remote Control for DVD Player
Operation” on page 20.)
The tuner frequencies on this product are allocated for use in North America. Use in other
areas may result in improper reception.
This product features a “Virtual Theater” Graphical User Interface which is referred to in this
manual as the “Virtual Theater Quick Tour”. Once you understand the basic structure of the
“Virtual Theater”, you will be able to navigate quite easily throughout it.
The basic structure of the “Virtual Theater” is actually quite simple. Everything is centralized
around a base location known as the “Center Room”. (Refer to “Virtual Theater Quick Tour”
on page 29.)
Dolby* Digital/DTS** Compatibility
You can enjoy the atmosphere and excitement provided by DVD-Video software featuring 5.1
channel recordings.
1
* Manufactured under license from Dolby Laboratories. “Dolby”, “Pro Logic”, and the double-D
symbol are trademarks of Dolby Laboratories.
**“DTS” and “DTS Digital Surround” are registered trademarks of Digital Theater Systems, Inc.
This equipment has been tested and found to comply with the limits for a class B digital device, pursuant to Part 15 of the FCC Rules. These limits are designed to provide
reasonable protection against harmful interference in a residential installation. This
equipment generates, uses and can radiate radio frequency energy and, if not installed
and used in accordance with the instructions, may cause harmful interference to radio
communications. However, there is no guarantee that interference will not occur in a
particular installation. If this equipment does cause harmful interference to radio or
television reception, which can be determined by turning the equipment off and on,
the user is encouraged to try to correct the interference by one or more of the following measures:
– Reorient or relocate the receiving antenna.
– Increase the separation between the equipment and receiver.
– Connect the equipment into an outlet on a circuit different from that to which the
receiver is connected.
– Consult the dealer or an experienced radio/TV technician for help.
Information to User
Alteration or modifications carried out without appropriate authorization may invalidate the user’s right to operate the equipment.
[For Canadian model]
This Class B digital apparatus complies with Canadian ICES-003.
Page 9

Before Using This Product
8
Video System of a Connected Component
This product is NTSC system compatible. When connecting an external component to this
product, be sure the component is compatible with the same video systems. If it is not, images
will not be correctly reproduced.
Output Setting of the DVD Player
When using a DVD Player for the first time, make the “Digital Output Setting (DIGITAL
OUTPUT)” and “Digital and Analog Audio Output Setting (OUTPUT SELECTION)” as
follows:
Function Setting
DIGITAL OUTPUT Dolby D/LPCM
OUTPUT SELECTION 48 kHz
Refer to “Setting for Digital Output” on page 126 and “Setting Digital and Analog
Audio Output” on page 127.
Precaution:
• Be sure to set the correct position. If not, no audio can be output.
Be Sure to Adjust Picture Brightness
Although the angle at which the LCD can be positioned and viewed clearly is limited because
of its design, visibility can be improved by adjusting the pictures brightness. When first using
the display, adjust the picture to a brightness that allows clear visibility at the angle of use.
(Refer to page 131.)
Preventing the Battery from Becoming Exhausted
When using this product, be sure your car engine is running. If you use this product when
your engine is not running, the battery will become exhausted.
About This Manual
This product features a number of sophisticated functions ensuring superior reception and
operation. All are designed for the easiest possible use, but many are not self-explanatory.
This operation manual is intended to help you benefit fully from their potential and to maximize your listening enjoyment.
We recommend that you familiarize yourself with the functions and their operation by reading
through the manual before you begin using this product. It is especially important that you
read and observe the “Precaution” on page 11 and in other sections.
In the explanation on DVD Player operation, when there are restrictions concerning which
discs can be operated, compatible discs are indicated with an icon.
Page 10
Before Using This Product
To Ensure Safe Driving
WARNING
• To avoid the risk of accident and the potential violation of applicable laws, this
product is not for use with a video screen that is visible to the driver.
• In some countries or states the viewing of images on a display inside a vehicle even
by persons other than the driver may be illegal. Where such regulations apply, they
must be obeyed.
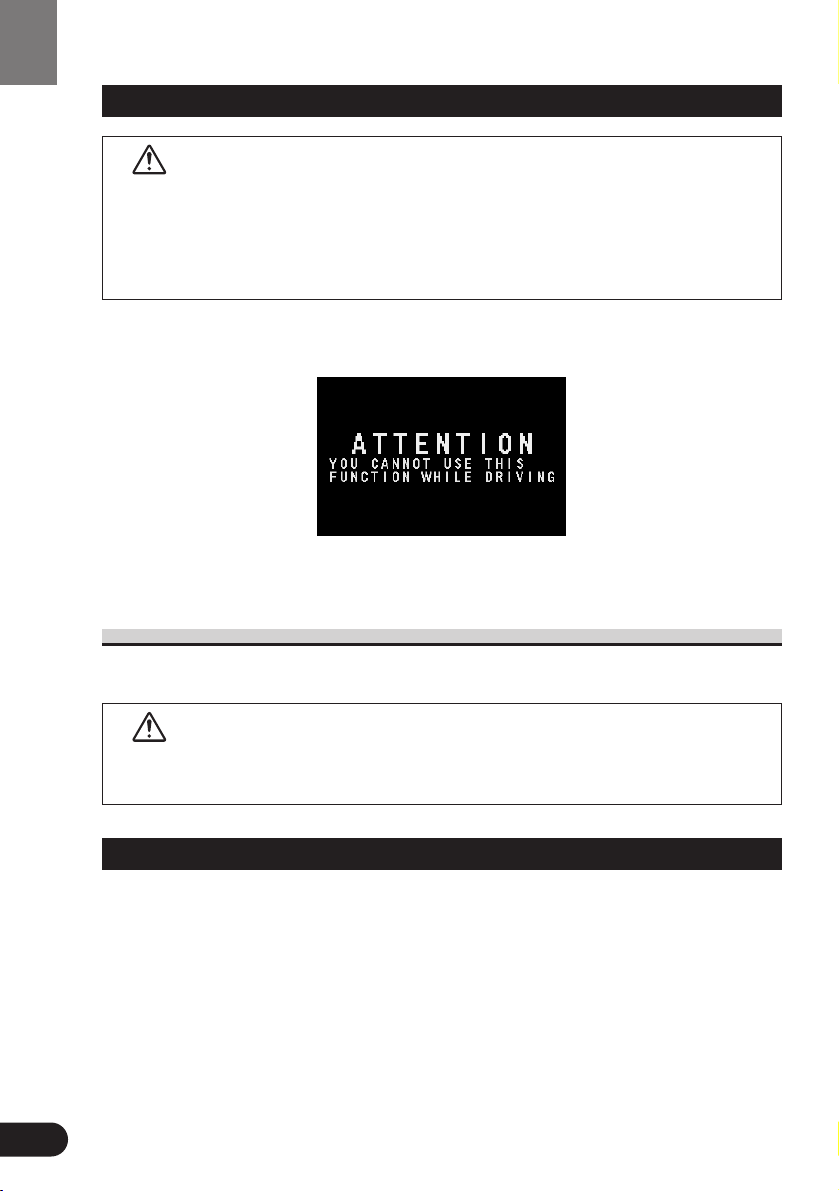
To ensure safe vehicle operation, do not operate this product during driving. If you try to view
pictures from a DVD-Video disc or other sources on the front display while the parking brake
is not engaged, this warning will appear:
When you park your car in a safe place and apply the parking brake, the picture appears on
the screen.
When Using a Display connected to Rear Video Output
This product’s Rear video output is for connection of a display to enable passengers in the
Rear seats to watch the Video or DVD.
WARNING
• NEVER install the display in a location that enables the Driver to watch the Video
or DVD while Driving.
Important
The serial number of this device is located on the top of the DVD player. For your own security and convenience, be sure to record this number on the enclosed warranty card.
9
Page 11
Before Using This Product
Condition Memory
This function memorizes audio language, subtitle language, angle number, audio output (L, R)
and aspect ratio made during disc playback for up to 30 discs. Without any special operations,
the final setting details during playback of a disc are memorized. The next time a disc is
played, the previous settings are automatically applied.
Note:
• With some discs, audio language and subtitle language are automatically specified, in which
case condition memory does not function.
• When the number of discs exceeds 30, settings for the latest disc replace those for the least
recent disc.
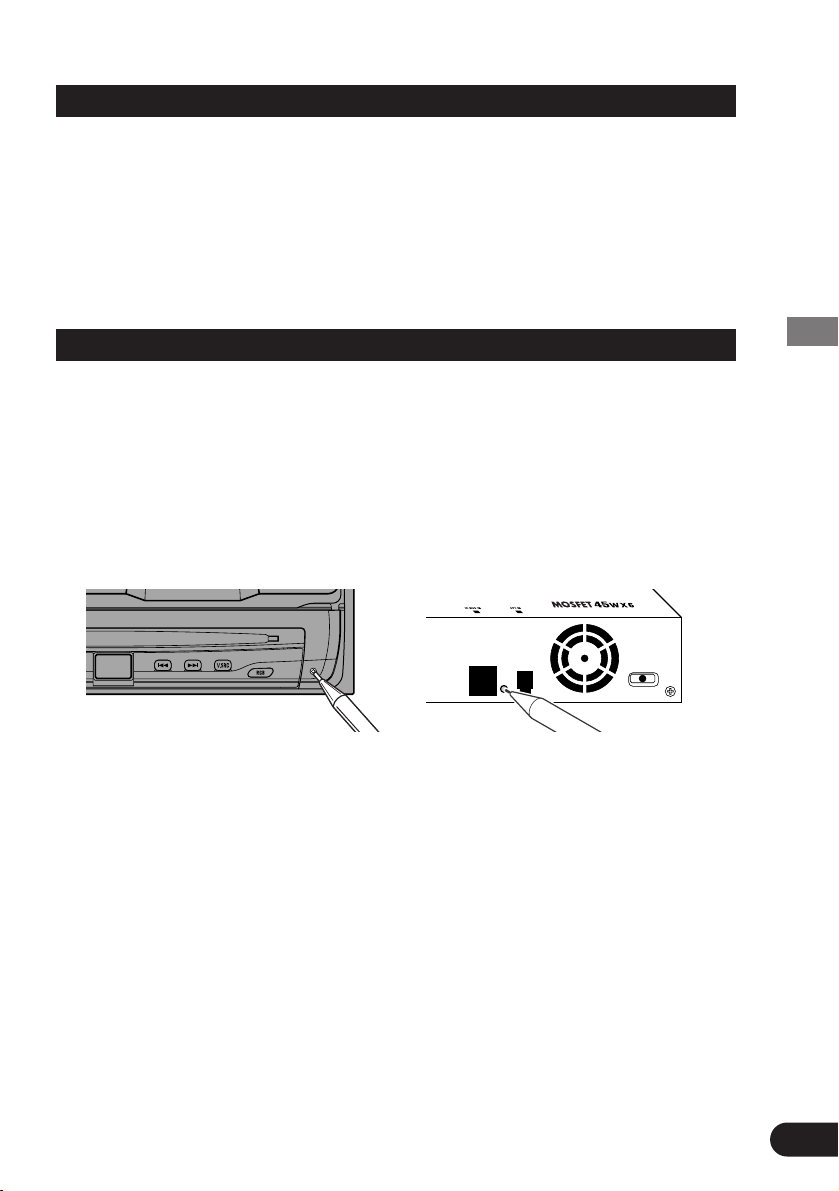
Resetting the Microprocessor
When the ignition switch is turned OFF, pressing the RESET button lets you reset the microprocessor to its initial settings without changing SET UP MENU settings, Condition Memory
and other settings.
Press the RESET button in the following cases.
• When this unit fails to operate correctly.
• When strange (incorrect) messages appear on the display.
1. Turn the ignition switch OFF.
2. Press the RESET button.
Use a pen tip or other pointed instrument.
Note:
• After completing connections or when you want to erase all memorized settings or return the
unit to its initial (factory) settings, switch your engine ON or set the ignition switch to ACC
ON before pressing the RESET button.
10
Page 12

11
Before Using This Product
Precaution
• Keep this manual handy as a reference for operating procedures and precautions.
• Always keep the volume low enough for outside sounds to be audible.
• Protect this product from moisture.
• If the battery is disconnected, the preset memory will be erased and must be repro-
grammed.
After-sales Service for Pioneer Products
Please contact the dealer or distributor from where you purchased the product for its
after-sales service (including warranty conditions) or any other information. In case the
necessary information is not available, please contact the companies listed below:
Please do not ship your product to the companies at the addresses listed below for
repair without advance contact.
For warranty information please see the Limited Warranty sheet included with your
product.
When using the 50-Disc Type Multi-CD Player
The available functions of the 50-Disc Type Multi-CD Player are described in this manual.
Note that other 50-Disc Type Multi-CD Player functions cannot be used with this product.
CAUTION: USE OF CONTROL OR ADJUSTMENT OR PER-
FORMANCE OF PROCEDURES OTHER THAN
THOSE SPECIFIED HEREIN MAY RESULT IN
HAZARDOUS RADIATION EXPOSURE.
CAUTION: THE USE OF OPTICAL INSTRUMENTS WITH
THIS PRODUCT WILL INCREASE EYE HAZARD.
7 U.S.A.
Pioneer Electronics (USA) Inc.
CUSTOMER SUPPORT
DIVISION
P.O. Box 1760
Long Beach, CA 90801-1760
800-421-1404
7 CANADA
Pioneer Electronics of Canada, Inc.
CUSTOMER SATISFACTION
DEPARTMENT
300 Allstate Parkway
Markham, Ontario L3R OP2
(905) 479-4411
1-877-283-5901
Page 13
Discs Compatible with this Product
Features of This Player
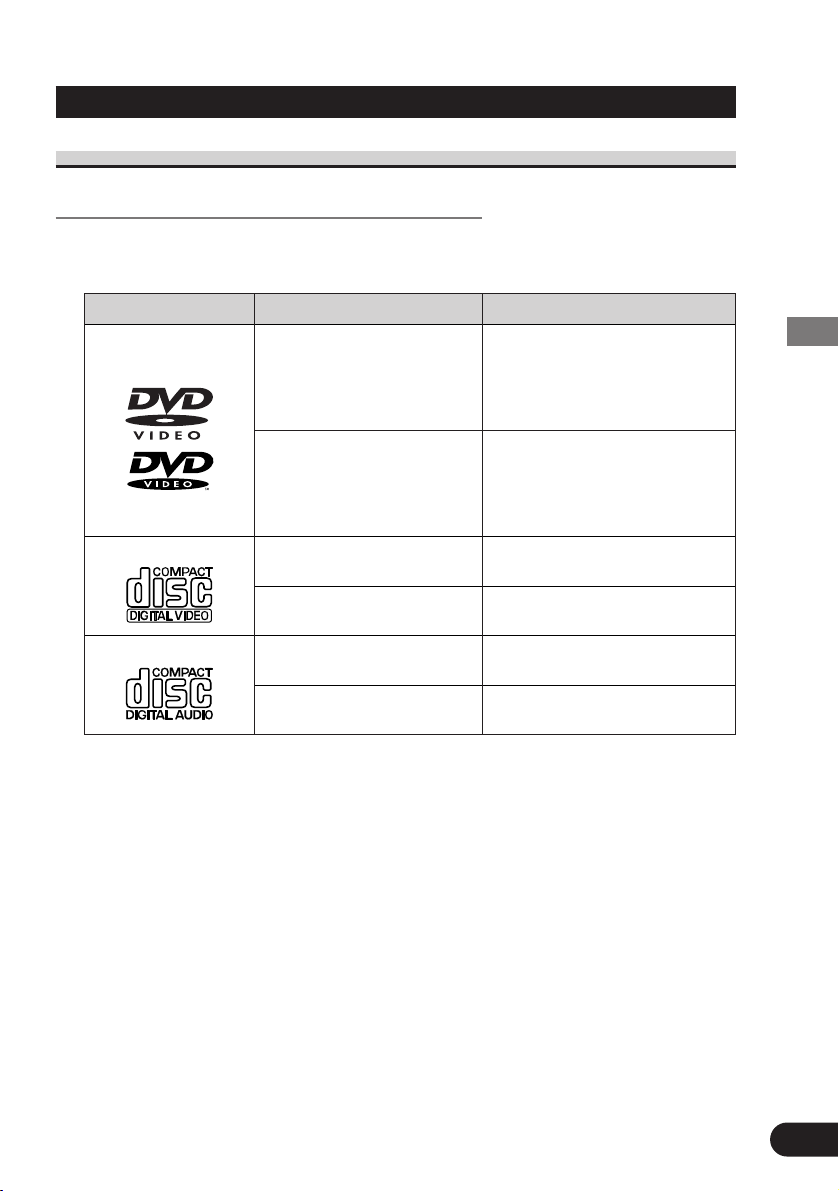
Compatible with DVD, Video CD and CD Formats
DVD, Video CD and CD discs that display the logos shown below can be played back
on this player. For more information on discs compatible with this player, refer to the
table below.
The disc format logos shown above are found on disc labels or on disc jackets.
Note:
• With some DVD-Video discs, you may not be able to use certain functions.
• Playback of some DVD-Video discs may not be possible.
• With DVD-R/DVD-RW discs, only recordings made in the Video format (Video mode) can
be played back. DVD-RW discs recorded in the Video Recording format (VR mode) cannot
be played back.
• Even with DVD-R/DVD-RW discs featuring recordings made in the Video format (Video
mode), playback may not be possible with this product due to disc characteristics or scratches
or dirt on the disc. Dirt or condensation on the lens inside this product may also prevent playback.
• Playback of CD-R/RW and DVD-R/RW discs that have not been finalized is not possible.
• Playback of discs recorded with a PC using the correct format is possible, but depending on
the application software settings, environment and other factors, playback may not be possible. (For details, inquire at the store or dealer's where you purchased the application software.)
• Playback of CD-TEXT discs is possible, but display of titles and other information is not possible.
• CD-Extra discs can be played back as music CDs.
12
Before Using This Product
Disc types and logos Diameter/Playable sides Playback time
DVD VIDEO Digital audio/Digital video (MPEG 2)
12 cm (5 in.)/single-sided 1 layer 133 min.
2 layer 242 min.
12 cm (5 in.)/double-sided 1 layer 266 min.
2 layer 484 min.
DVD VIDEO Digital audio/Digital video (MPEG 2)
8 cm (3 in.)/single-sided 1 layer 41 min.
2 layer 75 min.
8 cm (3 in.)/double-sided 1 layer 82 min.
2 layer 150 min.
VIDEO CD Digital audio/Digital video (MPEG 1)
12 cm (5 in.)/single-sided Max. 74 minutes
VIDEO CD single Digital audio/Digital video (MPEG 1)
8 cm (3 in.)/single-sided Max. 20 minutes
CD Digital audio
12 cm (5 in.)/single-sided Max. 74 minutes
CD single Digital audio
8 cm (3 in.)/single-sided Max. 20 minutes
DVD VIDEO
CD
VIDEO CD
Page 14
13
Precaution:
• Playback of DVD-Audio and CD-ROM discs is not possible. This player can only playback
discs bearing the marks shown on page 12.
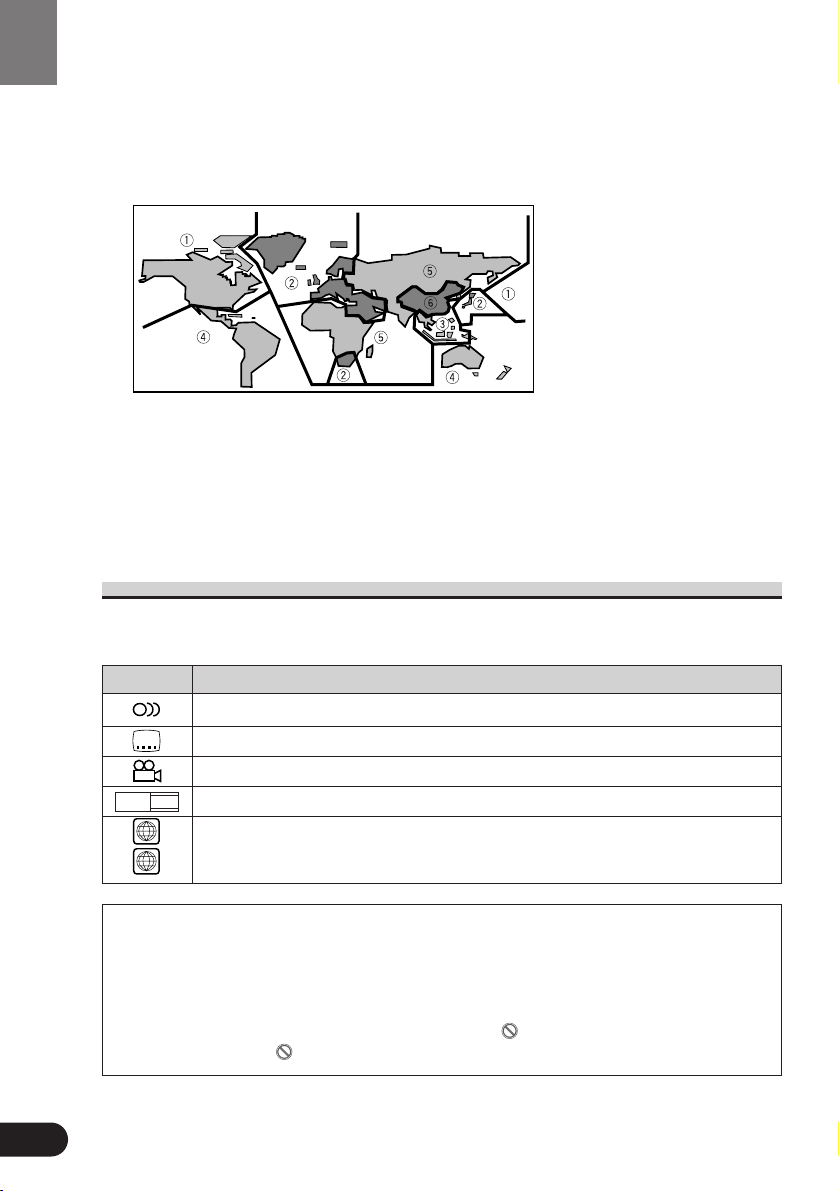
• DVDs that have incompatible region numbers (see page 150) cannot be played on this
player. The region number of the player can be found on the top of this product.
The illustration below shows the regions and corresponding region numbers.
• Normal playback of CD-R/CD-RW discs other than those recorded with a music CD recorder
may not be possible.
• Playback of music CD-R/CD-RW discs, even those recorded with a music CD recorder, may
not be possible with this product due to disc characteristics or scratches or dirt on the disc.
Dirt or condensation on the lens inside this product may also prevent playback.
• If you insert a CD-RW disc into this product, time to playback will be longer than when you
insert a conventional CD or CD-R disc.
• Read the precautions with the CD-R/CD-RW discs before using.
What the Marks on DVDs Indicate
The marks below can be found on DVD disc labels and packages. They indicate the type of
images and audio recorded on the disc, and the functions you can use.
Mark Meaning
Indicates the number of audio systems.
Indicates the number of subtitle languages.
Indicates the number of viewing angles.
Indicates the picture size (aspect ratio: screen width-to-height ratio) type.
Indicates the number of the region where playback is possible.
7 Disc Operation
With some DVDs, depending on the intentions of the disc’s producer, certain operations
may be prohibited. Also, with discs enabling menu operation and two-way operation during playback, the way titles and chapters are organized may prevent certain operations
such as Repeat play.
If this happens with this player, the prohibited mark “”is displayed.
The prohibited mark “” may not appear on some discs.
ALL
1
16 : 9 LB
3
2
2
Before Using This Product
Page 15
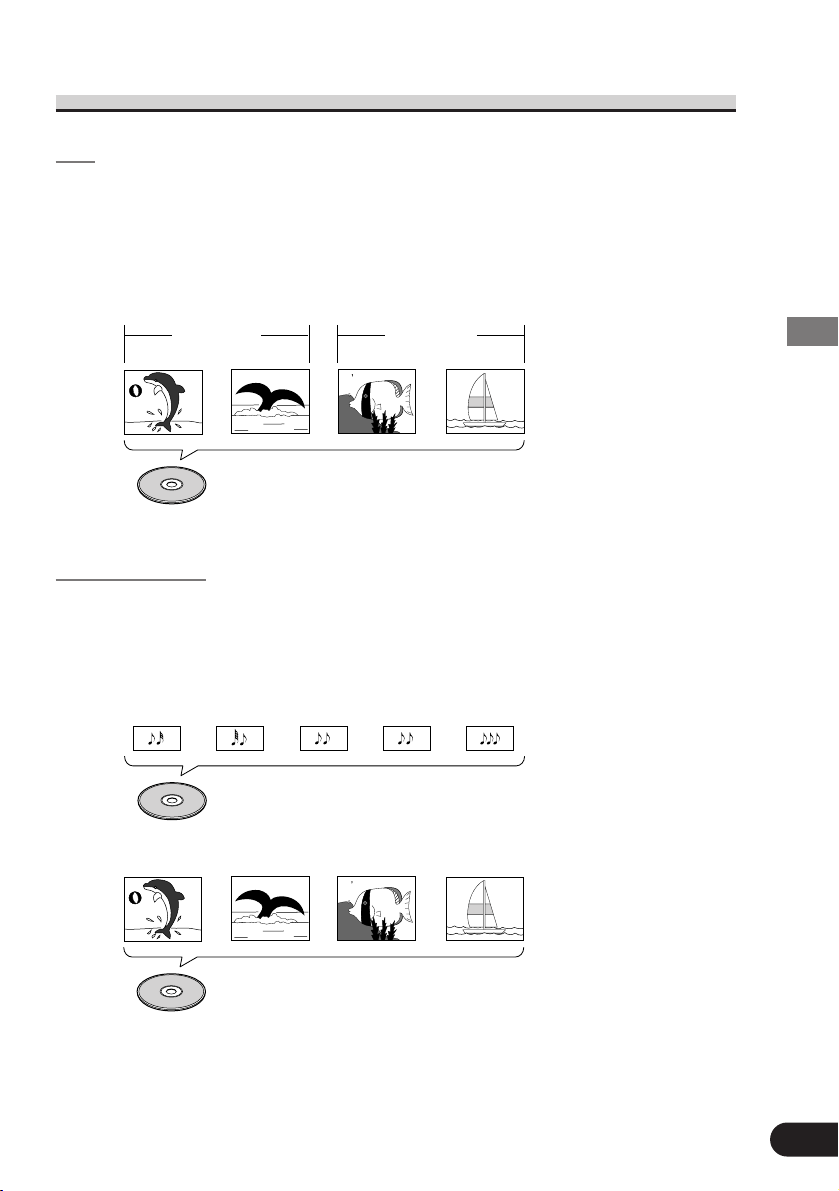
Disc Organization
DVD
On DVD-Video discs, the contents are divided into titles which are in turn divided
into chapters.
With video material, a single work (movie etc.) usually corresponds to a single title,
with different scenes corresponding to separate chapters. With karaoke discs, one
song corresponds to one title.
However, some discs are not organized like this, so bear this in mind when using the
Search function.
Video CD and CD
On CDs and Video CDs, the contents are divided into tracks. One track usually corresponds to one song. On some discs, tracks may also feature an index.
With Video CDs featuring PBC (Playback Control), you can use a menu to perform
playback operations. It may not be possible to use functions such as Repeat and
Search.
Track 1 Track 2
Video CD
Track 3 Track 4
Track 1 Track 2CDTrack 3 Track 4 Track 5
Title 1
Chapter 1 Chapter 2 Chapter 1 Chapter 2
Title 2
DVD
14
Before Using This Product
Page 16

15
Main Features of DVD Player
You can play back DVDs, Video CDs (PBC compatibility) and CDs.
You can enjoy different kinds of repeat play.
You can view still images or playback of one frame at a
time.
Slow motion playback is possible.
Switching between Wide screen, Letter box and Panscan
display is possible.
You can switch between multiple audio systems recorded
on a DVD as desired.
You can switch between multiple subtitle languages
recorded on a DVD as desired.
You can switch between multiple viewing angles of a
scene recorded on a DVD as desired.
You can play back Video CDs featuring PBC (Playback
Control).
You can use this to prevent your children viewing violent
or adult oriented scenes.
This product incorporates copyright protection technology that is protected by method claims of
certain U.S. patents and other intellectual property rights owned by Macrovision Corporation and
other rights owners.
Use of this copyright protection technology must be authorized by Macrovision Corporation, and
is intended for home and other limited viewing uses only unless otherwise authorized by
Macrovision Corporation. Reverse engineering or disassembly is prohibited.
Before Using This Product
Repeat Play
Still Image &
Frame-By-Frame Playback
Slow Motion Playback
Multi-Aspect
Multi-Audio
Multi-Subtitle
Multi-Angle
Video CDs featuring PBC
Compatibility
Parental Lock
Page 17
Care of Discs
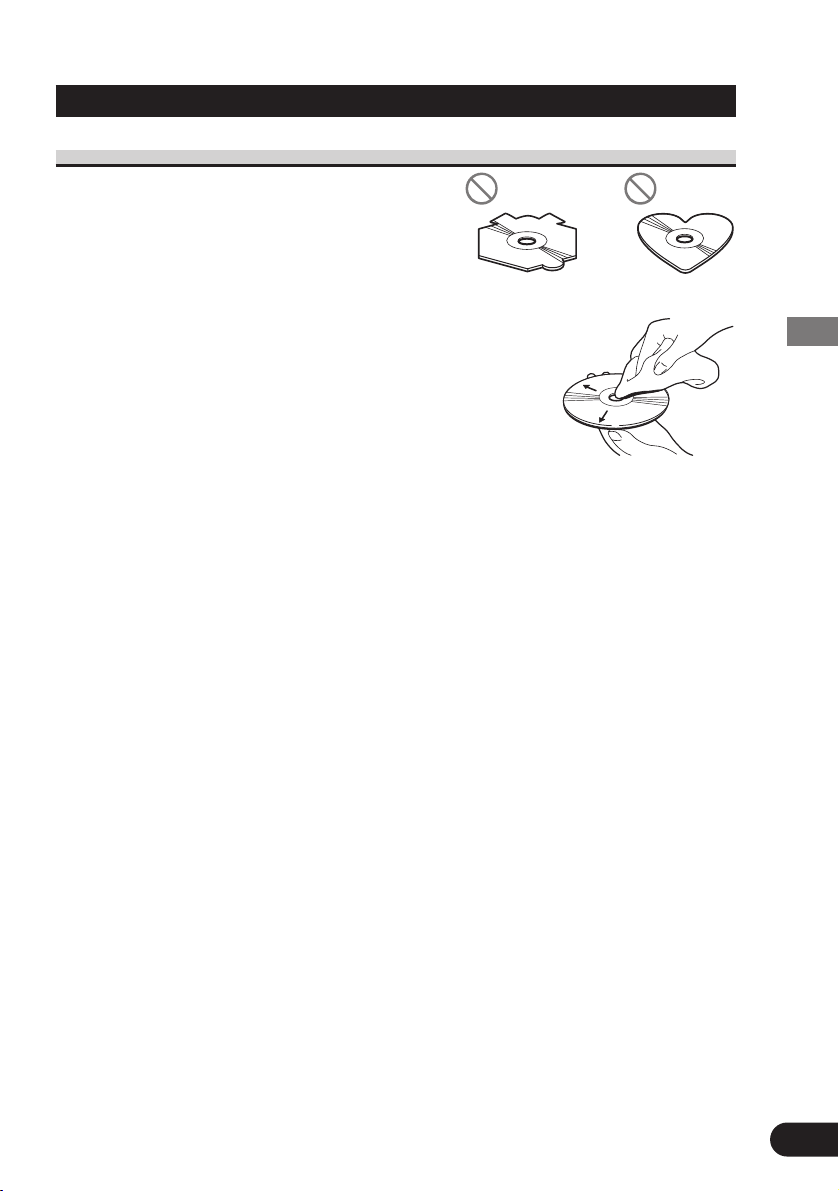
Precaution
• This product is designed for use with
conventional, fully circular discs only. Use of
shaped discs are not recommended for this product.
• Check all discs before playing and discard
cracked, scratched or warped discs.
• Wipe dirty or damp discs outward from the center with a soft
cloth.
• Avoid touching the recorded (iridescent) surface when
handling discs.
• Store discs in their cases when not in use.
• Keep discs out of direct sunlight and high temperatures.
• Do not affix labels or apply chemicals to discs.
• Condensation may collect inside the player when using the
heater in cold weather, interfering with playback. Turn it off for an hour or so and
wipe damp discs with a soft cloth.
• Road shocks may interrupt disc playback.
• Never insert anything other than discs. Do not attach a label or tape to a disc.
• The use of benzine, thinner, insecticide, or other volatile chemicals may damage the
disc surface.
16
Before Using This Product
Page 18
17
Detaching and Replacing the Front Panel
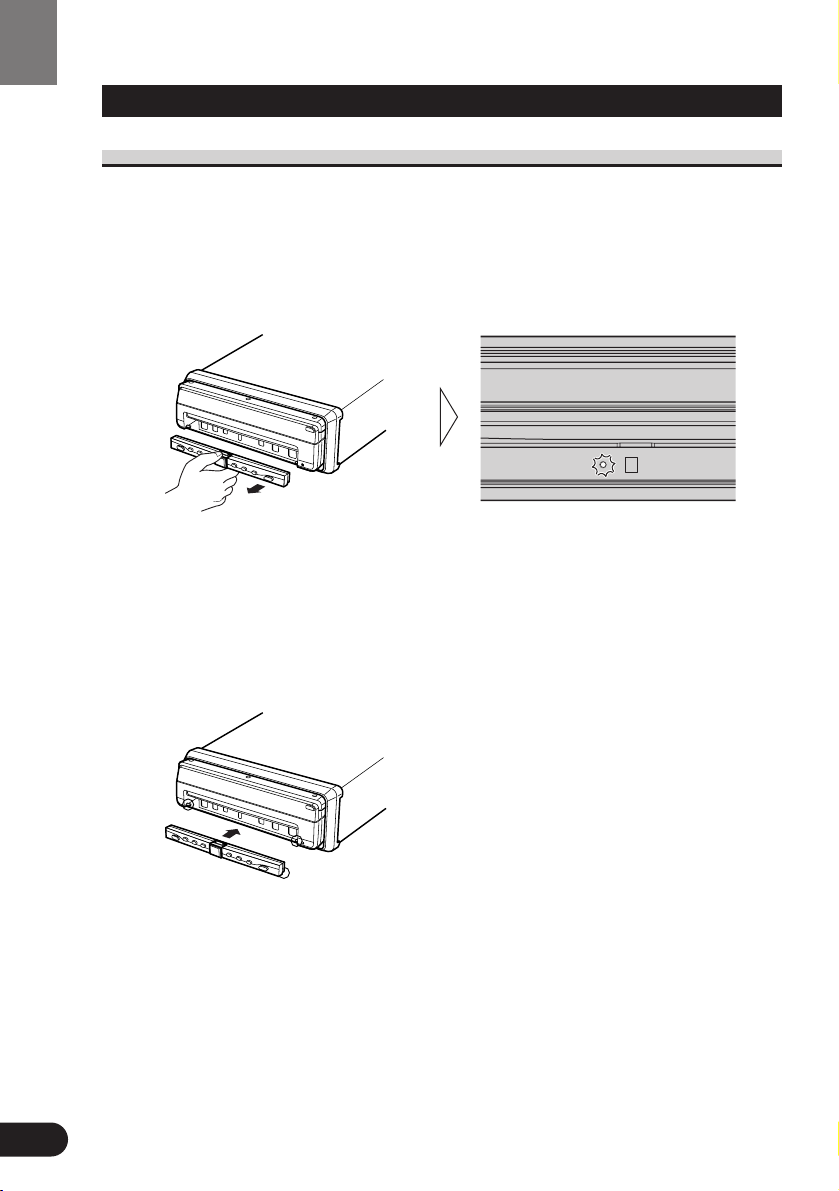
Theft Protection
The front panel of the DVD player is detachable to discourage theft.
When the front panel is detached, the display closes automatically and cannot be opened.
So, you will not be able to operate this product.
Detaching the Front Panel
• Eject the front panel.
The LED indicator will flash while the front panel is being detached.
Note:
• Take care not to grip it too tightly or drop it.
Replacing the Front Panel
• Replace the front panel by clipping it into place.
Align the groove on the bottom of the front panel with the guide on the main body,
and clip in.
Precaution:
• When replacing the front panel, avoid pressing any of the buttons.
• Avoid subjecting the front panel to excessive shocks.
• Keep the front panel out of direct sunlight and high temperatures.
Before Using This Product
Page 19

18
Before Using This Product
Key Finder
DVD Player
The following diagram shows the display when it is deployed.
Note:
• The DVD player plays one standard 12 cm (5 in.) or 8 cm (3 in.) single disc at a time. Do not
use an adapter when playing 8 cm (3 in.) disc.
• Do not insert anything into the Disc Loading Slot other than discs that are compatible with
this product.
• The DVD function can be turned ON/OFF with the disc remaining in the DVD player. (Refer
to page 73.)
• A disc left partially inserted after ejection may incur damage or fall out.
q
w
e
r
t
y
i
o
!0
!1
u
!3
!2
q Disc loading slot
w POWER button
e Eject button
r PLAY/PAUSE (6) button
t STOP (7) button
y PREVIOUS (4) button
u NEXT (¢) button
i V.SOURCE button
o RGB button
!0 RESET button
!1 OPEN/CLOSE (0) button
!2 ANGLE buttons
!3 WIDE button
Page 20
19
Before Using This Product
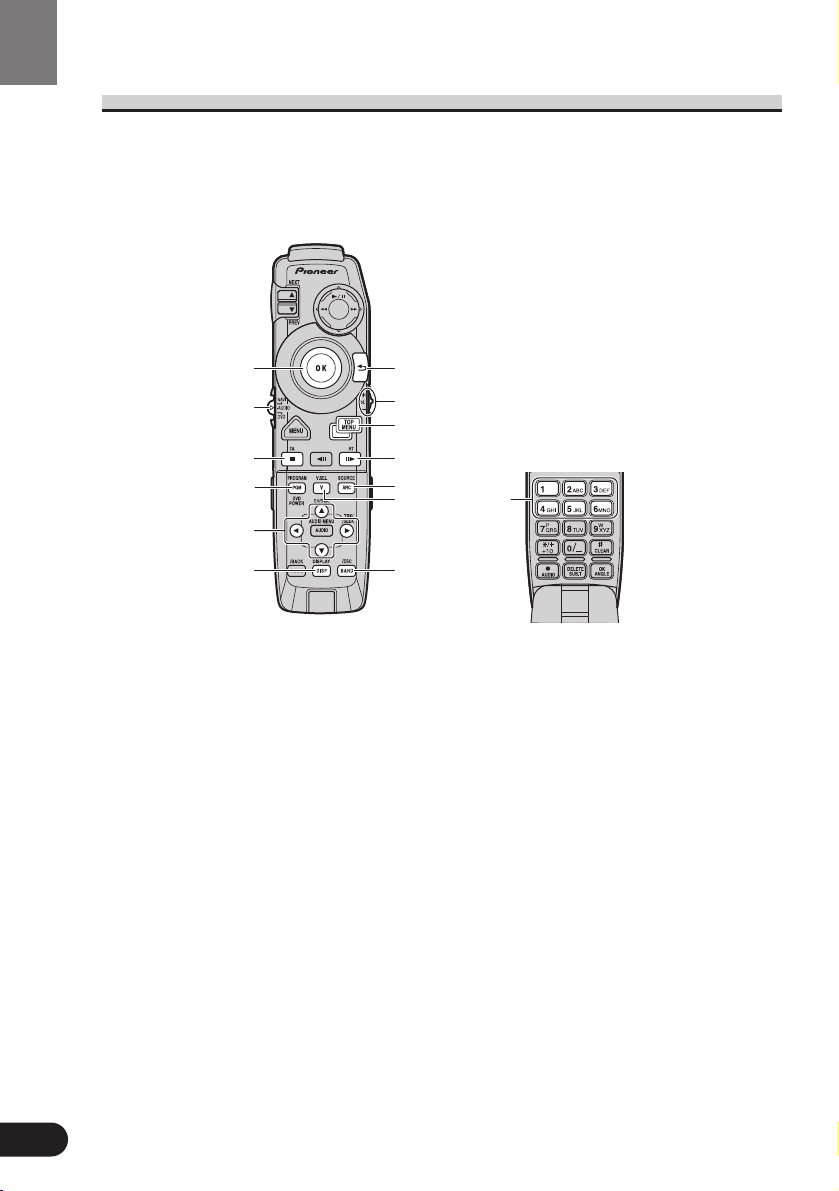
Setting the Remote Control for AV Receiver Operation
To operate this system’s AV Receiver, set the remote control’s operation mode switch to
“AUDIO”.
q
w
e
r
t
y
u
i
o
!0
!1
!2
!3
!4
q Joystick
w Remote control operation mode switch
e TA button
r PGM button
t 5/∞/2/3 buttons
y DISPLAY button
u RETURN button
i VOLUME
Move upward or downward to adjust
the volume.
If it is pressed, the volume is reduced
(by about 90%).
Press once more to return to the original
volume level.
o MENU button
!0 RT button
!1 SOURCE button
!2 V.SEL button
!3 BAND button
!4 Buttons 1–6
Page 21
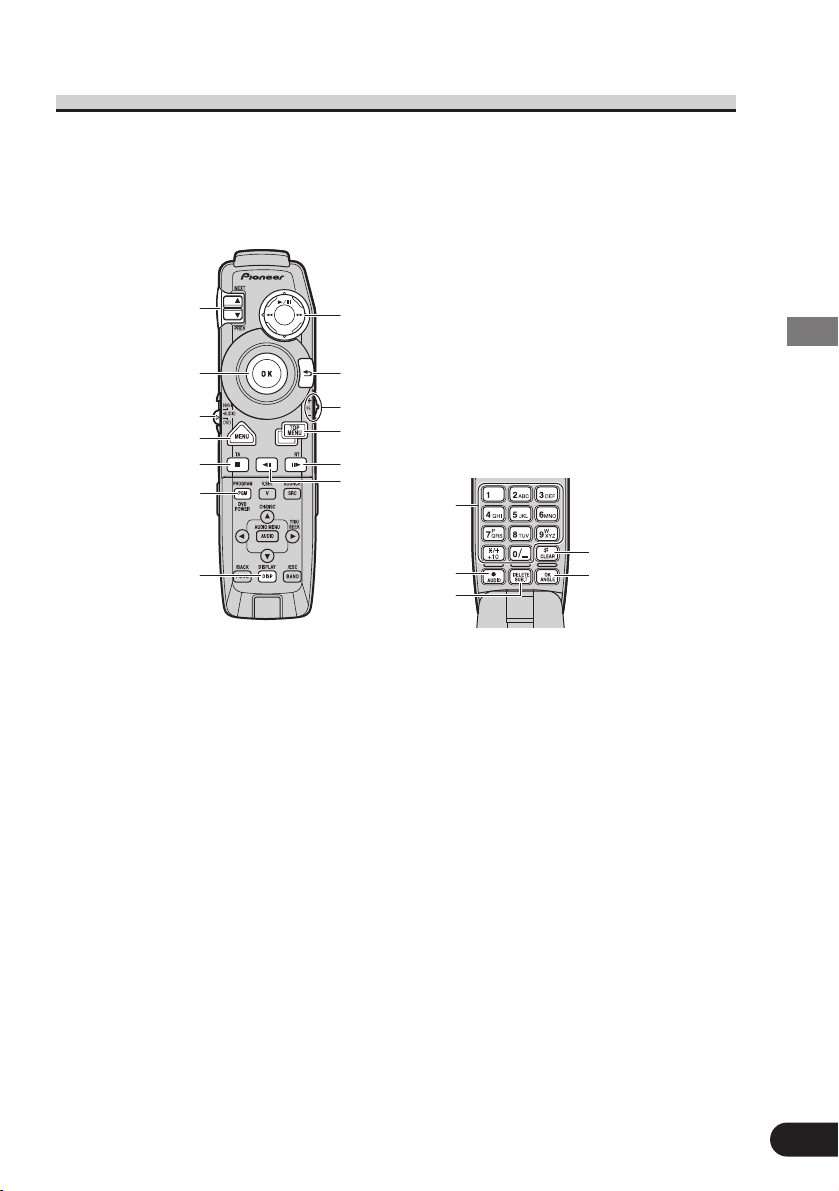
Setting the Remote Control for DVD Player Operation
To operate this system’s DVD Player, set the remote control’s operation mode switch to
“DVD”.
q
e
t
y
u
o
!0
!1
!2
!3
!4
i
w
r
!5
!6
!7
!8
20
Before Using This Product
q NEXT/PREV button
w Joystick
e Remote control operation mode switch
r MENU button
t STOP (7) button
y POWER button
u DISPLAY button
i Control stick
o RETURN button
!0 VOLUME
Move upward or downward to adjust
the volume.
If it is pressed, the volume is
reduced (by about 90%).
Press once more to return to the
original volume level.
!1 TOP MENU button
!2 STEP (E) button
!3 STEP (e) button
!4 Number buttons
!5 AUDIO button
!6 SUBTITLE button
!7 CLEAR button
!8 ANGLE button
Page 22
Before Using This Product
21
Using the Remote Control
This product is equipped with a remote control for convenient operation.
• Point the control in the direction of the signal reception on the color display to
operate.
• When the control is not in use, attach it firmly to the provided mounting base.
Precaution:
• Do not store the remote control in high temperatures or direct sunlight.
• The control may not function properly in direct sunlight.
• Do not let the remote control fall onto the floor, where it may become jammed under the brake
or accelerator pedal.
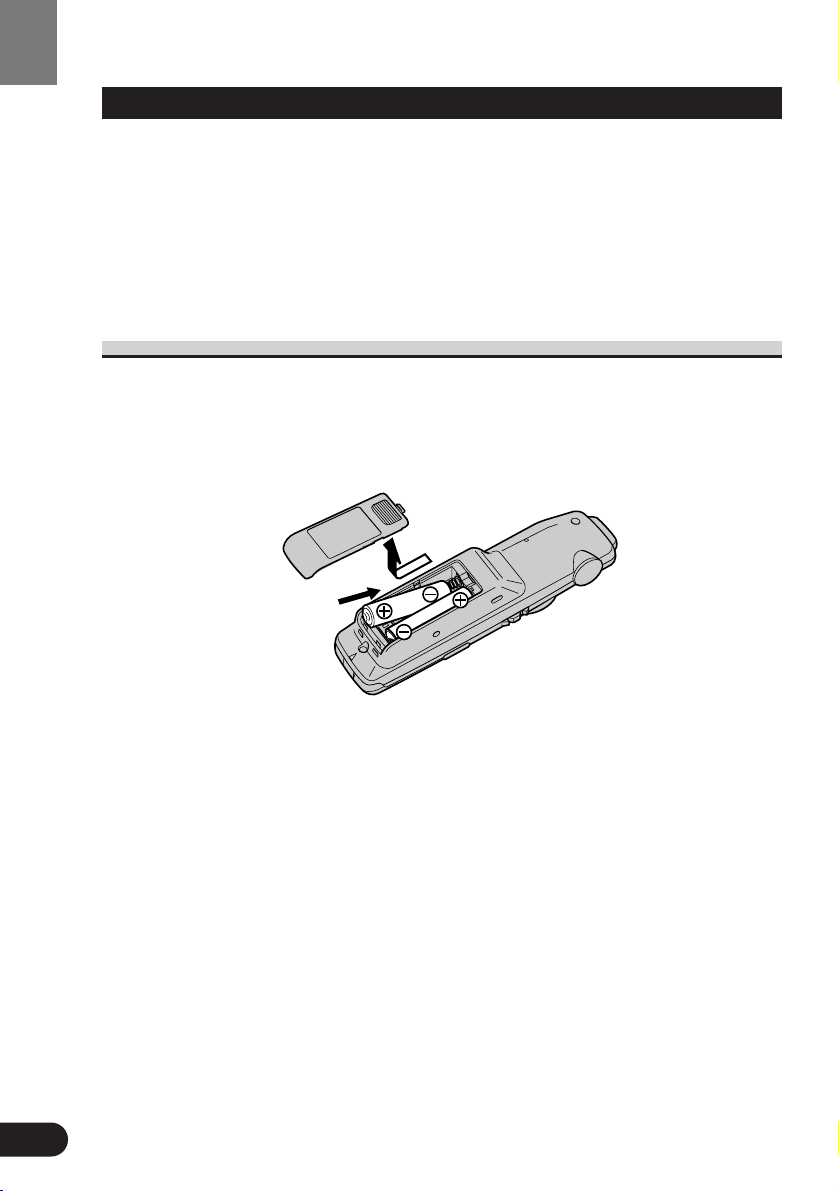
Batteries
• Remove the cover on the back of the remote control and insert the batteries
with the (+) and (–) poles pointing in the proper direction.
Precaution:
• Use only UM-4, AAA or IEC LR03 1.5 V batteries.
• Remove the batteries if the remote control is not to be used for a month or longer.
• Do not attempt to recharge the batteries supplied with remote control.
• Do not mix new and used batteries.
• In the event of battery leakage, wipe the remote control completely clean and install new
batteries.
• We recommended using alkaline batteries as replacements.
• When disposing of used batteries, please comply with governmental regulations or environ-
mental public institution’s rules that apply in your country/area.
Page 23
Operation of the Display
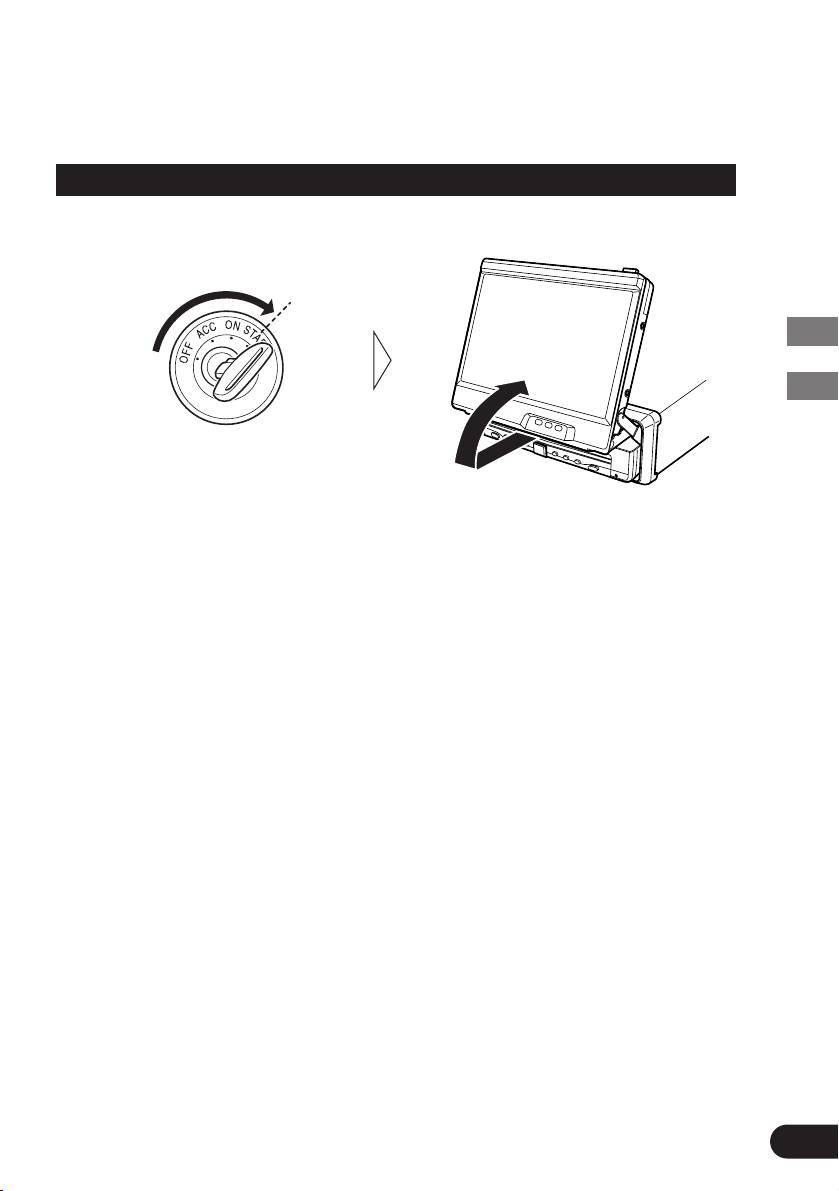
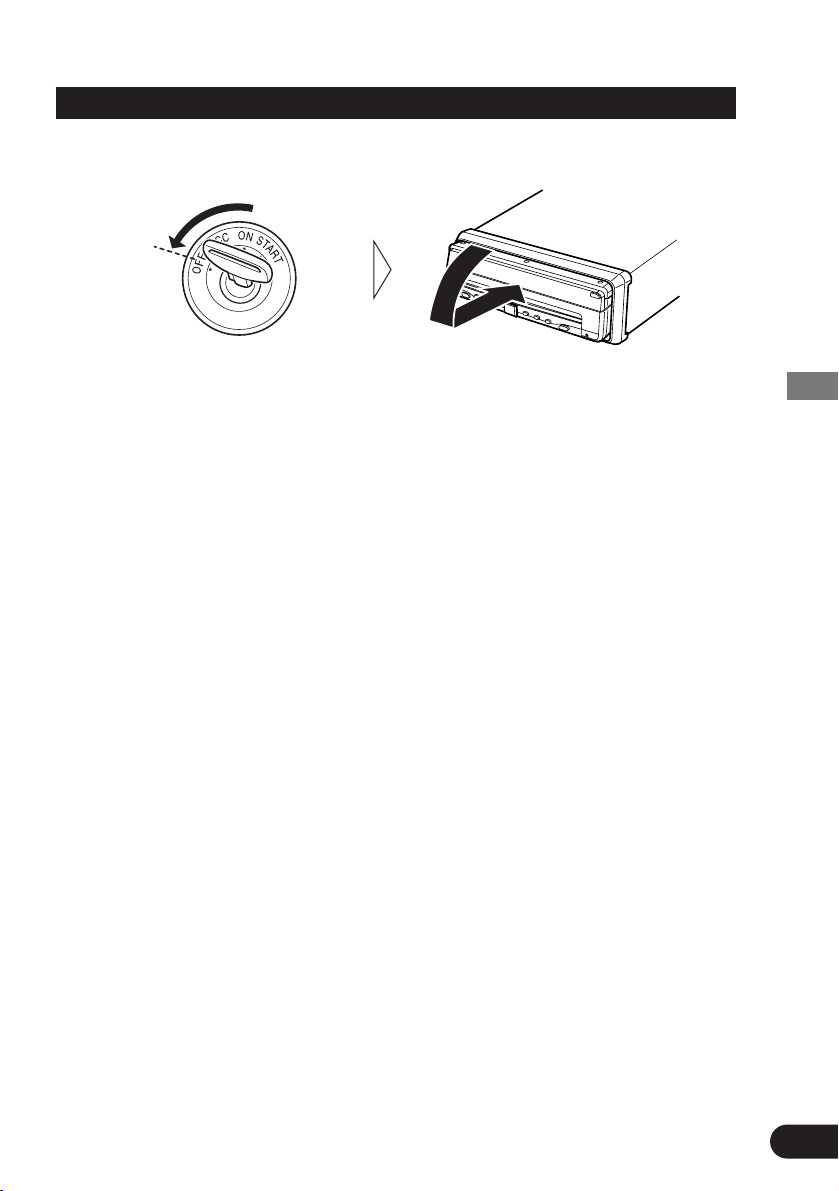
Deploying the Display
• Turn your vehicle’s engine ON.
The display will be automatically deployed by the automatic close/open mode.
If the display is not automatically deployed, press the OPEN/CLOSE button.
Note:
• The automatic close/open mode will operate the display as follows.
* When the ignition switch is turned OFF while the display is deployed, the display will be
closed after approximately 6 seconds.
When the ignition switch is turned ON again (or turned to ACC), the display will be
deployed automatically.
* Installing the front panel will automatically deploy the display. (Refer to page 17.)
• The automatic close/open mode can be switched ON/OFF. (Refer to page 130.)
• When the ignition switch is turned OFF after the display has been closed, turning the ignition
switch ON again (or turning it to ACC) will not deploy the display. In this case, press the
OPEN/CLOSE button to deploy the display.
22
Before Using This Product/Operation of the Display
Page 24
23
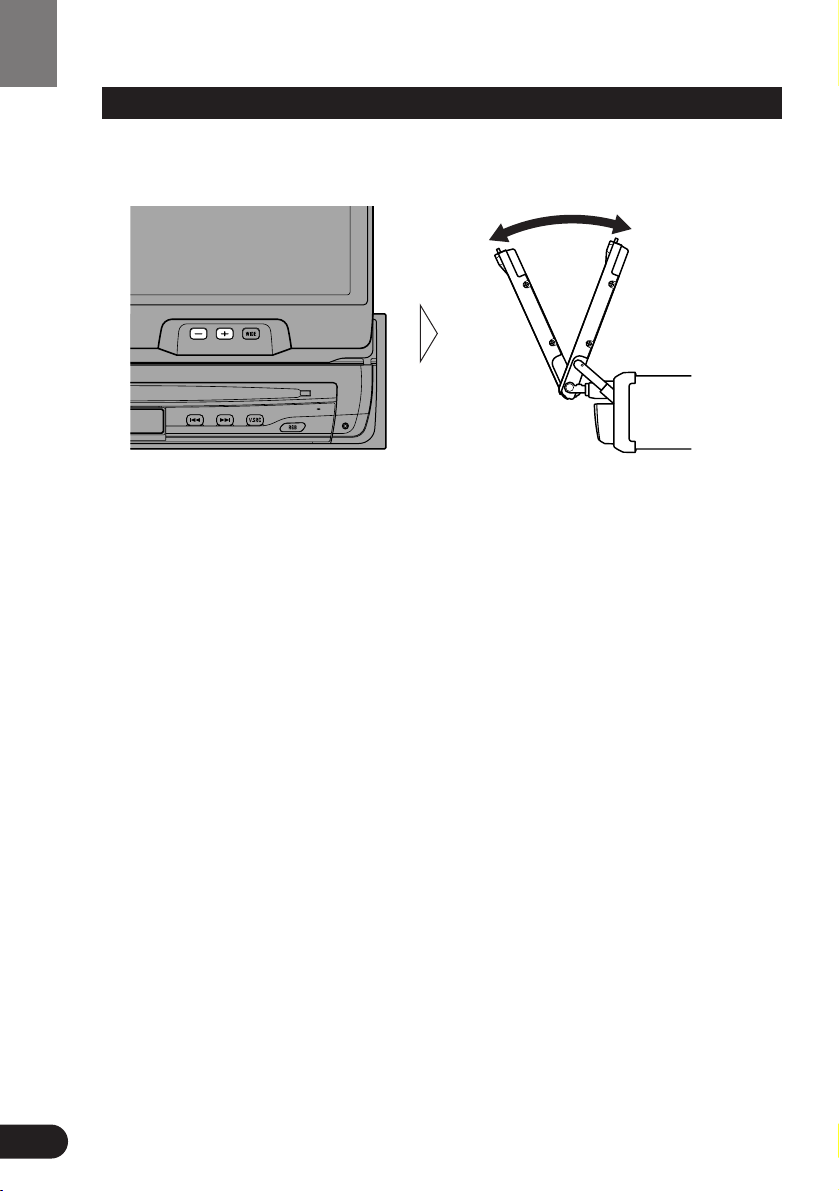
Screen Angle Adjustment
The angle of this product’s screen continues changing as long as you keep pressing the
ANGLE button.
• Adjust the screen to an easily viewable angle.
Precaution:
• If you can hear the display knocking against your vehicle’s console or dashboard, press the
ANGLE button on the (–) side to move the screen a little forward.
Note:
• When adjusting the angle, be sure to press the ANGLE button. Forcible adjusting of the display by hand may damage it.
• The adjusted angle of the display will be memorized and automatically returned to the next
time the display is deployed.
Operation of the Display
Page 25
Closing the Display
• Turn the vehicle’s engine OFF.
The display will be automatically closed by the automatic close/open mode. If the display does not close automatically, press the OPEN/CLOSE button.
Note:
• When closing the display, check to make sure that it has closed completely. If the display has
stopped halfway, leaving it like this could result in damage to it.
• The automatic close/open mode will operate the display as follows.
* When the ignition switch is turned OFF while the display is deployed, the display will be
closed after approximately 6 seconds.
When the ignition switch is turned ON again (or turned to ACC), the display will be
deployed automatically.
* Removing the front panel will close the display. (Refer to page 17.)
• The automatic close/open mode can be switched ON/OFF. (Refer to page 130.)
• When the ignition switch is turned OFF after the display has been closed, turning the ignition
switch ON again (or turning it to ACC) will not deploy the display. In this case, press the
OPEN/CLOSE button to deploy the display.
24
Operation of the Display
Page 26

25
Changing the Wide Mode
You can select a desired mode for enlarging a 4:3 picture to a 16:9 one.
• Select the desired mode in the following order:
Full (FULL) = Just (JUST) = Cinema (CINEMA) = Zoom (ZOOM) = Normal
(NORMAL)
Full (FULL)
A 4:3 picture is enlarged in the horizontal direction only, enabling you to enjoy a 4:3
TV picture (normal picture) without any omissions.
Just (JUST)
The picture is enlarged slightly at the center and the amount of enlargement increases
horizontally to the ends, enabling you to enjoy a 4:3 picture without sensing any disparity even on a wide screen.
Cinema (CINEMA)
A picture is enlarged by the same proportion as FULL or ZOOM in the horizontal
direction and by an intermediate proportion between FULL and ZOOM in the vertical
direction; ideal for a cinema-sized picture (wide-screen picture) where captions lie
outside.
Zoom (ZOOM)
A 4:3 picture is enlarged in the same proportion both vertically and horizontally; ideal
for a cinema-sized picture (wide-screen picture).
Normal (NORMAL)
A 4:3 picture is displayed as it is, giving you no sense of disparity since its proportions are the same as that of the normal picture.
Note:
• Different settings can be memorized for the AV, VCR and RGB video. In addition, different
settings can also be memorized for a component (AV) connected to the AV-BUS input.
• The Wide Mode used for menu setting is switched to Full (FULL). The Wide Mode will
return when the menu setting is deleted.
• When video is viewed in a wide mode that dose not match its original aspect ratio, it may
appear differently.
• Remember that using the wide mode feature of this system for commercial or public viewing
purpose may constitute an infringement on the author’s rights protected by the Copyright
Law.
• Video will appear roughened when viewed in CINEMA or ZOOM mode.
Operation of the Display
Page 27
Switching the Video Source
7 Switching to RGB
You can watch videos from the AV-Receiver. Usually set the video source to RGB.
• Switch to RGB.
Repeat the preceding operation to switch to the previous video source.
Note:
• If you select the “AVM” video select setting in the display setting menu, video is locked to
RGB. (See page 130.)
7 Switching to AV and VCR
You can switch between video from a component connected to the DVD player’s
video input (VCR) and video from the built-in DVD player or component connected
to AV-BUS input (AV).
Note:
•
When switched to AV, you can watch video from the AV-BUS component selected with the
AV Receiver’s source select.
• Select the desired video source in following order:
AV = VCR
Note:
• If you select the “AVM” video select setting in the display setting menu, video is locked to
RGB. (See page 130.)
26
Operation of the Display
Page 28
27
Operation for Each Source Unit
To Listen to Music
The following explains the initial operations required before you can listen to music.
Initially, set the remote control’s operation mode switch to “AUDIO”. (Refer to “Setting the
Remote Control for AV Receiver Operation” on page 19.) Also set the display’s video source
to RGB. (Refer to “Switching the Video Source” on page 26.)
1. Select the desired source (e.g. Multi-CD Player).
Each press of the SOURCE button selects the desired source in the following order:
DVD Player =
TV = VIDEO = Tuner = MD Player = CD Player = Multi-CD
Player =
External 1 = External 2 = AUX = Speaker Input
Note:
• External Unit refers to a Pioneer product (such as one available in the future) that, although
incompatible as a source, enables control of basic functions by this product. Two External
Units can be controlled by this product, although “External” is displayed whether you select
External Unit 1 or External Unit 2. When two External Units are connected, the allocation of
them to External Unit 1 or External Unit 2 is automatically set by this product.
• In the following cases, the sound source will not change:
* When the sound source from another product is not connected to this product.
* When no magazine is set in the Multi-CD player.
* When no disc is set in the DVD player.
* When no disc is set in the CD player.
* When no disc is set in the MD player.
* When the AUX (auxiliary input), VIDEO and Speaker Input are set to OFF.
(See pages 134, 135.)
• When this product’s blue/white lead is connected to the car’s Auto-antenna relay control terminal, the car’s Auto-antenna extends when this product’s source is switched ON. To retract
the antenna, switch the source OFF.
Each press changes the Source ...
Operation for Each Source Unit
Page 29
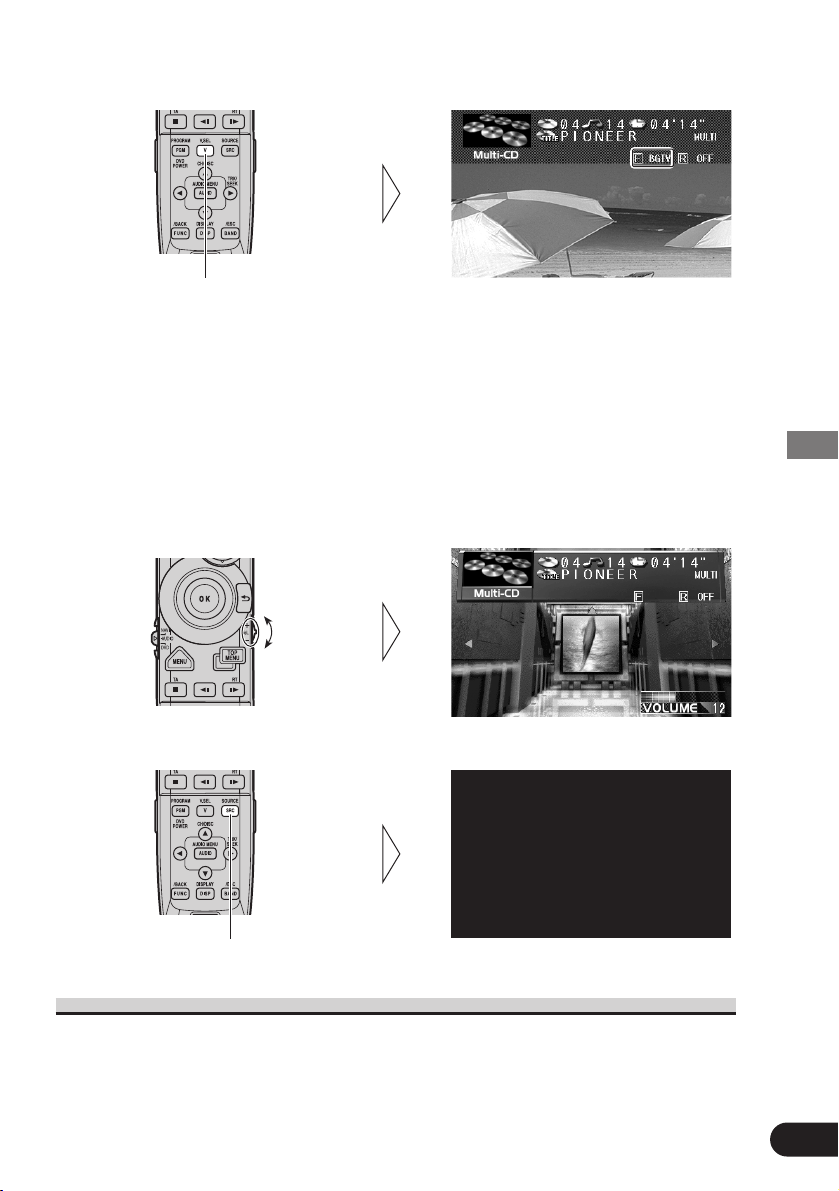
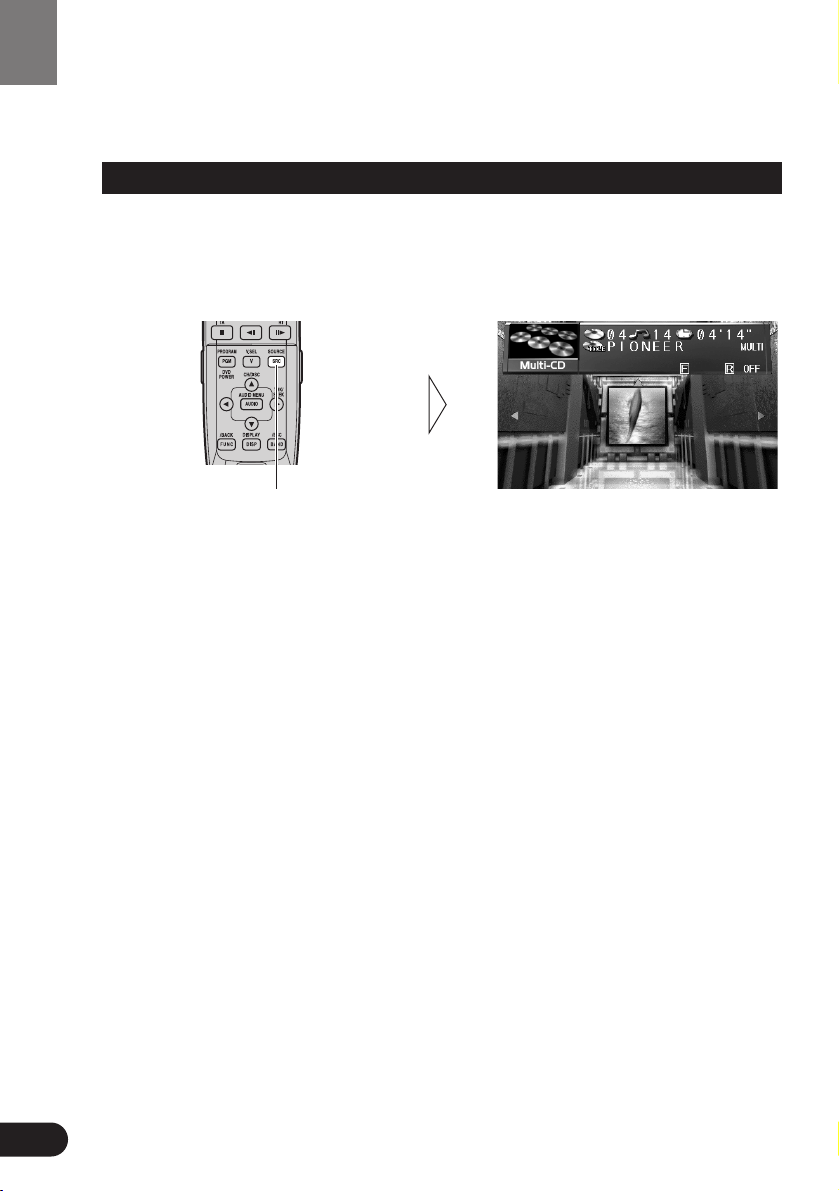
2. Select the desired picture.
Each press of the V.SEL button selects the source in the following order:
Source Screen =
Navigation Unit (NAVI) = TV Tuner Unit (BGTV)
=
Video (BGVTR)
Note:
• Select “Source Screen” to hear/view playback of normal audio/video sources.
• You can select the Pioneer Navigation Unit only when that unit is switched on.
• You can select the TV Tuner Unit only when connecting it to this product. (The video source
selected with the TV Tuner is displayed.)
• To select the VIDEO mode, switch the VIDEO mode ON in the Set Up Menu. (See page 33.)
3. Raise or lower the volume.
4. Turn the source OFF.
When using the DVD player
You can switch on and off the DVD player independently from other units. Switching the AV
Receiver off independently does not switch the DVD player off. You have to switch the DVD
player off separately.
• If, while “DVD” is selected as source, you switch off the DVD player, you can confirm it on
the display.
Hold for 1 second
Each press changes the picture ...
28
Operation for Each Source Unit
Page 30
29
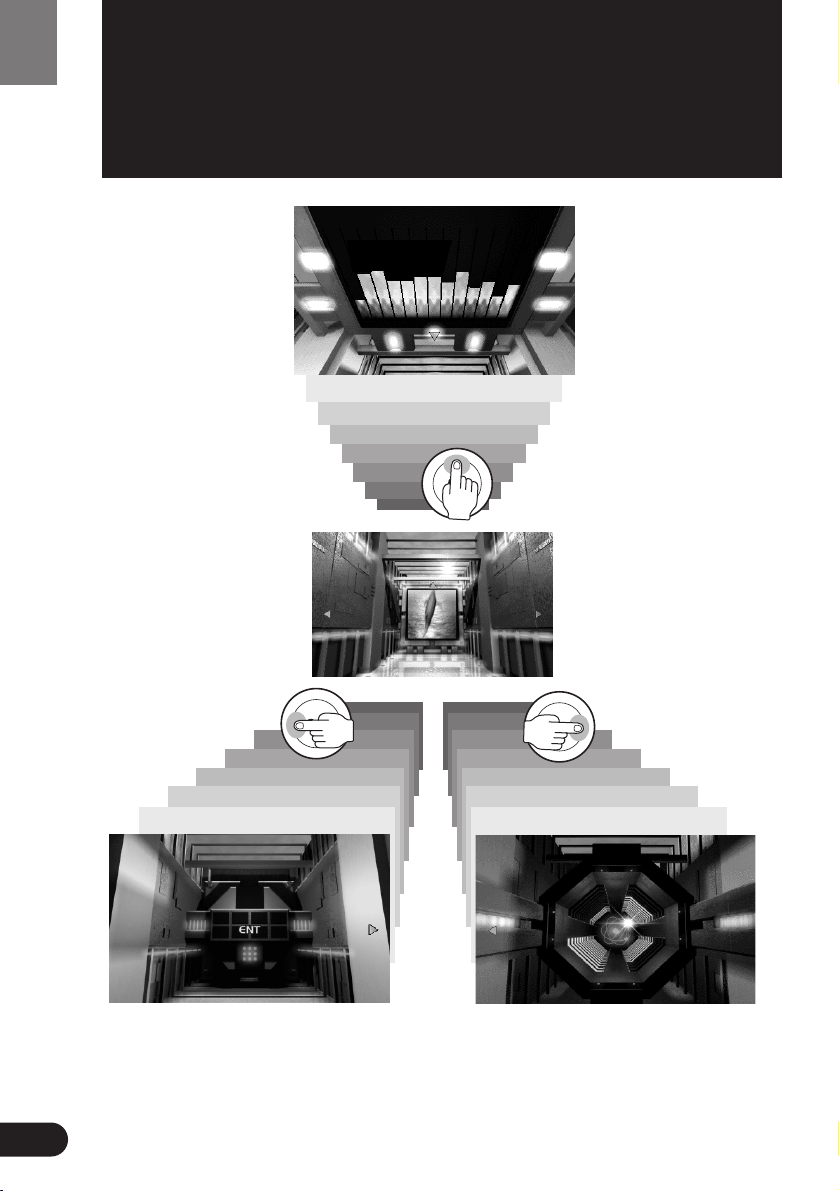
Virtual Theater Quick Tour
Virtual Theater Quick Tour
Move the joystick up to
move in virtual space to
the Spectrum Analyzer
Room. The spectrum analyzer features a graph
indicating the frequency
of the sound currently in
play.
Move the joystick left to move to the
entrance of the Function Menu Screen. If
you click the joystick, you switch to the
Function Menu Screen. Further explanation on how to use the Function Menu
Screen will follow.
Move the joystick right to move to the
Power Band Room. This screen provides a
visual image of the volume settings. Click
the joystick to change the power band display as below.
Monaural display j 4-band display
When the power is turned on,
the Center Room screen is
displayed automatically. The
screen appearing at the center
of the room can be changed.
(See page 133.)
Page 31

30
Virtual Theater Quick Tour
Returning to the Center Room
You can return to the Center Room after you are finished in any of the sub-rooms quite simply with either
of 2 options. Either use the joystick to select the Return option in that rooms screen, then click the joystick, or simply press the RETURN button on the remote controller. In either case, you are brought back
to the Center Room.
Click the joystick
Click the joystick means to press the center of the joystick down and release one time.
• The Picture icon appears only when the selected source is a visual medium.
Menu Structure
The setting and adjusting operation of AV Receiver is done from the Main Menu. Press the
MENU button, and four main menu icons appear on the screen: “Function”, “Audio”,
“Picture” and “Set Up”. The selected function is highlighted in green. Move to each menu
screen from this opening screen.
Select “Function”, then click the joystick to display the Function Menu
Screen. The menu varies depending on
the source.
Select “Set Up”, then click the joystick
to display the Set Up Menu.
Select “Audio”, then click the joystick
to display the Audio Setting Menu.
Select “Picture”, then click the joystick
to display the Picture Adjust Menu.
Animation
Animation
Animation
Page 32

31
Virtual Theater Quick Tour
Information Screen
By pressing the DISPLAY button on this remote control unit you can show the title list, make
changes to the Source Plate Information Screen, etc.
Switching the Information Screen
In the following, the Multi-CD Player is used as an example of source.
7 Multi-CD Player
Pressing the DISPLAY button switches the Information display on the Source Plate as follows. The title list appears on the plate and you can input disc titles here. You can also switch
the titles displayed on the Flip-Down Plate.
Entered title is displayed.
7
When playing a CD TEXT disc
The Disc Title and Track Title are displayed.
7
When playing a CD TEXT disc
Pressing the DISPLAY button switches
the display as follows:
1 Track Title
Disc Title
«
2 Disc Artist Name
Disc Title
«
3 Track Artist Name
Disc Title
Note:
• If the Multi-CD Player in use is not CD
TEXT compatible, you cannot access CD
TEXT-specific display features.
Source Plate Display
Flip-Down Plate Display
No Plate
Page 33

32
Virtual Theater Quick Tour
7 Tuner
Source Plate Display
«
Flip-Down Plate Display
(Preset Frequency List)
«
Flip-Down Plate Display
(Radio Text Display)
«
No Plate
7 TV
Source Plate Display
«
No Plate
7 DVD Player
Source Plate Display
«
No Plate
7 CD Player
Source Plate Display
«
Flip-Down Plate Display
«
No Plate
7 MD Player
Source Plate Display
«
No Plate
7 External Devices
External Devices are VIDEO, AUX, Speaker
Input and External Units.
Source Plate Display
«
No Plate
• For visual sources, the Source Plate
Display disappears after about 8 seconds.
• Each press of the DISPLAY button
switches the display on the Source Plate
as follows:
1. Disc Title
Track Title
2. Track Title
Disc Title
Pressing the DISPLAY button for 2 seconds scrolls the upper title.
• For televisions, the Source Plate Display
disappears after about 8 seconds.
Page 34

33
Using the Screen Pictures (Selecting the NAVI, VTR etc.)
Selecting the Navigation Picture
You can switch the picture (separately from the audio) of the Navigation to another source
while listening to the sound from the current source.
Switch the power to your navigation unit ON before performing operations.
(Refer to the navigation manual.)
• Select the “NAVI” by pressing the V.SEL button.
Note:
• You can select the Pioneer Navigation Unit only when that
unit is switched on.
• If, while “NAVI” is selected as source, you switch off your
navigation unit, you can confirm it on the display.
Selecting the Video Source
Switching the Video ON/OFF Mode
You can select the video unit when one is connected to the video input on the AV-Receiver.
To select the Video mode, switch the Video in the Set Up Menu On.
1. Press the MENU button.
The main menu icons whirl down, with
“Function” highlighted in green.
2. Select “Set Up” by moving the joystick.
“Set Up” is highlighted in green.
3. Click the joystick.
The Set Up Menu appears.
4. Select “Video” by moving the joystick.
“Video” is highlighted in green.
5. Click the joystick.
Each click toggles Video On/Off.
6. Press the RETURN button.
You go back to the Center Room.
Using the Screen Pictures (Selecting the NAVI, VTR etc.)
Page 35

34
Using the Screen Pictures (Selecting the NAVI, VTR etc.)
Selecting the Video Source
You can enjoy video and audio entertainment from external components connected to video
input.
Switch the power to your video unit ON before performing operations.
(Refer to the video unit manual.)
• Select “Video” by pressing the SOURCE button.
Selecting the BGTV, BGVTR
You can switch the picture (separately from the audio) of the TV or Video to another source
while listening to the sound from the current source.
Switch the power to your video unit ON before performing operations.
(Refer to the video unit manual.)
• Select “BGTV” or “BGVTR” by pressing the
V.SEL button.
Page 36

35
Using the Screen Pictures (Selecting the NAVI, VTR etc.)
Selecting the Picture to Rear Display
You can also enjoy video and audio entertainment from external components connected to
video input on a rear display (sold separately).
This is only possible if a rear display is connected to the AV Receiver.
Switch the power to your video unit ON before performing operations.
(Refer to the video unit manual.)
• Press the V.SEL button for 2 seconds.
Each press of the V.SEL button for 2 seconds selects
the source in the following order:
OFF =
Link to Front Display Source (F.SRC)
=
Video (VTR)
Note:
• The rear display will only display audiovisual sources (i.e. DVD player, TV Tuner, etc.).
Audio only sources (MD, CD, FM/AM Tuner) cannot be heard from the rear display.
• You cannot switch rear display source audio and video separately.
Page 37

36
Using the Screen Pictures (Selecting the NAVI, VTR etc.)
Adjusting the Picture
You can independently adjust Video, DVD and TV Tuner unit picture quality.
You can also make adjustments to the picture quality when viewing with the car courtesy light
ON or OFF, and store both settings in memory.
1. Select the desired source (picture) by pressing the SOURCE button.
2. Press the MENU button.
The main menu icons whirl down.
3. Select “Picture” by moving the joystick right.
“Picture” is highlighted in green.
4. Click the joystick.
The “PICTURE ADJUST” screen appears.
5. Select an option by moving the joystick
up/down.
The selected option is highlighted in yellow.
You can adjust the selected option.
Option Adjustment
SHARP You can adjust the sharpness of the picture.
• The display changes as the distinction of the picture changes from sharp
to dull.
HUE You can adjust the hue of the picture.
• The display changes as the distinction of the picture changes from reddish to greenish.
COLOR You can adjust the color of the picture.
• The display changes as the distinction of the picture changes from light
to dark.
6. Adjust the selected option by moving the joystick left/right.
7. Cancel the “PICTURE ADJUST” screen by
pressing the RETURN button.
Note:
• After entering the “PICTURE ADJUST” screen, if you do not perform an operation within
about 30 seconds, the “PICTURE ADJUST” screen is automatically canceled.
Page 38

37
Built-In Tuner
Built-In Tuner
Basics
Manual and Seek Tuning
You can select the tuning method by changing the length of time you press the 2/3
button.
Manual Tuning (step by step) Less than 0.5 seconds
Seek Tuning More than 0.5 seconds
Note:
• If you continue pressing the button for longer than 0.5 seconds, you can skip broadcasting stations. Seek Tuning starts as soon as you release the button.
• Stereo indicator “STEREO” lights when a stereo station is selected.
Preset Number Frequency
Band
Selecting the Tuner
Select the “Tuner” as source by pressing
the SOURCE button as many times as
necessary.
Preset Tuning
You can memorize broadcast stations in buttons 1
through 6 for easy, one-touch station recall.
Preset station recall Less than 2 seconds
Broadcast station preset memory More than 2 seconds
Note:
• Up to 18 FM stations (6 in FM1, FM2 and FM3) and 6
AM stations can be stored in memory.
• You can also use the 5/∞ button to recall broadcast sta-
tions memorized in buttons 1 through 6.
Band
FM1 = FM2 = FM3 = AM
Page 39

Operation at the Function Menu Screen
Accessing the Tuner Function Menu
1. Press the MENU button.
The main menu icons whirl down, with
“Function” highlighted in green.
2. Click the joystick.
The Tuner Function Menu appears, offering you
the following options:
3. Select the option by moving the joystick.
The selected option is highlighted in green.
4. Click the joystick.
Refer to detailed operation of each function.
Exit from the Tuner Function Menu
• Press the RETURN button.
38
Built-In Tuner
7 FM Tuner Function Menu
7 AM Tuner Function Menu
Best Stations Memory
(See page 39.)
Local Seek Tuning
(See page 39.)
PGM button
(See page 40.)
TA Function
(See page 40.)
Seek Select
(See page 40.)
Best Stations Memory
(See page 39.)
Local Seek Tuning
(See page 39.)
PGM button
(See page 40.)
Page 40

Operating Each Function
Best Stations Memory (BSM)
The BSM function stores stations in memory automatically.
Select the band before performing operations. (See “Band” on page 37.)
1. Check to see “BSM” is currently highlighted.
If not, select that option by moving the joystick.
“BSM” is highlighted in green.
2. Click the joystick.
The “BSM Off” display changes to “BSM On”.
The stations with the strongest signals will be stored
under buttons 1–6 and in order of their signal strength.
• To Cancel the process, click the joystick before memorization is complete.
Local Seek Tuning
When Local is ON, you can only select broadcast stations providing strong reception.
1. Select “Local” by moving the joystick.
“Local” is highlighted in green.
2. Click the joystick.
Each click selects the desired Local Seek Sensitivity in
the following order:
FM: Off =
Level 1 = Level 2 = Level 3 = Level 4
AM: Off =
Level 1 = Level 2
Note:
• The “Level 4” setting allows reception of only the strongest stations, while lower settings let
you receive progressively weaker stations.
39
Built-In Tuner
Page 41

Continued overleaf.
40
Built-In Tuner
TA Function
You can switch TA (Traffic Announcements) on/off. (See page 45.)
1. Select “TA” by moving the joystick.
“TA” is highlighted in green.
2. Click the joystick.
Each click toggles TA On/Off.
Seek Select
You can select seek mode between PTY search and Frequency search. (See page 43.)
1. Select “Seek Select Mode” by moving the joy-
stick.
“Seek Select Mode” is highlighted in green.
2. Click the joystick.
Each click toggles the PTY/Frequency.
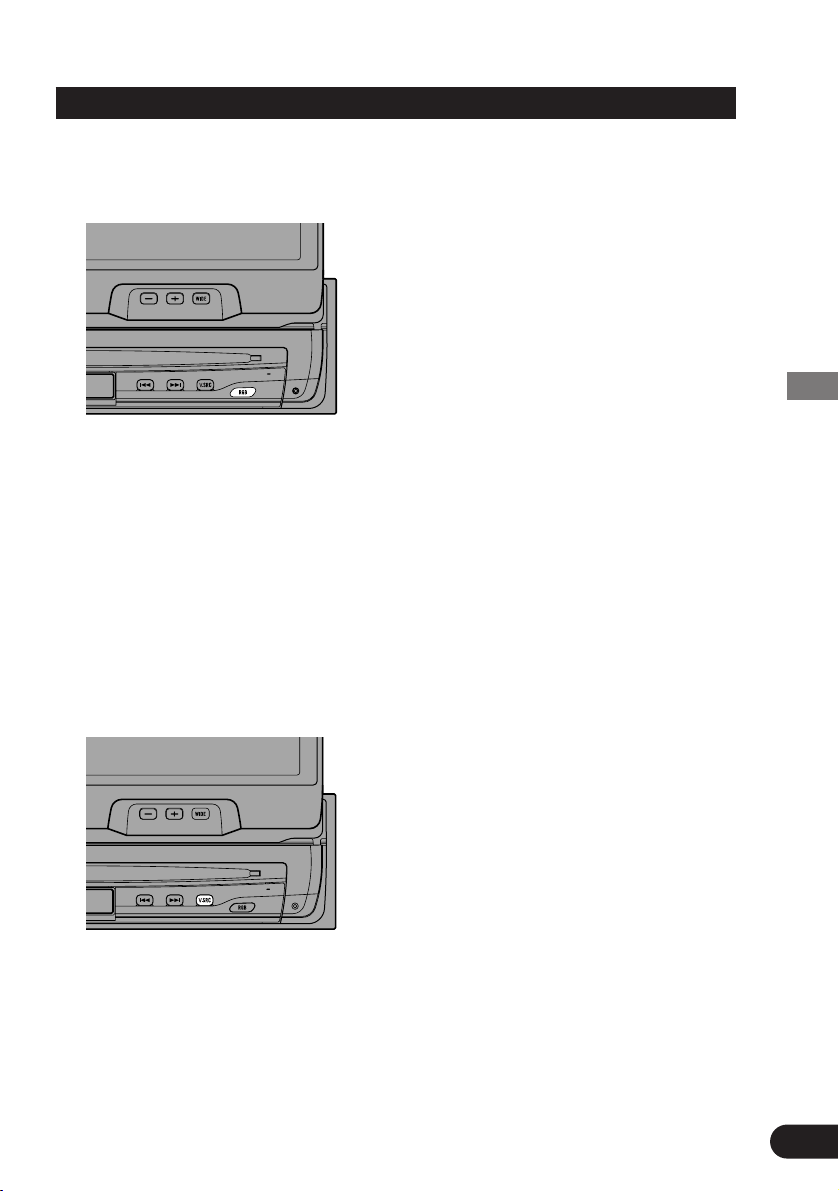
PGM button
You can create a shortcut for BSM or Local Mode.
If you want to control the function of one of these, without needing to go to the Function
Menu each time, do the following:
1. Select “PGM” by moving the joystick.
“PGM” is highlighted in green.
2. Click the joystick.
Each click changes the PGM mode in the following
order:
BSM =
Local
Press the PGM button in the Tuner source
Function name (Display) Press Hold for 2 seconds
Best Stations Memory (BSM) OFF ON
Local Seek Tuning (Local) Switch the Local ———
Seek Sensitivity
Page 42

41
Built-In Tuner
Display the Flip-Down Plate
• Press the DISPLAY button.
Each press of the DISPLAY button changes the Source Plate and Flip-Down Plate in
the following order:
Source Plate =
Preset Frequency List = Radio Text Display = No Plate
Examples
Recalling Preset Stations by Preset Frequency List
1. Press the DISPLAY button for the Preset
Frequency List to appear.
2. Select the band by pressing the BAND button.
3. Select the preset station by moving the joystick
up/down.
Selected station is highlighted.
4. Click the joystick.
Selected station is indicated in yellow and tuned.
Source Plate Radio Text Display (FM band)
Preset Frequency List
Page 43

Continued overleaf.
42
Built-In Tuner/Using the RDS Functions
Using the RDS Functions
This product features a tuner with RDS functions.
RDS (Radio broadcast Data System) is a system that transmits broadcast station information
together with FM programs.
You get display of Program Service Name and PTY (Program Type ID code), tuning to stations broadcasting a desired PTY, automatic tuning to traffic information, and emergency
broadcasts and radio text display.
Note:
• The RDS service does not provide AM broadcast information.
• The RDS service may not be provided by all FM stations.
PTY Function
This product allows you to look for a station by PTY information (Program Type ID code).
The information is divided into 8 types, such as ROCK, COUNTRY, NEWS and TALK.
PTY Corresponding PTY
ROCK TOP 40
CLS ROCK
ROCK
SFT ROCK
EASY LIS SOFT
ADLT HIT
OLDIES
CLS/JAZZ CLASSICL
JAZZ
NOSTALGA
PUBLIC
COUNTRY COUNTRY
R & B R AND B
SOFT R/B
INFO SPORTS
NEWS
TALK
INFORM
PERSNLTY
RELIGION REL MUSC
REL TALK
MISC LANGUAGE
MISC
Page 44

43
Using the RDS Functions
Searching the PTY
1. Press the MENU button.
The main menu icons whirl down, with “Function”
highlighted in green.
2. Click the joystick.
The Tuner Function Menu appears.
3. Select “Seek Select Mode” by moving the joy-
stick.
“Seek Select Mode” is highlighted in green.
4. Click the joystick.
Each click toggles the PTY/Frequency.
5. Press the RETURN button.
Note:
• To search for the same PTY as the currently received
broadcast station, perform step 7 only.
6. Select a PTY by pressing the 5/∞ button.
A station broadcasting a program with a different PTY
from the PTY of the currently received broadcast station is selected.
7. Select a station by pressing the 2/3 button.
A station broadcasting a program with the same PTY
as the currently received broadcast station is selected.
Note:
• If a PTY code of zero is received from a station, “NONE” will be displayed. This indicates
that the station has not defined its program contents.
• The program of some stations may differ from that indicated by the transmitted PTY.
• If no station broadcasting the selected programming type is found, “NOT FOUND” is dis-
played for about 2 seconds, and the tuner returns to the original station.
Page 45

Continued overleaf.
44
Using the RDS Functions
PTY Alarm
The PTY Alarm function automatically lets you hear broadcasts of emergency announcements
concerning natural disasters and other emergencies, regardless of the source you are listening
to.
• If the tuner receives a radio alarm code, “ALARM” is indicated in the display, and the tuner switches to reception of an emergency announcement.
Note:
• The system switches back to the original source following emergency announcement recep-
tion.
• In sources other than tuner, the tuner automatically seeks out the RDS station with the
strongest signal in the current area 10 seconds after RDS station reception has become impossible. (This function does not operate when the TA function is active.)
Canceling Announcements
• Press the SOURCE button during announcement reception to cancel the
announcement and return to the original source.
Page 46

45
Using the RDS Functions
TA Function
The TA (Traffic Announcement standby) function lets you receive traffic announcements
automatically, no matter what source you are listening to. The TA function can be activated
for a TP station (a station that broadcasts traffic information).
Activating/Deactivating the TA Function
1. Tune in a TP station by pressing the 2/3 but-
ton.
The Car icon lights when the tuner is tuned to a TP station.
2. Press the MENU button.
The main menu icons whirl down, with “Function”
highlighted in green.
3. Click the joystick.
The Tuner Function Menu appears.
4. Select “TA” by moving the joystick.
“TA” is highlighted in green.
5. Activate the TA function by clicking the joystick.
Each click toggles TA On/Off.
6. Press the RETURN button.
You go back to the Center Room.
The “Traffic” indicator lights, indicating that the tuner
is waiting for traffic announcements.
Repeat the preceding operation when no traffic
announcement is being received to deactivate the TA
function.
“Traffic” Car icon
Page 47

Continued overleaf.
46
Using the RDS Functions
Note:
• The system switches back to the original source following traffic announcement reception.
• The TA function can be activated from sources other than tuner if the tuner was last set to the
FM band but not if it was last set to the AM band.
• In sources other than tuner, the tuner automatically seeks out the TP station with the strongest
signal in the current area 10 seconds after the Car icon disappears from the display. (During
seek operation, Car icon disappears.)
• Only TP stations are tuned in during the Seek Tuning mode when the “Traffic” indicator is
ON.
• Only TP stations are stored by BSM when the “Traffic” indicator is ON.
• You can also switch TA on/off without needing to go to the Function Menu each time by
pressing the TA button.
Canceling Traffic Announcements
• Press the SOURCE button while a traffic announcement is being received to
cancel the announcement and return to the original source.
The announcement is canceled but the tuner remains in the TA mode until the TA
function is deactivated.
Adjusting the TA Volume
When a traffic announcement begins, the volume adjusts automatically to a preset
level to enable you to hear the announcement clearly.
• Set the volume by adjusting it by moving the
VOLUME up/down during reception of
a traffic announcement.
The newly set volume is stored in memory and recalled
for subsequent traffic announcements.
Page 48

47
Using the RDS Functions
Radio Text
This tuner can display Radio Text data transmitted by RDS stations, such as station information, the name of the currently broadcast song and the name of the artist.
Note:
• When an RDS station is received, the “RDS” indicator lights.
• When Radio Text is received, the “Text” indicator and Note icon light.
• The tuner automatically memorizes the three latest Radio Text broadcasts received, replacing
text from the least recent reception with new text when it is received.
• You can store data from up to six Radio Text transmissions in buttons 1–6.
• You can also switch to the Radio Text Display by pressing the DISPLAY button. (Refer to
“Display the Flip-Down Plate” on page 41.)
Radio Text display
1. Press the RT button if the RDS indicator is
On.
Flip-Down Plate displaying Radio Text Display
appears.
Note:
• Press the RT button once more, and the Radio Text mode is canceled.
• When no Radio Text is currently being received, “NO TEXT” is displayed.
2. Select either “” or “” by moving the joy-
stick left/right.
3. Click the joystick.
Each click switches the three Radio Text data display left or right.
Note:
• If there is no Radio Text data stored in the tuner, the function does not operate.
Note icon “Text”
Page 49

Continued overleaf.
48
Using the RDS Functions
Storing Radio Text in memory
1. Perform “Radio Text display” steps 1–3, and
then select the Radio Text you want to store in
memory.
2. Press one of buttons 1 – 6 for 2 seconds to store
the desired Radio Text. (e.g. Press button 4 for
2 seconds.)
The Radio Text is stored in memory under the selected
button.
Recalling preset Radio Text
1. Press the RT button.
Flip-Down Plate displaying Radio Text appears.
2. Press one of buttons 1 – 6 to recall a Radio
Text preset under that button. (e.g. Press button 4.)
Page 50

49
DVD Player (Control with AV Receiver)
DVD Player
(Control with AV Receiver)
Basics
Selecting the DVD player
Select the “DVD” as source by pressing
the SOURCE button as many times as
necessary.
The player starts playing automatically.
Note:
• Although DVD and Video CD images cannot be seen on screen while driving, all functions of the
DVD player can be operated. (Audio can be heard.)
• You can use DVD player to play DVDs, Video CDs, and CDs.
• The AV Receiver may not be available to operate the DVD player momentarily depending on
discs and the playing status.
Chapter (Track) Search and Fast Forward/Reverse
You can select between Chapter (Track) Search or
Fast Forward/Reverse by pressing the 2
/3 button
for a different length of time.
Chapter (Track) Search Less than 0.5 seconds
Fast Forward/Reverse Continue pressing
Play Time
Title Number
Chapter (Track)
Number
Page 51

Operation at the Function Menu Screen (DVD, Video CD)
With DVD player, the Function Menu differs for playing DVDs, Video CDs and CDs. When
playing CDs, refer to “Operation at the Function Menu Screen (CD)”. (See page 53.)
Accessing the DVD Function Menu (DVD, Video CD)
Begin play of a disc before selecting options from the DVD Function Menu.
1. Press the MENU button.
The main menu icons whirl down, with
“Function” highlighted in green.
2. Click the joystick.
The DVD Function Menu appears, offering you
the following options:
3. Select the option by moving the joystick.
The selected option is highlighted in green.
4. Click the joystick.
Refer to detailed operation of each function.
Exit from the DVD Function Menu (DVD, Video CD)
• Press the RETURN button.
50
DVD Player (Control with AV Receiver)
7 DVD Function Menu (DVD, Video CD)
Repeat Play
(See page 51.)
Pause
(See page 51.)
PGM button
(See page 52.)
Page 52

DVD Player (Control with AV Receiver)
51
Operating Each Function
Repeat Play
You can select the desired repeat mode play range from the chapter (track), title or disc currently in play.
1. Check to see “RPT” is currently highlighted.
If not, select that option by moving the joystick.
“RPT” is highlighted in green.
2. Click the joystick.
Each click changes repeat range in the following order:
7 DVD
Disc RPT = Chapter RPT = Title RPT
Display Repeat range
Chapter RPT Chapter Repeat
Title RPT Title Repeat
Disc RPT Disc Repeat
7 Video CD
Disc RPT = Track RPT
Display Repeat range
Track RPT Track Repeat
Disc RPT Disc Repeat
Pause
Pause pauses the currently playing track.
1. Select “Pause” by moving the joystick.
“Pause” is highlighted in green.
2. Click the joystick.
Each click toggles the Pause On/Off.
Source plate
Repeat range
Page 53

PGM button
You can create a shortcut for Pause or Repeat Play Mode.
If you want to control the function of one of these, without needing to go to the Function
Menu each time, do the following:
1. Select “PGM” by moving the joystick.
“PGM” is highlighted in green.
2. Click the joystick.
Each click changes the PGM mode in the following
order:
Pause =
RPT Mode
Press the PGM button when playing a DVD or Video CD in the DVD source
Function name (Display) Press Hold for 2 seconds
Pause (Pause) ON/OFF ———
Repeat play (RPT Mode) Switch repeat range ———
DVD Player (Control with AV Receiver)
52
Page 54

Operation at the Function Menu Screen (CD)
With DVD player, the Function Menu differs for playing DVDs, Video CDs and CDs. When
playing DVDs and Video CDs, refer to “Operation at the Function Menu Screen (DVD, Video
CD)”. (See page 50.)
Accessing the DVD Function Menu (CD)
Begin play of a disc before selecting options from the DVD Function Menu.
1. Press the MENU button.
The main menu icons whirl down, with
“Function” highlighted in green.
2. Click the joystick.
The DVD Function Menu appears, offering you
the following options:
3. Select the option by moving the joystick.
The selected option is highlighted in green.
4. Click the joystick.
Refer to detailed operation of each function.
Exit from the DVD Function Menu (CD)
• Press the RETURN button.
DVD Player (Control with AV Receiver)
53
Repeat Play
(See page 54.)
Random Play
(See page 54.)
Pause
(See page 55.)
Scan Play
(See page 55.)
ITS Play
You cannot use the
ITS function with this
system.
PGM button
(See page 56.)
7 DVD Function Menu (CD)
Page 55
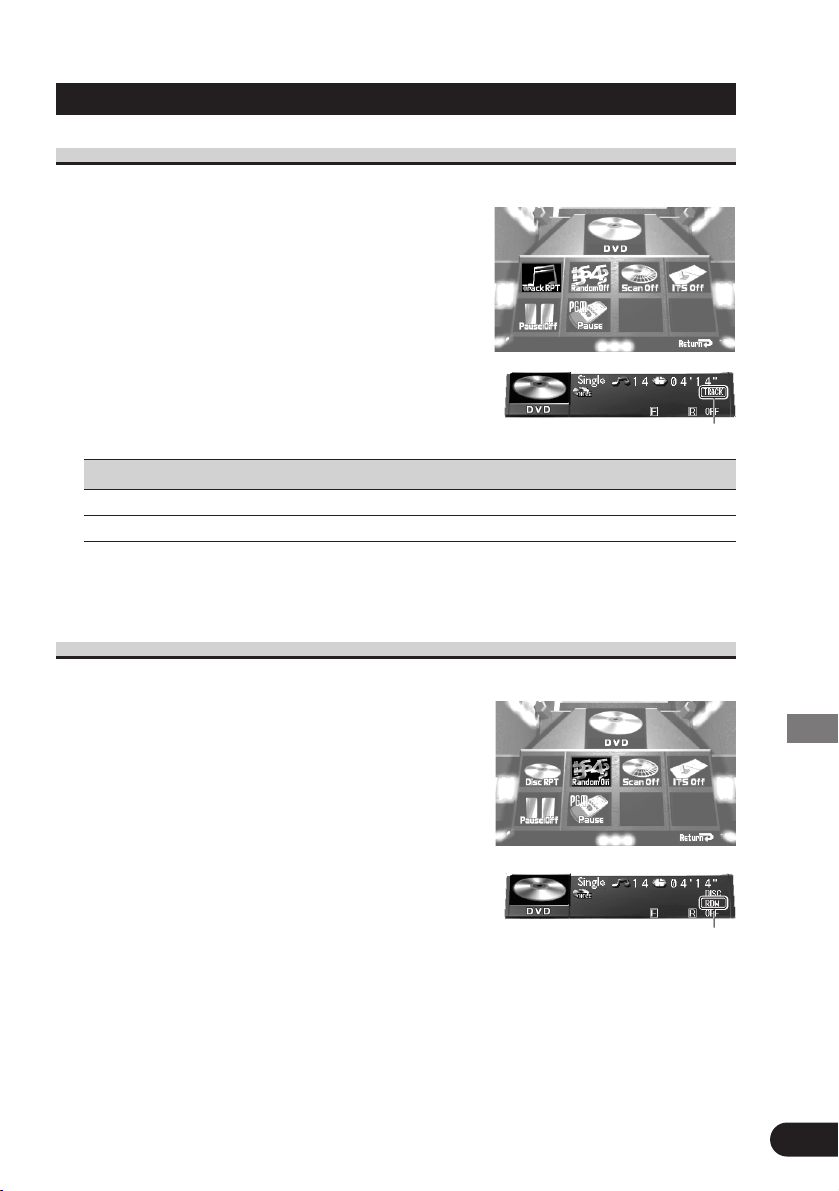
DVD Player (Control with AV Receiver)
54
Continued overleaf.
Operating Each Function
Repeat Play
Repeat Play plays the same disc and track repeatedly.
1. Check to see “RPT” is currently highlighted.
If not, select that option by moving the joystick.
“RPT” is highlighted in green.
2. Click the joystick.
Each click changes the Repeat mode in the following
order:
Disc RPT =
Track RPT
Display Repeat range
Track RPT Track repeat
Disc RPT Disc repeat
Note:
• If you perform Track Search, Repeat Play is automatically canceled.
Random Play
Random Play plays the tracks on a CD in random order for variety.
1. Select “Random” by moving the joystick.
“Random” is highlighted in green.
2. Click the joystick.
Each click toggles the Random On/Off.
Source plate
Repeat range
Source plate
Random
Page 56

DVD Player (Control with AV Receiver)
55
Scan Play
Scan Play plays the first 10 seconds or so of each track on a CD in succession.
1. Select “Scan” by moving the joystick.
“Scan” is highlighted in green.
2. Switch the Scan Play On by clicking the joystick.
3. When you find the desired track, cancel the
Scan Play by clicking the joystick.
If the Function Menu has been canceled automatically,
select the “Scan” in the Function Menu again.
Note:
• Scan Play is canceled automatically after all the tracks on a disc have been scanned.
Pause
Pause pauses the currently playing track.
1. Select “Pause” by moving the joystick.
“Pause” is highlighted in green.
2. Click the joystick.
Each click toggles the Pause On/Off.
Source plate
Scan
Page 57

PGM button
You can create a shortcut for Pause, RPT or Random Mode.
If you want to control the function of one of these, without needing to go to the Function
Menu each time, do the following:
1. Select “PGM” by moving the joystick.
“PGM” is highlighted in green.
2. Click the joystick.
Each click changes the PGM mode in the following
order:
Pause =
RPT Mode = Random = ITS*
Note
• You cannot use the ITS function with this system. If you select ITS, nothing will happen even
if you press the PGM button.
Press the PGM button when playing a CD in the DVD source
Function name (Display) Press Hold for 2 seconds
Pause (Pause) ON/OFF ———
Repeat play (RPT Mode) Switch repeat range ———
Random play (Random) ON/OFF ———
56
Continued overleaf.
DVD Player (Control with AV Receiver)
Page 58

57
Multi-CD Player
Multi-CD Player
Basics
Selecting the Multi-CD Player
Select the “Multi-CD” as source by
pressing the SOURCE button as many
times as necessary.
The player starts playing automatically.
Track Search and Fast Forward/Reverse
You can select between Track Search or Fast Forward/Reverse by pressing the 2/3
button for a different length of time.
Track Search Less than 0.5 seconds
Fast Forward/Reverse Continue pressing
Note:
• The Multi-CD player may perform a preparatory operation, such as verifying the presence of a
disc or reading disc information, when the power is turned ON or a new disc is selected for playback. “READY” is displayed.
• If the Multi-CD player cannot operate properly, an error message such as “ERROR-14” is displayed. Refer to the Multi-CD player owner’s manual.
• If there are no discs in the Multi-CD player magazine, “NO DISC” is displayed.
Disc Number Search (for 6-Disc, 12-Disc types)
You can select discs directly with the 1 to 6 buttons. Just press the number corresponding to
the disc you want to listen to.
Note:
• When a 12-Disc Multi-CD Player is connected and
you want to select disc 7 to 12, press the 1 to 6 buttons for 2 seconds.
Track Number
Disc Number
Play Time
Disc Search
Page 59

59
Multi-CD Player
Operation at the Function Menu Screen
Accessing the Multi-CD Function Menu
1. Press the MENU button.
The main menu icons whirl down, with
“Function” highlighted in green.
2. Click the joystick.
The Multi-CD Function Menu appears offering
you the following options:
3. Select the option by moving the joystick.
The selected option is highlighted in green.
4. Click the joystick.
Refer to detailed operation of each function.
Exit from the Multi-CD Function Menu
• Press the RETURN button.
58
Repeat Play
(See page 59.)
Random Play
(See page 59.)
Pause
(See page 61.)
Scan Play
(See page 60.)
ITS Play
(See page 60.)
Compression and DBE
(See page 61.)
PGM button
(See page 62.)
7 Multi-CD Function Menu
Page 60

59
Multi-CD Player
Random Play range
Operating Each Function
Repeat Play
There are three repeat play ranges: One-track Repeat, Disc Repeat and Multi-CD player
Repeat. Default repeat play range is Multi-CD player Repeat.
1. Check to see “RPT” is currently highlighted.
If not, select that option by moving the joystick.
“RPT” is highlighted in green.
2. Click the joystick.
Each click changes the Repeat mode in the following
order:
Multi RPT =
Track RPT = Disc RPT
Display Repeat range
Track RPT One-track Repeat
Disc RPT Disc Repeat
Multi RPT Multi-CD player Repeat
Random Play
Tracks are played at random within the selected repeat play range as explained in “Repeat
Play” above.
1. Select “Random” by moving the joystick.
“Random” is highlighted in green.
2. Click the joystick.
Each click toggles Random play On/Off.
After selecting the desired repeat play range from those
referred to in “Repeat Play” above, switch Multi-CD
Player Random Play ON.
Display Play range
DISC RDM Disc Repeat
MULTI RDM Multi-CD player Repeat
Note:
• One-track Repeat changes to the Disc Repeat when you switch the Random Play ON.
Source plate
Repeat range
Source plate
Page 61

60
Continued overleaf.
Multi-CD Player
Scan Play
In the Disc Repeat, the beginning of each track on the selected disc is scanned for about 10
seconds. In the Multi-CD player Repeat, the beginning of the first track on each disc is
scanned for about 10 seconds.
1. Select “Scan” by moving the joystick.
“Scan” is highlighted in green.
2. Switch the Scan Play ON by clicking the joystick.
After selecting the desired repeat play range from those
referred to in “Repeat Play” on page 59, switch MultiCD Player Scan Play ON.
3. When you find the desired track (or disc), cancel the Scan Play by clicking the joystick.
If the Function Menu has been canceled automatically,
select the “Scan” in the Function Menu again.
Display Play range
DISC SCAN Disc Repeat
MULTI SCAN Multi-CD player Repeat
Note:
• Scan Play is canceled automatically after all the tracks or discs have been scanned.
• One-track Repeat changes to the Disc Repeat when you switch the Scan Play ON.
ITS Play
ITS Play plays the memorized track. (Refer to “ITS Programming (ITS)” on page 65.) ITS
play of tracks is performed within the play range explained in the “Repeat Play” section.
1. Select “ITS” by moving the joystick.
“ITS” is highlighted in green.
2. Click the joystick.
Each click toggles ITS play On/Off.
After selecting the desired repeat play range from those
referred to in “Repeat Play” on page 59, switch ITS
Play ON.
Note:
• If no track in the current range is programmed for ITS Play,
“Empty” is displayed.
Source plate
Scan Play range
Source plate
ITS Play
Page 62

61
Multi-CD Player
Pause
Pause pauses the currently playing track.
1. Select “Pause” by moving the joystick.
“Pause” is highlighted in green.
2. Click the joystick.
Each click toggles Pause On/Off.
Compression and DBE
Using the COMP (Compression) and DBE (Dynamic Bass Emphasis) functions enables
Multi-CD player sound quality adjustment. Each of the functions enables two-step adjustment.
7 COMP
The COMP (Compression) function adjusts imbalances between loud and subdued
sounds at higher volumes.
7 DBE
DBE (Dynamic Bass Emphasis) boosts bass levels to give a fuller sound.
COMP/DBE ON/OFF Switching
1. Select “COMP.” by moving the joystick.
“COMP.” is highlighted in green.
2. Click the joystick.
Each click changes the mode in the following order:
COMP. Off =
COMP. 1 = COMP. 2 = COMP. Off
=
D.B.E. 1 = D.B.E. 2
Note:
• You can use these functions with a Multi-CD player that has them. If the player does not feature the COMP/DBE functions, “No COMP” is displayed in “COMP.”.
Page 63

62
Multi-CD Player
PGM button
You can create a shortcut for Pause, RPT, Random or ITS mode.
If you want to control the function of one of these, without needing to go to the Function
Menu each time, do the following:
1. Select “PGM” by moving the joystick.
“PGM” is highlighted in green.
2. Click the joystick.
Each click changes the PGM mode in the following
order:
Pause =
RPT Mode = Random = ITS
Press the PGM button in the Multi-CD source
Function name (Display) Press Hold for 2 seconds
Pause (Pause) ON/OFF ———
Repeat play (RPT Mode) Switch repeat range ———
Random play (Random) ON/OFF ———
ITS play (ITS) ON/OFF ———
Display the Flip-Down Plate
You can display input titles and titles recorded on CD TEXT compatible CDs.
For CD TEXT, up to 12 letters of a title can be seen at a time. If the title is longer than 12 letters, the remaining letters can be viewed by scrolling.
• Press the DISPLAY button.
Each press of the DISPLAY button changes the Source Plate and Flip-Down Plate in
the following order:
Source Plate =
Disc Title List = No Plate
Examples
Note:
• If a disc title has not been input, “NO TITLE” is displayed.
• For numbers that do not have a disc, no title is shown.
Source Plate Disc Title List
Page 64

63
Multi-CD Player
Disc Title Input
You can input Titles up to 10 letters long for up to 100 discs. Using this function lets you easily search for and select a desired disc for play. (You can store ITS program and Disc Title
data for up to 100 discs in memory.)
Note:
• When playing a CD TEXT disc on a CD TEXT compatible Multi-CD player, you cannot
switch to this mode.
• A CD TEXT disc is a CD featuring recorded text information such as Disc Title, Artist Name
and Track Title.
• Don’t click the joystick to confirm your entry of title. Doing so cancels the title and you must
start from the beginning.
1. Press the DISPLAY button for the Flip-Down
Plate to appear.
2. Play the disc you wish to input the disc title.
3. Select “Title Edit” by moving the joystick.
“Title Edit” is highlighted in green.
4. Click the joystick.
“Title Edit” is highlighted in yellow and the display changes to show the left most
character position highlighted.
5. Select the desired character type by pressing
the button 1.
Each press of button 1 changes the character type in the
following order:
Alphabet (Upper case), Numbers and Symbols =
Alphabet (Lower case)
Note:
• You can select to input Numbers and Symbols by pressing button 2.
6. Select letters, numbers and symbols by moving
the joystick up/down.
To insert a space, select the cursor “_”.
Page 65

64
Multi-CD Player
7. Move the box left and right by moving the joystick left/right.
8. When you have completed title input, move to
the 10th letter position, then memorize by
moving the joystick right.
Note:
• Titles remain in memory, even after the disc has been removed from the magazine, and are
recalled when the disc is reinserted.
• After the titles for 100 discs have been entered, data for a new disc will overwrite the data for
the disc that has not been played back for the longest time.
Getting Text Displayed (for CD TEXT compatible type)
You can use these functions when playing a CD TEXT disc on a CD TEXT compatible MultiCD player.
Title Display Switching
• Select the desired title display by pressing the DISPLAY button.
Refer to “Information Screen” on page 31.
Note:
• If certain text information is not recorded on a CD TEXT disc, “NO TITLE” is displayed.
Title Scroll
This product displays the first 12 letters only of Disc Title, Artist Name and Track
Title. With text longer than 12 letters, you can see the rest of the text by scrolling.
• Scroll the upper title display by pressing the DISPLAY button for 2 seconds.
Entered Title
Page 66

65
Multi-CD Player
Selecting Discs by Disc Title List
Follow the procedures below to play a disc for which you have input the title in a Multi-CD
player or a CD TEXT disc on a CD TEXT compatible Multi-CD player.
1. Press the DISPLAY button for the Flip-Down
Plate to appear.
2. Select the desired disc title by moving the joystick up/down.
“NO TITLE” is displayed for disc whose titles have not
been input.
3. Click the joystick.
The selected disc is indicated in yellow and begins play.
ITS (Instant Track Selection)
The ITS function allows you to search for the track you wish to play. You can use ITS to
enter and playback up to 99 tracks per disc, up to 100 discs (with the disc title). (With multiCD players sold before the CDX-P1250 and CDX-P650, up to 24 tracks can be stored in the
playlist.)
ITS Programming (ITS)
Programmed tracks are played within the selected repeat play range in the “Repeat Play” on
page 59.
1. Press the DISPLAY button for the Flip-Down
Plate to appear.
2. Play the track you wish to program.
3. Select “ITS MEMO” by moving the joystick.
“ITS MEMO” is highlighted in green.
4. Click the joystick.
The currently playing track is stored.
Note:
• After 100 discs have been programmed, data for a new disc will overwrite the data for the disc
that has not been played back for the longest time.
Page 67

66
Multi-CD Player
Erase a Track Program
1. Press the DISPLAY button for the Flip-Down
Plate to appear.
2. Select the track you wish to erase, during ITS
Play.
3. Select “ITS Clear” by moving the joystick.
“ITS Clear” is highlighted in green.
4. Click the joystick.
Erase the track program and playback of the next ITS-programmed track begins. If
there are no more programmed tracks in the current range, “ITS EMPTY” is displayed
and normal play resumes.
Erase a Disc Program
1. Press the DISPLAY button for the Flip-Down
Plate to appear.
2. Select the disc you wish to erase, while the disc
is playing.
3. Select “ITS Clear” by moving the joystick.
“ITS Clear” is highlighted in green.
4. Click the joystick.
Erase the disc program.
Page 68

67
TV Tuner
TV Tuner
Basics
Selecting the TV Tuner
Select the “TV Tuner” as source by
pressing the SOURCE button as many
times as necessary.
Channel
The following explains how to use this product to control TV tuners. For details of
TV tuner-specific operations/features, see your TV tuner’s manual.
Band
Manual and Seek Tuning
You can select the tuning method by changing the length of time you
press the 2
/3 button.
Manual Tuning (step by step) Less than 0.5 seconds
Seek Tuning More than 0.5 seconds
Note:
• If you continue pressing the button for longer than 0.5 seconds, you can skip
broadcasting stations. Seek Tuning starts as soon as you release the button.
Band
TV1 = TV2
Preset Tuning
You can recall memorized stations.
Preset Memory and Direct Recall
You can memorize broadcast stations in buttons
1 through 6 for easy, one-touch station recall.
Direct recall Less than 2 seconds
Broadcast station preset memory
More than 2 seconds
Note:
• Up to 12 stations (6 in TV1 and TV2) can be stored
in memory.
• You cannot memorize in Preset Channels 7–12 with
this function.
Page 69

68
TV Tuner
Operation at the Function Menu Screen
Accessing the TV Tuner Function Menu
1. Press the MENU button.
The main menu icons whirl down, with
“Function” highlighted in green.
2. Click the joystick.
The TV Tuner Function Menu appears, offering
you the following options:
3. Select the option by moving the joystick
and click the joystick.
The selected option is highlighted in green.
Exit from the TV Tuner Function Menu
• Press the RETURN button.
7 TV Tuner Function Menu
1 Best Station Sequential Memory
(BSSM)
Switch the BSSM ON by clicking the
joystick.
2 PGM button
For TV, you cannot memorize functions
other than BSSM in the PGM button.
21
Page 70

69
CD Player
CD Player
Basics
Selecting the CD Player
Select the “Compact Disc” as source by
pressing the SOURCE button as many
times as necessary.
The player starts playing automatically.
Track
Number
Play Time
Track Search and Fast Forward/Reverse
You can select between Track Search or Fast
Forward/Reverse by pressing the 2
/3 button for a
different length of time.
Track Search Less than 0.5 seconds
Fast Forward/Reverse Continue pressing
The following explains how to use this product to control CD players. For details of CD
player-specific operations/features, see your CD player’s manual.
Page 71

70
CD Player
Operation at the Function Menu Screen
Accessing the CD Function Menu
1. Press the MENU button.
The main menu icons whirl down,with
“Function” highlighted in green.
2. Click the joystick.
The CD Function Menu appears, offering you the
following options:
3. Select the option by moving the joystick
and click the joystick.
The selected option is highlighted in green.
Disc Title Input
For detail operation to enter titles, refer to “Disc Title Input” on page 63.
Exit from the CD Player Function Menu
• Press the RETURN button.
7 CD Function Menu
1 Repeat Play
Each click changes the Repeat mode in the
following order:
Disc RPT (Disc Repeat) = Track RPT
(Track Repeat)
2 Random Play
Each click toggles Random play On/Off.
3 Scan Play
Each click toggles Scan play On/Off.
4 Pause
Each click toggles Pause On/Off.
5 Compression and DBE
Each click changes the COMP in the following order:
COMP. Off = COMP. 1 = COMP. 2
= COMP. Off = D.B.E. 1 = D.B.E. 2
6 PGM button
Each click changes the PGM mode in the following order:
Pause = RPT Mode = Random
2134
5 6
Page 72

71
MD Player
MD Player
Basics
Selecting the MD Player
Select the “Mini Disc” as source by
pressing the SOURCE button as many
times as necessary.
The player starts playing automatically.
Track
Number
Play Time
Track Search and Fast Forward/Reverse
You can select between Track Search or Fast
Forward/Reverse by pressing the 2
/3 button for a
different length of time.
Track Search Less than 0.5 seconds
Fast Forward/Reverse Continue pressing
The following explains how to use this product to control MD players. For details of
MD player-specific operations/features, see your MD player’s manual.
Note:
• If “TEMP” is displayed, look it up (or “HEAT”) in the error message table in the MD Player’s
manual.
Page 73

72
MD Player
Operation at the Function Menu Screen
Accessing the MD Function Menu
1. Press the MENU button.
The main menu icons whirl down with
“Function” highlighted in green.
2. Click the joystick.
The MD Function Menu appears, offering you the
following options:
3. Select the option by moving the joystick
and click the joystick.
The selected option is highlighted in green.
Switching the Title Positions
You can switch the display position of the Disc Title and Track Title. Also with text longer
than 12 letters, you can see the rest of the text by scrolling. (Refer to “Information Screen” on
page 31.)
Exit from the MD Function Menu
• Press the RETURN button.
7 MD Function Menu
1 Repeat Play
Each click changes the Repeat mode in the
following order:
Disc RPT (Disc Repeat) = Track RPT (Onetrack Repeat)
2 Random Play
Each click toggles Random play On/Off.
3 Scan Play
Each click toggles Scan play On/Off.
4 Pause
Each click toggles Pause On/Off.
5 PGM button
Each click changes the PGM mode in the following order:
Pause = RPT Mode = Random
2134
5
Page 74

73
Basic Operations of DVD Player
Selecting the DVD
1. Press the SOURCE button.
Press repeatedly until DVD is selected, and the disc starts playing. (See page 49.)
Note:
• If you were previously playing a DVD, playback of that disc resumes from where you left off.
• With some discs, a menu may be displayed. (See page 74.)
2. Set the remote control’s operation mode switch to “DVD”.
(Refer to “Setting the Remote Control for DVD Player Operation” on page 20.)
IP AUTO Mode
•
When power to DVD Player is switched OFF, you can switch the IP AUTO mode
ON/OFF by pressing the POWER button for two seconds.
When the IP AUTO mode is ON, if a disc is loaded in DVD player, the AV Receiver
automatically switches the source to DVD Player.
If the IP AUTO mode is OFF, even if there is a disc loaded in DVD player, the AV
Receiver will not switch the source to DVD Player.
When using DVD Player mainly as a REAR SEAT ENTERTAINMENT SYSTEM, you
are recommended to switch the IP AUTO mode OFF.
• When the IP AUTO mode is ON, [A] is indicated in the Display Setting Menu.
In the initial settings, the IP AUTO mode is switched ON.
When using a rear display
• Even if the source selected with the
AV Receiver
is not DVD, if you switch power to
DVD Player
ON with the POWER button, you can watch the DVD picture from
DVD
Player
on the rear display.
• Regardless of whether the
AV Receiver
is switched ON/OFF, you can switch power to
DVD Player
ON/OFF.
Precautions
• When you have switched power to
DVD Player
ON by pressing the POWER button, be
sure not to forget to switch power to
DVD Player
OFF. If you switch power to
DVD
Player
OFF after switching to DVD video display, the display shows that power to
DVD
Player
has been switched OFF.
• When you eject a source disc (CD or MD) selected with the
AV Receiver
, power to the
AV Receiver
switches OFF. Depending on the connection method, the picture on the
rear display may disappear.
Basic Operations of DVD Player
Page 75

Disc (DVD/Video CD/CD) Playback
Move the control stick upward (PLAY/PAUSE (6)).
The playback mark ( ) is displayed for 4 seconds and the
disc starts playing.
Note:
• Moving the control stick upward (PLAY/PAUSE (6)) when a disc is playing, pauses
playback.
• If the last disc played was a DVD, playback starts from the point on that disc where you
stopped play previously. With some discs, a menu may be displayed and playback may not be
possible from where you left off previously.
Working with the Menu Screen
When DVDs offering menu or Video CDs featuring the PBC (Playback Control) function
start playing, a menu is displayed.
With DVDs
1. Use the joystick to select the desired MENU option.
2. Click the joystick.
Playback starts from the selected menu option.
Note:
• The way to display the menu differs depending on the disc.
74
Continued overleaf.
Basic Operations of DVD Player
VD
V
V
ideo
CD
D
C
C
7 To Display the Menu
You can display the menu by pressing the MENU button or TOP MENU button
while a disc is playing. Pressing either of these buttons again lets you start playback
from the location selected from the menu. For details, refer to the instructions provided with the disc.
Page 76

75
With Video CDs
Press the number buttons to select a desired menu
option.
Playback starts from the selected menu option.
Operation with the joystick is not possible.
Note:
• When menu are two or more pages long, move the NEXT/PREV button upward/downward
(NEXT (¢)/PREVIOUS (4)) to switch between displays.
• To play a disc without using a menu (without PBC playback), when the disc is stopped press
the appropriate number button to select the desired track. To return to PBC playback, stop
playback and move the control stick upward (PLAY/PAUSE (6)).
Chapter and Track Advance/Return
Skipping to the Next Chapter/Track
During play, move the NEXT/PREV button upward
(NEXT (¢)).
Chapter/track numbers are displayed for 8 seconds and you
advance to the next chapter/track.
Returning to the Previous Chapter/Track
During play, move the NEXT/PREV button downward
(PREVIOUS (4)).
Chapter/track numbers are displayed for 8 seconds and you return
to the beginning of the current chapter/track.
Move the NEXT/PREV button downward (PREVIOUS (4
))
twice in succession takes you to the beginning of the chapter/track
before the current chapter/track.
Basic Operations of DVD Player
7 To Display the Menu
You can display the menu by pressing the RETURN button while PBC playback.
For details, refer to the instructions provided with the disc.
Page 77

Specifying Title/Chapter/Track (Direct Search)
Specifying Title
Press the number button corresponding to a desired title
number when the disc is stopped.
Title number is displayed for 8 seconds and playback starts from
the selected title.
To select 3, press button 3.
To select 10, press buttons 10 and 0 in order.
To select 23, press buttons 10, 10 and 3 in order.
Specifying Chapter
Press the number button corresponding to a desired
chapter number during playback.
Chapter number is displayed for 8 seconds and playback starts
from the selected chapter.
To select 3, press button 3.
To select 10, press buttons 10 and 0 in order.
To select 23, press buttons 10, 10 and 3 in order.
Specifying Track
Press the number button corresponding to a desired
track number.
Track number is displayed for 8 seconds and playback starts from
the selected track.
To select 3, press button 3.
To select 10, press buttons 10 and 0 in order.
To select 23, press buttons 10, 10 and 3 in order.
Note:
• With some discs, the prohibited mark “” may be displayed and operation may not be possible.
• With Video CD, Direct Search is not possible during PBC playback.
76
Continued overleaf.
Basic Operations of DVD Player
VD
V
V
ideo
CD
D
C
C
Page 78

77
Disc Fast Forward/Reverse
Fast Forward
1. During play, continue moving the control stick to the
right (FORWARD (¡)).
The fast forward mark ( ) is displayed while pressing
the button and disc fast forward is performed.
2. Release the control stick at the point you want to
watch/listen.
Playback resumes from that point.
Note:
• If you continue moving the control stick to the right (FORWARD (¡)) for 5 seconds, the
color of the fast forward mark ( ) changes from white to blue. When this happens, fast
forward continues even if you release the control stick. To resume playback at a desired point,
move the control stick upward (PLAY/PAUSE (6)).
• If you fast forward to the end of a CD, fast forward continues from the beginning of the disc.
• Fast forward may not be possible at certain locations on some discs. If this happens, normal
playback automatically resumes.
Fast Reverse
1. During play, continue moving the control stick to the
left (REVERSE (1)).
The fast reverse mark ( ) is displayed while pressing
the button and disc fast reverse is performed.
2. Release the control stick at the point you want to
watch/listen.
Playback resumes from that point.
Note:
• If you continue moving the control stick to the left (REVERSE (1)) for 5 seconds, the color
of the fast reverse mark ( ) changes from white to blue. When this happens, fast reverse
continues even if you release the control stick. To resume playback at a desired point, move
the control stick upward (PLAY/PAUSE (6)).
• If you fast reverse to the beginning of a CD, normal playback resumes.
• Fast reverse may not be possible at certain locations on some discs. If this happens, normal
playback automatically resumes.
Basic Operations of DVD Player
Page 79

Stopping Playback
Press the STOP (7) button.
Note:
• When you stop DVD or Video CD playback (during PBC playback only) by pressing the
STOP (7) button, that location on the disc is memorized enabling playback from that point
when you play the disc again.
78
Basic Operations of DVD Player
VD
V
V
ideo
CD
D
C
C
Page 80

79
Playback Variations of DVD Player
Still, Frame-by-Frame and Slow Motion Playback
Still Playback
This lets you pause playback and view a still picture.
Move the control stick upward (PLAY/PAUSE (6))
during playback.
The still mark ( ) is displayed for 4 seconds and playback is
paused letting you view a still image.
• To return to normal playback, move the control stick upward (PLAY/PAUSE
(6
)) once more.
Frame-by-Frame Playback
This lets you move ahead one frame at a time during playback.
Press the STEP (E) button.
Each time you press the STEP (E) button, you move ahead one
frame.
• To return to normal playback, move the control stick upward (PLAY/PAUSE (6)).
Slow Motion Playback
This lets you slow down playback speed.
Press the STEP (E) button for 1 second during playback.
The slow playback mark ( ) is displayed, forward Slow Motion
playback begins.
• To return to normal playback, move the control stick upward (PLAY/PAUSE (6)).
Note:
• There is no sound during Still, Frame-by-Frame or Slow Motion playback.
• Depending on the disc and the playback location on the disc, the prohibited mark “” may
be displayed indicating that Still, Frame-by-Frame and Slow Motion playback are not possible.
• With some discs, images may be unclear during Frame-by-Frame and Slow Motion playback.
• Reverse Frame-by-Frame playback and Reverse Slow Motion playback are not possible.
Playback Variations of DVD Player
AUDIO RTN
S.TITLE
DISP
ANGLE
RGB
BAND
BSSM/
ch call
MENU
V.SEL
DVD
TV
RGB
Page 81

Changing Audio Language during Playback (Multi-Audio)
DVDs can provide audio playback with different languages and different systems (Dolby
Digital, DTS etc.). With DVDs featuring multi-audio recordings, you can switch between languages/audio systems during playback.
1. Press the AUDIO button during playback.
The audio selection mark ( ) is displayed for 8 seconds.
2. Press the AUDIO button while the audio selection
mark is displayed.
The audio changes each time you press the AUDIO
button.
Note:
• This function only operates with DVDs featuring multi-audio recordings.
• The number in the “” mark on a DVD’s package indicates the number of recorded lan-
guages/audio systems.
• With some DVDs, switching between languages/audio systems may only be possible using a
menu display.
• You can also switch between languages/audio systems using the SET UP MENU. For details,
refer to “Setting the Audio Language” on page 120.
• While the audio selection mark is displayed, you can also switch to a desired audio language
number using the number buttons.
• Display indications such as “Dolby D” and “5.1ch” indicate the audio system recorded on the
DVD. Depending on the setting, playback may not be with the same audio system as that indicated.
2
80
Continued overleaf.
Playback Variations of DVD Player
VD
V
V
ideo
CD
Page 82

81
Changing the Subtitle Language during Playback (Multi-Subtitle)
With DVDs featuring multi-subtitle recordings, you can switch between subtitle languages
during playback.
1. Press the SUBTITLE button during playback.
The subtitle selection mark ( ) is displayed for 8 seconds.
2. Press the SUBTITLE button while the subtitle selection mark is displayed.
The subtitle language changes each time you press the
SUBTITLE button.
Note:
• This function only operates with DVDs featuring multi-subtitle recordings.
• The number in the “” mark on a DVD’s package indicates the number of recorded subtitle
languages.
• With some DVDs, switching between subtitle languages may only be possible using a menu
display.
• You can also switch between subtitle languages using the SET UP MENU. For details, refer to
“Setting the Subtitle” on page 117.
• While the subtitle selection mark is displayed, you can also switch to a desired subtitle lan-
guage number using the number buttons. At this time, you can also switch subtitle display
OFF by pressing the CLEAR button.
2
Playback Variations of DVD Player
Page 83

VD
Changing the Viewing Angle during Playback (Multi-Angle)
With DVDs featuring multi-angle (scenes shot from multiple angles) recordings, you can
switch among viewing angles during playback.
1. Press the ANGLE button during playback of a scene
shot from multiple angles.
The angle mark ( ) and angle number ( ) are displayed for 8 seconds.
2. Press the ANGLE button while the angle mark and
angle number are displayed.
The angle changes each time you press the ANGLE button.
Note:
• This function only operates with DVDs featuring multi-angle recordings.
• The “” mark on a DVD’s package indicates it features multi-angle scenes. The number in
the “” mark indicates the number of angles from which scenes were shot.
• You cannot switch angles during Slow Motion playback.
• If you press the ANGLE button during fast forward/fast reverse or pause, fast forward/fast
reverse or pause is canceled and normal playback resumes but the viewing angle does not
change.
• While the angle mark and angle number are displayed, you can also switch to a desired angle
number using the number buttons.
3
3
7 About Scenes that Let You Change the Viewing Angle
During playback of a scene shot from multiple angles on this product, the angle
mark ( ) is displayed in the bottom right of the screen.
Switch angle mark display ON/OFF using the SET UP MENU. For details, refer
to “Setting Angle Mark Display” on page 125.
82
Continued overleaf.
Playback Variations of DVD Player
Page 84

83
Operating DVD Player with Information Displays
Calling up Information Displays
Information displays let you easily perform a wide range of disc operations. These include
starting playback from a specified title, chapter or time, setting the range of Repeat play and
switching between different audio and subtitle settings.
1. Press the DISPLAY button.
Each time you press the button the display changes as
follows:
Information display 1 =
Information display 2
(for DVD) =
Display OFF = Information display 1
Operating DVD Player with Information Displays
Information display 1 (e.g. DVD)
Information display 2 (e.g. DVD)
Note:
• For CDs there is no Display OFF setting.
• You can perform title, chapter and time settings with either the information display 1 or 2.
This manual explains how to use the information display 1 to perform title, chapter and time
settings.
• Pressing the DISPLAY button during fast forward/reverse returns you to normal playback.
Page 85

VD
V
V
ideo
CD
D
C
C
Operating with the Information Display 1 of a DVD
This display lets you use the Search function to specify a title or chapter to search for a
desired scene, use the Time Search function to specify a time to search for a desired scene,
select the desired audio and subtitle language, and select the angle.
Searching for a Desired Scene, Starting Playback from a Specified Time
You can use the Search function to search for a desired scene by specifying a title or chapter,
and the Time Search function to specify the time on a disc at which play starts.
1. Move the joystick left/right to select a
desired option.
The selected option is indicated in blue.
2. Press the number buttons to input the
desired number.
For Titles and Chapters
To select 3, press button 3.
To select 10, press buttons 1 and 0 in order.
To select 23, press buttons 2 and 3 in order.
• To jump 10 titles or chapters ahead of the selected one, press the 10 button.
For Time (Time Search)
To select 21 minutes 43 seconds, press buttons 2, 1, 4 and 3 in order.
To select 1 hour 11 minutes, convert the time into 71 minutes 00 seconds and press
buttons 7, 1, 0 and 0 in order.
• To jump 10 seconds ahead of the selected time, press the 10 button.
Note:
• Pressing the CLEAR button cancels the input number.
• You can also select titles and chapters by moving the joystick up/down.
3. While the input number is displayed, click the joystick.
This starts playback from the selected scene.
Note:
• With discs featuring a menu, you can also press the MENU button or TOP MENU button and
then make selections from the displayed menu.
• With some discs, the prohibited mark “” may be displayed, indicating that titles, chapters
and time cannot be specified.
• Chapter Search and Time Search are not possible when disc playback has been stopped.
7 Direct Search
Even without using an information display you can start playback from a specified title or chapter. For details, see page 76.
84
Operating DVD Player with Information Displays
Title Chapter Time
Page 86

85
Selecting Audio, Subtitle and Angle
You can perform Audio (language, stereo, audio type as Dolby Digital etc.), Subtitle language
and Angle selection.
1. Move the joystick left/right to select a
desired option.
The selected option is indicated in blue.
2. Move the joystick up/down to switch to the
desired setting.
This switches you to the selected setting.
For Audio
Selection options switch as follows:
Audio 1 Ô
Audio 2 Ô Audio 3 Ô Audio 1
For Subtitles
Selection options switch as follows:
Subtitles 1 Ô
Subtitles 2 Ô Subtitles OFF Ô Subtitles 1
For Angle
Selection options switch as follows:
Angle 1 Ô
Angle 2 Ô Angle 3 Ô Angle 1
Note:
• The number of switching options depends on how many options are recorded on the DVD.
• You can switch Audio, Subtitle and Angle during playback using the respective buttons. For
details, refer to “Playback Variations of DVD Player” on page 79.
• You can also switch settings by inputting numbers with the number buttons.
• Display indications such as “Dolby D” and “5.1ch” indicate the audio system recorded on the
DVD. Depending on the setting, playback may not be with the same audio system as that indicated.
Operating DVD Player with Information Displays
Audio Subtitles Angle
Page 87

Operating with the Information Display 2 of a DVD
In addition to the Search and Time Search functions of the information display 1, this display
lets you select the range for Repeat play, and switch audio output.
Selecting Repeat Range
You can choose between Repeat play of a disc, title or chapter.
1. Move the joystick left/right to select the
Repeat range option.
The Repeat range option is indicated in blue.
2. Move the joystick up/down to switch to the
desired setting.
This switches you to the selected setting.
Disc Ô
Title Ô Chapter Ô Disc
• When you select Disc, playback of the entire disc
is repeated. When you select Title or Chapter, playback of that title or chapter only
is repeated.
Note:
• When the Repeat play of a DVD disc is selected, play stops and depending on the disc a menu
is displayed upon completion of play of an entire disc once through.
Selecting Audio Output
You can select between stereo and monaural audio output.
1. Move the joystick left/right to select the
Audio option.
The Audio option is indicated in blue.
2. Move the joystick up/down to switch to the
desired setting.
This switches you to the selected setting.
L+R (Stereo) Ô
L (Left) Ô R (Right) Ô
L+R (Stereo)
• When you select Stereo, audio is output through both left and right channels. When
you select Left or Right, audio is output from that channel only.
86
Operating DVD Player with Information Displays
VD
Repeat range
Audio
Page 88

87
Operating with the Information Display of a Video CD
This display lets you use the Search function to specify a track to search for desired scenes,
use the Time Search function to specify a time to search for a desired scene, switch audio
output, and select the range for Repeat play. During playback of Video CDs featuring PBC
(Playback Control), “PLAYBACK CONTROL ON” is displayed. During such playback,
Search and Time Search functions cannot be used nor can you select the range for Repeat
play. (See page 75.)
Searching for a Desired Scene, Starting Playback from a Specified Time
You can use the Search function to search for a desired scene by specifying a track, and the
Time Search function to specify the time on a disc at which play starts.
1. Move the joystick left/right to select a
desired option.
The selected option is indicated in blue.
2. Press the number buttons to input the
desired number.
For Tracks
To select 3, press button 3.
To select 10, press buttons 1 and 0 in order.
To select 23, press buttons 2 and 3 in order.
• To jump 10 tracks ahead of the selected one, press the 10 button.
For Time (Time Search)
To select 21 minutes 43 seconds, press buttons 2, 1, 4 and 3 in order.
To select 1 hour 11 minutes, convert the time into 71 minutes 00 seconds and press
buttons 7, 1, 0 and 0 in order.
• To jump 10 seconds ahead of the selected time, press the 10 button.
Note:
• Pressing the CLEAR button cancels the input number.
• You can also select tracks by moving the joystick up/down.
Operating DVD Player with Information Displays
Track
Time
Page 89

3. While the input number is displayed, click the joystick.
This starts playback from the selected scene.
Note:
• Time Search is not possible while the disc is stopped.
Selecting Repeat Range
You can choose between Repeat play of a disc or a track.
1. Move the joystick left/right to select the
Repeat range option.
The Repeat range option is indicated in blue.
2. Move the joystick up/down to switch to the
desired setting.
This switches you to the selected setting.
Disc Ô
Track
• When you select Disc, playback of the entire disc is repeated. When you select
Track, playback of that track only is repeated.
Note:
• When the Repeat play of a Video CD disc is selected, play stops and depending on the disc a
menu is displayed upon completion of play of an entire disc once through.
Selecting Audio Output
You can select between stereo and monaural audio output.
1. Move the joystick left/right to select the
Audio option.
The Audio option is indicated in blue.
2. Move the joystick up/down to switch to the
desired setting.
This switches you to the selected setting.
L+R (Stereo) Ô
L (Left) Ô R (Right) Ô
L+R (Stereo)
• When you select Stereo, audio is output through both left and right channels. When
you select Left or Right, audio is output from that channel only.
7 Direct Search
Even without using an information display you can start playback of a desired
track. For details, see page 76.
88
Continued overleaf.
Operating DVD Player with Information Displays
V
V
ideo
CD
Repeat range
Audio
Page 90

89
Operating with the Information Display of a CD
This display lets you use the Search function to specify a track to search for desired track,
select the range for Repeat play, and switch Random play and Scan play ON/OFF.
Searching for a Desired Track
You can use the Search function to specify a track to search for a desired track.
1. Move the joystick left/right to select the
Track option.
The Track option is indicated in blue.
2. Press the number buttons to input the
desired track number.
To select 3, press button 3.
To select 10, press buttons 1 and 0 in order.
To select 23, press buttons 2 and 3 in order.
• To jump 10 tracks ahead of the selected one, press the 10 button.
Note:
• Pressing the CLEAR button cancels the input number.
• You can also select tracks by moving the joystick up/down.
3. While the input number is displayed, click the joystick.
Play of the selected track starts.
Selecting Repeat Range
You can choose between Repeat play of a disc or a track.
1. Move the joystick left/right to select the
Repeat range option.
The Repeat range option is indicated in blue.
2. Move the joystick up/down to switch to the
desired setting.
This switches you to the selected setting.
Disc Ô
Track
• When you select Disc, playback of the entire disc is repeated. When you select
Track, playback of that track only is repeated.
Operating DVD Player with Information Displays
Track
Repeat range
Page 91

Setting Random Play
Tracks of the CD you are currently listening to are played in a random order.
1. Move the joystick left/right to select the
Random option.
The Random option is indicated in blue.
2. Move the joystick up/down to switch to the
desired setting.
This switches you to the selected setting.
ON Ô
OFF
Setting Scan Play
The beginning of each track on the CD you are currently listening to is played for about 10
seconds.
1. Move the joystick left/right to select the Scan
option.
The Scan option is indicated in blue.
2. Move the joystick up/down to switch the
Scan play ON.
This switches you to the selected setting.
ON Ô
OFF
3. When you find the desired track, move the joystick up/down to cancel the
Scan play.
Note:
• Scan play is canceled automatically after all tracks have been scanned.
90
Continued overleaf.
Operating DVD Player with Information Displays
D
C
C
Random play
Scan play
Page 92

91
Adjusting Audio (Basic)
Accessing the Audio Menu
Before operating with the Audio Menu, set the remote control’s operation mode switch to
“AUDIO”. (Refer to “Setting the Remote Control for AV Receiver Operation” on page 19.)
1. Press the MENU button.
The main menu icons whirl down,with
“Function” highlighted in green.
2. Select “Audio” by moving the joystick.
“Audio” is highlighted in green.
3. Click the joystick.
Audio Menu appears, offering you the following options:
4. Select the option by moving the joystick.
The selected option is highlighted in green.
5. Click the joystick.
Refer to detailed operation of each function.
Exit from the Audio Menu
• Press the RETURN button.
Adjusting Audio (Basic)
7 Audio Menu
Cabin Equalizer
(See page 92.)
Position Selector
(See page 93.)
Equalizer Curve
(See page 96.)
Balance Adjustment
(See page 93.)
Adjustments for
Speaker
(See page 94.)
Direct Control On/Off
(See page 99.)
Sound Field Control
(See page 98.)
Dynamic Range
Control
(See page 99.)
Source Level Adjustment
(See page 97.)
Page 93

Proper Setting for the In-car Acoustic Characteristics
The built-in cabin equalizer allows you to easily adjust your audio system to meet the incar acoustic characteristics which vary depending on the type of car and its measurement.
To get the best possible sound spaciousness, be sure to make settings for the speakers.
As well, making settings for “Position” and “Balance” boosts the effects of the cabin
equalizer.
Cabin Equalizer
You can optimize the in-car acoustic characteristics by simply selecting a preset cabin EQ
among SUV, SEDAN, WAGON and MINI VAN.
1. Check to see “Cabin EQ” is currently highlighted.
If not, select that option by moving the joystick.
“Cabin EQ” is highlighted in green.
2. Click the joystick.
The Audio Setting Menu appears, with the currently
effective type of car shown green.
3. Click the joystick.
Each click changes type of car in the following order:
SUV =
SEDAN = WAGON = MINI VAN
=
CUSTOM = Off
Note:
• You can fine adjust or customize the preset cabin EQ. For
details, see “Adjusting the Cabin Equalizer (Expert)” on
page 104.
Operation at the Audio Setting Menu
• Use the joystick to move the cursor between different
options. As such, the joystick will only move the cursor
up/down and left/right. You cannot move diagonally.
: Move the joystick left/right.
: Move the joystick up/down.
• There are some settings you can make at the Audio
Setting Menu without needing to go back to the Audio
Menu.
Position: See “Position Selector” (p. 93).
LOUD: See “Loudness Adjustment” (p. 100).
FAD/BAL: See “Balance Adjustment” (p. 93).
SP Setting: See “Adjustments for Speaker” (p. 94).
Expert: See “Adjusting the Cabin Equalizer (Expert)” (p. 104).
Return: Completes operations at the Audio Setting Menu, bringing you back to the previous
screen.
92
Adjusting Audio (Basic)
Page 94

93
Position Selector
One way to assure a more natural sound is to clearly position the stereo sound image (putting
you in the center of the sound field).
About the Position Selector
• The Position Selector function is a feature that automatically adjusts the speakers’ output levels and
inserts a delay time into the speakers’ outputs depending on seats passengers occupy and the number of them. When used in conjunction with the Cabin EQ and SFC, the feature will make the
sound image more natural and offer a panoramic sound that envelops you.
1. Select “Position Selector” by moving the joystick.
“Position Selector” is highlighted in green.
2. Click the joystick.
The Audio Setting Menu appears, with “Position”
highlighted in green.
3. Click the joystick again.
Each click changes listening position in the following
order:
Front Left =
Front Right = Front Left & Right
=
Rear Left = Rear Right = Rear Left & Right
=
All Seats = Off
Note:
• For Time Alignment to be made, you need to have set the listening position to either of the
Front Left or Right, or of the Rear Left or Right.
Balance Adjustment
This function allows you to select a Fader/Balance setting that provides ideal listening conditions in all occupied seats.
1. Select “FAD/BAL” by moving the joystick.
“FAD/BAL” is highlighted in green.
2. Click the joystick.
The Audio Setting Menu appears, with “FAD/BAL”
highlighted in green.
3. Click the joystick.
The FAD/BAL Setting Menu appears.
4. Adjust speaker balance by moving the joystick.
The display shows “F 15” – “R 15” as it moves from
front to rear.
The display shows “L 09” – “R 09” as it moves from
left to right.
Adjusting Audio (Basic)
Page 95

Adjusting Audio (Basic)
5. Cancel the FAD/BAL Setting Menu by clicking the joystick.
Note:
•“F 00” is the proper setting when 2 speakers are in use.
Adjustments for Speaker
You need to make “with/without” (or yes/no) and “size” (bass reproducing capacity) selection/adjustments depending on the installed speakers. The size needs to be set to Large if the
speaker is capable of reproducing sounds of about 100 Hz or below. Otherwise select Small.
1. Select “SP Setting” by moving the joystick.
“SP Setting” is highlighted in green.
2. Click the joystick.
The Speaker Setting Menu appears.
The Front Left speaker is highlighted in green and in
the lower right-hand corner of the screen the current
settings of that speaker is shown.
94
Continued overleaf.
Operation at the Speaker Setting Menu
• To select a speaker, move the joystick up/down and
left/right. You cannot move diagonally.
: Move the joystick left/right.
: Move the joystick up/down.
Test Tone: See “Adjusting the Speakers’ Output
Levels using a Test Tone” (p. 102).
Cross Over: See “Selecting a Crossover Frequency” (p. 103).
SW Phase: See “Correcting the Subwoofer’s Phase” (p. 103).
Audio Setting: Select this to go to the Audio Setting Menu.
Return: Completes operations at the Speaker Setting Menu, bringing you back to the
previous screen.
Center
Front Left
Rear Left
Sub Woofer
Front Right
Rear Right
Show the current settings
of the selected speaker
Page 96

95
3. Select the speaker you want to make adjustments to by moving the joystick.
The currently selected speaker is highlighted in green.
4. Click the joystick.
and are displayed and you can set the size and
the level for the selected speaker.
5. Select the correct size for the selected speaker
in use by moving the joystick left/right.
Select the speaker settings as follows:
Speakers Setting
Front (Left & Right) SMALL/LARGE
Rear (Left & Right) OFF/SMALL/LARGE
Center OFF/SMALL/LARGE
Sub Woofer OFF/ON
Note:
• The Front Left and Right speakers cannot be set differently. The same is true for the Rear Left
and Right.
6. Adjust the speaker for output level by moving the joystick up/down.
When you make adjustments for listening position, the speakers are automatically set
for appropriate output levels. You can tailor them if you want as discussed under the
heading of “Adjusting the Speakers’ Output Levels using a Test Tone” or “Adjusting
the Speakers’ Output Level”.
7. Click the joystick.
This completes adjustment to the selected speaker.
8. Repeat steps 3 – 7 for other speakers.
Precaution:
• Low frequency range is not output if the subwoofer is set “OFF” and the front or rear speakers
set “SMALL” or “OFF”.
Note:
• It is imperative that non-installed speakers be set to “OFF”.
• Set the front or rear speaker to “LARGE” if the speaker is capable of reproducing bass con-
tent, or if no subwoofer is installed.
• When playing a 2-channel mono source with PRO LOGIC switched ON, there are occasions
when the following will occur:
No audio is output if the center speaker setting is “ON” while no center speaker is installed.
Audio is heard only over the center speaker if installed and the center speaker setting is “ON”.
Adjusting Audio (Basic)
Size Level
Page 97

Adjusting Audio (Basic)
Equalizer Curve
You can switch between Equalizer curves.
1. Select “Equalizer” by moving the joystick.
“Equalizer” is highlighted in green.
2. Click the joystick.
The Graphic Equalizer Menu appears, with “Band”
highlighted in green.
3. Select either “EQ+” or “EQ–” by moving the
joystick up/down.
4. Click the joystick.
Each click changes EQ curve in the following order:
With “EQ+” selected:
Powerful = Natural = Vocal = Custom = Flat
=
Super Bass
With “EQ–” selected:
Powerful = Super Bass = Flat = Custom = Vocal = Natural
Note:
•“CUSTOM” stores an equalizer curve you have made adjustments to. (Refer to “Adjusting the
Equalizer Curves” on page 109.)
• You can create a different “CUSTOM” curve for each of the SLA function groups (see page
97). Remember, however, SLA is based on FM volume, so FM and AM curve are always the
same.
96
Page 98

97
Source Level Adjustment (SLA)
The SLA (Source Level Adjustment) function prevents radical leaps in volume level when
switching between sources. Settings are based on the FM volume level, which remains
unchanged.
Before performing the following steps, select the source whose volume level you will
adjust. (Refer to “Operation for Each Source Unit” on page 27.)
1. Select “SLA” by moving the joystick.
“SLA” is highlighted in green.
2. Click the joystick.
The SLA Setting Menu appears, with the selected
source’s level highlighted in green.
3. Increase or decrease the level by moving the
joystick up/down.
The display shows “+8” – “– 8”.
4. In a similar manner, adjust the volume level of
other sources.
You can perform SLA independently for each of the
following groups:
Display Source
TUN AM
CD CD player, Multi-CD player, DVD player
MD MD player
TV TV, Video
AUX AUX, Speaker Input
EXT External 1, External 2
Note:
• Since the FM volume is the control, SLA is not possible in the FM modes.
Adjusting Audio (Basic)
Page 99

Adjusting Audio (Basic)
98
Sound Field Control (SFC)
The SFC function creates the sensation of a live performance.
About the SFC function
• The acoustics of different performance environments are not the same and depend on the extent and
contour of space through which sound waves move and on how sounds bounce off the stage, walls,
floors and ceilings. At a live performance you hear music in three stages: direct sound, early reflections, and late reflections, or reverberations.
Those factors are programmed into the SFC circuitry to recreate the acoustics of various performance settings.
1. Select “SFC” by moving the joystick.
“SFC” is highlighted in green.
2. Click the joystick.
The SFC Menu appears, with “Musical” highlighted in
green.
3. Select the desired SFC mode by moving the
joystick.
The currently selected SFC mode is highlighted in
green.
Display Sound Field Control
Musical Musical
Drama Drama
Action Action
5D 5D Theater
Jazz Jazz
Hall Hall
Club Club
Theater Theater
Continued overleaf.
Dolby Pro Logic
Page 100

Adjusting Audio (Basic)
4. Click the joystick.
Each click toggles the selected SFC mode On/Off. Switch the SFC mode On to experience a sense of presence and spaciousness.
Dynamic Range Control
The dynamic range refers to the difference between the largest and softest sounds. The
dynamic range control compresses this difference so that you can clearly hear sounds even at
low volume levels.
1. Select “D. Range Control” by moving the joystick.
“D. Range Control” is highlighted in green.
2. Click the joystick.
Each click toggles the Dynamic Range Control On/Off.
Note:
• The Dynamic Range Control is effective only on Dolby Digital sounds.
Direct Control ON/OFF
You can override audio settings to check for effectiveness of your audio settings.
1. Select “DIRECT” by moving the joystick.
“DIRECT” is highlighted in green.
2. Click the joystick.
Each click toggles DIRECT ON/OFF.
When this feature is turned on, “DIRECT ON” appears
in the center of the screen.
Note:
• All audio functions are locked out during DIRECT ON except VOLUME.
99
Remarks on Dolby PRO LOGIC ON/OFF
• If the source is a 2-channel LPCM audio or a 2-channel Dolby Digital audio and you select SFC
effects that are most applicable for 5.1-channel audio (i.e., Musical, Drama, Action or 5D), we
recommend switching Dolby Pro Logic ON. On the other hand, when selecting SFC effects that
are intended for use with 2-channel audio (i.e., Jazz, Club, Hall or Theater), we recommend
switching Dolby Pro Logic OFF.
• When playing a 2-channel mono source with PRO LOGIC switched ON, there are occasions
when the following will occur:
No audio is output if the center speaker setting is “ON” while no center speaker is installed.
Audio is heard only over the center speaker if installed and the center speaker setting is “ON”.
 Loading...