

Page 1
AVH-270BT
AVH-170DVD
AVH-271BT
AVH-171DVD
RECEIVER
AV
DVD
AUTORADIO
RADIO
RDS
AV
AV
RDS
RDS
CON
LECTEUR
DVD
DE
DVD
Important (Serial
~
number is
serial
The
convenience, be sure to record this number on the
Important (Numero
~
Le numero de
commodite,
lmportante
~
numero de serie se encuentra en
El
propia seguridad y comodidad, asegurese de anotar este numero en
garantia que se adjunta.
serie
veillez
number)
on the bottom of this unit. For your own security and
located
serie)
de
se trouve au bas de cet appareil. Pour
noter ce numero sur
a
(Numero de serie)
Ia
parte inferior de esta unidad.
Ia
enclosed
carte de garantie fournie.
warranty card.
securite et votre
votre
su
Por
tarjeta de
Ia
Owner's
Mode
Manual
d'emploi
Manual de instrucciones
Page 2
Contents
Th~m
k
you
fot
bu
y1t1g
t111s
Pi
o1
1ee
t ptoduct
P
l
e~1
se
tea
c!
t
h
tou~
.
Jh
th
es
e ms
ttuct
vv
il
l
k1
Attet
tlotlS.
tutute
10w how to
yo
u
k
ee
tefetence.
h
p
ave
th1s
opet ate
f
1n
1she
d 1
document
yout
model pt opetly.
eacJ
i11
q
th
111
,1
Sc
lfe
e
01mportant
The
sct eens shown in the
di
ff
et· ho
rn
actua l screens. w
changed without not1ce
hmct
i
on
lrllPtovements.
exJ
mp
ht
ch
fm
pedom1ance
• Precaution .......................... 4
Information
License, Warranty Disclaimer
Liability ................................
Important
Parking
When using a display connected to V
To
avoid battery exhaustion .............................. 6
Rear view camera .................
Handling the USB connector
Failure to operate .....
Visit our website .
Protecting
~~otes
About this manual ............................................ 7
to User .........................................
&
Limitation of
..
safety information .................
brake interlock ..........
......
..
....................... ..................... 6
the
LCD
on internal memory ................................ 6
panel and screen ............... 6
...
...
.....................
..
....................
...
......................... 6
............
..
...
• Basic operation ..................
Checking part names and functions ....
Remote control
Inserting/ejecting/connecting media .
On
first-time startup ......................................... 8
How to use the screens .............. ...................... 9
Supported
Selecting a source .... .......
Using the touch panel .................................... 1 0
...
..
.................
AV
source ................
...
....................... 8
..
................... 1
...
..
.
..
............
• Registration and connec-
tion of Bluetooth
device ............................... 10
Displaying the
Registering your Bluetooth devices ......... ....
2
"Biuetooth"
screen ..............
1o
ns
so
ltlstw
c-
place fot
l
es
may
rnay
be
................
..
......... 5
OUT
...
..
..
..
...
..
....
..
.
...
.......... 8
..
........ 1
yo
and
.
..
..
..... 6
..
..... 8
..
...
...
Connecting a registered Bluetooth device
u
manually .......................................... .........
Switching
Entering the
Displaying the device information ...................
Clearing the Bluetooth memory ............ ..........
Updating Bluetooth software ...........
Displaying the Bluetooth software version ......
visibility ..........................................
PIN
connection ............................... ...... .........
code for Bluetooth wireless
• Hands-free phoning ......... 12
Displaying the
Making a phone call ........
Receiving a phone call ................................... 12
Changing the phone settings ............
Notes for hands-free phoning ......................... 13
•
Setup for iPod .................. 13
iPod
.4
...
5
...
5
..
. 6
...
6
compatibility .................................... ....... 13
Information
functions ...................
•Radio
Starting procedure ......................................... 14
Storing the strongest broadcast
frequencies .............................................. 14
Tuning into strong frequencies ....................... 14
•oisc
Starting procedure ............................
Selecting files from the file name list .............. 16
Switching the media file type .......................... 16
Searching for the part you want to play .......... 16
a
Operating the DVD menu ............................... 17
Switching the subtitle/audio language ............ 17
Phone
menu screen ................ 12
..
.............................
on
the connections and
...
............................. 13
................................ 14
................................... 15
• Compressed audio
files ................................... 17
Starting procedure (for Disc) .......................... 18
0
Starting procedure (for USB) .............
0
Selecting files from the file name list ............
Switching the media file type ...............
• Compressed video
files
................................... 18
Starting procedure .............................
1
0
Selecting files from the file name list .............. 19
1
0
• Still image
files
................ 19
..
.............
..
...........
..
........... 16
..
........... 18
...
........ 18
...
......... 19
Starting procedure ......................................... 19
Selecting files from the file name list ..............
11
Switching the media file type ..........................
11
Setting the slideshow interval.
11
11
•iPod
11
Connecting your
11
Starting procedure ....................
11
Selecting song or video sources from the playl-
ist screen ................................................
..................................
iPod
.............................. .
• Bluetooth audio
12
Starting procedure
Selecting files from the file name list .............. 22
13
..
....................................... 22
........................
player
• AUX source ......................
Starting procedure ......................................... 22
Setting the video signal ................. ................. 22
• System settings ...............
Displaying the
Activating the Bluetooth audio source ..........
Setting the ever scroll .............. ...... ...........
Setting the rear view camera .......................... 23
Setting the camera for Rear View mode ......... 23
Selecting the system language ...................... 23
Setting the beep sound .................................. 23
Adjusting the response positions of the touch
panel (touch panel calibration) .................. 23
Setting the dimmer
Adjusting the picture ...................... ................ 24
•Audio
Displaying the
Using fader/balance adjustment.. ................... 25
Using balance adjustment.. ............................ 25
Adjusting source levels ..........
Adjusting loudness ......................................... 25
Using the subwoofer output. .... ....................... 25
Adjusting the subwoofer settings
Switching the rear speaker output.. ................ 26
..
18
Switching the
Boosting the bass
Setting the high pass filter .............................. 26
Using the equalizer ........................................ 26
"System"
setting screen .......... 23
..
..................... .................. 24
adjustments .......... 25
"Audio"
setting screen ..........
..
...................
RCA
rear output.. ..................
...
..
..................................
• Theme menu .................... 27
Selecting the theme color ............................... 27
...
..
....
: .
..
................
..
........
....
...
.. ..
20
•
Setting up the video
player
Setting the top-priority languages .................. 27
Setting the angle icon display ......................... 28
Setting parental lock ............. ......................... 28
Setting the DivX Subtitle ................................ 28
Displaying your DivX VOD
code .......................................................... 28
Displaying your DivX
code
Automatic playback of DVDs .......................... 29
Setting the video signal for the rear view
camera .......... ............................................ 29
................................ 27
registration
VOD
..
.
..
...
.....
..
.............
deregistration
...
.
...
.................
• Favorite menu .....
Creating a shortcut ...........
Selecting a shortcut ............................
Removing a shortcut.. .........................
...
.......................... 29
20
...
..
21
22
20
20
21
21
21
23
• Common operations ........ 29
Setting the time and date ............................... 29
..
23
Changing the wide screen mode .................... 29
..
23
• Other
Resetting various settings/Restoring this prod-
uct to the default settings ............. .............
functions ................
• Connection .......................
Precautions
Precautions
Before installing this product ..........................
To
...
25
...
25
..
26
...
26
...
26
prevent damage ............................
Notice for the blue/white lead .........................
This product ...................................................
Power
Speaker leads ................................................ 32
Power
iPod
iPod
iPod
Camera .......... ................ ................................ 33
External video component and the display ..... 34
•Installation
Precautions
Before installing ...............
Installation
.......
..
...........................................
before connecting the system .....
cord .
..
.....................
amp (sold separately) .......................... 32
I
iPhone
I
I
.................................................. 33
iPhone
with Lightning connector .......... 33
iPhone
with
30-pin
..
.....
connector ............... 33
....................... 34
before installation ....................... 34
notes ............................................ 34
..
.
..
......................... 34
...
.
.-
............ 29
..
......... 29
..
......... 29
..
..........
..
........
..
..
...
.
...
..
28
30
30
30
30
30
31
31
31
31
. 32
Page 3
Contents
Installation using the screw holes on the side of
this product ............................................... 35
Installing the microphone ............................... 35
Mounting on the sun visor .............................. 35
Installation on the steering column ................. 35
Adjusting the microphone angle ..................... 36
• Appendix .......................... 36
Troubleshooting ............................................. 36
Error messages ............................................. 37
Handling and care of discs ............................. 38
Playable discs ................................................ 38
Detailed information for playable media ......... 39
Copyright and trademark notice ....................
Bluetooth .......................................................
WMA .............................................................. 42
DivX ............................................................... 42
AAC ............................................................... 42
Detailed information regarding connected iPod
devices ...................................................... 42
Using app-based connected content ............. .42
Notice regarding video viewing ..................... .42
Notice regarding DVD-Video viewing ............ .42
Notice regarding MP3 file usage ................... .43
Using the LCD screen correctly ..................... .43
Specifications ................................................ .43
.41
41
3
Page 4
Precaution
e MODEL
Contains
Contains/Contient
e This device complies with Part
Industry Canada licence-exempt
Operation ls subject to the following two conditions:
this device may not cause interference, and
must accept any interference, including interference that
may cause undesired operation of this device.
e
The
by
e This equipment complies with FCC/IC radiation exposure
limits set forth for
meets the
and
rules. This equipment has very low levels of
that it deemed to comply
exposure evaluation (MPE).
should
least
extremities: hands, wrists, feet and ankles).
e This transmitter must not
corU_unction
NO.
: AVH-270BT,
FCC
ID:
AJDK083
Bluetooth antenna cannot
user.
FCC
radio frequency
RSS-1
02
of the
be
installed and operated keeping the radiator at
20
em or more away from person's body (excluding
with any other antenna
AVH-271
IC:
775E-K083
an
uncontrolled environment and
IC
radio frequency
without
be
BT
15
of
FCC
RSS
be
(RF)
But
it is desirable that it
co-located or operated
Rules and
standard(s).
removed (or replaced)
Exposure Guidelines
(RF)
Exposure
maximum permissive
or
transmitter.
(2)
this device
RF
energy
(1)
in
e
This
device complies with Part
is
Operation
(1)
this device may not cause harmful interference, and
(2)
this device must accept any interference received,
including interference
operation.
subject to the following two conditions:
that
15
of the
FCC
Rules.
may cause undesired
e Alteration or modifications carried out without
appropriate authorization may invalidate the user's right
to operate the equipment.
e
NOTE:
This equipment has been tested and found to
limits
comply with the
pursuant to Part
designed to provide reasonable protection against
harmful interference
equipment generates, uses and can radiate radio
frequency energy and, if not installed and used
accordance with the instructions, may cause harmful
interference to radio communications. However, there
is
no guarantee
particular installation. If this equipment does cause
harmful interference to radio or television reception,
be
which can
off and on, the user
interference
- Reorient or relocate the receiving antenna.
- Increase the separation between the equipment and
receiver.
- Connect the equipment into
different from that to which the receiver
- Consult the dealer or
technician for
determined
by
for a Class B digital device,
15
of the
FCC
Rules. These limits are
in
a residential installation. This
in
that
interference will not occur
by
turning the equipment
is
encouraged to try to correct the
one or more of the following measures:
an
outlet
an
hei_Q.
experienced radio/TV
in
on a circuit
is
connected.
CAUTION
This product is a Class 1 laser product classified under the
Safety of laser products, I
1M
class
remove any covers or attempt to gain access ·to the
the product. Refer all servicing to quatified personnel.
laser module.
I
CLASS 1 LASER
CAUTION-CLASS
LASER
RADIATION
DIRECTLY
a
WITH
To
OPTICAL
EC
60825-1
:2007,
and contains a
ensure continued safety,
PRODUCT
1M
VISIBLE
AND
WHEN.OPEN,
INSTRUMENTS.
INVISIBLE
DO
NOT
VIEW
do
not
inside
I
of
A WARNING
Handling the cord
with accessories sold with the product may expose you
chemicals listed
California and other governmental entities to cause cancer
and birth defect or other reproductive harm.
after handling.
on
this product
on
proposition
or
cords associated
65
known to the State
Wash
to
of
hands
CAUTION:
USE
OF
CONTROL
OF
PROCEDURES
MAY
RESULT
CAUTION:
THE
USE
WILL INCREASE
IN
OF
OPTICAL INSTRUMENTS
OR
ADJUSTMENT
OTHER
THAN
HAZARDOUS RADIATION
EYE
HAZARD.
OR
THOSE
SPECIFIED HEREIN
WITH
PERFORMANCE
EXPOSURE.
THIS PRODUCT
Get
the most out of your equipment
a
level
that lets the sound come through clearlywithout annpying blaring or distortion and, most importantly, without affecting
your sensitive hearing. Sound can
hearing "comfort level" adapts
what sounds "normal" can actually
hearing. Guard against this
level
BEFORE
t;.~!"~~~~~t-1.~
your hearing adapts.
.~~r=.;
by
playing it at a safe
be
deceiving. Over time, your
to higher volumes of sound, so
be
by
loud and harmful
setting your equipment at a safe
~t;Vt;~:
level-
to
your
e Set your volume control at a low setting.
e Slowly increase the sound until
and clearly, without distortion.
e Once
4
you
the dial and
have
established a comfortable sound level, set
leave
it there.
you
can hear it comfortably
Page 5
Precaution
BE
SURE TO OBSERVE
THE
FOLLOWING
GUIDELINES:
e
Do not
turn
around you.
e
Use caution
hazardous situations.
e
Do not use headphones while operating a motorized vehicle;
the use of headphones may create a
illegal in many areas.
up the volume so high
or
temporarily discontinue use in potentially
that
you can't hear what's
traffic
hazard and
Disclaimer
THE WARRANTIES
WARRANTY
OR
ANY
AND
WARRANTIES,
LIMITATION,
FITNESS
OF
ITS
LICENSORS
FOR
Limitation
TO
THE
APPLICABLE
WILL
ANY
OR
ACTION,
NEGLIGENCE,
OF
TO
LAW,
ANY
OF
ANY
DAMAGE,
FORUM
OR
NEGLIGENCE),
LEGAL
(USD$1
MAXIMUM
BE
LIABLE
INDIRECT , CONSEQUENTIAL, INCIDENTAL, PUNITIVE,
SPECIAL
WHETHER
THE
POSSIBILITY
THE
MAXIMUM
PIONEER'S,
KIND ARISING OUT
THE
PRODUCTS, INCLUDING,
WARRANTY CLAIMS,
DEATH
AND
CLAIM
THEORY,
000).
SET
FORTH
ARE
THE
ITS
WARRANTIES
LAW,
DAMAGES. REGARDLESS
REGARDLESS
IS
BASED
ONLY
LICENSORS,
EXPRESSLY
EXPRESS
A PARTICULAR
of
Liability
EXTENT
NEITHER PIONEER NOR
TO
YOU
IN
EVEN
CONTRACT
IF
SUCH PARTIES HAVE BEEN
OF
EXTENT
OR
ITS
OR
DISABILITY,
ON
STRICT
PRODUCT
WILL NOT
IN
WARRANTIES MADE
AS
APPLICABLE. PIONEER
OR
IMPLIED, INCLUDING, WITHOUT
OF
MERCHANTABILITY
PURPOSE.
PERMISSIBLE UNDER
OR
TO
ANY
SUCH
DAMAGES.
PERMISSIBLE UNDER
LICENSORS',
OF
OR
RELATED
OR
ANY CLAIMS
OF
WHETHER ANY
CONTRACT,
EXCEED
PIONEER'S LIMITED
BY
DISCLAIM
OTHER
OR
BUT
REGARDLESS
LIABILITY,
ONE
ALL
OTHER
ITS
LICENSORS
PARTY
OF
THE
IN
TOTAL
NOT LIMITED
TORT,
FORM
TORT, INCLUDING
LIABILITY
TO
YOUR
FOR
PROPERTY
OF
ACTION
(INCLUDING
OR
ANY
THOUSAND
AND
FOR
ADVISED
APPLICABLE
USE
THE
PIONEER
TO,
OTHER
is
OF
OF
DOLLARS
SOME JURISDICTIONS DO NOT ALLOW
OF
DAMAGES
EXCLUSIONS
BY
APPLICABLE
RIGHTS
MAY
OR
LIMITATION
OR
LIMITATIONS,
LAW,
VARY
MAY
FROM JURISDICTION
OF
TO
NOT
LIABILITY,
THE
APPLY
THE
EXCLUSION
SO
THE
EXTENT
TO
YOU
.
TO
JURISDICTION.
ABOVE
PROHIBITED
YOUR
&WARNING
e
Do not
attempt
Installation
training
automotive
expose you
hazards.
e
Do not
allow
Electrical
smoke, and overheating
liquids.
e
If
liquid
park
your
off
(ACC
nearest authorized Pioneer Service Station. Do not use
product
fire,
electric
e
If you
notice
product,
turn
off
the
the
nearest
product
to
the
e
Before using
the following safety information:
e
e
system .
Do
not
disassemble
are
high
an
electric
nearest authorized Pioneer Service Station
inspection
Do not operate
view camera option (if purchased) if doing so will divert your
attention in any way from the safe operation of your vehicle.
Always observe safe driving rules and follow all existing
traffic regulations.
this
product
safe location and apply
necessary adjustments.
Never set the volume of
hear outside traffic and emergency vehicles.
to
install
or
service
or
servicing of
and
experience in
accessories may
to
the
risk of
this
product
shock
could
or
foreign
matter
vehicle in a safe place,
OFF)
immediately
in
this
condition
shock,
smoke, a
or
any
other
power
immediately
author
in
-voltage
,
this
ized Pioneer Service Station.
this
condition
components
shock. Be sure
adjustments
product,
this
If
or
reading the display, park your vehicle in a
this
electronic
electric
to
result. Also,
could
should get inside
and
because
or
other
strange
abnormal
may result in
or
modify
to
or
be
sure to read and fully understand
product, any applications, or the rear
you experience difficulty in operating
the
parking brake before making
this
this
product
be
come
failure.
consult
repairs.
product so high
equipment
dangerous and
shock,
into
damage
result
from
turn
the
consult
doing
noise
or
signs on
and
consult
this
product
inside
which
your dealer
product
by
injury
contact
your dealer
odor
permanent
by yourself.
persons
and
could
or
other
with
to
the
contact
this
product,
ignition
so may result in a
from
the
LCD
your dealer
Using
, as there
may cause
or
for
internal
that
you cannot
SPECIFIC
without
liquids.
product,
with
switch
or
the
this
this
screen,
or
this
damage
the
the
e
To
promote safety, certain functions are disabled unless the
vehicle
is
e
Keep this manual handy
dures and safety information.
e
Do not install this product where it may
driver's vision, (ii)
vehicle's operating systems
bags or hazard lamp buttons or (iii)
to safely operate the vehicle.
e
Please remember
operating your vehicle.
injuries can
not properly buckled.
e
Never use headphones while driving.
Certain
touch panel
dangerous (possibly resulting in serious injury
or unlawful if used while driving.
being used while the vehicle
system
vehicle
above while driving, they will become disabled until you stop
the vehicle in a safe place, and
release the parking brake, and then
again. Please keep the brake pedal pushed down before releasing the parking brake.
stopped
functions
key
that
senses when the parking brake
is
moving.
and/or
the parking brake
as
a reference for operating proce-
impair
the performance of any of the
or
safety features, including air
to
fasten your seat belt at all times while
If
be
considerably more severe if your seat belt is
(such as viewing of video image and certain
operations) offered
If
you attempt to use the
you are ever in an accident, your
by
this
To
prevent such
is
in motion, there
(1)
apply the parking brake,
(3)
apply the parking brake
is
(i)
obstruct the
impair
the driver's ability
product could
or
functions
is
is
set and when the
functions
applied.
death)
and/
an interlock
described
be
from
(2)
&WARNING
e
LIGHT
GREEN LEAD
IS
DESIGNED
AND
MUST
SUPPLY
IMPROPER
MAY
IN
SERIOUS
e
Do not take any steps to tamper with
BE
SIDE
CONNECTION
VIOLATE
INJURY
parking brake
your protection. Tampering with or
parking brake interlock
injury
or
e
To
death.
avoid the risk of damage and injury and the
potential violation of
not for use with a video image that is visible to the
driver.
AT
TO
POWER
DETECT PARKED
CONNECTED
OF
THE
PARKING
APPLICABLE
OR
DAMAGE.
interlock
system which
system
applicable laws,
CONNECTOR
STATUS
TO
THE
BRAKE
OR USE OF
LAW
AND
or
disabling
could result
POWER
SWITCH.
THIS
LEAD
MAY
RESULT
disable the
is
in
place for
the
in
serious
this product is
5
Page 6
Precaution
some countries the viewing of video image
In
e
inside a vehicle even
illegal.
be
obeyed.
attempt to watch video image while driving, the warning
you
If
"Viewing
prohibited."
on
parking brake.
releasing the parking brake.
.
The
.
to enable passengers
of
this display, stop the vehicle
video output terminal
Where such regulations apply, they
seat video source
front
appear
will
Please
persons other than the driver may
by
driving
while
watch video image
the screen.
on
the brake pedal pushed down before
keep
OUT)
(V
the rear seats to watch video images .
in
To
a safe place and apply the
in
is for connection of a display
AWARNING
install the rear display in a location
NEVER
watch video images while driving.
to
driver
sure to run the vehicle engine while using this product. Using
Be
this product without running the engine can drain the battery.
that
AWARNING
does not have
not install
Do
wire
ACC
an
With
product
tight parking spot.
this
circuitry available.
or
optional rear view camera,
aid to
an
as
product
keep
in
an
a vehicle
eye
that
are able to use this
you
trailers, or backing into a
on
AWARNING
SCREEN IMAGE
e
INPUT
USE
e
VIEW
REAR
INJURY
MAY
FOR
ONLY
CAMERA. OTHER
DAMAGE.
OR
APPEAR
REVERSE
REVERSED.
MIRROR IMAGE
OR
MAY
USE
RESULT
ACAUTION
The rear view mode is to use
on the trailers,
eye
an
entertainment purposes.
function
for
6
product
this
while backing up. Do not use
or
as an aid
a display
on
be
must
strictly
is
enables the
an
IN
keep
to
this
ACAUTION
prevent data loss and damage to the storage device,
To
e
never remove it from
transferred.
Pioneer
e
storage devices and assumes no responsibility
of data
devices while using
cannot guarantee compatibility with
media players,
on
product while data is being
this
smartphone, or other
this
iPhone,
product.
USB mass
all
any loss
for
After-sales service for Pioneer products
distributor
contact the dealer
Please
purchased the product
warranty conditions)
necessary information is not available, please contact
companies listed below.
do not ship your product to the companies at the
Please
addresses listed below
contact.
U.S.A
e
Pioneer
CUSTOMER SUPPORT DIVISION
P.O.
800-421-1404
CANADA
e
Pioneer
CUSTOMER SATISFACTION DEPARTMENT
340 Ferrier Street,
Canada
1-877-283-5901
905-479-4411
For warranty information, please see the Limited Warranty
sheet included with your product.
Visit us at the following site:
http://www
http://www
1 Register your product.
2 Receive updates
3 Download owner's manuals, order product catalogs,
research new products, and much more.
Electronics (USA)
Box 1760 Long Beach,
Electronics of
.pioneerelectronics.com
.pioneerelectronics.ca
or
after-sales service (including
for
any other information.
or
repair
for
Inc.
CA
Canada, Inc.
Markham, Ontario
2,
Unit
the latest products and technologies.
on
from which you
without
90801-1760
case the
In
the
making advance
2Z5,
L3R
4 Receive notices of software upgrades and software updates.
screen to direct
not expose the
Do
e
e
e
e
The
the battery (or removing the battery itself).
e
is
product
tion due to the resulting high temperatures.
When using a cellular phone,
lular phone away from the
of the video
protect the
To
touch panel
Some of the settings and recorded contents will
information
Some of the settings and recorded contents
LCD
not used. This may result in
the antenna of the cel-
keep
screen to prevent disruption
the form of spots, colored stripes, etc.
in
LCD
only with your finger and do so gently .
keys
erased
is
LCD
screen from damage,
disconnecting the yellow lead from
by
sunlight
LCD
when this
screen malfunc-
sure to touch the
be
not be reset.
not be reset.
will
ACAUTION
button resets settings and recorded
RESET
Pressing
contents to the factory settings.
e
e
The
conditions:
e
e
e
e
the
operation when a device is connected
Do not perform
product.
this
to
Some of the settings and recorded contents
reset.
microprocessor must
to using this product for the first time after installation.
Prior
this product fails to operate properly.
If
there appears to
If
system.
your vehicle position
If
cant positioning error.
Turn the ignition switch
this
reset under the following
be
problems with the operation of the
be
the map with a signifi-
on
shown
is
OFF.
will
not
be
Page 7
Precaution
2 Press the
pointed implement.
:>
Checking
Settings and recorded contents are reset to the factory settings.
This manual uses diagrams of actual screens to describe operations. However, the screens on some units may not match those
shown
in
~t!~~~~~~~
RESET
part names
this
manual depending
;
~~~
',;
button with a pen tip or other
and
functions
Sy.,.tlfils
on
the
Os4Kf
on page 8
model
used.
i
i~
Tftis
'Manu•:lt
1'-il=ll
!j
bi~D
<y/
'
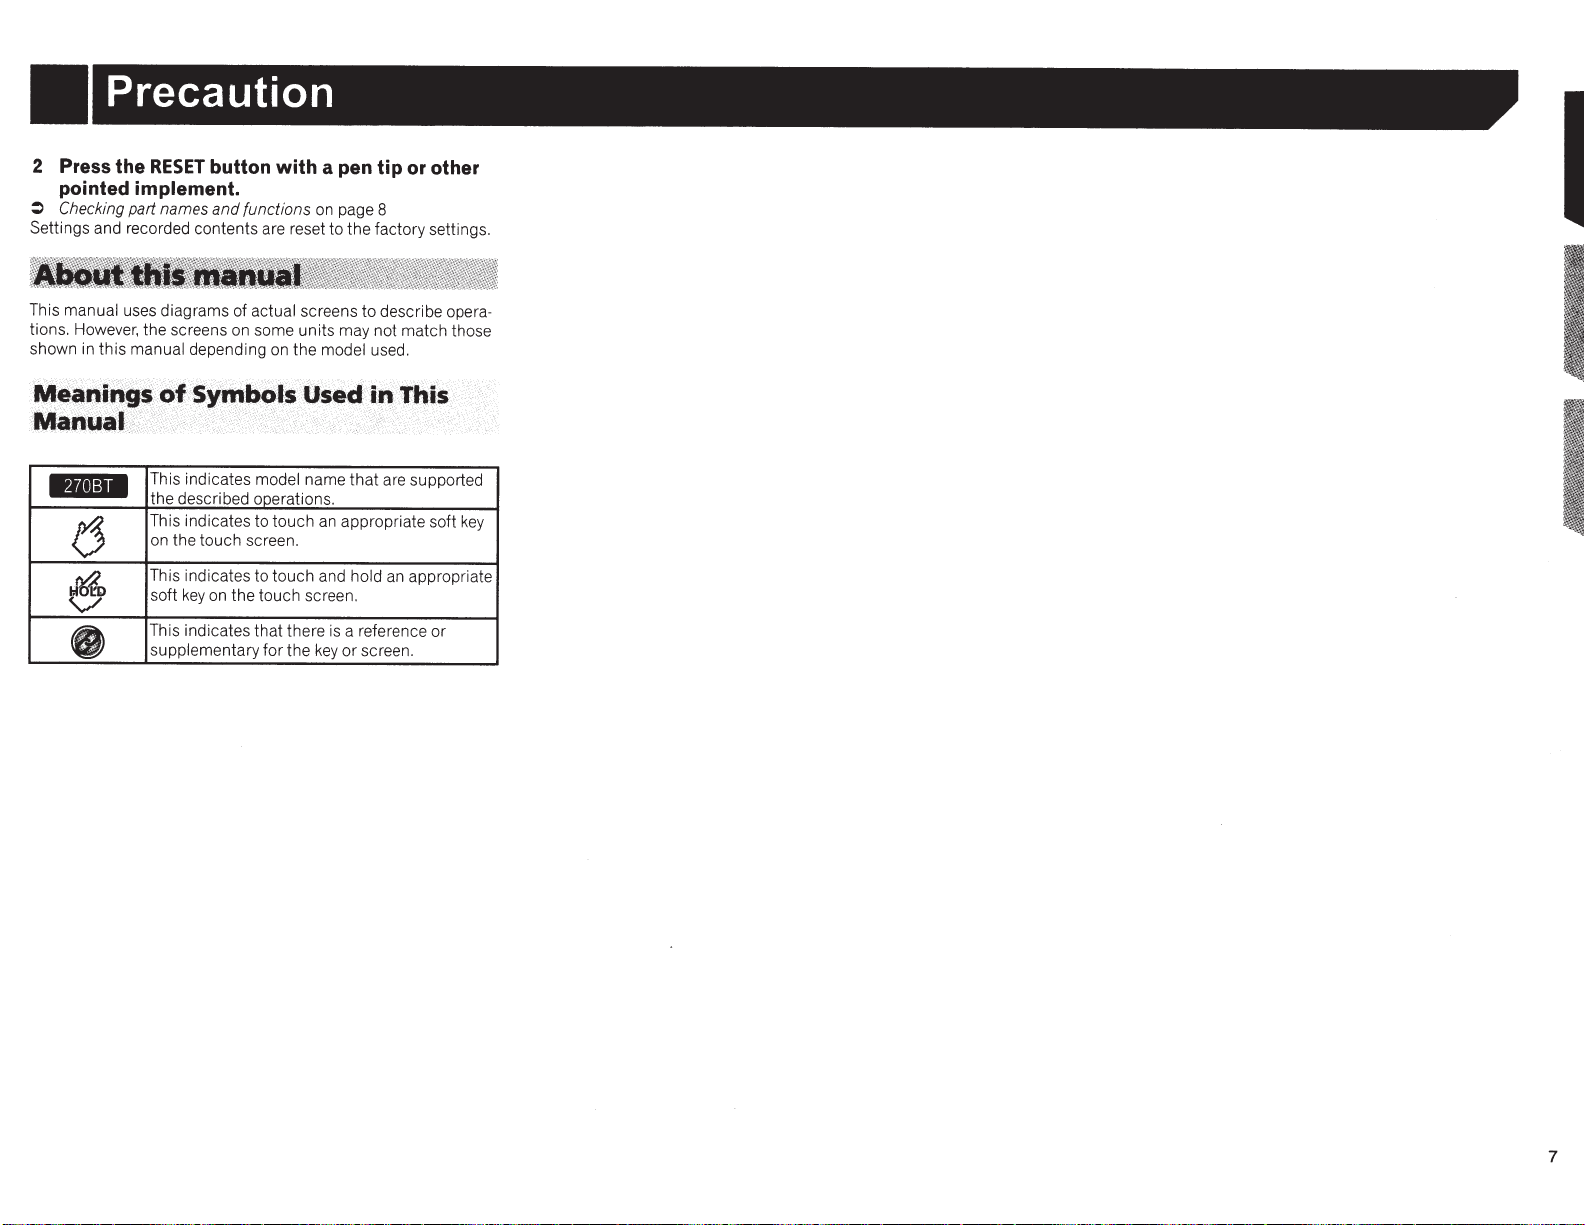
This indicates
the described operations.
This indicates to touch
on the touch screen.
This indicates to touch and
soft
key
This indicates that there
supplementary
model
name
an
appropriate soft
on the touch screen.
is
the
key
a reference or
or
for
that
are supported
hold
an
screen.
key
appropriate
•
7
Page 8
Basic operation
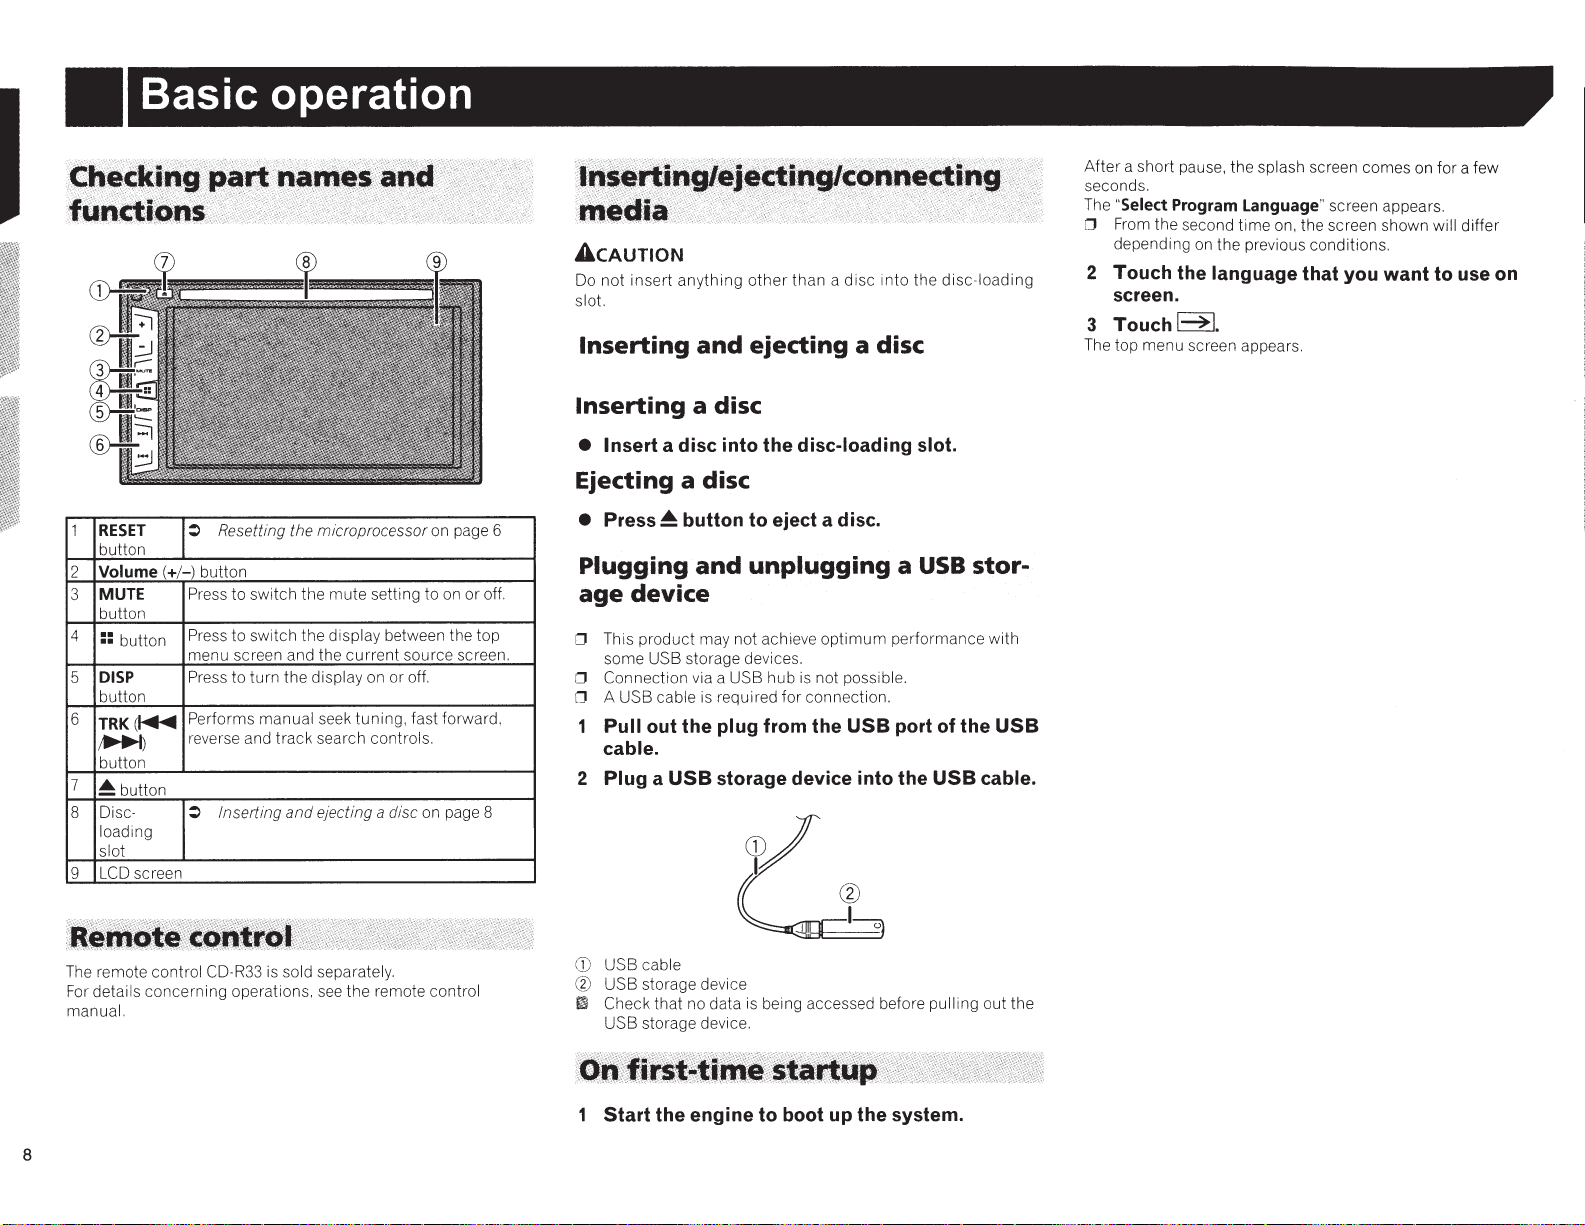
1
RESET
button
Volume(+/-)
2
MUTE
3
button
4
::
button
DISP
5
button
6
TRK(~
~)
button
7
~button
Disc-
8
loading
slot
LCD screen
9
Resetting the microprocessor on page 6
~
button
Press to switch the
Press to switch
menu screen and the
Press to
Performs manual seek
reverse and track search controls.
~
turn
Inserting
mute
setting to
the
display between the top
current
source screen.
the display on or off.
tuning,
fast forward,
and
ejecting a disc
on
on
or off.
page 8
ACAUTION
Do
not
insert
anything
slot.
Inserting
other
than a disc
and
ejecting a disc
into
the
Inserting a disc
• Insert a disc into the disc-loading slot.
Ejecting a disc
•
Press~
Plugging
age
0 This
some USB storage devices.
0 Connection via a USB
0 A USB cable is required
Pull out the plug from the
cable.
2 Plug a
button to eject a disc.
and
unplugging a
device
product
may not achieve
USB
storage device into the
hub
for
is
optimum
not possible.
connection.
USB
USB
performance with
port of the
USB
disc-loading
stor-
USB
cable.
After
a short pause, the splash screen comes on
seconds.
"Select Program Language" screen appears.
The
0 From the second
depending
time
on
on, the screen shown will differ
the previous conditions.
for
a few
2 Touch the language that you want to use
screen.
Touchl~l.
3
The top menu screen appears.
on
The remote control CD-R33 is sold separately.
For
details concerning operations, see
manual.
8
the
remote control
CD
USB cable
CIJ
USB storage device
lm
Check
that
no data
is
USB storage device.
being accessed before pulling out the
1 Start the engine to boot up the system.
Page 9
Basic
operation
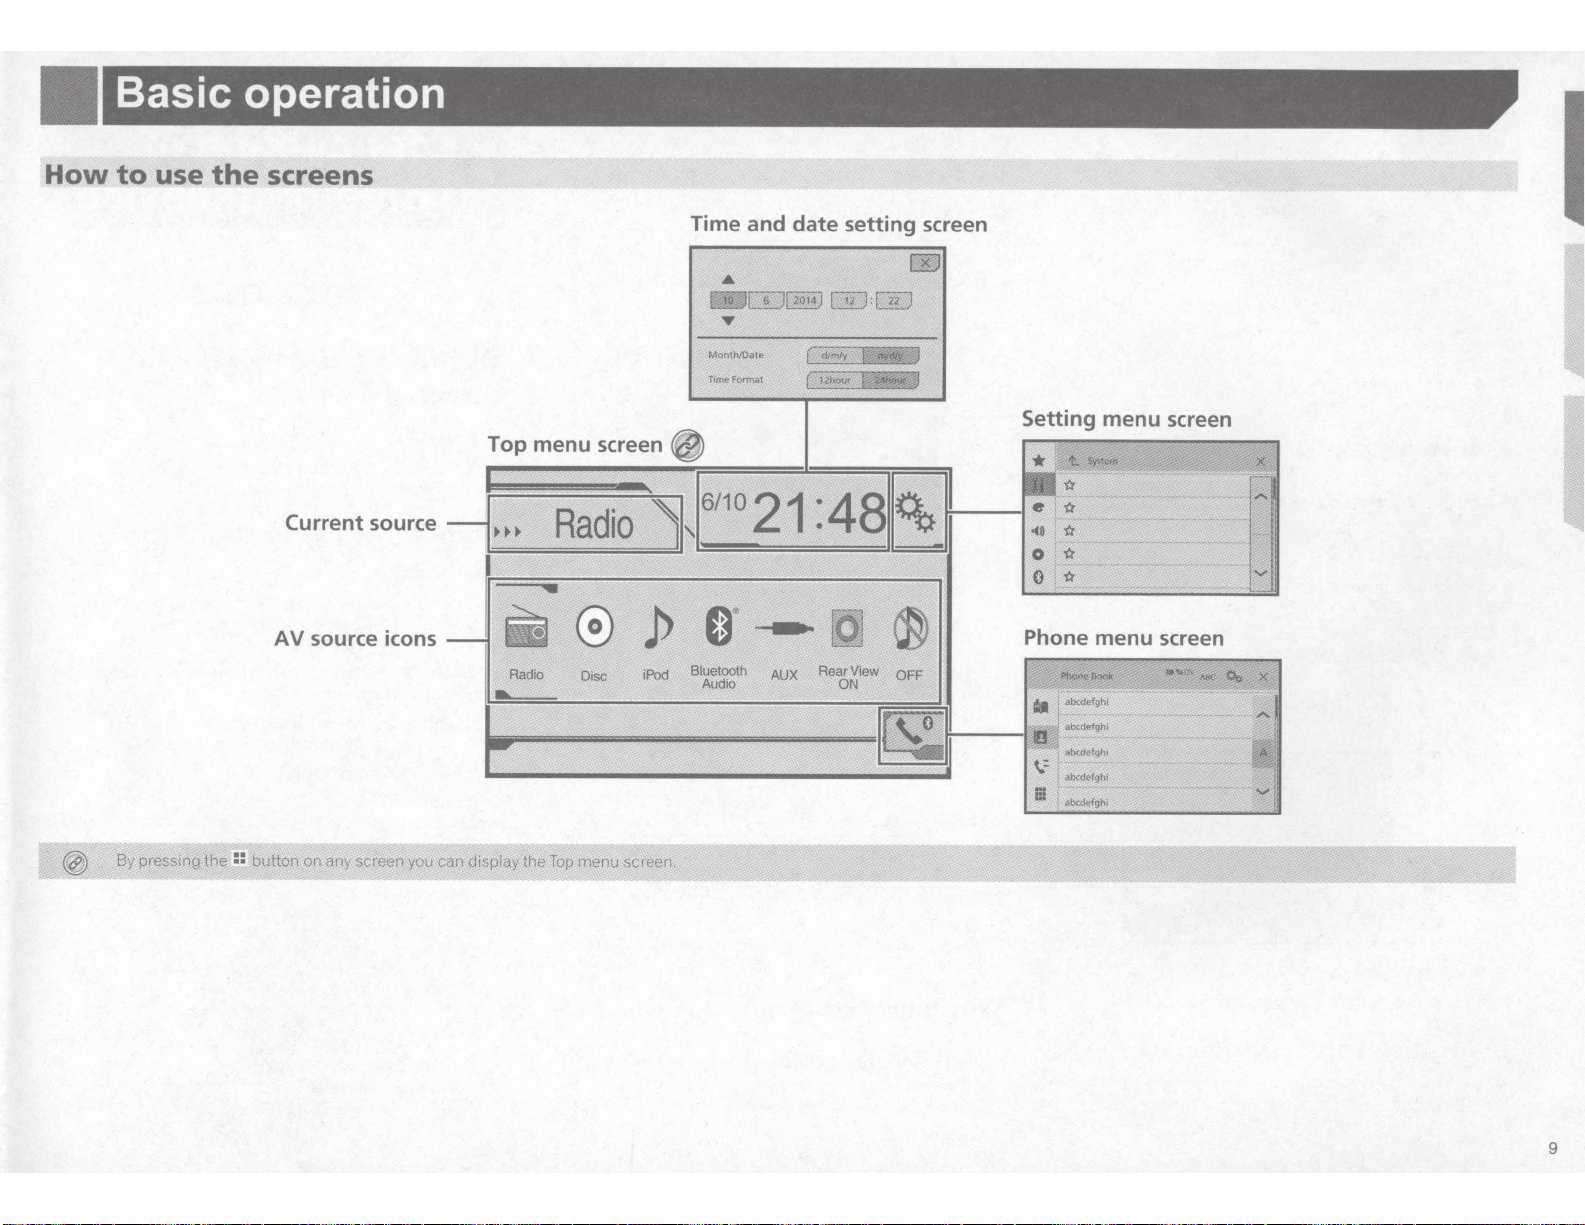
How
to
use
the
screens
Current
AV
source icons
source
Top
menu
screen
Time
e
and
•
-~
...
Mont.h:!O,a'te
Jfmefotmat
date
6)l2M4)
setting
I''
):I
2<
J
screen
Setting
menu
screen
0
By
pressing
the
_
;;,
.,
.Qutton
pn
any
screen
you
can
diSPlaY'
----~~-------~-~~~--~~~-------~~-~-~--
the
Top
menu
screen.
~~-------------~
9
Page 10
Basic operation
Registration and
Supported
You
can play
or
AV
source
use the following sources
with
e Radio
e CD
e ROM (compressed audio files)
e DVD-Video
can
The following sources
an auxiliary device.
be played back
e USB
e iPod
e Bluetooth audio (AVH-270BT) (AVH-271
e AUX
Selecting a source
Source
1
Press::.
2 Touch the source icon you want to select.
0 When you select "
Source
1 Display the source list.
CD
Displays
2 Touch the source key you want to select.
Using
You
can operate
directly
0
To
10
screen only
w1th
protect
on
the
OFF
on
the
./'Track
99
the
source list.
the
touch
this
product
your fingers.
the
LCD
screen
with
your
Top
menu
",
the
AV
source
panel
by
touching
from
finger
gently.
source
list
the
damage, be sure to
this product.
or
used by
BT)
screen
is turned off.
keys on
connecting
the
screen
touch
the
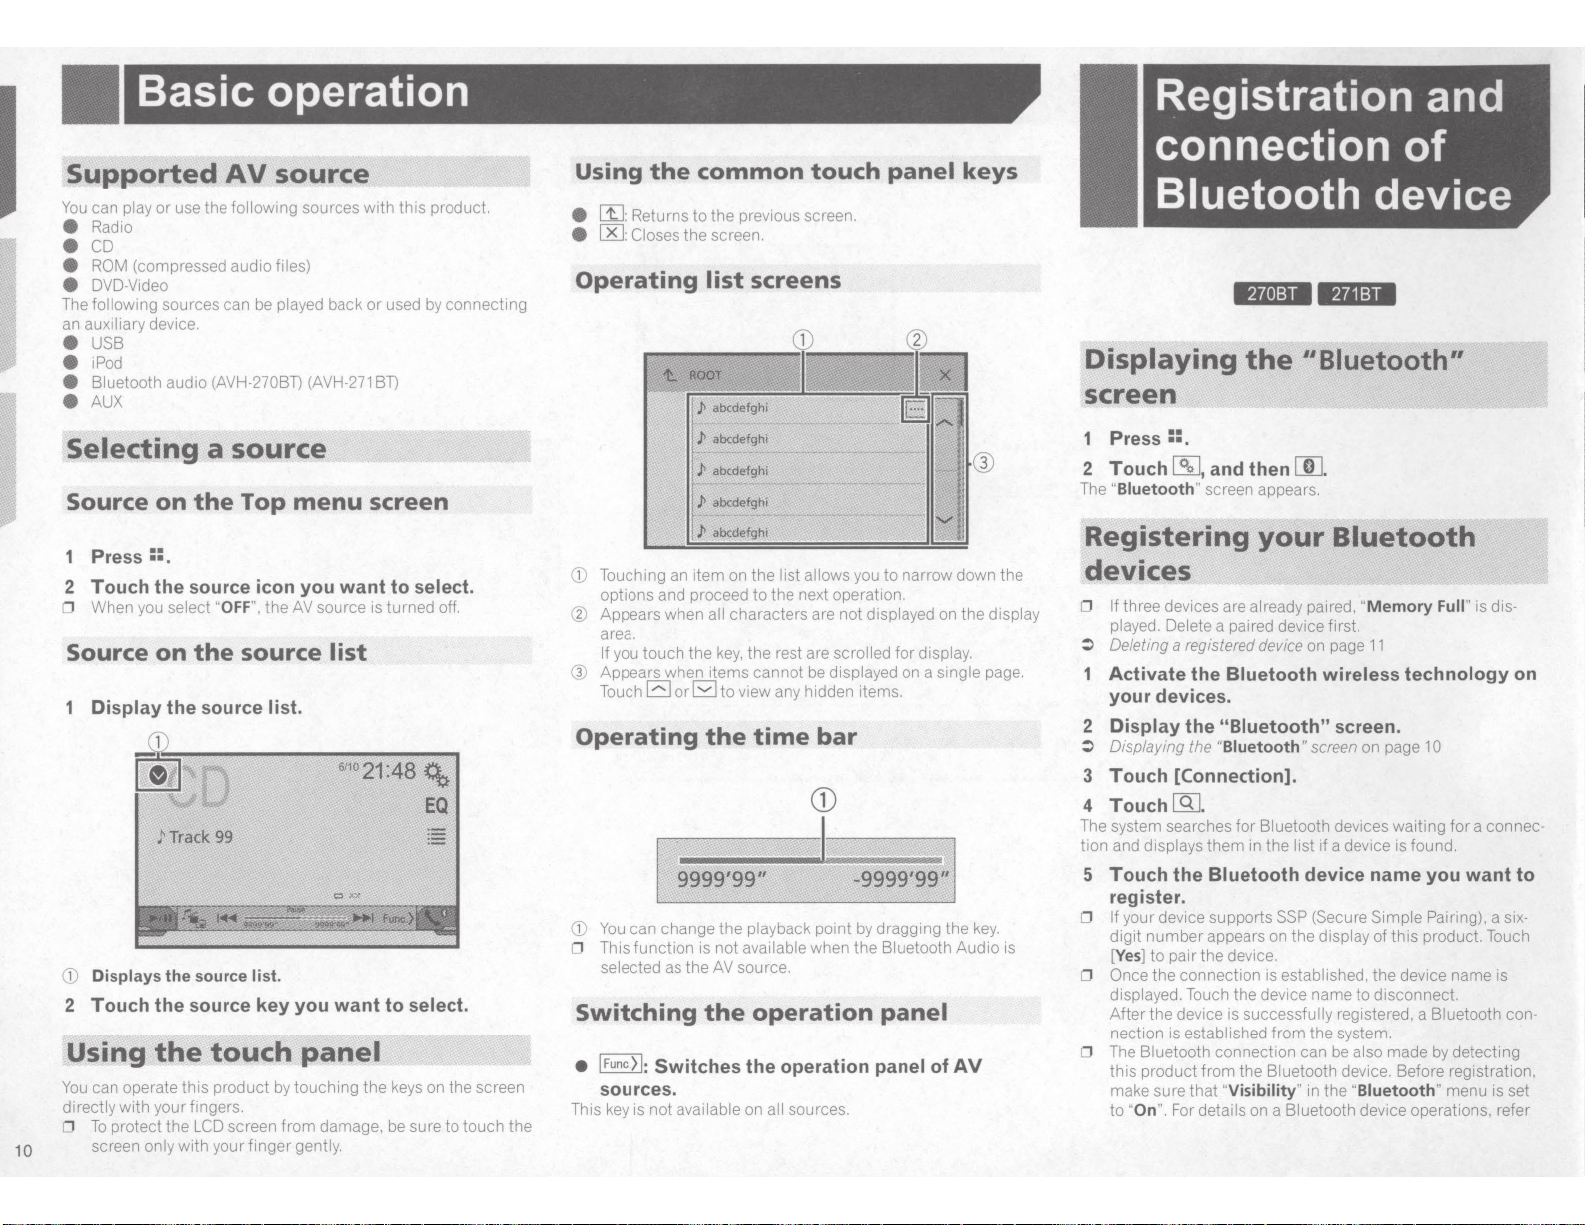
Using
e W: Returns
e
Operating
CD
@ Appears when all characters are
Q)
Operating
the
common
to
00:
Closes
Touching an
options and proceed
area.
touch
If you
Appears when items cannot
EJ
Touch
the previous screen.
the
screen.
list
screens
J>
abcdefghi
J>
alx:defghi
1tem
on
the
list allows you
to
the next operation.
the
key,
the
rest are scrolled
orB
to view any hidden items.
the
time
touch
be
bar
9999'99"
CD
You
can
change
0 This
function
selected as
Switching
• I
Func.>l:
Switches the operation panel of
sources.
This
key
is not available on all sources.
the playback point by dragging
IS not available when
the
AV
source.
the
operation
panel
to
narrow down the
not
displayed on
displayed on a single page.
for
-9999'99:
the
Bluetooth
display.
1
the
Audio
keys
the
display
key.
is
panel
AV
connection
of
Bluetooth device
*14e!:ll
Displaying
the
screen
1
Press::
2
Touch~.
The "Biuetooth" screen appears.
.
and
then[[],
Registering
devices
0 If three devices are already paired, "
played. Delete a paired device first.
:>
Oe
letmg a
reg
istered
1 Activate the Bluetooth wireless technology
your devices.
2 Display the "Biuetooth" screen.
:>
Displaying the "Biuetooth"
3 Touch [Connection].
4 Touch
The system searches
tion and displays
5 Touch the Bluetooth device name you want to
register.
0 If your device supports SSP (Secure Simple
digit
[Yes
0 Once
displayed. Touch
After
nection is established
0 The Bluetooth connection can
this
make sure
to
[9],
for
them
in
number
)
product
"On".
appears on the display of this product. Touch
to
pair
the device.
the
connection is established,
the
For details on a Bluetooth device operations. refer
the
device is successfully registered, a Bluetooth con-
from
the
that
"Visibility"
*111:11
"Biuetooth"
your
device
Bluetooth devices waiting
the
dev1ce name
from
Bluetooth device. Before registrat ion,
Bluetooth
Memory
on
page
11
screen
on page
list if a device is found.
the
to
disconnect.
the system.
be
also made by detecti
in
the
"
Biuetooth
Full" is di
10
Pa
device name is
" menu is set
for
a connec-
iring), a si
ng
s-
on
x-
Page 11
Registration and connection
Bluetooth device
of
operating instructions supplied with the Bluetooth
the
to
device.
Switching visibility
:>
Connecting
on
to
11
page
Bluetooth
a
device
automatically
This function connects the last connected Bluetooth device to
this product automatically
than a few meters apart.
Display the
Displaying the
:>
Touch [Auto Connect] to switch "On"
2
".
"Off
or
Deleting
a registered device
as
"Biuetooth"
"Biuetooth"
A cAUTION
turn
Never
being deleted.
is
this
product
off while the paired Bluetooth device
1 Display the "Biuetooth"
Displaying the
:>
"Biuetooth"
2 Touch [Connection].
,
3
Touch
[][]
the two devices are less
as
soon
screen.
page
on
screen
screen.
on page
screen
10
(default)
10
Switching visibility
This function sets whether
other device.
the
Display the
1
Displaying the
:>
Touch [Visibility] to switch
2
or
"Biuetooth"
"Biuetooth"
screen
screen.
on page
"On"
10
(default) or
make this product visible
to
not
"Off".
''
Enteri~g
·
.
PI~
the
code
,
f~"
Bluetodth wireless con11ection
connect your Bluetooth device to this product, you need
To
enter a
You
1 Display the
:>
2 Touch
3 Touch
4 Touch
0
Displaying
code.
PIN
can change the
Displaying the
[PIN
to
[0]
-digits).
.
G;!l
PIN
default
The
code with
PIN
"Biuetooth"
"Biuetooth"
screen
Code Input].
to input
[9]
"0000".
is
code
device
the
function.
this
screen.
on page
the
10
pin code (up to 8
to
to
3 Touch [Clear].
confirmation screen appears.
The
Updating
This function is used to update
Bluetooth software. For details on Bluetooth software and updating, refer
0
0
0
to
The source is turned off and
disconnected before the process starts.
This setting is available only when you stop your vehicle
safe place and apply the parking brake.
need to store
You
device in advance.
Bluetooth
our website.
the
this
the
version up
software
product
with the latest
Bl uetooth connection is
storage
USB
the
to
file
in
A CAUTION
and never
product
this
turn
Never
while the software is being updated.
Connect the
sion up file
:>
Plugging
and
2 Display the
Displaying the
:>
3 Touch
[BT
off
storage device stored the
USB
this unit.
to
unplugging
a
USB
storage device
"Biuetooth" screen.
"Biuetooth"
screen
Software Update].
disconnect
on page
the phone
on
10
ver-
page 8
4 Touch [Start].
updating the
finish
Follow the on-screen instructions
Bluetooth software.
to
a
r~gi$tere«Ji
Conne~ing
BluetQpth
Connect
e
e
e
the Bluetooth device manually in the following cases:
more Bluetooth devices are registered, and you want
or
Two
to manually select
want to reconnect a disconnected Bluetooth device.
You
Connection
reason.
cannot be established automatically for some
a
devi«l
device
the
manuaUy
be used.
to
/"
Activate the Bluetooth wireless technology on
your devices.
2 Display
Displaying the
:>
"Biuetooth"
the
"Biuetooth "
screen.
screen
on page
10
3 Touch [Connection].
4 Touch the name of the device that you
want
connect.
to
~tion
infor~
1 Display the
Displaying the
:>
2 Touch [Device
The device name and address of
product are displayed.
Clearing
This setting is available only when you stop your vehicle
0
safe place and apply the parking brake.
.
"Biuetooth"
"Biuetooth"
the
screen.
screen
Information].
Bluetooth device and
the
-
Bluetooth
on page
10
memory
A cAUTION
this product off while
turn
Never
being cleared.
1 Display the
Displaying the
:>
"Biuetooth"
"Biuetooth"
screen
Bluetooth
the
screen.
on page
memory
10
2 Touch [Biuetooth Memory Clear].
this
in
is
Display;ng
ware
this product fails
If
your dealer for repair.
such cases, perform the following procedure to check the
In
software version on
1 Display the
··
:>
a
2 Touch
The version of
version
Displaying the
[BT
this
~luetootfi
the
soft·
"'
operate properly, you may need
to
unit.
th1s
"Biuetooth"
"Biuetooth"
Version
product's Bluetooth module appears.
screen
Info].
screen.
on page
10
consult
to
11
Page 12
Hands-free phoning
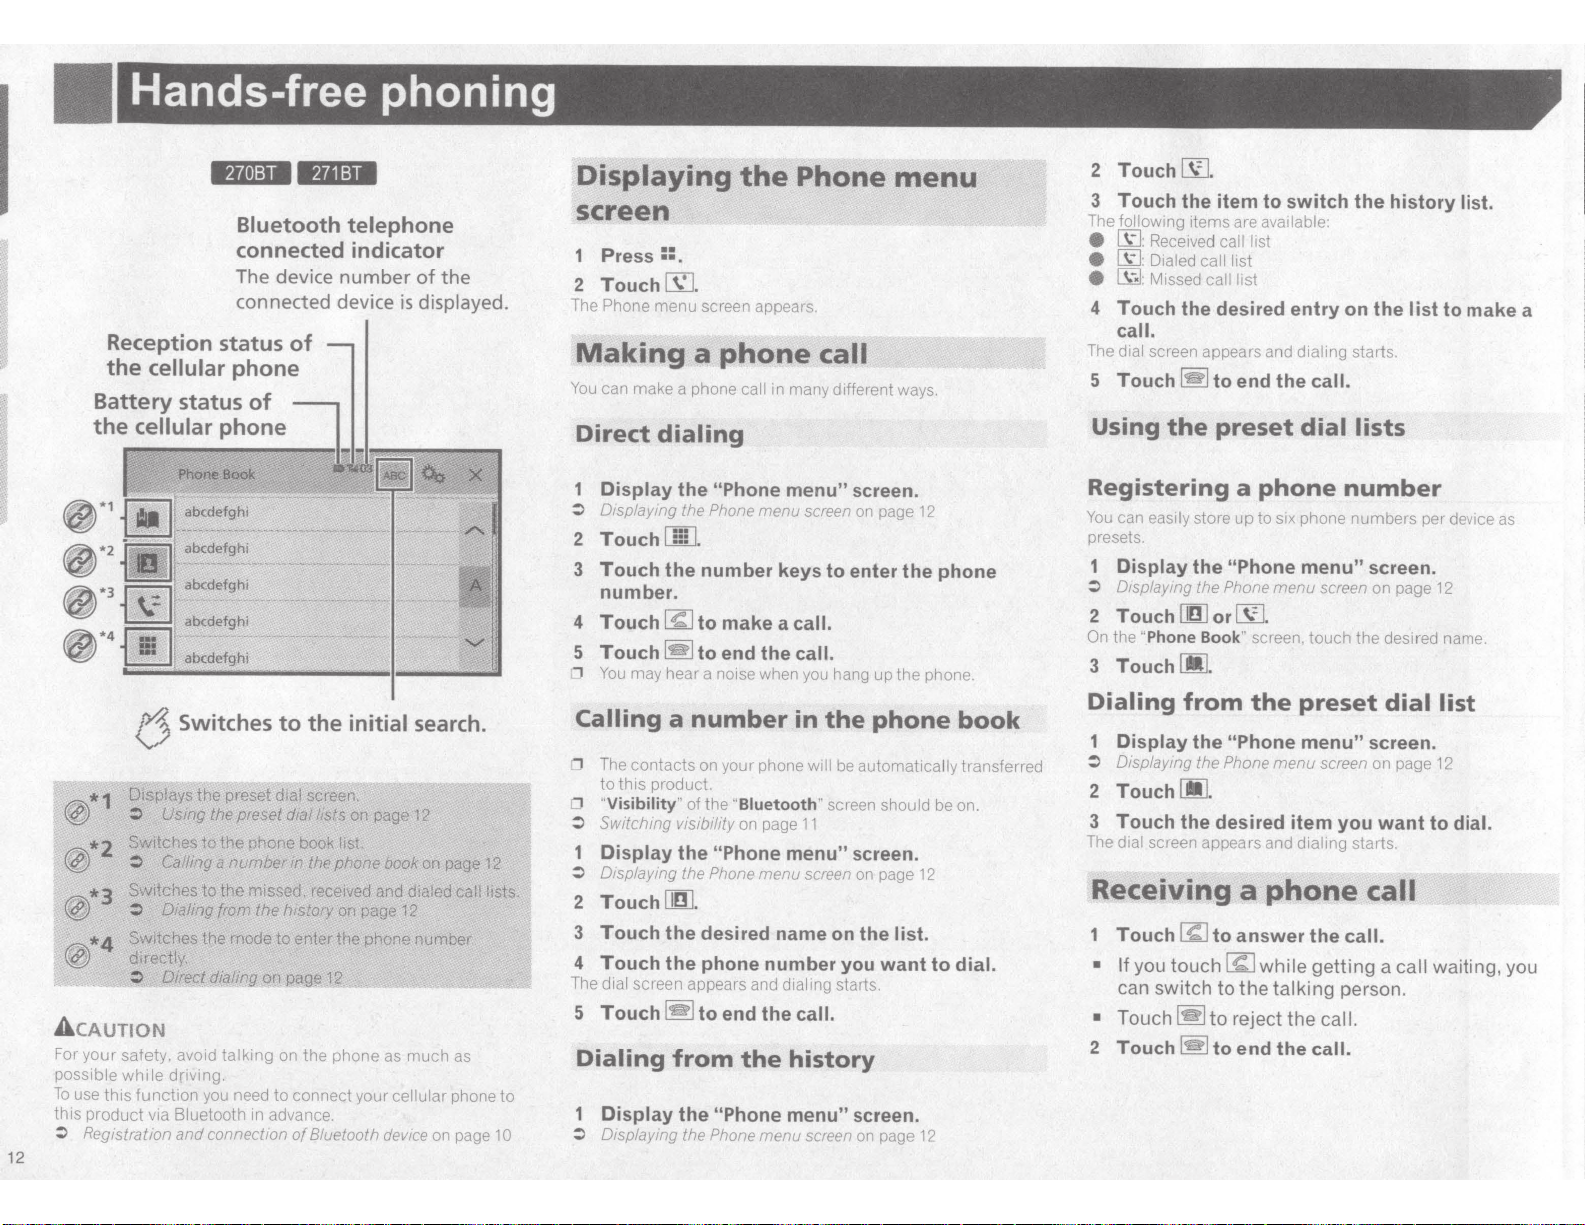
R.lle!:IM
The device
connected device
Reception status
the
cellular
Battery status
the
cellular
phone
phone
•
.111:14
Bluetooth telephone
connected indicator
number
of
the
is
displayed.
of
of
Displaying
the
Phone
screen
1
Press::.
2
Touch~.
The Phone menu screen appears.
Making
You
can make a phone call
Direct
a
phone
dialing
in many d1fferent
call
menu
ways.
2
Touch~.
3 Touch the item to switch the history
The following
e
~:
e
~:Dialed
e
~:
items are
Received
call list
Missed
available:
call list
call list
list.
4 Touch the desired entry on the list to make a
call.
The
dial
screen appears and
5
Touch
Using
~
the
to end the
preset
dialing
call.
dial
starts.
lists
12
@*1
~·2
~·3
~·4
*
1 ·
f'!'l7l...?7il.
vv
f'Ji\
*2
~
lf2'j:,
*3
· l1lg)
~
*4
VfY
A
CAUTION
For
your
possible
To
use
this
this
product
~
Registration
!j
Switches
ofsplays
:>
Switches
~
Sw·
.··
..
:
'#
SWitches
<iifectly.
~
safety. avoid
while
function
the
Using
to
Calling
)tc~e~
to
D1almg
the
Direct
driving.
you need
via
Bluetooth in advance.
and
connectiOn
prl;is?i
the
preset
the
a
nv{!Jber
the
.
from
~e
dialfn!J
talking
to
the
dlal screen. ,
dial
phone
book
in the
rni
·
s.
s·e
.•
d,
tf;e
htstory
to
enter
on
page
on
the
to
connect your
of
initial
lists
on
list
phone
receMJd·
onPEI.~&!
the
12
_~-~-------'
phone as
8/uetooth device
search.
~e
12
book
on
···
..
•
~n.
d
dialed
12
phone
number
much
cellular phone
page
call
as
on page
1 Display
~
2 Touch
3 Touch the number keys to enter the phone
4
5
CJ
Calling
'J
0 "Visibility"
~
12
list~
.· · '
1 Display
~
2 Touch
3 Touch
4 Touch
The dial screen appears and
5
Dialing
to
10
1
~
Displaying the
"Phone menu"
Phone
menu
screen
screen.
on page
the
iii .
number.
Touch
Touch
You
The contacts on your phone
to
Switchmg visibility
Displaying
~
to make a
~
may hear a noise when you hang up the phone.
this
to end the
a
number
product.
of the
the
the
"Phone menu" screen.
Phone
call.
call.
in
will
"Biuetooth"
on page
11
menu screen
the
phone
be
automatically
screen
should
on page
DnJ.
the
the
Touch
~
from
Display the
Displaying
the
desired name
phone number you
to end the call.
the
"Phone menu"
Phone menu screen
on
dialing
starts.
history
screen.
the list.
want
on page
12
be on.
12
to
12
book
transferred
dial.
Registering a
You
can
easily
presets.
Display
~
D1splaymg the
2 Touch
On the
3 Touch
Dialing
Display the
~
Displaying the Phone
2 Touch
store up to six phone numbers per device
the
DnJ
"Phone Book"
CMJ.
from
lMJ.
phone
number
"Phone menu"
Phone
menu
screen
or~-
screen, touch the desired name.
the
preset
"Phone menu"
menu
screen
3 Touch the desired item you
The
dial screen appears and
Receiving a
Touch
•
If
can switch
•
Touch~
2
Touch
C£J
to answer the
you
touch~
to
to
~
to end the
reject the
dialing
phone
while
the
talking
starts.
call.
getting
person.
call.
call.
screen.
on page
dial
screen.
on page
want
call
a
call
as
12
list
12
to
dial.
waiting, you
Page 13
Hands-free phoning
phone
Changing
Answering
Display the
Displaying the
:>
2 Touch [Auto Answer]
(default).
Switching
select whether
can
You
Display the
1
Displaying the
:>
2 Touch [Ring Tone] to switch
"Off".
Inverting
Display the
1
Displaying the
:>
2 Touch
Setting
During a conversation, you can switch
on your
directly
T h
ouc
•
off.
Adjusting
volume
This product can be adjusted
volume.
• Touch
levels.
ume
Settings can be stored
0
the
automatically
call
a
"Biuetooth"
"Biuetooth"
ring
the
not
or
"Biuetooth"
"Biuetooth"
names
"Biuetooth"
"Biuetooth"
[Invert
the
~t
l
It
Name].
private
phone).
cellular
"""'
It
'''""l
""
~
011
or
other
the
to switch between the three
!...I
screen.
screen
switch
to
tone
th1s
to use
screen.
screen
the
in
screen.
screen
mode
t t . t d
o urn
party's
other
the
to
each device.
tor
settings
on page
on page
on page
to
pnva
10
or
"On"
product's ring tone.
10
"On" (default) or
10
e mo
book
(talk
eon
phone
private mode
listening
listening
party's
"Off"
or
vol-
hands-free
Notes
General
Connection
e
less technology
The
e
cellular
receiving voice and data via
With some
e
output from the speakers.
It
e
phoning may
for
notes
all cellular
to
line-of-sight distance between
private mode is
is not guaranteed.
must
phone
cellular
be
selected
disabled.
phones featuring
meters
10
be
Bluetooth technology.
phones, the ring sound may not
the
on
phoning
Bluetooth wire-
product and your
this
less when sending and
or
phone, hands-tree
cellular
Registration and connection
Cellular phone operations vary depending on the type of
e
phone. Refer to the
lular
your ce
When phone book
e
phone and then perform pairing agam
this product.
lular
phone
Making and receiving
may hear a noise in
You
e
When you answer
phone.
When the person on the
phone.
the person on the other end
It
e
conversation
hands-tree phoning.
With some
e
button on the
free phoning may not be performed.
The registered name
e
already
number
number
received
The
cannot make a call
You
e
phone number) in the received
If calls
e
data
due
cellular
cellular
registered in
is registered under different names.
displayed.
will be
call
are made
will be recorded
instruction
detailed
tor
transfer
does
calls
following
the
phone using the button on the
the
other
to an echo, decrease the
phones, even
phone when a
appear
will
phone book. When one phone
the
the
and
to the
operating
by
1n
this
product.
instructions.
not
end
the
of
after
the phone
if
dialed
of an unknown user (no
entry
history.
call
cellular
your
that came with
manual
work, disconnect your
from your phone to
situations:
line
the
of
cannot hear the
line
volume level
you press the accept
comes in,
call
number
only
number histories
phone, no history
Phone book transfers
phone book entries on your
are more than 1
If them
e
lular phone, not all entries may
Depending on the phone,
e
phone book
the phone book in the phone contains image data,
If
e
phone book may not be transferred
Depending on the
e
not be
correctly.
available.
000
download completely.
product
this
phone, phone book transfer may
cellular
may not
correctly.
be
cel-
hangs up the
for
hands-
is
the phone
cel-
the
display
the
Setup
with
When using an
product
this
iPod
product
This
software versions.
1Phone
e
iPhone
e
iPod
e
iPod
e
iPod
e
iPod classic 160GB (2009):
e
iPod classic
e
iPod classic
e
iPod nano (7th generation)
e
iPod nano (6th generation):
e
iPod nano (5th generation):
e
iPod nano (4th generation):
e
iPod nano (3rd generation):
e
You
0
product by using
Operation methods may vary depending on the
0
and
Depending on the software version
0
compatible
For details
information on
manual applies
This
iPod with
iPhone
e
iPod
e
iPod classic
e
iPod
e
with
iPod
iPhone
e
iPod
e
iPod
e
Information
and
The settings and
and the available
iPod
according to the device to be connected.
compatibility
supports
Others
5s, 5c:
5,
4s.
4,
iOS
3GS:
(4th, 5th generation):
touch
(3rd generation):
touch
(2nd generation):
touch
160GB
80GB:
can connect and
software version.
the
this
with
iPod compatibility with this product, refer to the
about
touch 2nd, 3rd. 4th generation
nano 3rd, 4th, 5th, 6th generation
touch
nano 7th generation
website.
our
to
connector
30-pin
4s
4,
3GS,
80GB, 160GB
Lightning connector
5s, 5c
5,
5th generation
functions
cables
sources are
for iPod
product, configure the settings of
this
following iPod models
the
only
may not work
iOS 7.0
6.0.1
Ver.
Ver.
(2008):
1.1.2
Ver.
control
separately sold
product.
following iPod models.
the
on
required for connecting each device,
as
correctly.
later.
or
6.0.1
iOS
5.1.1
iOS
2.1
iOS 4
2.0.4
2.0.1
1.2
Ver.
1.0.2
Ver.
1.0.4
Ve1·.
1.1.3
Ver.
iPod compatible
an
connector
of
connections
the
follows.
the
cables.
iPod,
iPod
and
this
with
iPod model
may not
it
be
13
Page 14

Setup
iPod
I
iPhone
When
separately)
e
iPod (audio)
iPod (video)
iPod
connector
When
separately)
e
iPod
connecting
Available
I
iPhone
connecting
Availab
le
(au
dio)
sources
sources
for iPod
with
with
a
30-pin
via
CD-IU201V
a
Lightning
via
CD-IU52
connector
(sold
(sold
Radio
f'/1..
Displays
V
Select
to
switch
,
"'4.,
VorAM
{j
Performs
M~o
Performs
<....:,/
non
Re
leasing
to
the
frequency.
system
and performs
Keeping
seconds, performs non stop seek
f'/1..
Recalls
V
stored
~~Stores
V'
frequency
the
an i
tem
to
the preset
Selects
the
band.
manual
seek
stop
seek
the
nearest station
If
you touch again
is
searching,
holding
the
preset
to
a
key
the
current
to
a key.
preset channel list.
on
the
list("
1"
to
"6")
channel.
FM1, FM2, FM3
tuning.
tuning
or
tuning.
key in a
manual
few
from
cancels seek
tuning.
the
key
seconds, skips
the
current
while
tuning
for
a
long
tun
channel
from
memory.
broadcast
the
ing.
Starting
1
Press::.
2
Touch
The
"
Radio
Storing
procedure
[Radio].
"
screen appears.
the
strongest
broadcast
frequencies
The BSM (best stations memory) function
the six strongest broadcast frequencies under the preset
keys
"1" to
''
6
0
Storing broadcast frequencies with BSM may replace
you have
0
Previously stored broadcast frequencies may remain stored
if the
limit.
1
Touch
2
Touch
While
frequencies
of
their
• If you touch
canceled.
Tuning
0
You
source.
Local
lions
1
Display
".
already saved.
number
the message is displayed, the six strongest broadcast
signal
can use this function when
seek tuning
with
of frequenci
[}]
.
~
to
begin
a search.
will
be stored under the preset
strength.
[Cancel], the storage proce
into
sufficiently strong
the
strong
allows you
"System"
es
stored has not reached
to
only
signals.
setting
automatically
tun
ing
keys
ss
frequencies
"Radio "
tune
is
selected
into
those radio
screen.
stores
tuning
those
the
in order
is
as
the
sta·
14
0
By
pressing
channels.
0
By pressing and
also
0
By keeping pressing and
perform
seek
~
perform seek tuning.
non
stop seek tuning.
tuning
is canceled
or
~
,
you
hold
~
or
~
holding
and the preset channel
can
also
switch the preset
and
release,
you can
~
or
~
.
If
you press again, non stop
you can
is switched.
2
Touch
3
Touch
4
Touch
5
Touch
e
Off
(default):
Turns the seek
e
Level1
[AV
Source Settings].
[Radio
[Local].
the
to
settings].
item
tuning
Level4:
you
want
setting off.
to
set.
Page 15

Radio
the
Sets
Level1
AM
"Level4"
FM
The
0
only stations with
level of sensitivity
or
).
Level2
"Level2
(AM
strongest signals.
the
to
Level1
to
FM
tor
setting allows reception of
")
Level4
(tor
Disc
Track number indicator
Audio source screen 1
Hides
6
To display again
touch
touch panel keys.
the
the
the
anywhere
on
keys,
screen.
2
Skips files
rYJ.
*
backward.
or
V
I
I:
:
Does
Plays
between
available
is
play
not
tracks in random order.
all
Switches
rYJ.
and pause.
V
Plays files in random order.
6
function
This
~
I
I~
Audio source screen 2
~·1
forward
playback
CD.
music
for
tracks in random order.
Performs frame-by-frame
6
Performs
~
Each
speed in
the
order:
Video source screen 1
6
slow-motion playback.
touch
you
time
steps in
four
1/16->
1/8-> 1/4->
Performs fast reverse
forward.
fast
or
Touch again
speed.
it
I
Ill~
the
1/2
change
to
playback.
changes
following
~*3
~*4
~·s
playback
the
Sets a repeat
6
0
I
~I
I
Repeats
:
I
Repeats
:
play
the
the
range.
current
current
disc.
track.
Stops playback.
6
15
Page 16

Disc
0 If
a
Video
source screen 2
•
6/t{)21:48
~
Video
source screen 2
EQ
Q.
'
9
.
Video-CO
0
Changing the wide screen mode.
:l
Common operations on page
You
can play a normal music
the built-in drive of
A
cAUTI
For safety reasons, video images cannot
vehicle is in motion. To view video images, stop in
and apply
with PBC
this
ON
the
parking brake.
On is being played,
29
CD.
product.
Video-CO
I
or
DVD-Video
be
v1ewed
PBCOn
a
I
appears.
using
while
your
safe place
16
p/J._
(/
(j
~
Changes
V
angle
This
featuring
Selects
[L+R],
This
and
Sets a repeat
I~~:
I~~
I~~
Repeats
:Repeats
:
Repeats
the
(Multi-angle).
function
multi
the
audio
[Left],
function
DVDs
[Right],
is
available
recorded wi
play
all files .
the
the
viewing
is
available
-angle
output
th
range.
current
current
for
DVDs
recordings.
from
[Mix].
for
Video-COs
LPCM
audio.
chapter.
title.
r:)
Resumes
This
You
Bookmark
To
clear
touch and
,
o/1,
Returns
V
the
This
and
c
ontrol)
*
1
~
e
~
0
. tflj;, .
.
'¥11
0
0
Selects
:l
*2
'
;
w
3
/
~
16
*4
Oispt~ysthe
~
*5
Sw
:>
17
By
pressmg
forward or backwar
By
pressing and
fast reverse
Starting
1
Press::.
2
playback
function
can
memor
for
the
bookmark
hold
is
available
a disc (up
and
specified
function
Video-
COs
.
a
track
i
ng
Jil
from
es
S{;;lect
t
~~r~h~~g1h!~:~~atymt
aF~!a~~b~~;~~~~Zh~~
OPerating
!tc!les
.6 .
;pVffrthing
DVDrnenu.
tree
the
subtiUe/audio
i ' .
tt
'!fffi
(Bookmark).
ize one
this
key.
begins
point.
is
avail
featur
the
list
from
the
OVD
mrmt:J
S.
ubtltleli,
for
DVD-Video.
point
as
a
to
fi
ve
discs).
on
the
di
sc,
playback
ab
le
for
i
ng
PBC
f!lena,me
i
J,pe
on
;J;t~n~~~~
on
page
l.f4ngvage.
tJ
:dio
Jarrg!Ji;J,~e
from
DVD-Video
(playback
lislon
page
16,
pag~16
qy
on
page
n:
bp
pqg!':
,
Insert
The
source changes and then playback will start.
:l
Inserting and ejecting a disc on page
0
If the disc is already
Selecting
name
Touch
2
Touch
Switching
When playing a digital media containing a mixture
media file types you
1
Touch
2
Touch
e
Music
Switches the media file type
e
Video
Switches
• CO-DA:
Switches
Searching
want
0
For
~
or
~
d.
ho
l
ding
or
fast forward.
.
you can also skip files/chapters
~
or
~
.
you can also perform
DVD-Videos, you can select
0
For
Video-COs,
Touch
procedure
the
disc
you
set.
files
list
§ .
a
track
on
the
can
l?SJ
.
the
item
:
:
the
the
you
media file type to video.
media file type to
for
to
play
you can select
[g]
_
the
switch between media file types
.
want
to
play.
select [Disc] as the playing source.
from
list
media
want
the
8
the
file
to
play
back.
file
type
of
various
to
set.
to
music (compressed audio).
CD
(audio data
part
[T
itle
[T
rack
],
] or
you
[
Chapter
[10Key]
(CO-DA)).
]
or
(PBC only).
to
play.
[
10Key
].
Page 17

Disc
select
to
item
cancel
menu.
Changes
Changes
can
the
to
[0]
input
an
to
g
that
In
or
~
desired
the
or
[!5]
the
the audio
also
DVD/DivX
"
input
to
[9]
number, touch
playback
start
the
case, use touch
MENU!.
I
menu
subtitle/audio
the
change
to
U3J
subtitle language.
language.
switch
the
Touch
2
Touch
3
To
0
Touch
4
you registered.
Operating
can operate the DVD menu
You
the screen directly.
0 This function may not work
content.
DVD
Touch
1
Touch
2
Switching
language
Touch
•
(j5]:
e
U3J:
e
You
•
using the
Setting the top-priority languages
~
search function.
the
desired number.
the
.
C]
[
the
from
DVD
Setup"
menu
touching the menu item
by
properly
with some
keys
panel
item.
language.
the
subtitle/audio
menu .
on page
27
number
on
disc
DVD
to operate the
languages
Compressed audio files
Displays the artwork
being played.
the artwork
with
file
file
size
The
and
artwork
the
Playback screen 1 (Example:
Abcx:lefghi
'
OABC
Skips
~
•2
~
Switches between playback
14.
and pause.
\.,/
1
or backward.
'-./
Switches
14.
information display.
\.,/
is
needs
type
should
the
be
forward
files
current music
when
to
less
USB)
the
JPEG,
be
than
file
99
KB.
(j
\,,/
files
Plays
Does
:
I
~
I
Plays
I :
X){'
I
range
screen 2 (Exam
Sets
(j
I
I~~
I
Selects
14.
the
or
random order.
in
within
e:
in
USB)
play files
not
all files
random order.
in
a repeat play range.
Repeats
:
~
I~
or
I
0
Repeats
:
Repeats
~~:
previous
the
the
the
folder
next folder.
random
repeat
the
all
current
current
order.
les.
fi
folder.
file.
.
.
.
.
.
I
-
a file from
SeJects
Selecting
~
pressing
By
0
backward.
pressing and
By
0
reverse
can
You
storage device.
Media compatibility chart
:>
~
fast forward.
or
play compressed audio
fi/f!S
you can
.
~
or
~
holding
files
on page
hamelist
'fe
also
~
or
stored in a
40
skip
you
.
on
files
perform fast
can
or
disc
1$
page
forward
a USB
'!li'i
f
or
17
Page 18

Compressed
Compressed video files
audio files
-S.tartit\_g procedure {for
1
Press::.
2 Insert the disc you want to play.
The source changes and then playback will start.
:>
Inserting
0 If the disc is already set, select [Disc]
Press::.
2 Plug the
:>
Plugging
3 Touch [USB].
0 Play back is performed in order of folder numbers. Folders
are skipped if they contain no playable files.
selectingnarne
You
can find files
folder
Touch~.
2 Touch a
0 Files are played back in file
switching
When
media
1
Touch~.
2 Touch the item you
e Music:
Switches
e Video:
Switches the media
•
CO-DA
Switches the media file type to
e Photo:
Switches the media
18
data).
and
ejecting a disc on page 8
USB
and
storage device.
unplugging a USB storage device on page 8
filf!s.;f,roriJ
list
or
folders
to
name list.
file
on the list to play back.
the
playing a digital media containing a mixture of various
file types you can switch between media file types to
the
media file type to music (compressed audio).
:
play back using the file name
number
~
media
want
to set.
file type
file type
to
video.
CD
(audio data (CO-DA)).
to
still image
Dis~t
as
the playing source.
~Ne:
,·
fil~
order.
file
(JPEG
-
·
type
or
BMP
or
play.
(Example:
6
6 Hides
To display
touch
Disc)
Sets
I 0 I
I
~~:
I~~:
the
touch panel keys.
again
the
keys,
anywhere
on
the
a repeat play range.
or
I~~:
Repeats all files.
Repeats
Repeats
the
current folder.
the
current file.
screen.
6 Performs frame-by-frame playback.
~
Performs slow-motion playback.
6 Stops playback.
(Example: Disc)
3
e *
14,
V playback
0
By
pressing
backward.
0
By
pressing and
reverse or fast
0 Changing the wide screen mode.
:>
Common operations on page
You
can play compressed video files stored on a di
USB storage device.
:>
Media compatibili
ACAUTION
For safety reasons, video images
is in
vehicle
and apply the parking brake.
f4.
V
Switches
I~ or~
holding
forward.
ty
motion.
To view video images, stop
Performs fast reverse
or
fast
forward.
Touch
playback speed.
aga
in
to
between
and
pause.
.
you can also skip files
~
or
.....-J
29
chart
on
page
40
cannot
change
,
you
be viewed while your
the
forward
can
perform fast
sc
or
in
a safe place
or
in an
Page 19

Compressed
Still
image
files
on page
files
the
on
in
files
from
Jist
number
file
video
Compressed audio files
~
Selecting
name
can
You
Touch§.
2 Touch a file
Files are
0
skipped when they contain no files.
Touch the playback sign of the
•
preview the file.
lis.t
lect files to view using
se
played back
17
the
file name list.
the
to play back.
order and folders are
thumbnail
file
to
r4.
V
Selects
r4,
Vor
/j
next
Sets a repeat
I:
I 0
=I
I
Plays files
t::j
~
I
I~
touch
Hides
lj
To display again
touch
Rotates
picture
the
the
anywhere
displayed
the
90° clockwise.
previous
folder.
range.
play
Repeats all files.
current
Repeats
:
I
I:
the
random order.
in
play files in random order.
not
Does
:
all files in
Plays
play range in random order.
the
panel
keys,
the
screen.
the
on
folder.
current repeat
keys.
~*1
6110
21A8
2
Skips files
~*
Switches
!4,
playback
V
images are
JPEG
0
pressing
By
0
backward.
pressing and
By
0
files at a time.
last file in
0 Changing
Common operations
~
can view still images stored in an USB storage device.
You
Media compatibility chart
~
r4.
backward.
or
V
between
and pause.
displayed in the rear display.
not
or
~
holding
If the file currently being played is the first
folder, the search is not performed.
the
the wide screen mode.
you can also skip files forward
.
~
~
page 29
on
page
on
or
forward
you can search
.
~
40
Starting procedure
~'
.
(b
EQ
or
10
or
Press::.
1
storage device.
2 Plug the
Plugging
~
Playback is performed in
0
are skipped
3 Touch
The image is displayed on the screen.
USB
unplugging a USB storage device
and
they contain no playable files.
if
[USB].
of folder numbers. Folders
order
on
page 8
19
Page 20

Still
image files
iPod
Selecting files
name
You
can
Touch§.
2
Touch
0
Touching a
a
Switching
When
media
1
Touch~.
2
Touch
e
Music
Switches
e
Video
Switches
e
Photo
Switches
Setting
JPEG
In
this
0 This setting is
files.
1
Display
list
select
files
to
a
file
on
:
:
:
the
a
the
the
the
the
folder
list
digital
item
media
media
media
by
file on
playmg
file types you can
the
or
BMP
files
setting,
can be viewed as a
the
interval between each image can be set.
available
the
"Video
view
the
on
the
touching
the
media
switch
you
file
file
file
slideshow
from
using
the
file
list
to
play
list
shows its contents.
it.
media
containmg
between media
want
to
type to
music
type
to
video.
type to still
during
Setup"
image
slideshow
playback
screen.
the
file
name list.
back.
You
can play
file
type
a mixture
set.
(compressed audio).
of
file
types to
(JPEG
various
data).
interval
on
this
product.
of
the
JPEG
or
play.
BMP
Audio source screen 1
·
14.
14.
V
Skips
V
Switches
and
files forward
backward.
between
pause.
6
Sets a shuffle play.
I
_:)¢
I
:
Plays
randomly
I
·
.
..
:
videos
Plays
o·m~:48~
1
0)¢
c::l
,
::!C"~/99999
·-
Audio source screen 2
-
~~.~.
within
album
&def~hi
l
or
playback
Abcdefghi
OABC
6
6
GIJ
~
/PQps
Sets a
I
0
I:
Repeats
I~~
:
Repeats
video.
Changes
:
Normal playback
:
Fast
repeat
the
the
audiobook
playback
all
t
he
randomly.
play
range.
in
the
current
songs
or
selected list.
selected
song
speed.
list.
or
2
3
The following
"10sec" (default),
20
Touch
Touch
[Time
the
item
items
"Ssec
Per
are
available:
'',
Photo
you
"15sec
Slide].
want
",
"
to
set.
Manual"
lx
1121
:
Slow-motion playback
.
Page 21

iPod
Bluetooth
audio
Video source screen
reverse
Performs
6
fast
Selectsattackf-
Selecting
:>
on
screen
pressing
By
0
forward
pressing and
By
0
perform fast reverse
Changing
0
Common
~
'l!li
'!'
the
backward.
or
the wide screen mode.
operations
Connecting
a
with
iPod
For
Via
0
iPod audio and/or video sources are
cables
~
For
Via
0
However, functions
~
AcAUTION
For safety reasons, video
vehicle
cable
USB
Depending on your iPod, a USB interface
(CD-IU201
iPhone
is connected.
I
!Pod
iPod
cable
USB
With a USB interface
separately),
I
!Pod
is in
with
!Phone
iPhone
I
iPod audio source is available.
with Lightning connector
!Phone
mot1on.
fast
forward.
s
page
~
or
~
~
the
hold
fast forward.
or
on page
''
your
connector
30-pin
(sold separately),
V)
connector
30-pin
a
with
cable
to iPod video files
related
images
video images.
v1ew
To
button, you can
29
iPod
Lightning
iPod/iPhone
for
cannot
:48
21
S/1{)
or
sources/rom
button. you can
~
or
'
users
cable
is required to connect.
enabled
if either of the
on page
connector
are not
page
on
be viewed
stop
33
(CD-IU52) (sold
<b
EQ
playtfst
fh~;:
5
files
skip
also
also
I
for iPod
users
available.
33
your
while
in a safe place
and apply
Starting
1 Connect
~
The source changes and then
0
2
3
the parking brake.
Connecting
If connecting
before.
Press::.
Touch
your
[iPod].
procedure
your
an
Selecting
playli.
from
You
playlist
1
,
2
~
3
4
you
If
according to the above steps.
5
D Depending on the generation
D
the
the
can search
Touch~.
Touch
category
Touch
Touch
can not find the desired song
Start
funct1ons
You
tion. The
for
screen.
or
[]]
list.
category
the
title
the
playback
may not
play playlists created
can
application
iPod.
on
!Pod
iPhone
song
song
switch
to
[]]
the
of
the
of
available.
be
available
is
21
page
playback will
iPod touch,
or
video
or
screen
st
video you want to
or
the
want
you
that
list
video, try
or
selected
version of the iPod, some
or
the MusicSphere
with
our
on
start.
applications
quit
sources
play
or
music
search for.
to
want
you
to
list.
website.
search again
from the
video
play.
to
appli
ca-
player
*.14•1:11
Playback screen 1
Abcdefghi
&
OABC
forward
Skips
6
You
the
Playback screen 2
·er
Abcdefghi
I Abcdefghi
0
"4.
1
V
files
cannot
is
audio
Plays files
6
ABC
Sets a repeat
6
Switches
pause.
and
use
played
/House
between
*.111:11
function
this
back.
Track
10
21:48
backward.
or
number
random
in
play
playback
(b
EQ
while
indicator
order.
(\;.
:48
EQ
range.
21
Page 22

Bluetooth
audio
AUX
source
player
0
By
pressing
forward
0
By pressing and
perform fast reverse or fast forward.
0
Before using the
nect the device
:>
Registering
0
Depending
uct,
or
differ from the descriptions in
0
While
please
possible. If
song
0
When you are
this
Starting
1 Display the
2 Touch [AV
3 Confirm that
4
Press::
5 Touch [Biuetooth Audio].
Selecting files
name
0
This function may not
Bluetooth
1
Touch § .
2 Touch a file
22
the
~
or
backward.
hold
Bluetooth
to
your
Bluetooth devices
on
the
you are
playback.
product via
the
available
refrain from operating the phone function as
operations with this product may be
listening
you
try
talking
Bluetooth,
procedure
"System"
Source
"Biuetooth Audio"
.
list
device.
or
or
~
button, you can
the
~
or
~
audio
this product.
Bluetooth
to
operating, the
on
the
player,
on page
device connected
this
songs on your
Bluetooth
it
manual.
signal
may pause
setting screen.
Settings].
from
be
available depending on some
a folder on
the
the
list to play back.
also
skip
button, you can
register and
10
Bluetooth
may cause noise
device connected
playback.
to
con-
this
device,
much
prod-
limited
is turned on.
file
files
also
for
to
!j
as
Switches between
operate video files and that
operate music files.
0 IIH II
0
A CAUTION
For safety reasons, video images
vehicle is in motion.
and
You
to
1 Display the
2 Confirm that
4 Touch [AUX].
is
only available
files
on
the
A Mini-jack
for connection.
:>
External video
apply
auxiliary equipment.
AV
the parking brake.
Starting
can
display
video input.
3
Press::.
the video image output
Hides
To display again
the
touch panel keys.
the
touch anywhere on
the
screen
when there are
cable
(CD-RM1
component
To
and
view video images. stop in a safe
both audio and video
0)
(sold separately)
the display
cannot
be viewed
procedure
by
the device connected
"System"
"AUX
setting screen.
Input"
is turned on.
keys,
the
to
on
screen.
to
is required
page 34
while
your
place
The image is
Setting
When you connect
suitable
0
You
into the AUX input.
1 Display the
2 Touch [Video
displayed on the screen.
the
video
this
video
signal
can operate
product
setting.
this
function
"Video Setup"
Signal Setting].
signal
to
an
AUX equipment,
only
for the video
screen.
3 Touch [AUX].
4 Touch the item you want to set.
The following
Auto
(default),
items are
available:
PAL, NTSC, PAL-M, PAL-N, SECAM.
select
signal
i
nput
the
Page 23

System settings
''System"
Displaying
screen
Press::.
1
Touch~.
2
The
"System"
setting screen appears.
Activating
source
1 Display the
Displaying the
~
2 Touch [AV
3 Touch [Biuetooth Audio] to switch
(default)
Setting
"Ever Scroll"
When
continuously in the
scrolls
Display the
Displaying the
~
2 Touch [Ever
(default).
Setting
A separately
for utilizing the rear view
your dealer.)
Rear view camera
This product features a
full-screen
the
vehicle,
When the shift
::J
immediately after the system of
only
assist guidelines will
Camera for Rear
sold
the
when
the camera image
the
then[]],
and
Bluetooth
the
*.l4ei:ll
"System"
"System "
Source
"Off".
or
ever
the
is set to
"System" setting screen.
"System"
Scroll]
ree~,
the
rear view
shift
lever
function
lever
is aligned
View
image of the rear view camera installed on your
*.111:11
setting screen.
setting
Settings].
scroll
the recorded text information
",
On
"
ay.
l
disp
setting
switch
to
view
r
~
camera
camera
function. (For details,
that
the
is in
to
displayed and the parking
be
will
displayed.
be
not
mode
on
screen
on
screen
"On"
camera
(e.g. ND-BC6)
automatically switches to
REVERSE
REVERSE
the
product
this
setting
audio
23
page
"On"
23
page
"Off"
or
is required
consult
position.
(R)
position
(R)
started up,
is
Rear
this setting,
portion of what is seen
camera image is not resized to
the
displayed at
be
can
View
all
the camera is not viewable.
by
Please
times.
AcAUTION
Pioneer
mirror
appear reversed.
0
0
Setting
recommends
reversed images, otherwise the screen image may
Immediately
rear view camera image when the shift lever
REVERSE
When the screen changes
image during
in
(R)
"Camera
rear
Display the
Displaying the
~
2 Touch [Camera
3 Touch [Back
(default).
"Off"
Setting
the
the use of a camera
display
verify whether
from another position.
normal
Polarity
view
"System"
"System"
the
full-screen
to
driving, switch
".
camera
setting screen.
setting screen
Settings].
Camera Input]
polarity
of
changes
to
to switch
the
camera
Camera
"Back
available
function
This
0
".
uon
Setting rear view camera activation
~
1 Display the
Displaying the
~
2 Touch
3 Touch
Battery
e
The polarity
Ground:
e
The polarity
Setting
,
,View
display
To
On
"
set to
Press::.
1
is
"System"
"System"
[Camera
[Camera
(default):
of the connected
the
of
tf'le camera
mode
View
"Rear
".
when
setting screen
Settings].
Polarity].
connected
times,
all
at
"
on page
setting screen.
is positive.
lead
is negative.
lead
for
View
"Rear
with
that
note
and that a
fit,
outputs
which
a
to
moved to
is
rear view camera
the opposite setting
activation
"On"
rear
Input
23
23
view
"
23
or
is
on page
on page
Rear
needs to
"
be
2 Touch [Rear View] to switch
"On"
"Off"
or
(default).
If no operations are performed for seven seconds on
operation screen, the camera view
set the rear view camera for
To
0
Camera
Setting rear view camera activation
~
Input
Selecting
the embedded
If
e
are not the same, text information may not
Some characters may not
e
1 Display the
Displaying the
~
2 Touch
[System language].
".
On
" to "
system
the
language
"System"
"System"
be
setting screen
appear
will
View
Rear
page
on
language
selected language
and the
displayed properly.
setting screen.
on
the
automatically.
mode, set
23
display properly.
23
page
3 Touch the language that you want to use.
sound
beep
Setting
.
Display the
Displaying the
~
the
"System"
"System"
2 Touch [Beep Tone] to switch
~
setting screen.
setting screen
"On"(default) or
on page
23
"Off".
I'A~ponse
Adjusting
of
tions
'
panel
,
If you
the
response positions of the touch
0
0
0
·
feel that the touch panel
positions
actual
This setting is
place and
safe
Do not use sharp pointed
mechanical pen,
turn
not
Do
data.
t~e
t9.:ach
;
the
calibr~~-Rnl
respond to your touch, adjust
that
available only
the parking brake.
apply
could
which
off the engine
1 Display the "System"
Displaying the
~
"System"
setting screen
pan~l
·
the screen deviate from
on
keys
screen.
panel
when you stop your vehicle in a
such as a
tools
damage the screen.
saving the adjusted position
while
setting screen.
posi-
(toucll
ballpoint
on page
the
or
23
2 Touch [Touch Panel Calibration].
3 Touch four corners of the screen along
the
arrows.
AV
"Back
setting
I
·
23
Page 24

System settings
4 Press
The adjustment results are saved.
5
Proceed
6 Gently
The target
•
•
::.
Press
::
once again.
to
16-polnt adjustment.
touch the center of
played
on
the screen.
ind1cates
the order.
When you press
tion
returns.
When you press and
canceled.
7
Press and
The adjustment results are saved.
Setting
Setting
0
Th1s
setting is
safe place and apply the parking brake.
1
Display
:>
Displaying the
hold
the
the
dimmer
available only
the
"System"
"System"
2 Touch [Dimmer Settings].
3
Touch [Dimmer Trigger].
4
Touch the item.
e
Auto
(default):
24
Switches the
your vehicle's headlight
e
Manual
Switches the
e
Time
Switches the
Setting
or
night
0
You
can use this function when
"
Manual
0
This setting
safe place and apply the parking brake.
1
Display
:>
Displaymg the
dimmer
:
d1mmer
:
dimmer
the
dimmer
".
is
available only when you stop your vehicle in a
the
"System"
"System"
the"+"
::,
the previous
hold
::,the
::.
dimmer
trigger
when
setting screen.
settmg screen
to
on
or
off automatically according
turn1ng
on
to on
or
off
manually.
to on
or
off
at the
duration
"
Dimmer
setting screen.
settmg screen
mark
adjustment
adjustment
you
stop your vehicle in a
or
on page
off.
time
23
you adjusted.
in
Trigger
"
on page
23
dis-
posi-
is
day
IS
set
to
to
2
Touch [Dimmer Settings].
3
Touch [Day/Night] to switch the
following
items.
e
Day
(default)
Turns the
•
Night
Turns the
Setting
:
dimmer
dimmer
the
manually
manually
to
dimmer
to
off.
on.
duration
optional
You
can adjust the time
0
You
can use this function when
''Time
0
1
:>
".
This setting is
safe place and apply the parking brake.
Display
Displaying the
the
that
the d1mmer
available only
"System"
"System"
settmg screen
is turned on
"
Dimmer
when you stop your vehicle
Trigger"
setting screen.
on page
2 Touch [Dimmer Settings].
3
Touch [Dimmer Duration].
The
"
Duration
4 Touch the time
Setting
··
screen appears.
display
to
activate the
ment mode.
5
Touch the graph to set the dimmer duration.
•
You can
also
set the
dimmer
duration
touching
WorW.
Each touch of
ward
or
•
The
default
AM).
• When the cursors are placed
the
dimmer
•
When the cursor
the
left
placed
time
is 0
•
When the
the
left
placed
time
is
W
or
W
moves the cursor
forward in the
setting is
available
for
off
15
minute
18:00-6:00
time
time
end and the cursor
on the right end, the
hours.
cursorfor
end and the
on
time
cursor
on the right end, the
24
hours.
width.
(6:00 PM-6:00
on
the
is 0
hours.
setting is
for
on
time
dimmer
setting is
for
off
time
dimmer
same point,
placed
setting is
available
placed
setting is
available
or
off.
is set
23
adjust-
back-
to
in
on
on
•
The time display
bar is depending on the
:>
Setting the
time
Adjusting
You
can adjust the
of
the
dimmer
duration adjusting
clock display
and
date on page
the
picture
picture
for each source and rear view camera.
29
AcAUTION
For safety reasons, you
while your vehicle is in motion. To enable these functions, you
must
stop in a safe
to
Important
1
Display the screen you wish to adjust.
2
a
Display the
:>
Displaying the
3
Touch [Picture Adjustment].
4
Touch the item
Information
cannot
use some of these
place
and
apply
the
for
the
parking brake. Refer
User (a separate manual).
"System" setting screen.
"
System
"
setting screen
to
select
the
on page
function
adjusted.
e
Brightness:
Adjusts the black intensity.
e
Contrast:
Adjusts the contrast.
e
Color:
Adjusts the
e
Hue
Adjusts the tone
green).
e
Dimmer
Adjusts
:
color
(-24
to
:
the
brightness
of
+24)
saturat1on.
(-24
color
of
(-24
to
+24)
to
+24)
(-24
to
(which color
the
display.
+24)
is
emphasized, red
(+
1
to
• With some pictures, you cannot adjust Hue and
Color.
• When you
to the picture
ing [Source],
ment
5 Touch
•
The
and
vehicle's
touch
adjustment
you
for
AV source.
W,
W,
~.~to
adjustments
"Dimmer"
are stored
headlights
[Rear View] , the mode changes
for
rear view. By
can return
to
the picture
adjust.
of
"Brightness", "Contrast"
separately
are
off
(daytime)
(nighttime).
• "Brightness"
matically
headlights
and
"Contrast" are switched
depending
are on
or
on whether the
off.
setting.
funct
ions
23
to
be
+48)
touch-
ad
when
your
and
on
auto-
vehicle's
ju
or
st-
Page 25

System settings
changed the setting
be
• "Dimmer"
switch
to
Setting the
:l
• The setting contents can
separately.
can
on
to
it
dimmer
off.
or
on page
24
be
memorized
or
the
time
Audio adjustments
''Audio"
Displaying
screen
Press::.
1
2 Touch
"
The
Using
This function is
0
"Full
Display
Displaying the
:l
2 Touch [Fader/Balance].
Touch~
3
balance.
4 Touch
balance.
0 "Front15"
0
The
0
•
Using
This function is
0
are set to
1 Display
Displaying the
:l
2 Touch
3 Touch
balance.
"Left15
0
The
0
You
•
C3J,
setting screen appears.
"
Audio
fader/balance
and
",
CiJ
moves from
balance
"Left15"
balance
You
the point
to
moves from the left
default
can
balance
[Balance].
CiJ
to
''
balance
on the
moves from
default
can
displayed table.
"
the
and then
available
"Preout"
"Audio"
the
Audio
"
or~
W
or
"Rear15"
to
"Right15"
setting is
set the fader/balance by
also
the
on
B!l.
when
is set to
setting screen.
setting screen
"
to adjust
to adjust the
displayed
is
hont
the
displayed
is
0
FIR
''
displayed table.
adjustment
available
Subwoofer
"Audio"
the
Audio
"
W
or
"Right15"
setting
set the balance
also
when
Settings
setting screen.
setting screen
"
to adjust the
is d1splayed
left
the
0
"L/R
is
setting
adjustment
Speaker
Rear
''
".
"Rear
page
on
front/rear speaker
the
left/right
the front/rear speaker
as
rear.
to
to right.
0
LIR
"Rear Speaker"
".
r1ght.
to
".
left/right
as the
".
on page
left/right
left/right
as the
by touching the point
to
is set
"
25
speaker
speaker
touching
"Preout"
and
25
speaker
speaker
Adjusting
(source level
SLA
each source
ing between sources.
0 Settings are based on the
remains unchanged .
This function is not
0
as the
to
AV
Compare the
of
level
Display the
2
Displaying the
:l
3 Touch [Source
Touch~
4
0 If
0
0 The default
directly
you
setting
SLA
the
point.
-4
·'
to
+4"
''
or decreased.
Adjusting
This function compensates for deficiencies in the
and high-frequency ranges at
This function
0
:l
the
using
Display
Displaying the
source
adjustment)
prevent radical
source.
available
tuner
FM
the source you
"Audio" setting screen.
"
Audio
"
Level
to adjust
or~
touch the area where
is displayed
''
setting is
will
changed
be
"0
loudness
available while
not
is
hands-free function.
"Audio"
the
Audio
"
"
levels
the volume l
adjust
you
lets
changes
tuner
FM
when
volume
want
setting screen
Adjuster].
as the source volume
".
low volume.
setting screen.
setting screen
volume when switch-
in
volume level, which
FM
the
level
adjust.
to
on page
source
the
cursor can
the
value
the
to
you make or receive a
on page
selected
tuner is
with the
25
volume.
be
of the touched
is increased
low-frequency
25
evel
moved,
2 Touch [Loudness].
item.
3 Touch
following
The
(default),
Off
Using
This product is equipped with a subwoofer output mechanism,
which can
Display
1
Displaying the
:l
the
items are
Low
the
turned on
be
the
available:
.
High
,
Mid
,
subwoofer
off.
or
"Audio"
Audio
"
setting screen.
setting screen
"
output
on page
25
2 Touch [Subwoofer] to switch "On" (default)
"Off".
of
call
or
25
Page 26

Audio adjustments
Adjusting
settings
0
This
~
1
~
2
3
4
function
Using
Display
Displaying the
Touch
Touch
to
normal
Touch
between
5
Touch
is available only when
the
subwoo(er
the
"Audio"
"
Audio
[Subwoofer Settings].
1
~
1
or
or reverse.
rn
or[£]
-24
and
W
or[£]
frequency.
The
80Hz
following
(default),
items are available:
50Hz,
Switching
output
Turn
the
source off.
2
Display
~
Displaying the
3
Touch
4
Touch
the "Audio"
"
Audio
[Rear Speaker].
to
switch
Settings".
• When
this
Settings",
function is set to
"Precut"
Settings".
Switching
When
"
Rear
ting
is fixed to
1
Display
~
Displaying the
2
Touch
Settings"(default) or
Speaker"
"
Subwoofer
the
"Audio"
"
Audio
[Precut] to switch "Subwoofer
the
subwoofer
"
output
on page 25
Subwoofer
setting screen.
"
I
~
I
to
setting screen
turn the subwoofer phase
on page
to adjust the subwoofer
6.
to
adjust the subwoofer
63Hz,
80Hz
the
, 100Hz,
rear
125Hz.
speaker
setting screen.
"
setting screen
"Full" (default)
on page
or "Subwoofer
"Subwoofer
the
is set to
is fixed to
RCA
"
Subwoofer
Settings
"Subwoofer
rear
Settings
".
setting screen.
"
setting screen
on page
"Rear".
"
is
"
On
25
level
25
output
",
this
25
".
set-
Boosting
Display
~
Displaying the
2 Touch
3 Touch
the
[Bass
to
select
the
bass
"Audio"
"
Audio
setting screen.
"
setting screen
Booster].
the bass boost
+6.
Setting
1
Display the
~
Displaying the
2 Touch [High Pass
the
"Audio"
"
Audio
high
pass
setting screen.
"
setting screen
Filter].
3 Touch the item.
The following items are available:
Off
(default),
Using
Recalling
There are seven stored equalizer curves
at
any time. Here is a list of the equalizer curves:
•
S.Bass
•
Powerful
are boosted.
•
Natural
are slightly boosted.
•
Vocal
vocal range, is boosted.
•
Flat
e
Custom1
you select
• Custom2
you select
0
The default setting
1
Display
~
Displaying the
50Hz, 63Hz.
the
equalizer
is a curve in which only low-pitched sound is boosted.
is a curve in
is a curve in
is a curve in
is a flat curve in
is an adjusted equalizer curve
this
is an adjusted equalizer curve
this
the
80Hz
, 100Hz.
equalizer
125Hz.
-
curves
that
which
low- and high-pitched sounds
which
low- and high-pitched sounds
which
the
midrange,
which
nothing is boosted.
curve, the effect is applied
curve, the effect is applied
is
"
Powerful
"Audio"
"
Audio
"
setting screen
".
setting screen.
2 Touch [Graphic EQ].
3 Touch the
equalizer
you want.
on page 25
level from
0
filter
on page 25
you can easily recall
which
is
the
human
that
you create.
to
all
AV
that
to
on page 25
sources.
you create.
all
AV
sources.
to
Customizing
You
can adjust the currently selected equalizer curve setting
as desired. Adjustments can be made
equalizer.
0
If
you make adjustments when a curve
"Natural", "Vocal" ,
settings will
0
If
you make adjustments when the
selected for example, the
0 "Custom1"
to
all sources.
1
Display the
~
Displaying the
be
changed to
and
"Custom2"
"Audio"
"
Audio
the
equalizer
or
"Flat"
··
"Custom2"
curves can be created
setting screen.
"
setting screen
with
is selected,
custom1
"Custom2"
curves
a 5-band graphic
"
S.Bass
",
"
the
"
mandatorily.
curve will
on page
Powerful
equalizer curve
curve is
be
updated.
common
25
",
2 Touch [Graphic EQ].
3
Select
a curve that you want to use
as
the
basis
of customizing.
4 Touch the frequency for which you want to
adjust the
0
If
you trail a finger across the bars
bands, the equalizer curve settings will
the
touched point on each bar.
If
If
level.
of
multiple
be
equalizer
set to
the
value of
26
Page 27

Theme menu
theme
the
Selecting
A theme color can
Display
2 Touch [Theme].
3 Touch the
~
ed
select
be
the "Theme"
you want.
color
from 3 different colors.
screen.
.color
Setting up the video
top.;;priority
Setting
languag~s
can assign the top-priority language
You
audio and menu in initial playback.
title,
is recorded
output in that language.
or
0 This setting
CD
"
Setting
can set a desired subtitle language. When
You
subtitles
Display
2 Touch [DVD/DivX Setup].
3 Touch
pop-up
The
4 Touch the desired
you
When
shown.
rd
touch
the
If
•
guage specified on the disc is
You
•
touching the switch subtitle languages key during
playback.
The setting made here
•
the
using the switch
Setting
can set the preferred audio language.
You
Display the
1
the
the top-priority sub-
to
selected language
the
If
the disc, subtitles, audio and menu are displayed
on
available when the selected source
"Video
",
will
is
or
"
CD
subtitle
the
displayed
be
"Video Setup"
the
".
"DVD
language
the selected language.
in
screen.
[Subtitle language].
menu appears.
language.
a language code input screen is
",
Others
"
select
Input the four-digit code of the desired language then
.
selected language is not available,
displayed.
switch
also
can
subtitle language
subtitle languages
audio
the
"Video Setup"
subtitle
the
will
is switched during playback
language
language
not be affected even
screen.
is
available,
the
key.
"
the
by
Disc
lan·
player
2 Touch [DVD/DivX Setup].
",
The
pop-up
menu appears.
4 Touch the desired language.
3 Touch [Audio
When you select
shown.
touch
If
•
the four-dig it code of the desired language then
Input
ld
selected language
the
guage specified on
can also
You
•
touching the
playback.
The setting made here
•
the audio
using the swi
Setting
can set
You
a disc are displayed.
on
the
the
Display the "Video Setup"
2 Touch [DVD/DivX
if
3 Touch [Menu
menu appears.
pop-up
The
4 Touch the desired
When you select
shown.
touch
If
•
the four-digit code of the desired language then
Input
ld
selected language
the
guage specified on
language].
a language code input screen
",
Others
"
available,
is not
disc is
the
switch
switch
the
audio
will
language
tch
preferred language in which the menus recorded
is switched during
audio
menu
language
displayed.
language
audio
languages
be
not
languages
affected even
key.
is
lan-
the
by
key during
playback
if
screen.
Setup].
language].
language.
the
is
lan-
Others
"
a language code input screen
",
available,
is not
displayed.
disc is
the
27
Page 28

Setting up the video player
Setting
The
angle
angle
can
0
This setting is available when the selected source is
"CD
Display the
the
icon can be
be switched.
",
"Video
angle
set
so
it
appears on scenes where
CD
"
or
"
DVD
".
"Video Setup"
i~on
screen.
2 Touch [DVD/DivX Setup].
3 Touch [Multi Angle] repeatedly until
desired setting appears.
e
On
(default): Turns
e
Off
:
Turns the multi-angle setting off.
Setting
Some DVD-Video discs let you use parental lock to set
tions
so
that
scenes.
0
When you set a parental lock level
turing
displayed.
code
0
Th1s
"
Setting
When you first use
If
you do not register a code number, the parental lock
operate.
Display the
children
You
can set
parental lock, code
In
number
setting is available when the selected source is
CD
",
"Video
the
the
mult1-angle
parental
cannot
the
this
is input.
CD
"
code
th1s
"Video Setup"
watch violent or adult-oriented
parental lock
"DVD
number
".
case, playback
or
number
function, register your code number.
setting on.
lock
level
and then play a
input
will
screen.
2 Touch [DVD/DivX Setup].
3 Touch
The
"Parental"
[Parental].
screen appears.
28
display
the
"
Disc
",
the
restric-
in steps
begin when the correct
as
desired.
indications may
and
disc
"Disc
level
will
fea-
be
",
not
4 Touch
[0]
to [9] to input a four-digit code
number.
5 Touch the
following
Registers
set the level.
the
key.
code number. and you can
6 Touch any number between [1] to [8) to
the desired
e
[8
]:
Enables playback
e
[7]
to
[2
adult
e
1
oriented discs.
[1
]:
Enables only playback
Touch the following
J....JJ
0
We
recommend to keep a record
case you forget it.
0
The parental lock
firm
it
by looking
or
the disc itself.
do
not feature a recorded parental lock
0
With
some discs, parental lock operates to skip certain
scenes only, after
details, refer to the
Setting
0
This setting is available when the selected source is
"
USB
".
Display
2 Touch [DivX
(default)
Displaying
istration
If
you
want
product, you
level.
of
]:
Enables playback
the
of
of
key.
Sets the parental lock level.
level
is recorded on the disc.
at
the
disc
You
cannot
which
normal playback resumes.
disc's
instructions.
the
DivX
the
"Video
Setup" screen.
Subtitle] to switch
or
"Custom".
your
code
to
play
DivX'
VOD
must
first register
(video on demand) content on
this
enti1·e
disc
discs for children and
discs
package, the included literature
use parental lock with discs
(initial setting).
for
children.
of
your code number in
You
level.
Subtitle
"Original"
DivX
product
VOD reg-
w1th
your DivX
now
select
non-
can
con-
For
"
Disc
this
VOD
that
"
or
content
tion code,
0
Keep a record
register
0
This setting
"
CD
",
Display
provider.
which
this
"
Video
You
do this
by
you
submit
of
the code
product
is
available when the selected source is
CD
"
or
the
"Video Setup"
generating a DivX
to
your provider.
as
to
"DVD
you
the DivX
".
will
need
VOD
provider.
screen.
VOD
it
when you
2 Touch [DVD/DivX Setup].
3 Touch [DivX®
The
"
DivX®
0
If
displayed.
VOD
a registration code has already been activated.
VOD].
"
screen appears.
it
4 Touch [Registration Code].
Your
1
O-d1git
0
Make a note of the code as you
ter from a DivX
Displaying
deregistration
A registration code registered with a deregistration code
be
deleted.
0
This setting is available when the selected source is
"
CD
Display
registration code is displayed.
VOD
provider.
your
cod~
",
"Video
CD
the
" or"DVD
"Video
".
Setup" screen.
will
need
DivX
it
when you de
VOD
2 Touch [DVD/DivX Setup].
3 Touch [DivX®
The
"
DivX®
VOD
VOD].
"
screen appears.
4 Touch [Deregistration Code].
Your 8-digit deregistration code
0
Make a note of the code
ter
fmm
a DivX
VOD
as
you wi
provider.
1s
displayed.
II
need
it
when you de reg
registra-
"Disc
cannot
regis-
can
"
Disc
",
be
",
is-
Page 29

Setting up the
Favorite menu
Common
operations
video
Automatic
disc with a DVD menu is inserted,
When a
cancel the menu automatically and start playback from the first
chapter of the first title.
0
0
DVD
Some DVDs may
operable, turn
fully
This setting
"Video
",
CD
"
available
is
CD
Display the
"Video Setup"
player
playba~k
operate properly.
not
function off and start playback.
this
when the selected source is
".
"DVD
or
"
of
If
screen.
DYQs
product
this
function is not
this
Disc
"
will
",
2 Touch [DVD/DivX Setup].
the
3 Touch [DVD Auto Play]
repeatedly
until
desired setting appears.
off
setting
Play
(default): Turns the DVD
Off
e
Turns the
:
On
e
Setting
rear
When you connect a rear view camera
suitable video signal setting.
0
2 Touch [Video
view
can operate
You
into the
Display
AV
the
Auto
DVD
video
the
camera
this
input.
"Video Setup"
Signal
Play
function
Setting].
Auto
setting on
signal
to
for
only
screen.
for
product, select the
this
video signal input
the
the
3 Touch [Camera].
The pop-up menu appears.
4 Touch the item you
(default): Adjusts
Auto
e
automatically.
:
PAL
e
NTSC:
e
PAL-M
e
PAL-N
e
SECAM
e
Sets the video
Sets the video signal to
Sets the video
:
Sets the video signal to
:
Sets the video signal
:
signal
the
signal
to set.
want
video signal setting
PAL.
to
NTSC.
PAL-M.
to
-N.
PAL
SECAM.
to
Registering
quickly
the
0 Up
Creating
2 Touch
The star icon for the selected menu is
•
your
the registered menu screen
to
jump
"Favorites"
to
screen.
menu items can
12
Display the
the
add to the favorite menu.
to
want
To cancel
menu
the
registered in the favorite menu.
be
shortcut
a
"Settings"
screen.
star icon of the menu item that you
filled
the registration, touch the star icon in
column again.
items in shortcuts allows you
menu
favorite
Selectiog a shortcut
Display
2 Touch
"Favorites"
the
desired menu item.
the
screen.
Removing a shortcut
Display the
2 Touch and
to
want
The selected menu item is removed from the
can
You
•
star icon in
"Favorites" screen.
the favorite menu
hold
remove.
also remove a shortcut
registered menu
the
a simple touch on
by
in.
column
"Favorites"
touching
by
column.
to
you
screen.
the
Clock display
CD
Displays
®
Changes
the
Setting the
~
Screen display mode
the
Changing
~
""-.">.
Setting
Touch
Touch~
2
and date setting screen
time
time
wide screen mode
the wide screen mode
-
the
··
current time
the
or~
date
and
key
time
to set the correct
on page
""
date.
can operate
You
minute.
You
0
or
You
0
year.
can change the time display format
"24hour
can change the order of date display format:
the
".
Month-day-year.
Changing
following
the
items:
wide
mode
the video and
can set the screen size
You
0 The default setting
"Normal
0 When there are touch
displayed with the
".
Touch the screen display
0 The appearance of this
setting.
2 Touch the desired mode.
Full
e
for
and
.
Full"
"
is
keys
panel
mode regardless of your
"
Full
"
changes according to
key
29
29
page
on
and
on
date
the screen.
time
month , date. hour,
Year.
"12hour"
to
screen
JPEG/BMP
JPEG/BMP images is
for
the screen, images are
on
mode key.
-
and
(default)
Day-month-
images.
sett
the
ing.
current
29
1·
,·
·
tlJ
Page 30

I
Common
A 4
:3
picture is enlarged in the horizontal direction only,
enabling you
e
Zoom
A
4:3
cally and horizontally.
e
Normal
A 4:3 picture is displayed normally, without changing its
proportion.
0
You
cannot operate this function while driving.
0
Different settings can
0
When a
match its original aspect ratio,
0 The video image
mode.
to
enjoy
an
picture is enlarged in
Video
is viewed
be
will
appear coarser when viewed in
operations
image
without
any omissions.
the
same proportion both
stored for each video source.
in
a wide screen mode
it
may appear different.
that
verti-
does not
"Zoom"
I
Other functions
Resetting various settings/
Restoring
default
You
can restore settings
tings. Various methods are used
Method
Resets various settings registered
0
Method
Method
:>
Restoring
0
ACAUTION
Do
1 Display the
2 Touch [Restore Settings].
A message confirming
3 Touch [Restore].
0
1:
The settings configured on the
reset.
2:
3:
Resetting the microprocessor
This setting is available only when you stop your vehicle in a
safe place and apply the parking brake.
not
turn
off
The source
disconnected before
this
s~ttio
Remove
Initialize
Press the
the
the
engine
product
_
gs
.
or
recorded content
to
clear user data.
the
vehicle
to
"Theme"
from the
RESET
default
while
button
on page 6
restoring
this
"System"
settings
"System" setting screen.
is
turned
whether
to initialize the settings appears.
off
and the Bluetooth connection is
the
process starts.
to
to
the default
battery
product.
screen are not
the
settings.
tlie
menu
set
Connection
Your
-
e
e
Important
& WARNING
Pioneer does not recommend that you install this
product yourself.
professional installation only. We recommend that
authorized Pioneer service personnel, who have special
training and experience in mobile electronics, set
install
YOURSELF.
connecting cables
shock or other hazards, and can cause damage to
product
Precautions
the
new
Do
not
view camera option (if purchased) if doing so will divert
attention in any way
Always observe safe driving rules and follow
traffic regulations.
this product
safe location and apply
necessary adjustments.
Do
not
driver's vision, (ii)
vehicle's operating systems of safety features, including
airbags, hazard
ity
to
safely operate the vehicle.
possible
the
shape
product
operate this product, any applications, orthe rear
If you experience difficulty
or
reading
install this product where it may (i) obstruct
impair
lamp
to
install
this
of
the vehicle interior.
and
this
from
the safe operation of your vehicle.
the
display, park your
the
parking brake before making
the performance of any of
buttons, or (iii) impair the driver's
product because of the vehicle type
In
some cases, it may not be
safeguards
This
product is designed for
this
product. NEVER
Installing
may
that
is not covered by warranty.
SERVICE
or servicing this product and its
expose you to
before
THIS
the
connecting
system · ·
manual
all
existing
in
operating
veh
icle in a
the
the
only
up
PRODUCT
risk of
electric
thi
your
the
abil-
or
and
s
30
A WARNING
Do not
take
parking
protection.
brake
death.
any
brake
Tampering
interlock
steps
interlock
system
to
tamper with or disable the
system which is
with
or disabling the parking
could result in serious i
in
place for you r
njury
or
Page 31

Connection
AcAUTION
Secure
e
Do
Do
e
to
to
the
passes
engine
tears
circuiting
It
e
wound
sure
away
driving.
e
with
vehicle's
e
e
circuit
e
Before
e
e
To
A WARNING
e
e
all
allow
not
directly
not
vehicle
the
battery,
the
insulation
from
compartment.
a
as
extremely
is
around
install
to
such
in
sure
Make
parts,
parking
Do
high
may
malfunction
Do
fail
Never
cutting
this
capacity
overheating.
become
or
especially
brake,
controls.
route
not
temperatures.
become
shorten
not
(fuse
work
to
feed
the
product
of
unit
th1s
Use
only. Failure
avoid shorts in the
To
the(-)
nect
prevent
speakers
Use
n
8
to
n
4
speakers
The
for
black
wiring
any
battery.
engine
to
the
result
occur,
can
dangerous
the
this
so
that
sliding
wires
damaged,
and
holder,
properly.
power
insulation
and
the
wiring
bare
connect
If
vibration
at
fail
passenger
If
contact
of
resulting
steering
product,
they
that
cables
the
caught
steering
the
seat
where
the
If
permanent
leads.
any
fuse
other
to
of
tapping
will
lead
the
the
the
the
in
insulation
resulting
resistor
the
into
be
cable
with
installing
with
do
to
battery
result
may
so
electrical system, be sure
before installation.
cable
battery and negative grounding
12-volt
a
damage
(output
W
50
over
unit
ground.
is
value).
.
(impedance
this
cable
clamps
remain
to
yellow
point
compartment
with
to
column
will
and
any
tracks,
they
If
electronic
lead
is
lead
may
where
lead's
yellow
metal
considerable
in
cables
allow
cables,
its
obstruct
not
wires
the
of
wheel,
doors,
be
will
in
damage
do,
you
or
power
lead.
the
exceeded
directly
supply
this
in a fire
value)
not
Do
installing
When
electrical
or
exposed
of
eventually
the
parts,
shift
or
and
will
vehicle's
shift
exposed
heats
short
a
the
to
protection
the
filter,
products
The
causing
,
.
product
this
connected
cause
wire
the
into
insulation
short-
danger.
become
to
lever.
wiring
hinder
or
interfere
not
moving
lever,
of
any
or
to
wires
up,
circuit
product
may
.)
etc
by
of
lead
current
product
malfunct1on.
or
use
and
1
discon-
to
between
3
to
n
unit
this
tape.
Be
the
or
.
0
or
ground
the
properly
ground
The
any
or
unit
separately
ground
generation
wire
first.
wire
connected
of
wire
device
other
different
with
loosens
smoke
of
Ensure
to
the
or
or
that
parts
metal
power
be
must
screws
out
falls
malfunction.
separately),
(sold
amp
power
Ground wire
~66
Other devices
(Another
electronic
T
Metal
device in the car)
unit
this
the
especially
is
It
leads,
for
for
, be
fuse
this
on
installed
be
ign1t1on
which
amp
the product
sure
product.
important
left uncovered may cause a
if
other devices
or
supplied
Non
1
*
replacing
When
e
the
This
e
(accessory) position on the
avoid short-circuiting, cover the disconnected
To
e
msulating
unused speaker
short circuit.
For
e
refer
prescribed
rating
ACC
the
to
cannot
pos1t1on
tape.
manual
product
connect1ng a power
make
the
of
and
amp
connected
the
If
.
could
it
,
POWER
of
parts
only
to
vehicle
a
1n
sw1tch.
ACC
No
connected.
be
to
to
sure
ground
car
the
one
the
screw
result
AMP
car's body
use
without
position
insulate all
to
this
to
connect
wire
body
's
of
the
to
for
in
fuse
a
lead
product.
is
this
car
the
fire
ACC
with
DC).
lead
The
even
control
to
the
control
the
if
an
Notice
.
When the
e
signal1s
external
auto-antenna
power control terminal
signal1s
audio source is switched
for
turned on
IS
1gnition
output
power amp's system remote
output
switch
through the
relay control terminal.
through the
blue/wh1te lead. Connect
mA
300
(max.
blue/white lead,
.
off
(ACC ON). a
control terminal,
the antenna booster
or
12 V
blue/white
the
This product
00
0
00
supply
A)
(10
moo
1nput
remote
BT)
adapter can be connected
control
(sold
31
of
Microphone 4 m (13ft. 1 in.)
CD
(AVH-270BT/AVH-271
This product
(g)
Antenna jack
G)
Wired remote
@
Hard-w1red
separately).
Power
®
Fuse
®
Page 32

32
Connection
Power
CD
To
(g)
Power cord
®
Yellow
To
pos1tion.
®
Red
To
ON/OFF.
®
Orange/white
To
®
Black
To
(j)
VioleVwhite
Of
the one in
is in
the
backwards.
®
Blue/white
Connect
300
®
Light green
Used
cord
power
supply
term1nal supplied
electric terminal controlled
lighting
vehicle (metal)
switch
(ground)
the
two
lead wires connected
which
the
REVERSE
unit
to
sense whether the
to
system
mA
12
V
DC).
to
detect
w1th
power
by ignition switch
terminal.
body.
the
voltage
(R)
control terminal
the
ON/OFF
changes when the
position. This connection
car
status of the parking brake. This
regardless
to
is moving forwards
of
ignition switch
the back lamp,
gear
enables
of the power
(12
V
connect
shift
or
amp
DC)
(max.
lead
must
parking brake switch.
@l
Power
@
Parking brake switch
@
Ground side
be connected to the power
supply side
supply
side
Parking Brake
If
"Light green" cable is connected to parking
brake switch, video image on the display
be
2
The
controlled
monitor displays the black screen
by this function.
warning information to prevent the driver
watching video contents during driving.
Speaker
leads
m
@
Perform these connections when using a subwoofer
optional amplifier.
of
the
will
with
without
the
CD
To
power supply
(g)
Power cord
®
Left
®
Right
®
Front speaker
®
Rear speaker
(j)
White
®
White/black
®
Gray
@l
Gray/black
@
Green
@
Green/black
@
Violet
@
VioleVblack
@
Subwoofer
@
When using a subwoofer
subwooferto
not connect anything
@
Not used.
@l
Subwoofer
13
When a subwoofer is connected to
a rear speaker,
setting. The
~
Switching the rear speaker
m
With a two-speaker system, do not
speaker
Power
Without
(40)
the
violet
and
to
(40)
x
2
change
subwoofer
leads
that are not connected
amp
the rear
output
(sold
internal
the
Qlmportant
The speaker
use.
leads
are
not
used when
@
@ @
of
violeVblack leads
output
@
[
@ @
70W
(20).
green and
this
output
of
this
on page
connect
I
EB
@)
~
8
be sure to
green/black leads.
product instead
setting in the
product
to
speakers.
connect
of this unit. Do
is
monaural.
26
anyth1ng
initial
to
separately)
amp
this
connection
is
in
the
of
the
Page 33

Connection
With
O
Front speaker and Rear speaker signals are
speaker leads when
(j)
CD
Q)
CD
@
®
(j)
®
I
E
internal
lmportant
System remote control
Connect
Power
Connect
To
Connect
Rear speaker
To
Front speaker
Subwoofer
You
on your subwoofer system.
The subwoofer
to
amp
with
subwoofer
or
Rear
a cable according to the preout setting.
output
Front
can change the
amp
connection
this
Blue/white cable.
(sold separately)
cable (sold separately)
RCA
output
subwoofer
or
output
RCA
this
of
output
is in use.
the subwoofer depending
of
product
is
output
monaural.
from
the
iPod
iPhone
I
with
connector
Connecting
The USB interface cable
rately) is required for the connection.
USB port
CD
USB cable
<V
USB interface cable
®
separately)
iPhone with Lightning connector
@
-
iPod
'/
via
for
(4ft.
m
1.5
for
iPhone
I
iPod
in.)
11
I
iPod
with
iPhone
iPhone
USB
the
connector
AUX
the
Connecting
The USB interface cable
separately) is required
via
iPod
for
the connection.
for
iPhone
I
Lightning
port
(CD-IU52)
(CD-IU52)
--·
(sold
(sold
30-pin
input
(CD-IU201V)
(sold
®
sepa-
USB port
CD
AUX input
®
USB cable
®
USB interface cable
@
separately)
iPhone with
®
m
1.5
30-pin
11
(4ft.
iPod
for
connector
in.)
I
Camera
camera
the
or
or
view
Rear
).
(R
FOR
image
rear view
into
back
purposes.
of
checking
the video
from
mode also allows you
View
REVERSE
USE MAY RESULT
may appear reversed.
camera
full-screen
tight
a
may
the
you
parking
appear
rear
About rear
When you use the rear view camera,
automatically switched
REVERSE
to
is behind you while driving.
what
A WARNING
INPUT ONLY
USE
VIEW CAMERA. OTHER
DAMAGE.
A CAUTION
The screen
e
With
e
trailers,
entertainment
Objects in rear view
e
than in reality.
The image area
e
backing
slightly.
(CD-IU201V)
iPhone
rear view image is
the
moving the
by
OR MIRROR IMAGE
keep an
can
spot. Do not use
closer
displayed
images
vehicle may
the
of
IN
or
more
to
INJURY
eye
(sold
shift
check
REAR
OR
on
distant
while
differ
lever
for
iPodJ
For details on how
B
separately sold cable, refer to the manual
For details concerning the connection, operations and
B
compatibility of iPhone, refer to
iPbone
connect an external device using a
to
Setup (or
for
iPod
the cable.
on page
13.
-__,.J'
ITB
13
d
t
Rear view camera
CD
video
To
®
®
@
®
®
cable (supplied with
RCA
This product
(R.C
Brown
Power supply
output
IN)
D-BC6)
(N
(sold separately)
ND-BC6)
33
Page 34

Connection
Installation
(/) Power
®
IS
~
:>
cord
VioleVwhite
:>
Power
Connect
any
other
Some appropriate settings are required to use other view
cameras.
Setting the rear view
(REVERSE-GEAR
cord
on page 32
only the rear view camera
equipment.
camera
SIGNAL
on page
to
INPUT
R.C
23
)
IN
.
Do not connect
CD
Rear display
®
To
video
®
RCA
@
This product
@
Yellow
®
AUX input
(J)
Mini-jack AV cable
®
Yellow
®
Red,
@
ToYellow
@
To
Red,
@
To
video
@
To
audio outputs
@
External video component (sold separately)
Fa
The appropriate setting
component.
:>
AUX
source
A
WARNING
NEVER
the
driver to watch
This
product's
to
enable passengers in the rear seats
source.
with
RCA
input
cables (sold separately)
(V
oun
white
white
output
on page
install
the
rear
input jacks
(CD-RM1
is
required to use the external video
22
rear display in a location
the
video source
video
output
0)
(sold separately)
is
for
while
driving.
connection
to
watch
that
of
the
enables
a display
video
Precautions
ACAUT
Never install this product in places where, or in a manner
that:
e
e
e
e
e
ION
Could injure
stops suddenly.
May
interfere
vehicle, such as on
seat, or close
To
ensure proper installation, be sure
supplied parts in
are not supplied
parts in
compatibility
than supplied or compatible ones are used,
damage
work
Do not install this product
the driver's vision, (ii)
of
including airbags, hazard
the
Never install this product in front
place
of your vehicle's airbags
to
deployment
the
internal parts
loose and
the
vehicle's operating systems or safety
driver's
your vehicle's owner's
in
ability
the
before
the
driver or passengers
with
the
driver's operation
the
to
manner specified
checked
the
dashboard, door,
area
floor in
the
steering
the
manner specified.
with
this product, use compatible
by
your dealer.
of
this product or
product
where
impair
to
of
lamp
safely operate
would
manual
the
frontal
installation
if
the
front
wheel
after
may
become detached.
it
the
performance
buttons or
or
pillar
deploy. Pl
for reference
airbags.
Clf
of the
or shift lever.
to
use
If
any
you have
If
parts
tlley
may
(i)
(iii)
the
vehicle.
of
or next
from
ease
vehicle
the
driver
's
the
parts
the
parts'
other
they
may
may
obstruct
of
any
features
impair
to
the
which
refer
to
the
one
,
34
Before
e
Consult
ing holes
e
Before making a final installation of
ily connect the wiring to confirm
correct and the system works properly.
Installation
e
Do
tures
e
Places
e
Places
dashboard.
e
Places
or
on the vehicle's floor.
e
Install
degrees tolerance (within 5 degrees
Improper
installing
with your nearest dealer
or
other
modifications
note~
not install
this
or
humidity, such as:
close to a heater, vent
exposed
that
th1s
installation of the
product in places subject
to
direct
sunlight
may
be
exposed to rain, such
product horizontally on a surface
unit
if
instal lation requires
of
the vehicle.
this
product,
that
the connections are
or
air
condit
, such
with
ioner.
as
on top
as
to
the left or
the surface tilted more
to
1-Jigh
close
wthin
drill-
temporar-
tempera-
of
the
to
the
0
to
30
right
).
door
Page 35

Installation
than these tolerances increases
the vehicle's location display, and
reduced
display
performance.
the
might
potential
errors in
for
otherwise cause
installing,
When
e
this unit, make sure you
and wrap any
panel
vents.
Leave
space
lnstal,li\tion usi'
holes
to ensure proper heat dispersal when using
leave ample
loose cables
ample
tg
side.
the
ori
space behind the rear
so they are
s~~ew
:the
this
of
not
:;,,'
product
Fastening this product to the factory radio-
•
mounting
Position
the screw
locations on each side.
Use either the truss head screws
surface screws
bracket's screw
this product
bracket.
so
of the bracket, and
holes
mm
(5
holes.
tighten
mm
(5
holes
x 8
the screws
mm)
its screw
that
x 9 mm), depending on the shape of the
aligned with
are
blocking the
;
three
at
flush
or
Factory radio-mounting bracket
CD
the
If
®
out
Dashboard
G)
Truss head screw
G)
Be sure to use the screws supplied with
l_nstallfng
Install
e
tance from the driver make
voice.
Be sure to
e
the microphone.
interferes with installation,
pawl
way.
of the
console
or
or
flush
the
*14ei:ll
the microphone in a
(ACC
off
turn
surface
rni~rophone
*IJI:II
place
easiest
it
the
OFF)
--
the
Mounting
Fit the microphone
on
lead
you may bend it down
screw
this
product.
,
where its direction and dis-
pick up the driver's
to
product before connecting
sun visor
into the groove.
Microphone
CD
Clamps
(g)
Use separately
sary inside the vehicle.
the
Install
position. It
in the down position.
Installation
clip
secure the
to
clamps
sold
the sun visor when
microphone
cannot recognize the driver's voice
on
on
the
steering
where
lead
is in the
it
the sun visor
if
column
Detach the microphone base from the microphone
while
Tab
CD
Microphone base
®
clip
pressing the tab.
sliding
by
2 Mount the microphone
the microphone base
the steering column.
on
neces-
up
is
Microphone
CD
Groove
(g)
lead
2 Attach the microphone
clip
to the
sun
visor.
35
Page 36

Installation
CD
Double-sided
@ Clamps
Use
separately sold
sary inside the
3 Keeping it
Adjusting
angle
tape
clamps
vehicle.
away
the
to secure the
from the steering wheel.
microphone
lead
where
neces-
Appendix
Troubleshooting
If
you have
tion. The most
likely
be
found here, contact your
Pioneer
Problems
CD
-+
-+
-+
-+
-+
-+
The
cannot be shown.
-+
-+
The
-+
No
-+
-+
-+
problems
causes and
service
or
DVD
The disc is inserted upside down.
The disc
The disc is cracked
The files
The disc
The
-
playback
Insert
the
1s
Clean
the
Insert a
on
Check
format
Replace
loaded
Check
operating
common
facility.
problems
solutions. If
with
the
is not
disc with the
dirty.
disc.
or
normal,
the disc are in an
the
file
the disc.
d1sc
what
otherwise damaged.
round disc.
format.
cannot
1s
a type
type
of
disc
this
product, refer to
are
listed below, along with
a
solution
dealer
to
your problem
or the nearest authorized
AV screen
possible.
label
upward.
irregular file
be
played
back.
th1s
product cannot
it
is.
format.
play.
screen is covered by a caution message and the video
The parking brake
-
Connect
parking brake.
The parking brake
-
Park your
brake.
lead
1s
the parking brake
veh1cle
not connected
Interlock
in a safe
lead correctly,
is activated.
place
and apply
or
applied.
and apply
the parking
audio or video skips.
This
product
- Secure
sounds
Cables are not connected
-
Connect
The system is performing
frame
- There is
frame
The system is paused
during
- For the media other than
sound
is not
firmly
this
product
are
produced.
the
cables correctly.
playback with DVD-Video.
no
sound
playback
the
disc playback.
on
fast reverse
secured.
firmly.
The
volume level
correctly.
still, slow
during
with DVD-Video.
still, slow motion,
or
performing, fast reverse or forward
music
or
forward.
will
not rise.
motion, or frame-by-
or
CD (CD-DA),
there is no
th1s
sec-
cannot
the
frame-by-
The
icon
&
is
-+
displayed,
The operation is not
- This operation is not
playing
does not feature
language,
The
picture stops (pauses) and this product cannot be
etc.)
and operation
compatible
possible.
that
is
with the video configuration.
(For example,
angle,
impossible.
audio system, subtitle
operated.
-+
The reading
- Stop
The
picture is stretched,
-+
The aspect setting is incorrect
-
Select
A
parental lock
is not
possible.
-+
The
parental lock
- Turn the
The
parental lock
-+
The code
-
Input
Playback
language
-+
The
DVD play1ng
language selected
- Switching
language selected
on the disc.
The
picture is
of
data is
playback
impossible
once, then restart.
with
the appropriate setting
message
parental lock
number
the correct code number.
is
not
with
settings
to a
extremely
is
displayed
is on.
off
or
for
DVD
playback
is incorrect.
the audio language
selected in
does not feature
in
"DVD/DivX Setup
selected language is not
in
"DVD/DivX Setup"
unclear/distorted and
during disc
an incorrect aspect ratio.
for
the
display.
for
that image.
and
DVD
change the
level.
cannot be canceled.
and
"DVD/DivX
d1alog
Setup".
o1·
subtitles
".
possible
playback.
-+
The disc features a
may have this.)
- Since
this
analog
copy protect system. the picture may
horizontal
that
kind of protection
This is
not
signal
to prohibit copying. (Some discs
product is
stripes or other
a
malfunction.
compatible
signal
with the copy
1m
perfections when a
is viewed on some
the
DVD
playback.
playback
subtitle
in
the
if
dark
guard
suffer
disc
displays.
the
during
from
with
is not recorded
36
Page 37

Appendix
iPod cannot be operated.
- The iPod is frozen.
~
Reconnect the iPod
iPhone.
- Update the iPod software version.
- An
error
- Reconnect the iPod
- Park your vehicle in a safe place, and
- Update the iPod software version.
- Cables are not
- Connect the cables correctly.
has occurred.
iPhone.
Turn the ignition key back to off (ACC
the engine. and
with
with
turn
the
connected
the USB interface cable
the USB interface cable
turn
off the engine.
OFF).
power to this
correctly.
Then restart
product
back on.
Sound from the iPod cannot be heard.
The audio
the Bluetooth and USB
time.
- Use the iPod to
Problems
Dialing
output
direction
change
with
is
impossible because the touch panel keys for
may switch automatically when
connections
the audio
the
are used at the same
output
direction.
phone screen
dialing are inactive.
- Your phone
- Retry after re-entering
- The connection between
cannot
- Perform the
Problems
A black screen
-
While
on the
- Press
- The
- Stop the vehicle in a safe place and check the screen on
the
The
screen
- An error has occurred.
- Park your vehicle in a safe place. and then
ignition switch (ACC OFF). Subsequently,
switch to on (ACC ON) again.
is
out of range for service.
be
established now.
connection
with
is
operating an application, the application was ended
smartphone
smartphone
smartphone.
displayed.
::to
display
OS
is
displayed, but operation does not work at all.
the
range for service.
the
cellular phone and this product
process.
the
Application screen
side.
the
Top
menu screen.
may be awaiting screen operation.
turn
off the
turn
the ignition
for
for
iPod I
iPod I
The
smartphone was not charged.
Charging stopped because the temperature of
phone rose due to prolonged use of the
charging.
-
Disconnect
the
- More battery power was consumed than was gained from
charging.
-This
sary services on the smartphone.
When problems
appears on the display. Refer to the table below
problem,
persists. record the error message and
your nearest Pioneer service center.
then
the smartphone from the cable, and wait until
smartphone
problem may
take the suggested corrective action. If the error
cools down.
be
occur
with this product.
resolved
by
stopping any unneces-
an
contact
the
smartphone
error message
smart-
during
to
identify the
your dealer or
Common
AMP Error
- This
Product overheat. System will be shut
in
problem.
that
- The temperature
product
incorrect; the protective
- Check the speaker connection.
disappear even after the engine
your dealer or
assistance.
1 minute. Restart the product by
some problem occurred
- Follow the instructions displayed on the screen.
does not solve the problem, contact your dealer or an
authorized Pioneer Station for assistance.
fails to operate or the
circuit
an
authorized Pioneer Service Station
speake1-
1s
activated.
If
the message fails to
is
switched off/on.
down
ACC
If
this message keep showing up, it
in
the
is
too high
product.
for
this product to opel-ate.
connection
automatically
Off/On
is
possible
contact
may fix this
If
this
Disc
Error-02-XX/FF-FF
- The disc is dirty.
- Clean the disc.
- The disc
- Replace the disc.
- The disc
- Check
- There
- Press
is
scratched.
is
loaded upside down.
that
the disc
is
an electrical or mechanical error.
the
RESET
is
loaded correctly.
button.
is
for
Different Region
- The disc does not have the same region
product.
- Replace the DVD with one bearing the correct region
number.
Unplayable
- This type of disc cannot
- Replace the disc with one
product.
Disc
Disc
be
played on
that
can
number
this
product.
be
played on
as
this
this
Unplayable File
- This type of
- Select a file that can
f1le
cannot
be
played on
be
played.
this
product.
Skipped
- The inserted disc contains DRM protected files.
-The
protected files are skipped.
Protect
- All the files on the insel-ted disc are embedded
- Replace the disc.
with
DRM.
TEMP
- The temperature of this
ing range.
- Wait until this product returns to a
normal operating limits.
This
DivX rental
- The inserted disc contains expired DivX VOD content.
- Select a file
has
that
product
expired.
can
be
is
outside the normal operat-
temperature
played.
within
Video resolution not supported
- Files that
the file.
- Select a file
Unable to
- The playback history for VOD
some reason.
- Retry.
-
Your device
cannot
be
played on this
that
can
be
played.
write
to
flash memory.
If
the message appears frequently,
is
not authorized
contents
to
play this DivX protected
product
cannot
consult
are included in
be
saved
your dealer.
video.
- This product's DivX registration code has not been authoby
the DivX VOD
rized
- Register
this
contents
product to the DivX VOD contents provider.
provider.
Video frame rate not supported
- DivX file's frame rate
- Select a file
Audio Format
- This type of file
- Select a file
not
is
can
more
be
that
supported
is
not supported on
that
can
be
than
played.
played.
30 fps.
this
product.
the
for
37
Page 38

Appendix
USB
storage
Error-02-6X
-
Communication
-Turn
the ignition switch
- Disconnect the USB storage device.
- Change to a different source. Then, return to the
storage device.
Unplayable File
- This type
- Select a file that can
- Security
- Follow the USB storage device instructions to
Skipped
- The connected USB storage device contains DRM protected
files.
- The protected files are skipped.
Protect
- All the files on the connected USB storage device are
embedded with DRM.
- Replace the USB storage device.
Incompatible
- The connected USB storage device
product. .
- Disconnect your device and replace it with a
Check
- The USB
- Check
- The connected USB storage device consumes more
maximum
- Disconnect the USB storage device and do not use it. Turn
Video resolution
- Files
the file.
- Select a file
of
for
security.
USB storage device.
USB
connector
that
in something or damaged.
the ignition switch to
connect a compliant
that
device
failed.
file cannot
the connected USB storage device is enabled.
USB
the USB connector or USB cable is
allowable current.
not
cannot
be
that
OFF
and back ON.
be
played on this product.
be
played.
is
not supported
or USB cable
OFF,
USB storage device.
supported
played on this product are
can
be
then to
played.
is
short-circuited.
ACC
or
disable
compatible
not
ON
and then
included
USB
by
th1s
caught
than
in
.
USB
was disconnected for device protection. Do
USB
insert this
USB
memory.
- The USB connector or USB cable is short-circuited.
- Check
in
The connected USB storage device consumes more than
maximum allowable current.
- Disconnect the USB storage device and do not use it.
the ignition switch to
connect a compliant USB storage device.
- The USB interface cable
- Confirm that the USB interface cable
USB cable
Audio Format
- This type of file is not supported on
- Select a file that can
memory into
that
something or damaged.
the USB connector
is
not caught
not
supported
the
unit.
Press
or
USB cable is not caught
OFF,
then to ACC or
for
iPod I iPhone is short-circuited.
in
something or damaged.
this
be
played.
product.
not
reset
to
ON
and then
for
iPod I iPhone or
re-
restart
iPod
Error-02-6X
- iPod failure.
- Disconnect the cable from the iPod. Once the iPod's main
menu is displayed, reconnect the iPod and reset it.
Error-02-60
- The iPod firmware version is old.
- Update the iPod version.
Sluetooth
Error-10
- The power failed
- Turn the ignition switch to
If
the error message
above action, please contact your dealer
Pioneer Service Station.
Some basic precautions are necessary when handling your
discs.
for
the Bluetooth module of
OFF
is
still displayed after performing the
and then to ON.
this
product.
or
an authorized
Turn
e Use 12-cm discs. Do not use 8-cm discs or
8-cm discs.
e When using discs
check the instructions and the warnings of the discs.
Depending
possible. Using such discs may result
equipment.
e
Do
not attach labels, write on or apply chemicals to the
surface of the discs.
e
Do
not attach
als to the discs.
e
To
clean a disc, wipe it with a soft cloth, moving outward
from the center.
e Condensation may temporarily
performance.
e Playback of discs may not
characteristics,
environment, storage conditions and so on.
e
Road
e
Ambient
e
e Despite
DVD-Video
shocks may
Read
the precautions
At
extremely high temperatures, a temperature cutout
protects this
our
that
do not affect
surface
as
for
use or handling of the disc. This is not a sign
malfunction of
and tear.
that
can
be
printed on label surfaces,
on
the discs, inserting and ejecting may not
commercially
disc
interrupt
available labels or other materi-
be
format, recorded application, playback
possible because
disc playback.
for
discs before using them.
in
impair
the built-in drive's
damage to this
conditions>for. playil'lg a disc
product
careful design of the product. small scratches
a result of mechanical wear, ambient conditions
by
switching it off automatically.
actual
operation may appear
this
product. Consider it to
DVD.
VIDEO
be
an
adapter
of
disc
on
the d
of
the
normal wear
for
be
1sc
38
Built-in
e Use only conventional, fully
shaped discs.
drive
and
care
circular
discs. Do not use
e Do not use cracked, chipped, warped, or otherwise damaged
as
discs
they may damage the built-in drive.
e
~is
a trademark of DVD Format/Logo Licensing
Corporation.
e It is not possible
be
may not
above.
able
to
play DVD-Audio discs. This
to
play all discs bearing the marks shown
DVD
drive
Page 39

Appendix
CD
lli]Q~~
DIGITAL
AVCHD
This
unit
(Advanced Video Codec High Definition) format. Do not insert
AVCHD discs. If inserted, the disc may not
recorded
is
not
compatible
Playi.ng DuaiDisc
e Dual Discs are two-sided discs
for
audio on one side and a recordable DVD
other.
e Playback of
However, since
compatible
sible
the
DVD side is possible with
the
with
to
play the CD side
the general CD standard, it may not
CD
e Frequent loading and ejecting of a Dual Disc may result in
to
scratches
the disc.
e Serious scratches can lead
product.
in
we
product.
e Please refer to
tion
Dolby·
This
product
the
sound will
Manufactured
0
Dolby and
Laboratories.
In
the
recommend
some cases, a Dual Disc may become
disc-loading slot and will not eject.
about
you refrain
the
manufacturer
Dual Discs.
Digital
will down-mix Dolby Digital signals internally and
be
output
in stereo.
under
the
license
double-D symbol are trademarks of Dolby
AUDIO
discs
with
discs recorded in AVCHD
be
ejected.
that
have a recordable CD
side of Dual Discs is not physically
with
this
product.
to
playback problems on
from
using Dual Disc
for
from
Dolby Laboratories.
for
video on
this
product.
be
this
To
more detailed informa-
stuck
prevent this,
with
this
the
pos-
DOLB~
III
DIGITAL
Compatibility
Common
notes
about
disc
compatibility
e Certain
e Compatibility
e It
e Playback of discs may become impossible
DVD-Video
e DVD-Video discs
DVD-RIDVD-RW/DVD-R
functions
some discs.
is
not possible to playback DVD-ROM/DVD-RAM discs.
sure to sunlight, high temperatures,
storage conditions
with
of
this
all discs
in
the vehicle.
product
may not be available
is
not guaranteed.
with
or
depending
discs
that
have
cannot
be
the player can
played on
be
found on
incompatible
this
DVD drive. The region
this
product's
SL
{Single
region
chassis.
direct
on the
numbers
number
Layer)/DVD-R DL {Dual Layer) discs
e Unfinalized discs
format
e Discs
e DVD-R
(video mode) cannot
which
format
(VR
DL
Layer
Jump
which
have been recorded
have been recorded
mode)
cannot
(Dual Layer) discs
recording cannot
be
be
played back.
with
the
played back.
which
be
played back.
Video Recording
have been recorded with
with
the Video
e For detailed information about recording mode, please
contact the
software.
CD-RICD-RW discs
e Unfinalized discs cannot
e It may not
recorded on a
manufacturer
be
possible to playback CD-R/CD-RW
music
of media, recorders,
be
played back.
CD
recorder
or a computer
or
writing
discs
because
for
expo-
of
of disc characteristics,
scratches
e Playback of
sible, depending on
their
or
condensation
discs
settings, and
e Please record
contact
manufacturer
software.)
e Titles and
disc
audio data (CO-DA)).
e Read
them.
Common
other
may not be displayed
the
precautions
notes
recorded on a
the
other
with
the
of media, recorders, or
text
information
with
about
scratches
recording device,
environmental
correct
or
dirt
on
the
format.
by
this
CD-R/CD-RW discs before using
on the disc,
lens of the built-in drive.
computer
recorded on a CD-R/CD-RW
product
the
may not
writing
factors.
(For details, please
writing
(in the case of
USB
device
e Do not leave
high temperatures.
e Depending on
this
product may
may not
e The text
be
correctly displayed.
e File extensions
e There may
on an USB storage device
e Operations may vary
age device.
e It may not
because of file
tion, playback
USB
storage device compatibility
~
For details
product, refer
the
USB storage device in any location
the
kind of
not
be
played back properly.
information
be a slight
be
about
recognize
of some
must
be
used properly.
delay
depending
possible
to
characteristics,
environment,
USB storage device
to
Specifications on page
the
USB storage device you use,
the
storage device
audio
and video files may not
when
starting
with
complex
on
play
some
file
storage conditions, and so on.
playback of files
folder hierarchies.
the
kind of an USB stor-
music
files
format, recorded applica-
compatibility
from
43.
e Protocol: bulk
e
You
cannot
a USB hub.
connect
a USB storage device
to
this
e Partitioned USB storage device is not compatible
product.
e Firmly secure
let the USB storage device fall
become
e There may
files encoded
e Some USB storage devices
generate noise on
e Do not
The sequence of
For USB storage device,
USB storage device.
jammed
be a slight
with
connect
audio
the
USB storage device when driving. Do not
under
delay
image
the
radio.
anything
files on USB storage device
the
onto
the
the
brake
when
data.
connected
other
than
sequence is different from
floor, where it may
or
gas pedal.
starting
playback of audio
to
this
the
USB storage device.
product may
or
dirt,
be
pos-
software,
storage
with
or
files
USB
with
this
product
with
that
via
this
of
39
Page 40

Appendix
Handling guidelines and supplemental
e
This
product
(MMC).
e
Copyright
Common
Notes specific to DivX
e
Only
anteed for proper operation. Unauthorized
operate properly.
e
ORM
started .
e
This
product
minutes
limit
e
OivX
product to the
refer to
28.
e
For
details on the
this product. refer to
e
For
more details about
http://www.divx.com/
DivX
subtitle files
e
Srt
format
e
Only
subtitle files cannot
e
Subtitle files that are named with the same character string
as
the
Oiv
X
exactly the same. However. if there is
one subtitle file in a single folder. the files are associated
even if the file names are not the same.
e
The subtitle file
OivX
e
Up to
will
not
e
Up to
file.
including
are used
recognized.
e
The
character
IS0-8859-1.
cause the characters to
e
The subtitles may not
characters in the subtitle file include control code.
e
For materials that use a high transfer rate, the subtitles and
video may
40
is not
compatible
protected files cannot
notes
OivX
files downloaded
rental files cannot
corresponds to a
43
seconds. Search operations beyond this time
are prohibited.
VOO
file playback requires supplying the
Displaying your
subtitle files with the extension
one subtitle file can
OivX
file befo
file. The character s
file.
255
subtitle files may
be
recognized.
64
characters can
for
the
Using characters other than
not
about
files
be
OivX
VOO
provider. Regarding the
DivX
Oi
vx
video versions that can
Specifications
Oi
be
associated.
re
th e extension are associated with the
trings
must
be
stored
the extension. If
file
code
be
be
name, the subtitle file may not
for
the subtitle file should comply with
be
be
completely synchronized.
with the Multi Media
from
operated until playing back is
Oi
VOD
vX
. visit the following site:
be
used for each
be
used. Any more subtitle files
used for the name of the subtitle
more than
displayed incorrectly.
displayed correctly if the displayed
information
be
played back.
DivX
OivX
vX
registration
before the extension must
in
the same folder
files
partner sites are guar-
OivX
file display of up to 1
on page
".srt"
OivX
only
one
64
IS0-8859-1
Card
files may not
10
code of this
10
code.
code
on page
be
played
43.
can
file. Multiple
Oiv
X file and
as
characters
be
be
the
may
used.
590
on
be
e
If
multiple
short
be
Media
subtitles are programed to display
time
frame, such
displayed at the correct time.
as
0.1
seconds. the subtitles may not
compatibility
General
D
Maximum
B
Maximum
age device: 7.5 h
CD-R/-RW
File system: IS09660 levei1 .1S09660
1.
02
/ 1.50/2.00/2.01/2.
Max
imum
Maximum
Playable file types: MP3,
MPEG2. MPEG4
DVD-R/-R
File system:
1.
02/1
.
Maximum
Maximum
Playable
MPEG2, MPEG4
USB
storage device
File system:
Maximum
Maximum
Playable file
MP3
a
Ver
exist.
li
This
interactive), mp3
CD-R/-RW
File
extension: .mp3
Bit
rate: 8 kbps
Sampling
for
emphasis)
I
03
tag:
DVD-R/-R
File extension: .mp3
Bit
rate: 8 kbps to
Sampling
for
emphasis)
103
tag:
playback time of audio file stored in the disc:
playback time of audio file stored on an USB stor-
(450 m1nutes)
number
number
SLJ-R
IS09660 levei1.1S09660
50
/2.00/2.01/2.50
number
number
file types:
FAT16/FAT32
number
number
types:
50
of folders:
of files:
WMA,
DLJ
DVD-RW
of folders:
of files: 3
MP3.
WMA,
of folders:
of files:
MP3.
WMA,
999
15
300
AAC,
300
500
AAC.
300
000
AAC,
compatibility
. 2.x of
103
tag
is
prioritized when both
product
103
103
is not compatible with the following:
PRO.
m3u playlist
to
320
kbps
1.0,
1.1. 2.2.
DVD-RW
kbps
16kHz
1.0,
1.1.
(CBR),
48kHz
2.3
(CBR),
to
48kHz
2.2
, 2.3
frequency: 16kHz to
tag
Ver.
SLJ-R
DLJ
320
frequency:
tag
Ver.
within
a very
chart
levei2.Romeo, Joliet.UOF
WAV.
OivX,
MPEG1,
level 2.Romeo, Joliet.UOF
WAV.
OivX,
MPEG1,
WAV
,
MPEG4,
VBR
(32kHz.
VBR
(32kHz.
JPEG
Ver.
1
.x
and
44.1
kHz.48 kHz
44
.1 kHz.48 kHz
MP3i (MP3
60
, BMP
Ver.
2.x
USB
storage device
File extension: .mp3
Bit rate: 8 kbps to
Sampling frequency:
103
tag:
103
tag
WMA
5
h
compatibility
This product
Media
TM
Audio 9 Professional, Loss less. Voice
CD-R/-RW
File extension: .wma
Bit
rate: 5 kbps to 320
Sampling frequency:
DVD-R/-R
File extension: .wma
Bit
Sampling frequency:
USB
File extension: .wma
Bit
Sampling frequency:
WAV
~
USB
File extension: .wav
Format: Linear
Sampling frequency: 16kHz to
Quantization bits: 8 bits and
AAC
Q
SLJ-R
rate: 5 kbps to 320
storage device
rate: 5 kbps to 320
compatibility
The sampling frequency shown in the display m
rounded.
storage device
compatibility
This product plays back
CD-R/-RW
File extension: .m4a
Bit
rate : 8 kbps to
Sampling frequency:
DVD-R/-R
File extension: .m4a
Bit
rate: 8 kbps to
Sampling frequency:
USB
File extension: .m4a
Bit
Sampling frequency:
SLJ-R
storage device
rate: 8 kbps to
320
kbps
8kHz
Ver
. 1.
0.
1.1
is
not compatible
kbps (CBR),
8kHz
DLJ
DVD-RW
kbps
8kHz
kbps
8kHz
PCM (LPCM)
320
kbps
8kHz
DLI
DVD-RW
320 kbps
8kHz
320
kbps
8kHz
(CBR).
to
48kH
, 2.
2.
to
48kHz
(CBR),
to
48kHz
(CBR),
to
48kHz
48kHz
16
bits
AAC
(CBR)
to
44.1
(CBR)
to
44.1
(CBR)
to
48kHz
2.3, 2.4
VBR
z
with
the
following: Windows
VBR
VBR
VBR
files encoded
kHz
kHz
by
ay
iTun
e
be
s.
Page 41

Appendix
DivX
~
6
m
~
~
m
CD-RJ-RW
File extension: .avi/.divx
Profile
Ver.
Compatible
Bit
Sampling
48kH
Ma
Maximum
DVD-RJ-R
File extension: .avi/.divx
Profile
Ver.
Compatible
Bit
Sampling
48kHz
Maximum
Maximum
Video
~
ii
m
~
e
compatibility
compatible
not
product
This
format
LPCM
Depending on the file
number
stari
a file
If
end.
Some special operations may be
composition
Files
rectly. The standard
Mbps
DivX files on the USB
(DivX version):
6.x_
r·ate (MP3):
z for
xrmum image size:
(DivX versron):
6.x
(MP3):
rate
for
Files may not be played
environment
of the
product
This
application used to
Depending on the version of
to encode
may not be correctly displayed.
tion
There may be a
files encoded
product
This
transfer.
is
, DivX files
(linear
of
of playback on discs.
contains
with
for DVDs.
audio codec:
frequency
emphasis
file size:
SLI-R
audio codec:
frequency
emphasis)
image size:
file size:
files
file.
without
audio
PCM)
information
streams.
audio
than
more
of DivX files.
transfer
high
8 kbps to
8 kbps
Home
(MP3):
)
720
4GB
DLI
Home
to
(MP3):
720
4GB
transfer
storage
MP3.
320
DVD-RW
MP3.
320
compatibility
the
which
in
operate correctly.
not
may
encode
album
files.
WMA
delay
slight
image
with
compatible
is not
the
with
video data. DivX files
codec
composition.
may be a
there
playback
4GB.
prohibited
be played back cor-
rate is 4
device
y Digital
Dolb
(CBR).
to
576 pixels
x
ter
Dolby
(C
z to
576 pixels
><
not
Mbps
cannot
3.11/Ver. 4.x.Ner. 5.x/
Ver.
VBR
48kHz
3.11/Ver.
Ver.
Digital
VBR
BR).
48kHz
rates may
Theater
kbps
16kHz
pixels
Thea
kbps
16kH
pixels
(USB)
depending
ly
proper
back
was created
file
files.
WMA
Windows
names
when
data.
Media'"' Player-
and
starting
packet write data
with
following:
slight
(32k
(32 kHz ,
depending
other
DivX
encoded
such
delay in the
stops before the
because
and 10.08
COs
for
be played.
44.1
z.
H
x/Ver 5.x/
4.
44.1
on the
contents
the
on
or
on the
informa-
text
playback ot audio
Ultra
with
as the
of the
kHz.
kHz.
used
~
1¥
ti
the
with
folder name. Depending on
try
may
ma
the
varies
ay
displ
Folder selection sequence or o
altered,
Regardless of
originalr·ecording.
of
hori
s
product
This
can recognize up
character,
fir·st
to display
imum
x
according
area.
dependlilg
pause between songs.
them
number
the wrdth
to
on
length of bla
the
.a vi
Format:
Compatible
Compatible
Maxrmum
Maximum
Fries
~
rate.
deo codec:
vr
audio codec: Linear
resolution:
hame
may
720
30
rate:
be able to be played back dependrng
not
-4
MPEG
.mp4
Format: MPEG-4
Compatible
Compatible
Maxirnum
x
Ma
~
resolution:
Frame rate:
imum
Fi!es may
rate.
video codec:
audio codec:
not
be
720
30
able
.mov
MPEG-4
Format:
Compatible
Compatible
Maxim
Maxrmum
~
Example
This
&J
Copyright
The Regents of
Redistribution
without
video codec:
audio
resolution:
um
Frame
Files may not
rate .
of
product
assign folde r
(c) 1987. 1993. 1994
the
and
modification.
codec:
720
30
mte:
able to be played back depending on
be
hierarchy
a
assigns
numbers.
Univers ity
use in
are permrtted provided
32 characters,
to
including
with
of the
the
compressed
MPEG-4
pi.)(els
fps
MPEG-4
AAC
pixels
fp s
be
to
MPEG-4
J'.AC
pixels x
fps
folder
source
extension
display area.
the
reduced
a
characters
eac h character. and of
of
opemtions
ther
encoding
section between the songs
nk
audio
PCM(LPCM) MP3
pixels
480
x
pixels
480
x
played back depending on the
PCM
r·
/ Linea
pixels
480
·
number
California.
of
binary
and
font
that
or wrrting
discs play
PCM) MP3
(L
The user
s.
Ail rights
forms
that
size. Howe
beginning
file and
the
for
product
this
u can display
yo
may be
softwme.
wrth
or,
cannot
served.
re
with
.
following
the
ve
the
the bit
the
or
met:
conditions
Redistributions
1.
right
Redistr
r.
a
bit
brt
2.
right
in the
distribution
Ali advertising
3.
softw
Thrs produ ct
Calrforni a.
~~either
4.
tributors
from
THIS SOFTWARE
CONTRIBUTORS''
WARRANTIES, INCLUDING. BUT NOT LIM
WARRANTIES
PARTICULAR PURPOSE ARE DISCLAIMED.
SHALL
ANY
OR CONSEQUENTI,.'\L DAMAGES (INCLUDING.
LIMITED
SERVICES: LOSS
INTERRUPTiON)
LIABiliTY
(INCLUDING NEGLIGENCE
WAY OUT
OF
The
owned
PIONEER CORPORATION
and trade
ar·e
notice.
ibutions
notice.
men
cu
do
.
must
are
Berkeley
the
may be used
software
this
REGE~HS
THE
DIRECT.
,
TO
WHETHER IN CONTRACT. STRICT LIABILITY
OF
THE POSSIBILITY OF SUCH
0
ooth
Bluet
Bluetooth
by
names
source
of
conditi
list of
this
binary
in
condrtions
list of
thrs
includes
INDIRECT.
PROCU REMENT
THE
and
tation
materials
the
display
software
its
and
the
of
name
OF
endorse or
to
without
PROVIDED
IS
AS IS''
MERCHANTABIUTT
OR CONTRIBUTORS
lf
USE,
OF
V
HOWE
OF
USE
Bluetooth®
mark
word
•
SIG. inc.
those
ar-e
must
code
ons and the following disclaimer.
must
form
and the
matenals
other
r
/o
mentioning
following acknowledgement:
developed
contnbutors.
Universtty
specific
A
'~C!DENTAL.
DATA.
ER
OR
THIS
and logos are reg
is
of
nor
promote
prior
THE
BY
EXPRESS
W
·
~
A
ND
SUBSTiTUTE GOODS OR
OF
PROFITS:
OR
ED
CAUS
OTHERWISE) ARISING IN
SOFTWARE.
MA.GE
.
DA
and any use of such marks
cense. Other· trademar-ks
l1
under
their·
pective owners.
es
1
py
the above
retaltl
reproduce the
following
provided
features or
the
by
the names
products
written
REGENTS
TO.
ITED
FITNESS
AND
!1'-J
LIABLE
BE
SPECIAL, EXEMPLARY.
OR
ON
AND
EVEN
tered
is
co
above copy-
disclaimer
rth
w
use of
Untversity
of its
derived
permission.
AND
IMPLIED
OR
NO
ANY
THE
FOR
EVENT
NOT
BUT
BUSINESS
THEORY
ADVISED
IF
·a
tr
IMPLIED
FOR
OR
demarks
by
the
this
of
con-
A
TORT
A~~y
-
OF
41
Page 42

Appendix
Windows Media
of
Microsoft
countries.
This product includes
Corporation and cannot
from
Microsoft Licensing,
is
either a registered
Corporation
technology
be
in
Inc.
the
used
United
owned
or
distributed
trademark
States
and/or
by
Microsoft
DIVX.
DivX
Certified"
(.divx, .avi) video playback.
know you have the freedom
DivX®,
DivX,
LLC
This DivX
it plays
To
play purchased DivX movies,
divx.com. Find your registration code in the DivX
your device setup menu.
:>
Displaying your
AAC
is
compression technology
MPEG-4. Several
but file formats and extensions
tion which
encoded
devices have been tested
DivX
Certified "
and are used
Certified'"
DivX·E·
video.
short
for
is
used to encode. This
by
iTunes.
and associated logos are trademarks of
device has passed rigorous testing
DivX
Advanced
applications
for
When
you see the DivX logo, you
to
play your favorite DivX movies.
under
license.
first
VOD
registration
Audio
can
differ
Coding
used
be
unit
standard
high-quality
register your device at vod.
code
and
with
used
to
depending on the applica-
plays back
refers to an audio
MPEG-2 and
encode
or
trademark
without
VOD
on page
AAC
other
a license
DivX(B'
to
ensure
section of
28
AAC
files,
files
e
Firmly
secure
the
iPod
when
fall
onto
the
floor,
brake
:>
For
iPod
or
gas pedal.
details
and
Made
where
,
refer
to
iPhone
for
the
~iPod
"Made
for
iPod"
and
accessory has been designed to
iPhone, respectively, and has been certified
meet Apple
Apple is
compliance
Please note
may affect wireless performance.
iPhone, iPod, iPod classic, iPod nano, and iPod
marks of Apple Inc.,
performance
not
responsible
with
that
"Made
for
safety and regulatory standards.
the use of
registered in the
driving. Do
it may
become
iPod
manuals.
!OliPhone
for
iPhone" mean
connect
standards.
the operation of
this
accessory with iPod
specifically to iPod
by
this
U.S. and other countries.
Lightning
Lightning is a
App
App Store
trademark
of Apple
Store
is
a service mark of Apple
Inc.
Inc.
not
let the iPod
jammed
that
under
an electronic
the developer to
device or its
or
iPhone
touch
are trade-
the
or
01MPORTANT
Requirements
services
e
Latest version of
content
the
e
A
current
e
Smartphone
Note: if
vide
your
content
e
Connection
network.
e
Optional
this
to
using
service provider, downloaded to your
for
carrier
product.
access app-based connected
this
product:
the
Data
EDGE
the
adapter
Pioneer
for
with
the
Plan.
for
data usage ,
for
and/or
Internet
application(s)
account
the
Data Plan
unlimited
may apply
via
3G,
to
Pioneer
Limitations:
e
Access
to
availability
the
Internet.
e
Service
region.
additional
e
Ability
subject
by
firmware
future
for
connected
purpose
availability
Consult
of
to
any of
versions
the
smartphone:
app-based
of
of
information.
this
change
the
following
versions
Content
cellular
allowing
may be
the
product
without
of
of
the
connected
and/or
your
connected
to
:
compatibility
smartphone:
connected
changes
application(s)
compatible
the
smartphone, available
content
y
our
accessing
via
cable
geographically
access
notice
service provider.
smartphone
additional
app-based
LTE
(4G)
networks.
3G,
EDGE,
connecting
content
Wi-Fi
network
smartphone
content
connected
and
could
issues with
compatibility
content
to
or
discontinuation
or
service
service
content
connected
smartphone.
does
not
charges
LTE
will
application(s)
(4G)
your
depend on
coverage
to
connect
limited
provider
content
be
affected
by
its provider.
from
connected
or
iPhone
to
is
future
issues
of
from
pro-
Wi-Fi
for
to
the
with
the
to
the
the
for
42
e
Pioneer accepts no
iPod, even if
Please back up
e
Do
not
leave
amounts
can result in iPod
temperature.
e
Do
temperatures.
of time. Extended exposure
not
leave the iPod in
that
the
data
your
iPod in
responsibility
is
lost
iPod
data
direct
malfunction
any
for
while
using
regularly.
sunlight
due
location
to
data
for
to
direct
the
with
lost
from
this
product.
extended
sunlight
resulting
high
an
high
iOS
iOS
is a
trademark
the
US
and certain other countries.
iTunes
iTunes
is
a
other countries.
trademark
on
which
of Apple
Cisco
holds the
Inc.,
registered in the
trademark right in
U.S.
and
Remember
ing purposes may
rights as protected by the Copyright
This item
tected by U.S. patents and other intellectual property
that
use
of
constitute
incorporates
this system
copy protection technology that is pro-
for
an infringement on the
commercial
Law.
or
public
author's
rights
view-
of
Page 43

Appendix
Corporation.
Rovi
prohibited.
Supply of this product
commercial use and does not convey a
right to use this product in any
real
ating)
any other media) , broadcasting/
and/or other networks or in
systems, such as pay-audio or audio-on-demand applications.
An independent
please visit
http://www.mp31icensing.com.
Handling
When the
e
e
e
e
e
e
period of
long
damage to the
sible
uct, avoid exposing it to
LCD
The
ranges shown in
not use the
Do
than the operating
screen may not operate
LCD
The
within
may damage it.
not push the
Do
scratch it.
Never touch the
finger
screen can scratch
Liquid
LCD
the
If
e
sure that air from the air
Heat from the heater may break the
air from the
product,
Reverse engineering and disassembly are
for private, non-
license
conveys
only
time broadcasting (terrestrial, satellite,
for
license
LCD
the
screen is subjected to direct
LCD
screen
screen is exposed in order to increa
the vehicle. Please
when operating the
crystal
screen is near
resulting
, it will
time
LCD
should
Specifications
screen at temperatures higher or lower
LCD
temperature
screen with excessive force
LCD
screen
LCD
easily.
display
may cause moisture to form inside this
cooler
possible
in
a
commercial
streaming
electronic content distribution
other
such use
is
nor
license
(i.e. revenue-gener-
via internet, intranets
required.
screen
become very hot,
screen. When not using this prod-
sunlight
direct
used within the temperature
be
on page
range, because the
y and
normall
not press
do
an
with
panel
touch
much
as
43.
could
strongly
ything besides your
functions. The
(LCD) screen
air conditioner, make
an
vent of
the
conditioner
damage.
not
is
screen, and
LCD
blowing
imply
cable
details,
For
sunlight
result ing
as
damaged.
be
its visibility
se
on it
as
any
and/or
for a
po
in
possible.
LCD
this
as
this may
LCD
on it.
cool
..............................
....
white dots (bright dots) may appear on
or
Small black
e
LCD
the
LCD
The
e
sunlight.
When using a
e
lular
of the video in the
colored
Maintaining
When removing
e
turn
cloth.
When wiping the
e
surface. Do not use harsh or abrasive
LED
emitting
light
A
screen.
LCD
low
At
e
s-
image
characteristics of
with
The product
e
000
10
temperatures.
the
If
e
the screen
visible.
be
nearest authorized Pioneer Service Station.
dots
screen. These are due to the characteristics of the
screen and
screen
LCD
phone away
stripes.
this product off and then wipe the screen with a soft dry
not indicate a
do
be
will
cellular
from
form
the
dust
LCD
difficult
phone, keep the antenna of the cel-
the
of disturbances such
LCD
from or
screen, take care not to scratch the
(light-emitting
diode is used inside the
temperatures, using the
and degrade the image
lag
increase in temperature.
an
lifetime
hours. However, it may decrease if used
backlight
LED
will
that
In
LCD
the
of the
reaches the end of its product
become
dimmer
case, please consult
malfunct
to see if
screen to prevent disruption
LCD
screen
cleaning
diode)
display
backlight
LED
quality
Image quality will
screen.
backlight
LED
and the image will
.
on
i
exposed to
is
it
as
LCD
the
chemical cleaners.
direct
spots or
screen, first
backlight
to illuminate the
may increase
cause of the
be
is
your
more than
dealer
high
in
lifetime,
or the
impro
no
longer
Chassis
Nose ......
Weight ............................
Display
Screen size/aspect ratio ........
Pi
Display
Color
Durable
Power off ......
Audio
Max
•50
Continuous
Load impedance ............ .
Preout
Equalizer
Frequency
ve
Gain ...........
HPF:
Frequency
Slope
Subwoofer/
Frequency
Slope
Gain
Phase .................................................
Bass boost:
Gain ..............................
DVD
General
..........
Rated power source ..........
( 1
Grounding system ......................
imum
Max
Dimensions (W x H
DIN
Chassis
(7-1
Nose ............
(7-3/8 in. x 2-1/4 in. x
D
15.1
V to
0.8
current
......
..
..
.... ..
....
/8 in. x 2 in. x 6-1/4 in.)
................
..
allowable)
V
consumpt
D):
x
.. .. ....
..
....
1-1
..
ion
....
.................
/4 in.)
......
.......................... 14.4 V
....
....
..
..
....
..
....
..
..
....
..
............
180
..
..
188
............
..
mm
mm
......
x
50
x
Negative ty
...
..
........
..
....
..
mm
mm
58
DC
10.0
mm
160
x
mm
32
x
System ........ .DVD-Video,
Usable
pe
A
Region
Signal
Sampling
Number
Frequency response ......
Signal-to-noise ratio
Output
........
/8 in. x 6-1/ 2 in.)
3-7
in. x
(7
/4 in. x
(6-3
(effective
(5-3/Sin. x 3in.)
......
xels
method ..........
system ...........
temperature range:
imum
W x 2 ch/4
LO
40
output
...............
............
....
.. ..
........
..
........
..
..
(5-Band Graph ic Equalizer) :
/8 in. x 3/8 in.)
3-7
display
..................................
..
..............
..
power output ......................
0 +
power output .....
Both
AD,
level
...................
..
....
....
..
...
..
..
....
....................
.. ..
......
.. ..
LPF:
................
..
....
................................................................
....
....
.. ..
..
....
..
drive
player
DVD-RW, DVD-RDL
frequency 96kHz)
DVD-VIDEO, VIDEO-CD, CD, CD-
..
discs
number
Format:
level:
.............
frequency
of quantization bits
....
.... ..
..................
..
area: 137.52mm x
....
..
..
PAUNTSC/
..
.. ..
W x 1 ch/2
70
Channels
.4
....
(max)
100
.....................
.. ..
..
.................
..
....
..........
..
..................
..
................
....
VCD,
....
.
..
.................
..
....
5Hz
91
.
....
178
mm
171
.......
....
.. ..
............
....
..
.................... 6.2inch wide/
.. ..
....
..........
............
22
Driven)
(4
0
............
Hz
........
CD,
.....
....
........
....
to
(1
dB
..............
..
....
..
PAL-M
..
W x 4 (
0
315
/
50
50
.....
..
..
..
32
44
kHz)
.232mm)
77
1152
TFT
..
....
PAL-N
/
............
..
....
.............
..
subw
for
(
0
50
[2
0
to 8
....................
....
/1.
Hz
..................
....
Hz/80
63
/
Hz
.............
.. ..
....
Hz/80
63
/
Hz
..
......
..
........... Norma
...
..
.....
................
..
.. ..
..
WMA,
MP3,
........... ..........
kHz/44.1 kHz/
16
....
.. ..
with
(
Hz
000
(IHF-A
mm
97
x
kg
1.7
.
....
400
( 2
000
Active matrix driv
/SECAM
Hz
0
25
.......
..
bit/20
network)
compatible
-4°F
.. ..
.
....
W x 4 ch/4
•50
oofer)
, 5%
15kHz
to
allowable)
1 ch]
for
...............
..
kHz/3.15 kHz/
........... ±1 2
..
Hz/125 Hz
00
/1
Hz
-12
......
...
..
Hz/125 Hz
00
/1
Hz
-18
dB to
+6
l/
dB to
+12
DivX,
AAC,
CD-RW.
R,
................ 1
.. ..
....
..
..
48kHz/96kHz
bit/24 bit;
sampling
DVD, at
(RCA level)
mm
x 9
lbs)
.7
(3
:9
16
480)
x
ing
176°F
to
0
THO,
2.0
8kHz
dB
oct
/
dB
oct
dB/
dB
-24
Reverse
dB
0
MPEG
DVD-R ,
linear
V
mm
x 165
mm
100
x
mm
43
Page 44

Video
Number
MP3
decoding
VVMA
Media
.AA
C
decoding
.m4a
OivX
decoding
and
MPEG
Appendix
.... ................ .
of channels .....................
decoding
video
format..
format
Player-)
form
(Ve
r.
10.6 and eadier)
forTnat
HO) : .avi
decodin
........
at
Horne Theater
..
divx
g
forrnat
Ver
MPEG-4
..
.................
7,
7.
..
MPEG-1. MPEG-2. MPEG-4
1.0
Vp-p/750
..
....................... 2 (stereo)
.. ..
MPEG-1
1.
8.
,
t:.AC
Ver.
&
2
9
(2
(iTunes encoded only):
3.
Audio
ch
audio)
4.
5.2. 6 (Except
(±0.2
(W
V)
La
ye
r 3
indows
ultra
(part2)
CEA2006
Specifications
USB
USB
standard
USB
standaHJ
Max
current
U
SB
Class
t=
il
e
system...
MP3
decoding
WMA
decoding
(Wi
AAC
decoding
(Ver.
W.AVE
Sampling
32 kHz,
Sampling
JPEG
decodin[~
Pi:~el
Sampling.....
Decode
MPEG4
Bluetooth
C
AV
H-
270
Version
Output
(Power
FMtuner
Frequency range ...... 87.9 MHz
Usable
Signal-to-noise
spec .
USB
1
.1.
USB
spec
.............
supp
ly ......
...
. .........
USB 2
. .....
...
. .
2.0
.0
format ...............
for
ndows
10.6 and eE
signal
Frequ
Freque ncv
Size
video
81
..
.......
power
sensitivity .
mat
~v1edi
a
P!ayeri
form
a
t..
HI
forrn at Linear PCM. MS
44.1
........
//'I.VH-271
class
ier)
cr
·:cv
..
MA
2)
z.
48 kHz
1at
X: 8
~
BT)
..
..Linear
(MSC
J
format
.......
kh
fom
decodin
..
...
ratio ............
...
192 (H
12
.........
MPEG4
PCM:
MS
Mode
only) .jpeg
)'/..
7
680 (W). MIN: 32
dBf
(0.8 f.JV/750.
fu
II
speed (For video files)
high
speed (For
MSC
(Mass
...........
MPEG
-1
Ver.7.
AI\C
16
ADPCM:
&
7.1.
8.
(iTunes
~
.
Hz.
22.05
22.05 kHz/44.1 kHz
..
Bluetooth
.
...........
mono.
72
dB
(IEC-A
aud
Storage
FAT16.
2
/'l
.
udio
9
(2
encoded
ADPCM
kHz,
..
..
..
4:2:2. 4:2:0
(H) ><
Simple
3.0
+4
dBm
to
107.9
S/N: 30
io
f1les)
1.0
Class)
FAT32
Layer 3
ch
audio)
only)
wav
24kHz,
jpg
..
32
(W)
Profile
certified
Ma
MHz
dB)
network)
jpe
Power
ou
tput
and
cificati
ithout
~1
. .....................
%
THO+~~)
ons and
notice
design
due
are
to
(40
S/N
ratio.......... .
~
A
x.
Spe
ti ons w
91
subject
impro
dBA
vemen
...
14W RMS
(r
-eference:
to
ts
possible
.
x
4
Channels
1
W
modifica-
into
40)
44
AM
tuner
t=requency
Usable
Signal
range
sensitivity .
-to-noise ratio .......... .
..
..
..............
..
.....
530kHz
..
to
1
710kHz
....
28f.JV
..
...
62
dB
(S/N: 20 dB)
(IEC-A
(10kHz)
network)
Page 45

Register
your
product
at
Enregistrez votre produit au
Registre su producto en
http://www.pioneerelectronics.com
in Canada
au Canada
en
Canada
http://WWW.pioneerelectroniCS.C8
PIONEER
1-1,
Shin-ogura, Saiwai-ku, Kawasaki-shi,
Kanagawa
CORPORATION
212-0031,
JAPAN
PIONEER ELECTRONICS (USA) INC.
P.O.
Box
1540,
Long Beach,
TEL:
(800) 421-1404
PIONEER ELECTRONICS OF
340
Ferrier
Canada
TEL: 1-877-283-5901
TEL: 905-479-4411
PIONEER EUROPE
Haven
Belgique
TEL:
Street,
Unit
NV
1087, Keetberglaan
(0)
3/570.05.11
California
2,
Markham,
1,
B-9120 Melsele,
90801-1540, U.S.A.
CANADA,
Ontario
INC.
L3R
Belgium/
2Z5,
PIONEER ELECTRONICS ASIACENTRE PTE. LTD.
253
Alexandra
TEL: 65-6472-7555
PIONEER ELECTRONICS
5
Arco
Lane, Heatherton, Victoria, 3202,
TEL:
(03) 9586-6300
PIONEER ELECTRONICS
Blvd.
Manuel
Coi.Lomas
Tel:
52-55-9178-4270,
$tafDiffi~!Ja~
a~t
r11
pg~~Jffit7\::fm4075~8tt
~g~
: 886-(0)2-2657-3588
$taf11-=f
w~tLfl!~t:Pltlili9095JJf5tl
~g~
:
852-2848-6488
Road,
#04-01,
Avila
Camacho
de Chapultepec,
Fax:
~
<
ti5i)
~~a~~
Singapore
AUSTRALIA
DE
MEXICO, S.A.
138,
10
pi so
Mexico,
52-55-5202-3714
D.
F.
159936
PTY. LTD.
Australia
de C.V.
11000
©
2014
<
KOKZ14J
PIONEER
>
CORPORATION.
All
rights
reserved.
<
CRD4837-A
>
UC
Page 46

PIONEER ELECTRONICS (USA) INC.
GARANTIE VALl DE SEULEMENT DANS LE
GARANTIE
Pioneer
Electronics
avoir ete installes
vice
de
fabrication,
Les unites ou pieces
LA
PRESENTE
CONDITION
A
OU
UNE
AUTRE
LA
PREMIERE
PAYS
OU
L'ACHAT A
PUSAOU
POC,
PERIODE
Produits
La
peri
ode
de
ELEMENTS NON COUVERTS PAR
UN
PRODUIT ACHETE CHEZ
IMPLICITE
"AVEC
TOUS SES DEFAUTS EVENTUELS ".
PIONEER N'EST
PIONEER
DE
TOUTE APPLICATION
LA
PRESENTE
DOCUMENTS
LA
PRESENTE
PENDANT DE LONGUES PERIODES
LA
PRESENTE
DISQUES
PAR ECRIT PAR PIONEER, D'UN ACCIDENT, D'UN
LES DOMMAGES
CONFORMES
LA
PRESENTE
PRESENTE
PIONEER.
NON AUTORISEES, Nl
LES NUMEROS
INVALIDITE
AUX
ETATS~UNIS
DE
QUALITE MARCHANDE
LA PERIODE
APRES
L'EXCLUSION
S'APPLIQUER
ETAT
A L'AUTRE.
CANADA
AU
QU'ELLE
SOIT IMPLICITE,
(USA)
Inc.
(PUSA)
et
Pioneer
et
utilises
conformement
seront
repares
de
rechange
GARANTIE LIMITEE S'APPLIQUEAU
QUE
LE
PRODUIT
PREUVE D'ACHAT
LOCATION.
ETE
LE
CAS
ECHEANT,
DE
GARANTIE DES PRODUITS
stereo
pour
garantie pour les clients qUIIouent le produit
DE
QUALITE MARCHANDE
PAS
NE
OU
LA
RESPONSABLE
GARANTIT
GARANTIE
S'Y
APPLIQUANT.
GARANTIE
GARANTIE
AUX
RUBANS
SUBSEQUENTS
A
CELLES
GARANTIE
GARANTIE,
PRESENTE
DE
SERlE MODIFIES, OBLITERES
DE
TOUTE AUTRE GARANTIE
- PIONEER LIMITE SES
DE
OU
LA
LIMITATION DES DOMMAGES CONSECUTIFS
A VOUS.
- SOUS RESERVE DE CE QUI EST EXPRESSEMENT
ourem
fournies
AIT
ETE
ACHETE
VALIDE
51
JAMAIS
UN
EFFECTUE
l'auto
PAS LES PRODUITS ENUMERES CI-DESSUS
INDUSTRIELLE
NE
NE
NE
QUI SONT SPECIFIEES DANS LE
NE COUVRE PAS LE COOT DES PIECES OU DE
51
ELLES
GARANTIE
D'UN ENTRETIEN INADEQUAT.
OU
GARANTIE. CERTAINS ETATS
LA
PRESENTE GARANTIE VOUS DONNE DES DROITS LEGAUX SPECIFIQUES. VOUS POUVEZ JOUIR D'AUTRES DROITS, QUI PEUVENT VARIER D'UN
OBLIGATOIRE
SERVICE
SEULEMENT,
PA~ERA
POURVOUS
UN
DISTRIBUTEUR NON AUTORISE N'EST COUVERT PAR AUCUNE GARANTIE EXPRESSE
DE
S'APPLIQUE
COUVRE PAS LES
(IMAGES
COUVRE PAS LE
OU
DISQUES D'ENREGISTREMENT, LES DOMMAGES AU PRODUIT
DECOULANT
SONT
NE COUVRE PAS LES DEFECTUOSITES OU LES
D'ADAPTATION A
Electronique
au
manuel
places
par
en
vertu
de
PROPRIETAIRE
CHEZ
INDIQUANT LA
DE
TEL
commence
LA
GARANTIE
OU
D'ADAPTATION A
QUELQUE DOMMAGE CONSECUTIF ET(OU) INDIRECT QUE CE
OU
COMMERCIALE
PAS
REMANENTES).
OBTENUES
OU
OBLI~ATIONS
OU AUTRE,
SERVICE
Pour profiter du service en vertu
indiquant l'endroit et
AUX
ETATS-UNIS -
marchand
Votre
de
caisse
devrait
societe
Votre
acceder
Veuillez
Ia
plus proche.
Pioneer
Customer
ci-dessous
AU
CANADA
Communiquez
Expedition
en
port
prepaye
pendant
le transport.
Pour
toutes les plaintes
Satisfaction
raccordement
Pour le
Ia
date
Communiquez
Pioneer
enumerer
de
service autorisee - Celle-ci peut
au site
Web
Support-
pour
communiquer
- POC a desigl)e un certain
avec
Pioneer
de
votre
unite
et
selon
lncluez
de
Ia
clientele au 1-877-283-5901.
ou le
de
Ia
garantie
de
Ia
transaction
autorise
une
et
avec
- Votre
ses
coordonnees
de
Pioneer
Ce
service peut vous
avec
Pioneer
Electronique du
aux
fins
de
methode
votre nom,
problemes
fonctionnement
aux
CUSTOMER
PIONEER
LONG
BEACH,
http://www.pioneerelectronics.com
aux
par
le
un
des
partenaires
marchand
(numeros
a www.pioneerelectronics.com, cliquer sur
par
telephone,
nombre
Canada
service
de
transport
vo\re
adresse
Etats-Unis,
de
votre unite, ou
AUX
ETATS-UNIS
ELECTRONICS
P.O.
BOX
CALIFORNIA
1-800-421-1404
REGLEMENT DES CONFLITS
AUX
ETATS-UNIS
recours au Programme de
de resolution des plaintes avant de
Improvement
Pour
avoir
probleme
distributeur I marchand
resolution
par
a
AU
No. du
Dated'achat
ecrit
votre
CANADA-
auquel
pour
plainte
modele:
- Si un
conflit
se
resolution
Act, 15 U.S.C.
recours
au
Programme
vous
faites
sera
communique.
aviser
ecrit
autorise
pour
vous
vous
par
Communiquez avec le
__________________________
2301
des
vous
face
vous
et
s.s.
de
et
aupres
Pioneer
demarches
indiquer
directeur
produit
entre
des
plaintes
prevaloir de
resolution
les
demarches
duquel
etudiera
qu'elle
les
de
Ia
ENREGISTREZ
PRENEZ SOIN DE GARDER CETTE INFORMATION ET VOTRE
GARANTIE
du
de
une unite
Ia
presente garantie
UN
DISTRIBUTEUR
REPARATION
QU'IL
RETOURNER
51
LE PRODUIT A ETE SOUMIS A UNE PUISSANCE
TELEVISEURS
COFFRAGE
USAGE
DE FUITES, LES DOMMAGES
AUPRES
ENLEVES ANNULENT
UN
USAGE PARTICULIER, A UNE PERIODE N'EXCEDANT PAS
Etats-Unis
premier
Pioneer
reparer
aviser
de
(les
- Si
vous
pouvant
SUPPORT
1720
vous
de Pioneer
des
vous vous
entreprendra
raisons
Satisfaction de
Canada, Inc.
l'utilisateur
DATE
EST
NE
NE
de
des
societes
et
communiquez
vos
que
indus
de
valeur
INITIALAINSI QU'A
DE
L'ACHAT INITIAL
EST
REQUIS,
EXPLIQUE
LE
PRODUIT
le
jour
ou le produit
UN
USAGE PARTICULIER QUE CE SOIT.
QUE CE SOIT.
OU LES ECRANS
OU LES ELEMENTS ESTHETIQUES, LES
INAPPROPRIE OU D'UN
MANUEL
D'UNE SOURCE
EN
VERTU
PERMETTENT PAS
S'APPLIQUE
et
au Canada,
proprietaire.
Pioneer
peut
reparer
telephone
Ia
plupart
options
par
courrier
de
expediez
etre
un
numero
pour
(USA)
90801
et
Pioneer apres
droits
plaintes,
vous
etes
conflit
pour
LE LIEU
service
suivie
trouver
INC.
pour
ou de
avez
et,
lesquelles
Ia
coordonnees
le
(POC)
avec
!'unite, ne
comparable, au choix
peuvent
etre
OU
DE
STIPULE
suivants
des
de
de
appelez
procure
pour
clientele au (905) 946-7412
TOUT
MARCHAND
OU,
LE
PRODUIT
DANS
LE
PRESENT
REPARE
OU
est
utilise
pour
LORSQU'ILS
DE
et
service
ou
se
!'unite,
avec
resoudre
dans
DECOULANT
L'UTILISATEUR.
LA
MAIN-D'CEUVRE QUI
AUTRE
LA
PRESENTE GARANTIE DANS SA TOTALITE.
TOL!TE GARf.NTIE
LA
OU
INDIRECTS. LES LIMITATIONS ET EXCLUSIONS ETABLIES CI-DESSUS PEUVENT DONC NE PAS
DANS LES PRESENTES,
A CE PRODUIT.
vous
pour
ou
remplacer
de
telecopieur, courriel, etc.).
produits
optimales
par
le biais
autorisees
trouvent
vous
et
assuree.
telephone
le service
une
societe de service autorisee,
Ia
reponse a une demande initiale faite au service de Soutien a
le
chercher
au 1 800
entreprises
le
produit
un
delai
resoudre
elle
n'entreprendra
ET
LA DATE
LIMITI~E
PAYS
OU LE PRODUIT A ETE ACHETE
garantissent
neuves
PROPRIETAIRE
PIONEER
51
VOUS
REMPLACE, A L'INTERIEUR
Ia
premiere fois (a)
ENDOMMAGES
USAGE
LIMITATION
devez
le service :
electroniques
l'onglet"
de
son site Web.
partout au
ci-dessous)
devez
Emballez
ou
nous
de
conflit.
reparation en vertu
421-1404
pour
de
le
D'ACHAT
No.
Achetede:
que
fonctionnent
de
ou
DOlT
DOCUMENT.
SONT
QU'UNE SOCIETE DE SERVICE OU
DOMMAGES
votre
pour
l'emballer
Soutien a
faire
Pioneer.
quarante
conflit,
de
les produits distribues
pas
PUSAou
de
remises
SUBSEQUENT
AUTO
RISE
LOUEZ
LE
ETRE
EXPEDIE
VOUS
pendant
UTILISES
DECOULANT
ABUSIF, LES DOMMAGES PRODUITS PAR
DE PILES DEFECTUEUSES OU
IMPLICI!E
DE
LA
presenter
unite, ou bien
pour
!'auto
Support"
votre
modele
Canada
pour
trouver
soigneusement
le
produit
pouvons
vous
Ia
Ce
programme
et
expliquez
reparer
Une
(40)
et
indiquera
aucune
pour
discuter
POUR
serie:
_____________________________
_____________________________
RE<;U
PIONEER ELECTRONIQUE
par
PUSA
aux
de
fac;:on
appropriee
POC,
sans
a neuf, au choix
AUX
PRODUIT,
SOIT.
DU
ETATS-UNIS
VOTRE
PENDANT
ETES
RESPONSABLE
DU
PAYS
Ia
peri ode
DE
PLUS, CE PRODUIT EST STRICTEMENT VENDU " TEL QUEL " ET
A DES FINS
NOMINALE
EN
RAISON DE
ANTENNES
D'UNE RETOUCHE, D'UNE MODIFICATION NON
SERAIENT
CAUSES PAR
QUE CE SOIT1 Y COMPRIS ENTRE AUTRES LES GARANTIES IMPLICITES
DUREE D'UNE GARANTIE IMPLICITE, ET CERTAINS
AUCUNE
votre releve
et
choisir"
clientele au 1-800-421-1404.
du
le
fois
jours a pres
REFERENCE
AUTREMENT
LA
REPRESENTATION,
de
vous
diriger
et
vous
Find a Service
et
votre
si
jamais
une
societe
au
moyen
joindre
pendant
appelez
GROUPE
PIONEER
vous
est
Titre I de
au
representant
produit
que
votre
combien
demarche.
de
votre
D'ACHA T DANS
dans
que
vous
deviez
de
PUSAou
PRESENT
de
EXCEDANT
PERIODE
aviser
emplacement
vous
ou ecrivez a :
pendant
PRODUIT
OU
AU
CANADA.
CONTRAT
LA
PERIODE
OU
L'ACHAT AETE
location ou (b) a pres
COMMERCIALES
L'APPLICATION
INSTALLEES
AUTRE
L'UTILISATION
DE
caisse ou, si
vers
une
des
avez
besoin
de
service autorisee.
et
l'envoyer a une
de
materiaux
les
AU
DE
SATISFACTION
ELECTRONIQUE
FERRIER
340
MARKHAM,
(905) 4 79-4411
1-877-283-5901
http://www.pioneerelectronics.ca
offert
sans frais. Vous devez
Ia
loi Magnuson-Moss Warranty-Federal Trade
Ia
plainte a ete
Ia
reception
de
temps
plainte
et
resoudre rapidement le probleme.
ULTERIEURE
UN
ENDROIT SUR
Etats-Unis
des
conditions d'utilisation
payer
pour
de
POC.
DE
LOCATION
DE
GARANTIE,
DU
DEMONTAGE
OU
IMPLICITE, Y COMPRIS QUELQUE GARANTIE
CELLE
PAR
DE
L'UTILISATION
OFFERTES
GARANTIE. AUCUNE GARANTIE
vous
societe
options
Center"
geographique.
coussines
heures
CANADA
STREET,
du
periode
de
ces
les pieces ou les
PIONEER
VOUS
DEVREZ
INDIQUANT L'ENDROIT
EN
EFFECTUE.
Ia
vente au detail, selon ce qui se produit en
OU
PROFESSIONNELLES,
QUI A ETE
D'IMAGES
L'UTILISATEUR,
LA
FOUDRE OU
SANS
AUTORISEE OU DESIGNEE PAR
D'UNE MAIN-D'CEUVRE OU DE PIECES
GARANTIE,
louez le produit, votre contrat
de
service
supplementaires
pour
trouver
de
services
societe
adequats
de
bureau.
Au
Canada,
DE
LA
DU
CANADA,
UNIT
ON L3R
2Z5
service
a Ia
de
garantie,
expliquee
votre
plainte,
demarches
DU
CANADA, INC.
et
par
POC
au
normales
travaux
PENDANT
de
LA
PERIODE
FOURNIR
UN
PORT
PREPAYE,
ET
DE
L'INSTALLATION
Pieces
1
an
ETABLIE
STATIQUES ET
DE PILES NON
FRAIS
OBLIGATION
Veuillez
de
service
communiquez
CLIENTELE
2
Ia
clientele
au
DANS LES
LES
LA
EN
NE
Pioneer
autorisee.
qui pourraient s'appliquer.
Ia
societe
consulter
reparation
autorisee
pour
eviter
INC.
clientele,
avoir
recours
qui
puis
donnez-lui
representant,
(1)
repondra a votre
prendront ; ou
<
QRY3001-B/N
lmprime
Canada
qui, apn3s
en
raison d'un
de
reparation.
DE
GARANTIE,
RELEVE
DE
CAISSE
ET
LA
DATE
A L'INTERIEUR
DU
PRODUIT.
Main-d'oouvre
1
an
premier
OU AU SEIN
IMMOBILES
DOMMAGES
SURTENSION,
VERTU DE
NE
PERMETTENT PAS
OU CONDITION,
de
les
pour
avec
vous
vous
AUX
AUTORISEE
LA
S'APPLIQUE
de
location
Votre
service
Pioneer
coordonnees
votre produit.
ou a Pioneer,
les
dommages
le
groupe
pouvez
au Programme
Commission
repondra
le
nom
un
numero
plainte
(2)
repondra
en ThaHande
DE
DU
rec;:u
de
avoir
du
de
___
>
le
_
Page 47

PIONEER ELECTRONICS (USA) INC.
PIONEER ELECTRONICS OF
CANADA,
INC.
LIMITED WARRANTY
WARRANTY VALID ONLY
WARRANTY
Pioneer Electronics (USA) Inc. (PUSA), and Pioneer Electronics
function properly under normal use due to a manufacturing defect when installed and operated according to the owner's manual enclosed with the unit will be repaired or replaced with
a unit of comparable value, at the option of
new or rebuilt at the option of
THIS LIMITED
PRODUCT WAS
RECEIPT OR OTHER VALID PROOF OF
AND
PREPAID, ONLY FROM WITHIN THE COUNTRY OF PURCHASE
THE PRODUCT.
WARRANTY
PURCHASED
DATE OF FIRST RENTAL. IN THE EVENT SERVICE IS REQUIRED,
PUSAOR
PUSAor
APPLIES TO
POC,ASAPPROPRIATE,
POC.
FROM
PUSAor
THE
ORIGINAL
AN
AUTHORIZED
PURCHASE
POC, without charge to you for parts or actual repair work. Replacement units and/or parts supplied under this warranty may be
Of
Canada, Inc. (POC), warrantthatproductsdistributed by
ORA
NY
SUBSEQUENT
PIONEER
SHOWING THE DATE OF
WILL
PAY TO RETURN THE REPAIRED OR
DISTRIBUTOR/DEALER
AS
EXPLAINED
PRODUCT WARRANTY PERIOD
Car Stereo
The warranty period for retail customers who rent the product commences upon the date product is first put into use (a) during the rental period or (b) retail sale, whichever occurs first.
Products
WHAT IS NOT COVERED
IF
THIS PRODUCT
OF MERCHANTABILITY AND THE IMPLIED WARRANTY OF FITNESS
PIONEER
PIONEER DOES NOT
THIS WARRANTY DOES NOT APPLY IF THE PRODUCT HAS BEEN
THIS WARRANTY DOES NOT COVER DISPLAY SCREENS
THIS
WARRANTY DOES NOT COVER THE CABINET OR ANY APPEARANCE ITEM, USER ATTACHED ANTENNA, ANY DAMAGE
DAMAGE
UGHTNING ORTO POWER SURGES, SUBSEQUENT DAMAGE FROM LEAKING, DAMAGE FROM INOPERATIVE BATTERIES, OR THE USE OF BATTERIES NOT CONFORMING
SPECIFIEDINTHEOWNER'SMANUAL
WARRANTY
THIS
OBTAINED FROM
DEFECTS OR DAMAGE CAUSED
ALTERED, DEFACED, OR REMOVED
WAS
PURCHASED FROM AN UNAUTHORIZED DISTRIBUTOR, THERE ARE NO WARRANTIES, EXPRESS OR IMPLIED, INCLUDING THE IMPLIED WARRANTY
SHALL
NOT
BE
LIABLE
FOR
ANY
CONSEQUENTIALAND/OR
WARRANT
TO
THE PRODUCT RESULTING FROM ALTERATIONS, MODIFICATIONS NOT AUTHORIZED
DOES
ANY
SOURCE OTHER THAN A PIONEER AUTHORIZED SERVICE COMPANY OR OTHER DESIGNATED LOCATION. THIS WARRANTY DOES NOT COVER
NOT
ANY
PRODUCT LISTED
COVER
THE
COST
BY
THE USE OF UNAUTHORIZED PARTS
SERIAL
NUMBERS
ABOVE
OF PARTS
FORA
WHEN IT IS USED IN A
SUBJECTED
DAMAGED
OR
LABOR
VOID THIS ENTIRE
NO OTHER WARRANTIES
IN
THE
U.S.A.MERCHANTABILITY
WARRANTY PERIOD. SOME STATES DO NOT
OR LIMITATIONS OF INCIDENTAL OR CONSEQUENTIAL DAMAGES, SO THE
YOU SPECIFIC
IN
CANADA-
OR OTHERWISE,
PIONEER
LEGAL
EXCEPT AS EXPRESSLY PROVIDED HEREIN, THERE
APPLICABLE
AND
RIGHTS
LIMITS
FITNESS
ITS
FORA
AND
YOU MAY HAVE OTHER RIGHTS WHICH MAY VARY FROM STATE TO STATE.
TO THIS PRODUCT.
OBLIGATIONS
PARTICULAR PURPOSE,
ALLOW
UNDER
LIMITATIONS ON
ANY
TO OBTAIN SERVICE
In
the U.S.A. or Canada to receive warranty service you need to present your sales receipt or your rental contract showing place and date of original owner's transaction.
Y.M- Please
Your Authorized
list the contact information (phone number, fax, email, etc.)
Your Authorized
Pioneer website at
Pioneer
email or
CANADAShipping
Use adequate padding material to prevent damage in transit. Include your name, address and telephone number where you can be reached during business hours.
On all complaints and concerns
contact
one
of
Pioneer
Dealer-
Pioneer
Service
www.pioneerelectronics.com
Customer
access
Support-
the Pioneer website to
POC has a
Your
Unitfor
number
Service-
For hook-up and operation
the
following
Your Pioneer
Company-
Can advise the optimal service option
of Authorized Service Companies should your product require service. Contact Pioneer
Please package it carefully and send
Pioneer
partners
Dealer
Can
perform
and click on
contact
Pioneer.
in
the U.S.A. call Customer Support at 1-800-421-1404,
IN
THE U.S.A.
of
your unit or to locate an For additional information
to
obtain
may repair or replace your unit,
for
your Dealer.
repairs for
"Support"
it,
Authorized Service Company, please call or write:
CUSTOMER SUPPORT
I PIONEER ELECTRONICS (USA) INC. PIONEER ELECTRONICS OF CANADA, INC.
P.O.
BOX 1720 340 FERRIER STREET UNIT 2
LONG BEACH, CALIFORNIA 90801 MARKHAM
1-800-421-1404 (905) 4 79-4411 ' 1-877-283-5901
http://www. pioneerelectronics. com
DISPUTE RESOLUTION
IN THE U.S.A. - Following
Resolution Program to resolve the dispute. The Complaint Resolution Program is available to you without charge. You are required to use the Complaint Resolution Program
before you exercise any rights under, or seek any remedies, created by Title I
To
use the Complaint Resolution Program call 1-800-421-1404 and explain to the customer service representative the problem you are experiencing, steps you have taken to
have the product repaired during the warranty period and the name
has been explained to the representative, a resolution number will be issued. Within 40 days of receiving your complaint, Pioneer will investigate the dispute and will either:
(1) respond to your complaint
informing you why it will not take any action.
IN
CANADA-
Call the Customer Satisfaction Manager at (905) 946-7 412 to discuss your complaint and to obtain a prompt resolution.
our
response to any initial request to
in
writing informing you what action Pioneer will take, and
Customer
IN
COUNTRY OF PRODUCT PURCHASE
PUSAinthe
OWNER
OF THIS PIONEER PRODUCT DURING THE
ORIGINAL
THE
PRODUCT
IN THIS DOCUMENT. YOU
PARTICULAR PURPOSE AND THIS PRODUCT IS SOLD STRICTLY
INCIDENTAL
BY
TOA
ARE
most
for
transportation prepaid by a traceable, insured method, to an Authorized Service Company or Pioneer.
TO POWER IN EXCESS OF ITS PUBLISHED POWER RATING.
STATIC, NON-MOVING, IMAGES APPLIED FOR LENGTHY PERIODS (BURN-IN).
WHICH
OR
LABOR
WARRANTY
IMPLIED WARRANTIES
PERIOD NOT TO EXCEED THE WARRANTY PERIOD.
HOW
LONGAN
ABOVE
NO REPRESENTATIONS, WARRANTIES, OBLIGATIONS OR CONDITIONS, IMPLIED, STATUTORY
service:
Car
Electronics products and can advise other options as applicable. Please
and select
your
model and
IN THE U.S.A. OR
PURCHASE
MUST
BE
REPLACEMENT
DAMAGES.
TRADE
OR BUSINESS OR IN
IN
WRITING BY PIONEER, ACCIDENT, MISUSE OR ABUSE, DAMAGE DUE
WOULD
BE
OTHERWISE PROVIDED
OR FROM IMPROPER MAINTENANCE.
INCLUDING,
IMPLIED WARRANTY LASTS
LIMITATIONS OR EXCLUSIONS MAY
or
refer you to an Authorized Pioneer
"Find a Service
geographic
location. Please reference
or,
CANADA.
OR, IF RENTED,
DELIVERED WITHIN
WILL
Center"
in
Canada, call Customer Satisfaction at (905) 479-4411.
YOUR
BE
RESPONSIBLE FOR
PRODUCT TO YOU WITHIN THE COUNTRY OF PURCHASE .
ANY
TO
BUT
NOT
AND
to find the
of
Canada as listed below to obtain a local service location.
U.S.A., and by POC
YOU
THE
INDUSTRIAL OR COMMERCIALAPPLICATION.
RECORDS OR RECORDING TAPES OR
WITHOUT
LIMITED
SOME STATES DO NOT
IN
on
WARRANTY
WILL
BE
RENTAL
NO
NOT
Service
nearest
the
REQUIRED TO PROVIDE A
CONTRACT
WARRANTY
REMOVALAND
"AS
CHARGE
TO,
THE
WARRANTIES
APPLY TO YOU. THIS WARRANTY GIVES
Company. Your sales receipt should
Pioneer servicer.
information listed
CANADA
this warranty, please call or write:
in
Canada that fail to
PERIOD PROVIDED THE
SHOWING THE
PERIOD, TRANSPORTATION
IS" AND "WITH
IMPLIED WARRANTIES
INSTALLATION OF
~
1 Year
UNDER
THIS
SHALL
APPLY AFTER THE
ALLOW
THE EXCLUSIONS
access
below
.Y.QQ.r
1 Year
ALL
FAULTS".
DISCS,
TO
WARRANTY
the
and phone,
CUSTOMER SATISFACTION GROUP
ON
L3R 2Z5
http://www.pioneerelectronics.ca
Support, should a dispute arise between you and Pioneer, Pioneer makes available its Complaint
ofthe
Magnuson-Moss Warranty-Federal Trade Commission Improvement Act, 15 U.S.C. 2301
of
the authorized Distributor/Dealer from whom the Pioneer product was purchased. After the complaint
in
what time period, to resolve the dispute; or (2) respond to your complaint
in
SALES
PLACE
ANY
TO
THOSE
OF
et
seq.
writing
Model
No.
___________________
Purchased From
UCC0212
RECORD THE PLACE AND DATE OF PURCHASE FOR FUTURE REFERENCE
Serial No.
____________________________________________________
KEEP THIS INFORMATION AND YOUR SALES RECEIPT
_________________
IN
A SAFE PLACE
Purchase Date
_________
< QRY3001-B/N >
Pirnted
in
Thailand
_
__
 Loading...