


En
INSTRUCTION MANUAL
TR-90
En
De
Fr
Es
It
Pl
Ru
Cn
Cn
Simp
Trad
INSTRUCTION MANUAL.................................................................. 2
BENUTZERHANDBUCH................................................................. 20
MANUEL D’UTILISATION.............................................................. 40
MANUAL DE INSTRUCCIONES.................................................... 60
ISTRUZIONI D’USO.......................................................................... 80
INSTRUKCJA OBSŁUGI..................................................................100
РУКОВОДСТВО ПОЛЬЗОВАТЕЛЯ............................................120
说明书..................................................................................140
說明書..................................................................................156
1
2

En
INSTRUCTION MANUAL
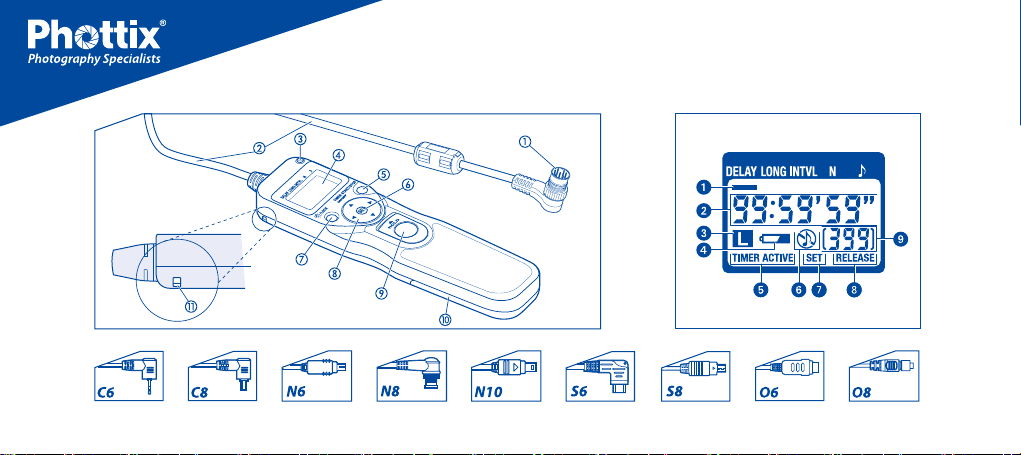
Parts of the TR-90
Refer to the illustrations above
Body
Connector
Cord
Release lamp
Display panel
TIMER START/STOP button
ON/OFF button
SET button
Illuminator/lock button
Selector button
Shutter-release button
Battery-chamber cover
Eyelet for strap (available separately; use
cell phone or other similar strap)
For Your Safety
To prevent damage to your product or
injury to yourself or to others, read the
following safety precautions in their entirety
before using this equipment. Keep these
safety instructions where all those who use
this equipment will read them.
The consequences that could result from
failure to observe the precautions listed in this
section are indicated by the following symbol:
This icon marks warnings, information
that should be read before using this
Phottix product to prevent possible
injury.
Do not disassemble or modify
Failure to observe this precaution could result
in electric shock or product malfunction.
Should the product break open as the result of
a fall or other accident, remove the batteries
and take the product to a Phottix-authorized
service representative for inspection.
3

Keep dry Keep out of reach of children
Do not handle with wet hands or immerse in
or expose to water or rain. Failure to observe
this precaution could result in fire or electric
shock.
Do not use in the presence of
flammable gas
Failure to observe this precaution could
result in explosion or fire.
4
This device contains small parts which may
pose a choking hazard. Consult a physician
immediately if a child swallows any part of
this device.
Turn off immediately in the
event of malfunction
Should you notice smoke or an unusual
smell coming from this device, remove the
battery immediately and take the device to
a Phottix-authorized service representative
for inspection, taking care to avoid burns.
Continued operation could result in injury.
Do not expose to high
temperatures
Do not leave the device in a closed vehicle
under the sun or in other areas subject to
extremely high temperatures. Failure to
observe this precaution could result in fire
or in damage to the casing or internal parts.

En
INSTRUCTION MANUAL
Observe precaution when
handling batteries
Batteries may leak or explode if improperly
handled. Observe the following precautions
when handling batteries for use in this
device:
• Use only batteries listed in this manual. Do
not mix old and new batteries or batteries of
different types.
• Read and follow all warnings and
instructions
provided by the manufacturer.
• Do not short or disassemble.
• Do not expose to flame or excessive heat.
• Do not attempt to insert batteries upside
down or backwards.
• Batteries are prone to leakage when
fully discharged. To avoid damage to the
product, be sure to remove the batteries
when leaving the product unattended
for prolonged periods or when no charge
remains.
• Should liquid from the batteries come
into contact with skin or clothing, rinse
immediately with fresh water.
5
Parts of the TR-90
*
Display Panel
Selection cursor
Timer display
Lock indicator
Low battery indicator
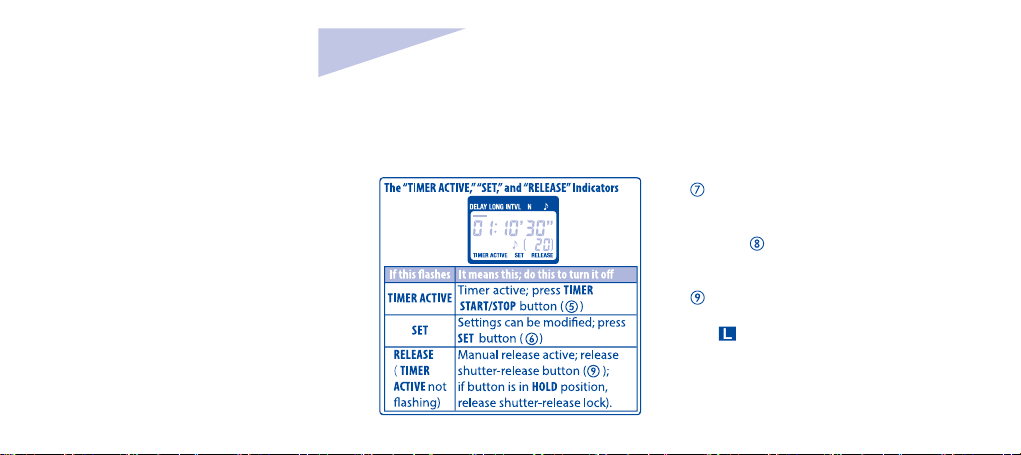
“TIMER ACTIVE” indicator
Speaker on/off indicator
“S ET” indicator
“RELEASE” indicator
Number of shots
6
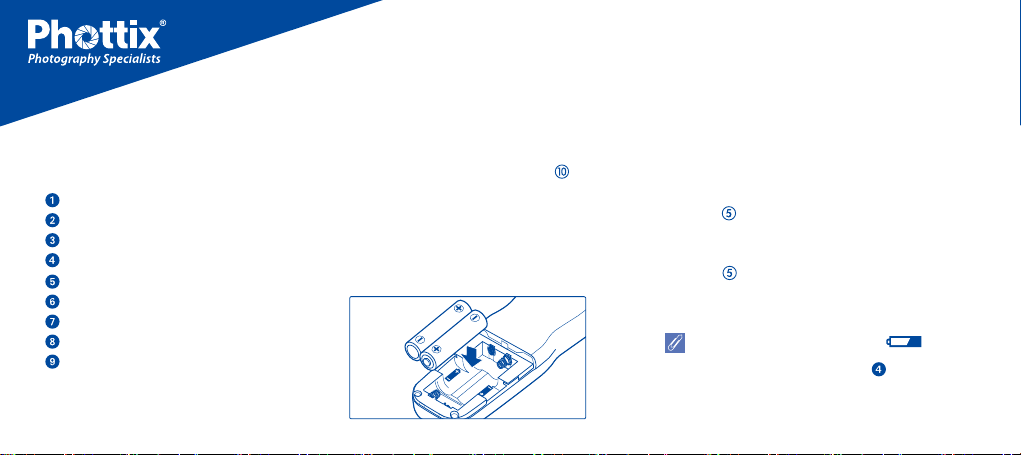
Inserting Batteries
Slide the battery-chamber cover ( ) from
the back of the TR-90 and insert two AAA
1.5 V LR03 alkaline batteries (available
separately) as shown.
The TR-90 will power on after batteries are
inserted. If not being used please turn off
(below).
Inserting Batteries
Power on/off:
Power on: Press the TIMER START/STOP
button (
will light up.
Power off: Press the TIMER START/STOP
button (
will go blank when the TR-90 shuts powers
off.
) for 3 seconds. The display panel
) for 3 seconds. The display panel
The Low Battery Indicator (
The low battery indicator ( ) will blink
when the batteries are low. Ready spare
batteries.
)
En
INSTRUCTION MANUAL
Replacing Batteries
When replacing batteries:
1.
Turn the camera and TR-90 off and
disconnect the TR-90.
2. Remove the batteries.
3. Insert new batteries
Parts of the TR-90
The Illuminator/Lock Button
Press the illuminator/lock button
( ) briefly to activate the control panel
backlight. The backlight will remain lit for
about six seconds; pressing the selector
button ( ) while the backlight is on
extends the timer for another six seconds. To
lock all controls except the shutter-release
( ) and illuminator/lock buttons, press
the illuminator lock button until the lock
icon( ) is displayed in the control panel.
To release the lock, press the illuminator/
lock button until the lock icon is no longer
displayed.
7
Connecting the TR-90
1. Turn the camera and TR-90 off.
2. Insert the cable into the camera remote
port.
8
Disconnecting the TR-90
Turn the camera and TR-90 off and
disconnect the TR-90.
Using the TR-90
The TR-90 functions as:
• An automatic timer Choose the delay
(time before shooting starts), exposure time,
interval, and number of shots for timed
interval photography. Shutter speed can be
selected with the camera if desired.
• A manual release Take photographs
manually using the shutter-release button
on the TR-90. Photographs can be taken
manually even when the timer is running.
Timed Photography
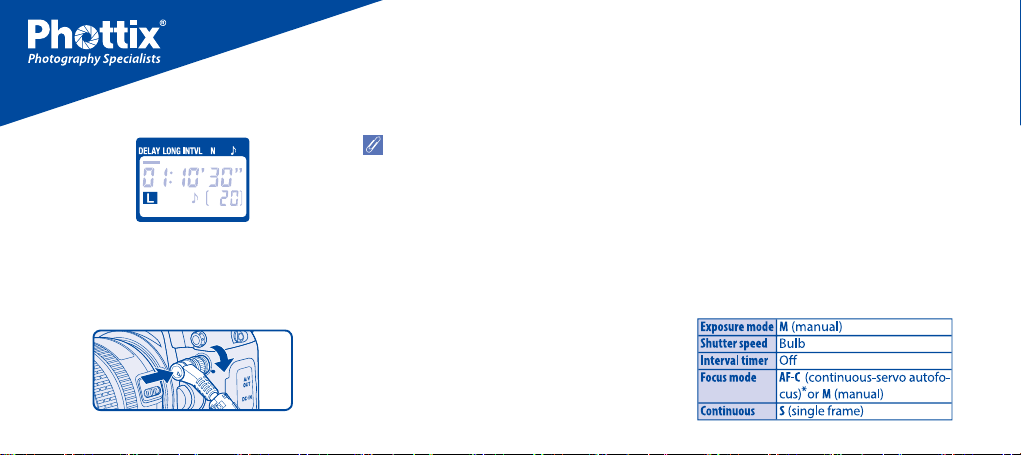
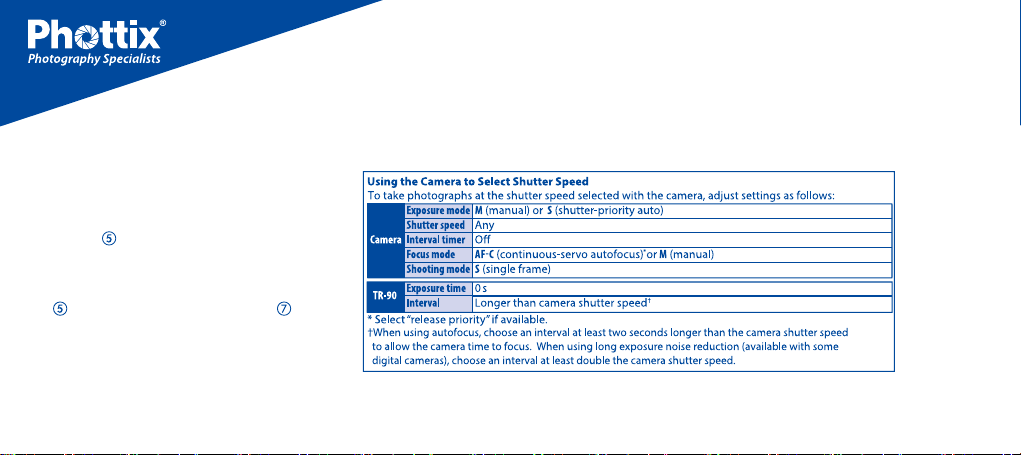
1. Adjust Camera Settings
1.1 Connect the TR-90 and turn the camera
on.
1.2 Adjust camera settings as follows (see
the camera manual for details):

En
INSTRUCTION MANUAL
* Select “release priority” if available.
2. Set the Timer
2.1 Press the SET button (
flash in the display panel.
The TR-90 can be connected to the camera
after the timer has been set.
). “SET” will
Timed Photography
2.2 Adjust the following settings:
9

Timed Photography
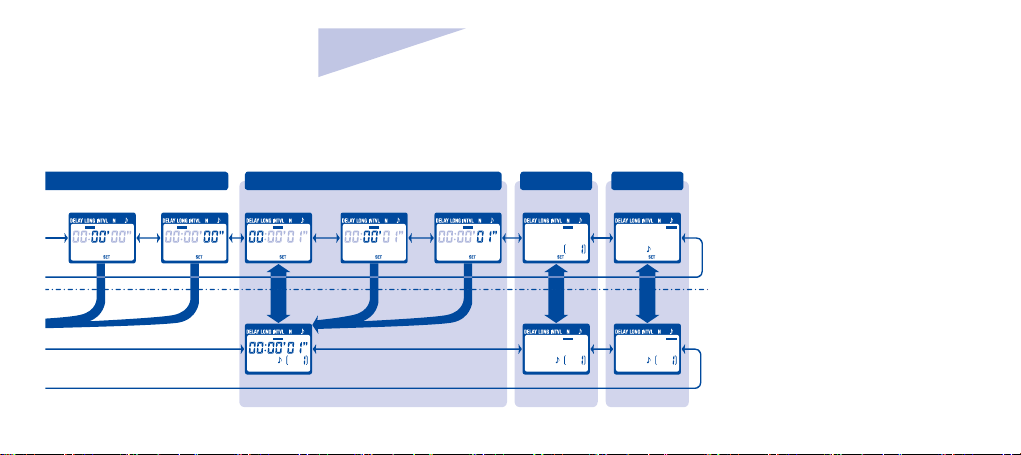
Setting the Timer
Use the selector button to set the timer.
Press left or right to select, up or down
to change. The current selection is indicated
by the selection cursor (
Press SET ( ) at any time to complete the operation
and display the new settings for the selected item.
To view other settings, press the selector button
left or right.The current selection is indicated by the
selection cursor ( ). Press the SET button to edit
the current setting as described above.
10
).
Adjust
settings
Setting
complete
Delay (time until shooting starts)
SecondMinuteHour
Hour
En
INSTRUCTION MANUAL
Timed Photography
Exposure time Interval Number of shots Speaker
Minute MinuteSecond
Hour Second
11

Timed Photography
Setting the Timer
To ensure correct operation, choose an
interval at least one second longer than
the exposure time. When using autofocus,
set the delay to two seconds or more and
choose an interval at least two seconds
longer than the exposure time to ensure
that the camera has time to focus. When
using long exposure noise reduction
(available with some digital cameras),
the interval should be at least twice the
exposure time.
12
Intervals of 00:00:00 will automatically be
reset to 00:00:01 when the SET button (
is pressed to put settings into effect.
To set the number of shots to
select 1 and press the selector button ( )
down or select 399 and press the selector
button up.
2.3 After adjusting all settings as desired,
press the SET button (
settings into effect. A beep will sound (if the
speaker is on) and the “SET” indicator will
go out.
(unlimited),
) to put the new
)
The new settings will remain in effect until
changed or until the batteries are removed
or exhausted.
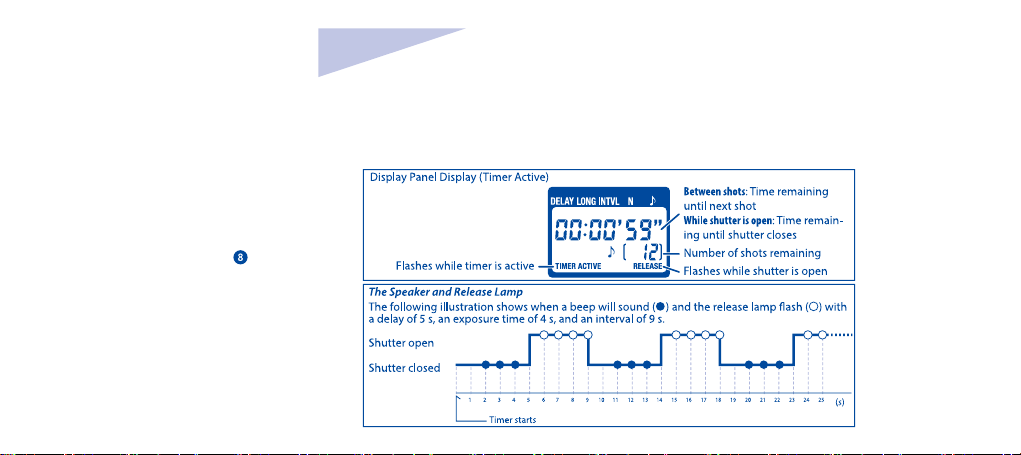
3. Start the Timer
Press the TIMER START/STOP button(
The timer will start and “TIMER ACTIVE”
( ) will flash in the display panel. Between
shots, the display panel will show the time
remaining until the next photograph is
).
En
INSTRUCTION MANUAL
taken. If the speaker is on, a beep will sound
three times at one-second intervals before
the shutter opens.
While the shutter is open, the display
panel will show the time remaining until
the shutter closes, and the release lamp
and “RELEASE” indicator (
one-second intervals. The number of shots
remaining will be updated each time a
photograph is taken.
) will flash at
Timed Photography
13
4. End Shooting
Shooting will end automatically when the
selected number of shots has been taken. To
end shooting before all photographs have
been taken, press the TIMER START/STOP
button (
5. Clear Timer setting
Pressing the TIMER START/STOP button
(
same time will clear all timer settings and
reset the TR-90.
14
).
) and illuminator
/
lock button ( ) at the
Timed Photography
En
INSTRUCTION MANUAL
Using the Timer
Before using the timer for extended periods,
check that the batteries have enough
charge. Replace the batteries when the
low battery indicator ( ) flashes in the
display panel ( ).
Manual Release
The TR-90 shutter-release button ( )
functions in much the same way as the
camera shutter-release button.
1. Adjust Camera Settings
Connect the TR-90 and turn the camera
on. Choose exposure mode, shutter speed,
focus mode, and shooting mode as desired.
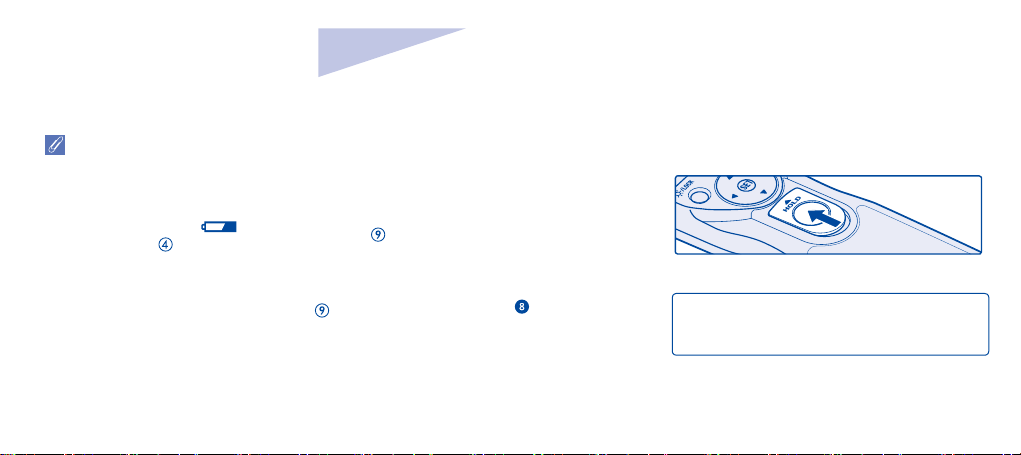
2. Take Pictures
2.1 Press the TR-90 shutter-release button
(
) halfway and check focus and exposure,
then press it the rest of the way down to
take a picture. While the shutter is open, a
beep will sound at one-second intervals, the
“RELEASE“ indicator ( ) will flash, and the
display panel will show the time remaining
until the shutter closes.
To keep the shutter-release button fully
pressed for bulb photography, slide the
button to the HOLD position. Slide it in the
opposite direction to release the lock.
2.2 Release the button to end shooting
The TR-90 shutter-release button can be used
when no batteries are inserted. The display
panel will remain off and no beep will sound.
15

The shutter-release button can be used to
release the shutter manually while the timer
is active. Timer count-down (including the
display panel display, release lamp, and
beep) continues during manual release. If a
manual release overlaps with an automatic
release, the shutter will remain open until
both exposure times have expired.
Precautions for Use
Check the camera battery level and number
of exposures remaining before using the TR90 (see the camera manual for details). The
16
timer will continue to operate even when no
pictures can be recorded due to low battery,
lack of film or memory, or lack of space in
the
memory buffer (digital cameras only).
Some cameras have an AF activation option
that determines whether the camera will
focus when the shutter-release button is
pressed halfway (see the camera manual for
details). Enable shutter-release button AFactivation when using the TR-90.
Please note that the timer is less accurate
than most watches or household clocks.
Caring for the TR-90
Do not drop: The product may malfunction
if subjected to strong shocks or vibration.
Keep dry: This product is not waterproof
and may malfunction if immersed in water
or exposed to high levels of humidity.
Rusting of the internal mechanism can
cause irreparable damage.
Avoid sudden changes in temperature:
Sudden changes in temperature, such
as occur when entering or leaving a
heated building on a cold day, can cause
condensation inside the device. To prevent

En
INSTRUCTION MANUAL
condensation, place the device in a carrying
case or a plastic bag before exposing it to
sudden changes in temperature.
Keep away from strong magnetic fields:
Strong static charges or the electromagnetic
fields produced by equipment such as radio
transmitters could interfere with the device.
A note on electronically-controlled devices:
In extremely rare instances, unusual
characters may appear in the display panel
and the device may stop functioning. In
most cases, this phenomenon is caused
by a strong external static charge. Turn the
camera off, disconnect the TR-90, remove
the batteries, and then replace them once
the display panel has turned off . Caution
is required when handling the batteries,
which may be hot from use. In the event of
continued malfunction, contact your retailer
or Phottix.
The display panel: LCD displays tend to
darken at high temperatures and exhibit
slower response times at low temperatures.
This does not indicate a malfunction.
17
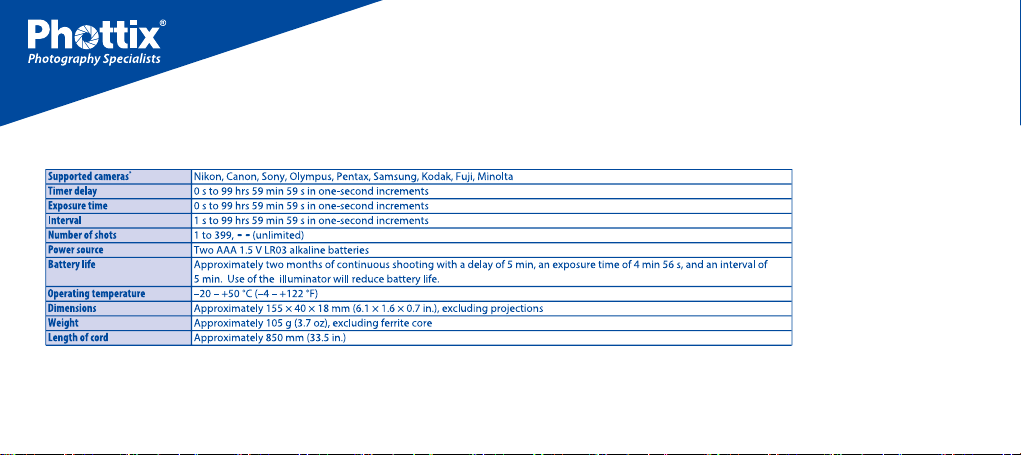
Specifications
18

En
INSTRUCTION MANUAL
19

20

De
BEDIENUNGSANLEITUNG
Komponenten des TR-90
Siehe Abbildungen auf dem Deckblatt
Body
Stecker
Kabel
Auslöser-Kontrollleuchte
Display
Taste TIMER START/STOP
ON/OFF Taste
SET-Taste
Beleuchtung/Arretierung
Pfeiltaste
Auslöser
Batteriefach (hinter Abdeckung)
Öse für Trageriemen (seperat erhältlich;
Mobiltelefon-Trageriemen o.ä. verwenden)
Sicherheitshinweise
Bitte lesen Sie diese Sicherheitshinweise
aufmerksam durch, bevor Sie Ihr PhottixProdukt in Betrieb nehmen, um Schäden
am Produkt zu vermeiden und möglichen
Verletzungen vorzubeugen. Halten Sie
diese Sicherheitshinweise für alle Personen
griffbereit, die dieses Produkt benutzen
werden.
Die in diesem Abschnitt beschriebenen
Warnhinweise und Vorsichtsmaßnahmen
sind durch das folgende Symbol
gekennzeichnet:
Dieses Symbol kennzeichnet wichtige
Warnhinweise, die Sie unbedingt
vor Gebrauch Ihres Phottix-Produkts
lesen sollten, um möglichen
Verletzungen vorzubeugen.
21

Nehmen Sie das Gerät nicht
auseinander
Andernfalls besteht das Risiko eines
Stromschlags oder einer Fehlfunktion
des Produkts. Falls das Gerät durch einen
Sturz oder eine andere äußere Einwirkung
beschädigt werden sollte, entfernen Sie die
Batterien und wenden sich zur Reparatur
an Ihren Fachhändler oder PhottixKundendienst.
22
Setzen Sie das Gerät keiner
Feuchtigkeit aus
Gerät nicht mit nassen Händen anfassen
und vor Wasser und Regen schützen. Eine
Missachtung dieser Vorsichtsmaßnahme
könnte einen Brand oder Stromschlag
verursachen.
Benutzen Sie die Kamera nicht in
der Nähe von brennbarem Gas
Eine Missachtung dieser Vorsichtsmaßnahme
könnte zu einer Explosion oder zu einem
Brand führen.
Achten Sie darauf, dass Kamera
und Zubehör nicht in die Hände
von Kindern gelangen
Das Gerät enthält keine Teile, die eine
Erstickungsgefahr darstellen. Wenden Sie sich
sofort an einen Arzt, wenn ein Kind ein Teil
dieses Geräts verschluckt hat.
Schalten Sie das Gerät bei einer
Fehlfunktion sofort
Aus wenn es bei diesem Gerät zu ungewöhnlicher
Geruchs-oder Rauchentwicklung kommt,

De
BEDIENUNGSANLEITUNG
müssen die Batterien sofort entfernt werden
und wenden Sie sich zur Überprüfung an
Ihren Fachhändler oder an den PhottixKundendienst. Der fortgesetzte Betrieb kann
zu ernsthaften Verletzungen führen.
Hohe Temperaturen vermeiden
Das Gerät darf niemals direktem Sonnenlicht
oder hohen Temperaturen ausgesetzt werden.
Eine Missachtung dieser Vorsichtsmaßnahme
kann zu einem Brand oder zu einer Beschädigung
des Gehäuses oder der Teile im Geräteinneren
führen.
Besondere Vorsicht mit Batterien
Batterien können bei unsachgemäßer
Anwendung auslaufen oder explodieren.
Beachten Sie die folgenden Punkte, wenn Sie
Batterien verwenden:
• Verwenden Sie nur in die in dieser Anleitung
beschriebenen Batterietypen.Benutzen Sie
immer Batterien mit gleichem Ladungsstand.
Mixen Sie neue und alte Batterien nicht!
•
Lesen und beachten Sie die vom Hersteller
angegebenen Warnhinweise und Anweisungen.
• Schließen Sie Batterien nicht kurz und
versuchen Sie niemals, sie zu öffnen.
• Setzen Sie Batterien keinem offenen Feuer
oder übermäßiger Hitze aus.
• Batterien richtig herum einsetzen.
•
Die Gefahr des Auslaufens ist vor allem bei
leeren Batterien gegeben. Um Beschädigungen
des Geräts zu vermeiden, sollten Sie die Batterien
entnehmen, wenn Sie den Fernauslöser über
einen längeren Sicherheitshinweise Zeitraum
nicht benutzen oder wenn die Batterien völlig
entladen sind.
• Wenn Batterieflüssigkeit mit Haut oder
Kleidung in Kontakt kommt, spülen Sie die
betroffenen Stellen sofort mit frischem Wasser
aus.
23

Komponenten des TR-90
Display *
Auswahl-Cursor
Timer-Anzeige
Arretierungsanzeige
Anzeige für niedrigen Batteriestand
“TIMER ACTIVE” (Timer aktiv)-Anzeige
Lautsprecher ein/aus-Anzeige
“S ET” - Anzeige
“RELEASE” (Auslöser)-Anzeige
Anzahl Aufnahmen
24
Einsetzen der Batterien
Öffnen Sie die Abdeckung des Batteriefachs
( ) auf der Rückseite des TR-90 und setzen
Sie zwei Alkaline-Microbatterien 1,5 V
LR03 (separat erhältlich) in der gezeigten
Ausrichtung ein.
Der TR-90 schaltet sich ein, nachdem
Batterien eingesetzt wurden. Bitte
entnehmen Sie die Batterien bei längerer
Nichtbenutzung.

De
BEDIENUNGSANLEITUNG
Ein- und Ausschalten des Timers
Power on/off:
Power on: Drücken Sie die TIMER START/
STOP Taste (
leuchtet auf.
Power off: Drücken Sie die TIMER START/
STOP Taste (
erlischt wenn der TR-90 sich abschaltet.
Anzeige für niedrigen Batteriestand
(
Die Anzeige für niedrigen Batteriestand
(
niedrig ist. Halten Sie Ersatzbatterien
bereit.
) für 3 Sekunden. Das Diplay
) für 3 Sekunden. Das Diplay
)
) blinkt, wenn die Batterieladung
Batterien austauschen
Um Batterien zu wechseln:
1.
Stellen Sie die Kamera und den TR-90 aus.
Entfernen Sie den TR-90 aus der Kamera
2. Entnehmen Sie die Batterien.
3. Setzen Sie neue Batterien ein.
Komponenten des TR-90
.
25

Beleuchtung/Arretierung
Drücken Sie kurz die Taste Beleuchtung/
Arretierung( ),um die Display-Beleuchtung
einzuschalten. Die Beleuchtung bleibt ca.
sechs Sekunden lang an; durch Drücken
der Pfeiltaste( )bei eingeschalteter
Beleuchtung verlängert sich die
Beleuchtung um weitere 6 Sekunden.Um alle
Bedienelemente außer dem Auslöser ( )
und der Taste Beleuchtung/Arretierung zu
sperren, drücken Sie die Taste Beleuchtung/
Arretierung, bis das Symbol( ) auf dem
Display angezeigt wird. Drücken Sie die
Taste Beleuchtung/Arretierung, bis das
26
Symbol verschwindet um die Arretierung
aufzuheben.
Anschluss de TR-90
1 . Schalten Sie die Kamera aus.
2.
Stecken Sie das Kabel in die Kamerabuchse.
Entfernen des TR-90
Schalten Sie die Kamera und den TR90 aus. Entfernen Sie das Kabel aus der
Kamerabuchse.
De
BEDIENUNGSANLEITUNG
Verwendung des TR-90
Funktionen des TR-90:
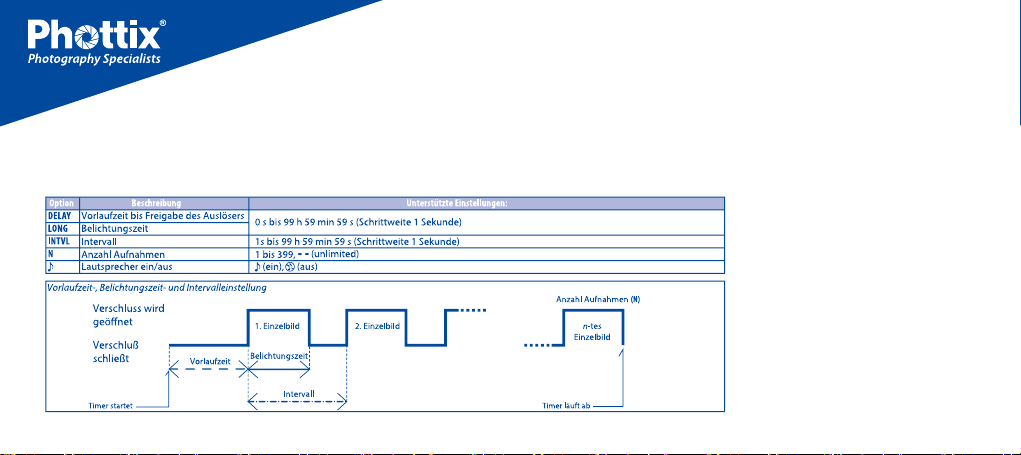
• Automatischer Timer Wählen Sie die
Vorlaufzeit (Zeit bis Beginn der Aufnahme),
Belichtungszeit,Intervall und Anzahl
Aufnahmen für die Intervallaufnahmen aus.
Die Belichtungszeit kann ggf. auch mit der
Kamera eingestellt werden.
• Manuelles Auslösen Machen Sie mit
Hilfe des Auslösers auf dem TR-90 manuelle
Aufnahmen.Sobald der Timer aktiviert ist,
können Sie manuelle Aufnahmen machen.
Aufnahmen mit Timer
1. Kameraeinstellungen
1.1 Schließen Sie den TR-90 an und schalten
Sie die Kamera ein.
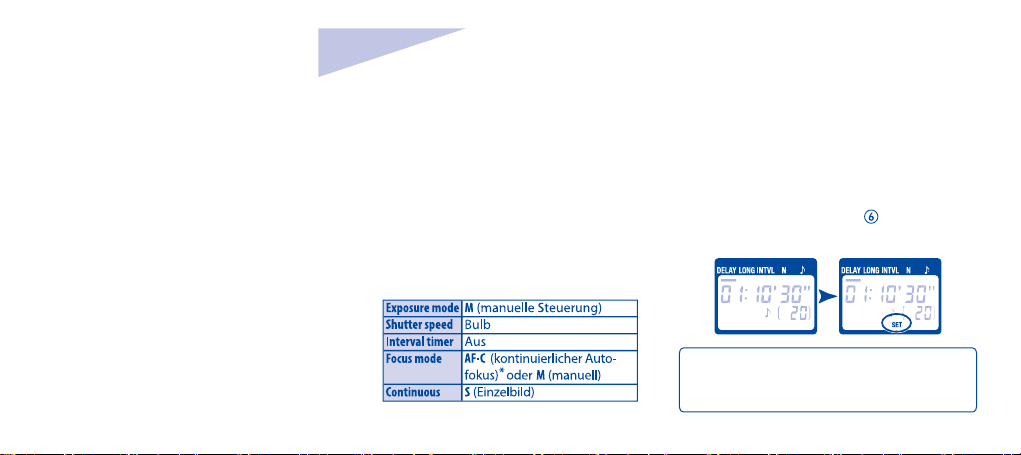
1.2 Nehmen Sie die Kameraeinstellungen
wie folgt vor (Nähere Einzelheiten finden Sie
in der Bedienungsanleitung der Kamera):
* Wählen Sie “Auslösepriorität“, falls
vorhanden.
2. Timer einstellen
2.1 Drücken Sie SET-Taste (
auf dem Display.
Der TR-90 kann nach dem Einstellen des
Timers an die Kamera angeschlossen
werden.
). “SET” blinkt
27
Aufnahmen mit Timer
2.2 Nehmen Sie folgende Einstellungen vor:
28
De
Aufnahmen mit Timer
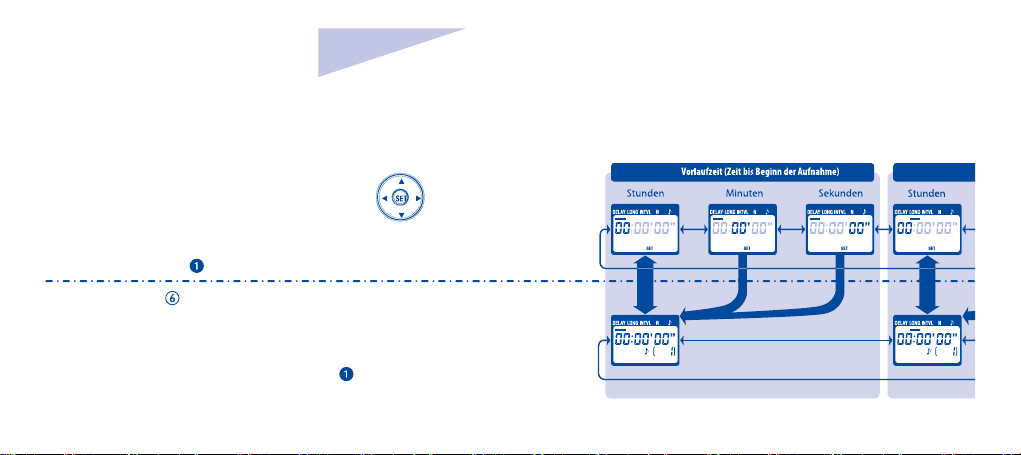
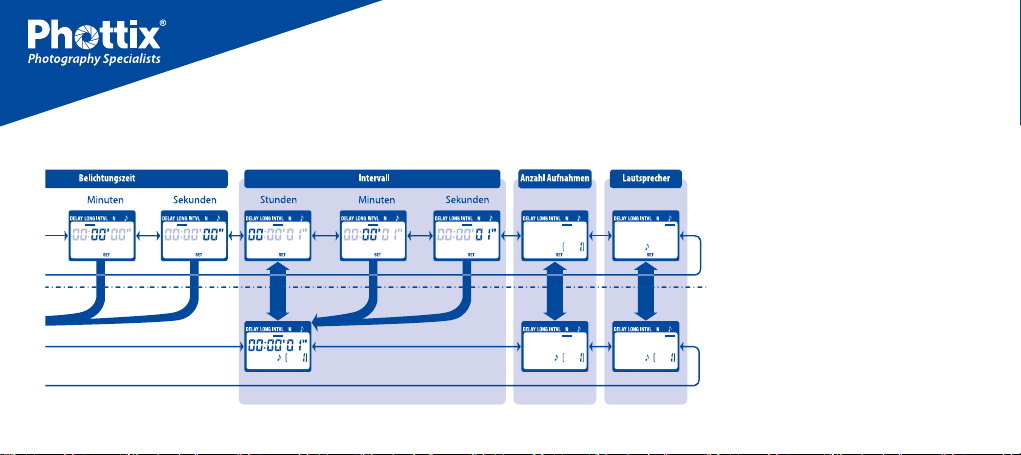
Einstellen des Timers
Stellen Sie den Timer mit der Pfeiltaste ein.
Drücken Sie links oder rechts, um eine
Einstellung zu markieren, und anschließend
oben oder unten, um den gewünschten Wert
einzustellen. Die aktuelle Einstellung wird durch
den Auswahl Cursor ( ) angezeigt.
Drücken Sie SET ( ) um den Vorgang
abzuschließen und um die neuen Einstellungen
für das ausgewählte Element anzuzeigen. Um
andere Einstellungen anzuzeigen, drücken Sie
die Taste nach links oder rechts. Die aktuelle
Einstellung wird durch den Auswahl Cursor( )
angezeigt. Drücken Sie die Taste SET, um die
aktuelle Einstellung wie oben beschrie ben zu
bearbeiten.
BEDIENUNGSANLEITUNG
Nehmen Sie die
nötigen Einstel lungen vor
Einstellung
abgeschlossen
29
Aufnahmen mit Timer
30

De
BEDIENUNGSANLEITUNG
Aufnahmen mit Timer
Einstellen des Timers
Damit ein fehlerfreier Betrieb gewährleistet
ist, sollte das Intervall mindestens eine
Sekunde länger als die Belichtungszeit
sein. Bei Verwendung des Autofokus
müssen Sie die Vorlaufzeit auf zwei
Sekunden oder länger einstellen und ein
Intervall wählen, das mindestens zwei
Sekunden länger als die Belichtungszeit ist.
Somit stellen Sie sicher, dass die Kamera
genug Zeit zum Scharfstellen hat. Bei
Verwendung der Rauschunterdrückung
bei Langzeitbelichtungen (bei einigen
Digitalkameras verfügbar) sollte das Intervall
mindestens doppelt so lang sein wie die
Belichtungszeit.
Intervalle von 00:00:00 werden automatisch
auf 00:00:01 zurückgesetzt, wenn die
Taste SET (
Einstellungen gedrückt wird. Stellen Sie
die Aufnahmeanzahl auf (unbegrenzt)
ein, wählen Sie 1 aus und drücken Sie die
Pfeiltaste ( ) nach unten oder wählen Sie
399 aus und drücken Sie die Pfeiltaste nach
oben.
2.3 Nachdem alle Einstellungen wie
gewünscht vorgenommen wurden,
drücken Sie zwecks Übernahme der neuen
) zum Übernehmen der
Einstellungen die Taste SET (
ein akustisches Signal (falls der Lautsprecher
eingeschaltet ist) und die “SET”-Anzeige
geht aus.
Die neuen Einstellung bleiben wirksam,
bis sie geändert werden oder die Batterien
ersetzt werden oder leer sind.
3. Timer starten
Drücken Sie Taste TIMER START/STOP
). Es ertönt
31

). Der Timer wird gestartet und “TIMER
(
ACTIVE” ( ) (Timer aktiv) blinkt auf dem
Display. Zwischen den Aufnahmen zeigt
das Display die verbleibende Zeit bis
zur nächsten Aufnahme an. Wenn der
Lautsprecher eingeschaltet ist, ertönt vor
dem Öffnen des Verschlusses dreimal im
Abstand von jeweils einer Sekunde ein
akustisches Signal.
Wenn der Verschluss geöffnet ist, zeigt
das Display die verbleibende Zeit bis
zum Schließen des Verschlusses an und
die Auslöser-Kontrollleuchte sowie die
32
“RELEASE” (Auslöser)«-Anzeige ( )blinken
im Abstand von einer Sekunde. Die Anzahl
der verbleibenden Aufnahmen wird bei
jeder neuen Aufnahme aktualisiert.

De
BEDIENUNGSANLEITUNG
Aufnahmen mit Timer
4. Aufnahmen beenden
Die Aufnahmen werden automatisch beendet,
wenn die ausgewählte Anzahl Aufnahmen
gemacht wurde. Um die Aufnahmen vorzeitig
zu beenden, müssen Sie die Taste TIMER
START/STOP (
5. Timer Einstellungen löschen
Gleichzeitiges drücken der TIMER START/
STOP (
( ) löscht alle Einstellungen des TR-90 und
setzt ihn auf Werkseinstellungen zurück.
) drücken.
) und Taste Beuchtung/Arretierung
33

Aufnahmen mit Timer
34
Using the Timer
Prüfen Sie vor Einsatz des Timers über
einen längeren Zeitraum, ob die Batterien
genug Ladung haben. Wenn die Anzeige
für niedrigen Batteriestand ( ) auf dem
Display ( ) blinkt, müssen die Batterien
ersetzt werden.
Manuelles Auslösen
Der Auslöser des TR-90 ( ) funktioniert
sehr ähnlich wie der Auslöser der Kamera.

De
BEDIENUNGSANLEITUNG
1. Kameraeinstellungen
Schließen Sie den TR-90 an und schalten Sie
die Kamera ein. Wählen Sie die gewünschte
Belichtungssteuerung, Belichtungszeit,
Fokuseinstellung und Aufnahmebetriebsart
aus.
2. Fotografieren
2.1 Drücken Sie den Auslöser des TR-90 (
bis zum ersten Druckpunkt und überprüfen
Sie, ob das Motiv scharf gestellt und korrekt
belichtet ist. Anschließend drücken Sie
den Auslöser bis zum zweiten Druckpunkt,
um das Bild aufzunehmen. Bei geöffnetem
Verschluss ertönt einmal pro Sekunde ein
Signalton. Außerdem blinkt die Anzeige
“RELEASE“ (Auslöser) (
wird angezeigt, wie lange der Verschluss
noch geöffnet ist.
Um den Auslöser bei Langzeitbelichtungen
vollständig gedrückt zu halten,schieben
Sie die Arretierung in die Position HOLD
(Halten). Der Auslöser ist nicht mehr
arretiert, wenn die Arretierung in die
)
entgegengesetzte Richtung geschoben
wird.
) und im Display
2.2 Zum Beenden der Aufnahmen
Auslöser loslassen
Der Auslöser des TR-90 kann auch
verwendet werden, wenn keine Batterien im
Gerät sind. Das Display bleibt dann aus und
es ertönt kein akustisches Signal.
Bei aktiviertem Timer kann der Verschluss
manuell durch Drücken des Auslösers
geschlossen werden. Der Countdown des
Timers (einschließlich Anzeige im Display,
Auslöser-Kontrollleuchte und Signalton)
wird während der manuellen Auslösung
fortgesetzt. Bei einer Überschneidung von
manueller und automatischer Auslösung
bleibt der Verschluss geöffnet,bis beide
Belichtungszeiten abgelaufen sind.
35

Gebrauchshinweise
Prüfen Sie vor der Verwendung des TR-90
die Akku bzw. Batteriekapazität der Kamera
und die Zahl der noch verbleibenden
Aufnahmen. Der Selbstauslöser bleibt auch
dann aktiv, wenn aufgrund zu geringer
Akku-/Batteriekapazität, dem Erreichen des
Filmendes bzw. unzureichendem Speicher
oder Speicherpuffer keine Aufnahmen
gemacht werden können. Wenn sich die
Aufnahmen über einen längeren Zeitraum
erstrecken, sollte ein Netzadapter (separat
erhältlich) verwendet werden.
36
Einige Kameras besitzen eine AF-Aktivierung,
die bestimmt, ob die Kamera beim Drücken
des Auslösers bis zum ersten Druckpunkt
scharf stellt (Nähere Einzelheiten finden Sie
in der Bedienungsanleitung der Kamera).
Aktivieren Sie bei Verwendung des TR-90 die
AF-Aktivierung des Auslösers.
Bitte beachten Sie, dass der Timer nicht so
genau ist wie herkömmliche Armband- oder
Wanduhren.
Pflege des TR-90
Setzen Sie die Kamera keinen
Erschütterungen aus: Wenn die Kamera
Schlägen oder starken Vibrationen
ausgesetzt ist, kann es zu Fehlfunktionen
kommen.
Setzen Sie das Gerät keiner Feuchtigkeit
aus: Dieses Phottix Produkt ist nicht
wasserdicht. Bei hoher Luftfeuchtigkeit oder
wenn Wasser ins Gehäuse eindringt, kann es
zu Fehlfunktionen kommen. Die Korrosion
der internen Mechanik und Elektronik kann
zu irreparablen Schäden führen.

De
BEDIENUNGSANLEITUNG
Setzen Sie die Kamera keinen starken
Temperaturschwankungen aus: Durch
plötzliche Temperaturänderungen
(beispielsweise beim Verlassen eines gut
beheizten Gebäudes an einem kalten
Wintertag) kann Feuchtigkeit im Inneren
des Gehäuses kondensieren. Um eine
Kondenswasserbildung zu vermeiden,
sollten Sie die Kamera in der Weichtasche
oder in einer Plastiktüte aufbewahren, bevor
Sie an einen Ort mit höherer oder niedriger
Temperatur wechseln.
Schützen Sie die Kamera vor starken
Magnetfeldern: Starke statische
Aufladungen oder elektromagnetische
Felder, wie sie z.B. von Radiosendern erzeugt
werden, können die Funktion des Geräts
stören.
Ein Hinweis zu elektronisch gesteuerten
Geräten: In sehr seltenen Fällen kann
es aufgrund einer äußeren statischen
Aufladung zu einer Störung der Elektro nik
kommen. Als Folge erscheinen seltsame
Zeichen auf dem Display oder das Gerät
funktioniert nicht mehr richtig. Schalten Sie
die Kamera aus, klemmen Sie das TR-90 ab,
entfernen Sie die Batterien und ersetzen Sie
diese, nachdem das Display abgeschaltet
hat. Vorsicht beim Umgang mit den
Batterien. Sie können durch die Verwendung
heiß sein. Bei einer andauernden Störung
wenden Sie sich bitte an Ihren Händler oder
den Phottix-Kundendienst.
Das Display: LCD-Displays werden bei
hohen Temperaturen häufig dunkler; bei
niedrigen Temperaturen reagieren sie
langsamer. Dies ist völlig normal.
37

Technische Daten
38

De
BEDIENUNGSANLEITUNG
39

40

Fr
NOTICE D’UTILISATION
Composants du TR-90
Reportez-vous aux illustrations
ci-dessus
Corps
Connecteur
Câble
Voyant de déclenchement
Écran d'affichage
Bouton TIMER START/STOP
Bouton ON/OFF (Démarrage/Arrêt)
Bouton de SET (Réglage)
Bouton de verrouillage/rétroéclairage
Bouton flèche
Déclencheur
Couvercle du logement des piles
Œillet de sangle (sangle disponible
séparément; utilisez une sangle de
téléphone portable ou similaire)
Pour votre sécurité
Pour ne pas risquer d’endommager votre
matériel ou de vous blesser, vous ou d’autres
personnes, prenez soin de lire attentivement
les recommandations suivantes avant
d’utiliser votre matériel. Gardez ensuite
précieusement ces consignes de sécurité
dans un endroit facilement accessible à tous
ceux qui auront à se servir de cet appareil
photo.
L’importance des conséquences dues au
non-respect de ces consignes est symbolisée
de la manière suivante:
Cette icône signale les consignes qui
doivent être impérativement lues
avant d'utiliser votre matériel Phottix
pour éviter d'éventuels risques
physiques.
41

Ne pas démonter ni modifier le
produit
Le non-respect de cette précaution peut
avoir pour conséquence une décharge
électrique ou un dysfonctionnement du
produit. Si le produit se brise suite à une
chute ou tout autre accident, retirez les
piles et portez-le à un fabricant pour le faire
inspecter.
42
Conserver le produit à l’abri de
l'humidité
Ne manipulez pas le produit avec les mains
mouillées, ne l’immergez pas et ne l’exposez
pas à l’eau ou à la pluie. Le non-respect de
cette précaution peut causer un incendie ou
une décharge électrique.
Ne pas utiliser le produit en
présence de gaz inflammables
Le non-respect de cette précaution peut
causer une explosion ou un incendie.
Ne pas laisser le produit à la
portée des enfants
Cet appareil contient de petites pièces
qui représentent un risque d'étouffement.
Consultez un médecin immédiatement si un
enfant avale une pièce de cet appareil.
Éteindre immédiatement l’appareil
en cas de dysfonctionnement
Si vous remarquez de la fumée ou une odeur
inhabituelle en provenance de l’appareil,
retirez immédiatement les piles et portez-le

Fr
NOTICE D’UTILISATION
à un centre agrée de Phottix pour le faire
inspecter (veuillez à ne pas vous bruler). Si
vous continuez à utiliser le produit dans ces
conditions, vous risquez de vous blesser.
Ne pas exposer le produit à des
températures élevées
Ne laissez pas l’appareil dans un véhicule
fermé en plein soleil ou dans d’autres
endroits soumis à des températures très
élevées. Le non-respect de cette précaution
peut causer un incendie ou endommager le
boitier ou les éléments internes.
Manipuler les piles avec
précaution
Les piles peuvent couler ou exploser si
elles ne sont pas manipulées correctement.
Prenez les précautions suivantes pour
manipuler les piles de cet appareil:
• N’utilisez que les piles mentionnées dans
cette notice. Ne mélangez pas des piles
neuves et usagées ou différents types de
piles.
• Lisez et respectez tous les avertissements
et instructions fournis par le fabricant.
• Veuillez à ne pas court-circuiter ni
démonter le produit.
• Ne l’exposez pas aux flammes ou à une
chaleur excessive.
• N’essayez pas d'insérer les piles à l’envers
ou par l'arrière.
• Les accumulateurs ont tendance à couler
lorsqu’ils sont totalement déchargés. Pour
éviter d’endommager le produit, n’oubliez
pas de retirer les accumulateurs lorsqu’ils
sont déchargés ou lorsque le produit n’est
pas utilisé pendant de longues périodes.
• Si le liquide des piles entre en contact
avec la peau ou les vêtements, rincez
immédiatement avec de l’eau.
43

Composants du TR-90
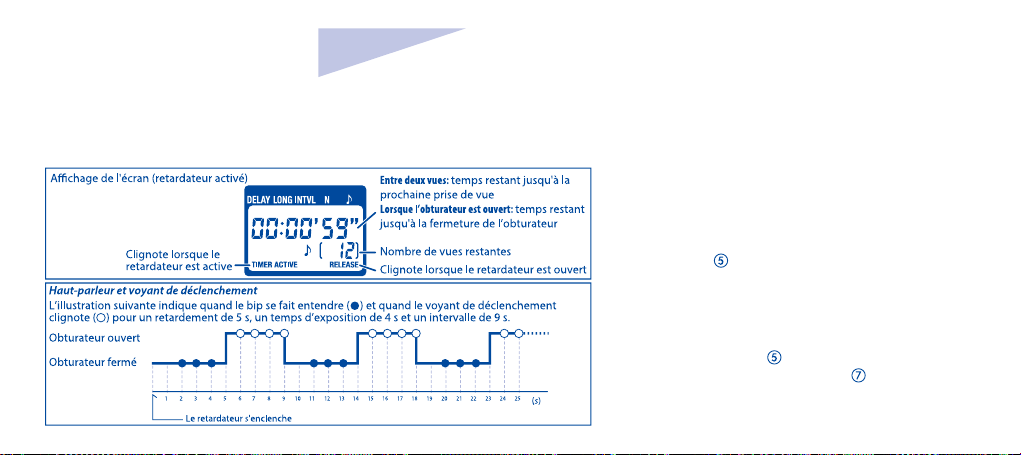
Écran d'affichage *
Curseur de sélection
Affichage du retardateur
Indicateur de verrouillage
Indicateur de pile faible
Indicateur “TIMER ACTIVE” (Retardateur
actif)
Indicateur de marche du haut-parleur
Indicateur “S ET” (Réglage)
Indicateur “RELEASE” (Déclenchement)
Nombre de vues
44
Insertion des piles
Faites glisser le couvercle du logement pour
accumulateurs/piles ( ) à l'arrière du TR90 et insérez deux piles alcalines AAA 1,5 V
LR03 (disponibles séparément) dans le sens
indiqué.
Le TR-90 s'allumera après avoir inséré les
piles. S'il n'est pas utilisé, éteignez-le (cidessus).

Fr
NOTICE D’UTILISATION
Insertion des piles
Allumer / éteindre:
Pour allumer: Appuyez sur le bouton TIMER
START/STOP (
L'écran s'allumera.
Pour éteindre: Appuyez sur le bouton
TIMER START/STOP (
secondes. Lorsque le TR-90 s'éteint, l'écran
s'éteint également.
Indicateur de pile faible (
L’indicateur de pile faible ( ) clignote
lorsque le niveau des piles est faible.
Prévoyez des piles de rechange.
) pendant 3 secondes.
) pendant 3
)
Remplacement des piles
Pour remplacer les piles:
1.
Éteignez l'appareil photo et le TR-90
et puis déconnectez le TR-90.
2. Retirez les piles.
3. Insérez de nouvelles piles.
Composants du TR-90
45

Bouton de verrouillage/rétroéclairage
Appuyez brièvement sur le bouton
de rétroéclairage ( )pour activer le
rétroéclairage de l'écran d'affichage. Le
rétroéclairage reste allumé environ six
secondes; si vous appuyez sur la touche
flèche ( ) alors que le rétroéclairage est
actif, il reste allumé six secondes de plus.
Pour verrouiller toutes les commandes à
l’exception du déclencheur ( ) et des
boutons de verrouillage/ rétroéclairage,
appuyez sur le bouton de verrouillage/
rétroéclairage jusqu'à ce que l'icône de
verrouillage ( ) s’affiche sur l'écran
46
d'affichage. Pour déverrouiller, appuyez sur
le bouton de verrouillage/rétroéclairage
jusqu'à ce que l'icône de verrouillage ne
s’affiche plus.
Connexion du TR-90
1 . Éteignez l’appareil photo et le TR-90.
2.
Insérez le câble dans le port comme
indiqué.
Déconnexion du TR-90
Éteignez le TR-90 et l’appareil photo et
puis déconnectez le TR-90.

Fr
NOTICE D’UTILISATION
Utilisation du TR-90
Le TR-90 fonctionne comme:
• Retardateur automatique. Choisissez
le retardement (durée qui précède la prise
de vue), la durée d’exposition, l’intervalle
et le nombre de vues pour la photographie
à intervalles programmés. La vitesse
d’obturation peut être sélectionnée au
niveau de l’appareil photo, si nécessaire.
• Déclencheur manuel. Prenez des photos
manuellement à l’aide du déclencheur du
TR-90. La prise de vue manuelle est possible
même lorsque le retardateur est enclenché.
Photographie programmée
1. Réglage des paramètres de l’appareil
photo
1.1 Connectez le TR-90 et allumez l’appareil.
1.2 Réglez les paramètres de l’appareil
comme suit (consultez la notice de l’appareil
pour plus d’informations):
* Sélectionnez “priorité au déclenchement“
si cette option est disponible.
2. Réglage du retardateur
2.1 Appuyez sur le bouton SET (
L’indicateur “SET” (Réglage) se met à
clignoter sur l'écran d'affichage.
Le TR-90 peut être connecté à l’appareil
après le réglage du retardateur.
).
47

Photographie programmée
2.2 Réglez les paramètres suivants:
48

Fr
Photographie programmée
Réglage du retardateur
Réglez le retardateur à l’aide du bouton flèche.
Appuyez sur la gauche ou la droite pour faire
votre sélection et sur le haut ou le bas pour faire
la modification. La sélection active est indiquée
par le curseur ( ) .
NOTICE D’UTILISATION
Réglage des
paramètres
Appuyez sur SET ( Réglage
pour terminer et afficher les nouveaux
paramètres de l'élément sélectionné. Pour
afficher d’autres paramètres, appuyez sur le
bouton flèche, à gauche ou à droite. La sélection
active est indiquée par le curseur ( ) . Appuyez
sur le bouton SET(Réglage) pour modifier le
paramètre actif (cf. explications ci-dessus).
) à tout moment
Réglage
terminé
49

Photographie programmée
Temps d’exposition
Minute MinuteSeconde
50
Heure Seconde
Intervalle Nombre de vues Haut-parleur

Fr
NOTICE D’UTILISATION
Photographie programmée
Réglage du retardateur
Afin de garantir le bon fonctionnement
de l’appareil, choisissez un intervalle
supérieur d’au moins une seconde au
temps d’exposition. Lorsque vous utilisez
l’autofocus, réglez le retardement sur deux
secondes ou plus et choisissez un intervalle
supérieur d’au moins deux secondes
au temps d’exposition afin de laisser à
l’appareil le temps de faire la mise au point.
Lorsque vous utilisez la réduction du bruit
en exposition longue durée (disponible
sur certains appareils photo numériques),
l’intervalle doit être au moins égal au double
du temps d’exposition.
Les intervalles de 00:00:00 sont
automatiquement réglés sur 00:00:01 lorsque
vous appuyez sur le bouton SET (Réglage
) pour activer les paramètres. Pour régler le
nombre de vues sur ( illimité ), sélectionnez
1, puis appuyez sur le bouton flèche ( ) vers
le bas ou sélectionnez 399, puis appuyez sur le
bouton flèche vers le haut.
2.3 Après avoir réglé tous les paramètres,
appuyez sur le bouton SET (Réglage ).
pour les activer. Un bip se fait entendre (à
condition que le haut-parleur soit activé) et
l’indicateur “SE T” (Réglage) s'éteint.
Les nouveaux paramètres restent activés
jusqu'à ce que vous les changiez à nouveau
ou jusqu'à ce que les piles soient retirées ou
vides.
51

3. Démarrage du retardateur
Appuyez sur le bouton TIMER START/
STOP(démarrage/arrêt retardateur
retardateur démarre et l'indicateur “TIMER
ACTIVE”(Retardateur actif ) clignote sur
l'écran d'affichage. Entre deux vues, l'écran
affiche le temps restant jusqu'à la prochaine
prise de vue. Si le haut-parleur est activé,
vous entendrez trois bips à une seconde
d’intervalle avant l’ouverture de l’obturateur.
Lorsque l’obturateur est ouvert, l'écran
affiche le temps restant avant la
fermeture de l’obturateur et le voyant
52
de déclenchement ainsi que l’indicateur
“RELEASE” (Déclenchement
toutes les secondes. Le nombre de vues
).Le
restantes est mis à jour à chaque prise de
vue.
) clignote
Fr
NOTICE D’UTILISATION
Photographie programmée
4. Arrêt de la prise de vue
La prise de vue s'arrête automatiquement
lorsque le nombre de vues sélectionné a été
atteint. Pour arrêter la prise de vue avant que
toutes les vues aient été prises, appuyez sur le
bouton TIMER START/STOP (Démarrage/arrêt
retardateur
5. Effacer les réglages du retardement.
Si vous appuyez en même temps sur le
bouton TIMER START/STOP (démarrage/
arrêt retardateur
verrouillage/rétroéclairage ( ), tous les
réglages du retardement seront effacés et le
TR-90 sera réinitialisé.
) .
) et sur le bouton de
53

Photographie programmée
54
Utilisation du retardateur
Si vous souhaitez utiliser le retardateur pour
une longue période, vérifiez au préalable
si les piles sont suffisamment chargées.
Changez les piles si l’indicateur de pile faible
( ) clignote sur l'écran d'affichage ( ).
Déclenchement manuel
Le déclencheur ( ) du TR-90 fonctionne
d'une manière analogue au déclencheur de
l’appareil photo.

Fr
NOTICE D’UTILISATION
1. Réglage des paramètres de l’appareil
photo
Connectez le TR-90 et allumez l’appareil
photo. Choisissez le mode d’exposition, la
vitesse d’obturation, le mode de mise au
point et le mode de prise de vue souhaités.
2. Prise de vue
2.1 Appuyez à moitié le déclencheur
(
) du TR-90 et vérifiez la mise au point et
l'exposition, puis enfoncez-le complétement
pour prendre la photo. Lorsque l'obturateur
est ouvert, un bip se fait entendre toutes
les secondes, l'indicateur “RELEASE“
(Déclenchement ) clignote et l'écran
affiche le temps restant avant la fermeture
de l’obturateur.
Pour maintenir le déclencheur
enfoncé pour photographier en pose longue
(bulb), faites-le glisser en position HOLD.
Faites-le glisser dans le sens opposé pour le
relâcher.
2.2 Relâchez le déclencheur pour arrêter
la prise de vue
complétement
Le déclencheur du TR-90 peut être utilisé
même si aucune pile n’a été insérée. Dans ce
cas, l'écran restera éteint et il n’y aura pas de
bip.
Le déclencheur peut être utilisé pour
déclencher manuellement l’obturateur
même lorsque le retardateur est activé.
Le compte à rebours du retardateur (y
compris l’affichage de l'écran, le voyant
de déclenchement et le bip) se poursuit
pendant le déclenchement manuel. Si
un déclenchement manuel empiète
sur un déclenchement automatique, le
déclencheur demeure ouvert jusqu'à ce que
les temps d’exposition soient écoulés.
55

Précautions d’utilisation
Vérifiez le niveau de charge de
l’accumulateur de l’appareil et le nombre
d’expositions restantes avant d’utiliser le TR90 (consultez la notice de l’appareil photo
pour plus d’informations). Le retardateur
continue à fonctionner même si un
accumulateur faible, l’absence de pellicule,
ou encore l’insuffisance de mémoire ou
d’espace dans la mémoire tampon (appareils
photo numériques uniquement) ne
permettent pas de prendre des photos.
Certains appareils disposent d’une option
d’activation AF qui détermine si l’appareil
56
fait la mise au point lorsque le déclencheur
est à demi enfoncé (consultez la notice de
l’appareil photo pour plus d’informations).
Autorisez l’activation AF par le déclencheur
lorsque vous utilisez le TR-90.
Notez que le retardateur est moins précis
que la plupart des chronomètres ou des
horloges domestiques.
Entretien du TR-90
Ne laissez pas votre appareil tomber:
l’appareil photo risque de mal fonctionner
s’il est soumis à de violents chocs ou à de
fortes vibrations.
Conserver le produit à l’abri de l'humidité:
ce produit n’est pas étanche et peut subir
des dysfonctionnements en cas d’immersion
dans l’eau ou d’exposition à une forte
humidité. La corrosion du mécanisme
interne peut causer des dommages
irréversibles.

Fr
NOTICE D’UTILISATION
Évitez les changements brusques de
température: les changements brusques de
température, comme il peut s’en produire
lorsque vous entrez ou sortez d’un local
chauffé quand il fait froid dehors, sont
susceptibles de créer de la condensation
à l'intérieur de l’appareil. Pour éviter ce
problème, rangez votre équipement dans
un étui ou dans un sac plastique avant de
l’exposer à de brusques changements de
température.
Garder hors de portée des champs magnétiques
puissants:
champs électromagnétiques importants
produits par des équipements tels que des
des charges statiques ou des
émetteurs radio peuvent interférer avec
l’appareil.
Note sur les appareils électroniques:
dans des cas extrêmement rares, des
caractères inhabituels peuvent s’afficher
sur l'écran d'affichage et le fonctionnement
de l’appareil peut être interrompu. Dans
la plupart des cas, ces phénomènes sont
provoqués par une forte charge statique
externe. Éteignez l’appareil, déconnectez le
TR-90, retirez les piles et remplacez-les une
fois l'écran d'affichage éteint. Manipulez
les piles avec précaution car elles peuvent
être chaudes. Si les dysfonctionnements
persistent, contactez votre détaillant ou
votre revendeur.
Écran d'affichage: les écrans LCD tendent
à s’assombrir sous l’effet de hautes
températures et répondent plus lentement
sous l’effet de basses températures. Ceci
n’est pas le signe d’un dysfonctionnement.
57

Caractéristiques
58

Fr
NOTICE D’UTILISATION
59

60

Es
MANUAL DE INSTRUCCIONES
Partes del TR-90
Consulte las ilustraciones de la
contraportada
Terminal
Cable
Indicador de obturador abierto
Panel de control
Botón TIMER START/STOP (Encendido/
Apagado del temporizador) Interruptor
ON/OFF
Botón SET (Ajustar)
Botón de la luz/bloqueo
Botón de flechas
Disparador
Tapa del compartimento de la batería
Ojal de la correa (disponible por separado,
se puede utilizar una correa de teléfono
móvil o una parecida)
Seguridad
Para evitar estropear el producto o lesionar
a otras personas o a usted mismo, lea todas
estas instrucciones de seguridad antes de
utilizar el equipo y guárdelas en un lugar
donde todas las personas que utilicen el
producto puedan leerlas.
Las consecuencias que pueden derivarse
de un incumplimiento de las precauciones
señaladas en esta sección se indica con el
símbolo siguiente:
Este símbolo indica una advertencia:
información que debe leer antes de
utilizar este producto para evitar
posibles danos.
61

No lo desmonte ni lo modifique
En caso contrario, podría producirse
una descarga eléctrica o un fallo en el
funcionamiento del producto. Si, a causa
de un golpe u otro accidente, el equipo se
rompiera y abriera, retire las baterías y lleve
el producto a un servicio técnico autorizado
para su revisión.
Manténgalo en un lugar seco
No lo maneje con las manos mojadas ni lo
sumerja o exponga al agua o a la lluvia. De
62
no ser así, se podría provocar una descarga
eléctrica o un incendio.
No utilice el equipo si hay gas
inflamable
De no ser así, se podría provocar una
explosión o un incendio.
Manténgase fuera del alcance
de los niños
Este dispositivo contiene piezas pequeñas
que podrían provocar la asfixia. Si un niño se
traga una pieza de este dispositivo, consulte
inmediatamente con un medico.
En caso de funcionamiento
defectuoso, apague
inmediatamente el equipo
Si notara humo o un olor anormal
procedente de este dispositivo, retire la
batería inmediatamente y llévelo a un
servicio técnico autorizado para su revisión,
teniendo cuidado de no sufrir quemaduras.
Si sigue utilizando el equipo, corre el riesgo
de lesionarse.

Es
MANUAL DE INSTRUCCIONES
No lo exponga a altas
temperaturas
No deje el dispositivo en un vehículo cerrado
bajo el sol o en otras zonas expuestas a
temperaturas extremadamente altas. Si no
respeta esta medida de seguridad, se podría
originar un incendio o dañarse la carcasa o
las piezas internas.
Precauciones a tomar cuando
se manejan baterías
La manipulación incorrecta de la batería
podría dar lugar a fugas o a la explosión de
la misma. Respete las siguientes medidas de
seguridad cuando maneje las baterías que
se utilizan con este dispositivo:
• Utilice unicamente las baterías que se
indican en este manual. No mezcle baterías
nuevas y viejas o baterías de distintos tipos.
• Lea y cumpla las advertencias e
instrucciones proporcionadas por el
fabricante.
• No las cortocircuite ni las desmonte.
• No las exponga al fuego ni a un calor
excesivo.
• No intente introducir las pilas al revés.
• Cuando están completamente agotadas,
las baterías suelen tener fugas. Para evitar
dañar el producto, asegúrese de retirar las
baterías cuando no lo vaya a utilizar durante
periodos largos de tiempo o cuando ya no
quede carga.
•
Si el liquido de las baterías entrara en
contacto con la piel o la ropa, aclare
inmediatamente con agua corriente.
63

Partes del panel de control
Panel de control *
Cursor de selección
Indicador del temporizador
Indicador de bloqueo
Indicador de batería baja
Indicador “TIMER ACTIVE”
(Temporizador activo)
Indicador altavoz encendido/apagado
Indicador “S ET” (Ajustar)
Indicador “RELEASE” (Obturador)
Número de disparos
64
Introducción de las baterías
Retire la tapa del compartimento de las
baterías( ) de la parte trasera del TR-90 e
introduzca dos pilas alcalinas AAA LR03 de
1,5 V (vendidas por separado).
El TR-90 se conectará tras insertas las
baterías. Cuando no se use por favor
desconéctelo (abajo).
Introducción de las baterías
Conectar/desconectar:
Conectar: Pulse el botón TIMER START/STOP
(
) durante 3 segundos. La pantalla se
iluminará.
Desconectar: Pulse el botón TIMER START/
STOP (
se apagará cuando el TR-90 se desconecte.
) durante 3 segundos. La pantalla
Indicador de batería baja ( )
El indicador de batería baja ( )
parpadea cuando queda poca carga
en las baterías. Prepare las baterías de
repuesto.

Es
MANUAL DE INSTRUCCIONES
Cambio de baterías
Al cambiar las baterías:
1. Apague la cámara y el TR-90 y desconecte
este de la cámara
2. Extraiga las baterías.
3. Inserte nuevas baterías.
.
Partes del panel de control
El botón de la luz/bloqueo
Pulse brevemente el botón de la luz/
bloqueo ( ) para activar la iluminación
del panel de control. La luz permanecerá
encendida durante seis segundos; si se
pulsa el botón de flechas ( ) mientras la
luz está encendida, se prolonga durante
otros seis segundos. Para bloquear todos los
controles excepto el disparador ( ) y el
botón de la luz/bloqueo , pulse el botón de
la luz/bloqueo hasta que aparezca el icono
de bloqueo ( ) en el panel de control. Para
liberar el bloqueo, pulse el botón de la luz/
bloqueo hasta que desaparezca el icono de
bloqueo.
65

Conexión del TR-90
1 . Apague la cámara y el TR-90.
2. Inserte el cable en el puerto para control
remoto de la cámara
66
.
Desconexión del TR-90
Apague la cámara y el TR-90 y desconecte
el TR-90.
Uso del TR-90
El TR-90 presenta las funciones de:
• Temporizador automático Seleccione
el retardo (tiempo antes de que comience
el disparo), el tiempo de exposición, el
intervalo y el número de tomas para la
fotografía de intervalos. Si lo desea, puede
seleccionar la velocidad de obturación en la
cámara.
• Disparador manual Tome las fotografías
manualmente mediante el disparador del
TR-90. Las fotografías se pueden tomar
a mano aunque el temporizador esté en
funcionamiento.

Es
MANUAL DE INSTRUCCIONES
Fotografía temporizada
1. Ajuste la configuración de la cámara
1.1 Conecte el TR-90 y encienda la cámara.
1.2 Ajuste la configuración de la cámara de
la manera siguiente (consulte el manual de
la cámara para conocer los detalles):
* Seleccione “prioridad al disparo”, si
estuviera disponible.
2. Ajuste el temporizador
2.1
Pulse el botón SET (Ajustar ). En el
panel de control parpadeará “SET” (Ajustar) .
El TR-90 se puede conectar a la cámara
después de ajustar el temporizador.
67

Fotografía temporizada
2.2 Ajuste la siguiente configuración:
68

Es
MANUAL DE INSTRUCCIONES
Fotografía temporizada
Configuración del temporizador
Utilice el botón de flechas para ajustar el
temporizador. Pulse hacia la izquierda o hacia la
derecha para seleccionar y hacia arriba o hacia
abajo para cambiar. La selección actual queda
indicada por el cursor de selección ( ) .
Pulse SET (Ajustar
para finalizar la operación y mostrar los nuevos
ajustes del elemento seleccionado. Para ver
otros ajustes, pulse el botón de fl echas hacia la
izquierda o hacia la derecha. La selección actual
queda indicada por el cursor de selección
( ) . Pulse el botón SET(Ajustar) para modificar
la configuración actual tal como se describió
anteriormente.
) en cualquier momento
Realice la
configuración
Finalización de la
configuración
Retardo (tiempo hasta que empieza el disparo)
SegundoMinutoHora
Hora
69

Fotografía temporizada
Tiempo de exposición Intervalo
Minuto MinutoSegundo
70
Hora Segundo
Numero de
disparos
Altavoz

Es
MANUAL DE INSTRUCCIONES
Fotografía temporizada
Configuración del temporizador
Para garantizar un funcionamiento correcto,
seleccione un intervalo que sea al menos un
segundo superior al tiempo de exposición.
Cuando utilice el autofoco, ajuste el retardo
en dos segundos o más y seleccione un
intervalo que sea al menos dos segundos
mayor que el tiempo de exposición para
asegurarse de que la cámara tiene tiempo
para enfocar. Cuando utilice la reducción
de ruido para exposiciones prolongadas
(disponible con algunas cámaras digitales),
el intervalo debería ser de al menos el doble
del tiempo de exposición.
Los intervalos de 00:00:00 pasarán
automáticamente a 00:00:01 cuando se
pulse el botón SET (Ajustar
la confi guración.
Para ajustar el número de tomas en
(ilimitada), seleccione 1, y pulse el botón de
flechas ( ) hacia abajo o seleccione 399, y
pulse el botón de fl echas hacia arriba.
2.3 Después de realizar todos los ajustes,
pulse el botón SET (Ajustar
la nueva configuración. Sonará un pitido (si
el altavoz está encendido) y desaparecerá el
indicador “S ET” (Ajustar).
) para activar
). para activar
El nuevo ajuste permanecerá activo hasta
que se modifique o se retiren o agoten las
baterías.
71

3. Ponga en marcha el temporizador
Pulse el botón TIMER START/STOP
(Encendido/Apagado del temporizador
). El temporizador se pondrá en marcha y
parpadeará “TIMER ACTIVE”(Temporizador
activo ) en el panel de control. El panel
de control mostrará entre toma y toma
el tiempo restante hasta que se haga la
siguiente fotografía. Si el altavoz está
encendido, sonará un pitido tres veces a
intervalos de un segundo antes de que se
abra el obturador.
Mientras el obturador esté abierto, el panel
72
de control mostrará el tiempo restante
hasta que se cierre y el indicador de
obturador abierto y el indicador “RELEASE”
(Obturador
un segundo. El número de tomas restantes
se actualizará cada vez que se tome una
fotografía.
) parpadearán a intervalos de

Es
MANUAL DE INSTRUCCIONES
Fotografía temporizada
4. Finalice disparo
El disparo finalizará automáticamente cuando
se haya tomado el número de fotografías
seleccionado. Para fi nalizar el disparo antes
de que se tomen todas las fotografías, pulse
el botón TIMER START/STOP (Encendido/
Apagado del temporizador
5. Poner a cero los ajustes del control
remoto
Al pulsar al mismo tiempo los botones TIMER
START/STOP (
a cero todos los ajustes del TR-90.
) y bloqueo ( )se pondrán
) .
73

Fotografía temporizada
74
Uso del temporizador
Antes de utilizar el temporizador durante
periodos prolongados, compruebe que las
baterias tienen carga suficiente. Sustituya
las baterías cuando el indicador de batería
baja ( ) del panel de control parpadee
( ).
Disparo manual
El disparador del TR-90 ( ) funciona
prácticamente del mismo modo que el de la
cámara.

Es
MANUAL DE INSTRUCCIONES
1. Ajuste la configuración de la cámara
Conecte el TR-90 y encienda la cámara.
Elija el modo de exposición, velocidad de
obturación, modo de enfoque y modo de
disparo.
2. Tome las fotografías
2.1 Pulse el disparador del TR-90 (
la mitad para comprobar la exposición y
el foco y púlselo por completo para tomar
la fotografía. Mientras el obturador esté
abierto, se oirá un pitido a intervalos de
un segundo, parpadeará el indicador
“RELEASE“ (Obturador) y el panel de
control mostrará el tiempo que queda para
) hasta
que se cierre el obturador.
Para mantener el disparador completamente
pulsado para fotografías con tiempo de
exposición prolongado, desplace el botón a
la posición HOLD. (Mantener). Deslícelo en
sentido contrario para desbloquearlo.
2.2 Suelte el botón para finalizar el
disparo
El disparador del TR-90 se puede utilizar sin
baterías. El panel de control estará apagado
y no sonara ningún pitido.
El disparador se puede utilizar para activar
manualmente el disparador mientras el
temporizador esta activo. La cuenta atrás
del temporizador (incluyendo la pantalla del
panel de control, el indicador de obturador
abierto y la señal acústica) continuara
mientras se dispare manualmente. Si el
disparo manual se superpone al automático,
el obturador seguirá abierto hasta que se
cumplan ambos periodos de exposición.
75

Precauciones de uso
Antes de utilizar el TR-90, compruebe el
nivel de batería de la cámara y el numero de
exposiciones restantes (consulte el manual
de la cámara para conocer los detalles). El
temporizador seguirá funcionando aunque
no se pueda grabar ninguna imagen ya
sea porque no quede batería, no quede
película o memoria, o no haya espacio en
la memoria intermedia (solo en las cámaras
digitales).
Algunas cámaras tienen una opción de
activación del autofoco que determina
si la cámara enfocara cuando se pulse
76
el disparador hasta la mitad (consulte
el manual de la cámara para conocer
los detalles). Encienda la activación del
autofoco del disparador cuando utilice el
TR-90.
Tenga en cuenta que el temporizar es
menos preciso que la mayoría de relojes.
Cuidado del TR-90
Evite los golpes: el producto podría no
funcionar adecuadamente si se somete a
golpes o vibraciones fuertes.
Manténgalo en un lugar seco: este
producto no es resistente al agua y podría
estropearse si se sumerge en el agua o se
expone a altos niveles de humedad. El oxido
en el mecanismo interno puede producir
danos irreparables.
Evitar los cambios bruscos de
temperatura: los cambios bruscos de

Es
MANUAL DE INSTRUCCIONES
temperatura que se producen, por ejemplo,
cuando se entra o se sale de un edificio con
calefacción en un día frío, pueden provocar
condensación dentro del aparato. Para evitar
la condensación, se debe colocar el equipo
en una caja o en una bolsa de plástico
antes de exponerlo a cambios bruscos de
temperatura.
Manténgase lejos de campos magnéticos
potentes: las cargas estáticas fuertes y los
campos electromagnéticos que producen
los equipos, como los transmisores de radio,
podrían interferir con el dispositivo.
Observaciones sobre las cámaras
controladas electrónicamente:
muy raros, en el panel de control pueden
aparecer caracteres extraños y el dispositivo
puede dejar de funcionar. En la mayoría
de los casos, este fenómeno se debe a una
carga estática externa de gran intensidad.
Apague la cámara, desconecte el TR-90,
retire las baterías y, a continuación, vuelva
a colocarlas cuando se haya apagado el
panel de control. Se debe tener cuidado
cuando se manipulan las baterías, pues
podrían estar calientes por el uso. Si el error
de funcionamiento continuara, póngase en
contacto con su vendedor.
en casos
El panel de control: las pantallas LCD
tienen a oscurecerse a altas temperaturas y
a mostrar unos tiempos de respuesta mas
lentos a bajas temperaturas. Esto no supone
un fallo en el funcionamiento.
77

Características
78

Es
MANUAL DE INSTRUCCIONES
79

80

It
ISTRUZIONI D’USO
Componenti del telecomando
TR-90
Fare riferimento alla figura situata
qui sopra
Corpo
Connettore
Cavo
Spia di scatto
Schermo
Pulsante TIMER START/STOP Pulsante ON/
OFF
Pulsante SET (Imposta)
Pulsante Illuminatore/Blocco
Pulsante Freccia
Pulsante di scatto
Coperchio del vano batteri
Occhiello per tracolla (disponibile
separatamente, utilizzate una tracolla per
cellulare o simile)
Per la vostra sicurezza
Per prevenire rischi di danneggiamento
del prodotto o di lesioni a voi o a terze
persone, prima di utilizzare la fotocamera,
leggete con la massima attenzione ed in
ogni loro parte le avvertenze che seguono,
relative alla sicurezza. Conservatele in modo
che chiunque utilizzi l’apparecchio possa
preventivamente consultarle
Le conseguenze che possono derivare
dalla mancata osservanza delle precauzioni
elencate in questo capitolo, sono indicate
dal seguente simbolo:
Questo simbolo segnala avvertenze
che vanno lette prima di utilizzare
il prodotto, per prevenire possibili
danni fisici all’utente.
81

Non smontare
Il mancato rispetto di tale precauzione può
causare scosse elettriche o un guasto del
prodotto. Se il prodotto dovesse rompersi
a causa di una caduta o di un altro evento
accidentale, rimuovete le batterie e fate
esaminare il prodotto presso un centro di
assistenza autorizzato Phottix.
Non bagnare
Non maneggiate il prodotto con le mani
bagnate, non immergetelo in acqua e non
esponetelo alla pioggia. Il mancato rispetto
82
di tale precauzione può causare un incendio
o esporre al rischio di scosse elettriche.
Non utilizzare in presenza di
gas infiammabili
Il mancato rispetto di tale precauzione può
causare un’esplosione o un incendio.
Tenere lontano dalla portata
dei bambini
Questo dispositivo è costituito da
componenti di piccole dimensioni che,
se ingerite, possono essere causa di
soffocamento. Nel caso in cui un bambino
ingerisca uno di questi componenti,
rivolgetevi immediatamente a un medico.
Spegnere immediatamente in
caso di guasto
In caso di emissione di fumo o di odore
insolito dal dispositivo, rimuovete
immediatamente le batterie e fate
esaminare il prodotto presso un centro di
assistenza autorizzato Phottix, prestando
attenzione a evitare scottature. Il mancato

It
ISTRUZIONI D’USO
rispetto di questa precauzione può causare
lesioni.
Non esporre a temperature
elevate
Non lasciate il dispositivo in un veicolo
chiuso esposto al sole o in aree soggette
a temperature estremamente elevate. Il
mancato rispetto di questa precauzione può
causare un incendio o danni al prodotto o ai
suoi componenti interni.
Maneggiare le batterie con
precauzione
Se maneggiate in modo improprio, le
batterie possono perdere liquidi o esplodere.
Per l’utilizzo di batterie con questo prodotto,
osservate le seguenti precauzioni:
•
Utilizzate solo le batterie citate nel
presente manuale. Non utilizzate
contemporaneamente batterie nuove ed
usate o batterie di tipo diverso.
• Leggete ed applicate tutte le avvertenze e
le istruzioni fornite dal produttore.
• Non smontare il prodotto.
• Non esporre il prodotto a fiamme libere o
a calore eccessivo.
• Non inserire le batterie in un senso diverso
da quello indicato.
• Le batterie possono perdere del liquido
quando sono completamente scariche.
Onde evitare di danneggiare il prodotto,
rimuovete le batterie in vista di un lungo
periodo di inattività, o se completamente
scariche.
• Se del liquido fuoriuscito dalle batterie
viene a contatto con la pelle o con gli abiti,
risciacquate immediatamente con acqua
corrente.
83

Componenti del TR-90
Schermo *
Cursore di selezione
Timer
Indicatore Blocco
Indicatore batteria scarica
Indicatore “TIMER ACTIVE”
(Timer attivo)
Spia altoparlante acceso/spento
Indicatore “S ET” (Imposta)
Indicatore “RELEASE” (Scatto)
Numero di scatti
84
Inserimento delle batterie
Fate scorrere il coperchio del vano batteria
( ) sulla parte posteriore del TR-90 ed
inserite due batterie alcaline AAA 1,5 V LR03
(disponibili separatamente) come mostrato.
Il TR-90 si accenderà dopo aver inserito le
batterie. Se il TR-90 non viene utilizzato,
spegnerlo (sotto).
Inserimento delle batterie
Accendere / Spegnere:
Per accendere: Premere il pulsante TIMER
START/STOP (
si accenderà.
Per spegnere: Premere il pulsante TIMER
START/STOP (
il TR-90 si spegne, lo schermo si spegne
anche.
Indicatore batteria scarica ( )
L’indicatore batteria scarica ( )
lampeggia quando le batterie stanno per
) per 3 secondi. Lo schermo
) per 3 secondi. Quando

It
ISTRUZIONI D’USO
esaurirsi. Preparate una coppia di batterie di
ricambio.
Sostituzione delle batterie
Per sostituire le batterie:
1. Spegnete la fotocamera ed il TR-90 e poi
scollegate il TR-90
2. Rimuovete le batterie.
3. Inserite le nuove batterie.
.
Componenti del TR-90
Pulsante Illuminatore/Blocco
Premete brevemente il pulsante
Illuminatore/Blocco( ) per attivare la
retroilluminazione dello schermo. La
retroilluminazione rimane accesa per circa
sei secondi. Se si preme il pulsante Freccia
( ) quando la retroilluminazione è accesa,
la sua durata viene estesa di altri sei secondi.
Per bloccare tutti i controlli ad eccezione
dei pulsanti di scatto ( ) ed Illuminatore/
Blocco, premete quest’ultimo fino a
visualizzare l’icona di blocco ( ) nello
schermo. Per eliminare il blocco, premete il
pulsante Illuminatore/Blocco finché l’icona
di blocco non è più visualizzata.
85

Collegamento del telecomando
TR-90
1 . Spegnete la fotocamera ed il TR-90.
2. Inserite il connettore nella porta della
fotocamera come illustrato
86
.
Scollegamento del telecomando
TR-90
Spegnete la fotocamera ed il TR-90 e
scollegate il TR-90.
Uso del telecomando TR-90
Il telecomando TR-90 può funzionare nei
modi seguenti:
• Timer automatico Scegliete il ritardo (il
periodo di tempo prima dell’inizio della
ripresa), il tempo di esposizione, l’intervallo
ed il numero di scatti per la ripresa di
fotografie con timer. Se si desidera, è
possibile selezionare il tempo di posa con la
fotocamera.
• Scatto manuale Per scattare fotografie
manualmente utilizzate il pulsante di
scatto sul TR-90. È possibile scattare foto
manualmente anche quando il timer è
attivo.

It
ISTRUZIONI D’USO
Fotografia con timer
1. Regolazione delle impostazioni della
fotocamera
1.1 Collegate il telecomando TR-90 ed
accendete la fotocamera.
1.2 Regolate le seguenti impostazioni della
fotocamera (per ulteriori dettagli, vedere il
manuale della fotocamera):
* Selezionate la priorità allo scatto, se
disponibile.
2. Impostazione del timer
2.1 Premete il pulsante SET (Imposta;
L’indicatore "SET" (Imposta) lampeggerà
sullo schermo.
Dopo l’impostazione del timer è possibile
collegare il TR-90 alla fotocamera.
).
87

Fotografia con timer
2.2 Regolate le seguenti impostazioni:
88

It
Fotografia con timer
Impostazione del timer
Utilizzate il pulsante Freccia per impostare il
timer. Premete a sinistra oppure a destra per
selezionare, in alto o in basso per modificare.
La selezione corrente è indicata dal cursore di
selezione ( ) .
È possibile premere SET (Imposta; )per
completare l’operazione e visualizzare le
nuove impostazioni per la voce selezionata.
Per visualizzare altre impostazioni, premete
il pulsante Freccia a sinistra o a destra. La
selezione corrente è indicata dal cursore
di selezione ( ) . Premete il pulsante SET
(Imposta) per modificare le impostazioni
correnti come sopra descritto.
ISTRUZIONI D’USO
Regolazione delle
impostazioni
Impostazione
completata
89

Fotografia con timer
Tempo di esposizione
Minuti MinutiSecondi
90
Intervallo
Ore Secondi
Numero di scatti
Altoparlante

It
ISTRUZIONI D’USO
Fotografia con timer
Impostazione del timer
Per garantire un funzionamento corretto,
scegliete un intervallo di almeno due
secondi più lungo del tempo di esposizione.
Quando utilizzate l’autofocus, impostate un
ritardo minimo di due secondi e scegliete un
intervallo di almeno due secondi più lungo
del tempo di esposizione, per consentire alla
fotocamera di effettuare la messa a fuoco. Se
si utilizza la funzione di riduzione disturbo
con tempi di esposizione lunghi (disponibile
su alcune fotocamere digitali), l’intervallo
deve essere pari ad almeno il doppio del
tempo di esposizione.
Gli intervalli uguali a 00:00:00 vengono
reimpostati su 00:00:01 quando si preme
il pulsante SET (Imposta;
effettive le impostazioni.
Per impostare il numero di scatti su
(illimitati), selezionate 1, e premete il
pulsante Freccia ( ) in basso oppure
selezionate 399, e premete il pulsante
Freccia in alto.
2.3 Dopo aver regolato le impostazioni
come desiderato, premete il pulsante SET
(Imposta;
impostazioni. Se l'altoparlante è attivo, verrà
emesso un bip e l’indicatore “SE T” (Imposta)
non sarà più visibile.
)per rendere effettive le nuove
) per rendere
Le nuove impostazioni saranno effettive
finché non verranno modificate o fino alla
rimozione o all’esaurimento delle batterie.
91

3. Avvio del timer
Premete il pulsante TIMER START/STOP
(
). Il timer si avvierà e l’indicatore “TIMER
ACTIVE”(Timer attivo; ) lampeggerà nello
schermo. Tra uno scatto e l’altro, lo schermo
mostra il tempo rimanente prima della
foto successiva. Se l'altoparlante è attivo,
verranno emessi tre bip a intervalli di un
secondo prima dell’apertura dell’otturatore.
Durante l’apertura dell’otturatore, lo
schermo mostra il tempo rimanente fino
alla chiusura dell’otturatore. Inoltre, la
92
spia di scatto e l’indicatore “RELEASE”
( Scatto;
secondo. Il numero di scatti rimanenti viene
aggiornato a ogni ripresa.
) lampeggiano a intervalli di un

It
ISTRUZIONI D’USO
Fotografia con timer
4. Fine della ripresa
La ripresa termina automaticamente quando è
stato raggiunto il numero di scatti selezionato.
Per terminare la ripresa prima di scattare
tutte le fotografie, premete il pulsante TIMER
START/STOP (
5. Cancellare le impostazioni del timer
Premete contemporaneamente il pulsante
TIMER START/STOP (
illuminatore/blocco ( ) per cancellare tutte le
impostazioni del TR-90.
) .
) ed il pulsante
93

Fotografia con timer
94
Uso del timer
Prima di utilizzare il timer per un lungo
periodo, assicuratevi che le batterie
siano sufficientemente cariche. Quando
l’indicatore batteria scarica ( ) sullo
schermo ( ) lampeggia, sostituite le
batterie.
Scatto manuale
Il pulsante di scatto ( ) del TR-90 funziona
in modo molto simile al pulsante di scatto
della fotocamera.

It
ISTRUZIONI D’USO
1. Regolazione delle impostazioni della
fotocamera
Collegate il telecomando TR-90 ed
accendete la fotocamera. Scegliete il modo
di esposizione, di messa a fuoco e di ripresa,
nonché il tempo di posa, desiderati.
2. Ripresa di fotografie
2.1 Premete il pulsante di scatto (
90 fino a metà corsa, controllate la messa
a fuoco e l’esposizione, quindi completate
la pressione del pulsante per scattare la
foto. Durante l’apertura dell’otturatore
viene emesso un bip a intervalli di un
secondo, l’indicatore “RELEASE“ (Scatto ;
) del TR-
) lampeggia e lo schermo indica il tempo
rimanente alla chiusura dell’otturatore.
Per mantenere completamente premuto il
pulsante di scatto per la posa B, fate scorrere
il pulsante in posizione HOLD. Per sbloccare,
fate scorrere il pulsante nella direzione
opposta.
2.2 Rilasciate il pulsante per terminare la
ripresa.
Il pulsante di scatto del TR-90 è utilizzabile
anche quando le batterie non sono inserite.
In questo caso lo schermo rimane spento e
non viene emesso alcun segnale sonoro.
È possibile utilizzare il pulsante di scatto
per scattare manualmente quando il
timer è attivo. Il funzionamento del timer
(visualizzazione dello schermo, spia di
scatto e bip compresi) continua durante
lo scatto manuale. Se uno scatto manuale
si sovrappone a uno scatto automatico,
l’otturatore rimarrà aperto fino al termine di
entrambi i tempi di esposizione.
95

Precauzioni per l’uso
Controllate il livello della batteria della
fotocamera ed il numero di esposizioni
rimanenti prima di utilizzare il TR-90. Per
ulteriori dettagli, vedere il manuale della
fotocamera. Il timer funziona anche se
non è più possibile scattare altre foto in
seguito all’esaurimento della batteria della
fotocamera, se non vi è sufficiente pellicola
o memoria, oppure in caso di esaurimento
dello spazio nel buffer di memoria (solo
fotocamere digitali).
Alcune fotocamere dispongono di
un’opzione di attivazione AF che consente di
96
attivare la messa a fuoco quando il pulsante
di scatto viene premuto fino a metà corsa.
Per ulteriori dettagli, vedere il manuale
della fotocamera. Attivate questa opzione
quando utilizzate il TR-90.
Tenete presente che il timer è meno preciso
della maggior parte degli orologi.
Cura del telecomando TR-90
Non lasciatela cadere: forti colpi contro
superfici rigide e vibrazioni possono
danneggiare apparecchio ed obiettivo.
Non bagnare: questo prodotto non è
impermeabile e può guastarsi se immerso in
acqua o esposto a elevati livelli di umidità.
La formazione di ruggine nel meccanismo
interno può causare danni irreparabili.
Evitate i bruschi sbalzi di temperatura:
variazioni improvvise di temperatura (quali
si manifestano ad esempio entrando o

It
ISTRUZIONI D’USO
uscendo da un ambiente riscaldato in
inverno) possono provocare la formazione
di condensa all’interno del corpo camera.
Prima di esporre l’apparecchio ad uno
sbalzo di temperatura, riponetelo in borsa
o avvolgetelo in un sacchetto di plastica in
modo che il cambio termico avvenga più
gradualmente.
Tenere lontano da campi magnetici
intensi: forti cariche elettrostatiche o
campi magnetici intensi provocati da
apparecchiature quali trasmettitori radio
possono interferire con il dispositivo.
Nota sui dispositivi controllati
elettronicamente: in casi estremamente
rari, lo schermo può visualizzare caratteri
insoliti ed il funzionamento del dispositivo
può interrompersi. Nella maggior parte
dei casi, questo fenomeno è dovuto a una
carica elettrostatica esterna molto forte.
Spegnete la fotocamera, scollegate il TR-90,
rimuovete le batterie e ricollocatele dopo
che lo schermo si sia spento. Maneggiate
con attenzione le batterie, che potrebbero
essere calde per l’uso. Se il problema si
verifica di frequente, contattate il rivenditore
o un centro di assistenza Phottix.
Schermo: I display LCD tendono a perdere
luminosità con le alte temperature ed ad
avere tempi di risposta più lunghi con le
basse temperature. Questo non è sintomo di
un guasto.
97

Caratteristiche tecniche
98

It
ISTRUZIONI D’USO
99

100
 Loading...