

Page 1

Strato
En
De
Fr
Es
Pl
It
Ru
Cn
Cn
Simp
Trad
INSTRUCTION MANUAL
BENUTZERHANDBUCH
MANUEL D’UTILISATION
MANUAL DE INSTRUCCIONES
INSTRUKCJA OBSŁUGI
ISTRUZIONI D’USO
РУКОВОДСТВО ПОЛЬЗОВАТЕЛЯ
说明书
說明書
2
10
20
30
38
46
54
64
72
1
Page 2

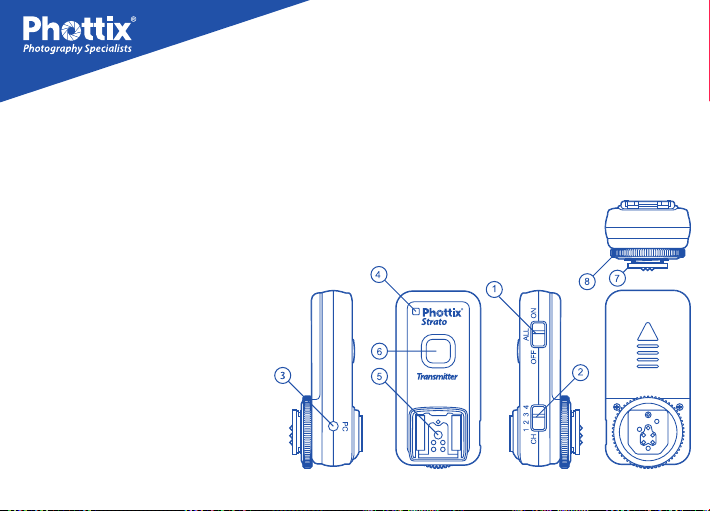
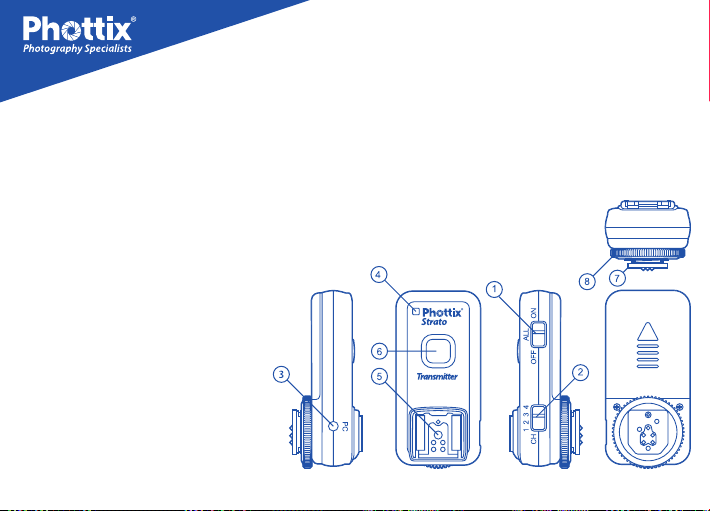
Transmitter
1. Fire All Channels Switch
2. Channel Selector Switch
3. 3.5 mm PC input port
4. Status LED
5. TTL Hot Shoe Port
6. Test / Shutter Button
7. Camera Hot Shoe Connection
8. Locking Ring
Warning: Use only ashes designed
for DSLR cameras (under 6V) on the
Phottix Strato transmitter hot shoe.
2
Page 3

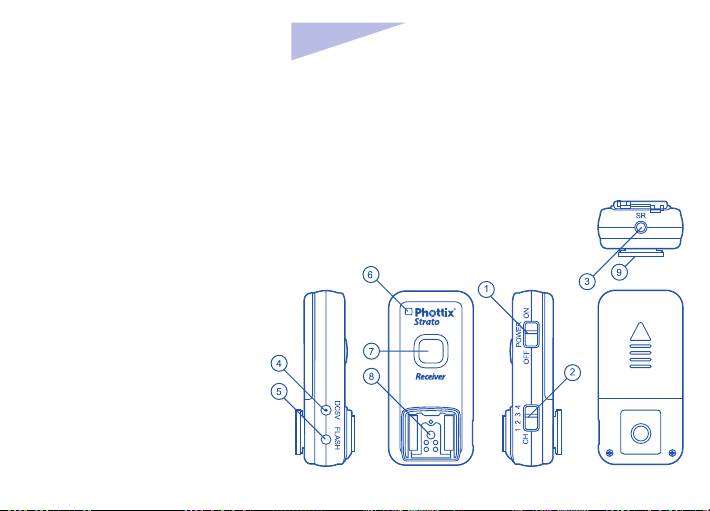
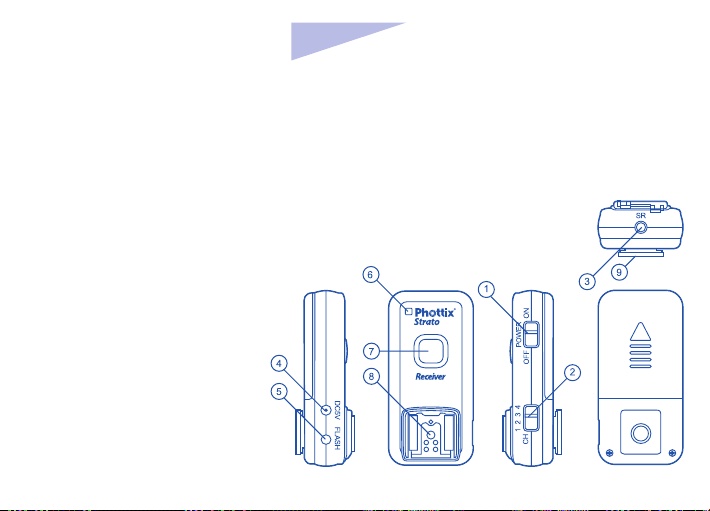
Receiver
1. Power Switch
2. Channel Selector Switch
3. 2.5 mm Accessory Cable Port
4. DC Power Port
5. 3.5 mm PC Sync Port
6. Status LED
7. Test / Shutter Button
8. Camera Hot Shoe Connection
9. Tripod Lug / Cold Shoe Mount
En
INSTRUCTION MANUAL
3
Page 4

1. Parts
Strato receivers are designed to work in Manual
Exposure mode and have no TTL functions.
2. Tip
Turn o all devices – ashes/strobes, cameras,
and Phottix Strato receivers - when connecting
and disconnecting devices.
3. Inserting Batteries
Press the battery cover in while pushing it away
from the Strato transmitter or receiver. The battery cover will snap open.
Remove the battery cover from the Strato.
Insert AAA batteries.
Replace the battery cover and push back into
the locked position.
4
4. Test / Shutter Button
The Test / Shutter Button will test re remote
ashes/strobes or take a photo when the Phottix Strato is used as a wireless shutter release.
To Test: Press the transmitter or receiver Test /
Shutter Button – ashes connected to Phottix
Strato receivers on the same channel will re.
For Wireless Shutter Release: See Using
the Strato as a wireless shutter release below
5. Status LED
The Status LED on the front of the Phottix Strato
transmitter will turn solid green when autofocusing (on camera or as a wireless remote) and
turn red when sending a signal
The Status LED on the Phottix Strato receiver
will ash green while the power is on and idle.
The LED will turn red when a signal is received
from the transmitter.
Page 5

En
INSTRUCTION MANUAL
6. Turning receiver on/o
To turn on the Phottix Strato Recevier– move
the power switch to the “ON” position.
To turn o the Phottix Strato Recevier - move
the power switch to the “OFF” position.
7. Setting Channels
The Phottix Strato has four channel settings.
Move the Channel Selector Switch to 1, 2, 3, or 4
to select a channel.
Make sure Phottix Strato transmitters and receivers are set to the same channel.
8. Fire All Channels Switch
To re all ashes or strobes on dierent channels move the Fire All Channels Switch on the
transmitter to the ON position.
All nearby Strato receivers will re ashes/
strobes, or trigger connected camera shutters.
9. Connecting to the camera hot shoe
Turn o the camera.
Slide the Strato transmitter into the camera’s
hot shoe mount.
Turn the Strato locking ring until tight.
Turn on the camera and set the shooting mode.
10. Connecting to the camera sync
port by 3.5mm Sync cable (included)
The Strato Transmitter can also be attached to a
camera’s PC Sync port if you do not wish to use
the hot shoe. Turn o the camera.
Connect a cable to Strato transmitter 3.5mm
port. Connect the opposite end of the cable to
the camera’s PC Sync Port.
Turn on the camera.
5
Page 6

11. Connecting a ash to the Strato
transmitter or receiver hot shoe
Turn o the ash and the Phottix Strato receiver.
Slide the ash into the transmitter’s or receiver’s
hot shoe mount. Lock the ash with the ash’s
locking mechanism. Turn on the ash and the
Phottix Strato receiver. Set the ash to Manual
mode (receiver only).
* It is not unusual for the ash to discharge once
after turning on the Phottix Strato.
12. Connecting the Strato receiver
by PC sync
Turn o the ash/strobe and the Phottix Strato
receiver. Connect a cable to the receiver’s 3.5
mm PC Sync Port. Connect the opposite end of
the cable to a ash or studio strobe (A 6.3 mm
adapter is included for studio strobes with larger ports). Turn on the ash/strobe and the Phot-
6
tix Strato receiver. Set the ash to Manual mode.
* It is not unusual for the ash to discharge once
after turning on the Phottix Strato.
13. Using the Strato as a wireless
shutter release*
Turn o the camera and the Phottix Strato receiver.
Attach the correct Phottix Accessory Cable for your
camera make and model to the 2.5 mm Accessory
Port on the Strato receiver Attach the other end of
the cable to the camera’s remote port. Turn on the
camera and Phottix Strato receiver. Consult your
camera manual for specic settings for remote use.
Using the Phottix Strato transmitter will allow for
remote wireless shutter release functions. The Strato
test/shutter button functions the same as a camera
shutter button: A half-press of the test/shutter button will autofocus, a full press will take a photo.
*On compatible cameras
Page 7

En
INSTRUCTION MANUAL
14. Using the Strato as a wired shutter
release*
Turn o the camera and the Phottix Strato receiver. Attach the correct Phottix Accessory Cable for your camera make and model to the 2.5
mm Accessory Port on the Strato receiver
Attach the other end of the cable to the camera’s remote port. Turn on the camera and
Phottix Strato receiver**. Consult your camera
manual for specic settings for remote use. The
Phottix Strato receiver will function as a wired
shutter release functions. The test/shutter button functions the same as a camera shutter button: A half-press of the test/shutter button will
autofocus, a full press will take a photo.
*On compatible cameras
**Wired Shutter Release function can be used without turning on the Strato receiver, and will function
without batteries in the receiver.
15. Warnings
This product is a precise electronic instrument.
Do not expose to damp environments or dust.
Do not drop or crush.
Do not use harsh chemical(s) or solvents to
clean the body. Use a soft cloth or lens paper.
Interference: The Phottix Strato transmits and
receives radio signals at 2.4 GHz. Its performance can be aected by electrical current,
magnetic elds, radio signals, wireless routers,
cellular phones, and other electronic devices.
Environmental objects, such as large buildings
or walls, trees, fences, or cars can also aect performance. If your Strato receiver will not trigger
move its location slightly.
7
Page 8

Technical Specs
Frequency: 2.4 GHz
Distance: 100m +
Channel: 4 channels
Batteries: 2 x AAA batteries (Transmitter and Receiver), 5V DC
Max sync speed: 1/250 sec*
Output: Hot shoe, 3.5 mm, 2.5 mm ports (receiver)
Input: 3.5mm PC input port (transmitter)
Attachment: 1/4 tripod lug, cold shoe (Receiver)
Input voltage: 2.5-3.2V
Minimum response time: 400us
8
Page 9

En
Top ports: TTL port on the top of transmitter
C/F port voltage handling: 5V
Flash port voltage handling: 5V(transmitter), 300V(receiver)
Body dimensions:
Antenna: built-in PCB antenna
Weight:
60g (transmitter),49g (receiver)
Operating temperature: -15—65 °C
Storage temperature: -30—85 °C
85(L)*40(W)*38(H)mm(transmitter), 85(L)*40(W)*31(H)mm (receiver)
INSTRUCTION MANUAL
9
Page 10

Sender
1. „Alle-Kanäle“-Schalter
2. Schalter für Kanalwechsel
3. 3.5 mm PC-Eingabeport
4. LED-Kontrolllampe
5. TTL-Blitzschuhport
6. Test-/Verschlussknopf
7. Kamera-Blitzschuhverbindung
8. Klemmenring
Achtung: Verwenden Sie nur die
Blitzlichte, die für die DSLR-Kameras
(unter 6V) geeignet sind, indem Sie
diese auf dem Blitzschuh von dem
Phottix Strato Sender montieren.
10
Page 11

Empfänger
1. Stromschalter
2. Schalter für Kanalwechsel
3. 2.5 mm Zubehörbuchse
4. DC-Strombuchse
5. 3.5 mm PC-Synchronisationsbuchse
6. LED-Kontrolllampe
7. Test-/Verschlussknopf
8. Kamera-Blitzschuhverbindung
9. Stativ-/Kaltschuhbefestigung
De
GEBRAUCHSANWEISUNG
11
Page 12

1. Bitte, beachten Sie
Der Strato Empfänger wurde entworfen, um in
dem manuellen Modus zu funktionieren und
funktioniert nicht mit dem TTL-Modus.
2. Hinweis
Schalten Sie alle Geräte aus – Blitzlichte, Apparate und Strato Empfänger, während Sie das
Gerät anschließen.
3. Batterienhineinstecken
Die Batteriendecke eindrücken und in die umgekehrte Richtung des Geräts schieben. Die
Batteriendecke wird aufschnappen.
Die Batteriendecke entfernen.
Die AAA-Betterien gemäß den Anweisungen
reinstecken.
Die Batteriendecke an der richtigen Stelle aufsetzen und sie in die Richtung des Geräts schieben, bis sie zuschlägt.
12
4. Test-/Verschlussknopf
Der Test-/Verschlussknopf wird die Blitzlichte
testen und auslösen, oder wird das Gerät auslösen wenn der Phottix Strato als drahtlose
Fernbedienung verwendet wird.
Für das Testen: Den sich auf dem Sender oder
Empfänger bendenden Test-/Verschlussknopf
drücken – die Lampen, die auf denselben Kanal
eingestellt sind, werden ausgelöst .
Als drahtlose Fernbedienung: Lesen Sie, bitte,
die unten aufgeführte Anweisung: Gebrauch
von Strato als drahtlose Fernbedienung
5. LED-Kontrolllampe
Die LED-Kontrolllampe, die sich auf dem
Vorderteil von dem Phottix Strato Sender bendet, wird grün wenn es zu automatischer Bildschärfeeinstellung kommt (auf der Kamera oder
auf drahtloser Fernbedienung) und sie
Page 13

De
GEBRAUCHSANWEISUNG
wird rot wenn ein Signal gesendet wird.
Die LED-Kontrolllampe auf dem Vorderteil des
Empfängers wird grün wenn das Gerät eingeschaltet wird. Die LED-Kontrolllampe wird rot
wenn der Signal von dem Sender empfangen
wird.
6. Das Ein- und Ausschalten von dem
Empfänger
Um den Empfänger einzuschalten, stellen Sie,
bitte, den Schalter zur Position „ON” um.
Um den Empfänger auszuschalten, stellen Sie,
bitte, den Schalter zur Position „OFF” um
7. Einstellung von den Kanälen
Phottix Strato hat vier Kanäle.
Den Kanalschalter zur Position 1, 2, 3, oder 4
umstellen, damit ein entsprechender Kanal
gewählt wird. Vergewissern Sie sich, dass der
Sender und Empfänger auf den gleichen Kanal
eingestellt sind.
8. Aktivierung von dem „AlleKanäle“-Schalter
Um alle Blitzlichte zu aktivieren, die auf verschiedene Kanäle eingestellt sind, den „AlleKanäle“-Schalter zur Position „ON” umstellen.
Alle Strato Empfänger werden Blitzlichter oder
Apparate auslösen.
9. Anschluss an den KameraBlitzschuh
Die Kamera ausschalten.
Den Strato Sender in den Kamera-Blitzschuh
reinschieben. Den Strato Klemmenring drehen,
bis er fest sitzt. Die Kamera einschalten und
entsprechenden Modus einschalten.
13
Page 14

10. Anschluss an den PC-Synchronisierungsport mittels eines Synchroniesierungskabels mit dem Stecker 3.5mm
Der Strato Empfänger kann auch an den PCSynchroniesierungsport angeschlossen werden
wenn Sie keinen Blitzschuh verwenden wollen.
Die Kamera ausschalten. Das Kabel an den,
3.5mm großen, Strato Senderport und an
den Kamera-PC-Synchroniesierungsport
anschließen. Die Kamera einschalten.
11. Anschluss des Blitzgerätes an den
Strato Sender oder Strato Empfänger
Das Blitzgerät und den Phottix Strato ausschalten. Das Blitzgerät in den Strato Senderoder Empfängerblitzschuh reinschieben.
Das Blitzgerät mit einem Blitzlichtklemmenring befestigen. Das Blitzgerät und den Phottix
14
Strato einschalten. Das Blitzgerät zum manuellen Modus einstellen (nur auf dem Empfänger).
* Es kann vorkommen, dass das Blitzgerät einmalig ausgelöst wird, nachdem Phottix Strato eingeschaltet wird.
12. Anschluss des Strato Empfängers
mittels des PC-Synchroniesierungskabels
Das Blitzgerät und den Strato Empfänger ausschalten. Das Kabel an den, 3.5mm großen, PCSynchroniesierungsport und an das Blitzgerät
anschließen (6.3 mm großer Adapter für
größere Porte im Set inbegrien). Das Blitzlicht
und den Strato Empfänger einschalten. Das
Blitzgerät zum manuellen Modus einstellen.
* Es kann vorkommen, dass das Blitzgerät einmalig ausgelöst wird, nachdem Phottix Strato eingeschaltet wird.
Page 15

De
GEBRAUCHSANWEISUNG
13. Anwendung von Strato als eine
drahtlose Fernbedienung*
Die Kamera und den Phottix Strato Empfänger
ausschalten. Das für Ihre Kamera richtige Zubehörkabel an den 2.5 mm großen Zubehörport
auf dem Strato Empfänger anschließen. Die
zweite Seite von dem Kabel an den KameraFernport anschließen. Die Kamera und den
Phottix Strato Empfänger einschalten. Wenn
notwendig, sehen Sie in der Kamera-Gebrauchsanweisung nach, wie man die Kamera anders
einstellen kann. Die Anwendung von dem Phottix Strato Sender wird die Fernauslösung des
Apparats ermöglichen. Der Test-/Verschlussknopf funktioniert auf dieselbe Art und Weise
wie der Kamera-Verschlussknopf: Ein Halbdrücken von dem Test-/Verschlussknopf wird
die Bildschärfe einstellen, ein Volldrücken wird
die Verschlussauslöseung bewirken.
* In den kompatibelen Kameras
14. Anwendung von Strato als einen
verkabelten Verschlussauslöser*
Die Kamera und den Phottix Strato Empfänger
ausschalten. Das für Ihre Kamera richtige Zubehörkabel an den 2.5 mm großen Zubehörport
auf dem Strato Empfänger anschließen. Die
zweite Seite von dem Kabel an den KameraFernport anschließen. Die Kamera und den
Phottix Strato Empfänger einschalten.** Wenn
notwendig, sehen Sie in der Kamera-Gebrauchsanweisung nach, wie man die Kamera anders
einstellen kann. Der Phottix Strato Empfänger
funktioniert auf dieselbe Art und Weise wie
die verkabelte Fernbedienung. Der Test-/Verschlussknopf funktioniert auf dieselbe
15
Page 16

Art und Weise wie der Kamera-Verschlussknopf: Ein Halbdrücken von dem Test-/Verschlussknopf wird die Bildschärfe einstellen,
ein Volldrücken wird die Verschlussauslöseung
bewirken.
* In den kompatibelen Kameras
** Die Funktion der verkabelten Fernbedienung
kann ohne des Einschaltens von dem Phottix Strato Empfänger verwendet werden und wird auch
dann funktionieren, wenn sich keine Batterien in
dem Phottix Strato Empänger benden.
15. Warnung
Dieses Produkt ist ein elektronisches Gerät. Es
darf weder der Feuchtigkeit noch dem Staub
ausgesetzt werden.
Nicht fallen lassen und nicht zerquetschen.
Keine chemische Substanzen zum Kameraputzen verwenden. Einen weichen Lappen ver-
16
wenden.
Störung: Der Phottix Strato sendet und empfängt Funksignale bei 2.4 Ghz. Seine Leistung kann von elektronischen Geräten, magnetischen Feldern, Funksignalen, drahtlosen
Routern, Handys und anderen elektronischen
Geräten gestört werden. Physische Gegenstände, wie z.B. große Gebäude oder Wände,
Bäume, Mauer oder Autos können auch deren
Leistung stören. Wenn Ihr Strato Empfänger
nicht funktionieren wird, deren Position ein
bisschen ändern.en.
Page 17

De
GEBRAUCHSANWEISUNG
17
Page 18

Sender
Frequenz: 2.4 GHz
Distanz: 100m +
Kanal: 4 Kanäle
Batterien: 2 x AAA Batterien (Sender und Empfänger), 5V DC
Maximale Synchronisationsgeschwindigkeit: 1/250 Sekunden*
Ausgabeausstattung: Blitzschuh, 3.5 mm, 2.5 mm Porte (Empfänger)
Eingabeausstattung: 3.5 mm PC-Eingabeport (Sender)
Sonstiges Zubehör: 1/4 Stativgri, Kaltschuh (Empfänger)
Eingabespannung: 2.5 – 3.2V
Minimale Antwortzeit: 400us
18
Page 19

De
GEBRAUCHSANWEISUNG
Obere Porte: TTL-Port auf dem oberen Teil des Senders
C/F Portspannungshandhabung: 5V
Blitzgerätportspannungshandhabung: 5V (Sender), 300V (Empfänger)
Hauptteilmaße: 85(L) * 40(B) * 38(H)mm (Sender), 85(L) * 40(B) * 31(H)mm (Empfänger)
Antenne: eingebaute PCB-Antenne
Gewicht: 60g (Sender), 49g (Empfänger)
Bedienungstemperatur:-15 − 65ºC
Lagerungstemperatur: - 30 − 85ºC
19
Page 20

Émetteur
1. «Déclencheur de tous les canaux»
2. Sélection du canal
3. Port prise PC 3.5mm
4. Indicateur LED
5. Port prise TTL
6. Bouton Test/Obturateur
7. Grie de contact
8. Anneau de verrouillage
Attention : Sur la grie de l’émetteur
Phottix Strato il se peut utiliser seulement les ashes destinés aux appareils
photo DSLR (sous 6V).
20
Page 21

Récepteur
1. Indicateur On/O
2. Sélection du canal
3. Port accessoire 2.5mm
4. Fiche d’alimentation DC
5. Port prise PC 3.5mm
6. Indicateur DEL
7. Bouton Test/Obturateur
8. Grie de contact
9. Filetage trépied/Grie potre-acces
soire sans contact
Fr
MODE D’EMPLOI
21
Page 22

1. Notez
Le Phottix Strato ne fonctionne qu’au mode
manuel (Manual Exposure), non TTL.
2. Indication
Éteindre tout l’équipement (ashes externes,
ashes de studio, appareils et Phottix Strato)
avant toute connexion ou déconnexion.
3. Insertion des piles
Faites glisser le volet du logement des piles
à l’arrière et insérez les piles AAA dans le sens
indiqué. Fermez le volet du logement des piles.
4. Bouton Test/Obturateur
Le Phottix Strato utilisé comme télécommande
à distance permet de tester le déclenchement
de ashes externes/ashes de studio à travers
d’un bouton Test/Obturateur.
Pour tester: Appuyez sur le bouton Test/Obtu-
22
rateur – les ashes externes connectés aux récepteurs Phottix Strato (au même canal) seront
déclenchés.
Pour déclencher à distance consultez
le chapitre : «Phottix Strato en fonction d’une
télécommande à distance»
5. Indicateur LED
Sur l’émetteur: la diode LED allumée en vert signalise la mise au point. La diode LED allumée en
rouge signalise la transmission du sidnal radio
par l’émetteur.
Sur le récepteur: la diode LED allumée en vert
signalise la batterie à l’état de charge complète.
La diode LED allumée en rouge conrme la
bonne réception du signal radio de l’emetteur
vers le récepteur.
Page 23

Fr
MODE D’EMPLOI
6. Mise en marche/mise en arrêt
Pour allumer le récepteur Phottix Strato choisissez la position «ON».Pour éteindre le récepteur
Phottix Strato choisissez la position «OFF».
7. Sélection des canaux
Le Phottix Strato est équipé de quatre canaux.
Utilisez le bouton de sélection des canaux pour
choisir le canal 1, 2, 3 ou 4. Assurez-vous que
l’émetteur et les récepteurs Phottix Strato sont
positionnés sur le même canal.
8. «Déclencheur de tous les canaux»
Vous pouvez déclencher à la fois les ashes externes
/ ashes de studio positionnés sur les canaux différents. Pour déclencher activez le bouton « Déclencheur de tous les canaux» en choisissant la position « ON». Les récepteurs se trouvant à proximité
déclencherons les ashes
studio ou les appareils.
externes, les ashes de
9. Installation sur la grie de
l’appareil photo.
Faites éteindre l’appareil. Faites glisser
l’émetteur Phottix Strato sur la grie de
l’appareil et serrez la molette rotative pour le
maintenir. Allumez l’appareil et sélectionnez le
mode souhaité.
10. Connexion au port prise PC de
l’appareil par câble synchro PC
3.5mm (inclus).
Il n’est pas obligatoire de monter l’émetteur
Phottix Strato sur la grie de l’appareil.
Il est possible de le connecter au port prise PC
synch à l’aide d’un câble synchro.
Faites éteindre l’appareil. Connectez le câble
PC synch au port prise PC 3.5mm surl’émetteur
Phottix Strato. Connectez le même câble au
port prise PC. Faites allumer l’appareil.
23
Page 24

11. Connexion d’un ash sur la grie
de l’émetteur ou du récepteur Phottix
Strato
Faites éteindre le ash et le récepteur Phottix Strato. Faites glisser le ash sur la grie de
l’émetteur ou du récepteur et serrez la molette
rotative pour le maintenir. Allumez le ash et le
récepteur Phottix Strato. Faites fonctionner le
ash au mode manuel (seulement récepteur).
*Après avoir allumé le Phottix Strato le ash peut
déclencher spontanément.
12. Connexion du récepteur Phottix
Strato par PC synch.
Faites éteindre le ash externe / ash de studio
et le récepteur Phottix Strato. Connectez le câble au port prise PC 3.5mm du récepteur. Connectez le même câble au ash externe / ash de
24
studio (jack 6.3 mm pour l’éclairage de studio
inclus). Allumez le ash externe / ash de studio
et le récepteur Phottix Strato. Faites fonctionner
le ash au mode manuel (seulement récepteur).
*Après avoir allumé le Phottix Strato le ash peut
déclencher spontanément.
13. Phottix Strato en fonction d’une
télécommande à distance*
Faites éteindre l’appareil et le récepteur Phottix
Strato. Connectez le câble accessoire compatible avec votre appareil à la prise à accessoire
2.5mm sur le récepteur Phottix Strato. Connectez le même câble au port à accessoire de
l’appareil. Faites allumer l’appareil et le récepteur Phottix Strato. Pour un fonctionnement
corrècte du Phottix Strato en fonction d’une
télécommande à distance,
Page 25

Fr
MODE D’EMPLOI
consultez le chapitre « télécommande» dans le
mode d’emploi de votre appareil. Le bouton test/
obturateur permet de déclencher l’obturateur
d’une manière analogue à l’appareil: appuyé à
mi-course - la mise au point, appuyé à fond - la
prise de vue.
*Fonction disponible dans les appareils compatibles..
14. Phottix Strato en fonction d’une
télécommande laire*
Faites éteindre l’appareil et le récepteur Phottix
Strato. Connectez le câble accessoire compatible avec votre appareil à la prise à accessoire
2.5mm sur le récepteur Phottix Strato. Connectez le même câble au port à accessoire de
l’appareil. Faites allumer l’appareil et le récepteur Phottix Strato**. Pour un fonctionnement
corrècte du Phottix Strato en fonction d’une
télécommande à distance, consultez le chapitre
« télécommande » dans le mode d’emploi de
votre appareil.
Le récepteur Phottix Strato fonctionne comme
télécommande laire. Le bouton test/obturateur du Phottix Strato déclenche l’obturateur
d’une manière analogue à l’appareil: appuyé à
mi-course - la mise au point, appuyé à fond - la
prise de vue.
*Fonction disponible dans les appareils compatibles.
**Utilisation du Phottix Strato comme télécommande laire n’exige pas une activation préalable
du récepteur. Le récepteur peut fonctionner sans
piles.
25
Page 26

15. Précautions
C’est un système électronique. Ne manipulez
pas le produit avec les mains mouillées, ne
l’immergez pas et ne l’exposez pas à l’eau, à la
pluie ou à la poussière.
Ne laissez pas votre appareil tomber. Le produit
risque de mal fonctionner s’il est soumis à de
violents chocs ou à de fortes vibrations.
Ne pas utiliser les moyens chimiques pour un
nettoyage du produit. Pour nettoyer le système
utiliser un chion.
Interférence: Le système Phottix Strato utilise la
fréquence 2.4 GHz pour transmettre et recevoir
les signaux radio. Garder hors de portée des
champs magnétiques puissants : des charges
statiques ou des champs électromagnétiques
importants produits par des équipements tels
que des émetteurs radio peuvent interférer
26
avec l’appareil. Les grands immeubles, murs, arbres, camions peuvent perturber le signal radio.
Si le recepteur Phottix Strato ne déclenche pas
les ashes veuillez repositionner le système.
Page 27

Fr
MODE D’EMPLOI
27
Page 28

Caractéristiques techniques
Fréquence: 2.4 GHz
Portée: 100m +
Canaux: 4 canaux
Batteries: 2 x AA batteries (Émetteur et Recepteur), 5V DC
Temps de synchronisation: 1/250 sec*
Portsortie: grie 3.5 mm, 2.5 mm (récepteur)
Port prise: 3.5 mm port prise PC (émetteur)
Adaptateur trépied:1/4’’, grie porte-accessoire sans contact (récepteur)
Voltage: 2.5-3.2V
Temps de réaction minimal: 400us
28
Page 29

Fr
Ports:
port TTL sur l’émetteur
Tension maximale port prise/sortie:5V
Tension ash: 5V(transmitter), 300V(receiver)
Dimensions:
85(L)*40(W)*38(H)mm(émetteur),85(L)*40(W)*31(H)mm (récepteur)
Antenne: antenne PCB integree
Poids:
60g (émetteur), 49g (récepteur)
Température d’opération: -15—65 °C
Température de traitement: -30—85 °C
MODE D’EMPLOI
29
Page 30
Transmisor
1. “Disparador de todos los canales”
2. Selector de canales
3. Entrada de PC 3.5 mm
4. Indicador LED
5. Entrada de TTL
6. Botón Prueba/Obturador
7. Zapata de contacto
8. Anillo de jación
Atención : Sobre la zapata caliente del
Phottix Strato se puede usar sólo los
ashes destinados para las cámaras
DSLR (menos 6V).
30
Page 31
Receptor
1. Conmutador On/O
2. Selector de canales
3. Entrada de accesorios 2.5 mm
4. Fuente de alimentación DC
5. Entrada de PC 3.5 mm
6. Indicador LED
7. Botón Prueba/Obturador
8. Zapata de contacto
9. Tornillo para trípode / Zapata fría
Es
MANUAL DE INSTRUCCIONES
31
Page 32

1. Seguridad
El Phottix Strato funciona sólo en modo manual (Manual Exposure), no TTL
2. Indicación
Apague todo el equipamiento (ashes externos, ashes de estudio, cámaras y Phottix Strato) durante conec-
tar y desconectar.
3. Introducción de las baterías
Retire la tapa del compartimento de las baterías e introduzca las pilas AAA como se indica. Cierre la tapa
del compartimento de las baterías.
4. Botón Prueba/Obturador
Se puede utilizar el Phottix Strato como mando a
distancia inalámbrico. A través de un botón Prueba/
Obturador puede revisar si el disparo de los ashes
externos/de estudio es correcto. Para probar: Presione
el botón Prueba/Obturador – los ashes externos
conectados al Phottix Strato (siempre en mismo canal)
dispararán. Para disparar desde una distancia consulte
32
el capítulo: “Phottix Strato como mando a distancia
inalámbrico*”
5. Indicador LED
Transmisor: LED de color verde signica un autofoco
automático. LED de color rojo signica la transmisión
de la señal de radio por el transmisor. Receptor: LED de
color verde signica que la batería ha alcanzado la carga completa. LED de color rojo conrma la recepción
correcta de la señal de radio enviada desde el transmisor hasta el receptor.
6. Conexión/Deconexión
Para conectar el Phottix Strato elija la posición “ON”.
Para desconectar el Phottix Strato elija la posición
“OFF”.
7. Selección de los canales
El Phottix Strato está equipado con cuatro canales.
Utilice el botón de selector de canales para elegir el
canal 1, 2, 3 o 4. Asegúrese de que el transmisor y los
receptores estén en el mismo canal.
Page 33

Es
MANUAL DE INSTRUCCIONES
8. “Disparador de todos los canales”
Hay una posibilidad de disparar en mismo tiempo los
ashes externos o los ashes de estudio jados en
diferentes canales. Para disparar tiene que activar el
botón “Disparador de todos los canales” a la posición
“ON”. Los receptores dispararán todos los ashes exter-
nos, los ashes de estudio o las cámaras.
9. Instalación en la zapata de la cámara.
Apague la cámara. Conecte el transmisor Phottix Strato en la zaptata de la cámara y ajuste el anillo de cierre.
Encienda la cámara y seleccione el modo deseado.
10. Conexión a la entrada de PC de la cámara por un cable sync PC 3.5mm (incluido).
No es obligatorio montar el transmisor Phottix Strato sobre la zapata de la cámara. Se puede conectarlo a la entrada de PC via cable sync PC. Apague la cámara. Conecte
el cable sync PC a la entrada de PC 3.5mm sobre el transmisor Phottix strato. Conecte el mismo cable a la entrada
de PC de la cámara. Encienda la cámara.
11. Conexión de un ash a través de la zapata del transmisor o receptor Phottix Strato.
Apague el ash y el receptor Phottix Strato. Conecte
el ash en la zapata del transmisor o en la zapata del
receptor y ajuste el anillo de cierre. Encienda el ash y
el receptor Phottix Strato. Seleccione el modo manual
del ash (sólo receptor).
*Después haber encendido el Phottix Strato el ash
puede disparar una vez espontáneamente.
12. Conexión del receptor Phottix Strato
por cable sync PC.
Apague el ash externo / ash de estudio y el receptor Phottix Strato. Conecte el cable sync PC a la entrada de PC 3.5mm
del receptor. Conecte el mismo cable a la entrada del ash
externo / ash de estudio (jack 6.3mm incluido). Encienda el
ash externo / ash de estudio y el receptor Phottix Strato.
Seleccione el modo manual del ash (sólo receptor).
*Después haber encendido el Phottix Strato el ash puede disparar una vez espontáneamente.
33
Page 34

13. Phottix Strato como mando a distancia
inalámbrico*
Apague la cámara y el receptor Phottix Strato. Conecte
el cable accesorio compatible con la cámara a la entrada para accesorios 2.5mm del receptor Phottix Strato.
Conecte el mismo cable a la entrada para accesorios
de la cámara. Encienda la cámara y el receptor Phottix Strato. Para un funcionamiento correcto del sistema
Phottix Strato como mando a distancia
inalámbrico consulte el capítulo “ mando a distancia”
en el manual de su cámara. El botón Prueba/Obturador funciona como el obturador de la cámara – al
oprimir ligeramente activa el autofoco, al oprimir completamente toma una foto.
*Función disponible en algunas cámaras.
14. Phottix Strato como mando a distancia
con cable*
Apague la cámara y el receptor Phottix Strato. Conecte
el cable accesorio compatible con la cámara a la entra-
34
da para accesorios 2.5mm del receptor Phottix Strato.
Conecte el mismo cable a la entrada para accesorios
de la cámara. Encienda la cámara y el receptor Phottix
Strato**. Para un funcionamiento correcto del sistema
Phottix Strato como mando a distancia consulte el
capítulo “ mando a distancia” en el manual de su cámara.
El receptor Phottix Strato funciona como mando a distancia con cable. El botón Prueba/Obturador funciona
como el obturador de la cámara – al oprimir ligeramente activa el autofoco, al oprimir completamente
toma una foto.
*Función disponible en las cámaras compatibles. **Uso
del Phottix Strato como mando a distancia con cable no
necesita ninguna activacion precedente del receptor. El
receptor puede funcionar sin baterías.
Page 35

Es
15. Precauciones de uso
Es un sistema electrónico. Manténgalo en un lugar
seco: este producto no es resistente al agua y podría
estropearse si se sumerge en el agua o se expone a altos niveles de humedad o polvo.
Evite los golpes: el producto podría no funcionar correctamente si se somete a golpes o vibraciones fuertes.
No usar detergentes químicos para limpiar la unidad.
Usar una bayeta.
Interferencias: Para transmitir y recibir la señal radio
el sistema Phottix Strato usa la frecuencia 2.4 GHz.
Manténgase lejos de campos magnéticos potentes:
las cargas estáticas fuertes y los campos electromagnéticos que producen los equipos, como los transmisores de radio, podrían interferir con el dispositivo. Los
edicios, arboles grandes, paredes y camiones pueden
interferir la señal radio. Si el ash no se dispara cambie
la posición del Phottix Strato.
MANUAL DE INSTRUCCIONES
35
Page 36

Los datos técnicos
frecuencia:
alcance:
canales:
baterías:
tiempo sincrónico máximo:
salida:
adaptador rosca de trípode:
tensión de entrada:
tiempo mínimo de reacción:
36
2.4 GHz
100m+
4 canales
2 x AA baterías (Transmisor y Receptor), 5V DC
zapata de 3,5 mm, entrada 2.5mm (receptor)
2.5-3.2 V
1/250 seg*
1/4”, zapata fría (receptor)
400 us
Page 37

Es
MANUAL DE INSTRUCCIONES
entradas superiores:
entrada TTL en el transmisor
tensión máxima de entrada/salida E/S:
tensión máxima de ash:
dimensiones:
antena:
peso:
85(L)*40(W)*38(H)mm(transmisor), 85(L)*40(W)*31(H)mm (receptor)
antena PCB integrada
60g (transmisor), 49g (receptor)
temperatura de actividad:
temperatura de guardar:
5V (tansmisor) 300V (receptor)
-15-65
°C
-30—85
°C
5V
37
Page 38
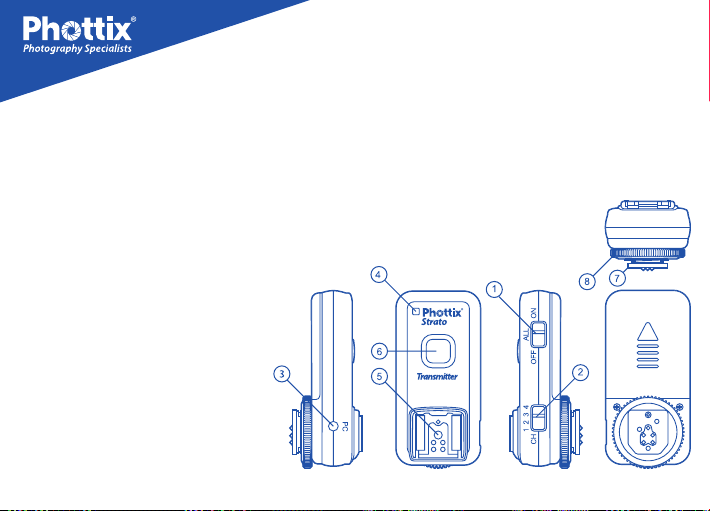
Nadajnik
1. Przełącznik “Wszystkie kanały”
2. Przełącznik zminy kanałów
3. 3.5 mm wejście PC
4. Lampka kontrolna LED
5. TTL Hot Shoe Port
6. Przycisk Test/Migawka
7. Połączenie z gorącą stopką aparatu
8. Pierścień zaciskowy
Ostrzeżenie: Proszę używać lamp
błyskowych przeznaczonych dla
cyfrowych lustrzanek (poniżej 6V)
na gorącej stopce nadajnika Phottix
Strato.
38
Page 39
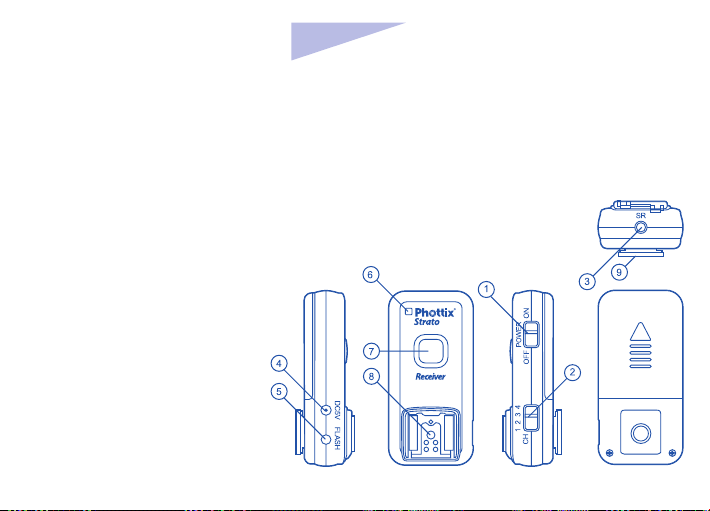
Odbiornik
1. Włącznik zasilania
2. Przełącznik zmiany kanałów
3. 2.5 mm wejście akcesoriów
4. Wejście zasilania DC
5.
3.5 mm wejście synchronizacyjne PC
6. Lampka kontrolna LED
7. Przycisk Test/Migawka
8. Połączenie z gorącą stopką aparatu
9. Mocowanie na statyw/zimną stopkę
Pl
INSTRUKCJA OBSŁUGI
39
Page 40

1. Uwaga
Odbiorniki Strato zostały zaprojektowane do pracy w
trybie manualnym i nie współpracuję z trybem TTL.
2. Wskazówka
Wyłącz wszystkie urządzenia – lampy błyskowe, aparaty
i odbiornik Strato – podczas podłączania urządzenia.
3. Umieszczanie baterii
Przyciśnij przykrywkę baterii i przesuń ją w stronę
od urządzenia. Przykrywka odskoczy. Wyjmij
przykrywkę. Umieść baterie AAA we wskazany
sposób. Umieść przykrywkę baterii we właściwym
miejscu i przesuń ją w stronę do urządzenia, aż do jej
zatrzaśnięcia.
4. Przycisk Test/Migawka
Przycisk Test/Migawka wyzwoli testowo lampy
błyskowe lub wyzwoli aparat jeśli Phottix Strato
będzie użyty jako pilot bezprzewodowy.
W celu przetestowania: Wciśnij przycisk Test/Migaw-
40
ka na nadajniku lub odbiorniku – lampy błyskowe
na tym samym kanale zostaną wyzwolone.Jako bezprzewodowy pilot: Zobacz fragment poniżej:
Używanie Phottix Strato jako bezprzewodowego
pilota.
5. Lampka kontrolna LED
Lampka kontrolna LED na przodzie nadajnika Phottix
Strato będzie świeciła na zielono podczas automatycznego ustawiania ostrości przez aparat (na aparacie
lub jako bezprzewodowy pilot) i na czerwono podczas
przesyłania sygnału. Lampka kontrolna LED na przodzie
odbiornika będzie migała na zielono kiedy urządzenie
jest włączone. Lampka kontrolna będzie świeciła na czerwono kiedy otrzyma sygnał z nadajnika.
6. Włączanie/wyłączanie odbiornika
W celu włączenia odbiornika przesuń przełącznik na
pozycję „ON”. W celu wyłączania odbiornika przesuń
przełącznik na pozycję „OFF”.
Page 41

Pl
INSTRUKCJA OBSŁUGI
7. Ustawianie kanałów
Phottix Strato posiada cztery kanały. Przsuń
przełącznik kanałów na pozycję 1,2,3 lub 4 aby
wybrać pożądany kanał. Upewnij się, że nadajnik i
odbiornik mają ustawiony ten sam kanał. Przełącznik
“Wszystkie kanały” Aby jednocześnie wyzwolić
wszystkie na lampy błyskowe ustawione na różnych
kanałach przesuń przełącznik „Wszystkie kanały”
na nadajniku na pozycję „ON”. Wszystkie odbiorniki
Strato wyzwolą lampy lub aparaty
8. Podłączanie do gorącej stopki aparatu
Wyłącz aparat. Wsuń nadajnik Phottix Strato na
gorącą stopkę aparatu. Przekręć pierścień mocujący,
aż do pewnego zamocowania. Włącz aparat i wybierz
odpowiedni tryb.
9. Podłączanie do wejścia synchronizacyjnego PC za pomocą dołączonego kabla
z wtyczką 3.5mm
Odbiornik Strato może być również połączony z
portem synchronizacyjnym PC aparatu jeśli nie chcą
Państwo korzystać z gorącej stopki. Wyłącz aparat.
Podłącz kabel do portu 3.5mm w nadajniku Strato
oraz do portu synchronizacyjnego PC aparatu. Włącz
aparat.
10. Podłączanie lampy błyskowej z
nadajnikiem lub odbiornikiem Strato
za pomocą gorącej stopki.
Wyłącz lampę i Phottix Strato. Wsuń lampę
błyskową na gorącą stopkę nadajnika lub odbiornika Strato. Przytwierdź lampę za pomocą
pierścienia mocującego lampy błyskowej.
11. Podłączanie lampy błyskowej z
nadajnikiem lub odbiornikiem Strato
Wyłącz lampę i Phottix Strato. Wsuń lampę
41
Page 42

błyskową na gorącą stopkę nadajnika lub odbiornika Strato. Przytwierdź lampę za pomocą
pierścienia mocującego lampy błyskowej.
Włącz
lampę błyskową i Phottix Strato. Ustaw lampę
błyskową w trybie manualnym (tylko na odbiorniku)
*Jednokrotne wyzwolenie błysku po włączeniu
Phottix Strato jest prawidłowe.
12. Podłączanie odbiornika Strato
przy użyciu kabla synchronizacyjnego
PC
Wyłącz lampę błyskową i odbiornik Strato.
Podłącz kabel do 3.5mm portu synchronizacyjnego PC w odbiorniku Strato z do lampy
błyskowej (6.3 adapter do większych portów
w zestawie). Włącz lampę błyskową i odbiornik
Strato. Ustaw lampę w trybie manualnym.
*Jednokrotne wyzwolenie błysku po włączeniu
Phottix Strato jest prawidłowe.
42
13. Używanie Phottix Strato jako bezprzewodowego pilota*
Wyłącz aparat i odbiornik Phottix Strato.
Podłącz właściwym dla Twojego aparatu kablem akcesoriów do 2.5mm portu akcesoriów
na odbiorniku Strato. Drugi koniec kabla połącz
z gniazdem zdalnego wyzwalania w Twoim
aparacie.Włącz aparat i odbiornik Phottix Strato.
Sprawdź instrukcję swojego aparatu jeśli konieczne będzie wybranie innych ustawień.
Używanie nadajnika Phottix Strato pozwoli na
zdalne wyzwolenie aparatu. Przycisk Test/Migawka działa w taki sam sposób jak spust migawki w aparacie: wciśnięty do połowy ustawi
ostrość, wciśnięty do końca wyzwoli migawkę.
*W kompatybilnych aparatach
14. Używanie Phottix Strato jako pilota przewodowego*
Page 43

Pl
INSTRUKCJA OBSŁUGI
właściwym dla Twojego aparatu kablem akcesoriów do 2.5mm portu akcesoriów na odbiorniku Strato. Drugi koniec kabla połącz z gniazdem zdalnego wyzwalania w Twoim aparacie.
Włącz aparat i odbiornik Phottix Strato**
Sprawdź instrukcję swojego aparatu jeśli konieczne będzie wybranie innych ustawień.
Odbiornik Phottix Strato będzie działał jak przewodowy pilot. Przycisk Test/Migawka działa w
taki sam sposób jak spust migawki w aparacie:
wciśnięty do połowy ustawi ostrość, wciśnięty
do końca wyzwoli migawkę.
*W kompatybilnych aparatach
**Funkcja pilota przewodowego może być użyta
bez włączania odbiornika Phottix Strato i będzie
działała również bez baterii w odbiorniku Phottix
Strato.
15. Ostrzeżenia
Ten produkt jest urządzeniem elektronicznym. Nie
wystawiać urządzenia na działanie wilgoci i kurzu.
Nie upuszczaj i nie naciskaj produktu. Nie używać
środkach chemicznych do czyszczenia obudowy. Do
tegoużywać delikatnej szmatki.
Zakłócenia: Phottix Strato nadaje i odbiera sygnał
radiowy na częstotliwości 2.4 Ghz. Jego sprawność
może zostać zakłócona przez urządzenia elektroniczne, pola magnetyczne, sygnały radiowe, bezprzewodowe routery, telefony komórkowe i inne
urządzenia. Obiekty takie jak duże budynki, ściany,
drzewa, mury lub samochody mogą wpłynąć na
sprawność urządzenia. Jeśli Twój odbiornik Strato
nie będzie działań zmień nieznacznie jego umiejscowienie
43
Page 44

Dane techniczne
Częstotliwość:
Zasięg:
Ilość kanałów:
Zasilanie:
Maksymalny czas synchronizacji:
Wyjścia:
Wejścia:
Attachment:
Input voltage:
Minimum response time:
44
2.4 GHz
100m +
4
2 x AAA Baterie (Nadajnik i odbiornik), Zasilanie 5V DC
Gorąca stopka, porty 3.5 mm, 2.5 mm (odbiornik)
port synchronizacji PC 3.5mm (nadajnik)
1/4 tripod lug, cold shoe (odbiornik)
2.5-3.2V
400us
1/250 sec*
Page 45

Pl
INSTRUKCJA OBSŁUGI
Top ports:
TTL port on the top of transmitter
C/F port voltage handling:
Flash port voltage handling:
Body dimensions:
Antenna:
Weight:
built-in PCB antenna
60g (nadajnik), 49g (odbiornik)
Operating temperature:
Storage temperature:
85(L)*40(W)*38(H)mm(nadajnik), 85(L)*40(W)*31(H)mm (nadajnik)
-15—65
-30—85
5V
5V(nadajnik), 300V(nadajnik)
°C
°C
45
Page 46
Trasmettitore
1. Interruttore Tutti Canali
2. Interruttore Selettore canali
3. Porta di ingresso 3.5 mm PC
4. Stato LED
5. TTL contatto caldo per ash
6. Pulsante Test / Scatto
7. Contatto caldo per fotocamera
8. Anello di bloccaggio
Attenzione: Utilizzare solo ash
progettati per Camere DSLR (sotto 6V)
sul contatto caldo del trasmettitore
Phottix Strato .
46
Page 47
Ricevitore
1. Interruttore
2. Interruttore Selettore canali
3. Uscita accessori 2.5 mm
4. Uscita DC
5. Uscita PC Sync 3.5 mm
6. Stato LED
7. Pulsante Test / Scatto
8. Contatto caldo per fotocamera
9. Treppiedi Lug / Innesto contatto
freddo
It
ISTRUZIONI D’USO
47
Page 48

1. Attenzione
Il Phottix Strato lavora in esposizione manuale
(Manual Exposure) e non ha funzioni TTL.
2. Consiglio
Tutta l’apparecchiatura ( ash, luci da studio,
fotocamere e il Phottix Strato) deve essere
spenta nel momento in cui ci si connette si
sconnette.
3. Inserimento Batterie
Premere e far scorrere il coperchio lontano dal
trasmettitore o dal ricevitore. Il coperchio scatterà. Rimuovere il coperchio. Inserire le batterie
tipo AAA. Chiudere il coperchio del comparto
batterie.
4. Pulsante Test / Scatto
Il pulsante Test / Scatto scatta i ash / i luci da
studio o una foto quando il Phottix Strato viene
usato come un telecomando. Per Test: Premere
48
il pulsante Test / Scatto scatta i ash collegati a
Phottix Strato trasmettitori sincronizzati sullo
stesso canale. Per Scatto Remoto senza li: consulta Usare il Phottix Strato come scatto re-
moto senza li, qui di seguito.
5. Stato LED
IL LED, sul frontale del trasmettitore Phottix Strato,
diventa verde quando l’autofocus viene attivato
(sulla fotocamera o usato come scatto remoto) e
diventa rosso quando si invia un segnale.
Il LED, sul frontale del ricevitore Phottix Strato,
lampeggerà in verde quando è acceso e inattivo. Il LED si allumina in rosso quando un segnale viene ricevuto dal trasmettitore.
6. Accensione e spegnimento del ricevitore
Per accender il Ricevitore Phottix Strato – scegliere “ON”
Page 49

It
ISTRUZIONI D’USO
Per spegnere il Ricevitore Phottix Strato – scegliere “OFF”
7. Selettore canali
Il Phottix Strato trasmettitore funziona su 4 canali. Cambiare la posizione del selettore 1, 2, 3
o 4 per scegliere il canale. Vericare che tutti i
trasmettitori Phottix Stato e ricevitori siano sincronizzati sullo stesso canale
.
8. Interruttore Scatto Tutti Canali
Per scattare tutti i ash o luci da dierenti canali scegliere “ON” sul interruttore scatto di tutti
canali.
9. Connettere alla fotocamera tramite
contatto caldo
Spegnere la fotocamera. Inserire il Phottix Strato
trasmettitore sull’innesto della fotocamera. Girare
l’anello di bloccaggio per stringerlo. Accendere la
fotocamera e impostare la modalità di scatto.
10. Connettere alla fotocamera tramite
il cavo PC Sync 3.5mm (incluso)
Il Phottix Strato può essere connesso alla uscita
PC Sync della fotocamera se non desideri usare
il contatto caldo. Spegnere la fotocamera.
Connettere il trasmettitore Strato con il
cavo 3.5mm. Connettere l’estremità opposta
all’uscita PC Sync della fotocamera. Accendere
la fotocamera.
11. Connettere un ash al trasmettitore Strato o al contatto caldo del
ricevitore
Spegnere il ash e il Phottix Strato ricevitore.
Inserire il ash nell’ innesto a caldo del trasmettitore o ricevitore. Bloccare il ash con il meccanismo di bloccaggio del ash.
Accendere il ash e il Phottix Strato ricevitore.
49
Page 50

Vericare che il ash sia in modalità manuale
(solo ricevitore).
* Accendendo il Phottix Strato trasmettitore per
la prima volta, il ash potrebbe accendersi una
volta.
12. Connettere il Phottix Strato
ricevitore tramite il cavo PC sync
Spegnere ash /luci da studio e il Phottix Strato
ricevitore. Connettere un cavo con l’uscita 3.5
mm Sync del ricevitore. Connettere l’estremità
del cavo al ash o i luci da studio (A 6.3mm adattatore per grandi luci da studio incluso).
Accender ash / luci da studio e il Phottix Strato
ricevitore. Vericare che il ash sia messo in
modo manuale.
* Accendendo il Phottix Strato trasmettitore per
la prima volta, il ash potrebbe accendersi una
volta.
50
13. Usare il Phottix Strato come uno
scatto remoto senza li*
Spegnere la fotocamera e il Phottix Strato
ricevitore. Attaccare il Phottix cavo accessorio
compatibile con la tua fotocamera con l’uscita
accessori 2.5mm sul Phottix Strato ricevitore.
Attaccare l’altra estremità del cavo con l’uscita
scatto remoto sulla tua fotocamera. Accendere la fotocamera e il Phottix Strato ricevitore.
Consultare il manuale della tua fotocamera per
controllo remoto. Il Phottix Strato trasmettitore
funziona come uno scatto remoto senza li. Il
pulsante test/scatto funziona come l’otturatore
della Sua fotocamera: premere a metà attiva
messa a fuoco, premere no a fondo scatta una
foto.
*Sulle fotocamere compatibili
Page 51

It
ISTRUZIONI D’USO
14. Usare il Phottix Strato come uno
scatto remoto a li*
Spegnere la fotocamera e il Phottix Starto
ricevitore. Attaccare il Phottix cavo accessorio
compatibile con la tua fotocamera con l’uscita
accessori 2.5mm sul Phottix Strato ricevitore.
Attaccare l’altra estremità del cavo alla porta remota della fotocamera. Accendere la fotocamera e il Phottix Strato ricevitore.** Consultare il
manuale della tua fotocamera per controllo remoto. Il Phottix Strato trasmettitore funzionerà
come uno scatto remoto senza a li. Il pulsante
test / scatto funziona come l’otturatore della
Sua fotocamera: premere a metà attiva messa
a fuoco, premere no a fondo scatta una foto.
* Sulle fotocamere compatibili
** Usare i Phottix Strato come uno scatto remoto
senza li è possibile senza accendere il Phottix
Strato ricevitore, anche senza mettere le batterie
nel ricevitore.
15. Precauzioni per l’uso
Conservare in luogo asciutto, evitare improvvisi
sbalzi di temperatura ed evitare la polvere.
Non lasciar cadere.
Non usare i detergenti, le sostanze chimiche.
Usa un panno umido o carta per lenti.
Interferenza: Il Phottix Strato trasmette e riceve
le radio onde su radiofrequenze 2.4GHz. Conservare lontano da altre radio onde o forti campi magnetici, cellulari e da altri dispositivi elettronici. Ostacoli ambientale, come i muri e alti
edici, alberi, recinzioni o auto possono causare
interferenze. Quando il ash non si lascia scattare riposizionare leggermente il Phottix Strato
ricevitore.
51
Page 52

Dati tecnici
Frequenza: 2.4 GHz
Distanza: 100m +
Canali: 4 canali
Batterie: 2 x batterie AAA (trasmettitore e ricevitore), 5V DC
Max velocità sync : 1/250 sec*
Uscite: contatto caldo, uscite 3.5 mm, 2.5 mm (ricevitore)
Input: ingresso 3.5mm PC (trasmettitore)
Attacco: 1/4 attacco cavalletto, attacco caldo (ricevitore)
Voltaggio d’alimentazione: 2.5-3.2V
Tempo minimale di risposta: 400us
52
Page 53

It
ISTRUZIONI D’USO
Uscita parte superiore: TAL-uscita su parte superiore di trasmettitore
Uscita voltaggio: 5V
Uscita voltaggio ash: 5V (trasmettitore), 300V (ricevitore)
Dimensioni: 85(L)*40(W)*38(H)mm (trasmettitore), 85(L)*40(W)*31(H)mm (ricevitore)
Antenna: PCB antenna integrata
Peso: 60g (trasmettitore), 49g (ricevitore)
Temperatura operante: -15—65
Temperatura deposito: -30—85
°C
°C
53
Page 54
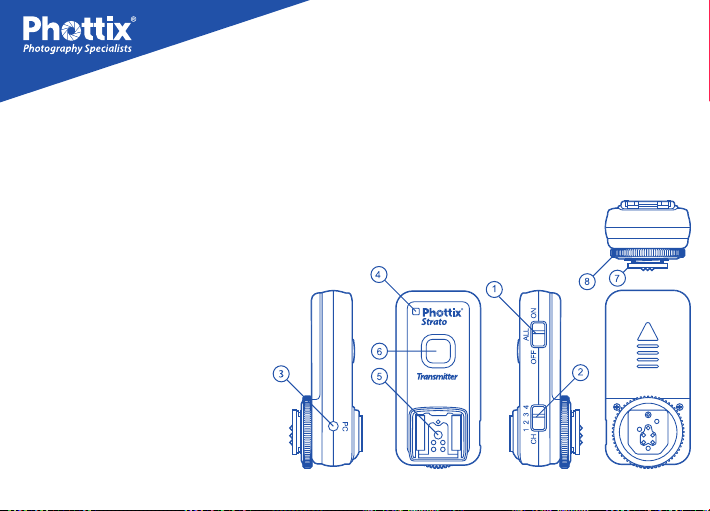
Передатчик
1. переключатель срабатывания
всех каналов
2. переключатель рабочего канала
3. вход для синхрокабеля PC 3.5 мм
4. диод состояния
5. крепление «горячий башмак» TTL
6. кнопка тест/спуск
7. крепление «горячий башмак»
фотоаппарат
8. крепительное кольцо
Внимание: Используйте только
вспышки для фотоаппаратов DSLR
(меньше 6V) на креплении “горячий
башмак” устройства Phottix Strato.
54
Page 55
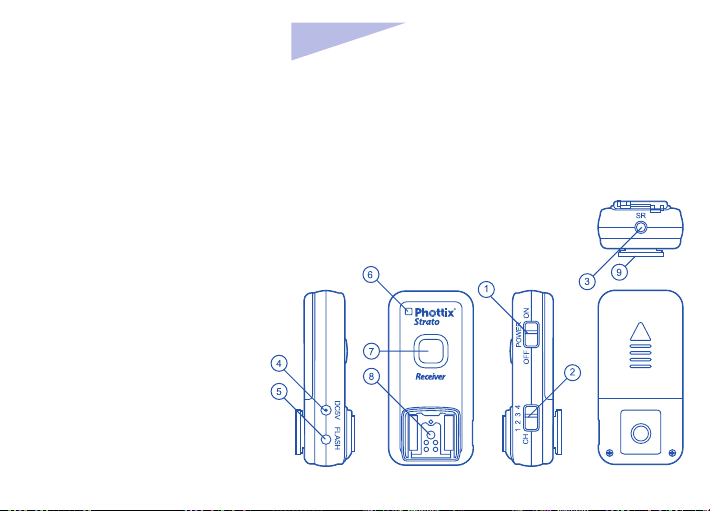
Приёмник
1. сетевой выключатель
2. переключатель рабочего канала
3. вход для кабеля аксессуаров
2.5мм
4. вход для адаптера постоянного
питания
5. вход для синхрокабеля PC 3.5 мм
6. диод состояния
7. кнопка тест/спуск
8. крепление «горячий башмак»
фотоаппарат
9. зажим для трипода/крепления
«холодный башмак»
Ru
РУКОВОДСТВО ПОЛЬЗОВАТЕЛЯ
55
Page 56

1. Примечание
приёмники Strato работают в режиме ручной
экспозиции и не имеют функции ТТL.
2. Рекомендация
выключите все устройства — вспышки/
осветители, фотоаппараты, и приёмники Phottix Strato — при подключении и отключении
устройств.
3. Установка Батарей
Откройте крышку отсека батарей
передатчика или приёмника Strato, нажав
и переместив её всторону. Вставьте
элементы питания (AAA батареи) соблюдая
полярность. Закройте крышку отске батарей,
зафиксировав её в изначальном положении.
4. Кнопка Тест/Спуск
Нажатие кнопки тест/спуск приведёт к
срабатыванию в тестовом режиме вспышки/
56
стробы, или произведёт снимок, если Phottix
Strato используется в качестве дистанционного
управления спуска затвора фотоаппарата. Для
тестирования: при нажатии кнопки тест/спуск
на передатчике или приёмнике Strato сработают
отдалённые вспышки подсоединённые к Phottix
Strato и настроенные на один и тот же канал. Для
использования в качестве пульта д/у: смотрите
ниже Использование Phottix Strato в качестве
дистанционного управления спуска затвора
фотоаппарата.
5. Диод Состояния
Диод состояния на передней панеле
передатчика Phottix Strato загорится
зелёным цветом при автофокусировке
(на фотоаппарате или в качестве
дистанционного управления), и приобретёт
красный цвет при передаче сигнала.
Page 57

Ru
РУКОВОДСТВО ПОЛЬЗОВАТЕЛЯ
Диод состояния на приёмнике Phottix
Strato будет мигать зелёным цветом при
включённом состоянии, либо находясь
в режиме ожидания. Диод состояния
приобретёт красный цвет в момент
получения сигнала с передатчика.
6. Включение/выключение
устройства
Для включения Phottix Strato – переместите
сетевой выключатель в положение “ON”
Для выключения Phottix Strato – переместите
сетевой выключатель в положение “OF”
7. Настройка каналов
Phottix Strato может работать на четырёх каналах.
Переместите Переключатель Каналов на 1,2,3 или
4 для выбора рабочего канала. Убедитесь, что все
передатчики и приёмники Phottix Atlas настроены на
одинаковом канале.
8. Переключатель
срабатывания всех каналов
Для синхронного срабатывания вспышек/строб,
настроенных на различные каналы, переместите
переключатель срабатывания всех каналов в
положение ON (включить).
Все находящиеся приёмники Strato одномоментно
приведут к срабатыванию вспышек/строб, либо
произведут спуск затвора фотоаппаратов.
9. Подсоединение к
адаптеру «горячий башмак»
фотоаппарата.
Выключите фотоаппарат. Плавно уместите
приёмник на горячем башмаке фотоаппарата.
Плотно закрутите кольцо крепления. Включите
фотоаппарат и установите его в режим съёмки.
57
Page 58

10. Подключение к порту PC Sync
фотоаппарата при помощи синхрокабелю 3.5мм (есть в комплекте)
Передатчик Strato может быть подключён к
порту PC Sync фотоаппрата, если вы не хотите
использовать крепление на горячий башмак.
Выключите фотоаппарат.Подключите кабель к
передатчику Strato через вход 3.5мм. Другой
конец кабеля подключите в порт PC Sync
фотоаппарата.Включите фотоаппарат.
11. Подсоединение вспышки к
передатчику или приёмнику Strato
при помощи горячего башмака
Выключите вспышку и приёмник Phottix Strato.
Плавно уместите вспышку на крепление
«горячий башмак» передатчика или приёмника.
Закрепите вспышку при помощи крепления
58
вспышки. Включите вспышку и приёмник Phottix Strato. Установите вспышку в режим ручной
установки Manual mode (приёмник только).
* Внимание: вспышка может сработать после
подключения к Phottix Strato.
12. Подключение Strato приёмника
при помощи синхро-кабеля PC
Выключите вспышку/стробу и приёмник Phottix
Strato. Подключите кабель к синхро порту 3.5
мм PC приёмника Strato. Подключите другой
конец кабеля к вспышке или студийной стробе
(переходник 6.3 мм для студийных строб с
данным разъёмом находится в комплекте).
Выключите вспыку/стробу и приёмник Phottix
Strato. Установите вспышку в режиме ручной
настройки (Manual mode).
Внимание: вспышка может сработать после
подключения к Phottix Strato.
Page 59

Ru
РУКОВОДСТВО ПОЛЬЗОВАТЕЛЯ
13. Использование Strato в
качестве беспроводного пульта
дистанционного управления
(далее д/у) спуска затвора
фотоаппарата*.
Выключите фотоаппарат и приёмник Phottix Strato.
Подключите соответстувующий вашему
фотоаппарату соединительный кабель
Phottix Shutter Release Cable (поскольку
он отсутствует в штатном комплекте
поставки, то данное использование Strato
возможно только после его отдельного
приобретения) к порту 2.5мм для
аксессуаров на приёмнике Strato.
Подключите другой конец кабеля в
порт для дистанционного управления
фотоаппарата.
Включите фотоаппарат и приёмник Phottix
Strato.
Ознакомьтесь с инструкциям к Вашему
фотоаппарату по вопросам подключения
к нему устройства дистанционного
управления.
Использование передатчика Phottix
Strato позволит использовать функцию
дистанционного спуска затвора. Кнопка
спуск/тест Strato будет выполнять функцию
кнопки спуска затвора — неполное
нажатие активизирует автофокус, полное
нажатие произведёт снимок.
*на совместимых фотоаппаратах.
59
Page 60

14. Использование Strato в качестве
проводного пульта д/у спуска
затвора фотоаппарата*.
Выключите фотоаппарат и приёмник Phottix Strato. Подключите соответстувующий
вашему фотоаппарату соединительный
кабель Phottix Shutter Release Cable (не
находится в комплекте) к порту 2.5мм для
аксессуаров на приёмнике Strato.
Подключите другой конец кабеля к
порту для дистанционного управления
фотоаппарата. Включите фотоаппарат и
приёмник Phottix Strato. Ознакомьтесь с
инструкциям к Вашему фотоаппарату по
вопросам подключения к нему устройства
дистанционного управления.
Использование приёмника Phottix
Strato позволит использовать функцию
60
дистанционного спуска затвора. Кнопка
спуск/тест Strato будет выполнять функцию
кнопки спуска затвора — неполное нажатие
активизирует автофокус, полное нажатие
произведёт снимок.
*на совместимых фотоаппаратах.
** Функция проводного пульта д/у спуска
затвора может быть использована без
включения приёмника Strato. Для этого
также не требуются батареи в приёмнике.
15. Предупреждения
Не подвергайте данное устройство контакту
с влажным или пыльным окружением.
Не роняйте и давите его.
Не используйте неблагоприятные
химические препараты или растворители
для чистки видоискателя. Используйте
соответствующую мягкую тряпку и кисточку.
Page 61

Ru
Помехи: Phottix Strato использует радио
частоту 2.4 Ггц для передачи и приёма
сигнала. Помехи могут создаваться от
электрического тока, магнитных полей и
радио сигналов. Объекты окружающей
среды, такие как высокие здания, стены,
деревья, заборы или машины могут
повлиять на работоспособность устройства.
Для лучшего результата расположите
Atlas таким образом, чтобы антена
находилась в вертикальном положении.
Если радиосинхронизация вспышек не
происходит, можно немного переместить
приёмник Strato.
РУКОВОДСТВО ПОЛЬЗОВАТЕЛЯ
61
Page 62

Технические характеристики
Частота: 2.4 Ггц
Растояние: 100 м +
Каналы: 4 канала
Батареи: 2 х ААA батареи (Передатчик и Приёмник), 5V DC
Максимальная скорость синхронизации: 1/250 сек*
Выход: Горячий башмак, 3.5 мм, 2.5 мм порты (приёмник)
Вход: 3.5мм PC порт (передатчик)
Прикрепление: крепление штатива ¼, холодный башмак (приёмник)
Входное напряжение: 2.5V -3.2V
Минимальное время реагирования: 400мс
62
Page 63

Ru
РУКОВОДСТВО ПОЛЬЗОВАТЕЛЯ
Верхние порты: порт TTL на верхней части передатчика
Порт C/F напряжение: 5V
Порт вспышки напряжение: 5V (передатчик), 300V (приёмник)
Размеры: 85x40x38 мм (передатчик), 85x40x31 мм (приёмник)
Антена: встроенная PCB
Вес: 60g (передатчик), 49g (приёмник)
Рабочая температура: -15— 65
Температура хранения: -30 — 85
°C
°C
63
Page 64
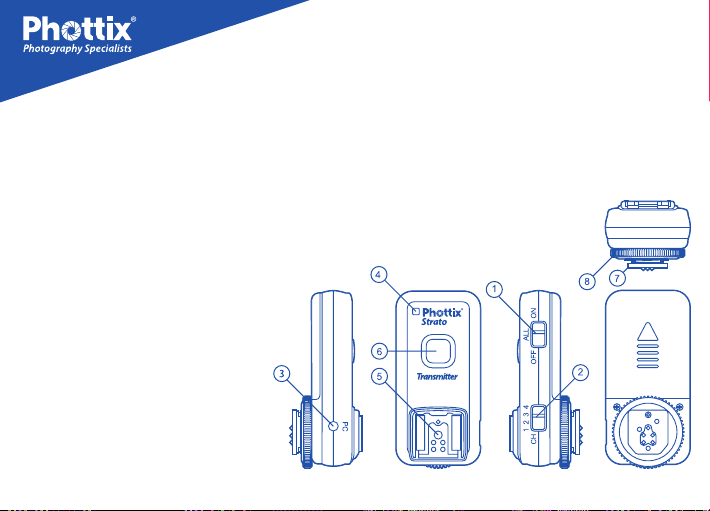
发射器
1. 全频开关
2. 頻道选择开关
3. 3.5mm PC输入端口
4. LED状态灯
5. TTL热靴端口
6. 测试/快门按钮
7. 相机热靴连接
8. 锁环
警告:Phottix Strato 发射器热靴上
只能接适用于数码单反相机的闪光灯
(电压低于6V)
64
Page 65
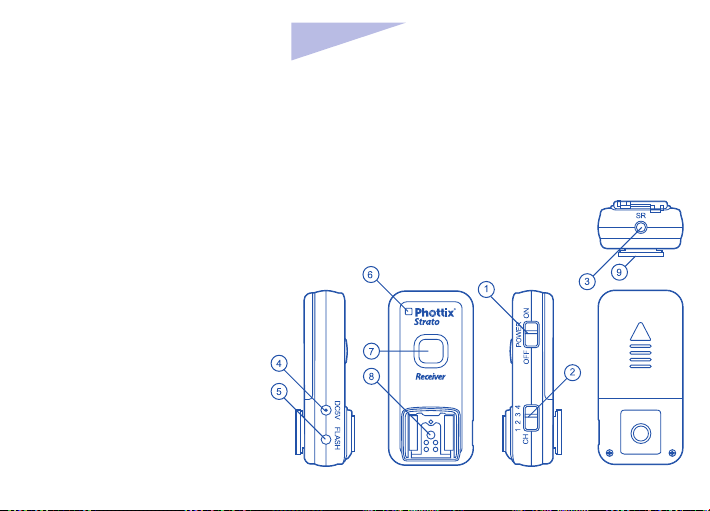
接收器
1. 电源开关
2. 频道选择开关
3. 2.5mm 配件线端口
4. DC电源端口
5. 3.5mm PC同步端口
6. LED状态灯
7. 测试/快门按钮
8. 相机热靴连接
9. 三角架螺口/冷靴插座
Cn
Simp
说明书
65
Page 66

1. 请注意
Strato 接收器具有手动曝光模式而没有
TTL功能。
2. 提示
关闭所有的装置-闪光灯/影楼灯,相
机,Phottix Strato 接收器-不管是连接还
是未连接装置时。
3. 安装电池
按住发射器和接收器电池盖并按箭头方向
向外滑开,电池盖将会开启。
从机身移除电池盖。
放置AAA电池。.
把电池盖放回原处并推回锁定处。
4. 测试/快门按钮
将Phottix Strato当做无线快门遥控来使
用的时候,测试/快门按钮将会测试触发远
距离闪光灯/影楼灯或者拍下一张照片。
测试:按下发射器或者接收器的测试/快门
66
按钮-和与之相同频道的Phottix Strato接
收器相连接的闪光灯将会被触发。
用于无线快门释放:请查看以下将Strato
当做无线快门遥控器来使用。
5. LED状态灯
当自动对焦的时候(在相机上或者作为无
线遥控来使用),Phottix Strato 发射器
前面的LED状态灯将会变成绿色,当发射
信号的时候,灯变为红色。
当其电源开启并且闲置的时候,Phottix
Strato 接收器上面的LED状态灯将会闪
烁绿色。当接收到了发射器发射的信
号,LED灯将会变为红色。
6. 开启/关闭接收器
开启Phottix Strato 接收器-将电源开关移
至“ON”处。
关闭Phottix Strato 接收器-将电源开关移
至“OFF”处。
Page 67

Cn
Simp
说明书
7. 设置频道
Phottix Strato具有四个频道供设置。
将频道选择开关分别移至1,2,3,或者4来
选择一个频道。
确保Phottix Strato 发射器和接收器都设
置为同一个频道。
8. 全频开关
当发射器上的全频开关移至“ON”位置
时,将可触发所有设置为不同频道的闪光
灯和影楼灯。
所有附近的Strato 接收器都能触发闪光
灯/影楼灯,或者触发与之连接的相机快
门。
9. 连接于相机热靴插座
关闭相机。
将Strato 发射器插入相机热靴插座。
旋转Strato锁环直至锁紧。
开启相机并设置拍摄模式。
10. 通过3.5mm的同步线(附送)连接于相机
同步端口
如果您不愿使用热靴的话,也可以将
Strato 发射器连接于相机PC同步端口。
关闭相机 将连接线的一端插入Strato 发
射器3.5mm端口。将线的另一端插入相机
PC同步端口。开启相机
11. 将闪光灯连接于Strato 发射器或者接收器
的热靴插座
关闭闪光灯和Phottix Strato 接收器。
将闪光灯插入发射器或者接收器的热靴插
座。根据闪光灯的锁紧机构锁紧闪光灯。
开启闪光灯和Phottix Strato 接收器。
将闪光灯设置为手动模式(只配一个接收
器时)
*当开启Phottix Strato时闪光灯闪光一次
是属正常现象。
67
Page 68

12. 通过PC同步线连接Strato 接收器
关闭闪光灯/影楼灯和Phottix Strato 接
收器。
将连接线的一端插入接收器的3.5mm PC
同步端口。
将线的另一端与闪光灯或影楼灯(附送了
一个适用于影楼灯大端口的6.3mm适配
器)相接。
开启闪光灯/影楼灯和Phottix Strato 接收
器。将闪光灯设置为手动模式。
*当开启Phottix Strato时闪光灯闪光一次
是属正常现象。
13. 将Strato 当做无线快门遥控来使用
关闭相机和Phottix Strato 接收器。
将适用您相机型号的Phottix配件线的一端
插入Strato 接收器的2.5mm 配件端口。
将线的另一端插入相机的遥控端口。
开启相机和Phottix Strato 接收器。
68
*更多遥控使用设置的详情请查阅相机说
明书。
Phottix Strato 发射器可当做无线快门遥
控来使用。测试/快门按钮的功能与相机
快门按钮的一样:半按自动对焦,全按拍
照一张。
*适用兼容相机
14. 将Strato 当做有线快门遥控来使用
关闭相机和Phottix Strato 接收器。
将适用您相机型号的Phottix配件线的一端
插入Strato 接收器的2.5mm 配件端口。
将线的另一端插入相机的遥控端口。
开启相机和Phottix Strato 接收器。
*更多遥控使用设置的详情请查阅相机说
明书。
Page 69

Cn
Simp
说明书
Phottix Strato 接收器可当做有线快门遥
控来使用。测试/快门按钮的功能与相机
快门按钮的一样:半按自动对焦,全按拍
照一张。
*适用兼容相机
**当Strato接收器未开启时,接收器中未
放置电池时,有线遥控功能依然存在。
15. 警告
-本产品属精密电子仪器,请注意防潮防
尘。
-不要摔落或碰撞。
-不要使用化学或有机溶剂清洁机身,请用
柔软干净的布或镜头纸对其外表面进行
擦拭。
-干扰:Phottix Strato发射器与接收器无
线电信号都为2.4GHZ。它可受电流,磁
场,无线电信号,移动电话和其他一些电子
设备的影响,还可受诸如大型的建筑或墙
壁,树,围墙,车等周边事物的影响。如
果您的Strato 接收器没有被触发,可稍微
移动下它的位置
69
Page 70

技术参数
频率: 2.4 GHz
距离: 100m +
频道: 4 个频道
使用电池: 2 x AAA 电池 (发射器和接收器), 5V DC(接收器5V DC)
最大同步速度: 1/250 s
输出:热靴, 3.5 mm, 2.5 mm 端口(接收器)
输入: 3.5 mm PC输入端口 (发射器))
固定方式: 1/4 英寸三角架螺孔, 冷靴 (接收器)
输入电压: 2.5-3.2V
最小响应时间: 400us
70
Page 71

Simp
Cn
说明书
顶部端口:发射器顶部TTL接口
C/F 端口电压处理: 5V
闪光灯端口电压处理: 5V(发射器), 300V(接收器)
机身尺寸大小:发射器85*40*38mm (长*宽*高) 接收器85*40*31mm ( 长*宽*高 )
天线: 内置PCB天线
重量: 60g (长*宽*高) 49g( 长*宽*高 )
工作温度: -15—65 ℃
储存温度: -30—85 ℃
71
Page 72
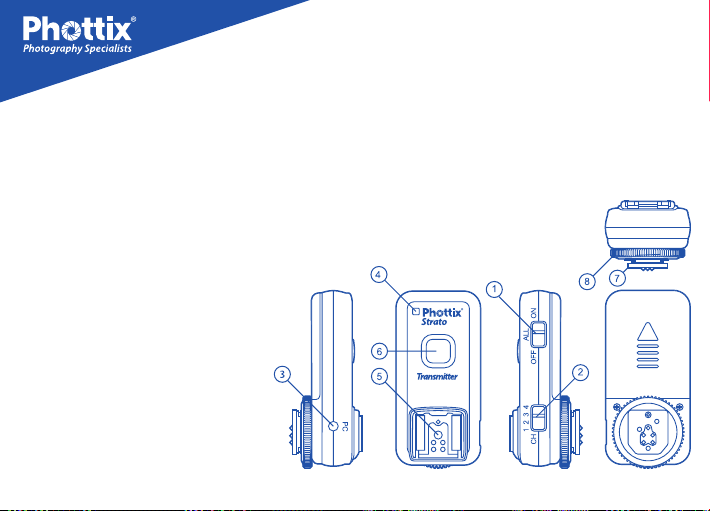
發射器
1. 全頻開關
2. 頻道選擇開關
3. 3.5mm PC 輸入端口
4. LED狀態燈
5. TTL熱靴端口
6. 測試/快門按鈕
7. 相機熱靴連接
8. 鎖環
警告: Phottix Strato 發射器熱靴上
只能接適用于數碼單反相機的閃光燈
(電壓低於6V)
72
Page 73
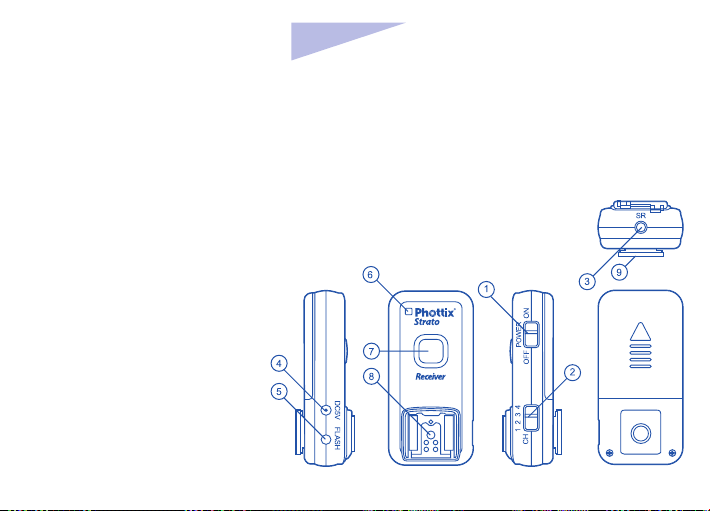
接收器
1. 電源開關
2. 頻道選擇開關
3. 2.5mm 配件線端口
4. DC電源端口
5. 3.5mm PC同步端口
6. LED狀態燈
7. 測試/快門按鈕
8. 相機熱靴連接
9. 三腳架螺口/冷靴插座
Cn
Trad
說明書
73
Page 74

1. 請注意
Strato 接收器具有手動曝光模式而沒有
TTL功能。*当开启Phottix Strato时闪光
灯闪光一次是属正常现象。
2. 提示
關閉所有的裝置-閃光燈/影樓燈,相
機,phottix Strato 接收器-不管是連接
還是未連接裝置時。将Strato 当做有线
快门遥
3. 安裝電池
按住發射器和接收器電池蓋并按箭頭方向
向外滑開,電池蓋將會開啟。
從機身移除電池蓋。
放置AAA電池。
把電池蓋放回原處并推回鎖定處。
4. 測試/快門按鈕
將phottix Strato當做無線快門遙控來使
74
用的時候,測試/快門按鈕將會測試觸發遠
距離閃光燈/影樓燈或者拍下一張照片。
測試:按下發射器或者接收器的測試/快門
按鈕-和與之相同頻道的phottix Strato接
收器相連接的閃光燈將會被觸發。
用於無線快門釋放:請查看以下將Strato
當做無線快門遙控器來使用。
5. LED狀態燈
當自動對焦的時候(在相機上或者作為無
線遙控來使用),phottix Strato 發射器
前面的LED狀態燈將會變成綠色,當發射
信號的時候,燈變為紅色。
當其電源開啟並且閒置的時候,phottix
Strato接收器上面的LED狀態燈將會閃
爍綠色。當接收到了發射器發射的信
號,LED燈將會變為紅色。
Page 75

Cn
Trad
說明書
6. 開啟/關閉接收器
開啟phottix Strato 接收器-將電源開關移
至“ON”處。
關閉phottix Strato 接收器-將電源開關移
至“OFF”處。
7. 設置頻道
phottix Strato 具有四個頻道供設置。
將頻道選擇開關分別移至1,2,3,或者4來
選擇一個頻道。
確保phottix Strato 發射器和接收器都設
置為同一個頻道。
8. 全頻開關
當發射器上的全頻開關移至“ON”位置
時,將可觸發所有設置為不同頻道的閃光
燈和影樓燈。
所有附近的Strato 接收器都能觸發閃光
燈/影樓燈,或者觸發與之連接的相機快
門。
9. 連接于相機熱靴插座
關閉相機。
將Strato 發射器插入相機熱靴插座。
旋轉Strato 鎖環直至鎖緊。
開啟相機并設置拍攝模式。
10. 通過3.5mm 的同步線(附送)連接于相
機同步端口
如果您不願使用熱靴的話,也可以將
Strato 發射器連接于相機PC同步端口。
關閉相機。
將連接線的一端插入Strato發射器3.5mm
端口。
將線的另一端插入相機PC同步端口。
開啟相機。
75
Page 76

11. 將閃光燈連接于Strato 發射器或者接收的
熱靴插座
關閉閃光燈和phottix Strato 接收器。
將閃光燈插入發射器或者接收器的熱靴
插座。
根據閃光燈的鎖緊機構鎖緊閃光燈。
開啟閃光燈和phottix Strato 接收器。
將閃光燈設置為手動模式(只配一個接收
器時)。
*當開啟phottix Strato 時閃光燈閃光一次
是屬正常現象
12. 通過PC同步線連接Strato 接收器
關閉所有的裝置-閃光燈/影樓燈,相
機,phottix Strato 接收器-不管是連接
還是未連接裝置時。将Strato 当做有线
快门遥
13. 將Strato當做無線快門遙控來使用
關閉相機和phottix Strato 接收器。
76
將適用您相機型號的phottix配件線的一端
插入Strato 接收器的2.5mm 配件端口。
將線的另一端插入相機的遙控端口。
開啟相機和phottix Strato 接收器。
*更多遙控使用設置的詳情請查閱相機說
明書。phottix Strato 發射器可當做無線
快門遙控來使用。測試/快門按鈕的功能與
相機快門按鈕的一樣:半按自動對焦,全
按拍照一張。
*適用兼容相機。
14. 將Strato當做有線快門遙控來使用
關閉相機和phottix Strato 接收器。
將適用您相機型號的phottix配件線的一端
插入Strato 接收器的2.5mm 配件端口。
將線的另一端插入相機的遙控端口。
開啟相機和phottix Strato 接收器 。
*更多遙控使用設置的詳情請查閱相機說
明書。
Page 77

Cn
Trad
說明書
phottix Strato 接收器可當做有線快門遙
控來使用。測試/快門按鈕的功能與相機
快門按鈕的一樣:半按自動對焦,全按拍
照一張。
*適用兼容相機
**當Strato 接收器未開啟時,接收器中未
放置電池時,有線遙控功能依然存在。
15. 警告
-本產品屬精密電子儀器,請注意防潮防
塵。
-不要摔落或碰撞。
-不要使用化學或有機溶劑清潔機身,請
用柔軟乾淨的布或鏡頭紙對其外表面進行
擦拭。
-干擾:Phottix Strato發射器與接收器
無線電信號都為2.4GHZ.它可受電流,磁
場,無線電信號,移動電話和其他一些電
子設備的影響,還可受諸如大型的建築或
牆壁,樹,圍牆,車等周邊事物的影響。
如果您的Strato 接收器沒有被觸發,可稍
微移動下它的位置。
77
Page 78

技術參數
頻率: 2.4 GHz
距離: 100m +
頻道: 4 個頻道
使用電池: 2 x AAA 電池 (發射器和接收器), 5V DC(接收器5V DC)
最大同步速度: 1/250 s
輸出:熱靴, 3.5 mm, 2.5 mm 端口(接收器)
輸入: 3.5 mm PC輸入端口 (發射器))
固定方式: 1/4 英寸三角架螺孔, 冷靴 (接收器)
輸入電壓: 2.5-3.2V
最小響應時間: 400us
78
Page 79

Trad
Cn
說明書
頂部端口:發射器頂部TTL接口
C/F 端口電壓處理: 5V
閃光燈端口電壓處理: 5V(發射器), 300V(接收器)
機身尺寸大小:發射器85*40*38mm (長*寬*高) 接收器85*40*31mm (長*寬*高 )
天線: 內置PCB天線
重量: 60g (長*寬*高) 49g (長*寬*高 )
工作溫度: -15—65 ℃
儲存溫度: -30—85 ℃
79
Page 80

www.phottix.com
 Loading...