

Philips MCB275 05 User Manual

Micro Hi-Fi System
User manual
Brugervejledning
Brukerhåndbok
MCB275

Important notes for users in the
U.K.
Mains plug
This apparatus is fitted with an approved 13
Amp plug. To change a fuse in this type of plug
proceed as follows:
1 Remove fuse cover and fuse.
2 Fix new fuse which should be a BS1362 3 Amp,
A.S.T.A. or BSI approved type.
3 Refit the fuse cover.
If the fitted plug is not suitable for your socket
outlets, it should be cut off and an appropriate
plug fitted in its place.
If the mains plug contains a fuse, this should
have a value of 3 Amp. If a plug without a fuse
is used, the fuse at the distribution board
should not be greater than 3 Amp.
Note: The severed plug must be disposed of to
avoid a possible shock hazard should it be
inserted into a 13 Amp socket elsewhere.
How to connect a plug
The wires in the mains lead are coloured with
the following code: blue = neutral (N),
brown = live (L).
¶ As these colours may not correspond with the
colour markings identifying the terminals in
your plug, proceed as follows:
– Connect the blue wire to the terminal
marked N or coloured black.
– Connect the brown wire to the terminal
marked L or coloured red.
– Do not connect either wire to the earth
terminal in the plug, marked E (or e) or
coloured green (or green and yellow).
Before replacing the plug cover, make certain
that the cord grip is clamped over the sheath
of the lead - not simply over the two wires.
Norge
Typeskilt finnes på apparatens underside.
Observer: Nettbryteren er sekundert
innkoplet. Den innebygde netdelen er
derfor ikke frakoplet nettet så lenge
apparatet er tilsluttet nettkontakten.
For å redusere faren for brann eller elektrisk
støt, skal apparatet ikke utsettes for regn
eller fuktighet.
Copyright in the U.K.
Recording and playback of material may
require consent. See Copyright Act 1956 and
The Performer’s Protection Acts 1958 to 1972.
2
8
1
2
3
7
6
5
4
9
0
!
@
#
SCAN/PROGRAM
MENU
OK
%
$
3

4

Index
English ------------------------------------------------ 6
Dansk ----------------------------------------------- 31
Bokmål --------------------------------------------- 56
English
Dansk
Bokmål
5

Contents
English
General Information
Supplied accessories ............................................ 7
Environmental information ................................ 7
Safety Information ................................................ 7
About Digital Audio Broadcasting (DAB) ....... 8
Hearing Safety ....................................................... 8
Controls
Controls on the set ............................................. 9
Remote control ............................................ 10-11
Installation
Placing MCB275 .................................................. 11
Mounting stand onto the set
Mounting MCB275 onto walls
Rear connections ............................................... 12
Connecting an additional appliance .................... 13
Connecting a USB device
Connecting a non-USB device
Using AC power .................................................. 14
Preparations
Before using the remote control .................... 15
Replacing battery (lithium CR2025) into the
remote control ................................................... 15
Setting the clock ................................................. 15
Different play modes: REPEAT, SHUFFLE ...... 19
Display track information
(MP3 only)............................................................ 19
DAB Reception
Tuning to DAB for the first time .................... 20
Re-tuning .............................................................. 20
Manual tuning ...................................................... 20
DAB information display ................................... 21
Menu operation .................................................. 21
Programming DAB stations ............................. 21
Tuning to preset DAB stations ........................ 21
Tuner
Tuning to radio stations .................................... 22
Programming radio stations ............................. 22
Autostore: Automatic programming
Manual programming
To listen to a preset station
RDS (Radio Data System) ................................ 23
Switching through RDS information
Automatic clock setting via RDS
External Sources
Using a USB mass storage device ............. 24-25
Playing a USB mass storage device
AUX (Listening to an external source) ......... 25
Basic Functions
Switching on/off the set and
selecting functions .............................................. 16
Switching between Standby and
ECO POWER mode.......................................... 16
Auto-standby ....................................................... 16
Volume control ................................................... 16
Volume adjustment
MUTE
Sound control ............................................................ 16
DSC
DBB
Displaying the clock ....................................................... 17
CD
Discs for playback .............................................. 17
Playing discs ................................................... 17-18
Selecting and searching ..................................... 18
Selecting a different track
Finding a passage within a track during playback
Programming tracks .................................... 18~19
Erasing the program
6
Timer
Setting the timer ................................................. 26
Activating and deactivating TIMER ................. 26
SLEEP
................................................................................ 26
Specifications ........................................... 27
Maintenance .............................................. 27
Troubleshooting .............................. 28-29
Appendix ...................................................... 30

General Information
Supplied accessories
–2 speaker boxes including 2 speaker cables
– remote control (with 1 x CR2025 battery)
– stand
– mounting kit
–1 X certified AC/DC adapter (Input: 100-
240V ~ 50-60Hz 0.8A MAX., Output:14V
1.8A)
Environmental Information
All unnecessary packaging has been omitted. We
have tried to make the packaging easy to
separate into three materials: cardboard (box),
polystyrene foam (buffer) and polyethylene (bags,
protective foam sheet).
Your system consists of materials which can be
recycled and reused if disassembled by a
specialized company. Please observe the local
regulations regarding the disposal of packaging
materials, exhausted batteries and old
equipment.
Disposal of your old product
Your product is designed and
manufactured with high quality materials
and components, which can be recycled
and reused.
When this crossedout wheeled bin
symbol is attached to
a product it means
the product is
covered by the
European Directive
2002/96/EC
Safety Information
English
● Place the system on a flat, hard and stable
surface.
● Place the system in a location with adequate
ventilation to prevent internal heat build-up in
your system. Allow at least 10 cm (4 inches)
clearance from the rear and the top of the unit
and 5 cm (2 inches) from each side.
● The ventilation should not be impeded by
covering the ventilation openings with items,
such as newspapers, table-cloths, cur tains, etc.
● Do not expose the system, batteries or discs to
excessive moisture, rain, sand or heat sources
caused by heating equipment or direct sunlight.
● No naked flame sources, such as lighted candles,
should be placed on the apparatus.
● No objects filled with liquids, such as vases, shall
be placed on the apparatus.
● Install this unit near the AC outlet and where the
AC power plug can be reached easily.
● If the system is brought directly from a cold to a
warm location, or is placed in a very damp room,
moisture may condense on the lens of the disc
unit inside the system. Should this occur, the CD
player would not operate normally. Leave the
power on for about one hour with no disc in the
system until normal playback is possible.
● The mechanical par ts of the set contain self-
lubricating bearings and must not be oiled or
lubricated.
● When the system is switched to Standby
mode, it is still consuming some power.
To disconnect the system from the
power supply completely, remove the AC
power plug from the wall socket.
Please inform yourself about the local
separate collection system for electrical
and electronic products.
Please act according to your local rules
and do not dispose of your old products
with your normal household waste. The
correct disposal of your old product will
help prevent potential negative
consequences for the environment and
human health.
7

General Information
English
About Digital Audio
Broadcasting (DAB)
DAB digital radio is a new way of broadcasting
radio via a network of terrestrial transmitters. It
provides listeners with more choice and
information delivered in crystal clear, crackle-free
sound quality.
– The technology allows the receiver to lock
on to the strongest signal it can find.
–With DAB digital stations there are no
frequencies to remember, and sets are tuned by
station name, so there's no retuning on the
move.
What is a multiplex?
Digital radio operation is made up of a single
block of frequencies called a multiplex. Each
multiplex works within a frequency spectrum,
such as Band III for DAB broadcasts.
Note:
–You will receive only those stations within
your transmission area.
DAB Broadcasters and DLS
Each DAB broadcaster (or multiplex operator)
also provides text and audio data services. Some
programmes are suppor ted by Dynamic Label
Segments (DLS). This is data which you can read
as scrolling text on your DAB radio display.
Some stations transmit the latest news, travel,
and weather, what's on now and next, website
addresses and phone numbers.
For more information on digital radio coverage
and services, please visit: www.drdb.org.
Hearing Safety
Listen at a moderate volume.
● Using headphones at a high volume can impair
your hearing. This product can produce sounds
in decibel ranges that may cause hearing loss for
a normal person, even for exposure less than a
minute. The higher decibel ranges are offered
for those that may have already experienced
some hearing loss.
● Sound can be deceiving. Over time your hearing
"comfort level" adapts to higher volumes of
sound. So after prolonged listening, what sounds
"normal" can actually be loud and harmful to
your hearing. To guard against this, set your
volume to a safe level before your hearing
adapts and leave it there.
To establish a safe volume level:
● Set your volume control at a low setting.
● Slowly increase the sound until you can hear it
comfortably and clearly, without distortion.
Listen for reasonable periods of time:
● Prolonged exposure to sound, even at normally
"safe" levels, can also cause hearing loss.
● Be sure to use your equipment reasonably and
take appropriate breaks.
Be sure to observe the following
guidelines when using your headphones.
● Listen at reasonable volumes for reasonable
periods of time.
● Be careful not to adjust the volume as your
hearing adapts.
● Do not turn up the volume so high that you
can't hear what's around you.
● You should use caution or temporarily
discontinue use in potentially hazardous
situations.
● Do not use headphones while operating a
motorized vehicle, cycling, skateboarding, etc.; it
may create a traffic hazard and is illegal in many
areas.
8
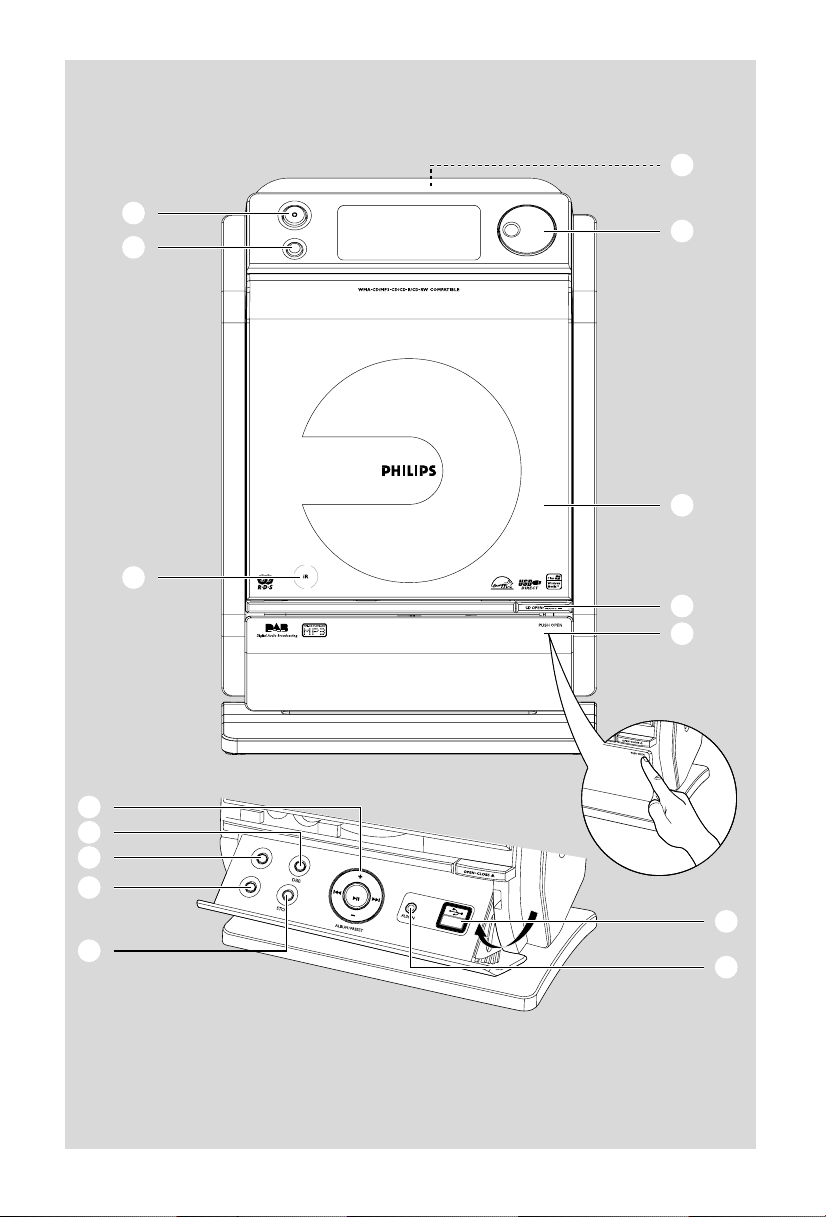
Controls
Controls on the set (illustrations
on page 3)
1 STANDBY-ON/ ECO POWER
– press briefly to switch the set on or off (standby/
ECO POWER);
– In standby or Eco Power mode: press and
hold to toggle between Standby and ECO
POWER mode (power-saving mode).
– Red indicator: lights up red when the set is
switched to ECO POWER mode.
2 SOURCE
– selects sound source DAB, FM, DISC, USB or
AUX.
– In standby or Eco Power mode: switches the
set on and selects sound source DAB, FM,
DISC, USB or AUX.
3 IR
– sensor for the infrared remote control
Helpful hints: Always point the remote control
towards this sensor.
4 PUSH OPEN
– push to unfold or fold the control panel.
5 CD OPEN • CLOSEç
– opens/closes the CD door.
6 CD door
7 VOLUME
– adjusts the volume level.
nn
8
n
nn
– 3.5 mm headphone socket
Helpful hints:
– Adjust the volume to a moderate level
before you plug in the headphones.
– Connecting headphones will switch off the
speakers.
9 ALBUM/ PRESET + /-
– CD/USB: selects albums (for MP3/WMA only).
– FM/DAB: selects a preset radio station.
4 / ¢
– CD/USB: skips or searches CD tracks/titles
backwards/forwards.
– FM/DAB: tunes to r adio stations.
– Clock/Timer: adjusts the hours and minutes.
OK / ÉÅ
– CD/USB: starts or pauses playback.
– DAB: press to select an option.
– DAB: press and hold to start manual tuning.
0 DBB (Dynamic Bass Boost)
– turns the bass enhancement on/off.
! MENU
– selects DAB full scan, quick scan, manual tuning,
language and DRC value.
@ SCAN/PROGRAM
– CD/USB: programs tracks.
– FM: programs preset radio stations.
– DAB: starts DAB service scanning.
# STOP
– CD/USB: stops playback; erases a program
$ AUX-IN
– connects to the AUDIO OUT jack on the
external appliance
%
– jack for the external USB mass storage device
English
9
 Loading...