

Philips IPF525/GBB, IPF555/GBB, IPF555/NLB, IPF555/ITB, IPF555/HUB User Manual
...
EN
IPF520
IPF525
IPF555
User Manual
2 Philips · IPF 520 · 525 · 555
EN
Dear Customer
Introduction Brand Variable
With the purchase of this device, you have chosen a quality
PHILIPS product brand. Their device fulfils the most varied requirements for private use or in your office and business everyday.
Your device is delivered with a starter cartridge for a few
test pages.
Short and Speed Dialling
You can assign frequently dialled numbers to speed dial
keys or short dialling numbers. These functions help you
to call these numbers quickly.
The built-in answering machine (IPF¦555) stores up to 30
minutes of messages. You can record internal and external
voice messages (= memos). Using remote message retrieval,
you can call new messages from each telephone.
You can send fax messages in different resolutions to one
or more recipients. You can also poll faxes.
Select the resolution for text and photo in order to copy
documents with your device. You can also create multiple
copies.
You can send SMS messages from your device if this service
is activated for your telephone line (this function is not
supported in all countries and networks). Received SMS
messages can be managed with the extensive functions of
the SMS menu.
We hope you enjoy your device and its many functions!
About this User Manual
With the installation guide on the following pages, you can
start using your device quickly and easily. Detailed descriptions can be found in the following sections of this user
manual.
Read the entire user manual carefully. Follow all safety
instructions in order to ensure proper operation of your
device. The manufacturer accepts no liability if these
instructions are not followed.
Multiple models of this device series are described in this
user manual. Please note that some functions are only
available with specific models.
Symbols Used
Dangers
Troubleshooting
DANGER!
DANGER!
Warns about dangers for people, damage to the
device or other objects as well as possible loss of
data. Injuries or damage can result from
improper handling.
Notice
Troubleshooting
This symbol designates tips that will help you to
use your device more effectively and easily.

Table of Contents 3
EN
Table of Contents
Dear Customer ............................................................ 2
About this User Manual .............................................. 2
1 General Safety Information................ 4
Setting Up the Machine ............................................... 4
Power Supply .............................................................. 4
Repairs ......................................................................... 4
Consumable Materials ................................................. 4
2 Overview............................................... 5
Overview of the Menu Functions ................................ 5
Machine Overview ....................................................... 6
Panel ........................................................................... 7
3 Initial Operation .................................. 8
Packing contents .......................................................... 8
Attaching Paper Tray ................................................... 8
Loading Paper ............................................................. 8
Connecting handset ..................................................... 9
Connecting the Telephone Cable ................................ 9
Connecting the Mains Cable ....................................... 9
Inserting Ink Cartridge ................................................ 9
Initial Installation ...................................................... 10
4 Telephone Functions......................... 12
Placing a call to the device ......................................... 12
Hands-Free ................................................................ 12
Secret mode ............................................................... 12
Speed Dialling ........................................................... 12
Telephone Book of the Device ................................... 13
Calling Line Identification (CLIP) ............................. 14
Missed Calls .............................................................. 14
5 Answering Machine ........................... 15
Switching on and off ................................................. 15
Editing the outgoing message .................................... 15
Listening to messages ................................................. 16
Deleting Messages ..................................................... 16
Recording Internal Memos ........................................ 16
Setting up Remote Access .......................................... 16
Using remote access ................................................... 17
Remote Control Functions ........................................ 17
Forwarding Messages ................................................. 17
Modifying the Settings .............................................. 18
6 Fax....................................................... 19
Sending fax ................................................................ 19
Sending Fax Manually ............................................... 19
Direct Inward Dialling or Selecting Sub-address ........ 19
Sending to Multiple Recipients (= Broadcasting) ....... 20
Sending Fax Later ...................................................... 20
Fax Reception ............................................................ 21
Polling Faxes .............................................................. 21
Selective Spam Filter .................................................. 21
7 Copier ................................................. 22
Inserting Documents ................................................. 22
Copying a Document ................................................ 22
8 SMS..................................................... 23
SMS Requirements .................................................... 23
Sending SMS ............................................................. 23
Sending saved SMS .................................................... 24
Receiving SMS ........................................................... 24
Composing SMS ........................................................ 25
Printing SMSs ............................................................ 25
Deleting SMS ............................................................ 25
Modifying the Settings ............................................... 25
9 Settings............................................... 27
Entering the Date and Time ...................................... 27
Selecting the Language ............................................... 27
Selecting the Country ................................................ 27
Entering Name and Fax Number ............................... 27
Entering Print Position .............................................. 28
Setting the Contrast ................................................... 28
Setting Page Adjustment ............................................ 28
Adjusting Volume Level ............................................. 28
Setting the fax switch ................................................. 29
Setting the fax switch ................................................. 29
Printing Lists ............................................................. 31
Starting Initial Installation ......................................... 32
Eavesdropping while Connection is Established ......... 32
Set Up Receipt of Longer Documents ........................ 32
10 Telephone Lines and Additional
Devices .................................................... 33
Configuring Telephone Lines and Services ................. 33
PABX Systems ........................................................... 33
Connecting Additional Devices .................................. 34
Using Additional Telephones (Easylink) .................... 34
Detecting call signal clock pulse automatically ........... 35
11 Service ................................................ 36
Changing the Ink Cartridge ....................................... 36
Fixing a Paper Jam ..................................................... 37
Fixing a Document Jam ............................................. 37
Cleaning .................................................................... 37
Power Cycling ............................................................ 39
Troubleshooting ........................................................ 40
12 Appendix ............................................ 41
Technical Data .......................................................... 41
Guarantee .................................................................. 41
Declaration of Conformity (DoC) ............................. 42
Customer Information ............................................... 44

4 Philips · IPF 520 · 525 · 555
EN
1 General Safety Information
Introduction 3
Your device has been tested in conformity with standards
EN 60950-1 and IEC 60950-1 and should only be operated with telephone systems and power equipment that
meet these standards. The device was built exclusively for
use in the indicated sales region.
Introduction 2
Do not make any changes or settings that are not described
in this user manual. Physical injury or damage to the
device or loss of data can result from improper handling.
Take note of all warning and safety notes indicated.
Setting Up the Machine
The device should rest securely on a stabile, flat surface.
The device should rest securely on a stabile, flat surface. If
the device should fall, it can be damaged or can cause
injury to people, especially small children. Position all
cables in such a way that no one will stumble on them, thus
avoiding possible injuries to persons or damage to the
device itself.
The distance between t he device and other ap pliances or objects, m ust be at least 15 ce ntimetres.
The distance between the device and other devices or
objects must be at least 15 centimetres; this also applies to
the use of additional cordless telephones. Do not place the
device in the vicinity of radios or televisions.
Lock the cover of the device co mpletely into place
Lock the cover of the device completely into place when
opening the device. You could be injured if the cover falls
while you are working on the device.
Protect the device against direct sunlight
Protect the device against direct sunlight, heat, large temperature fluctuations and moisture. Do not place the
device in the vicinity of heaters or air conditioners.
Observe the information on temperature and humidity in
the technical data.
The device must have sufficient ventilation
The device must have sufficient ventilation and may not be
covered. Do not put your device in closed cabinets or
boxes. Do not place the machine on soft surfaces such as
tablecloths or carpets and do not cover the ventilation slits.
Otherwise, the device can overheat and catch on fire.
In the event that the device becomes too hot, or if you see smoke com ing from the device
In the event that the device becomes too hot, or if you see
smoke coming from the device, you must immediately pull
the power cable out of the power socket. Have your device
examined by trained professionals at a technical service
location. To prevent the spread of fire, open flames should
be kept away from the device.
Do not plug in the device in moist rooms.
Do not plug in the device in moist rooms. Never touch the
mains cable, the mains connection or the telephone socket
with wet hands.
Do not allow liquids to enter into the device.
Do not allow liquids to enter into the device. Disconnect
the device from the power socket if liquids or foreign
objects have entered the device and have your device examined by trained professionals at a technical service location.
Do not allow children to handle th e device without supervision.
Do not allow children to handle the device without supervision. The packing materials should be kept out of the
hands of children.
Magnetic telephone handset
The telephone handset of the device is magnetic. Caution,
small metallic objects (paper clips) may be retained if
placed near or on the telephone handset.
Power Supply
Check whether the mains voltage of your device
Check whether the mains voltage of your device (indicated
on the type label) matches the mains voltage available at
the setup location.
Use only the power and telephones cables supplied.
Use only the power and telephones cables supplied.
The device does not have an on/off button.
Set up your device so that the power socket is easily accessible. The device does not have an on/off button. In an
emergency, disconnect your device from the power supply
by pulling the power plug.
Never touch the power or telephone cable if the insulation is damaged.
Never touch the power or telephone cable if the insulation
is damaged. Replace damaged wires immediately. Use suitable cables only; if necessary please contact our technical
customer service or your retailer.
Disconnect your device from the power and t elephone networks during an electrical storm.
Disconnect your device from the power and telephone networks during an electrical storm. If this is not possible, do
not use the device during an electrical storm.
Before cleaning the surface of your device, disconnect it from the power and telephone networks.
Before cleaning the surface of your device, disconnect it
from the power and telephone networks. Use a soft, lintfree cloth. Never use liquid, gaseous or easily flammable
cleansers (sprays, abrasives, polishes, alcohol). Do not
allow any moisture to reach the interior of the device.
Only clean the display with a dry , soft cloth.
Only clean the display with a dry, soft cloth. If the display
breaks, a mildly corrosive liquid may escape. Avoid all contact with your skin and eyes.
In the event of a power failure, you r device will not function;
In the event of a power failure, your device will not function; saved data is retained.
Repairs
Display
Should disruptions occur, follow the instructions on the
display and on the error report.
Repairs
Do not make any repairs to the device yourself. Improper
maintenance can result in injuries or damage to the device.
Only have your device repaired by an authorised service
centre.
Do not remove the type label from your device; this would
void the warranty.
Consumable Materials
Original Consumabl e Material
Use only original consumable materials. These are available from a specialised retailer or through our order service
(see back side of this user manual). Other consumable
materials could damage the device or shorten its service
life.
Environment
Dispose of old consumable materials according to the
waste regulations of your country.

Overview · Overview of the Menu Functions 5
EN
2Overview
Overview of the Menu Functions
Calling Ijet 3 Menu Functions
Press MENU to open the function menu. Page through
[ menu entries. Confirm the selected function with o.
Select further functions using [ or o. Press C to return
to the previous menu level. Press j to close the menu and
return to the starting mode.
—
RECEPT. SET-UP
Reception mode basic (TypeBas ic)
— RECEPTION MODE (IPF¦520)
—
AUTOMATIC
— MANUAL
Reception mode Type 3 with handset
— RECEPTION MODE (IPF¦525, IPF¦555)
—
AUTOMATIC
— TAD/FAX
— MANUAL
— PHONE/FAX
— SILENT RX
— RING VOLUME
— RINGS NUMBER
— BLACK LIST
— PRINT SET-UP
— TX FROM MEMORY
Print out protocol
— PRINT REPORT
— LAST TX REPORT
— CALLER ID LIST
— LAST BROADCAST
— ACTIVITY REPORT
— PHONE BOOK
— CART. MAINTEN.
Fax set up
— FAX SET-UP
— DATE AND TIME
— SET DATE/TIME
— DATE FORMAT
— HOUR FORMAT
— VARIOUS SETT.
— ECM
— TX REPORT
— FAX HEADER
— BUZZER VOLUME
— CONTRAST
— PRINTER PARAM.
— REDUCTION
— SURPLUS
— PRINT SET-UP
— POLLING RX
Installation
— INSTALLATION
— STATION NAME
— STATION NUMBER
— DISTINCT. RING (IPF¦525, IPF¦555)
—
TEL.LINE SETUP
— LINE TYPE
— DIAL MODE (country dependent)
—
CALLER ID
— PBX FLASH
— REMOTE CONTROL
— FAX/TEL TIMER (IPF¦525, IPF¦555)
—
SILENCE LAPSE (IPF¦555)
—
LINE MONITOR
— LANGUAGE
— COUNTRY SET-UP
— PRINT INSTALL.
— TECHN. SERVICE
TAM Settings
— TAD SET-UP (IPF¦555)
—
ICM ON SPEAKER
— OGM #1
— OGM #2
— OGM #3
— FORWARD MSGS
— ANNOUNCE ONLY
— ICM REC.TIME
— SECURITY
— TOLL SAVER
— PRINT SET-UP
6 Philips · IPF 520 · 525 · 555
EN
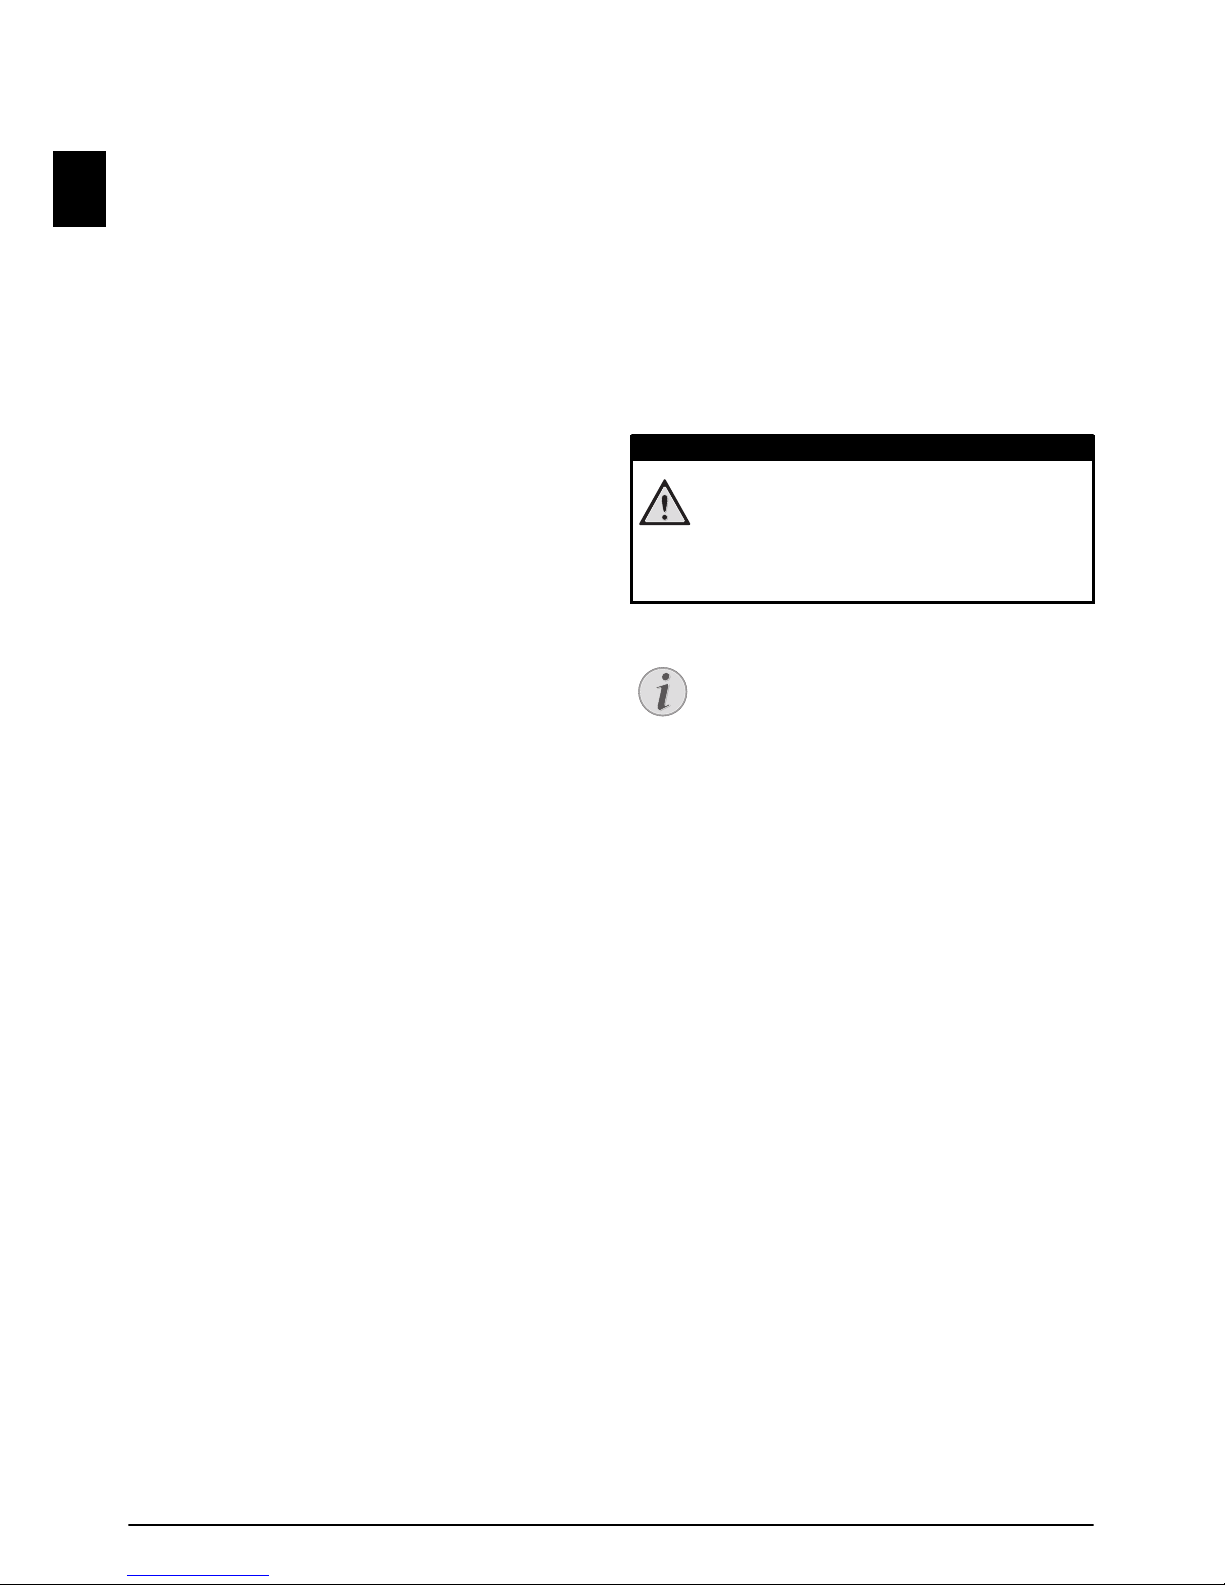
Machine Overview
‚ Handset (IPF¦525, IPF¦555)
ƒ Paper tray
„ Document feeder (writing facing up)
… Panel with display
Vorderansicht
‚ EXT socket—Connection socket for additional
devices
ƒ LINE socket—Connection socket for telephone cable
„ ) Telephone handset socket—Connection socket for
the telephone handset (IPF¦525, IPF¦555)
Bodenansicht
Overview · Panel 7
EN
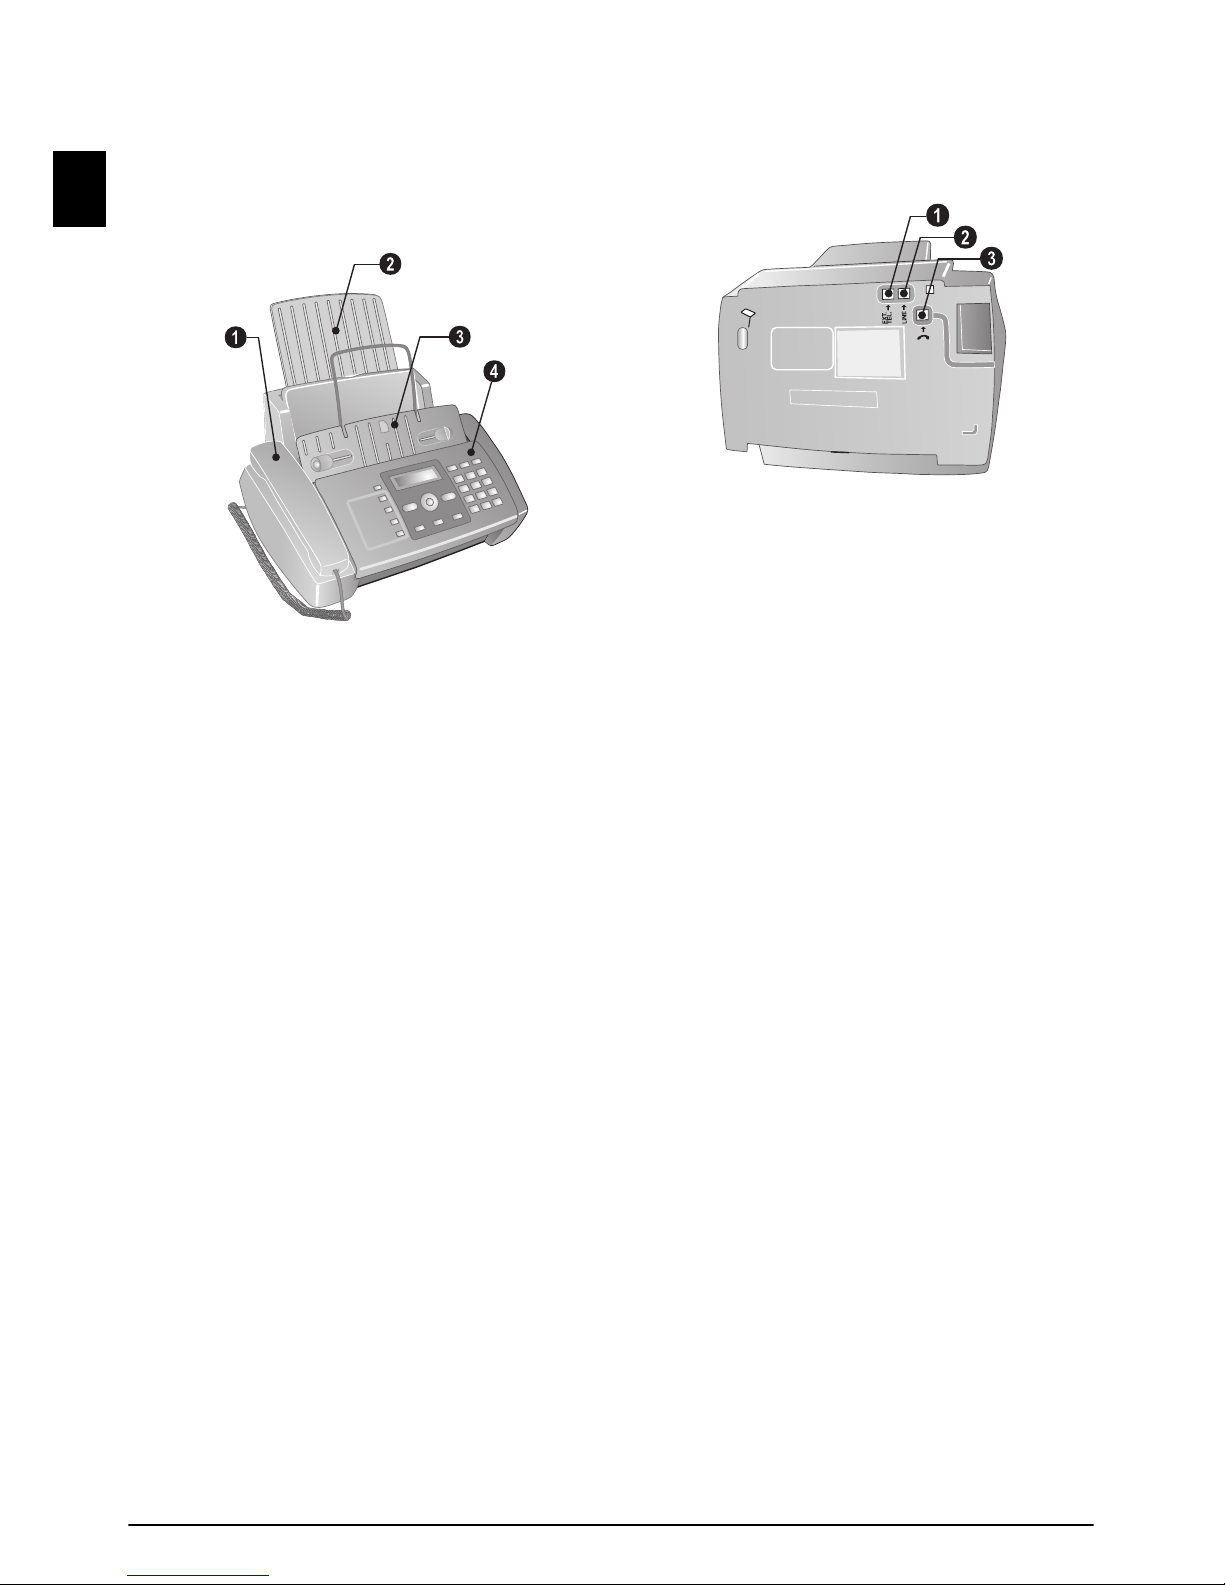
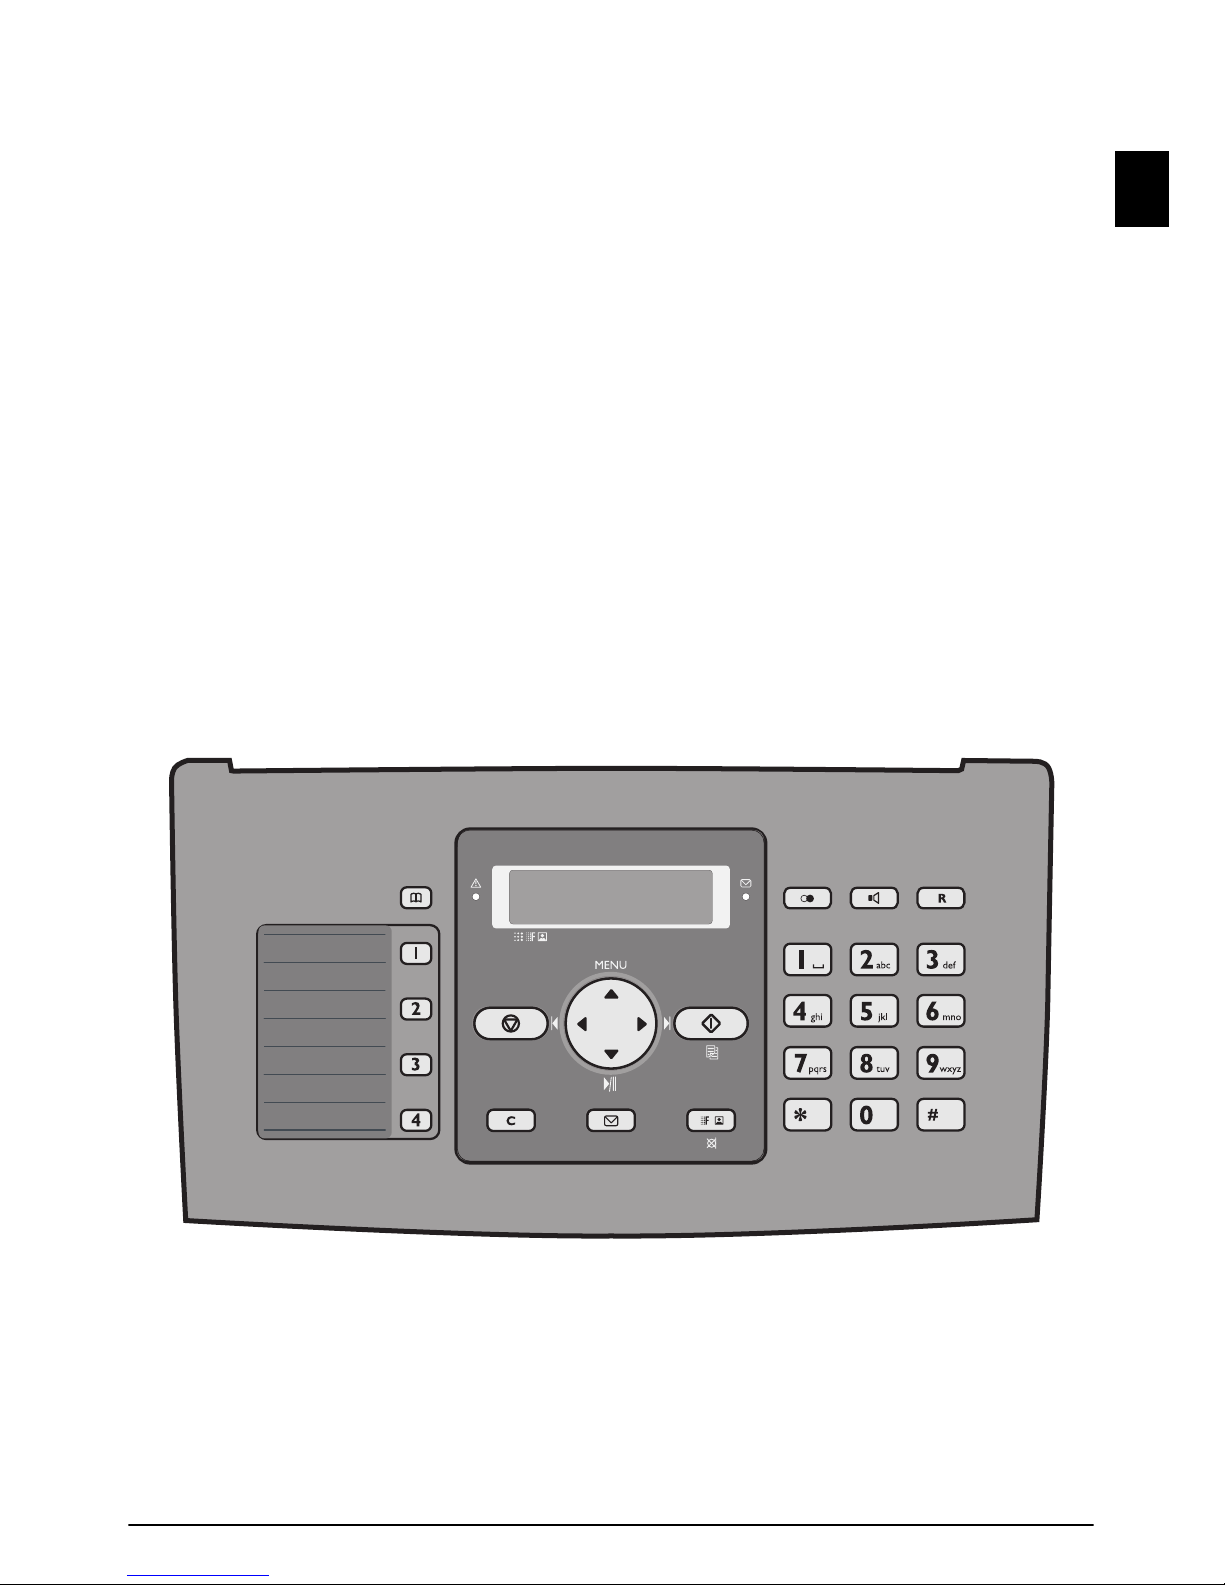
Panel
Telephone Book Entries ljet 3
m—Calling up the telephone book entries. Select the
entries with [ or with the numeric keys
Speed Dial Keys Ijet 2
q—Recalling speed dial entries.
Green Lamp (SMS)
Green Lamp _—It flashes whenever an SMS message
has arrived or when a document is waiting to be retrieved
from the fax memory.
Red Lamp
Red lamp Æ—If the lamp flashes or is lit, please read what
is indicated on the display
Stop Key Ijet 2
j—Function abort / abort copying / return to the starting
mode / delete error message
Menu Functions ljet 3
MENU—Call-up menu functions / call-up copy menu
(document in the document feeder) / switch to 12 hour
clock AM, PM / adjust volume level
Left/Right Arrow Key Ijet 3
u—Move the cursor
Start Key Ijet 2
o—Starting transmission of messages / starting copying
C Key Ijet 2
C—Return to the previous menu level / press briefly:
deleting individual characters / press and hold: deleting
complete input
SMS Key Ijet 3
_—Calling up the SMS menu (function is not sup-
ported in all countries and networks) / in countries where
the SMS function is not supported, start the print out of
fax transmission reports using this key (list of the last ten
fax messages sent and received).
Loudspeaker Key with/without Handset Ijet 3
ß—(IPF¦520): Listening while the connection is estab-
lished / (IPF¦525, IPF¦555): Dialling with the handset
replaced / (IPF¦525, IPF¦555): hands-free
Redial ljet 3
@—Toggling between the list of the last 10 dialled num-
bers (= redial list), and the list of last 20 callers (= caller
list). Confirm using o / insert dialling pause
R Key with/without Handset Ijet 3
R - trigger flash function (only if the device is configured
as an extension) / (IPF¦525, IPF¦555): Switching between
calls (= call toggling)
f x—Setting higher resolution for faxes and copying /
switching microphone off for hands-free
Numeric Keypad Ijet 3
Numeric keypad—Inputting digits, characters and special
characters
Heading answering machine keys
Answering machine keys
Type 2 (großer Core)
(IPF¦555)
Answering machine keys
ç—Playback of the saved messages/ interrupting during
playback
å – Listening to previous message
æ – Listening to next message /listen to message again/in
the starting mode, recording a memo.
C—Deleting current message during play-back /press
twice, delete all messages
ipf 520-555

8 Philips · IPF 520 · 525 · 555
EN
3 Initial Operation
Packing contents
Packing contents Basic Primo Voice
‚ Device
ƒ Telephone handset (IPF¦525, IPF¦555)
„ Spiral cable for telephone handset (IPF¦525, IPF¦555)
… Paper tray
† Mains cable with plug (country-specific)
‡ Telephone cable with plug (country-specific)
ˆ Ink cartridge (black)
User Manual
User manual with installation guide (not depicted)
Verpackungsinhalt
Missing Package Contents
Attaching Paper Tray
Attaching Paper Tray
Insert the paper tray in the opening provided for it.
Papierhalter einstecken
Loading Paper
Paper Format
Before you can receive documents or make copies, you
must load paper into the device. Please use only appropriate paper in standard format A4 (210 × 297 millimetre ·
preferably 80 g/m
2
). Follow the specifications in the tech-
nical data.
Loading Paper
Preparing Paper
Loading Paper
Loading Paper
1 Fold open the paper feed flap towards front until stop.
2 Insert paper in the paper feeder. You can insert maxi-
mum 100 sheets (A4 · 80 g/m2).
3 Close the paper feed flap.
Notice
Missing Package Contents
If one of the parts is missing or damaged, please
contact your retailer or our customer service.
Notice
Loading Paper
Separate the paper sheets by fanning them out,
then align them by tapping edge of the stack lightly
against a flat surface. This will prevent several
sheets of paper from being drawn in all at once.
Initial Operation · Connecting handset 9
EN
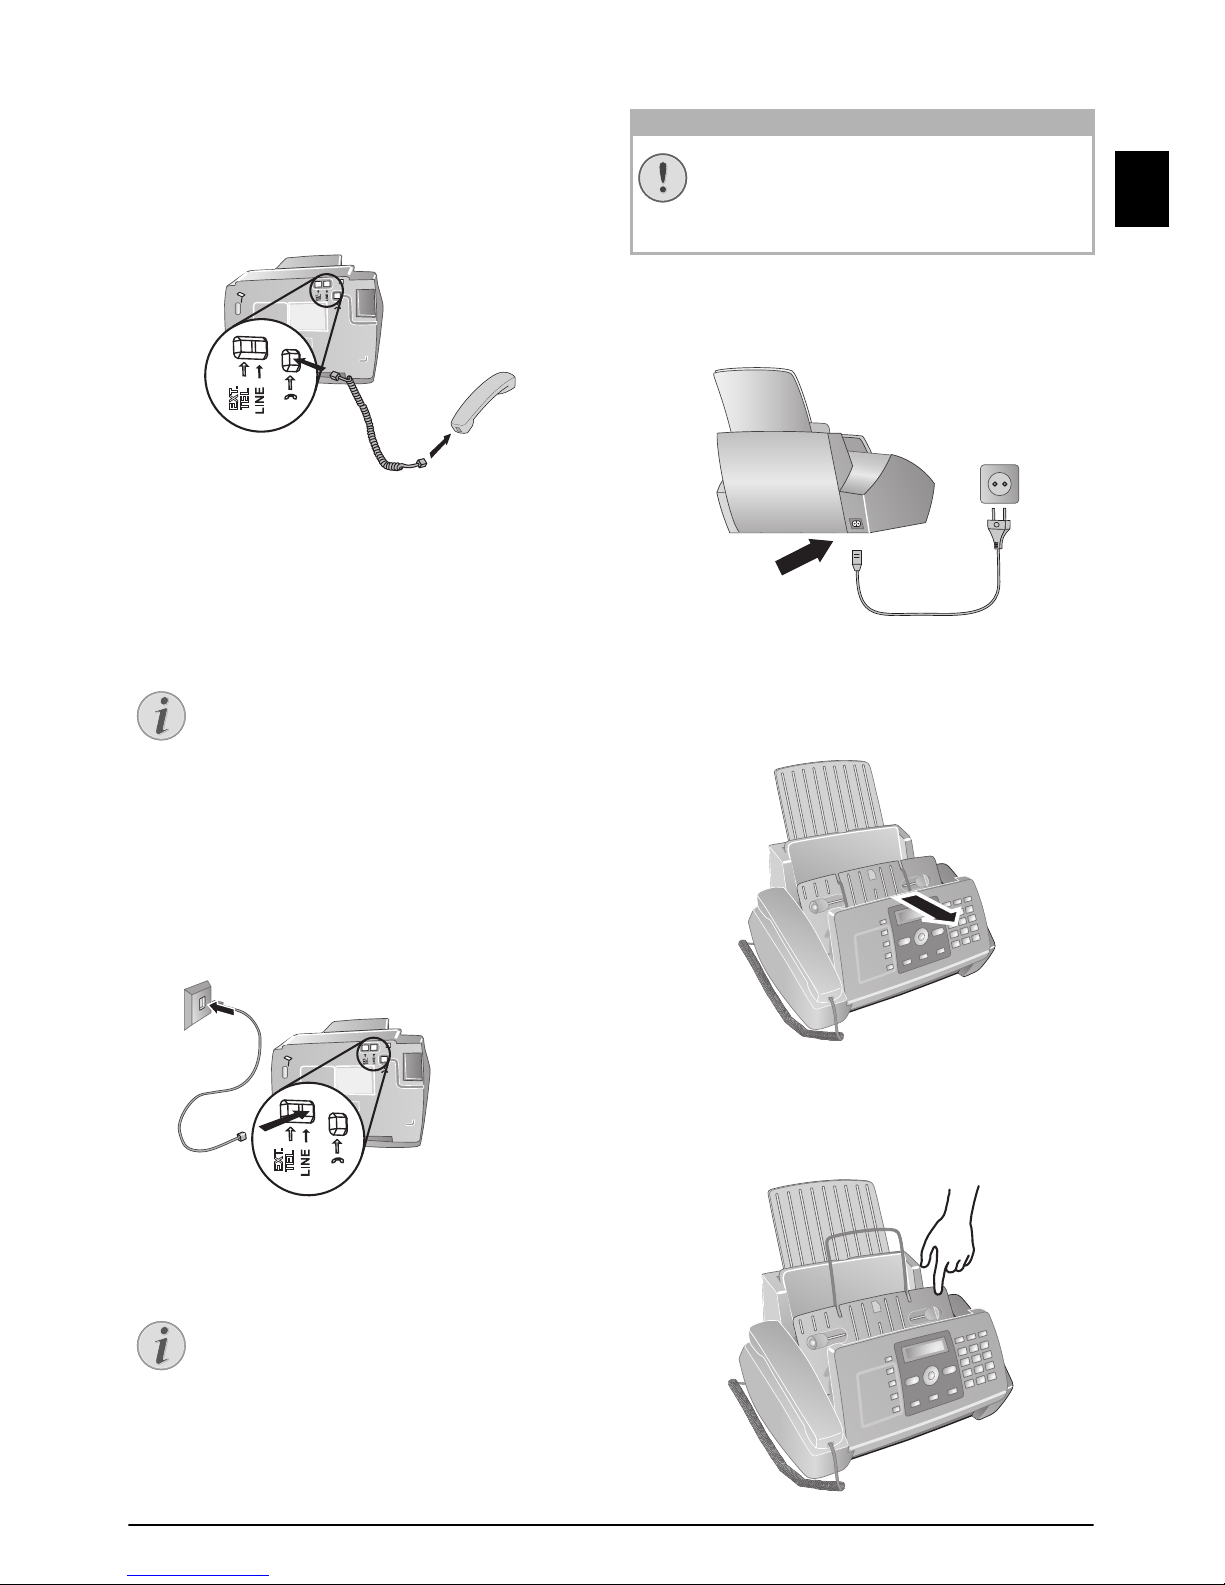
Connecting handset
Type 3 (mit Telefon)
(IPF¦525, IPF¦555)
Plug one end of the spiral cable into the socket on the telephone handset. Put the other end into the socket at the
device bottom marked with ) symbol.
Telefonhörer anschließen
Connecting the Telephone
Cable
Connecting the Telephone Cable
Connecting the Telephone Cable
Connect the telephone cable to the device by inserting it in
the socket designated with LINE (RJ-11-Connector).
Insert the telephone plug into your PTT line socket.
Telefonkabel anschließen
PABX Systems 1
Connecting the Mains Cable
Mains Voltage at the Site of In stallation
Connecting the Mains Cable
Insert the mains cable into the connection located on the
rear side of the device. Plug the power cable into the electrical outlet.
Netzkabel anschließen Faxjet
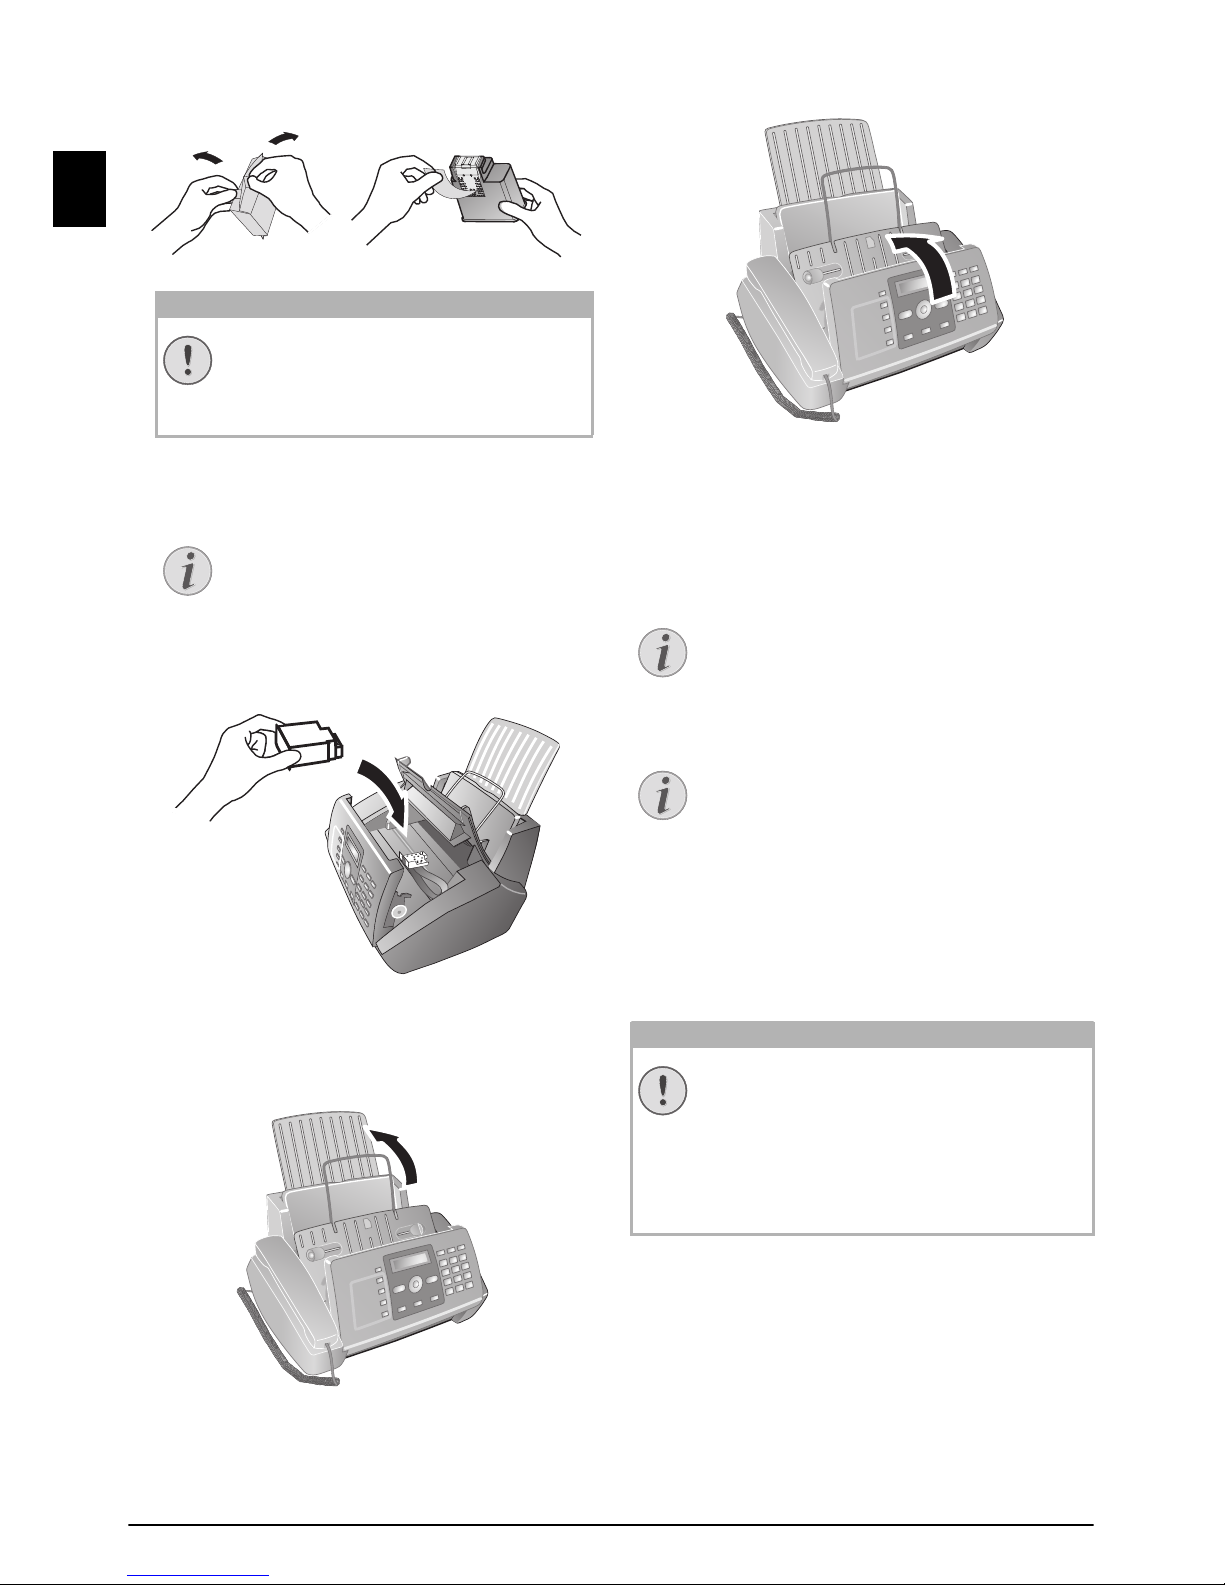
Inserting Ink Cartridge
1 Open the control panel, by lifting and folding it up in
the centre. Click the control panel completely in place.
2 Open the cartridge compartment by pressing on the
upper right corner of the document holder (arrow) and
then carefully lifting it backwards. Click the document
holder completely in place.
Notice
Analogue Fax Machine
Your device is an analogue fax device (Group 3).
It is not an ISDN device (Group 4), and therefore it cannot be operated directly on an ISDN
connection. In order to do this, you need either
an analogue adapter or a connection for analogue terminals.
Notice
Connection to Private Automatic
Branch Exchange
If you connect your device as extension to a telephone system, you must set it for working as an
extension (also see Chapter
Telephone connec-
tions and additional devices
, page 33).
CAUTION!
Mains Voltage at the Site of Installation!
Check whether the mains voltage of your device
(indicated on the type label) matches the mains
voltage available at the setup location.
10 Philips · IPF 520 · 525 · 555
EN
3 Remove the cartridge from the packing and remove the
protective strips.
4 Insert the cartridge into the holder with the coloured
end facing front and the contacts facing down.
5 Press the cartridge down until it snaps into place.
6 Close the device by folding the document holder down
and swivelling the metal bracket upward.
7 Then close the control panel.
Initial Installation
After you connect your device to the mains voltage, the initial installation commences.
Starting Initial Installation Process
Printing the Functions List
Selecting the Language
1 Use [ to select the desired display language.
2 Confirm with o.
Selecting the Country
Setting the Country Correctly
Setting the Country
1 Use [ to select the country in which you are operat-
ing the device.
2 Confirm with o.
CAUTION!
Remove the Protection Strip!
Please make certain that the protective strip
has been completely removed. Be careful not
to touch the nozzles or contacts.
Notice
Only Insert Cartridge When Connected to the Electric Power Source
Only insert the cartridge if the device is connected to the electricity power supply. Otherwise, the cartridge will not be detected.
Notice
Starting Initial Installation Process
You can start the initial installation at a later
point of time using MENU and 1 also
Notice
Printing the Functions List
You can print the menu overview using MENU
and 2.
CAUTION!
Setting the Country Correctly!
You must set the country in which you are operating the device. Otherwise your device is not
adapted to the telephone network. If your country is not included in the list, you must select a
different setting and use the correct telephone
cable for the country. Consult your retailer.

Initial Operation · Initial Installation 11
EN
Activating the Printing Head
1 Confirm NEW PRINT CART.? using 1 to set the
ink level memory to "full“.
2 A test page is printed.
3 Check the print sample for interruptions.
4 If necessary, repeat the printing using 0.
5 You can finish using 1 and j.
Entering the Date and Time
1 Press MENU. RECEPT. SET-UP appears on the
display.
2 Select using [
FAX SET-UP.
3 Confirm with o.
4 Confirm
DATE AND TIME with o.
5 Select using [
SET DATE/TIME.
6 Confirm with o.
7 Enter the date (two digits each) e.g.
080608 for 08.06.08.
8 Enter the time, e.g. 1400 for 2 pm.
9 Confirm with o.
10 You can exit with j.
Time and Date After a Short Pow er Failure
Notice
Format of Time and Date
Select further settings in step 5 using [
DATE FORMAT—Change the date format
HOUR FORMAT—Change the time format (12/
24 clock).
Notice
Time and Date After a Short Power
Failure
If SET DATE/TIME appears in the display,
you must adjust the date and time.
1 Press MENU and confirm using o.
2 Enter the date and time with the numeric keys.
3 Confirm with o.

12 Philips · IPF 520 · 525 · 555
EN
4 Telephone Functions
Link: Additional Telephone s
For information on how to connect additional telephones
and which functions are available to you, please refer the
chapter on Telephone Connections and Additional
Devices, Page 33.
Placing a call to the device
Type 3 (mit Telefon)
(IPF¦525, IPF¦555)
No Paper in Feeder
Dial the desired number. There are several ways to do this:
Then pick up the handset.
Direct Dialling
Manual Dialling:
Dial the desired number using the numeric keypad.
Telephone Book:
1 Press m.
2 Select an entry using [.
Speed Dialling:
Press and hold (at least two seconds) the desired speed dial
key (q).
Redial List:
1 Press @.
2 Using ^ select
OUTGOING CALLS.
3 Confirm with o.
4 Use [ to select an entry from the list of the dialled
numbers.
5 Confirm with o.
Caller List:
1 Press @.
2 Using ` select
INCOMING CALLS.
3 Confirm with o.
4 Use the [ to select an entry from the list of callers.
5 Confirm with o.
CLIP Prerequisite
Hands-Free
Type 3 (mit Telefon)
(IPF¦525, IPF¦555)
1 Press ß to dial without lifting up the handset. You will
hear a dial tone from the loudspeaker.
2 Enter the desired number using the numeric keypad or
select a saved entry. The dialling process begins immediately. At this stage, any numbers that have been
incorrectly entered can no longer be changed.
Adjusting Volume Level
Secret mode
Type 3 (mit Telefon)
(IPF¦525, IPF¦555)
You can put the handset on mute, if you want to speak to
someone without letting the caller hear the conversation.
1 During a call, press ê. Your caller cannot hear any-
more.
LINE ON HOLD appears on the display.
2 Press ê again to continue with the call.
Speed Dialling
Speed Dialling
You can assign the speed dial keys to frequently dialled telephone numbers. You can load these telephone numbers
quickly with the speed dial keys.
Assigning Speed Dial Entry
1 Press MENU. RECEPT. SET-UP appears on the
display.
2 Select using [
PHONE BOOK.
3 Confirm with o.
4 Confirm
NEW NUMBER with o.
5 Enter 01—04 as a position for the speed dial keys
(q) with the numeric keys. The position must
always be a two digit number.
6 Confirm with o.
Notice
No Paper in Paper Feeder
No paper must be present in the paper feeder for
the telephone function. Otherwise the device
switches to fax operation.
Notice
Direct Dialling
You can also lift up the receiver first, then dial a
number. The dialling process begins immediately.
Notice
Navigating in the Telephone Book
Enter the starting letters with the numeric
keypad to quickly navigate through the telephone book.
Notice
Calling Line Identification (CLIP)
For this function to work, the Caller Line Identification (CLIP) must be activated for your telephone connection (country and network
dependent). The number and name will not be
shown if the caller suppresses his number.
Notice
Adjusting Volume Level
Using MENU, set the volume.
Notice
Speed Dial Entry Assigned
If you select a position that is already
assigned, a message appears on the display.

Telephone Functions · Telephone Book of the Device 13
EN
7 Enter the telephone numbers.
8 Confirm with o.
9 Enter the name.
10 Confirm with o.
11 Select a ring tone using [.
12 Confirm with o.
13 Using [ select if would like to save further entries or
exit the function.
14 Confirm with o.
Deleting a Speed Dial Entry
1 Press MENU. RECEPT. SET-UP appears on the
display.
2 Select using [
PHONE BOOK.
3 Confirm with o.
4 Using [ select
DELETE.
5 Confirm with o.
6 Using [ select the entry which you would like to
delete.
7 Confirm with o.
8 Using [ select
YES.
9 Confirm with o.
Telephone Book of the
Device
Telephone Book ljet 3
You can store up to 100 entries in the telephone book of
your device. You can assign various ring tones to the
entries. Follow the specifications in the technical data.
Saving Entry
1 Press MENU. RECEPT. SET-UP appears on the
display.
2 Select using [
PHONE BOOK.
3 Confirm with o.
4 Confirm
NEW NUMBER with o.
5 Enter the position of the entry using the numeric keys.
The position must always be a two digit number.
6 Confirm with o.
7 Enter the telephone numbers.
8 Confirm with o.
9 Enter the name. You can enter characters using the
numeric keys (see key labels). Enter special characters
using * or #. Press the respective key several times
until the character or special character appears on the
display.
10 Confirm with o.
11 Select a ring tone using [.
12 Confirm with o. The entry is saved.
Save e-mail address
You can also save an e-mail address to which SMS messages
can be sent.
1 Press MENU.
RECEPT. SET-UP appears on the
display.
2 Select using [
PHONE BOOK.
3 Confirm with o.
4 Using [ select
NEW ADDRESS.
5 Confirm with o.
6 Enter the position of the entry using the numeric keys.
The position must always be a two digit number.
7 Confirm with o.
8 Enter the e-mail address.
9 Confirm with o.
10 Enter the name.
11 Confirm with o. The entry is saved.
Edit Entry
1 Press MENU. RECEPT. SET-UP appears on the
display.
2 Select using [
PHONE BOOK.
3 Confirm with o.
4 Using [ select
MODIFY.
5 Confirm with o.
Notice
Positions of the Speed Dial Entries
Speed dial entries are only saved in positions
01 to 04.
Notice
Navigating in the Telephone Book
You can move the cursor using u. Use C to
delete individual characters. Press j to close the
menu and return to the starting mode.
Notice
Telephone Book Entry Assigned
If you select a position that is already
assigned, a message appears on the display. If
necessary, print out the telephone book in
order to receive an overview of the positions
that are still available.
Notice
Enter E-Mail Addresses
Please note that e-mail addresses cannot contain a space.

14 Philips · IPF 520 · 525 · 555
EN
6 Using [ select the entry which you would like to edit.
7 Confirm with o.
8 Edit the number.
9 Confirm with o.
10 Edit the name.
11 Confirm with o.
12 Select a ring tone using [.
13 Confirm with o. The changed entry is saved.
Deleting an Entry
1 Press MENU. RECEPT. SET-UP appears on the
display.
2 Select using [
PHONE BOOK.
3 Confirm with o.
4 Using [ select
DELETE.
5 Confirm with o.
6 Using [ select the entry which you would like to
delete.
7 Confirm with o.
8 Using [ select
YES.
9 Confirm with o.
Printing the Telephone Book
1 Press MENU. RECEPT. SET-UP appears on the
display.
2 Select using [
PHONE BOOK.
3 Confirm with o.
4 Using [ select
PRINT PHONE B..
5 Confirm with o.
Calling Line Identification
(CLIP)
CLIP Definition
The number of an incoming call appears on the display.
For this function to work, the Calling Line Identification
Presentation (CLIP) must be activated for your telephone
connection. Enquire with your telephone company. Caller
Line Identification may be associated with a fee.
Number is Suppressed
Switching Caller Line Identification On/Off
1 Press MENU. RECEPT. SET-UP appears on the
display.
2 Select using [
INSTALLATION.
3 Confirm with o.
STATION NAME appears on the
display.
4 Select using [
TEL.LINE SETUP.
5 Confirm with o.
6 Select using [
CALLER ID.
7 Confirm with o.
8 Using [ select whether the telephone number of the
caller is to be displayed or not .
9 Confirm with o.
10 You can exit with j.
Missed Calls
Type 3 (mit Telefon)
(IPF¦525, IPF¦555)
1 Press @.
2 Using ` select
INCOMING CALLS.
3 Press o.
4 Using [, you can page through the list of missed calls.
5 Confirm with o.
6 To call back, pick up the handset.
Notice
Navigating in the Telephone Book
Enter the initial letters with the numeric keys
to quickly navigate through the telephone
book.
Notice
Navigating in the Telephone Book
Enter the initial letters with the numeric keys
to quickly navigate through the telephone
book.
Notice
Setting the Country Correctly
If the Caller Line Identification does not work
even though the function is activated for your
telephone connection, check if you have set the
correct country.
Notice
Number is Suppressed
The number and name will not be shown if the
caller suppresses his number.
Notice
Newly missed calls are indicated by means of
a flashing indicator light.
 Loading...