

Page 1
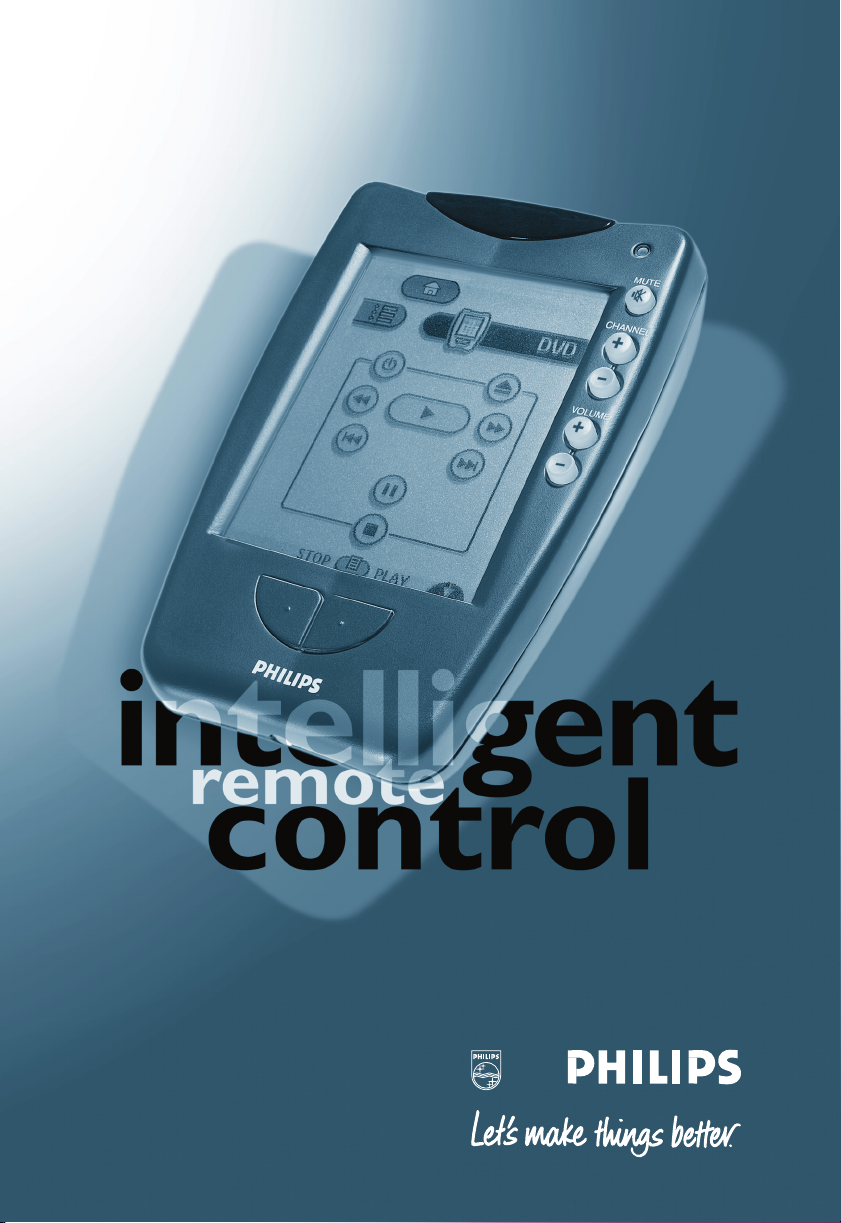
user guide
Page 2

Intelligent Remote Control User Guide
The information in this manual is copyright-protected. No part of this manual may be copied or
reproduced in any form without prior written consent from Philips Electronics Corporation.
PHILIPS ELECTRONICS CORPORATION SHALL NOT BE LIABLE FOR OMISSIONS OR
FOR TECHNICAL OR EDITORIAL ERRORS CONTAINED IN THIS MANUAL. PHILIPS
ELECTRONICS CORPORATION SHALL NOT BE HELD LIABLE FOR INCIDENTAL OR
CONSEQUENTIAL DAMAGES RESULTING FROM THE SUPPLYING OR USE OF THIS
INFORMATION. PHILIPS ELECTRONICS CORPORATION SHALL NOT BE HELD LIABLE
FOR INCIDENTAL OR CONSEQUENTIAL DAMAGES RESULTING FROM THE
PERFORMANCE OR USE OF THE MATERIALS DESCRIBED IN THIS MANUAL.
The information in this manual may be subject to change without prior notice.
All other brand or product names are trademarks or registered trademarks of their respective companies
or organizations.
FCC NOTICE: This equipment has been tested and found to comply with the limits for a Class B
digital device, pursuant to part 15 of the FCC Rule. These limits are designed to provide reasonable
protection against harmful interference in residential installation. This equipment generates, uses, and
can radiate radio frequency energy and, if not installed and used in accordance with the instructions,
may cause harmful interference to radio communications. However, there is no guarantee that
interference will not occur in a particular installation. If this equipment does cause harmful interference
to radio or television reception, which can be determined by turning the equipment off and on, the
user is encouraged to try to correct the interference by one or more of the following measures:
• Reorient or relocate the receiving antenna
• Increase the separation between the equipment and receiver
• Connect the equipment into an outlet on a different circuit from the receiver.
Consult the dealer or an experienced radio/TV technician for help.
NOTE: If serial or parallel ports are configured, a filtered/shielded serial or parallel cable is
recommended to minimize EMI and ensure FCC B compliance.
Page 3

User Guide
Intelligent Remote Control
customizable/programmable, touch screen
universal remote control
Page 4
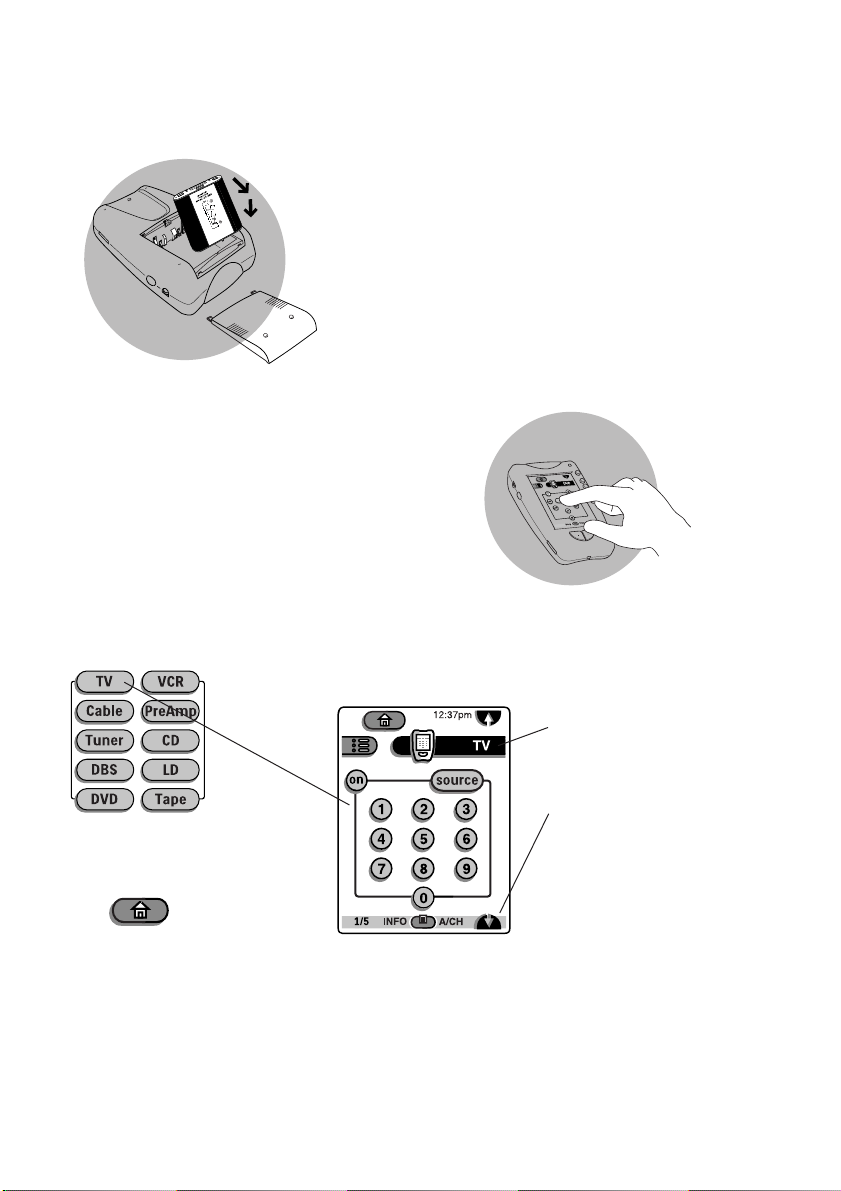
quickstart
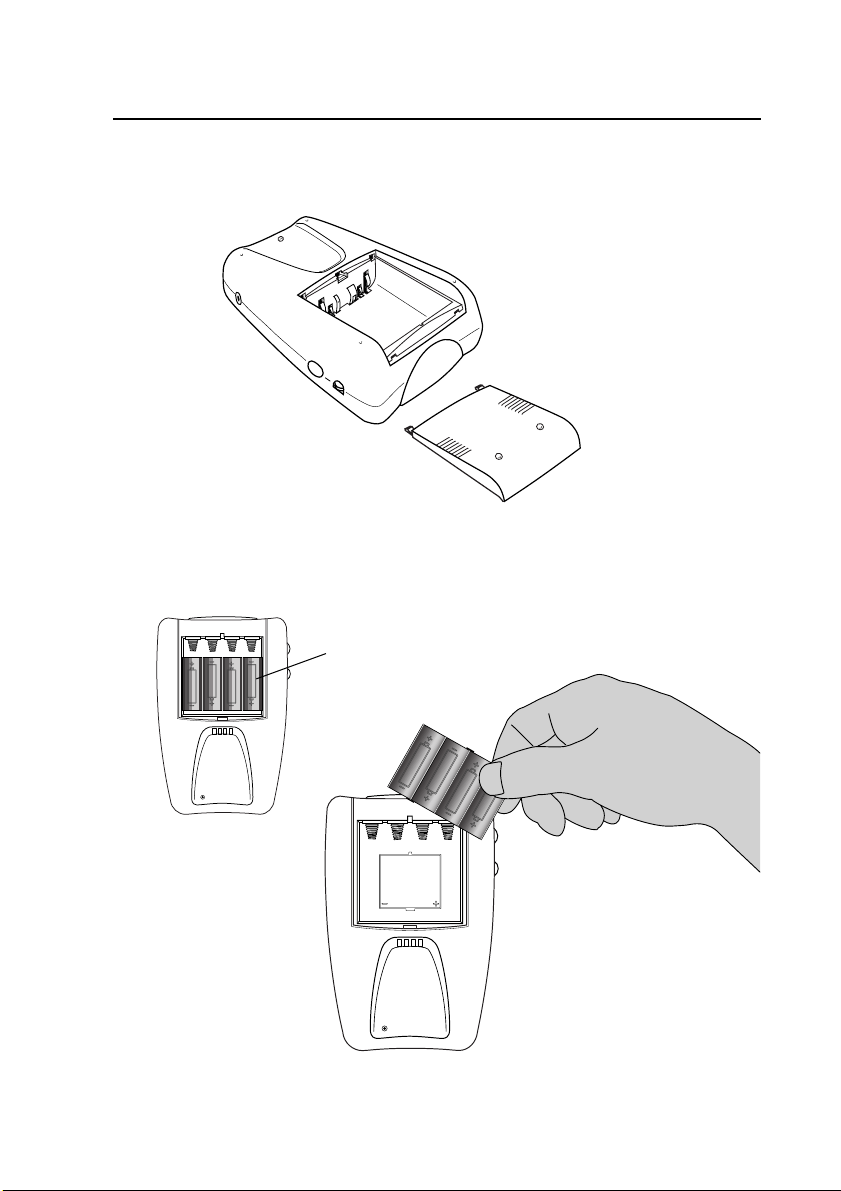
Insert batteries
Insert 4 AA batteries according to the picture
on the inside of the battery compartment.
OR
Use the rechargeable battery pack included
with the dock. (Remove the AA battery tray
first). Before using the remote control, be sure
to charge the battery completely according to
the instructions in the manual.
Battery compartment lid slides off
Touch the screen to start
To turn on the screen, tap it gently with your finger.
To use the touchscreen, simply tap the images you
see on the screen.
There's no need to turn the screen off–it shuts off
automatically to save power.
Operate your components
Be sure to read the manual for
important information about care and
use of the touchscreen
You can also use the
Device menu; tap
here to display it.
Tap name of
Home
If you get lost, you
can always go Home.
Just tap
Fresh out of the box,the remote control is set up to work with popular components
made by Philips, Marantz and certain other companies. If someone has programmed
the remote control for you, it will operate all your components. If not, you need to
teach it.Teaching the remote control is easy:Add components to the Device menu, if
necessary.Then, teach the remote control the commands for the components. For
instructions, refer to the manual.
component
to display
component’s
control panels
Tap to scroll to
next panel for this
component.
Page 5
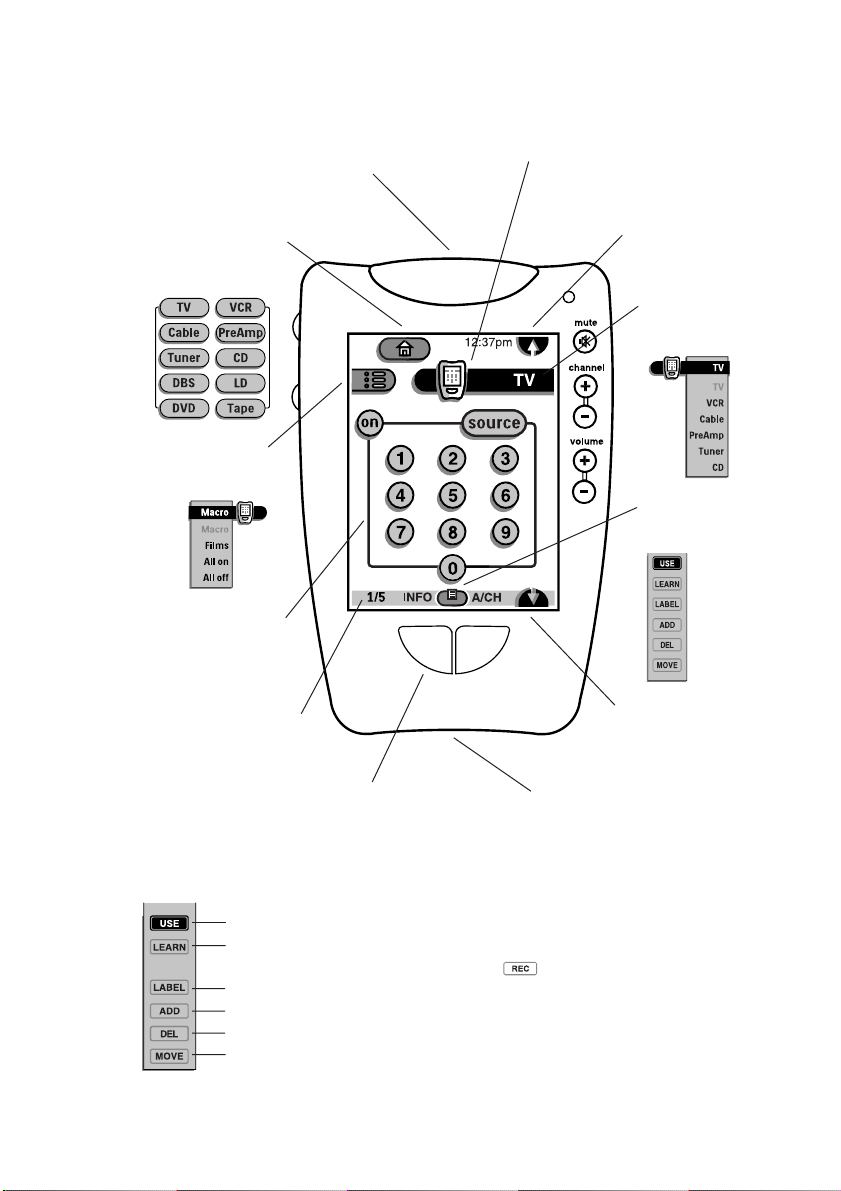
quickreference
Send commands to devices
Home
Easy access to all
components
Macro menu
Execute stored lists
of commands
Control panel
Tap buttons to send
commands to
components
Panel number
Shows what panel
you’re onl l
Left and Right buttons
Activate the commands
shown immediately
Sending eye
(IR transmitter)
above the buttons
The remote control icon
Press and hold for 3
seconds to go to Setup
Scroll button
Display previous
control panel
Device menu
Open a component’s
control panels
Mode menu
Customize the remote
control (see below)
Scroll button
Display next control
panel. Scroll buttons
may appear on left
Learning eye
(bottom of remote control)
For learning commands from
other remote controls
Modes
Normal use controlling components.
Learn commands from other remote controls.When a macro panel
is displayed, this button changes to for recording macros.
Assign letters and symbols to buttons and commands.
Add a new component or group of macros.
Delete a button, component, macro, or macro group.
Change the order of commands in a menu.
Page 6

Contents
Welcome 7
Features 8
The intelligent remote control 8
Recharging dock 8
1 Batteries 9
Installing AA batteries 9
Using the recharging dock 11
2 Using the remote control 14
Buttons and controls 14
Direct-access buttons 15
Left and Right buttons 15
Touchscreen buttons 15
Getting started 16
To turn the display on 16
To adjust the display 17
To turn on the backlight 17
Using the remote control to control your equipment 18
Home 18
Device menu 19
Control panels 21
Use mode 22
To switch devices without affecting the source 23
3 Customizing the intelligent remote control 25
To customize the remote control 25
Understanding modes 28
To switch modes 29
To show or hide the Mode menu 29
4
Page 7

Learning commands from other remote controls
(Learn mode) 30
To program a button on the display (soft button) 31
To program an item on the Device menu 34
To program a template button 36
Programming the direct-access and Left/Right buttons 37
To program a button globally 37
To program a direct-access button on a per-device basis 38
Adding devices to your system (Add mode) 39
To add a device 39
Relabeling buttons and menu items (Label mode) 41
To relabel a button 41
To relabel an item on a menu 43
Rearranging items in menus (Move mode) 44
To rearrange the items in a menu 44
Deleting buttons and menu items (Delete mode) 46
To delete a button or button action 46
To delete a device, Device menu action, or macro group 47
4 Creating Macros 50
Recording macros 52
To record a macro 52
To view the commands in a macro 57
Editing macros 57
To edit a previously recorded macro 57
Organizing macros into groups 59
To add a macro group 59
Using macros 61
To execute a macro 61
To stop a macro 61
5 Settings 62
To adjust settings 62
To exit Setup 65
5
Page 8

6 Troubleshooting 66
Problems using the remote control 66
Problems using the recharging dock 69
Common questions 70
Additional procedures 71
To reset the remote control 71
To revert to the original configuration 72
To calibrate the touchscreen 72
Service and support 73
7 Specifications 74
8 Command Reference 75
6
Page 9

Welcome
Congratulations on purchasing the intelligent remote control. The remote
control is a universal learning remote control that combines flexibility with ease
of use through an LCD touchscreen and an intuitive user interface.
The remote control and
recharging dock
COMPLETE CUSTOMIZATION
You decide how you want the remote control to look. You can add and remove
devices and functions. You can relabel buttons using the remote control’s
unique virtual keyboard. You can record all the macros you need, and edit them
on-screen. The remote control is as individual as you are.
TOTAL CONTROL
While other universal remotes confine you to a predefined list of devices, the
remote control lets you add, delete, reorganize, and even relabel new devices, so
it grows with your system. It can learn to control any device that understands
infrared signals, from your TV to your remote-control curtains. The built-in
device templates make it easy to add and program all kinds of devices.
SIMPLICITY AND DEPTH
The remote control’s elegant interface is simple enough for the entire family to
use. Yet it has the power and flexibility to satisfy any home entertainment or
home control enthusiast.
Welcome
7
Page 10

Features
The intelligent remote control
• Large dynamic touchscreen with liquid crystal display.
• Direct-access buttons for frequently used functions.
• Elegant, intuitive interface with animation (patent pending).
• Automatic backlighting for visibility in the dark.
• Built-in, customizable device templates for total control.
• Programmable, editable macros (patent pending).
• Virtual keyboard for labeling buttons and devices (patent pending).
• Can control any device that receives infrared remote control signals.
• Learns infrared (IR) codes from your existing remote controls—then replaces
those remotes.
• Comes with hundreds of built-in commands (RC-5/6) for out-of-the-box use
with your Philips and Marantz components.
• Designed for one- or two-handed operation, or tabletop use.
• Flash memory stores your commands even when batteries aren’t present.
Recharging dock
• Easy, unlimited recharging—no need to remove the battery.
• The remote control can be used while it’s on the dock,
even if the battery is low.
• NiMH rechargeable battery pack minimizes loss of battery life over time.
• Rechargeable battery pack is easier on the environment than ordinary
batteries that need replacing.
• Indicator light tells you when the remote control is charging.
PC serial cable
• To connect the remote control with your computer.
• Allows you to customize the graphical user interface through PC software.
8
Welcome
Page 11
CHAPTER 1
1
Batteries
The remote control uses four AA batteries or the rechargeable battery pack
supplied with the recharging dock. If you purchased the recharging dock, see
“Using the recharging dock” on page 11.
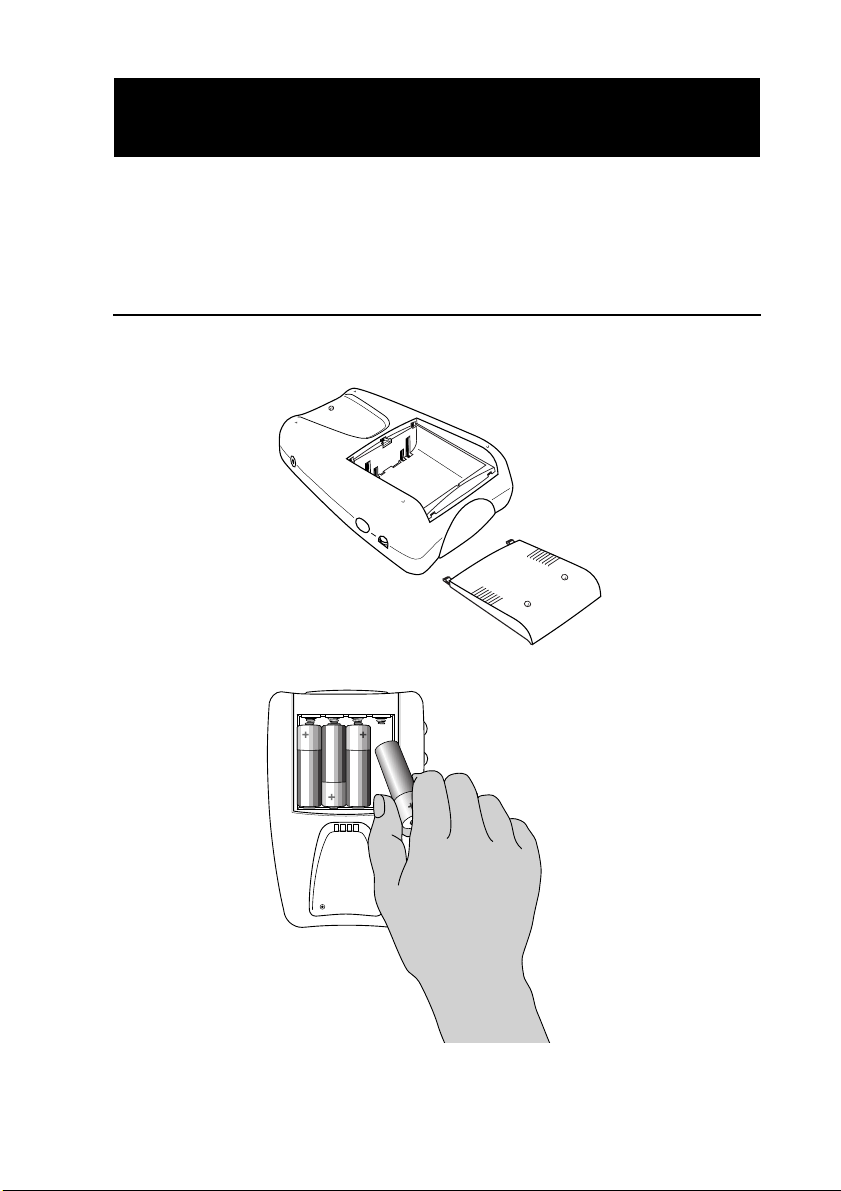
Installing AA batteries
Install four AA batteries as shown.
•
Slide the battery cover
off the back of the
remote control.
Insert 4 AA batteries
as shown. Improper
installation could damage
the remote control.
When you’re done, slide
the battery cover back
on. The remote control
starts up automatically,
and the word “remote
control” appears on the
display. After a few
seconds, the remote
control beeps twice to
indicate that it’s ready to
use.
Chapter 1—Batteries
9
Page 12

NOTE
BATTERY LIFE
If the display is too light or too dark, adjust the contrast. (See page 14.)
When the batteries are running low, the Low Battery icon blinks at the
center top of the display. The remote control may continue to operate your
equipment with low batteries. However, you won’t be able to use the remote
control’s learning or customizing features until the batteries have been replaced.
This prevents the remote control from accidentally losing custom commands if
it’s in a customization mode when the batteries run out.
TIP
To preserve battery life, set the LCD backlight to stay on very briefly (20
seconds or less). For instructions, see Chapter 5, “Settings.”
IF THE BATTERIES RUN OUT
The remote control will retain your commands and settings in memory even
after the batteries run out. However, you should replace the worn batteries with
a fresh set as soon as possible.
After replacing batteries, you’ll need to set the clock to the current time. For
instructions, see Chapter 5, “Settings.”
10
Chapter 1—Batteries
Page 13
Using the recharging dock
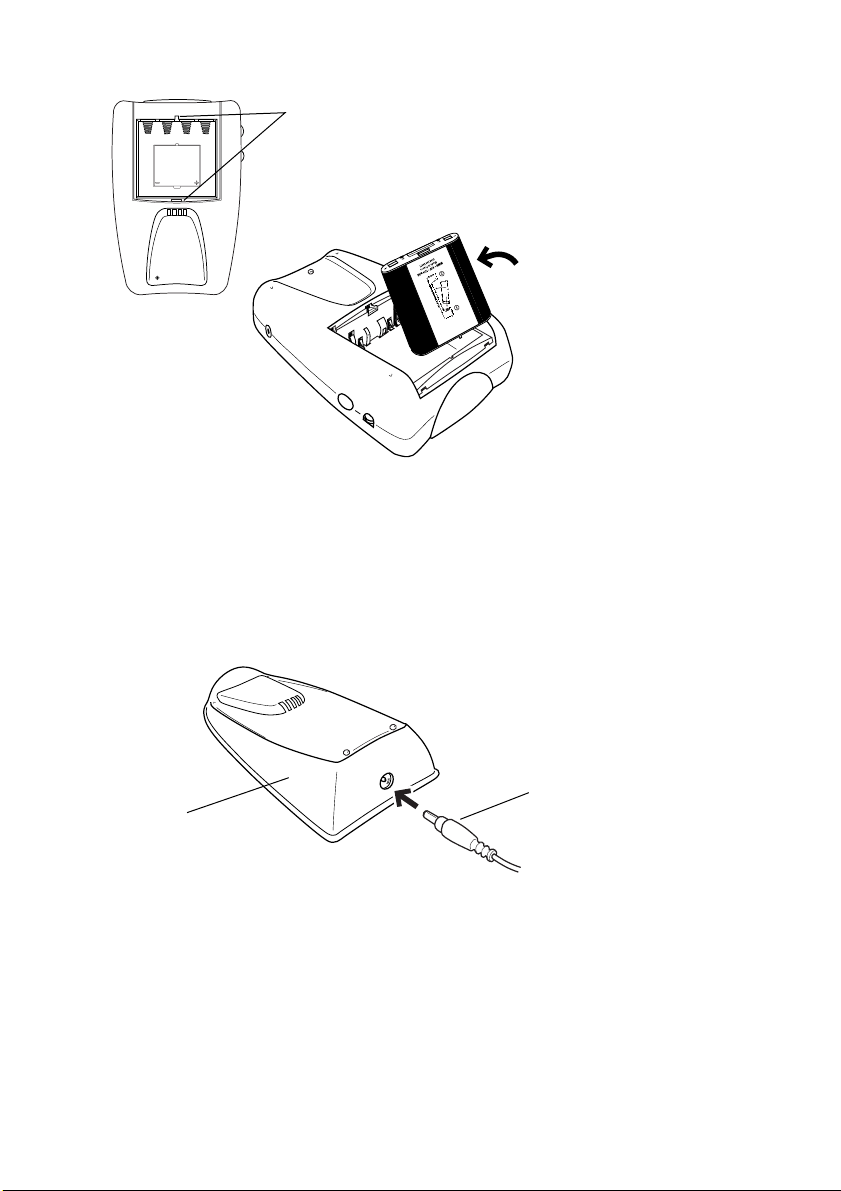
The recharging dock comes with a rechargeable battery pack.
You should fully charge the battery pack before using the remote control.
Slide the battery cover
off the back of the
remote control.
Remove the AA battery
tray (the ridged piece of
plastic at the back of the
battery compartment).
AA battery tray
Using the recharging dock
11
Page 14
Notches
Orient the battery pack
as shown. The label
should face outward, and
the plastic tabs on the
battery pack should be
aligned with the notches
in the sides of the battery
compartment.
Insert the battery pack
You will need to press
firmly.
When you’re done, slide
the battery cover back
on. You’re ready to
charge up the battery.
When you insert the battery pack, the remote control starts up automatically,
and the word “remote control” appears on the display. After a few seconds, the
remote control beeps twice to indicate that it has finished starting up. Now
you’re ready to charge up the battery.
Plug the power adapter
into a wall outlet and
connect it to the
recharging dock.
Recharging dock
12
Chapter 1—Batteries
Power adapter
Page 15
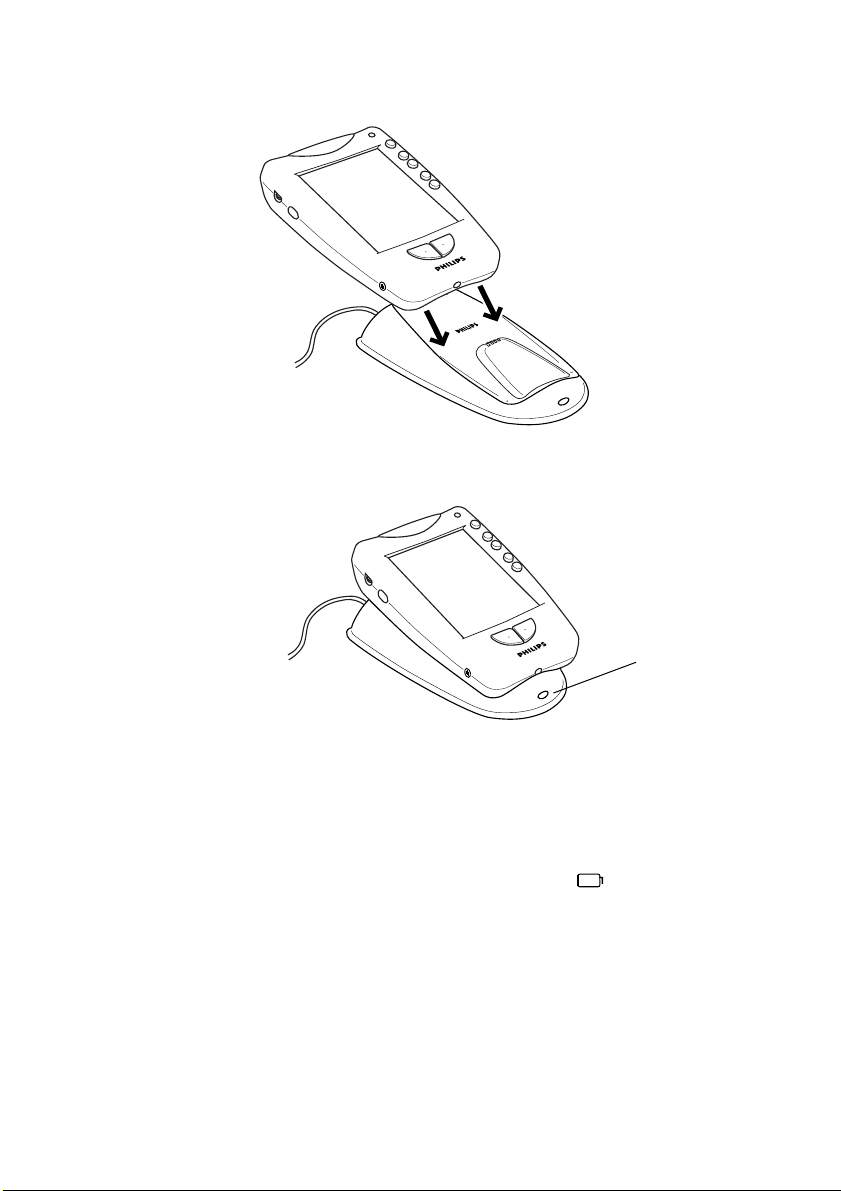
Place the remote control
on the recharging dock.
You can use the remote
control while it’s being
recharged. The battery
will not run down.
Light is on while
battery is
charging.
The light on the front of the recharging dock turns off when the batteries are
fully charged. The charging time is 2 to 3 hours, depending on the condition of
the battery pack. It’s a good idea to place the remote control on the recharging
dock when you’re not using it.
When the battery is running low, the Low Battery icon blinks at the center
top of the display. The remote control may continue to operate your equipment
with low batteries. However, you won’t be able to use the remote control’s
learning or customizing features.
IMPORTANT
Use the recharging dock only with the NiMH rechargeable
battery pack. The dock won’t recharge ordinary AA batteries, and if AA batteries
are installed, the remote control can’t get power from the dock while resting on
it.
Using the recharging dock
13
Page 16
CHAPTER 2
2
Using the remote control
This chapter shows you how to use the remote control to operate your equipment.
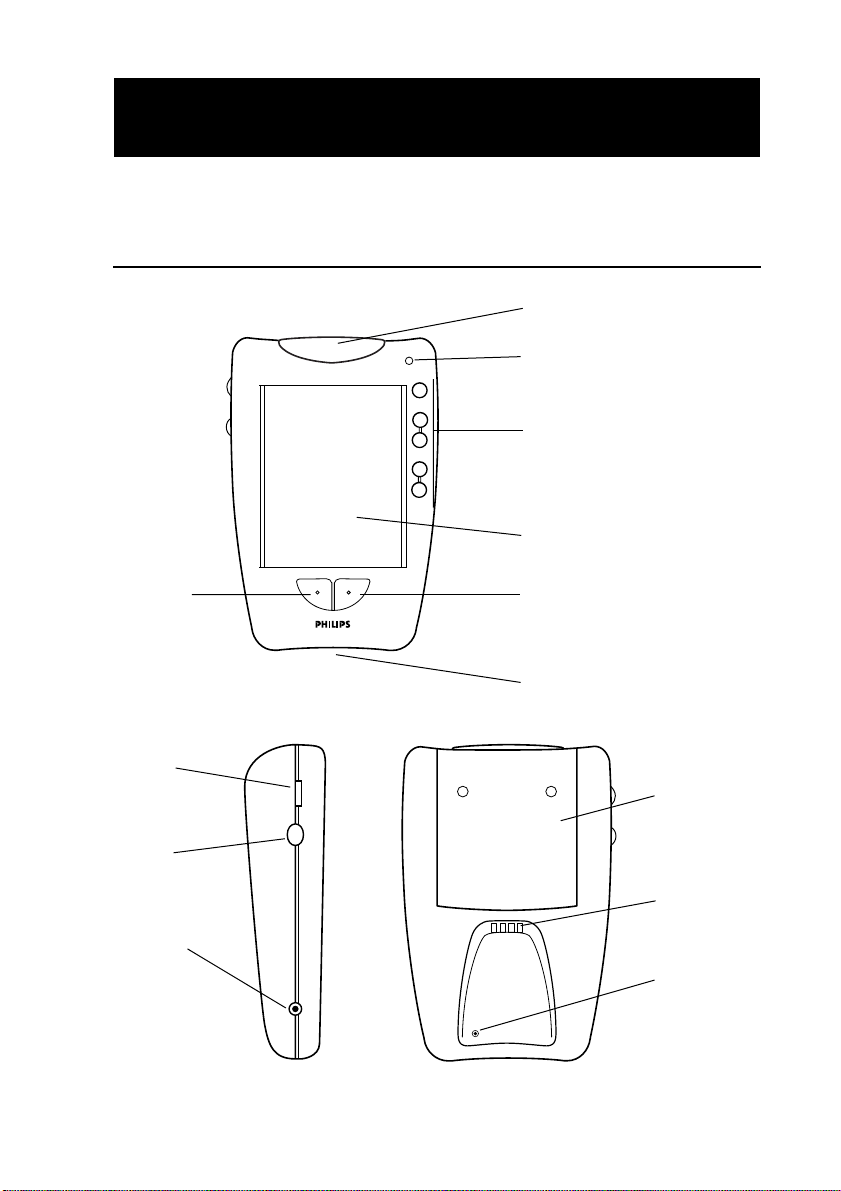
Buttons and controls
Sending eye (IR transmitter)
Light sensor
Direct-access buttons
Touchscreen
Left button
Contrast
dial
Backlight
button
Serial port
(for future
upgrades)
14
Chapter 2—Using the remote control
Right button
Learning eye
Battery cover
Recharging
contacts
Reset button
Page 17
Direct-access buttons
The buttons labeled
Mute, Channel
, and
Volume
are
direct-access buttons
direct-access buttons make these frequently used functions available even when
the touchscreen is off. You can program them so that they always operate the
same component—for example, the TV. Or, you can program them to operate
different devices at different times.
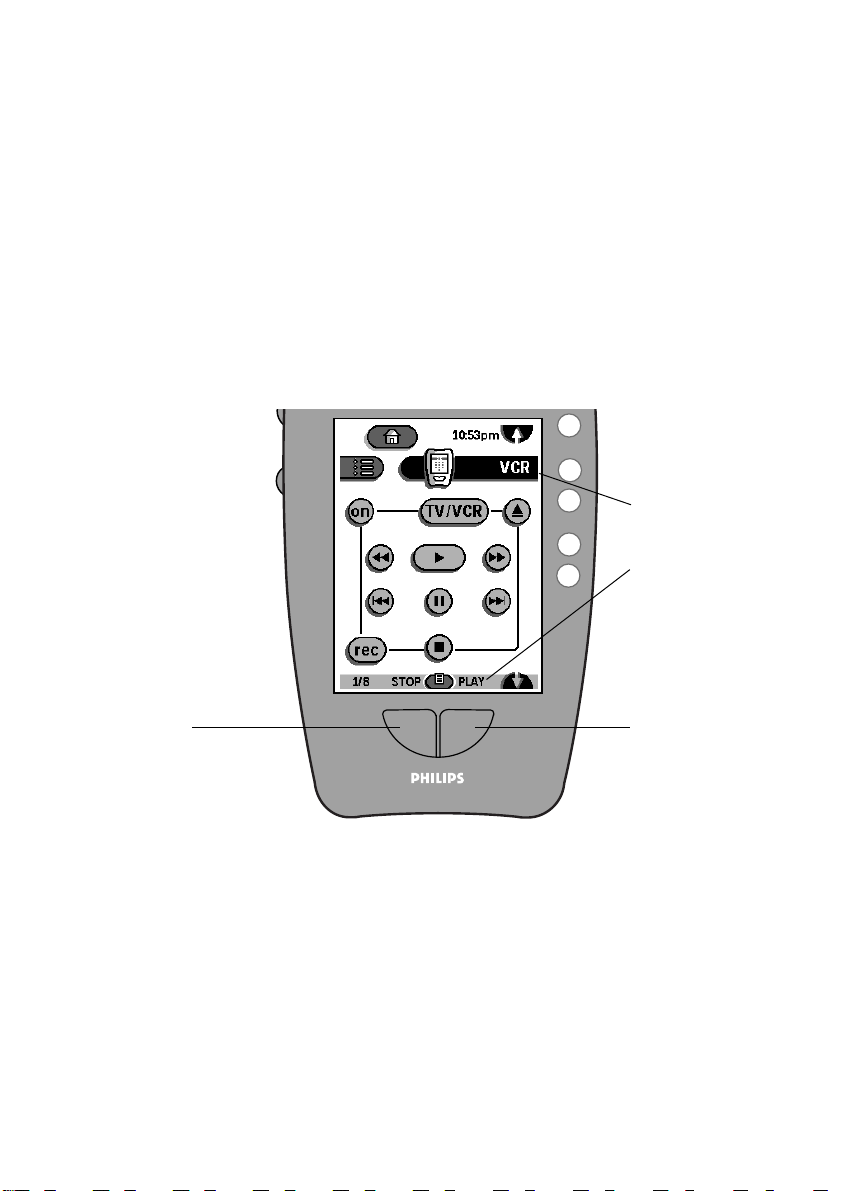
Left and Right buttons
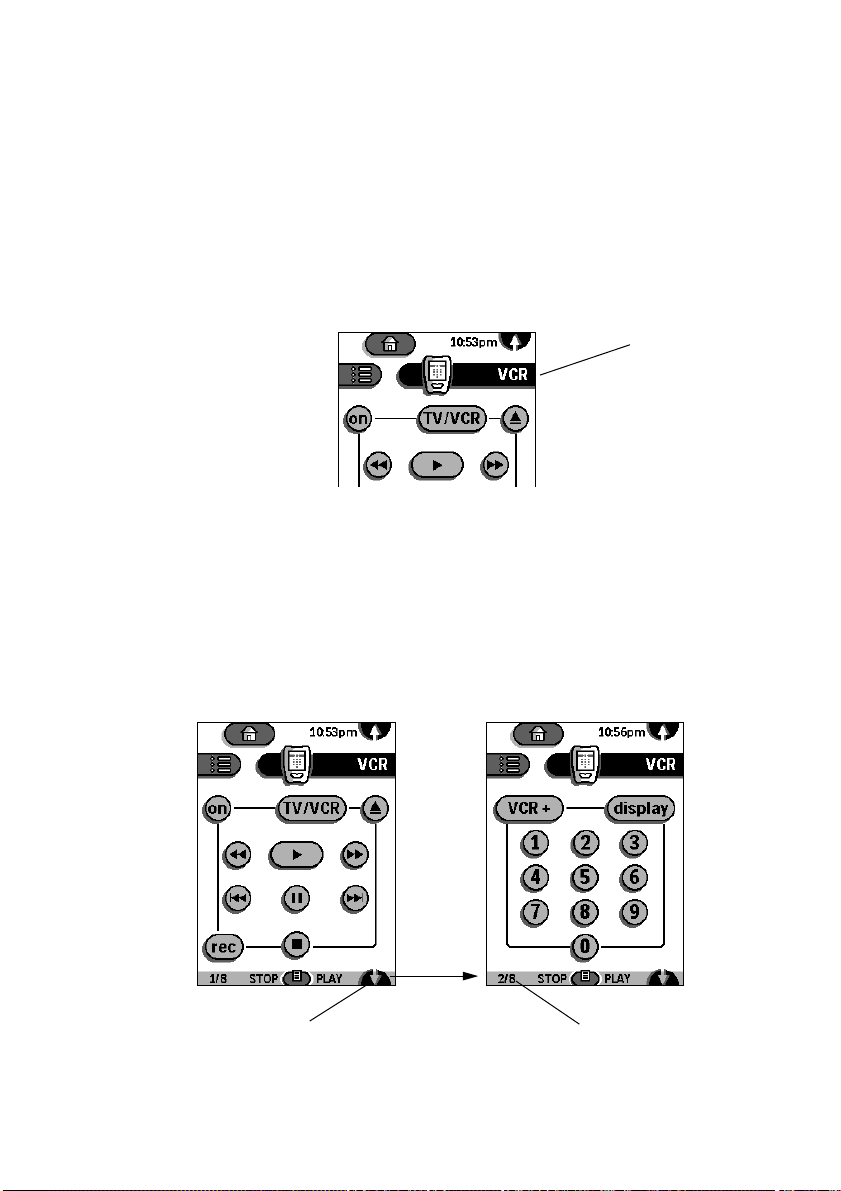
The Left and Right buttons change function depending on the device the
remote control is controlling. Labels displayed above them on the touchscreen
show their current function.
VCR is the current
device.
Labels show
current function of
Left and Right
buttons. Functions
can vary depending
on device.
. The
Left button
Right button
Touchscreen buttons
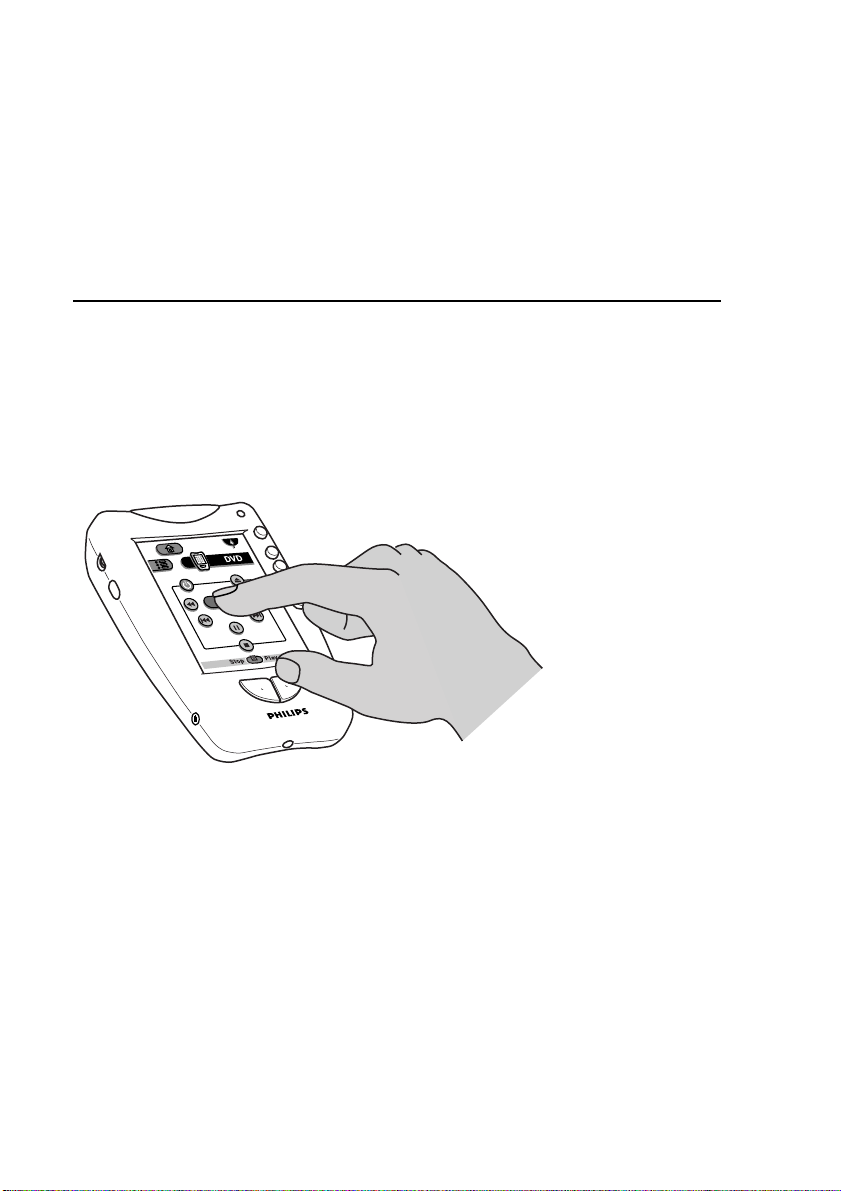
Buttons on the touchscreen let you control particular devices. You activate the
buttons by tapping them with your finger.
Buttons and controls
15
Page 18
WHICH BUTTONS CAN BE PROGRAMMED?
Direct-access buttons, Left and Right buttons, and buttons on the touchscreen
can all be programmed. You can set the direct-access and Left/Right buttons to
always perform the same function. Or, you can program them to perform
different functions depending on the device. For instructions, see “To program
a button globally” on page 37.
Getting started
To turn the display on
Touch the screen with your finger, then let go.
•
This is called tapping the screen.
Gently tap anywhere
on the touchscreen to
turn on the display.
NOTE
automatically a few seconds after you stop using the remote control. To change
how long the display stays on, see Chapter 5, “Settings.”
When the remote control is new, it displays the first panel of Home. From
Home, you can choose devices to control; for more information, see “Home”
on page 18. (If your dealer or installation technician has configured the remote
control, you might see a different screen when you turn on the display.)
16
There’s no need to turn the remote control off. The display shuts off
Chapter 2—Using the remote control
Page 19

To adjust the display
Turn the contrast dial (on the left side of the remote control).
•
To turn on the backlight
Press the backlight button (on the left side of the remote control).
•
Pressing the backlight button also turns on the display (if it is not already on).
The backlight shuts off automatically after a few seconds to save power. To keep
the backlight on, hold the backlight button down.
In low-light conditions, the remote control switches the backlight on
automatically whenever you tap the touchscreen. You can adjust the sensitivity
of the remote control’s light sensor and the length of time the backlight stays
on. For instructions, see Chapter 5, “Settings.”
BE KIND TO YOUR LCD TOUCHSCREEN
Take the following precautions when using the remote control:
• Tap the LCD touchscreen gently . Never use force.
• Do not use a pen or any sharp object to tap the screen; you might damage the
surface. If you like, you can use a blunt object such as a pencil eraser or the
cap of a pen.
• Keep the touchscreen dry. Wipe off any spills immediately. The remote
control is not waterproof; never immerse it in liquid.
• Don’t expose the remote control to extreme temperatures. Keep it away from
heat sources.
• Avoid dropping the remote control.
• Don’t drop anything on the touchscreen; it’s made of glass.
• Clean the LCD touchscreen with a soft cloth. If needed, dampen the cloth
slightly before cleaning. Never use abrasives or cleaning solutions.
Getting started
17
Page 20
18
Using the remote control to control your equipment
NOTE
components made by Philips, Marantz, and certain other companies. If the
remote control doesn’t operate your components, you will need to teach it; for
instructions, see “Learning commands from other remote controls (Learn
mode)” on page 30. However, if a dealer or installer has programmed the remote
control for you, it should operate all your components.
The remote control is preprogrammed to work with popular
Home
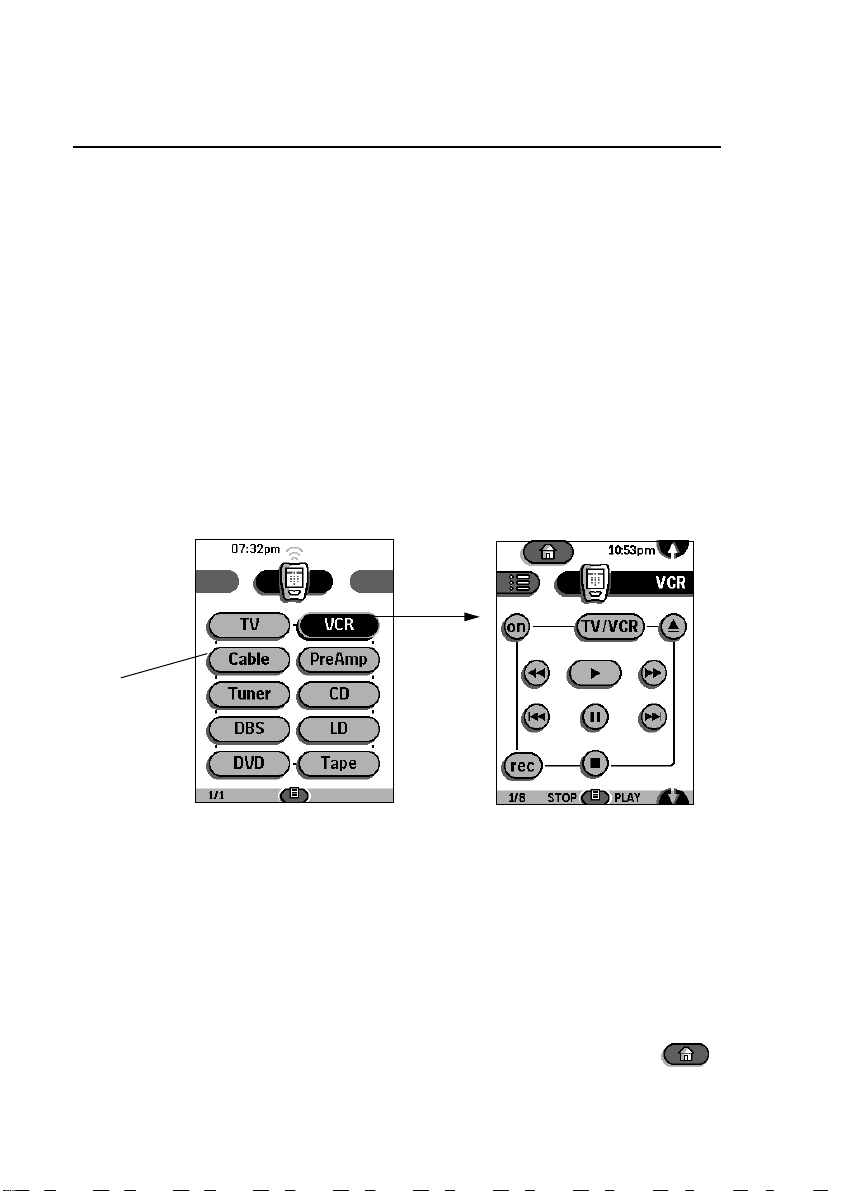
When you first tap the touchscreen, Home is diplayed. Here you’ll find a
button for each of the devices that the remote control is set up to operate.
Tap one of the buttons to choose a device.
Tap a device ... ... the remote control displays
a control panel for the device.
Home
NOTE
device, choosing a device from Home may automatically switch the input source
to the chosen device. You can control this behavior; for more information, see
“To program an item on the Device menu” on page 34.
GOING BACK HOME
The purpose of Home is to make navigating easy. The device buttons in Home
are set up for you automatically when you add devices to your system or remove
them. You can go back home at any time by pressing the Home button .
If your components are connected to a preamplifier, receiver, or similar
Chapter 2—Using the remote control
Page 21
NOTE
Another feature of Home is the ability to assign global default
commands to the direct-access and Left/Right buttons; for instructions, see “To
program a button globally” on page 37.
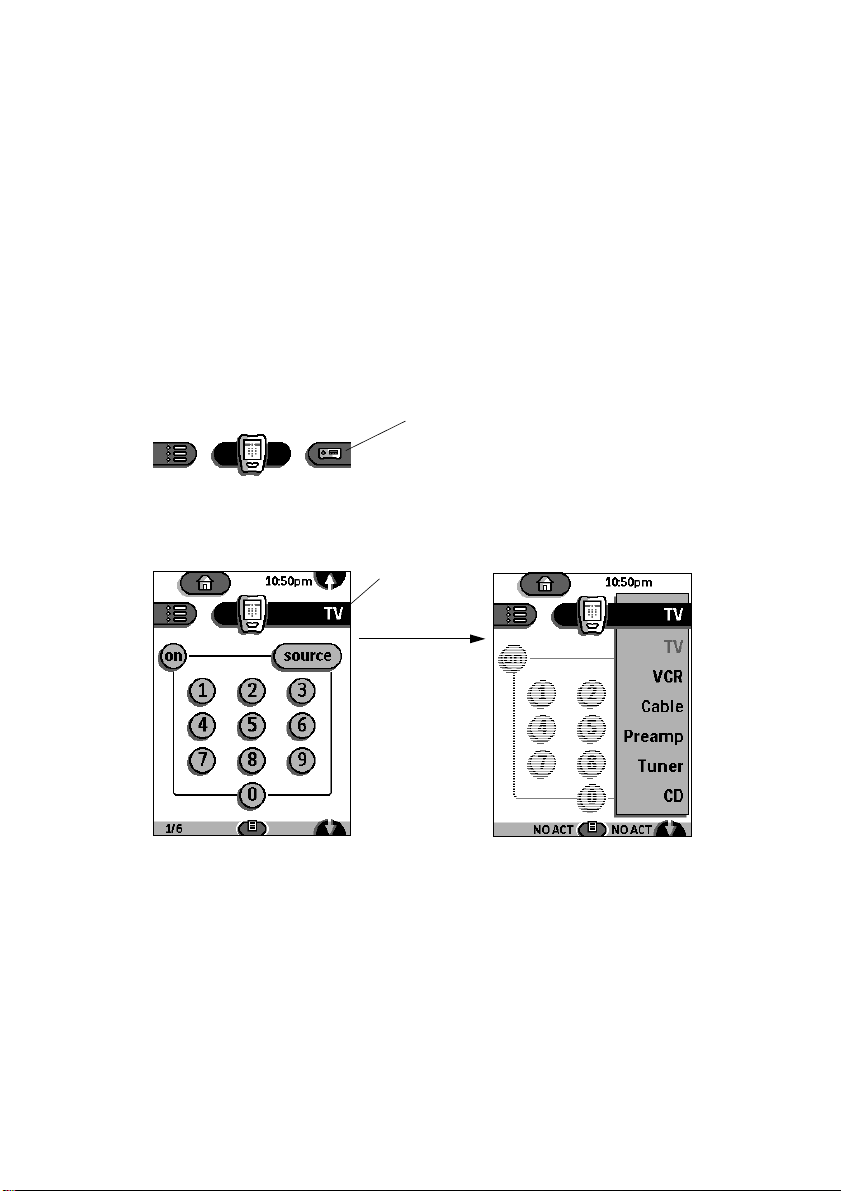
Device menu
The Device menu contains the names of all the components you can operate
with the remote control, and it allows you to choose a device to operate.
OPENING THE DEVICE MENU
If the Device tab is
inactive (gray), tap it once
to activate it.
Device tab (inactive)
Tap it again ...
Device tab
(active)
... the Device menu opens.
Using the remote control to control your equipment
19
Page 22

20
CHOOSING A DEVICE
Tap the name of the device
you want to operate. (If
necessary, scroll the Device
menu to find it.) ...
Scroll the Device menu
IS A DEVICE MISSING?
... the remote control displays
a control panel for the device.
The remote control can be taught to work with any device that recognizes
infrared remote control signals. If you have a device that is not on the Device
menu, you can add it and teach the remote control to operate it. For
instructions, see “Adding devices to your system (Add mode)” on page 39.
NOTE
The Device menu contains more items than you can see at one time.
Before you add new devices, use the scroll buttons and to view the
entire menu.
Chapter 2—Using the remote control
Page 23
Control panels
Once you have a control panel displayed for a specific device, you can send
commands to the device. To send a command, simply press a button on a
control panel.
Each device has a set of control panels containing buttons that send specific
commands. Although some of the control panels for certain devices might look
similar, each control panel operates only one device. A control panel operates
the active device —the device whose name appears in the Device tab.
VCR is the active
device.
SCROLLING TO A DIFFERENT CONTROL PANEL
Scroll buttons take you to different control panels within the same device.
The Scroll button at the top of the display takes you to the previous panel,
while the Scroll button at the bottom takes you to the next panel.
Tap a Scroll button ...
Scroll to next VCR panel Panel number
Using the remote control to control your equipment
... the remote control displays either the
next or the previous panel, depending on
which scroll button you pressed.
(panel 2 of 8 VCR panels)
21
Page 24
22
For convenience, the control panels loop around—when you’re on the last
panel, pressing the lower scroll button takes you back to the first panel.
Similarly, if you’re on the first panel, the upper scroll button takes you to the
last panel in the device. At the bottom of each panel is a panel number . It shows
how many control panels the device has and which panel is currently displayed.
To learn about the commands for each device, refer to Chapter 8, “Command
Reference.”
NOTE
When you choose a device from the Device menu, the remote control
takes you to the last panel you accessed for the device. However, when you select
a device from Home, the remote control always takes you to the first panel of the
device. When you turn the touchscreen on after it has shut off automatically, the
remote control displays the same panel it displayed before shutting off. (The
exception is any mode other than Use mode; after several minutes idle, the
remote control reverts to Use mode automatically.)
Scroll buttons are repeating buttons; if you hold down a scroll button, the
TIP
scrolling continues until you let go.
Use mode
Use mode is the mode that the remote control is in when it is operating your
components. The remote control will operate devices only if it’s in Use mode.
NOTE
configuring and customizing. For more about modes, refer to Chapter 3,
“Customizing the remote control”. To operate your components, you only have
to know about Use mode.
DETERMINING IF THE REMOTE CONTROL IS IN USE MODE
The remote control is in Use mode if the entire icon (at center top of the
display) is visible. If a mode label , such as or , is covering the icon,
the remote control is not in Use mode, and you won’t be able to operate any
components.
The remote control has several modes, most of them for advanced
Chapter 2—Using the remote control
Page 25
SWITCHING TO USE MODE
Tap the Mode button
to open the Mode
menu ...
... in the Mode menu,
tap Use.
You can also tap the mode label covering the icon to open the Mode menu.
NOTE
If the Mode button isn’t visible, the Mode menu has been hidden to
protect against accidental changes to the remote control commands. When the
Mode menu is hidden, the remote control is always in Use mode. (For
information about showing and hiding the Mode menu, see “To show or hide
the Mode menu” on page 29.)
To switch devices without affecting the source
If your components are connected to a preamplifier or other device, such as a
receiver, the remote control may be programmed to automatically switch the
input source when you choose a device from Home or the Device menu.
However, sometimes you may want to operate a device without affecting the
input source. For example, you may want to rewind your VCR while watching
TV. You don’t want to interrupt your TV viewing when you switch the remote
control to the VCR control panels.
To switch devices without switching the source:
1 Open the Device menu.
Using the remote control to control your equipment
23
Page 26

24
2
Press and hold either the Left or the Right button.
The icon turns around to show a back view of the remote control.
Back view of the
remote control
(source won’t be
switched.)
With Device menu
open, hold down
the Left or Right
button ...
3 Still holding down the Left button or Right button, tap the device you
want to operate.
... tap the device
you want to
operate.
The remote
control displays a
control panel for
the device without
switching the input
source.
You might need to scroll up or down to find the device you want.
When you choose a device, the icon turns back around, and the remote control
displays a control panel for the device you want to operate. Now you can send
commands to the device without disrupting the video or audio feed to your
monitor or speakers.
NOTE
When you choose a device from Home, the input source is always
switched (if the button is programmed to switch the source). To switch devices
without switching the source, you must use the Device menu.
Chapter 2—Using the remote control
Page 27

CHAPTER 3
3
Customizing the remote control
The remote control is preprogrammed to work with popular Philips and
Marantz components. The remote control may also operate equipment made
by other manufacturers if the equipment recognizes RC-5 and RC-6 infrared
codes (see “What are RC-5 and RC-6 codes?” on page 27). However, you need
to customize the remote control if:
• You have components that don’t recognize the built-in RC-5 and RC-6 codes.
• The remote control operates your components but needs more functions
performed by your components’ remote controls.
• You have a device that isn’t on the Device menu.
• You want to take advantage of special customization features such as
relabeling or deleting buttons and devices; changing the order of devices in
the Device menu; or recording macros.
NOTE
control for you, it should operate all your components. No further
customization is necessary unless you purchase new devices that you would like
to control using the remote control.
If someone like a dealer or technician has programmed the remote
To customize the remote control
The following steps provide an
These steps are explained further in the next sections.
1 Scroll through the Device menu. Do all of your components appear on
the menu?
Use the scroll buttons and to view the entire menu. If you need to add
a device, refer to “Adding devices to your system (Add mode)” on page 39. You
can also delete unneeded items from the list; refer to “To delete a device, Device
menu action, or macro group” on page 47.
2 Try the remote control out with each of your components.
First, make sure the remote control is in Use mode: confirm that there is no
label, such as or , covering the icon . For each component,
scroll through the control panels and test all buttons—Mute, Volume,
overview
of customizing the remote control.
Chapter 3—Customizing the remote control
25
Page 28

Channel, Left and Right Buttons, as well as the buttons on the display. (If
you’re not sure what a button is supposed to do, refer to Chapter 8, “Command
Reference.”)
If the remote control operates the device correctly, you don’t need to do
anything else. However, if some functions fail or are missing from the remote
control, you will need to teach the remote control those functions.
3 Teach the remote control the commands for operating your
components.
Using your existing remote controls, and working in Learn mode, assign the
correct commands to the buttons on the remote control. For instructions, refer
to “Learning commands from other remote controls (Learn mode)” on page 30.
4 Add any commands you need that don’t already appear in the remote
control.
To do this, assign commands to “empty” buttons (
template buttons
); for
instructions, see “To program a template button” on page 36. Then label the
buttons appropriately; see “To relabel a button” on page 41.
5 (Optional) Refine your configuration.
To: Refer to:
Rearrange the Device menu page 44
Relabel devices or buttons page 41
Delete devices you don’t need from
page 47
the Device menu
Delete buttons you don’t need from
page 46
the display
6 (Optional) Create macros to make your life easier.
A
macro
is a sequence of commands executed by a single button. For
information about recording macros, see Chapter 4, “Creating Macros.”
NOTE
While customizing the remote control you use special
available from the
Mode menu . When you’re done customizing the remote
modes
that are
control you can protect your work from accidental changes by hiding the Mode
menu. (You can easily enable it again when you want to do more customizing.)
For more about modes, including how to hide the Mode menu, see
“Understanding modes” on page 28.
26
Chapter 3—Customizing the remote control
Page 29

WHAT ARE RC-5 AND RC-6 CODES?
Philips and Marantz devices are designed to understand certain kinds of
infrared signals sent by remote controls—specifically, signals belonging to the
RC-5 and RC-6 code sets. Although Philips developed the RC-5 and RC-6
standards for infrared remote controls, several other manufacturers have
adopted them, and they are becoming a standard.
When the remote control is brand-new, many of the devices in the Device
menu are preprogrammed with RC-5 and RC-6 codes. This means that the
remote control automatically works with most Philips and Marantz devices—
and with devices of other brands that use RC-5/6 codes. If you have a device
that recognizes RC-5/6 codes, the remote control might operate the device
without special customization.
Try using the remote control with your components to determine whether
they’ll recognize the built-in codes.
IF YOUR COMPONENTS ARE CONNECTED TO A PREAMPLIFIER, RECEIVER, OR SIMILAR DEVICE
Are your components connected to a preamp or receiver? Do you use the
preamp/receiver’s remote control to change the video or audio input source for
your monitor or speakers? If so, you can program the Device menu so that
choosing a device automatically switches the input source; for instructions, see
“To program an item on the Device menu” on page 34. When you assign
source-switching commands to the items in the Device menu, those commands
also get assigned to the device buttons on the Home panels.
The remote control lets you switch to a device’s control panels without
switching the input source; for instructions, see “To switch devices without
affecting the source” on page 23.
27
Page 30

28
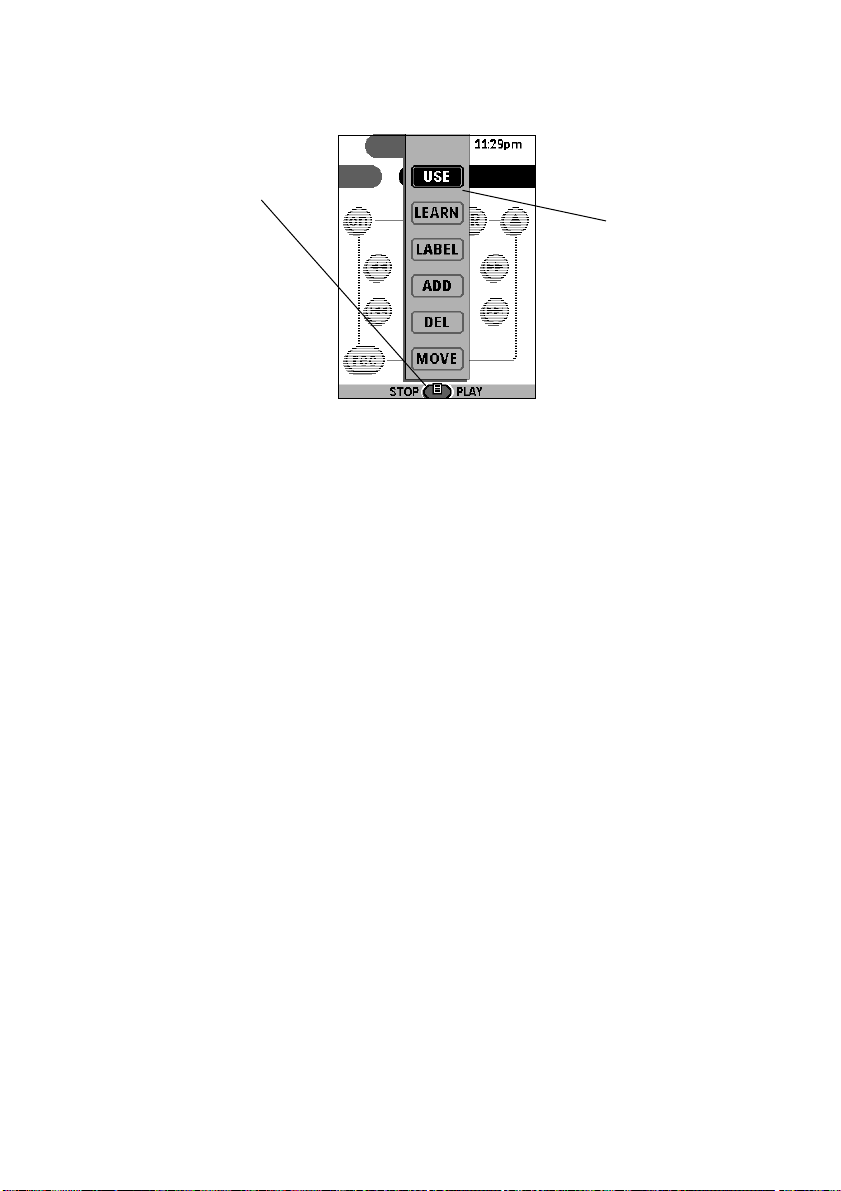
Understanding modes
The remote control is in Use mode when it is operating your components. To
customize the remote control, you must use other modes, which are available
from the Mode menu.
Most of the customizing modes look and feel very similar to Use mode. For
example, in Label mode, you can navigate menus and panels just as you do in
Use mode. This allows you to easily find and select the button or menu item
whose label you want to change.
The following table summarizes the modes and their use. Instructions for using
the modes are later in this chapter.
Use this mode: To:
Use the remote control to control your components.
Learn commands from other remote controls. When a
macro panel is displayed, this button changes to
for recording macros.
Assign labels consisting of letters or symbols to buttons
and commands.
Add a new component. When a macro panel is
displayed, this mode lets you create a macro category.
Delete a button, component, macro, or macro group.
Change the order of commands in a menu.
Chapter 3—Customizing the remote control
Page 31

To switch modes
1 Tap the Mode button to open the Mode menu.
If you don’t see the Mode button on the display, it has been hidden to protect
the remote control from accidental changes. To show the Mode button, refer to
“To show or hide the Mode menu” on page 29.
2 In the Mode menu, tap the name of the mode you want.
Mode menu
Tap any mode name
to change modes.
Tap the Mode button
to open or close the
Mode menu.
To show or hide the Mode menu
You can hide the Mode menu so that other users don’t inadvertently make
changes to your custom commands. To hide the Mode menu:
1 Make sure the remote control is in Use mode.
For help, refer to “Use mode” on page 22.
2 Press and hold the icon for a few seconds, until the Setup panels
appear.
3 Scroll down to the second Setup panel. 4 Tap the Mode Menu button to hide the Mode menu.
Mode menu is
hidden
5 Tap to exit Setup.
The Mode button is no longer visible on the display.
To show the Mode menu, repeat steps 1 through 4.
Understanding modes
29
Page 32

30
Learning commands from other remote controls (Learn mode)
You teach the remote control to operate a device by assigning the correct
commands to the buttons on the display, the direct-access buttons, and the Left
and Right buttons. The remote control learns these commands by receiving
infrared signals directly from your existing remote controls. The remote control
receives these signals through its learning eye , the small hole at the bottom of
the case.
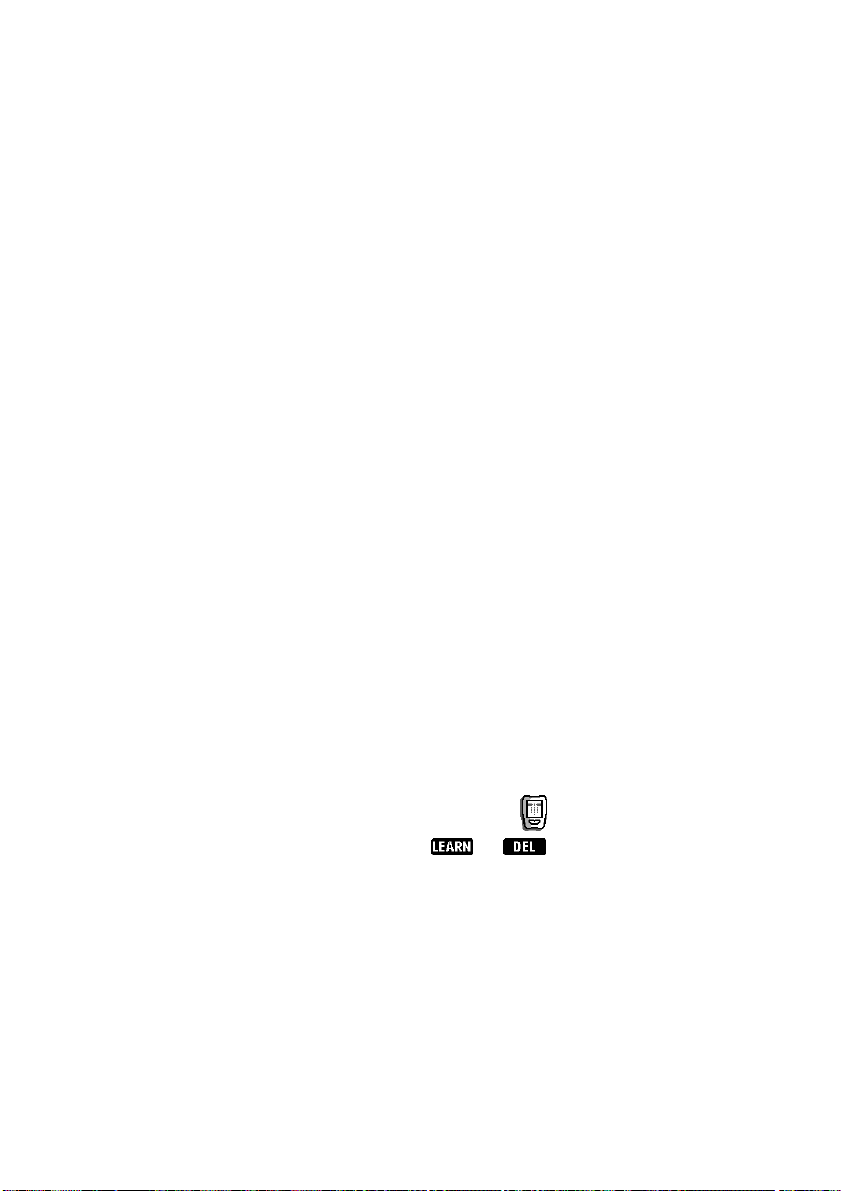
The learning eye
The following illustration shows which buttons can “learn” commands.
Instructions for teaching these buttons are in the next sections.
Buttons that can learn commands
Control panel
buttons
NOTE
The device buttons on the Home panels can’t be programmed directly.
Direct-access
buttons
Items in the Device
menu
Left and Right
buttons
To assign commands to the buttons in Home, you must program the items on
the Device menu; for instructions, see “To program an item on the Device
menu” on page 34. The commands you assign to the Device menu will
automatically be assigned to the buttons in Home.
Chapter 3—Customizing the remote control
Page 33

Although you can’t program the device buttons from Home, you can program
the direct-access buttons and the Left and Right buttons. When you program
these buttons in Home, the commands become global defaults; see page “To
program a button globally” on page 37.
MISSING FUNCTIONS
If your device’s remote control has a function for which there appears to be no
button on the remote control, you can assign the function to one of the remote
control’s template buttons and then give the button a label. For instructions, see
“To program a template button” on page 36.
To program a button on the display (soft button)
1 View the control panels for the device you want to program.
For example, if you want to teach the remote control ‘s TV Power On button to
turn on your TV, first display the control panels for TV.
2 Switch the remote control to Learn mode: Tap the Mode button to
display the Mode menu. Then, tap .
The Learn label appears over the icon to indicate that the remote control
is in Learn mode.
3 Place the remote control and the device’s remote control on a flat
surface, 6 to 8 inches apart. Point the device’s remote toward the
learning eye .
Learning eye
6–8″
4 On the device’s remote, locate the button for the function you want the
remote control to learn. (Don’t press the button yet.)
For example, if you want to teach the remote control to turn on the TV, first
locate the Power On button on the TV remote control.
Learning commands from other remote controls (Learn mode)
31
Page 34

32
5 On the remote control, find the button that matches the function on
your device’s remote, and tap it once. (Don’t hold it down; simply tap it
to make it flash.) Immediately press and hold the corresponding button
on the device’s remote control.
First, tap the button
on the remote
control...
... then immediately
press and hold the
corresponding
button on the source
remote.
When the remote control learns the command, OK flashes briefly on the
display. At this point, you can let go of the button you pressed on the source
remote. The remote control beeps and then returns to Learn mode.
If after a few seconds the remote control has not learned the command
successfully, it buzzes, and FAIL appears briefly on the display. See
“Troubleshooting” on page 33.
TIP
You can use this same method to program the Mute, Volume, Channel,
Left, and Right buttons; see the next sections for special instructions.
6 Repeat steps 4 and 5 to program other buttons.
As long as you’re in Learn mode, you can continue to program other soft
buttons. You can even use the scroll buttons to navigate to different panels.
If you let the remote control sit idle in Learn mode for five minutes, it will
automatically exit Learn mode and return to the panel that was displayed before
you entered Learn mode.
NOTE
You can’t test your commands in Learn mode; you must first return to
Use mode.
7 When you’re done, return to Use mode: Tap to open the Mode
menu, and then tap .
Now you’re ready to use the new commands.
Chapter 3—Customizing the remote control
Page 35

TROUBLESHOOTING
If the remote control fails to learn a function on the first try:
• Try again. Sometimes the second attempt works.
• Keep both remotes stable by placing them on a flat surface.
• Make sure the source remote is pointed at the learning eye , the small hole at
the lower end of the case.
• Make sure the source remote is directly in line, not at an angle.
• Make sure the source remote’s batteries aren’t low.
• Avoid programming the remote control under bright fluorescent light. It can
interfere with the infrared signals.
• If all else fails, try resetting the remote control. See “To reset the remote
control” on page 96.
NOTE
Certain buttons on the display can’t be programmed—in particular,
any button without a border. A borderless button has no function; it serves as a
label for the buttons around it.
Programmable
Not programmable
IMPORTANT
If the source remote—the remote from which the remote
control is learning—operates more than one kind of device, be sure it’s in the
correct mode when teaching its commands. For example, if the source remote
operates both your TV and VCR, and you want to teach the remote control to
operate your TV, be sure the source remote is in TV mode when sending
commands to the remote control.
TIP
To avoid sending signals to nearby equipment while programming the
remote control, fold a stiff sheet of paper and place it on the table between the
two remotes to form a “tunnel.” The paper tunnel lets the signals from the source
remote travel to the remote control without escaping into the room.
Learning commands from other remote controls (Learn mode)
33
Page 36

34
To program an item on the Device menu
You can assign an action to each of the items on the Device menu. For example,
if your audio and video components are connected to a preamplifier or A/V
receiver, you can teach the items on the Device menu to switch the current
input source when you select a new device. For other A/V receiver commands
besides source-switching, you can use the Preamp device template; see page 76
for an overview of built-in Preamp commands.
NOTE
When you assign a command to a device in the Device menu, that
command is automatically assigned to the same device on the Home panels.
Tapping a device in Home executes the same command as choosing a device
from the Device menu.
TIP
There is no separate device template for A/V receiver. However, if you have
an A/V receiver, you can use the Preamp device template. It includes A/V
receiver commands.
1 Make sure the Device tab is active.
Device tab is active
If necessary, tap the Device tab once to extend it.
2 Place the remote control and the device’s remote control on a flat
surface, 6 to 8 inches apart. Point the device’s remote toward the
learning eye .
See the illustration on page 31.
3 Switch the remote control to Learn mode: Tap the Mode button to
display the Mode menu. Then, tap .
4 On the remote control, tap the Device tab to open the Device menu.
Scroll up or down , if necessary, to display the item you want to
program.
Even if the item you want to program is the currently active device, you must
scroll to its location in the Device menu. (The currently active device will
appear gray in the menu.)
5 On the source remote control , locate the button for the function you want
the remote control to learn. (Don’t press the button yet.)
For example, if you want to teach the remote control to switch the input source
to VCR when you choose the VCR device, locate the VCR source button on
your preamp’s remote control.
Chapter 3—Customizing the remote control
Page 37

6 On the remote control, press and hold either the Left or the Right button.
In the Device menu, while holding down the Left or Right button, tap a
device.
With Device menu
open, hold down
the Left or Right
button ...
... tap the menu
item you want to
program.
The remote control flashes the word device .
7 While device is flashing, press and hold the correct button on the source
remote.
When the remote control learns the command, OK flashes briefly on the
display. The remote control beeps and then returns to Learn mode.
If after a few seconds the remote control has not learned the command
successfully, it buzzes, and FAIL appears briefly on the display. See
“Troubleshooting” on page 33.
8 Repeat steps 4 through 7 to program other Device menu items. 9 When you’re done, return to Use mode to test the new commands: Tap
to open the Mode menu, and then tap .
CHOOSING A NEW DEVICE WITHOUT SWITCHING THE SOURCE
On occasion, you might want to send commands to a device without switching
the source. For example, you might want to rewind the VCR while you’re
watching a DVD. For instructions, see “To switch devices without affecting the
source” on page 23.
Learning commands from other remote controls (Learn mode)
35
Page 38

To program a template button
For adding new functions, the remote control offers “empty” buttons to which
you can assign a command and a label. These template buttons are hidden from
view during normal use; they are visible only in Learn mode. Some of them
have labels because they are intended for a particular use; however, you can
assign any command or label to any button on a control panel. Some devices
have entire panels of empty template buttons, as well as some template buttons
scattered among the active buttons.
A control panel in Use mode The same control panel in
Learn mode
Template buttons
36
In addition to the template buttons, Learn mode displays any buttons that were
previously deleted from panels; you can restore these buttons by assigning
commands to them, or you can relabel them and use them for a different
purpose.
To assign a command to a template button:
1 Perform steps 1 through 7 of “To program a button on the display (soft
button)” on page 31.
When the remote control is in Learn mode, template buttons and previously
deleted buttons are visible so that you can select and program them.
TIP
If the template buttons are hard to see, use the contrast dial on the upper
left side of the remote control to adjust the display.
2 (Optional) Assign new labels to the buttons.
For instructions, see “To relabel a button” on page 41.
Chapter 3—Customizing the remote control
Page 39

Programming the direct-access and Left/Right buttons
You can assign a function to any of the following buttons: Mute, Channel Up,
Channel Down, Volume Up, Volume Down, Left, and Right. Each button can
have a global function—a command that the button will always execute, no
matter what device’s control panels are displayed. For example, you can
program the Volume buttons to always adjust the preamp volume, even when
TV is the current device.
As an alternative, you can program the buttons on a per-device basis; their
functions will depend on the active device —the device whose control panels are
currently displayed. When you program a button on a per-device basis, the new
command is available whenever that device is active—no matter which of the
device’s panels is displayed. For example, in the default configuration, when any
VCR panel is displayed, the Left button is Stop and the Right button is Play.
You could also program the Channel buttons to change the channels on the
VCR (rather than the TV) when VCR is the active device.
Before you program a direct-access, Left, or Right button, decide whether you
want the new function to be available all the time or only when a certain
device’s control panels are displayed.
TIP
You can also do a combination of global and per-device programming. For
example, you can set the Volume buttons to always operate the preamp, except
when Tuner is the active device. The tuner-specific functions will override the
global functions when Tuner is the active device; when any other device is active,
the Volume buttons will operate the preamp.
To program a button globally
You assign a global function to a direct-access or Left/Right button by making
sure Home is displayed before teaching the command to the button. To
program a button globally:
1 Switch to Home.
Programming the direct-access and Left/Right buttons
37
Page 40

2 Complete steps 2 through 6 of the instructions in “To program a button
on the display (soft button)” on page 31. Instead of pressing a button on
the display, press the button you want to program.
When you press a button in Learn mode, the name of the button, such as
chan+
or
left
, flashes on the display.
If you encounter problems, refer to “Troubleshooting” on page 33.
As long as you’re in Learn mode, you can continue to program other buttons.
3 When you’re done, return to Use mode to test the new commands: Tap
to open the Mode menu, and then tap .
4 (Optional) If you programmed the Left and Right buttons, give them new
labels.
You can relabel the
Left and Right
buttons; see “To
relabel a button” on
page 41.
To program a direct-access button on a per-device basis
You program a button on a per-device basis by making sure the device’s control
panels are displayed before teaching the command to the button. To program a
button on a per-device basis:
1 Switch to the device for which you want to program the button. 2 Complete steps 2 through 6 of the instructions in “To program a button
on the display (soft button)” on page 31. Instead of pressing a button on
the display, press the button you want to program.
When you press a button in Learn mode, the name of the button, such as
chan+
or
left
, flashes on the display.
If you encounter problems, refer to “Troubleshooting” on page 33.
As long as you’re in Learn mode, you can continue to program other buttons on
a per-device basis. Use the Device menu to change the active device.
38
Chapter 3—Customizing the remote control
Page 41

3 When you’re done, return to Use mode to test the new commands: Tap
to open the Mode menu, and then tap .
4 (Optional) Assign new labels to the Left and Right buttons.
For instructions, see “To relabel a button” on page 41.
Adding devices to your system (Add mode)
If you have a device that isn’t on the Device menu—for example, a second
VCR, or a new flat-panel TV—you can add it by using Add mode. In Add
mode, you can:
• Create a new device using a built-in device template.
• Create a copy of one of the devices in your Device menu.
• Restore a previously deleted device.
When you copy an existing device or create a new device from a template, you
decide whether to copy the built-in RC codes or leave the buttons “empty.”
Either way, as soon as you add the device the remote control is ready to start
learning how to operate it.
NOTE
Devices you add to the Device menu automatically appear in Home.
To add a device
1 Display any device control panel. 2 Switch the remote control to Add mode: Tap the Mode button to
display the Mode menu. Then, tap .
The remote control displays a choice of buttons.
Adding devices to your system (Add mode)
39
Page 42

3 Choose how you want to add the new device:
• Create New Device uses a built-in template to create a new kind of device.
Use this option if you are adding a new kind of device to your system.
• Copy Existing Device uses one of the devices on the Device menu as a
template to create the new device. The new device gets the same name as the
original, but a number is added to the name so you can tell the two devices
apart (for example, VCR and VCR2).
• Restore Deleted Device is for recovering devices you have deleted. For more
information, refer to “Restoring deleted buttons, devices, and macro groups”
on page 49.
Tap the device
you want to
create.
Scroll to see
more devices.
4 In the Device menu, tap the device you want to add. (Scroll the Device
menu, if necessary.)
If the type of device you’re adding isn’t on the list, add a similar device; you can
customize it later. Or, use the device called “Other”; it includes a variety of
generic buttons.
5 Tap a button to tell the remote control whether to assign RC codes to
the new device.
For more information about RC codes, refer to “What are RC-5 and RC-6
codes?” on page 27. If you think your new device might understand RC-5 or
RC-6 codes, it’s a good idea to include them in the new device. If some
commands are incorrect, you can always teach the correct commands.
NOTE If you choose not to copy the RC codes, the control panels of the new
device will not display any buttons. The buttons are hidden because no
commands are assigned to them. However, the buttons are visible in Learn
40
Chapter 3—Customizing the remote control
Page 43

mode, and you can easily teach them the correct commands. For more
information, refer to “Learning commands from other remote controls (Learn
mode)” on page 30.
After you tap one of the available buttons, the remote control returns to Use
mode, and your new device appears on the Device menu.
6 Test the control panels for the new device. If you need to teach new
commands to the remote control, refer to “Learning commands from
other remote controls (Learn mode)” on page 30.
Relabeling buttons and menu items (Label mode)
You can label or relabel any of the following:
• Buttons on control panels
• Items on the Device menu
• Stored macros
• Macro groups on the Macro menu
• The Left and Right buttons
The remote control offers a complete uppercase/lowercase alphabet and
numerous symbols to use in labeling buttons and menu items.
NOTE You can’t relabel buttons on Home panels. However, you can relabel
the items on the Device menu. The changes you make to the Device menu are
automatically reflected in Home.
To relabel a button
1 Display the panel containing the button you want to relabel.
You can relabel buttons on control panels and macro panels. You can also
relabel the Left and Right buttons. You can’t relabel the buttons on Home
panels; their labels are determined by the commands on the Device menu.
2 Switch the remote control to Label mode: Tap the Mode button to
display the Mode menu. Then, tap .
Relabeling buttons and menu items (Label mode) 41
Page 44

3 Tap the button you want to relabel.
The display changes to show a miniature keyboard. Above the keyboard is the
button you tapped.
The button you’re
relabeling
Virtual keyboard
Cursor ( | ) shows
where characters get
inserted or deleted.
Cancel relabeling
and return to Label
mode.
Shift keyboard to
uppercase or
symbols (press
repeatedly)
Save changes and
return to Label
mode
Delete a character
4 Edit the label.
• To delete characters from the current label, press the Right button.
• To “type” a character from the keyboard, tap near the character on the
display; the keyboard zooms to make it easier to select the correct character.
(Tap the Right button, labeled ZOOM, to zoom back out.)
Tap near the
character
you want...
... then tap exactly
the character
you want.
42 Chapter 3—Customizing the remote control
Page 45

• For capital letters, press the Left button (labeled SHIFT). For symbols, press
again. Press one more time to return to lowercase.
Lowercase keyboard
Symbol keyboard
NOTE Each button or menu item has a limit to the number of characters that
Uppercase keyboard
can fit on the label. If the limit is reached, the cursor ( | ) disappears and the
remote control buzzes if you try to add another character. You can make the
cursor reappear by pressing the Right button (labeled DEL); this deletes the last
character you entered.
5 Tap Enter to save your changes and go back to Label mode.
As long as you’re in Label mode, you can continue to relabel other buttons. You
can even navigate to different panels and devices.
6 When you’re done, return to Use mode: Tap to open the Mode
menu, and then tap .
To relabel an item on a menu
1 Switch the remote control to Label mode: Tap the Mode button to
display the Mode menu. Then, tap .
2 Display the menu containing the item you want to relabel.
3 If necessary, scroll the menu to display the item.
Even if the item you want to relabel is the currently active device, you must
scroll and select it from the Device menu. (You can select it even though it
appears gray in the menu.)
Relabeling buttons and menu items (Label mode) 43
Page 46

4 Press and hold either the Left or the Right button. While holding down
the Left or Right button, tap the menu item you want to relabel.
5 Edit the label.
For details, refer to step 4 of “To relabel a button” on page 41.
6 Tap Enter to save your changes and go back to Label mode.
As long as you’re in Label mode, you can continue to relabel other menu items
and buttons.
7 When you’re done, return to Use mode: Tap to open the Mode
menu, and then tap .
Rearranging items in menus (Move mode)
You can change the order of the items in the Device menu or the Macro menu.
NOTE When you change the order of devices in the Device menu, the new
order is automatically reflected on the Home panels.
To rearrange the items in a menu
1 Depending on which menu you want to change, do one of the following:
• If you are going to rearrange the Device menu, then display any device
control panel.
• If you are going to rearrange the Macro menu, then display any macro group.
2 Switch the remote control to Move mode: Tap the Mode button to
display the Mode menu. Then, tap .
3 Display the menu you want to change.
44 Chapter 3—Customizing the remote control
Page 47

Tap an item you
want to move ...
Save changes
and return to
Use mode
... then press the
Left and Right
buttons to change
the item’s position
in the menu.
4 Select an item by tapping it, and then use the Left (UP) and Right
(DOWN) buttons to move it.
5 Continue selecting and moving items in the menu.
As long as the remote control is in Move mode, you can continue rearranging
the menu items.
6 Tap Accept to save your changes.
After a few seconds, the remote control returns to Use mode.
Rearranging items in menus (Move mode) 45
Page 48

Deleting buttons and menu items (Delete mode)
You can delete unused buttons and menu items from the display. Any of the
following can be deleted from the display:
• buttons on control panels
• devices (from the Device menu)
• stored macros
• macro groups (from the Macro menu)
You delete a button from the display by deleting the action (command)
associated with the button. When you delete the button action, the button
becomes invisible in Use mode. However, the button remains in memory, and
it is visible in Learn mode, so you can restore it. (See “Restoring deleted
buttons, devices, and macro groups” on page 49.)
You can also delete the command (button action) associated with any of the
following buttons: Mute, Channel Up, Channel Down, Volume Up, Volume
Down, Left, and Right.
You can also delete items from the Device and Macro menus.
NOTE Changes you make to the Device menu are automatically reflected in
Home.
To delete a button or button action
You can delete buttons on control panels and macro panels. You can also delete
the actions associated with the Mute, Volume, Channel, and Left and Right
buttons. You can’t delete the buttons on Home panels, except by deleting the
corresponding commands from the Device menu. (For more information, see
“To delete a device, Device menu action, or macro group” on page 47.)
1 Switch the remote control to Delete mode: Tap the Mode button to
display the Mode menu. Then, tap .
2 Tap the button you want to delete.
46 Chapter 3—Customizing the remote control
Page 49

3 Tap Delete Button Action.
The remote control deletes the button action and returns to Delete mode.
• If you deleted a soft button, it disappears from the display. (To restore it, see
“To program a template button” on page 36.)
• If you deleted a Left or Right button action, the corresponding label
disappears from the display.
• If you deleted a Mute, Volume, or Channel button action, the button
becomes inactive.
As long as you’re in Delete mode, you can continue to delete other buttons.
4 When you’re done, return to Use mode: Tap to open the Mode
menu, and then tap .
NOTE
Certain buttons on the display can’t be deleted—in particular, any
button without a border.
Can be deleted
Can’t be deleted
Although you can’t delete a borderless button, you can hide it by removing its
label. Follow the instructions in “To relabel a button” on page 41; in Label
mode, use the Right button to delete the label. When the label has been
deleted, the borderless button will not be visible in Use mode. (However, it will
be visible in Label mode.)
To delete a device, Device menu action, or macro group
You can delete devices and macro groups from the remote control. (For
information about macro groups, refer to Chapter 4, “Creating Macros.”) You
can also delete an action—such as a source-switching command—associated
with an item on the Device menu. To delete any of these:
1 Switch the remote control to Delete mode: Tap the Mode button to
display the Mode menu. Then, tap .
Deleting buttons and menu items (Delete mode) 47
Page 50

2 Display the menu containing the item you want to delete. If necessary,
scroll the menu until you see the item.
The label above the Left button changes to DEVICE if the Device menu is
open or GROUP if the Macro menu is open. The Right button changes to
ACTION if the Device menu is open.
Macro menu open in Delete
mode
To delete a macro
group, hold the Left
button while tapping
the name of the
group.
Device menu open in Delete
mode
To delete a device,
hold the Left button
while tapping the
name of the device
in the Device menu.
(You can select an
item even if it
appears gray in the
menu.)
To delete an action
associated with a a
Device menu item,
hold the left button
while tapping the
menu item.
3 Press and hold the Left or Right button, as appropriate. While holding the
button down, tap the menu item you want to delete.
The remote control displays a button asking you to confirm your request. The
button label depends on the type of item you are deleting.
48 Chapter 3—Customizing the remote control
Page 51

4 Tap Delete Device or Delete Macro Group.
The remote control deletes the item and returns to Delete mode.
• If you deleted a device, the remote control removes the device from the
Device menu and Home.
• If you deleted a macro group, the remote control removes the group, and all
of the macros belonging to it, from the Macro menu.
You can restore deleted macro groups and devices. See “Restoring deleted
buttons, devices, and macro groups” on page 49.
5 When you’re done, return to Use mode: Tap to open the Mode
menu, and then tap .
NOTE
The remote control takes a few seconds to save changes before
returning to Use mode.
RESTORING DELETED BUTTONS, DEVICES, AND MACRO GROUPS
Buttons deleted from the display are stored in memory. They become “template
buttons,” visible only in Learn mode. To restore them, see “To program a
template button” on page 36.
Button actions associated with the Mute, Channel, Volume, Left, and Right
buttons can’t be restored from memory. To restore function to these buttons,
you need to teach them using another remote control. For instructions, see “To
program a button globally” on page 37.
Deleted devices and macro groups are stored in memory. To restore a deleted
device, make sure the Device tab is active. Tap the Mode button , and then
tap . Tap Restore Deleted Device, then choose the deleted device from
the menu that appears.
To restore a deleted macro group, make sure the Macro tab is active, then
follow the same procedure as for restoring deleted devices.
You can’t restore a deleted macro, only a macro group.
NOTE Deleted items are stored until the remote control needs the memory
they occupy. If you do a lot of customization, the remote control might have to
clear some of its memory in order to make room for new commands, devices, or
macros. The remote control displays a message before clearing the memory.
Once memory has been cleared, you can’t restore the deleted items.
Deleting buttons and menu items (Delete mode) 49
Page 52

CHAPTER 4
4
Creating Macros
If you find yourself pressing the same sequence of buttons frequently, you can
record the sequence and save it as a
RECORDING MACROS
Recording a macro is easy: switch the remote control to Record mode, select a
macro button, then use the remote control as you normally would when you’re
sending commands to your components. As you press buttons, the remote
control records the commands. A macro can include any variety of commands
for any variety of devices.
macro
.
A macro lets you send a
sequence of commands
with a single button.
EXAMPLE
You can create a macro that prepares your TV and VCR to play a tape. The
sequence of commands might look like this:
1
Turn TV on
2
Pause while TV warms up
3
Turn TV to channel 3
4
Turn VCR on
5
Set VCR to VCR input
6
Display the TV control panel 1
50
Chapter 4—Creating Macros
Page 53

Using a macro, you can execute all of these commands with a single button.
This macro is included with the remote control as “example macro” in the
group “Macro.” The example macro is preprogrammed with RC-5 codes,
which operate components from Philips, Marantz, and some other
manufacturers. (For information about RC codes, see “What are RC-5 and
RC-6 codes?” on page 27.)
You can create as many macros as you like and organize them into groups.
EDITING MACROS
The macros are editable. The remote control lets you view the commands in a
macro and rearrange or delete them. You can also add new commands to a
macro and specify delays between commands.
EXECUTING MACROS
To execute a macro, you open the Macro menu, choose the group to which the
macro belongs, and then tap the name of the macro. The remote control
automatically sends the commands to your components in sequence.
Macro menu
A macro group
To execute a macro,
Just tap it. The remote
control sends the
commands in sequence.
A macro
51
Page 54

52
Recording macros
Here are some things to keep in mind about recording macros:
• You can include any of the following buttons in your macro: Mute, Channel
Up and Down, Volume Up and Down, Left, Right, any item in the Device
menu, or any button on a control panel.
• You can send commands to as many different devices as you like.
• You can include up to 255 commands in a macro.
• As the last step in a macro, you can display a specific device’s control panels.
• You can insert delays.
• You can go back and edit any macro at any time.
IMPORTANT
(those that don’t have commands assigned to them). An inactive button can be
recorded as part of a macro, but the button won’t have any effect when you
execute the macro, because there is no command assigned to it. For this reason,
it’s best to teach the remote control all of the commands it needs to control your
devices before you record macros.
In Record mode, all buttons are visible, even inactive buttons
To record a macro
1 Decide what commands you want the macro to execute.
Note whether any commands need to be executed in a particular order. For
example, you must turn a device on before sending other commands to it.
2 Open the Macro menu and tap the name of the macro group to which
you want to add the new macro.
Chapter 4—Creating Macros
Page 55

3 Scroll to the macro panel where you want the new macro to appear.
You can add the macro to any macro panel that has space for a new button.
(The macro can only be placed on a macro panel; it can’t be placed on a device
control panel.)
From the Macro
menu, choose the
macro group that
the new macro
will belong to.
Room for new
macros on this panel
NOTE
At least one macro group must exist before you can create a macro. If
you need to create a macro group, see “Organizing macros into groups” on
page 59.
4 Switch the remote control to Record mode: Tap the Mode button to
display the Mode menu. Then, tap .
The label appears, and “empty” macro buttons, which were hidden in Use
mode, are now visible.
NOTE
The button appears on the Mode menu only if the Macro tab is
active—that is, if the Macro menu is open, or if a macro panel is currently
displayed. If the Device tab is active, will appear instead of , and you
won’t be able to record a macro.
Recording macros
53
Page 56

54
5 Tap the button to which you want to assign the new macro.
Tap an empty button to start a new macro.
Existing macro
Empty macro button
NOTE
If you choose an existing macro, the commands you record will be
added to the macro.
6 Enter the commands you want to record.
In Record mode, you can navigate from panel to panel and enter commands
just as you would during normal use. As you press buttons, the remote control
records the sequence so that you can save it as a macro. Each time a command
is recorded, the remote control beeps.
Besides button-presses, there are a few other kinds of command you can record:
Switching the source:
If the commands on the Device menu are programmed
to switch the amplifier input source, you can record the source-switching
command as part of your macro. While the Device menu is open, press and
hold the Right button (labeled ACTION ). While holding the Right button, tap
the device you want to switch to. The device menu item gets recorded as part of
the macro; if there is a source-switching command associated with the menu
item, the command is executed when the macro is executed. (If you don’t hold
down the Right button while choosing the device, no infrared command will be
recorded; the remote control will simply open the device’s control panels.)
Including direct-access and Left/Right buttons:
In Record mode, the
direct-access buttons (Mute, Channel, Volume) and Left and Right buttons are
recorded as long as a Home panel or a device panel is displayed.
Chapter 4—Creating Macros
Page 57

Ending with a specific device:
You can tell the remote control to end the
macro by displaying the control panels for a particular device. While still in
Record mode, open the Device menu. Hold down the Left button (labeled
DEVICE ), and tap the device you want. The device gets added to the end of the
macro as a “Go” command. In addition, the remote control automatically
records the device’s source-switching command and inserts the command just
before the Go command. (You can remove the source-switching command later
if you don’t want the source to be switched.)
You can only stored one Go command per macro, and it is always the last
command, even if you later add commands to the macro.
Adding delays:
When you’re done recording, you can add one or more delays
to the macro. A delay tells the macro to pause for a second or two before
continuing. After turning on a device, you should insert a delay before sending
the device any more commands. (Devices must sometimes “warm up” before
they’re ready to receive infrared commands.)
NOTE
The buttons on Home panels can’t be included in macros. However,
you can use them to navigate while you’re recording a macro.
7 When you’re done, tap the Macro tab.
The remote control displays the contents of the macro. Use the scroll buttons
and to view the commands in the macro.
Scroll to see
earlier
commands in
this macro
Commands you
recorded
Editing tools
See “Editing macros”
on page 57.
At this point, you can test, edit, or close the macro. Or, you can add
commands.
To test the macro:
Press the Right button, labeled PLAY .
Recording macros
55
Page 58

56
To edit the macro:
Refer to “Editing macros” on page 57. You can rearrange
or delete commands. You can also add delays.
To close the macro:
Press the Left button, labeled CLOSE . A message asks
you if you want to save your changes. Tap the Save Macro button to save your
changes and return to Use mode.
To add commands to the macro:
While still in Record mode, go back to the
device panels or Home and enter the additional commands. The commands get
added to the end of the current macro (but before the Go command, if you
included one).
8 Give the new macro a label.
Switch to Label mode and enter a label to appear on the macro button. For
instructions, see “To relabel a button” on page 41.
TROUBLESHOOTING MACROS
If a macro isn’t working correctly, consider the following:
• Make sure the sending eye is pointed toward the devices for the entire time
the macro is running.
• Try inserting delays between commands; see “Editing macros” on page 57.
• One or more of the buttons that the macro refers to might have been
reprogrammed.
NOTE
A macro doesn’t actually store commands; it just refers to a series of
buttons. If you “record” a button that has no command assigned to it, the
reference to the button still gets included in the macro. Furthermore, if you
include a button in a macro and later teach the button a new command, the new
command becomes part of the macro.
If the remote control buzzes during recording, either the macro is full (it has at
least 255 commands), or you pressed a button that didn’t get recorded.
Direct-access buttons (Mute, Channel, Volume) and Left and Right buttons
can only be recorded when a Home panel or a device panel is displayed. Macro
buttons can’t be recorded as part of a macro because a macro can’t include
another macro.
Chapter 4—Creating Macros
Page 59

To view the commands in a macro
To view the commands in a macro while in Use mode:
1 Display the macro panel that contains the macro. 2 Press and hold the Left button, labeled OPEN . While holding it down, tap
the macro you want to open.
Use the scroll buttons and to view the entire macro.
To execute (play) the macro, press the Right button. When you’re ready to close
the macro, press the Left button.
Editing macros
Once you have recorded a macro, you can add, remove, or change the order of
commands in the macro. You can also add delays.
NOTE
You should add a delay after turning on a device before sending more
commands to the device. Some devices recognize infrared commands only after
they have had time to “warm up.”
To edit a previously recorded macro
1 Display the macro panel that contains the macro. 2 Switch the remote control to Record mode: Tap the Mode button to
display the Mode menu. Then, tap .
3 Tap the macro you want to edit.
The contents of the macro appear on the display.
Tap a command
to select it.
Add a delay.
Scroll to see more
commands in this
macro.
Move the selected
command up or
down in the list.
Delete the selected
command.
Editing macros
57
Page 60

4 Edit the macro.
58
To move or delete a command:
Tap the command to select it, then tap
Delete or an arrow button.
To record more commands:
Go to the device controls and enter the
commands. When you return to the macro, the new commands automatically
appear at the end of the macro.
NOTE
5 Add delays, if needed.
The Go command, if any, is always at the end of the macro list.
Tap the Delay button to insert a new delay at the end of the macro.
Decrease or
increase the length
of the delay.
Delay
Move the delay up in
the command list.
Use + and – to increase the length of the delay. Use the arrow buttons to move
the delay to the right place.
6 When you’re done, tap the Left button (labeled CLOSE ) to close the
macro and return to Use mode.
A message asks you if you want to save your changes. Tap the Save Macro
button to save your changes and return to Use mode.
Chapter 4—Creating Macros
Page 61

Organizing macros into groups
You can organize your macros into groups to make them easier to find and use.
For example, you might have different macros for turning on the TV and
tuning to certain channels. You can place all of these macros in a macro group
you call TV . The macro group appears on the Macro menu.
Macro groups
The remote control comes with a built-in macro group called Macro . It
contains an example macro and five panels of empty macro buttons where you
can place your new macros. You can create as many new macro groups as you
like, and each group can contain up to 25 macros.
To add a macro group
1 Make sure the Macro tab is active.
Display any macro panel or individual macro.
2 Switch the remote control to Add mode: Tap the Mode button to
display the Mode menu. Then, tap .
The remote control offers up to three ways to add the new macro group: create
a new, empty group; copy an existing group and all of its macros; or restore a
previously deleted group.
Organizing macros into groups
59
Page 62

3 Choose how you want to add the new group.
60
Create New Group:
Creates a new group containing five panels of “empty”
template buttons to which you can assign new macros.
Copy Existing Group:
Lets you choose an existing group to copy. The new
group will have all of the original group’s macros, and its name will be based on
the original group. (This option is only available if a macro group already
exists.)
Restore Deleted Group:
Lets you select a group from a list of previously
deleted macro groups. When the macro group is restored, all of its macros are
restored along with it. (This option is only available if a macro group has been
deleted previously and the remote control has not erased its memory in order to
free up space.)
After you add the group, the remote control returns to Use mode. The new
group appears on the Macro menu.
4 (Optional) Change the label of the new macro group.
Switch to Label mode and enter a label to appear on the macro button. For
instructions, see “To relabel an item on a menu” on page 43.
REARRANGING THE MACRO MENU
You can change the order of the macro groups on the Macro menu. For
instructions, refer to “Rearranging items in menus (Move mode)” on page 44
DELETING MACROS AND MACRO GROUPS
You can delete a macro from a macro panel, and you can delete a macro group
from the Macro menu. Deleting a macro group removes not just the group, but
all of the macros belonging to the group.
For instructions on removing macros and macro groups, refer to “Deleting
buttons and menu items (Delete mode)” on page 46.
Chapter 4—Creating Macros
Page 63

Using macros
To execute a macro
Tap the macro button.
•
The remote control
icon indicates that
commands are being
sent.
It may take awhile for the macro to finish playing, depending on the number of
commands. Be sure to keep the remote control aimed in the direction of your
components until all the commands have been sent.
TIP
If you open the macro before running it, the remote control will show you
each command as it is sent. To open a macro, first display the macro panel that
contains the macro you want to view. While holding down the Left button
(labeled OPEN ), tap the macro. Then, play the macro by pressing the Right
button (labeled PLAY ).
To stop a macro
Tap the macro button again, or press the Right button, labeled STOP .
•
Using macros
61
Page 64

CHAPTER 5
5
Settings
The remote control lets you adjust features such as the volume of the beep
sound, the automatic shut-off of the touchscreen and backlight, and even the
sensitivity of the light sensor. This chapter describes how to adjust these and
other settings.
To adjust settings
Press and hold the icon for a few seconds (3 or more). It’s not
•
necessary to press hard.
The remote control displays the first Setup panel. To scroll to the next Setup
panel, tap the scroll buttons and .
Tap the scroll
buttons to
move between
the two setup
panels.
First Setup panel
Use Left and Right buttons to adjust individual settings.
Second Setup panel
62
Chapter 5—Settings
Page 65

Adjust the settings as described in the following tables.
First Setup panel
Setting What it does How to adjust it
Battery Level
Shows battery level.
Indicator
Clock Turns clock display on
Tap the clock once.
or off.
Time Sets the clock. Tap the Time button, then use
the Left (-) and Right (+)
buttons to set the clock ahead or
back.
LCD Sets how long the
display stays on.
Tap the LCD button, then use
the Left (-) and Right (+)
buttons to adjust the duration.
LCD Backlight Sets how long the
display backlight stays
on in a dark room. (To
Tap the LCD Light button, then
use the Left (-) and Right (+)
buttons to adjust the duration.
conserve power, it may
turn off sooner if room
light is sufficient.)
Button
Backlight
Sets how long the
button light stays on.
Tap the Button Light button,
then use the Left (-) and
Right (+) buttons to adjust the
duration.
TIP
The Left (-) and Right (+) buttons are
repeating buttons
one of these buttons will increase or decrease a value repeatedly.
; holding down
63
Page 66

Second Setup panel
Setting What it does How to adjust it
Light Sensor Shows the current level of light in the room (ambient light).
Set Level Sets the light level at
which the light sensor
turns the backlight on.
Tap Level, then use the Left (- )
and Right (+) buttons to
increase or decrease the
sensitivity.
To set the level relative to the
current lighting, first tap Set; the
Level indicator shows the
current light level. Then use the
Left and Right buttons to
increase or decrease the
sensitivity.
Mode Menu Hides or shows the
Mode button on
Tap the Mode Menu button
once.
the display. Hiding the
Mode button prevents
unwanted changes to
stored commands.
Touchscreen
Beep
Adjusts or turns off the
touchscreen beep.
Tap repeatedly to cycle through
four volume levels, including
off.
Button Beep Adjusts or turns off the
beep of the directaccess, Left, and Right
Tap repeatedly to cycle through
four volume levels, including
off.
buttons.
Calibrate Calibrates the touchscreen.
See Chapter 6, “Troubleshooting.” You won’t normally
need to adjust the calibration.
Revert Reverts to the
factory default configuration. All customization
and programming is lost.
See Chapter 6, “Troubleshooting.” You won’t normally
need to use the Revert button.
64
Chapter 5—Settings
Page 67

Third Setup panel
This panel provides technical information about the remote control. You need
this information if you contact our customer service. For information, see
“Service and support” on the inner backcover.
To exit Setup
Tap the Setup label near the top of the screen.
•
65
Page 68

CHAPTER 6
6
Troubleshooting
This chapter offers troubleshooting tips, answers to common questions, and
instructions for resetting the remote control. This chapter also tells you how to
reach our customer service if you need service or support.
Problems using the remote control
THE DISPLAY IS BLANK
• Tap the screen lightly to make sure the remote control is on.
• Adjust the contrast dial.
• Make sure the batteries are installed properly.
• Install fresh batteries. If you use the recharging dock, recharge the battery pack.
THE DISPLAY IS TOO LIGHT OR TOO DARK
• Adjust the contrast dial.
THE REMOTE CONTROL SHUTS ITSELF OFF
• The remote control is designed to shut off after a few seconds. This is a
power-saving feature. You can set the length of time the display stays on; see
Chapter 5, “Settings.”
DEVICES DON’T RESPOND TO COMMANDS FROM THE REMOTE CONTROL
• Make sure the remote control is in Use mode; see “Determining if the remote
control is in Use mode” on page 22.
• Make sure you point the remote control’s sending eye in the direction of the
device with a clear line of sight. If you’re sending a macro, make sure the remote
control is aimed toward the devices the
• If the Low Battery icon appears on the display, replace the batteries and
try sending the commands again.
• Make sure the remote control knows the correct commands for your device;
the remote control’s built-in RC-5 and RC-6 codes don’t work with all brands
of equipment. See “Learning commands from other remote controls (Learn
mode)” on page 30 for instructions on teaching the remote control to control
your devices.
66
Chapter 6
entire time
the macro is running.
Page 69

• Try resetting the remote control. See “To reset the remote control” on
page 71.
BUTTONS AREN’T SENDING THE RIGHT COMMANDS
• If a button isn’t having the right effect on the current device, the button
might have been programmed in Home. If so, the command learned in
Home will have same effect at all times. However, you can override the global
default: display a particular device’s control panels before teaching the
buttons the commands you want them to have for that device. For more
information, see “To program a button globally” on page 37.
• A large finger area can activate neighboring buttons. Try using the
tip
of your
finger or your fingernail when tapping the buttons on the display. You can
also use a pencil eraser or a capped pen. (
Don’t
press hard; you can damage
the display.)
MACROS DON’T WORK
• Make sure the remote control’s sending eye is pointed toward the devices for
the
entire time
the macro is running.
• Try inserting delays between commands; see “Editing macros” on page 57.
• The macro might include one or more
inactive buttons
(buttons that don’t
have commands assigned to them). Inactive buttons are visible in Record
mode and can be recorded as part of a macro, but they won’t have any effect
when you execute the macro, because there are no commands assigned to
them. (It’s best to teach the remote control all of the commands it needs to
control your devices before you record macros.)
• One or more of the buttons that the macro refers to might have been
reprogrammed. A macro doesn’t actually store commands; it just refers to a
series of buttons. if you include a button in a macro and later teach the button
a new command, the new command is executed when you play the macro.
THE TV GOES BLANK OR THE INPUT SOURCE CHANGES
• The items on the Device menu might be programmed to switch the input
source. For example, choosing VCR from the Device menu (or from a Home
panel) might tell the preamp to switch your TV’s input to VCR; if you’re
watching TV at the time, you’ll see the picture change. For instructions on
choosing a device without switching the input source, see “To switch devices
without affecting the source” on page 23.
Problems using the remote control
67
Page 70

68
THE REMOTE CONTROL WON’T LEARN/LABEL/DELETE COMMANDS
• If the remote control buzzes and the word locked appears on the the remote
control icon when you try to learn, label, or delete a command, it means that
the device’s control panels have been locked to prevent changes. You can’t
modify or delete the commands for the device.
• If the device is not locked, and you’re having trouble teaching the remote
control a command, see “Troubleshooting” on page 66. Or, try resetting the
remote control; see “To reset the remote control” on page 71.
• Keep in mind that a button that has no border can’t learn a command or be
deleted. However, you can relabel it as you would any other button, and you
can make it invisible in Use mode by deleting its label.
Programmable
Not programmable
THE REMOTE CONTROL WON’T SWITCH MODES
• To ensure that no custom commands are lost, the remote control prevents
you from switching to a customizing mode when the battery is low. You must
replace or recharge the batteries before the remote control can switch to any
mode other than Use mode.
THE REMOTE CONTROL IS LOW ON MEMORY
• If memory is low, the remote control won’t be able to add new devices,
macros, or commands. However, the remote control can clear up some
memory for its use; it does this by permanently removing any devices and
macro groups that you have deleted. When memory is low, the remote
control automatically displays a message and gives you the option to start
clean-up now or cancel and wait until later. (Until memory is cleaned up,
your “deleted” devices and macro groups remain available in memory so that
you can restore them; see “Restoring deleted buttons, devices, and macro
groups” on page 49. Once the remote control cleans up, you can no longer
restore these items.)
IMPORTANT
Memory clean-up can take 10 minutes or longer to finish.
Don’t remove the batteries while memory clean-up is in progress (or anytime you
see a Please Wait message on the screen). Doing so could corrupt the
configuration file, causing you to lose your custom commands. If you have a
recharging dock, it’s best to place the remote control on the dock while memory
clean-up is in progress.
Chapter 6 — Troubleshooting
Page 71

THE CONFIGURATION FILE IS CORRUPTED
• The remote control has a configuration file that stores all of your custom
devices, commands, and macros. In the extremely unlikely event that this
configuration file gets damaged, the remote control displays a message asking
you to revert to the original configuration. If you see this message, you must
revert in order to continue using the remote control. All your custom devices,
commands, and macros will be lost, so you will need to reprogram the remote
control.
THE REMOTE CONTROL ERROR MESSAGES
The following error messages indicate a problem with the configuration file
where your custom commands are stored. Contact your dealer or Philips
customer service if one of the following messages appears on the display:
• Can’t open configuration file
• Configuration file error
• No configuration file found
• Invalid configuration file version
Problems using the recharging dock
THE BATTERIES WON’T RECHARGE
• Make sure you’re using the special battery pack that comes with the
recharging dock. Ordinary AA batteries can’t be recharged using the dock.
THE INDICATOR LIGHT FLASHES
• Make sure the contacts on the charger and on the back of the remote control
are clean (see picture on page 14) and there are no obstructions between
them.
• Make sure the remote control is properly seated on the dock.
• Confirm that the rechargeable battery pack is installed properly in the remote
control.
IMPORTANT
recharging dock, remove it.
If the remote control becomes very hot while resting on the
Problems using the recharging dock
69
Page 72

70
Common questions
CAN I PROGRAM A BUTTON TO EXECUTE MORE THAN ONE COMMAND?
No, but you can create a macro to execute a sequence of commands. For
instructions, see Chapter 4, “Creating Macros.”
HOW DO I PROGRAM SOURCE-SWITCHING?
Refer to the instructions in “To program an item on the Device menu” on
page 34.
WHY CAN’T I LEARN/LABEL/DELETE BUTTON ON HOME PANELS?
Home is designed to make it easy to navigate among devices no matter what
mode you’re in. The commands in home are set up automatically when you
make changes to the Device menu; for instructions on adding, removing,
relabeling, and programming items on the Device menu, see Chapter 3,
“Customizing the remote control.”.
Although you can’t program the device buttons in Home, you can program the
direct-access and Left/Right buttons. The commands you assign to these
buttons in Home become global default. For instructions, see “To program a
button globally” on page 37.
HOW DO I PROGRAM MY RECEIVER COMMANDS?
There is no separate device template for receiver. However, if you have an A/V
receiver, you can use the Preamp device template. For an audio receiver, use the
Tuner device template. For an overview of commands in each template, refer to
Chapter 8, “Command Reference.”
Chapter 6 — Troubleshooting
Page 73

Additional procedures
To reset the remote control
The remote control’s reset button is accessible through a small hole on the back
of the remote control. Under normal circumstances, you should never need to
reset the remote control. However, if the display freezes or you notice other
unusual behavior, you might need to use the reset button to get the remote
control working again.
To reset the remote control:
Using the tip of an unfolded paperclip, gently press the Reset button
•
located deep within the remote control unit.
You might feel some resistance when you press down. When you have pressed
the Reset button, the remote control starts up. After a few seconds, the remote
control beeps, indicating that it’s ready to use.
Reset button
NOTE
However, if you were making changes to the remote control in a mode other
than Use, and you quit before you saved changes, you will lose the changes.
You will not lose custom commands and macros that you have saved.
Additional procedures
71
Page 74

72
To revert to the original configuration
The Revert command restores the remote control’s devices and commands to
the state they were in when the remote control was new (or when the the
remote control configuration software was last updated). All customization
information is lost permanently. This includes any devices, commands, or macros
you have created.
Under normal circumstances, you shouldn’t need to revert. However, if you
should find that you need to restore the remote control to its original
configuration, do the following:
1 In Use mode, press and hold the icon for 2 seconds to enter Setup.
2 Scroll to the second Setup panel. 3 Tap the Revert button.
The remote control asks you to confirm your choice.
4 Tap Revert... to complete the process.
(Tap Cancel to exit without reverting.)
To calibrate the touchscreen
Calibrating gives the software important information about your unit’s
touchscreen. The remote control is calibrated before it leaves the factory, and
under normal circumstances, you shouldn’t need to calibrate it yourself.
However, if the remote control displays a message asking you to calibrate the
touchscreen, do the following:
1 When the remote control says, “Touch TOP LEFT corner,” use the tip
of a blunt pencil to touch the upper-left corner of the screen.
Touch the screen as close to the corner as possible. You must use a pointed
object, not your finger. However, do not use a sharp object or the tip of pen ; this
can damage the touchscreen.
2 After step 1 is successful, repeat in the lower-right corner of the screen.
NOTE
tapping the Calibrate button. You can cancel calibration by pressing the Left or
Right button.
You can calibrate at any time by going to the second Setup panel and
Chapter 6 — Troubleshooting
Page 75

7
Specifications
Specifications for the intelligent remote control :
Hardware
High-resolution (320 × 240) liquid crystal display with
contrast control
Large touchscreen
Seven programmable direct-access buttons
Backlighting for LCD and direct-access buttons
Light sensor with adjustable sensitivity
Built-in RC-5 and RC-6 codes
Infrared sending and learning eyes
3-wire (RS232) serial port connector for future
expandability
Software
Infrared (IR)
Memory
Batteries
Battery life
Dynamic, animated interface
Editable macros (up to 255 commands per macro)
Total number of devices and macros limited only by
memory
Operating distance 10 meters (33 feet)
Learning frequency up 56 KHz
Learning distance 2.5cm (1 in) up to 30 cm (1 ft)
1 MB non-volatile flash memory (retains commands when
batteries aren’t present)
512K SRAM
4 AA 1.5V batteries, or one 4.8V rechargeable battery pack
Approximately 6 months with typical use
Specifications
73
Page 76

F)
Power
management
Dimensions
Operating
temperature
Accessories
NOTE
The specifications and design of this product are subject to change
without notice.
Automatic on/off (no power switch)
138 mm × 92 mm × 38 mm
(5.4 in × 3.6 in
0
°
C to 50
(32
°
F to 122
×
1.5 in)
°
C
°
The remote control recharge package :
NiMH 4.8V rechargeable battery pack
Recharging dock
110/220V-to-12V power adapter
RS232 cable for PC connection
74
Specifications
Page 77

CHAPTER 8
8
Command Reference
This chapter describes the controls for the remote control’s built-in devices.
One kind of devices is included with the remote control:
• Devices that appear on the Device menu
NOTE
technician programmed the remote control for you, the devices and controls
might be different.
ACTIVE BUTTONS AND TEMPLATE BUTTONS
Some of the buttons listed here don’t have commands assigned to them; they
are placeholders for optional functions. These
Use mode. In Learn mode they become visible so that you can teach them
commands. A button with no command assignment is light gray. An
button
dimensional.
Active buttons
(visible in Use
mode)
The active buttons that are shown in this chapter have RC codes assigned to
them by default. The command description for each active button tells you
what the RC code does. For template buttons, the command description tells
you the
any button.
This chapter describes the default setup. If a dealer or installation
template buttons
—a button that has a command assigned to it—is dark and looks three-
intended use
of the button. However, you can teach any command to
are invisible in
active
Template buttons
(visible only in Learn
mode)
Chapter 8 — Command Reference
75
Page 78

Button Command
Video output.
O
M
Text ON / OFF.
Stand-by.
Movie Expand.
Personal Preference.
DNR
H
N
W
Digital Noise Reduction.
Subtitle.
1st of 2nd language.
PIP.
Freeze.
S
R
U
T
O
F
I
Mosaic.
Select.
Swap.
Shift.
Teletext.
Cancel picture.
TV and text mixed.
Main freeze.
J
Page enlargement.
Reveal / Conceal.
Main Index Page.
Current Time.
Tracking.
Dual screen A + B.
Freeze second screen.
Switch screen A to B.
Install Open / Close.
«
‡
Open or close tray (eject).
Play.
76
Chapter 8 — Command Reference
Page 79

77
Button Command
π
ª º
(Fast) reverse and (fast) forward (play).
Fast reverse to previous chapter, fast forward to next
chapter.
e
…
†
+ / –
¬§•—
\
Frame by Frame.
Pause (still).
Stop.
Increase or decrease entry.
Navigate through menu.
Previous program.
Personal preferences.
0 - 9
+10
A / B
AC 3
AMS
SAP
cc
clear
display
dub
enter
erase
exit
favorite
index ‰ ‡
memory
memory clr
menu
off
Numeric entry.
Add 10 to numeric entry.
Select side for playback.
Play AC 3 encoded signal.
Automatic Music Search
Select audio track (language).
Closed caption.
No command (user-definable).
Display on-screen commands.
Dubbing from deck A to B.
Enter numeric entry.
Clear last function.
Exit on-screen menu.
Store programmed tracks/chapters in memory.
Index back and forward.
Display contents of memory.
Clear memory.
Open on-screen menu.
No command (user-definable).
Page 80

Button Command
ok
on
program
program AB
random
recall
repeat
rf
shuffle
one / all
source
strobe
title
VCR+
Confirm entry.
Turn LaserDisc player on or off.
Program tracks/chapters.
No command (user-definable).
Randomly play all or programmed chapters.
Modify contents of Favorites.
Continuously repeat all or programmed chapters.
Select RF as input.
Shuffle tracks/chapters.
Select the source via scart.
Stroboscopic effect.
Select a disc title.
Timer Programming using 3 - 9 buttons.
78
Chapter 8 — Command Reference
Page 81

ProntoEdit
One of the best features of the Pronto is its adaptability : you can make buttons and
whole panels appear and disappear, change button labels, learn IR codes and create
and edit your own macros. But if you want to personalize your Pronto even more,
ProntoEdit is the perfect tool for you.
What is ProntoEdit
ProntoEdit is software that allows you to perform a range of powerful tasks, including :
• upload and download configurations from and into your Pronto
• add buttons to panels
• add panels to devices
• use your own bitmaps
• create your own custom devices
• and more …
Serial Cable
Included with your Pronto you will
find a serial cable. This cable allows
you to connect your Pronto remote
to a PC (using the serial port) and use
ProntoEdit.
ProntoEdit System Requirements
• PC with a 486DX/66Mhz or higher processor
• Windows 95,Windows 98,Windows NT 4.0 or higher operating system
• 16 megabytes of RAM
• 10 megabytes of free disk space
• Super VGA or higher graphics card and monitor
• Available serial port which supports 115200 baud
The Pronto remote easily connects to your PC
using the serial port.
How to receive ProntoEdit
To ensure that you receive the most recent version of ProntoEdit you can install it
directly from our website. Please visit us at www.pronto.philips.com to download your
free copy today.A ProntoEdit users manual will also be available on this website.
Page 82

Service and support
For service and support, please contact Philips customer service at
888-486-6272 (USA). When you contact Philips customer service, you will be
asked for the technical information listed on the third panel of Setup.
To view this information:
1 In Use mode, press and hold the icon for 2 seconds to enter Setup.
2 Scroll to the third Setup panel.
UPDATES AND NEW PRODUCTS
For news about updates and new products, please visit us on the World Wide Web at
www.philips.com.
Page 83

Manual Printed in Belgium
8622 405 00006
 Loading...