

Philips HD 7612-6 Service Manual
Service
Service
Service
Service
Information
!
Coffee maker ”Café Therm”
HD 7612/6
Philips Domestic Appliances and Personal Care
Service Manual
PRODUCT INFORMATION
Voltage
Frequency
Power consumption
Contents jug
Coloursetting
SERVICE INFORMATION
Thermostat
Thermostat
Thermal fuse
REPAIR INSTRUCTIONS
1.
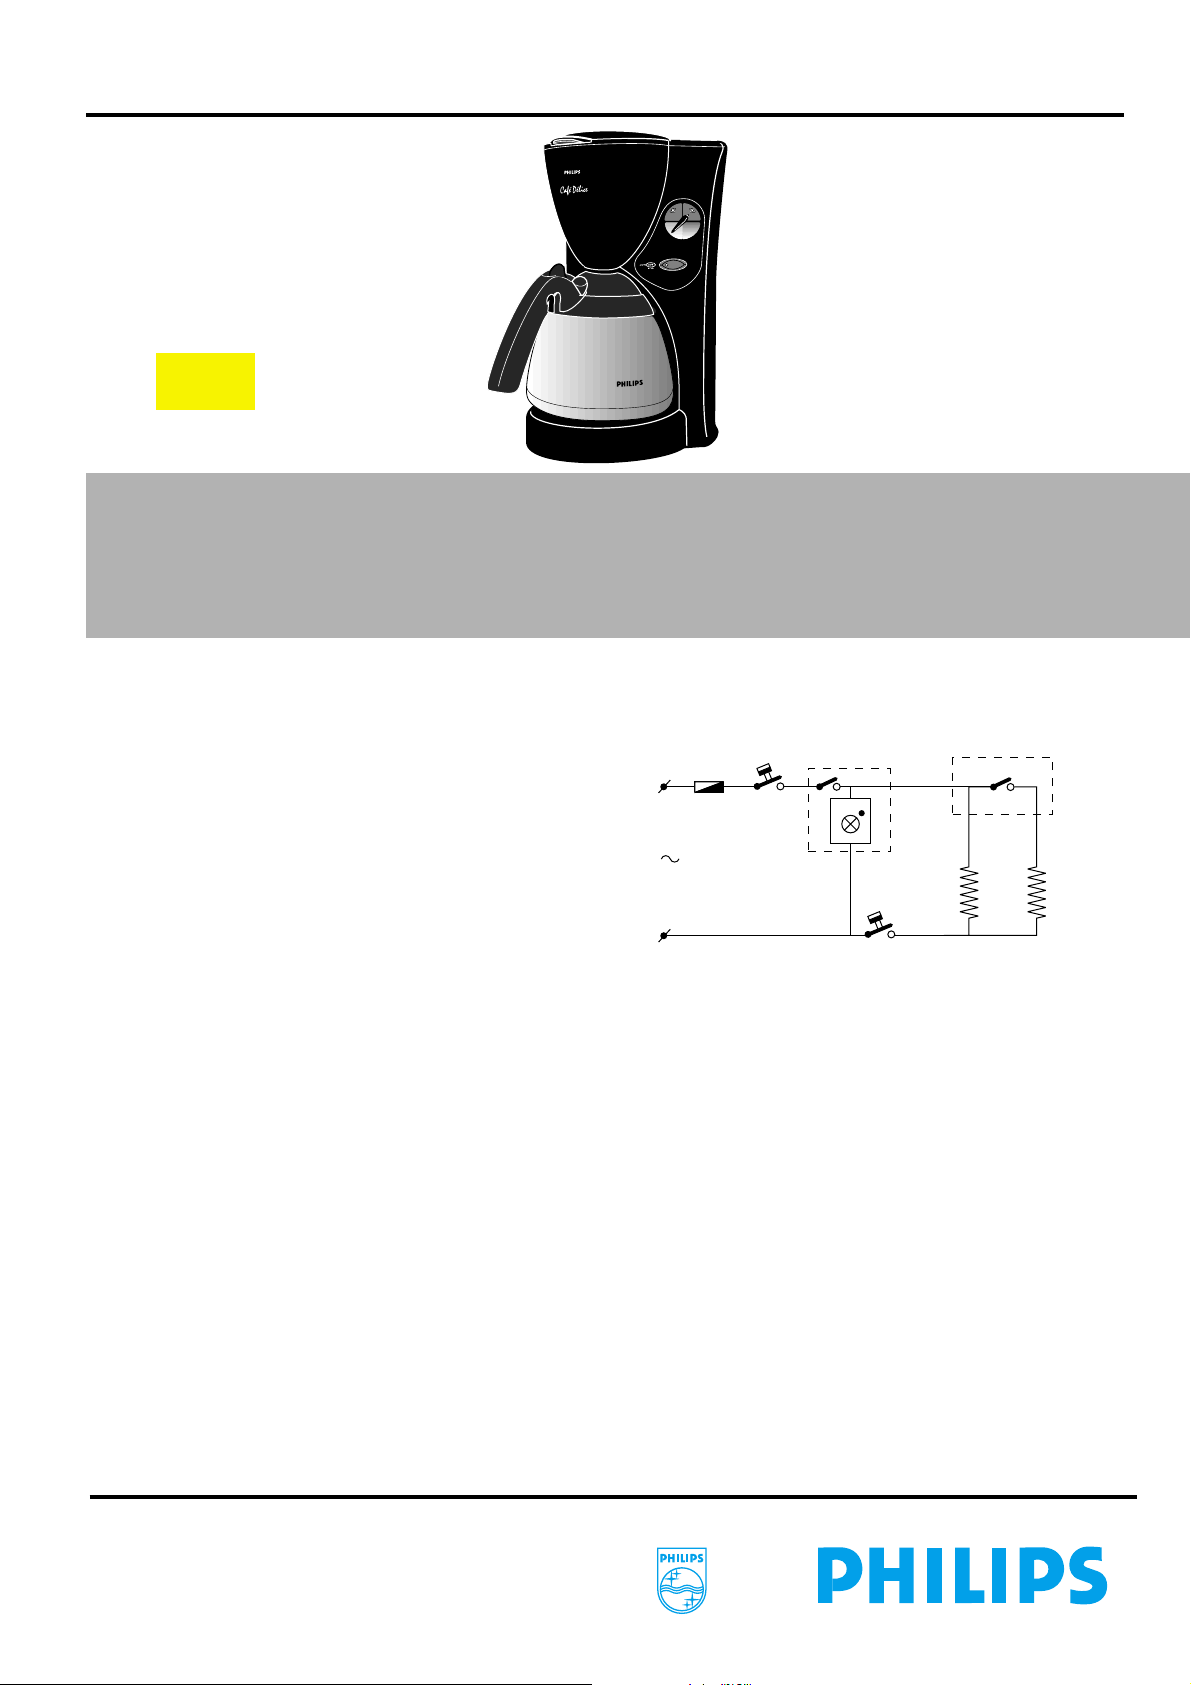
Electrical circuit
When the appliance does not work, check the electrical
circuit. If the thermal fuse or thermostat prove defective,
the complete pump unit has to be replaced.
switch-off temp
switch-off temp
:
230V
:
50 - 60Hz
:
1400W/850W
:
1200 cc
:
Black
cut-off temp
: 160°C (T1)
: 140°C (T2)
: 227°C
T1
AUTO
SHUT
OFF
T2
ROTARY
SWITCH
850W
SAP coding HD 7612/6
ROTARY SWITCH
550W
2.
De-scaling
If the water system is nearly or less clogged by scale
then operate the coffeemaker a few times with vinegar
or with a 10-15% solution of either vinegar-acid, citric
acid or tartar-acid, into cold tap water.
Do not use other de-scaling agents as these may harm
the appliance.
If this procedure does not restore the function, then switch
off the coffeemaker when the acid has passed through
during appr. 3 min. Keep the appliance in this condition
overnight and continue/repeat the cleaning operation.
After the de-scaling procedure, operate the coffeemaker
twice with tap water in order to rinse away any residual
substances.
Published by Philips Domestic Appliances and Personal Care Printed in The Netherlands Copyright reserved Subject to modification
3.
Pump unit removal
To separate the pump unit (item 24) from the hotplate
unit (item 22), the two plastic snaps at place A have to
be loosened. Then the pump unit can be lifted out easily.
4.
Exchanging the switch unit
Remove the panel (11) by carefully pushing a small
screwdriver into the chink at point A and moving it towards
to point B (see exploded view). Do not damage the housing.
If the panel has been damaged, get a new one.
Thermosjug handgrip removal (bajonet catch)
5.
To separate the handgrip 18 from the metal jug, lift up the
small cover B and unscrew the screw C. Then put a small
screwdriver at place D. Lift up the handgrip and turn
simultaneous the handgrip anti-clockwise 45°.
Before (re)placing the handgrip, apply a drop of detergent
to the sealing ring 19. This will make it easier to position the
handgrip by pushing it downwards and rotating.
©
4322 277 00284
00/03
PCS 104 801

HD 7612/6
1
2
14
3
15
16
B
4
18
8
19
M
A
X
10
15
13
8
11
6
9
7
4
5
3
MIN
A
B
A
E
C
D
21
A
22
13
26
10
12119
23
24
7
1 4822 442 01697 Tank lid
2 4822 466 12151 Spout disc
3 4822 529 10423 Spout
4 4822 256 10543 Rim
7 4822 462 40374 Stud
8 4822 402 11252 Jug lever
9 4822 273 10332 Rota switch
10 4822 276 13968 Aso switch
11 4222 259 01020 Panel printed
12 4822 410 11105 Rota button salmon
13 4822 247 55780 Switch casing
14 4222 259 01810 Filterholder
15 4822 360 10435 Drip stop assy
16 4822 442 01698 Lid assy
18 4822 498 10722 Carrier assy (pos. 18 + B + screw C)
25
19 4822 532 12886 Sealing ring
21 4822 418 10411 Thermos jug assy
22 4222 259 01820 Hotplate unit therm
23 4822 360 50864 Valve hose assy
24 4222 259 29470 Pump 1400 W therm
25 4822 492 71174 Wire spring
25 4822 532 21371 Hose piece
*** 4222 001 77760 DFU GBR, DEU, FRA, NLD
ESP, PRT, ITA, TUR.
*** 4222 001 77770 DFU Nordic
Notes:
1) Optional part for use as an insert in item 5:
4822 480 50479 Permanent filter nylon
4822 480 50402 Permanent filter gold coated
2) Commercial trade number of the complete thermosjug
is HD 7950
PCS 104 801
 Loading...