

Philips HD4209/00, HD4210/00 User Manual [fr]

2
English Page 4
• Keep page 3 open when reading
these operating instructions.
Français Page 11
• Pour le mode d'emploi: dépliez la page 3.
Nederlands Pagina 18
• Sla bij het lezen van de gebruiksaanwijzing
pagina 3 open.
Español Página 25
• Desplegar las página 3 al leer las instrucciones
de manejo.
Português Página 33
• Durante a leitura do modo de emprêgo, desdo-
bre e verifique a pág. 3.
For U.K. only:
Fitting a different plug
This appliance is fitted with a BS 1363 13 Amp.
plug.
Should you need to replace the plug, connect the
wires as follows:
Green/yellow wire to the Earth terminal (E) of
the new plug.
Brown wire to the Live (L) terminal of the new
plug.
Blue wire to the Neutral (N) terminal of the new
plug.
Always fit the same value of fuse as that originally
supplied with your appliance.
Only use BS 1362 approved fuses.
As a guide only: Appliances under 700 W can
have a 3 Amp. fuse (red) and all others should
have a 13 Amp. fuse (brown).
When disposing of an old plug (particularly the
moulded type which has been cut from the mains
cord) always remove the fuse as the plug could be
dangerous if ever inserted in a live socket.
3
E
F
N
G
Q
1
A
CB
D
I
0
160°
170°
180°
200°
20-25 min
4-6 min
4-5 min
4-5 min
2-4 min
2-4 min
5 min
4-5 min
I
P
T
H
J
LSRM
K
O

4
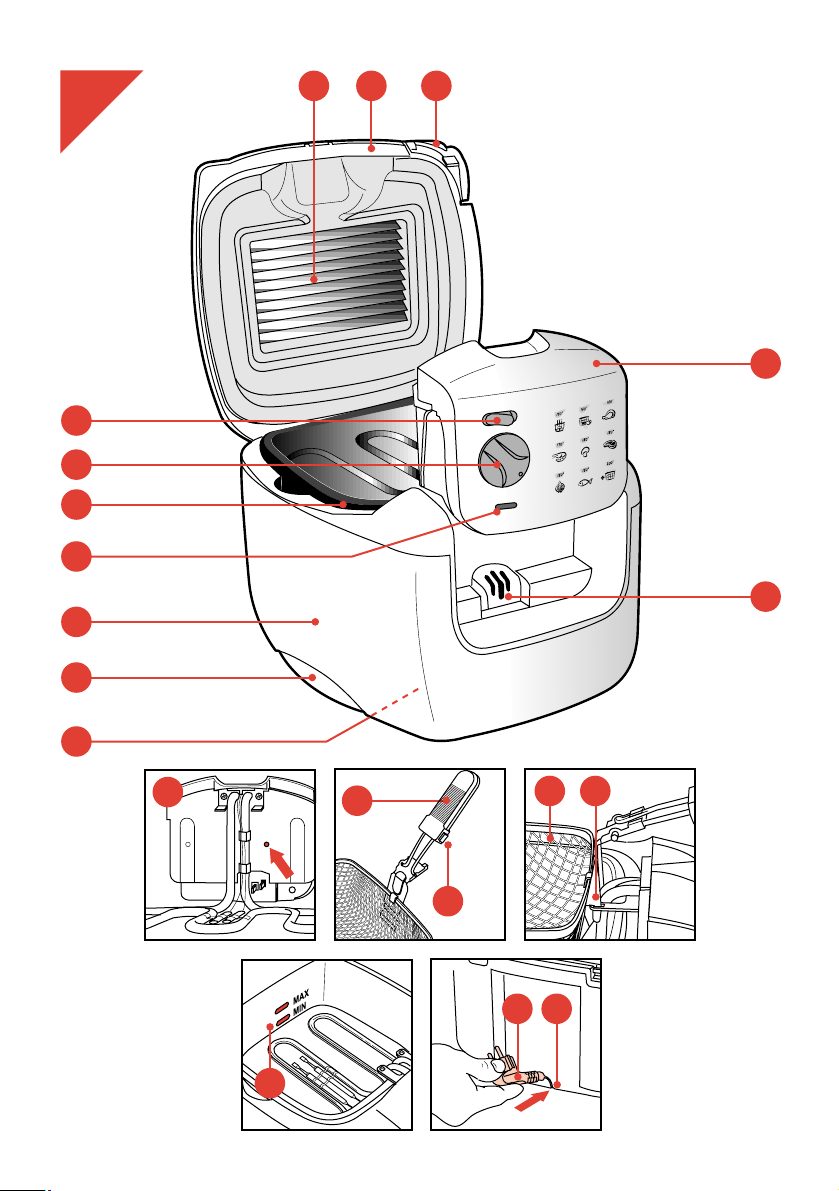
General description (fig. 1)
A Lid (removable)
B Anti-fat filter
C Lid release pad
D Control unit
E On / Off switch
F Temperature control
G Pilot light
H Reset hole (restart)
I Electrical safety connectors
J Handgrip (removable / foldable) of frying
basket.
K Handgrip release knobs
English
Important
• Read these instructions in conjunction with the illustrations before using the appliance.
• Before plugging the fryer in, check if the voltage indicated on the type plate is the same as
the mains voltage in your home.
• Only connect the appliance to an earthed wall socket.
• Never immerse the control unit with heating element in water.
• Clean the various parts thoroughly before using the fryer for the first time. Ensure that they
are thoroughly dry before filling the frying pan with oil or melted fat.
• In general, we advise you to use liquid frying fat or frying oil in this appliance.
Solid frying fat can also be used. However, when using solid frying fat extra precautions
must be taken to prevent spatting fat when melting. (See section "Deep fat frying".)
• Do not switch on until you have filled the frying pan with oil or (liquid/melted) fat.
• When using new fat (lumbs or blocks), melt the fat in a separate pan and then pour it into
the fryer before switching on.
• Only use oils and fats which are recommended for deep fat frying. This information can be
found on the packing of these oils/fats.
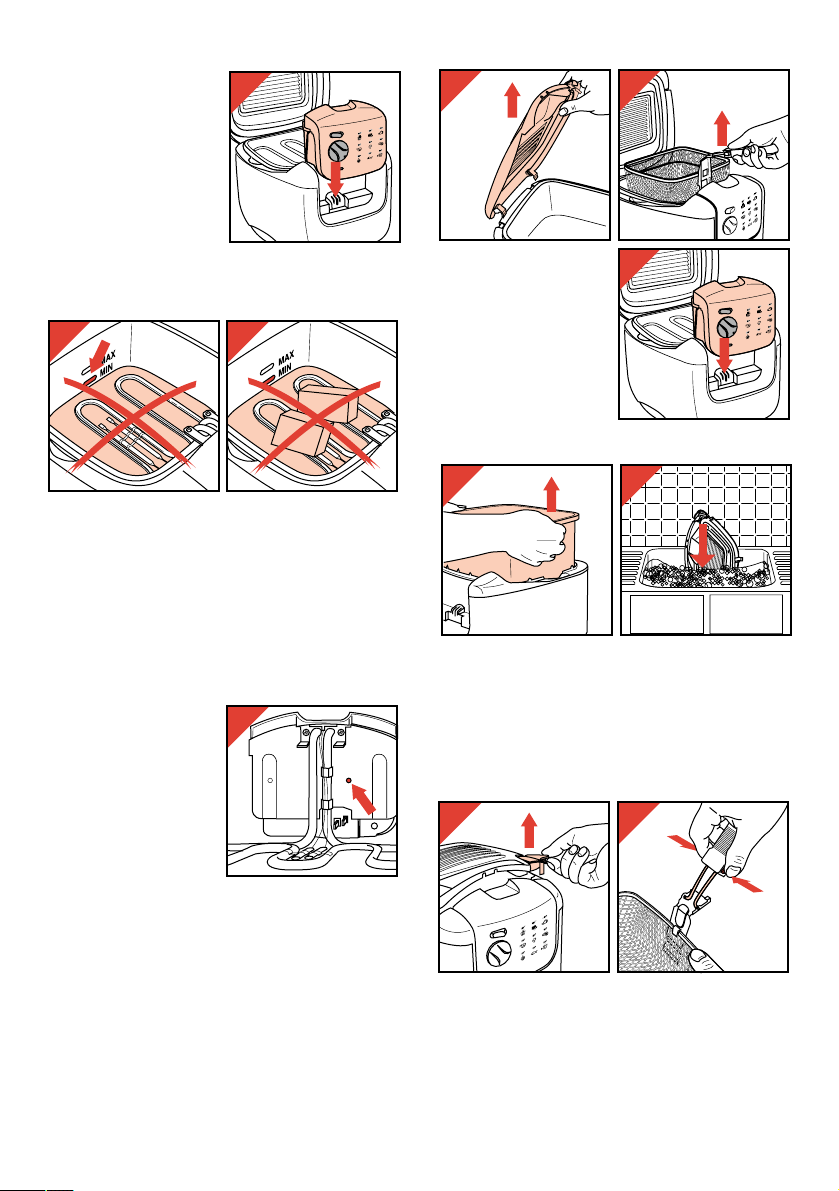
• Always fill with oil or fat to the level between the two measure indications.
Before you start frying, always check if there is sufficient oil/fat in the fryer.
• Do not exceed the maximum quantities indicated in the table. Never fill the basket higher to
3
⁄4
full.
If the basket is overfilled, hot fat/oil may flow over the frying pan ridge.
• During the process of frying hot steam comes from the appliance. Keep your hands and
face away from this steam.
• Keep the deep fat fryer out of the reach of children at all times especially when in use.
• Do not let the mains cord hang over the edge of the table or sink.
• After use set the temperature knob to the lowest position (rotate anti-clockwise until it
stops). Remove the plug from the mains socket and let the oil or fat cool down. Do not
move the fryer until it has cooled sufficiently.
• To avoid damage take care not to drop the enamelled frying pan, to bump it against hard
objects, or to scratch it with hard (metal) items.
• If the mains cord of this appliance is damaged, it must only be replaced by Philips or their
service representative, as special tools and/or parts are required.
• Keep these instructions for future reference.
L Frying basket
M Rest for frying basket (drain position)
N Frying pan
O Level indications (oil/fat)
P Transport handles
Q Housing (Cool wall)
R Mains cord
S Cord storage compartment
T Type plate
5
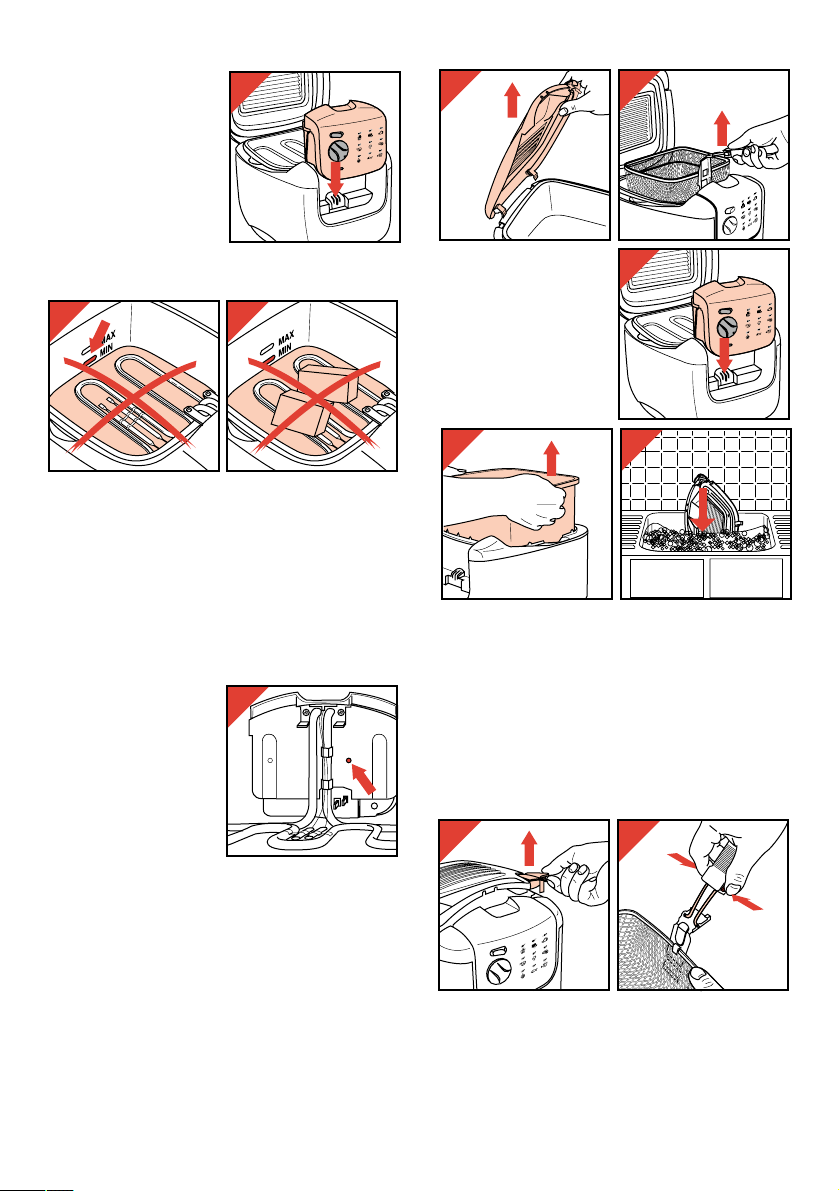
Extra safety
• The electrical safety
connectors ensure
that the heating
element can only be
switched on if the
control panel is
correctly positioned
(fig. 1a).
• A safety thermostat switches the appliance off
in case of overheating.
This may happen:
- if there is no (or too little) oil, melted fat, or
previously used (and resolidified) fat in the fryer
(fig. 2);
- if attempting to melt blocks or lumps of new fat
in the fryer (fig. 3).
The heat cannot be released quickly enough in
these cases.
If the safety thermostat has switched the
appliance off:
- Allow the appliance to
cool down.
- Using e.g. a small
screwdriver or a
toothpick, carefully
press the restart
button concealed in
the “reset hole” (fig. 4)
to make the appliance
ready for use again.
Prior to first use: clean thoroughly
• Ensure that the mains plug is not in the wall
socket.
• Never immerse the control unit with heating
element and mains cord in water. Never
rinse these items.
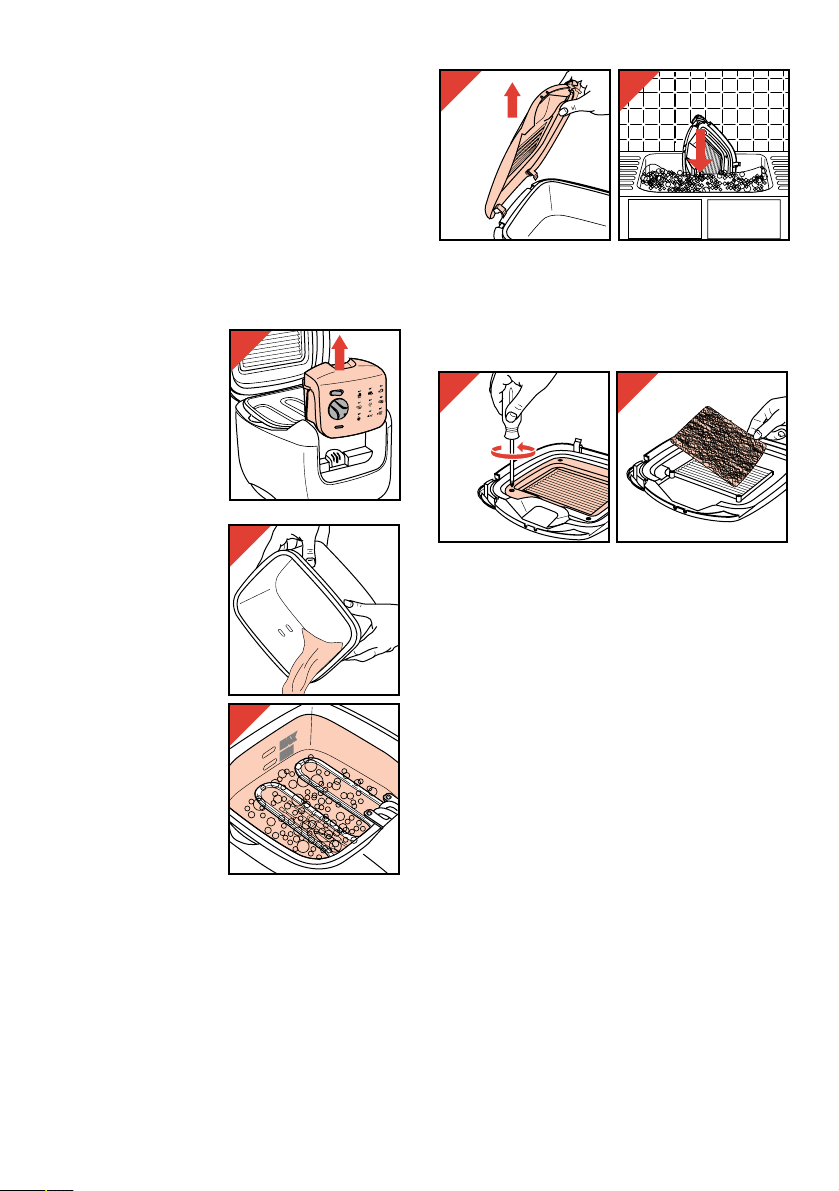
- Remove the lid (fig. 5),
the frying basket
(fig. 6) and the control
unit with the heating
element (fig. 7).
Put the control unit
with the heating
element aside to a
safe (dry) place.
- The frying pan can be removed (fig. 8) for quick
and easy cleaning.
- Wash the frying basket, the lid and the hand
grip in hot soapy water (fig. 9). Rinse with clean
water and dry.
Deep fat frying
- Place the appliance on an horizontal, flat and
stable surface.
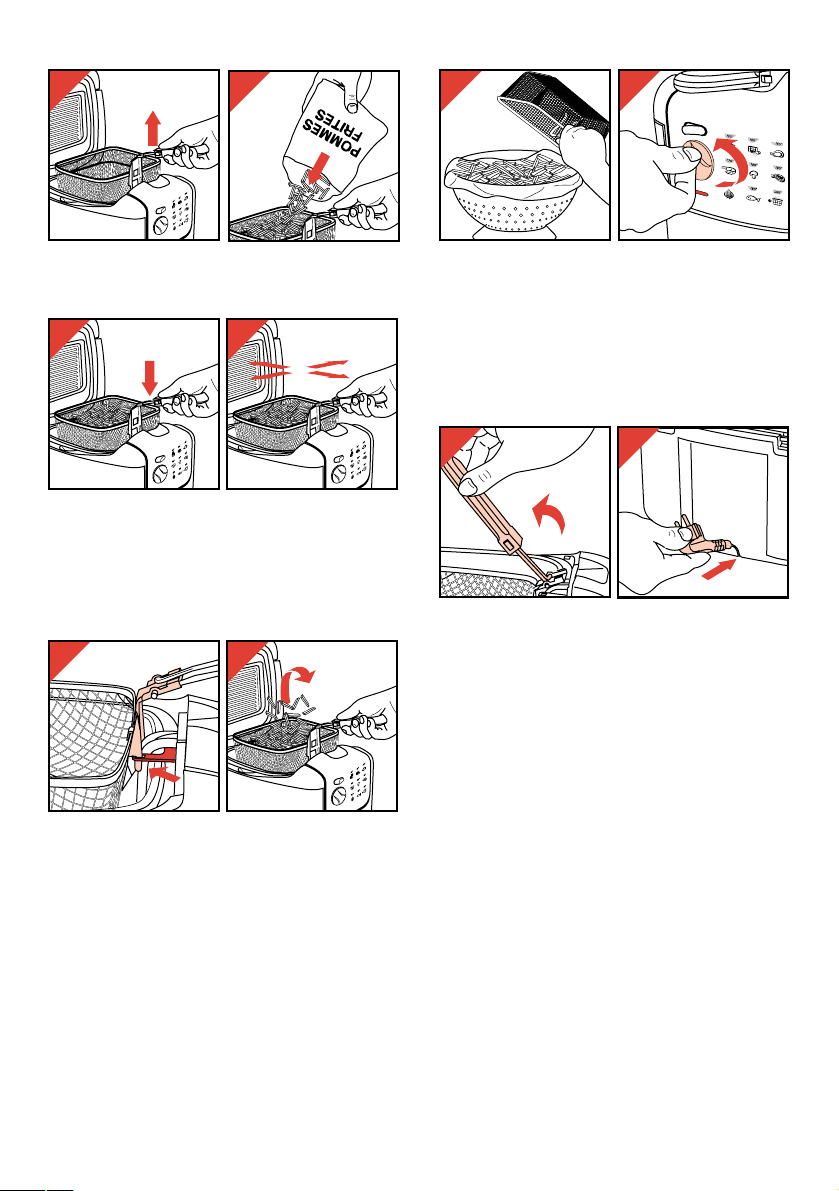
- Using the release pad, open the lid (fig. 10).
- Press the handle knobs to fix the handgrip to
the frying basket (fig. 11).
1a
I
0
n
i
m
6
4
n
i
m
5
4
160°
in
m
4
2
170°
180°
n
i
m
5
200°
n
i
m
5
4
2 3
4
5 6
n
i
m
5
2
0
2
n
i
m
5
4
n
i
m
4
2
7
8 9
10 11
n
i
m
5
20-2
in
m
4-6
in
m
-5
4
in
5 m
4-
in
2-4 m
in
m
-4
2
min
5
n
mi
4-5
I
n
i
m
5
2
0
2
0
n
i
m
6
4
n
i
m
5
4
n
i
m
5
4
160°
n
i
m
4
2
170°
n
i
m
4
2
180°
n
i
m
5
200°
n
i
m
5
4
20-25 min
4-6 min
4-5 min
4-5 min
2-4 min
2-4 min
160°
5 min
170°
4-5 min
180°
200°
6
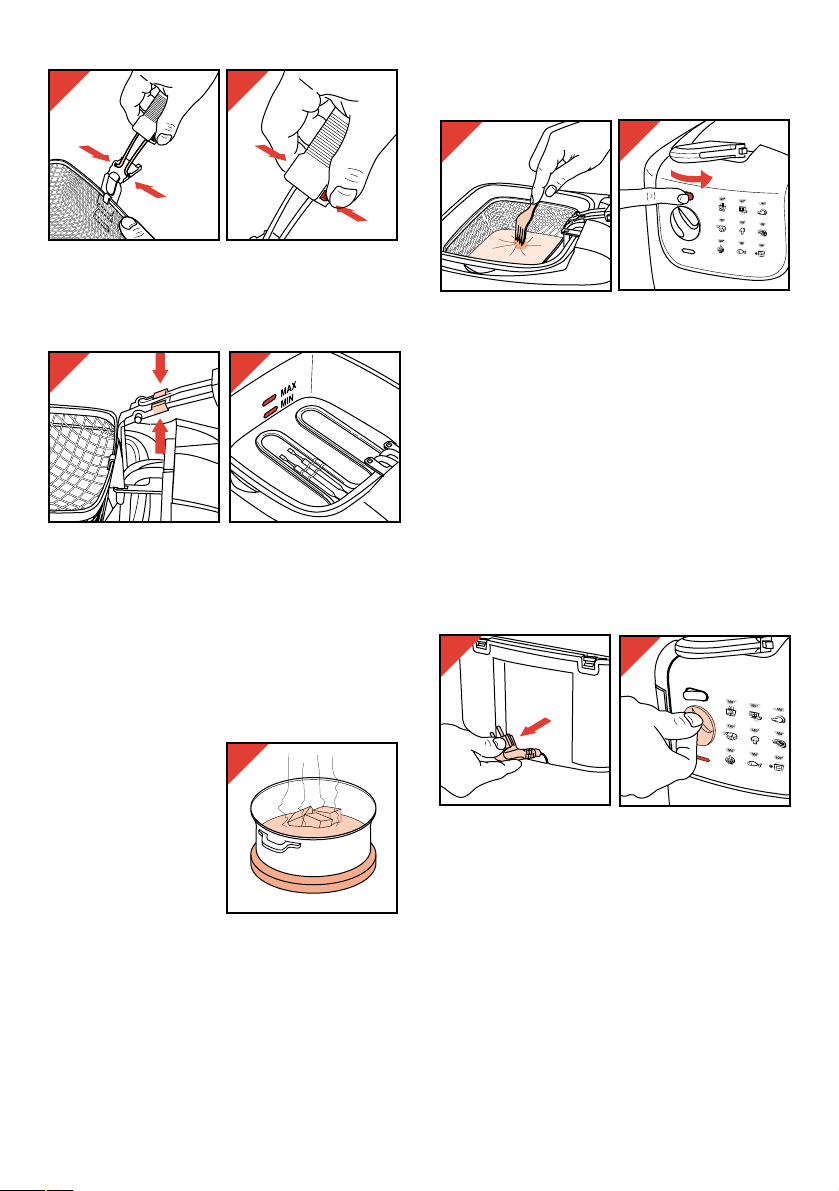
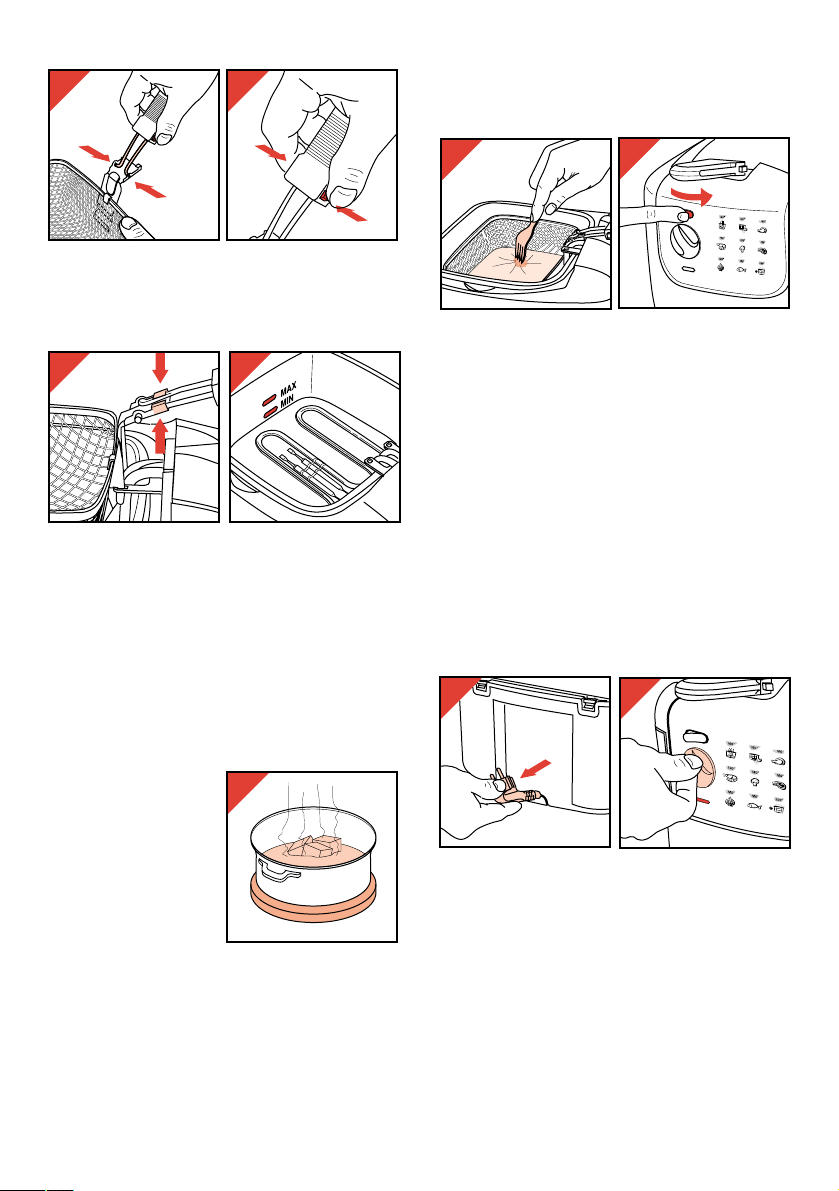
Ensure that both rods of the hand grip fit
securely in the corresponding holes of the frying
basket (fig. 12).
- Press the handle knobs to put the hand grip into
operational position (fig. 13).
Ensure that both rods of the hand grip fit
securely in the corresponding profiles of the
frying basket (fig. 14).
- Fill the frying pan with oil, liquid fat or melted
solid type fat to the highest indication line
(fig. 15):
2 litres for type HD 4209;
3 litres for type HD 4210.
• Never mix two different types of oil and/or fat.
When using new solid frying fat:
- Melt the piece(s) of
new solid frying fat in
a separate pan on a
low fire (fig. 16):
2
1
⁄2 kg for type
HD 4209;
4 kg for type
HD 4210.
Please note: Always
keep your eye on this
pan. Keep children away from it.
- Put out the fire below the pan as soon as the fat
has melted.
- Place the fryer in the sink basin.
- Very carefully pour the melted fat into the fryer.
- Carefully move the filled fryer to the place
where you want to use it. Then plug in and
switch on.
When melting used solid frying fat which has
curdled in the fryer:
- Carefully make some holes in the fat (fig. 17).
Avoid damaging the heating element when
doing so!
- Put the lid on the fryer.
- Switch the fryer on, selecting position 160 °C
(fig. 18).
Leave the lid on the fryer while the fat is melting
to prevent spattering.
- You can switch to a higher temperature as soon
as all the fat has melted.
• Only use the described melting procedure!
Otherwise there is a risk of warm melted fat
suddenly spouting from below through the still
solid top layer of fat.
• Store the fryer containing solidified fat at room
temperature. If the fat is very cold there is a
greater risk of spattering.
- Pull out the mains cord completely (fig. 19).
• Ensure that the mains cord will not touch hot
surfaces and that it does not hang over the
worktop edge.
- Insert the mains plug into the wall socket.
- Set the temperature knob to the position which
is most appropriate for the kind of food to be
fried (fig. 20). Refer to the table.
- After the pilot lamp has extinguished for the
second time (after 10-15 minutes) the oil/fat is
at the correct temperature.
12 13
14
15
16
17
18
4
6
m
i
n
2
0
2
5
m
i
160°
170°
180°
200°
n
2
4
m
i
n
4
5
m
i
n
4
5
m
i
n
4
5
m
i
n
5
m
i
n
2
4
m
i
n
19
20
4
6
m
in
2
0
-
160°
170°
180°
200°
2
2
4
m
i
n
4
5
m
in
4
5
4
5
m
i
n
5
m
i
n
2
4
m
5
m
in
m
in
i
n
7
- Open the lid and carefully lift the frying basket
out of the pan (fig. 21).
- Put the food into the basket (fig. 22).
- Lower the frying basket into the pan (fig. 23).
Ensure that the basket is fixed in the low
position (i.e. “frying position”).
• For better overall browning, it is advised to
open the lid and to lift and shake the basket a
couple of times during frying (fig. 24).
- After frying, hook the frying basket in the high
position (i.e. “drain position”) (fig. 25).
Allow the fried food to drain for a while.
If required you can shake the basket over the
fryer to remove excess fat/oil (fig. 26).
- Remove the basket from the fryer and put the
fried food in a colander with fat absorbing paper
(e.g. tissue paper/kitchen roll) (fig. 27).
- After use, set the temperature knob to the
lowest position (turn fully anti-clockwise)
(fig. 28) and remove the mains plug from the
wall socket.
- Clean the fryer after the oil or fat has cooled
down sufficiently.
- You can press the two knobs and tilt the hand
grip backwards to store it inside the frying
basket (fig. 29).
- You can push the mains cord into the appliance
(fig. 30).
- Store the fryer with the lid on top. This will keep
dust etc. from the pan.
“Cool Zone”
Loose food particles do not turn charred in this
fryer, so that the oil/fat will remain longer in good
condition. The loose particles will gather in the
“cool zone” below the heating element.
After the appliance has cooled down, you can
remove the control unit with heating element and
mains cord, lift the frying pan out of the appliance
and pour the oil/fat through a fine sieve.
21
22
n
i
m
-25
20
in
6 m
4
in
m
4-5
in
m
-5
4
in
-4 m
2
in
-4 m
2
n
i
m
5
n
i
m
-5
4
23
24
27 28
4
6
m
in
160°
2
4
170°
m
i
n
4
180°
5
m
in
200°
4
5
m
in
5
m
i
n
2
0
2
5
m
i
n
4
5
m
i
n
2
4
m
i
n
in
m
0-25
2
in
m
-6
4
in
m
-5
4
n
mi
4-5
n
i
m
4
2-
in
2-4 m
in
m
5
in
-5 m
4
in
-25 m
0
2
min
4-6
in
5 m
4-
in
m
4-5
n
i
m
-4
2
in
m
2-4
in
5 m
in
4-5 m
25 26
in
5 m
20-2
in
m
-6
4
in
m
4-5
in
-5 m
4
in
m
-4
2
in
2-4 m
in
5 m
in
m
4-5
29 30

8
Temperature Type of food Max quantity per preparation Frying time *)
unfrozen frozen (minutes)
160 °C Chicken (fillet, 300 g 200 g 20-25
(320 °F) drumsticks)
180 °C Cheese croquettes 5 pcs. 3 pcs. 5
(356 °F) Shrimp fritters 4 pcs. 2-4
Apple fritters 4 pcs. 4-5
Cheese fritters 4 pcs. 2-4
Fish fingers/fillet 6 pcs. 5 pcs. 3-5
Meat balls 13 pcs. 4-5
Mussels 12 pcs. 21⁄2-3
190 °C Ball fritters 4 pcs. 2-4
(374 °F) Doughnuts 3 pcs. 2 pcs. 6-8
**) French fries 300 g 200 g 5
Cordon bleu 2 pcs. 3-4
Fish croquettes 5 pcs. 4 pcs. 4
Meat croquettes 5 pcs. 4 pcs. 4
Potato croquettes 5 pcs. 4 pcs. 4
Sliced potato 300 g 200 g 4
Wiener Schnitzel 2 pcs. 21⁄2
-3
Temperature Type of food Max quantity per preparation Frying time *)
unfrozen frozen (minutes)
160 °C Chicken (fillet, 350 g 250 g 20-25
(320 °F) drumsticks)
180 °C Cheese croquettes 5 pcs. 4 pcs. 5
(356 °F) Shrimp fritters 6 pcs. 2-4
Apple fritters 6 pcs. 4-5
Cheese fritters 5 pcs. 4
Fish fingers/fillet 8 pcs. 7 pcs. 3-5
Meat balls 17 pcs. 4-5
Mussels 15 pcs. 21⁄2-3
190 °C Ball fritters 5 pcs. 2-4
(374 °F) Doughnuts 4 pcs. 3 pcs. 6-8
**) French fries 450 g 300 g 5
Cordon bleu 3 pcs. 3-4
Fish croquettes 6 pcs. 5 pcs. 4-5
Meat croquettes 6 pcs. 5 pcs. 4-5
Potato croquettes 6 pcs. 5 pcs. 4-5
Sliced potato 450 g 300 g 4-5
Wiener Schnitzel 3 pcs. 21⁄2-3
*) For frozen food the preparation times may be longer than indicated.
**) For new French fries please refer to section "French fries".
Type HD 4209 (2 litres version)
Type HD 4210 (3 litres version)

9
Tables
In the tables is indicated what types of food can
be prepared in one turn with the fryer and what
temperature and preparation times should be
chosen.
The table also indicates the maximum quantity per
preparation. You may deviate a little from these
instructions, depending on the quantities to be
prepared and on your personal taste.
If you find different instructions (for the same
quantities!) on the packaging of the food, follow
these.
Please note which of the two tables applies to
your appliance.
French fries
To obtain the nicest and most crispy French fries:
• Use not too new potatoes.
• Cut the potatoes first to thick slices and then to
sticks. Rinse the sticks in a colander under the
cold water tap: this will prevent the sticks from
adhering to one another while frying. Dry the
sticks using e.g. kitchen paper.
• French fries should be prepared in two steps:
- firstly at 160 °C (320 °F), for 8-10 minutes.
- secondly at 190 °C (374 °F), for 2-4 minutes.
During the second step shake the frying basket
at small intervals; then the French fries will get
a fine overall browning.
Deep frozen food
Food from your deep freezer or from the freezer
compartment of your fridge (-16 to -18 °C or -1 to
3 °F) will cool down the oil/fat vastly when lowered
into it, so that too much oil/fat may be absorbed.
• For that reason, do not put too big portions into
the fryer.
• Let the fryer regain optimum frying temperature
before you prepare a portion of deep frozen
food (approx. 15 minutes).
Set the temperature knob to the frying
temperature indications on the packaging of
the deep frozen food. If these indications are
not given, set the knob to the highest
temperature (190 °C or 374 °F).
These instructions are also valid for certain
types of food which require careful preparation,
such as meat croquettes.
• Deep frozen French fries are pre-fried and can
be fried in one step at 190 °C / 374 °F for about
5 minutes. (Model HD 4209: max. 150 g.
Model HD 4210: max. 200 g.)
• Deep frozen food often contains too much ice.
Shake off as much of the ice as possible in the
sink. Then lower the food into the oil/fat
carefully, as deep frozen articles can make the
hot fat/oil bubble and splash excessively.
Tips
• Pure vegetable fat or oil containing
polyunsaturated acids are often recommended
by health specialists.
Please note that these types of fat and oil must
be refreshed sooner than other types to
maintain their good qualities.
Also, a sticky and tenacious ridge of fat
deposits may set in the frying pan above the
fat/oil level.
• Regularly replace the oil or fat. Never add fresh
oil/fat to used oil/fat.
• In general, the fat/oil will be tainted rather
quickly when frying food containing a lot of
protein (such as meat and fish).
When the oil/fat is mainly used to deep fat fry
potatoes and is filtered after each use, the
oil/fat can be used ten to twelve times.
However, do not use it for over six months.
Oil (after cooling down) can be poured into a
bottle and curdled fat can be wrapped in an old
paper.
Curdled fat inside the pan can be easily
removed by heating it (at 160 °C/320 °F) until
just melted. (See the instructions in section
"Deep fat frying" on melting curdled fat in the
fryer.)
• Always replace all fat/oil as soon as it starts
seething when heated; when it has got a rancid
smell or taste; when its colour has become dark
and/or when it has turned syrupy.
• Make sure that the food to be fried is dry,
before lowering it into the hot fat/oil.
• Clean the fryer with paper tissue.
Do not forget the inside walls.
• If you do no not use the deep fat fryer
frequently, you can best keep the oil in wellclosed (glass) bottles; preferably in the fridge.
Store fat in a well-closed (glass or stone) pot or
bowl.
It is not advised to keep the fat/oil in the fryer
for a long time.
If the oil/fat has a taste...
Certain types of food (esp. fish) may lose some
fluid while being deep fat fried. This juice might
adversely affect the taste of food to be fried
later in the same oil/fat. To remove (or rather to
prevent) this taste heat the oil/fat to 160 °C /
320 °F. Then fry two thin slices of bread
10
(5-6 mm, or 0.25 "). Wait until all the air bubbles
have disappeared and the bread is brown all over.
Then take the bread out of the fryer and discard it.
Now the oil/fat has a neutral taste again.
Cleaning
• Always remove the mains plug from the wall
socket before cleaning.
• Always dry the inside and the outside of the
fryer thoroughly after cleaning.
• Outside and control unit:
- Remove the control
unit with the heating
element for easy
cleaning (fig. 31).
- Wipe the housing and
the control unit clean
with a damp cloth (if
so required add some
detergent) and/or
paper tissue.
• Frying pan, frying
basket, hand grip:
- Pour the oil or liquid
fat out of the frying
pan (fig. 32).
- Remove fat / oil
residue from the
inside of the frying
pan with a spatula
and kitchen paper.
- Pour hot water with a
washing-up agent into
the fryer. Ensure that
the level of this soapy
water is a little higher
than that of the oil / fat
you have used (fig.
33).
- Allow the soapy water
to act for 30 to 45
minutes.
- Wash the frying pan with a brush and/or a
plastic (nylon) scouring pad.
- Empty the frying pan and rinse it with hot water.
- Wash the frying basket in hot water with a
washing-up agent and rinse it well. Do not clean
the basket in a dishwasher.
• Lid and permanent filter:
Your deep fat fryer is equipped with a
permanent vapour filter.
We advise you to clean this metal filter at
regular intervals.
- Open the fryer lid. Put the lid in upright position
and pull it out of its hinges (fig. 34).
- Put the entire lid into hot soapy water and let it
be there for five to ten minutes (fig. 35).
- Rinse the lid with hot water. Shake the
remaining water out of the lid and let it dry.
- For thorough cleaning you can unscrew the four
screws which hold the permanent filter (fig. 36).
Subsequently you can take the filter out of the
lid (fig. 37).
For U.K. only:
Fitting a different plug
please turn to page 2
31
I
n
i
m
5
2
0
2
0
n
i
m
6
4
n
i
m
5
4
n
i
m
5
4
160°
n
i
m
4
2
170°
n
i
m
4
2
180°
n
i
m
5
200°
n
i
m
5
4
34 35
36 37
32
33

11
Description générale (fig. 1)
A Couvercle (amovible)
B Filtre anti-graisse
C Commande d’ouverture du couvercle
D Bloc de commande
E Bouton de marche/arrêt
F Commande de la température
G Témoin lumineux
H Orifice de reset (redémarrage)
I Connecteurs électriques de sécurité
J Poignée (amovible/pliable) du panier de
friture
Français
Important
• Lisez ces instructions en vous référant aux illustrations avant d’utiliser l’appareil.
• Avant de brancher votre appareil assurez-vous que la tension indiquée sur la plaque
signalétique placée sous l’appareil correspond bien à celle de votre logement.
• Ne branchez l’appareil qu’à une prise murale munie d’une mise à la terre.
• Ne plongez jamais le bloc de commande comportant l’élément chauffant dans l’eau.
• Nettoyez les différentes parties à l’aide d’un chiffon humide avant la première utilisation.
Assurez-vous qu’elles sont bien sèches avant de remplir la friteuse avec de l’huile ou de la
graisse fondue
• Nous vous conseillons, pour cet appareil, d’utiliser de la graisse liquide ou de l’huile pour
friture. Vous pouvez aussi utiliser de la graisse pour friture solide, mais vous devez alors
prendre des précautions supplémentaires pour éviter les éclaboussures de graisse
lorsqu’elle fond (voir le paragraphe “Friture à la graisse”).
• Ne branchez la friteuse qu’après l’avoir remplie d’huile ou de graisse (liquide ou fondue).
• Lorsque vous utilisez de la nouvelle graisse (en morceaux ou en bloc), faites fondre la
graisse dans une poêle à part, puis versez-la dans la friteuse avant de la mettre en marche.
• Utilisez uniquement des huiles et graisses recommandées pour la friture. Vous trouverez
cette information sur les emballages.
• Remplissez la cuve d’huile ou de graisse entre les niveaux niveaux de remplissage.
Avant de commencer une friture vérifiez toujours qu’il y a suffisamment d’huile dans la
friteuse.
• Ne dépassez pas les quantités maximum indiquées dans le tableau. Ne remplissez jamais le
panier au-delà des 3/4.
• Si le panier est trop rempli, de l’huile ou de la graisse peut déborder.
• Pendant la cuisson, de la vapeur chaude traverse le filtre situé à l’intérieur du couvercle.
Tenez votre visage et vos mains éloignés de cette vapeur.
• Mettez la friteuse hors de portée des enfants, surtout pendant son fonctionnement.
• Ne laissez pas le cordon d’alimentation pendre du bord d’une table ou de l’évier.
• Après utilisation placez le bouton de réglage de la température sur la valeur la plus basse
(tournez le bouton dans le sens inverse des aiguilles d’une montre jusqu’à l’arrêt).
Débranchez la friteuse après utilisation et laissez-la refroidir. Ne la déplacez pas tant qu’elle
est chaude.
• Pour éviter toute détérioration, ne faites pas tomber la friteuse émaillée, ne la heurtez pas
contre des objets durs, ne la rayez pas avec des objets durs (métalliques).
• Si le cordon d’alimentation de votre appareil est endommagé, il ne doit être remplacé que
par Philips ou un centre de service Philips. Cette opération nécessite en effet des pièces
et/ou un outillage spéciaux.
• Conservez ce mode d’emploi, il pourra vous être utile plus tard.
K Boutons de décrochage de la poignée
L Panier de friture
M Repose panier (position d’égouttage)
N Cuve de friture
O Indications de niveaux (huile/graisse)
P Poignées de transport
Q Corps de la friteuse
R Cordon d’alimentation
S Compartiment de rangement du cordon
T Plaque signalétique
12
Sécurité
supplémentaire
• Les connecteurs
électriques de sécurité
empêchent la mise en
marche de l’élément
chauffant si le
panneau de
commande n’est pas
correctement positionné (fig. 1a).
• Un thermostat de sécurité arrête l’appareil en
cas de surchauffe.
Une surchauffe peut se produire dans les cas
suivants :
- S’il n’y a pas ou pas assez d’huile, de graisse
fondue ou de la graisse préalablement utilisée
(et revenue à l’état solide) dans la friteuse
(fig. 2);
Si vous essayez de faire fondre des blocs ou
des morceaux de graisse nouvelle dans la
friteuse (fig. 3).
Dans tous ces cas, la chaleur ne peut être
libérée suffisamment vite.
Si le thermostat a éteint
l’appareil :
- Laissez refroidir
l’appareil.
- A l’aide d’un petit
tournevis ou d’un
cure-dents, appuyez
délicatement sur le
bouton de
redémarrage caché à l’intérieur du “trou de
reset” (fig. 4). pour mettre l’appareil en état de
fonctionner à nouveau.
Avant la première utilisation : nettoyez l’appareil soigneusement
• Assurez-vous que l’appareil est débranché.
• Ne plongez jamais le bloc de commande
avec l’élément chauffant et le cordon
d’alimentation dans l’eau. Ne rincez jamais
ces éléments.
- Retirez le couvercle
(fig. 5), le panier de
friture (fig. 6) et le
bloc de commande
comprenant l’élément
chauffant (fig. 7).
Placez le bloc de
commande avec
l’élément chauffant de
côté dans un endroit
sûr (au sec).
- La cuve de friture peut être retirée (fig. 8) pour
permettre un nettoyage plus aisé et plus rapide.
- Lavez le panier de friture, le couvercle et la
poignée avec de l’eau savonneuse (fig. 9).
Rincez à l’eau claire, puis séchez.
Friteuse
- Placez l’appareil sur un plan horizontal et
stable.
- Ouvrez le couvercle en actionnant la
commande d’ouverture (fig. 10).
- Appuyez sur les boutons de la poignée pour
fixer la poignée au panier de friture (fig. 11).
1a
I
2
0
2
0
n
i
m
6
4
5
4
n
i
m
5
4
160°
in
m
4
2
170°
4
2
180°
n
i
m
5
200°
n
i
m
5
4
2 3
4
5 6
n
i
m
5
n
i
m
n
i
m
7
8 9
10 11
20-25 min
4-6 min
4-5 min
4-5 min
2-4 min
2-4 min
160°
5 min
170°
4-5 min
180°
200°
n
i
m
5
20-2
in
m
4-6
in
m
-5
4
in
5 m
4-
in
2-4 m
in
m
-4
2
min
5
n
mi
4-5
I
n
i
m
5
2
0
2
0
n
i
m
6
4
n
i
m
5
4
n
i
m
5
4
160°
n
i
m
4
2
170°
n
i
m
4
2
180°
n
i
m
5
200°
n
i
m
5
4
13
- Assurez-vous que les deux tiges de la poignée
s’engagent bien dans les trous correspondants
du panier de friture (fig. 12).
- Appuyez sur les boutons de la poignée pour
placer la poignée en position d’utilisation. (fig. 13).
Assurez-vous que les deux tiges de la poignée
sont bien insérées dans les profils du panier de
friture (fig. 14).
- Remplissez la cuve de friture avec de l’huile, de
la graisse liquide ou de la graisse solide fondue
jusqu’au repère maxi. (fig. 15), soit :
2 litres pour le type HD 4209;
3 litres pour le type HD 4210
• Ne mélangez jamais deux types d’huile ou de
graisse différents.
Lorsque vous utilisez de la nouvelle graisse
solide :
- Faites fondre le ou les
morceaux de graisse
à part dans une poêle
à feu doux (fig. 16) :
2,5 kg pour le type
HD 4209
4 kg pour le type
HD 4210
Nota Bene : Surveillez
toujours cette poêle.
Tenez les enfants éloignés.
Eteignez le feu sous la poêle dès que la graisse
a fondu.
- Placez la friteuse dans l’évier.
- Versez très délicatement la graisse fondue
dans le friteuse.
- Amenez prudemment la friteuse à l’endroit ou
vous souhaitez l’utiliser. Branchez la friteuse
sur la prise du secteur et mettez-la en marche.
Lorsque vous faites fondre de la graisse qui a
déjà servi et à l’état solide à l’intérieur de la
friteuse :
- Faites quelques trous dans la graisse (fig. 17).
Pendant cette opération, veillez à ne pas
endommager l’élément chauffant.
- Mettez le couvercle de la friteuse en place
- Mettez en marche la friteuse, en réglant
l’appareil sur 160 °C (fig. 18).
Laissez le couvercle sur la friteuse pendant que
la graisse fond pour éviter les éclaboussures.
- Vous pouvez passer à une température
supérieure dès que toute la graisse a fondu.
• Pour faire fondre la graisse, appliquez
scrupuleusement la procédure décrite ! Sinon
de la graisse chaude pourrait s’échapper
violemment de dessous la couche de graisse
restée solide.
• Rangez la friteuse contenant la graisse
solidifiée à température ambiante. Si la graisse
est très froide, le risque d’éclaboussure est plus
important.
- Sortez entièrement le cordon (fig. 19).
• Assurez-vous que le cordon n’est pas en
contact avec des surfaces chaudes et qu’il ne
pend pas en dehors de la surface de travail.
- Branchez le cordon sur la prise murale.
- Réglez le bouton de température sur la position
la mieux adaptée pour le type d’aliment que
vous souhaitez faire frire (fig. 20) Reportezvous au tableau.
- Après que le témoin lumineux se soit éteint
pour la seconde fois (après 10-15 minutes),
l’huile/la graisse est à la bonne température.
12 13
14
15
17
18
4
6
m
i
n
2
0
2
5
m
i
160°
170°
180°
200°
n
2
4
m
i
n
4
5
m
i
n
4
5
m
i
n
4
5
m
i
n
5
m
i
n
2
4
m
i
n
19
20
16
160°
170°
180°
200°
4
6
m
i
n
2
0
2
5
m
i
n
2
4
m
i
n
4
5
m
i
n
4
5
m
in
4
-5
m
in
5
m
i
n
2
4
m
i
n
 Loading...