

Philips FWR88 Quick Start Manual
Important – CDRW discs only
Tracks can only be erased from the end.
It is also possible to erase the entire disc
at once.
1
Press ERASE CD.
2
ERASE DISC ? will be displayed.
Alternatively rotate the JOG to select
the track you want to start erasing
from.
3
Press YES to confirm the selection.
5
Press YES to confirm erasing.
1
2
345
678
910
1
2
345
678
910
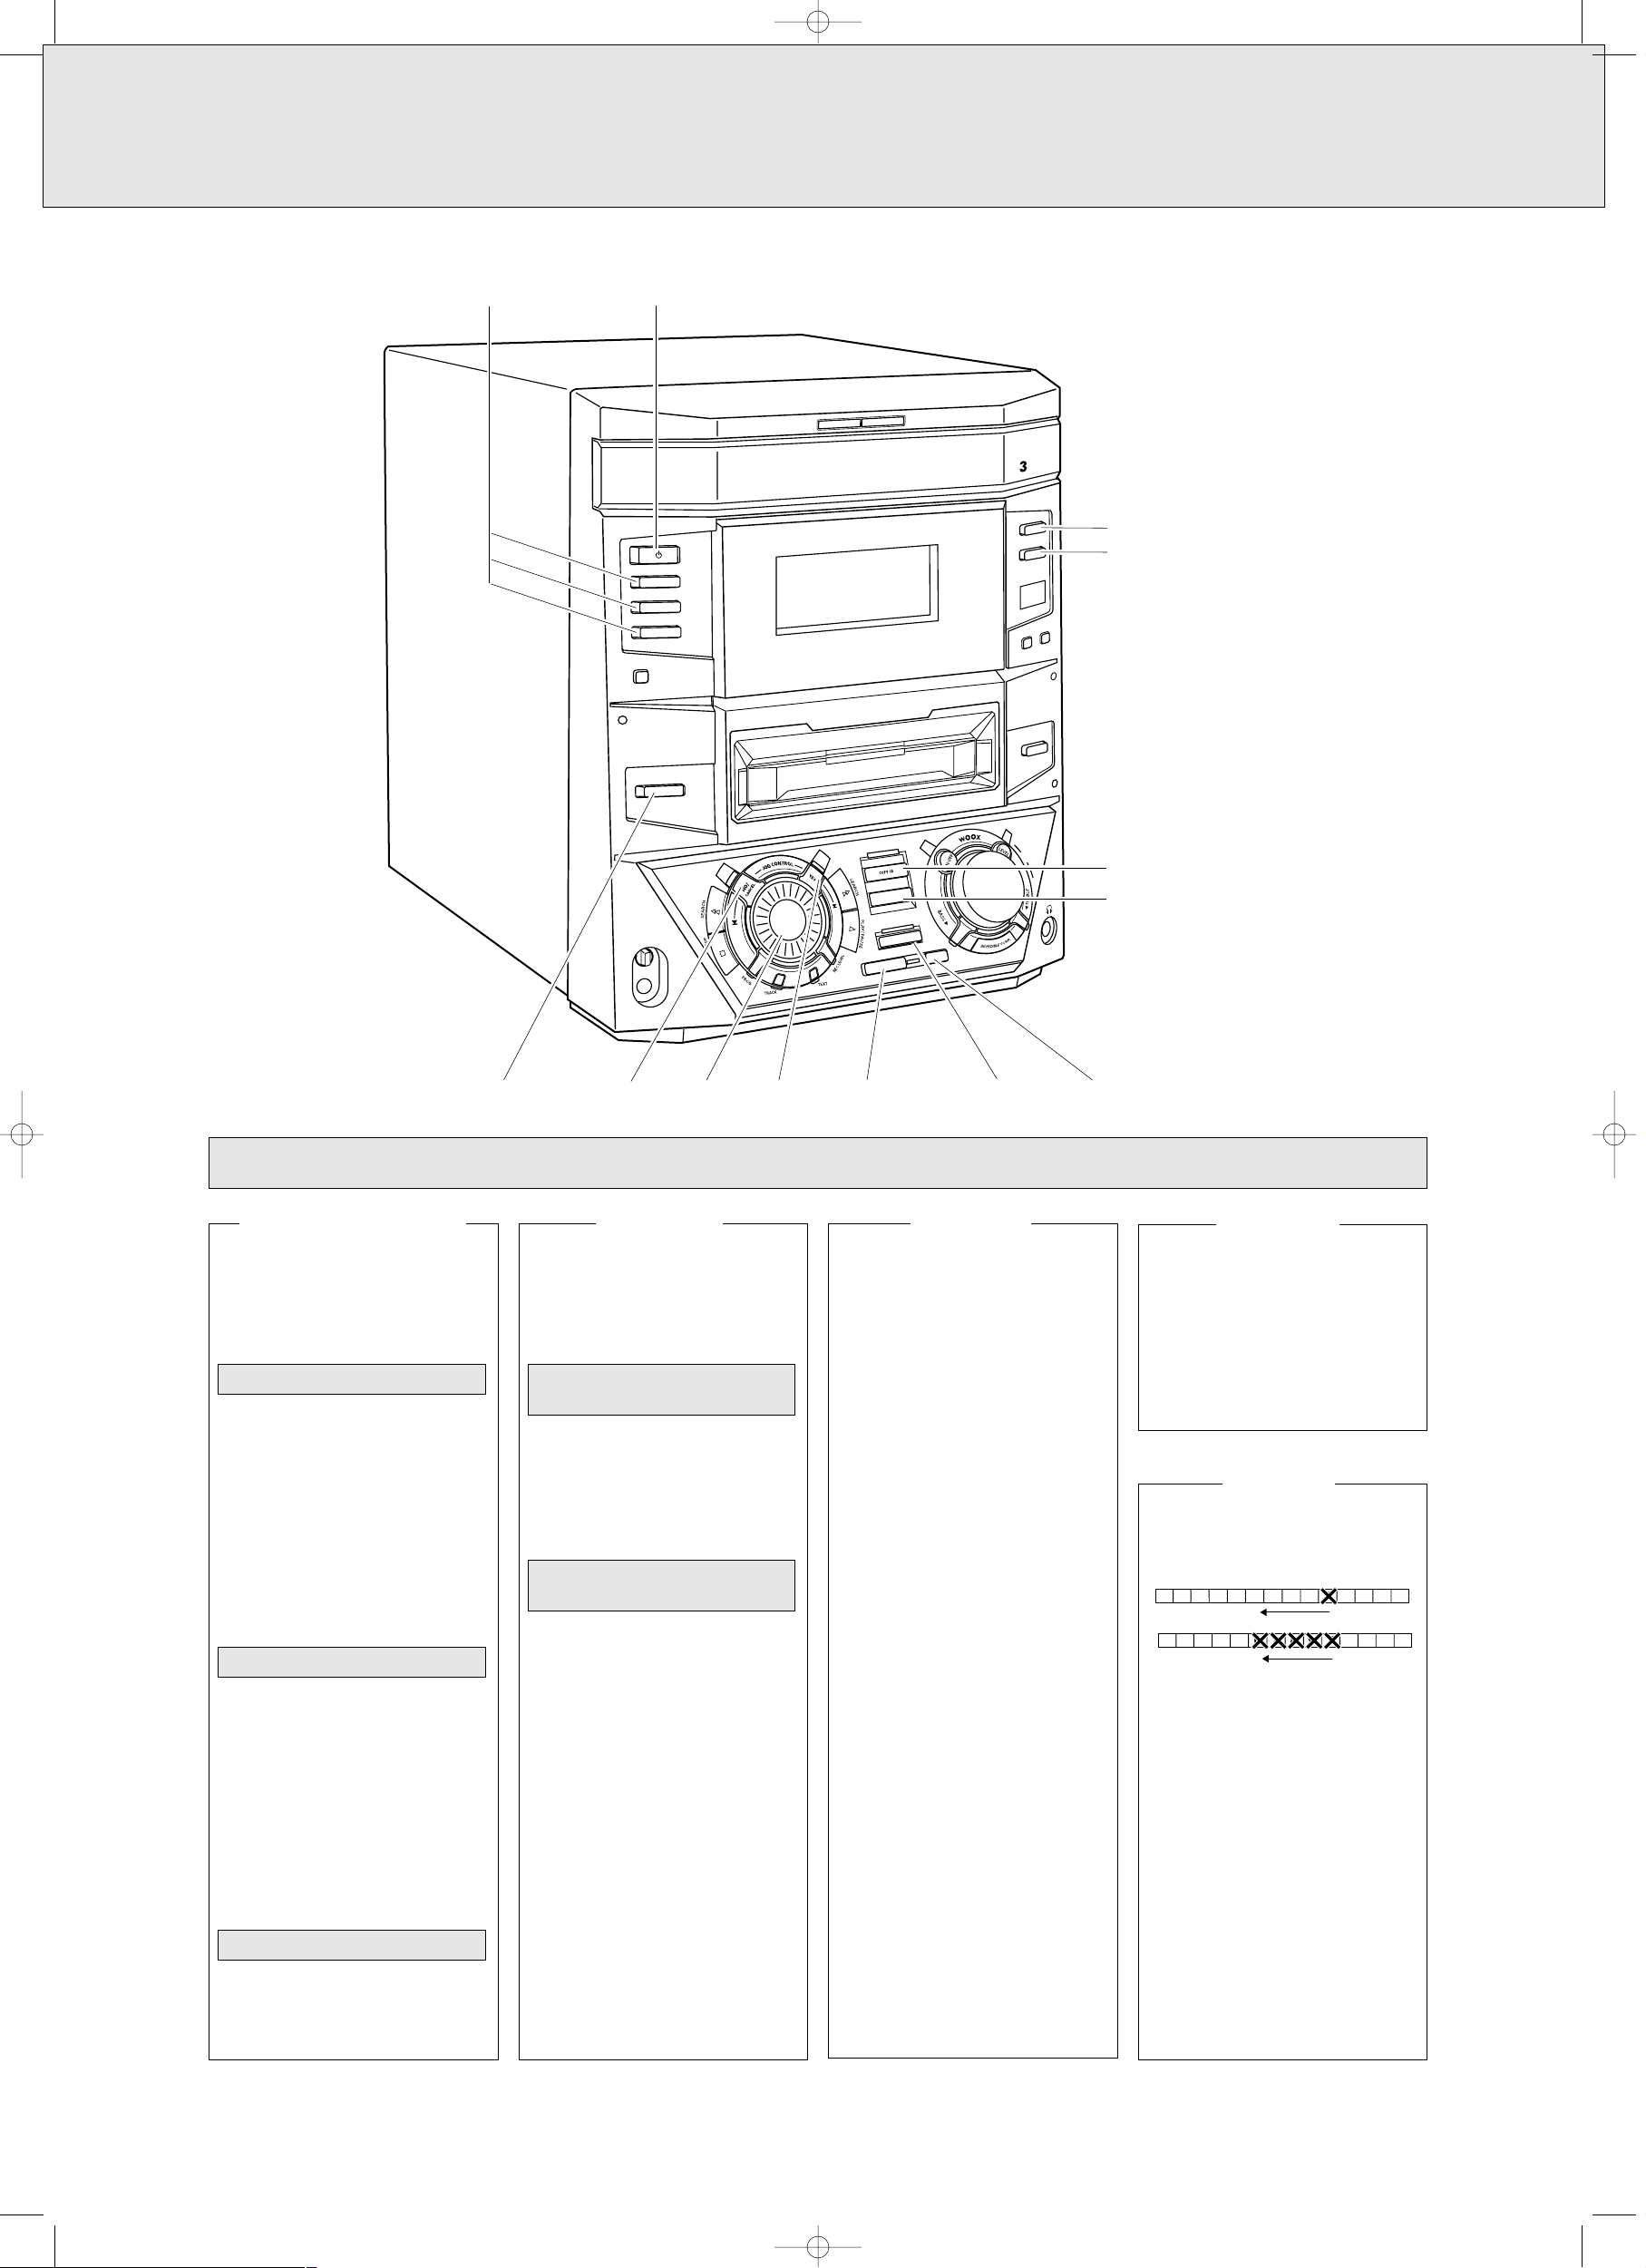
For your guidance, the set is equipped
with several buttons that will be
illuminated when the function beneath
can be activated.
•
Press buttons CD1, CD2 or CD3 to
select the respective disc in the CD
Changer.
•
Press button CDR to select the disc in
the CD Recorder drawer.
•
Press button TUNER to select the tuner.
•
Press button AUX to select the external
input (press again to switch between
the analog and digital inputs).
1
Load the CD changer or CD Recorder
tray with discs.
2
Select a CD Changer disc tray or the
CD Recorder tray with the respective
key.
3
Press PLAY/PAUSE to start playback.
4
To interrupt temporarily, press
PLAY/PAUSE again.
5
To stop playback, press STOP.
1
Turn JOG to select track.
2
Press PLAY/PAUSE to start playback.
Track selection
Playing
Source selection
C
D
C
H
A
N
G
E
O
P
E
N
/C
L
O
S
E
D
IS
P
L
A
Y
CDR
iR SENSOR
T
U
N
E
R
D
IG
IT
A
L
/ AN
A
LOG
AUX
O
P
E
N
/
C
L
O
S
E
M
IC
MIC
LEVEL
COMPILE CD
STANDBY
ON
CD
1
CD 2
CD 3
DC
C
H
A
N
G
E
R
EDIT
REC
OR
D
C
D
R
E
C
O
R
D
E
R
C
D
T
E
X
T
C
L
O
C
K
/T
I
M
E
R
M
A
S
T
E
R
V
O
L
U
M
E
FINALIZE CD
ERASE CD
REC TYPE
CD
-
TEXT EDITING
ERASE CD
REC TYPE
FINALIZE CD
JOG
NO
COPY CD
COMPILE CD
YES
CDR
STANDBY/ON
AUX
TUNER
CD 1
CD 2
CD 3
CDR Mini HiFi System FW-R88
QUICK START English
OPERATION
GENERAL OPERATION
You can record an entire disc, a
compilation of tracks from multiple discs
and single tracks from the internal 3 CD
changer.
1
Select the CD you want to record with
CD1, CD2, or CD3.
2
Press COPY CD.
3
Press YES to confirm.
1
Press COMPILE CD.
2
Use the JOG, CD1, CD2 and CD 3 to
select tracks and add them to the
program.
3
When all tracks are programmed, press
COMPILE CD again to confirm the
program.
4
Press YES to confirm recording.
5
Press YES or NO for automatic
finalizing.
6
Recording starts.
These recordings are done at double
speed with automatic finalizing. This
means you cannot listen to the music
during recording.
Rcording a compilation with
automatic finalizing
Recording an entire CD with
automatic finalizing
RECORDING
For advanced recording options:
1 Select the CD you wish to record with
CD 1, CD 2 or CD 3.
2
Press REC TYPE.
3
Rotate JOG to select:
•
CD Fast for recording an entire CD
at double speed;
•
Track Fast for recording a track at
double speed;
•
CD Listen for listening while
recording an entire CD;
•
Track Listen for listening while
recording an track;
4
Press YES to confirm your choice.
5
For track recordings, use the Jog to
select the track.
6
Press YES to start recording.
For more advanced recording modes like
recording from the FM tuner or external
sources please check the user manual.
RECORDING
If you want to use the disc in another CD
player, the disc has to be finalized first.
After finalizing, no more recordings can
be made on a CDR disc.
1
Press FINALIZE CD.
2
Press YES to confirm.
FINALIZING
ERASING
3103 306 1760 1 Printed in Hungary Cmm/RR/0039
xp CDR mini-88/17 - QR A3/eng 02-10-2000 11:31 Pagina 1

CDR Mini HiFi System FW-R88
QUICK START English
WHAT YOU SHOULD KNOW BEFORE STARTING
INSTALLATION
Recorded disc
Note:
Finalizing after recording
is only necessary for playback
in other CD-players
CD-R Finalized
CD-RW Finalized
CD-R (Unfinalized)
CD-RW (Unfinalized)
-
-
-
-
-
Normal
CD-player*
CD-player*
CDRW compatible
CD-Recorder
Playback in:
*Car stereo, CD Portable, etc.
CDR Mini Set
ReWritable
CD-R (Record once) CD-RW (Record & Erase)
Blank disc
Important:
Only blank discs with
'Digital Audio' in the logo
can be used.
Recordable
1 Position the antenna as far away as
possible from the TV, a VCR and other
radiation sources.
2 Turn the antenna for optimum reception.
AM antenna
The loop antenna supplied is for indoor use
only.
FM antenna
The wire antenna supplied can only be used
to receive nearby stations. For better
reception we recommend using a cable
antenna system or an outdoor antenna.
Connector type depends on version
•If you are using a cable antenna system
or an outdoor antenna, fit the antenna
plug to FM AERIAL instead of the wire
antenna.
FM AERIAL
300
FM AERIAL
300
F
M
A
E
R
IA
L
7
5
Ω
FM
A
ER
IA
L
75
Ω
Step 1 - Antenna connections
•Connect:
– Left speaket to L (red and black)
– Right speaker to R (red and black)
1 If your set is equipped with a VOLTAGE
SELECTOR set this selector to your local
mains voltage if necessary.
2 Make sure all connections have
been made before switching on the
mains supply.
3 Connect the mains cable supplied to AC
MAINS - and to the wall socket.
This switches on the mains supply.
Step 4 - Mains / AC Power
Step 3 - Speaker connections
ATTENTION FOR OPTIMAL PERFORMANCE ONLY USE ORIGINAL MAINS (AC) POWER CABLE
Step 2 - Analog and digital audio connections (optinal)
This Quick Reference Guide will help you to easily install and operate your CD recorder. We strongly recommand the use of a
CDRW disc first to get used to your recorder. For detailed information see the Instructions For Use.
xp CDR mini-88/17 - QR A3/eng 02-10-2000 11:31 Pagina 2
AM
AERIAL
SUBWOOFER
TAPE RECORDER
AM
AERIAL
FM AERIAL
Ω
300
SUBWOOFER
OUT
L
AUX
IN
DIGITAL
R
IN
L
LINE
OUT
R
AC MAINS
~
SPEAKERS 6Ω
4 x
L
R
4 x
CD PLAYER
 Loading...