

Page 1

51 Ip
/ - 1 / 1 / / ; ^ r : i v i i r i î H i l l H y n t i î r r i
‘ * iVl.ihM.il
Ni H'IeMlhMMhl^ *i
hi .h'iH-Uvu . ï;.’ nlMIiMIth
Toll Free Help Line
Ligne d'assistance en service libre
Línea de ayuda telefónica sin cargo
800-53I-0039
Page 2

Return your Warranty Registration card today to
ensure you receive all the benefits youVe entitled to.
Once your Philips Magnavox purchase is registered, you’re eligible • So complete and return the Warranty Registration Card enclosed
to receive all the privileges of owning a Philips Magnavox product. with your purchase at once. And take advantage of these
important benefits.
^Warranty i Venfication
Registering your product within 10 days
confirms your right to maximum protection
under the terms and conditions of your
Philips Magnavox warranty.
Know these
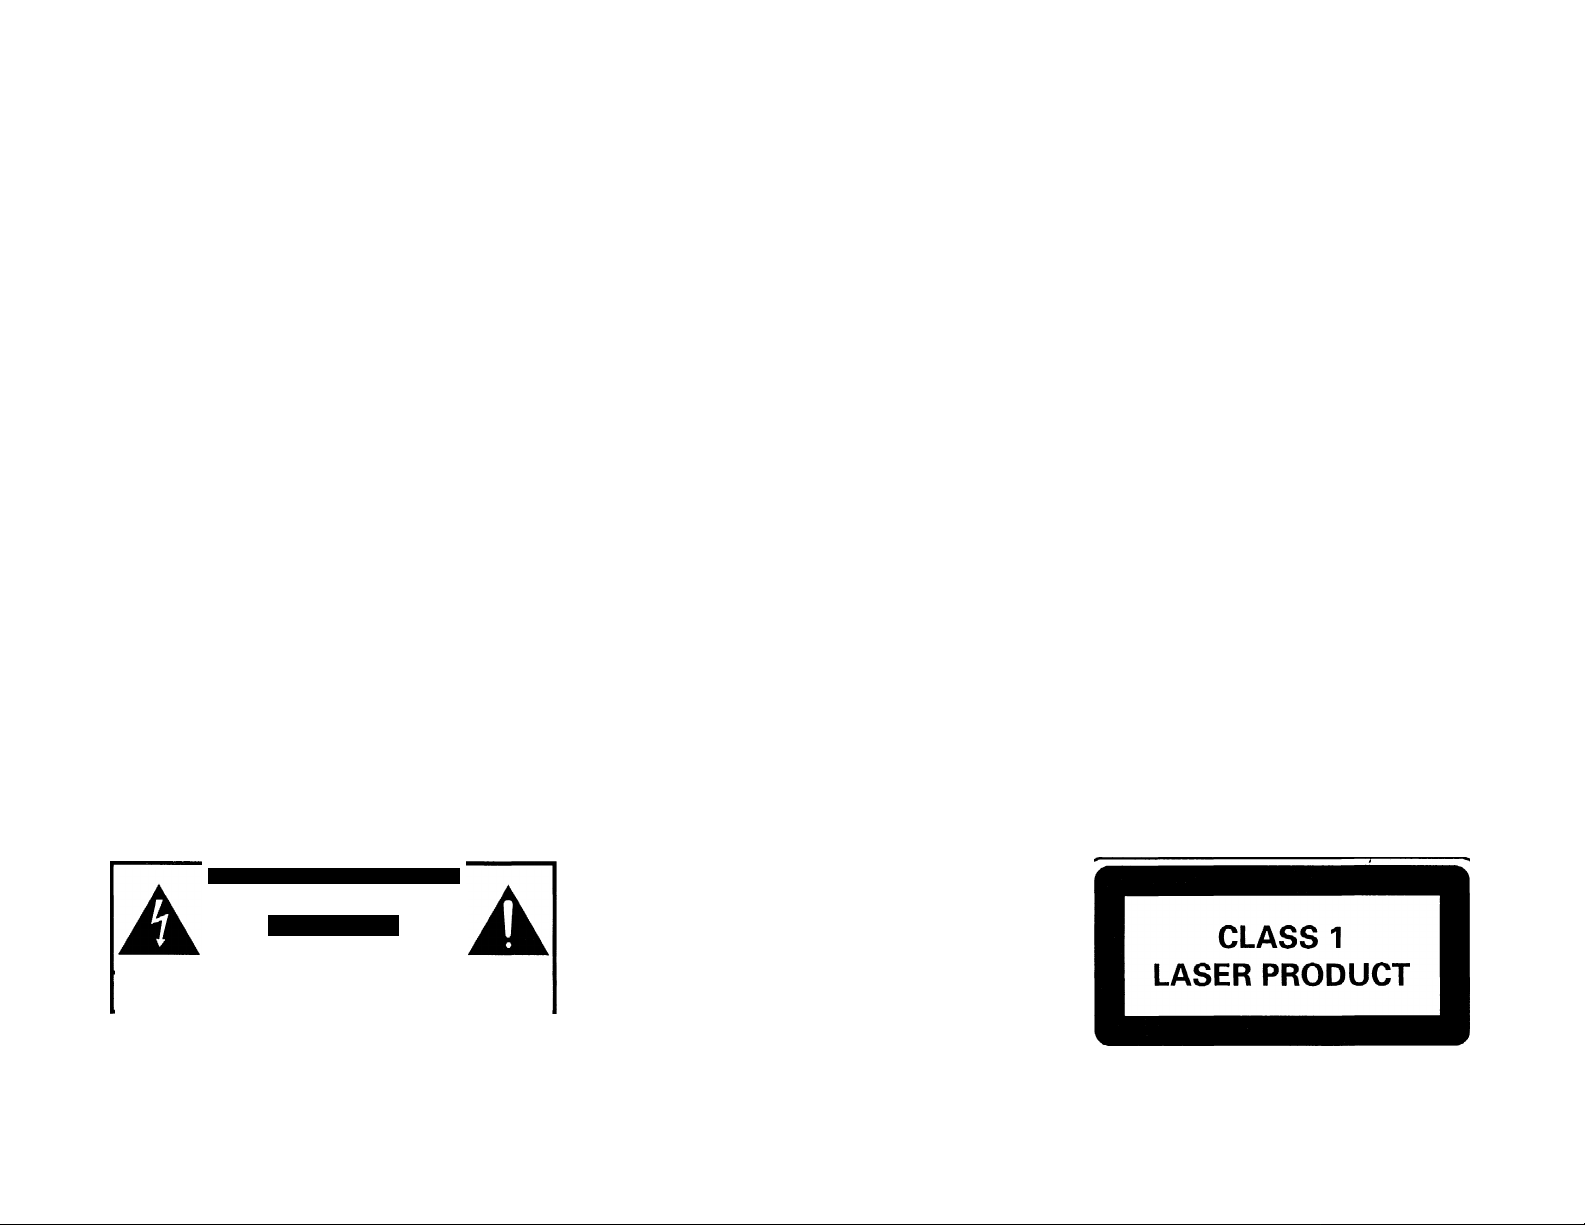
symbols
This "bolt of lightning” indicates uninsulated material
within your unit may cause an electrical shock. For the
A
safety of everyone in your household, please do not
remove product covering.
^ Owner I
Confirmation
Your completed Warranty Registration
Card serves as verification of ownership in
the event of product theft or loss.
RISK OF ELECTRIC SHOCK
A
CAUTIOIM: TO REDUCE THE RISK OF ELECTRIC SHOCK, DO IMOT
REMOVE COVER (OR BACK). NO USER-SERVICEABLE PARTS
INSIDE. REFER SERVICING TO QUALIFIED SERVICE PERSONNEL.
DO IVIOT OPEN
A
WARNING: to prevent fire or shock
HAZARD, DO NOT EXPOSE THIS EQUIPMENT TO RAIN
OR MOISTURE.
Model
Registration
Returning your Warranty Registration Card
right away guarantees you’ll receive all
the information and special offers which you
qualify for as the owner of your model.
For Customer Use
Enter below the Serial No. which is located on the
rear of the cabinet. Retain this information for
future reference.
Model No.
Serial No.
A
The “exclamation point” calls attention to features for
which you should read the enclosed literature closely to
prevent operating and maintenance problems.
CAUTION: To prevent electric shock, match wide
blade of plug to wide slot, and fully insert.
MAC5097
Page 3

PHILIPS
Visit our Worid Wide Web Site at http://www.magnavox.com
PHILIPS
MAGNAVOX
Congratulations on your purchase,
and welcome to the **family!*
Dear Philips Magnavox product owner:
Thank you for your confidence in Philips Magnavox.You’ve
selected one of the best-built, best-backed products available
today. And we’ll do everything in our power to keep you
happy with your purchase for many years to come.
As a member of the Philips Magnavox “family,” you’re
entitled to protection by one of the most comprehensive
warranties and outstanding service networks in the
industry.
What’s more, your purchase guarantees you’ll receive all
the information and special offers for which you qualify,
plus easy access to accessories from our convenient home
shopping network.
1»
And most importantly you can count
on our uncompromising commitment to your total
satisfaction.
All of this is our way of saying welcome-and thanks for
investing in a Philips Magnavox product.
Sincerely,
Robert Minkhorst
President and Chief Executive Officer
P.S. Remember, to get the most from your Philips
Magnavox product, you must return your
Warranty Registration Card within 10 days. So
please mail it to us right now!
Page 4

wm
CAUTION
RISK OF ELECTRIC SHOCK
DO NOT OPEN
CAUTION: TO REDUCE THE RISK OF ELECTRIC SHOCK.
DO NOT REMOVE COVER (OR BACK).
REFER SERVICING TO QUALIFIED SERVICE PERSONNEL.
A
A
NO USER-SERVICEABLE PARTS INSIDE.
This symbol warns the user that uninsulated voltage
within the unit may have sufficient magnitude to cause
electric shock. Therefore, it is dangerous to make
any kind of contact with any inside part of this unit.
This symbol alerts the user that important literature
concerning the operation and maintenance of this
unit has been included. Therefore, It should be read
carefully in order to avoid any problems.
A
AVIS
RISQUE DE CHQCS ELECTRIQUES
NE PAS OUVRIR
Attention: Afín de prévenir le risque de chocs électriques,
Toute réparation devrait être confiée à un personnel qualifié.
Ce symbole indique la présence d'une tension
suffisamment élevée pour engendrer un risque de
A
A
chocs électriques.
Ce symbole indique que le manuel d'installation
fourni avec l'appareil contient d'importantes
recommandations quant au fonctionnement et
à l'entretien de ce dernier.
ne pas retirer les vis.
\Ä
AVISO
A
Atención: Para reducir el riesgo de choque elécríco,
En su interior no hay piezas que el usuario pueda reparar.
A
A
RIESGO DE CHOQUE ELÉCTRICO
NO ABRIR
no quite la tapa (o el panel posterior).
Para servicio dírijase a personal calificado.
Este símbolo tiene por finalidad advertir al usuario de
la presencia de tensión peligrosa no aislada dentro de
la caja del aparato, que puede ser lo suficientemente
fuerte para constituir un peligro de choque eléctrico.
Este símbolo sirve para advertir al usuario de la
presencia de instrucciones de manejo y
mantenimiento (servicio) importantes en el manual
que acompaña al aparato.
A
WARNING
To reduce the risk of fire or electric shock, do not
expose this appliance to rain or moisture.
CAUTION
Use of controls or adjustments or performance of
procedures other than herein may result in
hazardous radiation exposure.
The set complies with the FCC-Rules, Part 15 and with 21
CFR 1040.10.
Canada
This digital apparatus does not exceed the Class B limits
for radio noise emissions from digital apparatus as set out
in the Radio Interference Regulations of the Canadian
Department of Communications.
AVIS
Afin de réduire tout risque d'incendie ou de choc
électrique, il ne faut pas exposer cet appareil à la
pluie ou à l'humidité.
AHENTION
L'utilisation des commandes ou réglages ou le nonrespect des procédures ci-incluses peuvent se
traduire par une exposition dangereuse à
l'irradiation.
L'appareil répond aux normes FCC, Part 15 et 21 CFR
1040.10.
Canada
Cet appareil numérique n'emet pas de bruits
radioélectriques dépassant les limites applicables aux
appareils numériques de Class B prescrites dans le
Règlement sur le Brouillage Radioélectrique édicté par le
Ministère des Communications du Canada.
AVISO
Para reducir el riesgo de fuego o choque eléctrico,
no exponga el aparato a la lluvia o humedad.
ATENCIÓN
El uso de mando o ajustes o la ejecucción de
métodos que no sean los aquí descritos puede
ocasionar peligro de exposición a radiación.
El aparato cumple las normas FCC, Parte 15 y 21 CFR
1040.10.
México
Es necesario que lea cuidadosamente su instructivo de
manejo.
Page 5
INDEX
ENGLISH Page
General/Safety Information
Preparation.........................................................10-11
Controls
Operating the System
CD........................................................................16-18
Tuner ...................................................................18-19
Tape.....................................................................20-21
Aux
Recording
Clock/Timer .............................................................23
Maintenance.............................................................24
Specifications
Troubleshooting
..............................................................
...........................................................................
...........................................................
..........................................................
......................................................
...................................
........................................
6-9
12-13
14-15
21-22
21
24
25
FRANÇAIS Page
Généralités / Informations relatives
à la sécurité........................................................28-31
Opérations Préalables
Commandes........................................................34-35
Utilisation de L'appareil.....................................36-37
Lenteur de Disques Compacts
Syntoniseur.........................................................41-42
Platine Cassette
Aux............................................................................44
Enregistrement...................................................45-46
Horloge/Minuterie...............................................46-47
Entretien...................................................................48
Caractéristiques
Remèdes en cas de panne
.......................................
........................
.................................................
......................................................
.....................................
32-33
38-40
43-44
48
49
ESPAÑOL Página
Información General / de Seguridad
Preparativos
Controles
Funcionamiento del Sistema............................60-61
Reproductor de CD
Sintonizador
Reproductor de Casete
Aux............................................................................68
Grabación
Reloj/Temporizador
Mantenimiento.........................................................72
Especificaciones
Solución de Problemas
.......................................................
............................................................
...........................................
.......................................................
.....................................
...........................................................
...........................................
.....................................................
..........................................
.............
52-55
56-57
58-59
62-64
65-66
67-68
69-70
70-71
72
73
PRECAUCION - ADVERTENCIA
I NO ABRIR, RIESGO DE CHOQUE ELECTRICO I
ATENCION
VERIFIQUE QUE EL VOLTAJE DE ALIMENTACION
SEA EL REOUERIDO PARA SU APARATO
PARA EVITAR EL RIESGO DE CHOQUE ELECTRICO, NO QUITE LA TAPA;
EN CASO DE REQUERIR SERVICIO, DIRIJASE AL PERSONAL AUTORIZADO DE PHILIPS.
NOM
Page 6

SAFETY INSTRUCTIONS > Read before operating equipment
This product was designed and manufactured to meet strict quality and safety standards.
S’
«o
g. There are, liowever, some installation and operation precautions which you should be
particularly aware of.
1.
Read Instructions - All the safety and operating instructions should be read before
the appliance is operated.
2.
Retain Instructions ^ The safety and operating instructions should be retained for
future reference.
3.
Heed Warnings - All warnings on the appliance and in the operating instructions
should be adhered to.
4.
Follow Instructions - All operating and use instructions should be followed.
Water and Moisture - The appliance should not be used near water - for example,
5.
near a bathtub, washbowl, kitchen sink, laundry tub or swimming pool, or in a wet
basement.
Carts and Stands - The appliance should be used only with a cart or stand that is
6
.
recommended by the manufacturer.
6A.
Wall or Ceiling Mounting - The appliance should be mounted to a wall or ceiling
only as recommended by the manufacturer.
Ventilation - The appliance should be situated so that its location or position does
not interfere with its proper ventilation. For example, the appliance should not be
situated on a bed, sofa, rug, or similar surface that may block the ventilation
openings; or, placed in a built-in installation, such as a bookcase or cabinet that may
impede the flow of air through the ventilation openings.
9.
Heat - The appliance should be situated away from heat sources such as radiators,
heat registers, stoves, or other appliances (including amplifiers) that produce heat.
10.
Power Seurces - The appliance should be connected to a power supply only of the
type described in the operating instructions or as marked on the appliance.
11.
Grounding or Polarization - Precautions should be taken so that the grounding or
polarization means of an appliance is not defeated.
An appliance and cart combination should be moved with care. Quick
stops, excessive force, and uneven surfaces may cause the
appliance and cart combination to overturn.
CAUTION To prevent electric shock, match the
wide blade of this plug to the wide slot and fully
insert. Do not use this (polarized) plug with an
extension cord, receptacle or other outlet unless the
blades can be fully inserted to prevent blade exposure.
Polarized Plug
12. Power Cord Protection - Power supply cords should be routed so that they
are not likely to be walked on or pinched by items placed upon or against them,
paying particular attention to cords and plugs, convenience receptacles, and the
point where they exit from the appliance.
13. Cleaning - The appliance should be cleaned only as recommended by the
manufacturer.
14. Power Lines - An outdoor antenna should be located away from power lines.
15. Outdoor Antenna Grounding - If an outside antenna is connected to the
receiver, be sure the antenna system is grounded so as to provide some
protection against voltage surges and built up static charges.
Section 810 of the National Electrical Code, ANSI/NFPA No. 70-1984, provides
information with respect to proper grounding of the mast and supporting
structure, grounding of the lead-in wire to an antenna discharge unit, size of
grounding connectors, location of antenna-discharge unit, connection to
grounding electrodes, and requirements for the grounding electrode. See Figure
below.
16. Nonuse Periods - The power cord of the appliance should be unplugged from
the outlet when left unused for a long period of time.
17. Object and Liquid Entry - Care should be taken so that objects do not fall and
liquids are not spilled into the enclosure through openings.
18. Damage Requiring Service - The appliance should be serviced by qualified
service personnel when:
A. The power supply cord or the plug has been damaged; or
B. Objects have fallen, or liquid has spilled into the appliance; or
C. The appliance has been exposed to rain; or
D. The appliance does not appear to operate normally or exhibits a marked
change in performance; or
E. The appliance has been dropped, or the enclosure damaged.
19. Servicing - The user should not attempt to service the appliance beyond that
described in the operating instructions. All other servicing should be referred to
qualified service personnel.
AC
Page 7
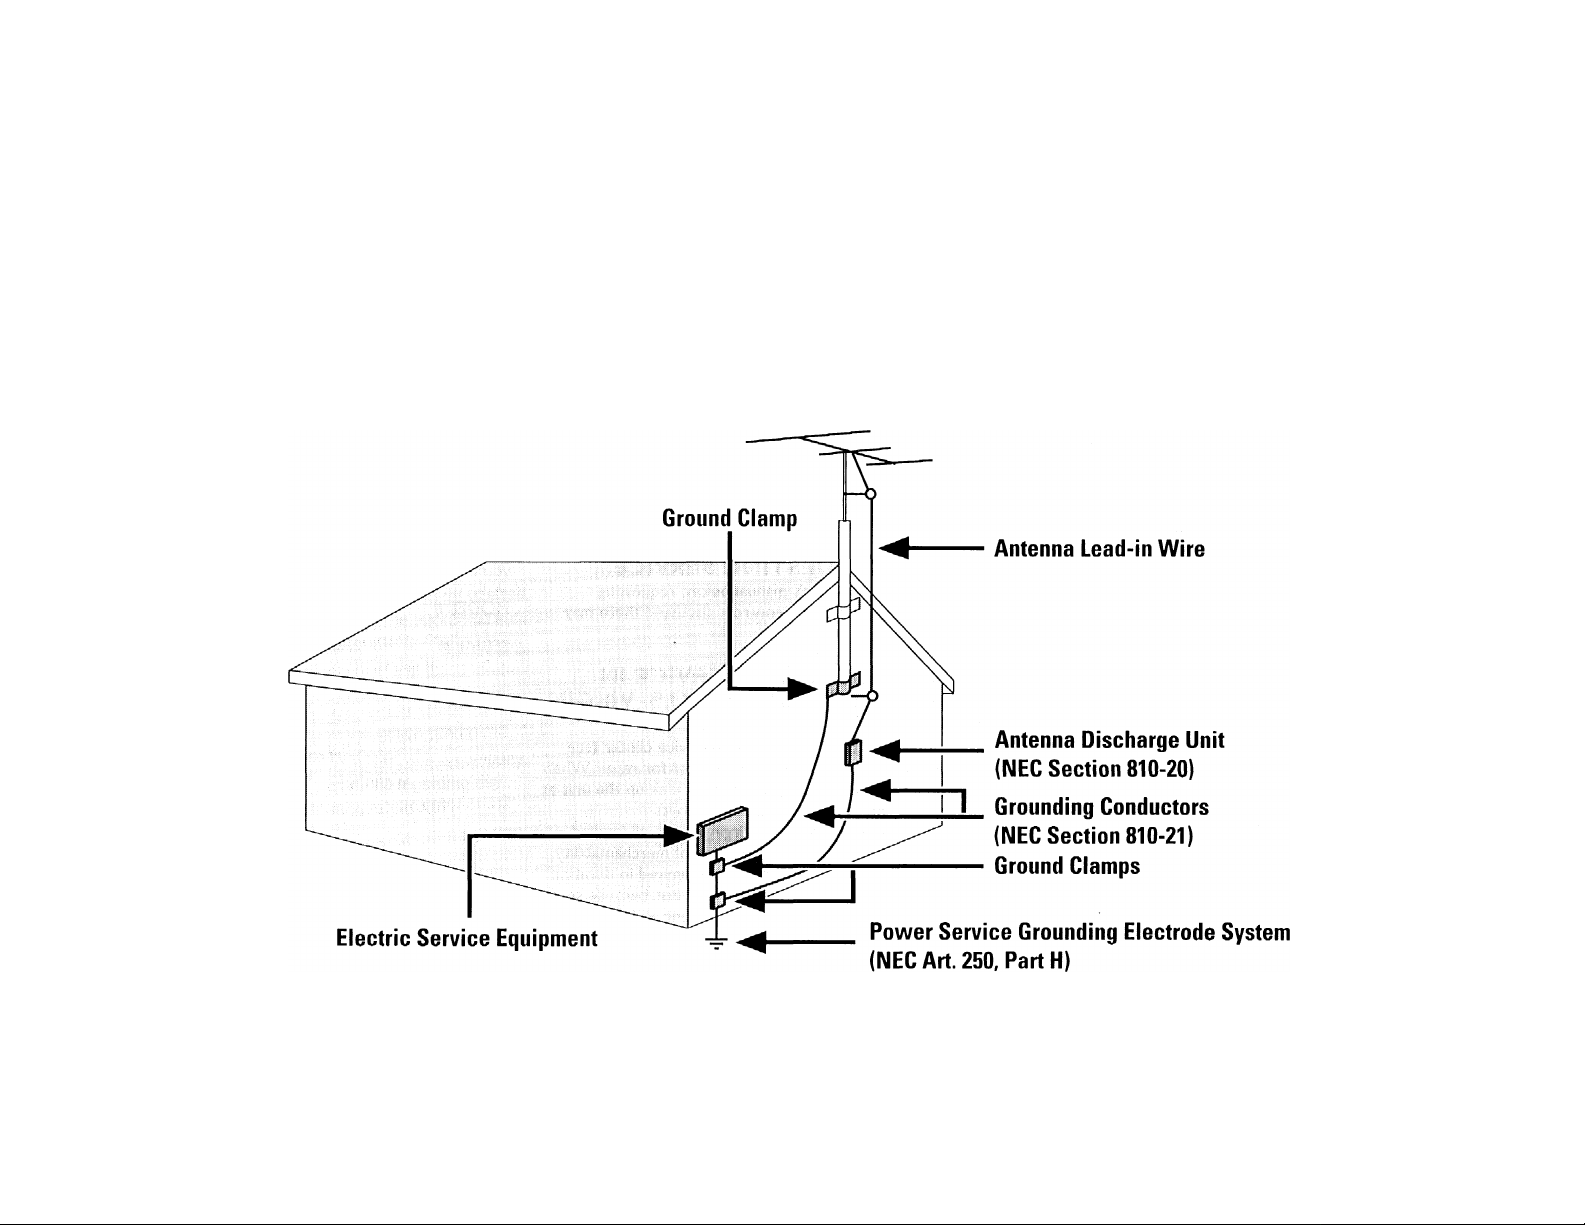
Note to the CATV system installer
This reminder is provided to call the CATV system installer's attention to Article 820-40 of the NEC that provides guidelines for proper grounding and, in particular,
specifies that the cable ground shall be connected to the grounding system of the building, as close to the point of cable entry as practical.
Example of Antenna Grounding as
per NEC - National Electrical Code
92/11
EL 4562-1
Page 8

LIMITED WARRANTY
AUDIO SYSTEM
One Year Free Labor
One Year Free Service on Parts
This product must be carried in for repair.
WHO IS COVERED?
You must have proof of purchase to receive warranty
service. A sales receipt or other document showing that
you purchased the product is considered proof of purchase.
WHAT IS COVERED?
Warranty coverage begins the day you buy your product.
For one year thereafter, all parts will be repaired or replaced,
and labor is free. After one year from the day of purchase,
you pay for the replacement or repair of all parts, and for
all labor charges.
All parts, including repaired and replaced parts, are covered
only for the original warranty period. When the warranty
on the product expires, the warranty on all replaced and
repaired parts also expires.
WHAT IS EXCLUDED?
Your warranty does not cover:
• labor charges for installation or setup of the product,
adjustment of customer controls on the product, and
Installation or repair of antenna systems outside of the
product.
• product repair and/or part replacement because of misuse,
accident, unauthorized repair or other cause not within
the control of Philips Consumer Electronics Company.
• reception problems caused by signal conditions or cable
or antenna systems outside the unit.
• a product that requires modification or adaptation to
enable it to operate in any country other than the
country for which it was designed, manufactured,
approved and/or authorized, or repair of products
damaged by these modifications.
• incidental or consequential damages resulting from the
product. (Some states do not allow the exclusion of
incidental or consequential damages, so the above
exclusion may not apply to you.This includes, but is not
limited to, prerecorded material, whether copyrighted or
not copyrighted.)
• a product that is used for commercial or institutional
purposes.
WHERE IS SERVICE AVAILABLE?
Warranty service is available in all countries where the
product is officially distributed by Philips Consumer
Electronics Company. In countries where Philips Consumer
Electronics Company does not distribute the product, the
local Philips service organization will attempt to provide
service (although there may be a delay if the appropriate
spare parts and technical manual(s) are not readily
available).
MAKE SURE YOU KEEP...
Please keep your sales receipt or other document showing
proof of purchase. Attach it to this owner’s manual and
keep both nearby. Also keep the original box and packing
material In case you need to return your product.
BEFORE REQUESTING SERVICE...
Please check your owner’s manual before requesting
service. Adjustments of the controls discussed there may
save you a service call.
TO GET WARRANTY SERVICE IN
U.S.A., PUERTO RICO OR U.S. VIRGIN
ISLANDS...
Take the product to a Philips factory service center (see
enclosed list) or authorized service center for repair.When
the product has been repaired, you must pick up the unit at
the center. Centers may keep defective parts.
(In U.S.A., Puerto Rico and U.S.Virgin Islands, all Implied
warranties, including Implied warranties of merchantability
and fitness for a particular purpose, are limited in duration
to the duration of this express warranty. But, because some
states do not allow limitations on how long an implied
warranty may last, this limitation may not apply to you.).
TO GET WARRANTY SERVICE IN
CANADA...
Please contact Philips at:
1-800-661-6162 (French Speaking)
1-800-363 7278 (English Speaking)
(In Canada, this warranty is given in lieu of all other
warranties. No other warranties are expressed or implied,
including any implied warranties of merchantability or
fitness for a particular purpose. Philips is not liable under
any circumstances for any direct. Indirect, special, incidental
or consequential damages, howsoever incurred, even if
notified of the possibility of such damages.)
REMEMBER...
Please record the model and serial numbers found on the
product below. Also, please fill out and mail your warranty
registration card promptly. It will be easier for us to notify
you if necessary.
MODEL#
SERIAL#
This warranty gives you specific legal rights. You may have other
rights which vary from statelprovince to state/province.
_______
______________________________________________
______________________________________
Philips Service Company, P.O. Box 555, Jefferson
City,Tennessee 37760, (423) 475-8869
EL4965E005 / MAC 4110/1-97
Page 9

GENERAL INFORMATION
SAFETY INFORMATION
General Information
• The type plate (which contains the serial
number) is located at the rear of the system.
• Recording is permissible if copyright or other
rights of third parties are not infringed.
• This device complies with part 15 of FCC rules.
Operation is subject to the following two
conditions:
~ This device may not cause harmful
interference, and
- This device must accept any interference
received, including interference that may
cause undesired operation.
Environmental Information
All unnecessary packaging material has been omitted.
We have done our utmost to make the packaging easily
separable into three mono-materials: cardboard (box),
polystyrene foam (buffer) and polythene (bags, protective
foam sheet).
Your system consists of materials which can be recycled
and reused if disassembled by a specialized company.
Please observe the local regulations regarding the
disposal of packaging materials, exhausted batteries and
old equipment.
_____________
Accessories (Supplied)
Remote control
Batteries (2 x
Alvi
loop antenna
FM antenna wire
AC
power cord
Philips Magnavox SS-15R surround speakers
AAA
size) for remote control
Safety Information
Before operating the system, check that the operating
voltage indicated on the typeplate (or the voltage
indication beside the voltage selector) of your system
is identical with the voltage of your local power
supply. If not, please consult your dealer. The type
plate is located at the rear of your system.
When the system is switched on, do not move it
around.
Place the system on a solid base (e.g. a cabinet).
Place the system in a location with adequate
ventilation to prevent internal heat build-up in your
system.
Do not expose the system to excessive moisture, rain,
sand or heat sources.
Under no circumstances should you repair the system
yourself, as this will invalidate the warrantyl
If the system is brought directly from a cold to a warm
location, or is placed in a very damp room, moisture
may condense on the lens of the CD unit inside the
system. Should this occur, the CD player will not
operate normally. Leave the power on for about one
hour with no disc in the system until normal playback
is possible.
Electrostatic discharge may cause unexpected
problems. See whether these problems disappear if
you unplug the AC power cord and plug it in again
after a few seconds.
To disconnect the system from the power supply
completely, remove the AC power plug from the
wall socket.
Page 10
PREPAHATION
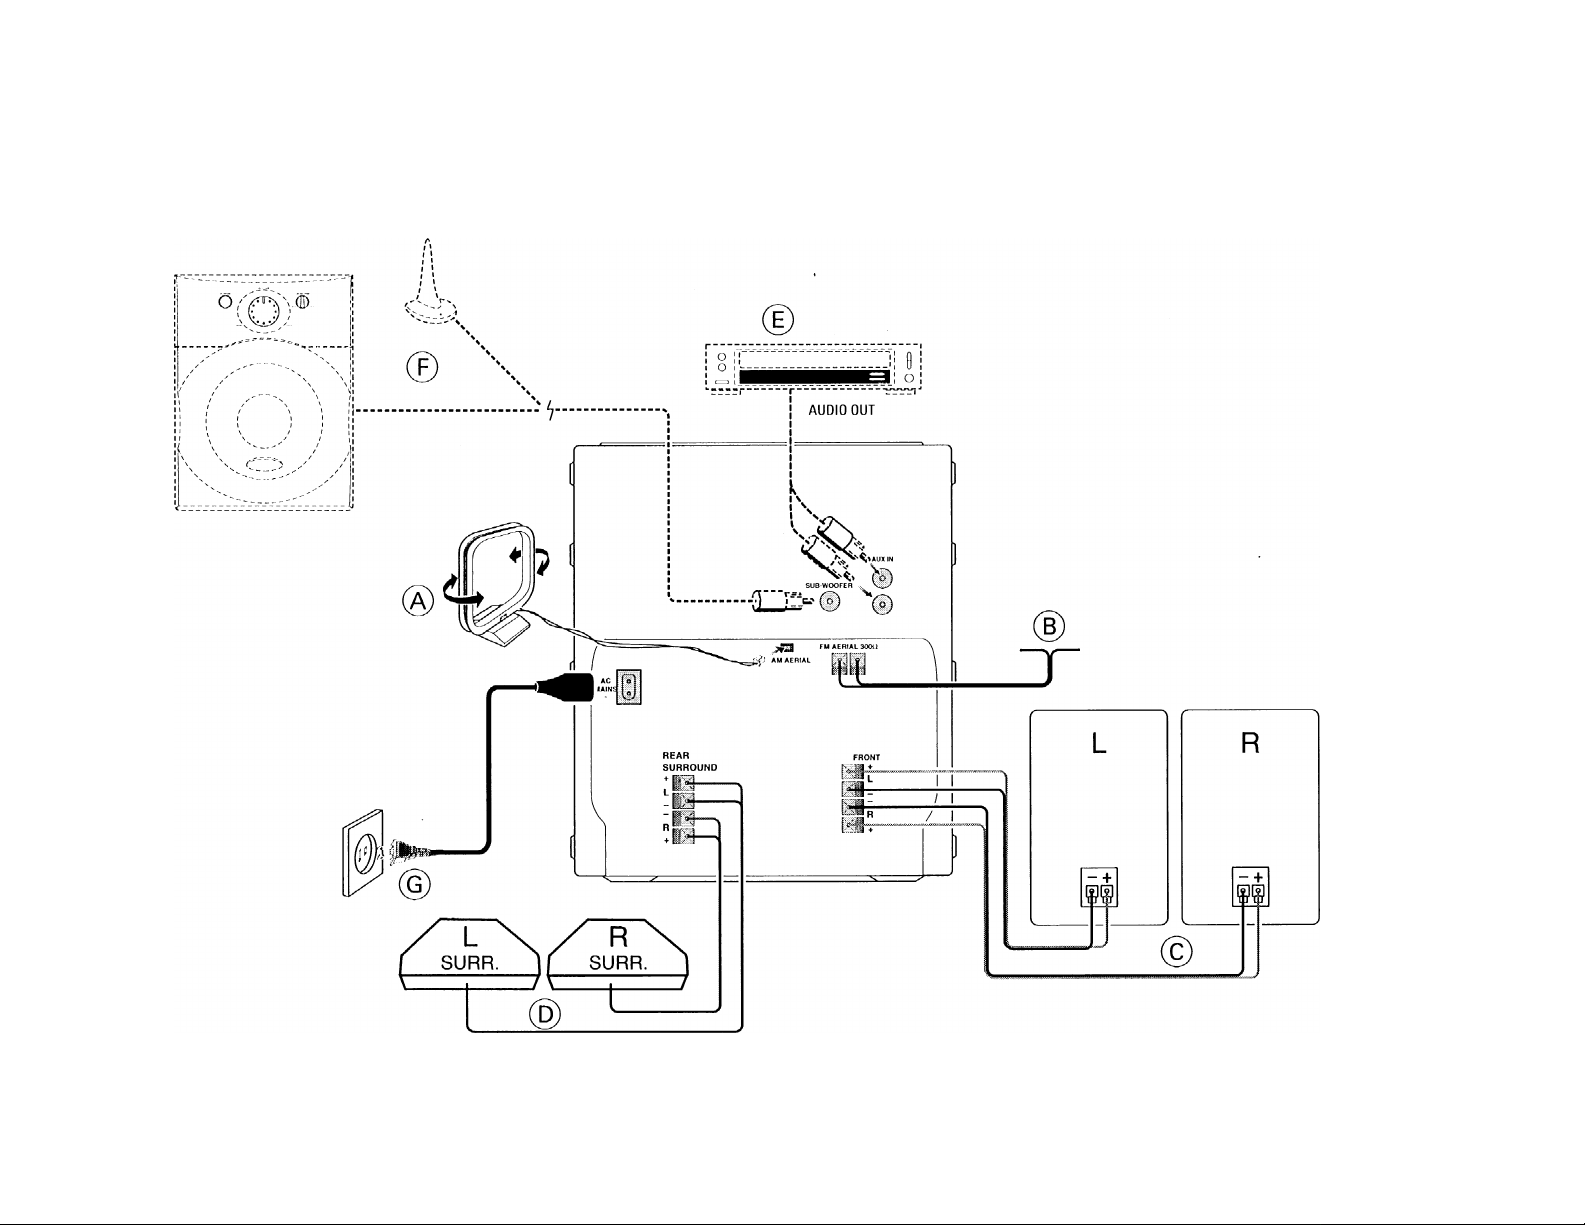
Rear Connections
1
10
Page 11
PREPARATION
(A) AM Antenna Connection
Connect the supplied loop antenna to the AM AERIAL
terminal. Place the AM loop antenna far away from the
system and adjust its position for the best reception.
® FM Wire Antenna Connection
Connect the supplied FM wire antenna to the FM 300 Q
terminal. Adjust the position of the FM antenna for the
best reception.
Outdoor Antenna
For better FM stereo reception connect an outdoor FM
antenna to the FM AERIAL 300 Q terminal using a 300
dipole wire.
(c) Speaker Connection
• Connect the right speaker to Eront terminal R, with the
red wire to + and the black wire to ~.
• Connect the left speaker to Eront terminal L, with the
red wire to + and the black wire to —.
• Clip the stripped portion of the speaker wire as shown.
_____________
_________
________________
@ Rear Surround Speakers'
Connection
• Connect the supplied surround speakers (model SS15R) to enhance the surround effect. The surround
speakers should be placed at normal listening ear
level or mounted on the wall at the back of the room.
• Connect the black or non-marked wires to the black
REAR terminals and the white or marked wires to the
greg REAR terminals.
______________________
FRONT
LEFT
FRONT
RIGHT
0; IM 0
iin REAR/SURROUND fight
(D Connecting other equipment to your
system
You can connect the audio left and right OUT terminals of
a TV, Laser Disc player, VCR or DVD player to the AUX IN
terminals at the rear of the system.
0 Subwoofer Out Connection
__________________________
___________
© AC Power Supply
After all other connections have been made, connect the
AC power cord to the system and to the wall outlet.
Inserting batteries into the Remote
Control
• Insert the batteries (Type R03 or AAA) into the
remote control as shown in the battery compartment.
• To avoid damage from possible battery leakage,
remove dead batteries or batteries that will not be
used for a long time. For replacement, use type R03 or
AAA batteries.
____________________________
UNLOCK LOCK
You can connect either an optional active subwoefer or
an optional wireless active subwoofer to the
SUBWOOEER OUT terminal. The wireless system uses a
radio frequency transmitter. The subwoofer reproduces
just the low bass effect (e.g. explosions, the rumble of
spaceships, etc.). Be sure to follow the instructions
supplied with the subwoofer.
Notes for remote control:
- First select the source you wish to control by pressing
one of the source select buttons on the remote control
(e.g. CD. TUNER. TAPE 1/2 or AUXj.
- Then select the desired function (PLAY. NEXT. etc.).
11
Page 12
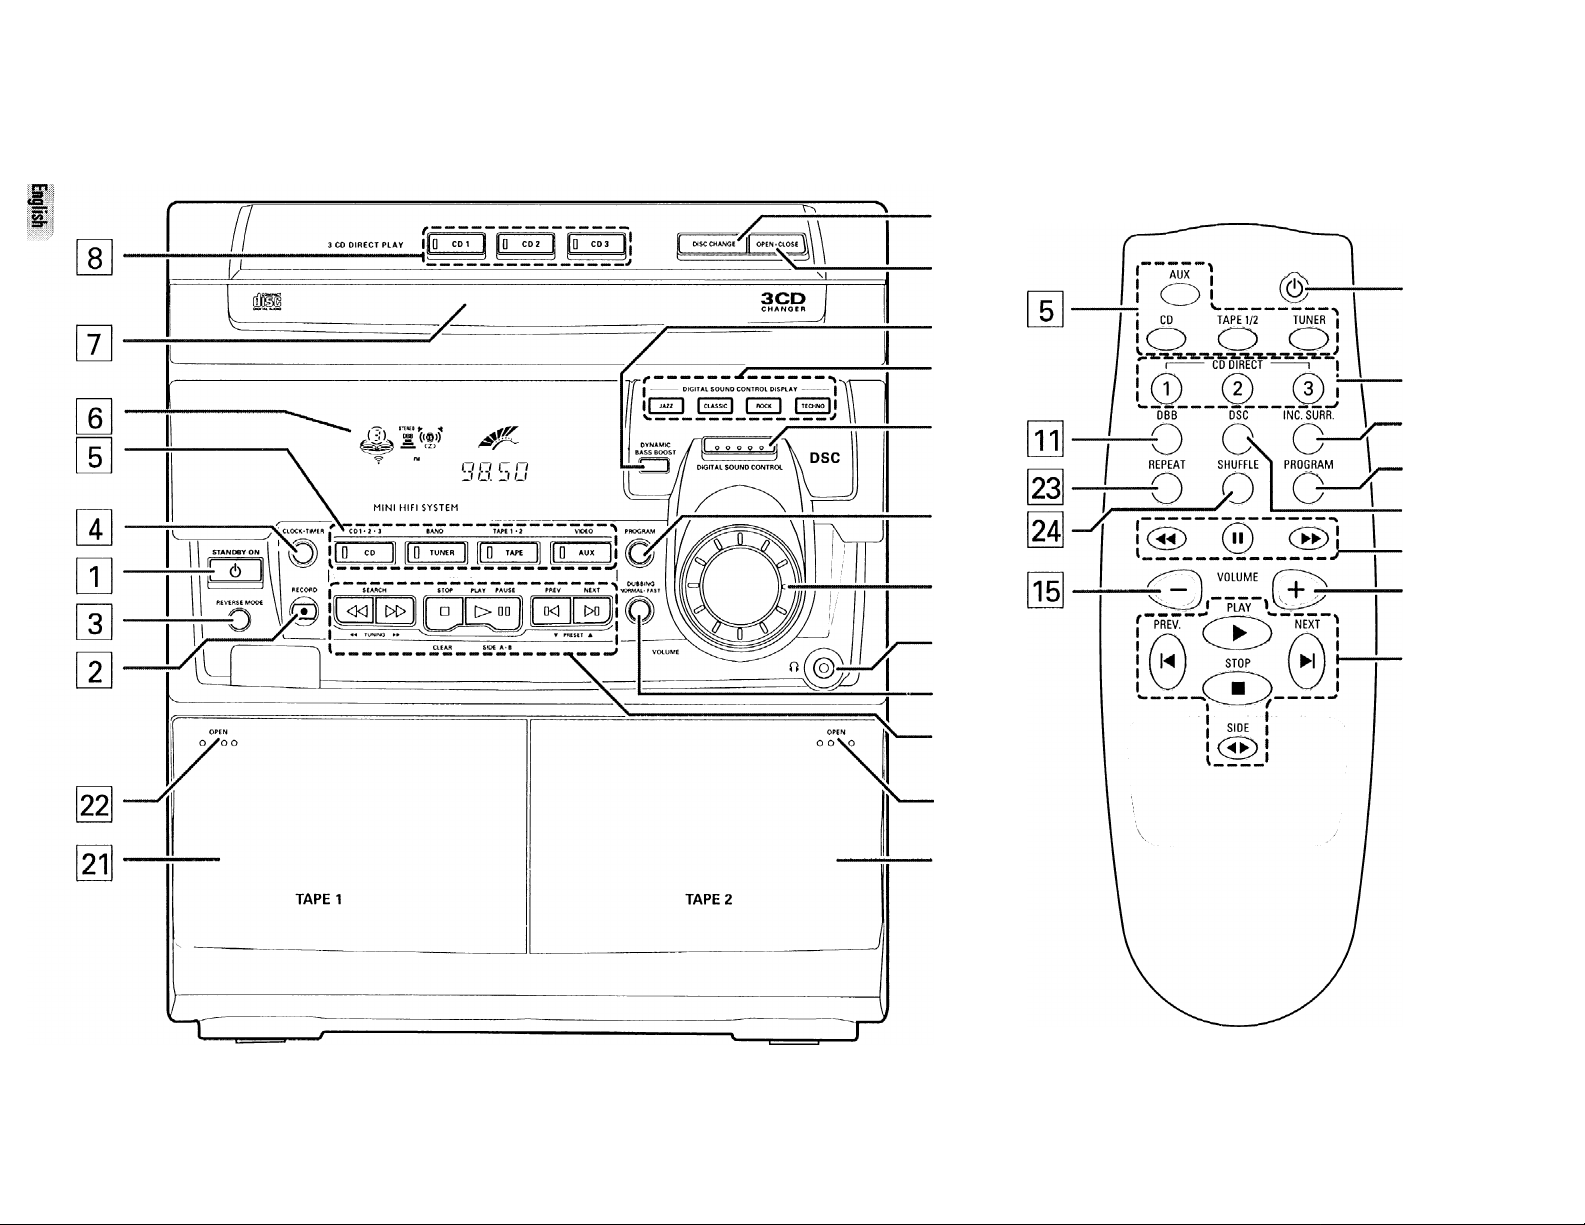
CONTROLS
10
11
12
13
14
15
16
17
18
19
26
8
25
14
13
18
15
18
12
Page 13

CONTROLS
Controls on the system and remote
control______________________________
[T] STANDBY*ON
- to switch the system on or to standby mode.
- to store radio stations automatically by pressing
and holding for 2 seconds (only in Standby or
Demonstration mode).
[2] RECORD
- to start recording on tape deck 2 only.
[I] REVERSE MODE
- to select the different playback mode on tape
deck 2 only.
[T] CLOCK-TIMER
- to view clock, set clock or timer.
[5] SOURCE SELECTION
- to select the following:
CD (CD 1 -2-3)
TUNER (BAND)
TAPE (TAPE 1 -2)......to select Tape mode. When in
AUX (VIDEO) .............to select external source (e.g.
[6] DISPLAY
- to view the current setting of the system.
[7] CD CAROUSEL TRAY
...........
to select CD mode. When in
CD stop mode; to select
respective disc tray.
.........
to select Tuner mode. When
in Tuner mode; to select the
waveband: FMorAM.
tape stop mode; to select
either tape deck 1 or tape
deck 2.
DVD. TV, Laser Disc or VCR
sound).
® 3 CD DIRECT PLAY
- to select a CD tray for playback.
@ DISC CHANGE
- to change CD(s).
^ OPEN-CLOSE
- to open or close the CD carousel tray.
[1 DYNAMIC BASS BOOST (DBB)
- to select bass boost level (Beat, Punch, Blast).
M DIGITAL SOUND CONTROL DISPLAY PANEL
- to view the selected DSC setting,
d DIGITAL SOUND CONTROL (DSC)
- to select the desired sound effect: OPTIMAL,
JAZZ, CLASSIC, ROCK or TECHNO.
M PROGRAM
- to program CD tracks in CD mode or preset radio
stations in tuner mode.
m VOLUME
- to adjust the volume level.
Qe] HEADPHONES Q,
- to connect headphones jack.
DUBBING
- to dub a tape in normal or high speed.
[1 MODE SELECTION
SEARCH ►► (◄◄ TUNING ►►)
for CD
...........
to search backward/forward.
for TUNER ... to tune to a lower or higher radio
frequency.
for TAPE
STOP ■ (CLEAR)
for CD
for TUNER ... to stop programming,
for TAPE
.......
to rewind or fast forward on tape
deck 2 only.
...........
to stop CD playback or clear a
program.
.......
to stop playback or recording.
PLAY ► / PAUSE II (SIDEA-B)
for CD
...........
to start or interrupt playback.
for TAPE
PREV !◄ / NEXT ►! (T PRESET ▲)
for CD
for TUNER ... to select a preset radio station in
OPEN
- to open tape deck 2.
TAPE DECK 2
TAPE DECK 1
OPEN
- to open tape deck 1.
REPEAT
- to repeat a CD track.
SHUFFLE
- to play all the available discs and their tracks in
MUTE
- to switch off the sound temporarily or to switch
(!)
- to switch the system to standby mode.
.......
to start playback; When playing in
tape 2 mode, to change side.
...........
to skip to the beginning of the current
or previous/next track.
memory.
random order.
on again.
'■■Si
13
Page 14

OPERATING THE SYSTEM
Important:
Before you begin operating the system, complete
the preparation procedures.
Demonstration mode
_________________
To cancel demonstration mode
• Press and hold STOP ■ (on the system only) tor 3
seconds to stop the demonstration.
The demonstration mode will be switched off
permanently.
Switching the system ON
• Press STANDBY*ON (on the system only), CD,
TUNER, TAPE orAUX
You can also switch on the system by pressing any one of
the 3 CD DIRECT PLAY buttons.
Switching the system to standby mode
• Press STANDBY*ON again.
Selecting the Source
Press the respective source selection button: CD,
TUNER, TAPE orAUX
The display indicates the selected source.
Note:
For an external source, make sure you have connected
the audio left and right OUT terminals of the external
equipment (TV, VCR, Laser Disc or DVD player) to the
AUX IN terminals.
The system has a demonstration mode that shows the
various features offered by the system. Whenever the
system is switched on from the wall socket, the
demonstration mode will start automatically.
Notes:
~ During demonstration mode, if you press any source
(or standby-on) button, the system will switch to the
respective (or standby) mode.
- When the system is switched to standby mode, 5
seconds later, the demonstration mode will begin
again.
14
Easy Set (only in standby or Demonstration mode)
EASY SET allows you to store all available radio stations
in a particular band (FM»AM) automatically (see Easy
Set under TUNER section).
Page 15

OPER/VriNG THE SYSTEM
Sound Control
VOLUME ADJUSTMENT
Adjust VOLUME to increase or decrease the sound
level.
For Personal Listening
Connect the headphones plug to the socket at the
front of the system. The speakers will be muted.
DIGITAL SOUND CONTROL (DSC)
The DSC feature enables you to enjoy special sound
effects that have preset equalizer settings, providing the
best music reproduction.
• Press DIGITAL SOUND CONTROL (DSC) to select
OPTIMAL, JAZZ, CLASSIC, ROCK or TECHNO
The Digital Sound Control display panel will light up
respectively. At OPTIMAL setting, the DSC display
panel does not light up.
"ППТ T^-1nl
ui I J.MT ll_ ,
in”“ ri niTCTTr crinri./
_lfl'. i., L-UI l„l_IXU , |VUL_IV or
will be displayed.
rir
Automatic DSC-DBB selection
The best setting for the DBB is automatically generated
for the respective DSC selection. You can also manually
select the DBB setting that best suits your listening
environment
DSC Selection
Optimal
|azz
Classic
Bock
Techno
DYNAMIC BASS BOOST (DBB)
The DBB mode enhances the bass response.
• Press DBB briefly to select the various level of bass
boost.
-* The DBB button lights up.
"ЖН1, PUfJCMorSLRGT"'
DBB DBB
■■1 ■■1
DBB Selection
Punch
Punch
Beat
Blast
Blast
' will be displayed.
DBB DBB
Note:
- Some CDs or tapes might be recorded in high
medulation. It may cause distortion at high volume. If
this occurs, switch off Incredible Surround (if
availablel DBB level or reduce the volume.
MUTE (only on remote controll
This feature allows you to temporarily switch off the
sound of the system without switching off the system
when you require a moment of silence.
• Press MUTE on the remote control to switch off the
sound.
"nUTE" will be displayed.
* Press MUTE again on the remote control or increase
the VOLUME level to switch on the sound.
DBB
OFF
To switch off DBB
BEAT
PUNCH
BLAST
• Press DBB briefly until the DBB button light is
switched off.
-* "SSS uEE" will be displayed.
15
Page 16
CD
4 Press OPEN-CLOSE to close the CD compartment.
— The total number of tracks and playing time of the
last selected disc appear on the display.
Warning!
1} This system is designed for conventional CDs.
Do not use any accessories like disc stabilizer
rings or CD treatment sheets, etc., which may
damage the CD mechanism.
2) Do not load more than one disc into each tray.
3) When the CD changer is loaded with CD(s), do
not turn over or shake the system. This may jam
the changer.
You can load up to three discs in the CD changer
for continuous playback without interruption.
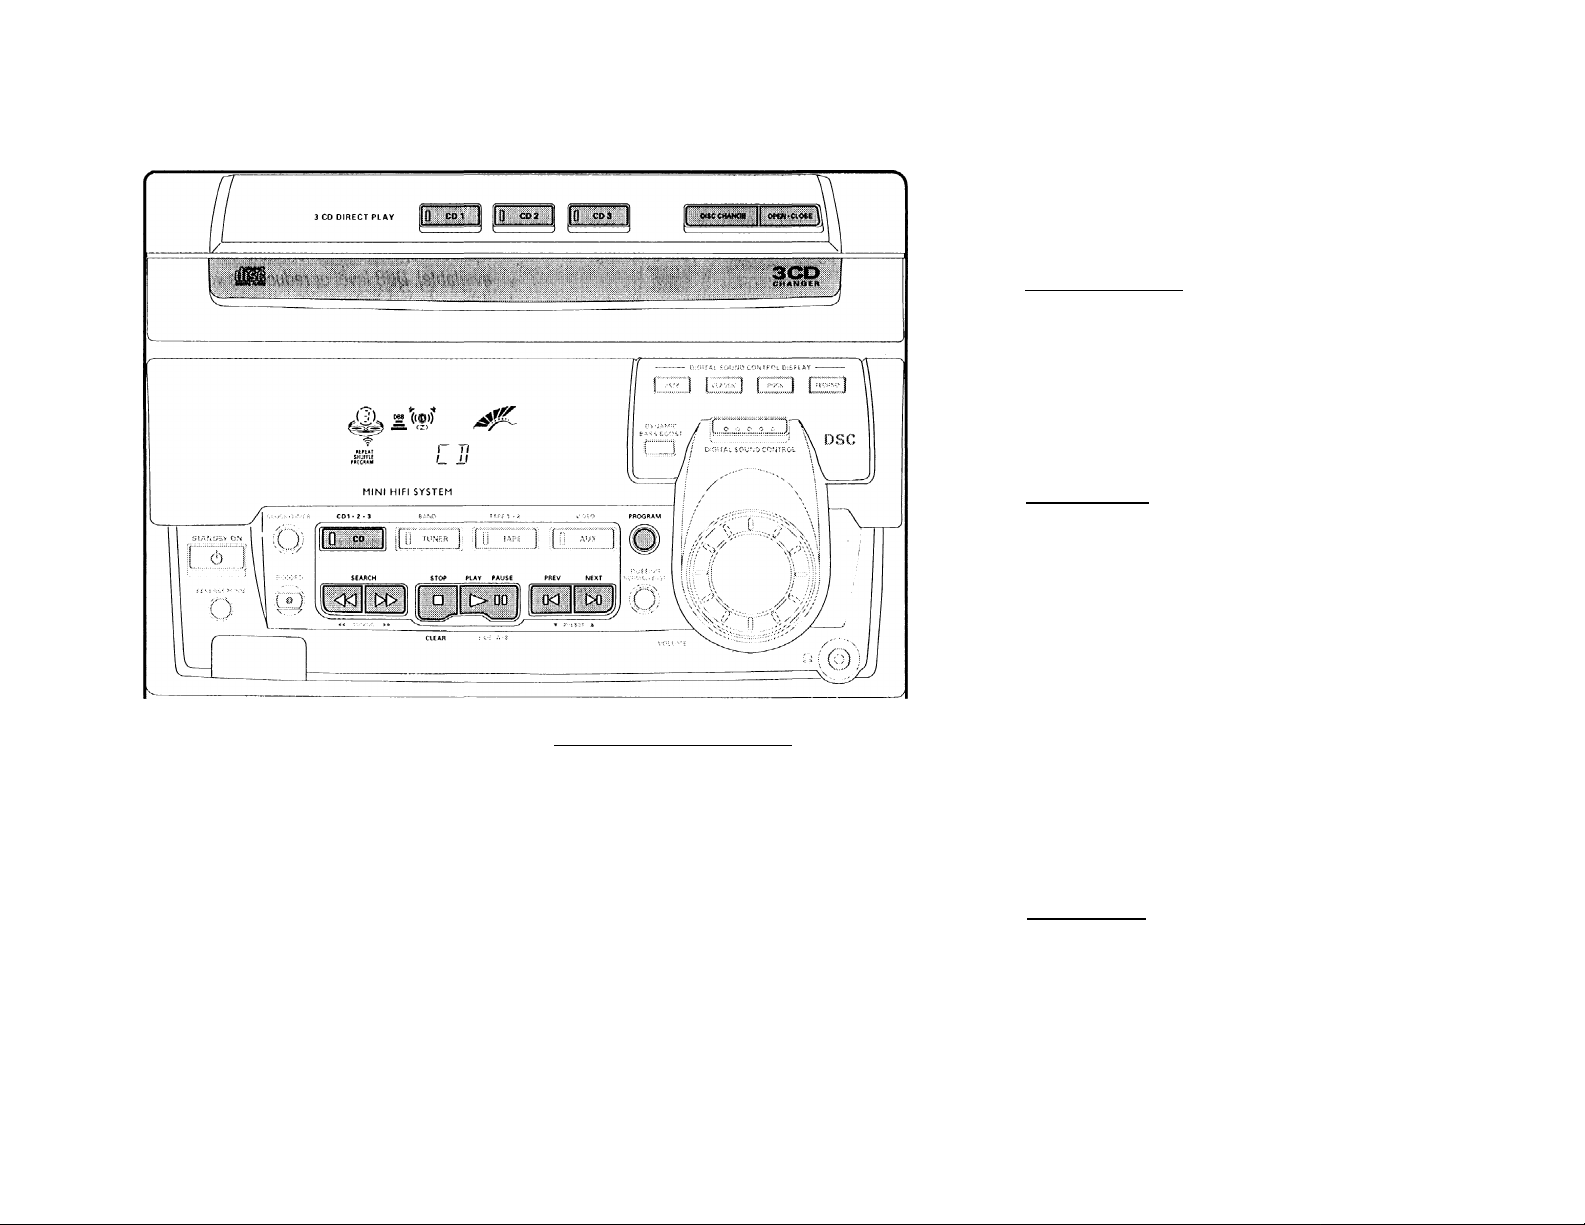
Loading the CD Changer
1 Press CD to select CD mode.
2 Press OPEN-CLOSE
The CD compartment slides out.
3 Load a CD with the printed side up in the right tray.
• You can load another disc in the left tray.
• To load the third disc, press DISC CHANGE.
The CD changer carousel will rotate until the empty
tray is at the right hand side and is ready for loading.
Playback will always start with the disc in the outer
right disc tray.
3 CD Direct Play
- You can play a CD directly by pressing the
corresponding 3 CD DIRECT PLAY (1 - 3) button. The
CD player will stop at the end of playback of the
selected disc.
When the button is lighted, it indicates that there is
a disc loaded in the disc tray.
Playing a CD
1 Press PLAY ► to start playback.
— The disc tray, track number and elapsed playing
time of the current track appear on the display.
-* The LED on the respective 3 CD Direct Play button
will be flashing.
- To interrupt playback, press PAUSE II.
— The playing time flashes.
- To resume playback, press PLAY ► again.
2 To stop playback, press STOP ■ .
Note:
- All the available discs will be played once, then stop.
When the CD has stopped playing, the system will
switch to the standby mode a fter 15 minutes if no
button is pressed.
Disc Change
You can change the outer 2 discs while the third inner
disc is at the stop or playback mode.
1 Press DISC CHANGE.
^ The CD compartment slides out.
______________________
_________________________
_________________________
16
Page 17

CD
2 Replace the discs in the left and right disc trays.
• If you press DISC CHANGE again during playback,
the CD will stop playing.
The CD carousel tray will rotate until the inner tray
is at the right hand side and is ready for changing.
3 Press OPEN'CLOSE to close the CD compartment.
Selecting a desired track
Selecting a desired track at the stop mode
1 Press PREV N or NEXT ► ! until the desired track
appears on the display.
2 Press PLAY ► to start playback.
The selected track number and elapsed playing
time appear on tbe display.
Selecting a desired track during playback
1 Press PREV N or NEXT N until tbe desired track
appears on the display.
The selected track number and elapsed playing
time appear on the display.
• If you press PREV W once it will skip to the beginning
of the current track and play the track again.
_______________
Searching for a particular passage
during playback
• Press and hold or ► ► until the desired passage is
located.
The volume will be reduced.
• Playback returns to normal when « or ► ► is
released.
______________________
Programming Tracks
Programming tracks of a loaded CD is possible in the stop
mode. The display will indicate the total tracks stored in
the program. Up to 40 tracks can be stored in the memory
in any order. When 40 tracks are stored and you attempt
to store another track, the display will show "PRuGRRif
n II I "
I uuu .
1 Load the desired discs in the disc trays.
2 Press PROGRAM to start programming.
The PROGRAM flag starts flashing.
3 Press the CD (CD 1 •2*3) to select the desired disc.
4 Press PREV !◄ or NEXT H to select the desired
track.
5 Press PROGRAM to store the track.
• Repeat steps 3to 5to store other discs and tracks.
6 Press STOP ■ once to end programming mode.
The total number of tracks programmed and total
playing time appear on the display.
Notes:
- If the total playing time is more than "S S •' 5 S'" or if
one of the programmed tracks has a number greater
than 30, then " appears in the display instead
of the total playing time.
- During programming, If no button is pressed within 20
seconds, the system will exit program mode
automatically.
Playing the program
1 Press PLAY ► to start program playback.
-* "Pi_RR PPuGPRi'l" will be displayed.
The track number and elapsed playing time of the
current track will appear on the display.
• If you press REPEAT during program playback, the
current track will be played repeatedly.
The REPEAT and PROGRAM flags will be displayed.
2 Press STOP ■ to stop program playback.
Note:
- If you press any of the 3 CD DIRECT PLAY buttons, the
system will play the selected disc or track and the
stored program will be ignored temporarily. The
PROGRAM flag will also temporarily disappear from
the display and then reappear, when the playback for
the selected disc ends.
Reviewing the program
Reviewing of the program is only possible in the stop mode.
• Press PREV W or NEXT ► ! repeatedly to review the
programmed tracks.
• Press STOP ■ to exit review mode.
________________
Erasing the program (in the stop mode)
• Press CLEAR on the system.
Note:
The program will be erased when the system is
disconnected from the power supply. If the CD
carousel is opened, the tracks belonging to the outer
two trays will be erased and the display will show
'Tinr^ n rr
jixf ll I I„I„L-I
"RREIT will be displayed.
17
Page 18
CD
Shuffle (only on remote control)
S’
It will play all the available discs and their tracks in
random order. Shuffle may also be used when tracks are
programmed.
To shuffle all the discs and tracks
1 Press SHUFFLE
— "GMUffLC" will be displayed.
— The SHUFFLE flag, the disc and the track selected
at random appear on the display.
• The discs and the tracks will now be played in random
order until you press STOP ■ .
• If you press REPEAT during shuffling, the current track
will be played repeatedly.
— The REPEAT and SHUFFLE flags will be displayed.
2 Press SHUFFLE again to resume normal playback.
-*■ The SHUFFLE flag disappears from the display.
Note:
- All the available discs and tracks will be played once,
then stop.
Repeat (only on remote control!
It will play the current track repeatedly.
1 Press REPEAT during playback.
-* 'VfTPPHT if?nPK" will be displayed.
The REPEAT flag and the track selected appear on
the display.
• The track will now be played repeatedly until you
press STOP ■.
2 Press REPEAT again to resume normal playback.
-* The REPEAT flag disappears from the display.
TUNER
Easy Set (only in Standby or Demonstration mode) Tuning to Radio Stations
EASY SET allows you to store all available radio stations
in a particular band (FM*AM) automatically.
• Press and hold STANDBY«ON (on the system only)
for 2 seconds.
— ТПБЧ БЕТ" will be displayed and followed by
"ТЬТч'ЕР".
Easy set will start with the last active band.
— All available radio stations with sufficient signal
strength will be stored or until 40 presets are filled.
Notes :
- When EASY SET is used, all previously stored stations
will be erased.
- The last preset station will appear on the display
when Easy Set is completed.
Press TUNER to select TUNER mode.
-* "TilNER" will be displayed.
The preset number, frequency and waveband
appear on the display.
Press TUNER (BAND) again to select the desired
waveband: FM or AM.
Press TUNING ◄ ◄ or ► ► for more than one second,
then release.
-*■ The display will show "EEHREH" until a radio
station with sufficient signal strength is found.
Repeat this procedure until the desired radio station is
reached.
To tune to a weak station, briefly press TUNING MM
or ► ► until the display shows the desired frequency
and/or when the best reception has been obtained.
18
Page 19

TUNER
Storing Preset Radio Stations
You can store up to 40 radio stations in the memory.
When a preset radio station is selected, the preset
number appears next to the frequency on the display.
Automatic programming
1 Press TUNER
2 Press TUNER (BAND) again to select the desired
waveband: FM or AM.
3 Press PROGRAM for more than one second.
The PROGRAM flag starts flashing and ‘RuTO' will
be displayed.
-* Every available radio station will be stored
automatically. The frequency and preset number
will be displayed briefly.
— The system will stop searching when all the
available radio stations are stored or when the
memory for 40 preset radio stations is used.
— The system will remain tuned to the last stored
preset radio station.
• Repeat the above procedure to store other preset
stations for the other waveband. Remember to select
the next available preset number before proceeding. If
not, some of the preset radio stations may be erased.
Notes:
- You can cancel the automatic programming by
pressing PROGRAM or STOP ■ .
- If you want to reserve a section of preset numbers, for
example preset numbers 1 to 9, select preset 10
before starting automatic programming: now only the
preset numbers 10 to 40 will be programmed.
___________
Manual programming
1 Press TUNER
2 Press TUNER (BAND) to select the desired
waveband: FM or AM.
3 Press PRDGRAM for less than one second.
The PROGRAM flag, frequency and preset number
start flashing.
The next available preset number will be displayed
for selection.
4 Press TUNING or ►► to tune to the desired
frequency.
• When all 40 presets are stored, no preset number is
shown.
The message "PROBRnil fuLL" will be
displayed.
• If you wish to store the radio station to another preset
number, press PRESET T or A to select the desired
preset number.
5 Press PROGRAM again.
-* The PROGRAM flag will stop flashing, and the radio
station will be stored.
• Repeat the above procedure to store other preset radio
stations.
Notes:
- You can cancel tbe manual programming by pressing
STOP m.
- During programming, If no button is pressed within 20
seconds, the program mode will exit automatically.
Tuning to Preset Radio Stations
• Press PRESET T or A to select the desired preset
number.
The preset number, frequency and waveband
appear on the display.
_______
19
Page 20
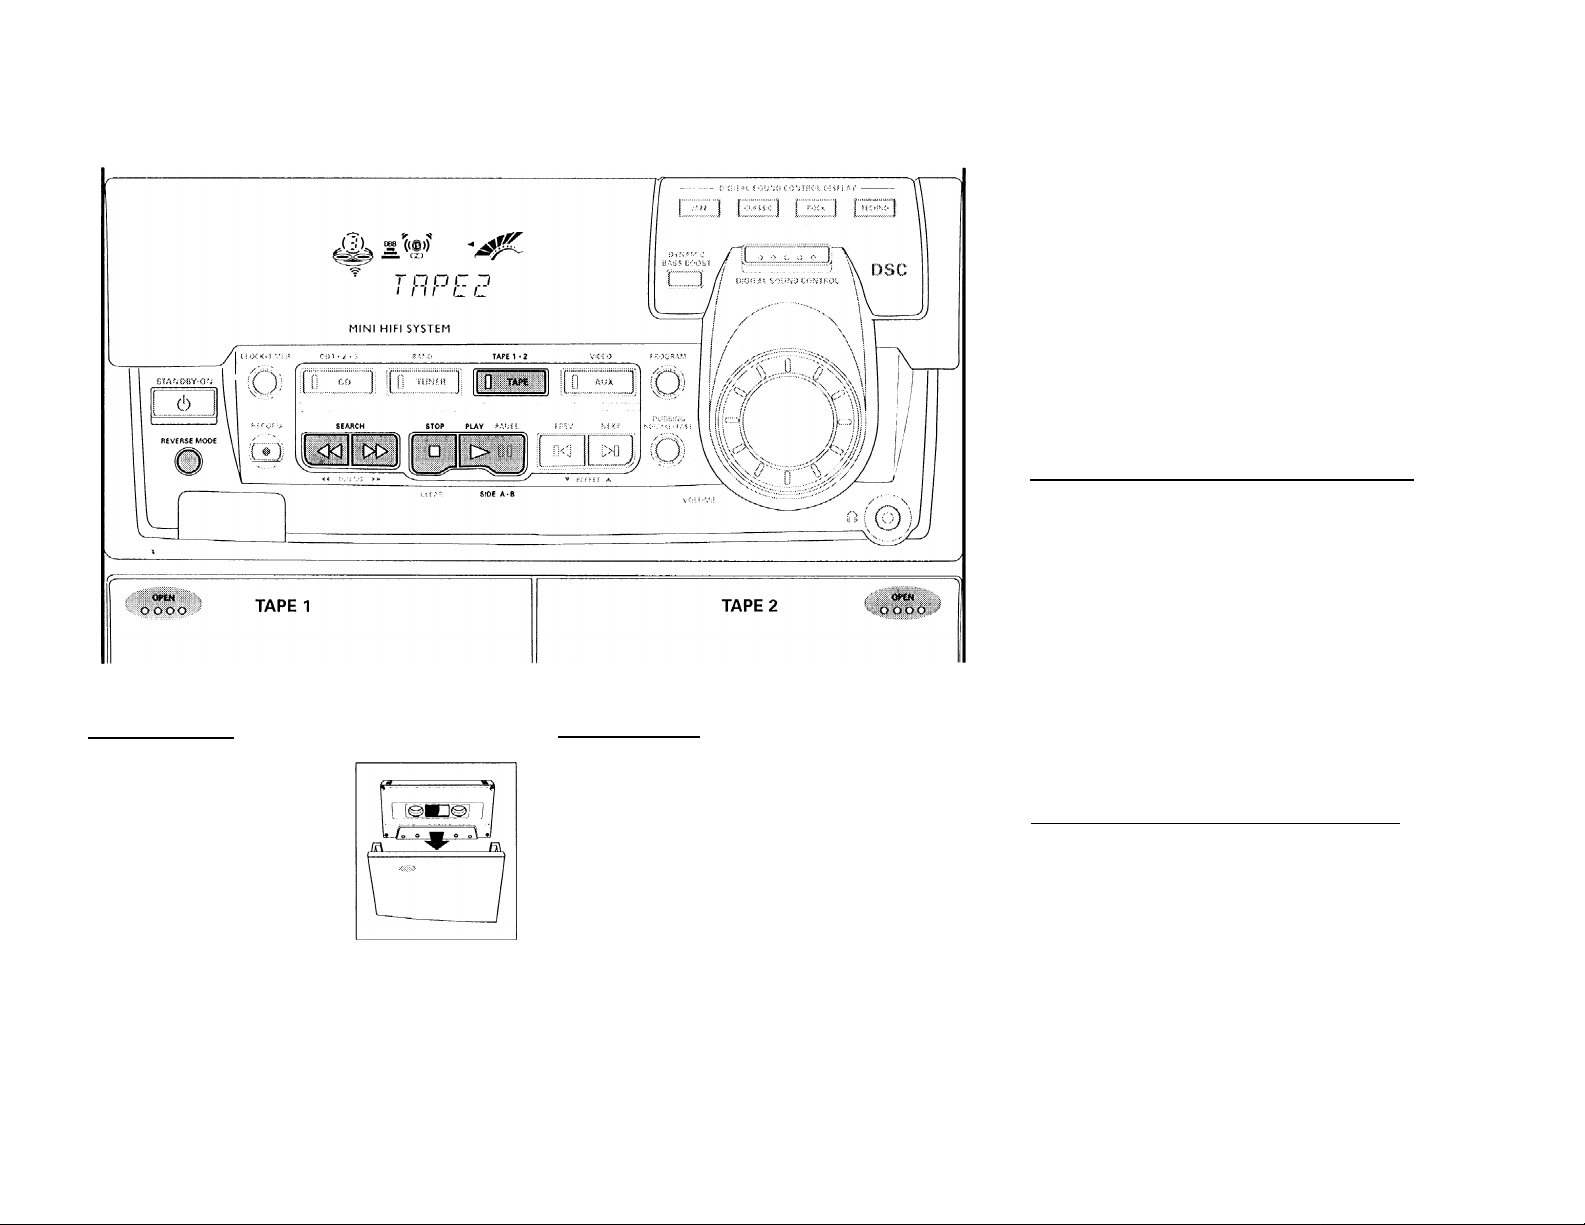
TAPE
5*^
Loading a tape
• Press OPEN.
• The tape deck door opens.
• Load the tape with the open
side downward and the full
spool to the left.
• Close the tape deck door.
Tape Playback
1 Press TAPE to select TAPE mode.
-* "ТПРЕГ i" or "ТПРС c?" will be displayed.
• Press TAPE again to select either tape deck 1 or tape
deck 2.
2 Load the tape into the desired tape deck.
3 Press PLAY ► to start playback.
3a (For Tape Deck 2 only)
Press SIDE A*B (or PLAY ► again on the remote
control) to switch playback between sides A and B.
-* The ◄ or ► (back or front) flag appears on the
display, depending on the side selected.
3b (For Tape Deck 2 only)
Press REVERSE MODE to select the different type of
playback mode (see auto reverse playback).
4 Press STOP ■ to end playback.
Notes:
- It Is necessary to start playback on tape deck 2 before
changing side A and B.
- When the tape has stopped playing, the system will
switch to the standby mode automatically after 15
minutes if no button is pressed.
Auto Reverse Playback (only on tape deck 2)
• Press REVERSE MODE to select the different
playback modes.
^
........................
.................recording or playback on both sides of
...............continuous playback on both sides of
recording or playback on one side of
the tape. The tape stops at the end of
one side.
the tape. The tape then stops.
the tape up to a maximum of 20 times
per side unless you press STOP ■ .
Rewind/Fast Forward (only on tape deck2)
At the stop mode
1 You can rewind or fast forward the tape by pressing
« or ► ► respectively.
"«< or »>" will be displayed depending on which
button is pressed.
The tape will stop automatically at the end of the
rewinding or fast forwarding.
20
Page 21
TAPE AUX
RECORDING
2 Press STOP ■ to stop rewind or fast forward.
During playback
• Press and hold or ► ► respectively until the desired
passage is located.
-* During searching, the sound is reduced to a low
volume.
-*• When you release or the tape continues
playing.
Notes:
- During rewinding or fast forwarding, it is possible to
select another source (e.g. CD, TUNER or AUX ).
~ Check and tighten slack tape with a pencil before use.
Slack tape may get jammed or may burst in the
mechanism.
- C-120 tape is extremely thin and may be deformed or
damaged easily. It is not recommended for use in this
system.
- Store the tapes at room temperature and do not put
them too close to a magnetic field (for example,
transformer, TV or loudspeaker boxes).
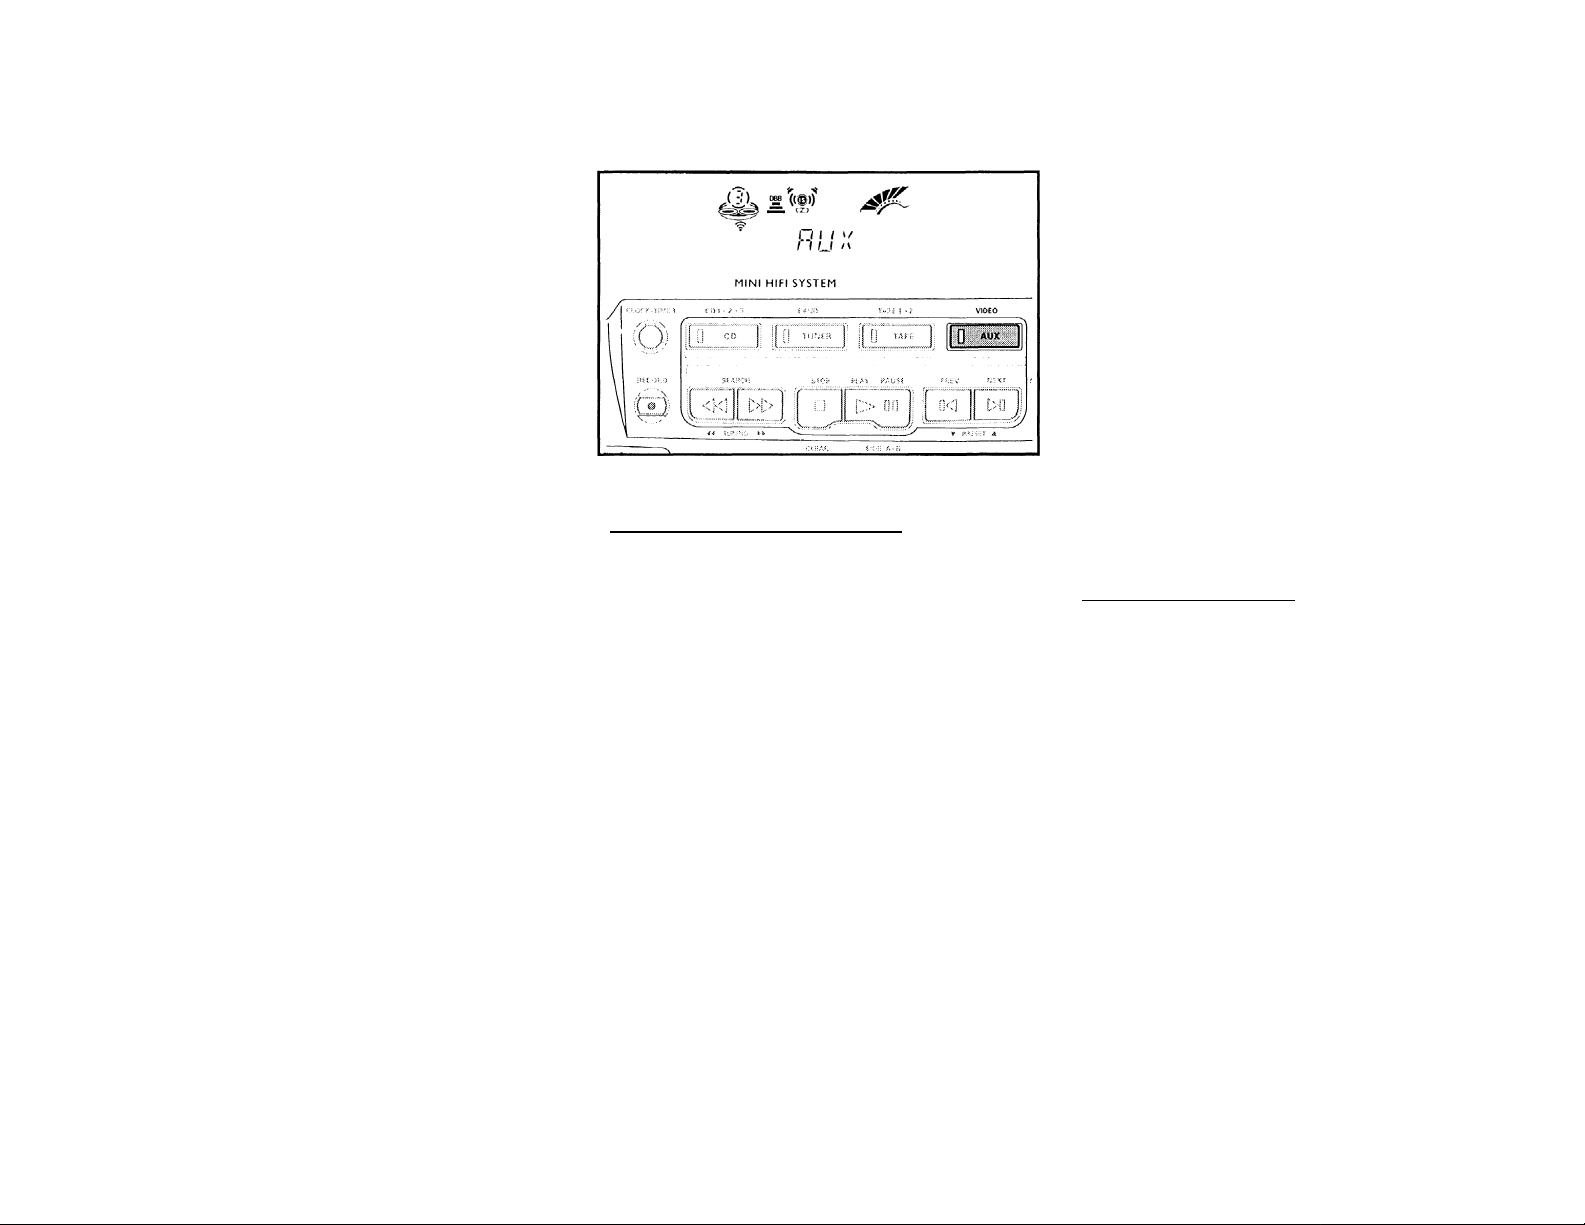
Selecting External Equipment
If you have connected the audio out terminals of the
external equipment (TV, VCR, Laser Disc or DVD player) to
the AUX ll'J terminals, you can hear the sound from the
system.
• Press AUX to select the external mode.
RLI-" will be displayed.
Note:
All the sound control features (e.g. DSC, DBB, etc.) are
available for selection.
___________
Notes:
- For recording, use only tape of lEC type I (normal tape)
or lEC type II (Chrome).
- The tape Is secured at both ends with leader tape. At
the beginning and end of tape, nothing will be
recorded for six to seven seconds.
- The recording level is set automatically, regardless of
the position of VOLUME or DBB.
- To prevent accidental recording, break out the tab on
the left shoulder of the tape side that you want to
protect.
- If'СНЕСИ TНРС " is displayed, the protection tab
has been broken. Put a piece of clear adhesive tape
over the opening. Do not cover the CrO^ tape detection
hole when covering the tab opening.
One Touch Recording__________________
• For One Touch Recording, as soon as you press
RECORD, the current source will be recorded on tape
deck 2.
1 Load a blank tape in tape deck 2.
2 Press RECORD to start recording.
— The RFC flag starts flashing.
3 Press STOP ■ to stop recording.
Note:
- When you press RECORD at TAPE mode, 'GO L C C T
uTHCP SuilRCC" will be displayed. One Touch
Recording is not possible at TAPE mode.
21
Page 22
RECORDING
Recording from othor sources loniym ape
deck 2)
_______________________________________
1 Press TAPE to select tape deck 2.
2 Load a blank tape into tape deck 2 with the open side
downward.
3 Press REVERSE MODE to select the playback mode
(
~Z.
or
~I2>
)•
4 Press CD, TUNER or AUX
• Start playback of the selected source.
5 Press RECORD to start recording.
The REC flag starts flashing.
6 Press STOP ■ to stop recording.
Notes:
- Only ^ or mode is available during recording.
- During recording, it is not possible to listen to another
source.
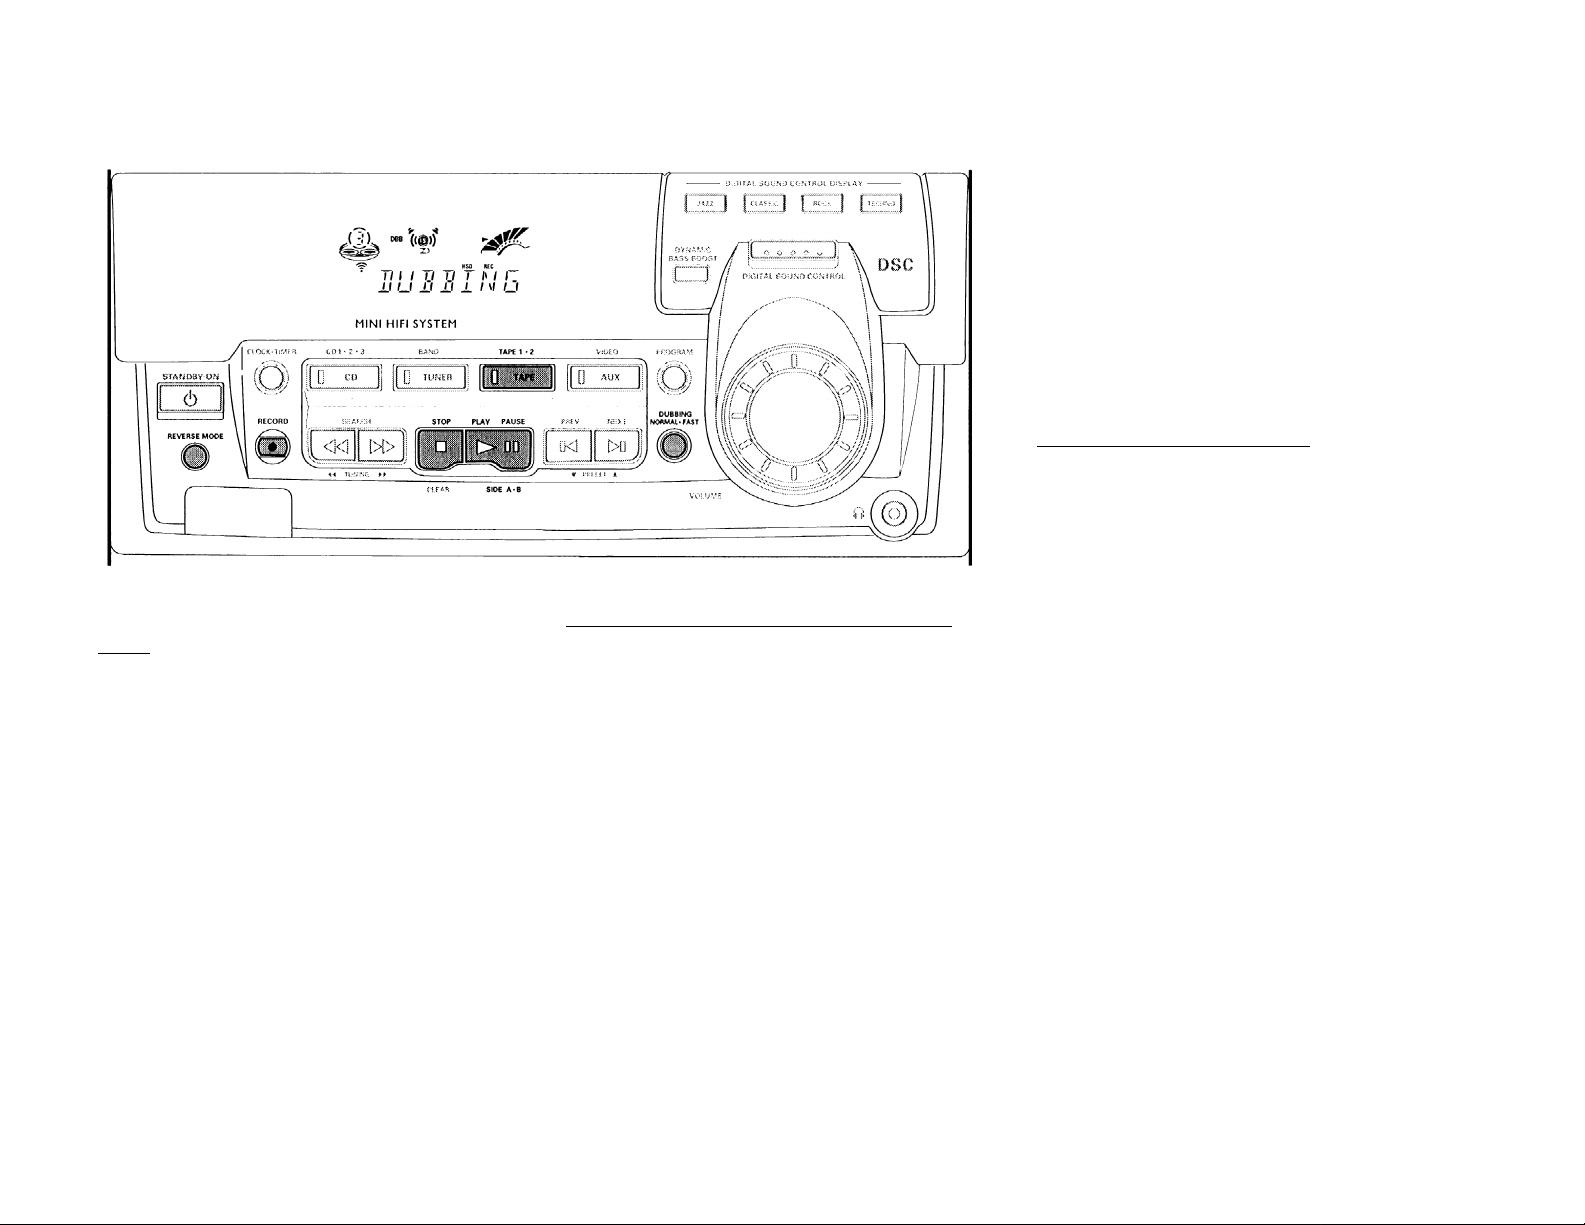
Dubbing tapes (from tape deck 1 to tape deck2)
1 Press TAPE to select tape deck 2.
2 Load the prerecorded tape into tape deck 1 and a
blank tape into tape deck 2.
-* Make sure that the tape in tape deck 1 has its full
spool to the left.
3 Press DUBBING once for normal speed dubbing or
twice within 2 seconds for high speed dubbing.
"iJljPiIRL" (normal speed) or TRST" (high speed)
will be displayed and then followed by
"T)i |■ o^эт^ iri"
UUUJJiMU .
The HSD flag appears on the display for high speed
dubbing.
• Dubbing will start immediately.
The REC flag starts flashing.
4 Press STOP ■ to stop dubbing.
Notes:
- At the end of side A. flip the tapes to side B and
repeat the procedure.
- Dubbing of tapes is only possible from tape deck 1 to
tape deck 2.
- To ensure good dubbing, use tapes of the same length.
- During high speed dubbing in Tape mode, the sound is
reduced to a low volume.
- You can switch to other source while dubbing.
CD Synchro Start Recording
1 Load a blank tape into tape deck 2 and a disc into the
disc tray.
2 Press CD to select CD mode.
• You can program the tracks in the order you want them
to be recorded (see Programming Tracks). If not, the
tracks are recorded according to the selected disc.
3 Press RECORD to start recording.
The REC flag starts flashing.
• CD will start playback automatically.
4 Press STOP ■ to stop recording.
22
Page 23
CLOCK
TIMER
View Clock
You can view the clock (if it is set) at standby or any
source mode. It will be displayed for about 7 seconds.
• Press CLOCK*TIMER briefly.
AM" (tbe current time) will be displayed.
— " - - - -" will be displayed if the clock is not set.
Clock setting
The clock is set in 12-hour mode, e.g. lc':lJO AM or
lc':iJlJ PM. Before setting the clock, you must be at the
View Clock mode.
1 Press CLOCK*TIMER to select clock mode.
" !c DO AM" or the current time starts flashing.
- "«,► ► ,!◄ , H " light up.
2 Set the hour with ■ ^■ ^or^^.
3 Set the minute with NorH.
4 Press CLOCK*TIMER again to store the setting.
-*■ The clock starts running.
• To exit without storing the setting, press STOP ■ .
Notes:
- During clock setting, if no button is pressed within 90
seconds, the system will exit clock setting mode
automatically.
- When power interruption occurs, the clock setting is
erased.
Timer Setting
• The system can switch on to CD, TUNER or TAPE 1
mode automatically at a preset time. It can serve as an
alarm to wake you up. After half an hour from the
preset time, the system will return to the standby
mode if no button is pressed.
• Before setting the timer, make sure the clock is set
correctly.
• The timer has to be reset or start again for each
subsequent preset time.
• The volume of the timer will be at the last setting before the system is switched to standby mode.
1 Press and hold CLOCK*TIMER for more than 2
seconds to select timer mode.
-* "ui J lc':00 AM" or the last set timer starts
flashing. The TIMER flag will be displayed.
The last selected source is lighted while other
available sources are flashing.
— ^ H _ ► ! , ■ " light up.
2 Press CD, TUNER or TAPE to select the desired
source.
• Before selecting CD or TAPE mode, make sure that a
CD or tape is loaded respectively in the CD tray or tape
deck 1.
3 Press ◄◄ or ►► to set the hour for the timer to start.
________________________
4 Press N or ►! to set the minute for the timer to start.
5 Press CLOCK*TIMER again to store the start time
and the selected source.
The TIMER is now set.
-* The TIMER flag remains on the display.
• To exit without storing the setting, press STOP ■ .
• At the preset time, the TIMER will be activated.
The selected source will be played.
The TIMER flag disappears from the display.
Notes:
- During timer setting, if no button is pressed within 90
seconds, the system will exit timer setting mode
automatically.
“ If the source selected is TUNER, the last tuned
frequency will be switched on.
- If the source selected Is CD, playback will begin with
the first track of the last selected disc. If the CD trays
are empty, the TUNER will be selected instead.
- If the source selected is TAPE I, and if the preset time
is reached during high speed dubbing, the TUNER will
be selected Instead.
To cancel the TIMER
1 Press CLOCK*TIMER for more than 2 seconds.
2 Press PAUSE II to cancel the timer.
THNCEL" will be displayed.
The TIMER flag disappears from the display.
To start the TIMER again (for the same time)
1 Press CLOCK*TIMER for more than 2 seconds.
2 Press CLOCK*TIMER again to store the start time
and the selected source.
23
Page 24

MAINTENANCE
SPECIFICATIONS
.'.1
Maintenance
Cleaning the Cabinet
• Use a soft cloth slightly moistened with a mild
detergent solution. Do not use a solution containing
alcohol, spirits, ammonia or abrasives.
Cleaning Discs
• When a disc becomes dirty, clean it with a cleaning
cloth. Wipe the disc from the center out.
• Do not use solvents such as benzine, thinner,
commercially available cleaners, or antistatic spray
intended for analog records.
Cleaning the CD lens
• After prolonged usage, dirt or dust may accumulate at
the CD lens. To ensure good playback quality, clean
the CD lens with Philips CD Lens Cleaner or any
commercially available. Follow the instructions
supplied with the Lens Cleaner.
Cleaning the Tape Heads and the Tape Paths
• To ensure good recording and playback quality, clean
the heads, capstan(s) and pressure roller(s) after every
50 hours of tape operation.
• Use a cotton swab slightly moistened with cleaning
fluid or alcohol.
• You can also clean the heads by playing a cleaning
tape through once.
Demagnetizing the heads
• Use a demagnetizing tape available at your dealer.
Specifications
AMPLIFIER
Output power
RMS(6 0,1 kHz,THD10%)
FW72C.......................................................... 2x50W
Surround Channel
Signal-to-noise ratio.....................................>75 dBA (lEC)
Frequency response
Input sensitivity
Auxin..................................................................... 350mV
Output
Speakers(Left/Right)
Surround Speakers
Fleadphones............................................. 32 Q- 1000 Q
Subwoofer Out ............................................................ 1.5 V
CD PLAYER
Number of programmable tracks
Frequency range
Signal-to-noise ratio.............................................>80 dBA
Channel separation.................................... > 60 dB (1 kHz)
Total harmonic distortion
TUNER
FM wave range
AM wave range
Number of presets ......................................................... 40
Antenna FM
AM
________________________
.......................................................
.......................
..................................................
.............................................
..........................................
....................................
..........................................
.........................................
.................................................
..............................................
60 - 16000 FIz, ±3 dB
...................................
87.5- 108 MHz
530- 1700 kHz
>6Q
> 6 i2
40 - 20000 Hz
< 0.003%
300 Q click fit
Loop antenna
40
TAPE DECK
Frequency range
CrO^ tape (type II)
Normal tape (type I)
Signal-to-noise ratio
CrO^ tape (type II)
7 W
Normal tape (type I) ...........................................>48 dBA
Wow and flutter.................................................< 0.4% DIN
SPEAKERS
(Front Left/Right)
System
.....................
Impedance
Woofer
Tweeter
Tweeter...................................................... 2x1" Polydome
Dimensions(wxhxd)........................ 260x325x310mm
Weight ............................................................... 5 kg/each
SURROUND SPEAKERS (SS-15R)
Impedance...................................................................... 6Q
Speaker Driver ........................................... 1x3" full range
Dimensions (wxhxd)
Weight ........................................................... 0.76 kg/each
GENERAL INFORMATION
Material/finish...................................... Polystyrene/Metal
AC Power ..................................................... 120 V/60 Hz
Power Consumption
Active........................................................................ 75 W
Standby................................................................. < 11 W
Dimensions (wxhxd)
Weight (without speakers)....................................... 7.5 kg
....................................................................
.....................................
................
..........................
.......................
.............................................
3-way; 2 bass ports + 1 G-bass port
lx 2.5"; Gradually cooled Ferro Fluid
........................
...................
80 - 14000 Hz (8 dB)
80- 12500 Hz (8 dB)
lx 6.5" G-cone shielded
224 x 98 x 224 mm
265 x 310 x 380 (mm)
>52 dBA
6S2
24
Subject to modification
Page 25

TROUBLESHOOTING
Warning! Under no circumstances should you try
to repair the system yourself, as this will invalidate
the warranty.
• If a fault occurs, check the points listed below before
taking the system for repair.
• Should any problems persist after you have made
these checks, consult your nearest dealer or service
center.
CD Player Operation
«Г (
I Ч
j UIGil" is displayed.
The disc is inserted upside down.
Place CD with printed side up.
• Moisture condensation at the lens.
Wait until lens has adjusted to normal room
temperature.
• There is no disc in the CD tray.
Insert a CD.
• The CD is dirty, badly scratched or warped.
-*■ Clean or replace the CD.
• The CD lens is dirty or dusty.
— See section under Maintenance.
Radio Reception
Poor radio reception
• The signal strength is too weak.
Adjust the antenna.
• The TV or VCR is too close to the stereo system.
-* Separate the stereo system from the TV or VCR.
-* Connect an external antenna for better reception.
___________________
Tape Deck Operation
- U UI ' -LU- I ^ о is displayed.
• A recording is in progress.
— Stop the recording or wait until it is finished.
"ТИРЕ SLiББ± MIj uI'm*l_ b" is displayed.
• Tape dubbing is only possible in tape mode.
Switch source to tape mode.
Recording or playback cannot be made or there is a
decrease in audio level.
• Dirty tape heads, capstans or pressure rollers.
See section on tape deck maintenance.
• Magnetic build-up in the record/playback head.
-*■ Use demagnetizing tape.
General
System does not react when any button is pressed.
• Electrostatic discharge.
Press STANDBY»ON to switch the system off
Remove the AC power plug from the wall outlet, then
reconnect and switch on the system again.
No or poor sound.
• Volume is not turned up.
— Adjust VOLUME.
• The headphones are connected.
— Disconnect the headphones.
• Speakers are not connected or are connected wrongly.
-* Check that the speakers are connected correctly.
Make sure that the stripped speaker wire is clamped.
Reversed left and right sound.
• Speakers are incorrectly connected.
Check the speaker connections and location.
_____________________________
Lack of bass sound or apparently imprecise physical location of musical instruments.
• Speakers are incorrectly connected.
Check the speaker connection for proper phasing, red/
black wires to red/black terminals.
Remote control has no effect on the system.
• Wrong source is selected.
Select the source (CD, TUNER, etc.) before pressing
the function button (PLAY, PREV/NEXT, etc.).
• The distance to the system is too large.
— Reduce the distance.
• Batteries are inserted incorrectly.
— Insert the batteries with their polarities (+/■ signs) as
indicated.
• Batteries are exhausted.
^ Replace the batteries.
Timer not working.
• Timer is not switched on.
— Press CLUCK* TIMER on the system to switch on the
timer.
• Dubbing/recording is in progress.
-* Stop dubbing/recording.
System display features automatically and buttons flashing continuously.
• Demonstration mode is switched on.
Press and hold STOP ■ for 3 seconds to switch off
the demonstration mode.
25
Page 26

Renvoyez votre carte d’enregistrement de garantie pour vous
assurer de recevoir tous les avantages auxquels vous avez droit.
Dès que l’achat de votre appareil Philips Magnavox est
enregistré, vous avez droit à tous les avantages dont bénéfcient
les possesseurs des produits Philips Magnavox.
^Vérification
de garantie
Enregistrez votre produit dans les
10 ¡ours pour confirmer votre droit à
une protection maximum selon les
termes et les conditions de votre
garantie Philips Magnavox.
I
^ Confimnationl
de possession
Votre carte d’enregistrement de garantie
prouve que vous possédez l’appareil en cas
de vol ou de perte du produit.
Connaissez ces symboles
J7
de
O
AHENTIÛN: POUR PEOUIRE LE RESÛUE DE CHOC ELECTRIQUE, NE PAS ENLEVER
LE COUVERCLE (NI LE PANNEAU ARRIERE). CET APPAREIL NE COMPORTE AUCUNE
PIECE POUVANT TRE REPAREE PAR L’UTILISATEUR. CONFIER SON ENTRETIEN A
Remplissez et renvoyez votre carte d’enregistrement de garantie
jointe à votre appareil sans tarder. Vous bénéficierez de ces
avantages importants.
RISQUE DE CHOC ELECTRIQUE
IME PAS OUVRIR
UN TECHNICIEN QUALIFIE.
^ Enregistrement
I
du modèle
Renvoyez votre carte d’enregistrement de
garantie dès aujourd’hui pour Vous assurer
de recevoir toutes les informations, les
offres et les bonus auxquels vous avez droit
en tant que possesseur de ce modèle.
Cet espace vous est réservé
Inscrivez ci-dessous le numéro de série situé à l’arrière
du bloc. Conservez cette information pour vous y
reporter à l’avenir.
№ de modèle
№ de série
_________________________
A
A
Cet «éclair à pointe de flèche» indique qu’un matériau non
isolé, situé à l’intérieur de l’unité, risque de provoquer un
choc électrique. Pour la sécurité de chacun, nous vous
prions de ne pas retirer le boîtier de ce produit.
Le «point d’exclamation» attire votre attention sur des
sujets risquant de provoquer des problèmes de
fonctionnement et d’entretien si vous ne lisez pas les
informations s’y reportant.
DANGER: ne pas exposer cet équipementa la
PLUIE NI A UNE HUMIDITÉ EXCESSIVE POUR ÉVITER LES
RISQUES D’INCENDIE ET DE CHOC ÉLECTRIQUE.
ATTENTION: Pour éviter les chocs électriques,
introduire la lame la plus large de la fiche dans la borne
correspondante de la prise et pousser jusqu’au fond.
MAC5097
Page 27

L'adresse de PHILIPS
sur le World Wide Web est: http://www.magnavox.com
PHILIPS
MAGNAVOX
Vous félicitant de votre achat,
la ((famille» vous souhaite la bienvenue!
Cher possesseur de produit Philips Magnavox,
Nous vous remercions de la confiance dont vous
témoignez à Philips Magnavox.Vous avez choisi l’un des
produits actuellement sur le marché les mieux construits
et bénéficiant d’un des meilleurs service après-vente. Et
nous mettrons tout en oeuvre pour que vous demeuriez
satisfait de votre produit au cours des nombreuses années
à venir.
A présent membre de la «famille» Philips Magnavox, vous
êtes protégé par l’une des garanties les plus complètes et
l’un des réseaux de service les plus exceptionnels de
l’industrie.
De plus, grâce à votre achat vous recevrez toutes les
informations, offres et tous les bonus auxquels vous avez
droit ainsi qu’un accès facile à notre réseau d’achat à
domicile très pratique.
Et, plus important encore, vous pouvez
compter sur notre dévouement incomparable à vous
apporter une satisfaction totale.
Nous vous souhaitons ainsi la bienvenue tout en vous
remerciant d’avoir investi dans un produit Philips Magnavox.
Sincèrement,
Robert Minkhorst
Président Directeur général
P.S. N’oubliez pas de renvoyer votre carte
d’enregistrement de garantie dans les 10 jours pour
obtenir le maximum de votre produit Philips
Magnavox.Veuillez donc la renvoyer dès maintenant!
Page 28

^iik MM w jÉk m M rfiik HÉ A jÉHÉk ^«uA^i^Lb ifc
CONSEILS DE ScCURITE - À lire avant de faire marcher le matériel
Ce produit a été conçu et fabriqué en conformité avec des normes strictes de qualité et de
sécurité. Il y a, cependant, certains précautions d'installation et d'opération qu'il faut
spécialement observer.
, 1. Lisez les instructions - Il faut lire toutes les instructions de sécurité et d'opération
“g • avant de faire marcher l'appareil.
" 2. Gardez les instructions - Il faut garder les instructions de sécurité et d'opération
pour pouvoir s'y référer à l'avenir.
3. Faites attention aux avertissements - Il faut observer tous les avertissements
collés à l'appareil et écrits dans le manuel d'instructions.
4. Suivez bien les instructions - il faut suivre toutes les instructions d'opération et
d'utilisation.
5. Eau et humidité - L'appareil ne devrait pas être utilisé près de l'eau (par exemple,
près d'un baignoire, d'un lavabo, de l'évier, dans un sous-sol humide ou près d'une
piscine.
6. Chariots et supports - Il faut utiliser cet appareil uniquement avec un chariot ou
une table recommandée par le fabricant.
6A. Il faut déplacer un appareil et chariot avec soin. Un arrêt rapide, une
force excessive et des surfaces inégales pourraient faire retourner
l'appareil et le chariot.
7. Montage au mur ou au plafond - Il faut monter l'appareil à un mur ou plafond
uniquement en suivant les recommandations du fabricant.
8. Aération - Il faut situer l'appareil de telle façon que son emplacement ou sa
position ne gêne pas la bonne aération. Par exemple, il ne faut pas placer l'appareil
sur un lit, un sofa, un tapis ou une autre surface pareille qui risque de boucher les
ouvertures d'aération; ni l'installer dans une bibliothèque ou un coffret qui pourrait
empêcher le flux d'air par les ouvertures d'aération.
9. Chaleur - Il faut situer l'appareil à l'écart des sources de chaleur telles que les
radiateurs, les bouches de chaleur, les fours ou d'autres appareils (y compris les
amplificateurs) qui produisent de la chaleur.
10. Sources d'électricité - Il faut relier l'appareil uniquement à une source
d'électricité du type décrit dans les instructions d'opération ou indiqué à même
l'appareil.
11. Mise à terre ou polarisation
Précautions à prendre de manière à ce que la mise à
terre et la polarisation del'appareil soient respectées. -pj?-
AHENTION: Pour prévenir les chocs polarisée
électriques, introduire la lame la plus large de la fiche dans la borne la plus
large et insérer à fond. Ne pas utiliser cette fiche polarisée avec un
prolongateur, une prise de courant ou une autre sortie de courant, sauf si les
lames peuvent être insérées à fond sans en laisser aucune partie à découvert.
12. Protection du cordon d'alimentation - Il faut faire passer les cordons
d'alimentation de façon à éviter qu'on marche dessus ou que les objets placés
sur eux ou contre eux les coincent. Faire attention en particulier au cordons et
fiches et à l'endroit où ils sortent de l'appareil.
13. Nettoyage - Il faut nettoyer l'appareil uniquement de la façon recommandée
par le fabricant.
14. Lignes de transmission - Il faut situer une antenne extérieure à l'écart des
lignes de transmission d'électricité.
15. Mise à terre de l'antenne extérieure - Si une antenne extérieure est reliée
au récepteur, assurez-vous que le système d'antenne est bien mis à la terre
pour protéger contre les sauts de tension et l'accumulation des charges
d'électricité statique.
La section 810 du National Electric Code, ANSI/NFPA № 70-1984 fournit des
renseignements sur la mise à terre du mât et de sa structure de soutient, du fil
d'entrée à un appareil de décharge/antenne, sur la grosseur des conducteurs de
mise à terre, sur l'emplacement d'un appareil de décharge/antenne, sur la mise
à terre vers les électrodes de terre, ainsi que sur les recommandations sur les
électrodes de terre. Voir la Figure ci-dessous.
16. Périodes d'inactivité - Débranchez l'appareil lorsqu'il ne sera pas utilisé
pendant une longue période de temps.
17. Entrée des objets et des liquides - Évitez de laisser tomber des objets ou
des liquides par les ouvertures de l'enclos.
18. Dommages qu'il faut faire réparer - Il faut faire réparer l'appareil par un
technicien qualifié lorsque:
A. Le cordon d'alimentation en électricité ou la fiche a été endommagé ou
B. On a laissé tomber des objets ou du liquide dans l'appareil ou
C. On a exposé l'appareil à la pluie ou
D. L'appareil ne paraît pas marcher normalement ou présente de grands
changements d'opération ou
E. On a laisseé tomber l'appareil ou endommager le coffret.
19. Service après-vente - L'utilisateur ne doit pas tenter de réparer l'appareil
sauf les réparations décrites dans les instructions d'opération. Toutes les autres
réparations doivent être effectuées par un technicien qualifié.
28
Page 29

CONSEILS DE ÉÉUBITÉ^^ il
Note à l'installateur du système câble:
Ce rappel est fourni pour attirer l'attention de l'installateur du système câble à l'article 820-40 du National Electric Code qui fournit des conseils pour la bonne mise à terre
et, en particulier, spécifie que la terre du câble doit être reliée au système de mise à terre du bâtiment aussi près que possible de l'endroit où le câble y pénètre.
Exemple de mise à terre d‘une antenne
suivant les recommandations du
National Electric Code (NEC)
92/11
EL 4562-1
29
Page 30

GARANTIE LIMITEE
SYSTEME SONORE
Main d’œuvre gratuite pendant un an
Pièces garanties pendant un an
il faut porter ce produit à un centre de service
pour réparations.
QUI EST COUVERT ?
Il faudra présenter une preuve d’achat pour pouvoir bénéficier
des services de la garantie. Le reçu, la facture ou un autre
document portant la date d’achat et qui prouve que vous avez
bien acheté le produit est considéré comme preuve d’achat.
QU’EST-CE QUI EST COUVERT?
La couverture de la garantie entre en vigueur le jour où vous
achetez le produit. Pendant un an à compter de cette date,
toute pièce sera réparée ou remplacée gratuitement et la
main d’œuvre sera sans frais. Après cette période d’un an, les
frais de remplacement ou de réparation des pièces, ainsi que
la main d’œuvre, seront facturés au consommateur.
Toute pièce, y compris une pièce réparée ou remplacée, est
couverte seulement pendant la période de garantie d’origine.
Lorsque la garantie du produit arrive à terme fin, la garantie
de toute pièce remplacée ou réparée est terminée aussi.
QU’EST-CE QUI EST EXCLU DE LA
GARANTIE ?
La garantie ne couvre pas:
• les frais de main d’œuvre pour installer ou préparer, pour
régler les commandes et pour installer ou réparer les
systèmes d’antenne à l’extérieur du produit.
• la réparation du produit et/ou d’une pièce pour cause du
mauvais emploi, d’accident, de réparations non-agréées ou
d’une autre raison qui ne peut pas être contrôlée par
Philips Consumer Electronics Company.
• des problèmes de réception dûs à des conditions de signal,
au câble ou aux systèmes d’antenne à l’extérieur de l’unité.
• un produit qui nécessite des modifications ou adaptations
pour lui permettre de fonctionner dans un pays autre que
le pays pour lequel il a été conçu, fabriqué, agréé et/ou
autorisé, ou la réparation de produits endommagés par
de telles modifications.
• des dommages indirects ou conséquents qui résultent du
produit. (Certains états ou provinces ne permettent pas
30
l’exclusion de dommages indirects ou conséquents. Il est
donc possible que l’exclusion ci-dessus ne s’applique pas
au cas présent. Cela comprend, mais de façon nonlimitative, enregistrements, qu’ils soient protégés ou non
par les lois sur les droits d’auteur.)
• un appareil acheté, utilisé ou réparé en dehors des ÉtatsUnis, de Porto Rico, des îles Vierges ou du Canada ou utilisé
à des fins commerciales ou institutionnelles (y compris mais
non limités aux appareils utilisés pour la location.)
où LE SERVICE EST-IL PROPOSÉ ?
Le service de garantie est disponible dans tout pays où le
produit est distribué officiellement par Philips Consumer
Electronics Company. Dans des pays où Philips ConsumerElectronics Company ne distribue pas le produit, l’organisme
local de service Philips tentera de fournir le service (mais il
pourra y avoir des retards si la bonne pièce ou les manuels
techniques ne sont pas facilement disponibles).
NE PAS OUBLIER DE GARDER...
Veuillez garder le reçu, la facture ou tout autre document
qui prouve l’achat. L’attacher à ce manuel d’emploi et les
garder tous les deux à portée de main. Garder aussi le
carton et l’emballage d’origine pour le cas où il faudra
renvoyer le produit.
AVANT DE FAIRE APPEL AU
TECHNICIEN...
Veuillez consulter le manuel d’instructions avant de faire
appel à un technicien. Un petit réglage d’une des
commandes expliqué dans le manuel d’instructions pourrait
éviter de faire appel à un technicien.
POUR BÉNÉFICIER DU SERVICE DE
GARANTIE AUX É.-U.,AU PUERTO
RICO OU DANS LES ÎLES VIERGES
AMÉRICAINES...
Porter le produit à un centre de service Philips (voir liste
ci-jointe) ou bien à un centre de service agréé pour les
réparations. Lorsque le produit aura été réparé, il faudra
aller le chercher au centre. Les centres ont le droit de
garder les pièces défectueuses.
(Aux É.-U.,au Puerto Rico et aux îles Vierges, toute garantie
implicite, y compris des garanties de vendabilité et d’aptitude
à un but spécifique, est limitée à la durée de cette garantie
explicite. Mais, étant donné que certains états et provinces ne
permettent pas de limité la durée d’une garantie implicite,
cette limitation pourrait ne pas s’appliquer au cas présent.)
POUR BÉNÉFICIER DU SERVICE DE
GARANTIE AU CANADA...
Veuillez contacter Philips à
1-800-661-6162 (Francophone)
1-800-363 7278 (Anglophone)
(Au Canada, cette garantie est consentie à la place de toute
autre garantie. Aucune autre garantie, qu’elle soit explicite
ou implicite, n’est donnée, y compris la garantie Implicite de
vendabilité ou d’aptitude à un but spécifique. Philips n’est en
aucun cas responsable des dommages, qu’ils soit directs ou
Indirects, spéciaux, secondaires ou conséquents, quelles que
soient leurs origines, même en présence d’une mise en
garde contre de tels dommages.)
RAPPEL IMPORTANT...
Veuillez inscrire ci-dessous les numéros de modèle et de
série qui se trouvent sur le produit même. De plus, veuillez
remplir et renvoyer sans délai la carte d’enregistrement de
garantie. Il nous sera ainsi plus facile de vous contacter en
cas de besoin.
№ DE MODELE
№ DE SÉRIE
Cette garantie vous donne des droits légaux spécifiques et vous
pourriez avoir d*autres droits qui varient d'état en état et de
province en province.
Philips Service Company, P.O. Box 555, Jefferson
City,Tennessee 37760 É.-U.,(423) 475-8869
EL4965E005 / MAC 4110/1-97
Page 31

GÉNÉRALITÉS
INFORMATIONS RELATIVES À LA SÉCURITÉ
Généralités
La plaquette signalétique (comportant le numéro
de série) est située à l’arrière de l'appareil.
L'enregistrement n'est autorisé que dans la
mesure où les droits d'auteur ou autres droits
des tiers ne sont pas enfreints.
Cet appareil est conforme aux règlements de la
FCC, chapitre 15. Son fonctionnement est soumis
aux deux conditions suivantes :
- Cet appareil ne doit pro voguer d'interférence
nuisible et
- cet appareil doit accepter toute interférence
captée, Y compris une interférence pouvant
engendrer un fonctionnement indésiré.
Informations relatives à
l'environnement
Tous les matériaux d'emballage superflus ont été
supprimés. Nous avons fait notre possible afin que
l'emballage soit facilement séparable en trois types de
matériaux : carton (boîte), polystyrène expansible
(matériel tampon) et polyéthylène (sachets, feuille de
protection en mousse).
Votre appareil est composé de matériaux pouvant être
recyclés et réutilisés s'il est démonté par une firme
spécialisée. Veuillez observer les règlements locaux sur
la manière de vous débarrasser des anciens matériaux
d'emballage, des piles usagées et de votre ancien
appareil.
Accessoires (Fournis)
Télécommande
Piles (2 X AAA) pour télécommande
Antenne-cadre AM
Câble d'antenne FM
Câble secteur CA
Haut-parleurs Surround Philips Magnavox SS-15R.
Informations relatives à la sécurité
Avant d'utiliser le système, assurez-vous que la
tension de régime indiquée sur la plaquette
signalétique (ou l'indication de tension située près du
sélecteur de tension) de votre système correspond à la
tension secteur locale. Si cela n'est pas le cas,
consultez votre revendeur. La plaquette signalétique
se trouve à l'arrière de l'appareil.
Lorsque le système est mis sous tension, ne le
déplacez pas.
Disposez le système sur une base solide (par ex. un
meuble).
Placez le système dans un endroit suffisamment
ventilé afin d'éviter toute formation de chaleur à
l'intérieur de l'appareil.
N'exposez pas le système à une humidité excessive, à
la pluie, à la poussière ou à toute autre source de
chaleur.
Vous ne devez en aucun cas essayer de réparer vousmême l'appareil car vous risqueriez de perdre vos
droits en matière de garantie.
Si vous déplacez le système d'un environnement froid
vers un environnement chaud, ou si vous le laissez dans
une pièce très humide, de la buée peut se former sur la
lentille du lecteur de CD à l'intérieur du système. Dans ce
cas le lecteur de CD ne fonctionnera pas normalement.
Laissez-le allumé pendant environ une heure, en veillant à
retirer tout disque de l'appareil, jusqu'à ce que la lecture
normale soit à nouveau possible.
Une décharge électrostatique peut provoquer des
symptômes inattendus. Voyez si ces symptômes
disparaissent lorsque vous retirez la fiche d'alimentation et
lorsque vous la réinsérez au bout de quelques secondes.
Pour débrancher complètement le système de
l'alimentation secteur, retirez la fiche CA de la
prise murale.
31
Page 32

OPiriAinONS PREAUBLES
Branchements a I'arriere
AUDIO OUT
32
'• AM AERIAL
FM AERIAL 3(
eg)
"T
Page 33

OPÉRATIONS PRÉALABLES
■ ,:îÎî*-
@ Branchement de l'antenne AM
Connectez l'antenne-cadre fournie à la borne AM AERIAL.
Placez l'antenne loin du système et réglez l’orientation
pour une réception optimale.
@ Branchement de l'antenne-câble
FM
_____________________________
Branchez l'antenne-câble fournie sur la borne FM 300 Q.
Réglez l'orientation de l'antenne FM afin d'obtenir une
réception optimale.
Antenne extérieure
Pour une meilleure réception FM stéréo, connectez une
antenne FM extérieure à la borne FM AERIAL 300 Q à
l'aide d'un câble dipôle 300 Q.
(c) Branchement des haut-parleurs
• Connectez le haut-parleur droit à la borne avant R
(droite), le fil rouge branché sur le + et le fil noir sur
le —.
• Connectez le haut-parleur gauche à la borne avant L
(gauche), le fil rouge branché sur le + et le fil noir
sur le —.
• Serrez la partie dénudée du câble du haut-parleur
comme indiqué ci-dessus.
@ Branchement des haut-parleurs
Surround arrière
• Connectez les haut-parleurs Surround fournis (modèle
SS-15R) pour augmenter l'effet Surround. Les hautparleurs Surround doivent être placés à la hauteur
d'écoute normale de l'auditeur ou bien montés au mur
à l'arrière de la pièce.
• Branchez les fils noirs ou non repérés sur les bornes
noires BEAR et les fils blancs ou repérés sur les
bornes grises REAR.
__________________
(D Branchement d'un autre appareil
sur votre système
Vous pouvez connecter les sorties audio (OUT) gauche et
droite du téléviseur, du magnétoscope, du Laser Disc ou
du lecteur DVD aux prises AUX IN situées à l'arrière du
système.
_________________
vaisseaux spatiaux, etc.). Suivez les instructions fournies
avec l'unité subwoofer.
(G) Branchement sur secteur CA
Lorsque tous les autres branchements auront été
effectués, connectez la prise secteur CA au système et
dans la prise murale.
_________
Mise en place des piles dans la
télécommande
• Insérez les piles (Type
R03 ou AAA) dans la
télécommande de la
façon indiquée dans le
logement de la
télécommande.
• Pour éviter tout
dommage provenant
d'une éventuelle fuite
des piles, il est recommandé de les retirer de la
télécommande lorsqu'elles sont arrivées à épuisement
ou si elles ne doivent pas être utilisées pendant
longtemps. Lorsque vous les remplacez, utilisez
uniquement des piles de type R03 ou AAA.
________________
déver
rouiller verrouiller
(F) Branchement Subwoofer Out
Vous pouvez connecter en option un subwoofer actif ou
un subwoofer actif sans fil à la borne SUBWOOFER OUT.
Le système sans fil a recours à un émetteur radio
fréquence. Le subwoofer reproduit uniquement l'effet des
sons graves (par ex. des explosions, le grondement des
_________
Remarques concernant la télécommande :
- Sélectionnez la source que vous désirez commander
en appuyant sur l'une des touches de sélection de
source sur la télécommande (par ex. CD, TUNER, TAPE
1/2 ou AUX).
- Sélectionnez ensuite la fonction désirée (PLAY, NEXT,
etc.).
33
Page 34

COMMANDES
10
11
12
13
14
15
16
II
18
19
26
A
25
U
18
15
18
Page 35

Il i
Commandes sur l'appareil et sur la
télécommande
[T]
STANDBY«ON
- pour mettre l'appareil sous tension ou le
commuter en mode de veille.
- pour mémoriser automatiquement des émetteurs en
maintenant la touche enfoncée pendant 2 secondes
(uniquement en mode de veille ou de
démonstration).
d] RECORD
- pour faire démarrer l'enregistrement sur la
platine cassette 2 uniquement.
[H REVERSE MODE (INVERSION DE DÉFILEMENT)
- pour sélectionner les différents modes de lecture
sur la platine cassette 2 uniquement.
[4] CLOCK*TIMER
- pour visualiser l'horloge, le réglage horloge ou la
minuterie.
[5] SOURCE - pour sélectionner les sources suivantes:
CD (CD 1»2*3)
TUNER (BAND) . pour sélectionner le mode radio.
TAPE (TAPE 1*2) pour sélectionner le mode
AUX (VIDED)
_______________________
.......
pour sélectionner le mode CD.
Lorsque le CD est en mode
arrêt; pour sélectionner le
logement de disque 1, 2 ou 3.
En mode Tuner : pour
sélectionner la gamme d'ondes
FM ou AM.
cassette. Lorsque la cassette
est en mode arrêt : pour
sélectionner la platine cassette
1 ou 2.
.......
... pour sélectionner la source
externe (par ex. son DVD, TV,
Laser Disc ou magnétoscope).
[U AFFICHEUR
- pour visualiser le réglage actuel du système.
[7] PLATEAUDUCARRDUSELÀCD
g 3 CD DIRECT PLAY
- pour sélectionner la lecture d'un CD du carrousel,
[g] CHANGEMENT DE DISOUE
- pour changer le(s) CD.
m DPEN-CLDSE
- pour ouvrir et fermer le plateau du carrousel à
CD.
01 DYNAMIC BASS BDDST (DBB)
- pour sélectionner le niveau de suramplification
des fréquences basses (Beat, Punch, Blast).
AFFICHEUR DIGITAL SDUND CDNTRDL
- pour visualiser le réglage DSC sélectionné.
(1 DIGITAL SDUND CDNTRDL (DSC)
- pour sélectionner les ambiances sonores désirées:
OPTIMAL, JAZZ, CLASSIC, ROCK ou TECHNO.
M PRDGRAM
- pour programmer une plage de CD en mode CD
ou des présélections en mode syntoniseur (tuner).
[il
VDLUME
- pour ajuster le niveau de volume.
M CASQUE ii
- pour brancher une prise de casque.
[17] DUBBING
- pour copier une cassette à vitesse normale ou
élevée.
SÉLECTIDN DE MDDE
« SEARCH ►► (◄-< TUNING ►►)
pour CD
..........
pour la recherche en sens arrière/
avant.
pour TUNER .. pour accorder sur une fréquence radio
plus basse ou plus élevée.
pour TAPE
......
pour rebobiner ou bobiner sur la
platine cassette 2 uniquement.
STDP ■ (CLEAR)
pour CD
..........
pour arrêter la lecture d'un CD ou
effacer un programme.
pour TUNER .. pour stopper la programmation.
pour TAPE
PLAY ► / PAUSE II (SIDEA*B)
pour CD
pour TAPE
PREV !◄ / NEXT M (A PRESET T)
pour CD
pour TUNER .. pour sélectionner une présélection en
DPEN
- pour ouvrir la platine cassette 2.
PLATINE CASSEHE 2
PLATINE CASSETTE 1
DPEN
- pour ouvrir la platine cassette 1.
REPEAT
- pour répéter la lecture d'une plage d'un CD.
SHUFFLE
- pour lire tous les disques disponibles et leurs
MUTE (SDURDINE)
- pour mettre le son momentanément en sourdine
......
pour arrêter la lecture ou
l'enregistrement.
..........
pour démarrer ou interrompre la
lecture.
......
pour démarrer la lecture. En cas de
lecture en mode tape 2, pour changer
de face.
..........
pour sauter au début de la plage en
cours ou de la plage précédente/
suivante.
mémoire.
plages dans un ordre aléatoire.
ou pour le remettre sous tension.
CD
- pour commuter l'appareil en mode de veille.
35
Page 36

UTiySATION DE L'APPAREIL
Easy Set (uniquement en mode de veille ou de
démonstration)
EASY SET vous permet de mettre automatiquement en
mémoire tous les émetteurs radio disponibles dans une
bande de fréquence particulière (EM«AM) (Reportez-vous
au paragraphe "Easy Set" dans le chapitre
SYNTONISEUR).
Mise sous tension du système___________
• Appuyez sur la touche STANDBY*ON (sur le système
uniquement), CD, TUNER, TAPE ou AUX.
Vous pouvez également mettre le système sous tension
en appuyant sur l'une des touches 3 CD DIRECT PEAY.
Important:
Avant d'utiliser le système pour la première fois,
effectuez d'abord complètement les opérations
préliminaires.
Mode de démonstration
L'appareil dispose d'un mode de démonstration
présentant les différentes fonctions offertes. Chaque
_______________
fois que l'appareil est mis sous tension à partir de
la prise murale, le mode de démonstration
commencera automatiquement.
Remarques:
- Pendant le mode de démonstration, si vous appuyez
sur n'importe quelle touche de source (ou la touche de
veille) le système commutera sur le mode sélectionné
(ou en veille).
36
- Lorsque le système est commuté sur le mode de veille,
le mode de démonstration recommencera 5 secondes
plus tard.
Annulation du mode démonstration
• Maintenez enfoncée la touche STOP ■ (uniquement
sur le système) pendant 3 secondes pour arrêter la
démonstration.
-* Le mode démonstration sera mis hors tension de
façon définitive.
Commutation du système en mode de
veille
_______________________________
• Appuyez à nouveau sur STANDBY«ON.
Sélection de la source
• Appuyez sur la touche de sélection de source
souhaitée : CD, TUNER, TAPE ou AUX
E'afficheur indique la source sonore sélectionnée.
Remarque:
- Pour une source externe, assurez-vous que vous avez
connecté les sorties OUT audio gauche et droite de
l'équipement externe (TV, magnétoscope. Laser Disc
ou lecteur DVD) aux bornes d'entrée AUX IN.
_________________
Page 37

UTIUSATION DE L'APPAREIL
Contrôle du son
REGLAGE DU VOLUME
Ajustez VOLUME pour augmenter ou diminuer le niveau
sonore.
Écoute personnelle
Branchez la prise du casque sur la prise iTii en façade de
l'appareil. Les haut-parleurs seront alors en sourdine.
CONTRÔLE NUMÉRIQUE DU SON (DSC)
La fonction DSC vous permet de bénéficier d'effets
sonores spéciaux préréglés par égaliseur pour vous
fournir la meilleure reproduction musicale qui soit.
• Appuyez sur DIGITAL SOUND CONTROL (DSC) pour
sélectionner OPTIMAL, JAZZ, CLASSIC, ROCK ou
TECHNO
-*• L'afficheur Digital Sound Control s'allumera en
fonction de votre sélection. Au réglage Optimal,
l'afficheur ne s'allume pas.
--Les messages "DPiIfIRL, JDZZ, CLRDDID,
s'afficheront.
Sélection automatique DSC-DBB
Le meilleur réglage de suramplification des graves est
automatiquement produit pour la sélection DSC
appropriée. Vous pouvez également sélectionner
manuellement le réglage DBB convenant le mieux à votre
environnement d'écoute.
DSC Selection
Optimal
Jazz
Classic
Rock
Techno
DYNAMIC BASS BOOST (DBB)
DBB Selection
Punch
Punch
Beat
Blast
Blast
Le mode DBB accentue la réponse des graves.
• Appuyez brièvement sur DBB pour sélectionner les
différents niveaux de suramplification.
-* La touche DBB s'allume.
Les messages
Putte H ou SL
ns
T
s'affichent.
DBB
DBB
■■
DBB
■■■
DBB
HH
Bemarque:
- Certains CD ou certaines cassettes peuvent être
enregistrés en modulation élevée. Ceci peut entraîner
une distorsion à un volume élevé. SI c'était le cas, il
est conseillé de neutraliser l'effet Incredible Surround,
de sélectionner un niveau DBB inférieur ou de réduire
le volume.
MUTE (uniquement sur la télécommande)
Cette fonction vous permet de mettre temporairement le
son du système hors circuit sans pour autant désactiver
le système lorsque vous voulez un moment de silence.
• Appuyez sur MUTE sur la télécommande pour
supprimer le son.
— "fiuiC" s'affiche.
• Réappuyez sur MUTE sur la télécommande ou
augmentez le niveau de la commande VOLUME pour
réactiver le son.
DBB
OFF
Neutralisation de la suramplification des graves
BEAT
PUNCH BLAST
• Appuyez brièvement sur DBB jusqu'à ce que la
lumière de la touche DBB s'éteigne.
— Les message "SSl OfT" s'affichent.
37
Page 38

ÎiCitÛR DE DISQUES COMPACTS
Mise en garde !
1) Cet appareil est conçu pour les CD traditionnels.
N'utilisez pas d'accessoires comme les anneaux
stabilisateurs de disques ou les produits de
nettoyage pour CD, etc. car ils risqueraient
d'endommager le mécanisme du lecteur.
2) N'introduisez pas plus d'un disque dans chaque
logement.
3) Lorsqu'un ou plusieurs CD est (sont) introduit(s)
dans le changeur, ne retournez pas l'appareil et
ne le remuez pas car vous risqueriez
d'endommager le mécanisme du changeur.
Vous pouvez mettre en place jusqu'à trois disques
dans le changeur de CD pour une lecture continue.
Insertion de disques dans le changeur
1 Appuyez sur CD pour sélectionner le mode CD.
2 Appuyez sur 0PEN*CL0SE.
Le compartiment à CD s'ouvre.
3 Insérez un CD face imprimée sur le dessus dans le
logement de droite.
• Vous pouvez mettre en place un autre disque dans le
logement de gauche.
• Pour mettre en place le troisième disque, appuyez sur
la touche DISC CHANGE
Le carrousel à CD tournera jusqu'à ce que le
plateau vide se trouve sur la droite prêt à être
chargé.
-*• La lecture commencera toujours par le disque situé
à droite.
38
Page 39

LECTEUR DE DISQUES COMPACTS
4 Appuyez sur OPEN*CLOSE pour fermer le
compartiment à CD.
^ Le nombre total de plages ainsi que la durée de
lecture du dernier disque sélectionné apparaîtront
sur l'afficheur.
Touche 3 CD Direct Play
• Vous pouvez lire directement un CD en appuyant sur la
touche correspondante 3 CD DIRECT PLAY (1 - 3). Le
lecteur de CD s'arrêtera à la fin de la lecture du disque
sélectionné.
Lorsque la touche est allumée, cela signifie qu'un
disque est en place dans le plateau du changeur.
Lecture d'un CD
1 Appuyez sur PLAY ► pour faire démarrer la lecture.
Le numéro de logement du disque, le numéro de
plage et la durée de lecture écoulée de la plage en
cours apparaissent sur l'afficheur.
— La DEL de la touche 3 CD Direct Play
correspondante clignote.
• Pour interrompre la lecture appuyez sur PAUSE II.
— La durée de lecture clignote.
• Pour reprendre la lecture, réappuyez sur PLAY ► .
2 Pour arrêter la lecture, appuyez sur STOP ■ .
Remarque:
- Tous les disques disponibles seront lus une fois puis la
lecture s'arrêtera. Lorsque le lecteur a terminé la
lecture, l'appareil commute automatiquement en mode
de veille au bout de 15 minutes si aucune touche n'a
été enfoncée.
______________________
________________
Changement de disque
Vous pouvez changer les 2 disques extérieurs alors que le
troisième disque intérieur est en mode d'arrêt ou de
lecture.
1 Appuyez sur DISC CHANGE
-* Le compartiment à CD glisse vers l'extérieur.
2 Replacez les disques dans les logements gauche et
droit.
• Si vous réappuyez sur DISC CHANGE pendant la
lecture, le CD s'arrêtera.
— Le carrousel à CD tournera jusqu'à ce que logement
interne se trouve à main droite et prêt à être
changé.
3 Appuyez sur OPEN*CLOSE pour fermer le
compartiment à CD.
Sélection d'une plage spécifique
Sélection d'une plage spécifique en mode arrêt
1 Appuyez sur PREV N ou NEXT H jusqu'à ce que la
plage désirée apparaisse sur l'afficheur.
2 Appuyez sur PLAY ► pour faire démarrer la lecture.
^ Le numéro de plage sélectionné ainsi que la durée
de lecture écoulée apparaissent sur l'afficheur.
Sélection d'une plage spécifique en mode lecture
1 Appuyez sur PREV N ou NEXT ► ! jusqu'à ce que la
plage désirée apparaisse sur l'afficheur.
— Le numéro de la plage sélectionnée ainsi que la
durée de lecture écoulée apparaîtront sur
l'afficheur.
• Si vous appuyez sur PREV !◄ une fois vous
reviendrez au début de la plage en cours et la lecture
de cette plage reprendra.
_________
Recherche d'un passage spécifique
pendant la lecture
• Maintenez enfoncée la touche •
repérer le passage désiré.
-* Le volume du son est réduit.
• La lecture s'effectue à nouveau normalement dès que
vous relâchez la touche ◄ ◄ ou
Programmation de plages
Programmer des plages du CD inséré dans l'appareil est
possible en mode arrêt. L'afficheur indique le nombre
total de plages mémorisées dans le programme. Vous
pouvez introduire dans la mémoire jusqu'à 40 plages
dans un ordre quelconque. Au-delà de cette limite,
l'afficheur indique "PROOrtnt'l TULL" (Programme
saturé) si vous tentez de mémoriser une autre plage.
1 Insérez les disques désirés dans les logements du
carrousel.
2 Appuyez sur PROGRAM pour faire démarrer la
programmation.
— L'indication PROGRAM clignote sur l'afficheur.
3 Appuyez sur la touche CD (CD 1*2*3) pour
sélectionner le disque.
4 Appuyez sur PREV !◄ ou NEXT ►! pour sélectionner
la plage désirée.
5 Appuyez sur PROGRAM pour mémoriser la plage.
• Répétez les opérations 5 à 5pour mémoriser d'autres
disques et plages.
6 Appuyez sur STOP ■ une fois pour mettre fin au
mode de programmation.
Le nombre total de plages programmées ainsi que
la durée totale de lecture apparaîtront sur
l'afficheur.
____________________
loul jusqu a
______________
39
Page 40

LECTEUR DE DISQUES COMPACTS
Remarques:
- Si la durée totale de lecture dépasse "3 3 S 5 " ou si
le numéro de l’une des plages programmées est
supérieur à 40, le message - - - "apparaîtra sur
l'afficheur à la place de la durée de lecture totale.
- Pendant la programmation, si aucune touche n 'est
enfoncée dans les 20 secondes, le système quittera
automatiquement le mode de programmation.
Lecture du programme
1 Appuyez sur PLAY ► pour faire démarrer la lecture
________________
du programme.
Le message ''i
PMI"!” apparaîtra sur
l'afficheur.
-* Le numéro de la plage ainsi que la durée de lecture
écoulée de la plage en cours apparaîtront sur
l'afficheur.
• Si vous appuyez sur REPEAT pendant la lecture du
programme, la plage en cours sera sans cesse lue.
Les indications REPEAT et PROGRAM apparaissent
sur l'afficheur.
2 Appuyez sur STOP ■ pour arrêter la lecture du
programme.
Remarque:
- Si vous appuyez sur l'une des touches 3 CD DIRECT PLAY,
l'appareil procédera à la lecture du disque ou de la plage
sélectionnée et le programme mémorisé sera
provisoirement ignoré. L'indication PROGRAM disparaîtra
également provisoirement de l'afficheur et ne
réapparaîtra qu'à la fin de la lecture du disque
sélectionné.
40
Survol du programme
Le survol du programme est uniquement possible en
mode arrêt.
• Appuyez sur PREV W ou NEXT ► ! plusieurs fois afin
de passer en revue les plages programmées.
• Appuyez sur STOP ■ pour quitter le mode de survol
du programme.
Effacement du programme (en mode arrêt)
Appuyez sur CLEAR sur l'appareil.
Le message "PPi
sur l'afficheur.
Remarque:
- Le programme est également effacé lorsque l'appareil
est débranché du secteur. Si le carrousel à CD est
ouvert, les plages faisant partie des deux logements
avant seront effacées et l'indication 'EL ERRE U"
apparaîtra sur l'afficheur.
пrпп^^ r
UUI
V Ml I L.
LEnREU" apparaîtra
Lecture dans un ordre aléatoire
(uniquement sur la télécommande!
Shuffle permet la lecture de tous les disques disponibles
et de leurs plages dans un ordre aléatoire. Cette fonction
peut également être utilisée lors de la programmation
des plages.
Pour lire dans un ordre aléatoire tous les disques
et toutes les plages
1 Appuyez sur SHUFFLE.
— Le message "GMuTrEP" est affiché.
L'indication SHUFFLE, ainsi que le disque et la
plage sélectionnés au hasard apparaissent sur
l'afficheur.
__________________
• Les disques et les plages seront à présent lus dans
un ordre aléatoire jusqu'à ce que vous appuyez sur
STOP ■
• Si vous appuyez sur REPEAT pendant la lecture
aléatoire, la plage en cours sera sans cesse lue.
Les indications REPEAT et SHUFFLE apparaissent
sur l'afficheur.
2 Appuyez à nouveau sur SHUFFLE pour reprendre la
lecture normale.
L'indication SHUFFLE disparaît de l'afficheur.
Remarque:
- Tous les disques disponibles seront lus une fois puis la
lecture s'arrêtera.
Repeat (répétition) (uniquement sur la
télécommande)
Cette fonction permet de lire plusieurs fois la plage en
cours.
1 Appuyez sur REPEAT pendant la lecture.
-* Le message "MCPCRT TRREE" apparaît sur
l'afficheur.
-* L'indication REPEAT ainsi que la plage sélectionnée
apparaissent sur l'afficheur.
• La plage sera lue plusieurs fois jusqu'à ce que vous
appuyez sur STOP ■.
2 Appuyez à nouveau sur REPEAT pour reprendre la
lecture normale.
L'indication REPEAT disparaît de l'afficheur.
__________________________________
Page 41

Easy Sat (uniquement en mode de veille ou de
démonstration!
EASY SET vous permet de mettre automatiquement en
mémoire tous les émetteurs radio disponibles dans une
bande de fréquence particulière (FM«AM).
___________________________________
Remarques:
- Lorsque la fonction EASY SET est utilisée, tous les
émetteurs précédemment mémorisés seront effacés.
-Le dernier émetteur présélectionné apparaîtra sur
l'afficheur lorsque la fonction Easy Set sera achevée.
SYNTONISEUR
Accord sur les émetteurs
1 Appuyez sur TUNER pour sélectionner le mode TUNER
(SYNTONISEUR).
-* Le message "TiltJER" apparaît sur l'afficheur.
Le numéro de présélection, la fréquence ainsi que
la gamme d'ondes apparaissent sur l'afficheur.
2 Appuyez à nouveau sur TUNER (BAND) pour
sélectionner la gamme d'ondes désirée : FM ou AM.
3 Appuyez sur TUNING ou ► ► pendant plus d'une
seconde puis relâchez la touche.
— L'afficheur indique "bCnRCM" jusqu'à ce qu'un
émette'ur de puissance suffisante soit trouvé.
• Répétez cette procédure jusqu'à atteindre l'émetteur
désiré.
• Afin de procéder à l'accord sur un émetteur faible,
appuyez brièvement sur TUNING ou ► ► jusqu'à
ce que l'afficheur indique la fréquence voulue et/ou
jusqu'à ce qu'une réception optimale soit obtenue.
• Maintenez enfoncée pendant 2 secondes la touche
STANDBY*ON (sur l'appareil uniquement).
— TH5b' 5CT" s'affiche suivi de "TUiJCR".
La fonction "Easy set" commencera par la dernière
bande de fréquence active.
Tous les émetteurs radio disponibles et de
puissance de signal suffisante seront mémorisés ou
bien jusqu'à 40 adresses de présélection seront
remplies.
41
Page 42

SYNTONISEUR
Mémorisation de présélections__________
Vous pouvez mémoriser jusqu'à 40 émetteurs. Lorsqu'une
présélection est choisie, son numéro apparaît sur
l'afficheur ainsi que la fréquence.
Programmation automatique
1 Appuyez sur TUNER.
2 Appuyez à nouveau sur TUNER (BAND) afin de
sélectionner la gamme d'ondes désirée : FM ou AM.
3 Appuyez sur PROGRAM pendant plus d'une seconde.
-* L'indication PROGRAM commence à clignoter et
'lOMTu' apparaît sur l'afficheur.
-* Tous les émetteurs disponibles seront
automatiquement mémorisés. La fréquence ainsi
que le numéro de présélection seront brièvement
affichés.
L'appareil cesse la recherche dès qu'il a mémorisé
tous les émetteurs ou si la mémoire des 40
présélections est saturée.
L'appareil reste accordé sur le dernier numéro de
présélection mémorisé.
• Répétez la procédure ci-dessus pour mémoriser
d'autres présélections pour une autre gamme d'ondes.
Avant de le faire, souvenez-vous du numéro de
présélection suivant disponible. Sinon, certains
émetteurs présélectionnés pourraient être effacés.
Remarques:
- Vous pouvez arrêter la programmation automatique en
appuyant sur PROGRAM ou STOP ■ .
- Si vous désirez garder une partie des anciennes
présélections, par exemple les présélections I à 9,
sélectionnez la présélection 10 avant de débuter la
programmation automatique : à présent seuls les
numéros compris entre 10 et 40 seront programmés.
42
Programmation manuelle
1 Appuyez sur TUNER.
2 Appuyez sur TUNER (BAND) pour sélectionner la
gamme d'ondes désirée : FM ou AM.
3 Appuyez sur PROGRAM pendant moins d'une
seconde.
L'indication PROGRAM, la fréquence et le numéro
de présélection commencent à clignoter.
— Le numéro de présélection suivant disponible
s'affichera pour la sélection.
4 Appuyez sur TUNING ou ►► pour procéder à
l'accord sur la fréquence désirée.
• Lorsque les 40 présélections auront été mémorisées,
aucun numéro de présélection ne sera affiché.
Le message "Pf?uGf?nfl PULL" (Programme
saturé) apparaîtra sur l'afficheur.
• Si vous désirez mémoriser l'émetteur sous un autre
numéro de présélection, appuyez sur PRESET ▼ ou i
pour sélectionner le numéro de présélection désiré.
5 Appuyez à nouveau sur PROGRAM.
-* L'indication PROGRAM cesse de clignoter et
l'émetteur est mémorisé.
• Répétez la procédure ci-dessus pour mémoriser
d'autres émetteurs.
Remarques:
- Vous pouvez arrêter la procédure de programmation
manuelle en appuyant sur STOP ■ .
- Pendant la programmation, si aucune touche n 'est
enfoncée dans les 20 secondes, l'appareil sortira
automatiquement du mode de programmation.
Accord sur les émetteurs
présélectionnés
• Appuyez sur PRESET ▼ ou A pour sélectionner le
numéro de présélection désiré.
— Le numéro de présélection, la fréquence et la
gamme d'ondes apparaissent sur l'afficheur.
_________
Page 43

■ PLATINE CASSEHE
3a (Pour platine cassette 2 uniquementl
Appuyez sur SIDE A«B (ou à nouveau sur PLAY ► sur
la télécommande) pour commuter la lecture entre les
faces A et B de la cassette.
— L'indication ◄ ou ► apparaît sur l'afficheur suivant
la face sélectionnée.
3b (Pour platine cassette 2 uniquementl
Appuyez sur REVERSE MODE pour sélectionner les
différents types de mode de lecture (voir également
lecture autoreverse).
4 Appuyez sur STOP ■ pour arrêter la lecture.
Remarques:
- Il faut commencer la lecture sur la platine cassette 2
avant de changer la face A et B.
- Lorsque la lecture de la cassette est terminée,
l'appareil commute automatiquement en mode de
veille après 15 minutes si aucune touche n'est
enfoncée.
Lecture autoreverse
Introduction d'une cassette
• Appuyez sur OPEN.
• Le volet de la platine cassette
s'ouvre.
• Insérez une cassette, côté
ouvert vers le bas et bobine
pleine vers la gauche.
» Refermez le volet de la platine
cassette.
Lecture d'une cassette
1 Appuyez sur TAPE pour sélectionner le mode
CASSETT.
— "ÎRPC I" ou "ÎRPP P" apparaît sur l'afficheur.
• Appuyez à nouveau sur TAPE pour sélectionner la
platine cassette 1 ou la platine cassette 2.
2 Insérez la cassette dans la platine cassette
sélectionnée.
3 Appuyez sur PLAY ► pour faire démarrer la lecture.
(uniquement sur la platine cassette 2)
• Appuyez sur REVERSE MODE pour sélectionner les
différents modes de lecture.
....................
.................
ÇZD
..................
enregistrement ou lecture sur une
face de la cassette. La cassette
s'arrête à la fin d'une face.
enregistrement ou lecture sur les
deux faces de la cassette. La cassette
s'arrête alors.
lecture continue sur les deux faces de
la cassette jusqu'à un maximum de 20
fois par face sauf si vous appuyez sur
la touche STOP ■ .
________________
43
Page 44

PLATINE CASSEHE
Rebobinage/bobinage
(uniquement sur la platine cassette 2)
En mode arrêt
1 Vous pouvez rebobiner ou bobiner la bande en
appuyant respectivement sur ◄ ◄ ou
"«< ou >»" apparaîtront sur l'afficheur selon la
touche enfoncée.
La cassette s'arrêtera automatiquement à la fin du
rebobinage ou du bobinage.
2 Appuyez sur STOP ■ pour arrêter le rebobinage ou
le bobinage.
AUX
Pendant la lecture
• Maintenez enfoncé respectivement « ou ► ► jusqu'à
ce que le passage désiré soit localisé.
Pendant la recherche, le son est fortement diminué.
Dès que vous relâchez la touche ◄ ◄ ou la
lecture de la cassette se poursuit.
Remarques:
- Pendant le rebobinage ou le bobinage d'une cassette,
Il est possible de sélectionner une autre source (par
ex. CD, TUNER ou AUX).
- Avant utilisation, vérifiez que la bande n'est pas lâche
à l'aide d'un crayon. Une bande lâche pourrait se
coincer ou se casser dans le mécanisme.
“ Les cassettes de type C-120 sont extrêmement fines et
peuvent facilement se déformer ou être
endommagées. Elles ne sont pas recommandées pour
cet appareil.
- Rangez les cassettes à température ambiante en
veillant à les éloigner des champs magnétiques (par
ex. les transformateurs, les téléviseurs ou les
enceintes de haut-parleur).
Sélection d'un équipement externe
Si vous avez branché les sorties audio de l'appareil
externe (téléviseur, magnétoscope. Laser Disc ou lecteur
DVD) sur les prises AUX IN, vous percevrez une
amélioration de la sonorité depuis le système.
• Appuyez sur AUX pour sélectionner le mode externe.
— "nu;;" apparaît sur l'afficheur.
Remarque:
- Toutes les fonctions de contrôle du son (par ex. DSC,
DBB, etc.) peuvent être sélectionnées.
44
Page 45

■ ï*
Remarques:
“ Pour l'enregistrement, utilisez uniquement des
cassettes IEC de type I (cassette normale) ou IEC de
type II (Chrome).
- La bande est fixée en ses deux extrémités par une
bande amorce. Au début et à la fin de la cassette,
aucun enregistrement ne sera possible pendant six à
sept secondes.
- Le niveau d'enregistrement est réglé
automatiquement, quelle que soit la position de
VOLUME ou DBB.
- Afin d'éviter tout enregistrement accidentel, cassez
l'ergot situé sur le côté gauche de la cassette que
vous souhaitez protéger.
- Si 'üMEEE' rnPE " apparaît sur l'afficheur, l'ergot de
protection a été cassé. Placez un morceau de ruban
adhésif transparent sur l'ouverture. Ne recouvrez pas
la détection de cassette CrO^ lorsque vous recouvrez
l'emplacement de l'ergot.
Enregistrement à partir d'autres sources
(uniquement sur la platine cassette 2)
I Appuyez sur TAPE pour sélectionner la platine
cassette 2.
l Insérez une cassette vierge dans la platine cassette 2
côté ouvert vers le bas.
) Appuyez sur REVERSE MODE pour sélectionner le
mode de lecture ( ^ ou ).
l Appuyez sur CD, TUNER ou AUX.
• Faites démarrer la lecture de la source sélectionnée.
» Appuyez sur RECORD pour faire démarrer
l'enregistrement.
L'indication REC commence à clignoter.
________________
ENREGIS1KEMENT
6 Appuyez sur STOP ■ pour arrêter l'enregistrement.
Remarques:
- Seul le mode ^ ou est disponible pendant
l'enregistrement.
- Pendant l'enregistrement il n 'est pas possible
d'écouter une autre source sonore.
Copie de cassettes
(de la platine cassette 1 vers la platine cassette 2)
1 Appuyez sur TAPE afin de sélectionner la platine
cassette 2.
2 Insérez la cassette préenregistrée dans la platine
cassette 1 et une cassette vierge dans la platine
cassette 2.
^ Assurez-vous que la bobine pleine de la cassette de
la platine cassette 1 se trouve bien à gauche.
3 Appuyez une fois sur DUBBINO pour la copie à
vitesse normale ou deux fois (dans les 2 secondes)
pour une copie à vitesse élevée.
L'indication "MuPnnL " (vitesse normale) ou
"Ff
' (vitesse élevée) apparaîtra sur l'afficheur
L'indication HSD apparaîtra sur l'afficheur pour
indiquer la copie à vitesse élevée.
La copie démarrera immédiatement.
-* L'indication REC commence à clignoter.
Appuyez sur STOP ■ pour arrêter la copie.
45
Page 46

ENREGISTREMENT HORLOGE
Remarques:
-Àia fin de face A, passez à la face B et répétez la
procédure.
-La copie de cassettes n 'est possible que de la platine
S
cassette I vers la platine cassette 2.
- Pour une bonne copie, employez des cassettes de
même longueur.
- Pendant la copie à vitesse élevée en mode Cassette,
le son est réduit au minimum.
- Vous pouvez commuter sur une autre source sonore
pendant la copie.
Synchronisation du début de
Tenregistrement du CD
1 Mettez en place une cassette vierge dans la platine
cassette 2 et un disque dans le logement du changeur.
2 Appuyez sur CD pour sélectionner le mode CD.
• Vous pouvez programmer les plages dans l'ordre
d'enregistrement souhaité (Reportez-vous au
paragraphe "Programmation de plages"). Si vous ne
désirez pas de programmation, les plages seront
enregistrées selon le disque sélectionné.
3 Appuyez sur RECORD pour faire démarrer
l'enregistrement.
L'indication REC commence à clignoter.
• La lecture du CD commencera automatiquement.
4 Appuyez sur STOP ■ pour arrêter l'enregistrement.
________________
Enregistrement à une touche
• Pour l'enregistrement à une touche, dès que vous
appuyez sur RECORD, la source en cours sera
enregistrée sur la platine cassette 2.
1 Mettez en place une cassette vierge dans la platine
cassette 2.
2 Appuyez sur RECORD.
L'indication REC commence à clignoter.
3 Appuyez sur STOP ■ pour arrêter l'enregistrement.
Remarque:
- Lorsque vous appuyez sur RECORD en mode TAPE, le
message 'SELEC T ETHER SEEREE "apparaîtra
sur l'afficheur. Un enregistrement à une touche n'est
pas possible en mode TAPE.
___________
Affichage de l'heure
Vous pouvez voir l'heure (si elle est réglée) en veille dans
n'importe quelle source sonore. Elle s'affichera pendant
sept secondes.
• Appuyez brièvement sur CLOCK»TIMER.
— " lu AM" (heure actuelle) s'affichera.
s'affichera si l'horloge n'a pas été
réglée.
Réglage de l'horloge
L'appareil est doté d'une horloge 12 heures, par ex.
ic' OO AM ou !c':00 PM. Avant de procéder au
réglage de l'horloge, vous devez être en mode affichage
de l'heure.
1 Appuyez sur CLOCK'TIMER pour sélectionner le
mode d'horloge.
" le':DO AM" ou l'heure actuelle commence à
clignoter.
-* "-44 _ ^ 1-4 , H , ■ " s'allument.
2 Réglez l'heure avec les touches « ou
3 Réglez les minutes à l'aide de N ou ►!.
4 Appuyez à nouveau sur CLOCK*TIMER pour
mémoriser le réglage.
L'horloge se met en marche.
• Pour sortir sans mémoriser le réglage, appuyez sur
STDP ■
46
Remarques:
- Pendant le réglage de l'horloge, le système sortira
automatiquement du mode réglage d'horloge si
aucune touche n'est enfoncée pendant 90 secondes.
- En cas d'interruption d'alimentation, le réglage de
l'horloge est effacé.
Page 47

Réglage de la minuterie
L'appareil peut être mis automatiquement sous tension
en mode CD, TUNER ou TAPE 1 à une heure
déterminée. Il peut également servir à vous réveiller.
Le système commutera en mode de veille après une
demi-heure si aucune touche n'est enfoncée.
Avant de régler la minuterie, assurez-vous que
l'horloge est réglée correctement.
La minuterie doit être remise à zéro ou remise en
marche pour chaque heure prédéterminée.
Le volume de la minuterie est celui du dernier réglage avant que l'appareil ne commute en mode de veille.
Maintenez enfoncé CLOCK«TIMER pendant plus de 2
secondes pour sélectionner le mode timer.
"ON' ic':ÜÜ AM" ou le dernier réglage de
minuterie commence à clignoter. L'indication TIMER
apparaît sur l'afficheur.
La dernière source sélectionnée est allumée tandis
que les autres sources disponibles clignotent.
, H , H , ■ " s'allument.
Appuyez sur CD, TUNER ou TAPE pour sélectionner
la source désirée.
Avant de sélectionner le mode CD ou CASSETTE,
assurez-vous qu'un CD ou une cassette se trouvent
bien dans le tiroir du lecteur de CD ou dans le
compartiment de la platine cassette 1.
Appuyez sur ◄ ◄ ou ► ► .pour régler l'heure de départ
de la minuterie.
Appuyez sur N ou ► ! pour régler les minutes pour le
début de la minuterie.
' I
MINUTERIE
5 Appuyez sur CLOCK*TIMER pour mémoriser l'heure
du début et la source sélectionnée.
— La minuterie est à présent activée.
L'indication TIMER reste affichée.
• Pour sortir sans mémoriser le réglage, appuyez sur
STOP ■
• À l'heure présélectionnée, la minuterie sera activée.
La source sélectionnée sera lue.
L'indication TIMER disparaît de l'afficheur.
Remarques:
- Pendant le réglage de la minuterie, le système sortira
automatiquement du mode de réglage de minuterie si
aucune touche n'est enfoncée pendant 90 secondes.
- Si la source sélectionnée est TUNER, la dernière
fréquence accordée sera activée.
- Si la source sélectionnée est CD, la première plage du
dernier disque sélectionné sera lue. Si les logements à
CD sont vides, la source TUNER sera sélectionnée.
- Si la source sélectionnée est TAPE 1, et si l'heure
préréglée est atteinte pendant la copie à vitesse
élevée, la source TUNER sera sélectionnée.
Pour neutraliser la minuterie
1 Appuyez sur CLOCK«TIMER pendant plus de 2
secondes.
2 Appuyez sur PAUSE II pour neutraliser la minuterie.
"r.nuOF.i " apparaît sur l'afficheur.
L'indication TIMER disparaît de l'afficheur.
Pour réactiver la minuterie (pour la même heure)
1 Appuyez sur CLOCK*TIMER pendant plus de 2
secondes.
2 Réappuyez sur CLOCK*TIMER pour mémoriser
l'heure de début et la source sélectionnée.
47
Page 48

ENTRETIEN
CARACTERISTIÛUES
Entretien
Nettoyage du boîtier
• Utilisez un chiffon doux légèrement humidifié avec du
détergent doux. N'utilisez pas de solution contenant
de l'alcool, de l'ammoniaque ni des produits abrasifs.
Nettoyage des disques
• Lorsqu'un disque devient sale, nettoyez-le à l'aide d'un
chiffon en le frottant du centre vers la périphérie.
• N'utilisez pas de produits dissolvants comme
l'essence, les diluants, les produits de nettoyage
disponibles dans le commerce ou une bombe
antistatique prévue pour les disques analogiques.
Nettoyage de la lentille
• Après une utilisation prolongée, il se peut que de la
poussière ou de la saleté se soit accumulée sur la
lentille du lecteur de CD. Pour garantir une bonne
qualité de reproduction du son, nettoyez la lentille du
lecteur avec le produit de Philips spécial pour le
nettoyage de lentille de lecteur, ou bien avec un
produit disponible dans le commerce. Suivez les
instructions fournies avec le produit.
Nettoyage des têtes et des points de passage de la
bande
• Afin d'assurer une bonne qualité d'enregistrement et de
lecture, nettoyez les têtes, le(s) cabestan(s) et le(s)
galet(s)-presseur(s) après 50 heures d'utilisation environ.
• Utilisez un coton-tige légèrement imbibé de liquide de
nettoyage ou d'alcool.
• Vous pouvez également nettoyer les têtes à l'aide
d'une cassette de nettoyage que vous lirez une fois
comme une cassette normale.
Démagnétisation des têtes
• Utilisez une cassette de démagnétisation disponible
chez votre revendeur.
Caractéristiques
AMPLIFICATEUR
Puissance de sortie
RMS (valeur efficace) (6 Q, 1 kHz, THD 10%)
FW72C.............................................................. 2x50W
Canal Surround......................................................... 7 W
Rapport signal-bruit
Réponse en fréquence
Sensibilité d'entrée
Entrée Aux............................................................ 350 mV
Sorties
Haut-parleurs(gauche/droit)
Haut-parleurs Surround............................................ >6i2
Casque...................................................... 32S2- 1000Q
Sortie subwoofer
LECTEUR DE CD
Nombre de plages programmables
Gamme de fréquence
Rapport signal/bruit.............................................>80 dBA
Séparation des voies ................................. >60dB(1kHz)
Distorsion harmonique totale..............................< 0,003%
SYNTONISEUR
Gamme d'ondes FM
Gamme d'ondes AM
Nombre de présélections
Antenne
FM
.....................................
AM............................................................. Antenne-cadre
PLATINE CASSEHE
Réponse en fréquence
Cassette CrO^ (type II)
Cassette normale (type I)
________
.....................................
...................
...................................
......................................................
..................................
..................................
..................................
...............................................
300 Q ajustement par déclic
.....................
................
>75dBA(IEC)
60 - 16,000 Hz, ±3 dB
...............................
40 - 20,000 Hz
87,5- 108 MHz
530 - 1700 kHz
80 - 14,000 Hz (8 dB)
80 - 12,500 Hz (8 dB)
>6S2
1,5 V
40
40
Rapport signal-bruit
Cassette CrO^ (type II)
Cassette normale (type I)
Pleurage et scintillement
HAUT-PARLEURS
Avant gauche/droit
Système .............................. 3 voies, 2 ports des graves +
Impédance.................................................................... 6i2
Haut-parleur des graves
Haut-parleur des aiguës.........................................1 x 2,5";
Haut-parleur des aiguës
Dimensions (I x h x p)
Poids............................................................... 5 kg/chaque
HAUT-PARLEURS SURROUND (SS-15R)
Système
Impédance.................................................................... 6i2
Commande de haut-parleur
Dimensions (I x h x p)
Poids........................................................... 0,76 kg/chaque
GÉNÉRALITÉS
Matériau/finition
Puissance CA ............................................... 120 V/60 Hz
Consommation
Dimensions (I X h X p)
Poids (sans haut-parleurs)
....................................................
Active........................................................................ 75 W
En veille
................................................................
.......................................
..................................
.................................
...........
1 x 6,5"; G cone shielded
Gradually cooled Ferro-Fluid
..........................
........................
................
..........................
...........................
.......................
..................
>52 dBA
>48 dBA
< 0,4% DIN
1 port de graves G
2x1" Polydôme
260 x 325 x 310 mm
closed satellite
large bande 1 x 3"
224 x 98 x 224 mm
Métal et polystyrène
< 11 W
265 x310 x380 mm
....................
7,5 kg
Données sujettes à modification
48
Page 49

REMEDES EN CAS DE
Mise en garde ! En aucun cas vous ne devez
essayer de réparer vous-même l'appareil car vous
perdriez vos droits en matière de garantie.
• Si une panne se produit, vérifiez d'abord les points
énumérés ci-dessous avant de faire appel à un
réparateur.
• Si les problèmes persistent après avoir effectué les
vérifications suivantes, prenez contact avec votre
revendeur ou avec le service d'entretien.
Fonctionnement du lecteur de CD
in Tirer'
|VIU JJ±JU
• Le disque n'est pas inséré du bon côté.
-♦ Insérez le CD face imprimée orientée vers le haut.
• De la buée s'est formée sur la lentille.
— Attendez que la lentille se soit acclimatée.
• Il n'y a pas de disque dans le compartiment du lecteur.
— Insérez un CD
• Le disque est sale, fortement rayé ou gondolé.
Nettoyez le CD ou remplacez-le.
• La lentille du lecteur de CD est sale.
— Reportez-vous au chapitre Entretien.
Réception radio
Réception radio de mauvaise qualité.
• Le signal est trop faible.
Orientez l'antenne.
• Le téléviseur ou le magnétoscope sont trop proches
du système stéréo.
Éloignez le système stéréo du téléviseur ou du
magnétoscope.
Branchez l'antenne extérieure pour une meilleure
réception.
est affiché.
______________________
Fonctionnement de la platine cassette
-U/T
JJ±I<JU
• Un enregistrement est en cours.
Interrompez l'enregistrement ou attendez qu'il soit
terminé.
'ÎRPE SM.
• La copie de cassette est uniquement possible en
mode Tape (cassette).
— Commutez la source sur le mode cassette.
L'enregistrement ou la lecture ne peuvent avoir lieu
ou il y a diminution du niveau audio.
• Les têtes, les cabestans ou les galets-presseurs sont
sales.
Reportez-vous au chapitre sur l'entretien de la platine
cassette.
• Accumulation magnétique dans la tête de lecture/
enregistrement.
— Utilisez une cassette de démagnétisation.
Généralités
Le système ne réagit pas à la pression sur une touche.
__________________________
• Décharge électrostatique.
-*■ Appuyez sur STANDBY»ON pour mettre l'appareil hors
tension ; retirez la fiche CA de la prise murale puis
reconnectez l'appareil et mettez-le à nouveau sous tension.
Absence de son ou son de mauvaise qualité.
• Le volume est au niveau minimum.
^ Réglez VOLUME.
• Le casque est branché.
Débranchez le casque.
• Les haut-parleurs ne sont pas bien connectés ou ne
sont pas connectés du tout.
Vérifiez que les haut-parleurs sont connectés
correctement.
— Assurez-vous que le fil de haut-parleur nu est serré.
est affiché.
Son inversé entre les haut-parleurs gauche et droit.
• Les haut-parleurs ne sont pas branchés correctement.
Vérifiez le branchement des haut-parleurs ainsi que
leur disposition.
Absence de son grave ou emplacement physique
apparemment imprécis des instruments de musique.
• Les haut-parleurs ne sont pas branchés correctement.
Vérifiez le branchement des haut-parleurs en vous
assurant que la mise en phase est correcte et que les fils
rouges/noirs sont insérés dans les bornes rouges/noires.
La télécommande n'a aucune influence sur
l'appareil.
• Une source sonore erronée a été sélectionnée.
— Sélectionnez la source (CD, TUNER, etc.) avant d'appuyer
sur la touche de fonction, PLAY, PREV/NEXT, etc.)
• La distance entre la télécommande et l'appareil est
trop grande.
Réduisez la distance.
• Les piles ne sont pas insérées correctement.
— Introduisez les piles correctement avec les polarités
comme indiqué (signes +/-).
• Les piles sont arrivées à épuisement.
Remplacez les piles.
La minuterie ne fonctionne pas.
• La minuterie n'est pas activée.
Appuyez sur la touche CLOCK»TIMER de l'appareil
pour activer la minuterie.
• La copie/l'enregistrement est en cours.
-* Interrompez la copie/l'enregistrement.
Le système affiche automatiquement des fonctions
et les touches clignotent continuellement.
• Le mode démonstration est activé.
— Maintenez enfoncée la touche STOP U pendants
secondes pour mettre le mode démonstration hors
tension.
49
Page 50

Envíe hoy su Tarjeta de Registro de la Garantía
para recibir todas las ventajas correspondientes.
Una vez que se registre la compra de su aparato
Philips Magnavox, Ud. tiene derecho a todas las ventajas
correspondientes al dueño de un producto Philips Magnavox.
Verificación i
de la garantía
Registre su producto dentro de 10 días para
confirmar su derecho a máxima protección
bajo los términos y condiciones de la
garantía de Philips Magnavox.
Confirmación i
del dueño
Su Tarjeta de Registro de la Garantía
comprueba que Ud. es el dueño del aparato
en caso de robo o pérdida del producto
Conozca estos símbolos de
A
PRECAUCION: PARA REDUCIR EL RIESGO DE SACUDIDA ELECTRICA,N0 RETIRE
LA CUBIERTA (NI EL PANEL POSTERIOR). ESTE APARATONO CONTIENE NINGUNA
PARTE QUE PUEDA SER REPARADA POREL USARIO. DE SER NECESARIO ALGUN
SERVICIO 0 REPARACIONDEL APARATO, LLEVELO UN TECNICO CALIFICADO.
• Sírvase llenar / devolver en seguida la Tarjeta de Registro de la
Garantía empacada con su aparato. Saque provecho de estas
ventajas importantes.
RIESGO DE SACUDIDA ELECTRICA
IMO ABRIR
A
^ Registro I
del modelo
La devolución inmediata de su Tarjeta de
Registro de la Garantía le garantiza que
recibirá toda la información y todas las
promociones especiales que le corresponden
por ser el dueño de su modelo.
Para uso del cliente:
Escriba abajo el número de serie que se
encuentra en el panel posterior. Guarde esta
información para el futuro.
No. de modelo _______________________________
No. de serie
A
A
El símbolo del “rayo” indica que algún material no aislado
dentro de su unidad podría resultar en una sacudida
eléctrica. Para la seguridad de todos, favor de no remover
la cubierta del producto.
El “signo de exclamación” le llama la atención a
características sobre las que Ud. debe leer la información
adjunta detenidamente para evitar problemas de
funcionamiento y mantenimiento.
ADVERTENCIA: para evitar el riesgo de
SACUDIDA ELECTRICA O INCENDIO, NO EXPONGA
ESTE EQUIPO A LLUVIA NI A HUMEDAD.
PRECAUCION: Para evitar sacudida eléctrica,
introduzca la patilla ancha del enchufe al fondo de la ranura
ancha.
MAC5097
Page 51

La dirección World Wide Web de PHILIPS
es: http://www.magnavox.com
PHILIPS
MAGNAVOX
¡Felicidades por su compra y
bienvenido a la **familia**!
Estimado dueño del producto Philips Magnavox:
Gracias por su confianza en Philips Magnavox. Ud. ha
elegido uno de los mejores productos disponibles hoy en
cuanto a fabricación y respaldo después de la venta.
Haremos todo lo posible para que Ud. quede satisfecho
con su producto por muchos años.
Como miembro de la “familia” Philips Magnavox, Ud. está
protegido por una de las garantías más completas y una de
las redes de servicio más sobresalientes de la industria.
Y además, gracias a su compra, Ud. recibirá toda la
información y todas las promociones especiales que le
corresponden, y también tendrá acceso fácil a los
accesorios a través de nuestra conveniente red de compras
a domicilio.
Y lo más importante es que Ud. puede
contar con nuestro compromiso incondicional de lograr su
satisfacción total.
Todo esto es nuestra manera de darle la bienvenida y las
gracias por invertir en un producto Philips Magnavox.
Atentamente,
Robert Minkhorst
Presidente y Director General
RD. Recuerde que para sacar máximo provecho de
su producto Philips Magnavox, Ud. debe devolver
su Tarjeta de Registro de la Garantía dentro de
10 días. ¡Sírvase enviárnosla ahora mismo!
Page 52

INSTRUCCIONES SOBRE SEGURIDAD - Léalas antes de hacer funcionar el equipo
Este producto fue diseñado para cumplir con normas rigurosas de calidad y seguridad. No
obstante, existen algunas medidas de precaución para la instalación y funcionamiento con
las que Ud. debe familiarizarse en particular.
1. Lea las instrucciones - Todas las instrucciones de seguridad y funcionamiento
deben leerse antes de hacer funcionar el aparato.
2. Guarde las instrucciones - Deben guardarse las instrucciones de seguridad y
*1
funcionamiento para consultas futuras.
3. Preste atención a las advertencias - Ud. debe observar todas las advertencias
en el aparato y en las instrucciones de funcionamiento.
4. Siga las instrucciones - Ud. debe seguir todas las instrucciones de funcionamiento y uso.
5. Agua y humedad - El aparato no debe usarse cerca de agua, por ejemplo, cerca de
un baño, lavabo, fregadero, tina para lavar ropa, en un sótano húmedo o cerca de
una piscina, etc.
6. Carritos o bastidores - El aparto sólo debe usarse con un carrito o bastidor
recomendado por el fabricante.
6A. La combinación carrito-aparato debe trasladarse con cuidado.
Cualquier parada repentina, fuerza excesiva y superficie desnivelada
pueden producir el volteo de la combinación carrito-aparato.
7. Montaje en una pared o techo interior - El aparato sólo debe montarse en una
pared o techo interior según las recomendaciones del fabricante.
8. Ventilación - El aparato debe situarse de tal modo que su ubicación o posición no
obstaculice una buena ventilación. Por ejemplo, el aparato no debe situarse en una
cama, sofá, alfombra o superficie similar que puede bloquear las aberturas de
ventilación: tampoco debe colocarse en muebles embutidos, tal como sería el caso
de una estantería para libros o un armario, porque así se podría impedir el flujo de
aire por las abe'rturas de ventilación.
9. Calor - El aparato debe situarse lejos de fuentes de calor, tales como radiadores,
rejillas para calefacción, hornos u otros aparatos (inclusive amplificadores) que
puedan producir calor.
10. Puesta a tierra o polarización
Tome las precauciónes utilizando los medios de puesta a tierra o de polarización de
un aparato que no estén estropeados.
11. Mise à terre ou polarisation
Précautions à prendre de manière à ce que la mise à
terre et la polarisation del'appareil soient respectóos.
AVISO : Para prevenir un choque eléctrico, haga
coincidir la clavija plana ancha con la ranura plana y
Clavija
polarizada de CA
52
inserte a fondo. No utilice esta clavija polarizada con un cable de prolongación
o otra toma de red a menos que las clavijas estén completamente cubiertas.
12. Protección del cable de potencia - Los cables de alimentación de energía
deben encaminarse de tal modo que nadie pise encima de ellos; también es
importante que no estén apretados por artículos colocados contra o encima de
ellos. Hay que prestar atención especial a los cables y enchufes, receptáculos
convenientes y al lugar donde éstos salen del aparato.
13. Limpieza - El aparato sólo debe limpiarse de acuerdo con las recomendaciones
del fabricante.
14. Líneas de energía - Una antena exterior debe situarse lejos de las líneas de energía.
15. Puesta a tierra de la antena exterior - Si una antenna exterior se conecta al
receptor, asegúrese de lograr la puesta a tierra del sistema de antena para así
proporcionar alguna protección contra sobrevoltajes y acumulación de cargas
de eléctricidad estática.
La sección 810 de las Normas para Instalaciones Eléctricas (NEC), ANSI/NFPA
№ 70-1984, proporciona información con respecto a la puesta a tierra correcta
del mástil y estructura de soporte, puesta a tierra correcta del conductor de
alimentación que se conecta a la unidad de descarga de la antena, tamaño de
los conductores de puesta a tierra, ubicación de la unidad de descarga de la
antena, puesta a tierra hacia los electrodos de tierra y recomendaciones sobre
los electrodos de tierra. Ver la Figura más abajo.
16. Períodos sin uso - Se debe desenchufar el aparato cuando no se lo usa por un
período considerable de tiempo.
17. Entrada de objetos extraños o de líquidos - Hay que tener cuidado para
que ningún objeto caiga dentro y también para que no se derrame ningún
líquido dentro de las aberturas de la caja del aparato.
18. Daño que requiere servicio - El aparato sólo debe ser reparado por un
técnico calificado cuando:
A. Se ha dañado el canle suministro de energía o el enchufe; o
B. Algún objeto hay caído dentro del aparato o se ha derramado algún líquido
dentro de mismo; o
C. El aparato ha sido expuesto a lluvia; o
D. El aparato no parece funcionar normalmente o exhibe un cambio marcado
en su funcionamiento; o
E. El aparato se ha caído o ha habido daño a su caja.
19. Servicio - El usuario no debe tratar de reparar el aparato más allá de lo descrito
en las instrucciones de funcionamiento. Toda otra reparación o mantenimiento
debe dejarse a cargo del personal técnico calificado para tal finalidad.
Page 53

Milli
INSTRUCCIONES SOBRE SEGURIOAD
Nota para el instalador del sistema de cable (CATV);
Se da esto a modo de llamarle la atención al instalador del sistema CATV al Artículo 820-40 de las Normas para Instalaciones Eléctricas (NEC), las cuales proveen las pautas
para puestas a tierra apropiadas y que en particular especifican que el cable de puesta a tierra deberá conectarse al sistema de puesta a tierra del edificio lo más cercano
posible al punto de entrada del cable como sea conveniente.
Ejemplo de la puesta a tierra de la antena
tal como lo especifican las Normas para
Instalaciones Eléctricas (NEC)
92/11
EL 4562-1
53
Page 54

SISTEMA DE AUDIO
Mano de obra gratis por un año
Servicio gratis por un año para piezas
Para reparaciones, hay que presentarse en persona
con este producto.
¿QUIEN TIENE PROTECCION?
Usted debe tener su comprobante de venta para recibir
servicio bajo la garantía. Una nota de venta u otro
documento mostrando que usted compró el producto se
considera un comprobante de venta.
¿QUE CUBRE?
La protección bajo la garantía comienza el mismo día en que
usted compra el producto. Durante un año a partir de esta
fecha, todas las piezas serán reparadas o reemplazadas gratis
y no se cobrará mano de obra. Después de este plazo de un
año, usted tendrá que pagar el costo del reemplazo o
reparación de las piezas y también toda mano de obra.
Todas las piezas, inclusive las piezas reparadas y de
repuesto, tienen cobertura sólo durante el período de la
garantía original. Una vez que venza la garantía del
producto, la garantía de cualquier pieza reemplazada o
reparada también habrá vencido.
¿QUE EXCLUYE LA GARANTIA?
Su garantía no cubre:
• cobros por mano de obra durante la instalación o
montaje del producto, ajuste de los controles del cliente
o de preferencia e instalación o reparación de los
sistemas con antena fuera de la unidad.
• reparación del producto y/o reemplazo de piezas, a raíz
de uso indebido, accidente, reparación no autorizada u
otra causa no bajo el control de Philips Consumer
Electronics Company.
• problemas de recepción ocasionados por condiciones de
señales o sistemas de cable o de antena fuera de la unidad.
• un producto que requiera modificación o adaptación para
que opere en un país que no sea el país para el que fue
concebido, fabricado, aprobado y/o autorizado, o la
reparación de productos dañados por tales
modificaciones.
54
• daños incidentales o consecuentes que resulten del
producto. (Algunos estados no permiten la exclusión por
daños incidentales o consecuentes, de modo que es
posible que la exclusión arriba indicada no le sea aplicable
a usted. Esto incluye, sin limitarse, materiales pregrabados
con o sin amparo de derechos de autor.)
• Una unidad que se ha comprado, usado o reparado fuera
de los EE.UU., Puerto Rico, las Islas Vírgenes y el Canadá,
o que se ha usado para fines comerciales o institucionales
(inclusive productos usados con fines de arrendamiento,
pero sin limitarse a éstos.)
¿DONDE SE OBTIENE SERVICIO?
El servicio de garantía está disponible en todos los países
con distribución oficial del producto por Philips Consumer
Electronics Company. En países donde Philips Consumer
Electronics Company no distribuye el producto, la entidad
local de servicio Philips tratará de brindar servicio (aunque
puede haber demora si las piezas de repuesto o manuales
técnicos correspondientes no están fácilmente disponibles.
NO SE OLVIDE DE GUARDAR...
Favor de guardar su nota de venta y otros materiales para
comprobar la compra del producto. Adjúntelos a este
manual de instrucciones y reténgalo a la mano. Favor de
retener también la caja y material de empaque originales en
caso de tener que devolver el producto.
ANTES DE LLAMAR PARA OBTENER
SERVICIO...
Sírvase chequear su manual de instrucciones. Algunos
ajustes de los controles según las indicaciones en el manual
podrían ahorrarle una llamada para servicio.
PARA SERVICIO DE GARANTIA EN
LOS EE.UU., PUERTO RICO O LAS
ISLAS VIRGENES...
Lleve el producto a un centro de servicio Philips (ver lista
adjunta) o a un centro de servicio autorizado para
reparaciones. Una vez terminada la reparación del producto,
usted debe recogerlo del centro. Los centros tienen
derecho a guardar toda pieza defectuosa.
(En los EE.UU., Puerto Rico o las Islas Vírgenes, toda garantía
implícita, inclusive las garantías implícitas de comerciabilidad
y aptitud para un propósito en particular, están limitadas en
cuanto a duración al plazo de esta garantía expresa. Puesto
que algunos estados no permiten limitaciones sobre la
duración de una garantía implícita, es posible que la limi
tación arriba indicada no le sea aplicable a usted.).
PARA SERVICIO DE GARANTIA EN
EL CANADA...
Favor de comunicarse con Philips al:
1-800-661-6162 (francófono)
1-800-363 7278 (anglòfono)
(En el Canadá, esta garantía es otorgada en lugar de toda
otra garantía. No se otorga ninguna otra garantía expresa ni
implícita, comprendiéndose aquí ninguna garantía implícita
de comerciabilidad o aptitud para propósito alguno. Philips
no será responsable bajo circunstancia alguna por daños y
perjuicios directos, indirectos, especiales. Incidentales o
consecuentes, independientemente de la manera
ocasionada, aún con notificación de la posibilidad de los
mismos.).
RECUERDE...
Favor de anotar los números de modelo y serle del
producto en el espacio abajo.También, sírvase llenar y
enviar oportunamente su tarjeta de registro de la garantía.
Así nos será más fácil notificarle en caso de ser necesario.
Modelo No.
Serie No.
Esta garantía le otorga derechos legales específicos y usted
podría gozar de otros derechos que varían de un estado a otro.
Philips Service Company, P.O. Box 555, Jefferson
___________________________________________
_____________________________________
City,Tennessee 37760 USA, (423) 475-8869
EL4965E005 /MAC 4110/ 1-97
Page 55

■ i
INFORMACIÓN GENERAL
INFORMACIÓN DE SEGURIDAD
Información general___________________
• La placa tipo (con el número de serie) está
situada en la parte posterior de la unidad.
• Las grabaciones están permitidas siempre que
no infrinjan los derechos de autor u otros
derechos de terceros.
• Este equipo cumple el reglamento de la FCC,
parte 15. El funcionamiento está sujeto a las dos
condiciones siguientes:
- Este equipo no debe producir interferencias
perjudiciales, y
- deberá aceptar cualquier interferencia
recibida, incluso aquéllas que pudieran dar
lugar a un funcionamiento indeseado.
Información medioambiental
Se ha prescindido de cualquier material de embalaje
innecesario. Hemos puesto el mayor empeño en que el
embalaje sea fácilmente separable en tres materiales:
cartón (caja), poliestireno expandible (amortiguación) y
polietileno (bolsas, plancha protectora de espuma).
Los materiales que componen el equipo son reciclables y
reutilizables si son desmontados por una empresa
especializada. Observe las normas locales concernientes
a la eliminación de los materiales de embalaje, pilas
usadas y equipos desechables.
___________
Accesorios (incluidos)
Mando a distancia
2 pilas AAA para el mando a distancia
Antena de cuadro de AM ■
Antena monofilar de FM
Cable de alimentación
Juego de sonido envolvente Philips Magnavox SS-15R
Información de Seguridad
• Antes de poner en funcionamiento el equipo,
compruebe que la tensión indicada en la placa tipo (o
la indicación de tensión junto al selector de voltaje)
coincide con la tensión de red de su zona. En caso
contrario, consulte a su distribuidor. La placa tipo se
encuentra situada en la parte posterior de la unidad.
• No cambie el equipo de lugar mientras está
encendido.
• Coloque el equipo sobre una superficie sólida (por
ejemplo, un mueble).
• Instale el equipo en un lugar debidamente ventilado
para evitar la acumulación de calor en su interior.
• No exponga el equipo a la lluvia, exceso de humedad,
arena o fuentes generadoras de calor.
• Bajo ninguna circunstancia deberá reparar el equipo
por su cuenta, o de lo contrario quedará invalidada la
garantía
• Si la unidad se traslada directamente de un entorno
frío a otro caliente, o se instala en una habitación con
exceso de humedad, ésta puede condensarse en la
lente del reproductor de CD, en el interior del equipo.
En tal caso, el reproductor de CD no funcionará con
normalidad. Deje la unidad encendida en torno a una
hora sin ningún disco insertado, hasta que pueda
restablecerse el funcionamiento normal.
• Las descargas electrostáticas pueden ocasionar
problemas inesperados. Compruebe si las anomalías
desaparecen desconectando el cable de la red y
volviéndolo a conectar después de unos instantes.
• Para interrumpir por completo el suministro de
corriente, desconecte el cable de alimentación
de la toma de red.
______________
55
Page 56

PREPARATIVOS
Conexiones del panel posterior
w
56
Page 57
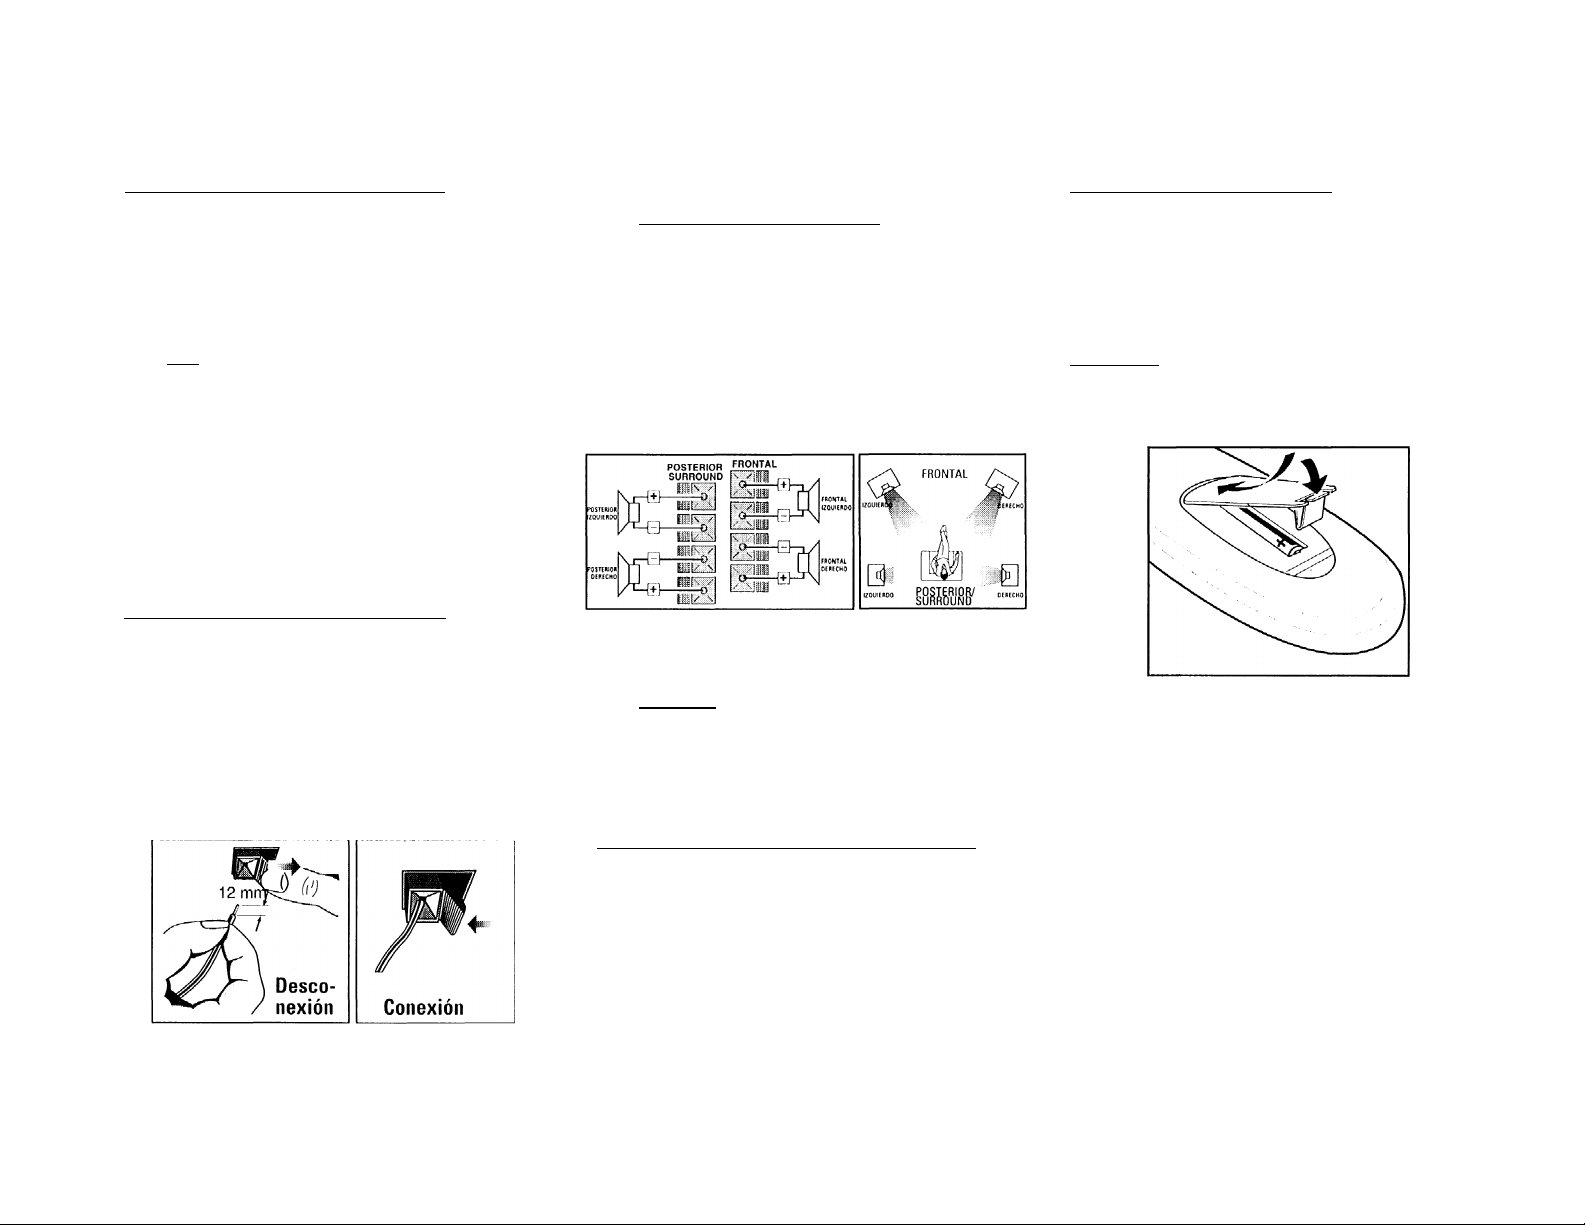
PREPARATIVOS
@ Conexión de la antena de AM
Conecte la antena de cuadro suministrada al terminal AM
AERIAL. Sitúe la antena de AM alejada del equipo, y
oriéntela para lograr la mejor recepción posible.
_________
(b) Conexión de la antena monofilar de
FM
_____________________________
Conecte la antena monofilar de FM suministrada al
terminal FM 300 Q.. Oriente la antena de FM para lograr
la mejor recepción posible.
Antena exterior
Para mejorar la recepción estéreo en FM, conecte una
antena de FM exterior al terminal FM AERIAL 300 Q,
utilizando para ello un cable dipolar de 300 Í2.
(c) Conexiones de los altavoces
• Conecte el altavoz derecho al terminal Eront R, con el
hilo rojo al positivo (+) y el hilo negro al negativo
(-).
• Conecte el altavoz izquierdo al terminal Front L, con el
hilo rojo al positivo (+) y el hilo negro al negativo
(-).
• Asegure la porción desnuda del cable de altavoz como
se indica en la ilustración.
_________
D) Conexión de los altavoces
envolventes posteriores
Conecte los altavoces envolventes suministrados
(modelo SS-15R) para realzar el efecto de sonido
envolvente. Estos altavoces deberán instalarse a la
altura normal del oído o en la pared del fondo de la
habitación.
Conecte los cables negros o no marcados a los
terminales REAR negros, y los cables blancos o
marcados a los terminales REAR grises.
__________
(D Conexión de otros componentes al
sistema
Puede conectar las salidas de audio derecha e izquierda
de un TV, vídeo, lector de discos láser o reproductor DVD
a las entradas AUX IN del panel posterior de la unidad.
__________________________
(fi Conexión de la salida de subwoofer
Puede conectar opcionalmente un subwoofer activo o un
subwoofer activo inalámbrico a la salida SUBWOOEER
OUT. El sistema inalámbrico utiliza un transmisor de
radiofrecuencia. El subwoofer reproduce los sonidos de
bajas frecuencias más profundos (explosiones, ruido de
naves espaciales, etc.). Procure seguir las instrucciones
facilitadas con el subwoofer.
(G) Suministro de corriente______________
Conecte el cable de alimentación a la unidad y a la toma
mural después de haber realizado el resto de conexiones.
Inserción de las pilas en el mando a
distancia
• Inserte las pilas (tipo R03 o AAA) en el mando a
distancia como se indica en el compartimento.
• Para evitar daños por posibles fugas, extraiga las pilas
si se agotan o si no se van a utilizar durante un largo
período de tiempo. Como recambio, utilice pilas R03 o
AAA.
Observaciones del mando a distancia :
- Primero seleccione la fuente que desea controlar,
pulsando para ello uno de los botones de selección de
fuente del mando a distancia (CD. TONER, TAPE 1/2 o
AUX).
- A continuación seleccione la función deseada
(reproducción, salto, etc.).
_________________________
57
Page 58

CONTROLES
26
8
25
14
13
18
15
18
58
21
TAPE 1
1
20
TAPE 2
1
Page 59

CONTROLES
Controles del sistema y mando a
distancia
□ STANDBY»OI\l
“ para encender la unidad o activar el modo de
- almacena automáticamente emisoras de radio
RECORD
- para dar comienzo a la grabación en la platina de
[3j REVERSE MODE
- selecciona un modo de reproducción distinto,
[T] CLOCK*TIMER
- para visualizar y poner en hora el reloj o
SOURCE - para seleccionar los distintos modos
operativos :
CD (CD 1»2»3)
TUNER (BAND) ... selecciona el modo de
TAPE (TAPE1«2). selecciona el modo de cinta.
AUX (VIDEO)
[6] PANTALLA
- para visualizar el ajuste seleccionado en cada
____________________________
espera.
pulsando durante dos segundos (sólo desde los
modos de espera o demostración!.
cinta 2.
únicamente en la platina 2.
programar el temporizador.
......
selecciona el modo CD. Si el CD
está detenido, selecciona la
bandeja de disco 1,2 ó 3.
sintonizador. Cuando está
activado dicho modo, selecciona
la banda de FM o AM.
Cuando la cinta está detenida,
selecciona la platina 1 ó 2.
......
... selecciona la fuente externa
(DVD, TV, Láser Disc o sonido
del vídeo).
momento.
[7] BANDEJA DE CD
[8] 3 CD DIRECT PLAY CD
STOP ■ (CLEAR)
..........
........
- selecciona una bandeja de disco para la
reproducción. TUNER ..
[I] DISC CHANGE
TAPE
........ para interrumpir la programación.
......
........
- para cambiar de CD. grabación.
D OPEN-CLOSE
- para abrir y cerrar la bandeja de CD. CD
PLAY ► / PAUSE II (SIDEA-B)
..........
........
POI REALCE DINÁMICO DE GRAVES (DBB)
- activa y desactiva el realce de graves (Beat, TAPE
......
........
Punch, Blast).
[12] PANEL VISUAL DSC
- para visualizar la opción DSC seleccionada.
m DIGITAL SOUND CONTROL (DSC)
PREV !◄ / NEXT ► ! (T PRESET A)
CD
..........
........
- para seleccionar el efecto de sonido deseado;
OPTIMAL, JAZZ, CLASSIC, ROCK o TECHNO. TUNER ..
[14] PROGRAM
- para programar pistas de CD en el modo CD, o
presintonizar emisoras en el modo de
sintonizador.
[I VOLUME
- ajusta el nivel de volumen.
[1 HEADPHONES
- toma de auriculares.
|Tj1 dubbing
- para copiar una cinta a velocidad normal o alta.
II SELECCIÓN DE MODO
◄◄ SEARCH ►► (« TUNING ►►)
CD
...........
para buscar bacia adelante o bacia atrás.
TUNER ... para sintonizar una frecuencia de radio
anterior o posterior.
TAPE........para activar el rebobinado o avance
rápido en la platina de cinta 2.
M OPEN
- para abrir el compartimento de cinta 2.
M PLATINA 2
PLATINAI
[22) OPEN
- para abrir el compartimento de cinta 1.
M REPEAT
- para repetir una pista de CD.
M SHUFFLE
- para reproducir todos los discos y sus pistas en
d MUTE (SILENCIAMIENTO)
“ desactiva provisionalmente el sonido, y lo vuelve
ü O
- para activar el modo de espera.
........
un orden aleatorio.
a activar.
para detener la reproducción de CD o
borrar un programa.
para detener la reproducción o
para interrumpir o reanudar la
reproducción.
para dar comienzo a la reproducción.
En el modo de cinta 2, para cambiar
de cara.
para saltar al principio de la pista
actual 0 anterior/siguiente.
para seleccionar una presintonía de la
memoria.
59
Page 60
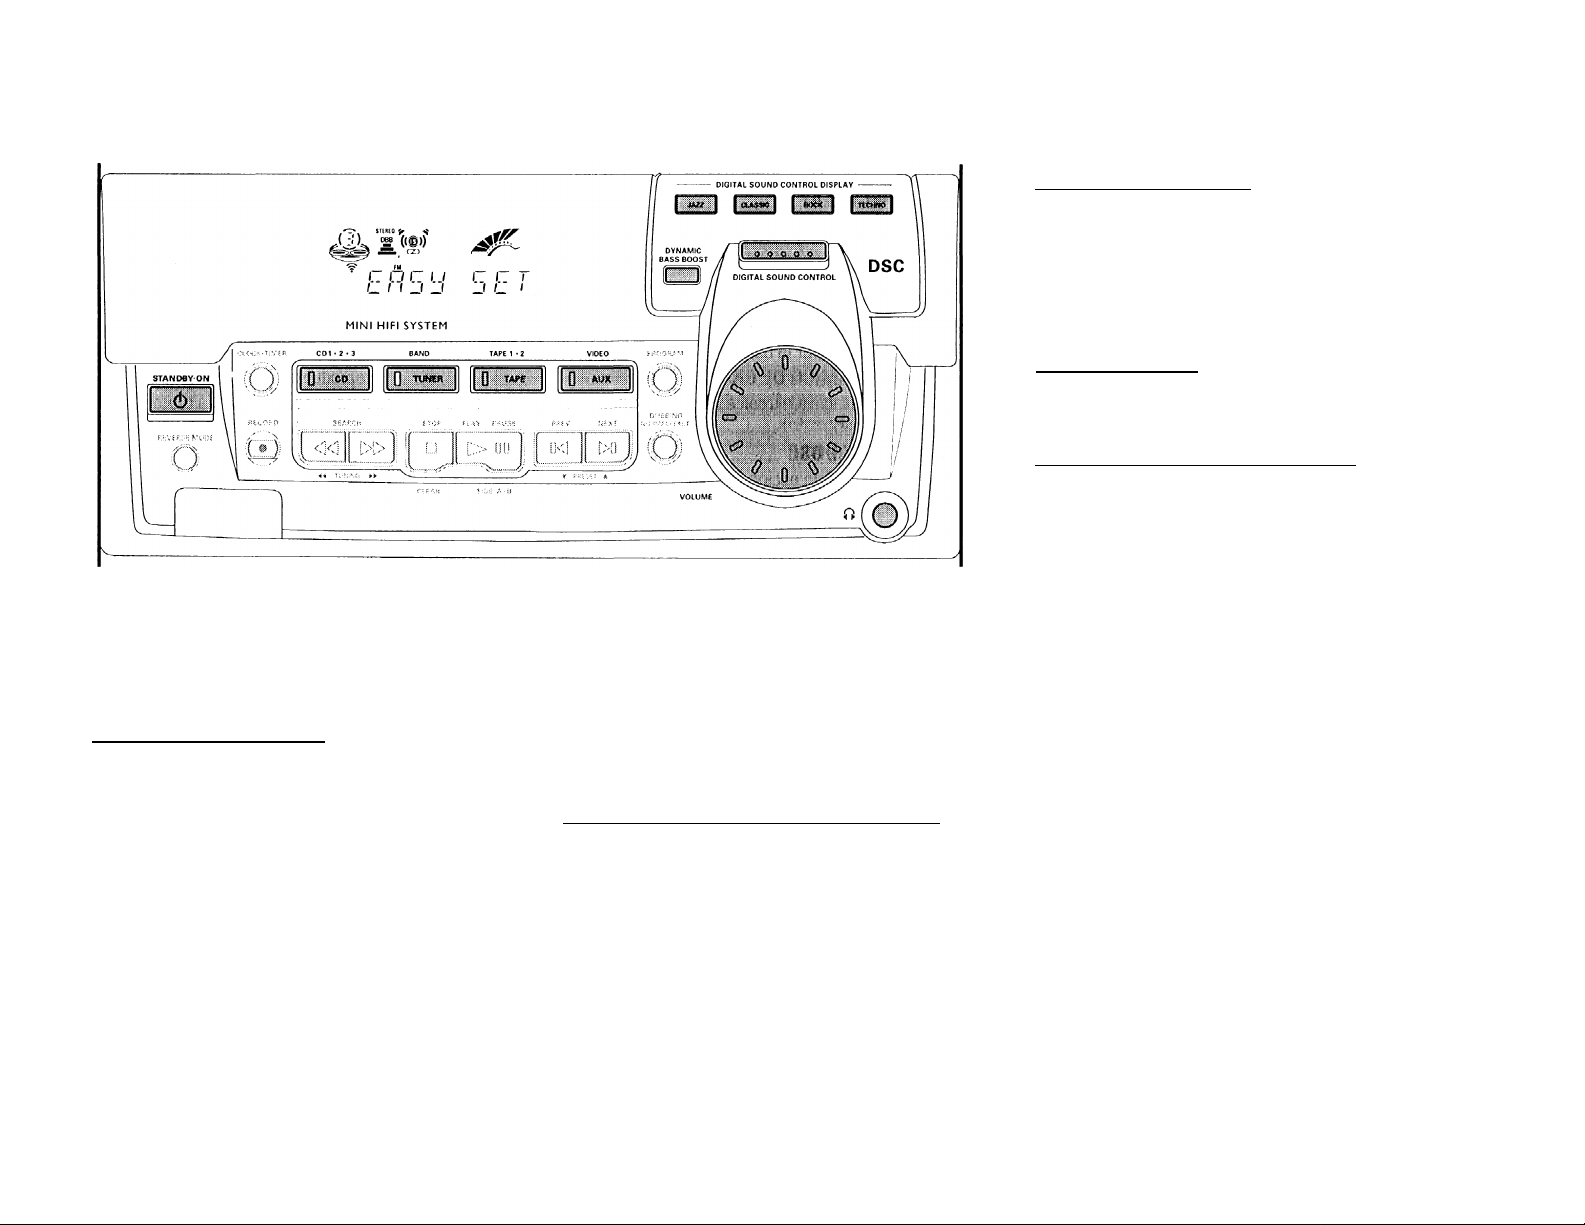
FUNCIONAMfENTO DEL SISTEMA
Encendido dei equipo
• Pulse STANDBY*ON (sólo en la unidad principal),
CD, TUNER, TAPE o AUX
También puede encender el equipo pulsando uno de los
botones 3 CD DIRECT PLAY.
Modo de espera
• Pulse STANDBY«ON de nuevo.
Importante:
Antes de poner en funcionamiento el equipo,
asegúrese de haber realizado correctamente todos
los preparativos.
Modo de demostración
El sistema dispone de un modo de demostración de las
diversas funciones que incorpora. Siempre que se
________________
conecte el equipo a la toma mural, el modo de
demostración se activará de forma automática.
Observaciones:
- Mientras está activado el modo de demostración,
pulsando un botón de selección de fuente (o de
espera) se activará el modo correspondiente.
- Cuando el sistema entra en el modo de espera, cinco
segundos más tarde volverá a activarse el modo de
demostración.
60
Para cancelar el mede de demestración
• Mantenga pulsado STOP ■ (sólo en la unidad
principal) durante 3 segundos para cancelar la
demostración.
El modo de demostración quedará desactivado por
completo.
Easy Set (presintonízación automática)
(sólo desde los modos de espera o demostración)
La función EASY SET le permite almacenar
automáticamente todas las emisoras de radio disponibles
de una banda específica (FM»MW) (véase "Easy Set" en
la sección de sintonizador).
Selección de la fuente de sonido
• Pulse el botón de selección de fuente deseado: CD,
TUNER, TAPE o AUX.
En la pantalla se visualiza la fuente seleccionada.
Observación:
- Si se trata de una fuente externa, asegúrese de haber
conectado las salidas de audio derecha e izquierda del
equipo externo (TV, VCR. Láser Disc o reproductor
DVD) a las entradas AUX IN.
_________
Page 61

FUNCIONAMIENTO DEL SISTEMA
Control de sonido
AJUSTE DE VOLUMEN
Utilice el mando VOLUME para elevar o reducir el nivel
de sonido.
Escucha privada
Conecte los auriculares a la toma íTíi del panel frontal
del equipo. Los altavoces se silenciarán.
CONTROL DE SONIDO DIGITAL (DSC)
La función DSC le permite disfrutar de efectos especiales
de sonido con preajustes de ecualizador, ofreciéndole la
mejor reproducción musical.
• Pulse DIGITAL SOUND CONTROL (DSC) para
seleccionar OPTIMAL. JAZZ, CLASSIC. ROCK o
TECHNO
-* El panel visual de la función DSC se iluminará en
consonancia, excepto si se trata de la opción
OPTIMAL.
— En la pantalla se visualiza "ОРТlílfli, JRZZ,
ri ocrcrrr
Selección automática DSC-DBB
El modo DBB selecciona automáticamente el ajuste
óptimo según la opción DSC activada. También puede
seleccionar manualmente el ajuste DBB que mejor se
adapte al entorno acústico.
DSC Selection
Optimal
jazz
Classic
Rock
Techno
REALCE DINÁMICO DE GRAVES (DBB)
El modo DBB refuerza la respuesta de graves.
• Pulse brevemente el botón DBB para seleccionar el
nivel de realce de graves.
-* Se iluminará el botón DBB.
-* En la pantalla aparecerá "SL'f
DBB
DBB DBB DBB
■■ ■■i ■■
DBB Selection
Punch
Punch
Beat
Blast
Blast
Observación:
- Algunos CD y casetes pueden estar grabados en alta
modulación, y producir distorsión a niveles de volumen
elevados. En tal caso, se recomienda desactivar el
modo Incredible Surround, seleccionar un nivel DBB
más bajo o reducir el volumen.
MUTE ¡sólo en el mando a distancia)
Esta función le permite desactivar provisionalmente el
sonido del sistema sin necesidad de apagarlo.
• Pulse MUTE en el mando a distancia para silenciar el
equipo.
En la pantalla se visualizará "HuTE".
• Pulse de nuevo MUTE en el mando a distancia o eleve
el volumen para restablecer el sonido.
DBB BEAT PUNCH BLAST
OFF
Para desactivar el modo DBB
• Pulse brevemente DBB hasta que se apague el botón.
— En la pantalla se visualiza "SSíl OfT".
61
Page 62

REPRODUCTOR DE СО
Advertencia
1) Este equipo está diseñado para discos
compactos convencionales. No utilice
accesorios tales como anillos estabilizadores o
láminas de tratamiento, ya que podrian dañar el
mecanismo del CD.
2) No cargue más de un disco en cada bandeja.
3) Cuando el cambiador de CD tenga cargado algún
disco, no gire ni aplique sacudidas al equipo, ya
que podría quedar bloqueado el mecanismo del
CD.
El cambiador de CD admite tres discos para su
reproducción ininterrumpida.
62
Carga del cambiador de CD
1 Pulse CD para seleccionar el modo de CD.
2 Pulse 0PEN«CL0SE
-* El compartimento de CD se desliza hacia afuera.
3 Cargue un CD con la cara impresa hacia arriba en la
bandeja derecha.
• Si lo desea, puede cargar otro disco en la bandeja
izquierda.
• Para cargar el tercer disco, pulse el botón DISC
CHANCE
^ El carrusel del cambiador girará hasta que la
bandeja vacía se sitúe a la derecha, preparada para
aceptar un disco.
La reproducción comenzará siempre desde el disco
cargado en la bandeja exterior derecha.
4 Pulse 0PEN*CL0SE para cerrar el compartimento de
CD.
En la pantalla se visualiza el número total de pistas
y el tiempo de reproducción del último disco
seleccionado.
_____________
Page 63

REPRODUCTOR DE CD
3 CD Direct Play
Puede reproducir directamente un CD pulsando los
botones 3 CD DIRECT PLAY (1 - 3). El reproductor se
detendrá al final del disco seleccionado.
-* El botón iluminado indica que hay un disco cargado
en la bandeja.
Reproducción de un CP
1 Pulse PLAY ► para dar comienzo a la reproducción.
En la pantalla se visualiza la bandeja de disco, el
número de pista y el tiempo transcurrido de la pista
actual.
El indicador luminoso del botón 3 CD Direct Play
correspondiente aparecerá intermitente.
• Para interrumpir la reproducción, pulse PAUSE II.
— El tiempo de reproducción aparecerá intermitente.
• Para reanudar la reproducción, pulse de nuevo
PLAY ►
2 Para detener la reproducción, pulse STOP ■.
Observación:
- Todos los discos disponibles se reproducirán una vez, y
la unidad se detendrá. Si transcurren 15 minutos sin
accionar ningún botón, el equipo entrará en el modo
de espera.
Cambio de disco
Es posible cambiar los dos discos exteriores mientras el
tercero se encuentra en los modos de parada o de
reproducción.
1 Pulse CISC CHANCE
El compartimento de CD se desliza hacia afuera.
2 Cambie los discos de las bandejas derecha e
izquierda.
• Si pulsa DISC CHANCE de nuevo durante la
reproducción, el CD se detendrá.
El carrusel de CD girará hasta que la bandeja
interior se sitúe a la derecha, preparada para el
cambio de disco,
3 Pulse OPEN’CLOSE para cerrar el compartimento de
CD.
Selección de una pista determinada
Desde la posición de parada
1 Pulse PREV !◄ o NEXT ► ! hasta que en la pantalla
aparezca la pista deseada.
2 Pulse PLAY ► para dar comienzo a la reproducción.
En la pantalla aparece el número de pista
seleccionado y el tiempo de reproducción
transcurrido.
Durante la reproducción
1 Pulse PREV W o NEXT ► ! hasta que en la pantalla
aparezca la pista deseada.
Se visualiza el número de pista seleccionado y el
tiempo de reproducción transcurrido.
• Si pulsa una vez PREV !◄ , saltará al principio de la
pista actual y se reproducirá de nuevo.
Búsqueda de un fragmento durante la
reproducción
• Mantenga pulsado ◄ ◄ o ► ► hasta localizar el
fragmento deseado.
El volumen se reducirá.
• La reproducción normal se restablece en el momento
de liberar ◄ ◄ o
Programación de pistas
La programación de pistas de un disco cargado se realiza
desde la posición de parada. La pantalla indicará las
pistas totales programadas. Se pueden almacenar en la
memoria hasta 40 pistas, en cualquier orden. Si ya hay
40 pistas programadas e intenta almacenar otra, la
pantalla indicará "PROBRRU riJLL" (programa
completo).
1 Cargue los discos'deseados en la bandejas.
2 Pulse PROGRAM para iniciar la programación.
La indicación PROGRAM comenzará a parpadear.
3 Pulse el botón CD (CD 1*2*3) para seleccionar el
disco.
4 Pulse PREV M o NEXT ►! para seleccionar la pista
deseada,
5 Pulse PROGRAM para almacenar la pista en el
programa.
• Repita los pasos 3a 5para programar otros discos y
pistas.
6 Pulse una vez STOP ■ para salir del modo de
programación.
En la pantalla se visualizará el número total de
pistas programadas y el tiempo total de
reproducción del programa.
________________________
________________
63
Page 64

REPRODUCTOR DE CD
Observaciones:
- Si el tiempo total de reproducción excede de
"3 3 5 3", o si una de las pistas programadas posee
un número mayor de 30, en la pantalla aparecerá
" en lugar del tiempo total de reproducción.
- La unidad abandonará automáticamente el modo de
programación si no se pulsa ningún botón durante
20 segundos.
Reproducción del programa
1 Pulse PLAY ► para dar comienzo a la reproducción
del programa.
— En la pantalla se visualiza "PLñy POOBRHíl".
— La pantalla indica también el número de pista y el
tiempo transcurrido de la pista en curso.
• Si pulsa REPEAT durante la reproducción de un
programa, la pista actual se reproducirá de forma
repetida. ,
En la pantalla aparecerán las indicaciones REPEAT
y PROGRAM.
2 Pulse STOP ■ para detener la reproducción del
programa.
Observación:
- Si pulsa uno de los botones 3 CD DIRECT PLAY, la
unidad reproducirá el disco o la pista seleccionada y
ignorará momentáneamente el programa. La
indicación PROGRAM también desaparecerá de la
pantalla, y reaparecerá cuando finalice la reproducción
del disco seleccionado.
____________
Revisión del programa
La revisión del programa sólo es posible desde la
posición de parada.
• Pulse PREV WoNEXT ► ! repetidas veces para
revisar las pistas programadas.
• Pulse STOP ■ para finalizar la revisión.
Borrado del programa (desde la
posición de parada)
• Pulse OLEAR en la unidad principal.
En la pantalla se visualizará "PROBREIt'l
ELEPRnJ'' (programa borrado).
Observación:
- El programa también se borra cuando se interrumpe la
alimentación dei equipo. Si se abre el carrusel, las
pistas correspondientes a las dos bandejas exteriores
quedarán suprimidas del programa, y la pantalla
indicará
TI room'
___________________
(borrado).
Reproducción al azar (SHUFFLE)
(sólo desde el mando a distancia)
Reproducción en un orden aleatorio de todas las pistas
de los discos cargados. También puede usarse para
reproducir las pistas programadas.
Para reproducir al azar todos los discos y pistas 1 Pulse SHUFFLE
En la pantalla aparece "BMUrfLE".
-* En la pantalla también aparece la indicación
SHUFFLE, el disco y la pista seleccionada al azar.
• Los discos y las pistas se reproducirán en un orden
aleatorio hasta que se pulse STOP ■.
_________________
• Si pulsa REPEAT durante la reproducción al azar, la
pista actual se reproducirá de forma repetida.
-* En la pantalla aparecerán las indicaciones REPEAT
y SHUFFLE.
2 Pulse de nuevo SHUFFLE para restablecer la
reproducción normal.
La indicación SHUFFLE desaparece de la pantalla.
Observación:
- Todos los discos disponibles se reproducirán una vez, y
la unidad se detendrá.
RupoticiÓn (sólo desde el mando a distancia)
Reproducción continua de la pista en curso.
1 Pulse REPEAT durante la reproducción.
En la pantalla se visualizará "ffCPCHT TRRO-:".
La indicación REPEAT y la pista seleccionada se
visualizan en la pantalla.
• La pista se reproducirá continuamente hasta que se
pulse STOP ■.
2 Pulse de nuevo REPEAT para restablecer la
reproducción normal.
— La indicación REPEAT desaparece de la pantalla.
64
Page 65

SINTONIZADOR
3 Pulse TUNING ◄ ◄ o ► ► durante más de un segundo,
y después libere el botón.
La pantalla indicará "5Cnf?CM" mientras localiza
una emisora con suficiente intensidad de señal.
• Repita la operación hasta encontrar la emisora
deseada.
• Para sintonizar una emisora débil, pulse brevemente
TUNING o ► ► hasta que la pantalla ofrezca la
frecuencia deseada o se consiga la mejor recepción
posible.
Easy Set (presintonización automática)
(sólo desde los modos de espera o demostración)
La función EASY SET le permite almacenar
automáticamente todas las emisoras de radio disponibles
de una banda espec'fica (EM*AM).
• Mantenga pulsado STANDBY*ON (sólo en la unidad
pr//7c;pa/j durante 2 segundos.
-* En la pantalla se visualizará TnstJ 5ET",
seguido de "TLiTvEP".
La función EASY SET comenzará en la última banda
seleccionada.
— Se programarán todas las emisoras de radio que se
reciban con suficiente intensidad de señal, o hasta
que se completen las 40 presintonías.
Observaciones:
- Cuando se utiliza la función EASY SET, todas las
emisoras previamente memorizadas quedarán
borradas.
- Una vez finalizada la presintonización EASY SET, en la
pantalla se visualizará la última emisora programada.
Sintonización de emisoras de radio
1 Pulse TUNER para seleccionar el modo de
sintonizador.
-* En la pantalla se visualizará "TUUEU".
En la pantalla se visualiza el número de presintonía,
la frecuencia y la banda.
2 Pulse TUNER (BAND) de nuevo para seleccionar la
banda deseada: FM o AM.
Almacenamiento de presintonías
En la memoria pueden almacenarse un total de
40 emisoras. Cuando se selecciona una presintonía, su
número aparece en la pantalla junto a la frecuencia.
Programación automática
1 Pulse TUNER
2 Pulse TUNER (BAND) de nuevo para seleccionar la
banda deseada: FM o AM.
3 Pulse PROGRAM durante más de un segundo.
La indicación PROGRAM comienza a parpadear, y
se visualiza la indicación 'RUTO'.
— Todas las emisoras de radio disponibles de la
banda seleccionada quedarán almacenadas de
forma automática. La frecuencia y el número de
presintonía se visualizan durante unos instantes.
- — El equipo detendrá la búsqueda cuando haya
programado todas las emisoras disponibles o
cuando haya completado las 40 posiciones de
memoria.
El equipo quedará sintonizado en la última
presintonía memorizada. “
________
65
Page 66

SINTONIZADOR
• Repita el mismo procedimiento para presintonizar
otras emisoras de la otra banda. No olvide especificar
el siguiente número de presintonía disponible antes de
continuar, o de lo contrario podría borrarse alguna de
las presintonías ya existentes.
Observaciones:
- Puede cancelar la programación automática pulsando
PROGRAM o STOP m .
- Si desea reservar una parte de los números de
presintonía, por ejemplo los números del 1 al 9,
seleccione la presintonía 10 antes de comenzar la
programación automática. De esta forma, únicamente
se programarán los números de presintonía del 10 al
40.
Programación manual
1 Pulse TUNER
2 Pulse TUNER (BAND) para seleccionar la banda
deseada: FM o AM.
3 Pulse PROGRAM durante menos de un segundo.
La indicación PROGRAM, la frecuencia y el número
de presintonía comienzan a parpadear.
— Se visualizará el siguiente número de presintonía
disponible para la selección.
4 Pulse TUNING ◄ ◄ o ► ► para sintonizar la frecuencia
deseada.
• Cuando estén programadas las 40 posiciones de
memoria, no se visualizará ningún número de
presintonía.
-* En la pantalla se visualizará el mensaje "PROGPffii
• Si desea programar la emisora en otro número de
presintonía, pulse PRESET T o A para seleccionar el
número.
5 Pulse de nuevo PROGRAM.
-* La indicación PROGRAM dejará de parpadear, y la
emisora quedará almacenada.
• Repita el mismo procedimiento para presintonizar
otras emisoras.
Sintonización de presintonías
* Pulse PRESET ▼ o A para seleccionar el número de
presintonía deseado.
El número de presintonía, la frecuencia y la banda
de ondas aparecen en la pantalla.
__________
66
Observaciones:
- Puede cancelar la programación manual pulsando
STOP ■ .
- La unidad abandonará de forma automática la
programación si no se pulsa ningún botón durante
20 segundos.
Page 67

MINI HIFI SYSTEM
REPRODUCTOR DE CASETE
-* En la pantalla aparecerá la indicación ◄ o ► ,
dependiendo de la cara seleccionada.
3b (Sólo platina de cinta 21
Pulse REVERSE MODE para seleccionar un modo
diferente de reproducción (véase el modo de inversión
automática).
4 Pulse STOP ■ para finalizar la reproducción.
^-,0^0"’' TAPE 1
Inserción de una cinta
• Pulse OPEN.
• Se abrirá la puerta del
compartimento de cinta.
• Inserte la casete con el lado
abierto mirando hacia abajo y la
cinta bobinada en el lado
izquierdo.
• Cierre la puerta del
compartimento.
[n <'*> I '[n
(J'‘:L1 '"0.
TAPE 2
000 0
Reproducción de cinta
1 Pulse TAPE para seleccionar el modo de cinta.
-* En la pantalla se visualizará "THPE í" o "ÍRPC
P".
• Pulse TAPE de nuevo para seleccionar la platina 1 o la
platina 2.
2 Inserte la cinta en el compartimento seleccionado.
3 Pulse PLAY ► para dar comienzo a la reproducción.
3a fSó/o platina de cinta 2)
Pulse SIDE A»B (o PLAY ► de nuevo en el mando a
distancia) para alternar entre las caras A y B.
Observaciones:
- Será preciso iniciar la reproducción en la platina 2
para poder cambiar de cara.
- Una vez detenida la reproducción, el equipo entrará
automáticamente en el modo de espera si no se pulsa
ningún botón durante 15 minutos.
Modo de inversión automática
(sólo en la platina 2)_______________________________
• Pulse REVERSE MODE para seleccionar los
diferentes modos de reproducción.
....................grabación o reproducción en una cara
de la cinta. La cinta se detiene al final
de la cara.
.................grabación o reproducción en ambas
caras de la cinta. La cinta se detiene
cuando llega al final de la segunda
cara.
...............reproducción continua de ambas
caras de la cinta, hasta un máximo de
20 veces cada una a menos que se
pulse el botón STOP ■ .
67
Page 68

REPRODUCTOR DE CASETE
Rebobinado/Avance rápido
(sólo en la platina 2)_______________________________
Desde la posición de parada
1 La cinta se puede rebobinar o adelantar pulsando «
o respectivamente.
En la pantalla se visualizará "«< o »>",
dependiendo del botón pulsado.
La cinta se detendrá automáticamente al final del
avance o rebobinado.
2 Pulse STOP ■ para detener el rebobinado o avance
rápido.
AUX
I
Durante la reproducción
• Mantenga pulsado o respectivamente, hasta
localizar el fragmento deseado.
Durante la búsqueda, el nivel de volumen se
reduce.
-* La cinta reanudará la reproducción cuando se libere
Observaciones:
- Si se desea, es posible seleccionar otra fuente de
sonido m TUNEfíoAUX).
- Compruebe y tense la cinta con un lapicero antes de
ponerla en funcionamiento. La cinta destensada podría
atascarse o quemarse en el interior del mecanismo.
- La cinta C-120 es extremadamente fina y, por tanto,
frágil y deformadle. Dicho tipo de cinta no es
recomendable con esta unidad.
- Conserve las cintas a temperatura ambiente, y no las
sitúe demasiado cerca de campos magnéticos (tales
como transformadores, televisores o cajas acústicasl.
Selección de equipos externos
Si ha conectado las salidas de audio del equipo externo
(TV, VCR, Láser Disc o reproductor DVD) a las entradas
AUX IN, podrá oír el sonido a través del sistema.
• Pulse AUX para seleccionar el modo externo.
En la pantalla se visualizará "HuX".
Observación:
- Todas las funciones de control de sonido (DSC, DBB,
etc.) se encuentran disponibles para la activación.
_________
68
Page 69

Observaciones:
- Para las grabaciones, utilice únicamente cintas del
tipo lEC I (normal) o lEC II (cromo).
- La cinta está asegurada en ambos extremos por la
sección de cabecera. Al principio y al final de la cinta
no se grabará nada durante seis o siete segundos.
- El nivel de grabación se ajusta de forma automática,
con independencia de la posición de los controles de
volumen o DBB.
- Para evitar grabaciones accidentales, desprenda la
pestaña de la esquina izquierda de la cara que desea
proteger.
- Si en la pantalla se visualiza 'C MCC К ÍRPC ",
significa que la pestaña de protección ha sido
desprendida. Cubra la abertura con un trozo de cinta
adhesiva transparente, teniendo cuidado de no
obstruir el orificio de detección de cintas CrO,.
Grabación de otras fuentes
(sólo en la platina 2)
1 Pulse TAPE para seleccionar la platina 2.
2 Inserte una cinta virgen en la platina 2, con el lado
abierto hacia abajo.
3 Pulse REVERSE MODE para seleccionar el modo de
reproducción ( o
4 Pulse CD, TUNER o AUX
• Inicie la reproducción de la fuente seleccionada.
5 Pulse RECORD para dar comienzo a la grabación.
-*• La indicación REC comienza a parpadear.
6 Pulse STOP ■ para detener la grabación.
_____________________________
GRABACIÓN
Observaciones:
- Sólo están disponibles los modos y durante
la grabación.
- En el transcurso de la grabación, no es posible
escuchar otra fuente de sonido.
Copia do cintas (de la platina I en la platina 2)
1 Pulse TAPE para seleccionar la platina 2.
2 Inserte la cinta pregrabada en la platina 1, y una cinta
virgen en la platina 2.
^ Asegúrese de que la cinta de la platina 1 está
bobinada por completo en el lado izquierdo.
3 Pulse DUBBING una izezpara activar la copia a
velocidad normal, y dos veces (en menos de
2 segundos) para realizar la copia a alta velocidad.
-* En la pantalla se visualizará "iLURilHL'' (velocidad
normal) o TRSí" (alta velocidad), seguido de
"Til iVVTh ir"
±iU±iri±i'JiD .
La indicación HSD aparece en la pantalla durante la
copia a alta velocidad.
• La operación de copia se iniciará de inmediato.
La indicación REC comenzará a parpadear.
4 Pulse STOP ■ para detener la operación de copia.
69
Page 70

GRABACIÓN
RELOtJ
Observaciones:
- Al final de la cara A, dé la vuelta a las cintas y repita
el procedimiento.
- La copia de cintas sólo es posible de la platina I en la
platina 2.
- Para garantizar una copia correcta, utilice cintas de la
misma longitud.
- Durante la copia a alta velocidad en el modo de cinta,
vstt ‘
o
el nivel de volumen se reduce.
- Durante la operación de copla es posible escuchar otra
fuente de sonido.
Grabación sincronizada de CD
___________
1 Inserte una cinta virgen en la platina 2, y cargue un
disco en la bandeja.
2 Pulse CD para seleccionar el modo de CD.
• Puede programar las pistas en el orden que desea que
se graben (véase Programación de pistas). Si no, las
pistas se grabarán en el orden del disco seleccionado.
3 Pulse RECORD para dar comienzo a la grabación.
La indicación REC comenzará a parpadear.
• La reproducción del CD comenzará de forma
automática.
4 Pulse STOP ■ para detener la grabación.
Modo OTR (grabación con una
pulsación)
• Para la grabación OTR (One Touch Recording), la
fuente de sonido actual se grabará en la platina 2 en
cuanto pulse el botón RECORD.
1 Inserte una cinta virgen en la platina 2.
2 Pulse RECORD
La indicación REC comenzará a parpadear.
3 Pulse STOP ■ para detener la grabación.
Observación:
- Cuando pulse RECORD en el modo de cinta, la pantalla
indicará '50..r.r.T DT’HEO EDUCEE "fseleccione
otra fuente). La grabación OTR no es posible en el
modo de cinta.
Visualización del reloj
Es posible ver el reloj (si está puesto en hora) desde la
posición de espera o estando activada cualquier fuente
de sonido. La lectura de la hora se visualizará durante
unos siete segundos.
• Pulse brevemente CLOCK*TIMER.
— En la pantalla se visualizará " lO 'c’S AM" (la
hora actual).
— En la pantalla se visualizará " si el reloj no
está puesto en hora.
Puesta en bora
El reloj ofrece la hora en formato de 12 horas, es decir,
ic'- Ciü AM o ¡c':Ou PM. Antes de poner en hora el
reloj, deberá encontrarse en el modo de Visualización del
reloj.
1 Pulse CLOCK*TIMER para seleccionar el modo de
reloj.
-• En la pantalla parpadeará " ic' OO AM" o la hora
actual.
-* Las indicaciones "■ «, ► ► , W , N, ■ " se
iluminan.
2 Ajuste la cifra de las horas con ◄ ◄ o
3 Ajuste la cifra de los minutos con No ►!.
4 Pulse de nuevo CLOCK»TIMER para memorizar el
ajuste.
El reloj se pone en marcha.
• Para salir sin memorizar el ajuste, pulse STOP ■ .
70
Page 71

RELOJ
Observaciones:
- Durante la puesta en hora del reloj, la unidad
abandonará automáticamente dicho modo si no se
pulsa ningún botón en 90 segundos.
- Si se produce un corte del fluido eléctrico, los ajustes
del reloj se borrarán.
Programación del temporizador
• El equipo puede activar automáticamente los modos
CD, TUNER o TAPE 1 a una hora programada, por lo
que puede utilizarse como despertador. Transcurrida
media hora de funcionamiento, la unidad regresará al
modo de espera si no se acciona ningún botón.
• Antes de programar el temporizador, asegúrese de que
el reloj está puesto en hora.
• El temporizador deberá reprogramarse cada vez que se
desee cambiar la hora de entrada en funcionamiento.
• El volumen del temporizador será el del último
_________
ajuste previo a la entrada del equipo en el modo de espera.
Mantenga pulsado CLOCK*TIMER durante más de
2 segundos para seleccionar el modo de temporizador.
— Comenzará a parpadear "u'J le 00 AM" o la
última hora programada. En la pantalla se
visualizará la indicación TIMER.
-* La última fuente programada se iluminará en color
rojo, mientras las restantes fuentes disponibles
parpadean.
Las indicaciones , ► ► , !◄ , ► !, ■ " se
iluminan.
Pulse CD, TUNER o TAPE para seleccionar la fuente
deseada.
Antes de seleccionar ios modos CD o TAPE, asegúrese
de haber insertado un CD o una cinta en la bandeja o
en la platina 1, respectivamente.
Pulse o ► ► para ajustar la cifra de las horas de la
TEMPORIZADOR
hora de comienzo.
4 Pulse N o ► ! para ajustar la cifra de los minutos.
5 Pulse CLOCK*TIMER para memorizar la hora de
comienzo y la fuente seleccionada.
El temporizador queda programado.
La indicación TIMER permanece en la pantalla.
• Para salir sin memorizar el ajuste, pulse STOP ■ .
• A la hora programada se activará el temporizador.
-* Comenzará la reproducción de la fuente
seleccionada.
La indicación TIMER desaparecerá de la pantalla.
Observaciones:
- Durante la programación del temporizador, la unidad
abandonará automáticamente dicho modo si no se
pulsa ningún botón en 90 segundos.
- Si la fuente seleccionada es el sintonizador, se
activará la última frecuencia sintonizada.
- Si la fuente seleccionada es el CD, la reproducción
comenzará en la primera pista del último disco
seleccionado. Si las bandejas están vacias, en su lugar
se activará el sintonizador.
- Si la fuente seleccionada es TAPE 1, y si la hora
programada se alcanza durante la copia a alta
velocidad, en su lugar se activará el sintonizador.
Para desactivar el temporizador
1 Pulse CLOCK»TIMER durante más de 2 segundos.
2 Pulse PAUSE II para desactivar el temporizador.
^ En la pantalla se visualizará ''CRNuEL".
— La indicación TIMER desaparecerá de la pantalla.
Para reactivar el temporizador (a la misma hora
programada!
1 Pulse CLOCK'TIMER durante más de 2 segundos.
2 Pulse de nuevo CLOCK»TIMER para programar la
hora de comienzo y la fuente seleccionada.
71
Page 72

MANTENIMIENTO
ESPECIFICACIONES
Maintenance
Limpieza de la carcasa
• Utilice un paño suave ligeramente humedecido con una
solución de detergente normal. No utilice soluciones
que contengan alcohol, amoníaco o abrasivos.
^: Limpieza de los discos
S • Cuando se ensucie un disco, pásele un paño en
sentido radial, desde el centro hacia afuera.
• No utilice disolventes como la bencina, diluyentes,
productos de limpieza disponibles en el mercado ni
pulverizadores antiestéticos para discos analógicos.
Limpieza de la lente del CD
• Tras un uso prolongado, la suciedad y el polvo pueden
acumularse en la lente del CD. Para garantizar una
óptima calidad de reproducción, limpie la lente del CD
con un Limpiador de Lentes de CD Philips u otro
producto del mercado. Siga las instrucciones
facilitadas con el Limpiador de Lentes.
Limpieza de cabezales de cinta y recorridos
• Para garantizar una buena calidad de grabación y
reproducción, limpie los cabezales, cabrestante(s) y
rodillo(s) de presión cada 50 horas de funcionamiento
de la cinta.
• Utilice un bastoncillo de algodón ligeramente
humedecido con líquido de limpieza o alcohol.
• También puede limpiar los cabezales pasando una
casete de limpieza.
Desmagnetización de cabezales
• Utilice una casete de desmagnetización, de venta en
su distribuidor.
Especificaciones
AMPLIFICADOR
Salida de potencia
RMS(6Q, 1 kHz, THD10%)
FW72C
................................................................
Canal envolvente................................................... 7 W
Relación señal/ruido
Respuesta en frecuencia
Sensibilidad de entrada
Entrada Aux
Salida
Altavoces(izquierdo/derecho)
Altavoces envolventes ............................................... >6í2
Auriculares
Salida de subwoofer
REPRODUCTOR DE CD
Número de pistas programadles
Margen de frecuencias
Relación señal/ruido
Separación entre canales
Distorsión armónica total (THD)
SINTONIZADOR
Banda de FM.............................................. 87,5- 108 MHz
Banda de AM
Número de presintonías
Antena FM
REPRODUCTORES DE CASETE
Respuesta en frecuencia
Cinta CrOj (tipo II)
Cinta normal (tipo I)
..........................................................
..............................................
............................................
..........................................
AM
........................................
______________________
....................................
................
...................................
.................................................
...................................
................................
............................................
..........................
..........................
.................................................
............................
........................
>75dBA(IEC)
60 - 16,000 Hz, ±3 dB
32ÍÍ- 1000Q
40 - 20,000 Hz
>80 dBA
> 60 dB (1 kHz)
< 0.003%
530 - 1700 kHz
300 ü de precisión
Antena de cuadro
80 - 14,000 Hz (8 dB)
80 - 12,500 Hz (8 dB)
2x50W
350 mV
1,5 V
>6Q
40
40
Relación señal/ruido
Cinta CrO^ltipo II)
Cinta normal (tipo I)
Fluctuación de velocidad
ALTAVOCES
Delanteros derecho/izquierdo
Sistema
...............................
Impedancia................................................................... 6Q
Graves
.......................................
Agudos
..................
Agudos
....................................................
Dimensiones (anch. x alt. x prof.). 260 x 325 x 310 (mm)
Peso
..........................................................
ALTAVOCES ENVOLVENTES (SS-15R)
Sistema
......................................................
Impedancia................................................................... 6Q
Altavoz ............................................gama completa 1 x 3"
Dimensiones (anch. x alt. x prof.)... 224 x 98 x 224 mm
Peso
.........................................................
INFORMACIÓN GENERAL
Material/Acabado
Alimentación c.a
Consumo
Activo........................................................................ 75 W
En espera.............................................................. < 11 W
Dimensiones (anch. x alt. x prof.). 265 x 310 x 380 (mm)
Peso (sin altavoces)
..............................................
...........................................
................................
3 vías; 2 puertos de graves +
1 puerto de graves G
1 x 6,5"; G cone shielded
1 X 2,5"; Gradually cooled Ferro-Fluid
...............................
..........................................
.................................................
Poliestireno/Metal
>52 dBA
>48 dBA
< 0,4% DIN
2x1" Polydome
5 kg/cada uno
closed satellite
0,76 kg cada uno
120 V / 60 Hz
7,5 kg
Sujetas a modificaciones
72
Page 73

SOLUCIÓN DE PROBLEMAS
Atención: Bajo ninguna circunstancia deberá
intentar reparar el equipo por su cuenta, o de lo
contrario quedaría invalidada la garantía.
• Si se produce alguna anomalía, compruebe los
siguientes puntos antes de solicitar asistencia
técnica.
• Si el problema persiste tras estas verificaciones,
consulte a su distribuidor o servicio técnico más
cercano.
Reproductor de CD
Mensaje "tJG SISC".
___________________
• Disco insertado al revés.
^ Cargue el CD con la cara impresa hacia arriba.
• Condensación de humedad en la lente.
^ Espere a que se aclimate la lente.
• No hay disco en la bandeja.
Inserte un CD.
• El disco está sucio, rayado o deformado.
Sustituya el disco o limpíelo.
• Se ha acumulado polvo o suciedad en la lente del CD.
Véase "Mantenimiento".
Recepción de radio
Recepción de poca calidad.
• La señal es demasiado débil.
^ Ajuste la antena.
• El TV o el vídeo están demasiado cerca del equipo
estéreo.
-*■ Aleje el equipo estéreo del televisor o vídeo.
— Conecte una antena externa para mejorar la
recepción.
Reproductor de casete
Mensaje
• Grabación en curso.
— Detenga la grabación o espere a que finalice.
КЛапоо1а 111 I IJ U í ^ M . I Ih íl
IVien$a|G M M i.íujjjj±í4n_j uiw/
• La copia de cintas sólo es posible en el modo de cinta.
-* Seleccione el modo de cinta como fuente de sonido.
Imposible grabar o reproducir, o reducción del
nivel de audio.
• Suciedad en cabezales, cabrestantes o rodillos de
presión.
-* Véase la sección de mantenimiento.
• Se ha magnetizado el cabezal de grabación/
reproducción.
— Utilice una casete de desmagnetización.
General
El equipo no responde a los botones.
_____________________________
• Se ha producido una descarga electrostática.
-* Pulse STANDBY»ON para apagar la unidad.
Desconecte el cable de alimentación de la toma
mural, vuelva a conectarlo y encienda de nuevo el
equipo.
Sonido deficiente o inexistente.
• El volumen no está subido.
Ajústelo.
• Están conectados los auriculares.
Desconéctelos.
• Los altavoces están desconectados o mal conectados.
Compruebe que estén debidamente conectados.
Observe que esté bien asegurado el hilo de conexión.
___________________
.
Sonido derecho e izquierdo invertido.
• Los altavoces están mal conectados.
Compruebe las conexiones y el emplazamiento de los
altavoces.
Ausencia de graves o localización física aparen
temente imprecisa de los instrumentos musicales.
• Los altavoces están mal conectados.
-* Compruebe la conexión en fase de los altavoces,
entre los cables de color rojo/negro y los terminales
correspondientes.
El mando a distancia no controla el equipo.
• Fuente de sonido mal seleccionada.
-* Seleccione la fuente (CD, TUNER, etc.) antes de
accionar el botón de función (PLAY, PREV/NEXT, etc.).
• Demasiada distancia entre el equipo y el mando.
Reduzca la distancia.
• Pilas mal insertadas.
Inserte las pilas respetando la polaridad (+/-).
• Pilas agotadas.
-* Sustituya las pilas.
No funciona el temporizador.
• El temporizador no está activado.
Pulse CLOCK• TIMER para activar el temporizador.
• Operación de copia/grabación en curso.
Detenga la copia o la grabación.
En la pantalla se visualizan funciones automática
mente y los botones parpadean de forma continua.
• Está activado el modo de demostración.
Mantenga pulsado STOP ■ durante 3 segundos para
desactivar la demostración.
73
Page 74

FW 72C
99551
482273616249
3139 I 16 I8I9I
IB8034T00I
HR
Philips Consumer Electronics Company
A Division of Philips Electronics North America Corporation, Knoxville,Tennessee 37914-1810, USA
Printed in China
JP-9865/37-3
 Loading...