


TABLE OF CONTENTS
Introduction...................................................................................1
Camera Features ..........................................................................2
Parts and Names ..........................................................................3
LC D Monitor .................................................................................5
Basic Operation•Quick Reference ..............................................7
Preparations ................................................................................. 7
Taking Pictures ............................................................................. 8
Playback and Erasure .................................................................. 9
Safety Precautions ..................................................................... 10
Chapter 1. Getting Started
Before Using the Camera.............................................................16
Confirming the Package Contents .................................... 16
Attaching the Wrist Strap .................................................. 16
Supplying Power to the Camera ................................................... 17
Inserting Batteries ............................................................. 17
Inserting a Lithium Battery ................................................ 19
Using AC Power ................................................................ 21
Before You Begin Recording.........................................................22
Adjusting the Date and Time............................................. 22
Adjusting the LCD ............................................................. 24
Holding the Camera ..........................................................24
Chapter 2. Recording Basics
Taking Pictures ........................................................................... 28
Picture-taking Sequence ................................................... 28
Turning on the Power ........................................................28
Selecting the Image Quality ..............................................29
Taking Pictures .................................................................. 30
Exposure Compensation................................................... 32
Chapter 3. Picture-Taking Applications
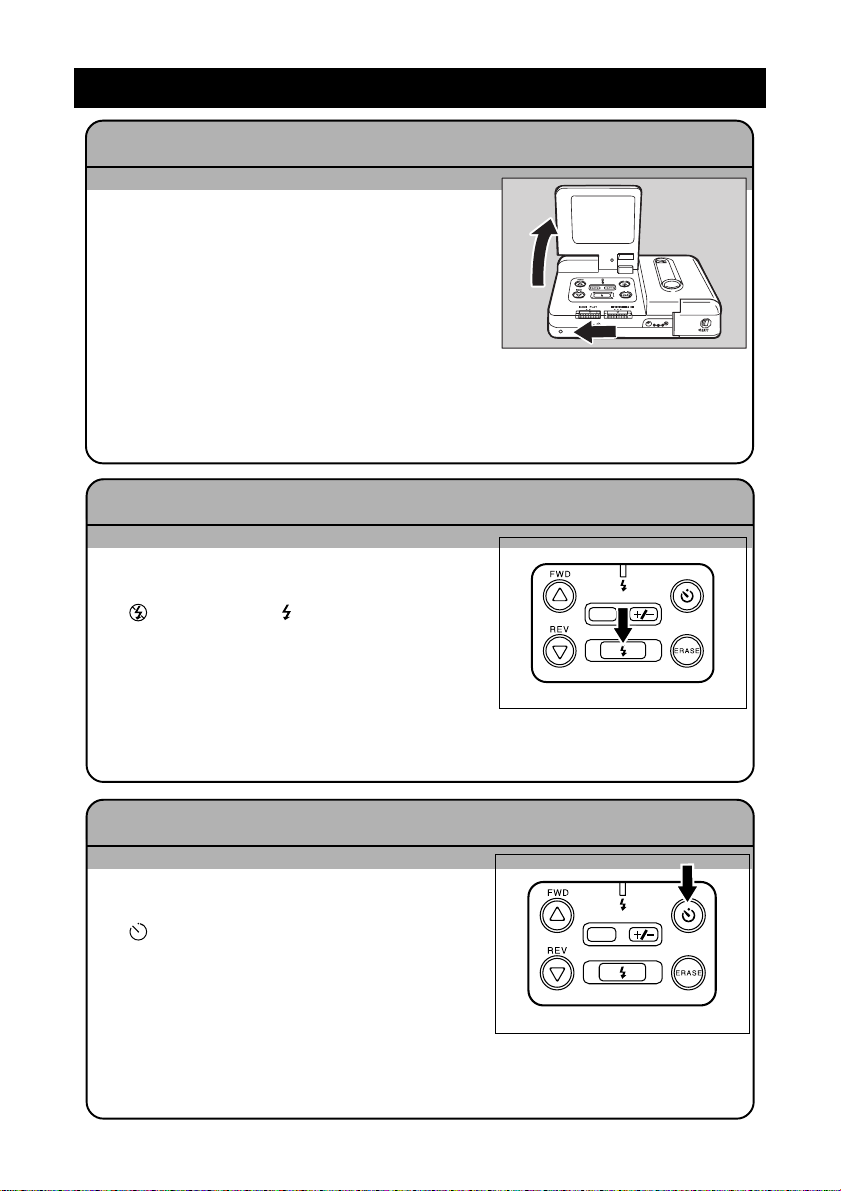
Flash Mode.................................................................................. 36
Selecting a Flash Mode.....................................................36
Flash Off Mode..................................................................37
Forced Flash Mode ...........................................................38
Auto Flash Mode ............................................................... 39
Setting the White Balance Mode ...............................................40
Selecting a White Balance Mode ......................................40
Daylight Mode ...................................................................41
15

Fluorescent Mode ............................................................. 42
Tungsten Light Mode ......................................................... 43
Special Functions....................................................................... 44
Using the Self Timer..........................................................44
Macro Shooting (Close-up Shooting) ................................ 45
Chapter 4. Picture Playback/Erasure
Before Playback..........................................................................48
Displaying Information.......................................................48
Connecting to a TV............................................................ 49
File Playback............................................................................... 50
File Playback.....................................................................50
Automatic Playback...........................................................50
File Erasing ................................................................................. 52
Operation Flow.................................................................. 52
Erasing One File ............................................................... 52
Erasing All Files ................................................................ 54
Chapter 5. Additional Information
Changing a Camera Setting ...................................................... 56
Setting the Auto Power Off mode......................................56
Setting the Power Saving Mode ........................................ 57
Saving Your Settings ......................................................... 58
Returning the settings to the Original Position .................. 59
System Configuration Figure .................................................... 60
Accessories for ESP2 ................................................................ 62
Computer and DC Connections ................................................ 63
Handling Precautions ................................................................ 66
Caring for Your Digital Camera.................................................. 67
Troubleshooting ......................................................................... 68
Using Your Digital Camera in Other Countries ........................71
Specifications ............................................................................. 72
16

Introduction
Testing the camera
Always test the camera b y taking several sample pictures to confirm that the pictures are
recorded correctly.
Respecting copyrights
Reproduction or alteration of copyrighted documents and magazines other than for personal or family use or for a similarly limited extent, without the consent of the author, is
prohibited.
About lost files
We regret that we cannot be responsible for files lost due to any malfunction of the camera.
About the warranty
This product is made according to local specifications. Should it malfunction while you
are abroad, we cannot be responsible for the cost or a vailability of service in other countries.
Radio-frequency interference
Using the digital camera near electric devices could inhibit the performance of both the
camera and nearby devices. Interference is likely to occur when the camera is placed
near a radio or television. If this condition occurs, perform the following procedures:
• Relocate the camera as far as possible from the interference source.
• Change the orientation of the radio or television antenna.
• Plug the camera into a different electrical outlet.
Microsoft, MS-DOS, and Windows are trademarks of the Microsoft Corporation of the U. S. A. and
are registered in the U. S. and other countries.
Macintosh is a trademark of Apple Computer Inc. of the U. S. A. and is registered in the U. S. and
other countries.
All trademarked product names mentioned in this manual are the property of their respective companies.
1

Camera Features
Recording quickly
Recording can be performed quickly and simply by determining the image composition
while observing the LCD monitor and pressing the shutter release button. The memory is
stored in the main unit of the camera.
Confirming a file after recording
A recorded file can be confirmed by the LCD monitor right after the recording. Playback
the file by switching to the playback mode.
Taking several pictures by switching the mode
Three modes can be set. These modes include Normal mode, Fine mode (sets the recording priority on image quality), and Economy mode, which records several which
images.
Natural color images
Use the Auto White Balance feature to place the subject in natural color, regardless of
the lighting conditions.
Close-up shooting
You may approach a subject as close as a distance of 1 cm. This is called Macro Shooting and is appropriate for pictures of flowers, insects, or other detailed subjects.
Monitoring on a TV
A recorded file may be viewed on a TV by connecting the video cable. Dubbing to a video
cassette tape and printing a full-color print are also possible if you connect the camera to
a video deck or a video printer (NTSC only).
Easy to carry, compact size
The compact size and light weight of the camera enable easy carrying. This camera has
an optional hard case, making it easy for you to take it with you anywhere.
Transferring files to a computer
Files can be transferred to a computer using the software for the ESP2. The file can be
printed with a color printer and color copier.
2
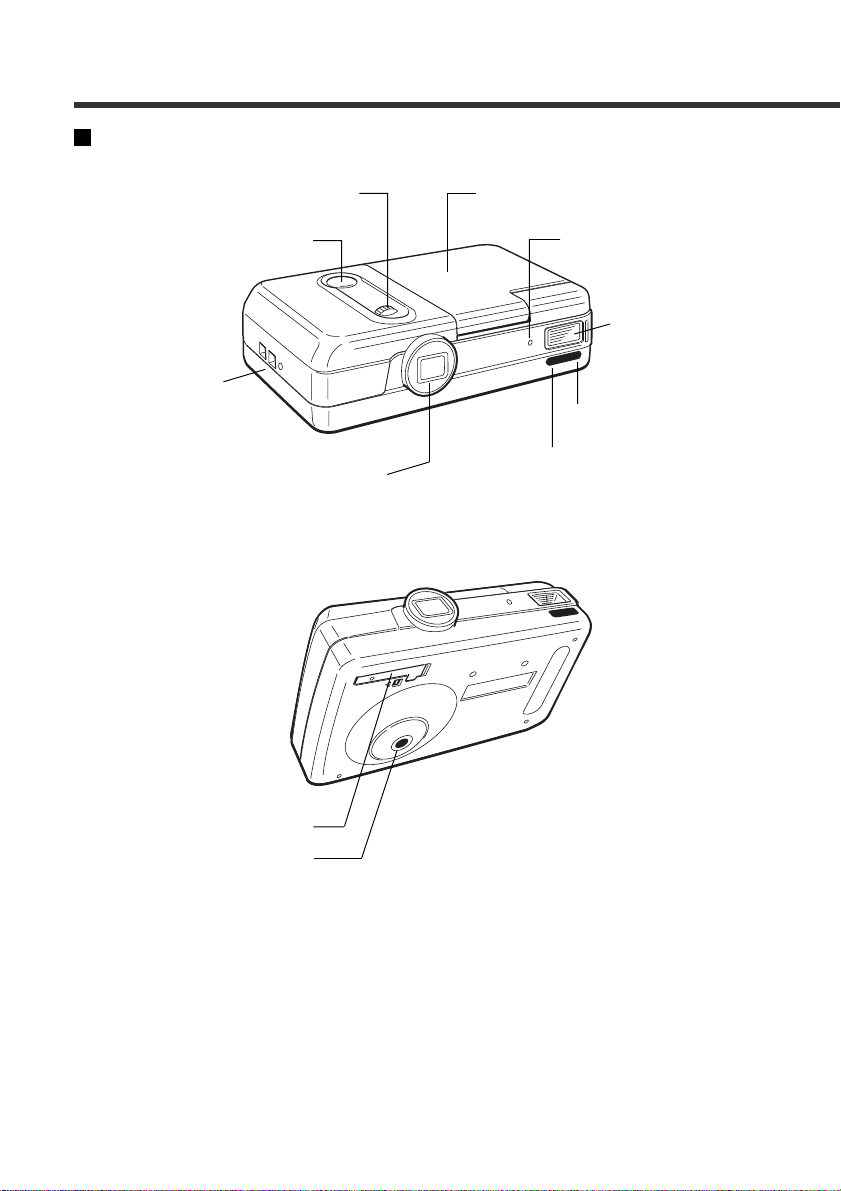
Parts and Names
Camera (main unit) (Top)
Wrist strap
eyelet
(Bottom)
Macro dial
Release button
Lens
LCD monitor
Flash sensor
reception window
Flash
Self timer light
Remote control
reception
Clock Battery compartment
Tripod screw hole
3
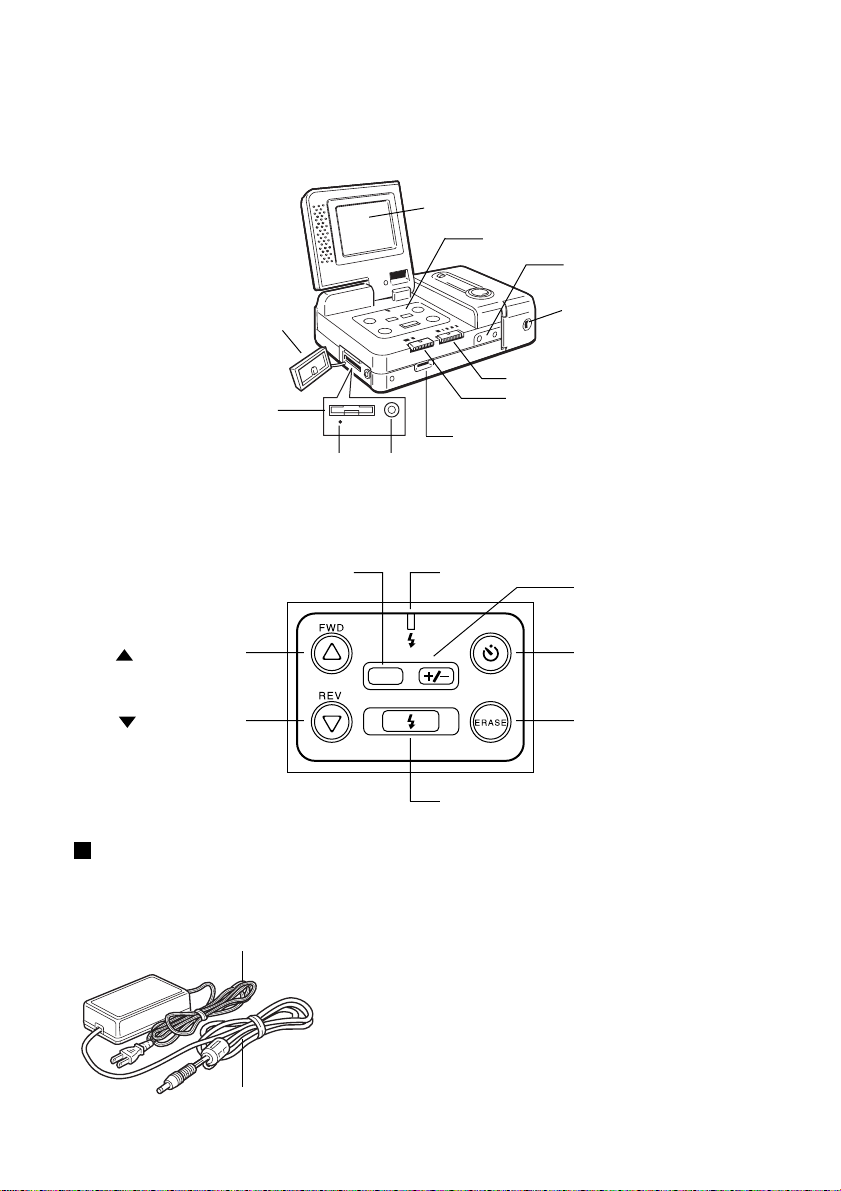
(Operation part)
Terminal cover
RS232C/AUX terminal
Reset button VIDEO OUT terminal
(Operation panel)
LCD monitor
Operation panel
Power supply terminal
(DC IN 5 V)
Battery compartment
PIC (Image Quality) switch
RECORD/PLA Y s witch
Brightness adjustment dial
DATE button Flash LED
(FWD) button
(REV) button
AC adaptor (not supplied)
• AY3140 (100V to 240V)
Power cord
Connection cable
4
+/- (exposure compensation) button
Self Timer button
DATE
Erase button
Flash button
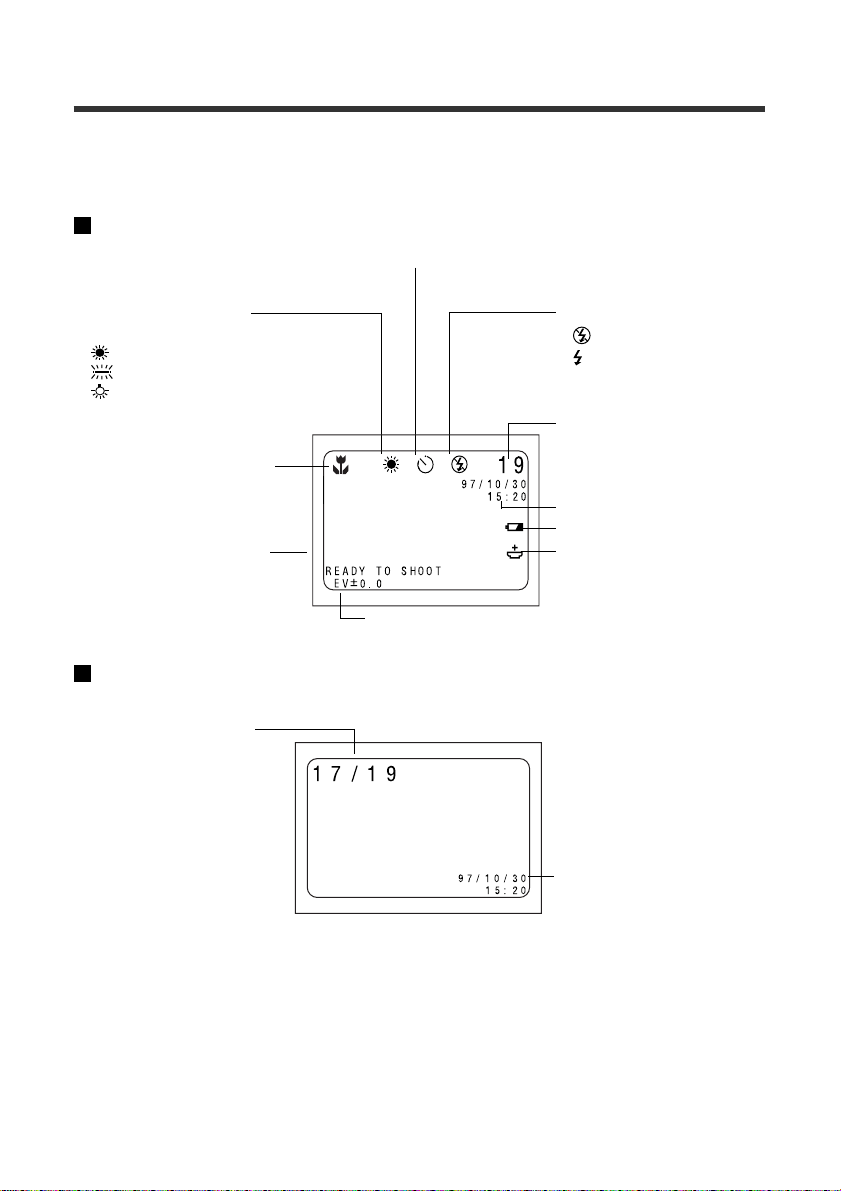
LCD Monitor
The battery condition, number of possible recordings, current mode, and other camera
conditions appear as symbols and numbers on the LCD monitor.
Recording Display
Self timer
White balance display
(No display) : AUTO
: Daylight mode
: Fluorescent light mode
: Tungsten light mode
Macro mode
Message display
Exposure compensation
value display
Flash display
: Flash OFF
: Forced flash
(No display) :Auto flash
Recording data display
The remaining number of
images is displayed.
Date and time display
Battery symbol
Clock battery symbol
Playback Display
Playback data display
The number of the current file
and the number of available file
are displayed.
Date and time display
(The date and time that the
image was shot appears
here.)
Note:
• All data is displayed in this figure. However, only the necessary data is displayed.
• When the LCD monitor is opened, if no camera operations (button or switch operations) are
performed for more than approximately five minutes, the Auto Power Off mode is activated to
conserve energy . The display of the LCD monitor disappears. (The battery is only used slightly in
this condition.) Supply the power again or press the release button for more than one second to
turn the power on.
• The Auto Power Off setting can be changed. See page 56.
5

Warnings
When the following warnings appear on the LCD monitor , verify the problem and correct
it.
Message Condition Description Reference page
Lights 17
Lights 19
This indicates that the batteries are depleted. Replace or recharge the batteries.
The clock battery is depleted or the clock battery is
not set. Replace or insert a new batteries.
Errors
When one of the following errors appears on the LCD monitor, verify the problem and
correct it.
Error message
Error message Description Reference page
ERROR RECORD 28
ERROR ERASE 28
ERROR PLAY 28
SYSTEM ERROR1 28
SYSTEM ERROR2 59
SYSTEM ERROR3
The file is lost or damaged. Record the image again;
the data that was recorded at this time may not be
played back correctly. If the error message is still
displayed, turn on the power again or press the
Reset button.
The erase operation was not performed correctly.
Turn off the power by closing the LCD monitor, then
turn it on again and take a test image. If the test
image data is erased, the incorrectly erased data
will also be erased at this time. If the error message
is still displayed, press the Reset button.
The playback failed. Turn on the power again or press
the Reset button.
Turn on the power again. Otherwise, press the Reset button.
59
52
59
59
* When problems cannot be solved by following the steps above, please contact your
dealer or the local service representative.
6
Basic Operation• Quick Reference
This section describes the basic operations. Refer to the additional pages for further
details.
Preparations
Inserting the batteries Pages 17 - 21
q Insert the batteries.
* When using the AC adaptor, connect the A C
adaptor to the camera, then connect the
adaptor to the wall outlet. See pages 19 -
20.
Setting the Date and Time Pages 22 - 23
q Open the LCD monitor.
w Press and hold the DATE button for more than
two seconds.
e Press the FWD U button or the REV T button
to change the information.
Each time the DATE button is pressed, the next
position starts flashing.
* Press the DATE button repeatedly to set (in
order) the year, month, date , hour, and minute .
When the selected date or time area is flashing, press the U button or the T b utton to set
the correct numbers.
r Start the clock.
When the information is correct, press the DATE
button again to start the clock.
DATE
7
Taking Pictures
Taking Pictures Pages 28 - 31
q Turn on the power. The recording mode is
set.
Open the LCD monitor. Set the REC(ord) /PLAY
switch to the REC position.
w Set the image quality mode.
Set the PIC switch to F, N, or E.
e While viewing the LCD monitor, move the
camera toward the subject.
Briefly press the Release button and make sure
the message “READY TO SHOOT” appears.
r Press the Release button to take a picture.
Changing the Flash Mode Pages 36 - 39
q Open the LCD monitor and slide the
REC(ord)/PLAY switch to the REC position.
w Press the Flash button and select Flash Off
(
), Forced Flash ( ) or Auto Flash (no sym-
bol).
e While viewing the LCD monitor, position the
camera to frame the subject, then press the
Release button to take the picture.
DATE
Using the Self Timer Page 44
q Open the LCD monitor and set the
REC(ord)/PLAY switch to REC.
w Press the Self Timer button. The Self Timer
) symbol will be displayed.
(
e Position the camera to frame the subject,
then press the Release button to take the
picture.
The Self Timer lights, the shutter will be re-
leased after approximately 10 seconds.
8
DATE
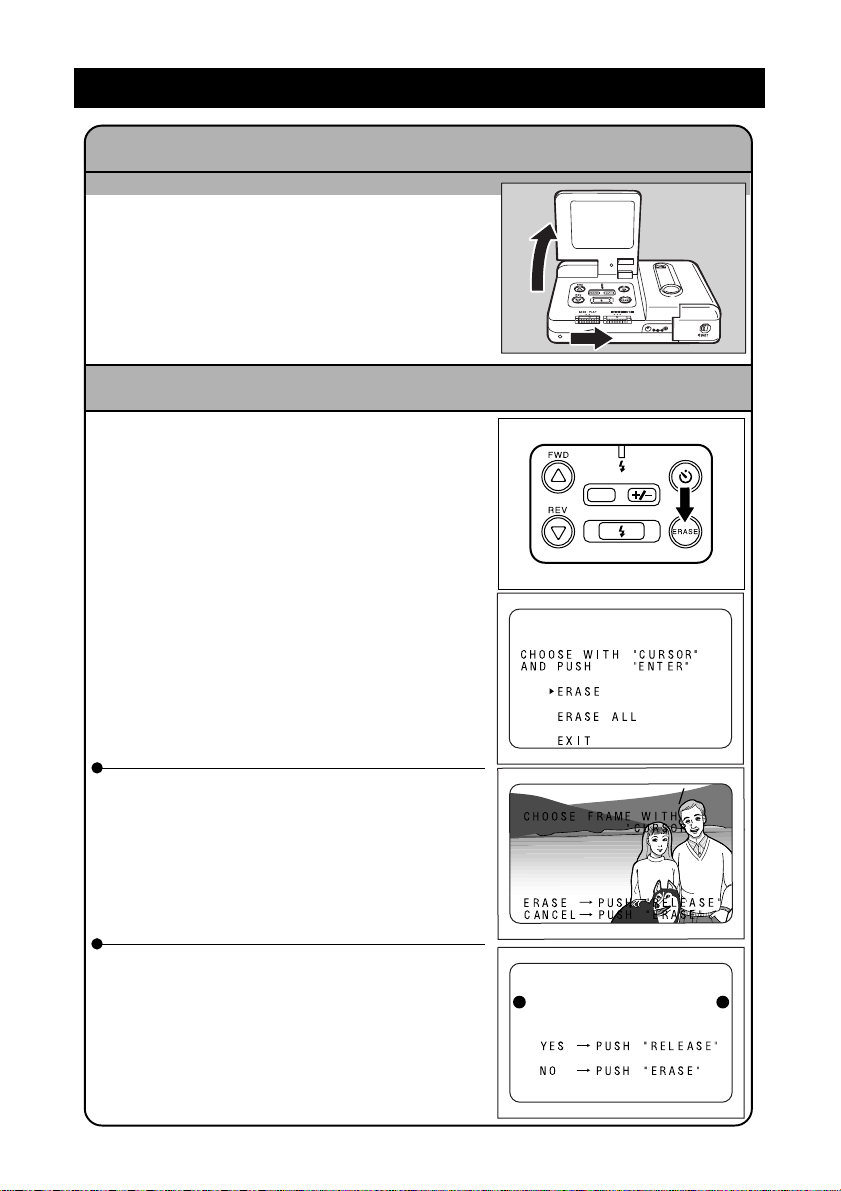
Playback and Erasure
ERASE
17
19
Viewing a File (File Playback) Page 50
q Open the LCD monitor and set the REC(ord)/
PLAY switch to PLAY.
UU
w Press the
the files.
Erasing a File Pages 52 - 54
q Open the LCD monitor and slide the
REC(ord)/PLAY switch to PLAY.
w Press the ERASE button.
Add a note:
The Release button is also referred to as the
ENTER button in the LCD monitor.
TT
U and
T buttons to move through
UU
TT
ERASE
DATE
UU
e To erase one file, press the
to select ERASE, then press the Release
UU
button. Press the
the file to be erased. Press the Release button be consistent. Repeat as desired.
e To erase all the files, press the
tons to select ERASE ALL, then Press the
RELEASE button to erase all files. Or, press
the Erase button if you do not want to erase
all files.
Erased files cannot be restored.
Check the contents of the file carefully before erasing the file.
TT
U and
T buttons to select
UU
TT
U and
UU
UU
U and
UU
TT
T buttons
TT
TT
T but-
TT
ERASE ALL?
9

Safety Precautions
Display
V arious messages enable y ou to use the product safely and prev ent unexpected danger
to people or damage to property.
R Warning This symbol means operations may result in a serious injury or death
if this message is ignored or if incorrect operation is performed.
R Caution This symbol means mishandling may injure the users or damage ob-
jects if the message is ignored.
Display Example
m Indicates a warning of a prohibited operation.
m
Observe the following precautions in order to use this equipment safely.
R Warning
m Indicates specifically prohibited items.
Display example
Meaning: T ouch prohibited.
n
Meaning: Disassembly prohibited.
q
o
o
10
Turn off the power immediately if a fire, odor or other abnormal
condition is observed. Remove the batteries carefully, being careful to avoid electrical shock or burning. When the po wer is supplied
by an electrical outlet, always remove the electrical plug from the
wall outlet to avoid fire or shoc k. Contact your nearest service representative. Do not use this equipment when it is damaged or is not
operating correctly.
Turn off the power immediately if foreign matter (metallic objects,
water, fluid, etc.) enters the internal parts. Remove the batteries,
being careful to avoid electrical shock or burning. When the po wer
is supplied by an electrical outlet, always remov e the electrical plug
from the wall outlet to avoid fire or shock. Contact your nearest
service representative. Do not use this equipment when it is damaged or is not operating correctly.

o
m
• When the LCD monitor is damaged, do not touch the fluid inside
the display. If any of the following conditions occur, perform the
appropriate action immediately.
• If liquid crystals contact the skin, wipe the crystals off the skin and
rinse the affected area with plenty of water. Then, wash the area
thoroughly with soap and water.
• If any fluid gets in your eyes, rinse y our ey es with clean water for at
least 15 minutes. Contact a doctor immediately.
• If someone drinks the fluid in the display , rinse out the mouth thoroughly with water. Drink a large quantity of water and induce vomiting. Then, contact a doctor immediately.
Observe the following precautions to prevent the batteries from
leaking, exploding, igniting, or breaking.
• Never use batteries that are not specifically recommended for use
with this camera.
• Never dispose of the batteries in a fire; do not short-circuit the terminals; and do not attempt to disassemble, heat, or recharge the
batteries. (Only Nickel Cadmium or nickel-metal-hydride (NiMH)
batteries can be recharged.) Doing so may damage the batteries
and cause a fire, injury, or environmental contamination.
• Do not use batteries incorrectly; do not use batteries of a different
type or name; do not use batteries of a different manufacturer; and
do not mix old and new batteries.
• Be sure to maintain the correct polarity (positive [+] and negative
[–] poles) when inserting the batteries.
• Do not solder the batteries. This may damage the batteries and
may cause a fire, injury, or environmental contamination.
m
o
m
• When using rechargeable batteries, do not mix them with other
types of batteries or with batteries in another charged condition.
• Store the batteries in a location that is not accessible to infants or
children in order to prevent the batteries from being sw allo w ed accidentally. Contact a doctor immediately if the batteries are swallowed accidentally. This may result in severe personal injury.
• Never leave this product within the reach of infants or children.
11

n
q
m
o
• Do not touch the inside of the camera. The inter nal high-voltage
circuits may cause an electrical shock. Remove the batteries right
away, being careful to avoid electrical shock or burns. When the
unit is damaged, contact the store where you purchased the product or contact the service representatives.
• Never attempt to disassemble, repair , or modify the camer a by yourself. There are internal, high-voltage circuits which may cause severe electrical shock.
• Never use the camera in the bathtub or shower. This may cause
fire or electrical shock.
• Do not use the unit near flammable gas, gasoline, benzene, thinner, etc. This may cause an explosion, fire, or burns.
• Do not use the camera in an airplane or other location where usage is restricted. Using the camera in these locations ma y result in
an accident.
• When dust accumulates on the electrical plug, wipe it off thoroughly.
The dust may cause a fire.
• When using a household electrical outlet, always use the special
AC adaptor (product name: AY3140, optional). If a non-recommended AC adaptor is used, this may cause fire, shock, or other
damage.
m
12
• When traveling outside the U.S., do not contact the AC adaptor to
power outlet. This may cause fire, shock or other damage.

Observe the following precautions in order to use this unit safely.
R Caution
Fluid leaking from a battery can cause skin burns. If you touch a
o
damaged battery, w ash y our hands with w ater immediately (do not
use soap).
If fluid leaks from the batteries, wipe off the fluid and replace the
batteries with new batteries.
o
m
m
m
Special Products
• When using products that are optional, such as the Ricoh remote controller and AC
adaptor, read the section Saf ety Precautions in the operation man ual for each product before operation.
Make sure that the electrical plug is plugged securely into the wall.
Do not get the camera wet. Do not touch the camera with wet hands.
This may cause an electrical shock.
Do not point the flash unit at the driver of a car, bicycle or tr ain. This
may cause an accident.
To prevent fire and shock, do not use metal objects such as a tweezers to grasp the batteries. This may cause a short-circuit.
13

14

Chapter 1. Getting Started
Before Using the Camera ....................................................... 16
Confirming the Package Contents.................................... 16
Attaching the Wrist Strap................................................... 16
Supplying Power to the Camera ............................................ 17
Inserting Batteries .............................................................. 17
Inserting a Lithium Battery ................................................ 19
Using AC Power .................................................................. 21
Before You Begin Recording .................................................. 22
Adjusting the Date and Time ............................................. 22
Adjusting the LCD .............................................................. 24
Holding the Camera............................................................ 24
Before Using the Camera
Confirming the Package Contents
Check the packaging to ensure you have received the following items. Read the warranty, then store it in a safe place.
• Digital Camera (main unit)
• Video connection cable
• Soft Case
• Four AA Alkaline Batteries
• Lithium battery (CR2025)
• Wrist Strap
• Instructions for use
• Warranty Card
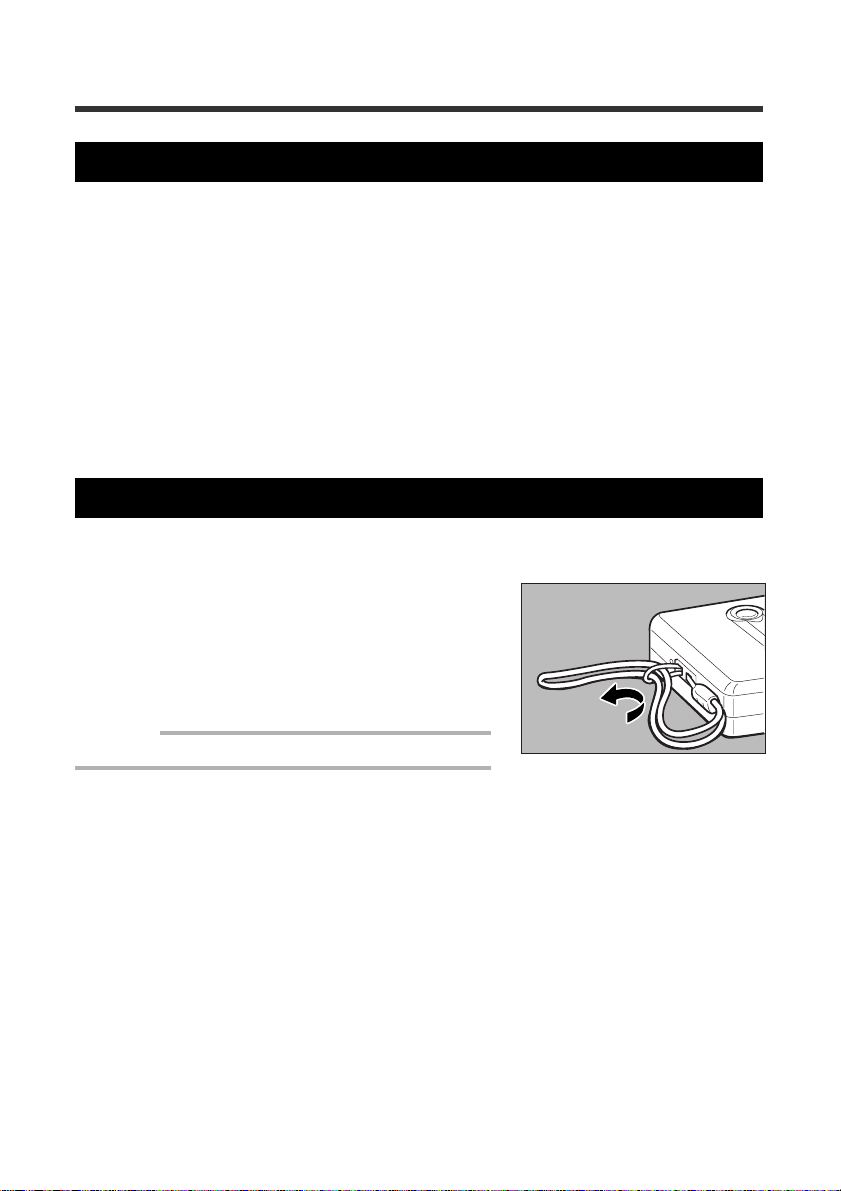
Attaching the Wrist Strap
For security, always use the wrist strap when carrying the camera.
q To attach the wrist strap, pull the leading
end of the strap through the wrist strap
eyelet on the camera, then pull then remainder of the strap through the looped
end of the strap as shown.
Important
• Avoid swinging the camera when carrying it.
16

Supplying Power to the Camera
The procedures for loading the batteries (alkaline batteries, Lithium battery) are explained
in this section. Electrical power supply by standard AC household current is also explained in this section.
Inserting Batteries
Insert four AA alkaline batteries to begin using the camera. It is recommended to use the
same type of batteries which are included in the package.
Note: The camera can also be powered by commercially available rechargeable nickel-cadmium
(NiCad) batteries or nickel-metal-hydride (NiMH) batteries. (It is recommended to use a high
capacity type of battery for NiCad batteries.)
1
R Warning
m
m
o
Getting Started
Observe the following precautions to prev ent the batteries from leaking, exploding, igniting fire or breaking.
• Never use batteries that are not specifically recommended for use
with this camera.
• Never dispose of the batteries in a fire; do not short-circuit the terminals; and do not attempt to disassemble, heat, or recharge the
batteries. (Only Nick el Cadmium or nick el-metal-hydride (NiMH) batteries can be recharged.) Doing so may damage the batteries and
cause a fire, injury, or environmental contamination.
• Do not use batteries incorrectly; do not use batteries of a different
type or name; do not use batteries of a different manufacturer; and
do not mix old and new batteries.
• Be sure to maintain the correct polarity (positive [+] and negative
[–] poles) when inserting the batteries.
• Do not solder the batteries. This may damage the batteries and
may cause a fire, injury, or environmental contamination.
• When using rechargeable batteries, do not mix them with other
types of batteries or with batteries in another charged condition.
• Store the batteries in a location that is not accessible to infants or
children in order to prevent the batteries from being sw allowed accidentally. Contact a doctor immediately if the batteries are swallowed accidentally. This may result in severe personal injury.
17

R Caution
Fluid leaking from a battery can cause skin burns. If you touch a
o
Rechargeable batteries
• Before using commercially available Nic k el Cadmium or nic k el-metal-hydride batteries, thoroughly read the safety precautions provided with each product.
Important
• Use only specified AA-type batteries.
• Never use manganese batteries, or any other type of battery that is not specifically recommended.
Use of such batteries may damage the camera or LCD monitor.
• Some batteries may become hot after a long period of use. Remove the batteries after they hav e
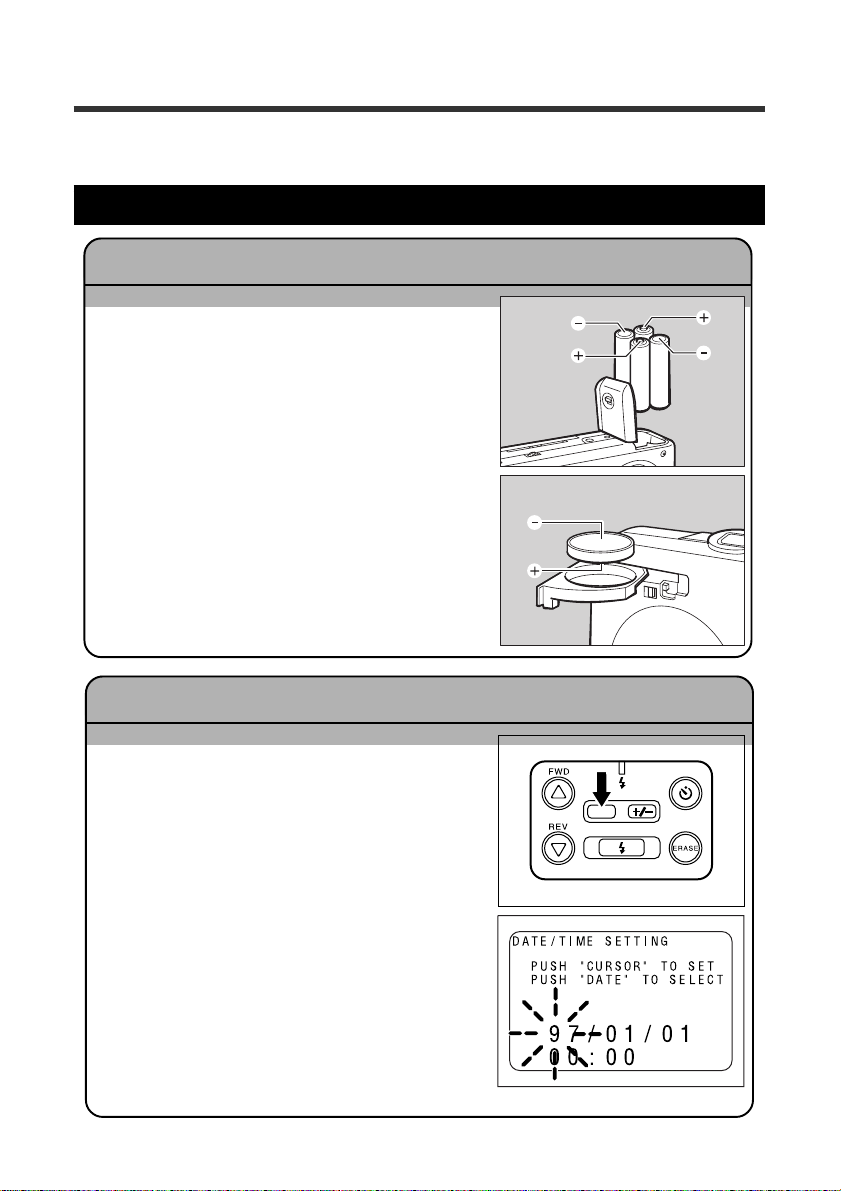
cooled.
q Close the LCD monitor, then press slide
the lever to open the battery compartment.
Note: See “Turning on the Power” on page 2 8 for informa-
tion about the camera power supply.
damaged battery, w ash your hands with water immediately (do not
use soap).
If fluid leaks from the batteries, wipe off the fluid and replace the
batteries with new batteries.
w Insert the batteries.
Important
• Carefully note the proper batter y polarities (positive [+]
poles and negative [-] poles).
e Close the battery compartment lid.
18
Recording and playback capacities
The following table shows the number of recordable images and the playback time
available with AA alkaline batteries (at temperatures between 10 °C and 30 °C).
Type of battery Number of recordable Standard playback time
AA alkaline batteries Approximately 150 images Approximately 2 hours
* The battery life varies according to flash usage and other factors.
* Results may vary according to the type and brand of battery.
Note:
• Whenever you do not have access to an electrical outlet, always carry four extra batteries.
• The battery symbol ( ) appears on the LCD monitor to indicate that the batteries are weak or
depleted. Replace the batteries.
For rechargeable Nickel Cadmium or nickel-metal-hydride batteries, the time between lighting of the battery symbol and complete depletion of the batteries is shorter than when alkaline batteries are used. The batteries run out quickly after the symbol lights.
standard images
Safety Precautions
• Do not use damaged batteries or batteries that are almost depleted.
• Do not subject the batteries to strong impact.
Inserting a Lithium Battery
The lithium battery (CR2025) maintains the set date and time. Insert the lithium battery
before starting to operate the camera.
R Caution
• To prev ent fire and shock, do not use metal objects, such as twee-
m
zers, to grasp the batteries. This may short out the circuit.
1
Getting Started
q After closing the LCD monitor, use a ball
point pen to move the battery compartment switch (on the bottom of the camera) to the left.
Note: See “T urning on the P o wer” on page 28 for more infor-
mation on the power supply of the camera.
w Then, pull out the lithium battery tray by
pulling the tray’s lever out and to the left.
19
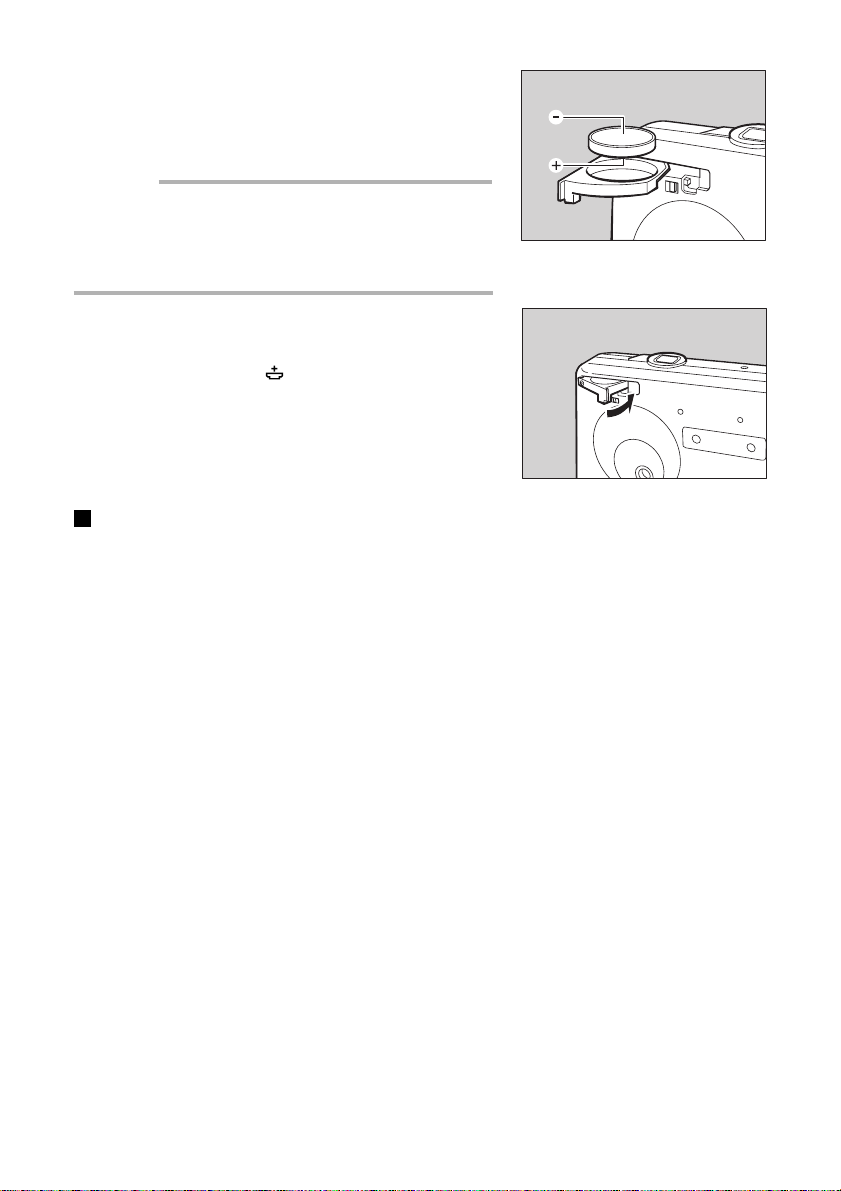
e Insert the lithium battery in the battery tray
so that the positive (+) pole surface is facing down.
Important
• Use the lithium batter y (CR2025) that is installed in the
camera. Do not use any other type of battery that is not
specifically recommended.
• Be sure to maintain the correct polarity (positive [+] poles
and negative [–] poles) when inserting the batteries.
r Close the battery tray.
Note: The battery symbol ( ) appears in the LCD monitor
to indicate that the lithium battery is worn out or is not
inserted. Replace or insert the battery.
Safety Precautions
• The lithium battery (CR2025) maintains the date and time. Battery life is approximately
one year.
• To prevent imperfect contact, wipe off the battery with a dry cloth before inserting lit.
• Dispose of the battery according to the local ordinances and regulations.
20
Using AC Power
If you intend to use your camera to record or playback files for a long period of time, use
the optional AC adapter to connect the camera to a household electrical outlet.
RR
R Caution
RR
• Make sure the electrical plug is plugged securely into the wall.
o
About the AC Adaptor
Be sure to read the safety precautions in the manual supplied with the AC adaptor.
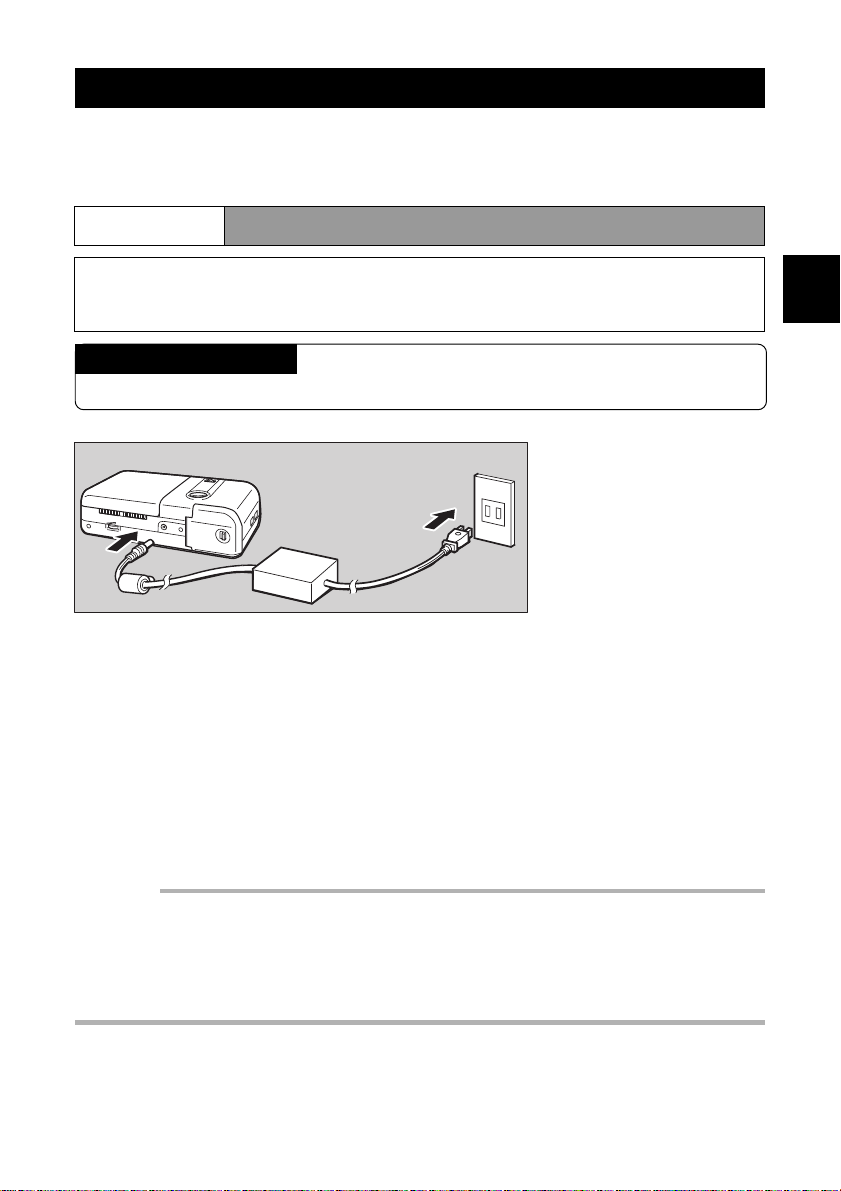
q Close the LCD monitor.
1
Getting Started
Note: See “Turning on the Power” on page 28 for information about the camera power source.
w Connect the cable of the AC adaptor to the DC IN 5 V jac k of the camera.
e Insert the plug into an electrical outlet.
Note: When the AC adaptor is used with the camera, it becomes the active power source, even
when the batteries are installed in the camera.
Important
• Plug the power cord firmly into the power source and into the camera. If the power plug or connecting cable loosens during recording, data could be lost or damaged.
• When the AC adapter is connected to the camera, the power supply to the camera is temporarily
interrupted during the change of the power source. If this occurs while the camera is in use such
as during recording, playback or erasing, data can be damaged or lost. Therefore, always turn off
the power of the camera before connecting the AC adaptor.
21

Before You Begin Recording
DATE
This section explains the initial camera adjustments and basic camera operations.
Adjusting the Date and Time
The camera records the date and time of every image that is recorded. You should set the
correct date and time when you first begin using your camera, as well as when you tr a v el
to a different time zone.
Note:
• Enter the date in following order: year/month/day.
• The camera uses a 24-hour clock, where 00:00 indicates midnight and 12:00 indicates noon.
q Open the LCD monitor.
Note:
The REC(ord)/PLAY switch can be set to either REC
or PLAY.
w Press and hold the DATE button for more
than two seconds.
e Press the
UU
U button or the
UU
TT
T button to
TT
change the flashing number (the year, f or
example).
To increase the number
Press the U button. Press and hold the button to
rapidly increase the number.
To decrease the number
Press the T button. Press and hold the button to
decrease the numbers rapidly.
22

r Press the DA TE b utton to adv ance to next
item (the month, for example).
Repeat steps 3 and 4 to correct the necessary
items.
Note: Every time the DATE button is pressed, the year,
month, day, hour, and minute flashes (in that order).
t After setting the minutes, press the DATE
button again.
The clock starts and the display reappears on the
LCD monitor.
Note: The current date and time will be displayed only when
in the RECORD mode.
Press the DATE button repeatedly to display the date and time on the LCD monitor.
* When the REC(ord)/PLAY switch is set to REC. The current date and time will appear on the
LCD monitor. When the REC(ord)/PLAY switch is set to PLAY, the date and time that the
image was captured will appear on the LCD monitor.
1
Getting Started
23

Adjusting the LCD
This section explains how to adjust the brightness and angle of the LCD monitor.
q Turn the brightness adjustment dial to the
right or left to adjust the brightness.
The brightness increases when you turn the brightness adjustment dial to the right. It decreases when
you turn the brightness adjustment dial to the left.
w Adjust the LCD monitor toward you or
away from y ou to obtain the optimal angle.
The LCD monitor can be adjusted between 60°
and 140°.
Holding the Camera
Moving the camera during picture taking will result in blurred pictures. For best results,
hold the camera steady when pressing the Release button.
q Securely hold the camera with both hands; hold your elbows lightly
against your side. Point the camera toward the subject and view the
subject in the LCD.
w Lightly press the Release button.
When holding the camera in a high position:
24

When holding the camera in a low position:
Important
• If you place your finger too far from the Release button, then press the button too fast, the camera
may shake and a blurred picture may result.
Note: Hold the camera vertically for a more vertical image. The image will appear vertically on the
LCD monitor.
Be sure to keep your fingers and the wrist strap away
from the camera lens and the flash window.
1
Getting Started
25

26

Chapter 2. Recording Basics
Taking Pictures........................................................................ 28
Picture-taking Sequence.................................................... 28
Turning on the Power ......................................................... 28
Selecting the Image Quality............................................... 29
Taking Pictures ................................................................... 30
Exposure Compensation ................................................... 32

Taking Pictures
This chapter explains the basic operations and other information needed to record images.
Picture-taking Sequence
To take a picture follow these steps. Details of each steps follow.
Turn on the power.
Open the LCD monitor, then slide the REC(ord)/PLAY switch to the REC side.
Select the image quality.
Select the image quality of either E, N, or F (Economy , Normal, or Fine). See page 29.
Take the picture.
Press the Release button to record the image. See page 30.
Turning on the Power
The power is turned on by opening the LCD monitor (approximately 60°).
q Open the LCD monitor, then set the
REC(ord)/PLAY switch to REC.
The lens cover opens and the power is turns on.
Note:
• When the power is turned on, the Recording Data Display
and the Flash display appear on the monitor in approximately three seconds.
• If the LCD monitor is closed, the power turns off and the
lens cover closes.
28

Hint: Auto Power Off Function
If no operations are performed for five minutes or longer while the LCD monitor is opened, the
LCD monitor will dim. This operation saves battery power. To turn the power back on, press the
Release button for more than one second.
To disable Auto Power Off, see page 56.
Note: When the Auto Power Off feature operates, the FLASH MODE, WHITE BALANCE MODE,
AUTO POWER OFF, and INTERVAL TIME SETTING are saved . See “Saving Your Settings ”
on page 58 for further details.
Selecting the Image Quality
This digital camera uses compression and decompression schemes to record a large
amount of information. N (Normal) mode is standard; F (Fine) mode improves picture
quality; and E (Economy) mode allows you to record and store more images. You may
change the image quality for each image. The number of pixels is set to the VGA resolution (640 (H) x 480 (V)).
2
Economy mode
Normal mode
q Slide the image mode switch (ENF PIC)
to select the desired mode (E, N, or F).
The number of images that can be recorded appears on the LCD monitor (see illustration above).
Fine mode
Recording Basics
29

Standard Data
Image Quality Mode Data Size/Image
Fine mode Approx. 160 KB/image
Normal mode Approx. 80 KB/ image
Economy mode Approx. 40 KB/ image
Note: The following chart indicates the maximum number of images that can be recorded when
the image quality mode is selected.
Image Quality Mode Number of Recorded images
Fine mode Approx. 25 images
Normal mode Approx. 50 images
Economy mode Approx. 100 images
Taking Pictures
This section explains the basic operations and other information needed to record images.
Note: See “Holding the Camera” on page 24
q Look at the LCD monitor and position the
camera to compose the image.
Use the macro mode to take pictures of subjects at
distances from 1 to 60 cm.
Note: See “Macro Shooting” on page 45.
w Press the Release button lightly so that it
is halfway down.
The Release button has two steps. Messages are
displayed if the button is pressed halfw a y down. The
exposure and white balance are set at this time.
Displayed Messages
Pictures can be taken when the message “READY
TO SHOOT” is displayed.
When the message “SLOW SHUTTER CHECK FLASH MODE” appears , press the
FLASH button to select a Flash mode.
Note: See “Selecting a Flash Mode” on page 36.
30

e To take the picture, depress the Release
button completely.
The Flash LED will light to indicate that an image
is recorded.
If the image is recorded, the remaining number of
images that can be recorded appears on the LCD
monitor.
When Forced Flash or Auto Flash is set:
When taking a flash photo in dark locations, the
Flash LED will light when the Release button is
pressed lightly.
Note: The strobe lamp flashes when the flash is charging. A
photo cannot be taken at this time.
Tip:
If no operation is performed for five minutes or longer while the po w er is on, the A uto Power Off
function dims the LCD monitor to save power. Turn off the Auto Power Off function if a certain
amount of time is required until a picture can be taken. Prepare a spare set of batteries; the
batteries may be worn out if they are used for a long time. Connect an optional AC adaptor to
use the camera with power from an electrical outlet.
Note: See “Setting the Auto Power Off mode” on page 56.
DATE
2
Recording Basics
Tip:
You may disable the LCD monitor during recording.
The following message appears when the FLASH button is pressed while pressing the U and T
buttons. Press the U or T button to switch ON and OFF.
á
31
Exposure Compensation
When there is a significant difference in brightness between the background and the
subject, the subject may be underexposed (too dark) or ov erexposed (too light). In such
cases, adjust the exposure. This function allows you to intentionally underexpose or ov erexpose an image.
Exposure compensation range
± 2.0 EV (in 0.5 EV increments)
Shooting with backlighting
When the background is bright, the subject is underexposed. In this case, adjust the
exposure by increasing the value (positive (+) compensation).
Important
• In backlit conditions, place the subject at the center of the shooting range. If the subject is not
placed at the center of the shooting range, the camera cannot determine the backlit conditions.
Shooting images that are too light
When shooting an image that is too light, the entire image is underexposed. The image
is recorded too dark; light-colored subjects are recorded in a gra yish tone . In this case,
increase the value (positive (+) compensation) to adjust the exposure.
Shooting images that are too dark
When shooting an image that is too dark, the entire image is overexposed. The image
is recorded too light; light-colored subjects are recorded in a grayish tine. In this case,
decrease the value (negative (–) compensation) to adjust the exposure. Follow the
same procedures as when shooting an image in direct light.
Exposure compensation setting
q When the REC(ord)/PLAY switch is set to
REC, press the +/– button to display the
exposure compensation value on the LCD
monitor.
32
DATE

UU
w Press the
TT
U or
T button to increase or
UU
TT
decrease the exposure compensation.
Each press the U or T button will increase or decrease the exposure 0.5 EV. After adjusting the
value, take the picture.
Note: To cancel the setting, press the +/– button again.
Important
About the exposure compensation
q
To confirm the effect of the exposure compensation on the recorded image, watch the image on
the LCD monitor after the picture is taken, or play back the image.
w
The exposure compensation value is retained in memory even when the exposure compensation
setting is released. How e ver, the exposure compensation setting only affects the images recorded
when the exposure compensation appears on the LCD monitor.
2
Recording Basics
33

34

Chapter 3. Picture-Taking
Applications
Flash Mode .............................................................................. 36
Selecting a Flash Mode...................................................... 36
Flash Off Mode.................................................................... 37
Forced Flash Mode............................................................. 38
Auto Flash Mode................................................................. 39
Setting the White Balance Mode............................................ 40
Selecting a White Balance Mode ....................................... 40
Daylight Mode ..................................................................... 41
Fluorescent Mode............................................................... 42
Tungsten Light Mode ......................................................... 43
Special Functions ................................................................... 44
Using the Self Timer ........................................................... 44
Macro Shooting (Close-up Shooting) ............................... 45

Flash Mode
This section explains how to change the flash mode. You can select the flash mode best
suited to the lighting conditions.
Selecting a Flash Mode
Press the FLASH button repeatedly to select the desired mode.
FLASH button:
Sets the flash mode
DATE
Flash Off Mode Forced Flash Mode
Important
• The White Balance Mode is set for the Flash Off mode and cannot be changed except when the
White Balance Mode is set to AUTO mode. Perform the operations after changing the White
Balance Mode to AUTO. See “Setting the White Balance Mode” on page 40.
• When performing Macro Shooting, the Flash Off mode is set. The flash mode cannot be changed.
• The light from the flash appears red in the picture if the flash discharges on the subject at a
distance less than the minimum distance (approximately 0.6 m).
Auto Flash Mode
(no display)
36

Flash Off Mode
If this mode is used, the flash will not discharge, even in dark locations. This feature is
convenient when you wish to take a picture where flash photography is prohibited. It is
also convenient for using the available room light when taking a picture.
q Press the FLASH button until the [ ] sym-
bol appears on the LCD monitor.
DATE
w Press the Release button.
The camera will take a picture without the flash
discharging.
Important
• In dim light, the camera's shutter speed is automatically reduced. The message SLOW SHUTTER CHECK FLASH MODE will appear. To prevent a blurred picture, steadily hold the camera or
stabilize the camera with a tripod.
3
Canceling the selected Flash Mode
Press the FLASH button repeatedly to select another mode.
Picture-Taking Applications
37

Forced Flash Mode
When taking photographs of subjects in strong light or with backlighting, dark shadows
may appear on the image. Forced Flash Mode is used to soften shadows. The flash will
operate in all lighting conditions.
q When the REC(ord)/PLAY switch is set to
REC, press the FLASH button until the [
symbol appears on the LCD monitor. The
Flash LED will blink.
The FLASH LED will light when the Release button is pressed lightly.
Note: The flash LED flashes while the flash is charging; a
picture cannot be taken at this time.
w Press the RELEASE button.
The camera will take a picture with the flash.
]
DATE
Canceling the Mode
Press the FLASH button repeatedly to select another mode.
Flash Distance
The recommended shooting range is approximately 0.6 m to 3.0 m if the flash is
used. If the flash does not reach the subject, a dark, underexposed image may result. If the lens-to-subject distance is less than 25 cm (10 in.), the image may look
washed-out.
38

Auto Flash Mode
The flash discharges automatically when shooting in dark locations or in backlighting.
Take the photo according to the lighting conditions.
q Press the FLASH button repeatedly until
neither flash symbol (
on the LCD monitor.
When shooting in a dark location, press the Release button lightly. The flash will operate.
Note: The flash LED flashes while the flash is recharging. A
photo cannot be taken at this time.
w Press the Release button.
The flash will discharge automatically in dark locations or in backlighting.
Canceling the Mode
Press the FLASH button repeatedly to select another mode.
and ) appears
DATE
3
Flash Distance
The recommended shooting range is approximately 0.6 m to 3.0 m if the flash is
used. If the flash does not reach the subject, a dark, underexposed image may result. If the lens-to-subject distance is less than 25 cm (10 in.), the image may look
washed-out.
Picture-Taking Applications
39

Setting the White Balance Mode
You may adjust the White Balance Mode so that subjects appear in natural colors, even
when under a light source. Normally, Auto is the preferred setting.
The white balance is adjusted automatically, using the white portion as a reference. The
white balance sometimes cannot be adjusted correctly. If the white area of the subject is
too small. If this occurs, set the White Balance Mode to the Daylight mode, Fluorescent
mode or Tungsten light mode, then take the picture.
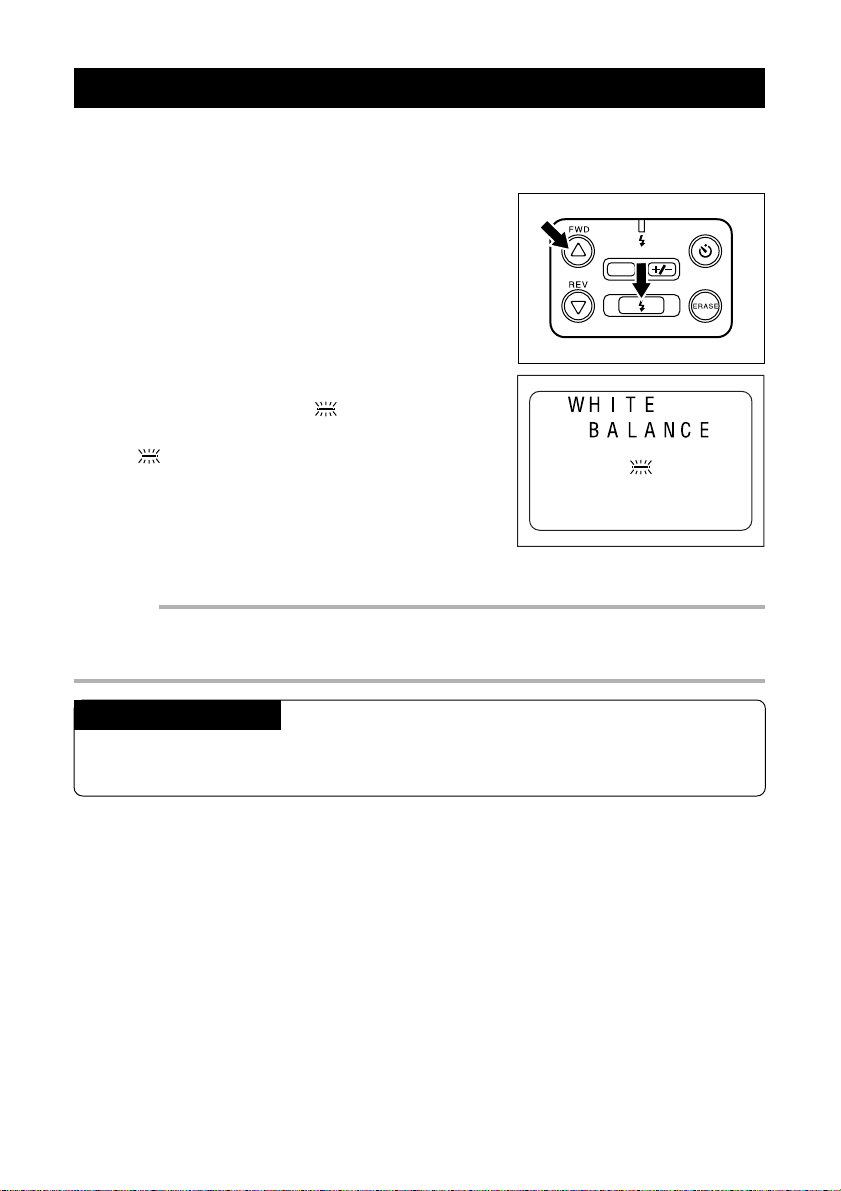
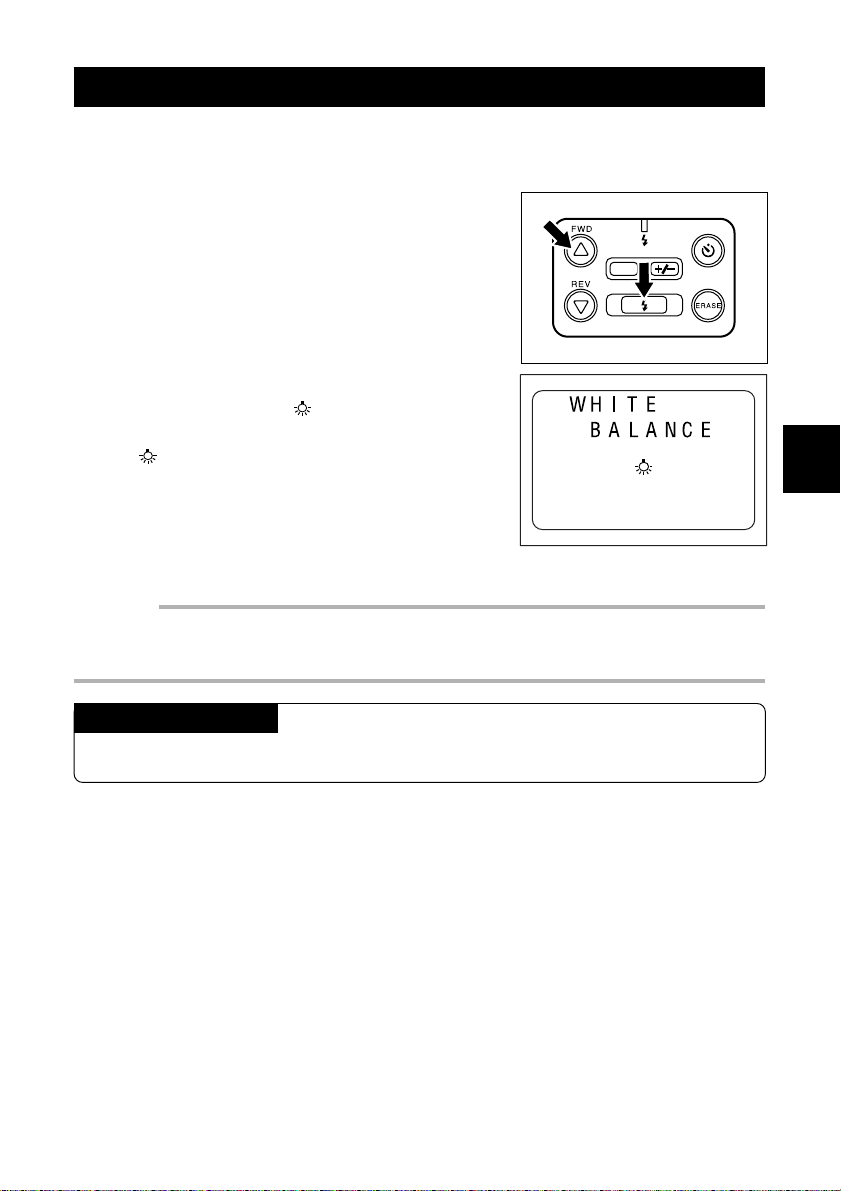
Selecting a White Balance Mode
While pressing the
press the FLASH button. Then,
press the
lect a white Balance Mode.
Auto mode
(no display)
UU
U or
UU
UU
U button,
UU
T T
T button to se-
T T
Daylight mode
Fluorescent mode
DATE
Tungsten light
mode
Subjects that the Auto White Balance may not work properly
• Monotone subjects.
• Subjects with multiple light sources.
• Subjects with a deep background, especially when a flash is used.
Note:
• If the white area of subject is insufficient, move the camera to increase the white portion of the
subject then shoot the picture.
• To adjust the White Balance Mode, make sure that REC(ord)/PLAY switch is set to REC.
40

Daylight Mode
Use Daylight Mode when shooting a picture outdoors or when the Auto White Balance
does not work properly.
q When the REC(ord)/PLAY switch is set to
REC, press the FLASH button while pressing the
w Within three seconds, press the
button repeatedly until the
pears on the LCD monitor. The
main on the LCD monitor for about three
seconds.
Important
• The Flash Off mode is set when the Daylight mode is set. At this time, the flash mode cannot be
switched, even if the FLASH button is pressed.
• The color tone of the same subject may vary depending on weather conditions .
UU
U button.
UU
UU
U or
UU
symbol ap-
will re-
DATE
TT
T
TT
3
Canceling the Mode
Press the FLASH button while pressing the U button, then use the U or T button to
choose a White Balance mode.
Picture-Taking Applications
41
Fluorescent Mode
Use the fluorescent mode when shooting a picture in fluorescent lighting or when the
Auto White Balance does not work properly.
q When the REC(ord)/PLAY switch is set to
REC, press the FLASH button while pressing the
w Within three seconds, press the
button to display the
LCD monitor.
The will remain on the LCD monitor for about
three seconds.
Important
• The Flash Off mode is set when the Fluorescent mode is set. At this time, the Flash mode cannot
be switched, even if the FLASH button is pressed.
• The color tone for the same subject may vary depending on the type of the fluorescent light .
UU
U button.
UU
U U
U or
U U
symbol on the
DATE
TT
T
TT
Canceling the Mode
Press the FLASH button while pressing the U button. Within three seconds, press
the U or T button to select AUTO.
42
Tungsten Light Mode
Use the Tungsten Light mode when shooting a picture in incandescent lighting or when
the Auto White Balance does not work properly.
q When the REC(ord)/PLAY switch is set to
REC, press the FLASH button while pressing the
w Within three seconds, press the
button to display the
monitor.
The will remain on the LCD monitor for about
three seconds.
Important
• The Flash Off mode is set when the Tungsten Light mode is set. At this time, the Flash mode
cannot be switched, even if the FLASH button is pressed.
• The color tone for the same subject may vary depending on the type of incandescent light.
UU
U button.
UU
UU
U or
UU
symbol on the LCD
DATE
TT
T
TT
3
Canceling the Mode
Press the FLASH button while pressing the U button. Within three seconds, press
the U or T button to select AUTO.
Picture-Taking Applications
43

Special Functions
This camera has a variety of special functions available.
Using the Self Timer
This function is convenient for taking a group picture that includes the photographer.
Before using the Self Timer, securely place the camera on a steady support or tripod.
q When the REC(ord)/PLAY switch is set to
REC, press the self timer mode button to
display the
tor.
w Frame the subject and make sure that the
camera is positioned securely. Press the
Release button.
Within 10 seconds position yourself in front of the
camera. The Self Timer light on the front of the
camera glows. The Self Timer light will flash for
nearly two seconds just before the picture is taken.
The Self Timer is disabled after one picture is
taken.
symbol on the LCD moni-
DATE
Note: The Self Timer cannot be activated when the flash is recharging. Wait until recharging is
completed before starting the Self Timer.
Note: You also may use this function with an optional remote control.
44

Macro Shooting (Close-up Shooting)
Macro shooting is tight, close-up photography.
q Approach the subject and compose the
picture. Adjust the focus by turning the
Macro to the dial right or left.
When you turn the Macro dial, the symbol appears on the LCD monitor.
w When the subject is focused, press the
Release button to take the picture.
Important
• When the camera is repositioned, the subject may go out
of focus; the accurate focus range for macro shooting is
quite narrow. Position the camera on a stable surface or
tripod before taking a close-up picture.
Important
• The Flash Off mode is set when the Macro mode is set. The Flash mode cannot be switched at
this time, even if the FLASH button is pressed.
• The Macro dial automatically returns to the original position when the LCD monitor is closed .
3
Picture-Taking Applications
45

46

Chapter 4. Picture Playback/
Erasure
Before Playback ...................................................................... 48
Displaying Information....................................................... 48
Connecting to a TV ............................................................. 49
File Playback ........................................................................... 50
File Playback....................................................................... 50
Automatic Playback............................................................ 50
File Erasing.............................................................................. 52
Operation Flow ................................................................... 52
Erasing One File ................................................................. 52
Erasing All Files.................................................................. 54

Before Playback
This section explains the preparation file the playback and provides information about
the images played back on the LCD monitor or TV.
Displaying Information
The file number of the recorded image appears on the monitor for three seconds as
shown in the following figure.
File number of this image
Tips:
The monitor displays information about the recorded images including the date and time of
recording. Press the DATE button repeatedly to change the display in the following sequence:
➡
Time
Total number of files
DateStandard playback display
➡
➡
Date/Time
➡
* The date and time setting mode is set if the DATE button is pressed and held for more than
two seconds. Refer to “Adjusting the Date and Time” on page 22 for the setting procedures.
48

Connecting to a TV
The recorded images can be played back on a TV by connecting the Video cable to the
camera and to the TV.
Important
• Refer to the TV manual for more information.
VIDEO
TONE
Yellow
IN
IN
q Close the LCD monitor and turn off the TV power.
w Remove the terminal cover, then connect the Video cable to the VIDEO
OUT terminal.
e Connect the opposite end of the Video cable to the VIDEO IN terminal of
the TV .
r Set your TV to Line Input or A uxiliary mode. For details, refer to your TV
owner's manual.
Note: When the Video cable is connected to the camera, no image is display ed on the LCD monitor .
Extended Playback
For extended pla ybac k, use the optional AC adaptor. See “Using AC Power” on page
21.
* Be sure to close the LCD monitor before connecting the AC adaptor.
3
4
Picture Playback/Erasure
49

File Playback
This section explains how to view a recorded images.
File Playback
To view a file, follow these steps.
q Open the LCD monitor, then slide the
REC(ord)/PLAY switch to PLAY.
The monitor displays the most recently recorded
file.
UU
w Press the
the available files.
Automatic Playback
TT
U or
T button to move through
UU
TT
DATE
The files may be played back in sequence using the optional remote control. This is
called the automatic playback function. The playback interval (length of time each image
is displayed) may be set between 0.5 to 30 seconds.
q Press the PROGRAM button of the remote
control.
ERASE
EV
REMOTE CONTROL
FWD
REV
AY3740
RELEASE
PROGRAM
ENTER
50

UU
w Press the
TT
U or
T button to set the length
UU
TT
of time for playback.
T o displa y the previous page or the next page
Use the U or T button to select the previous page
or the next page, then press the ENTER button on
the remote control unit.
To cancel the settings
Use the U or T button to select EXIT, then press
the ENTER button.
e Press the ENTER button of the remote
control.
The recorded files will be played back in sequence.
To stop the playback
Press the ENTER button or the PROGRAM button on the remote control.
ERASE
EV
REMOTE CONTROL
AY3740
RELEASE
FWD
PROGRAM
ENTER
REV
3
4
Picture Playback/Erasure
51

File Erasing
This section explains how to erase recorded files. You may erase one file at a time, or you
may erase all files at one time.
Operation Flow
The following is the basic explanation of how to erase a file.
Turn the power on.
Open the LCD monitor and set the REC(ord)/PLAY switch to PLAY. Press the
ERASE.
Select the erase method.
Choose to erase either a single file or all files.
Select a file.
Select a file to be erased, or erase all files
Erase the file.
See pages 52 - 53 for information on erasing one file.
See page 54 for information on erasing all files.
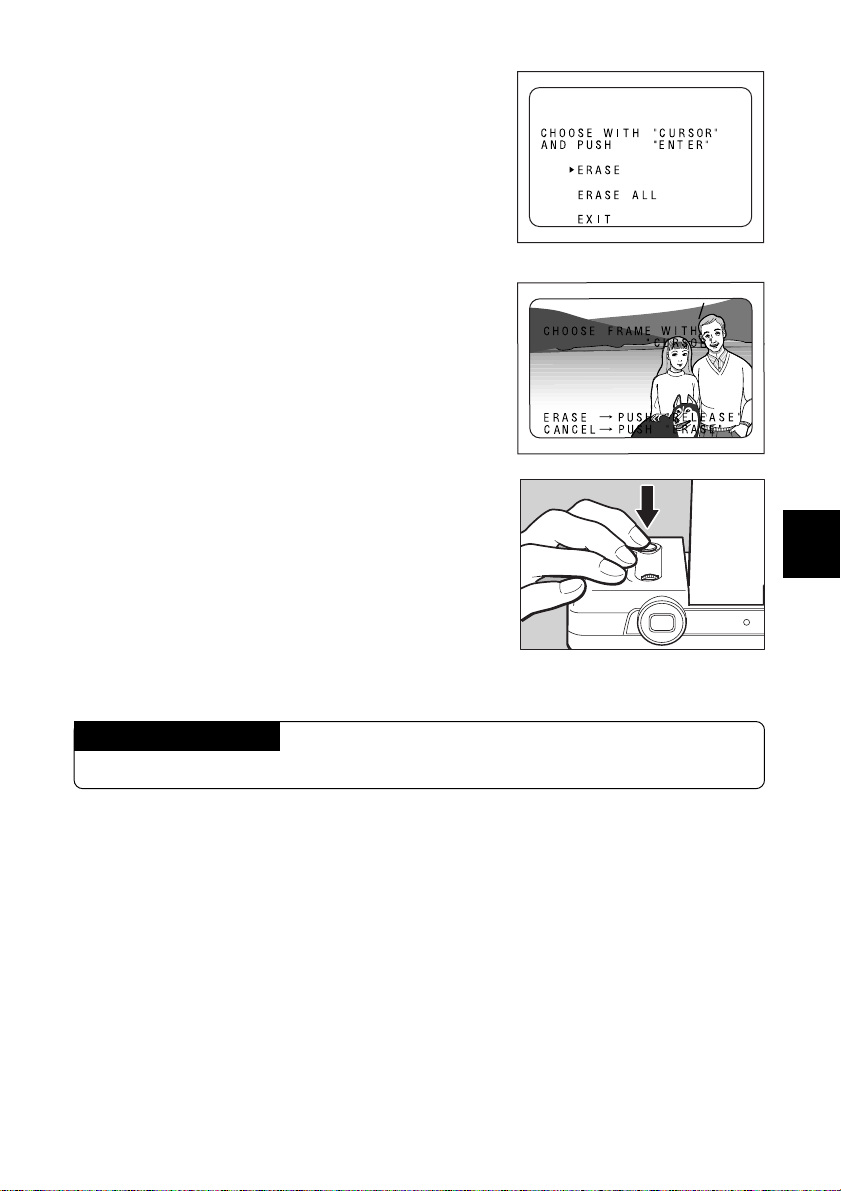
Erasing One File
The following steps explain how to erase a specific file.
Important
• An erased file cannot be restored. Carefully confirm the contents of a file before erasing it.
q Open the LCD monitor, then set the
REC(ord)/PLAY switch to PLAY.
w Press the ERASE button.
DATE
52
UU
ERASE
17
19
e Press the
with the arrow, then press the RELEASE
button.
Note: To stop erasing, select EXIT, then press the Release
button.
The Release button is also referred to as the ENTER
button in the LCD monitor.
r Press the
be erased.
TT
U or
T button to select ERASE
UU
TT
UU
TT
U or
T button to select the file to
UU
TT
ERASE
t Press the RELEASE button.
The selected file is erased. Repeat steps r and
t to erase another file. When you finish, press
the ERASE button.
Note: When a file is erased, the file numbers of the suc-
ceeding files decrease by one.
Canceling the Mode
Press the ERASE button again.
3
4
Picture Playback/Erasure
53
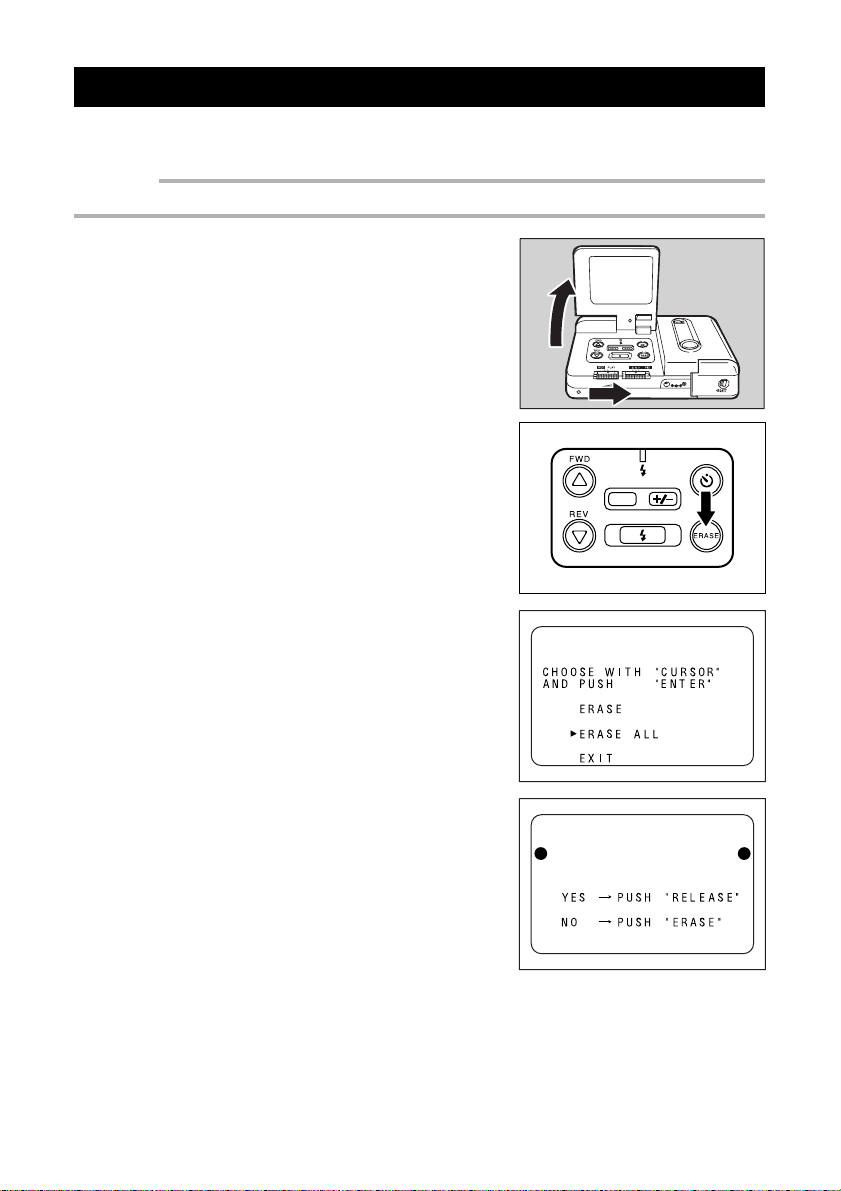
Erasing All Files
The following section explains how to erase all the files at one time.
Important
• Erased files cannot be restored. Carefully confirm the contents of files before erasing them.
q Open the LCD monitor, then slide the
REC(ord)/PLAY switch of the camera to
PLAY.
w Press the ERASE button.
DATE
UU
e Press the
ALL with the arrow. Then, press the RELEASE button.
An ERASE ALL message will appear.
TT
U or
T button to select ERASE
UU
TT
ERASE
Note: The Release button is referred to as the ENTER but-
ton in the LCD monitor.
r Press the RELEASE button.
The ERASING message appears and all files are
erased. After erasing is finished, the NO IMAGE
RECORDED message appears.
Note: To cancel erasure, press the ERASE button.
54
ERASE ALL?

Chapter 5. Additional Information
Changing a Camera Setting ................................................... 56
Setting the Auto Power Off mode ..................................... 56
Setting the Power Saving Mode ........................................ 57
Saving Y our Settings .......................................................... 58
Returning the Settings to the Original Position............... 59
System Configuration Figure................................................. 60
Accessories for ESP2 ............................................................. 62
Computer and DC Connections............................................. 63
Handling Precautions ............................................................. 66
Caring for Your Digital Camera .............................................. 67
Troubleshooting ...................................................................... 68
Using Your Digital Camera in Other Countries..................... 71
Specifications.......................................................................... 72

Changing a Camera Setting
You may change the camera setting to “Auto Power Off”, “Energy Saving” or “Power-Off
memory” according to the usage.
Setting the Auto Power Off mode
If no buttons or switches are operated for five minutes, the Auto Po wer Off function turns
off the main power in order to conserve power.
q Press the SELF TIMER b utton while press-
ing the
The REC(ord)/PLAY switch can be set to either
REC or PLAY. Auto Power Off is enabled.
w Within three seconds, press the
button to turn off the function.
Within three seconds, the Auto Power Off will be
disabled.
UU
U button.
UU
UU
U or
UU
DATE
TT
T
TT
Note:When the Auto Power Off feature turns off the LCD
monitor, you may turn on the LCD monitor by these
methods: close and reopen the LCD monitor, slide
the REC(ord)/PLA Y switch, or press the Release button for one second or more.
56

Setting the Power Saving Mode
This function saves battery power by adjusting the LCD monitor brightness. MODE 1,
MODE 2, or MODE 3 can be set. However, the operations vary depending on whether
the record mode and playback mode is set. Figure 57-1
Power saving mode
OFF
MODE1
MODE2
MODE3
To select a power saving mode, follow these steps.
Regular operation
The LCD monitor is slightly dark.
This condition remains until the setting is
changed.
The LCD monitor becomes dark. If the Release button is pressed lightly, the LCD
monitor returns to the regular brightness.
When the Release button is pressed and released, the picture is taken and the LCD
monitor turns dark again after a few seconds.
The LCD monitor becomes dark. If the Release button is pressed lightly, the LCD
monitor becomes slightly dark.
When the Release button is pressed and released, the picture is taken and the LCD
monitor turns dark again after a few seconds.
Record mode
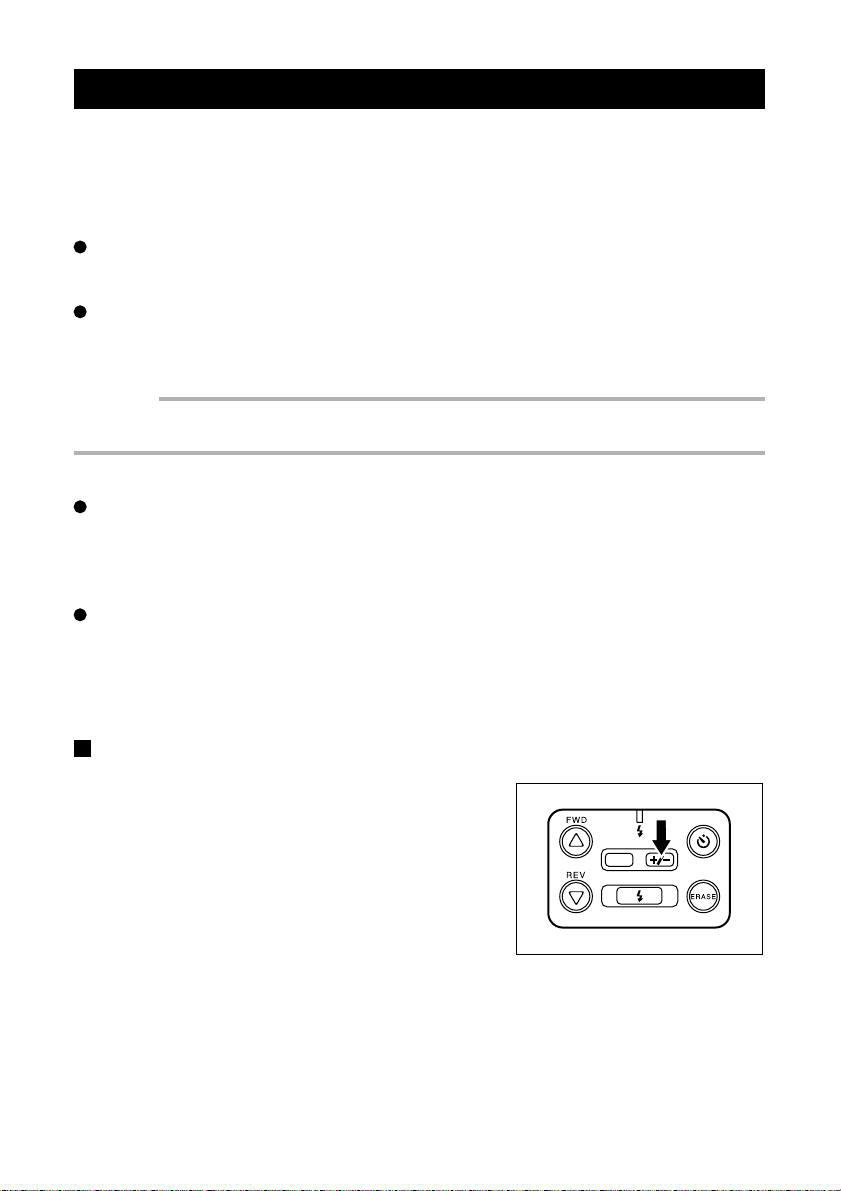
q Press the +/– button while pressing the
button, and the
The REC(ord)/PLAY switch may be set to either
REC or PLAY.
The power saving setting mode is set.
TT
T button at the same time.
TT
Playback mode
Regular operation
The LCD monitor is
slightly dark.
This condition remains until the setting is changed.
This setting can be operated, however, the power
saving function cannot be
operated.
Same as MODE 1.
3
4
UU
U
UU
DATE
5
UU
w Press the
TT
U or
T button to select the po wer
UU
TT
saving mode.
In three seconds, the power saving mode will be
set.
To cancel the setting
Repeat the operation described above, selecting
OFF at step 2.
Additional Information
57

Important
• The power saving mode is automatically set to OFF when the LCD monitor is closed.
• When the camera is used in an environment where the temperature is approximately 40
higher, the LCD monitor may ha ve a certain uneven quality. The LCD monitor will return to normal
when the temperature decreases.
Note: Depending on the environment in which the camera is used, the power saving mode can vary
because in the number of recording files can be 1.2 times greater than usual and the playback
time is approximately 2.5 hours.
°
C or
Saving Y our Settings
The Power Off Memory function saves your settings when the power is turned off. If the
power is turned off when the Power Off Memory is set, the Flash mode (see page 36),
White Balance mode (see page 40), Auto P ower Off (see page 56) and Automatic Playback (see page 51) settings are saved. They will be available when the power is turned
on next. All other camera settings will return to the original positions.
q Press the SELF TIMER button, the
ton, and the
The REC(ord)/PLAY can be set to either REC or
PLAY. The power-off memory setting mode is set.
TT
T button at the same time.
TT
w Within three seconds, press the
button to select ON.
Within three seconds, the Po wer Off Memory will
be set to ON.
To cancel the setting
Repeat steps 1 and 2 above, selecting OFF at
step 2.
UU
U but-
UU
UU
U or
UU
DATE
TT
T
TT
58

Returning the Settings to the Original Position
This section explains how to reset Flash mode, White Balance mode, Auto Power Off,
Automatic Playback and Power Off Memory settings the original positions.
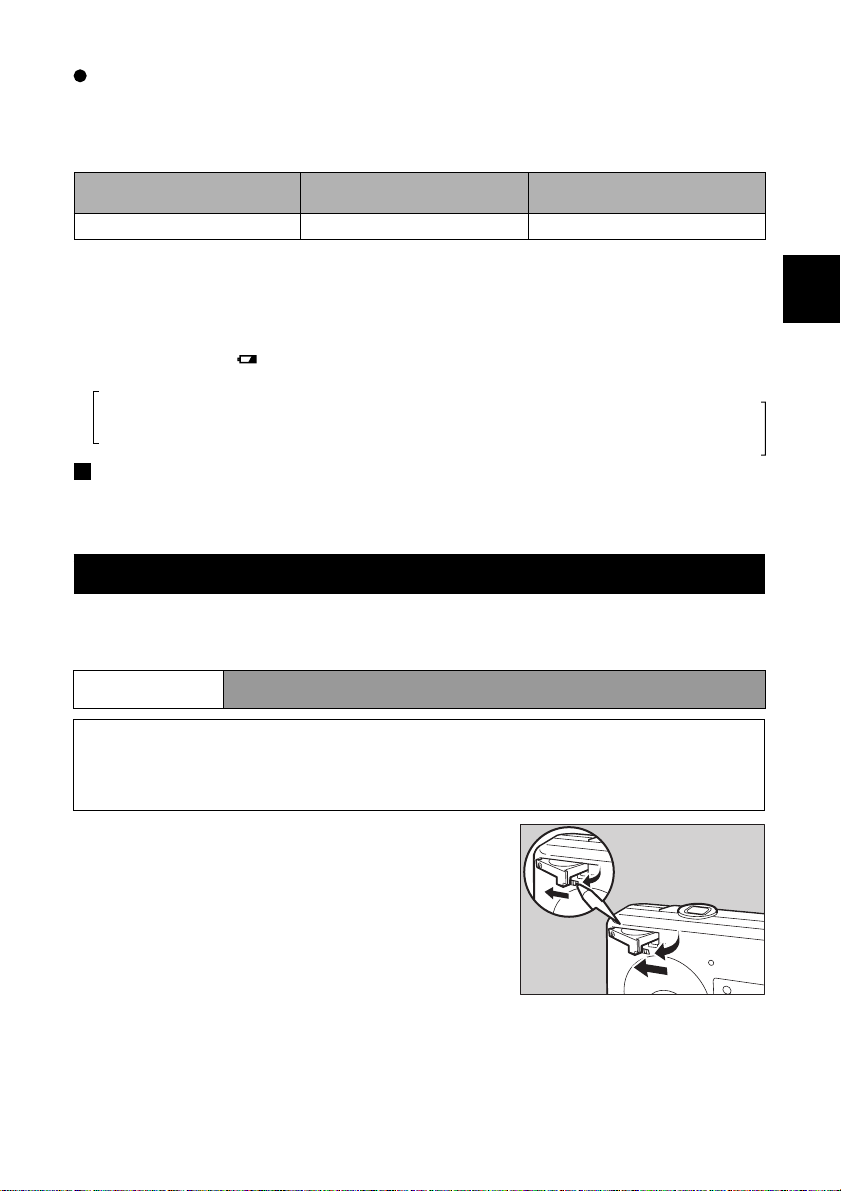
q Remove the terminal cover on the side of
the camera. Depress the RESET button
with the tip of a sharp pencil or similar
object.
The settings also are reset when the batteries or
the clock batteries are installed. The recorded images are not erased even after a reset is performed.
Important
• Do not use a sharp object or an object that breaks easily .
3
4
5
Additional Information
59

System Configuration Figure
RELEASE
ERASE
FWD
PROGRAM
EV
REV
ENTER
REMOTE CONTROL
AY3740
File transmission to a personal computer
Philips utility software for
ESP2 and a serial cable are
required.
Image transmission to a personal computer
You can transmit your file to a
personal computer using the
utility software for the ESP2.
The file can be transmitted using a special cable from the
camera.
Computer
Digital camera
60
Remote control
• Remote control AY3740
* When using this unit with
the camera, the screen display button and the monitor button do not function.
Power supply
• AC adaptor
AY3140 (100 V to 240 V)
Batteries
Alkaline batteries
Nickel Cadmium batteries
Nickel-metal-hydride batteries

Playback
• LCD monitor
• TV monitor (Connects to the camera with the Video cab le that is included.)
Output
Color printer
Color copier
Once data is sent to your personal computer, you can print
it with a color printer or color
copier.
* A video printer can be con-
nected to the camera for
printing still pictures.
* Accessories for ESP2 on page 62 for
information on products mentioned
above.
3
4
5
Additional Information
61

Accessories for ESP2
Item
AC Adaptor
Remote Control Unit
Model
AY3140
AY3740
Remarks
For operating on AC power. See page 21, “Using AC
Power.”
For recording or playback by remote control. The Automatic Playback feature enables you to program the sequence of pictures to be played back. This function is available only with this Remote Control.
62

Computer and DC Connections
Macintosh adaptor
Connection cable
• PC/AT compatible unit
(RS232C D-sub 9-pin)
• Macintosh
1. Open the terminal cover on the side of the
2. Connect the cable to the RS232C/ AUX ter-
3. Connect the other end of the cable to the serial port of the computer.
RS232C/AUX
camera.
minal.
3
4
5
63
Additional Information

For the Macintosh® Users:
q Select the New catalogue from the File menu.
Note: To import an image into a catalogue that already exists, select File and Open the Catalogue
to select the catalogue into which you want to import the image.
w Enter the new catalogue name in the dialog box, then click the Save button.
The new catalogue window is displayed.
e Set the REC(ord)/PLAY switch to PLAY.
r Select [Load from Philips Camera] in the File menu.
The dialog box is displayed.
t Set the serial port and the communication speed (Baud Rate) then click the
OK button.
Important:
• When connecting to the camera through the printer port, set the Apple Talk item to Not used in the
Selector of the Apple menu.
When the computer and the camera are connected correctly, the following dialog box is
displayed.
y Select the image to be imported.
• To specify one image at a time
Press the < button or the > button to select the image, then clic k the Select
check button. Repeat the operation and specify the images to be imported
in image sequence.
• To specify all images
Click the Select All button. All images that are recorded in the camera are
selected.
Note: To cancelthe image selection, remo v e the chec k in the Select chec k bo x or clic k the No select
button. The image that is currently selected is canceled.
u After selecting the image, click the OK button.
The specified image is imported.
Note: • Use the AC adaptor when you transfer images to the computer.
• Refer to the on-line HELP menu in the software for further details. The Acrobat Reader
should be installed to view the HELP menu.
64

For Windows®:
Transfer files from the camera
q Select [DOWNLOAD Philips FILES] from the FILE menu.
w Specify the communication speed (Baud Rate) and the serial por t for the
cable connection. Select whether a file is to be added to the album or to be
developed on the desktop.
e Select the format in which the file should be saved.
3
r Click OK to start the file transfer.
Note: • It is recommended to use an AC adapter when images are uploaded or downloaded. The
file transfer operations will be interrupted if the power is cut off during the operation.
• Refer to the on-line help menu in the software for further details.
4
5
Additional Information
65

Handling Precautions
This camera is not waterproof. Take great care to avoid water, rain, or spilled drinks. If
the camera gets wet, contact your local Philips service office.
Never drop the camera or subject it to strong shock.
To avoid overheating the system, do not continuously operate the built-in flash unit
more than necessary.
Protect the camera from sand or dust, especially at the beach or in dusty environments
(construction sites, etc.).
Do not expose the camera to high temperatures or high humidity for long periods of
time, such as in a closed car, at the beach, or in a bath.
Turn off the camera before connecting it to the optional AC adaptor.
Sudden changes of temperature may cause condensation to form inside and outside
the camera body and lens, resulting in malfunctions. If this occurs, place the camera
into a bag or plastic bag temporarily to moderate any drastic change of temperature.
Keep it in the bag until the temperature difference is minimized.
If the LCD monitor is exposed to sunlight or other bright light, it may appear white and
may become difficult to observe.
Sometimes a pixel that alwa ys lights or never lights is present in the LCD monitor . The
brightness may have an unevenness due to the characteristics of the LCD. However,
these are not malfunctions.
Do not pull the terminal cover with excessive force. Do not lift the camera by grasping
terminal cover.
Do not open the LCD monitor while holding the lens cover.
Always close the LCD monitor when carrying the camera.
Condensation occurs when:
• The camera is suddenly brought into a warm place from a cold place.
• The camera is used in a location subject to high humidity.
• The camera is used in a recently heated room. The camera was in a location
subject to direct cool air flow from an air conditioner.
66

Caring for Your Digital Camera
Camera Care
• Keep the lens of the camera clean; stains or dirt on the lens may lessen the precision
of the image quality.
• Do not attempt to remove dust or smears on the lens with your fingers. Use a blow er to
blow the dust aw ay, or wipe the surface gently with a soft cloth.
• After using the camera at the beach or exposing it to a chemical environment, take
special care to wipe off any dirt.
• If the camera does not operate properly, contact a service representative. The camera
is equipped with a hazardous high-voltage circuit. Never attempt to repair the camera
by yourself.
• Keep the camera away from volatile liquids such as thinner, benzene, and insecticide.
These chemicals may peel off the paint or damage the surface.
• Do not scrub the surface of the LCD monitor with a hard object; the LCD monitor is
scratched or damaged easily.
• Wipe off the surface of the LCD monitor gently, using a moistened, soft cloth with
thinned detergent; wipe off the moisture with a dry cloth.
* Remove the batteries and AC stet from the camera before cleaning.
3
Safekeeping
• Do not store the camera in a closet with insect repellents, which may damage the
camera and cause a malfunction.
4
5
Additional Information
67

Troubleshooting
Before sending the unit for repairs, first refer to the following checklist for a possible
solution to the problem. If y ou still cannot correct the prob lem, please contact the service
representatives.
Power Source Problems
Problem
No power
Sudden loss of power
The batteries go dead
quickly.
The batteries are not installed
properly or are depleted.
The AC adaptor is not connected
properly.
The Auto Power Off feature shuts
down the camera after several
minutes of inactivity.
The batteries are depleted.
The batteries were subjected to
excessively low or high temperatures.
The built-in flash was used too frequently because of dark conditions or other reasons.
Cause
Shooting and Playback Problems
Problem
The camera fails to
record the picture when
the Release button is
pressed.
The flash does not
work or recharge.
68
The batteries are not inserted
properly (incorrect polarity) or are
dead.
The power is off, or the REC(ord)/
PLAY switch is set to PLAY.
The shutter release button is not
fully pressed down. (Button was
pressed only halfway down.)
The internal memory is full.
The Self Timer mode is selected.
The flash is recharging.
Flash Off mode is selected.
The White Balance mode or
Macro mode is set.
The batteries are dead.
Cause
Remedy
Install the batteries correctly or replace with fresh batteries.
Reconnect the AC adaptor.
Press the Release button more
than one second or turn on the
power again.
Replace the old batteries with
fresh batteries.
Replace the batteries.
—
Remedy
Reposition the batteries correctly
or replace with fresh batteries.
Slide the main switch to [Record].
Press the Release button all the
way down.
Delete some files to secure
enough space.
Press the SELF TIMER button to
cancel the Self Timer mode.
Wait until the flash lamp stops
flashing.
Press the FLASH button to
change the setting.
Press the flash button while pressing the U button, then cancel the
White Balance mode, or rotate the
Macro dial to cancel the Macro
mode.
Replace with fresh batteries.

Problem
The flash discharged
properly but the image
is dark.
The picture is too
bright.
The image is underexposed.
The picture does not
show natural colors.
The camera fails to
play back the data or
display an image on
the monitor.
The image does not
play back clearly.
The image on the monitor has disappeared.
The remote control (optional) is malfunctioning.
The image has a vertical trail.
Cause
The distance to the subject exceeds approximately 3.0 meters.
The flash discharged when distance to the subject was less than
60 cm.
The image is overexposed.
The brightness adjustment dial is
not set correctly.
The picture was taken in the Flash
Off mode under dark conditions.
The image is underexposed.
The brightness adjustment dial is
not set correctly.
The image conditions prevent the
Automatic White Balance system
from functioning property.
The REC(ord)/PLA Y s witch is not
set to PLA Y.
Video connection cable is not correctly connected to the video output terminal of the camera and the
input terminal of the TV.
A noise source, such as a motor,
is close to the camera.
This is a malfunction in the
camera’s internal memory.
The batteries are dead.
The Auto Power Off system has
activated.
There is an obstruction in the path
between the reception window of
the camera and the transmission
window of the remote control.
The reception window on the camera or the transmission window on
the remote control is dirty.
The lithium battery in the remote
control is dead.
This condition occurs when a picture is taken of a well-lit subject. It
is called a smear.
Remedy
Reduce the distance to the subject.
Select the Flash Off mode.
Compensate the exposure with
the +/– button.
Turn the brightness adjustment
dial to the right or to the left to adjust the brightness.
Press the FLASH button to
change the setting.
Compensate the exposure with
the +/– button.
Turn the brightness adjustment
dial to the right or to the left to adjust the brightness.
Include a white or light-colored
object in the subject, or use the
flash or Fixed White Balance.
Slide the REC(ord)/PLA Y switch to
PLA Y.
Connect the cable properly.
Place the camera where it is not
close to a noise source.
Transfer important images to a
computer, then erase all files.
Replace the batteries with fresh
batteries.
Close the LCD monitor to turn off
the power, then turn on the power
again. Or, press the Release button more than one second.
Clear the path between the camera and the remote control.
Clean both windows.
Replace the battery with a fresh
lithium battery (CR2032).
This is not a malfunction.
3
4
5
Additional Information
69

Other Problems
Problem
The camera buttons
and switches do not
function.
The date is incorrect.
The date cannot be displayed.
The camera fails to
erase a file.
The camera changes
to a mode other than
the one selected.
The Auto Power Off
feature does not work.
Cause
The batteries are dead.
The camera does not function
properly.
The correct date and time have
not been set.
The batteries are dead.
The REC(ord)/PLAY switch is not
set to PLAY.
The power was shut off manually
or the Auto Power Off function
turned off the power.
The batteries were removed.
The Auto Power Off feature is set
to off.
Remedy
Replace the batteries with fresh
batteries.
Close the LCD monitor to turn off
the power. Reopen the LCD monitor and set the REC(ord)/PLAY
switch to either REC or PLAY. If
the camera still fails to function
properly, try the following.
1. Remove and reinstall all batteries in the camera.
2. Reset the REC(ord)/PLAY
switch to either REC or PLAY.
Reset the time and date correctly .
Replace the batteries with fresh
batteries and reset the date.
Slide the REC(ord)/PLAY switch
to PLA Y.
Select the mode again.
Select the mode again.
Confirm the Auto Power Off set-
ting.
70

Using Your Digital Camera in Other Countries
AY3140 AC adaptor (optional)
• The AC adaptor adjusts automatically to voltages ranging from 100 V to 240 V and
adjust to frequencies of 50 Hz to 60 Hz.
• Some countries use electrical outlets which have different shapes. Before leaving
on a trip, obtain the necessary plug adaptor from a travel agent or electric store.
Viewing the Image on a TV
• Check if the TV operates in the NTSC format with an image input terminal.
• The optional video connection cable is required.
The NTSC format is used in the following countries.
American Samoa
Barbados
Bermuda
Bolivia
Canada
Chile
Columbia
Costa Rica
Cuba
Democratic People’s
Republic of Korea
Dominican Republic
El Salvador
Ecuador
Guam
Guatemala
Haiti
Honduras
Japan
Mexico
Micronesia
Myanmar
Nicaragua
Panama
Peru
Philippines
Puerto Rico
Surinam
Taiwan
Trinidad and Tobago
U.S.A
Venezuela
3
4
5
71
Additional Information

Specifications
General
Video signal method : NTSC
Dimensions (W × H × D) : 125.8 mm (W) × 34 mm (H) × 72.6 mm (D)
(excluding protruding parts)
Weight : Approx. 230 g without batteries
Operating humidity range : less than 85%
Operating temperature range :0°C to 40°C
Storage temperature range : –20°C to 60°C
Camera
CCD : 1/4", 350,000 pixels (effective 330,000 pix els VGA)
with complementary color checkers
Lens : Single reflex F: 3.8
• Focal length : f:4 mm (equivalent to a 38 mm lens on a 35mm
camera)
• Minimum shooting range : Approx. 60 cm
• Macro shooting range : Approx. 1 cm to 60 cm
• Composition : 5 elements in 5 groups
LCD Monitor
• Screen size : 1.8 type (36.9 mm (W) × 27.5 mm (H))
• Drive system : TFT active matrix system
• Picture elements : 61,380 dots (279 (H) × 220 (V))
Brightness adjustment : Brightness adjustment dial is attached.
Color temperature
• Standard setting : 4200 ± 50K
• Automatic adjustment range : 2800K to 8000K
• Fixed adjustment range : Fluorescent light 4000K
Outdoor 5100K
Incandescent light 3200K
Exposure adjustment
• AE range : EV6.3 to EV17
• Light measuring system : Centerweighted
• EV memory system : With automatic backlight control program
Manual exposure adjustment range ± 2.0EV (in 0.5
EV increments)
• Exposure mode : Program AE
• Exposure measurement : TTL CCD method
• AE with flash : Included (with daylight synchro)
• Shutter speeds : Still picture: 1/5 to 1/8000 (electronic shutter)
• Focusing : F 2.8 fixed
• ISO sensitivity : Equivalent to ISO 80
Distance adjustment
• Standard : Fixed. Approx. 60 cm to ∞
• Macro : Manual adjustment. Approx. 1 cm to 60 cm
72

Built-in flash
• Method : Automatic
• Interval between flash : 5 sec. maximum
• Effective distance : 0.6 m to 3.0 m
• G no. : 12 (ISO140)
• Operating modes : OFF/ON/AUTO
The Flash is turned off when the Macro mode and
White Balance mode are set.
Image Data Recording
Internal memory :4 MB
Picture element : 640 × 480 (VGA)
File format : JPEG (Exif)
Compression method : Based on the JPEG base line method.
Number of recording files
Economy mode : Approx. 100 files
Normal mode : Approx. 50 files
Fine mode : Approx. 25 files
Input/Output
Power input : 5V (AC adaptor)
Video output : 1.0 Vp-p (75Ω)
RS232C/AUX : Special
Body
Hole for tripod : 1/4-20 UNC
5.7 mm max. bolt length
Power Supply
Batteries of main unit
• Battery types : AA alkaline batteries
AA Nickel-metal-hydride batteries
AA Nickel Cadmium batteries
• V oltage : 6 V (1.5V × 4 cells)
3
4
5
Clock Battery
Battery type : Lithium battery CR2025
• V oltage : 3V 160mAh
• Service life : Approx. 1 year
Auto Power Off : Activates when camera is used for approx. 5 min-
utes.
Additional Information
73

INFORMA TION TO THE USER
U.S. Federal Communictions Commission (FCC) Part 15 Class B
This equipment has been tested and found to comply with the limits for a Class B
digital device, pursuant to part 15 of the FCC Rules. These limits are designed to
provide reasonable protection against harmful interference in a residential installation. This equipment generates, uses, and can r adiate radio frequency energy and, if
not installed and used in accordance with the instructions, may cause harmful interference to radio communications. However, there is no guarantee that interference
will not occur in a particular installation. If this equipment does cause harmful interference to radio or television reception, which can be determined by turning the equipment off and on, the user is encouraged to try to correct the interference by one or
more of the following measures:
- Reorient or relocate the receiving antenna.
- Increase the separation between the equipment and receiver.
- Connect the equipment to an outlet on a circuit different from that to which the receiver
is connected.
- Consult the dealer or an experienced radio/TV technician for help. (FCC 15.105B)
Changes or modifications not expressly approved by the party responsible f or compliance could void the user’s authority to operate the equipment. (FCC 15.21)
Properly shielded and grounded cables and connectors must be used for connection
to a host computer in order to meet FCC emission limits. (FCC 15.27)
COMPLIANCE INFORMATION STATEMENT
Product Name: Philips Digital Camera
Model Number: ESP2/17
This device complies with Part 15 of the FCC Rules.
Operation is subject to the following two conditions:
(1) This device may not cause harmful interference, and
(2) This device must accept any interference received, including
interference that may cause undesired operation.
Philips Consumer Electronics Company
One Philips Drive
Knoxville, TN 37914-1810
USA
PHONE NUMBER:423-521-4409
FAX NUMBER:423-521-4728
CANADA Class B
This Class B digital apparatus meets all requirements of the Canadian InterferenceCausing Equipment Regulations.
Cet apparell numérique de la classe B respecte toutes les exigences du Réglement
IMPORTANT SAFETY INSTRUCTIONS INCLUDED-SAVE THESE INSTRUCTIONS DANGERTO REDUCE THE RISK OF FIRE OR ELECTRIC SHOCK,CAREFULLY FOLLOW THESE
INSTRUCTIONS.
74
 Loading...