

Philips 32PF7520D-10 User Manual

LCD TV
Cover page 18/4/05, 11:35 AM1
Introduction
Thank you for purchasing this television set.
This handbook has been designed to help you install and operate your TV set.
We would strongly recommend that you read it thoroughly.
Presentation of the LCD television . . . . . . . . . . . . . . . . . . . . . . . . . . . . . . . . . . . . . . . . . . . . . . . . . . . . . . . . . . . . . 2
Remote control . . . . . . . . . . . . . . . . . . . . . . . . . . . . . . . . . . . . . .. . . . . . . . . . . . . . . . . . . . . . . . . . . . . . . . . . . . . . . . . . 2
Digital or Analogue channels ? . . . . . . . . . . . . . . . . . . . . . . . . . . . . . . . . . . . . . . . . . . . . . . . . . . . . . . . . . . . . . . . . . . . 2
The remote control keys . . . . . . . . . . . . . . . . . . . . . . . . . . . . . . . . . . . . . . . . . . . .. . . . . . . . . . . . . . . . . . . . . . .. ... . .. 3
Video recorder or DVDkeys (mode selector) . . . . . . . . . . . . . . . . . . . . . . . . . . . . . . . . . . . . . . . . .. . . . .. ... . .. 4
Installing your television set. . . . . . . . . . . . . . . . . . . . . . . . . . . . . . . . . . . . . . . . .. . . . .. ... . .. . . . . . . . .. . . . . . ... . .. 4
Switching on for the first time . . . . . . . . . . . . . . . . . . . . . . . . . . . . . . . . . . . . . . . . . .. ... . .. . . . . . . . .. . . . . . .. . . .. . . 5
Understanding the information on the banner . . . . . . . . . . . . . . . . . . . . . . . . . . .... . .. . . . . . . . .. . . . .. ... . .. .. 5
Rearrange services . . . . . . . . . . . . . . . . . . . . . . . . . . . . . . . . . . . . . . . . . . . . . . . . . . . . .... . .. . . . . . . . .. . . . .. .. . . .. . . . 6
View or Listen to new TV services . . . . . . . . . . . . . . . . . . . . . . . . . . . . . . . . . . . . .... . .. . . . . . . . .. . . . .. ... . .. ... 6
Add new services . . . . . . . . . . . . . . . . . . . . . . . . . . . . . . . . . . . . . . . . . . . . . . . . . .. . . .... . .. . . . . . . . . . . . . .. ... . .. ... 6
Reinstall all services . . . . . . . . . . . . . . . . . . . . . . . . . . . . . . . . . . . . . . . . . . . . . . . . . .... . .. . . . . . . . .. . . . .. ... . .. ... . ..7
Test reception . . . . . . . . . . . . . . . . . . . . . . . . . . . . . . . . . . . . . . . . . . . . . . . . . . . . .. .... . .. . . . . . . . .. . . . .. ... . .. ... . .. 7
Language and location preferences . . . . . . . . . . . . . . . . . . . . . . . . . . . . . . . . . . . .. .. . . . . . . . .. . . . .. ... . .. ... . .. . 8
Access restrictions . . . . . . . . . . . . . . . . . . . . . . . . . . . . . . . . . . . . . . . . . . . . . . . . . . .. .. . . . . . . . .. . . . .. ... . .. ... . .. . 8
Setting up your favourite list . . . . . . . . . . . . . . . . . . . . . . . . . . . . . . . . . . . . . . . . . .. .. . . . . . . . .. . . . .. ... . .. ... . .. . 9
Information menu . . . . . . . . . . . . . . . . . . . . . . . . . . . . . . . . . . . . . . . . . . . . . . . . . . . .. .. . . . . . . . . . . . . .. ... . .. ... . .. . 9
DIGITAL MENUS
Downloading new software . . . . . . . . . . . . . . . . . . . . . . . . . . . . . . . . . . . . . . . . . . . . .. .. . . . . . . . .. . . . .. ... . .. ... . . 9
Using the Options menu . . . . . . . . . . . . . . . . . . . . . . . . . . . . . . . . . . . . . . . . . . . . . . . .. .. . . . . . . . .. . . . .. ... . .. ... . .10
TV guide . . . . . . . . . . . . . . . . . . . . . . . . . . . . . . . . . . . . . . . . . . . . . . . . . . . . . . . . . . . . . . . .. .. . . . . . . . .. . . . .. ... . .. ... . 10
Recording function . . . . . . . . . . . . . . . . . . . . . . . . . . . . . . . . . . . . . . . . . . . . . . . .. . . . . .. .. . . . . . . . .. . . . . . .. . . .. . . . . 11
English
English
FrançaisEspañolItalianoDeutschSuomiSvenska
Français
Français
Español
Español
Italiano
Italiano
Deutsch
Deutsch
Automatic tuning of analogue programmes . . . . . . . . . . . . . . . . . . . . . . . . . . . . .. .. .. . . . . . . . .. . . . .. ... . .. ... . 12
Manual tuning of analogue programmes . . . . . . . . . . . . . . . . . . . . . . . . . . . . . . . .. .. .. . . . . . . . .. . . . .. .. . . .. ... . 12
Other settings in the install menu . . . . . . . . . . . . . . . . . . . . . . . . . . . . . . . . . . . . . . ... .. . . . . . . . .. . . . .. ... . .. ... . 12
Picture settings . . . . . . . . . . . . . . . . . . . . . . . . . . . . . . . . . . . . . . . . . . . . . . . . . . .. . . . . . ... .. . . . . . . . .. . . . .. ... . .. ... .13
Sound adjustments . . . . . . . . . . . . . . . . . . . . . . . . . . . . . . . . . . . . . . . . . . . . . . . . . . . . . ... .. . . . . . . . .. . . . .. ... . .. ... .13
Feature settings . . . . . . . . . . . . . . . . . . . . . . . . . . . . . . . . . . . . . . . . . . . . . . . . . . . . . . . . .. . .. . . . . . . . . . . . . .. ... . .. ... .13
Screen Formats . . . . . . . . . . . . . . . . . . . . . . . . . . . . . . . . . . . . . . . . . . . . . . . . . . . . .. . . . ... .. . . . . . . . .. . . . .. ... . .. ... 14
Digital text . . . . . . . . . . . . . . . . . . . . . . . . . . . . . . . . . . . . . . . . . . . . . . . . . . . . . . .. . . . . . ... .. . . . . . . . .. . . . .. ... . .. ... .14
Analogue Teletext . . . . . . . . . . . . . . . . . . . . . . . . . . . . . . . . . . . . . . . . . . . . . . . . . . . . . . ... .. . . . . . . . .. . . . .. ... . .. ... .15
Using in the PC monitor mode . . . . . . . . . . . . . . . . . . . . . . . . . . . .. . . . . . ... .. . . . . . . . .. . . . .. ... . .. ... .. . . .. . . ..16
ANALAOGUE
Using in the HD (high definition) mode . . . . . . . . . . . . . . . . . . . . . . . . . . . .. . . . . . ... .. . . . . . . . .. . . . .. ... . .. . .17
Connecting peripheral equipment . . . . . . . . . . . . . . . . . . . . . . . . . . . . . . . . . . . . . . . ... .. . . . . . . . .. . . . .. ... . .. . ..18
Tips . . . . . . . . . . . . . . . . . . . . . . . . . . . . . . . . . . . . . . . . . . . . . . . . . . . . . . . . . . . .. . . . . . . . . ... .. . . . . . . . .. . . . .. ... . .. . ..20
Recycling
The packaging used in your set are either resuable or can be recycled.
To minimise environmental waste, specialist companies collect used appliances
and dismantle them after retrieving any materials that can be used again (ask
your dealer or local authorities for further details).
Suomi
Suomi
Svenska
Svenska
iDTV 19141 Eng 19/4/05, 2:20 PM1
1

Presentation of the LCD Television
& Television keys
•POWER : to switch the TV on or off.
•
VOLUME – / + : to adjust sound level.
• MENU : to access or close menus.
The PROGRAM – / + keys can be used to select
an adjustment and the VOLUME – / + keys to
make that adjustment.
•PROGRAM – / + : to select programmes.
Rear of set :
The main connections are made at the bottom
of the television.
For more details on connections, see page 18-19.
é Power socket
“ DVI and audio input for connectinga HD (high
7
definition) equipment or computer with DVI
output.
‘
C
I
D
ATA
S
P
D
IF
EXT1 and EXT2 sockets
(
TV aerial socket
§
Common interface slot and SPDIF socket
è
Side connections
Remote control
Insert the two R6-type batteries (supplied) making
sure that they are the right way round.
The batteries supplied with this appliance do not contain
mercury or nickel cadmium. If you have access to a
recycling facility, please use this facility
(if in doubt, consult your dealer).When the batteries are
replaced, use the same type.
Digital or Analogue channels
To r eceive TV channels, your television is equipped with 2 tuners. One is for digital channels, the other is for
analogue channels. Use the
Then use the P(age) +/– or keys to select channels.
2
key of the remote control to switch the TV between analogue and digital mode.
iDTV 19141 Eng 17/4/05, 3:08 PM2

The remote control keys
Mode selector
To activate the remote control in
TV, DVD or AUX mode (see p 4).
Cancel
VCR/DVD key (see p. 4).
To display or edit from the analogue
Analogue or Digital mode
To switch the television between
In digital mode, press once to display
the information banner, 2nd time to
the programme and a 3rd time to
In analogue mode, this displays/
informations (number, name, sound
mode). Hold down for 5 seconds to
permanently display the analogue
programme number on the screen.
To switch from Stero to Mono or to
choose between different languages
When the sound mode is switched to
Mono, the indication is displayed in red.
To activate/deactivate the subtitle
Screen format (see p. 14).
Teletext feature (see p. 15).
Select EXT sockets (see p. 18)
Teletext feature (see p. 15).
To activate/deactivate the Virtual
Dolby Surround* effect. In stereo,
you can obtain Dolby Surround Pro
Logic sound quality. In mono, a
stereo spatial effect is simulated.
* Manufactured under licence from Dolby
Laboratories. “Dolby” “Pro Logic” and the
double-D symbol are trademarks of Dolby
Picture and sound settings
The position Personal coresponds to
the settings stored in the menus.
TV menu
menus.
analogue and digital mode.
To adjust the sound level.
Screen information
get more information on
remove it (see p. 5).
removes the programme
Sound mode
(Dual I, Dual II,..).
Subtitle mode
mode.
Surround sound
Accesses a series of picture
Volume
Laboratories
and sound settings.
Standby
To set the TV to standby mode.To
switch the TV set on again, press
+
, P
Options menu (see p. 10).
Teletext features (see p. 15) and
VCR/DVD keys (p. 4).
Digital menu
To display or exit from the digital
menus (when TV is in digital mode).
Cursor
These 4 keys are used to move within
the menu or to directly access the
screen formats.
OK
Confirms selection. Also access
program list in Analogue or Digital
mode.
TV guide (see p. 10).
Mute
To disable or enable the sound.
Programme selection
To access the next or previous
programme (or page in digital menus).
Numerical keys
For direct access to programmes. For
a 2 (3) digit programme number, the
second (third) digit must be entered
before the dash disappears. The
number, the name (and the sound
mode, in analogue mode) are displayed
for a few seconds.
Previous programme
To access the previously viewed
programme. In Digital mode, it also
used as an edit or back space key.
PIP on/off
Display PIP screen on TV. Subsequent
presses of the key changes size of the
window. For display of PIP screen in
PC mode, see p. 18.
Teletext feature (see p. 15)
Pixel + (depending on version)
Switches the Pixel + demonstration
mode on or off.
Active control
Optimises the picture quality
depending on the quality of the
.
incoming signal and ambient light
conditions.
No function (not applicable).
or .
–
English
Français
Español
Italiano
Deutsch
Suomi
Svenska
iDTV 19141 Eng 17/4/05, 3:08 PM3
3

Video recorder or DVD keys (mode selector)
The remote control lets you control the main functions of the VCR or DVD.
Press the
remote control indicator lights up to display the selected mode. It switches off
automatically after 20 seconds if left idle. The remote control automatically returns to TV
mode.
The following keys are operational depending on the equipment :
(SELECT) key to select the required mode : DVD or AUX (video recorder). The
standby
recording
pause
stop
fast rewind
fast forward
tv menu
cancel
OK validation
OSD menu
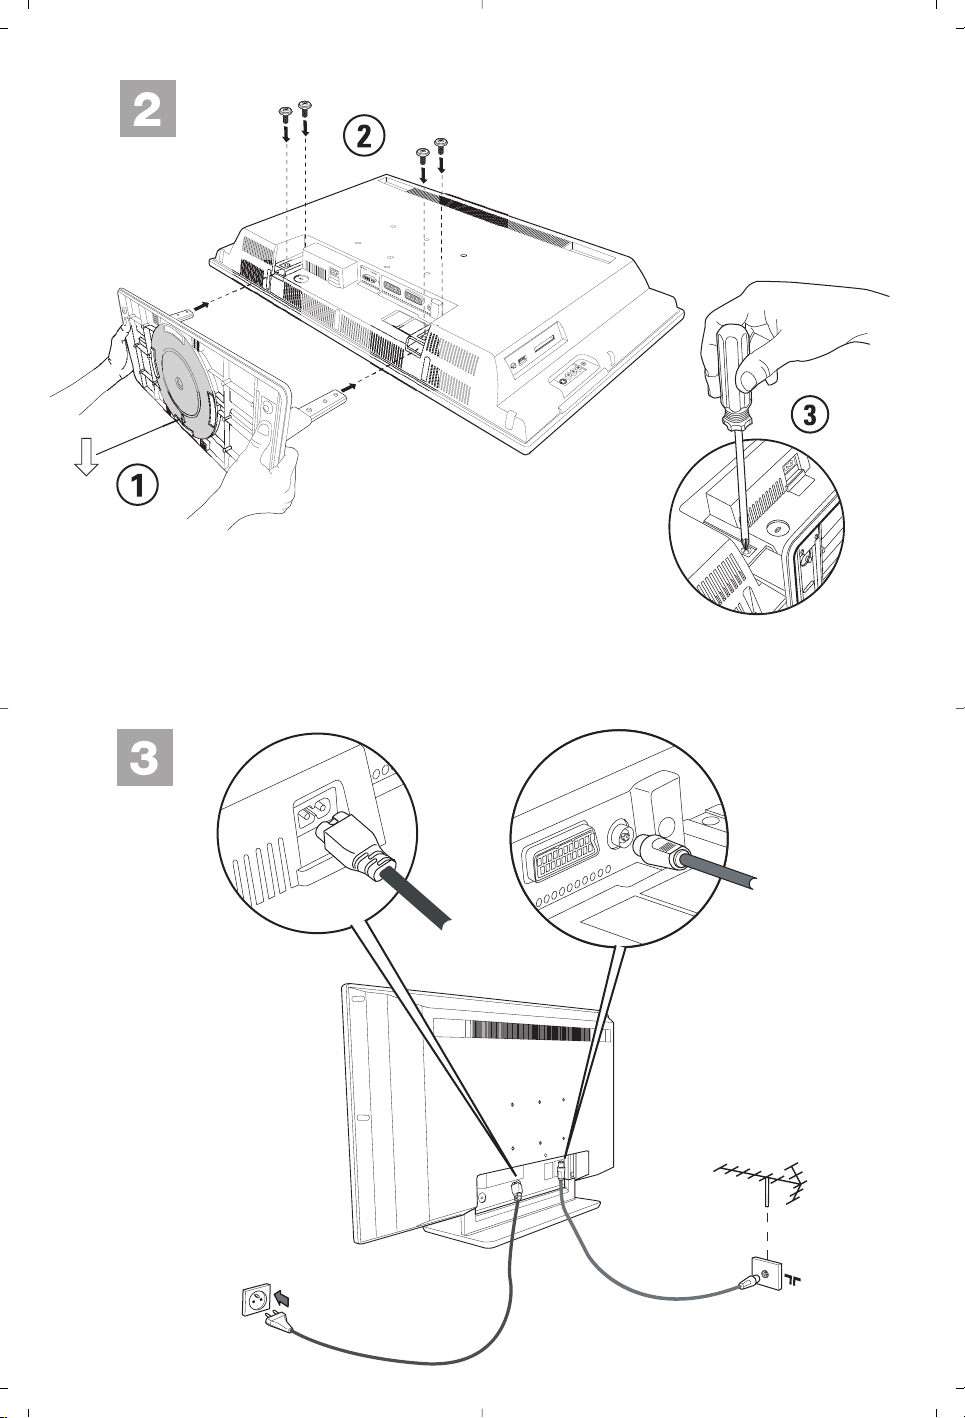
Installing your television set
navigation and adjustments
digit keys
programme selection
audio selection
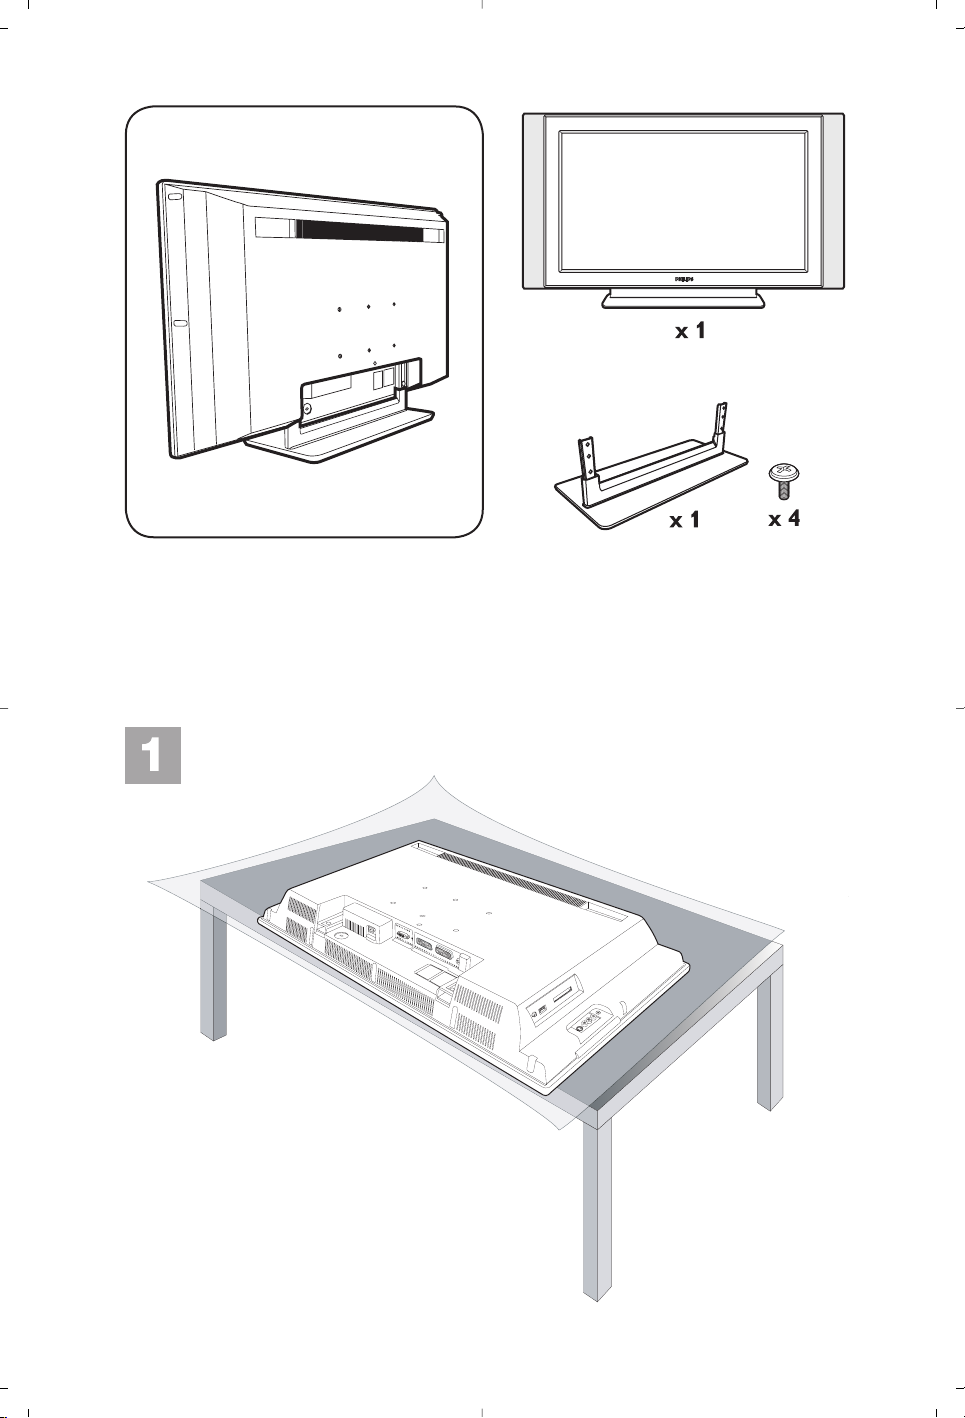
& Positioning the television set
Place your TV on a solid stable surface. To avoid
danger, do not expose the TV to water or a heat
source (e.g. lamp, candle, radiator). Do not
obstruct the ventilation grid at the rear
4
iDTV 19141 Eng 17/4/05, 3:08 PM4
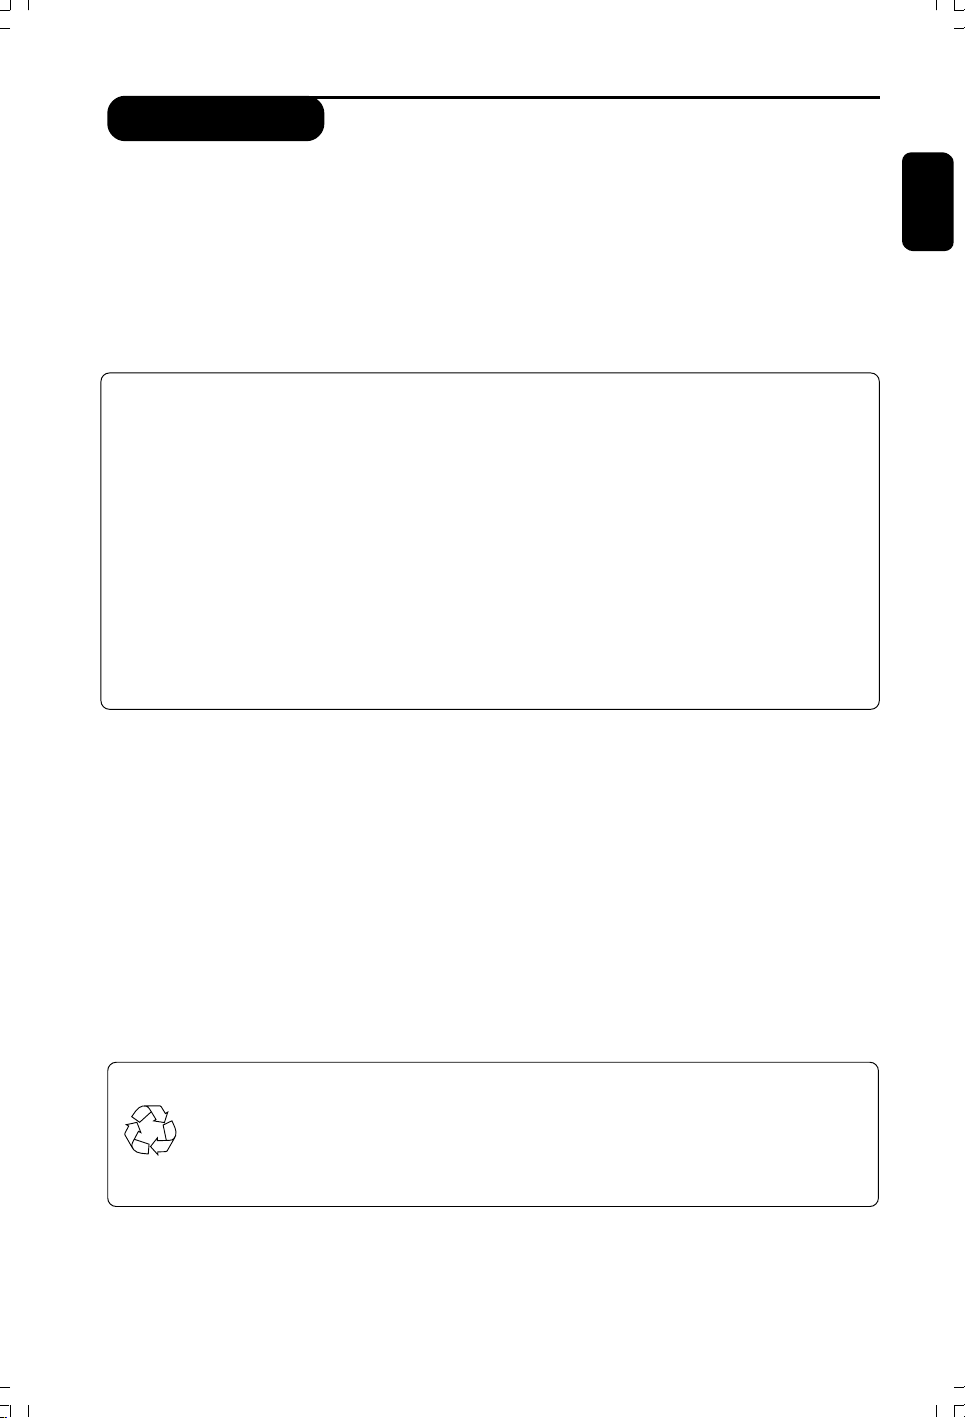
é Connecting the aerials
• Use the aerial connection lead supplied and
connect the ¬ socket situated at the bottom of
the TV to your aerial socket.
“ Switching on
To switch on the set, press the POWER key. A
green indicator comes on and the screen lights
up. Go straight to the chapter “Switching on for
the first time on page 5. If the television remains
in standby mode, press the P(age) + key on th
remote control.
The indicator will flash when you use the remote
control.
Switch on for the first time
The first time the TV set is switched on, a
congratulation message will appear on screen.
The language of which changes every 5 seconds.
If the menu is not displayed, press and hold down
the MENU key on the side of the TV set for 5
seconds to display the menu.
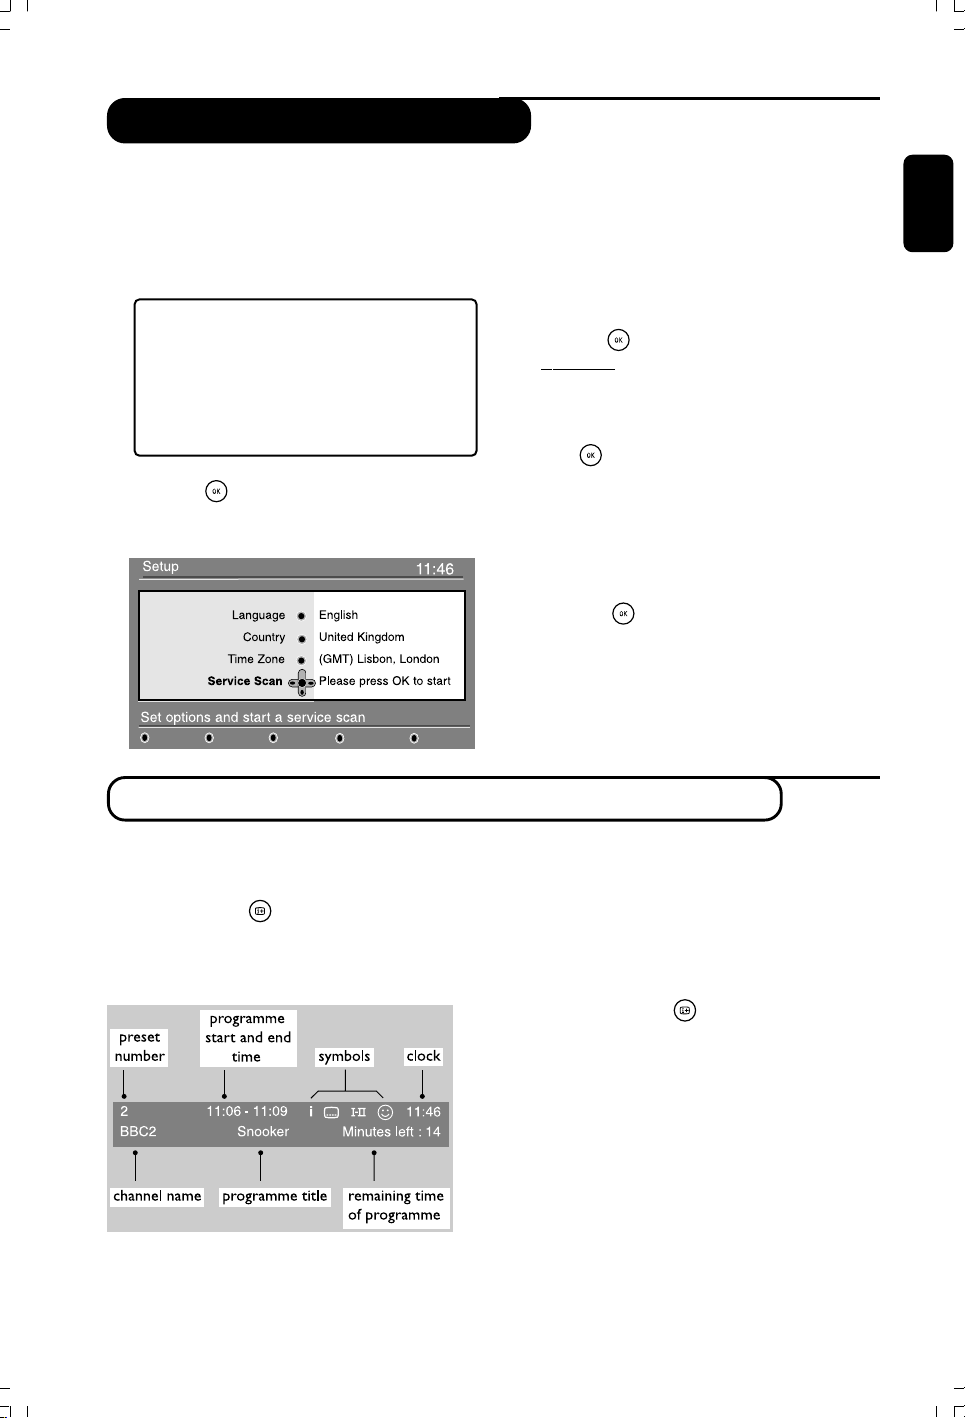
& Press the
key on the remote control, the
moment your prefered language is visible
on the screen.The Setup menu is displayed :
é The language, corresponding country and time
zone is now preselected according to the
opening screen. However, you can still change
your preferences before you start a service scan.
“ With the cursor keys, select language, country
or Time zone and check if the adjustment is
according to your preferences. If necessary,
use the cursor keys to make your adjustment
and press
to exit.
CAUTION : if you select a wrong country, the channel
numbering will not be according to the standard for
your country.
‘ Select service scan from the menu and
press
to start the installation.The service
scan menu is displayed.
All the digital and analogue programmes are
searched for and stored automatically.When
the search is complete, the menu will indicate
the number of digital services and analogues
programmes found.
( Press the key twice to start watching TV.
The television then displays the current
programme.The installation is now complete.
English
Français
Español
Italiano
Deutsch
Understanding the information in the banner
When you select a digital programme, an
information banner is displayed for a few
seconds at the top of the screen.
You can also use the
key of the remote control
to display this banner.A second press displays more
information about the programme (when available).
Banner description
The banner contains information on the
preset number, channel name, programme
duration, transmission clock, programme title
and the time remaining of the current
programme.
Symbols description :
i more information about this programme is
available : press the key to display or remove it.
i subtitling is available : if you want to display
them, press the i key or the OPTIONS key to
access the options menu and select subtitles.
4 other audio languages are availables and can be
selected in the options menu.
s the selected Favourite list is displayed in the
one of the colour (red, green, yellow or blue) of
the activated list.
Note : A white colour s will appear if the
programme is stored in one or more of the favourite
list which is currently not activated.
Suomi
Svenska
5
iDTV 19141 Eng 17/4/05, 3:09 PM5
 Loading...