

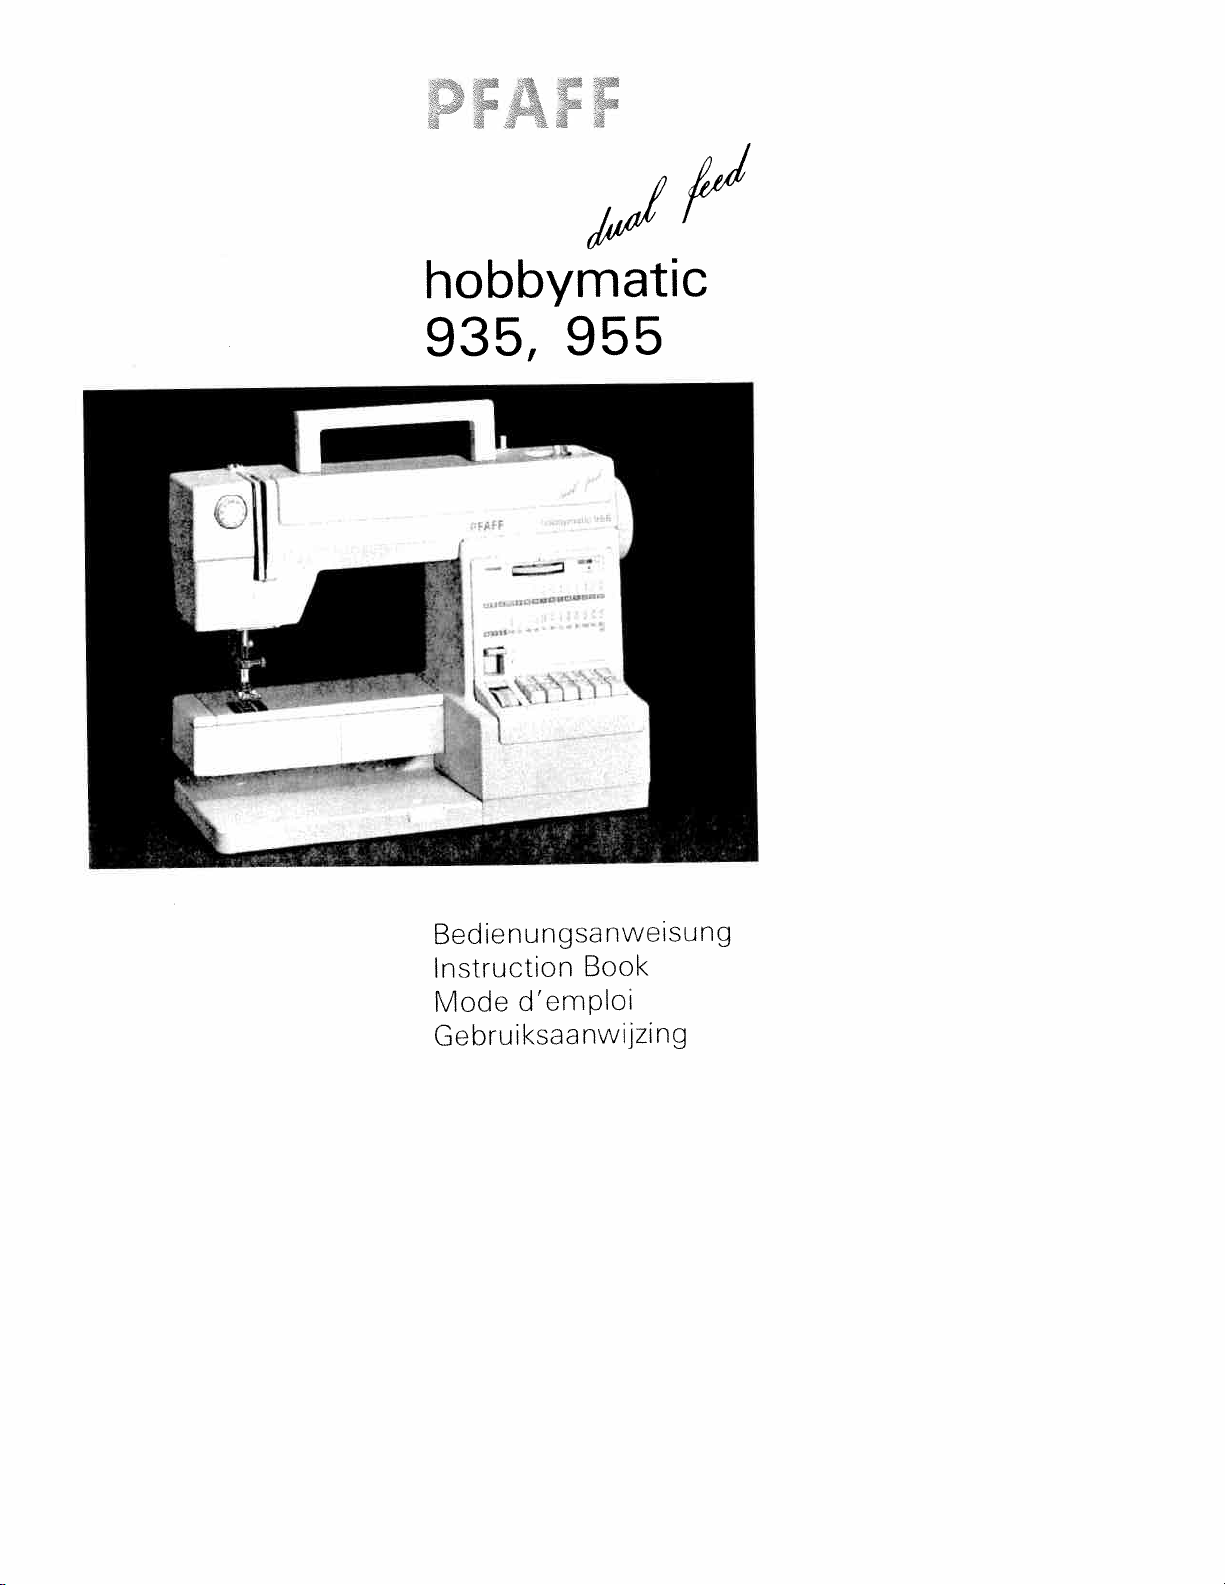
Page 1
øI
hobbymatic
fri
935,
955
Bedienungsanweisung
Instruction
Mode
Gebruiksaanwijzing
d’emploi
Book
Page 2
Diese
Fold
out
Rabattre
Deze
pagina
Seite
this
ce
nach
page
volet
open
au1en
vers
vouwen
kiappen
l’extérieur
Sicherheitshinweise
für
Haushaltnähmaschinen
nach
bzw.
a)
hi
ci
d)
Some
IEC
a>
hi
ci
dl
Special
see
VDE
DIN
335-2-28
IEC
Benutzer
Der
abgehenden
walten
sicht
stelle
beobachten.
Beim
Wartungsarbeiten
seln
Zubehör,
ausziehen
Steckdose
Die
Lampe
Die
darf
eingestellt
335-2-28
Take
fingers
Make
cord
machine
change
parts.
Be
bulb
The drive
adjusted
authorized
page
be>
Verlassen
von
maximal
betrdgt
Spannung
nur
safety
care
by
sure
whenever
mechanical
sure
the
in
safety
36.
der
mechanischen
ist
von
rules
or
to
by
0700
hat
Nadel
zu
Arbeit
die
des
vom
zuldssige
einem
werden.
avoid
to
the
you
want
use
sewing
belt
anyone
Pfaff
rules
28
Tell
wegen
genugend
und
lassen
ständig
Maschine,
der
oder
Maschine
Netzsteckers
Netz
zu
Leistung
5
Watt.
1
Antriebsriemens
des
Pfaff-Mechaniker
injury
during
needle
unplug
have
you
clean
to
and
a15
only
lamp.
never
must
but
agent.
United
for
der
die
beim
Teilen
durch
trennen.
to
power
the
to
it,
accessory
watt
be
an
auf-
und
Vor
Näh
zu
bei
Wech
oder
Her
aus
der
der
your
sewing.
leave
it
oil
light
Kingdom
the
or
I
Mesures
IEC
a)
b)
cI
di
Veiligheidsvoorschrift
voor
volgens
a)
hi
ci
dl
de
335-2-28
Toujours
continuellement
Toujours
secteur
les
avant
de
cas
caniques
Puissance
l’ampoule:
Confier
courroie
Pfaff.
den
huishoudnaaimachines
IEC
dient
Men
voorzichtigheid
ten
vooral
neergaande
hat
van
het
oog
in
het
Bij
onderhoud,
het
verwisselen
het
of
delen
stroomtoevoer
uitgeschakeld
stopkontact
mogen
Er
lampjes
machine
daze
spanning
De
door
alleen
ingesteld.
den
sécurité
preuve
faire
surveiller
débrancher
avant
de
d’accessoires.
maximale
Watts.
15
reglage
steeds
in
aanzien
naald
te
houden.
van
schoonmaken
van
te
door
nemen
te
uitsluitend
maximaal
worden
van
Pfaff
de
quitter
travaux
remplacement
ou
Ia
d’entrainement
335-2-28
naaimechanisme
verlaten
accessoires.
van
de
machine
Ia
d’entretien
de
admissible
Ia
tension
de
voldoende
te
acht
de
van
de
en
machine,
de
mechanische
dient
worden
stekker
de
naaimachine
1
gebruikt.
aandrijfriem
de
handelaar
prudence
le
travail
machine,
Ia
et
pièces
mécani
au
nemen,
op-en
werkwilze
regelmatig
of
de
Watt
5
de
de
ult
wor
et
du
en
me
Ia
bij
bij
het
voor
mag
)
Page 3
ècesdoIa
machine
t
Bedieningsdelen
vandonaaimachine
Dl
Levier
D2
D3
D4
D5
D6
D7
D8
D9
10
11
12Tension
13Levier
14 Pince-aiguille
1
5
16Tableau
17Touches
1
8
1
9
20
21
22
23
24
25
26 Entramnement
27
28
releveur
Pretension
Poignee
Dévidoir
Volant
Disquededébrayage
Reglepoint
Plaque
de
accessoires
Plaqueaaiguille
Support
Fentes
Brochesabobines
Plaque
Compartiment
Guide-fil
Butée
Disque
dornementation
Touche marche
Bras
Interrupteur
Couvercle
a
Compartiment
avec
denfilage
du
presse-tissu
de
de
de
pour
de
libre
accessoires
de
ddvidoir
du
rangement
pied
fil
d’aiguille
avec
points
commande
base
du
travaux
reglage
arrière
general
double
compartiment
du
accessoires
a
fil
du
volant
avec
bolte
presseur
visdefixation
crochet
reprisage
de
points
des
101
Draadhefboom
102
Spoelvoorspanning
103
Handgreep
104 Spoelwinder
Handwiel
105
Koppelschroef
106
107
Steeklengte-instelwiel
108
a
Afneembare
tevens
109
Steekplaat
110
Naaivoethouder
lnrijggleuf
111
11 2
Bovendraadspanning
Stofaandrukker
11
3
114
Naaldslot met
Garenpennen
11 5
116
Stekentabel
11 7
Tiptoetsen
118 Bodemplaat
119
Afsluitklep,
daarachter
120
Draadgeleider
121
lnstelschuif
122lnstelwiel
123Toets
Vrije
1
24
Hoofdschakelkaar
1
25
Dubbel
126
127
Deksel
128Accessoiresvak
werkbox
accessoiresbakje
grijper
voor
voor
achteruit
arm
stoftransport
van
het
naaivoet
met
borgschroef
stopwerk
siersteken
stikken
accessoiresvak
Page 4

Page 5
Nähmaschine
der
iIe
Fadenhebel
01
Spuler-Vorspannung
02
Tragegriff
03
Spuler
04
Handrad
05
AuslOsescheibe
06
Snchiängen-EnsteIler
07
Verwandlungsnähfiäche
08
09
ill
Ii
11
114
11
116
11
118
119
1
121
1
123
Zubehbrfach
mit
Stichplatte
Ndhfu6,halter
10
Einfädelschlitze
Oberfadenspannung
2
Stoffdrückerhebel
3
Nadelhalter
Garnrol!enstifte
5
Stichmustertabelle
Tipptasten
7
Grundplatte
VerschluRklappe
Fadenfuhrung
20
Anschlag
Zierstich-Einstellrad
22
Rückwdrtstaste
Freiarm
24
1
Hauptschalter
125
Doppelter
26
1
Klappdeckel
27
1
Zubehörfach
128
NähfuR
mt
Halteschraube
mit
dahinter
Stopfen
zum
Stofttransport
Zubehörfach
für
Greifer
Parts
101
102
103
104
105
106
107
108
109
110
111
112
11
114
11
116
11
118
11
1
121
1
1
124
1
126
127
1
20
22
23
25
Take-up
Bobbin
Carrying
Bobbin
Hand
Stop
Stitch
3
5
7
9
28
sewing
the
of
winding
winder
wheel
motion
length control
Detachable
accessory
Needle
Sewing
foot
Threading
Needle
Presser
Needle
Thread
of
Table
Finger-tip
Bedplate
arm
Free
enclosing
Thread
for
Stop
Fancy-stitch
Reverse-feed
arm
Free
Master
fabric
Dual
Cover
Accessory
lever
handle
knob
work
compartment
plate
foot
slots
thread
lifter
bar
holder
pins
reel
stitch
controls
cover
sewing
guide
darning
switch
accessory
of
compartment
machine
tension
holder
tension
with
patterns
thumb
control
feed
support
with
screw
hook>
operations
wheel
compartmen
with
sewing
Page 6

Page 7
sewing
all
d
IMPORTANT
machine
instructions
before
designed
is
using
SAFETY
manufactured
and
sewing
this
INSTRUCTIONS
HOUSEHOLD
for
machine.
use
only.
ANGER
sewing
fhe
inplug
Dleaning.
lways
not
Do
not
Do
Do
sink.
ARNII\IG
,
not
Do
machine
this
Use
attachments
only
Never
working
Return
nation,
Never
openings
lint,
dust,
Never
not
Do
not
Do
being
disconnect,
To
Never
may
not
Do
Keep
sewing
Always
not
Do
only.
not
Do
Switch
area,
presser
Always
lubricating,
instruction
the
Hold
winding.
machine
appliance
this
unplug
for
reach
or
place
place
not
allow
used
is
sewing
operate
properly,
appliance
the
repair,
operate
the
of
and
or
drop
outdoors.
use
operate
administered.
operate
blocked.
be
unplug
fingers
machine
the
use
bent
use
or
pull
sewing
the
as
such
foot,
unplug
or
when
plug
before
a
store
to
this
electrical
the
loose
insert
where
turn
on
by
away
proper
push
threading
etc.
when
manual.
To
reduce
should
from
relamping.
sewing
sewing
drop
or
in
To
to
used
be
near
or
by
machine
recommended
sewing
has
it
if
the
to
or
sewing
cloth.
any
all
soft
a
pulling
from
needle.
blunt
fabric
machine
making
rewinding
machine
object
aerosol
controls
needle
machine
sewing
or
sewing
never
the
machine
machine
into
reduce
persons:
toy.
a
as
children.
for
only
machine
been
nearest
mechanical
machine
(spray>
surface
cord.
on
all
moving
plate.
needles.
stitching.
while
off
needle,
any
into
risk
the
be
electric
Replace
that
water
the
Close
its
the
by
dropped
with
and
into
off
to
such
To
The
Use
(“0”>
changing
from
other
cord
electric
of
left
outlet
bulb
has
where
other
or
of
risk
attention
intended
manufacturer
has
it
if
authorized
adjustment.
any
foot
controller
any
opening.
products
position,
(“0”)
a
as
unplug,
parts.
wrong
needles
may
It
when
the
user
reel.
schock:
unattended
immediately
with
into
fallen
can
it
liquid.
burns,
as
use
damaged
a
damaged,
or
dealer
openings
air
are
or
bed
grasp
Special
plate
recommended
deflect
making
needle,
electrical
servicing
not
Do
when
same
water.
or
fall
fire,
necessary
is
described
contained
as
or
free
being
then
couch
plug,
the
care
cause
can
the
any
threading
outlet
adjustments
allow
plugged
using
after
rated
type
Unplug
pulled
be
electric
when
in
or
cord
dropped
or
where
not
required
is
when
plug
center
the
or
plug
the
the
by
causing
bobbin,
to
service
blocked.
from
used
remove
needle
adjustments
in.
and
Watts.
15
immediately.
into
this
manual.
manual.
this
in
if
into
for
ventilation
oxygen
from
air
cord.
around
to
manufacturer
it
the
in
or
mentioned
whip
or
openings
schock,
this
plug,
Keep
accumulation
where
the
needle
the
removing
Always
before
tub
a
injury
sewing
Use
not
is
it
water.
exami
outlet.
the
break.
break.
to
needle
changing
covers,
when
or
of
is
in
re
SAVE
THESE
INSTRUCTIONS
Page 8
4
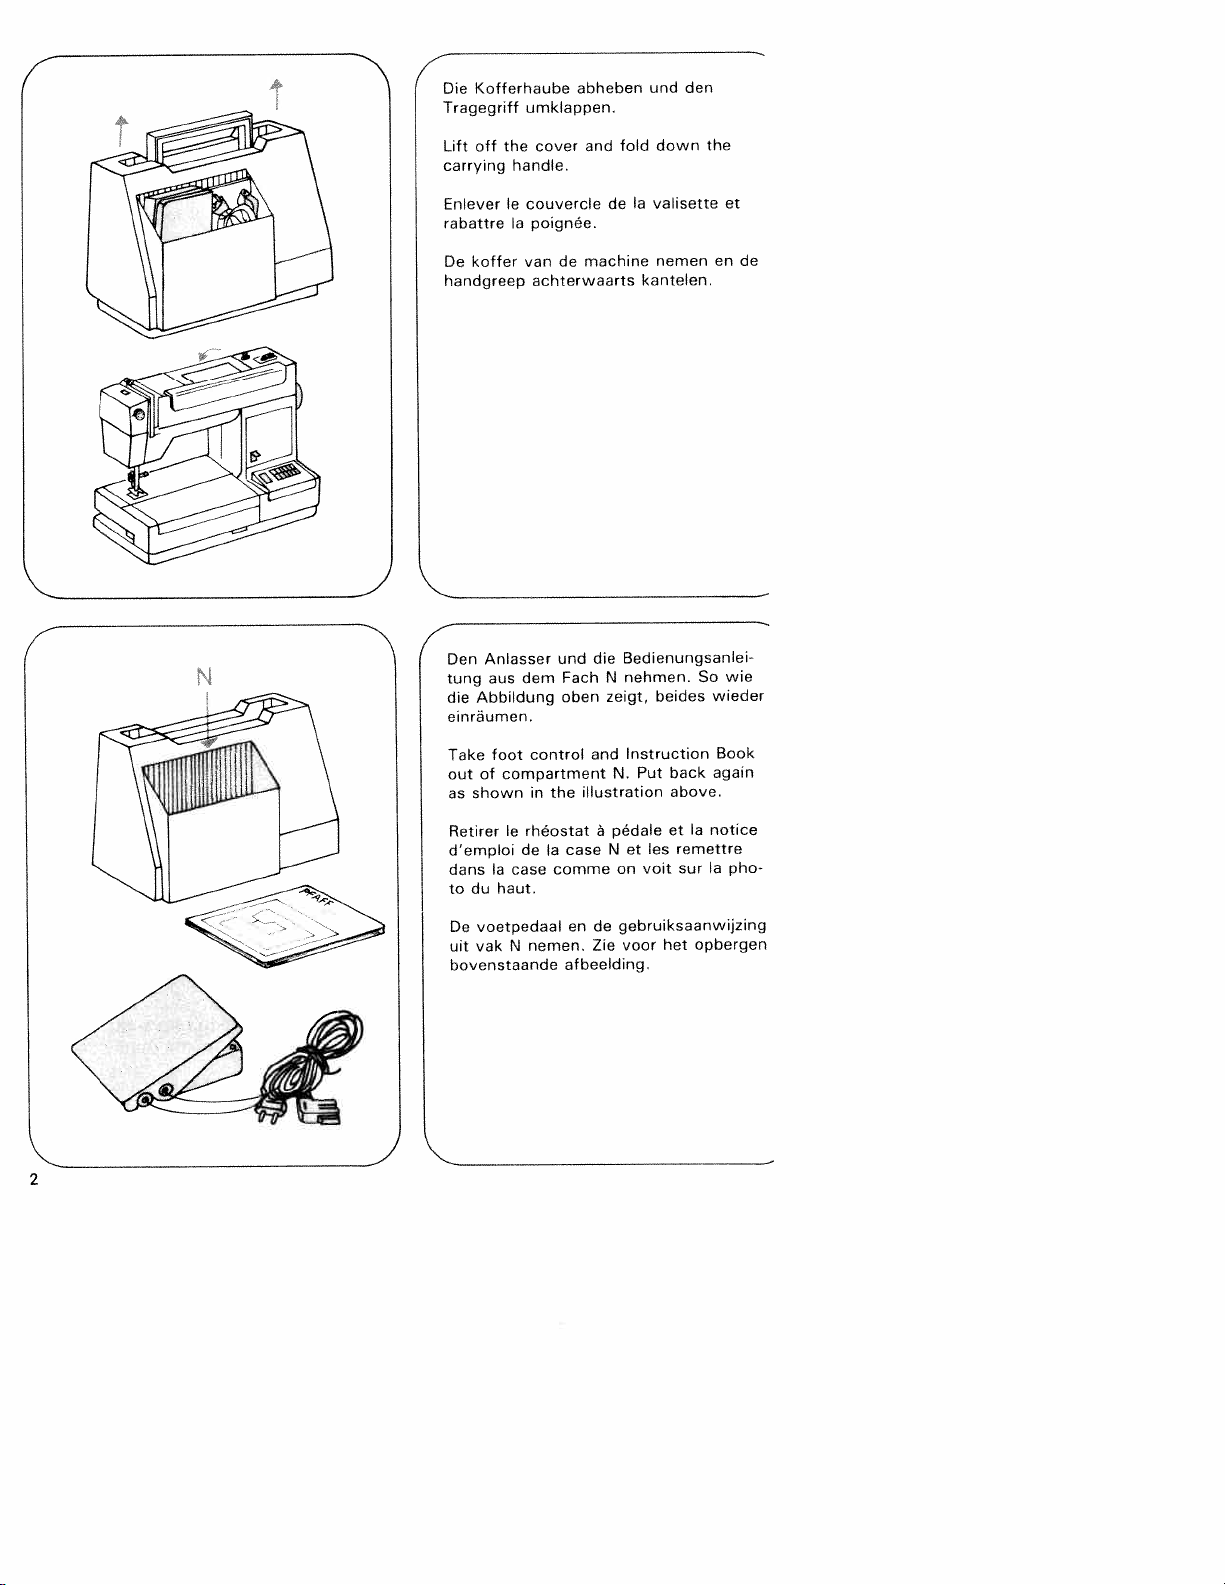
Kofferhaube
Die
Tragegriff
abheben
umklappen.
und
den
off
Lift
carrying
Enlever
rabattre
koffer
De
handgreep
cover
the
handle.
couvercle
le
ía
poignee.
van
achterwaarts
de
fold
and
de
machine
Ia
kantelen.
down
valisette
nemen
the
et
de
en
)
4
Den
tung
die
einräumen.
Anlasser
dem
aus
Abbildung
und
Fach
oben
Bedienungsanlei
die
nehmen.
N
beides
zeigt,
So
wie
wieder
foot
Take
compartment
of
out
shown
as
Ia
Retirer
d’emploi
dansIacase
haut.
du
to
voetpedaal
Dc
N
yak
uit
bovenstaande
control
the
in
rheostat
Ia
de
nemen.
and
illustration
case
comme
de
en
Zie
afbeelding,
Instruction
Put
N.
pédale
a
les
N
et
voit
on
gebruiksaanwijzing
voor
back
above.
et
remettre
sur
het
Book
again
notice
Ia
pho
Ia
opbergen
)
Page 9
4
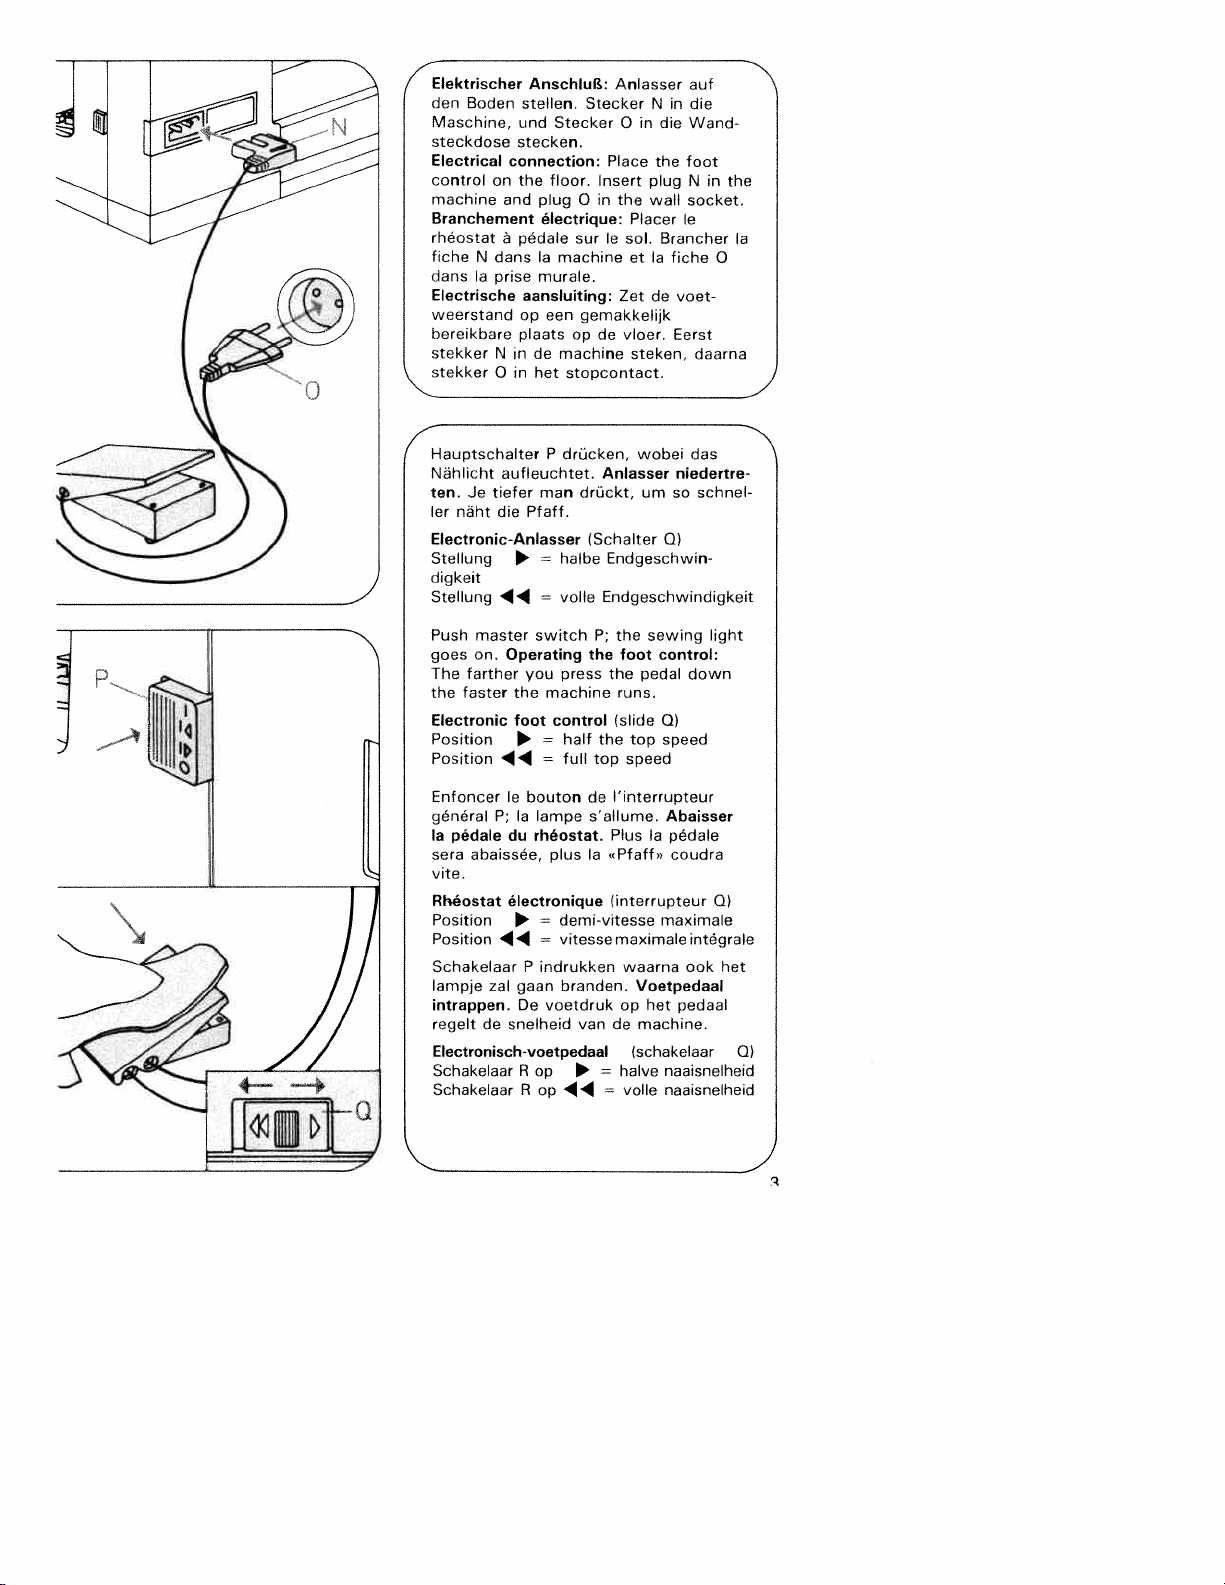
Elektrischer
den
Boden
Maschine,
steckdose
Electrical
control
machine
stellen.
und
stecken.
connection:
on
the
and
Branchement
rheostat
fiche
dans
Electrische
weerstand
bereikbare
stekker
stekker0in
4
Hauptschalter
Nählicht
ten.Jetiefer
ler
a
pédale
N
dans(amachine
a
prise
op
plaats
Ninde
aufleuchtet.
nCht
die
aansluiting:
Pfaff.
Electronic-Anlasser
Stellung halbe
digkeit
Stellung
Push
goes
The
the
Electronic
Position
Position
44
master switchP;the
on.
Operating the
farther
faster
you
the
foot
44
Anschlulf.:
SteckerNin
Stecker0in
floor.
plug0in
electrique:
sur
murale.
een
gemakke(ijk
opdevloer.
machine
het
stopcontact.
P
drücken,
man
drückt,
(Schalter
=
voIle
press
machine
control
=
half
=
full
Anlasser
Place
Insert
the
Ic
sol.
Zetdevoet
Anlasser
Endgeschwin
Endgeschwindigkeit
foot
the
runs.
(slide
the
top
speed
the foot
plug
wall
Placer
Ia
et
steken,
wobei
urn
sewing
control:
pedal
top
auf
die
die
Wand
Ninthe
socket.
le
Brancher
fiche
Eerst
daarna
das
niedertre
schnel
so
Q)
down
Q(
speed
Ia
0
ight
Enfoncerlebouton
general
Ia
sera
vite.
Rheostat
Position
Position
SchakelaarPindrukken
lampje
intrappen.
regelt
Electronisch-voetpedaal
Schakelaar
Schakelaar
pedale
abaissée,
P;Ialampe
du
electronique
44
zal
gaan branden.
De
de
snelheid
R
R
rheostat,
plus
demi-vitesse
=
vitessemaximaleintegrale
voetdruk
van
op
op
44
(‘interrupteur
de
s’allume.
Plus
(a
Pfaff>
(interrupteur
waarna
op
de
(schakelaar
=
halve
=
voIle
Abaisser
(a
pédale
coudra
maximale
ook
Voetpedaal
het
pedaal
machine.
naaisnelheid
naaisnelheid
Ql
het
QI
Page 10
/
4
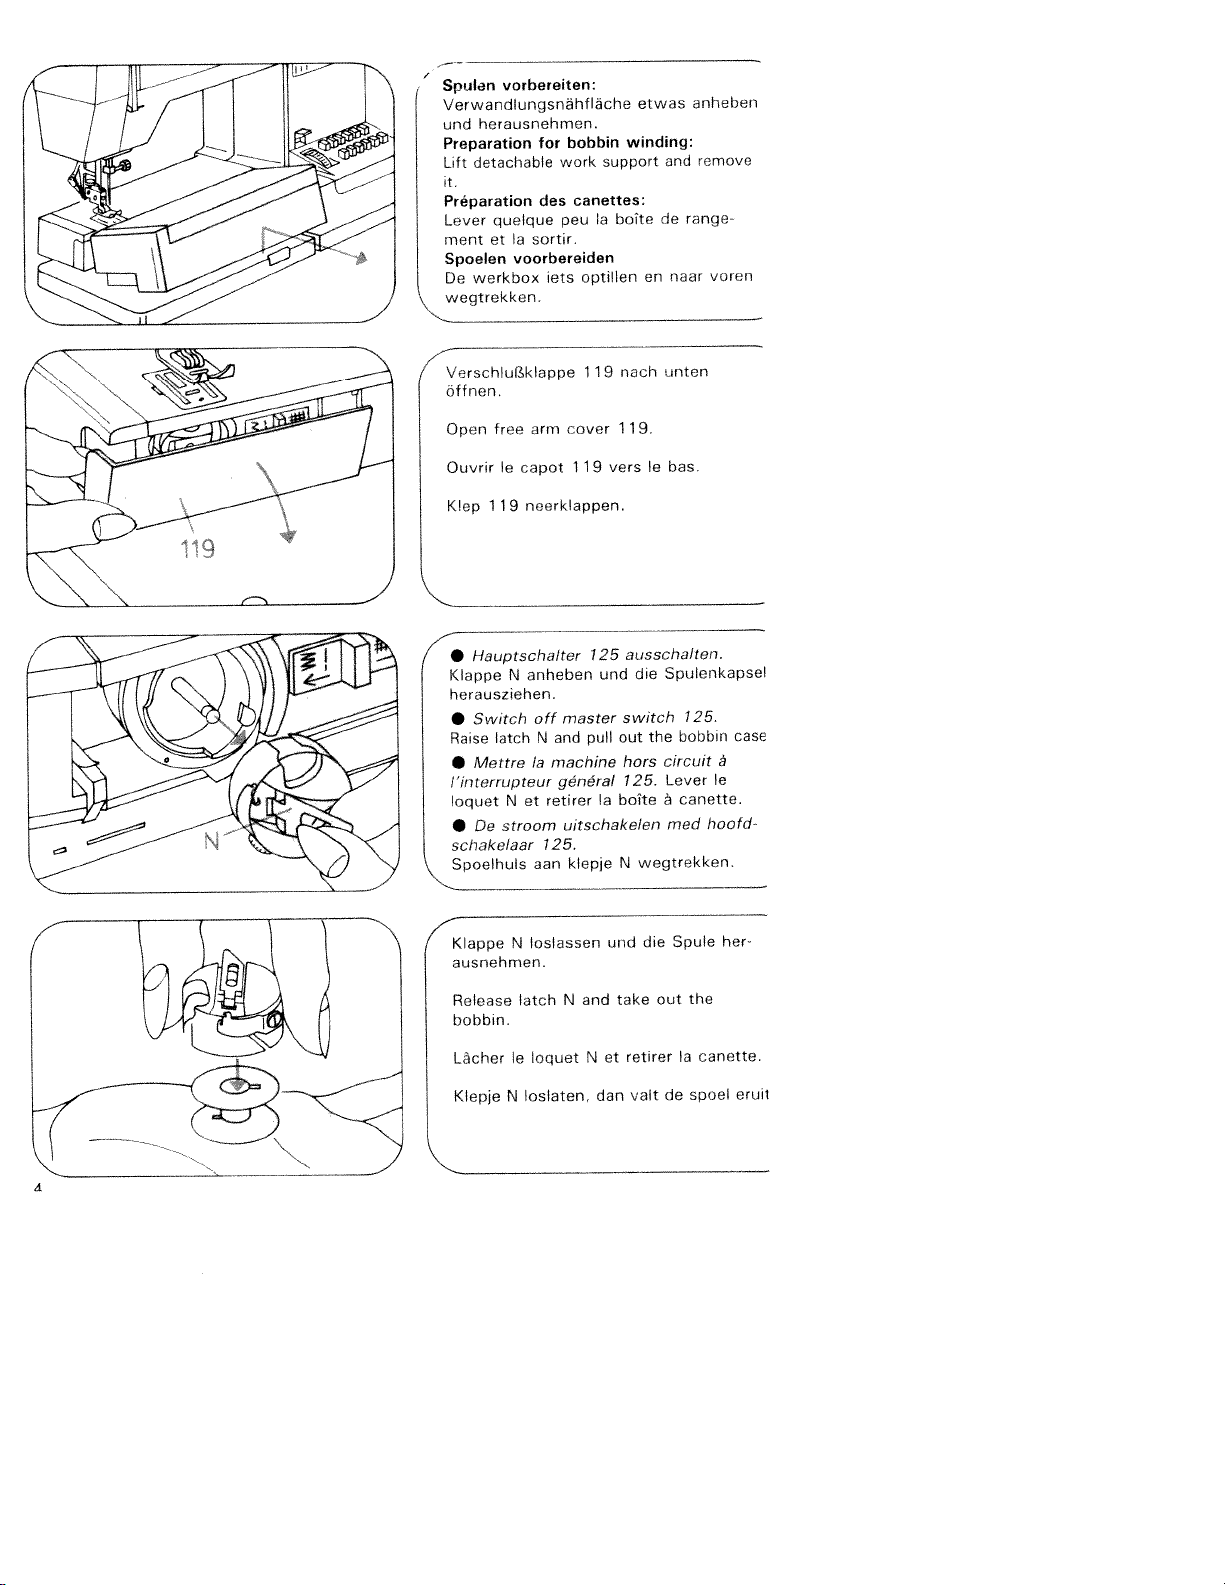
vorbereiten:
Spulen
Verwandlungsndhfläche
und
herausnehmen,
Preparation
Lift
detachable
it.
Preparation
quelque
Lever
ment
Spoelen
De
wegtrekken
VerschluRklappe
öffnen,
Open
Ouvrir
et
werkbox
free
Ic
a
voorbereiden
arm
capot
for
des
sortir,
lets
bobbin
work
canettes:
peu
optillen
119
cover
119
winding:
support
bolte
a
nach
119.
vers
etwas
en
Ic
and
de
naar
unten
bas.
anheben
remove
range
voren
Klep
•
4
Klappe
herauszehen.
•
Raise
•
I’interrupteur
loquet
•
schakelaar
Spoelhuls
4
Klappe
ausnehmen.
Release
bobbin.
Làcher
119
Haup
N
Switch
latchNand
Mettre
N
stroom
Do
N
le
neerklappen.
tschalter
anheben
master
off
machine
Ia
general
retirer
et
uitschakelen
125.
aan
loslassen
N
latch
oquet
125
pull
klepje
and
N
ausschalten.
die
und
switch
Out
hors
125.
Ia
bolte
N
und
take
retirer
et
Spulenkapsel
125.
bobbin
the
circuit
Lever
canette.
a
med
wegtrekken.
Spule
die
the
out
canette.
Ia
case
a
Ic
hoofd
her
Klepje
N
loslaten,
dan
valt
crud
spoel
do
Page 11
4
4
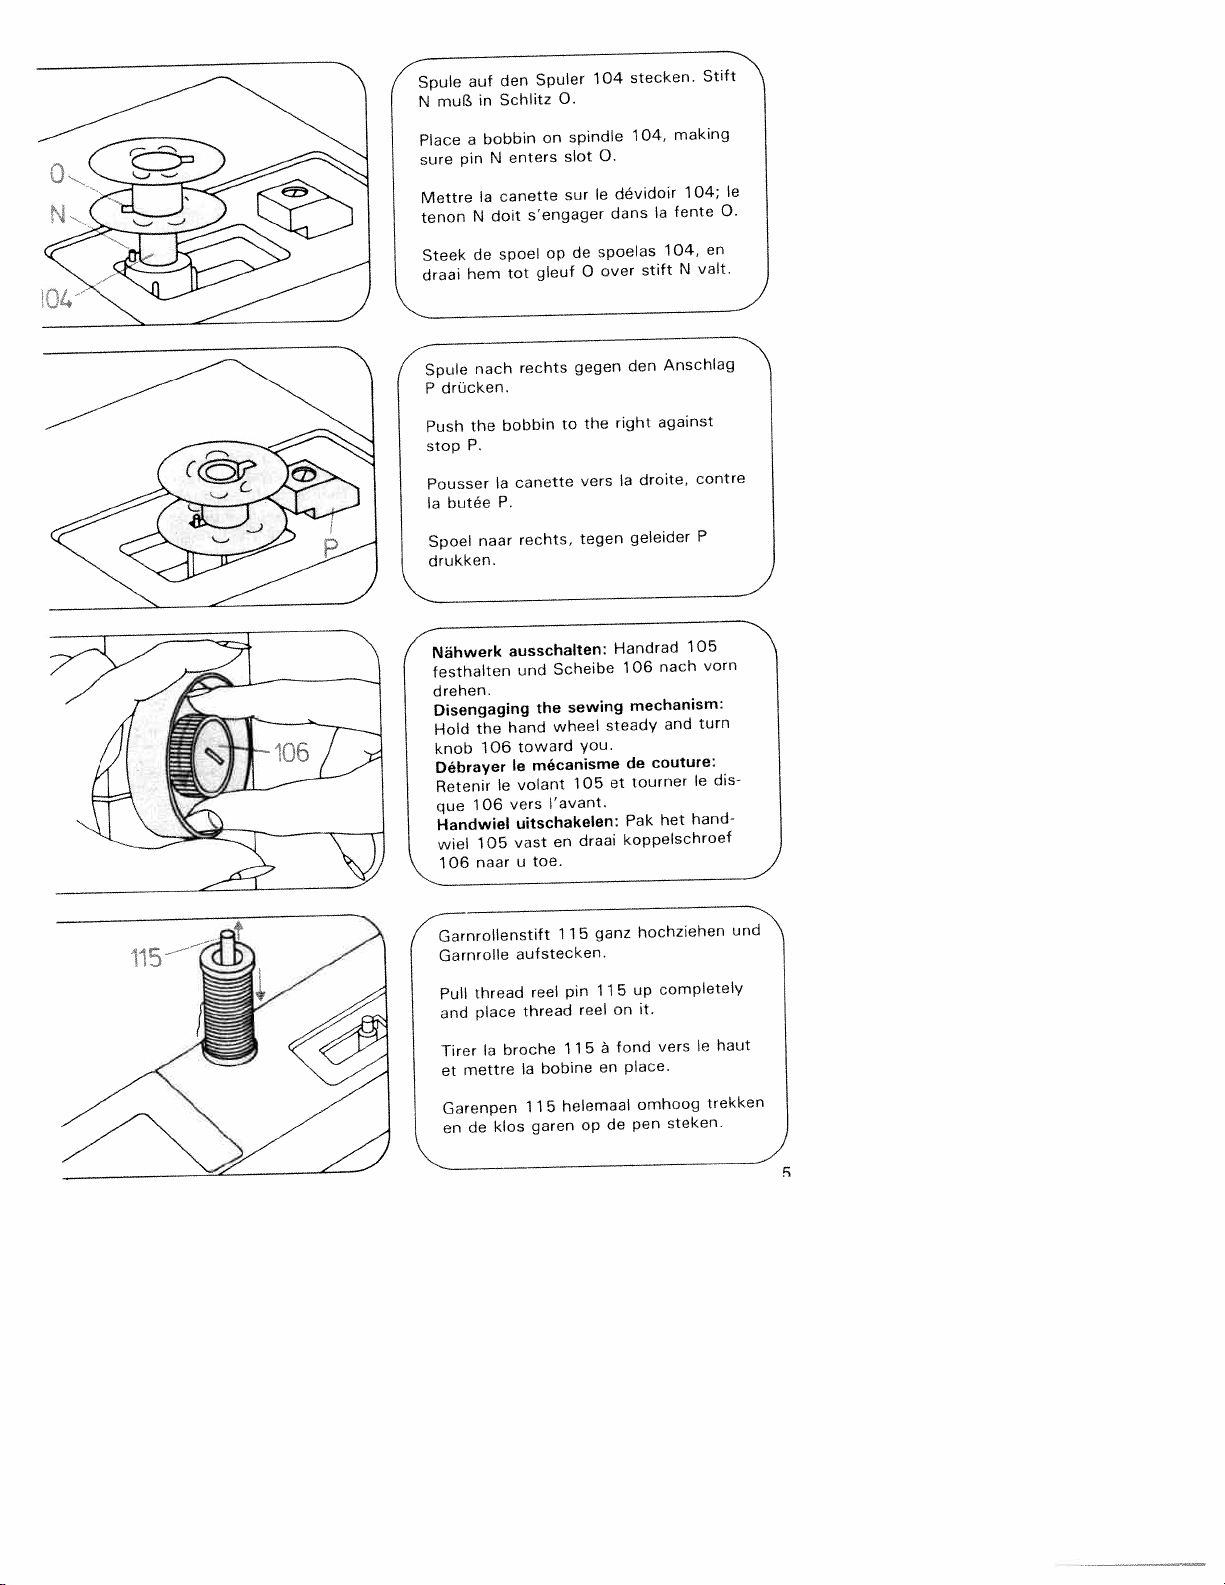
Spule
mutt
N
Place
sure
Mettre
tenon
Steek
draai
Spule
drücken.
P
Push
stop
Pousser
Ia
Spoel
drukken.
pin
butée
auf
a
N
de
hem
nach
the
P.
den
Schlitz
in
bobbin
N
Ia
canette
doit
spoel
Ia
P.
naar
enters
s’engager
tot
rechts
bobbin
canette
rechts,
Spuler
0.
on
op
gleuf
spindle
slot
sur
de
0
gegen
to
vers
tegen
104
0.
le
spoelas
over
the
stecken.
104,
dévidoir
dans
stift
den
right
droite,
a
geleider
making
104;
fente
a
104,
valt.
N
Anschlag
against
contre
P
Stift
le
0.
en
Nähwerk
4
festhalten
drehen.
Disengaging
Hold
knob
Debrayer
Retenir
que
Handwiel
wiel
106
Garnrollenstift
Garnrolle
Pull
and
Tirer
et
Garenpen
en
the
106
106
105
naar
thread
place
Ia
mettre
de
ausschalten:
und
the
hand
toward
mécanisme
le
volant
Ic
vers
uitschakelen:
vast
toe.
u
aufstecken.
reel
thread
broche
bobine
Ia
115
garen
klos
Scheibe
sewing
wheel
you.
105
‘avant.
draai
en
11
5
pin
reel
11
5
helemaal
op
Handrad
106
mechanism:
steady
de
tourner
et
Pak
koppelschroef
hochziehen
ganz
up
11
5
it.
on
fond
a
place.
en
omhoog
pen
de
105
nach
and
couture:
Ic
hand
het
completely
Ic
vers
steken.
vorn
turn
dis
und
haut
trekken
9
Page 12
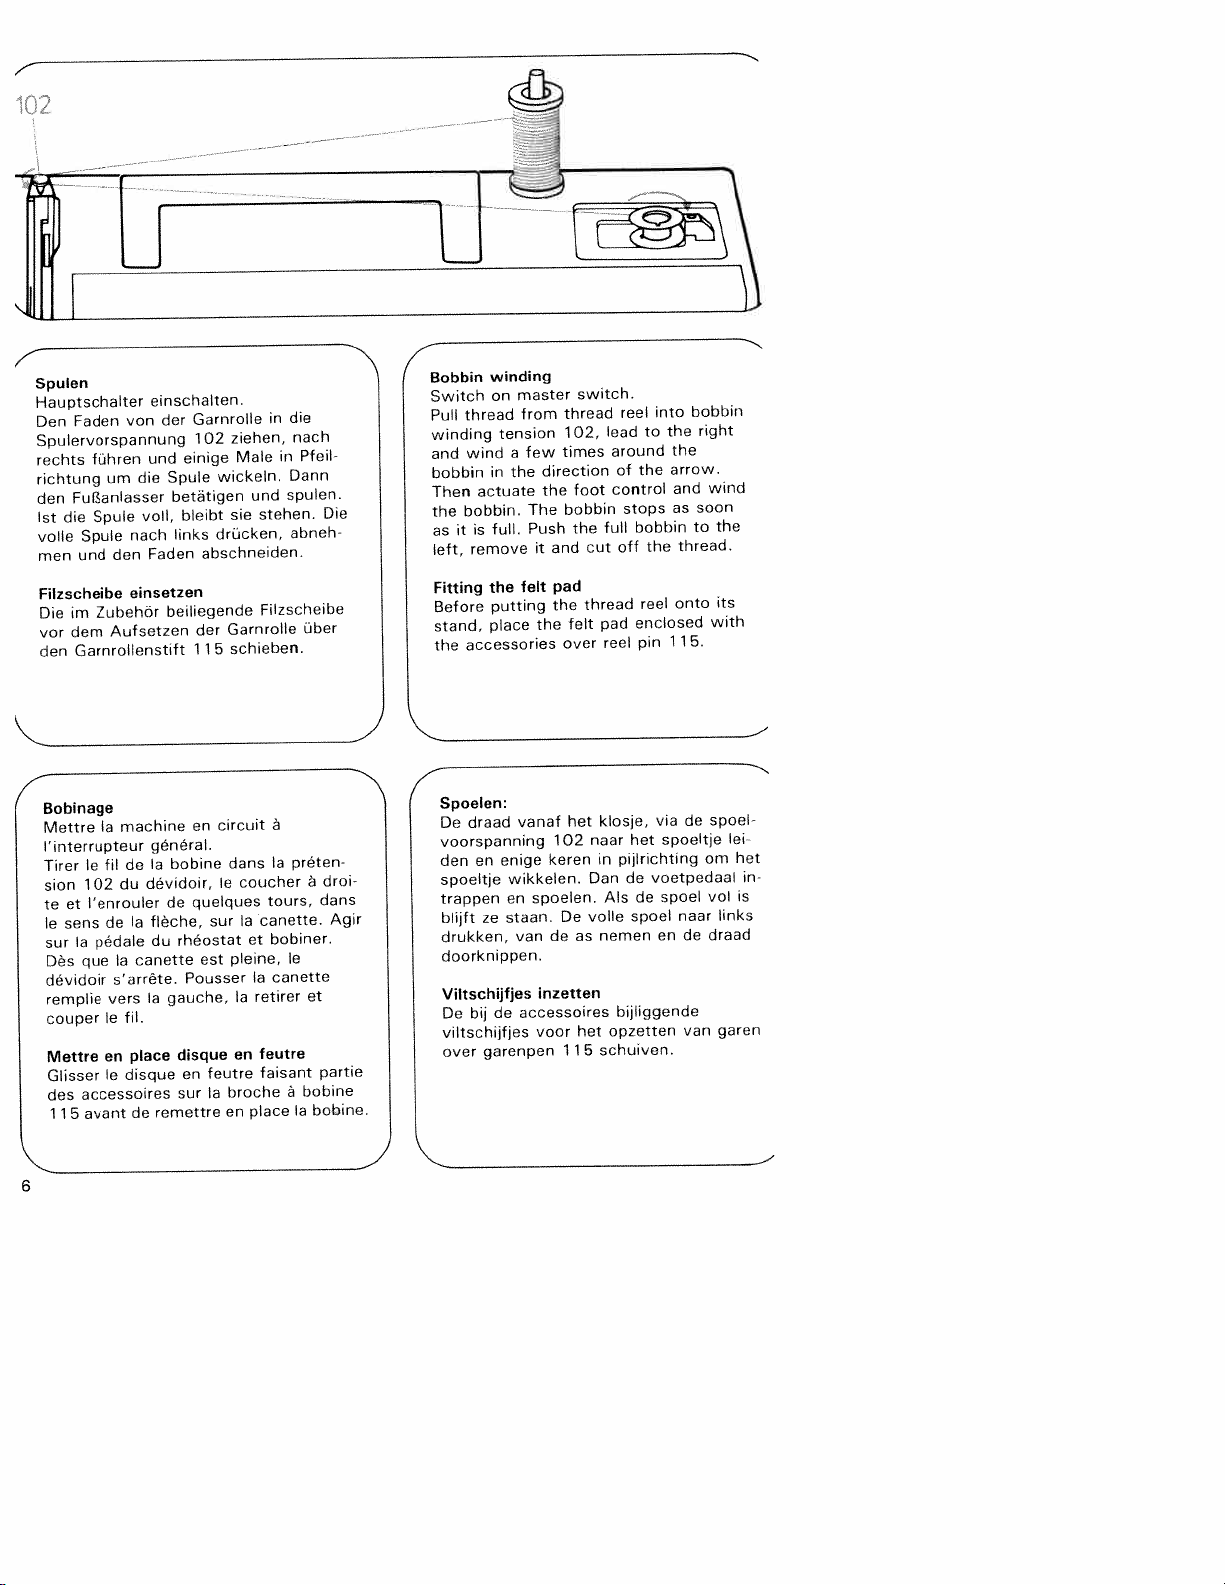
Spulen
Hauptschalter
Den
Spulervorspannung
rechts
richtung
den
die
st
voile
rnen
Filzscheibe
Die
vor
den
Bobinage
Mettre
l’interrupteur
Tirer
sion
et
to
sens
le
sur
Des
dévidoir
remplie
couper
Mettre
Glisser
des
11
von
Faden
führen
die
urn
Fulanlasser
Spule
nach
Spule
den
und
einsetzen
Zubehör
im
Aufsetzen
dern
Garnrollenstift
machine
Ia
de
fil
le
du
102
l’enrouler
Ia
do
pCdale
Ia
5
canette
Ia
quo
s’arrète.
vers
fil.
le
place
en
disque
le
accessoires
do
avant
einschalten.
Garnrolle
der
einige
und
Spule
betatigen
bleibt
you,
links
Faden
beiliegende
en
general.
hobine
Ia
dévidoir,
quelques
do
flèche,
rheostat
du
Pousser
gauche,
Ia
disque
en
sur
rernettro
ziehen,
102
Male
wickein.
und
sie
drücken,
abschneiden.
Garnrolle
der
schieben.
115
circuit
dans
coucher
Ic
Ia
sur
et
pleine,
est
Ia
en
feutre
broche
Ia
place
en
die
in
nach
Pfeil
in
Dann
spulen.
stehen.
abneh
Filzscheibe
über
a
préten
Ia
tours,
canette.
bobiner.
10
canette
Ia
retirer
feutre
faisant
bobine
C
Ia
Die
droi
a
dans
Agir
et
partie
bobine.
4
Bobbin
Switch
Pull
winding
and
bobbin
Then
the
as
left,
Fitting
Before
stand,
the
4
Spoelen:
De
voorspanning
den
spoeltje
trappen
blijft
drukken,
doorknippen.
Viltschijfjes
De
viltschijfjes
over
winding
master
on
from
thread
tension
few
wind
a
direction
the
in
full.
felt
the
putting
place
vanaf
enige
wikkelen.
en
staan.
ze
van
garenpen
the
The
Push
it
the
spoelen.
inzetten
voor
actuate
bobbin.
is
it
remove
accessories
draad
en
bijdeaccossoires
thread
102,
times
bobbin
and
pad
the
over
102
keren
De
de
115
switch.
foot
the
cut
thread
felt
het
voIle
as
het
reel
lead
around
of
control
stops
full
off
pad
reel
klosje,
naar
pijlrichting
in
Dan
Als
nernen
bijliggende
opzetten
schuiven.
into
to
the
bobbin
the
reel
enclosed
pin115.
via
spoeltje
het
voetpedaal
de
spoel
de
spoel
endedraad
the
the
arrow.
and
as
thread.
onto
de
naar
van
bobbin
right
wind
soon
the
to
its
with
spool
orn
vol
garen
lei
het
in
is
links
Page 13
und
Dann
einrastet.
es
hand
forward
vasthouden
u
draaien
toe
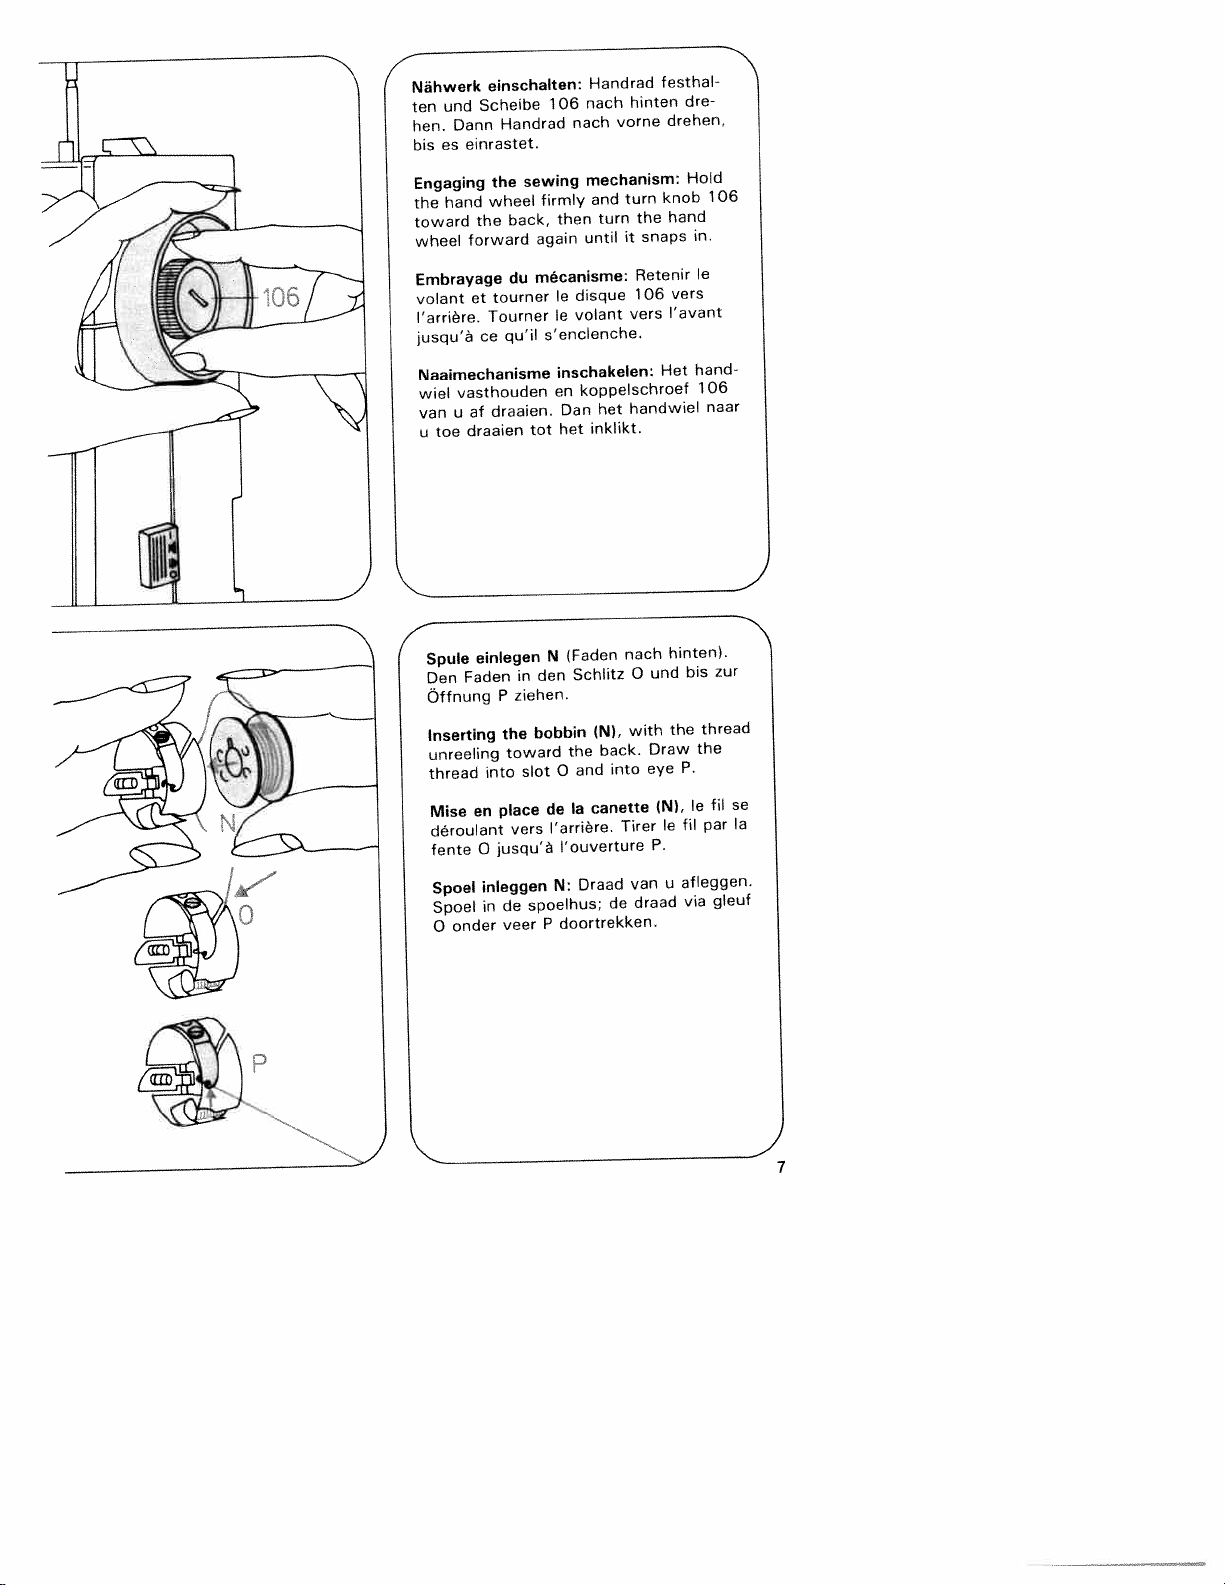
einschalten:
Scheibe
the
wheel
the
tourner
et
Tourner
ce
draaien.
at
Nähwerk
ten
hen.
bis
Engaging
the
toward
wheel
Embrayage
volant
l’arrière.
jusqu’a
Naaimechanisme
wiel
van
u
Handrad
sewing
back,
again
mécanisme:
du
qu’il
tot
Handrad
nach
106
nach
mechanism:
and
firmly
turn
then
until
disque
le
volant
le
s’enclenche,
inschakelen:
koppelschroef
en
het
Dan
inklikt.
het
hinten
vorne
turn
the
snaps
it
Retenir
106
vers
handwiel
festhal
dre
drehen,
Hold
knob
hand
vers
‘avant
Het
106
in.
le
hand
106
naar
4
Spule
Faden
Den
Offnung
Inserting
unreeling
thread
Mise
déroulant
fente
Spoel
Spoel
onder
0
einlegen
P
the
toward
into
place
en
jusqu’a
0
inleggen
in
de
veer
in
ziehen.
bobbin
slot
vers
spoelhus;
IFaden
N
Schlitz
den
the
and
0
Ia
de
l’arrière.
l’ouverture
N:
doortrekken.
P
(N),
back.
canette
Draad
into
de
nach
0
with
Tirer
van
draad
und
Draw
eye
(N),
le
P.
u
hinten).
his
thread
the
the
P.
le
fil
afleggen.
via
fil
par
gleuf
zur
se
Ia
J
7
Page 14
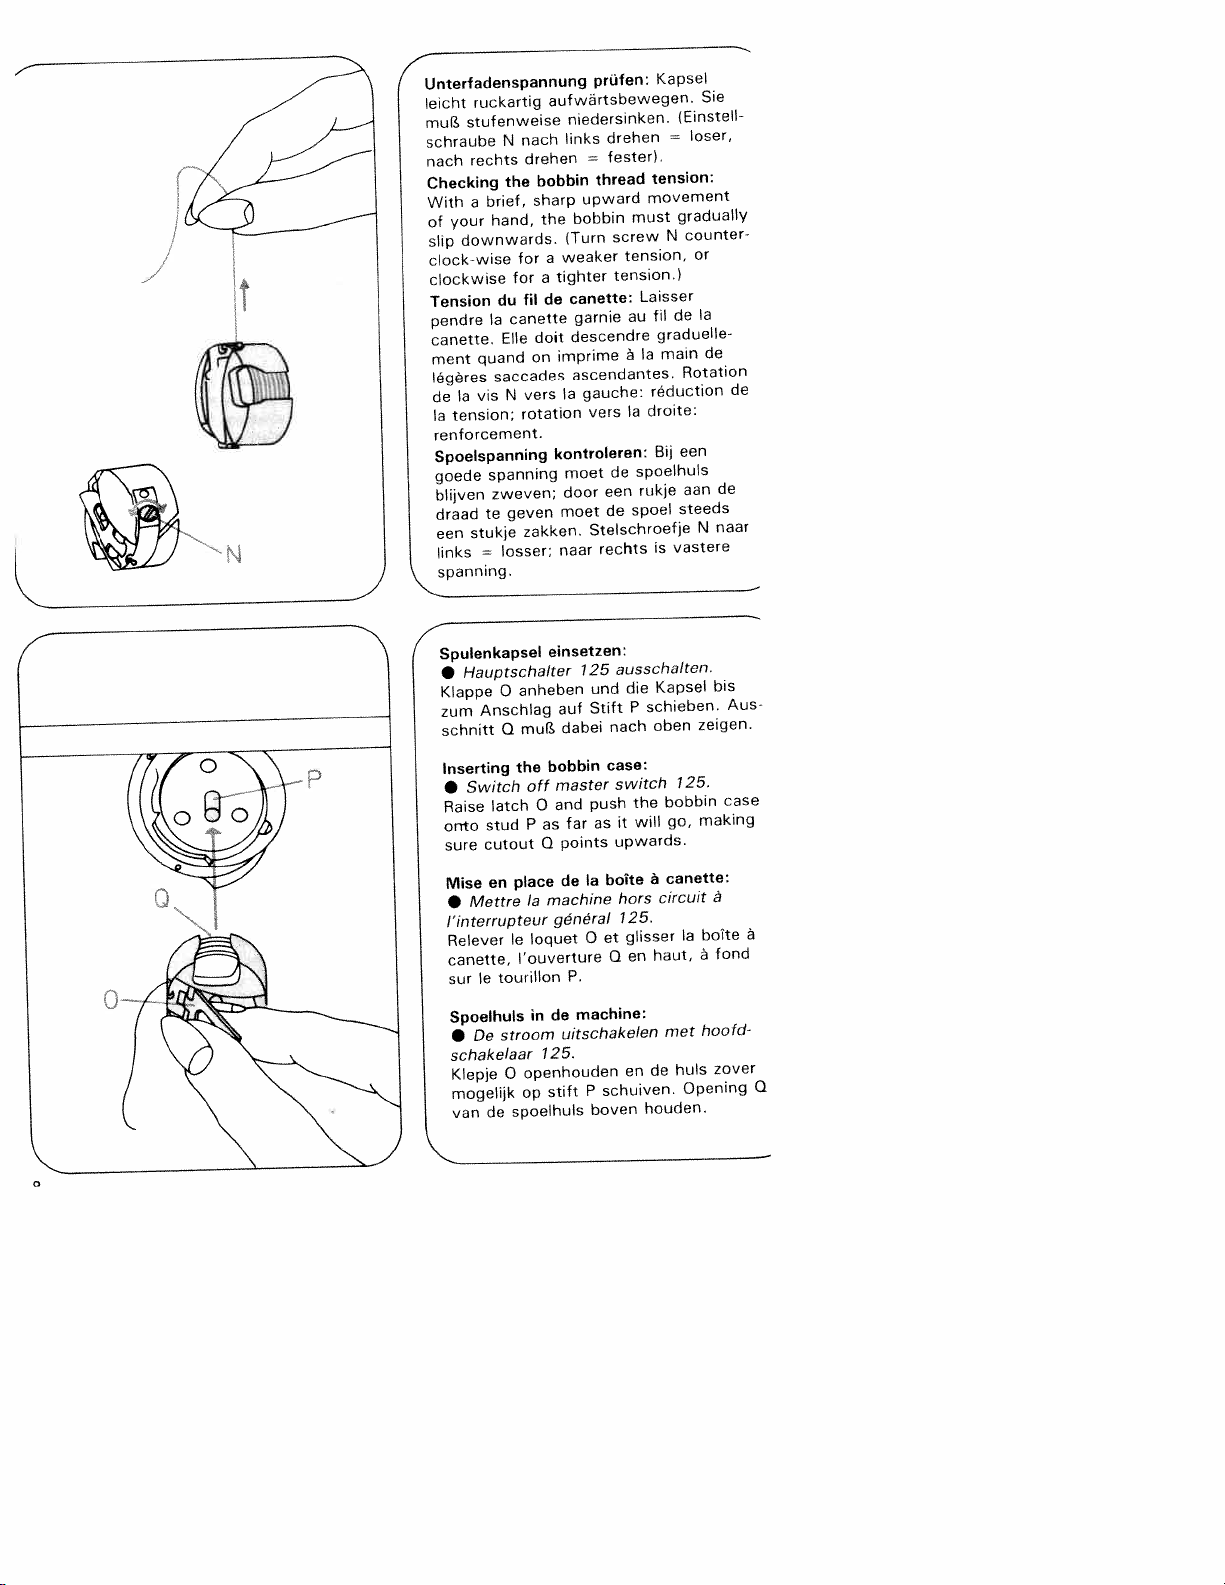
Unterfadenspannung
ruckartig
Ieicht
stufenweise
mu
schraube
nach
Checking
With
your
of
downwards.
slip
clock-wise
clockwise
Tension
pendre
canette.
ment
légères
Ia
de
Ia
tension;
rent
Spoetspanning
goede
blijven
draad
een
links
spanning.
N
rechts
the
brief,
a
hand,
du
canette
Ia
Elle
quand
saccades
N
vis
orcement.
spanning
zweven;
geven
te
stukje
losser;
=
nach
drehen
sharp
for
for
fit
dolt
on
vers
rotation
zakken.
bobbin
the
a
prüfen:
aufwartsbewegen.
niedersinken.
drehen
inks
fester).
=
thread
upward
must
bobbin
screw
(Turn
tension.)
canette:
garnie
descendre
ascendantes.
Ia
gauche:
vers
de
moet
een
door
de
Stelschroetje
rechts
tension,
au
a
Ia
spoelhuls
spoel
weaker
a
tighter
de
imprime
kontroteren:
moet
naar
Kapsel
lEinstell
=
tension:
movement
gradually
N
Laisser
de
fil
graduelle
main
Ia
reduction
droite:
een
Bij
rukje
steeds
vastere
is
Sie
loser,
counter
or
(a
de
Rotation
de
aan
naar
N
de
4
Spulenkapsel
•
Klappe
zum
schnitt
Inserting
•
Raise
onto
sure
Mise
•
I’interrupteur
Relever
canette,
sur
Spoelhuls
•
schakelaar
Klepje
mogelijk
van
Hauptschalter
anheben
0
Anschlag
mu(
Q
the
latch
stud
cutout
en
Mettre
le
De
de
of
P
place
Ia
le
Ioquet
l’ouverture
tourillon
in
stroom
openhouden
0
op
spoelhuls
Switch
einsetzen:
auf
dabei
bobbin
master
f
and
0
far
as
points
0
de
machine
général
P.
de
uitschakelen
125.
stift
ausschalten.
125
und
Stift
nach
case:
switch
push
it
as
upwards.
bolte
Ia
hors
et
0
0
machine:
P
schuiven.
boven
die
P
the
will
125.
glisser
en
en
Kapsel
schieben.
oben
125.
bobbin
go,
canette:
a
circuit
Ia
haut,
met
huls
de
Opening
houden.
bis
Aus
zeigen.
case
making
a
boite
fond
a
hoofd
zover
a
Q
Page 15
______
die
Offnung
den
den
die
ziehen.
master
Raise
and
piece
take-up
behind
thread
machine
Ia
fil
haute.
bobine
Is
par
releveur
le
fente
dans
boven
draad
naar
Q
0
geleider
van
125
101
N,
Schlitz
rechte
lever
sew-
draw
through
125.
101
Lever
es
P.
at
0
le
125.
vanaf
P
omhoog
hefboom
de
P,
P.
R
Nadel
stehen.
der
hinter
Schlitz
den
zurück
FUhrung
am
S
•
needle
Both
“up”
thread
winding
0,
slot
through
into
then
needle
I’aiguiile:
I’interrupteur
a
le
levier
Tirer
derriere
0,
Ia
guide-hI
le
du
S
inleggen
hoofdschakelaar
met
omhoog.
om
draad
de
naar
links
gleuf
door
draadgeleider
trekken.
•
Fadenhebel
und
Nähful
Garnrolle
die
durch
Fuhrungsstück
das
0,
durch
R
und
Nadelhalter
Switch
and
position.
spool
from
tension,
guiding
behind
through
0,
slot
right
the
holder.
Mettre
•
releveur
position
en
fil
le
dévidoir,
du
le
guide-hI
Q,
fente
par
pince-aiguille.
Dc
•
moeten
De
de
spoelvoorspanning,
gleuf
en
N
door
rechts
achter
0,
anheben,
in
durch
in
off
takeup
0,
general
de
de
par
Ia
et
R
stroom
gleuf
door
S
Faden
Schlitz
oben
hinter
foot.
pied
fil
klosje
de
einlegen:
oben
die
threading:
125.
in
be
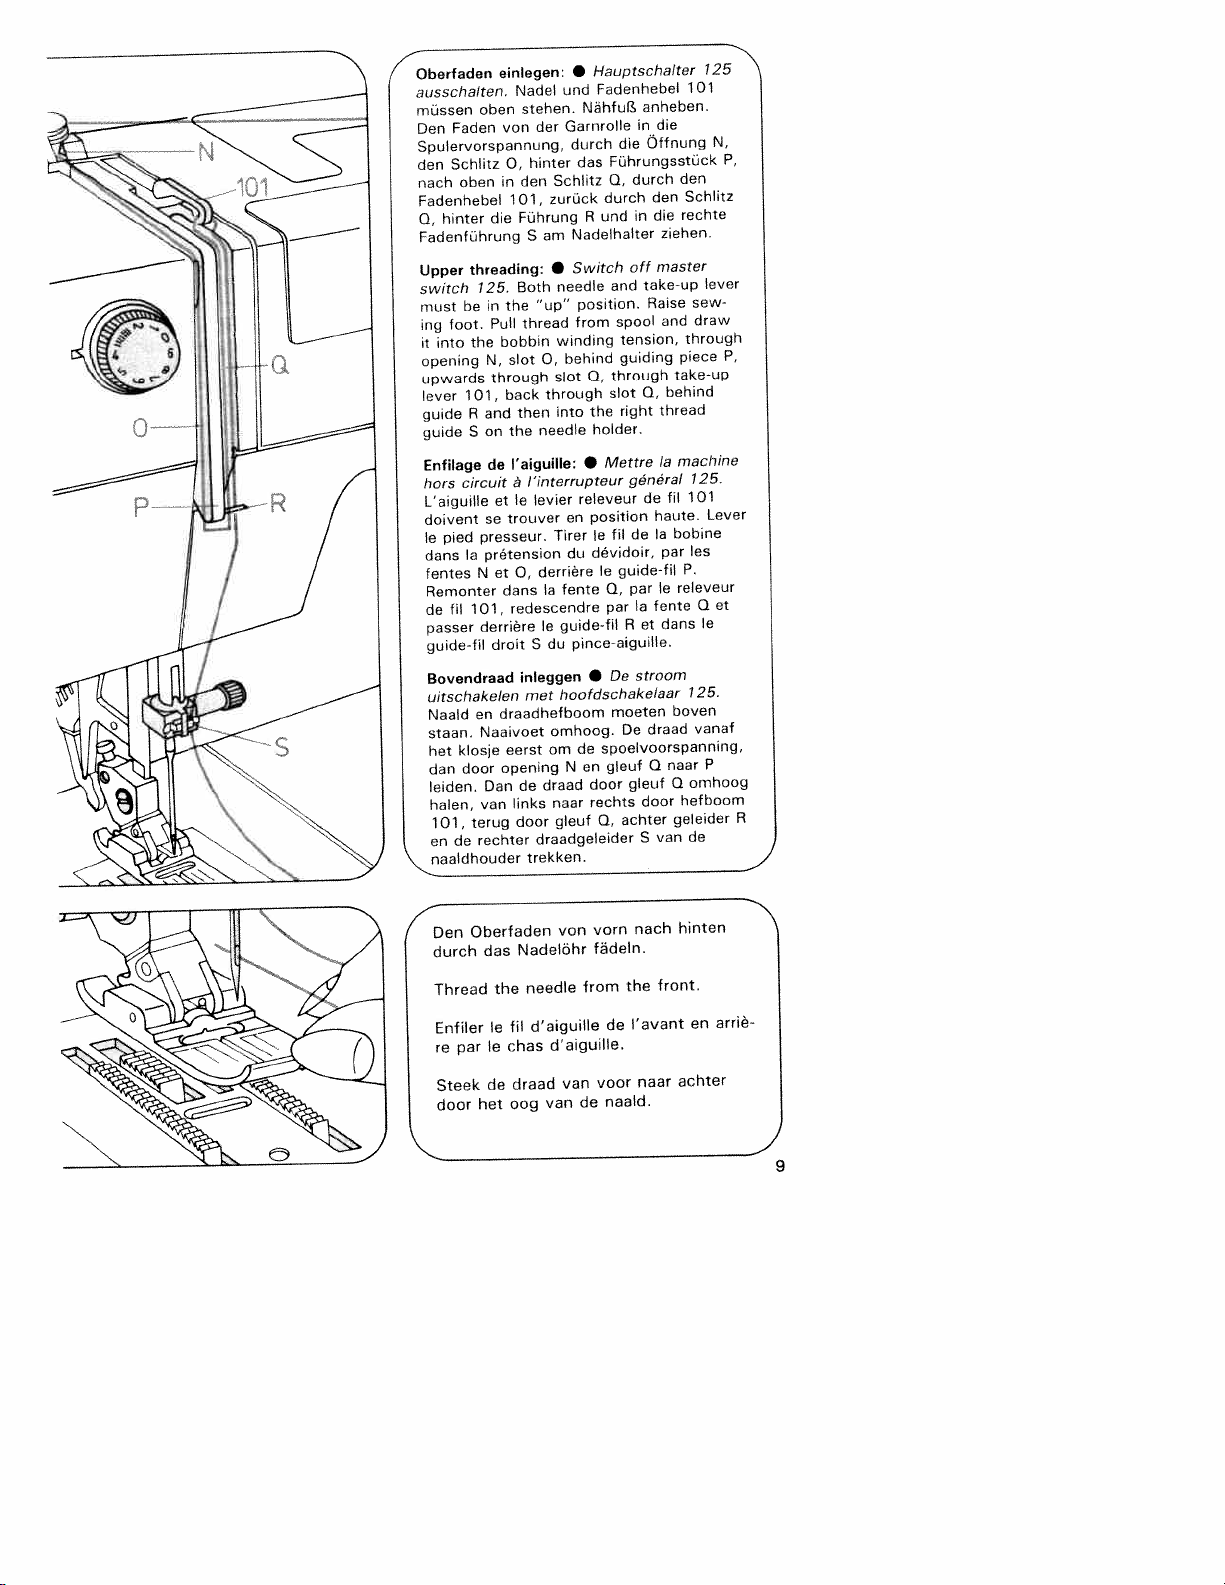
Pull
the
N,
through
101,
R
and
on
S
de
circuit
et
se
presseur.
Ia
pretension
at
N
101,
derriere
droit
en
Naaivoet
door
Dan
van
terug
rechter
von
0,
in
101,
the
bobbin
slot
back
the
trouver
dans
redescendre
draadhefboom
eerst
opening
Oberfaden
ausschalten.
müssen
Den
Spulervorspannung,
I
9
/
/
I
,
-
“s’
den
nach
Fadonhebel
0,
I
Fadenfuhrung
Upper
switch
must
ing
it
opening
I
lever
upwards
guide
I
guide
Enfilage
I
hors
I
L’aiguille
doivent
le
dans
fentes
Remonter
de
passer
guide-Ill
Bovendraad
uitschakelen
into
Naald
staan.
bet
dan
leiden.
halen,
101,
en
naaldhouder
Hauptschalter
hinten
nach
vorn
durch
Thread
Enfiler
re
par
Steek
door
Oberfaden
das
the
Ia
le
de
bet
en
I
-
0
Nadelöhr
needle
d’aiguille
fil
chas
draad
oog
von
from
d’aiguille.
van
de
van
de
voor
naald.
the
‘avant
naar
front.
en
achter
arrié
9
Page 16
I
Unterfaden
halten.
einen
hebel
Oberfaden
ziehen.
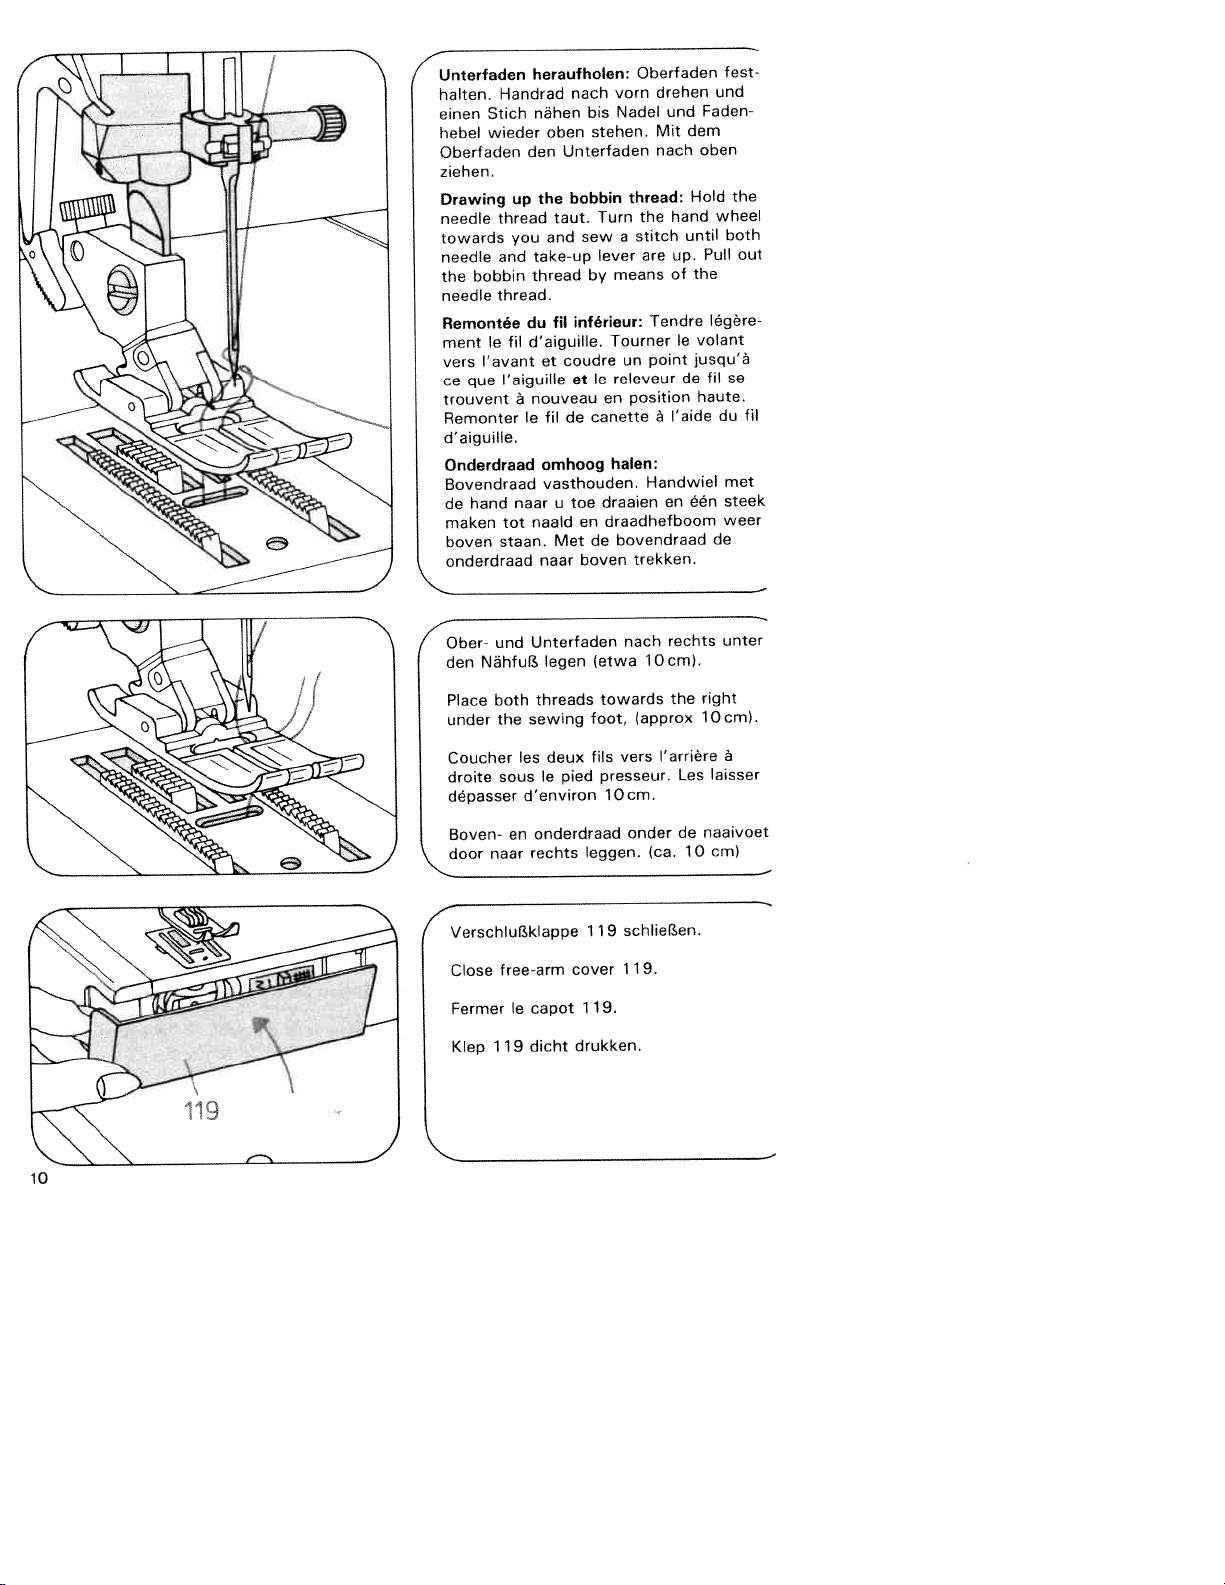
Drawing
needle
towards
needle
the
needle
Remontée
ment
trouvent
I
Handrad
Stich
wieder
thread
and
bobbin
thread.
le
‘avant
vers
que
ce
Remonter
d’aiguille.
Onderdraad
Bovendraad
hand
de
tot
maken
staan.
boven
onderdraad
und
Ober-
Nähful
den
heraufholen:
nähen
oben
den
the
up
and
you
take-up
thread
du
fil
d’aiguille.
et
‘aiguille
nouveau
a
fil
le
omhoog
vasthouden.
naar
naald
naar
Unterfaden
legen
nach
bis
stehen.
Unterfaden
bobbin
Turn
taut.
sew
lever
by
inférleur:
fil
coudre
le
et
canette
de
toe
u
en
de
Met
boven
letwa
Oberfaden
drehen
vorn
und
Nadel
Mit
nach
thread:
the
hand
stitch
a
up.
are
of
means
Tendre
Tourner
point
un
releveur
position
en
a
l’aide
halen:
Handwiel
draaien
draadhefboom
en
bovendraad
trekken.
rechts
nach
l0cml.
dem
until
le
de
één
und
Faden
oben
Hold
wheel
Pull
the
ldgere
volant
jusqu’a
fil
haute.
de
test
the
both
se
du
met
steek
weer
unter
out
fil
Place
under
Coucher
droite
dépasser
Boven-
door
4
VerschluI.klappe
Close
Fermer
KIep
both
the
sous
en
naar
free-arm
le
119
threads
sewing
deux
les
le
d’environ
onderdraad
rechts
capot
dicht
pied
leggen.
cover
119.
drukken.
towards
foot,
fils
presseur.
10cm.
119
lapprox
l’arrière
vers
onder
(ca.
schlielen.
119.
the
Les
de
10
right
10
cm).
a
laisser
naaivoet
cml
Page 17
4
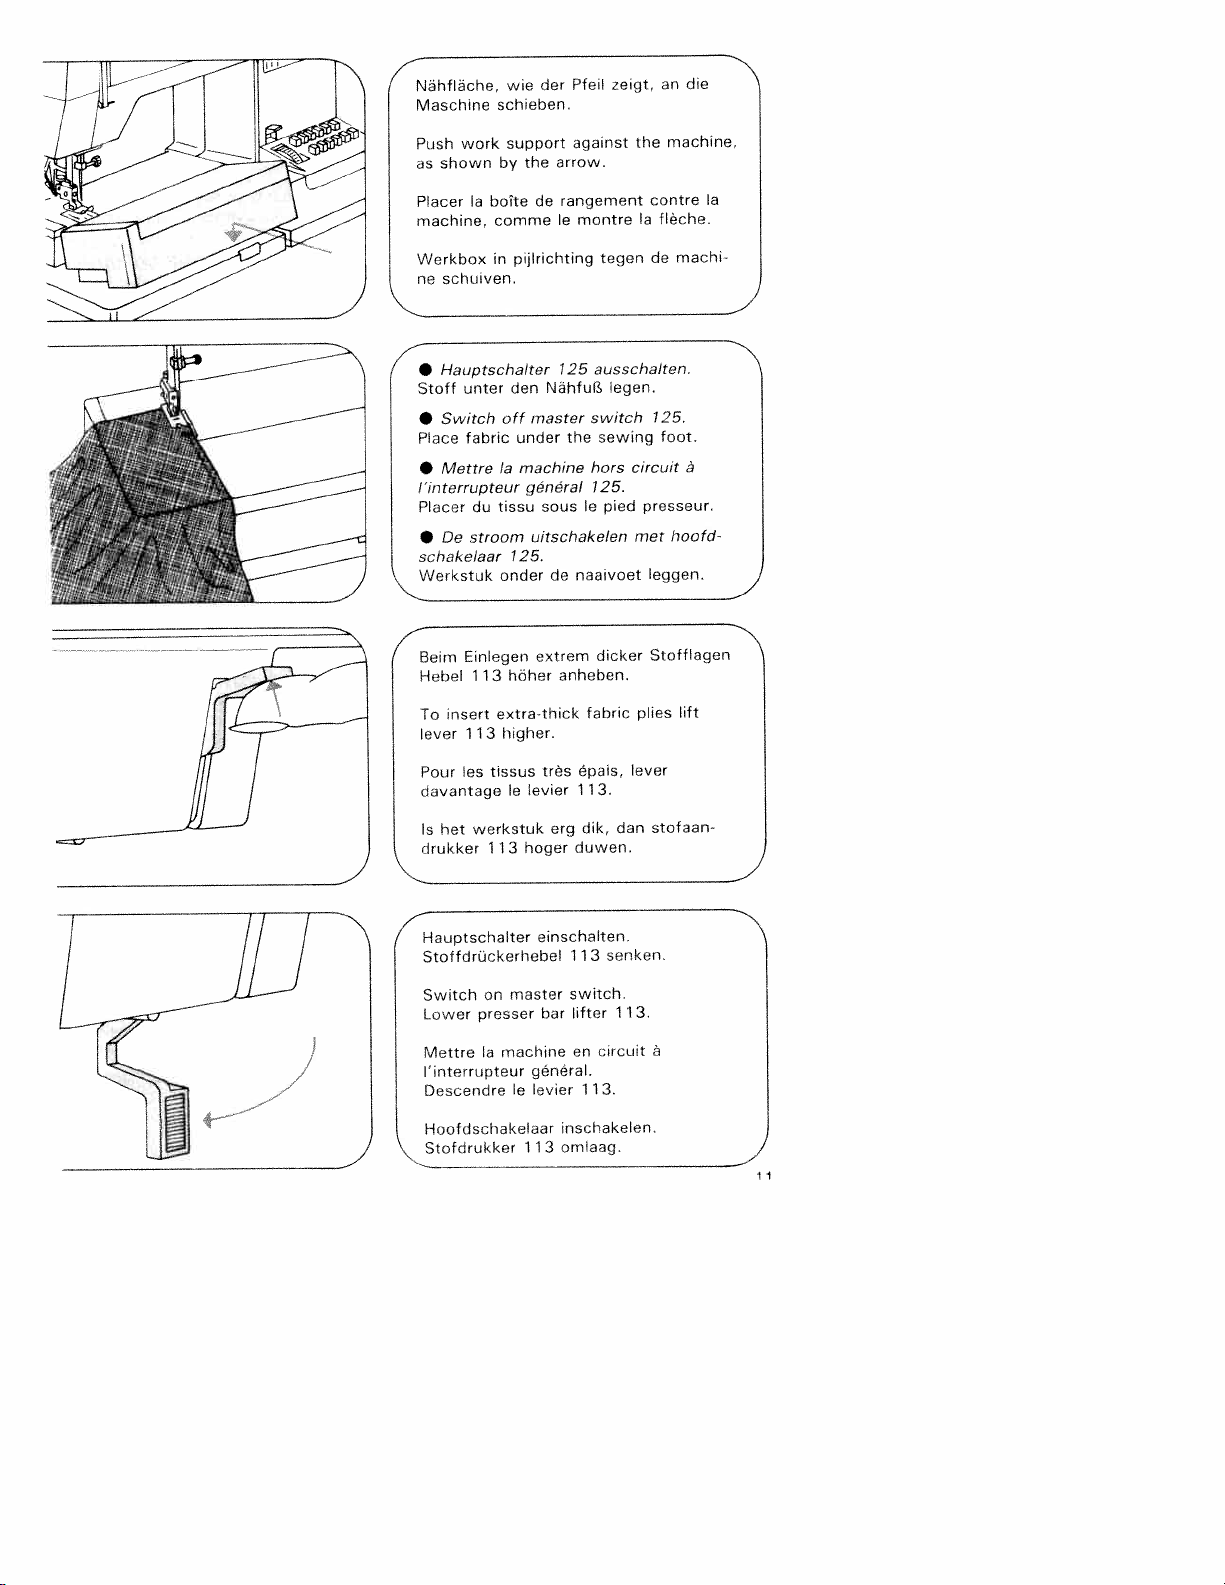
Nähfläche,
Maschine
Push
as
Placer
machine.
Werkbox
ne
•
Stoff
•
Place
•
I’interrupteur
Placer
•
schakeiaar
Werkstuk
Beim
Hebei
wie
schieben,
support
work
by
shown
a
bolte
comme
in
schuiven.
Hauptschalter
den
unter
Switch
off
fabric
Ia
Mettre
du
tissu
De
stroom
125.
onder
Einlegen
hdher
113
der
arrow.
the
rangement
de
le
pijlrichting
125
Nähfult
master
the
under
machine
général
sous
uitschakelen
de
extrem
anheben.
Pfeil
against
montre
tegen
ausschalten.
switch
sewing
hors
125.
le
pied
naaivoet
dicker
zelgt,
legen.
circuit
an
machine,
the
contre
flèche.
Ia
de
125.
foot.
presseur.
met
leggen.
Stofflagen
die
Ia
machi
I
a
hoofd
To
lever
Pour
davantage
Is
het
drukker
113
tissus
es
werkstuk
113
higher.
le
extra-thick
insert
Hauptschalter
Stoffdrückerhebel
master
on
Switch
presser
Lower
machine
Mettre
a
interrupteur
Descendre
le
Hoofdschakelaar
Stofdrukker
très
levier
erg
hoger
einschalten,
switch.
bar
general.
levier
inschakelen.
omaag.
113
fabric
épais,
1
13.
dik,
duwen.
11 3
lifter
en
11
dan
senken.
11
circuit
3.
plies
lever
3.
lift
stofaan
a
11
Page 18
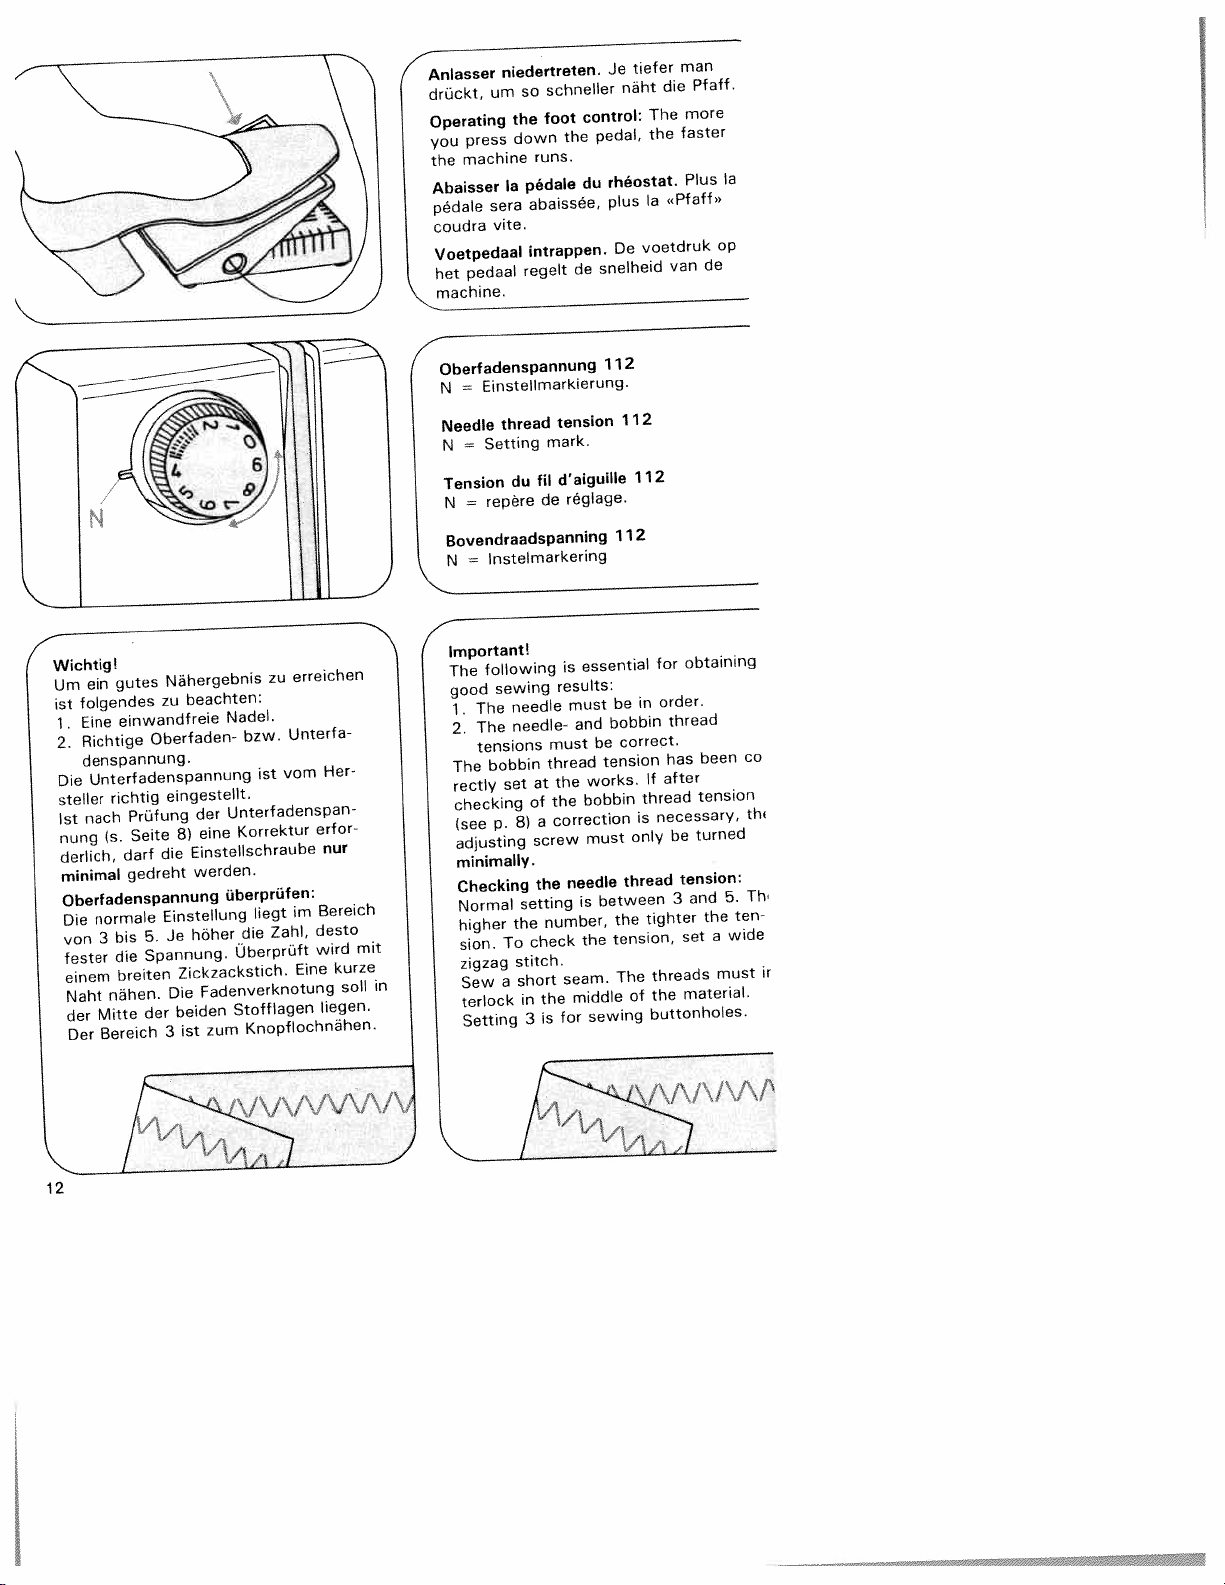
Anlasser
drückt,
Operating
you
the
Abaisser
pedale
coudra
Voetpedaal
het
\rnachine.
urn
press
machine
sera
vite.
pedaal
niedertreten.
schneller
so
foot
the
the
down
runs.
Ia
pédale
abaissée,
intrappen.
regelt
control:
pedal,
du
de
tiefer
Je
näht
rheostat.
plus
De
snelheid
man
die
The
faster
the
<Pfaff>>
Ia
voetdruk
van
Pfaff.
more
Plus
Ia
op
de
Wichtig!
gutes
em
Urn
folgendes
st
1
2.
einwandfreie
Eine
IRichtige
Oberfaden-
denspannung.
Uriterfadenspannung
Die
richtig
stelier
1st
riung
derlich,
minimal
nach
is.
Prufung
Seite
darf
gedreht
Oberfadenspannung
normale
Die
von
fester
einem
Naht
der
Der
bis
3
die
breiten
nähen.
Mitte
Bereich
5.
Spannung.
der
Nahergebnis
beachten:
zu
eingestellt.
der
eine
8)
EinsteIlschraube
die
werden.
EinstelIung
höher
Je
Zickzackstich.
Fadenverknotung
Die
beiden
zum
ist
3
erreichen
zu
Nadel.
Unterfa
bzw.
vom
ist
Unterfadenspan
Korrektur
überprüfen:
rn
liegt
Zahl,
die
Uberpruft
Eine
Stofflagen
Knopflochnähen.
Her
erfor
nur
Bereich
desto
wird
kurze
soil
)iegen.
mit
tension
mark.
d’aiguille
regi
essential
is
results:
must
and
must
thread
the
bobbin
the
correction
112
age.
be
bobbin
be
tension
works.
must
112
112
112
in
correct.
thread
is
only
obtaining
for
order.
thread
has
after
If
necessary,
be
been
tension
turned
co
thi
Oberfadenspannung
Einstellmarkierung.
=
N
thread
Needle
Setting
=
N
fil
=
repère
du
de
Tension
N
Bovendraadspanning
Instelmarkering
=
N
Important!
following
The
sewing
good
needle
The
1.
needle-
The
2.
tensions
bobbin
The
rectly
checking
(see
adjusting
at
set
of
a
8)
p.
screw
minimally.
tension:
thread
needle
To
a
setting
the
check
stitch.
short
in
3
the
number,
the
is
seam.
middle
for
between
is
the
sewing
tighter
the
tension,
The
of
and
3
the
set
threads
material.
the
buttonholes.
a
must
5.
ten
wide
Th
ir
Checking
Normal
higher
sion.
zigzag
in
Sew
terlock
Setting
Page 19
portant:
illez
a
uture:
Utiliser
tensions
Des
tension
jlée
a
après
)ir
pag.
r
que
ntröte
sition
Tension
5.
iffre
est
Ic
zag
udre
quelques
nouer
plage
utonnières.
ceci
une
inférieure
l’usine.
contrOle,
8)
très
Ia
de
normale
élevé.
plus
dans
réglage
de
pour
aiguille
de
doit
peu
tension
dautant
large.
l’épaisseur
obtenir
impeccable
fils
est
Ia
tension
rajustée,
être
vis
a
du
dans
ContrOler
points.
convient
3
une
reglées.
bien
correctement
inférieure
réglage.
de
d’aiguille:
fit
plage
a
forte
plus
avec
fils
Les
des
bonne
ne
entre
le
doivent
deux
pour
que
et
tour
point
3
plis.
les
4
Belangrijk:
goed
een
verkrijgen
Het
onderstaande
van
naald
De
1.
spanningen
De
2.
draad
spanning
De
de
dens
regeld.
wijzigen
spoelhuls.
verdraaien
le
Bovendraadspanning
gebruikelijke
De
tussen
zone
hoe
fer
leer
de
zigzagsteek.
kort
Een
boven
van
stof
de
knoopsgaten
By
van
mag
moeten
van
fabricage
nodig
lndien
het
met
schroefje
Dit
bldz.
Izie
en5.Hoe
3
zwaarder
spanning
proefnaaien.
stukje
onderdraad
en
plaatshebben.
afhankelijk:
punten
beschadigd
niet
onder-
van
zijn
goed
onderdraad
de
juiste
of
de
spanning
deze
instelschroefje
altijd
8).
kontroleren:
draadspanning
de
altijd
staat
hoger
spanning.
met
de
spanning
ingesteld.
een
moet
is
stiksel
zijn.
boven
en
tij
is
wijze
de
op
minimaat
ligtinde
het
Kontro
brede
Verknoping
tussen
op
ge
cij
3.
4
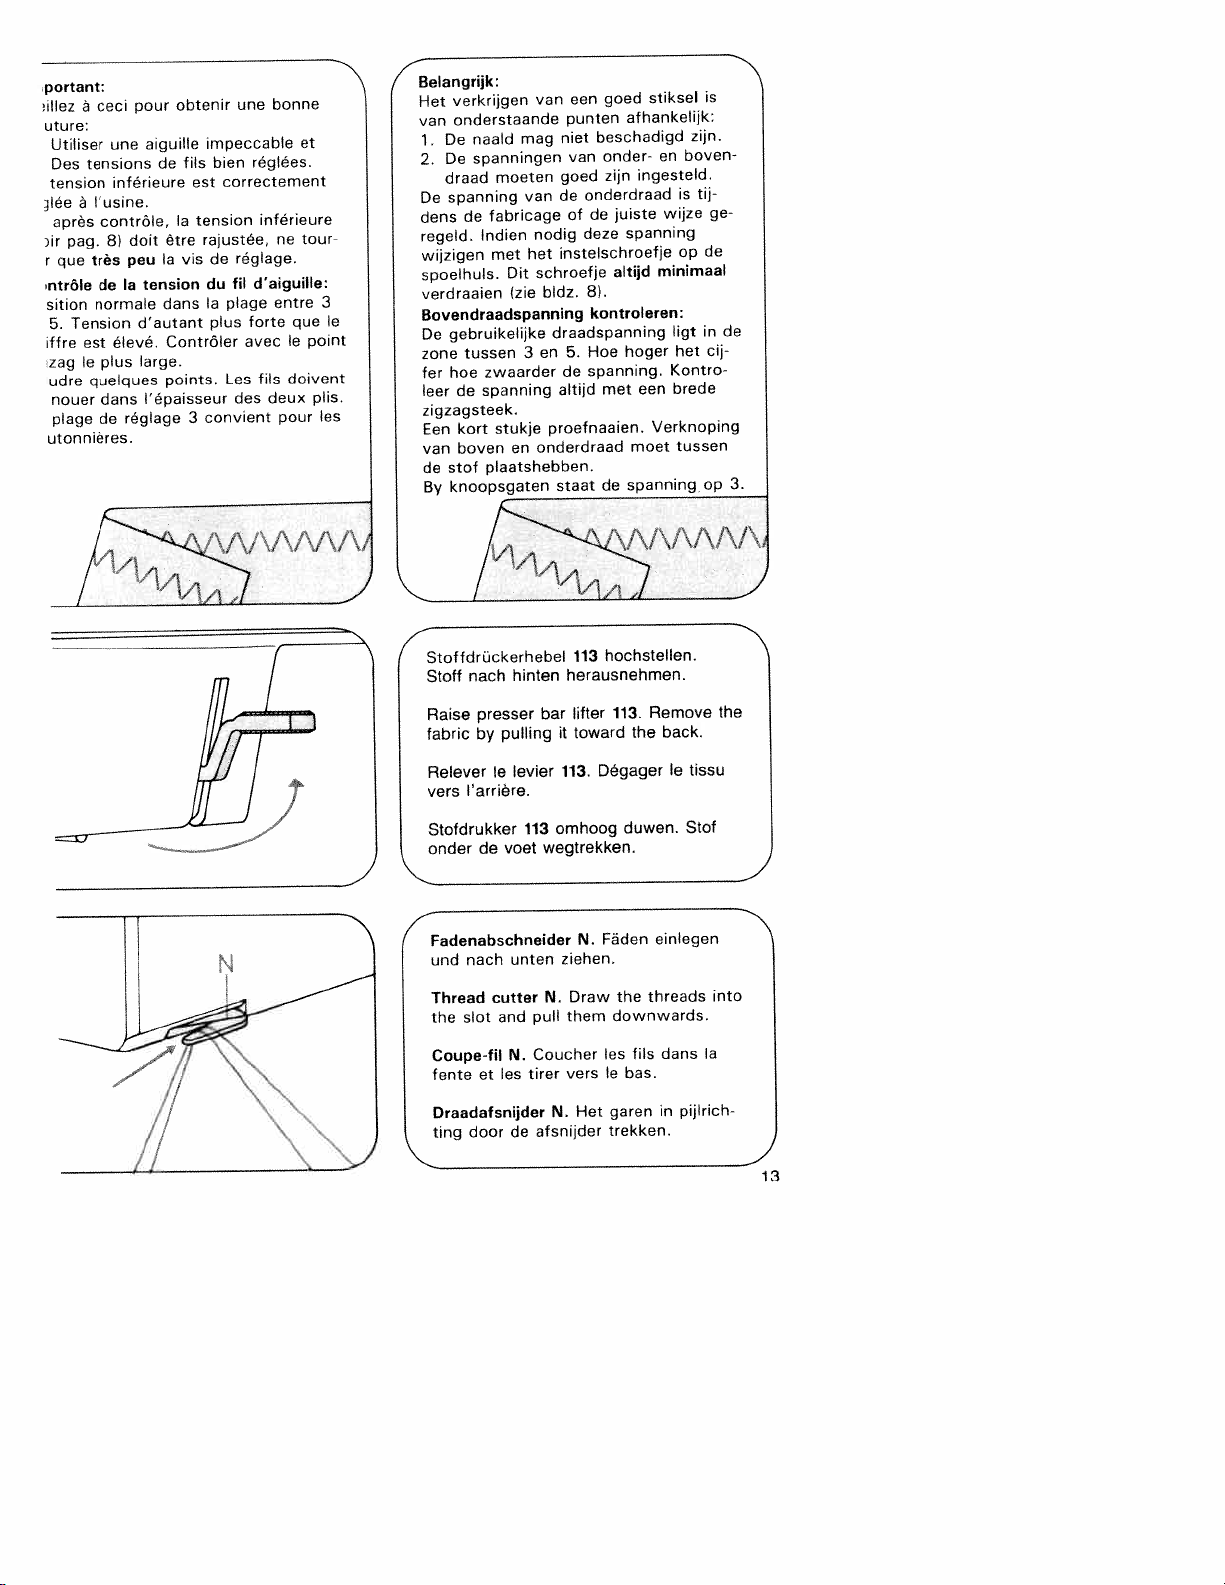
Stoffdrückerhebel
Stoff
Raise
fabric
Relever
vers
Stofdrukker
onder
Fadenabschneider
nach
und
Thread
slot
the
Coupe-fit
fente
Draadafsnijder
ting
nacti
presser
by
arrière.
de
et
door
hinten
pulling
Ic
voet
unten
cutter
and
N.
les
de
bar
levier
113
wegtrekken.
N.
pull
Coucher
tirer
afsnijder
113
hochstellen.
herausnehmen.
113.
lifter
it
toward
Degager
113.
omhoog
Fäden
N.
ziehen.
Draw
the
them
downwards.
les
vers
le
gareri
Het
N.
trekken.
Remove
the
duwen.
threads
fils
bas.
back.
le
tissu
Stof
einlegen
daris
pijlrich
in
the
into
Ia
13
Page 20
4
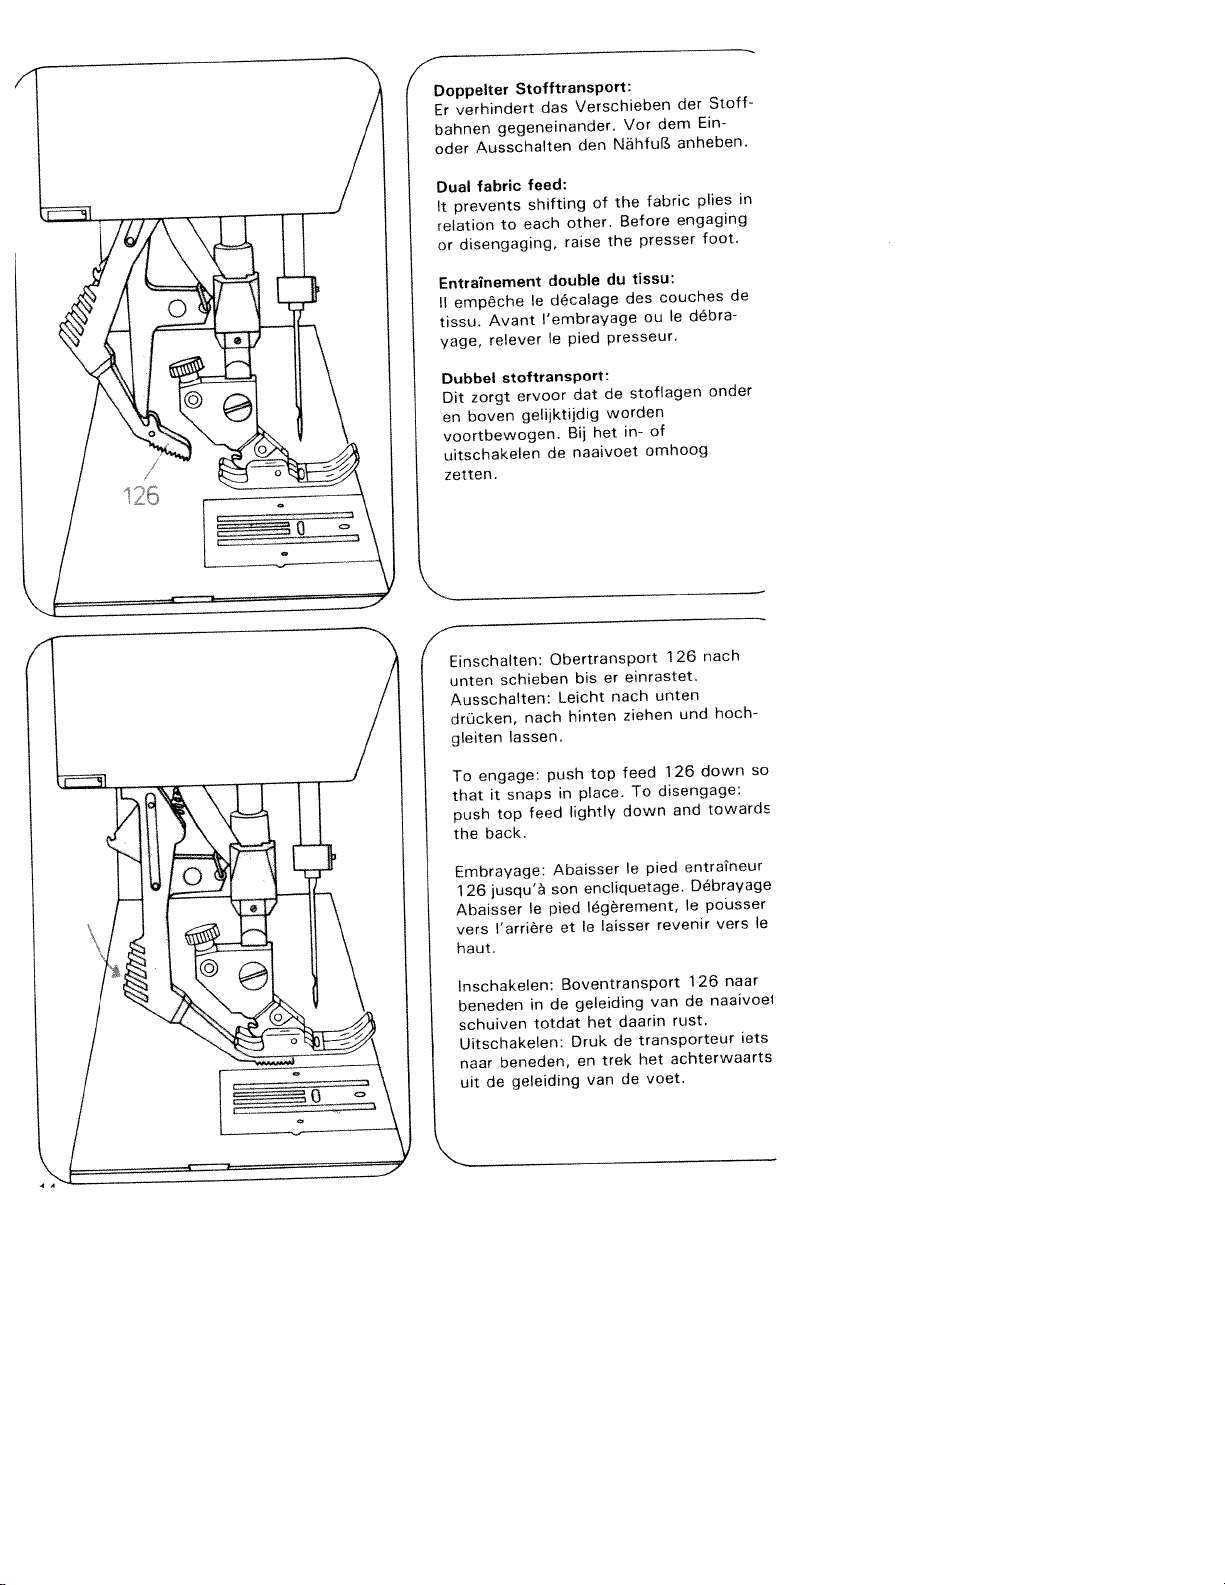
Doppelter
Er
bahnen
oder
Du&
It
relation
or
Entralnement
II
tissu,
yage,
verhindert
gegeneinander.
Ausschalten
fabnc
prevents
to
disengaging,
empêche
Avant
relever
Stofftransport:
Verschieben
das
den
feed:
shifting
other.
each
raise
double
decalage
Ic
I’embrayage
pied
Ic
Nähful
the
of
the
du
presseur.
Vor
fabric
Before
presser
tissu:
des
ou
der
dem
anheben.
engaging
couches
debra
le
Stoff
Ein
plies
foot.
in
de
Dubbel
zorgt
Dit
boven
en
voortbewogen.
uitschakelen
zetten
4
Einschalten:
unten
Ausschalten:
drücken,
gleiten
engage:
To
that
push
the
Embrayage:
126
Ahaisser
vors
haut.
lnschakelen:
beneden
schuiven
Uitschakelen:
naar
uit
stoftransport:
ervoor
gelijktijdig
schieben
nach
lassen.
snaps
it
feed
top
back.
jusqu’à
le
I’arrière
in
beneden,
geleiding
de
dat
Bij
naaivoet
de
Obertransport
bis
Leicht
hinten
top
push
place.
in
lightly
Abaisser
encliquetage.
son
legérement,
pied
Ic
et
Boventransport
geleiding
de
het
totdat
Druk
en
van
de
worden
het
er
nach
laisser
de
trek
stoflagen
of
in-
omhoog
einrastet,
unten
ziehen
feed
disengage:
To
down
Ic
pied
revenir
van
daarin
transporteur
het
voet.
de
onder
nach
126
hoch
und
down
126
towards
and
entraineur
Debrayage
le
poUsser
vers
26
1
naaivoel
de
rust,
achterwaarts
so
le
naar
iets
Page 21
4
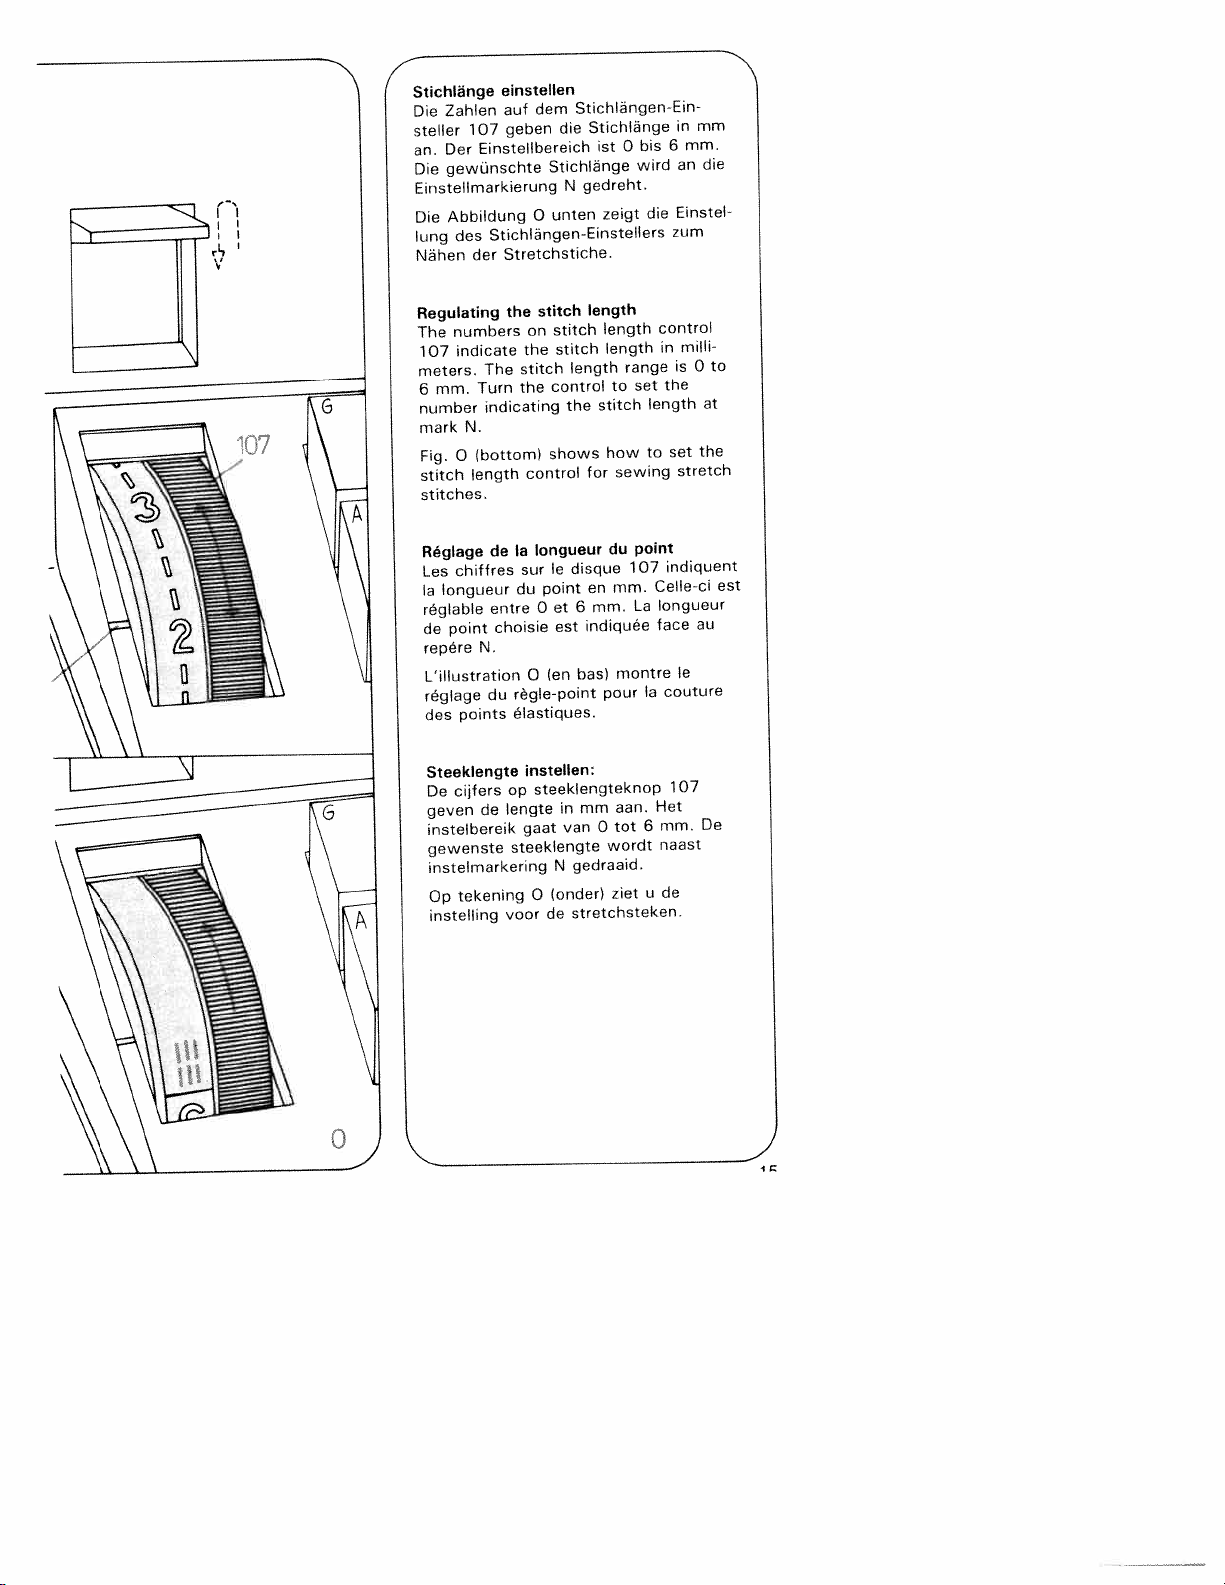
Stichlänge
Zahlen
Die
stefler
Der
an.
gewunschte
Die
Einstellmarkierung
Abbildung
Die
des
lung
Ndhen
Regulating
numbers
The
indicate
107
meters,
mm.
6
number
mark
0
Fig.
stitch
stitches.
Reglage
chiffres
Les
longueur
Ia
réglable
point
de
repére
L’illustration
reglage
points
des
einstellen
dem
auf
die
geben
107
Einsteltbereich
der
The
Turn
indicating
N.
(bottoml
length
N.
du
Stichlänge
N
unten
0
Stichlangen-Einstellers
Stretchstiche.
stitch
the
stitch
on
stitch
the
length
stitch
control
the
the
shows
control
longueur
Ia
de
entre
choisie
le
sur
point
du
et
0
est
len
0
regle-point
élastiques.
disque
Stichlangen-Ein
Stichldnge
bis
st
0
wird
gedreht.
die
zeigt
length
stitch
for
en
mm.
6
indiquee
bas)
length
length
range
to
how
sewing
du
mm.
montre
pour
set
point
107
La
control
in
length
to
Celle-ci
longueur
face
Ia
mm
in
mm.
6
die
an
Einstel
zum
milli
0
is
the
at
the
set
stretch
indiquent
au
le
couture
to
est
Steeklengte
De
geven
instelbereik
gewenste
instelmarkering
Op
instelling
cijfers
de
tekening
op
lengte
voor
instellen:
steeklengteknop
in
van
gaat
steeklengte
gedraaid.
N
0
londer)
stretchsteken.
de
mm
0
wordt
aan.
tot
ziet
107
Het
De
mm.
6
naast
u
de
Page 22
4
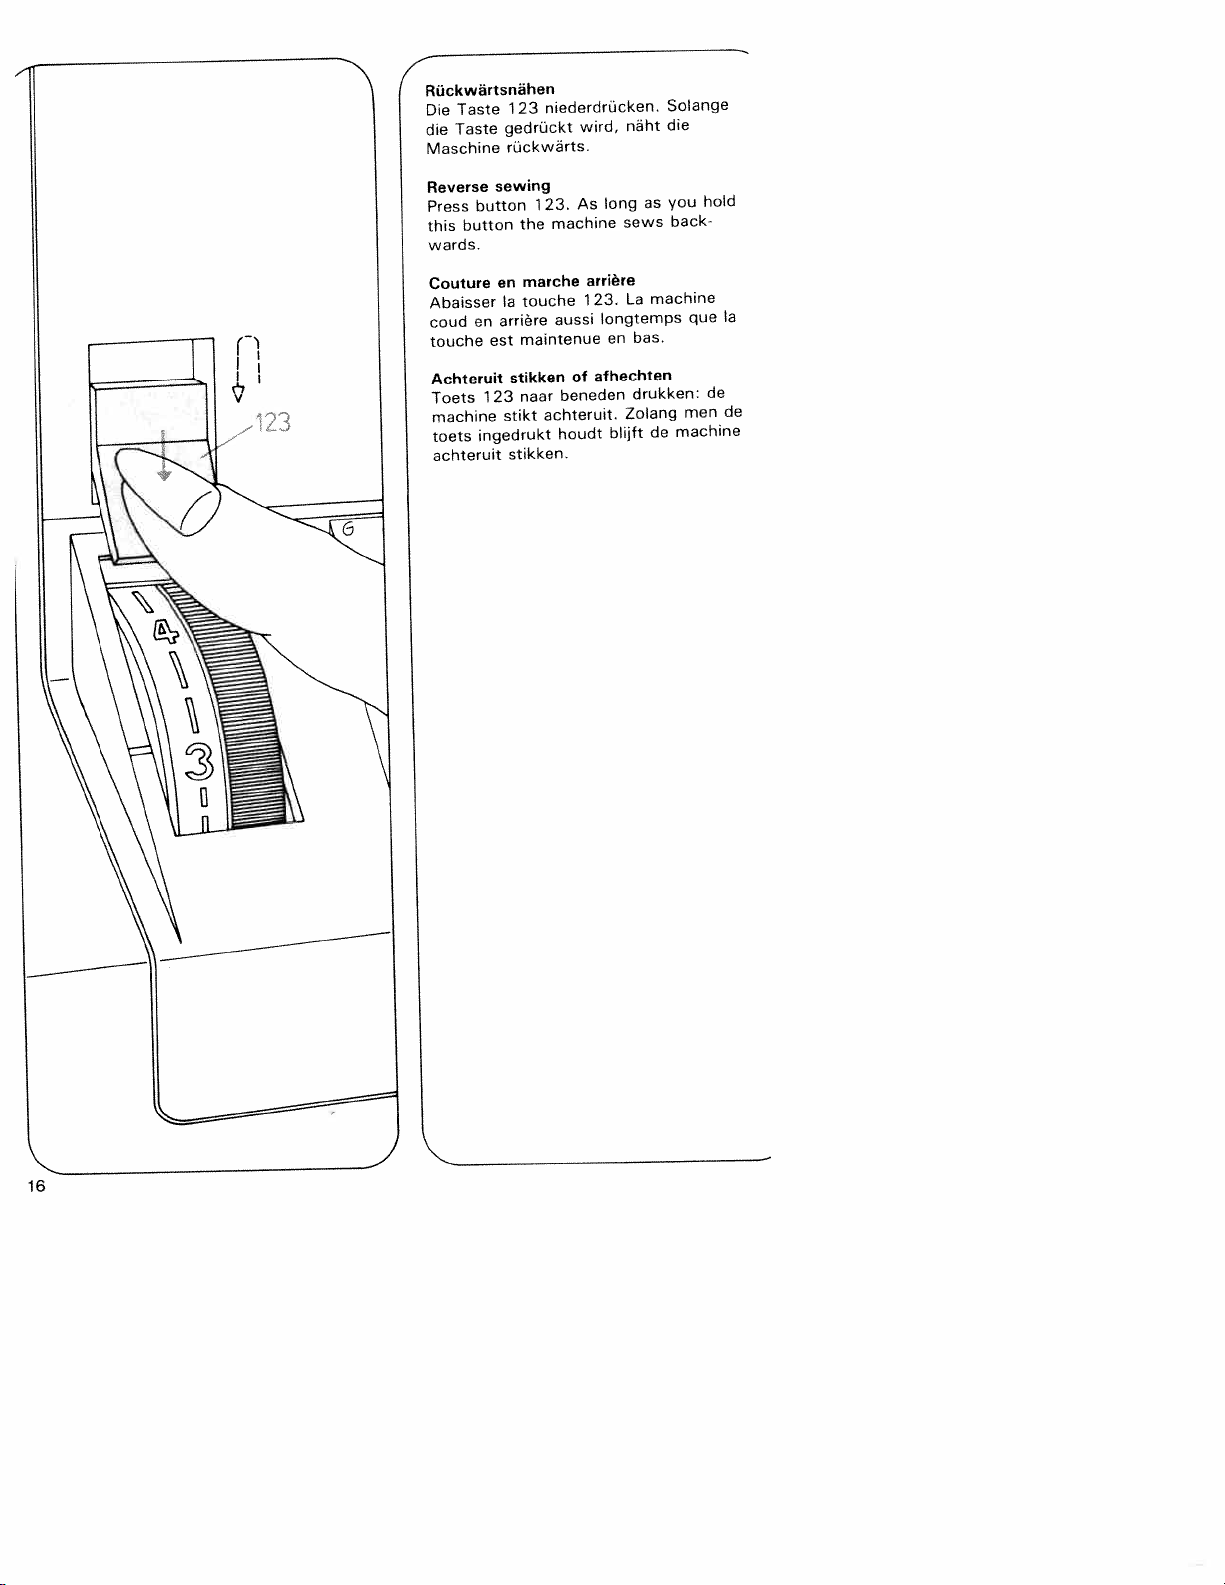
Ruckwartsnahen
Taste
Die
Taste
die
Maschine
niederdrücken.
123
gedruckt
rückwärts.
wird,
näht
Solange
die
4
button
button
en
est
123
ingedrukt
sewing
the
marche
en
touche
a
arrière
maintenue
stikken
naar
stikt
stikken.
23.
1
machine
aussi
beneden
achteruit.
houdt
As
arrière
1
of
long
sews
La
23.
longtemps
bas.
en
afhechten
drukken:
Zolang
blijft
you
as
back
machine
de
hold
que
de
men
machine
Ia
de
Reverse
Press
this
wards.
Couture
Abaisser
coud
touche
(1
V
Achteruit
Toets
machine
toets
achteruit
Page 23
Garnrollenstift
ieiter
Näharbeiten
Garnrollenstift
eiten
wenden
gegriff
rnrollenstift
schlag
den
nach
ppen.
rscheibe
Zubehär
irn
dem
Garnrol(enstift
hochstellen
103
aufstecken
rechts
nach
Tragegriff
einsetzen
Aufsetzen
zwei
mit
aus
schwenken,
beiliegende
der
115
Nadeln
dern
den
und
wieder
103
Garnrolle
schieben.
den
Zubehdr
zweiten
zurn
bis
Filzscheibe
über
urn
4
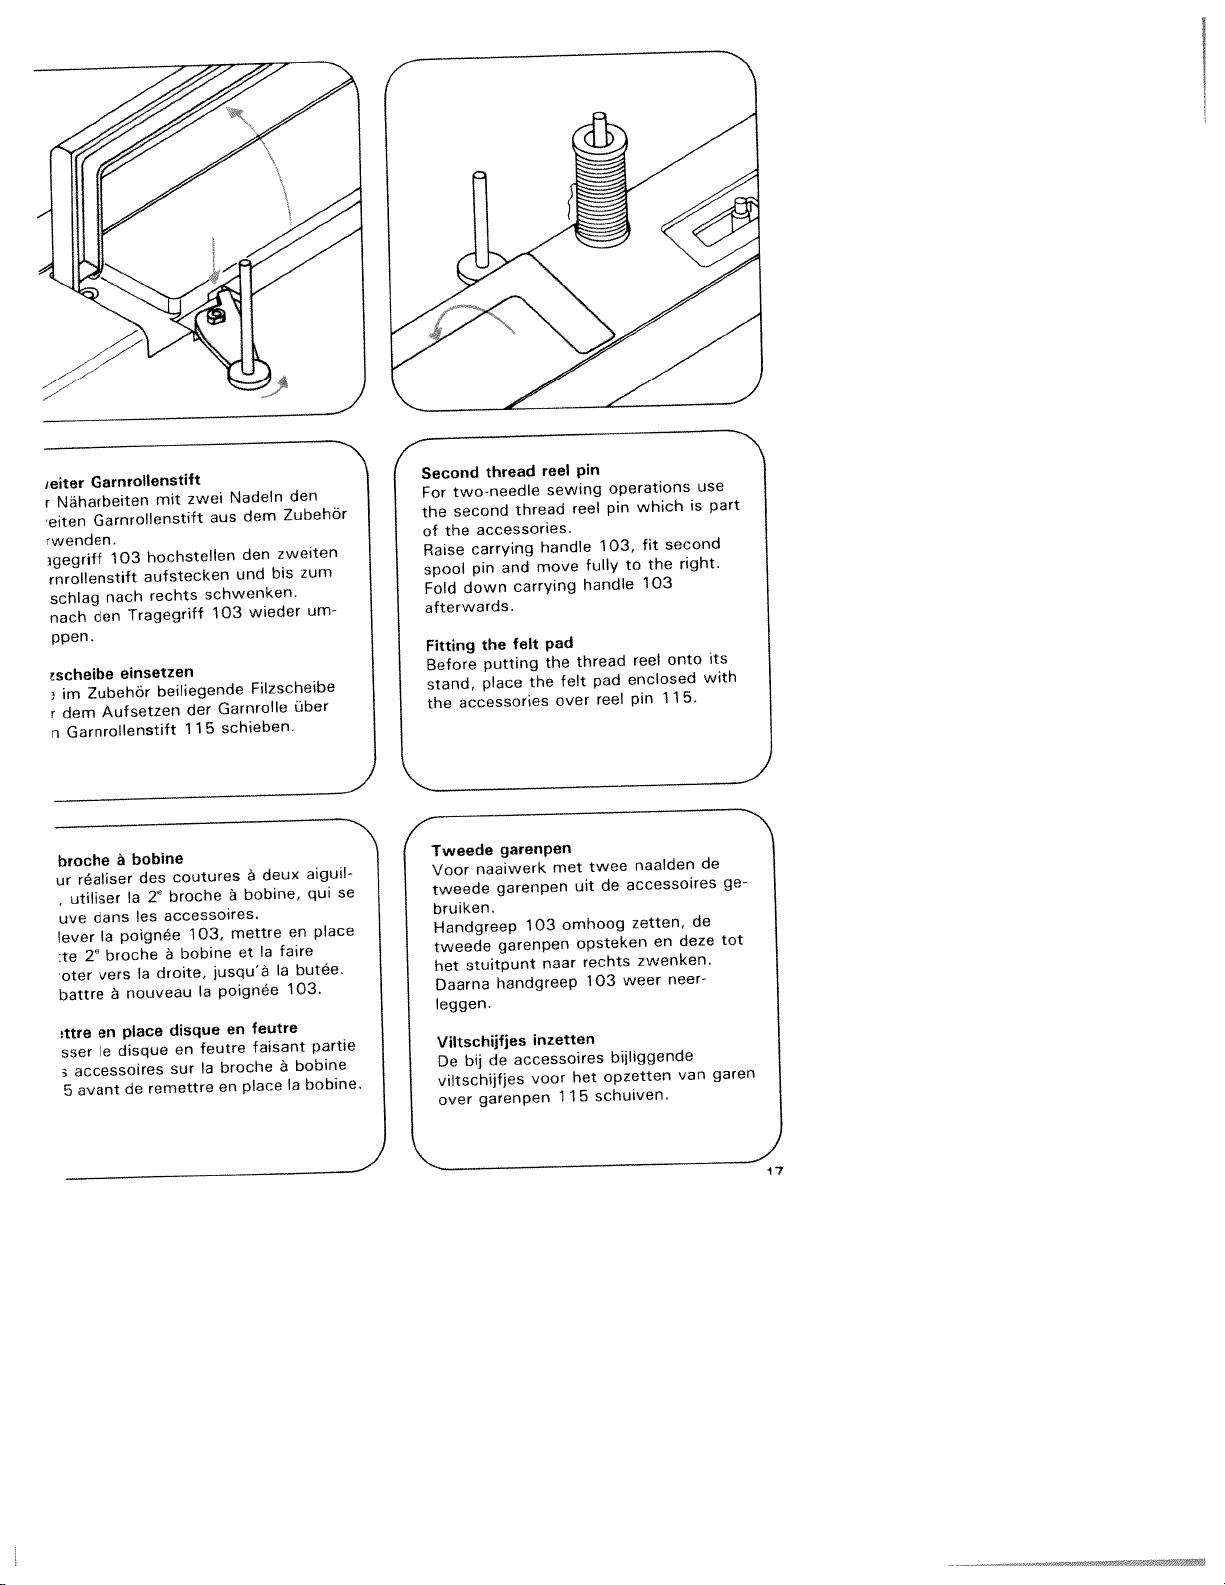
Second
For
the
two-needle
second
accessories.
the
of
carrying
Raise
pin
spool
down
Fold
afterwards.
Fitting
Before
stand,
accessories
the
thread
and
the
putting
place
reel
sewing
thread
handle
move
carrying
pad
felt
the
the
felt
over
pin
reel
fully
handle
thread
operations
pin
103,
to
enclosed
pad
reel
which
fit
the
103
reel
pin
second
right.
onto
11
5.
use
part
is
its
with
broche
réaliser
ur
utiliser
uve
lever
20
te
oter
battre
ttre
sser
accessoires
s
avant
5
dans
Ia
vers
en
le
bobine
a
Ia
poignée
broche
nouveau
a
place
disque
de
des
broche
2°
accessoires.
es
a
droite,
a
disque
sur
remettre
coutures
103,
bobine
Ia
feutre
en
Ia
a
rnettre
et
jusqu’à
poignée
en
broche
place
en
deux
a
bobine,
Ia
feutre
faisant
faire
Ia
a
aiguil
qui
en
butde.
103.
bobine
bobine.
Ia
place
partie
Tweede
Voor
se
tweede
bruiken.
Handgreep
tweede
het
Daarna
leggen.
Viltschijfjes
Dc
viltschijfjes
over
garenpen
naaiwerk
garenpen
garenpen
stuitpunt
handgreep
de
bi
1
garenpen
met
ornhoog
103
naar
inzetten
accessoires
voor
11
twee
de
uit
opsteken
rechts
103
opzetten
het
schuiven.
5
naalden
accessoires
zetten,
en
zwenken.
weer
bijliggende
neer
deze
van
de
ge
de
tot
garen
17
Page 24
Sicherheitshinweise
Haushaltnähmaschinen
für
nach
bzw.
a)
Der
DIN
IEC
Benutzer
VDE
335-2-28
abgehenden
walten
sicht
stelle
bei
der
beobachten.
Verlasson
Boim
b)
Wartungsarboiten
seln
ZubehOr.
st
mechanischen
von
ausziehen
Steckdose
maximal
Die
ci
dl
Lampe
Die
darf
beträgt
Spannung
von
nur
eingestellt
0700
hat
Nadel
zu
Arbeit
die
des
vom
zuldssige
einem
werden.
28
Teil
wegen
genugend
und
lassen
stdndig
Maschine,
der
oder
Maschine
Notzsteckers
zu
Netz
Leistung
Watt.
5
1
Antriebsriemens
des
Pfaff-Mechaniker
der
beim
Teilen
durch
trerrnen.
die
zu
auf-
\/or
bei
Wech
odor
aus
Näh
der
der
und
Her
Mesures
335-2-28
IEC
Toujours
a)
continuellement
Toujours
b)
socteur
avant
do
cas
caniquos
Puissance
cI
l’ampoule:
Confier
dl
courroie
cien
do
sécurité
faire
débrancher
avant
travaux
Ies
remplacement
ou
maximale
15
Ic
réglage
dentramnement
Pfaff,
preuve
surveiller
Ia
quitter
do
d’entretien
d’accessoires.
admissible
Watts.
de
de
machine
Ia
de
tension
Ia
au
prudence
travail.
le
machine,
et
pieces
mécani
en
de
de
et
du
me
a
Some
IEC
a)
b)
c)
dl
Safety
see
safety
335-2-28
Take
finciers
Make
whenever
cord
machine
change
parts.
sure
Be
bulb
drive
The
adjusted
authorized
rules
page
care
by
sure
or
mechanical
to
the
in
36.
rules
to
the
you
use
belt
by
for
avoid
needle
want
sewing
must
anyone
Pfaff
United
unplug
you
to
only
agent
injury
during
have
clean
and
a
lamp.
never
but
Kingdom
to
the
to
it.
accessory
15-watt
an
your
sewing.
power
leave
oil
be
it
light
the
or
Veiligheidsvoorschrift
huishoudnaaimachines
voor
volgons
Men
a)
IEC
dient
335-2-28
steeds
voorzichtigheid
vooral
neergaande
van
in
Bij
b)
bet
bet
dolon
het
het
hot
ondorhoud,
verwissolen
naald
naaimechanisme
te
oog
verlaten
accessoires,
of
aanzien
ten
stroomtoevoer
uitgeschakeld
stopkontact
uitsluitend
mogen
Er
ci
d)
lampjes
deze
Dc
eIleen
den
van
machine
spanning
door
ingesteld,
in
houden.
van
schoonmaken
van
to
door
nemen
to
maximaal
worden
van
Ptaff
de
voldoende
te
acht
de
van
de
en
machine,
do
mochanische
diont
worden
stekker
do
naaimachine
1
gebruikt.
aandrijfriem
de
handelaar
nemen,
op-en
werkwi)ze
regelmatig
of
do
uit
Watt
5
bij
bij
hot
voor
mag
wor
Page 25
H
N
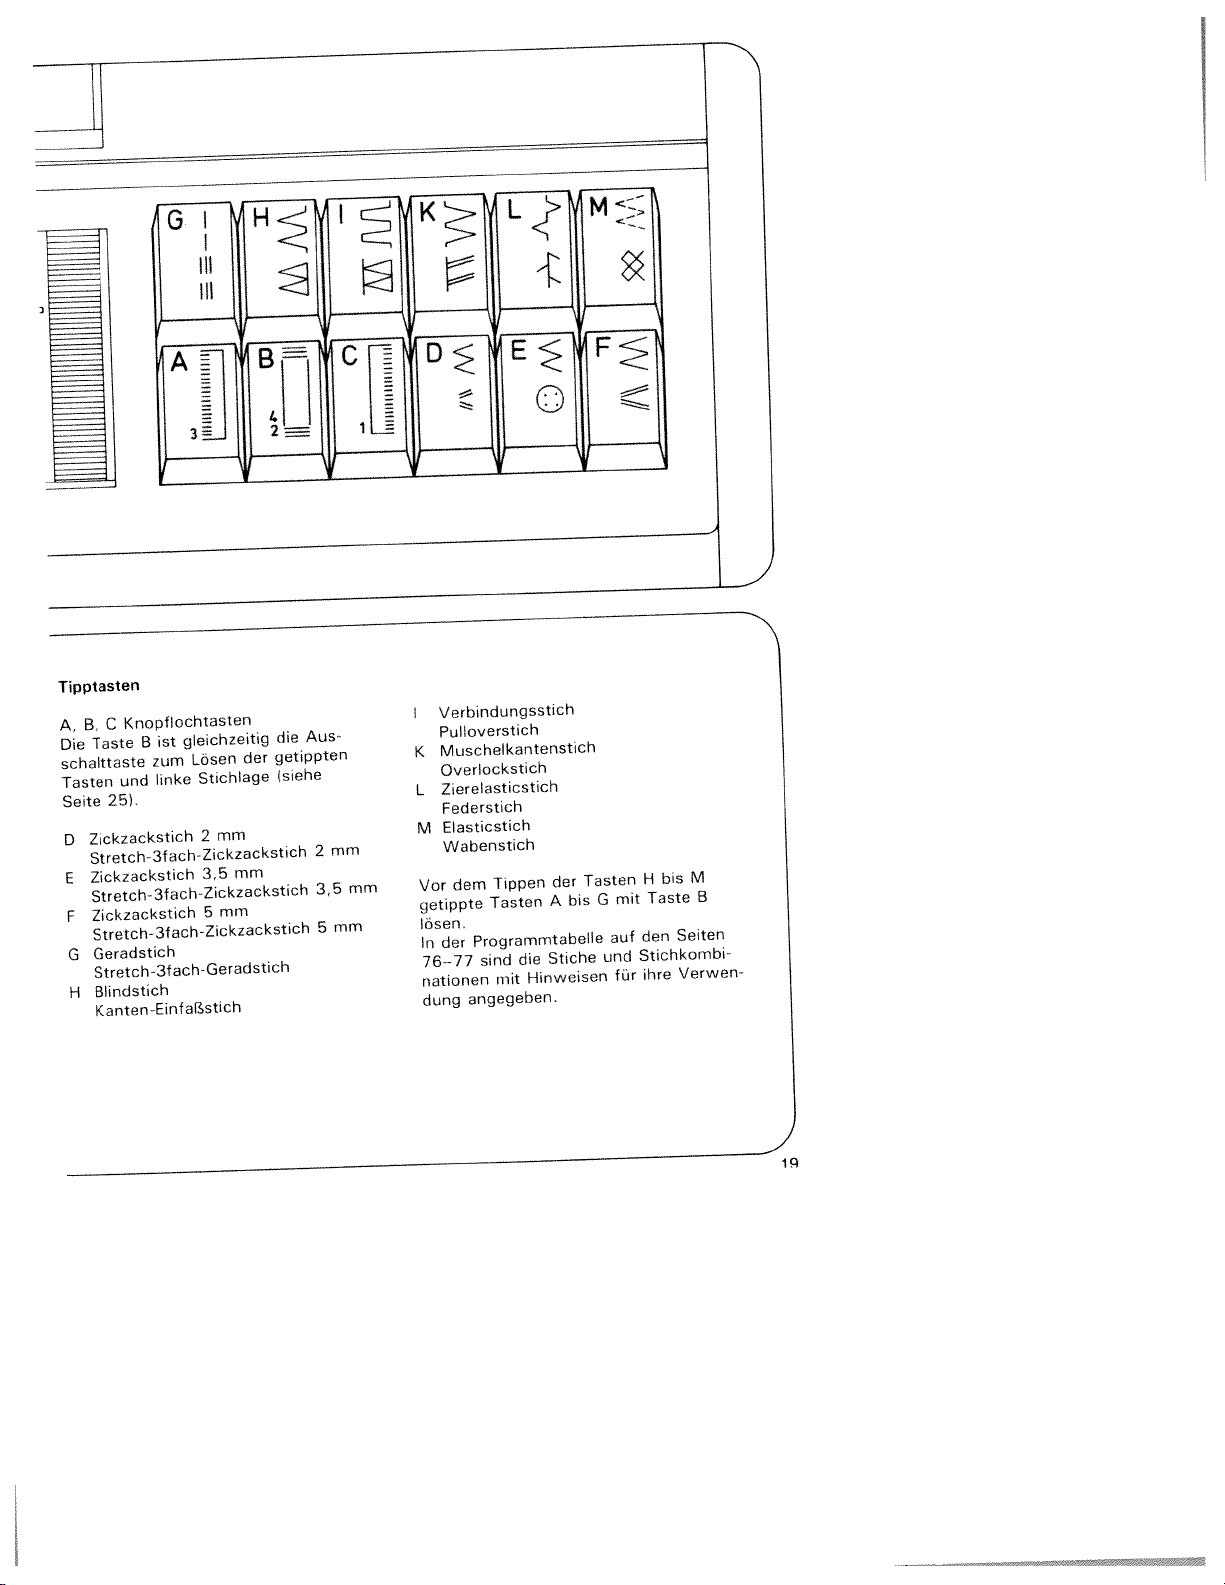
Tipptasten
Knopflochtasten
C
B,
A,
Taste
Die
schaittaste
und
Tasten
251.
Seite
Zickzackstich
D
Stretch-3fach-2ickzackstich
Zickzackstich
E
Stretch-3fach-Zickzackstich
Zickzackstich
F
Stretch-3fach-Zickzackstich
Geradstich
G
Stretch3fach-Geradstich
Blindstich
H
KantenEinfaBstich
B
zum
linke
gleichzeitig
ist
Lösen
Stichiage
mm
2
3,5
mm
5
der
mm
Aus
die
getippten
(siehe
2
3,5
Verbindungsstich
I
Pulloverstich
Musche(kantenstich
K
Overlockstich
Zierelasticstich
L
Federstich
Elasticstich
M
mm
mm
mm
5
Wabenstich
dem
Vor
getippte
(ösen.
der
In
76—77
nationen
dung
mit
der
A
Stiche
die
Hinweisen
Tippen
Tasten
Programmtabelle
sind
angegeben.
his
Tasten
G
und
mit
auf
Stichkombi
für
H
Taste
den
ihre
bis
Seiten
Verwen
M
B
iq
Page 26
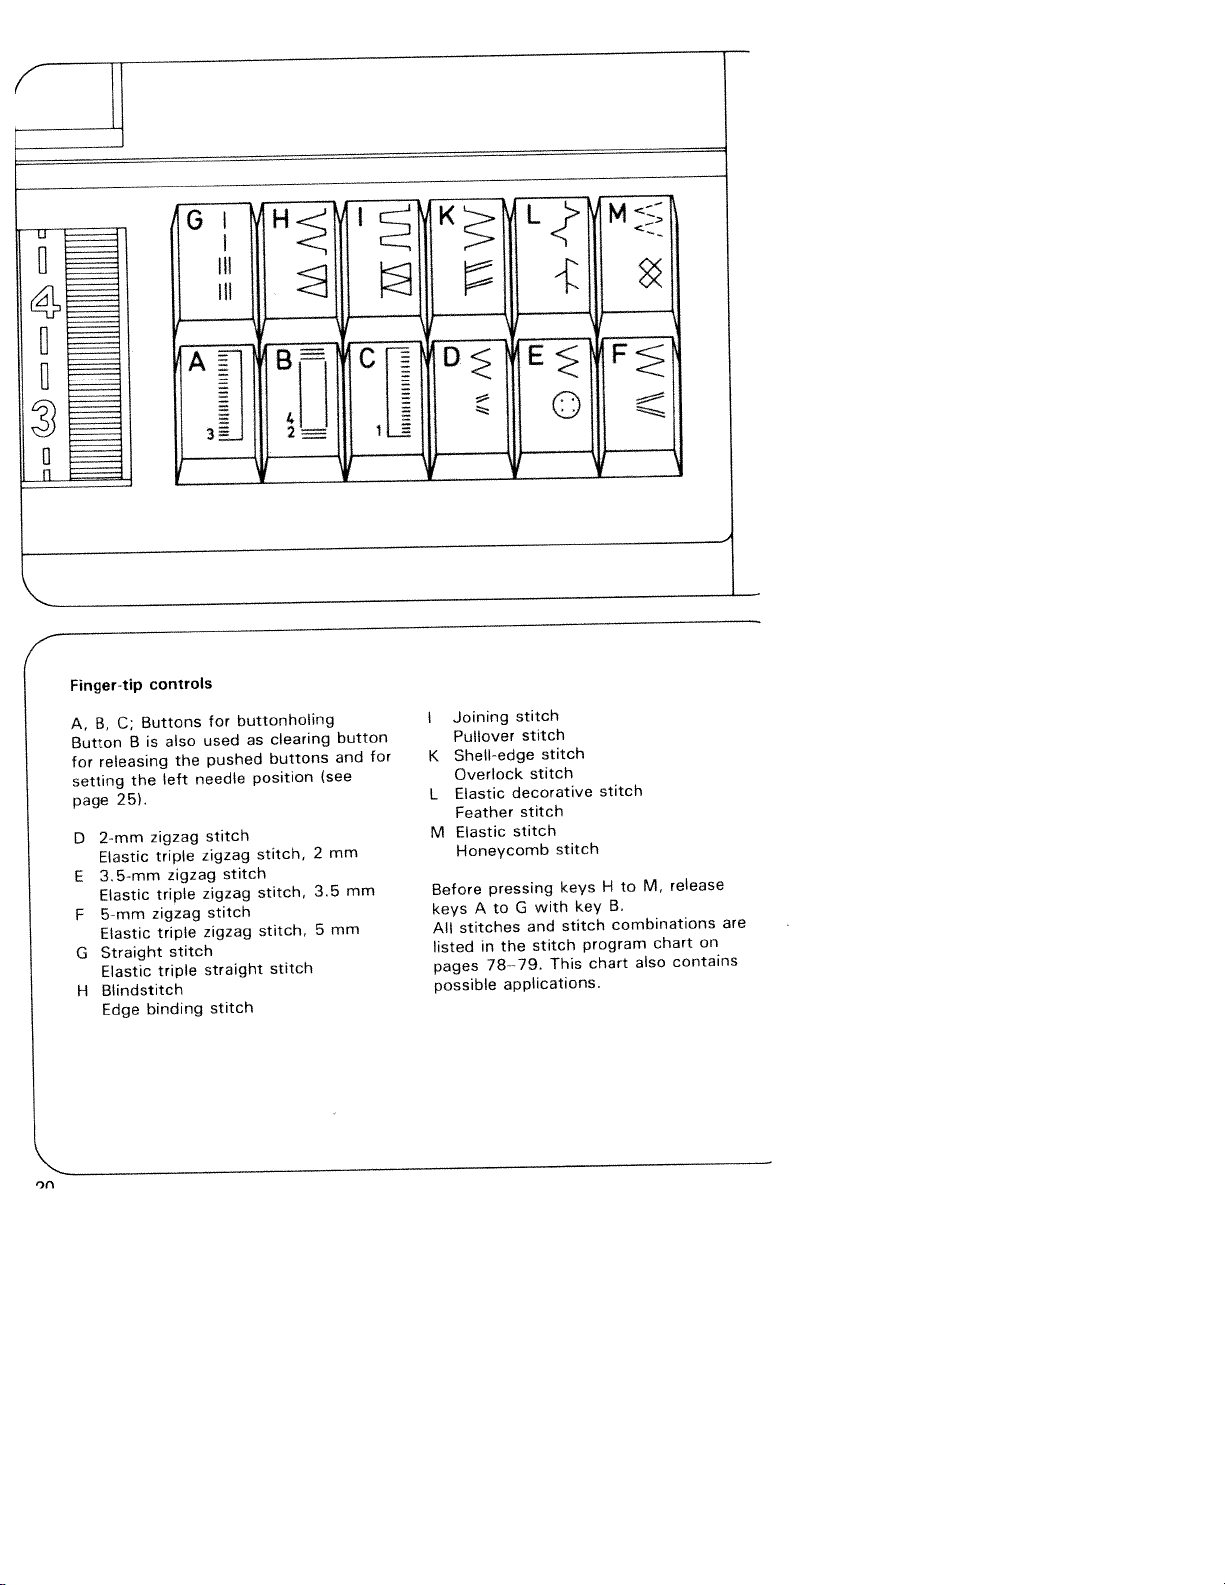
Finger-tip
A,B,C;
Button
releasing
for
setting
page
2-mm
o
Elastic
35-mm
E
Elastic
5-mm
F
Elastic
Straight
G
Elastic
Blindstitch
H
Edge
25).
controls
Buttons
is
B
the
zigzag
binding
also
the
left
triple
zigzag
triple
zigzag
triple
stitch
triple
for
used
pushed
needle
stitch
zigzag
zigzag
stitch
zigzag
straight
stitch
buttonholing
clearing
as
buttons
position
stitch,
stitch
stitch,
stitch,
stitch
2
3.5
5
(see
mm
button
and
mm
mm
for
Joining
I
Pullover
Shell-edge
K
Overlock
Elastic
L
Feather
Elastic
M
Honeycomb
Before
keys
stitches
All
listed
pages
possible
pressing
to
A
in
the
78—79.
applications.
stitch
stitch
stitch
stitch
decorative
stitch
stitch
stitch
keys
with
G
stitch
and
stitch
This
stitch
H
key
program
chart
release
M,
to
B.
combinations
chart
contains
also
are
on
Page 27
commande
touche
déporter
Point
Triple
Point
Triple
Point
Triple
Point
Triple
Point
Point
de
boutonnières:
boutonniere
annuler
a
l’aiguille
zigzag
point
zigzag
point
zigzag
point
droit
couture
invisible
bordure
de
Touches
Touches
La
temps
a
D
E
F
G
H
Tiptoetsen
de
zijn
C,
B,
A,
Toets
voor
ker
D
E
F
G
H
tevens
is
B
ingetipte
de
naaldstand
Zigzagsteek
3Voudige-stretch-zigzagsteek
Zigzagsteek
3Voudige-stretch-zigzagsteek
Zigzagsteek
3Voudige-stretch-zigzagsteek
Rechte
steek
Voudige-stretch-rechte
3
Blindzoomsteek
Kantensteek
B,
A,
sert
B
touches
les
gauche
a
mm
2
elastique
zigzag
mm
3,5
élastique
zigzag
mm
5
elastique
zigzag
elastique
knoopsgatentoetsen.
uitschakeltoets
de
toetsen
25).
pag.
(zie
mm
2
mm
3,5
mm
5
C
en
activées
(page
voor
en
méme
2
3,5
5
steek
mm
mm
251.
mm
de
2
3,5
5
et
mm
mm
lin
mm
Point
I
Point
Point
K
Point
Point
L
Point
Point
M
Point
Debloquer
sur
sion
es
sur
tableau
Le
presente,
points,
principales
Verbindingssteek
I
Pulloversteek
Schulpsteek
K
Overlocksteek
Elastische
L
Vedersteek
Gestikte
M
Wafelsteek
Voordat
gedrukt
toets
In
de
steken
de
aanwijzingen
worden
d’assemblage
tricot
de
coquille
bord
overlock
elastique
d’épis
zigzag
d’abeille
nid
touches
les
a
touche
touches
programme
du
los
sur
points
los
utilisations.
zigzag
toetsen
de
eerst
uitschakelen.
B
stekentabel
en
gebruikt
décoratif
piqué
A
avant
B
M.
H
a
pages
combines
siersteek
H
toetsen
de
pag.
op
steekkombinaties,
de
waarvoor
aangegeven.
G
a
d’appuyer
des
80
tot
A
ze
par
81,
a
et
M
tot
82,
kunnen
pres
points
los
leurs
worden
G
83
in
met
staan
met
Page 28
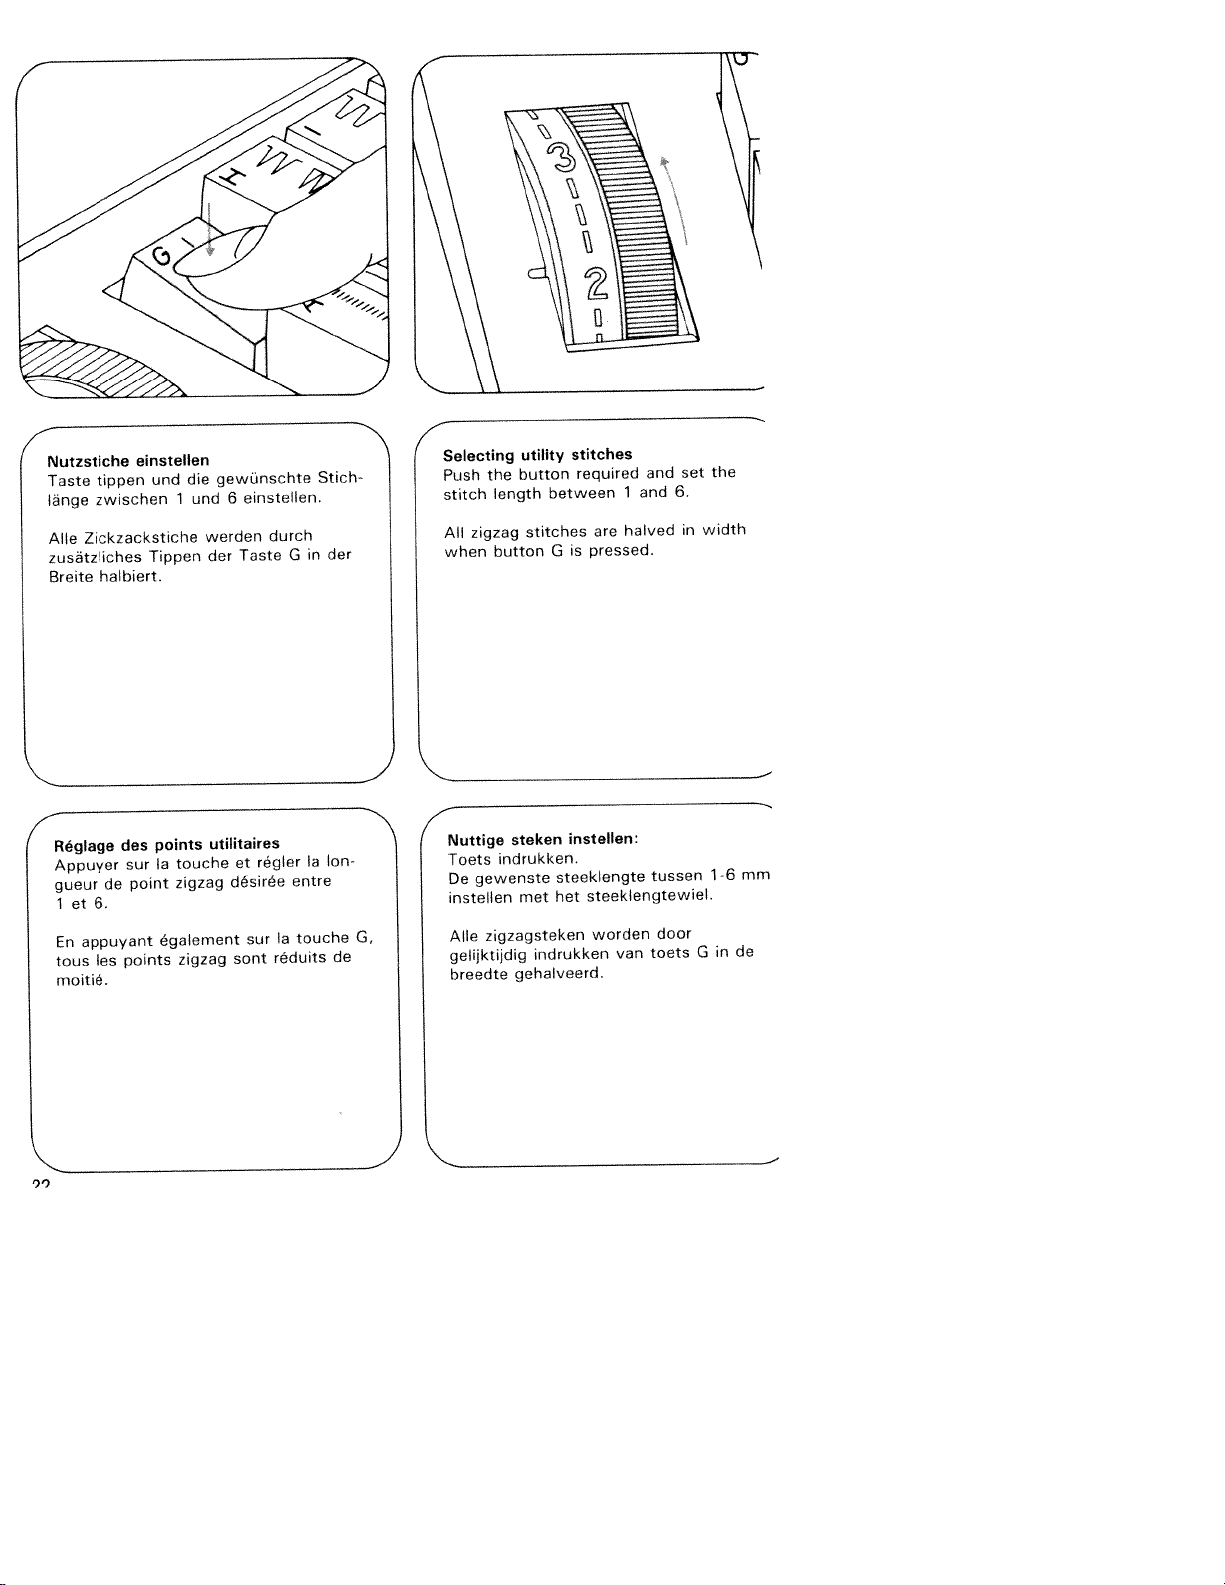
Nutzstiche
tippen
Taste
zwischen
lange
Zickzackstiche
Alle
zusätzliches
halbiert.
Breite
einstellen
und
1
Tippen
die
gewünschte
und
werden
der
einstellen.
6
Taste
durch
the
length
zigzag
button
utility
button
stitches
required
between
is
G
1
are
halved
pressed.
and
and
the
set
6.
width
in
Selecting
Stich
der
in
G
Push
stitch
All
when
stitches
Reglage
Appuyer
gueur
et
1
appuyant
En
tous
moitié.
4
des
regler
zigzag
et
désirée
sur
sont
touche
Ia
sur
zigzag
point
de
6.
egalement
points
les
entre
touche
Ia
réduits
Ion
Ia
G,
de
utilitaires
points
Nuttige
Toets
gewenste
De
instellen
zigzagsteken
Alle
gelijktijdig
breedte
ndrukken.
steken
steeklengte
bet
met
indrukken
gehalveerd.
insteUen:
steeklengtewiel.
worden
van
tussen
door
toets
mm
16
in
de
G
Page 29
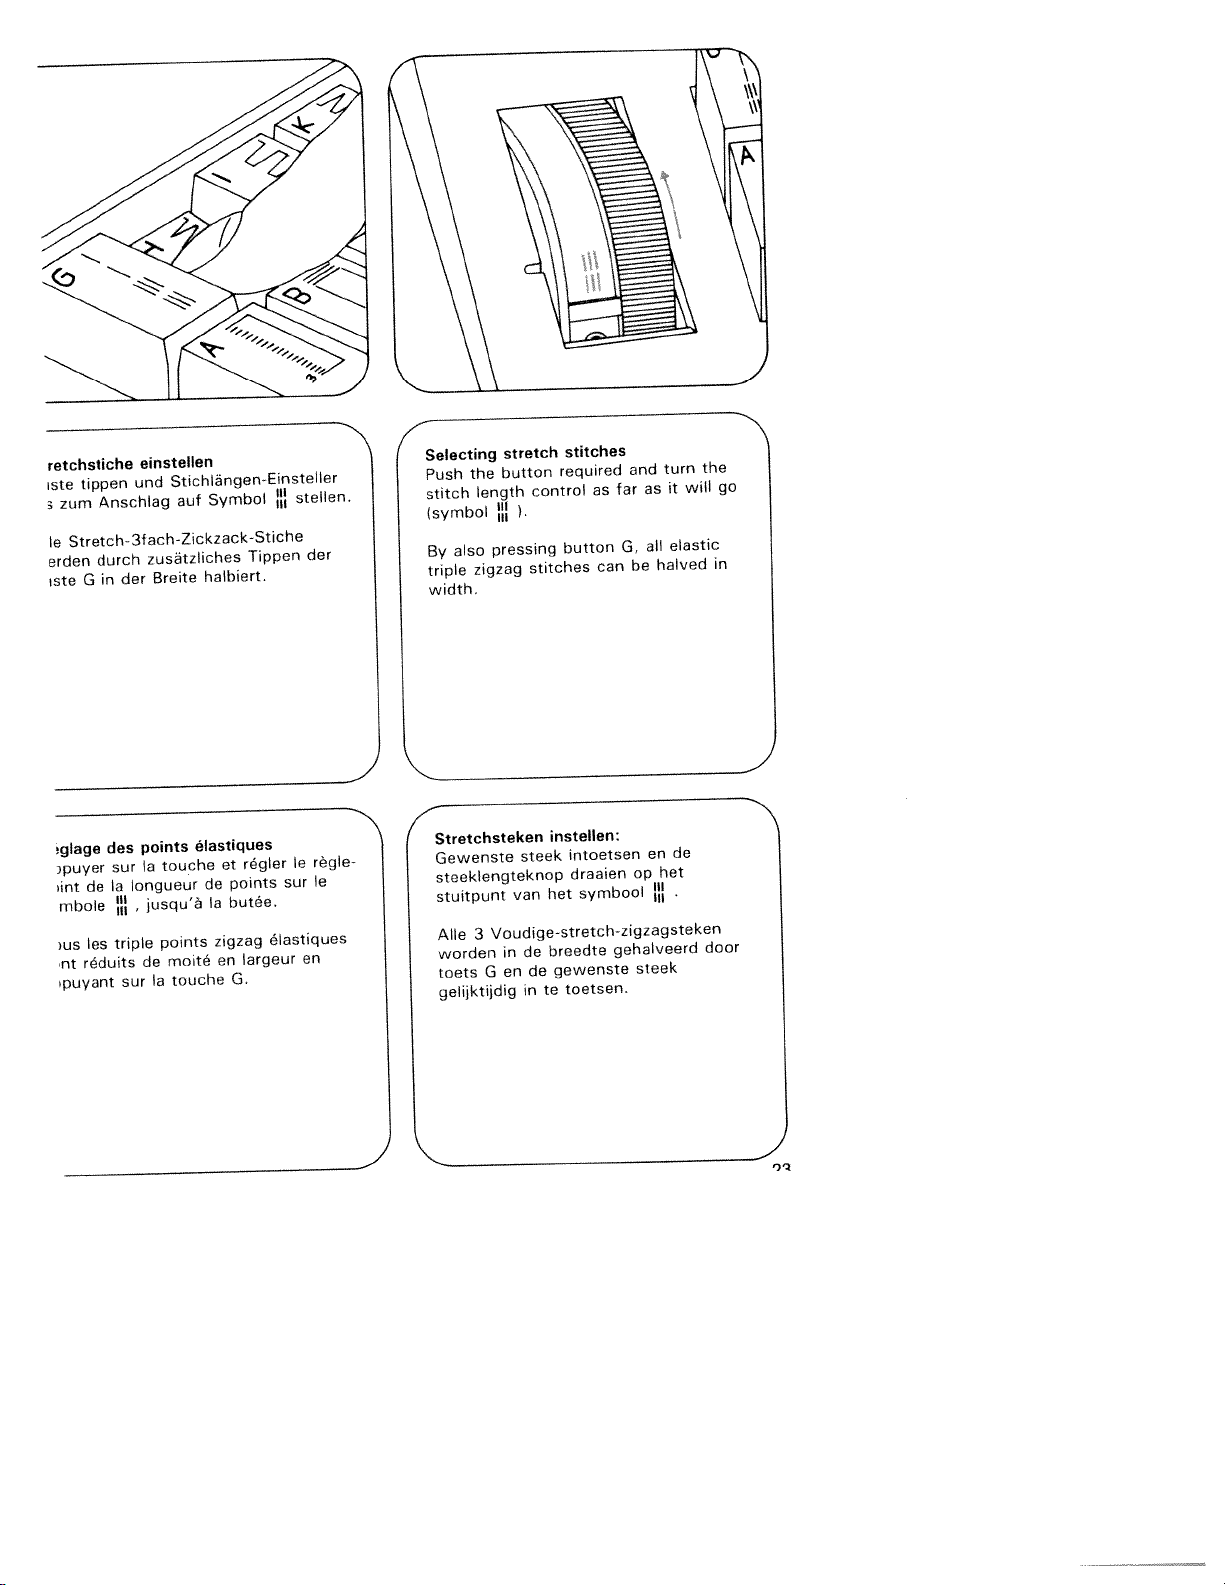
tippen
Anschlag
durch
In
G
einstellen
Stichlängen-Einsteller
und
auf
zusätzliches
Breite
der
retchstiche
ste
zum
Stretch-3fach-Zickzack-Stiche
le
arden
ste
Symbol
halbiert.
Tippen
stellen.
der
4
Selecting
Push
stitch
(symbol
also
By
triple
width.
the
length
pressing
zigzag
stretch
button
required
control
stitches
stitches
as
button
can
far
and
as
all
G,
halved
be
will
it
elastic
go
in
the
turn
glage
puyer
mt
mhole
)US
nt
puyant
des
de
es
réduits
sur
(ongueur
(a
tnple
sur
points
touche
(a
jusqu’à
points
de
(a
moité
touche
elastiques
et
points
de
(a
butée.
zigzag
en
G.
régler
élastiques
(argeur
sur
Stretchsteken
règle
le
(e
en
Gewenste
steeklengteknop
stuitpunt
3
Al(e
worden
G
toets
gelijktijdig
instellen:
intoetsen
steek
draaien
symbool
het
van
Voudige-stretch-zigzagsteken
breedte
in
de
gewenste
de
en
toetsen.
te
in
en
het
op
gehalveerd
steek
de
door
Page 30

I
und
Nutz-
Stichkombinationen
Bei
Tipptasten
Stichkombinationen
grammtabelle
weisung
Stretchstich-Kombinationen
werden
am
gedruckt.
sind
Ende
auf
dieser
angegeben.
gleichzeitig
und
Nähhinweisen
mit
der
mehrer
Die
Pro
An
and
Utility-
In
finger-tip
neously.
together
can
well
of
case
found
be
at
as
Book.
Combinaisons
utilitaires
et
combiner
Pour
appuyer
touches.
ces
figurent
bles
grammes,
conseils
des
Nuttige-en
steekkombinaties
Bij
toetsen
stekentabel
steekkombinaties
de
aanwijzingen
stretch-stitch
combinations,
stitch
the
compris,
y
stitch
some
in
the
end
points
de
plusieurs
combinaisons
Les
dans
couture
de
are
controls
The
with
simultanément
stretchsteken
gelijktijdig
achter
voor
combinations
pressed
combinations,
useful
program
Instruction
this
of
élastiques
types
sur
tableau
le
fin
en
correspondant
kombineren
worden
ingedrukt.
boekje
dit
in
afgebeeld,
gebruik.
het
simulta
sewing
table
plusieurs
des
de
meerdere
In
several
de
possi
pro
notice,
de
staan
met
tips,
as
point
dE
Page 31

CD
H
tichiage
tichlage
tichlage
tichlage
)éport
)éport
ouche
)éport
ouche
)dport
ouches
einstellen
inks:
Mitte:
rechts:
point
du
gauche:
a
B
milieu:
au
G
droite:
a
et
H
Taste
Taste
Taste
1
bei
droit:
appuyer
appuyer
appuyer
Geradstich:
tippen
B
tippen
G
und
H
sur
sur
sur
tippen
I
Ia
Ia
es
Selecting
straight
needle
Left
Central
Right
I
and
Naaldstand
Naaldstand
Naaldstand
Naaldstand
gelijktijdig
stitching:
needle
needle
the
position:
instellen:
links:
midden:
rechts:
indrukken
needle
position:
position:
position
push
toets
toets
toets
push
button
push
buttons
indrukken
B
G
H
for
button
indrukken
I
en
B
G
H
25
Page 32
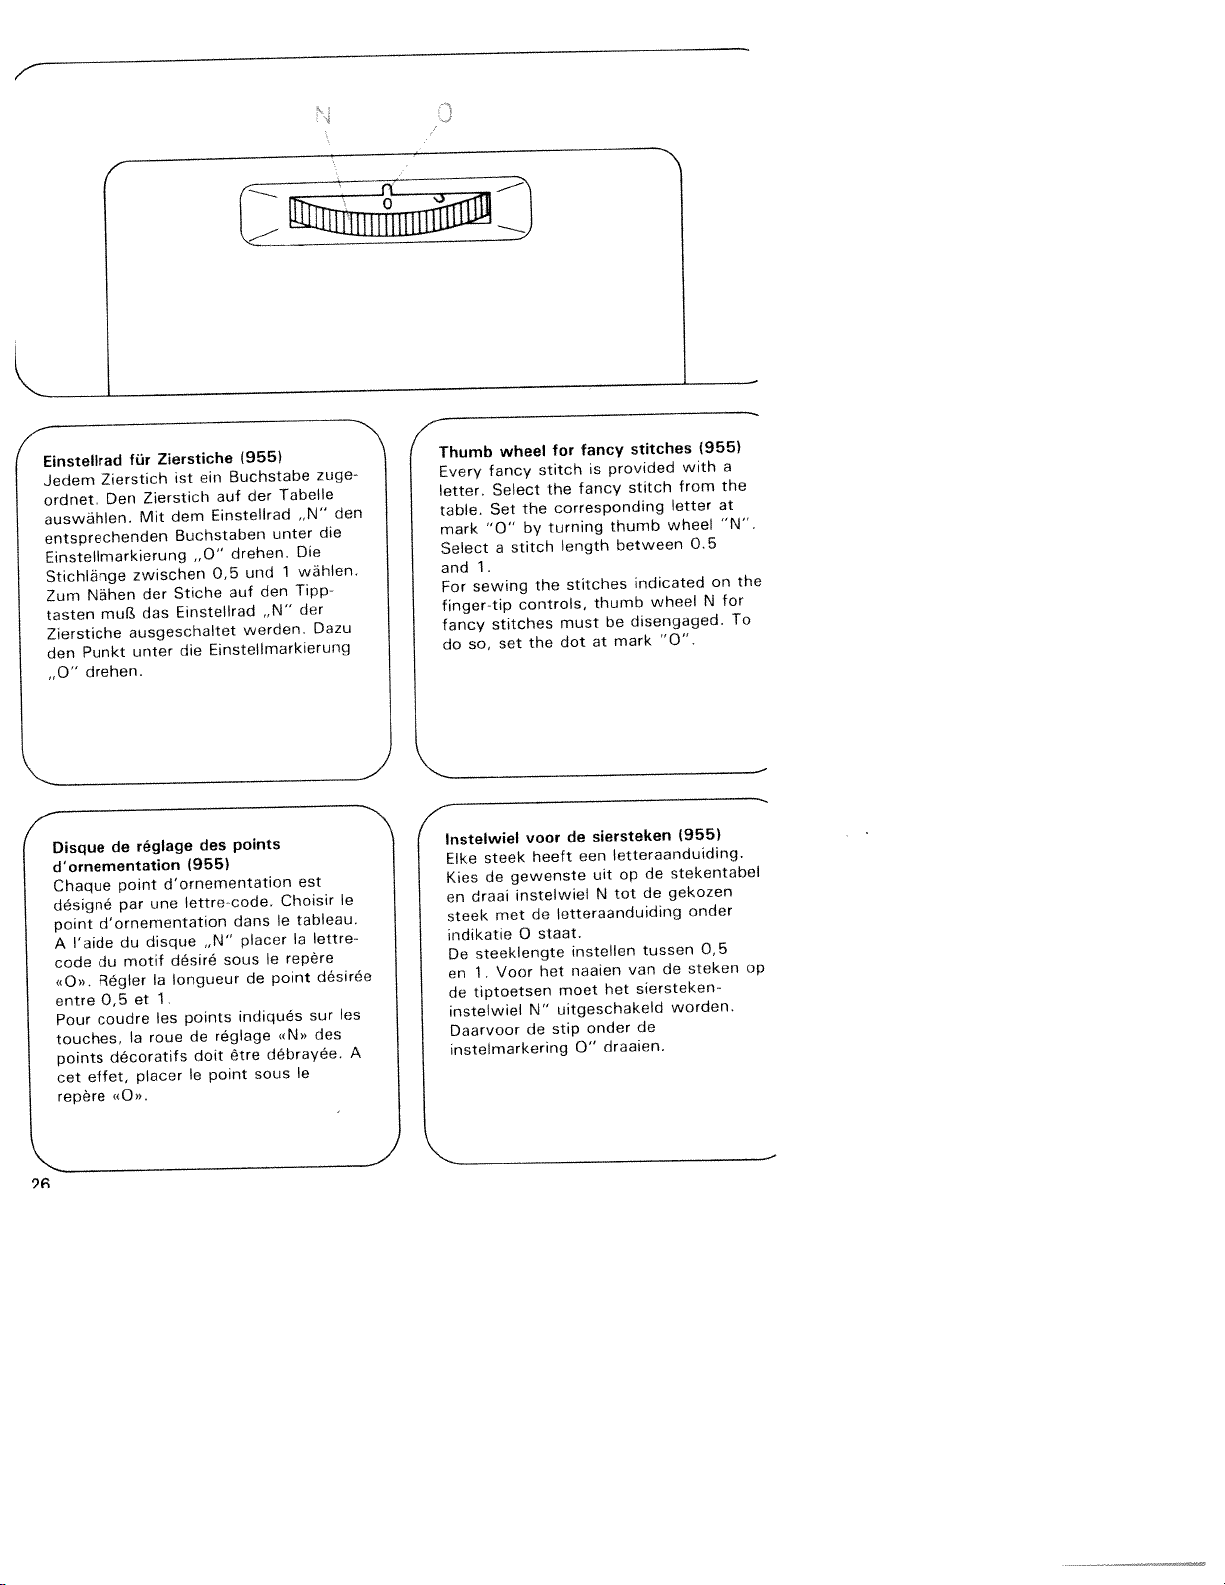
LUáfflflD
Einstellrad
Jedem
ordnet.
auswählen.
entsprechenden
Einstellniarkierung
Stichlange
Zum
tasten
Zierstiche
den
0”
Disque
d’ornementation
Chaque
désigne
point
A
code
<0>.
entre0,5et
Pour
touches,
points
cet
repere
für
Zierstich
Den
zwischen
Nähen
muB
ausgeschaltet
unter
Punkt
drehen.
de
point
par
d’ornementation
du
l’aide
motif
du
Régler
coudre
Ia
décoratifs
effet,
0”.
Zierstich
Mit
der
das
réglage
placer
Zierstiche
em
ist
auf
Einstellrad
dem
Buchstaben
,,0”
0,5
Stiche
Einstellrad
Einstellmarkierung
die
des
(955)
d’ornementation
lettre-code,
une
désird
longueur
Ia
1.
es
points
de
doit
le
N”
reglage
point
disque
roue
(955)
Buchstabe
der
drehen.
und
den
auf
,,N”
werden.
points
dans
placer
sous
de
indiques
ètre
sous
Tabelle
N”
unter
Die
wdhlen,
1
Tipp
der
est
Choisir
le
tableau.
a
repère
le
point
sur
N’
debrayee.
Ie
zuge
den
die
Dazu
ettre
désrde
des
wheel
wheel
‘0”.
stekentabel
de
gekozen
de
tussen
do
worden.
with
from
letter
(955)
steken
(955)
0.5
N
onder
0,5
on
a
the
at
“N”
the
for
To
op
Thumb
letter.
le
es
A
wheel
fancy
Every
Select
Set
table.
‘0”
mark
Select
and
For
finger-tip
fancy
do
lnstelwiel
Elke
Kies
en
steek
indikatie
De
en
de
instelwiel
Daarvoor
instelmarkering
stitch
a
1.
sewing
stitches
set
so,
steek
gewenste
de
draai
met
steeklengte
Voor
1.
tiptoetsen
stitch
the
corresponding
the
turning
by
length
the
controls,
must
dot
the
voor
heeft
instelwiel
letteraanduiding
de
staat.
0
het
rnoet
uitgeschakeld
N”
stip
de
is
fancy
stitches
thumb
at
siersteken
de
een
uit
N
instellen
naaien
onder
0”
provided
be
het
draaien.
stitch
thumb
between
indicated
disengaged.
mark
letteraanduiding.
op
tot
van
siersteken
do
stitches
fancy
for
Page 33

IkIl
iilL1l
IIii
1411
Ihk,j
tj4ttj
11
flI
‘IIiJ
“Ii.I
P’’
I
1JLh
1’
-j1i
III
lLIl44IillhlI’
Ill
44ipluu’lpI
iImlIi
IlII11I1IlIIIlIIII1llIIIiIIlLllIliIlLl1lI1LIiIlUfl
-
iniI
iiituriur
ililiF
Ii1iIIillhiisihIlliiiiIII1ii1lllhillllI
iI1r
III1L
11
lIlli
11
Il1ii
1
IlI11i
11
1iii
11
llhIiii
1
J11lli
--
---S
DC
(IC
CD
C--
llIl
‘411
4111W
ftW
—.
C,
Cr
Cl-
(Cr
DCr
-
CrCD
O<
DCD
-
CDCr,
(C
Cr(O
QC1)
r
‘1P’
H
(Cr5
C
Cr
CD
(lCD
5Cr
—
1$lI”—1lIl’”
111I’’’•
—
-
55
CC
55
CD
3
3-
c
Cr
3
-
3
Cr
3-
.55
Ct
D1CCQ.
jIillh
huh
jhlllb
_!hmf11
_jIilflh
Iit
3
Cr
33
CD
DCCr
5515
t’
f%-j
/C-%
CC%4
-7
—
CC
—re
-
CC
DC
CC
-<
-
Cr
(CC
(I
C)
Cr
CI
CrC
Cr:
_CD
°
3
3-Cr
2:
CC
Cr
)
CD
-
Cr
a_
Cr
--
CD
DC<1
CC
-
Cr-CC
—
£
-
3
Cr-CD
-
—D
(3
C
C)CDCC
C.
-
3-
CC.,Z
55
DC
—
CDQ
-
CDCC’
CD
-_—
4--
-
Q
Cr
—
CD
CD
DC
—i
3
3
C1
Cr
Cr
—
Cr
CD
Cr
CC
DC
-
-
(C
3
521
CC
5.2
CC
ICC
2:
Cr
DC
CC
Cr
CrCr
-
CC
-
CD
Cl
Cr
CD
CD
3
—
3-
3
Cr
CD
3
CC-
Cr
Cr
g
CD
=
Cr
L(
C
£52_S
Cr
CC
C)
523
CT..
DC
5
=
Cr
C
CD
CC
CD
Cl
(C
Cr
CDCD
CD
CCrD
DC
Cr
N
CD
CC
CD
Cr
CC
DC
CD
Cr
(CD
CC-C
C
-
CrC
o
C)
Page 34

(Nadel
•
Schraube
Neue
hinten(
Schraube
Changing
130/705
switch
the
flat
go.
Remplacement
130/705
circuit
serrer
Engager
talon
serrer
Naald
len
auswechseln
Hauptschalter
Nadel
ganz
125.
needle.
facing
side
Tighten
a
Ia
vers
Ia
wisselon:
met
Schroef
Nieuwe
kant
platte
mogeliik
vastdraaien.
A
125
ldsen.
N
(liache
nach
festdrehen.
needle
the
Switch
•
H):
Loosen
new
Push
rear
screw.
the
de
Mettre
•
H):
I’interrupteur
vis
l’aiguille
vis.
et
N
l’arrière(
retirer
•
fdschakelaar
hon
losdraaien.
N
(1301705
naald
in
naar
de
de
houder
)System
ausschalten.
herausnehmen
Nadel
Kothenseite
schieben.
oben
(System
off
screw
needle
as
up
l’aiguille
Ia
general
neuve
jusqu’à
stroom
De
Naald
achterziide,
schuiven.
130/705
master
N.
(with
far
(système
machine
‘aiguille.
mdplat
(le
(a
125.
eruit
met
H)
nach
Take
it
as
125.
butée
uitschakr
de
zo
H)
out
its
will
hors
Des
du
et
halen
hooc
Schroe
4
Transporteur
Klappe
nach
schieben
Lowering
Open
feed
dog
position>.
Abaissement
19
1
schieben
P
free
lowering
lowered>
le
Ouvrir
abaisse-griffe
escamotée;
couture.
Transporteur
119
KIep
Grendel
schakeld.
in
in
werking.
versenken
öffnen.
zum
=
the
arm
cache
le
openen.
richting
Richtung
Versenkschieber
versenkt,
=
Nähen.
dog
feed
cover
control
toward
or
griffe
Ia
de
9.
11
le
dans
deplacer
uitschakelen:
P
0
11
9.
toward
0
Déplacer
sens
vers
schuiven
schuiven
nach
Push
P
(sewing
=
P
0
the
(feed
le
pour
=
0
curset
griffe
uitge
=
Ia
weet
Page 35

ausschalten.
Nähful
Fuf
gezogen
die
Q
und
JR
hors.
Removing
switch
the
Push
The
front.
buttonhole
the
the
of
work
the
Fatting
presser
pins
that
and
P
sewing
the
auswechseln:
rastet
mul,
anbringon:
und
Stege
sind
die
ist
sewing
1
25.
sewing
foot
foot
support.
the
bar
N
are
Q
Nähful
125
Den
der
lochfuF,
vorne
herausgenommen
Nahfur
senken
dal.
rasten.
P
Remplacement
machine
a
general
Presser
bas,
du
tirer
plan
Mise
presseur:
presseur,
que
rainures
P
R
sem
Naaivoet
125
omhoog.
omlaag
knoopsgatenvoet
voet
werkbox
Naaivoet
laten
schuiven
P
toebehoren.
pied
le
pied
semelle
Ia
de
en
es
servent
Q
et
Ia
est
elle.
uitschakelen.
naar
zakken
0
en
25.
i
Vavant
boutonnières,
a
travail.
place
Abaisser
deplacer
étriers
0.
vis
wisselen:
De
drukken
naar
aanzetten:
zijn
Hauptschalter
Nadel
Die
unten
nach
vorne
den
fully
sewing
lifter
snap
foot
hors
de
dat
aus.
dabei
zuerst
und
N
zum
Nähfut?,halterschraube.
Needle
snaps
foot,
for
du
Placer
dégage
se
de
N
de
naaivoet
voorkant
voren
en
stift
voor
R
Schiene
die
Nähfläche
die
werden.
Stoffdrückerhebel
Ful,
dabei
Nuten
die
in
Befestigen
switch
foot:
must
downwards
foot
out.
first
front
the
to
lower
foot:
move
and
grooves
into
accessories.
fitting
retaining
presseur:
pied
a
circuit
l’aiguille
presseur
pied
du
vers
alors.
l’avant
semelle
Ia
levier
le
semelle
Ia
s’engagent
es
fixer
a
fixation
is
du
Hoofdschakelaar
Naaivoet
aan
voet
en
de
eerst
schuiven
wegtrekken.
De
zooltje
het
uitholling
in
N
bevestigen
het
naaivoethouderschroef.
hochstellen.
drücken,
Knopf
Beim
nach
schieben,
so
em
0
Zube
des
off
raised.
be
change
To
runner
the
pull
l’interrupteur
il
de
stofaandrukker
and
the
foot
the
0.
screw.
haut.
en
S’il
d’abord
faut
enlever
et
pied
du
pied
du
de
dans
accessoires.
support
naald
en
voorkant
de
los.
is
slede
intussen
remove
Mettre
vers
s’agit
manière
in
en
van
main
at
les
de
0
the
so
JR
Bij
de
de
klikt.
is
le
de
zo
het
J
29
Page 36

I
Verwandlungsnahfläche
Die
Ndhfläche
ausnehmen
Ansetzen
Zum
zeigt,
Pfeil
(0).
Detachable
Lift
To
push
cated
Plan
Sou(ever
de
Pour
de
on
and
the
fit
is
by
de
couture
(a
couture
voit
remove
close
the
travail
quelque
remettre
sur
(N).
an
work
work
(N).
contre
(a
ewas
die
die
the
support
the
to
arrow
variable
figure
anheben
Ndhfläche,
Maschine
support
work
machine
(0).
et
peu
place,
en
machine,
Ia
(0).
support
the
to
en)ever
glisser
und
wie
schieben
machine
indi
as
le
comme
her
der
(N).
le
plan
plar
Werkvlak
werkbox
De
wegtrekken
Voor
richting
de
schuiven
4
Zubehörfach
Den
Darunter
Accessory
Open
Under
sewing
Boite
Ouvrir
108.
rangement
Accessoiresbox
De
Daaronder
het
Deckel
the
this
de
L’espace
deksel
veranderen
iets
(N).
weer
van
(0).
der
Platz
ist
box
cover
lid
accessories.
rangement
le
couvercle
aisé
van
is
optillen
aansluiten
pijI
de
Nähf)äche
für
work
of
there
du
en
dessous
des
werkbox
de
plaats
naar
en
de
tegen
108
Nähzubehhr.
support
room
is
plan
permet
accessoires.
accessoires.
voor
werkbox
machine
de
Offnen.
your
for
couture
de
108
voren
ir
108.
le
openen
Page 37

Nahfuge
Normalndhful
o
ZierstichfuE,
2
für
Blindstich-
3
Overlockfulf,
(NormalzubehOr(
ncht
Obertransport
und
4
ReiLverschluf.,
Kantenful
und
KnopflochfuR
5
7
Filzscheibe
Lineal
8
Sewing
Ordinary
o
sewing
Fancy
2
foot
top
Blindstitching
3
overlock
or
Semelles
(accessoires
pied
o
normal
pied
2
décoratifs,
rain
nt
e
supérieur
pied
3
invisible
sur(et
Naaivoetjes
Normale
o
Borduurvoetje
2
(zonder
stoftransport)
Blindzoomvoet
3
overlockvoetje
(standard
feet
foot
stitching
(without
feed>
foot
pieds
de
courants>
presseur
points
pour
sans
ement
point
a
pour
et
(Standaardaccessoires(
naaivoet
dubbel-
accessonesl
4
5
7
8
presseurs
4
5
7
8
4
5
7
en
8
and
Zip-
stitching
Buttonhole
washer
Felt
guide
Edge
pour
pied
es
fermetures
glissiere
a
piqüres
pour
bord
au
a
pied
boutonnières
Rondelle
guide-bord
flitssluiting-
Kantenvoetie
Knoopsgaten
voet
Viltringetje
Lineaal
edge
foot
poser
de
foot
et
feutre
en
Page 38

31
a
Zubehörfach
Klappdeckel
Den
128
fach
Abbildung
der
in
eingeordnet
die
sind
Spulen.
NormalnähfuR
=
o
KIarsichtfu1
=
2
BIindstichfu1
-
3
für
öffnen.
werden.
Nähfü1.e
Normalzubehör
das
für
27
1
Zubehör
Das
gezeigt,
abgebildet
Unter
n
den
Zubehdr
mu1,,
die
und
Fächer
Fächern
die
wte
M\\
Reil,verschlugfuR
4=
KnopfIochfuS
5=
Nadein
N=
Spulen
0=
Tabelle
Die
folgendes:
Nadelsysteme
=
P
Die
=
Q
NähfuR
Einfädelweg
=
R
Klappdeckel
rn
Ndharbeiten
zurn
zurn
Spulen
zeigt
jeweiHgen
Page 39

Accessory
lid
Open
accessories
The
individual
illustration.
the
identified
respective
Normal
=
o
Clear-view
=
2
Blind-stitch
=
3
3oite
;tandard
elever
faccessoires
Joivent
artiments
igure.
eprésentOs
anottes.
)
=
3
box
of
127
compartments
illustrations
by
sewing
sewing
d’accessoires
couvercle
Ic
places
ëtre
comme
los
Soiis
los
presseur
Pied
transparent
Pied
point
a
Pied
standard
for
accessory
should
compartments
The
feet
foot
sewing
foot
pour
1
Les
1
28.
dans
1
est
compartiments
presseurs
pieds
standard
invisible
box
placed
be
as
of
bobbins.
and
foot
accessoires
de
27
accessoires
les
montré
accessories
1
28.
in
shown
the
bolte
Ia
divers
sur
sont
et
in
are
com
los
the
Ia
Zipper
4=
Button-hole
5=
Needles
Bobbins
0=
table
The
following:
Needle
P
The
Q
to
Threading
R
Pied
4=
Pied
5=
N
0=
Dans
représentés:
=
P
Q
=
B
foot
the
in
systems
sewing
the
use
pour
boutonnières
a
Aiguilles
Canettes
tableau
le
Systèmes
operations
Les
correspondant
d’enfilago
Traiet
sewing
indicates
lid
operations
respective
for
path
fermetures
le
sur
d’aiguilles
de
aux
foot
foot
bobbin
a
couvercle
couture
divers
le
pour
the
which
for
winding
glissiere
pieds
bobinage
sont
)pbergvak
klep
)e
penen.
ifbeelding
token.
iaaivoetjes
)
Gewone
Borduurvoet
=
Blindzoomvoet
=
I
voor
127your
accessoires
Do
in
do
Ondor
en
accessores
de
bet
desbetretfende
vakjes
do
spoelen
de
naaivoet
opbergvak
volgens
zijn
afgebeeld.
Ritsvoet
1
28
de
vakjes
de
4
Knoopsgatonvoet
5
Naalden
=
N
Spoelen
O
de
Op
tabellen
hot
ziet
klep
in
do
u
volgende:
Naaldensystoom
=
P
Werkzaamheden
Q
verschillendo
lnrijgschema
=
R
voor
naaivootjos
hot
voor
do
spoolen
Page 40

4
Abstepparbeiten
\iontuR.
Such:
ts
0
h6iIten
Befestigung
Lineal
od
ch
Local
nd
Pirilei
Abseepparociten
belos
rn
Daos
odm
fl’Cfl
F.ihrurgslnaal
‘iahluerlaut
korrekt
Normal
lineal
T,5t
maclineal
Fuh
durh
N
der
mit
Verwendur
uf
ellen
erlaufnrde
duft
hei
lever
me
aussehen
zumn
des
Schrobe
den
nit
die
.arallel
;aid
NdhfuR
6
Firisrtz
Lineas
die
gszwnck
qeiiürschten
an
Fuhrungslmneal.
‘1cm
Stotfkarte
verlaufenden
‘1eraCte
ntldnq
nmmer
urd
kane
N
kummen
Bormrunq
ie,tdrehen.
P
Sterpinen
Karitn
Steepmriie
)Abh
Fir.ngs
hni
0
diV
Abstand
n
Anb
ordntl,ch
fast
rhieben
sich
oder
iht
Stoppli
Ri.
‘nan
0),
Ocr
am
allen
Je
das
mci
511
Topstitching
sewing
Stitch:
guide
Edge
sewing
all
the
Fitting
edge
Push
it
secure
can
quide
sttchmng
sdtions.
the
With
sew
to
parallel
stitch
follows
emther
making
the
along
Fig
RI.
and
neat
foot:
feet,
edge
guide
n
he
margin
edge
parallel
parallel
preceding
The
accurate.
Ordinary
edge
Button
can
N
positon
adlusted
gumde
to
an
seam
guide
N
for
lines
the
lines
guide
he
throim
edge
thus
sewing
G
used
eth
to
StiOUS
attached,
stitches
of
edge.
of
line
with
hole
lh
screj
the
The
Fig.
stitches,
of
stitches
made
foot
desired
,mppli
01
nearly
0
P.
it
or
guide
or
looks
is
runs
and
and
The
eec
to
‘tide
j
Page 41

;urpiquage
presseur:
ed
‘oint:
guide-droit
e
es
ous
ixaton
iisser
P.
vis
s
sur
juide
guide
o
surpiqâres
es
bords.
los
fig.
QI
le
,uit
toujours
;era
pieds
guide-droit
du
guide
le
Suivant
l’écartement
droit
Ce
bion
ou
guide-droit
presseur
pied
guidedrnit
Bouton-poussoir
convient
N
presseurs.
le
trou
par
N
application,
ddsiré,
considérablement
facilite
parallèlos
(a
piqUre
(fig.
et
Ic
RI.
régulière.
faisant,
nette
normal
presque
a
0
surpiquage
le
et
bord
précédente
couture
La
G
et
rdgler
du
sorrer
tissu
Watteren
et
Naaivoetje:
Steek:
Iineaal
De
voetjes
Bevestigen
inesal
Do
le
met
kan
steld
Parallel
angs
moeiteloos
lineaal
Tildens
men
ste
watteerwerk
Bij
over
Steeds
Norrnale-naaivoet
lineaal
Toets
N
warden
van
N
schroef
iedere
op
worden.
lopende
kragen,
maken
doorstikken
het
loopt
ed.
afstand-langs
voorqaande
het
can
bij
kan
gebruikt.
de
door
vastdraaien,
P
gewenste
stiksels
zomen
de
loopt
dezelfde
0
nagenoeg
Iineaal
qoatle
d.
e
met behulp
ineaal-op
stofkant,
do
de
stikse(,
kant
0
breedte
of
van
en
alle
schuiven
lineaal
Dc
sierstiksels
men
kan
van
kragen,
de
lineaal
afb.
beginnen.
geleide
afge
gewen
abf
steeds
naai
en
de
zo
Q.
R.
Page 42

Blindstich
NähfuR:
Spannung:
Garn:
Stich:
Stichlange:
Nade(:
wird
So
reguliert
vorbereiteten
Den
Blindstichful?,
Oberstoffes
BlindstichfuRes
des
der
Mit
nach
soweit
linken
beim
einen
nur
Sie
Nähen
Stoffrest.
einem
Blindstchfug
Oberfaden
Nähgarn
Taste
breit
schmal
3--4
Stärke
Einstich
der
egen.
läuft
Stellschraube
links
Einstich
Faden
zunächst
Taste
70
Saum
dabei
drehen,
erfaBt
etwas
H
oder
der
Der
am
entlang.
den
N
den
n
(Abb.
eine
leichter
und
H
80
Nadel
den
unter
Stoffbruch
Anschlag
Ansch(ag
die
daB
Oberstoff
P
Probenaht
Bliridstitch
Sewing
Tension:
Thread:
L
des
0
0
Nadel
u.
Q).
auf
Stitch:
Stitch
Needle:
to
How
penetration
the
Place
stitch
outer
the
the
of
0
screw
Turn
to
far
one
only
when
and
Q(.
make
First
waste
of
foot:
length:
regulate
prepared
sewing
fabric
blindstitch
N
left
the
thread
penetrating
a
material.
b(indstitch
needle
little
ordinary
wide,
narrow,
3—4
size
the
toot.
runs
to
that
of
sewing
slack.
button
70
hem
The
sewing
adjust
the
the
on
thread
sewing
buttons
or
needle
along
needle
outer
the
test
foot
80
under
crease
edge
left
using
tension
thread
H
H
the
edge
foot.
guide
picks
fabric
side
line
a
and
blind-
guide
(Fig.
piece
a
L
of
so
0
up
P
Page 43

N
-j
N
-j
-J
invisible
nt
presseur:
d
ision:
int:
igueur
nt:
juilte:
glage
ser
ints
térieur
ints
(‘aide
butée
iguitte,
‘un
aliser
essai
de
Ia
de
t’ourlet
invisibtes.
longe
invisibtes.
de
vers
0
au
du
fit
tout
sur
Pied
Fit
Fit
large
étroit
jetée
préparé
vis
a
point
tissu
d’abord
une
a
d’aiguilte
coudre
a
touche
3à4
Grosseur
de
La
butée
a
de
gauche
a
gauche,
extérleur
chute
points
touches
I’aiguille
sous
cassure
régtage
une
de
70
0
tissu.
invisibtes
moms
H
H
ou
pied
te
du
pied
du
N.
sorte
de
saisisse
ne
(fig.
couture
tendu
L
et
80
a
tissu
a
déptacer
que
et
P
Qt.
Blindzoom:
Naaivoet:
Spanning:
Garen:
Steek:
Steektengte:
Naatd:
wordt
Zo
gereg&d
zoom
De
onder
of
P
kant
gen
voetje
het
instelschroet
Met
(inks
naar
tinkerinsteek
de
venstof
Maakt
restje
U
stofl
de
inrljgen
moet
pakt,
eerst
btindzoomvoet
bovenspanning
normaal
breed
smat
34
dikte
insteek
en
voet
de
tangs
open.
draaien
—
afb.
een
naaigaren
toets
toets
70
van
votgens
teggen.
geteiding
ptaatje
N,
de
tot
een
en
P
proefnaad
of
draad
H,
H
80
de
naatd
Q.
iets
L
en
naald
voorbeetd
omgesla
De
0
zover
0
van
op
tosser
van
met
de
een
bo
35
Page 44

Safety
for
valid
wires
The
coloured
code:
Neutral
Blue:
Brown:
the
As
of
lead
correspond
terminals
the
follows:
be
must
which
coloured
wire
The
connected
be
marked
Please
When
3-ampere
rules
United
in
according
Live
colours
this
the
connected
marked
is
black.
which
with
note:
3-ampere
1
a
fuse
Kingdom
mains
the
of
appliance
the
with
your
in
wire
is
to
the
has
to
the
which
to
with
coloured
the
letter
to
cad
the
wires
may
colour
plug,
the
the
terminal
L
plug
be
only
are
following
in
not
coding
proceed
coloured
is
terminal
letter
brown
coloured
or
used,
is
fitted.
the
N
which
mains
of
as
blue
or
must
is
a
L
Page 45

opfloch
ste
opflochfuS
opflochbereich
len
ion
aff
inkIemmen.
einstellen
tippen.
C
Knopflochbereich
tolgt
wie
die
Cber
ziehen
der
an
il
0
Knoptlochlänge
in
die
Knopflochnähen
Zum
i.
n
verwenden.
Oberfadenspannung
bei
anbringen.
einstellen.
N
Nahful
im
Nocke
hintere
und
Beim
Skala
vorderen
der
in
Nähen
entlang.
R
stellen.
3
Stichdichte
Einlauf
einlegen:
0
läuft
Dadurch
bestimmt
feines
logan,
Nocke
der
Näh
wer
4
Buttonhole
in
im
Push
tension
sewing.
the
gimp
shown
thread
taut
front.
along
hole
For
thread.
button
stitch
thread
so
During
scale
length
sewing
at
Attach
in
over
that
setting
C.
range
density
in
illustration:
the
the
is
it
sewing,
This
P.
determined.
is
buttonholes
Set
3
the
the
back
held
the
buttonhole
for
buttonhole
range
at
sewing
ridge
in
arrow
how
is
needle
Place
tab
use
N.
foot
0,
the
P
Q
light
thread
foot.
Insert
as
the
and
at
runs
button
pull
the
sewing
Set
a
it
j
de
glage
puyer
fil
du
n
inheres
utonnières.
dana
nts
roduire
suit:
mme
0,
era
crochet
flèche
iduée
terrniner
inhere.
du
User
Ia
Ia
sur
d’aiguille
sur
Ia
fil
Ic
tendre
Ic
avant
coulisse
Q
Ainsi,
P.
Ia
fil
boutonmère
touche
dans
Fixer
3.
Regler
zone
passe
de
a
Poser
et
Pendant
P.
ii
longueur
coudre
a
Regler
C.
zone
Ia
Ia
sernelle
densité
a
boutonnières
dans
Ic
sur
fil
I’accrocher
de
long
le
possible
est
Ia
de
fin,
des
Ia
crochet
couture
a
I’échelle
bou
ten
a
bou
N.
semelle
dans
de
Knoopsgat
Toets
de
in
Knoopsgatenvoet
heid
De
Draad
strak
P
vastklemmen.
Bi
1
schaal
het
Ieiigteverdeling
verloopt
Voor
gebruiken.
instellen:
indrukken.
C
knoopsgatenzone
in
knoopsgatenzone
vuldraad
over
aantrekken
naaien
hat
Hierdoor
P.
knoopsgat
in
knoopsgaten
alsvolgt
hat
loopt
halve
Bovendraadspanning
op
inklikken,
N
aanbrengen:
achterste
an
worden
op
nokje
hat
in
Q
pijl
cia
ken
bepaald.
slede
de
centimeters.
nacigaren
dun
zetten.
3
Steekdicht
instellen.
voorste
langs
‘enqte
van
0
lengte
De
de
laggen,
nokje
van
voet
Page 46

Knopflochnahen
Schiene
ziehen.
1
2
3
4
5
bis
Raupe
Erste
nähen.
Lange
Taste
6
festhalten.
oslassen.
Taste
gleichen
Nadel
Taste
6
festhalten.
loslassen.
Einige
herausnehmen.
und
6
Es
Knopflocher
Probeknopfloch
B
Riegelstiche
A
hochstellen.
B
Riegelstiche
abschneiden,
Knoptloch
empfiehlt
tippen
Vernähstiche
Anschlag
zum
in
der
Nadel
und
nähen.
Nadel
tippen.
Lange wie
und
tippen
nähen.
Nadel
aufschneiden.
sich,
in
das
zu
nach
gewunschten
hochstellen.
festhalten,
Den
hochstellen.
Raupe
Zweite
erste
die
festhalten,
Den
hochstellen.
nähen.
Enlauffaden
Nähen
dem
vor
Kleidungsstuck,
nähen.
Stoft
Stoff
Den
vorne
bis
4
dabei
Taste
der
in
nähen.
his
4
dabei
Taste
Stoff
anziehen
der
em
Sewing
Pull
forward
Sew
1
needle.
Push
2
stitches
piece
release
Push
3
tonhole
first.
Push
4
stitches
material
Then
Sew
5
the
trim.
Cut
6
Before
ment
tonhole
the
fabric,
it
buttonholes
bottom
far
as
buttonhole
first
button
are
Raise
fast.
button.
the
button
seam
the
Raise
button
are
fast.
release
few
a
pull
buttonhole
the
sewing
recommended
is
test.
a
as
of
the
it
will
as
until
B
sewn,
the
A.
Sew
the
needle.
until
B
sewn,
Raise
button.
the
stitches.
tying
the
buttonholes
buttonhole
go.
seam.
4
to
holding
needle.
the
same
to
4
holding
the
filler
open.
6
second
length
6
needle.
cord
in
sew
to
foot
Raise
bartackirn
work-
the
Then
as
bartackinc
the
Remove
taut
gar
the
a
thE
but
thE
an
but
Page 47

Zeichnungen
Drawings
illustrations
Les
presseur.
pied
sen
Voor
at
de
op
and
not
do
hater
beeldingen
ohne
show
montrent
ire
overzicht
weggelaten.
Ndhfult.
the
is
sewing
pee
knoopsgatenvoet
de
a
foot.
senrete
du
Kécution
a
rer
squ’ã
Executer
gueur
position
Appuyer
tenir
Maintenir
en
touche.
Appuyer
deuxième
gueur
I’aiguille
Appuyer
tenir
Maintenir
en
touche.
Brider
ge.
passe
Ouvrir
ous
ioutonnière
nent
outonnières.
boutonntères
de
a
butée.
a
mobile
premiere
semelle
désirée.
haute.
sur
pendant
Ia
position
haute.
sur
lèvre
Ia
que
position
en
sur
pendant
Ia
position
quelques
par
Enlever
Iegèrement
boutonniere.
Ia
recommandons
a
de
avant
Arrêter
touche
Is
a
6
4
matière.
touche
Ia
dans
premiere.
touche
Ia
a
4
matière.
haute.
matière.
Ia
d’essai
titre
comrnencer
vers
lèvre
I’aiguille
8
points
Arrêter
RelCcher
A.
même
Ia
Arréter
haute.
B
points
6
Arréter
Relâcher
points
Tenir
tendu
d’exécuter
‘avant
a
Ia
et
d’arrêt.
Ia
Executer
Ia
et
d’arrêt.
de
le
et
sur
coudre
a
Ion
a
main
I’aiguille
Ion
main
I’aiguille
Ia
noua
fil
le
couper.
une
véte
le
4
Knoopsgaten
slede
De
schuiven.
toe
u
Het
1
van
staat.
Toets
2
en
stof
toets
Toets
3
4
Dit
rechter
Toets
Ia
en
stof
de
De
5
enige
stof
inlegdraad
Het
de
6
opensnijden.
Maak
van
eerste
voet
de
Naald
indrukken,
B
trenssteken
4-6
vasthouden.
loslaten.
indrukken
A
net
rijtje
rijtje.
indrukken,
B
trenssteken
4-6
vasthouden.
toets
machine
afhechtsteken
van
knoopsgat
eerst
maken:
voet
de
rijtje
op
omhoog
zolang
Naald
Ioslaten.
even
machine
de
aantrekken
knoopsgat
een
eerst
naaien
de
Nasld
Naald
met
geheel
tot
gewenste
brengen.
ingedrukt
maken
omhoog.
voor
maken
omhoog.
ingedrukt
maken,
Iaten
te
nemen
en
het
het
Iengte
houden
daarbij
linkerijtje.
het
als
daarbij
omhoog.
Iopen
maken.
en
afknippen.
tornmesje
een
op
naar
pijltje
de
De
het
houden
de
Dan
om
De
de
proeflapje.
les
39
Page 48

annähen
Knopf
tuB,
Nih
Stich:
Transporteur:
Garn:
Drehen
Nadel
die
eht.
Sie
Legen
markierte
unter
Knopf
ihfuB,halter
N
linke
die
Handrad
sen.
in
Nadel
sticht.
vornehmen.
rektur
nahen
B
Taste
Steppstiche
ndhen.
Knopf
GroBe
nOtigen
Nadel
Die
stechen
senken,
nadelkoiben
Knopfmitte
nähen
assen.
Len
lurchfädeln
wickein
Hand
ohne
mit
Taste
versenken
feines
das
Sie
linker
in
nun
Stete.
den
senken
Knoptbohrung
weiter
rechte
die
am
Dabei
N).
(Abb.
tippen,
in
Stiel
mit
KnOpfe
einen
die
in
assen.
legen
oder
lAbb.
ca.
und
Oher-
lAhb.
(Abb.
verknoten.
NähfuB
KlarsichtfuIf
E
Handrad
Stichiage
Knopf
den
Vorsichtig
Nahfufhaiter
Knopfbohrung
Knopf
6-8
loslassen
(inken
der
schweren
in
Stiel,
inke
Bevor
eiilen
Sic
em
0).
cm
15
und
P1
Die
0).
oder
Nähgarn
auf
abwdrts
auf
Stoff
die
und
einstechen
drehen,
ovtl,
lJberstiche
und
Knopfbohrung
Stoften
Knopfbohrimng
den
Sic
Maschinen
Streichholz
Einige
Fadenlänge
Unterfaden
den
und
Fadenenden
7U,
sich
zuvor
die
mit
schieben.
Nadel
die
bis
Kor
eine
einige
NahfuIf,
auf
Uberstiche
Stiel
em
ste
as
in
his
be
urn
von
cm
die
Sewing
Sewing
Stitch:
Feed
Thread:
Mnve
turn
the
Position
marked
rial
holder.
nd
hoe
further
rignt
alter
8
to
Press
sew
the
Buttons
Large
stem,
a
Let
of
sewing
needle
of
zigzag
about
bobbin
the
ends.
dog:
the
the
needle
and
ct
of
hole
the
zigzag
a
button.
the
the
the
stern
on
foot:
hand
the
material:
button
Lower
the
the
until
position
button
few
with
buttons
needle
button.
foot
shank
button
stitches
5
1
threads
buttons
Clear
sewing
Button
Lowered
Fine
needle
descends.
button
needle
button
the
the
of
stitches
B,
stitches
pUce
cm
(Fig.
wheel
under
the
stem
in
stitch
Before
or
(Fig.
long.
01.
view
foot
E
sewing
its
to
towards
on
Carefully
sewing
stitch
Turn
needle
button.
the
of
release
in
heavy
a
match
a
01.
and
Pull
(Fig.
out
Tie
foot
eft
the
the
stitches
Fig.
it
the
materals
into
lowering
sewing
Sew
nave
off
thread
position,
previously
place
sewmng
foot
into
the
necessary,
If
button.
NI.
again,
left
the
on
a
needle
P
the
without
or
you
holder
the
hand
into
hole
left
the
machine
the
few
a
thread
and
and
thread
until
mate
foot
left
whee
Sew
and
requirt
hole
middle
wrap
anc
the
6
of
end,
Page 49

N
/
‘
boutons
de
ose
presseur:
ed
oint:
riffe
ourner
‘aiquifle
je
gauche.
tee
Ic
oser
tissu
ir
le
prCcautionneusement
lisser
bouton
rosseur.
I’aiquille
jer
juton,
aqua
droit.
ou
ositlon
S
points
bouton
isuite
dans
lace
outon
jrands
as
fixer
ant
a
queue.
ne
piquer
aire
-is
du
resseur,
,illumette
us
1g.
0).
laisser
asser
ir
I’envers
ig.
P)
a
queue
e
ouer
votant
le
descendants
beuton
et
sous
Abaisser
Continuer
cc
que
Rectifier
bouton,
du
zigzag
poussoir
coudre
et
Ic
a
queue
boutons
a
l’aiguIte
bouton.
poser
Coudre
dépasser
fits
es
par
et
enrouler
bouts
es
sans
avec
Beuton
abaisser
H)
vers
a
sous
le
dans
I’aiguille
trou
distance,
Avant
Ic
cur
d’aigui)le
bouton
du
a
support
quelques
de
de
pied
en
pied
noussoir
coudre
soi
jusqu’a
se
‘emplacement
pied
Ic
du
ci
celui
gauche
trou
Ic
tourner
a
pique
éventuellernent
Ensuite,
Appuyer
N).
Ifig.
re)ácher
8,
que)ques
gauche
es
sur
c’est
dans
d’abaisser
talon
dune
centre
le
cm
1
5
et
es
trous
fits
tea
Ifig.
Ia
fit
a
biche
plexiqlas
E
fin
trouve
presseur.
tisSu
IC
pied
faire
et
Ic
volant
dana
executer
celui-ci
points
bouton.
du
tissus
a-dire
trou
Ic
aiguille
du
points
fit
de
canette
de
bouton
do
léches
0).
main.
ou
ce
voulu
pi
du
gao
Ic
bouton
zigzag
ccv.
autour
Ensuite
en
te
a
cur
sur
curds
avec
Ct
pied
Knopen
Nuaivoet:
Steek:
Transporteur:
Garen:
Draai
de
Leg
piaats.
der
beneden
kerqaate
6
ou
aanzetten:
bet
naald
de
nu
Voorzichtig,
yost
de
handwiel
Het
in
naatd
Daarvoor
stoat,
bijdraaien.
naatd
de
B
Toets
afhechtsteken
Knopen
dikke
Op
steeltje
naald
De
ptaatsen,
knoop
zakken,
of
naald
de
van
zagsteken
weghalen
cm
1
5
het
naar
de
met
en
P
afb.
Zonder
ho
toets
laten
dun
handwie)
naar
links
knoop
leggen.
zetten
de
van
verder
rechtergaatje
het
8
6
boven
intippen.
steel
op
stof
worden
in
het
eerst
lucifer
een
knoop
naaien,
en
afknippen.
steeltje
hand
0.
voet
urv
rdu
E
zakken
naaigaren
zover
beneden
de
op
knoop
Stofandrukker
de
en
knoop
draaien,
de
knoop
zigzagsteken
stof
de
loslaten
linkergaatje
in
het
moeten
aangezet.
linkergaatje
Voor
koif
de
tussen
leggen,
de
draadeinden
de
Boven
halen
omwikkelen
of
net
naar
gaat.
gemarkeerde
met
in
neald
aten
van
eventueel
zetten,
en
knopen
de
naaivoet
de
u
een
van
de
0.
afb.
onder
stof
en
het
en
en
de
met
toe,
u
stof
het
insteken.
de
tot
knoop
de
naaien
afb.
enige
maken.
de
van
machine
gaatjes
Enige
de
op
ca.
onderdraad
steeltje
verknopen,
tot
on
naar
tin
lets
en
N.
op
Liat
zig
voet
41
Page 50

ReiBverschlul
NàhfuR:
Stichlänge:
Stich:
Garn:
nach
Je
schluI.,fuI.
werden
Beidseitig
ReiRverschluRfuR
2Taste
Ndhgarn
Verarbeitung
inks
(Fig.
verdeckt
ReiB.verschluB.
Verarbeitung:
ReiP,verschlulf.
einrasten
rechts
Reil?,verschluB
ten
(egen,
FuRkante
versch(uR
die
da1
entlanglaufen
bis
wünschten
stehen
Stoff
ReiRverschluR
und
NãhfuR
senken,
ReiRverschluRende
Quernaht
Die
im
Nahtende
NähfuR
öffnen
Ende
steppen.
zweite
g(eichen
Nadel
anheben
(Fig.
nähen.
einnähen
3
G
kann
rechts
oder
01.
N
+
eingenahter
einheften.
(Fig.
Zähne
Den
Den
N).
unter
so
der
an
(Fig.
Hä(fte
zur
etwa
absteppen.
Breite
(assen.
NähfuR
sch(ieRen
Naht
die
weitertühren
ReiRversch(uRseite
Abstand
RI.
Stoff
im
und
NähfuR
nähen.
den
senken.
Reilver
der
eingerastet
NähfuQ
geoffne
FuL,
den
rechten
ReiR
P1.
der
in
Nade(
anheben
(Fig.
Q(.
zum
bis
und
parallel
vor
Kurz
(assen.
stehen
ReiRversch(uR
Naht
zippers
zipper
The
left
the
method
concealed
Fully
Baste
zipper
opened
the
so
foot
right-hand
Stitch
its
half
and
gin
terial.
the
zipper
foot,
the
sew
Sew
parallel
shortly
foot
the
sewing
in
foot:
length:
or
of
zipper
the
foot
that
along
length
stop
Raise
continue
crosswise
opposite
the
and
before
open
and
zipper
2
Button
sewing
foot
right,
insertion
the
on
zipper
the
edge
the
at
with
the
(Fig.
at
foot
to
can
as
zipper
in
teeth
of
zipper
the
sewing
Q).
the
the
the
the
and
sewing
3
G
thread
snapped
be
required
(Figs.
insertion
place.
(Fig.
right
under
run
foot
the
tape
required
the
needle
foot
Lower
seam
seam.
lengthwise
same
raise
end,
zipper
finish
foot
by
and
N
Engage
N).
sewing
the
along
(Fig.
for
and
the
the
to
distance.
(Fig.
sewing
in
the
seam
in
sewing
end
seam
the
RI.
on
01.
the
Place
the
P1.
about
the
close
sewing
mar
ma
and
Stop
Lower
the
Sewing
Sewing
Stitch
Stitch:
Thread:
ge
rn
die
seam.
zu
Page 51

//
//
/
Il_Il
z
/
,/
/
1
0
I
4
7
,
1
I
F
/
/
I
I
,
1
/
/7
—
1
I
I
I
I
j
—
/
1
I
/
I
/
I
/
sertion
presseur:
3d
ngueur
int:
ivant
ut
oite
inde
uverte
tir
ettre
squ’à
eture
con
oil
abord
ulue.
er
eture
ad
a(iser
)udre
ent
ix
ins
de
1
ouvrir
)aisser
uture.
de
de
I’opération,
b)oquée
être
Net0(.
(fig.
fermeture
de
symétriquement
fermeture
(a
pied
Ic
a
butde.
ouverte
(es
qua
(fig.
P(.
jusqu’à
Laisser
pied
(e
glissiere
a
presseur,
couture
(a
seconde
(a
(a
premiere
a
bords
(‘étoffe
couture.
(a
(a
(a
fermetures
poInt:
presseur
sous
dents
Insérer
(a
(‘aiguille
presseur
terminer
fente.
(a
de
arrivant
en
fermeture
pied
a
Pied
glissière
3
a
2
Bouton
a
Fil
semelle
a
position
en
glissiêre
a
g)issiere
a
a
Ensuite,
le
(ongent
fermeture
(a
moitié
at
(fig.
0).
transversa(e.
couture
symétriquement
et
Laisser
Lever
a
presseur
glisslére
fermeture
a
mm
poussoir
coudre
droite
poser
pied
dans
dans
fermer
Abaisser
(a
couture
juste
pied
(e
glissiere
et
du
gauche
main.
(a
a
(fig.
(a
presseur
bord
Ia
(a
tissu,
le
(a
para((e(e
(‘aiguille
avant
presseur
terminer
a
G
pied
N>,
fer
(argeur
far
(e
et
(fig.
ou
(a
de
R>.
a
4
Ritsstuiting
Naaivoet:
Steek(engte:
Steek:
Garen:
De
rechts
Ritssluiting
De
aan
naald
ritss(uiting-voet
ingek(ikt
inriigen
rits
rechterkant
de
boven
staat
voet
(eggen
voet
rechter
s(uiting
Dc
stof;
in
de
dichtritsen
Naaivoet
eindpunt
naaien.
tweede
Het
stikken.
in
naa(d
openen;
rits
da
afmaken.
stiksel
inzetten
(afb.
kant
naaivoet
om)aag;
instikken
Op
de
ritsvoet
2-3
Toets
normaal
worden
inzetten:
en
rechter
de
N).
dat
van
de
tot
(afb.
stikse(
helft
de
stof;
G
kan
onzichtbare
openritsen.
inklikken
De
tandjes
de
voet
de
helft
omhoog;
0).
de
en
op
van
voet
naaivoet
garen
zowe>
(afb.
opening
rits
(open
instikken;
s(uiting
het
dezelfde
het
omhoog
om(aag;
(inks
N
+0).
sluiting
voet
De
zodat
van
onder
zo
buiten
(afb.
naa(d
sluiting
de
hat
tot
dwarsnaadje
afstand
stiksel
(afb.
a(s
de
de
de
de
P).
de
R>;
het
4
Page 52

--n-
--
—4
HosenreilverschluB
Maschinen-Einstellung
43.
Reit,verschluIful
Den
Schlitzkanten
Die
Reil?,verschluE,
senen
gehugelten
ten
Reit?,verschlul?,zähne
die
Vorbereitete
sind.
anstecken
fassen.
rechten
am
N).
lAbb.
stehen
Stoff
Rei1verschluB
die
und
schlieRen.
schluL,
Ubertretenden
zustecken.
lauf
einheften
Rei1verschIuP,
anbringen
lineal
so
breite
an
lineal
)Abb.
läuft
Stoff
im
ReiBverschluR
hen,
senken
der
Ende
Riegel
Schlitzrand
beim
und
ReitverschluP,zähne
Die
Fuhrungssteg
vor
Kurz
lassen,
öffnen,
fertig
Naht
Schlitzrand
)Abb.
Offnen
ausrichten,
Kante
der
Pt.
stehen
die
und
ReiI?,verschlutf,naht
sichern.
(Darnen)
siehe
rechts
bugeln.
unter
so
noch
Untertrittsleiste
Aufsteppen
Nahtende
Nàhfu)t
Nähfuf
nãhen.
F1eilverschluRseite
Linke
0).
Das
auf
und
dat?,
des
vor
Kurz
lassen,
schliegen,
fertig
Naht
Seite
einrasten.
Den
heften,
sichtbar
enfiang
Nadel
anheben,
Den
nach
FUhrungs
Abstepp
die
das
Stoffes
Nahtende
Nähtul?,
ndhen.
42,
geschlos
rech
den
mit
laufen
senken
ReiBver
Nahtver
Führungs
entlang
anhe
Ndhfeitf
durch
daBs
Q
irn
Nadel
Das
einen
N
Zippers
For
machine
Engage
Press
the
placket
that
strip
down
zip
guiding
Shortly
leave
raise
lower
sewing
Pin
intended
(Fig.
Open
position
so
fabric
the
fabric,
the
sewing
zip
the
closed
its
0
at
The
the
the
the
the
0).
that
seam.
zip.
seam
ladies’
in
setting
zipper
the
edges
zip
the
on
teeth
the
to
the
teeth
zip
edge
before
needle
zipper
zipper
seam.
the
overlapping
seam
Attach
zip,
for
it
it
moves
P1.
(Fig.
leave
raise
Lower
the
with
slacks
of
the
to
reverse
still
are
underside
same
the
of
the
down
foot,
foot
line.
the
Shortly
the
zipper
the
the
seam.
a
see
foot
the
right
visible.
time
along
run
foot
end
open
again
Close
edge
Baste
edge
the
desired
along
needle
zipper
Secure
bartack.
page
the
on
placket.
edge
fabric
and
as
(Fig.
the
of
the
in
the
along
the
before
foot
you
the
the
and
left
guide
seam
edge
down
foot
the
42,
right.
side
Pin
stitch
N).
seam,
fabric,
zip.
zip
the
and
end
Baste
of
facing
sew
right
zip,
finish
the
margin
close
and
43.
so
edge
and
of
the
it
end
in
of
the
the
o
the
finist
th
Page 53

rmeture
me
glage
gas
‘placer
tee
passer
meture
rd
droit
dents
ibles.
mbler
nts
barrette
ure
sser
presseur,
d
ssière,
miner
jlissière.
nte
partie
ssière
vrir
place
geur
de-droit
P).
j.
sser
pied
ssière.
miner
uture,
a
de
43.
42,
le
las
a
de
de
Epingler
(a
Ia
de
Peu
N.
I’aiguille
rabaisser
Ia
salon
gauche
(fig.
fermeture
(a
at
de
Peu
l’aiguille
pressaur
Rabaisser
Ia
coudre
glissiere
a
machine
pied
bards
glissiere
Ia
Ia
fermeture
tout
fermeture
droite,
avant
ouvrir
couture.
Epingler
le
trace
O(.
aligner
piqiire
Ia
longe
avant
couture.
a
fente
Ia
par
dans
de
dans
at
un
pour
droite
de
fermée
de
sous
une
comme
Ia
le
a
pied
Farmer
(a
de
Ia
a
le
de
bord
(a
Ia
farmer
le
A
arrét.
pantalon
voir
jusqu’à
fente.
a
manière
soient
patte
couture.
glissiera
a
Ia
de
fin
tissu,
a
fermeture
presseur
sous-patte
couture.
Ia
fermeture
glissière.
guide
sorte
du
fin
de
tissu,
Ic
Ia
pied
fin
Ia
Bâtir
sous
Q
montre
couture,
a
relever
fermeture
Ia
Mettre
droit
qua
tissu
Ia
couture,
remonter
fermeture
presseur
de
Ia
a
qua
encore
as
et
Les
longent
a
et
depas
Bátir
a
sur
Ic
Ia
4
Treksluiting
Machine
Varschuif
geheel
voet
inslagen
De
Dc
ken.
rechterzijde
de
Ia
Ia
le
(a
der
spelden,
Voorgeknipt
zijn.
bet
en
bij
de
van
de
onder
N).
(afb.
naad
de
Stofdrukker
luiting
tot
naad
sluiting
linkerovarsiag
Dc
de
over
Sluiting
voet
de
op
dat
len
an
sal
is
lafb
nauwkeurig
met
naad
in
instellen
zoo)
de
naar
van
treksluiting
da
dat
naaien
sluiting
rechter
Laat
naald
de
omhoog
openritsan.
einde
het
weer
treksluiting
openritsan.
aanbrengen
afstikbreedte
de
stofkant
de
Voet
P1.
doornaaien.
een
damespantalon
blz.
zie
de
van
links.
split
het
lgeslotenl
van
tandjes
tegenbeleg
meastikken.
bij
liggen
zijkant
voor
vlak
in
de
zetten
Voet
afnaaien.
trekken.
dicht
volgens
spelden
Verstelbara
precies
omlaag
afhechten.
trens
42.
treksluiting
scherp
split
hat
zichtbaar
nog
hat
van
einde
hat
staan.
stof
an
omlaag
afb.
zovar
en
tussen
breed
de
en
Aan
instrij
zOvar
nrijgen
Q
tandjes
De
instikken
voet
da
de
an
Dan
0
inrijgen.
en
Iineaal
inrage
het
genoeg
naad
het
van
treks
de
de
ruim
eind
on
stik
de
a
at
AC
Page 54

Geradstich
Stopfen
NähfuB:
Stich:
Oberfadenspannung:
Garn:
Nadel:
Transporteur:
Stopfanschlag
StopffuI
Die
nach
Den
einführen,
mit
anbringen
Nadel
hinten
des
Stift
Stoffdruckerstange,
die
Anschlag
zum
loslassen,
schraube
drehen.
Unterfaden
Fdden
einige
Sie
überstopfen
Jeweils
stopten
gleichmalMg
Stoff
zuvor
stelle
Die
Arbeit
und
Q
bei
Stiche
Fäden
die
am
(Fig.
urn
gespannten
geschlossen
Stichlange
selbst,
herbewegen.
hochstellen:
drücken
die
wobei
egt.
nach
Nähbeginn
Sie
Nahtende
90
121:
Fuses
Gabel
einsetzen.
er
Die
oben
Stoff
irn
dicht
die
SI.
bedeckt
Grad
bestimmen
indem
Stopffu1.
SonderzubehOrl
Taste
etwas
feines
stickgarn
Stärke
versenkt
nach
schieben
drückerhebel
ken
sen
Den
und
die
in
greift
R
und
auf
sich
Schraube
holen,
festhalten.
nähen.
nebeneinander
schadhafte
in
die
Sobald
st.
stopfen
und
Fäden,
(Fig.
ist
Sie
G
leichter
Maschinen
70
hinten
Stoff
Bügel
festhalten,
Bohrung
dabei
den
Bugel
Den
die
0
Beide
Spannen
runden
Stopfsteile
drehen
die
bis
Ti.
bei
Sie
Nahgut
das
P
Ful’
Halte
fest
Zuerst
Stelle.
Bogen
Sie
über
Stopf
N
urn
P
und
den
die
dieser
bis
hin
Darning
Sewing
Stitch:
Tension:
Thread:
Needle:
Feed
Darning
Attaching
Position
back
the
foot
the
fork
push
which
Tighten
Draw
threads
few
over
the
the
(Fig.
been
workpiece
right
stitches
You
stitches
the
with
foot:
dog:
stop
the
and
in
R
engages
toot
the
then
screw
up
until
stitches.
damaged
the
other
lines
When
SI.
covered
angles
(see
determine
by
fabric
the
hole
rests
the
in
of
through
back
straight
121:
darning
needle
hold
N
the
fully
on
0.
bobbin
machine
the
First
serpentine
stitching
the
completely,
the
to
Fig.
the
rate
the
and
stitch
Darning
(special
Button
needle
Ease
tension
machine
Fine
embroidery
70
Size
Lowered
backwards,
push
lower
lifter
foot
Push
up.
there.
it
the
(at
presser
Let
in.
retaining
thread.
a
sew
from
spot
fashion,
close
damaged
and
90
preceding
TI.
length
which
at
forth.
foot
accessoryl
G
presser
bar
Fit
same
barl
of
go
Hold
has
few
one
together
spot
turn
darn
the
of
thread
thread
bar
P
the
time,
and
bar
screw
made
stitches
placing
the
row
darning
you
to
pin
both
side
has
at
of
move
N
of
P.
Q.
a
to
Page 55

4
Reprisage
presseur:
Pied
Point:
Tension
d’aiguilte:
Fil:
Aiguilte:
Grifte:
ButCe
Fixation
Lever
vers
P
tenon
le
fourche
presseur;
butCe.
de
vis
0.
vis
Remonter
es
deux
points.
dans
bord
SI.
(fig.
ment
sons,
recouvrir
points
(ongueur
(‘ouvrage
\
\
s
au
du
121:
du
barre
(a
l’arrière
de
B
introduire
Lâcher
maintien
fits
Ancrer
tissu
to
(‘autre
a
Des
recouvert
tourner
(fig.
des
point
Pied
(contre
Bouton-poussoir
fit
moms
Fit
Grosseur
abaissée
La
Abaisser
presse-tissu
a
pied
aiguitte.
a
et
semette
a
entoure
Vétrier
Q.
fit
de
(e
pendant
d’abord
puis,
du
que
de
(‘ouvrage
fits
es
Determiner
T).
points
ou
plus
I
droit
repriser
a
supplement)
forte
broder
a
70
vers
glisser
le
repriser
Déplacer
maintenir.
le
dans
barre
Ia
pied
le
it
se
P;
Ensuite
canette
premiers
les
quelques
tendre
serpentin
en
trou,
est
trou
(e
couches
fits
de
uniformément
déptacant
en
vito,
moms
G
fin
l’arriere
levier
tntroduire
trou
le
pied
du
jusqu’à
pose
resserrer
maintenir
et
fits
es
regutiere
90°
de
soi-méme
l’étrier
points
dun
dans
et
N;
(a
sur
petits
-i-n-
t-F
4t*
ri-t-4-+trti-1-f-H--’
‘rf1-tt11m
t-’t-l-
-4-+---4--l--—————
irl-t-t-ttt
**
)-zf
4
N
Stoppen
Naaivoet:
Steek:
Bovenspanning:
Garen:
Naatd:
Transporteur:
Schuifje
Stofaandrukker
med
121
Stopvoet
naald
Dc
P
Beuget
houden.
ning
(a
(a
(a
un
a
stofaandrukstang
mogetijk
Beuget
schroef
vastdraaion.
Haat
den
steken
liggende
roren
boreikt.
schuif
liggende
stop
moot
schuiven,
N
P
do
oven
ptek,
nogmaats
goreod
u
Do
naar
Q
spoetdraad
maken.
Draai
zotf
de
stopvoet
(extra
toots
(ets
dun
dikte
taten
naar
omtaag.
bevestigen:
hoogste
in
do
van
naar
stift
links
tostaton,
komt
vasthouden
Ga
(Afb.
banen
eon
tot
do
steekbanon
is
(Afb
at
—
rechte
achteren
u
van
waarbij
vatt.
drukken.
waardoor
tiggon.
to
vervolgons
hochto
stof
met
schuivend
—‘
-I
—,
—J
steek
accessoirel
G
tosser
machinestopgaren
70
zakken
schuiven.
zetten.
stand
drukken
af
voetje
hot
vorkje
voetje
Hot
doze
Schroef
en
SI
90°
dicht
enkote
over
basis
gradon
opoen
het
stoek(ongte
Do
Beide
met
do
gat
—
bopaten.
omhoog.
over
Ti.
en
in
B
hocht
to
is
vast
ope
om
zover
over
0
dra
dicht
repa
en
tot
do
de
I
)
Page 56

Wolle
ähgarn:
Sie
Faden
Woflfäden
N).
Elastiknaht
beachten
zu
die
sonst
ohen
Die
werden
Stopfste))e
schdner
mit
121:
den
Sie
ihn
liegi
Sie
oben
und
mit
dicht
Stopfste)le
beschriebenen
der
auf
sieht
aus.
Stopfen
NahfuR:
Stich:
Oberfadenspannung:
N
Nadel:
Transporteur:
Stopfschlag
Fdhren
Stichlochausschnitt
legen
Der
ginnen
die
lAhb.
AnschheRend
schnitten
Woflfäden
der
Bitte
nicht
StopffuR
Sonderzubehdr)
Taste
mm
hereich
Stick
Stopfgarn,
Stärke
verse
nach
schieben,
drbckerhebel
senken
Woilfaden
des
Fadenfdhrung
die
in
wird
dem
unter
und
inks
dber
quer
der
zuvor
die
Zickzackstichen
übernäht
dalt,
Sic,
nebeneinander
zu
Seite
linken
dadurch
E
Knopfloch
bei
md
70
k
n
hinten
durch
Stopffuttes
Stopfful.
spannen
Stopfstelle
die
Wollfaden
gespannten
)Abb.
Stichreihen
die
liegen,
wird,
hart
Arbeitsgdnge
gendht.
von
3
Wote
Stoff
den
oder
0).
rechts
P.
Sic
abge
und
mit
Be
da
Die
4
Darnmg
Sewing
Stitch:
Tension:
Sewing
Needle:
Feed
Darning
Draw
needle
thread
Place
foot.
wool
damaged
Then
the
stitches
(Fig.
not
Do
close
darn
darning
All
carried
fabric,
the
dog:
the
guide
the
Start
thread
cut
rows
0).
together,
too
face
with
foot:
thread:
stop
wool
hole
wool
area
the
of
or
place
hard.
out
so
side.
at
an
that
wool
121
of
P.
the
back
wool
wool
the
work
on
Darning
(special
Button
3
Embroidery
darning
Size
lowered
push
thread
the
thread
top
and
(Fig.
thread
elastic
lines
as
described
the
the
in
lower
lifter
darning
left
N).
thread
stitch
this
reverse
darn
foot
accessory)
F
buttonhole
thread,
70
backwards,
presser
through
foot
under
and
across
forth
and
with
seam
stitching
of
would
above
side
looks
and
the
place
zigzag
make
neater
bar
the
and
sew
of
range
wool
into
darning
the
the
over
too
the
is
the
on
Page 57

Reprise
Red
Point:
Tension
daiguiile:
Eu:
Aiguifle:
Griffe:
ButCe
Enfiler
repriser
C
guidage
do
Tourner
cer
trou
Couper
iCiflO
do
ou
de
Vetiler
zigzag
reprise
ride.
En
ciage
a
presseur:
du
21:
1
lo
fixer
a
dun
Ia
points
a
no
deviendrait
repnsarit
est
lame
Ia
fil
do
fil
Ic
Ct
P,
(‘ouvrage
lame
Ia
bord
fil
he
ayant
zigzag
que
ce
soient
do
mains
-_
repriser
C
Red
(contre
Bouton-poussoir
Zone
fil
hi
Grosseur
abaissée
lame
sous
Cté
broder
C
do
qlisser
La
Abaisser
so-t
pros
coucher
C
a
I’autre
C
lame
fixes
as
pas
trop
(covers,
voyant
suppldment(
boutonnières
lame
is
so
Ic
par
dens
pied
Ic
(‘envers
gauche
(fig.
couvrir
et
de
piqués
rangCes
trap
duro
ou
10
vers
C
trou
a
serrdes,
Ic
oviar
points
E
repriser
C
l’arr;Cre
du
rainufe
a
repriser,
Commen
couvrir
et
NI.
es
(fig.
0).
points
de
trap
et
raccumrno
(3;
pied
his
zIgzag
Ia
wol
P
van
dread
boven
rechts
OI,
bij
do
minder
met
near
21
1
dread
he
stopvoet.
do
nu
Iigt
bet
en
bedekt
is
doorknippen;
zigzag
he
Om
behoeven
do
over
voorkour
rechterkant
zichtbaar.
stopvoet
E
toots
knoopsgatenzone
en
snepel
dun
stopgaren,
Iiefst
70
dikte
uitgeschakeld
achteren
omlaag.
door
wol
do
onder
en
span
gat
over
terug
N).
(afb.
z;gzagsteek
met
de
woldraden
niet
stop
slechts
warden
to
stop
linker
do
on
de
is
schuiven,
hot
voet.
het
Dan
te
enke(e
wolstop
hi
garen,
wol
draadg(euf
Start
wuldraden
tot
gat
do
wol
(osjes
to
hard
hecht
geiegd
stat
dear-
3
dit
of
kant.
Stoppen
Naaivoet:
Steok:
Bovenspanning:
Naaigaren:
Naald:
Transporteur:
Schuifie
Stofaandrukker
Steok
e
Do
(inks
near
qnheei
draad
Ic
gestikte
hechten.
maken
stikse(s
(afb.
Stop
Aan
door
I
Page 58

Reinigen
Netzstecker
•
Spulenkapsel
len.
Nahfug
Knopflochful.es
des
linken
der
stecken.
wobel
platte
Transporteur
den
reinigen.
und
ab
Zeichnung
geben.
bleri
und
ziehen.
ausrasten.
Kante
Ful’
Den
Stichplatte
die
sich
herausnehmen.
Maschine
Die
einen
zu
zeigt,
Nadel
herausnehmen
vordere
Die
die
in
Stichplatte
der
unten
nach
Mit
den
und
nicht
Tropfen
Greiferbahn
die
in
hochstel
Nocke
Offnung
drücken,
Stich
lost.
Pinsel
dem
Greiferraum
Olen.
wie
0!,
und
die
0
Nor
oiling
Poll
N
on
put
out
foot
of
the
the
is
the
sewing
the
oil
a
and
and
the
Remove
snap
buttonhole
the
left
foot
loosened.
feed
hook
machine.
drop
then
mains
bobbin
out.
of
edge
downwards,
Remove
and
dog
with
in
oil
of
shown
las
plug.
the
All
the
case
Insert
foot
the
soft
a
you
Raise
needle
the
needle
vicinity
have
hook
the
in
and
the
opening
in
needle
brush.
raceway
the
let
front
plate.
plate.
to
of
Do
do
Cleaning
•
needle.
N
an
sewing
tab
o
Push
plate
Clean
the
not
is
now
illustrationl.
Nettoyage
Ddbrancher
•
Amener
Sortir
semelle.
a
pied
gauche
a
semelle
libhrée.
‘aide
A
compartiment
Ic
et
huiler
suffit
a
coursière,
ma.
hO
sc
graissage
et
l’aiguille
bolte
Ia
Engager
houtonnières
Ia
de
plaque
Ia
et
Enlever
d’un
machine.
Ia
mettre
de
comme
machine
Ia
en
canette
a
Ic
plaque.
Ia
pinceau,
one
position
tenon
dans
a
plaque
do
De
gootte
il
et
Abaisser
aiguille
nettoyer
crochet.
temps
est
secteur.
du
haute.
degager
avant
l’ouverture
est
aigoille.
a
Ia
Ne
autre,
a
d’huile
montré
N
Ia
Ia
do
griffe
pas
dens
sur
4
Schoonmaken
Stekker
•
omhoog
Naald
ren.
men.
0
1
Ic
knoopsgatenvoet
kerkant
voet
steekplaat
verwijderen.
transporteor
spoelhols
De
voorste
Het
van
naar
schoonmaken.
grijperbaan
De
druppel
een
behoeft
der
worden.
te
en
het
uit
en
de
beneden
omhoog
Met
en
olie
de
smeren:
stopkontakt.
naaivoet
de
de
oit
nokje
gaatje
in
steekplaat
drukken,
komt.
een
grijperruimte
de
toe
af
en
schets
lzie
machine
machine
N
kwastje
smeren
niet
van
aan
0
steken,
waarbij
De
boveni.
gesmeerd
verwijde
ne
de
de
De
steekplaat
de
met
lin
de
Var
Page 59

Gluhlampe
Netzstecker
•
Mit
auf
und
wieder
Fuhrungslineal
nung
stecken,
und
drücken,
men.
die
ten.
nach
Die
Lampe
Knopflochfu1
dem
Kopfdeckel
dem
nach
eindrücken,
auf
N
Lampengehäuse
festhalten.
Die
Fuhrungen
Die
GlUhlampe
drehen.
P
maximal
betragt
auswechseln
ziehen.
Wechseln
dem
etwas
dem
Die
0
nach
Lampe
neue
in
zulässige
1
anheben,
Nähfläche
schräg
Kopf
Gluhlampe
drehen
Schlitzen
den
hochdrücken
Watt.
5
Einsatz
den
der
Maschine
der
niederdrdcken
und
einsetzen,
so
Leistung
R
entfernen
Gluhlampe
abnehrnen.
Off
die
in
hoch
herausneh
glei
0
und
der
daB
N
Changing
Pull
•
the
Use
insert
up
the
cover
having
after
the
Hold
it
push
machine.
the
lamp
the
upwards,
it
out,
enter
pins
upwards
sure
Be
in
bulb
the
the
out
buttonhole
on
A
and
edge
into
and
turn
Insert
slots
and
use
to
the
bulb
mains
the
push
exchanged
guide
opening
Press
hold
it
in
the
new
Q,
turn
only
sewing
plug.
sewing
arm
back
it
slightly
N
down
fast.
it
direction
bulb
push
in
it
1
a
lamp.
foot
cover,
in
the
the
in
the
Push
so
the
direction
5-watt
remove
place
light
tilted
head
housing
0
that
bulb
to
the
and
P.
light
lift
bulb.
and
of
of
bulb
pull
the
Changement
Debrancher
•
moyen
Au
soulever
l’enlever
remplacé
avoir
Ic
Placer
l’ouverture
dans
machine.
de
boitier
haut,
Ic
vers
Placer
ver.
ses
que
Pousser
tes
Q.
tourner
Ia
Puissance
I’ampoule:
de
Ia
pied
du
‘applique
remettre
Ia
et
guide-bord
Descendre
lampe.
Ia
Ia
l’ampoule
tenons
vers
maximale
15
l’ampoule
machine
boutonnières,
a
sur
A
l’ampoule.
de
sur
N
et
Pousser
tourner
s’engagent
l’ampoule
P.
admissible
Watts.
le
en
facon
tête
Ia
maintenir
vers
neuve
secteur.
do
couvercle,
place
oblique
de
l’ampoule
0
de
dans
vers
après
Ia
le
l’enle
et
manière
les
haut
le
de
fen
Lampje
•
Met
A
en
indrukken.
De
et
wisselen
Stekker
uit
na
kop
phuis
den.
richting
Nieuw
pennen
lampje
drasien.
naaimachinelampjes
5
1
gebruikt.
ult
knoopsgatenvoet
de
kopdeksel
de
het
wisselen
iets
lineaal
van
de
near
oude
Het
draaien
0
lample
de
in
omhoogdrukken
Er
voor
Watt
machine
heneden
gleuven
mogen
het
scheef
lampje
zo
deze
inzetten
stopkontakt.
het
optillen,
het
van
opening
in
steken.
drukken
omhoog
eruit
en
glijden.
Q
en
uitsluitend
van
maximeal
machine
inzetstukje
verwijderen
lampje
Het
en
drukken,
nemen.
de
dat
naar
worden
weer
in
N
lam
vasthou
beide
Het
P
de
51
Page 60

JadeI-TabeIIe
richtigen
der
Wahi
)ie
ne
bessere
Verarbeitung
Nadel
garantiert
Nähmaterials
des
Stotfquahtat
1
Stoffquatät
Ieicht
Nadel
——.——-—
60
Nadelspitzen
Bezeichnung
H-N
130/705
100
H
H-SUK
H-PS
H-SKF
H-J
-IL
H
H-PCL
H-Wing
130/705
Nadelstârke:
70/80
130/705
Nadelstdrke:
70/110
130/705
Nadelstärke:
75+90
130/705
Nadelstärke:
70/110
130/705
Nadelstärke:
90/110
130/705
Nadelstärke;
70—120
130/705
Nadelstärke:
80—110
130
Nadelstdrke:
70—110
Nadelstärke:
52
70
75
-
Profil
—
—
Stoffqualität
I
80
Nadespitze
mittel
Nadel
90
und
Geeignet
für
100
schwer
Nadel
110
120
Nadelöhr
Chiffon,
Ziernähte,
Synthe
Batist,
feinmaschige
kleine
—
Kugelspitze
Universalnadel
tikgewebe,
Organdy,
für
feines
Wollstoffe,
Leinen,
Samt,
Stickereien
mittlere
—
Kugelspitze
m,ttlere
Kugelspitze
grole
Kugelspitze
—
—
spitze
Rundspitze
Schneidspitze
Grobmaschige
Lastex,
Speziell
Besonders
StretchGrobmaschige
Simplex,
Koper,
Leinenstoffe,
tuch
Wildieder,
Leder,
Strickstoffe,
Interlock,
Ouiana,
entwickelte
geeignet
gut
Wirkstoffe
und
Miederwaren,
Lastex
Berufsbekleidung,
Blue
Jeans,
Kalbsleder,
Wirkstoffe,
Simplex
Stretchnadel.
empfindliche
für
schwere
feines
Lycra,
Segel
Ziegenleder
lrechts
schneidend)
Wachstuch
Schneidspitze
Spitzen
mit
Kunstleder,
Plastik,
Folien,
rinne
(linkslaufend)
Knopflochseide
Kugel-
kleine
spitze,
langes
<
Absteppnähte
synthetischem
oder
mit
Garn
30/3
Nadelöhr
stark
HohlsaumSpitze
Effektvolle
appretierten
Glasbatist
Hohlsaumnähte
Geweben,
bei
Organdy,
Page 61

idel-Tabelle
jj
II
‘f’
Ziermuster
Bevor
rades,
sgesc
cu
‘
ri
7
Bezeichnung
130/705
Stärke:
130/705
Stärke:
Stärke:
Stärke:
Sic
ob
Zierstichmuster
130/705
Stärke:
Stärke:
Stärke:
H-ZWI
80
HZWI
80
90
100
ZwiHingsnadeln
mit
gewdnschte
die
Nadein
die
haltet
80
80
80
HohkaumlSpezial
130/705
H-ZWI-HO
Stärke
Stärke:
H-ZWI
80
100
Stichiänge
mm
2,5
mm
2,5
mm
2,5
mm
2,5
3,0mm
Verzierung
einwandfrei
Zickzack-Muster
/
0,5—1,5
0,5—1,5
0,5-1,5
Doppelnadel
2,0—3,0
2,0—3,0
ausnähen,
einstechen.
mm
mm
mm
mm
mm
Stchbreite
—
---
—
-
Dadurch
breit
schmal
schmal
sehr
sehr
kontrollieren
wird
schmal
schmal
NadeI
entfernung
mm
1,6
mm
2,0
mm
2,5
mm
3,0
4,0mm
Sie
Nadeibrechen
em
1,6mm
mm
2,0
mm
2,5
durch
Geeignet
I
J
normale
normale
breite
extra
Biesen
Drehung
weitgehenst
Verzierungen
Verzierungen
Verzierurigen
Dekorativer
Hohlsaumetfekt.
Stark
Gewebe
Glasbatist
besonciers
geeignet
für
Biesen
Biesen
Biesen
breite
des
appretierte
Hand
und
sind
gut
53
Page 62

eedle
of
se
the
chart
correct
needle
ensures
better
processing
material.
the
of
Fabric
Needle
System
130/705
80
70,
130/705
110
70,
130/705
90
75,
130/705
110
70,
130/705
90—110
130/705
70—120
130/705
80—110
130
70-110
130/705
100
Needle
60
No.
&
H
H-SUI(
H-PS
H-SKF
H-N
weight:
light
size:
70
points
H-J
H-IL
H-PCI
H-Wing
r
75
Profile
Point
Light
Medium
ball
Medium
ball
Heavy
ball
Acute
round
Narrow
twist
C
weight
Fabric
medium
-
Needle
8090
eye
&
point
ball
point
point
point
-_
point
point
Narrow
point
left-twist
Light
long
wedge
with
ball
eye
Hemstitching
point
size
groove
point
:
Suitable
Universal
synthetics,
organdy,
embroidery
and
Coarse
jersey
Stretch-fabric
suitable
fabrics.
Wide-meshed
and
Twill,
and
Leather,
leathers
Imitation
plastic
Seams
or
Attractive
dressed
glass
for
needle
woolens,
knitted
fabrics,
for
Lastex
workwear,
light
sheeting
topstitched
30/3
No.
cambric.
fine
fabrics,
Qulana
needle.
delicate
corsetry,
canvas.
suede,
leathers,
synthetic
hemstitching
materials,
linen,
work.
Fabric
Needle
100
fine-meshed
for
velvet,
stretch-
heavy
calf
plastic
and
weight
heavy
size:
110
chiffon,
fancy
Lastex,
Simplex.
and
Particularly
Lycra,
linen,
goatskin
and
materials,
oilcloth.
buttonhole
with
thread.
on
organdy
120
batiste,
seams
double-
and
Simplex
blue
heavily
and
knitted
jeans
silk
Page 63

leedle
chart
System
fl
130/705
80
130/705
ç’
Decorative
Before
the
into
Decorative
II
J
‘
11
jiJ[
i)
7
&
80
90
designs
start
you
fabric
80
80
80
Special
130/705
H-ZWI-HO
80
100
No.
H-ZWI
H-ZWI
[30mm
sewn
sewing,
properly.
zigzag
and
[
hemstitching
Stitch
2.5
2.5
2.5
2.5
with
turn
this
In
0,5—1.5
0.5—1.5
0.5—1.5
2.0—3.0
2.0—3.0
length
mm
mm
mm
mm
the
patterns
twin
twin
way,
mm
mm
mm
needle
mm
mm
needles
handwheel
needle
Stitch
—
—
—
--
wide
narrow
narrow
very
very
width
and
breakage
narrow
narrow
check
can
to
Needle
spacing
1.6
2.0
2.5
3.0
4Mmm
make
largely
be
1.6
2.0mm
2.5
—
—
mm
mm
mm
mm
mm
mm
sure
prevented.
Suitable
Medium-wide
cording
Wide
Extra
Exftawecorng
needles
the
Ornamentations
Ornamentations
Ornamentations
Decorative
stitching
Heavily
fabrics
ticulary
for
cording
wide
stitch
dressed
are
suitable.
cording
hem
effect.
par
55
Page 64
Tableau
cl,oix
e
jJrtJflt
aiguilles
des
P
st
te
adqu
aiquAe
d
nolote
de
s
ni1eurs
jrfltt
On
tarS
60
Pointes
Designation
130,705
Grssur
aquIn
130i705
Grosseur
agrse
705
130
Grosseur
‘djuih
130i705
Grsseur
aquWe’
130i705
Grosseur
‘aigulin.90a11’3
1301705
Grossnur
saute’
130i705
Grosseur
aquile
H-N
130
-
rjrosserr
sgule
I
130705
Giossnur
grits
Mtieres.
égères
Aquhes
70
d’aiguiile
H
he
30
70
H
SUK
de
110
iOd
H-PS
do
90
75
a
H-SKF
ac
110
70a
H-J
do
IL
H
Pc
120
70a
H-PCI
he
110
SOa
e
10
lflt
H-Wing
Se
00
75
Forme
de
I
pointe
—
—-—
—
—--——--—-rc:
Pointe
de
or
iC
poinre
bile
ponte
bile
0
rande
bile
comm
pointje
porte
oiqz
jr-jj!e
3
oonm
pante
minurn
poe
petite
cOla
sp,ntn
urudo’cs
ii
Materes:
noyennes
A
80
et
1aigiiilie
te
Poe
nioveni-e
moyer’ne
poole
ante
cou
avon
3
ponte
e
5
rules.
chas
nde
obli
a’sur
90
Utillsatons
AguWe
nt_ail’
ques
urqancl
d
tures
Tisss
maifle
Agulle
machines
pour
runm
grande
Lycra
Lynra,
etc.?
CruisS,
blue
leans
jaim
Cur
Smlr’uir,
crue
tote
Piqurns
t
aynthetque
il
(Da,tires
tiSrS
universelle
foe
ssus
t
ornementation
trinotés
Lastex
Stretch,
gr
Interlock,
sperérment
Pfaf
,
155
mamlie
Simpux,
vt-mrts
toTe
eCCu,
olastiqu,
some
avec
-jours
orgind
tins,
one,
Crv
to
tr-oh
a
‘a’
Pr
\fateres
Aqifles:
100
pour
fi
velours
mOe
ent
gaines,
LisPrx
rraviil,
‘fe
voleS
i’hnvreau
feilns
boutonniere
a
3
très
hatiste
ourdes
110
ti’-sus
chiffon,
pour
et
mille
Q
tout
at
fine
IC-orit’,ies
-
120
syniheti
batste,
pour
broder
ossus
Smpx
iina,
aevelnopée
nirtOulidre
hair
miHC
combines,
os
Tastques,
ou
Oiu
i-s
pour
dts.
curtis,
air
Page 65

ableau
des
aiguilles
Designation
[
130/705
i
Grosseur:
130/705
,
Grosseur:
Grosseur:
Grosseur:
Ia
a
couture.
Motifs
130/705
Grosseur:
Grosseur:
Grosseur:
Ourlet
130/705
Grosseur:
Grosseur:
d’ornementation
couture
Coutures
Avant
impeccablement
de
n
1
11
V
ii
•
I
jt
i7
H-ZWI
80
H-ZWI
80
90
100
d’ornementation,
dans
point
au
H-ZWI
80
80
80
ajour/Aiguille
80
100
mm
mm
mm
mm
avec
double
de
aiguilles
tournez
Ainsi
mm
mm
mm
spéciale
mm
mm
vous
Longueur
point
2,5mm
2,5
2,5
2,5
3,0
a
plaque.
d’ornementation/Motifs
0,5-1,5
0,5—1,5
0,5—1,5
2,0—3,0
2,0-3,0
Largeur
point
—
—
—
-
jumelees
Ic
ne
large
étroite
étroite
très
très
volant
risquez
au
étroite
étroite
de
point
et
pas
Espacement
des
1,6mm
2,0
2,5
3,0
4,0
contrólez
que
zigzag
1,6
2,0mm
2,5
--
—
aiguilles
mm
mm
mm
mm
si
les
aiguilles
mm
mm
es
aiguilles
Utilisations
nervures
normales
nervures
nervures
extralarges
cassent
Ornementations
Ornementations
Ornementations
Effet
d’ourlet
Soot
ment
es
apprêtés
larges
pénètrent
au
décoratif
ajours.
particuliere
appropriés
tissus
et
cours
très
le
Page 66

Naaldentabel
Het
betere
thwitStoth
wahteitflthw&itei
t
Vorm
gebruik
van
verwerking
van
de
van
de
Naaldpunt
de
stof
garandeert
naald,
juiste
een
Benaming
130/705
naalddikte:
70/80
130/705
naalddikte:
70/110
130/705
naalddikte:
75/90
130/705
naalddikte:
70/110
130/705
naalddikte:
90/110
130/705
naalddikte
70/120
130/705
naalddikte:
80-110
H-N
130
naalddikte
100—110
130/705
naalddikte:
100
H
H-SUK
H-PS
H-SKF
H-J
H-IL
H-PCL
H-Wing
Prof
Geschikt
iel
Naaldpunt
en
voor:
naaldoog
bol-
kleine
—
vormige
punt
Universele
synthetische
batist,
sierrandjes
bolvormige
—
—
—
—
middel
bol-
kleine
vormige
klein
grote
vormige
—
punt
naald-oog
bol-
punt
punt,
—
—
spitse
naaldpunt
—
—
—
snijpunt
Grofmazige
mazig
interlock,
Special
Bijzonder
stoffen,
Grofmazige
simplex,
Keper,
jeans,
Leer,
naald
weefsels,
chiffon,
en
gebreide
gebreid
simplex,
ontwikkelde
geschikt
zijden
by.
foundation,
lastex
werkkleding,
zeildoek
fijn
wildleer,
organdie,
linnen,
borduurwerk.
stoffen,
materiaal,
quiana
stretchnaald.
voor
jersey
zwaar
kalfsleer
wol,
lastex,
delikate
lycra,
linnen,
katoen,
zijde
fijn
stretch-
fijnmazige
voor
(rechts
snijdend)
wasdoek
snijpunt
gleuf
llinks
met
Skai,
plastic,
folie,
uitlopend)
knoopsgatgaren
naaldoog
lang
bol-
—C
—
—
kleine
vormige
ajour-punt
punt
Zadeisteek
30/3
Effectvolle
geappreteerde
met
ajournaad
weefsels,
in
sterk
organdie,
glasbatist
Page 67

Jaaldentabel
Sierstiksels
Voor
of
de
_____
11
IT
J’I
1
Benaming
130/705
naalddikte:
130/705
naalddikte:
naalddikte:
naalddikte:
met
gewenste
de
naalden
Zigzagstiksels
130/705
80
dikte
80
dikte
80
dikte
Dubb&e
130/705
H-ZWI-HO
80
dikte
100
dikte
Steeklengte
H-ZWI
2,5
2,5
80
H-ZWI
2,5
80
2,5
90
3,0
100
tweelingnaald
de
niet
steek
in
de
met
gemaakt
steekplaat
de
H-ZWI
0,5—1,5
0,5—1,5
0,5—1,5
zwaardnaald/ajour
2,0—3,0
2,0-3,0
mm
mm
mm
mm
mm
wordt
steken.
tweelingnaald
mm
mm
mm
mm
mm
Steokbreedte
—
—
—
—
[
kontroleren,
eerst
—___________
Naa(d-
afstand
1,6
2,0
2,5
3,0
4,0
door
1,6
2,0mm
2,5
—
—
mm
mm
mm
mm
mm
draaien
mm
mm
Geschikt
normale
normale
brede
brede
extra
met
sierstksel
sierstiksel
sierstiksel
Decoratief
ajour-effect
in
weef
biezen
biezen
brede
vliegwiel,
het
grofmazige
sets
voor:
bezen
biezen
biezen
Page 68

Nähstörungen
Ursache:
Maschine
Die
1.
Nadel
Die
eine
st
Es
Nadel
Die
Maschine
Die
Nadel
Die
ist
falsche
ist
ist
und
Iä1.t
nicht
verbogen
nicht
st
für
des
ihre
Stiche
richtig
Nadel
Garn
Beseitigung
aus
eingesetzt.
eingesetzt.
stumpf,
oder
engetadeIt.
richtig
zu
fein.
Beseitigung:
bis
Nadel
Kolbenseite
Flache
System
Nadel
Nadel
Neue
Einiadelweg
Stdrkere
zum
einsetzen.
überprüfen.
Nadel
Anschlag
nach
30/705
1
einsetzen.
hochschieben.
hinten.
einsetzen.
H
Oberfaden
Der
2.
vorgenannten
Aus
starker
zu
Bei
schlechtem
Bei
bei
oder
Lagerung
Nad&
Die
3.
Nadel
Die
eingesetzt.
Die
Nadel
Nadel
Die
Ziehen
Durch
die
wird
Stichplatte.
die
Spulenkapsel
Die
eingesetzt.
Naht
Die
4.
Spannung
Die
starkes,
Zu
Unterfaden
Der
Fadenschlingen
Stoffes.
des
soichem,
tmocken
zu
bricht
nicht
ist
verbogen.
st
zu
ist
Nadel
ist
knotiges
reiIt
Gründen.
Fadenspannung.
knotigem
oder
durch
des
geworden
ab
zum
his
oder
dunn
Schieben
oder
verbogen
nicht
ist
gIeichma1ig
nicht
versteilt,
st
oder
ungleich
ist
unterhaib
Anschiag
zu
und
richtig
hartes
oder
Gem,
lange
1st.
dick.
Stoffes
des
stagt
Gem,
aufgespult.
obemhalb
auf
unter
Siehe
Fadenspannung
gutes
Nur
Nadel
Neue
ieben.
sch
Nadel
Neue
Nadeltabelle
Maschine
Nahgut
Bairn
bis
nur
Einsetzen
Anschlag
zum
und
Oberkontrollieren.
einwandfreies
Nur
fmeihãndig
Nicht
dumch
Faden
lessen.
ten
eintädeln.
Richtig
spannung
1.
regulieren.
Nahgarn
allein
Unterfadenspannung
kontrolliemen.
verwenden.
bis
einsetzen,
beachten.
leicht
Anschlag
zum
transportieren
führen.
Spulenkapsel
der
nach
Gem
aufspulen,
Spulemvomspannung
die
Obem-
lassen.
hinten
verwenden.
sondemn
Unterfaden
und
diese
schieben.
den
au
Page 69

Ursache:
Maschine
Die
5.
sich
Die
Die
den
Ndhstaub
Maschine
befinden
Maschine
mit
st
Zierstichen)
Zwischen
hat
Transporteur
Versenkschieber
6.
Fadenreste
Greiferbahn.
7.
(Modelle
Zierstich-Einstellrad
transportiert
Transporteur-Zahnreihen
festgepreth.
versenkt.
rechts.
steht
schwer
geht
sich
die
näht
ist
nicht
der
in
Stiche
eingeschaltet.
auf
oder
den
Beseitigung:
unregemäIig
nur
Stichplatte
entfernen.
Pinsel
Versenkschieber
Fadenreste
Tropfen
Tipptasten
Einstellrad
stellen.
abnehmen,
entfernen
in
die
Of
nicht
ausschalten;
Nähstaub
links
nach
und
Greiferbahn
auf
stellen
nur
den
mit
einen
geben.
Punkt
Wichtige
8.
Auswechseln
Beim
ausgeschaltet
eingefädefte
Die
Verlassen
Beim
Dies
ist
wichtig,
Hinweise
werden.
Maschine
der
wenn
Nähfülen
von
Maschine,
Kinder
nicht
auch
in
und
ohne
der
Nadeln
Stotf
kurzfristig,
sind.
Nähe
muP
Bewegung
in
den
Hauptschalter
der
setzen.
Hauptschalter
125
ausschalten.
Page 70

and
Faults
Cause:
Machine
1.
Needle
Wrong
Needle
Machine
Needle
Needle
2.
any
For
Thread
Poor-quality
thread
excessive
Needle
3.
Needle
will
go.
Needle
Needle
Needle
because
Bobbin
how
not
needle
bent
threaded
too
of
tension
that
storage.
not
bent.
too
bent
workpiece
case
skips
inserted
used.
or
thin
thread
the
or
has
breaks
pushed
thin
and
improperly
remedy
to
stitches
blunt.
improperly.
for
breaks
above
too
knotty
become
or
strikes
correctly.
thread
reasons.
high.
thread
as
up
thick.
too
pushed
is
them
used.
dry
too
far
needle
inserted.
used,
as
or
by
it
plate
pulled.
Remedy:
it
case,
go,
up
its
as
push
far
it
Push
flat
Insert
Insert
Check
Use
See
Regulate
Use
or
Insert
as
Insert
See
Let
Only
When
in
shank
system
new
threading.
thicker
par.
only
new
will
it
new
Needle
machine
guide
far
as
side
needle.
needle.
1
above.
thread
good
needle
go.
needle.
the
inserting
as
Chart.
feed
it
facing
130/705
tension.
quality
the
material
the
will
and
bobbin
go.
rear.
needle.
H
thread.
push
workpiece.
lightly.
will
it
far
as
as
up
needle
4.
Seam
Tension
Thread
Bobbin
Kinks
material.
is
out
too
thread
appear
not
adjustment.
of
thick,
wound
on
uniform
knotty
top
or
unevenly.
and
hard.
bottom
tensions.
lower
and
upper
Check
only.
hand,
winding
machine
thread
winding,
but
tension.
properly
pass
do
not
through
it
and
hold
the
check
first-class
Use
bobbin
During
in
thread
bobbin
of
Thread
both
tensions.
Page 71

Cause:
Machine
5.
has
Lint
of
rows
dog
Feed
control
Machine
6.
Thread
The
7.
(Models
Fancy-stitch
feeds
accumulated
dog.
feed
lowered.
right.(
is
at
runs
in
ends
machine
fancy
with
thumb-wheel
irregularly
between
(Feed-lowering
with
raceway.
hook
not
does
stitches(
difficulty
sew
is
not
or
tooth
the
engaged.
all
at
stitches
Remedy:
Remove
feed-lowering
Push
Remove
oil
into
the
on
Disengage
plate
needle
ends
thread
raceway.
hook
push-buttons
thumb-wheel:
and
control
and
clean
to
put
set
lint.
Out
left.
the
of
drop
a
dot.
at
Fundamental
8.
Before
Never
foot.
master
the
exchanging
run
a
If
you
threaded
have
switch.
rules
to
either
leave
This
sewing
machine
the
is
foot
unless
machine,
particularly
needle,
or
there
even
important
switch
isapiece
a
for
when
short
off
fabric
of
while,
children
master
under
be
are
switch
the
sure
around.
sewing
to
125.
switch
off
J
Page 72

Causes
de
Causes:
Points
1
Laiguille
prescnpflons
L’aiguWe
L’aiguitle
Lenfilage
L’aiguille
Casse
2.
es
Pour
Tensions
mauvaise
Eli
de
cassant.
Casse
3.
L’aiguille
L’aiguille
L’aiguille
tirant
En
dévie
le
La
boite
correctement.
derangements
manques
pas
nest
pas
nest
déformée
est
pas
nest
trop
est
d’aiguille
ii
f
du
trop
precitees.
fortes.
qualité,
causes
d’aiguille
pas
nest
dèformée.
est
trop
est
poussant
ou
a
plaque
sur
canette
a
placée
du
correct.
fine
engagee
grosse
nest
et
selon
système
épointée.
ou
le
pour
noueux
ou
J’ouvrage,
aiguille.
a
pas
remèdes
es
prescrit.
fil.
ou
fond.
a
trop
introduite
fine.
‘aiguil
Remèdes:
Engager
vers
talon
N’utiliser
130/705
Placer
Contrôler
Utiliser
1.
Voir
Regler
N’employer
Introduire
Remplacer
Tenir
Laisser
Guider
Appuyer
en
misc
perceptible.
‘aiguille
l’arrière.
des
que
H.
aiguille
une
es
passages
aiguille
une
convenablement
du
que
a
nouvelle
l’aiguille.
compte
du
machine
Ia
legerement
Ia
sur
place,
boite
jusqu’a
fond,
a
aiguilles
neuve.
plus
fil
tableau
entramner
l’ouvrage.
méplat
Ic
du
fil.
du
forte.
es
tensions.
qualite.
de
aiguille
des
canette
a
l’enibomtage
système
fond.
aiguilles.
seule.
a
du
sa
Couture
4.
tension
La
fil
Le
Canette
Des
sous
est
trop
est
irregukerement
boucles
l’ouvrage.
aissant
ddrdglee.
gros,
de
fil
a
noueux
se
desirer
garnie.
torment
d’aiguille
fils
des
fils.
fils
main
a
pretension
Ia
correct;
des
bonne
de
mais
ibre
du
contrôler
tensions
crochet.
pas
Ic
a
les
que
bobiner
hi
par
l’enfilage
des
Verifier
de
dur.
ou
ou
sur
Nutiliser
Ne
passer
dévidoir.
Veiller
tensions
et
qualité.
faire
les
Page 73

Causes:
La
5.
Bourres
griffe.
a
Griffe
position
en
Marche
6.
bribes
Des
coursière
La
7.
ModCle
disque
Le
mentation
machine
agglomerees
abaissée
de
du
machine
avec
de
est
n’entraIne
droitel.
dure
hI
crochet.
ne
points
régiage
embraye,
entre
(glissière
Ia
de
soot
se
coud
d’ornementationl
des
pas
abaissegriffe
machine
poses
pas
points
Remèdes
de
irregulièrement
Enlever
bourres
Placer
a
au
a
plaque
pinceau.
glissiere
aiguille,
a
abaissegriffe
Oter
es
a
entralne
ou
dents
es
gauche.
lee
d’hule
par
cc
dans
touche.
disque;
coursière.
Ia
Ic
placer
sur
Ic
les
dens
points
d’orne-
Enlever
a
goutte
commandés
Ddbrayer
une
mettre
et
fil
de
bribes
point.
Remarques
8.
Pour
ArrCt.
Ne
pee
Ne
machine
a
enfants
remplacer
amais
ooblier
dans
mettre
que
importantes
pied
a
marche
en
toujours
de
quelques
pour
méme
a
presseur
débrayer
pièce.
et
machine
a
instants.
l’aiguille,
enfilée
l’interrupteur
Cela
placer
est
‘interrupteur
sans
general,
surtout
tissu
COOS
mCme
nécessaire
génhral
pied
Ic
s
‘on
sil
125
presseur.
quote
ne
des
a
y
sur
Page 74

Opheffen
Oorzaak
De
1.
naald
De
gobruikt
U
naald
De
machine
De
naald
De
van
machine
is
een
is
is
niet
krom
is
to
kleine
slaat
goed
vorkeerd
niet
dun
of
goed
voor
storingen
steken
ingezet.
systeem
stomp.
ingeregen.
het
over
garen.
naald,
Opheffen
Naald
schuifen,
Naald
Nieuwe
machine
De
Dikkere
zover
system
naald
naald
met
mogelijk
platte
do
30/705
1
inzetten.
opnieuw
inzetten.
naar
kant
H
inrijgen.
boven
van
inzetten,
af.
u
2.
De
dezelfde
Door
eon
Si
slochte
Si
1
knoopies
veel
liggen
De
3.
naald
De
naald
De
naald
Do
Door
naald
de
steekplaat.
spoelhuis
Hat
Het
4.
spanning
De
dik,
Te
onderdraad
Do
opgespoeld
Grote
bovendraad
zware
te
kwaliteit
uitgedroogd
breekt
naald
niet
is
krom.
is
te
is
trekken
krom
stiksel
onregelmatig
lussen
breekt
oorzaken
bovenspanning.
garen,
garen
bij
of
is.
hoog
of
dun
duwon
of
getrokken
goed
niet
is
onregelmatig
is
versteld.
is
niet
is
do
ondor
als
b.
dat
genoeg
dik.
te
aan
en
to
of
regelmatig
stof.
boven.
v.
door
ingezot.
stof
de
stoot
ingozet.
stug
met
garen.
lang
is
op
Zie
Bovenspanning
Goode
syntetisch
Nieuwe
mogelijk
Nieuwe
Naald
Niet
alleen,
de
Bij
stuitpunt
Bovenen
kontroleron
Alleon
Spoelon
spanning,
Bovendraad
ondor
onder
trekken
hot
opheffen
kwaliteit
naald
in
naald
volgens
sturen
inzetten
goode
met
spanning
1.
zotten.
losser
gemerceriseerd
gebruiken.
garen
duwen
spoolhuls
do
drukkon.
af
draad
devrije.
utt
inrigon,
kontrolleren,
en
aan
garen
door
inzetten
naaldhouder
do
inzetten.
naaldtabel
of
u
van
ondordraadspanning
kwalitoit
do
niot
opniouw
of
hoog
zo
schuiven.
uitzoeken.
stof
do
tot
gobruikon.
spoo[
do
8ovon
hot
on
Page 75

Oorzaak
machine
De
5.
stof
de
geperst.
Tussen
zit
Transporteur
machine
De
6.
Draadresten
machine
De
7.
insteiwief
Het
ingeschakeld.
tandjes
is
in
voor
transporteert
de
van
uitgeschakeld.
zwaar
loopt
grijperbaan.
de
met
(types
siersteken
de
of
niet
transporteur
siersteken)
onregelmatig
maakt
is
Opheffen
Steekplaat
stofkwastje
Transporteur
Draadresten
in
de
olie
niet
insteiwiel
uitschakelen.
wegnemen,
weghalen.
grijperbaan
steken
de
voor
inschakelen.
verwijderenen
doen.
van
siersteken
de
stof
de
met
druppel
een
tiptoetsen:
het
Belangrijke
8.
het
Bij
Daarvoor
ingeregen
Oe
voor
is
Dit
verwisselen
hoofdschake(aar
tijd
korte
belangrijk,
aanwijzingen
van
machine
machine
de
vooral
naalden
nooit
wanneer
125
zonder
alleen
naaivoetjes
en
indrukken.
stof
Iaat,
kinderen
er
eronder
altijd
moet
laten
hootdschakelaar
de
buurt
de
in
de
draaien.
stroom
zijn.
uitgeschakeld
Wanneer
machine
d.
v.
men,
worden.
ook
uitzetten.
67
Page 76

onderzubehör
Sonderzubehör
)as
rhältlich.
Berechnung
Ihrem
für
spezielle
ist
Näharbeiteri.
Esstbei
Handler
gegen
4
ubehdr
Applikationsfus
Bandeinfasser
BiesenfuB
(Zwiflingsnadeln
Biesenfu8
(Zwiflingsnadeln
Fransenfu8
Geradstichful3
--.-.--
Stichpatte
Kapper
.——-
4,5
6.5
Kapper
Krauselfu8
Mehrstichkrausler
Kordonierfu8
Lochstickplatte
Rollsàumer
(Nàhfu8halter
Rflen
5
RilIen
7
mit
--—--
mit
Rundloch
mm
.._—___—-_-_----.__-_--_——--
mm
mm
2
Nadelabstand
mit
Nadelabstand
mit
Rundloch
enifernen)
20—25)
16)
Bestell-Nr.
93-042941
98-053
1
I
93-042950-91
93-042953-91
93-042943-91
98-694821-00
93-032087-91
93-042946-91
.—
93-042
93-036998-91
98-999
93-03691
93-036
98-694873-00
-91
484-91
948-91
650-00
5-91
976-45
T
H
—
Näharbeit
Applizieren
Zum
Einfassen
Zum
Biesennähen
Zum
(Nadelstarke
feine
fur
Nadelstárke
Zum
Durchschlagen
Achtung1
8esen
Nahen
einstellen.
Mitte
Absteppnahte
Für
besonders
(Seidenjersey
Kappnahte
Für
Kräuseln
Zum
Kräuseln
Zum
Kordonieren
Zum
Lochstickerei
Für
Säumen
Zum
Nur
von
80,
70)
von
Geradstich
feinen
etc.)
von
von
von
Kanten
Fransen
und
und
Volants
Volants
Kanten
und
Stichiage
zum
weichen
etc.
mit
zum
Nàhen
etc.
Band
Stoffen
von
Säumer
4
Stopffu8
StrickkantenfuB
nfu8
68
mm
Obertransport)
(für
98-694823-00
93-035960-91
957-91
93-042
93-036917-91
Saumen
Zum
Stopten
Nahen
Zum
Nahen
Zum
Kunststoff
Wollestopfen
und
von
von
und
Kanten
von
Strickmaterial
Plastik,
Leder
Page 77

Inhaltsverzeichnis
Abstepparbeten
Anlasser
Blindstich
Doppetter
Einstel(rad
Efektrischer
Glühlampe
HosenreiRverschlug
Knopfannähen
Knopflochnähen
Nadel
Nadeltabelle
NähtüIe
NähfüRe
Nahstorungen
Nähwerk
Nutzstiche
Nutz-
Oberfaden
Oberfadenspannung
Programmtabeile
Reingen
Rei1,verschIu1?
Rückwärtsnähen
Sicherheitsbestimmungen
Spulen
Spulen
Spule
Spulenkapsel
Stichiage
Stichlänge
Stoffdrückerhebel
Stopfen
Stopfen
Stretchstiche
Tipptasten
Transporteur
Unterfaden
Unterfadenspannung
Verwandlungsnahfläche
Zierstiche
Zubehdrfach
Zweiter
Stofftransport
Zierstiche
für
Anschlu(.,
auswechseln
auswechseln
auswechseln
und
und
aus-
einstellen
Stretchstichkombinationen
und
einlegen
Olen
und
einnähen
vorbereten
einlegen
einsetzen
einstellen
einstellen
Geradstich
mit
Wolle
mit
einstellen
versenken
heraufholen
und
Garnrollenstift
(Damen)
Beseitigung
ihre
einschalten
prüfen
Geradstich
bei
prüfen
Kombinationen
32,
3,
34,
44,
40,
37--39
52,
60,
76,
11,
46,
48,
33
12
35
14
26
3
51
45
41
28
53
31
29
61
7
5,
22
24
9
12
77
50
42
16
18
5
4,
6
7
8
25
1
5
13
47
49
23
19
28
10
8
30
27
31a
1
7
69
Page 78

pecial
The
rom
accessories
special
your
accessories
dealeratan
listed
extra
below
charge.
are
intended
Part
No.
for
special
sewing
Sewing
jobs.
Operation
They
can
be
obtained
Appliqué
Binder
Cording
(twin
needle
Cording
(twin
needle
Fringe
Straight-stitch
Needle
Felling
—--.
Felling
Shirring
Multi-stitch
Single-needle
---
Eyeletting
hemmer2mm
Roll
Hemmer,
foot
(remove
foot,
foot,
sewing
plate
foot,
foot.
foot
plate
4
sewing
grooves
5
with
grooves
7
with
foot
foot
with
mm
4.5
mm
6.5
gathering
cording
(for
mm
2.0—25
mm
1.6
with
round
attachment
-----..----.-
dual
foot
round
foot
mm
needle
needle
feed)
holder)
needle
needle
gauge)
hole
gauge)
hole
93-042941-91
98-053484-91
9342
j
9304295391
93-042943-91
98-694821-00
9303208791
93-042946-91
—.-.------.
93-042948-91
93-036998-91
98-999
93-036915-91
93-036976-45
98-694873-00
98-694
950
650-00
823-00
91
appliqué
For
binding
For
cording
For
(needle
for fine
needle
sewing
For
lmportantl
needle
topstitching
For
soft
and
felled
For
shirring
For
shirring
For
single-needle
For
For
eyeletting
hemming
For
hemming
For
edges
size
cording
size
70)
fringes
Only
position
fabrics
seams
work
work
80,
for
center.
and
(silk
valances
valances
edges
edges
with
and
straight
sewing
jersey,
cording
tape
for
basting
stitches,
very
etc)
delicate
Darning
Knit-edge
Tflon
70
foot
sewing
sewing
foot
foot
93-035960-91
93-042957-91
93-036917-91
eyeletting
For
sewing
For
sewing
For
synthetic
knitted
plastic.
materials
fabrics
and
leather
Page 79

Contents
Accessory
Blindstitching
winding
Bobbin
winding
Bobbin
Changing
Changing
Changing
Checking
Checking
Cleaning
Darning
Darning
Disengaging
Drawing
fabric
Dual
Electrical
stitches
Fancy
and
Faults
Finger-tip
Inserting
Inserting
Lowering
chart
Needle
thread
Needle
Operating
Presser
Program
Reverse
Second
rules
Safety
Setting
Setting
Setting
Setting
Sewing
Sewing
Sewing
Sewing
Thumb
Topstitching
threading
Upper
Utility-
support/accessory
Work
Zippers
compartment
bulb
the
needle
the
sewing
the
bobbin
the
needle
the
oiling
and
straight
with
wool
with
and
the
up
feed
connection
how
controls
bobbin
the
bobbin
the
feed
the
the
lifter
bar
table
sewing
thread
stretch
needle
the
stitch
the
utility
the
buttonholes
feet
zippers
in
buttons
on
wheel
stretch-stitch
and
ladies’
for
preparations
foot
thread
thread
stitches
engaging
bobbin
combinations
and
remedy
to
case
dog
tension
control
foot
pin
reel
stitches
position
length
stitches
fancy
for
slacks
tension
tension
the
thread
them
for
stitches
combinations
box
sewing
straight
mechanism
stitch
34
46,
48,
62,
54,
11,
78,
31
35
4,
51
28
29
50
47
49
5,
3,
37--39
42,
40,
32,
44,
a
6
5
8
1
2
7
10
4
1
3
27
63
20
7
8
28
55
1
2
1
2
13
79
16
17
18
23
25
5
1
22
31
43
41
26
33
9
24
30
45
J
71
Page 80

.ccessoires
accessuires
es
aCturdtiofl.
spéclaux
pour
des
travaux
particuliers
sont
Pfaff
dOpositaire
votre
chez
vente
en
contre
Accessoires
applications
pour
Pied
a
Pmed
4
pose
P’ed
Pied
pour
Plaque
Rabatteur
(en)ever
nervures,
en
nervures,
en
point
aiguille
4
4,5
Bordeur
°ed
jumees
umelées
Rabatteur
Pied
fronceur
Fronceur
P
Plaque
Ourleur
mu)tipoints
guide
ed
pour
rou)otté
Ourleur4mm
entrainement
(pour
repriser
a
Pied
Ccartements
ecartements
franges
drab,
mm
mm
6.5
cordonnet
brodere
support
rainures
5
ramnures
7
avec
mm
2
supermeur)
a
trou
a
du
de
de
trou
jour
pied)
(aiguilles
2,5
2,0
Iaiguml)es
mm)
1.6
rond
rand
mm)
•
References
93-042941-91
9805348491
93042950-91
93-042953-91
93-042943-91
98-694
T
93032087
93-04294691
——
‘--
93-042
93-036998-91
1—
98-999
93-036915-91
93-03697645
—
98-094
98-694823-00
93-03596091
—
821
——
948-9
650-00
87300
Operations
appications
bordage
couturedenervures
lalguifles
—
pour
aiguilles
couture
Imperativement
00
deport
1
Surp)qUres
91
-----1
fins
trés
coutures
1
froncement
froncement
pose
broderies
-f
our)age
1-
ourlage
reprisage
n0
nervures
n°70>
de
du
et
rabattues
cordons
de
de
de
80,
franges
point
coutures
et
souples
de
de
ours
a
bords
bords
normal
fines.
-
rCgler
au
volants,
vo)ants.
et
milieu
(jersey
et.CIa
bCtissage
point
sur
tissus
sur
de
etc
etc
lame
droit,
sole)
Pmed
asemel)e
gude
bard
pour
ibtIon
trcot
93-042957-91
93036917
coulures
matiCros
91
issus
plastiques
mamiles
at
synthetiques,
cuir
I
Page 81

des
Table
Abaissement
Sobinage
de
Boite
Branchement
Changement
Changement
Changement
Combinaisons
ContrOle
Contrôle
Couture
do
Deport
de
Disque
Embrayage
Enfilage
Entrainement
Execution
Fermeture
Insertion
presse-tissu
Levier
broche
2’
Mesures
en
Mise
Mise
en
Nettoyage
Perturbations
presseurs
Pieds
de
Plaque
Plan
de
d’ornementation,
Points
invisibles
Points
de
Pose
Preparation
Réglage
Réglage
Réglage
Remontée
Reprisage
Reprisage
Rheostat
Surpiquage
Tableau
Tableau
Touches
matières
de
rangement
electrique
de
de
do
de
tension
Ia
de
tension
Ia
de
marche
en
point
reglage
débrayage
et
d’aiguille
fil
du
double
boutonnières
de
glissiere
a
fermetures
de
bobine
a
sécurité
de
place
place
graissage
et
et
rangement
couture
boutons
des
Ia
de
points
des
points
des
do
fil
au
point
au
pedale
a
aigoilles
des
programmes
des
griffe
a
des
l’aiguille
lampoule
pied
points
arrière
droit
des
Ia
de
a
de
rernèdes
variable
canettes
longueur
de
fil
de
accessoires
presseur
dlastiques
fil
do
fil
du
points
des
tissu
do
pour
a
canette
bolte
points
de
utilitaires
élastiques
canette
lame
droit
et
d’aiguille
canette
de
ddcoratifs
organes
pantalons
glissière
canette
a
correspondants
combines
point
utilitaires
couture
de
femmes
28
30
12,
5
37—39
44,
42,
11
64,
31
34,
40,
4,
48,
46,
3,
32,
56,
80,
20,
6
3
28
51
29
24
13
8
16
25
26
7
9
14
45
43
13
17
18
7
8
50
65
31
a
30
27
35
41
5
5
1
22
23
10
49
47
12
33
57
81
21
Page 82

Extra
extra
)e
)fbciele
accessoires
accessoires
Ptatf
dealer.
ziin
voor
bijzondere
werkzaarnheden.
bij
betaling
tegen
zijn
Ze
!everbaar
de
essoires
Applikatievoet
Biaisboorvoet
.
naatvoethouder
Biezenvoet
ischroef)
tunnels
5
verwijderen
weetngnad,naaldafstand23-l5)
tunnels
Biezenvoet
(Tweelingnaald,
7
naaldafstand
Doorslagvoet
rond
Rechtstikvoet
Plattenaadvoet
Plattenaadvoet
met
4.5
mm
6.5
Rimpelvoet
plooivoet
en
Rimpel-
Kordonneervoet
Nestelplaatje
mm
Rolzomer
Zomer
2
(voor
mm
4
16)
steekgat
mm
boventransport)
l3estelnr
93-042941-91
98-053484-91
93-042950-91
93-042953-91
93-042943-91
98-694821-00
.
i
93-042946-91
93-042948-91
93-036998-91
98-999
93-036
93-036
98-694
98-694823-00
650-00
915-91
976-45
873-00
Toepassen
applikatiewerk
Voor
Omboren
maken,
Biesjes
naaldte
j
smalle
biesjes
naalddikte
000rslaan.
Opgelet!
naaldstand
doorstiknaden
Voor
vannstoffendenjsey
platte
Voor
Rimpelen
Rimpelen
Kordonneerwerk
Nestelgaatjes
Rolzoom
Platte
zoom
kanten
van
80.
70)
stofversieren
Alleen
in
bet
naden
volants
van
volants
van
mm
4
rechte
midden
met
en
breed
steken
voor
etc.
etc.
band
met
gebruiken.
stikken
bet
Stopvoet
Breiwerkvoet
\.reflnvoet
74
93-035960-91
957-91
93-042
93-036917-91
Stoppen
Gelijktijdig
gebreide
van
bet
Voor
kunststotfen
sbkken
stikken
en
stof
van
leder
en
atwerken
plastic,
Page 83

Inhoud
Aansluiten
Accessoiresbox
Accessoiresvac
Afhechten,
Blindzomen
Bovendraad
Bovendraadspanning
Draadafsniider
Dubbel
Knopen
Knoopsgaten
Knoopsgaten
Lampje
Naaimechanisme
Naaldentabel
Naaivoetjes
Naaivoetje
Naald
Naaldstand
Nuttige
Nuttige-
Onderdraad
Opheffen
Programmatabel
Schoonmaken
Siersteken
Siersteekkombinaties
Spoelen
Spoelen
Spoel
Spoe)hu)s
Spoelspanning
Steeklente
Stofdrukker
Stoppen
Stoppen
Stretchsteken
Tiptoetsen
Transporteur
Treksluiting
Treksluiting
Tweede
Veiligheidsvoorschriften
Voetpedaal
Watteren
Werkbox
van
achterwaarts
inrijgen
stoftransport
aanzetten
wisselen
wisselen
wisselen
instellen
steken
stretchsteek
en
naar
van
instellen
voorbereiden
spoelhuls
de
in
in
instellen
met
garenpen
en
aanstuiten
instellen
maken
de
inzetten
in
machine
de
tevens
kontroleren
en
uit
(rechte
instefleri
boven
storingen
smeren
en
machine
kontroleren
wol
instellen
uitschakelen
pantalon
sierstiksels
stoftoevoerbiad
stikken
inschakelen
steek)
kombineren
halen
(dames)
34,
40,
58,
66,
82,
11,
46,
48,
42,
44,
32,
3
30
31
a
16
35
9
1
2
13
14
41
37
39
51
7
5,
59
31
29
28
25
22
24
10
67
83
50
26
27
5
4,
6
7
8
8
1
5
13
47
49
23
19
28
43
45
7
1
16
1
2
3,
33
11
Page 84

Programmtabelle
Tabelle
Die
weiche
der
Tasten
Stichlangen-Einsteller
zeigt
Programmnumrner,
die
drücken
zu
his
sind.
zum
alien
Sd
Anschiag
dazugeharenden
den
Programmen
auf
zu
dem
mit
drehen.
Stich
Hinweis
Bei
und
alien
darunter,
stretch
übri
st
01
02
03
04
05
Bezeichnung
..
Knopflocher
Geradstich
Zickzackstich
Stretch-3fach-
Geradstich
Stretch3fach
Zickzackstich
02
I
I
CD
D
G
I
I
03
I
CD
H
I
Anwendung
Drehen
Ohne
st
loch
alle
Für
Vielseitig
Applizieren,
nähten,
die
Nàhte,
Beanspruchung
jeder
Besonders
Beispiel
zum
—
/
—‘..‘
\
.—
/
-.‘-,
-
/
.
\
D
D
E
des
Die
fertig.
Näharbeiten
anwendbar;
Spitzen
Sticken,
etwas
flache,
für
—--
----
.——--
.----,---
—
—
E
Stoffes,
Stichdichte
einen
und
zurn
einsetzen,
Knöpfe
Miederwaren.
annähen,
aushalten
ohne
eiastische
04
III
IN IN
IN
.•-.
CD
F
tippen
nur
laRt
mm
6
Versäubern
Nähen
müssen,
reilten
zu
Nahtverstarkung,
Ill
HI
c
C,
D
und
regulieren.
sich
Ziersteppstich
von
von
Stopfen
dehnen
mit.
05
.
#-
C) C)
Fr
Knopf
das
Ndhten,
Raupen
usw.
sich
06
M
bei
Ausbessern
06
07
08
09
10
Elasticstich
Wabenstich
.
.
Blindstich
KantenEinfaRstich
nten
he
Mu
a
k
sc
Flicken
Einsetzen
Zum
Rissen
von
Aufndhen
Zum
Uberdecken
unsichtbare
Für
Versdubern
Zum
h
st
ic
Eftektvoller
von
dehnbarem
in
von
Frotteenahten.
von
Saumnähte
und
KantenabschluR
oder
Material.
Gummifäden
an
Verzieren
an
oder
dickeren
von
zarten
zurn
Stoffen.
Kanten,
Materialien.
76
Page 85

die
st
Anwendung
07
/\/
.“
ii
\/\
/\/
.
C)
—
—
Stichlange
08
I
I
I
I
I
1
der
09
li
—J
nach
einzelnen
R.
C)
10
I
K
Wunsch
Programme
11
L#
Ii
h
t
Ii
K
C)
K
zu
12
..-#
\/\
\/\
\/\
‘
-#
wählen.
C)
In
angegeben.
14
13
M
>
M
.
1
L
der
i
s.
-,
C)
Texttabelle
15
—i
-
-i
T
T
16
L-I
r—j
i—9
F-J
P..
C)
sind
17
—
L..
r
Th
[
Bezeichnung
18
N
J
N
‘n
L
.-,
ISaK
I
C)
19
20
h%
X
X’
‘“
‘.
-‘
-,
MCI)
C)
-
K
‘
L
Fr.
2
13
14
15
6
17
18
Bezeichnung
Overlockstich
Kordeistich
Zierelasticstich
Federstich
Verbindungsstich
Pulloverstich
Verbindungsstich
Webestich
breit
schmal
Anwendung
Elastische
Maschenware.
für
Eine
Zum
dehnbarem
in
nähte
Eine
zum
Eine
Elastische
Jerseymaterialien.
für
1
Eine
Eine
SchlieB-
lockere
Flicken
schmückende
Beispiel
Schmucknaht
einsetzen
elastischen
auf
für
klassische
Schlie8-
klassische
Schmucknaht,
und
oder
Material
oder
Geweben
Überdecknaht,
Schürzen.
Dekorationsnaht
und
Dekorationsnaht
zum
Versauberungsnaht
luftige
für
ausbessern
Risse
dekorative
für
alle
für
Versduberungsnaht
Unistoffe.
für
Beispiel
für
Bekleidung.
Schmuck
Unistoffe,
rustikale
.
Kleider.
Diagonal-Stich
19
Dreiecksstich
?O
-I______
Eine
zum
Eine
Schmucknaht,
Beispiel
Ziernaht,
für
moderne,
zum
Beispiel
schlichte
für
Kleider.
Kindernachthemden.
j
Page 86

Stitch
Listed
the
marked
program
in
lower
chart
this
half,
stretch”,
chart
the
I1LUi
A
are
buttons
turn
the
the
02
I
I
I
I
cD
stitch
to
stitch
be
c
program
pressed
control
I
I
I
G
c
I
I
H
I
number,
sew
to
toward
03
corresponding
the
this
—
/
\
-
/
“
/
D
as
.-
0
seam
far
—--
-
as
—--
—
E
pattern.
E
stitch
programs
stitch
all
For
go.
will
it
06
Iii
III
III
05
--
--
-
-
—,
—C)
F,
M
-,
C)
D
04
Ill
Ill
-
11
Ill
.-
F
,
.
C)
in
and,
Nr.
01
02
03
04
05
06
07
08
Stitch
Buttonholes
Straight
.
Zgzag
,
Elastic
straight
Elastic
zigzag
Elastic
Honeycomb
Blindstitch
stitch
.
stich
triple
stitch
triple
stich
stitch
stitch
Application
Buttonholes
push
Just
stitch
The
ordinary
All
stitching
finishing,
Edge
.
sewing
Seams
stress.
under
very
For
on
e.g.
Inserting
Sewing
cloth.
Hemming
without
the
density
sewing
operations.
satin
and
exposed
flat,
corsetry.
patches
elastic
on
heavier
buttons
appliqué
stitching,
to
elastic
turning
and
be
can
operations
great
reinforcing
darning
and
threads
fabrics
the
the
regulated.
work,
embroidering,
stress
or
with
fabric.
buttonhole
6-mm
and
inserting
which
seams,
on
rips
covering
invisible
lace,
stretch
elastic
seams
stitches.
finished.
is
fancy
darning
button
fabrics.
on
etc.
terry
enhancing
serging
binding
Edge
09
Shell-edge
stitch
stitch
For
Attractive
or
edge
finish
edges.
fabrics.
dainty
on
Page 87

all
agrams
07
i\/
‘/‘
“I
‘i,”.
/\/
\/\
M
other
:-
grograms,
and
08
their
application
09
-.--_n
—
C)
select
10
below,
17
r
stitch
19
18
NJ
•.-..ii
NJ
li
‘—I,
ISKM.
I
20
Xi
/‘
‘
Al
X
“I
A’
X
K
D
individual
the
described
are
12
‘
11
I
i
\/\
Ii
“
ii
i
\/\
ti
-+
I
C)
I
-,
—I
in
detail
14
13
i
.>
j%.
M
,-‘
i
C)
t
M
(
desired.
as
length
stitch
The
table
in
the
16
15
-I
—
—J
L—1
m
r-J
—‘
—(
r—.J
‘
—
0
No.
11
-
Application
Elastic
on
Ornamental
Inserting
or
Decorative
Classic
Elastic
1
Classic
1
Ornamental
-
Ornamental
modern
knitted
sewing
----
-
--
assembly
fabrics,
patches
ornamentai
cover
ornamental
assembly
ornamental
--
dresses
--
seam
seam,
seam,
and
on
and
seams,
and
------.-
edge
light
darning
seam
finishing
seam
e.
a.
seams
—
q.
g
finishing
clothing.
e.
g.
on
on
for
for
--
.
on
rips
e1astic
on
on
aprons.
plain
all
seams
fabrics.
plain
countrylook
--------..
look,
plain
seams
elastic
fabrics.
on
—
fabrics.
jersey
---
dresses.
materials
fabrics.
—
—
Stitch
-
Overlock
Knurl
12
Elastic
1
3
stitch
Feather
14
Joining
15
Pullover
16
Joining
17
Loom
1
8
Diagonal
1
9
stitch
stitch
ornamental
stitch
stitch.
stitch
stitch,
stitch
stitch
.--—
-
wide
narrow
--
dresses.
children’s
for
a.
Triangular
20
stitch
Ornamental
seam,
g.
night
70
Page 88

ableau
tableau
e
diffèrents
3s
a
e
des
mention
programmes
indique
reglages
<stretch>,
le
numéro
effectuer
a
le
programme,
du
regle-point
sur
machine.
Ia
est
tourner
a
le
schema
Pour
du
tous
pont
es
correspondant
programmes
et
pourvus
a
-j
IH
Ill
jfl
-‘
C-)
dIes
.1.
.1.
0506
‘‘
---
--
D
sur
des
et
pour
incrustations
etc.
s’Ctirent
--
H
-
suffit
reglable.
les
de
6
applications,
a
de
Clastiques
04
Ill
m
j
-
-‘I
I
(‘I
:3-I
appuyer
d
coutures
mm
reprisage,
effort;
.
ski
.
I
I
I
(surpiqUresl.
.
.
02
I
I
I
I
—
I
I
ji
---I--
03
—
—‘
/
I
\
/
I
I
/
--
l—I---l_——
—
I—
—
I
I
/
N’
01
02
03
04
05
Designation
Boutonnieres
droit
Point
zigzag
Point
couture
Triple
droit
point
point
Triple
-
des
zigzag
points
Utilisations
tourner
Sans
touches;
de
Point
réaliser
Emplois
dentelle,
de
Coutures
casse
sans
renforcer
Pour
(gaines,
densite
base
point
un
multiples:
nervures,
élastiques
du
combines,
ouvrage;
I
.
des
pour
ddcoratif
-
fil
es
1
points
executer
surfilage,
broderies,
soumises
Ipantalons
coutures
soutiens-gorge
tissus
es
movens
des
dans
et
bords.
couture
et
épais.
piqué
zigzag
Point
06
d’abeille
nid
Point
invisible
Point
08
bordure
de
Point
09
cocotte
Point
10
Pose
elastiques.
do
Pose
d’assemhlage
Ourlets
invisibles
Surfilage
Rèalisation
elastiques
hIs
ornementation
et
d’un
cur
tissu
sur
bord
Ismocksl
èponge.
tissus
coquille.
raccommodage
ou
pièces
de
Page 89

nd
sur
re
choisie
)plications
07
/\/
\f\
/\/
\/\
/\/
\/\
R.
C)
D
Ia
:Z
1
position
volonté.
a
des
08
Z
différents
09
C)
Pour
Dans
10
1
les
le
points.
K[iiT
autres
tableau
11
Ii
II
Ii
r+
C)
programmes,
descriptif
12
“/\
‘
\/\
\/\
F*
C)
point
17
r
Th
peut
es
et
18
19
20
I
NJ
—s
NI
.ft
NJ
u
i:-1-
I
IKaM.
I
C)
//\
XI
‘II
‘
k\
XI
XI
“
—
—
C)
-
a
longueur
1%
i’%.
1%
es
15
-‘
m
C)
figurent
13
14
I
>
-
i
M
.-
(‘
du
designations
16
I—i
I—I
I’%J
I—I
IJ
—*
C)
N
1
1
1
2
1
3
14
15
16
17
Designation
overlock
Point
Pointdecorde
Point
zigzag
d’epine
Point
Point
d’assemblage
Point
Point
tricot
de
dassemblage
etrolt
points
des
fantaisie
large
Utiksations
Assemblage
Couture
de
Pose
elastiques
élastiques.
tissus
Couture
Couture
Assemblage
Couture
et
decorative
pieces
encore
ou
decorative
decorative
et
decoranve
surfilage
fine
raccommodage
ou
pour
sur
classique
surfilage
.
classique
elastique
pour
coutures
tabliers
du
vêtements
sur
jersey.
sur
tissus
sur
dans
décoratives
tous
tissus
les
légers.
les
tissus
unis.
a
tissus
N
mailles.
sur
unis.
18
19
20
Pointdetissage
diagonal
Point
triangle
Point
Couture
Couture
Couture
decorative
decorative
decorative
pour
pour
sur
robes
robes
chemises
paysannes
modernes
nuit
de
simples
et
denfants
.
Page 90

rogrammtabel
tabel
deze
umrner
teken
met
met
is
de
de
overzichtelijke
op
daarhij
verwijzing
behorende
,,stretch”
wijze
steek,
meet
stekenprogramma
bet
daaronder
steeklengteknep
de
welke
toets
afgeheeld.
meet
het
tot
Boven
werden
stuitpunt
programmm
bet
ingedrukt.
symhooi
van
Bij
afle
Nr.
01
02
03
04
05
Benaming:
Knoopsgaten
Rechte
steek
Zigzagsteek
Drievoudige-stretch
steek
rechte
Drievoudige-stretch
zigzagsteek
02
I
I
I
I
El)
CD
G
I
I
I
I
03
I
c
H
I
asse
oep
T
Automatisch,
knoopsgat
bet
al
Veer
medellen
Veelzijdig
inzetten,
kant
knepen
naden
Veor
bil
mee
Bijzondere
in
v.
b.
—
\
/
\
/
D
n:
naaiwerk
het
uitgevuerd
toe
aanzetten
die
elke
platte,
foundation,
—--
-.---
-
.—
.-
s—.
—
.
D
E
zonder
klaar.
is
passen;
te
kordonneren,
enz.
extra
belasting,
elastische
—.
E
de
met
is
.—,--
—
stof
Do
ceo
en
zoals
versterkt
zonder
tevens
04
IH
IN
ii
ft
El)
-.
F
keren,
to
steekdichtheid
zadeisteek
steeklengte.
mm
6
afwerken,
horduren
moeten
dat
neadversteviging
ceo
IllI-
iii
D
C)
D
alleen
en
naad
do
siersteek.
105
II
Ill
O0
D
is
6
tot
applikeren,
stoppen,
worden,
knapt.
F
intippen
instelbaar.
mm
rekt
06
M
en
in
badstof
stoffen,
Kanten,
dunne,
to
met
opstikken,
to
maken.
zachte
een
verwerken
zijn
stof
schulprandje.
)
herstelwerkzaamheden,
Gestikte
06
Wafelsteek
07
Blindsteek
08
Kantensteek
09
Schulpsteek
zigzag
Voor
reparatie
rimpelelastiek
Om
em
en
Onzichtbaar
afwerken
Voor
Lingerie
bijzonder
elastisch
in
zoompjes
kinderkieding
en
geschikt
zomen
op
stretchbadstet
in
in
versieren
en
voor
materiaal.
te
elastiek
stikken,
stevige
van
van
afwerking
Page 91

jedradid
benamirg
ie
07
/\/
\,\
\/
Nr
__±
11
08
—
\
1!HKl
CD
C)
Benarning:
—
Overlocksteek
Norden.
en
1-11i
—‘-JI
I
09
de
de
Bij
toepassing
10
ovenqe
11
‘ii
II
K.
i
teIen
fznnderlijke
in
12
-4i
Kj
13
I
I
_I
C-)
Topa
Elastische
stikken
kunt
I
>
1
L
seen:
en
r,teeklenqte
de
a
programma’s
15
14
M
I__I
I-
I—i
it
L
CD
C)
afwerknaad.
en
stik
afwerken
aangegeven.
16
ri
‘—I
I—’
I
van
zef
0)
CD
C)
rekbaor
17
C—
L
Voor
kiezen.
18
NJiI
NJ
IKPJM.
het
materiaal.
fl
I
I
°
-I
geiijktdig
19
4.’
‘
de
Xi
i
Xi
teksttabel
I
20
I,H
I
/1
I
L
j
.
L
1
2
15
1
7
18
Vlechtsteek
Elastische
Veerrjessteek
Verhindinqssteek,
Pulloversteek
Verbindinqssteek
Woefsteek
Diagonaie
siersteek
steek
breed
smal
-
zumers
Een
te
Orn
niateriaa
rekbare
in
En
qebrutkt
Een
Elastische
Een
Een
Een
versteten,
sierlijke
worden,
kiassieke
kiassieke
coke
siersteeke
steekje
of
e’fseIs,
sluit
siersteek
-
orn
rand,
decorative
steek
in
—
scheurijes
decoratieve
als
kan
afwerknaad
en
voor
Iuchtige
vast
op
rand
sUe
voor
in
a.
o.
eenvoudige,
kieding.
dchten
te
en
voor
voor
effen
rusteke
siersteek
rekhaar
afle
-
moderne
in
effen
jersey.
toffen.
kiediding.
rekbaar
gebruiken
te
matenaal
stoften.
Kieding.
1
nachtbemden
in
Frosteek
20
Siersteek
inderkIedi
g,
enz.
83
Page 92

MPFAFF
G
Aktiengesellschaft
Karisruhe-Durlach
Werk
Anderungen
)eutschiand
tutattr
nsndes
nrmany
reservetemod
RFA
iqirigen
s
ii
Duitsiand.
hlfranzosisch/hofland
11
41
GntznerstraBe
Karlsruhe
7500
r
flroS
hE
*duhin
to
,
bje
t
Pr
n
ntd
Ac
ruin
rprirrec
in
cte
icc
uS
‘9924878-94000
Nr
engirtu
t
ch
vorbeha
gfl.
ficationa
voorbehouden
ten
techniques.
sch
 Loading...