

Page 1
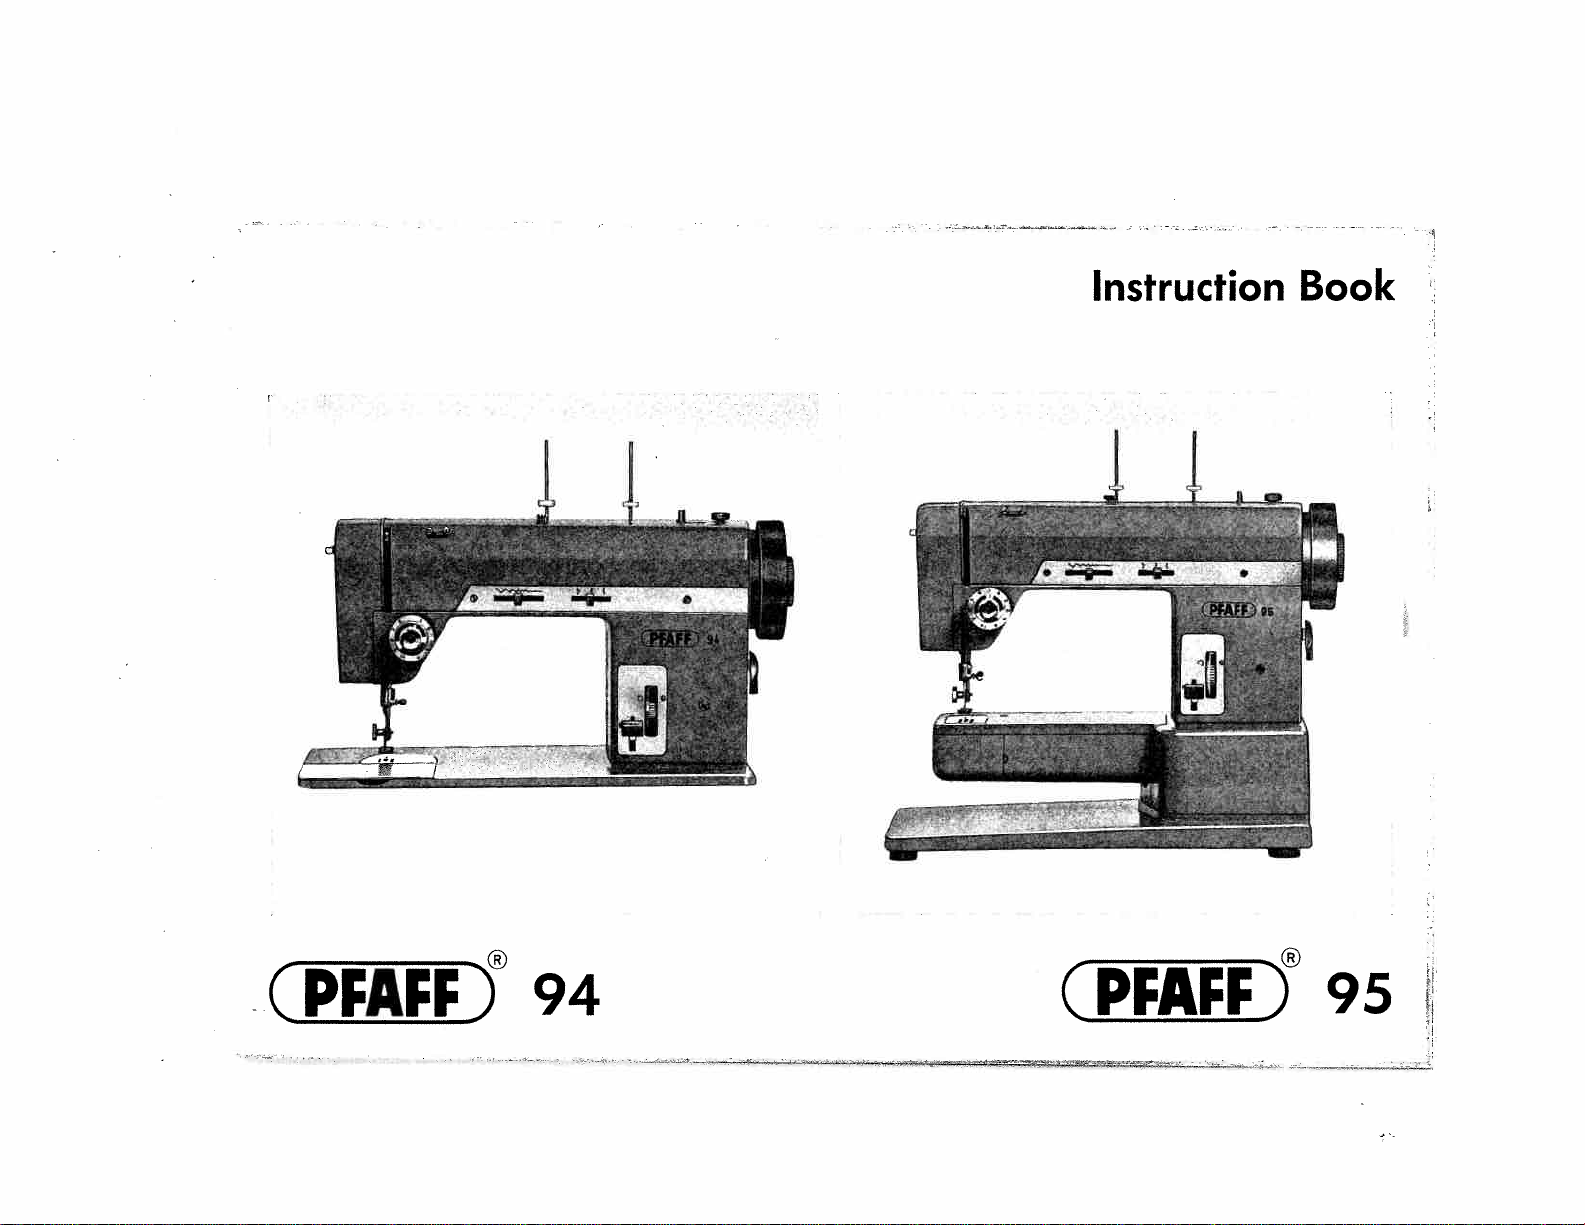
Instruction
Book
CPFAFFD®
94
CPFAFFD®
95
Page 2

Needle
linen
Bed
Fine
linen
Muslin
Dress
satin
ottoman,
crêpe,
fabrics
Suitings
Twill,
Heavy
Burlap
Terry
knitted
corduroy
Cotton,
Jersey
Lostex,
Foambacks
Jersey
Woolens
Cotton
Synthetic
Acella,
Elastic
corsetry
Leather
Decorative
Thread
and
of
Type
such
fabrics,
taffeta,
botiste,
chiffon,
poplin
and
mantlings
and
denim
linen________
chenille
cloth,
fabric
pile
rayon
staple
(synthetic)
fabrics
Helanca
(wool)
fabrics
curtains
curtains
leatherette,
corsetry
fabrics,
stitching
Fabric
as
shirting
goods
for
fabrics
oilcloth
fabrics,
corset
Chart
brocade,
georgette,
blouse
both-obes,
fabrics
Firm
satin
Cotton
Silk
cotton
Silk
Cotton
Cotton
Cotton
Linen
Cotton
—
Silk
Cotton
Synthetic
Cotton
Synthehc___
TW
Synthec
—
Silk
Silk
Mercerizeclcotton
Mercerized
Synthetic
Cotton
Synthetic
Cotton
Cotton
Linen
Embroidery
Heavy
Buttonhole
Embroidery
darning
Type
linen
or
——---—
cotton
thread
thread
thread
embroide
sHk
and
thread
Thread
—
—
—
read
Needle
Style
130
Point
R
Size
40
50
-
50
40
40
Size
80
70
—80
70—80
70—80
80—90
90—
100
4090-100
40
90—100
40
110
40
50
50
50
50
40
40
50
50
40
40
40
40
40
40
40
30
so
80—90
70—80
ses
70—80
70—90
-80
90
80
70—80
70—80
70—80
80
70—90
913
110
130
sos
130
130
R
ses______________
130
130R
stik
130
PCL
ses
130
l3OLr
—
70
90
—100
90—100
—
R
80
-
130
o—ao
—-—
30—50
Silver-gold
thread
Silver
thread
80—
100
70
Page 3
Instructions
CPFAFFi
Foreword
Your
youtomaster
embroidering
quickly.
piledinorder
with
home.
We
ing
you
machine.
you
If
not
who
We
your
PFAFF-Haushaltmaschinell
Karisruhe-Durlach
Pfaff
new
This
oil
the
suggest
techniques
will
become
have
any
hesitate
will
be
hope
you
Pfaff.
sewing
large
a
and
darning
instruction
familiarize
to
sewing
that
to
glad
will
jobs
you
try
discussedinthis
well
sewing
contact
to
help
always
and
machine
varietyofsewing,
book
out
acquainted
problems,
will
jobs
eosily
has
thoroughly
you
coming
various
the
booksothat
Pfaff
your
youatany
sewing
enjoy
GmbH
been
up
with
please
95
enable
and
com
in
sew
your
do
dealer
time.
with
a
Page 4
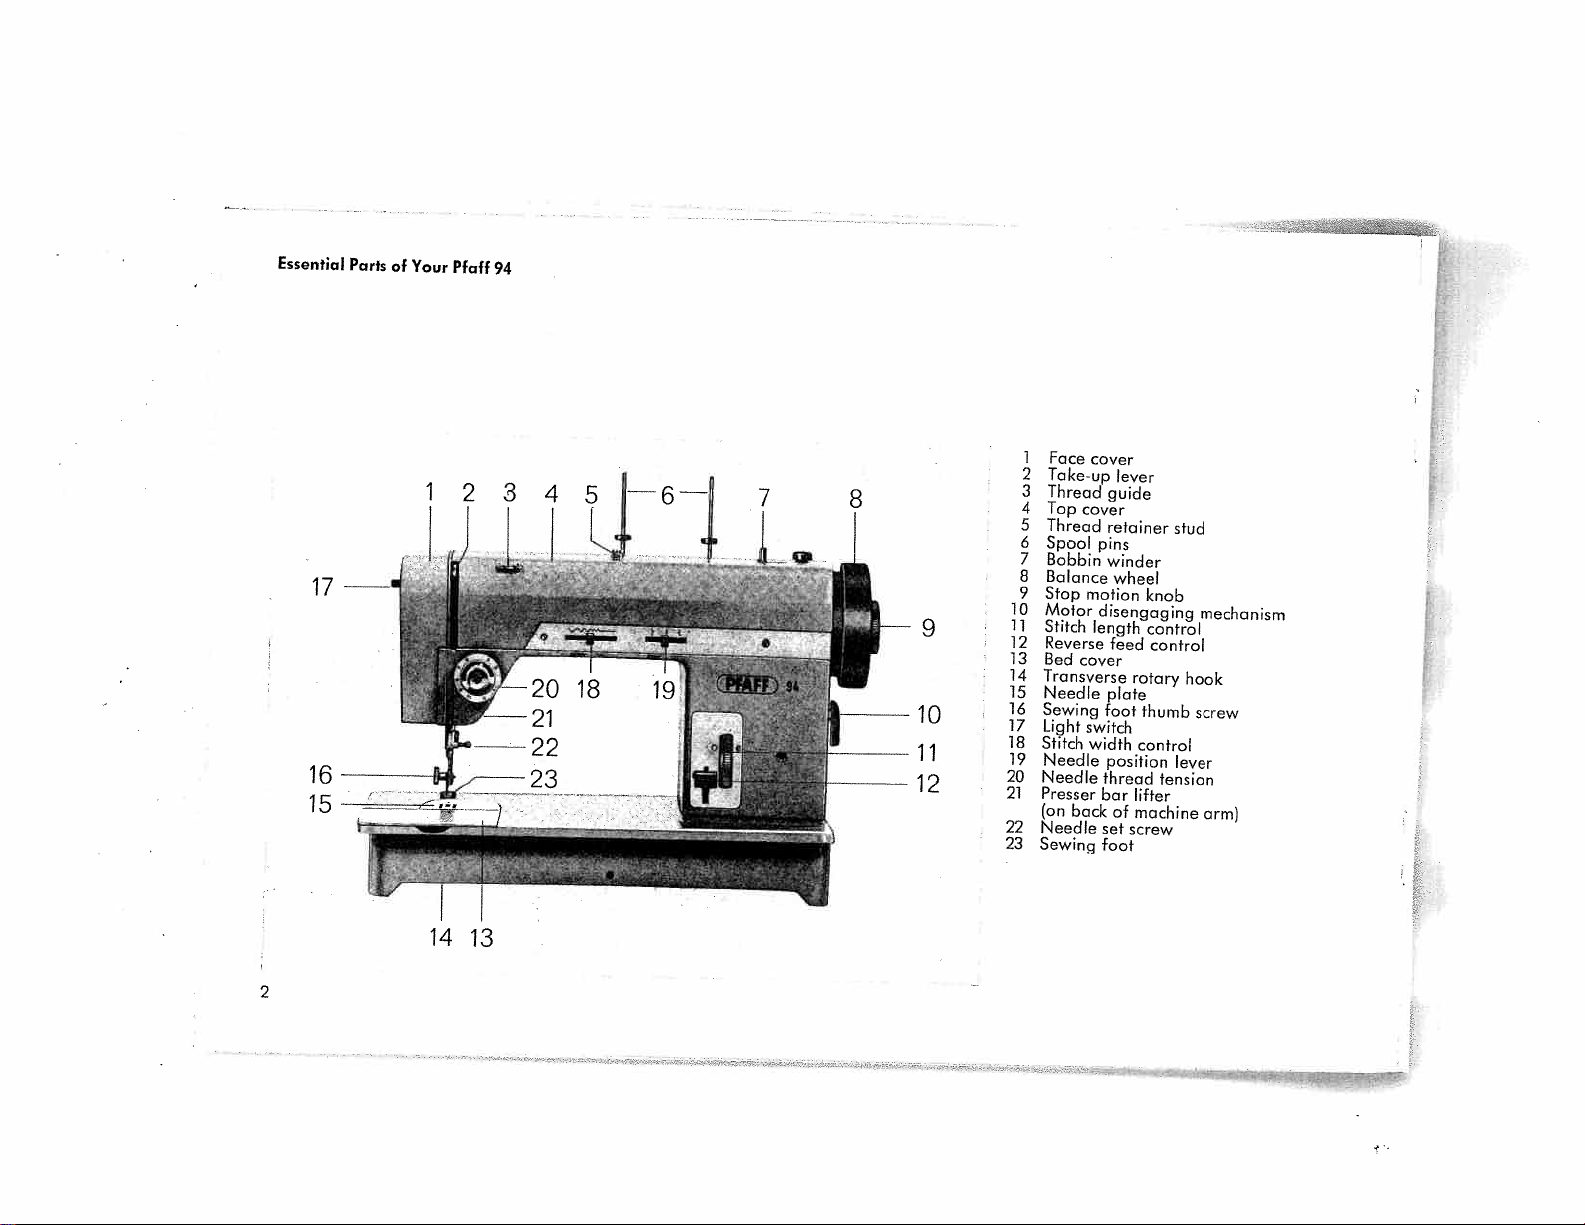
Essential
17
16
15
Parts
of
Your
Pfaff
—=------‘,w-
-
94
345j64
1
Face
2
3
4
5
6
7
8
9
10
9
11
12
13
14
15
16
17
18
19
20
21
22
23
cover
Take-up
Thread
Top
cover
Thread
Spool
pins
Bobbin
Balance
Stop
motion
Motor
disengaging
Stitch
length
Reverse
Bed
cover
Transverse
Needle
Sewing
Light
switch
Stitch
width
Needle
Needle
Presser
(on
back
Needle
Sewing
lever
guide
retainer
winder
wheel
feed
rotary
plate
foot
position
thread
bar
lifter
machine
of
set
screw
foot
knob
control
control
thumb
control
tension
stud
mechanism
hook
screw
lever
arm)
14
13
2
Page 5
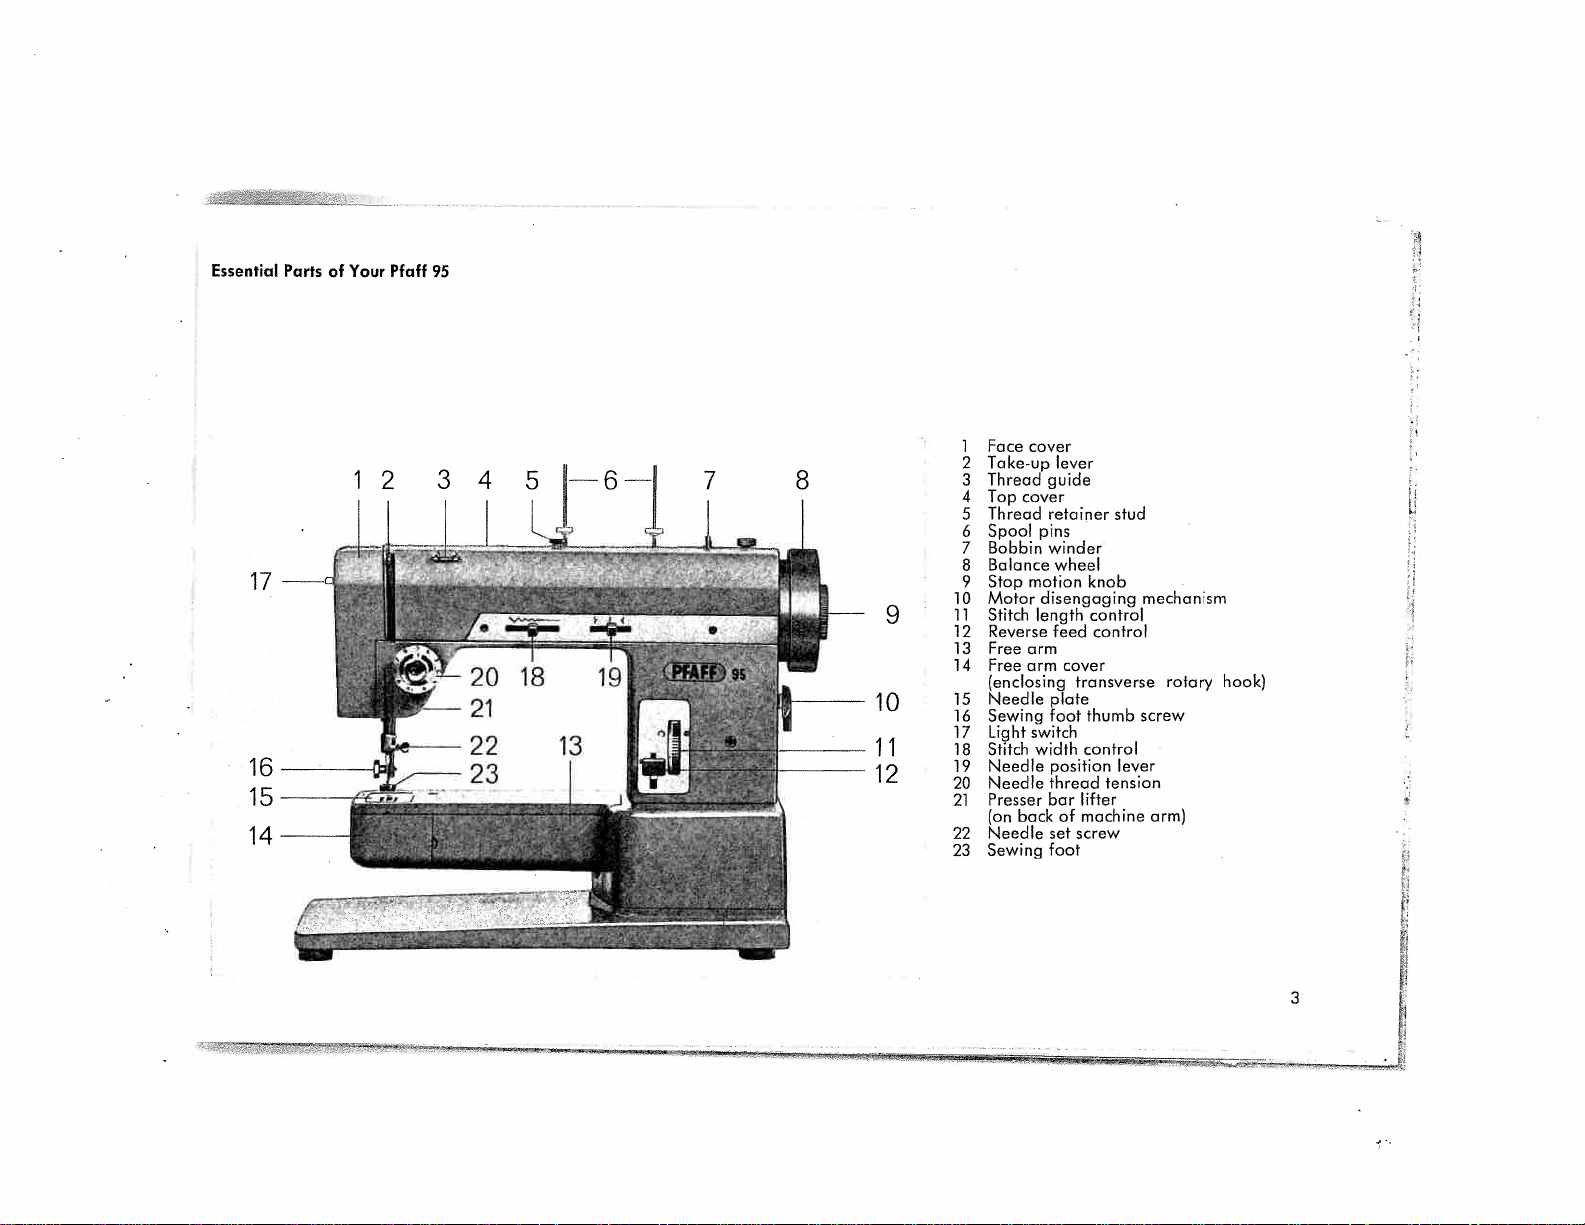
Essential
17
Parts
Your
of
Pfaff
95
10
11
Face
1
2
3
4
5
6
7
8
9
10
9
11
12
13
14
15
16
17
18
19
20
21
22
23
cover
Take-up
Thread
cover
Top
Thread
Spool
pins
Bobbin
Balance
motion
Stop
disengaging
Motor
Stitch
length
Reverse
arm
Free
Free
arm
(enclosing
Needle
Sewing
Light
switch
Stitch
width
Needle
Needle
Presser
back
(on
Needle
Sewing
lever
guide
retainer
winder
wheel
feed
cover
transverse
plate
thumb
foot
control
position
thread
bar
lifter
machine
of
screw
set
foot
stud
knob
contro’
control
lever
tension
mechanism
rotary
screw
arm)
hook)
3
ii
Page 6
Preparing
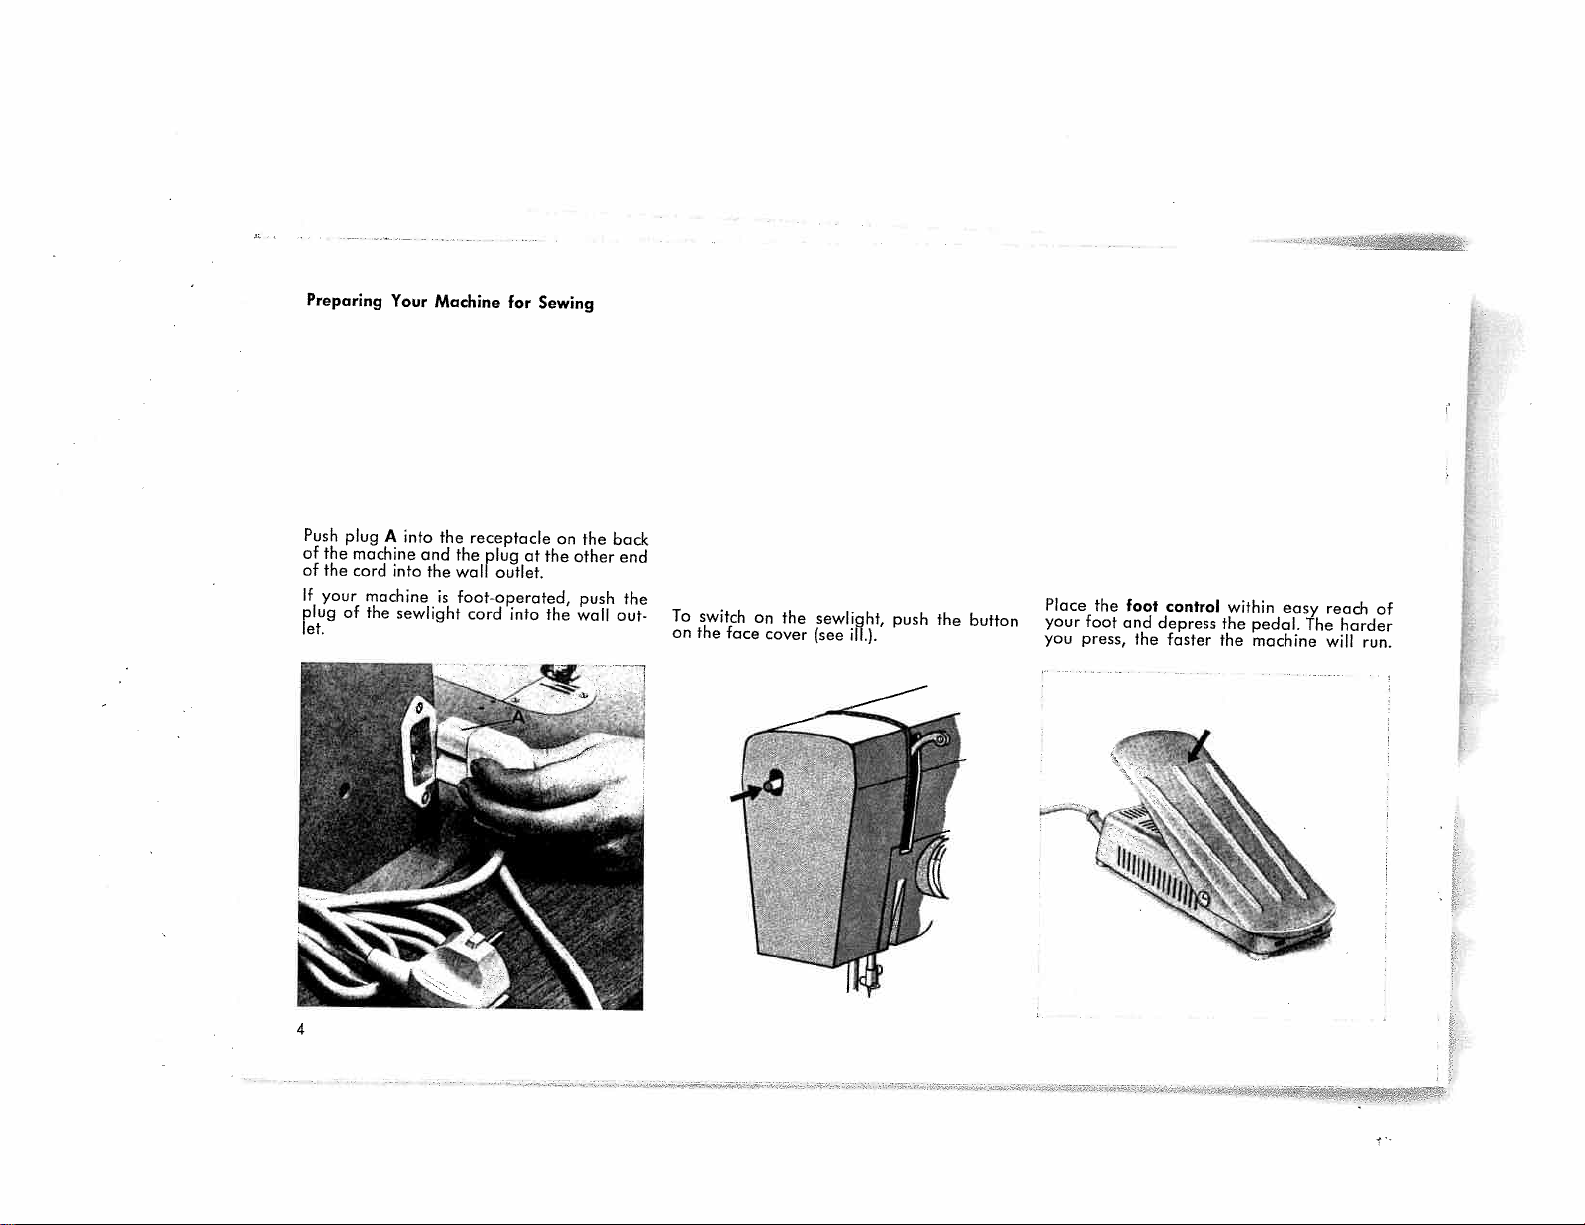
Push
plug
of
the
machine
of
the
cord
your
If
plug
of
let.
Your
A
into
into
machine
the
sewlight
Machine
receptacle
the
and
the
wall
the
foot-operated,
is
cord
plug
outlet.
for
into
Sewing
at
the
the
on
the
other
push
wall
back
end
the
out
To
on
switch
face
the
on
cover
the
sewlight,
(see
ill.).
push
the
button
Place
your
you
the
foot
press,
foot
and
the
control
depress
faster
within
the
the
easy
pedal.
machine
The
reach
harder
will
of
run.
4
Page 7
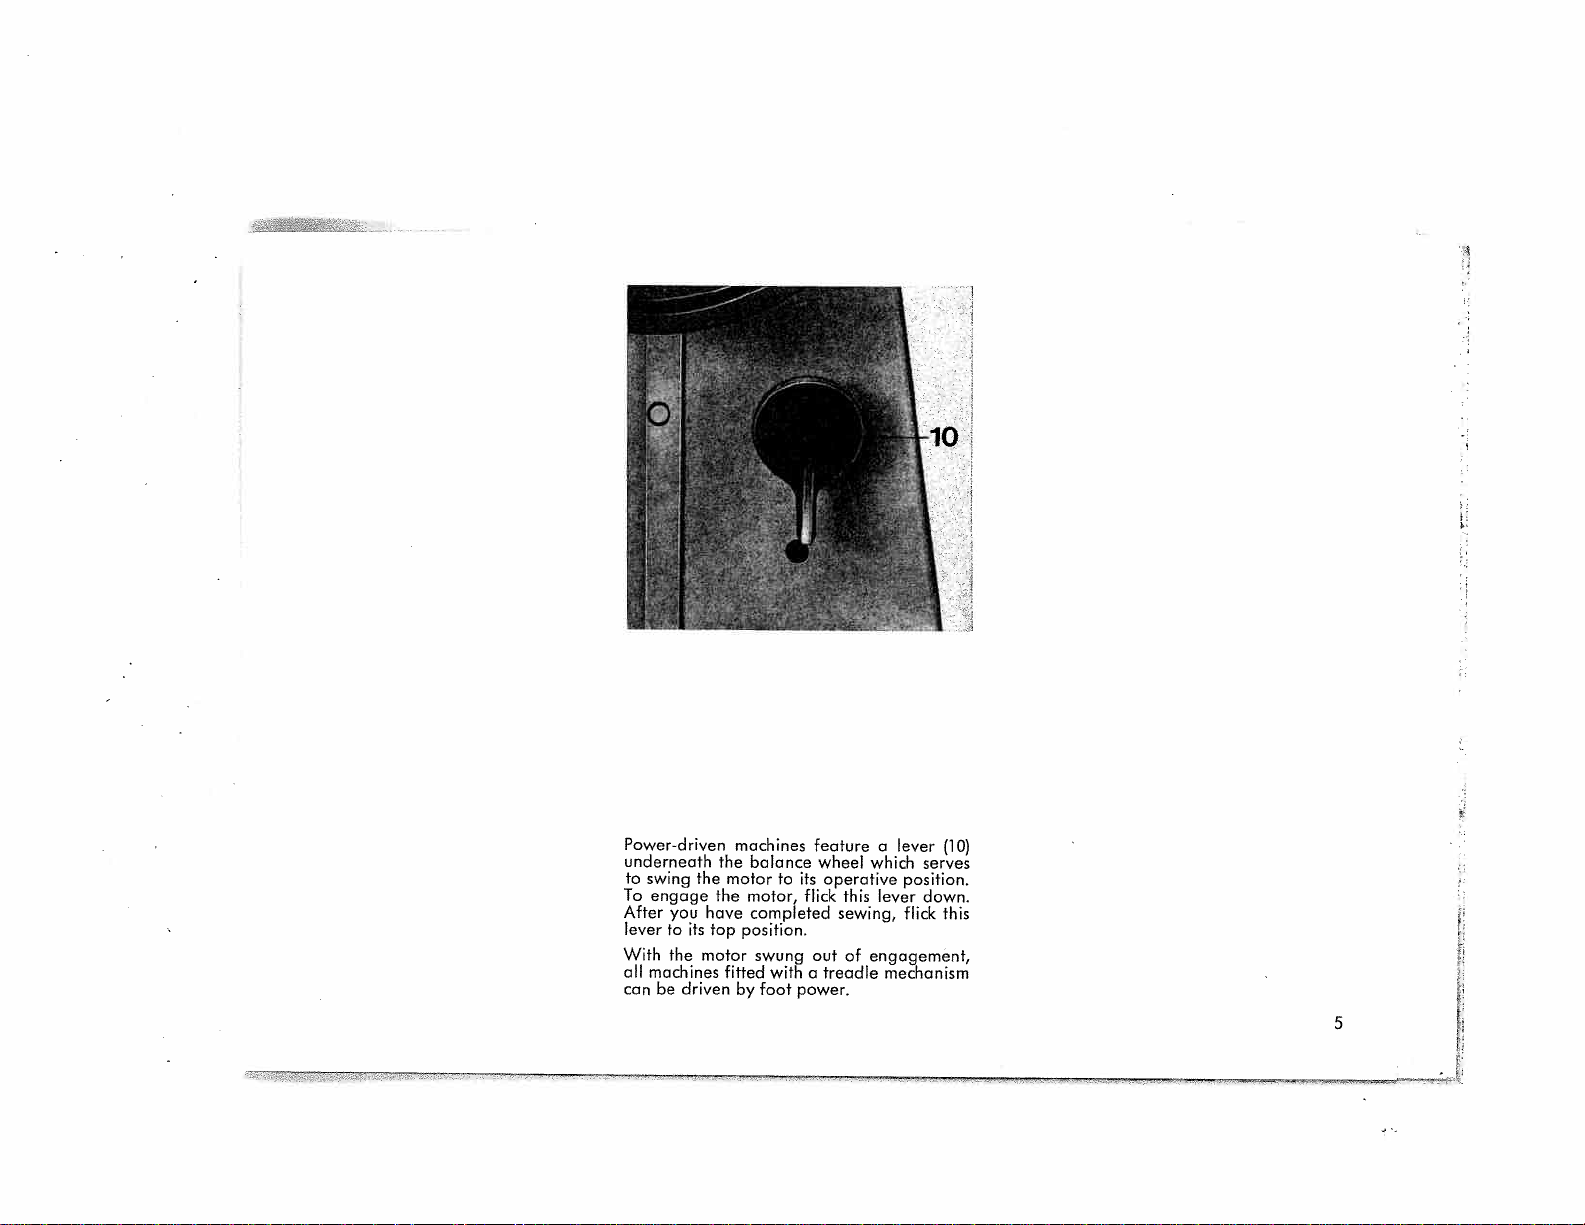
Power-driven
underneath
to
To
After
lever
With
oil
con
the
swing
engage
you
to
its
the
machines
driven
be
have
top
motor
machines
the
balance
motor
motor,
the
completed
position.
fitted
by
feature
wheel
operative
to
its
flick
swung
out
withatreadle
power.
foot
a
which
this
lever
sewing,
engagement,
of
mechanism
lever
serves
position.
down.
flick
(10)
this
5
Page 8
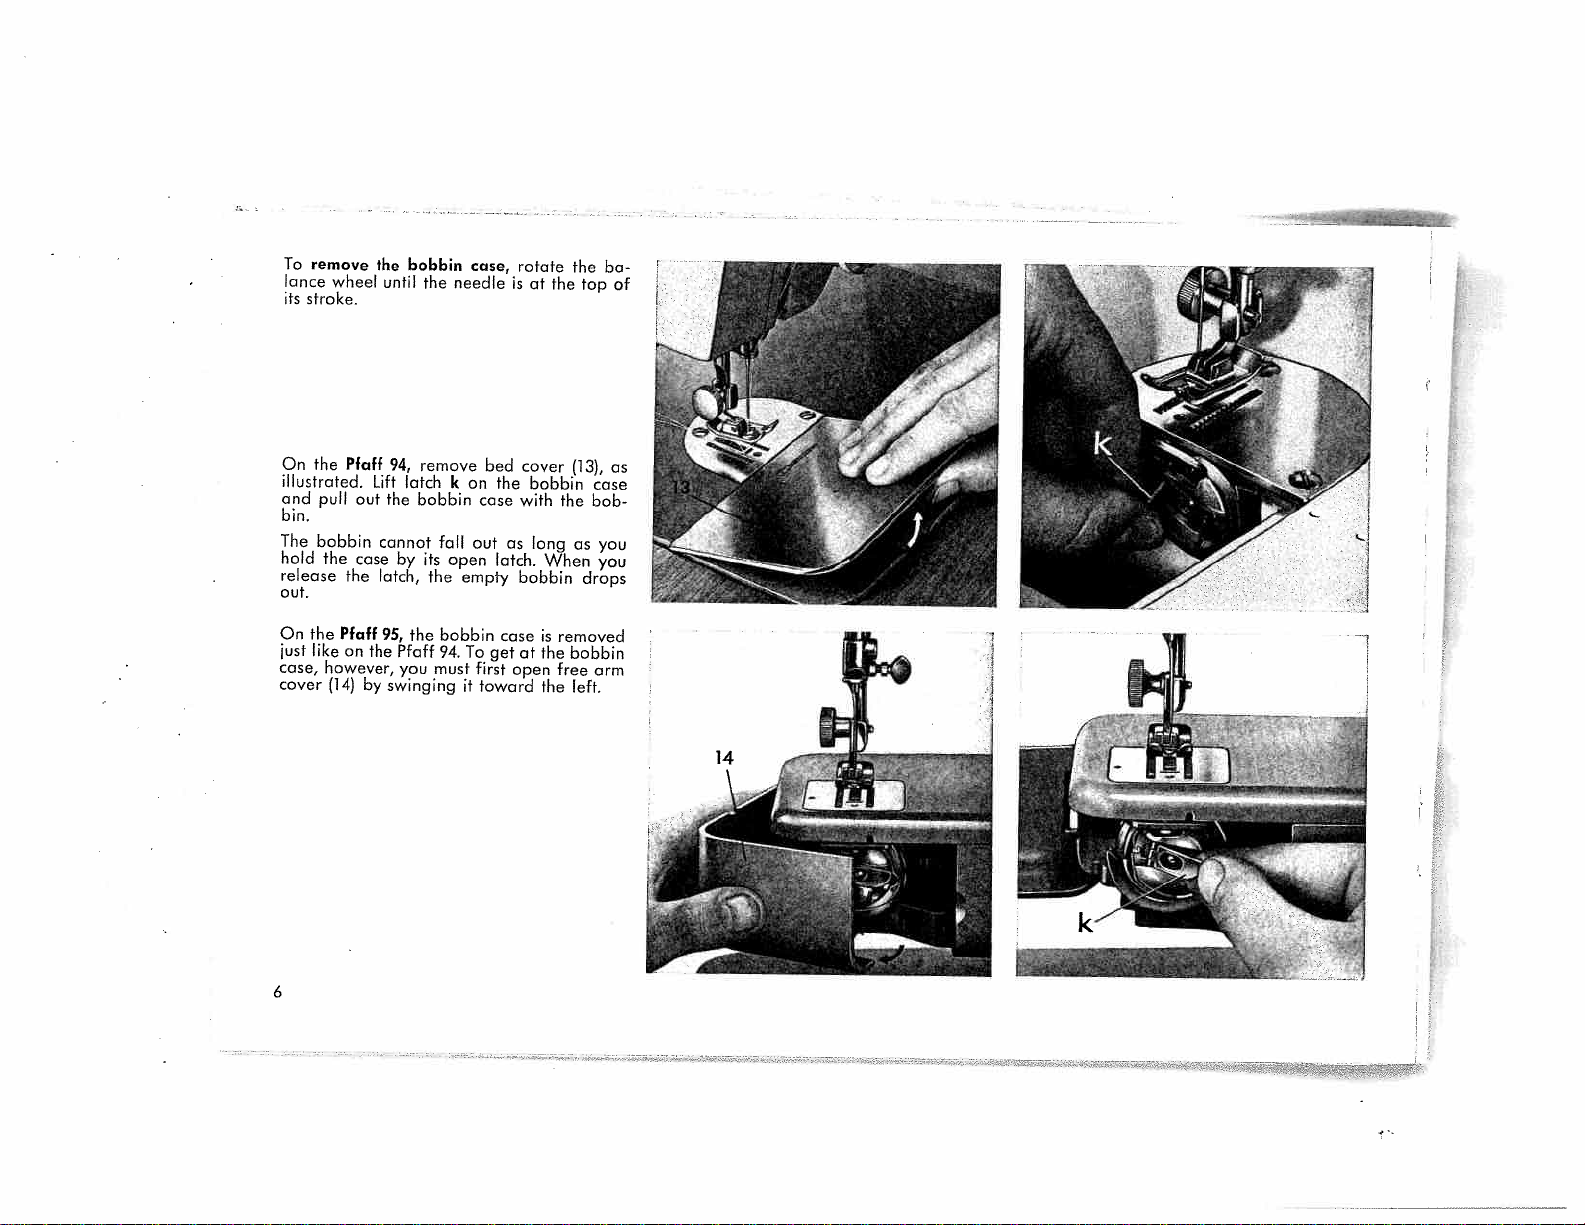
To
lance
stroke.
its
remove
wheel
the
until
bobbin
the
case,
needle
rotate
is
at
the
the
top
ba
of
On
the
illustrated.
and
pull
bin.
The
bobbin
hold
the
release
out.
On
the
just
like
case,
however,
cover
6
Pfaff
(14)
Pfaff
out
case
the
on
Lift
the
cannot
latch,
95,
the
swinging
by
94,
by
Pfaff
you
remove
latch
bobbin
its
the
konthe
fall
open
the
bobbin
94.
must
bed
case
out
empty
To
getatthe
first
it
toward
with
as
latch.
bobbin
case
open
cover
bobbin
long
When
is
the
(13),
case
the
bob
you
as
you
drops
removed
bobbin
free
arm
left.
as
Page 9
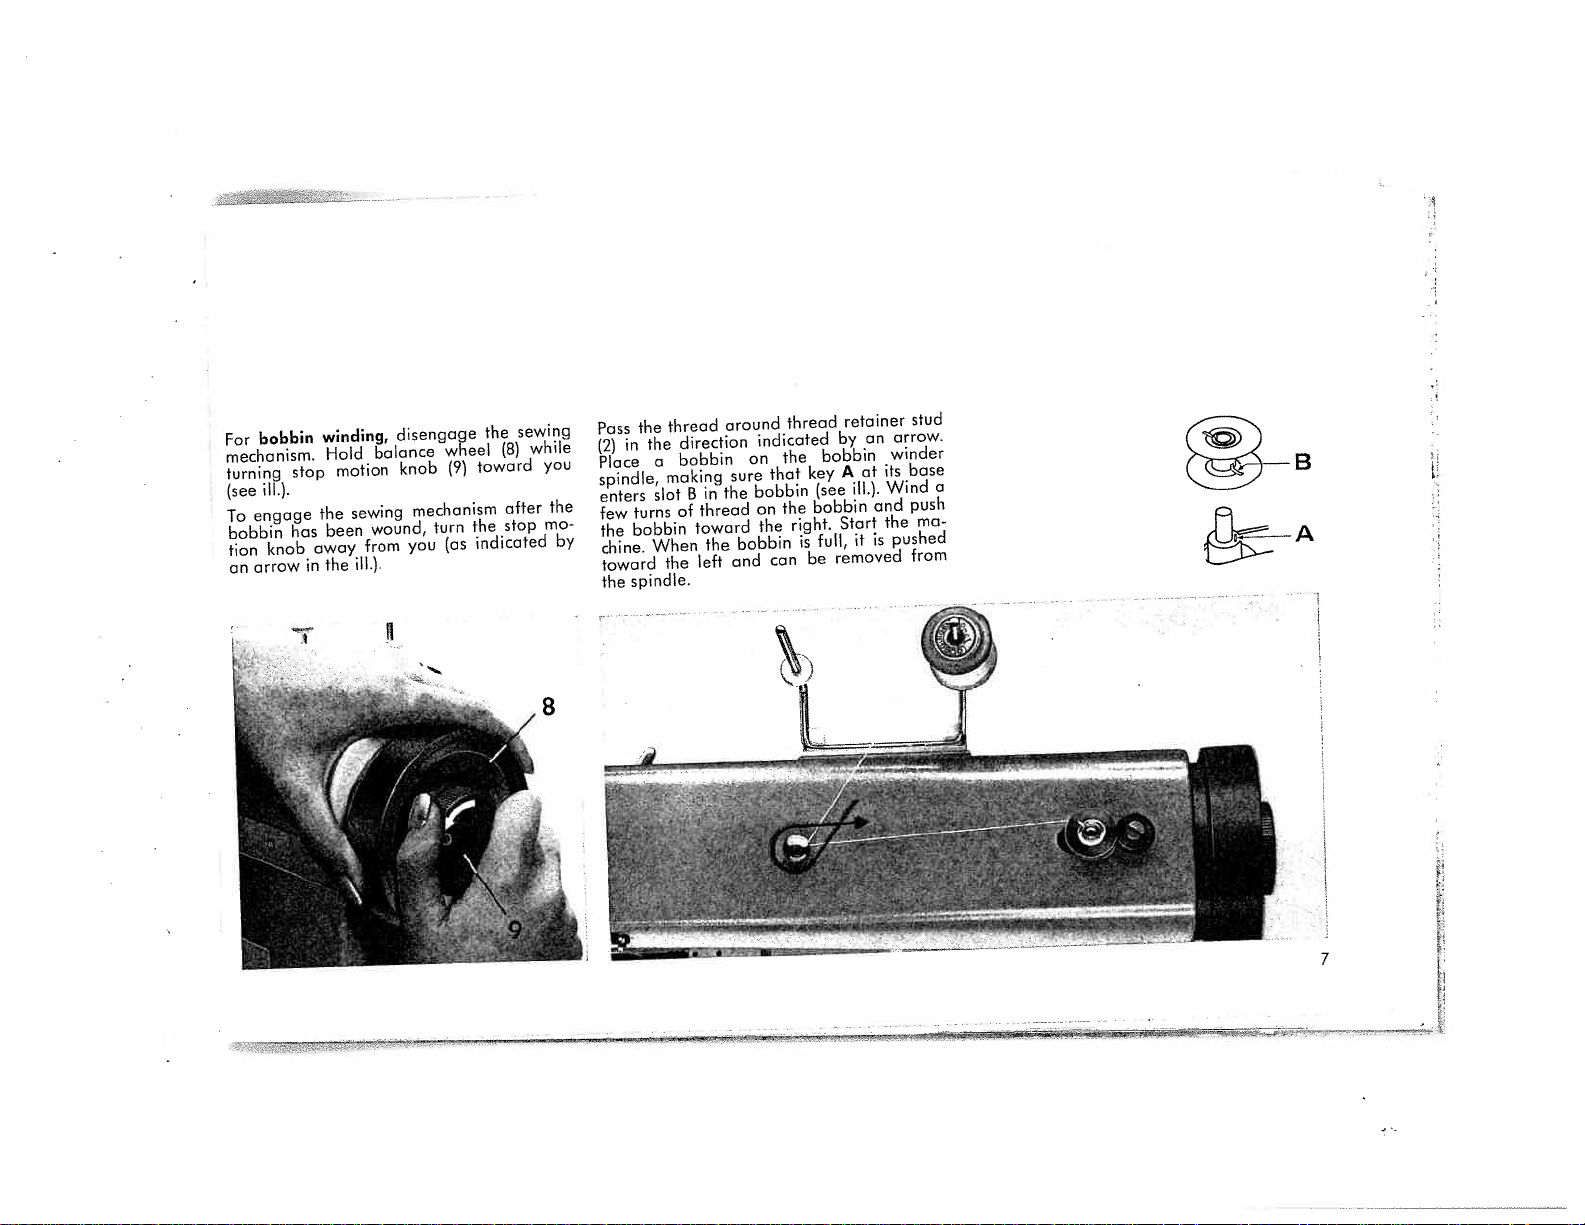
bobbin
For
mechanism.
turning
(see
To
bobbin
tion
an
stop
ill.).
engage
has
knob
arrow
winding,
Hold
motion
the
been
away
the
in
balance
sewing
wound,
from
ill.).
disengage
wheel
(9)
knob
mechanism
turn
(as
you
sewing
the
(8)
toward
after
stop
the
indicated
while
you
the
mo
by
the
Pass
in
(2)
Place
spindle,
enters
turns
few
bobbin
the
chine.
toward
spindle.
the
thread
the
a
making
slot
When
the
around
direction
bobbin
the
in
B
thread
of
toward
the
left
indicated
on
sure
bobbin
on
the
bobbin
and
the
that
the
can
thread
key
(see
bobbin
right.
is
be
retainer
by
bobbin
A
Start
full,
removed
an
at
ill.).
it
arrow.
winder
its
Wind
and
the
pushed
is
stud
base
a
push
ma
from
7
Page 10
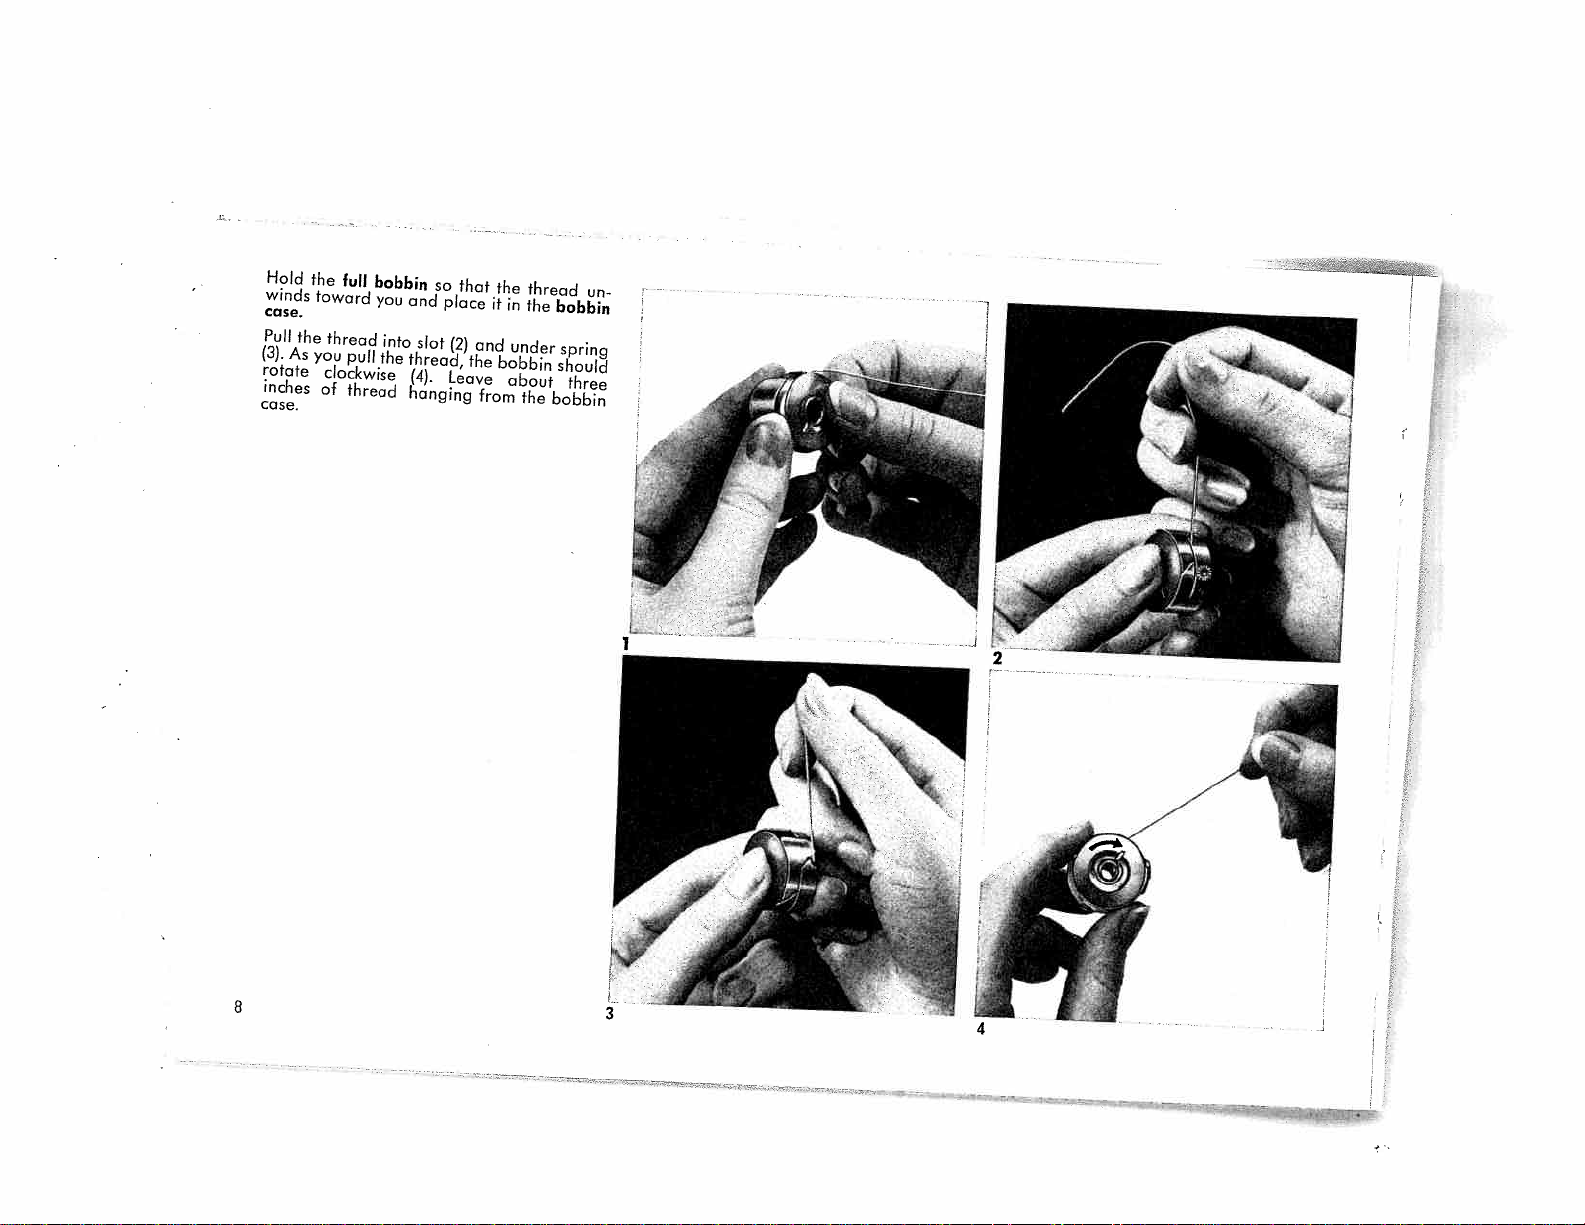
Hold
winds
case.
Pull
(3).
rotate
inches
case.
the
As
the
full
toward
thread
you
pull
clockwise
of
thread
bobbin
you
into
the
so
and
place
slot
(2)
thread,
(4).
Leave
hanging
that
the
it
and
from
the
thread
in
the
under
bobbin
about
the
bobbin
spring
should
three
bobbin
un
8
Page 11
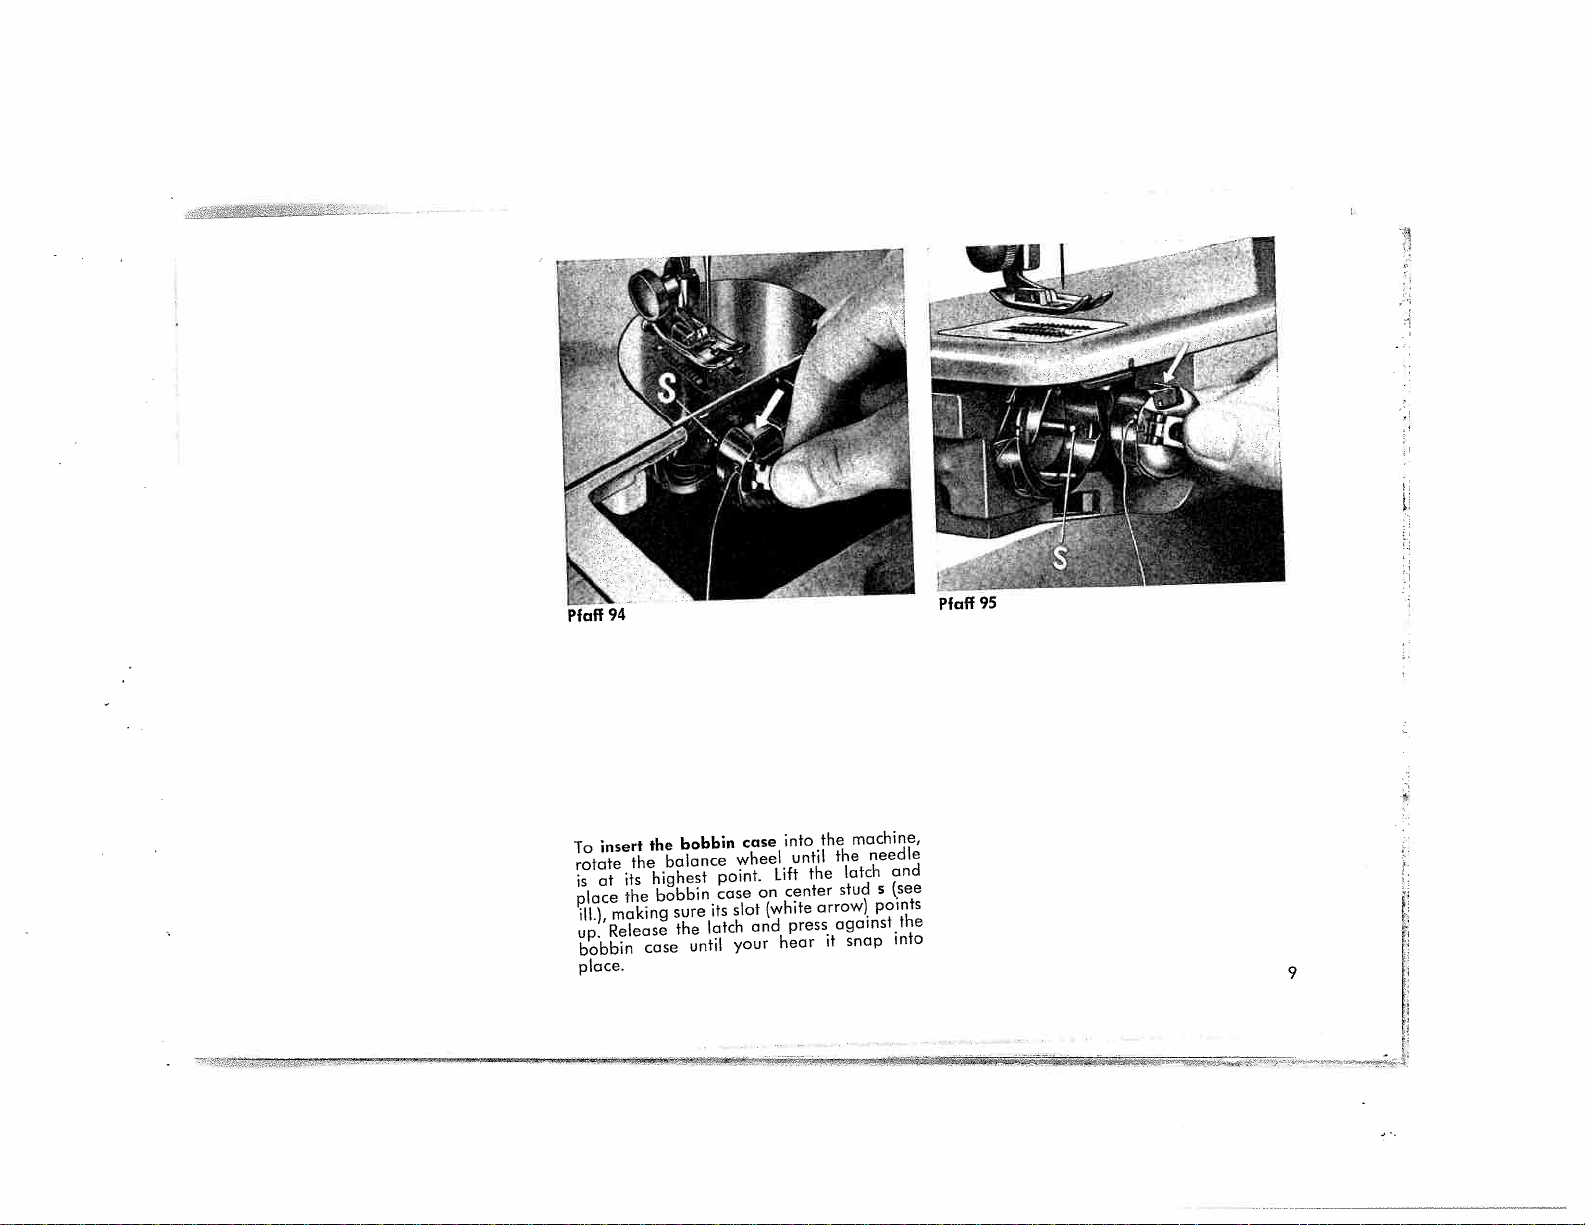
insert
To
rotate
at
is
place
ill.),
up.
bobbin
place.
the
the
its
the
making
Release
case
bobbin
balance
highest
bobbin
sure
the
until
point.
case
its
latch
case
wheel
slot
and
your
Lift
on
(white
hear
into
until
the
center
press
the
the
latch
stud
arrow)
against
snop
it
machine,
needle
and
(see
s
points
the
into
9
Page 12
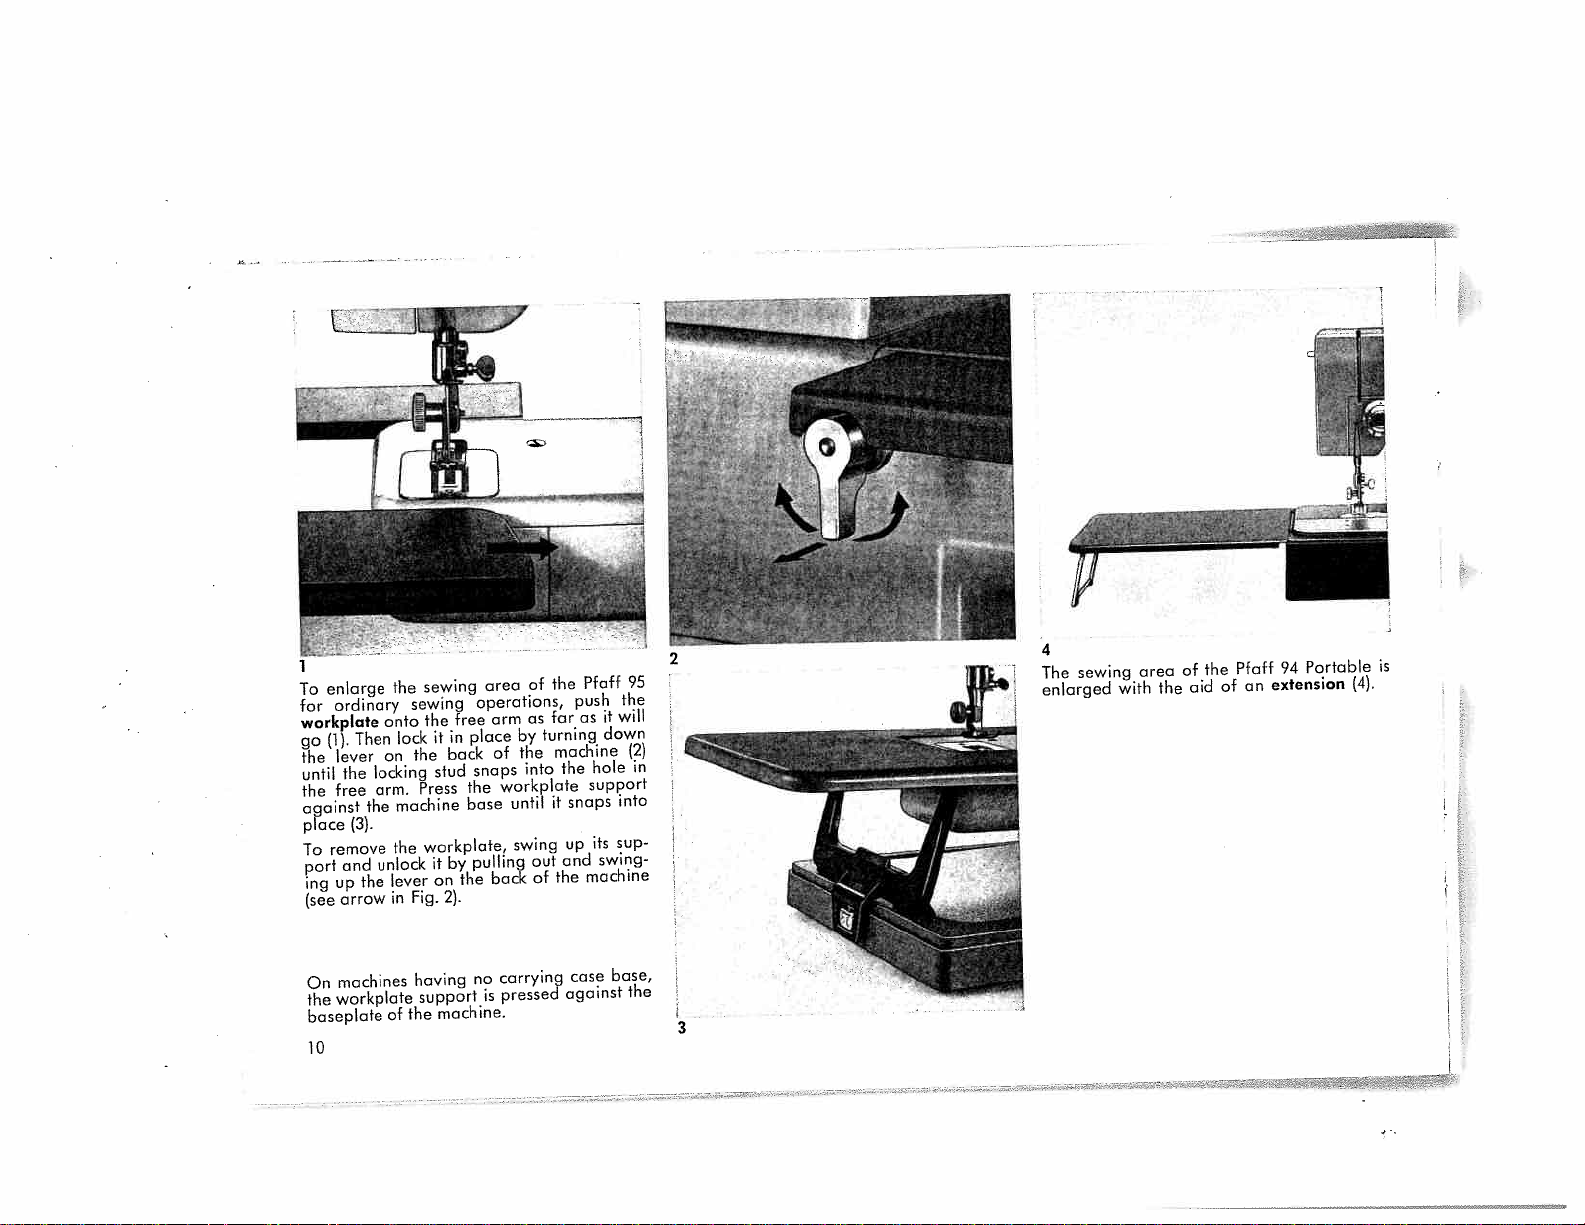
P
To
enlarge
ordinary
for
workplate
Then
(1).
go
lever
the
the
until
free
the
against
(3).
place
remove
To
and
port
up
ing
arrow
(see
mathines
On
workplate
the
baseplate
io
onto
on
locking
arm.
the
unlock
the
sewing
the
sewing
lock
the
Press
machine
workplaie,
the
lever
Fig.
in
having
support
the
of
free
the
in
it
back
stud
by
it
the
on
2).
machine.
area
operations,
arm
by
place
the
of
snaps
workplate
the
until
base
swing
pulling
back
carrying
no
pressed
is
of
as
turning
into
out
of
Pfaff
the
push
as
far
machine
hole
the
support
snaps
it
up
and
machine
the
case
against
it
down
its
swing
base,
the
will
into
sup
95
(2)
in
the
2
4
sewing
The
enlarged
with
area
the
of
aid
of
extension
an
Portable
94
Pfaff
the
is
(4).
Page 13
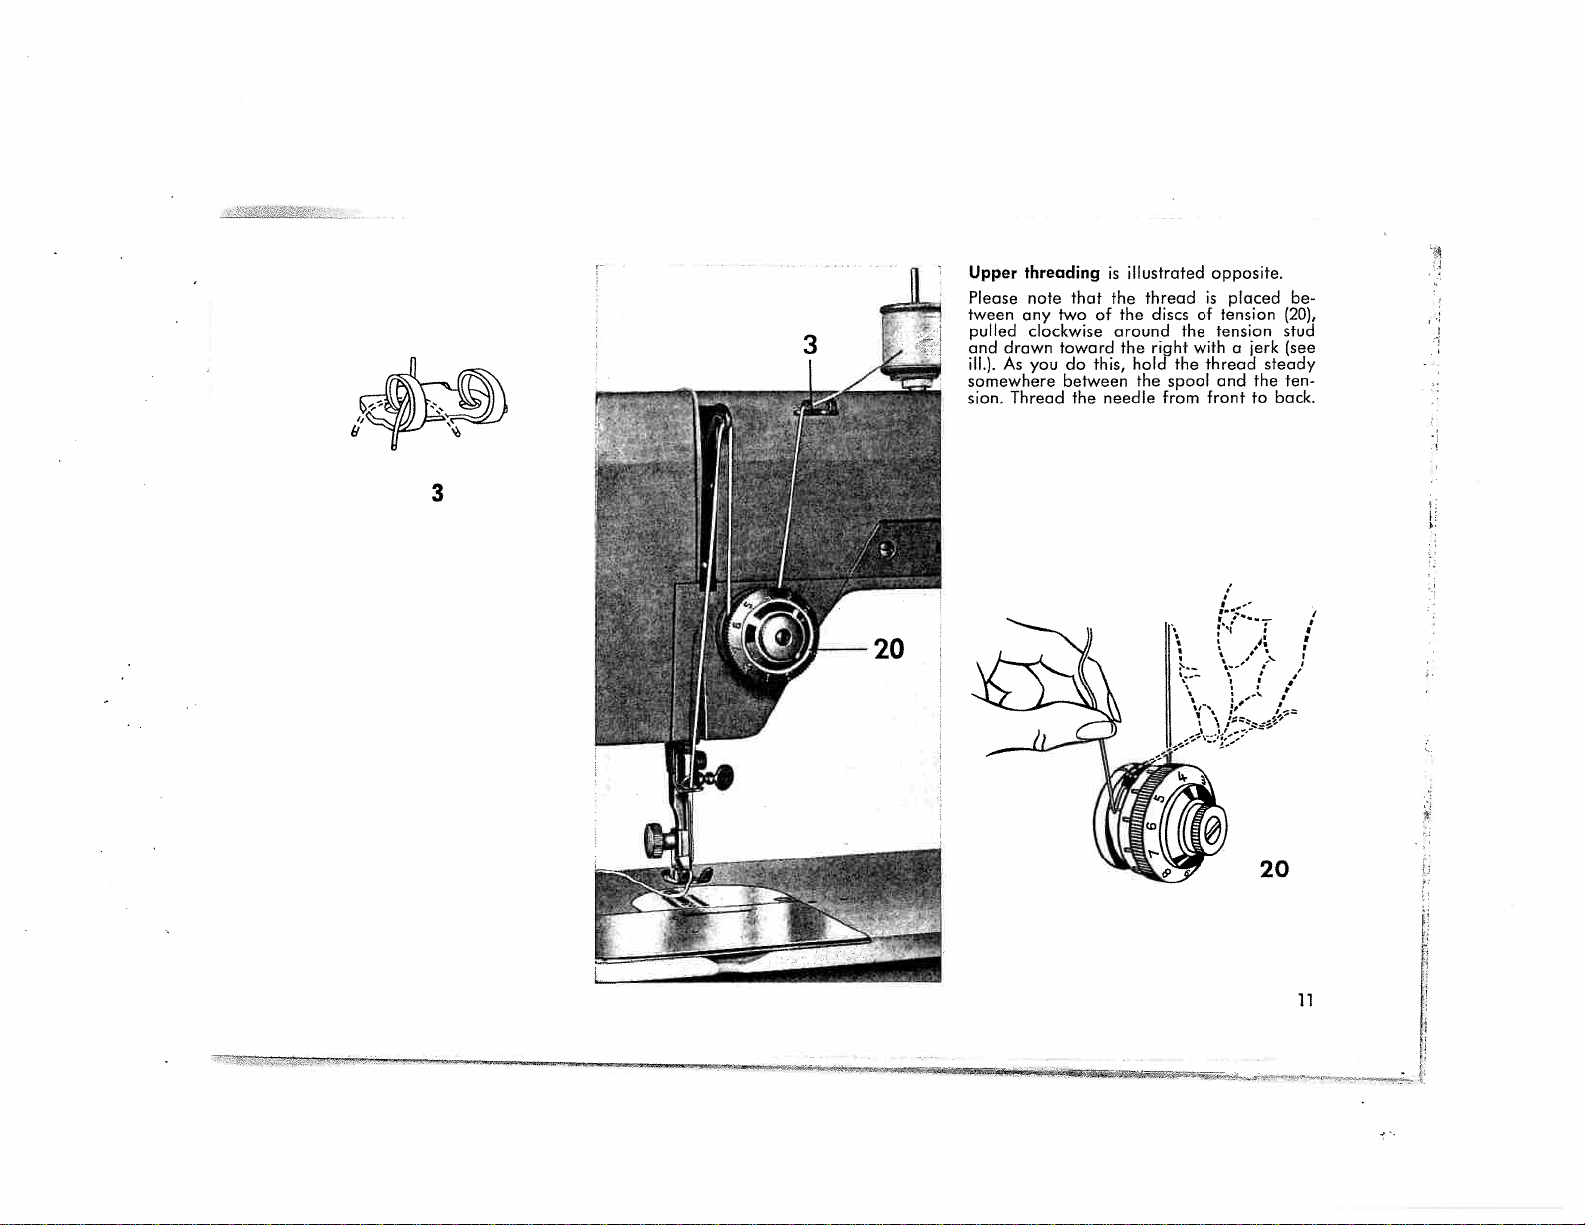
Upper
threading
Please
note
tween
any
pulled
clockwise
drawn
and
ill.).Asyou
somewhere
Thread
sion.
two
toward
do
between
that
the
illustrated
is
threadisplaced
the
discs
of
the
around
right
the
hold
this,
the
needle
the
the
spool
from
opposite.
of
tension
tension
with
thread
and
front
be
(20),
stud
jerk
(see
a
steady
the
ten
back.
to
3
20
11
Page 14

The
sewing
operating
of
the
A
Presser
B
=
Presser
12
the
machine
foot
presser
(see
bar
bar
is
ill.).
lifter
lifter
raised
bar
up
down
and
lifter
lowered
on
the
bac
b
To
draw
up
the
needle
Turn
turn.
bobbin
der
the
again.
the
Pull
thread.
sewing
thread
balance
the
and
needle
Place
foot
bobbin
wheel
lower
thread
both
after
thread,
the
toward
to
threads
it
has
hold
sewing
you
draw
back
been
the
foot.
a
full
up
the
un
raised
Page 15

Fundamentals
Machine
of
Operation
For
(19)
ordinary
should
sewing,
be
toward
(8)
you
wheel
do
knob
this,
check
tightened
is
balance
Always
highest
its
at
is
begin
(2).
lever
and
after
you
have
Make
needle
center
its
in
position
position,
lever
point
completed
before
a
you
seam
take-up
the
sure
see
sure
ly.
rotate
arrow).
stop
the
As
motion
you
make
to
firm
Page 16

Begin
this
end,
right
The
stitch
stitch
cating
opposite
slot.
For
stitch
Place
and
lower
Place
your
foot
you
press,
by
far
as
length
the
the
ordinary
length
the
the
sewing
posh
as
length
control
stitch
dot
control
material
the
presser
foot
and
depress
the
stitch
it
will
length
on
sewing
control
faster
straight-stitch
a
width
control
go.
is
regulated
(11).
The
chosen
the
left-hand
operations,
on
“2”.
the
under
bar
lifter.
within
the
pedal.
the
machine
by
number
should
side
sewing
easy
The
will
seam.
(18)
turning
reach
harder
of
set
run.
to
indi
To
the
be
the
the
foot
of
14
Page 17

18
To
seam,
sew
reverse
n
simply
or
depress
backtack
fingertip
end
the
control
of
(12).
a
The
stitch
stitch
may
be
Various
cussed
width
desired.
zigzag
on
width
control
page
is
sewing
and
26
regulated
toward
(18)
operations
the
by
the
following
pushing
left,
are
dis
pages.
as
15
Page 18

Balanced
Both
needle
center
The
turning
bin
case.
tension,
If
the
needle
to
adjust
tension
has
to
Numbers
of
tension
higher
For
ordinary
tension
tensions
and
of
bobbin
the
or
same
and
is
be
overcome
0
the
should
tensions
bobbin
the
material.
thread
small
Turn
left
size
on
the
bobbin
set
correctly
to
10
on
the
number,
sewing
be
are
knurled
this
for
threads
the
indicate
upper
set
are
essential
correctly
threads
tension
screw
a
looser
bobbin,
thread
if
a
when
pulling
different
tension
the
tighter
operations,
at
about
balanced
is
screw
right
tension.
are
there
slight
for
interlock
regulated
on
the
for
a
used
is
no
tension.
resistance
the
degrees
dial.
the
tension.
the
5.
sewing.
if
in
bob
tighter
in
the
need
This
thread.
The
upper
the
the
by
bottom
Upper
loose.
bottom
Upper
too
tight.
tension
tension
too
too
tight
loose
or
lower
or
lower
top
tension
top
tension
too
16
bottom
Both
iIIiiiiiiiiiii
top
tensions
correctly
balanced.
Page 19

accessory
The
machine
special
sewing
point
the
until
it
ing
tached
contains
sewing
foot,
raise
and
sewing
sideways
the
in
box
operations.
bring
the
foot
(see
reverse
which
several
needle
the
foot.
can
ill.).
order.
belongs
sewing
Turn
be
The
change
To
to
out
removed,
new
feet
its
screw
foot
your
to
highest
is
for
the
tilt
at
16
To
to
foot.
the
Insert
will
shank
22
Use
change
highest
its
loosen
needle
old
the
making
go,
faces
securely.
System
the
needle
needle
toward
130
needle,
point
out
and
sure
needles
R
and
of
the
F’
bring
set
the
push
that
lower
screw
needle
the
back.
only.
the
up
it
flat
Tighten
22
needle
the
22
clamp.
as
side
sewing
and
far
bar
pull
as
its
of
screw
it
17
Page 20

Darning
To
ceed
Replace
ing
foot
the
rear
set
screw
screw
prepare
as
follows:
the
No.
so
(16).
your
machine
ordinary
91-102826-91,
that
spring
(22).
Tighten
Lower
the
sewing
clip
sewing
presser
for
darning,
foot
attaching
c
rests
foot
bar
by
on
lifter.
pro
darn
it
from
needle
thumb
Now
drop
94,
this
and
pressing
slantwise,
To
raise
down
and
is
done
as
the
let
the
machine
by
the
indicated
machine
it
return
feed.
removing
drop
feed
by
feed,
to
its
On
bed
the
white
press
original
cover
lever
this
the
Pfaff
(13)
down
arrow.
lever
position.
On
the
by
simply
derside
chine
posite
Pfaff
turning
of
the
feed
again,
direction.
95,
the
the
free
machine
thumb
arm.
turn
this
feed
screw
To
screw
raise
is
dropped
on
the
in
the
the
un
ma
op
18
Page 21

Darning
facilitated
hoops.
both
hold
the
while
threads
the
across
forth
sure
Make
unworn
the
Turn
and
back
short
with
the
Select
the
ing
needle
If
the
tension
per
sheer
by
Draw
threads
first
the
area
fabric
forth
stitches.
darning
darning
is
and
placing
up
stitches
and
the
threads
around
at
over
job
thread
too
soft
the
lightly
start
hole
the
right
hoops
to
tight.
materials
them
bobbin
with
being
ore
stitching
in
are
hole.
the
be
should
is
in
threads
your
made.
back
sewing
anchored
angles
preceding
size
a
in
performed.
break,
greatly
darning
and
hand
left
Trim
and
direction.
the
in
sew
and
work
match
up
the
19
Page 22

Zipper
Attach
Stitch
Inserton
zipper
length:
1.5
foot
to
without
2
quilting
gauge.
Baste
Stitch
it.
about
for
foot
the
needle
the
and
foot
Continue
the
of
up
and
finished
The
4.
Fig.
closed
close
along
close
zipper.
the
zipper
to
inch,
1
the
in
the
stitching
Then
other
zipper
on
the
guiding
the
material,
zipper
until
stitch
side.
the
left
zipper
closure
fabric,
edge
the
(2).
you
across
teeth
raise
reach
of
right
is
then
the
edge
(1).
the
the
this
shown
open
zipper
Leave
zipper
end
end
of
(3)
in
20
1
2
3
4
Page 23

Seams
Felled
Flat
93-847561-00.
No.
foot
felling
Attach
length:
Stitch
seams
felled
Flat
pieces
two
straight-stitched.
Seam:
First
right
truding
enters
tom
piece
sides
the
fabric
(see
facing
about
felling
is
ill.),
to
1.5
of
Lay
/s
folded
but
2
are
fabric
pieces
and
inch.
foot
over
the
used
the
Make
evenly
lop
to
and
together
bottom
sure
edge
the
piece
durably
are
with
piece
the
the
and
of
not
is
join
usually
the
pro
fabric
bot
top
the
fold
ed.
pieces
two
the
Open
Second
pressing
the
of
felling
Seam:
it
foot.
foot
Lightly
against
Insert
and
stitch
the
the
tension
down
needle
seam
ridge
(see
the
plate
ill,
I
fabric
in
into
at
front
the
right.
847
by
561
Quilting
zipper
Use
quilding
the
over
gauge
entire
_
foot
surface
-w
for
No.
sewing
93-847
the
of
.
parallel
fabric.
-
600-00
with
seams
21
Page 24

Hemming
Stitch
length:
847557
L5
Fold
the
to
2
making
ral
hemmer
to
edge
Draw
both
drawing.
Feed
scroll
sure
at
ways
To
use
as
beginning
a
inches
foot
4
straight
in
place.
the
threads
the
fabric
with
that
the
all
times
under
produce
zigzag
instructed
hem
long.
fabric
your
and
the
on
stitches.
about
Place
and
stitches
into
backwards,
edge
right
scroll
the
right
elastic
on
25.
p.
of
the
Is
the
lower
to
the
into
hand
is
well
fabric
half
Set
fabric
inch
material
the
secure
hemmer
as
does
of
hem
the
wide
the
(see
filled
the
on
stitches
edge
some.
the
by
shown
hemmer
ill.>,
with
not
foot.
soft
and
under
Make
folded
pulling
in
making
fabric
slip
fabrics,
width,
twice,
seve
the
3
the
foot
side
22
L
Page 25

Cording
ordinary
Use
insert
and
tained
Stitch
Cording
When
lead
tension
of
render
To
sert
gauge
the
type
Lace
trated.
rotate
bobbin
The
seams
abt.
is
one
of
make
To
twin
ing
supplied
Twin
(/64”),
4.0
and
Cording
grooves
cording
grooves
cording
grooves
from
length:
is
threading
each
discs
filler
a
and
of
filler
the
Hold
the
thread.
smallest
made
V4
the
different
needles
at
needles
1.6
(/32”)
is
foot
for
foot
for
sewing
needle
a
twin
Pfaff
your
2
to
1.5
with
made
the
between
thread
(see
cording
your
cord.
the
size
material
cord
needle
both
balance
distance
with
the
For
inch.
cording
size
and
cost.
extra
for
(1/io’),
1.8,
mm.
No.
foot
for
used
No.
medium-heavy
No.
lightweight
No.
foot
(which
dealer).
needle
two
needles,
a
ill).
more
the
Select
filler
the
of
used.
through
threads
to
wheel
between
ordinary
narrower
listed
feet
cording,
cording
2.0
distances
(I64”),
needle
93-847671-00
materials,
heavy
93-847675-00
fabrics,
93-847680-00
materials.
93-838
can be
make
separate
prominent,
twin
cord
hole
g,
lightly
draw
sewing
cording,
below.
the
feet
(I32”),
2.5
954-00,
ob
threads.
sure
pair
needle
suit
to
illus
as
and
the
up
cording
foot
use
follow
can
of
with
with
and
with
to
in
be
1.2
3.0
94
Pfaff
95
Pfaff
3
5
7
23
Page 26

Hemsttchng
Stitch
length:
—
93-100179
2to2.5
24
Useathread
matches
the
(preferably
Insert
Make
are
is
crease
stitching
needle
fabric
seam,
needle
in
You
along
guiding
stitches
the
the
the
System
a
sure
same
same
the
penetrating
by
guiding
enters
fabric
can
the
the
into
effect
produce
which
material
a
No.
130
the
needle
size.
as
for
needle
is
half
a
the
the
previously.
hemmed
material
the
fabric
is
50
embroidery
Zwi-Ho
and
threading
The
cording
thread
produced
the
and
turn
material
needle
a nice
edge
so
that
close
not
too
being
hemstitched
needle.
bobbin
work.
tension.
by
the
fabric.
sew
the
that
so
holes
it
hemstitchin
9
the
of
the
right
to
the
heavy
thread).
threads
procedure
Slightly
The
hem-
left
wing
Turn
second
the
wing
has
made
effect
fabric
needle
hem.
and
in
the
by
Page 27

18
The
The
stitch
may
Never
the
The
stitch
Zigzag
stitch
width
desired.
be
change
needle
stitch
length
Seam
width
control
outside
is
length
control
the
regulated
is
(18)
stitch
the
is
(11).
toward
width
fabric.
regulated
(See
by
the
setting
by
ill.).
pushing
left,
unless
turning
as
-:
25
Page 28

Overcasting
Edges
with
Zigzag
Stitches
Attach
Stitch
length:
838
u
To
overcast
weight
mum
stitch
Soft
and
with
a
Make
sure
the
fabric
will
cover
ordinary
954
the
fabrics,
width.
flimsy
zigzag
the
and
the
sewing
2
edges
set
stitch
needle
the
fabric
the
fabrics
of
other
edge
foot.
of
light
machine
are
medium
takes
over
securely.
best
one
its
and
for
width.
medium-
its
overcast
stitch
edge.
maxi
into
This
26
Page 29

nsertng
Stitch
838
Larger
way
utting
width:
954
holes
the
exactly
Patches
medium
can
ragged
be
along
edges
patches
around
the
fabric
quickly.
the
yarns.
Trim
hole,
Cut
a
hole
its
grain
Set
the
stitch
and
stitch
Set
the
the
stitch
of
its
At
the
needle
its
throw.
corners
away
Elastic
manner.
patch
and
place
to
stitch
width
stitch
width
slot
and
corners,
down
Then
are
the
excess
materials
about
that
control
along
in
stitched
it
of
length
the
length
control
sew
stop
the
turn
material
are
Vs
under
the
fabric.
control
in
edge
control
over
the
material
the
twice
patched
inch
the
the
at
first
fabric
on
larger
hole,
on
middle
of
the
on
the
extreme
seam.
machine
on
(see
the
in
matching
“1”
of
patch.
“0.5”
with
the
so
ill.).
wrong
the
than
and
its
right
that
the
the
slot
and
left
the
of
the
Trim
side.
same
27
Page 30

Inserting
Stitch
length:
838
954
u
Place
the
down
with
Cut
the
(2)
and
Sew
over
zigzag
fabric
the
28
I.cice
1
laceonthe
straight
fabric
open
ironiton
the
edgesofthe
stitchesofmedium
edges
stitches on
under
both
away
material and
sides
an the
the
both
lace
of
the
lace
width
wrong
stitch
sides
insertion
lace.
with
(3).
side
it
(1).
short
Trim
(4).
Page 31

19
sewing
slot.
right
Position
jobs
the
to
donebymoving
This
is
left,
and
is
lever
made
are
rightorleft
respectively.
indispensable
with
of
Changing
Some
needle
the
needle
the
lever
(19)
needle
The
sewing
for
—
—
—
C
the
special
plate
to
buttonholes.
Needle
switched
the
position
Lever
4-
at
left
t
center
right
29
Page 32

Sewing
Buttonholes
Attach
machine.
Flick
the
When
the
are
threads,
To
groove
Allpurpose
may
30
buttonhole foot
the
needle
to
stitch
using
stitch
opposite
obtain
placeafiller cord of
of the sewing
alsobeused
controlinnotchR1
width
No.
50
length
controlsothat
each
slightly
increase
more
sewing
No.
847616tothe
its
left
position
embroidery
other
(see
the
prominent buttonholes,
medium
foot.
foot
No.
this
for
operation.
and
(see
thread,
both
ill.).
For
heavier
stitch
length.
size
in
the
91-100179-00
put
ill.).
set
dots
left
3
4
Page 33

the
Sew
When
leave
the
of
its
throw.
fabric
place
the
pull
it
ofthefoot.
descend
Move
stitch
notch
slightly
length
of
first
the
buttonhole
needle
around
filler
forward,
Lower
on
the
width
R
2,
make
holding
bar.
seam
in
Lift
the
clockwise
cord
placing
the
left
control
4to6
the
over
is
the
sewing
around
it
foot
of
its
materials
the
the
fabric
by
the
in
and
throw.
(18)
bartack
the
right
on
foot,
half
let
to
to
filler
the
turn
a
needle
left
the
the
stitches,
reduce
cord.
length,
right
the
turn,
and
groove
needle
second
the
Push
first
hole
end
of
Push
notch
holding
bar.
to
right
Slightly
to
the
Open
stitch
notch
seam,
the
stitch
R
Flick
bar.
the
width
R
1
stopping
first
width
2
and
the
material
stitch
the
and
make3to
pull
the
buttonhole
whichisincluded
and
seam.
sew
filler
control
sew
about
control
the
to
width
cord
with
the
in
(18)
the
1/
(18)
second
reduce
control
fastening
4
and
your
accessory
bock
second
inch
to
the
tack,
the
all
trim
seam
to
button
from
second
slightly
length
the
stitches.
it
ripper
box.
the
the
of
way
close
31
Page 34

Button
Sewing
Flick
the
drop
the
Place
the
so
that
needle
ill.).
Raise
its
lowered
width
until
through
Move
the
right
and
Monogram
Regulate
the
monogram.
needle
machine
button
the
needle,
position.
the
bath
holes.
stitch
make
Embroidery
the
stitch
feed.
will
needle
width
two
to
under
enter
Sew
or
width
its
right
the
the
but
Regulate
alternately
on
control
three
to
foot
right
retain
the
suit
position
and
hole
the
the
button.
toward
tying
the
and
align
(see
foot
stitch
stitches
the
stitches.
size
of
in
93100179
Remove
chine
Trace
place
the
Let
the
beginning
bin
thread
thread
move
the
out
turning
ning
at
To
give
ty,
embroider
the
feed.
the
needle
ends
hoops
high
your
sewing
Lower
monogram
material
stitch
of
the
up
through
and
start
in
them,
speed.
monogram
the
foot
the
in
darning
into
design
the
your
“writing”
while
outlines
Li
and
drop
presser
on
the
hoops.
the
fabric
and
draw
fabric.
machine.
direction,
the
machine
dimensional
twice.
the
bar
fabric
the
Hold
ma
lifter.
and
at
the
bob
both
Slowly
with
is
run
qual
32
Page 35

93-100179
Blndstitching
clear-view
Apply
91-100
No.
179-00.
sewing
foot
Baste
edge,
Then
the
set
the
Fold
the
in
line
ill.).
needle
folded
yarn
Please
Fold
(3)
stitches
the
illustrated
as
flick
stitch
needle
hem
the
sewing
with
Regulate
takes
edge,
(see
note:
the
and
before
hem
the
thread
foot
the
ill.).
hem
finish
about
needle
lenght
and
(2)
so
left
the
the
catching
heavy
of
the
it
is
inch
/16
(1).
its
to
control
tension
place
that
groove
stitch
stitch
left
raw
hemmed.
from
right
at
one
by
the
folded
the
of
width
exactly
merely
woolens
edge
the
position
‘4’.
grade.
fabric
foot
the
that
so
one
only
with
fabric
and
Reduce
under
edge
(see
the
the
in
fabric
once
zigzag
is
seam
Basting
Fold
33
Page 36

Ornamental
You
can
by
needle
can
make
varying
position.
make
Additional
by
sewing
Sewing
exciting
stitch
Some
are
illustrated
ornamental
over
a
filler
fashion-stitch
length,
of
on
effects
cord.
stitch
the
this
width
designs
page.
are
designs
and
you
obtained
Sewing
Stitch
Stitch
838
Use
Chart).
Ease
Hold
sewing.
34
Curtains
length:
width:
954
thin
a
the
needle
synthetic
2.5
medium
needle
materials
to
3
(see
thread
Needle
tension
a
little
and
Thread
somewhat.
taut
while
Page 37

Applique
b
To
make
Trace
1.
2.
Set
stitch
3.
Sew
right
4.
Follow
wrong
(stitch
(3).
Trim
5.
seam
6.
Sew
closely
length:
lustrated
93-100179
the
the
along
the
side
the
on
over
work
appliqué,
design
stitch
the
fabric
with
the
outlines
side
with
length
excess
the
right
the
packed
0.2;
stitch
(4).
proceed
lenght
outlines.
to
long
a
control
edges
zigzag
on
the
control
be
stitches
of
the
narrow
on
material
side.
of
the
width:
follows:
as
right
on
appliquéd
(2).
design
zigzag
“1
“),
close
appliqué
stitches
medium),
side
as
“1”
to
on
shown
to
(stitch
as
(1).
and
the
the
stitch
the
with
il
Page 38

To
cover
by
36
change
by
arrow.
an
the
pulling
light
it
in
bulb,
the
remove
direction
face
the
indicated
Push
and
pins
bulb
the
pull
slide
in
ond
light
out.
into
turn
bulb
Insert
the
right.
into
the
socket
its
new
socket,
bulb
slots.
turn
so
Press
that
left
its
the
As
slot
til
you
it
c,
then
snaps
replace
push
into
the
against
place.
face
cover,
the
slip
face
tip
cover
into
d
un
Page 39

Machine
Longevity
are
dependent
per
oiling.
has
been
there
ore
The
raceway
important
put
a
drop
ill,
at
left
winder.
Pfaff
94
Care
and
Since
mode
only
oiling
of
and
smooth
on
your
from
o
few
in
the
point.
oil
into
center).
machine
regular
Pfaff
high-grade
oiling
sewing
the
Do
cleaning
sewing
points
hook
From
hook
not
performance
and
mochines
materials,
left.
is
the
time
to
raceway
oil
the
bobbin
pro
most
time,
(see
37
Page 40

From
machine
hook
ing
move
bobbin
time
the
case
to
arm
with
needle,
and
with
time,
soft
a
the
in
the
clean
the
vicinity
the
brush.Tothis
sewing
bobbin.
foot
partsinthe
sew
of
the
end,
re
the
and
ii.
Pfaff
On
lift
the
cover
the
Pfaff
able
bottom
machine
38
95
front
out
94
machines
machines,
the
of
back
machines,
free
of
the
lengthwise
are
loosen
machine
cautiously
loosen
arm
of
tilted
the
base
(3).
the
cover
the
back.
screw
arm
and
set
and
On
screw,
(1
&
port
on
tilt
pull
2).
the
the
-
3
Page 41

Trouble
When
will
chine
Please
after
ting
(buttonhole
job
instance)
straight
lever
tion
machine
control
Shooting
operated
hardly
remember
you
switching
by
stitching,
its
to
feed
“2”.
on
properly,
develop
to
have
sewing
flicking
central
and
restore
completed
the
position,
setting
your
trouble.
any
the
your
darning,
or
machine
needle
the
stitch
the
sewing
normal
sewing
back to
raising
ma
set
for
posi
the
length
trouble
If
•
•
•
•
•
•
•
•
•
•
The
needle
must
be
Select
Needle
the
Check
threaded
Use
only
sewing
Check
inserted
been
tensions
Both
Don’t
guide
Clean
Make
wedged
remove
between
Pfaff
The
jam
handled
thread
If
hook
drop
balance
back
should
inserted
correct
the
and
whether
correctly.
high-grade
silk.
to
see
farce
the
material
and
oil
sure
there
between
them,
the
rotary
even
improperly.
should
raceway,
oil
of
wheel
forth,
and
occur,
must
correctly.
needle
Thread
the
that
correctly.
must
feeding
the
the
are
pull
tension
hook
if
the
it
into
back
without
check
not
be
needle
machine
the
balanced
be
lightly.
machine
no
tension
the
narrow
a
discs.
will
machine
happen
is
sufficient
raceway,
the
and
the
damaged
and
Chart.
bobbin
motion,
as
pieces
not
to
applying
following:
thread
has
thread
case
correctly.
merely
instructed.
of
thread
discs.
fabric
normally
should
jam
to
jer
rock
then
and
from
been
has
strip
the
in
put
the
force.
or
To
be
a
it
39
Page 42

Contents
Appliqué
Blindstitching
Button
Work
Sewing
Changing
Changing
Changing
the
the
Changing
Cleaning
Cording
Darning
Darning
Drawing
Dropping
Electrical
Engaging
Mechanism
Essential
Essential
Flat
Foot
Foot
Up
the
Equipment
and
Parts
Parts
Felled
Control
Foreword
Fundamentals
Hemming
Hemstitching
Inserting
Inserting
a
Lace
40
Light
the
Needle
Needle
the
Sewing
the
Machine
Disengaging
of
of
Seams
of
Full
Bulb
Bobbin
Pfaff
Pfaff
Machine
Bobbin
Position
.
Foot
Thread
Feed
the
94
95
Operation
Sewing
Page
•
•
•
35
33
32
36
17
29
17
37
23
18
18
12
18
4
7
2
3
21
13
22
24
B
28
Inserting
Inserting
Machine
Monogram
Disengaging
Motor
Ornamental
Overcasting
Preface
Quilting
Raising
and
Regulating
Regulating
Removing
Removing
Reverse
Sewing
Sewing
Curtains
Straight
Trouble
Threading
Upper
Winding
Workplate
Workplate
Zigzag
Zipper
Stitching
Insertion
Patches
Bobbin
the
Care
Embroidery
Sewing
Edges
Lowering
Stitch
the
the
Thread
the
Bobbin
the
Face
Sewing
Buttonholes
Stitching
Shooting
Bobbin
the
of
Pfaff
of
Pfaff
Case
Mechanism
the
Length
Tension
Case
Cover
94
95
.
Sewing
.
.
.
Foot
.
Page
.
27
9
37
32
5
34
26
1
21
12
14
16
6
36
15
30
34
14
39
11
7
10
10
25
20
Page 43

No.
20835
cog!.R1070
CPFAFFD
Printed
Germany
in
 Loading...