


-900/51
-900/57
Service Manual
for the series
480, 560 and 950
296-12-17 607
Justieranleitung dtsch. 06.95

At the time of printing, all information and illustrations contained in this document were up
to date.
Subject to alteration
The reprinting, copying or translation of PFAFF Service Manuals, whether in whole or in
part, is only permitted with our previous agreement and with written reference to the
source.
G.M. PFAFF
Aktiengesellschaft
Postfach 3020
D-67653 Kaiserslautern
Königstr. 154
D-67655 Kaiserslautern
Editing / Illustration
HAAS-Publikationen GmbH
D-53840 Troisdorf

Table of Contents
Contents ...............................................................................Chapter - Page
1 Safety ..................................................................................................... 1- 1
1.01 General notes on safety ............................................................................................ 1 -1
1.02 Safety symbols ......................................................................................................... 1 - 2
1.03 Danger .......................................................................................................................1- 2
2 Adjustment ............................................................................................. 2- 1
2.01 Notes on the service manual .................................................................................... 2 - 1
2.02 Tools, gauges and other accessories ........................................................................ 2 - 1
2.03 Abbreviations ............................................................................................................. 2 - 1
2.04 Work symbols ........................................................................................................... 2 - 1
2.05 Pre-adjusting the control cam ................................................................................... 2 - 2
2.06 Roller lever .................................................................................................................2- 3
2.07 Pawl ........................................................................................................................... 2 - 4
2.08 Engaging solenoid...................................................................................................... 2 - 5
2.09 Release lever ............................................................................................................. 2 - 6
2.10 Engaging lever ........................................................................................................... 2 - 7
2.11 Lateral adjustment of the thread catcher ................................................................. 2 - 8
2.12 Front reversal point of the thread catcher ................................................................ 2 - 9
2.13 Re-adjusting the control cam .................................................................................... 2 - 10
2.14 Retaining spring ......................................................................................................... 2 - 11
2.15 Knife to needle clearance .......................................................................................... 2 - 12
2.16 Manual trimming check ............................................................................................ 2 - 13
2.17 Tension release of needle thread .............................................................................. 2 - 14
2.18 Positioner.................................................................................................................. .2-15
2.19 Mounting and dismounting the control unit .............................................................. 2 - 16

Safety
1 Safety
1.01 General notes on safety
● This machine must only be operated by adequately trained operators and only after
having completely read and understood the Instruction Manual!
● All Notes on Safety and Instruction Manuals of the motor manufacturer are to be read
before operating the machine!
● The Danger and Safety Instructions on the machine itself are to be followed!
● The machine must be used only for the purpose for which it is intended and must not
be operated without its safety devices. Observe all relevant safety regulations!
● When exchanging sewing tools (e.g. needle, presser foot, needle plate, feed dog and
bobbin), when threading, when the workplace is left unattended and during servicing,
the machine must be disconnected from the mains by switching off the on/off switch
or by removing the plug from the mains!
● Daily servicing work must be carried out only by appropriately trained persons!
● Repairs and special maintenance work must only be carried out by technicians or
persons with appropriate training!
● For service or repair work on pneumatic systems the machine must be disconnected
from the compressed air supply. The only exceptions to this are adjustments and
function checks made by appropriately trained personnel!
● Work on the electrical equipment must be carried out only by electricians or
appropriately trained personnel!
● Work is not permitted on parts and equipment which are connected to the power
supply! Exceptions to this are contained in the regulations EN 50110!
● Modifications and alterations to the machine must only be carried out under
observance of all the relevant safety regulations!
● Only spare parts which have been approved by us are to be used for repairs! We
expressly point out that any replacement parts or accessories which are not supplied
by us have not been tested and approved by us. The installation and/or use of any such
products can lead to negative changes in the structural characteristics of the machine.
We shall not be liable for any damage which may be caused by non-original parts!
1 - 1
Safety
1.02 Safety symbols
Danger!
Points to be observed.
Danger of injury to operating and specialist personnel!
1.03 Danger
Do not reach into the sewing area while sewing!
Danger of injury caused by needle!
Do not leave any objects on the table or near the needle plate while carrying
out adjusting work. Objects can become jammed or be slung away! Danger
of injury!
In order to adjust this device, the machine must be tilted to the back.
Use both hands when returning the machine to an upright position!
Danger of crushing between sewing head and table top!
1 - 2
Adjustment
2 Adjustment
Please observe the safety instructions of this service manual as and the
notes on safety in the instruction manual before carrying out any
maintenance or adjustment work.
On the 480 series no c-clamps may be attached to the needle bar as this
would damage the special coating on the needle bar.
Refer to the motor manufacturer’s instruction manual for the setting of the
cutting torque (180 min-1).
2.01 Notes on the service manual
All adjustments in this servicing manual apply to a fully assembled machine. Covers on
the machine which have to be removed and replaced for checking and adjustment work
are not mentioned in the text.
Screws and nuts mentioned in brackets () are to be loosened before making an adjustment
and tightened again when the adjustment is complete.
2.02 Tools, gauges and other accessories
● Screw drivers with blade widths from 2 to 10 mm
● Wrenches with jaw widths from 7 to 14 mm
● Allan keys from 1.5 to 6 mm
● Metal rule, part no. 08-880 218-00
● Rig pin (diameter: 5 mm), part no. 13-030 341-05
● Clearance control device
● Sewing thread
2.03 Abbreviations
t.d.c = top dead centre
b.d.c. = bottom dead centre
2.04 Work symbols
Note, information
Servicing, repair,
adjusting, maintenance
2 - 1
Adjustment
2-02
24V = 4% ED
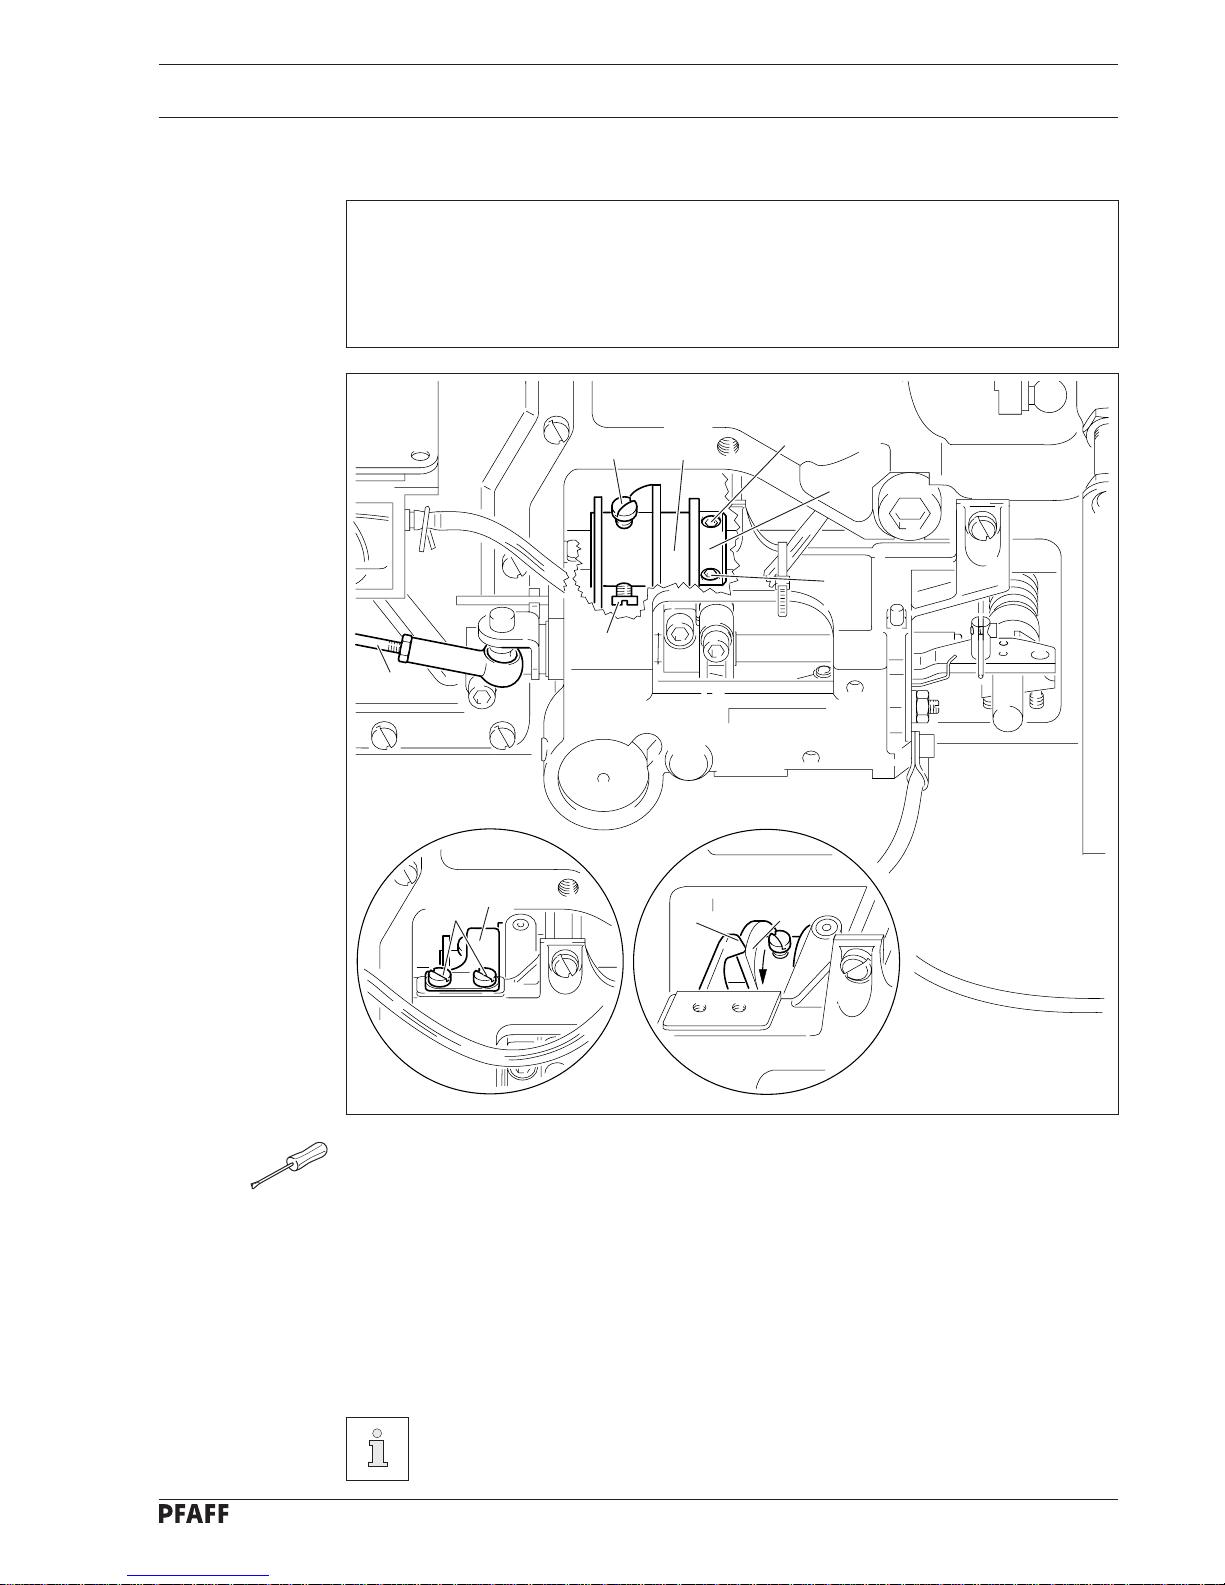
2.05 Pre-adjusting the control cam
Requirements
At the t.d.c of the needle bar,
1. the beginning of the highest point of the trip of the control cam 6 sould be positioned
under the tip of pawl 8 and
2. the right-hand side of the trip should be flush with the right-hand side of pawl 8.
● Pull the ball heads of connecting rod 1 off the ball pin at the cutting and control units
and remove connecting rod 1.
● Loosen screws 2 and retaining spring 3 together with the cover disk.
● Loosen screws 4 and 5.
● Twist or shift control cam 6 in accordance with requirement 1 or requirement 2 as
required.
● Tighten screws 4 firmly.
● Push fixing collar 7 onto control cam 6.
● Tighten screws 5 firmly.
Connecting rod 1 and retaining spring 3 stay dismantled for further
adjustments.
3
2
1
8
6
4 6
4
5
5
7
Fig. 2 - 01
2 - 2
Adjustment
2-03
24V = 4% ED
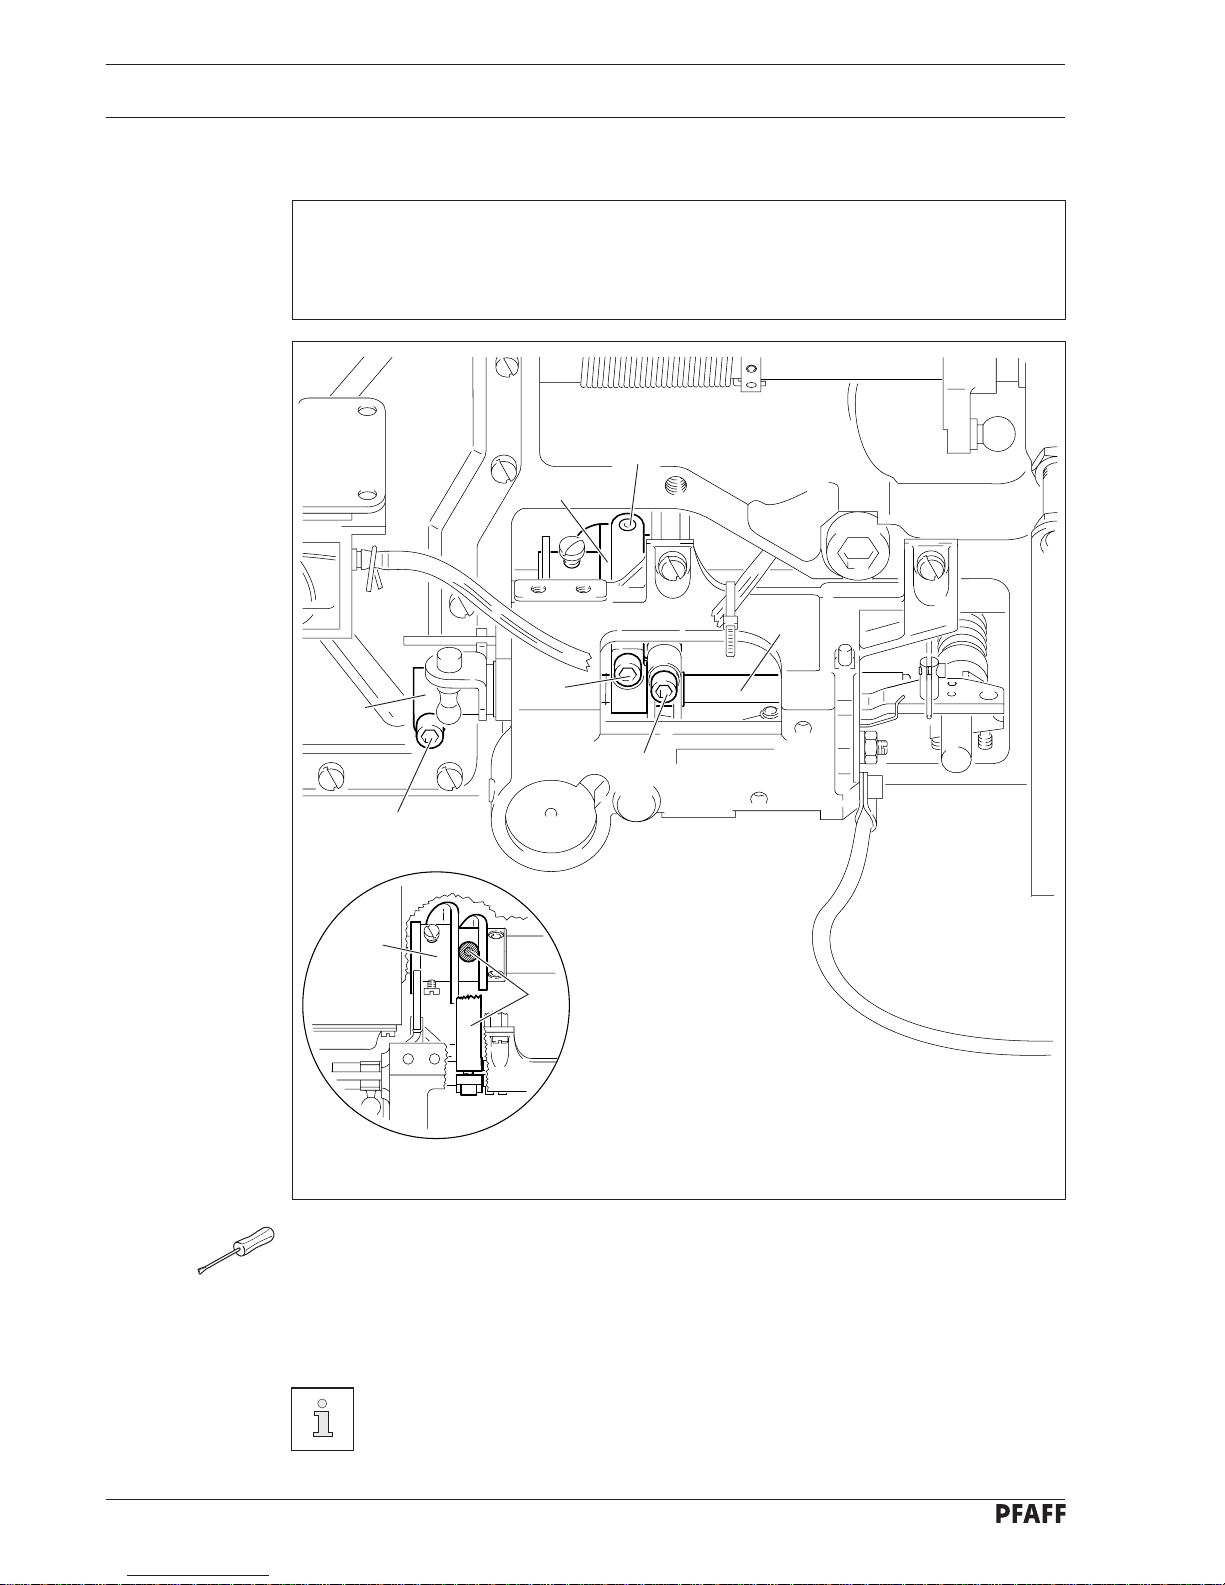
Fig. 2 - 02
2
3
2.06 Roller lever
2 - 3
4
7
5
6
1
4
7
Requirements
When the needle bar is positioned 1.8 mm after the b.d.c,
1. the roller of the roller lever 4 should engage easily with the control cam 7 and
2. the roller of roller lever 4 should be centred in the cam notch of the control cam 7
● Unscrew screws 1 and 2.
● Put pressure on rockshaft 3 to the right.
● Adjust roller lever 4 in accordance with requirements 1 and 2.
● Tighten screw 1 firmly.
● Position the surface of the fixing collar 5 (bolt 6) parallel to the base plate.
Screw 2 stays undone for the following adjustment.
 Loading...