

Peugeot RCZ 2012 Owner's Manual


You can find your user guide on the PEUGEOT website, under
f
address
(
P
n
r
S
the heading "Personal space".
Referring to the user guide on-line also gives you access to the
latest information available, easily identified by the bookmarks,
associated with this pictogram:
lease note the following point:
The fitting of electrical equipment or accessories which are
ot recommended by PEUGEOT may result in a failure of your
vehicle's electronic system. Please note this specific warning.
It is advisable to contact a PEUGEOT dealer to be shown the
ecommended equipment and accessories.
If the heading "Personal space" is not available on the public website
or your country, you can find your user guide at the following
:
http://public.servicebox.peugeot.com
elect:
The Vehicle documentation link in the home page
no registration is needed),
the language,
the model,
the edition date appropriate for the date of registration of your vehicle.
You will find your user guide, presented in the same way as the paper version.
WELCOME
Thank you for choosing an RCZ, a symbol of confi dence, passion and
inspiration.
This handbook has been designed to enable you to make the most of
your vehicle in all situations.
Therefore, on the fi rst few pages, you will fi nd a list of contents followed
by a quick reference guide intended to make it easier for you to become
familiar with your vehicle.
All of the details specifi c to your vehicle, comfort, safety, driving, are
then presented in this handbook, to increase your appreciation of the
vehicle and to help you make the most of it.
Your vehicle is fi tted with only some of the equipment described in this
document, depending on its trim level, version and the specifi cation for
the country in which it was sold.
KEY
WARNING:
this symbol marks warnings which it is essential to observe for
your own safety, for the safety of others or to avoid any risk of
damaging your vehicle.
INFORMATION:
this symbol draws your attention to additional information for
better use of your vehicle.
PROTECTION OF THE ENVIRONMENT:
this symbol accompanies advice relating to protection of
the environment.
PAGE REFERENCE:
this symbol invites you to refer to the pages which provide details
of the function.
CONTENT
S
10
2
H
E
3
H
10
3
3
5
6
10
8
10
9
seat belts
1
1
4
1
6
7
seats
7
Ventilatio
7
4
digital ai
7
defros
7
7
8
8
8
9
A
4
9
9
9
10
/
Al
5
5
6
2
2
3
3
3
3
))
))
FAMILIARISATION 4-19
ECO-DRIVING 20-21
1
INSTRUMENTS and CONTROLS 22-51
Instrument panels
Warning and indicator lamps
Indicators
Instrument panel buttons
Clock
Trip computer
onochrome screen C (Peugeot Connect Sound (RD5
Retractable colour screen (Peugeot Connect Navigation (RT6
etractable colour screen (Peugeot Connect Media Navigation (NG4 3D))4
ACCESS 52-64
emote control key 5
arm
ectric windows
oors
Boot 6
2
/EASE OF USE and COMFORT 65-89
ront seats
teering wheel adjustment 6
irrors
r
n
VISIBILITY 90-101
Lighting controls
LED lamps 9
utomatic illumination of headlamps 9
ual-zone
r screen demist -
ourtesy lamp
Interior mood lighting
eadlamp adjustment
irectional lighting
Wiper controls
r conditioning
t
nterior fittings 8
Front armrest
Boot fittings
Automatic rain sensitive wipers
5/SAFETY 102-126
Direction indicators
azard warning lamps 10
mergency or assistance call 10
orn
Tyre under-inflation detection 10
Braking assistance systems 10
Trajectory control systems 10
Active bonnet
Active spoiler
Front
Airbags 1
hild seats 1
1

S
2
assis
12
13
3
3
1
15
5
5
5
6
7
7
7
8
8
8
9
ccessories
19
6
/
/
Weig
9
Weig
9
9
0
0
0
/
DRIVING 127-144
teering lock - Starting 1
Parking brake 128
ill start
anual gearbox
7
CHECKS 145-155
Fuel tank
Bonnet 14
Petrol engines 14
t
ear shift indicator 1
Automatic gearbox 13
peed limiter 13
ruise control 1
4
Diesel engine
unning out of fuel (Diesel) 1
Checking levels 1
Parking sensors 14
hecks 1
PRACTICAL INFORMATION 156-194
Temporary puncture repair kit 15
hanging a wheel 16
now chains 1
hanging a wiper blade 16
nergy economy mode 1
Battery 1
hanging a bulb 1
hanging a fuse 1
Towing a vehicle 1
Towing a trailer 1
leaning and maintenance 1
A
TECHNICAL DATA 195-200
Petrol engines 19
hts (petrol) 19
Diesel engine 1
hts (Diesel) 1
Dimensions 1
Identification markings 2
ONTENT
4
10
AUDIO EQUIPMENT and TELEMATICS 201-320
mergency or assistance 20
ALPHABETICAL INDEX 321-325
VISUAL SEARCH 326-332
Peugeot Connect Media Navigation (NG4 3D) 2
Peugeot Connect Navigation (RT6) 24
Peugeot Connect Sound (RD5) 3

EXTERIOR
1. Welcome lighting
This additional exterior and
interior lighting, controlled
remotely, makes your approach to
the vehicle easier when the light
is poor.
80
2. Directional lighting
This lighting automatically
provides additional visibility when
4
cornering.
97
Aluminium arches
For maintenance of these
arches, do not use a dry
cloth with an abrasive
product. Use a sponge and
soapy water.
3. Active spoiler
This system improves the
aerodynamics of the vehicle.
109
4. Front and rear parking
sensors
This system warns you of any
obstacles detected in front of or
behind the vehicle when parking.
142
5. Temporary tyre repair kit
This kit is a complete system,
consisting of a compressor
and a sealant cartridge, for the
temporary repair of a tyre.
156

A
CCESS
REMOTE CONTROL KEY
Unfolding / Folding the key
(press fi rst before unfolding or folding the key).
or
Normal locking
(press once; fi xed lighting of the
direction indicators).
Deadlocking the vehicle
(press twice in succession; fi xed
lighting of the direction indicators).
Unlocking and partial opening of
the boot lid
(press for more than two seconds).
Complete or selective unlocking of
the vehicle
(rapid fl ashing of the direction
indicators).
52
WELCOME LIGHTING
When poor light is detected by a sensor,
the remote switching on of the dipped beam
headlamps and sidelamps makes your
approach to the vehicle easier.
81
In the same way, the passenger compartment
lighting, such as the courtesy lamps, the door
sill lamps and the footwell lamps, comes on.
80
FAMILIARISATION

Vehicle locked
1. Unlocking and partial opening of the boot lid.
2. Open the boot lid.
Vehicle unlocked
6
1. Partial opening of the boot lid.
2. Open the boot lid.
FUEL TANK BOOT
For access to the fuel fi ller cap, the vehicle must be unlocked.
1. Open the fuel fi ller fl ap by pressing at its rear edge.
2. Remove the fuel fi ller cap by unscrewing it and hook it on to the
back of the fi ller fl ap.
Capacity of the tank: approximately 55 litres.
146
64

INTERIOR
1. Interior mood lighting
This dimmed lighting of the passenger
compartment facilitates visibility inside the
vehicle when the light is poor.
80
2. Audio and telematic systems
This equipment benefi ts from the latest technology:
MP3 compatible Peugeot Connect Sound (RD5),
Peugeot Connect Navigation (RT6) or Peugeot Connect
Media Navigation (NG4 3D) with 16/9 retractable colour
screen, JBL audio system, auxiliary sockets.
Peugeot Connect Media Navigation (NG4 3D)
205
Peugeot Connect Navigation (RT6)
249
Peugeot Connect Sound (RD5)
303
PEUGEOT Techno PVC
For maintenance of this trim, do not use
solvent or detergent with a dry cloth.
Remove dust fi rst, then use a soft cloth
and soapy water. Dry using another soft
cloth.
3. Dual-zone digital air conditioning
This systems allows different levels of comfort
to be set for the driver and front passenger.
It then controls these levels automatically
according to the ambient conditions.
76
4. Active spoiler
This automatic system can be controlled
manually by means of this control on the
centre console.
109
FAMILIARISATION

INSTRUMENTS AND
CO
1. Wipers / screenwash / trip computer
control stalk.
2. Steering lock and ignition.
3. Audio and telematic system steering
wheel control stalk.
4. Driver's airbag.
Horn.
5. Gear lever.
6. Parking brake.
7. Instrument panel.
8. Speaker (tweeter).
9. Side adjustable air vent.
10. Passenger's airbag deactivation switch.
8
11. Manual headlamp height adjustment.
NTROLS

INSTRUMENTS AND
CO
1. Door mirror controls.
Electric window controls.
2. Lighting and direction indicator control
stalk.
3. Steering wheel adjustment control.
4. Cruise control / speed limiter switches.
5. Bonnet release lever.
6. Fusebox.
7. Glove box / Audio/video sockets.
8. Passenger's airbag.
9. Front side window demisting vent.
10. Windscreen demisting vent.
11. Sunshine sensor.
12. Central adjustable air vents.
NTROLS
FAMILIARISATION

10
C
CONSOLES
ENTRE
1. Audio and telematic system microphone.
2. Courtesy lamp / Map reading lamps /
Interior mood lighting.
3. Seat belt and front passenger's air bag
warning lamps display.
4. Interior volumetric sensors (alarm).
5. Multifunction screen.
6. Clock.
7. Emergency call button.
Alarm button.
Central locking button.
Hazard warning lamps button.
Dynamic stability control (ESC/ASR/EBA) button.
Parking sensors button.
PEUGEOT services button.
8. Peugeot Connect Sound (RD5) and
storage compartment, Peugeot Connect
Navigation (RT6) or Peugeot Connect
Media Navigation (NG4 3D).
9. Heating / air conditioning controls.
10. Front ashtray.
11. 12 V accessories socket.
12. Active spoiler control.
13. Storage compartment or instrument panel
navigator associated with the Peugeot
Connect Media Navigation (NG4 3D).
14. Cup holder.
15. Front armrest / USB/Auxiliary socket.

S
ITTING
CO
FRONT SEATS
Forwards-backwards Height
MFORTABLY
MANUAL ADJUSTMENTS
65
ELECTRIC ADJUSTMENTS
66
Seat back angle
FAMILIARISATION

SITTING
CO
FRONT SEATS
MFORTABLY
STEERING WHEEL ADJUSTMENT
FRONT ARMREST
Other functions available...
12
Lumbar adjustment.
67
Heated seats.
67
Storing of driving positions (driver's electric
seat).
68
1. Release the adjustment mechanism.
2. Adjust for height and reach.
3. Lock the adjustment mechanism.
As a safety precaution, these
operations must only be carried out
when stationary.
69
For your comfort, the height and the
longitudinal position of the front armrest can
be adjusted.
It also offers a storage compartment.
85

S
ITTING
CO
MFORTABLY
DOOR MIRRORS
Adjustment
A. Selection of the mirror to be adjusted.
B. Adjustment of the position of the mirror in
the four directions.
C. De-selection of the mirror.
REAR VIEW MIRROR
Automatic day/night model
A. Automatic "day/night" mode light detector.
B. Adjustment of the mirror.
72
FRONT SEAT BELTS
1. Fitting the belt.
70
Other functions available...
Folding / Unfolding.
Automatic tilting of the mirror in reverse
gear for parking.
71
2. Fastening the buckle.
3. Checking the fastening by pulling
the strap.
111
FAMILIARISATION

LIGHTING
DIRECTION INDICATORS
WINDSCREEN WIPERS
2. Fast wipe.
1. Normal wipe.
I. Intermittent wipe.
0. Park.
AUTO È Automatic wipe or single wipe.
Wash-wipe: pull the stalk towards you.
98
14
Ring A
Ring B
Lighting off.
Automatic illumination of headlamps.
Sidelamps.
Dipped / main beam headlamps.
Rear foglamp.
91, 92
Raise or lower the lighting stalk passing
the point of resistance; the corresponding
direction indicators will fl ash until the stalk is
moved from this position.
102
"Motorway" function
Press the lighting stalk up or down once,
without passing the point of resistance; the
corresponding direction indicators will fl ash
three times.
The use of this function is available regardless
of the speed, but you will fi nd it particularly
useful when changing lane on fast roads.
Switching on "AUTO"
) Press the stalk down and release it.
Switching off "AUTO"
) Push the stalk up and return it to
position "0" .
100

MONITORIN
G
INSTRUMENT PANEL
The instrument panel has permanent backlighting for improved visibility in all situations,
both day and night.
- With the ignition on, the fuel gauge needle
should indicate the level of fuel remaining.
- With the engine running, its associated
low level warning lamp should go off.
- With the ignition on, the oil level indicator
should display "OK" or "correct",
depending on version, for a few seconds.
If the levels are not correct, top up the levels
which are low.
22
WARNING LAMPS
- With the ignition on, the orange and red
warning lamps come on.
- With the engine running, these warning
lamps should go off.
If warning lamps remain on, refer to the page
concerned.
26
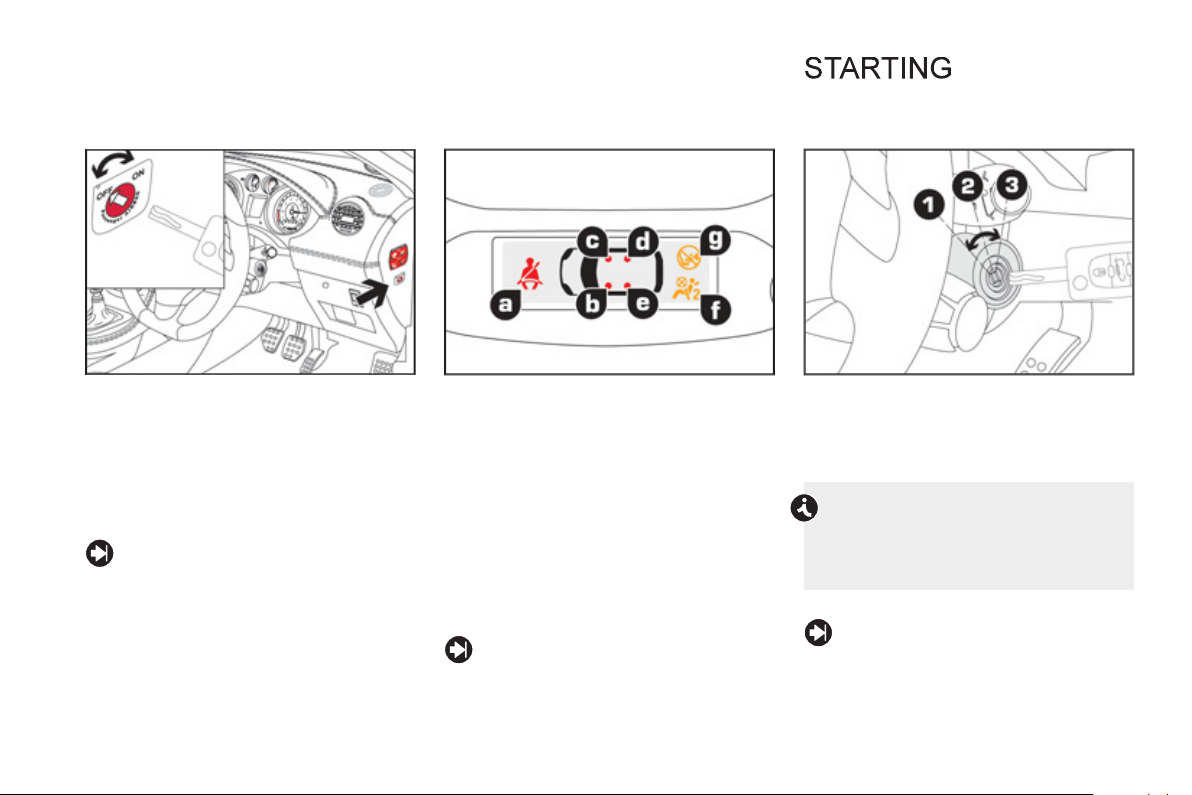
SWITCH PANEL
Illumination of the indicator lamp indicates the
status of the corresponding function.
A. Emergency call.
202, 203
B. Deactivation of the interior volumetric and
anti-tilt sensors (alarm).
57
C. Central locking.
62
D. Deactivation of the ESC/ASR system.
107
E. Deactivation of the front and rear parking
sensors.
143
F. Access to PEUGEOT services.
202, 203
FAMILIARISATION
PA
SS
ENGER SAFETY
PASSENGER'S FRONT AIRBAG
) Selection of the position:
16
"OFF" (deactivated), with "rear facing"
child seat,
"ON" (activated), with front passenger or
"forwards facing" child seat.
115, 119
SEAT BELTS AND
PASSENGER'S FRONT AIRBAG
A. Front and/or rear seat belts not fastened /
unfastened warning lamp.
B. Front left seat belt warning lamp.
C. Front right seat belt warning lamp.
D. Rear right seat belt warning lamp.
E. Rear left seat belt warning lamp.
F. Passenger's front airbag deactivated
warning lamp.
G. Passenger's front airbag activated
warning lamp.
111, 115, 119
IGNITION SWITCH
1. Stop position.
2. Running position.
3. Starting position.
Avoid attaching any heavy objects to the
key which would weigh down on its shaft
in the ignition switch; this could cause a
malfunction.
127

ACCESS TO THE REAR SEATS
1. Releasing the backrest.
2. Tilting the backrest.
The control giving access to the rear
seats does not release the seat.
73
REAR SEAT BELTS
- Insert the tongue A in the buckle A in the
middle of the rear seat.
- Insert the tongue B in the outer buckle B .
Press the red button B then the black button A
to remove the seat belt.
112
FOLDING DOWN THE REAR
BACKREST
1. Release the backrest by pulling the
handle from the boot.
2. Fold the backrest onto the seat cushion
from the passenger compartment.
73
FAMILIARISATION

DRIVING SAFELY
SPEED LIMITER "LIMIT"
1. Limiter mode Selection / Off.
18
2. Decrease the programmed value.
3. Increase the programmed value.
4. Speed limiter On / Off.
The values must be set with the engine running.
136
CRUISE CONTROL "CRUISE"
1. Cruise control mode Selection / Off.
2. Programme a speed / Decrease the
programmed value.
3. Programme a speed / Increase the
programmed value.
4. Cruise control Off / Resume.
In order to be programmed or activated, the
vehicle speed must be higher than 25 mph
(40 km/h), with at least fourth gear engaged
on the manual gearbox (second gear for the
automatic gearbox).
139
DISPLAY IN THE INSTRUMENT
PANEL
The cruise control or speed limiter mode
appears in the instrument panel when it is
selected.
Cruise control
Speed limiter

FAMILIARISATION

E
CO
Eco-driving is a range of everyday practices that allow the motorist to optimise their fuel consumption and CO2 emissions.
-DRIVING
20
OPTIMISE THE USE OF YOUR GEARBOX
With a manual gearbox, move off gently, change up without waiting
and drive by changing up quite soon. If your vehicle has the system,
the gear shift indicator invites you to change up; it is displayed in the
instrument panel, follow its instructions.
With an automatic or electronic gearbox, stay in Drive "D" or
Auto "A" , according to the type of gearbox, without pressing the
accelerator pedal heavily or suddenly.
DRIVE SMOOTHLY
Maintain a safe distance between vehicles, use engine braking rather
than the brake pedal, and press the accelerator progressively. These
practices contribute towards a reduction in fuel consumption and CO2
emissions and also helps reduce the background traffi c noise.
If your vehicle has cruise control, make use of the system at speeds
above 25 mph (40 km/h) when the traffi c is fl owing well.
CONTROL THE USE OF YOUR ELECTRICAL
EQUIPMENT
Before moving off, if the passenger compartment is too warm, ventilate it
by opening the windows and air vents before using the air conditioning.
Above 30 mph (50 km/h), close the windows and leave the air vents
open.
Remember to make use of equipment that can help keep the temperature
in the passenger compartment down (sunroof and window blinds...).
Switch off the air conditioning, unless it has automatic digital regulation,
as soon as the desired temperature is attained.
Switch off the demisting and defrosting controls, if not automatic.
Switch off the heated seat as soon as possible.
Switch off the headlamps and front foglamps when the level of light
does not require their use.
Avoid running the engine before moving off, particularly in winter; your
vehicle will warm up much faster while driving.
As a passenger, if you avoid connecting your multimedia devices
(fi lm, music, video game...), you will contribute towards limiting the
consumption of electrical energy, and so of fuel.
Disconnect your portable devices before leaving the vehicle.

LIMIT THE CAUSES OF EXCESS
CONSUMPTION
Spread loads throughout the vehicle; place the heaviest items in the
bottom of the boot, as close as possible to the rear seats.
Limit the loads carried in the vehicle and reduce wind resistance (roof
bars, roof rack, bicycle carrier, trailer...). Use a roof box in preference.
Remove roof bars and roof racks after use.
At the end of winter, remove snow tyres and refi t your summer tyres.
OBSERVE THE RECOMMENDATIONS ON
MAINTENANCE
Check the tyre pressures regularly, when cold, referring to the label in
the door aperture, driver's side.
Carry out this check in particular:
- before a long journey,
- at each change of season,
- after a long period out of use.
Don't forget the spare wheel and the tyres on any trailer or caravan.
Have your vehicle serviced regularly (engine oil, oil fi lter, air fi lter...)
and observe the schedule of operations recommended by the
manufacturer.
When refuelling, do not continue after the third cut-off of the nozzle to
avoid any overfl ow.
At the wheel of your new vehicle, it is only after the fi rst 1 800 miles
(3 000 kilometres) that you will see the fuel consumption settle down
to a consistent average.
ETROL - DIESEL MANUAL
S
R AUTOMATIC GEARBOX
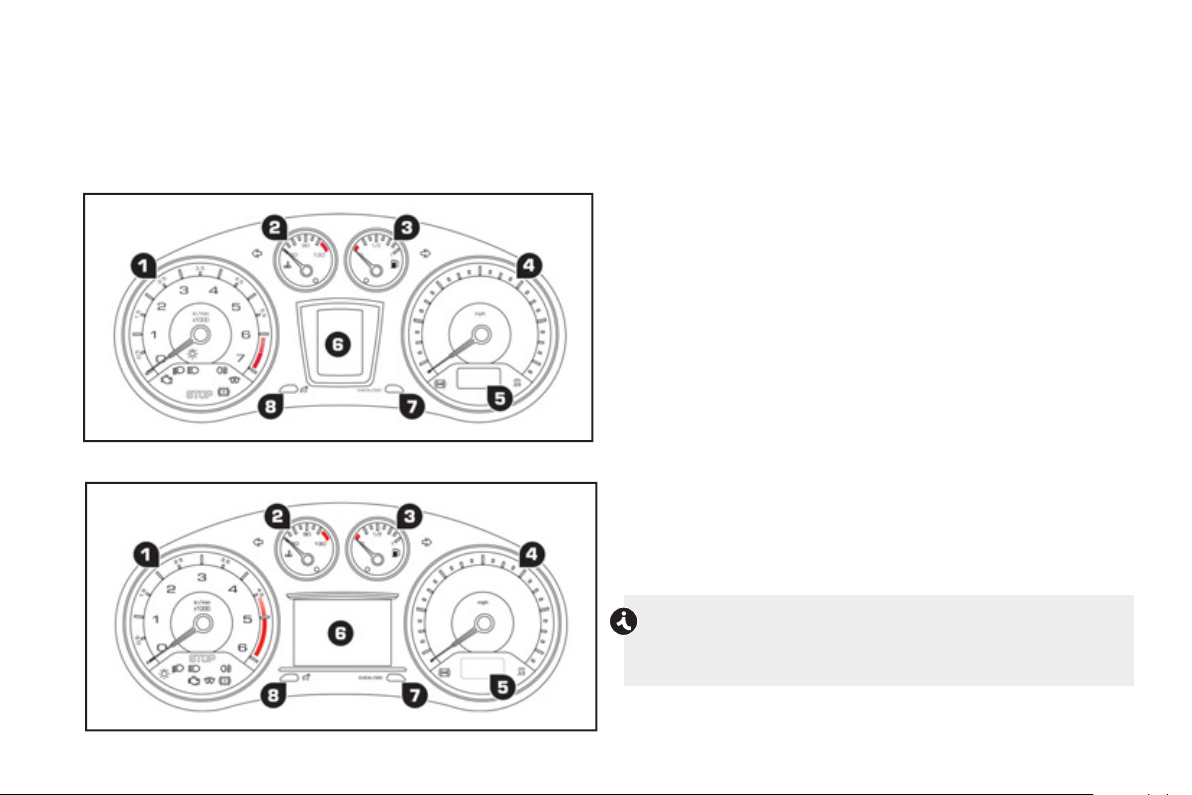
INSTRUMENT PANEL
With small central display screen
22
With large central display screen
Panel grouping together the vehicle operation indication dials and
warning lamps, with permanent back-lighting.
DIALS
1. Rev counter.
Indicates the speed of rotation of the engine (x 1 000 rpm).
2. Coolant temperature.
Indicates the temperature of the engine coolant (°Celsius).
3. Fuel level.
Indicates the quantity of fuel remaining in the tank.
4. Vehicle speed.
Indicates the current speed of the moving vehicle (mph or km/h).
5. Small display screen.
6. Central display screen.
7. Display management button.
Starts a manual CHECK.
Recalls the service information.
Resets the selected function to zero (trip distance recorder or
service indicator).
8. Lighting dimmer button.
Adjusts the brightness of the lighting of the instruments and
controls.
For more information, refer to the paragraph relating to the button
or function and its associated display.

DISPLAYS
Small display screen
A. Trip distance recorder.
(miles or km)
B. Distance recorder.
(miles or km)
C. Service spanner, if a service is due shortly or is overdue.
Central display screen
D. Speed limiter
(mph or km/h) or
Cruise control.
E. Indication:
- of a gear change * (manual gearbox),
or
- of the programme or gear (automatic gearbox).
F. Engine oil level indicator,
service indicator.
(miles or km)
These two functions are displayed when the ignition is switched on,
then disappear after a few seconds.
Warning and status indicator lamps / CHECK.
Tyre under-infl ation detection.
Trip computer.
Vehicle speed repeat ** .
Vehicle parameters ** .
Navigation - Guidance *** .
These six functions are displayed according to the selection.
* According to engine.
** Only on the large central display screen.
***
Only on the large central display screen with Peugeot Connect Media (NG4 3D).
INSTRUMENTS and CONTROLS
1/

INSTRUMENT PANEL NAVIGATOR WITH THE
LARGE CENTRAL DISPLAY SCREEN
LIMIT Pause
mph
55
miles
500
l/100
10,2
This group of buttons permits:
- when stationary , confi guration of the vehicle's equipment and of
24
the parameters of the central display (languages, units...),
- while driving , scrolling of the active functions (trip computer,
navigation...).
Controls
There are four buttons to control the instrument panel large central
display screen:
1. access the main menu, confi rm the selection,
2. move up through the menu,
3. move down through the menu,
4. return to the previous screen, exit from the menu.
The main menu and its associated functions can only be
accessed when stationary , via buttons 1 to 4 .
A message appears on the central screen, above a certain speed
threshold, indicating that the main menu cannot be displayed.
The trip computer displays can only be accessed while driving, via
buttons 2 and 3 (refer to the "Trip computer" section).
Main menu
) Press button 1 for access to the main menu and select one of the
following functions:
- "Vehicle parameters",
- "Choice of language",
- "Choice of units".
) Press button 2 or 3 to move on the screen.
) Press button 1 again to confi rm the selection.

Vehicle parameters
This menu allows you to activate or deactivate certain driving and
comfort equipment:
- vehicle speed repeat,
- selective unlocking (refer to the "Access" section),
- guide-me-home and welcome lighting (refer to the "Visibility" and
"Ease of use and comfort" sections),
- interior mood lighting (refer to the "Ease of use and comfort" section),
- daytime running lamps (refer to the "Visibility" section),
- directional headlamps (refer to the "Visibility" section),
- rear parking sensors (refer to the "Driving" section).
Choice of language
This menu allows you to select the language used by the display:
Deutsch, English, Espanol, Français, Italiano, Nederlands, Portugues,
Pусский, Portugues-Brasil, Türkçe * .
Choice of units
This menu allows you to select the units: temperature (°Celsius or
°Fahrenheit) and fuel consumption (l/100 km, mpg or km/l).
INSTRUMENTS and CONTROLS
* According to country.
1/

WARNING AND INDICATOR LAMPS
Visual indicators which inform the driver of the occurrence of a
fault (warning lamp) or of the operation of a system (operation or
deactivation indicator lamp).
When the ignition is switched on
Certain warning lamps come on for a few seconds when the ignition is
switched on.
When the engine is started, these warning lamps should go off.
If they remain on, before moving off, refer to the information for the
warning lamp concerned.
Associated warnings
The illumination, fi xed or fl ashing, of certain warning lamps may be
26
accompanied by an audible signal and a message in the screen.
Depending on your version of instrument panel, illumination of the
warning lamp is also accompanied by:
- a symbol in the central instrument panel screen and a message in
the multi-function screen,
or
- a symbol and a message in the central instrument panel screen.
Warning lamps
When the engine is running or the vehicle is being driven, the
illumination of one of the following warning lamps indicates a fault which
requires action on the part of the driver.
The illumination of a warning lamp is always accompanied by the
display of an additional message, to assist you in identifying the
fault.
If you encounter any problems, contact a PEUGEOT dealer or a
qualifi ed workshop.

Warning lamp is on Cause Action / Observations
STOP
Braking
+
Maximum
coolant
temperature
fi xed, alone
or associated
with another
warning lamp,
accompanied by
an audible signal
and a message
in the screen.
fi xed, associated
with the STOP
warning lamp.
fi xed, associated
with the STOP
and ABS warning
lamp.
fi xed with the
needle in the red
zone.
Illumination of this warning
lamp is associated with a
serious braking system, power
steering, engine lubrication or
cooling system malfunction or a
punctured tyre.
The braking system fl uid level is
too low.
The electronic brake force
distribution (EBFD) system has
a fault.
The temperature of the cooling
system is too high.
Stop as soon as it is safe to do so as there is a risk that the
engine will cut out while driving.
Park, switch off the ignition and contact a PEUGEOT
dealer or a qualifi ed workshop.
You must stop as soon as it is safe to do so.
Top up with brake fl uid recommended by PEUGEOT.
If the problem persists, have the system checked by a
PEUGEOT dealer or a qualifi ed workshop.
You must stop as soon as it is safe to do so.
Have it checked by a PEUGEOT dealer or a qualifi ed
workshop.
Stop as soon as it is safe to do so.
Wait until the engine has cooled down before topping up
the level, if necessary.
If the problem persists, contact a PEUGEOT dealer or a
qualifi ed workshop.
INSTRUMENTS and CONTROLS
1/

28
Warning lamp is on Cause Action / Observations
Identify the fault by reading the message displayed in the
screen, such as:
- doors, boot or bonnet open,
- low engine oil level,
- low screenwash/headlamp wash reservoir level,
- remote control battery fl at,
- low tyre pressures,
- saturation of the particle emission fi lter on Diesel
vehicles (see "Checks" - "Checking levels / Particle
emissions fi lter" section).
For any other faults, contact a PEUGEOT dealer or a
qualifi ed workshop.
Identify the fault by reading the message shown in the
screen and you must then contact a PEUGEOT dealer or
a qualifi ed workshop.
Risk of destruction of the catalytic converter.
Have it checked by a PEUGEOT dealer or a qualifi ed
workshop.
The warning lamp should go off when the engine is started.
If it does not go off, contact a PEUGEOT dealer or qualifi ed
workshop without delay.
Refuel as soon as possible to avoid running out of fuel.
Until suffi cient fuel has been added, this warning lamp
will come on every time the ignition is switched on,
accompanied by an audible signal and a message.
The audible signal and message are repeated with
increasing frequency as the fuel level drops towards "0" .
Fuel tank capacity: approximately 55 litres .
Never continue to drive until you run out of fuel, as this
could damage the emission control and injection systems.
Service
Engine
autodiagnosis
system
Low fuel level
temporarily,
accompanied by
a message.
fi xed,
accompanied by
a message and
an audible signal.
fl ashing.
fi xed.
fi xed with the
needle in the
red zone,
accompanied by
an audible signal
and a message.
Minor faults have occurred for
which there is no specifi c warning
lamp.
Major faults have occurred for
which there is no specifi c warning
lamp.
The engine management system
has a fault.
The emission control system has
a fault.
When it fi rst comes on there
remains approximately 5 litres of
fuel in the tank.
At this point, you begin to use the
fuel reserve.
 Loading...