

Peugeot 607 2004 Owner's Manual
YOUR AT A GLANCE
2
02-02-2004
02-02-2004
3
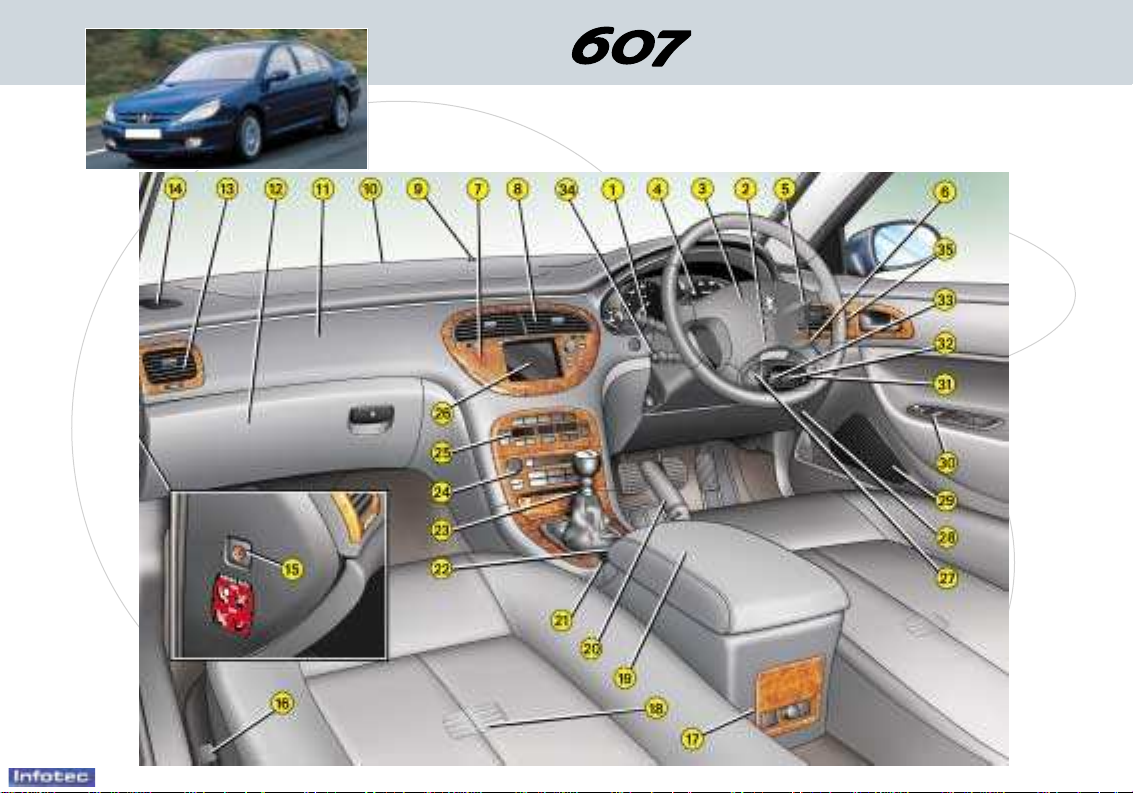
YOUR AT A GLANCE
1-Lights and direction indicators
stalk.
2-Steering wheel adjustment.
3 - Driver's front air bag.
- Horn.
4-Instrument dials.
5-Windscreen wash/wipe stalk.
- Trip computer stalk.
6-Audio remote control stalk.
7-Hazard warning lights
switch.
8-Central adjustable
air conditioning/ ventilation
vents and air flow regulation.
9-Sunshine / brightness
sensor.
10 - Windscreen demisting vents.
11 - Passenger air bag.
12 - Glove compartment.
13 - Side adjustable
air conditioning/ ventilation
vents and air flow regulation.
14 - Door window demisting vent.
15 - Passenger air bag disarming
switch.
16 - Front seats heating switches.
17 - Rear ashtray.
- Rear lighter.
- Rear seats heating switches.
18 - Rear footwell air conditioning
vent.
19 - Two-position armrest with
compartments.
20 - Handbrake.
21 - Electronically controlled
suspension switch.
- Doors and boot locking
switch.
- Sunroof switch.
- Rear blind switch.
22 - Front ashtray.
- Front lighter.
23 - Gear lever.
24 - RM2 audio system or RT2
audio/telephone system with
PEUGEOT call button.
25 - Air conditioning controls.
26 - Multi-function display.
27 - Steering lock and ignition.
28 - Fuse box.
29 - Speakers location.
30 - Electric mirror controls.
- Window controls.
- Rear window locking control.
31 - Headlamp height
adjustment.
32 - ESP disarming switch.
33 - Alarm button.
34 - Cruise control.
35 - Memory buttons for:
- Front seat settings
- Electric mirror settings
02-02-2004
YOUR AT A GLANCE
4
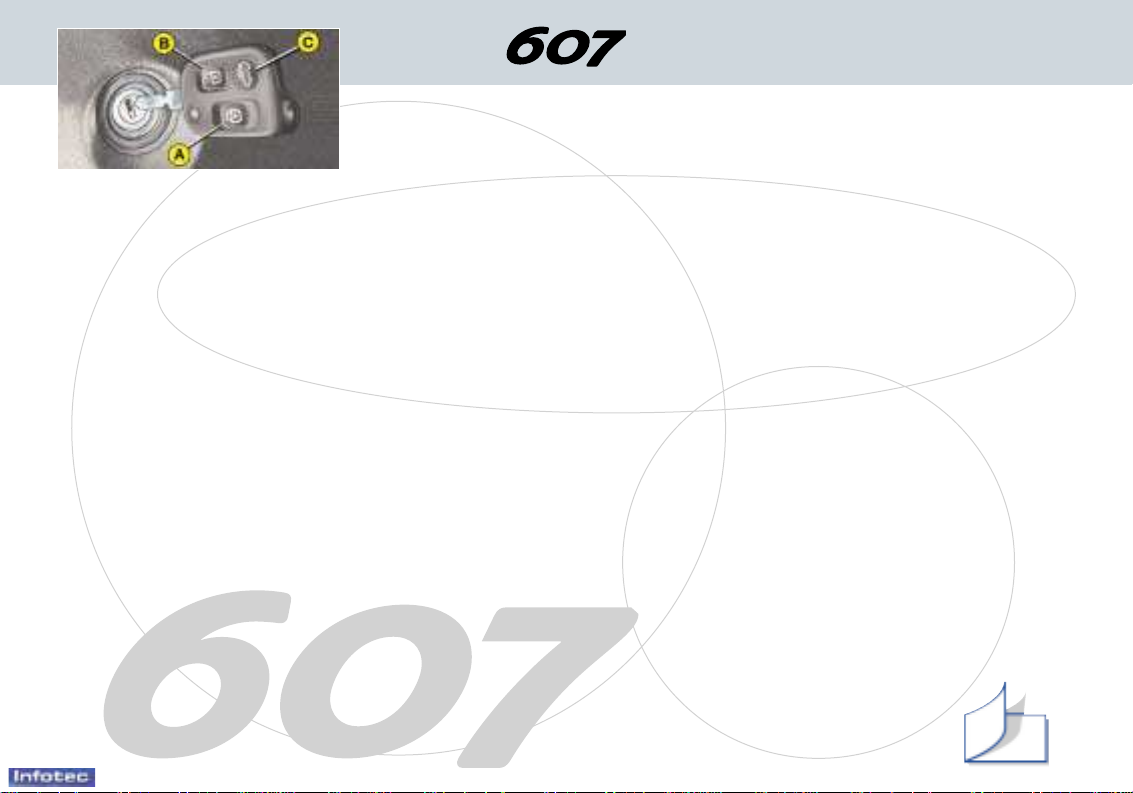
THE REMOTE CONTROL
KEY
From the driver's door, the key
allows you to lock or unlock the
doors, the boot and the fuel filler
flap, as well as to fold back or
open out the exterior mirrors.
The remote control in the key
performs the same function at a
distance.
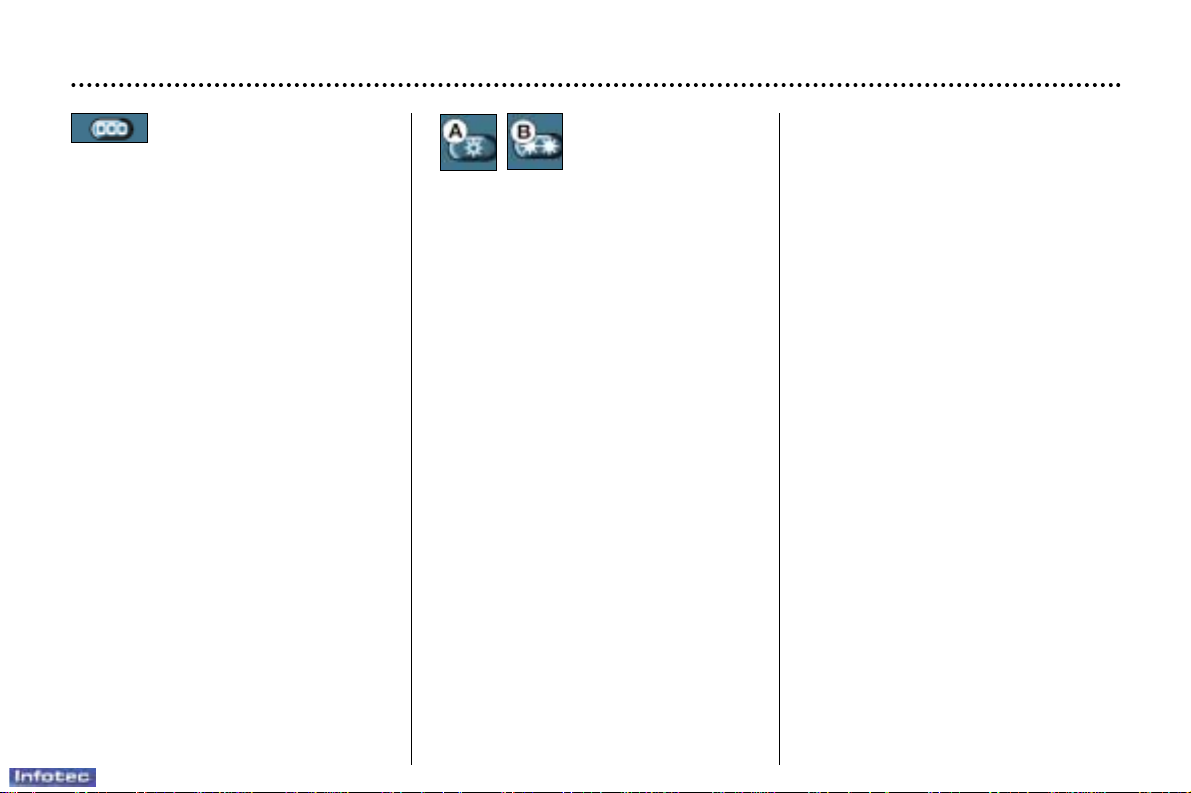
Locking with the remote
control
☞
Press button A.
This is confirmed by fixed lighting
of the direction indicators for
approximately two seconds.
Unlocking with the remote
control key
☞
Press button B.
This is confirmed by rapid flashing
of the direction indicators.
With the vehicle unlocked, the
boot is opened using the electric
push button located on the right
rear side, in the 'zero' of the 607
badge.
Opening the boot with the
remote control key
☞
Keep button C pressed.
Key in ignition
If you leave the key in the ignition, this is indicated by a buzzer
upon opening the driver's door.
Locating the vehicle
To locate your vehicle in a car
park, press button A; the courtesy lights come on and the direction indicators flash for
approximately twenty seconds.
Driving position memorised
by the remote control key
When locking the doors, the
remote control key memorises
the position of the driver's seat
and the driving mirrors. Each
remote control key memorises a
specific setting.
When unlocking the doors, the
driver's seat and the exterior
mirrors assume the position
memorised by the remote control
key, if this position has been
changed in the meantime.
Note: do not press the buttons of
your remote control key out of
range of your vehicle as there is a
risk that you could render it inoperative. It would then be necessary
to reprogramme it.
Deadlocking
This renders the internal and
external door locking controls
inoperative and permits the automatic closing of the windows and
the sunroof.
With the key:
☞ lock the vehicle and keep the
key in the locked position for
approximately one second.
With the remote control:
☞ press button A to lock the
vehicle (the direction indicator
lights remain on for approximately two seconds),
☞ within five seconds, press
button A again to deadlock
the vehicle (the direction indicator lights remain on for
approximately two seconds).
104
02-02-2004
YOUR AT A GLANCE
5
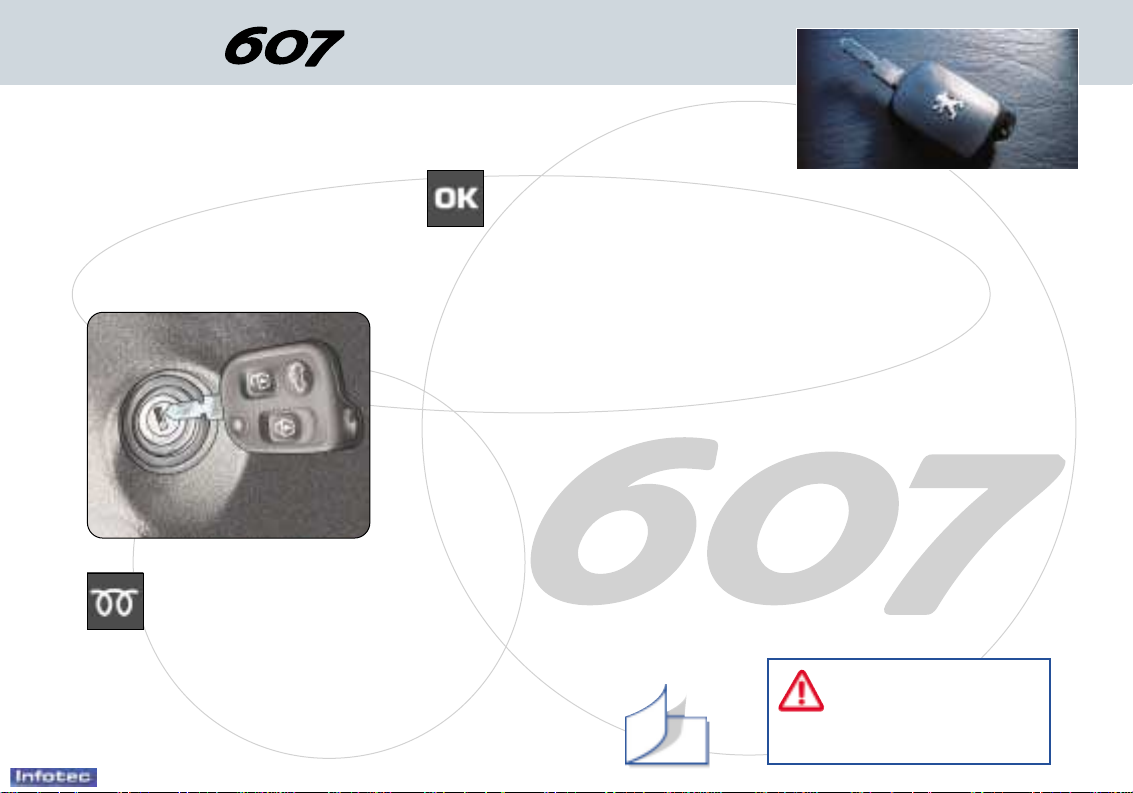
STARTING
STOP position:
The ignition is switched off.
1st notch, Accessories position:
The ignition is switched off but the
accessories still function.
2nd notch, Running position:
The ignition is on.
Starting position:
Operates the starter.
Starting a diesel engine
If the temperature is high
enough, the pre-heat indicator light does not come
on and you can start immediately.
If the indicator light comes on, wait
for it to go out before operating the
starter.
If the engine stalls, it is necessary
to return the key to the 'Stop' posi-
tion before re-starting.
CHECK (vehicle autotest)
Automatic check
With the ignition on (2nd notch)
If no malfunction has
been detected: In the
absence of vehicle function status indicator lights,
the OK light is displayed
after two seconds on the instrument panel screen. Otherwise, it
will be displayed after these indicator lights come on.
If a 'minor' malfunction has been
detected: the warning light for the
faulty function is displayed on the
instrument panel screen. Certain
indicator lights showing the status of
vehicle functions may also come on,
followed by the OK indicator light.
If a 'major' malfunction has been
detected: the corresponding warning
light is displayed on the instrument
panel screen. Certain indicator lights
showing the status of vehicle functions may also come on. The OK
indicator light does not come on. Do
not start your vehicle. Contact a
PEUGEOT dealer.
Afterwards, if the passenger air
bag is disarmed, the corresponding warning light will come on.
With the engine running or if the
vehicle is moving, the instrument
panel screen temporarily displays:
- lights indicating warnings, when
these occur,
- vehicle function
status indicator lights,
when a change
occurs.
The display of certain indicator
lights is accompanied by an
audible signal and a message
on the multi-function display.
Manual check
☞ Press the "CHECK" button on
the instrument panel.
With the ignition key in the accessories
position, with the ignition switched on,
with the engine running or the vehicle
moving, this function informs you at all
times of the following:
- any current warnings,
- the status of functions which it is
possible to switch on or switch off
(windscreen wipers, automatic
switching on of lights, cruise
control, disarming of passenger air
bag, etc.).
The corresponding warning lights
are displayed in succession on
the instrument panel screen.
If a warning or a change of status
occurs during the CHECK mode, the
corresponding indicator light(s) will be
displayed at the end of this mode.
21
Never run the engine in
a confined space.
Do not make any modi-
fications to the steering lock.
02-02-2004
YOUR AT A GLANCE
6
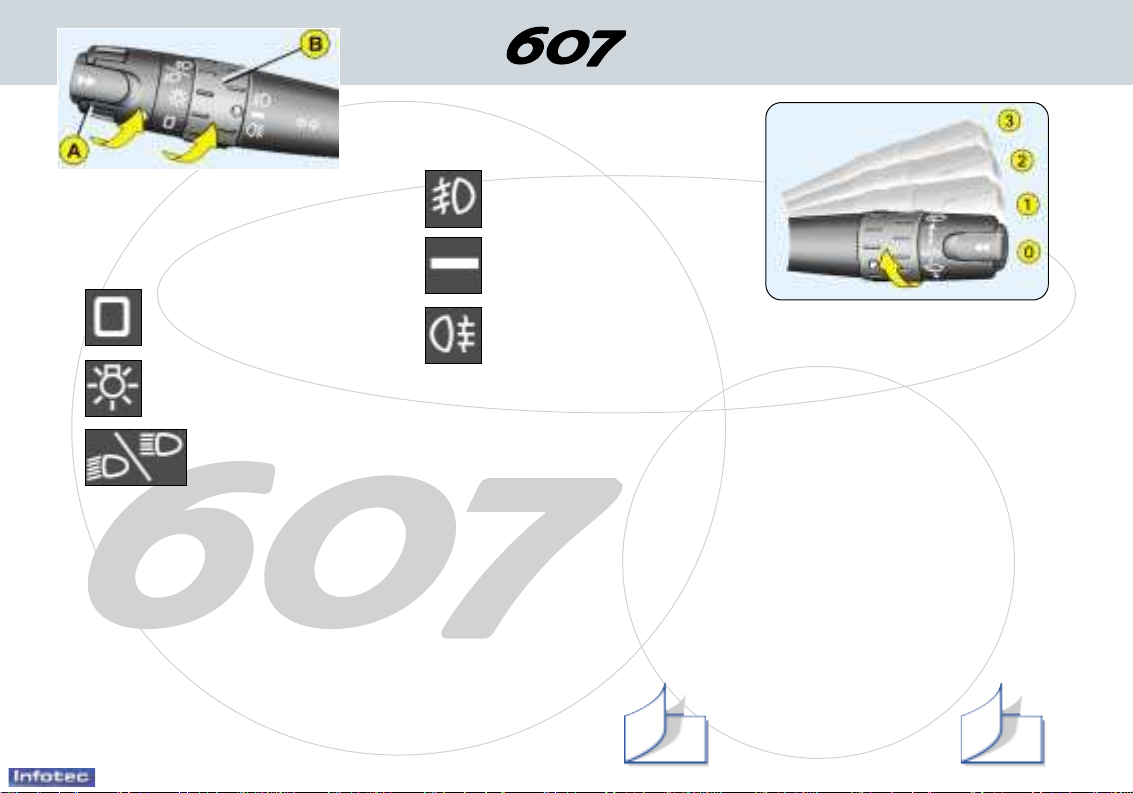
STEERING WHEEL
STALKS
LIGHTS
Front and rear lights (ring A)
Lights off.
Side lights.
Dipped / main
beam headlamps.
Front and rear fog lamps (ring B)
Front fog lamps.
Neutral position of the
ring.
Rear fog lamps.
Parking lights
To switch on the parking lights on
the traffic side, with the engine
off, place the direction indicator
lights stalk on the traffic side.
Automatic switching on of lights
This occurs if the light is poor, as well as in cases of continuous operation
of the windscreen wipers, and stops as soon as the light has become bright
enough or the windscreen wipers have stopped.
☞ To activate or disarm the function, place the key in the accessories
position (1st notch), place the lights stalk in position 0 and press the
end of the stalk for more than two seconds.
Do not cover the sunshine / brightness sensor located in
the centre of the fascia. It helps to regulate the air
conditioning, the automatic switching on of the lights
and the automatic adjustment of the instrument panel
brightness.
WINDSCREEN WIPERS
3 Rapid wipe
2 Normal wipe
1 Automatic wipe
0 Off
Automatic wipe
In position 1, the wipers operate
automatically and adjust their
speed to the intensity of the rainfall.
When the ignition has been
switched off for more than one
minute with the control in a
wipe position, it is necessary
to reactivate this function.
To do this, move the control to
any position, then return to the
required position.
112 114
02-02-2004
YOUR AT A GLANCE
8
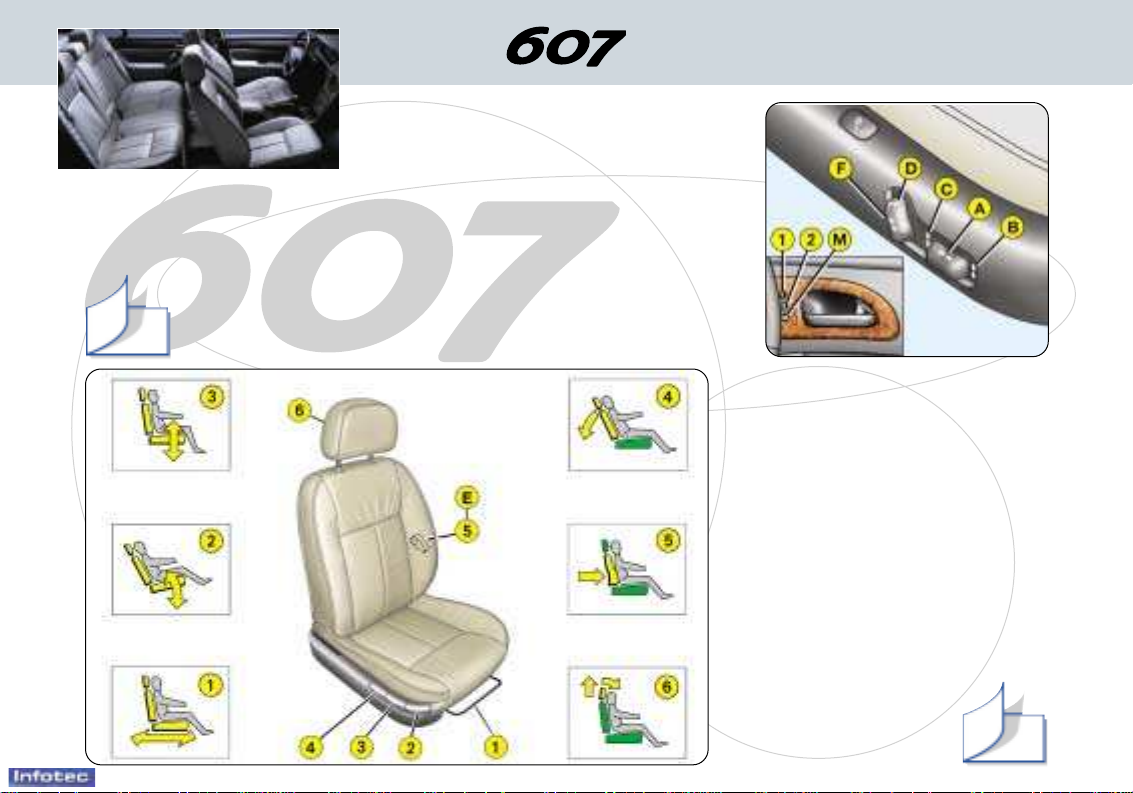
THE SEATS
Manual front seats
1 - Forwards-backwards adjustment.
2 - Seat angle adjustment*.
3 - Seat height adjustment*
4 - Seat back angle adjustment.
5 - Lumbar adjustment*.
6 - Head restraint height and tilt
adjustment (press the tab to slide it
down).
* Driver's seat only.
Electric front seats
A- Forwards-backwards
adjustment.
B - Seat angle adjustment.
C - Seat height adjustment
D - Seat back angle adjustment.
E - Lumbar adjustment.
F Head restraint height
adjustment.
M - Memorises settings.
☞ Switch on the ignition and
adjust the seat and the
mirrors.
☞ Press button 'M' then within 4
seconds either button '1' for
the first position, or button '2'
for the second position.
1 - Recalls the first
position.
2 - Recalls the
second position.
94
93
02-02-2004
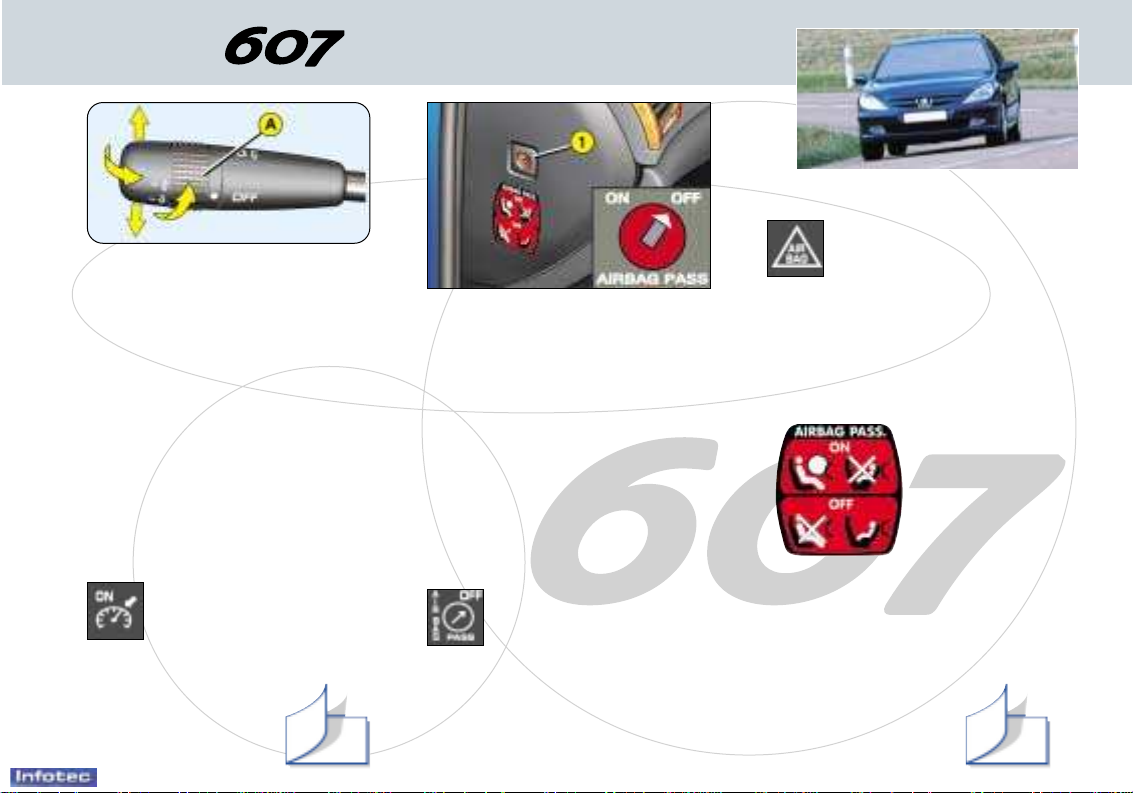
CRUISE CONTROL
Cruise control enables the vehicle
to maintain a steady speed
programmed by the driver, irrespective of the road conditions and
without the accelerator or brake
pedal being pressed.
In order for it to be memorised, the
speed of the vehicle must be
greater than 25mph (40km/h) or
40mph (60km/h), depending on
engine, with at least 4th gear
engaged (2nd gear for the automatic gearbox).
Operation
☞ Place the ring of stalk
A in the ON position.
The indicator light
comes on, accompanied by an audible
signal.
FRONT AIR BAGS
Disarming the passenger
air bag*
☞ with the ignition off, insert the
key into slot 1 and turn it:
– to the 'ON' position, the
passenger air bag is armed,
– to the 'OFF' position, the
passenger air bag is disarmed.
Operating check
When the passenger air
bag is disarmed, the warning light comes on when
the ignition is switched on
(2nd notch), accompanied
by an audible signal and the message 'Passenger air bag deacti-
vated'.
Front air bag fault
If this warning light
comes on, accompanied
by an audible signal and
the message 'Air bag
fault', contact a PEUGEOT dealer
to have the system checked.
Passenger air bag precautions
☞
Disarm the
air bag if
you install
a rearfacing child
seat.
☞
Arm the air
bag for an
adult passenger.
Never place your feet or any
object on the fascia.
* According to country
YOUR AT A GLANCE
11
131 133
02-02-2004
YOUR AT A GLANCE
7
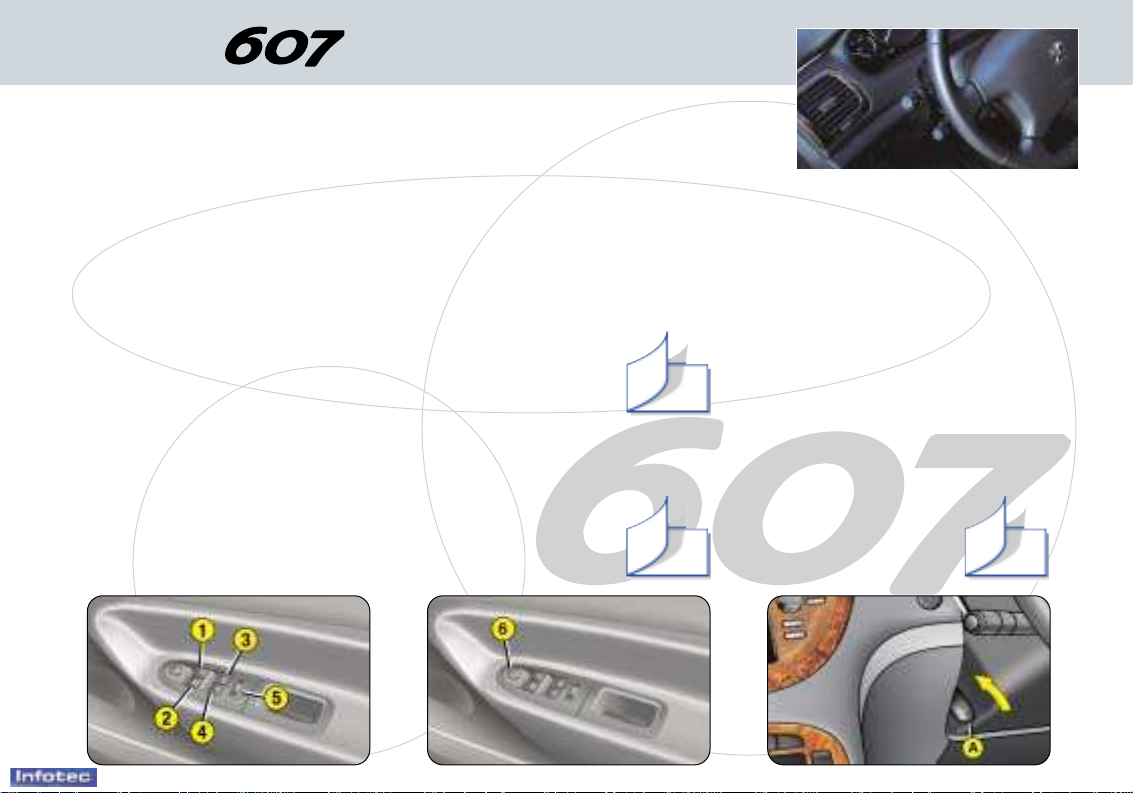
ELECTRIC WINDOWS
1 - Driver's electric window.
2 - Passenger's electric window.
3 - Rear right electric window.
4 - Rear left electric window.
5 - Disarming the rear window controls and the rear lighter (child
safety).
Manual mode:
☞ Press or pull the switch lightly. The window stops as soon as the
switch is released.
Automatic mode:
☞ Press or pull the switch firmly.
One touch completely opens or closes the window.
Safety auto-reverse: when the glass rises and meets an
obstacle, it stops and lowers again.
ELECTRIC EXTERIOR MIRRORS
☞ Turn knob 6 to the right or to the left to select the corresponding mirror.
☞ Move the knob in all four directions to adjust.
When parked, the mirrors can be folded back manually,
electrically by means of button 6 or automatically on locking
the vehicle.
STEERING WHEEL
HEIGHT AND DEPTH
ADJUSTMENT
☞ Push handle A to unlock the
steering wheel.
☞ Adjust the height and depth of
the steering wheel.
☞ Lock by pulling handle A fully.
119
120 122
02-02-2004
14
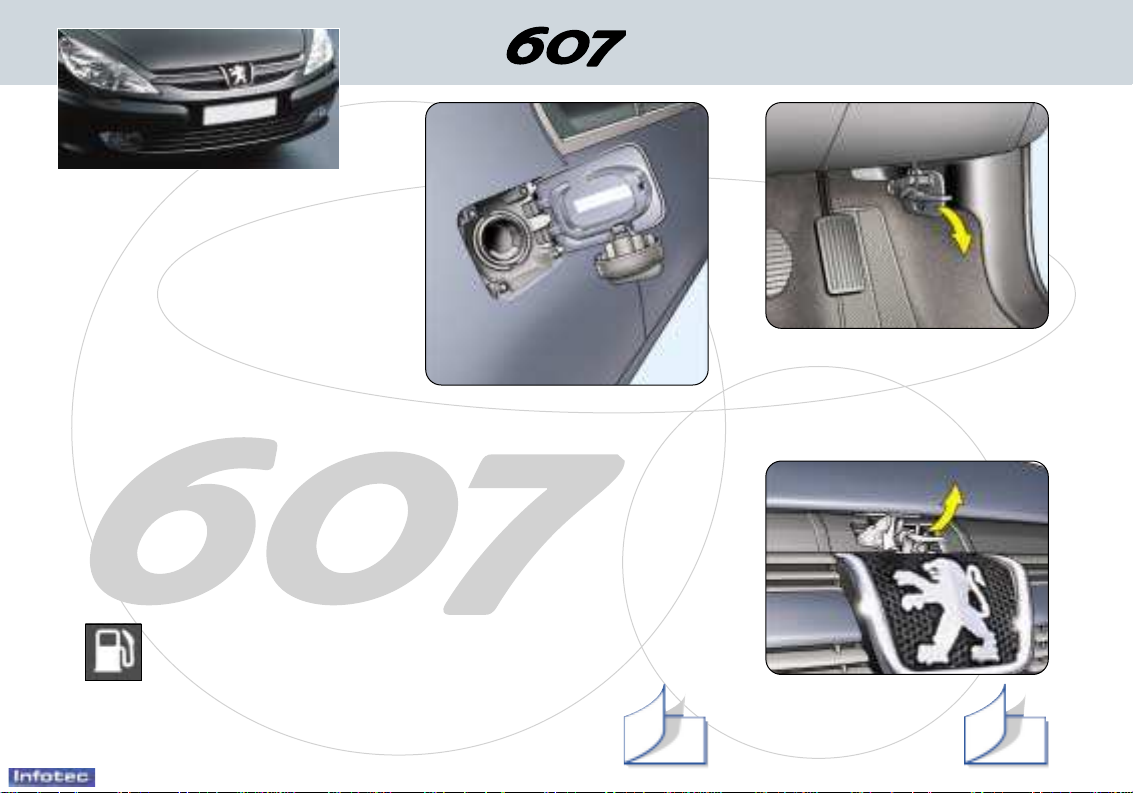
FUEL FILLER FLAP
Opening / Closing: Locking and
unlocking of the fuel filler flap, the
doors and boot is simultaneous
(except when selective unlocking is
initialised; in this case press the
unlocking button of the remote control
once).
FILLING WITH FUEL
This must be carried out with the engine and the ignition switched off.
A hook is provided inside the fuel filler flap to hold the filler cap.
Alabel affixed to the inside of the fuel filler flap informs you which fuels are
authorised or prohibited.
The tank capacity is approximately 80 litres.
When the minimum level of the tank is reached, this light comes
on, accompanied by an audible signal and the message 'Fuel
level low' on the multi-function display.
You have enough fuel to drive approximately
30 miles (50 km).
OPENING THE BONNET
From inside:
☞ pull the handle downwards.
From outside:
☞ lift the catch and
raise the bonnet.
YOUR AT A GLANCE
111 110
02-02-2004
YOUR AT A GLANCE
9
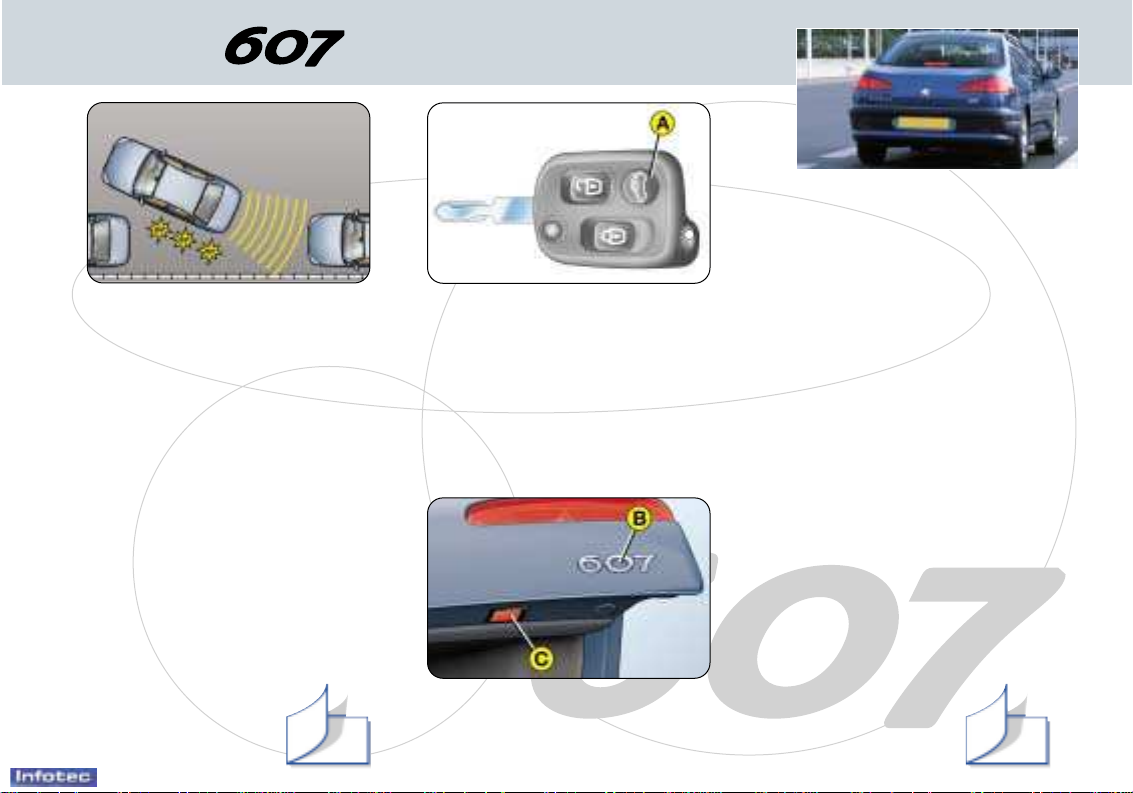
REAR PARKING ASSISTANCE
This system, installed in the rear
bumper, detects any obstacle
(person, vehicle, tree, gate,
kerb...) located behind the
vehicle.
To activate
With the engine running, the
system is activated as soon as
reverse gear is engaged; a bleep
sounds to inform you that it is
active.
The proximity information is given
by an audible signal, consisting of
bleeps which become more and
more rapid as the vehicle
approaches the obstacle.
When the distance between the
rear of the vehicle and the
obstacle is less than approximately twenty-five centimetres, the
signal becomes continuous.
☞ The system
ceases to be active when you change to neutral.
MOTORISED BOOT
Opening the boot
Vehicle locked / deadlocked
☞ Press and hold button A on the
remote control.
This action will also unlock the
doors and the fuel filler flap.
Vehicle unlocked
☞
Press and hold button A on the
remote control, or press and hold
the push button Bon the boot lid.
Closing the boot lid
Press the push button C to carry
out electric locking of the boot lid.
Note: do not hinder closing of the
boot lid: any obstacle to closing
causes the boot lid to stop and rise
a few centimetres automatically.
T o close the boot lid manually, use
one of the two handles inside the
boot lid.
Stopping and intermediate
position of the boot lid
While electric opening or closing of
the boot lid is in progress, you can
stop its movement at any time.
☞ press the push button B or C
on the boot lid.
or
☞ press button A on the remote
control.
Note: to leave the intermediate
position, start an electric opening or
closing operation or move the boot
lid manually.
132 109
02-02-2004
YOUR AT A GLANCE
10
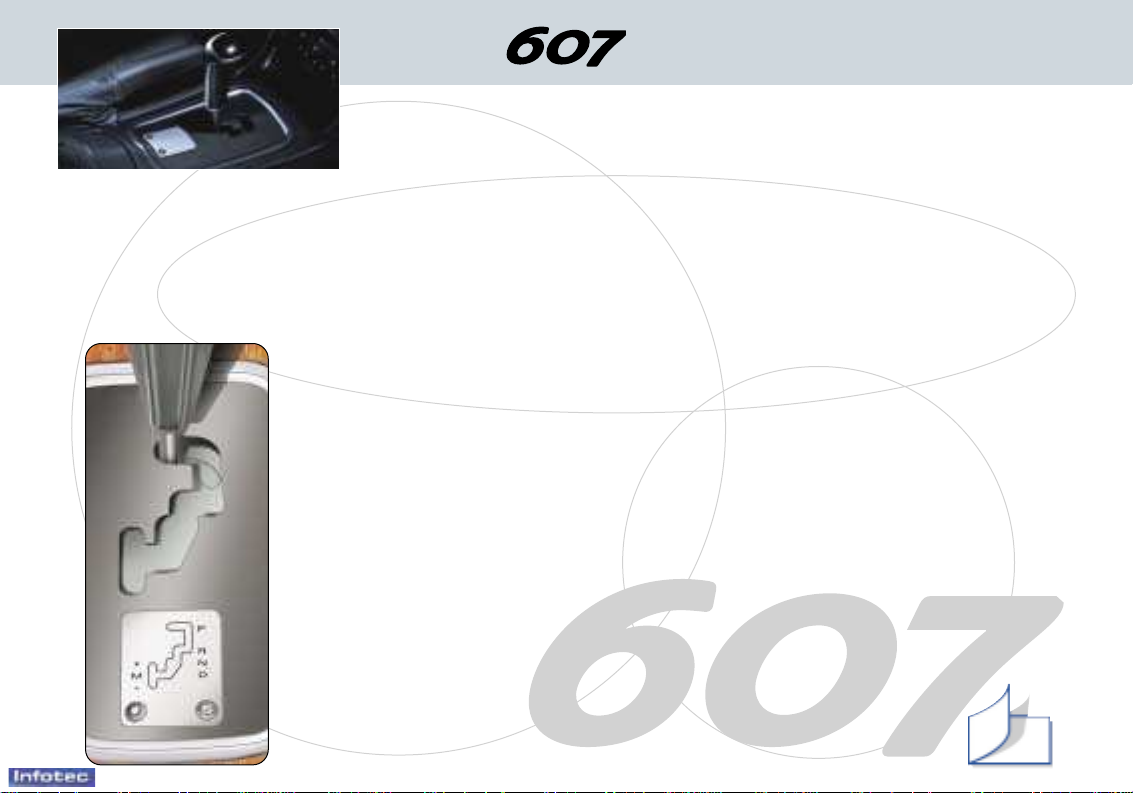
"PORSCHE TIPTRONIC System"
AUTOMATIC GEARBOX
The four speed automatic gearbox offers a choice between the comfort
of integral automatic operation, enhanced by a sport programme and
a snow programme, or the pleasure of manual gear changing.
Gear selection gate
☞ Move the lever in the gate to select one of the functions.
Once the function is selected, the indicator light for that function is
displayed on the instrument panel screen.
S: sport programme.
뽋
: snow programme.
Park: to immobilise the vehicle and to start the engine,
with the handbrake on or off.
Reverse: to engage reverse; select this function with
the vehicle stationary and the engine at idle.
Neutral: to start the engine and to park, with the
handbrake on.
Note: if position N is engaged by mistake while the
car is moving, allow the engine to return to idling
speed before engaging function D to accelerate.
Drive: for automatic gear changing
Manual: for manual gear changing.
To change the four gears manually:
☞ Push the lever to the + symbol to change up to
the next gear and pull it towards the - symbol to
change down a gear.
Note: the S (sport) and 뽋(snow) programmes do
not operate in manual mode.
Moving Off
With the engine running, to move
off from position P:
☞
it is essential to press the
brake pedal to exit position
P,
☞
select function R, D or M, then
gradually release the pressure
on the brake pedal; the vehicle
will move off immediately.
You can also move off from
position N:
☞
release the handbrake, with
your foot on the brake,
☞
select function R, D or M, then
gradually release the pressure
on the brake pedal;
the vehicle will move off
immediately.
WARNING
When the engine is idling with the
brakes not applied, if function R, D
or M is selected, the vehicle
moves without the accelerator
being pressed.
For this reason, do not leave
children unsupervised inside
the vehicle, with the engine
running.
When maintenance operations
have to be carried out
with the engine
running, apply the
handbrake and select
position P.
126
02-02-2004
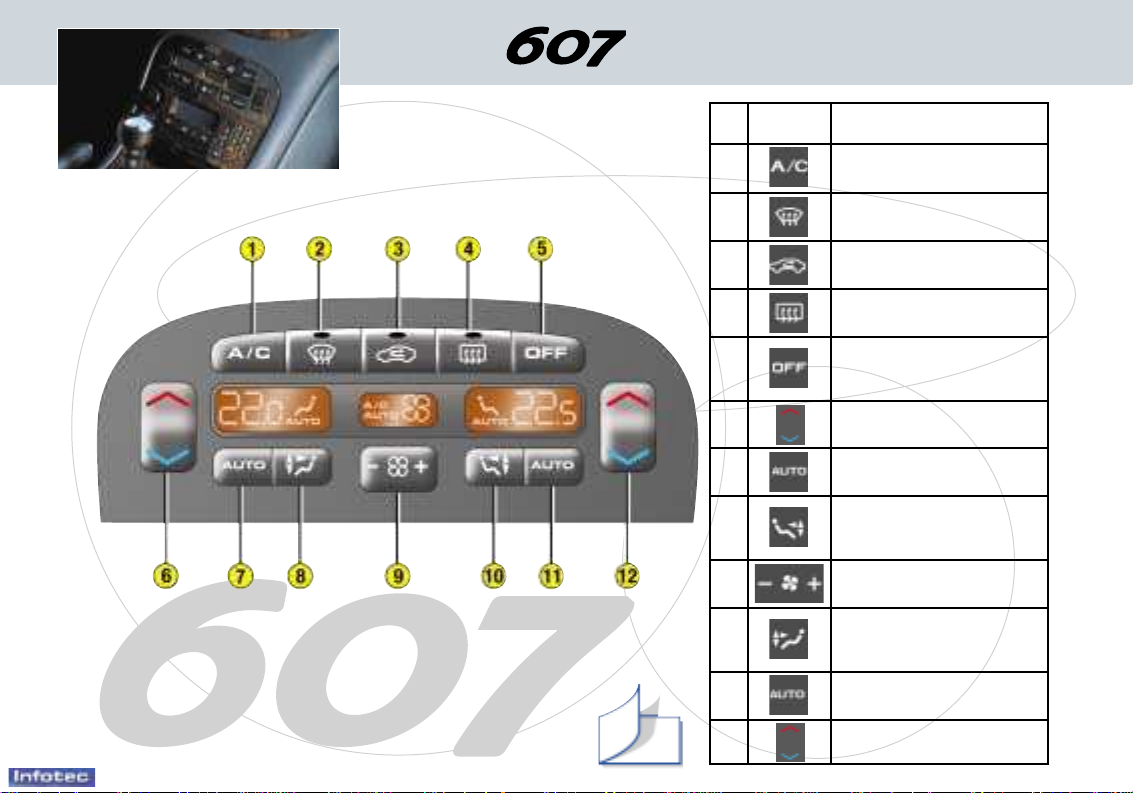
No. Symbol Function
1 Air conditioning
on/off.
2 Front visibility
programme.
3 Air intake/
recirculation control.
4 Rear screen
demisting.
5
Switching
off.
6 Passenger
setting
7 Passenger comfort
programme.
8 Passenger
air distribution
setting.
9 Air flow
adjustment.
10 Driver
air distribution
setting.
11 Driver comfort
programme.
12 Driver
setting.
12
YOUR AT A GLANCE
AUTOMATIC AIR CONDITIONING
Do not cover the sunshine / brightness sensor located in the
centre of the fascia.
It helps to regulate the air conditioning, automatic
switching on of the lights and the automatic adjustment
of the instrument panel brightness.
90

13
YOUR AT A GLANCE
02-02-2004
RM2 AUDIO SYSTEM
RT2 AUDIO/TELEPHONE
40
42
02-02-2004
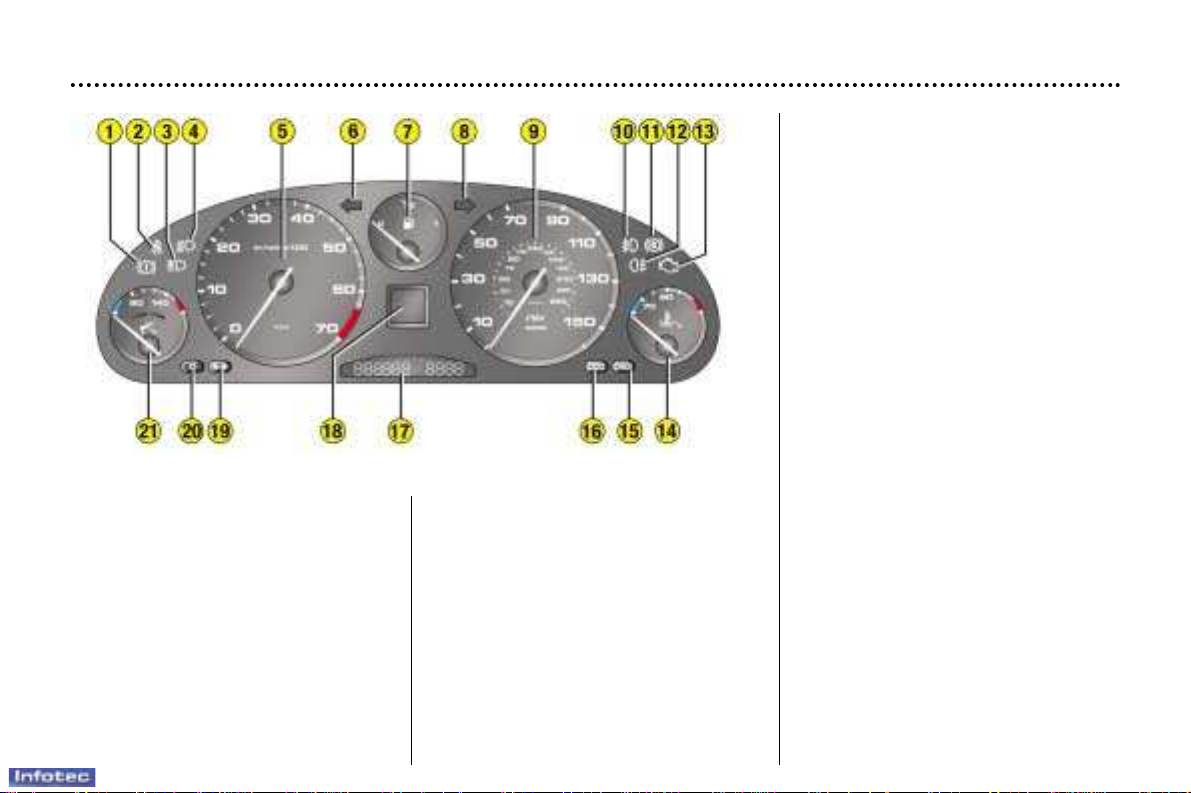
INSTRUMENTS AND CONTROLS
18
1 - Handbrake indicator light.
2 - Seat belt not fastened indicator
light.
3 - Main beam headlamps indicator
light.
4 - Dipped beam headlamps
indicator light.
5 - Rev counter.
6 - Left-hand direction indicator.
7 - Fuel gauge.
8 - Right-hand direction indicator.
9 - Speedometer.
10 -Front fog lamps indicator light.
11 - ABS anti-lock braking system
warning light.
12 -Rear fog lamps indicator light.
13 -Engine diagnostics warning
light.
14 -Coolant temperature indicator.
15 -CHECK button.
16 -Trip recorder zero re-set.
17 -Service indicator and total
distance recorder.
18 -Warning/status screen.
19 -Illumination button +.
20 -Illumination button -.
21 -Engine oil level indicator.
-Engine oil temperature
indicator.
INSTRUMENT PANEL DIALS: PETROL

02-02-2004
INSTRUMENTS AND CONTROLS
19
1 - Handbrake indicator light.
2 - Seat belt not fastened indicator
light.
3 - Main beam headlamps indicator
light.
4 - Dipped beam headlamps indi-
cator light.
5 - Rev counter.
6 - Left-hand direction indicator.
7 - Fuel gauge.
8 - Right-hand direction indicator.
9 - Speedometer.
10 -Front fog lamps indicator light.
11 - ABS anti-lock braking system
warning light.
12 -Rear fog lamps indicator light.
13 -Engine diagnostics warning
light.
14 -Coolant temperature indicator.
15 -CHECK button.
16 -Trip recorder zero re-set.
17 -Service indicator and total
distance recorder.
18 -Warning/status screen.
19 -Illumination button +.
20 -Illumination button -.
21 -Engine oil level indicator.
-Engine oil temperature
indicator.
INSTRUMENT PANEL DIALS: DIESEL
02-02-2004
INSTRUMENTS AND CONTROLS
20
INDICATOR LIGHTS
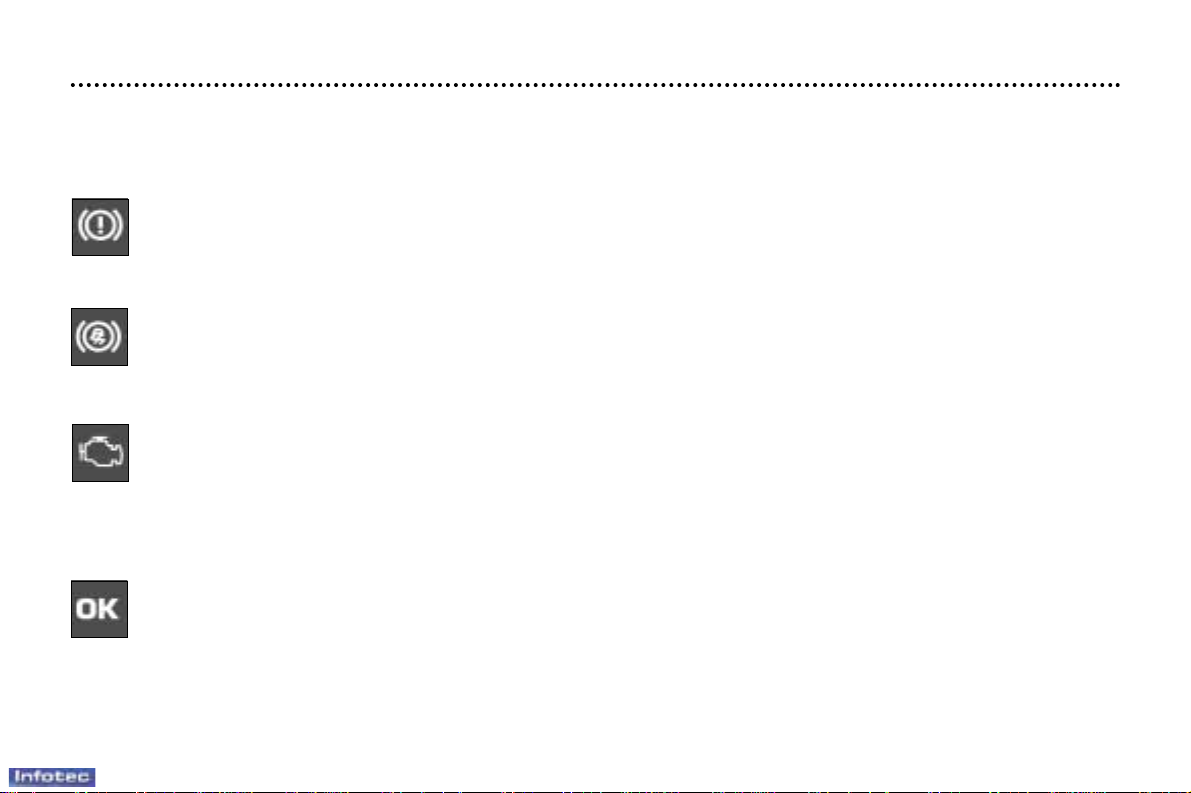
With the key in the accessories position (1st notch): the battery charge warning light illuminates on the instrument panel display.
With the ignition on (2nd notch): the following three warning lights illuminate on the sides of the instrument panel:
Brake fluid level and brake force distribution fault warning light.
This light should go out after 3 seconds.
If the warning light remains on, or if it comes on when the engine is running and the vehicle is moving, it indicates
an excessive drop in the brake fluid level or a malfunction of the brake force distribution.
Stop immediately. Contact a PEUGEOT dealer.
Anti-lock braking system (ABS) warning light
This should go out after 3 seconds.
If the warning light remains on or comes on above 8 mph (12 km/h), this indicates a malfunction of the ABS.
However, the vehicle retains conventional servo-assisted braking.
Contact a PEUGEOT dealer.
Engine diagnostics warning light
This should go out 3 seconds after the engine starts.
If it flashes with the engine running, this indicates a malfunction in the injection or the ignition system. There is a
risk of damage to the catalytic converter.
If it is on continuously, this indicates a fault in the emission control system.
Contact a PEUGEOT dealer as soon as possible.
At the same time, on the instrument panel display:
If no malfunction has been detected: the OK light comes on after two seconds (following a black screen), in the
absence of indicator lights showing the status of vehicle functions. If these indicator lights are present, the OK
button will come on after these. You may start your vehicle.
If a 'minor' malfunction has been detected: the warning light for the faulty function comes on. Certain indicator
lights showing the status of vehicle functions may also come on, followed by the OK indicator light. You can start
your vehicle; however, contact a PEUGEOT dealer as soon as possible.
If a 'major' malfunction has been detected: the corresponding warning light comes on. Certain indicator lights showing
the status of vehicle functions may also come on. The OK indicator light does not come on. Do not start your vehicle.
Contact a PEUGEOT dealer.
Afterwards, if the passenger air bag is disarmed, the corresponding indicator light will come on.
02-02-2004
INSTRUMENTS AND CONTROLS
21
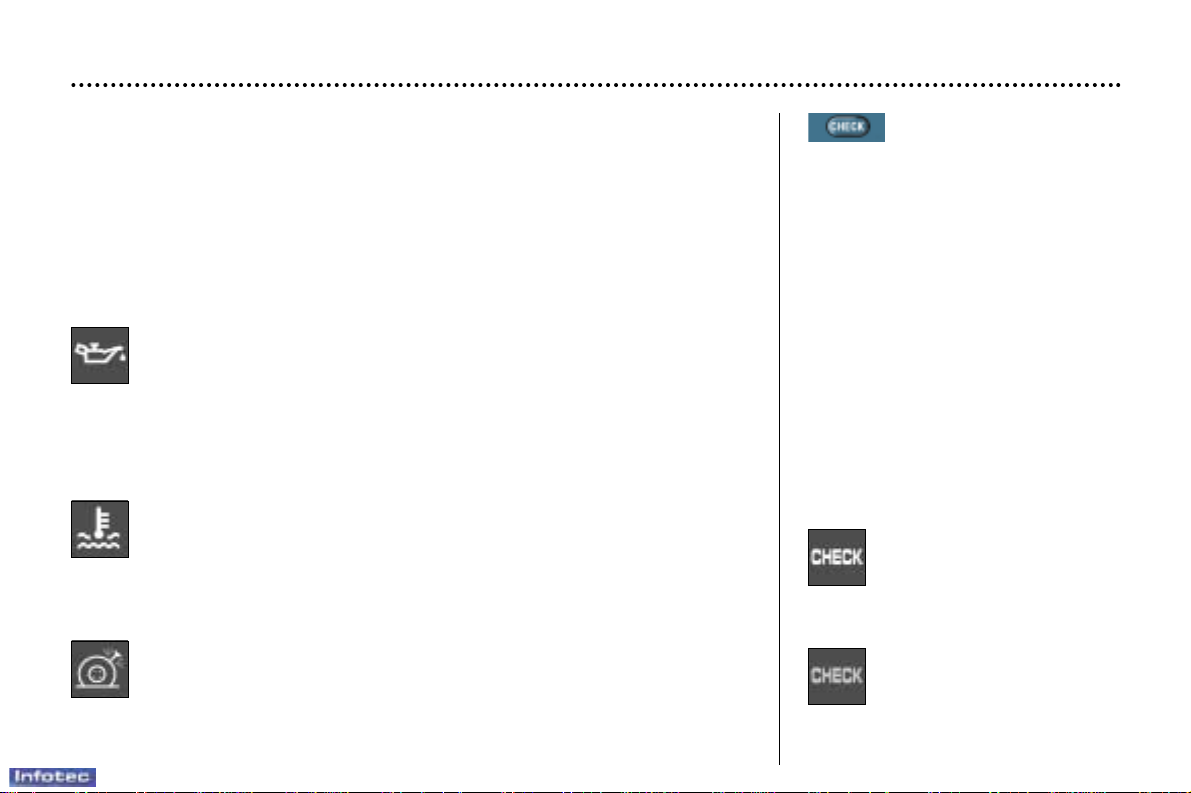
Coolant temperature warning light
This symbol is accompanied by an audible signal and the message
'Engine temperature too high' on the multi-function display.
It is linked to the STOP warning light. Stop immediately.
Warning: wait for the engine to cool.
If necessary, top up the level.
With the engine running and the vehicle moving
The instrument panel display temporarily shows:
- lights indicating warnings, when these occur,
- vehicle function status indicator lights, when a change occurs.
Certain warning lights may be accompanied by an audible signal and a
message on the multi-function display.
List of warning symbols
MANUAL CHECK
(vehicle autotest)
☞ Press the "CHECK" button on the
instrument panel.
With the ignition key in the accessories position, with the ignition switched on, with the engine running or
when the vehicle is moving, this
function informs you at all times of
the following:
- any current warnings,
- the status of functions which it is
possible to switch on or off (windscreen wipers, automatic switching
on of lights, cruise control, disarming
of passenger air bag, etc.).
The corresponding warning lights
are displayed in succession on the
instrument panel screen.
If a warning or a change of status
occurs during the CHECK mode, the
corresponding indicator lights will be
displayed at the end of this mode.
CHECK mode entry
indicator light (vehicle
autotest)
This comes on when you
press the 'CHECK' button.
CHECK mode exit indicator light (vehicle autotest)
This comes on at the end of
the CHECK mode.
Engine oil pressure warning light
This symbol is accompanied by an audible signal and the message 'Oil
pressure insufficient' or 'Engine oil level low' on the multi-function
display.
It is linked to the STOP warning light.
Stop immediately if this comes on when the engine is running.
If there is a lack of oil in the lubrication circuit, top up the level.
Contact a PEUGEOT dealer as soon as possible.
Puncture warning light
This symbol comes on accompanied by an audible signal and the mes-
sage 'Punctured tyre(s) detected' on the multi-function display.
It is linked to the STOP warning light. Stop immediately.
Change the damaged wheel.
Have it repaired by a PEUGEOT dealer.
02-02-2004
INSTRUMENTS AND CONTROLS
22
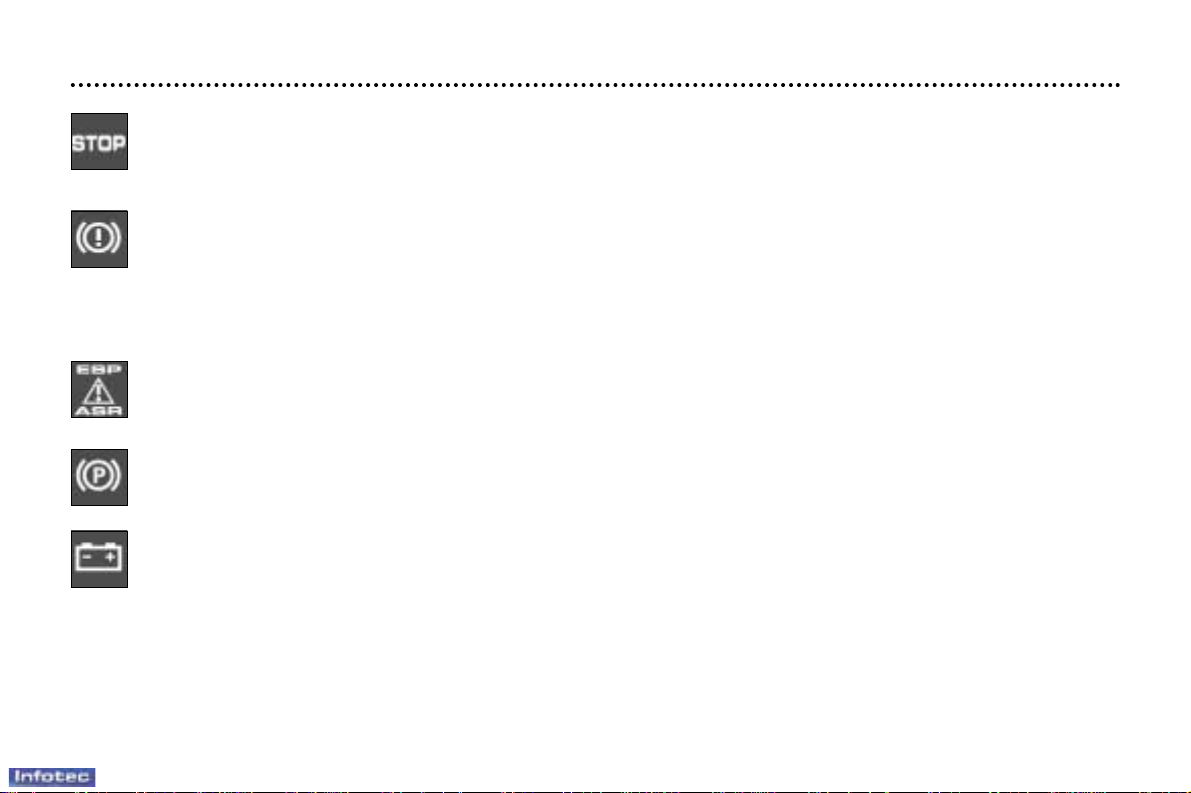
STOP warning light
This comes on after the engine oil pressure, coolant temperature or puncture warning lights, to which it is
linked.
Stop immediately. Contact a PEUGEOT dealer.
Brake fluid level and brake force distribution fault warning light
This is linked to the light on the instrument panel.
Display of this warning light accompaned by an audible signal and the message 'Brake fluid level low' indicates
an excessive drop in the brake fluid level.
Display of this warning light, accompanied by an audible signal and the message 'Braking system fault' on the
multi-function display indicates a malfunction of the brake force distribution system.
Stop immediately in both cases. Contact a PEUGEOT dealer.
Dynamic stability control (ESP/ASR) warning light
Display of this warning light, accompanied by an audible signal and the message 'ESP/ASR system fault' on the
multi-function display indicates a system malfunction.
Contact a PEUGEOT dealer.
Handbrake warning light
Display of this warning light, accompanied by an audible signal (vehicle moving) and the message 'Handbrake on'
on the multi-function display, indicates that the handbrake is applied or has not been released correctly.
Battery charge warning light
This comes on each time the ignition key is in the accessories position (1st notch).
Display of this warning light when the engine is running is accompanied by an audible signal and the message
'Battery charge fault' on the multi-function display.
This can indicate:
- faulty operation of the charging circuit,
- loose battery or starter terminals,
- a cut or slack alternator belt,
- an alternator fault.
Contact a PEUGEOT dealer.
02-02-2004
INSTRUMENTS AND CONTROLS
23
Tyre under-inflation warning light
Display of this warning light is accompanied by an audible signal and the message 'Tyre(s) pressure low' on the
multi-function display.
Have the tyre pressure checked as soon as possible.
Low coolant level warning light (except 2 litre 16V and 2.2 litre 16V petrol engines)
Display of this warning light is accompanied by an audible signal and the message 'Cooling circuit level low' on
the multi-function display.
Stop immediately.
Warning: wait for the engine to cool before topping up.
The cooling system is pressurised.
In the event of breakdown and to prevent the risk of scalding, unscrew the cap by two turns to allow the pressure to drop.
When the pressure has dropped, remove the cap and top up the level.
Contact a PEUGEOT dealer.
Seat belt not fastened warning light
Display of this warning light is accompanied by an audible signal and the message 'Seat belt reminder' on the
multi-function display.
With the engine running, the warning light comes on when the driver's seat belt is unfastened.
Electronic immobiliser warning light
Display of this warning light is accompanied by an audible signal and the message 'Electronic theft protection
fault' on the multi-function display.
It indicates a malfunction of the electronic immobiliser system.
Contact a PEUGEOT dealer.
02-02-2004
INSTRUMENTS AND CONTROLS
24
Water in diesel filter warning light (according to country)
Display of this warning light is accompanied by an audible signal and the message 'Water in diesel filter' on the
multi-function display.
There is a risk of damage to the injection system.
Contact a PEUGEOT dealer as soon as possible.
Front brake pad wear warning light
Display of this warning light is accompanied by an audible signal and the message 'Brake pads worn' on the
multi-function display.
For your safety, have the pads replaced by a PEUGEOT dealer as soon as the warning light comes on.
Low fuel level warning light
Display of this warning light is accompanied by an audible signal and the message 'Fuel level low' on the
multi-function display.
When the warning light comes on, you have enough fuel to drive approximately 30 miles (50 km). The tank
capacity is approximately 80 litres.
Fuel cap warning light
Display of this warning light is accompanied by an audible signal and the message 'Fuel cap open' on the
multi-function display.
It comes on if the fuel tank cap is not correctly screwed on or is missing.
Door/bonnet/boot open warning light
Display of this warning light with the engine running is accompanied by an audible signal and an illustration on the
multi-function display, showing which opening has not been correctly closed.
Air bag warning light
Display of this warning light is accompanied by an audible signal and the message 'Air bag fault' on the
multi-function display.
Contact your PEUGEOT dealer.
02-02-2004
INSTRUMENTS AND CONTROLS
25
Engine diagnostics warning light
This is linked to the warning light on the instrument panel.
Display of this warning light is accompanied by an audible signal and the message 'Engine emission control
system fault' on the multi-function display.
If it flashes when the engine is running, this indicates a malfunction in the injection, ignition or emission control system.
There is a risk of damage to the catalytic converter.
Contact a PEUGEOT dealer as soon as possible.
Bulb blown warning light
Display of this indicator light is accompanied by an audible signal and the message 'Bulb...faulty' on the
multi-function display, indicating the faulty bulb: a bulb in the dipped beam lights, the side lights, the direction
indicator lights (except side repeaters) or the brake lights (except the central brake light).
Change the faulty bulb.
Windscreen/headlamp wash reservoir warning light
Display of this warning light is accompanied by an audible signal and the message 'Screenwash low' on the
multi-function display.
Fill the windscreen/headlamp wash reservoir the next time you stop.
Particulate emission filter saturation warning light (diesel engine)
Display of this warning light is accompanied by an audible signal.
When it occurs with the engine running, this indicates the start of saturation of the particulate emission filter (excep-
tionally long periods of town type driving conditions: reduced speed, long tailbacks...).
To regenerate the filter, you are advised to drive as soon as possible and when traffic conditions permit at a speed of 35 mph
(60 km/h) or more for at least five minutes (until the warning light goes out).
If the light remains on, contact a PEUGEOT dealer.
Note: After prolonged operation of the vehicle at a very low speed or at idle, you may sometimes notice steam coming from
the exhaust during acceleration. This has no effect on the performance of the vehicle or on the environment.
02-02-2004
INSTRUMENTS AND CONTROLS
26
Anti-lock braking system (ABS) warning light
This is linked to the warning light on the instrument panel.
Display of this warning light is accompanied by an audible signal and the message 'ABS fault' on the multi-function
display.
If the warning light remains on, or comes on at over 8 mph (12 km/h), this indicates a malfunction of the ABS.
However, the vehicle retains conventional servo-assisted braking.
Contact a PEUGEOT dealer.
Automatic headlamp adjustment warning light
Display of this warning light is accompanied by an audible signal and the message 'Automatic adjustment of
headlamps fault' on the multi-function display.
It comes on if there is a malfunction of the system.
Contact a PEUGEOT dealer.
Automatic gearbox fault warning light
Display of this warning light is accompanied by an audible signal and the message 'Automatic gearbox fault' on
the multi-function display.
It comes on if there is an abnormality in the automatic gearbox.
The gearbox will continue to operate in downgrade mode (locked in 3rd gear).
Contact a PEUGEOT dealer.
Tyre under-inflation detector battery flat / remote control battery flat / impact sensor fault / wheel(s)
missing warning light
Display of this warning light is accompanied by an audible signal and a message on the multi-function display sho-
wing the cause of the warning:
- 'Tyre pressure sensor battery charge low',
- 'Remote control battery charge low',
- 'Impact sensor fault',
- 'X tyre pressure sensor(s) missing'.
Contact a PEUGEOT dealer.
INSTRUMENTS AND CONTROLS
27
List of status indicator lights
SPORT suspension indicator light
Display of this indicator light is accompanied by an audible signal.
The indicator light comes on when the SPORT function is switched on.
Dynamic stability control (ESP/ASR) system disarming indicator light
Display of this indicator light when the system is disarmed is accompanied by an audible signal and the message
'ASR/ESP systems de-activated' on the multi-function display.
Dynamic stability control (ESP) system operation indicator light
This comes on when the system starts to function.
Diesel engine pre-heat indicator light
If the temperature is high enough, the indicator light does not come on and you can start the engine immediately.
If the indicator light does come on, wait for it to go out before operating the starter.
Air bag disarming indicator light*
Display of this light is accompanied by an audible signal and the message 'Passenger air bag deactivated' on the
multi-function display.
If the passenger air bag is disarmed, the indicator light comes on when the ignition is switched on (2nd notch).
In all cases, if the indicator light flashes, contact a PEUGEOT dealer.
*According to country
02-02-2004
02-02-2004
INSTRUMENTS AND CONTROLS
28
Automatic headlamps disarming indicator light
Display of this light is accompanied by an audible signal.
The light comes on when the function is disarmed.
Automatic headlamps indicator light
Display of this light is accompanied by an audible signal.
The indicator light comes on when the function is activated.
Automatic windscreen wiper disarming indicator light
Display of this light is accompanied by an audible signal.
The indicator light comes on when the function is disarmed.
Automatic windscreen wiper indicator light
Display of this light is accompanied by an audible signal.
The indicator light comes on when the function is activated.
Cruise control indicator light
Display of this light is accompanied by an audible signal.
The indicator light comes on when the function is activated.
AUTO suspension indicator light
Display of this light is accompanied by an audible signal.
The indicator light comes on when the SPORT function is disarmed.
02-02-2004
INSTRUMENTS AND CONTROLS
30
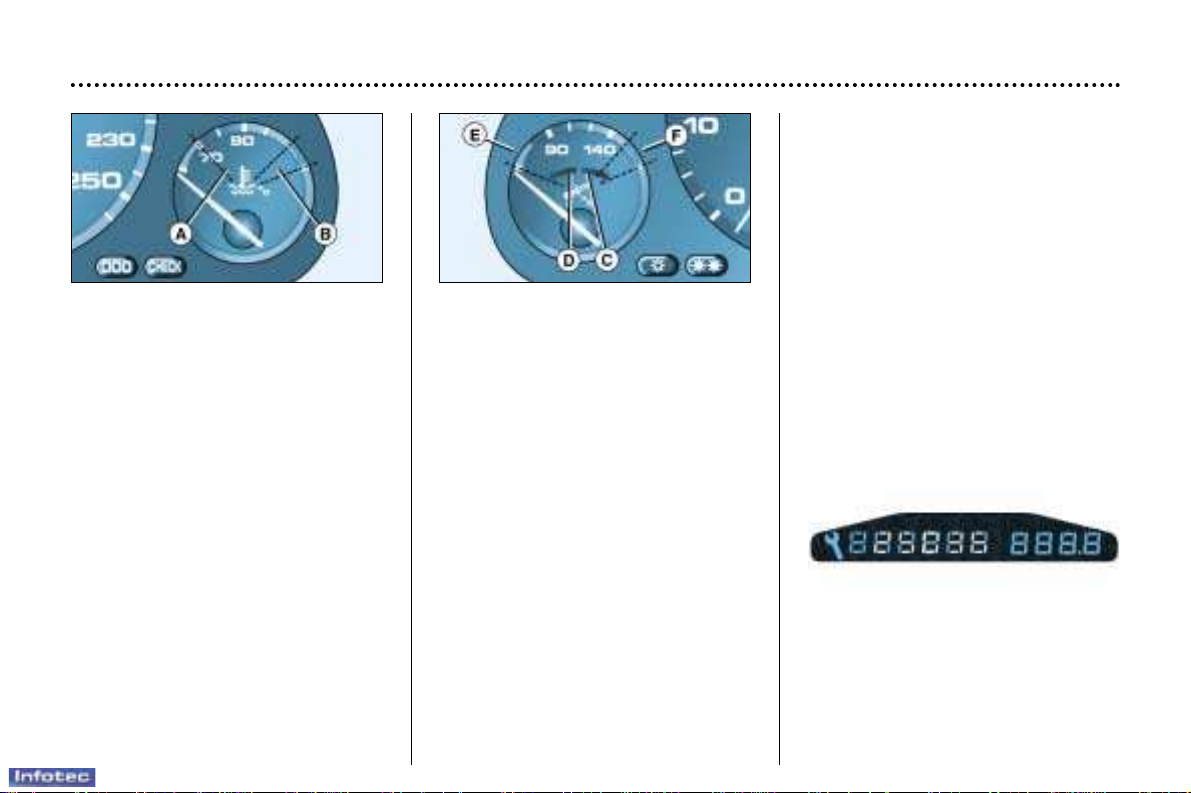
Coolant temperature indicator
When the needle is in zone A, the
temperature is correct.
When the needle is in zone B, the
temperature is too high.
In cases where the coolant temperature warning light comes on (lin-
ked to the STOP warning light), you
must stop immediately.
Warning: wait for the engine to cool
down.
If necessary, top up the level.
Because the cooling system is pressurised, to prevent the risk of scalding, turn the cap two turns to allow
the pressure to drop.
When the pressure has dropped,
remove the cap and top up the level.
Contact a PEUGEOT dealer.
Engine oil level and temperature
When the ignition is switched on, this
gauge indicates the engine oil level
for approximately 20 seconds, then it
indicates the engine oil temperature.
Engine oil level
The reading is valid only if the
vehicle is on level ground, and the
engine has been switched off for 10
minutes.
With the ignition on, wait for the graduated sector to light up and the indicator needle to move.
When the needle is in zone C, the oil
level is correct.
When the needle is in zone D, the oil
level is incorrect.
There is a risk of damage to the
engine.
☞ Check the level with the dipstick.
You must top up the level without
exceeding the maximum level on
the gauge.
Engine oil temperature
When the needle is in zone E, the
temperature is correct.
When the needle is in zone F, the
temperature is too high.
Reduce your speed to lower the
temperature.
Service indicator and
total distance recorder
When the ignition is switched on, this
indicates servicing information for a
few seconds, then the total and trip
distances.
Service function
See the 'Service indicator' section.
Total distance recorder function
The total distance is displayed on the
left side of the screen and the trip
distance on the right side.
02-02-2004
INSTRUMENTS AND CONTROLS
29
Automatic gearbox selector lever position indicator lights
'Park' indicator lights
'Reverse' indicator lights
'Neutral' indicator lights
'Drive' indicator lights
Note: the letter S and the symbol 뽋 linked to the above indicator lights correspond respectively to the Sport and Snow
operating programmes.
'Manual' indicator lights
These indicator lights correspond to the four manually operated gears.
02-02-2004
Trip recorder zero
reset button
With the ignition on, press the button
until the zeros appear.
INSTRUMENTS AND CONTROLS
33
Manual operation
With the headlamps on, press button
B to increase the brightness of the
instrument panel lighting or button A
to reduce it.
As soon as the lighting reaches the
required level of brightness, release
the button.
Illumination
buttons
Automatic operation
The degree of illumination of the
instrument panel automatically
adapts to the external brightness.
By day, the setting cannot be
altered.
At night, the brightness can be
increased by means of button B.
A PEUGEOT dealer is able to cancel
automatic operation if you prefer
manual operation.
Service indicator zero re-set
Your PEUGEOT dealer carries out
this operation after each service.
However, if you carry out the service
yourself, the re-set procedure is as
follows:
☞ Switch off the ignition,
☞ Press and hold the trip recorder
re-set button,
☞ Switch on the ignition.
The display begins a countdown.
When the display shows 0, release
the button; the service symbol disappears.
Important: after this operation, if you
wish to disconnect the battery, lock
the vehicle and wait for at least five
minutes, otherwise the zero re-set
will not be registered.
02-02-2004
INSTRUMENTS AND CONTROLS
32
5 seconds after the ignition is switched on, the total distance recorder
resumes normal operation and the
display shows the total or trip distances.
The distance remaining before the
next service is less than 500 miles
(1,000 km).
Example: 400 miles (900 km) remain
before the next service is due.
When switching on the ignition and
for 5 seconds, the display shows:
5 seconds after the ignition is switched on, the total distance recorder
resumes normal operation and the
symbol remains lit.
This indicates that a service should
be carried out shortly. The display
shows the total or trip distances.
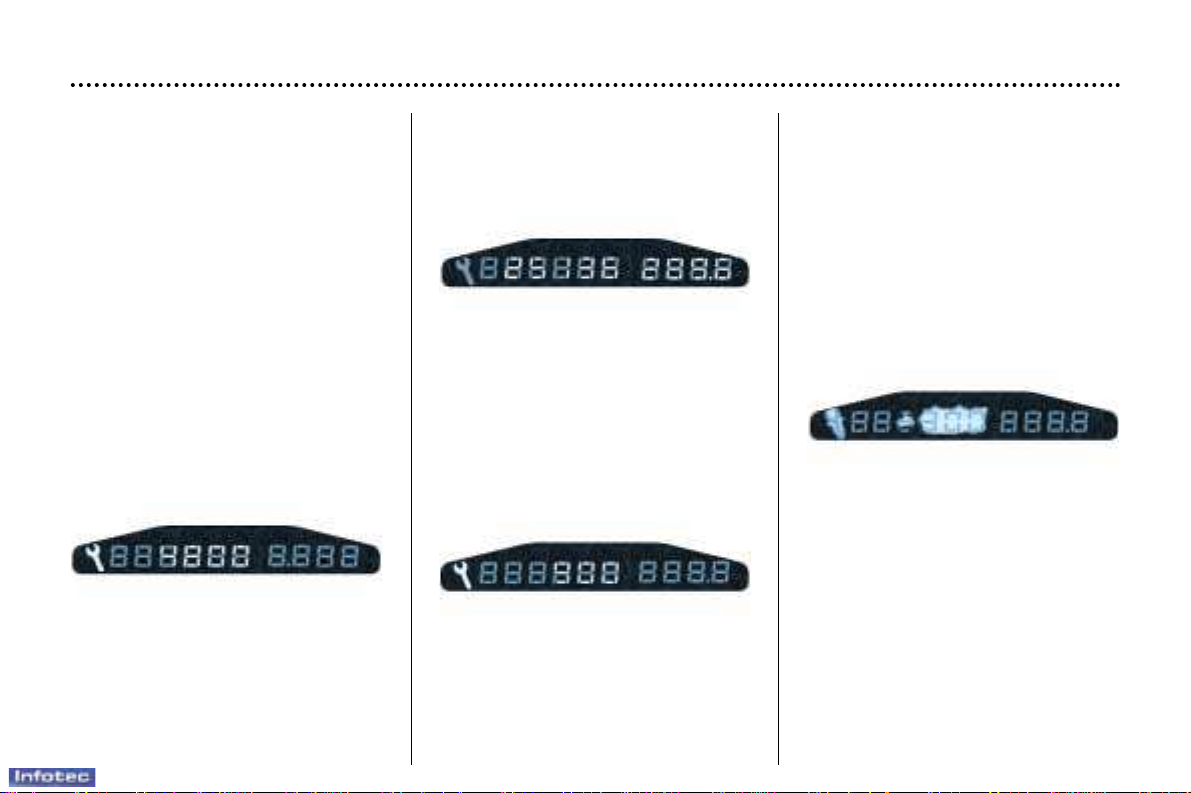
SERVICE INDICATOR
This is a visual reminder of when the
next service is due. This service is to
be carried out according to the
manufacturer's servicing schedule.
Operation
As soon as the ignition is switched
on and for 5 seconds, the spanner
symbolising ''service operation'' is lit.
The trip recorder display shows the
distance remaining (in round figures)
before the next service.
Example: 4,800 miles/km remain
before the next service is due. When
the ignition comes on and for
5 seconds the display indicates:
The service is overdue.
Each time the ignition is switched on
and for 5 seconds, the symbol and
the excess distance flash.
Example: the service is overdue by
300 miles/km. The service should be
carried out very shortly.
When the ignition is switched on and
for 5 seconds, the display shows:
5 seconds after the ignition is switched on, the total distance recorder
resumes normal operation and the
symbol remains lit. The display
shows the total or trip distances.
Note: the service spanner lights if
the two-year interval has been
exceeded (see "PEUGEOT Servicing" section).
YOUR 607 IN DETAIL
34
THE MULTI-FUNCTION DISPLAY
General
The multifunction, monochrome C or
colour display shows the following:
- the time,
- the date,
- the outside temperature (symbol
°C flashes if there is a risk of ice),
- the audio system displays,
- the telephone displays,
- the name of the road along which
the vehicle is travelling (permanent
locating),
- status of the openings,
- warning messages (e.g. 'Fuel level
low') and vehicle function status
messages, displayed temporarily,
- trip computer display (see
corresponding section),
- satellite navigation system
displays* (see corresponding
section),
- video images.
It is controlled by a keypad.
Superimposed display
When the status of a function (audio
system, telephone, trip computer,
satellite navigation system,....)
changes while the display has been
showing a different function, a
window opens to announce the
modification (information / warning
message), then disappears.
* According to country
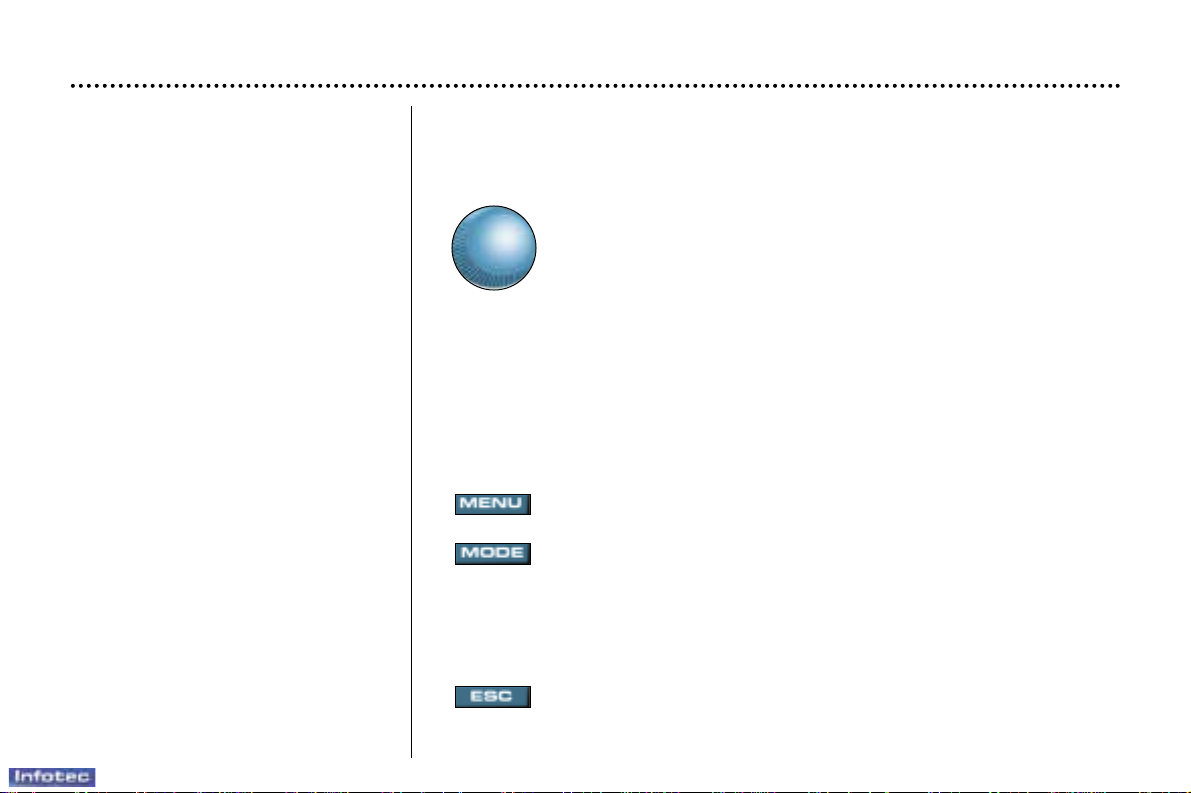
The control pad
This enables the functions, controls and parameters displayed to be selected
and validated. It is located next to the display.
Dial; this has two functions:
- Rotation of the dial:
This allows you to move around the screen and thus select a
function.
It also allows you :
- after selection of a 'setting' type parameter, to increase or
decrease the value,
- with a 'list' type parameter, to open the list and scroll through
the values.
- Pressing the dial:
This allows:
- confirmation of the selected function or the modified value.
- selection of a 'setting' or 'list' type parameter in order to
modify it.
- cancelling of a superimposed display.
'MENU' button:
This allows access at any time to the general menu.
'MODE' button:
- brief press:
- monochrome screen C: selection of functions (audio system,
navigation / guidance...),
- colour screen: access to the list of controls (context menu) of
the function being displayed.
- Press for more than two seconds: putting the screen on standby.
'ESC' button:
- brief press: cancelling of the operation in progress and a return
to the previous screen or erasing of a superimposed display.
- press for more than two seconds: return to the start-up screen.
02-02-2004
YOUR 607 IN DETAIL
35
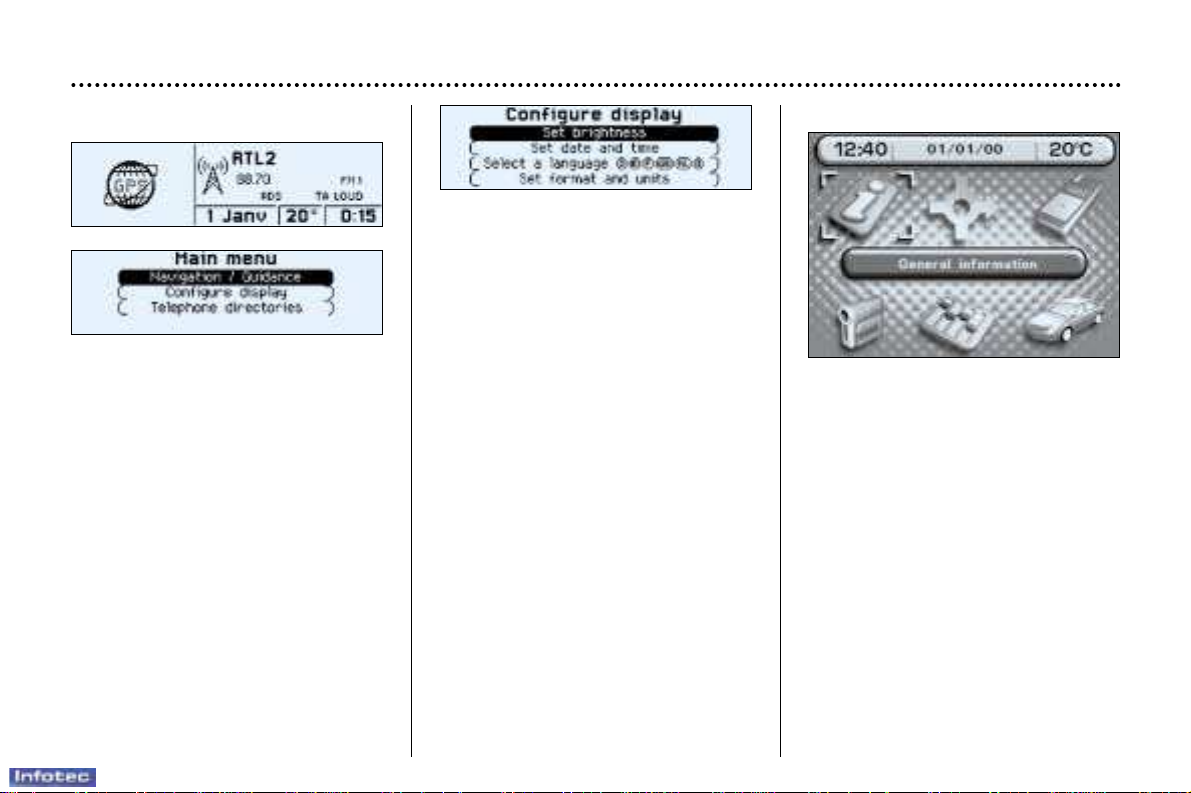
Setting the parameters
From the 'general menu', the
'Display configuration' menu
allows you to access the following
parameters:
- setting the video brightness and
display,
- setting the date and time,
- choosing the language in which
information is heard and displayed
(German, Spanish, French,
English, Italian, Dutch), setting the
formats and the units. These
settings allow you to choose a
display in km/h or mph, the
temperature in Celsius or in
Fahrenheit, and to modify the hour
(12 or 24 hour) and date format.
Monochrome screen C
General menu
Press the 'Menu' button to select one
of the following functions:
• navigation/guidance*
(see Section on 'Satellite navigation system'),
• display configuration
(see paragraph on 'Setting the
parameters', below),
• telephone directories
(see 'RT2 audio equipment'
section).
* According to destination.
The colour screen
General menu
From the general menu, select one
of the following functions by turning
the dial then press the dial to
confirm:
• general information,
• navigation/guidance*,
• map*,
• trip computer,
• settings,
• video.
Note: to enable you to make full use
of all the system functions, you have
two CD-Roms: one contains the software and the different languages of
the voice synthesis, the other
contains the "Satellite navigation
system" map data. The latter must
be in the drive for the
"Navigation/Guidance" and "Map"
functions to be active.
02-02-2004
 Loading...