

Peugeot 607 2003 Owner's Manual
YOUR AT A GLANCE
1
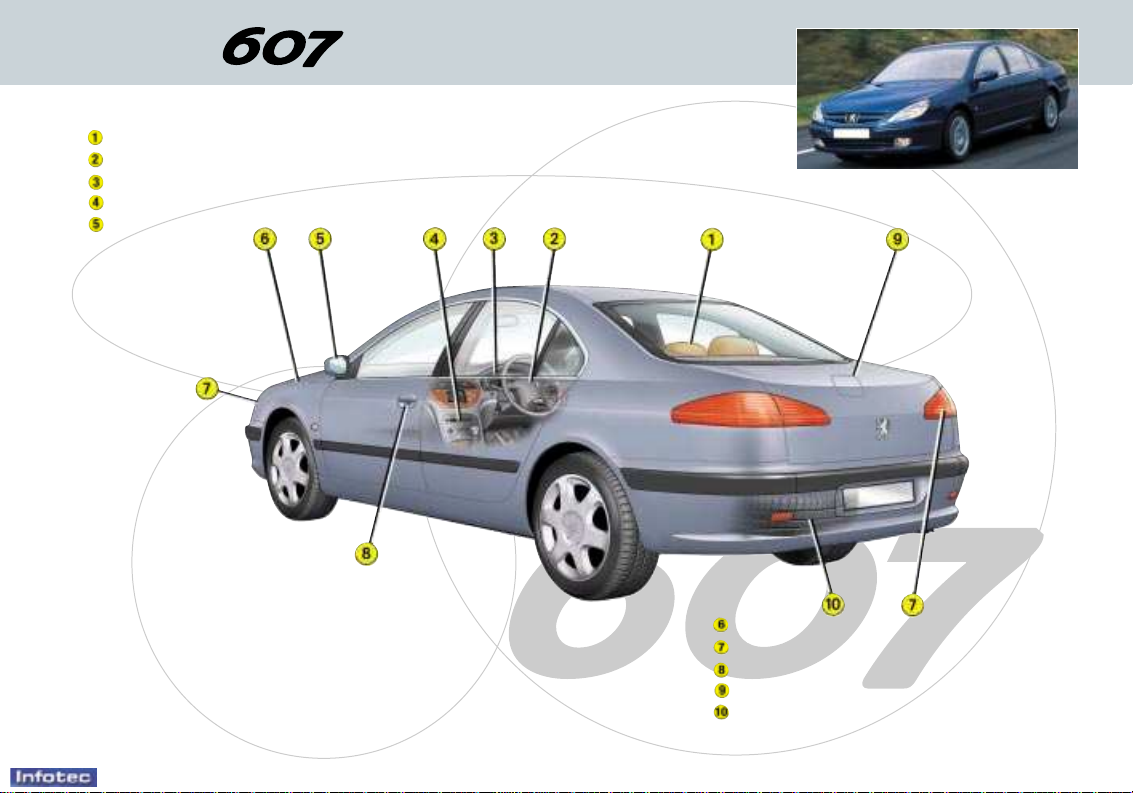
Each model may only be fitted with some of the equipment shown, according to its specification and the technical
requirements in the country of first registration of the vehicle.
Pages
Checks 146-147
Changing a bulb 152-154
Access 110-112
Fuel filler flap 116
Changing a wheel 149-151
Pages
Seats 99-108
Steering wheel controls 117-120
Instrument dials 28-29
Automatic air conditioning 96-98
Mirrors 125-126
10-02-2003
10-02-2003
YOUR AT A GLANCE
2
10-02-2003
3
YOUR AT A GLANCE
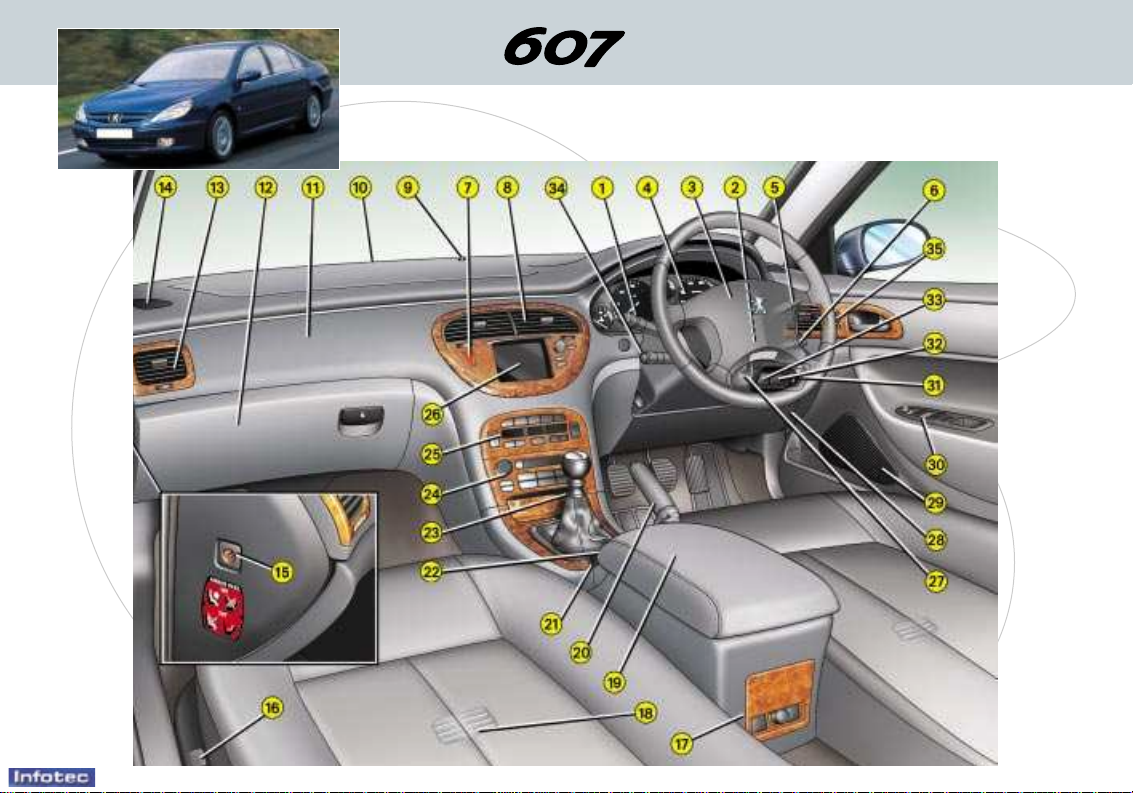
1-Lights and direction indica-
tors stalk.
2-Steering wheel adjustment.
3-Driver's front air bag.
- Horn.
4-Instrument dials.
5-Windscreen wash/wipe
stalk.
- Trip computer stalk.
6-Audio remote control stalk.
7-Hazard warning lights
switch.
8-Central adjustable
heating/ventilation vents and
air flow regulation.
9-Sunshine / brightness
sensor.
10 - Windscreen demisting vents.
11 - Passenger air bag.
12 - Glove compartment.
13 - Side adjustable
heating/ventilation vents and
air flow regulation.
14 - Door window demisting vent.
15 - Passenger airbag disarming
switch.
16 - Front seats heating switch.
17 - Rear ashtray.
- Rear lighter.
- Rear seats heating switch.
18 - Rear footwell heating vent.
19 - Two-position armrest with
compartments.
20 - Handbrake.
21 - Electronically controlled
suspension switch.
- Doors and boot locking
switch.
- Sunroof switch.
- Rear blind switch.
22 - Front ashtray.
- Front lighter.
23 - Gear lever.
24 - RM2 audio system or RT2
audio/telephone system with
PEUGEOT call button.
25 - Heating/ventilation controls.
26 - Multi-function display.
27 - Steering lock and ignition.
28 - Fuse box.
29 - Speakers location.
30 - Electric mirror controls.
- Window controls.
- Rear window locking control.
31 - Headlamp height adjust-
ment.
32 - ESP disarming switch.
33 - Alarm button.
34 - Cruise control.
35 - Memory buttons for:
- Front seat settings
- Electric mirror settings
10-02-2003
YOUR AT A GLANCE
4
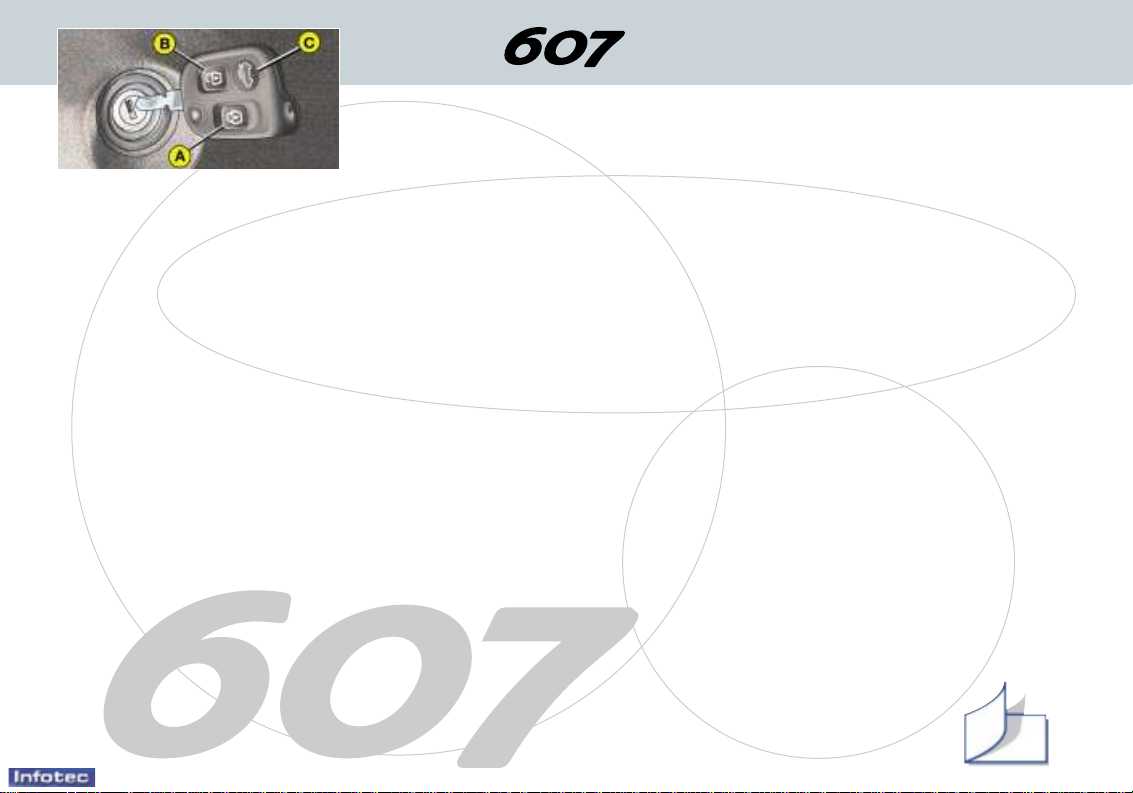
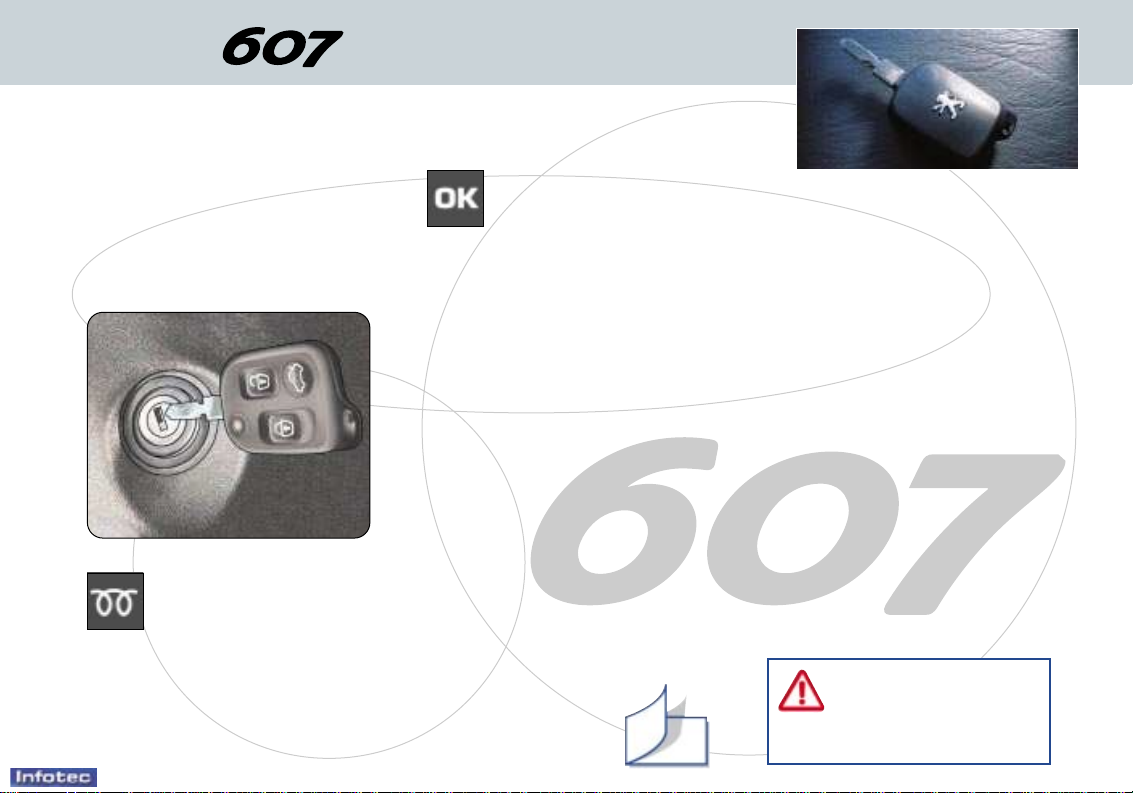
THE REMOTE CONTROL
KEY
From the driver's door, the key
allows you to lock or unlock the
doors, the boot and the fuel filler
flap, as well as to fold back or
open out the exterior mirrors.
The remote control in the key
performs the same function at a
distance.
Locking with the remote
control
☞ Press button A.
This is confirmed by fixed lighting
of the direction indicators for
approximately two seconds.
Unlocking with the remote
control key
☞ Press button B.
This is confirmed by rapid flashing of the direction indicators.
With the vehicle unlocked, the
boot is opened using the push
button located on the right rear
side, in the 'zero' of the 607
badge.
Opening the boot with the
remote control key
☞ Keep button C pressed.
Key in ignition
If you leave the key in the
ignition, this is indicated by a
buzzer upon opening the driver's door.
Locating the vehicle
To locate your vehicle in a car
park, press button A; the courtesy lights come on and the
direction indicators flash for
approximately twenty seconds.
Driving position memorised
by the remote control key
When locking the doors, the
remote control key memorises
the position of the driver's seat
and the driving mirrors.
Each remote control key memorises a specific setting.
When unlocking the doors, the
driver's seat and the driving mirrors assume the position memorised by the remote control key, if
this position has been changed in
the meantime.
Note: do not press the buttons of
your remote control key out of
range of your vehicle as there is
a risk that you could render it
inoperative. It would then be necessary to reprogramme it.
Deadlocking
This renders the internal and
external door locking controls
inoperative and permits the automatic closing of the windows and
the sunroof.
With the key:
☞ lock the vehicle and keep the
key in the locked position for
approximately one second.
With the remote control:
☞ press button A to lock the
vehicle (the direction indicator
lights remain on for approximately two seconds),
☞ within five seconds, press but-
ton A again to deadlock the
vehicle (the direction indicator
lights remain on for approximately two seconds).
110
10-02-2003
YOUR AT A GLANCE
5
STARTING
STOP position:
The ignition is switched off.
1st notch, Accessories position:
The ignition is switched off but
the accessories still function.
2nd notch, Running position:
The ignition is on.
Starting position:
Operates the starter.
Starting a diesel engine
If the temperature is high
enough, the pre-heat indicator light does not come
on and you can start
immediately.
If the indicator light comes on,
wait for it to go out before operating the starter.
If the engine stalls, it is necessary to return the key to the
'Stop' position before re-starting.
CHECK (vehicle autotest)
Automatic check
With the ignition on (2nd notch)
If no malfunction has been
detected: In the absence of
vehicle function status indicator lights, the OK light is
displayed after two seconds
on the instrument panel screen.
Otherwise, it will be displayed after
these indicator lights come on.
If a 'minor' malfunction has been
detected: the warning light for the
faulty function is displayed on the
instrument panel screen. Certain
indicator lights showing the status of
vehicle functions may also come on,
followed by the OK indicator light.
If a 'major' malfunction has been
detected: the corresponding warn-
ing light is displayed on the instrument panel screen. Certain indicator
lights showing the status of vehicle
functions may also come on. The
OK indicator light does not come
on. Do not start your vehicle.
Contact a PEUGEOT dealer.
Afterwards, if the passenger airbag
is disarmed, the corresponding
warning light will come on.
With the engine running or if the
vehicle is moving, the instrument
panel screen temporarily displays:
– lights indicating warnings, when
these occur,
– vehicle function sta-
tus indicator lights,
when a change
occurs.
The display of certain indicator
lights is accompanied by an audible signal and a message on the
multi-function display.
Manual check
☞ Press the "CHECK" button on the
instrument panel.
With the ignition key in the accessories
position, with the ignition switched on,
with the engine running or the vehicle
moving, this function informs you at all
times of the following:
– any current warnings,
– the status of functions which it is
possible to switch on or switch off
(windscreen wipers, automatic
switching on of lights, cruise control, disarming of passenger air
bag, etc.).
The corresponding warning lights are
displayed in succession on the instrument panel screen.
If a warning or a change of status
occurs during the CHECK mode, the
corresponding indicator light(s) will be
displayed at the end of this mode.
31
Never run the engine in
a confined space.
Do not make any modifications to the steering
lock.
10-02-2003
YOUR AT A GLANCE
6
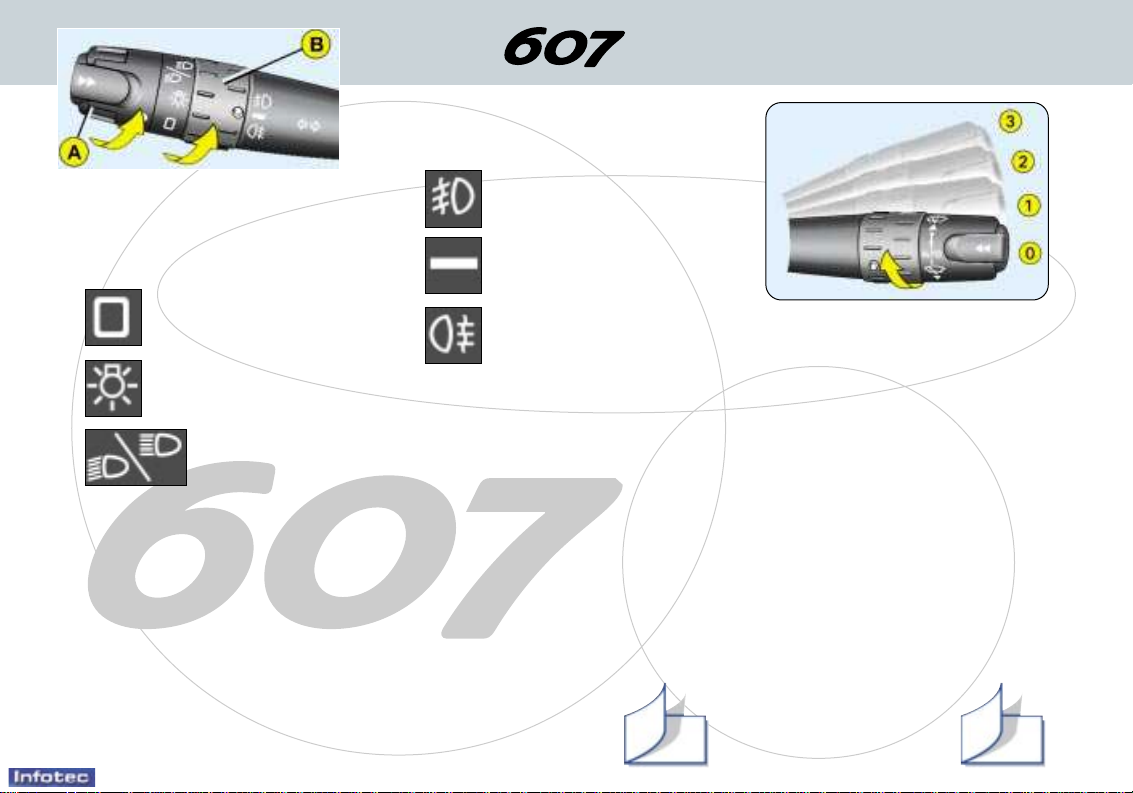
STEERING WHEEL
STALKS
LIGHTS
Front and rear lights (ring A)
Lights off.
Side lights.
Dipped / main
beam headlamps.
Front and rear fog lamps
(ring B)
Front fog lamps.
Neutral position of the
ring.
Rear fog lamps.
Parking lights
To switch on the parking lights on
the traffic side, with the engine
off, place the direction indicator
lights stalk on the traffic side.
Automatic switching on of lights
This occurs if the light is poor, as well as in cases of continuous operation
of the windscreen wipers, and stops as soon as the light has become
bright enough or the windscreen wipers have stopped.
☞ To activate or disarm the function, place the key in the accessories
position (1st notch), place the lights stalk in position 0 and press the
end of the stalk for more than two seconds.
Do not cover the sunshine / brightness sensor located in
the centre of the fascia. It helps to regulate the air conditioning, the automatic switching on of the lights and the
automatic adjustment of the instrument panel brightness.
Windsreen wipers
3 Rapid wipe
2 Normal wipe
1 Automatic wipe
0 Off
Automatic wipe
In position 1, the wipers operate
automatically and adjust their
speed to the intensity of the rainfall.
When the ignition has been
switched off for more than one
minute with the control in a wipe
position, it is necessary to reactivate this function.
To do this, move the control to
any position, then return to the
required position.
117 119

10-02-2003
YOUR AT A GLANCE
8
THE SEATS
Manual front seats
1 - Forwards-backwards adjustment.
2 - Seat angle adjustment*.
3 - Seat height adjustment*.
4 - Seat back angle adjustment.
5 - Lumbar adjustment*.
6 - Head restraint height and tilt adjust-
ment (press the tab to slide it down).
* Driver's seat only.
Electric front seats
A - Forwards-backwards adjust-
ment.
B - Seat angle adjustment.
C - Seat height adjustment
D - Seat back angle adjustment.
E - Lumbar adjustment.
F - Head restraint height adjust-
ment.
M - Memorises settings.
☞ Switch on the ignition and
adjust the seat and the mirrors.
☞ Press button 'M' then within
4 seconds either button '1' for
the first position, or button '2'
for the second
position.
1 - Recalls the first
position.
2 - Recalls the
second position.
100
99
10-02-2003
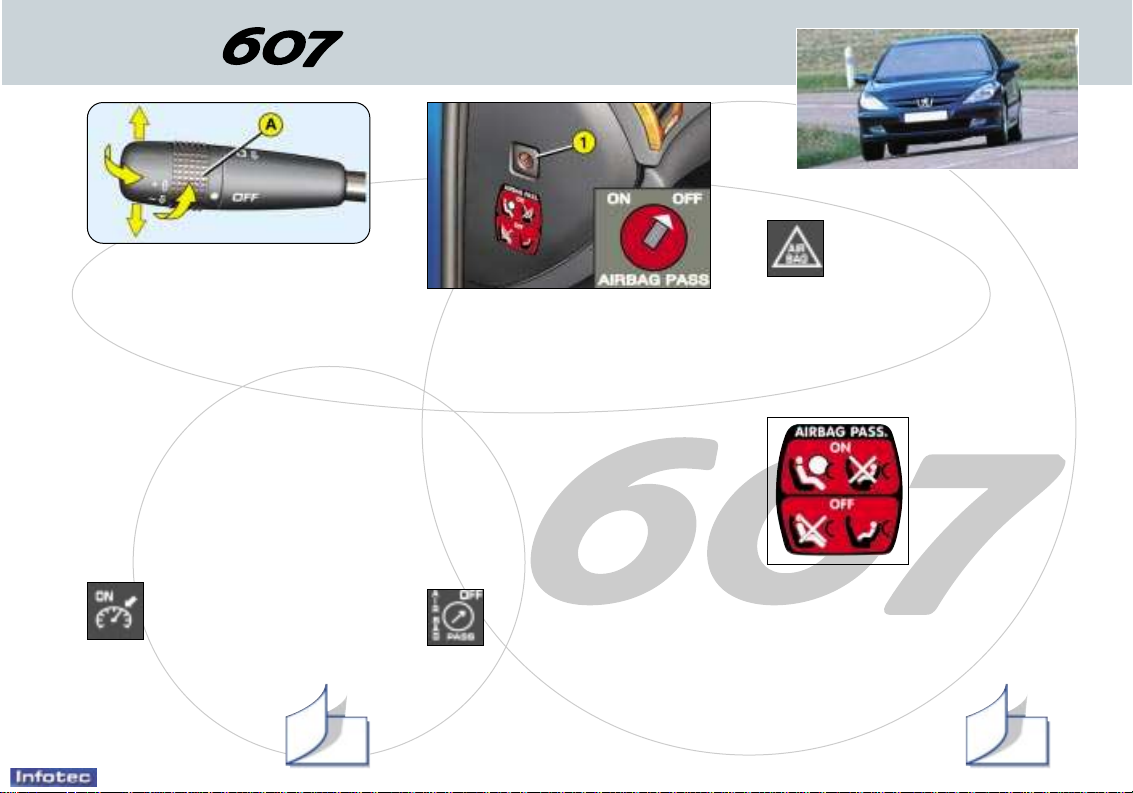
CRUISE CONTROL
Cruise control enables the vehicle
to maintain a steady speed
programmed by the driver, without
the accelerator being pressed.
In order for it to be memorised, the
speed of the vehicle must be
greater than 25mph (40km/h) or
40mph (60km/h), depending on
engine, with at least 4th gear
engaged (2nd gear for the automatic gearbox).
Operation
☞ Place the ring of stalk
A in the ON position.
The indicator light
comes on, accompanied by an audible signal.
FRONT AIR BAGS
Disarming the passenger
air bag*
☞
with the ignition off, insert the
key into slot 1 and turn it:
– to the 'ON' position, the pas-
senger air bag is armed,
– to the 'OFF' position, the pas-
senger air bag is disarmed.
Operating check
When the passenger air
bag is disarmed, the
warning light comes on
when the ignition is
switched on (2nd notch),
accompanied by an audible signal and the message 'Passenger
air bag disarmed'.
Front air bag faulty
If this warning light
comes on, accompanied
by an audible signal and
the message 'Air bag
faulty', contact a
PEUGEOT dealer to have the
system checked.
Passenger air bag
precautions
☞
Disarm the
air bag if
you install
a rear-facing child
seat.
☞
Arm the air
bag for an
adult passenger.
Never place your feet or any
object on the fascia.
* According to country
YOUR AT A GLANCE
11
136 138
10-02-2003
YOUR AT A GLANCE
7
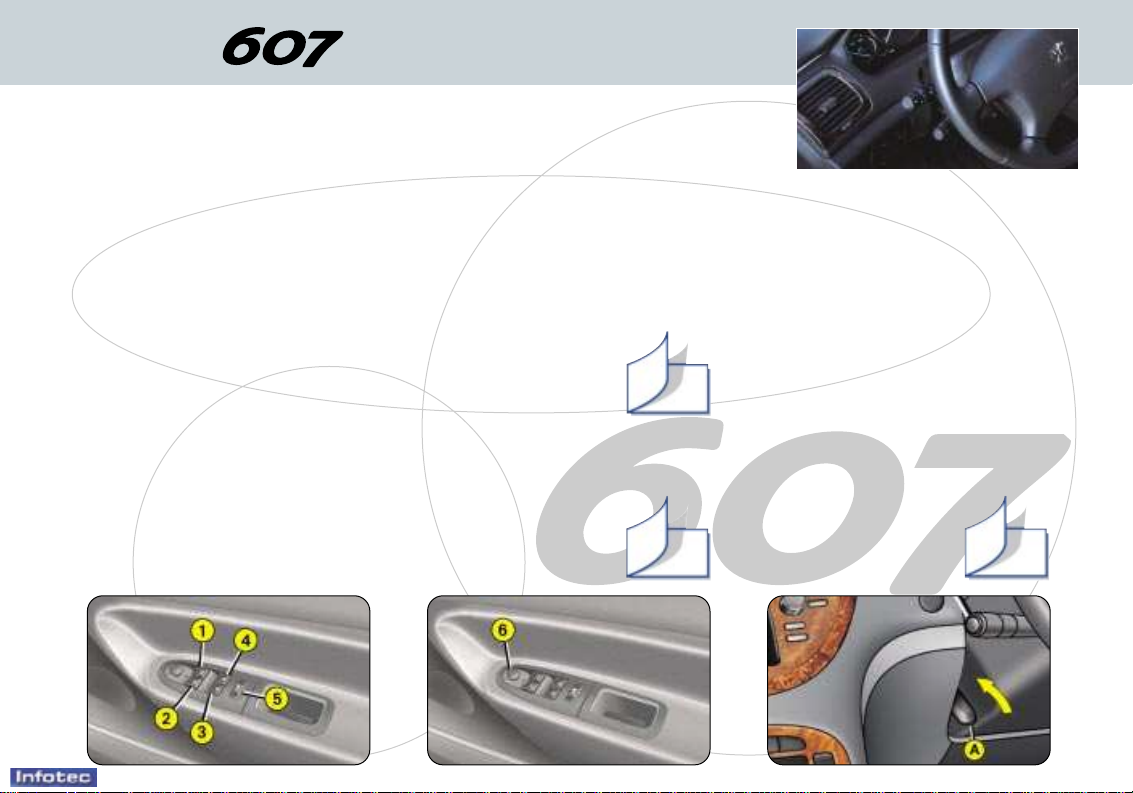
ELECTRIC WINDOWS
1 - Driver's electric window.
2 - Passenger's electric window.
3 - Rear left electric window.
4 - Rear right electric window.
5 - Disarming the rear window controls.
Manual mode:
☞ Press or pull the switch lightly. The window stops as soon as the switch
is released.
Automatic mode:
☞ Press or pull the switch firmly.
One touch completely opens or closes the window.
Safety auto-reverse: when the glass rises and meets an
obstacle, it stops and lowers again.
ELECTRIC REAR VIEW MIRRORS
☞ Turn knob 6 to the right or to the left to select the corresponding mirror.
☞ Move the knob in all four directions to adjust.
When parked, the mirrors can be folded back manually,
electrically by means of button 6 or automatically on locking
the vehicle.
STEERING WHEEL
HEIGHT AND DEPTH
ADJUSTMENT
☞ Pull handle A downwards to
unlock the steering wheel.
☞ Adjust the height and depth of
the steering wheel.
☞ Lock by pushing handle A fully
upwards.
124
125 127
10-02-2003
14
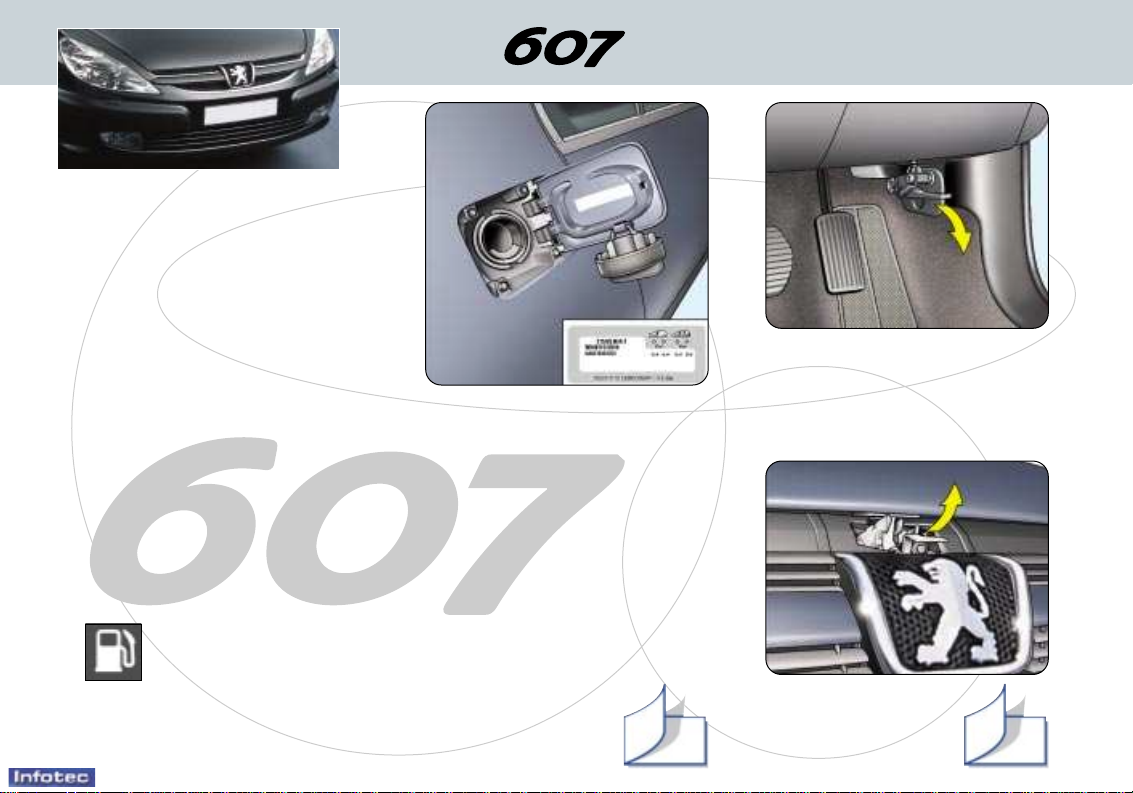
FUEL FILLER FLAP
Opening / Closing:
Locking and unlocking of the fuel filler
flap, the doors and boot is simultaneous (except when selective unlocking
is initialised; in this case press the
unlocking button of the remote control
once).
FILLING WITH FUEL
This must be carried out with the engine and the ignition switched
off.
A hook is provided inside the fuel filler flap to hold the filler cap.
A label affixed to the inside of the fuel filler flap informs you which fuels
are authorised or prohibited.
The tank capacity is approximately 80 litres.
When the minimum level of the tank is reached, this light comes
on, accompanied by an audible signal and the message 'Fuel
level low' on the multi-function display.
You have enough fuel to drive approximately
30 miles (50 km).
OPENING THE BONNET
From inside:
☞ pull the handle downwards.
From outside:
☞ lift the catch and
raise the bonnet.
YOUR AT A GLANCE
116 116

10-02-2003
YOUR AT A GLANCE
9
REAR PARKING
ASSISTANCE
This system, installed in the rear
bumper, detects any obstacle (person, vehicle, tree, gate, kerb...)
located behind the vehicle.
To activate
With the engine running, the system is activated as soon as
reverse gear is engaged; a bleep
sounds to inform you that it is
active.
The proximity information is
given by an audible signal, consisting of bleeps which become
more and more rapid as the vehicle approaches the obstacle.
When the distance between the
rear of the vehicle and the obstacle is less than approximately
twenty-five centimetres, the
signal becomes continuous.
☞ The system ceas-
es to be active
when you change
to neutral.
TYRE UNDER-INFLATION
DETECTION
Sensors check the tyre pressure
during driving, and trigger a warning if there is a malfunction (speed
greater than 15 mph (25 km/h).
Tyre under-inflation
When this warning light
comes on, accompanied
by a bleep and the mes-
sage 'Tyre(s) pressure
low', have the tyre pressure
checked as soon as possible.
Puncture
Display of this warning
light, accompanied by an
audible signal and the
message 'Punctured
tyre(s) detected', is followed by illumination of the
STOP warning light.
Stop immediately, avoiding all
abrupt manoeuvres with the
steering wheel and the brakes.
Change the damaged (punctured
or very under-inflated) wheel and
have the tyre pressure checked
as soon as possible.
Note: if the damaged wheel is
stored temporarily in the boot, it
will again send this message as a
reminder of the necessity of having it repaired. This will prevent a
similar warning being displayed.
Sensor(s) not detected
Display of this warning
light, accompanied by an
audible signal and the
message 'X tyre pres-
sure sensor(s) missing', indicates that one or more wheels
are not being detected.
Contact a PEUGEOT dealer to
replace the faulty sensor(s).
Warning: this message is displayed when one of the wheels is
at a distance from the vehicle
(being repaired) or when a wheel
without a sensor is fitted (winter
fitting).
This system does not eliminate
the need to check the tyre
pressure regularly.
137 148
10-02-2003
YOUR AT A GLANCE
10
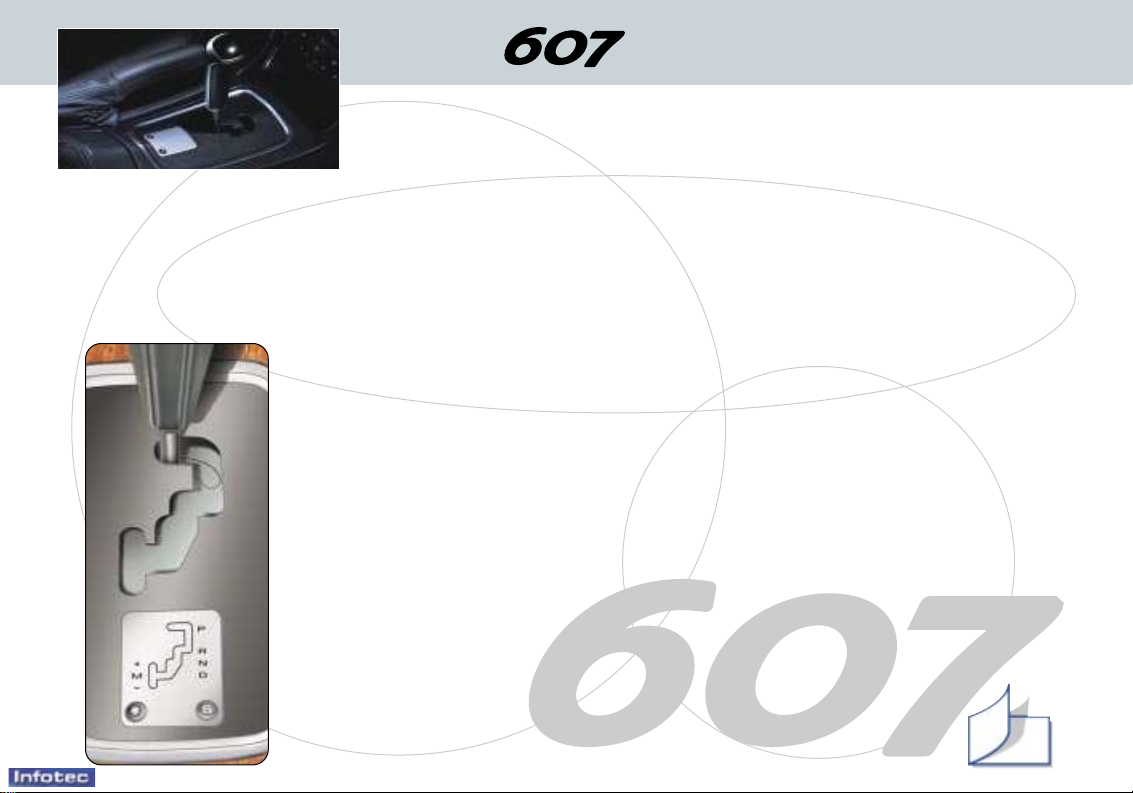
AUTOMATIC GEARBOX
'PORSCHE TIPTRONIC system'
The four speed automatic gearbox offers a choice between the comfort
of integral automatic operation, enhanced by a sport programme and
a snow programme, or the pleasure of manual gear changing.
Gear selection gate
☞ Move the lever in the gate to select one of the functions.
Once the function is selected, the indicator light for that function is displayed on the instrument panel screen.
S: sport programme.
$
: snow programme.
Park: to immobilise the vehicle and to start the
engine, with the handbrake on or owff.
Reverse: to engage reverse; select this function
with the vehicle stationary and the engine at idle.
Neutral: to start the engine and to park, with the
handbrake on.
Note: if position N is engaged by mistake while
the car is moving, allow the engine to return to
idling speed before engaging function D to accelerate.
Drive: for automatic gear changing.
Manual: for manual gear changing.
To change the four gears manually:
☞ Push the lever to the + symbol to change up to
the next gear and pull it towards the - symbol to
change down a gear.
Note: the S (sport) and $(snow) programmes do
not operate in manual mode.
Moving Off
With the engine running, to move
off from position P:
☞ it is essential to press the
brake pedal to exit position P ,
☞ select function R, D or M, then
gradually release the pressure
on the brake pedal; the vehicle will move off immediately.
You can also move off from position N:
☞ release the handbrake, with
your foot on the brake,
☞ select function R, D or M, then
gradually release the pressure
on the brake pedal; the vehicle will move off immediately.
WARNING
When the engine is idling with
the brakes not applied, if function
R, D or M is selected, the vehicle
moves without the accelerator
being pressed.
For this reason, do not leave
children unsupervised inside
the vehicle, with the engine
running.
When maintenance operations
have to be carried out with the
engine running, apply the handbrake and select position P.
131

10-02-2003
No. Symbol Function
1 Air conditioning
on/off.
2 Front visibility
programme.
3 Air intake
control.
4 Rear screen
demisting.
5
Switching
off.
6 Passenger
setting
7 Passenger comfort
programme.
8 Passenger
air distribution
setting.
9 Air flow
adjustment.
10 Driver
air distribution
setting.
11 Driver comfort
programme.
12 Driver
setting.
12
YOUR AT A GLANCE
AUTOMA TIC AIR CONDITIONING
Do not cover the sunshine / brightness sensor located in the
centre of the fascia.
It helps to regulate the air conditioning, automatic
switching on of the lights and the automatic adjustment of the instrument panel brightness.
96
13
YOUR AT A GLANCE
10-02-2003
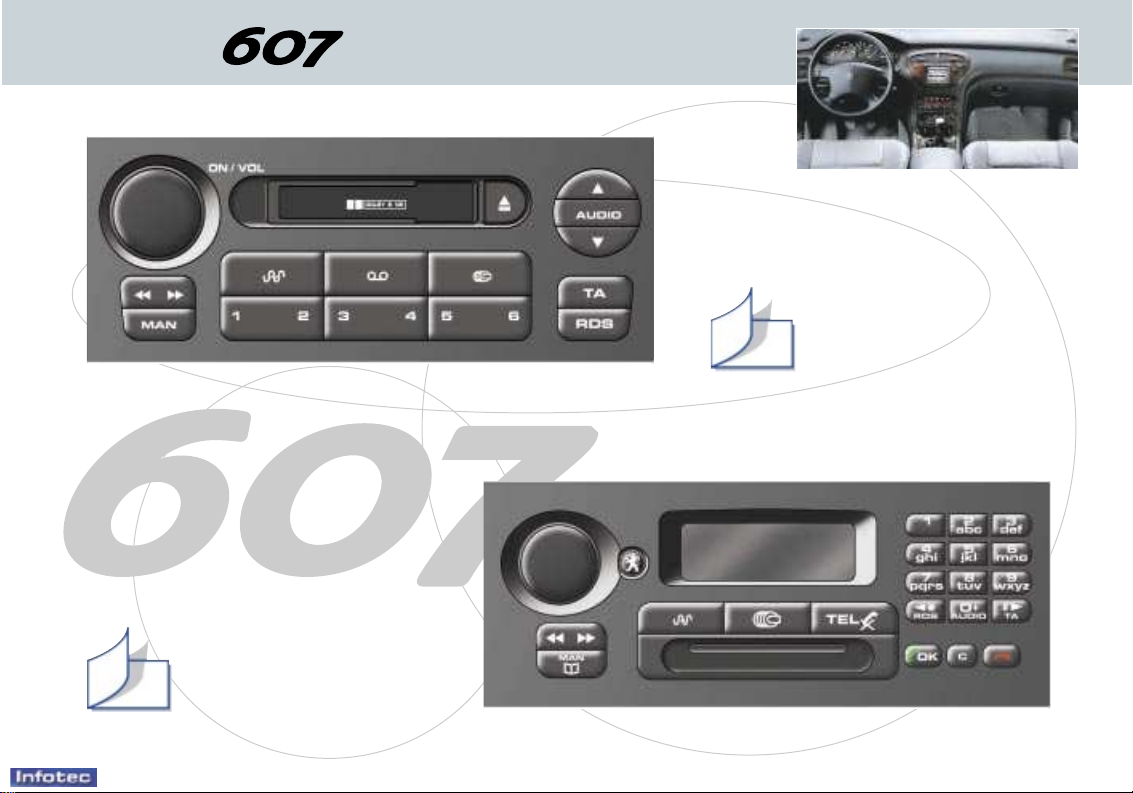
RM2 AUDIO SYSTEM
RT2 AUDIO/TELEPHONE SYSTEM
48
50
10-02-2003
PEUGEOT SERVICING
Your vehicle benefits from extended service intervals.
• For petrol engines: every 20,000 miles (30 000 km) or every two years.
• For direct injection diesel engines: every 12,000 miles (20 000 km) or every two years.
The extension of the service intervals means that the engine oil level must be checked regularly: topping up of the
oil between oil changes is normal.
It is for this reason that the PEUGEOT network invites you to an intermediate visit between regular services.
The date of this service is not shown by the service indicator. It is to be carried out at least every 10,000 miles
(15 000 km) for petrol engines and every 6,000 miles (10 000 km) for direct injection diesel engines. A Peugeot
dealer will carry out a quick check, and will top up the levels if necessary (oil, coolant, screenwash up to 2 litres).
If the oil level is too low there is a risk of serious damage to the engine: check the engine oil level at least every
2,000 miles (3 000 km) or 3,000 miles (5 000 km), depending on the conditions of use.
The extended service intervals have been made possible by technical modifications to the vehicles and lubricants:
THUS IT IS ESSENTIALTO ONLY USE ENGINE LUBRICANTS WHICH ARE APPROVED AND RECOMMENDED BYTHE
MANUFACTURER
PEUGEOT SERVICING
18
10-02-2003
PEUGEOT SERVICING
20
5 seconds after the ignition is switched on, the total distance recorder
resumes normal operation and the
display shows the total or trip distances.
The distance remaining before the
next service is less than 1,000 km.
Example: 900 km remain before the
next service is due.
When switching on the ignition and
for 5 seconds, the display shows:
5 seconds after the ignition is switched on, the total distance recorder
resumes normal operation and the
symbol remains lit.
This indicates that a service should
be carried out shortly. The display
shows the total or trip distances.
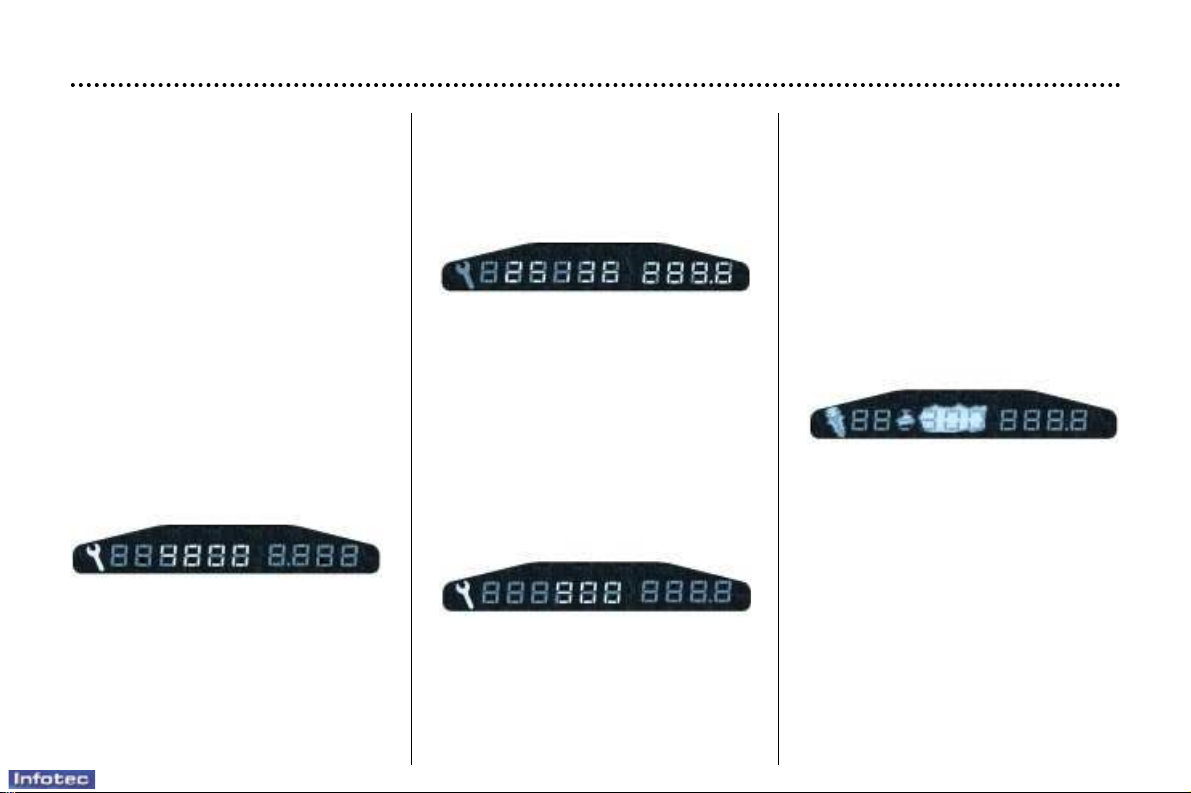
SERVICE INDICATOR
This is a visual reminder of when the
next service is due. This service is to
be carried out according to the
manufacturer's servicing schedule.
Operation
As soon as the ignition is switched
on and for 5 seconds, the spanner
symbolising ''service operation'' is lit.
The trip recorder display shows the
distance remaining (in round figures)
before the next service.
Example: 4,800 km remain before
the next service is due. When the
ignition comes on and for 5 seconds
the display indicates:
The service is overdue.
Each time the ignition is switched on
and for 5 seconds, the symbol and
the excess distance flash..
Example: the service is overdue by
300 km. The service should be carried out very shortly.
When the ignition is switched on and
for 5 seconds, the display shows:
5 seconds after the ignition is switched on, the total distance recorder
resumes normal operation and the
symbol remains lit. The display
shows the total or trip distances.

10-02-2003
PEUGEOT SERVICING
21
Zero re-set
Your PEUGEOT dealer carries out
this operation after each service.
However, if you carry out the service
yourself, the re-set procedure is as
follows:
☞ Switch off the ignition,
☞ Press and hold the trip recorder
re-set button,
☞ Switch on the ignition.
The display begins a countdown.
When the display shows 0, release
the button; the service symbol disappears.
Important: after this operation, if you
wish to disconnect the battery, lock
the vehicle and wait for at least five
minutes, otherwise the zero re-set
will not be registered.
MAINTENANCE OF PARTS SUBJECT TO WEAR AND A CHECK OF CONSUMABLES
Some of your vehicle's vital components have specific servicing schedules.
• The brake fluid is to be replaced every 36,000/40,000 miles (60,000 km) or
every two years maximum;
• The passenger compartment filter must be checked at each service by a
PEUGEOT dealer (services and intermediate visits) or more often, depending
on the environment (dust, pollution, etc.);
• For HDI turbo diesel engines with particulate emission filter, maintenance
of the filter and topping up of the additive reservoir must be carried out every
72,000 miles (120,000 km) maximum by a PEUGEOT dealer;
• Replacement of the timing belt : contact a PEUGEOT dealer.
• Air bags and pretensioning parts on seat belts must be checked every
10 years.
• Tyre pressure sensors are to be replaced every 10 years.
• The check on tyre inflation presure must be carried out cold at least once a
month.
Note: the engine coolant does not need to be changed.

10-02-2003
PEUGEOT SERVICING
22
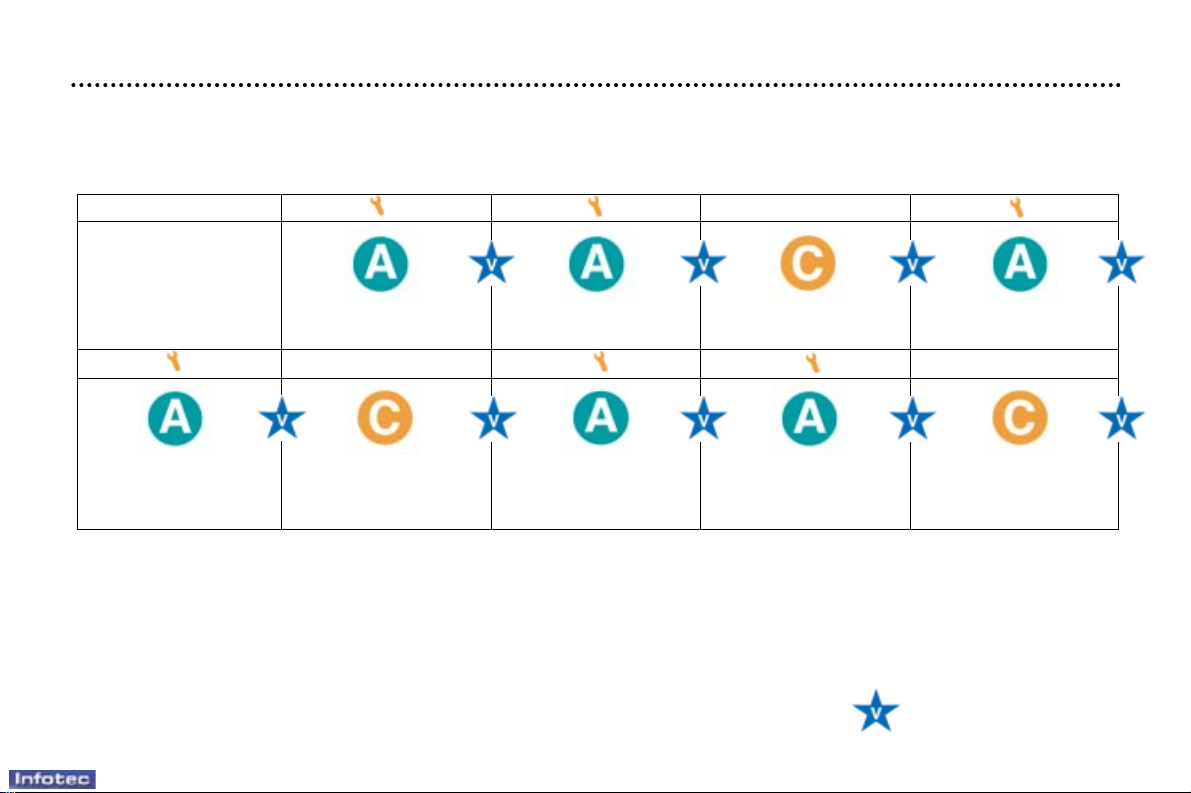
THE SERVICE LEVELS
Each vehicle has its own servicing cycle, defined by the manufacturer in terms of its technical specification.
This cycle consists of alternating 2 types of service A and C, intermediate visits and a few additional operations specific to
your vehicle; these correspond to key stages in the life of your 607.
At your first and each subsequent service, your dealer will advise you of the type and content of the next service
due.
Intermediate top-up
visit.
MAINTENANCE CYCLE FOR YOUR PETROL ENGINE 607
2 litre 16 V and 2.2 litre 16V petrol engines : service every 2 years or 20,000 miles (30 000 km) maximum (unless the
service indicator shows it is required before this)
1st service at 6,000 miles
(10 000 km) or 6 months*.
This is necessary in order to
benefit from the warranty.
MILES (KM) 40,000 (60 000) 80,000 (120 000) 120,000 (180 000)
24V V6 petrol injection engine: service every 2 years or 20,000 miles (30 000 km) maximum (unless the service
indicator shows it is required before this)
1st service at 6,000 miles
(10 000 km) or 6 months*.
This is necessary in order to
benefit from the warranty.
MILES (KM) 40,000 (60 000) 80,000 (120 000) 120,000 (180 000)
Automatic gearbox oil level every 40,000 miles (60 000 km).
Replacement of brake fluid every 2 years or 40,000 miles (60 000 km).
These fixed operations are carried out with synthetically based oil. Fuel economy oil
or synthetic oil may also be used (except for the 2.2 litre 16 V petrol engine).
+ replacement of air filter
+ replacement of
fuel filter
+ replacement of air filter
+ replacement of
fuel filter
* Whichever comes first.
10-02-2003
PEUGEOT SERVICING
23
Intermediate top-up
visit.
MAINTENANCE CYCLE FOR YOUR 607 TURBO DIESEL HDI
Turbo diesel HDI: service every 2 years or 12,000 miles (20 000 km) maximum (unless the service indicator shows it is
required before this).
1st service
at 6,000 miles (10 000 km)
or 6 months*.
This is necessary in
order to benefit from
the warranty.
MILES (KM) 36,000 (60 000)
72,000 (120 000) 108,000 (180 000)
+ maintenance of
particulate emission filter
Automatic gearbox oil every 36,000 miles (60 000 km).
Replacement of brake fluid every 2 years or 36,000 miles (60 000 km).
These fixed operations are carried out:
– with synthetically based oil, Fuel Economy oil or synthetic oil;
– with 5W 40 oil for Turbo Diesel HDI engines fitted with a particulate emission filter.
* Whichever comes first.

10-02-2003
ARDUOUS CONDITIONS OF USE
• Continuous door-to-door use.
• Town use (e.g. taxi).
• Repeated short journeys, with the engine cold at low temperatures.
• Aprolonged stay under the following conditions:
– countries with temperatures often above +30 °C,
– countries with temperatures often below –15 °C,
– countries with a dusty atmosphere,
– countries whose lubricants or fuels do not conform to our recommendations.
PEUGEOT SERVICING
24
10-02-2003
PEUGEOT SERVICING
25
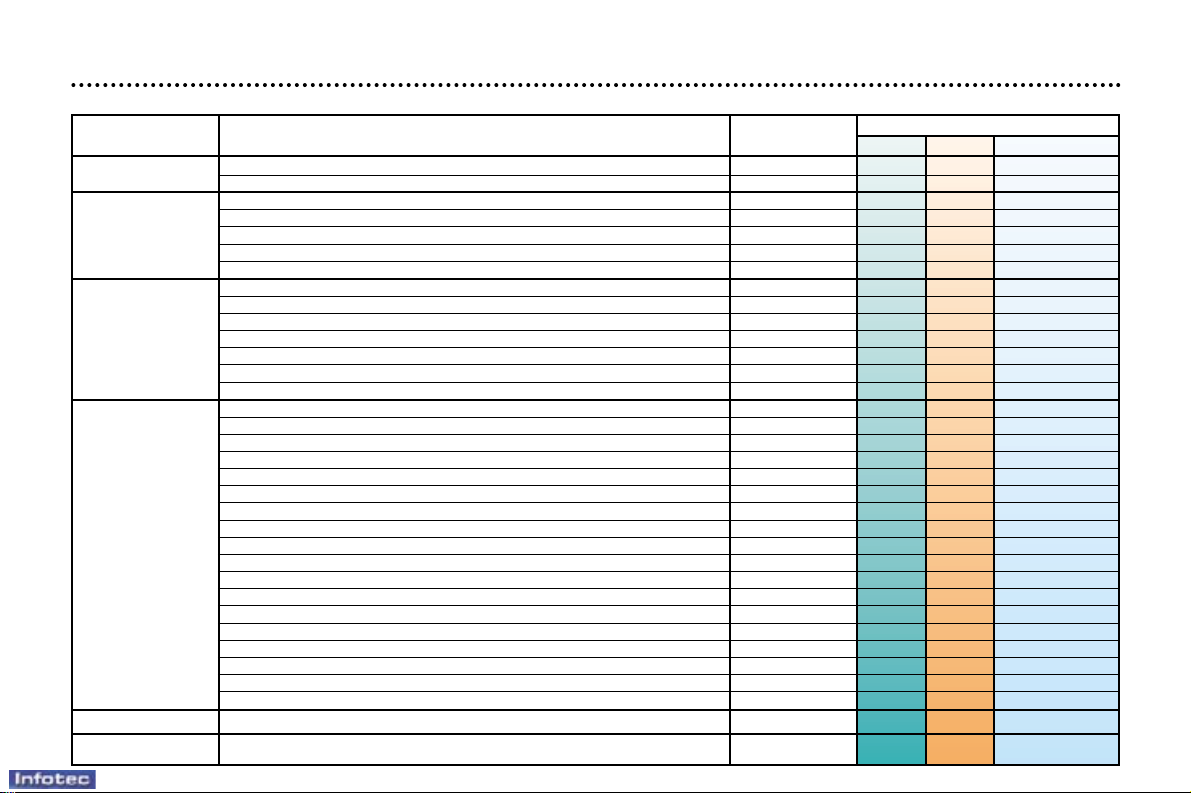
∀ All driving conditions. o Arduous conditions. * According to destination.
A AND C SERVICE LEVELS AND THE INTERMEDIATE VISIT
Level
Operations Description of operation 1st service
A C Intermediate
DRAIN/REFILL
- Engine oil
∀∀
- Bleed fuel filter (diesel)
∀∀∀
- Oil filter
∀∀
- Fuel filter* (petrol)
∀
REPLACE
- Fuel filter element (diesel)
∀
- Air filter element
∀
- Spark plugs (petrol)
∀
- Engine oil (check + top-up)
∀∀
- Manual gearbox oil (check + top-up)
∀∀
- Battery (check + top-up) if cap is removable
∀∀
LEVEL
- Screen wash front/rear (check + top-up)
∀∀∀∀
- Coolant (check + top-up)
∀∀∀∀
- Brake fluid (check + top-up)
∀∀∀
- Power steering fluid (check + top up according to specification)
∀∀∀
- Operation of lights and indicators
∀∀∀
- Condition of glass, headlamp and light lenses and mirrors
∀∀
- Horn
∀∀
- Windscreen washer jets
∀∀
- Condition of wiper blades
∀∀
- Condition and tension of the ancillary drive belts
∀∀
- Handbrake
∀∀
- Condition of hydraulic circuits (hoses and covers)
∀∀
CHECK
- Condition of rubber boots and gaiters
∀∀∀
- Brake pads
∀∀ #
- Play in hubs, link rods, ball joints, flexible mountings
∀
- Shock absorbers
∀
- Rear drum brake lining wear
∀
- Condition and pressure of tyres (including spare wheel)
∀∀∀
- Emission control check as per current legislation (petrol)
∀∀∀
- Smoke opacity (diesel)
∀∀
- Passenger compartment filter (according to specification)
∀∀ #
- Visual check of the whole vehicle
∀∀
SERVICE*
Courtesy vehicle
∀
ROAD TEST
∀∀
10-02-2003
DIESELDIESELPETROL PETROL
26
(1) Minimum quality standard: Petrol engines ACEAA3 and API SH/SJ; Diesel engines ACEAB3 and API CF/CD
ACEA = Association des Constructeurs Européens Automobiles (Association of European Automobile Manufacturers).
API = American Petroleum Institute
If oil is used which does not conform to the ACEAA3-B3 standards, this requires the "Arduous Conditions" servicing
schedule to be followed, which involves shorter intervals between services.
Use only 5W40 synthetic oil for the HDI Turbo Diesel engines with particulate emissions filter.
Fuel economy oil cannot be used for the 2.2 litre 16V petrol engine.
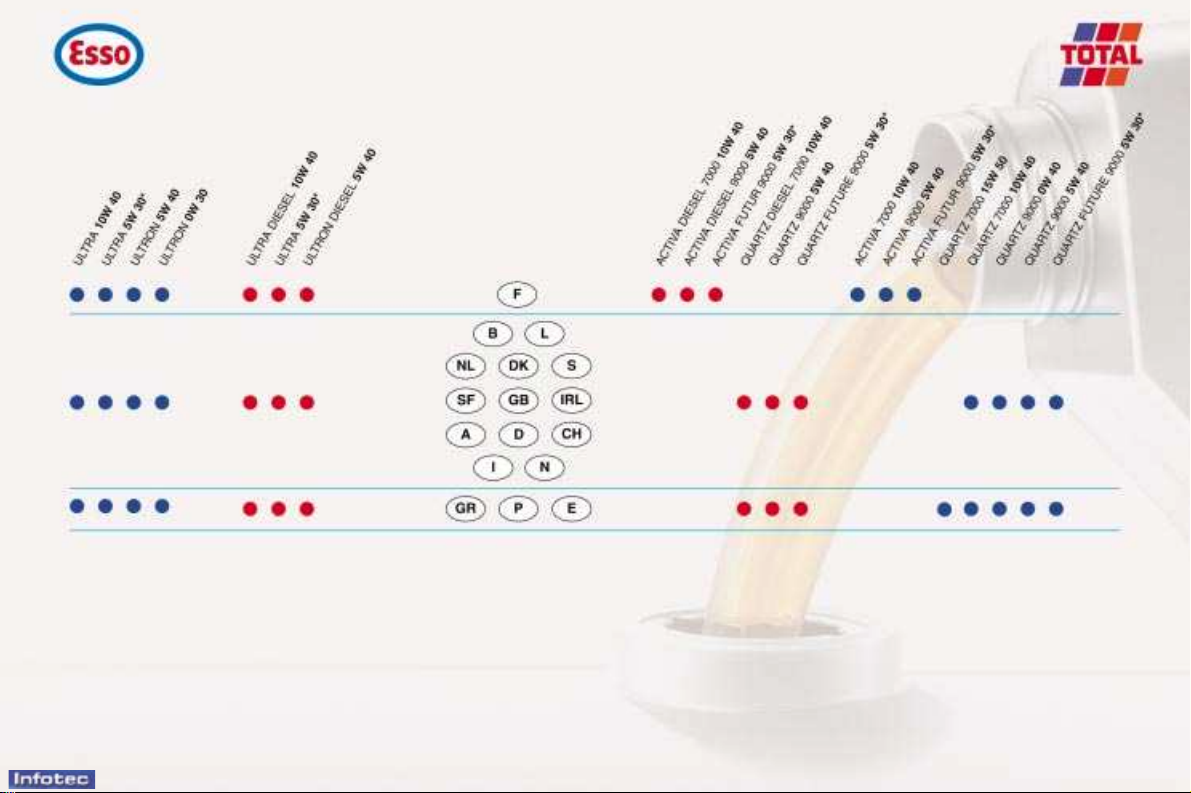
TRADE NAMES OF RECOMMENDED LUBRICANTS IN EUROPE
(1)
10-02-2003
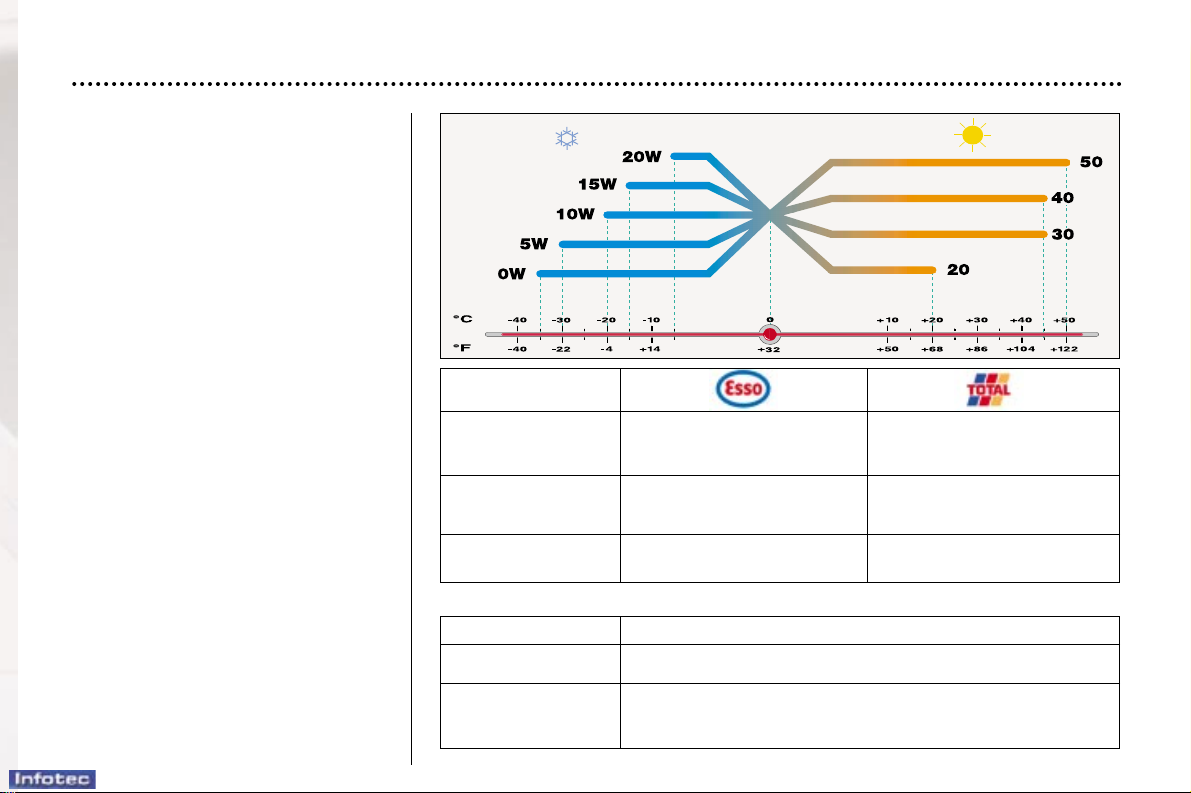
27
Recommendations for
approved lubricants
The oils which appear in the table
opposite are suitable for most purposes.
The diagram opposite states the
optimum range of viscosity depending on the temperatures at which the
oils are to be used.
It is also possible to use synthetic
oils of `superior quality'.
In the absence of semi-synthetic or
synthetic oils, oils of API SH/SJ quality (for petrol engines), or CD/CF
quality (for diesel engines) may be
used by following the 'Arduous Conditions' servicing schedule, which
specifies shorter service intervals.
Do not hesitate to ask for advice
from a Peugeot dealer to maintain
driving pleasure and to minimise the
maintenance cost of your vehicle.
For countries outside Europe, please
contact a local PEUGEOT dealer.
ONLY ONLY
Manual Gearbox ESSO GEAR OIL BV
TOT ALTRANSMISSION BV
75W 80 PR 9736.41 75W 80
ONLY
Automatic Gearbox ATF 4HP20-AL4
PR 9736.22
Power steering ESSO ATF D TOT ALFLUIDE AT42
PR 9730.94
Power steering FLUIDE DA PR 9730.A1*
Brake circuit PEUGEOT DOT4
Cooling circuit PROCOR TM108/GLYSANTIN G33 or REVKOGEL 2000
ONLY Protection to minus 35 degrees Celsius
* Only for extremely cold countries.
Other recommended products
PEUGEOT SERVICING
10-02-2003
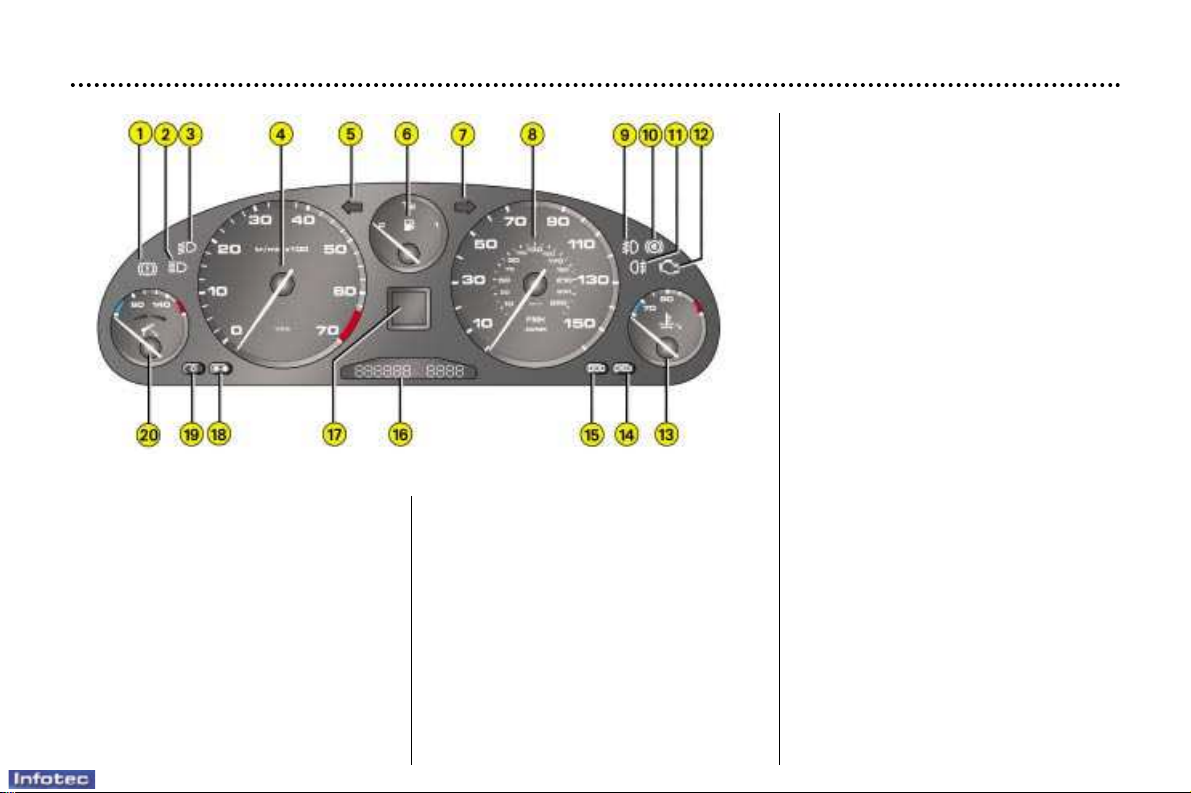
INSTRUMENTS AND CONTROLS
28
1 - Handbrake indicator light.
2 - Main beam headlamps indicator
light.
3 - Dipped beam headlamps
indicator light.
4 - Rev counter.
5 - Left-hand direction indicator.
6 - Fuel gauge.
7 - Right-hand direction indicator.
8 - Speedometer.
9 -Front fog lamps indicator light.
10 -ABS anti-lock braking system
warning light.
11 - Rear fog lamps indicator light.
12 -Engine diagnostics warning
light.
13 -Coolant temperature indicator.
14 -CHECK button.
15 -Trip recorder zero re-set.
16 -Service indicator and total
distance recorder.
17 -Warning/status screen.
18 -Illumination button +.
19 -Illumination button -.
20 -Engine oil level indicator.
-Engine oil temperature
indicator.
INSTRUMENT PANEL DIALS: PETROL

10-02-2003
INSTRUMENTS AND CONTROLS
29
1 - Handbrake indicator light.
2 - Main beam headlamps
indicator light.
3 - Dipped beam headlamps
indicator light.
4 - Rev counter.
5 - Left-hand direction indicator.
6 - Fuel gauge.
7 - Right-hand direction indicator.
8 - Speedometer.
9 -Front fog lamps indicator light.
10 -ABS anti-lock braking system
warning light.
11 - Rear fog lamps indicator light.
12 -Engine diagnostics warning
light.
13 -Coolant temperature indicator.
14 -CHECK button.
15 -Trip recorder zero re-set.
16 -Service indicator and total
distance recorder.
17 -Warning/status screen.
18 -Illumination button +.
19 -Illumination button -.
20 -Engine oil level indicator.
-Engine oil temperature
indicator.
INSTRUMENT PANEL DIALS: DIESEL
10-02-2003
INSTRUMENTS AND CONTROLS
30
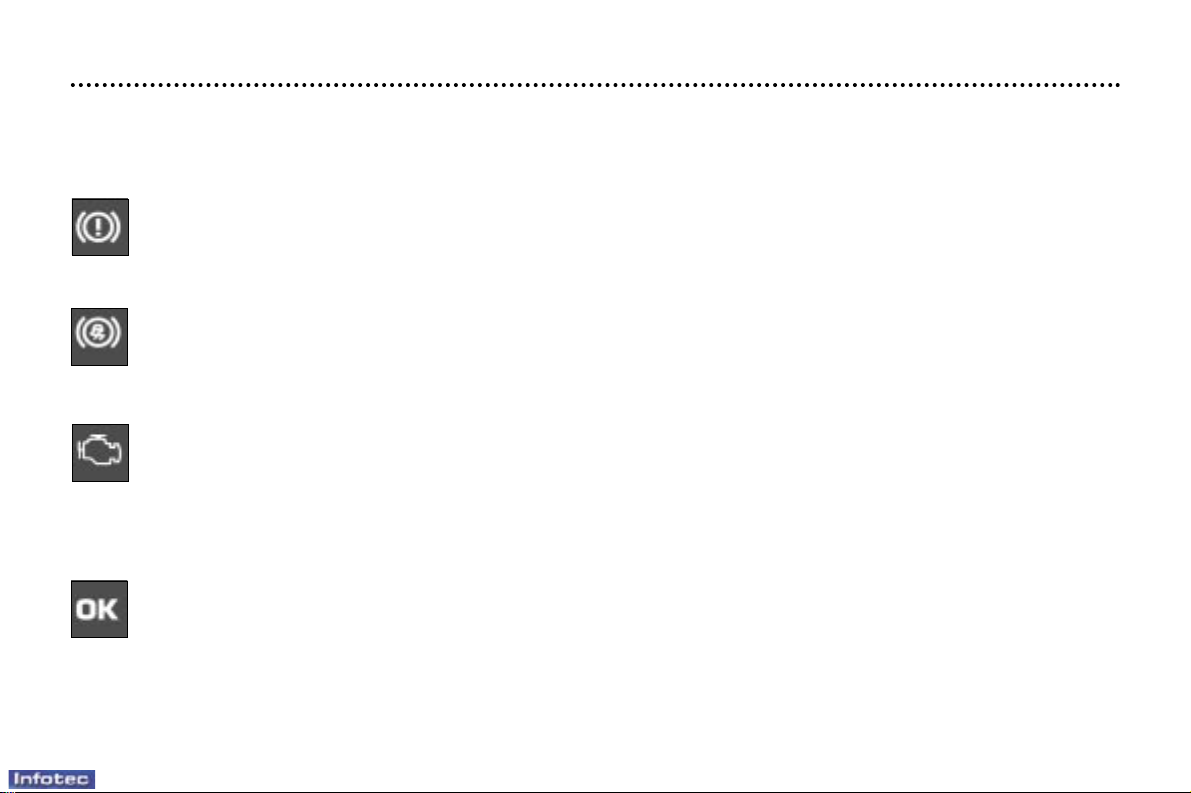
INDICATOR LIGHTS
With the key in the accessories position (1st notch): the battery charge warning light illuminates on the instrument panel display .
With the ignition on (2nd notch): the following three warning lights illuminate on the sides of the instrument panel:
Brake fluid level and brake force distribution fault warning light.
This light should go out after 3 seconds.
If the warning light remains on, or if it comes on when the engine is running and the vehicle is moving, it indicates
an excessive drop in the brake fluid level or a malfunction of the brake force distribution.
Stop immediately. Contact a PEUGEOT dealer.
Anti-lock braking system (ABS) warning light
This should go out after 3 seconds.
If the warning light remains on or comes on above 8 mph (12 km/h), this indicates a malfunction of the ABS.
However, the vehicle retains conventional servo-assisted braking.
Contact a PEUGEOT dealer.
Engine diagnostics warning light
This should go out 3 seconds after the engine starts.
If it flashes with the engine running, this indicates a malfunction in the injection or the ignition system. There is a risk
of damage to the catalytic converter (petrol engine only).
If it is on continuously, this indicates a fault in the emission control system.
Contact a PEUGEOT dealer as soon as possible.
At the same time, on the instrument panel display:
If no malfunction has been detected: the OK light comes on after two seconds (following a black screen), in the
absence of indicator lights showing the status of vehicle functions. If these indicator lights are present, the OK but-
ton will come on after these. You may start your vehicle.
If a 'minor' malfunction has been detected: the warning light for the faulty function comes on. Certain indicator
lights showing the status of vehicle functions may also come on, followed by the OK indicator light. You can start
your vehicle; however, contact a PEUGEOT dealer as soon as possible.
If a 'major' malfunction has been detected: the corresponding warning light comes on. Certain indicator lights showing
the status of vehicle functions may also come on. The OK indicator light does not come on. Do not start your vehicle.
Contact a PEUGEOT dealer.
Afterwards, if the passenger air bag is disarmed, the corresponding indicator light will come on.
10-02-2003
INSTRUMENTS AND CONTROLS
31
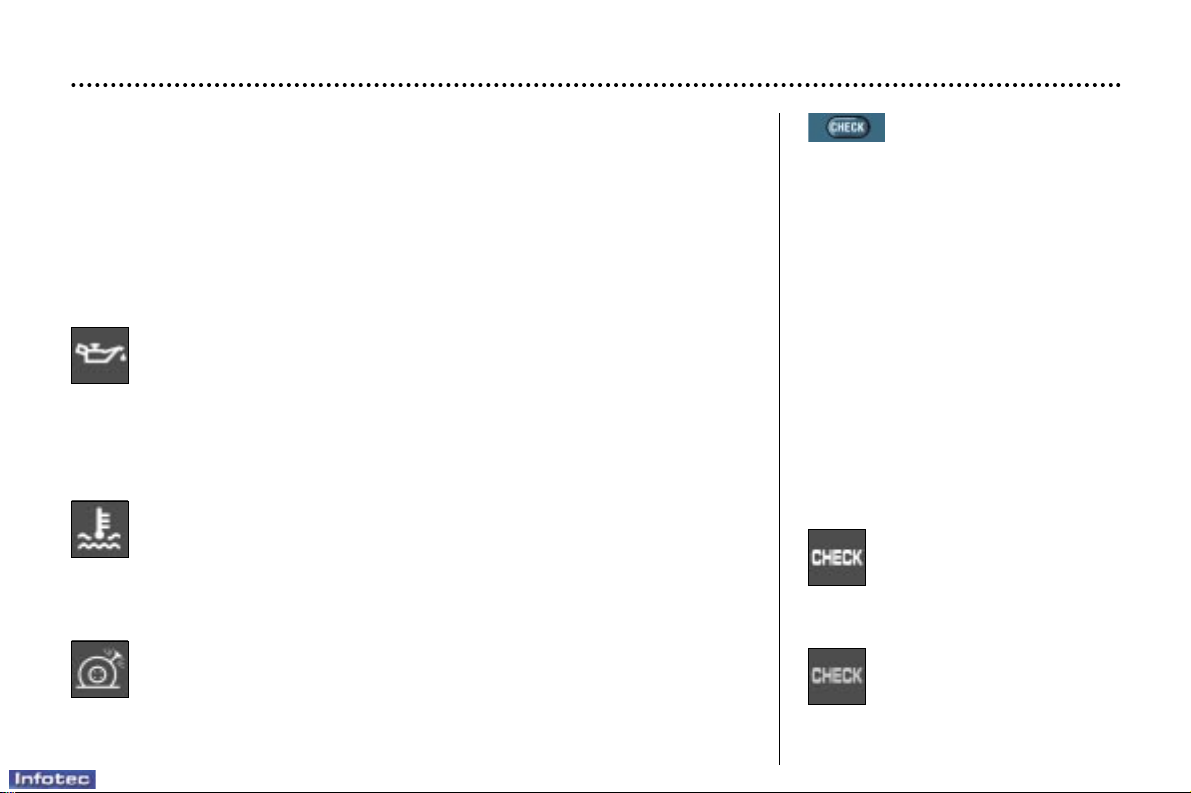
Coolant temperature warning light
This symbol is accompanied by an audible signal and the message
'Engine temperature too high' on the multi-function display.
It is linked to the STOP warning light. Stop immediately.
Warning: wait for the engine to cool.
If necessary, top up the level.
With the engine running and the vehicle moving
The instrument panel display temporarily shows:
– lights indicating warnings, when these occur,
– vehicle function status indicator lights, when a change occurs.
Certain warning lights may be accompanied by an audible signal and a
message on the multi-function display.
List of warning symbols
MANUAL CHECK
(vehicle autotest)
☞ Press the "CHECK" button on the
instrument panel.
With the ignition key in the accessories position, with the ignition
switched on, with the engine running
or when the vehicle is moving, this
function informs you at all times of
the following:
– any current warnings,
– the status of functions which it is
possible to switch on or off (windscreen wipers, automatic switching on of lights, cruise control, disarming of passenger air bag, etc.).
The corresponding warning lights
are displayed in succession on the
instrument panel screen.
If a warning or a change of status
occurs during the CHECK mode, the
corresponding indicator lights will be
displayed at the end of this mode.
CHECK mode entry indicator light (vehicle
autotest)
This comes on when you
press the 'CHECK' button.
CHECK mode exit indicator light (vehicle autotest)
This comes on at the end of
the CHECK mode.
Engine oil pressure warning light
This symbol is accompanied by an audible signal and the message
'Insufficient engine oil pressure' or 'Engine oil level low' on the
multi-function display.
It is linked to the STOP warning light.
Stop immediately if this comes on when the engine is running.
If there is a lack of oil in the lubrication circuit, top up the level.
Contact a PEUGEOT dealer as soon as possible.
Puncture warning light
This symbol comes on accompanied by an audible signal and the mes-
sage 'Punctured tyre(s) detected' on the multi-function display.
It is linked to the STOP warning light. Stop immediately.
Change the damaged wheel.
Have it repaired by a PEUGEOT dealer.
10-02-2003
INSTRUMENTS AND CONTROLS
32
STOP warning light
This comes on after the engine oil pressure, coolant temperature or puncture warning lights, to which it is linked.
Stop immediately. Contact a PEUGEOT dealer.
Brake fluid level and brake force distribution fault warning light
This is linked to the light on the instrument panel.
Display of this warning light accompaned by an audible signal and the message 'Brake fluid low' indicates an
excessive drop in the brake fluid level.
Display of this warning light, accompanied by an audible signal and the message 'Braking system faulty' on the multi-func-
tion display indicates a malfunction of the brake force distribution system.
Stop immediately in both cases. Contact a PEUGEOT dealer.
Dynamic stability control (ESP/ASR) warning light
Display of this warning light, accompanied by an audible signal and the message 'ESP/ASR system faulty' on the
multi-function display indicates a system malfunction.
Contact a PEUGEOT dealer.
Handbrake warning light
Display of this warning light, accompanied by an audible signal (vehicle moving) and the message 'Handbrake on'
on the multi-function display, indicates that the handbrake is applied or has not been released correctly.
Battery charge warning light
This comes on each time the ignition key is in the accessories position (1st notch).
Display of this warning light when the engine is running is accompanied by an audible signal and the message 'Bat-
tery charge fault' on the multi-function display.
This can indicate:
– faulty operation of the charging circuit,
– loose battery or starter terminals,
– a cut or slack alternator belt,
– an alternator fault.
Contact a PEUGEOT dealer.
10-02-2003
INSTRUMENTS AND CONTROLS
33
Tyre under-inflation warning light
Display of this warning light is acompanied by an audible signal and the message 'Tyre(s) pressure low' on the
multi-function display.
Have the tyre pressure checked as soon as possible.
Low coolant level warning light (except 2 litre 16V and 2.2 litre 16V petrol engines)
Display of this warning light is accompanied by an audible signal and the message 'Cooling circuit level low' on
the multi-function display.
Stop immediately.
Warning: wait for the engine to cool before topping up.
The cooling system is pressurised.
In the event of breakdown and to prevent the risk of scalding, unscrew the cap by two turns to allow the pressure to drop.
When the pressure has dropped, remove the cap and top up the level.
Contact a PEUGEOT dealer.
Seat belt not fastened warning light
Display of this warning light is accompanied by an audible signal and the message 'Seat belt not fastened' on the
multi-function display.
With the engine running, the warning light comes on when the driver's seat belt is unfastened.
Electronic immobiliser warning light
Display of this warning light is accompanied by an audible signal and the message 'Electronic theft protection
faulty' on the multi-function display.
It indicates a malfunction of the electronic immobiliser system.
Contact a PEUGEOT dealer.
10-02-2003
INSTRUMENTS AND CONTROLS
34
Water in diesel filter warning light (according to country)
Display of this warning light is accompanied by an audible signal and the message 'Water in diesel filter' on the
multi-function display.
There is a risk of damage to the injection system.
Contact a PEUGEOT dealer as soon as possible.
Front brake pad wear warning light
Display of this warning light is accompanied by an audible signal and the message 'Brake pads worn' on the multi-
function display.
For your safety, have the pads replaced by a PEUGEOT dealer as soon as the warning light comes on.
Low fuel level warning light
Display of this warning light is accompanied by an audible signal and the message 'Fuel level low' on the multi-
function display.
When the warning light comes on, you have enough fuel to drive approximately 30 miles (50 km). The tank capac-
ity is approximately 80 litres.
Fuel cap warning light
Display of this warning light is accompanied by an audible signal and the message 'Fuel cap open' on the multi-
function display.
It comes on if the fuel tank cap is not correctly screwed on or is missing.
Door/bonnet/boot open warning light
Display of this warning light with the engine running is accompanied by an audible signal and an illustration on the
multi-function display, showing which opening has not been correctly closed.
Air bag warning light
Display of this warning light is accompanied by an audible signal and the message 'Air bag faulty' on the multi-
function display.
Contact your PEUGEOT dealer.
 Loading...