

Peugeot 508 Rxh 2012 Owner's Manual


You can find your user guide on thePEUGEOTwebsite, under the
f
address
P
n
r
Selec
heading "Personal space".
This personal space offers advice and other useful information for
the care and maintenance of your vehicle.
Referring to the user guide on-line also gives you access to the
latest information available, easily identified by the bookmarks,
associated with this pictogram:
lease note the following point:
The fitting of electrical equipment or accessories which are
ot recommended by PEUGEOT may result in a failure of your
vehicle's electronic system. Please note this specific warning.
It is advisable to contact a PEUGEOT dealer to be shown the
ecommended equipment and accessories.
If the heading "Personal space" is not available on the public website
or your country, you can find your user guide at the following
:
http://public.servicebox.peugeot.com
t:
the link in "Private customer access",
the language,
the model,
the edition date appropriate for the date of registration of your vehicle.
You will find your user guide, presented in the same way as the paper version.

i
!
WELCOME
Key
s
a
add
use of
y
p
functio
y
g
y
situations
g
f
f
y
A
comf
p
y
make
f
f
g
s
ou for choosing a 508 RXH.
Thank
This handbook has been desi
ou to make the most of your vehicle in all
Therefore, on the first few pa
ind a detailed summary followed by a quick
re
appreciation of the vehicle and to help
Each model may only be
o
dependin
.
erence guide intended to make it easier for
ou to become familiar with your vehicle.
ll of the details specific to your vehicle,
ort, safety, practical information, are then
resented in this handbook, to increase your
the most of it.
the equipment shown in this handbook,
on the trim level, model, version and
pecification for the country in which it is sold.
ned to enable
es, you will
ou
itted with some
Warning:
this symbol marks warnings which it
is essential to observe for your own
afety, for the safety of others or to
void any risk of damaging your vehicle.
Protection of
the environment:
this symbol accompanies advice
relating to protection of the environment.
Information:
this symbol draws your attention to
itional information for better
our vehicle.
Page reference:
this symbol invites you to refer to the
ages which provide details of the
n.

Contents
5
6
Gaug
5
7
2
R
5
7
ec
7
6
7
8
M
7
9
Panoramic sunroof
8
F
8
3
D
8
F
8
Rear seats
9
0
M
9
S
9
9
5
9
8
H
10
M
D
0
8
Q
1
1
1
1
12
assis
12
3
3
3
3
A
5
15
A
15
5
5
esentatio
2
2
2
ode selecto
2
/
3
3
3
3
4
Vehicl
4
Familiarisation
Hybrid system
Pr
tarting/switching off your vehicle
eady lamp
Ybrid4 m
nergy consumption
eneration indicator 3
Display of hybrid power fl ow
co off
co-driving
onsumption
n
r
voltage battery
e recovery
.
.
Instruments and controls
Instrument panel 4
Indicator and warning lamps 4
es and indicators
Trip computer 6
Access
emote control key 6
Alarm
El
tric windows
Boot
otorised tailgate
uel tank
iesel misfuel prevention
lectric parking brake 1
4
-speed electronic gearbox system
ill start
ead-up display 1
eed limiter 1
ruise control 1
Parking sensors 13
Parking space sensors 1
Comfort
ront seats
irrors
teering wheel adjustment
Interior fi ttings
Boot fi ttings
eating and Ventilation
anual air conditioning 106
ual-zone digital air conditioning 1
uad-zone digital air conditioning 1
r screen demist - defrost 1
rogrammable Heating/Ventilation 1
6
Lighting controls 14
LED lamps 14
utomatic illumination of headlamps 14
eadlamp adjustment 14
Directional lighting 1
Wiper controls
4
utomatic rain sensitive wipers
ourtesy lamps 1
Interior mood lighting 1
Driving
t
Visibility

Contents
5
6
6
7
A
17
7
8
9
9
0
0
0
20
20
1
ccessories
1
1
1
2
2
22
22
2
2
3
Child safety
hild seats 1
ISOFIX child seats 1
hild lock 16
Safety
Direction indicators 16
mergency or assistance call 16
orn 1
SP system 16
eat belts 1
irbags
Practical information
Tem pora ry puncture repair kit 1
Changing a wheel 1
Changing a bulb 1
hanging a fuse 1
12 V battery 2
Energy economy mode 2
hanging a wiper blade 2
Recovering the vehicle 20
Vehicle recovery
Tow ing a trailer
itting roof bars 2
A
2
Checks
pening the bonnet 2
Running out of fuel (Diesel) 21
iesel engine 2
Checking levels 21
hecks 2
Electric motor 2
Diesel engine
Diesel weights
Dimensions 2
dentifi cation markings 22
Audio equipment and telematics
Emergency or assistance 2
BL equipment 2
Peugeot Connect Navigation (RT6) 23
Alphabetical index
Technical data
.
Visual search
.
Familiarisation
c
ehicles
S
S
g
y
f
(
y
.
El
.
S
.
HYbrid4 mode selecto
Presentation of the HYbrid4 system
Thank you for choosing this HYbrid4 vehicle,
whi
h has characteristics that are different from
nventional v
tudy this handbook to learn about the specific
brid functions and for more information, refer
to the "Hybrid
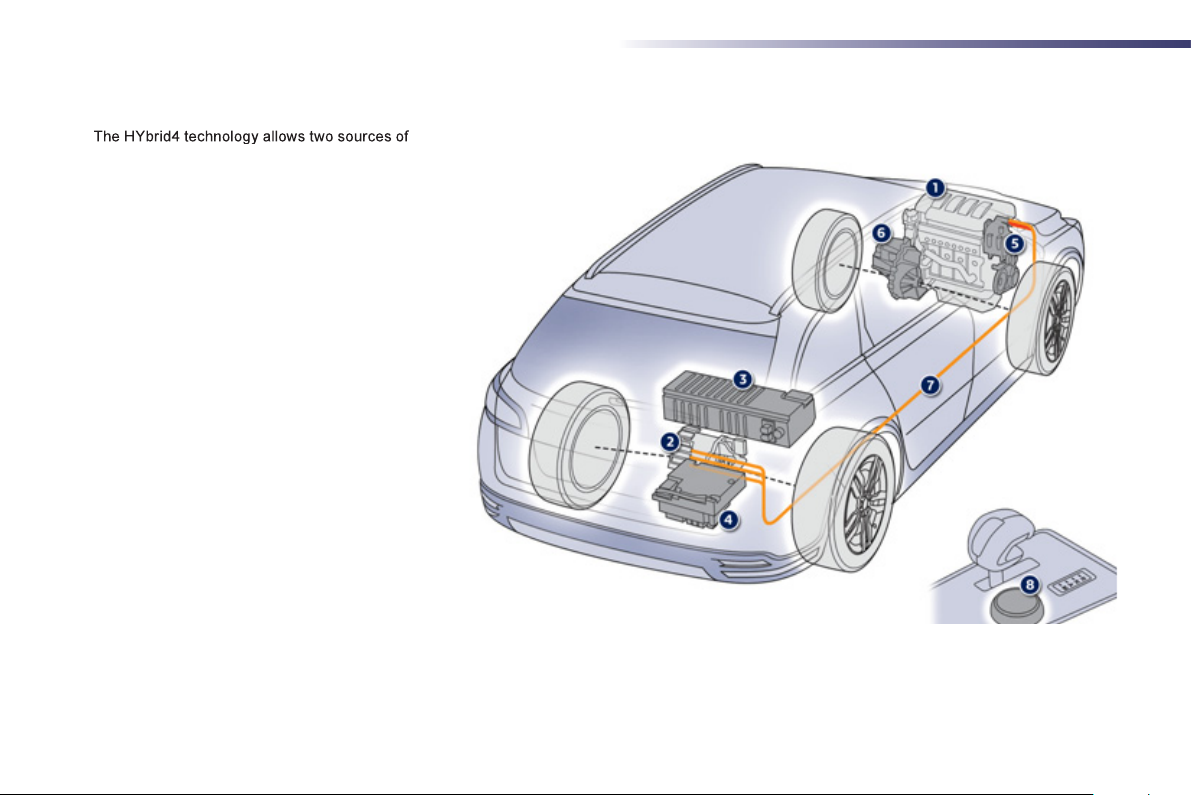
The HYbrid4 technology allows two sources of
nergy to be associated in an effective manner:
the Diesel HDi en
wheels and the electric motor, which drives the
r wheels.
These two motors can operate alternatel
imultaneously, according to the hybrid mode
elected and the driving conditions.
The electric motor alone provides power
the vehicle in "ZEV"
ode, and in "Auto" mode for running at slow
peed and low load. It also assists the Diesel
ngine when moving off, accelerating and
hanging gear.
The batter
echarged during phases of deceleration and
tores the energy for subsequent use.
that powers the electric motor is
.
ystem" section.
ine, which drives the front
Zero Emissions Vehicle)
or
or
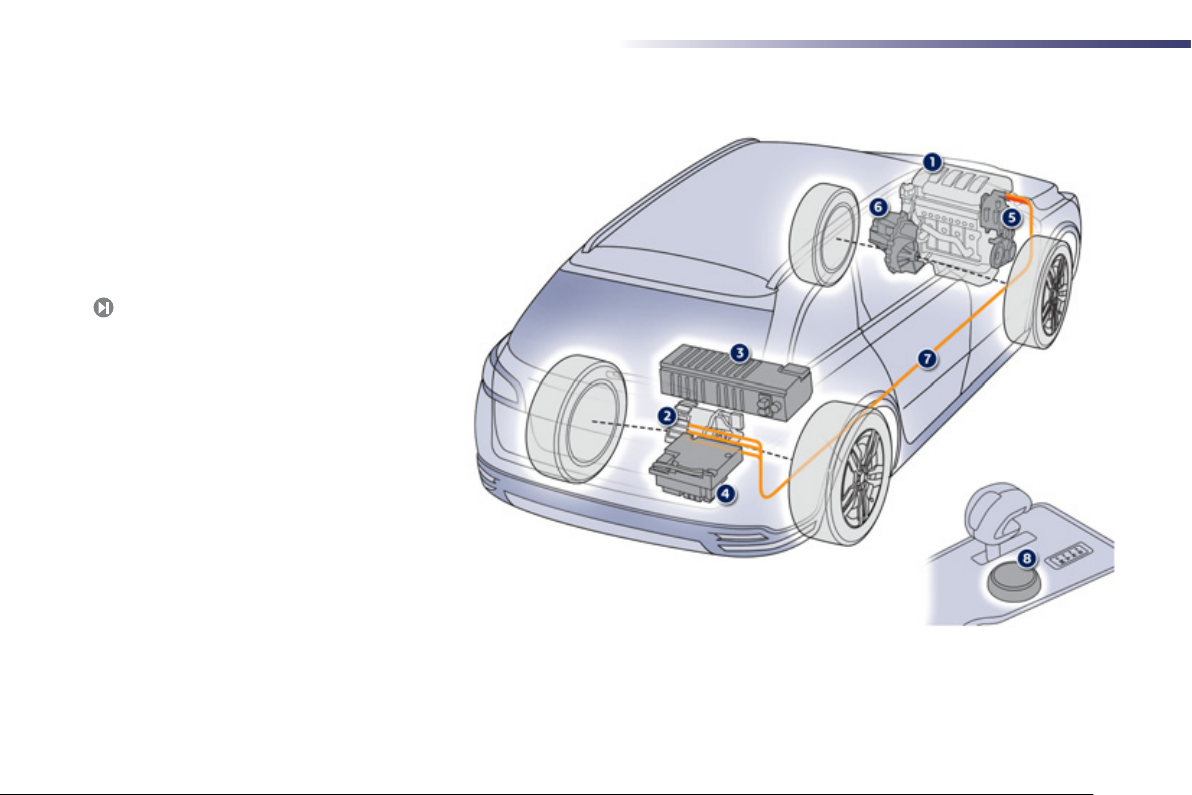
1
Diesel HDi engine (front wheel drive).
Electric motor (rear wheel drive).
200 V battery.
ectronic power supervisor.
5
top & Start system.
6-speed electronic gear control
6
earbox.
Electrical flow.
r.
4
For economical driving, caring for the environment
ode
g
gy
y
gy
)
O
The fuel
- according to the driver's style of driving (moderate, aggressive, fast, ...),
- according to the type of journeys made (urban, main road, motorway, flowing, heavy traffic, …) and the speed.
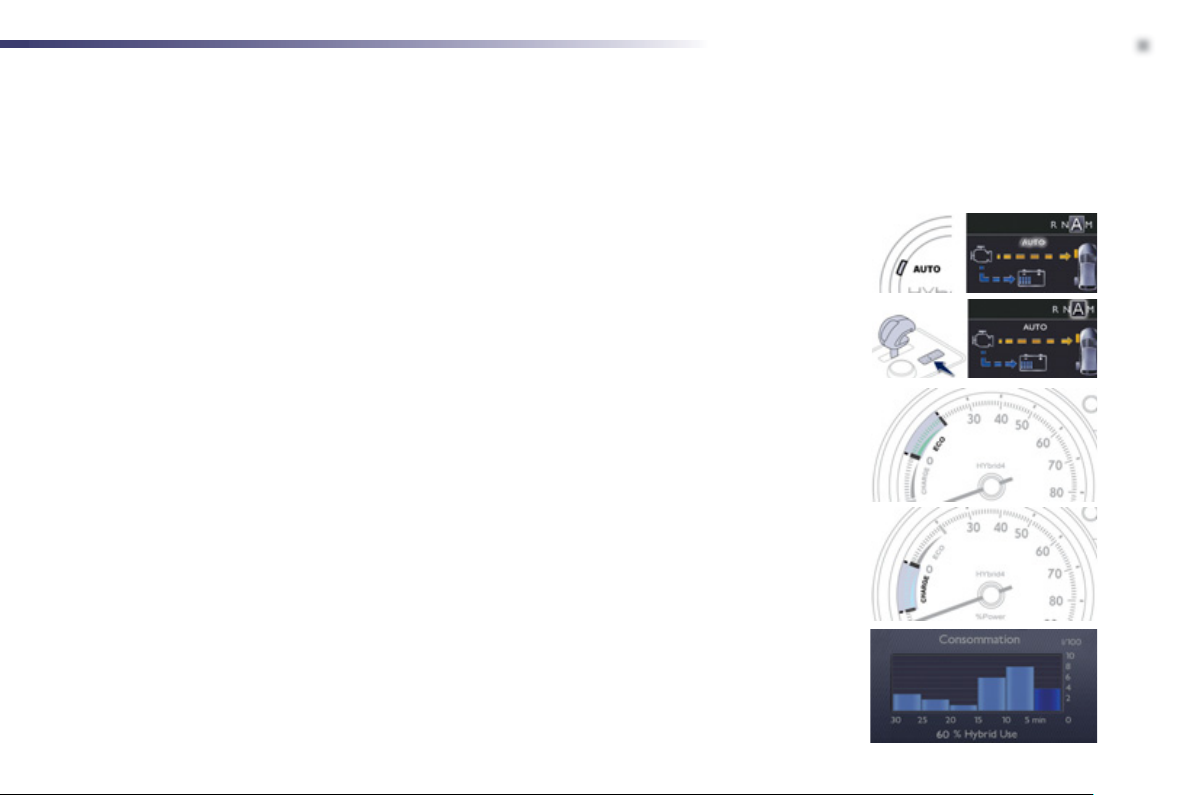
Main recommendations for driving economically
Hybrid mode selector
To optimise fuel consumption, use the Autoodeof the selector whenever possible (the mode is activated
automatically when starting) including for urban journeys.
This mode optimises the use of the energy sources (internal combustion engine and/or electric) contrary to other
Gear lever
Use the
Drive smoothly
Stay in the "eco" zone displayed in the energy consumption/generation indicator: accelerate gently, drive at
teady speeds using the speed limiter or cruise control as soon as possible.
brakin
the level of ener
Consumption histor
See the impact of your style of driving and the type of journey by reviewing the history of your ener
onsumption. Refer to the "Multifunction screens" section.
Causes of high consumption and checks
As with any vehicle, limit overloading, wind resistance (windows open above 30 mph (50 km/h), roof rack, loaded
or not, …
ervicing.
onsumptionof a vehicle varies greatly:
odes, which are for use in particular cases.
utomatic m
se the "charge" zone : anticipate the need to slow down by taking your foot off the accelerator rather than
. The movement of the energy consumption/generation indicator needle (into the "charge" zone), shows
, the use of power consumers (air conditioning, heated seats, heated rear screen, …).
bserve the recommendations on checks (regular check of tyre pressures, correct tyre pressures, …) and routine
recovery.
as much as possible as this optimises gear changes to suit the requirements.
Familiarisation
.
5
Familiarisation
Thi
d
hile k
g
y
9
g
g
e vehicle
7
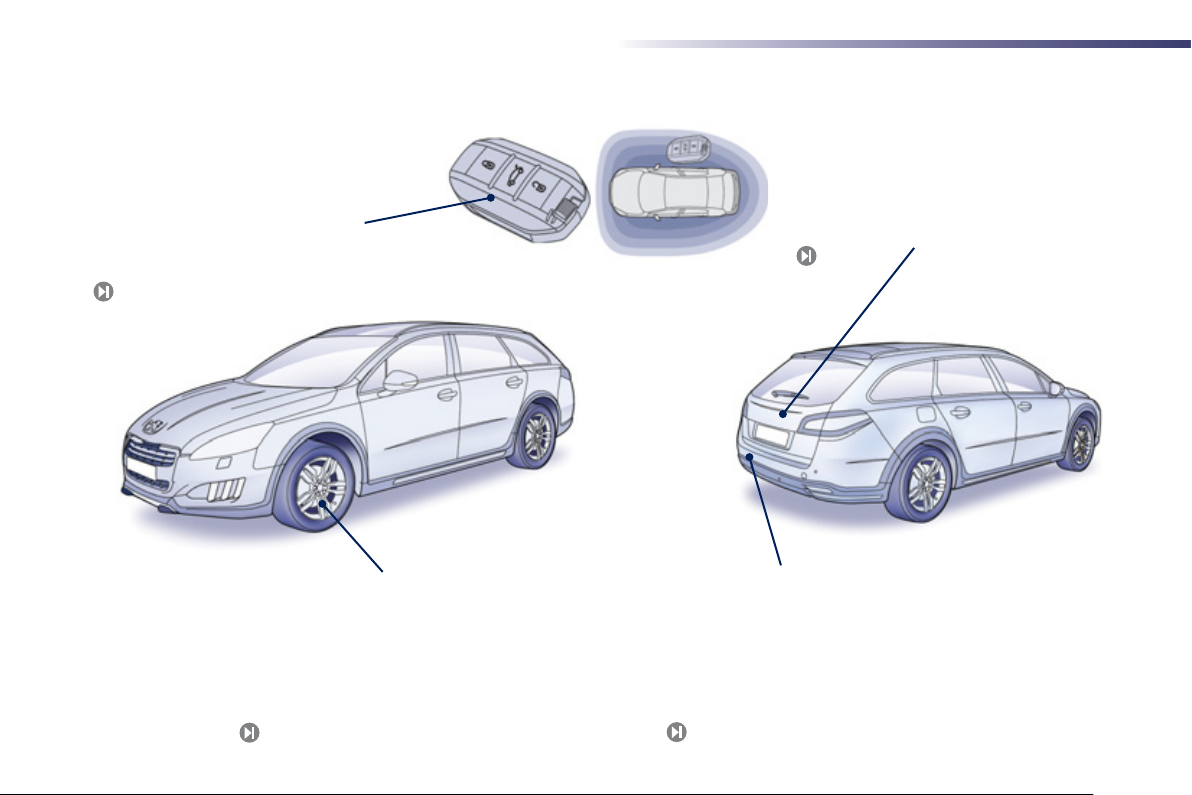
Exterior
Electronic key: Keyless
ntry and Starting
This system allows you to unlock, lock
nd start your vehicle w
the key on your person and in the
ined zone around the vehicle.
5, 65
6
eepin
Tempor ary puncture repair kit
This kit is a complete system consisting of a
ompressor and a sealant cartridge, to allow
the temporar
17
repair of a tyre.
Motorised tailgate
s system provides motorised opening an
losing of the tailgate, by pressing a button.
79
Front and rear parking sensors
This system provides a warning when
manoeuvrin
detectin
th
forwards and backwards by
obstacles located in front of or behind
.
3
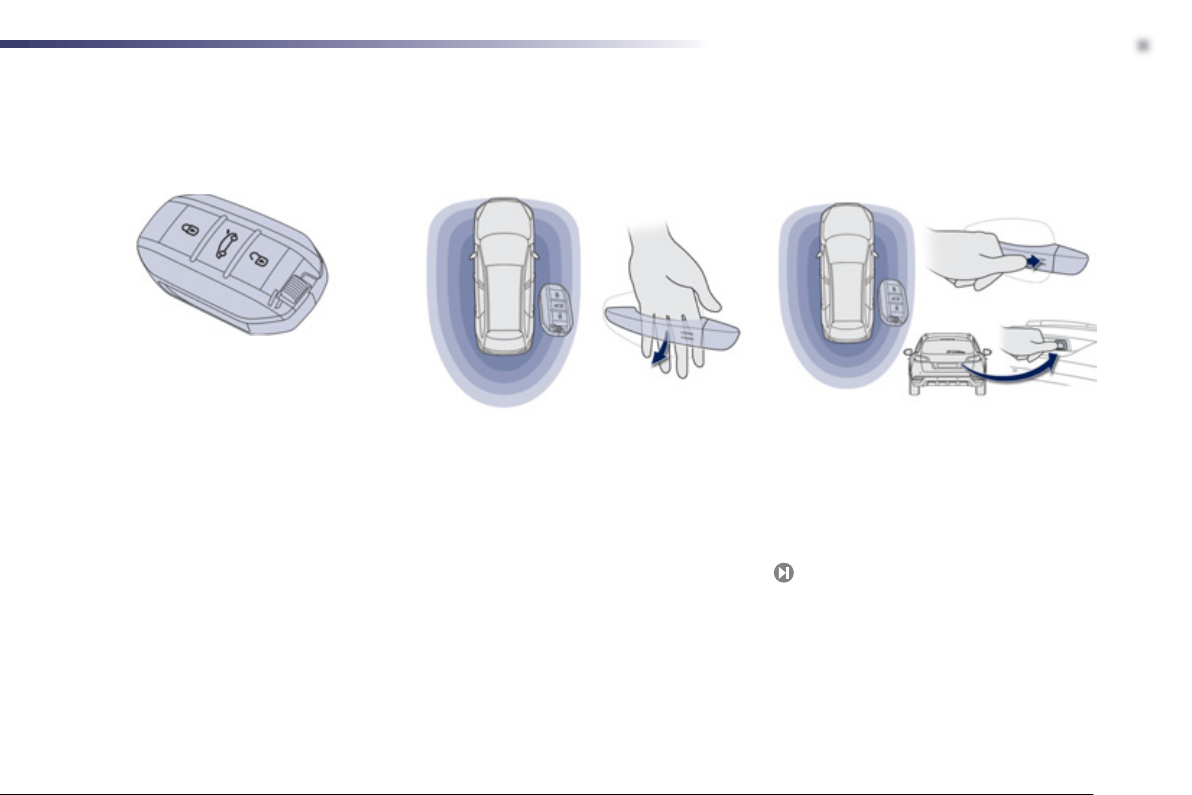
Opening
Unlocking
With th
d
y
e doo
fing
(
ehicle
g
8
Keyless Entry and Startin
system
e electronic key on your person an
n the defined zone around the vehicle, pass
our hand behind the door handle to unlock the
vehicle, then pull on the handle to open
th
r.
Familiarisation
Locking
With the electronic key in the defined zone
around the vehicle, press with a
the door handle
v
.
65, 6
at the markings) to lock the
er on
.
7
i
Familiarisation
O
O
.
ocatio
Opening
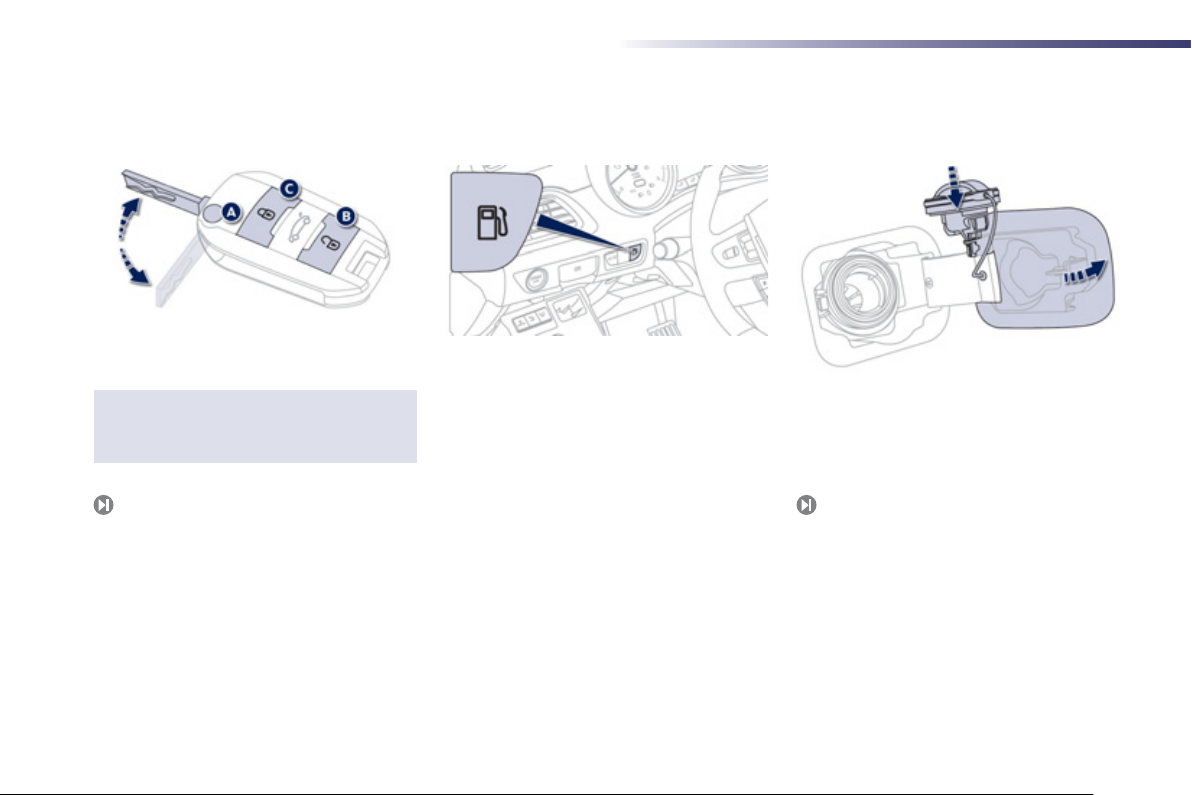
Remote control key
Unfolding/Folding the key.
Unlocking the vehicle.
Other functions..
C.Normal locking of the vehicle
Vehicle l
65
n.
Fuel tank
pening the fuel filler flap.
pening and hooking the fuel filler cap.
Tank capacity: approximately 72 litres.
3
8
Familiarisation
g
y
y
f
g
,
g
t
f
g
y
6
0
6
3
8
1
e
e
ehicle
g
efe
.
Interior
Head-up displa
This system projects speed and cruise control/
peed limiter information onto a smoked strip
in the driver's
eed to take their eyes off the road.
13
Interior mood lightin
This subdued passenger compar tment lighting
improves visibilit
nditions.
15
ield of vision, so that they do not
inside the vehicle in low light
Audio and communication system
This system benefits from the latest technology:
P3 compatible audio system, USB player,
Bluetooth handsnavi
ation system with colour screen, auxiliary
inputs, Hi-Fi audio s
Peu
eot Connect Navigation (RT6)
23
r to "Audio and telematics".
R
ree system, satellite
stem, ...
If your vehicle is fitted with a
BL Hi-Fi audio system, this
s designed specifically for the
assenger compartment of your
v
.
Digital air conditionin
After setting the desired level of comfort
the system then automatically controls
this level accordin
nditions.
Manual
10
ual-zon
10
Quad-zon
11
to the ambien
9
Familiarisation
g
O
8
4
g
El
8
y
6
bustio
6
0
g
g
Electric child lock
6
lighting
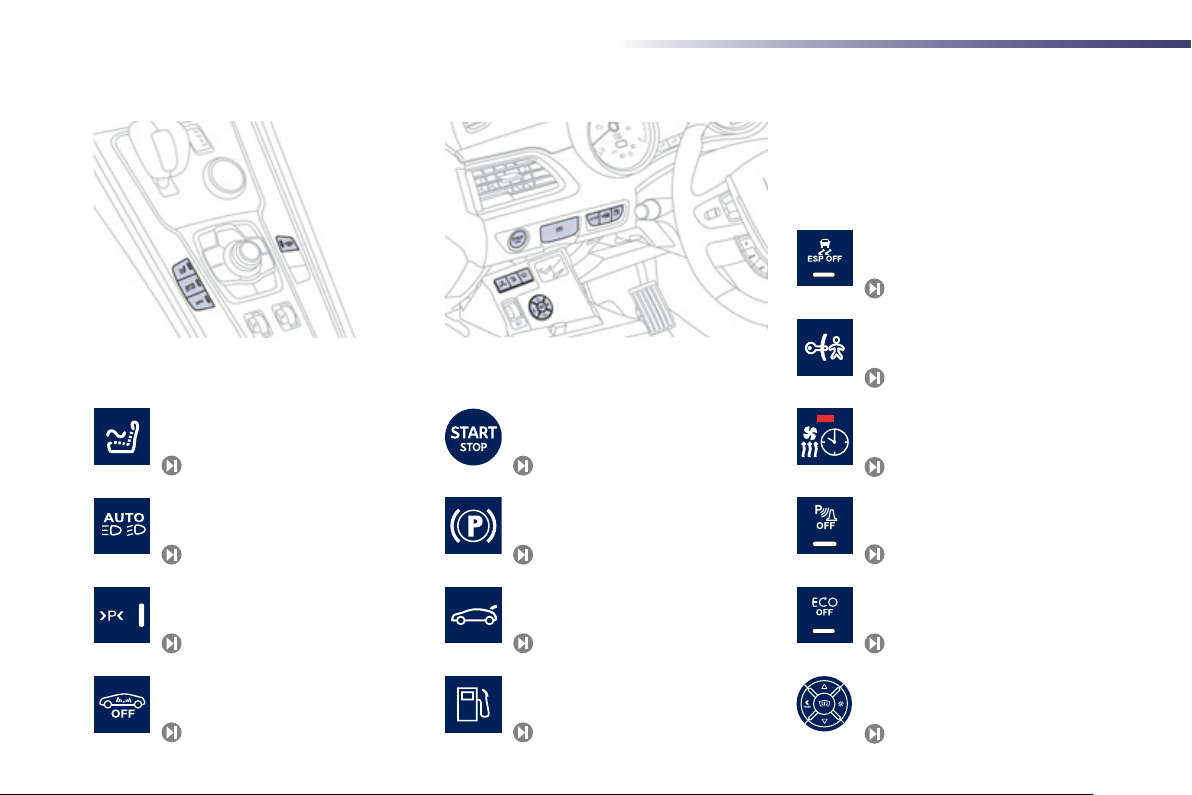
Switch panels
Deactivation of the DSC system.
Illumination of the lamp indicates the state of
the correspondin
10
Massage.
Adaptive
Parkin
Alarm.
7
function.
47
space sensor.
39
6
Pro
Starting/stopping using the electronic
ke
.
5/2
.
ectric parking brake.
11
Opening the boot.
67, 7
pening the fuel filler flap.
3
rammable heating warning lamp.
Deactivation of parkin
.
38
Inhibition of internal com
ngine stop.
3
Head-up display (on/off, settings).
13
.
n
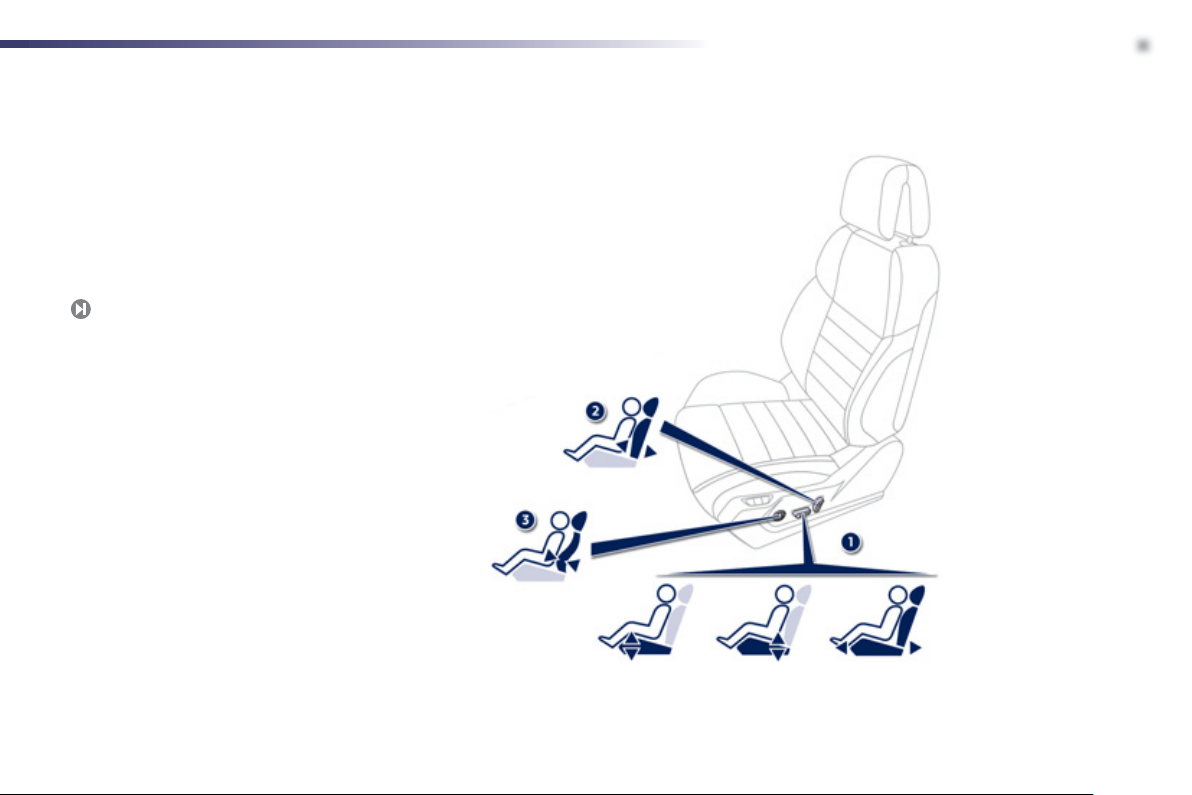
Sitting comfortably
Front seats
Electrical adjustment
Angle, seat height and seat forwards-
ackwards adjustment.
Backrest angle adjustment.
Lumbar support adjustment.
Familiarisation
.
11

Familiarisation
g
.
.
.
.
.
.
.
.
Ho
.
Gea
.
ode selecto
y
ease leve
usebo
.
Audi
SOS
C
)
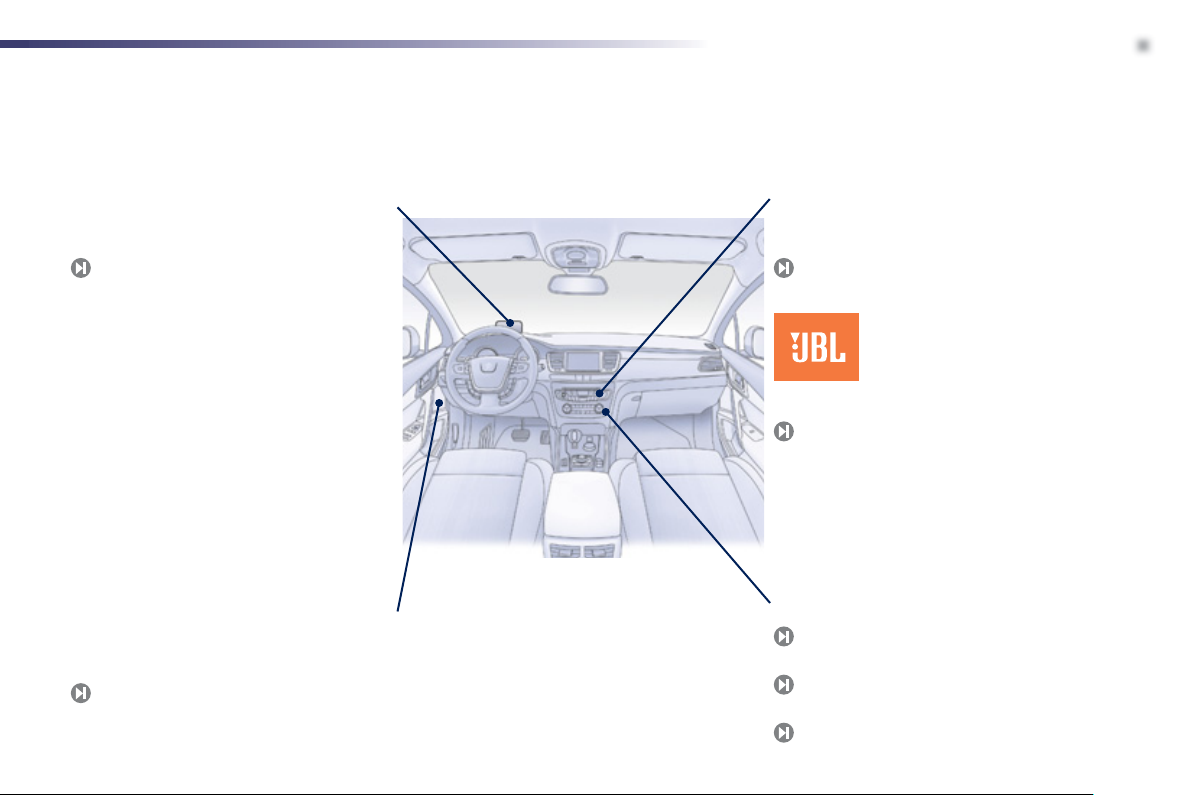
Instruments and controls
Cruise control/speed limiter controls.
Headlamp height adjustment.
Lighting and direction indicator stalk
Instrument panel.
Driver's airbag.
rn.
6
r lever.
7
HYbrid4 m
12 V accessory socket
USB port/auxiliar
Bonnet rel
0.F
x.
r.
socket.
r.
11.Front door window demisting/defrostin
vent.
12
Windscreen demisting/defrosting vent.
Steering lock and starting with the key.
13
Starting using the electronic key.
15
Audio equipment steering wheel controls.
16
Wiper/screenwash/trip computer stalk.
17
Central locking and hazard warning
ttons.
18
Screen.
19
Central adjustable air vents.
20
Passenger's airbag.
Side adjustable air vents.
2. Glove box/Passenger's airbag deactivation.
3. Electric parking brake.
4. Central armrest with storage.
5.Storage (according to version).
6
o system.
Heating/air conditioning controls.
Alarm/Peugeot Connect
Peugeot
Peugeot Connect Navigation (RT6
0. Massage/Adaptive lighting/Parking space
onnect Assistance.
ntrols.
nsor.
-
12

Familiarisation
.
13
!
Familiarisation
.
g
8
Sitting comfortably
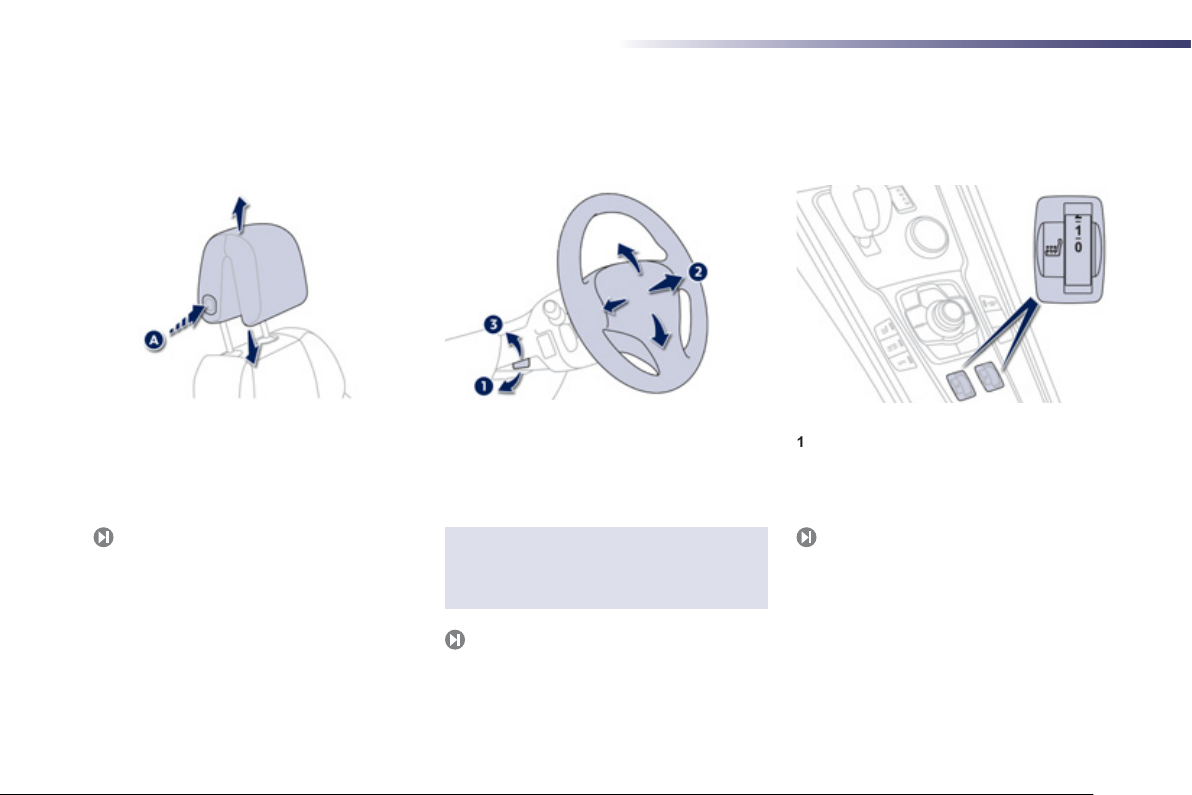
Head restraint adjustment
To lower it, press button A.
To raise it,
the desired position.
uide the head restraint upwards to
Steering wheel adjustment
1.Release the adjustment mechanism.
2
Adjust for height and reach.
Lock the adjustment mechanism.
For reasons of safety, these operations
ust only be carried out with the
vehicle stationary.
94
Heated seats control
: off.
: low.
: medium.
: high.
8
14
i
Sitting comfortably
.
.
S
A
.
Familiarisation
.
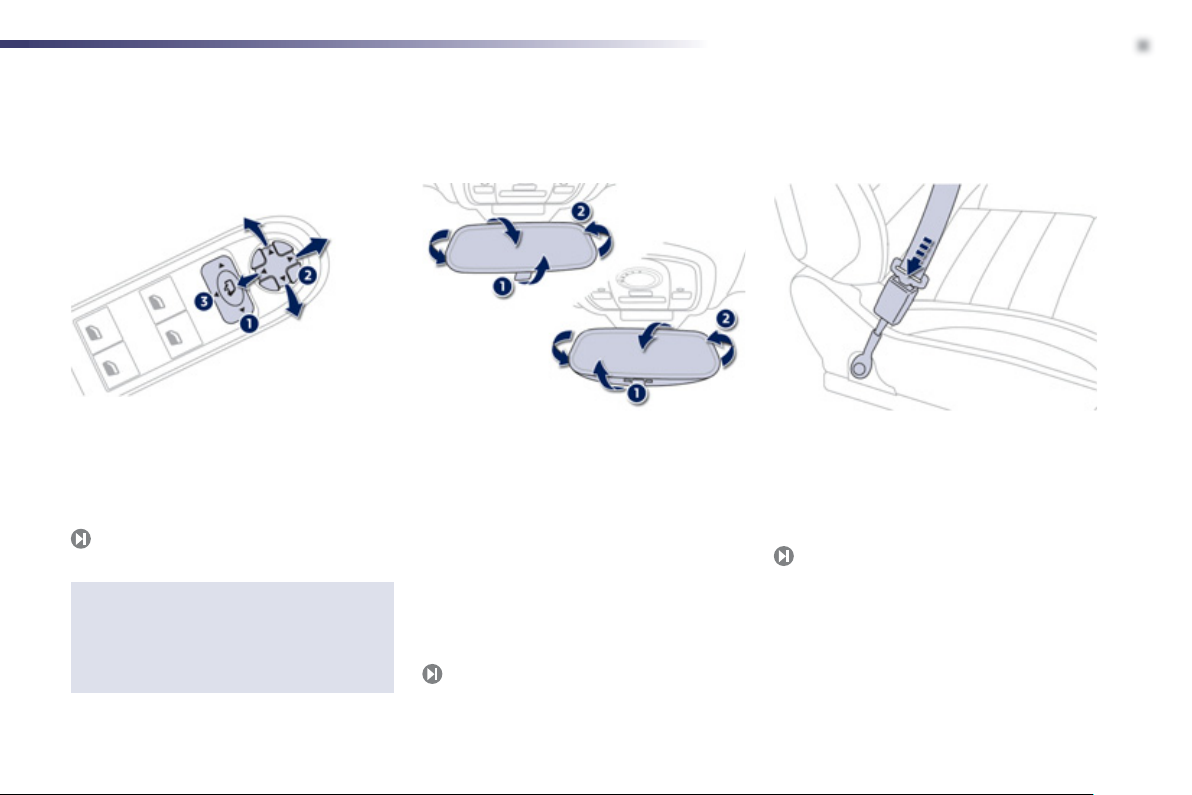
Door mirrors
Adjustment
Selection of the mirror.
Adjusting the position of the mirror glass.
De-selection of the mirror.
2
Other functions..
Folding/Unfolding.
Automatic dipping in reverse.
Rear view mirror
Manual day/night model
1
electing the "day" position of the rear
view mirror.
2. Rear view mirror adjustment.
utomatic day/night model
1.Automatic detection of day/night mode.
2
Rear view mirror adjustment.
4
Front seat belts
1. Fitting the belt.
Fastening.
Check that the belt is correctly fastened by
ulling on the belt webbing.
15
Familiarisation
g
Ring B
N
.
I
Park
O
Sing
owards
g
1
g
f
a
S
Seeing clearly
16
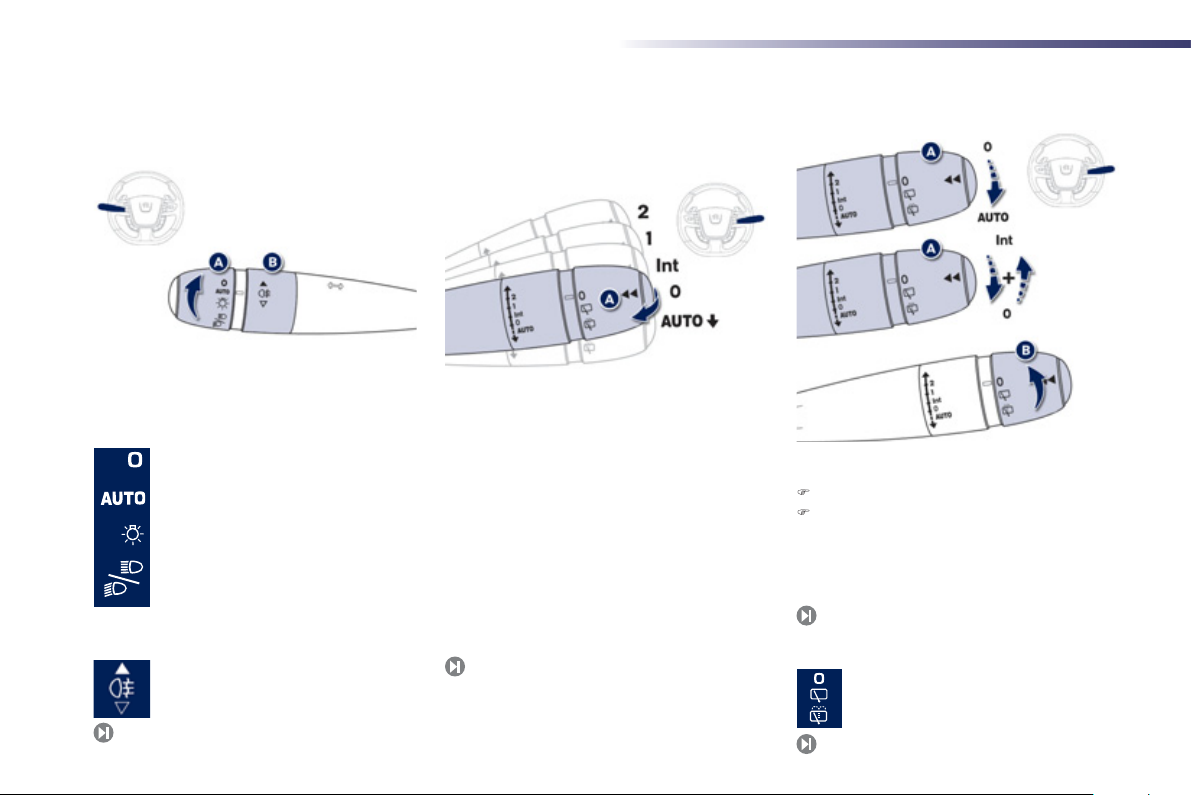
Lightin
Ring A
142
Li
hting off.
Automatic illumination of headlamps.
Sidelamps.
Dipped/main beam headlamps.
Rear
oglamps.
Wipers
Control stalk A: windscreen wipers
nt
0.
AUT
Screenwash: Lon
ast wipe.
ormal wipe.
ntermittent wipe.
Automatic wiping.
t
5
.
le wipe: Brief pull on the stalk
.
pull on stalk towards you.
Switching on "AUTO" mode
Briefly push the stalk downwards.
Briefly push the stalk downwards or place
the stalk in another position: Int, 1 or 2.
153
Ring B: rear wiper
rk.
P
Intermittent wipe.
creenwash.
152
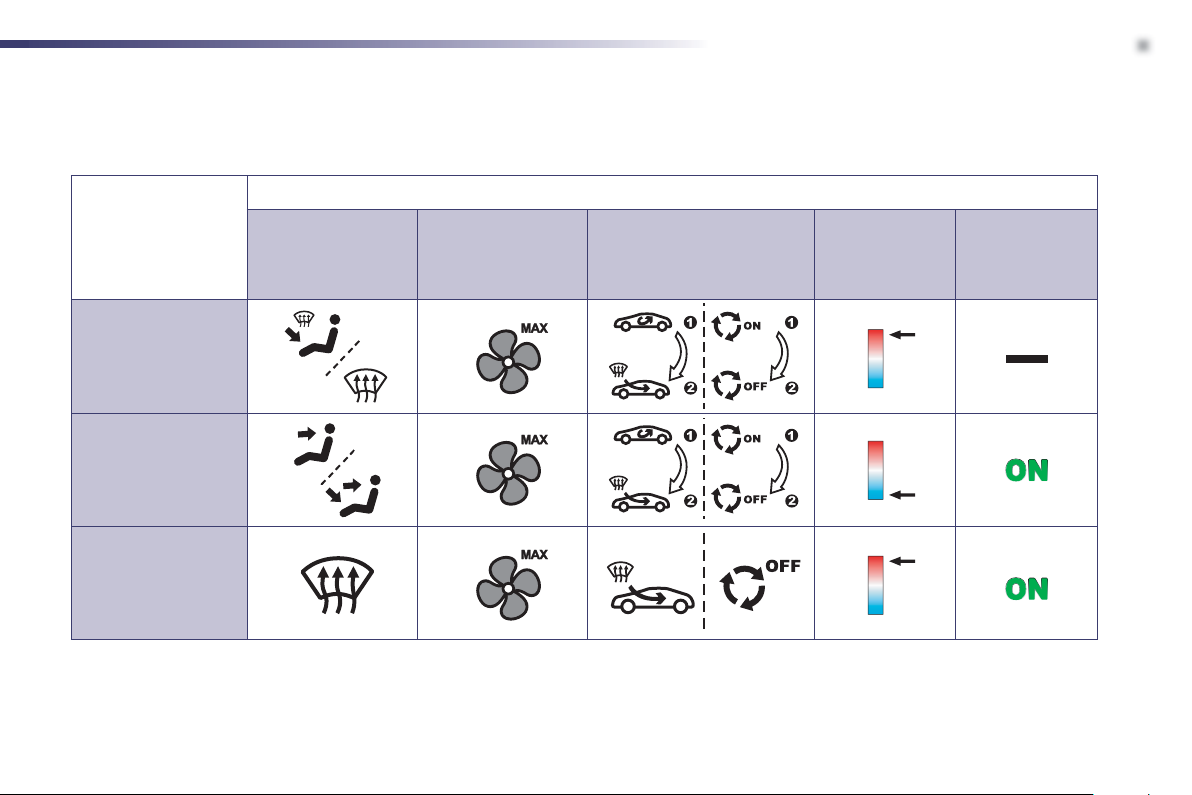
Ventilation
.
w
/
e
T
D
G
G
Recommended interior settings
eating or Manual air conditioning
Familiarisation
.
require..
HO
COL
EMISTIN
EFROSTIN
igital air conditioning:use fully automatic operation in preference, by pressing the
Air distribution Air flo
Air recirculation
Intake of exterior air
AUTO" button.
emperatur
Manual AC
17
Familiarisation
O
0
A.
With th
g
g
f
46
c
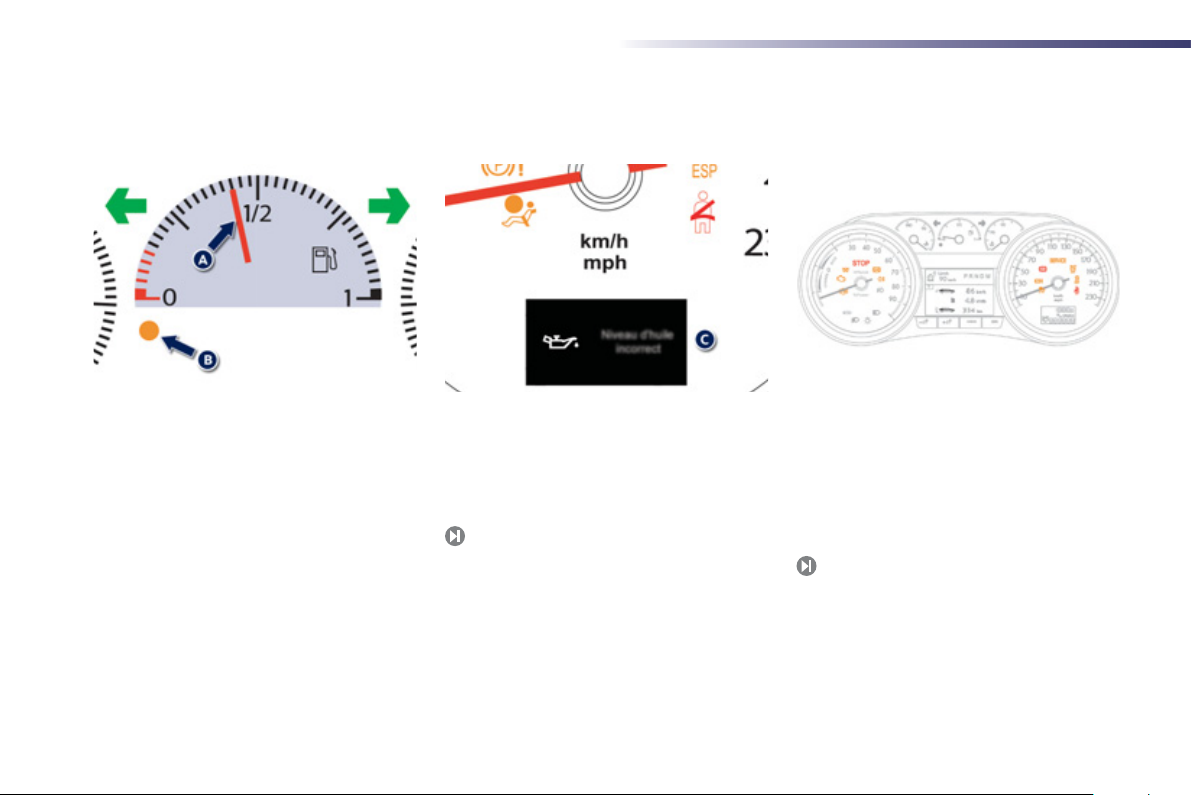
Monitoring
Instrument panel
n switching on, the dial needles go to
the extent of their travel then return to
With the ignition on, the needle should
ndicate the fuel remaining.
e engine running, the associated
ow level warning lamp should go off.
Warning lamps
With the ignition on, the instrument panel
.
reen should indicate the oil level.
If the levels are not correct, top up the level
whi
h is low.
5
With the ignition on, the orange and red
warnin
lamps come on.
With the engine running, these warnin
lamps should go off.
I
a warning lamp remains on, refer to the page
ncerned.
18
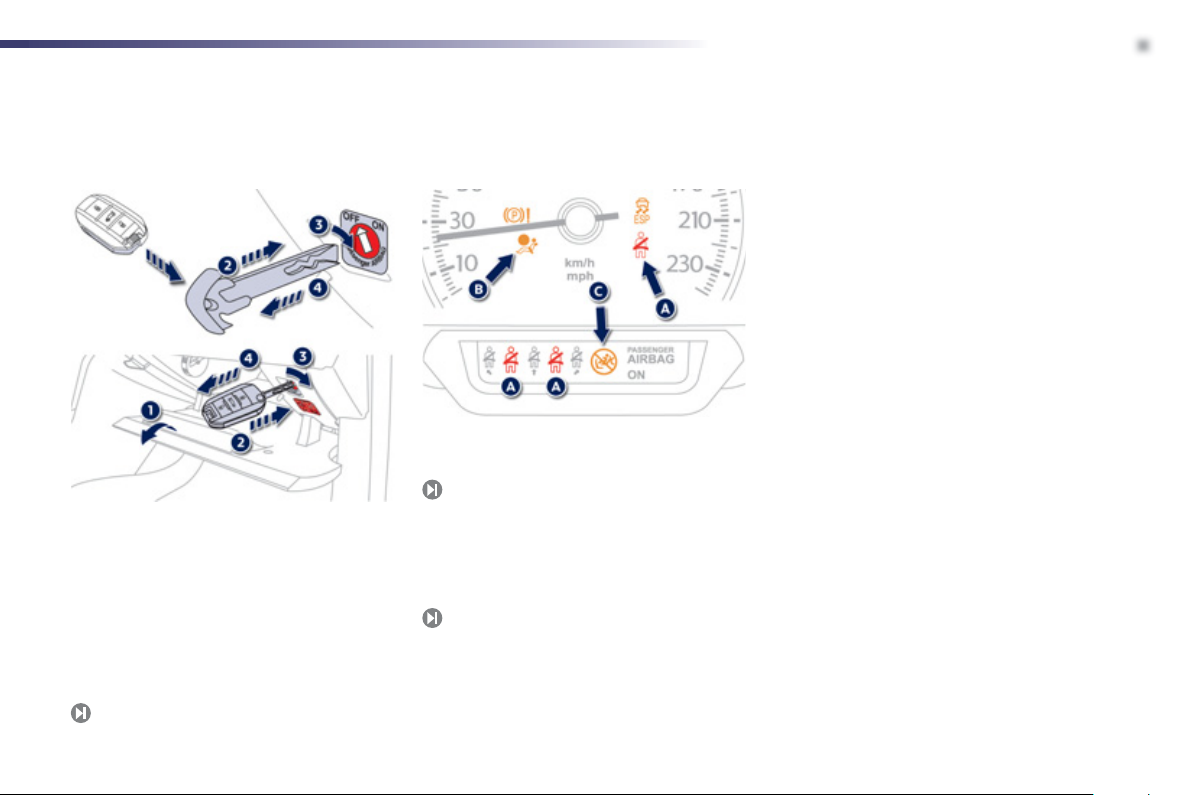
Passenger safety
I
S
sea
6
A.
seat belts not fastened or unfastened
g
6
3
Familiarisation
.
Front passenger's airbag
Open the glove box.
nsert the key.
elect position:
ON"(activation), with front passenger or
"forwards facing" child seat,
OFF" (deactivation), with "rear facing"
Remove the key keeping the switch in the
17
t.
ew positn.
Front seat belts and
passenger's front airba
Front
warning lamp.
17
B. Airbag fault warning lamp.
Front passenger's airbag activation
ndicator lamp.
7
19
Familiarisation
ehicle
E
p
e dia
ode
Whil
f
off
g
f
ess
y f
y
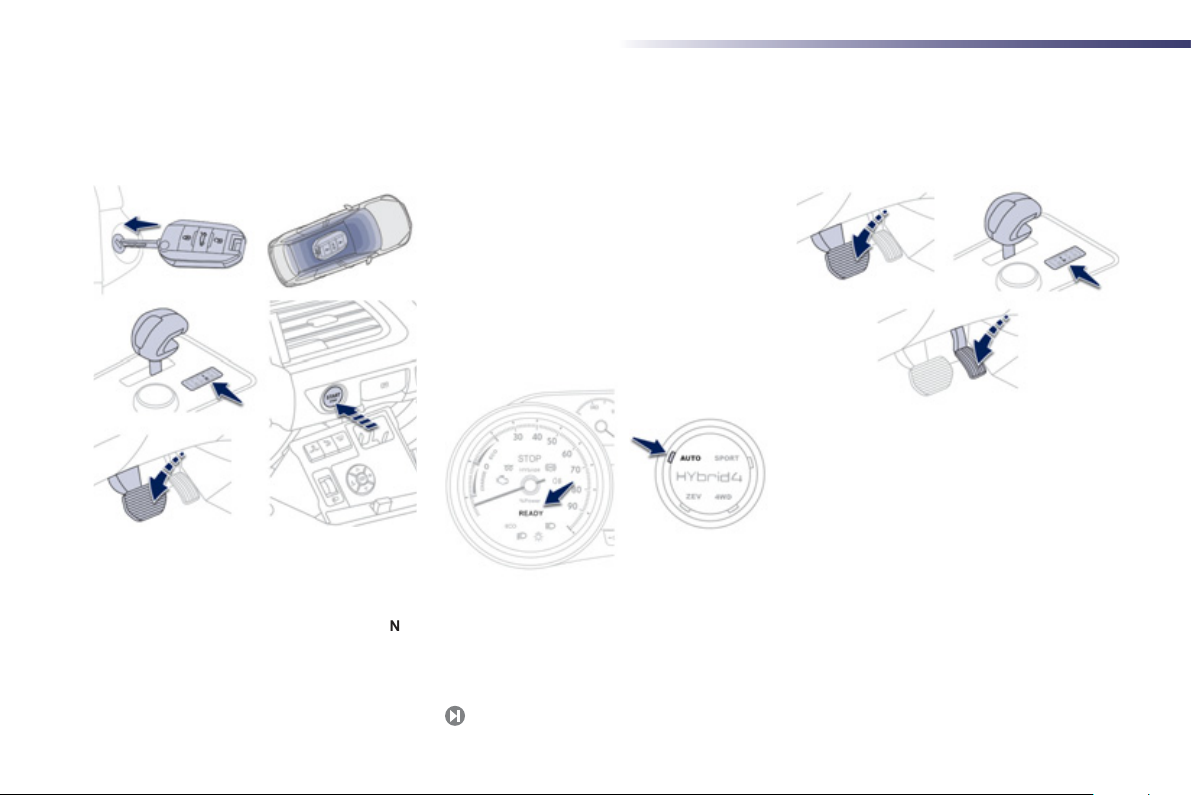
Driving safely
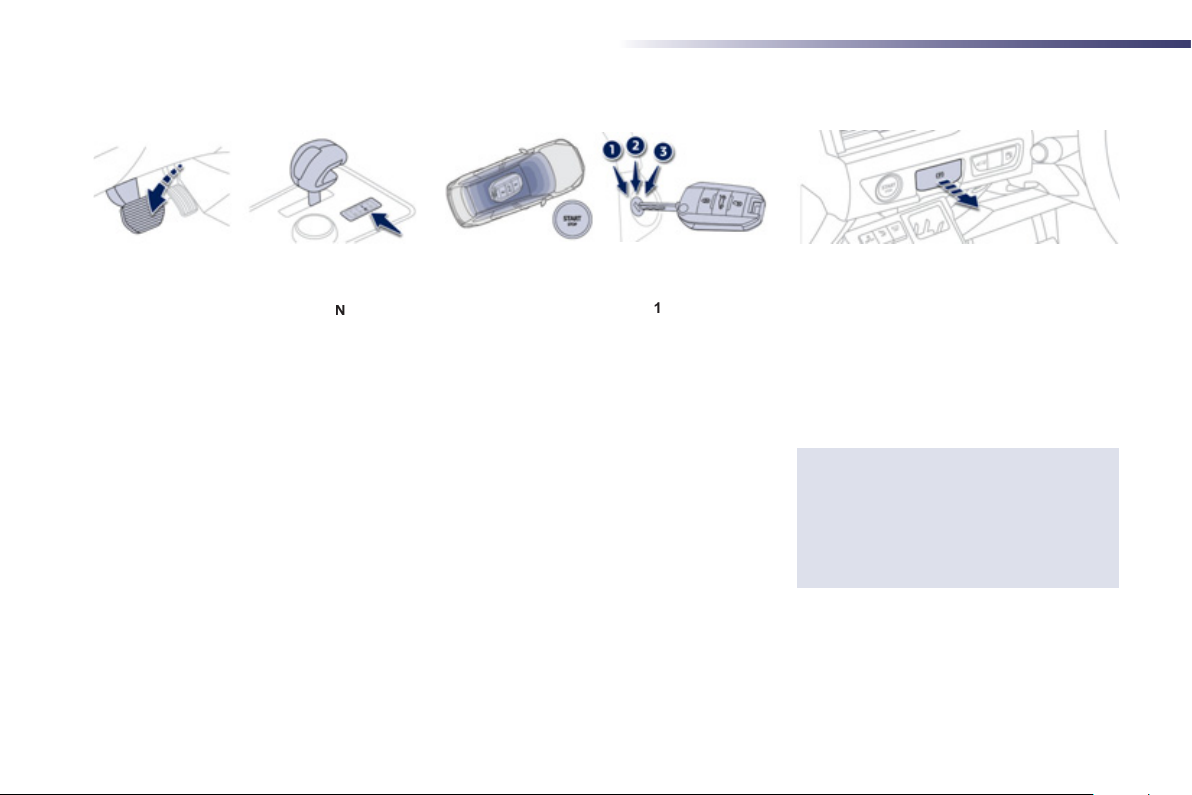
Starting the HYbrid4 system
- Insert the electronic key in the switch or
f the vehicle is fitted with Keyless Entry
nd Starting, keep the electronic key in the
v
-
.
nsure that the gear lever is in position
- Press the brake pedal
the
- Pr
the ke
position
h
brid system.
- The instrument panel and the
- Th
m
TART/STOP button or turn
ully towards the dashboard to
(Start), to initiate start-up of the
on.
l in the centre console is in AUTO
.
irmly.
eady lam
Moving off
-
e maintaining pressure on the brake
edal, move the gear lever to position
o forwards, or for reverse.
- Take yo ur
- The parkin
s you move off.
oot off the brake pedal; you can
w move
.
brake is released automatically
to
20
Driving safely
D
I
4.
.
g
S
.
. C
Off
g
g
h
pp
l
Familiarisation
.
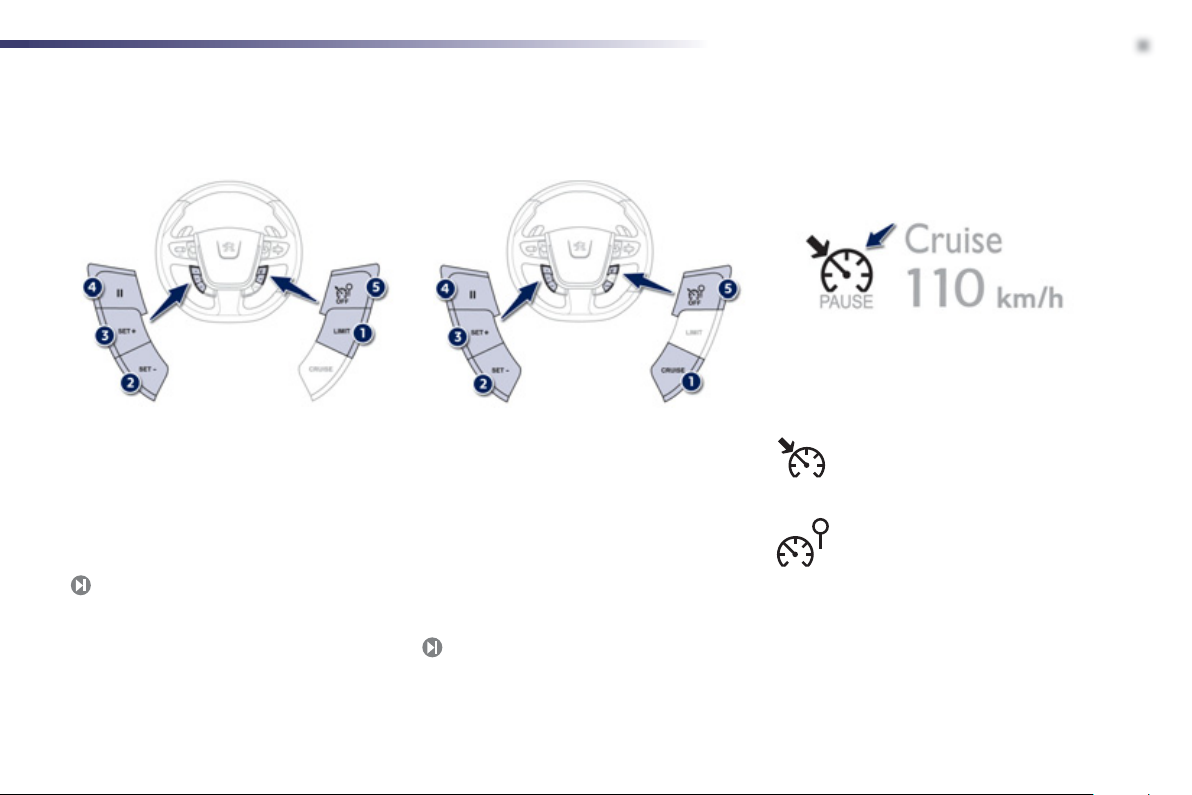
Speed limiter "LIMIT"
Selecting speed limiter mode.
ecrease the programmed value.
ncrease the programmed value.
Pause/resume speed limiter.
5
Speed limiter off.
The values must be set with the en
133
ine running.
Cruise control
CRUISE"
electing cruise control mode.
Decrease the programmed value.
Increase the programmed value.
4
Pause/resume cruise control.
5
ruise control
In order to be pro
vehicle speed must be hi
40 km/h), with at least 2 gear engaged.
35
.
rammed or activated, the
her than 25 mp
Display in the instrument panel
The cruise control or speed limiter mode
a
ears in the instrument panel when it is
lected.
Cruise contro
Speed limiter
21
Hybrid system
g
,
heels
Th
hybrid
p
(
The b
4.
.
S
.
ode selecto
Presentation
nergy to be associated in an effective manner:
the Diesel HDi en
wheels and the electric motor
r w
ese two motors can operate alternately or
multaneously, according to the
elected and the driving conditions.
The electric motor alone
the vehicle in "ZEV"
ode, and in "Auto" mode for running at slow
peed and low load. It also assists the Diesel
ngine when moving off, accelerating and
anging gear.
attery that powers the electric motor is
echarged during phases of deceleration and
tores the energy for subsequent use.
ine, which drives the front
which drives the
.
mode
rovides power for
Zero Emissions Vehicle)
22
Diesel HDi engine (front wheel drive).
Electric motor (rear wheel drive).
200 V battery.
Electronic power supervisor.
5
top & Start system.
6-speed electronic gear control
6
earbox.
Electrical flow.
HYbrid4 m
r.
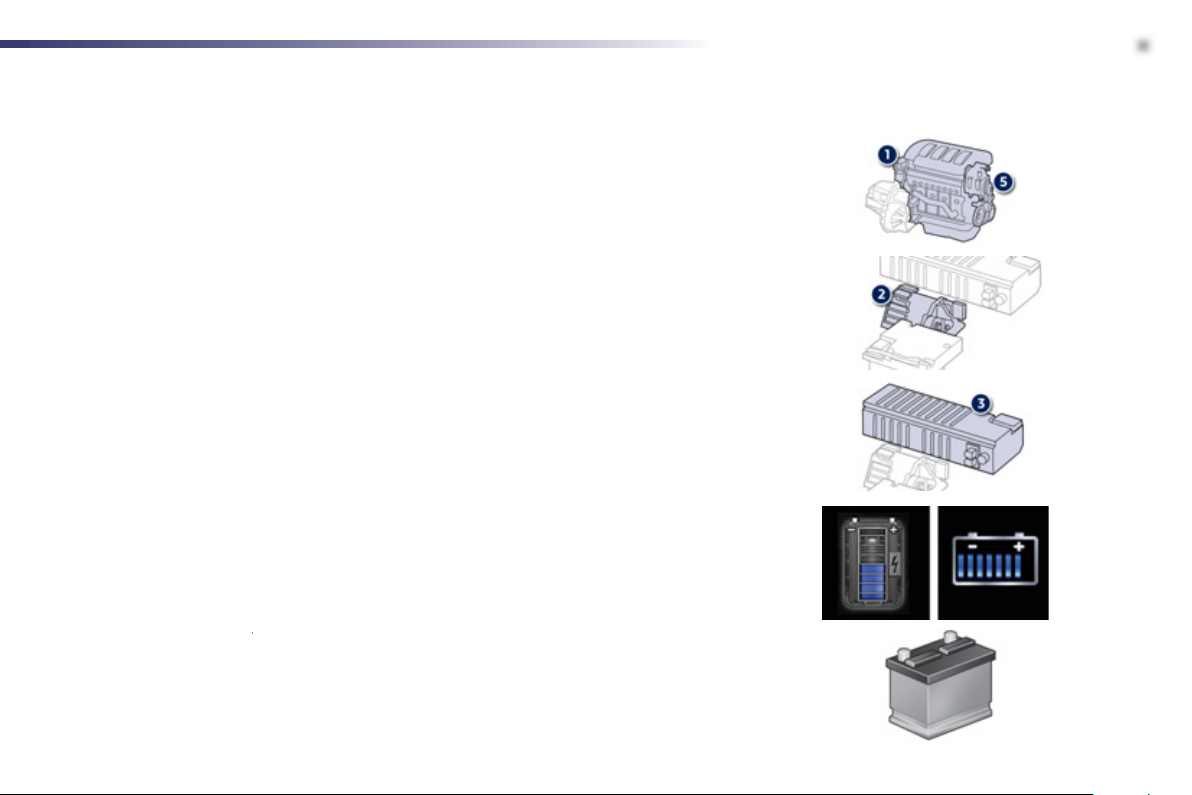
ain parts of the HYbrid4 system
s
e
g
gy
(
A 200
ging
It is l
echnicians
y
The
y
, located under the bonnet, powers the vehicle's 12 V systems. It is
lly by the high
The HDi Diesel engine - 1 , located at the front, drives the front wheels and provides most of the
ower needed to drive the vehicle.
It i
fitted with the Stop & Start system
ower when needed (in 4x4 mode).
electric motor - 2 , located at the rear, drives the rear wheels on its own, or supplements the
Th
Diesel en
It recovers ener
active up to 70 mph
Its char
t
ine, according to the hybrid mode selected.
and charges the batteries during phases of deceleration of the vehicle and is
120 km/ h).
V NI-MH high voltage battery - 3 , provides a source of energy for the rear electric motor.
rate is managed automatically by the vehicle during phases of deceleration.
ocated in a compartment in the boot, access to which is restricted to trained service
.
5 which recharges the batteries and provides additional
Hybrid system
.
The batter
recharged automatica
state of chargeis indicated by 8 horizontal or vertical bars (depending on the screen).
onventional batter
voltage network.
23
Hybrid system
A
f
f
y
e
g
g
e
x
ff
ddl
The
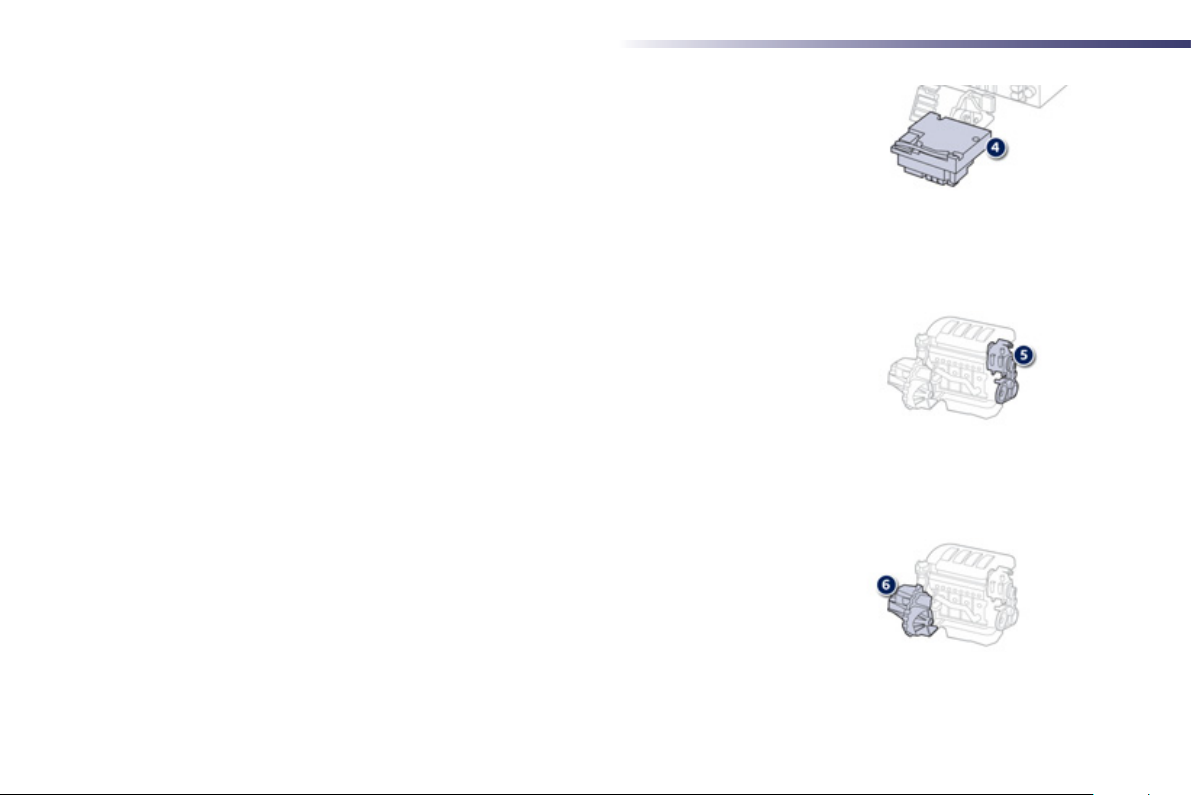
lectronic power supervisor - 4automatically manages the operation of the two power units
Diesel and electric) to provide the lowest consumption.
n inverter and a transformer are needed to manage the electric power.
The inverter acts on the torque o
voltage battery pack. Its operating range is between 150 and 270 volts.
The trans
Th
li
The stoppin
transparent for the driver.
Th
onsumption compared to a conventional manual gearbox, thanks to its electronic control system.
It also o
ormer converts the 200 V of the battery pack to 12 V, to power the vehicle's ancillar
stems.
Stop & Start system - 5 allows the Diesel engine to be put into standby during stops (traffic
hts, a stop, or in a traffic jam, for example) or during phases of running in all-electric mode.
and restarting of the Diesel engine is done in a way that is instantaneous and
lectronic
anging mode: automatic or manual, using the pa
ear controlearbo
ers improved driving pleasure with the possibility at any time of choosing the gear
the electric motor, by regulating the current coming from the high
6 provides, in automatic mode, significant savings in fuel
es located behind the steering wheel.
24
!
Starting your vehicle and moving off
y
ehicle
y
ft y
off
y
ess
y
(
dy
ligh
g
g)
y
y
t
.
Hybrid system
.
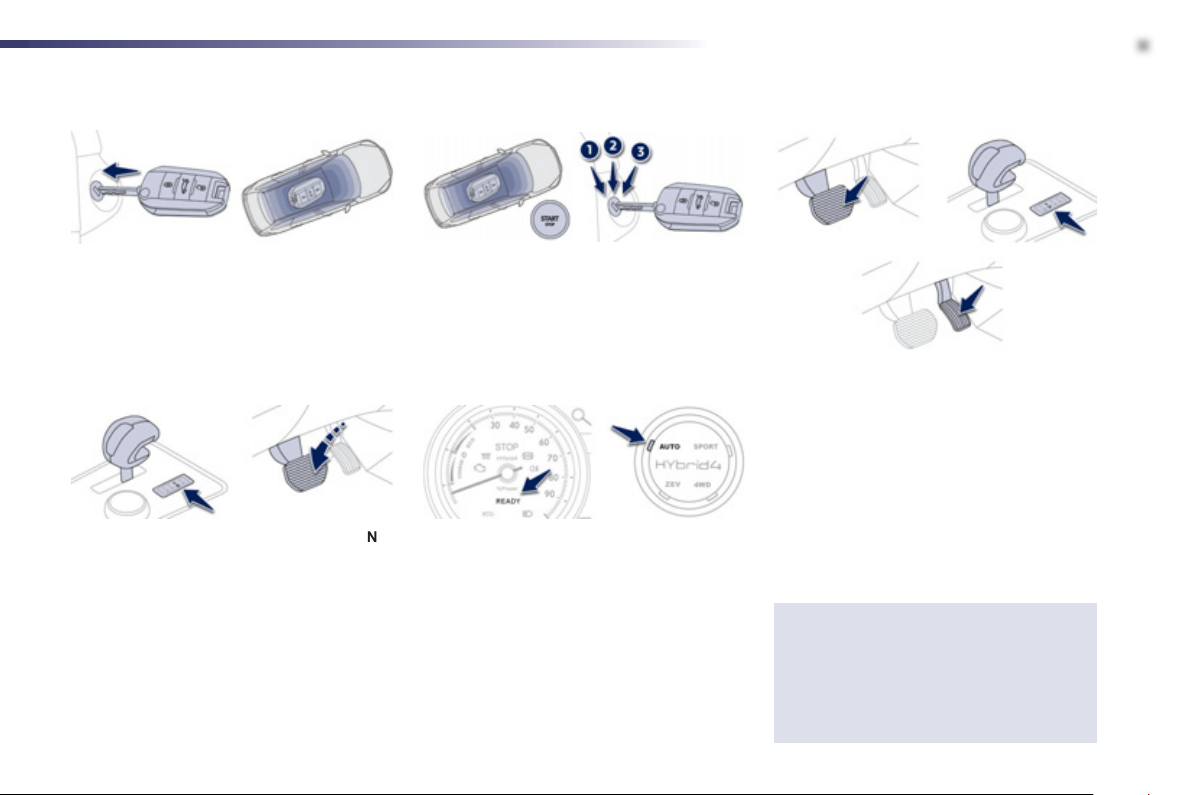
- Insert the electronic key in the switch,
or if
our vehicle has Keyless Entry and
tarting, keep the electronic key in the
v
.
- Ensure that the gear lever is in position
- Press firmly on the brake pedal.
- Pr
- The instrument panel and the
- The h
the START/STOP button or turn
the ke
fully towards the dashboard to
position
stem.
amp
splayed progressively, indicating that the
hybrid system is active, confirmed by
a messa
ntre console is in AUTO mode (default
mode for startin
necessar
Starting), to start the hybrid
t up. The power graduation is
e in the screen; the dial in the
.
brid system determines whether it is
to start the Diesel engine.
ea
- With the brake still applied, move the gear
lever to position
lifting the lever slightly) for reverse.
- Li
- The parking brake is released automatically
our foot off the brake pedal, you can
ve
.
as
ou move off.
When your vehicle vehicle moves off
n electric mode, it makes no noise.
Be very careful of pedestrians as
hey will not hear you coming
to go forwards or (b
25
i
Hybrid system
P
button o
y
y
g
O
Pl
Stopping your vehicle and the hybrid system
26
- Apply the brake until the vehicle comes to a
omplete stop.
-
ace the gear lever in position
- With the electronic key inside the vehicle,
then press the START/STO
the ke
fully off to position
remove the ke
the parkin
onfigured to do so.
from the ignition switch;
brake is applied automatically if
(stop) then
r turn
-
therwise apply the parking brake
anually, the
When stationary, switch off the ignition
nd check that the Readylamp is off
before leaving the vehicle. Otherwise
the hybrid system will still be active.
ee the section on "Underbonnet
precautions/warnings".
warning lamp must be on.

!
Ignition on without startin
g
d
ing
ibl
g
g
y
I
y
y
g
O
i
illary
g
P
h
ehicle to be locked
the engine
accessory position)
Turn the ke
intermediate position or with the Ke
and Startin
"START/ST
edal. This switches on the ignition and so
act
towards the dashboard to the
key inside the vehicle, press the
P" button, with no action on the
vates the anc
Using the ancillaries for a long period
introduces the risk of a flat battery.
equipment.
Press the "START/STOP" button,
the instrument panel comes on
but the en
ress the button again to switc
off the ignition and so allow the
v
ine does not start.
.
less Entry
Anti-theft protection
Electronic engine immobiliser
The keys contain an electronic chip which has
secret code. When the ignition is switche
on, this code must be recognised in order for
start
to be poss
This electronic engine immobiliser locks
the en
ine management system a few minutes
fter the ignition is switched of f and prevents
startin
of the engine by anyone who does not
ave the key.
In the event of a malfunction,
a message in the instrument panel screen.
n this case, your vehicle does not star t; contact
PEUGEOT dealer as soon as possible.
e.
ou are informed
Hybrid system
.
27
i
Hybrid system
h
y
g
O
I
ess
g
do
3
g
h
f
y
f
g
y)
by
(
f
g
y
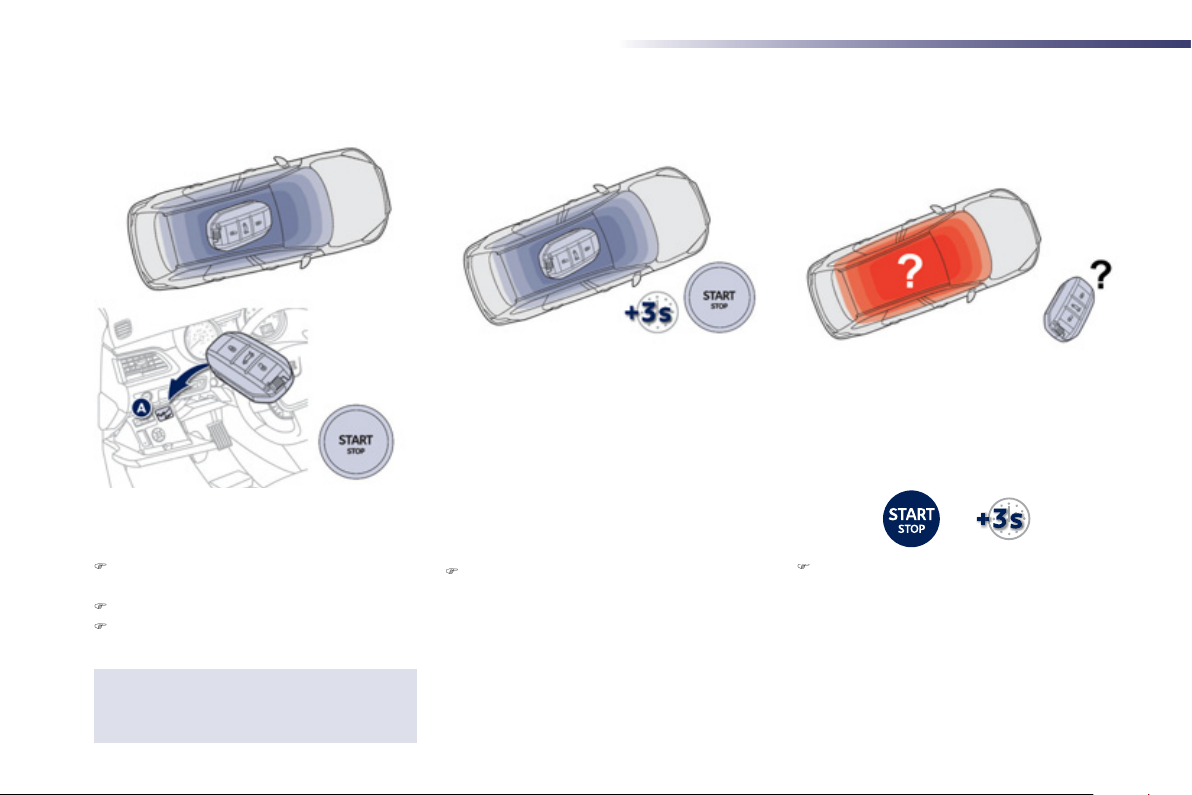
mergency starting wit
he electronic ke
When the electronic key is in the defined zone
nd your vehicle does not start after pressin
the "STAR T/STOP" button:
pen the housing below the "START/
TOP" button.
nsert the electronic key in the location
Pr
the "STAR T/STOP" button.
Once the engine has started, you can
remove the electronic key and close the
ousing.
Emergency switch-off usin
the electronic key
In the event of an emergency only, the engine
n be switched of without conditions. To
this, press and hold the "START/STOP" button
for about
In this case the steerin
as t
I
the electronic key is no longer in the defined
one when you request switching off the
ngine, a message appears in the instrument
anel.
seconds.
column locks as soon
e vehicle stops.
Press and hold the "START/STOP"
button for about 3 seconds if
orce switching off the engine (note that
restartin
the ke
will not be possible without
.
ou want to
ectronic key not recognised
he "Keyless Entry and Starting"
system
If the electronic key is no longer in the defined
zone when driving or when you
witching off of the hybrid system, a message
appears in the instrument panel.
Press and hold the "STAR T/STOP" button
or about 3 seconds if you want to force
witching off of the hybrid system (note
that restartin
the electronic ke
will not be possible without
in the defined zone).
later) request
28
 Loading...