

Page 1
NAVAHO SIT /NAVAHO SIT /
Instructions for use
WARNING
®
recto
Activities involving the use of this equipment are inherently dangerous.
You are responsible for your own actions and decisions.
Before using this equipment, you must:
- Read and understand all Instructions for Use.
- Get specific training in its proper use.
- Become acquainted with its capabilities and limitations.
- Understand and accept the risks involved.
FAILURE TO HEED ANY OF THESE
WARNINGS MAY RESULT IN SEVERE
INJURY OR DEATH.
3 year guarantee
Patented
PETZL
ZI Cidex 105A
38920 Crolles
France
www.petzl.com/contact
ISO 9001
Copyright Petzl
www.petzl.com
www.petzl.com
Latest version
NAVAHO SIT FASTNAVAHO SIT FAST
TOPTOP
TOP CROLL
TOP CROLL
A
B
C
A
70 120 cm
B
50 65 cm
1190 g
1190 g
1300 g
A
60
100 cm
B
45 57 cm
A
80
L XXL
140 cm
B
60 75 cm
S L
1
Size
XS S
0
Size
2
Size
A B C
-
-
-
-
-
-
-
NAVAHO SIT/
585 g
635 g
L XXL
C
160 180 cm
C
175 200cm
S L
2
Size
1
Size
TOP
-
-
-
-
645 g
695 g
L XXL
C
160 180 cm
C
175 200cm
S L
2
Size
1
Size
TOP CROLL
NAVAHO SIT FAST
0197
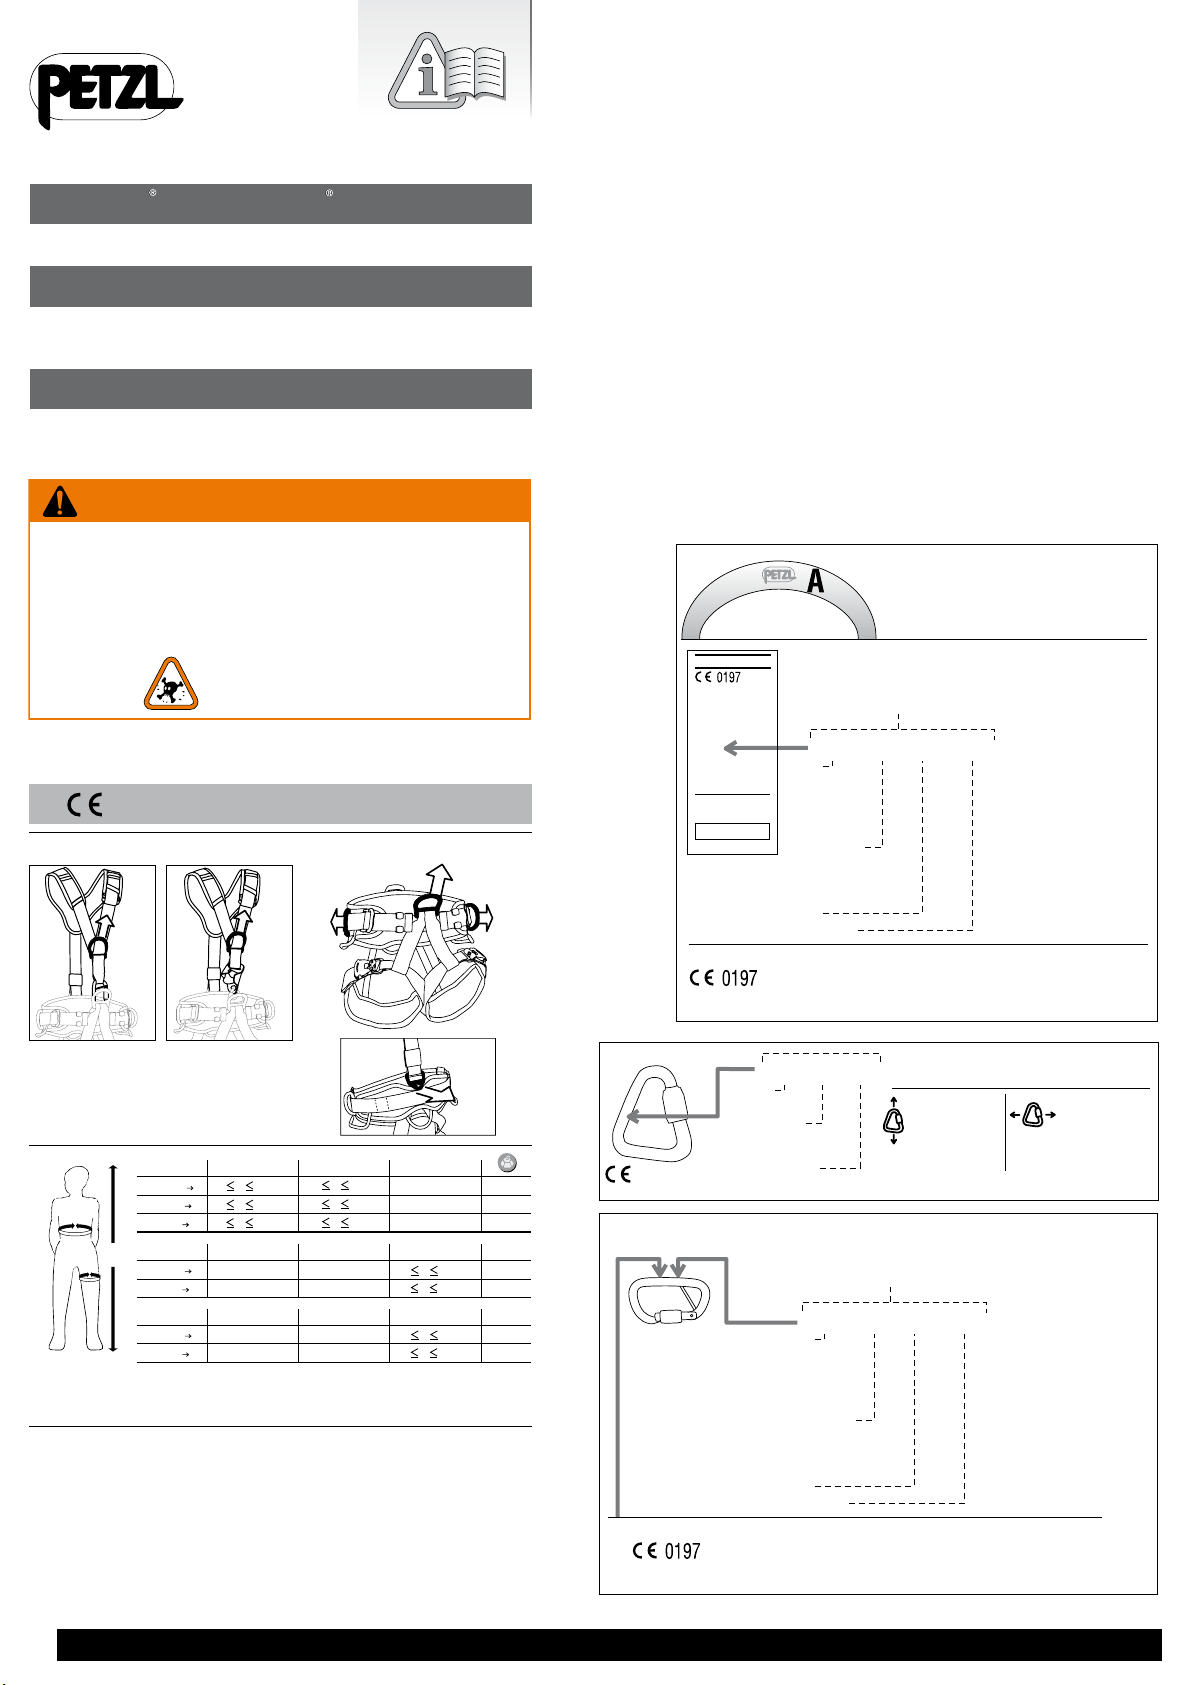
(EN) - NAVAHOSIT or NAVAHOSITFAST assembled with a TOPCROLL chest harness
Fall arrest harness, work positioning belt, seat harness,
rope access harness with integrated CROLL.
(EN) - NAVAHOSIT or NAVAHOSITFAST assembled with a TOP chest harness
Fall arrest harness, work positioning belt, seat harness.
(EN) Seat harness, work positioning belt.
Attachment point minimum breaking strength
15 kN 15 kN
15 kN
15 kN
15 kN
15 kN
EN FR DE IT ES
A 00 00
Last two digits
of the year of
manufacture
Equipment model
number
Supplier
traceability
0082
EN362:05/Q & 12275
MAILLON RAPIDE
MAILLON RAPIDE = Registered
trademark
25 kN = Major axis
breaking
strength in the closed
and
locked position
10 kN = Minor axis
breaking
strength in the closed
and
locked position
00 000 AA 0000
Control
Production date
Jour de fabrication
Tag der Herstellung
Giorno di fabbricazione
Día de fabricación
Year of
manufacture
Année de fabrication
Herstellungsjahr
Anno di fabbricazione
Año de fabricación
Individual number - Harness
Numéro individuel - Harnais
Individuelle Nummer - Gurt
Numero individale - Imbracatura
Numero individual - Arnés
Incrementation
APAVE SUD Europe BP 193,
13322 Marseille Cedex 16
N°0082
Notified body intervening for
the CE type examination
Organisme notifié intervenant
pour l’examen CE de type
Zertifizierungsorganisation für
die CE-Typenüberprüfung
Ente riconosciuto che interviene
per l’esame CE del tipo
Organismo notificado que
interviene en el examen CE de
tipo
Body controlling the manufacturing of this PPE
Organisme contrôlant la fabrication de cet EPI
Organisation, die die Herstellung dieser PSA kontrolliert
Organismo che controlla la fabbricazione di questo DPI
Organismo controlador de la fabricación de este EPI
TÜV Rheinland Product
Safety GmbH Am
Grauen Stein
D-51105 KÖLN
N°0197
NAVAHO SIT
User name / Nom de l'utilisateur /
Namen des Benutzers / nome
dell’utilizzatore / nombre del
usuario
Reference
Series N°
Size
®
Body controlling the manufacturing of this PPE
Organisme contrôlant la fabrication de cet EPI
Organisation, die die Herstellung dieser PSA kontrolliert
Organismo che controlla la fabbricazione di questo DPI
Organismo controlador de la fabricación de este EPI
TÜV Rheinland Product
Safety GmbH Am
Grauen Stein
D-51105 KÖLN
N°0197
00 000 AA 0000
Control
Production date
Jour de fabrication
Tag der Herstellung
Giorno di fabbricazione
Día de fabricación
Year of
manufacture
Année de fabrication
Herstellungsjahr
Anno di fabbricazione
Año de fabricación
Individual number - Connector
Numéro individuel - Connecteur
Individuelle Nummer - Verbindungselement
Numero individale - Connettore
Numero individual - Conector
Incrementation
APAVE SUD Europe BP 193,
13322 Marseille Cedex 16
N°0082
Notified body intervening for
the CE type examination
Organisme notifié intervenant
pour l’examen CE de type
Zertifizierungsorganisation für
die CE-Typenüberprüfung
Ente riconosciuto che interviene
per l’esame CE del tipo
Organismo notificado que
interviene en el examen CE de
tipo
A 00 00
Last two digits
of the year of
manufacture
Equipment model
number
Supplier
traceability
0082
EN362:05/Q & 12275
MAILLON RAPIDE
MAILLON RAPIDE = Registered
trademark
25 kN = Major axis
breaking
strength in the closed
and
locked position
10 kN = Minor axis
breaking
strength in the closed
and
locked position
Body controlling the manufacturing of this PPE
Organisme contrôlant la fabrication de cet EPI
Organisation, die die Herstellung dieser PSA kontrolliert
Organismo che controlla la fabbricazione di questo DPI
Organismo controlador de la fabricación de este EPI
TÜV Rheinland Product
Safety GmbH Am
Grauen Stein
D-51105 KÖLN
N°0197
00 000 AA 0000
Control
Production date
Jour de fabrication
Tag der Herstellung
Giorno di fabbricazione
Día de fabricación
Year of
manufacture
Année de fabrication
Herstellungsjahr
Anno di fabbricazione
Año de fabricación
Individual number - Connector
Numéro individuel - Connecteur
Individuelle Nummer - Verbindungselement
Numero individale - Connettore
Numero individual - Conector
Incrementation
APAVE SUD Europe BP 193,
13322 Marseille Cedex 16
N°0082
Notified body intervening for
the CE type examination
Organisme notifié intervenant
pour l’examen CE de type
Zertifizierungsorganisation für
die CE-Typenüberprüfung
Ente riconosciuto che interviene
per l’esame CE del tipo
Organismo notificado que
interviene en el examen CE de
tipo
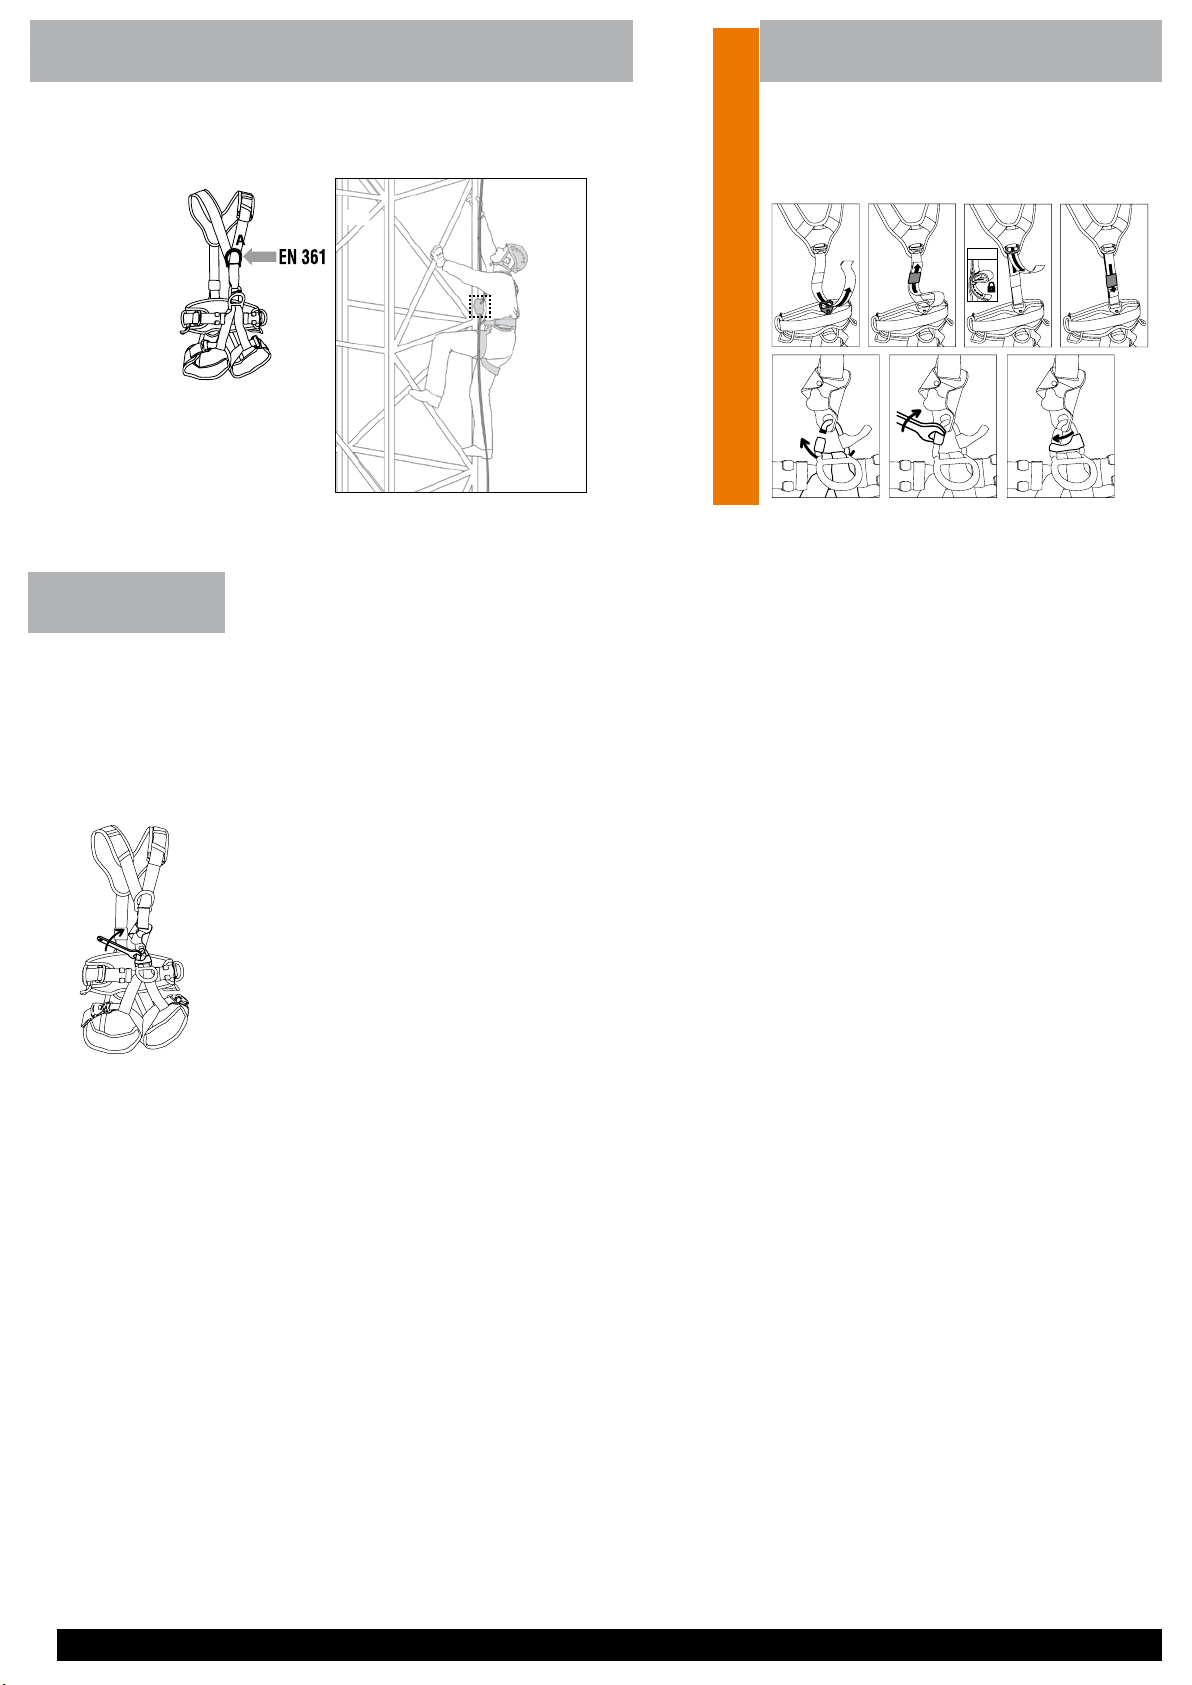
(EN)Fall-arrest
attachment point
EN 361
(FR) Anneau antichute EN 361
1
NAVAHO SIT / NAVAHO SIT FAST / TOP / TOP CROLL C79502-C (200907)
Page 2
A
A
A
3
13
4
1
10
13
13
4a
18
16
13
17
4b
8
10 / 10 bis
14
6
13
8
10
11
10 / 10 bis
10
13
13
1
2
1
8
12
11
9
15
10
13
11
5
7
3
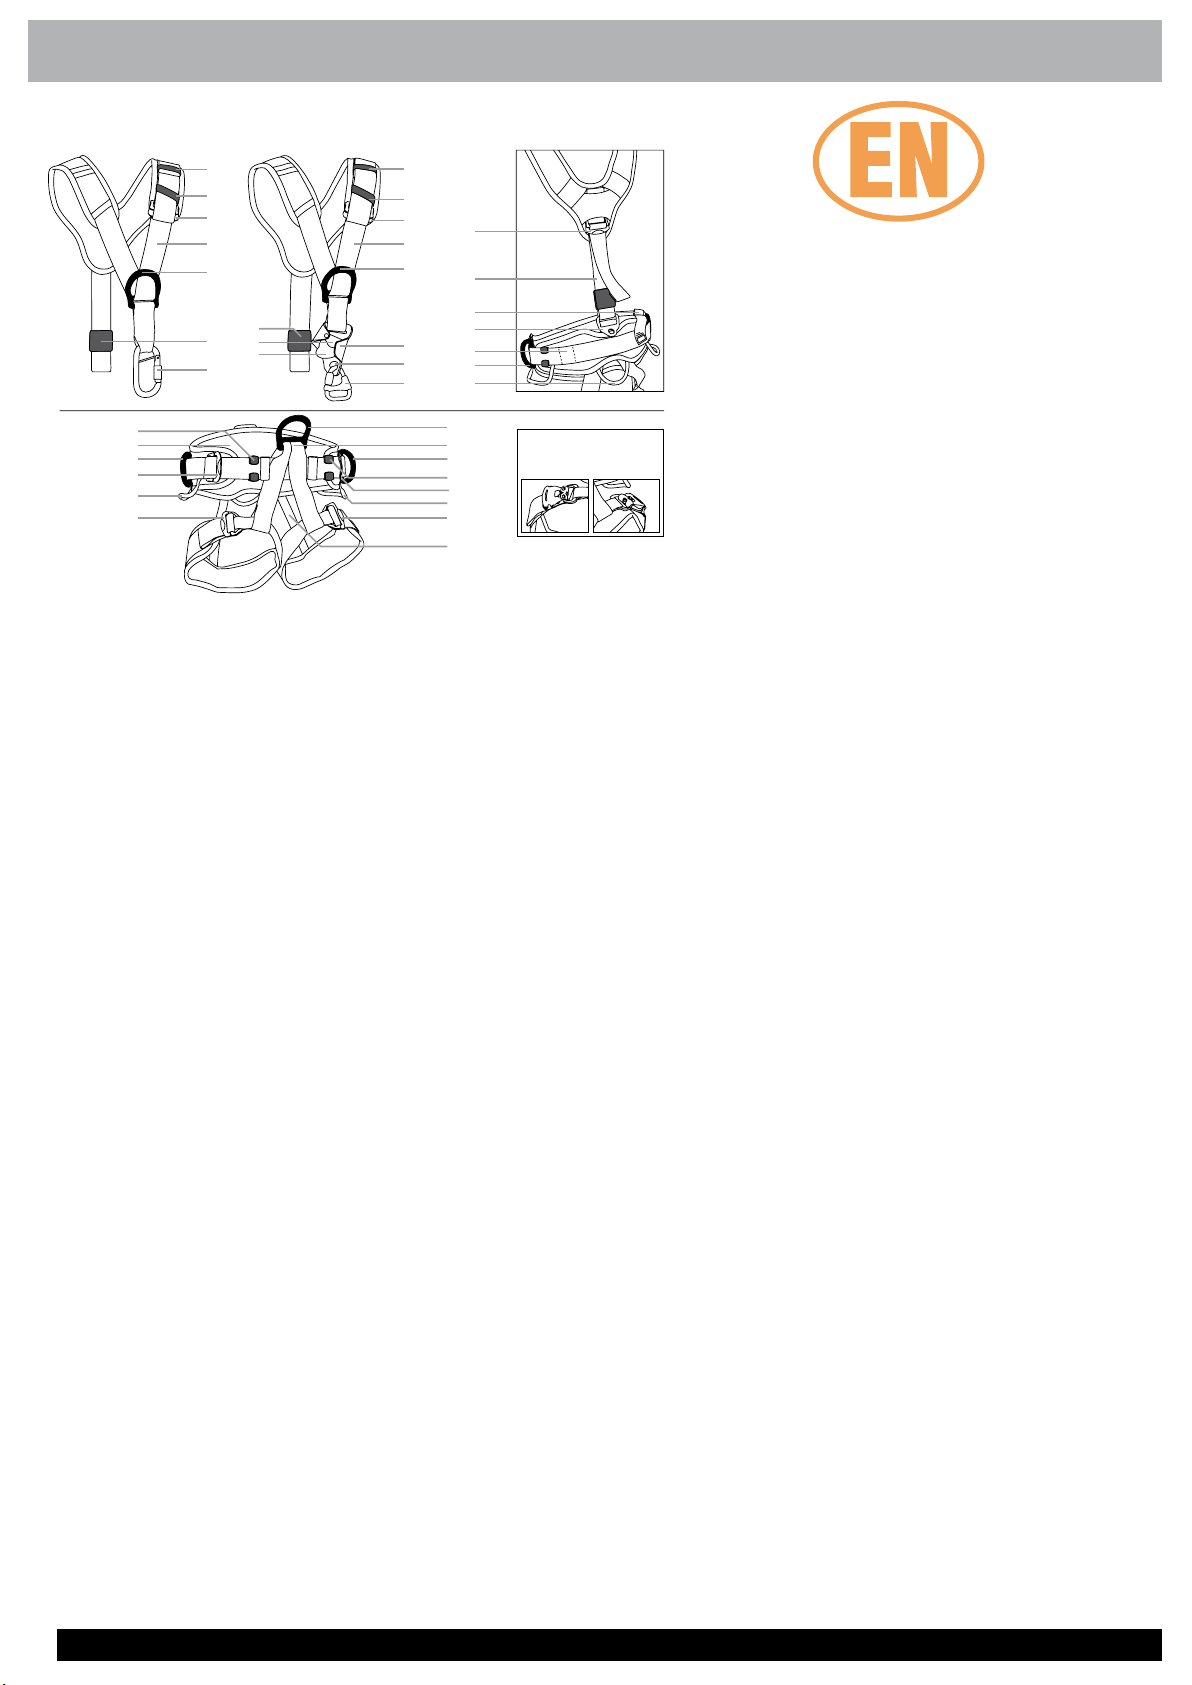
Nomenclature of parts
TOP TOP CROLL
NAVAHO SIT
(EN) Nomenclature of parts
- TOP chest harness:
(1) Shoulder straps,
(2) Dorsal adjustment buckle, (3) EN 361 sternal
attachment point,
(4) Directional connector.
- TOP CROLL chest harness:
(1) Shoulder straps,
(2) Dorsal adjustment buckle, (3) EN 361 sternal
attachment point,
(4) EN 12841 integrated CROLL ventral rope clamp,
(4b) Directional maillon rapide with separation bar,
(16) Cam,
(17) Trigger/safety catch, (18) Connection hole.
- NAVAHO SIT and NAVAHO SIT FAST seat harnesses:
(5) Ventral point (textile) connecting the chest harness
to the seat harness,
(6) Belt,
(7) EN 358, EN 813, ventral attachment point,
(8) EN 358 lateral belt attachment points,
(9) Rear buckle joining chest and seat components
with EN 358 restraint attachment point,
(10) DoubleBack adjustment buckles,
(10b) FAST quick-attach buckles,
(11) Equipment loop,
NAVAHO SIT FAST
10 b : FAST rapid buckles
(12) Slot for tool carrier,
(13) Strap retainer,
(14) Adjustable elastic straps, (15) Label with
markings that stows in the waist belt support.
Principal materials
Harness: polyester, steel (adjustment buckles),
aluminum alloy (attachment points).
CROLL ventral rope clamp: aluminum alloy (body),
chrome-plated steel (cam), polyamide (safety catch).
Only the techniques shown in the
diagrams that are not crossed out and/
or do not display a skull and crossbones
symbol are authorized. Check our Web
site www.petzl.com regularly to find the
latest versions of these documents.
Contact PETZL if you have any doubt
or difficulty understanding these
documents.
Field of
application
- NAVAHO SIT and NAVAHO SIT FAST
Seat harness, work positioning belt.
- NAVAHO SIT or NAVAHO SIT FAST
assembled with a TOP chest harness
Fall arrest harness, work positioning
belt, seat harness.
- NAVAHO SIT or NAVAHO SIT FAST
assembled with a TOP CROLL chest
harness
Fall arrest harness, work positioning
belt, seat harness, rope access harness
with integrated CROLL.
This product must not be loaded beyond
its strength rating, nor be used for any
purpose other than that for which it is
designed.
WARNING
Activities involving the use of this
equipment are inherently dangerous.
You are responsible for your own
actions and decisions.
Before using this equipment, you must:
- Read and understand all instructions
for use.
- Get specific training in its proper use.
- Become acquainted with its capabilities
and limitations.
- Understand and accept the risks
involved.
Failure to heed any of these warnings
may result in severe injury or death.
Responsibility
WARNING, specific training is essential
before use.
This product must only be used by
competent and responsible persons, or
those placed under the direct and visual
control of a competent and responsible
person.
Gaining an adequate apprenticeship in
appropriate techniques and methods of
protection is your own responsibility.
You personally assume all risks and
responsibilities for all damage, injury
or death which may occur during or
following incorrect use of our products
in any manner whatsoever. If you are not
able, or not in a position to assume this
responsibility or to take this risk, do not
use this equipment.
Inspection, points to verify
Before each use
- Harness
Check the webbing at the attachment
points, at the adjustment buckles and at
the safety stitching.
Look for cuts in the webbing, wear
and damage due to use, to heat, and
to contact with chemical products,
etc. Be particularly careful to check for
cut threads.
Verify that the DoubleBack and FAST
buckles operate properly.
- TOP
Directional connector
Make sure the body, gate, gate hinge and
locking sleeve are free of any cracks,
deformation, corrosion, etc. Open
the gate and verify that it closes itself
automatically when released. Verify that
the locking sleeve operates properly. The
Keylock slot (gate) must not be blocked
by any foreign matter (dirt, pebble, etc.).
- TOP CROLL
Directional maillon rapide
Before each use, check the body.
Verify that the locking nut is screwed
on completely (no threads visible) and
tightened with a torque of 3 Nm.
CROLL ventral rope clamp
Before each use, check the condition of
the body, the attachment hole, the cam
and the safety catch (cracks, scoring,
deformation, wear, corrosion), the cam
springs and axle. Make sure the teeth
are not worn out. Attention, do not
use a rope clamp that has missing or
worn-out teeth.
During each use
It is important to regularly inspect the
condition of the product. Check its
connections with the other equipment
in the system and make sure that the
various pieces of equipment in the
system are correctly positioned with
respect to each other.
Consult the details of the inspection
procedure to be carried out for each item
of PPE on the Web at www.petzl.com/
ppe or on the PETZL PPE CD-ROM.
Contact PETZL if there is any doubt
about the condition of this product.
2
NAVAHO SIT / NAVAHO SIT FAST / TOP / TOP CROLL C79502-C (200907)
Page 3
Clic !
DoubleBack
Fast
Adjustment and
suspension test
Your harness
must be adjusted
to fit snugly to
reduce the risk
of injury in case
of a fall.
You must move
around and hang
in the harness
(suspension
test) from each
attachment
point with your
equipment to
verify that the
harness fits
properly, provides
adequate comfort
for the intended
use and that
it is optimally
adjusted.
Go to size 2
1C. Fasten and adjust the leg loops.
- NAVAHO SIT: DoubleBack buckles.
- NAVAHO SIT FAST: Fasten the FAST buckles. Be careful of foreign bodies which can impede the
operation of the FAST buckles (such as pebbles, sand, clothing...). Check for correct locking.
1B. Adjust the belt by pulling on the belt straps. Stow the excess
webbing neatly using the strap retainers (flat against the waist
belt).
Diagram 1. How to put the harness on
Open the buckles on the leg loops.
1A. Hold the seat harness by
the belt, put your legs through
B
the belt and pull it up to your
waist.
1A. 1B. 1C.
DoubleBack
- Short ends: use the retainers in front of the adjustment
buckles.
Fast
- Long ends: pass them through the lateral rings then through
the retainers behind the rings.
NAVAHO SIT and NAVAHO SIT FAST
3
NAVAHO SIT / NAVAHO SIT FAST / TOP / TOP CROLL C79502-C (200907)
Page 4

4
NAVAHO SIT / NAVAHO SIT FAST / TOP / TOP CROLL C79502-C (200907)
C
WORK POSITIONING and RESTRAINT
Diagram 2. EN 358: 2000 harness for work positioning and restraint
These attachment points are designed to either hold the user in position at the work-post (work in suspension: work positioning), or to prevent the worker from entering a zone where a fall is possible (leash
principle: travel restraint). These attachment points must only be used to attach to a restraint or work positioning system, maximum fall height: 0,5 m.
These attachment points are not designed for fall arrest use and it may be necessary to supplement work positioning or restraint systems with collective fall arrest systems (e.g. safety nets) or personal fall
arrest systems (e.g. an EN 363 fall arrest system).
When used in a fall arrest system in accordance with the EN 363 standard, use a TOP or TOP CROLL chest harness in conjunction with your seat harness.
2A. Ventral attachment point
2B. Lateral belt attachment points
Always use the two lateral rings together by clipping a positioning
lanyard between them.
There should be a supporting surface for the feet for comfortable
work positioning.
Adjust the work positioning lanyard so that the anchor point is
above or at the same level as the user’s waist. The lanyard is kept
under tension and the free fall distance is limited to 0.5 m.
2C. Rear restraint attachment point
This rear attachment point on the belt is intended
only to attach a restraint system that keeps you
from entering a zone where the risk of a fall exists
(leash principle).
Regularly verify the length of your restraint and/or
work positioning lanyard during use.
GRILLON
EN 358
Maximum
height of
fall : 0,5 m
2A.
2B.
2C.
Restraint only - No suspension
D
ROPE ACCESS
Diagram 3. Seat harness:
EN 813: 1997
Ventral attachment point
The EN 813: 1997 standard concerns seat harnesses that are used in work positioning,
restraint, and rope access systems when a low attachment point is necessary.
Use this ventral ring to attach a descender, positioning lanyards or progression
lanyards.
This attachment point should not be used to attach fall arrest systems.
I’D
or Type C
rope
adjustment
devices
ASCENSION
+ EN 354
LANYARD
I’D
Example
Examples
Example
Page 5
E
Class T
Class T
19 mm
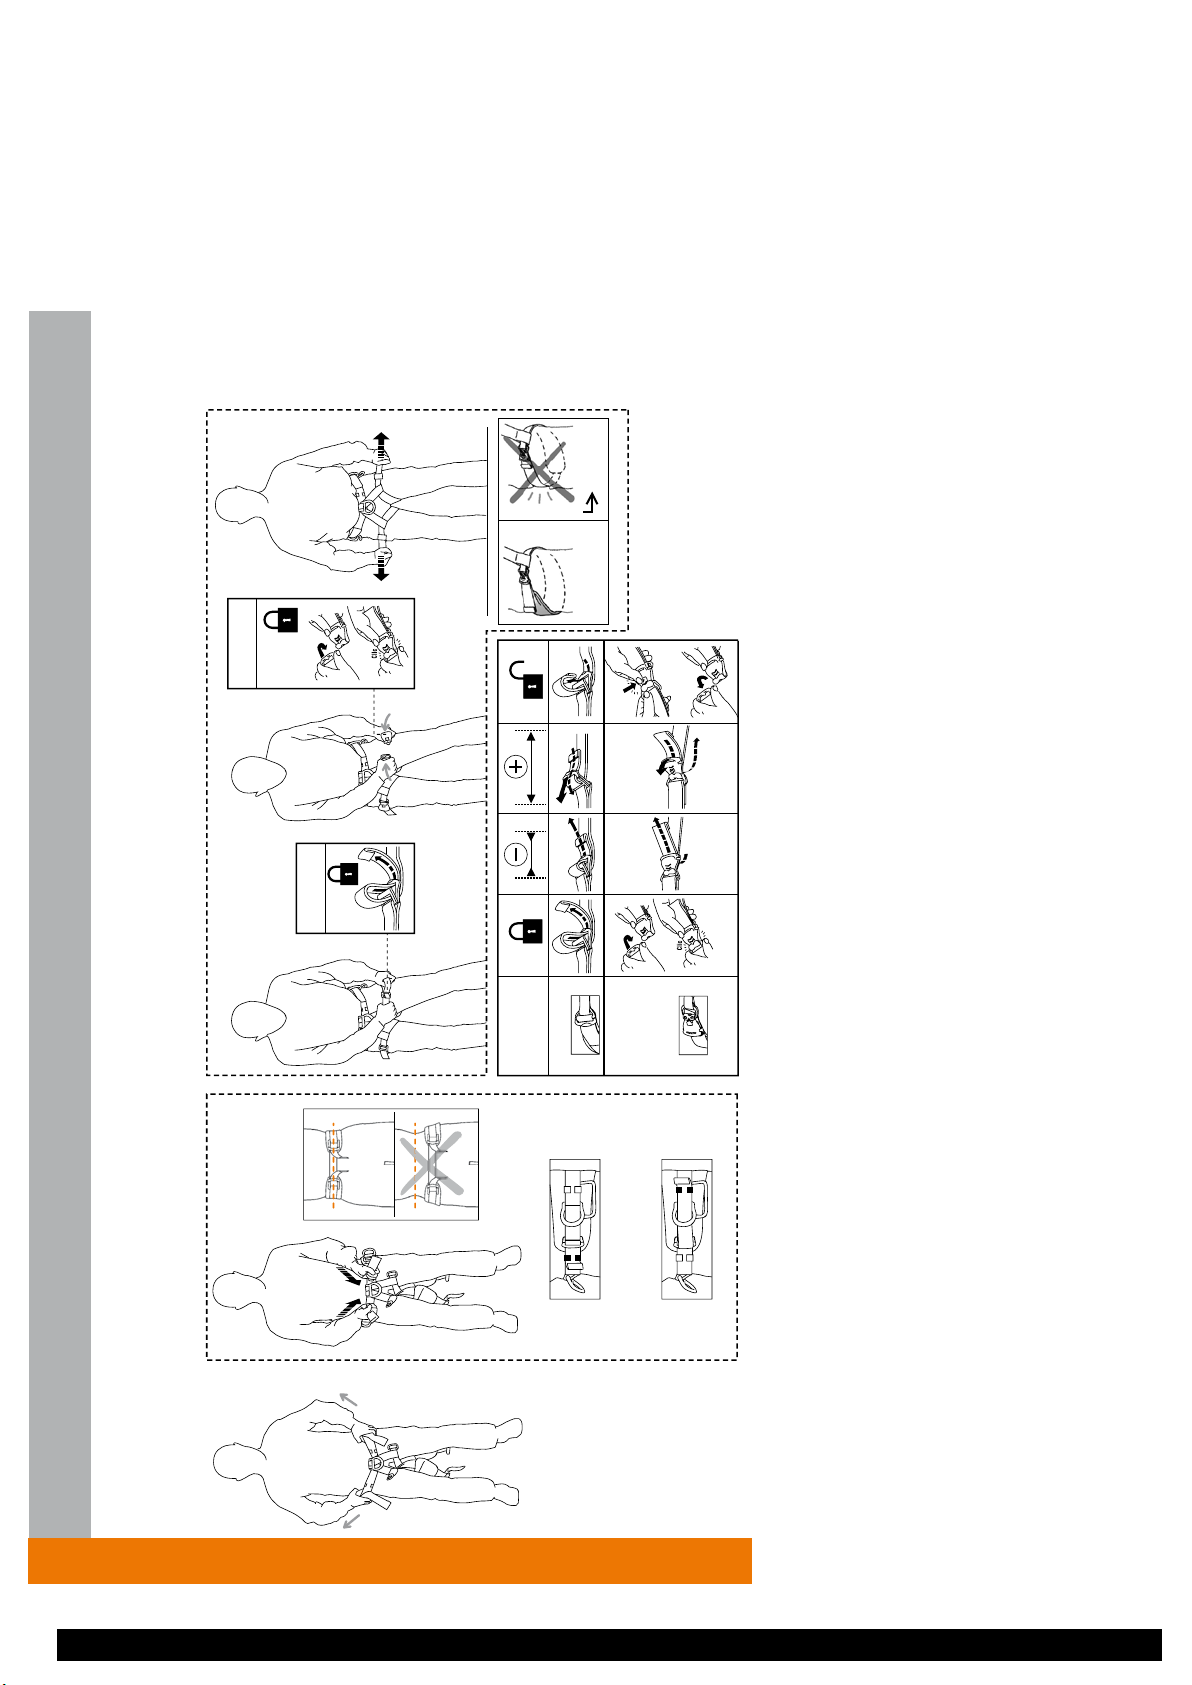
Diagram 4. Preparation
To attach the chest harness to the seat harness, pass the dorsal strap
through the rear chest-seat joining buckle (9), then through the elastic
retainer. Then thread the strap through the adjustment buckle for the dorsal
adjustment (2), then again through the elastic retainer.
1. 2.
3. 4.
NAVAHO SIT or NAVAHO SIT FAST + TOP
F
Diagram 5. How to put the harness on
Open the buckles on the leg loops.
5A. Putting the shoulder
straps off to one side, hold
the seat harness by the belt,
put your legs through the belt
and pull it up to your waist.
5A. 5B. 5C. 5D.
5B. Adjust the belt by pulling on the belt straps. Stow
the excess webbing neatly using the strap retainers
(flat against the waist belt).
- Short ends: use the retainers
in front of the adjustment buckles.
5C. Fasten and adjust the leg loops.
- NAVAHO SIT: DoubleBack buckles.
- NAVAHO SIT FAST: Fasten the FAST buckles. Be careful of foreign
bodies which can impede the operation of the FAST buckles (such as
pebbles, sand, clothing...). Check for correct locking.
5D. Position the shoulder straps on the shoulders. Put the connector in the
ventral point (textile) connecting the chest harness to the seat harness (5).
Lock the connector by turning the locking sleeve.
F
5E. Adjust the shoulder straps. Stow the excess webbing
using the strap retainer on the shoulder strap.
5E.
- Long ends: pass them through
the lateral rings then through the
retainers behind the rings.
5F. Initial dorsal adjustment
This adjustment should be done
only once when putting on your
harness for the first time. Have
another person help you do it.
Slide the strap retainer so that
both layers of webbing are
taut between the two buckles,
(2) and (9) (no slack).
Be sure to neatly stow the excess
webbing (flat - no loops of slack)
in the strap retainer so that it
doesn’t interfere with your work.
Adjust the position to suit your
individual body shape and size,
position the DoubleBack buckle at
the level of the shoulder blades.
5F.
Adjustment and
suspension test
Your harness must be
adjusted to fit snugly to
reduce the risk of injury in
case of a fall.
You must move around
and hang in the harness
(suspension test) from
each attachment point
with your equipment to
verify that the harness
fits properly, provides
adequate comfort for the
intended use and that it is
optimally adjusted.
G
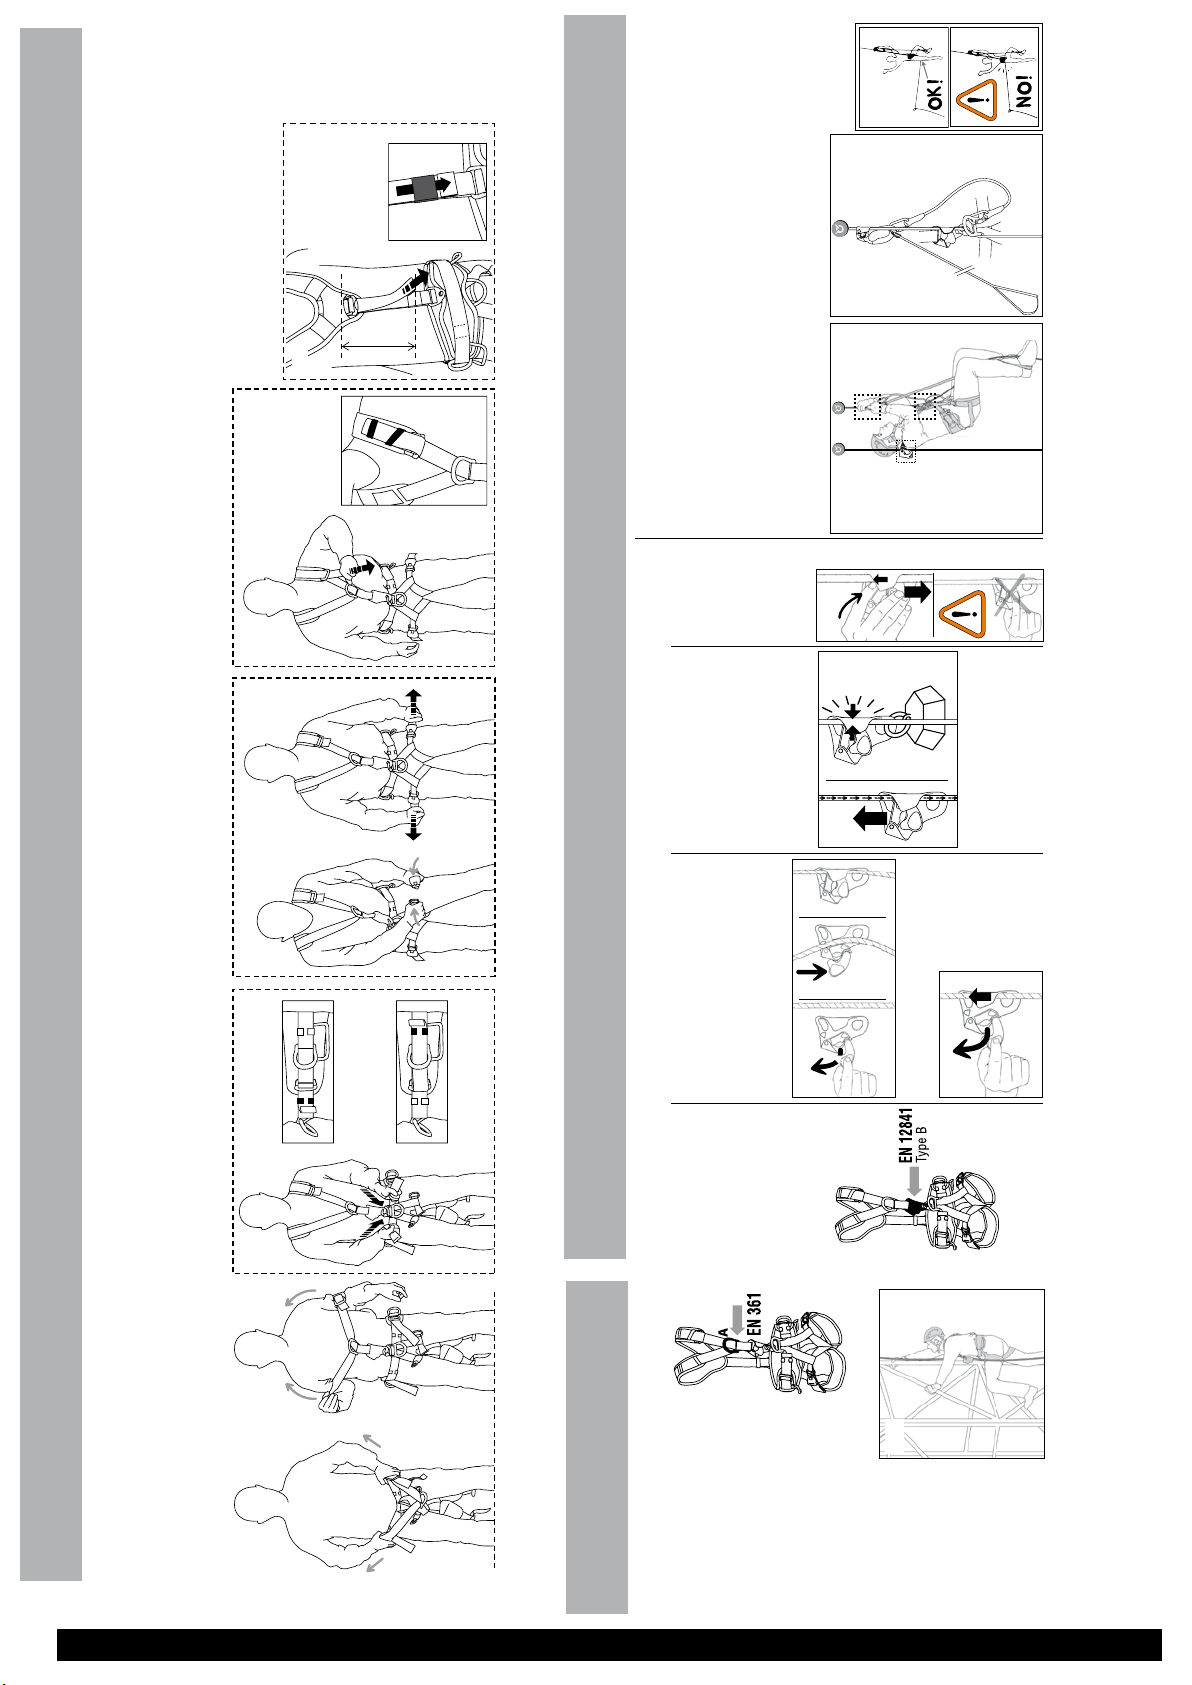
Diagram 6. Manual locking oval directional
connector
This EN 362: 2004
connector, a component
of the harness, is a
connecting element for
linking the chest harness
to the seat harness. Do not
use it to attach a lanyard
or energy absorber.
6A. ATTENTION DANGER,
the connector must always
be used with the gate
closed and locked. The
strength of the connector
is greatly reduced if the
gate is open.
Systematically verify the
gate is closed by pressing
it with your hand.
6B. The connector (closed)
is strongest when loaded
on its major axis. Any
other position reduces its
strength.
6A.
6B.
5
NAVAHO SIT / NAVAHO SIT FAST / TOP / TOP CROLL C79502-C (200907)
Page 6
ASAP
EN 353.2
H
3,0 Nm
Clic !
FALL ARREST
I
Diagram 7. EN 361: 2002 fall arrest
harness
Full body harness for fall arrest,
component of a fall arrest system
in accordance with the EN 363
standard (personal fall arrest
systems). It must be used in
conjunction with EN 795 anchors,
EN 362 locking carabiners,
EN 355 energy absorber, etc.
7A. Sternal attachment point
Use only this point to attach
a fall arrest system (for
example a mobile fall arrester,
an energy absorber, or other
system described in the
EN 363 standard). For ease of
identification, this point is marked
with the letter ‘A’.
Clearance: amount of free space
below the user
The clearance below the user
must be sufficient to prevent the
user from striking any obstacle in
case of a fall. Specific details on
calculating clearance are found in
the technical notices for the other
components (energy absorbers,
mobile fall arrester, etc.).
Fall arrest systems Example:
7A.
J
Diagram 9.
ASAP
EN 353.2
Diagram 8. Preparation
To attach the chest harness to the seat harness, pass the dorsal strap through the rear chestseat joining buckle (9), then through the elastic retainer. Then thread the strap through the
adjustment buckle for the dorsal adjustment (2), then again through the elastic retainer.
To attach the CROLL to the front of the harness, attach it to the maillon rapide located in
the textile ventral connection point (5). Screw the maillon closed and tighten the nut with a
wrench to 3 Nm of torque. Be sure to close and clip the plastic separation bar.
1. 2. 3. 4.
5. 6. 7.
NAVAHO SIT or NAVAHO SIT FAST + TOP CROLL
Directional
maillon rapide
The maillon rapide is a component of the
harness that is used as a connecting element
to join the front of the torso to the belt. It
must always be tightened to 3 Nm (making
unscrewing by hand impossible).
Do not use it to attach a lanyard or energy
absorber.
3,0 Nm
6
NAVAHO SIT / NAVAHO SIT FAST / TOP / TOP CROLL C79502-C (200907)
Page 7
Clic !
Adjustment and suspension test
ASAP
EN 353.2
ABSORBICA-I
EN 355
Etc...
STOP!
STOP!
STOP!
Your harness must be adjusted to fit snugly
to reduce the risk of injury in case of a fall.
You must move around and hang in the
harness (suspension test) from each
attachment point with your equipment to
verify that the harness fits properly, provides
adequate comfort for the intended use and
that it is optimally adjusted.
10F. Initial dorsal adjustment
This adjustment should be done only
once when putting on your harness
for the first time. Have another person
help you do it.
Slide the strap retainer so that both
layers of webbing are taut between the
two buckles, (2) and (9) (no slack).
Be sure to neatly stow the excess
webbing (flat - no loops of slack) in the
strap retainer so that it doesn’t interfere
with your work.
Adjust the position to suit your
individual body shape and size, position
the DoubleBack buckle at the level of the
10E. Adjust the shoulder straps. Stow the
excess webbing using the strap retainer on the
shoulder strap.
10F.
shoulder blades.
capable of damaging it (e.g. sharp
edge, rough surface, etc).
- The rope must be able to slide
freely through the CROLL. Beware
of situations that can impede sliding
(e.g. knot or worn/damaged section in
the rope, etc.).
- Do not forget to tie a stopper knot in
the end of the rope.
Diagram 14. Rope climbing
- Work rope: Use the CROLL and
another hand rope clamp (e.g.
ASCENSION handled rope clamp) with
a foot-loop. Always attach yourself
to the second ascender with an
of the cam (pebbles, mud, vegetation,
cordage, slings, clothing, paint, etc.).
- BEWARE of catching the safety
catch in clothing and webbing.
- The rope between the CROLL and
the anchor point must always be taut.
The user must always stay below the
anchor point of the rope.
- Shock-load absorption by the rope:
do not forget that it is the rope which
absorbs energy in the event of a fall.
The closer you get to the anchor
point, the more the energy-absorbing
capacity of the rope diminishes,
13C. Operational check
Before each use, to verify correct
orientation on the rope and
functioning of the device, a test must
always be carried out with the user
self-belayed.
Push the CROLL up the rope. It must
slide easily up the rope. Pull it down
to verify it grips the rope.
13D. Precautions
- Close the CROLL’s cam when not
in use because equipment or other
objects can become stuck in the
device if left open.
13B. Moving the
CROLL down the rope
(exceptional situation)
Move the CROLL a short
distance up the rope
and simultaneously
push down on the cam
with the index finger
to disengage the teeth
from the sheath of the
rope. Do not manipulate
the trigger/safety catch
because this creates
a risk of involuntary
appropriate lanyard.
- Safety rope: use a type A device.
JANE /
SPELEGYCA
ASCENSION
Type B
rope
1
FOOTPRO
adjustment
devices
Type A
rope
adjustment
3
Example :
eventually becoming practically zero.
- Protect the rope from anything
Working line
Safety line
- ATTENTION, do not allow foreign
objects to interfere with the operation
2
opening of the cam.
devices
10D. Fasten the FAST buckles and adjust the leg loops. Be careful of
foreign bodies which can impede the operation of the FAST buckles
(such as pebbles, sand, clothing...). Check for correct locking.
- Long ends: pass them through
the lateral rings then through the
- Short ends: use the
retainers in front of the
adjustment buckles.
10C. Adjust the belt by pulling on the belt straps.
Stow the excess webbing neatly using the strap
retainers (flat against the waist belt).
retainers behind the rings.
10B. Position the shoulder
straps on the shoulders.
Diagram 13. Principles of
operation
13A. Ascending
The CROLL is a device for ascending the work
or access rope. It grips the rope when loaded
in a downward direction and slides easily when
moved up the rope.
The teeth push into the sheath of the rope,
engaging the cam and causing the device to jam
on the rope. Slots in the cam allow mud, etc. to
be evacuated.
Diagram 12. Installation on the rope
Pull the trigger/safety catch down and out with the
thumb and index finger. Until it locks in place against
the body of the device. The cam is thus held open.
Put the rope into position. Push on the safety catch
until the cam swings into place against the rope.
The safety catch helps prevent involuntary opening
of the cam.
ROPE ACCESS
Field of application
The EN 12841: 2006 CROLL
rope clamp is a type B rope
adjuster used to ascend the
work rope.
ATTENTION, it must be used
with a type A backup device
on a second (safety) rope
(e.g. ASAP mobile fall arrester
for rope).
M
CROLL ventral rope clamp EN 12841: 2006
The CROLL ventral rope clamp
1 2
1 2 3
is not suitable for use in an
EN 363 fall arrest system.
Removing the rope
Move the device up the rope while pulling
ASAP
EN 353.2
1
2
the trigger/safety catch down and out.
Rope diameter
Use a 10-13 mm EN 1891
type A semi-static kernmantel
rope.
10A. Spread the shoulder straps
Diagram 10. How to put the harness on
K
7
Open the FAST buckles on the leg loops.
NAVAHO SIT / NAVAHO SIT FAST / TOP / TOP CROLL C79502-C (200907)
apart, grasp the harness by the
10A. 10B. 10C. 10D. 10E.
belt and slip both feet through
the leg loops.
FALL ARREST
Diagram 11.
EN 361: 2002 fall
arrest harness
Full body harness for fall arrest,
component of a fall arrest system
in accordance with the EN 363
L
standard (personal fall arrest
11A.
Fall arrest systems Example:
systems). It must be used in
conjunction with EN 795 anchors,
EN 362 locking carabiners, EN 355
energy absorber, etc.
11A. Sternal attachment point
Use only this point to attach a
fall arrest system (for example
a mobile fall arrester, an energy
absorber, or other system
described in the EN 363 standard).
For ease of identification, this point
is marked with the letter ‘A’.
Clearance: amount of free space
below the user
The clearance below the user
must be sufficient to prevent the
user from striking any obstacle in
case of a fall. Specific details on
calculating clearance are found in
the technical notices for the other
components (energy absorbers,
mobile fall arrester, etc.).
Page 8
(EN) Load
+ 80°C
- 40°C
+ 176°F
-
40°F
H
2
O
H
2
O
30
C maxi
30
C
maxi
PETZL
H
2
O
H
2
O
30
C maxi
30
C
maxi
PETZL
H
2
O
H
2
O
30
C maxi
30
C
maxi
30
C
maxi
PETZL
30
C
maxi
PETZL
(FR) Charge
(DE) Belastung
(IT) Carico
(EN) Anchor
(FR) Amarrage
(DE) Anschlagpunkt
(IT) Ancoraggio
(EN) Harness
(FR) Harnais
(DE) Gurt
(IT) Imbracatura
(RU) Прочитайте
внимательно эту инструкцию
(CZ) Čtěte pozorně tento návod
(PL) Przeczytać uważnie
(EN) Carefully read this notice
(FR) Lire attentivement cette
notice
Legends
(DE) Lesen Sie diese
(ES) Carga
(PT) Carga
(NL) Last
(SE) Belastning
(FI) Taakka
(NO) Belastning
(RU) Груз
(CZ) Zátížení
(PL) Obciążenie
(SI) Obremenitev
(HU) Tömeg
(BG) Натоварване
(ES) Anclaje
(PT) Amarração
(NL) Verankering
(SE) Förankring
(FI) Ankkuri
(NO) Forankring
(RU) Точка
страховки
(CZ) Ukotvení
(PL) Punkt
stanowiskow y
(SI) Sidrišče
(ES) Arnés
(PT) Harnês
(NL) Gordel
(FI) Valjaat
(NO) Sele
(RU) Oбвязка
niniejszą instrukcję
(SI) Pozorno preberite to
navodilo
(HU) Kérjük olvassa el
gyelmesen a tájékoztatót!
(BG) Прочетете внимателно
Gebrauchsanweisung sorgfältig
durch
(IT) Leggere attentamente
queste istruzioni
(ES) Lea atentamente esta ficha
técnica
(JP) ハーネス
(CZ) Postr oj
(PL) Uprząż
(SI) Pas
(HU) Hevederzet
(BG) Предпазен колан
тази инструкция
(JP) 本説明書を良くお読
みくだ さい
(KR) 기술 설명서 숙지
필수
(CN) 仔細閱讀本聲明
(PT) Leia atentamente esta
notícia
(NL) Lees aandachtig deze
bijsluiter
(SE) Läs denna information
noggrant
(JP) 荷重
(KR) 하중
(CN) 負重
(TH)
การรับน้ำหนัก
确定点
(HU) Fix pont
(BG) Закрепване
(JP) 支点
(KR) 확보점
(CN)
(TH) สมอ
(KR) 안전대
(CN) 安全帶
(TH) สายรัดนิรภัย
(TH)
อ่านข้อแนะนำนี้อย่างละเอียด
(FI) Lue tämä käyttöohje
huolellisesti
(NO) Les bruksanvisningen nøye
Product obsolescence
There are many reasons why a product may be judged
obsolete and thus retired before the end of its actual
lifetime. Examples include: changes in applicable
standards, regulations, or legislation; development of
new techniques, incompatibility with other equipment,
etc.
Modifications, repairs
Any modification, addition to, or repair of the equipment
other than that authorized by Petzl is prohibited: due to
the risk of reducing the effectiveness of the equipment.
Storage, transport
Keep your harness in a container (bag, box) to protect it
from exposure to UV, moisture, chemical products, etc.
Guarantee
This product is guaranteed for 3 years against any
faults in materials or manufacture. Exclusions from
When to retire your equipment
Immediately retire any equipment if:
- it fails to pass inspection (inspection before and during
use and the periodic in-depth inspection),
- it has been subjected to a major fall or load,
- you do not know its full usage history,
details: type of equipment, model, name and contact
information of the manufacturer or distributor, means
of identification (serial or individual number), year of
manufacture, date of purchase, date of first use, name
of user, all other pertinent information for example
maintenance and frequency of use, the history of
periodic inspections (date / comments and noted
problems / name and signature of the competent person
who performed the inspection / anticipated date of
next inspection). See example of detailed inspection
record and other informational tools available at www.
petzl.com/ppe
temperatures, sharp edges, major fall or load, etc.
The potential lifetime of Petzl products is as follows: up
to 10 years from the date of manufacture for plastic and
textile products. It is indefinite for metallic products.
The actual lifetime of a product ends when it meets one
of the retirement criteria listed below (see “When to
retire your equipment”), or when in its system use it is
judged obsolete.
Inspect equipment periodically for
The actual lifetime is influenced by a variety of factors
such as: the intensity, frequency, and environment of
use, the competence of the user, how well the product is
stored and maintained, etc.
- it is at least 10 years old and made of plastics or
damage and/or deterioration.
In addition to the inspection before and during use, a
periodic in-depth inspection must be carried out by a
competent inspector at least once every 12 months.
This inspection must be performed at least once every
12 months. The frequency of the in-depth inspection
the guarantee: normal wear and tear, oxidation,
modifications or alterations, incorrect storage, poor
maintenance, damage due to accidents, to negligence,
or to improper or incorrect usage.
PETZL is not responsible for the consequences, direct,
indirect or accidental, or any other type of damage
befalling or resulting from the use of its products.
textiles,
- you have any doubt as to its integrity.
Destroy retired equipment to prevent further use.
must be governed by the type and the intensity of use.
To keep better track of your equipment, it is preferable
to assign each piece of equipment to a unique user so
that he will know its history. The results of inspections
should be documented in an «inspection record».
This document must allow recording of the following
(JP) メンテナンス(KR)
(CN) 保養
(EN) Maintenance
(FR) Entretien
(DE) Wartung
(IT) Manutenzione
(HU) Szárítás
(EN) Drying
(RU) Опасная продукция
(EN) Dangerous products
(TH)
การซ่อมแซม
(ES)
Mantenimiento
(PT) Manutenção
(NL) Onderhoud
(SE) Underhåll
(BG) Сушене
(JP) 乾燥
(CN) 使干燥
(TH) ทำให้แห้ง
(FR) Séchage
(DE) Trocknen
(IT) Asciugamento
(ES) Secado
(PT) Secagem
(JP) 有害物質
(KR)
(CZ) Nebezpečné výrobky
(PL) Produkty niebezpieczne
(FR) Produits dangereux
(DE) Gefährliche Produkte
(FI) Huolehtiminen
(NO) Vedlikehold
(RU) Техническое
(NL) Het drogen
(SE) Torkning
(FI) Kuivaus
(CN) 危险產品
(SI) Nevarne kemikalije
(HU) Veszélyes termékek
(BG) Опасни продукти
(IT) Prodotti pericolosi
(ES) Productos peligrosos
(PT) produtos perigosos
(NL) Gevaarlijke producten
(SE) Farliga produkter
(FI) Vaaralliset tuotteet
обслуживание
(CZ) Údržba
(PL) Konserwacja
(SI) Vzdrževanje
(HU) Karbantartás
(BG) Поддържане
(NO) Tørking
(RU) Сушка
(CZ) Sušení
(PL) Suszenie
(SI) Sušenje
(TH) วัตถุอันตราย
(NO) Farlige produkter
8
Slot
for tool
carrier
10 kg
15 kg
maxi
maxi
10 kg
maxi
GENERAL INFORMATION
10 kg
Equipment loop maximum load
N
NAVAHO SIT / NAVAHO SIT FAST / TOP / TOP CROLL C79502-C (200907)
maxi
O
Inspect the connectors as indicated in their Instructions
for use.
Various
- ATTENTION DANGER, do not allow this product to rub
against abrasive materials or sharp edges.
- Users must be medically fit for activities at height.
WARNING, inert suspension in a harness can result in
serious injury or death.
- You must check to ensure that the product markings
remain legible during the entire lifetime of the product.
- You must verify the suitability of this equipment
for use in your application with regard to applicable
governmental regulations and other standards on
occupational safety.
- The instructions for use for each item of equipment
used in conjunction with this product must be
respected.
- The instructions for use must be provided to users of
this equipment. If the equipment is re-sold outside the
original country of destination the reseller shall provide
these instructions in the language of the country in
EN 365: WARNING
Compatibility
Check that this product is compatible with the other
components of your equipment, see the instructions
specific to the products.
WARNING, when using multiple pieces of equipment
together, a dangerous situation can result if the safety
function of one piece of equipment is compromised by
the operation of another piece of equipment.
Contact Petzl if you are uncertain about the compatibility
of your equipment.
Anchors: Work at height
The anchor point of the system should preferably be
located above the user’s position and must conform to
the requirements of the EN 795 standard, in particular
the minimum strength of the anchor must be 10 kN.
Rescue plan
You must have a rescue plan and the means to rapidly
implement it in case of difficulties encountered while
using this equipment. This implies an adequate training
in the necessary rescue techniques.
General information
Compatibility: attachment points /
connectors
An incompatible connection can cause accidental
disconnection, breakage, or affect the safety function of
another piece of equipment.
WARNING, the attachment points of your harness can
act as a lever on the gate of a connector.
When a sudden tension comes onto the rope and/or
an external pressure on the locking system, and the
connector is poorly positioned, the locking sleeve can
break and the gate can open itself.
To reduce this risk, check that your connectors are
properly positioned each time the system is loaded
(lanyard, descender, etc.).
Also make sure your connectors are compatible with
the attachment points (shape, size, etc.) by avoiding
the use of connectors showing a tendency to position
themselves incorrectly (and stably) in the attachment
Lifetime
WARNING, an exceptional event can reduce the lifetime
of the product to one single use; for example, if it is
exposed to any of the following: chemicals, extreme
which the product is to be used.
(BG) Транспорт и
съхранение
(JP) 持ち運びと保
管方法
Connectors
Carabiners must always be used with the gate closed
and locked. Systematically verify the gate is closed by
pressing it with your hand.
(EN) Storage and transport
(FR) Rangement et transport
(DE) Lagerung und Transport
(IT) Sistemazione e trasporto
(PL)
Temperatura
(SI) Temperatura
(HU)
(EN)
Temperature
(FR) Température
points.
(DE) Temperatur
(CZ) Čištění Desinfekce
(PL) Czyszczenie
Dezynfekcja
(SI) Čiščenje/razkuževanje
(HU) Tisztítás
(BG) Почистване
Дезинфекция
(JP) 手入れ方法 消毒
(KR)
(EN) Cleaning Disinfection
(FR) Nettoyage Désinfection
(DE) Reinigung Desinfektion
(IT) Pulizia Disinfezione
(ES) Limpieza Desinfección
(PT) Limpeza Desinfecção
(NL) Reiniging Ontsmetting
(SE) Rengöring
Desinficering
(KR) 보관과 운송
(CN) 運輸及儲存
(TH)
การขนส่งและการเก็บรักษา
(ES) Almacenamiento y
transporte
(PT) Armazenamento e
transporte
(NL) Opbergen en vervoeren
(FI) Säilytys ja kuljetus
(NO) Lagring og transport
(RU) Хранение и
транспортировка
Hőmérséklet
(BG)
Температура
(JP) 気温
(CN) 温度
(TH) อุณหภูมิ
(IT) Temperatura
(ES) Temperatura
(PT) Temperatura
(NL)
Temperatuur
(SE) Temperatur
(FI) Lämpötila
(NO) Temperatur
(RU)
(CN) 清洗 消毒
(TH) ทำความสะอาดโดย
ใช้สารฆ่าเชื้อ
(FI) Puhdistus Desinfiointi
(NO) Rengjøring
Desinfisering
(RU) Чистка Дезинфекция
(CZ) Skladování a doprava
(PL) Pakowanie i transport
(SI) Shranjevanje in transport
(HU) Tárolás, szállítás
Температура
(CZ) Teplota
Page 9

(FR) FRANÇAIS
Mode d’emploi
- NAVAHO SIT et NAVAHO SIT FAST
Harnais cuissard, ceinture de maintien.
- NAVAHO SIT ou NAVAHO SIT FAST assemblé au torse TOP
Harnais antichute, ceinture de maintien, harnais cuissard.
- NAVAHO SIT ou NAVAHO SIT FAST assemblé au torse TOP CROLL
Harnais antichute, ceinture de maintien, harnais cuissard, harnais d’accès sur corde avec
bloqueur CROLL intégré.
A
Seules les techniques présentées non barrées et/ou sans tête de mort sont autorisées.
Prenez régulièrement connaissance des dernières mises à jour de ces documents sur
notre site www.petzl.com
En cas de doute ou de problème de compréhension, renseignez-vous auprès de PETZL.
Champ d’application
- NAVAHO SIT et NAVAHO SIT FAST
Harnais cuissard, ceinture de maintien.
- NAVAHO SIT ou NAVAHO SIT FAST assemblé au torse TOP
Harnais antichute, ceinture de maintien, harnais cuissard.
- NAVAHO SIT ou NAVAHO SIT FAST assemblé au torse TOP CROLL
Harnais antichute, ceinture de maintien, harnais cuissard, harnais d’accès sur corde avec
bloqueur CROLL intégré.
Ce produit ne doit pas être sollicité au-delà de ses limites ou dans toute autre situation
que celle pour laquelle il est prévu.
ATTENTION
Les activités impliquant l’utilisation de cet équipement sont par nature dangereuses.
Vous êtes responsable de vos actes et de vos décisions.
Avant d’utiliser cet équipement, vous devez :
- Lire et comprendre toutes les instructions d’utilisation.
- Vous former spécifiquement à l’utilisation de cet équipement.
- Vous familiariser avec votre équipement, apprendre à connaître ses performances et
ses limites.
- Comprendre et accepter les risques induits.
Le non-respect d’un seul de ces avertissements peut-être la cause de blessures graves
ou mortelles.
Responsabilité
ATTENTION, une formation adaptée à la pratique est indispensable avant utilisation.
Ce produit ne doit être utilisé que par des personnes compétentes et avisées, ou placées
sous le contrôle visuel direct d’une personne compétente et avisée.
L’apprentissage des techniques adéquates et des mesures de sécurité s’effectue sous
votre seule responsabilité.
Vous assumez personnellement tous les risques et responsabilités pour tout dommage,
blessure ou mort pouvant survenir suite à une mauvaise utilisation de nos produits de
quelque façon que ce soit. Si vous n’êtes pas en mesure d’assumer cette responsabilité
ou de prendre ce risque, n’utilisez pas ce matériel.
Nomenclature des pièces
- Torse TOP :
(1) Bretelles, (2) Boucle de réglage dorsal, (3) Anneau sternal EN 361, (4) Connecteur
directionnel.
- Torse TOP CROLL :
(1) Bretelles, (2) Boucle de réglage dorsal, (3) Anneau sternal EN 361, (4a) Bloqueur
ventral CROLL intégré EN 12841, (4b) Maillon rapide directionnel avec barrette de
séparation, (16) Gâchette, (17) Taquet de sécurité, (18) Trou de connexion.
- Cuissards NAVAHO SIT et NAVAHO SIT FAST :
(5) Point ventral (textile) de liaison torse cuissard, (6) Ceinture, (7) Anneau ventral
EN 358, EN 813, (8) Anneaux latéraux de ceinture EN 358, (9) Boucle arrière de
liaison torse cuissard avec point d’attache de retenue EN 358, (10) Boucles de réglage
DoubleBack, (10 bis) Boucles rapides FAST, (11) Porte-matériel, (12) Passant pour porteoutil, (13) Passant pour sangle, (14) Élastiques réglables, (15) Étiquette de marquage à
ranger dans le renfort de la ceinture.
Matériaux principaux
Harnais : polyester, acier (boucles de réglage), alliage aluminium (points d’attache).
Bloqueur ventral CROLL : alliage aluminium (corps), acier chromé (gâchette), polyamide
(taquet de sécurité).
Contrôle, points à vérifier
Avant toute utilisation
- Harnais
Vérifiez les sangles au niveau des anneaux d’accrochage, des boucles de réglage et des
coutures de sécurité.
Surveillez les coupures, usures et dommages dus à l’utilisation, à la chaleur, aux produits
chimiques etc. Attention aux fils coupés.
Vérifiez le bon fonctionnement des boucles DoubleBack et FAST.
- TOP
Connecteur directionnel
Vérifiez sur le corps, le doigt, le rivet, la bague de verrouillage, l’absence de fissures,
déformations, corrosion… Ouvrez le doigt et vérifiez qu’il se ferme automatiquement
quand vous le relâchez. Vérifiez le bon fonctionnement de la bague de verrouillage. Le
trou du Keylock, au niveau du doigt, ne doit pas être encombré (terre, caillou…).
- TOP CROLL
Maillon rapide directionnel
Avant toute utilisation, vérifiez le corps.
Vérifiez que l’écrou de verrouillage soit correctement vissé à fond (aucun filet ne doit
apparaître) et bloqué au couple de serrage de 3 Nm.
Bloqueur ventral CROLL
Avant utilisation, vérifiez l’état du corps, du trou de connexion, de la gâchette et du taquet
de sécurité (fissures, marques, déformation, usure, corrosion), les ressorts et l’axe de
la gâchette. Vérifiez l’usure des dents. Attention, s’il manque des dents ou si elles sont
usées, n’utilisez plus ce bloqueur.
Pendant l’utilisation
Il est important de contrôler régulièrement l’état du produit. Assurez-vous de la connexion
et du bon positionnement des équipements les uns par rapport aux autres.
Consultez le détail du contrôle à effectuer pour chaque EPI sur le site www.petzl.fr/epi ou
sur le CD-ROM EPI PETZL.
Contactez PETZL en cas de doute.
B
NAVAHO SIT et NAVAHO SIT FAST
Schéma 1. Mise en place du harnais
Ouvrez les boucles des tours de cuisses.
1A. Saisissez le cuissard par la ceinture et enfilez-le par les pieds.
1B. Ajustez la ceinture en tirant sur les sangles de ceinture. Rangez proprement les
surplus de sangles dans les passants (bien plaqués).
- Surplus courts : mettez-les dans les passants devant les boucles de réglage.
- Surplus longs : vous avez des excédents de sangle, passez-les dans les anneaux latéraux
puis sous les passants derrière ces anneaux.
1C. Fermez et ajustez les tours de cuisses.
- NAVAHO SIT : boucles DoubleBack.
- NAVAHO SIT FAST : Fermez les boucles FAST. Attention aux objets étrangers qui risquent
de gêner le fonctionnement des boucles rapides FAST (cailloux, sable, vêtements…).
Vérifiez le bon verrouillage.
Réglage et test de suspension
Votre harnais doit être ajusté proche du corps pour réduire le risque de blessure en cas
de chute.
Vous devez effectuer des mouvements et un test de suspension sur chaque point
d’attache, avec votre matériel, pour être sûr qu’il soit de la bonne taille et du niveau de
confort nécessaire pour l’usage attendu et que le réglage soit optimum.
C
MAINTIEN AU TRAVAIL et RETENUE
Schéma 2. Harnais de maintien au travail et retenue
EN 358 : 2000
Ces points d’attache sont destinés soit à maintenir l’utilisateur en position à son poste
de travail (travail en tension : maintien au travail), soit à empêcher l’utilisateur d’atteindre
un emplacement d’où une chute est possible (principe de la laisse : retenue). Ces points
d’attache doivent être utilisés uniquement pour l’accrochage à un système de maintien au
travail ou système de retenue, hauteur de chute maximum : 0,5 m.
Ces points d’attache ne sont pas conçus pour des utilisations antichute et il peut être
nécessaire de compléter les systèmes de maintien au travail ou de retenue par des
moyens de protection contre les chutes de hauteur de type collectif (par exemple des
filets de sécurité) ou individuel (par exemple un système d’arrêt des chutes selon la
norme EN 363).
En utilisation dans un système d’arrêt des chutes selon la norme EN 363, complétez votre
cuissard avec un torse TOP ou TOP CROLL.
2A. Point d’attache ventral
2B. Points d’attache latéraux de ceinture
Utilisez toujours les deux anneaux latéraux ensemble en les reliant par une longe de
maintien pour être en appui confortablement dans la ceinture.
Les pieds doivent être en appui pour un maintien confortable.
Réglez la longe de maintien au travail de manière à ce que le point d’ancrage soit au
niveau ou au-dessus de la taille. La longe est maintenue en tension et le déplacement libre
est limité à 0,5 m.
2C. Point d’attache arrière de retenue
Ce point d’attache arrière de ceinture est uniquement un point de retenue qui vous
empêche d’évoluer dans une zone présentant un risque de chute (principe de la laisse).
Vérifiez régulièrement les éléments de votre réglage et/ou de fixation pendant l’utilisation.
D
Schéma 3. Harnais cuissard :
EN 813 : 1997
Point d’attache ventral
La norme EN 813 : 1997 concerne les harnais cuissards à utiliser dans des systèmes
de maintien au travail, de retenue et d’accès sur corde lorsqu’un point d’attache bas est
nécessaire.
Utilisez cet anneau ventral pour connecter un descendeur, des longes de maintien ou des
longes de progression.
Ce point d’attache n’est pas adapté pour l’arrêt des chutes.
E
NAVAHO SIT ou NAVAHO SIT FAST assemblé au torse TOP
Schéma 4. Préparation
Pour assembler le torse au cuissard, passez la sangle dorsale dans la boucle arrière de
liaison (9) puis dans le passant élastique. Passez ensuite cette sangle dans la boucle
DoubleBack de réglage dorsal (2), puis à nouveau dans le passant élastique.
F
Schéma 5. Mise en place du harnais
Ouvrez les boucles des tours de cuisses.
5A. Laissez les bretelles sur un côté, saisissez le cuissard par la ceinture et l’enfiler par
les pieds.
5B. Ajustez la ceinture en tirant sur les sangles de ceinture. Rangez proprement les
surplus de sangles dans les passants (bien plaqués).
- Surplus courts : mettez-les dans les passants devant les boucles de réglage.
- Surplus longs : vous avez des excédents de sangle, passez-les dans les anneaux latéraux
puis sous les passants derrière ces anneaux.
5C. Fermez et ajustez les tours de cuisses.
- NAVAHO SIT : boucles DoubleBack.
- NAVAHO SIT FAST : Fermez les boucles FAST. Attention aux objets étrangers qui risquent
de gêner le fonctionnement des boucles rapides FAST (cailloux, sable, vêtements…).
Vérifiez le bon verrouillage.
5D. Positionnez les bretelles sur les épaules. Placez le connecteur dans le point ventral
(textile) de liaison torse cuissard (5). Vissez la bague de verrouillage du connecteur.
5E. Ajustez les bretelles. Rangez le surplus de sangle (bien plaqué) dans les passants
situés sur la bretelle.
5F. Réglage dorsal initial
Réalisez ce réglage une seule fois lors de la première mise en place de votre harnais en
vous faisant aider par une autre personne.
Faites coulisser le passant de sangle pour que la sangle dorsale soit tendue dans ses
deux épaisseurs (aucun mou ne doit apparaître).
Veillez à ranger le surplus de sangle (bien plaqué) dans le passant afin de ne pas être gêné
dans votre travail.
Ajustez ce réglage à votre morphologie, positionnez la boucle DoubleBack au niveau des
omoplates.
Réglage et test de suspension
Votre harnais doit être ajusté proche du corps pour réduire le risque de blessure en cas
de chute.
Vous devez effectuer des mouvements et un test de suspension sur chaque point
d’attache, avec votre matériel, pour être sûr qu’il soit de la bonne taille et du niveau de
confort nécessaire pour l’usage attendu et que le réglage soit optimum.
G
Schéma 6. Connecteur ovale directionnel à verrouillage manuel
Ce connecteur EN 362 : 2004, composant du harnais, est un élément de connexion pour
relier l’avant du torse à la ceinture. Ne l’utilisez pas pour connecter une longe ou un
absorbeur d’énergie.
6A. ATTENTION DANGER, utilisez toujours le connecteur doigt fermé et verrouillé.
La résistance d’un connecteur diminue fortement si le doigt est ouvert.
Vérifiez systématiquement le bon verrouillage du doigt en le pressant avec la main.
6B. Le connecteur (fermé) offre la résistance maximale dans le sens de la longueur. Toute
autre position réduit sa résistance.
H
ANTICHUTE
Schéma 7. Harnais antichute EN 361 : 2002
Harnais complet pour besoins antichute, composant d’un système d’arrêt des chutes
selon la norme EN 363 (systèmes de protection individuelle contre les chutes de hauteur).
Il doit être utilisé en combinaison avec des ancrages EN 795, mousquetons à verrouillage
EN 362, absorbeur EN 355 etc.
7A. Point d’attache sternal
Seul ce point sert à connecter un système d’arrêt des chutes par exemple un antichute
mobile sur corde, un absorbeur d’énergie…, système décrit dans la norme EN 363. Pour
mieux l’identifier, ce point est marqué de la lettre A.
Tirant d’air : hauteur libre sous l’utilisateur
La hauteur libre sous l’utilisateur doit être suffisante pour qu’il ne heurte pas d’obstacle
en cas de chute. Les calculs spécifiques de tirant d’air sont détaillés dans les notices
techniques des autres composants (absorbeurs d’énergie, antichute mobile…).
I
NAVAHO SIT ou NAVAHO SIT FAST assemblé au torse TOP CROLL
Schéma 8. Préparation
Pour assembler le torse au cuissard, passez la sangle dorsale dans la boucle arrière de
liaison (9) puis dans le passant élastique. Passez ensuite cette sangle dans la boucle
DoubleBack de réglage dorsal (2), puis à nouveau dans le passant élastique.
Pour relier le CROLL à l’avant du cuissard, vissez le maillon rapide dans le point ventral en
textile de liaison (5). Serrez et bloquez à la clé à 3 Nm. N’oubliez pas de rabattre et clipper
la barrette de séparation en plastique.
J
Schéma 9. Maillon rapide directionnel
Ce maillon rapide, composant du harnais, est un élément de connexion pour relier
l’avant du torse à la ceinture. Il doit toujours rester bloqué à 3 Nm (desserrage à la main
impossible).
Ne l’utilisez pas pour connecter une longe ou un absorbeur d’énergie.
K
Schéma 10. Mise en place du harnais
Ouvrez les boucles FAST des tours de cuisses.
10A. Écartez les bretelles, saisissez le harnais par la ceinture et enfilez-le par les pieds.
10B. Positionnez les bretelles sur les épaules.
10C. Ajustez la ceinture en tirant sur les sangles de ceinture. Rangez proprement les
surplus de sangles dans les passants (bien plaqués).
- Surplus courts : mettez-les dans les passants devant les boucles de réglage.
- Surplus longs : vous avez des excédents de sangle, passez-les dans les anneaux latéraux
puis sous les passants derrière ces anneaux.
10D. Fermez les boucles FAST et ajustez les tours de cuisses. Attention aux objets
étrangers qui risquent de gêner le fonctionnement des boucles rapides FAST (cailloux,
sable, vêtements…). Vérifiez le bon verrouillage.
10E. Ajustez les bretelles. Rangez le surplus de sangle (bien plaqué) dans les passants
situés sur la bretelle.
10F. Réglage dorsal initial
Réalisez ce réglage une seule fois lors de la première mise en place de votre harnais en
vous faisant aider par une autre personne.
Faites coulisser le passant de sangle pour que la sangle dorsale soit tendue dans ses
deux épaisseurs (aucun mou ne doit apparaître).
Veillez à ranger le surplus de sangle (bien plaqué) dans le passant afin de ne pas être gêné
dans votre travail.
Ajustez ce réglage à votre morphologie, positionnez la boucle DoubleBack au niveau des
omoplates.
Réglage et test de suspension
Votre harnais doit être ajusté proche du corps pour réduire le risque de blessure en cas
de chute.
Vous devez effectuer des mouvements et un test de suspension sur chaque point
d’attache, avec votre matériel, pour être sûr qu’il soit de la bonne taille et du niveau de
confort nécessaire pour l’usage attendu et que le réglage soit optimum.
L
ANTICHUTE
Schéma 11. Harnais antichute EN 361 : 2002
Harnais complet pour besoins antichute, composant d’un système d’arrêt des chutes
selon la norme EN 363 (systèmes de protection individuelle contre les chutes de hauteur).
Il doit être utilisé en combinaison avec des ancrages EN 795, mousquetons à verrouillage
EN 362, absorbeur EN 355 etc.
11A. Point d’attache sternal
Seul ce point sert à connecter un système d’arrêt des chutes par exemple un antichute
mobile sur corde, un absorbeur d’énergie…, système décrit dans la norme EN 363. Pour
mieux l’identifier, ce point est marqué de la lettre A.
Tirant d’air : hauteur libre sous l’utilisateur
La hauteur libre sous l’utilisateur doit être suffisante pour qu’il ne heurte pas d’obstacle
en cas de chute. Les calculs spécifiques de tirant d’air sont détaillés dans les notices
techniques des autres composants (absorbeurs d’énergie, antichute mobile…).
M
ACCÈS SUR CORDE
Bloqueur ventral CROLL
EN 12841 : 2006
Champ d’application
Le bloqueur ventral CROLL EN 12841 : 2006 est un dispositif de réglage de corde de
type B destiné à être utilisé en progression vers le haut sur la corde de travail.
ATTENTION, il doit obligatoirement être utilisé avec un dispositif de type A en contreassurage sur une deuxième corde appelée corde de sécurité (par exemple antichute
mobile pour corde ASAP).
Le bloqueur ventral CROLL ne convient pas pour un usage dans un système d’arrêt des
chutes selon la norme EN 363.
Diamètre de la corde
Utilisez une corde de 10 à 13 mm de diamètre (âme + gaine) semi-statique EN 1891
type A.
Schéma 12. Mise en place sur la corde
Tirez la gâchette vers le bas en actionnant le taquet avec le pouce et l’index. Verrouillez le
taquet sur le corps de l’appareil. La gâchette reste ainsi en position ouverte.
Placez la corde dans son logement. Poussez le taquet pour que la gâchette prenne appui
sur la corde.
Le taquet de sécurité empêche l’ouverture involontaire de la gâchette.
Pour retirer la corde
Faites coulisser l’appareil vers le haut sur la corde et simultanément ouvrez la gâchette en
actionnant le taquet.
Schéma 13. Principes de fonctionnement
13A. Montée
Le CROLL est un dispositif de progression sur corde (à la montée). Il se bloque dans un
sens sous l’action de votre poids (vers le bas) et glisse librement dans le sens opposé
(vers le haut).
Les dents s’enfoncent dans la gaine et amorce le serrage de la gâchette. La gâchette
bloque la corde. Des fentes dans la gâchette permettent d’évacuer la boue etc.
13B. Faire descendre le CROLL (cas exceptionnel)
Faites coulisser légèrement l’appareil vers le haut sur la corde et simultanément poussez
la gâchette avec l’index. Ne manipulez pas le taquet car il y a un risque d’ouverture
involontaire.
13C. Vérification du fonctionnement
Avant chaque utilisation, pour vérifier le sens de placement de la corde et le
fonctionnement de l’appareil, un test doit toujours être effectué en étant contre-assuré.
Déplacez le CROLL sur la corde vers le haut. Il doit coulisser régulièrement. Testez son
blocage sur la corde.
13D. Précautions
- Refermez la gâchette du CROLL lorsqu’il n’est pas utilisé car un équipement (ou autre
objet) peut se coincer dans la gorge restée ouverte.
- ATTENTION aux objets étrangers qui risquent de gêner le fonctionnement de la gâchette
(cailloux, boue, branches, cordelette, sangles, vêtements, peinture, etc.).
- ATTENTION à l’accrochage du taquet de sécurité dans les vêtements ou les sangles.
- La corde doit toujours être tendue entre le CROLL et l’ancrage. L’utilisateur doit toujours
rester sous le point d’ancrage.
- Absorption d’énergie par la corde :
n’oubliez pas que c’est la corde qui absorbe l’énergie en cas de chute. Plus vous vous
9
NAVAHO SIT / NAVAHO SIT FAST / TOP / TOP CROLL C79502-C (200907)
Page 10

approchez du point d’amarrage, plus la capacité d’absorption du choc diminue jusqu’à
devenir presque nulle.
- Protégez la corde de tout objet pouvant l’endommager (par exemple : arête
coupante, etc.).
- La corde doit pouvoir coulisser librement dans le CROLL, par exemple méfiez-vous des
nœuds, d’une zone de corde abîmée…
- N’oubliez pas de faire un nœud d’arrêt à l’extrémité basse de la corde.
Schéma 14. Remontée sur corde
- Corde de travail : Utilisez le CROLL plus un autre bloqueur de main par exemple une
poignée ASCENSION avec un étrier. N’oubliez pas de vous attacher à ce deuxième
bloqueur par une longe appropriée.
- Corde de sécurité : utilisez un dispositif de type A (contre assurage).
Garantie
Ce produit est garanti pendant 3 ans contre tout défaut de matière ou de fabrication.
Sont exclus de la garantie : l’usure normale, l’oxydation, les modifications ou retouches,
le mauvais stockage, le mauvais entretien, les dommages dus aux accidents, aux
négligences, aux utilisations pour lesquelles ce produit n’est pas destiné.
PETZL n’est pas responsable des conséquences directes, indirectes, accidentelles ou de
tout autre type de dommages survenus ou résultant de l’utilisation de ses produits.
N
Charge maximum des porte-matériels
O
Informations générales
Compatibilité : anneaux / connecteurs
Une connexion incompatible peut conduire à un décrochement accidentel, à une rupture
ou à affecter la fonction de sécurité d’un autre équipement.
ATTENTION, les anneaux d’accrochage de votre harnais peuvent faire levier sur le doigt
du connecteur.
Lors d’une tension brusque de la corde et/ou d’un choc sur le système de verrouillage
combiné à une mauvaise position du mousqueton, la bague de verrouillage peut casser
et le doigt s’ouvrir.
Pour supprimer ce risque, veillez au bon positionnement des connecteurs lors de chaque
mise en tension du système (longe, descendeur…).
Veillez aussi à la compatibilité des connecteurs avec les anneaux (formes, dimensions…)
en éliminant les connecteurs qui ont tendance à se positionner incorrectement de manière
stable.
EN 365 : AVERTISSEMENT
Compatibilité
Vérifiez la compatibilité de ce produit avec les autres éléments de votre matériel (voir
notice spécifique).
ATTENTION, un danger peut survenir lors de l’utilisation de plusieurs équipements dans
laquelle la fonction de sécurité de l’un des équipements peut être affectée par la fonction
de sécurité d’un autre équipement.
Si vous n’êtes pas certain de la compatibilité de votre équipement, contactez Petzl.
Ancrages : Travail en hauteur
L’ancrage du système doit être de préférence situé au-dessus de la position de l’utilisateur
et doit répondre aux exigences de la norme dispositifs d’ancrage EN 795, en particulier la
résistance minimum de l’ancrage doit être de 10 kN.
Plan de secours
Prévoyez un plan de secours et définissez les moyens pour intervenir rapidement en
cas de difficultés rencontrées. Ceci implique une formation adéquate aux techniques de
sauvetage.
Connecteurs
Les connecteurs doivent toujours être utilisés dans la bonne position (grand axe), doigt
fermé et verrouillé. Vérifiez systématiquement le bon verrouillage du doigt en le pressant
avec la main.
Vérifiez l’état des connecteurs selon les indications des Instructions d’utilisation.
Divers
- ATTENTION DANGER, frottements interdits sur des matériaux abrasifs ou pièces
coupantes.
- Les utilisateurs doivent être médicalement aptes aux activités en hauteur. ATTENTION,
être suspendu et inerte dans un harnais peut déclencher des troubles physiologiques
graves ou la mort.
- Veillez à ce que les marquages sur le produit restent lisibles durant toute la vie du
produit.
- Vous devez vérifier l’aptitude de ce produit pour l’utilisation dans votre application par
rapport aux règlements gouvernementaux et normes de sécurité en vigueur.
- Les instructions d’utilisation définies dans les notices de chaque équipement associé à
ce produit doivent être respectées.
- Les instructions d’utilisation doivent être fournies à l’utilisateur de cet équipement. Le
revendeur doit rédiger ces instructions dans la langue du pays d’utilisation si le produit
est revendu hors du premier pays de destination.
Durée de vie
ATTENTION, un évènement exceptionnel peut limiter la durée de vie à une seule
utilisation, par exemple si le produit est exposé à des produits chimiques dangereux, des
températures extrêmes ou s’il est en contact avec une arête coupante ou s’il subit des
efforts importants, une chute importante, etc.
La durée de vie potentielle des produits Petzl peut être de 10 ans à partir de la date
de fabrication pour les produits plastiques et les textiles. Elle n’est pas limitée pour les
produits métalliques.
La durée de vie réelle d’un produit est terminée lorsqu’il rencontre une cause de mise
au rebut (voir liste paragraphe «Mise au rebut») ou lorsqu’il devient obsolète dans le
système.
Facteurs qui influencent la durée de vie réelle d’un produit : intensité, fréquence,
environnement d’utilisation, compétence de l’utilisateur, entretien, stockage, etc.
Vérifiez périodiquement si l’équipement n’a pas subi de
dommage et n’est pas détérioré.
En plus des vérifications avant et pendant l’utilisation, réalisez une vérification
approfondie (examen périodique) par un contrôleur compétent. Cette vérification doit
être réalisée au moins tous les 12 mois. Cette fréquence doit être adaptée en fonction
du type et de l’intensité d’utilisation. Pour un meilleur suivi du matériel, il est préférable
d’attribuer ce produit à un utilisateur unique afin qu’il en connaisse son historique. Les
résultats des vérifications doivent être consignés sur une «fiche de suivi». Cette fiche
de suivi doit permettre d’enregistrer les détails suivants : type d’équipement, modèle,
nom et coordonnées du fabricant ou du fournisseur, moyen d’identification (n° de série
ou n° individuel), année de fabrication, date d’achat, date de la première utilisation,
nom de l’utilisateur, toute information pertinente comme par exemple l’entretien et
la fréquence d’utilisation, l’historique des examens périodiques (date, commentaires
et défauts remarqués, nom et signature du contrôleur compétent, date du prochain
examen périodique prévu). Vous pouvez utiliser l’exemple de fiche détaillée et les outils
informatiques mis à disposition sur www.petzl.fr/epi
Mise au rebut
Cessez immédiatement d’utiliser ce produit si :
- le résultat des vérifications (avant, pendant, approfondie) n’est pas satisfaisant,
- il a subi des efforts importants ou une chute importante,
- vous ne connaissez pas l’historique complet de son utilisation,
- il a 10 ans d’âge et est composé de matières plastiques ou textiles,
- vous avez le moindre doute sur sa fiabilité.
Détruisez les produits rebutés pour éviter une future utilisation.
Obsolescence du produit
Il y a de nombreuses raisons pour lesquelles un produit peut-être jugé obsolète et par
conséquent retiré de la circulation, par exemple : évolution des normes applicables,
évolution des textes réglementaires, évolution des techniques, incompatibilité avec les
autres équipements, etc.
Modifications, réparations
Toute modification, adjonction ou réparation autre que celles autorisées par Petzl est
interdite : risque de diminution de l’efficacité du produit.
Stockage, transport
Après utilisation rangez votre produit dans un conditionnement (sac, boite…) de
protection contre les UV, l’humidité, les produits chimiques, etc.
10
NAVAHO SIT / NAVAHO SIT FAST / TOP / TOP CROLL C79502-C (200907)
Page 11

(DE) DEUTSCH
Gebrauchsanleitung
- NAVAHO SIT und NAVAHO SIT FAST
Sitzgurt, Haltegurt zur Arbeitsplatzpositionierung.
- NAVAHO SIT oder NAVAHO SIT FAST kombiniert mit dem Brustgurt TOP
Auffanggurt, Haltegurt zur Arbeitsplatzpositionierung, Sitzgurt.
- NAVAHO SIT oder NAVAHO SIT FAST kombiniert mit dem Brustgurt TOP CROLL
Auffanggurt, Haltegurt zur Arbeitsplatzpositionierung und Sitzgurt, Gurt für
Seilzugangstechniken mit integrierter CROLL.
A
Von den in den Abbildungen dargestellten Techniken sind nur solche zulässig, die nicht
durchgestrichen sind und/oder mit keinem Totenkopfsymbol versehen sind. Besuchen
Sie regelmäßig unsere Website (www.petzl.com), um die neuesten Versionen dieser
Dokumente zu erhalten.
Im Zweifelsfall oder bei jeglichen Verständnisschwierigkeiten hinsichtlich dieser
Dokumente wenden Sie sich direkt an PETZL.
Bestimmungsgemäßer Gebrauch
- NAVAHO SIT und NAVAHO SIT FAST
Sitzgurt, Haltegurt zur Arbeitsplatzpositionierung.
- NAVAHO SIT oder NAVAHO SIT FAST kombiniert mit dem Brustgurt TOP
Auffanggurt, Haltegurt zur Arbeitsplatzpositionierung, Sitzgurt.
- NAVAHO SIT oder NAVAHO SIT FAST kombiniert mit dem Brustgurt TOP CROLL
Auffanggurt, Haltegurt zur Arbeitsplatzpositionierung und Sitzgurt, Gurt für
Seilzugangstechniken mit integrierter CROLL.
Dieses Produkt darf nicht über seine Grenzen hinaus belastet werden. Es darf
ausschließlich zu dem Zweck verwendet werden, für den es entworfen wurde.
WARNUNG
Aktivitäten, bei denen diese Ausrüstung zum Einsatz kommt, sind naturgemäß
gefährlich.
Für Ihre Handlungen und Entscheidungen sind Sie selbst verantwortlich.
Vor dem Gebrauch dieser Ausrüstung müssen Sie:
- Die Gebrauchsanleitung vollständig lesen und verstehen.
- Eine fachgerechte Unterweisung zur richtigen Benutzung erhalten.
- Sich mit den Möglichkeiten und Einschränkungen der Ausrüstung vertraut machen.
- Die mit dem Einsatz verbundenen Risiken verstehen und akzeptieren.
Ein Versäumnis, diese Warnungen nicht zu berücksichtigen, kann zu schweren
Verletzungen oder sogar Tod führen.
Haftung
WARNUNG, vor der Verwendung ist eine fachgerechte Einweisung unbedingt erforderlich.
Dieses Produkt darf nur von kompetenten und verantwortungsbewussten Personen
verwendet werden, sowie von Dritten, die unter der direkten Aufsicht und visuellen
Kontrolle einer kompetenten und verantwortungsbewussten Person stehen.
Es liegt in Ihrer eigenen Verantwortung, eine angemessene Ausbildung in der Anwendung
der richtigen Techniken und Sicherheitsvorkehrungen zu erhalten.
Sie übernehmen die vollständige Verantwortung für alle Risiken und jegliche
Sachschäden, Körperverletzung oder Tod, die auf irgendeine Weise während oder in Folge
der unsachgemäßen Verwendung unserer Produkte entstehen können. Wenn Sie diese
Verantwortung oder dieses Risiko nicht übernehmen oder eingehen können oder dürfen,
verwenden Sie diese Produkte nicht.
Benennung der Teile
- TOP-Brustgurt:
(1) Schulterträger, (2) Rückwärtige Einstellschnalle für den Schulterträger, (3) Sternale
Auffangöse nach EN 361, (4) Richtungsabhängiges Verbindungselement.
- TOP CROLL-Brustgurt:
(1) Schulterträger, (2) Rückwärtige Einstellschnalle für den Schulterträger, (3) Sternale
Auffangöse nach EN 361, (4a) Integrierte Seilklemme CROLL nach EN 12841,
(4b) Richtungsabhängiges Verbindungselement mit Trennsteg, (16) Nocken,
(17) Sicherheitssperre, (18) Befestigungsöse.
- NAVAHO SIT und NAVAHO SIT FAST-Sitzgurte:
(5) Zentrale (textile) Öse zur Verbindung von Brust- und Sitzgurt, (6) Hüftgurt, (7) EN 358,
EN 813, zentrale Halteöse am Schwerpunkt, (8) EN 358 seitliche Halteösen am Hüftgurt,
(9) Rückseitige Schnalle zum Verbinden von Sitz- und Brustgurt mit der EN 358
Halteöse, (10) DoubleBack-Einstellschnallen, (10b) FAST-Schnellverschlussschnallen,
(11) Materialschlaufe, (12) Befestigungsmöglichkeit für Gerätehalter, (13) Riemenhalter,
(14) Elastische Riemen, (15) Etikett mit Kennzeichnungen in der Polsterung des Hüftgurts
verstaubar.
Materialien
Gurt: Polyester, Stahl (Einstellschnallen), Aluminiumlegierung (Auffang- und Halteösen).
CROLL-Seilklemme auf Bauchhöhe: Aluminiumlegierung (Körper),
Chromstahl (Klemmnocken), Polyamid (Sicherheitssperre).
Überprüfung, zu kontrollierende Punkte
Vor jedem Einsatz
- Gurt
Überprüfen Sie das Gurtband an den Befestigungsösen, an den Einstellschnallen und die
Sicherheitsnähte.
Stellen Sie fest, ob das Gurtband Schnitte, Abrieb oder sonstige Schäden aufweist, die
auf Abnutzung, Hitze oder Kontakt mit chemischen Produkten usw. zurückzuführen sind.
Achten Sie besonders auf durchtrennte oder abgenutzte Nähte.
Stellen Sie sicher, dass die DoubleBack- und FAST-Schnallen richtig funktionieren.
- TOP
Richtungsabhängiges Verbindungselement
Stellen Sie sicher, dass der Körper, der Schnapper, das Gelenk oder die
Verriegelungshülse keine Risse, Verformungen, Korrosionserscheinungen usw.
aufweisen. Öffnen Sie den Schnapper und stellen Sie sicher, dass er sich beim Loslassen
automatisch schließt. Stellen Sie sicher, dass die Verriegelungshülse richtig funktioniert.
Der Keylock-Schlitz am Schnapper darf nicht durch Fremdköper blockiert sein (Schmutz,
kleine Steinchen usw.).
- TOP CROLL
Richtungsabhängiger Schließring
Überprüfen Sie vor jedem Einsatz den Zustand des Körpers.
Stellen Sie sicher, dass das Verriegelungssystem vollständig (das Gewinde sollte nicht
sichtbar sein) verriegelt und mit einem Drehmoment von 3 Nm festgezogen wurde.
CROLL-Seilklemme auf Bauchhöhe
Überprüfen Sie vor jedem Einsatz den Zustand des Körpers, der Befestigungsösen, des
Nockens, der Sicherheitssperre (Risse, Riefen, Verformung, Abnutzung, Korrosion), der
Nockenfedern und der Achse. Stellen Sie sicher, dass die Zähne nicht abgenutzt sind.
Achtung: Verwenden Sie keine Seilklemme mit abgenutzten oder fehlenden Zähnen.
Während des Gebrauchs
Es ist unerlässlich, den Zustand des Produkts regelmäßig zu überprüfen. Stellen Sie
stets sicher, dass die einzelnen Ausrüstungsgegenstände im System richtig zueinander
positioniert sind.
Die genauen Anleitungen zur Überprüfung der einzelnen PSA-Komponenten (Persönliche
Schutzausrüstung) finden Sie im Internet unter www.petzl.com/ppe oder auf der PETZL
PSA-CD-ROM.
Sollten irgendwelche Zweifel hinsichtlich des Zustands eines Produkts bestehen, senden
Sie es zur Überprüfung an PETZL.
B
NAVAHO SIT und NAVAHO SIT FAST
Abbildung 1. Anlegen des Gurts
Öffnen Sie die Schnallen an den Beinschlaufen.
1A. Halten Sie den Sitzgurt am Hüftgurt fest, steigen Sie in die Beinschlaufen und ziehen
Sie den Gurt hoch.
1B. Stellen Sie den Hüftgurt ein, indem Sie an den Riemen ziehen. Verstauen Sie das
überstehende Gurtband in den Riemenhaltern (so dass es flach am Hüftgurt anliegt).
- Kurze Enden: Verwenden Sie die Riemenhalter vor den Einstellschnallen.
- Kurze Enden: Führen Sie sie durch die seitlichen Ringe und anschließend durch die
Riemenhalter dahinter.
1C. Schließen Sie die Beinschlaufen und stellen sie ein.
- NAVAHO SIT: DoubleBack-Schnallen.
- NAVAHO SIT FAST: Schließen Sie die FAST-Schnallen. Achten Sie darauf, dass keine
Fremdkörper die Funktion der FAST-Schnallen beeinträchtigen (Steinchen, Sand,
Kleidung...). Stellen Sie sicher, dass die Schnallen richtig schließen.
Einstellung und Hängetest
Ihr Auffanggurt sollte gut an Ihre Körperform angepasst sein und eng anliegen, um im
Falle eines Sturzes die Verletzungsgefahr zu verringern.
Sie sollten herumgehen und sich an jedem Befestigungspunkt mitsamt Ihrer Ausrüstung
in den Gurt hängen (Hängetest), um sicherzustellen, dass der Gurt richtig sitzt, beim
Gebrauch angemessenen Komfort bietet und optimal eingestellt ist.
C
ARBEITSPLATZPOSITIONIERUNG und RÜCKHALTEN
Abbildung 2. EN 358: 2000 Haltegurt zur
Arbeitsplatzpositionierung und zum Rückhalten
Diese Befestigungsösen dienen entweder zum Positionieren des Benutzers am
Arbeitsplatz (Arbeiten am gespannten Seil: Arbeitsplatzpositionierung) oder
sie verhindern, dass der Benutzer eine Zone betritt, in der ein Sturz möglich ist
(Rückhalten). Sie dürfen ausschließlich zum Befestigen eines Rückhaltesystems oder
zur Arbeitsplatzpositionierung verwendet werden, wobei die Sturzhöhe maximal 0,5 m
betragen darf.
Diese Halteösen sind NICHT zum Auffangen von Stürzen geeignet. Möglicherweise
müssen Sie Systeme zur Arbeitsplatzpositionierung oder zum Rückhalten mit kollektiven
Schutzausrüstungen gegen Absturz (z. B. Sicherheitsnetze) oder PSA-Systemen (z. B. ein
Auffangsystem gemäß EN 363) ergänzen.
Bei der Verwendung als Bestandteil eines Auffangsystems in Übereinstimmung mit der
Norm EN 363 muss der Sitzgurt zusammen mit einem TOP- oder TOP CROLL-Brustgurt
verwendet werden.
2A. Zentrale Halteöse auf Bauchhöhe
2B. Seitliche Halteösen
Verwenden Sie die beiden seitlichen Ösen stets zusammen, indem Sie ein
Verbindungsmittel zur Arbeitsplatzpositionierung in diese einhängen.
Zur bequemen Arbeitsplatzpositionierung sollte es möglich sein, die Beine abzustützen.
Stellen Sie das Verbindungsmittel zur Arbeitsplatzpositionierung so ein, dass sich der
Anschlagpunkt oberhalb oder auf Hüfthöhe des Benutzers befindet. Das Verbindungsmittel
ist straff gespannt und die Sturzhöhe darf nicht mehr als 0,5 m betragen.
2C. Rückseitige Halteöse zum Rückhalten
Diese rückseitige Öse am Hüftgurt darf ausschließlich zum Befestigen eines
Rückhaltesystems verwendet werden, um den Benutzer am Betreten einer Zone mit
Sturzgefahr zu hindern.
Überprüfen Sie die Länge des hierfür verwendeten Verbindungsmittels regelmäßig
während des Einsatzes.
D
Abbildung 3. Sitzgurt:
EN 813: 1997
Zentrale Halteöse auf Bauchhöhe
Die Norm EN 813: 1997 beschreibt Sitzgurte, die als Bestandteil von Systemen
zur Arbeitsplatzpositionierung, von Rückhaltesystemen und von Systemen der
Seilzugangstechnik verwendet werden, wenn ein tiefer Befestigungspunkt nahe des
Körperschwerpunktes erforderlich ist.
Verwenden Sie diesen zentralen Ring zum Befestigen eines Abseilgerätes oder
Verbindungsmitteln zur Arbeitsplatzpositionierung oder Verbindungsmitteln zur
Fortbewegung.
Verwenden Sie diese Befestigungsöse nicht zum Befestigen von Auffangsystemen.
E
NAVAHO SIT oder NAVAHO SIT FAST kombiniert mit dem
Brustgurt TOP
Abbildung 4. Vorbereitung
Um den Brustgurt mit dem Sitzgurt zu verbinden, führen Sie den rückseitigen Riemen
durch die hintere Schnalle (9), die die beiden Gurte miteinander verbindet, und
anschließend durch den elastischen Riemenhalter. Führen Sie den Riemen anschließend
durch die Einstellschnalle für die rückseitige Auffangöse (2) und dann erneut durch den
elastischen Riemenhalter.
F
Abbildung 5. Anlegen des Gurts
Öffnen Sie die Schnallen an den Beinschlaufen.
5A. Legen Sie die Schulterträger auf eine Seite, halten Sie den Sitzgurt am Hüftgurt fest,
steigen Sie in die Beinschlaufen und ziehen Sie den Gurt hoch.
5B. Stellen Sie den Hüftgurt ein, indem Sie an den Riemen ziehen. Verstauen Sie das
überstehende Gurtband in den Riemenhaltern (so dass es flach am Hüftgurt anliegt).
- Kurze Enden: Verwenden Sie die Riemenhalter vor den Einstellschnallen.
- Kurze Enden: Führen Sie sie durch die seitlichen Ringe und anschließend durch die
Riemenhalter dahinter.
5C. Schließen Sie die Beinschlaufen und stellen sie ein.
- NAVAHO SIT: DoubleBack-Schnallen.
- NAVAHO SIT FAST: Schließen Sie die FAST-Schnallen. Achten Sie darauf, dass keine
Fremdkörper die Funktion der FAST-Schnallen beeinträchtigen (Steinchen, Sand,
Kleidung...). Stellen Sie sicher, dass die Schnallen richtig schließen.
5D. Positionieren Sie die Schulterträger auf den Schultern. Positionieren Sie die
Schulterträger auf den Schultern. Hängen Sie das Verbindungselement in die zentrale
(textile) Öse zur Verbindung von Brust- und Sitzgurt (5) ein. Um das Verbindungselement
zu verriegeln, schrauben Sie die Verriegelungshülse zu.
5E. Stellen Sie die Schulterträger ein. Verstauen Sie das überstehende Gurtband im
Riemenhalter am Schulterträger.
5F. Erstmaliges Einstellen des Schulterträgers
Diese Einstellung sollte nur einmal vorgenommen werden, nämlich wenn Sie den Gurt
zum ersten Mal anlegen. Lassen Sie sich von einer zweiten Person helfen.
Stellen Sie den Riemenhalter so ein, dass die beiden Gurtbänder zwischen den
Schnallen (2) und (9) straff und ohne Schlaufen sind.
Verstauen Sie das überstehende Gurtband sorgfältig (flach) in der Riemenhalterung, so
dass es beim Arbeiten nicht im Weg ist.
Passen Sie die Position des Schulterträgers an Ihre individuelle Körperform und -größe
an. Richten Sie die DoubleBack-Schnalle an der Höhe der Schulterblätter aus.
Einstellung und Hängetest
Ihr Auffanggurt sollte gut an Ihre Körperform angepasst sein und eng anliegen, um im
Falle eines Sturzes die Verletzungsgefahr zu verringern.
Sie sollten herumgehen und sich an jedem Befestigungspunkt mitsamt Ihrer Ausrüstung
in den Gurt hängen (Hängetest), um sicherzustellen, dass der Gurt richtig sitzt, beim
Gebrauch angemessenen Komfort bietet und optimal eingestellt ist.
G
Abbildung 6. Ovaler richtungsabhängiger Karabiner mit
manueller Verriegelung
Dieses EN 362: 2004 Verbindungselement ist eine Komponente des Gurts, das als
Verbindungselement zwischen Brust- und Sitzgurt verwendet wird. Verwenden Sie ihn
nicht zum Befestigen eines Verbindungsmittels oder Falldämpfers.
6A. ACHTUNG, GEFAHR: Dieses Verbindungselement darf nur mit geschlossenem und
verriegeltem Schnapper verwendet werden. Die Bruchlast eines Verbindungselements ist
bei geöffnetem Schnapper stark vermindert.
Stellen Sie systematisch sicher, dass der Schnapper verriegelt ist, indem Sie mit der
Hand dagegen drücken.
6B. Ein Verbindungselement besitzt bei geschlossenem Schnapper und Belastung in
Längsrichtung die größte Festigkeit. Jede andere Position reduziert die Bruchlast.
H
AUFFANGEN VON STÜRZEN
Abbildung 7. EN 361: 2002 Auffanggurt
Auffanggurt, Bestandteil eines Auffangsystems in Übereinstimmung mit der Norm EN 363
(Persönliche Schutzausrüstung gegen Absturz: Auffangsysteme). Er muss zusammen
mit EN 795-Anschlagpunkten, EN 362-Verbindungselementen, EN 355-Falldämpfern usw.
verwendet werden.
7A. Vordere Auffangöse auf Brusthöhe
Verbinden Sie nur diese Ösen mit einem Auffangsystem (z. B. ein mitlaufendes
Auffanggerät, ein Falldämpfer oder andere in der Norm EN 363 beschriebene Systeme).
Zur leichteren Identifizierung als Auffangöse ist diese Öse mit dem Buchstaben „A“
markiert.
Sturzraum: hindernisfreier Raum unterhalb des Benutzers
Der Sturzraum unter dem Anwender muss so bemessen sein, dass dieser im Falle eines
Sturzes auf kein Hindernis trifft. Der Sturzraum unter dem Anwender muss so bemessen
sein, dass dieser im Falle eines Sturzes auf kein Hindernis Einzelheiten zum Berechnen
des Sturzraums finden Sie in den Gebrauchsanleitungen der anderen Komponenten
(Falldämpfer, mitlaufendes Auffanggerät usw.).
I
NAVAHO SIT oder NAVAHO SIT FAST kombiniert mit dem
Brustgurt TOP CROLL
Abbildung 8. Vorbereitung
Um den Brustgurt mit dem Sitzgurt zu verbinden, führen Sie den rückseitigen Riemen
durch die hintere Schnalle (9), die die beiden Gurte miteinander verbindet, und
anschließend durch den elastischen Riemenhalter. Führen Sie den Riemen anschließend
durch die Einstellschnalle für die rückseitige Auffangöse (2) und dann erneut durch den
elastischen Riemenhalter.
Um die CROLL vorne am Gurt zu befestigen, verwenden Sie das richtungsabhängige
Verbindungselement (Schließring mit Trennsteg) in der zentralen (textilen) Öse (5).
Das Verbindungselement muss verriegelt und mit einem Drehmoment von 3 Nm
festgezogen werden. Stellen Sie sicher, dass der Trennsteg aus Kunststoff eingehängt und
verschlossen ist.
J
Abbildung 9. Richtungsabhängiger Schließring
Der Schließring ist eine Komponente des Gurts, der als Verbindungselement zwischen
Brustgurt und Hüftgurt verwendet wird. Er muss stets mit einem Drehmoment von 3 Nm
festgezogen werden, um ein Öffnen von Hand zu verhindern.
Verwenden Sie ihn nicht zum Befestigen eines Verbindungsmittels oder Falldämpfers.
K
Abbildung 10. Anlegen des Gurts
Öffnen Sie die FAST-Schnallen an den Beinschlaufen.
10A. Halten Sie die Schulterträger auseinander, nehmen Sie den Hüftgurt in die Hände und
steigen Sie in die Beinschlaufen.
10B. Positionieren Sie die Schulterträger auf den Schultern.
10C. Stellen Sie den Hüftgurt ein, indem Sie an den Riemen ziehen. Verstauen Sie das
überstehende Gurtband in den Riemenhaltern (so dass es flach am Hüftgurt anliegt).
- Kurze Enden: Verwenden Sie die Riemenhalter vor den Einstellschnallen.
- Kurze Enden: Führen Sie sie durch die seitlichen Ringe und anschließend durch die
Riemenhalter dahinter.
10D. Schließen Sie die FAST-Schnallen und stellen Sie die Beinschlaufen ein. Achten
Sie darauf, dass keine Fremdkörper die Funktion der FAST-Schnallen beeinträchtigen
(Steinchen, Sand, Kleidung...). Stellen Sie sicher, dass die Schnallen richtig schließen.
10E. Stellen Sie die Schulterträger ein. Verstauen Sie das überstehende Gurtband im
Riemenhalter am Schulterträger.
10F. Erstmaliges Einstellen des Schulterträgers
Diese Einstellung sollte nur einmal vorgenommen werden, nämlich wenn Sie den Gurt
zum ersten Mal anlegen. Lassen Sie sich von einer zweiten Person helfen.
Stellen Sie den Riemenhalter so ein, dass die beiden Gurtbänder zwischen den
Schnallen (2) und (9) straff und ohne Schlaufen sind.
Verstauen Sie das überstehende Gurtband sorgfältig (flach) in der Riemenhalterung, so
dass es beim Arbeiten nicht im Weg ist.
Passen Sie die Position des Schulterträgers an Ihre individuelle Körperform und -größe
an. Richten Sie die DoubleBack-Schnalle an der Höhe der Schulterblätter aus.
Einstellung und Hängetest
Ihr Auffanggurt sollte gut an Ihre Körperform angepasst sein und eng anliegen, um im
Falle eines Sturzes die Verletzungsgefahr zu verringern.
Sie sollten herumgehen und sich an jedem Befestigungspunkt mitsamt Ihrer Ausrüstung
in den Gurt hängen (Hängetest), um sicherzustellen, dass der Gurt richtig sitzt, beim
Gebrauch angemessenen Komfort bietet und optimal eingestellt ist.
L
AUFFANGEN VON STÜRZEN
Abbildung 11. EN 361: 2002 Auffanggurt
Auffanggurt, Bestandteil eines Auffangsystems in Übereinstimmung mit der Norm EN 363
(Persönliche Schutzausrüstung gegen Absturz: Auffangsysteme). Er muss zusammen
mit EN 795-Anschlagpunkten, EN 362-Verbindungselementen, EN 355-Falldämpfern usw.
verwendet werden.
11A. Vordere Auffangöse auf Brusthöhe
Verbinden Sie nur diese Ösen mit einem Auffangsystem (z. B. ein mitlaufendes
Auffanggerät, ein Falldämpfer oder andere in der Norm EN 363 beschriebene Systeme).
Zur leichteren Identifizierung als Auffangöse ist diese Öse mit dem Buchstaben „A“
markiert.
Sturzraum: hindernisfreier Raum unterhalb des Benutzers
Der Sturzraum unter dem Anwender muss so bemessen sein, dass dieser im Falle eines
Sturzes auf kein Hindernis trifft. Der Sturzraum unter dem Anwender muss so bemessen
sein, dass dieser im Falle eines Sturzes auf kein Hindernis Einzelheiten zum Berechnen
des Sturzraums finden Sie in den Gebrauchsanleitungen der anderen Komponenten
(Falldämpfer, mitlaufendes Auffanggerät usw.).
M
SEILZUGANGSTECHNIKEN
CROLL-Seilklemme auf Bauchhöhe
EN 12841: 2006
Bestimmungsgemäßer Gebrauch
Die EN 12841: 2006 CROLL-Seilklemme des Typs B wird zum Aufstieg am Arbeitsseil
eingesetzt.
ACHTUNG: Es muss gleichzeitig ein Sicherungsgerät des Typs A (z. B. ASAP mitlaufendes
Auffanggerät an beweglicher Führung) an einem zweiten (Sicherungs-) Seil verwendet
werden.
Die CROLL-Seilklemme auf Bauchhöhe ist nicht als Bestandteil eines Auffangsystems
gemäß EN 363 geeignet.
11
NAVAHO SIT / NAVAHO SIT FAST / TOP / TOP CROLL C79502-C (200907)
Page 12

Seildurchmesser
Verwenden Sie ein 10 bis 13 mm starkes EN 1891 Typ A Halbstatikseil (Kernmantel).
Abbildung 12. Einlegen des Seils
Ziehen Sie die Sicherheitssperre mit Daumen und Zeigefinger nach unten und außen,
bis sie am Körper des Geräts einrastet. Auf diese Weise wird der Nocken geöffnet und
offen gehalten.
Legen Sie das Seil in die vorgesehene Führung ein. Drücken Sie auf die Sicherheitssperre,
bis der Nocken am Seil einrastet.
Die Sicherheitssperre verhindert das versehentliche Öffnen des Nockens.
Entfernen des Seils
Schieben Sie das Gerät am Seil nach oben, während Sie die Sicherheitssperre mit
Daumen und Zeigefinger nach unten und außen ziehen.
Abbildung 13. Bedienung
13A. Aufstieg
Die CROLL ist eine Seilklemme für den Aufstieg am Arbeitsseil. Es gleitet leicht am Seil
hinauf und blockiert, wenn Zug nach unten erfolgt.
Die Zähne durchdringen die Fasern des Seilmantels, so dass das Gerät am Seil
blockiert. Das Gerät blockiert am Seil. Der Nocken ist mit Öffnungen versehen, durch die
Schmutz usw. austreten kann.
13B. Herunterschieben der CROLL am Seil (Ausnahmesituation)
Schieben Sie das Gerät eine kurze Strecke am Seil nach oben und drücken Sie
gleichzeitig mit dem Zeigefinger auf den Nocken, um die Zähne aus dem Seilmantel zu
befreien. Ziehen Sie das Gerät gleichzeitig schräg nach unten. Betätigen Sie auf nicht die
Sicherheitssperre, da dies zu einem versehentlichen Öffnen des Nockens führen kann.
13C. Funktionsüberprüfung im Betrieb
Führen Sie vor jedem Gebrauch einen Test durch (der Benutzer muss sich hierbei selbst
sichern), um die korrekte Ausrichtung des Seils und ordnungsgemäße Funktion des
Geräts zu überprüfen.
Schieben Sie die CROLL am Seil nach oben. Sie muss problemlos am Seil nach oben
gleiten. Ziehen Sie sie nach unten, um sicherzustellen, dass das Gerät am Seil blockiert.
13D. Vorsichtsmaßnahmen
- Schließen Sie den Nocken der CROLL, während sie nicht in Gebrauch ist, da sich andere
Gegenstände im Gerät verklemmen könnten, wenn es geöffnet bleibt.
- ACHTUNG, stellen Sie sicher, dass keine Fremdkörper die Funktion des Nockens
beeinträchtigen (Steinchen, Schmutz, Pflanzen, Ausrüstung, Schlingen, Kleidung,
Farbe usw.).
- ACHTEN SIE DARAUF, dass sich die Sicherheitssperre nicht in Kleidung usw. verfängt.
- Das Seil zwischen der CROLL und der Anschlageinrichtung muss stets straff gespannt
sein. Der Anwender muss stets unterhalb der Anschlageinrichtung des Seils bleiben.
- Einwirken eines Fangstoßes auf das Seil:
Vergessen Sie nicht, dass im Falle eines Sturzes der Fangstoß vom Seil aufgenommen
wird. Je näher Sie sich am Anschlagpunkt befinden, desto geringer wird die falldämpfende
Eigenschaft des Seiles; gegen Ende beträgt sie gleich Null.
- Schützen Sie das Seil vor allen schädlichen Einflüssen (z. B. scharfe Kanten, raue
Oberflächen usw.).
- Das Seil muss frei durch die CROLL gleiten können. Achten Sie auf Situationen,
die das Gleiten beeinträchtigen können (z. B. Knoten, abgenutzte/beschädigte
Seilabschnitte usw.).
- Vergessen Sie nicht, das Seilende mit einem Bremsknoten zu versehen.
Abbildung 14. Aufstieg am Seil
- Arbeitsseil: Verwenden Sie die CROLL in Kombination mit einer Seilklemme mit Griff
(z. B. ASCENSION) mit Trittschlinge. Verbinden Sie sich stets mit der zweiten Seilklemme
und verwenden Sie hierfür ein passendes Verbindungsmittel.
- Sicherheitsseil: Verwenden Sie ein Gerät des Typs A.
N
Materialschlaufe - Maximallast
Die potentielle Lebensdauer von Petzl-Produkten lautet wie folgt: bis zu 10 Jahren ab
dem Herstellungsdatum für Kunststoff- und Textilprodukte. Für Metallprodukte ist sie
unbegrenzt.
Die tatsächliche Lebensdauer eines Produktes endet, wenn es eines der nachfolgend
aufgelisteten Kriterien zum Aussondern zutreffen (siehe „Aussondern von Ausrüstung“)
oder wenn es für die Verwendung in einem System als technisch überholt gilt.
Die tatsächliche Lebensdauer wird durch eine Reihe an Faktoren beeinflusst:
Gebrauchsintensität, -häufigkeit und -umgebung sowie Benutzerkompetenz,
Lagerungsbedingungen, Wartung usw.
Regelmäßige Überprüfung auf Schäden und/oder Abnutzung.
Neben der Überprüfung vor jedem Einsatz und während des Gebrauchs müssen die
Produkte mindestens ein Mal pro Jahr von einer sachkundigen Person überprüft, und
diese Überprüfung muss dokumentiert werden. Diese Überprüfung muss spätestens
alle 12 Monate durchgeführt werden. Die Häufigkeit dieser Überprüfung hängt von der
Intensität und von der Umgebung ab, in der das Produkt verwendet wird. Vorzugsweise
sollte die persönliche Schutzausrüstung den Benutzern persönlich zugeschrieben
werden, so dass sie oder er die genaue Geschichte der Ausrüstung kennt und die
Ausrüstung besser überprüft werden kann. Die Ergebnisse dieser Überprüfung werden
in den „Prüfbericht“ eingetragen. In diesem Dokument sollten die folgenden Einzelheiten
aufgezeichnet werden: Genauer Typ des Ausrüstungsgegenstands, Modell, Name und
Kontaktinformation des Herstellers oder Vertriebs, Möglichkeiten der Identifizierung
(Seriennummer oder individuelle Kennzeichnung), das Herstellungsjahr, das Kaufdatum,
das Datum der Inbetriebnahme, den Namen des Benutzers und andere wichtige
Informationen wie Wartung und Gebrauchshäufigkeit, Aufzeichnungen zur regelmäßigen
Überprüfung (Datum, Anmerkungen und bestehende Probleme, Name und Unterschrift
der prüfenden Person sowie das nächste Prüfdatum). Beispiele zu detaillierten
Prüfberichten und andere Informationen finden Sie unter www.petzl.com/ppe
Aussondern von Ausrüstung
In den folgenden Fällen sollten Sie Ausrüstung sofort aussondern:
- die Ausrüstung fällt bei der Überprüfung durch (Überprüfung vor jedem Einsatz,
während des Gebrauchs und regelmäßige Hauptüberprüfung),
- die Ausrüstung wurde einem schweren Sturz oder beträchtlicher Belastung ausgesetzt,
- die Gebrauchsgeschichte der Ausrüstung ist nicht bekannt bzw. unvollständig,
- die Ausrüstung ist mindestens 10 Jahre alt und aus Kunststoff oder Textilien gefertigt,
- Sie haben irgendwelche Zweifel an der Zuverlässigkeit.
Zerstören und entsorgen Sie alte Ausrüstungsgegenstände sofort, um weiteren Gebrauch
zu verhindern.
Veralterung von Produkten
Es gibt viele Gründe, wegen derer ein Produkt als veraltet betrachtet werden kann und
daher vor dem Ende seiner tatsächlichen Lebensdauer entsorgt werden sollte. Beispiele:
Änderungen an Normen, Richtlinien oder Gesetzen, Entwicklung neuer Techniken,
Inkompatibilität mit anderen Ausrüstungsgegenständen usw.
Änderungen, Reparaturen
Jegliche Änderungen, Zusätze und Reparaturen an der Ausrüstung, die nicht von
Petzl genehmigt wurden, sind aufgrund des Risikos, die Effektivität der Ausrüstung
einzuschränken, verboten.
Lagerung, Transport
Bewahren Sie Ihre Ausrüstung in einer Tasche oder einer anderen Schutzumhüllung auf,
um sie vor UV-Einstrahlung, Feuchtigkeit, Chemikalien usw. zu schützen.
Garantie
PETZL gewährt für dieses Produkt für Material- und Herstellungsfehler eine Garantie von
drei Jahren. Ausgeschlossen von der Garantie sind: normale Abnutzung, Oxidierung,
Modifizierungen oder Änderungen, unsachgemäße Aufbewahrung sowie durch Unfälle,
Vernachlässigung und durch nicht bestimmungsgemäßen Gebrauch entstandene
Schäden.
PETZL ist nicht verantwortlich für jegliche Konsequenzen, direkt, indirekt oder
unfallbedingt, sowie jegliche andere Art von Schäden, die aus der Verwendung seiner
Produkte entstehen.
O
Allgemeine Informationen
Kompatibilität: Befestigungsösen / Verbindungselemente
Eine inkompatible Verbindung kann eine versehentliche Trennung oder einen Bruch der
Verbindung zufolge haben und sich negativ auf die Sicherheitsfunktion eines anderen
Ausrüstungsgegenstands auswirken.
WARNUNG, die Auffang- und Halteösen Ihres Gurts können auf den Schnapper eines
Karabiners eine Hebelwirkung ausüben.
Wenn auf das Seil Zugbelastung ausgeübt und/oder das Verriegelungssystem stark
belastet wird, und der Karabiner ist ungünstig positioniert, kann die Verriegelungshülse
brechen und sich der Schnapper selbständig öffnen.
Um dieses Risiko zu vermindern, überprüfen Sie vor jeder Belastung des Systems
(Verbindungsmittel, Abseilgerät usw.), ob die Verbindungselemente richtig ausgerichtet
sind.
Stellen Sie außerdem sicher, dass die Verbindungselemente mit den Befestigungsösen
kompatibel sind (Form, Größe usw.). Vermeiden Sie die Verwendung von
Verbindungselementen, die dazu neigen, sich in ungünstiger Weise in den Ösen zu
verdrehen.
EN 365: WARNUNG
Kompatibilität
Überprüfen Sie die Kompatibilität dieses Produkts mit den anderen Elementen Ihrer
Ausrüstung (siehe spezifische Gebrauchsanleitung).
WARNUNG, werden mehrere Ausrüstungsgegenstände zusammen verwendet, kann es zu
gefährlichen Situationen kommen, wenn die Sicherheitsfunktion eines Gegenstands durch
einen anderen Ausrüstungsgegenstand behindert wird.
Wenn Sie sich hinsichtlich der Kompatibilität Ihrer Ausrüstung nicht sicher sind, wenden
Sie sich an Petzl.
Anschlageinrichtungen: Höhenarbeit
Der Anschlagpunkt des Systems muss oberhalb des Benutzers angebracht sein und den
Anforderungen der Norm EN 795 entsprechen. Die Mindestbruchlast des Anschlagpunkts
muss 10 kN betragen.
Rettungsplan
Der Benutzer muss stets einen Rettungsplan und entsprechende Mittel verfügbar haben,
diesen Plan umzusetzen, falls beim Gebrauch dieser Ausrüstung Probleme auftreten. Dies
setzt eine entsprechende Ausbildung und Einübung der notwendigen Rettungstechniken
voraus.
Verbindungselemente
Verbindungselemente dürfen nur mit geschlossenem und verriegeltem Schnapper
verwendet werden. Stellen Sie systematisch sicher, dass der Schnapper verriegelt ist,
indem Sie mit der Hand dagegen drücken.
Überprüfen Sie die Verbindungselemente gemäß der zugehörigen Gebrauchsanleitung.
Verschiedenes
- ACHTUNG GEFAHR: Vermeiden Sie, dass dieses Produkt in Kontakt mit rauen
Oberflächen oder scharfen Kanten kommt.
- Anwender müssen für Aktivitäten in der Höhe gesundheitlich in guter Verfassung sein.
WARNUNG, das regungslose Hängen in einem Gurt kann zu schweren Verletzungen oder
sogar Tod führen (Hängetrauma!).
- Stellen Sie sicher, dass die Produktmarkierungen während der gesamten Lebensdauer
des Produkts lesbar bleiben.
- Überprüfen Sie die Eignung dieser Ausrüstung für Ihre Zwecke hinsichtlich der
geltenden behördlichen Bestimmungen und Normen für die Arbeitssicherheit.
- Die Gebrauchsanleitungen für jeden Ausrüstungsgegenstand, der zusammen mit diesem
Produkt verwendet wird, müssen unbedingt befolgt werden.
- Die Gebrauchsanleitungen müssen allen Benutzern dieser Ausrüstung zur Verfügung
gestellt werden. Wird diese Ausrüstung außerhalb des ursprünglichen Ziellands
weiterverkauft, muss der Verkäufer die Gebrauchsanleitung in der Sprache des Landes zur
Verfügung stellen, in dem das Produkt zum Einsatz kommt.
Produktlebensdauer
ACHTUNG, außergewöhnliche Umstände können die Lebensdauer des Produkts auf eine
einmalige Anwendung reduzieren, beispielsweise im Falle von Kontakt mit Chemikalien,
extremen Temperaturen, scharfen Kanten, einem schweren Sturz usw.
12
NAVAHO SIT / NAVAHO SIT FAST / TOP / TOP CROLL C79502-C (200907)
Page 13

(IT) ITALIANO
C
I
Istruzioni d’uso
- NAVAHO SIT e NAVAHO SIT FAST
Imbracatura bassa, cintura di posizionamento.
- NAVAHO SIT o NAVAHO SIT FAST unita al pettorale TOP
Imbracatura anticaduta, cintura di posizionamento sul lavoro, imbracatura bassa.
- NAVAHO SIT o NAVAHO SIT FAST unita al pettorale TOP CROLL
Imbracatura anticaduta, cintura di posizionamento sul lavoro, imbracatura bassa,
imbracatura per l’accesso su funi con bloccante CROLL integrato.
A
Solo le tecniche presentate come non barrate e / o senza simbolo di morte sono
autorizzate. Informatevi regolarmente degli ultimi aggiornamenti di questo documento sul
nostro sito www.petzl.com
In caso di dubbi o di problemi di comprensione, rivolgersi direttamente a PETZL.
Campo di applicazione
- NAVAHO SIT e NAVAHO SIT FAST
Imbracatura bassa, cintura di posizionamento.
- NAVAHO SIT o NAVAHO SIT FAST unita al pettorale TOP
Imbracatura anticaduta, cintura di posizionamento sul lavoro, imbracatura bassa.
- NAVAHO SIT o NAVAHO SIT FAST unita al pettorale TOP CROLL
Imbracatura anticaduta, cintura di posizionamento sul lavoro, imbracatura bassa,
imbracatura per l’accesso su funi con bloccante CROLL integrato.
Questo prodotto non deve essere sollecitato oltre i suoi limiti o in qualsiasi altra situazione
differente da quella per cui è destinato.
ATTENZIONE
Le attività che comportano l’utilizzo di questo dispositivo sono per natura pericolose.
Voi siete responsabili delle vostre azioni e decisioni.
Prima di utilizzare questo dispositivo, occorre :
- leggere e comprendere tutte le istruzioni d’uso ;
- ricevere una formazione adeguata sul suo utilizzo ;
- acquisire familiarità con il dispositivo, imparare a conoscerne le prestazioni e i limiti ;
- comprendere e accettare i rischi indotti.
Il mancato rispetto di una sola di queste avvertenze può essere la causa di ferite gravi
o mortali.
Responsabilità
ATTENZIONE, una formazione specifica all’attività da svolgere è indispensabile prima
dell’utilizzo.
Questo prodotto deve essere utilizzato esclusivamente da persone competenti e
addestrate o sottoposte al controllo visivo diretto di una persona competente e addestrata.
L’apprendimento delle tecniche adeguate e delle misure di sicurezza è sotto la sola vostra
responsabilità.
Voi vi assumete personalmente tutti i rischi e le responsabilità per qualsiasi danno, ferita
o morte che possano sopraggiungere, in qualsiasi modo, conseguentemente al cattivo
utilizzo dei nostri prodotti. Se non siete in grado di assumervi questa responsabilità e
questi rischi, non utilizzate questo materiale.
Nomenclatura delle parti
- Pettorale TOP :
(1) Bretelle, (2) Fibbia di regolazione dorsale, (3) Anello sternale EN 361, (4) Connettore
direzionale.
- Pettorale TOP CROLL :
(1) Bretelle, (2) Fibbia di regolazione dorsale, (3) Anello sternale EN 361, (4a) Bloccante
ventrale CROLL integrato EN 12841, (4b) Maglia rapida direzionale con barretta di
separazione, (16) Fermacorda, (17) Leva di sicurezza, (18) Foro di collegamento.
- Imbracatura bassa NAVAHO SIT e NAVAHO SIT FAST :
(5) Punto ventrale (tessuto) di collegamento pettorale imbracatura bassa, (6) Cintura,
(7) Anello ventrale EN 358, EN 813, (8) Anelli laterali cintura EN 358, (9) Fibbia posteriore
di collegamento pettorale imbracatura bassa con punto di attacco di trattenuta EN 358,
(10) Fibbie di regolazione DoubleBack, (10 bis) Fibbie rapide FAST, (11) Portamateriale,
(12) Passante per portamateriale, (13) Passante per fettuccia, (14) Elastici regolabili,
(15) Etichetta di marcatura da riporre nel rinforzo della cintura.
Materiali principali
Imbracatura : poliestere, acciaio (fibbie di regolazione), lega d’alluminio (punti di attacco).
Bloccante ventrale CROLL : lega d’alluminio (corpo), acciaio cromato (fermacorda),
poliammide (leva di sicurezza).
Controllo, punti da verificare
Prima di ogni utilizzo
- Imbracatura
Verificare le fettucce a livello degli anelli di aggancio, delle fibbie di regolazione e delle
cuciture di sicurezza.
Fare attenzione ai tagli, all’usura e ai danni dovuti all’utilizzo, al calore, ai prodotti chimici,
ecc. Attenzione ai fili tagliati.
Controllare il buon funzionamento delle fibbie DoubleBack e FAST.
- TOP
Connettore direzionale
Verificare sul corpo, sulla leva, sul rivetto e sulla ghiera di bloccaggio, l’assenza di
fessurazioni, deformazioni, corrosione… Aprire la leva e controllare che si chiuda
automaticamente quando viene rilasciata. Controllare il corretto funzionamento della
ghiera di bloccaggio. Il foro del Keylock, a livello della leva, non deve essere ostruito
(terra, sassi…).
- TOP CROLL
Maglia rapida direzionale
Prima di ogni utilizzo, controllare il corpo.
Verificare che il dado di bloccaggio sia avvitato a fondo correttamente (nessuna filettatura
deve essere visibile) e che sia bloccato alla coppia di serraggio di 3 Nm.
Bloccante ventrale CROLL
Verificare prima dell’utilizzo lo stato del corpo, del foro di collegamento, del fermacorda e
della leva di sicurezza (fessure, segni, deformazione, usura, corrosione), le molle e l’asse
del fermacorda. Verificare l’usura dei denti. Attenzione, se mancano dei denti o se sono
usurati, non utilizzare più questo bloccante.
Durante l’utilizzo
È importante controllare regolarmente lo stato del prodotto. Assicuratevi del collegamento
e del buon posizionamento dei dispositivi gli uni rispetto agli altri.
Consultare i particolari della procedura di controllo di ogni DPI sul sito www.petzl.fr/epi o
sul CD-ROM DPI PETZL.
In caso di dubbio contattare PETZL.
B
NAVAHO SIT e NAVAHO SIT FAST
Schema 1. Sistemazione dell’imbracatura
Aprire le fibbie dei cosciali.
1A. Prendere l’imbracatura bassa per la cintura e infilarla per i piedi.
1B. Regolare la cintura tirando le sue fettucce. Infilare correttamente le parti in eccedenza
delle fettucce nei passanti (correttamente appiattite).
- Leggera eccedenza : infilare la fettuccia nei passanti davanti le fibbie di regolazione.
- Eccedenza maggiore : avete delle eccedenze di fettuccia, passatele negli anelli laterali poi
sotto i passanti dietro a questi anelli.
1C. Chiudere e regolare i cosciali.
- NAVAHO SIT : fibbie DoubleBack.
- NAVAHO SIT FAST : Chiudere le fibbie FAST. Attenzione ai corpi estranei che rischiano di
ostacolare il funzionamento delle fibbie rapide FAST (sassolini, sabbia, abbigliamento…).
Controllare il corretto bloccaggio.
Regolazione e prova di sospensione
L’imbracatura deve essere regolata aderente al corpo per ridurre il rischio di ferite in caso
di caduta.
Si devono effettuare dei movimenti e una prova di sospensione su ogni punto di attacco,
con la propria attrezzatura, per essere sicuri che sia della taglia giusta e della comodità
necessaria per l’utilizzo previsto e che la regolazione sia ottimale.
POSIZIONAMENTO SUL LAVORO e TRATTENUTA
Schema 2. Imbracatura di posizionamento sul lavoro e di
trattenuta EN 358 : 2000
Questi punti di attacco sono destinati sia a mantenere l’utilizzatore in posizione sul luogo
di lavoro (lavoro in tensione : posizionamento sul lavoro), sia ad impedire all’utilizzatore
di raggiungere un luogo da dove una caduta è possibile (principio di trattenuta). Questi
punti di attacco devono essere utilizzati unicamente per l’aggancio ad un sistema
di posizionamento sul lavoro o un sistema di trattenuta, altezza di caduta massima : 0,5 m.
Questi punti di attacco non sono concepiti per degli utilizzi anticaduta e può essere
necessario completare i sistemi di posizionamento sul lavoro o di trattenuta con dei mezzi
di protezione contro le cadute dall’alto di tipo collettivo (ad esempio delle reti di sicurezza)
o individuale (ad esempio un sistema di arresto caduta secondo la norma EN 363).
Nell’utilizzo in un sistema di arresto caduta secondo la norma EN 363, completare
l’imbracatura bassa con un pettorale TOP o TOP CROLL.
2A. Punto di attacco ventrale
2B. Punti di attacco laterali cintura
Utilizzare sempre i due anelli laterali insieme collegandoli tramite un cordino di
posizionamento per essere in appoggio confortevolmente sulla cintura.
I piedi devono essere in appoggio per un posizionamento comodo.
Regolare il cordino di posizionamento sul lavoro in modo che il punto di ancoraggio sia
al livello o al di sopra della vita. Il cordino è tenuto in tensione e lo spostamento libero è
limitato a 0.5 m.
2C. Punto di attacco posteriore di trattenuta
Questo punto di attacco posteriore sulla cintura è unicamente un punto di trattenuta
che impedisce di operare in una zona che presenta un rischio di caduta (principio di
trattenuta).
Verificare regolarmente gli elementi di regolazione e/o di attacco durante l’utilizzo.
D
Schema 3. Imbracatura bassa :
EN 813 : 1997
Punto di attacco ventrale
La norma EN 813 : 1997 concerne le imbracature basse da utilizzare nei sistemi di
posizionamento sul lavoro, di trattenuta e di accesso su funi quando è necessario un
punto di attacco basso.
Utilizzare questo anello per collegare un discensore, dei cordini di posizionamento o dei
cordini di progressione.
Questo punto di attacco non è adatto all’arresto delle cadute.
E
NAVAHO SIT o NAVAHO SIT FAST unita al pettorale TOP
Schema 4. Preparazione
Per assemblare il pettorale all’imbracatura bassa, passare la fettuccia dorsale nella fibbia
posteriore di collegamento (9) poi nel passante elastico. Infilare successivamente la
fettuccia nella fibbia DoubleBack di regolazione dorsale (2), poi nuovamente nel passante
elastico.
F
Schema 5. Sistemazione dell’imbracatura
Aprire le fibbie dei cosciali.
5A. Posizionare le bretelle su un lato, prendere l’imbracatura bassa per la cintura e infilarla
per i piedi.
5B. Regolare la cintura tirando le sue fettucce. Infilare correttamente le parti in eccedenza
delle fettucce nei passanti (correttamente appiattite).
- Leggera eccedenza : infilare la fettuccia nei passanti davanti le fibbie di regolazione.
- Eccedenza maggiore : avete delle eccedenze di fettuccia, passatele negli anelli laterali poi
sotto i passanti dietro a questi anelli.
5C. Chiudere e regolare i cosciali.
- NAVAHO SIT : fibbie DoubleBack.
- NAVAHO SIT FAST : Chiudere le fibbie FAST. Attenzione ai corpi estranei che rischiano di
ostacolare il funzionamento delle fibbie rapide FAST (sassolini, sabbia, abbigliamento…).
Controllare il corretto bloccaggio.
5D. Posizionare le bretelle sulle spalle. Posizionare il connettore nel punto ventrale
(tessuto) di collegamento pettorale imbracatura bassa (5). Avvitare la ghiera di bloccaggio
del connettore.
5E. Regolare le bretelle. Infilare l’eccedenza di fettuccia (ben appiattita) nei passanti posti
sulla bretella.
5F. Regolazione dorsale iniziale
Effettuare la regolazione una sola volta quando si indossa per la prima volta l’imbracatura
facendosi aiutare da un’altra persona.
Fare scorrere il passante della fettuccia affinché la fettuccia dorsale sia tesa nei suoi due
spessori (nessun allentamento deve essere visibile).
Fare attenzione ad inserire l’eccedenza di fettuccia (ben appiattita) nei passanti per non
essere ostacolati durante il lavoro.
Adattare la regolazione alla propria morfologia, posizionare la fibbia DoubleBack all’altezza
delle scapole.
Regolazione e prova di sospensione
L’imbracatura deve essere regolata aderente al corpo per ridurre il rischio di ferite in caso
di caduta.
Si devono effettuare dei movimenti e una prova di sospensione su ogni punto di attacco,
con la propria attrezzatura, per essere sicuri che sia della taglia giusta e della comodità
necessaria per l’utilizzo previsto e che la regolazione sia ottimale.
G
Schema 6. Connettore direzionale ovale a bloccaggio manuale
Il connettore EN 362 : 2004, componente dell’imbracatura, è un elemento di connessione
per collegare la parte anteriore del pettorale alla cintura. Non utilizzarlo per collegare un
cordino o un assorbitore d’energia.
6A. ATTENZIONE PERICOLO, utilizzare sempre il connettore con la leva chiusa e bloccata.
La resistenza di un connettore diminuisce considerevolmente se la leva è aperta.
Controllare regolarmente che la leva sia correttamente bloccata facendo pressione
con la mano.
6B. Il connettore (chiuso) garantisce la resistenza massima nel senso della lunghezza.
Qualsiasi altra posizione ne riduce la resistenza.
H
ANTICADUTA
Schema 7. Imbracatura anticaduta EN 361 : 2002
Imbracatura completa per esigenze anticaduta, componente di un sistema di arresto
caduta secondo la norma EN 363 (sistemi di protezione individuale contro le cadute
dall’alto). Deve essere utilizzata in combinazione con ancoraggi EN 795, moschettoni a
ghiera EN 362, assorbitore EN 355 ecc.
7A. Punto di attacco sternale
Solo questo punto serve a connettere un sistema d’arresto caduta ad esempio un
anticaduta guidato su corda, un assorbitore d’energia…, sistema descritto nella norma
EN 363. Per meglio identificarlo, questo punto è contrassegnato dalla lettera A.
Tirante d’aria : altezza libera sotto l’utilizzatore
L’altezza libera sotto l’utilizzatore deve essere sufficiente affinché non urti degli ostacoli in
caso di caduta. I calcoli specifici del tirante d’aria sono esposti dettagliatamente nelle note
informative degli altri componenti (assorbitori d’energia, anticaduta di tipo guidato…).
NAVAHO SIT o NAVAHO SIT FAST unita al pettorale TOP CROLL
Schema 8. Preparazione
Per assemblare il pettorale all’imbracatura bassa, passare la fettuccia dorsale nella fibbia
posteriore di collegamento (9) poi nel passante elastico. Infilare successivamente la
fettuccia nella fibbia DoubleBack di regolazione dorsale (2), poi nuovamente nel passante
elastico.
Per collegare il CROLL nella parte anteriore dell’imbracatura bassa, avvitare la maglia
rapida nel punto ventrale in tessuto di collegamento (5). Stringere e bloccare con la chiave
a 3 Nm. Non dimenticare di ribattere e agganciare la barretta di separazione in plastica.
J
Schema 9. Maglia rapida direzionale
La maglia rapida, componente dell’imbracatura, è un elemento di connessione per
collegare la parte anteriore del pettorale alla cintura. Deve sempre restare bloccata a 3 Nm
(allentamento manuale impossibile).
Non utilizzarla per collegare un cordino o un assorbitore d’energia.
K
Schema 10. Sistemazione dell’imbracatura
Aprire le fibbie FAST dei cosciali.
10A. Allargare le bretelle, prendere l’imbracatura per la cintura e infilarla per i piedi.
10B. Posizionare le bretelle sulle spalle.
10C. Regolare la cintura tirando le sue fettucce. Infilare correttamente le parti in
eccedenza delle fettucce nei passanti (correttamente appiattite).
- Leggera eccedenza : infilare la fettuccia nei passanti davanti le fibbie di regolazione.
- Eccedenza maggiore : avete delle eccedenze di fettuccia, passatele negli anelli laterali poi
sotto i passanti dietro a questi anelli.
10D. Chiudere le fibbie FAST e regolare i cosciali. Attenzione ai corpi estranei che
rischiano di ostacolare il funzionamento delle fibbie rapide FAST (sassolini, sabbia,
abbigliamento…). Controllare il corretto bloccaggio.
10E. Regolare le bretelle. Infilare l’eccedenza di fettuccia (ben appiattita) nei passanti
posti sulla bretella.
10F. Regolazione dorsale iniziale
Effettuare la regolazione una sola volta quando si indossa per la prima volta l’imbracatura
facendosi aiutare da un’altra persona.
Fare scorrere il passante della fettuccia affinché la fettuccia dorsale sia tesa nei suoi due
spessori (nessun allentamento deve essere visibile).
Fare attenzione ad inserire l’eccedenza di fettuccia (ben appiattita) nei passanti per non
essere ostacolati durante il lavoro.
Adattare la regolazione alla propria morfologia, posizionare la fibbia DoubleBack all’altezza
delle scapole.
Regolazione e prova di sospensione
L’imbracatura deve essere regolata aderente al corpo per ridurre il rischio di ferite in caso
di caduta.
Si devono effettuare dei movimenti e una prova di sospensione su ogni punto di attacco,
con la propria attrezzatura, per essere sicuri che sia della taglia giusta e della comodità
necessaria per l’utilizzo previsto e che la regolazione sia ottimale.
L
ANTICADUTA
Schema 11. Imbracatura anticaduta EN 361 : 2002
Imbracatura completa per esigenze anticaduta, componente di un sistema di arresto
caduta secondo la norma EN 363 (sistemi di protezione individuale contro le cadute
dall’alto). Deve essere utilizzata in combinazione con ancoraggi EN 795, moschettoni a
ghiera EN 362, assorbitore EN 355 ecc.
11A. Punto di attacco sternale
Solo questo punto serve a connettere un sistema d’arresto caduta ad esempio un
anticaduta guidato su corda, un assorbitore d’energia…, sistema descritto nella norma
EN 363. Per meglio identificarlo, questo punto è contrassegnato dalla lettera A.
Tirante d’aria : altezza libera sotto l’utilizzatore
L’altezza libera sotto l’utilizzatore deve essere sufficiente affinché non urti degli ostacoli in
caso di caduta. I calcoli specifici del tirante d’aria sono esposti dettagliatamente nelle note
informative degli altri componenti (assorbitori d’energia, anticaduta di tipo guidato…).
M
ACCESSO SU FUNI
Bloccante ventrale CROLL
EN 12841 : 2006
Campo di applicazione
Il bloccante ventrale CROLL EN 12841 : 2006 è un dispositivo di regolazione della corda di
tipo B destinato ad essere utilizzato nella progressione verso l’alto sulla fune di lavoro.
ATTENZIONE, deve obbligatoriamente essere utilizzato con un dispositivo di tipo A in
autoassicurazione su una seconda corda detta di sicurezza (ad esempio anticaduta di tipo
guidato su corda ASAP).
Il bloccante ventrale CROLL non è adatto ad un utilizzo in un sistema di arresto caduta
secondo la norma EN 363.
Diametro della corda
Utilizzare una corda da 10 a 13 mm di diametro (anima + calza) semistatica EN 1891
tipo A.
Schema 12. Installazione su corda
Tirare il fermacorda verso il basso azionando la leva con il pollice e l’indice. Bloccare la
leva sul corpo dell’apparecchio. Il fermacorda resta così in posizione aperta.
Sistemare la corda nel suo alloggiamento. Spingere la leva affinché il fermacorda si
appoggi sulla corda.
La leva di sicurezza impedisce l’apertura involontaria del fermacorda.
Per scollegare la corda
Far scorrere l’apparecchio sulla corda verso l’alto e contemporaneamente aprire il
fermacorda azionando la leva.
Schema 13. Principi di funzionamento
13A. Salita
Il CROLL è un dispositivo di progressione su corda (in salita). Si blocca in un senso
sotto l’azione del proprio peso (verso il basso) e scivola liberamente nel senso opposto
(verso l’alto).
I denti si conficcano nella calza e avviano il serraggio del fermacorda. Il fermacorda blocca
la corda. Delle fessure nel fermacorda permettono la fuoriuscita di fango ecc.
13B. Far scendere il CROLL (caso eccezionale)
Far scorrere leggermente l’apparecchio sulla corda verso l’alto e contemporaneamente
aprire il fermacorda con l’indice. Non manipolare la leva poiché c’è il rischio di apertura
involontaria.
13C. Verifica del funzionamento
Prima di ogni utilizzo, per verificare il senso di posizionamento della corda e
il funzionamento dell’apparecchio, deve essere sempre effettuata una prova in
autoassicurazione.
Spostare il CROLL sulla corda verso l’alto. Deve scorrere regolarmente. Testare il suo
bloccaggio sulla corda.
13D. Precauzioni
- Richiudere il fermacorda del CROLL quando non è utilizzato poiché un dispositivo (o un
altro oggetto) può incastrarsi nella gola rimasta aperta.
- ATTENZIONE agli oggetti estranei che rischiano di intralciare il funzionamento del
fermacorda (sassolini, fango, rametti, cordini, fettucce, indumenti, vernice, ecc.).
13
NAVAHO SIT / NAVAHO SIT FAST / TOP / TOP CROLL C79502-C (200907)
Page 14

- ATTENZIONE a non impigliare la leva di sicurezza sui vestiti o sulle fettucce.
- La corda deve sempre essere tesa tra il CROLL e l’ancoraggio. L’utilizzatore deve restare
sempre sotto il punto di ancoraggio.
- Assorbimento d’energia della corda :
non dimenticare che è la corda che assorbe l’energia in caso di caduta. Più ci si avvicina
al punto di ancoraggio, più diminuisce la capacità di assorbimento dell’arresto, fino a
diventare quasi nulla.
- Proteggere la corda da qualsiasi oggetto che possa danneggiarla (ad esempio : parte
tagliente, ecc.).
- La corda deve poter scorrere liberamente nel CROLL, fare attenzione ai nodi, a zone di
corda danneggiate…
- Non dimenticare di fare un nodo di arresto all’estremità inferiore della corda.
Schema 14. Risalita su corda
- Corda di lavoro : Utilizzare il CROLL più un altro bloccante a mano ad esempio una
maniglia ASCENSION con una staffa. Non dimenticare di attaccarsi a questo secondo
bloccante con un cordino appropriato.
- Corda di sicurezza : utilizzare un dispositivo di tipo A (autoassicurazione).
Questo prodotto ha una garanzia di 3 anni contro ogni difetto di materiale o di
fabbricazione. Sono esclusi dalla garanzia : l’usura normale, l’ossidazione, le modifiche o i
ritocchi, la cattiva conservazione, la manutenzione impropria, i danni dovuti agli incidenti,
alle negligenze ed agli utilizzi ai quali questo prodotto non è destinato.
PETZL non è responsabile delle conseguenze dirette, indirette, accidentali o di ogni altro
tipo di danno verificatosi o causato dall’utilizzo dei suoi prodotti.
N
Carico massimo dei portamateriali
O
Informazioni generali
Compatibilità : anelli / connettori
Una connessione incompatibile può portare ad uno sganciamento accidentale, ad una
rottura o a compromettere la funzione di sicurezza di un altro dispositivo.
ATTENZIONE, gli anelli di aggancio dell’imbracatura possono fare leva sulla leva del
connettore.
Al momento di una brusca tensione della corda e/o di un urto sul sistema di bloccaggio,
unito ad una non corretta posizione del moschettone, la ghiera di bloccaggio può
rompersi e la leva aprirsi.
Per eliminare tale rischio, fare attenzione alla corretta posizione dei connettori ad ogni
messa in tensione del sistema (cordino, discensore…).
Fare attenzione anche alla compatibilità dei connettori con gli anelli (forme, dimensioni…)
eliminando i connettori che hanno la tendenza a posizionarsi scorrettamente in maniera
stabile.
EN 365 : AVVERTENZA
Compatibilità
Verificare la compatibilità di questo prodotto con gli altri elementi del vostro materiale
(vedi nota informativa specifica).
ATTENZIONE, un pericolo può sopraggiungere al momento dell’utilizzo di più dispositivi in
cui la funzione di sicurezza di uno dei dispositivi può essere compromessa dalla funzione
di sicurezza di un altro dispositivo.
Se non siete certi della compatibilità dei vostri dispositivi contattate Petzl.
Ancoraggi : Lavoro in quota
L’ancoraggio del sistema deve essere preferibilmente situato al di sopra della posizione
dell’utilizzatore e deve rispondere ai requisiti della norma dispositivi di ancoraggio EN 795,
in particolare la resistenza minima dell’ancoraggio deve essere di 10 kN.
Procedura di soccorso
Prevedere una procedura di soccorso e definire i mezzi per intervenire rapidamente nel
caso dell’insorgere di difficoltà. Questo comporta una formazione adeguata alle tecniche
di salvataggio.
Connettori
I connettori devono sempre essere utilizzati in posizione corretta (asse maggiore), leva
chiusa e bloccata. Controllare regolarmente che la leva sia correttamente bloccata facendo
pressione con la mano.
Verificare lo stato dei connettori secondo le indicazioni delle Istruzioni d’uso.
Informazioni aggiuntive
- ATTENZIONE PERICOLO, evitare gli sfregamenti su materiali abrasivi o parti taglienti.
- Gli utilizzatori devono avere l’idoneità sanitaria per le attività in quota. ATTENZIONE, la
sospensione inerte nell’imbracatura può generare gravi disturbi fisiologici o la morte.
- Controllare che le marcature sul prodotto restino leggibili durante tutta la vita del
prodotto.
- Verificare che il connettore sia adatto all’uso nella vostra applicazione rispetto alle
normative nazionali di sicurezza in vigore.
- Devono essere rispettate le istruzioni d’uso indicate nelle note informative di ogni
dispositivo associato a questo prodotto.
- Le istruzioni d’uso devono essere fornite all’utilizzatore di questa attrezzatura. Il
rivenditore deve redigere queste istruzioni nella lingua del paese d’utilizzo se il prodotto è
venduto fuori dal primo paese di destinazione.
Durata
ATTENZIONE, un evento eccezionale può limitare la durata ad un solo utilizzo, ad esempio
se il prodotto è esposto a prodotti chimici pericolosi, temperature estreme, se è a contatto
con una parte tagliente o se subisce notevoli sforzi, una forte caduta, ecc.
La durata potenziale dei prodotti Petzl può essere di 10 anni a partire dalla data di
fabbricazione per i prodotti in plastica e tessili. Indefinita per i prodotti metallici.
La durata reale di un prodotto termina nel momento in cui si riscontra una causa
d’eliminazione (vedere la lista nel paragrafo «Eliminazione») o quando il prodotto risulta
obsoleto nel sistema.
Fattori che incidono sulla durata reale di un prodotto : intensità, frequenza, ambiente di
utilizzo, competenza dell’utilizzatore, manutenzione, stoccaggio, ecc.
Verificare periodicamente che il dispositivo non abbia subito
danni e che non sia deteriorato.
Oltre ai controlli prima e durante l’utilizzo, un controllore competente deve eseguire una
verifica approfondita (esame periodico). Tale controllo deve essere effettuato almeno
ogni 12 mesi. Bisogna adattare la frequenza in funzione al tipo e all’intensità dell’utilizzo.
Per un miglior controllo del materiale, è consigliabile destinare il prodotto ad un solo
utilizzatore così da conoscerne la storia. I risultati dei controlli devono essere riportati
su una «scheda di verifica». La scheda di verifica deve consentire di registrare i seguenti
dati : tipo di dispositivo, modello, nome e dati del fabbricante o del fornitore, mezzo
di identificazione (n° di serie o n° individuale), anno di fabbricazione, data d’acquisto,
data del primo utilizzo, nome dell’utilizzatore, ogni informazione pertinente come ad
esempio la manutenzione e la frequenza di utilizzo, la storia delle verifiche periodiche
(data, osservazioni e difetti riscontrati, nome e firma del controllore competente, data
della prossima verifica periodica prevista). È possibile utilizzare il modello di scheda e gli
strumenti informatici messi a disposizione su www.petzl.fr/epi
Eliminazione
Cessare immediatamente di utilizzare questo prodotto se :
- il risultato dei controlli (prima, durante, approfondito) è negativo ;
- ha subito notevoli sforzi o una forte caduta ;
- non si conosce l’intera storia del suo utilizzo ;
- ha 10 anni ed è composto da materiali plastici o tessili ;
- si ha un minimo dubbio sulla sua affidabilità.
Distruggere i prodotti scartati per evitare un futuro utilizzo.
Obsolescenza del prodotto
Esistono molteplici ragioni per le quali un prodotto può essere considerato obsoleto
e quindi ritirato dal servizio, per esempio : evoluzione delle norme applicabili, dei testi
normativi e delle tecniche, incompatibilità con gli altri dispositivi, ecc.
Modifiche, riparazioni
È vietata ogni modifica, aggiunta o riparazione oltre a quelle autorizzate da Petzl : rischio
di diminuzione dell’efficacia del prodotto.
Stoccaggio, trasporto
Dopo l’utilizzo riporre il prodotto in una confezione (sacca, scatola) di protezione contro i
raggi UV, l’umidità, i prodotti chimici. ecc.
Garanzia
14
NAVAHO SIT / NAVAHO SIT FAST / TOP / TOP CROLL C79502-C (200907)
Page 15

(ES) ESPAÑOL
Instrucciones de utilización
- NAVAHO SIT y NAVAHO SIT FAST
Arnés de cintura, cinturón de sujeción.
- NAVAHO SIT o NAVAHO SIT FAST unido al torso TOP
Arnés anticaídas, cinturón de sujeción, arnés de cintura.
- NAVAHO SIT o NAVAHO SIT FAST unido al torso TOP CROLL
Arnés anticaídas, cinturón de sujeción, arnés de cintura, arnés para acceso por cuerda
con bloqueador CROLL integrado.
A
Sólo están autorizadas las técnicas presentadas sin tachar y/o sin calavera. Infórmese
regularmente de las últimas actualizaciones de estos documentos en nuestra página web
www.petzl.com
En caso de duda o de problemas de comprensión, consulte a PETZL.
Campo de aplicación
- NAVAHO SIT y NAVAHO SIT FAST
Arnés de cintura, cinturón de sujeción.
- NAVAHO SIT o NAVAHO SIT FAST unido al torso TOP
Arnés anticaídas, cinturón de sujeción, arnés de cintura.
- NAVAHO SIT o NAVAHO SIT FAST unido al torso TOP CROLL
Arnés anticaídas, cinturón de sujeción, arnés de cintura, arnés para acceso por cuerda
con bloqueador CROLL integrado.
Este producto no debe ser solicitado más allá de sus límites o en cualquier otra situación
para la que no esté prevista.
ATENCIÓN
Las actividades que implican la utilización de este producto son por naturaleza
peligrosas.
Usted es responsable de sus actos y decisiones.
Antes de utilizar este equipo, debe :
- Leer y comprender todas las instrucciones de utilización.
- Formarse para el uso específico de este equipo.
- Familiarizarse con su equipo y aprender a conocer sus prestaciones y sus limitaciones.
- Comprender y aceptar los riesgos derivados.
El no respeto de una sola de estas advertencias puede ser la causa de heridas graves
o mortales.
Responsabilidad
ATENCIÓN : es indispensable una formación adaptada a la práctica antes de cualquier
utilización.
Este producto sólo debe ser utilizado por personas competentes e informadas, o que
estén bajo el control visual directo de una persona competente e informada.
El aprendizaje de las técnicas adecuadas y de las medidas de seguridad se efectúa bajo su
única responsabilidad.
Usted asume personalmente todos los riesgos y responsabilidades por cualquier
daño, herida o muerte que puedan producirse debido a una mala utilización de
nuestros productos, sea del modo que sea. Si usted no está dispuesto a asumir esta
responsabilidad o riesgo, no utilice este material.
Nomenclatura de las partes
- Torso TOP :
(1) Tirantes, (2) Hebilla de regulación dorsal, (3) Anillo esternal EN 361, (4) Conector
direccional.
- Torso TOP CROLL :
(1) Tirantes, (2) Hebilla de regulación dorsal, (3) Anillo esternal EN 361, (4a) Bloqueador
ventral CROLL integrado EN 12841, (4b) Maillón direccional con barra de separación,
(16) Gatillo, (17) Tope de seguridad, (18) Orificio de conexión.
- Arneses de cintura NAVAHO SIT y NAVAHO SIT FAST
(5) Punto ventral (textil) de unión torso-arnés de cintura, (6) Cinturón (7) Anillo ventral
EN 358, EN 813, (8) Anillos laterales del cinturón EN 358, (9) Hebilla posterior de unión
torso-arnés de cintura con punto de enganche de retención EN 358, (10) Hebillas de
regulación DoubleBack, (10 bis) Hebillas rápidas FAST, (11) Portamaterial, (12) Trabilla
para portaherramientas, (13) Trabilla para cinta, (14) Elásticos regulables, (15) Etiqueta
de marcado para guardar en el refuerzo interior del cinturón.
Materiales principales
Arnés : poliéster, acero (hebillas de regulación) y aleación de aluminio (puntos de
enganche).
Bloqueador ventral CROLL : aleación de aluminio (cuerpo), acero cromado (gatillo) y
poliamida (tope de seguridad).
Control, puntos a verificar
Antes de cualquier utilización
- Arnés
Compruebe las cintas al nivel de los anillos de enganche, de las hebillas de regulación y
de las costuras de seguridad.
Vigile los cortes, desgastes y daños debidos al uso, al calor, a los productos químicos,
etc. Atención a los hilos cortados.
Compruebe que las hebillas DoubleBack y FAST funcionen correctamente.
- TOP
Conector direccional
Compruebe el cuerpo del mosquetón, el gatillo, el remache, el casquillo de seguridad,
la ausencia de fisuras, deformaciones, corrosión… Abra el gatillo y compruebe que se
cierra automáticamente al soltarlo. Compruebe que el casquillo de seguridad funcione
correctamente. El orificio del Keylock, al nivel del gatillo, no debe estar obturado (tierra,
piedrecitas…).
- TOP CROLL
Maillón direccional
Antes de cualquier utilización, compruebe el cuerpo.
Compruebe que la tuerca de bloqueo esté correctamente roscada a fondo (no debe verse
ningún filete de la rosca) y bloqueada con el par de apriete de 3 Nm.
Bloqueador ventral CROLL
Antes de cualquier utilización, compruebe el estado del cuerpo, del orificio de conexión,
del gatillo y del tope de seguridad (fisuras, marcas, deformación, desgaste, corrosión),
los muelles y el eje del gatillo. Compruebe el desgaste de los dientes. Atención, si faltan
dientes o están desgastados, deje de utilizar este bloqueador.
Durante la utilización
Es importante verificar regularmente el estado del producto. Asegúrese de la conexión y
de la correcta la colocación de los equipos entre sí.
Consulte los detalles para realizar el control de cada EPI en www.petzl.fr/epi o en el
CD-ROM EPI PETZL.
En caso de duda, póngase en contacto con PETZL.
B
NAVAHO SIT y NAVAHO SIT FAST
Esquema 1. Colocación del arnés
Abra las hebillas de las perneras.
1A. Coja el arnés por el cinturón y colóqueselo por los pies.
1B. Ajuste el cinturón tirando de las cintas del mismo. Guarde correctamente los
sobrantes de cinta en las trabillas (bien enganchados).
- Sobrantes cortos : coloque la cinta en las trabillas situadas delante de las hebillas de
regulación.
- Sobrantes largos : pase la cinta sobrante por los anillos laterales y colóquela en la
trabilla situada detrás de los anillos laterales.
1C. Cierre y ajuste las perneras.
- NAVAHO SIT : hebillas DoubleBack.
- NAVAHO SIT FAST : Cierre las hebillas FAST. Atención a los cuerpos extraños que
podrían dificultar el funcionamiento de las hebillas rápidas FAST (piedrecitas, arena,
vestimenta…). Compruebe que estén correctamente bloqueadas.
Regulación y prueba de suspensión
Su arnés debe estar ajustado cerca del cuerpo para reducir el riesgo de lesión en caso
de caída.
Debe realizar movimientos y una prueba de suspensión de cada punto de enganche, con
su material, para estar seguro de que : sea la talla correcta, tenga el nivel de comodidad
necesario para el uso previsto y que la regulación sea óptima.
C
SUJECIÓN y RETENCIÓN
Esquema 2. Arnés de sujeción y de retención EN 358 : 2000
Estos puntos de enganche están destinados ya sea a mantener al usuario en posición en
su puesto de trabajo (trabajo en tensión), o a impedir que el usuario alcance una zona
desde la que se pueda producir una caída (principio de la correa : retención). Estos puntos
de enganche deben ser utilizados únicamente para la conexión a un sistema de sujeción o
a un sistema de retención, altura de caída máxima : 0,5 m.
Estos puntos de enganche no están diseñados para ser usados como anticaídas y puede
que sea necesario completar los sistemas de sujeción o de retención por medios de
protección contra las caídas de altura de tipo colectivo (por ejemplo, redes de seguridad)
o individual (por ejemplo, un sistema anticaídas según la norma EN 363).
Para utilizar el arnés de cintura en un sistema anticaídas según la norma EN 363,
complételo con un torso TOP o TOP CROLL.
2A. Punto de enganche ventral
2B. Puntos de enganche laterales del cinturón
Utilice siempre los dos anillos laterales a la vez uniéndolos con un elemento de amarre de
sujeción para estar en apoyo sobre el cinturón de forma cómoda.
Los pies deben estar apoyados para una sujeción cómoda.
Regule el elemento de amarre de sujeción de forma que el punto de anclaje esté al mismo
nivel o por encima de la cintura. El elemento de amarre se mantiene en tensión y el
desplazamiento libre está limitado a 0,5 m.
2C. Punto de enganche posterior de retención
Este punto de enganche posterior del cinturón sólo es un punto de retención que le
impide evolucionar en una zona que presenta un riesgo de caída (principio de la correa).
Compruebe regularmente los elementos de regulación y/o de fijación durante la
utilización.
D
Esquema 3. Arnés de cintura :
EN 813 : 1997
Punto de enganche ventral
La norma EN 813 : 1997 concierne a los arneses de cintura que se utilizan en sistemas
de sujeción, de retención y de acceso por cuerda cuando es necesario un punto de
enganche bajo.
Utilice este anillo ventral para conectar un descensor, elementos de amarre de sujeción o
elementos de amarre de progresión.
Este punto de enganche no está preparado para la detención de caídas.
E
NAVAHO SIT o NAVAHO SIT FAST unido al torso TOP
Esquema 4. Preparación
Para unir el torso al arnés de cintura, pase la cinta dorsal por la hebilla posterior de
unión (9) y, después, por la trabilla elástica. A continuación, pase esta cinta por la hebilla
DoubleBack de regulación dorsal (2), luego, de nuevo por la trabilla elástica.
F
Esquema 5. Colocación del arnés
Abra las hebillas de las perneras.
5A. Deje los tirantes a un lado, coja el arnés por el cinturón y colóqueselo por los pies.
5B. Ajuste el cinturón tirando de las cintas del mismo. Guarde correctamente los
sobrantes de cinta en las trabillas (bien enganchados).
- Sobrantes cortos : coloque la cinta en las trabillas situadas delante de las hebillas de
regulación.
- Sobrantes largos : pase la cinta sobrante por los anillos laterales y colóquela en la
trabilla situada detrás de los anillos laterales.
5C. Cierre y ajuste las perneras.
- NAVAHO SIT : hebillas DoubleBack.
- NAVAHO SIT FAST : Cierre las hebillas FAST. Atención a los cuerpos extraños que
podrían dificultar el funcionamiento de las hebillas rápidas FAST (piedrecitas, arena,
vestimenta…). Compruebe que estén correctamente bloqueadas.
5D. Colóquese los tirantes sobre los hombros. Coloque el conector en el punto ventral
(textil) de unión torso-arnés de cintura (5). Rosque el casquillo de seguridad del conector.
5E. Ajuste los tirantes. Guarde la cinta sobrante (bien enganchada) en las trabillas
situadas en el tirante.
5F. Regulación dorsal inicial
Realice esta regulación una sola vez cuando se coloque el arnés por primera vez y pida
que otra persona le ayude.
Haga deslizar la trabilla de cinta para que la cinta dorsal quede tensa (las dos cintas no
deben quedar flojas).
Procure guardar la cinta sobrante (bien enganchada) en la trabilla para que no le moleste
en su trabajo.
Ajuste esta regulación a su morfología, coloque la hebilla DoubleBack al nivel de los
omóplatos.
Regulación y prueba de suspensión
Su arnés debe estar ajustado cerca del cuerpo para reducir el riesgo de lesión en caso
de caída.
Debe realizar movimientos y una prueba de suspensión de cada punto de enganche, con
su material, para estar seguro de que : sea la talla correcta, tenga el nivel de comodidad
necesario para el uso previsto y que la regulación sea óptima.
G
Esquema 6. Conector oval direccional con bloqueo manual
Este conector EN 362 : 2004, componente del arnés, es un elemento de conexión para
unir la parte anterior del torso al cinturón. No lo utilice para conectar un elemento de
amarre o un absorbedor de energía.
6A. ATENCIÓN PELIGRO : utilice siempre el conector con el gatillo cerrado y bloqueado.
La resistencia de un conector disminuye mucho si el gatillo está abierto.
Compruebe sistemáticamente que el gatillo esté correctamente bloqueado
apretándolo con la mano.
6B. El conector ofrece su máxima resistencia cuando está cerrado y trabaja en sentido
longitudinal. Cualquier otra posición reduce su resistencia.
H
ANTICAÍDAS
Esquema 7. Arnés anticaídas EN 361 : 2002
Arnés completo para situaciones en las que se necesita un sistema anticaídas,
componente de un sistema anticaídas según la norma EN 363 (sistemas de protección
individual contra las caídas de altura). Debe ser utilizado en combinación con anclajes
EN 795, mosquetones de seguridad EN 362, absorbedores EN 355, etc.
7A. Punto de enganche esternal
Sólo este punto sirve para conectar un sistema anticaídas, por ejemplo, un anticaídas
deslizante para cuerda, un absorbedor de energía… sistemas descritos en la norma
EN 363. Para identificarlos mejor, este punto está marcado con la letra A.
Distancia de seguridad : altura libre debajo del usuario
La altura libre debajo del usuario debe ser suficiente para que no choque contra ningún
obstáculo en caso de caída. Los cálculos específicos de la distancia de seguridad están
detallados en las fichas técnicas de los demás componentes (absorbedores de energía,
anticaídas deslizante…).
I
NAVAHO SIT o NAVAHO SIT FAST unido al torso TOP CROLL
Esquema 8. Preparación
Para unir el torso al arnés de cintura, pase la cinta dorsal por la hebilla posterior de
unión (9) y, después, por la trabilla elástica. A continuación, pase esta cinta por la hebilla
DoubleBack de regulación dorsal (2), luego, de nuevo por la trabilla elástica.
Para unir el CROLL a la parte delantera del arnés de cintura, rosque el maillón en el
punto ventral textil de unión (5). Apriete y bloquee con la llave a 3 Nm. No olvide cerrar y
bloquear la barra de separación de plástico.
J
Esquema 9. Maillón direccional
Este maillón, componente del arnés, es un elemento de conexión para unir la parte
anterior del torso al cinturón. Debe permanecer siempre bloqueado a 3 Nm (imposible de
aflojar con la mano).
No lo utilice para conectar un elemento de amarre o un absorbedor de energía.
K
Esquema 10. Colocación del arnés
Abra las hebillas FAST de las perneras.
10A. Separe los tirantes, coja el arnés por el cinturón y colóqueselo por los pies.
10B. Colóquese los tirantes sobre los hombros.
10C. Ajuste el cinturón tirando de las cintas del mismo. Guarde correctamente la cinta
sobrante en las trabillas (bien enganchada).
- Sobrantes cortos : coloque la cinta en las trabillas situadas delante de las hebillas de
regulación.
- Sobrantes largos : pase la cinta sobrante por los anillos laterales y colóquela en la
trabilla situada detrás de los anillos laterales.
10D. Cierre las hebillas FAST y ajuste las perneras. Atención a los cuerpos extraños que
podrían dificultar el funcionamiento de las hebillas rápidas FAST (piedrecitas, arena,
vestimenta…). Compruebe que estén correctamente bloqueadas.
10E. Ajuste los tirantes. Guarde la cinta sobrante (bien enganchada) en las trabillas
situadas en el tirante.
10F. Regulación dorsal inicial
Realice esta regulación una sola vez cuando se coloque el arnés por primera vez y pida
que otra persona le ayude.
Haga deslizar la trabilla de cinta para que la cinta dorsal quede tensa (las dos cintas no
deben quedar flojas).
Procure guardar la cinta sobrante (bien enganchada) en la trabilla para que no le moleste
en su trabajo.
Ajuste esta regulación a su morfología, coloque la hebilla DoubleBack al nivel de los
omóplatos.
Regulación y prueba de suspensión
Su arnés debe estar ajustado cerca del cuerpo para reducir el riesgo de lesión en caso
de caída.
Debe realizar movimientos y una prueba de suspensión de cada punto de enganche, con
su material, para estar seguro de que : sea la talla correcta, tenga el nivel de comodidad
necesario para el uso previsto y que la regulación sea óptima.
L
ANTICAÍDAS
Esquema 11. Arnés anticaídas EN 361 : 2002
Arnés completo para situaciones en las que se necesita un sistema anticaídas,
componente de un sistema anticaídas según la norma EN 363 (sistemas de protección
individual contra las caídas de altura). Debe ser utilizado en combinación con anclajes
EN 795, mosquetones de seguridad EN 362, absorbedores EN 355, etc.
11A. Punto de enganche esternal
Sólo este punto sirve para conectar un sistema anticaídas, por ejemplo, un anticaídas
deslizante para cuerda, un absorbedor de energía… sistemas descritos en la norma
EN 363. Para identificarlos mejor, este punto está marcado con la letra A.
Distancia de seguridad : altura libre debajo del usuario
La altura libre debajo del usuario debe ser suficiente para que no choque contra ningún
obstáculo en caso de caída. Los cálculos específicos de la distancia de seguridad están
detallados en las fichas técnicas de los demás componentes (absorbedores de energía,
anticaídas deslizante…).
M
ACCESO POR CUERDA
Bloqueador ventral CROLL
EN 12841 : 2006
Campo de aplicación
El bloqueador ventral CROLL EN 12841 : 2006 es un dispositivo de regulación de cuerda
de tipo B para ser utilizado en progresión hacia arriba por la cuerda de trabajo.
ATENCIÓN : debe utilizarse obligatoriamente con un dispositivo de tipo A en
autoaseguramiento sobre una segunda cuerda denominada cuerda de seguridad (por
ejemplo, anticaídas deslizante para cuerda ASAP).
El bloqueador ventral CROLL no es adecuado para una utilización en un sistema
anticaídas según la norma EN 363.
Diámetro de la cuerda
Utilice una cuerda de 10 a 13 mm de diámetro (alma + funda) semiestática EN 1891
tipo A.
Esquema 12. Colocación en la cuerda
Tire el gatillo hacia abajo accionando el tope de seguridad con el dedo índice y pulgar.
Bloquee el tope de seguridad en el cuerpo del aparato. Así el gatillo permanece en
posición abierta.
Coloque la cuerda en su emplazamiento. Desbloquee el tope de seguridad para que el
gatillo pueda apoyarse sobre la cuerda.
El tope de seguridad impide la apertura involuntaria del gatillo.
Para retirar la cuerda
Haga deslizar el aparato hacia arriba, sobre la cuerda, y simultáneamente abra el gatillo
accionando el tope de seguridad.
Esquema 13. Principios de funcionamiento
13A. Ascenso
El CROLL es un dispositivo de progresión por cuerda (en el ascenso). Se bloquea en un
sentido bajo la acción de su peso (hacia abajo) y desliza libremente en el sentido opuesto
(hacia arriba).
Los dientes se hunden en la funda y se inicia la acción de apretar del gatillo. El gatillo
bloquea la cuerda. Las ranuras del gatillo permiten evacuar el barro, etc.
13B. Hacer descender el CROLL (caso excepcional)
Haga deslizar ligeramente el aparato hacia arriba, sobre la cuerda, y simultáneamente abra
el gatillo con dedo índice. No manipule el tope de seguridad, ya que existe el riesgo de
apertura involuntaria.
13C. Comprobación del funcionamiento
Antes de cualquier utilización, para verificar el sentido de colocación de la cuerda y el
funcionamiento del aparato, siempre debe realizarse una prueba estando autoasegurado.
Desplace el CROLL por la cuerda hacia arriba. Debe deslizar regularmente. Pruebe su
bloqueo sobre la cuerda.
13D. Precauciones
15
NAVAHO SIT / NAVAHO SIT FAST / TOP / TOP CROLL C79502-C (200907)
Page 16

- Vuelva a cerrar el gatillo del CROLL cuando no lo utilice ya que un equipo (o cualquier
objeto) puede engancharse en la garganta que está abierta.
- ATENCIÓN a los objetos extraños que pueden dificultar el funcionamiento del gatillo
(piedrecitas, barro, ramas, cordinos, cintas, vestimenta, pintura, etc.).
- ATENCIÓN : vigile que el tope de seguridad no se enganche a la ropa o a las cintas.
- La cuerda entre el CROLL y el anclaje siempre debe estar en tensión. El usuario siempre
debe permanecer por debajo del punto de anclaje.
- Absorción de energía por la cuerda :
no olvide que es la cuerda la que absorbe la energía en caso de caída. Cuanto más se
acerque al punto de anclaje, más disminuye la capacidad de absorción del choque hasta
casi convertirse en nula.
- Proteja la cuerda de cualquier objeto que pueda estropearla (por ejemplo : arista
cortante, etc.).
- La cuerda debe poder deslizar libremente en el CROLL, por ejemplo, desconfíe de los
nudos, de una zona de cuerda estropeada…
- No olvide de hacer un nudo de detención en el extremo inferior de la cuerda.
Esquema 14. Ascenso por cuerda
- Cuerda de trabajo : Utilice el CROLL más otro bloqueador de mano, por ejemplo un
puño ASCENSIÓN con un estribo. No olvide de engancharse a este segundo bloqueador
mediante un elemento de amarre apropiado.
- Cuerda de seguridad : utilice un dispositivo de tipo A (autoaseguramiento).
Modificaciones y reparaciones
Cualquier modificación, adición o reparación diferentes de las autorizadas por Petzl están
prohibidas : riesgo de disminución de la eficacia del producto.
Almacenamiento y transporte
Después de su utilización, guarde su producto en una bolsa de protección contra los
rayos UV, la humedad, los productos químicos, etc.
Garantía
Este producto está garantizado durante 3 años contra cualquier defecto de materiales
o de fabricación. Se excluye de la garantía : el desgaste normal, la oxidación, las
modificaciones o retoques, el mal almacenamiento, la mala conservación, los daños
debidos a los accidentes, a las negligencias y a las utilizaciones para las que este
producto no está destinado.
PETZL no es responsable de las consecuencias directas, indirectas, accidentales o de
cualquier otro tipo de daños ocurridos o resultantes de la utilización de sus productos.
N
Carga máxima de los anillos portamaterial
O
Información general
Compatibilidad : Anillos / conectores
Una conexión incompatible puede conducir a un desenganche accidental, a una rotura o
afectar a la función de seguridad de otro equipo.
ATENCIÓN, los anillos de enganche de su arnés pueden hacer palanca sobre el gatillo
del conector.
Cuando se produce una tensión brusca de la cuerda y/o un choque sobre el sistema de
bloqueo combinado con una mala posición del mosquetón, el casquillo de seguridad
puede romperse y el gatillo abrirse.
Para suprimir este riesgo, procure posicionar los conectores correctamente cada vez que
someta a tensión el sistema (elemento de amarre, descensor…).
Procure también que los conectores sean compatibles con los anillos (formas,
medidas…) y elimine los conectores que tienen tendencia a posicionarse incorrectamente
de manera estable.
EN 365 : PRECAUCIONES
Compatibilidad
Verifique la compatibilidad de este producto con los demás elementos de su material
(consulte ficha específica).
ATENCIÓN : un peligro puede sobrevenir cuando se utilizan varios equipos en los que
la función de seguridad de uno de los equipos puede verse afectado por la función de
seguridad de otro equipo.
Si no está seguro de la compatibilidad de su equipo, contacte con PETZL.
Anclajes : Trabajo en altura
El anclaje del sistema debe estar situado preferentemente por encima de la posición del
usuario y debe responder a las exigencias de la norma relativa a dispositivos de anclaje
EN 795, en particular la resistencia mínima del anclaje debe ser de 10 kN.
Plan de rescate
Debe prever un plan de rescate y definir los medios para intervenir rápidamente en caso
de encontrarse con dificultades. Esto implica una formación adecuada en las técnicas
de rescate.
Conectores
Los conectores siempre deben ser utilizados en la posición correcta (eje mayor), gatillo
cerrado y bloqueado. Compruebe sistemáticamente que el gatillo esté correctamente
bloqueado apretándolo con la mano.
Compruebe el estado de los conectores según las indicaciones de las Instrucciones de
utilización.
Varios
- ATENCIÓN PELIGRO : están prohibidos los rozamientos sobre materiales abrasivos o
piezas cortantes.
- Los usuarios deben ser aptos desde el punto de vista médico para las actividades en
altura. ATENCIÓN : estar en suspensión e inerte en un arnés puede provocar problemas
fisiológicos graves o la muerte.
- Procure que los marcados del producto permanezcan legibles durante toda la vida del
producto.
- Debe verificar que este producto sea adecuado para la utilización que le vaya a aplicar en
relación a las leyes gubernamentales y las normas de seguridad en vigor.
- Deben ser respetadas las instrucciones de utilización especificadas en las fichas técnicas
de cada equipo asociado a este producto.
- Las instrucciones de utilización deben entregarse al usuario de este equipo. El
revendedor debe redactar estas instrucciones en el idioma del país de utilización si el
producto se revende fuera del primer país de destino.
Vida útil
ATENCIÓN : un suceso excepcional puede limitar la vida útil a una sola utilización, por
ejemplo, si el producto está expuesto a productos químicos peligrosos, a temperaturas
extremas o si está en contacto con una arista cortante o si ha sufrido esfuerzos
importantes, una caída importante, etc.
La vida útil potencial de los productos Petzl puede ser de 10 años a partir de la fecha de
fabricación para los productos plásticos y textiles. No está limitada para los productos
metálicos.
La vida útil real de un producto finaliza cuando se produce alguna causa para darlo de
baja (ver lista en el párrafo «Dar de baja») o cuando pasa a ser obsoleto en el sistema.
Factores que influyen en la vida útil real de un producto : intensidad, frecuencia, entorno
de utilización, competencia del usuario, mantenimiento, almacenamiento, etc.
Compruebe periódicamente que el equipo no haya sufrido
ningún daño ni deterioro.
Además de las comprobaciones antes y durante la utilización, realice una comprobación
en profundidad (examen periódico) mediante un controlador competente. Esta verificación
debe realizarse como mínimo cada 12 meses. Esta frecuencia debe adaptarse en función
del tipo y de la intensidad de utilización. Para un mejor seguimiento del material, es
preferible atribuir este producto a un usuario único para que éste conozca su historia. Los
resultados de las verificaciones deben anotarse en una «ficha de seguimiento». Esta ficha
de seguimiento debe permitir registrar los detalles siguientes : tipo de equipo, modelo,
nombre y dirección del fabricante o del proveedor, medio de identificación (n° de serie
o n° individual), año de fabricación, fecha de compra, fecha de la primera utilización,
nombre del usuario, toda la información pertinente como, por ejemplo, el mantenimiento,
la frecuencia de utilización y el historial de los controles periódicos (fecha, comentarios
y defectos detectados, nombre y firma del controlador competente, fecha del próximo
control periódico previsto). Puede utilizar el ejemplo de ficha detallada y las herramientas
informáticas que encontrará a su disposición en www.petzl.fr/epi
Dar de baja
Deje de utilizar inmediatamente este producto si :
- el resultado de las verificaciones (antes, durante, en profundidad) no es satisfactorio,
- ha sufrido esfuerzos importantes o una caída importante,
- no conoce el historial completo de su utilización,
- tiene 10 años y está compuesto de materiales plásticos o textiles,
- tiene la mínima duda de su fiabilidad.
Destruya los productos que ha dado de baja para evitar una utilización futura.
Productos obsoletos
Hay numerosas razones por las que un producto puede considerarse obsoleto y, por
consiguiente, retirado de la circulación, por ejemplo : evolución de las normas aplicables,
evolución de los textos reglamentarios, evolución de las técnicas, incompatibilidad con
los otros equipos, etc.
16
NAVAHO SIT / NAVAHO SIT FAST / TOP / TOP CROLL C79502-C (200907)
Page 17

(PT) PORTUGUÊS
POSICIONAMENTO NO TRABALHO e RESTRIÇÃO
Esquema 2. Harnês de posicionamento no trabalho e restrição
Modo de emprego
- NAVAHO SIT e NAVAHO SIT FAST
Harnês de cintura, cinto de posicionamento.
- NAVAHO SIT ou NAVAHO SIT FAST montado com o torse TOP
Harnês antiqueda, cinto de posicionamento, harnês de cintura.
- NAVAHO SIT ou NAVAHO SIT FAST montado com o torse TOP CROLL
Harnês antiqueda, cinto de posicionamento, harnês de cintura, harnês de acesso por
corda com bloqueador CROLL integrado.
A
Só as técnicas não barradas e / ou sem a caveira estão autorizadas. Tome regularmente
conhecimento das últimas actualizações destes documentos no nosso site www.petzl.com
Em caso de dúvida ou problema de compreensão, informe-se junto da PETZL.
Campo de aplicação
- NAVAHO SIT e NAVAHO SIT FAST
Harnês de cintura, cinto de posicionamento.
- NAVAHO SIT ou NAVAHO SIT FAST montado com o torse TOP
Harnês antiqueda, cinto de posicionamento, harnês de cintura.
- NAVAHO SIT ou NAVAHO SIT FAST montado com o torse TOP CROLL
Harnês antiqueda, cinto de posicionamento, harnês de cintura, harnês de acesso por
corda com bloqueador CROLL integrado.
Este produto não deve ser solicitado para lá dos seus limites ou em qualquer situação
para a qual não tenha sido previsto.
ATENÇÃO
As actividades que implicam a utilização deste produto são por natureza perigosas.
Você é responsável pelos seus actos e pelas suas decisões.
Antes de utilizar este produto, deve:
- Ler e compreender todas as instruções de utilização.
- Formar-se especificamente na utilização deste equipamento.
- Familiarizar-se com o seu equipamento, aprender a conhecer as suas performances e
as suas limitações.
- Compreender e aceitar os riscos inerentes.
O não respeito destes avisos poderá causar ferimentos graves ou mortais.
Responsabilidade
ATENÇÃO, uma formação adaptada à prática é indispensável antes da utilização.
Este produto não deve ser utilizado senão por pessoas competentes e responsáveis, ou
colocado sob o controle visual directo de uma pessoa competente e responsável.
A aprendizagem das técnicas adequadas e das medidas de segurança efectua-se sob a
sua inteira responsabilidade.
Você assume pessoalmente todos os riscos e responsabilidade por todos os danos,
ferimentos ou morte que possam advir após uma má utilização dos nossos produtos
seja de que forma for. Se não está em condições de assumir esta responsabilidade ou de
correr este risco, não utilize este material.
Nomenclatura das peças
- Torse TOP:
(1) Alças, (2) Fivela de ajuste dorsal, (3) Anel esternal EN 361, (4) Conector direccional.
- Torse TOP CROLL:
(1) Alças, (2) Fivela de ajuste dorsal, (3) Anel esternal EN 361, (4a) Bloqueador ventral
CROLL integrado EN 12841, (4b) Maillon rapide direccional com barra de separação,
(16) Mordente, (17) Patilha de segurança, (18) Orifício de conexão.
- Harneses de cintura NAVAHO SIT e NAVAHO SIT FAST:
(5) Ponto ventral (têxtil) de ligação do torse ao harnês, (6) Cinto (7) Anel ventral
EN 358, EN 813, (8) Anéis laterais do cinto EN 358, (9) Fivela posterior de ligação ao
torse com ponto de fixação para restrição EN 358, (10) Fivelas de ajuste DoubleBack,
(10 bis) Fivelas rápidas FAST, (11) Porta-material, (12) Passador para porta-ferramentas,
(13) Passador para fita, (14) Elásticos ajustáveis, (15) Etiqueta para marcação de recolher
no reforço do cinto do harnês.
Matérias principais
Harnês: poliéster, aço (fivelas de ajuste), liga de alumínio (pontos de fixação)).
Bloqueador ventral CROLL: liga de alumínio (corpo), aço cromado (mordente),
poliamida (patilha de segurança).
Controle, pontos a verificar
Antes de qualquer utilização
- Harnês
Verifique as fitas ao nível dos anéis de fixação, das fivelas de ajuste e das costuras de
segurança.
Vigie os cortes, desgaste e danos devidos à utilização, ao calor, aos produtos químicos
etc. Atenção aos fios cortados.
Verifique o bom funcionamento das fivelas DoubleBack e FAST.
- TOP
Conector direccional
Verifique no corpo, no rebite e no anel de segurança, a ausência de fissuras, deformações,
corrosões... Abra o dedo e verifique que este se fecha e trava automaticamente quando
largado. Verifique o correcto funcionamento do anel de segurança. O orifício do Keylock
ao nível do dedo não deve estar obstruído (terra, calhaus…).
- TOP CROLL
Maillon rapide direccional
Antes de qualquer utilização, verifique o corpo.
Verifique que a porca de aperto está correctamente aparafusada até ao fim (nenhum fio de
rosca deve estar à vista) e bloqueie com uma força de aperto de 3 Nm.
Bloqueador ventral CROLL
Antes de utilizar, verifique o estado do corpo, dos orifício de conexão, do mordente e da
patilha de segurança (fissuras, marcas, deformações, desgaste e corrosão), as molas e
o eixo do mordente. Verifique o desgaste dos dentes. Atenção, se faltarem dentes ou se
estes estiverem desgastados, não utilize mais este bloqueador.
Durante a utilização
É importante controlar regularmente o estado do produto. Assegure-se da conexão e do
correcto posicionamento dos equipamentos, uns em relação aos outros.
Consulte o detalhe da inspecção a efectuar para cada EPI em www.petzl.fr/epi ou no
CD ROM EPI PETZL.
Contacte a Petzl em caso de dúvida.
B
NAVAHO SIT e NAVAHO SIT FAST
Esquema 1. Montagem no harnês
Abra as fivelas das perneiras.
1A. Segure o harnês pela cintura e enfie-o pelos pés.
1B. Ajuste à cintura puxando as fitas do cinto. Arrume cuidadosamente o excedente de
fitas nos passadores (bem aplacados).
- Excedentes curtos: coloque-o nos passadores à frente das fivelas de ajuste.
- Excedentes longos: com excedentes de fita, passe-a nos anéis laterais e depois nos
passadores atrás destes anéis.
1C. Feche e ajuste as perneiras.
- NAVAHO SIT: fivelas DoubleBack.
- NAVAHO SIT FAST: Feche as fivelas FAST. Atenção aos objectos estranhos que correm
o risco de interferir com o bom funcionamento das fivelas rápidas FAST (calhaus, areia,
vestuário...). Verifique que estão bem fechadas.
Ajuste e teste de suspensão
O seu harnês deve estar ajustado próximo ao corpo para reduzir o risco de ferimento em
caso de queda.
Deve efectuar movimentos e um teste de suspensão sobre cada ponto de fixação, com o
seu material, para estar seguro de que o harnês está convenientemente ajustado, tem o
nível de conforto necessário para a utilização pretendida e que o ajuste está optimizado.
C
EN 358: 2000
Estes pontos de fixação estão destinados quer a manter o utilizador em posição no seu
posto de trabalho (trabalho em tensão: posicionamento no trabalho), quer a impedir
que o utilizador alcance um lugar donde seja possível cair (princípio da trela: restrição).
Estes pontos de fixação devem ser utilizados unicamente para a fixação a um sistema de
posicionamento no trabalho ou sistema de restrição, altura de queda máxima: 0,5 m.
Estes pontos de fixação não estão concebidos para utilizações antiqueda e poderá ser
necessário completar os sistemas de posicionamento no trabalho ou de restrição com
meios de protecção contra quedas em altura do tipo colectivo (por exemplo redes de
segurança) ou individual (por exemplo um sistema de travamento de quedas conforme
à norma EN 363).
Em utilização num sistema de travamento de quedas conforme a norma EN 363, complete
o seu harnês de cintura com um torse TOP ou TOP CROLL.
2A. Ponto de fixação ventral
2B. Pontos de fixação laterais do cinto
Utilize sempre os dois anéis laterais em conjunto ligando-os por uma longe de
posicionamento para estar apoiado confortavelmente na cintura.
Os pés devem estar em apoio para um posicionamento confortável.
Ajuste a longe de posicionamento no trabalho de modo a que o ponto de ancoragem
esteja ao nível ou acima dos pontos de fixação lateral. A longe é mantida em tensão e o
deslocamento livre está limitado a 0,5 m.
2C. Ponto de fixação posterior de restrição
Este ponto de fixação posterior no cinto é unicamente um ponto de restrição que nos
impede de evoluir numa zona que apresente o risco de queda (princípio da trela).
Verifique regularmente os elementos de ajuste e/ou de fixação durante a utilização.
D
Esquema 3. Harnês de cintura:
EN 813: 1997
Ponto de fixação ventral
A norma EN 813: 1997 refere-se aos harneses de cintura a utilizar em sistemas de
posicionamento no trabalho, de restrição e de acesso por corda quando um ponto de
fixação baixo é necessário.
Utilize este anel ventral para conectar um descensor, as longes de posicionamento ou as
de progressão.
Este ponto de fixação não está adaptado para travamento de quedas.
E
NAVAHO SIT ou NAVAHO SIT FAST montado com o torse TOP
Esquema 4. Preparação
Para montar o torse no harnês de cintura, passe a fita dorsal na fivela de ligação
traseira (9) e depois no passador elástico. Passe depois esta fita na fivela DoubleBack de
ajuste dorsal (2), depois de novo no passador elástico.
F
Esquema 5. Montagem no harnês
Abra as fivelas das perneiras.
5A. Ponha as alças de um lado, segure o harnês pelo cinto e enfie-o pelos pés.
5B. Ajuste à cintura puxando as fitas do cinto. Arrume cuidadosamente o excedente de
fitas nos passadores (bem aplacados).
- Excedentes curtos: coloque-o nos passadores à frente das fivelas de ajuste.
- Excedentes longos: com excedentes de fita, passe-a nos anéis laterais e depois nos
passadores atrás destes anéis.
5C. Feche e ajuste as perneiras.
- NAVAHO SIT: fivelas DoubleBack.
- NAVAHO SIT FAST: Feche as fivelas FAST. Atenção aos objectos estranhos que correm
o risco de interferir com o bom funcionamento das fivelas rápidas FAST (calhaus, areia,
vestuário...). Verifique que estão bem fechadas.
5D. Posicione as alças nos ombros. Coloque o conector no ponto ventral (têxtil) de
ligação torse harnês (5). Aperte o anel de segurança do conector.
5E. Ajuste as alças. Arrume o excedente das fitas (bem aplacadas) nos passadores
situados na alça.
5F. Ajuste dorsal inicial
Efectue este ajuste permanente na primeira vez que se equipa com o seu harnês, pedindo
ajuda a outra pessoa.
Faça deslizar o passador da fita de modo a que a fita dorsal esteja em tensão entre estes
dois espaçadores (não deve haver nenhuma folga).
Cuide para arrumar o excedente de fita (bem aplacado) no passador afim de não
incomodar durante o seu trabalho.
Ajuste este aperto à sua morfologia, posicione a fivela DoubleBack ao nível das
omoplatas.
Ajuste e teste de suspensão
O seu harnês deve estar ajustado próximo ao corpo para reduzir o risco de ferimento em
caso de queda.
Deve efectuar movimentos e um teste de suspensão sobre cada ponto de fixação, com o
seu material, para estar seguro de que o harnês está convenientemente ajustado, tem o
nível de conforto necessário para a utilização pretendida e que o ajuste está optimizado.
G
Esquema 6. Conector oval direccional de segurança manual
Este conector EN 362: 2004, componente do harnês, é um elemento de conexão para
ligar a parte da frente do torse ao cinto. Não utilize para conectar uma longe ou um
absorvedor de energia.
6A. ATENÇÃO PERIGO, utilize sempre o conector com o dedo fechado e a segurança
travada. A resistência de um conector diminui fortemente se o dedo estiver aberto.
Verifique sistematicamente que a segurança está travada pressionando com a mão.
6B. O conector (fechado) oferece a resistência máxima no sentido do comprimento.
Qualquer outra posição reduz a sua resistência.
H
ANTIQUEDA
Esquema 7. Harnês antiqueda EN 361: 2002
Harnês completo antiquedas, componente de um sistema de travamento de quedas
conforme a norma EN 363 (sistema de protecção individual contra quedas em altura).
Deve ser utilizado em combinação com as ancoragens EN 795, mosquetões com
segurança EN 362, absorvedores EN 355 etc..
7A. Ponto de fixação esternal
Somente este ponto serve para conectar um sistema de travamento de quedas, como por
exemplo, um antiquedas móvel na corda, um absorvedor de energia..., sistema descrito
na norma EN 363. Para melhor o identificar, este ponto está marcado com a letra A.
Zona livre desimpedida: altura livre por debaixo do utilizador
A altura livre sob o utilizador deve ser suficiente para que não embata em obstáculos em
caso de queda. Os cálculos específicos da zona livre desimpedida estão indicados com
detalhe nas notícias técnicas (absorvedores de energia, antiquedas móvel...).
I
NAVAHO SIT ou NAVAHO SIT FAST montado com o torse
TOP CROLL
Esquema 8. Preparação
Para montar o torse no harnês de cintura, passe a fita dorsal na fivela de ligação
traseira (9) e depois no passador elástico. Passe depois esta fita na fivela DoubleBack de
ajuste dorsal (2), depois de novo no passador elástico.
Para ligar o CROLL à frente no harnês, aperte o maillon rapide no ponto de fixação ventral
têxtil (5). Aparafuse e bloqueie com chave dinamómetro a 3 Nm. Não esqueça de baixar e
clipar a barra plástica de separação.
J
Esquema 9. Maillon rapide direccional
Este maillon rapide, componente do harnês, é um elemento de conexão para ligar a parte
da frente do torse ao cinto. Deve manter-se sempre bloqueado a 3 Nm (desbloqueamento
à mão impossível).
Não utilize para conectar uma longe ou um absorvedor de energia.
K
Esquema 10. Montagem no harnês
Abra as fivelas FAST das perneiras.
10A. Afaste as alças, segure o harnês pelo cinto e enfie as perneiras pelos pés.
10B. Posicione as alças nos ombros.
10C. Ajuste à cintura puxando as fitas do cinto. Arrume cuidadosamente o excedente de
fitas nos passadores (bem aplacados).
- Excedentes curtos: coloque-o nos passadores à frente das fivelas de ajuste.
- Excedentes longos: com excedentes de fita, passe-a nos anéis laterais e depois nos
passadores atrás destes anéis.
10D. Feche as fivelas FAST e ajuste as perneiras. Atenção aos objectos estranhos que
correm o risco de interferir com o bom funcionamento das fivelas rápidas FAST (calhaus,
areia, vestuário...). Verifique que estão bem fechadas.
10E. Ajuste as alças. Arrume o excedente das fitas (bem aplacadas) nos passadores
situados na alça.
10F. Ajuste dorsal inicial
Efectue este ajuste permanente na primeira vez que se equipa com o seu harnês, pedindo
ajuda a outra pessoa.
Faça deslizar o passador da fita de modo a que a fita dorsal esteja em tensão entre estes
dois espaçadores (não deve haver nenhuma folga).
Cuide para arrumar o excedente de fita (bem aplacado) no passador afim de não
incomodar durante o seu trabalho.
Ajuste este aperto à sua morfologia, posicione a fivela DoubleBack ao nível das
omoplatas.
Ajuste e teste de suspensão
O seu harnês deve estar ajustado próximo ao corpo para reduzir o risco de ferimento em
caso de queda.
Deve efectuar movimentos e um teste de suspensão sobre cada ponto de fixação, com o
seu material, para estar seguro de que o harnês está convenientemente ajustado, tem o
nível de conforto necessário para a utilização pretendida e que o ajuste está optimizado.
L
ANTIQUEDA
Esquema 11. Harnês antiqueda EN 361: 2002
Harnês completo antiquedas, componente de um sistema de travamento de quedas
conforme a norma EN 363 (sistema de protecção individual contra quedas em altura).
Deve ser utilizado em combinação com as ancoragens EN 795, mosquetões com
segurança EN 362, absorvedores EN 355 etc..
11A. Ponto de fixação esternal
Somente este ponto serve para conectar um sistema de travamento de quedas, como por
exemplo, um antiquedas móvel na corda, um absorvedor de energia..., sistema descrito
na norma EN 363. Para melhor o identificar, este ponto está marcado com a letra A.
Zona livre desimpedida: altura livre por debaixo do utilizador
A altura livre sob o utilizador deve ser suficiente para que não embata em obstáculos em
caso de queda. Os cálculos específicos da zona livre desimpedida estão indicados com
detalhe nas notícias técnicas (absorvedores de energia, antiquedas móvel...).
M
ACESSO POR CORDA
Bloqueador ventral CROLL
EN 12841: 2006
Campo de aplicação
O bloqueador ventral CROLL EN 12841: 2006 é um dispositivo de ajuste de corda do
tipo B destinado a ser utilizado em progressão para cima na corda de trabalho.
ATENÇÃO, é obrigatório ser utilizado com um dispositivo do tipo A em contra-segurança
numa segunda corda apelidada de corda de segurança (um antiquedas móvel para corda
ASAP, por exemplo).
O bloqueador ventral CROLL não é conveniente para uma utilização num sistema de
travamento de quedas conforme à norma EN 363.
Diâmetro da corda
Utilize uma corda de 10 a 13 mm de diâmetro (alma + camisa) semi-estática EN 1891
tipo A.
Esquema 12. Montagem na corda
Empurre o mordente para baixo accionando a patilha de segurança com o polegar e o
indicador. Trave a patilha no corpo do aparelho. O mordente mantém-se assim na posição
de aberto.
Coloque a corda no devido lugar no bloqueador. Empurre a patilha para que o mordente
se apoie sobre a corda.
A patilha de segurança impede a abertura involuntária do mordente.
Para retirar a corda
Faça deslizar o aparelho para cima na corda e simultaneamente abra o mordente
accionando a patilha de segurança.
Esquema 13. Princípios de funcionamento
13A. Subida
O CROLL é um dispositivo de progressão em corda (na subida). Bloqueia num sentido
sob a acção do seu peso (para baixo) e desliza livremente no sentido oposto (para cima).
Os dentes afundam-se na camisa e iniciam o aperto do mordente. O mordente bloqueia a
corda. As fendas no mordente permitem evacuar a argila.
13B. Fazer descer o CROLL (casos excepcionais)
Faça deslizar ligeiramente o aparelho para cima na corda e simultaneamente empurre o
mordente com o indicador. Não manipule a patilha de segurança já que corre o risco de
abertura involuntária.
13C. Verificação do funcionamento
Antes de cada utilização, para verificar o sentido de colocação da corda e o funcionamento
do aparelho, um teste deve sempre ser efectuado estando contra-assegurado.
Desloque o CROLL na corda para cima. Deve deslizar ligeiramente. Teste se bloqueia
na corda.
13D. Precauções
- Volte a fechar o mordente do CROLL quando este não está a ser utilizado já que um
equipamento (ou outro objecto) pode ficar entalado no seu interior exposto.
- ATENÇÃO aos objectos estranhos que correm o risco de interferir com o bom
funcionamento do mordente (calhaus, argila, gravetos, cordoletas, fitas, vestuário, tinta,
etc.).
- ATENÇÃO para que a patilha de segurança não fique presa no vestuário ou em fitas.
- A corda deve estar sempre em tensão entre o CROLL e a ancoragem. O utilizador deve
manter-se sempre abaixo do ponto de ancoragem.
- Absorção de energia pela corda:
não esqueça que é a corda que absorve a energia em caso de queda. Quanto mais se
aproximar do ponto de amarração, mais a capacidade de absorção do impacto diminui até
17
NAVAHO SIT / NAVAHO SIT FAST / TOP / TOP CROLL C79502-C (200907)
Page 18

tornar-se totalmente nula.
- Proteja sempre a corda de qualquer objecto que a possa danificar (por exemplo: aresta
cortante, etc.).
- A corda deve pode deslizar livremente no CROLL, por exemplo desconfie de nós, de
uma zona de corda danificada...
- Nunca se esqueça de fazer um nó na extremidade da corda em baixo.
Esquema 14. Subida em corda
- Corda de trabalho: Utilize o CROLL mais um outro bloqueador de mão, por exemplo
um punho ASCENSION com um estribo. Não esqueça de se alonjar a este segundo
bloqueador com uma longe apropriada.
- Corda de segurança: utilize um dispositivo do tipo A (contra-segurança).
negligências, às utilizações para as quais este produto não está destinado.
A PETZL não é responsável das consequências directas, indirectas, acidentais ou de
todo e qualquer outro tipo de danos subsequentes ou resultantes da utilização destes
produtos.
N
Carga máxima dos porta-material
O
Informações gerais
Compatibilidade: anéis / conectores
Uma conexão incompatível pode conduzir a que se solte acidentalmente, a uma ruptura
ou a afectar a função de segurança de outro equipamento.
ATENÇÃO, os anéis de fixação do seu harnês podem fazer alavanca no dedo do
mosquetão.
Aquando de uma tensão brusca da corda e/ou um impacto sobre o sistema de
travamento, combinado com uma má posição do mosquetão, o anel de segurança pode
se partir e o dedo abrir-se.
Para suprimir este risco, vigie o bom posicionamento dos conectores cada vez que põe o
sistema em tensão (longe, descensor...).
Vigie também a compatibilidade dos conectores com os anéis (formas, dimensões...)
eliminado os conectores que têm tendência a se posicionar incorrectamente
sistematicamente.
EN 365: ADVERTÊNCIA
Compatibilidade
Verifique a compatibilidade deste produto com os outros elementos do seu equipamento
(ver notícia específica).
ATENÇÃO, um perigo pode surgir quando se utilizam vários equipamentos nos quais a
sua função de segurança está dependente e pode ser afectada pela função de segurança
de outro equipamento.
Se não está certo da compatibilidade do seu equipamento, contacte a Petzl.
Ancoragens: Trabalho em altura
A ancoragem do sistema deve de preferência estar situada acima da posição do utilizador
e deve responder às exigências da norma dispositivos de ancoragem EN 795, em
particular a resistência mínima de ancoragem deve ser de 10 kN.
Plano de resgate
Preveja um plano de resgate e defina os meios para intervir rapidamente no caso de
encontrar dificuldades. Tal implica uma formação adequada nas técnicas de resgate.
Conectores
Os conectores devem ser sempre utilizados na posição correcta (eixo maior), dedo
fechado e segurança travada. Verifique sistematicamente que a segurança está travada
pressionando com a mão.
Verifique o estado dos conectores conforme as indicações nas Instruções de utilização.
Diversos
- ATENÇÃO PERIGO, fricção interdita sobre materiais abrasivos ou peças cortantes.
- Os utilizadores devem estar clinicamente aptos para as actividades em altura. ATENÇÃO,
estar suspenso e inerte num harnês pode despoletar perturbações fisiológicas graves
ou a morte.
- Cuide para que as marcações no produto se mantenham legíveis durante toda a vida
do produto.
- Deve verificar regularmente a aptidão deste produto para a utilização na sua aplicação
em relação à legislação e normas de segurança em vigor.
- As instruções de utilização definidas nas notícias de cada equipamento associado a este
produto devem ser respeitadas.
- As instruções de utilização devem ser fornecidas ao utilizador deste equipamento. O
revendedor deve redigir estas instruções na língua do país de utilização se o produto for
revendido para fora do primeiro país de destino.
Tempo de vida
ATENÇÃO, um evento excepcional pode limitar o tempo de vida a uma só utilização, por
exemplo, se o produto estiver exposto a produtos químicos perigosos, temperaturas
extremas, se esteve em contacto com uma aresta cortante ou sujeito a esforços
importantes, uma queda importante, etc..
O tempo de vida potencial dos produtos Petzl pode ser de 10 anos a partir da data de
fabrico para os produtos plásticos e têxteis. Não tem limite para os produtos metálicos.
O tempo de vida real de um produto termina quando este se depara com uma causa que
o condena ao abate (ver lista no parágrafo «Abater um produto») ou quando este se torna
obsoleto no sistema.
Factores que influenciam o tempo de vida real de um produto: intensidade, frequência,
ambiente de utilização, competência do utilizador, manutenção, armazenamento, etc..
Verifique periodicamente se o equipamento não sofreu danos ou
foi deteriorado.
Para além das verificações antes e durante a utilização, realize uma verificação
aprofundada (exame periódico) por um controlador competente. Esta verificação deve
ser realizada pelo menos a cada 12 meses. Esta frequência deve ser adaptada em função
do tipo e da intensidade de utilização. Para um melhor acompanhamento do material, é
preferível atribuir este produto a um só utilizador para que saiba o histórico do produto.
Os resultados das verificações deve ser registados na «ficha de verificação». Esta ficha
de verificação permite registar os seguintes detalhes: tipo de equipamento, modelo,
nome e coordenadas do fabricante ou do fornecedor, meio de identificação (nº de série
ou nº individual), ano de fabrico, data de aquisição, data da primeira utilização, nome do
utilizador, toda a informação pertinente como por exemplo a manutenção e a frequência
de utilização, o histórico dos exames periódicos (data, comentários e defeitos anotados,
nome e assinatura do controlador competente, data do próximo exame periódico
previsto). Poderá utilizar o exemplo da ficha detalhada e das ferramentas informáticas
postas à disposição em www.petzl.fr/epi
Abater um produto
Cesse imediatamente de utilizar um produto se:
- o resultado das verificações (antes, durante, aprofundado) não é satisfatório,
- foi sujeito a esforços ou uma queda importantes,
- você não conhece o histórico completo da sua utilização,
- tem 10 anos de idade e é composto por matérias plásticas ou têxteis,
- você tem a mínima dúvida sobre a sua fiabilidade.
Destrua os produtos abatidos para evitar uma futura utilização.
Produto obsoleto
Existem inúmeras razões para as quais um produto pode ser considerado obsoleto e
por consequência retirado de circulação, por exemplo: evolução das normas aplicáveis,
evolução dos textos regulamentares, evolução das técnicas, incompatibilidade com os
outros equipamentos, etc..
Modificações, reparações
Toda a modificação, acrescento ou reparação para além das autorizadas pela Petzl está
interdita: risco de diminuição de eficácia do produto.
Armazenamento, transporte
Após a utilização arrume o seu produto num saco ou caixa de protecção contra os UV, a
humidade, os produtos químicos, etc.
Garantia
Este produto está garantido durante 3 anos contra todos os defeitos de material ou de
fabrico. Estão excluídos da garantia: o desgaste normal, a oxidação, as modificações ou
retoques, o mau armazenamento, a má manutenção, os danos devidos aos acidentes, às
18
NAVAHO SIT / NAVAHO SIT FAST / TOP / TOP CROLL C79502-C (200907)
Page 19

(NL) NEDERLANDS
Gebruiksvoorschriften
- NAVAHO SIT en NAVAHO SIT FAST
Zitgordel, positioneringgordel.
- NAVAHO SIT of NAVAHO SIT FAST verbonden met de borstgordel TOP
Antivalgordel, positioneringgordel en zitgordel.
- NAVAHO SIT of NAVAHO SIT FAST verbonden met de borstgordel TOP CROLL
Antivalgordel, positioneringgordel en zitgordel, gordel voor rope-access met
geïntegreerde CROLL touwklem.
A
Enkel de niet-doorkruiste technieken en/of die zonder het pictogram “doodshoofd” zijn
toegelaten. Neem regelmatig kennis van de nieuwe updates van deze documenten op onze
website www.petzl.com
Indien u twijfelt of moeite heeft om het te begrijpen, gelieve dan contact op te nemen
met PETZL.
Toepassingsveld
- NAVAHO SIT en NAVAHO SIT FAST
Zitgordel, positioneringgordel.
- NAVAHO SIT of NAVAHO SIT FAST verbonden met de borstgordel TOP
Antivalgordel, positioneringgordel en zitgordel.
- NAVAHO SIT of NAVAHO SIT FAST verbonden met de borstgordel TOP CROLL
Antivalgordel, positioneringgordel en zitgordel, gordel voor rope-access met
geïntegreerde CROLL touwklem.
Dit product mag niet méér belast worden dan toegelaten en mag niet gebruikt worden in
elke andere situatie waarvoor het niet voorzien is.
OPGELET
De activiteiten die het gebruik van deze uitrusting vereisen zijn van nature gevaarlijk.
U bent verantwoordelijk voor uw handelingen en beslissingen.
Alvorens deze uitrusting te gebruiken, dient u:
- Alle gebruiksinstructies te lezen en te begrijpen.
- Een aangepaste training te hebben gevolgd voor het gebruik van deze uitrusting.
- Zich vertrouwd te maken met uw uitrusting ; zijn prestaties en beperkingen leren kenen.
- De inherente risico’s te begrijpen en te aanvaarden.
Het niet-respecteren van één van deze waarschuwingen kan de oorzaak zijn van
ernstige of dodelijke verwondingen.
Verantwoordelijkheid
OPGELET, een aangepaste training in deze toepassing is noodzakelijk vóór gebruik.
Dit product mag enkel gebruikt worden door bevoegde en beraden personen of die onder
direct visueel toezicht van een competent en beraden persoon geplaatst zijn.
Het aanleren van de gepaste technieken en veiligheidsmaatregels gebeurt onder uw eigen
verantwoordelijkheid.
U neemt persoonlijk alle risico’s en verantwoordelijkheid voor eventuele schade,
verwondingen of overlijden, ongeacht de manier waarop dit zou kunnen optreden
na verkeerdelijk gebruik van onze producten. Indien u niet in staat bent om deze
verantwoordelijkheid op te nemen of om dit risico te lopen, gebruik dit materiaal dan niet.
Terminologie van de onderdelen
- Borstgordel TOP:
(1) Borstriemen, (2) Dorsale sluitingsgesp, (3) Sternum-bevestiging EN 361,
(4) Directioneel verbindingselement.
- Borstgordel TOP CROLL:
(1) Borstriemen, (2) Dorsale sluitingsgesp, (3) Sternum-bevestiging EN 361, (4a) Ventrale
touwklem met geïntegreerde CROLL EN 12841, (4b) Directionele snelschakel met
scheidingstaafje, (16) Spanveer, (17) Veiligheidspal, (18) Verbindingsoog.
- Zitgordels NAVAHO SIT en NAVAHO SIT FAST:
(5) Ventraal inbindpunt (textiel) voor de verbinding tussen borst- en zitgordel,
(6) Heupriem, (7) Navel-bevestiging EN 358, EN 813, (8) Laterale bevestigingsringen
op heupriem EN 358, (9) Verbindingsgesp achteraan tussen borst- en zitgordel met
inbindpunt voor werkplaatsbeperking EN 358, (10) Regelbare DoubleBack sluiting,
(10bis) FAST snelgespen, (11) Materiaallus, (12) Bandgeleider voor materiaal-drager,
(13) Bandgeleider voor borstriem, (14) Verstelbare elastieken, (15) Etiket voor markering
opgeborgen in de heupriempolstering.
Voornaamste materialen
Gordel: polyester, staal (sluitingsgespen), aluminiumlegering (inbindpunten).
Ventrale CROLL touwklem: aluminiumlegering (body), verchroomd staal (spanveer),
polyamide (veiligheidspal).
Check: te controleren punten
Vóór elk gebruik
- Gordel
Nazicht van de riemen ter hoogte van de bevestigingen, van de sluitingsgespen en van de
veiligheidsstiksels.
Controleer scheuren, slijtageverschijnselen en schade ten gevolge van het gebruik, hitte,
chemische producten enz... Let op doorgesneden vezels.
Check de goede werking van de DoubleBack en FAST gespen.
- TOP
Directioneel verbindingselement
Nazicht van het body, de snapper, de klinknagel, de vergrendelring op afwezigheid van
scheuren, vervormingen, corrosie... Open de snapper en check dat hij zich automatisch
sluit als u hem loslaat. Controleer de goede werking van de vergrendelring. Het gaatje van
de Keylock, ter hoogte van de snapper, mag niet verstopt zitten (aarde, steentjes,...).
- TOP CROLL
Directionele snelschakel
Vóór elk gebruik, nazicht van het body.
Controleer of de vergrendelring correct en volledig aangedraaid is (men mag geen
schroefdraad meer zien) en vastgezet is op een kracht van 3 Nm.
Ventrale CROLL touwklem
Vóór elk gebruik, nazicht van het body, het verbindingsoog, de veren, de spanveer en
de veiligheidspal (scheuren, krassen, vervorming, slijtage, corrosie) en check dat de
spanveer op de juiste as ligt. Controleer de tanden op slijtage. OPGELET, als er tanden
ontbreken, of als ze versleten zijn, gebruik dan deze touwklem niet meer.
Tijdens het gebruik
Het is belangrijk om regelmatig de toestand van het product te controleren. Vergewis er u
van dat alle elementen goed verbonden en goed geplaatst zijn ten opzichte van elkaar.
Meer details over de uit te voeren controle voor elk PBM in de specifieke PBM CDROM
van PETZL of op www.petzl.com/ppe
Bij twijfel, contacteer uw lokale PETZL verdeler.
B
NAVAHO SIT en NAVAHO SIT FAST
Schema 1. Aantrekken van de gordel
Open de gespen van de beenlussen.
1A. Houd de zitgordel vast bij de heupriem, steek de voeten er door en trek hem aan.
1B. Span de heupriem aan door aan de riemen te trekken. Berg het overschot aan riemen
(goed platgedrukt) zorgvuldig weg in de bandgeleiders.
- Kort overschot: steek ze door de bandgeleiders voor de sluitingsgespen.
- Lang overschot: bij een teveel aan riemen, steek ze door de laterale bevestigingsringen
en dan door de bandgeleiders onder deze ringen.
1C. Sluit de gespen en pas de beenlussen aan.
- NAVAHO SIT: DoubleBack gespen.
- NAVAHO SIT FAST: Sluit de FAST gespen. Let op losse voorwerpen die de goede werking
van de FAST gespen kunnen hinderen (steentjes, zand, kledij...). Controleer of ze goed
vergrendeld zijn.
Afstelling en ophangingtest
Uw gordel moet dicht bij het lichaam worden aangepast om het risico op verwondingen
bij een val te beperken.
De gebruiker dient een ophangingtest op elk inbindpunt en verschillende bewegingen
met zijn uitrusting uit te voeren, om er zeker van te zijn dat dit de gepaste maat is en
voldoende comfort verzekert voor het gewenste gebruik, en dat alles optimaal afgesteld is.
C
WERKPOSITIONERING en WERKPLAATSBEPERKING
Schema 2. Gordel voor werkpositionering en
werkplaatsbeperking EN 358: 2000
Deze inbindpunten zijn bedoeld om ofwel de gebruiker in positie te houden
op zijn werkplaats (werk onder spanning: werkpositionering), ofwel hem te
verhinderen een plaats te bereiken waar een valrisico bestaat (principe van de
leiband: werkplaatsbeperking). Deze inbindpunten mogen enkel gebruikt worden voor
het bevestigen aan een systeem voor werkpositionering of werkplaatsbeperking, met een
maximale valhoogte van 0,5 m.
Deze inbindpunten zijn niet ontworpen voor een gebruik als antival-beveiliging en het kan
nodig zijn om deze systemen voor werkpositionering en werkplaatsbeperking aan te vullen
met beschermingsmiddelen tegen hoogtevallen van collectieve aard (bv. veiligheidsnetten)
of individuele aard (bv. een valstop-systeem volgens de EN 363 norm).
Bij gebruik in een valstop-systeem volgens de EN 363 norm, vul uw zitgordel aan met een
TOP of TOP CROLL borstgordel.
2A. Ventraal inbindpunt
2B. Laterale bevestigingsringen op heupriem
Gebruik steeds beide laterale bevestigingsringen samen door ze te verbinden met een
leeflijn voor werkpositionering om comfortabel gesteund te zitten in de heupriem.
De voeten moeten gesteund zijn voor een comfortabele houding.
Regel de leeflijn voor werkpositionering zodanig dat het verankeringpunt ter hoogte van
of boven het middel geplaatst is. De leeflijn wordt onder spanning gehouden en de vrije
verplaatsing is beperkt tot 0,5 m.
2C. Verbindingspunt achteraan voor werkplaatsbeperking
Dit verbindingspunt achteraan de heupriem is enkel een weerhoudingspunt dat u
verhindert een plaats te bereiken waar een valrisico bestaat (principe van de leiband).
Controleer regelmatig de elementen van de afstelling en/of bevestiging tijdens het gebruik.
D
Schema 3. Zitgordel:
EN 813: 1997
Ventraal inbindpunt
De EN 813: 1997 norm betreft de zitgordels die gebruikt moeten worden in systemen van
werkpositionering, werkplaatsbeperking en rope-access wanneer een laag inbindpunt
noodzakelijk is.
Gebruik dit ventraal inbindpunt voor het verbinden van een afdaalapparaat, leeflijnen voor
werkpositionering of voortbeweging.
Dit inbindpunt is niet geschikt voor valstop-systemen.
E
NAVAHO SIT of NAVAHO SIT FAST verbonden met de borstgordel
TOP
Schema 4. De voorbereiding
Om de borstgordel te verbinden met de zitgordel, schuif de dorsale riem door de
verbindingsgesp achteraan (9) en dan door de elastische bandgeleider. Schuif vervolgens
deze riem door de dorsale DoubleBack sluitingsgesp (2), dan opnieuw door de elastische
bandgeleider.
F
Schema 5. Aantrekken van de gordel
Open de gespen van de beenlussen.
5A. Laat de borstriemen aan één zijde, houd de zitgordel vast bij de heupriem, steek er de
voeten door en trek hem aan.
5B. Span de heupriem aan door aan de riemen te trekken. Berg het overschot aan riemen
(goed platgedrukt) zorgvuldig weg in de bandgeleiders.
- Kort overschot: steek ze door de bandgeleiders voor de sluitingsgespen.
- Lang overschot: bij een teveel aan riemen, steek ze door de laterale bevestigingsringen
en dan door de bandgeleiders onder deze ringen.
5C. Sluit de gespen en pas de beenlussen aan.
- NAVAHO SIT: DoubleBack gespen.
- NAVAHO SIT FAST: Sluit de FAST gespen. Let op losse voorwerpen die de goede werking
van de FAST gespen kunnen hinderen (steentjes, zand, kledij...). Controleer of ze goed
vergrendeld zijn.
5D. Plaats de schouderriemen op de schouders. Plaats het verbindingselement in het
ventraal inbindpunt (in textiel) dat voor de verbinding zorgt tussen borst- en zitgordel (5).
Schroef de vergrendelring van het verbindingselement vast.
5E. Pas de schouderriemen aan. Berg het overschot aan riemen (goed platgedrukt)
zorgvuldig weg in de bandgeleiders van de schouderriemen.
5F. Eenmalige dorsale afstelling
Voer deze afstelling eenmalig uit bij de eerste installatie van uw gordel en laat u hierbij
helpen door een andere persoon.
Verschuif de bandgeleider van de riem zodat de dorsale riem opgespannen is in beide
lengtes (er mag geen gedeelte los hangen).
Berg het overschot aan riemen (goed platgedrukt) zorgvuldig weg in de bandgeleiders om
niet gehinderd te worden bij het werken.
Pas de afstelling aan volgens uw lichaamsbouw, plaats de DoubleBack gesp ter hoogte
van de schouderbladen.
Afstelling en ophangingtest
Uw gordel moet dicht bij het lichaam worden aangepast om het risico op verwondingen
bij een val te beperken.
De gebruiker dient een ophangingtest op elk inbindpunt en verschillende bewegingen
met zijn uitrusting uit te voeren, om er zeker van te zijn dat dit de gepaste maat is en
voldoende comfort verzekert voor het gewenste gebruik, en dat alles optimaal afgesteld is.
G
Schema 6. Ovaal directioneel verbindingselement met manuele
vergrendeling
Dit verbindingselement EN 362: 2004, onderdeel van de gordel, is een verbindingselement
om de voorkant van de borstgordel te verbinden met de heupriem. Gebruik hem niet om
er een leeflijn of een energie-absorber aan te verbinden.
6A. OPGELET: GEVAAR, gebruik het verbindingselement steeds met gesloten en
vergrendelde snapper. De weerstand van een verbindingselement vermindert sterk, als de
snapper per ongeluk zou opengaan.
Controleer systematisch of de snapper goed gesloten is door hem in te drukken met
de hand.
6B. Gesloten, biedt het verbindingselement maximale weerstand in zijn lengte. Elke andere
positie vermindert zijn weerstand.
H
ANTIVAL
Schema 7. Antivalgordel EN 361: 2002
Gordel volledig uitgerust voor antival-vereisten, onderdeel van een valstop-systeem
volgens de EN 363 norm (persoonlijke beschermingssystemen tegen hoogtevallen).
Hij moet gebruikt worden in combinatie met verankeringen EN 795, vergrendelbare
karabiners EN 362, absorbers EN 355, enz...
7A. Sternaal inbindpunt
Enkel dit punt dient voor het verbinden van een valstop-systeem zoals bv. een mobiele
antival-beveiliging op touw, een energie-absorber..., systemen die beschreven zijn in de
EN 363 norm. Om dit punt beter te identificeren, is het aangeduid met de letter A.
Tirant d’air: vrije hoogte onder de gebruiker
De resterende hoogte onder de gebruiker moet voldoende zijn zodat hij geen hindernissen
raakt bij een val. De specifieke berekeningen van de tirant d’air zijn uitgelegd in de
technische bijsluiters van de andere onderdelen (energie-absorber, mobiele antivalbeveiliging,...).
I
NAVAHO SIT of NAVAHO SIT FAST verbonden met de borstgordel
TOP CROLL
Schema 8. De voorbereiding
Om de borstgordel te verbinden met de zitgordel, schuif de dorsale riem door de
verbindingsgesp achteraan (9) en dan door de elastische bandgeleider. Schuif vervolgens
deze riem door de dorsale DoubleBack sluitingsgesp (2), dan opnieuw door de elastische
bandgeleider.
Om de CROLL te verbinden met de voorkant van de zitgordel, schroef de snelschakel in
het ventraal verbindingspunt in textiel (5). Draai hem aan en zet hem vast met een sleutel
op 3 Nm. Vergeet niet het scheidingstaafje neer te dukken en vast te clippen.
J
Schema 9. Directionele snelschakel
Deze snelschakel, onderdeel van de gordel, is een verbindingselement om de voorkant van
de borstgordel te verbinden met de heupriem. Hij moet steeds vastgezet worden op 3 Nm
(onmogelijk met de hand los te maken).
Gebruik hem niet om er een leeflijn of een energie-absorber aan te verbinden.
K
Schema 10. Aantrekken van de gordel
Open de FAST gespen van de beenlussen.
10A. Spreid de schouderriemen, houd de gordel vast bij de heupriem, steek de voeten er
door en trek hem aan.
10B. Plaats de schouderriemen op de schouders.
10C. Span de heupriem aan door aan de riemen te trekken. Berg het overschot aan riemen
(goed platgedrukt) zorgvuldig weg in de bandgeleiders.
- Kort overschot: steek ze door de bandgeleiders voor de sluitingsgespen.
- Lang overschot: bij een teveel aan riemen, steek ze door de laterale bevestigingsringen
en dan door de bandgeleiders onder deze ringen.
10D. Sluit de FAST gespen en pas de beenlussen aan. Let op losse voorwerpen die de
goede werking van de FAST gespen kunnen hinderen (steentjes, zand, kledij...). Controleer
of ze goed vergrendeld zijn.
10E. Pas de schouderriemen aan. Berg het overschot aan riemen (goed platgedrukt)
zorgvuldig weg in de bandgeleiders van de schouderriemen.
10F. Eenmalige dorsale afstelling
Voer deze afstelling eenmalig uit bij de eerste installatie van uw gordel en laat u hierbij
helpen door een andere persoon.
Verschuif de bandgeleider van de riem zodat de dorsale riem opgespannen is in beide
lengtes (er mag geen gedeelte los hangen).
Berg het overschot aan riemen (goed platgedrukt) zorgvuldig weg in de bandgeleiders om
niet gehinderd te worden bij het werken.
Pas de afstelling aan volgens uw lichaamsbouw, plaats de DoubleBack gesp ter hoogte
van de schouderbladen.
Afstelling en ophangingtest
Uw gordel moet dicht bij het lichaam worden aangepast om het risico op verwondingen
bij een val te beperken.
De gebruiker dient een ophangingtest op elk inbindpunt en verschillende bewegingen
met zijn uitrusting uit te voeren, om er zeker van te zijn dat dit de gepaste maat is en
voldoende comfort verzekert voor het gewenste gebruik, en dat alles optimaal afgesteld is.
L
ANTIVAL
Schema 11. Antivalgordel EN 361: 2002
Gordel volledig uitgerust voor antival-vereisten, onderdeel van een valstop-systeem
volgens de EN 363 norm (persoonlijke beschermingssystemen tegen hoogtevallen).
Hij moet gebruikt worden in combinatie met verankeringen EN 795, vergrendelbare
karabiners EN 362, absorbers EN 355, enz...
11A. Sternaal inbindpunt
Enkel dit punt dient voor het verbinden van een valstop-systeem zoals bv. een mobiele
antival-beveiliging op touw, een energie-absorber..., systemen die beschreven zijn in de
EN 363 norm. Om dit punt beter te identificeren, is het aangeduid met de letter A.
Tirant d’air: vrije hoogte onder de gebruiker
De resterende hoogte onder de gebruiker moet voldoende zijn zodat hij geen hindernissen
raakt bij een val. De specifieke berekeningen van de tirant d’air zijn uitgelegd in de
technische bijsluiters van de andere onderdelen (energie-absorber, mobiele antivalbeveiliging,...).
M
ROPE-ACCESS
Ventrale CROLL touwklem
EN 12841: 2006
Toepassingsveld
De ventrale CROLL touwklem EN 12841: 2006 is een toestel voor touwen van het type B,
bestemd om te worden gebruikt bij verplaatsing naar boven op het werktouw.
OPGELET, hij moet verplicht worden gebruikt met een systeem van het type A voor
tegen-beveiliging op een tweede touw, met name het veiligheidstouw (bv. de mobiele
antival-beveiliging voor touw ASAP).
De ventrale CROLL touwklem is niet geschikt voor een gebruik in een valstop-systeem
volgens de EN 363 norm.
Diameter van het touw
Gebruik een semi-statisch touw van 10 tot 13 mm diameter (kern + mantel) EN 1891
type A.
Schema 12. Installatie op het touw
Neem de veiligheidspal tussen duim en wijsvinger en trek de spanveer naar beneden.
Vergrendel de veiligheidspal op het body van het toestel. De spanveer blijft aldus in open
positie.
Plaats het touw in de voorziene gleuf. Ontgrendel de pal zodat de spanveer tegen het touw
kan drukken.
De veiligheidspal verhindert dat de spanveer ongewild open gaat.
Om het touw te verwijderen
Laat het toestel naar boven glijden op het touw en open gelijktijdig de spanveer door de
pal over te halen.
Schema 13. Werkingsprincipe
13A. Opklimmen
De CROLL is een toestel voor verplaatsingen op touw (naar boven). Hij blokkeert in één
richting onder druk van uw gewicht (naar beneden) en glijdt vrij over het touw in de
tegenovergestelde richting (naar boven).
De tanden bijten zich vast in de mantel en dit start het klemmen van de spanveer. De
spanveer blokkeert het touw. De gleuven in de spanveer dienen voor de evacuatie van
neerslag op het touw.
13B. Om de CROLL te laten afdalen (in uitzonderlijke gevallen)
Laat het toestel een weinig naar boven glijden op het touw en duw gelijktijdig de spanveer
in met de wijsvinger. Kom niet aan de veiligheidspal want er is een gevaar dat de spanveer
ongewild open gaat.
13C. Test de goede werking
19
NAVAHO SIT / NAVAHO SIT FAST / TOP / TOP CROLL C79502-C (200907)
Page 20

Vóór elk gebruik, om de juiste plaatsing van het touw en het goed functioneren van het
toestel te checken, moet er steeds een test worden uitgevoerd terwijl men beveiligd is.
Verplaats de CROLL op het touw naar boven. Hij moet soepel glijden. Test het blokkeren
op het touw.
13D. Voorzorgen
- Sluit de spanveer van de CROLL wanneer hij niet in gebruik is want een deel van de
uitrusting (of een ander voorwerp) kan geklemd geraken in de opening.
- LET OP losse voorwerpen die de goede werking van de spanveer kunnen hinderen
(steentjes, modder, takken, touwtjes, riemen, kledij, verf, enz...).
- LET OP dat de veiligheidspal niet blijft vasthaken in kledij of riemen.
- Het touw moet steeds gespannen staan tussen de CROLL en de verankering. De
gebruiker moet steeds onder het verankeringpunt van het touw blijven.
- Absorptie van de energie door het touw:
vergeet niet dat de energie wordt geabsorbeerd door het touw bij een val. Hoe dichter u
zich bij het verankeringpunt bevindt, hoe minder de schok wordt opgevangen, tot deze
absorptie bijna onbestaand is.
- Bescherm het touw tegen elk voorwerp dat haar zou kunnen beschadigen (bv.: scherpe
rand, enz...).
- Het touw moet steeds vrij kunnen glijden in de CROLL, let dus bv. op knopen, een
beschadigd gedeelte van het touw...
- Vergeet geen knoop in het onderste uiteinde van het touw te leggen.
Schema 14. Opklimmen langs touw
- Werktouw: Gebruik de CROLL samen met een andere manuele touwklem, bv. een
ASCENSION stijgklem met voetlus. Vergeet niet u te verbinden aan deze tweede stijgklem
met een geschikte leeflijn.
- Veiligheidstouw: gebruik een beveiligingsysteem van het type A (extra beveiliging).
Er zijn meerdere redenen waarom men oordeelt dat een product in onbruik geraakt is
en bijgevolg uit circulatie moet gehaald worden, bv.: evolutie van de normen die van
toepassing zijn, evolutie van de regelgeving, evolutie van de technieken, niet compatibel
met de andere delen van de uitrusting, enz...
Veranderingen, herstellingen
Elke verandering, toevoeging of herstelling, ander dan deze toegelaten door Petzl, is
verboden: u loopt het risico de doeltreffendheid van het product te verminderen.
Berging, transport
Na gebruik, berg uw product in een verpakking (tas, doos...) die het beschermt tegen
UV-stralen, vochtigheid, chemische producten, enz...
Garantie
PETZL biedt 3 jaar garantie op dit product voor fabricagefouten of materiaalfouten.
Deze garantie is uitgesloten bij: normale slijtage, veranderingen of aanpassingen,
slechte berging, slecht onderhoud, beschadiging door ongeval, door nalatigheid of door
toepassingen waarvoor dit product niet voorbestemd is.
PETZL kan niet verantwoordelijk gesteld worden voor rechtstreekse of onrechtstreekse
gevolgen, ongevallen of eender welke schades die voorvallen bij of voortkomen uit het
gebruik van haar producten.
N
Materiaallus maximale belasting
O
Algemene informatie
Compatibiliteit: ringen/verbindingselementen
Een verbinding die niet compatibel is, kan leiden tot een ongewenst loshaken of tot de
breuk van het verbindingselement, of kan de veiligheidsfunctie van een ander deel van de
uitrusting beïnvloeden.
OPGELET, de verbindingsringen van uw gordel kunnen als een hefboom inwerken op de
snapper van de het verbindingselement.
Bij brutale spanning op het touw en/of een schok op het vergrendelsysteem in combinatie
met een verkeerde positie van de karabiner, kan de vergrendelring breken en de snapper
opengaan.
Om dit risico te vermijden, check de goede positie van de verbindingselementen telkens er
spanning wordt uitgeoefend op het systeem (door leeflijn, afdaalapparaat...).
Controleer ook de compatibiliteit van de verbindingselementen met de ringen (vorm,
afmeting...) en verwijder de verbindingselementen die dikwijls de neiging hebben zich
verkeerd te positioneren.
EN 365: WAARSCHUWING
Compatibiliteit
Gelieve na te zien of dit product compatibel is met de andere elementen van uw uitrusting
(zie specifieke bijsluiter).
OPGELET, er kan zich een gevaar voordoen tijdens het gebruik van meerdere uitrustingen
waarbij de veiligheidsfunctie van één der toestellen kan beïnvloed worden door de
veiligheidsfunctie van een ander toestel.
Als u niet zeker bent van de compatibiliteit van uw uitrusting, contacteer uw Petzl verdeler.
Verankeringen: Hoogtewerken
De verankering van het systeem bevindt zich bij voorkeur boven de positie van de
gebruiker en moet voldoen aan de vereisten van de EN 795 norm, waarbij in het bijzonder
de weerstand van de verankering minimum 10 kN moet bedragen.
Noodplan
Voorzie de nodige reddingsmogelijkheden in geval men moeilijkheden ondervindt. Dit
houdt in dat men een gepaste vorming moet gevolgd hebben in de reddingstechnieken.
Verbindingselementen
De verbindingselementen moeten steeds gebruikt worden in de juiste positie (grote as)
met de snapper gesloten en vergrendeld. Controleer systematisch of de snapper goed
gesloten is door hem in te drukken met de hand.
Check de toestand van de verbindingselementen volgens de aanduidingen in de
Gebruiksinstructies.
Diverse
- OPGELET: GEVAAR, het wrijven over ruwe oppervlaken of scherpe randen is verboden.
- De gebruikers moeten medisch geschikt zijn voor activiteiten op hoogte. OPGELET,
onbeweeglijk hangen in een gordel van welk model ook kan ernstige fysiologische letsels
of de dood veroorzaken.
- Zorg ervoor dat de aanduidingen op het product leesbaar blijven gedurende de ganse
levensduur van het product.
- U dient na te zien of dit product geschikt is voor een gebruik in uw toepassing volgens
de overheidsrichtlijnen en geldende veiligheidsnormen.
- De gebruiksinstructies, bepaald in de bijsluiter van elke uitrusting geassocieerd met dit
product, moeten worden gerespecteerd.
- De gebruiksinstructies moeten geleverd worden aan de gebruiker van deze uitrusting.
De verkoper moet de instructies opstellen in de taal van het land van gebruik, wanneer het
product verkocht wordt buiten het eerste land van bestemming.
Levensduur
OPGELET, een uitzonderlijk voorval kan de levensduur beperken tot één enkele toepassing,
als het product bv. wordt blootgesteld aan gevaarlijke chemische producten, aan extreme
temperaturen of als het in contact komt met een scherpe rand, ook als het een zware
belasting ondergaat of een belangrijke val, enz...
De potentiële levensduur van de Petzl producten kan gaan tot 10 jaar vanaf de
fabricagedatum voor producten in PVC en textiel. Zij is van onbepaalde duur voor metalen
producten.
De werkelijke levensduur van een product is beperkt wanneer er een reden is om het
product af te schrijven (zie lijst paragraaf «Afschrijven») of wanneer het in onbruik geraakt
in het systeem.
Factoren die de werkelijke levensduur van een product beïnvloeden: intensiteit, frequent
gebruik, gebruiksomgeving, competentie van de gebruiker, onderhoud, berging enz...
Controleer regelmatig of uw product niet beschadigd of defect is.
Naast de controles vóór en tijdens het gebruik, laat u best een grondige controle uitvoeren
door een bevoegd inspecteur (periodiek nazicht). Deze check-up moet minstens om de
12 maand worden uitgevoerd. Deze frequentie moet aangepast worden in functie van
het type en intensiteit van het gebruik. Voor een betere opvolging van het materiaal, is
het aangeraden om het product aan een unieke gebruiker toe te kennen, zodat hij de
historiek van het product kent. De resultaten van het nazicht moeten opgetekend worden
in de “productfiche”. Deze fiche moet de volgende details bevatten: type van uitrusting,
model, naam en coördinaten van de fabrikant of leverancier, identificatie (serienummer
of individueel nr.), jaar van fabricage, datum van aankoop, datum van de eerste
ingebruikneming, naam van de gebruiker, elke nuttige informatie zoals bv. het onderhoud
en de gebruiksfrequentie, de historiek van periodiek nazicht (datum, commentaar en
vastgestelde gebreken, naam en handtekening van de bevoegde inspecteur, datum van
het volgende voorziene nazicht). U kan het voorbeeld gebruiken van de gedetailleerde
productfiches en digitale hulpmiddelen die u ter beschikking heeft op www.petzl.com/ppe
Afschrijven
Houd onmiddellijk op het product te gebruiken als:
- het resultaat van de controles (vóór, tijdens, grondig) geen voldoening geeft,
- het product een zware belasting of een belangrijke val heeft ondergaan,
- u de volledige historiek van het gebruik niet kent,
- het product méér dan 10 jaar oud is en bestaat uit textiel of PVC materiaal,
- u ook maar de minste twijfel heeft over zijn betrouwbaarheid.
Vernietig deze afgeschreven producten om een verder gebruik te vermijden.
Product in onbruik
20
NAVAHO SIT / NAVAHO SIT FAST / TOP / TOP CROLL C79502-C (200907)
Page 21

(FI) SUOMI
Käyttöohjeet
- NAVAHO SIT ja NAVAHO SIT FAST
Istumavaljaat, työntekijän tukivyö.
- NAVAHO SIT tai NAVAHO SIT FAST asennettuna TOP -rintavaljaiden kanssa
Putoamisenpysäytysvaljaat, työntekijän tukivyö, istumavaljaat.
- NAVAHO SIT tai NAVAHO SIT FAST asennettuna TOP CROLL -rintavaljaiden kanssa
Putoamisenpysäytysvaljaat, työntekijän tukivyö, istumavaljaat, köysien varassa
työskentelyyn tarkoitetut valjaat, joissa on kiinteästi mukana CROLL-kahva.
A
Ainoastaan ne kuvissa esitetyt tavat ovat sallittuja, joiden yli ei ole vedetty ruksia ja joissa
ei ole pääkallo ja sääriluut -merkkiä. Käy verkkosivustolla www.petzl.com säännöllisesti,
jotta käytössäsi on viimeisimmät versiot näistä oppaista.
Ota yhteyttä PETZLiin, jos olet epävarma tai jos et täysin ymmärrä näitä asiakirjoja.
Käyttötarkoitus
- NAVAHO SIT ja NAVAHO SIT FAST
Istumavaljaat, työntekijän tukivyö.
- NAVAHO SIT tai NAVAHO SIT FAST asennettuna TOP -rintavaljaiden kanssa
Putoamisenpysäytysvaljaat, työntekijän tukivyö, istumavaljaat.
- NAVAHO SIT tai NAVAHO SIT FAST asennettuna TOP CROLL -rintavaljaiden kanssa
Putoamisenpysäytysvaljaat, työntekijän tukivyö, istumavaljaat, köysien varassa
työskentelyyn tarkoitetut valjaat, joissa on kiinteästi mukana CROLL-kahva.
Tätä tuotetta ei saa kuormittaa yli sen ilmoitetun kestokyvyn, eikä sitä saa käyttää
mihinkään muuhun tarkoitukseen kuin siihen, mihin se on suunniteltu.
VAROITUS
Toiminta, missä tätä varustetta käytetään on luonteeltaan vaarallista.
Olet vastuussa omista teoistasi ja päätöksistäsi.
Ennen tämän varusteen käyttämistä sinun pitää:
- Lukea ja ymmärtää kaikki käyttöohjeet.
- Hankkia erityiskoulutus sen käyttöön.
- Tutustua sen käyttökelpoisuuteen ja rajoituksiin.
- Ymmärtää ja hyväksyä tähän liittyvät riskit.
Näiden varoitusten huomiotta jättäminen saattaa johtaa vakavaan loukkaantumiseen
tai kuolemaan.
Vastuu
VAROITUS: erityiskoulutus ennen käyttöä on välttämätön.
Tätä tuotetta saavat käyttää vain pätevät ja vastuulliset henkilöt tai henkilöt, jotka ovat
pätevän ja vastuullisen henkilön välittömän valvonnan ja silmälläpidon alaisia.
On omalla vastuullasi hankkia riittävä koulutus asianmukaisiin turvamenettelyihin ja
-tekniikoihin.
Sinä kannat kaikki seuraukset ja vastuun kaikista mahdollisista vaurioista,
loukkaantumisista ja kuolemista, jotka saattavat tapahtua tuotteidemme virheellisen
käytön aikana tai sen jälkeen riippumatta siitä, millaista tuo virheellinen käyttö on. Jos
et ole kykenevä tai oikeutettu ottamaan tätä vastuuta tai kantamaan näitä seurauksia, älä
käytä näitä varusteita.
Osaluettelo
- TOP -rintavaljaat:
(1) Olkahihnat, (2) Selkäpuolen säätösolki, (3) EN 361: rintakiinnityspiste, (4) Suunnattu
sulkurengas.
- TOP CROLL -rintavaljaat:
(1) Olkahihnat, (2) Selkäpuolen säätösolki, (3) EN 361: rintakiinnityspiste, (4) EN 12841
: valjaisiin liittyvä CROLL-vatsaköysikahva, (4b) Suunnattu sulkurengas jakajalla,
(16) Lukko, (17) Turvasalpa, (18) Kiinnitysreikä.
- NAVAHO SIT ja NAVAHO SIT FAST -istumavaljaat:
(5) Rinta- ja istumavaljaat yhdistävä vatsakappale (tekstiili), (6) Vyö, (7) EN 358,
EN 813: vatsakiinnityspiste, (8) EN 358: poikkivyön kiinnityspisteet, (9) Ylävartalo- ja
istuinkappaleiden takakiinnityssolki, jossa on EN 358:n mukainen rajoitusköyden
kiinnityspiste, (10) DoubleBack-säätösoljet, (10b) FAST-pikasoljet, (11) Varustesilmukka,
(12) Työkalupidikkeen aukko, (13) Hihnanpidike, (14) Joustokudoshihnat,
(15) Vyötärövyön tuen sisään menevä merkintälippu.
Päämateriaalit
Valjaat: polyesteri, teräs (säätösoljet), alumiiniseos (kiinnityspisteet).
CROLL-vatsaköysikahva: alumiiniseos (runko), kromipinnoitettu teräs (lukko),
polyamidi (turvasalpa).
Tarkastuskohteet
Ennen jokaista käyttöä
- Valjaat
Tarkasta hihnat kiinnityskohtien, säätösolkien ja turvatikkausten kohdalta.
Tutki, ettei hihnoissa ole viiltoja, etteivät ne ole kuluneet tai vaurioituneet käytön,
kuumuuden tai kemikaalien vuoksi jne. Varmista erityisen huolellisesti, että kuidut eivät
ole leikkautuneet.
Varmista, että DoubleBack- ja FAST-soljet toimivat moitteettomasti.
- TOP
Suunnattu sulkurengas
Varmista, että rungossa, portissa tai lukitusvaipassa ei ole halkeamia, vääntymiä,
syöpymisjälkiä tms. Avaa portti ja varmista, että se sulkeutuu ja lukittuu automaattisesti,
kun se päästetään irti. Varmista, että lukitusvaippa toimii moitteettomasti.
Lukitushahlo (portti) ei saa olla vieraiden materiaalien tukkima (lika, pikkukivet jne.).
- TOP CROLL
Suunnattu sulkurengas
Tarkasta runko ennen jokaista käyttöä.
Varmista, että lukkomutteri on ruuvattu täysin kiinni (kierteitä ei näy) ja kiristetty 3 Nm
vääntövoimalla.
CROLL-vatsaköysikahva
Tutki ennen jokaista käyttöä rungon kunto, kiinnitysreiät, lukko ja turvasalpa (mahd.
halkeamat, naarmut, vääntymät, kulumisjäljet, syöpyminen) sekä lukon jouset ja akselit.
Varmista, ettei hampaissa ole kulumia. Varoitus: jos hampaita puuttuu tai jos ne ovat
kuluneet, älä käytä köysikahvaa.
Jokaisen käytön aikana
On tärkeää tarkastaa tuotteen kunto säännöllisesti. Tarkasta sen kytkennät toisiin
varustejärjestelmän osiin ja varmista, että järjestelmän eri varusteosat ovat oikeassa
asennossa toisiinsa nähden.
Tarkista kunkin henkilösuojainjärjestelmän osan oikea tarkastusmenetelmä Internetosoitteesta www.petzl.com/ppe tai PETZL PPE CD-ROM:ilta.
Ota yhteyttä PETZLiin, jos olet epävarma tuotteen kunnosta.
B
NAVAHO SIT ja NAVAHO SIT FAST
Kuva 1. Valjaiden pukeminen
Avaa jalkasilmukoiden soljet.
1A. Pidä istumavaljaita kiinni vyöstä, laita jalat vyön läpi ja vedä se vyötäröllesi.
1B. Säädä vyö vetämällä vyön hihnoista. Kiinnitä hihnojen ylijäävä osuus siististi
vyötärövyötä vasten hihnanpidikkeiden avulla.
- Lyhyet päät: Käytä säätösolkien edessä olevia pidikkeitä.
- Pitkät päät: pujota hihnat sivulla olevien renkaiden läpi ja sitten renkaiden takana olevien
pidikkeiden läpi.
1C. Kiinnitä ja säädä jalkasilmukat.
- NAVAHO SIT: DoubleBack-soljet.
- NAVAHO SIT FAST: Kiinnitä FAST-pikasoljet. Varo ulkopuoisia kappaleita, jotka saattavat
estää FAST-solkien toiminnan (pikkukivet, hiekka, vaatteet jne.). Varmista, että lukitus
tapahtuu asianmukaisesti.
Säätö ja riippumiskoe
Valjaat on säädettävä niin, että ne istuvat tukevasti. Tämä vähentää loukkaantumisriskiä
putoamistilanteessa.
Sinun tulee kokeilla liikkumista valjaissa ja roikkua niiden varassa (riippumiskoe)
jokaisesta varusteen kiinnittymispisteestä varmistaaksesei, että valjaat istuvat hyvin,
ovat riittävän mukavat odotettavissa olevaa käyttöä silmällä pitäen ja että säädöt on tehty
parhaalla mahdollisella tavalla.
C
TYÖNTEKIJÄN TUKEMINEN ja KULUNRAJOITUS
Kuva 2. EN 358: 2000 -standardin mukaiset valjaat työntekijän
tukemiseen ja rajoitusköyden käyttöön
Nämä kiinnityspisteet on suunniteltu joko pitämään käyttäjä paikoillaan työpisteessä
(työskentely köyden varassa: työasemointi) tai estämään työntekijää menemästä alueelle,
jossa putoaminen on mahdollista (”talutusnuora”: kulunrajoitus). Näitä kiinnityspisteitä
saa käyttää ainoastaan kulunrajoitus- tai työasemointijärjestelmän kiinnittämiseen; korkein
sallittu putoamiskorkeus: 0,5 m.
Näitä kiinnityspisteitä ei ole suunniteltu putoamisen pysäyttämiseen. Työasemointi- tai
kulunrajoitusjärjestelmän kanssa saattaa olla tarpeen käyttää myös joko yhteistä
putoamisen pysäyttävää järjestelmää (esim. turvaverkkoja) tai henkilökohtaisia
putoamissuojaimia (esim. EN 363 -standardin mukaista putoamiseen pysäyttävää
järjestelmää).
Kun TOP tai TOP CROLL -valjaita käytetään EN 363 -standardin mukaisen putoamisen
pysäyttävän järjestelmän osana, tulee niitä käyttää yhdessä istumavaljaiden kanssa.
2A. Vatsakiinnityspiste
2B. Vyön sivukiinnityspisteet
Käytä aina molempia sivurenkaita yhdessä kiinnittämällä asemointiköysi niiden väliin.
Jaloilla tulee olla tukialusta, jotta työasento on mukava.
Säädä asemointiköysi niin, että ankkuripiste on käyttäjän vyötärön korkeudella tai
ylempänä. Köysi pidetään jännittyneenä ja vapaan pudotuksen matka ei saa ylittää
0,5 metriä.
2C. Kulunrajoituksen takakiinnityspiste
Tämä vyössä oleva takakiinnityspiste on tarkoitettua ainoastaan sellaisen
kulunrajoitusjärjestelmän kiinnittämiseen, jonka tarkoitus on estää pääsy alueelle, jossa on
putoamisvaara (”talutusnuora”).
Tarkista kulunrajoitus- tai asemointiköyden pituus säännöllisesti työskentelyn aikana.
D
Kuva 3: Istumavaljaat:
EN 813: 1997
Vatsakiinnityspiste
EN 813: 1997 -standard määrittelee vaatimukset istumavaljaille, joita käytetään
työasemointiin, kulunrajoitus- ja köysityöskentelyjärjestelmiin silloin, kun on tarpeen
käyttää matalalla sijaitsevaa kiinnityspistettä.
Käytä tätä vatsarengasta laskeutumiskahvan, asemointiköyden tai etenemisköyden
kiinnittämiseen.
Tätä kiinnityspistettä ei saa käyttää putoamisen pysäyttävien järjestelmien kanssa.
E
NAVAHO SIT tai NAVAHO SIT FAST asennettuna TOP
-rintavaljaiden kanssa
Kuva 4. Valmistelu
Kiinnittääksesi rintavaljaat istumavaljaisiin, laita selkähihna ylävartalo- ja istuinkappaleiden
takakiinnityssoljen (9) läpi ja sen jälkeen joustavan pidikkeen läpi. Pujota hihna sitten
selkäpuolen säätösoljen (2) läpi ja sitten uudestaan joustavan pidikkeen läpi.
F
Kuva 5. Valjaiden pukeminen
Avaa jalkasilmukoiden soljet.
5A. Laita olkahihnat toiselle sivulle, pidä istumavaljaita kiinni vyöstä, laita jalat vyön läpi
ja vedä se vyötäröllesi.
5B. Säädä vyö vetämällä vyön hihnoista. Kiinnitä hihnojen ylijäävä osuus siististi
vyötärövyötä vasten hihnanpidikkeiden avulla.
- Lyhyet päät: Käytä säätösolkien edessä olevia pidikkeitä.
- Pitkät päät: pujota hihnat sivulla olevien renkaiden läpi ja sitten renkaiden takana olevien
pidikkeiden läpi.
5C. Kiinnitä ja säädä jalkasilmukat.
- NAVAHO SIT: DoubleBack-soljet.
- NAVAHO SIT FAST: Kiinnitä FAST-pikasoljet. Varo ulkopuoisia kappaleita, jotka saattavat
estää FAST-solkien toiminnan (pikkukivet, hiekka, vaatteet jne.). Varmista, että lukitus
tapahtuu asianmukaisesti.
5D. Aseta olkahihnat hartioille. Laita sulkurengas rinta- ja istumavaljaat yhdistävään
vatsakappaleeseen (tekstiili) (5). Lukitse sulkurengas kiertämällä lukitusvaippaa.
5E. Säädä olkahihnat. Kiinnitä hihnojen ylijäävä osuus olkahihnaa vasten
hihnanpidikkeiden avulla.
5F. Selkäpuolen alustava säätö
Tämä säätö tulee tehdä vain kerran, kun valjaat laitetaan päälle ensimmäistä kertaa. Pyydä
joku auttamaan sen tekemisessä.
Liu’uta hihnanpidike siten, että molemmat hihnakerrokset ovat kireällä kahden soljen,
(2) ja (9) välissä (väljyyttä ei saa jäädä).
Kiinnitä hihnojen ylijäävät osat huolellisesti (tasaisesti – ei silmukoita tai väljyyttä)
hihnanpidikkeellä, jotta ne eivät häiritse työskentelyäsi.
Säädä selkäkiinnityspisteen asento vastaamaan oman kehosi muotoa ja kokoa. Aseta
DoubleBack-solki lapaluiden korkeudelle.
Säätö ja riippumiskoe
Valjaat on säädettävä niin, että ne istuvat tukevasti. Tämä vähentää loukkaantumisriskiä
putoamistilanteessa.
Sinun tulee kokeilla liikkumista valjaissa ja roikkua niiden varassa (riippumiskoe)
jokaisesta varusteen kiinnittymispisteestä varmistaaksesei, että valjaat istuvat hyvin,
ovat riittävän mukavat odotettavissa olevaa käyttöä silmällä pitäen ja että säädöt on tehty
parhaalla mahdollisella tavalla.
G
Kuva 6. Soikean, suunnatun sulkurenkaan lukitseminen käsin
Tämä EN 362: 2004 -standardin mukainen sulkurengas on valjaiden osa ja toimii
yhdistävänä osana liittäen rintavaljaat istumavaljaisiin. Älä käytä sitä kannatinköyden tai
nykäyksenvaimentimen kiinnittämiseen.
6A. HUOMIO, VAARA: Kun sulkurengasta käytetään, sen täytyy aina olla kiinni ja lukittu.
Sulkurenkaan kestävyys alenee suuresti, jos portti on auki.
Tarkasta järjestelmällisesti, että portti on kiinni painamalla sitä kädellä.
6B. Sulkurengas (suljettu) on vahvin pituussuuntaan kuormitettuna. Muihin suuntiin
kuormittaminen heikentää sitä.
H
PUTOAMISSUOJAIN
Kuva 7. EN 361: 2002 -standardin mukaiset
putoamissuojainvaljaat
EN 363 -standardin (putoamissuojaimet ja putoamisen pysäyttävät järjestelmät)
mukaisen putoamisen pysäyttävän järjestelmän osana käytettävät kokovartalovaljaat.
Varustetta on käytettävä yhdessä EN 795 -ankkurien, EN 362 -sulkurenkaiden, EN 355
-nykäyksenvaimentimen jne. kanssa.
7A. Rintakiinnityspiste
Käytä ainoastaan tätä pistettä kiinnittymisessä putoamisen pysäyttävään järjestelmään
(esim. liikkuvaan putoamisen pysäyttäjään, nykäyksenvaimentimeen tai muuhun
EN 363 -standardissa kuvattuun järjestelmään). Tunnistamisen helpottamiseksi tämä piste
on merkitty ”A”-kirjaimella.
Välimatka: vapaa tila käyttäjän alapuolella
Käyttäjän alapuolella olevan välimatkan täytyy olla riittävä, jottei hän pudotessaan osu
mihinkään esteeseen. Yksityiskohtaiset ohjeet välimatkan laskemiseen löytyvät muiden
osien (nykäyksenvaimentimet, liikkuva putoamisen pysäyttäjä jne.) teknisistä ohjeista.
I
NAVAHO SIT tai NAVAHO SIT FAST asennettuna TOP CROLL
-rintavaljaiden kanssa
Kuva 8. Valmistelu
Kiinnittääksesi rintavaljaat istumavaljaisiin, laita selkähihna ylävartalo- ja istuinkappaleiden
takakiinnityssoljen (9) läpi ja sen jälkeen joustavan pidikkeen läpi. Pujota hihna sitten
selkäpuolen säätösoljen (2) läpi ja sitten uudestaan joustavan pidikkeen läpi.
Kiinnittääksesi CROLL-kahvan valjaiden eteen, kiinnitä se rinta- ja istumavaljaat yhdistävä
vatsakappaleessa (5) olevaan sulkurenkaaseen. Kierrä sulkurengas kiinni ja kiristä se
3 Nm vääntövoimalla. Varmista, että muovinen jakaja on napsahtanut kiinni.
J
Kuva 9. Suunnattu sulkurengas
Sulkurengas on valjaiden osa, jota käytetään liittämään vartalon etukappale vyöhön. Se
täytyy aina kiristää 3 Nm voimalla (jotta sitä ei voida kiertää auki käsivoimin).
Älä käytä sitä nykäyksenvaimentimen kiinnittämiseen.
K
Kuva 10. Valjaiden pukeminen
Avaa jalkasilmukoiden FAST-soljet.
10A. Levitä hartiahihnat erilleen, tartu valjaisiin vyöstä ja laita molemmat jalat läpi
jalkasimukoista.
10B. Aseta olkahihnat hartioille.
10C. Säädä vyö vetämällä vyön hihnoista. Kiinnitä hihnojen ylijäävä osuus siististi
vyötärövyötä vasten hihnanpidikkeiden avulla.
- Lyhyet päät: Käytä säätösolkien edessä olevia pidikkeitä.
- Pitkät päät: pujota hihnat sivulla olevien renkaiden läpi ja sitten renkaiden takana olevien
pidikkeiden läpi.
10D. Kiinnitä FAST-soljet ja säädä jalkasilmukat. Varo ulkopuoisia kappaleita, jotka
saattavat estää FAST-solkien toiminnan (pikkukivet, hiekka, vaatteet jne.). Varmista, että
lukitus tapahtuu asianmukaisesti.
10E. Säädä olkahihnat. Kiinnitä hihnojen ylijäävä osuus olkahihnaa vasten
hihnanpidikkeiden avulla.
10F. Selkäpuolen alustava säätö
Tämä säätö tulee tehdä vain kerran, kun valjaat laitetaan päälle ensimmäistä kertaa. Pyydä
joku auttamaan sen tekemisessä.
Liu’uta hihnanpidike siten, että molemmat hihnakerrokset ovat kireällä kahden soljen,
(2) ja (9) välissä (väljyyttä ei saa jäädä).
Kiinnitä hihnojen ylijäävät osat huolellisesti (tasaisesti – ei silmukoita tai väljyyttä)
hihnanpidikkeellä, jotta ne eivät häiritse työskentelyäsi.
Säädä selkäkiinnityspisteen asento vastaamaan oman kehosi muotoa ja kokoa. Aseta
DoubleBack-solki lapaluiden korkeudelle.
Säätö ja riippumiskoe
Valjaat on säädettävä niin, että ne istuvat tukevasti. Tämä vähentää loukkaantumisriskiä
putoamistilanteessa.
Sinun tulee kokeilla liikkumista valjaissa ja roikkua niiden varassa (riippumiskoe)
jokaisesta varusteen kiinnittymispisteestä varmistaaksesei, että valjaat istuvat hyvin,
ovat riittävän mukavat odotettavissa olevaa käyttöä silmällä pitäen ja että säädöt on tehty
parhaalla mahdollisella tavalla.
L
PUTOAMISSUOJAIN
Kuva 11. EN 361: 2002 -standardin mukaiset
putoamissuojainvaljaat
EN 363 -standardin (putoamissuojaimet ja putoamisen pysäyttävät järjestelmät)
mukaisen putoamisen pysäyttävän järjestelmän osana käytettävät kokovartalovaljaat.
Varustetta on käytettävä yhdessä EN 795 -ankkurien, EN 362 -sulkurenkaiden, EN 355
-nykäyksenvaimentimen jne. kanssa.
11A. Rintakiinnityspiste
Käytä ainoastaan tätä pistettä kiinnittymisessä putoamisen pysäyttävään järjestelmään
(esim. liikkuvaan putoamisen pysäyttäjään, nykäyksenvaimentimeen tai muuhun
EN 363 -standardissa kuvattuun järjestelmään). Tunnistamisen helpottamiseksi tämä piste
on merkitty ”A”-kirjaimella.
Välimatka: vapaa tila käyttäjän alapuolella
Käyttäjän alapuolella olevan välimatkan täytyy olla riittävä, jottei hän pudotessaan osu
mihinkään esteeseen. Yksityiskohtaiset ohjeet välimatkan laskemiseen löytyvät muiden
osien (nykäyksenvaimentimet, liikkuva putoamisen pysäyttäjä jne.) teknisistä ohjeista.
M
KÖYDEN VARASSA TYÖSKENTELY
CROLL-vatsaköysikahva
EN 12841: 2006
Käyttötarkoitus
EN 12841: 2006 CROLL -köysikahva on tyyppiä B oleva köyden pituuden säätölaite, jota
käytetään työskentelyköydessä nousemiseen.
HUOMIO: sen kanssa on käytettävä tyyppiä A olevaa varalaitetta toisessa (turva-)
köydessä (esim. liikkuva ASAP-putoamisen pysäyttäjä ).
CROLL-vatsaköysikahva ei sovi käytettäväksi EN 363 -standardin mukaisessa putoamisen
pysäyttävässä järjestelmässä.
Köyden halkaisija
Käytä 0-13 mm paksuista, EN 1891 type A -vaatimukset täyttävää puolistaattista
kernmantel-köyttä.
Kuva 12. Asennus köyteen
Vedä turvasalpaa alas- ja ulospäin peukalon ja etusormen avulla. Se lukkiutuu paikoilleen
laitteen runkoa vasten. Siten lukko pysyy auki.
Laita köysi paikoilleen. Työnnä turvasalpaa, kunnes lukko kääntyy paikoilleen köyttä
vasten.
Turvasalpa auttaa estämään lukon aukeamisen vahingossa.
Köyden poistaminen
Liikuta laitetta ylöspäin köydessä vetämällä samalla turvasalpaa alas- ja ulospäin.
Kuva 13. Toiminnan periaatteet
13A. Nouseminen
CROLL on laite, jolla noustaan työskentelyköydessä. Se tarttuu köyteen, kun sitä
kuormitetaan alaspäin suuntautuen, ja liukuu helposti, kun sitä siirretään köydessä
ylöspäin.
Hampaat pureutuvat köyden vaippaan ja kytkevät lukon, jolloin laite kiinnittyy tukevasti
köyteen. Lukon lovet mahdollistavat mudan yms. poistamisen.
13B. CROLLin liikuttaminen köydessä alaspäin (poikkeustilanne)
Liikuta CROLLia köydessä hieman ylöspäin ja paina lukkoa samalla etusormella alaspäin
pitääksesi hampaat irti köyden vaipasta. Älä käsittele turvasalpaa, koska tämä tuo
mukanaan vaaran, että lukko avautuu itsestään.
13C. Toiminnan tarkastus
Ennen jokaista käyttöä täytyy aina suorittaa testi sen varmistamiseksi, että suuntaus
köydessä on oikea ja että laite toimii moitteettomasti. Käyttäjän täytyy olla varmistettuna
testiä suoritettaessa.
21
NAVAHO SIT / NAVAHO SIT FAST / TOP / TOP CROLL C79502-C (200907)
Page 22

Työnnä CROLLia köydessä ylöspäin. Sen tulee liukua helposti ylös köyttä pitkin. Vedä sitä
alaspäin varmistaaksesi, että se tarttuu köyteen.
13D. Varotoimenpiteet
- Pidä CROLLin lukko suljettuna, kun laitetta ei käytetä, sillä varusteet tai muut esineet
saattavat juuttua laitteeseen, jos lukko on auki.
- HUOMIO: lukon toimintaa eivät saa häiritä ulkopuoliset materiaalit (pikkukivet, muta,
kasvien osat, köydet, nauhat vaatteet, maali jne.)
- VARO turvasalvan tarttumista vaatteisiin tai nauhoihin.
- CROLLin ja ankkurin välillä olevan köyden pitää aina olla kireä. Käyttäjän pitää aina
pysytellä köyden ankkuripisteen alapuolella.
- Köyden äkillisen kuormituksen vaimennus:
älä unohda, että putoamisen sattuessa köysi on se, joka vaimentaa nykäyksen. Mitä
lähemmäs tulet ankkurikohtaa, köyden kyky vaimentaa nykäystä vähenee ja laskee lopulta
nollaan.
- Suojaa köysi kunnolla kaikelta, mikä saattaa vaurioittaa sitä (esim. terävät reunat,
karheat pinnat jne.).
- Köyden pitää voida liikkua vapaasti CROLLin läpi. Varo tilanteita, joissa liukuminen
saattaa estyä (esim. solmu tai kulunut kohta köydessä jne.).
- Älä unohda solmia pysäyttäjäsolmua köyden päähän.
Kuva 14. Kiipeäminen köydellä
- Työskentelyköysi: Käytä CROLLia ja toista käsikahvaa (esim. ASCENSION-köysikahvaa)
jalkalenkin kanssa. Kiinnittäydy aina toiseen nousukahvaan asianmukaisella köydellä.
- Turvaköysi: käytä tyypin A laitetta.
Kaikki sellaiset korjaukset, muutokset tai lisäykset varusteeseen, joihin Petzl ei ole antanut
lupaa, ovat kiellettyjä; ne saattavat vaarantaa varusteen tehokkuuden.
Säilytys ja kuljetus
Säilytä valjaat laukussa, laatikossa tai muuten suojattuna, jotteivät ne altistu UV-säteilylle,
kosteudelle, kemikaaleille jne.
Takuu
Tällä tuotteella on 3 vuoden takuu, joka koskee kaikkia materiaali- tai valmistusvirheitä.
Takuun piiriin eivät kuulu: normaali kuluminen, hapettuminen, varusteeseen tehdyt
muutokset, virheellinen säilytys, huono hoito, onnettomuuksien, välinpitämättömyyden tai
väärän/virheellisen käytön aiheuttamat vauriot.
PETZL ei ole vastuussa suorista, välillisistä eikä satunnaisista seurauksista tai minkään
muun tyyppisistä vahingoista, jotka tapahtuvat sen tuotteiden käytön aikana tai aiheutuvat
sen tuotteiden käytöstä.
N
Varustesilmukan enimmäiskuormitus
O
Yleisiä tietoja
Yhteensopivuus: kiinnityspisteet / sulkurenkaat
Yhteensopimaton kiinnittäytyminen voi aiheuttaa tahattoman irtoamisen, rikkoutumisen tai
vaikeuttaa toisen laitteen turvallista toimintaa.
VAROITUS: valjaiden kiinnityspisteet saattavat toimia vipuna sulkurenkaan portilla.
Jos köyteen tulee äkillinen jännitys ja/tai lukkojärjestelmään kohdistuu ulkoinen paine
samalla kun sulkurengas on huonossa asennossa, lukkovaippa voi murtua ja portti voi
aueta itsestään.
Vähentääksesi tätä riskiä varmista, että sulkurenkaat ovat oikeassa asennossa aina, kun
järjestelmää kuormitetaan (köysi, laskeutumiskahva jne.).
Varmista myös, että sulkurenkaat ovat yhteensopivia kiinnityspisteiden kanssa (muoto,
koko jne.) ja vältä käyttämästä sulkurenkaita, joilla on taipumusta mennä väärään
asentoon (ja pysyä väärässä asennossa) kiinnityspisteissä.
EN 365: VAROITUS
Yhteensopivuus
Varmista, että tämä tuote sopii yhteen varusteidesi muiden osien kanssa. Ks. kunkin osan
tuotekohtaiset ohjeet.
VAROITUS: kun käytät useita varusteosia yhdessä, yhden varusteen aiheuttama toisen
varusteen luotettavuuden heikkeneminen saattaa johtaa vaaratilanteeseen.
Ota yhteyttä Petzliin, jos olet epävarma varusteidesi yhteensopivuudesta.
Ankkurit: Korkealla työskentely
Järjestelmän ankkuripisteen tulee mieluiten sijaita käyttäjän yläpuolella, ja sen tulee täyttää
EN 795 -standardin vaatimukset, erityisesti ankkurin minimikestävyyden (10 kN) osalta.
Pelastussuunnitelma
Sinulla on oltava pelastussuunnitelma ja nopeasti toteutettavat pelastuskeinot, jos tämän
varusteen käytön aikana ilmaantuu ongelmia. Tämä vaatii asiaankuuluvaa koulutusta
tarpeellisissa pelastustekniikoissa.
Sulkurenkaat
Sulkurenkaiden täytyy aina olla kiinni ja lukittuna. Tarkasta järjestelmällisesti, että portti on
kiinni painamalla sitä kädellä.
Tarkasta sulkurenkaat niiden käyttöohjeissa annettujen ohjeiden mukaisesti.
Muita asioita
- HUOMIO, VAARA: Älä salli tuotteen hiertyvän naarmuttaviin pintoihin tai teräviin
reunoihin.
- Käyttäjien täytyy soveltua lääketieteellisen kuntonsa puolesta toimimaan korkealla.
VAROITUS: valjaiden löysä sidonta saattaa johtaa vakavaan loukkaantumiseen tai
kuolemaan.
- Sinun täytyy varmistaa, että tuotemerkinnät pysyvät lukukelpoisina koko tuotteen
käyttöajan.
- Sinun täytyy varmistaa tämän varusteen soveltuvuus suunnittelemaasi käyttöön. Tee se
tutustumalla soveltuviin viranomaismääräyksiin ja muihin työturvallisuussäädöksiin.
- On noudatettava kaikkien tämän tuotteen kanssa käytettävien varusteiden tuotekohtaisia
käyttöohjeita.
- Käyttöohjeet on annettava varusteen käyttäjille. Jos tämä varuste myydään uudestaan
alkuperäisen kohdemaan ulkopuolella, jälleenmyyjän velvollisuus on tarjota nämä
käyttöohjeet sen maan kielellä, jossa tuotetta tullaan käyttämään.
Käyttöikä
VAROITUS: erikoistapauksissa tuotteen käyttöikä saattaa jäädä vain yhteen ainoaan
käyttöön, esim. jos tuote altistuu seuraavan tyyppisille asioille: kemikaalit, äärimmäiset
lämpötilat, terävät reunat, raju pudotus tai raskas kuorma jne.
mahdollinen käyttöikä on seuraava: jopa 10 vuotta muovi- ja tekstiilituotteiden osalta.
Metallituotteiden osalta se on määrittämätön.
todellinen käyttöikä päättyy, kun jokin alla luetelluista käytöstä poistoa vaativista ehdoista
täyttyy (ks. “Koska varusteet poistetaan käytöstä”) tai kun se havaitaan vanhentuneeksi
järjestelmässään.
Todelliseen käyttöikään vaikuttavat useat eri tekijät kuten: käytön raskaus, käyttötiheys,
käyttöympäristö, käyttäjän taidot, tuotteen säilytys ja huolto jne.
Tutki varusteet säännöllisesti huomataksesi vauriot ja/tai
heikentymisen.
Käyttöä edeltävän ja käytön jälkeisen tarkastuksen lisäksi pätevän tarkastajan on
suoritettava perusteellinen määräaikaistarkastus korkeintaan 12 kuukauden välein. Tämä
tarkastus on suoritettava vähintään kerran 12 kuukaudessa. Perusteellisen tarkastusten
tiheyttä valittaessa on otettava huomioon käyttötapa ja käytön raskaus. Pitääksesi
varusteet paremmin seurannassa on suositeltavaa, että osoitat kullekin osalle yhden
tietyn käyttäjän, jolloin hän tuntee välineen historian. Tarkastuksen tulokset tulee kirjata
tarkastuslokiin. Siihen tulee olla mahdollista kirjata seuraavat tiedot: varustetyyppi, malli,
valmistajan tai jälleenmyyjän nimi ja yhteystiedot, tunniste (sarja- tai yksilönumero),
valmistusvuosi, ostopäivämäärä, ensimmäisen käytön päivämäärä, käyttäjän nimi,
kaikki muut olennaiset tiedot koskien esim. huoltoa ja käyttötiheyttä, säännöllisten
tarkastusten historia (pvm / havainnot ja huomatut ongelmat / tarkastuksen suorittaneen
pätevän tarkastajan nimi ja allekirjoitus / seuraavan tarkistuksen arvioitu pvm). Esimerkki
yksityiskohtaisesta tarkastuslokista sekä muita tietoja on saatavilla osoitteesta www.
petzl.com/ppe
Koska varusteet poistetaan käytöstä
Lopeta minkä tahansa varusteen käyttö välittömästi, jos:
- se ei läpäise tarkastusta (käyttöä edeltävää, käytön jälkeistä tai perusteellista
määräaikaistarkastusta),
- se on altistunut rajulle pudotukselle tai raskaalle kuormitukselle,
- et tunne sen käyttöhistoriaa täysin,
- se on yli 10 vuotta vanha ja tehty muovista tai tekstiileistä,
- sinulla on mitään epäilyksiä sen luotettavuudesta.
Tuhoa käytöstä poistetut varusteet, jottei kukaan käytä niitä enää.
Tuotteen vanhentuminen
On monia syitä, miksi tuotetta voidaan pitää vanhentuneena, jolloin se poistetaan käytöstä,
vaikka sen todellinen käyttöikä ei ole päättynyt. Esimerkkejä tästä: soveltuvien standardien,
määräysten tai lakien muuttuminen; uusien tekniikoiden kehittyminen, sopimattomuus
yhteen muiden varusteiden kanssa jne.
Muutokset, korjaukset
22
NAVAHO SIT / NAVAHO SIT FAST / TOP / TOP CROLL C79502-C (200907)
Page 23

(NO) NORSK
Slik bruker du utstyret
- NAVAHO SIT og NAVAHO SIT FAST
Sittesele, støttebelte for arbeidsposisjonering.
- NAVAHO SIT eller NAVAHO SIT FAST montert med brystselen TOP
Fallsikringssele, støttebelte, sittesele
- NAVAHO SIT eller NAVAHO SIT FAST montert med brystselen TOP CROLL
Fallsikringssele, støttebelte, sittesele, sele for oppstigning på tau med innebygd CROLL
tauklemme.
A
Kun teknikkene som er vist uten kryss og/eller uten ”dødningehode” er tillatt. Hold deg
jevnlig oppdatert om de siste endringene i disse dokumentene på www.petzl.com
Dersom du er i tvil eller dersom noe er vanskelig å forstå, vær vennlig å kontakte PETZL.
Bruksområder
- NAVAHO SIT og NAVAHO SIT FAST
Sittesele, støttebelte for arbeidsposisjonering.
- NAVAHO SIT eller NAVAHO SIT FAST montert med brystselen TOP
Fallsikringssele, støttebelte, sittesele
- NAVAHO SIT eller NAVAHO SIT FAST montert med brystselen TOP CROLL
Fallsikringssele, støttebelte, sittesele, sele for oppstigning på tau med innebygd CROLL
tauklemme.
Produktet må ikke brukes utover begrensningene eller til annet bruk enn det er beregnet
for.
VIKTIG
Aktivitetene som innebærer bruk av dette utstyret er farlige.
Du er selv ansvarlig for dine handlinger og avgjørelser.
Før du tar i bruk utstyret, må du:
- Lese og forstå alle bruksinstruksjonene.
- Få tilpasset opplæring i hvordan dette spesifikke produktet brukes.
- Gjort deg kjent med utstyret, og satt deg inn i kapasiteten og begrensningene.
- Forstå og akseptere risikoen.
Manglende respekt for selv ett av disse punktene kan føre til alvorlige skader eller
død.
Ansvar
VIKTIG: det er nødvendig med tilpasset opplæring i praktisk bruk av utstyret før bruk.
Dette produktet skal kun brukes av kompetente og ansvarlige personer, eller brukes under
direkte visuell kontroll av en kompetent og ansvarlig person.
Å sørge for opplæring i riktige teknikker og sikkerhetstiltak er ditt eget ansvar.
Du tar selv risikoen og ansvar for skader eller dødsfall som følge av feilaktig bruk at våre
produkter, uansett på hvilken måte. Dersom du ikke er i stand til å ta dette ansvaret eller
denne risikoen skal du ikke bruke utstyret.
Oversikt over deler
- Brystsele TOP:
(1) Skulderremmer, (2) Justeringsspenne rygg, (3) Brystfeste EN 361,
(4) Retningsbestemt koblingsstykke.
- Brystsele TOP CROLL:
(1) Skulderremmer, (2) Justeringsspenne rygg, (3) Brystfeste EN 361, (4a) Innebygd
CROLL brystklemme EN 12841, (4b) Retningsbestemt hurtigledd/låsring med låsesperre,
(16) Låskam, (17) Sikkerhetsstropper, (18) Festehull.
- Sitteseler NAVAHO SIT og NAVAHO SIT FAST:
(5) Magefeste (tekstil) for kobling mellom brystsele og sittesele, (6) Belte, (7) Festepunkt
mage EN 358, EN 813, (8) Sidefeste for støttebelte EN 358, (9) Bakre spenne for
kobling mellom brystsele og sittesele EN 358, (10) DoubleBack justeringsspenne,
(10 bis) FAST hurtigspenner, (11) Utstyrsløkker, (12) Innkoplingspunkt for verktøyholder,
(13) Båndholder for remmer (14) Stropper, (15) Produktets merkelapp som brettes inn i
mellom selens polstring.
Hovedmaterialer
Sele: polyester, stål (justeringsspenner), aluminiumslegering (festepunkt).
CROLL brystklemme: aluminiumslegering (kropp), forkrommet stål (låskam), polyamid
(sikkerhetsstropp).
Kontrollpunkter
Før hver bruk
- Sele
Sjekk alltid bånd ved festepunkter, justeringsspenner og bærende sømmer.
Følg nøye med på kutt, slitasje og skader som skyldes bruk, varme, kjemikalier, osv. Vær
oppmerksom på avkuttede tråder.
Sjekk at spennene DoubleBack og FAST fungerer som de skal.
- TOP
Retningsbestemt koblingsstykke
Sjekk at kroppen, porten, splinten og låshylsen er fri for sprekker, bulker og rust... Åpne
porten og sjekk at den lukkes og låses automatisk når du slipper den. Sjekk at låsehylsen
fungerer som den skal. Keylockhullet ved porten må ikke tettes igjen (jord, stein...)
- TOP CROLL
Retningsbestemt hurtigledd/låsring
Sjekk tilstanden før hver bruk.
Sjekk at låsmutteren er skrudd fast helt til bunns på riktig måte (gjengene skal ikke vises),
og at den er festet med et strammemoment på 3 Nm.
CROLL brystklemme
Sjekk før bruk at kroppen, festehullet, låskammen og sikkerhetstroppen er i god stand
(fri for sprekker, merker, bulker, slitasje og rust), og at fjærene og bolten på låskammen
fungerer som de skal. Sjekk også at tennene ikke er slitte. Viktig: Dersom låskammen
mangler tenner, eller dersom tennene er slitte, må ikke brystklemma brukes.
Under bruk
Det er viktig å kontrollere jevnlig at produktet fungerer som det skal. Pass på at
tilkoblingen er riktig og at enhver komponent i systemet er i riktig posisjon i forhold til de
andre komponentene.
For informasjon om kontrollrutinene for hver PVU, se www.petzl.com/ppe eller CD-ROM
PVU PETZL.
Kontakt PETZL dersom du er i tvil.
B
NAVAHO SIT og NAVAHO SIT FAST
Figur 1. Slik tar du på deg selen
Åpne spennene på lårløkkene.
1A. Hold sitteselen i beltet og tre beina inn i løkkene.
1B. Juster beltet ved å dra i belteremmene. Fest overflødige remmer i båndholderne (fest
dem godt).
- Korte overflødige bånd: tre dem inn i båndholderne foran justeringsspennene.
- Lange overflødige bånd: tre dem gjennom sidefestene, og deretter under båndholderne
bak festepunktene.
1C. Lukk og juster lårløkkene.
- NAVAHO SIT: DoubleBack spenner.
- NAVAHO SIT FAST: Lukk spennene FAST. Vær oppmerksom på fremmedlegemer som
kan hindre at hurtigspennene FAST fungerer som de skal (småstein, sand, klær…). Sjekk
at den låser seg som den skal.
Justering og testing når man henger i tauet
Selen må justeres nært kroppen for å redusere risikoen for skader i tilfelle fall.
Du må røre deg i selen og prøve å henge i den med alt utstyret på, i de ulike festepunktene
for å være sikker på at den er i riktig størrelse og at den er riktig justert, samt at den gir
nødvendig komfort for planlagt brukt.
C
ARBEIDSPOSISJONERING
Figur 2. Sele for arbeidsposisjonering. EN 358: 2000
Selens festepunkter skal enten sikre at brukeren holder seg i ønsket arbeidsposisjon
(arbeid med stramt tau), eller at brukeren ikke når en posisjon hvor det er fare for fall.
Disse festepunktene må kun brukes sammen med arbeidsposisjoneringssystem med
maksimum fallhøyde på 0,5 m.
Disse festepunktene er ikke beregnet for fallsikring, og det kan være nødvendig
å komplettere arbeidsposisjoneringssystemet med fallsikringsbeskyttelse (for
eksempel gjerder, nett etc.) eller individuell fallsikringsbeskyttelse (for eksempel
fallsikringssystemer som oppfyller kravene i standard EN 363).
Ved bruk av selen i fallsikringssystemer som oppfyller kravene i standard EN 363, må
selen kompletteres med brystsele TOP eller TOP CROLL.
2A. Festepunkt mage
2B. Sidefester for støttebelte
Bruk alltid de to sidefestene samtidig ved å koble dem sammen med en støtteline for at
belastningen mot mage og hofte skal være mest mulig behagelig.
Beina må ha støtte for at posisisjonen skal føles behagelig.
Juster lengden på støttestroppen slik at festepunktet er på høyde med eller over midjen.
Støttestroppen skal være stram, og det skal ikke være mer enn 0,5 m slakk.
2C. Bakre festepunkt for tilbakeholding
Dette bakre festepunktet på selen sikrer at brukeren ikke kommer i en posisjon hvor det er
fare for fall (fallhindring).
Kontroller jevnlig under bruk at justeringselementene og festeelementene er i god stand.
D
Figur 3. Sittesele:
EN 813: 1997
Festepunkt mage
Standard EN 813: 1997 omfatter sitteseler for arbeidposisjonering,
tilbakeholdingssystemer, og oppstigning på tau i tilfeller hvor det er nødvendig med et
nedre festepunkt.
Dette festepunktet for mage brukes for tilkobling av nedfiringsbrems, forbindelsesline
eller støtteline.
Festepunktet må ikke brukes til fallsikring.
E
NAVAHO SIT eller NAVAHO SIT FAST montert med brystselen TOP
Figur 4. Forberedelser
Brystselen festes til sitteselen ved å kople ryggbåndet gjennom bakre koblingsspenne (9)
og deretter gjennom den elastiske båndholderen. Skyv deretter båndet gjennom
DoubleBack justeringsspenne for rygg (2), deretter gjennom båndholderne på nytt.
F
Figur 5. Slik tar du på deg selen
Åpne spennene på lårløkkene.
5A. Hold skulderremmene til én side, hold sitteselen i beltet og tre beina inn i lårløkkene.
5B. Juster beltet ved å dra i belteremmene. Fest overflødige remmer i båndholderne (fest
dem godt).
- Korte overflødige bånd: tre dem inn i båndholderne foran justeringsspennene.
- Lange overflødige bånd: tre dem gjennom sidefestene, og deretter under båndholderne
bak festepunktene.
5C. Lukk og juster lårløkkene.
- NAVAHO SIT: DoubleBack spenner.
- NAVAHO SIT FAST: Lukk spennene FAST. Vær oppmerksom på fremmedlegemer som
kan hindre at hurtigspennene FAST fungerer som de skal (småstein, sand, klær…). Sjekk
at den låser seg som den skal.
5D. Posisjoner skulderremmene på skuldrene. Fest koblingsstykket i magefestet (tekstil)
for kobling mellom brystsele og sittesele (5). Skru til låsehylsen på koblingsstykket.
5E. Juster skulderremmene. Fest overflødige bånd (festes godt) i båndholderne på
stroppen.
5F. Første justering av ryggfeste
Foreta justeringen når du tar på deg selen for første gang, og få en annen person til å
hjelpe deg.
Skyv båndholderen helt til begge nivåene på ryggbåndet er stramme (det må ikke være
slakk på båndet).
Plasser overflødig bånd (festes godt) i båndholderen, slik at du ikke blir forhindret i
arbeidet.
Juster koblingen slik at den er tilpasset kroppen din, og plasser DoubleBack-spennen på
høyde med skulderbladene.
Justering og testing når man henger i tauet
Selen må justeres nært kroppen for å redusere risikoen for skader i tilfelle fall.
Du må røre deg i selen og prøve å henge i den med alt utstyret på, i de ulike festepunktene
for å være sikker på at den er i riktig størrelse og at den er riktig justert, samt at den gir
nødvendig komfort for planlagt brukt.
G
Figur 6. Ovalt retningsbestemt koblingsstykke med manuell
låsemekanisme
Koblingsstykket EN 362: 2004 er en del av selen, og brukes for å koble sammen
brystdelen til sitteselen. Bruk aldri dette punktet for å feste forbindelsesline eller en
falldemper.
6A. VIKTIG - FARE: koblingenes port må alltid være lukket og låst ved bruk. Dersom
porten er åpen, reduseres koblingsstykkets bruddstyrke kraftig.
Kontroller med jevne mellomrom at porten låser seg som den skal ved å trykke den
inn med hånden.
6B. Koblingsstykket (lukket) gir maksimal bruddstyrke i lengderetningen. Dersom den er
plassert på annen måte, reduseres bruddstyrken.
H
FALLSIKRING
Figur 7. Fallsikringssele EN 361: 2002
Sele for fallsikring som inngår i et fallsikringsystem som oppfyller kravene i standard
EN 363 (fallsikringssystem mot fall til lavere nivå). Selen må brukes sammen med
forankringspunktene EN 795, låskarabinere EN 362, falldemper EN 355 osv.
7A. Festepunkt bryst
Kun dette punktet må brukes for tilkobling av fallsikringssystemer, for eksempel løpende
fallsikring for tau (løpebrems), falldemper og andre systemer som beskrevet i standard
EN 363. Disse punktene er merket med bokstaven A for at de skal være lett synlige.
Frihøyde: fri høyde under brukeren
frihøyden under brukeren må være tilstrekkelig for å unngå å treffe hindringer i tilfelle
fall. Nøyaktig beregning av frihøyde er angitt i tekniske spesifikasjoner for de ulike
utstyrstypene (falldempere, løpende fallsikring/løpebrems osv.).
I
NAVAHO SIT eller NAVAHO SIT FAST montert med brystselen
TOP CROLL
Figur 8. Forberedelser
Brystselen festes til sitteselen ved å kople ryggbåndet gjennom bakre koblingsspenne (9)
og deretter gjennom den elastiske båndholderen. Skyv deretter båndet gjennom
DoubleBack justeringsspenne for rygg (2), deretter gjennom båndholderne på nytt.
For å feste CROLL foran på selen, skrus hurtigleddet fast i tilkoblingspunktet for mage (5).
Sku til og fest hurtigleddet med 3 Nm belastning ved hjelp av en fastnøkkel. Husk å feste
låsesperren av plast.
J
Figur 9. Retningsbestemt hurtigledd/låsring
Hurtigleddet er en del av selen, og brukes for å koble sammen brystdelen til beltet.
Hurtigleddet må alltid være strammet med et moment på 3 Nm (det skal ikke kunne åpnes
for hånd).
Bruk aldri dette punktet for å feste forbindelsesline eller en falldemper.
K
Figur 10. Slik tar du på deg selen
Åpne spennene FAST på lårløkkene.
10A. Brett ut skulderremmene, ta tak i beltet på selen og kle den på som en bukse.
10B. Posisjoner skulderremmene på skuldrene.
10C. Juster beltet ved å dra i belteremmene. Fest overflødige remmer i båndholderne
(fest dem godt).
- Korte overflødige bånd: tre dem inn i båndholderne foran justeringsspennene.
- Lange overflødige bånd: tre dem gjennom sidefestene, og deretter under båndholderne
bak festepunktene.
10D. Fest spennene FAST og juster lårløkkene. Vær oppmerksom på fremmedlegemer
som kan hindre at hurtigspennene FAST fungerer som de skal (småstein, sand, klær…).
Sjekk at den låser seg som den skal.
10E. Juster skulderremmene. Fest overflødige bånd (festes godt) i båndholderne på
stroppen.
10F. Første justering av ryggfeste
Foreta justeringen når du tar på deg selen for første gang, og få en annen person til å
hjelpe deg.
Skyv båndholderen helt til begge nivåene på ryggbåndet er stramme (det må ikke være
slakk på båndet).
Plasser overflødig bånd (festes godt) i båndholderen, slik at du ikke blir forhindret i
arbeidet.
Juster koblingen slik at den er tilpasset kroppen din, og plasser DoubleBack-spennen på
høyde med skulderbladene.
Justering og testing når man henger i tauet
Selen må justeres nært kroppen for å redusere risikoen for skader i tilfelle fall.
Du må røre deg i selen og prøve å henge i den med alt utstyret på, i de ulike festepunktene
for å være sikker på at den er i riktig størrelse og at den er riktig justert, samt at den gir
nødvendig komfort for planlagt brukt.
L
FALLSIKRING
Figur 11. Fallsikringssele EN 361: 2002
Sele for fallsikring som inngår i et fallsikringsystem som oppfyller kravene i standard
EN 363 (fallsikringssystem mot fall til lavere nivå). Selen må brukes sammen med
forankringspunktene EN 795, låskarabinere EN 362, falldemper EN 355 osv.
11A. Festepunkt bryst
Kun dette punktet må brukes for tilkobling av fallsikringssystemer, for eksempel løpende
fallsikring for tau (løpebrems), falldemper og andre systemer som beskrevet i standard
EN 363. Disse punktene er merket med bokstaven A for at de skal være lett synlige.
Frihøyde: fri høyde under brukeren
frihøyden under brukeren må være tilstrekkelig for å unngå å treffe hindringer i tilfelle
fall. Nøyaktig beregning av frihøyde er angitt i tekniske spesifikasjoner for de ulike
utstyrstypene (falldempere, løpende fallsikring/løpebrems osv.).
M
OPPSTIGNING PÅ TAU
CROLL brystklemme
EN 12841: 2006
Bruksområder
Brystklemmen CROLL EN 12841: 2006 er et sikringssystem type B som brukes til
progresjon oppover på arbeidstauet.
VIKTIG: brystklemmen må brukes sammen med utstyr av type A som ekstra sikring på et
eget sikringstau (for eksempel ASAP løpende fallsikring for tau).
Brystklemmen CROLL passer ikke til bruk i et fallsikringssystem i henhold til standard
EN 363.
Tauets diameter
Bruk et semistatisk tau på 10-13 mm i diameter (med kjerne og strømpe) EN 1891 type A.
Figur 12. Tilkobling på tauet
Trekk låskammen nedover ved å flytte sikkerhetsstopperen med tommelen og
pekefingeren. Fest låskammen ved kroppen, i åpen posisjon. Låskammen forblir åpen.
Plasser tauet i hulrommet. Skyv sikkerhetsstopperen slik at låskammen legger trykk på
tauet.
Sikkerhetsstroppen forhindrer at låskammen åpnes ved et uhell.
Slik tar du ut tauet
Før brystklemma opp langs tauet og åpne samtidig låskammen ved hjelp av
sikkerhetsstroppen.
Figur 13. Slik fungerer det
13A. Oppstigning
CROLL er et utstyr for progresjon på tau (oppstigning) Den blokkeres når brukeren legger
vekten på den (nedover) og glir fritt i motsatt retning (oppover).
Tennene griper tak i taustrømpen slik at låskammen festes. Låskammen blokkerer tauet.
Tennene i låskammen fjerner blant annet søle fra tauet.
13B. Føre CROLL nedover (unntakstilfelle)
Før brystklemma litt opp langs tauet og trykk samtidig på låskammen med pekefingeren.
Ikke rør sikkerhetsstroppen, da det er fare for at den åpner seg.
13C. Slik sjekker du at alt virker som det skal
Hver gang du skal bruke produktet må du kontrollere at tauet ligger riktig og at alt
fungerer som det skal. Slike tester må alltid utføres mens du har ekstra sikring.
Flytte CROLL oppover på tauet. Den må gli jevnt. Sjekk at den blokkerer riktig på tauet.
13D. Forholdsregler
- Lukk låskammen på CROLL når den ikke er i bruk, da annet utstyr (eller annet objekt)
kan hekte seg fast til produket.
- Vær oppmerksom på fremmedlegemer som kan forhindre låskammen i å virke som den
skal (småstein, søle, grener, snorer, slynger, klær, maling osv).
- Pass på at ikke sikkerhetsstroppen hekter seg fast i klær eller annet utstyr.
- Tauet må alltid være stramt mellom CROLL og forankringspunktet. Brukeren må alltid
befinne seg under forankringspunktet.
- Tauets falldempende egenskap:
Glem ikke at det er tauet som er falldemperen i tilfelle fall. Jo nærmere du kommer
forankringspunktet, jo mindre effektiv vil falldempingen være, før den blir omtrent
ubetydelig.
- Beskytt tauet mot objekter som kan skade det (for eksempel: skarpe kanter osv.).
- Tauet må kunne gli fritt i CROLL (vær oppmerksom på for eksempel knuter, ødelagte
deler av tauet osv.).
- Ikke glem å lage en knute helt nederst på tauet.
Figur 14. Oppstigning på tauet
- Arbeidstau: Bruk CROLL sammen med en tauklemme, for eksempel ASCENSION
håndklemme med påmontert fotløkke. Ikke glem å koble deg fast til håndklemma med en
en forbindelsesline i tilpasset lengde.
- Sikkerhetstau: bruk utstyr type A (ekstra sikring).
N
23
NAVAHO SIT / NAVAHO SIT FAST / TOP / TOP CROLL C79502-C (200907)
Page 24

Maksbelastning på utstyrsløkker
O
Generell informasjon
Kompatibilitet: festepunkter/koblingsstykker
En kobling som ikke er kompatibel kan føre til at koblingen hektes av tilfeldig, at den
ødelegges eller at den påvirker sikkerhetsfunksjonen i annet utstyr.
VIKTIG: festepunktene/innkoplingspunktene på selen kan fungere som vektstang mot
koblingsstykkets port.
Ved kraftige rykk i tauet og/eller ved støt mot låsesystemet når karabineren er i feil
posisjon, kan låsehylsen gå i stykker og porten åpne seg.
For å unngå denne risikoen, pass på at koblingsstykkene er i riktig posisjon når systemet
strammes (forbindelseslinen, nedfiringsbremsen…).
Pass også på at koblingsstykkene er kompatible med festepunktet (form, dimensjon…),
og bruk ikke koblingsstykker som har en tendens til å ende opp i tverrposisjon.
EN 365: ADVARSEL
Kompatibilitet
Sjekk at produktet er kompatibelt med de andre delene av utstyret (se egen merknad).
VIKTIG: det kan være farlig å bruke flere sikkerhetssystemer samtidig dersom det ene
systemet påvirker funksjonen til det andre systemet. La systemene være uavhengige av
hverandre.
Kontakt Petzl dersom du er i tvil om kompatibiliteten med utstyret ditt.
Forankringspunkt: Arbeid i høyden
- Forankringspunktet må helst befinne seg høyere oppe enn brukeren og må oppfylle
kravene i standard for forankringsanordninger EN 795, særlig må minimum bruddstyrke i
forankringene være 10 kN.
Redningsplan
Lag en redningsplan og definer metoder for å gripe inn raskt dersom det skulle oppstå
vanskeligheter. Dette innebærer tilpasset opplæring om redningsteknikker.
Koblingsstykker
Koblingene må alltid brukes i riktig posisjon (i lengderetning) og med porten lukket og
låst. Kontroller med jevne mellomrom at porten låser seg som den skal ved å trykke den
inn med hånden.
Kontroller at koblingsstykkene fungerer som de skal i samsvar med bruksanvisningen.
Diverse
- VIKTIG - FARE: unngå gnisninger mot materialer med slipeeffekt eller skarpe kanter.
- Brukerne må være medisinsk i stand til å drive aktivitet i høyden. VIKTIG: Det å henge
ubevegelig i en sele kan medføre alvorlig sirkulasjonssvikt eller død.
- Pass på at merkingen på produktet er lesbar under hele produktets levetid.
- Kontroller at produktet er tilpasset og egnet for bruk i det valgte systemet i forhold til
statlige bestemmelser og gjeldende sikkerhetsbestemmelser.
- Bruksinstruksjonene som følger med hver del av disse produktene må følges nøye.
Bruksanvisningene må gis til brukeren av utstyret. Selgeren må sørge for at
bruksanvisningene er oversatt til språket i landet hvor utstyret brukes dersom produktet
er kjøpt utenfor opprinnelseslandet.
Levetid
VIKTIG: spesielle hendelser som kan begrense produktets levetid til kun én gangs bruk er
for eksempel eksponering for farlige kjemiske produkter, ekstreme temperaturer, skarpe
kanter eller kraftig belastning pga fall osv.
Potensiell levetid for Petzl-produktene er 10 år fra produksjonsdato for plast- og
tekstilprodukter. Metallprodukter har ubegrenset levetid.
Et produkt vil ha en reell levetid som avsluttes dersom produktet må kasseres (se liste
over årsaker i avsnittet ”Kassering”) eller dersom produktet ikke lenger inngår i systemet.
Faktorer som påvirker produktets reelle levetid: intensitet, frekvens, bruksmiljøer,
brukerens kompetanse, vedlikehold, lagring osv.
Kontroller jevnlig at utstyret ikke er skadet eller forringet.
I tillegg til kontroll før og under bruk bør det gjennomføres en grundig kontroll (periodisk
undersøkelse) av en kompetent kontrollør. Denne kontrollen må gjennomføres minst
én gang i året. Intervallene for denne kontrollen må justeres i forhold til brukstype og
-intensitet. For bedre oppfølging er det en fordel av hver enkelt bruker har sitt eget utstyr,
slik at vedkommende kjenner utstyrets historie. Resultatene fra kontrollen registreres på
eget oppfølgingsskjema/journalkort. På oppfølgingsskjemaet registreres: utstyrstype,
modell, navn og opplysninger om produsent eller leverandør, identifikasjonsmåte
(serienummer eller unikt sporingsnummer), produksjonsår, kjøpsdato, dato for første
gangs bruk, navn på bruker, all annen viktig informasjon som for eksempel vedlikehold og
bruksfrekvens, oversikt over periodiske kontroller (dato, kommentarer og markerte feil,
kompetent kontrollørs navn og signatur, dato for neste planlagte periodiske kontroll). Du
kan se eksempel på slikt skjema og annen informasjon på www.petzl.fr/epi
Kassering
Utstyret må tas ut av bruk umiddelbart dersom:
- resultatet av undersøkelsene (før og under bruk, grundig kontroll) ikke er
tilfredsstillende,
- utstyret har vært utsatt for kraftig belastning eller fall,
- du ikke kjenner utstyrets fullstendige historie,
- det er 10 år gammelt og består av plast eller tekstil,
- du har den minste tvil om at utstyret er solid nok.
Ødelegg gammelt utstyr for å unngå videre bruk.
Ukurante produkter
Det kan være flere årsaker til at et produkt ikke lenger er kurant og følgelig må tas ut
av bruk, som for eksempel: videreutvikling av gjeldende standarder, lover og regler og
teknikker samt at utstyret ikke lenger er kompatibelt med annet utstyr osv.
Endringer, reparasjoner
Enhver endring, tillegg eller reparasjon, annet enn det som er godkjent av Petzl, er
forbudt: fare for at produktet er svekket, og at det ikke lenger fungerer som det skal.
Lagring, transport
Etter bruk må utstyret oppbevares i en sekk eller kasse som beskytter mot UV-stråling,
fukt, kjemikalier osv.
Garanti
Dette produktet har 3 års garanti mot alle materielle feil og fabrikasjonsfeil. Følgende
dekkes ikke av garantien: normal slitasje, oksidering, endringer eller modifikasjoner, feil
lagring, dårlig vedlikehold, skader som skyldes ulykker, uaktsomhet eller annen bruk enn
det produktet er beregnet for.
PETZL er ikke ansvarlig for direkte, indirekte eller tilfeldige konsekvenser eller andre typer
skader som følge av bruk av produktene.
24
NAVAHO SIT / NAVAHO SIT FAST / TOP / TOP CROLL C79502-C (200907)
Page 25

(RU) РУССКИЙ
Инструкции по эксплуатации
- NAVAHO SIT и NAVAHO SIT FAST
Беседка, пояс для позиционирования.
- NAVAHO SIT и NAVAHO SIT FAST сблокированные с
грудной обвязкой TOP
Обвязка для удержания срыва, пояс для позиционирования, беседка.
- NAVAHO SIT и NAVAHO SIT FAST сблокированные с
грудной обвязкой TOP CROL
Обвязка для удержания срыва, пояс для позиционирования, обвязка для
промышленного альпинизма с встроенным зажимом CROLL.
A
Разрешены только те способы применения изделия, которые указаны на рисунках,
за исключением перечёркнутых и/или имеющих пометку в виде черепа с костями.
Регулярно заходите на наш сайт www.petzl.com так, как этот документ будет
регулярно обновляться.
В случае возникновения каких-либо сомнений или трудностей обращайтесь в
компанию Petzl.
Область применения
- NAVAHO SIT и NAVAHO SIT FAST
Беседка, пояс для позиционирования.
- NAVAHO SIT и NAVAHO SIT FAST сблокированные с
грудной обвязкой TOP
Обвязка для удержания срыва, пояс для позиционирования, беседка.
- NAVAHO SIT и NAVAHO SIT FAST сблокированные с
грудной обвязкой TOP CROL
Обвязка для удержания срыва, пояс для позиционирования, обвязка для
промышленного альпинизма с встроенным зажимом CROLL.
Данное изделие не должно подвергаться нагрузке превышающей предел его
прочности и использоваться в ситуациях, для которых оно не предназначено.
ВНИМАНИЕ
Деятельность, связанная с использованием данного
снаряжения, опасна по своей природе.
Вы сами являетесь ответственными за свои действия и
решения.
Перед использованием данного снаряжения Вы должны:
- Прочитать и понять все инструкции по эксплуатации.
- Пройти специальную тренировку по его применению.
- Познакомиться с потенциальными возможностями изделия и ограничениями
по его применению.
- Осознать и принять вероятность возникновения рисков, связанных с
применением этого снаряжения.
Игнорирование этих предупреждений может привести к
серьёзным травмам и даже к смерти.
Ответственность
ВНИМАНИЕ, перед началом работы необходимо пройти соответствующее
обучение.
Это изделие может применяться только лицами прошедшими специальную
подготовку или под непосредственным контролем такого специалиста.
Получение необходимого образования, приобретение правильных навыков и
соблюдение мер безопасности - это Ваша ответственнос ть.
Вы лично отвечаете за все повреждения,травмы,а также смертельный исход,
возможные при неправильном использовании нашего снаряжения. Если Вы не
способны идти на такой риск,не используйте данное снаряжение.
Составные части
- Грудная обвязка TOP:
(1) Плечевые ремни, (2) Спинная регулировочная пряжка, (3) Грудная точка
крепления по EN 361, (4) Направляющий карабин.
- Грудная обвязка TOP CROLL:
(1) Плечевые ремни, (2) Спинная регулировочная пряжка, (3) Грудная точка
крепления по EN 361, (4) EN 12841 интегрированный брюшной верёвочный зажим
CROLL, (4b) Направляющий карабин maillon rapide с разделительной планкой,
(16) кулачок, (17) защёлка безопасности, (18) отверстие для присоединения.
- Беседки NAVAHO SIT и NAVAHO SIT FAST:
(5) Брюшная точка (текстиль) прикрепления грудной обвязки к беседке,
(6) Пояс, (7) Брюшная точка прикрепления по EN 358, EN 813, (8) Боковые точки
прикрепления по EN 358, (9) Задняя пряжка объединяющая грудную обвязку и
беседку и создающая удерживающую точку прикрепления сертифицированную
по EN 358, (10) Регулировочная пряжка DoubleBack, (10b) Пряжка для быстрого
присоединения FAST, (11) Петля для снаряжения, (12) Прорезь для подвески
инструмента, (13) Держатель для стропы, (14) Регулируемые эластичные стропы,
(15) Бирка с маркировкой, уложенная в суппорт поясного ремня.
Основные материалы
Обвязка: полиэстер, сталь (регулировочные пряжки), алюминиевый сплав (точки
прикрепления).
Брюшной зажим CROLL: алюминиевый сплав (корпус), хромированная
сталь (кулачок), полиамид (защёлка безопасности).
Проверка изделия
Перед каждым применением
- Обвязка
Проверить ремни обвязки в области точек прикрепления и регулировочные
пряжки, а также и надежность швов.
Также необходимо убедиться в отс утствии порезов, износа, следов воздействия
высоких температур, химикатов и т.п. Особое внимание следует обратить на
разорванные нити.
Проверить безупречность раб оты пряжек DoubleBack и FAST.
- TOP
Направляющий карабин
Перед каждым применением необходимо проверить тело карабина, шарнир,
муфту и убедиться, что они не имеют трещин, деформаций, следов коррозии и
т.п. Откройте защелку и проверьте, чтобы она при отпускании закрывалась
автоматически. Убедитесь, что блокирующая муфта работает правильно. Система
Keylock не должна блокироваться из-за посторонних воздействий (грязь, песок
и т.д.).
- TOP CROLL
Расположение карабина maillon rapide
Перед каждым применением необходимо проверять состояние корпуса.
Убедитесь в том, что блокирующая муфта завёрнута до конца и затянута с
усилием. Сосредоточенный момент должен быть равен 3 Нм.
Брюшной зажим для веревки CROLL
Перед началом эксплуатации каждый раз необходимо проверять: состояние
корпуса, присоединительных отверстий, пружины кулачка и шпинделя, на кулачке
и защёлке безопасности не должно быть трещин, заусенцев, деформаций и следов
износа и коррозии. Убедитесь, что зубцы не стёрлись. Внимание, не используйте
зажим, если у него отсутс твуют или стёрлись зубцы.
Во время каждого использования
Важно регулярно проверять исправность изделия. Проверьте совместимость
карабинов с другим снаряжением и убедитесь в том, что остальные элементы
снаряжения располагаются корректно друг относительно друга.
По деталям процедуры проверки каждого СИЗ проконсультируйтесь на сайте
www.petzl.com/ppe или с помощью диска PETZL PPE CD-ROM.
В случае сомнений относительно состояния изделия свяжитесь с PETZL.
B
NAVAHO SIT и NAVAHO SIT FAST
Рисунок 1. Надевание обвязки
Откройте пряжки на ножных обхватах.
1A. Поддерживая беседку за пояс, влезьте обеими ногами в пояс беседки и
затяните пояс на своей талии.
1B. Отрегулируйте поясной ремень, натянув поясные ленты. Свободный конец
аккуратно уложите в держатель (плоско относительно поясного ремня).
- Короткие концы: применяйте держатели перед регулировочными пряжками.
- Длинные концы: пропустите их сначала через боковые кольца, затем через
держатели позади колец.
1C. Застегните пряжки и отрегулируйте ножные обхваты.
- NAVAHO SIT: Пряжки DoubleBack.
- NAVAHO SIT FAST: Застегните пряжки FAST. Будьте осторожны так, как
посторонние предметы могут нарушить работ у пряжек FAST (камушки, песок,
детали одежды и т.п.). Проверьте правильность застегивания.
Регулировка и проверка зависания
Ваша обвязка должна быть хорошо подогнана, чтобы исключить опасность
получения травм в случае срыва.
Вы должны выполнить несколько движений и зависнуть в обвязке (тест на
зависание) на каждой точке прикрепления вместе с вашим оборудованием, чтобы
проверить, что обвязка хорошо подогнана, обеспечивает достаточный комфорт
для предполагаемого применения и оптимально отрегулирована.
C
ПОЗИЦИОНИРОВАНИЕ НА РАБОЧЕМ МЕСТЕ и
ОГРАНИЧЕНИЕ ПЕРЕМЕЩЕНИЯ
Рисунок 2. Обвязка для позиционирования на
рабочем месте и ограничения перемещения 2000
года. EN 358
Эти точки прикрепления предназначены для удержания пользователя на рабочем
месте (работа в зависании) или для предотвращения попадания пользователя
в зону возможного падения (принцип поводка). Эти точки прикрепления
следует применять только для систем позиционирования на рабочем месте или
ограничения перемещения с максимальной высотой падения: 0,5 м.
Эти точки прикрепления не рассчитаны на удержание срыва и требуют
обязательного дополнения систем позиционирования на рабочем месте или
ограничения перемещения средствами коллективной защиты (например,
защитными сетями) или СИЗ от срыва (например, системой защиты от срыва по
EN 363).
Для создания системы удержания срыва соответствующей ста ндарту EN 363,
используйте беседку сблокированную с грудной обвязкой TOP или TOP CROLL.
2A. Брюшная точка прикрепления
2B. Боковые точки прикрепления на поясе
Всегда следует применять два боковых кольца одновременно с пристегнутой
между ними позиционирующей самостраховкой.
Для удобства позиционирования на рабочем месте следует име ть опорную
поверхность для ног.
Отрегулируйте самостраховку для позиционирования та к, чтобы точка
закрепления была выше или на том же уровне, что и талия работника.
Самостраховка находится в натянутом состоянии, а длина свободного падения не
должна превышать 0,5 м.
2С. Задняя удерживающая точка прикрепления
Задняя точка подвески на поясе предназначена только для систем ограничения
перемещения, предохраняющих от попадания в зону риска возможного падения
(принцип поводка).
Регулярно проверяйте длину вашей самостраховки для позиционирования или
ограничения перемещения.
D
Рисунок 3. Беседка:
EN 813: 1997
Брюшная точка прикрепления
Стандарт EN 813: 1997 описывает беседки, которые применяются для
позиционирования, ограничения перемещения и систем передвижения по
веревке, когда требуется нижняя точка прикрепления.
Кольцо, расположенное в районе живота, предназначено для присоединения
спускового устройства, позиционирующих самостраховок или перемещаемых
самостраховок.
Данная точка прикрепления не должна применяться для присоединения систем
удержания срыва.
E
NAVAHO SIT и NAVAHO SIT FAST сблокированные с
грудной обвязкой TOP
Рисунок 4. Подготовка
Для присоединения грудной обвязки к беседке, проденьте спинную стропу
сквозь спинную пряжку (9) беседки и затем сквозь эластичный держатель. Затем
проденьте ремень сквозь регулировочную пряжку спинной регулировки (2) и
затем опять сквозь эластичный держатель.
F
Рисунок 5. Надевание обвязки
Откройте пряжки на ножных обхватах.
5A. Уберите обе плечевые стропы в бок и поддерживая беседку за пояс влезьте
обеими ногами в пояс беседки. После чего затяните пояс на своей талии.
5B. Отрегулируйте поясной ремень, натянув поясные ленты. Свободный конец
аккуратно уложите в держатель (плоско относительно поясного ремня).
- Короткие концы: применяйте держатели перед регулировочными пряжками.
- Длинные концы: пропустите их сначала через боковые кольца, затем через
держатели позади колец.
5C. Застегните пряжки и отрегулируйте ножные обхваты.
- NAVAHO SIT: Пряжки DoubleBack.
- NAVAHO SIT FAST: Застегните пряжки FAST. Будьте осторожны так, как
посторонние предметы могут нарушить работ у пряжек FAST (камушки, песок,
детали одежды и т.п.). Проверьте правильность застегивания.
5D. Разместите плечевые ремни на плечах. Установите карабин в брюшную
точку прикрепления (текстиль) и соедините грудную обвязку с беседкой (5).
Заблокируйте карабин, закрутив блокирующую муфту.
5E. Отрегулируйте плечевые ремни. Заправьте длинные концы ремней в
держатели ремней на плечевых ремнях.
5F. Начальная спинная регулировка
Эта регулировка выполняется только при надевании обвязки впервые. Попросите
кого-нибудь помочь Вам.
Подвиньте держатель ремня так, чтобы об а конца ремня были натянуты между
двумя пряжками (2) и (9) (без слабины).
Убедитесь, что лишний конец ремня аккуратно заправлен (плоско, без свободных
петель) в держатель ремня так, чтобы он не мешал Вам при работе.
Установите в положение, которое подходит Вам по форме и размеру, пряжка
DoubleBack должна располагаться на уровне разветвления плечевых ремней.
Регулировка и проверка зависания
Ваша обвязка должна быть хорошо подогнана, чтобы исключить опасность
получения травм в случае срыва.
Вы должны выполнить несколько движений и зависнуть в обвязке (тест на
зависание) на каждой точке прикрепления вместе с вашим оборудованием, чтобы
проверить, что обвязка хорошо подогнана, обеспечивает достаточный комфорт
для предполагаемого применения и оптимально отрегулирована.
G
Рисунок 6. Направляющий карабин с ручной
блокировкой овальной формы
Данный карабин, соответствующий стандарту EN 362: 2004, является деталью
обвязки и предназначен для соединения грудной обвязки с беседкой. Не
применяйте его для присоединения самостраховок или амортизаторов рывка.
6A. ВНИМАНИЕ, ОПАСНОСТЬ: Защелка карабина должна быть всегда закрыта
и заблокирована муфтой. Прочность карабина существенно снижае тся при
открытой защелке.
Систематически проверяйте закрыта ли защёлка, нажатием
на неё рукой.
6B. Закрытый карабин имеет наибольшую прочность при нагрузке направленной
вдоль главной оси. Любое другое положение карабина уменьшает его прочность.
H
УДЕРЖАНИЕ СРЫВА
Рисунок 7. Обвязка для удержания срыва 2002 года.
EN 361:
Полная обвязка для удержания срыва, компонент системы удержания срыва
в соответствии со ст андартом EN 363 (СИЗ от падения с высоты). Должна
применяться в сочетании с точками крепления по EN 795, карабинами с муфтой
по EN 362, амортизаторами рывка по EN 355 и т.д.
7A. Грудная точка прикрепления
Для присоединения к системе удержания срыва применяйте только эту точку
(например, к мобильному устройству для защиты от падения, к амортизатору
рывка или другим системам, описанным в стандарте EN 363). Для простоты
нахождения эта точка промаркирована буквой ‘A’.
Свободное пространство: размер свободного пространства
под пользователем
должно быть достаточным, чтобы предотвратить удар пользователя о
конструкции в случае срыва. Подробности расчета величины свободного
пространства приведены в технической документации к дру гим компонентам
системы (амортизатор рывка, передвигаемое средство удержания и т.д.).
I
NAVAHO SIT и NAVAHO SIT FAST сблокированные с
грудной обвязкой TOP CROL
Рисунок 8. Подготовка
Для присоединения грудной обвязки к беседке, проденьте спинную стропу
сквозь спинную пряжку (9) беседки и затем сквозь эластичный держатель. Затем
проденьте ремень сквозь регулировочную пряжку спинной регулировки (2) и
затем опять сквозь эластичный держатель.
Для присоединения зажима CROLL к передней части беседки необходимо
присоединить его к карабину maillon rapide расположенному в текстильной части
брюшной точке прикрепления (5). Закрутите муфту карабина maillon rapide и
затяните её гаечным ключом с усилием. Сосредоточенный момент должен быть
равен - 3 Нм. Убедитесь в том, что пластиковый разделитель на карабине закрыт
и зафиксирован.
J
Рисунок 9. Направляющий карабин maillon rapide
Соединительное звено maillon rapide – это компонент обвязки, который
применяется для соединения передней части грудной обвязки с поясным ремнем.
Он должен быть всегда затянут усилием 3 Нм (чтобы откручивание вручную бы ло
невозможно).
Не применяйте его для присоединения самостраховок или амортизаторов рывка.
K
Рисунок 10. Надевание обвязки
Откройте пряжки FAST на ножных обхватах.
10A. Раздвиньте плечевые ремни, возьмите обвязку за ремни и вденьте ноги в
ножные обхваты.
10B. Разместите плечевые ремни на плечах.
10C. Отрегулируйте поясной ремень, натянув поясные ленты. Свободный конец
аккуратно уложите в держатель (плоско относительно поясного ремня).
- Короткие концы: применяйте держатели перед регулировочными пряжками.
- Длинные концы: пропустите их сначала через боковые кольца, затем через
держатели позади колец.
10D. Застегните пряжки FAST и отрегулируйте ножные обхваты. Будьте
осторожны так, как посторонние предметы могут нарушить работу пряжек FAST
(камушки, песок, детали одежды и т.п.). Проверьте правильность застегивания.
10E. Отрегулируйте плечевые ремни. Заправьте длинные концы ремней в
держатели ремней на плечевых ремнях.
10F. Начальная спинная регулировка
Эта регулировка выполняется только при надевании обвязки впервые. Попросите
кого-нибудь помочь Вам.
Подвиньте держатель ремня так, чтобы об а конца ремня были натянуты между
двумя пряжками (2) и (9) (без слабины).
Убедитесь, что лишний конец ремня аккуратно заправлен (плоско, без свободных
петель) в держатель ремня так, чтобы он не мешал Вам при работе.
Установите в положение, которое подходит Вам по форме и размеру, пряжка
DoubleBack должна располагаться на уровне разветвления плечевых ремней.
Регулировка и проверка зависания
Ваша обвязка должна быть хорошо подогнана, чтобы исключить опасность
получения травм в случае срыва.
Вы должны выполнить несколько движений и зависнуть в обвязке (тест на
зависание) на каждой точке прикрепления вместе с вашим оборудованием, чтобы
проверить, что обвязка хорошо подогнана, обеспечивает достаточный комфорт
для предполагаемого применения и оптимально отрегулирована.
L
УДЕРЖАНИЕ СРЫВА
Рисунок 11. Обвязка для удержания срыва 2002 года.
EN 361:
Полная обвязка для удержания срыва, компонент системы удержания срыва
в соответствии со ст андартом EN 363 (СИЗ от падения с высоты). Должна
применяться в сочетании с точками крепления по EN 795, карабинами с муфтой
по EN 362, амортизаторами рывка по EN 355 и т.д.
11A. Грудная точка прикрепления
Для присоединения к системе удержания срыва применяйте только эту точку
(например, к мобильному устройству для защиты от падения, к амортизатору
рывка или другим системам, описанным в стандарте EN 363). Для простоты
нахождения эта точка промаркирована буквой ‘A’.
25
NAVAHO SIT / NAVAHO SIT FAST / TOP / TOP CROLL C79502-C (200907)
Page 26

Свободное пространство: размер свободного пространства
под пользователем
должно быть достаточным, чтобы предотвратить удар пользователя о
конструкции в случае срыва. Подробности расчета величины свободного
пространства приведены в технической документации к дру гим компонентам
системы (амортизатор рывка, передвигаемое средство удержания и т.д.).
M
СИСТЕМЫ ДОСТУПА К РАБОЧЕМУ МЕСТУ С
ПРИМЕНЕНИЕМ ВЕРЕВКИ
Брюшной зажим для веревки CROLL
EN 12841: 2006
Область применения
EN 12841: 2006. Верёвочный зажим CROLL относится к снаряжению типа В и
используется для подъема по верёвке.
ВНИМАНИЕ: это устройство следует применять вместе со с траховочными
устройствами типа А размещаемыми на второй (страховочной) веревке
(например, с устройством для защиты от срыва ASAP).
Брюшной зажим для веревки CROLL не предназначен для применения в системах
защиты от срыва. EN 363.
Диаметр веревки
Применяется полустатическая веревка диаметром 10-13 мм конструкции
«сердцевина в оплетке» типа А по стандарту EN 1891.
Рисунок 12. Установка на веревке
Оттяните защёлку безопасности большим и указательным пальцами вниз и
наружу. До тех пор пока кулачок не зафиксируется вне тела устройства. Таким
образом зажим будет открыт.
Заправьте верёвку в специальные направляющие. Снимите защёлку безопасности,
после чего кулачок повернётся и прижмёт верёвку.
Защёлка безопасности препятствует непроизвольному открытию кулачка.
Снятие с веревки
Подвиньте зажим вверх по веревке с одновременным отведением защёлки
безопасности вниз и наружу.
Рисунок 13. Принципы работы
13A. Подъем
CROLL – это устройство для подъема по веревке. Оно фиксируется на веревке при
нагрузке направленной вниз и легко скользит при перемещении вверх.
Зубья впиваются в оплётку верёвки з ацепляя кулачок. Устройство блокируется на
верёвке. Через прорезь в кулачке удаляется грязь и т.п.
13B. Перемещение зажима CROLL вниз по веревке
(неординарная ситуация)
Передвиньте CROLL немного вверх по веревке и одновременно надавите
на кулачок, сдвигая его вниз указательным пальцем, чтобы высвободить
зубцы из оплетки веревки. Не работать защёлкой безопасности, ввид у риска
непроизвольного открытия кулачка.
13C. Проверка работы
Перед каждым применением следует проверить правильность расположения
устройства на веревке и его функционирование. Во время тестир ования работник
должен быть пристрахован.
Передвиньте CROLL вверх по веревке. Он должен передвигаться легко. Нагрузите
устройство и убедитесь, что оно держит.
13D. Меры предосторожности
- закрывайте кулачок зажима CROLL, если он не используется, так как при
отрытом кулачке в зажиме могут застрять снаряжение или другие предметы.
- ВНИМАНИЕ, не допускайте, чтобы посторонние предметы мешали работе
кулачка (камушки, грязь, растения, веревки, петли, краска т т.п.).
- ОПАСАЙТЕСЬ зацепления защёлки безопасности за одежду или с тропы.
- Веревка между зажимом CROLL и точкой закрепления должна быть всегда
натянута. Работник должен всегда находиться ниже точки закрепления веревки.
- Поглощение рывка веревкой:
Не забывайте, что верёвка способна поглощать энергию рывка, в случае
срыва. Чем ближе Вы подходите к точке закрепления, тем меньше становится
энергопоглощающая способность веревки, стремясь к нулю.
- Защищайте веревку от повреждений (например, острыми кромками,
шероховатыми поверхностями и т.п.).
- Веревка должна скользить сквозь CROLL свободно. Избегайте факторов,
которые могут мешать ее прохождению (например, наличие узлов или
поврежденных участков веревки и т.д.).
- Не забывайте завязать останавливающий уз ел на конце веревки.
Рисунок 14. Подъём по верёвке
- Рабочая веревка: используйте CROLL и ручной зажим (например, ручной
зажим ASCENSION) с педалью на ногу. Всегда приcjtlbyzntcm ко второму зажиму
соответствующим усом самост раховки.
- Страховочная веревка: используйте устройства типа А.
N
максимальная нагрузка на петлю для снаряжения
O
Общая информация
Совместимость: точки прикрепления / карабины
Несовместимое снаряжение может привести к непроизвольному выстегиванию,
разрушению или нарушению страховки другими видами снаряжения.
ВНИМАНИЕ, точка прикрепления Вашей обвязки может воздействовать на
защелку карабина как рычаг.
При внезапном натяжении веревки и/или приложении давления снаружи на
систему блокировки карабина блокирующая муфта может сломаться, а защелка
открыться, если карабин был расположен неправильно.
Чтобы уменьшить этот риск, всегда проверяйте правильность расположения
карабина под нагрузкой (в самостраховочном усе, спусковом устройстве и т.п.).
Убедитесь также, что Ваши карабины совместимы с точками прикрепления
(форма, размер и т.п.), чтобы избежать применения карабинов, имеющих
тенденцию к неправильному расположению на точках прикрепления.
EN 365: ВНИМАНИЕ
Совместимость
Проверьте совместимо ли это изделие с другими компонентами вашего
снаряжения, см.инструкции к соответствующему снаряжению.
ВНИМАНИЕ: в случае применения многих видов снаряжения вместе может
возникнуть опасная ситуация, когда безопасная работ а одного элемента
снаряжения нарушает надежность работы другого.
Если вам точно не известна совместимость разных видов Вашего снаряжения,
обратитесь в Petzl.
Точки закрепления: Работа на высоте
Точка закрепления системы должна, по возможности, находиться выше
расположения пользователя и должна удовлетворять требованиям стандарта
EN 795, в частности ее минимальная прочность должна быть не менее 10 кН.
План спасательных работ
При использовании данного снаряжения Вы должны иметь план спасательных
работ и средства для быстрой его ре ализации. Реализация подобного плана
предполагает определённый уровень подготовки персонала в проведении
спасательных работ.
Карабины
Следует всегда применять карабины с блокировкой защелки, сами защелки
должны быть закрыты. Систематически проверяйте их закрытие нажатием на
них рукой.
Проверяйте состояние карабинов в соответствии с Инстру кциями по
эксплуатации.
Дополнительные замечания
- ВНИМАНИЕ, ОПАСНОСТЬ: не допускайте трения изделия об абразивные
материалы или острые кромки.
- Пользователи, работающие на высоте, должны иметь медицинский допуск к
такому виду работ. ВНИМАНИЕ, длительное зависание в страховочной обвязке
без движения может привести к серьёзным травмам и даже к смерти.
- Вы должны контролировать сохранность всех маркировок продукции на
протяжении всего времени её использования.
- Вы должны удостовериться в годности этого вида снаряжения для Ваших
целей с учетом действующих государственных предписаний и других стандартов
обеспечения безопасности.
- Инструкции по эксплуатации для любого снаряжения связанного с
использованием данного изделия также должны быть приняты во внимание.
- Каждый пользователь данного устройства должен иметь все необходимые
инструкции. В случае продажи данного изделия для использования
(перепродажи) за пределами Вашей страны, Вы должны обеспечить потре бителя
соответствующими инстру кциями на языке той страны, в которой изделие будет
использоваться.
Срок службы
ВНИМАНИЕ, при особых обстоятельствах, ср ок службы может сократиться
до одного использования, например в следующих случаях: при работе с
агрессивными химическими веществами, при экстрема льных температурах, при
контакте с острыми гранями, после сильных рывков или больших нагрузок и т.п.
Потенциальный срок службы изделий Petzl таков: до 10 лет со дня изготовления,
для изделий из пластика и текстиля. Для металлических изделий срок службы
неограничен.
Действительный срок службы изделий заканчивается, когда возникает один из
перечисленных ниже критериев (см. раздел «Выбраковка снаряжения»), или если
снаряжение морально устарело.
Действительный срок службы зависит от множества факторов таких, как:
интенсивность и частота применения, воздействие окружающей среды,
компетентность пользователя, условия хранения снаряжения и ухода за ним и т.д.
Периодически проверяйте снаряжение на
отсутствие повреждений и/или следов износа.
В дополнение к проверкам снаряжения проводимым до и во время применения
изделий, периодически, не реже чем раз в год, следует проводить тщательную
инспекцию снаряжения с помощью специалиста. Такая инспекция должна
проводиться по крайней мере один раз в год. Частота таких тщательных
проверок определяется способом и интенсивностью применения изделий. Для
отслеживания применения снаряжения, целесообразно каждое изделие закрепить
за конкретным пользователем, чтобы знать историю использования данного
изделия. Результаты проверок заносятся в «Журнал инспекции снаряжения». Этот
документ должен содержать следующую информацию: тип снаряжения, модель,
название и контактную информацию о производителе или дистрибьюторе, а
также идентификационные параметры (серийный или индивидуальный номер,
год изготовления, дату покупки, дату первого применения, имя пользователя,
прочую полезную информацию, например, условия и частоту применения,
историю периодических инспекций (дату / комментарии и отмеченные
проблемы / имя и подпись компетентного инспектора, проводившего проверку /
предполагаемую дату следующей инспекции). Примеры записей о проведении
подробной инспекции и другую информацию см. на сайте www.petzl.com/ppe
Выбраковка снаряжения
Немедленно выбраковывайте любое снаряжение, если:
- снаряжение не удовлетворило требованиям при проверке (проверка проведённая
до или во время применения и тщательная периодическая проверка),
- снаряжение подвергалось действию сильного рывка или большой нагрузки,
- Вы не знаете полную историю его применения,
- снаряжению больше 10 лет и оно изготовлено из пластика или текстиля,
- у Вас есть сомнения в его целостности.
Чтобы избежать использования выбракованного снаряжения, его следует
уничтожить.
Моральное устаревание изделий
Существует насколько причин, определяющих моральное устаревание изделий и
необходимость их списания до окончания срока службы. Например: изменение
действующих стандартов, положений или законов, разработка новых технических
приемов, несовместимость с другим снаряжением и т.п.
Модификации, ремонт
Любые изменения конструкции изделия, а также дополнения или ремонт не
санкционированные Petzl, не допустимы: так как существует риск понизить
уровень безопасности снаряжения.
Хранение, транспортировка
Храните свою беседку в сумке или контейнере для защиты от в оздействия
ультрафиолета, влажности, химических соединений и т. д.
Гарантии
Данное изделие имеет гарантию 3 года от любых дефектов материала или
изготовления. Гарантия не распространяется на следующие случаи: нормальный
износ и старение, изменение конструкции или переделка изделия, неправильное
хранение и плохой уход, повреждения, которые наступили в результате
несчастного случая или по небрежности, а также использование изделия не по
назначению.
PETZL не отвечает за последствия прямого, косвенного или другого ущерба
наступившего в следствии неправильного использования своих изделий.
26
NAVAHO SIT / NAVAHO SIT FAST / TOP / TOP CROLL C79502-C (200907)
Page 27

(CZ) ČESKY
Návod k použití
- NAVAHO SIT a NAVAHO SIT FAST
Sedací postroj, pás pro pracovní polohování a zadržení.
- NAVAHO SIT nebo NAVAHO SIT FAST ve spojení s hrudním
postrojem TOP
Zachycovací postroj, pás pro pracovní polohování a zadržení, sedací postroj
- NAVAHO SIT nebo NAVAHO SIT FAST ve spojení s hrudním
postrojem TOP CROLL
Zachycovací prostroj, pás pro pracovní polohování, sedací postroj, postroj pro lanový
přístup s integrovaným blokantem.
A
Dovolené jsou pouze způsoby užívání zobrazené na nepřeškrtnutých obrázcích a/nebo
u kterých není symbol lebky. Pravidelně sledujte webové stránky www.petzl.com, kde
naleznete nejnovější verze těchto dokumentů.
V případě pochybností nebo neporozumění návodu kontaktujte rmu Petzl nebo
zástupce výrobce.
Rozsah použití
- NAVAHO SIT a NAVAHO SIT FAST
Sedací postroj, pás pro pracovní polohování a zadržení.
- NAVAHO SIT nebo NAVAHO SIT FAST ve spojení s hrudním
postrojem TOP
Zachycovací postroj, pás pro pracovní polohování a zadržení, sedací postroj
- NAVAHO SIT nebo NAVAHO SIT FAST ve spojení s hrudním
postrojem TOP CROLL
Zachycovací prostroj, pás pro pracovní polohování, sedací postroj, postroj pro lanový
přístup s integrovaným blokantem.
Zatížení tohoto výrobku nesmí překročit uvedenou hodnotu pevnosti; výrobek nesmí
být používán jiným způsobem, než pro který je určen.
UPOZORNĚNÍ
Činnosti zahrnující používání tohoto výrobku jsou z podstaty
nebezpečné.
Jste zodpovědní za své jednání a rozhodování.
Před používáním tohoto vybavení je nutné:
- Přečíst si a prostudovat celý uživatelský návod.
- Nacvičit správné používání výrobku.
- Seznámit se s možnostmi výrobku a s omezeními jeho použití.
- Pochopit a přijmout riziko činnosti související s jeho používáním.
Opomenutí či porušení některého z těchto pravidel může vést k
vážnému zranění nebo smrti.
Zodpovědnost
UPOZORNĚNÍ: Před použitím výrobku je nezbytný nácvik používání.
Tento výrobek smí používat pouze způsobilé a odpovědné osoby, nebo osoby pod
přímým vedením a dohledem těchto osob.
Za zvládnutí příslušných postupů a způsobů ochrany jste zodpovědní sami.
Osobně zodpovídáte za veškeré škody, poranění nebo smrt, které by mohly nastat
během nebo v důsledku nesprávného používání tohoto výrobku. Jestliže nechcete nebo
nemůžete toto riziko a zodpovědnost přijmout, výrobek nepoužívejte.
Popis jednotlivých částí
- Hrudní postroj TOP:
(1) ramenní popruhy, (2) zádová nastavovací přezka, (3) EN 361 přední kotvící
připojovací bod, (4) směrová spojka.
- Hrudní postroj TOP CROLL:
(1) ramenní popruhy, (2) zádová nastavovací přezka, (3) EN 361 přední kotvící
připojovací bod, (4) EN 12841 integrovaný hrudní blokant CROLL, (4b) směrová
maticová spojka s oddělovací příčkou, (16) vačka, (17) bezpečnostní západka,
(18) připojovací otvor.
- Sedací postroje NAVAHO SIT a NAVAHO SIT FAST:
(5) přední připojovací bod (popruhový) pro spojení hrudního a sedacího postroje,
(6) pás, (7) EN 358, EN 813, přední připojovací bod, (8) EN 358 postranní polohovací
připojovací body, (9) zadní přezka spojující hrudní a sedací postroj, s připojovacím
bodem EN 358 pro zadržovací systém, (10) nastavovací přezky DoubleBack,
(10b) rychlospony FAST, (11) poutko na materiál, (12) sloty pro nosiče materiálu,
(13) poutko na popruh, (14) nastavitelné elastické pásky, (15) štítek se značením, který
lze založit do polstrování pásu.
Hlavní materiály
Postroj: polyester, ocel (nastavovací přezky), slitina hliníku (připojovací body).
Hrudní blokant CROLL: hliníková slitina (tělo blokantu), chromová ocel (vačka),
polyamid (pojistka).
Kontrolní body
Před každým použitím
- Postroj
Zkontrolujte stav popruhů v místech připojovacích bodů, u nastavovacích přezek a
bezpečnostních švů.
Zaměřte se na řezy v popruhu, opotřebení a poškození vzniklé používáním, vysokou
teplotou či kontaktem s chemikáliemi apod. Zvláštní pozornost věnujte přetrženým
nitím.
Ujistěte se, že všechny rychlospony FAST správně fungují.
- TOP
Směrová spojka
Ujistěte se, že tělo spojky, západka a pojistka zámku nemají žádné praskliny, deformace
nebo známky koroze. Otevřete západku a přesvědčte se, že se při puštění automaticky
uzavře. Dále ověřte správnou funkci pojistky zámku. Funkci zámku Keylock nesmí
bránit žádné cizí předměty (bláto, kamínky, apod.).
- TOP CROLL
Směrová maticová spojka
Před každým použitím zkontrolujte stav těla.
Zkontrolujte, zda je maticová spojka úplně zašroubovaná (není vidět závit) a utažená
momentem 3 Nm.
Integrovaný hrudní blokant CROLL
Před každým použitím zkontrolujte stav těla blokantu, připojovacího otvoru, vačky,
bezpečnostní západky (praskliny, poškození, deformace, opotřebení, koroze), pružinu
vačky a osu. Ujistěte se, že hroty nejsou opotřebené. Upozornění: Nepoužívejte blokant s
opotřebovanými nebo chybějícími zuby.
Během používání
Je důležité stav výrobku pravidelně kontrolovat. Vždy si ověřte, jsou-li jednotlivé součásti
systému spojeny a jsou-li vůči sobě ve správné pozici.
Podrobnosti o periodických prohlídkách jednotlivých osobních ochranných prostředků
najdete na webových stránkách www.petzl.com/ppe nebo na speciálním CD-ROMu.
Máte-li jakékoli pochybnosti o stavu výrobku, kontaktujte rmu PETZL.
B
NAVAHO SIT a NAVAHO SIT FAST
Nákres č. 1 Postup nasazení postroje
Rozepněte spony u nožních popruhů.
1A. Uchopte postroj za pás, provlečte jím nohy a natáhněte si ho do úrovně pasu.
1B. Dotáhněte popruh a nastavte požadovanou velikost. Volné konce popruhů založte
naplocho do poutek na pásu.
- Krátké konce popruhů: použijte poutka před nastavovacími přezkami.
- Dlouhé konce popruhů: protáhněte je bočními kroužky a pak poutky našitými za
kroužky.
1C. Zapněte přezky nožních popruhů a nastavte jejich velikost.
- NAVAHO SIT: přezky DoubleBack.
- NAVAHO SIT FAST: rychlospony FAST. Pozor na cizí předměty, které mohou bránit
funkci rychlospon FAST (kamínky, písek, oděv…). Zkontrolujte jejich správné uzavření.
Nastavení a zkouška zavěšením
Postroj jby měl pohodlně padnout, aby snížil riziko poranění v případě pádu.
Zavěste se v postroji s vaším vybavením, použijte postupně všechny připojovací body,
vyzkoušejte si pohyby všemi směry a ve všech polohách, ověřte si zda vám postroj dobře
padne a poskytuje dostatečné pohodlí pro požadovaný způsob použití a že je optimálně
nastaven.
C
PRACOVNÍ POLOHOVÁNÍ A ZADRŽENÍ
NNákres č. 2 Pás pro pracovní polohování a zadržení dle
EN 358: 2000
Tyto polohovací připojovací body jsou určeny k udržování uživatele v příslušné pracovní
poloze (práce v zavěšení: pracovní polohování), nebo k zabránění vstupu uživatele
do prostoru s nebezpečím pádu (princip vodítka: zadržení). Smí být použity pouze k
připojení systémů pracovního polohování a zadržení, maximální délka pádu je 0,5 m.
Nejsou konstruovány pro zachycení pádu a proto je nutné systém pro pracovní
polohování a zadržení doplnit nějakým systémem kolektivní ochrany proti pádu
(například bezpečnostní sítě) nebo osobním systémem pro zachycení pádu (např. systém
pro zachycení pádu dle EN 363).
Pokud jsou použity v systému zachycení pádu dle normy EN 363, použijte sedací postroj
ve spojení s hrudním postrojem TOP nebo TOP CROLL.
2A. Přední připojovací bod
2B. Postranní polohovací připojovací body
Vždy používejte oba postraní polohovací připojovací body současně, propojené
polohovacím spojovacím prostředkem.
Pro zaujmutí pohodlné pracovní polohy je třeba opory pro nohy.
Polohovací spojovací prostředek nastavte tak, aby kotvicí bod byl umístěn nad nebo
v úrovni pasu uživatele. Prostředek je nutné udržovat napnutý a minimální hloubka
volného pádu je omezená na 0,5 m.
2C. Zadní připojovací bod pro zadržení
Tento připojovací bod je určen pouze pro připojení zadržovacího systému, který brání
uživateli ve vstupu do prostoru s nebezpečím pádu (princip vodítka).
Během používání pravidelně kontrolujte délku vašeho spojovacího prostředku, který
zrovna používáte pro pracovní polohování, nebo zadržení.
D
Nákres č. 3 Sedací postroj:
EN 813: 1997
Přední připojovací bod
Norma EN 813 se zabývá sedacími postroji používanými v systémech pracovního
polohování a zadržení a v systémech lanového přístupu, které musí být vybaveny
předním (nízko umístěným) kotvícím připojovacím bodem.
Tento přední připojovací bod použijte k připevnění slaňovací brzdy, polohovacího nebo
postupového spojovacího prostředku.
Nesmí být používán k připojení systému zachycení pádu.
E
NAVAHO SIT nebo NAVAHO SIT FAST ve spojení s
hrudním postrojem TOP
Nákres č. 4 Příprava
Abyste spojili hrudní postroj se sedacím, protáhněte zadní popruh hrudního postroje
propojovací přezkou (9) a poté elastickým poutkem. Potom popruh provlékněte zadní
nastavovací přezkou (2) a znovu elastickým poutkem.
F
Nákres č. 5 Postup nasazení postroje
Rozepněte spony u nožních popruhů.
5A. Ramenní popruhy dejte na stranu, uchopte sedací postroj za pás, provlečte jím nohy
a natáhněte si ho do úrovně pasu.
5B. Dotáhněte popruh a nastavte požadovanou velikost. Volné konce popruhů založte
naplocho do poutek na pásu.
- Krátké konce popruhů: použijte poutka před nastavovacími přezkami.
- Dlouhé konce popruhů: protáhněte je bočními kroužky a pak poutky našitými za
kroužky.
5C. Zapněte přezky nožních popruhů a nastavte jejich velikost.
- NAVAHO SIT: přezky DoubleBack.
- NAVAHO SIT FAST: rychlospony FAST. Pozor na cizí předměty, které mohou bránit
funkci rychlospon FAST (kamínky, písek, oděv…). Zkontrolujte jejich správné uzavření.
5D. Ramenní popruhy položte přes ramena. Spojku připojte do předního připojovacího
bodu (popruhové oko), který slouží k propojení hrudního a sedacího postroje (5).
Zajistěte ji zašroubováním pojistky.
5E. Nastavte ramenní popruhy. Volný konec popruhu založte naplocho do poutka na
ramenním popruhu.
5F. Počáteční nastavení zádové části
Toto nastavení by mělo být provedeno pouze jednou, při prvním použití postroje. Budete
k tomu potřebovat pomoc další osoby.
Elastické poutko stáhněte tak, že oba konce popruhů jsou napjaté mezi
přezkami, (2) a (9) (bez prověšení).
Ujistěte se, že volný konec popruhu je založen v poutkách naplocho, takže vám při práci
nebude překážet.
Polohu nastavte dle vašich tělesných proporcí, přezka DoubleBack by měla být na úrovni
lopatek.
Nastavení a zkouška zavěšením
Postroj jby měl pohodlně padnout, aby snížil riziko poranění v případě pádu.
Zavěste se v postroji s vaším vybavením, použijte postupně všechny připojovací body,
vyzkoušejte si pohyby všemi směry a ve všech polohách, ověřte si zda vám postroj dobře
padne a poskytuje dostatečné pohodlí pro požadovaný způsob použití a že je optimálně
nastaven.
G
Nákres č. 6 Ruční zajištění oválné směrové spojky
Tato spojka (EN 362: 2004), součást postroje, spojuje hrudní postroj s postrojem
sedacím. Nepoužívejte ji k připojení spojovacího prostředku, ani tlumiče pádu.
6A. POZOR, NEBEZPEČÍ! Spojka musí být používána vždy s uzavřenou a zajištěnou
západkou. Je-li západka otevřena, pevnost spojky je výrazně snížena.
Pravidelně stiskem ruky kontrolujte, zda se je západka zavřená.
6B. Spojka (uzavřená) je nejpevnější při zatížení v její hlavní podélné ose. Jakákoliv jiná
poloha snižuje její pevnost.
H
ZACHYCENÍ PÁDU
Nákres č. 7 Zachycovací postroj dle EN 361: 2002
Zachycovací postroj je součást systému zachycení pádu dle normy EN 363 (osobní
systémy zachycení pádu). Smí být používán pouze v kombinaci s kotvícím zařízením
EN 795, spojkami s pojistkou zámku EN 362, tlumiči pádu EN 355, apod.
7A. Přední kotvící připojovací bod
Toto nosné oko používejte pouze pro připojení k systému pro zachycení pádu (například
k pohyblivému zachycovači pádu, tlumiči pádu a ostatním systémům denovaným
normou EN 363). Pro snadnou identikaci jsou tyto body označeny písmenem A.
Minimální bezpečná výška: volný prostor pod uživatelem
Prostor volné hloubky pod uživatelem musí být dostatečný, aby v případě pádu nedošlo
k nárazu na jakoukoliv překážku. Specické informace o výpočtech minimální bezpečné
hloubky jsou uvedeny v návodech k použití ostatních prvků systému zachycení pádu
(tlumiče pádu, pohyblivý zachycovač pádu a pod.).
I
NAVAHO SIT nebo NAVAHO SIT FAST ve spojení s
hrudním postrojem TOP CROLL
Nákres č. 8 Příprava
Abyste spojili hrudní postroj se sedacím, protáhněte zadní popruh hrudního postroje
propojovací přezkou (9) a poté elastickým poutkem. Potom popruh provlékněte zadní
nastavovací přezkou (2) a znovu elastickým poutkem.
Chcete-li blokant CROLL připevnit k postroji zepředu, připevněte jej k maticové
karabině v předním látkovém navazovacím oku (5). Maticovou spojku zašroubujte a
dotáhněte klíčem na moment 3 Nm. Přesvědčte se, že plastová oddělovací příčka dobře
drží na svém místě.
J
Nákres č.9. Směrová maticová spojka
Maticová karabina je součástí postroje a je využita jako díl spojující přední část hrudního
úvazku s pásem. Musí být vždy utažena momentem 3 Nm (nesmí být možné ji povolit
rukou).
Nepoužívejte ji k připojení spojovacího prostředku, ani tlumiče pádu.
K
Nákres č. 10 Postup nasazení postroje
Rozepněte spony u nožních popruhů.
10A. Roztáhněte ramenní popruhy, uchopte postroj za pás a prostrčte nohy nohavičkami.
10B. Ramenní popruhy položte přes ramena.
10C. Dotáhněte popruh a nastavte požadovanou velikost. Volné konce popruhů založte
naplocho do poutek na pásu.
- Krátké konce popruhů: použijte poutka před nastavovacími přezkami.
- Dlouhé konce popruhů: protáhněte je bočními kroužky a pak poutky našitými za
kroužky.
10D. Zapněte přezky nožních popruhů a nastavte jejich velikost. Pozor na cizí předměty,
které mohou bránit funkci rychlospon FAST (kamínky, písek, oděv…). Zkontrolujte
jejich správné uzavření.
10E. Nastavte ramenní popruhy. Volný konec popruhu založte naplocho do poutka na
ramenním popruhu.
10F. Počáteční nastavení zádové části
Toto nastavení by mělo být provedeno pouze jednou, při prvním použití postroje. Budete
k tomu potřebovat pomoc další osoby.
Elastické poutko stáhněte tak, že oba konce popruhů jsou napjaté mezi
přezkami, (2) a (9) (bez prověšení).
Ujistěte se, že volný konec popruhu je založen v poutkách naplocho, takže vám při práci
nebude překážet.
Polohu nastavte dle vašich tělesných proporcí, přezka DoubleBack by měla být na úrovni
lopatek.
Nastavení a zkouška zavěšením
Postroj jby měl pohodlně padnout, aby snížil riziko poranění v případě pádu.
Zavěste se v postroji s vaším vybavením, použijte postupně všechny připojovací body,
vyzkoušejte si pohyby všemi směry a ve všech polohách, ověřte si zda vám postroj dobře
padne a poskytuje dostatečné pohodlí pro požadovaný způsob použití a že je optimálně
nastaven.
L
ZACHYCENÍ PÁDU
Nákres č. 11 Zachycovací postroj dle EN 361: 2002
Zachycovací postroj je součást systému zachycení pádu dle normy EN 363 (osobní
systémy zachycení pádu). Smí být používán pouze v kombinaci s kotvícím zařízením
EN 795, spojkami s pojistkou zámku EN 362, tlumiči pádu EN 355, apod.
11A. Přední kotvící připojovací bod
Toto nosné oko používejte pouze pro připojení k systému pro zachycení pádu (například
k pohyblivému zachycovači pádu, tlumiči pádu a ostatním systémům denovaným
normou EN 363). Pro snadnou identikaci jsou tyto body označeny písmenem A.
Minimální bezpečná výška: volný prostor pod uživatelem
Prostor volné hloubky pod uživatelem musí být dostatečný, aby v případě pádu nedošlo
k nárazu na jakoukoliv překážku. Specické informace o výpočtech minimální bezpečné
hloubky jsou uvedeny v návodech k použití ostatních prvků systému zachycení pádu
(tlumiče pádu, pohyblivý zachycovač pádu a pod.).
M
LANOVÝ PŘÍSTUP
Integrovaný hrudní blokant CROLL
EN 12841: 2006
Rozsah použití
EN 12841: 2006 CROLL lanová svěra (blokant) je nastavovací zařízení lana typu B pro
výstupy na laně.
UPOZORNĚNÍ: Musí být používáno se záložním jištěním typu A na druhém
(bezpečnostním) laně (např. pohyblivý zachycovač pádu ASAP).
Hrudní blokant CROLL není vhodný pro použití v systémech zachycení pádu dle
EN 363.
Průměr lana
Používejte nízkoprůtažná lana s opláštěným jádrem o průměru 10-13 mm.
Nákres č.12. Instalace lana
Stáhněte palcem a ukazováčkem bezpečnostní západku dolů. až se zablokuje o tělo
blokantu. Tím se vačka uvolní a zůstane otevřená.
Vložte lano do drážky na lano. Zatlačte na bezpečnostní západku, vačka se zavře a opře
se o lano.
Bezpečnostní západka zabraňuje nechtěnému otevření vačky.
Vyjmutí lana
Blokant posunujte vzhůru po laně a současně zatáhněte za bezpečnostní pojistku
směrem dolů a ven.
Nákres č. 13. Pracovní postup
13A. Výstup
Blokant CROLL je pomůcka sloužící ke stoupání během pracovní činnosti na laně nebo
k výstupu po přístupovém laně. Při zatížení směrem dolů sevře lano; při pohybu směrem
vzhůru blokant hladce klouže po laně.
Zuby se zachytí o oplet lana a přenesou pohyb na vačku, která se pootočí a pevně sevře
lano. Čistící štěrbiny na vačce umožňují vypadávání případných nečistot.
13B. Posun blokantu CROLL po laně směrem dolů (výjimečná
situace)
27
NAVAHO SIT / NAVAHO SIT FAST / TOP / TOP CROLL C79502-C (200907)
Page 28

Posuňte blokant vzhůru po laně a zároveň ukazováčkem zatlačte směrem dolů na vačku,
abyste uvolnili zuby z opletu lana. Nedotýkejte se bezpečnostní západky, aby nedošlo
nechtěnému otevření vačky blokantu.
13C. Kontrola funkce
Před každým používáním musíte provést zkoušku funkčnosti, abyste si ověřili správnou
instalaci na lano a blokovací funkci prostředku. Při provádění této zkoušky musí uživatel
zajištěn.
Posuňte blokant CROLL nahoru po laně. Musí po něm hladce klouzat. Zatáhněte
směrem dolů, abyste ověřili, že sevře lano.
13D. Bezpečnostní opatření
- Jestliže CROLL nepoužíváte, uzavřete vačku, aby nedošlo k zachycení vašeho vybavení,
nebo jiných předmětů.
- POZOR, nedovolte cizím předmětům (kamínky, bláto, větvičky, popruhy, smyčky, oděv,
barva, atd.) aby omezily funkci vačky.
- Vyvarujte se zachycení bezpečností západky za oděv či popruhy.
- Lano mezi blokantem CROLL a kotvícím bodem musí být vždy napnuté. Uživatel musí
být vždy níže než je kotvící bod lana.
- Rázová síla absorbovaná lanem:
Nezapomínejte, že tím, co v případě pádu tlumí energii, je lano. Čím více se blížíte
kotvícímu bodu, tím nižší je schopnost lana ráz tlumit a může dosáhnout až nulové
hodnoty.
- Chraňte lano před vším, co by je mohlo poškodit (např. ostré hrany, drsné povrchy,
atd.).
- Lano musí procházet blokantem CROLL volně. Vyvarujte se situací, které mohou bránit
volnému průchodu lana blokantem (např. uzel nebo poškozená část lana, atp.).
- Nikdy nezapomeňte uvázat na konci lana pojistný uzel!
Nákres č. 14. Výstup na laně
- Pracovní lano: Použijte blokant CROLL společně s dalším ručním blokantem (např.
ASCENSION) a s nožním blokantem. Vždy se k druhému blokantu navažte odpovídající
smyčkou.
- Zajišťovací lano: Použijte prostředek typu A.
N
Maximální nosnost poutka na materiál
O
Všeobecné informace
Slučitelnost: nosná oka / spojovací prvky
Spojení neslučitelných výrobků může způsobit náhodné rozpojení prvků, jejich
poškození, nebo může ovlivnit bezpečné fungování dalších součástí vybavení.
UPOZORNĚNÍ: Připojovací body vašeho postroje mohou působit jako páka na západku
spojky.
Pokud by došlo k nečekanému napnutí lana a/nebo byl na západku nesprávně umístěné
spojky vyvinut tlak, pojistka zámku se může zlomit a západka otevřít.
Pro snížení tohoto rizika, vždy před každým zatížením systému zkontrolujte správnou
polohu spojek (spojovací prostředek, slaňovací brzda, apod.).
Také se ujistěte o slučitelnosti spojek s připojovacími body (velikostí, tvarem, apod.) a
vyhněte se používání spojek, které mají tendenci sami sklouzávat do nesprávné polohy
v připojovacím bodě.
EN 365: UPOZORNĚNÍ
Slučitelnost
Zkontrolujte, zda je tento výrobek slučitelný s ostatními součástmi vašeho vybavení,
přečtěte si všechny návody k použití pro jednotlivé součásti.
UPOZORNĚNÍ: Při používání systémů složených z více prostředků může nastat
nebezpečná situace, kdy zabezpečovací funkce jednoho prostředku je ovlivněna funkcí
jiného.
Máte-li pochybnosti o slučitelnosti výrobků, kontaktujte rmu Petzl.
Kotvící body: Práce ve výškách
Kotvící bod by měl být umístěn nejlépe nad hlavou uživatele; musí splňovat požadavky
normy EN 795; jeho minimální pevnost musí být alespoň 10 kN.
Záchranný plán
Musíte mít záchranný plán a prostředky pro jeho rychlou realizaci v případě obtíží
vzniklých při používání tohot vybavení. To zahrnuje mimo jiné odpovídající školení v
oblasti nutných záchranných technik.
Spojky
Spojky musí být vždy používány s uzavřenou západkou a zajištěným zámkem. Pravidelně
stiskem ruky kontrolujte, zda se je západka zavřená.
Spojky kontrolujte dle pokynů uvedených v jejich návodu k použití.
Různé
- POZOR, NEBEZPEČÍ! Vyvarujte se odírání tohoto výrobku o drsné povrchy a ostré
hrany.
- Pro aktivity ve výškách musí být uživatelé v dobrém zdravotním stavu. UPOZORNĚNÍ:
Nehybné zavěšení v sedacím úvazku může způsobit vážné zranění nebo smrt.
- Ujistěte se, že označení výrobku zůstane čitelné po celou dobu jeho životnosti.
- Jste povinni si ověřit, zda je daný výrobek určen pro činnost, kterou hodláte vykonávat,
s ohledem na příslušné normy a standardy týkající se bezpečnosti práce.
- Je nutné dodržovat pokyny pro použití všech výrobků používaných ve spojení s tímto
výrobkem.
- Všichni uživatelé tohoto výrobku musí mít k dispozici návod k jeho použití. Je-li
výrobek dále prodán mimo zemi původního určení, prodejce je povinen zajistit návod k
použití v jazyce země, v níž bude výrobek používán.
Životnost výrobků
UPOZORNĚNÍ: Ve výjimečných případech může být životnost výrobku omezena jen na
jeho jediné použití, například: vlivem působení chemikálií, extrémních teplot, ostrých
hran, těžkého pádu, velkého zatížení, apod.
Potenciální životnost výrobků Petzl je do 10 let od data výroby pro plastové a textilní
výrobky, neomezená pro kovové výrobky.
Skutečná životnost výrobku končí při splnění některé z podmínek, uvedených níže (viz
„Kdy vyřadit vaše vybavení“), nebo když se výrobek jako součást systému stane pro
používání zastaralým.
Na skutečnou životnost mají vliv různé faktory jako je např.: intenzita a četnost
používání, okolní prostředí, zkušenost uživatele, skladovací podmínky, údržba, atd.
Periodické prohlídky OOP, poškození a/nebo chátrání
výbavy.
Kromě kontroly před a během používání výrobku musí být alespoň jednou za
12 měsíců provedena důkladná periodická prohlídka odborně způsobilou osobou.
Tato kontrola musí být provedena nejméně jednou každých 12 měsíců. Četnost
důkladných periodických prohlídek musí být dána způsobem a intenzitou používání
výrobku. Pro efektivnější vedení záznamů o vašem vybavení je vhodnější, aby každý
jednotlivý pracovník měl přiděleny vlastní prostředky osobní ochrany a znal jejich
minulost. Výsledky prohlídek by měli být dokumentovány v záznamech o prohlídkách.
Tyto záznamy musí obsahovat: druh prostředku, model, název a kontaktní údaje
na výrobce nebo dodavatele, identikační údaje (sériové nebo individuální výrobní
číslo), rok výroby, datum prodeje, datum prvního použití, jméno uživatele, případně
další relevantní údaje, např. o údržbě, četnosti používání, o průběhu předchozích
periodických kontrol (datum / komentář a zjištěné nedostatky / jméno a podpis odborně
způsobilé osoby, která kontrolu provedla / předpokládané datum příští kontroly). Viz.
příklady podrobného zápisu o periodických prohlídkách a další informace na www.
petzl.com/ppe
Kdy vaše vybavení vyřadit
Okamžitě vyřaďte jakékoliv prostředky, pokud:
- nevyhověly požadavkům prohlídky (prohlídky před a během používání a důkladné
periodické prohlídky),
- byly vystaveny těžkému pádu nebo velkému zatížení,
- neznáte úplnou historii jejich používání v minulosti,
- jsou starší než 10 let a vyrobeno z plastu nebo z textílií,
- máte jakékoliv pochybnosti o jejich neporušenosti.
Znehodnocením vyřazeného vybavení zabráníte jeho dalšímu použití.
Stárnutí výrobku
Existuje mnoho důvodů, proč smí být výrobek posuzován jako zastaralý a z tohoto
důvodu vyřazen dříve, než je jeho skutečná životnost. Například změny v příslušných
normách, předpisech, nařízeních a stanovách či v legislativě; vývoj nových technik;
neslučitelnost s ostatními součástmi vybavení, atd.
Úpravy, opravy
Jakákoliv změna, úprava nebo oprava výrobku jiným způsobem, než který povoluje
výrobce Petzl, je zakázána z důvodu možného snížení funkčnosti výrobku.
Doprava a skladování
Postroj uchovávejte ve vaku nebo jiném obalu, aby byl chráněn před UV zářením,
vlhkostí, chemikáliemi, apod.
Záruka
Na tento výrobek se vztahuje tříletá záruka na výrobní vady či vady materiálu. Záruka
se nevztahuje na: vady vzniklé běžným opotřebením, oxidací, změnami a úpravami
výrobku, nesprávnou údržbou a skladováním, poškozením při nehodě či z nedbalosti a
způsoby použití, pro něž výrobek nebyl určen.
PETZL není odpovědný za následky přímé, nepřímé nebo náhodné ani za škody
vzniklé v průběhu používání tohoto výrobku.
28
NAVAHO SIT / NAVAHO SIT FAST / TOP / TOP CROLL C79502-C (200907)
Page 29

(PL) POLSKI
Instrukcja użytkowania
- NAVAHO SIT i NAVAHO SIT FAST:
Uprząż biodrowa, pas stabilizujący.
- NAVAHO SIT lub NAVAHO SIT FAST połączone z uprzężą
piersiową TOP:
Uprząż chroniąca przed upadkiem z wysokości, pas stabilizujący, uprząż biodrowa.
- NAVAHO SIT lub NAVAHO SIT FAST połączone z uprzężą
piersiową TOP CROLL:
Uprząż chroniąca przed upadkiem z wysokości, pas stabilizujący, uprząż biodrowa,
uprząż do wychodzenia po linie zintegrowana z przyrządem zaciskowym CROLL.
A
Dopuszczalne są wyłącznie techniki przedstawione na rysunkach nieprzekreślonych lub
nieoznaczone symbolem trupiej czaszki. Należy regularnie sprawdzać uaktualnienia tych
dokumentów na stronie www.petzl.com
W razie wątpliwości w rozumieniu instrukcji należy się skontaktować z przedstawicielem
rmy PETZL.
Zastosowanie
- NAVAHO SIT i NAVAHO SIT FAST:
Uprząż biodrowa, pas stabilizujący.
- NAVAHO SIT lub NAVAHO SIT FAST połączone z uprzężą
piersiową TOP:
Uprząż chroniąca przed upadkiem z wysokości, pas stabilizujący, uprząż biodrowa.
- NAVAHO SIT lub NAVAHO SIT FAST połączone z uprzężą
piersiową TOP CROLL:
Uprząż chroniąca przed upadkiem z wysokości, pas stabilizujący, uprząż biodrowa,
uprząż do wychodzenia po linie zintegrowana z przyrządem zaciskowym CROLL.
Produkt nie może być poddawany obciążeniom przekraczającym jego wytrzymałość oraz
stosowany innych celów niż te, do których został przewidziany.
UWAGA
Wszelkie działania wymagające użycia tego produktu są z samej
swej natury niebezpieczne.
Użytkownik ponosi odpowiedzialność za swoje działania
i decyzje.
Przed użyciem produktu należy:
- Przeczytać i zrozumieć wszystkie instrukcje użytkowania.
- Zdobyć odpowiednie przeszkolenie dla prawidłowego używania tego produktu.
- Zapoznać się z produktem, z jego parametrami i ograniczeniami.
- Zrozumieć i zaakceptować potencjalne niebezpieczeństwo.
Nieprzestrzeganie lub zlekceważenie któregokolwiek
z powyższych ostrzeżeń może prowadzić do poważnych
uszkodzeń ciała lub śmierci.
Odpowiedzialność
UWAGA! Przed przystąpieniem do użytkowania niezbędne jest specjalistyczne
przeszkolenie.
Produkt ten może być używany jedynie przez osoby kompetentne i odpowiedzialne lub
pod bezpośrednią kontrolą takich osób.
Użytkownik sprzętu ponosi więc całkowitą odpowiedzialność za zapewnienie sobie
odpowiedniego przeszkolenia, zarówno w zakresie technik działania jak i środków
bezpieczeństwa.
Użytkownik ponosi również pełne ryzyko i odpowiedzialność za wszelkiego rodzaju
szkody, z uszkodzeniami ciała i śmiercią włącznie, wynikłe z niewłaściwego użytkowania
naszych wyrobów. Jeżeli nie zamierza lub nie jest w stanie takiej odpowiedzialności
i ryzyka podjąć, nie powinien posługiwać się tym sprzętem.
Oznaczenia części
- Uprząż piersiowa TOP:
(1) Szelki, (2) Regulacja tylnego punktu wpinania, (3) Piersiowy punkt wpinania EN 361,
(4) Łącznik kierunkowy.
- Uprząż piersiowa TOP CROLL:
(1) Szelki, (2) Regulacja tylnego punktu wpinania, (3) Piersiowy punkt wpinania EN 361,
(4a) Zintegrowany piersiowy przyrząd zaciskowy CROLL EN 1284, (4b) Kierunkowy
maillon rapide z rozdzielającą poprzeczką, (16) Język, (17) Bezpiecznik, (18) Otwór do
wpinania.
- Uprzęże biodrowe NAVAHO SIT i NAVAHO SIT FAST
(5) Przedni punkt (tekstylny) łączący szelki / uprząż biodrową, (6) Pas, (7) Przedni
punkt wpinania EN 358, EN 813, (8) Boczne punkty wpinania pasa EN 358, (9) Tylna
klamra łącząca szelki / pas z punktem podtrzymania EN 358, (10) Klamry regulujące
DoubleBack, (10 bis) Klamry do szybkiej regulacji FAST, (11) Uchwyt sprzętowy,
(12) Szlua na uchwyty do noszenia narzędzi (13) Szlua na taśmę, (14) Regulowane
taśmy elastyczne, (15) Etykietka na oznaczenia, którą można schować w elemencie
wzmacniającym pas.
Materiały podstawowe
Uprząż: poliester, stal (klamry do regulacji), stop aluminium (punkty wpinania).
Piersiowy przyrząd zaciskowy CROLL: stop aluminium (obudowa), stal
chromowa (język), poliamid (bezpiecznik).
Kontrola, miejsca do sprawdzenia
Przed każdym użyciem
- Uprząż
Należy sprawdzić stan taśm przy punktach wpinania, klamer, szwów bezpieczeństwa.
Zwrócić uwagę na przecięcia i rozerwania oraz uszkodzenia spowodowane wysoką
temperaturą, kontaktem ze środkami chemicznymi itp.
Sprawdzić prawidłowe działanie klamer DoubleBack i FAST.
- TOP
Łącznik kierunkowy
Sprawdzić korpus, ramię, nit, nakrętkę (brak śladów deformacji, pęknięć, korozji itd.).
Otworzyć ramię i sprawdzić czy zamyka i blokuje się automatycznie, w momencie gdy się
je puści. Sprawdzić prawidłowe działanie nakrętki. Otwór zamka Keylock nie może być
zanieczyszczony przez żadne ciała obce (żwir, glina itp.).
- TOP CROLL
Kierunkowy łącznik maillon rapide
Przed każdym użyciem sprawdzić stan obudowy przyrządu.
Upewnić się czy nakrętka jest prawidłowo zakręcona (gwint nie może być widoczny)
i zablokowana, moment dokręcania 3 Nm.
Piersiowy przyrząd zaciskowy CROLL
Przed każdym użyciem sprawdzić stan obudowy przyrządu (pęknięcia, deformacje,
korozja, ślady zużycia), otworów do wpinania, bezpiecznika i języka. Sprawdzić stopień
zużycia zębów. Uwaga, jeżeli zęby są zużyte lub wyłamane, nie używać więcej tego
przyrządu zaciskowego.
Podczas użytkowania
Należy regularnie kontrolować stan produktu oraz jego połączenia z innymi elementami
systemu. Upewnić się co do prawidłowej pozycji elementów względem siebie.
Szczegółowe procedury kontrolne każdego Sprzętu Ochrony Indywidualnej znajdują się
na stronie stronie www.petzl.fr/epi lub na CDROM-ie EPI PETZL.
W razie wątpliwości skontaktować się z przedstawicielem PETZL.
B
NAVAHO SIT i NAVAHO SIT FAST
Rysunek 1. Zakładanie uprzęży
Otworzyć klamry na taśmach udowych.
1A. Chwycić uprząż za pas i włożyć «przez nogi».
1B. Dopasować pas ciągnąc za taśmy. Schować nadmiar taśm w szluach znajdujących
się na szelkach.
- Niewielki nadmiar taśmy: schować ją w szluach znajdujących się przed klamrami
regulacyjnymi.
- Duży nadmiar taśmy: przeciągnąć nadmiar taśmy przez boczne kolucha, a następnie
przez szlui znajdujące się za nimi.
1C. Zapiąć klamry i dopasować taśmy udowe.
- NAVAHO SIT: klamry DoubleBack.
- NAVAHO SIT FAST: Zapiąć klamry FAST. Należy zwracać uwagę na przedmioty, które
mogą utrudniać działanie klamer FAST, jak zaschnięte błoto, kamienie, ubranie itp.
Sprawdzić prawidłowe zablokowanie.
Regulacja i test wiszenia
Uprząż musi być dopasowana blisko ciała, by zmniejszyć ryzyko zranienia podczas
upadku.
Użytkownik powinien uprząż wypróbować: zrobić test wiszenia na każdym z punktów
wpinania, przejść kilka kroków, usiąść, zrobić parę skłonów i przysiadów. Tylko w ten
sposób można sprawdzić czy uprząż ma odpowiednie rozmiary i czy jest wystarczająco
wygodna.
C
STABILIZACJA W POZYCJI ROBOCZEJ
i PODTRZYMYWANIE
Rysunek 2. Uprząż stabilizująca w pozycji roboczej
i podtrzymująca EN 358: 2000
Punkty wpinania uprzęży przeznaczone są do stabilizacji użytkownika w pozycji
roboczej (praca w podparciu) lub do uniemożliwienia użytkownikowi osiągnięcia
miejsca, w którym upadek jest możliwy (zasada smyczy). Punkty wpinania powinny być
używane wyłącznie do wpięcia do systemu stabilizacji w pozycji roboczej lub systemu
podtrzymywania (maksymalna długość lotu 0,5 m).
Wymienione wyżej punkty wpinania nie są przeznaczone do ochrony przed upadkiem
z wysokości. Może zachodzić potrzeba uzupełnienia systemu stabilizacji w pozycji
roboczej lub podtrzymywania przez zbiorowe środki chroniące przed upadkiem
z wysokości (np. siatka bezpieczeństwa) lub indywidualne (np. system zatrzymania
upadku z wysokości zgodny z norma EN 363).
Chcąc używać uprzęży biodrowej w systemie zatrzymania upadków z wysokości
zgodnym z normą EN 363, należy do niej wpiąć uprząż piersiową TOP lub TOP CROLL.
2A. Przedni punkt wpinania
2B. Boczne punkty wpinania pasa
By uzyskać wygodne podparcie w pasie używać zawsze obu bocznych punktów
wpinania, połączonych lonżą podtrzymującą.
Chcąc uzyskać wygodną pozycję stabilizującą należy mieć podparcie dla stóp.
Wyregulować lonżę podtrzymującą w pozycji roboczej w taki sposób by punkt
zaczepienia znajdował na poziomie pasa lub nieco powyżej. Lonża powinna być
naprężona, a przemieszczanie ograniczone do 0.5 m.
2C. Tylny podtrzymujący punkt wpinania
Tylny punkt wpinania pasa jest wyłącznie punktem podtrzymującym, który ma
uniemożliwić użytkownikowi osiągnięcie miejsca, w którym upadek jest możliwy
(zasada smyczy).
Podczas użytkowania należy regularnie kontrolować elementy regulacji i/lub stan
połączeń.
D
Rysunek 3 Uprząż biodrowa:
EN 813: 1997
Przedni punkt wpinania
Norma EN 813: 1997 dotyczy uprzęży biodrowych, wykorzystywanych w systemach
stabilizacji w pozycji roboczej, podtrzymywania, dostępu przy pomocy liny, z nisko
umieszczonym punktem wpinania.
Przedni punkt wpinania służy do wpięcia przyrządu zjazdowego, lonży stabilizujących
lub lonży do przemieszczania się.
Ten punkt wpinania nie jest przeznaczony do zatrzymywania upadków z wysokości.
E
NAVAHO SIT lub NAVAHO SIT FAST połączone
z uprzężą piersiową TOP
Rysunek 4. Przygotowanie
Chcąc połączyć uprząż piersiową z uprzężą biodrową należy: przewlec tylną taśmę przez
tylną klamrę łączącą (9), a następnie przez elastyczną szluę. Przewlec taśmę przez
klamrę DoubleBack tylnej regulacji (2), a następnie z powrotem przez elastyczną szluę.
F
Rysunek 5. Zakładanie uprzęży
Otworzyć klamry na taśmach udowych.
5A. Rozsunąć szelki, chwycić uprząż za pas, włożyć «przez nogi».
5B. Dopasować pas ciągnąc za taśmy. Schować nadmiar taśm w szluach znajdujących
się na szelkach.
- Niewielki nadmiar taśmy: schować ją w szluach znajdujących się przed klamrami
regulacyjnymi.
- Duży nadmiar taśmy: przeciągnąć nadmiar taśmy przez boczne kolucha, a następnie
przez szlui znajdujące się za nimi.
5C. Zapiąć klamry i dopasować taśmy udowe.
- NAVAHO SIT: klamry DoubleBack.
- NAVAHO SIT FAST: Zapiąć klamry FAST. Należy zwracać uwagę na przedmioty, które
mogą utrudniać działanie klamer FAST, jak zaschnięte błoto, kamienie, ubranie itp.
Sprawdzić prawidłowe zablokowanie.
5D. Dopasować szelki na ramionach. Umieścić łącznik w przednim (tekstylnym) punkcie
łączącym szelki / uprząż biodrową (5). Zakręcić nakrętkę łącznika.
5E. Dopasować szelki. Schować nadmiar taśm w szluach znajdujących się na szelkach.
5F. Regulacja początkowa tylnego punktu wpinania
Wykonać ją podczas pierwszego założenia uprzęży, przy pomocy drugiej osoby.
Przesunąć szluę w taki sposób by tylna taśma była naciągnięta (nie może być żadnego
luzu).
Schować nadmiar taśmy w szlufce, by nie przeszkadzał w pracy.
Dopasować regulację do budowy ciała użytkownika, ustawić klamrę DoubleBack na
wysokości łopatek.
Regulacja i test wiszenia
Uprząż musi być dopasowana blisko ciała, by zmniejszyć ryzyko zranienia podczas
upadku.
Użytkownik powinien uprząż wypróbować: zrobić test wiszenia na każdym z punktów
wpinania, przejść kilka kroków, usiąść, zrobić parę skłonów i przysiadów. Tylko w ten
sposób można sprawdzić czy uprząż ma odpowiednie rozmiary i czy jest wystarczająco
wygodna.
G
Rysunek 6. Owalny łącznik kierunkowy zakręcany
ręcznie
Łącznik EN 362: 2004, będący na wyposażeniu uprzęży, jest elementem służącym do
połączenia uprzęży piersiowej z pasem. Nie wolno go stosować do wpinania lonży lub
absorbera energii.
6A. UWAGA NIEBEZPIECZEŃSTWO! W trakcie użytkowania ramię łącznika zawsze
musi być zamknięte i zablokowane. Wytrzymałość łącznika przy otwartym zamku
znacząco maleje.
Należy regularnie sprawdzać prawidłowe zamknięcie łącznika
naciskając go ręką.
6B. Największa wytrzymałość zamkniętego łącznika jest w kierunku jego osi podłużnej.
Obciążanie w jakimkolwiek innym kierunku wiąże się ze znaczną utratą wytrzymałości.
H
OCHRONA PRZED UPADKIEM Z WYSOKOŚCI
Rysunek 7. Uprząż chroniąca przed upadkiem
z wysokości EN 361: 2002
Uprząż kompletna, element systemu chroniącego przed upadkiem z wysokości zgodnie
z normą EN 363 (indywidualne systemy chroniące przed upadkiem z wysokości).
Musi być stosowana w połączeniu z punktami stanowiskowymi EN 795, karabinkami
z blokadą EN 362, absorberami energii EN 355 itd.
7A. Piersiowy punkt wpinania
Do łączenia uprzęży z systemem chroniącym przed upadkiem z wysokości służą
wyłącznie wymienione wyżej elementy, jak np. absorber energii, przesuwny przyrząd
autoasekuracyjny..., systemy opisane w normie EN 363. Dla łatwiejszej identykacji
punktu wpinania, został oznaczony literą A.
Wolna przestrzeń: pod użytkownikiem
Przestrzeń pod użytkownikiem na drodze jego potencjalnego upadku musi być
pozbawiona jakichkolwiek przeszkód. Szczegółowe obliczenia wolnej przestrzeni
znajdują się w instrukcjach innych elementów systemu (absorbery energii, przesuwny
przyrząd autoasekuracyjny).
I
NAVAHO SIT lub NAVAHO SIT FAST połączone
z uprzężą piersiową TOP CROLL
Rysunek 8. Przygotowanie
Chcąc połączyć uprząż piersiową z uprzężą biodrową należy: przewlec tylną taśmę przez
tylną klamrę łączącą (9), a następnie przez elastyczną szluę. Przewlec taśmę przez
klamrę DoubleBack tylnej regulacji (2), a następnie z powrotem przez elastyczną szluę.
Chcąc połączyć przyrząd CROLL z przodem uprzęży biodrowej należy wpiąć maillon
rapide w przednim (tekstylnym) punkcie wpinania (5). Zakręcić i zablokować kluczem
z momentem dokręcania 3 Nm. Nie zapomnieć zamknąć plastikowej poprzeczki.
J
Rysunek 9 Kierunkowy łącznik maillon rapide
Łącznik maillon rapide, będący na wyposażeniu uprzęży, jest elementem służącym do
połączenia uprzęży piersiowej z pasem. Musi być zawsze zablokowany z momentem
3 Nm (odkręcenie rękoma niemożliwe).
Nie wolno go stosować do wpinania lonży lub absorbera energii.
K
Rysunek 10. Zakładanie uprzęży
Otworzyć klamry FAST na taśmach udowych.
10A. Rozsunąć szelki, chwycić uprząż za pas, włożyć «przez nogi».
10B. Dopasować szelki na ramionach.
10C. Dopasować pas ciągnąc za taśmy. Końce taśm zamocować w szluach.
- Niewielki nadmiar taśmy: schować ją w szluach znajdujących się przed klamrami
regulacyjnymi.
- Duży nadmiar taśmy: przeciągnąć nadmiar taśmy przez boczne kolucha, a następnie
przez szlui znajdujące się za nimi.
10D. Zapiąć klamry FAST i dopasować taśmy udowe. Należy zwracać uwagę na
przedmioty, które mogą utrudniać działanie klamer FAST, jak zaschnięte błoto,
kamienie, ubranie itp. Sprawdzić prawidłowe zablokowanie.
10E. Dopasować szelki. Schować nadmiar taśm w szluach znajdujących się na szelkach.
10F. Regulacja początkowa tylnego punktu wpinania
Wykonać ją podczas pierwszego założenia uprzęży, przy pomocy drugiej osoby.
Przesunąć szluę w taki sposób by tylna taśma była naciągnięta (nie może być żadnego
luzu).
Schować nadmiar taśmy w szlufce, by nie przeszkadzał w pracy.
Dopasować regulację do budowy ciała użytkownika, ustawić klamrę DoubleBack na
wysokości łopatek.
Regulacja i test wiszenia
Uprząż musi być dopasowana blisko ciała, by zmniejszyć ryzyko zranienia podczas
upadku.
Użytkownik powinien uprząż wypróbować: zrobić test wiszenia na każdym z punktów
wpinania, przejść kilka kroków, usiąść, zrobić parę skłonów i przysiadów. Tylko w ten
sposób można sprawdzić czy uprząż ma odpowiednie rozmiary i czy jest wystarczająco
wygodna.
L
OCHRONA PRZED UPADKIEM Z WYSOKOŚCI
Rysunek 11. Uprząż chroniąca przed upadkiem
z wysokości EN 361: 2002
Uprząż kompletna, element systemu chroniącego przed upadkiem z wysokości zgodnie
z normą EN 363 (indywidualne systemy chroniące przed upadkiem z wysokości).
Musi być stosowana w połączeniu z punktami stanowiskowymi EN 795, karabinkami
z blokadą EN 362, absorberami energii EN 355 itd.
11A. Piersiowy punkt wpinania
Do łączenia uprzęży z systemem chroniącym przed upadkiem z wysokości służą
wyłącznie wymienione wyżej elementy, jak np. absorber energii, przesuwny przyrząd
autoasekuracyjny..., systemy opisane w normie EN 363. Dla łatwiejszej identykacji
punktu wpinania, został oznaczony literą A.
Wolna przestrzeń: pod użytkownikiem
Przestrzeń pod użytkownikiem na drodze jego potencjalnego upadku musi być
pozbawiona jakichkolwiek przeszkód. Szczegółowe obliczenia wolnej przestrzeni
znajdują się w instrukcjach innych elementów systemu (absorbery energii, przesuwny
przyrząd autoasekuracyjny).
M
DOSTĘP PRZY POMOCY LINY
Piersiowy przyrząd zaciskowy CROLL
EN 12841: 2006
Zastosowanie
Piersiowy przyrząd zaciskowy CROLL EN 12841: 2006 jest urządzeniem typu B, do
regulacji liny, przeznaczonym do przemieszczania się w górę po linie roboczej.
UWAGA, CROLL musi być używany razem z urządzeniem typu A do autoasekuracji
na drugiej linie, nazywanej liną asekuracyjną (np. ASAP - przesuwny przyrząd
autoasekuracyjny na linę).
Piersiowy przyrząd zaciskowy CROLL nie jest przeznaczony do użycia w systemie
chroniącym przed upadkiem zgodnym z normą EN 363.
Średnica liny
Stosować linę półstatyczną o średnicy od 10 do 13 mm (rdzeń + oplot) EN 1891 typ A.
29
NAVAHO SIT / NAVAHO SIT FAST / TOP / TOP CROLL C79502-C (200907)
Page 30

Rysunek 12. Wpinanie przyrządu
Odciągnąć kciukiem bezpiecznik i język, otwierając przyrząd. Zablokowanie
bezpiecznika na obudowie przyrządu utrzymuje język przyrządu w pozycji otwartej.
Założyć przyrząd na linę. Zwolnić bezpiecznik zsuwając jego ramię z obudowy,
dociskając linę językiem.
Bezpiecznik uniemożliwia przypadkowe otwarcie przyrządu (wypięcie języka).
Wypinanie przyrządu z liny
Przesunąć przyrząd w górę i jednocześnie otworzyć go przez odciągnięcie języka
z bezpiecznikiem.
Rysunek 13. Zasady działania
13A. Wychodzenie
CROLL jest przyrządem służącym do wychodzenia po linie. W górę przesuwa się
swobodnie, w dół (pod ciężarem użytkownika) blokuje się, uniemożliwiając zsuwanie.
Blokada ma miejsce wtedy, gdy język przyrządu dociska linę do jego obudowy.
Skuteczność blokady zwiększają zęby języka, wbijające się w oplot liny. Szczeliny
w języku umożliwiają usuwanie błota, lodu itd.
13B. Opuszczanie przyrządu CROLL (przypadek wyjątkowy)
Lekko przesunąć przyrząd w górę i jednocześnie pchnąć język kciukiem. Nie
manipulować przy bezpieczniku, ryzyko mimowolnego otwarcia.
13C. Test prawidłowego funkcjonowania
Przed każdym użyciem powinien zostać wykonany test prawidłowego funkcjonowania
produktu - czy lina jest prawidłowo założona i czy przyrząd działa poprawnie.
Użytkownik, w czasie testowania, musi być wpięty w stanowisko.
Przyrząd CROLL, przesuwany w górę powinien przemieszczać się swobodnie,
obciążany - ma blokować się bez przeszkód.
13D. Środki ostrożności
- Nieużywany CROLL powinien być zamknięty, by do przyrządu nie dostał się element
wyposażenia lub jakiś przedmiot, który mógłby go zablokować.
- UWAGA! Należy zwracać uwagę na przedmioty, które mogą utrudniać działanie
języka, jak zaschnięte błoto, kamienie, gałęzie, ubranie, taśmy, farba itp.
- UWAGA! Bezpiecznik może się otworzyć podczas przypadkowego zahaczenia
o ubranie lub o taśmy.
- Lina pomiędzy stanowiskiem i przyrządem CROLL nie może być luźna. Użytkownik
zawsze musi znajdować się poniżej stanowiska.
- Absorpcja energii przez linę:
nie wolno zapominać, że energia ewentualnego upadku jest absorbowana przez linę.
W miarę zbliżania się do punktu zamocowania liny, zmniejsza się amortyzujące działanie
liny, przy samym zamocowaniu nie ma go wcale.
- Chronić linę przed przetarciem i przecięciem (ostre krawędzie, nierówne powierzchnie
itp.).
- Lina powinna się powinien przesuwać swobodnie w przyrządzie CROLL (uwaga na
węzły, uszkodzone fragmenty liny...).
- Nie zapomnieć o zabezpieczającym węźle na końcu liny.
Rysunek 14. Wychodzenie po linie
- Lina robocza: stosować przyrząd CROLL razem z innym przyrządem zaciskowym
z rączką, jak np. ASCENSION + pętla nożna. Nie zapomnieć o wpięciu się do tego
drugiego przyrządu przy pomocy odpowiedniej lonży.
- Lina asekuracyjna: stosować urządzenie typu A (autoasekuracja).
Oprócz kontroli - przed i podczas użytkowania - należy wykonywać gruntowną
kontrolę okresową przez kompetentnego kontrolera. Kontrola ta powinna odbywać
się przynajmniej co 12 miesięcy. Częstotliwość kontroli powinna być dostosowana
do typu sprzętu i intensywności użytkowania. Zaleca się, aby sprzęt był przydzielany
imiennie jednemu użytkownikowi, który będzie dbał o jego stan i znał historię
użycia. Dla większego bezpieczeństwa i lepszej kontroli radzimy również założyć, dla
każdego produktu lub grupy produktów, kartę kontrolną. Karta kontrolna pozwala
na odnotowanie następujących uwag: typ sprzętu, model, nazwa i adres producenta
lub dostawcy, sposób identykacji (numer seryjny lub indywidualny), rok produkcji,
data zakupu, data pierwszego użycia, nazwa użytkownika, istotne informacje jak np.
konserwacja i częstość użytkowania, rezultaty poprzednich kontroli (data, komentarze,
zauważone wady, nazwisko i podpis kompetentnego kontrolera, data następnej kontroli).
Jako przykład można wykorzystać narzędzia informatyczne i wzór szczegółowej karty
kontrolnej znajdujące się stronie www.petzl.fr/epi
Wycofanie sprzętu
Produkt należy natychmiast wycofać, jeżeli:
- rezultat kontroli (przed, w trakcie użycia, okresowej) nie jest satysfakcjonujący
- nastąpiło poważne odpadnięcie lub poważne przeciążenie systemu
- nie jest znana pełna historia użytkowania
- produkt ma 10 lat i składa się z elementów tekstylnych lub plastikowych
- istnieją jakiekolwiek podejrzenia co do jego niezawodności.
Należy zniszczyć wycofane produkty, by uniknąć ich przypadkowego użycia.
Produkt przestarzały
Istnieje wiele przyczyn, dla których produkt może zostać oceniony jako przestarzały
i w konsekwencji wycofany z użytkowania, na przykład: ewolucja norm, przepisów
prawnych, techniki, niekompatybilność z innymi produktami itd.
Modykacje, naprawy
Naprawy i modykacje, inne niż autoryzowane przez Petzl, są zabronione: ryzyko
zmniejszenia skuteczności produktu.
Przechowywanie, transport
Po użyciu należy schować produkt w pojemniku (worek, pudełko...) chroniącym przed
promieniowaniem UV, produktami chemicznymi itd.
Gwarancja
Produkt ten posiada 3 - letnią gwarancję dotyczącą wszelkich wad materiałowych
i produkcyjnych. Gwarancji nie podlegają produkty: noszące cechy normalnego zużycia,
przerabiane i modykowane, nieprawidłowo przechowywane, uszkodzone w wyniku
wypadków, zaniedbań i zastosowań niezgodnych z przeznaczeniem.
PETZL nie ponosi odpowiedzialności za wszelkie konsekwencje, bezpośrednie czy
pośrednie oraz jakiekolwiek szkody, zaistniałe w związku z użytkowaniem jego
produktów.
N
Maksymalne obciążenie uchwytów sprzętowych
O
Informacje ogólne
Kompatybilność: kolucha / łączniki
Niekompatybilne połączenie może doprowadzić do przypadkowego wypięcia,
uszkodzenia lub może negatywnie wpłynąć na funkcje bezpieczeństwa innego elementu
wyposażenia.
UWAGA, punkty wpinania uprzęży mogą zadziałać jak dźwignia na ramię łącznika.
Podczas gwałtownego nacisku liny i/lub uderzenia w system blokowania, połączonego
z niewłaściwą pozycją karabinka, nakrętka może ulec uszkodzeniu, a ramię się otworzyć.
Dla ograniczenia tego niebezpieczeństwa, należy sprawdzać prawidłową pozycję
łączników przy każdorazowym obciążeniu systemu (lonża, przyrząd zjazdowy...).
Należy również sprawdzać kompatybilność łączników (kształty, wymiary), eliminując te
łączniki, które mają tendencję do nieprawidłowego ustawiania się.
EN 365: OSTRZEŻENIE
Kompatybilność
Należy sprawdzić kompatybilność tego produktu z pozostałymi elementami systemu
(patrz właściwa dla produktu instrukcja).
UWAGA! Niebezpieczeństwo! Podczas używania wielu elementów wyposażenia,
poszczególne przyrządy mogą nawzajem zakłócać prawidłowe, bezpieczne
funkcjonowanie.
Jeżeli nie jesteście pewni kompatybilności waszego sprzętu, należy skontaktować się
z przedstawicielem Petzl.
Punkty stanowiskowe: Praca na wysokości
Punkt zaczepienia (stanowisko) powinien znajdować się nad użytkownikiem i spełniać
wymagania normy EN 795. W szczególności wytrzymałość punktu zaczepienia nie może
być mniejsza niż 10 kN.
Działania awaryjne
Przed przystąpieniem do jakiejkolwiek działalności należy mieć zawsze świadomość
wszystkich możliwych działań awaryjnych (autoratowniczych i ratowniczych). Zalecane
jest przeszkolenie z technik ratownictwa.
Łączniki
Łączniki muszą być zawsze używane w prawidłowej pozycji (obciążenie zgodne z dłuższą
osią), z zamkniętym ramieniem, zablokowane. Należy regularnie sprawdzać prawidłowe
zamknięcie łącznika naciskając go ręką.
Sprawdzić stan łączników zgodnie ze wskazówkami z Instrukcji użytkowania.
Różne
- UWAGA NIEBEZPIECZEŃSTWO! Tarcie o powierzchnie chropowate lub posiadające
ostre krawędzie jest zabronione.
- Nie uprawiać działalności wysokościowej, jeśli istnieją jakiekolwiek medyczne
przeciwwskazania. UWAGA: bezwładne wiszenie w uprzęży może doprowadzić do
poważnych zaburzeń zjologicznych lub śmierci.
- Należy dbać o to, by oznaczenia znajdujące się na produkcie były widoczne przez cały
czas jego użytkowania.
- Sprawdzić czy wasz produkt i jego zastosowanie jest zgodne z prawem, w szczególności
z normami bezpieczeństwa.
- Dołączone do produktu instrukcje użytkowania muszą być zawsze przestrzegane.
- Użytkownikowi muszą być dostarczone instrukcje użytkowania. Jeżeli produkt jest
sprzedawany poza pierwotnym krajem przeznaczenia, sprzedający powinien dostarczyć
instrukcję w języku kraju, w którym produkt będzie użytkowany.
Czas użytkowania
UWAGA: w wyjątkowych okolicznościach może się zdarzyć, że jednorazowe użycie
sprzętu spowoduje jego zniszczenie, np. kontakt z niebezpiecznymi substancjami
chemicznymi, ekstremalnymi temperaturami, kontakt z ostrą krawędzią, duże
obciążenia, poważne odpadnięcie itd.
Potencjalny czas użytkowania produktów plastikowych i tekstylnych Petzl może wynosić
10 lat od momentu produkcji. W przypadku produktów metalowych jest nieokreślony.
Rzeczywisty czas użytkowania produktu warunkowany jest stanem sprzętu - może
pojawić się przyczyna, dla której należy przestać go używać (patrz paragraf „Wycofanie
sprzętu”) lub gdy staje się przestarzałym elementem w systemie.
Czynniki, które mają wpływ na czas użytkowania produktu to: intensywność, częstość,
środowisko użytkowania, kompetencja użytkownika, konserwacja, przechowywanie itd.
Należy okresowo sprawdzać sprzęt pod kątem uszkodzeń
i poprawności funkcjonowania.
30
NAVAHO SIT / NAVAHO SIT FAST / TOP / TOP CROLL C79502-C (200907)
Page 31

(SI) SLOVENSKO
Navodila za uporabo
- NAVAHO SIT in NAVAHO SIT FAST
Pas za sedenje in namestitev pri delu.
- NAVAHO SIT ali NAVAHO SIT FAST sestavljena z TOP
prsnim pasom
Pas za ustavljanje padca, namestitev pri delu, sedenje/visenje.
- NAVAHO SIT ali NAVAHO SIT FAST sestavljena z
TOP CROLL prsnim pasom
Pas za ustavljanje padca, namestitev pri delu, sedenje/visenje, vzpenjanje po vrvi z
vgrajeno prižemo CROLL.
A
Samo tehnike, ki so prikazane na neprečrtanih slikah in/ali niso označene s
piktogramom smrtno nevarno, so dovoljene. Redno preverjajte spletno stran www.petzl.
com, kjer se nahajajo zadnje različice teh dokumentov.
Če imate kakršenkoli dvom ali težave z razumevanjem teh dokumentov, se obrnite na
PETZL.
Področja uporabe
- NAVAHO SIT in NAVAHO SIT FAST
Pas za sedenje in namestitev pri delu.
- NAVAHO SIT ali NAVAHO SIT FAST sestavljena z TOP
prsnim pasom
Pas za ustavljanje padca, namestitev pri delu, sedenje/visenje.
- NAVAHO SIT ali NAVAHO SIT FAST sestavljena z
TOP CROLL prsnim pasom
Pas za ustavljanje padca, namestitev pri delu, sedenje/visenje, vzpenjanje po vrvi z
vgrajeno prižemo CROLL.
Izdelka ne smete obremeniti preko dovoljene sile, ali ga uporabljati za kakršnekoli druge
namene kot je namenjen.
OPOZORILO
Aktivnosti, pri katerih uporabljate ta izdelek, so same po sebi
nevarne.
Sami ste odgovorni za svoja dejanja in odločitve.
Pred uporabo tega izdelka morate:
- prebrati in razumeti navodila za uporabo v celoti;
- ustrezno se usposobiti za njegovo uporabo;
- spoznati se z možnostmi in omejitvami izdelka.
- razumeti in sprejeti z uporabo izdelka povezano tveganje;
Neupoštevanje kateregakoli od teh opozoril lahko povzroči
resno poškodbo ali smrt.
Odgovornost
OPOZORILO: pred uporabo je bistveno ustrezno usposabljanje.
Izdelek lahko uporabljajo le pristojne in odgovorne osebe ali tisti, ki so pod neposredno
in vidno kontrolo pristojnih ali odgovornih oseb.
Pridobitev ustreznih izkušenj in poznavanje tehnik ter načinov varovanja so vaša lastna
odgovornost.
Osebno prevzemate vso odgovornost in tveganje za škodo, poškodbe ali smrt, ki
nastanejo ali so posledica uporabe naših izdelkov, kadarkoli in kakorkoli. Če niste
pripravljeni ali se ne čutite sposobne prevzeti odgovornosti in tveganja, ne uporabljajte
tega izdelka.
Poimenovanje delov
- TOP prsni pas:
(1) ramenska trakova, (2) sponka za nastavitev hrbtnega navezovalnega mesta,
(3) EN 361 prsno navezovalno mesto, (4) usmerjevalna vponka/vezni člen.
- TOP CROLL prsni pas:
(1) ramenska trakova, (2) sponka za nastavitev hrbtnega navezovalnega mesta,
(3) EN 361 prsno navezovalno mesto, (4) EN 12841 vgrajena prsna vrvna prižema
CROLL, (4b) usmerjevalna sponka/vezni člen z ločilcem, (16) čeljust, (17) varnostna
zapora, (18) odprtina za pritrjevanje.
- NAVAHO SIT in NAVAHO SIT FAST sedežna pasova:
(5) sprednje mesto (iz tekstila) za povezovanje prsnega in sedežnega pasu, (6) pas,
(7) EN 358, EN 813, sprednje navezovalno mesto, (8) EN 358 stranski navezovalni mesti
na pasnem obroču, (9) sponka v zadnjem delu za povezovanje prsnega in sedežnega dela
pasu z EN 358 pritrditvenim mestom za omejitev delokroga, (10) DoubleBack sponki
za nastavitev, (10b) sponki FAST za hitro zapenjanje, (11) zanka za opremo, (12) reža
za nosilec za orodje, (13) držalec traku, (14) nastavljiva elastična trakova, (15) etiketa z
oznakami, ki jo zataknete v trak na pasu.
Glavna materiala
Pas: poliester, jeklo (sponke za nastavitev), aluminijeva zlitina (navezovalna mesta).
CROLL prsna vrvna prižema: aluminijeva zlitina (telo), kromirano jeklo (čeljust),
poliamid (varnostna zapora).
Preverjanje, točke preverjanja
Pred vsako uporabo
- Pas
Preverite trakove na navezovalnih mestih, na sponkah za nastavitev in varnostne šive.
Bodite pozorni na zareze v trakovih, obrabo, ki je nastala pri uporabi in poškodbe nastale
s toploto ali kemičnimi sredstvi, ipd. Še posebej morate biti pozorni na poškodovane in
prerezane šive.
Preverite pravilno delovanje DoubleBack in FAST sponk.
- TOP
Usmerjevalna vponka/vezni člen
Preverite, da so steblo, vratica, zakovica in varnostna matica brez razpok, deformacij,
znakov korozije, idr. Odprite vratica in se prepričajte, da se samodejno zaprejo in
zaklenejo, ko jih spustite. Preverite pravilno delovanje varnostne matice. "Keylock" utor
ne sme biti blokiran s kakršnimkoli tujkom (umazanija, pesek, ipd.).
- TOP CROLL
Usmerjevalna sponka/vezni člen
Pred vsako uporabo preverite steblo.
Preverite, da je matica popolnoma privita (navoji niso vidni) in zategnjena z navorom
3 Nm.
CROLL prsna vrvna prižema
Pred vsako uporabo preverite stanje telesa, odprtine za pritrjevanje, čeljust in varnostno
zaporo (razpoke, zareze, deformacije, obraba, korozija), vzmet čeljusti in os. Prepričajte
se, da zobje niso izrabljeni. Opozorilo: ne uporabljajte vrvne prižeme, če ji manjka kateri
od zob ali so ti obrabljeni.
Med vsako uporabo
Pomembno je, da redno preverjate stanje izdelka. Preverite njegovo povezavo z drugo
opremo v sistemu in se prepričajte, da so različni kosi opreme v sistemu pravilno
nameščeni eden na drugega.
Podrobnosti o postopkih pregleda za vsak izdelek OVO lahko najdete na zgoščenki
PETZL PPE ali na www.petzl.com/ppe.
V kolikor dvomite v dobro stanje izdelka, navežite stik s PETZLOM.
B
NAVAHO SIT in NAVAHO SIT FAST
Slika 1. Namestitev pasu
Odpnite sponki na nožnih zankah.
1A. Primite sedežni pas za pasni obroč, vanj vtaknite nogi in si ga povlecite na pas.
1B. Prilagodite velikost pasnega obroča s potegom za trakova ob strani. Prosta konca
trakov pospravite s pomočjo držalcev trakov (poravnajte jih ob pas).
- Kratka konca: uporabite držalca trakov, ki sta pred sponkama za nastavitev.
- Daljša konca: speljite ju skozi stranska obroča in nato v držalca za njima.
1C. Spnite sponki in prilagodite velikost trakov na nogah.
- NAVAHO SIT: DoubleBack sponki.
- NAVAHO SIT FAST: Spnite FAST sponki. Bodite pozorni na karkoli, kar bi lahko
oviralo delovanje FAST sponk (pesek, mivka, obleka...). Preverite pravilno zapiranje.
Nastavitev in test visenja
Pas mora biti nastavljen udobno, da zmanjša tveganje poškodbe v primeru padca.
Uporabnik mora z gibanjem in prostim visenjem na vseh navezovalnih mestih z opremo
preveriti pravilno prileganje izdelka, si zagotoviti ustrezno udobje za predvideno
uporabo in najboljše prileganje.
C
NAMESTITEV PRI DELU in OMEJITEV DELOKROGA
Slika°2. EN°358:°2000 pas za namestitev pri delu in
omejitev delokroga
Ti navezovalni mesti sta namenjeni za namestitev pri delu (visenje: položaj pri delu) ali
za omejitev gibanja v območju, kjer je mogoč padec (princip povodca: omejitev gibanja).
Lahko ju uporabite le za omejitev delokroga ali namestitev pri delu, z največjo možno
višino padca: 0,5 m.
Ti mesti nista namenjeni za ustavljanje padca in lako je potrebno namestiti kolektivne
zaščite za ustavitev padca (npr. varnostne mreže) ali osebne sisteme za ustavitev padca
(npr. EN 363 sistem za ustavljanje padca).
Pri uporabi sistema za ustavljanje padca v skladu s preizkusom tipa EN 363, uporabite
TOP ali TOP CROLL prsni pas, skupaj z vašim sedežnim pasom.
2A. Sprednje navezovalno mesto
2B. Stranski navezovalni mesti na pasnem obroču
Stranski navezovalni mesti vedno uporabljajte skupaj, tako da ju povežete s podaljškom
za namestitev pri delu.
Za udobno namestitev pri delu morate imeti podporo/stojišče za noge.
Podaljšek za namestitev pri delu mora biti nameščen tako, da je sidriščna točka nad ali v
isti višini kot pas uporabnika. Podaljšek naj bo napet in višina padca omejena do 0,5°m.
2C. Hrbtno pritrditveno mesto za omejitev
Hrbtno pritrditveno mesto je namenjeno le za pritrditev omejevalnega sistema, ki vam
omeji gibanje v območju, kjer je možen padec (princip povodca).
Med delom redno preverjajte dolžino podaljška za omejitev in/ali podaljška za
namestitev pri delu.
D
Slika°3. Sedežni pas:
EN 813: 1997
Sprednje navezovalno mesto
Preizkus tipa EN 813: 1997 zadeva sedežne pasove, ki se uporabljajo za namestitev pri
delu, sistemih za omejitev delokroga in vzpenjanje po vrvi, kjer je potrebno nizko mesto
za pritrditev.
Za namestitev zavore, varovalnega podaljška ali podaljška za napredovanje, uporabite
sprednji obroč.
Nanj ne smete namestiti sisteme za ustavljanje padca.
E
NAVAHO SIT ali NAVAHO SIT FAST sestavljena z TOP
prsnim pasom
Slika 4. Priprava
Za pritrditev prsnega pasu na sedežni pas, speljite hrbtni trak skozi povezovalno sponko
v zadnjem delu (9) in nato skozi elastični držalec. Nato speljite trak skozi sponko za
nastavitev hrbtnega navezovalnega mesta (2) in še enkrat skozi elastični držalec.
F
Slika 5. Namestitev pasu
Odpnite sponki na nožnih zankah.
5A. Ramenska trakova postavite na stran, primite sedežni pas za pasni obroč, vanj
vtaknite nogi in si ga povlecite na pas.
5B. Prilagodite velikost pasnega obroča s potegom za trakova ob strani. Prosta konca
trakov pospravite s pomočjo držalcev trakov (poravnajte jih ob pas).
- Kratka konca: uporabite držalca trakov, ki sta pred sponkama za nastavitev.
- Daljša konca: speljite ju skozi stranska obroča in nato v držalca za njima.
5C. Spnite sponki in prilagodite velikost trakov na nogah.
- NAVAHO SIT: DoubleBack sponki.
- NAVAHO SIT FAST: Spnite FAST sponki. Bodite pozorni na karkoli, kar bi lahko
oviralo delovanje FAST sponk (pesek, mivka, obleka...). Preverite pravilno zapiranje.
5D. Namestite ramenska trakova. Vpnite vponko skozi sprednje mesto (iz tekstila), da
povežete prsni pas na sedežni pas (5). Privijte varnostno matico.
5E. Prilagodite ramenska trakova. Prosta konca trakov pospravite s pomočjo držalcev
na ramenskem traku.
5F. Začetna hrbtna nastavitev
Namestitev morate narediti enkrat za vselej, ko si prvič nadenete pas. Pri tem naj vam
nekdo pomaga.
Z drsenjem držalca za trak poravnajte trakova med obema sponkama (2) in (9) tako, da
nista ohlapna.
Prost konec traku tesno namestite z držalcem (poravnano, brez zank), da vas ne ovira
med delom.
Prilagodite mesto glede na obliko in velikost vašega telesa, tako da je DoubleBack sponka
nameščena v višino lopatic.
Nastavitev in test visenja
Pas mora biti nastavljen udobno, da zmanjša tveganje poškodbe v primeru padca.
Uporabnik mora z gibanjem in prostim visenjem na vseh navezovalnih mestih z opremo
preveriti pravilno prileganje izdelka, si zagotoviti ustrezno udobje za predvideno
uporabo in najboljše prileganje.
G
Slika 6. Usmerjevalna ovalna vponka/vezni člen z
ročnim zapiranjem
EN 362: 2004 vponka je del pasu, ki se uporablja kot vezi člen za povezovanje prsnega
pasu na sedežni pas. Ne uporabljajte je za pritrjevanje vrvnega podaljška ali blažilca
sunka.
6A. POZOR NEVARNOST! Vponko morate vedno uporabljati z zaprtimi vratci in
privito matico. Pri odprtih vratcih je nosilnost vponke močno zmanjšana.
S pritiskom na vratica vponke sistematično preverjajte, da so
vratica zaprta.
6B. Vponka ima največjo nosilnost, ko so vratca zaprta in je obremenjena vzdolž glavne
osi. Ob obremenitvi v katerikoli drugi smeri, je njena nosilnost manjša.
H
USTAVLJANJE PADCA
Slika 7. EN 361: 2002 pas za ustavljanje padca
Pas za celo telo za ustavljanje padca je del sistema za ustavljanje padca v skladu s
preizkusom tipa EN 363 (osebni sistemi za ustavljanje padca). Uporabljati se mora skupaj
z EN 795 sidrišči, EN 362 vponkami z matico, EN 355 blažilcem sunka, idr.
7A. Prsno navezovalno mesto
Za namestitev sistema za ustavljanje padca (na primer prenosni lovilec padca, blažilec
sunka ali drugi sistemi, ki so opisani v preizkusu tipa EN°363) uporabite le to mesto. Za
lažje prepoznavanje, je to mesto označeno s črko 'A'.
Čistina: prazen prostor pod uporabnikom
Pod uporabnikom mora biti dovolj praznega prostora, da ob padcu ne bi zadel ob
kakršnokoli oviro. Podrobnosti o izračunu čistine lahko najdete v tehničnih informacijah
za ostale elemente (blažilci sunka, prenosni lovilci padca, idr.).
I
NAVAHO SIT ali NAVAHO SIT FAST sestavljena z
TOP CROLL prsnim pasom
Slika 8. Priprava
Za pritrditev prsnega pasu na sedežni pas, speljite hrbtni trak skozi povezovalno sponko
v zadnjem delu (9) in nato skozi elastični držalec. Nato speljite trak skozi sponko za
nastavitev hrbtnega navezovalnega mesta (2) in še enkrat skozi elastični držalec.
Za namestitev prižeme CROLL na sprednji del pasu, uporabite sponko, ki je v sprednjem
povezovalnem mestu iz tekstila (5). Zaprite sponko in privijte ter zategnite matico z
navorom 3 Nm. Prepričajte se, da zaprete in zataknete plastični ločilec.
J
Slika 9. Usmerjevalna sponka/vezni člen
Sponka je del pasu, ki se uporablja kot vezni člen za povezovanje sprednjega dela prsnega
pasu na sedežni pas. Privita mora biti s 3 Nm (nemogoče jo je odviti ročno).
Ne uporabljajte je za pritrjevanje vrvnega podaljška ali blažilca sunka.
K
Slika 10. Namestitev pasu
Odpnite sponki FAST na nožnih zankah.
10A. Razmaknite ramenska trakova, primite pas za pasni obroč in vtaknite nogi v nožni
zanki.
10B. Namestite ramenske trakove.
10C. Prilagodite velikost pasnega obroča s potegom za trakova ob strani. Prosta konca
trakov pospravite s pomočjo držalcev trakov (poravnajte jih ob pas).
- Kratka konca: uporabite držalca trakov, ki sta pred sponkama za nastavitev.
- Daljša konca: speljite ju skozi stranska obroča in nato v držalca za njima.
10D. Spnite FAST sponki in prilagodite velikost trakov na nogah. Bodite pozorni na
karkoli, kar bi lahko oviralo delovanje FAST sponk (pesek, mivka, obleka...). Preverite
pravilno zapiranje.
10E. Prilagodite ramenska trakova. Prosta konca trakov pospravite s pomočjo držalcev
na ramenskem traku.
10F. Začetna hrbtna nastavitev
Namestitev morate narediti enkrat za vselej, ko si prvič nadenete pas. Pri tem naj vam
nekdo pomaga.
Z drsenjem držalca za trak poravnajte trakova med obema sponkama (2) in (9) tako, da
nista ohlapna.
Prost konec traku tesno namestite z držalcem (poravnano, brez zank), da vas ne ovira
med delom.
Prilagodite mesto glede na obliko in velikost vašega telesa, tako da je DoubleBack sponka
nameščena v višino lopatic.
Nastavitev in test visenja
Pas mora biti nastavljen udobno, da zmanjša tveganje poškodbe v primeru padca.
Uporabnik mora z gibanjem in prostim visenjem na vseh navezovalnih mestih z opremo
preveriti pravilno prileganje izdelka, si zagotoviti ustrezno udobje za predvideno
uporabo in najboljše prileganje.
L
USTAVLJANJE PADCA
Slika 11. EN 361: 2002 pas za ustavljanje padca
Pas za celo telo za ustavljanje padca je del sistema za ustavljanje padca v skladu s
preizkusom tipa EN 363 (osebni sistemi za ustavljanje padca). Uporabljati se mora skupaj
z EN 795 sidrišči, EN 362 vponkami z matico, EN 355 blažilcem sunka, idr.
11A. Prsno navezovalno mesto
Za namestitev sistema za ustavljanje padca (na primer prenosni lovilec padca, blažilec
sunka ali drugi sistemi, ki so opisani v preizkusu tipa EN°363) uporabite le to mesto. Za
lažje prepoznavanje, je to mesto označeno s črko 'A'.
Čistina: prazen prostor pod uporabnikom
Pod uporabnikom mora biti dovolj praznega prostora, da ob padcu ne bi zadel ob
kakršnokoli oviro. Podrobnosti o izračunu čistine lahko najdete v tehničnih informacijah
za ostale elemente (blažilci sunka, prenosni lovilci padca, idr.).
M
VZPENJANJE PO VRVI
CROLL prsna vrvna prižema
EN 12841: 2006
Področja uporabe
EN 12841: 2006 CROLL je vrvna prižema tipa B, namenjena za vzpenjanje po delovni
vrvi.
OPOZORILO, uporabljati jo morate skupaj z varovalno pripravo tipa A, nameščeno na
drugi varnosti vrvi (npr. s prenosnim lovilcem padca ASAPOM).
Prsna prižema CROLL ni primerna za uporabo v EN 363 sistemu za ustavljanje padca.
Premer vrvi
Uporabljajte 10-13 mm EN 1891 tipa A polstatične oplaščene vrvi.
Slika 12. Namestitev na vrv
Varnostno zaporo primite s palcem in kazalcem in jo potegnite navzdol in nato navzven.
Tako se odpre in premakne ob telo naprave. Čeljust prižeme tako ostane odprta.
V utor vstavite vrv. Sprostite zaporo, da se bo čeljust lahko premaknila in pritisnila na
vr v.
Varnostna zapora preprečuje nenamerno odprtje prižeme.
Smemanje z vrvi
Potisnite napravo po vrvi navzgor, medtem pa potegnite varnostno zaporo navzdol in
navzven.
Slika°13. Načini delovanja
13A. Vzpenjanje
CROLL je priprava za vzpenjanje po delovni vrvi ali vrvi za pristop. Ob obremenitvi
navzdol zagrabi vrv in lahkotno drsi navzgor po vrvi.
Zobje pritisnejo ob plašč vrvi, aktivirajo čeljust in povzročijo zagozdenje naprave na vrvi.
Reža v čeljusti omogoča samoodstranjevanje blata idr. iz priprave.
13B. Premikanje CROLLA po vrvi navzdol (izjemni primeri)
CROLL malo premaknite po vrvi navzgor in istočasno s kazalcem potisnite navzdol
čeljust, da zobje na plašču popustijo. Ne izvajajte manevra z varnostno zaporo, ker lahko
pride do neželjenega odprtja čeljusti.
13C. Operativni pregled
Pred vsako uporabo se prepričajte, da je vrv prvilno vstavljena in da priprava pravilno
deluje. Test mora biti opravljen s samovarovanjem uporabnika.
Potisnite CROLL po vrvi navzgor. Drseti mora lahkotno. Potegnite ga navzdol, da se
prepričate, da zagrabi vrv.
13D. Varnostna opozorila
31
NAVAHO SIT / NAVAHO SIT FAST / TOP / TOP CROLL C79502-C (200907)
Page 32

- Ko CROLLA ne uporabljate, zaprite čeljust, ker se vanjo lahko zatakne oprema ali
kakšen drug predmet.
- OPOZORILO: delovanje čeljusti ne sme biti omejeno z oviro ali tujkom (pesek, blato,
vegetacija, vrvice, zanke, obleka, barva, idr.).
- PAZITE, da varnostno zaporo ne zataknete za obleko in trak.
- Vrv med CROLLOM in nosilnim sidriščem mora biti vedno napeta. Uporabnik mora
biti vedno pod nosilnim pritrdiščem varovalnega sistema.
- Absorbcija sunkovitih obremenitev z vrvjo:
ne pozabite da je vrv tista, ki absorbira energijo v primeru padca. Bližje kot ste pritrdišču,
bolj se sposobnost absorbcije energije z vrvjo manjša in približuje ničli.
- Zavarujte vrv pred vsakršnjo možnostjo poškodbe (npr. ostrim robom, grobo površino,
idr).
- Vrv mora prosto drseti skozi CROLL. Pazite na razmere, ki lahko ovirajo drsenje (npr.
vozel ali obrabljen/poškodovan del vrvi idr.).
- Ne pozabite narediti vozel na koncu vrvi.
Slika 14. Vzpenjanje po vrvi
- Vrv za delo: Uporabite CROLL in drugo ročno prižemo (npr. ASCENSION ročno
vrvno prižemo) z zanko za nogo. Na drugo prižemo se vedno pripnite z ustreznim
vrvnim podaljškom.
- Varovalna vrv: uporabljajte priprave tipa A.
N
Največja obremenitev zanke za opremo
O
Splošne informacije
Skladnost: mesta pritrditve/vezni členi
Pri uporabi neskladne opreme lahko pride do nekontroliranega izpetja, zloma ali vpliva
na varnostno funkcijo drugega kosa opreme.
OPOZORILO: mesta pritrditve na pasu lahko delujejo kot vzvod na vratica vponke.
Ob nenadnem nategu vrvi in/ali zunanjem pritisku na sistem zapiranja, skupaj z
nepravilno lego vponke, se varnostna matica lahko zlomi in se vratica sama odprejo.
Za zmanjšanje tveganja preverite pravilno lego vponk vsakič, ko obremenite sistem
(vrvni podaljšek, zavora, idr.).
Preverite skladnost vponk z mesti pritrditve (oblika, velikost...), da se izognete uporabi
vponk, ki se nepravilno nameščajo v mestih pritrditve.
EN 365: OPOZORILO
Skladnost
Preverite, če je ta izdelek združljiv z ostalo vašo opremo. Preberite navodila za posamezni
izdelek.
OPOZORILO: pri hkratni uporabi več kosov opreme lahko pride do nevarne situacije,
v primeru, da je varnostna funkcija enega kosa opreme ogrožena z delovanjem drugega
kosa opreme.
Če ste v dvomih glede skladnosti vaše opreme, se posvetujte s proizvajalcem.
Sidrišča: Delo na višini
Nosilno pritrdišče varovalnega sistema mora biti nad uporabnikom in mora zadoščati
zahtevam po preizkusu tipa EN 795, s posebnim poudarkom na minimalni sili pretrga za
sidrišča, ki mora biti 10 kN.
Načrt reševanja
Imeti morate načrt in potrebno opremo, da lahko v primeru težav, ki bi lahko nastale
ob uporabi tega izdelka, takoj začnete z reševanjem. To narekuje ustrezno praktično
usposabljanje za potrebne primere reševanja.
Vponke/vezni členi
Vponke morate vedno uporabljati z zaprtimi vratci in privito matico. S pritiskom na
vratica vponke sistematično preverjajte, da so vratica zaprta.
Preverjajte vponke kot je opisano v njihovih navodilih za uporabo.
Razno
- POZOR NEVARNOST! Izogibajte se drgnenju ob hrapave površine in ostrim robovom.
- Uporabnik mora biti zdravstveno sposoben za dejavnosti na višini. OPOZORILO:
Nedejavno visenje v pasu lahko povzroči resne poškodbe ali smrt.
- Zagotovite čitljivost oznak na izdelku skozi njegovo celotno življenjsko dobo.
- Preveriti morate primernost opreme za vaš namen uporabe. Upoštevajte pravilnike in
standarde za varnost pri delu, ki veljajo v vaši državi.
- Upoštevati morate navodila za uporabo vsakega posameznega kosa opreme, ki ga
uporabljate s tem izdelkom.
- Uporabnik mora dobiti izdelek opremljen z navodili za uporabo. Če je izdelek prodan
izven namembne države, je prodajalec dolžan zagotoviti ta navodila v jeziku države, kjer
se bo izdelek uporabljal.
Življenjska doba
OPOZORILO: v izjemnih okoliščinah je lahko življenjska doba izdelka omejena le
na enkratno uporabo. Če je bil izpostavljen, na primer: kemikalijam, ekstremnim
temperaturam, ostrim robovom, večjemu padcu ali obremenitvi, itd.
Predvidena življenjska doba Petzlovih izdelkov je: do 10 let od dneva proizvodnje za
izdelke iz umetnih mas in tekstila. Za kovinske izdelke je neomejena.
Dejanska življenjska doba izdelka se izteče, ko doseže enega od naštetih kiterijev
za umik iz uporabe (glejte ˝Kdaj umakniti izdelek iz uporabe˝) ali ga spoznate za
zastarelega.
Dejanska življenjska doba je pogojena z vrsto dejavnikov kot so intenzivnost, pogostost
uporabe, okolje uporabe, kompetentnost uporabnika, kako dobro je bil izdelek
skladiščen in vzdrževan, itd.
Periodično preverjajte opremo za poškodbe in/ali
obrabo.
Poleg preverjanja pred in med uporabo, mora izdelek periodično podrobno preveriti
pristojna oseba najmanj na vsakih 12 mesecev. Pregled mora biti opravljen vsaj enkrat
vsakih 12 mesecev. Pogostost podrobnega preverjanja je odvisna od tipa in intenzivnosti
uporabe. Za boljše sledenje vaše opreme je priporočljivo, da opremo uporablja en
uporabnik, ki bo tako poznal njeno zgodovino. Rezultate preverjanj zabeležite v "obrazec
preverjanj". Obrazec mora omogočiti vnos naslednjih podatkov: tip opreme, model,
ime in kontaktne informacije proizvajalca ali distributerja, pomen oznak (serijske
ali individualne številke), leto proizvodnje, datum nakupa, datum prve uporabe, ime
uporabnika ter vse ostale potrebne informacije, kot npr. vzdrževanje in pogostost
uporabe, zgodovino periodičnih preverjanj (datum/opombe in opažene probleme,
nepravilnosti/ime in podpis pristojne osebe, ki je opravila preverjanje/predviden datum
naslednjega pregleda). Primere podrobnejšega preverjanja in ostale informacije si oglejte
na www.petzl.com/ppe
Kdaj umakniti izdelek iz uporabe
Izdelka ne uporabljajte več takoj, ko:
- izdelek ni prestal preverjanja (preverjanja pred in med uporabo in periodičnega
podrobnejšega preverjanja);
- je utrpel večji padec ali preobremenitev;
- ne poznate njegove celotne zgodovine uporabe;
- je star vsaj 10 let in je izdelan iz umetnih mas ali tekstila;
- imate kakršenkoli dvom v njegove lastnosti.
Da bi preprečili nadaljno uporabo, odpisano opremo uničite.
Zastarelost izdelka
Obstaja več razlogov zaradi katerih je izdelek lahko zastarel in umaknjen iz uporabe pred
koncem njegove dejanske življenjske dobe. Primeri: spremembe v standardih, pravilnikih
ali zakonodaji, razvoj novih tehnik, nezdružljivost z drugo opremo, idr.
Priredbe, popravila
Kakršnekoli predelave, dodatki ali popravila z izjemo tistih, ki jih dovoljuje proizvajalec,
zaradi tveganja zmanjšanja učinkovitosti izdelka, niso dovoljena.
Shranjevanje, transport
Shranjujte pas v embalaži (torba, zaboj) da ga zaščitite pred vplivom UV, vlago,
kemičnimi izdelki idr.
Garancija
Izdelek ima 3 letno garancijo za vse napake v materialu in izdelavi. Omejitve garancije:
normalna obraba in izraba, oksidacija, predelave ali priredbe, neprimerno skladiščenje
ter slabo vzdrževanje. Ravno tako so izključene poškodbe nastale pri nesrečah,
nepazljivostih ali pri uporabi, za katero izdelek ni namenjen oz. ni primeren.
PETZL ne odgovarja za neposredne, posredne ali naključne posledice ali kakršnokoli
drugo škodo, ki bi nastala z uporabo tega izdelka.
32
NAVAHO SIT / NAVAHO SIT FAST / TOP / TOP CROLL C79502-C (200907)
Page 33

(HU) MAGYAR
Használati utasítás
- NAVAHO SIT és NAVAHO SIT FAST:
Beülőhevederzet a törzset megtámasztó derékrésszel.
- NAVAHO SIT vagy NAVAHO SIT FAST kiegészítve a TOP
mellhevederrel:
Teljes testhevederzet zuhanás megtartására, a testet megtámasztó derékrésszel.
- NAVAHO SIT vagy NAVAHO SIT FAST kiegészítve a
TOP CROLL mellhevederrel:
Teljes testhevederzet zuhanás megtartására, törzset megtámasztó derékrésszel, a kötélen
való közlekedésre alkalmas, beépített CROLL mászóeszközzel.
A
Kizárólag azok a használati módok megengedettek, melyek az ábrákon nincsenek
áthúzva vagy halálfejes piktogrammal megjelölve. Mindenkinek ajánljuk, hogy a
termékek legújabb használati módozatairól tájékozódjon minél gyakrabban a www.petzl.
com internetes honlapon.
Ha kétsége vagy megértési problémája támad, kérjük, forduljon bizalommal a Petzl-hez.
Felhasználási terület
- NAVAHO SIT és NAVAHO SIT FAST:
Beülőhevederzet a törzset megtámasztó derékrésszel.
- NAVAHO SIT vagy NAVAHO SIT FAST kiegészítve a TOP
mellhevederrel:
Teljes testhevederzet zuhanás megtartására, a testet megtámasztó derékrésszel.
- NAVAHO SIT vagy NAVAHO SIT FAST kiegészítve a
TOP CROLL mellhevederrel:
Teljes testhevederzet zuhanás megtartására, törzset megtámasztó derékrésszel, a kötélen
való közlekedésre alkalmas, beépített CROLL mászóeszközzel.
A terméket tilos a megadott szakítószilárdságánál nagyobb terhelésnek kitenni, vagy
más, a megadott felhasználási területeken kívüli célra használni.
FIGYELEM
A termék használata közben végzett tevékenységek
természetükből adódóan veszélyesek.
Mindenki maga felel döntéseiért, tetteiért és azok
következményeiért.
A termék használata előtt okvetlenül szükséges, hogy a felhasználó:
- Elolvassa és megértse a termékhez mellékelt valamennyi használati utasítást.
- Arra jogosult személytől megfelelő oktatást kapjon.
- Alaposan megismerje a terméket, annak előnyeit és korlátait.
- Tudatában legyen a termék használatával kapcsolatos kockázatoknak, és elfogadja
azokat.
A fenti gyelmeztetések bármelyikének be nem tartása súlyos
balesetet vagy halált okozhat.
Felelősség
FIGYELEM: használat előtt megfelelő gyakorlati képzés szükséges.
A terméket csakis képzett és hozzáértő személyek használhatják, vagy a felhasználók
legyenek folyamatosan képzett és hozzáértő személyek felügyelete alatt.
A megfelelő módszerek elsajátítása és a szükséges óvintézkedések megtétele
mindenkinek saját felelőssége.
Mindenki maga viseli a kockázatot és felelősséget termékeink helytelen használatából
adódó bárminemű kárért, balesetért vagy halálesetért. Ha Ön nincs abban a helyzetben,
hogy ezt a felelősséget vállalja, kérjük, ne használja a terméket.
Részek megnevezése
- TOP mellheveder:
(1) Vállpántok, (2) Hátsó állítócsat, (3) Mellső bekötési pont EN 361, (4) Irányban tartó
összekötőelem.
- TOP CROLL mellheveder:
(1) Vállpántok, (2) Hátsó állítócsat, (3) Mellső bekötési pont EN 361, (4a) Beépített
CROLL hasi mászóeszköz EN 12841, (4b) Irányban tartó maillon rapide
elválasztóelemmel, (16) Fogazott nyelv, (17) Biztonsági kar, (18) Csatlakozónyílás.
- NAVAHO SIT és NAVAHO SIT FAST beülőhevederek:
(5) Hasi összekötési pont (heveder) a mellheveder és a beülőheveder között,
(6) Derékrész, (7) Hasi bekötési pont gyűrűje EN 358, EN 813, (8) Oldalsó bekötési
pontok a derékrészen EN 358, (9) A mellrészt és a derékrészt összekötő hátulsó csat
pozicionálásra alkalmas bekötési ponttal EN 358, (10) DoubleBack állítócsatok, (10 b)
FAST gyorscsatok, (11) Felszereléstartó, (12) Bújtató felszereléstartónak, (13) Heveder
bújtatója, (14) Elasztikus pánt, (15) A derékrészben elrejthető jelölőcimke.
Alapanyagok
Beülőhevederzet: poliészter, acél (állítócsatok), alumíniumötvözet (bekötési pontok).
CROLL hasi mászóeszköz: alumíniumötvözet (test), krómacél (nyelv),
poliamid (biztonsági kar).
Ellenőrzés, megvizsgálandó részek
Minden egyes használatbavétel előtt
- Beülőhevederzet
Vizsgálja meg a hevedereket a bekötési pontok és a csatok körül, valamint az állítócsatok
és a biztonsági varratok állapotát.
Ügyeljen a kopásokra, az elhasználódás, magas hőmérséklet vagy kémiai anyagok által
okozott elváltozásokra. Ügyeljen a szakadt szálakra.
Vizsgálja meg a DoubleBack és a FAST csatok működőképességét.
- TOP
Irányban tartó összekötőelem
Vizsgálja meg a karabiner testének, szegecsének és zárógyűrűjének állapotát, különös
tekintettel a repedésekre, deformációkra és a korrózió jeleire. Nyissa ki a nyelvet, és
győződjön meg róla, hogy elengedéskor automatikusan becsukódik. Vizsgálja meg a
zárógyűrű működőképességét. A Keylock nyílását ne zárja el idegen test (föld, kavics
stb.).
- TOP CROLL
Irányban tartó maillon rapid
Minden használatbavétel előtt vizsgálja meg a testet.
Vizsgálja meg, hogy a csavar teljesen be legyen tekerve (a menetnek nem szabad
látszania) és 3 Nm szorítónyomatékkal le legyen zárva.
CROLL hasi mászóeszköz
Minden használatbavétel előtt vizsgálja meg a test, a csatlakozónyílás, a fogazott nyelv
valamint a biztonsági kar állapotát (nem láthatók-e repedések, karcolások, deformációk,
az elhasználódás vagy korrózió jelei) és a nyelv rugóját és tengelyét. Szemrevételezze
a fogak állapotát. Figyelem, ha a fogak nagyon elhasználódtak, vagy hiányoznak, a
mászóeszköz nem használható.
A használat során
A termék állapotát a használat során is rendszeresen ellenőrizni kell. Győződjön meg
arról, hogy a felhasznált eszközök egymáshoz képest jól helyezkednek el.
A személyi védőfelszerelés ellenőrzésére vonatkozóan részletes tájékoztatást talál az EPI
PETZL CD-ROM-on vagy a www.petzl.fr/EPI internetes honlapon.
Kétséges esetben forduljon bizalommal a Petzl-hez.
B
NAVAHO SIT és NAVAHO SIT FAST
1. ábra: A hevederzet felvétele
Nyissa ki a combrészek csatjait.
1A. Fogja meg a hevedert a derékrésznél fogva, és lépjen bele a lábaival.
1B. Állítsa be a derékrész méretét a hevederek meghúzásával. Rendezze el a kilógó
hevedervégeket a bújtatókban (jól elsimítva).
- Rövid hevedervég: bújtassa az állítócsat előtti bújtatóba.
- Hosszú hevedervég: fűzze át a hevedervégeket az oldalsó bekötési pont gyűrűjén, majd
bújtassa őket az emögötti bújtatókba.
1C. Zárja a csatokat, és állítsa be a combrész méretét.
- NAVAHO SIT: DoubleBack csatok.
- NAVAHO SIT FAST: Zárja a FAST csatokat. Ügyeljen az idegen testekre (kavics,
homok, ruházat stb.), melyek akadályozhatják a FAST gyorscsatok működését. Vizsgálja
meg a csatok kifogástalan záródását.
Beállítás és kipróbálás
Hevederzetét mindig állítsa be pontosan saját testméretére, hogy az esetleges zuhanás
káros következményeinek veszélyét ezzel is csökkentse.
Minden bekötési pontban próbáljon mozogni, és lógjon bele a hevederzetbe
felszerelésével együtt, hogy meggyőződjön a hevederzet helyes méretéről, optimális
beállításáról és a várható használati módnak megfelelő kényelemről.
C
MUNKAHELYZET POZICIONÁLÁSA
2. ábra: Munkahelyzetet pozicionáló testhevederzetek
EN 358: 2000
Ezek a bekötési pontok tevékenysége során egyrészt segítik a felhasználót egyensúlyi
helyzetének megtartásában munkahelyén (a rendszer terhelése közben, munkahelyzet
pozicionálásakor), másrészt megakadályozzák abban, hogy olyan helyre elérjen, ahol
zuhanás veszélye áll fenn (mozgástér korlátozása, pozicionálás). Ezekhez a bekötési
pontokhoz kizárólag munkahelyzet pozicionálására vagy a test megtámasztására szolgáló
rendszereket szabad rögzíteni, ahol a lehetséges esésmagasság legfeljebb 0,5 m.
Ezek a bekötési pontok nem alkalmasak zuhanás megtartására, és adott esetben
szükséges lehet a munkahelyzetet pozicionáló vagy a testet megtámasztó rendszer
kiegészítése zuhanás megtartására alkalmas, kollektív védőeszközökkel (pl. biztonsági
háló) vagy egyéni védőeszközökkel (pl. az EN 363 szabványnak megfelelő zuhanás
megtartását szolgáló rendszer).
Zuhanás megtartására alkalmas, EN 363 szabványnak megfelelő rendszerben használva
egészítse ki beülőhevederzetét TOP vagy TOP CROLL mellhevederrel.
2A. Hasi bekötési pont
2B. A derékrész oldalsó bekötési pontjai
A két oldalsó bekötési pontot mindig együtt kell használni, egy munkahelyzetet
pozicionáló kantárral összekötve, hogy a derékrész a törzset kényelmesen megtámassza.
A kényelmes munkavégzés érdekében a lábakat is meg kell támasztani.
A munkahelyzetet pozicionáló kantárat úgy kell beállítani, hogy a felhasználó a
kikötési ponttal egy vonalban vagy az alatt maradjon. A kantár végig legyen feszes, és a
mozgásteret legfeljebb 0.5 m-re kell korlátozni.
2C. Hátsó pozicionáló bekötési pont
A derékrésznek ez a bekötési pontja kizárólag kantár rögzítésére szolgál, mely meggátolja
a felhasználót abban, hogy zuhanás kockázatát jelentő zónába elérjen (mozgástér
korlátozása).
Használat során rendszeresen ellenőrizze felszerelésének állító- és/vagy rögzítőelemeit.
D
3. ábra: Beülőheveder:
EN 813: 1997
Hasi bekötési pont
Az EN 813: 1997 rendelet rendelkezik a munkahelyzet pozicionálására, a test
megtámasztására és a kötélen való közlekedésre szolgáló beülőhevederzetekről, melyeken
kellően alacsonyan lévő bekötési pontra van szükség.
Ezt a bekötési pontot kell használni ereszkedőeszköz, munkahelyzetet pozicionáló vagy
az előrehaladást szolgáló kantár rögzítésére.
Ez a bekötési pont nem alkalmas zuhanás megtartására.
E
NAVAHO SIT vagy NAVAHO SIT FAST kiegészítve a
TOP mellhevederrel
4. ábra: Előkészületek
A mellhevederzetet úgy csatlakoztathatja a beülőhöz, hogy a hátsó hevedert átfűzi az
összekötőcsaton (9) és az elasztikus bújtatón. Ezután fűzze be ugyanezt a hevedert a
hátulsó DoubleBack állítócsatba (2), majd újra az elasztikus bújtatóba.
F
5. ábra: A hevederzet felvétele
Nyissa ki a combrészek csatjait.
5A. Tartsa a mellhevedereket egy oldalon, fogja meg a hevedert a derékrésznél fogva, és
lépjen bele a lábaival.
5B. Állítsa be a derékrész méretét a hevederek meghúzásával. Rendezze el a kilógó
hevedervégeket a bújtatókban (jól elsimítva).
- Rövid hevedervég: bújtassa az állítócsat előtti bújtatóba.
- Hosszú hevedervég: fűzze át a hevedervégeket az oldalsó bekötési pont gyűrűjén, majd
bújtassa őket az emögötti bújtatókba.
5C. Zárja a csatokat, és állítsa be a combrész méretét.
- NAVAHO SIT: DoubleBack csatok.
- NAVAHO SIT FAST: Zárja a FAST csatokat. Ügyeljen az idegen testekre (kavics,
homok, ruházat stb.), melyek akadályozhatják a FAST gyorscsatok működését. Vizsgálja
meg a csatok kifogástalan záródását.
5D. Igazítsa el a mellhevedert a vállain. Akassza be az összekötőelemet a hasi összekötési
pontba (hevederbe) a mellheveder és a beülőheveder között. Zárja az összekötőelem
zárógyűrűjét.
5E. Állítsa be a mellhevederzetet. Rendezze el a kilógó hevedervégeket a
mellhevederzeten található bújtatókban (jól elsimítva).
5F. A hátsó hevederhossz beállítása
Ezt a beállítást egyszer kell elvégezni, a hevederzet első felvételekor, egy másik személy
segítségével.
Csúsztassa olyan helyre a bújtatót, hogy a hátsó heveder mindkét szála megfeszüljön és
kisimuljon (egyik oldalon se legyen hurok).
A kilógó hevedervéget (jól elsimítva) fűzze a bújtatóba, hogy az a későbbiekben ne
zavarja a munkában.
A hátsó bekötési pont magasságát egyéni alkatának megfelelően állítsa be, a bekötési
pont a lapockák magasságába essen.
Beállítás és kipróbálás
Hevederzetét mindig állítsa be pontosan saját testméretére, hogy az esetleges zuhanás
káros következményeinek veszélyét ezzel is csökkentse.
Minden bekötési pontban próbáljon mozogni, és lógjon bele a hevederzetbe
felszerelésével együtt, hogy meggyőződjön a hevederzet helyes méretéről, optimális
beállításáról és a várható használati módnak megfelelő kényelemről.
G
6. ábra: Kézi zárású, ovális, irányban tartó
összekötőelem
Ez az EN 362: 2004 szabvány szerinti összekötőelem a mellhevederzet első felét a
derékrésszel összekötő elem. Nem alkalmas kantár vagy energiaelnyelő rögzítésére.
6A. VIGYÁZAT, VESZÉLY: az összekötőelemet csak csukott nyelvvel és lezárt
zárógyűrűvel szabad használni. Nyitott nyelvvel a karabiner szakítószilárdsága jelentősen
csökken.
Ellenőrizze a nyelv tökéletes záródását oly módon, hogy kézzel
megpróbálja benyomni azt.
6B. A (csukott nyelvű) karabiner szakítószilárdsága hosszirányú terhelésnél a legnagyobb.
Minden más helyzetben ez a szakítószilárdság kisebb.
H
ZUHANÁS MEGTARTÁSA
7. ábra: Zuhanás megtartására alkalmas testhevederzet
EN 361: 2002
Az EN 363 (magasból való lezuhanás elleni egyéni védőrendszerekről szóló)
szabványban előírt rendszer elemeként használható, zuhanás megtartására alkalmas
teljes testhevederzet. Csak az EN 795 szabványnak megfelelő kikötési ponttal, az
EN 362 szabványnak megfelelő zárható karabinerrel, az EN 355 szabványnak megfelelő
energiaelnyelővel stb. használható.
7A. Mellső bekötési pont
Kizárólag ez a pont alkalmas az EN 363 szabványban leírt zuhanás megtartását szolgáló
rendszer, pl. kötélre szánt mobil zuhanásgátló, energiaelnyelő stb. rögzítésére. A jobb
felismerhetőség érdekében ez a bekötési pont "A"
Szabad eséstér: a felhasználó alatti szabad tér
A felhasználó alatti szabad térnek elegendően nagynak kell lenni ahhoz, hogy egy
esetleges zuhanás során semmilyen tárgynak ne ütközzön neki. A szabad eséstér pontos
kiszámítását a rendszer egyéb elemeinek (energiaelnyelők, mobil zuhanásgátló stb)
használati utasításában részletezzük.
I
NAVAHO SIT vagy NAVAHO SIT FAST kiegészítve a
TOP CROLL mellhevederrel
8. ábra: Előkészületek
A mellhevederzetet úgy csatlakoztathatja a beülőhöz, hogy a hátsó hevedert átfűzi az
összekötőcsaton (9) és az elasztikus bújtatón. Ezután fűzze be ugyanezt a hevedert a
hátulsó DoubleBack állítócsatba (2), majd újra az elasztikus bújtatóba.
A CROLL mászóeszközt úgy tudja a beülőhevederhez csatlakoztatni, hogy a maillon
rapidot rögzíti a hasi összekötési ponthoz (hevederhez) a mellheveder és a beülőheveder
között (5). Csavarja be a csavart és húzza meg kulccsal 3 Nm nyomatékkal. Ne feledje a
műanyag elválasztóelemet bepattintani.
J
9. ábra: Irányban tartó maillon rapid
Ez a maillon rapid a mellhevederzet első felét a derékrésszel összekötő elem. Mindig
3 Nm szorítónyomatékkal lezárt állapotban kell lennie (ez kézi erővel még nyitható).
Nem alkalmas kantár vagy energiaelnyelő rögzítésére.
K
10. ábra: A hevederzet felvétele
Nyissa kia a combrészek FAST csatjait.
10A. Tárja szét a vállhevedereket, fogja meg a hevedert a derékrésznél fogva, és lépjen
bele a lábaival.
10B. Vegye a mellhevedert a vállaira.
10C. Állítsa be a derékrész méretét a hevederek meghúzásával. Rendezze el a kilógó
hevedervégeket a bújtatókban (jól elsimítva).
- Rövid hevedervég: bújtassa az állítócsat előtti bújtatóba.
- Hosszú hevedervég: fűzze át a hevedervégeket az oldalsó bekötési pont gyűrűjén, majd
bújtassa őket az emögötti bújtatókba.
10D. Zárja a FAST csatokat, és állítsa be a combrész méretét. Ügyeljen az idegen testekre
(kavics, homok, ruházat stb.), melyek akadályozhatják a FAST gyorscsatok működését.
Vizsgálja meg a csatok kifogástalan záródását.
10E. Állítsa be a mellhevederzetet. Rendezze el a kilógó hevedervégeket a
mellhevederzeten található bújtatókban (jól elsimítva).
10F. A hátsó hevederhossz beállítása
Ezt a beállítást egyszer kell elvégezni, a hevederzet első felvételekor, egy másik személy
segítségével.
Csúsztassa olyan helyre a bújtatót, hogy a hátsó heveder mindkét szála megfeszüljön és
kisimuljon (egyik oldalon se legyen hurok).
A kilógó hevedervéget (jól elsimítva) fűzze a bújtatóba, hogy az a későbbiekben ne
zavarja a munkában.
A hátsó bekötési pont magasságát egyéni alkatának megfelelően állítsa be, a bekötési
pont a lapockák magasságába essen.
Beállítás és kipróbálás
Hevederzetét mindig állítsa be pontosan saját testméretére, hogy az esetleges zuhanás
káros következményeinek veszélyét ezzel is csökkentse.
Minden bekötési pontban próbáljon mozogni, és lógjon bele a hevederzetbe
felszerelésével együtt, hogy meggyőződjön a hevederzet helyes méretéről, optimális
beállításáról és a várható használati módnak megfelelő kényelemről.
L
ZUHANÁS MEGTARTÁSA
11. ábra: Zuhanás megtartására alkalmas testhevederzet
EN 361: 2002
Az EN 363 (magasból való lezuhanás elleni egyéni védőrendszerekről szóló)
szabványban előírt rendszer elemeként használható, zuhanás megtartására alkalmas
teljes testhevederzet. Csak az EN 795 szabványnak megfelelő kikötési ponttal, az
EN 362 szabványnak megfelelő zárható karabinerrel, az EN 355 szabványnak megfelelő
energiaelnyelővel stb. használható.
11A. Mellső bekötési pont
Kizárólag ez a pont alkalmas az EN 363 szabványban leírt zuhanás megtartását szolgáló
rendszer, pl. kötélre szánt mobil zuhanásgátló, energiaelnyelő stb. rögzítésére. A jobb
felismerhetőség érdekében ez a bekötési pont "A"
Szabad eséstér: a felhasználó alatti szabad tér
A felhasználó alatti szabad térnek elegendően nagynak kell lenni ahhoz, hogy egy
esetleges zuhanás során semmilyen tárgynak ne ütközzön neki. A szabad eséstér pontos
kiszámítását a rendszer egyéb elemeinek (energiaelnyelők, mobil zuhanásgátló stb)
használati utasításában részletezzük.
M
KÖTÉLEN VALÓ KÖZLEKEDÉS
CROLL hasi mászóeszköz
EN 12841: 2006
Felhasználási terület
A CROLL EN 12841: 2006 egy kötélre szánt, B típusú hasi mászóeszköz a munkakötélen
való felfelé haladásra.
FIGYELEM: A típusú kötél esetén mindig kötelező egy második, ún. biztosító kötélszál
használata (pl. kötélre szánt ASAP mobil zuhanásgátlóval).
A CROLL hasi mászóeszköz nem használható EN 363 szabványnak megfelelő zuhanást
megtartó rendszer elemeként.
Kötélátmérő
Csak 10 - 13 mm átmérőjű (körszövött) EN 1891 A típusú félstatikus kötéllel
használható.
12. ábra: Az eszköz kötélre helyezése
33
NAVAHO SIT / NAVAHO SIT FAST / TOP / TOP CROLL C79502-C (200907)
Page 34

Hüvelykujjával és mutatóujjával fogja meg a biztonsági kart, és húzza a fogazott nyelvet
lefelé. Akassza ki a kart az eszköz testének peremére. A fogazott nyelv így nyitott állásban
marad.
Helyezze be a kötelet a vájatba. Tolja el a kart, hogy a nyelv felfeküdjön a kötélre.
A biztonsági kar meggátolja a nyelv véletlen kinyílását.
Levétel a kötélről
Tolja az eszközt a kötélen felfelé, és ezzel egy időben mutatóujjával nyomja lefelé a kart.
13. ábra: Működési elv
13A. Felmászás
A CROLL kötélen való (felfelé irányuló) közlekedére szánt eszköz. A testúly (lefelé
irányuló) terhelésére blokkol, ellenkező (felfelé irányuló) mozdításra szabadon csúszik.
A fogak belemélyednek a kötél köpenyébe, így blokkolják a nyelvet. A blokkolt nyelv
megakadályozza az eszköz elcsúszását a kötélen. A nyelven található résen át távozhat a
sár és egyéb szennyeződés.
13B. Ereszkedés CROLL-lal (kivételes esetben)
Tolja az eszközt a kötélen felfelé, és ezzel egy időben mutatóujjával nyomja lefelé a kart. A
biztonsági kart ne használja, nehogy véletlenül kinyissa az eszközt.
13C. A működőképesség vizsgálata
A kötélre helyezés helyes irányáról minden használat előtt önbiztosítás mellett elvégzett
teszt során kell meggyőződni.
Tolja felfelé a CROLL-t a kötélen. Akadálytalanul kell csúsznia. Győződjön meg róla,
hogy lefelé blokkol a kötélen.
13D. Óvintézkedések
- Használaton kívül zárja vissza a CROLL nyelvét, mert a nyitva hagyott eszköz vájatába
beakadhat a felszerelés vagy más tárgy.
- VIGYÁZAT: belekerült idegen test (kavics, sár, ág, kötélgyűrű, heveder, ruházat, festék
stb.) akadályzhatja az eszköz működését.
- VIGYÁZAT: a biztonsági kar ne akadjon bele a ruházatba vagy a hevederzetbe.
- A kötél mindig legyen feszes a CROLL és a kikötési pont között. A felhasználó mindig
maradjon a kikötési pont alatt.
- A kötél energiaelnyelése:
ne feledje, hogy zuhanás megtartásakor az esés energiáját a kötél nyeli el. A kötél
energiaelnyelő kapacitása annál kisebb, minél közelebb van a felhasználó a kikötési
ponthoz, legrosszabb esetben ez a kapacitás csaknem nulla.
- A kötelet óvni kell minden káros behatástól (pl. éleken való felfekvéstől stb.).
- A kötélnek szabadon kell futnia a CROLL-ban, ezért kerülje a csomók, kopott
köpenyrészek stb. használatát.
- A kötélszálak végére ne felejtsünk el csomót kötni.
14. ábra: Kötélen való felmászás
- Munkakötél: használja a CROLL-t és egy másik, kézi mászóeszközt, pl. ASCENSION-t
és lépőhurkot. Ne felejtse ezt a másik eszközt is megfelelő kantárral önmagához rögzíteni.
- Biztonsági kötél: használjon A típusú kötelet (önbiztosítás).
N
kell rögzíteni. A jegyzőkönyvnek a következő adatokat kell tartalmaznia: az eszköz
típusa, megnevezése, a gyártó vagy forgalmazó neve és címe, egyedi azonosítószám vagy
sorozatszám, gyártási éve, vásárlás dátuma, első használatbavétel dátuma, felhasználó
neve, minden fontos információ, mint pl. a karbantartás és a használat gyakorisága, az
időszakos felülvizsgálatok története (dátum, megjegyzések, észlelt hibák felsorolása, a
szakképzett ellenőr neve és aláírása, a következő esedékes vizsgálat időpontja). A www.
petzl.fr/epi internetes honlapon megtalálható egy jegyzőkönyv minta.
Leselejtezés
Az eszközt nem szabad tovább használni, ha:
- valamely (a használat előtt vagy annak során elvégzett ill. az időszakos) felülvizsgálat
eredménye nem kielégítő,
- az eszközt nagy erőhatás érte vagy magasból leejtették,
- az eszköz használatának körülményei nem teljesen ismertek,
- az eszköz műanyagból vagy textíliából készült részeket tartalmaz és 10 évnél idősebb,
- a használat biztonságosságát illetően bármilyen kétely merül fel.
A leselejtezett terméket semmisítse meg, hogy azt a későbbiekben se lehessen használni.
Az eszköz elavulása
Egy termék elavulásának számtalan olyan oka lehet, amely miatt azt a használatból ki kell
vonni, pl. vonatkozó szabványok ill. jogszabályok változása, technikai fejlődés, a többi
eszközzel való kompatibilitás hiánya stb.
Javítások, módosítások
Tilos a termék bármilyen javítása vagy módosítása, amit nem a Petzl szakszervizében
végeztek el, mivel ez a termék működőképességét veszélyeztetheti.
Raktározás, szállítás
Használat után helyezze felszerelését olyan zsákba, mely védi azt az UV-sugárzástól,
nedvességtől, vegyi anyagoktól stb.
Garancia
Anyag- és gyártási hibák esetén erre a termékre a gyártó 3 év garanciát vállal. A garancia
nem vonatkozik a következő esetekre: normális elhasználódásból, nem szakszervizben
történt javításból vagy átalakításból, helytelen tárolásból valamint balesetekből,
hanyagságból vagy nem rendeltetésszerű használatból eredő károk.
A PETZL nem vállal felelősséget semmiféle olyan káreseményért, amely a termék
használatának közvetlen, közvetett, véletlenszerű vagy egyéb következménye.
Felszereléstartó fül
O
Általános információk
Kompatibilitás: bekötési pontok / összekötőelemek
Nem kompatibilis elemek csatlakoztatása a karabiner véletlenszerű kiakadásához vagy
eltöréséhez vezethet, valamint akadályozhatja a többi felszerelési tárgy biztonságos
működését.
FIGYELEM: a hevederzet bekötési pontjának gyűrűi a karabiner nyelvére nyomást
gyakorolhatnak.
A kötél hirtelen megfeszülése és / vagy a zárórendszert érő ütés következtében a helytelen
pozícióban lévő karabiner zárógyűrűje eltörhet, és a nyelv kinyílhat.
Ezért a felhasználó mindig győződjön meg a karabiner helyes állásáról, mielőtt a
rendszerbe beleterhel (kantárral, ereszkedőeszközzel stb.).
Ellenőrizze ezenkívül a bekötési pontok gyűrűinek és a használt összekötőelemeknek a
kompatibilitását (alak, méret stb.) és kerülje az olyan összekötőelemeket, melyek stabil
helyzetükből könnyen elfordulnak.
EN 365: FIGYELMEZTETÉS
Kompatibilitás
Vizsgálja meg, hogy ez az eszköz kompatibilis-e felszerelése többi részével (lásd a termék
használati utasítását).
VIGYÁZAT: többféle felszerelés használata esetén veszélyt jelenthet, ha az egyik
felszerelés biztonsági működése a másik eszköz biztonsági működését akadályozza.
Ha a kompatibilitással kapcsolatban bármilyen kérdése vagy kétsége merülne fel, kérjük,
forduljon bizalommal a Petzl-hez.
Kikötési pontok: Magasban végzett munka
A rendszer kikötési pontja lehetőleg a felhasználó fölött helyezkedjen el és
mindenképpen feleljen meg az EN 795 szabvány előírásainak, vagyis teherbírása legalább
10 kN legyen.
Mentési terv
- Mindig készítsen mentési tervet, és határozza meg a gyors beavatkozáshoz szükséges
felszerelést. Ehhez természetesen a mentési technikák alapos ismeretére van szükség.
Összekötőelemek
A karabinereket csak helyes (hosszanti) állásban, csukott nyelvvel és lezárt állapotban
szabad használni. Ellenőrizze rendszeresen a nyelv tökéletes záródását oly módon, hogy
kézzel megpróbálja benyomni azt.
Vizsgálja felül az összekötőelemek állapotát a használati utasításuknak megfelelő módon.
Egyebek
- VIGYÁZAT, VESZÉLY: Óvja az eszközt a maró anyagoktól és az élektől.
- A felhasználó egészségi állapota feleljen meg a magasban végzett tevékenység
követelményeinek. FIGYELEM: beülőhevederzetben való hosszantartó lógás eszméletlen
állapotban súlyos vagy halálos keringési rendellenességekhez vezethet.
- Ügyeljen arra, hogy a terméken látható jelzések annak teljes élettartama alatt
olvashatóak maradjanak.
- Győződjön meg arról, hogy ez a karabiner megfelel-e az Ön által végzett
tevékenységhez a munkavédelmi előírások és szabványok tekintetében.
- Használat során a rendszer valamennyi elemének használati utasítását be kell tartani.
- A felhasználónak a termékkel együtt a termék használati utasítását is rendelkezésére
kell bocsátani. Amennyiben a termék külföldön kerül továbbértékesítésre, az eladónak
mellékelnie kell a használati utasítást az adott ország nyelvén, ahol a terméket használni
fogják.
Élettartam
FIGYELEM, kivételes esetben az élettartam akár egyetlen használatra is korlátozódhat,
pl. ha a termék veszélyes vegyi anyaggal érintkezett, igen magas hőmérsékletnek volt
kitéve, éles felületen feküdt föl vagy nagy erőhatás érte, magasból leejtették stb.
A Petzl termékek lehetséges élettartama műanyag és textiltermékek esetében a gyártástól
számított 10 év, fémeszközök esetében pedig korlátlan. A fémeszközök élettartama
korlátlan.
Termékeink valós élettartama akkor ér véget, ha azt bármilyen okból le kell selejtezni
(lásd a Leselejtezés c. bekezdést) illetve ha az eszköz a rendszerben elavult.
A termék valós élettartamát többek között a következő tényezők befolyásolják: a
használat intenzitása, gyakorisága, környezete, a felhasználó kompetenciája, a tisztítás,
karbantartás stb.
Rendszeresen ellenőrizze, hogy az eszköz kifogástalanul
működik és nem károsodott.
A használat előtti és a használat során elvégzett szemrevételezésen kívül a terméket
rendszeresen alapos időszakos felülvizsgálatnak kell alávetni, melyet szakképzett személy
végezhet. Ezt a felülvizsgálatot évente legalább egyszer el kell végezni. A felülvizsgálat
gyakorisága függ a használat gyakoriságától, intenzitásától és körülményeitől.
Az eszközök nyilvántartásának megkönnyítése érdekében ajánlatos az egyéni
védőfelszereléseket egyetlen felhasználónak névre szólóan személyes használatra kiutalni,
aki gyelemmel kíséri annak sorsát. A felülvizsgálatok eredményeit jegyzőkönyvben
34
NAVAHO SIT / NAVAHO SIT FAST / TOP / TOP CROLL C79502-C (200907)
Page 35

(BG) БЪЛГАРСКИ
Начин на употреба
- NAVAHO SIT и NAVAHO SIT FAST:
Колан за седнало положение, позициониращ колан.
- NAVAHO SIT или NAVAHO SIT FAST в комбинация с
гръден колан TOP:
Предпазен колан против падане, позициониращ колан, седалка.
- NAVAHO SIT или NAVAHO SIT FAST в комбинация с
гръден колан TOP CROLL:
Предпазен колан срещу падане, позициониращ колан, колан за седнало
положение, предпазен колан за въжен достъп с интегриран самохват CROLL.
A
От показаните техники може да използвате само тези, които не са зачеркнати и/
или маркирани с череп. Осведомявайте се редовно за актуализирането на тези
документи на страницата www.petzl.com
В случай на съмнение или неразбиране, обърнете се към PETZL.
Предназначение
- NAVAHO SIT и NAVAHO SIT FAST:
Колан за седнало положение, позициониращ колан.
- NAVAHO SIT или NAVAHO SIT FAST в комбинация с
гръден колан TOP:
Предпазен колан против падане, позициониращ колан, седалка.
- NAVAHO SIT или NAVAHO SIT FAST в комбинация с
гръден колан TOP CROLL:
Предпазен колан срещу падане, позициониращ колан, колан за седнало
положение, предпазен колан за въжен достъп с интегриран самохват CROLL.
Този продукт не трябва да бъде използван извън неговите възможностите или в
ситуация, за която не е предназначен.
ВНИМАНИЕ
Дейностите, изискващи употребата на това средство по
принцип са опасни.
Вие сте отговорни за вашите действия и за вашите
решения.
Преди да започнете да употребявате това средство, трябва:
- Да прочетете и разбере те всички инструкции за употреба.
- Да научите специфичните за средството начини на употреба.
- Да се усъвършенствате в работа със средството, да познавате качествата и
възможностите му.
- Да разберете и осъзнае те съществуващия риск.
Неспазването дори на едно от тези предупреждения, може
да доведе до тежки, дори смъртоносни травми.
Отговорност
ВНИМАНИЕ, задължително е да преминете обучение, съотв етстващо на
дейността с която ще се занимавате.
Този продукт трябва да се използува или от компетентни и добре осведомени
лица, или работещият с него трябва да бъде под непосредствен зрителен контрол
на такова лице.
Вие поемате отговорност за правилното усвояване на начина на употреба и
мерките за безопасност.
Вие лично поемате всякакъв риск и отговорност при всяка щета, нараняване или
смърт, произлезли вследствие на каквато и да било неправилна употреба на наши
продукти. Ако не сте в състояние да поемете този риск и тази отговорност, не
използувайте продукта.
Номерация на елементите
- Гръден колан TOP:
(1) Презрамки, (2) регулируема катарама на гърба, (3) гръдна халка EN 361,
(4) еднопосочен съединител.
- Гръден колан TOP CROLL:
(1) Презрамки, (2) регулируема катарама на гърба, (3) гръдна халка EN 361,
(4a) интегриран гръден самохват CROLL EN 12841, (4b) еднопосочен майон рапид
с разделителна скоба, (16) палец, (17) предпазна ключалка, (18) отвор за свързване.
- Колани за седнало положение NAVAHO SIT и
NAVAHO SIT FAST:
(5) Предна долна (текстилна) точка за свързване на гръдния колан със седалката,
(6) Кръстен колан, (7) долна халка EN 358, EN 813, (8) странични халки на колана
EN 358, (9) задна катарама за обединяване на гръдния колан със седалката
с отвор за свързване към ограничителни системи EN 358, (10) регулируеми
катарами DoubleBack, (10 bis) бързи катарами FAST, (11) инвентарник, (12) гайка
за инвентарника, (13) гайка за лентата, (14) регулируеми ластици, (15) етикет с
маркировка, който се вкарва от вътрешната страна на колана.
Основни материали
Предпазен колан: полиестер, стомана (регулируемите катарами), алуминиева
сплав (точките на окачване).
Гръден самохват CROLL: алуминиева сплав (корпуса), хромирана
стомана (палеца), полиамид (предпазната ключалка).
Контрол, начин на проверка
Преди всяка употреба
- Предпазен колан
Проверявайте лентите в близост до халките за окачване, регулируемите катарами
и предпазните шевове.
Следете за скъсвания, износвания и повреди вследствие на употреба, топлина,
химически вещества и др. Внимавайте за скъс ани конци.
Проверявайте правилното функциониране на катарамите DoubleBack и FAST.
- TOP
Еднопосочен съединител
Проверявайте корпуса, ключалката, нита, муфата за липса на пукнатини,
деформации, корозия... Отворете ключалката и провере те дали се затваря
автоматично след като я пуснете. Проверявайте правилното функциониране на
муфата. Отворът на Keylock не трябва да бъде запушен (пръст, камъчета...).
- TOP CROLL
Еднопосочен майон рапид
Преди всяка употреба, провере те корпуса.
Проверете дали затварящата муфа е правилно и докрай завита (не трябва да се
вижда част от резбата) и стегната със сила 3 Nm.
Гръден самохват CROLL
Проверявайте преди употреба със тоянието на корпуса, отвора за об единяване,
палеца и ключалката (за пукнатини, белези, деформации, износване, корозия),
пружините и нита на ключалката. Проверете износв ането на зъбите. Внимание,
ако липсват някои от зъбите или са износени, не употребявайте повече този
самохват.
По време на употреба
Важно е редовно да контролирате състоянието на продукта. Уверете се, че
отделните средства са правилно свързани и правилно разположени едно спрямо
друго.
Осведомете се за срока за контрол на всяко едно ЛПС на www.petzl.fr/epi или от
CD-ROM EPI PETZL
Ако се съмнявате в нещо, отнесете се до PETZL.
B
NAVAHO SIT и NAVAHO SIT FAST
Схема 1. Поставяне на предпазния колан
Отворете катарамите на бедрените ленти.
1A. Хванете сбруята за кръстния колан и я обуйте през краката.
1B. Регулирайте кръстния колан чрез изтегляне на лентите. Прекарайте краищата
на лентите през гайките на колана (без да ги усуквате).
- Къси краища: прекарайте ги през гайките, които са пред катарамата.
- Дълги краища: ако остават дълги краища - прекарайте ги пре з страничните
халки, после през гайките намиращи за д тези халки.
1C. Затворете и регулирайте бедрените ленти.
- NAVAHO SIT: катарами DoubleBack.
- NAVAHO SIT FAST: Закопчайте катарамите FAST. Внимавайте функционирането
на автоматичните катарамите FAST да не бъде затруднено от наличието чужди
тела (камъчета, пясък, дрехи...). Проверявайте правилното закопчаване.
Регулиране и тест с увисване
Предпазният колан трябва да прилепва плътно към тялото, за да се намали риска
от травми в случай на падане.
За да сте сигурни, че сбруята е точния размер, предоставя желания комфорт
и е правилно регулирана, трябва да извършите няколко движения с нея и да я
изпробвате като увиснете на всичките й точки на окачване заедно с оборудването.
C
ПОЗИЦИОНИРАНЕ ПРИ РАБОТА И
ОГРАНИЧАВАНЕ НА ДОСТЪПА
Схема 2. Колан за позициониране и ограничаване на
достъпа EN 358: 2000
Тези точки на окачване са предназначени работещия да може да се позиционира
към работното място (работа с опора на колана при позициониране) или да
попречи на работещия да достигне зона, изложена на риск от падане (като
превантивна мярка). Тези точки на окачване трябва да сe използват само за
закачане към позиционираща система или работно-ограничителна; максимална
височина на падането: 0,5 м.
Тези точки на окачване не са предвидени за използване в случаи на падане и може
да се наложи позициониращите или ограничителните системи да се допълнят със
средства за защита срещ у падане от височина от типа на колективните (например
предпазни мрежи) или индивидуални (например спирачна система съответс тваща
на стандарт EN 363).
Ако се използва като елемент от спирачна система срещу падане съответстваща
на стандарт EN 363, седалката трябва да се комплектова с гръден колан TOP или
TOP CROLL.
2A. Предна долна точка на окачване
2B. Странични точки за окачване на колана
Употребявайте винаги двете странични халки едновременно, обединявайки ги с
позициониращ ремък, за да имате удобна опора на колана.
За да се позиционирате добре, трябва да имате опора за краката.
Регулирайте позициониращия ремък така, че точката на закрепване да бъде
или на нивото на талията или над нея. Позициониращият ремък да е опънат и
свободното движение да е ограничено до 0,5 м.
2С. Задна точка на окачване при ограничителни системи
Точката на окачване отзад на кръстния колан е предназначена само да ви задържи,
за да се предотврати достъпа до зона в която съществува риск от падане.
По време на употреба проверявайте редовно състоянието на елементите за
регулиране и/или фиксиране.
D
Схема 3. Колан за седнало положение:
EN 813: 1997
Предна долна точка на окачване
Стандарт EN 813: 1997 определя коланите за седнало положение, които се
използват при позициониращи системи, ограничителни системи и въжен достъп,
когато е необходима ниско разположена точка на окачване.
Използвайте долната халка за включване на десандьор, позициониращи ремъци
или ремъци, използвани за придвижване.
Тази точка за окачване не е предназначена да спре падане.
E
NAVAHO SIT или NAVAHO SIT FAST в комбинация с
гръден колан TOP
Схема 4. Подготовка
За да обедините гръдния колан със седалката, прекарайте лентата на гърба
през задната обединяваща катарама (9), после през ластичната гайка. След това
прекарайте тази лента през катарамата DoubleBack за регулиране лентите на
гърба (2), после отново през ластичната гайка.
F
Схема 5. Поставяне на предпазния колан
Отворете катарамите на бедрените ленти.
5A. Пуснете презрамките надолу, хванете сбруята за кръстния колан и я обуйте
през краката.
5B. Регулирайте кръстния колан чрез изтегляне на лентите. Прекарайте краищата
на лентите през гайките на колана (без да ги усуквате).
- Къси краища: прекарайте ги през гайките, които са пред катарамата.
- Дълги краища: ако остават дълги краища - прекарайте ги пре з страничните
халки, после през гайките намиращи за д тези халки.
5C. Затворете и регулирайте бедрените ленти.
- NAVAHO SIT: катарами DoubleBack.
- NAVAHO SIT FAST: Закопчайте катарамите FAST. Внимавайте функционирането
на автоматичните катарамите FAST да не бъде затруднено от наличието чужди
тела (камъчета, пясък, дрехи...). Проверявайте правилното закопчаване.
5D. Поставете презрамките върху раменете. Включете съединителя в предната
долна (текстилна) точка за свързване на гръдния колан със седалката (5). Завийте
муфата на съединителя.
5E. Регулирайте презрамките. Прекарайте края на лентата (без да я усуквате) през
гайките на презрамките.
5F. Първоначално регулиране на гърба
Регулирайте положението на тази халка с помощта на друго лице, като това се
прави само веднъж - при първото обличане сбруята.
Нагласете гайката на лентата по такъв начин, че лентата на гърба минаваща през
горната част на сбруята да бъде опъната (не трябва изобщо да е отпусната)
Внимавайте края на лентата да бъде прекаран (без да е ус укана) през гайката, за да
не пречи при работа.
Регулирайте лентите в зависимост от ръста ви, разположете катарамата
DoubleBack на нивото на плешките.
Регулиране и тест с увисване
Предпазният колан трябва да прилепва плътно към тялото, за да се намали риска
от травми в случай на падане.
За да сте сигурни, че сбруята е точния размер, предоставя желания комфорт
и е правилно регулирана, трябва да извършите няколко движения с нея и да я
изпробвате като увиснете на всичките й точки на окачване заедно с оборудването.
G
Схема 6. Елипсовиден еднопосочен съединител с
ръчно завиваща се муфа
Този съединител EN 362: 2004 е съставен елемент от сбруята и служи за
обединяване на предната част на гръдния колан с кръстния колан. Не го
използвайте за свързване на осигурителен ремък или поглъщател на енергия.
6A. ВНИМАНИЕ, ОПАСНО! Използвайте винаги съединителя със затворена
ключалка и завита муфа. Якостта на съединителя силно намалява ако ключалката
му е отворена.
Проверявайте редовно правилното затваряне на
ключалката като я натиснете с ръка.
6B. Съединителят (когато е затворен) има най-голяма якост при натоварване по
дължината му. Във всяко друго положение якостта му е намалена.
H
СРЕЩУ ПАДАНЕ
Схема 7. Предпазен колан срещу падане EN 361: 2002
Предпазен колан срещу падане от височина, състав ен елемент от спирачна
система съгласно стандарт EN 363 (спирачни системи срещу падане от височина).
Той трябва да се използва с крепежни елементи EN 795, карабинери с муфа EN 362,
поглъщатели на енергия EN 355 и т.н.
7A. Гръдна точка на окачване
Само тази точка е предназначена за свързване към спирачна система, например
спирачно устройство към въже, поглъщател на енергия..., система, посочена
в стандарт EN 363. За по-лесно идентифициране, тази точка е маркирана с
буквата А.
Свободно пространство: свободното пространство под
работещия
Свободното пространс тво под ползвателя трябва да е достатъчно, за да не се
удари при падане в някое препятствие. Начина на изчисляване на свободното
пространство е посочен в инструкциите към другите елементи от системата
(поглъщатели на енергия, спирачни устройств а...).
I
NAVAHO SIT или NAVAHO SIT FAST в комбинация с
гръден колан TOP CROLL
Схема 8. Подготовка
За да обедините гръдния колан със седалката, прекарайте лентата на гърба
през задната обединяваща катарама (9), после през ластичната гайка. След това
прекарайте тази лента през катарамата DoubleBack за регулиране лентите на
гърба (2), после отново през ластичната гайка.
За да обедините самохвата CROLL с предната част на седалката, включете майона
в долната предна текстилна точка за свързване (5). Завийте и стегнете майона с
ключ със сила 3 Nm. Не забравяйте да закачите пластмасовата разделителна скоба.
J
Схема 9. Еднопосочен майон рапид
Този майон рапид е съставен елемент от сбруята и служи за обединяване на
горната част с кръстния колан. Той трябва винаги да се затяга със сила 3 Nm
(развиването с ръка да е невъзможно).
Не го използвайте за свързване на осигурителен ремък или поглъщател на
енергия.
K
Схема 10. Поставяне на предпазния колан
Отворете катарамите FAST на бедрените ленти.
10A. Разхлабете презрамките, хванете с бруята за кръстния колан и я обуйте през
краката.
10B. Поставете презрамките върху раменете.
10C. Регулирайте кръстния колан чрез изтегляне на лентите. Прекарайте краищата
на лентите през гайките на колана (без да ги усуквате).
- Къси краища: прекарайте ги през гайките, които са пред катарамата.
- Дълги краища: ако остават дълги краища - прекарайте ги пре з страничните
халки, после през гайките намиращи за д тези халки.
10D. Закопчайте катарамите FAST и регулирайте бедрените ленти. Внимавайте
функционирането на автоматичните катарамите FAST да не бъде затруднено от
наличието чужди тела (камъчета, пясък, дрехи...). Проверявайте пра вилното
закопчаване.
10E. Регулирайте презрамките. Прекарайте края на лентата (без да я усуквате)
през гайките на презрамките.
10F. Първоначално регулиране на гърба
Регулирайте положението на тази халка с помощта на друго лице, като това се
прави само веднъж - при първото обличане сбруята.
Нагласете гайката на лентата по такъв начин, че лентата на гърба минаваща през
горната част на сбруята да бъде опъната (не трябва изобщо да е отпусната)
Внимавайте края на лентата да бъде прекаран (без да е ус укана) през гайката, за да
не пречи при работа.
Регулирайте лентите в зависимост от ръста ви, разположете катарамата
DoubleBack на нивото на плешките.
Регулиране и тест с увисване
Предпазният колан трябва да прилепва плътно към тялото, за да се намали риска
от травми в случай на падане.
За да сте сигурни, че сбруята е точния размер, предоставя желания комфорт
и е правилно регулирана, трябва да извършите няколко движения с нея и да я
изпробвате като увиснете на всичките й точки на окачване заедно с оборудването.
L
СРЕЩУ ПАДАНЕ
Схема 11. Предпазен колан срещу падане
EN 361: 2002
Предпазен колан срещу падане от височина, състав ен елемент от спирачна
система съгласно стандарт EN 363 (спирачни системи срещу падане от височина).
Той трябва да се използва с крепежни елементи EN 795, карабинери с муфа EN 362,
поглъщатели на енергия EN 355 и т.н.
11A. Гръдна точка на окачване
Само тази точка е предназначена за свързване към спирачна система, например
спирачно устройство към въже, поглъщател на енергия..., система, посочена
в стандарт EN 363. За по-лесно идентифициране, тази точка е маркирана с
буквата А.
Свободно пространство: свободното пространство под
работещия
Свободното пространс тво под ползвателя трябва да е достатъчно, за да не се
удари при падане в някое препятствие. Начина на изчисляване на свободното
пространство е посочен в инструкциите към другите елементи от системата
(поглъщатели на енергия, спирачни устройств а...).
M
ВЪЖЕН ДОСТЪП
Гръден самохват CROLL
EN 12841: 2006
35
NAVAHO SIT / NAVAHO SIT FAST / TOP / TOP CROLL C79502-C (200907)
Page 36

Предназначение
Гръдният самохват CROLL EN 12841: 2006 е средство за придвижване по въже
тип B и е предназначен за изкачване по работното въже.
ВНИМАНИЕ, той трябва задължително да се използва в комбинация с друга
осигуровка към въже от тип А, наричано обезопасително въже (например
сприрачно устройство за въже ASAP).
Гръдният самохват CROLL не е предназначен за употреба в спирачна система
отговаряща на стандарт EN 363.
Диаметър на въжето
Употребявайте полустатично въже EN 1891 тип А с диаметър от 10 до 13 мм
(сърцевина + броня).
Схема 12. Включване към въжето
Хванете предпазната ключалка с палеца и показалеца и я дръпне те надолу.
Закачете предпазната ключалка към корпуса на уреда. Палеца на самохвата е
отворен.
Поставете въжето на мястото му. Натиснете ключалката така, че палецът да захапе
въжето.
Предпазната ключалка не позволява нежелано отваряне на палеца.
За да извадите въжето
Плъзнете самохвата нагоре по въжето него и едновременно с това отворете палеца
посредством ключалката.
Схема 13. Начини на работа
13A. Изкачване
CROLL е средство за придвижване по въже (при изкачване). При натоварване
(надолу) той блокира в едната посока и се плъзга свободно в противоположната
(нагоре).
Зъбите му проникват в бронята и амортизират притискането на въжето с палеца.
Палецът блокира въжето. Отвора в палеца позволява лесно почистване на калта
и др.
13B. Слизане по въже с CROLL (частен случай)
Плъзнете леко самохвата нагоре по въжето и едновременно с това натиснете
палеца на самохвата с вашия показалец. Не правете това с ключалката, пора ди
риск от нежелано отваряне.
13C. Проверка на функционирането
Преди всяка употреба проверявайте посоката на пос тавяне на уреда към въжето и
функционирането му. Проверката трябва винаги да се прави с втора осигуровка.
Движете самохвата CROLL нагоре по въжето. Той трябва да се плъзга плавно.
Проверете блокирането му върху въжето.
13D. Предпазни мерки
- Когато не използвате самохвата CROLL не оставяйте палеца му отворен, защото
някой елемент от оборудването (или друг предмет) може да се заклещи в него.
- ВНИМАВАЙТЕ правилното функциониране на ключалката да не бъде
затруднено от наличието чужди тела (камъчета, кал, клони, въженца, ленти, дрехи,
боя и др.).
- ВНИМАВАЙТЕ ключалката да не се закача за дрехите или лентите.
- Въжето между уреда CROLL и осигурителната точка трябва да бъде винаги
опънато. Потребителят трябва винаги да бъде под нивото на осигурителната точка
на системата.
- Поглъщане на енергията от въжето:
не забравяйте, че енергията при падане се поема от въжето. Колкото сте по-близко
до осигурителната точка, толкова по-малко въжето ще поема удара, докато се
стигне почти до нулева стойност.
- Пазете въжето от всичко, което може да го повреди (например остър ръб и др.).
- Самохватът CROLL трябва да може да се движи свободно по въжето, избягвайте
възли или повредени участъци...
- Не забравяйте да вържете възел на края на въжето.
Схема 14. Изкачване по въже
- Работно въже: използвайте самохвата CROLL в комбинация със самохват с
ръкохватка, например водещ самохват ASCENSION с педал. Не забравяйте да се
закачите към този втори самохват с подходящ ремък.
- Осигурително въже: използвайте въже от тип А (за осигуряване към него).
N
Максимално натоварване на инвентарника
- Спазвайте описаните в листовките инструкции за упот реба, които са прикачени
към всеки един продукт.
- Инструкциите за употреба трябва да бъдат предоставени на ползвателя на това
средство. Вносителят трябва да преведе тези указания на езика на с траната, в
която ще се използва продукта в случай, че тя е различна от първоначалната
дестинация.
Срок на годност
ВНИМАНИЕ: някоя екстремна ситуация може да ограничи срока на годност до
една единствена употреба, например, ако продуктът е бил в контакт с опасни
химически вещества; изложен на екстремни температури, в съприкосновение с
режещ ръб, понесъл е голямо натоварване или сериозен удар и т.н.
Потенциалният срок на годност на пластмасовите и текстилните продукти
на Petzl може да бъде до 10 години след датата на производство. За мета лните
продукти той е неограничен.
Реалният срок на годност на един продукт изтича, когато има някаква причина
той да бъде бракуван (виж параграф "Бракуване на продукта") или когато е
остарял и несъвместим в техническо отношение с другите елементи в системата.
Фактори, влияещи върху срока на годност на един продукт: интензивност,
честота на употреба, ср едата, в която се използва, компетентност на ползвателя,
поддържане, съхранение и др.
Проверявайте редовно, дали средството не е
повредено или счупено.
Освен проверката преди и след всяка употреба, трябва да се извършва периодично
и задълбочена проверка от компетентен инспектор. Тази проверка трябва
да се осъществява най-малко на 12 месеца. Срокът за тази проверка трябва
да е съобразен с вида и интензивността на работата. За по-добър контрол на
оборудването, препоръчително е този продукт за бъде зачислен на един ползвател,
с цел по-добро познаване на неговата история. Резултатите от проверката, трябва
да се нанесат върху един формуляр. В този формуляр за проверка, трябва да
фигурират следните данни: вида на средството, модела, името и координатите
на производителя или доставчика, средството за идентификация (сериен №
или индивидуален №), годината на производство, датата на покупка, датата
на първата употреба, името на ползвателя, всякаква важна информация, като
например поддържане и честота на използване, данни от предишни проверки
(дата, забележки и констатирани проблеми, име и подпис на инспектора,
дата за следващата проверка). Може да използвате примерния формуляр и
информационните средства, които се намират на страницата www.petzl.fr/epi
Бракуване на продукта
Спрете незабавно да използвате продукта, ако:
- резултатите от проверките (преди, по време, периодична) са незадоволителни,
- понесъл е голямо натоварване или сериозен удар,
- не сте запознати напълно с историята на неговата употреба,
- той е на 10 години и е съставен от пластмасови или текстилни материали,
- имате и най-малко съмнение за неговата надеждност.
Унищожете бракува ните продукти, за да из бегнете бъдеща употреба.
Морално остаряване на продукта
Има многобройни причини, поради които даден продукт може да се счита за
морално остарял, вследствие на което да се спре от упот реба, например: развитие
на съответните стандарти, развитие на законовите разпоредби, техническо
развитие, несъвместимост с ос таналите средства и др.
Модификации, поправки
Забранени са всякакви модификации, допълнения или ремонти, с изключение на
разрешените от Petzl, поради риск от намаляване ефикасността на продукта.
Съхранение, транспорт
След употреба, поставете продукта в подходящ калъф (сак, ку тия...), който да го
предпазва от UV, влага, химически веществ а и др.
Гаранция
Този продукт е с три годишна гаранция относно дефекти в материала и фабрични
дефекти. Гаранцията не включва: нормално износване, оксидация, модификации
или поправки, лошо съхранение, лошо поддържане, повреди, дължащи се на
произшествия, небрежност, употреба на проду кта не по предназначение.
PETZL не носи отговорност за преки, косвени, случайни, или от какъвто и да било
характер щети, настъпили в резулт ат от използуването на неговите продукти.
O
Обща информация
Съвместимост: примки / съединители
Една несъвместима връзка може да доведе до инцидентно откачване, счупване
или да попречи на безопасното функциониране на друго средство.
ВНИМАНИЕ, халките за окачване на предпазния колан може да направят рамо
върху ключалката на съединителя.
При рязко натоварване на въжето и/или удар върху системата на затваряне на
карабинера, съчетано с лошо положение на карабинера, муфата на карабинера
може да се счупи и ключалката да се отвори.
За да се избегнете този риск, проверявайте за правилното положение на
съединителите при всяко натоварване на системата (осигурителен ремък,
десандьор...).
Проверете също съвместимос тта на съединителите с халките (форма, размери...) и
не използвайте съединители, които имат тенденция да се заклещват в неправилно
положение.
EN 365: ОСНОВНИ ИЗИСКВАНИЯ
Съвместимост
Проверете съвместимост та на този продукт с останалите елементи от вашето
оборудване (виж специфичните указания).
ВНИМАНИЕ, при употреба на няколко предпазни средства може да възникне
рискова ситуация ако правилното функциониране на дадено средство попречи на
правилното функциониране на друго.
Ако не сте сигурни в съвместимостта на вашето оборудване, отнесете се до Petzl.
Закрепвания: Работа на височина
Препоръчително е точката на закрепване на системата да се намира над
ползвателя и да отговаря на изискванията на стандарта за осигурителни
устройства EN 795, като минималната издръжливос т на точката на закрепване
трябва да бъде 10 kN.
План за спасителна акция
Планирайте възможност за спасителна акция и определете методите за бърза
намеса в случай на възникнал проблем. Това налага съответно обучение в
спасителните способи.
Съединители
Съединителите трябва винаги да се употребяват в правилно положение (да се
натоварват по голямата ос), със затворена ключалка и завита муфа. Проверявайте
редовно правилното затваряне на ключалката като я натиснете с ръка.
Проверявайте състоянието на съединителите по начина, посочен в инструкциите
за употреба.
Други изисквания
- ВНИМАНИЕ, ОПАСНОСТ! Забранено е триене в абразивни материали или
режещи елементи.
- За извършване на работа на височина е необходимо работещите да са в добро
здравословно състояние. ВНИМАНИЕ: неподвижно, висящо положение в
предпазния колан може да доведе до тежки физиологични нарушения или фатален
изход.
- Внимавайте маркировките върху продукта да оста нат четливи през целия период
на използване.
- Трябва да проверите, дали при работата, за която ще го използвате, този
продукт е в съответс твие със законовите разпоредби и задължителните норми
за безопасност.
36
NAVAHO SIT / NAVAHO SIT FAST / TOP / TOP CROLL C79502-C (200907)
Page 37

(JP) 日本語
使用方法
- 『ナバホ シット』『ナバホ シット ファスト』
シットハ ーネス 、ワ ークポジショニングベ ルト.
- 『ナバホ シット』または『ナバホ シット ファスト』にチェストハー
ネス『トップ』を組み合わせた場合
フォール アレストハー ネス、ワークポジショニング ベルト、シットハー
ネス
- 『ナバホ シット』または『ナバホ シット ファスト』にチェストハー
ネス『トップ クロール』を組み合わせた場合
フォール アレストハー ネス、ワークポジショニング ベルト、シットハー ネ
ス、『クロール』が付いたロープアクセスハーネス.
A
図に示された使用方法の中で、×印やドクロマークが付いていないも
のだけが認められています。 最新の取扱説明書はウェブサイト(www.
alteria.co.jp)で参照できますので、定期的に確認してください。
疑問点や不明な点は㈱アルテリア(TEL04-2969-1717)にご相談く
ださい 。
用途について
- 『ナバホ シット』『ナバホ シット ファスト』
シットハ ーネス 、ワ ークポジショニングベ ルト.
- 『ナバホ シット』または『ナバホ シット ファスト』にチェストハー
ネス『トップ』を組み合わせた場合
フォール アレストハー ネス、ワークポジショニング ベルト、シットハー
ネス
- 『ナバホ シット』または『ナバホ シット ファスト』にチェストハー
ネス『トップ クロール』を組み合わせた場合
フォール アレストハー ネス、ワークポジショニング ベルト、シットハー ネ
ス、『クロール』が付いたロープアクセスハーネス.
製品に表示された破断強度以上の荷重をかける使用や、本来の用途以
外での使用は絶対に避けてください。.
警告
この製品を使用する高所での活動には危険が伴います。
ユーザー各自が自身の行為、判断についてその責任を負うこ
ととします。
使用する前に必ず:
- 取扱説明書をよく読み、理解してください.
- この製品を正しく使用するための適切な指導を受けてください.
- この製品の機能とその限界について理解してください.
- 高所での活動に伴う危険について理解してください.
これらの注意事項を無視または軽視すると、重度の障害や死に
つながる場合があります。
責任
警告:使用前に適切なトレーニングが必要です。
この製品は使用方法を熟知していて責任能力のある人、あるいはそ
れらの人から目の届く範囲で直接指導を受けられる人のみ使用して
下さい 。
ユーザーは各自の責任で適切な技術及び確保技術を習得する必要
が ありま す 。
ペツル製品の誤った方法での使用中及び使用後に生ずるいかなる損
害、傷害、死亡に関してもユーザー各自がそのリスクと責任を負うことと
します。 各自で責任がとれない場合や、その立場にない場合はこの製
品を使用しないで下さい。
各部の名称
- チェストハ ー ネス『トップ 』:
(1) ショルダーストラップ (2) 背部調節バックル (3) EN 361 胸部ア
タッチメントポイント (4) 反転防止機能付コネクター.
- チェストハーネス『トップ クロール 』:
(1) ショルダーストラップ (2) 背部調節バックル (3) EN 361 胸
部アタッチメントポイント (4) EN 12841 ロープクランプ『クロール』
(4b) 反転防止機能付コネクター (16) カム (17) セーフティキャッチ
(18) 下部ホール.
- シットハーネス『ナバホ シット』『ナバホ シット ファスト』:
(5) チェストハーネスを連結するためのウェビングアタッチメントポイ
ント (6) ベルト (7) EN 358 EN 813 腹部アタッチメントポイント (8
) EN 358 側部アタッチメントポイント (9) チェストハーネスを連結す
るためのバックル / EN 358 レストレイン用アタッチメントポイント (10
) ダブルバックバックル (10b) ファストバックル (11) ギアループ (12
) キャリツール取付用スロット (13) ストラップリテイナー (14) 調節型
エラスティックストラップ (15) マーキングラベル.
主な素材
ハーネス: ポリエステル、スチール(調節バックル)、アルミニウム合金(
アタッ チメントポ イ ント)
ロープクランプ『クロール』: アルミニウム合金 (本体)、クロムメッキスチ
ール (カム)、ポリアミド (セーフティキャッチ)
点検のポイント
毎回、使用前に
- ハーネス
ウェビングのアタッチメントポイント部分、調節バックル部分、および縫
製部分を点検して下さい。
ウェビングに切れ目がないこと、使用による、または熱や化学製品との
接触による磨耗や損傷がないことを確認してください。特に縫製部分に
ほつれがないか注意して点検してください。
ダブルバックバックル、ファストバックルが正常に機能することを確認
して下 さい 。
- 『トップ 』
反転防止機能付コネクター
フレーム、ゲート、ヒンジ、およびロッキングスリーブに亀裂や変形、腐食
等がないことを確認してください。ゲートを開けて放すと、ゲートが閉ま
りロックされることを確認してください。 ロッキングスリーブが正常に機
能することを確認してください。 ゲート上部のキーロックスロットに泥や
小石等が詰まらないようにしてください。
- 『トップ クロ ー ル 』
反転防止機能付コネクター
毎回、使用前に必ず点検してください。
スクリューゲートがしっかりと締まっていることを確認してください(ネ
ジ山が見えないようにしてください)。3 Nm のトルクで締まっていること
を確認してください。
ロープクランプ『クロ ー ル』
毎回、使用前に、本体、アタッチメントホール、カム及びセーフティキャ
ッチに亀裂、傷、変形、磨耗、腐食等がないことを確認し、カムのスプリ
ングと軸の状態を点検してください。 カムの歯が磨り減っていないこと
を確認してください。 警告: カムの歯が欠けている場合は使用しない
でくだ さい 。
使用中の注意点
製品の状態を常に確認してください。 他の用具との連結部や、システム
を構成する各用具が正しくセットされていることを確認してください。
各PPE(個人保護用具)の点検方法の詳細についてはペツルのウェブ
サイト(www.petzl.com/ppe)もしくはPETZL PPE CD-ROMを参照くだ
さい。
もしこの器具の状態に関する疑問があれば、(株)アルテリア(TEL:042969-1717)にご相談ください。
B
『ナバホ シット』『ナバホ シット ファスト』
図1.ハーネスの装着方法
レッグループのバックルを解除します。
1A. シットハーネスのベルトを持ち、両足を通して腰の高さまで上げ
てくだ さ い 。
1B. ベルトストラ ップを引いてウエストサイズを調節します。 ストラッ
プの端は、ねじれがないようにして、ストラップリテイナーにしまってく
だ さ い 。
- ストラップの余りが短い場合: 調節バックルの前方のリテイナーを使
用 し て くだ さ い 。
- ストラップの余りが長い場合: 側部アタッチメントポイントを通して、
その後方のリテイナーにしまってください。
1C. バックルを締めてレッグループを調節してください。
- 『ナバホ シット』: ダブルバックバックル
- 『ナバホ シット ファスト』: ファストバックルを閉めてください。 ファス
トバックルの機能を妨げる可能性があるため、小石、小枝、ウェビング等
が挟まらないように注意してください。 ファストバックルが正しくロック
されていることを確認して下さい。
調節とテスト
墜落の際に怪我をする危険を低減するため、ハーネスは体にぴったりと
フィットするよう調節してください。
ハーネスが正しくフィットし、使用目的に見合う快適性が得られることを
必ず確認してください。ハーネスを装着した状態で動いたり、装備を全
て装着した状態で各アタッチメントポイントから吊り下がり、適切に調節
されているかテストをしてください。
C
ワークポ ジショニングとレストレイン
図2.ワークポジショニング / レストレイン用ハー
ネス(EN 358 2000 適合)
これらのアタッチメントポイントは、吊り下がった状態で体を支え作業
位置で停止する(ワークポジショニング)、または墜落の可能性がある場
所にユーザーが侵入できないよう行動範囲を制限する(レストレイン)
ために使用します。 落下距離が 0.5m を超えないレストレインまたは
ワークポジショニングにのみ使用できます。
これらのアタッチメントポイントは墜落を止める目的では使用できませ
ん。墜落の可能性がある場合は、ワークポジショニングやレストレインに
加え、共同の確保システム(セーフティネット等)や個人用フォールアレ
ストシステム(例:EN 363 に準じたフォールアレストシステム)をセット
する必要があります。
EN 363 に準じたフォールアレストシステムで使用する場合は、シットハ
ーネスにチェストハーネス『トップ』または『トップ クロール』を組み合わ
せて使用してください。
2A. 腹部アタッチメントポイント
2B. 側部アタッチメントポイント
両側部のアタッチメントポイントは、必ずワークポジショニングランヤー
ドで連結して使用してください。
快適なポジショニングをとるには、足場が必要となります。
支点がユーザーの腰の位置より高くなるようにワークポジショニングラ
ンヤードを調節してください。 常にランヤードにテンションをかけた状
態で使用し、0.5m を超える落下をしないようにしてください。
2 C . レ ストレ イン 用 ア タッ チ メ ント ポ イント
このアタッチメントポイントは、レストレインシステムを連結する目的に
のみ使用できます。
レストレインやワークポジショニングで使用するランヤードは、作業中も
常に適切な長さに調節されていることを確認してください。
D
図3.シットハーネス:
EN 813: 1997
腹 部 ア タッ チ メ ント ポ イント
EN 813 1997は、ワークポジショニングやレストレイン、ロープアクセス
等低い位置のアタッチメントポイントが必要な場合に使用するシットハ
ーネスに関する基準です。
腹部アタッチメントポイントは、下降器やワークポジショニングランヤー
ド、移動用ランヤードの接続に使用します。
フォールアレストシステムとの連結には使用しないでください。
E
『ナバホ シット』または『ナバホ シット ファスト』
とチェストハーネス『トップ』を組み合わせて使
用する場合
図4.準備
チェストハーネスとシットハーネスを接続するには、まずチェストハーネ
スの背部ストラップをシットハーネス背部のバックル(9)に通して折り
返し、リテイナーに通します。 次にそのストラップを背部調節バックル(2
)に通し、余りをリテ イナー にしまってください 。
F
図5.ハーネスの装着方法
レッグループのバックルを解除します。
5A. ショルダーストラップを片側に寄せてシットハーネスのベルトを持
ち、両足を通して腰の高さまで上げてください。
5B. ベルトストラ ップを引いてウエストサイズを調節します。 ストラッ
プの端は、ねじれがないようにして、ストラップリテイナーにしまってく
だ さ い 。
- ストラップの余りが短い場合: 調節バックルの前方のリテイナーを使
用 し て くだ さ い 。
- ストラップの余りが長い場合: 側部アタッチメントポイントを通して、
その後方のリテイナーにしまってください。
5C. バックルを締めてレッグループを調節してください。
- 『ナバホ シット』: ダブルバックバックル
- 『ナバホ シット ファスト』: ファストバックルを閉めてください。 ファス
トバックルの機能を妨げる可能性があるため、小石、小枝、ウェビング等
が挟まらないように注意してください。 ファストバックルが正しくロック
されていることを確認して下さい。
5D. ショルダーストラップを肩にかけて下さい。 ウェビングアタッチメン
トポイント(5)にチェストハーネスのコネクターを取り付けてください。
ロッキング スリー プを 回 してゲ ートを ロックしてくださ い。
5E. ショルダーストラップを調節してください。 余分なストラップはスト
ラップリテイ ナー にしまってくださ い 。
5F. 背部の調節
初めて使用する際に調節してください。そうすることにより以後調節す
る必要がなくなります。 別の人に手伝ってもらうことにより、調節が容
易 に な りま す 。
余分なストラップはリテイナーに収納してください。
作業の邪魔にならないようにするため、余分なストラップはしっかりと伸
ばし、弛みがない状態にしてストラップリテイナーで留めてください。
体型にあわせて調節してください。ダブルバックバックルが、肩甲骨の位
置と同じ高さになるように調節してください。
調節とテスト
墜落の際に怪我をする危険を低減するため、ハーネスは体にぴったりと
フィットするよう調節してください。
ハーネスが正しくフィットし、使用目的に見合う快適性が得られることを
必ず確認してください。ハーネスを装着した状態で動いたり、装備を全
て装着した状態で各アタッチメントポイントから吊り下がり、適切に調節
されているかテストをしてください。
G
図6.反転防止機能が付いたオーバル型手動ロ
ック式 コ ネクタ ー
この EN 362 2004 に適合したコネクターは、ハーネスの一部であり、チ
ェストハーネスとシットハーネスを連結するために使用します。 ランヤ
ードやエネルギーアブソーバーを取り付けることはできません。
6A. 注意、危険:カラビナは常にゲートを閉じ、ロックされた状態で使用
しなければなりません。 ゲートが開いた状態では、カラビナの強度は大
幅に低下します。
ゲートを 指 で 押し、ロックされ て いることを確 認してくださ い 。
6B. カラビナの強度は、ゲートが閉じられ、縦軸方向に正しく荷重がか
かったときに最大になります。 縦軸以外の方向に荷重がかかった場合
は強度が低くなります。
H
フォー ル アレスト
図7.フォールアレスト ハーネス(EN 361 2002
適合)
墜落を止めるためのフルボディハーネス。EN 363 が定めるフォールア
レストシステムを構成する用具の1つです。 必ず EN 795 に適合した
アンカー、EN 362 に適合したロッキングカラビナ、EN 355 に適合した
エネルギーアブソーバーと併用してください。
7A. 胸部アタッチメントポイント
フォールアレストシステム(例:モバイルフォールアレスター、エネルギ
ーアブソーバー、その他 EN 363 で定められているシステム)に連結す
る場合は必ず胸部アタッチメントポイントを使用してください。 区別し
やすくするため、このアタッチメントポイントには「A」の文字が刻印さ
れています。
クリアランス: ユーザーの下の障害物のない空間
墜落した場合に途中で障害物にあたることを回避するため、ユーザーの
下には必ず十分なクリアランスを確保してください。 必要なクリアラン
スを算出する方法は、フォールアレストシステムを構成するその他の器
具(エネルギーアブソーバー、モバイルフォールアレスター等)の取扱説
明書に記載されています。
I
『ナバホ シット』または『ナバホ シット ファスト』
とチェストハ ーネス『トップ クロール』を組み 合
わせて使用する場合
図8.準備
チェストハーネスとシットハーネスを接続するには、まずチェストハーネ
スの背部ストラップをシットハーネス背部のバックル(9)に通して折り
返し、リテイナーに通します。 次にそのストラップを背部調節バックル(2
)に通し、余りをリテ イナー にしまってください 。
『クロール』を取り付けるには、ウェビングアタッチメントポイント(5)に
反転防止機能付コネクターを取り付け、『クロール』の下部ホール(18)
に通してください。 トルクレンチを使用して、3 Nm のトルクでスクリュー
ゲートを締めてください。 反転防止のため、プラスチックのカバーを必
ず閉じてください。
J
図9.反転防止機能付コネクター
このコネクターは、ハーネスの一部であり、シットハーネスのベルトとチ
ェストハーネスの前部を連結するために使用します。 このコネクターは
常に 3 Nm のトルクで締められていなければなりません(手で解除でき
ないようにするため)。
ランヤードやエネルギーアブソーバーを取り付けることはできません。
K
図10.ハーネスの装着方法
レッグループのファストバックルを解除します。
10A. ショルダーストラップを両側に開いてハーネスのベルトを持ち、
両足を通してください。
10B. ショルダーストラップを肩にかけて下さい。
10C. ベルトストラ ップを引いてウエストサイズを調節します。 ストラ
ップの端は、ねじれがないようにして、ストラップリテイナーにしまって
くだ さ い 。
- ストラップの余りが短い場合: 調節バックルの前方のリテイナーを使
用 し て くだ さ い 。
- ストラップの余りが長い場合: 側部アタッチメントポイントを通して、
その後方のリテイナーにしまってください。
10D. ファストバックルを閉め、レッグループを調節します。 ファストバッ
クルの機能を妨げる可能性があるため、小石、小枝、ウェビング等が挟ま
らないように注意してください。 ファストバックルが正しくロックされて
いることを確認して下さい。
10E. ショルダーストラップを調節してください。 余分なストラップはス
トラップリテイナ ー にしまってくださ い。
10F. 背部の調節
初めて使用する際に調節してください。そうすることにより以後調節す
る必要がなくなります。 別の人に手伝ってもらうことにより、調節が容
易 に な りま す 。
余分なストラップはリテイナーに収納してください。
作業の邪魔にならないようにするため、余分なストラップはしっかりと伸
ばし、弛みがない状態にしてストラップリテイナーで留めてください。
体型にあわせて調節してください。ダブルバックバックルが、肩甲骨の位
置と同じ高さになるように調節してください。
調節とテスト
墜落の際に怪我をする危険を低減するため、ハーネスは体にぴったりと
フィットするよう調節してください。
ハーネスが正しくフィットし、使用目的に見合う快適性が得られることを
必ず確認してください。ハーネスを装着した状態で動いたり、装備を全
て装着した状態で各アタッチメントポイントから吊り下がり、適切に調節
されているかテストをしてください。
37
NAVAHO SIT / NAVAHO SIT FAST / TOP / TOP CROLL C79502-C (200907)
Page 38

L
フォー ル アレスト
図11.フォールアレスト ハーネス(EN 361 2002
適合)
墜落を止めるためのフルボディハーネス。EN 363 が定めるフォールア
レストシステムを構成する用具の1つです。 必ず EN 795 に適合した
アンカー、EN 362 に適合したロッキングカラビナ、EN 355 に適合した
エネルギーアブソーバーと併用してください。
11A. 胸部アタッチメントポイント
フォールアレストシステム(例:モバイルフォールアレスター、エネルギ
ーアブソーバー、その他 EN 363 で定められているシステム)に連結す
る場合は必ず胸部アタッチメントポイントを使用してください。 区別し
やすくするため、このアタッチメントポイントには「A」の文字が刻印さ
れています。
クリアランス: ユーザーの下の障害物のない空間
墜落した場合に途中で障害物にあたることを回避するため、ユーザーの
下には必ず十分なクリアランスを確保してください。 必要なクリアラン
スを算出する方法は、フォールアレストシステムを構成するその他の器
具(エネルギーアブソーバー、モバイルフォールアレスター等)の取扱説
明書に記載されています。
M
ロー プ アクセス
ロープクランプ『クロー ル』
EN 12841: 2006
用途について
EN 12841 2006 に適合した『クロール』はタイプ B のロープクランプ
で、作業ロープの登高に使用します。
注意:必ずバックアップロープにセットした、モバイルフォールアレスター
『アサップ』等のバックアップ器具と併用してください。
ロープクランプ『クロール』は、EN 363 に準じたフォールアレストシステ
ムでの使用には適していません。
ロープの直径
EN 1891 タイプ A に適合した直径 10 ~ 13mm のセミスタティックロ
ープを使用してください。
図12.ロープのセット方法
親指と人差し指でセーフティキャッチを下に引き、外側に開いてくださ
い。 セーフティキャッチを本体部分にひっかけます。 これでカムが開い
た状態でロックされます。
ロープを挿入します。 セーフティキャッチをロック状態から解除し、カム
がロープを押さえていることを確認してください。
セーフティキャッチは不意にカムが解除されるのを防ぎます。
ロープ の 取り外し方 法
器具を上にスライドさせながら、セーフティーキャッチをまず下側に、そ
れから外側に引いてください。
図13.『クロール』の機能とその他の注意点
13A. ロープ登高
『クロール』は、作業ロープやアクセスロープを登るために使用する器
具です。 ロープ上を上方向にはスライドしますが、下方向に荷重がかか
るとロ ー プ を ロックし て 止 まりま す 。
歯の付いたカムがロープをロックし、器具が下方向へは動かないよう
にします。 カムには、ロープについた泥等によるつまりを防ぐためのス
ロットがあります 。
13B. 『クロール』を下方向に動かす方法(例外的な状況で使
用)
『クロール』を少し上に動かすと同時に、人差し指でカムを押し、ロープ
の外皮から歯を外してください。 セーフティキャッチは操作しないでく
ださい。不意にカムを解除してしまう危険があります。
13C. 作動点検
毎回、使用前に、ロープが正しく取り付けられていること、器具が正しく
作動することを確認してください。確認作業は必ずセルフビレイをとっ
た状態で行ってください。
『クロール』を上にスライドさせ、 スムーズに動くことを確認してくだ
さい。 また、下に引いて、器具がロープをロックすることを確認してく
ださい 。
13D. 注意点
- 『クロール』のカムは、使用していないときは必ず閉じてください。カム
を開いたままにしていると、その他の器具等が挟まる危険があります。
- 注意:カムの動きを妨げるようなものが、器具に挟まらないようにして
ください(小石、泥、雑草、スリング、衣服、塗料等)。
- 衣服やウェビング等が、セーフティキャッチに引っかからないようにし
てくだ さ い 。
- 『クロール』と吊元との間のロープは常にたるみがない状態でなけ
ればなりません。 ユーザーは常に吊元よりも低い位置で作業をしてく
ださい 。
- ロープによる衝撃吸収:
墜落が起こった際に衝撃を吸収するのはロープです。 ロープの衝撃吸
収力は吊元に近づくにつれて下がり、最終的にゼロになります。
- とがった角やざらざらした壁面など、ロープを傷つける可能性のあるも
のとロープが接触しないようにしてください。
- 『クロール』が、ロープにセットされた状態でスムーズに動くことを確認
してください。 動きを妨げるものがないよう注意してください(例:ロー
プの結び目、磨耗した箇所等)。
- ロープの末端にストッパーノットを結ぶことを忘れないでください。
図14.ロープ登高
- 作業ロープ: 『クロール』と、フットループを取り付けたハンドル付ロー
プクランプ(『アッセンション』等)を使用します。 必ずハーネスとハンド
ル付ロープクランプをランヤードで連結してください。
- バックアップロープ: モバイルフォールアレスター『アサップ』等のバッ
クアップ器具を使用してください。
N
カラビナの位置が不適切で、突然ロープにテンションがかかったり、カラ
ビナのゲートに衝撃が加わった場合、ロッキングシステムが壊れ、ゲー
トが開いてしまう可能性があります。
このような危険を低減するために、システム(ランヤード、ディッセンダ
ー等)にテンションがかかる度にコネクターが正しい位置にあることを
確認してください。
また、使用しているコネクターがハーネスのアタッチメントポイントに適
していることを確認してください(形、サイズ等)。不適切な向きや位置
になりやすいコネクターは使用しないでください。
EN 365: 警告
適合性
この製品がお手持ちの用具と併用できることを確認してください。それ
ぞれの製品の取扱説明書を読んで下さい。
警告:複数の器具を同時に使用する場合、1つの器具の安全性が、別の
器具の使用によって損なわれることがあります。
もしこの製品の適合性に関して疑問点があれば(株)アルテリアにご相
談くだ さい 。
支点: 高所作業
システム用の支点はユーザーの体より上にとるようにしてください。支
点は、最低でも10 kNの破断強度を持ち、EN 795 基準を満たしていな
ければなりません。
レスキュープラン
- ユーザーは、この製品の使用中に問題が生じた際にすみやかに対処
できるよう、レスキュープランとそれに必要となる装備をあらかじめ用意
しておく必要があります。 このため、ユーザーは必要となるレスキュー
技術を習得しておく必要があります。
コネクター
- カラビナは必ずゲートがロックされた状態で使用してください。 ゲート
を指で押し、ロックされていることを確認してください。
コネクターは、それぞれ付属の取扱説明書に従って点検してください。
その他
- 警告、危険:この製品を、ざらざらした箇所や尖った箇所にこすりつけ
な いようにしてくださ い。
- ユーザーは、高所での活動が行える良好な健康状態にあることが必要
です。 警告: 動きの取れない状態のまま吊り下げられると、ハーネスを
着用していても重度の傷害や死に至る危険性があります。
- 製品に記載されたマーキングが、使用期間中識別できる状態にあるよ
う注意してください。
- この製品を使用する作業方法が、地域の行政機関が定める規則や基
準に適合していることを確認してください。
- 併用するすべての用具の取扱説明書もよく読み、理解してください。
- 取扱説明書は、製品と一緒にユーザーの手に届かなければなりませ
ん。 この製品を販売する場合、販売者はその国の言語に訳された取扱
説明書を添付しなければなりません。
耐用年数
注意: 以下にあげるような極めて異例な状況においては、1回の使用
で損傷が生じ、その後使用不可能になる場合があります: 化学薬品と
の接触、鋭利な角との接触、極端な高/低温下での使用や保管、大きな
墜落や過荷重等
ペツル製品の耐用年数は以下の通りです: プラスチック製品、繊維製
品は最長で製造日から10年。 金属製品には特に設けていません。
ただし、下に記された “廃棄基準”の内一つ以上に該当する場合や、技
術や基準の進歩を反映した新しい器具との併用に適さないと判断され
る場合は直ちに廃棄してください。
実際の耐用年数は様々な要因によって決まります。例: 製品を使用す
る環境、使用の頻度、状況、ユーザーの能力、保存やメンテナンスの
状況等
製品に損傷や劣化がないか定期的に点検して
くだ さ い 。
安全のため、使用前、使用中の点検に加え、専門家による綿密な点検を
少なくとも12ヶ月ごとに行う必要があります。 綿密な点検は少なくとも
12ヶ月ごとに行う必要がありますが、 必要な頻度は、使用の頻度と程
度、目的により異なります。 また、各PPEユーザーが用具の使用履歴を
把握できるようにするため、各ユーザーが専用の用具を持ち、未使用の
状態から管理することをお勧めします。 用具をよりよく管理するため、製
品ごとに点検記録をとることをお勧めします。 点検記録に含める内容:
用具の種類、モデル、製造者または販売元の名前と連絡先、製造番号、
識別番号、製造年、購入日、初めて使用した時の日付、ユーザー名、その
他の関連情報(例:メンテナンス、使用頻度、定期点検の履歴、点検日、コ
メント、点検者の名前と署名、次回点検予定日) 詳しい点検記録の見本
はwww.petzl.com/ppeを参照ください。
廃棄基準
以下のいずれかに該当する製品は以後使用しないでください:
- 使用前、使用中の点検、または定期点検において使用不可と判断さ
れた
- 大きな墜落を止めた場合や、非常に大きな荷重がかかった
- 完全な使用履歴が分からない
- プラスチック製品または繊維製品で、製造日から10年以上経過した
- 製品の状態に疑問がある
使用しなくなった製品は、以後使用されることを避けるため廃棄して
くだ さ い 。
新しい技術および器具の発達
製品が、システムの中での使用に適さないと判断され、実際の耐用期間
が過ぎる前に廃棄される場合の理由は様々です。 例: 関連する基準、規
格、法律の変更、新しい技術の発達、他の器具との併用に適しない等
改造と修理
ペツルによって認められた場合を除き、製品の改造および修理を禁じま
す。 製品の機能を損ねる危険性があります。
持ち運びと保管
紫外線、湿気、化学薬品等から保護するため、ハーネスは付属の袋もし
くはその他のケース等に収納して保管してください。
保証
この製品には、原材料及び製造過程における欠陥に対し3年の保証
期間が設けられています。 ただし以下の場合は保証の対象外としま
す: 通常の磨耗、酸化、改造や改変、不適切な保管方法、メンテナンス
の不足、事故または過失による損傷、不適切または誤った使用方法に
よる故障。
ペツル及びペツル総輸入販売元である株式会社アルテリアは、製品の
使用から生じた直接的、間接的、偶発的結果またはその他のいかなる
損害に対し、一切の責任を負いかねます。
ギアループの最大許容荷重
O
一般注意事項
被着体について: アタッチメントポイント / コネ
クター
適していない用具に連結した場合、カラビナが偶発的に外れる、壊れ
る、または併用する用具の安全機能を損なうといった危険性がありま
す。
警告:ハーネスのアタッチメントポイントは、コネクターのゲートに、てこ
の作用を起こす可能性があります。
38
NAVAHO SIT / NAVAHO SIT FAST / TOP / TOP CROLL C79502-C (200907)
Page 39

(KR)한국어
사용 설명서
- NAVAHO SIT & NAVAHO SIT FAST
하단 안전대, 작업 위치확보 벨트.
- TOP 상단 안전대를 연결할 수 있는 NAVAHO SIT 또는
NAVAHO SIT FAST 하단 안전대
추락 방지 안전대, 작업 위치확보 벨트, 하단 안전대.
- TOP CROLL 상단 안전대를 연결할 수 있는 NAVAHO SIT 또는
NAVAHO SIT FAST 하단 안전대
추락 방지 안전대, 작업 위치확보 벨트, 하단 안전대, CROLL
로프크램프가 장착된 로프 접근 안전대.
A
그림에서 X 표시와 해골과 두 개의 뼈를 교차시킨 상징이 없는
기술만이 허용된다. 이 문서의 최근 버젼을 원하시면 정규적으로
www.petzl.com 웹사이트를 방문하여 확인한다.
이 설명서를 보고 이해하기 어렵거나 어떤 의문점이 있으시면, (
주)안나푸르나로 연락하시기 바랍니다.
적용 범위
- NAVAHO SIT & NAVAHO SIT FAST
하단 안전대, 작업 위치확보 벨트.
- TOP 상단 안전대를 연결할 수 있는 NAVAHO SIT 또는
NAVAHO SIT FAST 하단 안전대
추락 방지 안전대, 작업 위치확보 벨트, 하단 안전대.
- TOP CROLL 상단 안전대를 연결할 수 있는 NAVAHO SIT 또는
NAVAHO SIT FAST 하단 안전대
추락 방지 안전대, 작업 위치확보 벨트, 하단 안전대, CROLL
로프크램프가 장착된 로프 접근 안전대.
장비가 가진 강도 그이상으로 하중을 받어서는 안되고, 원래
용도 이외의 어떤 다른 목적으로 사용되어서는 안된다.
주의사항
이 장비와 관련된 활동은 원래 위험합니다.
착용자는 자신의 행동과 결정에 책임이 있습니다.
장비를 사용하기 전에 반드시 숙지해야 할 사항:
- 사용 설명서를 읽고 이해하기.
- 훈련을 통해 사용법 익히기.
- 장비의 활용법과 사용제한을 숙지하기.
- 관련된 위험을 이해하고 수용하기.
이와 같은 경고를 유념하지 않을 시에는 심각한 부상이나 사망을
초래할 수 있습니다.
책임
제품을 사용하기 전에 철저한 훈련이 필수적입니다.
이 장비는 전문가와 책임질 수 있는 사람만이 사용할 수 있고,
전문가와 책임질 수 있는 사람의 직접적이고 눈으로 볼수 있는
통솔아래 사용되어야 한다.
적절한 기술과 안전 수칙에 관한 교육을 받는 것은 개인에게
책임이 있습니다.
어떤 방법으로든 부정확한 장비 사용으로 발생되는 모든 손상과
부상, 심지어 사망에 대한 모든 위험은 개인이 전책임을 집니다.
모든 위험을 책임질 능력이 없거나 그런 위치에 있지 않다면, 이
장비를 사용하지 마십시오.
부분명칭
- TOP 상단 안전대:
(1) 어깨끈, (2) 등쪽 조절 버클, (3) EN 361 가슴 부착지점,
(4) 방향 고정고리.
- TOP 상단 안전대:
(1) 어깨끈, (2) 등쪽 조절 버클, (3) EN 361 가슴 부착지점,
(4) EN 12841 CROLL 복부 로프크램프가 장착, (4b) 방향 고정
분리 바가 있는 마일론 래피드, (16) 캠, (17) 제동걸이/
안전덮개, (18) 카라비너 구멍.
- NAVAHO SIT & NAVAHO SIT FAST 하단 안전대:
(5) 상단 안전대를 하단 안전대에 연결시키는 복부 지점 (섬유),
(6) 벨트, (7) EN 358, EN 813, 복부 부착지점, (8) EN 358
측면 벨트 부착지점, (9) EN 358 이동 제한 부착지점이 달린
가슴과 하단 부분을 연결하는 뒤쪽 버클, (10) 더블백 조절
버클, (10b) 신속하게 부착되는 FAST 버클, (11) 장비걸이,
(12) 장비걸이용 슬롯, (13) 여유분의 끈을 정리하는 고정고리,
(14) 신축끈, (15) 허리벨트 지지대 표시 라벨.
사용 재질
안전대: 폴리에스테르, 강철 (조절 버클), 알루미늄 합금 (
부착지점).
복부 로프 크램프 CROLL: 알루미늄 합금 (몸체), 크롬 도금한
철강 (캠), 폴리아라미드 (잠금 장치).
검사 및 확인사항
매번 사용 전에
- 안전대
부착지점, 조절 버클, 안전 박음질의 웨빙을 확인한다.
웨빙의 절단, 마모, 사용상 또는 열, 화학제품 등으로 인한
손상된 부분이 있는지 확인한다. 특히, 바느질 실의 절단을
유심히 관찰한다.
버클이 잘 작동되는지 확인한다.
- TOP
방향 고정 연결고리
몸체, 개폐구, 잠금덮개에 어떤 갈라짐, 변형, 부식 등이 없는지
확인한다. 개폐구를 열고 놓았을때 그것이 자동적으로 닫히고
잠기는지 확인한다. 잠금덮개가 잘 작동되는지 확인한다. 키락
홈 (개폐구)에 이물질이 끼이지 않도록 한다 (오물, 자갈 등).
- TOP CROLL
방향 마일론 래피드
매번 사용 전에 몸체를 확인한다.
잠금 너트가 완전히 잠겼는지, 3 Nm 토크를 꽉 죄였는지
확인한다.
복부 로프 크램프 CROLL
매번 사용전에 몸체, 카라비너 구멍, 캠, 잠금 장치 (갈라짐,
긁힌 상처, 변형, 마모, 부식), 캠의 스프링과 차축의 상태를
확인한다. 톱니가 마모되지 않았는지 확인한다. 경고: 톱니가
빠졌거나 마모된 로프 크램프는 사용하지 말라.
사용 중간에
장비의 상태를 정규적으로 검사하는 것이 매우 중요하다.
장치에서 다른 장비와의 연결상태를 확인하고 그 장치에서 여러
장비가 서로 관련하여 정확하게 위치하였는지 확인한다.
각 제품의 PPE 검사 절차에 관한 상세한 정보는 페츨사의
홈페이지인 www.petzl.com/ppe 에 방문하거나, PETZL PPE CD/ROM
을 통해 직접 확인할 수 있다.
제품 상태에 관한 궁금한 점은 (주)안나푸르나로 연락하시기
바랍니다.
B
NAVAHO SIT & NAVAHO SIT FAST
그림 1. 안전대 착용 방법
다리고리에 있는 버클을 연다.
1A. 하단 안전대의 허리벨트를 양쪽으로 잡고 다리를 다리고리에
통과시킨 후 허리 끈를 당기면서 조절한다.
1B. 끈을 잡아 당기면서 벨트를 조절한다. 여유분의 웨빙을
고정고리 (허리벨트에 납작하게 장치)에 끼워넣고 깔끔하게
정리한다.
- 벨트 여유분이 짧을 때: 조절 버클 앞쪽에 있는 고정고리를
사용.
- 벨트의 여유분이 길때: 측면 고리를 통과시켜 뒤쪽 고정고리에
끼운다.
1C. 버클을 채우고 다리고리를 조절한다.
- NAVAHO SIT: 더블백 버클.
- NAVAHO SIT FAST: FAST 버클을 채운다. FAST 버클의 작동을
방해할 수 있는 이물질이 끼이지 않도록 조심한다 (자갈,
나뭇가지, 웨빙...). 정확히 잠겼는지 확인.
조절과 매달리기 테스트
추락이 발생할 경우를 대비하여 부상을 줄이기 위해 안전대를 꼭
맞게 조절해야 한다.
안전대가 몸에 잘 맞는지, 의도한 사용에도 충분한 편안함을
제공하는지 확인하기 위해서는 각 부착지점에 개인의 장비를
착용하여 안전대를 착용한채로 이리저리 움직여 보거나 매달려
본 후 (매달리기 실험), 크기를 적절하게 조절한다.
C
작업 위치확보와 이동 제한
그림 2. EN 358: 작업 위치확보와 이동 제한용
2000 안전대
이 부착지점은 사용자가 작업장에서 제 위치 (매달려서 작업:
작업 위치확보)를 잡을 수 있을 뿐만 아니라 추락의 가능성이
있는 곳으로 접근을 금지하기 위해 제작되었다 (제한의 원리).
이 부착지점은 반드시 이동제한이나 작업위치 확보 장치용으로만
사용해야한다, 최대 추락 높이: 0.5 m.
이 부착지점은 추락 방지용로 제작된 것이 아니라, 작업
위치확보 또는 집합 추락 방지 장치가 있는 이동제한 장치 (예:
안전망), 개인 추락 방지 장치 (예: EN 363 추락 방지 장치)를
보충하기 위해 필요할 지도 모른다.
EN 363 기준과 관련된 추락 방지 장치를 사용할 때는 TOP 또는
TOP CROLL 상단 안전대를 하단 안전대와 함께 사용한다.
2A. 복부 부착지점
2B. 측면 벨트 부착지점
항상 위치확보 죔줄을 고리사이에 끼워서 두개의 측면 고리를
함께 사용한다.
편안한 작업 위치확보를 위해 두 발로 표면을 지지할 수 있어야
한다.
작업 위치확보 죔줄을 조절하여 확보지점이 위에 있거나
사용자의 허리 위치와 같은 곳에 있어야 한다. 죔줄은 팽팽하게
유지되어야 하고 자유 추락 거리는 0.5 m로 제한된다.
2C. 뒤쪽 이동 제한 부착지점
벨트의 뒤쪽 부착지점은 추락의 위험이 있는 지역에 접근을
금지하는 이동 제한 장치에만 부착하기 위해 만들어졌습니다 (
제한의 원리).
사용 중간에 정규적으로 개인의 제한/작업 위치확보용 죔줄의
길이를 확인한다.
D
그림 3. 하단 안전대:
EN 813: 1997
복부 부착지점
EN 813: 1997 기준은 낮은 부착지점이 필요할때 작업위치 확보,
이동제한, 로프 접근 장치에 사용되는 하단 안전대와 관계가
있다.
이 복부 고리는 하강기, 위치확보 죔줄 또는 전진 죔줄을
부착하기 위해서 사용된다.
이 부착지점은 추락 방지 장치에 연결하여 사용할 수 없다.
E
TOP 상단 안전대를 연결할 수 있는 NAVAHO SIT
또는 NAVAHO SIT FAST 하단 안전대
그림 4. 준비
하단 안전대에 상단 안전대를 부착하기 위해 등쪽 끈을 뒤쪽
상단 벨트의 버클 (9)에 끼워 통과시키고, 여유분 끈은
고정고리에 끼워 넣는다. 등 길이를 조절하기 위해서는 (2) 조절
버클을 통해 끈을 잡아당기고, 끈 고정고리에 다시 통과시킨다.
F
그림 5. 안전대 착용 방법
다리고리에 있는 버클을 연다.
5A. 한 쪽 어깨끈을 벗고, 벨트의 하단 안전대를 잡고, 벨트를
통과하여 다리를 끼운 뒤 허리끈을 조여 당긴다.
5B. 끈을 잡아 당기면서 벨트를 조절한다. 여유분의 웨빙을
고정고리 (허리벨트에 납작하게 장치)에 끼워넣고 깔끔하게
정리한다.
- 벨트 여유분이 짧을 때: 조절 버클 앞쪽에 있는 고정고리를
사용.
- 벨트의 여유분이 길때: 측면 고리를 통과시켜 뒤쪽 고정고리에
끼운다.
5C. 버클을 채우고 다리고리를 조절한다.
- NAVAHO SIT: 더블백 버클.
- NAVAHO SIT FAST: FAST 버클을 채운다. FAST 버클의 작동을
방해할 수 있는 이물질이 끼이지 않도록 조심한다 (자갈,
나뭇가지, 웨빙...). 정확히 잠겼는지 확인.
5D. 어깨끈을 어깨에 걸친다. 상단 안전대를 하단 안전대에
연결하기 위해 카라비너를 복부지점에 끼워 넣는다 (5).
잠금덮개를 돌리면서 연결장비를 잠근다.
5E. 어깨끈 조절. 어깨끈의 고정고리를 사용하여 여유분의
웨빙을 정리한다.
5F. 등 길이 먼저 조절하기
처음 안전대를 착용하면서 단 한번만 조절해 두면 된다. 다른
사람의 도움을 청해 조절한다.
웨빙 고정고리를 밀어 양쪽 웨빙이 (2) 과 (9) 번 버클 사이가
팽팽하도록 한다 (느슨함이 없음).
여유분 웨빙을 고정고리에 끼워 깔끔하게 정돈하여 작업 중에
방해받지 않도록 한다.
개인의 체형과 사이즈에 맞추어 길이를 조절하고 어깨의 평평한
곳에 더블백 버클을 둔다.
조절과 매달리기 테스트
추락이 발생할 경우를 대비하여 부상을 줄이기 위해 안전대를 꼭
맞게 조절해야 한다.
안전대가 몸에 잘 맞는지, 의도한 사용에도 충분한 편안함을
제공하는지 확인하기 위해서는 각 부착지점에 개인의 장비를
착용하여 안전대를 착용한채로 이리저리 움직여 보거나 매달려
본 후 (매달리기 실험), 크기를 적절하게 조절한다.
G
그림 6. 수동 잠금 둥근형 방향 고정고리
이 EN 362: 2004 고정고리는 안전대의 구성 성분으로 상단
안전대를 하단 안전대에 연결하기 위한 구성 요소이다. 죔줄과
충격 흡수 장비 연결용으로 사용하지 말라.
6A. 사망 위험: 연결장비는 반드시 개폐구가 닫히고 잠긴
상태에서 사용되어야 한다. 연결장비의 강도는 개폐구가 열렸을
때 상당히 줄어든다.
개폐구가 자신의 손으로 눌러 닫히는지 체계적으로 확인한다.
6B. 연결장비는 긴 축으로 하중이 실였을 때 가장 강도가 높다.
어떤 다른 방향으로 하중이 실리게 되면 그 강도는 줄어들게
된다.
H
추락 방지
그림 7. EN 361: 2002 추락 방지 안전대
추락 방지용 전신 안전대, EN 363 기준에 따른 추락 방지 장치의
구성 요소 (개인 추락 방지 장치). 반드시 EN 795 확보물,
EN 362 잠금 카라비너, EN 355 충격 흡수 장비 등과 함께
사용해야 한다.
7A. 가슴 부착지점
이 부착지점은 추락 방지 장치를 연결할 때만 사용한다 (
예: 이동식 추락 방지대, 충격 흡수 장비, EN 363 기준을
설명하는 다른 장치). 부착지점이라는 것을 확인하기 위해, 각
지점에‘A’문자로 표기해 둔다.
이격거리: 사용자 아래의 빈 공간 길이:
사용자 아래의 이격거리는 추락이 발생한 경우에 어떤
장애물과도 부딪히지 않도록 충분해야 한다. 이격거리를
계산하는 구체적인 상세설명은 다른 구성 제품 (충격 흡수 장비,
이동 추락 방지대 등)을 위해 기술 상세설명서에서 찾아볼 수
있다.
I
TOP CROLL 상단 안전대를 연결할 수 있는
NAVAHO SIT 또는 NAVAHO SIT FAST 하단 안전대
그림 8. 준비
하단 안전대에 상단 안전대를 부착하기 위해 등쪽 끈을 뒤쪽
상단 벨트의 버클 (9)에 끼워 통과시키고, 여유분 끈은
고정고리에 끼워 넣는다. 등 길이를 조절하기 위해서는 (2) 조절
버클을 통해 끈을 잡아당기고, 끈 고정고리에 다시 통과시킨다.
안전대 앞에 CROLL 크램프를 부착하기 위해서는 섬유로된 복부
연결지점에 위치해 있는 마일론 래피드에 그것을 부착한다 (5).
마일론을 돌려 잠그고 토크 3 Nm에 렌치로 너트를 조인다.
잠겼는지 확인하고 플라스틱 고정 분리 바가 끼워졌는지
확인한다.
J
그림 9. 방향 마일론 래피드
마일론 래피드는 가슴 앞의 벨트와 연결하기 위한 연결
구성요소로써 사용되는 안전대의 구성 부품이다. 항상 3 Nm으로
꽉 조인다 (손으로 푸는 것을 불가능).
죔줄과 충격 흡수 장비 연결용으로 사용하지 말라.
K
그림 10. 안전대 착용 방법
다리고리에 있는 FAST 버클을 연다.
10A. 어깨끈을 펼치고 안전대의 벨트를 잡고 다리를 양쪽
다리고리에 끼워 넣는다.
10B. 어깨끈을 어깨에 걸친다.
10C. 끈을 잡아 당기면서 벨트를 조절한다. 여유분의 웨빙을
고정고리 (허리벨트에 납작하게 장치)에 끼워넣고 깔끔하게
정리한다.
- 벨트 여유분이 짧을 때: 조절 버클 앞쪽에 있는 고정고리를
사용.
- 벨트의 여유분이 길때: 측면 고리를 통과시켜 뒤쪽 고정고리에
끼운다.
10D. FAST 버클을 조이고 다리걸이를 조절한다. FAST 버클의
작동을 방해할 수 있는 이물질이 끼이지 않도록 조심한다 (자갈,
나뭇가지, 웨빙...). 정확히 잠겼는지 확인.
10E. 어깨끈 조절. 어깨끈의 고정고리를 사용하여 여유분의
웨빙을 정리한다.
10F. 등 길이 먼저 조절하기
처음 안전대를 착용하면서 단 한번만 조절해 두면 된다. 다른
사람의 도움을 청해 조절한다.
웨빙 고정고리를 밀어 양쪽 웨빙이 (2) 과 (9) 번 버클 사이가
팽팽하도록 한다 (느슨함이 없음).
여유분 웨빙을 고정고리에 끼워 깔끔하게 정돈하여 작업 중에
방해받지 않도록 한다.
개인의 체형과 사이즈에 맞추어 길이를 조절하고 어깨의 평평한
곳에 더블백 버클을 둔다.
조절과 매달리기 테스트
추락이 발생할 경우를 대비하여 부상을 줄이기 위해 안전대를 꼭
맞게 조절해야 한다.
안전대가 몸에 잘 맞는지, 의도한 사용에도 충분한 편안함을
제공하는지 확인하기 위해서는 각 부착지점에 개인의 장비를
착용하여 안전대를 착용한채로 이리저리 움직여 보거나 매달려
본 후 (매달리기 실험), 크기를 적절하게 조절한다.
L
추락 방지
그림 11. EN 361: 2002 추락 방지 안전대
추락 방지용 전신 안전대, EN 363 기준에 따른 추락 방지 장치의
구성 요소 (개인 추락 방지 장치). 반드시 EN 795 확보물,
EN 362 잠금 카라비너, EN 355 충격 흡수 장비 등과 함께
사용해야 한다.
11A. 가슴 부착지점
이 부착지점은 추락 방지 장치를 연결할 때만 사용한다 (
예: 이동식 추락 방지대, 충격 흡수 장비, EN 363 기준을
설명하는 다른 장치). 부착지점이라는 것을 확인하기 위해, 각
지점에‘A’문자로 표기해 둔다.
이격거리: 사용자 아래의 빈 공간 길이:
사용자 아래의 이격거리는 추락이 발생한 경우에 어떤
장애물과도 부딪히지 않도록 충분해야 한다. 이격거리를
계산하는 구체적인 상세설명은 다른 구성 제품 (충격 흡수 장비,
이동 추락 방지대 등)을 위해 기술 상세설명서에서 찾아볼 수
39
NAVAHO SIT / NAVAHO SIT FAST / TOP / TOP CROLL C79502-C (200907)
Page 40

있다.
M
로프 접근
복부 로프 크램프 CROLL
EN 12841: 2006
적용 범위
EN 12841: 2006 CROLL 로프크램프는 작업로프를 등강하기 위해
사용되는 B 형태의 로프 조절기다.
주의: 반드시 두번째 (안전) 로프에서 A 형태의 백업 장비와
함께 사용해야 한다 (예: 로프용 ASAP 이동 추락 방지대).
CROLL 복부 로프 크램프를 EN 363 추락 방지 장치에 사용하는
것은 부적합하다.
로프 직경
10-13 mm EN 1891 A 형태 세미-스택틱 케른맨틀 로프를 사용.
그림 12. 로프에 설치하기
엄지와 집게 손가락으로 제동걸이/안전장치를 아래로 당겨
밖으로 건다. 장치가 장비의 몸체의 제자리에 잠길때까지
당긴다. 캠은 열린 상태로 둔다.
로프를 장비에 끼운다. 캠이 로프에 맞물려 휙 치켜올릴 때까지
잠금 장치를 누른다.
잠금장치는 캠이 무의식적으로 열린는 것을 방지한다.
로프에서 분리하기
제동걸이/안전장치를 아래로 당기고 밖으로 끄집어 내면서
장비를 로프 위로 움직인다.
그림 13. 작동 원리
13A. 등강하기
CROLL 크램프는 작업 또는 접근 로프를 등강하기 위한 장비이다.
아래 방향으로 하중이 실였을때 로프에 맞물리고, 로프 위로
움직일때는 쉽게 미끄러진다.
로프에 캠에 맞물리고 장비가 로프에 끼이도록 톱니를 로프의
표피 안으로 누른다. 캠안의 홈은 진흙 등이 빠질수 있도록
한다.
13B. CROLL 크램프를 로프 아래로 움직이기 (특별한 상황)
로프의 표피로부터 톱니가 맞물리지 않도록 하기 위해 CROLL
크램프를 로프 위로 짧게 이동시키는 동시에 집게 손가락으로
캠을 아래로 누른다. 제동걸이/안전장치를 조작하지 말라. 캠이
무의식적으로 열리는 위험이 발생하기 때문이다.
13C. 작동상의 검사
매번 사용전에 로프의 정확한 성향, 장비의 기능을 확인하고,
사용자는 반드시 자기확보를 하고 제품 실험을 수행한다.
CROLL 크램프를 로프 위로 밀어라. 반드시 쉽게 미끄러져야
한다. 로프에 맞물리는 것을 확인하기 위해 아래로 당긴다.
13D. 유의사항
- 사용하지 않을 때는 CROLL 크램프의 캠을 닫는다. 왜냐하면
열린상태에서는 장비나 다른 물체가 캠에 끼일 수 있기
때문이다.
- 주의: 이물질 (조각, 진흙, 식물, 코드, 슬링, 의류, 페인트
등)이 캠의 작동을 방해하지 않도록 한다.
- 잠금장치에 의류나 웨빙이 끼이지 않도록 유의한다.
- CROLL 크램프와 확보점 사이의 로프가 항상 팽팽하게
유지되어야 한다. 로프의 확보점은 항상 사용자 아래에 두어야
한다.
- 로프로부터 충격 하중 흡수:
추락할 경우 충격을 흡수하는 로프라는 것을 잊지 말라.
확보점에 가까이 갈수록 로프의 충격 흡수력이 점점 줄어들고,
결국 실제적으로는 0 에 이르게 된다.
- 로프를 손상시킬 수 있는 어떤 것으로부터 로프를 보호한다 (
예: 날카로운 모서리, 거친 표면 등).
- 로프는 CROLL 크램프를 통과하여 자유롭게 미끄러질 수 있어야
한다. 미끄러지는 것을 방해할 수 있는 상황을 조심한다 (예:
매듭이나 로프의 손상된 부분 등).
- 로프의 끝자에 정지 매듭 묶는 것을 잊지 말자.
그림 14. 로프 클라이밍
- 작업 로프: CROLL 크램프와 발고리가 달린 주마를 사용 한다 (
예: ASCENSION 손잡이가 있는 로프크램프). 항상 스스로 적당한
죔줄이 달린 보조 등강기를 부착한다.
- 안전 로프: A 형태 장비를 사용.
N
장비걸이 최대하중
사용 설명서에 지시된데로 카라비너를 검사한다.
다양성
- 사망 위험: 이 장비는 거칠거칠한 재질이나 날카로운 모서리와
마찰되지 않도록 한다.
- 사용자는 수직 활동이 의학적으로 적합해야 한다. 주의:
안전벨트에서 움직일 수 없이 매달리는 것은 심각한 부상이나
사망을 초래할 수 있다.
- 제품을 사용하는 전 수명기간동안 제품의 품질 표시가 읽을 수
있게끔 남아있는지 반드시 확인한다.
- 작업 안전에 해당되는 정부 규정과 다른 기준에 관련하여
자신의 장비 응용이 사용상 이 장비와 적합한지 확인해야 한다.
- 이 장비와 함께 사용되는 각 장비의 사용 설명서를 반드시
고려해야 한다.
- 사용 설명서는 반드시 이 장비의 사용자에게 제공되어야 한다.
도착지의 원산지 밖에서 장비가 판매될 때, 공급자는 그 장비가
사용되는 그 나라의 언어로 된 사용설명서를 제공할 수 있다.
수명
주의: 제품의 수명은 예외적인 일에서 단 한번의 사용으로도
줄어들수 있습니다. 예를 들면 아래와 같은 어떤 상황에 노출된
경우: 화학제품, 극한 온도, 날카로운 모서리, 심각한 추락이나
하중 등.
Petzl 제품의 잠재 수명은 아래와 같습니다: 플라스틱, 섬유
제품은 제조년일로부터 10 년까지. 금속 제품은 무제한.
실제 수명은 아래에 열거된 폐기 기준 ("장비의 폐기 시점"
참조)에 하나라도 해당되거나, 사용 장치에 장비가 노후화된
것으로 판단되었을때 끝이 납니다.
실제수명은 아래와 같은 다양한 요소에 영향을 받습니다: 강도,
사용빈도, 사용환경, 사용자의 역량, 제품의 보관과 관리
상태 등.
장비의 손상과 품질저하를 주기적으로 검사하기.
게다가 사용전과 사용중에도 적어도 일년에 한번은 전문가를
통한 주기적인 정밀검사를 거칩니다. 적어도 일년에 한번은
정밀검사를 거칩니다. 정밀검사의 빈도는 사용 형태나 강도에
좌우됩니다. 장비의 상태를 보다 정확하게 관리하기 위해서는 각
장비마다 특정한 사람을 선정하여 관리함으로써, 장비의 현재
상태를 잘 알수 있습니다. 검사 결과는 «장비검사 기록지»
에 문서화되어야 합니다. 이 문서는 다음과 같은 자세한
사항에 맞게 기록합니다: 장비 형태, 모델, 품명, 제조회사나
공급업체의 연락 정보, 신원확인의 방법 (일련 또는 개별번호),
제조년도, 구입날짜, 처음 사용한 날짜, 사용자의 이름, 예를
들면, 관리나 사용빈도, 주기적인 검사기록 (날짜 / 의견과
문제점, 검사를 수행한 전문가의 싸인 / 다음 예상 검사 날짜)과
같은 모든 관련 정보. 구체적인 검사 기록의 예시와 다른 정보
툴은 www.petzl.com/ppe 웹사이트를 참조하시기 바랍니다.
장비 폐기 시점
아래와 같은 경우에는 즉시 장비를 폐기하십시오:
- 불합격 판정 (사용 전과 사용중, 주기적인 정밀검사에서),
- 심한 추락이나 하중을 받은 적이 있는 경우,
- 장비에 대한 기록을 전혀 모를 경우,
- 플라스틱이나 섬유 재질의 장비가 최소 10 년 사용되었을
경우,
- 장비의 보전상태가 의심되는 경우.
장비가 다시 사용되는 일이 없도록 폐기합니다.
제품의 노후화
제품이 노후화된 것으로 판단되거나 실제수명 전에 폐기해야
하는 이유에는 여러가지가 있습니다. 예를 들면: 적용기준,
규정, 법규의 변경이나 신기술 개발, 다른 장비와 호환되지 않을
경우 등.
변형, 수리
페츨로부터 검증되지 않은 어떤 변형과 제품의 수리도
금지됩니다: 장비의 효율성을 줄이는 위험 때문.
보관, 운송
자외선 노출, 습기, 화학제품 등으로부터 제품을 보호하기 위해
가방이나 다른 보관함에 안전대를 보관한다.
보증
제질 또는 제작상의 어떤 문제가 없는한 이 제품은 3 년간
보증됩니다. 보증에서 제외되는 부분: 정상적인 마모와 찢어짐,
산화작용, 제품의 변형과 교체, 부적절한 보관, 허술한 관리,
사고나 부주의, 부적절하고 부정확한 사용으로 발생한 손상.
PETZL (페츨)은 제품 사용으로 발생된 직간접적이거나 우발적인
또는 어떤 다른 형태의 손상과 결과에도 책임지지 않습니다.
O
일반적인 정보
호환성: 부착지점 / 카라비너
부적합한 연결은 갑작스런 분리, 파손을 불러오거나 다른 장비의
안전 기능에 영향을 끼칠 수 있다.
주의: 안전대의 부착지점은 카라비너의 개폐구에서 레버의
역할을 수행할 수 있다.
로프가 갑자기 팽팽해지거나 잠금장치에 외부적인 압력이
가해지면 카라비너의 위치가 불안전하게 되고, 잠금덮개가
파손되고 개폐구가 저절로 열릴 수 있다.
이런 위험을 줄이기 위해서는 매번 자신의 카라비너가 올바르게
놓여 장치에 하중을 받고 있는지 확인한다 (죔줄, 하강기 등).
또한 부착지점의 부정확한 곳에 위치할 성향을 보이는 카라비너
사용을 삼가함으로써 자신의 카라비너가 부착지점 (모양, 크기
등)과 호환되는지 확인한다.
EN 365: 주의사항
호환성
이 장비를 개인의 다른 장비와 호환하여 사용할 수 있는지
확인하고, 제품의 특별 지시사항을 참조합니다.
주의: 만약 장비 한 개의 안전 기능이 다른 한 개의 장비
작동으로 위태롭게 된다면, 다수의 장비를 함께 사용할 때
위험한 상황이 발생할 수 있다.
당신이 가진 장비의 호환성에 대해 불확실하다면 페츨과
상담한다.
확보물: 고소작업
장치의 확보지점은 사용자의 위치보다 위에 설치되어야 하고,
반드시 EN 795 규정의 지시서를 승인받아야 한다. 특히 확보
지점의 최소 강도는 10 kN 되어야 한다.
구조 계획
장비 사용 도중에 우연히 부닥칠게 될 위기에 대비하여, 반드시
신속하게 이행할 수 있는 구조 계획과 방법을 가지고 있어야
한다. 이것은 필수적인 구조 기법은 충분한 훈련이 필요하다는
것을 함축하고 있다.
카라비너
카라비너는 반드시 개폐구가 닫히고 잠긴 상태에서 사용되어야
한다. 개폐구가 자신의 손으로 눌러 닫히는지 체계적으로
확인한다.
40
NAVAHO SIT / NAVAHO SIT FAST / TOP / TOP CROLL C79502-C (200907)
Page 41

(CN)中文
使用指南
- NAVAHO SIT 和 NAVAHO SIT FAST
座式安全帶,維持工作位置腰帶.
- NAVAHO SIT 或 NAVAHO SIT FAST 與 TOP 胸式安全
帶裝配
防下墮安全帶,維持工作位置腰帶,座式安全帶.
- NAVAHO SIT 或 NAVAHO SIT FAST 與 TOP CROLL 胸
式安全帶裝配
防下墮安全帶,維持工作位置腰帶,座式安全帶,內置CROLL的繩索前
進安全帶.
A
只有那些圖中沒有交叉符號和/或沒有骷髏頭骨符號的技巧才授權使
用. 定期查閱www.petzl.com網頁以找尋最新版本的使用指南.
如果你有任何疑問或對於這些文件的理解是有困難的話,請聯絡
PETZL.
應用範圍
- NAVAHO SIT 和 NAVAHO SIT FAST
座式安全帶,維持工作位置腰帶.
- NAVAHO SIT 或 NAVAHO SIT FAST 與 TOP 胸式安全
帶裝配
防下墮安全帶,維持工作位置腰帶,座式安全帶.
- NAVAHO SIT 或 NAVAHO SIT FAST 與 TOP CROLL 胸
式安全帶裝配
防下墮安全帶,維持工作位置腰帶,座式安全帶,內置CROLL的繩索前
進安全帶.
這產品不能負荷超出它可負載的重量,或不能用於其他不是原本設計
的用途.
警告
那些需要使用這工具的活動有內在的危險.
你要為你個人的行動和決定負責.
在使用這件工具前,你必須:
-閱讀及明白全部使用指南.
-取得正確使用方法的訓練.
-熟悉它的性能及限制.
-明白和接受所涉及的危險.
不留意這些警告會導致嚴重受傷或死亡.
責任
警告,在使用前必須受過特別的訓練.
這產品必須由有能力和負責任的人使用,或那些在有能力和負責任的
人直接和視線可觸及的情況下使用.
取得合適的技巧和使用方法的訓練是閣下的責任.
你個人需承擔所有不正確使用產品所帶來的風險和損壞,受傷或死亡
的責任. 如果你不能或不是在一個位置是可以負起這個責任或冒這個
險的話,不要使用該產品.
零件名稱
- TOP 胸式安全帶:
(1) 肩帶, (2) 背部調校扣, (3) EN 361 尾部繫縛點, (4) 方向性連
接器.
- TOP CROLL 胸式安全帶:
(1) 肩帶, (2) 背部調校扣, (3) EN 361 尾部繫縛點, (4) EN 12841
內置CROLL腹式繩柄, (4b) 設有分隔條的快速連接器, (16) 凸輪,
(17) 扳鈕/安全鈕, (18) 連接洞.
- NAVAHO SIT 和 NAVAHO SIT FAST座式安全帶:
(5) 腹部繫縛點(紡織品)連接胸式安全帶至座式安全帶, (6) 腰
帶, (7) EN 358, EN 813, 腹部繫縛點, (8) EN 358 水平腰帶繫縛
點, (9) 後扣連接胸式及座式組件,備有 EN 358 限制前進繫縛點,
(10) DoubleBack 調校扣, (10b) FAST 快速連接扣, (11) 設備環,
(12) 工具攜帶器凹槽, (13) 索帶收藏器, (14) 可調校橡筋帶, (15) 有
刻度的標籤放置在腰帶承托器上.
主要物料
安全帶: 聚脂,鋼(可調校扣),鋁合金(繫縛點).
CROLL 腹部繩柄: 鋁合金(扣身),鍍鉻不鏽鋼 (凸輪),聚酰胺(
抓手).
檢查,需要檢查的地方
在每次使用前
- 安全帶
檢查挽索的繫縛點,調節扣和安全縫合.
檢查挽索因使用,暴露於高溫和與化學品接觸過而導致的割痕,磨損和
損壞等,尤其小心檢查割斷的線頭.
檢查DoubleBack和FAST扣是否操作正常.
- TOP
向性連接器
檢查器身,閘門鉸和上鎖套是否有裂痕,變型,侵蝕等.打開閘門以檢查它
是否可以在鬆開手時自動關上. 檢查上鎖套是否操作正常. Keylock凹
槽(閘門)不得被任何外物(污垢,小石等)所阻力.
- TOP CROLL
快速方向性連接器
在使用前,檢查器身.
檢查上鎖螺釘帽是否旋緊(見不到線頭),用3Nm扭矩旋緊.
CROLL 腹部繩柄
每次使用前,檢查器身的狀況,繫縛孔,凸輪和安全鈕(裂痕,割痕,變型,損
耗,侵蝕),凸輪彈簧和中軸. 確保尖齒沒有損耗。 注意,不要使用缺失或
損耗了凸齒的繩柄.
在使用中
定期檢查產品的狀況是重要的. 檢查它跟系統內其他工具的連接,確保
系統內不同的工具在正確位置.
請參閱在www.petzl.com/ppe或PETZL PPE光碟有關個人保護設備內
的每一件工具的檢查程序.
如對產品的狀態有任何疑問,請聯絡PETZL.
B
- NAVAHO SIT 和 NAVAHO SIT FAST
圖1.如何穿上安全帶
打開腳環上的扣.
1A. 拿著座式安全帶上的腰帶,把腳穿上腰帶然後拉上腰部.
1B. 拉著腰帶以作調整. 把多餘的索帶整齊地放在腰帶收藏器內(貼
在腰帶上).
- 短的一端: 用在調校扣前端的腰帶收藏器.
- 長的一端: 把索帶穿入水平的環內然後穿入環後面的腰帶收藏器內.
1C. 縛好腳環.
- NAVAHO SIT: DoubleBack 扣.
- NAVAHO SIT FAST: 扣上FAST扣. 小心外物會防礙FAST扣的運
作(例如小石,沙礫,布料...). 檢查正確上鎖的方法.
調校和懸吊測試
安全帶必須合身以減低下墮時受傷.
你需要移動身體及帶同工具在安全帶之內(懸吊測試)以不同的繫縛點
懸吊以確保安全帶合身,安全帶能提供足夠的舒適度去從事所需的工
作,這便是良好的調校.
C
維持工作位置和限制前進
圖 2. EN 358: 2000 維持工作位置和限制前
進安全帶
這些繫縛點是設計用於維持用者的工作位置(懸吊工作),或防止工人進
入有下墮可能的地帶(繫帶原則). 這些繫縛點只可用於連接一個限制
前進和維持工作位置系統,最大的下跌高度:0.5米.
這些繫縛點不是設計用於防下墮而且可能需要集體的防下墮系統以輔
助維持工作或限制前進系統(例如安全網)或個人防下墮裝置(例如一個
EN 363防下墮系統).
當一個符合EN 363 標準的防下墮系統, TOP or TOP CROLL 胸式安
全帶與你的座式安全帶連接.
2A. 背部繫縛點
2B. 水平腰帶繫縛點
時常將兩個水平環一起使用,把維持工作挽索扣在兩個環之間.
舒適的維持工作位置應該有一個腳部支撐平面.
調校維持工作挽索使確定點在用者之上或在用者腰部的位置. 挽索必
須拉緊而且淨空距離限制在 0.5 米之內
2C. 後限制前進繫縛點
這個在腰帶上的背後繫縛點只是設計用於連接一個限制前進系統以免
你進入存在下墮危險的區域.
在使用時定時檢查限制前進帶和/或維持工作位置挽索的長度.
D
圖3. 座式安全帶:
EN 813: 1997
背部繫縛點
EN 813: 1997 標準是有關用於維持工作位置,限制前進和繩索前進系
統之中當繫縛點必須在較下位置的座式安全帶.
使用這腹環連接到一個下降器,維持位置或限制前進挽索.
這繫縛點不應用於連接防下墮系統.
E
NAVAHO SIT 或 NAVAHO SIT FAST 與 TOP
胸式安全帶裝配
圖4.準備
要連接胸式安全帶到一個座式安全帶,把背帶穿過後胸式座位連接扣
(9),然後穿過彈性收藏器. 然後把索帶穿過用於背部調校的扣(2), 然後
再穿在彈性收藏器內.
F
圖5.如何穿上安全帶
打開腳環上的扣.
5A. 把肩帶放在一邊,拿著座式安全帶上的腰帶,把腳穿上腰帶然後拉
上腰部.
5B. 拉著腰帶以作調整. 把多餘的索帶整齊地放在腰帶收藏器內(貼
在腰帶上).
- 短的一端: 用在調校扣前端的腰帶收藏器.
- 長的一端: 把索帶穿入水平的環內然後穿入環後面的腰帶收藏器內.
5C. 縛好腳環.
- NAVAHO SIT: DoubleBack 扣.
- NAVAHO SIT FAST: 扣上FAST扣. 小心外物會防礙FAST扣的運
作(例如小石,沙礫,布料...). 檢查正確上鎖的方法.
5D. 調整肩帶在肩上的位置. 把連接器放在腹部繫縛點(紡織品)以連接
胸式安全帶到座式安全帶(5). 轉動上鎖套以關上連接器.
5E. 調校肩帶. 把多餘的索帶收藏在肩帶的收藏器內.
5F. 基本的背部調校.
這調校應該只在第一次穿上時調校. 調整時請其他人幫忙.
滑動索帶收藏器使兩層索帶在兩個扣之間拉緊, (2) 和 (9) (沒有鬆弛).
確保把多餘的索帶整齊收藏在索帶收藏器內(平整-沒有鬆弛的環狀)
使之不會防礙工作.
調節位置以適合個人的身形和尺寸,把DoubleBack 扣調校至肩葉骨
位置.
調校和懸吊測試
安全帶必須合身以減低下墮時受傷.
你需要移動身體及帶同工具在安全帶之內(懸吊測試)以不同的繫縛點
懸吊以確保安全帶合身,安全帶能提供足夠的舒適度去從事所需的工
作,這便是良好的調校.
G
圖6.手動上鎖橢圓形方向性連接器
這個EN 362: 2004 連接器是安全帶的一個組件, 它是用於連接胸式
安全帶至座式安全帶. 不要用它連接一條挽索或勢能吸收器.
6A. 注意危險,連接器閘門必須時常關閉及鎖上. 如連接器的閘門是打
開的話,它的力量會大大地削弱.
用手按下閘門作系統性的檢查,看它是否緊閉.
6B. 當連接器(關閉)負重在中軸時,它的力量是最大的. 其他任何位置
都會削弱它的力量.
H
防下墮
圖 7. EN 361: 2002 防下墮安全帶
全身防下墮安全帶,是根據EN 363 標準的防下墮設備中的一個組件
(個人防下墮系統). 它必須與 EN 795 確定點, EN 362 上鎖安全扣,
EN 355 勢能吸收器等一同使用.
7A. 尾部繫縛點
只可使用這些繫縛點連繫一個防下墮系統(例如一個流動防下墮器,一
個勢能吸收器,或其他在EN 363標準內所描述的系統). 為方便識別,這
些繫縛點刻上字母‘A’.
淨空: 用者下面沒有阻礙物的空間
用者下面的淨空必須足夠以防止用者遇到下墮時撞著阻礙物. 計算淨
空的詳細資料可在其他組件的使用指南內找到(勢能吸收器,流動防
下墮器等).
I
NAVAHO SIT 或 NAVAHO SIT FAST 與
TOP CROLL 胸式安全帶裝配
圖8.準備
要連接胸式安全帶到一個座式安全帶,把背帶穿過後胸式座位連接扣
(9),然後穿過彈性收藏器. 然後把索帶穿過用於背部調校的扣(2), 然後
再穿在彈性收藏器內.
要把CROLL連接至安全帶前端,將之與位於腹部的連接點接上快速
連接扣(5). 關上快速扣,用扳手旋緊至3 Nm. 確保關上和扣上塑膠分
隔條子.
J
圖9.快速方向性連接器
快速連接器是安全帶的組件,用作連接上身組件至腰帶. 它必須時常旋
緊至3Nm(不可能用手旋開連接器).
不要用它連接一條挽索或勢能吸收器.
K
圖10.如何穿上安全帶
打開腳環上的FAST扣.
10A. 分開肩帶,抓著安全帶的腰帶,然後把雙腳穿上腳環.
10B. 調整肩帶的位置.
10C. 拉著腰帶以作調整. 把多餘的索帶放在存放腰帶收藏器內(貼在
腰帶上).
- 短的一端: 用在調校扣前端的腰帶收藏器.
- 長的一端: 把索帶穿入水平的環內然後穿入環後面的腰帶收藏器內.
10D. 扣上FAST扣和調校腳環. 小心外物會防礙FAST扣的運作(例如
小石,沙礫,布料...). 檢查正確上鎖的方法.
10E. 調校肩帶. 把多餘的索帶收藏在肩帶的收藏器內.
10F. 基本的背部調校.
這調校應該只在第一次穿上時調校. 調整時請其他人幫忙.
滑動索帶收藏器使兩層索帶在兩個扣之間拉緊, (2) 和 (9) (沒有鬆弛).
確保把多餘的索帶整齊收藏在索帶收藏器內(平整-沒有鬆弛的環狀)
使之不會防礙工作.
調節位置以適合個人的身形和尺寸,把DoubleBack 扣調校至肩葉骨
位置.
調校和懸吊測試
安全帶必須合身以減低下墮時受傷.
你需要移動身體及帶同工具在安全帶之內(懸吊測試)以不同的繫縛點
懸吊以確保安全帶合身,安全帶能提供足夠的舒適度去從事所需的工
作,這便是良好的調校.
L
防下墮
圖 11. EN 361: 2002 防下墮安全帶
全身防下墮安全帶,是根據EN 363 標準的防下墮設備中的一個組件
(個人防下墮系統). 它必須與 EN 795 確定點, EN 362 上鎖安全扣,
EN 355 勢能吸收器等一同使用.
11A. 尾部繫縛點
只可使用這些繫縛點連繫一個防下墮系統(例如一個流動防下墮器,一
個勢能吸收器,或其他在EN 363標準內所描述的系統). 為方便識別,這
些繫縛點刻上字母‘A’.
淨空: 用者下面沒有阻礙物的空間
用者下面的淨空必須足夠以防止用者遇到下墮時撞著阻礙物. 計算淨
空的詳細資料可在其他組件的使用指南內找到(勢能吸收器,流動防
下墮器等).
M
繩索前進
CROLL 腹部繩柄
EN 12841: 2006
應用範圍
EN 12841: 2006 CROLL 繩柄是 B 型繩索調校器在工作繩索上攀
登.
注意,它必須與A型在第二條繩(安全)上作後備設備(例如ASAP用於繩
索的流動防下墮器).
CROLL 腹式繩柄不適用於EN 363 防下墮系統.
繩索直徑
用一條10-13毫米的EN 1891 A型半靜止核心型繩索.
圖 12. 安裝在繩索上
拉下扳鈕/安全鈕然後鬆開姆指和食指. 直至它穩鎖在器身之間. 凸輪
便會打開.
把繩索放好. 把凸輪安全鈕推入,直至凸輪轉動到繩索上.
安全鈕幫助防止凸輪自動打開.
移除繩索
在拉下扳鈕/安全鈕時,把工具在繩索上往上移.
圖 13. 操作原則
13A. 上升
CROLL 是一件用於往上攀登或前進繩索工作的工具. 卡上時,它緊咬
著繩索而且很容易在繩索上滑動.
凸齒卡著繩索的外圍使凸輪和工具能卡在繩索上. 凸輪的凹槽容許
清理泥濘.
13B. 由繩索上移除CROLL(例外情況))
在繩索上稍為向上移動CROLL而且同時以食指向下推開凸輪使凸齒
由繩索鬆開. 不要操作扳鈕/安全鈕,因為這樣凸輪有自動打開的危險.
13C. 操作檢查
在使用前,檢查工具是否正確安上及正常操作,用者必須以自我保護形
式進行測試.
把CROLL 推上繩索. 它必須容易的滑上繩索. 拉下它以確保它緊抓
著繩索.
13D. 預防措施
- 當不使用時關閉 CROLL的凸輪,因為如果打開了,工具或其他物體
會卡著它.
- 注意,不要容許外物防礙凸輪的操作(小石,泥濘,植物,繩線,環索,衣物,
油漆等).
- 在CROLL 與繩索及確定點之間必須是拉緊的.
- 在CROLL 與繩索及確定點之間必須是拉緊的. 用者必須保持在繩索
的確定點之下.
- 繩索吸收衝力的負荷:
不要忘記在下墮時是繩索吸收重力. 你越接近確定點,繩索吸收能量的
能力便越減弱,最後差不多達到零.
-保護繩索避免接觸任何可損壞它的物件(例如尖銳邊沿,粗糙表面等).
- CROLL必須能在繩索之內自由滑動. 小心能導致下滑的情況(例如繩
結/損毀了的繩段等).
41
NAVAHO SIT / NAVAHO SIT FAST / TOP / TOP CROLL C79502-C (200907)
Page 42

-不要忘記在繩索末端打一個止墮結.
圖14.繩索攀登
- 工作繩索: 使用CROLL和另外一款手動繩柄(例如ASCENSION繩
柄)及一個腳環. 時常將你自己與一個備有合適挽索的第二個上升器
連接著.
- 安全繩: 用一個A型工具.
N
工具環最大負重
O
一般資料
兼容性: 繫縛點/連接器
一個不兼容的連接器可引致意外的鬆脫,破裂或影響設備內的另一件
工具的操作.
警告,安全帶上的繫縛點可造成連接器閘門成為一個槓桿.
當繩索突然產生拉力和/或有外在壓力加於上鎖系統時,而連接器放在
不妥當的位置,上鎖套會斷裂和閘門自己會打開.
要減低這危險,檢查連接器在每次負載時是否都在正確位置(挽索,下
降器等).
同時亦需確保連接器與繫縛點兼容(形狀,尺寸等),這樣避免了連接器在
拉緊的情況下放在繫縛點內不正確(及穩妥)的位置.
EN 365: 警告
兼容性
檢查這產品與設備的其他組件是否兼容,參閱這產品的使用指南.
警告,當一起使用多種工具時,一個危險的情況是可能由於另一個工具
的使用而削弱一個工具的安全操作.
如不清楚設備內各工具的兼容性,請聯絡Petzl.
確定點: 高空工作
系統的確定點最理想是在用者之上而且必須要符合EN 795標準,確定
點必須最少有10kN的負重力.
拯救計劃
你必須要有一個拯救計劃而且要在使用這工具遇上困難時能快速應
用. 這意味著合適的拯救技巧訓練是必須的.
連接器
安全扣必須在使用時閘門是關閉和鎖上的. 用手按下閘門作系統性的
檢查,看它是否緊閉.
依使用指南的指示檢查連接器.
其他注意事項
-注意危險,不要讓產品與磨損性物料或尖邊磨擦.
-用者的身體狀態必須是適合高空活動的. 警告,在靜止的安全帶上可導
致嚴重的受傷或死亡.
-你必須檢查以確定產品上所刻劃的符號在整個產品的使用週期中是
清晰可見的.
-你必須確保工具在你的應用情況下是符合政府的法例和其他職業安
全標準.
-每一件工具與此一產品一同使用時,必須遵守其使用指南.
-此工具的使用指南必須提供給用者. 如果工具是在原產地以外轉售,銷
售商會提供當地語言版本的使用指南.
產品壽命
警告,一次意外事件可減低產品的壽命至一次的使用,如果產品暴露在
下列任何物品: 化學品,極端的氣候,尖銳的邊緣,嚴重的下墮或負重等.
所有 Petzl產品的壽命如下: 塑膠和紡織品以製造日期起計可有長達十
年的壽命. 金屬產品沒有壽命限期.
真正的產品壽命由下列的條件決定它應該被終止使用(參閱「你的
設備應何時終止使用」,或當在一個系統中運作時該在何時判斷為不
能使用.
確實的產品壽命會被不同的因素所影響,例如: 例如使用時的力度和頻
密度,用者的熟練程度,產品儲存和維修的情況等.
定期檢查工具以確定是否有損毀和/或變壞.
除了在使用前或使用時作檢查外,每隔十二個月由資深檢查員作定期
深入檢查是必須的. 這種檢查必須每隔十二個月進行一次. 深入檢查的
頻密程度需視乎使用的類型和力度而定. 為使有良好的工具檢查記錄,
最理想是把工具分配給一個使用者,這樣他便知道工具的歷史. 檢查結
果應該記錄在一部檢查記錄內. 這份文件必須記載以下的細節: 設備的
種類,型號,生產商或分銷商的聯絡資料,辨認產品的方法(產品編號或個
別號碼),製造年份,購買日期,首次使用日期,用者姓名,其他相關資料例
如保養和使用頻率,定期檢查的歷史(日期/評語和出現問題的記錄/資
深檢查員的姓名及簽署/下次檢查的日期). 請參閱在www.petzl.com/
ppe網頁內有關詳細檢查記錄和其他資料的工具.
何時該棄你的工具
如遇下列情況,立即棄用該設備:
-不能通過檢查(在使用前和使用中及定期的深入檢查),
-經過一次嚴重的下墮或負重,
-你並不知道設備的全部歷史,
-以塑膠或纖維造的產品用了最少十年,
-你對它的狀態有懷疑.
銷毀棄用的設備以防誤用.
廢棄產品
產品被判定為廢棄及在真正的壽命終結前被棄用是有很多原因的. 例
子包括: 使用標準,法例或立法的改變;新技巧的發展,與其他設備不兼
容等.
改裝,維修
不是Petzl認可的任何改裝,加裝或工具維修均被禁止: 這是由於工具的
效能會被削弱.
儲存,運輸
把安全帶放在一個容器(袋,盒)以保護它免於暴露在UV光,潮濕,化學
品等.
保用証明
這產品對於物料或生產上的錯誤有三年保用期. 不包括在保用証明之
內的有: 正常的損耗,氧化,加工及改裝,不正確存放,欠佳的保養,因意外
而產生的損壞,疏忽,或不正當使用.
PETZL對於直接,間接或意外所造成的後果,或使用她的產品所造成的
任何類型的損壞慨不負責.
42
NAVAHO SIT / NAVAHO SIT FAST / TOP / TOP CROLL C79502-C (200907)
Page 43

สายรัดสะโพก, เข็มขัดยึดติดกับที่.
สายรัดนิรภัยแบบเต็มตัวกันตก, เข็มขัดรัดอยู่กับที่,สายรัดสะโพก.
สายรัดนิรภัยกันตก, เข็มขัดยึดติดกับที่, สายรัดสะโพก, สายรัดนิรภัยเพื่อไต่เชือกประกอบรวมกับตัวไต่ขึ้น CROLL.
A
เฉพาะข้อมูลทางเทคนิคที่แสดงในแผนผังซึ่งไม่ถูกขีดฆ่า และ / หรือไม่ได้แสดงภาพกากบาดบนหัวกระโหลกเท่านั้นที่ถูกต้องตา
มมาตรฐาน. เช็คจาก เว็ปไซด์ www.petzl.com เพื่อหาข้อมูลเพิ่มเติมใหม่ ๆ ได้ตลอดเวลา.
ติดต่อ PETZL หรือตัวแทนจำหน่ายถ้ามีข้อสงสัยหรือไม่เข้าใจเอกสารคำอธิบายนี้.
จุดเชื่อมต่อที่ออกแบบมาเพื่อห้อยตัวผู้ใช้งานในพื้นที่ที่ติดตั้งงาน (ทำงานโดยห้อยตัวกับที่: ตำแหน่งการทำงาน), หรือจัดไว้สำ
หรับผู้ทำงานในบริเวณที่มีโอกาสตกได้ (โดยการผูกเชือก: ข้อจำกัด). จุดเชื่อมต่อนี้จะต้องใช้ด้วยข้อจำกัดของระบบการทำง
าน, ด้วยการตกที่ความสูงไม่เกิน: 0,5 m.
จุดเชื่อมต่อนี้ไม่ได้ออกแบบมาสำหรับยับยั้งการตกซึ่งมีความสำคัญต่อสิ่งที่เสริมเข้าไปกับการทำงานหรือระบบที่จำกัดซึ่
งรวมเข้ากับระบบยับยั้งการตก (เช่น ตาข่ายกันตก) หรือระบบป้องกันการตกส่วนบุคคล (เช่น มาตรฐาน EN 363
ระบบยับยั้งการตก).
นการใช้งานของระบบกันตกตามมาตรฐาน EN 363, ควรใช้สายรัดอกแบบ TOP หรือ สายรัดอกแบบ TOP CROLL
(ที่มีตัวบีบเชือกประกอบติด) ต่อเชื่อมเข้าสายรัดสะโพกด้วยเสมอ.
จะต้องใช้ห่วงเชื่อมต่อทั้งสองด้านโดยการคลิบกับเชือกสั้นเพื่อตำแหน่งการทำงานระหว่างมันเสมอ.
เพื่อช่วยให้การรองรับแรงที่พื้นที่เท้าเหยียบได้สะดวกสบายขึ้นในขณะทำงาน.
เมื่อทำการปรับตำแหน่งที่เชือกสั้นดูดซับแรงที่ตำแหน่งการทำงานแล้ว จุดผูกยึดจะอยู่เหนือหรืออยู่ในระดับเดียวกับส่วนเอวของ
ผู้ใช้งาน. เชือกสั้นจะต้องตึงเสมอและระยะห่างของการตกอิสระต้องอยู่ท 0.5 ม.
จุดเชื่อมต่อด้านหลังบนสายรัดเอวมีข้อจำกัดให้ใช้เฉพาะการนำตัวผู้ใช้งานออกจากบริเวณที่มีความเสี่ยงสูงต่อการตก
(โดยระบบการผูกกับเชือก).
กฏการตรวจเช็คความยาวที่มีข้อจำกัดและ/หรือเชือกสั้นนิรภัยในการทำงานระหว่างที่ใช้อยู่.
สายรัดสะโพก, เข็มขัดยึดติดกับที่.
สายรัดนิรภัยแบบเต็มตัวกันตก, เข็มขัดรัดอยู่กับที่,สายรัดสะโพก.
สายรัดนิรภัยกันตก, เข็มขัดยึดติดกับที่, สายรัดสะโพก, สายรัดนิรภัยเพื่อไต่เชือกประกอบรวมกับตัวไต่ขึ้น CROLL.
อุปกรณ์ชนิดนี้จะต้องใช้ตามเกณฑ์การรับน้ำหนักตามที่กำหนดไว้, หรือไม่นำไปใช้ในทางอื่นที่ไม่ได้ออกแบบมาให้ใช้งาน.
ก่อนการใช้อุปกรณ์ชนิดนี้, ควรจะต้อง:
-อ่านและทำความเข้าใจข้อแนะนำการใช้งานให้ละเอียด.
-ฝึกฝนการใช้อุปกรณ์ได้อย่างถูกวิธี.
-ทราบถึงรายละเอียดของอุปกรณ์และข้อจำกัดในการใช้งาน.
-ทำความเข้าใจและรับรู้ถึงความเสี่ยง.
การฝึกฝนวิธีใช้อุปกรณ์ก่อนการใช้งานเป็นสิ่งจำเป็น.
อุปกรณ์นี้ต้องถูกใช้โดยบุคคลที่มีวุฒิภาวะและมีความรับผิดชอบเท่านั้น, หรือใช้ในสถานที่ที่อยู่ภายใต้ความควบคุมของบุคคลที่มีคว
ามสามารถรับผิดชอบได้เท่านั้น.
การฝึกฝนให้เพียงพอและเรียนรู้ถึงเทคนิควิธีการใช้อุปกรณ์ให้ถูกต้อง เป็นหน้าที่และความรับผิดชอบของผู้ใช้งานเอง.
เป็นความรับผิดชอบส่วนบุคคลต่อความเสี่ยงและความชำรุดบกพร่อง, รวมทั้งการบาดเจ็บหรืออันตรายต่อชีวิตที่อาจเกิดขึ้นระห
ว่างหรือภายหลังการใช้อุปกรณ์ที่ผิดวิธีใด ๆ ก็ตาม. ไม่ควรใช้อุปกรณ์นี้, ถ้าคุณไม่สามารถหรือไม่อยู่ในสภาวะที่จะรับผิดชอบต่
อความเสี่ยงที่จะเกิดขึ้น.
(1) สายรัดไหล่ทั้งสองข้าง, (2) ตัวล็อคจุดห้อยตัว, (3) EN 361 จุดยึดที่ตำแหน่งหน้าอก,
(4) จุดยึดหลักเพื่อเชื่อมต่ออุปกรณ์.
(1) สายรัดไหล่ทั้งสองข้าง, (2) ตัวล็อคจุดห้อยตัว, (3) EN 361 จุดยึดที่ตำแหน่งหน้าอก, (4) EN 12841 CROLL
ตัวจับเชือกตำแหน่งหน้าท้อง, (4b) ตัวต่อ maillon rapideที่จุดยึดหลักพร้อมแผ่นปิดกั้น, (16) ลูกเบี้ยว, (17) กลไก/
ตัวจับป้องกันภัย, (18) รูเชื่อมต่อ.
(5) จุดยึดที่หน้าท้อง (สิ่งทอ) เพื่อเชื่อมต่อสายรัดอกกับสายรัดสะโพก, (6) แถบสายรัดเอว, (7) EN 358, EN 813,
จุดเชื่อมต่อที่หน้าท้อง, (8) EN 358 จุดยึดต่อด้านข้างเอว, (9) ตัวล็อคเชื่อมต่อสายรัดอกกับส่วนของสายรัดเอว
EN 358 จุดยึดต่อยับยั้งการตก, (10) ตัวล็อคปรับสายด้านหลังแบบ DoubleBack, (10b) ตัวล็อคแบบปลดล็อคเร็ว,
(11) ห่วงคล้องอุปกรณ์, (12) ช่องสำหรับใส่เครื่องมือ, (13) แถบสายรัดรับแรง, (14) สายรัดยืดสำหรับปรับขนาด,
(15) ป้ายแถบแสดงเครื่องหมายที่ติดแนบอยู่ด้านในของแถบสายรัดเอว.
สายรัดสะโพก: โพลีเอสเตอร์, เหล็ก (ตัวล็อคปรับสายรัด), อลูมีนั่มอัลลอยด์ (จุดเชื่อมต่อ).
CROLL ตัวจับเชือกที่หน้าท้อง: อลูมีนั่มอัลลอยด์ (ลำตัว), เหล็กชุบโครเมี่ยม (ลูกเบี้ยว),
โพลีเอมายด์ (ตัวจับป้องกันภัย).
ตรวจเช็คจุดยึดต่อที่แถบสายรัด, ที่ตัวล็อคปรับสายรัดและรอยเย็บที่จุดป้องกันภัย.
ตรวจดูรอยฉีกขาดบนสายรัด, สภาพชำรุดจากการใช้งาน, จากความร้อน,และการสัมผัสกับสารเคมี, ฯลฯ. ตรวจสอบให้ละ
เอียดสำหรับการหลุดลุ่ยของเส้นใย.
เช็คให้แน่ใจว่า ตัวล็อค DoubleBack และตัวล็อค FAST ยังคงใช้งานได้ตามปกติ.
เช็คให้แน่ใจที่ลำตัว, ประตู, บานพับและปลอกล็อคประตูไม่ติดขัดและปราศจากรอยร้าว, การผิดรูปร่าง, การสึกกร่อน
ฯลฯ. เปิดประตูและเช็คว่ามันปิดได้โดยอัตโนมัติเมื่อปล่อย. ตรวจเช็คปลอกล็อคประตูว่าอยู่ในสภาพใช้งาน ได้ปกติ.
ส่วนล็อคของ(ประตู)ล็อคต้องไม่ถูกปิดกั้นโดยสิ่งแปลกปลอม (ดิน,ก้อนกรวด, อื่นๆ.).
ก่อนการใช้งานแต่ละครั้ง, เช็คที่ลำตัว.
ตรวจเช็คปลอกล็อคว่าหมุนได้ตามปกติ (หมุนได้สุดจนมองไม่เห็นแกน) และสามารถขันแน่นได้ตามหน่วย 3 Nm.
ก่อนการใช้งานทุกครั้ง, ตรวจเช็คสภาพของลำตัว, รูเชื่อมต่อ, ลูกเบี้ยวและตัวจับนิรภัย (รอยแตก, รอยขีดข่วน,
การผิดรูปร่าง, สึกกร่อน, เกิดสนิม), สปริงและระบบของลูกเบี้ยว. ต้องแน่ใจว่าฟันที่เกาะเชือกไม่สึกหรอ. ข้อควรระวัง,
อย่าใช้ตัวจับเชือกที่มีสภาพฟันสึกหรอหรือหลุดร่อนออก.
เป็นสิ่งสำคัญที่จะต้องตรวจเช็คสภาพของอุปกรณ์อย่างสม่ำเสมอ. ตรวจเช็คการต่อเชื่อมกับอุปกรณ์อื่นในระบบ
และแน่ใจว่าอุปกรณ์ทุก ๆ ชิ้นในระบบอยู่ในตำแหน่งที่ถูกต้องและสามารถเข้ากันได้กับชนิดอื่น.
ศึกษารายละเอียดข้อแนะนำการตรวจสอบอุปกรณ์แต่ละชนิดของ PPE ที่เว็ปไซด์ www.petzl.com/ppe หรือศึกษาจาก
PETZL PPE CD-ROM.
โปรดติดต่อ PETZL หรือตัวแทนจำหน่าย กรณีมีข้อสงสัยเกี่ยวกับอุปกรณ์นี้.
B
ทำการเปิดล็อคห่วงล็อคเร็วที่สายรัดขาออก.
1A. คล้องสายรัดสะโพกด้วยสายรัดรอบเอว, สอดขาทั้งสองข้างและดึงสายรัดสะโพกขึ้นไปที่ตำแหน่งรอบเอว.
1B. ปรับสายรัดเอวโดยการดึงที่แถบสายรัดรอบเอว. เก็บส่วนปลายสายรัดโดยสอดเข้าที่เก็บสายรัด
(แถบแบนที่ยึดกับสายรัดรอบเอว).
-แถบสายสั้น: ใช้ที่เก็บสายด้านหน้าของตัวล็อคปรับสาย.
-แถบสายยาว: สอดปลายสายผ่านช่องที่เย็บติดอยู่กับแถบสายรัดรอบเอวแล้วสอดเก็บในช่องด้านหลัง.
1C. ปรับและล็อคสายรัดขาทั้งสอง.
-NAVAHO SIT: ตัวล็อค DoubleBack.
-NAVAHO SIT FAST: ทำการล็อคตัวล็อค FAST. ระวังสิ่งแปลกปลอมที่อาจขัดขวางการทำงานของตัวล็อคแบบปลดเร็ว
(เช่น ก้อนกรวด, ทราย, เสื้อผ้า...). ตรวจเช็คว่าการล็อคถูกต้อง.
สายรัดนิรภัยจะต้องปรับให้พอดีเพื่อช่วยลดแรงตกกระชากในกรณีที่มีการตกเกิดขึ้น.
ผู้ใช้จะต้องเคลื่อนไหวในขณะแขวนห้อยตัวโดยสวมใส่สายรัดนิรภัย (เพื่อทดสอบการยับยั้งการตก) จากจุดเชื่อมต่อด้วยอุปกรณ์
เพื่อเช็คว่าสายรัดมีขนาดพอดี, ให้ความรู้สึกสบายเหมาะสมกับสภาพของงานด้วยการปรับที่เหมาะสมที่สุด.
C
D
มาตรฐาน EN 813: 1997 รับรองเกี่ยวกับสายรัดสะโพกที่ใช้ในการทำงาน, ข้อจำกัดการใช้, และระบบการใช้เชือกเมื่อจุ
ดเชื่อมต่อที่ต่ำจำเป็นต้องใช้.
ใช้จุดเชื่อมต่อที่ตำแหน่งหน้าท้องนี้กับตัวไต่ลง, เชือกสั้นดูดซับแรงการทำงานหรือเชือกสั้นนิรภัยที่ต่อเนื่อง.
จุดเชื่อมต่อนี้จะไม่ใช้เชื่อมต่อกับระบบยับยั้งการตก.
E
การต่อยึดสายรัดอกเข้ากับสายรัดสะโพก, ให้สอดสายของจุดยึดด้านหลังสายรัดอกเข้าไปที่ตัวล็อคเชื่อมต่อ ( joining
buckle) ของสายรัดสะโพก (9), แล้วดึงปรับสายรัดยืดลงมา. สอดสายรัดเข้าที่ตัวล็อคปรับสายที่จุดยึดด้านหลัง (2), แล้
วดึงปรับสายรัดยืดลงมาอีกครั้ง.
F
ทำการเปิดล็อคห่วงล็อคเร็วที่สายรัดขาออก.
5A. กางสายรัดหัวไหล่ออกไปข้างหนึ่ง, คล้องสายรัดสะโพกด้วยแถบสายรัดเอว, สอดขาทั้งสองข้างเข้าไปและดึงสายรัดขึ้
นที่ตำแหน่งรอบเอว.
5B. ปรับสายรัดเอวโดยการดึงที่แถบสายรัดรอบเอว. เก็บส่วนปลายสายรัดโดยสอดเข้าที่เก็บสายรัด
(แถบแบนที่ยึดกับสายรัดรอบเอว).
-แถบสายสั้น: ใช้ที่เก็บสายด้านหน้าของตัวล็อคปรับสาย.
-แถบสายยาว: สอดปลายสายผ่านช่องที่เย็บติดอยู่กับแถบสายรัดรอบเอวแล้วสอดเก็บในช่องด้านหลัง.
5C. ปรับและล็อคสายรัดขาทั้งสอง.
-NAVAHO SIT: ตัวล็อค DoubleBack.
-NAVAHO SIT FAST: ทำการล็อคตัวล็อค FAST. ระวังสิ่งแปลกปลอมที่อาจขัดขวางการทำงานของตัวล็อคแบบปลดเร็ว
(เช่น ก้อนกรวด, ทราย, เสื้อผ้า...). ตรวจเช็คว่าการล็อคถูกต้อง.
5D. วางตำแหน่งสายรัดหัวไหล่ทั้งสองข้าง. ใส่ตัวต่ออุปกรณ์เข้าที่จุดเชื่อมต่อหน้าท้อง (สิ่งทอ) เชื่อมต่อสายรัดอกเข้ากับส่ว
นของสายรัดสะโพก (5). ล็อคตัวเชื่อมต่ออุปกรณ์โดยการหมุนปลอกล็อค.
5E. ปรับสายรัดไหล่ทั้งสองข้าง. เก็บส่วนปลายของสายรัดโดยใช้ที่เก็บสายบนไหล่ทั้งสองข้าง.
การปรับที่จุดนี้จะทำเมื่อเริ่มการสวมใส่สายรัดนิรภัยในครั้งแรกเท่านั้น. โดยการให้คนอื่นช่วยปรับให้.
สอดสายรัดไปที่เก็บสายรัดด้านหลังโดยให้ตึงซ้อนกันระหว่างตัวล็อคสายทั้งสอง, (2) และ (9) (อย่าให้หลวมหรือหย่อน).
แน่ใจว่าได้พับเก็บปลายสายรัดเรียบร้อยแล้ว (เก็บให้เรียบ-ไม่โป่งหรือหย่อน) ในช่องที่เก็บสายเพื่อไม่ให้เกะกะในขณะทำ
งาน.
ปรับตำแหน่งให้พอดีกับขนาดและรูปร่างของผู้ใช้งาน, ตำแหน่งของตัวล็อค DoubleBack อยู่ที่ระดับขอบแผ่นรองไหล่.
สายรัดนิรภัยจะต้องปรับให้พอดีเพื่อช่วยลดแรงตกกระชากในกรณีที่มีการตกเกิดขึ้น.
ผู้ใช้จะต้องเคลื่อนไหวในขณะแขวนห้อยตัวโดยสวมใส่สายรัดนิรภัย (เพื่อทดสอบการยับยั้งการตก) จากจุดเชื่อมต่อด้วยอุปกรณ์
เพื่อเช็คว่าสายรัดมีขนาดพอดี, ให้ความรู้สึกสบายเหมาะสมกับสภาพของงานด้วยการปรับที่เหมาะสมที่สุด.
G
ตัวเชื่อมต่อนี้ได้รับมาตรฐานEN 362: 2004 เป็นส่วนประกอบอย่างหนึ่งของสายรัดนิรภัย, ใช้เป็นส่วนเชื่อมต่อระหว่างสายรั
ดอกกับสายรัดสะโพก. ห้ามใช้เชื่อมต่อกับเชือกสั้นนิรภัยหรือเชือกรับแรงตกกระชาก.
6A. ข้อควรระวังอันตราย, ตัวต่ออุปกรณ์จะต้องใช้งานในขณะที่ประตูปิดและล็อคเสมอ. ความแข็งแรงของคาราไบเนอร์จะถู
กลดลงอย่างมากในขณะที่ประตูเปิด.
6B. คาราไบเนอร์จะแข็งแรงที่สุดเมื่อประตูปิดและรับน้ำหนักตามแนวยาวของแกน. ในแนวทิศทางอื่นการรับน้ำหนักจะลดลง.
H
สายรัดแบบเต็มตัวสำหรับยับยั้งการตก, เป็นส่วนประกอบของระบบยับยั้งการตกตามข้อกำหนดมาตรฐาน EN 363
(ระบบยับยั้งการตกส่วนบุคคล). จะต้องใช้ในการเชื่อมต่อกับจุดผูกยึดที่ได้มาตรฐาน EN 795, ตัวล็อคที่ได้มาตรฐาน
EN 362, เชือกสั้นดูดซับแรงที่ได้มาตรฐาน EN 355, ฯลฯ.
ใช้เฉพาะจุดนี้เท่านั้นเชื่อมต่อกับระบบยับยั้งการตก (เช่นกับการเคลื่อนที่ในระบบยับยั้งการตก,กับเชือกสั้นดูดซับแรง, หรือกับ
ระบบอื่นที่อธิบายอยู่ในมาตรฐาน EN 363). สำหรับเอกสารอ้างอิง, จุดเชื่อมต่อนี้จะบ่งบอกด้วยตัวอักษร ‘A’.
ช่องว่างระหว่างจุดตกกับพื้นที่อยู่ต่ำกว่าผู้ใช้งานต้องเพียงพอกับการป้องกันผู้ใช้งานตกใส่เครื่องกีดขวางต่าง ๆ
ในกรณีที่มีการตกเกิดขึ้น. รายละเอียดของการคำนวณพื้นที่ว่างสามารถค้นหาได้จากข้อมูลทางเทคนิคสำหรับส่วนประกอบอื่นๆ
(เชือกสั้นดูดซับแรง, การเคลื่อนไหวในระบบยับยั้งการตก, ฯลฯ.).
I
การต่อยึดสายรัดอกเข้ากับสายรัดสะโพก, ให้สอดสายของจุดยึดด้านหลังสายรัดอกเข้าไปที่ตัวล็อคเชื่อมต่อ ( joining
buckle) ของสายรัดสะโพก (9), แล้วดึงปรับสายรัดยืดลงมา. สอดสายรัดเข้าที่ตัวล็อคปรับสายที่จุดยึดด้านหลัง (2), แล้
วดึงปรับสายรัดยืดลงมาอีกครั้ง.
การติดยึด CROLL ด้านหน้าของสายรัดสะโพก, ติดตั้งที่ตำแหน่งตัวต่อเชื่อม (maillon rapide) ที่ติดอยู่ในแถบผ้าสายรัดจุ
ดเชื่อมต่อหน้าท้อง (5). หมุนปิดตัว maillon โดยแรงบิดแน่นของสกรูที่ 3 Nm of torque. เช็คให้แน่ใจว่าได้หมุนปิดแล
ะคลิปแผ่นพลาสติคปิดกั้นแล้ว.
J
ห่วงล็อค maillon rapideใช้เป็นส่วนประกอบของสายรัดนิรภัยโดยการเชื่อมต่อด้านหน้าของสายรัดอกกับสายรัดรอบเอว.
จะต้องขันเกลียวได้แน่นที่หน่วย 3 Nm เสมอ (ทำการหมุนและคลายเกลียวด้วยมือ).
ห้ามใช้เชื่อมต่อกับเชือกสั้นนิรภัยหรือเชือกรับแรงตกกระชาก.
43
NAVAHO SIT / NAVAHO SIT FAST / TOP / TOP CROLL C79502-C (200907)
Page 44

ตรวจเช็คว่าอุปกรณ์นี้สามารถเข้ากันได้กับส่วนประกอบอื่น ๆ ของอุปกรณ์คุณ, ดูที่คำแนะนำและข้อมูลเฉพาะของอุปกรณ์นี้.
K
ทำการเปิดล็อคห่วงล็อค FAST ที่สายรัดขาออก.
10A. กางแถบสายรัดไหล่ออก,จับส่วนรอบเอวของสายรัดนิรภัยไว้ให้แน่นและสอดเท้าเข้าที่สายรัดขาทั้งสองข้าง.
10B. วางตำแหน่งสายรัดหัวไหล่ทั้งสองข้าง.
10C. ปรับสายรัดเอวโดยการดึงที่แถบสายรัดรอบเอว. เก็บส่วนปลายสายรัดโดยสอดเข้าที่เก็บสายรัด
(แถบแบนที่ยึดกับสายรัดรอบเอว).
-แถบสายสั้น: ใช้ที่เก็บสายด้านหน้าของตัวล็อคปรับสาย.
-แถบสายยาว: สอดปลายสายผ่านช่องที่เย็บติดอยู่กับแถบสายรัดรอบเอวแล้วสอดเก็บในช่องด้านหลัง.
10D. ทำการล็อคตัวล็อค FAST และปรับสายรัดขาทั้งสอง. ระวังสิ่งแปลกปลอมที่อาจขัดขวางการทำงานของตัวล็อคแบบปลด
เร็ว (เช่น ก้อนกรวด, ทราย, เสื้อผ้า...). ตรวจเช็คว่าการล็อคถูกต้อง.
10E. ปรับสายรัดไหล่ทั้งสองข้าง. เก็บส่วนปลายของสายรัดโดยใช้ที่เก็บสายบนไหล่ทั้งสองข้าง.
การปรับที่จุดนี้จะทำเมื่อเริ่มการสวมใส่สายรัดนิรภัยในครั้งแรกเท่านั้น. โดยการให้คนอื่นช่วยปรับให้.
สอดสายรัดไปที่เก็บสายรัดด้านหลังโดยให้ตึงซ้อนกันระหว่างตัวล็อคสายทั้งสอง, (2) และ (9) (อย่าให้หลวมหรือหย่อน).
แน่ใจว่าได้พับเก็บปลายสายรัดเรียบร้อยแล้ว (เก็บให้เรียบ-ไม่โป่งหรือหย่อน) ในช่องที่เก็บสายเพื่อไม่ให้เกะกะในขณะทำ
งาน.
ปรับตำแหน่งให้พอดีกับขนาดและรูปร่างของผู้ใช้งาน, ตำแหน่งของตัวล็อค DoubleBack อยู่ที่ระดับขอบแผ่นรองไหล่.
สายรัดนิรภัยจะต้องปรับให้พอดีเพื่อช่วยลดแรงตกกระชากในกรณีที่มีการตกเกิดขึ้น.
ผู้ใช้จะต้องเคลื่อนไหวในขณะแขวนห้อยตัวโดยสวมใส่สายรัดนิรภัย (เพื่อทดสอบการยับยั้งการตก) จากจุดเชื่อมต่อด้วยอุปกรณ์
เพื่อเช็คว่าสายรัดมีขนาดพอดี, ให้ความรู้สึกสบายเหมาะสมกับสภาพของงานด้วยการปรับที่เหมาะสมที่สุด.
L
สายรัดแบบเต็มตัวสำหรับยับยั้งการตก, เป็นส่วนประกอบของระบบยับยั้งการตกตามข้อกำหนดมาตรฐาน EN 363
(ระบบยับยั้งการตกส่วนบุคคล). จะต้องใช้ในการเชื่อมต่อกับจุดผูกยึดที่ได้มาตรฐาน EN 795, ตัวล็อคที่ได้มาตรฐาน
EN 362, เชือกสั้นดูดซับแรงที่ได้มาตรฐาน EN 355, ฯลฯ.
ใช้เฉพาะจุดนี้เท่านั้นเชื่อมต่อกับระบบยับยั้งการตก (เช่นกับการเคลื่อนที่ในระบบยับยั้งการตก,กับเชือกสั้นดูดซับแรง, หรือกับ
ระบบอื่นที่อธิบายอยู่ในมาตรฐาน EN 363). สำหรับเอกสารอ้างอิง, จุดเชื่อมต่อนี้จะบ่งบอกด้วยตัวอักษร ‘A’.
ช่องว่างระหว่างจุดตกกับพื้นที่อยู่ต่ำกว่าผู้ใช้งานต้องเพียงพอกับการป้องกันผู้ใช้งานตกใส่เครื่องกีดขวางต่าง ๆ
ในกรณีที่มีการตกเกิดขึ้น. รายละเอียดของการคำนวณพื้นที่ว่างสามารถค้นหาได้จากข้อมูลทางเทคนิคสำหรับส่วนประกอบอื่นๆ
(เชือกสั้นดูดซับแรง, การเคลื่อนไหวในระบบยับยั้งการตก, ฯลฯ.).
M
มาตรฐาน EN 12841: 2006 CROLL ตัวจับเชือกใช้กับเชือกแบบ type B เพื่อช่วยในการไต่ลงประกอบเชือกทำงาน.
ข้อควรระวัง, จะต้องใช้กับอุปกรณ์ type A backup device บนเชือก (ป้องกันภัย) เส้นที่สอง (เช่น ASAP
ตัวจับเชือกยับยั้งการตก).
CROLL ตัวจับเชือกที่หน้าท้องไม่สามารถนำมาใช้เพื่อระบบป้องกันตกตามมาตรฐาน EN 363.
ใช้กับเชือกขนาด 10-13 mm EN 1891 type A แบบ semi-static kernmantel.
ดึงกลไกของตัวจับป้องกันภัยดันออกด้วยหัวแม่มือและนิ้วชี้. จนมันล็อคติดอยู่กับที่ลำตัวของอุปกรณ์. ตัวลูกเบี้ยวจะเปิดค้างอยู่.
ใส่เชือกให้ตรงตามตำแหน่ง. ผลักตัวจับป้องกันภัยจนลูกเบี้ยวหมุนกลับไปดันตรงตำแหน่งที่ใส่เชือกไว้.
ตัวจับป้องกันภัยจะช่วยป้องกันไม่ให้ตัวลูกเบี้ยวดันเปิดออกเอง.
เลื่อนตัวอุปกรณ์ขึ้นบนเชือกพร้อมกับดึงกลไกตัวจับป้องกันภัยลงและดันออก.
CROLL เป็นอุปกรณ์สำหรับไต่ขึ้นทำงานหรือการไต่ขึ้นเชือก. ทำหน้าที่บีบเกาะเชือกขณะที่เกิดแรงกดในการเคลื่อนไปตามทิศท
างทำให้ง่ายต่อการเลื่อนตัวขึ้นบนเชือก.
ฟันของมันจะกดลงบนปลอกเชือก, ทำให้ลูกเบี้ยวของตัวอุปกรณ์เกาะติดกับเชือก. ช่องเล็กๆในลูกเบี้ยวช่วยทำให้หนืด,
ไม่หลุดออก. ช่องในลูกเบี้ยวทำให้โคลน ฯลฯ. ถูก ออกไป.
เลื่อน อุปกรณ์ ขึ้นไปบนเชือกเล็กน้อยและในเวลาเดียวกันให้ผลักตัวลูกเบี้ยวลงด้วยนิ้วชี้ทำให้ฟันของลูกเบี้ยวหลุดเลื่อนออกจ
ากปลอกเชือก. อย่าทำใดๆ กับกลไกของตัวจับป้องกันภัยเพราะจะเป็นการเสี่ยงต่อการเปิดออกของลูกเบี้ยวโดยขาดการคว
บคุม.
ก่อนการใช้งานทุกครั้ง, ตรวจเช็คความถูกต้องของเชือกและส่วนประกอบของอุปกรณ์, การตรวจเช็คจะต้องทำด้วยการควบคุ
มเชือกของผู้ใช้งานเองเสมอ.
การเลื่อน CROLLขึ้นบนเชือก. จะต้องเลื่อนขึ้นบนเชือกได้โดยง่าย. ทำการดึงมันลงเพื่อเช็คการบีบเชือก.
-ปิดตัวลูกเบี้ยวของ CROLL เมื่อไม่ได้ใช้งานเพราะอุปกรณ์อื่น ๆ หรือสิ่งของอาจเข้าไปติดถ้ามันเปิดค้างอยู่.
-ข้อควรระวัง, อย่าให้มีสิ่งแปลกปลอมเข้าไปขัดขวางการทำงานของลูกเบี้ยว (ก้อนกรวด,โคลน, กิ่งไม้, เส้นใย,
สายรัด, เสื้อผ้า, สีทา, ฯลฯ.).
-ระวังไม่ให้ตัวจับนิรภัยเข้าไปติดที่เสื้อผ้า หรือสายรัด.
-เชือกที่อยู่ระหว่าง CROLL และจุดผูกยึดจะต้องถูกดึงตึงอยู่เสมอ. ผู้ใช้งานต้องอยู่ในตำแหน่งต่ำกว่าจุดผูกยึดเชือกเสมอ.
-แรงตกกระชากจะถูกดูดซับโดยเชือก:
อย่าลืมว่าเชือกที่ใช้ต้องเป็นเชือกที่ช่วยดูดซับแรงตกกระชากในกรณีที่มีการพลัดตกจากที่สูง. ยิ่งอยู่ใกล้กับจุดผูกเท่าไหร่, ประ
สิทธิภาพการดูดซับแรงของเชือกจะยิ่งลดลงมากเท่านั้น, และอาจจนกระทั่งถึงกับไม่มีเลย.
-ทำการป้องกันเชือกจากสิ่งที่จะทำให้เชือกเสียหาย (เช่น ขอบที่คม, พื้นผิวที่หยาบ, ฯลฯ).
-เชือกจะต้องลื่นไหลอย่างสะดวกและอิสระด้วยการใช้ CROLL. หลีกเลี่ยงสาเหตุที่ทำให้ขัดขวางการลื่นไหล (เช่น ปมเชือก
หรือสภาพเก่าเปื่อย/การหลุดลุ่ยของเชือก, ฯลฯ.).
-อย่าลืมที่จะผูกเงื่อน stopper ที่ปลายเชือก.
-เชือกทำงาน: ใช้ CROLL และอุปกรณ์บีบจับเชือกตัวอื่น (เช่น ASCENSION ตัวมือจับเชือก)
ด้วยการใช้แถบสายรัดคล้องเท้า. ผูกยึดติดตัวคุณกับอุปกรณ์ไต่ขึ้นตัวที่สองด้วยเชือกเซฟที่เหมาะสม.
-เชือกนิรภัย: ใช้อุปกรณ์แบบ type A.
คำเตือน, ในขณะที่ต้องใช้อุปกรณ์หลายอย่างประกอบกัน, อาจทำให้เกิดอันตรายได้ถ้าองค์ประกอบเพื่อความปลอดภัยของอุปก
รณ์บางชิ้นถูกกระทบกระเทือนโดยการทำงานของบางชิ้นส่วนของอุปกรณ์อื่น.
ติดต่อ PETZL หรือตัวแทนจำหน่าย ถ้าไม่แน่ใจเกี่ยวกับการเข้ากันได้ของอุปกรณ์.
จุดผูกยึดของระบบจะต้องมีตำแหน่งสูงกว่าตำแหน่งของผู้ใช้งาน และจะต้องถูกต้องตามมาตรฐาน EN 795, และโดยเฉพาะค
วามแข็งแรงที่จุดผูกยึดต้องไม่ต่ำกว่า 10 kN.
คุณจะต้องมีแผนการกู้ภัยและรู้วิธีการทำได้อย่างรวดเร็วในกรณีที่ประสบความยุ่งยากขึ้นในขณะที่ใช้อุปกรณ์นี้ เป็นสิ่งจำเป็นที่จะ
ต้องฝึกฝนอย่างเพียงพอให้รู้ถึงเทคนิคการกู้ภัย. เป็นสิ่งจำเป็นที่จะต้องฝึกฝนอย่างเพียงพอให้รู้เทคนิคในการกู้ภัย.
คาราไบเนอร์จะต้องใช้งานในสภาพที่ประตูถูกปิดและล็อคอยู่เสมอ. ด้วยการตรวจสอบอย่างเป็นระบบ
ประตูจะถูกปิดโดยการกดด้วยมือ.
ทำการตรวจสอบตัวต่อเชื่อมตามข้อมูลเฉพาะที่ระบุในคู่มือการใช้.
-ข้อควรระวังอันตราย, ไม่ให้ใช้อุปกรณ์นี้ร่วมกับวัสดุที่มีเนื้อหยาบสากหรือแหลมคม.
-ผู้ใช้ต้องมีสภาพร่างกายสมบูรณ์ตามการวินิจฉัยจากแพทย์ สำหรับการทำงานในที่สูง. คำเตือน, การหยุดนิ่งหรือหมดสติอยู่ใน
สายรัดสะโพกอาจมีผลให้เสียชีวิตได้.
-ผู้ใช้ต้องเช็คให้แน่ใจว่าเครื่องหมายบนอุปกรณ์ยังสามารถมองเห็นได้โดยง่ายตลอดอายุการใช้งานของอุปกรณ์.
-ผู้ใช้ต้องตรวจสอบสภาพของตัวต่ออุปกรณ์นี้ ว่าสามารถใช้งานได้ตามระบบของกฏข้อบังคับและตามมาตรฐานของการประกอบ
การเกี่ยวกับความปลอดภัย.
-ข้อแนะนำสำหรับการใช้อุปกรณ์แต่ละชนิดที่ใช้ต่อเชื่อมกับอุปกรณ์นี้ต้องได้รับการยอมรับ.
-ข้อแนะนำการใช้งานจะต้องเอื้ออำนวยต่อผู้ใช้อุปกรณ์นี้. ถ้าอุปกรณ์นี้ได้ถูกจำหน่ายไปยังนอกอาณาเขตของประเทศที่เป็นแหล่
งกำเนิด ผู้แทนจำหน่ายต้องจัดทำข้อแนะนำในภาษาของประเทศที่อุปกรณ์ได้ถูกนำไปใช้งาน.
คำเตือน, ในสถานการณ์ที่รุนแรง อายุการใช้งานของอุปกรณ์อาจลดลงได้เพียงการใช้งานแค่ครั้งเดียว; ยกตัวอย่างเช่น,
ถ้าถูกสัมผัสกับสิ่งต่อไปนี้: การถูกกับสารเคมี, เก็บในอุณหภูมิที่ร้อนจัดหรือเย็นจัด, สัมผัสกับสิ่งมีคม, การตกกระชากที่รุนแร
งเกินขีดจำกัด, ฯลฯ.
อายุการใช้งานของอุปกรณ์ Petzl เป็นไปดังนี้: ได้ถึง 10 ปีนับจากวันที่ผลิต สำหรับพลาสติคและวัสดุสิ่งทอ. ไม่
จำกัดอายุสำหรับผลิตภัณฑ์โลหะ.
อายุการใช้งานของอุปกรณ์อาจขึ้นอยู่กับกฏเกณฑ์อื่น ๆ (ให้ดูจากข้อความที่ระบุว่า"เมื่อไรควรเปลี่ยนอุปกรณ์ของท่า
น" ), หรือ เมื่ออุปกรณ์นั้นตกรุ่นและล้าสมัย.
ข้อเท็จจริงของอายุการใช้งาน อาจขึ้นอยู่กับองค์ประกอบอื่น ๆ เช่น: ความเข้มข้นของการใช้, ความถี่และสภาพแวดล้อม,
ความสามารถของผู้ใช้, อุปกรณ์นั้นได้รับการเก็บรักษาอย่างไร, ฯลฯ.
นอกเหนือจากการตรวจสภาพอุปกรณ์ตามปกติก่อนและระหว่างการใช้งาน, จะต้องทำการตรวจเช็คอุปกรณ์โดยผู้เชี่ยวชาญ
เฉพาะเป็นประจำ อย่างน้อยทุก ๆ 12 เดือนต่อครั้ง. การตรวจสอบอุปกรณ์โดยผู้เชี่ยวชาญจะต้องมีกำหนดอย่างน้อย ทุก
ๆ 12 เดือน. ความถี่และความคุมเข้มในการตรวจสอบอุปกรณ์ต้องกระทำตามข้อมูลเฉพาะและความรุนแรงของการใช้. สิ่
งที่จะช่วยให้ทราบข้อมูลของอุปกรณ์ได้ดีคือ, ทำบันทึกแยกตามชิ้นส่วนของอุปกรณ์ทั้งหมดเพื่อให้รู้ประวัติการใช้งานของมัน.
ผลของการตรวจสอบอุปกรณ์ ต้องบันทึกไว้ในเอกสารการตรวจสอบ (บันทึก การตรวจสอบ). เอกสารการตรวจสอบต้องระ
บุหัวข้อต่อไปนี้: ชนิดของอุปกรณ์, รุ่นแบบ, ชื่อและที่อยู่ของโรงงานผู้ผลิต หรือตัวแทนจำหน่าย, เครื่องหมายหรือสัญญลักษณ์
(หมายเลขกำกับ หรือ หมายเลขเฉพาะ), ปีที่ผลิต, วันที่สั่งซื้อ, วันที่ใช้งานครั้งแรก, ชื่อของผู้ใช้, รายละเอียดอื่น ๆ เช่
นการเก็บรักษาและความถี่ของการใช้, ประวัติการตรวจเช็ค (วันที่ / ข้อมูลบันทึกเกี่ยวกับปัญหาจากการใช้ / ชื่อและลายเ
ซ็นต์ของผู้เชี่ยวชาญซึ่งได้ทำการตรวจเช็ค / วันที่กำหนดการตรวจเช็คครั้งต่อไป). ดูตัวอย่างและรายการทำบันทึกการตรวจ
สอบ และข้อมูลอื่น ๆของอุปกรณ์ได้ที่ www.petzl.com/ppe
ยกเลิกการใช้อุปกรณ์ทันที ถ้า:
-ไม่ผ่านมาตรฐานการตรวจสอบ (ในการตรวจสอบก่อน และระหว่างการใช้ และ ในการตรวจสอบโดยผู้เชี่ยวชาญ),
-ได้มีการตกกระชากอย่างรุนแรงเกินขีดจำกัด,
-ไม่สามารถรู้ถึงประวัติการใช้งานมาก่อน,
-ครบอายุการใช้งาน 10 ปี ของวัสดุที่ทำด้วยพลาสติกหรือสิ่งทอ,
-เมื่อมีข้อสงสัยเกี่ยวกับส่วนประกอบ.
ให้ทำลายอุปกรณ์ที่เลิกใช้แล้ว เพื่อป้องกันการนำกลับมาใช้อีก.
มีหลายเหตุผลที่ทำให้อุปกรณ์ล้าสมัย และถูกเลิกใช้ก่อนที่จะหมดอายุการใช้งานตามที่ระบุไว้. ตัวอย่างประกอบ: เปลี่ยนแปล
งข้อมูลของมาตรฐานที่ใช้, เปลี่ยนกฏเกณฑ์, หรือโดยข้อกฏหมาย, การพัฒนาของเทคนิคใหม่, ไม่สามารถใช้ร่วมกันได้กับอุ
ปกรณ์อื่น ๆ, ฯลฯ.
การแก้ไขเปลี่ยนแปลงใด ๆ, การทำเพิ่มเติม, หรือการซ่อมแซมอุปกรณ์นอกเหนือจากความยินยอมโดย Petzl
เป็นสิ่งผิดกฏหมาย: เป็นความเสี่ยงต่อการลดลงของประสิทธิภาพในการใช้งานของอุปกรณ์.
เก็บรักษาสายรัดนิรภัยไว้ในถุงหรือกล่องเพื่อช่วยป้องกันความเสี่ยงจากรังสี UVในแสงแดด, ละอองน้ำ,วัสดุสารเคมี,ฯลฯ.
ผลิตภัณฑ์นี้ รับประกัน 3 ปีต่อความบกพร่องของวัสดุที่ใช้ในการผลิตหรือจากขั้นตอนการผลิต. ข้อยกเว้นจากการรับประกัน:
การสึกหรอและฉีกขาดตามปกติ, การเป็นสนิม, การดัดแปลงแก้ไข, การเก็บที่ผิดวิธี, ขาดการบำรุงรักษา,
การเสียหายจากอุบัติเหตุ, ความละเลย, หรือการนำไปใช้งานผิดประเภท.
PETZL ไม่ต้องรับผิดชอบต่อผลที่เกิดขึ้น, ทั้งทางตรง, ทางอ้อม หรือ อุบัติเหตุ, หรือจากความเสียหายใด ๆ ที่เกิดขึ้น หรือ
ผลจากการใช้ผลิตภัณฑ์นี้.
N
การเข้ากันไม่ได้ในการต่อเชื่อมอาจเป็นสาเหตุของอุบัติเหตุจากการหลุดจากจากต่อเชื่อม, การแตกหักชำรุด, หรือผลสะท้อน
ที่เกิดกับชิ้นส่วนอื่นๆ ของอุปกรณ์.
คำเตือน, จุดผูกยึดบนสายรัดนิรภัยอาจเป็นเหมือนคันโยกเปิดประตูของตัวเชื่อมต่อได้.
เมื่อเชือกถูกดึงให้ตึงอย่างทันทีและ/หรือจากแรงกดภายนอกที่มีต่อระบบล็อค, และตัวเชื่อมต่อมีสภาพเก่าชำรุด, ปลอกล็อคสา
มารถแตกหักและประตูล็อคอาจเปิดออกได้เอง.
เพื่อลดความเสี่ยงเหล่านี้, เช็คดูว่าตัวเชื่อมต่อของคุณมีสภาพสมบูรณ์พร้อมตลอดทุกเวลาเพื่อรับแรงกระชากของระบบ
(เชือกสั้น, อุปกรณ์ไต่ลง, ฯลฯ.).
และต้องทำให้แน่ใจว่าตัวเชื่อมต่อสามารถใช้เข้ากันได้กับจุดผูกยึด (รูปร่าง, ขนาด, ฯลฯ.) โดยหลีกเลี่ยงการใช้ตัวเชื่อมต่
อที่มีแนวโน้มว่ามีสภาพไม่เหมาะสม (และมั่นคง)ในจุดผูกยึด.
44
NAVAHO SIT / NAVAHO SIT FAST / TOP / TOP CROLL C79502-C (200907)
 Loading...